

Page 1
Document Centre C400/320 Series
One Point Guide
Page 2
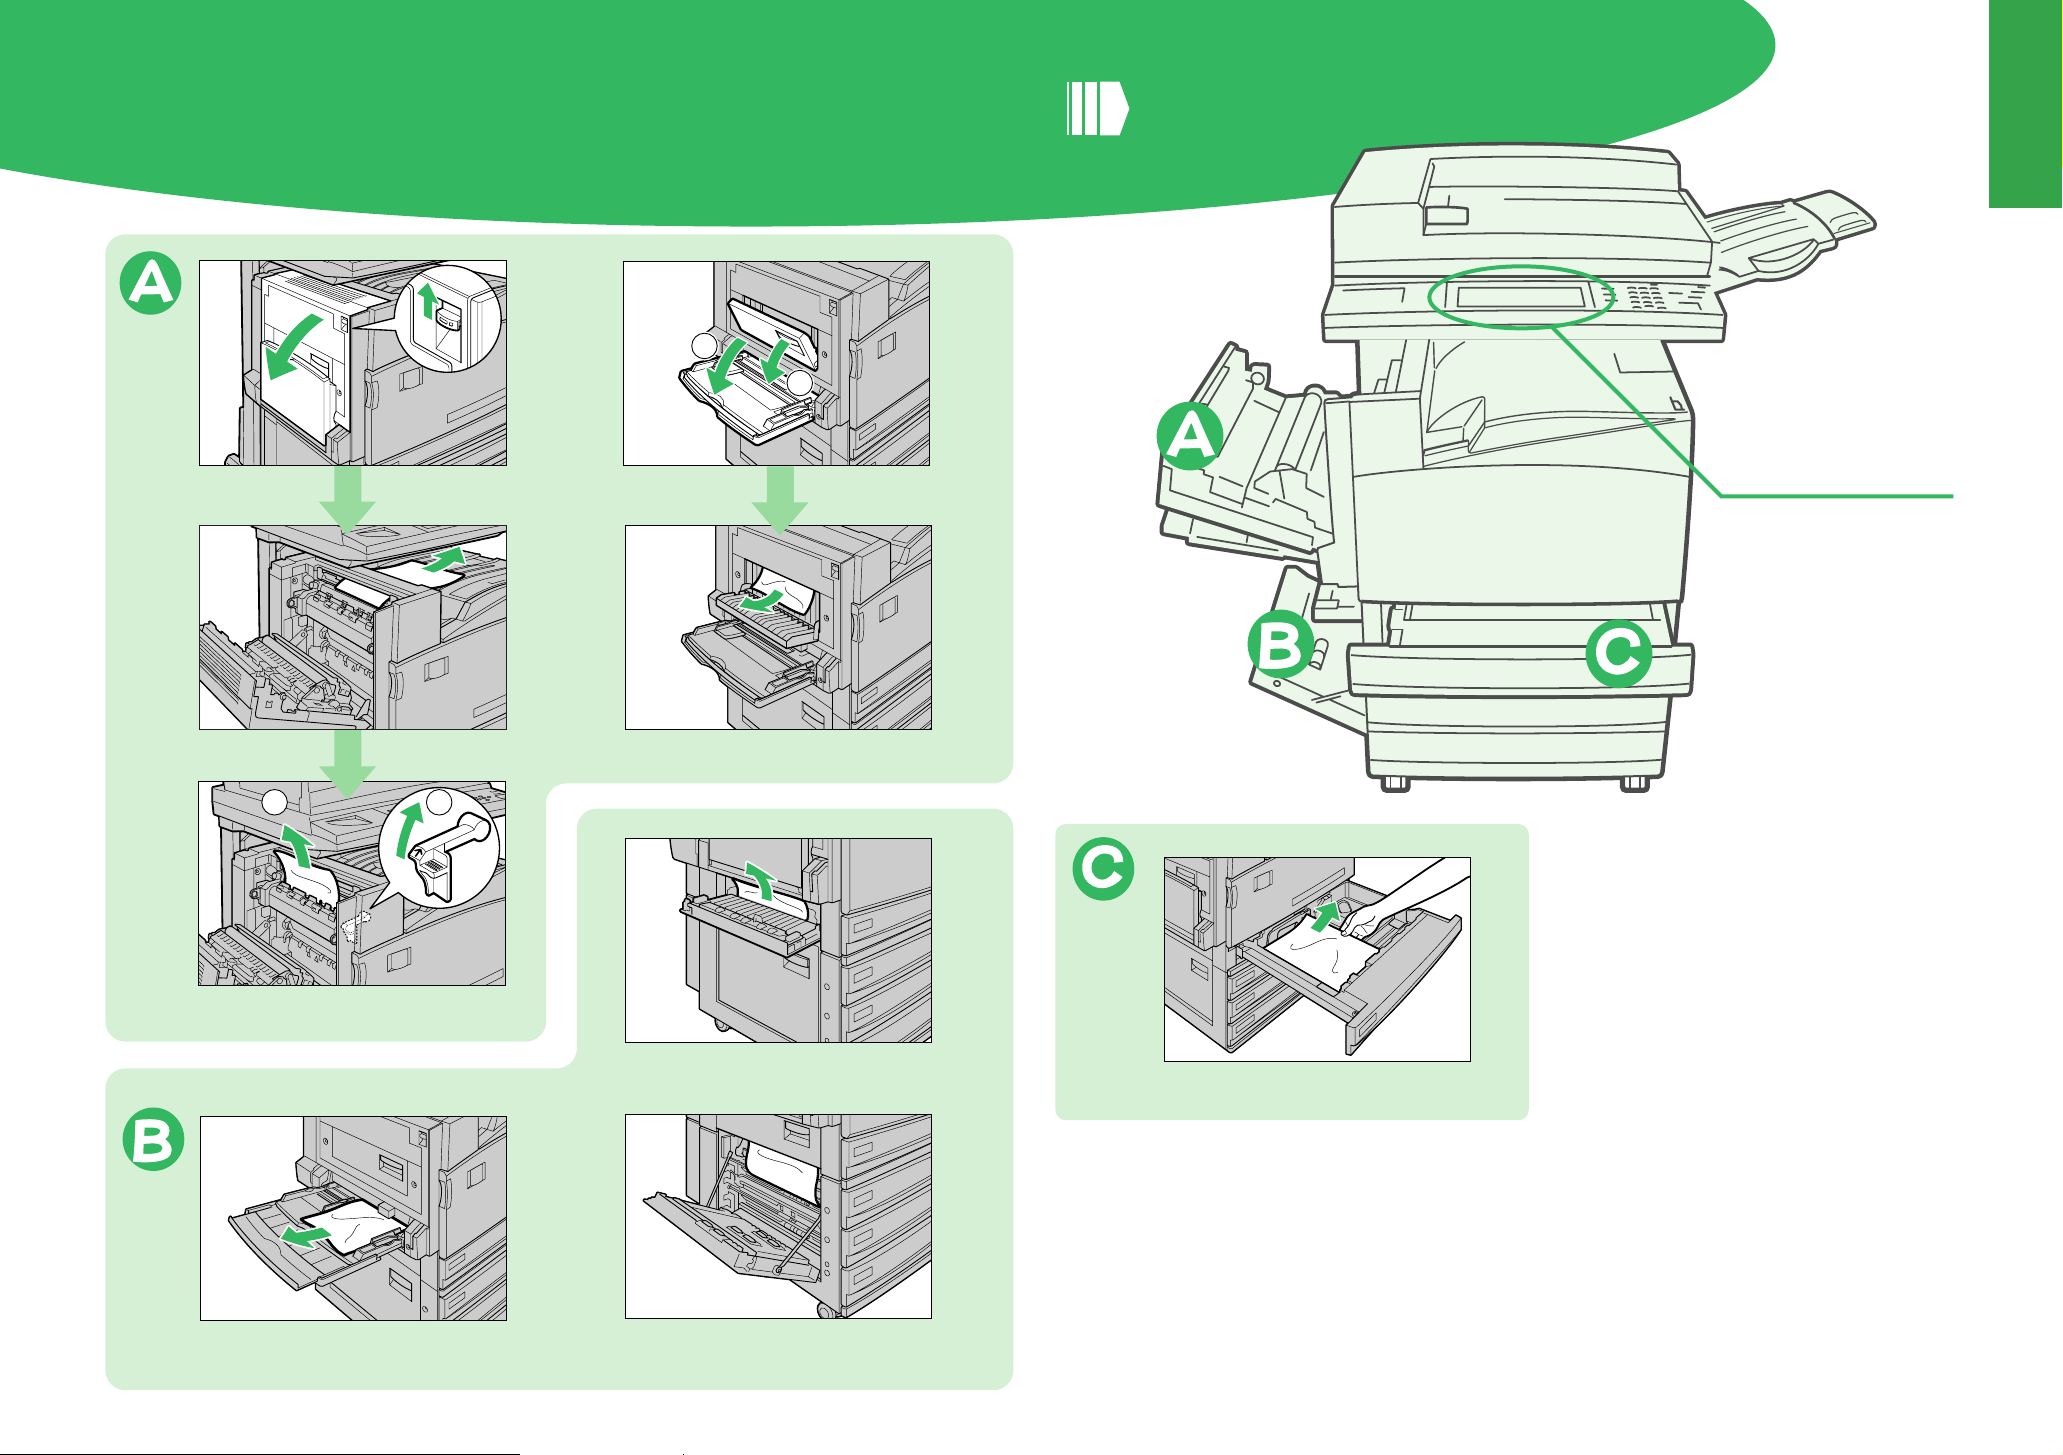
Removing Paper Jam
Removing Paper Jam
See "4.5 Paper Jams" in "Part 1 Hardware"
of the User Guide (Copier).
zTop left cover
Gently open the top left cover while lifting
up the release lever.
If the edge of the jammed paper can be reached at
the output tray, pull the jammed paper in the direction of the feed-out area.
1 2
zDuplex Module Cover
1
2
Open the Tray 5 (Bypass) and gently open
the duplex module cover.
Remove the jammed paper.
zLeft center cover
See the message on the
display to check the
relevant parts of the
machine.
zTray 1 to 4
If you cannot remove jammed paper inside the fuser
unit, lift up the lever and remove the jammed paper.
Remove the jammed paper.
zTray 5 (Bypass)
Inspect the inside (paper feed entrance) of Tray 5
(Bypass), and remove any jammed paper.
zBottom left cover
Remove the jammed paper.
2
Remove the jammed paper.
3
Page 3
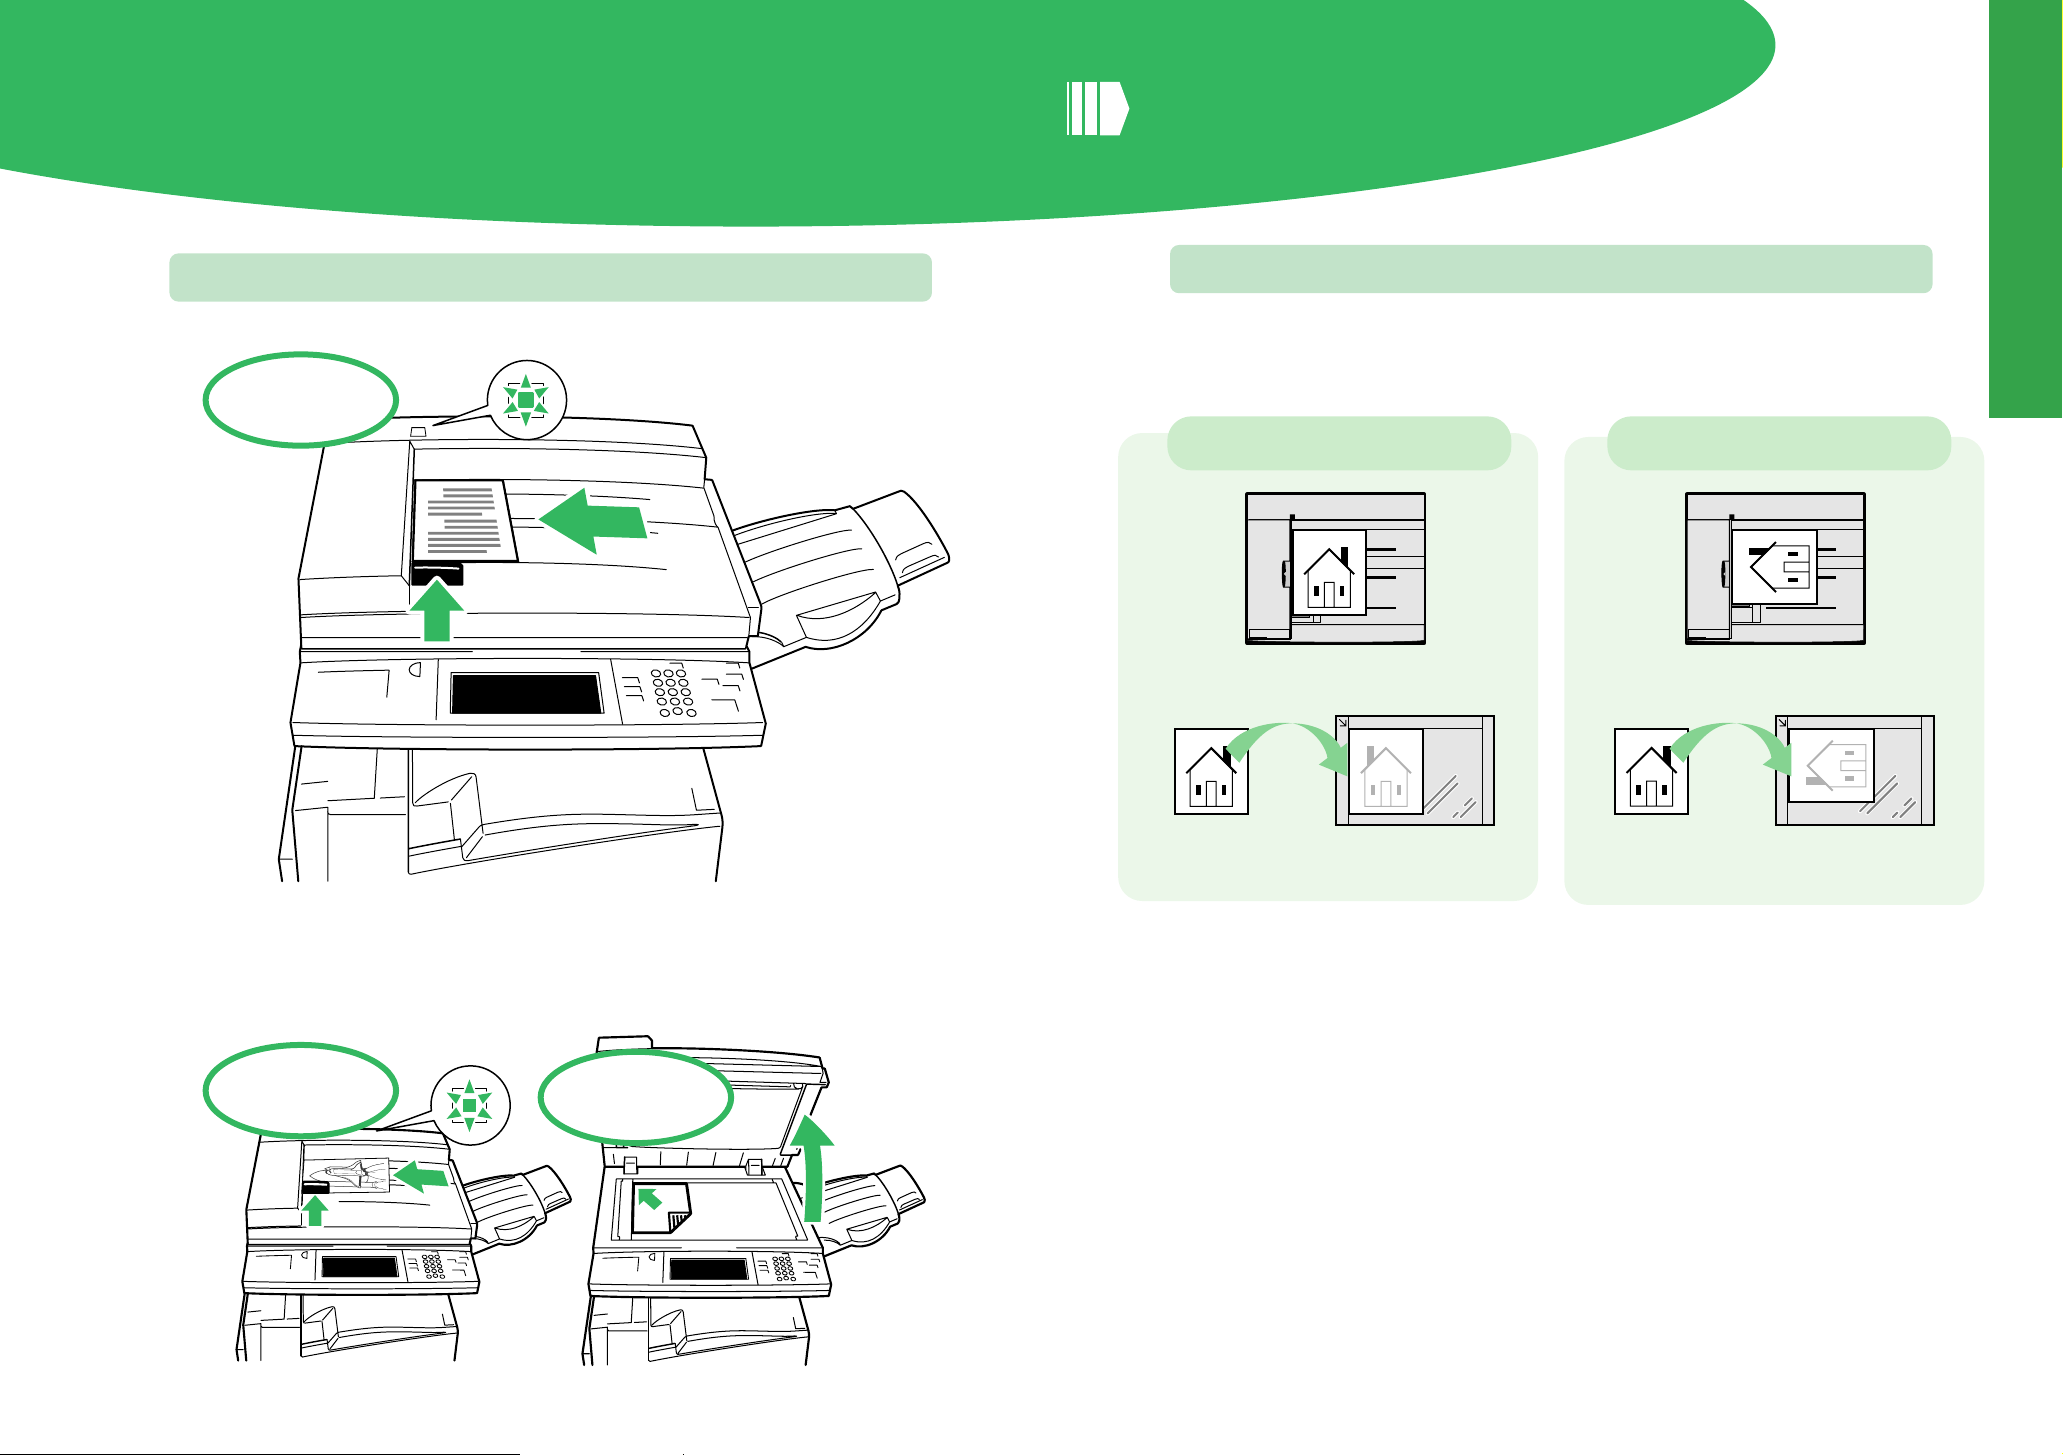
Loading Documents
See "Chapter 1 Loading Documents" in "Part 2
Copier" of the User Guide (Copier).
Loading Documents
Load documents into the Document Feeder.
Place documents
facing up.
A
B
About Original Orientation when Loading Documents
If you copy using the function, such as “Margin Shift”, which needs to set
the top, bottom, left and right positions of documents correctly, specify
the orientation of the original by using Original Orientation button.
Load the documents in Head
to Top Orientation.
Top
Left
Bottom
Right
Load the documents in Head
to Left Orientation.
Loading documents on the Document Feeder.Loading documents on the Document Feeder.
Top
Left Right
Bottom
Placing documents (such
as B4, A3) in the Document
Placing Documents on the Document Glass.
Placing Documents on the
Document Glass
Placing Documents on the Document Glass.
Feeder
Place documents
facing up.
4
Place documents
facing down.
5
Page 4

Loading Paper
See "Chapter 2 Loading Paper" in "Part 1 Hardware"
of the User Guide (Copier).
zTray 5 (Bypass)
When loading paper onto the Tray 5 (Bypass),
insert the paper with the copy side facing down.
Transparency
Heavyweight paper
zTrays 1, 2, 3, 4
Papers that can be / cannot be loaded in Tray 5 (Bypass)
zTransparency
sheets
Unframed
Transparency
Full-color Transparency
sheets
Black and white/Unframed transparencies
zLabel paper
Full-color transparencies (with white frame)
Loading Paper
Single-label type Paper base not entirely
20-label type
covered with labels
zOther Paper
Already printed or
copied paper
Note If you change the type of paper to be
loaded in trays, set the paper type on the
Control panel. See “Setting the Paper
Type” (P. 8) for details.
6
Inkjet
exclusive
paper
7
Page 5

Setting the Paper Type
See "2.3 Changing Paper Settings" in "Part 1 Hardware" of
the User Guide (Copier).
Press on the Control Panel.
If the Password Entry screen is displayed, enter the pass-
word and select Confirm. And then, select System Settings.
System Administrator - Password Entry
Password
✽✽✽✽✽
Note If the Password Entry screen is not displayed, proceed to
Step 3.
Confirm
Cancel
System Adminstrator Menu
User Mode System Settings
Select System Settings.
System Settings
SystemSettings
Auditron
Administration
Setup Menu
Close
System Administrator
Password
Select Paper Type.
Paper/Tray Attributes
Custom Paper Name
Paper Type Priority
Paper Type
Image Quality Tray 5 (Bypass)
Paper Tray Priority
Paper Size Defaults
Close
Select the paper tray whose paper type setting is
to be changed at Items, and select Change Set-
tings.
Paper Type
Items
1. Tray 1
2. Tray 2
3. Tray 3
4. Tray 4
5. Tray 5 (Bypass)
Current Settings
0
0
0
0
0
Close
Change
Settings
Enter the setting value of the paper type to be
changed using Numeric Keypad, and select Save.
1. Tray 1
Cancel
Save
Setting the Paper Type
Select Common Settings.
System Settings
Common Settings Copy Mode Settings
Print Mode Settings Scan Mode Settings
Close
Network Settings
Current Value :
New Value :
See See “5.4.4 Setting Paper Tray Attributes” in “Part 1 Hardware”
of the User Guide (Copier) for details on value of paper type.
0
1
Select Close repeatedly until the System Settings screen is
Select Paper Tray Attributes.
Common Settings
Machine Clock/Timers
Paper Tray
Attributes
Reports Diagnostics Others
Audio Tones
Printing Priority Image Quality
Screen Defaults
Adjustment
Close
8
displayed, and then select Exit.
This exits the System Administration Mode.
9
Page 6

Changing Screens
See "1.1 Main Components and Their Functions" in
"Part 1 Hardware" of the User Guide (Copier).
Note How these features buttons are
displayed differs according to which
optional accessories are installed.
001 006 011
002 007 012
003 008 013
004 009 014
005 010 015
016 021 026
017 022 027
018 023 028
019 024 029
020 025 030
Changing to the Menu screen.
Menu
Ready to copy.
Added
Features
Output Color Paper Supply
Auto
Full Color
Black
Dual Color-Red/Black
More...
This button is to return to
t
he screen that is displayed
when you select the Menu
button.
Back
2 Sided
1->1 Sided
1->2 Sided (H to H)
2->2 Sided (H to H)
2->1 Sided (H to H)
More...
Image Quality OthersBasic Copying
Reduce/Enlarge
100%
Auto%
50% A3->A5
70% A3->A4,B4->B5
More...
Copy Memory 100%
Quantity
Menu
Auto
1 A4
2 A3
3 8.5
More...
Plain
Plain
Plain
1
1 2 3
4 5 6
7 8 9
0
C
Password/System Settings
The Password Entry screen is
Machine Status
You can check machine status, meters,
displayed to enter the System
Administration Mode.
consumables and print reports.
Job Status
You can check Job status such as Secure
Print.
Changing Screens
Features
You can operate copy, scanner and facsimile.
Copy Scan
Fax
See See “1.4 Using the Touch Panel Display” of the User Guide
(Facsimile) for details on the Fax screen.
Scan OptionsBasic Scanning
Save To Output Color
Auto 200dpi
Mailbox...
Template...
Full Color
Grayscale
Black
Image Quality/
File Format
Scan Resolution 2 Sided Originals
300dpi
400dpi
600dpi
Changing to the Scan screen.
Menu
1 Sided
2 Sided (H to H)
2 Sided (H to T)
More...
Basic Features Scan Options Send Options
Resolution Original Type Lighter/Darker
Address Book
A B C
Keyboard
Standard
Fine
Super-fine(400dpi)
Super-fine(600dpi)
Text
Text & Photo
Photo
Changing to the Fax screen.
On-Hook/
Others
Menu
10 11
Page 7

Getting know the Features
Basic Copying screen
Basic Copying
Output Color Paper Supply
Auto
Full Color
Black
Dual Color-Red/Black
More...
Output Color
Selecting the color
to copy
See 3.2
Added
Features
2 Sided
1->1 Sided
1->2 Sided (H to H)
2->2 Sided (H to H)
2->1 Sided (H to H)
More...
2 Sided
Making Onesided/
Two-sided copies.
See 3.3
Image Quality
Reduce/Enlarge
100%
Auto%
50% A3->A5
70% A3->A4,B4->B5
More...
Reduce/Enlarge
Making enlarged/
reduced copies.
See 3.4
Others
Auto
More...
Paper Supply
Selecting paper
(trays)
See 3.5
Menu
1 A4
2 A3
3 8.5 11''
Plain
Plain
Plain
See "Chapter 3 User Friendly Features" in "Part 2
Copier" of the User Guide (Copier).
Note Reference number (Example: 3.2, 3.3,
Image Quality
screen
Basic Copying
Original Type
Text & Photo
Original Type
Copies can be
made at the image quality corresponding to each
type of document.
3.16
See
(Halftone)
Sharpness/Saturation
Sharpness: Normal
Saturation: Normal
Image Quality Presets
Normal
Sharpness/Saturation
The contours and brightness of
images can be adjusted.
3.19
See
Image Quality Presets
Copies can be made at a quality
appropriate for the image of documents.
See 3.22
Added
Features
Auto Exposure
Copies can be made with the background
color of the document such as newspapers.
See 3.17
Color Shift
The tone of document can
be adjusted.
See
3.20
Image Quality
Auto Exposure
On
Color Shift
Normal
etc.,) represents the heading number of
“Chapter 3 User Friendly Features” in “Part
2 Copier” of the User Guide (Copier).
Others
Light/Dark/Contrast
L/D : Normal
Contrast: Normal
Color Balance
Y: 0 0 0
C
Menu
M
: 0 0 0 K: 0 0 0
: 0 0 0
Light/Dark/Contrast
The color density and contrast can
be adjusted.
See 3.18
Color Balance
The strength of the four colors
(yellow, magenta, cyan, and black)
can be adjusted for each density level.
See 3.21
Added Features
screen
Basic Copying
Output
Auto
Center Output Tray
Original Size
Auto Size Detect
Multiple Up
1 Up
Output
Copies can be outputted
collated, stacked, or stapled.
See 3.6, 3.7
Original Size
Scanning non-standard size
documents to copy.
See 3.10
Multiple Up
Two or four document sheets
can be copied together onto a
single sheet of paper.
See 3.13
Added
Features
Image Quality Others
Margin Shift
S1: No Shift
S2: No Shift
Mixed Size Originals
Off
Separators
Off
Margin Shift
Copying with the position of
the image in the document
shifted.
See 3.8
Mixed Size Originals
Simultaneously scanning
different size documents
See 3.11
Separators
Printing with a blank sheet
inserted as a transparency separator between transparencie
See 3.14
Border Erase
Bound Originals
Off
Image Rotation
On during Auto
Staple Position
Border Erase
Erasing black shadows that
appear in the paper when
copying.
Bound Originals
Copying facing papers of a
document in page order.
Image Rotation
Copying with the document image automatically rotated so that the orientation of the
s.
document matches that of the paper.
See 3.15
12 13
Menu
:
mm
0
mm
:
See 3.9
See 3.12
:2
2
mm
Others screen
Basic Copying Image Quality Others
Covers
No Covers
Repeat Image
Off
Stored Jobs
Covers
Make copies with a cover on different type of paper of the document.
See 3.23
Repeat Image
The image of a document on one
sheet of paper can be copied repeatedly for the specified number of times.
See
3.26
Stored Jobs
Frequently used job setups can be
stored to job memory and called up
by a single button operation.
3.29
See
Added
Features
Booklet Creation
Off
Poster
Off
Build Job
Off
Booklet Creation
Copies can be made in a way such
that paper can be folded along the
center and made into a booklet.
See 3.24
Poster
An enlarged copy of a document
can be made spread over multiple
sheets.
See
3.27
Build Job
Documents with different settings
can be copied in a single operation.
See
3.30
Menu
Book Duplex
Off
Mirror/Negative Image
Mirror Image: Off
Negative Image: Off
Original Orientation
Head to Top
Book Duplex
Copies can be made with pages assigned so that they are in the same
facing state as the books.
See 3.25
Mirror/Negative Image
Copies can be made with the left and
right sides of the document image reversed or the colors of the document reversed in the color mode.
Original Orientation
The Original Orientation is set to
instruct the top of the document.
3.28
See
See 3.31
Note
How these feature buttons are
displayed differs according to
which optional accessories
are installed.
Getting know the Features
Page 8

Replacing Toner Cartridges
See "3.2.3 Replacing Toner Cartridges" in "Part 1 Hardware"
of the User Guide (Copier).
Make sure that
the machine has
stopped before
opening the front
cover.
Gently pull the toner cartridge
towards you to remove.
Warnings
Do not throw toner cartridges into an open
fire.Toner remaining in the cartridge can
cause an explosion and you can get burnt.
Note • Pull out toner cartridges gently.
Otherwise, toner may fly out of the car-
tridges.
• Return used toner cartridges to our Cus-
tomer Support Center for disposal.
Turn the toner cartridge of
the color indicated in the
message to the left up to
the key mark (open).
Note “Y” stands for Yellow, “M” for
Magenta, “C” for Cyan, and “K”
for Black.
Close the front door.
Note A message will be displayed and
the machine will not operate if the
front cover is even slightly open.
Lightly shake the new toner
cartridge three or four times up
14 15
and down to the left and right.
Insert the toner cartridge as far
as possible with the arrow (↑)
on the cartridge facing up.
Turn the toner cartridge
to the right up to the key
(closed).
Replacing Toner Cartridges
Page 9

Copy Ration Quick Reference Matrix
Making Copies by Selecting a Specified Size/Ratio (Standard Scaling Ratios)
Ratio (%)
141
122
115
86
81
70
50
Making Copies by Selecting a Variable Ratio (Zoom)
Copy
Document
A6
B6
A5
Paper Size
A4→ A3/B5→ B4
A4→ B4/A5→ B5
B4→ A3/B5→ A4
A3→ B4/A4→ B5
B4→ A4/B5→ A5
A3→ A4/B4→ B5
A3→ A5
A5
141
115%
100%
%
B5
173
141%
122%
%
A4
%
200
163%
141%
B4
%
245
200%
173%
A3
282
231%
200%
%
B5
A4
B4
A3
This Guide describes as the example where an optional
Offset Catch Tray is installed.
This guide uses Recycled paper.
81%
70%
58%
50%
100%
86%
70%
61%
115%
100%
81%
70%
141%
122%
100%
86%
163%
141%
115%
100%
Edition 1
June 2002
892E77290
Form No. DE3012E2-2
 Loading...