

Page 1

DocumentCentre C400/320/240 Series
User Guide (Facsimile)
This PDF file is best viewed using Acrobat® Reader 5
Page 2
Using the printer to print copies of bank notes or securities is illegal and punishable, regardless of whether they
are being used.
Microsoft, MS-DOS, Windows, Windows NT, Microsoft Network are trademarks or registered trademarks of
Microsoft Corporation in the U.S. and other countries.
All product/brand names are trademarks or registered trademarks of the respective holders.
Permission has been obtained from Microsoft Corporation for use of software screen shots.
Saved data may be lost if hard disk of the machine breaks down due to external shocks or if the power is
accidentally cut off in a manner not following the methods listed in manuals or other documentations. Fuji Xerox
is not responsible for such data loss and any consequence caused by such data loss.
Fuji Xerox is not responsible for any breakdown of machines due to infection of computer virus.
Important
1
This guide is copyrighted with all rights reserved. Under the copyright laws, this guide may not be copied or
modified in whole or part, without the written consent of the publisher.
2
Parts of this guide are subject to change without prior notice.
3
We welcome any comments on ambiguities, errors, omissions, or missing pages.
4
Never attempt any procedure on the machine that is not specifically described in this guide. Unauthorized
operation can cause faults or accidents. Fuji Xerox is not liable for any problems resulting from unauthorized
operation of the equipment.
Xerox, The Document Company and Ethernet are registered trademarks.
DocuWorks and CentreWare are trademarks.
Page 3
Preface
Thank you for selecting the Fuji Xerox DocumentCentre C400/320/240 Series.
This guide aims to provide all the necessary operating information for facsimile functions for
new users. Please read this guide carefully before use to obtain the best performance of
your machine.
For details on how to use the copier functions, daily maintenance, and precautions for
machine usage, see the User Guide (Copier). Also, for details about printing and scanning
features, and how to set a network environment, see the User Guide (Printer/Scanner).
After reading it, please keep this guide handy for quick reference should you encounter difficulties with the machine.
In this guide, DocumentCentre C400/320/240 may be referred to as the DocumentCentre
C400/320/240 series.
In this guide, precautions are indicated with the symbol . Always read and follow these instructions
before carrying out the required procedure. Also, thoroughly read the Safety Notes provided in this
guide.
As a member of the International Star Program, Fuji Xerox certifies that this product satisfies
the Japanese requirements for International Star Program standards.
Fuji Xerox shares the global concern about environmental conservation and has integrated that concern in its business activities from research and development to disposal. We have implemented a
number of programs to lessen the burden on the environment through totally eliminating ozone-depleting chlorofluorocarbons from our manufacturing facilities.
We are committed to leadership in the conservation of resources by reusing and recycling post-consumer waste material such as paper, consumables such as cartridges and parts from copiers and printers of our customers.
Along with our efforts to make environmental values a part of the Fuji Xerox culture, DocumentCentre
C400/320/240 adopts recycled components that satisfy our strict quality standards.
About reception interference
If you notice flickering or distorted images or noises on your audio-visual units, your machine may be
causing radio interference. Switch it off immediately. If this interference disappears, the machine is the
cause of the interference. Perform the following procedure until the interference is corrected.
●
Reposition or re-orient the machine and the TV and/or radio.
●
Move the machine and the TV and/or radio away from each other.
●
Unplug the machine, TV and/or radio, and replug them into outlets that operate on different circuits.
●
Reorient the TV and/or radio antennas and cables until the interference stops. (For an outdoor
antenna, ask your local electrician for support.)
●
Use coaxial cable antennas.
This equipment is certified as a Class 1 laser product under IEC60825. This means that the machine
does not emit hazardous laser radiation. Since radiation emitted inside the machine is completely confined within the protective housings and external covers, the laser beam cannot escape from the
machine during any phase of user operation.
Important Note:
This equipment will be inoperable when main power fails.
This equipment complies with the guidelines set forth by the Japan Business Machine Makers
Association on the harmonic affects by copiers and other reproduction devices in accordance with
the guidelines on the harmonic suppressors of electronic appliances and general-purpose
machines.
i
Page 4
S
Features in Brief
The following shows the basic features of this machine.
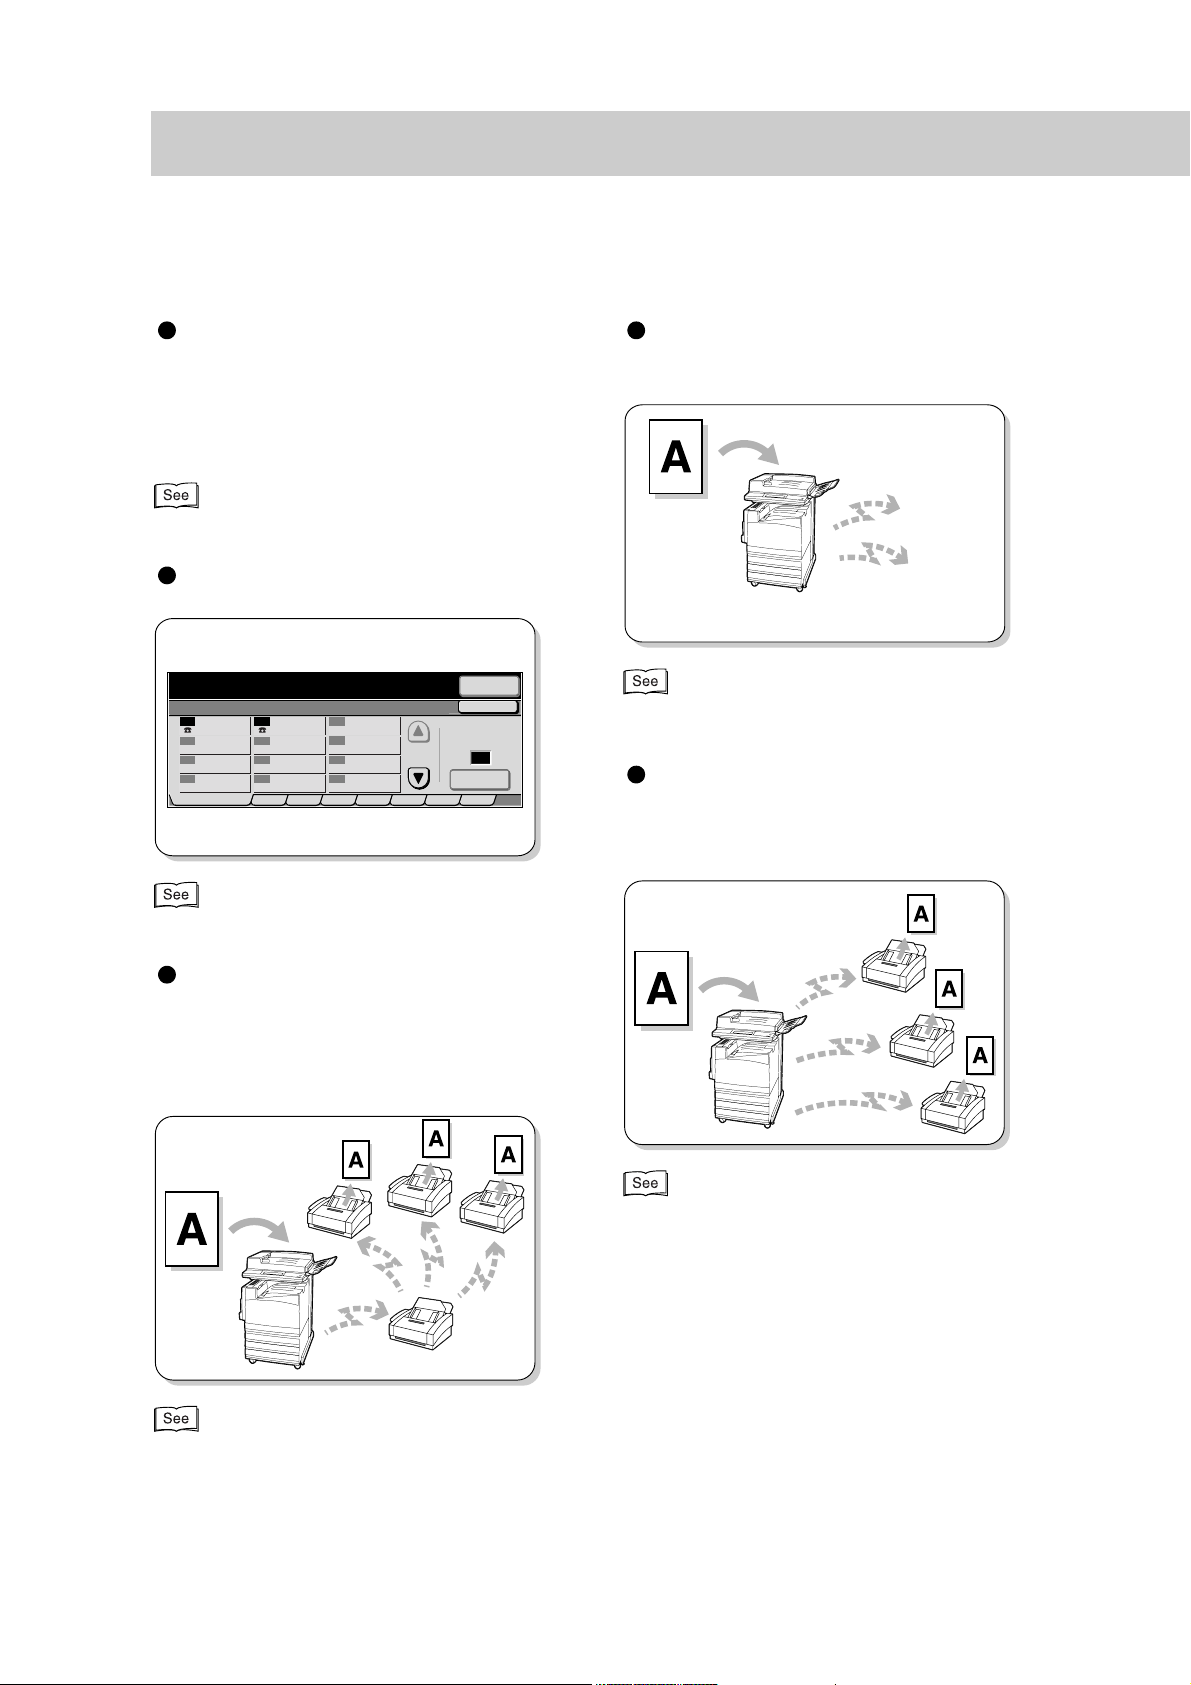
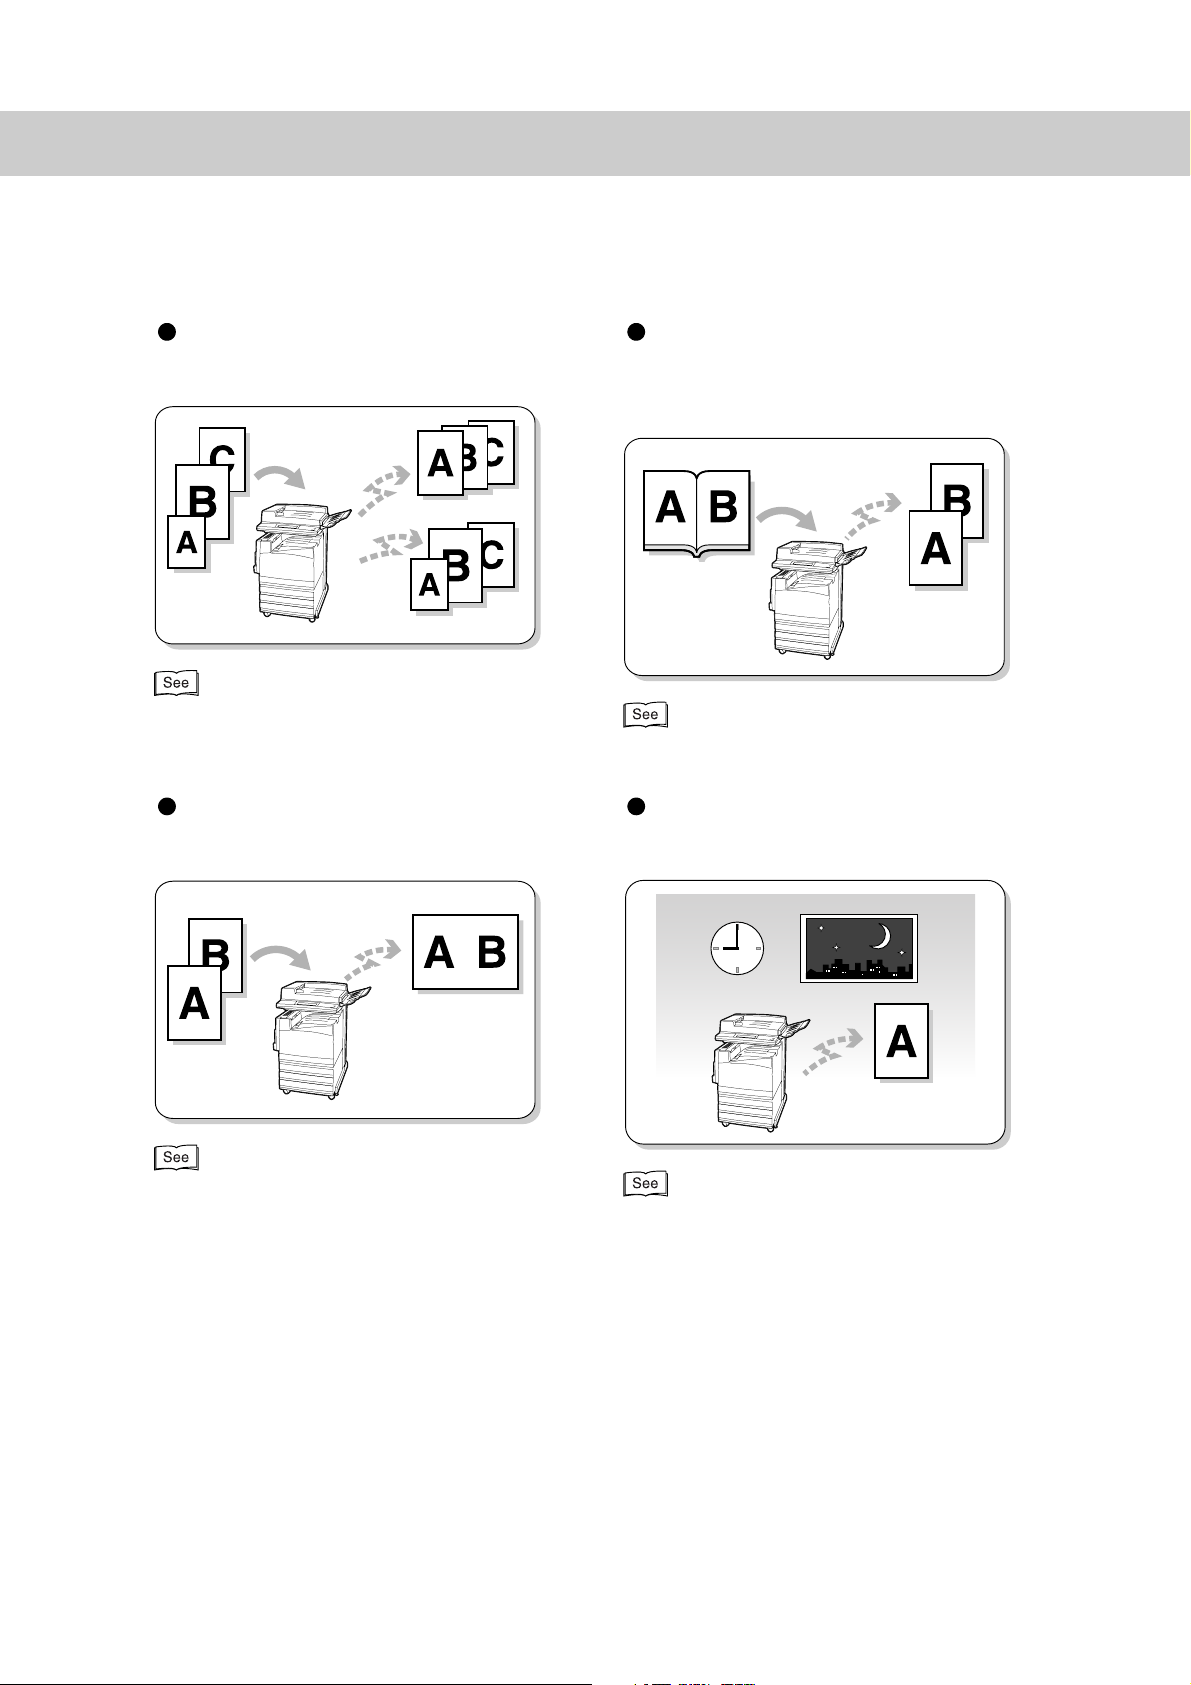
Adjusting the image quality
for documents to be transmitted
You can adjust the resolution, density and document quality for document scanning.
mode
electing a communication
“3.1 Simple Send Procedure” (P. 20)
Using the Address Book
Enter recipient’s Fax No. Memory :100%
[ Fax No. ]
Address Book
001
Fuji Xerox Akira Endo
004
007
010
002 003
005
008
011 012
ABCDE
006
009
FGHIJ KLMNO PQRST UVWXYZ
Enter Number
0-9
Recipient
Close
Go to
(001-500)
GroupAddress List
“3.4 Dialing” (P. 27)
Transmitting documents
through a relay station
When transmitting the same document to
multiple remote terminals over a long distance, this feature saves on cost.
G3
F4800
Next
“3.3 Selecting a Communication Mode (Communication Mode)” (P. 25)
Transmitting documents to
multiple locations with a single operation
“4.1 Transmitting to Multiple Destinations (Broadcast Send)” (P. 36)
“4.2 Transmitting Documents Through a Relay Station (Relay Broadcast)” (P. 39)
ii
Page 5
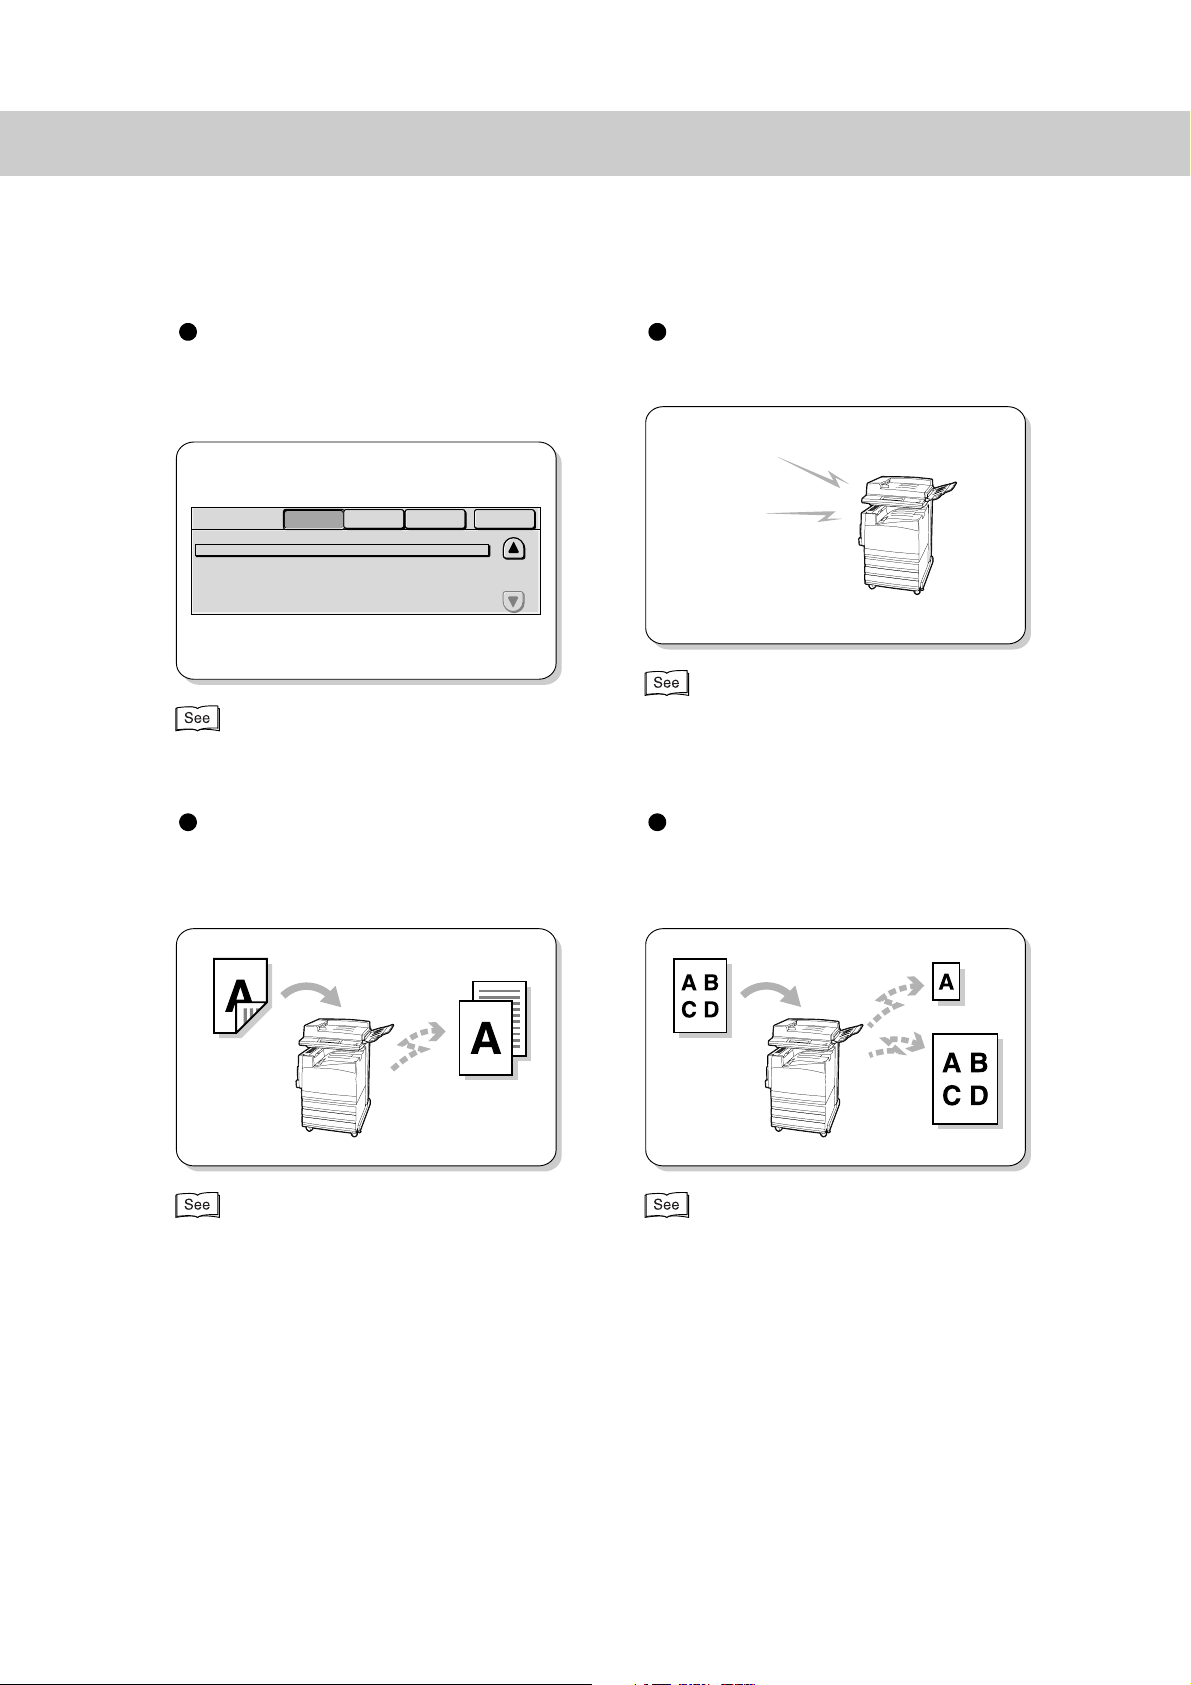
Confirming Job Status
Press the Job Status button to view information about pending jobs, current jobs and
communication results.
Job Status
Doc. No. - Job Type
00010 - Fax-Send
Current and
Pending Jobs
Status
Waiting
Completed Jobs
Remote Terminal/Contents
0123456789
Stored
Documents
“5.2 Confirming Job Status” (P. 58)
Pages
Waiting Jobs
1/1
Print
Hearing an incoming call without using the handset
Facsimile
service
“7.1 Making a Telephone Call” (P. 72)
Transmitting two sided documents by dividing them onto
separate pages
“8.1 Transmitting Two sided Originals (2 Sided
Originals)” (P. 78)
Specifying the size and reduction/enlargement ratio for
transmitting documents
“8.2 Specifying Document Size for Transmission
(Scan Size)” (P. 81), “8.4 Scanning Documents at a
Specified Size/Ratio (Reduce/Enlarge)” (P. 87)
iii
Page 6
Scanning documents in vari-
d
p
ous sizes at a time
“8.3 Scanning Documents in Various Sizes (Mixed
Size Originals)” (P. 84)
Transmitting facing pages by
dividing them onto separate
pages
“8.5 Transmitting Facing Pages on Separate Sheets
(Bound Originals)” (P. 89)
Transmitting documents by
merging pages
“8.6 Merging Several Pages Onto One Sheet (Multi-
le Up)” (P. 91)
Transmitting documents at a
specified time
“8.8 Transmitting Documents at a Programme
Time (Delayed Start)” (P. 96)
iv
Page 7
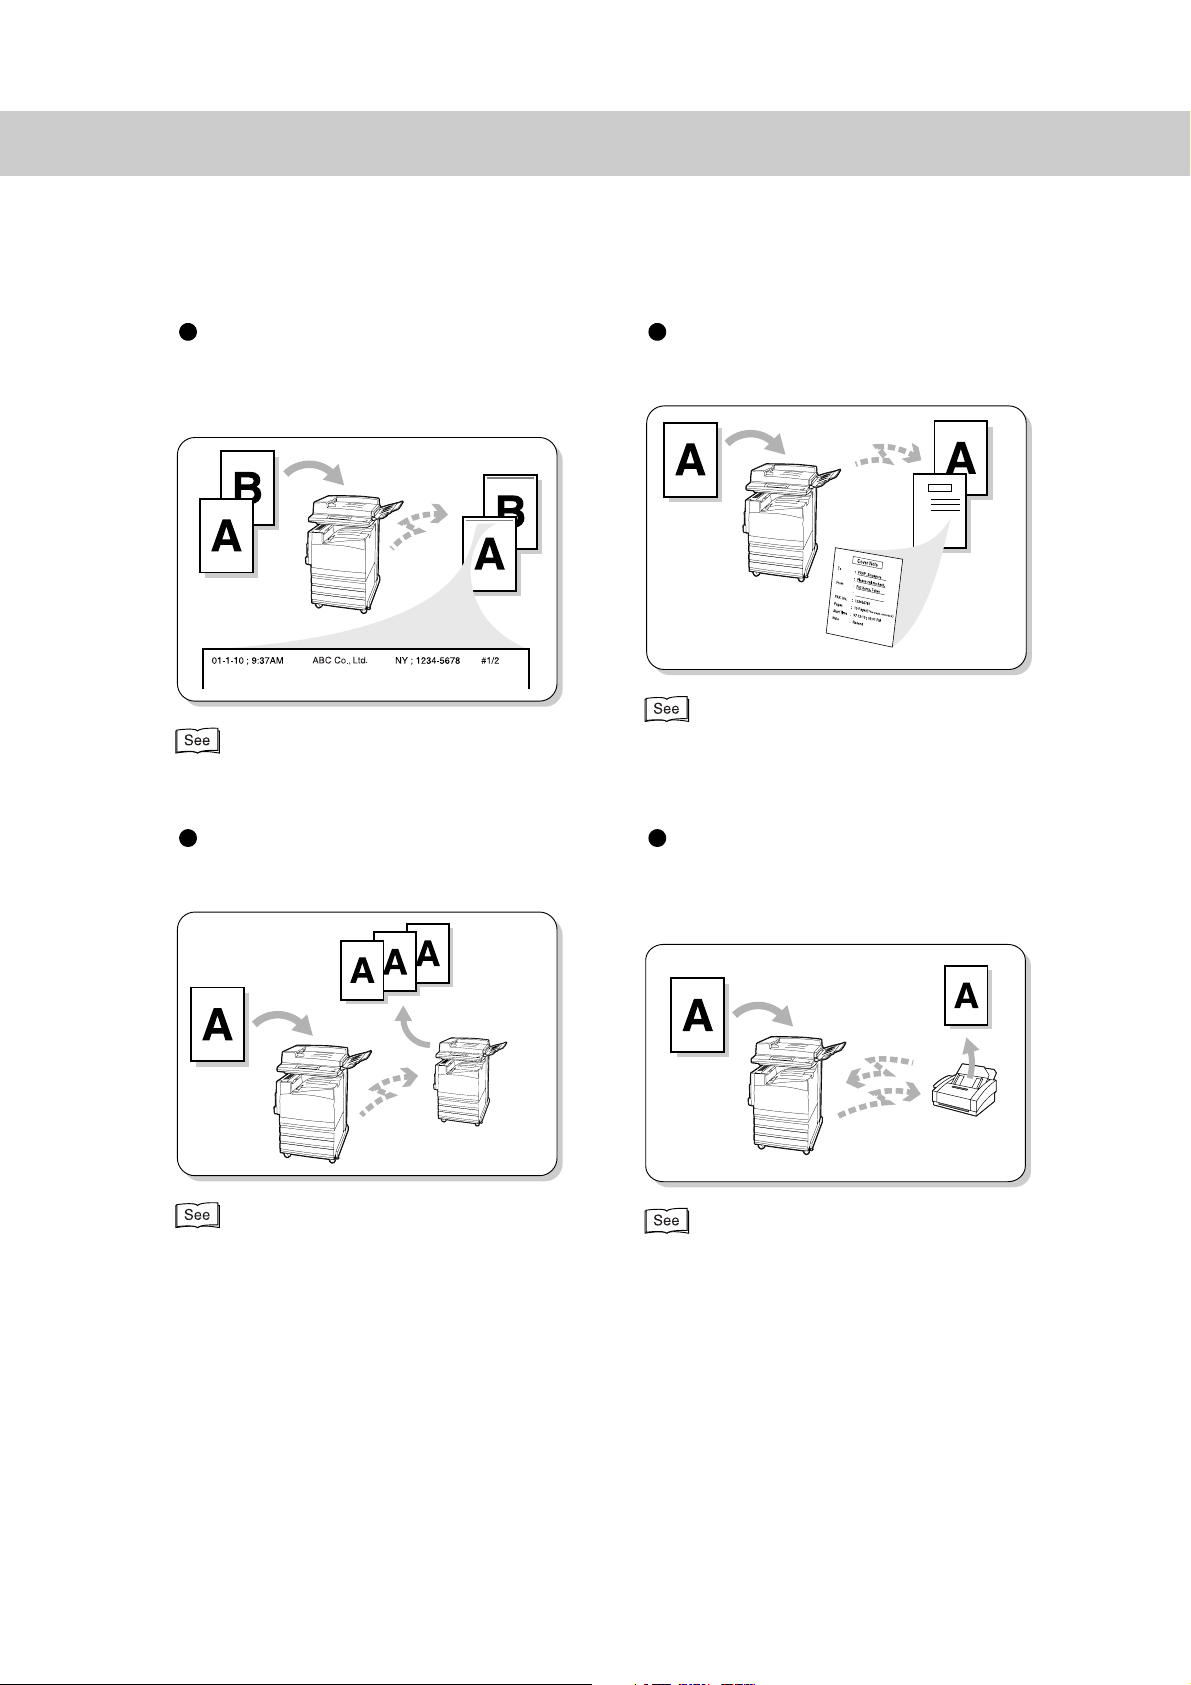
Transmitting documents with
”
brief information (date, time
and name)
“8.9 Transmitting Documents With Brief Information
(Send Header)” (P. 99)
Transmitting documents with
a cover page (Cover Note)
“8.10 Transmitting Documents With a Cover Page
(Cover Note)” (P. 101)
Making multiple copies at a
remote machine
Three
Copies
“8.11 Remote Copy (Recipient Print Sets)” (P. 104)
Storing documents being
polled from a remote machine
Retrieve
“8.12 Preparing to Be Polled (Store for Polling)
(P. 106)
v
Page 8
/
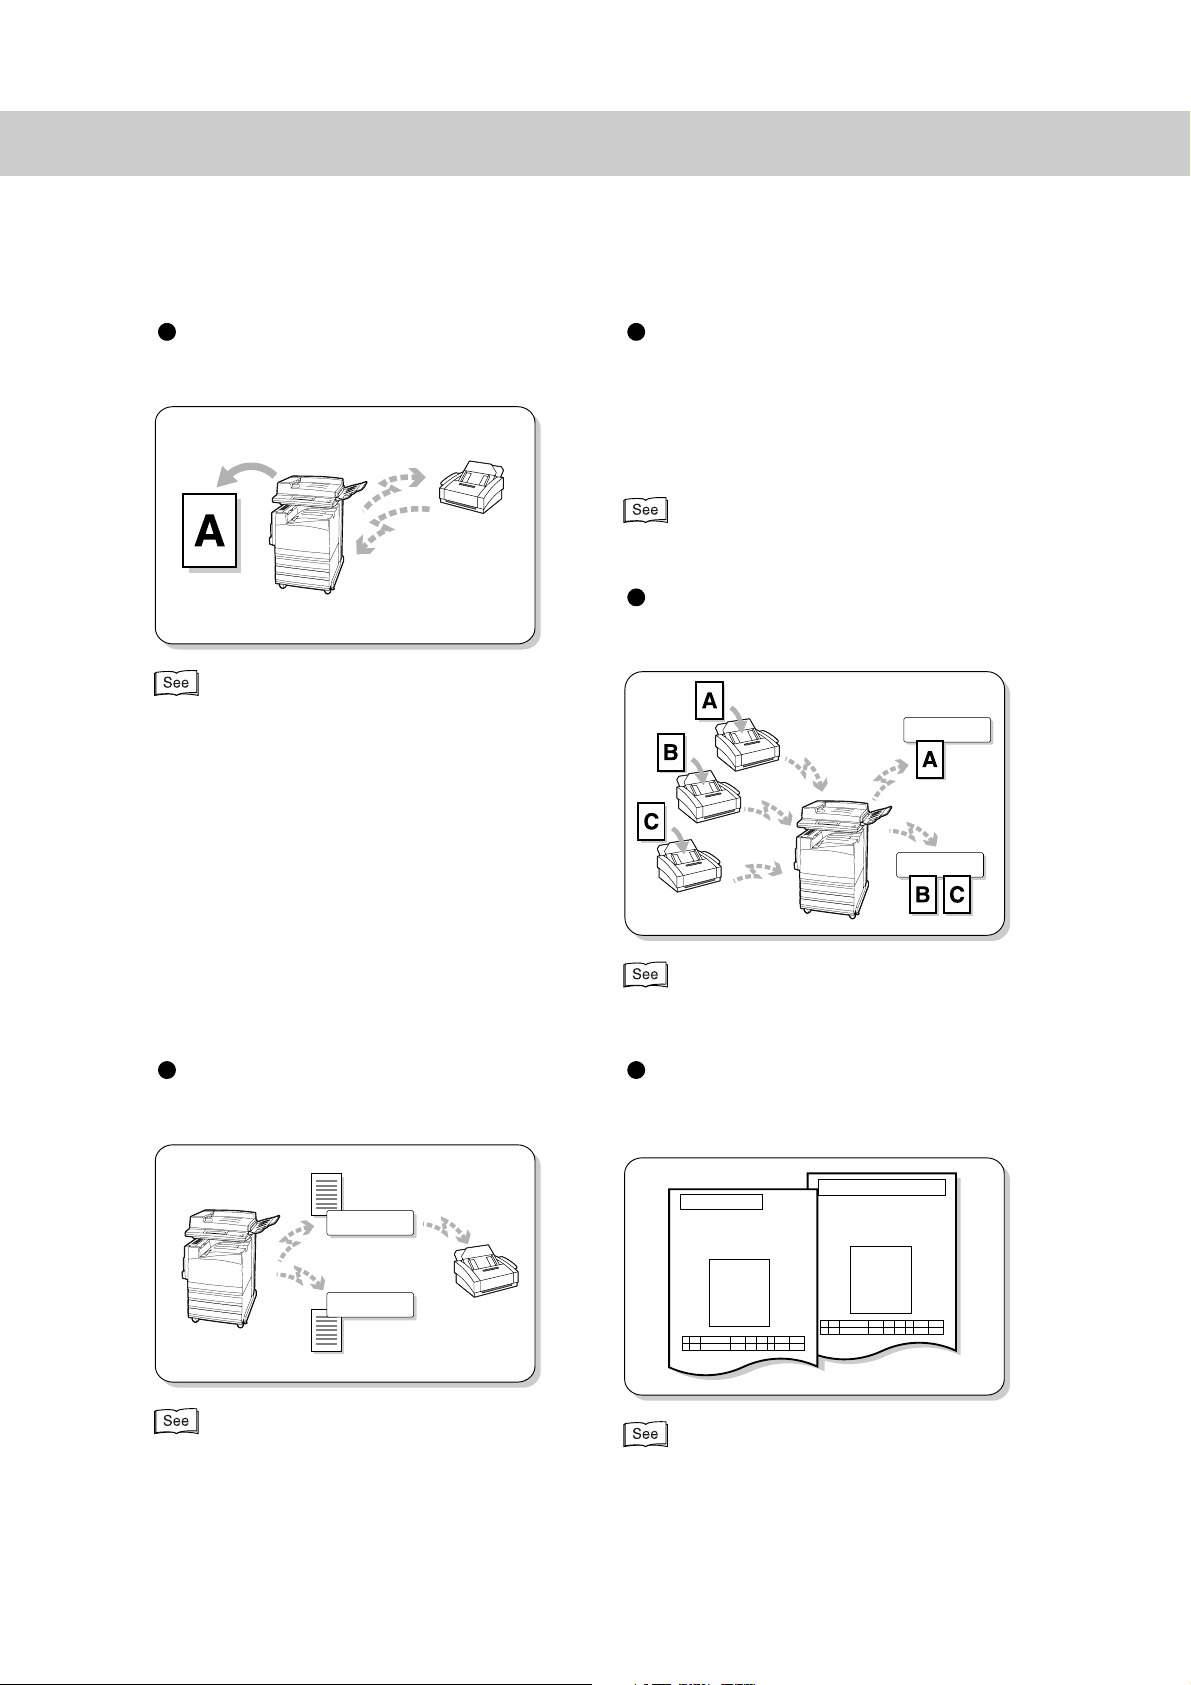
Receiving documents stored
M
x
at a remote machine
Retrieve
Communicating confidential
documents with a specified
person
You can send/receive documents to/from a
specified person by entering a mailbox password.
“8.14 Using the Mailbox Feature (Remote Mailbox
Retrieve from Mailbox)” (P. 112)
Sorting received documents into mailboxes
“8.13 Retrieving a Document From Remote
achine(s) (Polling)” (P. 110)
For Support
For Support
For A
For Support
“8.15 Sorting Received Documents Into Mailbo
(Box Selector)” (P. 129)
Programming commands
(requests) for mailbox
Printing Transmission Report
You can check results of transmissions on
the report.
Forward
Transmission Report-Undelivered
Document has not been sent.
Pass this report to the sender.
Document Size A4S
For A
Transmission Report
Document has been sent.
Document Size A4S
vi
For Support
Printed immediately
“9.6 Creating a Mailbox” (P. 183)
“10.2 Printing Reports and Lists” (P. 216)
Page 9

M
anaging use of fax transmis-
F
sions between departments
“9.6 Creating a Mailbox” (P. 183)
Direct Transmission of Faxes
from a Computer
“Chapter 12 Direct Transmission of Faxes From a
Computer” (P. 251)
Internet Facsimile (option)
“Chapter 13 Using the Internet to Send and Receive
axes” (P. 265)
vii
Page 10

Contents
◆ Preface ...................................................................................................................................i
◆ Features in Brief .................................................................................................................... ii
◆ Contents ............................................................................................................................. viii
◆ Related Guides .................................................................................................................. xiv
◆ Using This Guide ................................................................................................................. xv
Chapter 1 Before Use
1.1 Data to be Registered Before Using the Machine ................................................. 2
1.2 Notes on Fax Communications.............................................................................. 3
1.2.1 Telephone Line Connection..................................................................... 3
1.2.2 Automatic Receive Mode ........................................................................ 3
1.2.3 Making a Telephone Call......................................................................... 3
1.3 Telephone Line Connectors ................................................................................... 4
1.4 Using the Touch Panel Display .............................................................................. 5
1.4.1 Displaying Copy, Scan and Fax Screens ................................................ 5
1.4.2 Selecting Fax Function Screen ............................................................... 6
1.5 Entering Text.......................................................................................................... 8
1.5.1 Entry Method........................................................................................... 8
Chapter 2 Loading Documents
2.1 Documents .......................................................................................................... 10
2.1.1 Applicable Document Sizes .................................................................. 10
2.1.2 Automatically Detected Document Sizes .............................................. 11
2.1.3 Document Handling............................................................................... 12
2.2 Loading Documents............................................................................................. 14
2.2.1 Loading Documents on the Document Glass........................................ 14
2.2.2 Loading Documents in the Document Feeder....................................... 15
2.2.3 Document Orientation ........................................................................... 16
2.2.4 If You Have More Documents to Scan .................................................. 17
Chapter 3 Transmitting
3.1 Simple Send Procedure....................................................................................... 20
3.1.1 Resolution ............................................................................................. 20
3.1.2 Original Type ......................................................................................... 21
3.1.3 Lighter/Darker ....................................................................................... 21
3.1.4 Simple Send Procedure ........................................................................ 22
viii
Page 11

3.2 Transmitting by a Specified Telephone Line......................................................... 23
3.2.1 Transmitting by a Specified Telephone Line.......................................... 23
3.2.2 Adding Lines ......................................................................................... 24
3.3 Selecting a Communication Mode (Communication Mode)................................. 25
3.4 Dialing.................................................................................................................. 27
3.4.1 Numeric Keypad Dialing........................................................................ 27
3.4.2 Speed Dialing........................................................................................ 28
3.4.3 One Touch Dialing ................................................................................. 29
3.4.4 Group Dialing ........................................................................................ 29
3.4.5 Using the Address Book........................................................................ 30
3.4.6 Entering Symbols .................................................................................. 33
3.5 Transmission Failure ............................................................................................ 34
Chapter 4 Broadcast Send
4.1 Transmitting to Multiple Destinations (Broadcast Send) ...................................... 36
4.1.1 Broadcast Send Operation .................................................................... 38
4.2 Transmitting Documents Through a Relay Station (Relay Broadcast) ................. 39
4.2.1 Before Using the Relay Broadcast Send Feature.................................. 40
4.2.2 Fax Signal Method ................................................................................ 41
4.2.3 DTMF (Dual Tone Multi Frequency) Method ......................................... 42
4.2.4 F Code Method ..................................................................................... 44
4.3 Transmitting Documents Through a Remote Relay Station
(Remote Relay Broadcast)................................................................................... 47
4.3.1 Fax Signal Method ................................................................................ 48
4.3.2 DTMF (Dual Tone Multi Frequency) Method ......................................... 49
4.3.3 F Code Method ..................................................................................... 51
Chapter 5 Confirming and Canceling a Communication
5.1 Canceling Jobs .................................................................................................... 56
5.2 Confirming Job Status ......................................................................................... 58
5.2.1 Checking Jobs in Progress and Pending Jobs ...................................... 58
5.2.2 Confirming Completed Jobs.................................................................. 59
Chapter 6 Receiving Jobs
6.1 Reception Mode................................................................................................... 62
6.1.1 Switching Between the Modes .............................................................. 62
6.1.2 Automatic Reception ............................................................................. 63
ix
Page 12

6.1.3 Manual Reception ................................................................................. 63
6.2 Printing Received Documents ............................................................................. 65
6.2.1 Tray Mode and User Mode .................................................................... 65
6.2.2 Printing the Same Size Images............................................................. 66
6.2.3 Printing the Same Size Images With Margins....................................... 67
6.2.4 Reducing Images at the Sender Side ................................................... 68
6.2.5 Reducing Images at the Recipient Side ................................................ 69
6.2.6 Using the 2 Up on Receipt Feature ....................................................... 70
6.2.7 Using the 2 Sided Printing Feature ....................................................... 70
Chapter 7 Making and Receiving Telephone Calls
7.1 Making a Telephone Call ..................................................................................... 72
7.1.1 Off-hook Dialing .................................................................................... 72
7.1.2 On-hook Dialing .................................................................................... 73
7.2 Receiving a Telephone Call ................................................................................. 75
Chapter 8 Using Additional Features
8.1 Transmitting Two sided Originals (2 Sided Originals) .......................................... 78
8.2 Specifying Document Size for Transmission (Scan Size) .................................... 81
8.3 Scanning Documents in Various Sizes (Mixed Size Originals) ............................ 84
8.4 Scanning Documents at a Specified Size/Ratio (Reduce/Enlarge) ..................... 87
8.5 Transmitting Facing Pages on Separate Sheets (Bound Originals)..................... 89
8.6 Merging Several Pages Onto One Sheet (Multiple Up) ....................................... 91
8.7 Executing an Urgent Job (Priority Send) ............................................................. 94
8.8 Transmitting Documents at a Programmed Time (Delayed Start) ....................... 96
8.9 Transmitting Documents With Brief Information (Send Header) .......................... 99
8.10 Transmitting Documents With a Cover Page (Cover Note)................................ 101
8.11 Remote Copy (Recipient Print Sets).................................................................. 104
8.12 Preparing to Be Polled (Store for Polling) .......................................................... 106
8.12.1 Store the Document to Be Polled........................................................ 106
8.12.2 Checking Documents to Be Polled...................................................... 107
8.13 Retrieving a Document From Remote Machine(s) (Polling)............................... 110
8.14 Using the Mailbox Feature (Remote Mailbox/Retrieve from Mailbox)................ 112
8.14.1 Send to Mailbox (Fax Signal Method) ................................................. 113
8.14.2 Send to Mailbox (DTMF Method) ........................................................ 115
8.14.3 Send to Mailbox (F Code Method) ...................................................... 116
8.14.4 Receive in Mailbox .............................................................................. 119
x
Page 13

8.14.5 Retrieve From Mailbox (Fax Signal Method) ....................................... 119
8.14.6 Retrieve From Mailbox (DTMF Method) .............................................. 122
8.14.7 Retrieve From mailbox (F Code Method) ............................................ 123
8.14.8 Private Mailbox.................................................................................... 126
8.15 Sorting Received Documents Into Mailbox (Box Selector) ................................ 129
8.15.1 Sorting by Incoming Line..................................................................... 129
8.16 Checking/Printing/Deleting Documents in Mailbox ............................................ 130
8.17 Managing Use by Account (Copylyzer).............................................................. 133
8.17.1 Before Use .......................................................................................... 133
8.17.2 Making Auditron Administration Valid.................................................. 134
8.17.3 Programming Billing Units................................................................... 135
8.17.4 Report/List........................................................................................... 139
8.18 Transmitting with F Code (F Code Transmitting)................................................ 148
8.18.1 About F Code and Passwords............................................................. 148
8.18.2 Functions Used with F Code Transmission ......................................... 148
Chapter 9 Setting up System Administration Mode (Fax Functions)
9.1 Overview of System Administration Mode (Fax Functions) ............................... 152
9.2 Entering Local Terminal Information .................................................................. 155
9.2.1 How to Enter and Change ................................................................... 156
9.3 Setting an Address Number............................................................................... 160
9.3.1 Entry Method....................................................................................... 163
9.3.2 Changing/Deleting Entered Address Numbers ................................... 176
9.4 Setting a Group Dial .......................................................................................... 179
9.5 Setting a Comment ............................................................................................ 181
9.6 Creating a Mailbox ............................................................................................. 183
9.7 Programming Sort to Mailbox (Box Selector Entry) ........................................... 188
9.7.1 Documents Sorted by Incoming Line .................................................. 188
9.8 Other Items ........................................................................................................ 191
9.8.1 Setup Method...................................................................................... 191
9.8.2 Audio Tones......................................................................................... 192
9.8.3 Printing Priority.................................................................................... 193
9.8.4 Reports ............................................................................................... 194
9.8.5 Screen Defaults................................................................................... 196
9.8.6 Feature Defaults.................................................................................. 198
9.8.7 Fax Control.......................................................................................... 202
9.8.8 Output Destination-Line Setup ............................................................ 209
xi
Page 14

9.8.9 Reduce/Enlarge Presets ..................................................................... 210
9.8.10 Setting Scan Size Defaults.................................................................. 211
Chapter 10 Reports/Lists
10.1 Report/List Types ............................................................................................... 214
10.2 Printing Reports and Lists ................................................................................. 216
10.2.1 Guide Print Operation ......................................................................... 216
10.2.2 Printing Reports and Lists Automatically ............................................ 217
10.2.3 Printing a Transmission Report ........................................................... 218
10.3 Extended Features Settings List ........................................................................ 220
10.4 Address Book .................................................................................................... 221
10.5 Comment List .................................................................................................... 223
10.6 Box Selector List................................................................................................ 224
10.7 Activity Report ................................................................................................... 225
10.8 Transmission Report .......................................................................................... 228
10.9 Broadcast/Multi-Poll Report ............................................................................... 233
10.10 Relay Broadcast Report .................................................................................... 236
10.11 Mailbox Documents Report ............................................................................... 239
10.12 Stored Documents List ...................................................................................... 240
Chapter 11 Troubleshooting
11.1 Troubleshooting ................................................................................................. 244
11.1.1 Problems With Transmission ............................................................... 244
11.1.2 Problems With Reception.................................................................... 245
11.1.3 Other Problems................................................................................... 246
11.2 Error Code List ................................................................................................. 249
Chapter 12 Direct Transmission of Faxes From a Computer
12.1 Overview............................................................................................................ 252
12.2 Direct Faxing...................................................................................................... 253
12.3 Entering Recipient List....................................................................................... 257
12.3.1 Entering Fax Recipient Information Directly ........................................ 257
12.3.2 Importing From Fax Recipient Data .................................................... 259
12.3.3 Importing From Fax Phonebook Entries ............................................. 262
12.4 Registering Address Number From a PC .......................................................... 263
xii
Page 15

Chapter 13 Using the Internet to Send and Receive Faxes
13.1 What is Internet Fax (iFax)?............................................................................... 266
13.1.1 Overview ............................................................................................. 266
13.1.2 The Differences Between iFax and Facsimile Features ...................... 273
13.2 Setting the Environment .................................................................................... 275
13.2.1 Before Use .......................................................................................... 275
13.2.2 Environment Setting............................................................................ 276
13.2.3 Setup the Environment........................................................................ 280
13.2.4 Confirming the Settings....................................................................... 283
13.3 Receiving and Sending E-mails......................................................................... 284
13.3.1 Sending E-mails .................................................................................. 284
13.3.2 Settings That are Configurable During an Outgoing iFax Transmission
............................................................................................................ 287
13.3.3 Receiving E-mails ............................................................................... 293
13.4 Useful Features.................................................................................................. 295
13.4.1 Sending E-mails to Mailboxes Using E-mail Addresses...................... 295
13.4.2 Sending Faxes to Recipients as Relay Centers .................................. 298
13.4.3 Forwarding a Fax as E-mail From Mailbox.......................................... 301
13.5 Report/List ......................................................................................................... 304
13.6 Troubleshooting.................................................................................................. 305
13.6.1 Problems With Transmission ............................................................... 305
13.6.2 Problems With Reception.................................................................... 306
13.7 Precautions and Limitations............................................................................... 307
Appendix
A Specifications..................................................................................................... 312
B Accessories ....................................................................................................... 313
C Facsimile Service System.................................................................................. 314
C.1 Using the Handset............................................................................... 314
C.2 When Not Using a Handset................................................................. 315
D Overseas Communication.................................................................................. 317
D.1 Dialing “0011” as an Example ............................................................. 317
E Models Providing Relay Broadcast and Recipient Print Set Function ............... 319
F Glossary ............................................................................................................ 321
◆ Index.................................................................................................................................. 325
xiii
Page 16

Related Guides
This section describes the guides provided for this machine.
Guides Supplied
We provide the following guides for optimum usage of this machine.
■User Guide (Copier)
This guide describes all the necessary steps for copying, clearing paper jams,
daily care, setting the various items and safety information.
■User Guide (Printer/Scanner)
This guide describes all the necessary steps for printing and scanning, setting
the network environment, setting the various items, and troubleshooting.
■User Guide (Facsimile) (this guide)
This guide describes all the necessary steps for faxing and troubleshooting
when faxing. This guide is provided with the DocumentCentre C400/320/240
Series machine equipped with the fax function as well as with the Standard
G3 Fax Kit (option).
■User Guide (PostScript® Kit)
This guide describes how to install and use the software that is included in the
PostScript Driver Library. It is included with the PostScript kit.
Guides for Optional Accessories
Optional accessories are also available for this machine. User Guides are provided
with the optional accessories exclusively for the DocumentCentre C400/320/240
Series. These User Guides are referred to as “guides for optional accessories”. Guides
for optional accessories are provided in two forms, printed or as On-line Help.
Guides for optional accessories describe all the necessary steps for operating optional
accessories and installing software.
xiv
Page 17

Using This Guide
This section describes the organization of this guide.
This guide has been produced for people who use the DocumentCentre C400/320/240
series with fax functions on a regular daily basis. When reading this guide, read the chapter
that is of particular relevance to the operation you are performing.
What You Need to Know
This guide assumes that the operator has a basic knowledge of the operating
environment of the personal computer in use, networking environments, and how
to operate a personal computer.
For details about the environment of the personal computer in use, basic knowledge of networking environments, and how to operate a personal computer,
refer to the User Guides provided with the personal computer, operating system,
and network system.
Organization of This Guide
This Guide consists of the following chapters.
Chapter 1 Before Use
This Chapter describes the operating precautions and basic operations such as
text input when using the facsimile features.
Be sure to read this chapter before operating the machine.
Chapter 2 Loading Documents
This Chapter describes the types of original documents that can be used on this
machine; precautions on how to load documents.
Chapter 3 Transmitting
This Chapter describes how the machine receives a document from a remote
facsimile and outputs it. Most routine procedures are described in this chapter.
Chapter 4 Broadcast Send
This Chapter describes how to transmit a document to multiple destinations with
a single operation.
Chapter 5 Confirming and Canceling a Communication
This Chapter describes how to cancel communication and view information
about pending jobs, current jobs and communication results.
xv
Page 18

Chapter 6 Receiving Jobs
This Chapter describes how the machine receives and prints documents.
Chapter 7 Making and Receiving Telephone Calls
This Chapter describes how to make and receive telephone calls using an external telephone.
Chapter 8 Using Additional Features
This Chapter describes useful facsimile features and operations.
Chapter 9 Setting up System Administration Mode (Fax Functions)
This Chapter describes how to register data to use the fax functions and the
setup procedures to customize these functions.
Chapter 10 Reports/Lists
This Chapter describes reports and list settings and how to print them.
Chapter 11 Troubleshooting
This Chapter describes what to do when transmission errors occur and when an
error code is displayed in the Activity Report.
Chapter 12 Direct Transmission of Faxes From a Computer
This Chapter describes how to transmit faxes directly from a computer.
Chapter 13 Using the Internet to Send and Receive Faxes
This Chapter describes how to use the Internet Fax (iFAX) function (option) to
send and receive faxes.
Appendix
This appendix describes specifications, brief information on the facsimile service
system, and overseas communication.
xvi
Page 19

Conventions
1
In this guide, host device refers to a personal computer or workstation and “Doc-
umentCentre C400/320/240” refers to “Fuji Xerox DocumentCentre C400/320/
240”.
2
The following icons are used in this guide.
Indicates important information and must be read in detail.
Indicates supplementary information.
Indicates references used in this guide. Guide titles are noted without double
quotes while specific sections like “1.9.2 Disabling the Power Saver Mode” or
found within double quotes.
3
Special marks/characters used in this guide.
“ ” : Double quotes indicate the following:
●
Messages that appear in the touch panel display and computer
screens.
●
Characters to be entered.
●
Feature names or buttons that are difficult to understand.
Bold face : Bold face characters refer to selections made like options on the
screen, hard or soft buttons, and keys from the keyboard.
For example: Press ESC.
When a checkbox is checked, it indicates ON, otherwise it indicates OFF.
4
5
The item with the radio button checked is the selected item.
xvii
Page 20

1Before Use
1.1 Data to be Registered Before Using the Machine.............................. 2
1.2 Notes on Fax Communications.......................................................... 3
1.2.1 Telephone Line Connection ................................................ 3
1.2.2 Automatic Receive Mode.................................................... 3
1.2.3 Making a Telephone Call .................................................... 3
1.3 Telephone Line Connectors ................................................................ 4
1.4 Using the Touch Panel Display............................................................ 5
1.4.1 Displaying Copy, Scan and Fax Screens ........................... 5
1.4.2 Selecting Fax Function Screen........................................... 6
1.5 Entering Text ...................................................................................... 8
1.5.1 Entry Method ...................................................................... 8
Page 21

Data to be Registered
Before Use
1
1.1
The following data has to be registered before using the machine.
Item Contents See
Date and
time
Telephone
line
Local
name
Send
header
Address
Number
The current date and time. “5.4.1 Machine Clock/Timers” in “Part 1
A fax number and dial type is registered for
each line the fax is connected to.
The name of the machine displayed by the
receiving machine and recorded in the remote
activity report. The machine identifies itself to
the remote machine when they communicate.
The local name can include alphanumeric
characters and symbols.
Machine name (Send Header) that will be
printed on the first line of the document transmitted.
The Send Header can include alphanumeric
characters and symbols.
The telephone numbers you frequently use.
The Address Number can include remote
name, telephone number, and specifications
for communication mode, resolution, Broadcast Send and Relay Broadcast.
Before Using the Machine
Hardware” of the User Guide (Copier)
“9.2 Entering Local Terminal Informa-
tion” (P. 155)
“9.2 Entering Local Terminal Informa-
tion” (P. 155)
“9.2 Entering Local Terminal Informa-
tion” (P. 155)
“9.3 Setting an Address Number”
(P. 160)
For details on settings for the optional Internet Fax (iFAX), see “13.2 Setting the Environment” (P. 275).
2
Page 22

Notes on Fax
1.2
Follow the instructions described below when using the fax features on the machine.
For details about precautions for installation and relocation, and operating safeguards, see
“Safety Notes” of the User Guide (Copier).
Communications
1.2.1 Telephone Line Connection
You cannot use this machine with a call waiting service.
A facsimile located close to a main unit of a cordless phone can cause distorted
images or interrupted transmission.
This machine should be installed at least five meters away from the main unit of
the cordless phone.
If the digital line leased for your company network is multiplexed, facsimile communication may be restricted as follows:
(1) The features using our unique transmission method, such as Recipient Print
Sets, Relay Broadcast and Remote Mailbox, are not available.
(2) The transmission speed is limited.
(3) Super G3 cannot be used.
The following communication errors may also occur.
These restrictions may occur because the multiplexing device restricts the bandwidth to the minimum required for voice communications. These restrictions vary
according to the network configuration.
For more information, contact your network administrator.
Before Use
1
1.2.2 Automatic Receive Mode
If the telephone rings while the machine is in standby mode with the automatic
receive mode activated, you cannot speak with the caller.
When you want to answer a telephone call in this mode, connect an external
telephone and use the Auto Switch Time feature to change the time for the
machine to answer the call.
“9.8.7 Fax Control” (P. 202)
1.2.3 Making a Telephone Call
In power saving, you cannot make telephone call with the receiver.To make a
telephone call, press the Power Saver button to cancel power saving.
3
Page 23
Telephone Line
Before Use
1
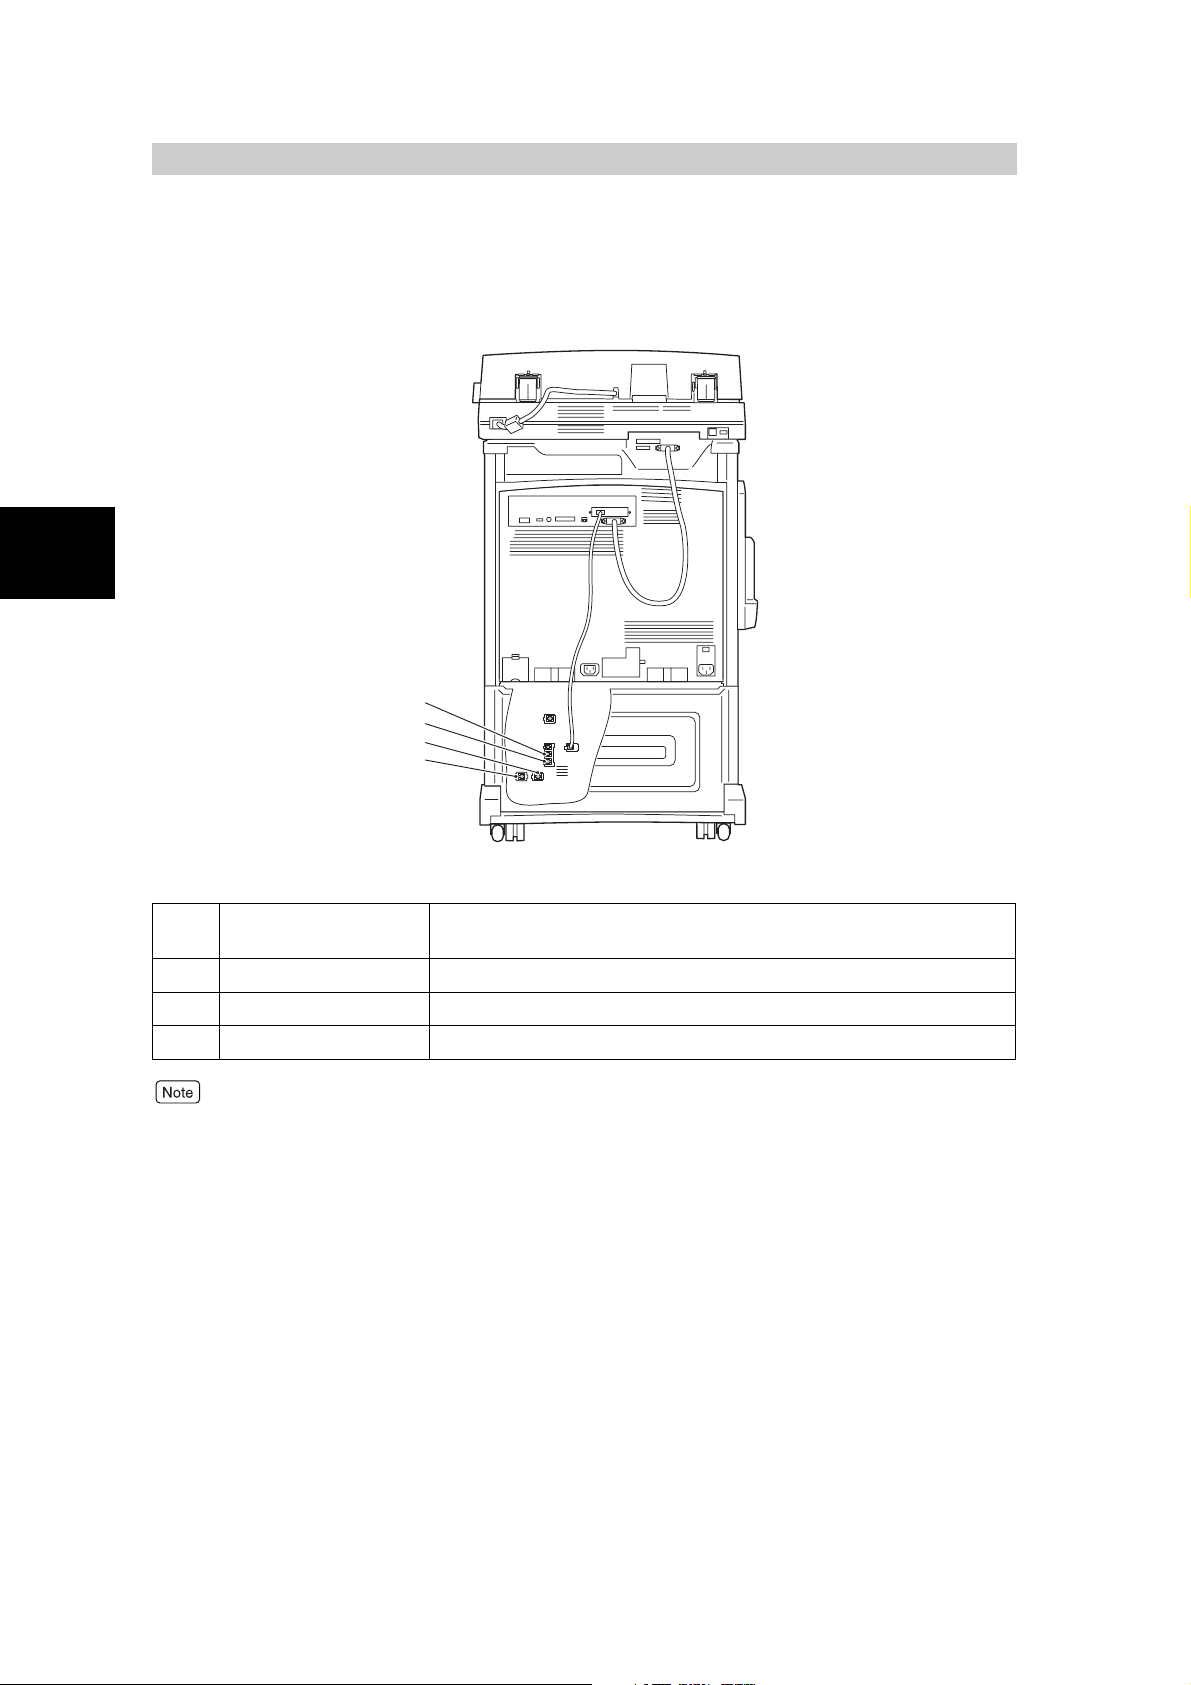
1.3
The figure below shows the telephone line connectors at the rear side of the machine.
Connectors
1
2
3
4
1 LINE 1 Connect the fax to a public switched telephone network (PSTN). An
external telephone cannot be connected.
2 TEL An external telephone is connected here.
3 LINE 2 (Line 2) Connect to a public line.
4 LINE 4 (Line 4) Connect to a public line.
Line 2 and 4 can be specified when an option is installed.
4
Page 24
Using the Touch Panel
1.4
Display
By selecting the feature buttons on the touch panel display, you can select various features.
For details on using the touch panel display, see “1.1.3 How to Use the Touch Panel Display” in “Part 1 Hardware” of the User Guide (Copier).
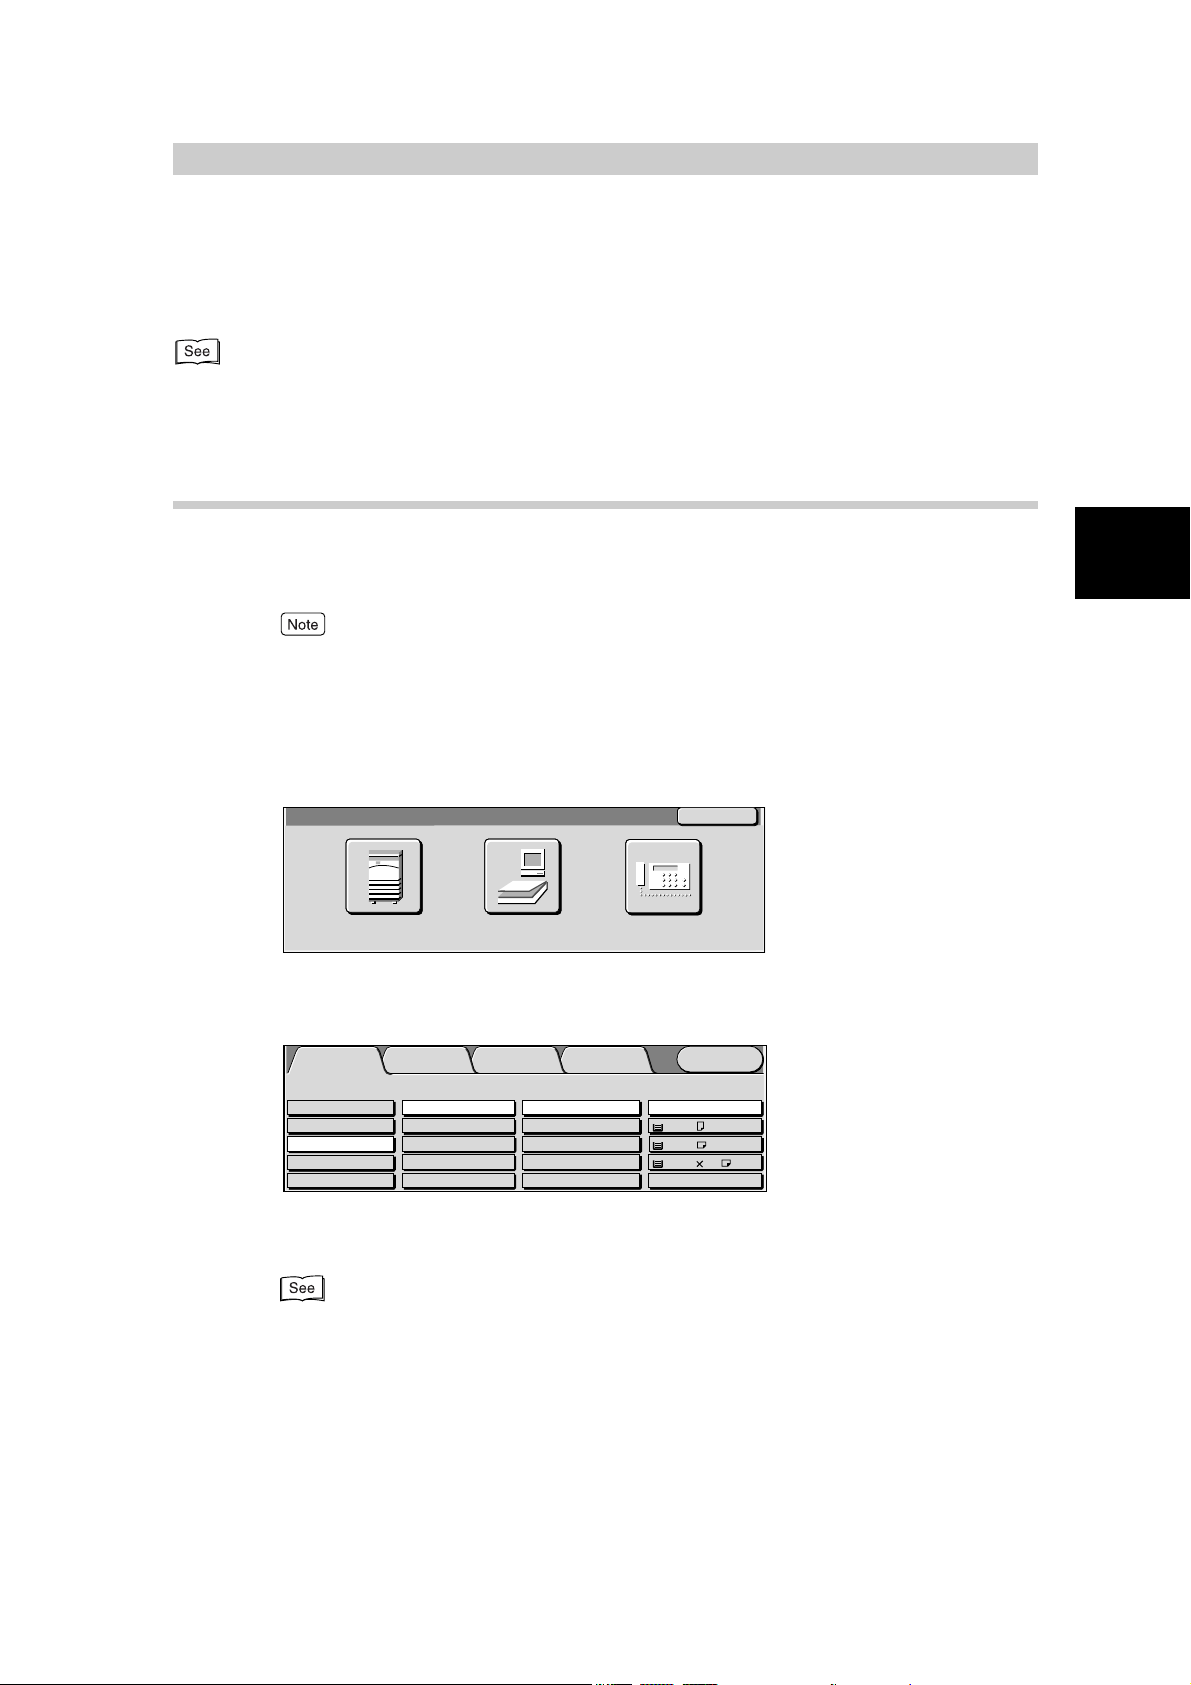
1.4.1 Displaying Copy, Scan and Fax Screens
Use the Menu to access one of the three screens Copy, Scan, and Fax.
Press the Menu at the top right of each screen to display the Menu.
●
If this fails to display the Menu, press the Features button to display the Menu.
●
The machine is factory set to display the Copy screen as the default screen on the touch panel display when the power is turned on. This default screen can be changed in the System Administration
Mode. For details on changing the default screen, see “5.4.3 Setting Screen Defaults” in “Part 1
Hardware” of the User Guide (Copier).
■Menu screen
Before Use
1
Menu
Copy Scan
Use the buttons on the Menu screen to display the screen of the required features.
Back
Fax
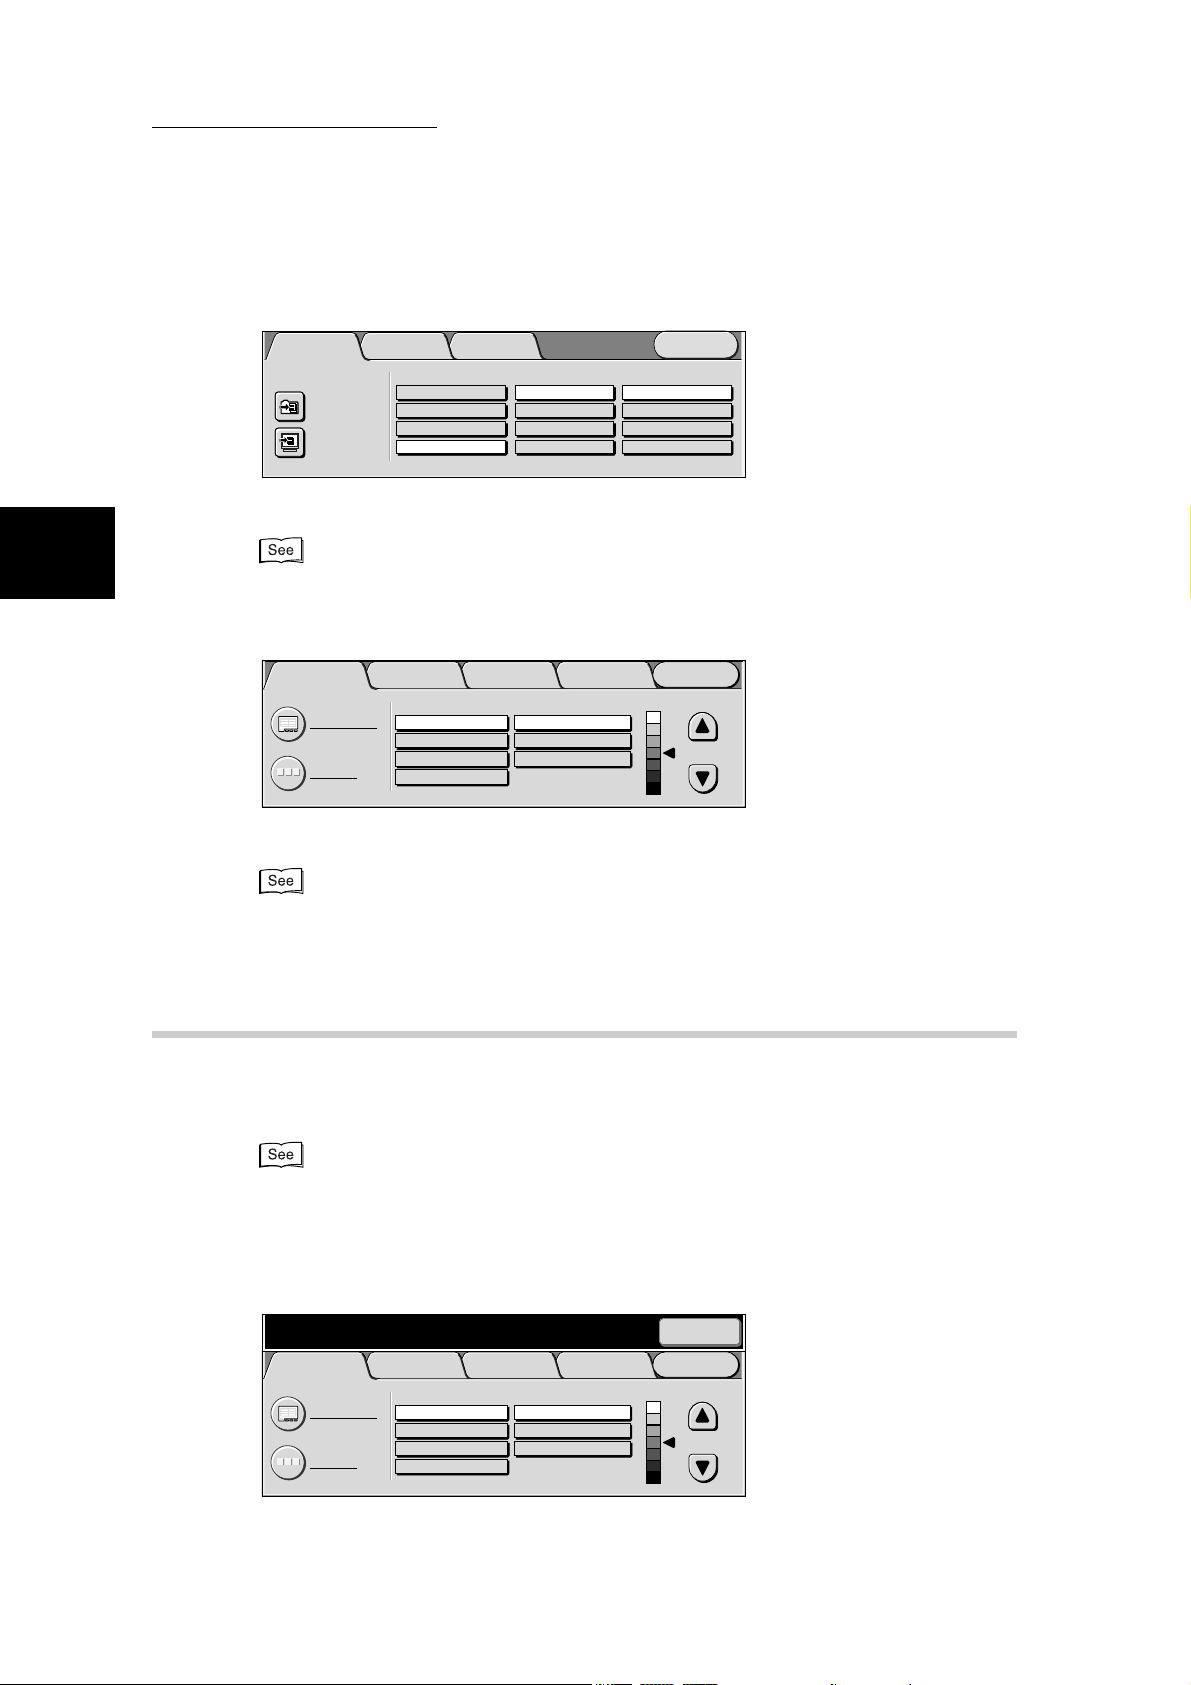
■Copy screen
Basic Copying
Output Color Paper Supply
Auto
Full Color
Black
Dual Color-Red/Black
More...
The Copy screen allows you to select the copy features. The Copy screen consists of Basic Copying,
Added Features, Image Quality, and Others.
For details on how to use the copier functions, see “Part 2 Copier” of the User Guide (Copier).
Added
Features
2 Sided
1->1 Sided
1->2 Sided (H to H)
2->2 Sided (H to H)
2->1 Sided (H to H)
More...
Image Quality
Reduce/Enlarge
100%
Auto%
50% A3->A5
70% A3->A4,B4->B5
More...
Others
Auto
1 A4
2 A3
3 8.5 11’’
More...
Menu
Plain
Plain
Plain
5
Page 25
Before Use
1
1.4 Using the Touch Panel Display
■Scan screen
Scan OptionsBasic Scanning
Scan to: Output Color
Mailbox...
Job Template...
Auto 200dpi
Full Color
Grayscale
Black
The Scan screen allows you to select the scanner features.
For details on how to use the scanner functions, see “Part 2 Scanner” of the User Guide (Printer/
Scanner).
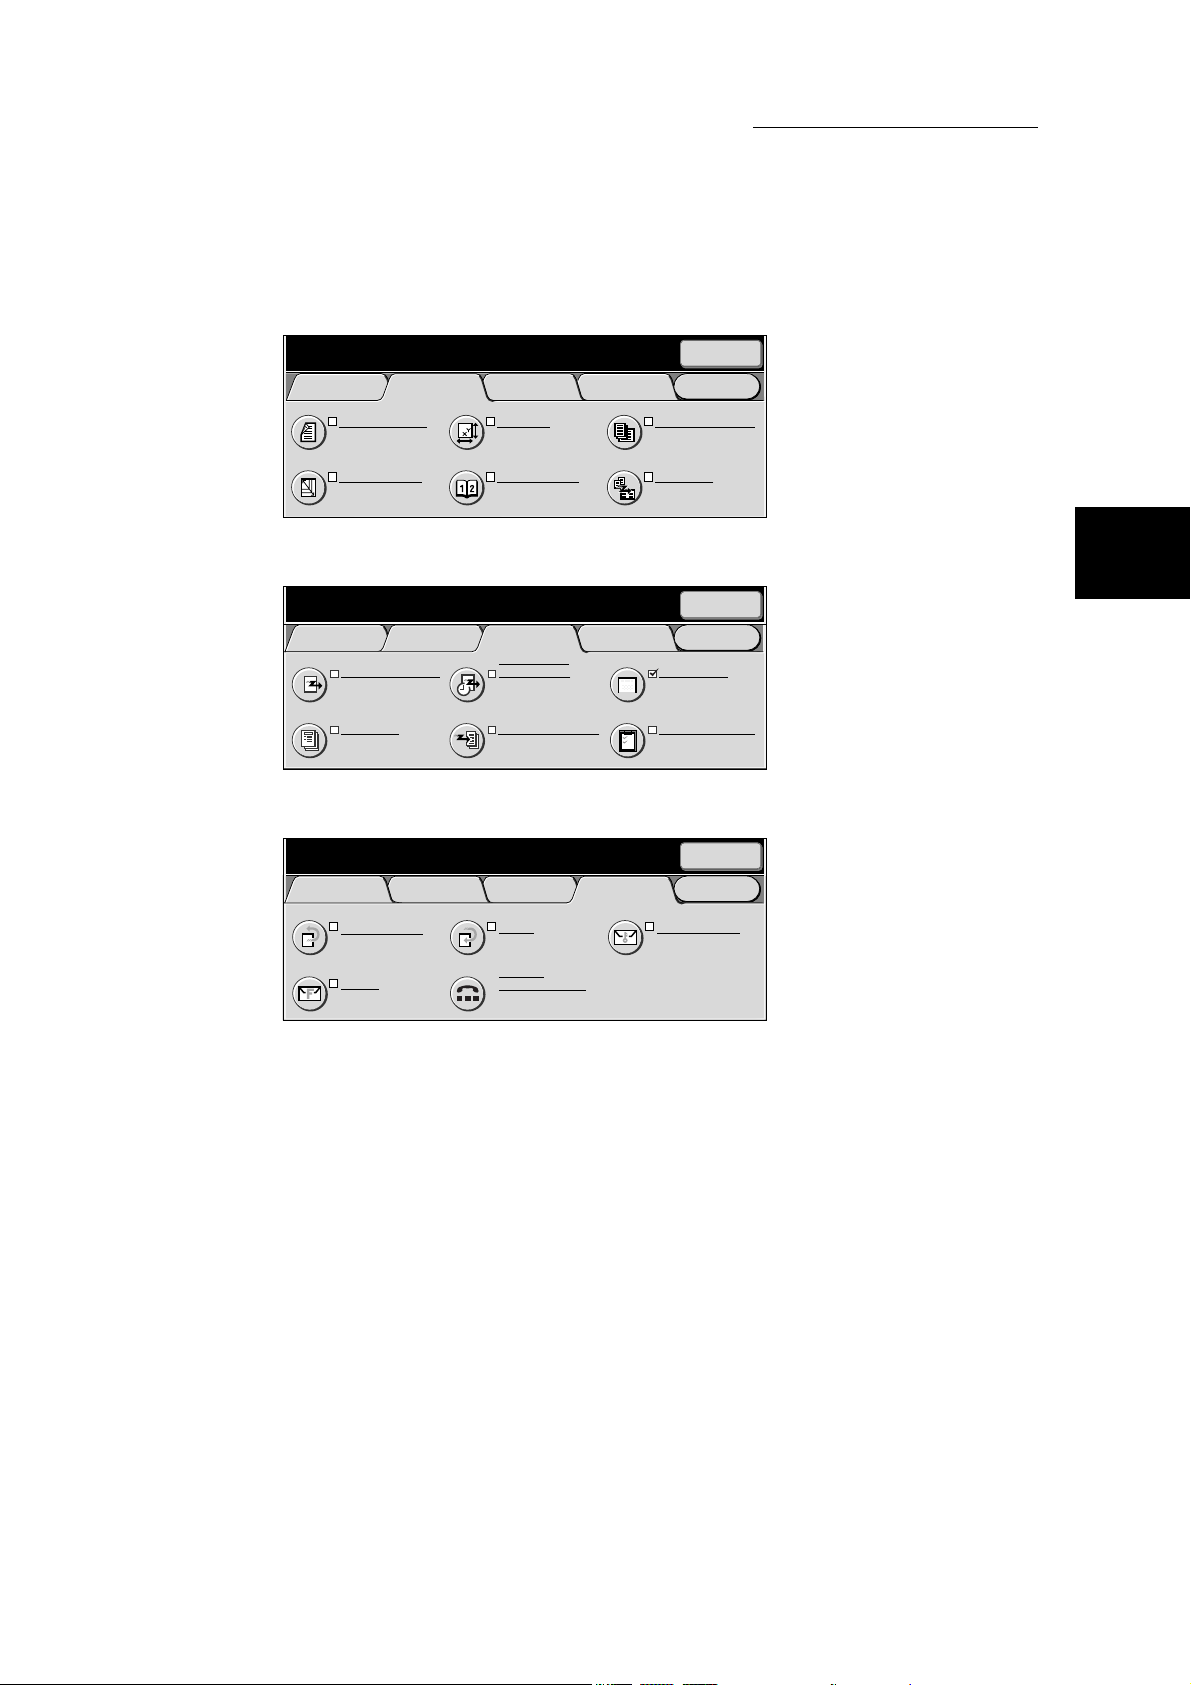
■Fax screen
Image Quality/
File Format
Menu
Scan Resolution 2 Sided Originals
300dpi
400dpi
600dpi
1 Sided
2 Sided (H to H)
2 Sided (H to T)
More...
Basic Features Scan Options Send Options
Resolution Original Type Lighter/Darker
A B C
Address Book
Keyboard
Standard
Fine
Super-fine (400dpi)
Super-fine (600dpi)
Text
Text & Photo
Photo
On-Hook/
Others
Menu
The Fax screen allows you to select the fax features.
The Fax screen consists of Basic Features, Scan Options, Send Options and On-Hook/Others. For
details on each screen, see “1.4.2 Selecting Fax Function Screen” (P. 6).
1.4.2 Selecting Fax Function Screen
The Fax screen consists of Basic Features, Scan Options, Send Options and
On-Hook/Others.
●
The machine is factory-set to display the Basic Features screen as the default Fax screen. For
details on switching the Fax screens, see “9.8 Other Items” (P. 191).
●
For details on the features displayed on each screen, see “Chapter 3 Transmitting” (P. 19) and
“Chapter 8 Using Additional Features” (P. 77).
■Basic Features screen
Enter recipient’s Fax No. Memory :100%
[ Fax No. ]
Basic Features Scan Options Send Options
Resolution Original Type Lighter/Darker
Standard
Fine
Super-fine (400dpi)
Super-fine (600dpi)
A B C
Address Book
Keyboard
On-Hook/
Others
Text
Text & Photo
Photo
Next
Recipient
Menu
6
Page 26
■Scan Options screen
1.4 Using the Touch Panel Display
Enter recipient’s Fax No. Memory :100%
[ Fax No. ]
Basic Features Scan Options Send Options
2 Sided Originals
1 Sided
Reduce/Enlarge
Auto %
Scan Size
Auto Size Detect
Bound Originals
Off
On-Hook/
Others
■Send Options screen
Enter recipient’s Fax No. Memory :100%
[ Fax No. ]
Basic Features Scan Options Send Options
Communication Mode
G3 Auto
Cover Note
Off
Priority Send/
Delayed Start
Priority Send : Off
Delayed Start : Off
Recipient Print Sets
1 Set(s)
On-Hook/
Others
■On-Hook/Others screen
Enter recipient’s Fax No. Memory :100%
[ Fax No. ]
Basic Features Scan Options Send Options
Store for Polling
Off
F Code
Off
Polling
Off
On-hook
(Manual Receive)
On-Hook/
Others
Next
Recipient
Menu
Mixed Size Originals
Off
Multiple Up
Off
Next
Recipient
Menu
Send Header
On
Transmission Report
Off
Next
Recipient
Menu
Remote Mailbox
Off
Before Use
1
7
Page 27
Entering Text
1.5
This section describes how to enter characters. Use the keyboard displayed on the touch
panel display to enter text.
This machine allows you to enter numerics, alphabetic characters, and symbols. However,
Before Use
restrictions on the number of characters that can be entered apply to some items.
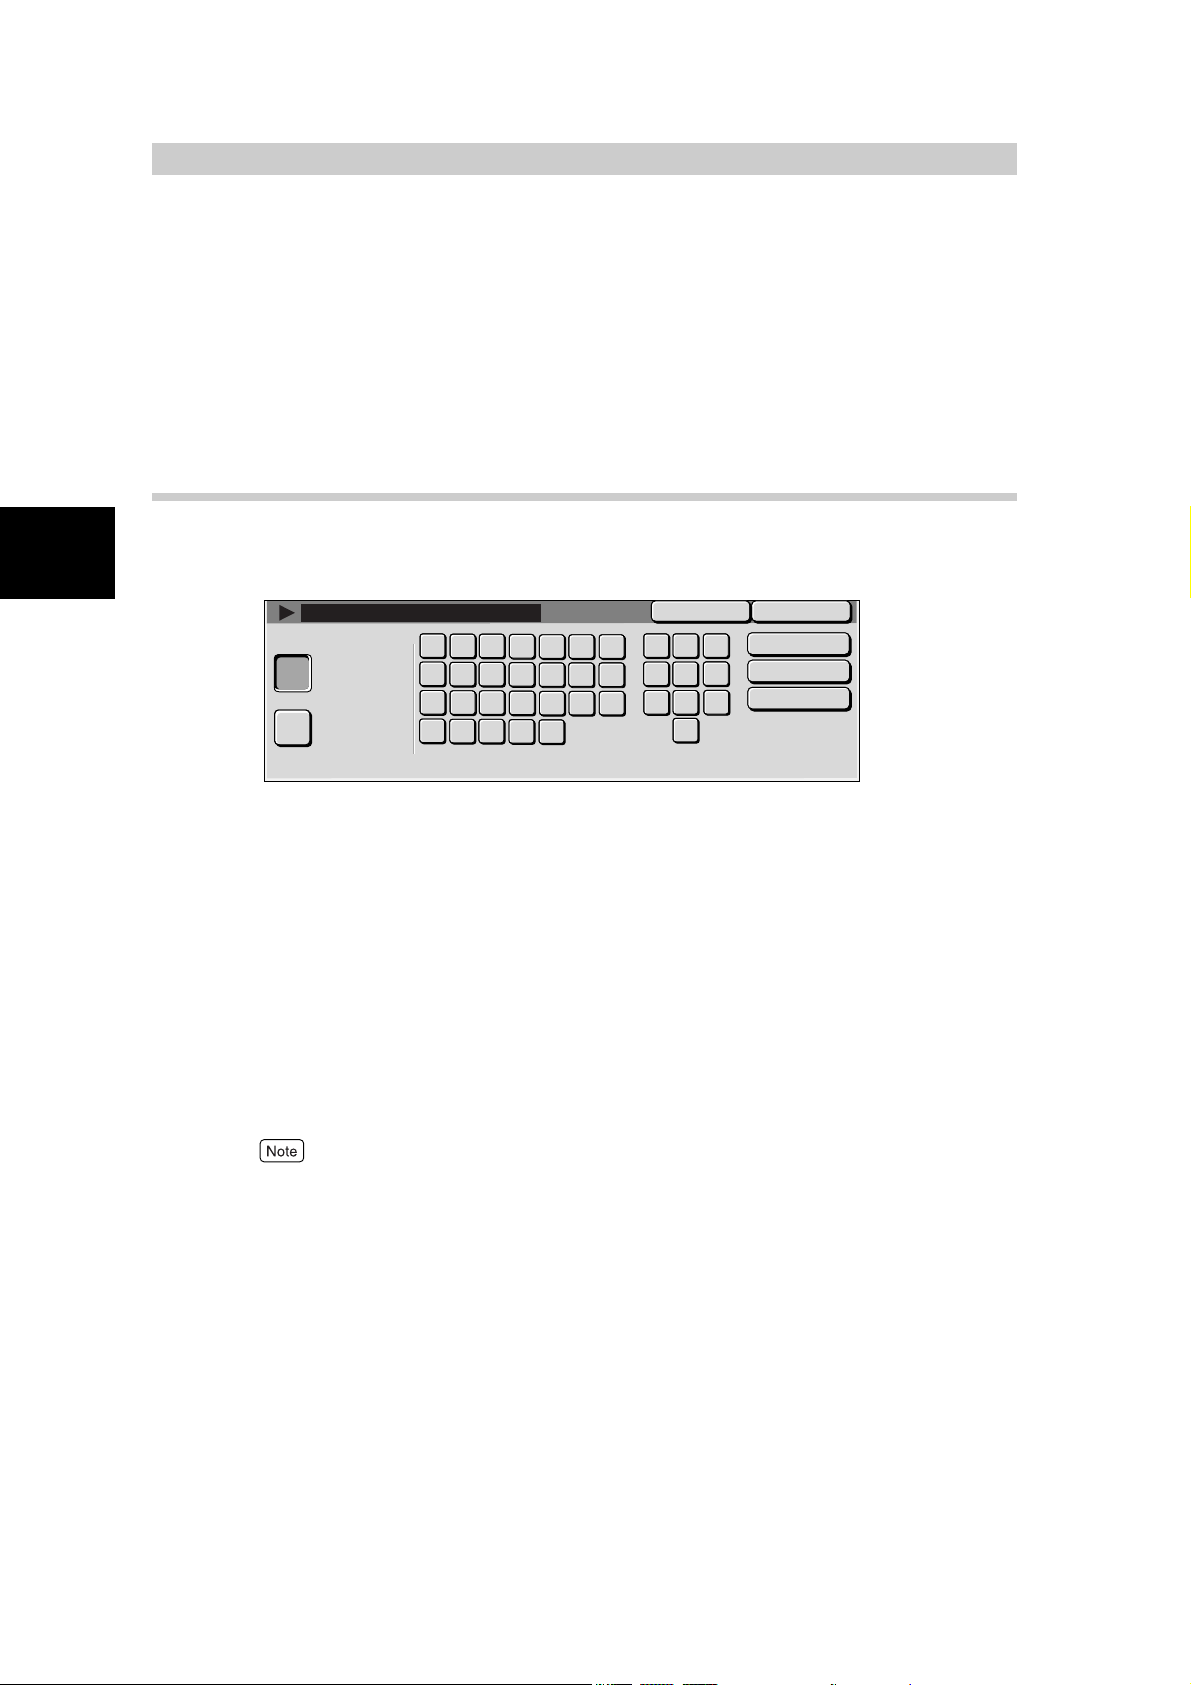
1.5.1 Entry Method
1
The screen for entering text is sometimes displayed during machine operations. The following describes how to enter text.
Save
Backspace
Space
Shift
Alphanumeric
Symbol
●
Entering alphabet
Cancel
b
a
c
d
h
o
v
j
j
k
q
r
p
x
w
y
f
e
g
l
m
n
t
s
u
z
3
2
1
6
54
9
7
8
0
characters and numbers......... Select the Alphanumeric button. You can
select between upper- and lower-case
characters by selecting the Shift button.
To return to the previous state, select the
Shift button again.
●
Entering symbols................... Select the Symbol button.
●
Entering spaces..................... Select the Space button.
●
1 Deleting characters ............ Select the Backspace button. This deletes one
character at a time.
●
You can also use the buttons on the control panel.
●
The display might differ according to the ROM versions.
8
Page 28

2Loading Documents
2.1 Documents....................................................................................... 10
2.1.1 Applicable Document Sizes .............................................. 10
2.1.2 Automatically Detected Document Sizes.......................... 11
2.1.3 Document Handling .......................................................... 12
2.2 Loading Documents ......................................................................... 14
2.2.1 Loading Documents on the Document Glass ................... 14
2.2.2 Loading Documents in the Document Feeder .................. 15
2.2.3 Document Orientation....................................................... 16
2.2.4 If You Have More Documents to Scan .............................. 17
Page 29
Documents
2.1
You can load documents on the document glass, or place them on the document feeder.
The document feeder allows you to load a stack of documents in it each time.
This section describes the size of documents that can be loaded on the document glass or
Loading Documents
on the document feeder.
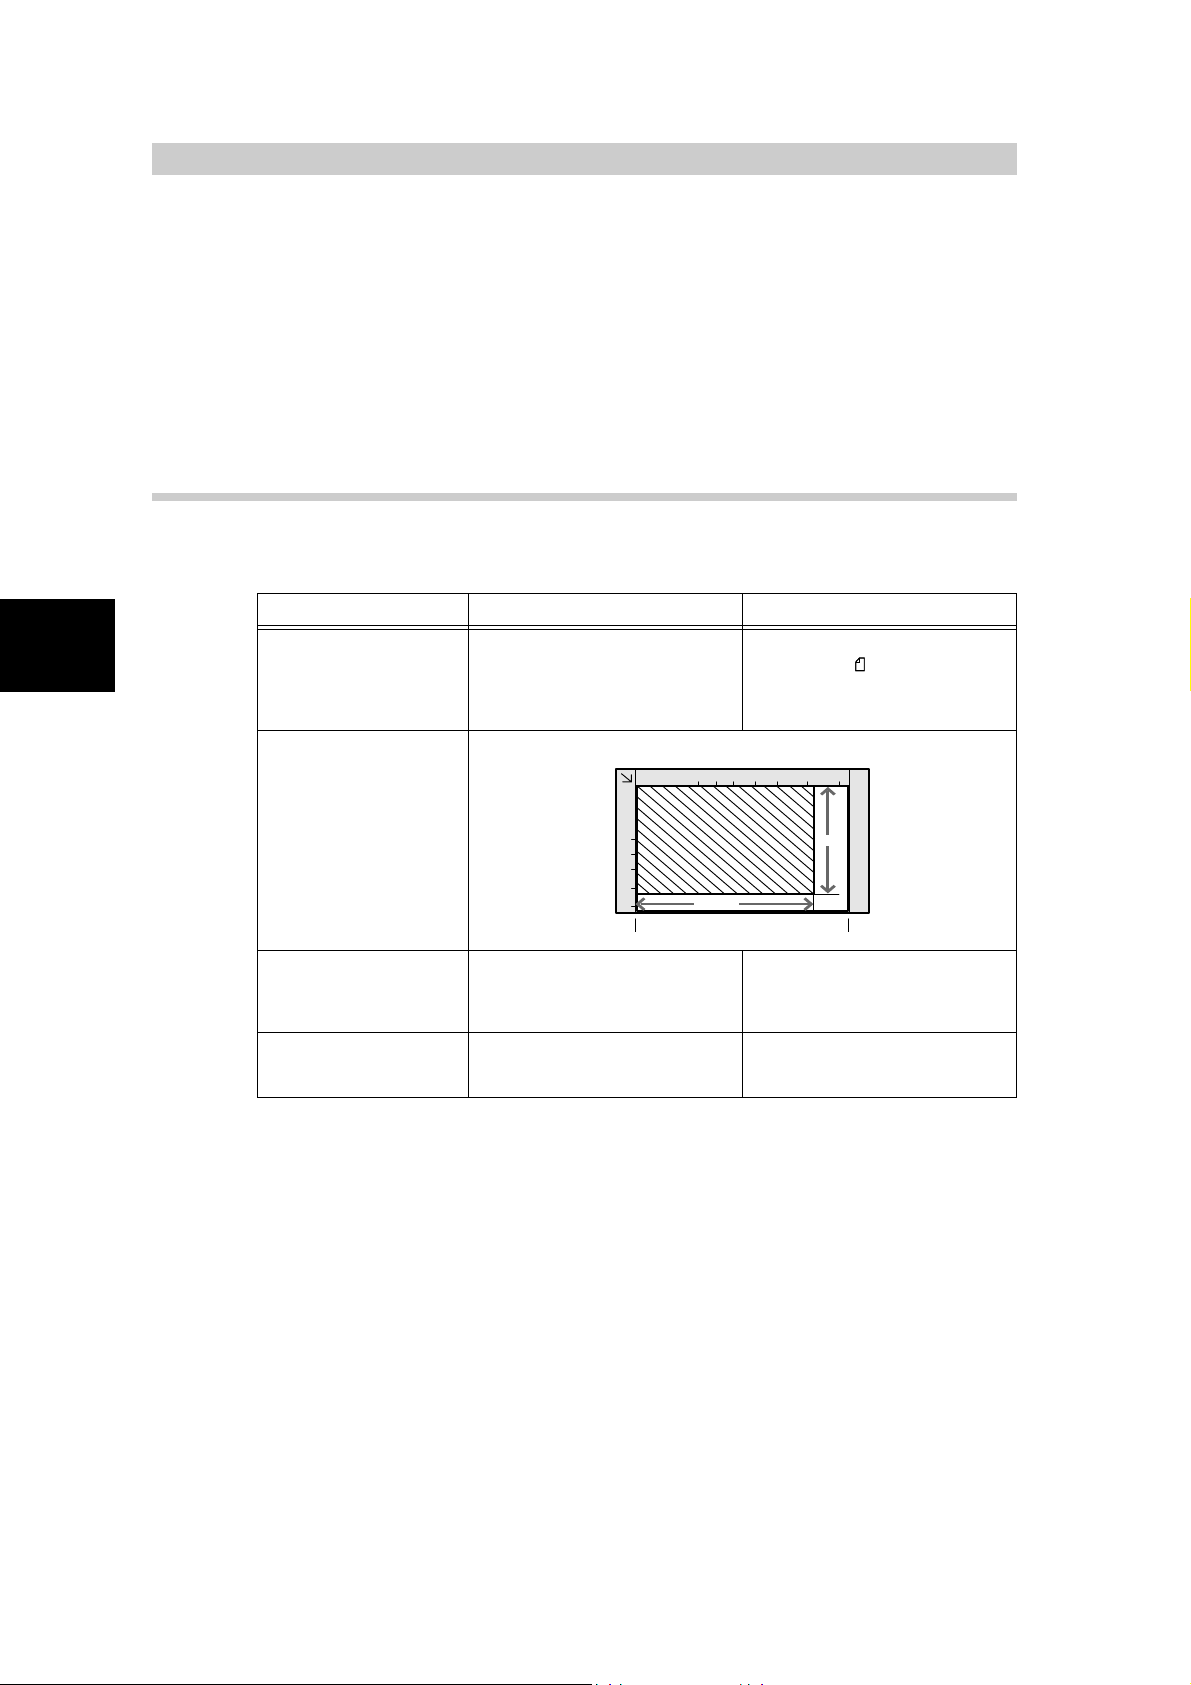
2.1.1 Applicable Document Sizes
Load only the document sizes listed in the table below on the document glass or
document feeder.
Document glass Document feeder
2
Document size Smallest size 15 × 15 mm
Largest size 334.5 × 452 mm
Scanning area 297 × 432 mm
Document weight (per
square meter
Number of documents
that can be loaded
*1 Paper weight is expressed in grams per square meter (gsm).
*2 This value applies when both sides of a two sided document is scanned and transmitted.
*1
)
38 to 128 g/m (one sided docu-
1 sheet
Smallest size 210 × 148.5 mm
(A5 )
Largest size 297 × 432 mm
(A3, 11 × 17 inch)
297mm
432mm
ment) 50 to 110 g/m (2 sided
documents*2)
50 sheets (38 to 100 g/m
40 sheets (101 to 128g/m
2
)
2
)
10
Page 30
2.1 Documents
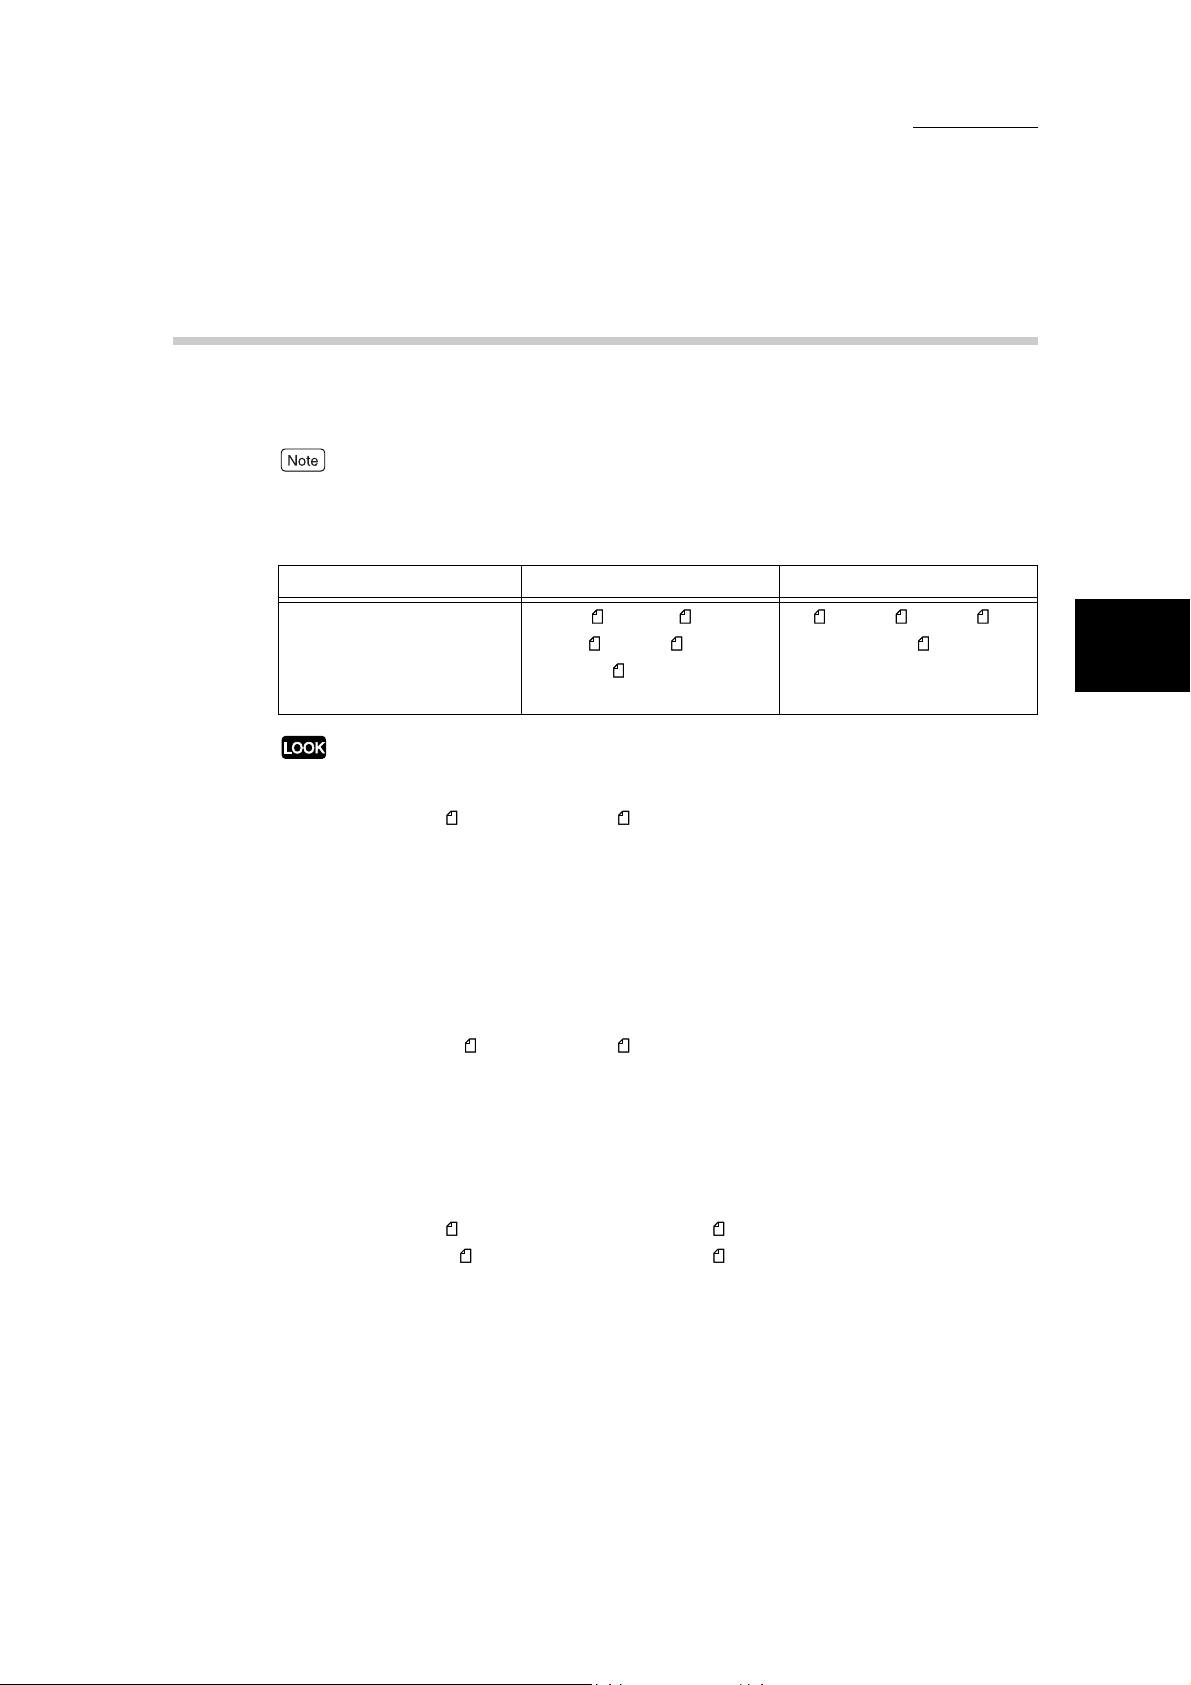
2.1.2 Automatically Detected Document Sizes
This machine automatically detects document sizes during transmission. The following standard sizes are automatically detected and need not be set.
Specify the closest standard size using Scan size on the Scan Options screen when loading a non-standard document. For details on how to enter the document size, see “8.2 Specifying Document Size for
Transmission (Scan Size)” (P. 81).
Document glass Document feeder
Loading Documents
Automatically Detected
Document Sizes
The sizes on the left are detected as sizes shown on the right.
■Document glass loading
•8 × 10 inches
•8 × 10 inches
• 8 × 10.5 inches
• 8.5 × 11 inches*
• 8.5 × 13 inches
• 8.5 × 14 inches
• 11 × 15 inches
• 11 × 17 inches
■Document feeder loading
• 5.5 × 8.5 inches
• 5.5 × 8.5 inches
•8 × 10 inches
•B5
• 8 × 10.5 inches
• 8.5 × 11 inches*
• 8.5 × 13 inches
• 8.5 × 14 inches
•8 × 10 inches
• 8 × 10.5 inches
• 11 × 15 inches
• 11 × 17 inches
B6, B6 , B5, B5 , B4, A6,
A5, A5 , A4, A4 , A3, 8.5 ×
11 inches , 8.5 × 13 inches,
8.5 × 14 inches
→
B5
→
A4
→
A4
→
A4
→
A4
→
A4
→
A3
→
A3
→
A5
→
A4
→
A4
→
A4
→
A4
→
A4
→
A4
→
A4
→
8.5 × 11 inches
→
8.5 × 11 inches
→
B4
→
B4
B5 , B4, A5 , A4, A4 , A3,
8.5 × 11 inches
2
* Our customer engineer can set it so that 8.5” × 11” paper can be detected.
11
Page 31

2.1 Documents
2.1.3 Document Handling
Loading Documents
Pay attention to the following when placing documents on the document glass or
in the document feeder
Document Glass
Since the following document types are not automatically detected, an error
message may appear or the entire image may not be scanned.
Use the listed procedures to solve this problem.
2
Documents
(for facsimile)
Non-standard size document
Glossy documents
Thick documents (magazines or the like)
Highly transparent materials such as transparencies
Torn, creased, perforated
or excessively curled documents
●
Do not load excessively wet documents. Such documents exposes the machine to water and may
damage it.
●
Do not load a document of a weight greater than 5 kg. Such a document could damage the document glass and the machine.
Documents placed in a photograph holder may not be scanned correctly if the film is severely creased.
Specify the closest standard size using Scan Size on the
Scan Options screen.
Place a sheet of white paper the same size as the document
on top of it.
Specify the document size using Scan Size on the Scan
Options screen.
Procedure
12
For details on the scanning size function, see “8.2 Specifying Document Size for Transmission (Scan
Size)” (P. 81).
Page 32

Document Feeder
2.1 Documents
The following type of documents cause paper jams or document damage. Such
documents should be placed on the document glass and not in the document
feeder.
●
Folded documents
●
Glossy documents such as photographs
●
Documents to which pieces of
other documents have been
pasted
●
Thick documents
●
Documents that are too light
●
Torn, creased, perforated or excessively curled
documents
●
Documents that are held together by clips, staples
or adhesive.
●
Coated documents or documents with carbon
paper on the rear side
●
Highly transparent materials such as transparencies
●
Thermal paper
Loading Documents
2
13
Page 33

Loading Documents
2
Loading Documents
2.2
This section describes how to load documents.
2.2.1 Loading Documents on the Document
Glass
This section describes how to load documents on the document glass.
Procedure
Open the document cover.
1
Place the document face down, align-
2
ing the corner with the upper left-hand
side corner of the document glass.
Place a sheet of white paper on top of transparencies
and other highly transparent documents.
Close the document cover.
3
When transmitting a thick document, do
not use excessive force to press it against
the document glass. The glass could
break and cause injury.
When scanning with the document cover
open, avoid looking directly at the copy
lamp as this may cause eye fatigue or
strain.
14
Page 34

2.2 Loading Documents
2.2.2 Loading Documents in the Document
The document feeder can handle up to 50 documents of sizes ranging from
148.5 × 210 mm to 297 × 432 mm. Multiple documents are transmitted in order
from the top and are ejected with the text side face down. This section describes
how to load documents in the document feeder.
Up to 40 thick documents (101 to 128 g/m2) can be loaded.
Procedure
Align the edges of the document.
1
Remove any paper clips or staples.
Extend the document tray extension when loading large documents.
Place the document with the side to
2
be sent facing up (top side for a two
sided document) and slide it into the
document feeder in the direction of the
arrow as far as it will go.
The check indicator lights.
Feeder
Loading Documents
2
Place documents facing left in the orientation they are
scanned.
Adjust the movable document guide to
3
just touch the edge of the document
stack.
Observe the following to prevent paper jams and damage to documents.
●
Do not hold documents while they are being fed into
the scanner.
●
Do not allow sheets to accumulate in the document
tray.
●
Do not place objects on the document tray.
15
Page 35

2.2 Loading Documents
Mixed Size Originals
Loading Documents
2
Documents of different sizes can be loaded together. To do this, slide the documents into the document sending tray as far as they will go, select On in the
Mixed Size Originals screen under the Scan Options. A paper jam will occur
unless this setting is made.
For details, see “8.3 Scanning Documents in Various Sizes (Mixed Size Originals)” (P. 84).
2.2.3 Document Orientation
To transmit a two sided original using the document feeder, the orientation must
be set to indicate the top of the document.
Select Flip on Short-Edge or Flip on Long-Edge under Originals in the 2 Sided
Originals screen of the Scan Options.
The left side orientation is normally specified.
●
Flip on Long-Edge is used for documents where side 1 and side 2 of a document page have the same orientation.
NO.1
NO.1
NO.2
NO.2
The first page The second page
●
Flip on Short-Edge is used for documents where text orientation on side 2 is
inverted from that of side 1.
NO.1
NO.2
For details on the two sided transmission function, see “8.1 Transmitting Two sided Originals (2
Sided Originals)” (P. 78).
NO.1
The first page The second page
NO.2
16
Page 36

2.2 Loading Documents
2.2.4 If You Have More Documents to Scan
If you have more than one stack of documents to scan, select the Next Original
button on the touch panel display while the current stack of documents is being
scanned. This allows you to transmit several documents as one set of data.
Procedure
While documents are being scanned, select Next Original.
1
Scanning documents...
Fax Store
: 0123456789
Type: Single Terminal
Pages :
1
Standard
:Doc. No. 00010
Last Original
Next Original
Stop
Stop
Loading Documents
2
●
When using the document feeder, load the next sets of documents after the machine has finished
scanning the first set.
●
When no operation is performed in the above screen during a certain period of time, the machine
assumes there are no more documents to scan and an automatic reset is performed. The default
value for the automatic reset time can be changed in the System Administration Mode. For details
on changing the default value, see “5.4.1 Machine Clock/Timers” in “Part 1 Hardware” of the
User Guide (Copier). The default factory setting is 1 minute.
Place the next document.
2
Press Start.
3
When there are still more documents, load the next document and press the Start button.
17
Page 37

2.2 Loading Documents
When all documents have been scanned, select Last Original.
4
Loading Documents
2
Scanning documents...
Fax Store
: 0123456789
Type: Single Terminal
Pages :
1
Standard
:Doc. No. 00010
Stop
Stop
Last Original
Next Original
18
Page 38

3Transmitting
3.1 Simple Send Procedure ................................................................... 20
3.1.1 Resolution......................................................................... 20
3.1.2 Original Type..................................................................... 21
3.1.3 Lighter/Darker ................................................................... 21
3.1.4 Simple Send Procedure.................................................... 22
3.2 Transmitting by a Specified Telephone Line ..................................... 23
3.2.1 Transmitting by a Specified Telephone Line ..................... 23
3.2.2 Adding Lines ..................................................................... 24
3.3 Selecting a Communication Mode (Communication Mode)............. 25
3.4 Dialing .............................................................................................. 27
3.4.1 Numeric Keypad Dialing ................................................... 27
3.4.2 Speed Dialing ................................................................... 28
3.4.3 One Touch Dialing ............................................................ 29
3.4.4 Group Dialing.................................................................... 29
3.4.5 Using the Address Book ................................................... 30
3.4.6 Entering Symbols ............................................................. 33
3.5 Transmission Failure ........................................................................ 34
Page 39

Simple Send Procedure
3.1
This section describes setup of basic functions and send procedures.
●
The machine is factory-set to inform users of the completion of document scanning and communication with a
sound. For details on how to change the sound settings, see “5.4.2 Setting Audio Tones” in “Part 1 Hardware” of
the User Guide (Copier).
●
The document is scanned and “Documents Sent” appears on the touch panel display. This setting is canceled if a
momentary power outage occurs while is being displayed. If this happens, carry out the settings again.
Basic Features are set up using the Basic Features screen.
Transmitting
Enter recipient’s Fax No. Memory :100%
[ Fax No. ]
Basic Features Scan Options Send Options
Resolution Original Type Lighter/Darker
Standard
Fine
Super-fine (400dpi)
Super-fine (600dpi)
A B C
Address Book
Keyboard
On-Hook/
Others
Text
Text & Photo
Photo
Next
Recipient
Menu
3
3.1.1 Resolution
You can set the resolution level for the documents to be scanned.
■Standard
For documents with easily legible text. (Approx. 200 × 100 dpi/25.4 mm)
■Fine (200dpi)
For documents with fine text and/or images. (Approx. 200 × 200 dpi/25.4 mm)
■Super-fine (400 dpi)
For documents with extremely fine text and/or images. (400 × 400 dpi/25.4
mm)
■Super-fine (600 dpi)
For documents with extremely fine text and/or images.
(600 × 600 dpi/25.4 mm)
●
The Resolution can be individually set for each Address Number. For details on how to register
Address Numbers, see “9.3 Setting an Address Number” (P. 160). The factory-set default is Standard.
●
You can change the default value of the scanning resolution in the System Administration Mode.
For information on how to do the change, see “9.8.6 Feature Defaults” (P. 198). The factory
default value has been set as standard.
●
The machine scans the documents at the specified resolution setting, but if the remote terminal has
no corresponding mode, the machine automatically changes to a resolution supported by the other
machine with the resulting loss of high resolution.
20
Page 40

●
The higher the resolution, the lower the transmission speed. Usually, we recommend you even
Super-fine (400dpi).
●
When the Internet Fax (iFAX) function (option) is used for transmission and TIFF-S is selected in
the iFAX Profile in the On-Hook/Others screen, Super-fine (400 dpi) and Super-fine (600 dpi) cannot be selected. For details on IFAX Profile, see “13.3.2 Settings That are Configurable During an
Outgoing iFax Transmission” (P. 287).
3.1.2 Original Type
When transmitting photo images or a document that includes photo images, you
can select an appropriate document quality for transmission.
The Original Type can be selected as required for transmitting text documents or
documents containing photos, etc.
■Text
For documents with text.
■Text&Photo
For documents including both text and photo images. This setting automatically
assesses text and photo areas to set the appropriate document quality per
area.
3.1 Simple Send Procedure
Transmitting
3
■Photo
For documents including photo images.
●
The Original Type default value can be changed in the System Administration Mode. For details on
how to change this default value, see “9.8.6 Feature Defaults” (P. 198). The default factory setting
is Text.
●
We recommend selecting same-scale scanning for documents that include photo images. With a
reduction feature, such as the Scan Size Option, stripes may appear on photo images in the reproduced document.
3.1.3 Lighter/Darker
Enter the density level.
Seven density levels are available.
The Lighter/Darker default value can be changed in the System Administration Mode. For details on
how to change this default value, see “9.8.6 Feature Defaults” (P. 198). The default factory setting is
Standard.
21
Page 41

3.1 Simple Send Procedure
3.1.4 Simple Send Procedure
Transmitting
3
Loading documents.
Display the Fax screen.
Fax
Back
Next
Recipient
Menu
Menu
Copy Scanner
Select Resolution, Original Type and Lighter/Darker.
Enter recipient’s Fax No. Memory :100%
[ Fax No. ]
Text
Text & Photo
Photo
On-Hook/
Others
Basic Features Scan Options Send Options
Resolution Original Type Lighter/Darker
Standard
Fine
Super-fine (400dpi)
Super-fine (600dpi)
A B C
Address Book
Keyboard
Select features (if necessary)
Next
Recipient
Basic Features Scan Options Send Options
2 Sided Originals
1 Sided
Reduce/Enlarge
Auto %
Scan Size
Auto Size Detect
Bound Originals
Off
On-Hook/
Others
Menu
Mixed Size Originals
Off
Multiple Up
Off
“2.2 Loading Documents” (P. 14)
“1.4 Using the Touch Panel Display” (P. 5)
Select Fax.
Basic Features Scan Options Send Options
Communication Mode
G3 Auto
Cover Note
Off
Priority Send/
Delayed Start
Priority Send : Off
Delayed Start : Off
Recipient Print Sets
1 Set(s)
On-Hook/
Others
Next
Recipient
Menu
Send Header
On
Transmission Report
Off
22
Basic Features Scan Options Send Options
Store for Polling
Off
F Code
Off
Polling
Off
On-hook
(Manual Receive)
Dial the telephone number.
Select Start.
On-Hook/
Others
Next
Recipient
Menu
Remote Mailbox
Off
For details on fax functions, see the following.
“Chapter 3 Transmitting” (P. 19)
“Chapter 4 Broadcast Send” (P. 35)
“Chapter 8 Using Additional Features” (P. 77)
“3.4 Dialing” (P. 27)
The documents are scanned, and sending starts.
Page 42

Transmitting by a Specified
3.2
Special symbols can be used to select lines during transmission.
This section describes procedures for selecting lines for transmission and adding outside
lines with an optional fax (G3/NCU additional).
Telephone Line
3.2.1 Transmitting by a Specified Telephone
Line
When multiple lines are used, you can specify a line (port) for transmission. It is
useful to program local fax information for each line and select a telephone line.
For details on how to register Local Information, see “9.2 Entering Local Terminal Information”
(P. 155).
Procedure
Transmitting
3
Load documents.
1
“2.2 Loading Documents” (P. 14)
Display the Fax screen.
2
Enter recipient’s Fax No. Memory :100%
[ Fax No. ]
Outside Line
Basic Features Scan Options Send Options
iFax/Fax
Address Book
A B C
Keyboard
Select Keyboard to display the keyboard on the touch panel and enter
3
Resolution Original Type Lighter/Darker
Standard
Fine
Super-fine (400dpi)
Super-fine (600dpi)
On-Hook/
Others
Text
Text & Photo
Photo
Next
Recipient
Menu
the following format.
Port(line)
number
●
Port numbers are line 1 → “1”, line 2 → “2”and line 4 → “4”
●
Line 2 and 4 can be specified when an option is installed.
Dial number
23
Page 43

Transmitting
3
3.2 Transmitting by a Specified Telephone Line
Press Start.
4
Scanning and transmission begins.
For details on how to confirm and cancel the transmission of a document, “Chapter 5 Confirming and
Canceling a Communication” (P. 55).
3.2.2 Adding Lines
Lines can be increased by installing an optional FAX (G3/NCU additional). A
FAX additional board kit must be installed to enable the installation of these
options.
The following line and channel configurations are possible depending on how the
options are integrated.
●
FAX (G3/NCU) +FAX (G3/NCU additional) → 2 lines, 2 channels
●
FAX (G3/NCU) +FAX (G3/NCU additional) +FAX (G3/NCU additional) → 3
lines, 3 channels
24
Page 44

Selecting a Communication
3.3
You can select a communication mode based on the capabilities of the remote terminal.
G3 is the international standard for facsimile transmissions established by the ITU-T.
When the Address Number, One Touch Dialing, Group Dialing, or Address Book is used to dial a fax number, the
communications mode currently set to the address number is set and cannot be changed.
●
The Communication Mode can be individually set for each Address Number. For details on how to register
Address Numbers, see “9.3 Setting an Address Number” (P. 160).
●
The Communication Mode default value can be changed in the System Administration Mode. For details on how
to change this default value, see “9.8 Other Items” (P. 191). The default factory setting is G3 Auto.
Mode (Communication Mode)
Communication Modes that can be Selected
■G3 Auto
Select this mode if the remote terminal is G3 compatible. This mode is the one
normally selected.
The machine automatically switches modes in the following order of priority:
Unique SG3
T G3 depending on the capabilities of the remote terminal.
→ Unique ECM → Unique G3 → ITU-T SG3 → ITU-T ECM → ITU-
Transmitting
3
■F4800
Select this mode when transmitting over noisy or bad telephone lines, as can be
the case with overseas calls.
Use it also when transmitting over noisy or poor telephone lines in Japan.
●
The following indicates the initial transmission speed, although the machine may switch to a slower
transmission rate depending on the line.
●
G3 Auto: 33.6 kbps (maximum)
●
F4800: 4.8 kbps (maximum)
●
A communication mode can be specified for transmissions using the Internet Fax (iFAX) function
(option) only when the fax gateway function is used. G3 Auto is used in all other cases. For details
on the fax gateway function, see “13.1.2 The Differences Between iFax and Facsimile Features”
(P. 273).
25
Page 45

Transmitting
3
3.3 Selecting a Communication Mode (Communication Mode)
Procedure
Display the Fax screen.
1
Enter recipient’s Fax No. Memory :100%
[ Fax No. ]
Basic Features Scan Options Send Options
Address Book
A B C
Keyboard
Select Communication Mode in the Send Options Screen.
2
Enter recipient’s Fax No. Memory :100%
[ Fax No. ]
Basic Features Scan Options Send Options
Communication Mode
G3 Auto
Cover Note
Off
Resolution Original Type Lighter/Darker
Standard
Fine
Super-fine (400dpi)
Super-fine (600dpi)
Priority Send/
Delayed Start
Priority Send : Off
Delayed Start : Off
Recipient Print Sets
1 Set(s)
On-Hook/
Others
Text
Text & Photo
Photo
On-Hook/
Others
Send Header
On
Transmission Report
Off
Next
Recipient
Menu
Next
Recipient
Menu
The Communication Mode screen is displayed.
Select the desired communication mode.
3
Enter recipient’s Fax No. Memory :100%
[ Fax No. ]
Communication Mode
G3 Auto
F4800
Select Save.
4
Next
Recipient
SaveCancel
26
Page 46

Dialing
3.4
The machine allows the following five dialing methods (fax numbers/mail addresses):
●
Keypad Dialing
●
Speed Dialing
●
One Touch Dialing
●
Group Dialing
●
Using the Address Book
You can dial multiple locations (Broadcast Send) at a time by one or more of the above
methods. These methods can also be used in combination.
Several pending documents can be sent to one destination with a single phone call. This
function is referred to as -batch send.
Note that Batch Send cannot be used together with Broadcast Send, Relay Broadcast Send,
Remote Mailbox, and Delayed Start before the specified time. Nor can transmissions to a
single destination from separate departments be batch processed when there are redialing,
resending or delayed start jobs, or when the Copylyzer is used.
Transmitting
3
●
Mail addresses are used with the Internet Fax (iFAX) function (option). A mail address can contain up to 128
characters.
●
For details on Broadcast Send, see “4.1 Transmitting to Multiple Destinations (Broadcast Send)” (P. 36).
●
Both iFAX and normal Fax destinations can be used in a Broadcast Send operation. When both type of destinations are entered, mail is sent to iFAX destinations and normal fax transmissions are made to Fax destinations.
3.4.1 Numeric Keypad Dialing
You can use the numeric keypad to enter the fax number.
Procedure
Enter the fax number using the
1
numeric keypad.
The Touch Panel Display displays the fax number
entered.
Press the Clear button to correct incorrectly entered
numbers one by one.
1 2 3
4 5 6
7 8 9
0
27
Page 47

3.4 Dialing
2
Select Next Recipient to enter multiple locations.
Repeat this step to enter multiple fax numbers. You can designate up to 50 destinations at a time.
Transmitting
3
Enter recipient’s Fax No. Memory :100%
[ Fax No. ]
Basic Features Scan Options Send Options
A B C
0123456789
Address Book
Keyboard
Resolution Original Type Lighter/Darker
Standard
Fine
Super-fine (400dpi)
Super-fine (600dpi)
3.4.2 Speed Dialing
You can use Speed Dialing to dial numbers. Program the telephone numbers for
the speed dials beforehand.
A wild card (∗ character on the keypad or ∗ on the keyboard screen) can also be
used to designate multiple locations.
■Enter first two digits to select Address Numbers.
For example, 10 stations from 100 to 109 can be specified by entering 10∗.
■Select all the Address Numbers.
Enter “∗∗∗” to select all the Address Numbers.
On-Hook/
Others
Text
Text & Photo
Photo
Next
Recipient
Menu
28
You cannot use two wildcard characters, such as 1**, *1*, or **1.
For details on how to register speed dialing numbers, see “9.3 Setting an Address Number” (P. 160).
Procedure
Press Speed Dial and enter a 3-digit
1
Address Number.
Repeat this step1 for each additional number.
1 2 3
4 5 6
7 8 9
0
Page 48

3.4.3 One Touch Dialing
You can use the one touch buttons to dial numbers.
Each one touch button corresponds to each Address Number from 001 to 090.
For example, when the number you want to dial is programmed to the Address
Number 001, press the one touch button, 001.
3.4 Dialing
For details on how to register speed dialing numbers, see “9.3 Setting an Address Number” (P. 160).
Procedure
Press the desired one touch button.
1
●
Each one touch button corresponds to Address Numbers from 001 to 090, respectively.
●
Repeat this step to designate multiple destinations.
●
Turn the panel over to press the one touch buttons for
Address Numbers 031 and above.
3.4.4 Group Dialing
You can use the Group Dialing feature to dial telephone numbers. Prior to use,
program multiple locations to a group dial number.
For details on how to group dial numbers, see “9.4 Setting a Group Dial” (P. 179).
001 006 011
002 007 012
003 008 013
004 009 014
005 010 015
016 021 026
017 022 027
018 023 028
019 024 029
020 025 030
Transmitting
3
29
Page 49

3.4 Dialing
Procedure
Press Speed Dial and enter # and a
1
two-digit number using the numeric
keypad.
Repeat this step1 for each additional number.
Transmitting
3.4.5 Using the Address Book
1 2 3
4 5 6
7 8 9
0
3
This section describes how to use the Address Book to enter numbers.
The Address Book shows the fax numbers and mail addresses stored in the speed dialing numbers. For
details on how to register Address Numbers, see “9.3 Setting an Address Number” (P. 160).
30
Page 50

Procedure
Display the Fax screen.
1
Select Address Book in the Basic Features screen.
2
Enter recipient’s Fax No. Memory :100%
[ Fax No. ]
Basic Features Scan Options Send Options
Address Book
A B C
Keyboard
Enter recipient’s Fax No. Memory :100%
[ Fax No. ]
Basic Features Scan Options Send Options
Address Book
A B C
Keyboard
Resolution Original Type Lighter/Darker
Standard
Fine
Super-fine (400dpi)
Super-fine (600dpi)
Resolution Original Type Lighter/Darker
Standard
Fine
Super-fine (400dpi)
Super-fine (600dpi)
On-Hook/
Others
Text
Text & Photo
Photo
On-Hook/
Others
Text
Text & Photo
Photo
Next
Recipient
Menu
Next
Recipient
Menu
3.4 Dialing
Transmitting
3
The Address Book screen is displayed.
Select the tab you are looking for to search for a fax number.
3
Enter recipient’s Fax No. Memory :100%
[ Fax No. ]
Address Book
001
Fuji Xerox Akira Endo
004
007
010
002 003
005
008
011 012
ABCDE
006
009
FGHIJ KLMNO PQRST UVWXYZ
0-9
Next
Recipient
Close
Go to
(001-500)
Enter Number
GroupAddress List
The fax number is displayed.
Repeat this step to designate multiple destinations.
Using the Address Book
Speed dialing numbers, recipients, index and group dialing can be used to
search fax numbers and mail addresses.
The initial Address Number can be changed in the System Administration Mode. For details on how to
change this number, see “9.8.5 Screen Defaults” (P. 196).
31
Page 51

3.4 Dialing
■Address list
This shows a list of all registered addresses.
Press the button to display the previous screen and press the button to dis-
play the next screen. Press the Enter Number button and enter an Address Number (001 to 500) in the Go to using the numeric keypad to display the entered
number at the top of the list.
Transmitting
3
Enter recipient’s Fax No. Memory :100%
[ Fax No. ]
Address Book
001
Fuji Xerox Akira Endo
004
007
010
002 003
005
008
011 012
ABCDE
006
009
FGHIJ KLMNO PQRST UVWXYZ
Enter Number
0-9
Next
Recipient
Close
Go to
(001-500)
GroupAddress List
■Index Search
This search locates index characters entered when Address Numbers are registered.
Click the ABCDE, FGHIJ, KLMNO, PQRST, UVWXYZ or 0-9 tab to specify index
characters in the screen that appears.
Enter recipient’s Fax No. Memory :100%
[ Fax No. ]
Address Book
1 6
2 7
3 8
4 9
5 0
To access address, select any index button on the left.
ABCDE
FGHIJ KLMNO PQRST UVWXYZ
0-9
Next
Recipient
Close
GroupAddress List
32
■Group dial number
Group dial number searches for registered groups.
Press the button to display the previous screen and press the button to dis-
play the next screen.
Enter recipient’s Fax No. Memory :100%
[ Fax No. ]
Address Book
001
#01
#02
002
001,002,003,004,005,006,007,008,009,010,011,012,013,014,01
#03
5,016,017,018,019,020
#04
ABCDE FGHIJ KLMNO PQRST UVWXYZ
Page
1/13
For details on how to register group dial numbers, see “9.4 Setting a Group Dial” (P. 179).
0-9
Next
Recipient
Close
GroupAddress List
Page 52

3.4.6 Entering Symbols
You can use the following features for dialing by entering the appropriate symbols on the touch panel display.
Feature Symbol Description How to use
3.4 Dialing
Enter pause - or pause
(-)
Transmit
using a password
Transmit
DTMF signal
Transmit PB
(from dial
pulse to tone)
S Use a password to prevent
! Use to transmit the DTMF
: Switches the dial type from
One pause is three seconds. You can enter
pauses of six seconds, nine
seconds, etc. by additional
button presses.
transmission errors.
When a password has been
set, transmission will only
start if the password
matches the ID number on
the remote terminal.
signal.
pulse to tone when the Fax
service is used.
Press the Pause button.
(Example)
0-123...
0- -123...
1. Select the Keyboard
button in the Basic Features screen to display
the keyboard.
2. Select the PQRST button and the Shift button.
3. Select the S button.
(Example)
0312345678S12345678
1. Select the Keyboard
button in the Basic Features screen to display
the keyboard.
2. Select the Symbol button.
3. Select !.
(Example)
0311123456!123#
1. Select the Tone (:) button on the On-hook or
Off-hook screen.
Transmitting
3
33
Page 53

3.5
Redial
ECM
Transmitting
Transmission Failure
When the line is busy and the remote machine is engaged for example, the
machine can automatically redial. This function is called redial.
Error Correction Mode (ECM) is the error correction method defined by ITU-T for
G3 communication. Terminals with ECM mutually check whether the transmission is successful. If not, the transmitted data is returned to the sender.
This enables communication without fax image defects caused by line noise.
ECM on the Activity Report refers to ECM communication.
3
34
Page 54

4Broadcast Send
4.1 Transmitting to Multiple Destinations (Broadcast Send)................... 36
4.1.1 Broadcast Send Operation ............................................... 38
4.2 Transmitting Documents Through a Relay Station
(Relay Broadcast) ............................................................................ 39
4.2.1 Before Using the Relay Broadcast Send Feature............. 40
4.2.2 Fax Signal Method............................................................ 41
4.2.3 DTMF (Dual Tone Multi Frequency) Method..................... 42
4.2.4 F Code Method ................................................................. 44
4.3 Transmitting Documents Through a Remote Relay Station (Remote
Relay Broadcast).............................................................................. 47
4.3.1 Fax Signal Method............................................................ 48
4.3.2 DTMF (Dual Tone Multi Frequency) Method..................... 49
4.3.3 F Code Method ................................................................. 51
Page 55

Transmitting to Multiple Des-
4.1
Use the Broadcast Send feature to transmit documents to several locations in a single operation. There is no need to scan the same document repeatedly at each transmission.
When the additional G3 kit (option) is installed, you can use the extra lines for simultaneous
broadcast send to make multiple transmissions simultaneously.
The machine prints a Broadcast Report/Multi-Poll Report when a Broadcast Send operation
is completed.
●
The maximum number of remote machines that you can designate at a time is as follows:
●
The numeric keypad dialing : 50 locations
●
Speed dialing : 500 locations
●
Broadcast Send
Using the numeric keypad in combination with speed dialing 549 locations
●
The touch buttons correspond to Address Numbers 001-090.
●
The Cover Note and Remote Mailbox features cannot be selected on the control panel when using Broadcast
Send. To use the Cover Note and Remote Mailbox features, you have to program them in the Address Number.
●
The Transmission Report cannot be specified in this feature.
●
Use the following settings for Broadcast Send with the Internet FAX (iFAX) function (option) when the transmission settings for the destination differ.
●
Communication Mode : G3 Auto
●
iFAX Profile: : TIFF-S
tinations (Broadcast Send)
4
36
Page 56

4.1 Transmitting to Multiple Destinations (Broadcast Send)
The Broadcast Send feature enables you to
transmit to all the destinations at one time.
Broadcast Send
4
37
Page 57

4.1 Transmitting to Multiple Destinations (Broadcast Send)
4.1.1 Broadcast Send Operation
Procedure
Load documents.
1
“2.2 Loading Documents” (P. 14)
Broadcast Send
4
Display the Fax screen.
2
Enter recipient’s Fax No. Memory :100%
[ Fax No. ]
Basic Features Scan Options Send Options
Address Book
A B C
Keyboard
Dial multiple remote parties, then press Start.
3
Select the Yes button on the confirmation screen to start transmission.
Scanning and transmission begins.
●
For details on how to dial a number, see “3.4 Dialing” (P. 27).
●
For details on how to confirm and cancel the transmission of a document, see “Chapter 5 Confirming and Canceling a Communication” (P. 55).
Resolution Original Type Lighter/Darker
Standard
Fine
Super-fine (400dpi)
Super-fine (600dpi)
On-Hook/
Others
Text
Text & Photo
Photo
Next
Recipient
Menu
38
Page 58

Transmitting Documents
4.2
Through a Relay Station
(Relay Broadcast)
Remote Relay Broadcast transmits documents to multiple parties via other fax machines
(relay stations).
A document to be transmitted to multiple remote terminals is first transmitted to one remote
relay station and from there to all other faxes in the same area. This feature is useful to save
on telephone charges when broadcasting a document over a long distance.
Multiple Relay Broadcast operations can be made simultaneously. This is referred to as
Multiple Relay Broadcast.
There are two types of Relay Broadcast Send operations:
Fax signal method
Unique signal method only for Fuji Xerox machines that have the Relay Broadcast Send feature. The G3 mode is available.
DTMF method
G3-facsimiles that support Manual Send can make Relay Broadcasts to this
machine.
F Code method
This method can be used among types of machines that have the F Code and
the Relay Broadcast Send functions. The G3 mode is available.
Broadcast Send
Use of Broadcast Send is charged
4
For details on which machines can be used as initiating stations and relay stations, see “Appendix C Facsimile Service System” (P. 314).
39
Page 59

Broadcast Send
4
4.2 Transmitting Documents Through a Relay Station (Relay Broadcast)
4.2.1 Before Using the Relay Broadcast Send
Feature
Before using the relay broadcast send feature, program the initiating stations and
relay stations in the Speed Dialing feature.
For details on how to register Address Numbers, see “9.3 Setting an Address Number” (P. 160).
Where What is required
●
Fax Signal Method
●
Assign the relay station to an Address Number (001 to 500) to set up the
relay broadcast send feature.
●
Program the Address Number of the initiating station (which is already
programmed at a relay station) as a relay station ID for the relay broad-
Initiating
station
Relay
station
cast send operation.
●
Program the Address Number or group numbers of the destinations
(which are programmed at a relay station) as broadcast receivers. The
wildcard “∗” can be used.
●
DTMF method (G3)/F Code method
●
No programming is required. The dialing format can be programmed in
speed dialing.
●
Fax Signal Method
●
Assign the initiating station to an Address Number from (001 to 099) and
set Relay Station Setup of the Address Number to On.
●
Assign the destinations to Address Numbers from 001 to 099. The destinations can be assigned using group dial numbers from the assigning station.
●
DTMF method (G3)/F Code method
●
Assign the initiating station either an Address Number from 001 to 500
(when the specification method for the initiating station is 3 digits in F
Code) or 001 to 099 (when the specification method for the initiating station is 2 digits in F Code). Then, set Relay Station Setup of the Address
Number to On.
●
Assign the destinations to Address Number. For the destination, assign
the relay station either an Address Number from 001 to 500 (when the
specification method for the initiating station is 3 digits in F Code) or 001
to 099 (when the specification method for the initiating station is 2 digits in
F Code).
40
Page 60

4.2 Transmitting Documents Through a Relay Station (Relay Broadcast)
4.2.2 Fax Signal Method
Procedure
Load documents.
1
“2.2 Loading Documents” (P. 14)
Display the Fax screen.
2
Enter recipient’s Fax No. Memory :100%
[ Fax No. ]
Basic Features Scan Options Send Options
Address Book
A B C
Keyboard
Select an Address Number or group number to which a relay broadcast
3
Resolution Original Type Lighter/Darker
Standard
Fine
Super-fine (400dpi)
Super-fine (600dpi)
On-Hook/
Others
Text
Text & Photo
Photo
Next
Recipient
Menu
is programmed and press Start.
Repeat this step to designate multiple relay stations.
Scanning and transmission begins.
●
For details on how to dial a number, see “3.4 Dialing” (P. 27).
●
For details on how to confirm and cancel the transmission of a document, see “Chapter 5 Confirming and Canceling a Communication” (P. 55).
Broadcast Send
4
41
Page 61

4.2 Transmitting Documents Through a Relay Station (Relay Broadcast)
4.2.3 DTMF (Dual Tone Multi Frequency)
Method
Before using the DTMF method, program the following items.
■Password
A two-digit number programmed beforehand.
(The factory-set default is none.) For setting Password, contact our Customer Support Center. If a
Broadcast Send
password has not been programmed, you do not need to use one.
■Relay station ID
The last two digits of the assigning station Address Number registered at the
relay station.
4
■Address Number
An Address Number for the destination station registered at the relay station.
The wildcard “∗”can be used.
The dialing format is as follows.
Relay station
telephone
number
The above dialing format can be registered in Address Number to enable dialing using an Address
Number. For details on how to register Address Numbers, see “9.3 Setting an Address Number”
(P. 160).
Password
Relay
station
ID
Address
Number
Address
Number
42
Page 62

Procedure
Load documents.
1
“2.2 Loading Documents” (P. 14)
Display the Fax screen.
2
4.2 Transmitting Documents Through a Relay Station (Relay Broadcast)
Enter recipient’s Fax No. Memory :100%
[ Fax No. ]
Basic Features Scan Options Send Options
Resolution Original Type Lighter/Darker
Standard
Fine
Super-fine (400dpi)
Super-fine (600dpi)
A B C
Address Book
Keyboard
On-Hook/
Others
Text
Text & Photo
Photo
Next
Recipient
Menu
Broadcast Send
Select Keyboard to display the keyboard on the touch panel and enter
3
the following format.
Relay station
telephone
number
Password
Select the Next Recipient button for multiple Relay Broadcast jobs.
●
Use the keyboard on the touch panel display to enter symbols like “!” or “∗”. For details on how to
enter symbols, see “1.5 Entering Text” (P. 8).
●
Destinations for up to 20 stations can be specified.
Press Start.
4
Scanning and transmission begins.
Relay
station
ID
Address
Number
Address
Number
4
43
Page 63

4.2 Transmitting Documents Through a Relay Station (Relay Broadcast)
4.2.4 F Code Method
In the F Code method, you can do Relay Broadcast Send by doing the following
operations.
When the machine is used as an initiating station, to do Relay Broadcast Send,
check the F Code (sub-address) to the relay station and the necessary passwords.
When the machine is used as a relay station, to do Relay Broadcast Send, transmit the F Code (sub-address) to the initiating station and the necessary pass-
Broadcast Send
words.
When doing Relay Broadcast Send with the F Code method, to use the password set the receive password for the relay station.
4
●
When doing Relay Broadcast Send among these types of machines, we recommend using the fax
signal method.
●
When using a machine that is different from this machine as a relay station, check the F Code subaddress and password of the targeted destination.
When this machine is a relay station, the F Code that is transmitted to the initiating station is as follows.
Relay Broadcast
Send
Print
directive
Relay
station ID
Up to 20 digits
Address
Number
Address
Number
Address
Number ....
■Relay Broadcast Send
The number of digits in the relay station ID.
1: For relay station IDs and Address Numbers that are 2 digits.
2: For relay station IDs and Address Numbers that are 3 digits.
■Print directive
Activate or deactivate printing at the relay station.
1: Activate printing at the relay station.
0: Deactivate printing at the relay station.
■Relay station ID
The Address Number of the initiating station that is assigned to the relay station.
The initiating station is notified of the results of the Relay Broadcast Send when
the relay station ID is set.
The initiating station is not notified of the results of the Relay Broadcast Send
when the relay station ID is “00” or “000”.
44
Page 64

■Address Number
The Address Number assigned to the destination.
An example of the F Code indicating how to print at the relay station, to notify the
initiating station of the results and to Relay Broadcast Send to destinations (200,
201, 202 and 203) is shown below.
F Code example: 21100200201202203
Procedure
Load documents.
1
See “2.2 Loading Documents” (P. 14)
4.2 Transmitting Documents Through a Relay Station (Relay Broadcast)
Broadcast Send
Display the Fax screen.
2
Enter recipient’s Fax No. Memory :100%
[ Fax No. ]
Basic Features Scan Options Send Options
Address Book
A B C
Keyboard
Select F Code in the On-Hook/Others screen.
3
Enter recipient’s Fax No. Memory :100%
[ Fax No. ]
Basic Features Scan Options Send Options
Store for Polling
Off
F Code
Off
Resolution Original Type Lighter/Darker
Standard
Fine
Super-fine (400dpi)
Super-fine (600dpi)
Polling
Off
On-hook
(Manual Receive)
On-Hook/
Others
Text
Text & Photo
Photo
On-Hook/
Others
The F Code screen is displayed.
Select On.
4
Enter recipient’s Fax No. Memory :100%
[ Fax No. ]
F Code
Next
Recipient
Menu
Next
Recipient
Menu
Remote Mailbox
Off
Next
Recipient
SaveCancel
4
Off
On
45
Page 65

4.2 Transmitting Documents Through a Relay Station (Relay Broadcast)
Enter the F Code with the numeric keypad, and select Next.
5
Use the Numeric Keypad to enter the F Code.
F Code
Off
F Code
21100200201202203
Memory :100%
Next
Recipient
SaveCancel
Broadcast Send
4
On
Password
9
Next
Example: F Code: 21100200201202203
On the left side of Password, is displayed.
You can enter up to 20 digits for an F Code.
If necessary, enter the password on the numeric keypad then select
6
Next.
Use the Numeric Keypad to enter the password.
F Code
Off
On
F Code
21100200201202203
Password
9
Memory :100%
You can enter up to 20 digits for a password.
Next
Recipient
SaveCancel
Next
46
Select Save.
7
Specify the destination and press start.
8
Scanning and transmission begins.
●
For details on how to dial a number, see “3.4 Dialing” (P. 27).
●
For details on how to confirm and cancel the transmission of a document, see “Chapter 5 Confirming and Canceling a Communication” (P. 55).
Page 66

Transmitting Documents
Through a Remote Relay Station
4.3
(Remote Relay Broadcast)
The Remote Relay Broadcast operation is a feature that combines two or more Relay
Broadcast operations.
This function is more economical than Relay Broadcast in transmitting documents to multiple remote machines.
Remote Relay Broadcast
Local
Broadcast Send
The second relay station can send a document simultaneously to multiple remote terminals (Multiple
Relay Broadcast).
For details on which machines can be used as first and second relay stations for Remote Relay Broadcast, see “Appendix E Models Providing Relay Broadcast and Recipient Print Set Function” (P. 319),
for details on which models are provided with relay broadcast and recipient print set function.
There are two types of Relay Broadcast Send operations:
Fax signal method
Unique signal method only for Fuji Xerox machines that have the Relay Broadcast Send feature. The G3 mode is available.
DTMF method
G3-facsimiles that support Manual Send can make Remote Relay Broadcasts
to this machine.
F Code method
This method can be used among types of machines that have the F Code and
the Relay Broadcast Send functions. The G3 mode is available.
4
47
Page 67

Broadcast Send
4
4.3 Transmitting Documents Through a Remote Relay Station (Remote Relay Broadcast)
4.3.1 Fax Signal Method
Before using the fax signal method, program the initiating station, first relay station and second relay station in Address Number.
For details on how to register Address Numbers, see “9.3 Setting an Address Number” (P. 160).
Where What is required
●
Assign the first relay station to an Address Number (001 to 500) to set up
the relay broadcast send feature.
• Program the last two digits of the Address Number of the initiating station
Initiating
station
First relay
station
Second
relay
station
(which is already programmed at a relay station) as a relay station ID for
the relay broadcast send operation.
• Program the Address Number of the second relay station (which is
already programmed at the first relay station) as a relay broadcast
receiver.
●
Assign the initiating station to an Address Number from 001 to 099, and set
Relay Station Setup of the Address Number to On.
●
Assign the second relay station to an Address Number from 001 to 099.
• Program the two last digits of the Address Number of the first relay station
(which is already programmed at the second relay station) as a relay station ID for the Relay Broadcast Send operation.
• Program the Address Numbers of the destinations (which are already
programmed at the second relay station) as broadcast receivers.
●
Assign the first relay station to the same Address Number as that of the initiating station programmed at the first relay station, and set Relay Station
Setup of the Address Number to On.
●
Program the destinations to Address Numbers between 001 and 500.
●
Destinations of Address Number 100 or above can be programmed into a
group.
48
Procedure
Load documents.
1
“2.2 Loading Documents” (P. 14)
Page 68

4.3 Transmitting Documents Through a Remote Relay Station (Remote Relay Broadcast)
Display the Fax screen.
2
Enter recipient’s Fax No. Memory :100%
[ Fax No. ]
Basic Features Scan Options Send Options
Address Book
A B C
Keyboard
Next
Recipient
On-Hook/
Others
Resolution Original Type Lighter/Darker
Standard
Fine
Super-fine (400dpi)
Super-fine (600dpi)
Text
Text & Photo
Photo
Menu
Select an Address Number to which a remote relay broadcast is pro-
3
grammed and press Start.
Scanning and transmission begins.
●
For details on how to dial a number, see “3.4 Dialing” (P. 27).
●
For details on how to confirm and cancel the transmission of a document, see “Chapter 5 Confirming and Canceling a Communication” (P. 55).
4.3.2 DTMF (Dual Tone Multi Frequency)
Method
Before using the DTMF method, program the following items.
■Password
A two-digit number programmed beforehand.
(The factory-set default is none.) For setting Password, contact our Customer Support Center. If a
password has not been programmed, you do not need to use one.
■Relay station ID
The last two digits of the assigning station Address Number registered at the first
relay station.
Broadcast Send
4
■Address Number
An Address Number for the second relay station registered at the first relay station.
Before using the fax signal method, program the first relay station and the second relay station in Address Number.
49
Page 69

4.3 Transmitting Documents Through a Remote Relay Station (Remote Relay Broadcast)
For details on how to register Address Numbers, see “9.3 Setting an Address Number” (P. 160).
Where What is required
●
Assign the initiating station to an Address Number from 001 to 500, and set
Relay Station Setup of the Address Number to On.
●
Assign the second relay station to an Address Number from 001 to 500.
First relay
station
• Program the two last digits of the Address Number of the first relay station
(which is already programmed at the second relay station) as a relay station ID for the Relay Broadcast Send operation.
• Program the Address Numbers of the destinations (which are already programed at the second relay station) as broadcast receivers.
Broadcast Send
Second
relay
station
●
Assign the first relay station to the same Address Number as that of the initiating station programmed at the first relay station, and set Relay Station
Setup of the Address Number to On.
●
Program the destinations to Address Numbers between 001 and 500.
4
The dialing format is as follows.
●
●
Procedure
Load documents.
1
“2.2 Loading Documents” (P. 14)
Display the Fax screen.
2
The 1st relay station
telephone number
Password
Relay
station ID
Address
Number
This method is available for transmission only between machines of this model.
The above dialing format can be registered in Address Number to enable dialing using an Address
Number. For details on how to register Address Numbers, see “9.3 Setting an Address Number”
(P. 160).
Enter recipient’s Fax No. Memory :100%
[ Fax No. ]
Basic Features Scan Options Send Options
Resolution Original Type Lighter/Darker
Standard
Fine
Super-fine (400dpi)
Super-fine (600dpi)
A B C
Address Book
Keyboard
On-Hook/
Others
Text
Text & Photo
Photo
Next
Recipient
Menu
50
Page 70

4.3 Transmitting Documents Through a Remote Relay Station (Remote Relay Broadcast)
Select Keyboard to display the keyboard on the touch panel and enter
3
the following format.
The 1st relay station
telephone number
Select the Next Recipient button for multiple Relay Broadcast jobs.
Use the keyboard on the touch panel display to enter symbols like “!” or “∗”. For details on how to
enter symbols, see “1.5 Entering Text” (P. 8).
Press Start.
4
Scanning and transmission begins.
4.3.3 F Code Method
In the F Code method, you can do remote Relay Broadcast Send by doing the
following operations.
When doing remote Relay Broadcast Send using this machine as the initiating
station, check the F Code and the necessary passwords for the first relay station.
When doing remote Relay Broadcast Send using this machine as the first relay
station, transmit the F Code (sub-address) and the necessary passwords to the
initiating station, and check the F Code for the second relay station.
When doing remote Relay Broadcast Send using this machine as the second
relay station, transmit the F Code and the necessary passwords to the first relay
station.
Password
Relay
station ID
Address
Number
Broadcast Send
4
51
Page 71

Broadcast Send
4
4.3 Transmitting Documents Through a Remote Relay Station (Remote Relay Broadcast)
It is necessary to assign the first relay station and second relay station Address
Numbers in advance, as shown below.
Where What is required
First relay station
Second relay station
●
Assign the initiating station either an Address Number from
001 to 500 (when the specification method for the initiating
station is 3 digits in F Code) or 001 to 099 (when the specification method for the initiating station is 2 digits in F
Code). Then, set Relay Station Setup of the Address Number to On.
●
Assign the second relay station either an Address Number
from 001 to 500 (when the specification method for the initiating station is 3 digits in F Code) or 001 to 099 (when the
specification method for the initiating station is 2 digits in F
Code).
●
Assign the last two digits of the Address Number for the
first relay station that has been assigned to the second
station as the relay station ID.
●
Assign the Address Number for the destination station
that has been assigned to the second relay station as the
Broadcast Recipients.
●
Assign the same number for the first relay station as the
Address Number of the initiating station that has been
assigned to the first relay station. Then, set Relay Station
Setup of the Address Number to On.
●
Assign the destination either an Address Number from 001
to 500 (when the specification method for the initiating station is 3 digits in F Code) or 001 to 099 (when the specification method for the initiating station is 2 digits in F Code).
52
Station one and station two and equipment on which the Relay Broadcast Send function and the F
Code method are installed are targeted when using the F Code method for remote Relay Broadcast
Send.
When doing remote Relay Broadcast Send among these types of machines, we recommend using the
fax signal method.
When this machine is a relay station, the F Code that is transmitted to the initiating station is as follows.
Relay Broadcast
Send
Print
directive
First relay
station ID
Up to 20 digits
Address
Number
Address
Number
Address
Number ....
Page 72

4.3 Transmitting Documents Through a Remote Relay Station (Remote Relay Broadcast)
■Relay Broadcast Send
The number of digits in the first relay station ID.
1: For first relay station IDs and Address Number that are 2 digits.
2: For first relay station IDs and Address Number that are 3 digits.
■Print directive
Activate or deactivate printing at the first relay station.
1: Activate printing at the first relay station.
0: Deactivate printing at the first relay station.
■First relay station ID
The Address Number of the initiating station that is assigned to the first relay station.
The initiating station is notified of the results of the remote Relay Broadcast Send
when the first relay station ID is set.
The initiating station is not notified of the results of the remote Relay Broadcast
Send when the relay station ID is “00” or “000”.
Broadcast Send
■Address Number
The Address Number assigned to the second relay station.
The procedure is the same for Relay Broadcast Send. See “4.2.4 F Code Method” (P. 44).
4
53
Page 73

5Confirming and
Canceling a
Communication
5.1 Canceling Jobs ................................................................................ 56
5.2 Confirming Job Status...................................................................... 58
5.2.1 Checking Jobs in Progress and Pending Jobs ................. 58
5.2.2 Confirming Completed Jobs ............................................. 59
Page 74

Canceling Jobs
5.1
This section describes how to cancel a job in progress and pending job(s).
When you cancel a broadcasting job in progress, all pending jobs and a job in progress designated as broadcast are
Confirming and Canceling a Communication
canceled.
Canceling a job during scanning
Procedure
When the following screen appears, select Stop on the screen or press
1
Stop on the control panel.
When this screen does not appear, see the instructions in “ Canceling a Pending Jobs”.
Scanning documents...
Fax Store
: 0123456789
Type: Single Terminal
Pages :
1
Standard
:Doc. No. 00010
Last Original
Next Original
Stop
Stop
5
The machine pauses and the screen shown below appears.
Select Stop on the screen or press Clear on the control panel.
2
Transmission stops.
Ready to scan.
Load the next set of documents and press Start.
Or, select Last Original when the scanning completes.
Fax Store Doc. No. 0010
: 0123456789
Type: Single Terminal
Pages :
1
A 4
Standard
To continue transmission, select the Start button on the screen or press the Start button on the control
panel.
Last Original
Next Original
Close
Stop
Start
56
Page 75

Canceling a pending job
This section describes how to cancel a pending job.
Procedure
Press Job Status.
1
The Job Status screen is displayed.
Select Current and Pending Jobs, and select the job to cancel.
2
A list of current and pending jobs is displayed.
Select the button to display the previous screen and select the button to display the next screen.
Job Status
Doc. No. - Job Type
00010 - Fax-Send
Current and
Pending Jobs
Status
Waiting
Completed Jobs
Remote Terminal/Contents
0123456789
Stored
Documents
Pages
Print
Waiting Jobs
1/1
5.1 Canceling Jobs
Confirming and Canceling a Communication
Job status is shown.
Select Stop.
3
Job processing is terminated.
The document is waiting to be sent.
Touch Promote Job if you want this job to be executed first.
Or, press Stop to cancel.
Fax Store Doc. No.00010
: 0123456789
Type : Fax-Send
Pages:
0/1
Select Close.
4
To cancel other jobs, select the jobs you want to cancel in the screen at step 2 and select the Stop button.
Promote Job
Close
Stop
5
57
Page 76

Confirming Job Status
5.2
You can check transmitted documents, received documents or documents stored to be
polled.
There are three types of job status: Pending Jobs, Current Jobs, and Completed Jobs.
Confirming and Canceling a Communication
Priority Send can be set for a pending job.
Transmission jobs already selected for Priority Send cannot be selected for Priority Send again.
5.2.1 Checking Jobs in Progress and Pending
Jobs
Procedure
5
Press Job Status.
1
The Job Status screen is displayed.
Select Current and Pending Jobs, and check job status.
2
A list of current and pending jobs is displayed.
Select the button to display the previous screen and select the button to display the next screen.
Job Status
Doc. No. - Job Type
00010 - Fax-Send
When a job is selected, the screen shown below is displayed to provide detailed job information.
Select the Promote Job button to give priority to a job.
The document is waiting to be sent.
Touch Promote Job if you want this job to be executed first.
Or, press Stop to cancel.
Fax Store
: 0123456789
Type : Fax-Send
Pages :
0/1
Current and
Pending Jobs
Status
Waiting
Completed Jobs
Remote Terminal/Contents
0123456789
Doc. No. 00010
Stored
Documents
Promote Job
Pages
Stop
Print
Waiting Jobs
1/1
Close
58
Select Close.
3
To check other jobs, select the jobs you want to check in the screen at step 2.
Page 77

5.2.2 Confirming Completed Jobs
Procedure
Press Job Status.
1
The Job Status screen is displayed.
Select Completed Jobs.
2
5.2 Confirming Job Status
Confirming and Canceling a Communication
Job Status
Secure Print Sample Print
Private Mailbox Public Mailbox
Current and
Pending Jobs
Completed Jobs
Stored
Documents
Delayed Print
A list of completed jobs is shown.
Check job status.
3
Select the button to display the previous screen and select the button to display the next screen.
Job Status
Doc. No. - Type
00010 - Fax-Send
- - Copy Job
- - Print Job
- - Report/List
00006 - Fax Stored
Current and
Pending Jobs
Status
OK
Completed
Completed 3/3
Completed 1
Completed 2
Completed Jobs
Remote Terminal/Contents
0123456789
A4 : 100%
Endo-Akira: STREAM
Store for Polling
Stored
Documents
Pages
1/1
20
Page
1/10
When a job is selected, the screen shown below is displayed to provide detailed job information.
Fax-Send
Outside Line
Job Type
Status
No.of Pages
Communication Mode
Resolution
: 0123456789
: Fax Mailbox - Send
: O K : 2001/10/4 8:10 AMStart Date
: 1/1
: G3 14.4k
: Standard
Doc No.00010
: 2001/10/4 8:11 AMEnd Date
Close
5
Select Close.
4
To check other jobs, select the jobs you want to check in the screen at step 2.
59
Page 78

6Receiving Jobs
6.1 Reception Mode............................................................................... 62
6.1.1 Switching Between the Modes.......................................... 62
6.1.2 Automatic Reception......................................................... 63
6.1.3 Guide Reception ............................................................... 63
6.2 Printing Received Documents.......................................................... 65
6.2.1 Tray Mode and User Mode ............................................... 65
6.2.2 Printing the Same Size Images ........................................ 66
6.2.3 Printing the Same Size Images With Margins .................. 67
6.2.4 Reducing Images at the Sender Side ............................... 68
6.2.5 Reducing Images at the Recipient Side............................ 69
6.2.6 Using the 2 Up on Receipt Feature .................................. 70
6.2.7 Using the 2 Sided Printing Feature................................... 70
Page 79

Reception Mode
6.1
There are two reception modes: Auto Receive and Manual Receive.
In the Auto Receive mode, the machine automatically responds to transmissions from a
remote terminal.
In the Manual Receive mode, the machine begins reception after the handset has been
lifted and the ready tone of the remote machine sounded. This is useful if you wish to check
the sender or receive documents after speaking with the sender using an external telephone.
The Fax Receiving Mode default value can be changed in the System Administration Mode. For details on how to
change this default value, see “9.8.7 Fax Control” (P. 202). The default factory setting is Auto Receive.
6.1.1 Switching Between the Modes
Receiving Jobs
6
Procedure
Press Machine Status.
1
The Machine Status screen is displayed.
Select Fax Receiving Mode in the Machine Status screen.
2
The Fax Receiving Mode screen is displayed.
Select Manual Receive or Auto Receive.
3
Machine Status
Print Mode
Billing Meter/
Print Report
Machine Information Paper Tray Print Mode
Manual Receive
Auto Receive
FaultsConsumables
On-line
Fax Receiving Mode
Auto Receive
SaveCancel
62
Select Save.
4
Page 80

6.1.2 Automatic Reception
When the machine is in the Auto Receive mode, it automatically answers incoming calls and receives documents.
●
You can set the length of ringing time until the call is automatically answered. By picking up the
handset while the telephone is ringing, you can speak with the caller and receive a fax manually if
it has been sent.
●
The number of rings (Auto Switch Time) can be changed in the System Administration Mode. For
details on how to change this default value, see “9.8.7 Fax Control” (P. 202). The default factory
setting is 0 time.
6.1.3 Manual Reception
6.1 Reception Mode
In the Manual Receive mode, pick up the handset (external telephone) or select
the On-hook button in the screen that appears when the phone rings to
announce an incoming call.
It is recommended that the line monitor volume be set to Loud when using the On-hook feature. The
line monitor volume can be changed in the System Administration Mode. For details on how to change
this default value, see “9.8.2 Audio Tones” (P. 192). The default factory setting is Normal.
Procedure
When the telephone rings, the screen shown below is displayed.
1
If a handset is fitted, pick it up. If a handset is not fitted, select the On-hook button.
Receiving
Manual Receive Mode
Please pick up the handset or select On-hook.
On-hook
Receiving Jobs
6
63
Page 81

6.1 Reception Mode
Check whether the call is from a tele-
2
phone or a facsimile.
If the call is from a telephone, answer it.
If the incoming call is from a fax machine, you hear a
facsimile tone.
If On-hook is selected, you will hear the sound from the
machine speaker. However, you cannot speak to the
other party.
Press Start.
3
The reception starts.
Beep!
Receiving Jobs
6
If equipped with a handset, replace it when the online indicator light on
4
the control panel lights.
64
Page 82

Printing Received Docu-
6.2
The machine prints the received documents on the same paper size as the originals from
the remote terminal. However, if the same paper size is not loaded or the Receiving Paper
Size feature is activated, the documents may be printed on a different paper size. The document image may be reduced, partially lost, or split into two pages depending on the programmed settings.
This section describes how to print received documents.
ments
6.2.1 Tray Mode and User Mode
The Receiving Paper Size feature is used to specify the use of fixed paper sizes
for fax reception.
This feature has two modes: Tray Mode and User Mode.
The Receiving Paper Size feature setting can be changed in the System Administration Mode. For
details on how to change this default value, see “9.8.7 Fax Control” (P. 202). The default factory setting is Tray Mode.
■Tray Mode
All the paper types (plain paper only) loaded in the trays can be used for printing.
The machine reproduces documents without image loss using the size of paper
closest to that of the original documents. If the receiving machine has only paper
that is smaller than the documents being sent, it informs the sending machine
accordingly. The sending machine will then transmit images that have been
reduced to fit the paper loaded in the receiving machine.
If the receiving machine has only paper that is smaller than the documents being
sent, or the paper supply runs out during printing, how the received documents
are processed may vary according to the settings carried out by the sender.
Receiving Jobs
6
■User Mode
The paper size on which the received documents is printed is specified. You can
specify one or more paper sizes.
If the same size paper as the documents is specified and loaded in any paper
tray, the machine reproduces size-for-size images on the paper. If the same size
of paper as the document is not specified, the machine reproduces size-for-size
images without image loss on any larger size of paper that is specified and
loaded.
We recommend this mode if you always use the same size of paper or reproduce
images of the same size as the received documents.
The printout varies according to the programmed settings and the sizes of paper
loaded in the machine.
65
Page 83

6.2 Printing Received Documents
The following pages describe how to print received documents using Tray Mode
or User Mode, when:
●
Printing images on the same size of paper as the documents.
●
Printing the Same Size Images With Margins.
●
Reducing Images at the Sender Side.
●
Reducing the images at the receiver’s printing.
6.2.2 Printing the Same Size Images
■Tray Mode
If the same size of paper as the documents is loaded in any paper tray, the
machine automatically selects the tray and reproduces the same size images on
paper. If the same size of paper is loaded, but in a different orientation (for exam-
ple, the document is A4 while paper orientation is A4 ), the machine automatically rotates the images and reproduces them on paper.
Receiving Jobs
6
■User Mode
If the same size of paper as the documents is specified and loaded in any paper
tray, the machine automatically selects the tray and reproduces the same size
images on paper. If A4 paper is loaded in a different orientation, the machine
automatically rotates the images and reproduces them on A4 paper.
Sending
Document
Rotating images before reproduction may not be possible with some data.
Receiving
Reproduced
image
66
Page 84

6.2 Printing Received Documents
6.2.3 Printing the Same Size Images With Mar-
gins
In the following cases, images are printed on paper larger than the documents
with margins.
■Tray Mode
If the paper size of the documents is not loaded, but a larger paper size is loaded
in one of the paper trays, the machine prints the same size images with margins
on the larger paper size.
Sending
Document (B4)
■User Mode
If the same size of paper as the documents is not specified but closer paper
sizes are specified and loaded, the machine prints the same size images with
margins on the larger size paper.
Sending Receiving
Document (B4)
Receiving
Reproduced
image (A3)
Margin
No paper
Reproduced
image (A3)
Receiving Jobs
6
Specified
Margin
67
Page 85

6.2 Printing Received Documents
6.2.4 Reducing Images at the Sender Side
If the receiving machine only has paper sizes smaller than the documents to be
printed, it informs the sending machine that the documents cannot be received.
The images are reduced by the sending machine.
The images are reduced by a sending machine in the following cases:
■Tray Mode
When all the loaded paper sizes are smaller than the documents.
The receiving machine automatically selects the paper size closest to the document size.
■User Mode
When all the specified paper sizes are smaller than the documents.
Receiving Jobs
6
The receiving machine automatically selects the paper size closest to the document size.
Sending Receiving
Document
(A3)
Reduced
Document (B4)
Reproduced
image (B4)
Specified
68
Page 86

6.2 Printing Received Documents
6.2.5 Reducing Images at the Recipient Side
The receiving document may exceed the actual size due to a scanning slip at the
sending machine. This machine has a feature that automatically reduces the
document to fit available paper sizes.
The machine automatically reduces documents in the following cases:
The length of the received document is longer than regular sizes but within the
value programmed in the Border Limit feature and Auto Reduce on Receipt is set
to On.
Excess Iength
(below border limit)
The way documents are output when Auto Reduce on Receipt and Border Limit
are combined is shown below.
Auto Reduce
on Receipt
Border Limit
When border limits are
not exceeded
When border limits are
exceeded
For details on how to change these default values, see “9.8.7 Fax Control” (P. 202).
The document is automatically reduced and output as
one page.
The document is output at the same magnification on separate
pages.
On Off
The portion that exceeds the
set page size is cut off and
the document is output.
Receiving Jobs
6
69
Page 87

6.2 Printing Received Documents
6.2.6 Using the 2 Up on Receipt Feature
Use the 2 Up on Receipt feature to print two consecutive documents on a single
sheet of paper. In some cases, this feature may not be available, depending on
the size of the documents sent.
For details on how to change this default value, see “9.8.7 Fax Control” (P. 202).
The following shows the difference when the 2 Up on Receipt feature is on and
off.
Receiving Jobs
6
6.2.7 Using the 2 Sided Printing Feature
Using the 2 Sided Printing feature, multiple page documents that are received
can be printed out on both sides of a sheet.
●
Both sides of a sheet are printed only when the size of the received documents is the same.
●
Duplex printing may not be possible with some data.
For details on how to change this default value, see “9.8.7 Fax Control” (P. 202).
70
Page 88

7Making and Receiving
Telephone Calls
7.1 Making a Telephone Call.................................................................. 72
7.1.1 Off-hook Dialing ................................................................ 72
7.1.2 On-hook Dialing ................................................................ 73
7.2 Receiving a Telephone Call ............................................................. 75
Page 89

Making a Telephone Call
7.1
This section describes how to dial out using an external telephone.
The machine provides two methods:
●
Picking up the handset and dialing (Off-hook dialing)
●
Dialing without picking up the handset (On-hook dialing)
You cannot use the answering phone function from an external telephone.
7.1.1 Off-hook Dialing
Making and Receiving Telephone Calls
7
This section describes how to dial using the handset, Off-hook dialing.
Procedure
Pick up the handset.
1
Or lift the handset of your telephone if you are using your
own telephone.
In power saving, you cannot make telephone call with the
receiver.To make a telephone call,press the Power Saver
button to cancel power saving.
Dial the telephone number.
2
The display might differ according to the ROM versions.
[ Fax No. ]
Off-hook
Alphanumeric
Symbol
ABCDEFG
HI JKLMN
OPQR S
VWX
TU
123
456
789
0YZ
Memory :100%
Close
Shift
72
Use the numeric keypad, Address Number or one-touch buttons. You cannot use the Address Book.
You cannot send tones during a telephone call whether the handset is on or off hook.
Page 90

7.1 Making a Telephone Call
Answer when you hear the voice of the
3
other party.
Place the handset back on the cradle after hanging up.
4
Be sure to replace the handset properly as the line will otherwise not be disconnected and the telephone will remain “busy”.
Making and Receiving Telephone Calls
Press Close.
5
7.1.2 On-hook Dialing
This section describes how to dial with the handset on the cradle, On-hook dialing.
We recommend that the line monitor volume be set to the Loud when selecting
this feature.
The line monitor volume can be changed in the System Administration Mode. For details on how to
change this default value, see “9.8.2 Audio Tones” (P. 192). The default factory setting is Normal.
Procedure
Display the Fax screen.
1
Enter recipient’s Fax No. Memory :100%
[ Fax No. ]
Basic Features Scan Options Send Options
Resolution Original Type Lighter/Darker
A B C
Address Book
Keyboard
Standard
Fine
Super-fine (400dpi)
Super-fine (600dpi)
Text
Text & Photo
Photo
On-Hook/
Others
Next
Recipient
Menu
7
73
Page 91

7.1 Making a Telephone Call
2
3
Making and Receiving Telephone Calls
Select the On-hook in the On-Hook/Others screen.
Enter recipient’s Fax No. Memory :100%
[ Fax No. ]
Basic Features Scan Options Send Options
Store for Polling
Off
F Code
Off
Polling
Off
On-hook
(Manual Receive)
On-Hook/
Others
The On-hook screen is displayed.
Next
Recipient
Menu
Remote Mailbox
Off
Dial the telephone number.
The display might differ according to the ROM versions.
To disconnect the line, select the Exit (Line Cut) button.
Press Start to start receiving.
[ Fax No. ]
On-hook
Memory :100%
Exit (Line Cut)
7
TU
123
456
789
0YZ
Shift
Alphanumeric
Symbol
ABCDEFG
HI JKLMN
OPQR S
VWX
Use the numeric keypad, Address Number or one-touch buttons. You cannot use the Address Book.
You cannot send tones during a telephone call whether the handset is on or off hook.
Lift the handset to take the call when
4
the other party answers.
Place the handset back on the cradle after ending the call.
5
74
Be sure to replace the handset properly as the line will otherwise not be disconnected and the telephone will remain “busy”.
Page 92

Receiving a Telephone
7.2
This section describes how to answer incoming voice calls using an external telephone.
The machine is factory-set to enter the facsimile mode immediately after detecting an incoming call, so that the telephone does not ring. The number of rings (Auto Switch Time) can be changed in the System Administration Mode.
For details on how to change this default value, see “9.8.7 Fax Control” (P. 202). The default factory setting is 0
time. The ringing tone is available, either with or without a handset. When the machine is set to ring, you can take a
call while the telephone is ringing.
Procedure
When the telephone rings, pick up the
1
handset to speak with a remote party.
When you hear a fax incoming tone from a receiver,
receive the fax manually. For details on Manual
Receive, see “6.1.3 Guide Reception” (P. 63).
Call
Making and Receiving Telephone Calls
Place the handset back on the cradle
2
after ending the call.
Be sure to replace the handset properly as the line will otherwise not be disconnected and the telephone will remain “busy”.
7
75
Page 93

8Using Additional
Features
8.1 Transmitting Two sided Originals (2 Sided Originals)....................... 78
8.2 Specifying Document Size for Transmission (Scan Size)................. 81
8.3 Scanning Documents in Various Sizes (Mixed Size Originals) ........ 84
8.4 Scanning Documents at a Specified Size/Ratio (Reduce/Enlarge) . 87
8.5 Transmitting Facing Pages on Separate Sheets (Bound Originals) . 89
8.6 Merging Several Pages Onto One Sheet (Multiple Up).................... 91
8.7 Executing an Urgent Job (Priority Send).......................................... 94
8.8 Transmitting Documents at a Programmed Time (Delayed Start).... 96
8.9 Transmitting Documents With Brief Information (Send Header) ...... 99
8.10 Transmitting Documents With a Cover Page (Cover Note) ............ 101
8.11 Remote Copy (Recipient Print Sets).............................................. 104
8.12 Preparing to Be Polled (Store for Polling) ...................................... 106
8.12.1 Store the Document to Be Polled ................................... 106
8.12.2 Checking Documents to Be Polled ................................. 107
8.13 Retrieving a Document From Remote Machine(s) (Polling)........... 110
8.14
Using the Mailbox Feature (Remote Mailbox/Retrieve from Mailbox)
8.14.1 Send to Mailbox (Fax Signal Method)............................. 113
8.14.2 Send to Mailbox (DTMF Method).................................... 115
8.14.3 Send to Mailbox (F Code Method).................................. 116
8.14.4 Receive in Mailbox.......................................................... 119
8.14.5 Retrieve From Mailbox (Fax Signal Method)................... 119
8.14.6 Retrieve From Mailbox (DTMF Method).......................... 122
8.14.7 Retrieve From mailbox (F Code Method)........................ 123
8.14.8 Private Mailbox ............................................................... 126
8.15 Sorting Received Documents Into Mailbox (Box Selector) ............ 129
8.15.1 Sorting by Incoming Line ................................................ 129
8.16 Checking/Printing/Deleting Documents in Mailbox ........................ 130
8.17 Managing Use by Account (Copylyzer).......................................... 133
8.17.1 Before Use...................................................................... 133
8.17.2 Making Auditron Administration Valid ............................. 134
8.17.3 Programming Billing Units .............................................. 135
8.17.4 Report/List ...................................................................... 139
8.18 Transmitting with F Code (F Code Transmitting) ............................ 148
8.18.1 About F Code and Passwords ........................................ 148
8.18.2 Functions Used with F Code Transmission..................... 148
....... 112
Page 94
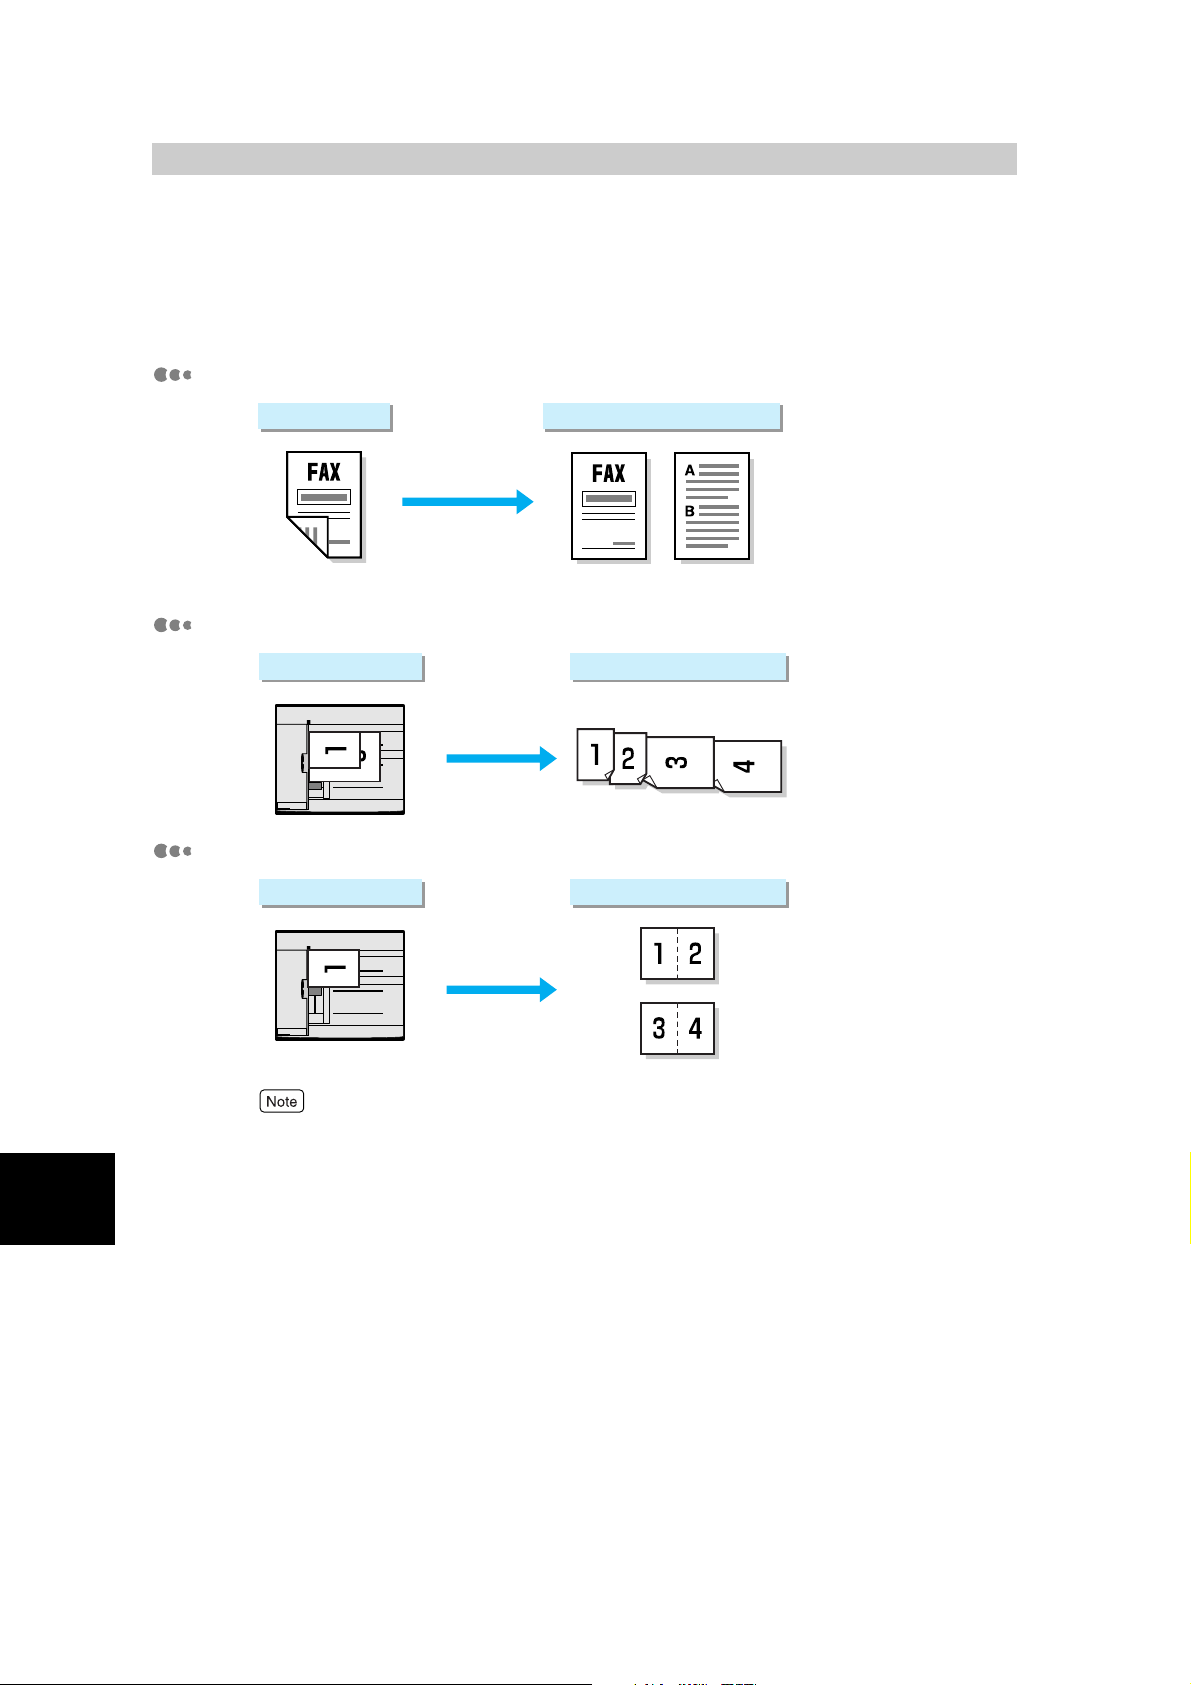
Transmitting Two sided
8.1
You can use the document feeder to automatically scan and transmit two sided originals.
Basic 2 Sided Originals
Document
2 Sided Originals in various sizes (using Mixed Size Originals)
Originals (2 Sided Originals)
Stored image
The first page The second page
Stored imageAt transmission
Using Additional Features
8
2 Sided Originals by merging pages (using Multi-Up)
Stored imageAt transmission
●
The default factory setting for 2 Sided Originals is 1 Sided. This default value cannot be changed.
●
The 2 Sided Originals feature is canceled if the document glass is used while transmitting 2 Sided
Originals.
●
If you select the 2 Sided (First Page 1 Sided) button in the 2 Sided Originals Feature with the Multiple Up feature, the first page that the machine scans is not merged.
●
The Send Header is printed on the first line for each page of the merged documents.
●
The data of the second side for a 2 sided original is rotated so that it has the same orientation as
side 1.
78
Page 95

Procedure
Load documents.
1
“2.2 Loading Documents” (P. 14)
Display the Fax screen.
2
8.1 Transmitting Two sided Originals (2 Sided Originals)
Enter recipient’s Fax No. Memory :100%
[ Fax No. ]
Basic Features Scan Options Send Options
Resolution Original Type Lighter/Darker
Standard
Fine
Super-fine (400dpi)
Super-fine (600dpi)
A B C
Address Book
Keyboard
On-Hook/
Others
Text
Text & Photo
Photo
Next
Recipient
Menu
Select 2 Sided Originals in the Scan Options screen.
3
Enter recipient’s Fax No. Memory :100%
[ Fax No. ]
Basic Features Scan Options Send Options
2 Sided Originals
1 Sided
Reduce/Enlarge
Auto %
Scan Size
Auto Size Detect
Bound Originals
Off
On-Hook/
Others
Next
Recipient
Menu
Mixed Size Originals
Off
Multiple Up
Off
The 2 Sided Originals screen is displayed.
When transmitting all pages, select 2 Sided. When you do not wish to
4
transmit the second side of the first page in a document, select 2 Sided
(First Page 1 Sided).
When you select the 2 Sided (First Page 1 Sided) button, you must scan the entire document at one
time. Pressing the Start button and selecting the Next Original button in the touch panel display
causes the first page in a document to be recognized as a cover page and the second side of this page
is not scanned. Do not exceed the capacity of the document feeder.
Enter recipient’s Fax No. Memory :100%
[ Fax No. ]
2 Sided Originals
1 Sided
Cancel
Next
Recipient
Save
Using Additional Features
8
2 Sided
2 Sided
(First Page
1 Sided)
Originals is indicated on the right side of the screen.
79
Page 96

8.1 Transmitting Two sided Originals (2 Sided Originals)
Select Flip on Long-Edge or Flip on Short-Edge at Originals for the
5
document to be transmitted.
Enter recipient’s Fax No. Memory :100%
[ Fax No. ]
2 Sided Originals
1 Sided
Originals
Flip on Long-Edge
Next
Recipient
SaveCancel
Using Additional Features
2 Sided
2 Sided
(First Page
1 Sided)
●
Flip on Long-Edge is used for documents where side 1 and side 2 of a document page have the
Flip on Short-Edge
same orientation.
NO.1
NO.2
●
Flip on Short-Edge is used for documents where text orientation on side 2 is inverted from that of
NO.1
The first page The second page
NO.2
side 1.
NO.1
NO.2
Select Save.
6
Dial a remote party, then press Start.
7
NO.1
The first page The second page
NO.2
Scanning and transmission begins.
8
80
●
For details on how to dial a number, see “3.4 Dialing” (P. 27).
●
For details on how to confirm and cancel the transmission of a document, see “Chapter 5 Confirming and Canceling a Communication” (P. 55).
Page 97

Specifying Document Size for
8.2
You can specify the document size of documents you transmit. Specify document size when
you wish the document to be sent in a size different from the loaded document. When a document size is specified, it is scanned at the specified size regardless of the size of the
loaded document. The feature allows you to add a margin to or delete excess space from
the actual image that is transmitted. Specify document sizes as described below.
●
Auto Detect
Document sizes are automatically detected.
●
Standard size
Document size is selected from 11 sizes (A3 , A4 , A4 , A5 , B4 , B5 , B5 , 11×17" , 8.5×14" ,
8.5×11" and 8.5×11" )
●
The factory set default for buttons other than the Auto Size Detect button can be changed in the System Administration Mode. For details on how to change this default value, see “9.8.10 Setting Scan Size Defaults”
(P. 211). The factory set defaults are A3 , A4 , A4 , A5 , B4 , B5 , B5 , 11×17" , 8.5×14" ,
8.5×11" and 8.5×11" .
●
When a document size cannot be set automatically, a message prompting document size entry appears.
●
When the Internet Fax (iFAX) function (option) is used for transmission and TIFF-S is selected in the iFAX Profile in the On-Hook/Others screen, any size larger than A4 that is selected is automatically reduced to A4. For
details on iFAX Profile, see “13.3.2 Settings That are Configurable During an Outgoing iFax Transmission”
(P. 287).
When a document size is set, the document is scanned as shown below.
Transmission (Scan Size)
Using Additional Features
Document Scanned image
Specifying smaller size
than the document
Image
loss
Specifying larger size
than the document
8
Blank
81
Page 98

8.2 Specifying Document Size for Transmission (Scan Size)
Procedure
Load documents.
1
“2.2 Loading Documents” (P. 14)
Display the Fax screen.
2
Enter recipient’s Fax No. Memory :100%
[ Fax No. ]
Basic Features Scan Options Send Options
Resolution Original Type Lighter/Darker
Standard
Fine
Super-fine (400dpi)
Super-fine (600dpi)
A B C
Address Book
Keyboard
On-Hook/
Others
Text
Text & Photo
Photo
Next
Recipient
Menu
Using Additional Features
8
Select Scan Size in the Scan Options screen.
3
Enter recipient’s Fax No. Memory :100%
[ Fax No. ]
Basic Features Scan Options Send Options
2 Sided Originals
1 Sided
Reduce/Enlarge
Auto %
Scan Size
Auto Size Detect
Bound Originals
Off
On-Hook/
Others
The Scan Size screen is displayed.
Select the desired document size.
4
Enter recipient’s Fax No. Memory :100%
[ Fax No. ]
Select Save.
5
Next
Recipient
Menu
Mixed Size Originals
Off
Multiple Up
Off
Next
Recipient
Save
82
Page 99

8.2 Specifying Document Size for Transmission (Scan Size)
Dial a remote party, then press Start.
6
Scanning and transmission begins.
●
For details on how to dial a number, see “3.4 Dialing” (P. 27).
●
For details on how to confirm and cancel the transmission of a document, see “Chapter 5 Confirming and Canceling a Communication” (P. 55).
Using Additional Features
8
83
Page 100

Scanning Documents in
8.3
Various Sizes (Mixed Size
Originals)
The document feeder can scan documents in various sizes at one time.
Document in different sizes
●
The Mixed Size Originals default value can be changed in the System Administration Mode. For details on how to
change this default value, see “9.8.6 Feature Defaults” (P. 198). The default factory setting is Off.
●
Be sure to set Scan Size in the Scan Options screen to Auto Size Detect when using mixed size originals.
●
When a document size cannot be set automatically, a message prompting document size entry appears.
●
This function cannot be used with Multiple Up.
Procedure
Detects and scans each document size
Using Additional Features
8
Place the document so that it faces left
1
aligning the top left corner of sides A
and B.
Remove any paper clips or staples. The document may
not be correctly scanned unless the top left corner of the
document pages are aligned.
Side A of the document indicates the location of document top edge.
Insert all the documents as far into the
2
document feeder as they will go and
adjust the document guide to the width
of the document.
“2.2 Loading Documents” (P. 14)
Be sure to place side B of the document against the side
of the document feeder. Paper jams may occur unless
the document is properly loaded.
Align the corners of the document pages
B
A
84
 Loading...