

Xerox D95-D110-D125 with built-in controller, D95-D110-D125 with EX Print Server, D95-D110-D125 with FreeFlow Print Server, D136 with built-in controller, D136 with EFI Fiery Controller User Manual
...Page 1

Version 3.0
September 2013
701P33170
Xerox® D95/D110/D125/D136
Copier/Printer
User Guide
Page 2

©2013 Xerox Corporation. All rights reserved. Xerox® and Xerox and Design® are
trademarks of Xerox Corporation in the United States and/or other countries.
FreeFlow®, SquareFold®, and CentreWare® are trademarks of Xerox Corporation in the
United States and/or other countries. Product status, build status, and/or specifications
are subject to change without notice.
Microsoft, Windows, Windows XP, Windows Vista, Internet Explorer, and Word are
registered trademarks of Microsoft Corporation in the United States and/or other
countries.
PANTONE® is a registered trademark of Pantone, Inc. ScanFlowStore® is a registered
trademark of Nuance Communications, Inc.
Apple®, Macintosh®, Mac OS®, and EtherTalk™ are trademarks or registered trademarks
of Apple Computer, Inc., registered in the U.S. and other countries. Elements of Apple's
Technical User Documentation used by permission from Apple Computer, Inc.
Adobe, the Adobe logo, Acrobat, the Acrobat logo, Acrobat Reader, Distiller, Adobe PDF
logo, Adobe PDF JobReady, Illustrator, InDesign, and Photoshop are registered trademarks
of Adobe Systems, Inc. PostScript is an Adobe registered trademark used with the Adobe
PostScript Interpreter, the Adobe page description language, and other Adobe products.
This product is not endorsed or sponsored by Adobe Systems, publisher of Adobe
Photoshop.
Fiery® and PrintMe® are registered trademarks of Electronics For Imaging, Inc. GBC® and
AdvancedPunch™ are trademarks or registered trademarks of General Binding Corporation.
HP, HPGL, HPGL/2, and HP-UX are registered trademarks of Hewlett-Packard Corporation.
Netscape® is a registered trademark of Netscape Communications. UNIX® is a registered
trademark of the Open Group. Mozilla Firefox™ is a trademark of Mozilla Foundation.
BR779
Page 3

Table of Contents
1 Product Overview.......................................................................................1-1
Machine Components........................................................................................................1-1
Document Feeder...................................................................................................1-3
User Interface (UI)..............................................................................................................1-3
Power Source..........................................................................................................................1-5
Power On....................................................................................................................1-5
Power Off...................................................................................................................1-6
Energy Saver..........................................................................................................................1-6
Exiting the Energy Saver mode.........................................................................1-7
Print server overview...........................................................................................................1-7
Feeding and finishing devices.........................................................................................1-7
High Capacity Feeder (HCF/Trays 6 and 7), 8.5 x 11 in./A4..................1-8
Oversized High Capacity Feeder (OHCF), 1 or 2 trays (Trays
6/7).........................................................................................................................1-8
Interface Module (D110/D125 configurations).........................................1-9
Interface (Cooling) Module (D136 configuration)....................................1-9
GBC® AdvancedPunch™...................................................................................1-10
Perfect Binder (D110/D125/D136 configurations)................................1-10
High Capacity Stacker........................................................................................1-12
Standard Finisher.................................................................................................1-12
Booklet Maker Finisher......................................................................................1-13
SquareFold Trimmer Module...........................................................................1-13
Standard Finisher Plus........................................................................................1-14
Third-Party Finishing Devices (D110/D125/D136
configurations)...............................................................................................1-14
2 Where to find help....................................................................................2-1
Customer documentation CD/DVD..............................................................................2-1
Print server customer documentation.........................................................................2-1
Help on the World Wide Web..........................................................................................2-1
3 Paper and other media...........................................................................3-1
Loading media in trays 1, 2, 3, and 4...........................................................................3-1
Loading paper in trays 1 and 2.........................................................................3-2
Loading paper in trays 3 and 4.........................................................................3-3
Loading tab stock in trays 3 and 4..................................................................3-4
Loading pre-drilled stock in trays 1, 2, 3, and 4..........................................3-4
Loading transparencies in trays 1-4................................................................3-5
Loading media in optional feeding devices..............................................................3-6
User Guide
iXerox® D95/D110/D125/D136 Copier/Printer
Page 4

Table of Contents
Loading post-process media in optional finishing devices..................................3-6
Loading tab stock with the GBC AdvancedPunch.....................................3-6
4 Copy................................................................................................................4-1
Basic copy using the document feeder.......................................................................4-1
Basic copy using the document glass..........................................................................4-2
Selecting copy options for a DFA finishing device..................................................4-3
Copy tab..................................................................................................................................4-4
Reduce/Enlarge........................................................................................................4-4
Paper Supply Screen..............................................................................................4-4
2-Sided Copying (Making 2-Sided Copies)...................................................4-5
Copy Output.............................................................................................................4-5
Image Shift...............................................................................................................4-5
Original Type............................................................................................................4-5
Lighten/Darken........................................................................................................4-6
Image Quality.......................................................................................................................4-6
Original Type............................................................................................................4-6
Image Options.........................................................................................................4-6
Background Suppression......................................................................................4-7
Layout Adjustment..............................................................................................................4-7
Book Copying...........................................................................................................4-7
2-Sided Book Copying...........................................................................................4-8
Original Size..............................................................................................................4-8
Edge Erase ................................................................................................................4-8
Image Shift...............................................................................................................4-9
Image Rotation ......................................................................................................4-9
Invert Image (Mirror Image/Negative Image).......................................4-10
Original Orientation............................................................................................4-10
Repeat Image........................................................................................................4-10
Output Format....................................................................................................................4-11
Booklet Creation...................................................................................................4-11
Perfect Binding (optional).................................................................................4-12
Selecting the Perfect Binding options............................................4-13
Covers.......................................................................................................................4-15
Page Layout...........................................................................................................4-15
Poster........................................................................................................................4-16
Annotations............................................................................................................4-16
Watermark..............................................................................................................4-18
Secure Watermark...............................................................................................4-18
Tab Margin Shift...................................................................................................4-19
Face Up/Down Output.......................................................................................4-19
User Guideii
Page 5

Table of Contents
Identification Card Copying............................................................................4-20
Folding......................................................................................................................4-20
Transparency Options........................................................................................4-20
Job Assembly tab..............................................................................................................4-21
Build Job..................................................................................................................4-21
Build Job Options.................................................................................................4-22
Sample Job.............................................................................................................4-23
Combine Original Sets........................................................................................4-23
Form Overlay..........................................................................................................4-24
Delete Outside/Delete Inside..........................................................................4-24
Stored Programming..........................................................................................4-25
5 Scan................................................................................................................5-1
Simple Scanning...................................................................................................................5-1
Simple Scan Procedure.........................................................................................5-1
Loading Documents..............................................................................................5-1
Selecting Document Features............................................................................5-1
Starting the Scan Job............................................................................................5-2
Saving the Scanned Data....................................................................................5-2
Cancelling a Scan Job...........................................................................................5-3
Preview Scanned Images of a Job...................................................................5-3
Stopping the Scan Job..........................................................................................5-3
Scan Settings............................................................................................................5-3
Scan Settings.........................................................................................................................5-4
Resolution..................................................................................................................5-4
Lighten/Darken........................................................................................................5-4
Original Orientation...............................................................................................5-5
Original Size .............................................................................................................5-5
E-mail........................................................................................................................................5-5
Address Book............................................................................................................5-6
Adding E-mail Recipients:....................................................................................5-6
Removing E-mail Recipients...............................................................................5-6
Subject........................................................................................................................5-6
Message Contents..................................................................................................5-6
Preview Scanned Image......................................................................................5-7
Selecting an Output Color...................................................................................5-7
Scan Both Sides of a Document.......................................................................5-7
Original Type............................................................................................................5-8
Scan Presets..............................................................................................................5-8
Network Scanning................................................................................................................5-9
Preview Scanned Images of a Job...................................................................5-9
User Guide
iiiXerox® D95/D110/D125/D136 Copier/Printer
Page 6

Table of Contents
Scan to PC............................................................................................................................5-11
Store to Folder....................................................................................................................5-13
Store to USB........................................................................................................................5-14
Send to Folder.....................................................................................................................5-18
Web Services for Devices (WSD)..................................................................................5-20
Advanced Settings tab....................................................................................................5-21
Selecting an Output Color...................................................................................5-9
Scan Both Sides of a Document.......................................................................5-9
Original Type..........................................................................................................5-10
Scan Presets...........................................................................................................5-10
Transfer Protocol..................................................................................................5-11
Address Book.........................................................................................................5-11
Browse Network for PC......................................................................................5-11
Specify Destination.............................................................................................5-12
Scan Presets...........................................................................................................5-12
Selecting an Output Color................................................................................5-13
Scan Both Sides of a Document....................................................................5-13
Original Type..........................................................................................................5-14
Preview Scanned Images of a Job................................................................5-14
Using a USB Storage Device............................................................................5-15
Save using the USB Memory Device (optional).......................................5-15
Removing the USB Device................................................................................5-16
Display Details of Storage in USB.................................................................5-16
Preview Scanned Images of a Job................................................................5-16
Selecting an Output Color................................................................................5-16
Scan Both Sides of a Document....................................................................5-17
Original Type..........................................................................................................5-17
File Format..............................................................................................................5-17
Scan To.....................................................................................................................5-18
From..........................................................................................................................5-18
Subject......................................................................................................................5-19
Message...................................................................................................................5-19
Selecting an Output Color................................................................................5-19
Scan Both Sides of a Document....................................................................5-19
Preview Scanned Image....................................................................................5-20
How to store to WSD..........................................................................................5-20
WSD Starting a Scan Job..................................................................................5-21
WSD Storing Data from a Network Computer.........................................5-21
Image Options......................................................................................................5-22
Image Enhancement..........................................................................................5-22
User Guideiv
Page 7

Table of Contents
Resolution...............................................................................................................5-23
Quality/File Size....................................................................................................5-23
Photographs...........................................................................................................5-23
Shadow Suppression...........................................................................................5-24
Color Space.............................................................................................................5-24
Layout Adjustment tab...................................................................................................5-24
Original Orientation............................................................................................5-24
Original Size ..........................................................................................................5-25
Edge Erase...............................................................................................................5-25
Book Scanning.......................................................................................................5-26
Reduce/Enlarge.....................................................................................................5-26
Filing Options......................................................................................................................5-26
File Name................................................................................................................5-26
File Format..............................................................................................................5-27
Read Receipts........................................................................................................5-27
File Name Conflict...............................................................................................5-28
Email Options tab..............................................................................................................5-28
File Name................................................................................................................5-28
File Format..............................................................................................................5-28
Reply to....................................................................................................................5-29
Read Receipts for Email.....................................................................................5-29
6 Send from Folder.......................................................................................6-1
Folder Operating Procedure.............................................................................................6-1
Selecting a Folder.................................................................................................................6-1
Checking files in Copy & Print Job.................................................................................6-2
Deleting Files in Copy & Print Jobs................................................................................6-2
Copying/Moving Files in Copy & Print Jobs...............................................................6-2
Copy.............................................................................................................................6-3
Move............................................................................................................................6-3
Editing Files............................................................................................................................6-3
Delete Pages.............................................................................................................6-3
Insert Separators....................................................................................................6-4
Chapter Start and Insert File.............................................................................6-4
Edit List and Delete Pages...................................................................................6-4
Merging/Batch Printing Files in Copy & Print Jobs.................................................6-4
File Details.................................................................................................................6-5
Merge..........................................................................................................................6-5
Merge and Print.......................................................................................................6-5
Separators.................................................................................................................6-6
Covers..........................................................................................................................6-6
User Guide
vXerox® D95/D110/D125/D136 Copier/Printer
Page 8

Table of Contents
Printing Files in Copy & Print Jobs.................................................................................6-8
Selecting a folder under Scan & Other Jobs...........................................................6-13
Checking/Operating Files in Scan & Other Jobs....................................................6-13
Checking File Details in Scan & Other Jobs.............................................................6-14
Printing Files in Scan & Other Jobs.............................................................................6-14
Configuring/Starting Job Flow.....................................................................................6-14
Making Backups of Files in Folders.............................................................................6-15
Watermark.................................................................................................................6-6
File Name...................................................................................................................6-7
Output.........................................................................................................................6-7
Annotations..............................................................................................................6-7
Secure Watermark..................................................................................................6-8
File Details.................................................................................................................6-8
Output.........................................................................................................................6-9
Covers..........................................................................................................................6-9
Folding.........................................................................................................................6-9
2 Sided Printing.....................................................................................................6-10
Image Shift............................................................................................................6-10
Booklet Creation...................................................................................................6-10
Annotations............................................................................................................6-11
Watermark..............................................................................................................6-11
Face Up/Down Output.......................................................................................6-12
Secure Watermark...............................................................................................6-12
Add Tab Stock........................................................................................................6-12
Link Job Flow Sheet to Folder..........................................................................6-15
Job Flow Restrictions..........................................................................................6-15
Setting a Password..............................................................................................6-15
7 Job Flow........................................................................................................7-1
Job Flow Procedures............................................................................................................7-2
Creating a Job Flow Sheet..................................................................................7-2
Linking a Job Flow Sheet with a Mailbox......................................................7-3
Starting a Job Flow Manually ...........................................................................7-5
Job Flow Sheet Filtering.......................................................................................7-5
Confirming/Changing Job Flow .......................................................................7-5
8 Stored Programming................................................................................8-1
Storing a Program................................................................................................................8-1
Deleting Stored Programs.................................................................................................8-3
Naming/Renaming a Stored Program.........................................................................8-3
Stored Program icons.........................................................................................................8-3
User Guidevi
Page 9

Table of Contents
Calling a Stored Program..................................................................................................8-4
9 Media Print - Text......................................................................................9-1
Overview..................................................................................................................................9-1
Supported file formats..........................................................................................9-1
Notes and Restrictions..........................................................................................9-2
Selecting media files...........................................................................................................9-2
Inserting USB Memory Device.......................................................................................9-3
Setting the Printing Options............................................................................................9-3
Media Print - Text printing options..................................................................9-3
Index Print.................................................................................................................9-4
10 Web Applications.................................................................................10-1
Web Application Overview.............................................................................................10-1
Accessing Using Buttons Registered on the Services Home window...........10-1
11 Computer operations..........................................................................11-1
Network Printing................................................................................................................11-1
Printing with the PS print drivers...................................................................11-1
Printing with the PCL print drivers.................................................................11-1
Copying a job with tabs..................................................................................................11-2
Network tab printing........................................................................................................11-3
Network printing on tabs using the PS print drivers..............................11-3
Network printing on tabs using the PCL print drivers............................11-3
E-mail print...........................................................................................................................11-4
Sending e-mails....................................................................................................11-4
Importing scanned data................................................................................................11-5
Importing from a TWAIN-compatible application.................................11-5
Changing network scan driver settings..........................................11-6
Configure the display method for the scanner name..............11-6
Configure the import method for scanned
documents..........................................................................................11-6
12 Job Status................................................................................................12-1
Job Status overview..........................................................................................................12-1
Active Jobs...........................................................................................................................12-1
Completed Jobs..................................................................................................................12-2
Secure Print Jobs & More tab........................................................................................12-2
Secure Print.............................................................................................................12-2
Sample Set..............................................................................................................12-3
Delayed Print.........................................................................................................12-3
Charge Print...........................................................................................................12-4
User Guide
viiXerox® D95/D110/D125/D136 Copier/Printer
Page 10

Table of Contents
13 Machine Status.....................................................................................13-1
Machine Status..................................................................................................................13-1
Machine Information tab..............................................................................................13-1
Faults tab..............................................................................................................................13-3
Supplies tab.........................................................................................................................13-3
Billing Information tab....................................................................................................13-4
Accessing Billing Information.........................................................................13-4
Billing meters/usage counters.........................................................................13-4
Usage Counters.......................................................................................13-4
User Account Billing Information....................................................13-5
Tools tab................................................................................................................................13-6
Changing the paper tray attributes..............................................................13-6
14 Maintenance..........................................................................................14-1
Cleaning the machine ....................................................................................................14-1
Cleaning the exterior..........................................................................................14-2
Cleaning the document cover and glass....................................................14-2
Cleaning the document feeder rollers.........................................................14-5
Cleaning the Fuser Stripper Fingers..............................................................14-6
Replacing consumable supplies...................................................................................14-8
Ordering supplies.................................................................................................14-8
Checking the status of CRUs...........................................................................14-9
Replacing the toner cartridge.........................................................................14-9
Replacing the toner waste container........................................................14-12
15 Problem solving.....................................................................................15-1
Paper jams............................................................................................................................15-1
Information about paper jams......................................................................15-1
Document feeder jams......................................................................................15-2
Document jams under the document feeder belt..................................15-4
Lower left cover jams..........................................................................................15-6
Paper jams in the Bypass (Tray 5).................................................................15-7
Envelope jams in the Bypass tray.....................................................15-8
Paper jams in Trays 1-4.....................................................................................15-9
Paper jams in transport unit 4.....................................................................15-10
Paper jams in duplex module 3...................................................................15-11
Paper jams inside the main unit..................................................................15-13
Fault codes........................................................................................................................15-16
Machine troubleshooting............................................................................................15-28
Basic troubleshooting......................................................................................15-28
Image quality problems.................................................................................15-32
User Guideviii
Page 11

Table of Contents
Image is not what was expected..................................................15-36
Copy troubleshooting......................................................................................15-37
Unable to copy......................................................................................15-38
The copy result is not what was expected.................................15-39
Print troubleshooting.......................................................................................15-41
Unable to print......................................................................................15-42
The printed result is not what was expected............................15-44
Scan troubleshooting.......................................................................................15-45
Unable to scan with the machine.................................................15-46
Unable to import the scanned document into the
computer...........................................................................................15-47
Unable to send the scanned document over the network
(FTP/SMB)........................................................................................15-48
Problems with sending Email..........................................................15-49
16 Specifications........................................................................................16-1
D95 Copy specifications.................................................................................................16-1
D110/D125 Copy specifications.................................................................................16-3
D136 Copy specifications..............................................................................................16-5
Print specifications............................................................................................................16-7
Scan specifications...........................................................................................................16-8
Duplex Automatic Document Feeder (DADF) specifications...........................16-9
17 High Capacity Feeder (HCF/Trays 6 and 7), 8.5 x 11
in./A4..........................................................................................................17-1
Loading media into the HCF (Trays 6 and 7).........................................................17-2
Problem solving..................................................................................................................17-3
Paper jams in Trays 6/7 (HCF)........................................................................17-3
Paper jams inside the HCF unit......................................................................17-4
Paper jams inside lower left cover...................................................17-5
Paper jams at lever 1a and knob 1c................................................17-6
Paper jams at lever 1b and knob 1c................................................17-8
Paper jams at lever 1d and knob 1c................................................17-9
Fault codes...........................................................................................................17-10
Trays 6/7 (HCF) specifications...................................................................................17-11
18 Oversized High Capacity Feeder (OHCF), 1 or 2 trays
(Trays 6/7)................................................................................................18-1
Postcard bracket.................................................................................................................18-2
Using the Postcard bracket..............................................................................18-2
Loading media in the 1 or 2-Tray OHCF..................................................................18-4
Loading paper in the OHCF (1 or 2 Trays).................................................18-4
User Guide
ixXerox® D95/D110/D125/D136 Copier/Printer
Page 12

Table of Contents
Loading tabs in the OHCF (1 or 2 Trays)....................................................18-4
Loading transparencies in the OHCF (1 or 2 Trays)...............................18-5
Loading pre-drilled stock into the OHCF (1 or 2 Trays) for 1-sided
print jobs...........................................................................................................18-6
Loading pre-drilled stock into the OHCF (1 or 2 Trays) for 2-sided
print jobs...........................................................................................................18-7
Skew adjustment levers..................................................................................................18-8
OHCF problem solving.....................................................................................................18-9
Clearing OHCF jams............................................................................................18-9
Paper jams inside the OHCF trays.................................................18-10
OHCF paper jams at lever 1a and knob 1c................................18-10
OHCF paper jams at lever 1b and knob 1c................................18-11
OHCF paper jams at lever 1d and knob 1c................................18-12
OHCF fault codes...............................................................................................18-14
OHCF specifications.......................................................................................................18-22
19 Interface Module/Interface Cooling Module............................19-1
Module overview................................................................................................................19-3
Control panel.........................................................................................................19-3
Paper path..............................................................................................................19-4
Paper curl settings on the module..............................................................................19-4
Preset decurler settings.....................................................................................19-4
Manual decurler buttons...................................................................................19-4
Problem solving..................................................................................................................19-5
Clearing jams.........................................................................................................19-5
Paper jams at lever 1a..........................................................................19-5
Paper jams at lever 2a..........................................................................19-6
Paper jams at lever 2b..........................................................................19-8
Fault codes..............................................................................................................19-9
20 High Capacity Stacker (HCS)...........................................................20-1
Overview................................................................................................................................20-1
Identifying the components...........................................................................20-2
Control panel.........................................................................................................20-3
HCS top tray...........................................................................................................20-3
Unloading the Stacker Tray...........................................................................................20-4
Problem solving..................................................................................................................20-5
General problems.................................................................................................20-5
Jam clearance........................................................................................................20-5
HCS entrance jams (E1, E2, and E3)...............................................20-5
HCS transport jams (E4, E5, and E6)...............................................20-6
HCS top tray jam (E7)...........................................................................20-7
User Guidex
Page 13

Table of Contents
HCS exit jam (E8)....................................................................................20-8
Hints and tips for using the HCS....................................................................20-9
Loss of power......................................................................................................20-10
Fault codes...........................................................................................................20-10
Specifications...................................................................................................................20-25
21 Perfect Binder (D110/D125/D136 with integrated
controller).................................................................................................21-1
Binder components..........................................................................................................21-3
External components..........................................................................................21-3
Cover inserter.........................................................................................................21-5
Internal components..........................................................................................21-6
Binder control panel............................................................................................21-7
Binder circuit breaker..........................................................................................21-8
Book binding path.............................................................................................................21-9
Bypass path............................................................................................................21-9
Standard path....................................................................................................21-10
Cover inserter path...........................................................................................21-11
Power on/off.....................................................................................................................21-12
Power Saver mode.............................................................................................21-12
Loading media in the cover inserter tray..............................................................21-13
Removing books from the binder.............................................................................21-14
Using the Perfect Binder..............................................................................................21-14
Perfect Binder hints and tips.........................................................................21-15
Copy mode...........................................................................................................21-15
Selecting the Perfect Binding options..........................................21-17
Manual mode.....................................................................................................21-18
Print mode............................................................................................................21-19
Maintenance....................................................................................................................21-20
Cleaning the binder..........................................................................................21-20
Empty the trimmer waste tray.....................................................................21-20
Adhesive filling tray..........................................................................................21-21
Replenishing the adhesive filling tray..........................................21-22
Binder problem solving.................................................................................................21-22
Paper jams in areas E1 and E2....................................................................21-22
Paper jams in area E3......................................................................................21-24
Paper jams in area E4......................................................................................21-25
Paper jams in areas E5 and E6....................................................................21-25
General problems..............................................................................................21-27
Power interruption during operation............................................21-27
Adjusting the printed image and trim.........................................21-28
User Guide
xiXerox® D95/D110/D125/D136 Copier/Printer
Page 14

Table of Contents
Fault codes...........................................................................................................21-28
Paper size and trim recommendations for perfect bound books................21-32
Binder specifications.....................................................................................................21-32
22 Standard/Booklet Maker Finisher..................................................22-1
Manual decurling feature on the finisher................................................................22-3
Folding feature...................................................................................................................22-4
Fold types................................................................................................................22-4
Loading paper/tabs in Tray 8/T1 (Post-Process Inserter)..................................22-6
Maintenance.......................................................................................................................22-7
Standard/Booklet Maker consumable supplies........................................22-7
Replace the standard staple cartridge........................................................22-7
Replace the booklet staple cartridge............................................................22-9
Replacing the Staple Waste Container on the finisher......................22-10
Empty the Punch Waste Container............................................................22-12
Finisher problem solving..............................................................................................22-13
Paper jams in Tray 8/T1 (Post-Process Inserter)...................................22-14
Paper jams at lever 1a and knob 1c..........................................................22-15
Paper jams at lever 1d.....................................................................................22-16
Paper jams at lever 1b.....................................................................................22-17
Paper jams at lever 3b and 3d.....................................................................22-18
Paper jams at lever 3e and knob 3c...........................................................22-19
Paper jams at lever 3g and knob 3f...........................................................22-20
Paper jams at lever 4b and knob 3a..........................................................22-21
Paper jams at lever 2a and knob 3a..........................................................22-22
Paper jams at lever 2b and knob 2c..........................................................22-23
Paper jams at 2c, 2e, 2f, and 2d..................................................................22-24
Paper jams at 2d and lever 2g.....................................................................22-25
Paper jams at unit 4 and knob 4a..............................................................22-26
Paper jams at finisher top tray....................................................................22-27
Paper jams at finisher stacker tray.............................................................22-28
Paper jams at the optional booklet maker tray....................................22-29
Stapler faults.......................................................................................................22-30
Staple jams in the standard staple cartridge...........................22-30
Staple jams in the booklet maker cartridge..............................22-32
Reinserting the standard staple cartridge...............................................22-34
Fault codes...........................................................................................................22-36
Specifications...................................................................................................................22-47
Standard/Booklet Maker Finisher...............................................................22-47
Optional C/Z Folder..........................................................................................22-50
User Guidexii
Page 15

Table of Contents
23 SquareFold Trimmer Module...........................................................23-1
Overview................................................................................................................................23-1
Identifying the components.........................................................................................23-2
Main components................................................................................................23-2
Paper path..............................................................................................................23-3
Control panel.........................................................................................................23-4
Square Fold feature..........................................................................................................23-4
Square fold options.............................................................................................23-5
Accessing the Square Fold options...............................................................23-6
Accessing the Square Fold options for network print
jobs.........................................................................................................23-6
Accessing the Square Fold options for copy jobs.......................23-7
Trimmer feature.................................................................................................................23-7
Trimmer options...................................................................................................23-7
Trim guidelines......................................................................................................23-9
Accessing the Trimmer options...................................................................23-10
Accessing the Trimmer options for network print
jobs......................................................................................................23-10
Accessing the Trimmer options for copy jobs...........................23-10
Hints and tips...................................................................................................................23-11
Printing full-page images on booklets......................................................23-11
Follow these tips................................................................................................23-12
Problem solving...............................................................................................................23-12
Jam clearance.....................................................................................................23-12
Clearing jams.........................................................................................23-13
Clearing E1/E2 jams............................................................................23-13
Clearing E3 jams..................................................................................23-15
Fault codes...........................................................................................................23-16
Technical data..................................................................................................................23-26
Specifications......................................................................................................23-26
24 Standard Finisher Plus........................................................................24-1
Overview................................................................................................................................24-1
Finisher Module..................................................................................................................24-2
Finisher Module main components..............................................................24-2
Folding feature......................................................................................................24-3
Fold types...................................................................................................24-4
Loading paper/tabs in Tray 8/T1 (Post-Process Inserter).....................24-5
Finishing Transport...........................................................................................................24-6
Finishing Transport main components........................................................24-6
Finishing Transport status indicators...........................................................24-7
User Guide
xiiiXerox® D95/D110/D125/D136 Copier/Printer
Page 16

Table of Contents
Standard Finisher Plus maintenance.........................................................................24-8
Problem solving...............................................................................................................24-13
Specifications...................................................................................................................24-44
Standard Finisher Plus consumable supplies............................................24-8
Replace the standard staple cartridge........................................................24-8
Replacing the Staple Waste Container on the finisher......................24-10
Empty the Punch Waste Container............................................................24-12
Paper jams in the Finisher Module.............................................................24-13
Paper jams in Tray 8/T1 (Post-Process Inserter)......................24-13
Paper jams inside the finisher left cover.....................................24-14
Paper jams inside the finisher right cover..................................24-17
Paper jams at the optional C/Z Folder.........................................24-22
Paper jams at the finisher output area.......................................24-29
Paper jams in the Finishing Transport......................................................24-30
Paper jams in area 1...........................................................................24-30
Paper jams in area 2...........................................................................24-32
Paper jams in area 3...........................................................................24-33
Paper jams in area 4...........................................................................24-34
Stapler faults.......................................................................................................24-35
Staple jams in the standard staple cartridge...........................24-35
Standard Finisher Plus fault codes.............................................................24-37
Finisher Module fault codes.............................................................24-37
Finishing Transport fault codes......................................................24-38
Third-party DFA fault codes.............................................................24-42
Finisher Module specifications....................................................................24-44
Optional C/Z Folder.............................................................................24-47
Finishing Transport specifications..............................................................24-47
User Guidexiv
Page 17
Product Overview
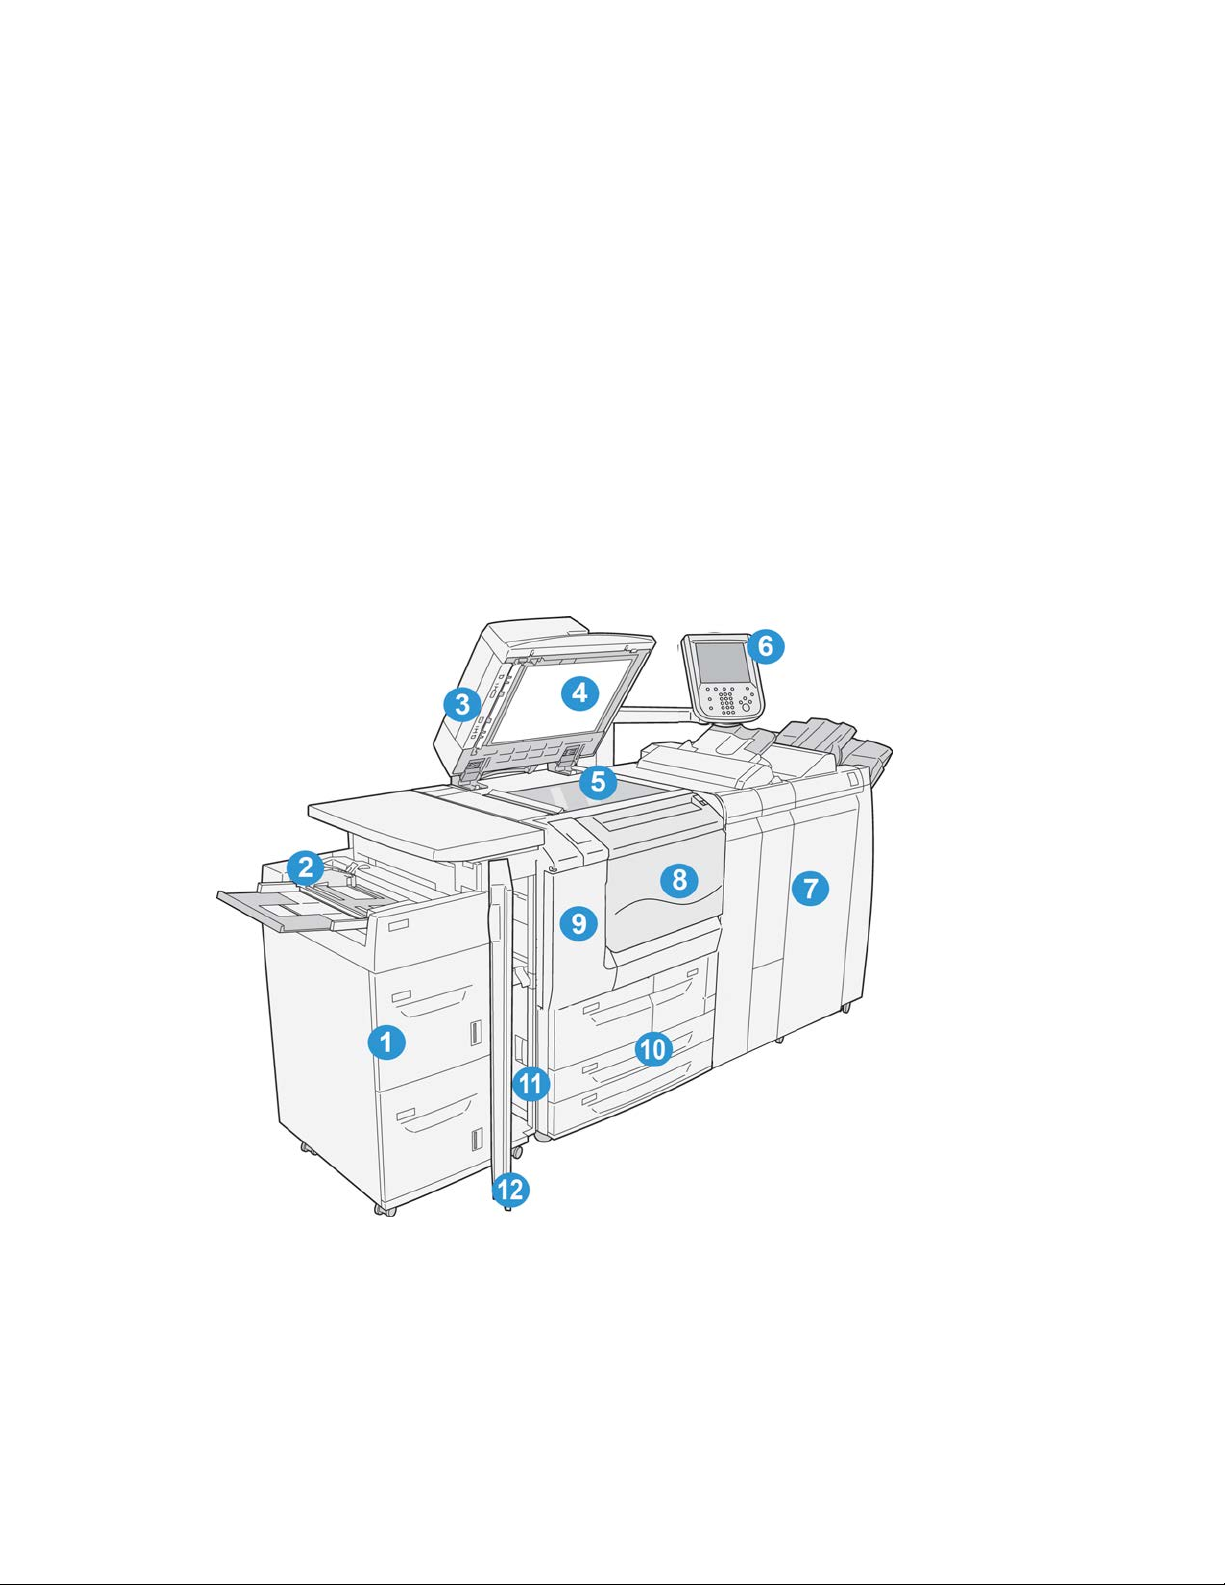
Machine Components
1
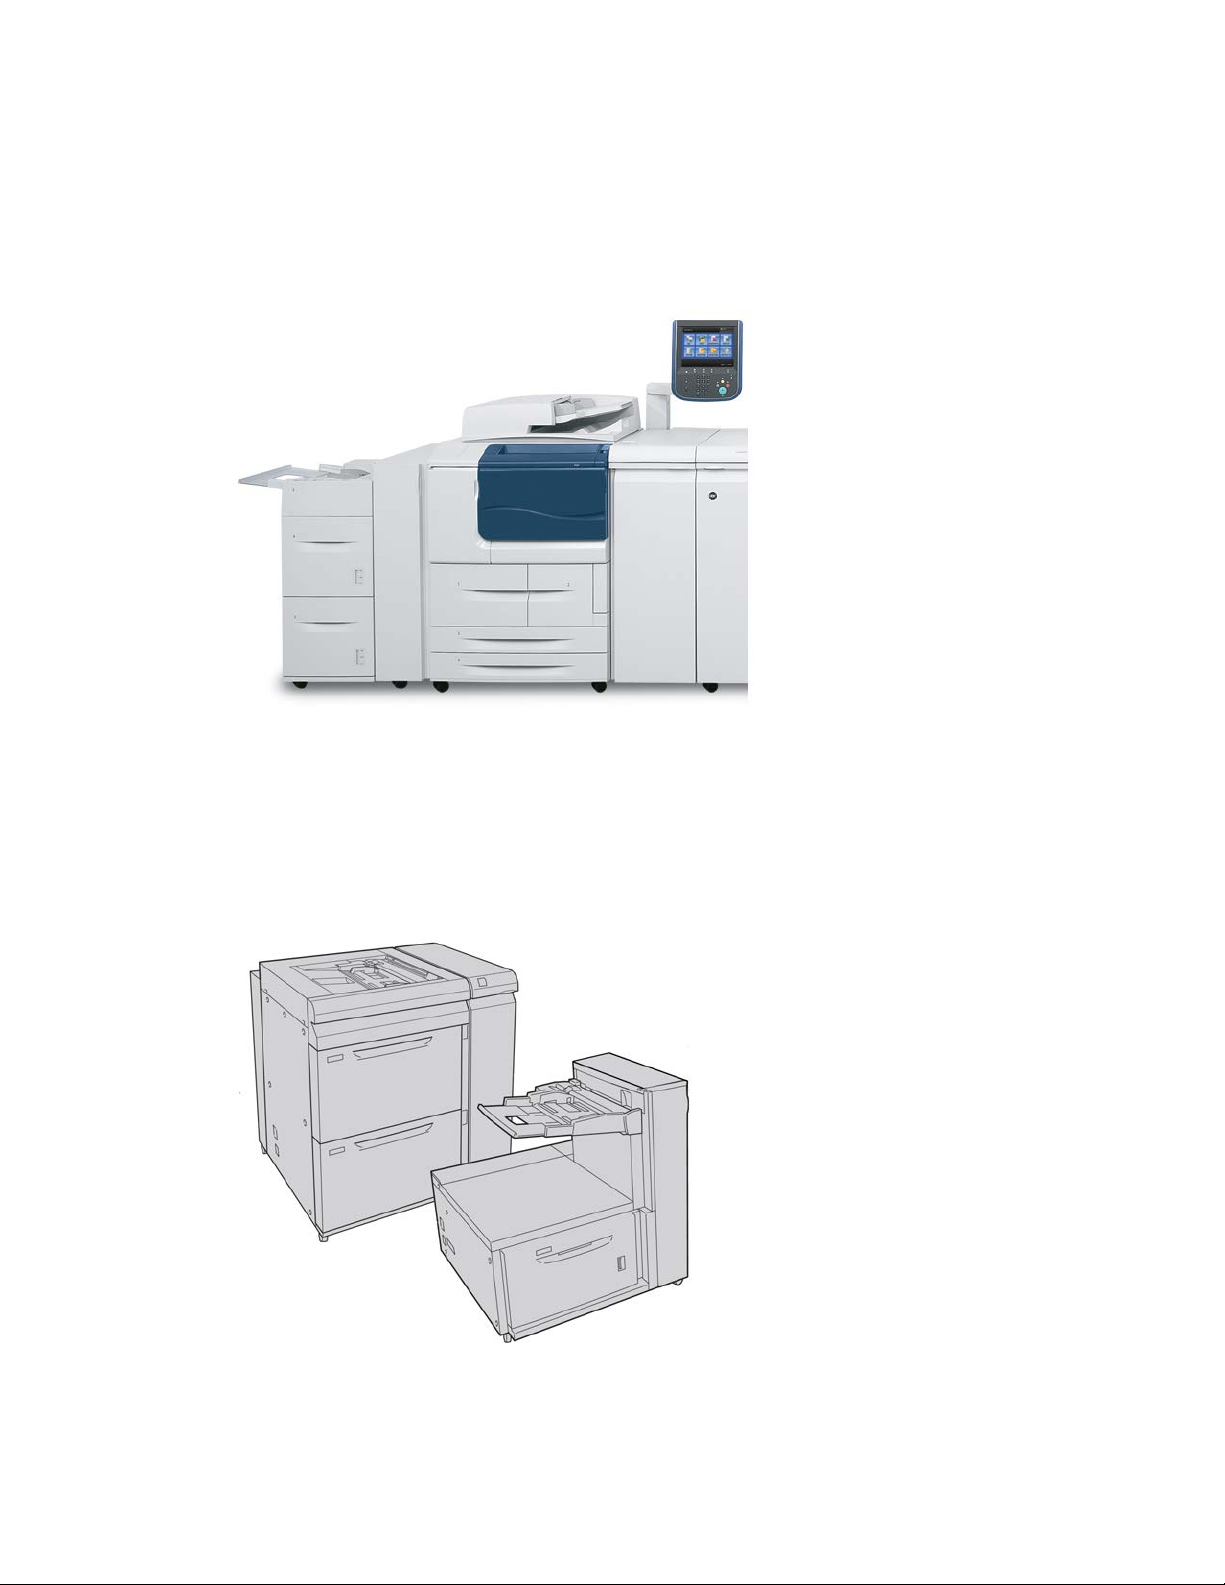
1 Optional High Capacity Feeder (HCF/Trays 6 and 7)
This optional feeding device adds an additional 2000 sheet capacity of letter-size (8.5
x 11 in.)/A4 media.
User Guide
1-1Xerox® D95/D110/D125/D136 Copier/Printer
Page 18

Product Overview
2 Bypass tray (Tray 5)
The Bypass tray, also called Tray 5, accommodates all types of stock in various size
and weight ranges. The tray holds a maximum of 250 sheets of 20 lb./75 gsm bond
paper. This tray is often used to load nonstandard paper, such as heavy stock or other
special media, which cannot be loaded in trays 1-4.
3 Duplex Automatic Document Feeder (DADF)
The document feeder automatically feeds 1 and 2-sided original documents to the
document glass for copying or scanning.
4 Document cover
Holds a document in place on the document glass.
5 Document glass
Place a document here in order to copy it.
6 User Interface (UI)
The User Interface (UI) consists of the control panel and the touch screen.
7 Optional Standard Finisher
This optional finishing device provides a wide range of finishing options including
stapling and folding.
8 Front cover
Open this cover to clear paper jams and to replace the toner waste container.
9 Left cover
Open this cover to replace the toner cartridge.
10 Trays 1-4
Contains the media used for copy or print output.
11 Lower left cover
Open this cover to access the inside of the machine to remove jammed paper.
12 Front cover on optional HCF
Open this cover to access the bottom left cover of the machine to remove jammed
paper.
User Guide1-2
Page 19
Product Overview
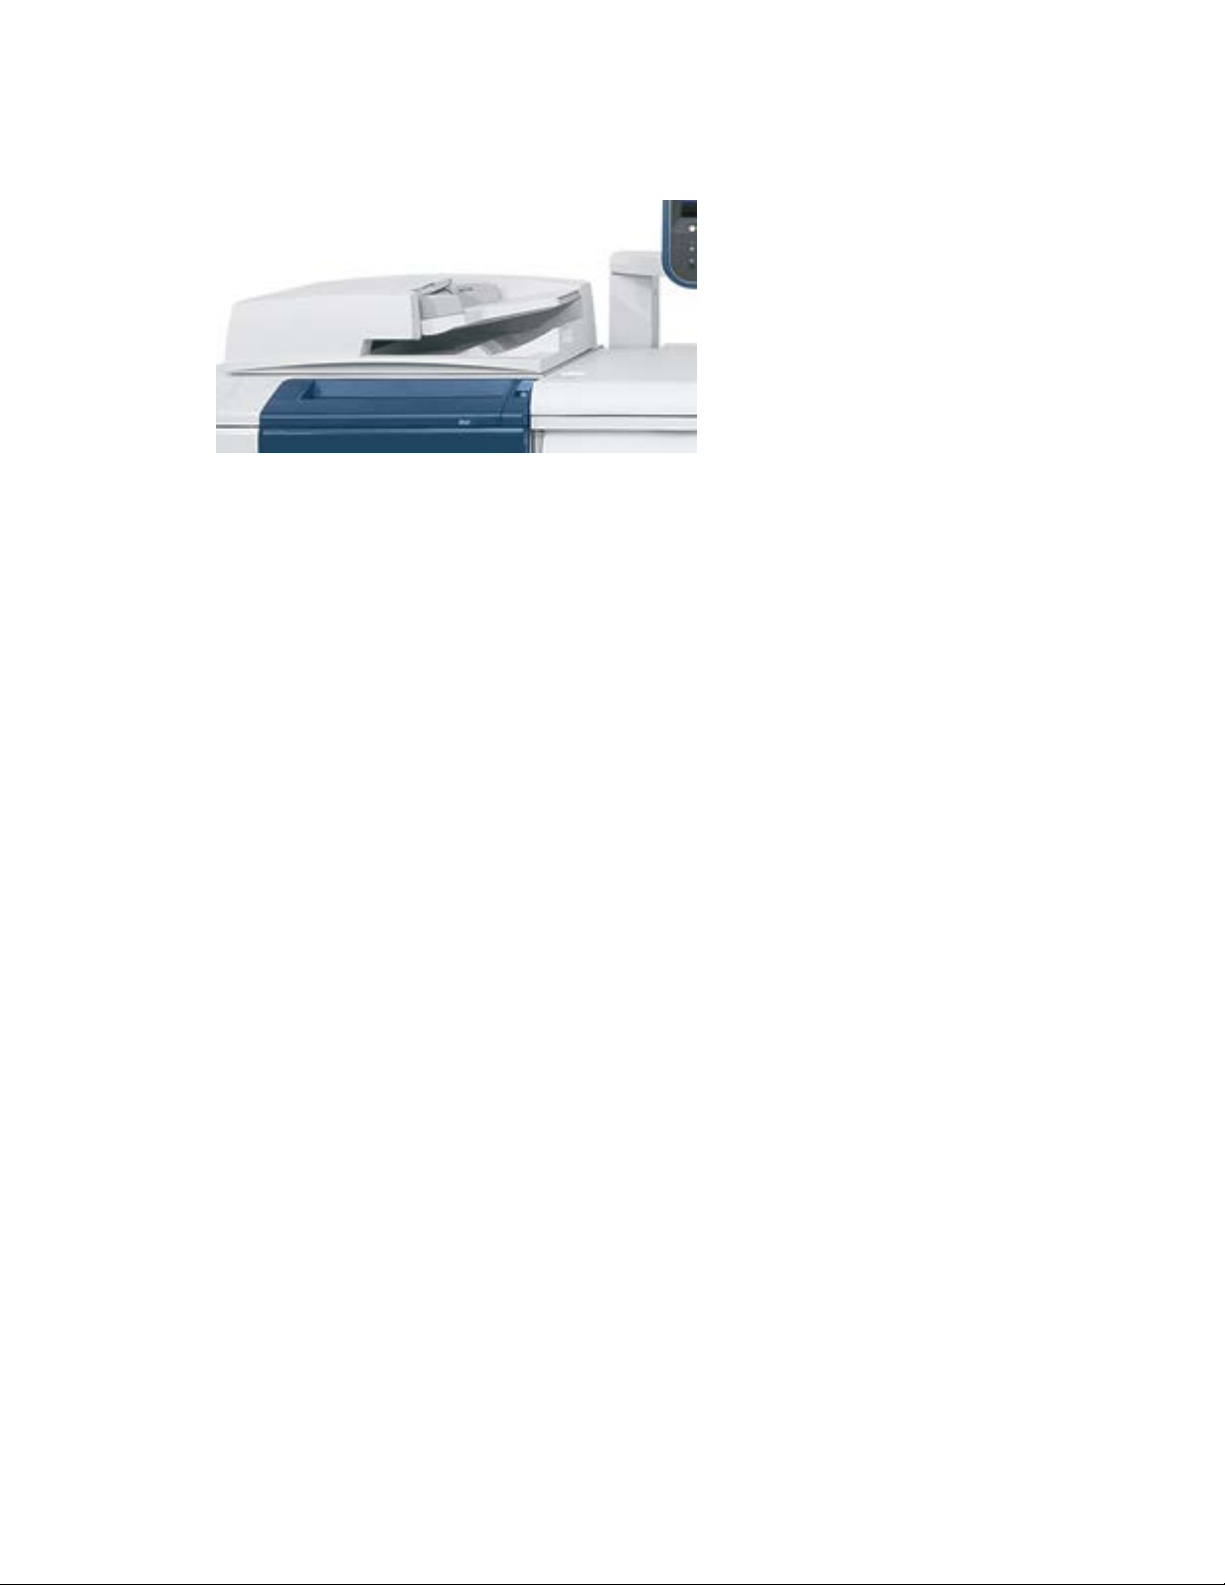
Document Feeder
Tips for using the Duplex Automatic Document Feeder (DADF):
• A maximum of 250 documents can be scanned at one time by using the document
feeder.
• Mixed-size original documents can be used; however, the top left corners of the
original documents must be aligned in the document handler.
• Remove any staples and paper clips from the documents before loading them in the
document feeder.
• For best output, ensure that the documents are in good condition.
User Interface (UI)
The User Interface is the main area where options are selected, procedures are completed,
and printer information can be viewed.
User Guide
1-3Xerox® D95/D110/D125/D136 Copier/Printer
Page 20
Product Overview
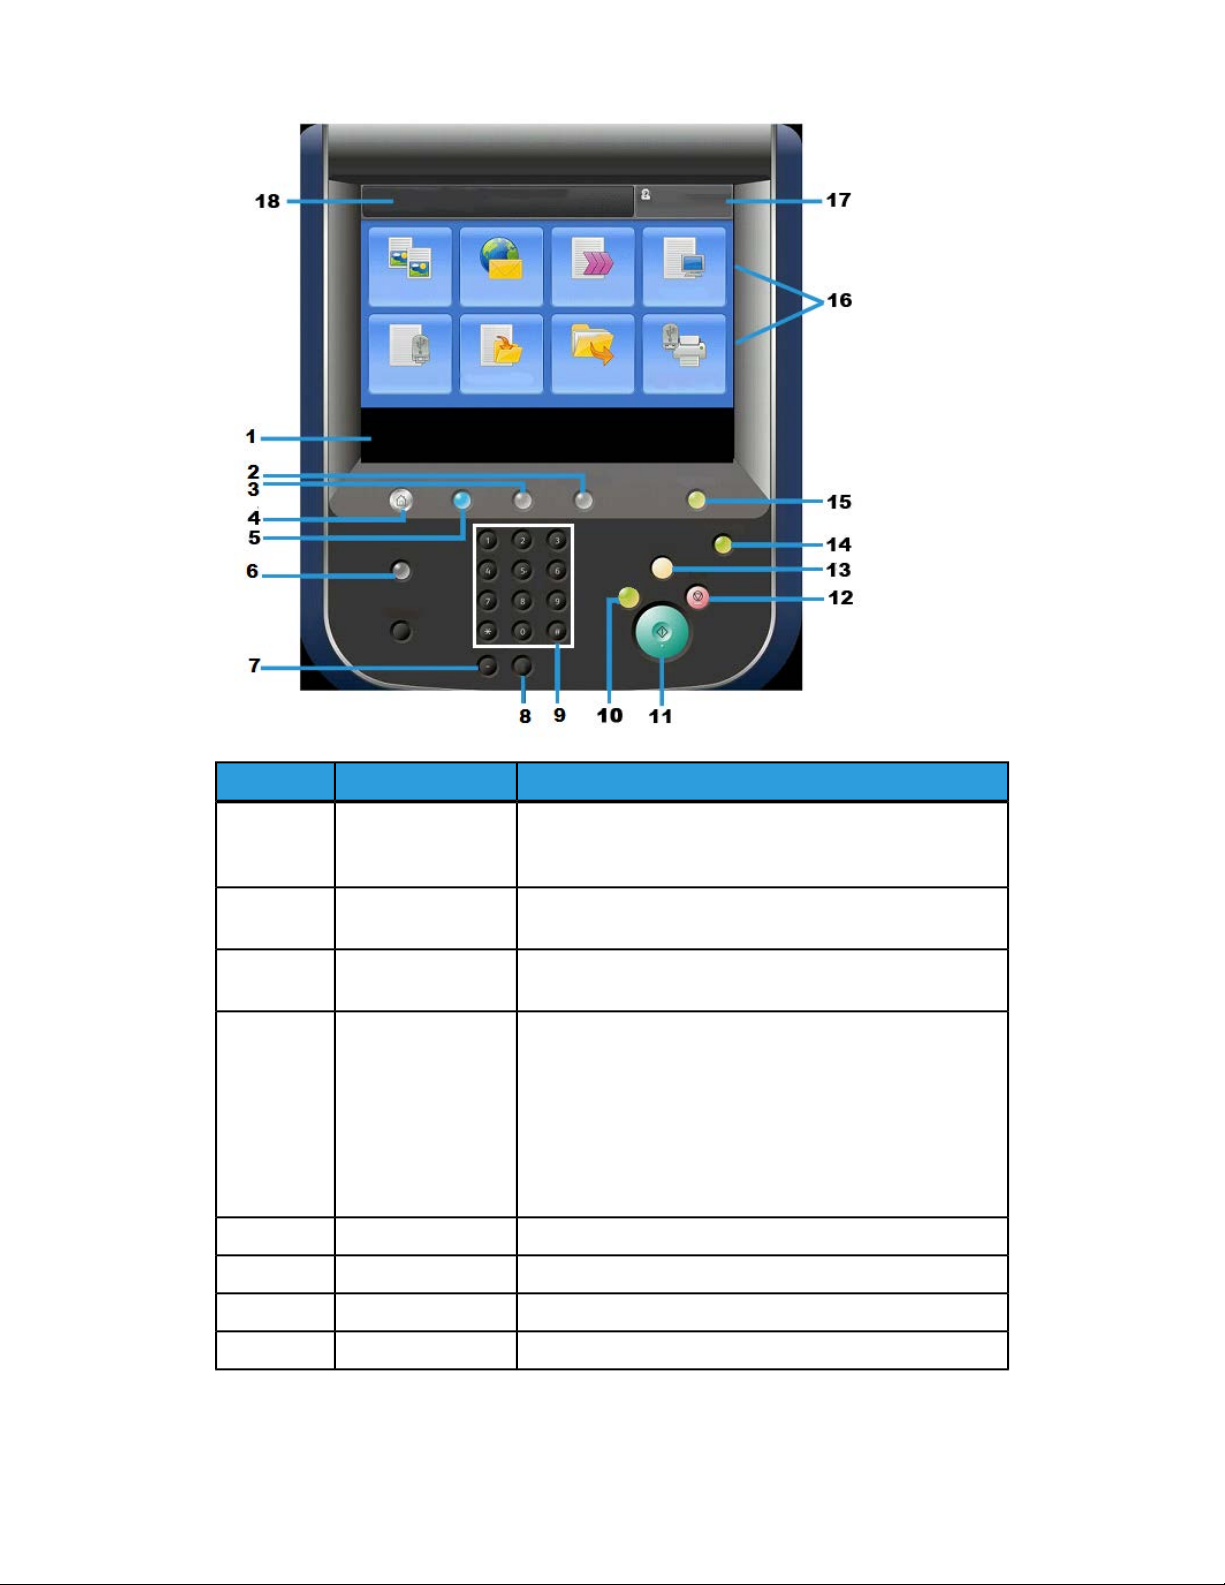
FunctionComponentNumber
Touch Screen1
Displays messages required for operation and buttons for
features. You can directly touch the screen to instruct
operations and to set features.
Machine Status2
Use this button to check the machine status, meters, the
status of the consumables, and to print reports.
Job Status3
Use this button to check or cancel the current job, to check
or print stored jobs, or to check completed jobs.
Services Home4
Press this button to display the main window, which is called
Services Home. The Services Home window, by default, is
where the UI displays the available service buttons such
as Copy, E-Mail, Network Scanning, Store to Folder, and
Send from Folder. The system administrator can change
the Services Home window to display a specific feature
(such as Copy); refer to the System Administration Guide
for more information.
This button lights when the main power is on.Services5
Displays the Help SystemHelp6
Not usedDial Pause7
Clear the last entryC8
User Guide1-4
Page 21
Product Overview
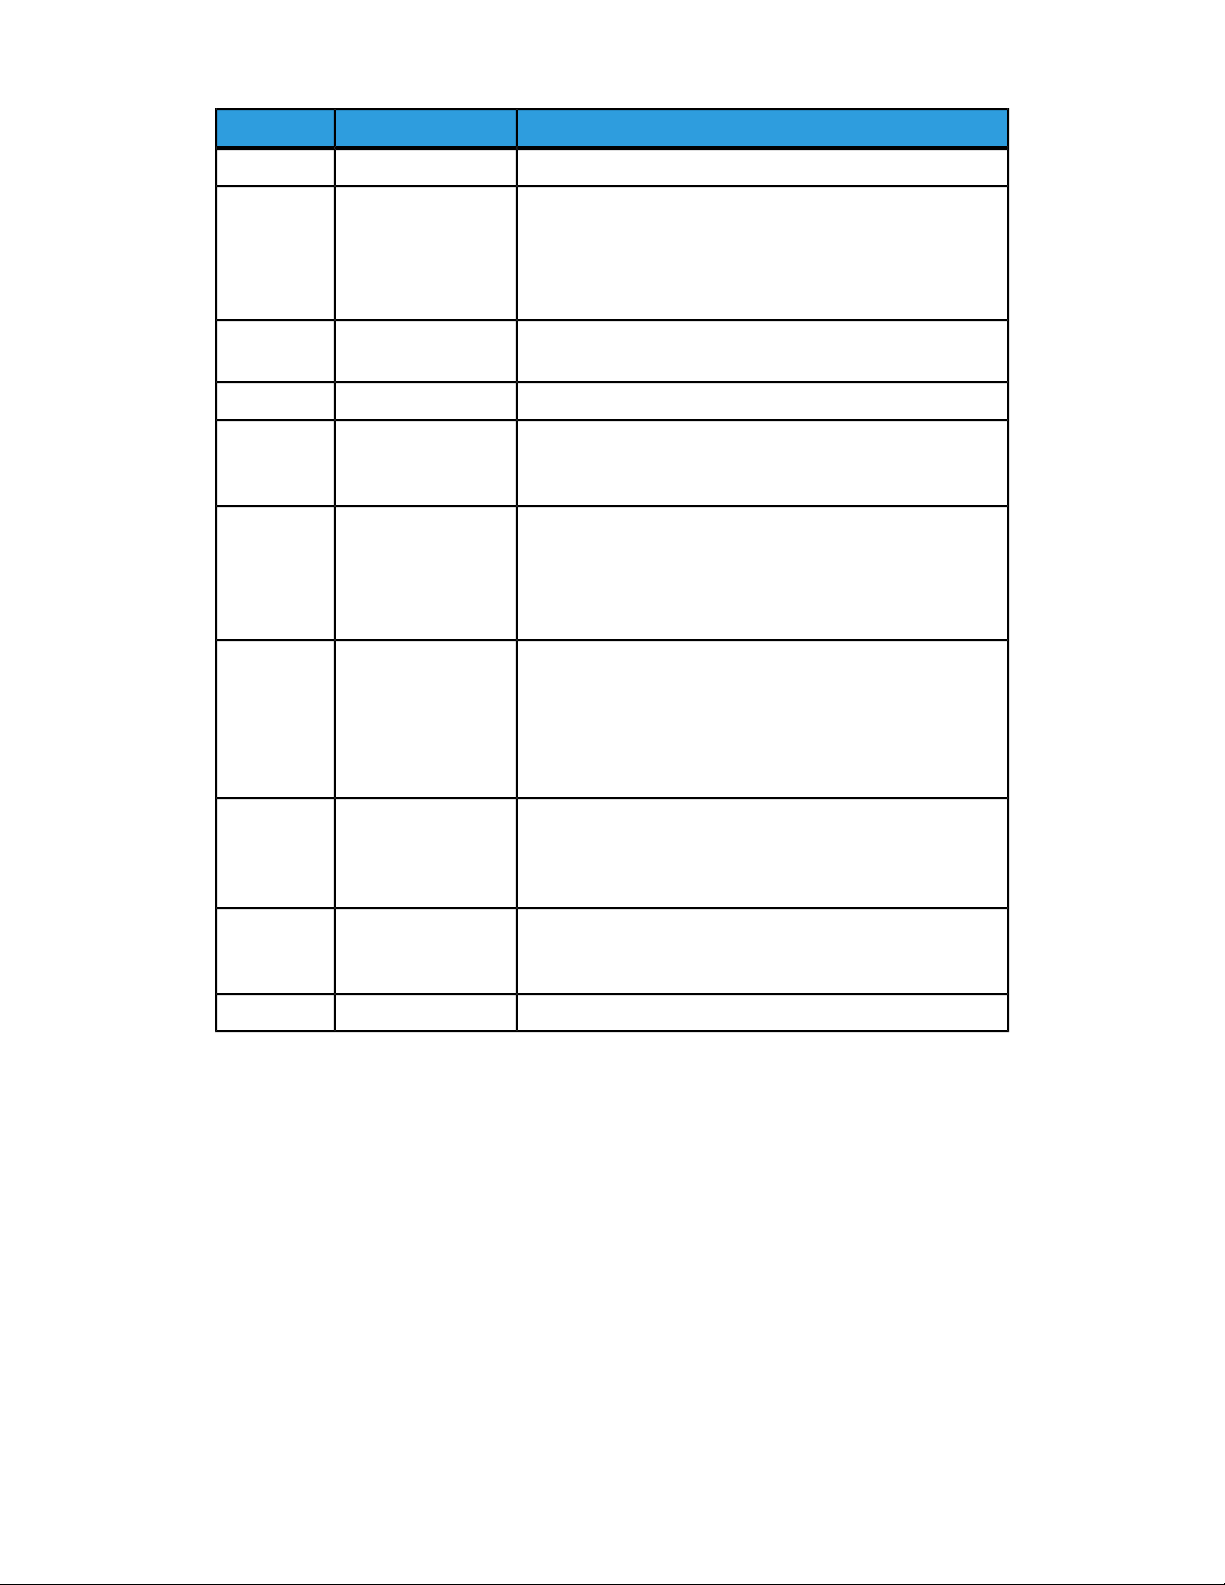
FunctionComponentNumber
Used to enter alpha/numeric dataKey Pad9
Interrupt button10
Start11
Clear All13
Energy Saver button14
Log In/Log Out15
Use this button to suspend a copy or print job in progress
and have the machine stop to process another job. During
the Interrupt mode, the Interrupt button lights. Pressing
the Interrupt button again exits the Interrupt mode and
resumes the suspended job.
Use this button to perform certain functions, such as
scanning a document.
Use this button to pause the current job or communication.Stop12
Select this button to return all selections to the default
values. The machine returns to the same state as when it
is powered on.
When the machine is not being used for a while, it enters
the Energy Saver mode to reduce power consumption.
When the Energy Saver mode is active, the Energy Saver
button lights. Press this button to exit the Energy Saver
mode.
This button lights when a user is logged in through the
System Administration mode, the Authentication mode,
or the Accounting mode. Press this button to display the
User ID entry screen for entering the System Administration
mode, the Authentication mode, or the Accounting mode.
Also press this button to exit these modes.
Services buttons16
Login field17
Use these options to enter the various service windows to
make feature selections. This is where you will find the
Copy, Network Scanning, and Store to USB options among
others.
This area displays the currently logged in user. Select this
option to login as the System Administration,
Authentication, or Accounting modes.
This area displays messages to the user.Message field18
Power Source
The machine is provided with the power switch and the main power switch.
Power On
After turning the power on, the machine takes approximately 3 minutes to warm up
before you can start making copies.
User Guide
1-5Xerox® D95/D110/D125/D136 Copier/Printer
Page 22
Product Overview
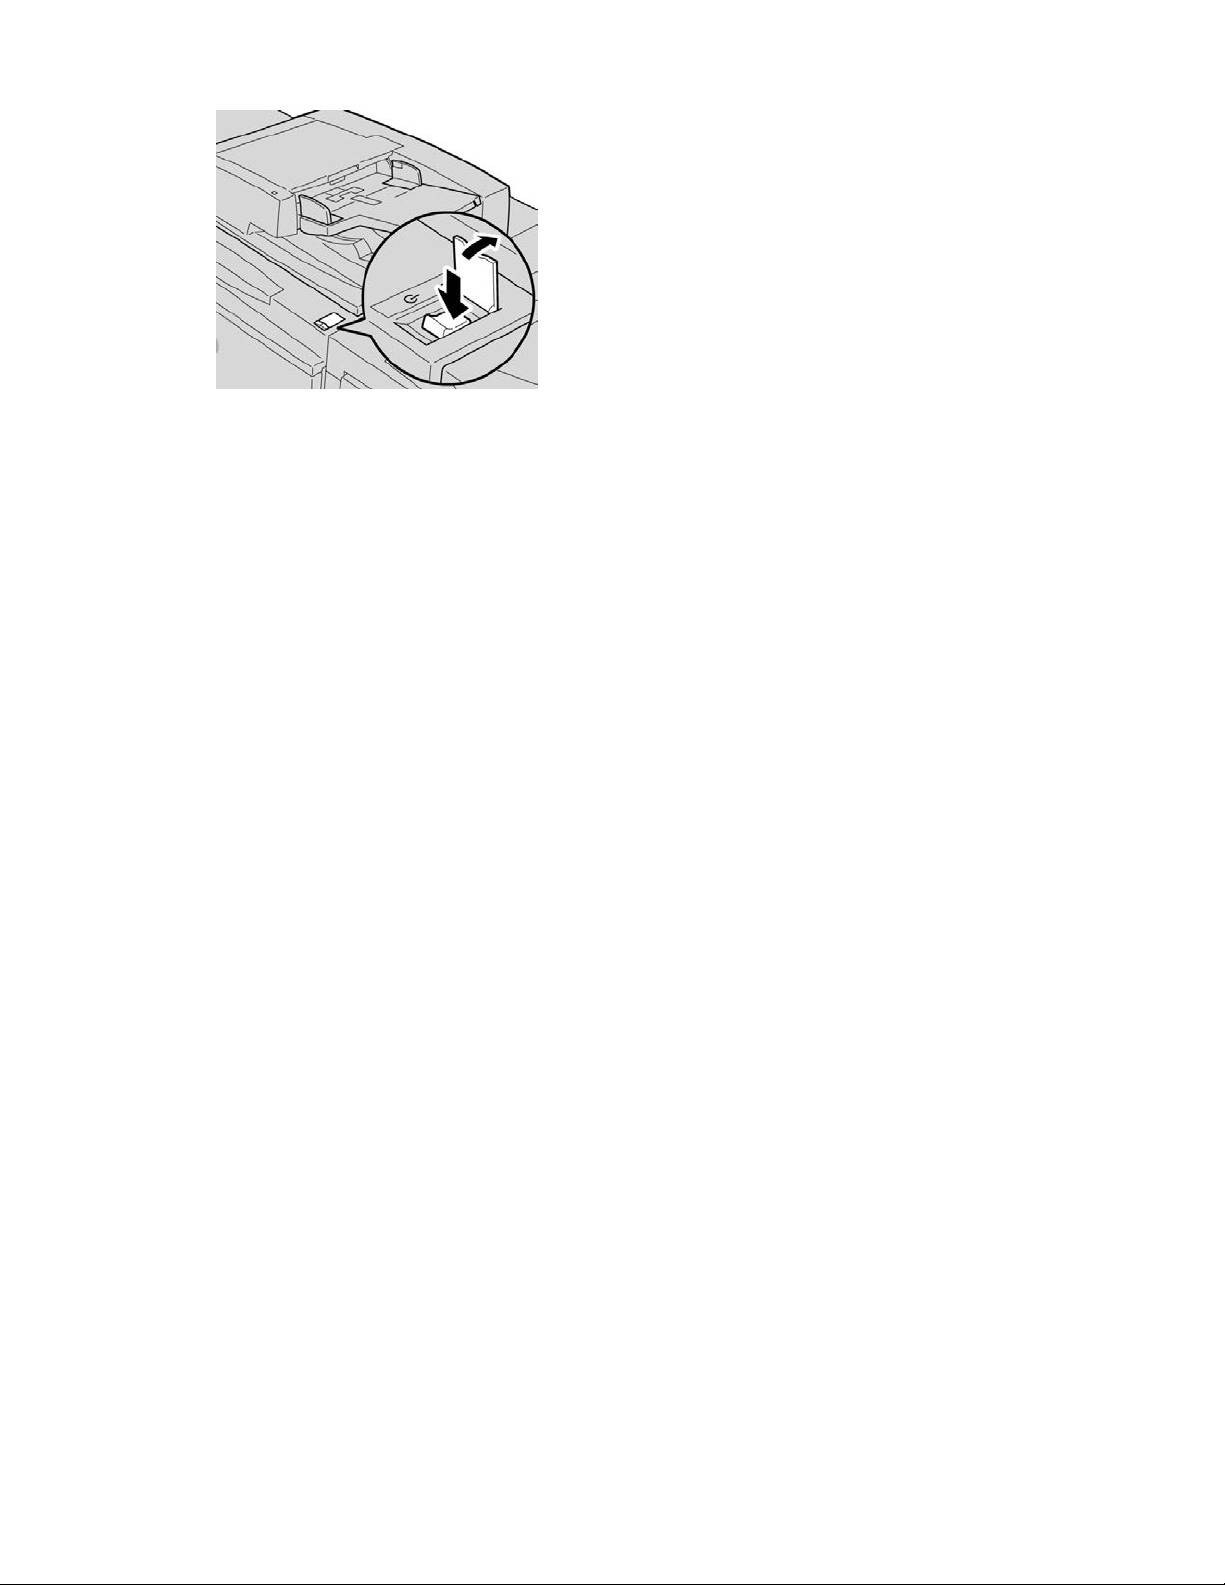
1. Open the cover.
2. Press the power switch to the On position.
The Please wait... message indicates that the machine is warming up. The machine
cannot be used while it is warming up.
Power Off
Before switching the power off, ensure all job processing, copy and printing is completed
and ensure that the Data indicator is not lit up.
1. Press the power switch on top of the printer to the upright position (I). This will power
off the printer.
2. To continue to power off the Main Power, ensure that the touch screen is blank and
the Energy Saver button is not lit up.
3. Open the front cover.
4. Press the main power switch to the zero [0] position to switch the main power off.
The Main Power indicator on the control panel will turn off.
5. Close the front cover.
Energy Saver
Note
The terms Power Saver and Energy Saver are used synonymously.
The Energy Saver feature has two modes:
• Low Power: After remaining inactive for a preset time period, the machine enters the
Low Power mode.
• Sleep Mode: After entering Low Power and remaining inactive for another preset
time period, the machine enters the Sleep mode.
User Guide1-6
Page 23

Product Overview
Here are two examples:
• If the Low Power Mode is set to 15 minutes and the Sleep Mode is set to 60 minutes,
the Sleep Mode activates after 60 minutes of total inactivity and not 60 minutes
after the Low Power Mode begins.
• If the Low Power Mode is set to 15 minutes and the Sleep mode is set to 20 minutes,
the Sleep Mode activates 5 minutes after the Low Power Mode begins.
When logged on as administrator, the time periods for both Low Power and Sleep Mode
may be set from Tools > System Settings > Common Service Settings > Energy
Saver Settings.
Exiting the Energy Saver mode
1. Press Energy Saver, or
2. Send a print job to the machine or make copies at the machine.
Print server overview
One of the following print servers may be available and used with your machine:
• Xerox®FreeFlow® Print Server
• Xerox® EX Print Server, Powered by Fiery
Note
For detailed information on your specific print server, refer to the customer
documentation that was delivered with it.
®
Feeding and finishing devices
Available with your machine is a variety of optional feeding and finishing devices. These
devices are briefly discussed on the following pages along with where to find specific
information on each device.
User Guide
1-7Xerox® D95/D110/D125/D136 Copier/Printer
Page 24
Product Overview
High Capacity Feeder (HCF/Trays 6 and 7), 8.5 x 11 in./A4
The two-tray High Capacity Feeder (HCF/Trays 6 and 7) provides an extra 4,000 sheet
capacity of either 8.5 x 11 in. or A4 paper. Each tray holds 2000 sheets (from 16 lb. Bond
to 80 lb. Cover/52 gsm to 216 gsm).
Oversized High Capacity Feeder (OHCF), 1 or 2 trays (Trays 6/7)
The Oversized High Capacity Feeder (OHCF) is available in a 1-tray or 2-tray option. The
OHCF feeds a variety of stock sizes, including standard and oversized stock up to 13 x
19.2 in./330.2 x 488 mm. Each tray holds 2,000 sheets.
User Guide1-8
Page 25

Product Overview
Note
The 1-Tray OHCF is not available with D136 configurations.
Interface Module (D110/D125 configurations)
The Interface Module is required with many finishing devices. It enables communication
and provides a paper path between the print engine and any attached finishing device
or devices.
Note
The Interface Module is not available with the D95 Copier/Printer configuration.
Interface (Cooling) Module (D136 configuration)
The Interface Cooling Module is required for all D136 configurations. It is similar in
function to the Interface Module (for D110/D125 configurations), but it also aids in
cooling the outgoing printed media through the use of additional fans and associated
duct work.
User Guide
1-9Xerox® D95/D110/D125/D136 Copier/Printer
Page 26
Product Overview
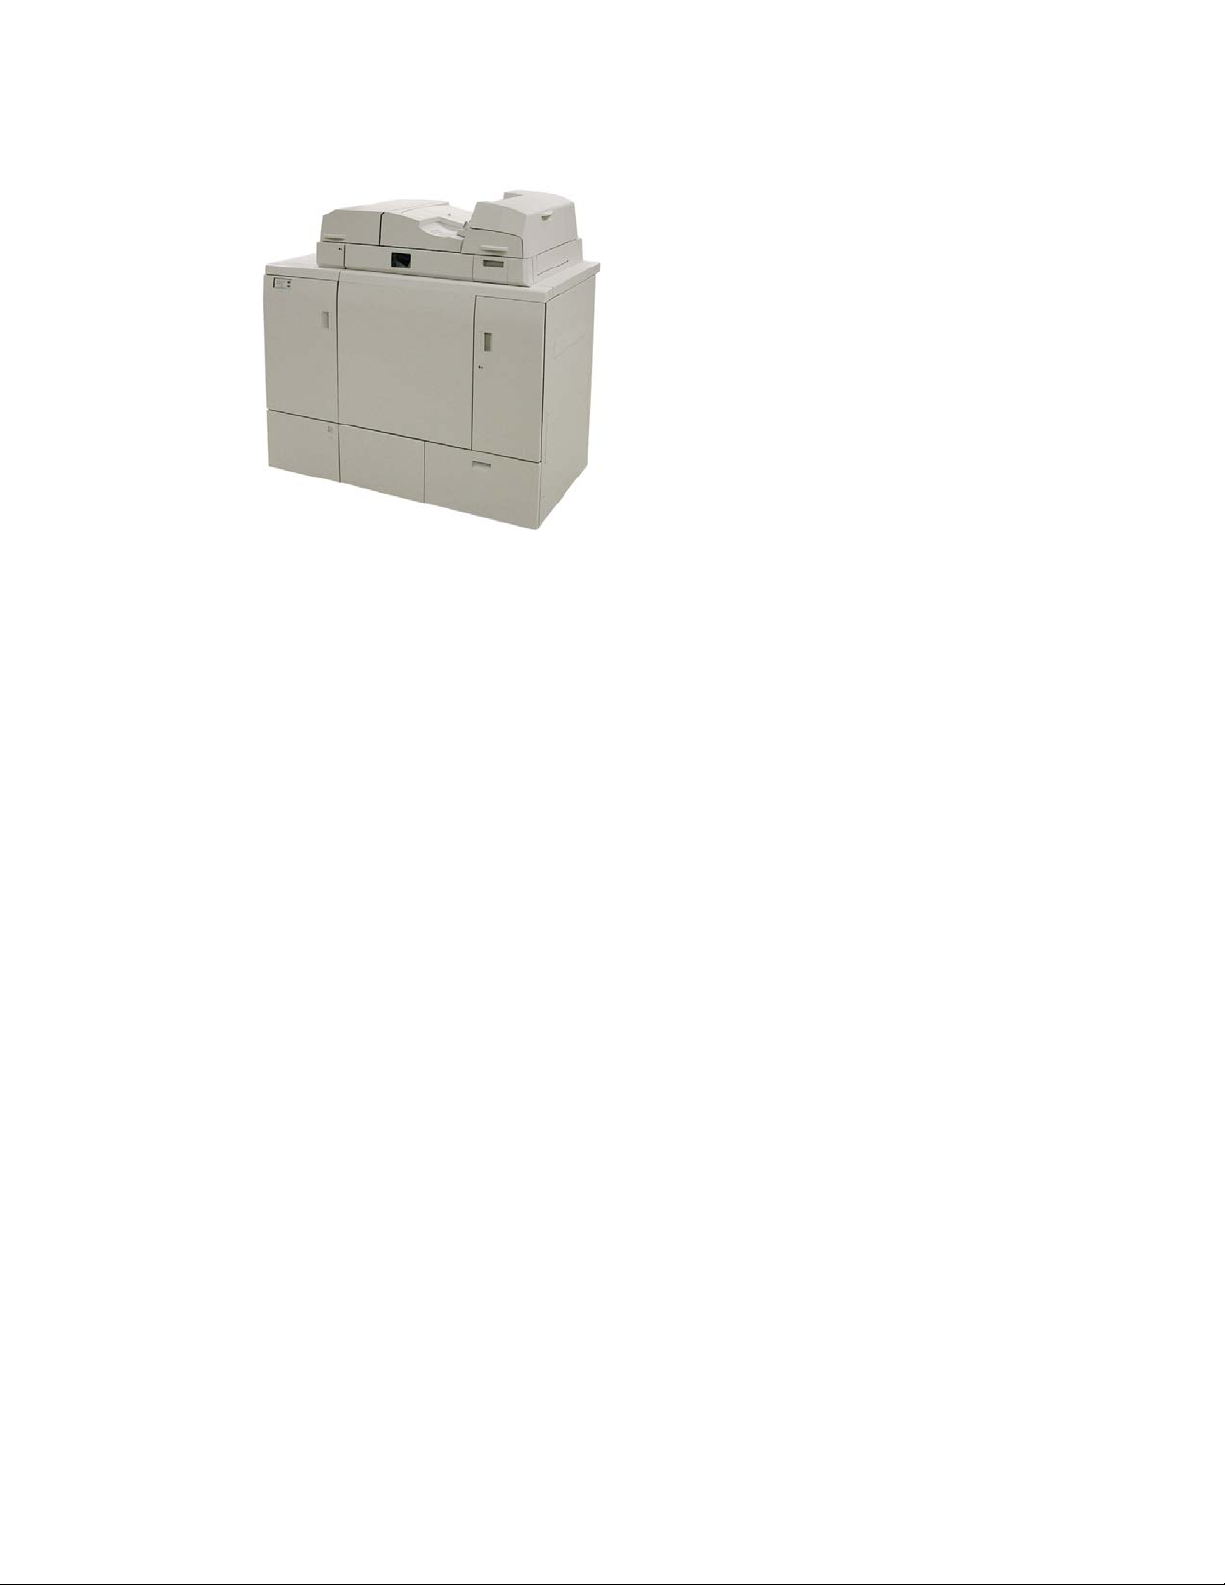
GBC® AdvancedPunch™
The GBC AdvancedPunch may be attached to a variety of optional finishing accessories.
The GBC AdvancedPunch provides another level of finishing options to your output by
allowing you to punch holes in 8.5 x 11 in./A4 documents, which support a variety of
binding styles. Punch types include 19-hole to a maximum of 32-hole for 8.5 x 11 in.
media. A4 media supports punch types 21-hole to a maximum of 47-hole.
Note
The GBC AdvancedPunch is shown here with either the required Interface Module or
the Interface Cooling Module (depends on your machine configuration); it is also shown
with the optional Booklet Maker Finisher and the optional C/Z Folder.
Important
The D110/D125 configurations require the Interface Module, while the D136
configuration requires the Interface Cooling Module.The Interface Module is not available
with the D95 Copier/Printer configuration.
Information on this device can be found on the customer documentation CD that came
with the accessory, or documentation can be downloaded from www.xerox.com. From
the website, enter the machine product name in the Search field and select the User
Documentation link.
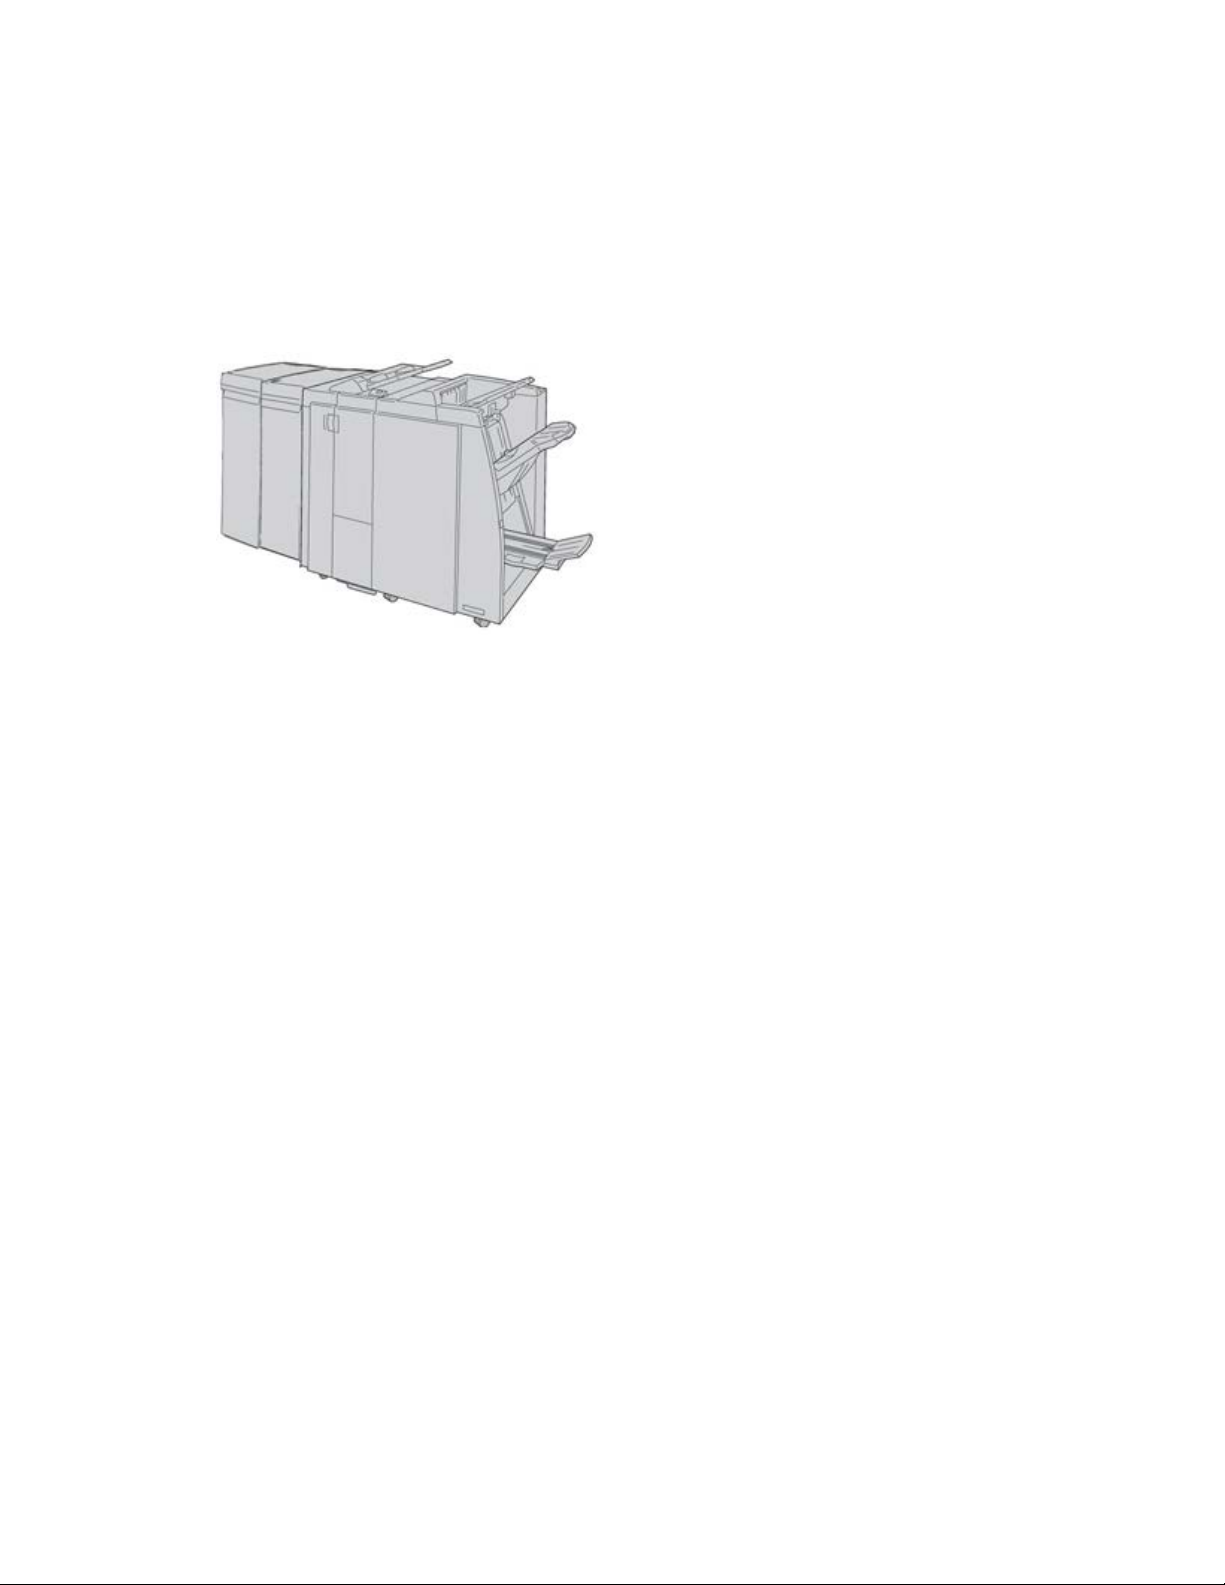
Perfect Binder (D110/D125/D136 configurations)
Important
The Perfect Binder is available with the D110, D125, and D136 Copier/Printer. The
copier/printer must use the integrated controller and not a separate print server.
User Guide1-10
Page 27
Product Overview
The Perfect Binder is an optional finishing device that takes the printed output and binds
it into a finished book; a front and back cover is included with the bound output.
Note
Depending on your machine configuration, the Perfect Binder requires either the Interface
Module or the Interface Cooling Module.The Perfect Binder also requires an optional
finisher, such as High Capacity Stacker, Standard Finisher, or Booklet Maker Finisher.
Important
The D110/D125 configurations require the Interface Module, while the D136
configuration requires the Interface Cooling Module.The Interface Module is not available
with the D95 Copier/Printer configuration.
The Perfect Binder can be used in three modes:
• Manual mode: Load the preprinted book block into the Perfect Binder compiler tray
and covers into Tray 9. Program the Perfect Binder settings using the copier/printer
UI and press Start to complete the job.
• Copy mode: Copy the book block and cover. Program the Perfect Binder settings using
the copier/printer UI and press Start to complete the job.
• Print mode: From the user’s computer, the book block and cover are programmed
using the print driver. Information and steps for submitting the job are available
through the print driver help screens.
Tip
For optimum efficiency with a minimal amount of time, refer to the Perfect Binder
chapter in this guide before using it.
User Guide
1-11Xerox® D95/D110/D125/D136 Copier/Printer
Page 28
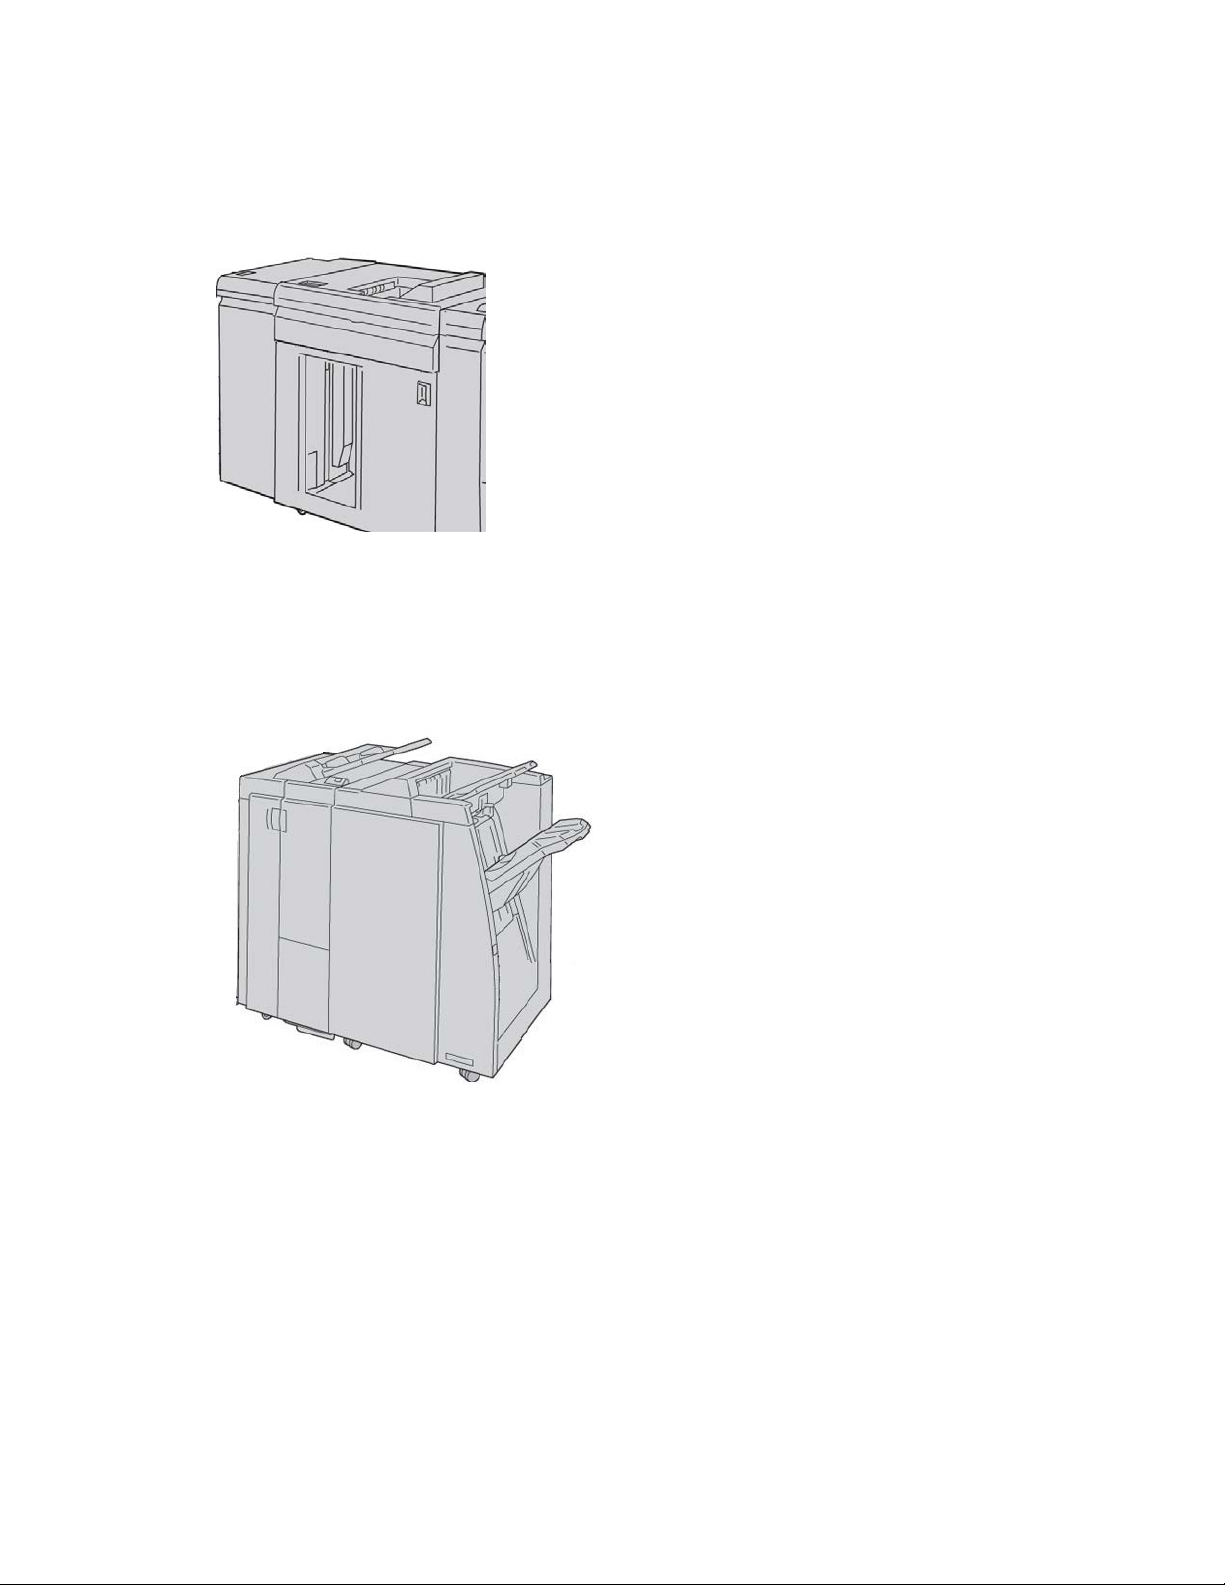
Product Overview
High Capacity Stacker
The High Capacity Stacker (HCS) is an optional finishing device that provides stacking
and offsetting capabilities for output to a Stacker Tray.
Note
The Interface Module is not available with the D95 Copier/Printer configuration.
Standard Finisher
This finisher provides a wide range of finishing/folding options.
Note
If attached to a D136 configuration, the Standard Finisher requires the Interface Cooling
Module.
User Guide1-12
Page 29
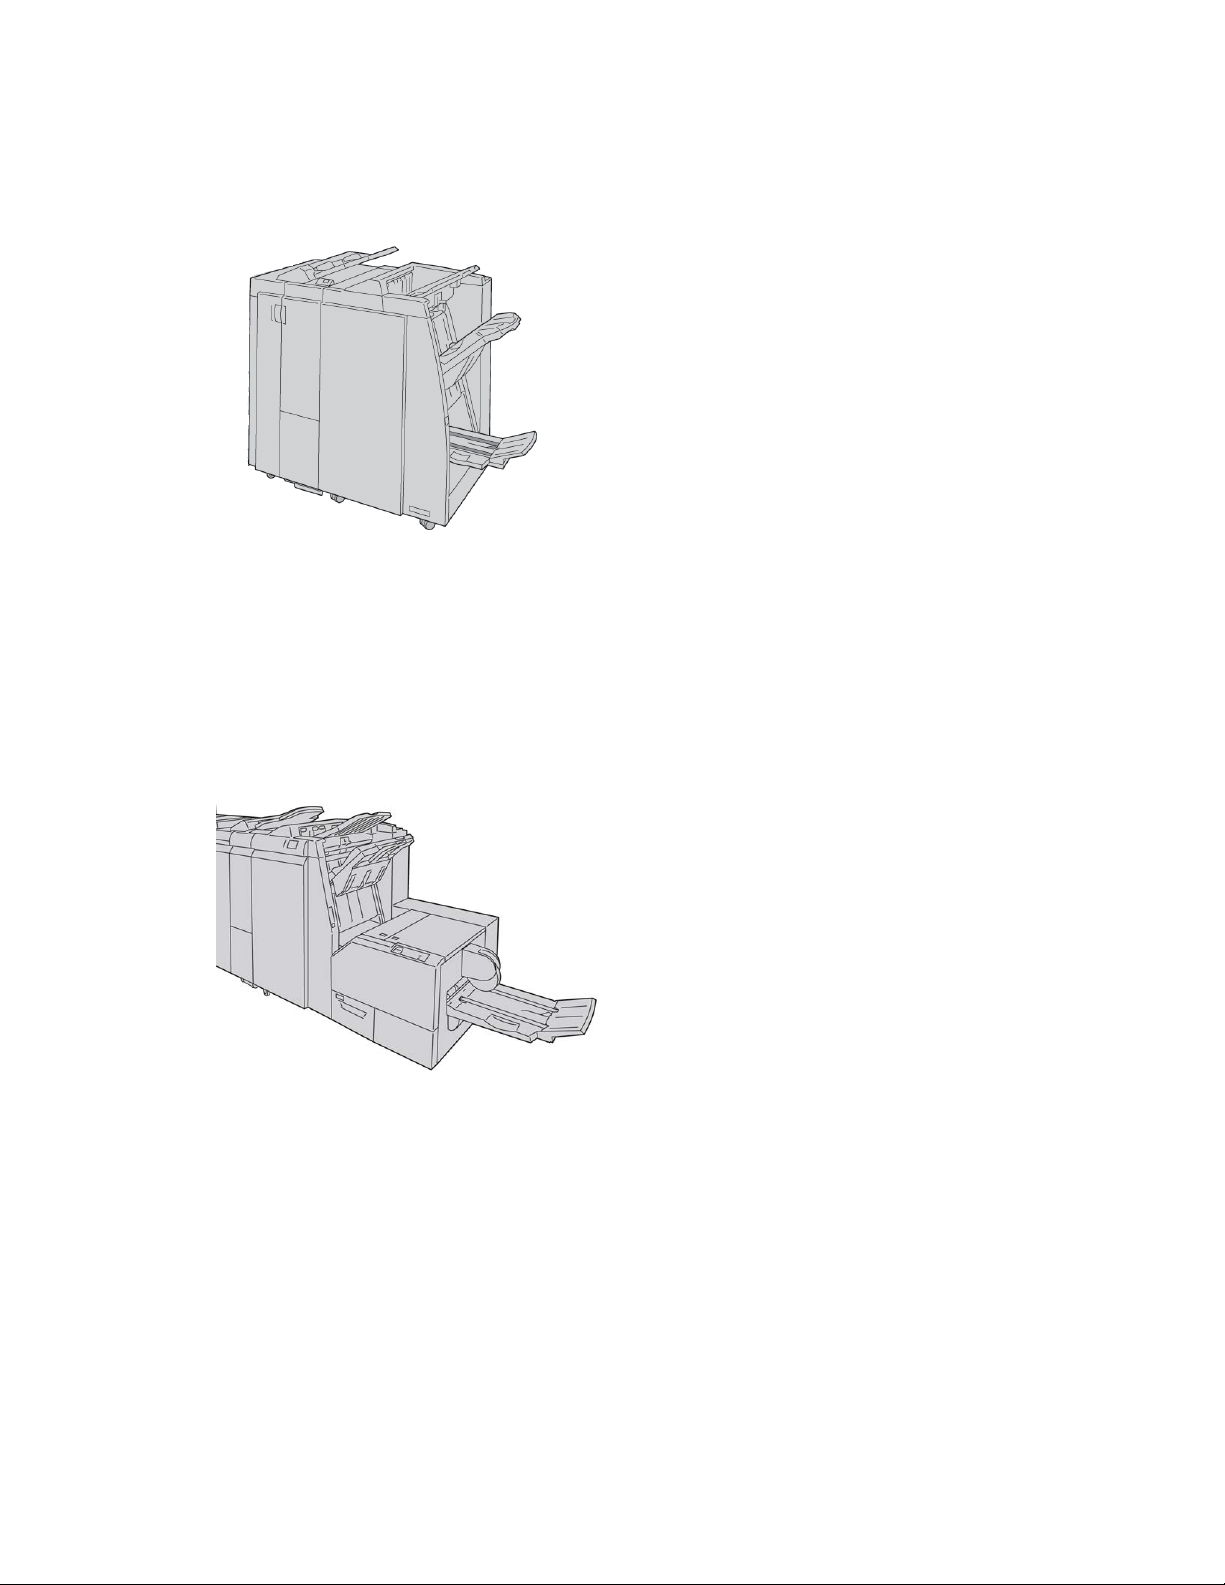
Product Overview
Booklet Maker Finisher
This finisher provides a wide range of finishing/folding options.
Note
If attached to a D136 configuration, the Booklet Maker Finisher requires the Interface
Cooling Module.
SquareFold Trimmer Module
The SquareFold Trimmer Module is an optional finishing device that is used in conjunction
with a finishing device that contains a booklet maker.
User Guide
1-13Xerox® D95/D110/D125/D136 Copier/Printer
Page 30
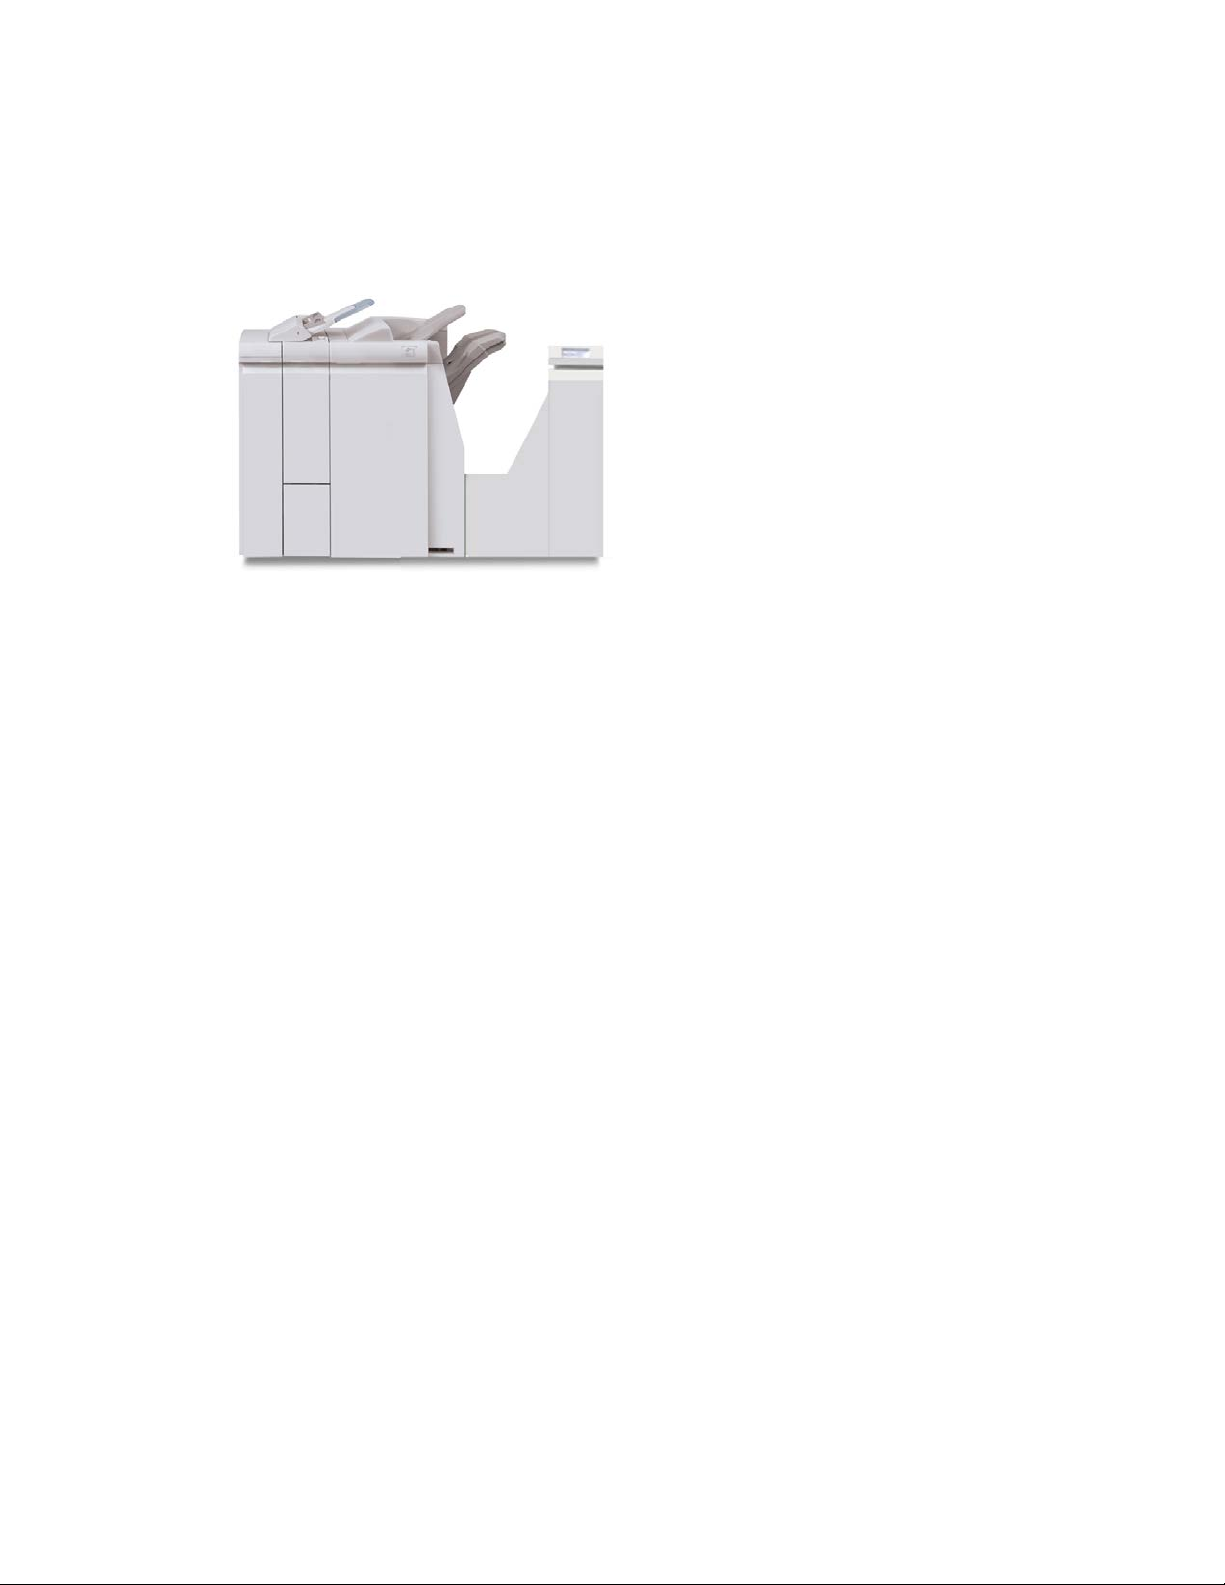
Product Overview
Standard Finisher Plus
The Standard Finisher Plus serves as an interface to transfer paper between the print
engine and any third-party, Document Finishing Architecture (DFA) device attached to
the machine.
Note
The Standard Finisher Plus requires the either the Interface Module (for D110/D125
configurations) or the Interface Cooling Module (for D136 configurations). The Standard
Finisher Plus is not available with the D95 Copier/Printer configuration.
Third-Party Finishing Devices (D110/D125/D136 configurations)
Additional third-party, Document Finishing Architecture (DFA) devices are also available
for your machine. Information on these DFA devices can be obtained by contacting your
Xerox sales representative.
Note
All third-party, DFA devices require the Interface Module (for D110/D125 configurations)
or the Interface Cooling Module (for D136 configurations), and they also require the
Standard Finisher Plus. DFA devices are not available with the D95 Copier/Printer
configuration.
User Guide1-14
Page 31

2
Where to find help
Customer documentation CD/DVD
We recommend that you print all customer documentation and keep it close to the
machine.
You can locate the customer documentation on your Customer Documentation CD/DVD.
Your customer documentation CD/DVD was shipped with the machine.
Print server customer documentation
Supporting customer documentation for your print server is on a CD/DVD and is shipped
with the print server. You or your System Administrator should print these documents,
after the installation is complete.
Help on the World Wide Web
Xerox on the World Wide Web: For system support, user help, customer documentation,
and service support, go to www.xerox.com and click the Contact Us link for specific
contact information/telephone numbers in your area.
Note
You can get the latest customer documentation updates for your product by going to
www.xerox.com. Be sure to periodically check this website for the latest information on
your product.
User Guide
2-1Xerox® D95/D110/D125/D136 Copier/Printer
Page 32

Where to find help
It may be helpful to know your machine serial number before calling for support. The
machine serial number is shown on the Machine Information tab: Machine Status >
Machine Information.
User Guide2-2
Page 33

3
Paper and other media
Loading media in trays 1, 2, 3, and 4
The following information is applicable for Trays 1-4:
Trays 1 and 2
• Trays 1 and 2 are identical
• Only 8.5 x 11 in./A4 media may be loaded into Trays 1 and 2
• Both trays accommodate media weights from 16 lb bond to 80 lb cover (52 gsm to
216 gsm)
• Tray 1 has a capacity of 1,100 sheets
• Tray 2 has a capacity of 1,600 sheets
• Media must be loaded into the trays in the long edge feed (LEF) direction
Trays 3 and 4
• Trays 3 and 4 are size-adjustable
• Both trays accommodate media sizes starting at 5.5 x 7.2 in./140 mm x 182 mm
(A5) to a maximum of 13.0 x 19.2 in./330 mm x 488 mm (SRA3)
• Both trays accommodate media weights from 16 lb bond to 80 lb cover (52 gsm to
216 gsm)
• Each tray has a capacity of 550 sheets
• Media may be loaded in either the long edge feed (LEF)/portrait or short edge feed
(SEF)/landscape direction
3-1Xerox® D95/D110/D125/D136 Copier/Printer
User Guide
Page 34

Paper and other media
Loading paper in trays 1 and 2
Note
A paper jam may occur if a tray is opened while it is being used to feed stock.
1. Select the appropriate paper stock for your print job.
2. Pull out the tray slowly until it stops.
3. Open the ream of paper with the seam side facing up.
4. Fan the sheets before loading them into the tray.
5. Load and align the edge of the paper against the LEFT edge of the tray.
Paper must be loaded in the Long Edge Feed (LEF)/portrait direction.
6. Gently push in the tray until it comes to a stop.
If enabled by your System Administrator, the Paper Tray settings screen may be
displayed on the UI.
7. If changes have been made to the paper tray, select the Change Settings button;
otherwise, proceed to the next step.
a) Make the desired selections for Paper Type/Paper Weight, Paper Size, and Paper
Color.
b) If necessary, make the desired changes to paper curl and alignment adjustment.
Note
Refer to the System Administration Guide for detailed information on the paper
curl and alignment adjustment options.
c) Select Save until you are returned to the tray settings window.
8. Select Confirm to close the window.
User Guide3-2
Page 35

Paper and other media
Loading paper in trays 3 and 4
Note
A paper jam may occur if a tray is opened while it is being used to feed stock.
1. Select the appropriate paper stock for your print job.
2. Pull out the tray slowly until it stops.
3. Open the ream of paper with the seam side facing up.
4. Fan the sheets before loading them into the tray.
5. Load and align the edge of the paper against the LEFT edge of the tray.
Paper can be loaded either in the Long Edge Feed (LEF)/portrait or Short Edge Feed
(SEF)/landscape direction.
6. Adjust the paper guides by pressing in the guide release and carefully moving the
Edge Guide until it lightly touches the edge of the material in the tray.
Do not load materials above the MAX line located on the rear Edge Guide.
7. Gently push in the tray until it comes to a stop.
If enabled by your System Administrator, the Paper Tray settings screen may be
displayed on the UI.
8. If changes have been made to the paper tray, select the Change Settings button;
otherwise, proceed to the next step.
a) Make the desired selections for Paper Type/Paper Weight, Paper Size, and Paper
Color.
b) If necessary, make the desired changes to paper curl and alignment adjustment.
Note
Refer to the System Administration Guide for detailed information on the paper
curl and alignment adjustment options.
c) Select Save until you are returned to the tray settings window.
9. Select Confirm to close the window.
User Guide
3-3Xerox® D95/D110/D125/D136 Copier/Printer
Page 36
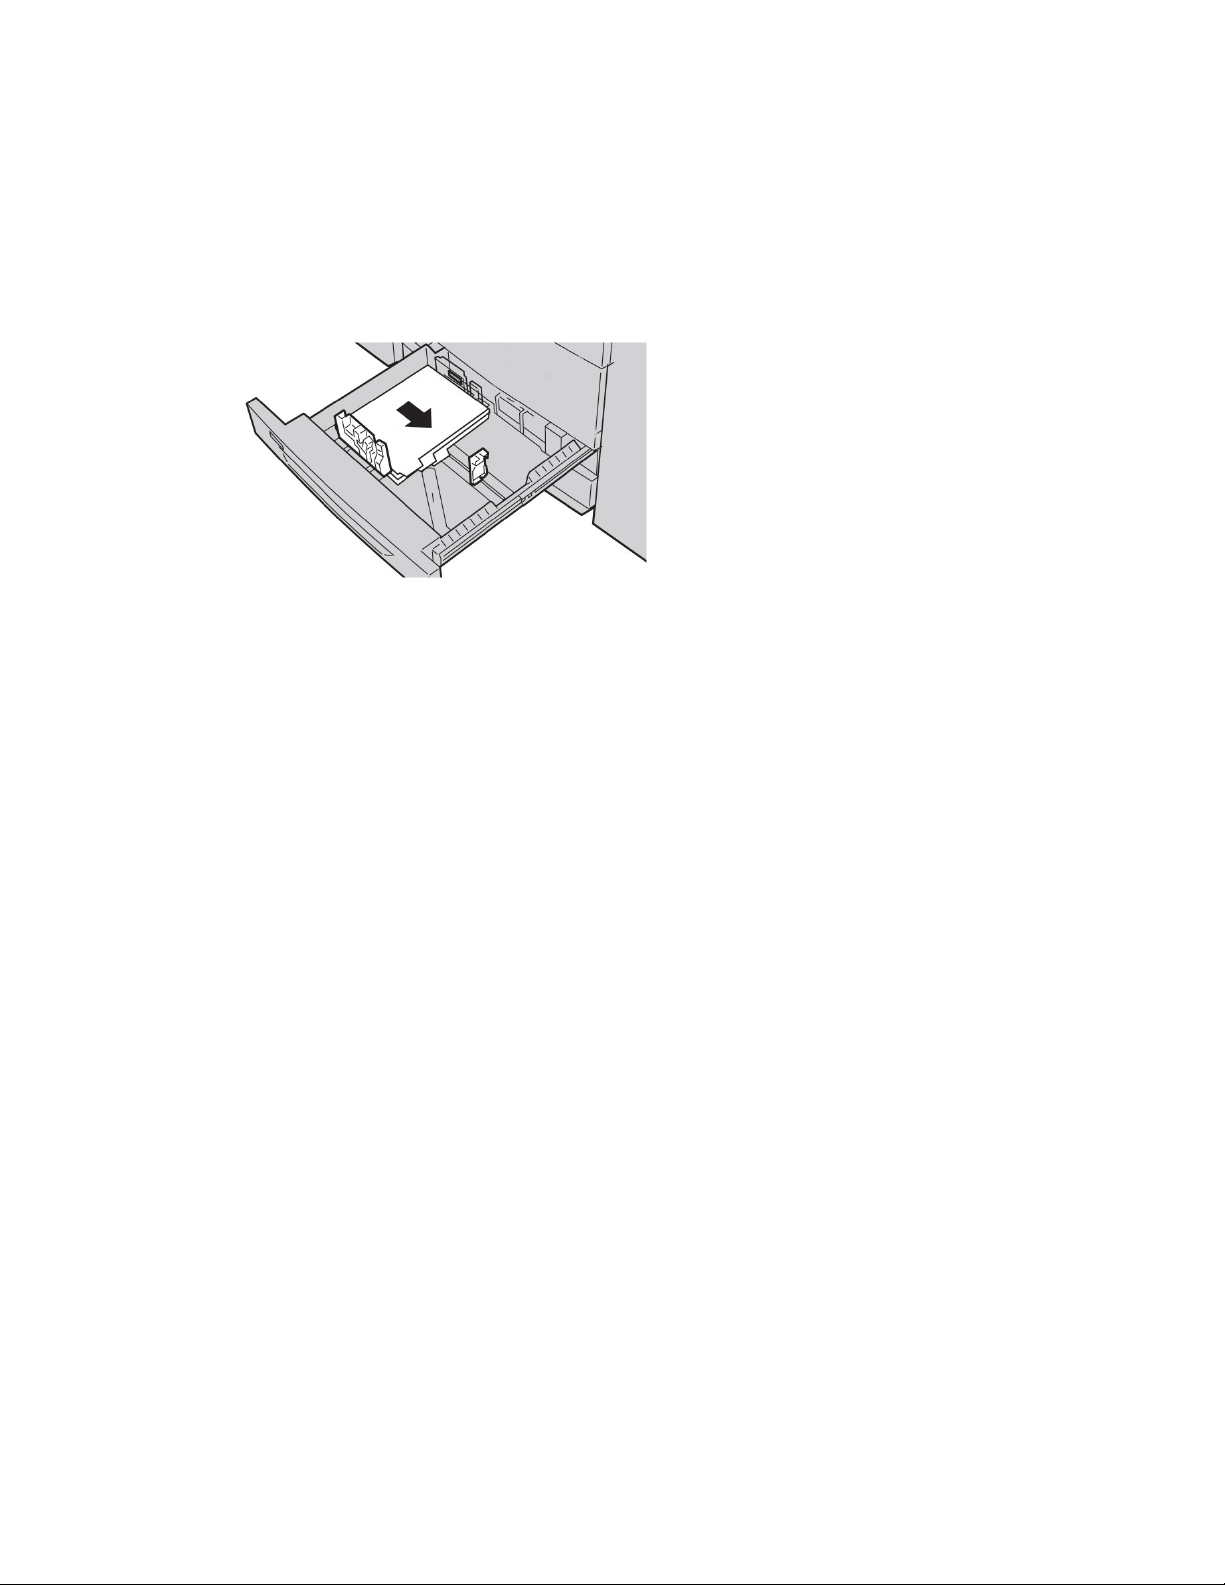
Paper and other media
Loading tab stock in trays 3 and 4
1. Select the appropriate paper stock for your print job.
2. Pull out the tray slowly until it stops.
3. Fan the tab paper before loading into the tray.
4. Load and align the edge of the tab paper against the RIGHT edge of the tray with
the side to be copied or printed on facing down.
Note
Tab stock can be loaded either long edge or short edge feed (portrait or landscape).
5. Adjust the paper guides by pressing in the guide release and carefully moving the
Edge Guide until it lightly touches the edge of the material in the tray.
Do not load materials above the MAX line located on the rear Edge Guide.
6. Gently push in the tray until it comes to a stop.
If enabled by your System Administrator, the Paper Tray settings screen may be
displayed on the UI.
7. If changes have been made to the paper tray, select the Change Settings button;
otherwise, proceed to the next step.
a) Make the desired selections for Paper Type/Paper Weight, Paper Size, and Paper
Color.
b) If necessary, make the desired changes to paper curl and alignment adjustment.
Note
Refer to the System Administration Guide for detailed information on the paper
curl and alignment adjustment options.
c) Select Save until you are returned to the tray settings window.
8. Select Confirm to close the window.
Loading pre-drilled stock in trays 1, 2, 3, and 4
1. Select the appropriate paper stock for your print job.
2. Pull out the tray slowly until it stops.
3. Open the ream of paper with the seam side facing up.
4. Fan the sheets before loading them into the tray.
User Guide3-4
Page 37

Paper and other media
5. Load and align the edge of the pre-drilled paper against the LEFT edge of the tray.
Align the paper so that the holes are against the left edge of the tray, and ensure
that the paper is loaded in the LEF direction.
6. Adjust the paper guides by pressing in the guide release and carefully moving the
Edge Guide until it lightly touches the edge of the material in the tray.
Do not load materials above the MAX line located on the rear Edge Guide.
7. Gently push in the tray until it comes to a stop.
If enabled by your System Administrator, the Paper Tray settings screen may be
displayed on the UI.
8. If changes have been made to the paper tray, select the Change Settings button;
otherwise, proceed to the next step.
a) Make the desired selections for Paper Type/Paper Weight, Paper Size, and Paper
Color.
b) If necessary, make the desired changes to paper curl and alignment adjustment.
Note
Refer to the System Administration Guide for detailed information on the paper
curl and alignment adjustment options.
c) Select Save until you are returned to the tray settings window.
9. Select Confirm to close the window.
Loading transparencies in trays 1-4
1. Select the appropriate paper stock for your print job.
2. Pull out the tray slowly until it stops.
3. Fan the transparencies to stop them from sticking together before loading into the
tray.
4. Load transparencies on top of a small stack of same-size paper, and align the edge
of the transparencies with the removable stripe against the LEFT edge of the tray
with the side to be copied or printed on facing down.
Note
• Do not load more than 100 transparencies in a paper tray at one time.
• Transparencies can be loaded either long edge or short edge feed (portrait or
landscape).
• Do not load transparencies above the MAX line as indicated on the tray.
5. When loading transparencies into either Tray 3 or 4, adjust the paper guides until
they lightly touch the edges of the material in the tray.
6. Gently push in the tray until it comes to a stop.
If enabled by your System Administrator, the Paper Tray settings screen may be
displayed on the UI.
7. If changes have been made to the paper tray, select the Change Settings button;
otherwise, proceed to the next step.
User Guide
3-5Xerox® D95/D110/D125/D136 Copier/Printer
Page 38

Paper and other media
a) Make the desired selections for Paper Type/Paper Weight, Paper Size, and Paper
Color.
b) If necessary, make the desired changes to paper curl and alignment adjustment.
Note
Refer to the System Administration Guide for detailed information on the paper
curl and alignment adjustment options.
c) Select Save until you are returned to the tray settings window.
8. Select Confirm to close the window.
Loading media in optional feeding devices
Refer to the specific chapter for information and instructions on loading media in the
optional feeding devices.
Loading post-process media in optional finishing devices
Refer to the specific chapter for information on loading post-process media in the optional
finishing devices.
Loading tab stock with the GBC AdvancedPunch
When the optional GBC AdvancedPunch is attached to your machine, tab stock is loaded
differently into paper trays. For information on how to load media into the paper trays
when a GBC AdvancedPunch is attached, refer to the GBC AdvancedPunch customer
documentation.
User Guide3-6
Page 39

4
Copy
Basic copy using the document feeder
1. Adjust the movable document guides to their widest position.
2. Load the documents face up with the first page on top and with the headings toward
the back or left of the machine.
The confirmation indicator lights to show that the documents are loaded correctly.
3. Press the Services Home button.
4. Select Copy on the Services Home screen.
5. From the Copy screen, select the desired features/options.
4-1Xerox® D95/D110/D125/D136 Copier/Printer
User Guide
Page 40

Copy
• Reduce/Enlarge
• Paper Supply
• Copy Output
• 2-Sided Copying
• Original Type
• Lighten/Darken
The features displayed on the main Copy screen vary depending on how the main
Copy screen is configured by the administrator.
6. Enter the quantity.
7. Press Start.
Basic copy using the document glass
1. Open the document feeder.
2. Place the document face down by aligning it as shown in the illustration.
3. Press the Services Home button.
4. Select Copy on the Services Home screen.
5. From the Copy screen, select the desired features/options.
• Reduce/Enlarge
• Paper Supply
• Copy Output
User Guide4-2
Page 41

Copy
• 2-Sided Copying
• Original Type
• Lighten/Darken
The features displayed on the main Copy screen vary depending on how the main
Copy screen is configured by the administrator.
6. Enter the quantity.
7. Press Start.
Selecting copy options for a DFA finishing device
If your machine has an optional, third-party, Document Finishing Architecture (DFA)
device attached, then this profile feature is available, and specific copy options may be
selected for a job.
Prior to physically attaching the DFA device to the machine, device profiles are created.
The profiles represent the characteristics of your finishing device.
Note
Refer to the third-party customer documentation for information on setting the profile
values for the specific DFA device attached to the machine.
A profile for the job can be selected from either the print server, the print driver on your
computer, or the machine’s User Interface. Depending on the DFA device, a maximum
of twelve profiles are available.
1. Place your original documents either in the document feeder or on the document
glass.
2. Press the Services Home button.
3. Select Copy on the Services Home screen.
4. Select the Output Format tab.
a) Select the DFA Finisher.
The DFA Finisher Profile screen displays.
b) From the displayed list, select the profile for the job.
If the device is an e-binder, select the binding position.
c) Select Save.
d) Select the desired Face Up/Down Output option.
5. From the Copy screen, select the desired features/options.
The features displayed on the main Copy screen vary depending on how the main
Copy screen is configured by the administrator.
6. Enter the quantity.
User Guide
4-3Xerox® D95/D110/D125/D136 Copier/Printer
Page 42

Copy
7. Press Start.
If prompted on the UI, follow the instructions provided to correct any job submission
errors. If there is a DFA problem, refer to your DFA documentation.
Copy tab
The Copy tab contains the following features:
• Reduce/Enlarge
• Paper Supply
Note
Depending on how the Copy tab is configured by the administrator, this tab may also
contain the following the features:
• Copy Output
• 2 Sided Copying
• Image Shift
• Original Type
• Lighten/Darken
Reduce/Enlarge
You can set the reduce or enlarge copy features on the Copy screen in the Reduce/Enlarge
area.
1. Select the applicable reduce/enlarge ratio.
2. You can also set the Reduce/Enlarge ratio by using the up or down buttons. The ratio
is displayed in the text box.
Paper Supply Screen
You can select a paper tray that does not appear on the Paper Supply area of the Copy
screen.
1. Under the Paper Supply feature, select the desired paper.
2. From the Paper Supply area of the Copy screen, select More...
3. From the list displayed, select the tray that contains the applicable paper size and
paper type.
4. Select Save to keep your changes.
User Guide4-4
Page 43

Copy
2-Sided Copying (Making 2-Sided Copies)
Copies of 1-sided and 2-sided documents can be made on one side or both sides.
1. From the Copy screen, in the 2 Sided Copying area, make the applicable selection
from the displayed buttons.
2. If Side 2 is to be rotated (head-to-foot) select the Rotate Side 2 check box.
Copy Output
Copy output can be defined by using the Copy Output button on the Copy screen.
1. From the Copy screen, select the Copy Output button.
2. From the Hole Punch & More screen select the applicable output features from the
Hole Punch & More screen:
• Paper Supply (The Paper Supply screen is displayed.)
• Collation feature
• Separator Tray
• Staple (Available only when Collated is selected)
• Hole Punch (Available only when Collated is selected)
• Output/Offset Stacking
3. Select Save to save the changes.
Image Shift
Image shift features are defined by using the Image Shift button on the Copy tab screen.
1. From the Copy screen, select the Image Shift button.
2. Select the applicable image shift features from the Image Shift screen.
3. When Margin Shift is selected, set the image shift parameters, using the left/right
(or) up/down buttons.
4. Select Original Orientation... and set and save the orientation.
5. You can elect to mirror the Side 1 settings to side 2 by selecting the Mirror Side 1
check box.
6. Select Save to save the changes.
Original Type
The original-type specifications can be defined by using the Original Type button on the
Copy tab screen.
1. From the Copy screen, select the Original Type button.
2. Select the applicable specifications for the original type.
3. Select Save to save the changes.
User Guide
4-5Xerox® D95/D110/D125/D136 Copier/Printer
Page 44

Copy
Lighten/Darken
You can adjust the copy density to one of seven levels from the Copy window, in the
Lighten/Darken area.
The density is adjusted by selecting either the left or right buttons.
Image Quality
The Image Quality option contains the following features/options: Original Type, Image
Options, and Background Suppression.
Original Type
The Original Type feature provides a convenient way to enhance the quality of your
output based on the type of original images you are copying. Select the Original Type
button on the Image Quality section, and select the desired option.
Select the Original Type.
• Photo & Text: Use this option if your original is from a magazine or other source
that contains high quality photographs with text. This setting produces better
pictures, but slightly reduces sharpness for text and line art.
• Text: Use this option if your original contains only text or line art. The result is
sharper edges for the text and line art.
• Photo: This option is specifically designed to copy photographs or magazine
pictures without any text or line drawings. This option prevents faint reproduction
of colors.
• Light Text: Select this option for text that requires enhancement, such as
handwritten pencil text.
• Text on See-Through Paper: Select this option to reduce blurs of tracing paper
documents or to suppress background shadows of lightweight documents.
Image Options
Use the Image Options feature to make adjustments to the following options:
Select Image Options:
• Lighten/Darken: This option provides manual control to adjust the lightness or
darkness of the scanned images. Select the Down scroll button to darken the
scanned image from light originals such as pencil images. Select the Up scroll
button to lighten the scanned image from dark originals such as half tones or
originals with colored backgrounds.
User Guide4-6
Page 45

Copy
• Sharpness: This option controls the balance between sharp text and moiré
(patterns within the image). Move the slider control down (Soften) to produce an
image with a smooth, uniform appearance (ideally suited for photographic scanned
images). Move the slider control up (Sharpen) to produce an image with better
quality text or line art.
Background Suppression
When Background Suppression is selected, the background color of documents such as
newspapers and colored paper documents is erased on the copy.
Note
When Document Type is set to Photo, the Background Suppression feature is not
functional.
1. From the Copy screen, select the Image Quality option.
2. Select Background Suppression.
3. Select Off (No Suppression) or Auto Suppression.
4. Select Save to save the changes.
Layout Adjustment
The Layout Adjustment section includes the following features: Book Copying, 2 Sided
Book Copying, Original Size, Edge Erase, Image Shift, Image Rotation, Invert Image,
and Original Orientation.
Book Copying
Bound originals (such as books) can be placed on the document glass to make 1-sided
or 2-sided copies. The bound original should be placed face down and registered to the
rear left corner of the document glass. Align the top of the bound original against the
rear edge of the document glass.
Select a Book Copying Option:
• Both Pages: Copies both pages in page order.
• Left Page Only: Copies the left page only.
• Right Page Only: Copies the right page only.
• Binding Edge Erase: Erases the shadow from the center section of the document.
You can set the binding erase width in the range from 0 to 50 mm in 1 mm
increments.
User Guide
4-7Xerox® D95/D110/D125/D136 Copier/Printer
Page 46

Copy
2-Sided Book Copying
This feature allows you to make 2-Sided copies of facing pages of the original bound
document.
Note
This feature and Book Copying cannot be activated simultaneously, you must use the
document glass to make copies from books, magazines, or pamphlets. Do not place
bound originals in the document feeder. Non-standard size documents will not be
separated into two pages accurately.
1. Select Copy on the Services Home window, then select the Layout Adjustment tab.
2. Select 2-Sided Book Copying and then select On.
3. To specify the copy start page and copy end page, select Starting & Ending Page.
• For Starting Page: touch Left Page or Right Page.
• For Ending Page: touch Left Page or Right Page.
4. To specify the Binding Edge Erase amount, the space between the image area and
the binding, touch the plus or minus (+/–) buttons.
5. Select Save.
Original Size
1. On the Services Home window, select Copy, then select the Layout Adjustment tab.
2. Select Original Size.
• The printer can pre-scan the first page of the originals to determine the area to
copy. Select Auto Detect.
• If the area to be copied matches a particular paper size, select Manual Size Input,
then select the desired paper size. To view the entire list, select the scroll arrows.
• If the original contains pages of different sizes, select Mixed Size Originals.
3. Select Save.
Edge Erase
You can erase content from the edges of your copies by specifying the amount to erase
on the right, left, top, and bottom edge.
1. Select Copy on the Services Home window, then select the Layout Adjustment tab.
2. Select Edge Erase.
3. To erase all the edges by the same amount:
• Select All Edges.
• Select the plus or minus (+/–) buttons.
4. To specify different amounts for the edges:
User Guide4-8
Page 47

Copy
• Select Individual Edges.
• For each edge, select the plus or minus (+/–) buttons.
• If you selected 2-sided copies: to specify the amount to erase from each edge on
Side 2, touch the plus or minus (+/–) buttons, or select Mirror Side 1.
5. To cancel edge erase, select Print to Edge.
6. To specify the original’s orientation as you place it in the document feeder or on the
document glass, select Original Orientation, then select either Upright Image or
Sideways Image (top to left), then select Save.
7. If preset values such as Hole Punch Erase or Header/Footer Erase were previously
saved, you can select the preset in the lower-left corner of the window.
8. Select Save.
Image Shift
You can change the placement of the image on the copy page. This feature is useful if
the image size is smaller than the page size. Originals must be positioned correctly for
image shift to work correctly.
1. Select Copy on the Services Home window, then select the Layout Adjustment tab.
2. Select Image Shift.
3. To center the image on the page, select Auto Center.
4. To specify the position of the image:
• Select Margin Shift.
• To specify the amount of Up/Down and Left/Right shift for Side 1, select the plus
or minus (+/–) buttons.
• If you selected 2-sided copies: to specify the amount to erase from each edge on
Side 2, touch the plus or minus (+/–) buttons, or touch Mirror Side 1.
5. To specify the original’s orientation as you place it in the document feeder or on the
document glass, select Original Orientation, then select either Upright Image or
Sideways Image (top to left), then select Save.
If preset values were previously saved, select the preset in the lower-left corner of
the window.
6. Select Save.
Image Rotation
If the orientation of the paper currently loaded in the tray differs from that of the
document that is loaded, the machine automatically rotates the document image to
make copies with the document and paper orientations matched.
1. From the Copy tab screen, select the Layout Adjustment tab.
2. Select Image Rotation...
3. Select the applicable image rotation.
4. Select Save to save the changes.
User Guide
4-9Xerox® D95/D110/D125/D136 Copier/Printer
Page 48

Copy
Invert Image (Mirror Image/Negative Image)
Copies can be made with a negative image of the original, or with the left and right-side
images of the document reversed.
1. From the Copy screen, select the Layout Adjustment tab.
2. Select Invert Image.
The default is Normal Image, which does not mirror the images.
3. Select the Mirror Image and/or Negative Image option.
4. To create negative images, select Negative Image. The default is Positive Image,
which does not print the image as a negative.
5. Select Save to save the changes.
Note
When Negative Image and Edge Erase are set simultaneously, the edge erase area
turns to white.
Original Orientation
The document orientation needs to be set to indicate the top of the document.
1. From the Copy screen, select Layout Adjustment.
2. Select Original Orientation.
3. Select the orientation in accordance with the document that is loaded.
4. Select Save to save the changes.
Note
If the Original Orientation differs from the actual document orientation, the machine
may mistakenly detect the wrong side as the head of the document.
Repeat Image
A document image can be copied on one sheet of paper repeatedly for a specified
number of times.
1. On the Services Home screen, select Copy.
2. Select Output Format.
3. Select Page Layout.
4. Select Repeat Image.
5. Select the applicable Repeat Image option.
6. If Variable Repeat is required, select the correct image layout button and then set
the number of columns and rows using the related buttons.
7. Select Original Orientation.
8. Set and save the original orientation features.
9. Select Save to keep your repeat-image changes.
User Guide4-10
Page 49

Copy
Tip
When the copy ratio is set to Auto, the repeated copies of the image are reduced to
fit on the selected paper. You can also specify how the repeated copies of the image
are arranged.
Note
When making repeat copies at the same size as the document image, you can specify
a number of repeats that will fit on the paper.
Output Format
The Output Format section contains features such as Booklet Creation, Secure Watermark,
Transparency Options, as well as many other output formats.
Booklet Creation
Copies can be printed in the form of a booklet. The page images are reduced to print
two images per side of each printed page. The pages can then be folded and stapled
manually, or with the appropriate finisher, they can be creased and stapled automatically.
In this mode, the printer does not print the copies until it has scanned all the originals.
1. Select Copy on the Services Home, then select the Output Format tab.
2. Select Booklet Creation, then select Booklet Options On.
3. Under Original Input, select 1-Sided Originals, 2-Sided Originals or 2-Sided Rotated
Originals.
4. If the Office Finisher LX with Booklet Maker option is installed, select No Crease &
Staple, Crease & Staple or Crease Only.
5. You can add margins in the center binding area to compensate for the thickness of
the booklet:
• Select Binding Shift, then select the plus or minus (+/–) buttons to set the shift.
• Select Save.
6. To add covers, select Covers, then select Blank Cover, Print on Both or 1-Sided Covers
Print Outside.
• Select the tray loaded with cover paper and the tray loaded with main body paper
and select Save.
• To print the copy of the last original page on the back cover for Blank Cover and
Print on Both, select Last Page on Back Cover, then select Save.
7. To print the copy of the last original page on the back cover for Blank Cover and Print
on Both, select Last Page on Back Cover, then select Save.
8. To enter the number of sheets for each subset, select the plus or minus (+/–) buttons,
then select Save.
User Guide
4-11Xerox® D95/D110/D125/D136 Copier/Printer
Page 50

Copy
9. Offset Stacking places each stack of printed pages slightly to the left or right of the
previous stack for easier separation.
a) Select Output /Offset.
b) Select Center Tray Upper or Center Tray Lower. For automatic creasing, select
Right Middle Tray.
c) Select Offset Stacking, then select System Default, No Offset, Offset Per Set or
Offset Per Job, then select Save.
10. Select Save.
Perfect Binding (optional)
Important
The Perfect Binder is available with the D110, D125, and D136 Copier/Printer. The
copier/printer must use the integrated controller and not a separate print server.
Note
The Layout Adjustment options may be useful when the completed output is a perfect
bound book.
When the optional Perfect Binding feature is On, the following options are available:
Covers
Choose one of three options:
• Blank Cover: Select this option either for blank covers (front and back) or when using
preprinted covers.
• Print on Both: Select this option when printing on front and back covers and on both
the inside and outside of the covers.
• 1 Sided Covers, Print on Outside: Select this option to print only on the outside of
the front and back covers.
Cover & Book Block Size/Paper Supply
This option allows you to set the size of both the Cover and the Book Block pages and
to select from which tray the paper will be supplied.
• Cover Size: Select the paper size of the book cover from either the standard sizes
(such as 11 x 17 in./A3) or set a custom size.
• Book Block Size: Select the paper size of the book block pages from the standard
sizes (such as 11 x 17 in./A3) or set a custom size.
• Paper Supply: Select the tray to use for both the cover and book block pages; these
will be two different trays (one for the cover and another for the book block pages).
User Guide4-12
Page 51

Copy
Cut to Size
Select the trim amount to use for the printed and bound book; options include (refer
to the UI screens to indicate the default trim amount for each option):
• No Trim: The book is not trimmed
• Minor Trim: 7 mm (0.275 in.) is removed from all three sides of the book
• Standard Size: Oversized stock is trimmed to 8.5 x 11 in. or A4
• Custom Size: Select the trim amounts in 0.1 mm (0.003 in.) increments, starting at
7 mm (0.275 in.) to 27 mm (1.062 in.) for the top and bottom, and 7 mm (0.275 in.)
to 34 mm (1.338 in.) for the face.
Refer to the Perfect Binder chapter of the User Guide for specific trim and size
recommendations for perfect bound books.
Fine Adjustment
Use this option to fine tune the adjustment to the cover and/or the book block pages;
options include:
• Adjust Trim Size
• Adjust Trim Position
• Trim Angle
• Adjust Cover Position
Note
Refer to the UI screen information when using one of these options.
Add As/Edit Preset
This option allows you to add a new preset that contains specific perfect binding
information for a frequently-run perfect-bound job. Once a new preset is added, it
remains in the system’s memory and is available for recall and reuse when required.
This option also allows you to edit or delete already-existing perfect bound presets.
Use Preset
As the name indicates, this option allows you to select a preexisting, perfect bound
preset.
Selecting the Perfect Binding options
1. Press the Services Home button.
2. Select Copy on the Services Home screen.
3. From the Copy screen, select the Output Format tab.
The Output Format screen displays.
4. Select Perfect Binding.
The Perfect Binding screen displays.
5. Select On.
User Guide
4-13Xerox® D95/D110/D125/D136 Copier/Printer
Page 52

Copy
The Perfect Binding options are available now for selection.
6. Select the desired Cover option:
a) Select the Cover button.
b) Select one of the three Cover options: Blank Cover, Print on Both, or 1 Sided
Covers, Print on Outside.
c) Select Save.
The main Perfect Binding screen displays.
7. Select Cover & Book Block/Paper Supply.
8. Select Cover Size.
a) Select the output size of the cover either from the Standard Size options or enter
a Custom Size.
b) Select Save.
The Cover & Book Block/Paper Supply screen displays.
9. Select Book Block Size.
a) Select the output size of the book block pages from the Standard Size options or
enter a Custom Size.
b) Select Save.
The Cover & Book Block/Paper Supply screen displays.
10. Select Paper Supply.
a) If using preprinted covers, select Tray 9 for the cover paper supply.
Ensure that the blank or preprinted cover stock is loaded into the Perfect Binder
Tray 9.
b) Select the desired tray for the book block pages.
Ensure that the correct paper stock is loaded into the selected tray.
c) Select Save.
The Cover & Book Block/Paper Supply screen displays.
11. Select Cut to Size.
a) Select the desired option: No Trim, Minor Trim, Standard Size, or Custom Size.
b) Select Save.
The Cover & Book Block/Paper Supply screen displays.
12. If necessary, select the desired Fine Adjustment options and select Save.
The main Perfect Binding screen displays.
13. Select Save.
The Output Format screen displays.
14. Select other copy options as applicable (such as Original Orientation or 2 Sided
Copying).
15. Enter the desired quantity.
16. Press Start to begin the perfect bound copy job.
User Guide4-14
Page 53

Copy
17. Follow the instructions provided on the copier/printer UI to complete the perfect
bound job.
Covers
To add covers to a copy job, select different trays for the first and last page. Those trays
can be loaded with heavier stock, color or pre-printed paper. The covers can be blank or
printed.
The paper used for the covers must be the same size as the paper used for the rest of
the document.
1. Select Copy on the Services Home window, then select the Output Format tab.
2. Select Covers.
3. To include both a front and back cover that use the same tray and printing options:
a) Select Front & Back Covers.
b) Select a printing option for the cover: Blank Cover, 1-Sided Covers or Print on Both.
c) Select the tray to use for the covers, then select the tray to use for the main body.
4. To include only a front cover or only a back cover:
a) Select Front Cover Only or Back Cover Only.
b) Select a printing option for the cover: Blank Cover, 1-Sided Covers or Print on Both.
c) Touch the tray to use for the covers, then touch the tray to use for the main body
of the document.
5. Select Save.
Page Layout
You can copy multiple original pages onto one side of a sheet of paper. The size of the
page images is reduced proportionally to fit on the selected paper.
1. Select Copy on the Services Home window, then select the Output Format tab.
2. Select Page Layout and then select Multiple Pages per Side.
3. To select the number of original pages for each sheet of paper, select 2 Pages, 4
Pages or 8 Pages. For 4 Pages Up or 8 Pages Up, select the desired Reading Order.
4. To change the orientation of the copies, select Original Orientation, then select
Upright Images or Sideways Images, then select Save.
5. To repeat the same image on a page, select Repeat Image.
a) Select 2 Times, 4 Times, or 8 Times.
b) To automatically calculate the number of times to repeat vertically or horizontally
(based on document size, paper size, and the enlarge/reduction ratio), select Auto
Repeat.
c) To specify the number of times to repeat the image vertically or horizontally, select
Variable Repeat, then select the plus or minus (+/–) buttons. You can repeat an
image between 1 to 23 times vertically (columns), and between 1 to 33 times
horizontally (rows).
d) To change the orientation of the copies, select Original Orientation, then select
Upright Images or Sideways Images, then select Save.
User Guide
4-15Xerox® D95/D110/D125/D136 Copier/Printer
Page 54

Copy
Poster
This feature allows you to create a large poster by pasting the copies spread over multiple
sheets together. Copied sheets are provided with a paste margin so that they can be
pasted together. This paste margin is fixed to 0.4 inches (10 mm).
1. On the Services Home window, select Copy.
2. Select the Output Format option.
3. Select Poster.
4. Select Output Size, then touch the desired size of the poster.
5. To select the width and length enlargement percentages independently, select
Enlargement %, then select the plus or minus (+/–) buttons. To set the width and
length proportionally, select Lock X–Y%.
6. Select Paper Supply and set the applicable paper supply tray options.
7. Save the paper-supply options.
8. Select Save to keep your changes
Tip
Confirm that the orientation of the document and the Original Orientation setting
of the Scan Options screen are the same.
Note
This feature is disabled when Collate is selected from the Holepunch & More screen
(Copy tab, Copy Output button).
Annotations
You can add an annotation-stamp, date, page number, and Bates Stamp to the final
copies that are not included on the original document.
1. On the Services Home screen, select Copy.
2. Select Output Format and then select Annotations.
3. To insert a comment:
a) Select Comment, then select On.
b) On the next screen, select the desired comment in the list of stored comments.
c) To create a comment, select an <Available> comment, then select Edit. Using the
touch screen keyboard, enter the new comment, then select Save.
d) Select Apply To, then select First Page Only, All Pages or All Pages Except First,
then select Save.
e) To select the location of the comment on the page, select Position, then select
the desired location.
f) Select Save twice.
4. To insert the current date:
a) Select Date, then select On.
b) Select the format to use for the date.
User Guide4-16
Page 55

c) To select the position of the date stamp on the page, select Position, then select
the desired position.
d) To select which pages the date appears on, select Apply To, then select First Page
Only, All Pages or All Pages Except First, then select Save.
e) SelectSave twice.
5. To insert page numbers:
a) Select Page Numbers, then select On.
b) To enter the starting page number, select the plus or minus (+/–) buttons.
c) To select which pages the page number appears on, select Apply To, then select
All Pages or All Pages Except First, then select Save.
d) To select the position of the date stamp on the page, select Position, then select
the desired position.
e) Select Save twice.
6. To insert a Bates Stamp:
a) Select Bates Stamp, then touch On.
b) Select an existing prefix or create a new prefix.
c) To create a new prefix, touch an <Available> prefix, then select Edit. Using the
touch screen keyboard, enter the new prefix, then select Save.
d) To enter the starting page number, select the plus or minus (+/–) buttons.
e) To select which pages the Bates Stamp appears on, select Apply To, then select
All Pages or All Pages Except First, then select Save.
f) To select the position of the Bates Stamp on the page, select Position, then select
the desired position, then select Save.
g) To specify the number of digits, select Number of Digits. To select the minimum
number of digits necessary, select Auto Assign, then select Save. To select a
specific number of digits, touch Manual Assign, then select the plus or minus (+/–)
buttons to insert up to nine leading zeros, then select Save.
h) Select Save.
Copy
7. To specify the original’s orientation as you place it in the document feeder or on the
document glass, under Original Orientation, select either Upright Images or Sideways
Images.
8. To change the format used for annotations:
a) Select Format & Style.
b) To select the font point size, select the plus or minus (+/–) buttons.
c) Select the desired font color.
d) To select the placement of the annotations on the second side when printing
2-sided copies, select Same as Side 1 or Mirror Side 1.
e) Select Save.
9. Select Save.
4-17Xerox® D95/D110/D125/D136 Copier/Printer
User Guide
Page 56

Copy
Watermark
You can elect to lightly print a sequential control-number, stored watermark, date and
time, or serial number on the background of each copy set as a watermark.
1. On the Services Home window, select Copy.
2. Select Output Format and then select Watermark.
3. To add a control number, select Control Number, select Add. To select the starting
number, select the plus or minus (+/–) buttons.
4. Select Save.
5. To add a stored watermark, select Stored Watermarks, then select On. Select a stored
watermark in the list, then select Save.
6. To print the current date and time on the copies, select Date & Time, select Add,
then select Save.
7. To print the printer’s serial number on the copies, select Serial Number, select Add,
then select Save.
8. The watermark image is faint so the content of the page can be seen. To make the
watermark visible on copies used as originals, select Watermark Effect, then select
Embossed or Outline, then select Save.
9. Select Save.
Secure Watermark
Secure Watermark is an optional feature and requires the purchase of an optional
package. For information, contact the Xerox Customer Support Center. Secure Watermark
is sometimes called Hybrid Watermark.
Secure Watermark is a security management feature that embeds a copy-protection,
digital code into a document in order to restrict the document from being duplicated
(copied). With the digital code, you can also determine when, from which machine, and
by whom the document originated.
The following limitations or conditions apply to the Secure Watermark feature:
Secure Watermark options include:
Protection Code
This option embeds a code into the document, and prevents it from being copied or
scanned.
Stored Secure Watermark
This option embeds hidden text into the documents. With this hidden text feature, the
specified text is embedded in the entire sheet. When copying a document with hidden
text, the embedded text on the printed output appears in white regardless of whether
or not the optional Secure Watermark kit is installed on the machine.
User Guide4-18
Page 57

Copy
• Using the Secure Watermark feature may cause print quality to deteriorate such as:
- Colors may appear darker and
- Resolution for text and dots (such as decimal characters and periods) may be
slightly out of focus and harder to read
• The Secure Watermark feature may not function properly for a document if any of
the following apply:
- The document size is smaller than 5.5 x 8.5 in./A5.
- The background color is not white.
- The Watermark or Secure Watermark feature was previously used for the
document.
Tab Margin Shift
You can copy images to a tab location on tabbed paper by specifying the exact position
of the tab, so that the image is copied onto the tab. Sizes of tab paper that can be copied
are A4 and 8.5 to 11 in.
1. On the Services Home screen, select Copy.
2. From the Output Format section, select Tab Margin Shift...
3. Select the applicable shift feature option:
• Shift to Tab - The image is only copied to the tab part of the paper.
• Shift All - The whole document image is copied to the tab paper.
4. Use the +/- button to specify the shift value.
5. Select the applicable tab stock size and type.
6. Select Add Tab Stock to set the tab stock quantity.
7. Select Save to keep your choices.
• When loading tab paper in Tray 5 (Bypass), load the paper with the side to be
copied facing up and with the edge opposite to the tab to be fed first.
• You can load the tab paper in tray 3 to 4 only when selecting Tabbed Stock 1
105-216 gsm. When loading the tab paper in tray 3 or 4, load the paper with the
side to be copied facing down and with the edge opposite to the tab aligning to
the left side of the tray.
Face Up/Down Output
Auto
Selecting the Auto button automatically determines whether the copies should be
output face up or face down.
Face Up
Selecting the Face Up button causes all output to be delivered face up, with the first
page on top of the output stack.
User Guide
4-19Xerox® D95/D110/D125/D136 Copier/Printer
Page 58

Copy
Face Down
Selecting the Face Down button causes all output to be delivered face down, with the
first page on the bottom of the output stack.
Face Up (Reverse Order)
Selecting the Face Up (Reverse Order) button causes all output to be delivered face
up, with the last page on the top of the output stack. This setting may not be available,
depending on how your system administrator configures the machine.
Identification Card Copying
This feature allows you to copy both sides of a small original, such as an identification
card, onto the same side of a page.
1. Open the document feeder and place the card in the upper left corner of the document
glass.
2. Close the document feeder, select Copy on the Services Home window, then select
the Output Format tab.
3. Select ID Card Copy, select On, then select Save.
4. To scan side one, press the green Start button.
5. To scan side two, turn the card over without changing its location on the document
glass, then select Start. Both sides of the card will then print onto the same side of
a sheet of paper.
Folding
If the machine is equipped with a folding option, you can make copies to be folded in
half (single fold) or in thirds (C fold or Z fold types). Each type fold is discussed in detail
in this section.
1. On the Services Home screen, select Copy.
2. Select Output Format.
3. Select Folding...
4. Select the applicable folding features:
5. Select Save to keep your choices.
Note
The orientation of documents is limited to short-edge feed; therefore, you must select
a paper tray set with short-edge feed stock.
Transparency Options
This feature allows you to place a blank paper of the same size and orientation between
each transparency.
User Guide4-20
Page 59

Caution
Xerox recommends OHP transparency film for transparent copies. Use of
non-recommended films could cause machine failure or paper jams.
1. On the Services Home screen, select Copy.
2. Select Output Format.
3. Select Transparency Options.
• Off
• Blank Transparency Separators
• Blank Separators and Handouts
• Transparency Set and Handouts
4. Select the applicable transparency option.
5. Select Paper Supply Settings and set the paper tray features.
6. Save the paper-tray features.
7. On the Transparency Options screen, select Save to keep your changes.
Copy
Job Assembly tab
Build Job
Complex copy jobs that include a variety of originals requiring different copy settings
can be produced using this feature. Each “segment” can have different copy settings.
After all segments are programmed and scanned, the page images are stored temporarily
in the printer. The complete copy job is then printed.
1. On the Services Home screen, select Copy.
2. Select Job Assembly.
3. Program and scan the first segment:
a) Place the originals in the document feeder or on the document glass for the first
segment.
b) Select the desired copy settings for the first segment.
c) Select the Job Assembly tab.
d) Select Build Job, select On, then select Save.
e) To scan the first set of originals, press the green Start button on the control panel.
4. Program and scan additional segments:
a) Place the originals in the document feeder or on the document glass for the next
segment, then select Next Original.
User Guide
4-21Xerox® D95/D110/D125/D136 Copier/Printer
Page 60

Copy
b) When printing 2-sided jobs, the start page of the next segment is set using Chapter
Start. To set the start page of the next 2-sided segment, select Chapter Start,
then choose from the following:
Off: the first page of the next segment prints on the next available side.
On: the first page of the next segment prints on Side 1 of a new sheet of paper.
Pages per Side-New Page: If the first segment has an odd number of pages, the
second segment starts on side 1. If the first segment has an even number of pages,
the second segment starts on side 2.
c) Select Change Settings. Select the settings for the segment.
d) To scan the next set of originals, press the green Start button on the control panel.
5. For each additional segment you wish to copy, repeat Step 3.
6. When all segments have been scanned, in the Copy screen, select Last Original.
Build Job Options
1. Select Copy on the Services Home window, then select the Job Assembly tab.
2. Select Build Job, then select On.
3. Select from:
• Copy Output: Touch Paper Supply, Stapling, Collation and Output/Offset options,
then touch Save.
• Booklet Creation: Select the desired settings, then select Save.
• Covers: Select the desired settings, then select Save.
• Annotations: Select the desired settings, then select Save.
• Segment Separators: To insert separator pages between segments, touch Segment
Separators, then choose from the following:
- No Separators: Separators are not inserted. Select Save.
- Blank Separators: Blank separators are inserted. To specify the quantity of
separators, select the plus or minus (+/–) buttons, then touch Save.
- 1-Sided Separators Side 1 Only: The first page of the loaded documents is
copied on the front side of a separator. Select Save.
- 1-Sided Separators Side 2 Only: The first page of the loaded documents is
copied on the back side of a separator. Select Save.
- 2-Sided Separators: The first two pages of the loaded documents are copied
onto eachside of a separator. Select Save.
• Watermarks: Select settings, then touch Save.
4. Select Save.
User Guide4-22
Page 61

Copy
Sample Job
With a complicated copy job, it can be helpful to print a test copy before printing multiple
copies. This feature prints a single copy and holds the remaining copies. After inspection
of the sample, the remaining copies can be printed using the same settings, or canceled.
The sample copy is counted as part of the total quantity selected. For example, when
copying a book, if 3 is entered as the number of desired copies, one copy of the book
will be printed, and two other copies will be held until they are released for printing.
1. Select Copy on the Services Home window, then select the desired copy settings.
2. Select the Job Assembly tab.
3. Select Sample Job, then select On.
4. Select Save.
5. Press the green Start button on the control panel. The sample set is printed.
6. To print the remaining copies of the job, select Start, or press the green Start button
on the control panel.
7. If the sample copy is unsatisfactory, select Delete.
Combine Original Sets
This feature allows you to copy sets of documents that cannot be loaded into the
document feeder. This is useful when copying documents that may be damaged, ripped
or torn, or too wrinkled to go through the document feeder. Combine Original Sets allows
you to copy each original by placing it on the document glass and creating one copy
job for the entire set.
1. Select Copy on the Services Home window. Select the desired copy settings, then
enter the number of copies using the alphanumeric keypad on the control panel.
2. Select the Job Assembly tab, then select Combine Original Sets.
3. Select On, then select Save.
4. Copy the first set of originals:
a) If the first set of originals is not damaged, place them in the document feeder.
b) If the set of originals is damaged, copy them from the document glass.
5. Press the green Start button on the control panel. Copying begins.
6. Scan additional sets:
a) Use either the document feeder (if the originals are not damaged) or the document
glass to copy the next set of originals.
b) On the Copy screen, select Next Original.
7. Select Start on the touch screen, or press the green Start button on the control panel.
8. When the final set has been copied, in the Combine Original Sets screen, select Last
Original.
9. To cancel the job, select Delete.
4-23Xerox® D95/D110/D125/D136 Copier/Printer
User Guide
Page 62

Copy
Form Overlay
You can make copies overlaying the first page of the document on the rest of the
documents. For example, if the first page of the document only has a header and footer,
the rest of the documents can be copied with the same header and footer.
1. From Job Assembly, select Form Overlay.
2. From the Form Overlay screen, select On or Off.
3. Select Save to keep your choices.
• If the first page is 2-sided, only the top side is used for the form overlay.
• The Center/Corner shift, Image shift, Delete Outside/Delete Inside, Edge Erase,
Border Erase features are applied to the text body.
Delete Outside/Delete Inside
1. Select Copy on the Services Home window.
2. Select Job Assembly.
3. Select Delete Outside/Delete Inside.
4. Select either Delete Outside or Delete Inside.
5. If the originals are 2-sided, select the applicable option:
• Both Sides
• Side 1 Only
• Side 2 Only
6. Select the Area 1 button.
7. To define a specific area, enter the two X/Y coordinates within a range 0.0-17.0 inches
(0.0-431.8 mm). Navigate from coordinate to coordinate by selecting each X/Y button:
a) Select the Y1 box and use the numeric keypad on the control panel to enter the
value for Y1.
b) Select the Y2 box and use the numeric keypad on the control panel to enter the
value for Y2.
c) Select the X1 box and use the numeric keypad on the control panel to enter the
value for X1.
d) Select the X2 box and use the numeric keypad on the control panel to enter the
value for X2.
Clear a deletion area by selecting the Clear Area X (1, 2, or 3) button.
8. Select Save.
9. Select Save again.
10. Enter the Quantity and press Start.
11. Retrieve the copies from the output area.
User Guide4-24
Page 63

Copy
Stored Programming
Frequently used features and job settings can be saved as Stored Programming, which
can be accessed using a shortcut button.
Stored Programming not only remembers feature settings, but it can record a series of
operations. This enables you to record the hierarchy of displayed screens for each step.
For example, you could use Stored Programming to record the following actions: press
the Machine Status button, and display the Print Reports screen to print reports.
• You can record up to 100 consecutive operations in each stored program.
• Up to 40 programs can be stored.
• Build Job cannot be used with Stored Programming.
• There are situations where a stored program will become invalid:
- When default values or paper tray settings are changed in the system setting
- When buttons are added or removed from the touch screen, since stored
programming only remembers the location of a button on the screen, not the
name of the button. For example, button positions can change when a job flow
or job template is added or deleted
- Changing the values of the Watermark feature when it is used in a stored program
- Changing the password to the folder used in the stored program after it is stored.
• System Settings, Job Flow Sheets, Network Scanning, Address Book and the Browse
feature for the Scan to PC cannot be used with Stored Programming.
User Guide
4-25Xerox® D95/D110/D125/D136 Copier/Printer
Page 64

Copy
User Guide4-26
Page 65

5
Scan
Features for the Scanning device are explained in this section. There are various ways
to scan a job as well as where the scanned output should reside when finished.
Simple Scanning
The simple scanning procedure involves loading documents, selecting features, scanning
the job, and identifying where to store the scanned job.
Simple Scan Procedure
1. Load the documents.
2. From the Services Home window, select the applicable feature.
3. Press Start on the Control Panel. The print job will scan.
Loading Documents
The following two methods are available to load documents:
• Document Feeder: Single Sheet or Multiple Sheets
• Document Glass: Single sheet or Bound book
1. Determine which method you are going to use to load the document.
2. Remove any paper clips and staples before loading a document.
3. Adjust any document guides to match the size of the document loaded.
4. Load the documents face up for the Document Feeder, or place the document face
down on the Document Glass.
Selecting Document Features
1. Place the document in either the Document Feeder or on the Document Glass.
User Guide
5-1Xerox® D95/D110/D125/D136 Copier/Printer
Page 66

Scan
2. Select the desired feature for the document.
• Email: Scans a document and sends the scanned data as an e-mail attachment
after converting the data to TIFF, JPEG, PDF, DocuWorks, or XPS (XML Paper
specification).
• Network Scanning: Scans a document using a job template created on CentreWare
Internet Services. When Scan to Home is enabled and the Remote Access feature
is available, the scanned data can be transferred to a different destination
according to an authenticated user.
• Scan to PC: Scans a document and sends the scanned data to a network computer
via the FTP or SMB protocol.
• Store to Folder: Scans a document and saves the scanned data in a folder on the
machine.
• Send from Folder: Scans a document and temporarily saves the scanned data on
the machine. The user is notified by e-mail of the URL to the location where the
scanned data is stored. Then, the user can access the URL to retrieve the scanned
data.
• Store to USB: Scans a document and saves the scanned data to a USB memory
device (This is an optional feature).
• Store to WSD: You can scan documents set on the machine and save the scanned
data from a computer. Also, you can save the scanned data to a computer on the
network.
(This is an optional feature)
Starting the Scan Job
1. Load the document into either the Document Feeder or onto the Document Glass.
2. Select the desired scanning method.
3. Select desired features from the Scan window.
4. On the Control Panel, select the Start button.
5. If more than one document needs to be scanned, or another page of a bound book,
select Next Original, place the original to be scanned and select the Start button.
6. Continue until you are scanning the last original, select Last Original then select the
Start button.
7. Select Job Status on the control panel to view the status of the scanned job.
Saving the Scanned Data
When you used the Store to Folder service, you can use the following methods to
import the file stored in a folder of the machine to your computer:
• Import using an application: Use Network Scanner Driver.
• Import using Stored File Manager 3
• Import using CentreWare Internet Services
• Import using EasyOperator
User Guide5-2
Page 67

Scan
Cancelling a Scan Job
Follow the procedure below to cancel a scan.
1. Either select Stop on the touch screen or press the Stop button on the Control Panel.
2. On the control panel, press Cancel to end scanning or Start to restart the scan.
3. Press the Job Status button on the control panel.
4. Select the job to cancel, and then press Stop.
Note
When a scan is cancelled, scan data already stored to the mailbox is deleted.
Preview Scanned Images of a Job
1. Scan the images and select job features.
2. While scanning, select Preview to preview the last page that was scanned.
3. From the drop-down menu, specify the view size by selecting Whole Page or Enlarge
View, and set Current Page.
4. After the confirmation, select Close to close the preview screen.
Stopping the Scan Job
1. While a scan job is in process, Press either the Stop button on the control panel or
select Delete on the touch screen.
2. Select Delete.
3. If Delete does not appear on the screen, press the Job Status button on the Control
Panel.
4. Select the job to cancel and select Delete.
Scan Settings
1. While your scan job is scanning, you can change settings to that job by selecting
Next Original.
2. Select Change Settings.
3. Select the appropriate section and make select features. The following features can
be adjusted:
• Color Scanning
• 2 Sided Scanning
• Original Type
• Image Options (Lighten/Darken)
• Image Enhancement
• Resolution
• Quality/File Size
User Guide
5-3Xerox® D95/D110/D125/D136 Copier/Printer
Page 68

Scan
• Shadow Suppression
• Original Orientation
• Original Size
• Edge Erase
• Book Scanning
• Reduce/Enlarge
4. After your changes are complete, select Start.
Scan Settings
The following settings can be set for scan jobs.
• Color Settings
• Original Type
• Resolution
• Lighten/Darken
• Original Orientation
• 2 Sided Scanning
• Original Size
Resolution
You can select preset resolution settings.
1. From the Advanced Settings tab, select Resolution...
2. Specify the image resolution.
3. Select Save.
Note
When File Format > MRC High Compression or OCR is set to On, only 200 dpi and
300 dpi are available.
Lighten/Darken
You can use the up/down buttons to adjust the density settings.
You can select the output type desired.
User Guide5-4
Page 69

Scan
Original Orientation
The document orientation needs to be set to indicate the top of the document.
1. From the Copy tab screen, select the Layout Adjustment tab.
2. Select Original Orientation...
3. Select the orientation in accordance with the document that is loaded.
4. Select Save to save the changes.
Note
If the Original Orientation differs from the actual document orientation, the machine
may mistakenly detect the wrong side as the head of the document.
Original Size
You can specify the size of the document when scanning standard and custom sized
documents or when making copies at a size different from that of the currently loaded
document.
1. From the Copy tab screen, select the Layout Adjustment option.
2. Select the Original Size button.
3. Select the actual size of the document from the options displayed.
4. If you select a Manual Size Input, specify values for the X and Y directions.
5. Select Save to save the changes.
Note
If the document size cannot be detected, a screen for inputting the document size
is displayed.
You can scan a document and send the scanned data as an e-mail attachment.
1. Select E-mail from the Service Home screen.
2. From the E-mail tab screen, select New Recipient... .
- OR -
3. Select Address book...to search for and specify recipients in the address book.
4. If you wish to add the machine as a recipient, select Add Me.
5. If you wish to remove or change a recipient, select the applicable recipient and then
select Remove or Edit... from the pop-up menu.
6. Select Subject... to enter and save the E-mail subject by using the keyboard screen.
7. Select Message... to enter and save the E-mail message by using the keyboard screen.
8. Set the various scan features.
9. As needed, select the Advanced Settings tab and set and save the advanced settings.
User Guide
5-5Xerox® D95/D110/D125/D136 Copier/Printer
Page 70

Scan
10. As needed, select the Layout Adjustment tab and set and save the layout
adjustments.
11. Select, set and save the various options from the Email Options tab.
12. Press Start on the control panel.
Note
The Mail Delivery Notification (MDN) and Split Send features in the Output Format
screen are only available when using the E-mail feature.
Address Book
1. From the E-mail option on the Services Home screen, select Address Book.
2. Select a Recipient from the address list. Search for an address if needed.
• List all public entries: Displays the local address list.
• Search Public: Searches recipients in the local address list.
• Search Network: Searches recipients in the remote address list.
3. Specify the To, CC, or BCC.
4. Use the scroll-bar to navigate the Name list.
5. If needed, select Details to display the Details screen.
6. Select Close.
Adding E-mail Recipients:
1. From the E-mail tab, select New Recipient...
2. Enter the new recipient(s). You can select +Add to add another recipient.
3. Select Close.
Removing E-mail Recipients
1. From the E-mail tab, select the recipient to be deleted in the Recipient(s) list.
2. Select Remove from the menu.
Subject
You can enter the Subject containing up to 128 characters for the e-mail.
1. From the E-mail tab, select Subject...
2. Use the keyboard to enter the e-mail subject.
3. Select Save.
Message Contents
You can enter the Message contents containing up to 128 characters for the e-mail.
1. From the E-mail tab, select Message...
2. Use the keyboard to enter a brief message.
User Guide5-6
Page 71

3. Select Save.
Preview Scanned Image
1. Select Email from the Services Home window.
2. On the Email window, select the Preview check box.
3. Preview the scanned images after the document is scanned.
Selecting an Output Color
You can set the output color to scan a document.
1. Select Color Scanning from the current scanning edit window.
2. Select a Color Option.
• Auto Detect: The color of the document is determined automatically; the machine
scans in full color when the document is colored; otherwise, scans in monochrome.
• Color: Select this option to scan a color document.
• Black & White: Scans a document in monochrome two tones. You can select the
document type in Original Type.
Scan
• Grayscale: Scans a document in grayscale. Adds shades to monochrome, creating
intermediate tones that change gradually. Suited to documents containing
gradations that cannot be reproduced with monochrome (2-color tone).
Scan Both Sides of a Document
You can scan a 1-sided or 2-sided document on one or both sides of paper. By setting
the binding style, both sides are scanned in the same orientation.
1. Select 2 Sided Scanning from the current scanning edit window.
2. Select an option.
• 1 Sided: Select this option to scan only one side of the document.
• 2 Sided (Head to Head): Select this option when both sides of the 2-sided
document are in the same orientation.
• 2 Sided (Head to Toe): Select this option when both sides of the 2-sided document
are in opposite orientations.
• More: Displays the 2 Sided Scanning window.
3. If More is selected, the 2 Sided Scanning window opens. Select an option.
• 1 Sided: Select this option to scan only one side of the document.
• 2 Sided: Select this option to scan both sides of the document.
• Originals: This option is displayed when 2 Sided is selected.
• Head to Head: Select this option when both sides of the 2-sided document are in
the same orientation.
User Guide
5-7Xerox® D95/D110/D125/D136 Copier/Printer
Page 72

Scan
• Head to Toe: Select this option when both sides of the 2-sided document are in
opposite orientations.
Original Type
When you select Black & White in Color Scanning, you must then select the document
type.
On the current Scanning edit window, select Original Type and select an option.
• Photo & Text: Select this option when scanning a document that contains both
text and photos. The machine automatically identifies text and photo areas to
scan each area with optimum quality.
• Text: Select this option when scanning text clearly.
• Photo: Select this option when scanning photos.
Scan Presets
There are various scan presets that can be chosen.
• Sharing and Printing: This setting is best used for sharing files to be viewed on screen
and for printing most standard business documents. Using this setting results in small
file sizes and higher image quality.
• Archival Record: This setting is best used for standard business documents that are
stored for record keeping purposes. Using this setting results in the smallest file size
and normal image quality.
• OCR: This setting is best used for documents that are processed by optical character
recognizing software. Using this setting results in large file sizes and the highest
image quality.
• Highest Quality Print: This setting is best used for documents that contain detailed
graphics and photos. Using this setting results in large file sizes and maximum image
quality.
• Simple Scan: This setting is best used for faster processing but may result in
excessively large file sizes. Use this setting to apply the minimal amount of image
processing and compression.
User Guide5-8
Page 73

Scan
Network Scanning
On the Network Scanning window, you can scan documents after specifying a file (job
template) saving scanning conditions, information on the forwarding destination server,
and others. This feature creates job templates on a computer using CentreWare Internet
Services. Scanned data is converted to the format specified in a job template, and is
automatically sent to a server. The machine allows you to automatically retrieve job
templates stored in a server.
When Scan to Home is enabled, and when the Remote Access feature is available, the
scanned document can be transferred to a different destination according to an
authenticated user.
Preview Scanned Images of a Job
1. Scan the images and select job features.
2. While scanning, select Preview to preview the last page that was scanned.
3. From the drop-down menu, specify the view size by selecting Whole Page or Enlarge
View, and set Current Page.
4. After the confirmation, select Close to close the preview screen.
Selecting an Output Color
You can set the output color to scan a document.
1. Select Color Scanning from the current scanning edit window.
2. Select a Color Option.
• Auto Detect: The color of the document is determined automatically; the machine
scans in full color when the document is colored; otherwise, scans in monochrome.
• Color: Select this option to scan a color document.
• Black & White: Scans a document in monochrome two tones. You can select the
document type in Original Type.
• Grayscale: Scans a document in grayscale. Adds shades to monochrome, creating
intermediate tones that change gradually. Suited to documents containing
gradations that cannot be reproduced with monochrome (2-color tone).
Scan Both Sides of a Document
You can scan a 1-sided or 2-sided document on one or both sides of paper. By setting
the binding style, both sides are scanned in the same orientation.
1. Select 2 Sided Scanning from the current scanning edit window.
2. Select an option.
User Guide
5-9Xerox® D95/D110/D125/D136 Copier/Printer
Page 74

Scan
• 1 Sided: Select this option to scan only one side of the document.
• 2 Sided (Head to Head): Select this option when both sides of the 2-sided
document are in the same orientation.
• 2 Sided (Head to Toe): Select this option when both sides of the 2-sided document
are in opposite orientations.
• More: Displays the 2 Sided Scanning window.
3. If More is selected, the 2 Sided Scanning window opens. Select an option.
• 1 Sided: Select this option to scan only one side of the document.
• 2 Sided: Select this option to scan both sides of the document.
• Originals: This option is displayed when 2 Sided is selected.
• Head to Head: Select this option when both sides of the 2-sided document are in
the same orientation.
• Head to Toe: Select this option when both sides of the 2-sided document are in
opposite orientations.
Original Type
When you select Black & White in Color Scanning, you must then select the document
type.
On the current Scanning edit window, select Original Type and select an option.
• Photo & Text: Select this option when scanning a document that contains both
text and photos. The machine automatically identifies text and photo areas to
scan each area with optimum quality.
• Text: Select this option when scanning text clearly.
• Photo: Select this option when scanning photos.
Scan Presets
There are various scan presets that can be chosen.
• Sharing and Printing: This setting is best used for sharing files to be viewed on screen
and for printing most standard business documents. Using this setting results in small
file sizes and higher image quality.
• Archival Record: This setting is best used for standard business documents that are
stored for record keeping purposes. Using this setting results in the smallest file size
and normal image quality.
• OCR: This setting is best used for documents that are processed by optical character
recognizing software. Using this setting results in large file sizes and the highest
image quality.
User Guide5-10
Page 75

Scan
• Highest Quality Print: This setting is best used for documents that contain detailed
graphics and photos. Using this setting results in large file sizes and maximum image
quality.
• Simple Scan: This setting is best used for faster processing but may result in
excessively large file sizes. Use this setting to apply the minimal amount of image
processing and compression.
Scan to PC
The Scan to PC service allows you to scan documents and send the scanned data to a
network computer using the FTP or SMB protocol.
Transfer Protocol
1. From the Scan to PC option, select Transfer Protocol.
2. Select FTP, SMB, or SMB (UNC Format) as a forwarding protocol.
• FTP: Transfers using the FTP protocol.
• SMB: Transfers using the SMB protocol
SMB (UNC Format):Transfers using the SMB protocol (UNC Format).UNC stands
for Universal Naming Convention and its format is as follows:\\host name\shared
name\directory name
3. Select Save.
Address Book
1. From the E-mail option on the Services Home screen, select Address Book.
2. Select a Recipient from the address list. Search for an address if needed.
• List all public entries: Displays the local address list.
• Search Public: Searches recipients in the local address list.
• Search Network: Searches recipients in the remote address list.
3. Specify the To, CC, or BCC.
4. Use the scroll-bar to navigate the Name list.
5. If needed, select Details to display the Details screen.
6. Select Close.
Browse Network for PC
Specify a destination pc by browsing your network.
Selecting Browse displays a hierarchy consisting of available server names and folders.
1. Select Scan to PC from Services Home.
5-11Xerox® D95/D110/D125/D136 Copier/Printer
User Guide
Page 76

Scan
2. Select Browse.
3. Select the destination for saving the data. To locate a file, select Previous or to move
to another level and view other destinations, select Next.
Specify Destination
Use this option to specify a destination PC using the screen keyboard, Enter information
in the fields provided for the selected protocol, to specify a forwarding destination.
1. On the Scan to PC window, select in the Server section of the window.
2. Enter information to identify the server using the keyboard displayed on the screen.
You can also select Address Book to locate information.
3. For the Server name, enter a server name or IP address. When the save location is in
the DFS namespace on Windows, enter a domain name or server name. Up to 64
characters are allowed.
4. Select in the Shared Name section of the window and enter a shared name. When
the save location is in the DFS namespace on Windows, enter a root name. Up to 64
characters. This option is only available when you select SMB in Transfer Protocol.
5. Select in the Save In section of the window and enter a directory path. When the
save location is in the DFS namespace on Windows, enter a folder name. Up to 128
characters. This option is only available when you select FTP or SMB in Transfer
Protocol.
When you select SMB (UNC Format) in Transfer Protocol, the following directory
path: "\\Host Name\Shared Name\Directory Name".
6. Click in the User Name section of the window then enter the user name of the
computer you are forwarding to. When a user name is not required for the destination,
this field can be skipped.
7. Select in the Password section of the window and enter the password for the user
name. Up to 32 characters are allowed.
Scan Presets
There are various scan presets that can be chosen.
• Sharing and Printing: This setting is best used for sharing files to be viewed on screen
and for printing most standard business documents. Using this setting results in small
file sizes and higher image quality.
• Archival Record: This setting is best used for standard business documents that are
stored for record keeping purposes. Using this setting results in the smallest file size
and normal image quality.
• OCR: This setting is best used for documents that are processed by optical character
recognizing software. Using this setting results in large file sizes and the highest
image quality.
• Highest Quality Print: This setting is best used for documents that contain detailed
graphics and photos. Using this setting results in large file sizes and maximum image
quality.
User Guide5-12
Page 77

Scan
• Simple Scan: This setting is best used for faster processing but may result in
excessively large file sizes. Use this setting to apply the minimal amount of image
processing and compression.
Store to Folder
Use the Store to Folder option to scan documents and save the scanned data in a folder
of the machine.
Note
Folders must be created before using the Store to Folder feature. Refer to the System
Administration Guide for detailed information and instruction on creating folders.
Selecting an Output Color
You can set the output color to scan a document.
1. Select Color Scanning from the current scanning edit window.
2. Select a Color Option.
• Auto Detect: The color of the document is determined automatically; the machine
scans in full color when the document is colored; otherwise, scans in monochrome.
• Color: Select this option to scan a color document.
• Black & White: Scans a document in monochrome two tones. You can select the
document type in Original Type.
• Grayscale: Scans a document in grayscale. Adds shades to monochrome, creating
intermediate tones that change gradually. Suited to documents containing
gradations that cannot be reproduced with monochrome (2-color tone).
Scan Both Sides of a Document
You can scan a 1-sided or 2-sided document on one or both sides of paper. By setting
the binding style, both sides are scanned in the same orientation.
1. Select 2 Sided Scanning from the current scanning edit window.
2. Select an option.
• 1 Sided: Select this option to scan only one side of the document.
• 2 Sided (Head to Head): Select this option when both sides of the 2-sided
document are in the same orientation.
• 2 Sided (Head to Toe): Select this option when both sides of the 2-sided document
are in opposite orientations.
• More: Displays the 2 Sided Scanning window.
3. If More is selected, the 2 Sided Scanning window opens. Select an option.
User Guide
5-13Xerox® D95/D110/D125/D136 Copier/Printer
Page 78

Scan
• 1 Sided: Select this option to scan only one side of the document.
• 2 Sided: Select this option to scan both sides of the document.
• Originals: This option is displayed when 2 Sided is selected.
• Head to Head: Select this option when both sides of the 2-sided document are in
the same orientation.
• Head to Toe: Select this option when both sides of the 2-sided document are in
opposite orientations.
Original Type
When you select Black & White in Color Scanning, you must then select the document
type.
On the current Scanning edit window, select Original Type and select an option.
• Photo & Text: Select this option when scanning a document that contains both
text and photos. The machine automatically identifies text and photo areas to
scan each area with optimum quality.
• Text: Select this option when scanning text clearly.
• Photo: Select this option when scanning photos.
Preview Scanned Images of a Job
1. Scan the images and select job features.
2. While scanning, select Preview to preview the last page that was scanned.
3. From the drop-down menu, specify the view size by selecting Whole Page or Enlarge
View, and set Current Page.
4. After the confirmation, select Close to close the preview screen.
Store to USB
The Store to USB feature allows you to scan documents and save the scanned data to
a USB memory device.
1. Insert the USB memory device into the USB memory slot on the control panel of the
printer.
2. Select Store to USB .
If the USB Detected window does not display, then select Services Home button and
then select the Store to USB option.
3. Select Save in and select a folder for saving the data.
4. Select Save.
5. Select Preview to view the scanned images while you are scanning the document or
preview saved files.
User Guide5-14
Page 79

Scan
6. Select the Color Scanning option to set the output color to scan a document. You
can choose Auto Detect, Color, Black & White, or Grayscale.
7. Select 2 Sided Scanning to automatically scan both sides of a 2-sided document. If
you select the binding style, the print job will scan both sides in the same orientation.
8. Select Original Type to identify the type of document. Select Photo & Text, Text, or
Photo.
9. Select Scan Presets. Select Sharing & Printing, Archive Record, OCR, High Quality
Printing, or Simple Scan.
Using a USB Storage Device
A commercially available Memory Card Reader with a single slot can be used for this
feature, but the safe performance of this reader is not guaranteed. When a Memory
Card Reader with multiple slots is used, only one particular slot is available.
The following USB memory devices are supported:
• A formatted USB memory device
• A USB 2.0 compliant memory device (USB 1.1 is not supported.)
• A USB memory device with a storage capacity of up to 128 GB
A USB memory device encrypted with software is not supported.
When a USB memory device is inserted into the USB memory slot during the Energy
Saver mode, the touch screen does not light. After exiting the Energy Saver mode by
pressing the Energy Saver button, insert the USB memory device again or select Store
to USB on the Services Home screen.
Before removing the USB memory device, make sure that the screen indicating that
data is being transferred is not displayed. If you remove the USB memory device while
the data is being stored, the data in the device may be damaged. You can also view the
[Job Status] screen to confirm if the data has been stored to the USB memory device.
Save using the USB Memory Device (optional)
The Store to USB is an optional service that allows you to scan documents and save the
scanned data to a USB memory device.
Use the following USB memory devices:
• A formatted USB memory device
• A USB 2.0 compliant memory device (USB 1.1 is not supported.)
• A USB memory device with a storage capacity of up to 128 GB
To save using the USB, perform the following:
1. Insert the USB memory device into the USB memory slot on the control panel.
User Guide
5-15Xerox® D95/D110/D125/D136 Copier/Printer
Page 80

Scan
2. The USB Memory Device Detected window should appear. If this window does not
appear, select the Services Home button and select Store to USB.
3. Select Save In.
4. Select a folder to for saving the data.
5. Select Save.
If you do not specify the file storage location, the scanned data is saved in the root
directory.
Removing the USB Device
Before removing the USB memory device, make sure that the screen indicating that
data is being transferred is not displayed. If you remove the USB memory device while
the data is being stored, the data in the device may be damaged. You can also view the
Job Status screen to confirm if the data has been stored to the USB memory device.
Display Details of Storage in USB
1. Select Store to USB on the Services Home window.
2. Select Details.
3. The folder and file names in all directories to be saved are displayed.
Preview Scanned Images of a Job
1. Scan the images and select job features.
2. While scanning, select Preview to preview the last page that was scanned.
3. From the drop-down menu, specify the view size by selecting Whole Page or Enlarge
View, and set Current Page.
4. After the confirmation, select Close to close the preview screen.
Selecting an Output Color
You can set the output color to scan a document.
1. Select Color Scanning from the current scanning edit window.
2. Select a Color Option.
• Auto Detect: The color of the document is determined automatically; the machine
scans in full color when the document is colored; otherwise, scans in monochrome.
• Color: Select this option to scan a color document.
• Black & White: Scans a document in monochrome two tones. You can select the
document type in Original Type.
• Grayscale: Scans a document in grayscale. Adds shades to monochrome, creating
intermediate tones that change gradually. Suited to documents containing
gradations that cannot be reproduced with monochrome (2-color tone).
User Guide5-16
Page 81

Scan
Scan Both Sides of a Document
You can scan a 1-sided or 2-sided document on one or both sides of paper. By setting
the binding style, both sides are scanned in the same orientation.
1. Select 2 Sided Scanning from the current scanning edit window.
2. Select an option.
• 1 Sided: Select this option to scan only one side of the document.
• 2 Sided (Head to Head): Select this option when both sides of the 2-sided
document are in the same orientation.
• 2 Sided (Head to Toe): Select this option when both sides of the 2-sided document
are in opposite orientations.
• More: Displays the 2 Sided Scanning window.
3. If More is selected, the 2 Sided Scanning window opens. Select an option.
• 1 Sided: Select this option to scan only one side of the document.
• 2 Sided: Select this option to scan both sides of the document.
• Originals: This option is displayed when 2 Sided is selected.
• Head to Head: Select this option when both sides of the 2-sided document are in
the same orientation.
• Head to Toe: Select this option when both sides of the 2-sided document are in
opposite orientations.
Original Type
When you select Black & White in Color Scanning, you must then select the document
type.
On the current Scanning edit window, select Original Type and select an option.
• Photo & Text: Select this option when scanning a document that contains both
text and photos. The machine automatically identifies text and photo areas to
scan each area with optimum quality.
• Text: Select this option when scanning text clearly.
• Photo: Select this option when scanning photos.
File Format
You can select a file format for scanned data.
1. From the scan window, select File Format and select the appropriate file format for
the output data.
5-17Xerox® D95/D110/D125/D136 Copier/Printer
User Guide
Page 82

Scan
• TIFF/JPEG Auto Select: Automatically selects JPEG or TIFF. The file format is
determined for each page. JPEG for full-color and grayscale pages, and TIFF for
monochrome pages.
• TIFF: Saves scanned data in the TIFF format.
• JPEG: Saves scanned data in the JPEG format. This option is selectable when either
Color or Grayscale is selected in Color Scanning.
• PDF: Saves scanned data in the PDF format.
• DocuWorks: Saves scanned data in the DocuWorks format.
• More: Displays the File Format window.
2. If More was selected, make a selection on the additional File Format window. In
addition to the previously listed file formats, you can also select:
• Compression Method: Allows you to select a compression method for scanned
image data.
• MRC High Compression: Allows you to save the PDF, DocuWorks, and XPS files
with high compression.
• Searchable Text: Allows you to select whether to perform character recognition
in the PDF and DocuWorks files.
• Add Thumbnail: Allows you to attach thumbnails to the DocuWorks and XPS files
when DocuWorks or XPS is selected. A thumbnail is a reduced, small file size image
that helps you check the file contents.
• Single File for Each Page: Saves each page as a single file in the specified format.
• Optimize For Quick Web View: Optimizes the PDF file so that it is displayed faster
on a web browser.
Send to Folder
Scan To
1. Press the Log In/Out button on the control panel or select the login information field
on the touch screen.
2. Enter the user ID.
3. Select Store & Send Link on the Services Home screen.
4. The system automatically obtains the pre-registered e-mail address of the
authenticated user, and it is displayed in the Scan To section.
From
1. Press the Log In/Out button on the control panel or select the login information field
on the touch screen.
2. Enter the user ID.
User Guide5-18
Page 83

Scan
3. Select Store & Send Link on the Services Home screen.
4. The system automatically obtains the pre-registered e-mail address of the
authenticated user.
Subject
1. Press the Log In/Out button on the control panel or select the login information field
on the touch screen.
2. Enter the user ID.
3. Select Store & Send Link on the Services Home screen.
4. Select Subject.
5. Enter a subject with up to 128 characters using the displayed keyboard.
Message
1. Press the Log In/Out button on the control panel or select the login information field
on the touch screen.
2. Enter the user ID.
3. Select Store & Send Link on the Services Home screen.
4. Select Message.
5. Enter a message with up to 512 characters using the displayed keyboard.
Selecting an Output Color
You can set the output color to scan a document.
1. Select Color Scanning from the current scanning edit window.
2. Select a Color Option.
• Auto Detect: The color of the document is determined automatically; the machine
scans in full color when the document is colored; otherwise, scans in monochrome.
• Color: Select this option to scan a color document.
• Black & White: Scans a document in monochrome two tones. You can select the
document type in Original Type.
• Grayscale: Scans a document in grayscale. Adds shades to monochrome, creating
intermediate tones that change gradually. Suited to documents containing
gradations that cannot be reproduced with monochrome (2-color tone).
Scan Both Sides of a Document
You can scan a 1-sided or 2-sided document on one or both sides of paper. By setting
the binding style, both sides are scanned in the same orientation.
1. Select 2 Sided Scanning from the current scanning edit window.
2. Select an option.
• 1 Sided: Select this option to scan only one side of the document.
User Guide
5-19Xerox® D95/D110/D125/D136 Copier/Printer
Page 84

Scan
• 2 Sided (Head to Head): Select this option when both sides of the 2-sided
document are in the same orientation.
• 2 Sided (Head to Toe): Select this option when both sides of the 2-sided document
are in opposite orientations.
• More: Displays the 2 Sided Scanning window.
3. If More is selected, the 2 Sided Scanning window opens. Select an option.
• 1 Sided: Select this option to scan only one side of the document.
• 2 Sided: Select this option to scan both sides of the document.
• Originals: This option is displayed when 2 Sided is selected.
• Head to Head: Select this option when both sides of the 2-sided document are in
the same orientation.
• Head to Toe: Select this option when both sides of the 2-sided document are in
opposite orientations.
Preview Scanned Image
1. Select Email from the Services Home window.
2. On the Email window, select the Preview check box.
3. Preview the scanned images after the document is scanned.
Web Services for Devices (WSD)
The Store to WSD service allows you to scan documents set on the machine from a
network computer. This is optional.
How to store to WSD
1. On the Services Home window, select Store to WSD (Web Services on Device).
2. In the Start Scan Job From section, select where to start a scan job. You will select
either Computer (a request will be sent from a network computer) or This Device
(from the current machine).
3. If you choose to use Computer, then load the document onto the document glass
or into the document feeder and select Operate from Computer.
4. Operate scanning from a network computer by using an application which supports
the image loading feature (Windows Fax & Scan is an application). Scan according
to the application being used. The scanned data will be sent to the specified computer.
5. Remove your originals and select OK.
6. If you choose to use This Device, load the document on the document glass or into
the document feeder and select the destination from the List of Computer and select
Start.
7. The scanned data will be saved at the specified destination.
User Guide5-20
Page 85

Scan
WSD Starting a Scan Job
The Store to WSD service allows you to scan documents set on the machine from a
network computer. It also allows you to save the scanned data to a network computer.
You can scan documents set on the machine by sending a request from a network
computer.
1. Select Store to WSD on the Services Home screen.
2. Select Computer.
3. Load the document on the document glass or in the document feeder, and select
Operate From Computer.
4. The standby screen is displayed on the touch screen.
5. Operate scan from a network computer. To operate scan from a network computer,
use application which supports image loading feature such as Windows Fax and
Scan. The following describes the method using Windows Fax and Scan with Windows
7.
6. After being scanned, the scanned data is forwarded to the specified computer.
WSD Storing Data from a Network Computer
You can forward the data scanned with the command from the machine to a specified
computer on the network.
1. Select Store to WSD on the Services Home window.
2. Load the document on the document glass or in the document feeder, and select
This Device.
3. Computer names and 5 processing methods are displayed in the List of Computers.
Select destination from the list in accordance with the intended use.
4. Press the Start button.
5. The scanned date will be forwarded to the specified destination.
6. Check the forwarded data on the destination computer.
Advanced Settings tab
You can set advanced setting options from the Advanced Settings tab.
1. Select E-mail from the All Services screen.
2. Select the Advanced Settings tab.
3. As needed, select the applicable options:
• Image Options
• Image Enhancement
• Resolution
• Quality/File Size
User Guide
5-21Xerox® D95/D110/D125/D136 Copier/Printer
Page 86

Scan
• Photographs
• Shadow Suppression
• Color Space
Image Options
• Lighten/Darken:
This option provides manual control to adjust the lightness or darkness of the scanned
images. Select the Down scroll button to darken the scanned image from light originals
such as pencil images. Select the Up scroll button to lighten the scanned image from
dark originals such as half tones or originals with colored backgrounds.
• Sharpness
This option controls the balance between sharp text and moiré (patterns within the
image). Move the slider control down (Soften) to produce an image with a smooth,
uniform appearance (ideally suited for photographic scanned images). Move the
slider control up (Sharpen) to produce an image with better quality text or line art.
• Saturation
This option allows colors to become more or less vivid. To make the colors on your
output more vivid, move the slide bar up. To create a less vivid output, or a pastel
effect, move the slide bar down. To keep the output normal, do not adjust the
saturation.
Image Enhancement
1. Select Image Enhancement.
2. Set Background Suppression and Contrast.
• Off: Scans the document backgrounds with no filtering.
• Auto Suppression: When Color Scanning is set to Black & White, the background
of a document printed on colored paper, such as newspaper, will be suppressed.
When Color Scanning is set to Color, the background of a document printed on
white-color paper will be suppressed.
• Contrast: Allows you to select a contrast level from five levels between [Less] and
[More]. Selecting an upper cell on the bar makes the difference between light and
dark areas greater; light areas become lighter and dark areas darker. In contrast,
selecting a lower cell on the bar makes the difference between light and dark
areas smaller.
3. Select Shadow Suppression.
4. Select Auto Suppression.
User Guide5-22
Page 87

Scan
Resolution
You can select preset resolution settings.
1. From the Advanced Settings tab, select Resolution...
2. Specify the image resolution.
3. Select Save.
Note
When File Format > MRC High Compression or OCR is set to On, only 200 dpi and
300 dpi are available.
Quality/File Size
This feature allows you to select the ratio of data compression for color and grayscale
scanned images.
Note
This feature is unavailable whenever Black and White is selected.
1. From the Advanced Settings tab, select Quality/File Size...
2. Use the right or left button to specify the output quality/file size.
Note
Only three compression levels are available when MRC High Compression is enabled
under PDF Multiple Pages per File in File Format.
3. Select Save.
Photographs
The Photographs enhancement feature is available if Color is selected from the Color
Scanning section of a tab screen.
1. From the Advanced Settings tab, select Photographs...
2. Select Off or Enhance Photographs:
• Off: Disables the feature.
• Enhance Photographs: Enhances images scanned from color photographs with
Output Color set to Full Color.
3. Select Save.
Note
When Enhance Photographs is selected, Shadow Suppression and Background
Suppression are not available.
User Guide
5-23Xerox® D95/D110/D125/D136 Copier/Printer
Page 88

Scan
Shadow Suppression
You can use the Shadow Suppression feature to hide background colors and image
bleed-through.
1. From the Advanced Settings tab, select Shadow Suppression...
2. Select No Suppression or Auto Suppression.
3. Select Save.
Color Space
The Color Space feature is available if Color is selected from the Color Scanning section
of a tab screen.
1. From the Advanced Settings tab, select Color Space.
2. Select sRGB or Device Color Space.
3. Select Save.
Note
When this Device Color Space is selected, the factory default values are used or the
Image Options, Shadow Suppression, and Image Enhancement features.
Layout Adjustment tab
You can specify layout adjustment settings from the Layout Adjustment tab.
1. Select E-mail from the All Services screen.
2. Select the Layout Adjustment tab.
3. Select the applicable option:
• Original Orientation
• Original Size
• Edge Erase
• Book Scanning
• Reduce/Enlarge
Original Orientation
The document orientation needs to be set to indicate the top of the document.
1. From the Copy tab screen, select the Layout Adjustment tab.
2. Select Original Orientation...
3. Select the orientation in accordance with the document that is loaded.
4. Select Save to save the changes.
User Guide5-24
Page 89

Scan
Note
If the Original Orientation differs from the actual document orientation, the machine
may mistakenly detect the wrong side as the head of the document.
Original Size
You can specify the size of the document when scanning standard and custom sized
documents or when making copies at a size different from that of the currently loaded
document.
1. From the Copy tab screen, select the Layout Adjustment option.
2. Select the Original Size button.
3. Select the actual size of the document from the options displayed.
4. If you select a Manual Size Input, specify values for the X and Y directions.
5. Select Save to save the changes.
Note
If the document size cannot be detected, a screen for inputting the document size
is displayed.
Edge Erase
When scanning with the document-feeder in the open position or from a book, you can
remove the black shadows along the edges using the Edge Erase feature.
1. From the Layout Adjustments tab, select Edge Erase.
2. Select All Edges or Individual Edges:
• All Edges: Erases the same amount of length from all four edges of your
document. The edge erase amount is specified by the System Administrator. If
you do not want to erase any edges, select [Individual Edges] and specify 0 for
both the top and bottom and left and right edges.
• Individual Edges: Allows you to specify the lengths to be erased from the top
and bottom and left and right edges of your document. Up to 50 mm (2 inches)
can be specified to each field.
3. For individual edges, you can use the up or down buttons to set the values.
4. Select the applicable Original Orientation:
• Upright Images - Selects the vertical orientation, where the top of the document
is orientated towards the back of the machine.
• Sideways Images - Selects the horizontal orientation, where the top of the
document is orientated towards the left of the machine.
5. Select Save.
User Guide
5-25Xerox® D95/D110/D125/D136 Copier/Printer
Page 90

Scan
Book Scanning
The Book Scanning feature allows you to scan facing pages of a document on separate
sheets of paper in page-number order.
1. From the Layout Adjustments tab, select Book Scanning.
2. From the Book Scanning screen, select the features.
3. Binding Edge Erase erases the center binding area of the book that tends to be
shadowed due to the fold in the pages. Use the Left or Right buttons to set the
dimensions.
4. Select Save to save the changes.
Tip
You cannot use the document feeder when using this feature.
Note
A document of non-standard size or undetectable size may not be divided exactly
into two equal sizes.
Reduce/Enlarge
The Reduce/Enlarge feature allows you specify a reduction or enlargement value for the
scanned document.
1. From the Layout Adjustments tab, select Reduce/Enlarge...
2. Select from:
a) Proportional% (default):
• In the Variable% area, specify the ratio with the up and down buttons.
• You can also select a preselect value from the Preset% area.
• Select Save to save the changes.
• Enter Output Size: Select from preset standard scanning ratios to set the
output size.
b) In the Output Size area, select the applicable preset.
c) Select Save to save the changes.
Filing Options
File Name
You can enter and save a file name.
1. From the E-mail Options tab, select File Name...
2. Use the keyboard to enter the file name.
3. Select Save to save the changes.
User Guide5-26
Page 91

Scan
File Format
You can select a file format for scanned data.
1. From the scan window, select File Format and select the appropriate file format for
the output data.
• TIFF/JPEG Auto Select: Automatically selects JPEG or TIFF. The file format is
determined for each page. JPEG for full-color and grayscale pages, and TIFF for
monochrome pages.
• TIFF: Saves scanned data in the TIFF format.
• JPEG: Saves scanned data in the JPEG format. This option is selectable when either
Color or Grayscale is selected in Color Scanning.
• PDF: Saves scanned data in the PDF format.
• DocuWorks: Saves scanned data in the DocuWorks format.
• More: Displays the File Format window.
2. If More was selected, make a selection on the additional File Format window. In
addition to the previously listed file formats, you can also select:
• Compression Method: Allows you to select a compression method for scanned
image data.
• MRC High Compression: Allows you to save the PDF, DocuWorks, and XPS files
with high compression.
• Searchable Text: Allows you to select whether to perform character recognition
in the PDF and DocuWorks files.
• Add Thumbnail: Allows you to attach thumbnails to the DocuWorks and XPS files
when DocuWorks or XPS is selected. A thumbnail is a reduced, small file size image
that helps you check the file contents.
• Single File for Each Page: Saves each page as a single file in the specified format.
• Optimize For Quick Web View: Optimizes the PDF file so that it is displayed faster
on a web browser.
Read Receipts
1. On the printer control panel, press the Services Home button.
2. Select the correct Scan option (Network Scanning, Send to Folder, and so on), then
select the Filing Options tab.
3. Select Read Receipts, then select On.
4. Select Save.
User Guide
5-27Xerox® D95/D110/D125/D136 Copier/Printer
Page 92

Scan
File Name Conflict
You can resolve a file-name conflict by using the File Name Conflict option.
1. Select the Filing Options tab.
2. Select the File Name Conflict option.
3. Select the appropriate option:
• Do Not Save: Cancels the scan operation so that you may enter another file
name.
• Rename New File: Attaches a 4-digit number (0000-9999) to the end of the
duplicate file name and saves the file in the same directory.
• Overwrite Existing File: Deletes the existing file with the duplicate file name and
saves the new file with the specified file name in the same directory.
4. Select Save.
Email Options tab
Set e-mail options using the E-mail Options tab.
1. Select E-mail from the Services Home window.
2. Select the E-mail.
3. Select the applicable option:
• File Name
• File Format
• Reply to
• Split Send
• Read Receipts
File Name
You can enter and save a file name.
1. From the E-mail Options tab, select File Name...
2. Use the keyboard to enter the file name.
3. Select Save to save the changes.
File Format
1. From the Scan window, select the Email Options tab.
2. Enter the File Name, File Format, Reply To, and Read Receipts sections.
User Guide5-28
Page 93

Scan
• TIFF/JPEG Auto Select: Automatically saves scanned data as TIFF or JPEG files.
Full color and grayscale scanned images are stored in the JPEG format, and
monochrome scanned images are saved in the TIFF format.
• PDF Images Multiple Pages per File: Saves multiple pages into a single file in the
PDF format.
• PDF/A: Saves scanned data in the PDF/A format; PDF/A format is used primarily
for archiving and long-term preservation.
• Optimize PDF for Fast Web: If you select one of the PDF file format options, the
Optimize PDF for Fast Web View option is available for selection.
• The Optimize PDF for Fast Web View feature allows the user to open and view
the first page of a multi-page PDF document within a web browser, while the
remainder of the document continues to load in the background. This may increase
the overall file size. Fast Web View restructures an Adobe PDF document for
page-at-a-time downloading (byte-serving) from web servers. With page-at-a-time
downloading, the web server sends only the requested page, rather than the entire
PDF document. This is especially important with large documents that can take
a long time to download from a server.
• Check with your web master to make sure that the web server software you use
supports page-at-time downloading. To ensure that the PDF documents on your
website appear in older browsers, you may also want to create HTML links (versus
ASP scripts or the POST method) to the PDF documents and keep path names, or
URLs, to the files at less than 256 characters.
• TIFF File for Each Page: Saves each page into a different file in the TIFF format.
• mTIFF Multiple Pages per File: Saves multiple pages into a single file in the TIFF
format.
• JPEG File for Each Page: Saves each page into a different file in the JPEG format.
• JPEG File for Each Page is not available when Color Scanning is set to Black &
White.
• XPS: Saves multiple pages into a single file in the XPS (XML Paper Specification)
format.
Reply to
Use the Reply to... feature to specify or search for a reply recipient.
1. From the E-mail Options tab, select Reply to...
2. Use the keyboard to enter or search for the applicable reply-to name.
3. Select Save to save the changes.
Read Receipts for Email
1. On the printer control panel, press the Services Home button.
2. Select E-mail, then select the E-mail Options tab.
3. Select Read Receipts, then select On.
4. Select Save.
User Guide
5-29Xerox® D95/D110/D125/D136 Copier/Printer
Page 94

Scan
User Guide5-30
Page 95

6
Send from Folder
Folder Operating Procedure
Two types of folders are available: Scan & Other Jobs and Copy & Print Jobs. The folders
under Scan & Other Jobs allow you to store print files submitted by a computer and
scan files. These files stored in a folder can be sent by e-mail and be retrieved from a
network computer. You can also automate routine tasks, or register private folders and
shared folders separately.
The folders under Copy & Print Jobs allow you to store copy files and print files. You
can also save the files again and reprint them in a folder after editing the files or changing
their settings.
Selecting a Folder
The following describes how to select a folder under Copy & Print Jobs. Access to some
folders may be restricted, depending on the settings of the Authentication feature.
1. Select Send from Folder on the Services Home window.
2. On the Send From Folder screen, select Copy & Print Jobs, and then select a folder.
3. Select a folder displayed on the window or select one using Go to.
4. In the Go to section, a folder at the top will display when you enter the 3-digit folder
number with the numeric keypad.
6-1Xerox® D95/D110/D125/D136 Copier/Printer
User Guide
Page 96

Send from Folder
Checking files in Copy & Print Job
You can check or operate files stored in a folder under Copy & Print Jobs. Both copy
and print files are displayed in folders under Copy & Print Jobs.
1. Select Send from Folder on the Services Home window.
2. Select a folder under Copy & Print Jobs on the Send from Folder screen.
3. Select a file.
4. Select any option.
• Refresh: Displays the updated information.
• List: Lists the files stored in the folder, with their stored dates and pages.
• Thumbnail: Displays the images and names of the files stored in the folder.
• Number of Files: Displays the number of files stored in the selected folder.
• Select All: Allows you to select all the files in the folder. If you select [Select All]
again, all the files are deselected.
• Delete: Allows you to delete the selected files in the folder.
• Copy/Move: Previews the selected file to allow you to check its details, and copy
or move it to another folder.
• Edit Pages: Allows you to edit the files in the folder.
• Merge/Batch Print: Allows you to merge multiple files in the folder, and batch
print them.
• Change Settings/Print: Allows you to change the file settings before printing the
files.
Deleting Files in Copy & Print Jobs
1. Select Send from Folder on the Services Home window.
2. Select Copy & Print Jobs, and then select a folder.
3. Select a file and select Delete.
4. Select Delete.
Copying/Moving Files in Copy & Print Jobs
1. Select Send from Folder on the Services Home window.
2. Select Copy & Print Jobs, and then select a folder.
3. Select a file and select Copy/Move.
User Guide6-2
Page 97

Send from Folder
4. Select any option.
• View Size: Allows you to select whether to display the whole page or to enlarge
the image by 200%.
• Rotation: Allows you to select an angle to preview the image from Right 90
degrees, Left 90 degrees, and 180 degrees.
• Change File Name: Allows you to change the file name.
• Current Page: Allows you to specify a page to preview on the screen using [+] and
[-] or the numeric keypad.
• First Page Only: Allows you to print the first pages of files for confirmation.
• Copy: Allows you to copy files from one folder to another.
• Move: Allows you to move files from one folder to another.
Copy
You can copy files from one folder to another.
1. Select Send from Folder on the Services Home window.
2. Select Copy & Print Jobs, and then select a folder.
3. Select a file and select Copy/Move.
4. Select Copy.
5. Select a folder to which a file will be copied, and select Save.
Move
1. Select Send from Folder on the Services Home window.
2. Select Copy & Print Jobs, and then select a folder.
3. Select a file and select Copy/Move.
4. Select Move.
5. Select a folder to which a file will be moved, and select Save.
Editing Files
1. Select Send from Folder on the Services Home window.
2. Select Copy & Print Jobs, and then select a folder.
3. Select a file and select Edit Pages.
4. Select Delete Pages or Insert File/Separators.
Delete Pages
1. Select Send from Folder on the Services Home window.
2. Select Copy & Print Jobs, and then select a folder.
3. Select a file and select Edit Pages.
User Guide
6-3Xerox® D95/D110/D125/D136 Copier/Printer
Page 98

Send from Folder
4. Select Delete Pages.
5. Use the numeric keypad to select the target page to be deleted and select Add to
Delete List.
6. Select Delete.
Insert Separators
1. Select Send from Folder on the Services Home window.
2. Select Copy & Print Jobs, and then select a folder.
3. Select a file and select Edit Pages.
4. Select Insert File/Separators.
5. Select a paper tray for separators to be inserted.
6. Use [+] and [-] or the numeric keypad to enter the number of separators to be inserted,
and then select Save.
Chapter Start and Insert File
1. Select Send from Folder on the Services Home window.
2. Select Copy & Print Jobs, and then select a folder.
3. Select a file and select Chapter Start + Insert File.
4. Select a file to be inserted, and select Save.
5. Select Insert File.
6. Select a file to be inserted, and select Save.
Edit List and Delete Pages
1. Select Send from Folder on the Services Home window.
2. Select Copy & Print Jobs, and then select a folder.
3. Select a file and select Edit Pages.
4. Select Edit List/Delete Pages
5. Use [+] and [-] or the numeric keypad to select a page to be deleted, and select Add
to Delete List.
6. Select Delete.
Merging/Batch Printing Files in Copy & Print Jobs
You can merge multiple files stored in a folder under [Copy & Print Jobs], and batch print
them.
1. Select Send from Folder on the Services Home window.
2. Select Copy & Print Jobs, and then select a folder.
3. Select a file and select Merge/Batch Print.
User Guide6-4
Page 99

Send from Folder
4. Select any option, and specify the number of print sets using the numeric keypad.
5. Select Print.
File Details
Use this option to check the content of selected files.
1. Select Send from Folder on the Services Home window.
2. Select Copy & Print Jobs, and then select a folder.
3. Select a file and select an option from this window.
4. Select File Details.
5. Select any option, and specify the number of print sets using the numeric keypad.
• Merge: Displays the Merge window.
• Merge & Print: Displays the Merge & Print window.
• Print: Merges and then prints (multiple) selected files. The merged files are not
saved.
Merge
1. Select Send from Folder on the Services Home window.
2. Select Copy & Print Jobs, and then select a folder.
3. Select a file and select Merge/Batch Print.
4. Select Merge.
5. Select any option.
• Delete Source Files
• Keep Source Files
• Cancel
Merge and Print
1. Select Send from Folder on the Services Home window.
2. Select Copy & Print Jobs, and then select a folder.
3. Select a file and select Merge/Batch Print.
4. Select Merge & Print.
5. Select any option.
• Delete Source Files
• Keep Source Files
• Cancel
User Guide
6-5Xerox® D95/D110/D125/D136 Copier/Printer
Page 100

Send from Folder
Separators
1. Select Send from Folder on the Services Home window.
2. Select Copy & Print Jobs, and then select a folder.
3. Select a file and select Merge/Batch Print.
4. Select Separators.
5. Select any option.
• No Separators
• Blank Separators
• Printed Separators
• No Chapter Start
• Separator Tray
• Separator Quantity
Covers
1. Select Send from Folder on the Services Home window.
2. Select Copy & Print Jobs, and then select a folder.
3. Select a file and select an option.
4. Select Covers.
5. Select any option.
• Front Cover: Front covers can be attached to a merged file.
• Back Cover: Back covers can be attached to a merged file.
• Front Cover Quantity: Allows you to specify the number of blank sheets to be
used as front covers.
• Back Cover Quantity: Allows you to specify the number of blank sheets to be used
as back covers.
• Paper Supply: Select the trays for front and back covers from Front Cover Tray
and Back Cover Tray.
Watermark
1. Select Send from Folder on the Services Home window.
2. Select Copy & Print Jobs, and then select a folder.
3. Select a file and select an option.
4. Select Watermark.
5. Select any option.
• Control Number: Select whether to print control numbers.
User Guide6-6
 Loading...