

Page 1

WorkCentre® C2424 Copier-Printer
Scanning
This chapter includes:
■ "Basic Scanning" on page 4-2
■ "Installing the Scan Driver" on page 4-4
■ "Adjusting Scanning Options" on page 4-5
■ "Retrieving Images" on page 4-11
■ "Managing Files and Controlling Scanning Options" on page 4-18
Copyright © 2005 Xerox Corporation. All Rights Reserved.
4-1
Page 2

Basic Scanning
Basic Scanning
This section includes:
■ "Overview" on page 4-2
■ "Scanning the Originals at the System" on page 4-3
■ "Retrieving the Scanned Images" on page 4-4
Videos are available with instructions for basic scanning. Videos are located on
the User Documentation CD-ROM and at www.xerox.com/office/c2424support.
Overview
The scanning procedure used with the WorkCentre C2424 Copier-Printer differs from that of
desktop scanners. Because the system is normally connected to a network rather than directly
to a computer, the user scans a document or image at the system, then uses their computer to
retrieve the scanned image.
Scanned images are normally stored on the system’s hard drive, in either the Public Folder or
in a private folder. Users can also choose to scan images directly to their computer (Windows
only).
Note
Jobs can print while you are scanning originals or retrieving files from the system hard
drive.
File Names
The system creates file names for scanned images using the current date and time. For
information about setting the system date and time, see the Features chapter of this guide.
File Sizes
The size of scanned image files varies based on the image that is scanned and the scan
resolution and color options selected:
■ The higher the scan resolution, the larger the file size.
■ An image scanned in color will have a larger file size than the same image scanned in
black and white.
For more information, see "Setting the Scan Resolution" on page 4-7 and "Selecting Color or
Black and White Images" on page 4-8.
For information about managing system disk space, see "Deleting Image Files" on page 4-19.
WorkCentre® C2424 Copier-Printer
4-2
Page 3
Basic Scanning
5
Scanning the Originals at the System
Follow these steps to scan an image at the system:
Note
To clear the settings from the previous job, press the Clear All button twice.
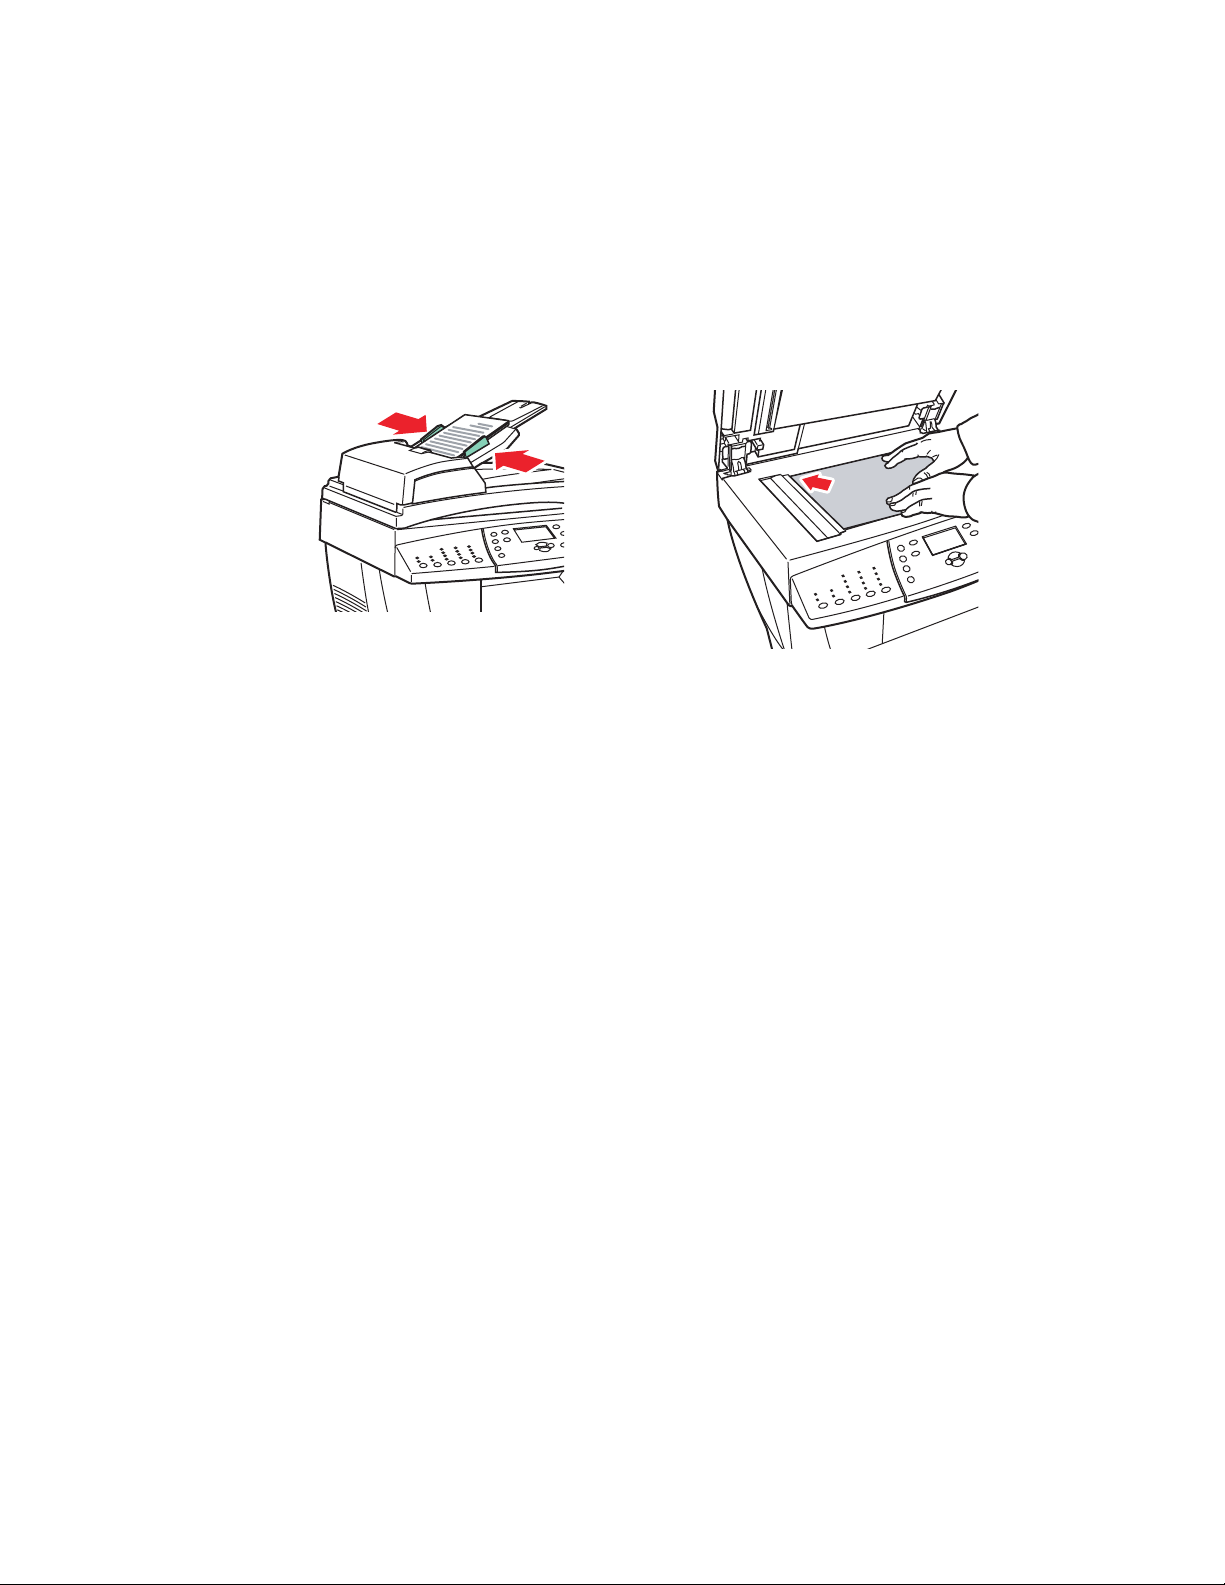
1. Load the originals to be scanned. Use either the document glass or the document feeder.
2424-076
2424-06
Document Feeder
Insert originals faceup with the top entering
the feeder first. Adjust the paper guides so they
fit against the originals.
Document Glass
Lift the document feeder, then place the original
facedown on the back, left corner of the
document glass.
2. Press the Scan button. A list of scanning options appears on the control panel screen.
3. If desired, change the destination of the scanned images. If you choose a private folder or a
PC name, you may also need to enter the correct numeric password. For information, see
"Setting the Scan Destination" on page 4-6.
4. Press the Start button on the right side of the control panel.
Unless you changed the destination in Step 3, the image is scanned to the public folder on
the system’s hard drive.
Note
If you placed originals in the document feeder, the images are placed in a multi-page
file. Scanning continues until the document feeder is empty.
5. When you finish scanning to a password protected location, press the Clear/Clear All
button twice. This prevents the next person that uses the system from scanning files to or
deleting files from that location.
WorkCentre® C2424 Copier-Printer
4-3
Page 4

Installing the Scan Driver
Retrieving the Scanned Images
The method you use to retrieve scanned images depends on how the system is connected to the
network and the destination you chose for the scanned image.
■ If the system is connected to a network, you can copy the image files from the Public
Folder or a private folder on the system’s hard drive to your computer’s hard drive using
CentreWare IS, or using the Xerox Scan Utility (Windows only).
■ If the system has either a USB or network connection, you can import the images from the
Public Folder or a private folder on the system’s hard drive into an application on your
computer by using the application’s Insert, Acquire, or Import menu selection.
■ If you scanned images directly to your Windows computer, you can retrieve the images
from the My Scanned Images folder on your computer.
For more information, see "Retrieving Images" on page 4-11.
Installing the Scan Driver
If you plan to either import the scanned images directly into an application (such as Photoshop
or Word) or scan directly to your computer, you must install the Xerox scan driver.
Xerox provides scan drivers for the Windows and Macintosh operating systems along with the
printer drivers on the WorkCentre C2424 Software CD-ROM that came with your system.
Note
Xerox scan drivers can also be found on the web at www.xerox.com/office/drivers
To install the scan driver:
1. Insert the WorkCentre C2424 Software CD-ROM in your computer.
2. Click the Install Drivers link.
3. Click the Install Printer and Scan Drivers link, then follow the instructions to install the
drivers.
.
WorkCentre® C2424 Copier-Printer
4-4
Page 5

Adjusting Scanning Options
Adjusting Scanning Options
This section includes:
■ "Setting Up a Private Folder for Scanning" on page 4-5
■ "Setting the Scan Destination" on page 4-6
■ "Setting the Scan Resolution" on page 4-7
■ "Automatically Suppressing Background Variations" on page 4-7
■ "Selecting Color or Black and White Images" on page 4-8
■ "Specifying 1-Sided or 2-Sided Originals" on page 4-8
■ "Specifying the Original Type" on page 4-9
■ "Setting the Original Size" on page 4-9
■ "Setting a Scan Password for Your Computer (Windows Only)" on page 4-10
■ "Calibrating the Scanner" on page 4-10
Setting Up a Private Folder for Scanning
If the system is connected on a network, you can create a private folder on the system’s hard
drive into which you can scan images. You can protect your private folder with a password to
prevent others from viewing or retrieving your scanned images.
To create a private folder:
1. Access CentreWare IS:
a. Launch your web browser.
b. Enter your system’s IP address in the browser’s Address field
(http://xxx.xxx.xxx.xxx).
Note
You can find the IP address on the “Configuration Page” or the “Startup Page. You can
also view the IP address on the control panel; press the System Setup button, select
Information, press the Enter button, select System Identification, press the
Enter button, then scroll down until you see the IP address.
2. Click the Scans button to view the Scans tab.
3. Under Private Folders on the left side of the screen, click Create Folder.
4. In the Create Folder window:
a. Enter the name you want to give to the private folder. The name can have a maximum
of 10 alphanumeric characters.
b. If desired, enter a 4-digit numeric password twice.
c. Click the Save Changes button.
WorkCentre® C2424 Copier-Printer
4-5
Page 6

Adjusting Scanning Options
Setting the Scan Destination
You can select one of three destinations for your scanned image:
■ Public Folder – Places the scanned image in the Public Folder on the system’s hard
drive, where it can be accessed by any user on the network that connects to the system.
(Factory default selection)
■ <private folder> – Places the scanned image in a private folder on the system’s hard
drive.
■ <user name> – Places the scanned image in the My Scanned Images folder on the
user’s computer hard drive. (Windows only.)
For information about creating private folders, see "Setting Up a Private Folder for Scanning"
on page 4-5.
To select the destination for your scanned images:
1. On the control panel, press the Scan button.
2. In the menu, select Scan To, then press the Enter button. The system displays a list of
available destinations.
Note
Private folders and user names are listed alphabetically below Public Folder. If there
are more than 10, the names are placed in alphabetic subgroups. If users have the
Xerox Scan Utility open on their computers, the first two user names appear with
an * at the top of list.
3. Select Public Folder, <private folder>, or <user name>, then press the
Enter button.
If there are more than 10 private folders or user names, select the menu for the alphabetic
subgroup, press the Enter button, select the private folder or user name, then press the
Enter button.
4. If you selected a password protected private folder or user name in Step 3, use the keypad
on the control panel to enter the correct 4-digit numeric password, then press the
Enter button.
Note
When you finish scanning to a password protected location, press the Clear/Clear All
button twice. This prevents the next person that uses the system from scanning files to or
deleting files from that location.
WorkCentre® C2424 Copier-Printer
4-6
Page 7

Adjusting Scanning Options
Setting the Scan Resolution
Depending on the way you are going to use the scanned image, you may want to change the
scan resolution. Scan resolution affects the size of the scanned image file as well as the quality.
To select the scan resolution:
1. On the control panel, press the Scan button.
2. In the menu, select Scan Resolution, then press the Enter button.
3. Select one of the following, then press the Enter button.
■ 100x100 – Produces the lowest resolution and smallest file size.
■ 200x200 – Produces low resolution and small file size.
■ 300x300 – Produces medium resolution and medium file size.
The following resolution options are available on systems configured with 512 MB RAM
or greater:
■ 400x400 – Produces high resolution and large file size.
■ 600x600 – Produces the highest resolution and largest file size.
Automatically Suppressing Background Variations
Sometimes, two-sided originals on thin paper show some of the text or images from the back
side of the paper. To improve your scanned images from this type of original, use the Auto
Suppression setting to minimize the sensitivity of the scanner to variations in light
background colors.
To change this setting:
1. On the control panel, press the Scan button.
2. In the menu, select Auto Suppression, then press the Enter button.
3. Select either On or Off, then press the Enter button. The factory default is Off.
WorkCentre® C2424 Copier-Printer
4-7
Page 8

Adjusting Scanning Options
Selecting Color or Black and White Images
You can scan the image in color or in black and white. Selecting black and white significantly
reduces the file size of the scanned images.
Press the Color Mode button on the control panel to change the selection to Color or B/W.
2
1
2
2
2
1
11
2424-166
Specifying 1-Sided or 2-Sided Originals
When you use the document feeder to scan 2-sided originals, set this option in order to have
both sides scanned to produce a multi-page scanned image file.
Press the 2-Sided button on the control panel to change the selection to:
■ 1 to 1 – Scans just one side of the originals. (Factory default value)
■ 2 to 1 – Scans both sides of the originals.
2
1
2
2
2
1
11
2424-167
WorkCentre® C2424 Copier-Printer
4-8
Page 9

Adjusting Scanning Options
Specifying the Original Type
You can have the scanner optimize the appearance of the output according to the contents of
the original.
Press the Original Type button on the control panel to change the selection to:
■ Photo – Optimizes for photograph prints.
■ Graphics – Optimizes for constant-colored areas.
■ Mixed – Optimizes for magazines and newspaper photographs.
■ Tex t – Optimizes for black and white or colored text.
2
1
2
2
2
1
11
2424-169
Setting the Original Size
You can specify the size of the original so that the correct area is scanned. To do this:
1. On the control panel, press the Scan button.
2. In the menu, select Original Size, then press the Enter button.
3. Select one of the preset sizes or Tray/ Aut o (the factory default), then press the Enter
button.
If you select Tray/ Au to and you are using the document glass, each original is prescanned to determine its size.
If you select Tray/ Au to and you are using the document feeder, the scanned area is the
same size as the current copy paper size.
WorkCentre® C2424 Copier-Printer
4-9
Page 10

Adjusting Scanning Options
Setting a Scan Password for Your Computer (Windows Only)
You can prevent others from scanning images directly to your computer by setting a password.
The control panel will prompt users for the password when they select your computer as the
scan destination.
Use the Xerox Scan Utility to set a scanning password for your computer.
1. Right-click the icon on the taskbar (in the lower-right corner of your screen),
then select Xerox Scan Utility on the popup menu.
Note
If the icon is not in the taskbar, select the Windows Start menu, select
Programs, select Xerox Office Printing, select Scanning, and then select
Xerox Scan Utility.
2. In the Location drop-down box, select My Scanned Images.
3. From the Settings menu, select Scan to PC.
4. Enter the desired 4-digit numeric password in each of the password boxes.
5. Click the OK button.
Note
See "Using the Xerox Scan Utility (Windows Only)" on page 4-13 for more
information about the Xerox Scan Utility. See "Setting the Scan Destination" on
page 4-6 for more information about scanning images to your computer.
Calibrating the Scanner
Perform the scanner calibration procedure if you replace your original scanner or document
feeder. Scanner calibration adjusts the output quality of the front and back pages of 2-sided
originals in relation to each other. This procedure should not need to be performed as part of
normal system operation.
For more information about calibrating the scanner, go to the Xerox infoSMART Knowledge
Base at www.xerox.com/office/c2424infoSMART
.
WorkCentre® C2424 Copier-Printer
4-10
Page 11

Retrieving Images
Retrieving Images
This section includes:
■ "Viewing and Retrieving Scanned Images" on page 4-12
■ "Using CentreWare IS" on page 4-12
■ "Using the Xerox Scan Utility (Windows Only)" on page 4-13
■ "Importing Scanned Images into Another Application" on page 4-14
■ "Using the Xerox Image Importer on Windows 2000, Windows XP, and
Windows Server 2003 (TCP/IP)" on page 4-14
■ "Using the WIA Image Manager on Windows XP and Windows Server 2003 (USB)"
on page 4-15
■ "Using the Xerox Image Importer on Macintosh OS X" on page 4-16
The following table lists the various methods to view and retrieve scanned image files and
shows which methods are available for specific operating systems.
Windows Macintosh Unix
XP,
Method 98, Me NT4 2000
Using CentreWare IS
Using the Xerox Scan Utility
Importing into another
application
● = Available with a TCP/IP network connection.
■ = Available with a USB connection.
* = The standard installation allows for retrieving images from the Public Folder.
●●●● ● ● ●
Server
2003
●●
●
■
OS 9.x
●
■*
OS X,
Version
10.x
●
■
Note
Using a method other than CentreWare IS requires installation of the scan driver from
the WorkCentre C2424 Software CD-ROM. For more information, see "Installing the
Scan Driver" on page 4-4.
WorkCentre® C2424 Copier-Printer
4-11
Page 12

Retrieving Images
Viewing and Retrieving Scanned Images
Using CentreWare IS
If your multifunction system is connected on a network, you can use CentreWare IS to view,
retrieve, and delete scanned images from the Public Folder or from a private folder on the
system’s hard drive.
1. Access CentreWare IS:
a. Launch your web browser.
b. Enter your system’s IP address in the browser’s Address field
(http://xxx.xxx.xxx.xxx).
Note
You can find the IP address on the “Configuration Page” or the “Startup Page. You can
also view the IP address on the control panel; press the System Setup button, select
Information, press the Enter button, select System Identification, press the
Enter button, then scroll down until you see the IP address.
2. Click the Scans button to view the Scans tab.
CentreWare IS displays thumbnails of the images in the Public Folder on the system’s hard
drive.
3. If you want to see thumbnails of the images in a private folder:
a. On the left side of the screen under Private Folders, click the name of the private
folder in the list.
b. If the private folder has a numeric password, enter the password and click the OK
button.
4. In the Retrieve As drop-down list to the right of the image that you want to retrieve, select
the desired file format.
5. Click the Go button for that file.
Note
If you want to delete that file, click the Delete button instead. To delete all of the files
in that folder, click the Delete All button below the thumbnails.
6. Follow the prompts to save the image to the desired location on your computer (Windows),
or save the image from the application in which it opened (Macintosh).
WorkCentre® C2424 Copier-Printer
4-12
Page 13

Retrieving Images
Using the Xerox Scan Utility (Windows Only)
You can use the Xerox Scan Utility to view, open, and delete scanned image files.
1. If you scanned images directly to your computer, the Xerox Scan Utility
automatically opens. If it is not open, right-click the icon on the taskbar (in
the lower-right corner of your screen), then select Xerox Scan Utility on the
popup menu.
Note
If the icon is not in the taskbar, select the Windows Start menu, select Programs,
select Xerox Office Printing, select Scanning, and then select Xerox Scan Utility.
2. From the Location drop-down list, select a folder to view those scanned images.
The window displays thumbnails of the images in the selected location. The date and
time that the image was scanned displays below each thumbnail.
Note
If you recently scanned an image and do not see it displayed, click the Refresh
button.
3. If you want to change the size of the thumbnails, select the View menu, select
Thumbnail Size, then select a size.
4. To retrieve an image from the Public Folder or from a private folder, click to highlight the
image, then click the Retrieve button.
The scan utility retrieves the image from the system and places it in your My Scanned
Images folder.
Note
If you want to delete the image you selected, click the Delete button instead.
For more information, select the Help menu item to view the online help.
WorkCentre® C2424 Copier-Printer
4-13
Page 14

Retrieving Images
Importing Scanned Images into Another Application
If the system has either a USB or TCP/IP connection, you can import scanned images directly
into an application on your computer by using the application’s Insert, Acquire, or Import
menu selection.
Using the Xerox Image Importer on Windows 2000, Windows XP, and
Windows Server 2003 (TCP/IP)
If the system has a TCP/IP network connection, use the following procedure to import images
into an application:
1. Start the application and open the file in which you want to place the image.
2. Select the menu item to acquire the image.
For example, if you are using Word to place an image in a document, select Custom
Insert, select Picture, select From Scanner or Camera, select the scanner, and click the
Custom Insert button.
3. In the upper left part of the Xerox Image Importer window, select the location of the
image from the Location drop-down list. You can select the Public Folder, a
<private folder>, or the My Scanned Images folder.
Note
If you are prompted, enter the 4-digit numeric password for the folder you selected.
The Xerox Image Importer window displays thumbnails of the images in that folder. The
date and time that the image was scanned displays below each thumbnail.
■ If you move your mouse over the thumbnail, a popup message shows information
including the resolution and size of the image file.
■ If you want to change the size of the thumbnails, select the View menu, select
Thumbnail Size, then select Small, Medium, or Big. If you recently scanned an
image and do not see it displayed, click the Refresh button.
4. If desired, you can change the color and resolution of the imported image. For more
information, see "Changing the Xerox Image Importer Settings in Windows" on
page 4-15.
5. Click to highlight the image you want to import.
Some applications allow you to import multiple images at one time. To select more than
one image, hold down the Ctrl or Shift button on your keyboard as you select another
image. To import all of the images in the folder, select the Edit menu, then select Select
All.
6. Click the Import button. A copy of the image is transferred to that location in your
application.
Note
If you want to delete the images you selected, click the Delete button instead. For more
information about the Image Importer, select the Help menu item to view the online
help.
WorkCentre® C2424 Copier-Printer
4-14
Page 15

Retrieving Images
Changing the Xerox Image Importer Settings in Windows
When you import images using the Xerox Image Importer, you can change the color and
resolution of the imported image.
1. Select the Settings menu, then select Import Options to open the Image Import Options
dialog box.
2. If desired, move the slider to change the resolution.
■ If you select Best, images are imported using the same resolution that they were
scanned.
■ If you select Fair, the images are imported at a resolution of 100x100. The lower the
resolution, the shorter the time to import the image.
3. If you want all images to be imported in black and white select Import Image as Black
and White. This selection shortens the time to import the image.
4. Click the OK button to save your changes and exit the dialog box.
To have the system automatically delete the image from the hard drive of the
WorkCentre C2424 system after it is imported, select the Settings menu, then select Delete
After Import so there is a checkbox on this menu item.
Using the WIA Image Manager on Windows XP and Windows Server 2003 (USB)
If the system has a USB connection, you can import images from the Public Folder on the
system’s hard drive.
Note
To import images using the WIA image manager, the Xerox Scan Utility
must be running in the taskbar. If the icon is not in the taskbar, select the
Windows Start menu, select Programs, select Xerox Office Printing,
select Scanning, and then select Xerox Scan Utility.
To import scanned images into an application:
1. Start the application and open the file in which you want to place the image.
2. Select the menu item to acquire the image.
For example, if you are using Word to place an image in a document, select Insert, select
Picture, select From Scanner or Camera, select the scanner, and click the OK button.
3. In the Get Pictures from WIA Xerox WorkCentre C2424 window, open the Public
Folder folder to view thumbnails of the images in that folder.
4. To see details of an image file:
a. Click to select the image.
b. Click View picture information to view the Properties dialog box, which shows the
date and time that the image was scanned and the file size.
c. Click the OK button to close the dialog box.
WorkCentre® C2424 Copier-Printer
4-15
Page 16

Retrieving Images
5. Click to highlight the image you want to import.
Some applications allow you to import multiple images at one time. To select more than
one image, hold down the Ctrl or Shift button on your keyboard as you select another
image. To import all of the images in the folder, select the Edit menu, then select Select
All.
6. Click the Get Pictures button.
A copy of the image is transferred to that location in your application.
Note
If you want to delete the images you selected, click the Delete button instead.
Using the Xerox Image Importer on Macintosh OS X
The Xerox Image Importer driver (TWAIN) is part of the standard installation for Macintosh
OS X. To import images into an application:
1. Start the application and open the file in which you want to place the image.
2. Select the menu item to acquire the image.
For example, if you are using Word to place an image in a document, select Insert, select
Picture, select From Scanner or Camera, select the scanner, and click the Acquire
button.
3. In the upper left part of the Xerox Image Importer window, select the location of the
image from the Location drop-down list. You can select the Public folder or a private
folder.
Note
If you are prompted, enter the 4-digit numeric password for the folder you selected.
The Xerox Image Importer window displays thumbnails of the images in that folder. The
date and time that the image was scanned displays below each thumbnail.
■ If you move your mouse over the thumbnail, a popup message shows information
including the resolution and size of the image file.
■ If you want to change the size of the thumbnails, move the slider near the lower-right
corner of the window.
Note
For more information about the Image Importer, click the Help button to view the
online help.
4. If desired, change the import settings. For more information, see "Changing the Xerox
Image Importer Settings on a Macintosh" on page 4-17.
WorkCentre® C2424 Copier-Printer
4-16
Page 17

Retrieving Images
5. Click to highlight one or more images that you want to import. To select more than one
image, hold down the Command button on your keyboard as you select an image.
To import all of the images in the folder, click the Select All checkbox.
Note
If you recently scanned an image and don’t see it displayed, click the Refresh button.
6. Click the Import button.
A copy of the image is transferred to that location in your application.
Note
If you want to delete the images you selected, click the Delete button instead.
Changing the Xerox Image Importer Settings on a Macintosh
To change the color and resolution used when images are imported:
1. Click the Settings button to open the Image Import Options dialog box.
2. If desired, move the slider to change the resolution. If you select As Scanned, images are
imported using the same resolution that they were scanned. If you select Least, the images
are imported at a resolution of 100x100. The lower the resolution, the shorter the time to
import the image.
3. If you want all images to be imported in black, white, and gray, select Import Image as
Black and White. This selection shortens the time to import the image.
4. Click the OK button to save your changes and exit the dialog box.
To have the system automatically delete the image from the hard drive of the
WorkCentre C2424 system after it is imported, select Delete After Import on the lower-left
corner of the Image Importer window.
WorkCentre® C2424 Copier-Printer
4-17
Page 18

Managing Files and Controlling Scanning Options
Managing Files and Controlling Scanning Options
This section includes:
■ "Viewing Images" on page 4-18
■ "Deleting Image Files" on page 4-19
■ "Controlling Scanning Policies" on page 4-21
Viewing Images
The image files are stored on the system’s hard drive with unique file names that indicate the
date and time of the scan: yyyy-mm-dd@hh.mm.ss.tif. However, these file names do not
describe the image. To see the content of the image files:
■ View thumbnails of the images using CentreWare IS (page 4-12) or the Xerox Scan
Control (page 4-13).
■ View thumbnails of the images using another application (page 4-14).
WorkCentre® C2424 Copier-Printer
4-18
Page 19

Managing Files and Controlling Scanning Options
Deleting Image Files
When you press the Scan button on the control panel, the display shows the <%> Full
indicating how much hard drive space has been used to store scanned images. If a new scanned
image would exceed the available space on the hard drive, the control panel displays an error
message indicating that the hard drive is full; scanning cannot continue until some files are
deleted to create enough space.
Note
The size of scanned image files varies based on the scan resolution and color options
selected.
To save space on the hard drive, periodically delete scanned images that are no longer needed.
You can delete files using:
■ The control panel
■ CentreWare IS
Note
When you retrieve a scanned image directly into an application, you can have the image
automatically deleted from the WorkCentre system’s hard drive after it is imported into an
application. For more information, see "Using the Xerox Image Importer on
Windows 2000, Windows XP, and Windows Server 2003 (TCP/IP)" on page 4-14 and
"Using the Xerox Image Importer on Macintosh OS X" on page 4-16.
Using the Control Panel to Delete Image Files
To remove all scan files from a folder:
1. At the control panel, press the Scan button.
2. In the menu, select the folder; see "Setting the Scan Destination" on page 4-6.
3. Select Clear Folder, then press the Enter button.
4. When prompted whether you want to remove all scan files from this folder, select Yes,
then press the Enter button.
WorkCentre® C2424 Copier-Printer
4-19
Page 20

Managing Files and Controlling Scanning Options
Using CentreWare IS to Delete Image Files
You can remove some or all scan files from a folder:
1. Access CentreWare IS:
a. Launch your web browser.
b. Enter your system’s IP address in the browser’s Address field
(http://xxx.xxx.xxx.xxx).
Note
You can find the IP address on the “Configuration Page” or the “Startup Page. You can
also view the IP address on the control panel; press the System Setup button, select
Information, press the Enter button, select System Identification, press the
Enter button, then scroll down until you see the IP address.
2. Click the Scans button to view the Scans tab.
3. If you want to delete scanned images from a private folder:
a. Click the name of the private folder in the list on the left side of the screen.
b. Enter the password for that private folder.
4. If you want to delete all image files in that folder, click the Delete All button.
5. If you want to delete a specific file, click the Delete button to the right of that file.
Note
You can automatically delete images from the public folder or private folders. Under
Administrative on the left side of the screen, click Folder Cleanup and enter your
password (if prompted). Refer to the online help for more information.
WorkCentre® C2424 Copier-Printer
4-20
Page 21

Managing Files and Controlling Scanning Options
Controlling Scanning Policies
Administrators can control the scanning policies, including requirements for passwords when
setting up private folders.
1. Access CentreWare IS:
a. Launch your web browser.
b. Enter your system’s IP address in the browser’s Address field
(http://xxx.xxx.xxx.xxx).
Note
You can find the IP address on the “Configuration Page” or the “Startup Page. You can
also view the IP address on the control panel; press the System Setup button, select
Information, press the Enter button, select System Identification, press the
Enter button, then scroll down until you see the IP address.
2. Click the Scans button to view the Scans tab.
3. Under Administrative on the left side of the screen, click General and enter your
password (if prompted).
4. Make desired changes to the scan policy settings. Refer to the online help for more
information.
WorkCentre® C2424 Copier-Printer
4-21
 Loading...