

Page 1
Scan to PC Desktop: Image Retriever
I
5.2 for Xerox WorkCentre C2424
Scan to PC Desktop includes Image Retriever, which is designed
to monitor a specified folder on a networked file server or local
drive for incoming scanned images. The Professional Edition of
the program can also monitor e-mail inboxes for attachments.
Image Retriever converts and transfers files from the watched
folder and/or e-mail inbox into the PaperPort desktop.
Monitoring an e-mail inbox is only available in the Professional Edition.
After you install the Scan to PC Desktop family of software
components, including Image Retriever, you must restart your
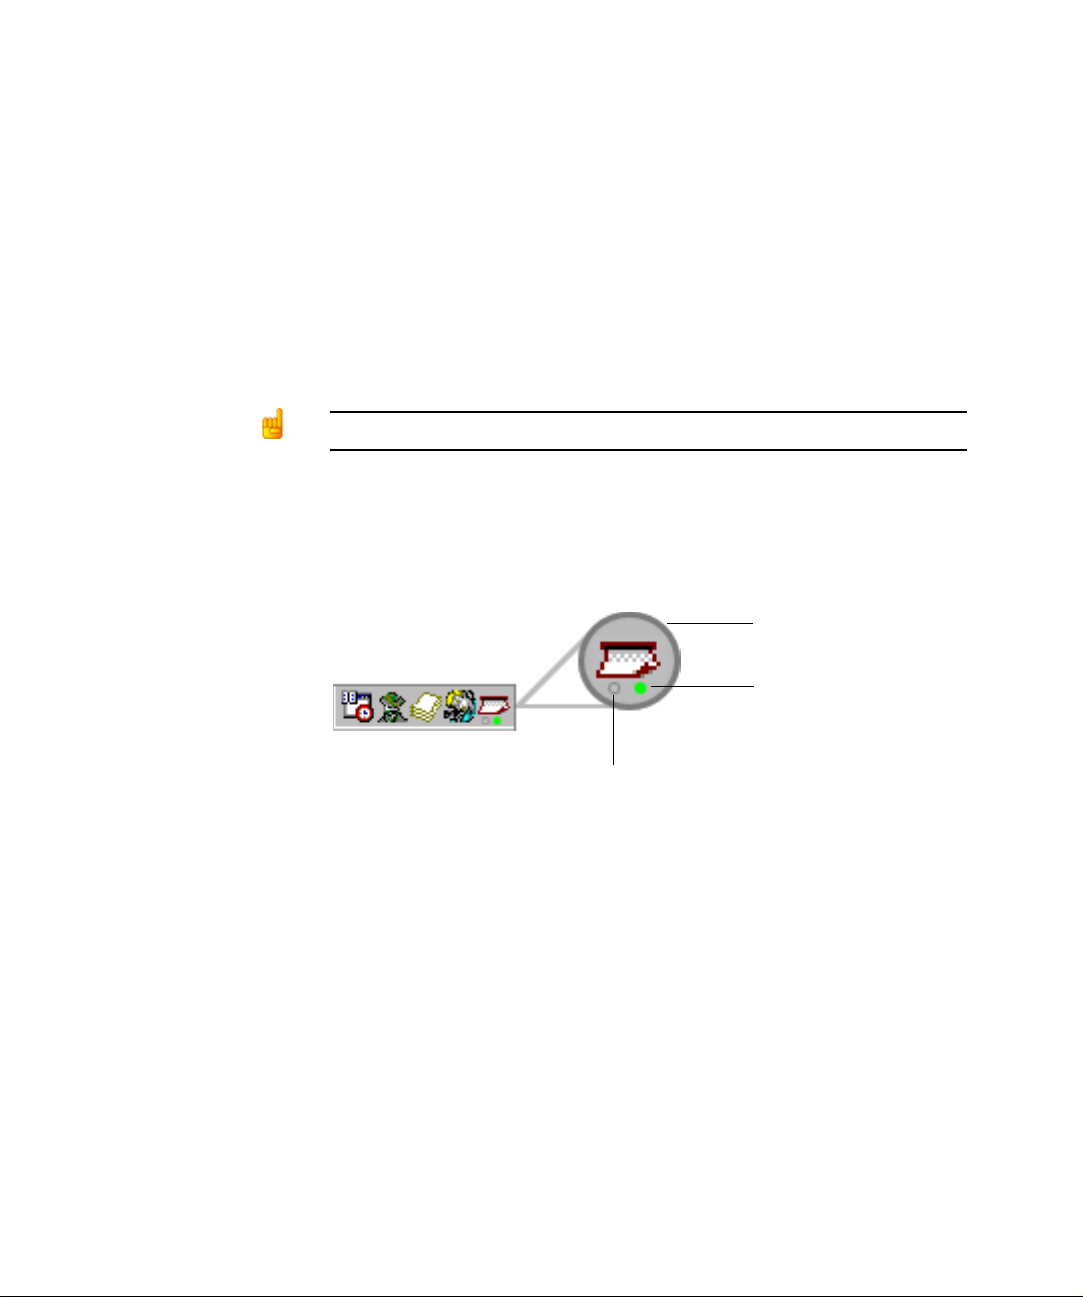
computer. When you do, Image Retriever runs as an icon in the
system tray on the Windows task bar:
mage Retriever
(Professional Edition icon)
Folder watching status
E-mail polling status
Depending on which program edition you use, the icon may have
one or two light indicators in the bottom. They represent the
status of e-mail polling and folder watching by means of different
colors. Since e-mail polling is only available in the Professional
Edition of Image Retriever, the corresponding (left) LED will not
be displayed in the Special Edition of the program. For details,
see: Image Retriever Status Display.
Right-click on the Image Retriever icon in the Windows system
tray to display the Image Retriever menu with six commands:
1
Page 2
• Get Now
• Use Defaults
• Settings
• View Log
• About
• Close
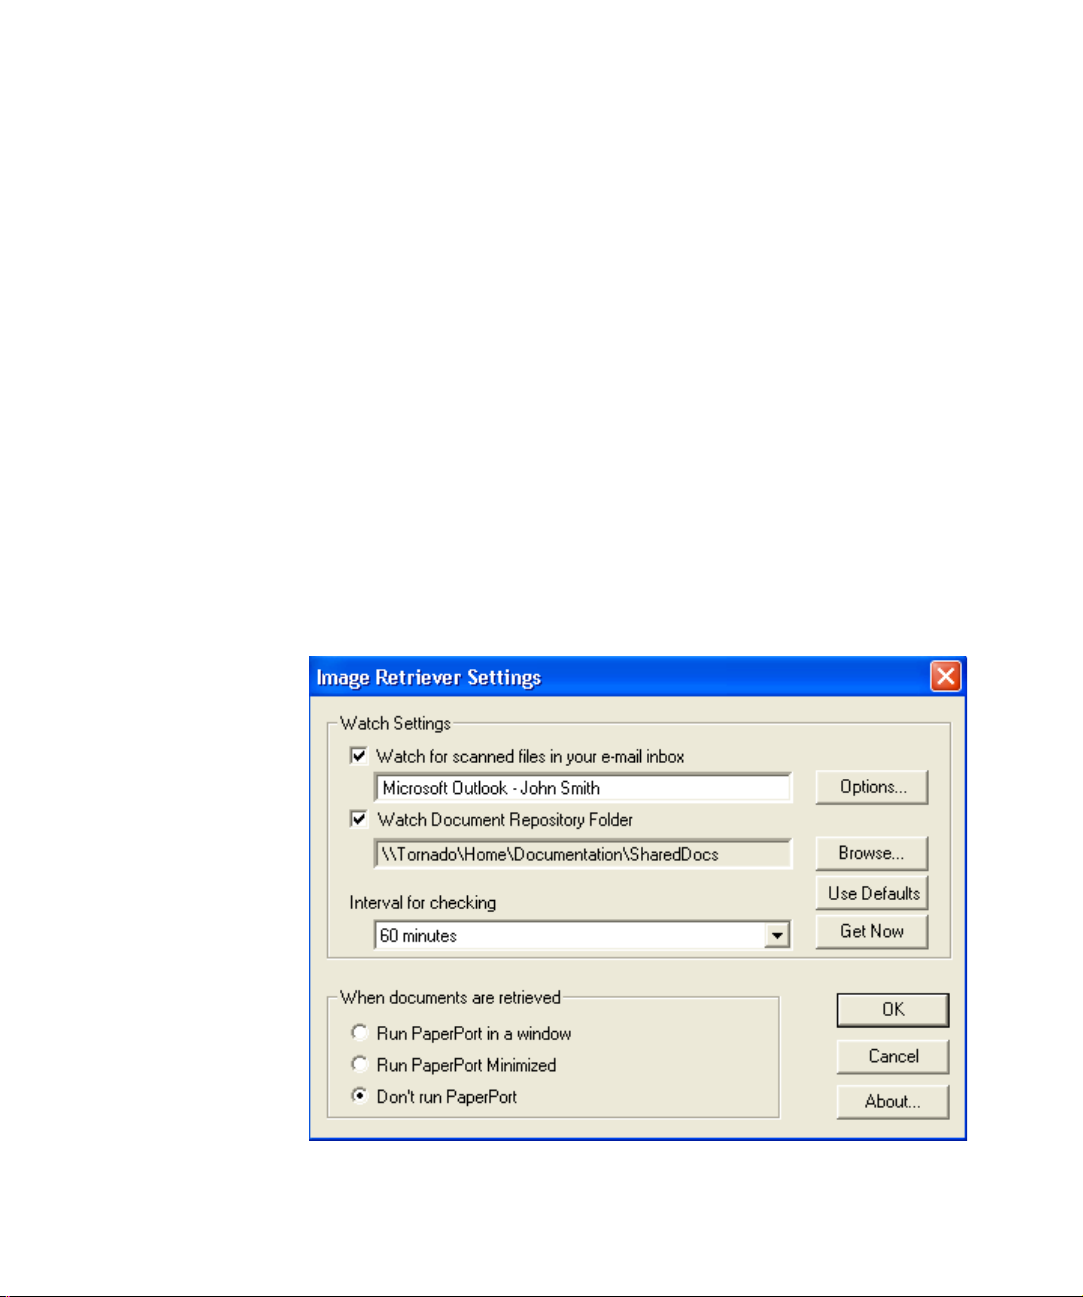
Settings command
Before using Image Retriever it has to be configured through the
“Image Retriever Settings” dialog.
Once you have installed the program it starts up along with your
PC and resides in the system tray.
To configure Image Retriever, right-click the Image Retriever icon
to display its menu. Then click the “Settings” command to display
a dialog box of all the Image Retriever controls:
2 SCAN TO PC DESKTOP: IMAGE RETRIEVER 5.2 FOR XEROX WORKCENTRE C2424
Page 3
E-mail Polling
This feature of Image Retriever (available in Professional Edition
only) lets you monitor your Microsoft Outlook or Lotus Notes inbox
for new messages with attached PDF or TIFF files generated by a
Xerox device. Disable the feature if you do not want to monitor
your e-mail. Use the following controls to configure e-mail polling
of Image Retriever.
Watch for scanned files in your e-mail inbox
Click this checkbox to enable e-mail polling.
Options Button
Click the Options... button to change your current e-mail polling
configuration.
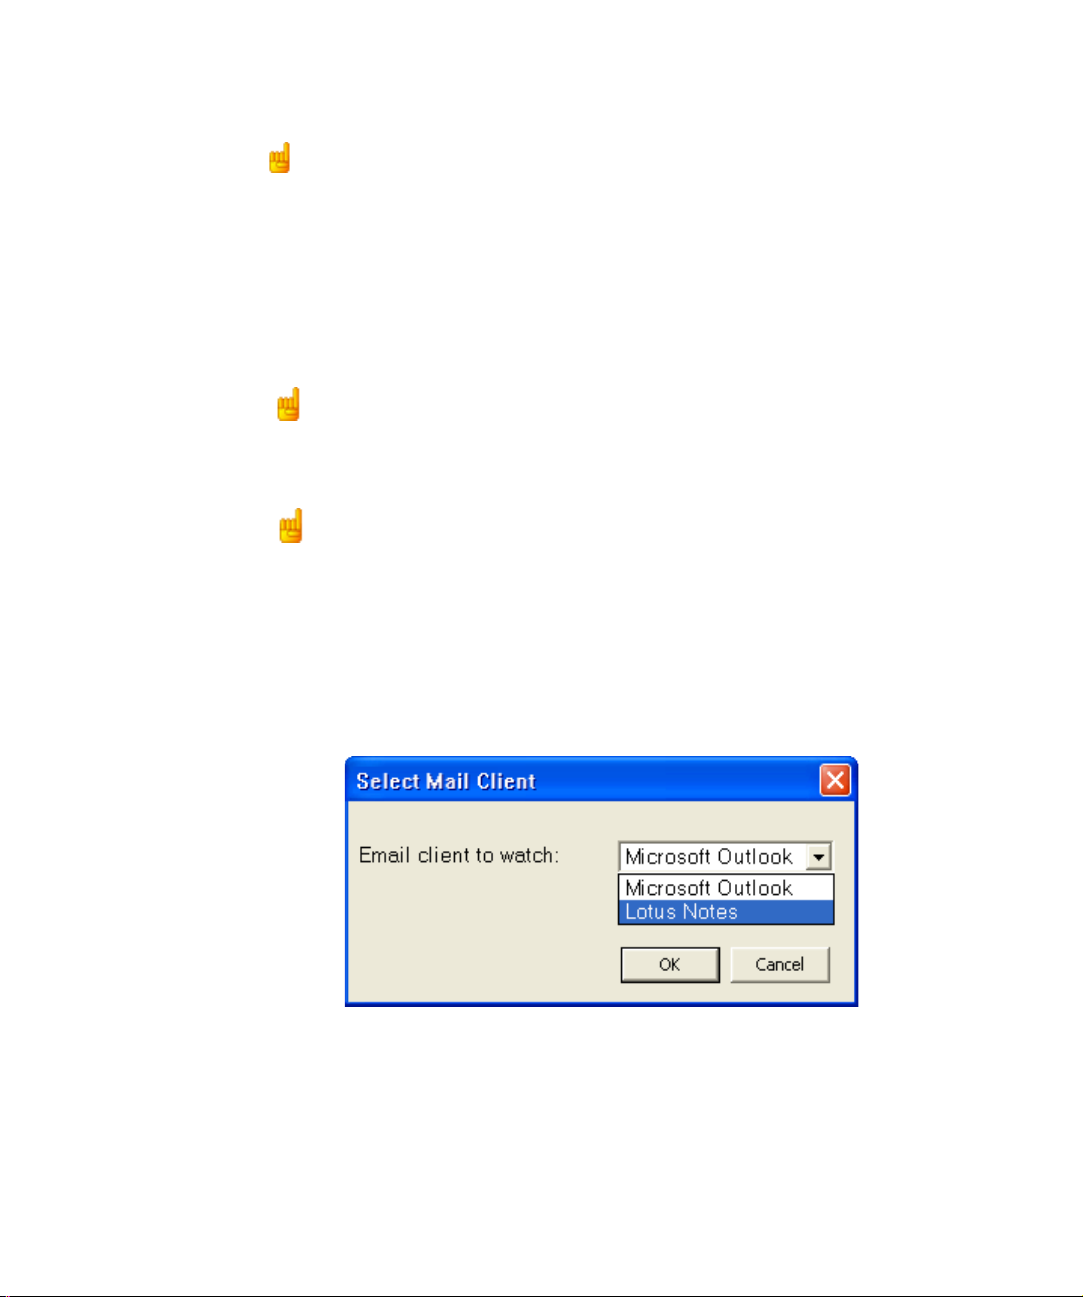
If you have both Microsoft Outlook and Lotus Notes installed on
your system, the following dialog box will display enabling you to
make your selection between the two mail clients. Click OK to
confirm your choice, or Cancel to close the dialog.
3
Page 4
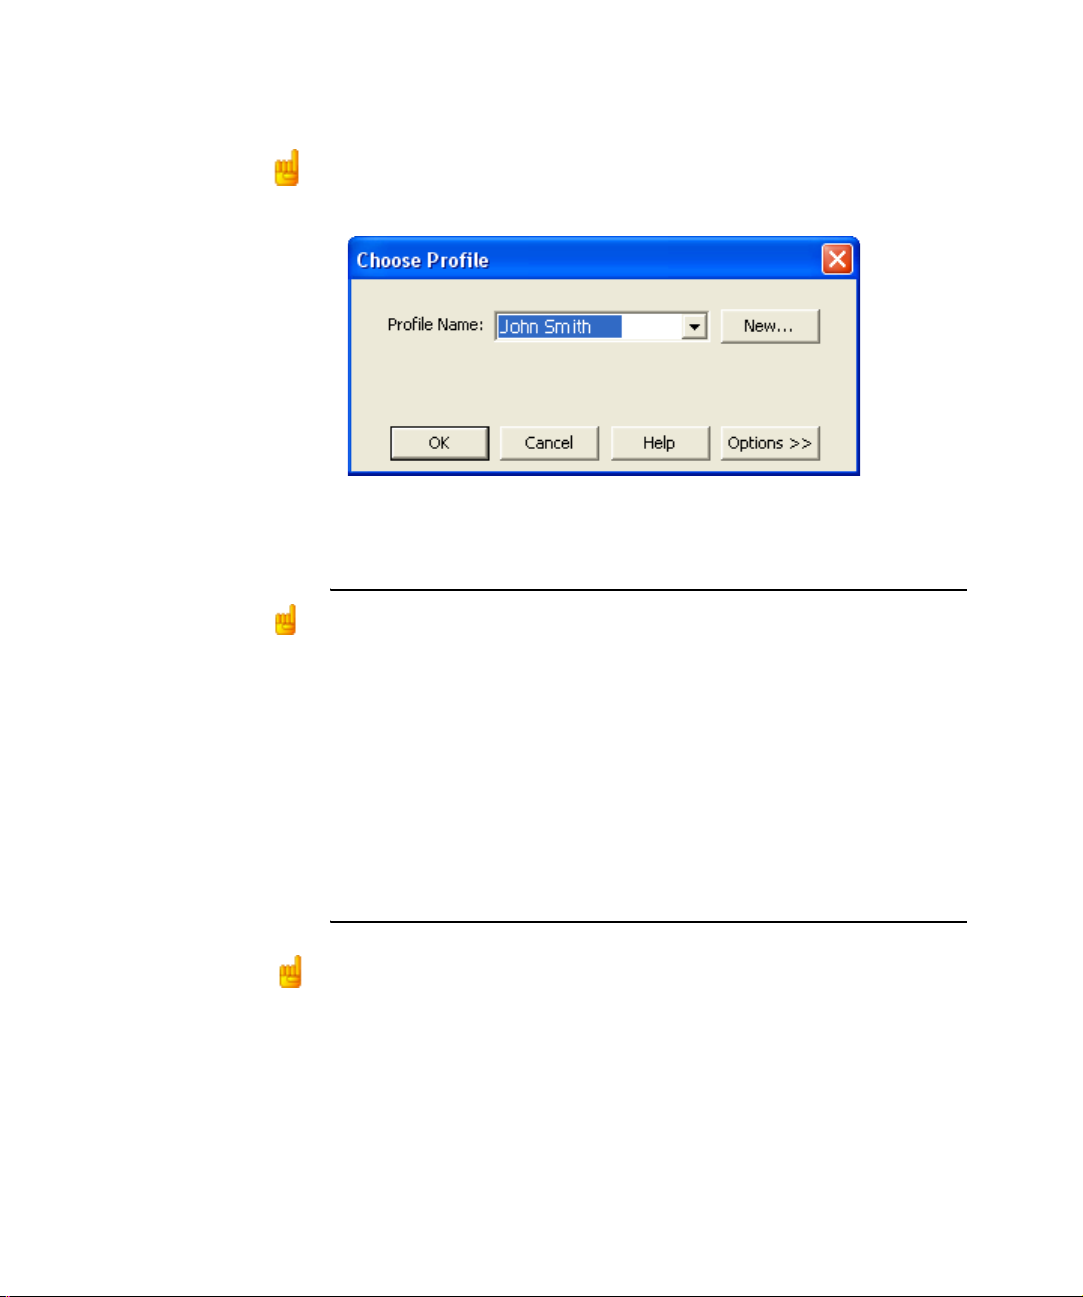
In case of Microsoft Outlook the “Choose Profile” dialog box
displays enabling you to choose the Microsoft Outlook profile
whose inbox you want Image Retriever to monitor. Select your
Microsoft Outlook profile and click OK.
In the “Image Retriever Settings” dialog, you will see your
Microsoft Outlook profile name displayed in the relevant field.
Microsoft Outlook users cannot enable e-mail monitoring or choose a Microsoft
Outlook profile unless Collaboration Data Objects is installed and enabled for
Microsoft Outlook. Image Retriever will display an error message if they attempt
to do so.
To install Collaboration Data Objects with Microsoft Outlook 2000, 2002 or 2003
• choose custom installation
• then detailed installation options for each application
• finally select and enable the installation of the Collaboration Data Objects.
Microsoft Outlook 98 users should pick the Full Installation option.
For more information about Collaboration Data Objects please see your
Microsoft Outlook documentation.
If you set Lotus Notes as the mail client for Image Retriever to
watch, you have to specify your password. If you leave the
checkbox “Save password“ empty you will have to give it again
every time Image Retriever starts. If you click the checkbox, your
password will be stored in an encrypted format and will not be
prompted for again.
4 SCAN TO PC DESKTOP: IMAGE RETRIEVER 5.2 FOR XEROX WORKCENTRE C2424
Page 5

Please note that if Lotus Notes is installed, but is not configured
properly, or not set for any users, e-mail polling will not work, and
Image Retriever will display an error message (during configuring
the program) or the left-hand side light indicator in the program
icon will turn red (during monitoring).
E-mail Polling Supported Xerox Devices
Image Retriever can poll for e-mail attachments generated by the
below Xerox devices. Additionally, all devices except Document
Centre 265/255/240 can have e-mail attachments generated by
the devices' Scan to Email feature polled.
Document Centre 265/255/240
Document Centre 490/480/470/460 ST
Document Centre 440/432/425/420 ST
Document Centre 420/432/440 ST
Document Centre 426/430
Document Centre 555/545/535
WorkCentre Pro 55/45/35
WorkCentre 55/45/35
WorkCentre Pro 90/75/65
WorkCentre Pro 40 Color/32 Color*
WorkCentre Pro 165/175
WorkCentre 165/175
WorkCentre Pro C2128/C2636/C3545*
WorkCentre C2128/C2636/C3545*
WorkCentre Pro 232/238/245/255/265/275
WorkCentre 232/238/245/255/265/275
Document Centre 430/426
WorkCentre C226*
XePDF
* Scan to Email with JPEG attachments will not be polled by the Image
Retriever e-mail feature.
5
Page 6

Folder Polling
Enable this setting to monitor a specified folder on a networked
file server or local drive for incoming scanned images generated
by a Xerox device.
Watch Document Repository Folder
Click this checkbox in the “Image Retriever Settings” dialog to
enable Image Retriever to monitor the folder of your choice.
Browse Button
Click the Browse... button to display the “Browse for Folder”
dialog box. This dialog box lets you locate and select the folder
you want Image Retriever to monitor:
After you identify the directory to be monitored and click OK, the
“Browse for Folder” dialog box closes.
Image Retriever can periodically monitor this folder to see if any
scanned images are placed there by the Xerox system.
6 SCAN TO PC DESKTOP: IMAGE RETRIEVER 5.2 FOR XEROX WORKCENTRE C2424
Browse to the
network server
that contains
the folder to be
watched; select
the folder and
click OK.
Page 7

Interval for checking
To set how often the watched folder or monitored inbox will be
checked, select a setting from the “Interval for checking” list box.
The following choices are available from the list box:
1, 2, 5, 10, or 30 seconds
1, 2, 3, 5, 10, 30, or 60 minutes
In addition to the above values, you could also select “Never“. In
this case Image Retriever will continue running but watching is
suspended.
One suggestion is to set the watch interval at about half the time it
takes you to walk from the device’s location in your company to
your office.
If it takes you 60 seconds to walk this distance, set the interval to
30 seconds. This way the document that you scanned can be
ready and waiting for you on your PaperPort desktop!
Use Defaults Button
To restore factory Watch Settings for Image Retriever, click the
Use Defaults button. This will restore the default watch interval
(30 seconds) and set the folder specified during program install as
the monitored one.
Get Now Button
Click the Get Now button if you wish to scan the folder or inbox of
your choice immediately. Image Retriever does the monitoring on
whichever component is checked. That is, if “Watch Document
Repository Folder” is checked, Image Retriever will immediately
scan the selected folder; whereas if “Watch for scanned files in
your e-mail inbox” is checked, your Microsoft Outlook or Lotus
Notes inbox will be polled for new PDF or TIFF e-mail
attachments generated by a Xerox device.
Monitoring an e-mail inbox is only available in the Professional Edition.
7
Page 8

In either case, the relevant signal of the Image Retriever icon on
the system tray will change to “Processing” state (light green). For
a complete list of color keys see: Image Retriever Status
Display).
Image Retriever will place the new items appearing in the
watched folder or inbox on the PaperPort desktop and will launch
the PaperPort application - unless you have specified “Don’t run
PaperPort“ in the “Image Retriever Settings” dialog.
When documents are retrieved Setting
In addition to specifying "Watch Settings" for Image Retriever you
can also control its behavior on document retrieval. The "When
documents are retrieved" setting offers three choices:
Select this
setting: To get this result:
Run PaperPort in
a window
Run PaperPort
minimized
Don’t run
PaperPort
Every time Image Retriever detects a new
document in the folder and/or inbox being
watched, it converts it and places it in
PaperPort, which is then opened on your
Windows desktop. It then purges the
original scanned document from the folder
being watched. If it brings a PDF or TIFF
attachment to the PaperPort desktop, the
original message remains in the e-mail
inbox but its status will switch to “Read”.
Same as above, but PaperPort runs
minimized. (Later, when you open
PaperPort, all scanned documents will be
on the PaperPort desktop.)
Documents are transferred into the
ScanSoft Documents folder, but are not
placed on the PaperPort desktop until you
launch PaperPort.
8 SCAN TO PC DESKTOP: IMAGE RETRIEVER 5.2 FOR XEROX WORKCENTRE C2424
Page 9

To specify where Image Retriever is to place the retrieved files,
launch PaperPort, click Options, choose the General tab, and
define the destination folder under Startup folder for the topmost
desktop. Do not leave this setting unchanged, otherwise Image
Retriever will always place the retrieved files into the My
Documents folder (default).
OK Button
Click OK in the “Image Retriever Settings” dialog box to confirm
Image Retriever settings.
Get Now command
Use this command for the same purpose as the corresponding
button in the “Image Retriever Settings” dialog. For details see the
Get Now button.
Use Defaults command
Use this command for the same purpose as the corresponding
button in the “Image Retriever Settings” dialog. For details see the
Use Defaults button.
View Log command
To get infromation about program events, right-click the Image
Retriever icon, then choose the “View Log” command. Click OK to
close this panel or the Clear Log button to delete your current list
of events.
About command
To get version and copyright information about Image Retriever,
right-click the Image Retriever icon to display its menu. Click the
“About” command. You can also select About... from the “Image
Retriever Settings” dialog.
9
Page 10

Close command
To close Image Retriever, right-click the Image Retriever icon to
display its menu. Click the “Close” command.
Image Retriever Status Display
The Image Retriever icon in the Windows system tray shows the
current status of the program, by way of one or two light indicators
in the bottom. In the Professional Edition (see illustration below),
two LEDs are displayed: the left one represents the status of email polling, the other displays that of folder monitoring as follo ws:
Color Status
dark green monitoring
light green processing
grey inactive
red error
This information is also displayed in the Screen T ip, specifying the
name of the application first (Image Retriever), then e-mail polling
and finally the folder monitoring status.
In the Special Edition of Image Retriever, the program icon has
only one LED (folder monitoring status).
Please note that Image Retriever will continue running even if an
error persists (e.g. connection is lost with a folder or e-mail inbox).
In this case the corresponding light indicator remains red until the
error is resolved. Then it switches to the color corresponding to
the current Image Retriever settings.
Errors occurring during configuring the program through the
“Image Retriever Settings” dialog are always reported by error
messages.
To get information about errors, right click on the Image Retriever
icon to display its menu, then choose the “View Log” command.
10 SCAN TO PC DESKTOP: IMAGE RETRIEVER 5.2 FOR XEROX WORKCENTRE C2424
Page 11

Other Information about Image Retriever
Now that you have specified the Image Retriever watch folder,
watch interval and PaperPort behavior, here is some other
information about Image Retriever.
• User-specific watch folder. Only one user is able to watch a
specific folder at any time. The mechanism for this is adding a
file named REPWATCH.XSW in the watched folder. This
ensures that no other Image Retriever users will be able to
watch this folder until the file is removed.
• Supported network operating systems. Image Retriever
works with a number of industry-standard network operating
systems — Microsoft Windows NT 4.0, Windows 2000 and
Windows 2003 Server.
• Supported client operating systems. Microsoft Windows 98,
ME, NT 4.0, 2000, and XP.
Notes on Using Image Retriever with a Xerox WorkCentre C2424 Device
Image Retriever ships with some special features designed to
meet your individual needs best when using the program with a
Xerox C2424 device. These are as follows:
• Installing Image Retriever. To ensure smooth operation
between PaperPort, Image Retriever and the C2424 device,
please make sure that you install the C2424 scan driver first.
This installs the Xerox Scan Utility program. Please initiate a
scanning process where the destination is your local machine
in order you will be able to properly install PaperPort and Image
Retriever afterwards.
• Watched folder. Xerox Scan Utility creates a user-specific
folder named My Scanned Images. This will be set as the
default folder for Image Retriever to monitor. This ensures that
the documents scanned by your device will be transferred to
the PaperPort desktop.
11
Page 12

• Multiple-users. Any other users logged on, should initiate a
scanning process with a destination to the machine first, in
order to create their own My Scanned Images folder.
• Xerox Scan Utility Auto Pop-up. To regain the original
functionality provided via the Auto Pop-up of the Xerox Scan
Utility program, you must terminate Image Retriever. To do so
temporarily, right-click the Image Retriever icon in the system
tray, and choose the “Close” command. To prevent Image
Retriever from launching automatically on system boot, remove
Image Retriever from the Startup program group.
• Supported image file formats. Image Retriever supports the
following file formats:
BMP
GIF
JPEG
PDF
TIFF.
Please note that Image Retriever copies the above files onto
the PaperPort desktop without any modification or conversion.
12 SCAN TO PC DESKTOP: IMAGE RETRIEVER 5.2 FOR XEROX WORKCENTRE C2424
 Loading...