


Version 1.0
June 2021
702P08622
Xerox
®
C235 Color Multifunction
Printer
User Guide

© 2021 Xerox Corporation. All rights reserved. Xerox®and Xerox and Design®are trademarks of Xerox Corporation in the
United States and other countries.
®
Adobe
, Adobe PDF logo, Adobe®Reader®, Adobe®Type Manager®, ATM™, Flash®, Macromedia®, Photoshop®, and
PostScript
Apple
OS
Gmail
HP-GL
®
are trademarks or registered trademarks of Adobe Systems, Inc.
®
, Bonjour®, EtherTalk™, TrueType®, iPad®, iPhone®, iPod®, iPod touch®, AirPrint®and the AirPrint Logo®, Mac®, Mac
®
, and Macintosh®are trademarks or registered trademarks of Apple Inc. in the U.S. and other countries.
™
webmail service, and Android™mobile technology platform are trademarks of Google, Inc.
®
, HP-UX®, and PCL®are registered trademarks of Hewlett-Packard Corporation in the United States and/or other
countries.
®
IBM
and AIX®are registered trademarks of International Business Machines Corporation in the United States and/or other
countries.
®
McAfee
, ePolicy Orchestrator®, and McAfee ePO™are trademarks or registered trademarks of McAfee, Inc. in the United
States and other countries.
Microsoft
®
, Windows Vista®, Windows®, Windows Server®, and OneDrive®are registered trademarks of Microsoft
Corporation in the United States and other countries.
Mopria is a trademark of the Mopria Alliance.
PANTONE
UNIX
Linux
Wi-Fi CERTIFIED Wi-Fi Direct
PCL
®
and other Pantone, Inc. trademarks are the property of Pantone, Inc.
®
is a trademark in the United States and other countries, licensed exclusively through X/ Open Company Limited.
®
is a registered trademark of Linus Torvalds.
®
is a trademark of the Wi-Fi Alliance.
®
is a registered trademark of the Hewlett-Packard Company. PCL is a designation of a set of printer commands
(language) and functions included in its printer products. This printer is intended to be compatible with the PCL language.
This means the printer recognizes PCL commands used in various application programs, and that the printer emulates the
functions corresponding to the commands.
All other trademarks are the property of their respective owners.

Table of Contents
1 Safety ........................................................................................................................................11
Conventions...... ............. . ...... ....... ...... . ...... ....... ....... ...... ....... ....... ...... . ...... ....... ....... ...... ....... ... 12
Product Statements ..... ...... ....... ....... ...... . ...... ....... ....... ...... ....... ....... ...... . ...... ....... ....... ............ 13
Maintenance Safety.. ....... ............. ....... ....... ...... ....... ....... ............. ....... ....... ...... ....... ....... ........ 16
Consumable Information ... ...... . ...... ....... ....... ...... ....... ....... ...... . ...... ....... ....... ............. ....... ...... 17
2 Learn About the Printer .........................................................................................................19
Printer Configurations ........ ....... ....... ...... ....... ....... ............. ....... ....... ...... . ...... ....... ............. ...... 20
Front View of the Printer .... ...... ....... ....... ...... ....... ....... ...... . ...... ....... ....... ...... ....... ....... ...... . 20
Using the Control Panel . ...... . ...... ....... ....... ............. ....... ....... ...... ....... ....... ............. ....... ....... ... 21
Customizing the Home Screen ..... ...... ....... ....... ............. ....... ....... ...... ....... ....... ............. ....... ... 22
Changing the Language of the Keyboard on the Display ............. ....... ....... ...... . ...... ....... ......... 23
Understanding the Status of the Indicator Light ........... ....... ....... ...... . ...... ....... ....... ...... ....... ... 24
Selecting Paper ....... ...... . ...... ....... ............. ....... ....... ...... . ...... ....... ....... ...... ....... ....... ...... ....... .... 25
Paper Guidelines ..... ....... ............. ....... ....... ...... . ...... ....... ....... ...... ....... ....... ...... ....... ....... .... 25
Paper Characteristics...... ....... ....... ...... ....... ....... ...... . ...... ....... ....... ...... ....... ....... ...... ....... .... 25
Unacceptable Paper.... ....... ....... ...... ....... ....... ...... ....... ....... ...... . ...... ....... ....... ...... ....... ....... 26
Selecting Preprinted Forms and Letterhead ..... ....... ....... ...... ....... ............. ....... ....... ...... . .... 26
Storing Paper........... . ...... ....... ...... . ...... ....... ............. ....... ....... ...... . ...... ....... ....... ...... ....... ... 27
Supported Paper Sizes.... . ...... ....... ....... ............. ....... ....... ...... ....... ....... ............. ....... ....... ... 27
Supported Paper Types ...... . ...... ....... ....... ...... ....... ....... ...... . ...... ....... ....... ............. ....... ...... 30
Supported Paper Weights. ...... ....... ....... ............. ....... ............. ....... ....... ...... ....... ....... ......... 30
3 Set Up, Install, and Configure..............................................................................................33
Selecting a Location for the Printer ....... ....... ............. ....... ...... . ...... ....... ....... ............. ....... ....... 34
Attaching cables ....... . ............. ....... ...... ....... ....... ...... . ...... ....... ....... ............. ....... ....... ...... ....... . 35
Setting up and using the home screen applications ...... ....... ....... ...... ....... ............. ....... ....... .... 36
Finding the IP Address of the Printer .... ....... ...... ....... ....... ...... ....... ....... ...... . ...... ....... ....... .. 36
Managing bookmarks ..... ....... ...... . ...... ....... ....... ...... ....... ....... ...... . ...... ....... ....... ............. ... 36
Setting up the Printer to Fax ..... ...... . ...... ....... ....... ...... ....... ....... ...... . ...... ....... ....... ............. ...... 38
Setting up the fax function ... ....... ....... ...... ....... ....... ...... . ...... ....... ....... ............. ....... ...... . ... 38
Setting up fax using a standard telephone line.... ...... . ...... ....... ....... ............. ....... ...... . ...... . 39
Setting up fax in countries or regions with different telephone wall jacks and
plugs.... ...... ....... ....... ...... . ...... ....... ....... ............. ....... ...... . ...... ....... ....... ............. ....... ....... ... 40
Connecting to a distinctive ring service ... ....... ............. ....... ....... ...... . ...... ....... ............. ...... 41
Setting the fax date and time ...... . ............. ....... ............. ....... ....... ...... ....... ....... ............. ... 42
Configuring daylight saving time ...... ....... ...... . ...... ....... ....... ............. ....... ...... . ...... ....... ..... 42
Configuring the fax speaker settings ..... ....... ...... . ...... ....... ....... ...... ....... ....... ...... . ...... ....... . 42
Configuring the Email SMTP Settings...... . ...... ....... ...... ....... ....... ............. ....... ....... ...... . ...... ..... 43
Xerox®C235 Color Multifunction Printer
User Guide
3

Table of Contents
Using the Email Setup Wizard in the Printer ...... ............. ....... ............. ....... ....... ...... . ...... ....... .. 44
Using the Settings Menu in the Printer . ....... ...... . ...... ....... ............. ....... ....... ...... . ...... ....... ....... . 45
Using the Embedded Web Server .... ............. ....... ............. . ...... ....... ...... ....... ....... ............. ....... 46
Email Service Providers...... ....... ............. ....... ............. ....... ...... . ...... ....... ....... ............. ....... ....... 47
™
Gmail
Yahoo!
... ....... ....... ...... . ...... ....... ....... ...... ....... ....... ...... . ...... ....... ...... . ............. ....... ...... ....... 47
®
Mail. ...... ....... ....... ............. ....... ....... ...... . ...... ....... ....... ...... ....... ....... ...... . ...... ....... . 47
Outlook Live. ............. ....... ....... ...... . ...... ....... ....... ...... ....... ....... ...... ....... ....... ...... . ...... ....... .. 48
AOL Mail. ...... ....... ....... ............. ....... ............. ....... ....... ...... ....... ....... ............. ....... ....... ...... . 48
iCloud Mail . ............. . ...... ....... ...... . ...... ....... ....... ...... ....... ....... ...... . ...... ....... ....... ...... ....... ... 49
Comcast Mail..... ....... ...... . ...... ....... ....... ...... ....... ............. ....... ....... ...... . ...... ....... ....... ...... ... 49
Mail.com...... ............. ....... ....... ...... ....... ....... ............. ....... ............. ....... ....... ...... . ...... ....... .. 50
Zoho Mail .... ............. ....... ...... . ...... ....... ....... ............. ....... ............. ....... ....... ...... ....... ....... .. 50
QQ Mail ... ....... ...... ....... ....... ...... . ...... ....... ....... ...... ....... ....... ...... . ...... ....... ....... ............. ...... 51
NetEase Mail (mail.163.com) .... ....... ....... ............. ....... ....... ...... ....... ....... ............. ....... ...... 51
NetEase Mail (mail.126.com) .... ....... ....... ............. ....... ....... ...... ....... ....... ............. ....... ...... 52
NetEase Mail (mail.yeah.net) .... ....... ............. ....... ....... ...... . ...... ....... ............. ....... ............. 52
Sohu Mail ....... ...... ....... ....... ...... . ...... ....... ....... ............. ....... ...... . ...... ....... ....... ............. ...... 53
Sina Mail ... ...... ....... ....... ............. ....... ....... ...... . ...... ....... ....... ...... ....... ............. ....... ....... .... 53
Loading paper and specialty media...... ....... ....... ...... . ...... ....... ....... ............. ....... ...... . ...... ....... . 55
Setting the Paper Size and Type.... . ...... ....... ............. ....... ............. ....... ....... ...... . ...... ....... .. 55
Configuring Universal paper settings.... ....... ............. ....... ............. ....... ....... ...... . ...... ....... .. 55
Loading the tray ........... ....... ............. . ...... ....... ...... . ...... ....... ............. ....... ....... ...... . ...... ..... 55
Loading the manual feeder..... ....... ...... . ...... ....... ....... ............. ....... ...... . ...... ....... ...... . ........ 58
Installing and updating software, drivers, and firmware .... ....... ...... . ...... ....... ....... ............. ...... 61
Installing the Software .... ....... ...... . ...... ....... ............. ....... ............. ....... ....... ...... . ...... ....... .. 61
Updating Firmware... ....... ....... ...... . ...... ....... ....... ...... ....... ............. ....... ....... ...... . ...... ....... .. 64
Exporting or importing a configuration file...... . ...... ....... ....... ............. ....... ...... ....... ....... .... 65
Networking ............. ....... ....... ...... ....... ....... ............. ....... ....... ...... . ...... ....... ....... ...... ....... ....... ... 66
Connecting the Printer to a Wi-Fi Network .... ............. . ...... ....... ...... . ...... ....... ....... ...... ....... 66
Connecting the printer to a wireless network using Wi-Fi Protected Setup (WPS) ..... . ...... .. 66
Configuring Wi-Fi Direct...... ....... ....... ...... . ...... ....... ....... ...... ....... ....... ...... . ...... ....... ....... ..... 67
Connecting a mobile device to the printer..... ....... ....... ...... . ...... ....... ....... ............. ....... ...... 67
Connecting a computer to the printer ...... ....... ...... ....... ....... ............. ....... ....... ...... . ...... ..... 68
Deactivating the Wi-Fi network ...... ....... ....... ...... . ...... ....... ....... ...... ....... ....... ...... . ...... ....... . 68
Checking the printer connectivity . ....... ............. ....... ....... ...... . ...... ....... ....... ...... ....... ....... ... 68
Printing the Menu Settings Page ..... ............. ....... ............. . ...... ....... ...... ....... ....... ............. ....... 70
4 Secure the printer ...................................................................................................................71
Erasing printer memory..... ....... ...... ....... ....... ...... ....... ....... ...... . ...... ....... ....... ...... ....... ....... ...... . 72
Restoring factory default settings... ....... ............. ....... ....... ...... . ...... ....... ....... ...... ....... ....... ...... . 73
Statement of Volatility.. ....... ....... ............. ....... ....... ...... . ...... ....... ............. ....... ............. ....... .... 74
5 Print ...........................................................................................................................................75
Printing from a computer .. ...... ....... ............. ....... ....... ...... . ...... ....... ....... ...... ....... ....... ...... . ...... . 76
Printing from a mobile device........ ....... ....... ...... ....... ....... ............. ....... ....... ...... . ...... ....... ........ 77
4
Xerox®C235 Color Multifunction Printer
User Guide

Table of Contents
Printing from a Mobile Device Using Mopria™Print Service ....... ....... ....... ...... ....... ....... ..... 77
Printing from a Mobile Device Using AirPrint
Printing from a mobile device using Wi-Fi Direct
Printing from a flash drive . ............. ....... ............. ....... ....... ...... ....... ....... ............. ....... ....... ...... . 79
Supported flash drives and file types........... ....... ....... ...... ....... ....... ............. ....... ....... ...... . ...... . 80
Flash drives.... ...... . ...... ....... ....... ...... ....... ....... ...... ....... ....... ...... . ...... ....... ....... ...... ....... ....... 80
File types ... ...... . ...... ....... ....... ...... ....... ....... ...... . ...... ....... ....... ............. ....... ............. ....... .... 80
Printing a font sample list .... ....... ....... ............. ....... ....... ...... ....... ....... ............. ....... ............. . ... 81
Placing separator sheets between copies.... ....... ...... ....... ....... ...... ....... ....... ...... . ...... ....... ....... .. 82
Canceling a print job.. ....... ....... ...... ....... ....... ...... ....... ....... ...... . ...... ....... ....... ...... ....... ....... ...... . 83
From the Printer Control Panel ....... ....... ....... ...... . ...... ....... ....... ...... ....... ....... ...... . ...... ....... . 83
From the Computer. ....... ....... ............. ....... ...... . ...... ....... ....... ............. ....... ............. ....... .... 83
Adjusting toner darkness....... ...... . ...... ....... ....... ............. ....... ...... . ...... ....... ....... ............. ....... ... 84
®
... ....... ............. ....... ....... ...... . ...... ....... ....... .. 77
®
... ....... ............. ....... ............. ....... ....... .... 77
6 Copy ..........................................................................................................................................85
Using the automatic document feeder and scanner glass..... ....... ....... ...... . ...... ....... ....... ......... 86
Making Copies .. ...... ....... ....... ...... . ...... ....... ....... ............. ....... ....... ...... ....... ....... ............. ....... ... 87
Copying photos.. . ...... ....... ....... ............. ....... ...... . ...... ....... ....... ............. ....... ....... ...... ....... ....... . 88
Copying on letterhead . ....... ...... ....... ....... ...... . ...... ....... ....... ............. ....... ...... . ...... ....... ....... ..... 89
Copying on Both Sides of the Paper ..... ....... ...... . ...... ....... ....... ...... ....... ....... ...... . ...... ....... ....... . 90
Reducing or enlarging copies.. ....... ....... ...... . ...... ....... ............. ....... ............. . ...... ....... ...... . ...... .. 91
Copying Multiple Pages onto a Single Sheet ...... . ...... ....... ............. ....... ....... ...... . ...... ....... ....... . 92
Collating copies . ....... ............. ....... ....... ...... . ...... ....... ............. ....... ............. . ...... ....... ...... . ...... .. 93
Copying cards ..... ....... ....... ...... ....... ....... ...... ....... ....... ...... . ...... ....... ....... ...... ....... ....... ...... . ...... . 94
Creating a copy shortcut...... ............. ....... ....... ...... . ...... ....... ....... ...... ....... ............. ....... ....... .... 95
7 Email .........................................................................................................................................97
Using the automatic document feeder and scanner glass..... ....... ....... ...... . ...... ....... ....... ......... 98
Sending an Email ...... ....... ....... ............. ....... ...... . ...... ....... ....... ............. ....... ....... ...... ....... ....... . 99
Using the Control Panel ....... ............. . ...... ....... ...... . ...... ....... ............. ....... ....... ...... . ...... ..... 99
Using a Shortcut Number....... ...... . ...... ....... ....... ...... ....... ....... ...... . ...... ....... ....... ...... ....... ... 99
Creating an e-mail shortcut. ....... ............. ....... ....... ...... ....... ....... ............. ....... ....... ...... . ...... ... 100
8 Fax .......................................................................................................................................... 101
Using the automatic document feeder and scanner glass..... ....... ....... ...... . ...... ....... ....... ....... 102
Sending a fax... ....... ...... . ...... ....... ....... ............. ....... ....... ...... ....... ....... ............. ....... ............. . . 103
Using the control panel... . ...... ....... ....... ...... ....... ....... ...... ....... ....... ...... . ...... ....... ....... ...... . 103
Scheduling a fax .......... ....... ............. ....... ...... . ...... ....... ....... ............. ....... ....... ...... ....... ....... ... 104
Creating a fax destination shortcut .... ............. ....... ....... ...... . ...... ....... ............. ....... ............. . . 105
Changing the fax resolution .. ....... ....... ............. ....... ............. ....... ....... ...... . ...... ....... ............. . 106
Adjusting the fax darkness ... ....... ....... ............. ....... ...... . ...... ....... ....... ............. ....... ............. .. 107
Printing a fax log..... ...... . ...... ....... ....... ............. ....... ....... ...... ....... ....... ............. ....... ............. .. 108
Blocking junk faxes ...... ....... ....... ...... ....... ....... ...... . ...... ....... ....... ...... ....... ....... ...... . ...... ....... ... 109
Xerox®C235 Color Multifunction Printer
User Guide
5

Table of Contents
Holding a fax . ............. ....... ....... ...... ....... ....... ............. ....... ....... ...... . ...... ....... ....... ...... ....... .... 110
Forwarding a fax.......... ....... ............. ....... ....... ...... . ...... ....... ....... ...... ....... ....... ...... . ...... ....... ... 111
9 Scan........................................................................................................................................ 113
Using the automatic document feeder and scanner glass..... ....... ....... ...... . ...... ....... ....... ....... 114
Scanning to a Computer ...... ............. ....... ....... ...... . ...... ....... ....... ...... ....... ....... ...... ....... ....... .. 115
For Windows Users.. ....... ............. ....... ....... ...... . ...... ....... ............. ....... ............. ....... ....... .. 115
For Macintosh Users............. ....... ....... ...... ....... ...... . ............. ....... ............. ....... ....... ...... ... 115
Scanning to an FTP server using a shortcut .... ....... ...... . ...... ....... ....... ...... ....... ....... ...... . ...... ... 116
Scanning to a network folder using a shortcut .. ...... ....... ....... ...... . ...... ....... ....... ............. ....... . 117
Scanning to a flash drive.. ....... ...... ....... ....... ...... . ...... ....... ....... ...... ....... ....... ...... . ...... ....... ...... 118
10 Use printer menus............................................................................................................. 119
Menu Map ....... ...... . ...... ....... ....... ...... ....... ....... ...... . ...... ....... ....... ............. ....... ...... ....... ....... .. 120
Device ..... ............. ....... ............. ....... ....... ...... . ...... ....... ............. ....... ....... ...... . ...... ....... ....... ... 121
Preferences .. ....... ............. ....... ....... ...... . ...... ....... ............. ....... ............. . ...... ....... ...... . ...... 121
Eco-Mode ... ....... ....... ...... . ...... ....... ....... ...... ....... ............. ....... ....... ...... . ...... ....... ....... ...... . 122
Remote Operator Panel..... ............. ....... ....... ...... ....... ....... ............. ....... ....... ...... . ...... ...... 123
Notifications... ............. ....... ...... . ...... ....... ....... ............. ....... ....... ...... ....... ....... ............. .... 124
Power Management. ....... ...... . ...... ....... ....... ............. ....... ....... ...... ....... ....... ............. ....... . 127
Restore Factory Defaults ...... ....... ...... . ...... ....... ...... . ............. ....... ............. ....... ....... ...... ... 128
Maintenance . ...... ....... ....... ...... ....... ............. ....... ....... ...... . ...... ....... ....... ...... ....... ....... ..... 128
Visible Home Screen Icons .... ...... ....... ....... ...... . ...... ....... ....... ...... ....... ....... ...... ....... ....... .. 132
About this Printer......... ....... ....... ...... ....... ....... ............. ....... ....... ...... . ...... ....... ............. .... 133
Print.......... ....... ....... ...... . ...... ....... ............. ....... ....... ...... . ...... ....... ....... ...... ....... ....... ...... ....... .. 134
Layout ........ ............. . ...... ....... ...... . ...... ....... ....... ...... ....... ....... ...... . ...... ....... ....... ...... ....... . 134
Setup......... ....... ....... ...... ....... ....... ............. ....... ....... ...... . ...... ....... ....... ...... ....... ............. . . 135
Quality........... ....... ....... ...... ....... ....... ............. ....... ....... ...... . ...... ....... ....... ...... ....... ........... 136
PostScript . ....... ....... ............. ....... ....... ...... ....... ....... ............. ....... ............. ....... ....... ...... . .. 137
PCL ....... ...... ....... ....... ...... . ...... ....... ....... ...... ....... ....... ...... ....... ....... ...... . ...... ....... ....... ...... . 138
Image ..... ....... ............. ....... ....... ...... . ...... ....... ....... ...... ....... ....... ...... . ...... ....... ....... ...... .... 139
Paper..... ...... . ...... ....... ....... ...... ....... ....... ...... ....... ....... ...... . ...... ....... ....... ...... ....... ....... ...... . ..... 141
Tray Configuration........ ....... ............. . ...... ....... ...... . ...... ....... ............. ....... ....... ...... . ...... ... 141
Media Configuration. ...... ....... ...... . ...... ....... ....... ...... ....... ....... ...... . ...... ....... ....... ............. . 141
Copy.... ....... ............. ....... ....... ...... ....... ....... ............. ....... ............. ....... ....... ...... ....... ....... ....... 144
Copy Defaults ... ....... ...... . ...... ....... ....... ...... ....... ....... ...... . ...... ....... ....... ...... ....... ....... ...... . . 144
Fax .... ....... ...... ....... ....... ............. ....... ....... ...... . ...... ....... ....... ...... ....... ............. ....... ....... ...... . .. 147
Fax Defaults... ....... ...... . ...... ....... ....... ............. ....... ...... . ...... ....... ...... . ............. ....... ........... 147
E-mail .. . ...... ....... ....... ............. ....... ....... ...... ....... ....... ............. ....... ............. . ...... ....... ...... . ...... 154
E-mail Setup ....... ............. ....... ...... . ...... ....... ....... ............. ....... ............. ....... ....... ...... ....... 154
E-mail Defaults .... ....... ....... ............. ....... ...... ....... ....... ...... . ...... ....... ....... ............. ....... ..... 155
FTP ...... . ...... ....... ............. ....... ....... ...... . ...... ....... ....... ...... ....... ....... ...... ....... ....... ...... . ...... ....... 159
FTP Defaults . ....... ....... ............. ....... ............. ....... ....... ...... ....... ....... ............. ....... ....... ..... 159
USB Drive . ...... ....... ....... ............. ....... ....... ...... ....... ...... . ............. ....... ............. ....... ....... ...... ... 162
6
Xerox®C235 Color Multifunction Printer
User Guide

Table of Contents
Flash Drive Scan ..... ....... ....... ...... ....... ....... ...... . ...... ....... ....... ...... ....... ....... ...... ....... ....... .. 162
Flash Drive Print. ....... ...... . ...... ....... ....... ............. ....... ............. ....... ...... . ...... ....... ....... ....... 164
Network/Ports.... ....... ....... ............. ....... ....... ...... ....... ....... ............. ....... ....... ...... ....... ....... ...... 167
Network Overview.... ...... . ...... ....... ....... ...... ....... ....... ...... . ...... ....... ....... ............. ....... ...... . . 167
Wireless ....... ....... ....... ............. ....... ....... ...... ....... ....... ............. ....... ....... ...... ....... ....... ...... 168
Wi-Fi Direct.. ............. ....... ....... ...... ....... ....... ............. ....... ............. ....... ....... ...... ....... ....... 170
Ethernet ..... ............. ....... ....... ...... ....... ....... ............. ....... ....... ...... . ...... ....... ............. ....... . 171
TCP/IP ... ...... . ...... ....... ....... ...... ....... ....... ...... . ...... ....... ....... ...... ....... ....... ...... . ...... ....... ...... 173
SNMP ...... ....... ............. ....... ....... ...... ....... ....... ............. ....... ....... ...... . ...... ....... ............. .... 174
IPSec ......... ....... ....... ...... ....... ....... ............. ....... ....... ...... . ...... ....... ............. ....... ............. . . 176
802.1x ... ....... ...... . ...... ....... ............. ....... ....... ...... . ...... ....... ....... ...... ....... ....... ...... . ...... ...... 177
LPD Configuration....... ....... ............. ....... ............. ....... ....... ...... ....... ....... ............. ....... ..... 177
HTTP/FTP Settings ....... ...... ....... ....... ............. ....... ....... ...... . ...... ....... ............. ....... ........... 178
USB ... . ...... ....... ....... ...... ....... ............. . ...... ....... ...... . ...... ....... ....... ...... ....... ....... ...... . ...... ... 179
Restrict external network access . ....... ....... ...... . ...... ....... ....... ...... ....... ....... ...... . ...... ....... ... 179
Security ... ....... ....... ...... ....... ............. ....... ....... ...... . ...... ....... ....... ...... ....... ....... ...... . ...... ....... ... 181
Login Methods... ....... ...... . ...... ....... ....... ............. ....... ............. ....... ....... ...... ....... ....... ....... 181
Certificate Management . ...... ....... ....... ............. ....... ...... . ...... ....... ....... ............. ....... ....... . 183
Schedule USB Devices..... ....... ...... . ............. ....... ............. ....... ....... ...... ....... ....... ............. . 183
Login Restrictions...... ....... ...... ....... ....... ............. ....... ............. ....... ....... ...... . ...... ....... ....... 183
Erase Temporary Data Files ... ............. ....... ....... ...... . ...... ....... ....... ...... ....... ....... ...... ....... .. 184
Miscellaneous ... ....... ...... . ...... ....... ....... ............. ....... ...... . ...... ....... ....... ............. ....... ....... . 184
Reports ....... ....... ....... ...... ....... ....... ...... . ...... ....... ....... ............. ....... ...... ....... ....... ...... . ...... ....... 185
Menu Settings Page.... . ...... ....... ....... ...... ....... ....... ...... . ...... ....... ...... . ............. ....... ........... 185
Device .... ....... ...... . ...... ....... ....... ...... ....... ....... ...... ....... ....... ...... . ...... ....... ....... ...... ....... ..... 185
Print... ....... ...... ....... ....... ...... ....... ....... ...... . ...... ....... ....... ...... ....... ....... ...... . ...... ....... ....... ... 185
Shortcuts .... ............. . ...... ....... ...... . ...... ....... ....... ...... ....... ....... ...... . ...... ....... ....... ...... ....... . 185
Fax ... ....... ....... ...... ....... ....... ...... . ...... ....... ....... ...... ....... ....... ...... . ...... ....... ....... ............. .... 186
Network.. ....... ...... ....... ....... ............. ....... ............. ....... ....... ...... . ...... ....... ............. ....... ..... 186
Troubleshooting..... ....... ............. ....... ....... ...... . ...... ....... ....... ...... ....... ............. ....... ....... ...... . .. 187
11 Maintain the Printer.......................................................................................................... 189
Checking the Status of Supplies ....... ...... . ...... ....... ....... ............. ....... ...... . ...... ....... ....... .......... 190
Configuring Supply Notifications... ...... . ...... ....... ....... ...... ....... ............. ....... ....... ...... . ...... ....... 191
Setting up e-mail alerts . ....... ....... ............. ....... ....... ...... . ...... ....... ....... ...... ....... ............. ....... .. 192
Viewing reports.. ...... ....... ....... ...... . ...... ....... ....... ............. ....... ...... ....... ....... ...... . ...... ....... ....... 193
Ordering Supplies. ...... . ...... ....... ....... ............. ....... ............. ....... ...... . ...... ....... ....... ............. ..... 194
Using Genuine Xerox Supplies ... . ...... ....... ....... ...... ....... ....... ...... . ...... ....... ....... ............. .... 194
Replacing Supplies ....... ....... ...... ....... ....... ...... . ...... ....... ....... ............. ....... ...... . ...... ....... ....... ... 195
Replacing a print cartridge .... ............. ....... ....... ...... ....... ....... ............. ....... ............. ....... .. 195
Replacing the waste toner bottle.... ....... ....... ...... . ...... ....... ....... ...... ....... ....... ...... . ...... ...... 198
Cleaning printer parts ....... ............. ....... ...... ....... ....... ...... . ...... ....... ....... ............. ....... ....... ..... 199
Cleaning the printer . ....... ...... ....... ....... ............. ....... ....... ...... ....... ....... ............. ....... ....... . 199
Cleaning the touch screen... ...... ....... ....... ............. ....... ....... ...... . ...... ....... ............. ....... .... 199
Cleaning the Scanner..... ....... ...... ....... ....... ...... . ...... ....... ....... ...... ....... ....... ...... ....... ....... .. 200
Saving energy and paper ...... ....... ...... . ............. ....... ...... ....... ....... ...... . ...... ....... ....... ............. . 202
Xerox®C235 Color Multifunction Printer
User Guide
7

Table of Contents
Configuring the power save mode settings ....... ....... ...... . ...... ....... ....... ...... ....... ....... ...... . . 202
Adjusting the brightness of the printer display ...... ....... ...... ....... ....... ...... . ...... ....... ....... ... 202
Conserving supplies.. ....... ...... . ...... ....... ....... ............. ....... ....... ...... ....... ....... ............. ....... . 202
Moving the Printer to Another Location.... ....... ....... ...... . ...... ....... ............. ....... ............. ....... .. 203
12 Troubleshoot a problem................................................................................................... 205
Print quality problems .... ...... . ...... ....... ....... ............. ....... ....... ...... ....... ....... ............. ....... ....... . 206
Printing problems..... ....... ...... . ...... ....... ....... ............. ....... ...... ....... ....... ...... . ...... ....... ....... ....... 207
Print quality is poor... ....... ....... ...... . ...... ....... ....... ...... ....... ....... ...... ....... ....... ...... . ...... ....... 207
Print jobs do not print ... ....... ............. . ...... ....... ...... . ...... ....... ....... ...... ....... ....... ...... . ...... ... 230
Slow printing.... ....... ............. ....... ....... ...... ....... ...... . ............. ....... ............. ....... ....... ...... ... 231
Job prints from the wrong tray or on the wrong paper. ...... . ...... ....... ....... ...... ....... ........... 233
The printer is not responding .... ...... ....... ....... ............. ....... ....... ...... . ...... ....... ............. ....... .... 234
Unable to read flash drive..... ...... . ...... ....... ....... ............. ....... ....... ...... ....... ....... ............. ....... . 236
Enabling the USB port...... ....... ....... ...... ....... ....... ...... . ...... ....... ....... ...... ....... ....... ...... . ...... ...... 237
Network connection problems ........ ....... ...... ....... ....... ...... . ...... ....... ....... ...... ....... ....... ...... . ..... 238
Cannot open Embedded Web Server .... . ...... ....... ....... ...... ....... ....... ...... . ...... ....... ...... . ...... 238
Cannot connect the printer to the Wi-Fi network . ...... . ...... ....... ....... ............. ....... ....... ..... 239
Issues with supplies ...... . ...... ....... ....... ...... ....... ....... ...... . ...... ....... ....... ...... ....... ....... ...... ....... .. 241
Replace Cartridge Printer Region Mismatch ... ............. . ...... ....... ...... ....... ....... ............. ..... 241
Non-Xerox Supplies .. ....... ....... ...... ....... ....... ............. ....... ....... ...... . ...... ....... ............. ....... . 241
Clearing Jams .... . ...... ....... ............. ....... ....... ...... . ...... ....... ....... ...... ....... ....... ...... . ...... ....... ...... 242
Avoiding jams .. ............. ....... ............. ....... ....... ...... ....... ....... ............. ....... ....... ...... . ...... ... 242
Identifying jam locations..... ....... ....... ...... ....... ....... ............. ....... ............. ....... ....... ...... . .. 244
Paper jam in the standard tray.. ....... ............. ....... ....... ...... . ...... ....... ............. ....... ........... 244
Paper jam in the standard output tray ..... ...... . ...... ....... ............. ....... ....... ...... . ...... ....... ... 246
Paper jam in the manual feeder... ....... ....... ............. ....... ....... ...... . ...... ....... ....... ...... ....... . 247
Paper jam in door B ...... ....... ...... ....... ....... ...... . ...... ....... ....... ............. ....... ...... . ...... ....... ... 248
Paper jam in the automatic document feeder ......... ....... ....... ...... . ...... ....... ....... ...... ....... . 250
Paper feed problems ..... ....... ............. ....... ....... ...... ....... ....... ............. ....... ............. ....... ....... .. 252
Envelope seals when printing .... ............. ....... ............. . ...... ....... ...... ....... ....... ............. ..... 252
Collated printing does not work.... ............. ....... ....... ...... ....... ....... ............. ....... ............. . . 253
Paper frequently jams ....... ....... ...... ....... ....... ...... . ...... ....... ....... ............. ....... ....... ...... ...... 254
Jammed pages are not reprinted .......... ....... ....... ...... . ...... ....... ....... ...... ....... ....... ...... . ..... 255
E-mailing problems ..... ....... ....... ...... . ...... ....... ............. ....... ....... ...... . ...... ....... ....... ...... ....... .... 256
Disabling the SMTP server not set up error message.. ............. ....... ....... ...... . ...... ....... ...... 256
Cannot send e-mails . ....... ...... . ...... ....... ....... ............. ....... ...... ....... ....... ...... . ...... ....... ....... 256
Faxing problems.... ....... ............. ....... ....... ...... . ...... ....... ....... ...... ....... ....... ...... . ...... ....... ....... ... 257
Caller ID is not shown ... ............. ....... ....... ...... ....... ....... ............. ....... ....... ...... ....... ....... ... 257
Cannot send or receive faxes....... ....... ...... . ...... ....... ....... ............. ....... ............. ....... ...... . .. 257
Can receive but not send faxes....... ...... . ...... ....... ....... ............. ....... ...... . ...... ....... ...... . ...... 259
Can send but not receive faxes.. ....... ...... ....... ....... ...... . ...... ....... ...... . ............. ....... ...... ..... 260
Poor fax print quality ... ....... ...... ....... ....... ............. ....... ....... ...... . ...... ....... ............. ....... .... 261
Scanning problems .... ....... ....... ...... ....... ....... ...... ....... ....... ...... . ...... ....... ....... ...... ....... ....... ..... 262
Cannot scan to a computer... ....... ............. ....... ....... ...... . ...... ....... ............. ....... ............. . . 262
8
Xerox®C235 Color Multifunction Printer
User Guide

Table of Contents
Cannot scan to a network folder ....... ...... . ...... ....... ....... ...... ....... ....... ...... . ...... ....... ....... ... 263
Partial copies of document or photo.. ...... ....... ....... ............. ....... ....... ...... . ...... ....... ....... ... 265
Scan job was not successful . ....... ...... . ...... ....... ...... . ............. ....... ............. ....... ...... . ...... ... 266
Poor copy quality ..... ...... . ...... ....... ....... ...... ....... ....... ...... . ...... ....... ....... ............. ....... ....... . 267
Vertical dark streaks on output when scanning from the ADF ..... ............. ....... ....... ...... ... 267
Scanner does not close............ ....... ....... ...... ....... ....... ............. ....... ....... ...... . ...... ....... ...... 268
Scanning takes too long or freezes the computer ....... ....... ...... ....... ....... ............. ....... ..... 268
Scanner does not respond...... ...... . ...... ....... ....... ...... ....... ....... ...... . ...... ....... ....... ...... ....... . 269
Adjusting scanner registration.... ....... ...... . ...... ....... ....... ............. ....... ....... ...... ....... ....... ... 269
Adjusting ADF registration .... ....... ....... ............. ....... ...... . ...... ....... ....... ............. ....... ....... . 270
Color quality problems . ...... ....... ....... ...... . ...... ....... ....... ............. ....... ....... ...... ....... ....... .......... 271
Modifying the colors in printed output ... ....... ............. . ...... ....... ...... . ...... ....... ....... ...... ..... 271
FAQ about color printing . ....... ....... ............. ....... ............. ....... ....... ...... . ...... ....... ............. . 271
The print appears tinted ... ............. ....... ....... ...... . ...... ....... ............. ....... ....... ...... . ...... ...... 273
Contacting Customer Support .... ............. ....... ...... . ...... ....... ....... ............. ....... ....... ...... ....... ... 274
A Regulatory Information...................................................................................................... 275
Basic Regulations... ...... ....... ....... ...... ....... ....... ...... . ...... ....... ....... ...... ....... ....... ...... . ...... ....... ... 276
Noise Emission Levels..... ...... ....... ....... ...... . ...... ....... ....... ............. ....... ...... ....... ....... ...... . .. 276
Static Sensitivity Notice ..... ...... ....... ....... ...... ....... ....... ...... . ...... ....... ....... ...... ....... ....... ..... 276
ENERGY STAR .. . ...... ....... ....... ...... ....... ....... ...... . ...... ....... ....... ...... ....... ....... ...... ....... ....... .. 276
Temperature Information........ ...... . ...... ....... ....... ............. ....... ............. ....... ....... ...... ....... 277
Información de la energía de México ...... ....... ....... ...... ....... ....... ...... . ...... ....... ....... ...... .... 277
Laser Notice...... ....... ....... ...... . ...... ....... ....... ............. ....... ....... ...... ....... ....... ............. ....... . 277
Power ............. ....... ............. ....... ...... . ...... ....... ....... ............. ....... ....... ...... ....... ....... .......... 277
Telecommunication Regulatory Notices..... ....... ....... ...... ....... ....... ............. ....... ............. .. 279
Regulatory Notices for Wireless Products.... ....... ...... ....... ....... ...... . ...... ....... ....... ...... ....... . 282
Federal Communications Commission (FCC) Compliance Information Statement . .......... 283
Innovation, Science and Economic Development Canada Compliance
Statement ....... ....... ............. ....... ...... . ...... ....... ...... . ............. ....... ............. ....... ...... . ...... ... 284
Germany... ....... ....... ............. ....... ....... ...... ....... ...... . ............. ....... ............. ....... ....... ...... ... 284
Turkey RoHS Regulation .. ...... . ...... ....... ....... ............. ....... ....... ...... ....... ....... ............. ....... . 285
Ukraine RoHS Compliance. ....... ...... ....... ....... ...... . ...... ....... ....... ............. ....... ....... ...... ...... 285
Copy Regulations .. ....... ...... ....... ....... ...... . ...... ....... ....... ............. ....... ...... . ...... ....... ....... .......... 286
United States...... ....... ............. ....... ....... ...... ....... ....... ............. ....... ....... ...... ....... ....... ...... 286
Canada...... ....... ....... ...... . ...... ....... ....... ...... ....... ....... ...... . ...... ....... ....... ............. ....... ...... . . 287
Other Countries.. ....... ....... ...... ....... ....... ............. ....... ............. ....... ....... ...... ....... ....... ....... 288
Material Safety Data Sheets .......... ....... ............. ....... ....... ...... ....... ....... ............. ....... ....... ..... 289
B Recycling and Disposal ....................................................................................................... 291
Product Disposal and Recycling...... ............. ....... ...... . ...... ....... ....... ............. ....... ....... ...... ...... 292
North America .... . ...... ....... ....... ...... ....... ....... ...... ....... ....... ...... . ...... ....... ....... ...... ....... ....... ..... 293
Xerox Green World Alliance .. ....... ....... ............. ....... ....... ...... ....... ....... ............. ....... ............. . . 294
Waste from Electrical and Electronic Equipment (WEEE) Directive ...... ....... ....... ...... . ...... ....... 295
India E-Waste notice... ....... ............. ....... ............. ....... ...... . ...... ....... ....... ............. ....... ..... 295
Xerox®C235 Color Multifunction Printer
User Guide
9

Table of Contents
10
Xerox®C235 Color Multifunction Printer
User Guide

1
Safety
This chapter contains:
• Conventions. . ...... ....... ....... ...... ....... ....... ...... . ...... ....... ...... . ............. ....... ...... ....... ....... ...... . ...... ..... 12
• Product Statements ....... ....... ............. ....... ...... ....... ....... ...... . ...... ....... ....... ............. ....... ...... . ...... . 13
• Maintenance Safety.... ....... ....... ...... ....... ....... ............. ....... ....... ...... ....... ....... ............. ....... ....... ... 16
• Consumable Information ..... ....... ...... ....... ....... ...... . ...... ....... ....... ............. ....... ....... ...... ....... ....... . 17
Your printer and the recommended supplies have been designed and tested to meet strict safety
requirements. Attention to the following information ensures the continued safe operation of your
Xerox printer.
Xerox®C235 Color Multifunction Printer
User Guide
11

Safety
Conventions
Note: A note identifies information that could help you.
Warning: A warning identifies something that could damage the product hardware or software.
Caution: A caution indicates a potentially hazardous situation that could injure you.
Different types of statements include:
CAUTION—POTENTIAL INJURY: Indicates a risk of injury.
CAUTION—SHOCK HAZARD: Indicates a risk of electrical shock.
CAUTION—HOT SURFACE: Indicates a risk of burn if touched.
CAUTION—TIPPING HAZARD: Indicates a crush hazard.
CAUTION—PINCH HAZARD: Indicates a risk of being caught between moving parts.
CAUTION—MOVING PARTS: Indicates a risk of laceration or abrasion injuries from rotating
parts.
12
Xerox®C235 Color Multifunction Printer
User Guide

Product Statements
CAUTION—POTENTIAL INJURY: To avoid the risk of fire or electrical shock, connect the
power cord to an appropriately rated and properly grounded electrical outlet that is near the
product and easily accessible.
CAUTION—POTENTIAL INJURY: To avoid the risk of fire or electrical shock, use only the
power cord provided with this product or the manufacturer authorized replacement.
CAUTION—POTENTIAL INJURY: Do not use this product with extension cords, multi-outlet
power strips, multi-outlet extenders, or UPS devices. The power capacity of these types of
accessories can be easily overloaded by a laser printer and may result in a risk of fire, property
damage, or poor printer performance.
CAUTION—POTENTIAL INJURY: Do not use this product with an inline surge protector. The
use of a surge protection device may result in a risk of fire, property damage, or poor printer
performance.
CAUTION—POTENTIAL INJURY: To reduce the risk of fire, use only a 26 AWG or larger
telecommunications RJ-11 cord when connecting this product to the public switched telephone
network. For users in Australia, the cord must be approved by the Australian Communications
and Media Authority.
Safety
CAUTION—SHOCK HAZARD: To avoid the risk of electrical shock, do not place or use this
product near water or wet locations.
CAUTION—SHOCK HAZARD: To avoid the risk of electrical shock, do not set up this product or
make any electrical or cabling connections, such as the power cord, fax feature, or telephone,
during a lightning storm.
CAUTION—POTENTIAL INJURY: Do not cut, twist, bind, crush, or place heavy objects on the
power cord. Do not subject the power cord to abrasion or stress. Do not pinch the power cord
between objects such as furniture and walls. If any of these things happen, a risk of fire or
electrical shock results. Inspect the power cord regularly for signs of such problems. Remove the
power cord from the electrical outlet before inspecting it.
CAUTION—SHOCK HAZARD: To avoid the risk of electrical shock, make sure that all external
connections, such as Ethernet and telephone system connections, are properly installed in their
marked plug-in ports.
CAUTION—SHOCK HAZARD: To avoid the risk of electrical shock, if you are accessing the
controller board or installing optional hardware or memory devices sometime after setting up
the printer, then turn the printer off, and unplug the power cord from the electrical outlet
before continuing. If you have any other devices attached to the printer, then turn them off as
well, and unplug any cables going into the printer.
CAUTION—SHOCK HAZARD: To avoid the risk of electrical shock, do not use the fax feature
during a lightning storm.
CAUTION—SHOCK HAZARD: To avoid the risk of electrical shock when cleaning the exterior
of the printer, unplug the power cord from the electrical outlet and disconnect all cables from
the printer before proceeding.
CAUTION—POTENTIAL INJURY: If the printer weight is greater than 20kg (44lb), then it may
require two or more people to lift it safely.
Xerox
®
C235 Color Multifunction Printer
User Guide
13

Safety
CAUTION—POTENTIAL INJURY: When moving the printer, follow these guidelines to avoid
personal injury or printer damage:
• Make sure that all doors and trays are closed.
• Turn off the printer, and then unplug the power cord from the electrical outlet.
• Disconnect all cords and cables from the printer.
• If the printer has separate floor-standing optional trays or output options attached to it,
then disconnect them before moving the printer.
• If the printer has a caster base, then carefully roll it to the new location. Use caution when
passing over thresholds and breaks in flooring.
• If the printer does not have a caster base but is configured with optional trays or output
options, then remove the output options and lift the printer off the trays. Do not try to lift
the printer and any options at the same time.
• Always use the handholds on the printer to lift it.
• Any cart used to move the printer must have a surface able to support the full footprint of
the printer.
• Any cart used to move the hardware options must have a surface able to support the
dimensions of the options.
• Keep the printer in an upright position.
• Avoid severe jarring movements.
• Make sure that your fingers are not under the printer when you set it down.
• Make sure that there is adequate clearance around the printer.
CAUTION—TIPPING HAZARD: Installing one or more options on your printer or MFP may
require a caster base, furniture, or other feature to prevent instability causing possible injury.
For more information on supported configurations, contact the place where you purchased the
printer.
CAUTION—TIPPING HAZARD: To reduce the risk of equipment instability, load each tray
separately. Keep all other trays closed until needed.
CAUTION—HOT SURFACE: The inside of the printer might be hot. To reduce the risk of injury
from a hot component, allow the surface to cool before touching it.
CAUTION—PINCH HAZARD: To avoid the risk of a pinch injury, use caution in areas marked
with this label. Pinch injuries may occur around moving parts, such as gears, doors, trays, and
covers.
CAUTION—MOVING PARTS: Indicates a risk of laceration or abrasion injuries from rotating
parts.
CAUTION—POTENTIAL INJURY: This product uses a laser. Use of controls or adjustments or
performance of procedures other than those specified in the User Guide may result in
hazardous radiation exposure.
CAUTION—POTENTIAL INJURY: The lithium battery in this product is not intended to be
replaced. There is a danger of explosion if a lithium battery is incorrectly replaced. Do not
recharge, disassemble, or incinerate a lithium battery. Discard used lithium batteries according
to the manufacturer instructions and local regulations.
14
Xerox®C235 Color Multifunction Printer
User Guide

Safety
This product is designed, tested, and approved to meet strict global safety standards with the use of
specific manufacturer components. The safety features of some parts may not always be obvious.
The manufacturer is not responsible for the use of other replacement parts.
Refer service or repairs, other than those described in the user documentation, to a service
representative.
This product uses a printing process that heats the print media, and the heat may cause the media to
release emissions. You must understand the section in your operating instructions that discusses the
guidelines for selecting print media to avoid the possibility of harmful emissions.
This product may produce small amounts of ozone during normal operation, and may be equipped
with a filter designed to limit ozone concentrations to levels well below the recommended exposure
limits. To avoid high ozone concentration levels during extensive usage, install this product in a wellventilated area and replace the ozone and exhaust filters if instructed to do so in the product
maintenance instructions. If there are no references to filters in the product maintenance
instructions, then there are no filters requiring replacement for this product.
SAVE THESE INSTRUCTIONS.
Xerox
®
C235 Color Multifunction Printer
User Guide
15

Safety
Maintenance Safety
Do not carry out any maintenance on this product that is not described in the customer
documentation.
CAUTION—POTENTIAL INJURY: Do not use aerosol cleaners. Aerosol cleaners can be
explosive or flammable when used on electromechanical equipment.
Use supplies and cleaning materials only as directed.
Do not remove the covers or guards that are fastened with screws. Customer service items are not
located behind these covers.
In case of a Dry Ink or Toner Spill, use a broom or a wet cloth to wipe off spilled dry ink or toner.
Sweep slowly to minimize generation of dust during clean up. Avoid using a vacuum. If a vacuum
must be used, the unit should be designed for combustible dusts, having an explosion rated motor
and non-conductive hose.
CAUTION—HOT SURFACE: The metallic surfaces in the fuser area are hot. Use caution when
you remove paper jams from this area and avoid touching any metallic surfaces.
16
Xerox®C235 Color Multifunction Printer
User Guide

Consumable Information
CAUTION—POTENTIAL INJURY: When handling cartridges such as ink or fuser, avoid skin or
eye contact. Eye contact can cause irritation and inflammation. Do not attempt to disassemble
the cartridge. This can increase the risk of skin or eye contact.
Store all consumables in accordance with the instructions given on the package or container.
Keep all consumables away from the reach of children.
Never throw dry ink/toner, print cartridges, or dry ink/toner containers into an open flame.
For information on Xerox
®
supplies recycling programs, go to: https://www.xerox.com/recycling.
Safety
Xerox
®
C235 Color Multifunction Printer
User Guide
17

Safety
18
Xerox®C235 Color Multifunction Printer
User Guide

2
Learn About the Printer
This chapter contains:
• Printer Configurations .... ............. ....... ............. ....... ....... ...... . ...... ....... ............. ....... ....... ...... . ...... . 20
• Using the Control Panel.. ....... ............. ....... ...... ....... ....... ...... . ...... ....... ....... ............. ....... ....... ...... . 21
• Customizing the Home Screen ....... ............. . ...... ....... ...... ....... ....... ............. ....... ....... ...... . ...... ..... 22
• Changing the Language of the Keyboard on the Display .............. ....... ....... ...... ....... ....... ............ 23
• Understanding the Status of the Indicator Light ....... ...... . ...... ....... ....... ...... ....... ....... ...... . ...... ..... 24
• Selecting Paper ........ ...... ....... ....... ............. ....... ............. ....... ....... ...... . ...... ....... ............. ....... ....... 25
Xerox®C235 Color Multifunction Printer
User Guide
19

Learn About the Printer
Printer Configurations
FFrroonntt VViieeww ooff tthhee PPrriinntteerr
Need new graphic without the optional trays, #7. Need to show the document glass also. Then can
remove the previous topic.
1. Automatic Document Feeder (ADF)
2. ADF Input Tray
3. ADF Output Tray
4. Output Tray
5. Manual Feeder
6. Standard 250-Sheet Tray
7. Document Glass
8. Control Panel
20
Xerox®C235 Color Multifunction Printer
User Guide

Using the Control Panel
Control Panel
Number
1 Power button Turn on or turn off the printer.
2 Home button Go to the home screen.
3 Back button Return to the previous screen.
Part Function
Note: To turn off the printer, press and hold the power button for
five seconds.
Learn About the Printer
4 Start button Start a job, depending on which mode is selected.
5 Indicator light Check the status of the printer.
6 Display
• View printer messages and supply status.
• Set up and operate the printer.
Xerox®C235 Color Multifunction Printer
User Guide
21

Learn About the Printer
Customizing the Home Screen
1. From the control panel, touch Settings > Device > Visible Home Screen Icons.
2. Select the icons that you want to appear on the home screen.
3. Apply the changes.
22
Xerox®C235 Color Multifunction Printer
User Guide

Learn About the Printer
Changing the Language of the Keyboard on the Display
Note: You can only change the language of the keyboard in printer tasks that require
alphanumeric input such as e-mail or scan.
1. Touch the input field.
2. On the keyboard, touch and hold the language key.
3. Select a language.
Xerox
®
C235 Color Multifunction Printer
User Guide
23

Learn About the Printer
Understanding the Status of the Indicator Light
Indicator Light
Off The printer is off.
Blue The printer is on or ready.
Blinking blue The printer is processing data.
Blinking red The printer requires user intervention.
Amber The printer is in Sleep mode.
Printer Status
24
Xerox®C235 Color Multifunction Printer
User Guide

Learn About the Printer
Selecting Paper
PPaappeerr GGuuiiddeelliinneess
Use the appropriate paper to prevent jams and help ensure trouble-free printing.
• Always use new, undamaged paper.
• Before loading paper, know the recommended printable side of the paper. This information is
usually indicated on the paper package.
• Do not use paper that has been cut or trimmed by hand.
• Do not mix paper sizes, types, or weights in the same tray; mixing results in jams.
• Do not use coated papers unless they are specifically designed for electrophotographic printing.
PPaappeerr CChhaarraacctteerriissttiiccss
The following paper characteristics affect print quality and reliability. Consider these factors before
printing on them.
WWeeiigghhtt
The trays can feed paper weights from 60–176 g/m2(16–47 lb.) grain long paper. Paper lighter than
60 g/m
2
(16 lb.) may not be stiff enough to feed properly, and may cause jams.
CCuurrll
Curl is the tendency for paper to curl at its edges. Excessive curl can cause paper feeding problems.
Curl can occur after the paper passes through the printer, where it is exposed to high temperatures.
Storing paper unwrapped in hot, humid, cold, or dry conditions can contribute to paper curling before
printing and can cause feeding problems.
SSmmooootthhnneessss
Paper smoothness directly affects print quality. If paper is too rough, toner cannot fuse to it properly.
If paper is too smooth, it can cause paper feeding or print quality issues. We recommend the use of
paper with 50 Sheffield points.
MMooiissttuurree CCoonntteenntt
The amount of moisture in paper affects both print quality and the printer ability to feed the paper
correctly. Leave paper in its original wrapper until you use it. Exposure of paper to moisture changes
can degrade its performance.
Store paper in its original wrapper in the same environment as the printer for 24 to 48 hours before
printing. Extend the time several days if the storage or transportation environment is very different
from the printer environment. Thick paper may also require a longer conditioning period.
®
Xerox
C235 Color Multifunction Printer
User Guide
25

Learn About the Printer
GGrraaiinn DDiirreeccttiioonn
Grain refers to the alignment of the paper fibers in a sheet of paper. Grain is either grain long,
running the length of the paper, or grain short, running the width of the paper.
For 60–176 g/m
2
(16–47 lb.) paper, grain long paper is recommended.
FFiibbeerr CCoonntteenntt
Most high-quality xerographic paper is made from 100 percent chemically treated pulped wood. This
content provides the paper with a high degree of stability, resulting in fewer paper feeding problems
and better print quality. Paper containing fibers such as cotton can negatively affect paper handling.
UUnnaacccceeppttaabbllee PPaappeerr
The following paper types are not recommended for use with the printer:
• Chemically treated papers used to make copies without carbon paper, also known as carbonless
papers, carbonless copy paper (CCP), or no carbon required (NCR) paper
• Preprinted papers with chemicals that may contaminate the printer
• Preprinted papers that can be affected by the temperature in the printer fuser
• Preprinted papers that require a registration (the precise print location on the page) greater than
±2.3mm (±0.9in.), such as optical character recognition (OCR) forms
In some cases, registration can be adjusted with a software application to successfully print on
these forms
• Coated papers (erasable bond), synthetic papers, thermal papers
• Rough-edged, rough or heavily textured surface papers, or curled papers
• Recycled papers that fail EN12281:2002 (European)
• Paper weighing less than 60 g/m
• Multiple-part forms or documents
2
(16 lb.)
SSeelleeccttiinngg PPrreepprriinntteedd FFoorrmmss aanndd LLeetttteerrhheeaadd
• Use grain long paper.
• Use only forms and letterhead printed using an offset lithographic or engraved printing process.
• Avoid paper with rough or heavily textured surfaces.
• Use inks that are not affected by the resin in toner. Inks that are oxidation-set or oil-based
generally meet these requirements; latex inks might not.
• Print samples on preprinted forms and letterheads considered for use before buying large
quantities. This action determines whether the ink in the preprinted form or letterhead affects
print quality.
• When in doubt, contact your paper supplier.
• When printing on letterhead, load the paper in the proper orientation for your printer. For more
information, see the Paper and Specialty Media Guide.
26
Xerox®C235 Color Multifunction Printer
User Guide

Learn About the Printer
SSttoorriinngg PPaappeerr
Use these paper storage guidelines to help avoid jams and uneven print quality:
• Store paper in its original wrapper in the same environment as the printer for 24 to 48 hours
before printing.
• Extend the time several days if the storage or transportation environment is very different from
the printer environment. Thick paper may also require a longer conditioning period.
• For best results, store paper where the temperature is 21°C (70°F) and the relative humidity is 40
percent.
• Most label manufacturers recommend printing in a temperature range of 18–24°C (65–75°F) with
relative humidity between 40 and 60 percent.
• Store paper in cartons, on a pallet or shelf, rather than on the floor.
• Store individual packages on a flat surface.
• Do not store anything on top of individual paper packages.
• Take paper out of the carton or wrapper only when you are ready to load it in the printer. The
carton and wrapper help keep the paper clean, dry, and flat.
SSuuppppoorrtteedd PPaappeerr SSiizzeess
Standard
250-sheet
Paper Size
A4
210 x 297 mm
(8.27 x 11.7
in.)
1
A5
148 x 210 mm
(5.83 x 8.27
in.)
A6
105 x 148 mm
(4.13 x 5.83
in.)
JIS B5
182 x 257 mm
(7.17 x 10.1
in.)
Tray
Manual Feeder
Two-sided
Printing
X
X
X
ADF Scanner Glass
Oficio
(Mexico)
215.9 x 340.4
mm (8.5 x 13.4
in.)
X
Xerox®C235 Color Multifunction Printer
User Guide
27

Learn About the Printer
Standard
250-sheet
Paper Size
Tray
Manual Feeder
Two-sided
Printing
ADF Scanner Glass
Hagaki
100 x 148 mm
(3.94 x 5.83
in.)
Statement
139.7 x 215.9
mm (5.5 x 8.5
in.)
Executive
184.2 x 266.7
mm (7.25 x
10.5 in.)
Letter
215.9 x 279.4
mm (8.5 x 11
in.)
Legal
215.9 x 355.6
mm (8.5 x 14
in.)
X X
X
X
X
Folio
215.9 x 330.2
mm (8.5 x 13
in.)
Universal
2,3
98.4 x 148–
215.9 x 355.6
mm (3.86 x
5.83–8.5 x 14
in.)
Universal
2,3
25.4 x 25.4–
215.9 x 297
mm (1 x 1–8.5
x 11.69 in.)
Universal
2,3
105 x 148–
215.9 x 355.6
mm (4.13 x
5.83–8.5 x 14
in.)
X X X X
X X X
X
4
X
28
Xerox®C235 Color Multifunction Printer
User Guide

Paper Size
Standard
250-sheet
Tray
Manual Feeder
Two-sided
Printing
Learn About the Printer
ADF Scanner Glass
7 ¾ Envelope
98.4 x 190.5
mm (3.875 x
7.5 in.)
9 Envelope
98.4 x 225.4
mm (3.875 x
8.9 in.)
10 Envelope
104.8 x 241.3
mm (4.12 x 9.5
in.)
DL Envelope
110 x 220 mm
(4.33 x 8.66
in.)
C5 Envelope
162 x 229 mm
(6.38 x 9.01
in.)
5
5
5
5
5
X X
X X
X X
X X
X X
B5 Envelope
5
X X
176 x 250 mm
(6.93 x 9.84
in.)
Other
Envelope
5
X X N/A
98.4 x 162–
176 x 250 mm
(3.87 x 6.38–
6.93 x 9.84 in)
1
The default support is long-edge feed. When running on short-edge feed, A5 is treated as narrow paper.
2
When selected, the page is formatted for 215.90 x 355.60 mm (8.5 x 14 in.) unless specified by the software
application.
3
Load narrow paper with the short edge entering the printer first.
4
Supports paper size only up to 216 x 297 mm (8.5 x 11.7 in.).
5
The standard 250-sheet tray supports only up to five envelopes at a time. The optional 250-sheet tray
supports up to 40 envelopes at a time.
Xerox®C235 Color Multifunction Printer
User Guide
29

Learn About the Printer
SSuuppppoorrtteedd PPaappeerr TTyyppeess
• Labels, envelopes, and card stock always print at reduced speed.
• Labels are supported for occasional use and must be tested for acceptability.
• The ADF supports only plain paper.
Standard 250-sheet
Paper type
Plain paper
Card stock X
Tray
Manual Feeder
Two-sided Printing
Labels
Envelopes
SSuuppppoorrtteedd PPaappeerr WWeeiigghhttss
Note: The ADF supports 52–90.3 g/m2(14–24 lb bond) paper.
Paper Type and
Weight
Light paper
60–74.9 g/m
long (16–19.9 lb. bond)
Plain paper
75–90.3 g/m
long (20–24 lb. bond)
Heavy paper
90.3–105 g/m
long (24.1–28 lb. bond)
2
grain
2
grain
2
grain
Standard 250-sheet
Tray
Manual Feeder
X
X
Two-sided Printing
Card stock
2
grain
2
grain
105.1–162 g/m
long (28.1–43 lb. bond)
Card stock
163–200 g/m
long (43.1–53 lb. bond)
30
Xerox®C235 Color Multifunction Printer
User Guide
X
X
X

Learn About the Printer
Paper Type and
Weight
Paper labels
131 g/m
Envelopes
60–105 g/m
lb. bond)
2
(35 lb. bond)
2
(16–28
Standard 250-sheet
Tray
Manual Feeder
Two-sided Printing
X
X
Xerox®C235 Color Multifunction Printer
User Guide
31

Learn About the Printer
32
Xerox®C235 Color Multifunction Printer
User Guide

3
Set Up, Install, and Configure
This chapter contains:
• Selecting a Location for the Printer....... ...... . ...... ....... ....... ............. ....... ....... ...... ....... ....... ............ 34
• Attaching cables ... ....... ...... . ...... ....... ...... . ............. ....... ............. ....... ....... ...... ....... ....... ............. ... 35
• Setting up and using the home screen applications ....... ....... ...... ....... ....... ............. ....... ....... ...... . 36
• Setting up the Printer to Fax...... ...... . ...... ....... ....... ...... ....... ....... ...... . ...... ....... ....... ...... ....... ....... ... 38
• Configuring the Email SMTP Settings ....... ....... ....... ...... ....... ....... ............. ....... ....... ...... . ...... ....... . 43
• Using the Email Setup Wizard in the Printer . ....... ....... ...... . ...... ....... ....... ...... ....... ....... ...... ....... .... 44
• Using the Settings Menu in the Printer .. ....... ...... ....... ....... ............. ....... ............. ....... ....... ...... . .... 45
• Using the Embedded Web Server ...... ....... ...... . ...... ....... ............. ....... ............. . ...... ....... ...... . ...... .. 46
• Email Service Providers........ ....... ....... ...... ....... ....... ............. ....... ............. ....... ....... ...... ....... ....... .. 47
• Loading paper and specialty media.. ...... . ............. ....... ............. ....... ....... ...... ....... ....... ............. ... 55
• Installing and updating software, drivers, and firmware ...... ....... ....... ............. ....... ...... . ...... ....... . 61
• Networking .............. ....... ....... ...... ....... ....... ............. ....... ....... ...... . ...... ....... ............. ....... ............. 66
• Printing the Menu Settings Page ....... ....... ...... . ...... ....... ............. ....... ............. . ...... ....... ...... . ...... .. 70
Xerox®C235 Color Multifunction Printer
User Guide
33

Set Up, Install, and Configure
Selecting a Location for the Printer
• Leave enough room to open trays, covers, and doors and to install hardware options.
• Set up the printer near an electrical outlet.
CAUTION—POTENTIAL INJURY: To avoid the risk of fire or electrical shock, connect the
power cord to an appropriately rated andproperly grounded electrical outlet that is near
the product and easily accessible.
CAUTION—SHOCK HAZARD: To avoid the risk of electrical shock, do not place or use this
product near water or wet locations.
• Make sure that airflow in the room meets the latest revision of the ASHRAE 62 standard or the
CEN Technical Committee 156 standard.
• Provide a flat, sturdy, and stable surface.
• Keep the printer:
– Clean, dry, and free of dust
– Away from stray staples and paper clips
– Away from the direct airflow of air conditioners, heaters, or ventilators
– Free from direct sunlight and humidity extremes
• Observe the temperature range.
Operating temperature: 10 to 32.2°C (50 to 90°F)
• Allow the following recommended amount of space around the printer for proper ventilation:
1. Top: 305 mm (12 in.)
2. Rear: 102 mm (4 in.)
4. Front: 76 mm (3 in.)
5. Left Side: 76 mm (3 in.)
3. Right Side: 76 mm (3 in.)
34
Xerox®C235 Color Multifunction Printer
User Guide

Set Up, Install, and Configure
Attaching cables
CAUTION—SHOCK HAZARD: To avoid the risk of electrical shock, do not set up this product or
make any electrical or cabling connections, such as the power cord, fax feature, or telephone,
during a lightning storm.
CAUTION—POTENTIAL INJURY: To avoid the risk of fire or electrical shock, connect the
power cord to an appropriately rated and properly grounded electrical outlet that is near the
product and easily accessible.
CAUTION—POTENTIAL INJURY: To avoid the risk of fire or electrical shock, use only the
power cord provided with this product or the manufacturer-authorized replacement.
CAUTION—POTENTIAL INJURY: To reduce the risk of fire, use only a 26 AWG or larger
telecommunications (RJ-11) cord when connecting this product to the public switched
telephone network. For users in Australia, the cord must be approved by the Australian
Communications and Media Authority.
Warning—Potential Damage: To avoid loss of data or printer malfunction, do not touch the
USB cable, any wireless network adapter, or the printer in the areas shown while actively
printing.
Number
1 LINE port Connect the printer to an active
2 Ethernet port Connect the printer to a network.
3 USB printer port Connect the printer to a computer.
4 Power cord socket Connect the printer to a properly
Printer port
Function
telephone line through a standard
wall jack (RJ-11), DSL filter, or VoIP
adapter, or any other adapter that
allows you to access the telephone
line to send and receive faxes.
To enable manual fax, use a
corded fax splitter.
grounded electrical outlet.
Xerox®C235 Color Multifunction Printer
User Guide
35

Set Up, Install, and Configure
Setting up and using the home screen applications
FFiinnddiinngg tthhee IIPP AAddddrreessss ooff tthhee PPrriinntteerr
To view the IP address of the printer, open the Home Screen. The IP address appears as four sets of
numbers separated by periods, such as 123.123.123.123.
If you are using a proxy server, temporarily disable it to load the Web page correctly.
MMaannaaggiinngg bbooookkmmaarrkkss
CCrreeaattiinngg bbooookkmmaarrkkss
Use bookmarks to print frequently accessed documents that are stored in servers or on the web.
1. Open a web browser, and then type the printer IP address in the address field.
• View the printer IP address on the printer home screen. The IP address appears as four sets of
numbers separated by periods, such as 123.123.123.123.
• If you are using a proxy server, then temporarily disable it to load the web page correctly.
2. Click Bookmarks > Add Bookmark, and then type a bookmark name.
3. Select an Address protocol type, and then do one of the following:
• For HTTP and HTTPS, type the URL that you want to bookmark.
• For HTTPS, make sure to use the host name instead of the IP address. For example, type
myWebsite.com/sample.pdf instead of typing 123.123.123.123/sample.pdf. Make sure that
the host name also matches the Common Name (CN) value in the server certificate. For more
information on obtaining the CN value in the server certificate, see the help information for
your web browser.
• For FTP, type the FTP address. For example, myServer/myDirectory. Enter the FTP port. Port 21
is the default port for sending commands.
• For SMB, type the network folder address. For example, myServer/myShare/myFile.pdf. Type
the network domain name.
• If necessary, select the Authentication type for FTP and SMB.
To limit access to the bookmark, enter a PIN.
Note: The application supports the following file types: PDF, JPEG, TIFF, and HTML-based web
pages. Other file types such as DOCX and XLXS are supported in some printer models.
4. Click Save.
36
Xerox®C235 Color Multifunction Printer
User Guide

Set Up, Install, and Configure
CCrreeaattiinngg ffoollddeerrss
1. Open a web browser, and then type the printer IP address in the address field.
• View the printer IP address on the printer home screen. The IP address appears as four sets of
numbers separated by periods, such as 123.123.123.123.
• If you are using a proxy server, then temporarily disable it to load the web page correctly.
2. Click Bookmarks > Add Folder, and then type a folder name.
Note: To limit access to the folder, enter a PIN.
3. Click Save.
Note: You can create folders or bookmarks inside a folder. To create a bookmark, see Creating
bookmarks.
Xerox
®
C235 Color Multifunction Printer
User Guide
37

Set Up, Install, and Configure
Setting up the Printer to Fax
SSeettttiinngg uupp tthhee ffaaxx ffuunnccttiioonn
• Some connection methods are applicable only in some countries or regions.
• If the fax function is enabled and not fully set up, then the indicator light may blink red.
• If you do not have a TCP/IP environment, then use the control panel to set up fax.
Warning: To avoid loss of data or printer malfunction, do not touch cables or the printer in the
area shown while actively sending or receiving a fax.
UUssiinngg tthhee ffaaxx sseettuupp wwiizzaarrdd iinn tthhee pprriinntteerr
• This wizard appears only when analog fax is not yet set up.
• This wizard only sets up the analog fax. To setup other fax modes, go to Settings > Fax > Fax
Setup.
• Before using the wizard, make sure that the printer firmware is updated. For more information, see
Updating Firmware.
1. From the home screen, touch Fax.
2. Touch Set up now.
3. Type the fax name, and then touch Next.
4. Enter the fax number and then touch Done.
UUssiinngg tthhee SSeettttiinnggss mmeennuu iinn tthhee pprriinntteerr
1. From the home screen, touch Settings > Fax > Fax Setup > General Fax settings.
2. Configure the settings.
UUssiinngg tthhee EEmmbbeeddddeedd WWeebb SSeerrvveerr
1. Open a Web browser, then type the printer IP address in the address field.
To view the IP address of the printer, refer to Finding the IP Address of the Printer.
2. Click Settings > Fax > Fax Setup > General Fax Settings.
38
Xerox®C235 Color Multifunction Printer
User Guide

Set Up, Install, and Configure
3. Configure the settings.
4. Apply the changes.
SSeettttiinngg uupp ffaaxx uussiinngg aa ssttaannddaarrdd tteelleepphhoonnee lliinnee
CAUTION—SHOCK HAZARD: To avoid the risk of electrical shock, do not set up this product or
make any electrical or cabling connections, such as the power cord, fax feature, or telephone,
during a lightning storm.
CAUTION—SHOCK HAZARD: To avoid the risk of electrical shock, do not use the fax feature
during a lightning storm.
CAUTION—POTENTIAL INJURY: To reduce the risk of fire, use only a 26 AWG or larger
telecommunications (RJ-11) cord when connecting this product to the public switched
telephone network. For users in Australia, the cord must be approved by the Australian
Communications and Media Authority.
SSeettuupp 11:: PPrriinntteerr iiss ccoonnnneecctteedd ttoo aa ddeeddiiccaatteedd ffaaxx lliinnee
1. Connect one end of the telephone cable to the line port of the printer.
2. Connect the other end of the cable to an active analog wall jack.
• You can set the printer to receive faxes automatically (set Auto Answer to On) or manually (set
Auto Answer to Off).
• If you want to receive faxes automatically, then set the printer to pick up on a specified number
of rings.
®
Xerox
C235 Color Multifunction Printer
User Guide
39

Set Up, Install, and Configure
SSeettuupp 22:: PPrriinntteerr iiss sshhaarriinngg tthhee lliinnee wwiitthh aann aannsswweerriinngg mmaacchhiinnee
Note: If you subscribe to a distinctive ring service, then make sure that you set the correct ring
pattern for the printer. Otherwise, the printer does not receive faxes even if you have set it to
receive faxes automatically.
Connected to different wall jacks
1. Connect one end of the telephone cable to the line port of the printer.
2. Connect the other end of the cable to an active analog wall jack.
• If you have only one telephone number on your line, then set the printer to receive faxes
automatically.
• Set the printer to pick up calls two rings after the answering machine. For example, if the
answering machine picks up calls after four rings, then set the printer Rings to Answer setting to 6.
SSeettttiinngg uupp ffaaxx iinn ccoouunnttrriieess oorr rreeggiioonnss wwiitthh ddiiffffeerreenntt
tteelleepphhoonnee wwaallll jjaacckkss aanndd pplluuggss
CAUTION—SHOCK HAZARD: To avoid the risk of electrical shock, do not set up this product or
make any electrical or cabling connections, such as the power cord, fax feature, or telephone,
during a lightning storm.
CAUTION—SHOCK HAZARD: To avoid the risk of electrical shock, do not use the fax feature
during a lightning storm.
CAUTION—POTENTIAL INJURY: To reduce the risk of fire, use only a 26 AWG or larger
telecommunications (RJ-11) cord when connecting this product to the public switched
telephone network. For users in Australia, the cord must be approved by the Australian
Communications and Media Authority.
The standard wall jack adopted by most countries or regions is RJ11. If the wall jack or equipment in
your facility is not compatible with this type of connection, then use a telephone adapter. An adapter
for your country or region may not come with your printer, and you may need to purchase it
separately.
There may be an adapter plug installed in the telephone port of the printer. Do not remove the
adapter plug from the telephone port of the printer if you are connecting to a serial or cascaded
telephone system.
40
Xerox®C235 Color Multifunction Printer
User Guide
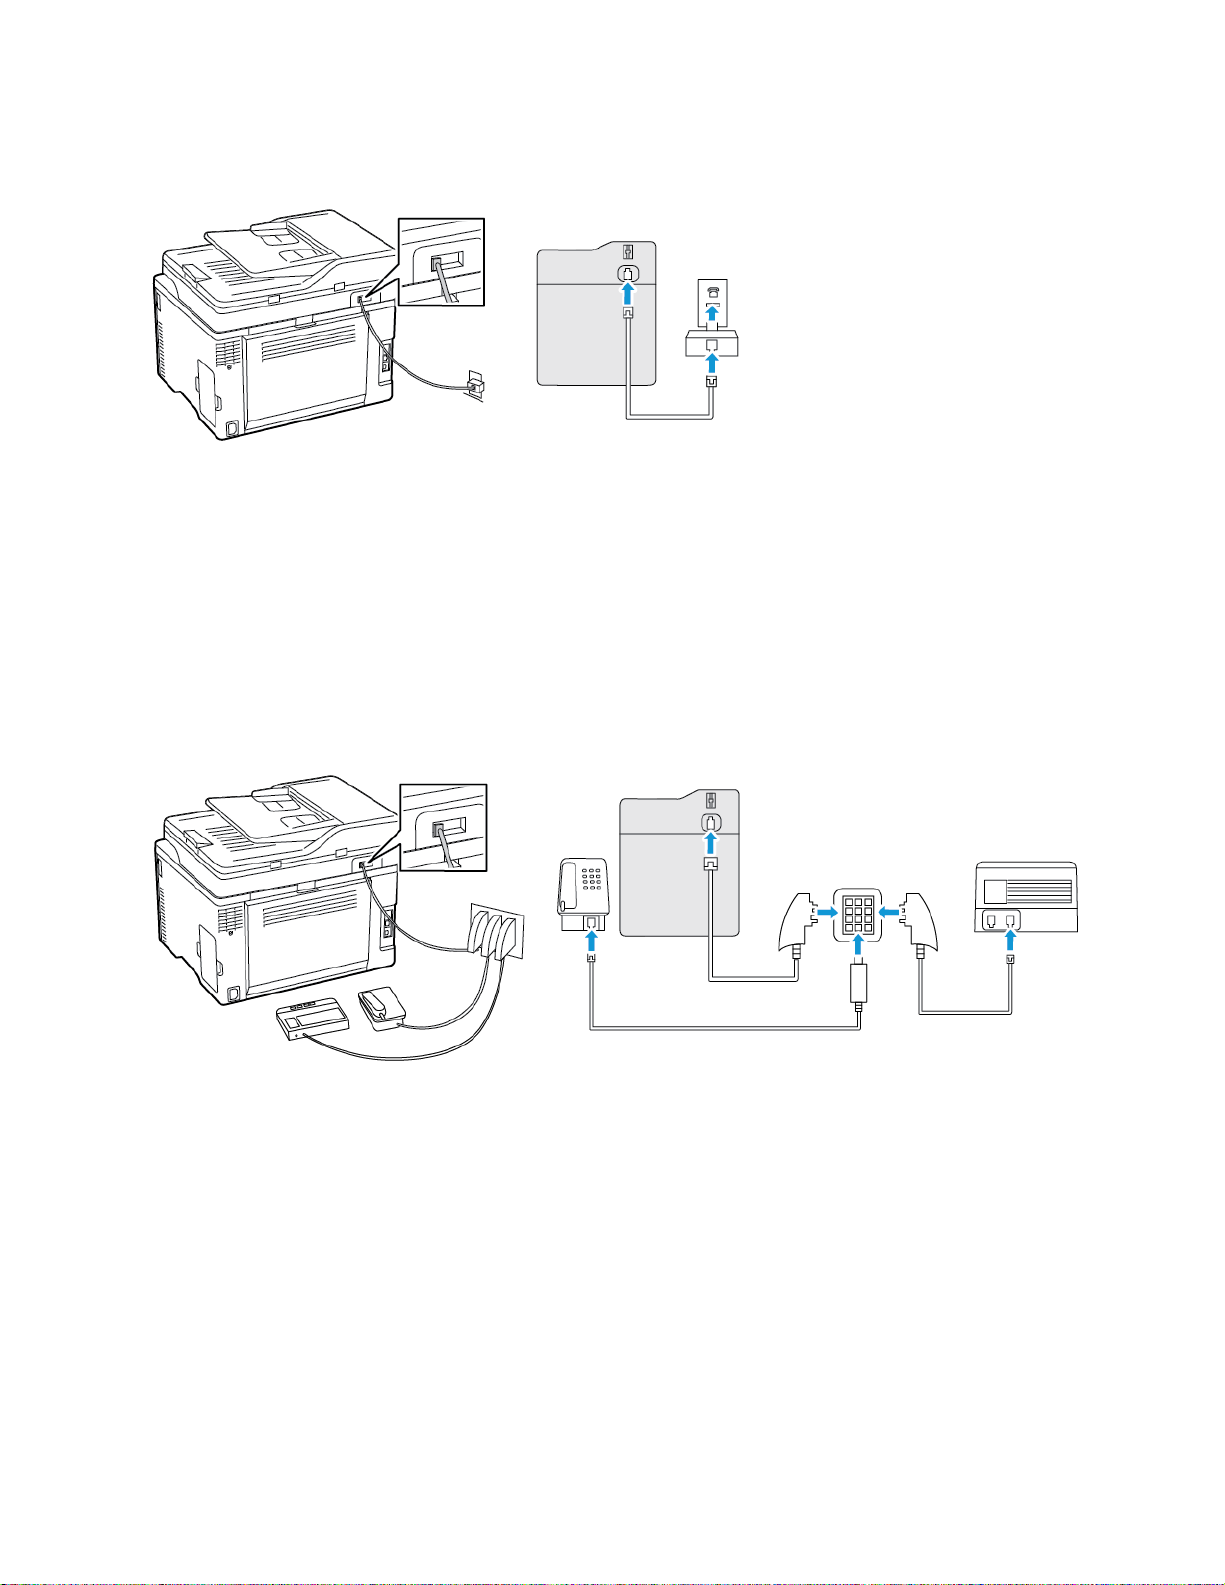
Set Up, Install, and Configure
CCoonnnneeccttiinngg tthhee pprriinntteerr ttoo aa nnoonn--RRJJ1111 wwaallll jjaacckk
1. Connect one end of the telephone cable to the line port of the printer.
2. Connect the other end of the cable to the RJ11 adapter, and then connect the adapter to the
wall jack.
3. If you want to connect another device with a non-RJ11 connector to the same wall jack, then
connect it directly to the telephone adapter.
CCoonnnneeccttiinngg tthhee pprriinntteerr ttoo aa wwaallll jjaacckk iinn GGeerrmmaannyy
The German wall jack has two kinds of ports. The N ports are for fax machines, modems, and
answering machines. The F port is for telephones. Connect the printer to any of the N ports.
1. Connect one end of the telephone cable to the line port of the printer.
2. Connect the other end of the cable to the RJ11 adapter, and then connect the adapter to an N
port.
3. If you want to connect a telephone and answering machine to the same wall jack, then connect
the devices as shown.
CCoonnnneeccttiinngg ttoo aa ddiissttiinnccttiivvee rriinngg sseerrvviiccee
A distinctive ring service lets you have multiple telephone numbers on one telephone line. Each
telephone number is assigned a different ring pattern.
®
Xerox
C235 Color Multifunction Printer
User Guide
41

Set Up, Install, and Configure
1. From the home screen, touch Settings > Fax > Fax Setup > Fax Receive Settings > Admin
Controls > Answer On.
2. Select a ring pattern.
SSeettttiinngg tthhee ffaaxx ddaattee aanndd ttiimmee
1. From the home screen, touch Settings > Device > Preferences > Date and Time > Configure.
2. Configure the settings.
CCoonnffiigguurriinngg ddaayylliigghhtt ssaavviinngg ttiimmee
1. From the home screen, touch Settings > Device > Preferences > Date and Time > Configure.
2. In the Time Zone menu, touch (UTC+user) Custom.
3. In the Configure menu, touch UTC Offset.
4. Configure the settings.
CCoonnffiigguurriinngg tthhee ffaaxx ssppeeaakkeerr sseettttiinnggss
1. From the home screen, touch Settings > Fax > Fax Setup > Speaker Settings.
2. Do the following:
• Set the Speaker Mode to Always On.
• Set the Speaker Volume to High.
• Activate the Ringer Volume.
42
Xerox®C235 Color Multifunction Printer
User Guide

Set Up, Install, and Configure
Configuring the Email SMTP Settings
Configure the Simple Mail Transfer Protocol (SMTP) settings to send a scanned document through email. The settings vary with each email service provider.
Before you begin, make sure that the printer is connected to a network and that the network is
connected to the Internet.
Xerox
®
C235 Color Multifunction Printer
User Guide
43

Set Up, Install, and Configure
Using the Email Setup Wizard in the Printer
Before using the wizard, make sure that the printer firmware is updated. For more information, refer
to Updating Firmware.
1. From the home screen, touch Email.
2. Touch and type your e-mail address.
3. Type the password.
• Depending on your e-mail service provider, type your account password, app password, or
authentication password. For more information on the password, refer to the list of Email
Service Providers, and then look for Device Password.
• If your provider is not listed, contact your provider and ask for the Primary SMTP Gateway,
Primary SMTP Gateway Port, Use SSL/TLS, and SMTP Server Authentication settings.
4. Touch OK.
44
Xerox®C235 Color Multifunction Printer
User Guide

Set Up, Install, and Configure
Using the Settings Menu in the Printer
1. From the home screen, touch Settings > E-mail > E-mail Setup.
2. Configure the settings.
• For more information on the password, refer to the list of Email Service Providers.
• For email service providers that are not on the list, contact your provider and ask for the
settings.
Xerox
®
C235 Color Multifunction Printer
User Guide
45

Set Up, Install, and Configure
Using the Embedded Web Server
1. Open a web browser, and then type the printer IP address in the address field.
• View the printer IP address on the printer home screen. The IP address appears as four sets of
numbers separated by periods, such as 123.123.123.123.
• If you are using a proxy server, then temporarily disable it to load the web page correctly.
2. Click Settings > Email.
3. From the Email Setup section, configure the settings.
• For more information on the password, refer to the list of Email Service Providers.
• For email service providers that are not on the list, contact your provider and ask for the
settings.
4. Click Save.
46
Xerox®C235 Color Multifunction Printer
User Guide

Set Up, Install, and Configure
Email Service Providers
To determine the SMTP settings of your email service provider, use the following tables.
GGmmaaiill
To enable two-step verification, go to the Google Account Security page, log in to your account, then
from the Signing in to Google section, click 2-Step Verification.
Setting
Primary SMTP Gateway smtp.gmail.com
Primary SMTP Gateway Port 587
Use SSL/TLS Required
Require Trusted Certificate Disabled
Reply Address Your email address
SMTP Server Authentication Login/Plain
Device-Initiated E-mail Use Device SMTP Credentials
Device UserID Your email address
Device Password App password
™™
Note: Make sure that two-step verification is enabled on your Google account.
Value
Note: To create an app password, go to the Google Account
Security page, log in to your account, and from the Signing
in to Google section, click App passwords.
YYaahhoooo!!®®MMaaiill
Setting
Primary SMTP Gateway smtp.mail.yahoo.com
Primary SMTP Gateway Port 587
Use SSL/TLS Required
Require Trusted Certificate Disabled
Reply Address Your email address
SMTP Server Authentication Login/Plain
Device-Initiated E-mail Use Device SMTP Credentials
Value
Xerox®C235 Color Multifunction Printer
47
User Guide
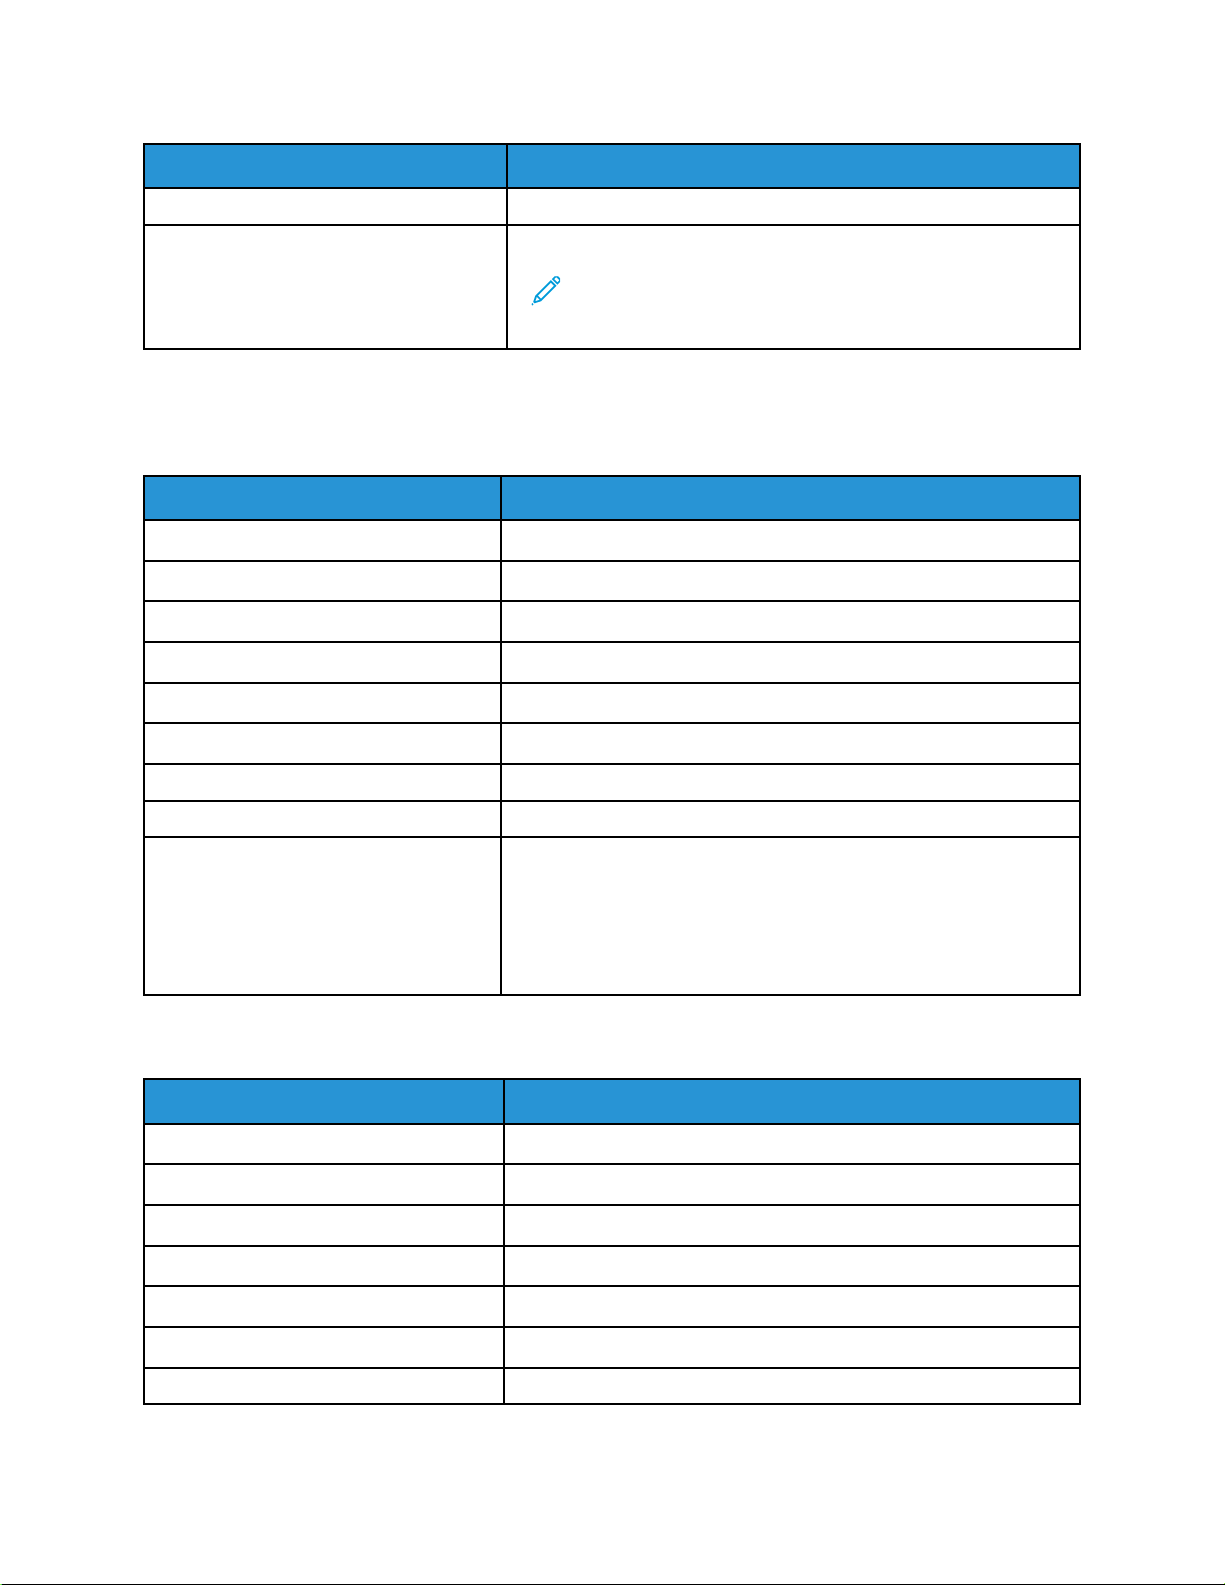
Set Up, Install, and Configure
Setting
Device UserID Your email address
Device Password App password
Value
Note: To create an app password, go to the Yahoo Account
Security page, log in to your account, and then click
Generate app password
OOuuttllooookk LLiivvee
These settings apply to outlook.com and hotmail.com email domains.
Setting
Primary SMTP Gateway smtp.office365.com
Primary SMTP Gateway Port 587
Use SSL/TLS Required
Require Trusted Certificate Disabled
Reply Address Your email address
SMTP Server Authentication Login/Plain
Value
Device-Initiated E-mail Use Device SMTP Credentials
Device UserID Your email address
Device Password Account password or app password
• For accounts with two-step verification disabled, use your
account password.
• For accounts with two-step verification enabled, use an app password. To create an app password, go to the Outlook Live
Account Managment page, then log in to your account.
AAOOLL MMaaiill
Setting
Primary SMTP Gateway smtp.aol.com
Primary SMTP Gateway Port 587
Use SSL/TLS Required
Require Trusted Certificate Disabled
Reply Address Your email address
SMTP Server Authentication Login/Plain
Value
Device-Initiated E-mail Use Device SMTP Credentials
48
Xerox®C235 Color Multifunction Printer
User Guide

Set Up, Install, and Configure
Setting
Device UserID Your email address
Device Password App password
Value
Note: To create an app password, go to the AOL Account
Security page, log in to your account, then click Generate
app password.
iiCClloouudd MMaaiill
Note: Make sure that the two-step verification is enabled on your account.
Setting
Primary SMTP Gateway smtp.mail.me.com
Primary SMTP Gateway Port 587
Use SSL/TLS Required
Require Trusted Certificate Disabled
Reply Address Your email address
Value
SMTP Server Authentication Login/Plain
Device-Initiated E-mail Use Device SMTP Credentials
Device UserID Your email address
Device Password App password
Note: To create an app password, go to the iCloud
Account Management page, log in to your account, then
from the Security section, click Generate Password.
CCoommccaasstt MMaaiill
Setting
Primary SMTP Gateway smtp.comcast.net
Primary SMTP Gateway Port 587
Use SSL/TLS Required
Require Trusted Certificate Disabled
Reply Address Your email address
SMTP Server Authentication Login/Plain
Value
Device-Initiated Email Use Device SMTP Credentials
Xerox®C235 Color Multifunction Printer
49
User Guide
Set Up, Install, and Configure
Setting
Device UserID Your email address
Device Password Account password
Value
MMaaiill..ccoomm
Setting
Primary SMTP Gateway smtp.mail.com
Primary SMTP Gateway Port 587
Use SSL/TLS Required
Require Trusted Certificate Disabled
Reply Address Your email address
SMTP Server Authentication Login/Plain
Device-Initiated E-mail Use Device SMTP Credentials
Device UserID Your email address
Device Password Account password
Value
ZZoohhoo MMaaiill
Setting
Primary SMTP Gateway smtp.zoho.com
Primary SMTP Gateway Port 587
Use SSL/TLS Required
Require Trusted Certificate Disabled
Reply Address Your email address
SMTP Server Authentication Login/Plain
Device-Initiated E-mail Use Device SMTP Credentials
Device UserID Your email address
Device Password Account password or app password
Value
• For accounts with two-step verification disabled, use your
account password.
• For accounts with two-step verification enabled, use an app password. To create an app password, go to the Zoho Mail
Account Security page, log in to your account, then from the
Application-Specific Passwords section, click Generate New
Password.
50
Xerox®C235 Color Multifunction Printer
User Guide

Set Up, Install, and Configure
QQQQ MMaaiill
Note: Make sure that the SMTP service is enabled on your account.
To enable the service, from the QQ Mail home page, click Settings > Account, then from the POP3/
IMAP/SMTP/Exchange/CardDAV/CalDAV Service section, enable either POP3/SMTP service or IMAP/
SMTP service.
Setting
Primary SMTP Gateway smtp.qq.com
Primary SMTP Gateway Port 587
Use SSL/TLS Required
Require Trusted Certificate Disabled
Reply Address Your email address
SMTP Server Authentication Login/Plain
Device-Initiated E-mail Use Device SMTP Credentials
Device UserID Your email address
Device Password Authorization code
Value
Note: To generate an authorization code, from the QQ
Mail home page, click Settings > Account, then from the
POP3/IMAP/SMTP/Exchange/CardDAV/CalDAV Service
section, click Generate authorization code
NNeettEEaassee MMaaiill ((mmaaiill..116633..ccoomm))
Note: Make sure that the SMTP service is enabled on your account.
To enable the service, from the NetEase Mail home page, click Settings > POP3/SMTP/IMAP, and
then enable either IMAP/SMTP service or POP3/SMTP service.
Setting
Primary SMTP Gateway smtp.163.com
Primary SMTP Gateway Port 465
Use SSL/TLS Required
Require Trusted Certificate Disabled
Reply Address Your email address
SMTP Server Authentication Login/Plain
Device-Initiated Email Use Device SMTP Credentials
Value
Xerox®C235 Color Multifunction Printer
User Guide
51

Set Up, Install, and Configure
Setting
Device UserID Your email address
Device Password Authorization password
Value
Note: The authorization password is provided when IMAP/
SMTP service or POP3/SMTP service is enabled.
NNeettEEaassee MMaaiill ((mmaaiill..112266..ccoomm))
Note: Make sure that the SMTP service is enabled on your account.
To enable the service, from the NetEase Mail home page, click Settings > POP3/SMTP/IMAP, then
enable either IMAP/SMTP service or POP3/SMTP service.
Setting
Primary SMTP Gateway smtp.126.com
Primary SMTP Gateway Port 465
Use SSL/TLS Required
Require Trusted Certificate Disabled
Reply Address Your email address
Value
SMTP Server Authentication Login/Plain
Device-Initiated Email Use Device SMTP Credentials
Device UserID Your email address
Device Password Authorization password
Note: The authorization password is provided when IMAP/
SMTP service or POP3/SMTP service is enabled.
NNeettEEaassee MMaaiill ((mmaaiill..yyeeaahh..nneett))
Note: Make sure that the SMTP service is enabled on your account.
To enable the service, from the NetEase Mail home page, click Settings > POP3/SMTP/IMAP, and
then enable either IMAP/SMTP service or POP3/SMTP service.
Setting
Primary SMTP Gateway smtp.yeah.net
Primary SMTP Gateway Port 465
Use SSL/TLS Required
Require Trusted Certificate Disabled
Value
52
Xerox®C235 Color Multifunction Printer
User Guide

Set Up, Install, and Configure
Setting
Reply Address Your email address
SMTP Server Authentication Login/Plain
Device-Initiated Email Use Device SMTP Credentials
Device UserID Your email address
Device Password Authorization password
Value
Note: The authorization password is provided when IMAP/
SMTP service or POP3/SMTP service is enabled.
SSoohhuu MMaaiill
Note: Make sure that the SMTP service is enabled on your account.
To enable the service, from the Sohu Mail home page, click Options > Settings > POP3/SMTP/IMAP,
and then enable either IMAP/SMTP service or POP3/SMTP service.
Setting
Primary SMTP Gateway smtp.sohu.com
Primary SMTP Gateway Port 465
Value
Use SSL/TLS Required
Require Trusted Certificate Disabled
Reply Address Your email address
SMTP Server Authentication Login/Plain
Device-Initiated Email Use Device SMTP Credentials
Device UserID Your email address
Device Password Independent password
Note: The independent password is provided when IMAP/SMTP
service or POP3/SMTP service is enabled.
SSiinnaa MMaaiill
Note: Make sure that the POP3/SMTP service is enabled on your account.
To enable the service, from the Sina Mail home page, click Settings > More settings > User-end POP/
IMAP/SMTP, and then enable POP3/SMTP service.
Setting
Primary SMTP Gateway smtp.sina.com
Value
Primary SMTP Gateway Port 587
Xerox®C235 Color Multifunction Printer
User Guide
53

Set Up, Install, and Configure
Setting
Use SSL/TLS Required
Require Trusted Certificate Disabled
Reply Address Your email address
SMTP Server Authentication Login/Plain
Device-Initiated Email Use Device SMTP Credentials
Device UserID Your email address
Device Password Authorization code
Value
Note: To create an authorization code, from the email home
page, click Settings > More settings > User-end POP/IMAP/
SMTP, and then enable Authorization code status.
• If you encounter errors using the settings provided, then contact your email service provider.
• For email service providers that are not on the list, contact your provider and ask for the settings.
54
Xerox®C235 Color Multifunction Printer
User Guide

Set Up, Install, and Configure
Loading paper and specialty media
SSeettttiinngg tthhee PPaappeerr SSiizzee aanndd TTyyppee
1. From the control panel, navigate to:
Settings > OK > Paper > OK > Tray Configuration > OK > Paper Size/Type > OK, then select a
paper source
2. Set the paper size and type.
CCoonnffiigguurriinngg UUnniivveerrssaall ppaappeerr sseettttiinnggss
1. From the home screen, touch Settings > Paper > Media Configuration > Universal Setup.
2. Configure the settings.
LLooaaddiinngg tthhee ttrraayy
CAUTION—TIPPING HAZARD: To reduce the risk of equipment instability, keep the tray
closed until needed.
1. Remove the tray.
Note: To avoid paper jams, do not remove the tray while the printer is busy.
Xerox®C235 Color Multifunction Printer
User Guide
55

Set Up, Install, and Configure
2. Flex, fan, and align the paper edges before loading.
3. Load the paper stack with the printable side face-up.
• Load letterhead face-up with the header toward the back of the tray for one-sided printing.
• Load letterhead face-down with the header toward the front of the tray for two-sided printing.
• Do not slide paper into the tray.
56
Xerox®C235 Color Multifunction Printer
User Guide

Set Up, Install, and Configure
4. To avoid paper jams, make sure that the stack height is below the maximum paper fill indicator.
5. Adjust the guides to match the size of the paper that you are loading.
6. Insert the tray.
7. If necessary, set the paper size and paper type from the control panel to match the paper loaded.
Xerox
®
C235 Color Multifunction Printer
57
User Guide

Set Up, Install, and Configure
LLooaaddiinngg tthhee mmaannuuaall ffeeeeddeerr
1. Adjust the guide to match the size of the paper that you are loading.
58
Xerox®C235 Color Multifunction Printer
User Guide

Set Up, Install, and Configure
2. Load a sheet of paper with the printable side face-up.
• Load letterhead with the printable side face-up and the top edge entering the printer first for
one-sided printing.
Xerox®C235 Color Multifunction Printer
User Guide
59

Set Up, Install, and Configure
• Load letterhead with the printable side face-down and the top edge entering the printer last
for two-sided printing.
• Load envelope with the flap side down and against the right side of the paper guide.
3. Feed the paper until its leading edge gets pulled in.
• To avoid paper jams, do not force paper into the manual feeder.
• Before loading another sheet, wait for a message to appear on the display.
60
Xerox®C235 Color Multifunction Printer
User Guide

Set Up, Install, and Configure
Installing and updating software, drivers, and firmware
IInnssttaalllliinngg tthhee SSooffttwwaarree
Before you install the print driver software, verify that the printer is plugged in, powered on,
connected correctly, and has a valid IP address. The IP address usually appears in the upper right
corner of the control panel.
To view the IP address of the printer, refer to Finding the IP Address of the Printer.
Note: If the Software and Documentation disc is not available, download the latest drivers
from www.xerox.com/drivers
OOppeerraattiinngg SSyysstteemm RReeqquuiirreemmeennttss
• Windows 7, Windows 8, Windows 8.1, Windows 10, Windows Server 2008 R2, Windows Server
2012, Windows Server 2016, and Windows Server 2019.
• MacOS version 10.14 and later.
• UNIX and Linux: Your printer supports connection to various UNIX platforms through the network
interface.
IInnssttaalllliinngg tthhee PPrriinntt DDrriivveerrss ffoorr aa WWiinnddoowwss NNeettwwoorrkk PPrriinntteerr
1. Insert the Software and Documentation disc into the appropriate drive on your computer. If the
installer does not start automatically, navigate to the drive, then double-click the Setup.exe
installer file.
2. Click Xerox Smart Start — Driver Installer (Recommended).
3. At the License Agreement, click Agree.
4. From the list of discovered printers, select your printer.
When you install print drivers for a network printer, if your printer does not appear in the list, click
Don’t See Your Printer?, then enter the IP address for your printer.
To view the IP address of your printer, refer to Finding the IP Address of the Printer.
5. Click Quick Install.
A message appears that confirms that the installation is successful.
6. To complete the installation and close the Installer window, click Done.
IInnssttaalllliinngg tthhee WWiinnddoowwss PPrriinntt DDrriivveerr ..zziipp FFiillee
You can download print drivers from Xerox.com in a .zip file, then use the Windows Add Printer Wizard
to install the print drivers on your computer.
To install the print driver from the .zip file:
1. Download, then extract the required .zip file to a local directory on your computer.
Xerox
®
C235 Color Multifunction Printer
User Guide
61

Set Up, Install, and Configure
2. At your computer, open the Control Panel, then select Devices and Printers > Add a Printer.
3. Click The printer that I want isn't listed, then click Add a local printer or network printer with
manual settings.
4. To use a previously established port, select Use an existing port, then from the list, select a
Standard TCP/IP Port.
5. To create a Standard TCP/IP port:
a. Select Create a New Port.
b. For Type of port, select Standard TCP/IP Port, then click Next.
c. In the Hostname or IP address field, type the printer IP address or host name.
d. To disable the feature, clear the check box for Query the printer and automatically select
the driver to use, then click Next.
6. Click Have Disk.
7. Click Browse. Browse to, then select the driver.inf file for your printer. Click Open.
8. Select your printer model, then click Next.
9. If a prompt appears because the print driver was installed previously, click Use the driver that is
currently installed (recommended).
10. In the Printer name field, type a name for your printer.
11. To install the print driver, click Next.
12. If needed, set the printer as the default printer.
Note: Before you select Share Printer, contact your system administrator.
13. To send a test page to the printer, click Print a test page.
14. Click Finish.
IInnssttaalllliinngg tthhee PPrriinntt DDrriivveerrss ffoorr aa WWiinnddoowwss UUSSBB PPrriinntteerr
1. Connect the B end of a standard A/B USB 2.0 or USB 3.0 cable to the USB Port on the back of the
printer.
2. Connect the A end of the USB cable to the USB port on the computer.
3. If the Windows Found New Hardware Wizard appears, click cancel.
4. Insert the Software and Documentation disc into the appropriate drive on your computer. If the
installer does not start automatically, navigate to the drive, then double-click the Setup.exe
installer file.
5. Click Xerox Smart Start — Driver Installer (Recommended).
6. At the License Agreement, click Agree.
7. From the list of discovered printers, select your printer, then click Quick Install.
A message appears that confirms that the installation is successful.
8. To complete the installation and close the Installer window, click Done.
62
Xerox®C235 Color Multifunction Printer
User Guide

Set Up, Install, and Configure
IInnssttaalllliinngg tthhee PPrriinntteerr aass aa WWeebb SSeerrvviiccee oonn DDeevviicceess
Web Services on Devices (WSD) allows a client to discover and access a remote device and its
associated services across a network. WSD supports device discovery, control, and use.
Installing a WSD Printer Using the Add Device Wizard
1. At your computer, click Start, then select Printers and Scanners.
2. To add the required printer, click Add a Printer or Scanner.
3. In the list of available devices, select the device that you want to use, then click Next.
Note: If the printer that you want to use does not appear in the list, click Cancel. To add the
printer manually, use the IP address of the printer. For details, refer to Installing the Windows
Print Driver .zip File.
4. Click Close.
IInnssttaalllliinngg tthhee DDrriivveerrss aanndd UUttiilliittiieess ffoorr MMaaccOOSS
1. Download the latest print driver from https://www.xerox.com/office/drivers.
2. Open the Xerox
3. To run Xerox
®
Print Drivers 5.xx.x.dmg or .pkg as needed for your printer.
®
Print Drivers 5.xx.x.dmg or .pkg, double-click the appropriate file name.
4. When prompted, click Continue.
5. To accept the license agreement, click I Agree.
6. To accept the current installation location, click Install, or select another location for the
installation files, then click Install.
7. If prompted, enter your password, then click OK.
8. From the list of discovered printers, select your printer, then click Next.
9. If your printer does not appear in the list of discovered printers:
a. Click the Network Printer Icon.
b. Type the IP address of your printer, then click Continue.
c. Select your printer in the list of discovered printers, then click Continue.
10. If your printer was not detected, verify that the printer is powered on and that the Ethernet or
USB cable is connected properly.
11. To accept the print queue message, click OK.
12. Select or clear the Set Printer as Default and Print a Test Page check boxes.
13. Click Continue, then click Close.
Adding the Printer for MacOS
For networking, set up your printer using Bonjour®(mDNS), or for an LPD, LPR connection, connect
using the IP address of your printer. For a non-network printer, create a desktop USB connection.
For more information, go to the Online Support Assistant at: https://www.xerox.com/support.
®
Xerox
C235 Color Multifunction Printer
User Guide
63

Set Up, Install, and Configure
Adding the Printer Using Bonjour
To add the printer using Bonjour
1. From the computer Applications folder or from the dock, open System Preferences.
2. Click Printers & Scanners.
The list of printers appears on the left of the window.
3. For the list of printers, click the Plus icon (+).
4. At the top of the window, click the Default icon.
5. Select your printer from the list, then click Add.
Note: If your printer is not detected, verify that the printer is powered on and that the Ethernet
cable is connected properly.
Adding the Printer by Specifying the IP Address
To add the printer by specifying the IP address:
1. From the computer Applications folder or from the dock, open System Preferences.
2. Click Printers & Scanners.
®
:
The list of printers appears on the left of the window.
3. In the list of printers, click the Plus (+) icon.
4. Click IP.
5. From the Protocol list, select the protocol.
6. In the Address field, enter the IP address of the printer.
7. In the Name field, enter a name for the printer.
8. From the Use list, choose Select a driver to use.
9. From the printer software list, select the print driver for your printer model.
10. Click Add.
IInnssttaalllliinngg PPrriinntt DDrriivveerrss aanndd UUttiilliittiieess ffoorr UUNNIIXX aanndd LLiinnuuxx
For more information on installing print drivers and utilities for UNIX and Linux, refer to https://www.
xerox.com/office/drivers.
UUppddaattiinngg FFiirrmmwwaarree
Some applications require a minimum device firmware level to operate correctly.
For more information on updating the device firmware, contact your customer service representative.
1. Open a web browser, and then type the printer IP address in the address field.
• View the printer IP address on the printer home screen. The IP address appears as four sets of
numbers separated by periods, such as 123.123.123.123.
• If you are using a proxy server, then temporarily disable it to load the web page correctly.
64
Xerox®C235 Color Multifunction Printer
User Guide

Set Up, Install, and Configure
2. Click Settings > Device > Update Firmware.
3. Choose one of the following:
• Click Check for updates > I agree, start update.
• Upload the flash file. To upload the flash file, perform the following steps.
To get the latest firmware, go to www.xerox.com, and search for your printer model.
1. Browse to the flash file.
Note: Make sure that you have extracted the firmware zip file.
2. Click Upload > Start.
EExxppoorrttiinngg oorr iimmppoorrttiinngg aa ccoonnffiigguurraattiioonn ffiillee
You can export the configuration settings of your printer into a text file, and then import the file to
apply the settings to other printers.
1. Open a web browser, and then type the printer IP address in the address field.
• View the printer IP address on the printer home screen. The IP address appears as four sets of
numbers separated by periods, such as 123.123.123.123.
• If you are using a proxy server, then temporarily disable it to load the web page correctly.
2. From the Embedded Web Server, click Export Configuration or Import Configuration.
3. Follow the instructions on the screen.
4. If the printer supports applications, then do the following:
a. Click Apps > select the application > Configure.
b. Click Export or Import.
Xerox
®
C235 Color Multifunction Printer
User Guide
65

Set Up, Install, and Configure
Networking
CCoonnnneeccttiinngg tthhee PPrriinntteerr ttoo aa WWii--FFii NNeettwwoorrkk
Before you begin, make sure that:
• Active Adapter is set to Auto. From the home screen, touch Settings > Network/Ports > Network
Overview > Active Adapter.
• The Ethernet cable is not connected to the printer.
UUssiinngg tthhee wwiirreelleessss sseettuupp wwiizzaarrdd iinn tthhee pprriinntteerr
Before using the wizard, make sure that the printer firmware is updated. For more information, see
Updating Firmware.
1. From the home screen, touch > Set up now.
2. Select a Wi-Fi network, and then type the network password.
3. Touch Done.
UUssiinngg tthhee SSeettttiinnggss MMeennuu iinn tthhee PPrriinntteerr
1. From the home screen, touch Settings > Network/Ports > Wireless > Setup On Printer Panel >
Choose Network.
2. Select a Wi-Fi network, then type the network password.
Note: For Wi-Fi-network-ready printer models, a prompt to set up the Wi-Fi network appears
during initial setup.
CCoonnnneeccttiinngg tthhee pprriinntteerr ttoo aa wwiirreelleessss nneettwwoorrkk uussiinngg
WWii--FFii PPrrootteecctteedd SSeettuupp ((WWPPSS))
Before you begin, make sure that:
• The access point (wireless router) is WPS-certified or WPS-compatible. For more information, see
the documentation that came with your access point.
• A wireless network adapter is installed in your printer. For more information, see the instructions
that came with the adapter.
• Active Adapter is set to Auto. From the home screen, touch Settings > Network/Ports > Network
Overview > Active Adapter.
UUssiinngg tthhee PPuusshh BBuuttttoonn mmeetthhoodd
1. From the home screen, touch Settings > Network/Ports > Wireless > Wi-Fi Protected Setup >
Start Push Button Method.
2. Follow the instructions on the display.
66
Xerox®C235 Color Multifunction Printer
User Guide

Set Up, Install, and Configure
UUssiinngg tthhee ppeerrssoonnaall iiddeennttiiffiiccaattiioonn nnuummbbeerr ((PPIINN)) mmeetthhoodd
1. From the home screen, touch Settings > Network/Ports > Wireless > Wi-Fi Protected Setup >
Start PIN Method.
2. Copy the eight-digit WPS PIN.
3. Open a web browser, and then type the IP address of your access point in the address field.
• To know the IP address, see the documentation that came with your access point.
• If you are using a proxy server, then temporarily disable it to load the web page correctly.
4. Access the WPS settings. For more information, see the documentation that came with your
access point.
5. Enter the eight-digit PIN, and then save the changes.
CCoonnffiigguurriinngg WWii--FFii DDiirreecctt
Wi-Fi Direct is a Wi-Fi-based peer-to-peer technology that allows wireless devices to connect directly
to a Wi-Fi Direct-enabled printer without using an access point (wireless router).
1. From the home screen, touch Settings > Network/Ports > Wi-Fi Direct.
2. Configure the settings.
• Enable Wi-Fi Direct—Enables the printer to broadcast its own Wi-Fi Direct network.
• Wi-Fi Direct Name—Assigns a name for the Wi-Fi Direct network.
• Wi-Fi Direct Password—Assigns the password for negotiating the wireless security when
using the peer-to-peer connection.
• Show Password on Setup Page—Shows the password on the Network Setup Page.
• Auto-Accept Push Button Requests—Lets the printer accept connection requests
automatically.
Note: Accepting push-button requests automatically is not secured.
• By default, the Wi-Fi Direct network password is not visible on the printer display. To show the
password, enable the password peek icon. From the home screen, touch Settings > Security >
Miscellaneous > Enable Password/PIN Reveal.
• To know the password of the Wi-Fi Direct network without showing it on the printer display,
from the home screen touch Settings > Reports > Network > Network Setup.
CCoonnnneeccttiinngg aa mmoobbiillee ddeevviiccee ttoo tthhee pprriinntteerr
Before connecting your mobile device, make sure that Wi-Fi Direct has been configured. For more information, see Configuring Wi-Fi Direct.
CCoonnnneeccttiinngg UUssiinngg WWii--FFii DDiirreecctt
Note: These instructions apply only to Android mobile devices.
1. From the mobile device, go to the settings menu.
Xerox
®
C235 Color Multifunction Printer
User Guide
67

Set Up, Install, and Configure
2. Enable Wi-Fi, and then tap Wi-Fi Direct.
3. Select the printer Wi-Fi Direct name.
4. Confirm the connection on the printer control panel.
CCoonnnneeccttiinngg UUssiinngg WWii--FFii
1. From the mobile device, go to the settings menu.
2. Tap Wi-Fi, and then select the printer Wi-Fi Direct name.
Note: The string DIRECT-xy (where x and y are two random characters) is added before the Wi-
Fi Direct name.
3. Enter the Wi-Fi Direct password.
CCoonnnneeccttiinngg aa ccoommppuutteerr ttoo tthhee pprriinntteerr
Before connecting your computer, make sure that Wi-Fi Direct has been configured. For more
information, see Configuring Wi-Fi Direct.
FFoorr WWiinnddoowwss UUsseerrss
1. Open the printers folder.
2. Select the printer you want to update, and then do either of the following:
• For Windows 7 or later, select Printer properties.
• For earlier versions, select Properties.
3. Navigate to the Configuration tab, and then select Update Now - Ask Printer.
4. Apply the changes.
FFoorr MMaacciinnttoosshh UUsseerrss
1. From System Preferences in the Apple menu, navigate to your printer, and then select Options &
Supplies.
2. Navigate to the list of hardware options, and then add any installed options.
3. Apply the changes.
DDeeaaccttiivvaattiinngg tthhee WWii--FFii nneettwwoorrkk
1. From the home screen, touch Settings > Network/Ports > Network Overview > Active Adapter >
Standard Network.
2. Follow the instructions on the display.
CChheecckkiinngg tthhee pprriinntteerr ccoonnnneeccttiivviittyy
1. From the home screen, touch Settings > Reports > Network > Network Setup Page.
68
Xerox®C235 Color Multifunction Printer
User Guide

Set Up, Install, and Configure
2. Check the first section of the network setup page, and confirm that the status is connected.
If the status is not connected, then the LAN drop may be inactive, or the network cable may be
malfunctioning. Contact your administrator for assistance.
Xerox
®
C235 Color Multifunction Printer
User Guide
69

Set Up, Install, and Configure
Printing the Menu Settings Page
From the home screen, touch Settings > Reports > Menu Settings Page.
70
Xerox®C235 Color Multifunction Printer
User Guide

4
Secure the printer
This chapter contains:
• Erasing printer memory ....... ....... ...... . ...... ....... ....... ...... ....... ....... ...... ....... ....... ...... . ...... ....... ....... .. 72
• Restoring factory default settings ... ............. . ...... ....... ...... . ...... ....... ....... ...... ....... ....... ...... . ...... ..... 73
• Statement of Volatility........... ....... ....... ...... . ...... ....... ............. ....... ....... ...... . ...... ....... ....... ...... ...... 74
Xerox®C235 Color Multifunction Printer
User Guide
71

Secure the printer
Erasing printer memory
To erase volatile memory or buffered data in your printer, turn off the printer.
To erase non-volatile memory or individual settings, device and network settings, security settings,
and embedded solutions, do the following:
1. From the home screen, touch Settings > Device > Maintenance > Out of Service Erase.
2. Select the Sanitize all information on nonvolatile memory check box, and then touch OK.
3. Select either Start initial setup or Leave printer offline, and then touch OK.
72
Xerox®C235 Color Multifunction Printer
User Guide

Restoring factory default settings
1. From the home screen, touch Settings > Device > Restore Factory Defaults.
2. In the Restore Settings menu, select the settings that you want to restore.
3. Touch RESTORE.
4. Follow the instructions on the display.
Secure the printer
Xerox
®
C235 Color Multifunction Printer
User Guide
73

Secure the printer
Statement of Volatility
Your printer contains various types of memory that can store device and network settings, and user
data.
Type of memory Description
Volatile memory Your printer uses standard random access memory
(RAM) to temporarily buffer user data during simple
print jobs.
Non-volatile memory Your printer may use two forms of non-volatile
memory: EEPROM and NAND (flash memory). Both
types are used to store operating system, device
settings, and network information.
Erase the content of any installed printer memory in the following circumstances:
• The printer is being decommissioned.
• The printer is being moved to a different department or location.
• The printer is being serviced by someone from outside your organization.
• The printer is being removed from your premises for service.
• The printer is being sold to another organization.
74
Xerox®C235 Color Multifunction Printer
User Guide

5
This chapter contains:
• Printing from a computer .... ...... . ...... ....... ....... ...... ....... ....... ...... ....... ....... ...... . ...... ....... ....... ...... ... 76
• Printing from a mobile device.... ...... ....... ....... ............. ....... ....... ...... . ...... ....... ............. ....... ....... ... 77
• Printing from a flash drive .. ...... ....... ....... ............. ....... ....... ...... ....... ....... ............. ....... ............. .... 79
• Supported flash drives and file types ....... ............. ....... ............. ....... ....... ...... . ...... ....... ............. ... 80
• Printing a font sample list ............. ....... ....... ...... ....... ....... ............. ....... ....... ...... . ...... ....... ............ 81
• Placing separator sheets between copies...... ....... ...... . ...... ....... ....... ...... ....... ....... ...... ....... ....... .... 82
• Canceling a print job.... ....... ....... ...... . ...... ....... ....... ............. ....... ...... ....... ....... ...... . ...... ....... ....... .. 83
• Adjusting toner darkness......... ....... ............. ....... ...... . ...... ....... ....... ............. ....... ....... ...... ....... ..... 84
Xerox®C235 Color Multifunction Printer
User Guide
75

Print
Printing from a computer
Note: For labels, card stock, and envelopes, set the paper size and type in the printer before
printing the document.
1. From the document that you are trying to print, open the Print dialog.
2. If necessary, adjust the settings.
3. Print the document.
76
Xerox®C235 Color Multifunction Printer
User Guide

Print
Printing from a mobile device
PPrriinnttiinngg ffrroomm aa MMoobbiillee DDeevviiccee UUssiinngg MMoopprriiaa™™PPrriinntt
SSeerrvviiccee
Mopria Print Service is a mobile printing solution for mobile devices running on Android™version 10.0
or later. It allows you to print directly to any Mopria-certified printer.
Note: Make sure that you download the Mopria Print Service application from™the Google
Play store and enable it in the mobile device.
1. From your Android mobile device, launch a compatible application or select a document from
your file manager.
2. Tap More OptionsPrint.
3. Select a printer, and then adjust the settings, if necessary.
4. Tap Print.
PPrriinnttiinngg ffrroomm aa MMoobbiillee DDeevviiccee UUssiinngg AAiirrPPrriinntt
The AirPrint software feature is a mobile printing solution that allows you to print directly from Apple
devices to an AirPrint-certified printer.
• Make sure that the Apple device and the printer are connected to the same network. If the
network has multiple wireless hubs, then make sure that both devices are connected to the same
subnet.
• This application is supported only in some Apple devices.
1. From your mobile device, select a document from your file manager or launch a compatible
application.
2. Tap Share/Upload > Print.
3. Select a printer, and then adjust the settings, if necessary.
4. Print the document.
PPrriinnttiinngg ffrroomm aa mmoobbiillee ddeevviiccee uussiinngg WWii--FFii DDiirreecctt
Wi-Fi Direct is a printing service that lets you print to any Wi-Fi Direct-ready printer.
Note: Make sure that the mobile device is connected to the printer wireless network. For more
information, see Connecting a mobile device to the printer.
1. From your mobile device, launch a compatible application or select a document from your file
manager.
®®
®®
2. Depending on your mobile device, do one of the following:
• Tap
• Tap
> Print.
> Print.
Xerox
®
C235 Color Multifunction Printer
User Guide
77

Print
• Tap > Print.
3. Select a printer, and then adjust the settings, if necessary.
4. Print the document.
78
Xerox®C235 Color Multifunction Printer
User Guide

Printing from a flash drive
This feature is available only in some printer models.
1. Insert the flash drive.
• If you insert the flash drive when an error message appears, then the printer ignores the flash
drive.
• If you insert the flash drive while the printer is processing other print jobs, then Busy appears
on the display.
Print
2. Select the document that you want to print.
If necessary, configure other print settings.
3. Print the document.
To print another document, select USB Drive.
Warning: To avoid loss of data or printer malfunction, do not touch the flash drive or the
printer in the area shown while actively printing, reading, or writing from the memory device.
Xerox®C235 Color Multifunction Printer
User Guide
79

Print
Supported flash drives and file types
FFllaasshh ddrriivveess
• Lexar JumpDrive S70 (16GB and 32GB)
• SanDisk Cruzer (16GB and 32GB)
• PNY Attache (16GB and 32GB)
• Notes:
– The printer supports high-speed USB flash drives with full-speed standard.
– USB flash drives must support the File Allocation Table (FAT) system.
FFiillee ttyyppeess
Documents
• PDF (version 1.7 or earlier)
• Microsoft file formats (.doc, .docx, .xls, .xlsx, .ppt, .
pptx)*
Images
• .JPEG or .jpg
• .TIFF or .tif*
• .gif*
• .bmp*
• .png*
• .pcx*
• .dcx*
80
Xerox®C235 Color Multifunction Printer
User Guide

Printing a font sample list
1. From the home screen, touch Settings > Reports > Print > Print Fonts.
2. Touch PCL Fonts or PostScript Fonts.
Print
Xerox
®
C235 Color Multifunction Printer
User Guide
81

Print
Placing separator sheets between copies
1. From the home screen, touch Settings > Print > Layout > Separator Sheets > Between Copies.
2. Print the document.
82
Xerox®C235 Color Multifunction Printer
User Guide

Canceling a print job
FFrroomm tthhee PPrriinntteerr CCoonnttrrooll PPaanneell
For touch-screen printer models, do the following:
1. From the home screen, touch Cancel a job.
2. Select a job to cancel.
For non-touch-screen printer models, press Cancel.
FFrroomm tthhee CCoommppuutteerr
1. Depending on the operating system, do either of the following:
• Open the printers folder, and then select your printer.
• From the System Preferences in the Apple menu, navigate to your printer.
2. Select the job to cancel.
Print
Xerox
®
C235 Color Multifunction Printer
User Guide
83

Print
Adjusting toner darkness
1. From the home screen, touch Settings > Print > Quality > Toner Darkness.
2. Select a setting.
84
Xerox®C235 Color Multifunction Printer
User Guide

6
Copy
This chapter contains:
• Using the automatic document feeder and scanner glass . ....... ............. ....... ............. ....... ....... .... 86
• Making Copies .... ....... ............. ....... ............. ....... ....... ...... ....... ....... ............. ....... ....... ...... . ...... ..... 87
• Copying photos..... ............. ....... ...... . ...... ....... ....... ............. ....... ....... ...... ....... ....... ............. ....... ... 88
• Copying on letterhead .... ...... . ...... ....... ....... ...... ....... ....... ...... . ...... ....... ...... . ............. ....... ...... ....... 89
• Copying on Both Sides of the Paper . ...... ....... ....... ...... ....... ....... ...... . ...... ....... ....... ............. ....... ... 90
• Reducing or enlarging copies.... . ...... ....... ............. ....... ....... ...... . ...... ....... ....... ...... ....... ....... ...... . ... 91
• Copying Multiple Pages onto a Single Sheet ....... ....... ....... ............. ....... ............. ....... ....... ...... . .... 92
• Collating copies. ....... ...... ....... ....... ............. ....... ............. ....... ....... ...... . ...... ....... ............. ....... ....... 93
• Copying cards . ...... ....... ....... ...... . ...... ....... ....... ...... ....... ....... ...... ....... ....... ...... . ...... ....... ....... ......... 94
• Creating a copy shortcut . ....... ....... ...... . ...... ....... ....... ...... ....... ....... ...... . ...... ....... ....... ...... ....... ...... 95
Xerox®C235 Color Multifunction Printer
User Guide
85

Copy
Using the automatic document feeder and scanner glass
Automatic document feeder (ADF)
• Use the ADF for multiple-page or two-sided
documents.
• Load an original document faceup. For multiplepage documents, make sure to align the leading
edge before loading.
• Make sure to adjust the ADF guides to match the
width of the paper that you are loading.
Scanner glass
• Use the scanner glass for single-page documents,
book pages, small items (such as postcards or
photos), transparencies, photo paper, or thin
media (such as magazine clippings).
• Place the document facedown in the corner with
the arrow.
86
Xerox®C235 Color Multifunction Printer
User Guide

Making Copies
1. Load an original document into the ADF tray or on the scanner glass.
Note: To avoid a cropped image, make sure that the original document and output have the
same paper size.
2. From the home screen, touch Copy, and then specify the number of copies.
If necessary, adjust the copy settings.
3. Copy the document.
Note: To make a quick copy, from the control panel, press the Start button.
Copy
Xerox
®
C235 Color Multifunction Printer
User Guide
87

Copy
Copying photos
1. Place a photo on the scanner glass.
2. From the home screen, touch Copy > Content Type > Photo.
3. Copy the document.
88
Xerox®C235 Color Multifunction Printer
User Guide

Copying on letterhead
1. Load an original document into the ADF tray or on the scanner glass.
2. From the home screen, touch Copy > Copy From > select the size of the original document.
3. Touch Copy To, and then select the paper source that contains the letterhead.
If you loaded the letterhead into the manual feeder, then navigate to:Copy To > Manual Feeder
> select a paper size > Letterhead.
4. Copy the document.
Copy
Xerox
®
C235 Color Multifunction Printer
User Guide
89

Copy
Copying on Both Sides of the Paper
1. Load an original document into the ADF tray or on the scanner glass.
2. From the home screen, touch Copy > Sides.
3. Adjust the settings.
4. Copy the document.
90
Xerox®C235 Color Multifunction Printer
User Guide

Reducing or enlarging copies
1. Load an original document into the ADF tray or on the scanner glass.
2. From the home screen, navigate to: Copy > Scale > specify a scale value
Note: Changing the size of the original document or output after setting Scale restores the
scale value to Auto.
3. Copy the document.
Copy
Xerox
®
C235 Color Multifunction Printer
User Guide
91

Copy
Copying Multiple Pages onto a Single Sheet
1. Load an original document into the ADF tray or on the scanner glass.
2. From the home screen, touch Copy > Pages per Side.
3. Adjust the settings.
4. Copy the document.
92
Xerox®C235 Color Multifunction Printer
User Guide

Collating copies
1. Load an original document into the ADF tray or on the scanner glass.
2. From the home screen, touch Copy > Collate > On [1,2,1,2,1,2].
3. Copy the document.
Copy
Xerox
®
C235 Color Multifunction Printer
User Guide
93

Copy
Copying cards
1. Load a card on the scanner glass.
2. From the control panel, navigate to: Copy > ID Copy
3. If necessary, adjust the settings.
4. Copy the document.
94
Xerox®C235 Color Multifunction Printer
User Guide

Creating a copy shortcut
1. From the home screen, touch Copy.
Copy
2. Configure the settings, and then touch
3. Create a shortcut.
.
Xerox
®
C235 Color Multifunction Printer
User Guide
95

Copy
96
Xerox®C235 Color Multifunction Printer
User Guide

7
This chapter contains:
• Using the automatic document feeder and scanner glass . ....... ............. ....... ............. ....... ....... .... 98
• Sending an Email ....... ....... ....... ...... ....... ....... ...... . ...... ....... ....... ............. ....... ............. ....... ...... . .... 99
• Creating an e-mail shortcut... ....... ....... ............. ....... ............. . ...... ....... ...... . ...... ....... ............. ..... 100
Xerox®C235 Color Multifunction Printer
User Guide
97

Email
Using the automatic document feeder and scanner glass
Automatic document feeder (ADF)
• Use the ADF for multiple-page or two-sided
documents.
• Load an original document faceup. For multiplepage documents, make sure to align the leading
edge before loading.
• Make sure to adjust the ADF guides to match the
width of the paper that you are loading.
Scanner glass
• Use the scanner glass for single-page documents,
book pages, small items (such as postcards or
photos), transparencies, photo paper, or thin
media (such as magazine clippings).
• Place the document facedown in the corner with
the arrow.
98
Xerox®C235 Color Multifunction Printer
User Guide

Sending an Email
Before you begin, make sure that the SMTP settings are configured. For more information, refer to
Configuring the Email SMTP Settings.
UUssiinngg tthhee CCoonnttrrooll PPaanneell
1. Load an original document into the ADF tray or on the scanner glass.
2. From the home screen, touch Email, and then enter the needed information.
3. If necessary, configure the output file type settings.
4. Send the email.
UUssiinngg aa SShhoorrttccuutt NNuummbbeerr
1. Load an original document into the ADF tray or on the scanner glass.
2. From the home screen, touch Shortcuts > Email.
3. Select the shortcut number.
Email
4. Send the email.
Xerox
®
C235 Color Multifunction Printer
User Guide
99

Email
Creating an e-mail shortcut
1. From the home screen, touch E-mail.
2. Configure the settings, and then touch
3. Create a shortcut.
.
100
Xerox®C235 Color Multifunction Printer
User Guide
 Loading...