

Page 1

WorkCentre C226
Quick Connect Guide
Purpose:
Refer to this guide to modify the printer network settings at the printer user
interface screens if required. For complete instructions refer to the Customer
documentation for additional information.
Note:
A Network Administrator is required to ensure that the printer is configured
properly. To properly configure the printer, the Network Administrator must
supply a valid IP Address, a Subnet Mask, and a Gateway Address if applicable.
DHCP is enabled by default. For more information in regards to Novell printing
and configuration, please refer to the Customer documentation.
Procedure:
The WorkCentre C226 has been designed to connect to a TCP/IP network with
minimal changes. Connect the printer to the network and review the Network
Settings List. Continue with Steps 2-6 and make changes to the printer port /
network as required for your network infrastructure.
Step 1: Default Printer Settings
Default Port Settings
Parallel Port – Enabled
Netware – Enabled
Port 9100 – Enabled
FTP – Enabled
Internet Service – Enabled
Network Settings
Default
IP Address DHCP (ON)
Printer Name: XC010228
Workgroup: Workgroup
Step 2: IP Setup
Follow this procedure if you want to make any changes to the port settings. If no
changes are required then please move on to Step 3.
1. Press Machine Administration button on the Local User Interface Operation Panel.
2. Press System Administrator Tools button. Enter Password (Default: 00000).
3. Press Printer Selections.
4. Press Network Settings.
5. Press IP Address Settings.
6. DHCP is default – uncheck DHCP and enter IP information if applicable.
7. Press OK.
8. Press Yes to restart after making changes.
9. Reboot the printer using on/off switch on the left side of machine.
10. If no further changes are required, continue to Step 4 in this guide.
Page 2
A
X
6
Step 3: Protocol Enablement
Follow this procedure if you want to make any changes to the port settings. If no
changes are required then please move on to Step 4.
1. Press Machine Administration button on the Local User Interface Operation Panel.
2. Press System Administrator Tools button. Enter Password (Default: 00000).
3. Press Printer Selections.
4. Press Network Settings.
5. Press Enable protocols by toggling them on/off as checkboxes
6. Press OK.
7. Press Yes to restart after making changes.
8. Reboot the printer using on/off switch on the left side of machine.
9. If no further changes are required, continue to Step 5 in this guide.
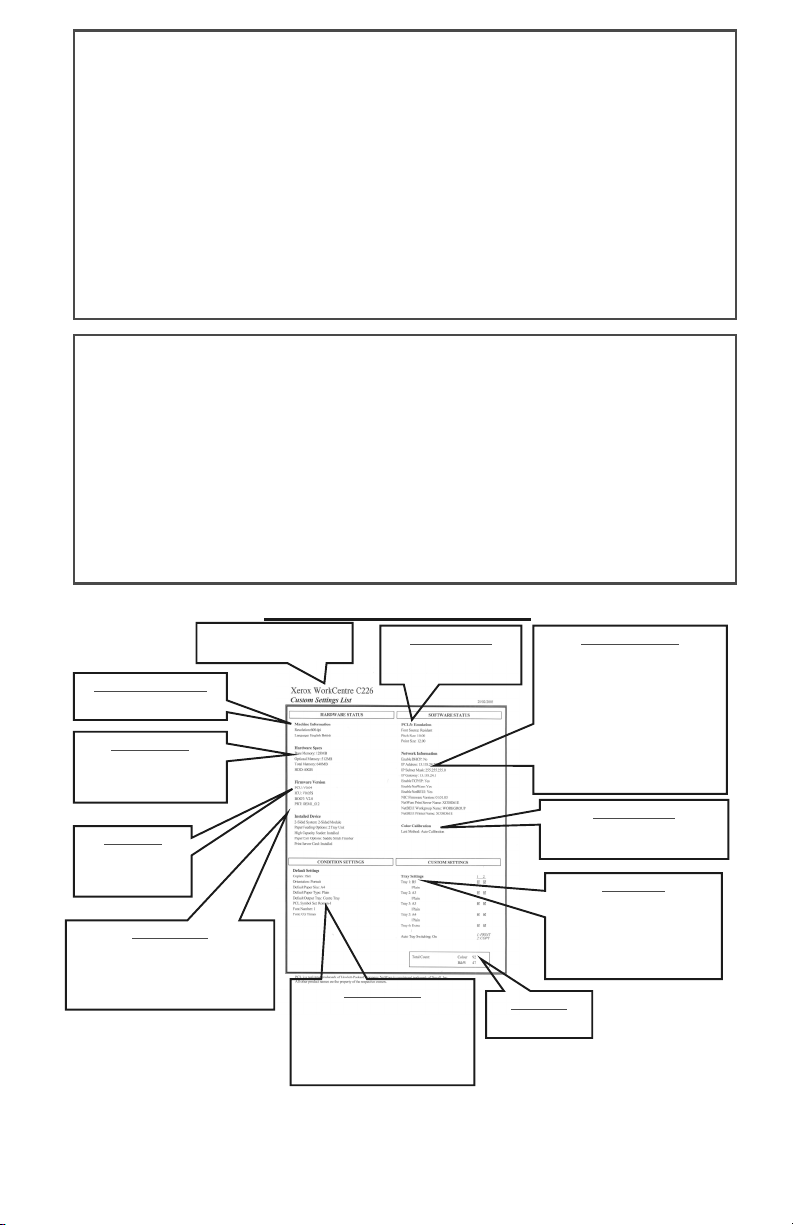
Step 4: Print Lists
1. Press the Machine Administration button on the Local User Interface Operation Panel.
2. Press Print Lists and Test Pages.
3. Press Print Test Pages.
4. Press one of the following:
5. Press the CA button on the Local UI Operation Panel to return to the
Machine Administration
Resolution: 600 DPI
Hardware Specs
Base Memory: 128 MB
Optional Memory: 512 M B
Total Memory: 640 MB
FW. Version
PCU Ver: x.xx
ICU Ver: x.xx
Boot Ver: x.xx
2-Sided System: 2-Sided M odule
Paper Feeding Options: 2 Tray Unit
High Cap. Feeder: Installed
Paper Exit Options: Saddle Stitch Fin.
Print Server Card: Installed
a. Printer Settings List
b. PCL Font List
c. PCL Symbol Set List
d. Network Interface Card Page.
Main Screen.
Sample Printer Settings List
erox WorkCentre C22
Custom Setting List
Installed Device
PCL5c Emulation
Font Source: Resident
Pitch Size: 10. 00
Default Settings
Copies: 1 Set
Orientation: Portrait
Default Paper: Size: A4
Default Paper Type: Plain
Default Output Tray: Centre Tray
PCL Symbol Set: Roman-1
Font Number:1 Font: Courier
Network Information
Enable DHCP: Yes/No
IP Address: xxx.xxx.xxx
IP Sub. Mask: xxx.xxx.xxx
IP Gateway: xxx.xxx.xxx
Enable TCPIP: Yes
Enable Netware: Yes
Enable NetBEUI: Yes
NIC Firmware Version: x.x.x
NW Print Server Name: XCxxxxxxx
NetBEUI Workgroup: Workgroup
NetBEUI Printer Name: XCxxxxxxx
Color Calibration
Low Method: AutoCalibration
Date & Time: 4/03/2005 6:45
Tray Settings
Tray 1: A4 /Plain
Tray 2: A3 /Plain
Tray 3 A4 /Plain
Tray 5 A4 /Plain
Tray 6 /A4 Plain
Print/Copy/Fax: Enabled
uto Tray Switching: On
Total Count
Color: 930
Page 3
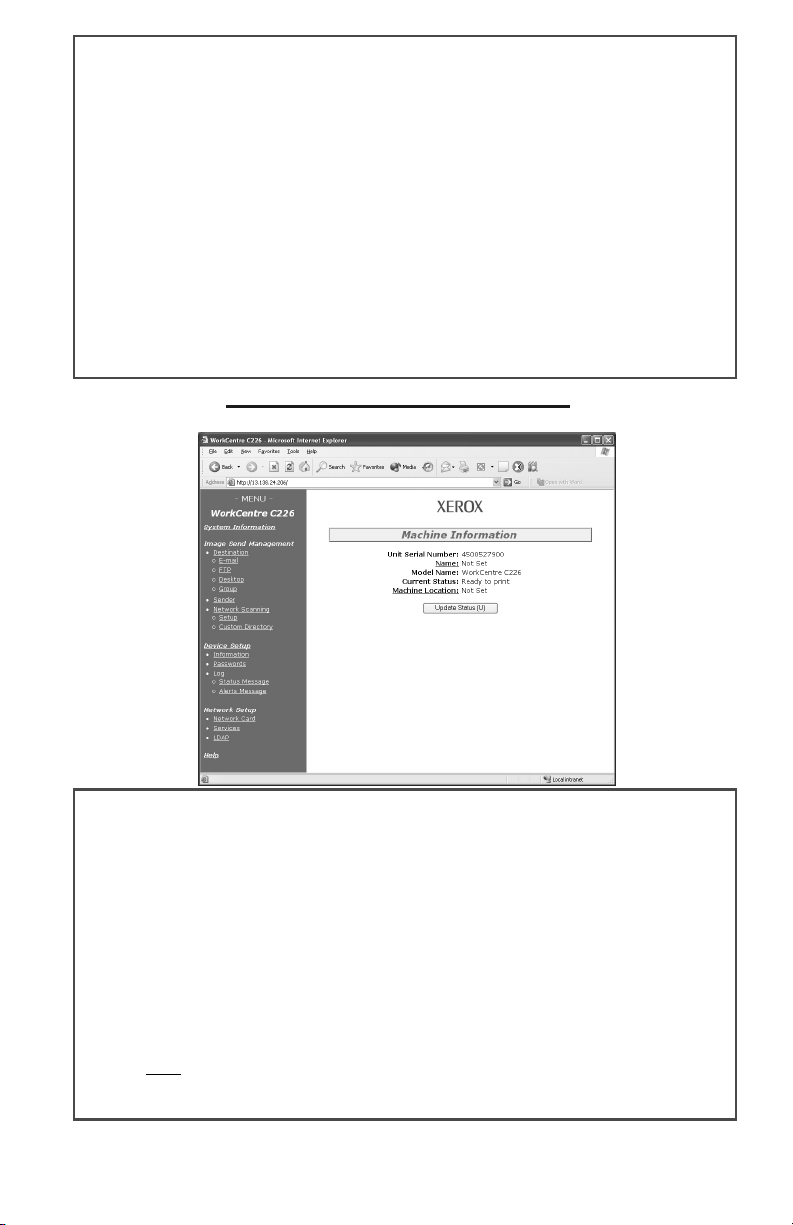
Step 5: Web User Interface Instructions
A PC client connected to the network is required to complete the printer network setup.
Follow this procedure if you want to make any other changes to the printer configuration.
1. Open a Web Browser (Internet Explorer).
2. Verify Proxy Servers are being bypassed for local web addresses.
3. Type the TCP/IP address assigned to the printer into the URL window. (Refer to the
Network Interface Card Page for the TCP/IP address.)
4. Make necessary changes by selecting one of the options on the let side pane in the
window.
5. To save changes or edit the default login information is:
6. Save changes and reboot the printer.
7. Print out a new Network Interface Card Page to review new settings.
8. (Please refer to Step 4 for additional information.)
a. Username: “admin”
b. Password: “Xerox”
Sample WorkCentre C226 Web Page
Step 6: Load Windows Print Drivers
1. Run Setup.exe
2. Select Language
3. License Agreement will appear, select Yes
4. Read the Welcome Screen and click “Next”
5. Select Print Driver button followed by Next when window appears
6. Select “Standard” or “Custom Installation” (Default: Standard)
7. Select printer to be installed
8. Select if you wish to have Windows Programs use this as default printer then Next
9. Enter Printer Name to used, click Next
10. Install Display Font window appears, make selection then click Next
11. Select Next, driver will be installed along with printer
12. Printer is now installed, select OK then Close again and restart if prompted
This install procedure is for all Windows Clients supported for the WorkCentre
Note:
C226. Please refer to the documentation for installing printers using the “Add Printer
Wizard”. For USB & Parallel port instructions please refer to the documentation.
Page 4

Print Driver Installation for Netware
Please refer to the System Administration Guide which came packaged with your new
machine for complete instructions on loading drivers for Netware.
Print Driver Installation for Mac OS using Ethertalk
Printer Type: LaserWriter 8
Printer Name: Xerox WorkCentre C226
PPD Installation & Configuration
Mac OS 8.6-9.x
1. Insert the PS3 Expansion Kit CD Rom into machine
2. Double-click the CDROM
3. Double-click the Mac OS Folder
4. Double Click the Installer icon
5. Click Install button
6. Software License Agreement appears, Click “Yes”
7. Click Continue
8. PPD is now installed
Setup Printer 8.6-9.x
1. Select Chooser from the Apple Menu
2. Select the LaserWriter 8 Icon
3. Select the AppleTalk zone for your network.
4. Select the XC010228 printer and click Create
5. Once installed, Select Configure and set the options for your printer.
Mac OS X
1. Insert the PS3 Expansion Kit CD Rom into machine
2. Double-click the CDROM
3. Double-click the Mac OS Folder
4. Double-click the OS version
5. Double Click the Installer icon and then Continue
6. Software License Agreement appears, Click Yes
7. Choose Hard Disk Location and select Continue
8. Click Install button
9. When message appear “The software was successfully installed”, select Close – Your
PPD has been installed.
Setup Printer for OS X
1. Select Applications from the Go Menu
2. Double-click the Utilities Folder
3. Double-click the Print Center Icon
4. Click Add, select AppleTalk followed by your AppleTalk zone name
5. Select the name of your AppleTalk device for the WorkCentre C226
6. PPD window will appear, select Xerox followed by the PPD
7. Click the Add button
8. Click the printer name in the Printer List window and select Show Info from the
Printers Menu.
9. Select Installable Options
10. Set the options for your printer
11. Close the window, your printer is now configured.
Page 5

WorkCentre C226
Guía de conexión rápida
Propósito:
Consulte esta guía para modificar los ajustes de red de la impresora en las
pantallas de la interfaz de usuario de la impresora en caso necesario. Para
obtener las instrucciones completas e información adicional, consulte la
documentación del cliente.
Nota:
Será necesario que un administrador de redes se asegure de que la impresora
se configura adecuadamente. Para ello, el administrador de redes deberá
facilitar una dirección IP válida, una máscara de subred y una dirección de la
puerta de enlace, si procede. DHCP está habilitado por defecto. Para obtener
más información sobre los ajustes de impresión y configuración de Novell,
consulte la documentación del cliente.
Procedimiento:
WorkCentre C226 ha sido diseñada para conectarse a una red TCP/IP con
las modificaciones mínimas. Conecte la impresora a la red y revise la lista
de ajustes de red. Realice los pasos del 2 al 6 y modifique el puerto de la
impresora o la red según sea necesario para su infraestructura de red.
Paso 1
Ajustes predeterminados de
los puertos
Puerto paralelo – Habilitado
Netware – Habilitado
Puerto 9100 – Habilitado
FTP – Habilitado
Servicio de Internet – Habilitado
: Ajustes predeterminados de la impresora
Configuración predeterminada
de red
Dirección de IP: DHCP (Activada)
Nombre de la impresora: XC010228
Grupo de trabajo: Grupo de trabajo
Page 6

Paso 2: Configuración de IP
Realice el siguiente procedimiento si desea cambiar los ajustes de los puertos.
Si no es necesario ningún cambio, continúe con el paso 3.
1. Pulse el botón Ajustes personalizados en el panel de control de la interfaz de
usuario local.
2. Pulse el botón Programas de operador principal. Introduzca la contraseña
(predeterminada: 00000).
3. Pulse Ajustes de impresora.
4. Pulse Configuración de red.
5. Pulse Configuración de dirección IP.
6. Aparece DHCP por defecto; quite la marca de la casilla DHCP e introduzca los datos de
IP si procede.
7. Pulse OK.
8. Pulse Sí para reiniciar una vez realizados los cambios.
9. Reinicie la impresora con el interruptor de alimentación en el lado izquierdo
de la máquina.
10. Si no es necesario realizar más cambios, continúe con el paso 4 de esta guía.
Paso 3: Habilitación del protocolo
Realice el siguiente procedimiento si desea cambiar los ajustes de los puertos.
Si no es necesario ningún cambio, continúe con el paso 4.
• Pulse el botón Ajustes personalizados en el panel de control de la interfaz de
usuario local.
• Pulse el botón Programas de operador principal. Introduzca la contraseña
(predeterminada: 00000).
• Pulse AJUSTES DE IMPRESORA.
• Pulse CONFIGURACIÓN DE RED.
• Pulse Habilitar protocolos marcando las casillas correspondientes.
• Pulse OK.
• Pulse Sí para reiniciar una vez realizados los cambios.
• Reinicie la impresora con el interruptor de alimentación en el lado izquierdo
de la máquina.
• Si no es necesario realizar más cambios, continúe con el paso 5 de esta guía.
Page 7

dioma
V
A
amaño punto
00
X
6
s
Paso 4: Impresión de listados
• Pulse el botón Ajustes personalizados en el panel de control de la interfaz de
usuario local.
• Pulse Imprimir lista.
• Pulse Imprimir página de prueba.
• Pulse una de las siguientes opciones:
• lista ajustes de impresora
• Listado de fuentes PCL
• Listado de juegos símbolos PCL
• Página NIC
• Pulse el botón Borror todo en el panel de control de la interfaz de usuario local
para volver a la pantalla principal.
Ejemplo de lista de ajustes de impresora
erox WorkCentre C22
Lista de ajustes personalizado
Administración de la máquina
Resolución: 600 DPI
: Inglés británico
I
Especificaciones del equipo
Memoria básica: 128 MB
Memoria opcional: 512 MB
Memoria total: 640 MB
Disco duro: 40 GB
ersión FW.
Versión PCU: x.xx
Versión ICU: x.xx
Versión Boot: x.xx
PRT: xxx
Dispositivo instalado
Sistema a doble cara: Módulo a doble cara
Opciones alimentación papel: Unidad 2 band.
Alimentador de gran cap.: Instalado
Opciones salida papel: Encuadern ador
Tarjeta de servidor de impresión: Instalad o
justes predeterminados
Tamaño de papel predeterminado: A4
Tipo de papel predeterminado: Normal
Bandeja salida predeterminada: Central
Conf. de juegos símb. PCL: Roman-1
Número de fuente:1 Fuente: Courier
Emulación de PCL5c
Fuente: Residente
Tamaño paso: 10.00
T
Copias: 1 juego
Orientación: Vertical
: 12.
Información de red
Habilitar DHCP: Sí/No
Dirección IP: xxx.xxx.xxx
Máscara de subred IP: xxx.xxx.xxx
Pasarela IP: xxx.xxx.xxx
Habilitar TCP/IP: Sí
Habilitar Netware: Sí
Habilitar NetBEUI: Sí
Versión Firmware de NIC: x.x.x
Nombre de servidor de impresión NW:
Grupo trabajo NetBEUI: Grupo trabajo
Facturación
Color: 930
B/N: 1294
XCxxxxxxx
Nombre de impresora NetBEUI:
XCxxxxxxx
Calibración de color
Método bajo: AutoCalibración
Fecha y hora: 4/03/2005 6:45
Configuración de bandejas
Bandeja 1: A4 / normal
Bandeja 2: A3 / normal
Bandeja 3: A4 / normal
Bandeja 5: A4 / normal
Bandeja 6: A4 / normal
Imprimir/Copiar/En. f ax: Habilitado
Cambio automático bandeja: Activ.
Page 8

Paso 5: Instrucciones para interfaz de usuario
por Internet
Los clientes con PC conectados a la red deben realizar la configuración de red para la
impresora. Siga este procedimiento si desea realizar más cambios en la configuración
de la impresora.
1. Abra un navegador de Internet (Internet Explorer).
2. Verifique que está configurado para no utilizar el servidor Proxy para direcciones
locales.
3. Introduzca la dirección TCP/IP asignada a la impresora en la pantalla de la URL.
(Consulte la página NIC para obtener la dirección TCP/IP.)
4. Realice los cambios necesarios seleccionando una de las opciones de la sección de la
parte izquierda de la pantalla.
5. Para guardar los cambios o editar, los datos predeterminados de inicio de sesión son:
• Nombre de usuario: “admin”
• Contraseña: “Xerox”
6. Guarde los cambios y reinicie la impresora.
7. Imprima una página NIC para revisar los nuevos ajustes.
8. (Consulte el paso 4 para obtener más información.)
Ejemplo de página web de WorkCentre C226
Page 9

Paso 6: Instalación de los controladores de
impresora en Windows
1. Ejecute Setup.exe.
2. Aparece el contrato de licencia; seleccione Sí.
3. Seleccione “PCL5c Driver Install”.
4. Seleccione “Típica” o “Instalación personalizada” (predeterminado: Típica).
5. Seleccione la impresora que se va a instalar.
6. Seleccione el controlador “WorkCentre C226 PCL5c”.
7. Seleccione Siguiente, imprima Página de prueba.
La impresora ya está instalada.
Nota: Este procedimiento de instalación es para todos los sistemas de entorno
Windows para WorkCentre C226. Consulte la documentación para la instalación
de impresoras utilizando el “Asistente para agregar impresoras”. Además, para
obtener las instrucciones para los puertos USB y paralelo, consulte la
documentación.
Page 10

Instalación de los controladores de la impresora en Netware
Consulte la Guía de administración del sistema entregada con la máquina nueva para
obtener instrucciones completas para instalar los controladores en sistemas Netware.
Instalación y configuración de PPD
Mac OS 8.6-9.x
Configuración de la impresora 8.6-9.x
Instalación de controladores de impresora en sistemas
Mac OS con Ethertalk
Tipo de impresora: LaserWriter 8
Nombre de impresora: Xerox WorkCentre C226
1. Inserte el CD-ROM de controladores PostSript de WorkCentre C226 (incluido en el
kit PS) en la máquina.
2. Haga doble clic en el CD-ROM.
3. Haga doble clic en la carpeta Mac OS.
4. Haga doble clic en el icono del instalador.
5. Haga clic en el icono de instalar.
6. Aparece el contrato de licencia; haga clic en Sí.
7. Haga clic en Continuar.
8. El controlador PPD ya está instalado.
1. Seleccione Selector del menú de Apple.
2. Seleccione el icono de LaserWriter 8.
3. Seleccione la zona AppleTalk de su red.
4. Seleccione la impresora XC010228 y haga clic en Crear.
5. Una vez finalizada la instalación, seleccione Configurar y ajuste las opciones de
su impresora.
Mac OS X
1. Inserte el CD-ROM de controladores PostSript de WorkCentre C226 (incluido en el
kit PS) en la máquina.
2. Haga doble clic en el CD-ROM.
3. Haga doble clic en la carpeta Mac OS.
4. Haga doble clic en la versión OS.
5. Haga doble clic en el icono del instalador y a continuación en Continuar.
6. Aparece el contrado de licencia de software; haga clic en Sí.
7. Seleccione la localización en el disco duro y seleccione Continuar.
8. Haga clic en el botón Instalar.
9. Cuando aparezca el mensaje “El software se ha instalado correctamente”,
seleccione Cerrar.
El archivo PPD ya está instalado.
Configuración de la impresora en OS X
1. Seleccione Aplicaciones en el menú Ir.
2. Haga clic en la carpeta Utilidades.
3. Haga clic en el icono de Centro de Impresión.
4. Haga clic en Añadir; seleccione AppleTalk y, a continuación, su nombre de
zona AppleTalk.
5. Seleccione el nombre de su dispositivo AppleTalk para WorkCentre C226
6. Aparecerá la pantalla PPD; seleccione Xerox y, a continuación, PPD.
7. Haga clic en el botón Añadir.
8. Haga clic en el nombre de la impresora en la pantalla Lista de impresoras y seleccione
Mostrar info en el menú Impresoras.
9. Seleccione Opciones instalables.
10. Ajuste las opciones de la impresora.
11. Cierre la pantalla; la impresora ya está configurada.
Page 11

WorkCentre C226
Guia de Ligação Rápida
Objectivo:
Consulte este guia se desejar modificar as definições da impressora de rede nos
ecrãs de interface do utilizador da impressora. Para instruções mais detalhadas,
consulte a documentação do cliente.
Nota:
É necessário um Administrador de Rede para garantir que a impressora
é configurada correctamente. Para configurar a impressora correctamente,
o Administrador de Rede deve fornecer um endereço IP válido, uma Subnet
Mask, e um endereço Gateway, se relevante. O DHCP é activado por defeito.
Para mais informações relativamente à impressão e configuração Novell,
consulte a documentação do cliente.
Procedimentos:
O WorkCentre C226 foi concebido para ser ligado a uma rede TCP/IP com
alterações mínimas. Ligue a impressora à rede e reveja a Network Settings List
(Lista de Definições de Rede). Avance para os passos 2 – 6 e faça alterações à
porta / rede da impressora de acordo com a infra-estrutura da sua rede.
Passo 1: Pré-definições da Impressora
Pré-definições da Porta
Porta Paralela – Activado
Netware – Activado
Porta 9100 – Activado
FTP – Activado
Serviço de Internet – Activado
Pré-definições de Rede
Endereço IP: DHCP (ON)
Nome da Impressora: XC010228
Workgroup: Workgroup
Passo 2: Configuração IP
Siga estas instruções se pretende fazer alterações às definições da porta. Se não tiver
que fazer alterações, avance para o passo 3.
1. Prima o botão Definições Personalizadas no Painel de Operação de Interface do
Utilizador Local.
2. Prima o botão Programas de Operador. Digite a palavra-passe (por defeito: 00000).
3. Prima Definições de Impressora.
4. Prima Definições Rede.
5. Prima Definição Endereço IP.
6. DHCP é o valor por defeito – desmarque a opção DHCP e insira as informações IP,
se relevante.
7. Prima OK.
8. Prima Sim para reiniciar depois de ter efectuado as alterações.
9. Reinicie a impressora utilizando o interruptor on/off no lado esquerdo do equipamento.
10. Se não tiver que fazer mais alterações, avance para o passo 4 deste guia.
Page 12

Passo 3: Activação do protocolo
Siga estas instruções se pretender fazer quaisquer alterações às definições de porta.
Se não desejar fazer alterações, avance para o passo 4.
• Prima o botão Definições Personalizadas no Painel de Operação de Interface
do Utilizador Local.
• Prima o botão Programas de Operador. Digite a palavra-passe (por defeito: 00000).
• Prima Definições de Impressora.
• Prima Definições Rede.
• Prima Activar protocolos utilizando on/off para os assinalar.
• Prima OK.
• Prima Sim para reiniciar depois de ter feito as alterações.
• Reinicie a impressora utilizando o interruptor on/off no lado esquerdo do
equipamento.
• Se não for necessário efectuar mais alterações, avance para o passo 5 deste guia.
Passo 4: Imprimir Listas
• Prima o botão Definições Personalizadas no Painel de Operação
de Interface do Utilizador Local.
• Prima Impressão Lista.
• Prima Página Teste Impressora.
• Prima uma das seguintes opções:
• Lista de Def. da Impressora
• List Fonte PCL
• Lista Conjunto Símbolos PCL
• Página NIC.
• Para voltar ao ecrã principal, prima o botão Clear All (Apagar tudo)
no Painel de Operação de Interface do Utilizador Local.
Page 13

V
X
6
Amostra da Lista de Definições da Impressora
Lista de Def. Personal.
Adm. do Equipamento
Resolução: 600 DPI
Idioma: Inglês
Espec. de Hardware
Memória de Base: 128 MB
Memória Opcional: 512 M B
Memória Total: 640 MB
HDD: 40 GB
ersão FW.
Ver.PCU: x.xx
Ver. ICU: x.xx
Ver. Boot: x.xx
PRT: xxx
Dispositivos instalados
Sistema 2 Faces: Módulo 2 faces
Op. de Ali. de Papel: Unid. de 2 band.
Ali. de Alta Cap.: Instalado
Op. de Saída de Papel:
Agrafamento na lombada
erox WorkCentre C22
Pré-def. Tipo do Papel: Comum
Cópias: 1 Conjunto
Orientação: Vertical
Pré-def. Formato do Papel:
Pré-def. Bandeja de Saída:
Bandeja Central
PCL Symbol Set: Roman-1
Font Number: 1 Font: Courier
Espaçamento: 10.00
Tam. do Ponto: 12.00
Pré-definições
Formato: A4
Emulação PCL5c
Fonte: Descar.
Informação de Rede
Activar DHCP: Yes/No
Endereço IP: xxx.xxx.xxx
Sub. Mask IP: xxx.xxx.xxx
Gateway IP: xxx.xxx.xxx
Activar TCPIP: Sim
Activar Netware: Sim
Activar NetBEUI: Sim
Versão NIC Firmware: x.x.x
Nome do Servidor de Imp. de
Rede: XCxxxxxxx
NetBEUI Workgroup: Workgroup
NetBEUI Printer Name:
XCxxxxxxx
Calibração de Cor
Método Baixo: AutoCalibration
Data & Hora: 4/03/2005 6:45
Definições Bandeja
Bandeja 1: A4 / Comum
Bandeja 2: A3 / Comum
Bandeja 3: A4 / Comum
Bandeja 5: A4 / Comum
Bandeja 6: A4 / Comum
Imp./Cop./Fax: Activado
Troca Aut. de Band.: On
Cont.Total
Cor: 930
B/P: 1294
Passo 5: Instruções do Utilizador
de Interface Web
Para um PC ligado à rede tem que completar a configuração da impressora de
rede. Siga estas instruções se pretender efectuar mais alterações à configuração
da impressora.
1. Abra um Web Browser (Internet Explorer).
2. Verifique se os servidores Proxy estão a ser anulados por endereços web locais.
3. Na janela URL, digite o endereço TCP/IP atribuído à impressora. (Consulte a Página
NIC para o endereço TCP/IP.)
4. Efectue as alterações necessárias seleccionando uma das opções do menu no lado
esquerdo da janela.
5. Para guardar as alterações ou editar as informações de login por defeito:
• Nome do utilizador: “admin”
• Palavra-passe: “Xerox”
6. Guarde as alterações e reinicie a impressora.
7. Imprima uma nova Página NIC para rever as definições.
8. (Consulte o passo 4 para obter mais informações.)
Page 14

Amostra de uma Web Page WorkCentre C226
Passo 6: Carregar os drivers de impressora
Windows
1. Execute Setup.exe.
2. O acordo da licença será apresentado; seleccione Sim.
3. Seleccione “PCL5c Driver Install.”
4. Seleccione “Standard” ou “Custom Installation” (por defeito: Standard).
5. Seleccione a impressora que vai instalar.
6. Seleccione o driver “WorkCentre C226 PCL5c”.
7. Seleccione Próximo, imprima a Página de Teste.
A impressora está instalada.
Nota: Esta instalação aplica-se a todos os clientes Windows suportados
pelo WorkCentre C226. Consulte a documentação sobre a instalação de
impressoras com o “Add Printer Wizard”. Consulte a documentação para
obter informações relativas às portas USB e Parallel.
Page 15

Instalação do Driver de Impressora para Netware
Consulte o Guia de Administração do Sistema que vem com o equipamento, para
obter informações completas sobre a instalação de drivers para Netware.
Instalação do Driver de Impressora para SO Mac com Ethertalk
Tipo de Impressora: LaserWriter 8
Nome da Impressora: Xerox WorkCentre C226
Instalação PPD e Configuração
Mac OS 8.6-9.x
1. Insira o CD-ROM WorkCentre C226 PostScript Driver (localizado no PS Kit).
2. Dê dois cliques em CD-ROM.
3. Dê dois cliques na pasta Mac OS.
4. Dê dois cliques no ícone Installer (Instalador).
5. Clique no botão Install (Instalar).
6. Aparece o acordo de licença; clique em “Yes.” (Sim)
7. Clique em Continue (Continuar).
8. A instalação PPD está concluída.
Configuração da Impressora 8.6-9.x
1. Seleccione Chooser no Menu Apple.
2. Seleccione o ícone LaserWriter 8.
3. Seleccione a zona AppleTalk para a sua rede.
4. Seleccione a impressora XC010228 e clique em Create (Criar).
5. Uma vez instalada, seleccione Configure (Configurar) e defina as opções
para a sua impressora.
Mac OS X
1. Insira o CD-ROM WorkCentre C226 PostScript Driver (localizado no PS Kit).
2. Dê dois cliques em CD-ROM.
3. Dê dois cliques na pasta Mac OS.
4. Dê dois cliques na versão OS.
5. Dê dois cliques no ícone Installer e depois em Continue.
6. Aparece o acordo de licença do software; Clique em Yes.
7. Escolha a localização do disco rígido e seleccione Continue.
8. Clique no botão Install.
9. Quando aparecer a mensagem “The software was successfully installed”
(O software foi instalado com sucesso), seleccione Close (Fechar).
A instalação PPD está concluída.
Configuração da impressora para OS X
1. Seleccione Applications (Aplicações) no menu Go.
2. Dê dois cliques na pasta Utilities (Utilitários).
3. Dê dois cliques no ícone Print Center (Centro de impressão).
4. Clique em Add (Adicionar); seleccione AppleTalk seguido do nome
da sua zona AppleTalk.
5. Seleccione o nome do seu dispositivo AppleTalk para o WorkCentre C226
6. Aparecerá a janela PPD; seleccione Xerox e depois PPD.
7. Clique no botão Add.
8. Clique no nome da impressora na janela Printer List (Lista de impressoras)
e seleccione Show Info (Mostrar info) no menu Printers (Impressoras).
9. Seleccione Installable Options (Opções de instalação).
10. Defina as opções para a sua impressora.
11. Feche a janela; a sua impressora está configurada.
Page 16

Page 17

English Trademark information
• Microsoft Windows operating system is a registered trademark
or trademark of the Microsoft Corporation in the U.S.A. and
other countries.
• Windows 98, Windows Me, Windows NT 4.0, Windows 2000,
and Windows XP are registered trademarks or trademarks of
Microsoft Corporation in the U.S.A. and other countries.
• Netscape Navigator is a trademark of Netscape
Communications Corporation.
®
• Adobe
• Adobe, the Adobe logo, Acrobat, and the Acrobat logo are
All other company names and product names appearing in this
manual are the trademarks of their respective owners.
Reader Copyright© 1987-2005 Adobe Systems
Incorporated. All rights reserved.
trademarks of Adobe Systems Incorporated.
Español Información de marcas comerciales
• El sistema operativo Microsoft Windows es una marca
registrada o marca comercial de Microsoft Corporation en
EE.UU. y en otros países.
• Windows 98, Windows Me, Windows NT 4.0, Windows 2000 y
Windows XP son marcas registradas o marcas comerciales de
Microsoft Corporation en EE.UU. y otros países.
• Netscape Navigator es una marca comercial de Netscape
Communications Corporation.
®
• Adobe
• Adobe, el logotipo de Adobe, Acrobat y el logotipo de Acrobat
Todos los otros nombres de compañías y nombres de productos que
aparecen en este manual son marcas comerciales de sus
respectivos propietarios.
Reader © 1987-2005 Adobe Systems Incorporated.
Reservados todos los derechos.
son marcas comerciales de Adobe Systems Incorporated.
Page 18

Português Informação sobre marcas comerciais
• O sistema operativo Microsoft Windows é uma marca
comercial registada ou uma marca comercial da Microsoft
Corporation nos EUA e noutros países.
• Windows 98, Windows Me, Windows NT 4.0, Windows 2000 e
Windows XP são marcas comerciais registadas ou marcas
comerciais da Microsoft Corporation nos EUA e noutros
países.
• Netscape Navigator é uma marca comercial da Netscape
Communications Corporation.
• Adobe
• Adobe, o logótipo do Adobe, Acrobat e o logótipo do Acrobat
Todos os outros nomes de empresas e produtos que aparecem
neste manual são marcas comerciais dos respectivos proprietários.
®
Reader Copyright© 1987-2005 Adobe Systems
Incorporated. Todos os direitos reservados.
são marcas comerciais da Adobe Systems Incorporated.
 Loading...