

Page 1
AccXES Client Tools
10.0 User Guide
701P41529 May 2004
Page 2

Trademark Acknowledgments
XEROX®, AccXES, The Document Company, and the identifying product
names and numbers herein are trademarks of XEROX CORPORATION.
Adobe Acrobat and Photo Shop are registered trademarks of Adobe Systems
Incorporated.
InstallAnywhere is a registered trademark of ZeroG Software Inc.
Mac OS X is a registered trademark of Apple Computer, Inc.
Netscape is a registered trademark of Netscape Communications Corporation.
Paint Shop Pro 5 is a registered trademark of Jasc Software, Inc.
Pentium is a registered trademark of the Intel Corporation.
Red Hat Linux is a registered trademark of Red Hat, Inc.
Sun Sparc is a registered trademark of Solaris.
Windows 95/98, Windows NT®, Windows ® XP, and Windows® 2000 are
registered trademarks of Microsoft Corporation.
Page 3

Table of Contents
Introduction .......................................................................................5
Objectives.........................................................................................5
Content of User Guide......................................................................5
Basic Requirements.........................................................................6
Overview...........................................................................................7
AccXES Client Tools - Functional Overview ......................................... 9
Before You Start.............................................................................10
Check your protocol.......................................................................10
Configure Your Network Connections............................................10
Installing AccXES Client Tools......................................................11
Installation for Windows.................................................................11
Installation for UNIX.........................................................................13
Installation for Mac OS X................................................................14
Installation for RedHat....................................................................14
Uninstalling AccXES Client Tools...................................................15
Printing a Configuration Test Print.................................................17
Quick Start.......................................................................................18
Background....................................................................................18
Quick Start Steps...........................................................................18
Quick Start - Device Manager Tool ...................................................19
Quick Start - Document Retrieve Tool...............................................19
SCANNING YOUR IMAGES/DOCUMENTS...................................19
RETRIEVING AND SAVING YOUR SCANNED DOCUM ENTS ........20
Quick Start - Document Submit Tool ................................................21
Quick Start - Printer Queue Tool ......................................................22
Quick Start - Accounting Tool..........................................................23
Device Manager Tool* ...................................................................24
Sections of the Device Manager Tab.............................................25
Using the Device Manager Tool.....................................................26
Adding a New Device......................................................................26
Editing an Existing Network Device..................................................26
Deleting an Existing Network Device.................................................27
Print to File....................................................................................27
Setting the Network Connection Retry Options ..................................27
Selecting the Default Printer and Scanner.........................................27
Canceling Device Manager activity....................................................27
Document Retrieve Tool*..............................................................28
DRT Toolbar Buttons .....................................................................28
DRT Toolbar Buttons and Menu Choices......................................29
Scanned Window............................................................................29
Retrieved Window...........................................................................30
Using the Document Retrieve Tool................................................31
Basic Steps to Scan and Retrieve Images .........................................31
Setting Retrieval Options .................................................................33
Document Submit Tool*.................................................................37
DST Toolbar Buttons......................................................................37
Document Submit Toolbar Button and Menu Choices ..................38
Using the Document Submit Tool..................................................42
Creating a Set of Documents to Print as One Print Job ......................42
Document Submit Tool Options.....................................................45
Default Document Print Options....................................................46
Media/Color Options – for Default Document Settings ........................47
Setup Options – for Default Document Settings .................................49
Transform Options – for Default Document Settings ...........................50
Composition Options – for Default Document Settings ........................51
Rendering for Jobs, Default Options, and Single Document Options
(starting with AccXES 8.0) ...............................................................53
Labels Options – for Default Document Settings ................................56
Labels Options – for Default Document Settings ................................56
Stamps Options – for Default Document Settings ..............................58
Finishing Tab for Default and Document Options................................60
Individual Document Print Options*...............................................62
Job Print Options*..........................................................................63
Setup Options - for Print Jobs ..........................................................63
Finishing Options - for Print Jobs ......................................................64
Composition Options - for Print Jobs .................................................66
Labels Options - for Print Jobs .........................................................68
Stamps Options - for Print Jobs .......................................................68
Rendering Options – for Print Jobs ...................................................69
Color Options – for Print Jobs ..........................................................70
AccXES Client Tools User Guide 3
Page 4

AccXES Client Tools User Guide 4
Printer Queue Tool*.......................................................................72
Printer Queue Toolbar Buttons ......................................................72
Using the Printer Queue Tool.........................................................73
Accounting Tool *............................................................................74
Accounting Toolbar Buttons...........................................................74
Accounting Options........................................................................75
Using the Accounting Tool..............................................................76
Querying for Account Data...............................................................76
Saving the Accounting Data.............................................................77
Creating and Printing an Accounting Report ......................................78
Deleting Data in an Account ............................................................78
Appendix 1: Creating a .FIN File to Connect to a Folder..........79
FIN File - Creating a file for your AccXES Client Tools to connect to the
folder: ............................................................................................79
Appendix 2: Paper Sizes................................................................81
Paper and Roll Sizes for AccXES Compliant Printers .........................81
Appendix 3: Collate and Reverse Print Order...........................82
Collate and Reverse Print Order Combinations ...................................82
Appendix 4: Printing PostScript Files.........................................83
Appendix 5: Navigational Paths and Default Values.................88
Index ...............................................................................................102
Page 5

Introduction
Objectives
The purpose of this guide is to enable the user of the AccXES Client Tools
(ACT) to do the following:
Ÿ To connect to an AccXES supported scanner and an AccXES supported
printer using the Device Manager Tool.
Ÿ To use the Document Retrieve Tool to retrieve and save scanned
documents.
Ÿ To create, print, and save document sets using the Document Submit
Tool.
Ÿ To view and cancel a submitted print job, using the Printer Queue Tool.
Ÿ To assign user and account identifiers to print jobs and scanned
documents so that media usage will be logged in the Controller. For
AccXES Firmware version 7.0 and greater, this logged data will get
retrieved and processed by the AccXES Account Management Tool
(AMT), or some other External Accounting Server.
Ÿ To select color options for printing color images.
Content of User Guide
Basic system requirements are included in this user guide, as well as
instructions on how to install and uninstall the software.
A Quick Start is presented as an easy way to begin using the main AccXES
Client Tools’ features and to practice the basic navigational steps of moving in
and out of the various tool tab dialogs. Each Tool is then explained in detail
and a practical “Using the …Tool” is present in each tool’s separate section of
this guide.
The screen shots in this document are for Windows XP, with the
Display settings of Windows Classic. The appearance of the software
screens will vary, depending on the operating system that you are using.
Summary tables of the various Document Submit and Document Retrieve
toolbar and menu choices are provided. Help screens are available as another
resource. To further assist the user, an appendix is provided which lists
default settings and navigational paths to get to the AccXES Client Tools
features.
NOTE: On the Solaris or Mac OS X platform, users can choose the “Default
Web Browser” for viewing the AccXES Client Tools’ Help files simultaneously
while using the ACT tools. This is instead of using the “Internal Help Viewer”.
Select “Help” in the AccXES Client Tool’s toolbar menu, then choose the
Default Web Browser. This choice will be remembered across user sessions.
AccXES Client Tools User Guide 5
Page 6

AccXES Client Tools User Guide 6
Basic Requirements
An AccXES Controller with v 4.0 or higher controller firmware, an AccXES
supported printer and an AccXES supported scanner (for scan to net features).
A Synergix Scan System and Color Scan-to-Net Feature Key are required for
Scanning-to-Net in color. A 9GB or larger controller’s hard drive is highly
recommended for color scanning because scanning large color documents
results in large files that quickly consume hard drive space. This can create a
scanner error message requiring you to retrieve the Scan Directory’s scanned
images to free up enough memory to scan more colored images.
Ÿ AccXES Client Tools software.
Ÿ A workstation running Windows 2000/XP, NT 4.0 (minimum service pack 3
and 16 bit color), or RedHat Linux with an Intel Pentium 90 Mhz or greater
(233 Mhz is recommended), or Mac OS X 10.2.x with Apple G3/G4/G5, or
a Sun Sparc workstation running Solaris v2.6, 2.7, or 2.8.
NOTE: The AccXES Client Tools software does not function over a
Novell network.
Ÿ Other System Requirements:
- 64 MB of memory
- 30 MB available disk space
- CD-ROM drive (not required for installing from the XES web site)
- Mouse or other pointing device
- Screen resolution: 800x600 or higher
Ÿ Appropriate protocols and ports enabled on both the printer and
workstation, with a connection established through the network or directly
between the printer and your workstation.
NOTE: The AccXES printers support the following types of files: CalComp,
Cals1, Cals2, NIRS , HPGL, HPGL/2, CGM, TIFF, JPEG, PDF (optional),
PostScript (optional). These file types are also listed on the Setup Tab > File
Format section of individual document and default document options.
Page 7
Overview
The AccXES Client Tools (ACT) application runs on your PC or Solaris
workstation. The tools are used to scan and print document sets using an
AccXES supported printer and scanner. The tools include Document Submit,
the Printer Queue, Document Retrieve, and the Device Manager. The
Accounting Tab functionality is available only if the printer with which the
AccXES Client Tools are interacting is using an AccXES firmware version less
than 7.0. See the NOTES below.
All of the tools are installed at the same time, using the Install Anywhere
software. The individual tools can be accessed after installation by selecting
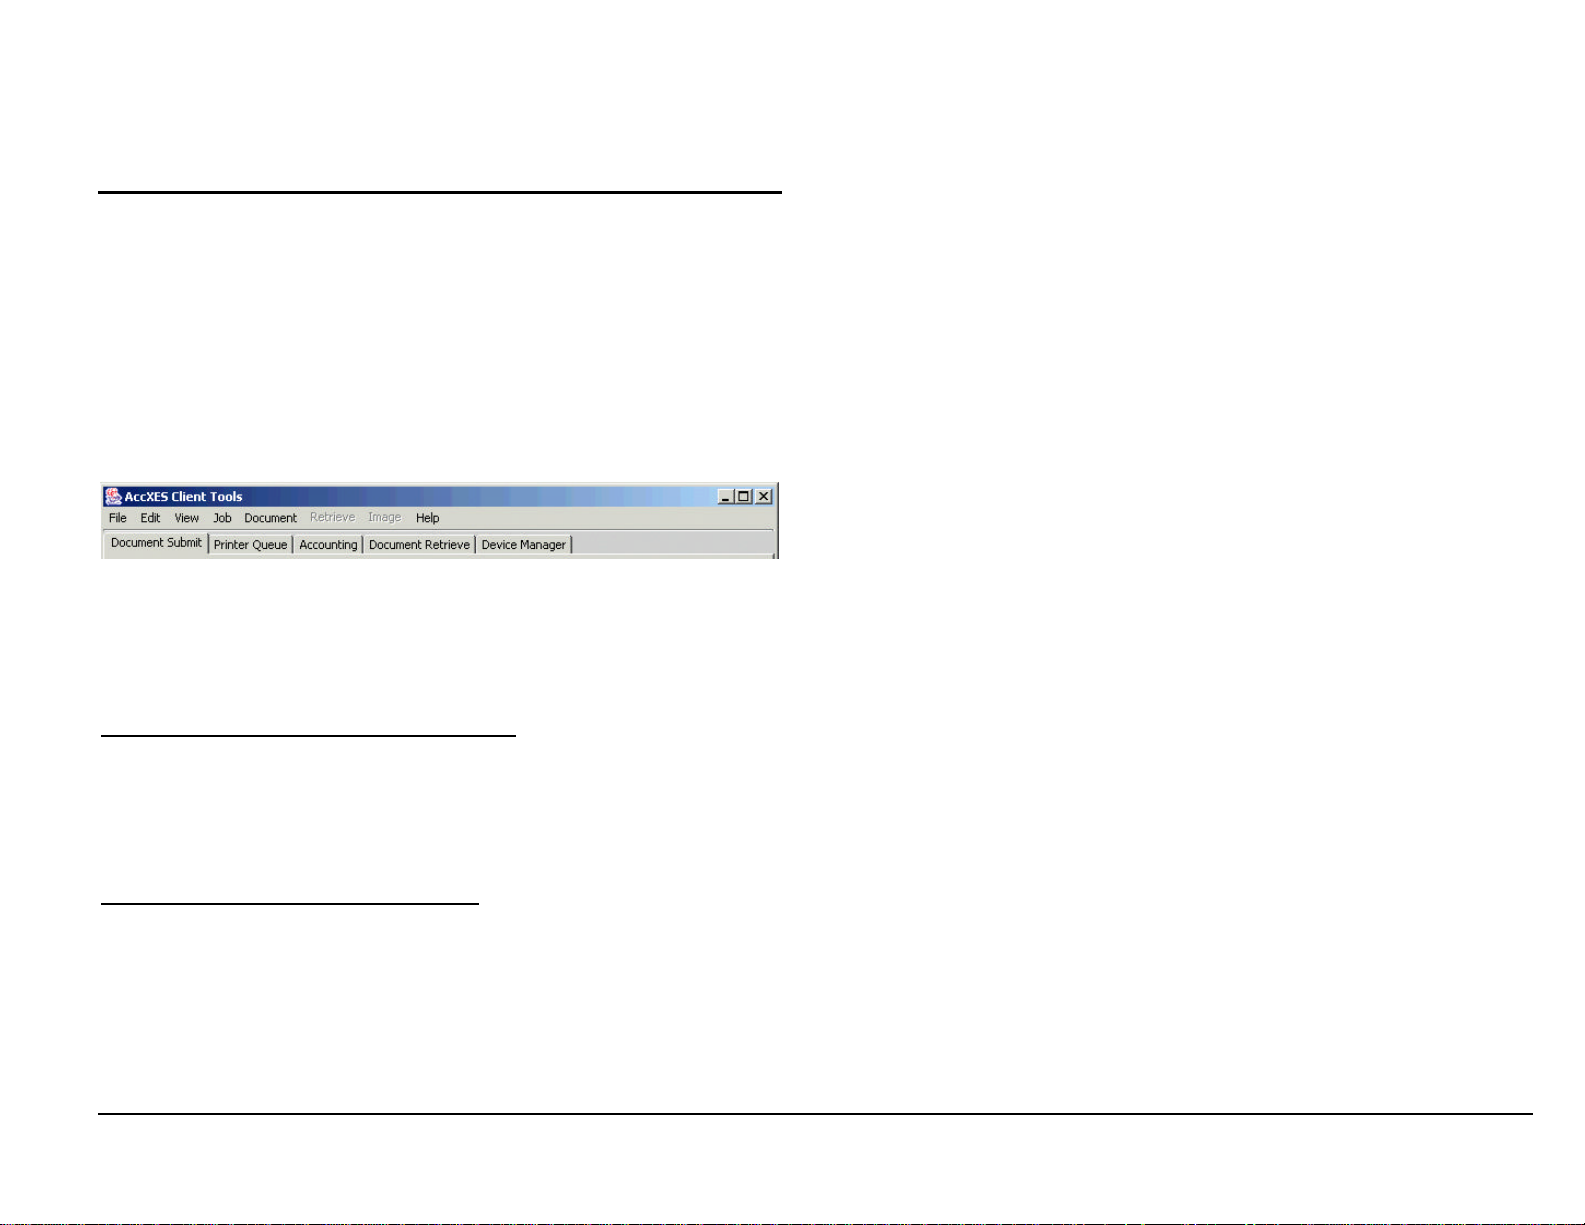
one of the individual tabs, which are shown here.
On each tab page, the user can select toolbar buttons, menus, and dialog
screen options to customize how documents should be submitted to and
retrieved from the printer. The printer queue can be viewed through the Printer
Queue Tab.
NOTES:
For AccXES firmware version 7.0 and greater, the AccXES Account
Management Tool (AMT) will be keeping track of multiple printers' scanned
and printed media usage. The AMT is loaded on only one computer.
Throughout the rest of this user guide, the AccXES Account
Management Tool will be listed as the example of an External
Accounting Server.
For AccXES firmware versions before 7.0 the media usage can be viewed
on the Accounting Tab.
If you want to access only some of the tools, you can go to the View menu
and select only which tabs you want to see on your screen. The view chosen
will impact the options available in the Device Manager Tab. The View
selected, and many other settings that the user selects, will remain from
session to session until changed. Examples are the device setup settings on
the Device Manager Tab, Document Retrieve preferences, and Accounting tab
preferences.
NOTE: Many of the AccXES Client Tool (ACT) options can also be chosen in
the Web PMT. Examples are page composition, plot nesting, and stamps or
labels. Whatever ACT option choices that you make will override the Web
PMT option selections if the two are different.
The Device Manager Tab lists all of the devices that are available to the user
for communicating from the local PC to the AccXES compliant scanner and
printer. The acceptable devices for the Document Submit Tool are the network,
serial ports, parallel ports, and Print to File. The Document Retrieve Tool, the
Printer Queue and Accounting use the network. The user can add, modify, or
remove devices from the list. The Device Manager is where the user indicates
which of the listed devices are to be used as the default printer and scanner.
The Document Retrieve Tab provides the user with options for previewing
and retrieving scanned images (TIF, CALS, JPEG, or PDF files) from the
AccXES controller, adding them to a document set, and saving them on the
user’s file system. If you wish to only use the Document Retrieve Tool, on the
View menu select Document Retrieve.
NOTE: The preview file, while it is still in the scanner’s memory, is a JPG file.
When it is saved to your file system, it becomes a PJPG file.
The Document Submit Tab is where the user creates a document set by
adding document files to the Document Submit window. The user may edit
default document options, the job options associated with the entire set, or an
individual document’s printing options. The document set is sent to the printer
from the Document Submit window. Document sets can be saved as a single
file. If you wish to only use the Document Submit Tool, on the View menu
select Document Submit.
NOTE: The AccXES printers support the following types of files: CalComp,
Cals1, Cals2, NIRS , HPGL, HPGL/2, CGM, TIFF, JPEG, PDF (optional),
PostScript (optional). These file types are also listed on the Setup Tab > File
Format section of individual document and default document options.
AccXES Client Tools User Guide 7
Page 8

AccXES Client Tools User Guide 8
The Printer Queue Tab provides the means for you to view the submitted
job’s status in the printer queue, change a job priority, and cancel a print job.
Mismatched jobs are indicated in red in the printer queue and are resolved
according to what options you select in the AccXES Client Tools’ Job Options.
If you wish to only use the Printer Queue Tool, on the View menu select
Printer Queue.
The Accounting Tab is available only if the printer with which the AccXES
Client Tools is interacting is using an AccXES firmware version less than 7.0.
For AccXES firmware versions 7.0 and greater, the Accounting Tab will be
disabled. The AccXES Account Management Tool will be keeping track of
multiple printers' media usage, according to the User ID and Account ID that
the user specifies at the scanner and on the Document Submit Tool.
If you are accessing a printer with an AccXES firmware version less than 7.0,
then the Accounting Tab is used to query the AccXES controller's hard drive
for media usage data from all scanned and printed jobs. The results can be
displayed in the AccXES Client Tools Accounting window and saved to your
file system. To assign the media usage to specific accounts, use the account
numbers that were created on the Web PMT, printer user interface, or
scanner.
Page 9
Stores scanned images for
retrieved images, document
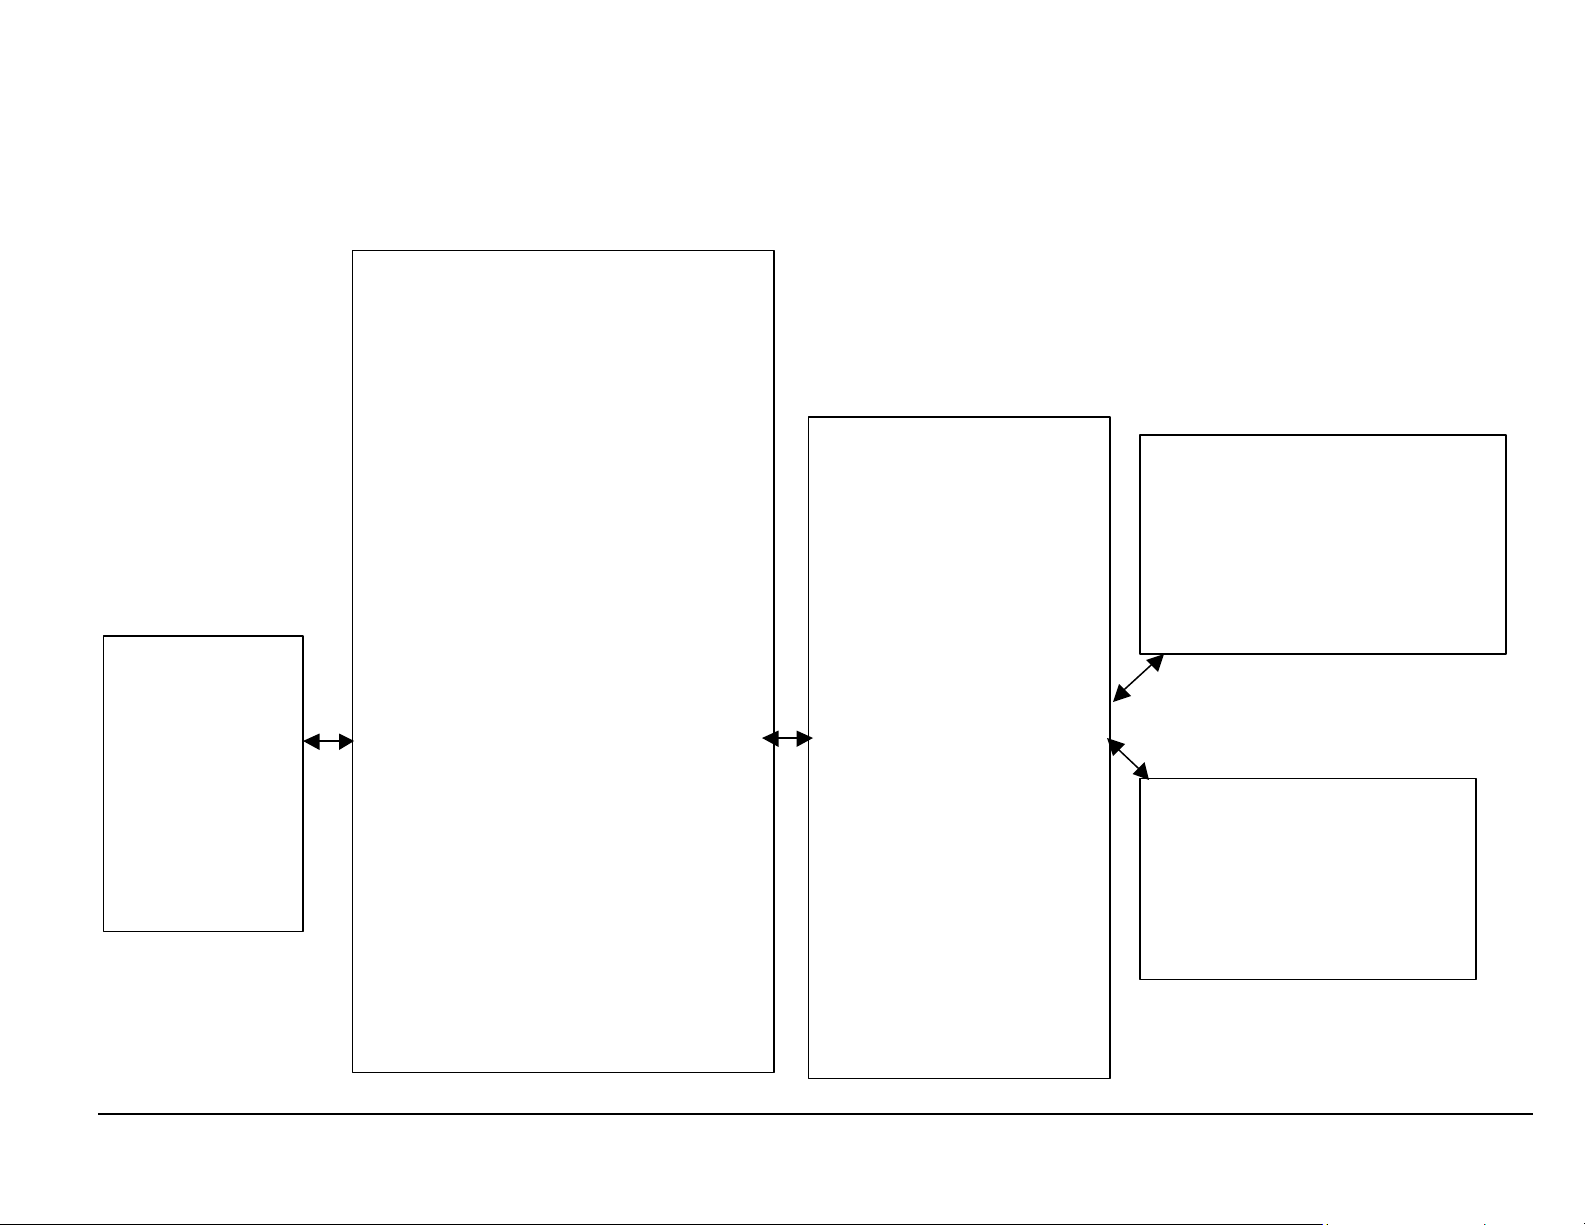
AccXES Client Tools - Functional Overview
The following diagram illustrates the interaction of the AccXES Client Tools with your file system, AccXES controller, compliant scanner, and compliant printer.
YOUR
FILE SYSTEM
Stores saved
sets,
document options,
and media usage
data.
AccXES Client Tools
(Loaded on a PC or Solaris)
DEVICE MANAGER TOOL
Ÿ Connects your PC to the scanner and
printer, via the Controller.
DOCUMENT RETRIEVE TOOL (DRT)
Ÿ Retrieves scanned images from Controller.
Ÿ Saves retrieved images to your file system.
Ÿ Sends retrieved images to the Document
Submit Tool to become part of a document
set.
DOCUMENT SUBMIT TOOL (DST)
Ÿ Creates a set of documents from single
files on your file system, or from images
sent from the Document Retrieve Tool.
Ÿ Sends document sets to the printer.
Ÿ Saves document set as a single file.
Ÿ Saves document options to a file.
Ÿ Select color printing options.
PRINTER QUEUE TOOL
Ÿ Views the status of jobs in printer’s queue.
Ÿ Cancels a job being transmitted to the
printer, or changes print priority.
ACCOUNTING TOOL
Ÿ (Only used for versions before 7.0 to query
and save
media usage data.) With AccXES
Firmware 7.0 or greater, the AccXES
Account Management Tool will monitor
media usage on multiple printers.
AccXES Controller
Ÿ Controls the AccXES
scanner and printer.
Ÿ
a specified period of time.
Ÿ Saves media usage data
from scanner and printer.
Ÿ Sends accounting data to
the Accounting Tool.
Ÿ Sends stored images to
the DRT.
Ÿ Receives document sets
from the DST and sends
them to the printer.
Ÿ Sends print queue status
information to the Printer
Queue Tool.
AccXES Compliant Scanner
Ÿ Scans images to be retrieved over
the network.
Ÿ Scans images to the printer.
Ÿ Sends scanned media usage data
to the Controller.
AccXES Compliant Printer
Ÿ Prints scanned images.
Ÿ Prints images/documents sent
from the DST.
Ÿ Sends media usage data to
the Controller.
AccXES Client Tools User Guide 9
Page 10

AccXES Client Tools User Guide 10
Before You Start
Check your protocol
Before installing the AccXES Client Tools (ACT) software, you should make
sure that you are using the TCP/IP protocol at BOTH your workstation and the
printer. (See NOTE below.) Check the protocols that are currently enabled at
your workstation.
Windows 2000/XP: Right mouse click on My Network Places. Select
Properties. Right mouse click on Local Area Connection. Select
Properties.
NT 4.0: Right mouse click on Network Neighborhood. Select
Properties, then left mouse click on the Protocols tab.
If you will be changing protocols from an existing working setup, or setting up
a new protocol, you should refer to the step-by-step setup instructions
provided in the Network Admin Guide/Controller Setup Tool available on the
Xerox website at http://www. xerox.com. (To read this document, you will
need Adobe Acrobat 3.0 software, or higher, installed on your workstation.)
NOTE: External print servers (such as the Xerox External Print Server), that
do not have bi-directional communications, are used for the submission of
print jobs only. The other AccXES Client Tools features, such as job
accounting, the printer queue, and document retrieval will not function. These
print servers are recommended for support of non-TCP/IP networking
environments only.
Configure Your Network Connections
At the printer user interface, or Web PMT, check that the Subnet Mask, IP
Address, and Gateway settings are correct. These are needed so that your
workstation will be able to communicate with your AccXES compliant scanner
and printer.
On the Web PMT select Printer Defaults > Network > TCP/IP.
On the printer user interface select Setup IO Ports > Ethernet TCP/IP >
TCP/IP Address, Gateway, and Mask.
Page 11

Installing AccXES Client Tools
NOTES:
If you are going to install the Tools on a network, be sure that the specific
drive (for example, G: \) to which you are going to install the software is
mapped. Otherwise ACT will be installed to the C drive where an AccXES
folder will be created in the Program Files.
If more that one computer will be us ing the same AccXES Client Tools
software, each computer must be mapped to the same drive.
Both ACT and AMT can be installed from the same installation software.
Both are uninstalled at the same time.
Installation for Windows
From CD-ROM
Ÿ On the “Choose Shortcut Location” screen, select On the Desktop, if you
want an AccXES Client Tools shortcut to show on your desktop.
(Otherwise each time you want to use the software you will need to select
Start > Program Files > AccXES > AccXESTools.) Click the Next button.
Ÿ On the “Choose Install Set” screen, select AccXES Client Tools, and the
Next button.
Ÿ On the Install Complete screen, click the Done button.
If you selected to have a shortcut created during the installation process, it will
now appear on your desktop. You can now access the Client Tools by double
clicking on this shortcut.
NOTE: If you didn’t create a shortcut, but now want to, do so by right clicking
on your Windows desktop. Select New > Shortcut. Use the Browse button
to select C:\Program Files\AccXES\AccXESTools.exe. Select the Open
button. Select the Next button, then click the Finish button.
Ÿ Start Windows on your PC.
Ÿ Insert the AccXES Client Tools CD-ROM into your CD-ROM drive. Select
setup.exe to begin the installation. The Install Anywhere software will
load.
Ÿ On the AccXES Client Tools screen, select your language .
Click OK.
Ÿ If you wish to install AccXES Client Tools only, just click NEXT on the
Enter Password screen. A password is only needed to proceed with the
Account Management Tool installation, which is explained in the AccXES
Account Management Tool Administrator’s Guide.
Ÿ Read the Introduction, License Agreement, and information screens,
clicking the Next button to get to the next screen.
Ÿ On the “Choose Install Folder” screen, click on the Choose button to
select where you want the software installed. The default is C: \Program
Files\ AccXES. Click the Next button.
AccXES Client Tools User Guide 11
Page 12
AccXES Client Tools User Guide 12
From the Internet
Ÿ First uninstall any present version of the software on your PC.
Download the AccXES Client Tools from the Xerox website as follows.
Ÿ Go to http://www.xerox.com.
Ÿ Choose Support & Drivers.
Ÿ Go to the Wide Format section.
Ÿ Select the hyperlink that refers to “AccXES 88xx/ X2 -Tech/ 510/ 721P”.
Ÿ Under your type of drive r, select Drivers & Downloads.
Ÿ Select your Operating System and Language. Press the Go button.
Ÿ In the Utilities & Applications section, choose the “AccXES Client
Tools (ACT) & AccXES Account Management Tool (AMT) hyperlink.
Ÿ Select the Start button.
Ÿ Select the Open or Save button to start the zip file download, which
may take an hour.
Ÿ Double click on the downloaded zip file. Double click on the install.exe
file that is listed. Select OK.
Ÿ On the AccXES Client Tools screen, select your language and OK ,
then follow the screen prompts.
If you didn’t choose to create a desktop icon during the installation process,
you can create a shortcut icon on your desktop now. Do so by right clicking
on your desktop. Select New> Shortcut. Select the Browse button to
select Program Files> AccXES> AccXESTools.exe. Select the Next
button, then the Finish button.
Clean Installation
To perform a clean installation of the AccXES Client Tools, the ACT
application must be uninstalled and the Act preferences folder must be
manually removed. The ACT preferences directory was created while using
the previously installed ACT, The uninstaller does not remove it.
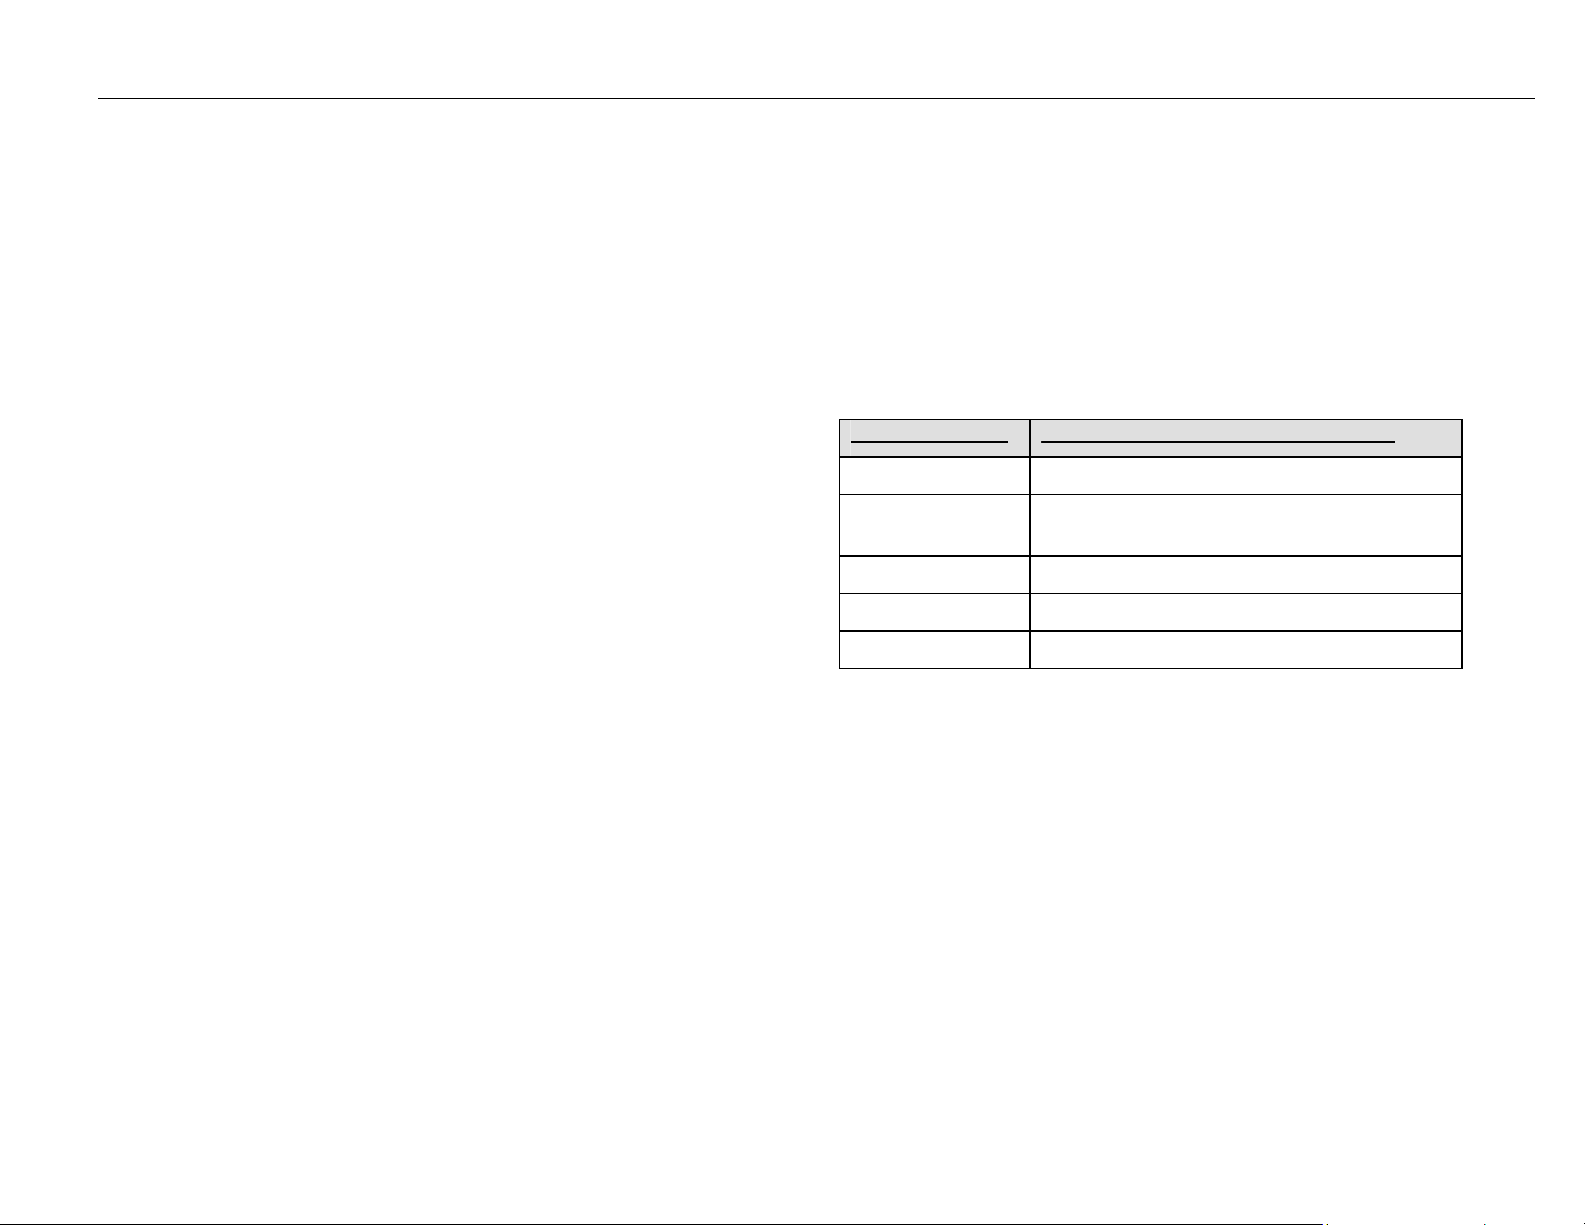
The following table describes where the ACT preferences directory is located
on various platforms.
NOTE: Removal of the directory will cause loss of all ACT user device
settings.
Type of Platform Location of Act Preferences Directory
Windows NT C:\WINNT \Profiles\<User Name> \XES\Act
Windows 2000/XP C:\Documents and Settings \<User
Name>\XES\Act
Solaris 2.6-2.8 <home directory>/.XES/Act
Red Hat Linux 8.0 <home directory>/.XES/Act
Mac OS X 10.2.x <home directory>/.XES/Act
NOTE: Windows 95/98 are no longer officially supported.
Page 13

Installation for UNIX
The following installation procedure is for the Solaris 2.6, 2.7, or 2.8 UNIX
based environment.
AccXES Client Tools: If you are using Solaris, you need to download the
patches for JVM 1.3 from the Internet. Go to
http://jsp2.java.sun.com/j2se/1.3/install-solaris-patches.html. It is especially
important to install patch number 105633 to make sure that fonts are
displayed correctly.
From CD-ROM
Ÿ Start your UNIX workstation and log on to your desktop.
Ÿ Insert the AccXES Client Tools CD-ROM into your CD-ROM drive.
Ÿ In a command window, type the following:
cd <cd-rom mount point>
./setup.bin
NOTE: In all cases <cd-rom mount point> is the directory where the CDROM is mounted.
Ÿ The Install Anywhere software will load.
Ÿ On the AccXES Client Tools screen, select your language .
Click OK.
Ÿ If you wish to install AccXES Client Tools only, just click NEXT on the
Enter Password screen. A password is only needed to proceed with the
Account Management Tool installation, which is explained in the AccXES
Account Management Tool Administrator’s Guide.
Ÿ Read the Introduction, License Agreement, and information screens,
clicking the Next button to get to the next screen.
Ÿ On the “Choose Install Folder” screen, click on the Choose button to
select where you want the software installed. Click the Next button.
Ÿ On the “Choose Install Set” screen, select the AccXES Client Tools
button and Next button. On the Install Complete screen, click the Done
button.
Ÿ Remove the AccXES Client Tools CD-ROM.
NOTES:
AccXES Client Tools does not support a parallel port on Solaris; therefore
it will not be listed on the Device Manager tab.
When running the AccXES Client Tools under Solaris version 2.6 and 2.7,
the arrow keys will function using the arrow keys on the numeric key pad
instead of the keyboard’s separate arrow keys.
From the Internet
To install the application on a Solaris system using a web browser:
Ÿ Start your UNIX workstation and log on to your desktop.
Ÿ Download the AccXES Client Tools from the Xerox website at
http://www.xerox.com. (See the instructions in the Windows section of
this guide, entitled “From the Internet”)
Ÿ Choose the directory to where you want to download the file.
Ÿ Cd to the directory where you downloaded.
Ÿ In a command window, type ./install.bin
Ÿ Follow the instructions on the screen to complete the installation. The
installer software will display a banner screen and prompt for an
installation directory for the AccXES Client Tools and associated files.
Ÿ To open the AccXES Client Tools, go to the directory where it is installed
and type AccXESTools.
Ÿ On the “Choose Shortcut Location” screen, select where you want the
shortcut to be located. On Unix it cannot be located on the desktop.
Click the Next button.
AccXES Client Tools User Guide 13
Page 14

AccXES Client Tools User Guide 14
Installation for Mac OS X
From CD-ROM
Ÿ To install this application on a Mac OS X system, insert the CD-ROM into
the CD-ROM drive and enter the following commands:
* At the top level of the install CD, right click on "setup.zip".
* Select "Copy "setup.zip"".
* Right click on the Desktop and select "Paste item".
* Double click on "setup.zip" on the Desktop.
* After the archive is expanded, double click on "install" on the
Desktop.
Ÿ To install the application on a MacOSX system using a web browser,
insert the CD-ROM into the CD-ROM drive and load <CD-ROM mount
point>/AccXES/install.htm into the browser. Follow the instructions on
the web page.
(In all cases <CD-ROM mount point> is the directory where the CDROM is mounted. Note that these commands may differ from that
shown above, depending on the version of MacOSX being used. The
commands shown here are for MacOSX 10.3.x.)
From the Internet
Ÿ Download the AccXES Client Tools from the Xerox website at
http://www.xerox.com. (See the instructions in the Windows section
of this guide, entitled “From the Internet”.)
Installation for RedHat
From CD-ROM
Ÿ To install an application on a RedHat 8 system, insert the CD-ROM into
the CD-ROM drive and enter the following commands:
* cd <CD-ROM mount point>/AccXES/InstData/Linux/VM/
* ./install.bin
or
* cd <CD-ROM mount point>
* ./setup.bin
Ÿ To install the application on a Linux system using a web browser, insert
the CD-ROM into the CD-ROM drive and load <CD-ROM mount
point>/AccXES/install.htm into the browser. Follow the instructions on
the web page.
(In all cases <CD-ROM mount point> is the directory where the CD-ROM is
mounted. Note that these commands may differ from that shown above,
depending on the version of Linux used. The commands shown here are for
a RedHat 8 system.)
From the Internet
Ÿ Download the AccXES Client Tools from the Xerox website at
http://www.xerox.com. (See the instructions in the Windows section
of this guide, entitled “From the Internet”.)
Page 15

Uninstalling AccXES Client Tools
NOTES: Close the AccXES Client Tools software and Account Management
Tool before running the uninstall software. Always run the uninstaller from
outside the install directories. Uninstalling the AccXES Client Tools software
will delete only those files that were installed by the software. Files, images,
data, user preferences, etc., that are created by the user or application will
remain. The Account Management Tool will also get uninstalled, if it is on your
work station, but the database files will remain.
Windows
To uninstall the AccXES Client Tools software for Windows 2000/XP and NT
4.0:
Ÿ Select Start > Settings > Control Panel > Add/Remove Programs.
Ÿ In the software list, select AccXES. Click the Add/Remove button.
Ÿ The InstallAnywhere Uninstaller screen will come up. Click the Uninstall
button.
Ÿ An “Uninstall Complete” message will appear when the uninstall is
complete. Click the Exit button.
NOTE: Uninstaller deletes the current working directory, the AccXES
Client Tools, and the Account Management Tool software from your PC.
UNIX
Always run the uninstaller from outside the install directories. If you run the
Uninstall_AccXES program within the AccXES/UninstallerData directory in
Unix, the current AccXES work directory, and the subdirectory that you are in,
will get deleted. Normal directory functions also will not work (i.e., ls or cd).
To uninstall the AccXES Client Tools software:
Ÿ In a command (shell) window, execute the following commands:
cd<application install directory>/Uninstaller Data/
./Uninstall_AccXES
where <application install directory> is the directory in which you
originally placed the ACT application.
NOTE: Uninstaller deletes the current working directory , the AccXES
Client Tools, and the Account Management Tool software from your work
station.
Ÿ You may also want to delete the Act folder where your files were stored if
you do not need to access them anymore (<Users Home
Directory>/.XES/Act ).
Ÿ You may also want to delete the Act folder, where your files were stored,
if you do not need to access them anymore. (See the table in the “Clean
Installation” section of this document.)
AccXES Client Tools User Guide 15
Page 16

AccXES Client Tools User Guide 16
MacOSX
To uninstall the application on a UNIX system, execute the following
commands:
* cd <application install directory>/UninstallerData/
* ./Uninstall_AccXES
or
* Navigate to the AccXES install directory using Apple's OSX user
interface.
* Double click on the "Uninstall_AccXES" icon inside of UninstallerData.
(Where <application install directory> is the directory in which InstallAnywhere
originally placed the Java application. Note that these commands may differ
from that shown above, depending on the version of MacOSX being used. The
commands shown here are for MacOSX 10.2.8 system.)
RedHat
To uninstall the application on a UNIX system, execute the following
commands:
* cd <application install directory>/UninstallerData/
* ./Uninstall_AccXES
(Where <application install directory> is the directory in which InstallAnywhere
originally placed the Java application. Note that these commands may differ
from that shown above, depending on the version of Linux is used. The
commands shown here are for a RedHat 8.0 system.)
Page 17

Printing a Configuration Test Print
Ÿ To check the communication settings of the printer, print a
CONFIGURATION Test Print from your printer user interface, or from the
Web PMT by selecting Printer Defaults> Test Print> Minimal button.
Your test print data will reflect your installed hardware, installed feature
keys, and AccXES firmware version.
Ÿ Accessing the Accounting feature requires a Job Accounting license. A
Scan to Net license is needed to scan documents to the network and to
retrieve them using the Document Retrieve Tool. Both Accounting and
Scan to Net need to be enabled on the printer. A Color feature key license
is needed for scanning colored images.
Ÿ See the left top area of the test print to locate the AccXES firmware
version that the printer is using. This version will also show in the Printer
Identification section of the Device Manager Tab.
AccXES Client Tools User Guide 17
Page 18

AccXES Client Tools User Guide 18
Quick Start
Background
Once you have installed the AccXES Client Tools, you will need to connect to
an AccXES compliant printer and scanner, using the Device Manager Tool.
You can then scan and retrieve documents, using the Document Retrieve
Tool. The scanned and retrieved documents can be previewed, saved on your
file system, or added to a document set. You can create a document set by
adding individual documents to the Document Submit Tool and then send the
set to the printer, or save the set as a single file on your file system. The
status of the job that you have sent to the printer can be viewed using the
Printer Queue Tool.
To use the Accounting feature, job accounting needs to be enabled. For
AccXES firmware versions 7.0 and greater, the Accounting Tab will be
disabled. The AccXES Account Management Tool will be keeping track of
multiple printers' media usage, according to the User ID and Account ID that
the user specifies at the scanner and on the Document Submit Tool.
The following Quick Start will introduce you to each Tool’s basic features and
give you practice in using them.
Quick Start Steps
Install the AccXES Client Tools
Ÿ Use the CD-ROM, or download it from the Xerox website.
Configure your network connections at the printer user interface, or Web
PMT, so that the Subnet Mask, IP Address, and Gateway settings are
correct. (See the “Configure your network connections” section of this guide
for details.)
Open the AccXES Client Tools as follows.
Ÿ Double click on the desktop icon,
or select Start > Programs > AccXES > AccXESTools.
Ÿ Go through each of the following Quick Starts to learn the basics for each
tool. For additional practice go to the “Using the …Tool” sections in this
user guide. Also see Appendix 5 for a list of features and how to locate
each feature.
Page 19
Quick Start - Device Manager Tool
Ÿ Select the Device Manager Tab.
Ÿ Click on the Device Name of the AccXES compliant printer and scanner with
which you want to communicate from your PC.
Ÿ In the Default Printer and Default Scanner columns, select which will be the
default devices to be used by the AccXES Client Tools.
Ÿ If your device with a connection to network printer and scanner is
not listed, select the Create a new device toolbar button. In the Network
section at the bottom of the screen, type in a name that you will recognize
for the device and its IP address.
Select the Accept the device parameters toolbar button to save
it in your device list, then select it as the default printer. Also select the
default scanner. The device name, IP Address, and Printer Identification
information will now appear in the bottom sections of the screen.
Ÿ For more practice, see the “Using the Device Manager Tool” section of this
user guide.
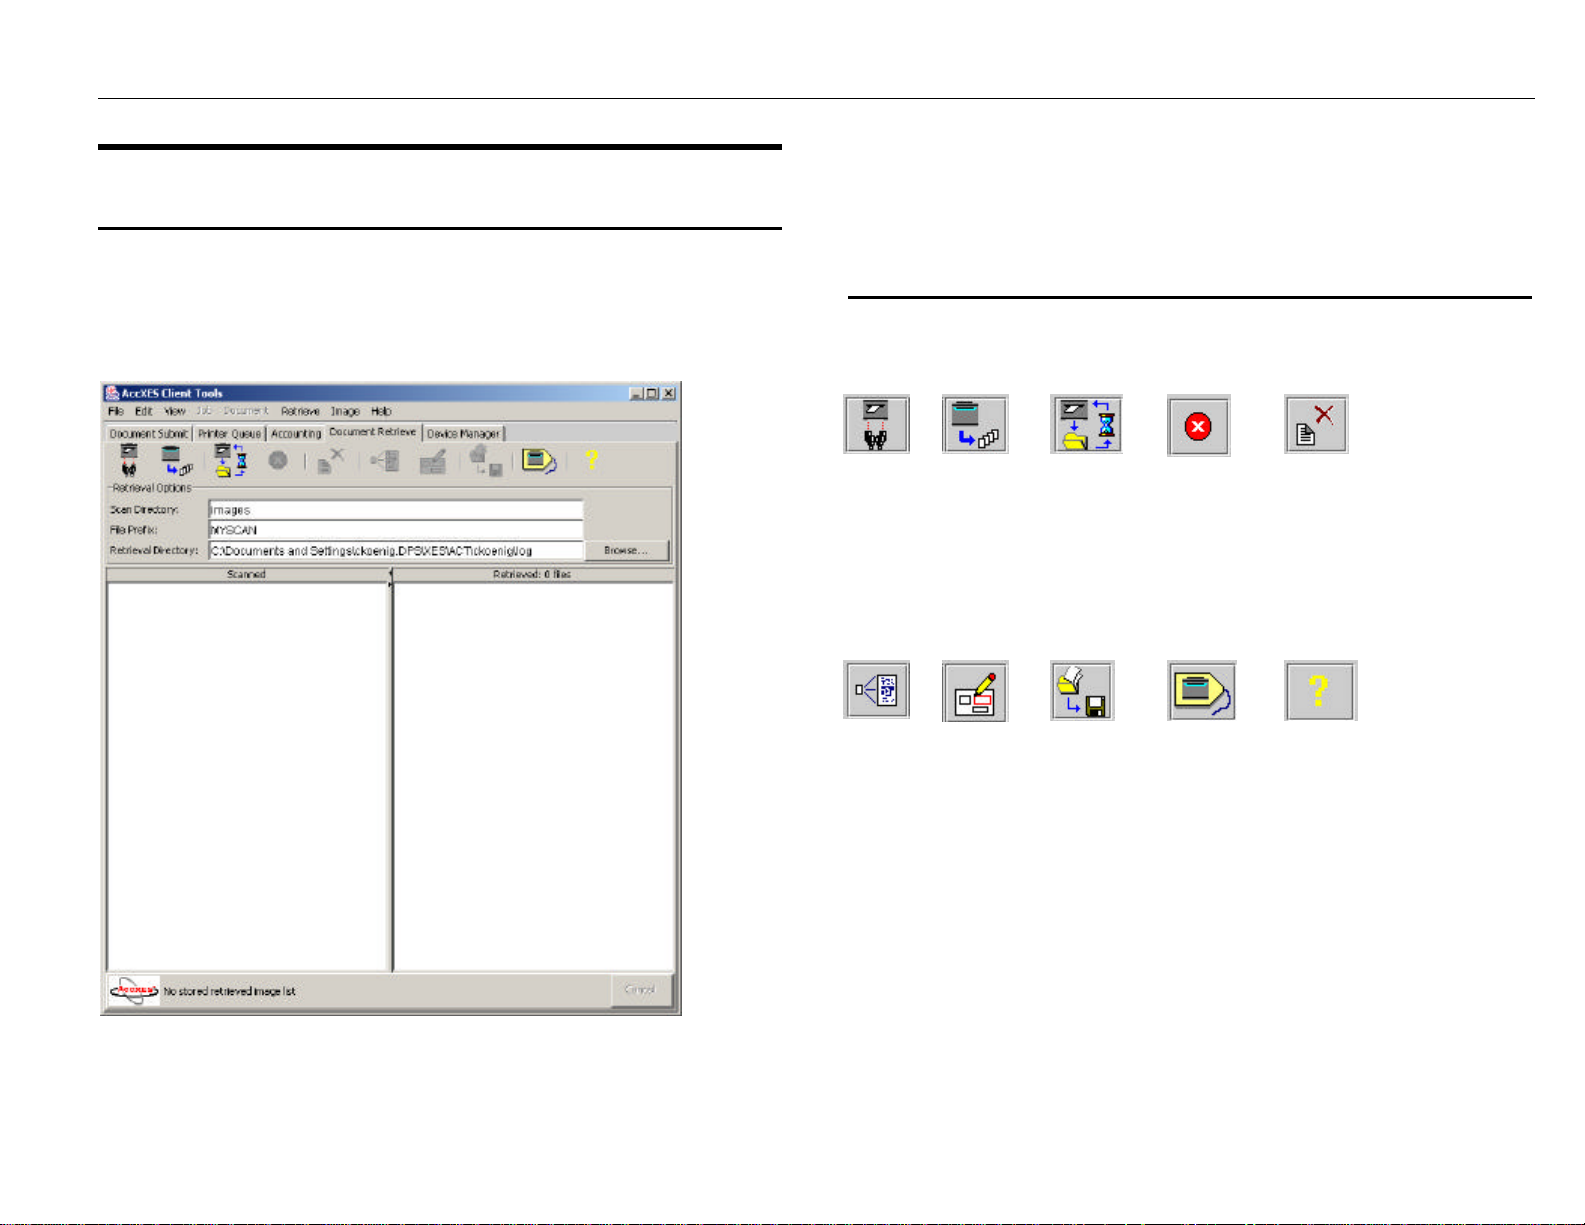
Quick Start - Document Retrieve Tool
Before using this tool, configure your network connections. Select your default
scanner on the Device Manager Tab. Have your Controller’s Scan Directory
identification information available. (For AccXES firmware versions less than
7.0, the Scan Directory will be your account and sub-account numbers.)
Enable the Create Preview feature on the scanner.
FILLING IN YOUR RETRIEVAL OPTIONS
Ÿ Select the Document Retrieve Tab.
Ÿ In the Scan Directory field, type in the directory identifier that you will be
using at the scanner when you scan images (for AccXES firmware
versions before 7.0 put in the account number). This will retrieve scanned
images that were assigned to that specific directory.
Ÿ In the File Prefix field, add the prefix that will appear at the beginning of
each file name that you create from retrieving a scanned image.
“MYSCAN” is the default prefix.
Ÿ In the Retrieval Directory field, use the Browse button to locate the
directory and folder, in your file system, to which you want the retrieved
images saved.
SCANNING YOUR IMAGES /DOCUMENTS
Ÿ Before scanning images, if you want the media usage to go to a specific
account for the AccXES Account Management Tool to track, Accounting
needs to be set to "Optional" or "Enabled" on the Web PMT's Accounting
screen, or on the scanner, or in the printer user interface.
Ÿ To select the file format for color scanning, at the scanner control panel
press the Mode button to select “Scan mode ”. Go to the Image Quality
section of the scanner control panel and select Photo & Normal. In the
Ready to Scan screen select Next button > Format > Enter button
>JPEG or TIFF >Enter button.
Ÿ At the scanner, put in a User ID and Account ID. (For AccXES firmware
versions before 7.0, put in the account number and sub-account number.)
Ÿ Press the Mode button to select "Scan mode ".
AccXES Client Tools User Guide 19
Page 20

AccXES Client Tools User Guide 20
Ÿ For AccXES firmware 7.0 or greater, put in the Scan Directory name.
Ÿ Scan in several images. They will be temporarily stored in the specified
Scan Directory on the Controller’s hard drive until you retrieve them at
your computer
RETRIEVING AND SAVING YOUR SCANNED DOCUMENTS
Ÿ Go to your computer.
Ÿ If you scanned JPEG images at the scanner, select the Retrieval
Options toolbar button. From the drop down menu, select which file
extension you want attached to the JPEG images that you will be
retrieving from the scanner. Select the OK button.
Ÿ
On the Document Retrieve tab, select the “List the image…”
toolbar button. The titles of the images that you scanned will be listed in
the Scanned window. They are still in the Controller.
Ÿ
Select the “Retrieve all scanned images …” toolbar button.
The images will be retrieved from the Controller, with a preview of each
being visible if the scanner’s default “Create Preview” option is on and if
the AccXES Client Tools retrieval setup “Auto Preview” default is enabled.
Ÿ Go to the “DRT Toolbar Button and Menu Choices” table in this user guide
for a quick reference to the DRT features.
Ÿ See the Appendix for a table of default settings and navigational paths to
the various AccXES Client Tools features.
Ÿ Right click on a retrieved file name and select Rename to rename it.
Ÿ Right click on another retrieved file name and select Delete .
Ÿ Select the “Save all images… ” toolbar button. This will remove
all of the images listed in the Retrieved window, which were saved to your
file system at the location that you specified in the Directory field. They
were saved there when they entered the Retrieved window. The .jpg
preview files will be changed to .pjpg files when saved to your file system.
Ÿ For more practice, see the “Using the Document Retrieve Tool” section of
this user guide.
Page 21

Quick Start - Document Submit Tool
Before using this tool, configure your network connections. Select your default
printer on the Device Manager Tab. Have your User ID and Account ID
information available. (For AccXES firmware versions before 7.0 you will need
your account and sub-account numbers.)
Ÿ Select the Document Submit Tab.
Ÿ Click on the Add document toolbar button to go to the Add
Document window. In the “Look in” drop down menu, select the Drive and
Folder where the properly formatted files (see Note below) are located.
Select each file name that you want to add to the Document Submit
screen, clicking on the Add button after each. To select multiple
documents, hold down your keyboard CTL or Shift key while making your
selections in the order they are listed in the window. Click the Done
button when you are finished with your selections. The files will be listed
on the Document Submit window.
NOTE: The AccXES printers support the following types of files:
CalComp, Cals1, Cals2, NIRS , HPGL, HPGL/2, CGM, TIFF, JPEG, PDF
(optional), PostScript (optional). These file types are also listed on the
Setup Tab > File Format section of individual document and default
document options.
Ÿ Go to the Job section at the bottom of the screen. Put in the User ID and
Account ID to which you want your print job logged. The AccXES Account
Management Tool will retrieve the logged information from the Controller's
hard drive. (For AccXES firmware versions before 7.0, only an Account ID
field will show in which you need to put your account and sub-account
number). Select 2 copies, Reverse Print Order, and Revers e collation if
your documents are each single pages. This will result in getting 2
collated document sets, with the documents stacked in the order that
they are listed in the Document Submit window.
Ÿ See Appendix 3 for the results of choosing various combinations of Collate
and Reverse Print Order for documents that contain multiple pages. See
Appendix 4 for the results of printing PostScript Files with settings for
collation and finishing options.
Ÿ Select the “Print document set” toolbar button to send this set
of documents to the printer as a single print job.
Ÿ Double click on a filename in the Document Submit window. Change
some of its options on the various tabs. On the Setup tab, in the
Description field, type in a note to remember what changes you made.
This note will appear in the Options column of the Document Submit
window, next to the file for which you changed the options. There will be
an “X” in the modified column. Your changes will only apply to the
selected document.
Ÿ Try copying the same option changes to another document that is listed.
Do so by highlighting the modified document and selecting the toolbar
menu Document > Copy Options. Highlight the document to which you
want to copy the options. Select Document > Paste Options.
Ÿ Double click on a document in the Document Submit window, which has
an X next to it in the default column. Not ice a few of the option settings.
Ÿ Close the dialog screens.
Ÿ Select the Edit default options toolbar button and make some
option changes. Go back to the same document. Observe that the
options that you changed in the default document options also changed
for this document which is using the default settings. The changes will
show in all documents that are listed which are now using the default
options. These changes will also apply to all new documents that you
add to the set. You can test this out by adding another document and
double clicking on it in the Document Submit window. Notice that the
same changes are there.
Ÿ Select the Job Options toolbar button. All of the fields that are
on the Setup tab are also on the Document Submit Tab. Making entries
in either location will also enter them in the other. Make some other print
job changes, such as selecting collate, or changing the number of copies.
Select the OK button to save your changes.
AccXES Client Tools User Guide 21
Page 22

AccXES Client Tools User Guide 22
Ÿ Select the Print document set toolbar button to send this
revised set of documents to the printer as a single print job. Notice the
results of your changed default, document, and job options when you pick
up the printed document set.
Ÿ See the Accounting Tool section of this Quick Start to see how to retrieve
the media usage for your sent jobs.
Ÿ To save your document set, select File > Save to select the directory,
folder, and filename.
Ÿ Select File > New to clear the Document Submit window if you would like
to try creating another document set, or opening an already created set.
Ÿ For more practice, see the “Using the Document Submit Tool” section of
this user guide.
Ÿ Go to the “DST Toolbar Button and Menu Choices” table in this user guide
for a quick reference of how to use the Document Submit Tool features.
Ÿ See the Appendix for a table of default settings and navigational paths to
the various AccXES Client Tools features.
Quick Start - Printer Queue Tool
Before using this tool, configure your network connections. Select your
default printer on the Device Manager Tab.
Ÿ Select the Printer Queue Tab.
Ÿ Select the Get the list of active and completed jobs in the
print queue toolbar button. Completed and active print jobs will be listed.
Look at the bottom of the screen to view the information about the media
width, type, and status of each roll that is in your printer.
Ÿ Submit a print job from the Document Submit window, and then quickly
select the Printer Queue Tab.
Ÿ Press the “Get the list of active jobs in the print queue”
toolbar button to see the status of the job that you sent. The status will be
updated each time that you press either of the two “Get…” buttons.
Ÿ Submit another print job, then quickly select the Printer Queue
Tab. Press the “Get the list of active jobs in the print queue” toolbar
button to see the status of the job that you sent. Cancel the job by
pressing the Cancel the selected print job toolbar button. An active
message at the bottom of the screen will also give you information about
the transmission of the job to the printer. If the job has already reached the
printer, you will need to cancel it at the printer user interface , or on the
Web PMT main page by selecting the job title to get to the cancel window.
Ÿ For more practice, see the “Using the Printer Queue Tool” section of this
user guide.
Page 23
Quick Start - Accounting Tool
Look at the Printer Identification section of the Device Manager Tab to see
which Print er (AccXES Firmware) Version the selected device is using.
For AccXES firmware versions 7.0 and greater, the AccXES Client Tool's
Accounting Tool is disabled. Instead, the AccXES Account Management Tool
(AMT) will be installed on one computer to track the media usage of many
printers. The AMT Administrator will generate the media usage details for all
printed media and scanned images. This is done according to the User ID
and Account ID that you specify at the scanner or when using the Document
Submit Tool. This information is stored temporarily on the Controller's hard
drive. The AMT will retrieve the information from the Controller. You can,
however, see the individual printer's present total number of stored records by
looking on the Web PMT Accounting page, in the Records Count field. If you
are the AMT Administrator, go to the AccXES Account Management Tool
User Guide to learn how to install and use the tool.
Ÿ For AccXES firmware versions before 7.0, you can use the Accounting
Tab as follows. Go to the printer user interface, or Web PMT, or the
scanner user interface. Set the Accounting Mode to “Enabled” or
“Optional”. Selecting Enabled will require that you to enter an account
number every time you print or scan.
Ÿ Select the AccXES Client Tool’s Accounting Tab.
Ÿ In the Password field, type in a password if it is required on the scanner or
printer.
Ÿ To save this data to a file, select the Write the account data to
file toolbar button. On the Account Report screen, Output File field, put
in a directory and folder where you want the file to be saved, followed by a
file name with an .xls extension (to use in a Microsoft Excel spreadsheet).
Ÿ For more practice, and to see how to create a report from the saved media
usage data, see the “Using the Accounting Tool” section of this user
guide.
Ÿ See the Appendix for a table of default settings and navigational paths to
the various AccXES Client Tools features.
The next section of this user guide gives more detail on each of the AccXES
Client Tools.
Ÿ In the Account ID field, put in the account number for which you want to
retrieve media usage data, such as 3.1, or the account number you put
into the Job Options > Setup tab > Account ID field and in the Document
Retrieve > Account ID field. To retrieve media usage data for all accounts,
use –1 as the account number and put in a password. Use “0” as the
default password.
Ÿ Select the Query the printer for account data toolbar button.
The media usage, for the account number that you specified, will be
shown on the Accounting window.
AccXES Client Tools User Guide 23
Page 24
AccXES Client Tools User Guide 24
selected in the
DMT Toolbar Buttons
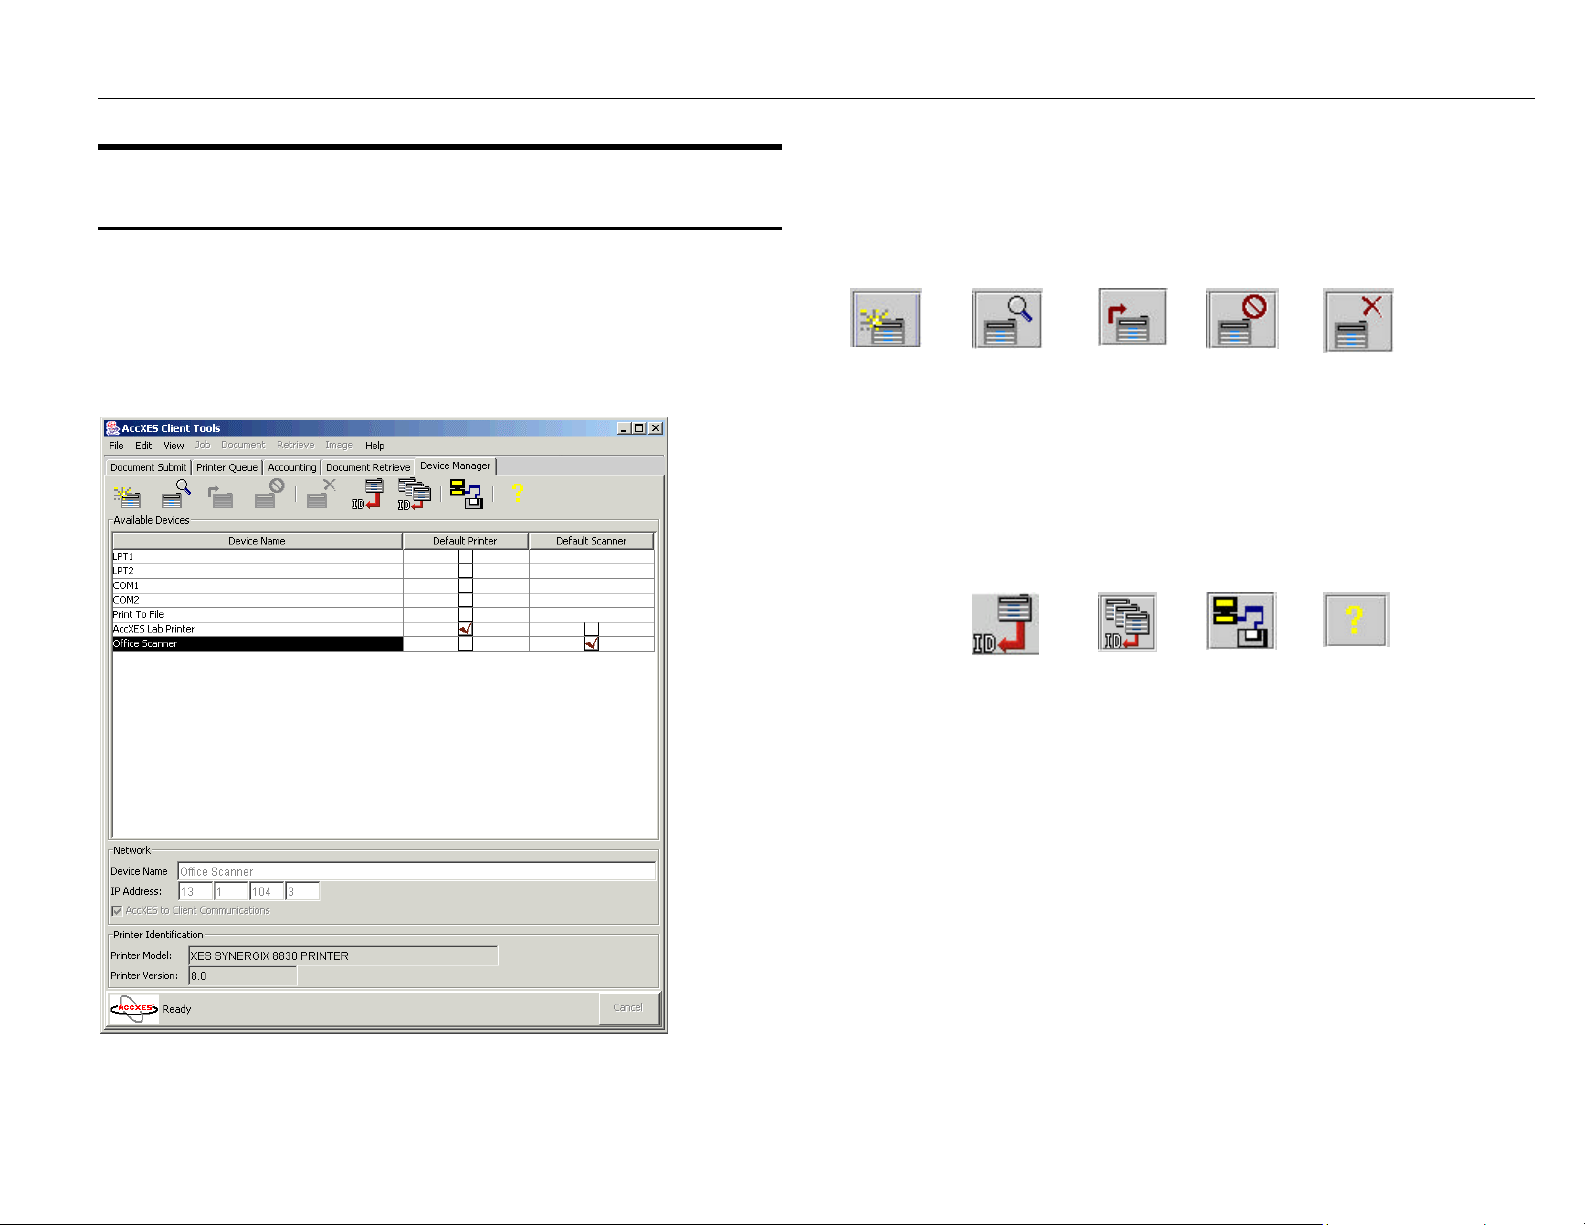
Device Manager Tool*
The Device Manager Tool (DMT) lists the names of all devices (printer and
scanner) to which you can connect your workstation’s AccXES Client Tools.
This graphic shows one user’s choices, with details for the selected device
being shown in the Network section at the bottom of the screen.
The following is a functional summary of each toolbar button.
Create a
new device.
Get Printer
Edit a device
that you have
selected in
the list.
ID and latest
media types
of Selected
Device
Accept the
device
parameters you
edited or
created.
Update
Printer ID
of all
Network
Devices
Cancel the
current
activity.
Display
Connection
Retry
Settings
dialog
Delete a
device that
you have
list.
Help for this
screen
and latest
media
types
See the following pages for more information.
Page 25

Sections of the Device Manager Tab
The Device Manager Tab contains the following areas (from top to bottom):
Ÿ Toolbar buttons - Commands include Create a New Device, Edit a
Selected Device, Accept the Device Parameters, Cancel the Current
Activity, Delete a Selected Device, Get Printer ID, Update Printer ID of
all Network Devices, Display Retry Settings, and Help.
Ÿ Available Devices Section - The Available Devices List displays the
available printers and scanners. The list automatically includes printers
that can be connected to local ports (identified by a local port label such
as LPT1) and Print To File. The network printers and scanners are listed
after the local printers. They can be added, edited, or deleted.
The Document Submit, Printer Queue, and Accounting Tabs use the
default printer when communicating with a printer.
The Accounting Tab and the Printer Queue Tab are not capable of twoway communication with the printer when a parallel port printer, or Print
To File have been selected.
The Document Retrieve Tab us es the selected default scanner for its
two-way communication with a network scanner.
Ÿ The Network section - This section displays the properties of the
selected device. The parameters displayed depend on the device
connection type (parallel, serial or network). For a parallel or serial port
printer, the parameters can not be changed. For a network device, the
Device Name and Address parameters, as well as the “AccXES to Client
Communications” checkbox may be edited. When editing or creating a
network device, you can uncheck the “AccXES to Client Communications”
checkbox if the device does not support bi-directional communication,
such as when connecting to an external print server. If this checkbox is
unchecked, then the Device Manager Tool will not attempt to obtain the
printer identification information from the network device. Instead, it will
list the same accounting as the last most recently updated network
device. When this checkbox is unchecked, you will not be able to use
the print queue or the accounting tool (the toolbar buttons become
disabled).
For Print to File, go to the Print to File section below.
Ÿ The Printer Identification section (for AccXES Client Tools version
7.0 and greater). This feature is needed to determine which AccXES
firmware version the printer is using. If it is 7.0 and greater, then the
Accounting Tab will be disabled and the AccXES Account
Management Tool will be used to provide the accounting features. If
the AccXES firmware version is before 7.0, then the AccXES Client
Tools Accounting features can be still used.
When AccXES Client Tools is first installed, the software will try to
update the Printer Identification information for all of the network
devices listed on the Device Manager Tab.
The serial port (COM1, COM2) devices are not updated when the
AccXES Client Tools is installed; therefore the Printer Model and
Printer Version values will show as “UNKNOWN”. Before using a
serial port device as a default printer, the user will want to update the
printer identification information by pressing the Get Printer ID
toolbar button.
When a device that does not support bi-directional communication
(LPT1, LPT2, or Print to File) is selected, the printer identification
information of the last updated bi-directional device will show in the
printer identification section.
If a new device is added to the Device Name list, the software will
connect to the printer, read what the printer identification is, and put it
into this Printer Identification section. A failed message will appear if
the software fails to connect to the printer.
Ÿ The Device Status line (at the bottom of the screen) - displays the
command's action status as a result of pressing the Toolbar buttons.
You can press the Cancel button on this line to cancel the action.
AccXES Client Tools User Guide 25
Page 26
AccXES Client Tools User Guide 26
Using the Device Manager Tool
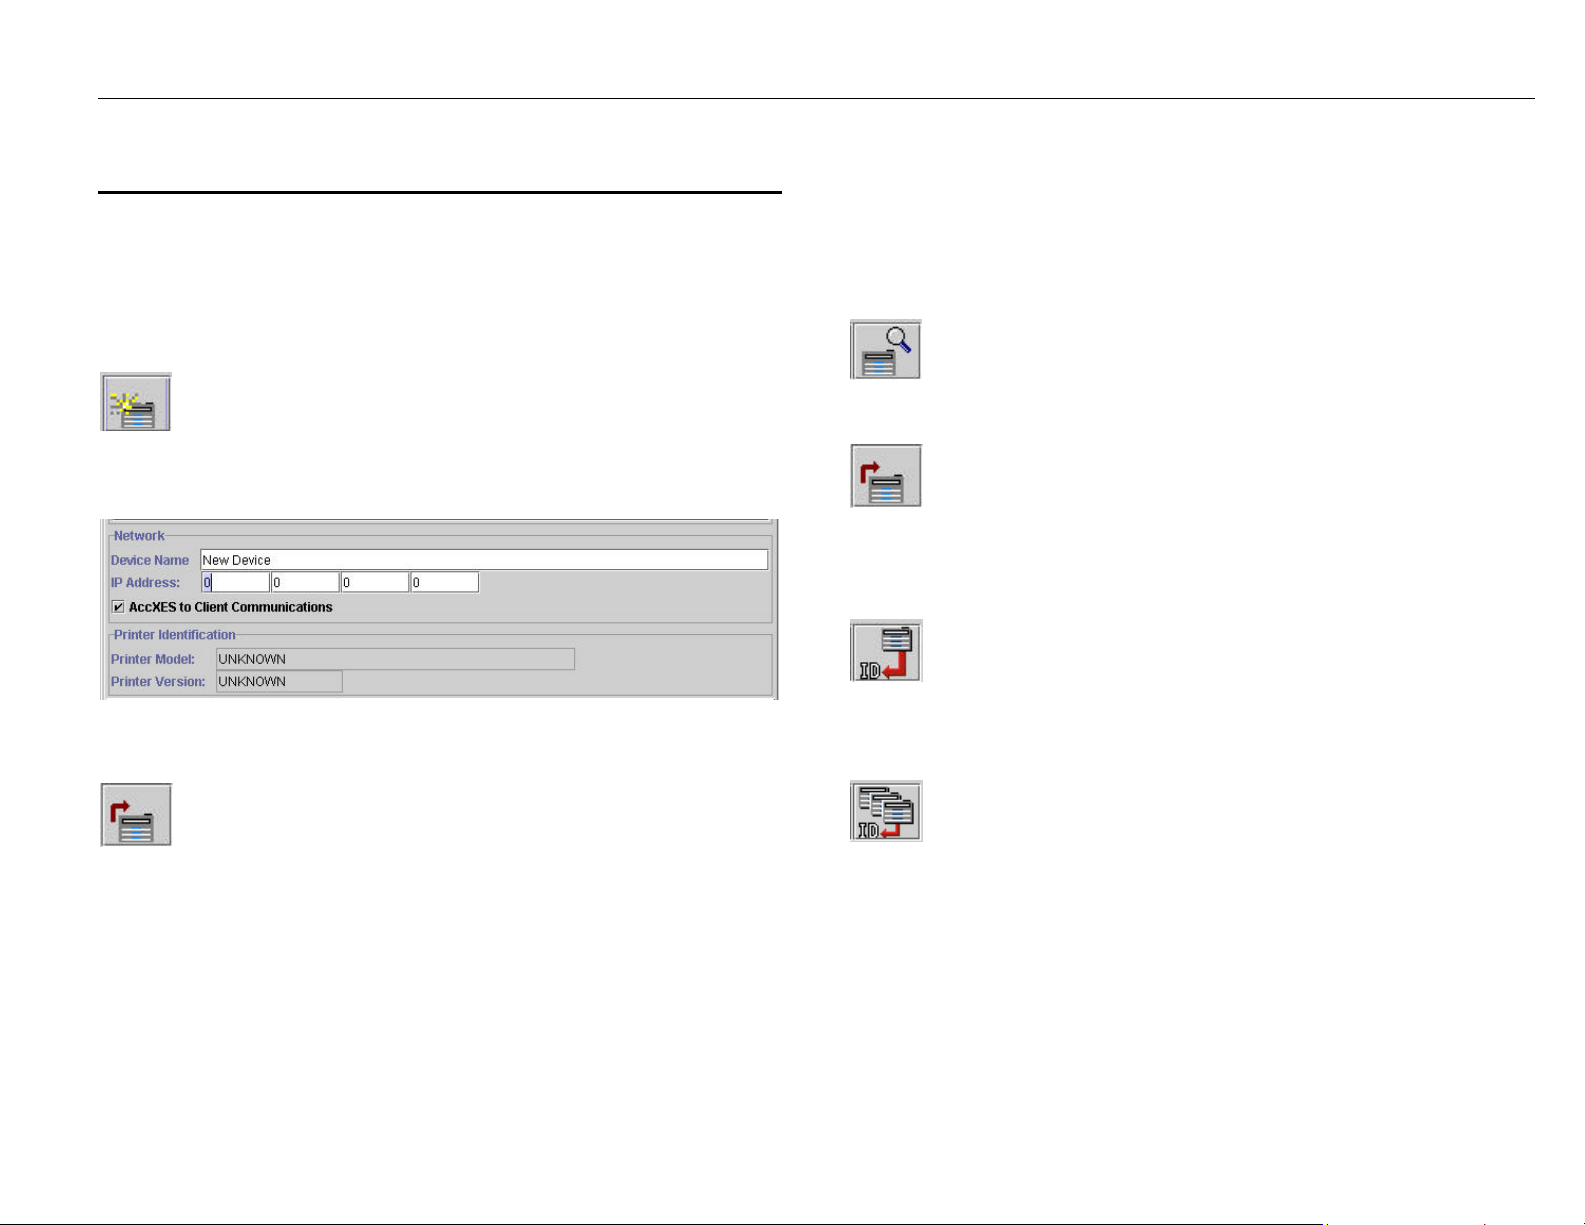
Adding a New Device
You can only create new devices with connections to network printers and
scanners.
Select the Create a new device toolbar button.
The following Network Device dialog will appear.
Type in the Device Name and the IP Address.
Editing an Existing Network Device
Click on the listed Device Name to highlight (select) it.
Click on the edit toolbar button.
The Network Device dialog will appear with the existing Device Name and IP
Address parameters in it, which you can change.
Accept the information and the list of supported media types (for
printer versions 8.0 or greater) by selecting the Accept the device
parameters toolbar button. The software will get the Printer Identification
information for the edited device. The selected printer’s (AccXES Firmware)
Version number will then appear on the bottom of the screen.
types (for printer versions 8.0 or greater) will also be obtained after a network
or serial device name is selected and the Get printer ID of selected device
button is pressed.
The Printer Identification information and the list of supported media
Accept the information and the list of supported media types (for
printer versions 8.0 or greater) by selecting the Accept the device
parameters toolbar button. The software will get the Printer Identification
information for the added device. That information will then appear in the
Printer Identification section at the bottom of the screen. A failed message will
appear if the IP Address is incorrect for the software to connect to the printer.
Click on the Default Printer and Default Scanner columns to indicate to
which devices your PC will be connected.
Select the Update Printer ID of all Network Devices toolbar
button. This will update the AccXES printer identification information and the
list of supported media types (for printer versions 8.0 or greater) of each of the
Network devices in the "Available Devices" list that supports bi-directional
communication.
Page 27

Deleting an Existing Network Device
Select how many seconds you want to lapse before the retries should occur.
The maximum number is 60 seconds. Select OK.
Click on the listed Device Name to highlight (select) it.
Select the Delete toolbar button.
NOTE: Any downloaded media types associated with only the deleted device,
will continue to be associated with non bi-directional devices until the ACT
application exits.
Print to File
When “Print To File” has been selected on the Device Manager Tab, a text
box will appear at the bottom of the screen. Enter the default print to file path,
or the path to a print server, using the Universal Naming Convent ion (UNC:
\\server\printer). UNC is valid only on the Windows operating systems.
Setting the Network Connection Retry Options
Select the Display Connection Retry Settings dialog button.
The following dialog will appear.
The following is an example of a retry message that will appear in the status
bar at the bottom of the Device Manager screen.
Selecting the Default Printer and Scanner
In the printer and scanner columns, click next to the Device Name that you
are choosing as your default.
Canceling Device Manager activity
To cancel your current activity on the Device Manager page, select
the Cancel toolbar button.
Select the number of times (Retry Limit) that the Device Manager tool should
try making connection to your printer and scanner, if the connection is not
made on the first try. Th e maximum number is 10.
AccXES Client Tools User Guide 27
Page 28
AccXES Client Tools User Guide 28
Document Retrieve Tool*
The Document Retrieve Tool (DRT) page is used for retrieving scanned images
from the AccXES controller. The images can then be saved to your file
system or moved to the Document Submit window, to be included in a
document set.
DRT Toolbar Buttons
The following is a summary of the Document Retrieve Tab’s toolbar buttons.
List all
scanned
images
stored
on the
scanner.
Preview
the
selected
images.
Retrieve
all
scanned
images
from the
scanner.
Launch
raster
editor for
selected
image.
Start
Automatic
Image
Retrieval.
Save all
images
and
remove
them from
Retrieved
list.
Stop
Automatic
Image
Retrieval.
Show the
retrieval
setup
dialog.
Delete
Selected
Images
and their
files.
Help for
this page.
In addition to these toolbar buttons, you can access document retrieval
options through toolbar menus and by right clicking on a file name in the
Scanned or Retrieved windows. A summary of these choices is in the
following tables.
Page 29
DRT Toolbar Buttons and Menu Choices
Scanned Window
Select a file name in the Scanned window before doing any of the following.
File Options Toolbar Button Toolbar Menu Scanned Window - Right Click Menu
Delete a scanned file
Deselect all images Edit > Deselect All Deselect All
Preview scanned image
Retrieval Directory field – Indicate where you want the scanned
files to be stored on your file system.
Retrieve all scanned images stored on the controller. (You do not
need to select the file names first.)
Scan Directory field – Indicate the directory name where the
scanned files will be temporarily stored on the Controller. This is
the same directory name that you put into the scanner after
selecting the Mode button, before scanning images.
Retrieve selected scanned image(s). Retrieve > Image Retrieve Image
Select all images Edit > Select All Select All
Edit > Delete Delete
Image > Preview Preview
Retrieve > Retrieve All Retrieve All
AccXES Client Tools User Guide 29
Page 30
AccXES Client Tools User Guide 30
Retrieved Window
Select a file name in the Retrieved window before doing any of the following.
File Options Toolbar Button Toolbar Menu Retrieved Window - Right Click Menu
Add files to document set job in Document Submit window Adding one file:
Image > Merge Image
Adding multiple files :
Image > Merge All
Automatic image retrieval
Delete a retrieved file
Deselect all images Edit > Deselect All Deselect All
List all scanned images stored on the controller
Preview retrieved image
Raster edit file before saving it
Rename file Edit > Rename Rename
Retrieval Setup dialog
Save all images
Retrieve > Auto Poll
Edit > Delete Delete
Retrieve > List
Image > Preview Preview
Image > Raster Edit Raster Edit
Retrieve > Retrieval
Setup
Image > Keep All Keep All
Save the selected image Image > Keep Image Keep Image
Select all images Edit > Select All Select All
Stop automatic image retrieval
Retrieve > Stop
Page 31

Using the Document Retrieve Tool
Basic Steps to Scan and Retrieve Images
1. Set your retrieval options, as explained in the section entitled “Setting
Retrieval Options ”. This is found in the next section of this user
guide.
2. Check that the "Auto Preview" box is checked on the Retrieval Setup
Dialog.
NOTE: To enable the preview feature on the scanner, press the Mode
button to select “Scan mode”. Go to the Image Quality section of
the scanner control panel and select Photo, Line, Normal, or Photo
& Normal. In the scanner control panel screen select the Preview
checkbox > Enter. The preview images will then be created.
3. Scan your images as follows.
Ÿ At your AccXES compliant scanner, if Accounting is enabled, put in
your User ID and Account ID. (For AccXES firmware versions before
7.0 this will be an account and sub-account number.)
Ÿ To select the file format for color scanning, at the scanner control
panel press the Mode button to select “Scan mode ”. Go to the
Image Quality section of the scanner control panel and select Photo
& Normal. At the scanner control panel screen select the Next
button > Format > Enter button >JPEG or TIFF >Enter button.
Directory, until they are retrieved to your file system using the
Document Retrieve Tool.
Ÿ When you scan an image, a TIFF file will be the default image file
format. To choose CALS, JPEG, or PDF as the desired file format, go
to the Image Quality section of the scanner control panel and select
Line. In the scanner control panel screen select CALS, JPEG, or
PDF > Enter button.
Ÿ Use the Mode button to select scan mode. Put in the Scan Directory
name.
Ÿ Scan your documents into the scanner. They will be temporarily
stored in the AccXES controller's hard drive, in the specified Scan
AccXES Client Tools User Guide 31
Page 32

AccXES Client Tools User Guide 32
4. Retrieve your images manually or automatically as follows.
Manually retrieving images:
If you scanned JPEG images at the scanner, select the Retrieval
Options toolbar button. From the drop down menu, select which file
extension you want attached to the JPEG images that you will be
retrieving from the scanner. Select the OK button.
After scanning your images, go back to your workstation.
Select the List All toolbar button to see a list of your scanned
documents. You can select these images and preview them to determine
if you want to retrieve them.
Select the Retrieve All toolbar button, or select Retrieve >
Retrieve All. You can also highlight some of the file names in the
Scanned window and then select Retrieve > Retrieve Image. The image
titles will now leave the Scanned window and move to the Retrieved
window. A preview of the image will appear as each image is retrieved, if
the preview feature is enabled on the scanner and if you enabled the “Auto
preview” feature on the Retrieval Setup screen.
Page 33

Automatically retrieving images:
If you want your scanned documents to be automatically
retrieved to your workstation, select the Automatic Image Retrieve
toolbar button. You can also select Retrieve > AutoPoll. The scanned
images will go to the Scanned window fi rst, then be automatically
transferred to the Retrieved window.
Select the Stop button to stop the automatic retrieval.
5. Once an image has been retrieved, it can be renamed, deleted, added to a
job on your Document Submit Tool page, raster edited, or saved to your
file system. To accomplish this, select the desired file in the Retrieved
window, then use the toolbar buttons, toolbar menu, or right click menus
to make the changes to that file. See the preceding table, or Appendix 5
for details.
Please note that the scanner will automatically remove scanned documents
after a period not exceeding 24 hours (the actual setting is user-defined at the
scanner user interface). You must retrieve the scanned documents before they
are removed.
Setting Retrieval Options
There are some retrieval features that you need to customize in the “Retrieval
Options” section of the Document Retrieve Page before you start retrieving
scanned images. Your choices will be saved for future AccXES Client Tools
sessions.
RETRIEVAL OPTIONS
In the “Retrieval Options” section of the Document Retrieve Page, adjust the
Scan Directory, File Prefix, and Retrieval fields.
Scan Directory – In this text field, enter the Scan Directory from which you
will be retrieving scanned documents. This should be the same directory
identifier that you entered into the scanner before you scanned documents.
For AccXES fi rmware versions 7.0 or greater, the Scan Directory name can
have 16 digit alphanumeric characters, including an underscore (_), period (.),
and dash (-). The period cannot be used for the first character.
For AccXES firmware versions before 7.0, the Scan Directory is an account
number and sub-account number.
NOTES:
Ÿ The Scan Directory field's default value is 0.1 in the Document Retrieve
Tool. However, the default value at the scanner user interface is images
when using AccXES Revision 7.0 or higher. When scanning and
retrieving images to the default scan directory, be sure that these two
values match. Either change the directory name at the scanner to 0.1 or
change it in the Document Retrieve tool to images. For AccXES
Revisions 6.1 or lower, the default value at both the scanner user
interface and in the Document Retrieve Tool are 0.1.
Ÿ If you are accessing a printer that is using an AccXES Firmware version
of 7.0 or greater, and then change your connection on the Device Manager
Tab to a printer that has a AccXES firmware version less than 7.0, then
the software will attempt to convert the Scan Directory value to an account
and sub -account number. If the attempt fails, a warning message will
appear. You would then need to type in the account number into the Scan
Directory field. The software will also attempt to convert the account and
sub-account numbers to a Scan Directory value if you change from a
printer using a less than 7.0 AccXES firmware version to a printer using a
7.0 or greater AccXES firmware version.
File Prefix – Type in the file prefix that you want in your retrieved file names
(default is MYSCAN).
AccXES Client Tools User Guide 33
Page 34

AccXES Client Tools User Guide 34
Retrieval Directory – Select where on your file system that you want the
files to be stored when they are retrieved. Use the Browse button to locate
the directory’s path.
Page 35

RETRIEVAL SETUP DIALOG
Click on this toolbar button to access the Retrieval Setup dialog
screen. It can also be accessed by selecting Retrieve > Retrieval Setup on
the toolbar menu. Each feature is described below.
Polling Interval – Choose the number of seconds that you want to lapse in
between each AutoPoll, where the scanned images are automatically retrieved
from the scanner to the Document Retrieve window. The range is from 15 to
3600 seconds.
Auto Preview - Select this check box to enable the automatic previewing of
the scanned images as they are being retrieved.
NOTE: “Create Preview” also needs to be enabled on the scanner for Auto
Preview to work.
Clear list and keep on exit - Select this check box to clear the Retrieve
window of listed files when you exit from the AccXES Client Tools software.
At the same time those retrieved files will be saved on your file system to the
Directory and folder which you previously specified in the Retrieval Directory
field of the Document Retrieve page. If this feature is not selected, the list of
retrieved files will still be in the Retrieved window when you reopen the
AccXES Client Tools application.
JPEG retrieved file extension - Select the file extension that will be used
when naming JPEG files that are retrieved from the scanner. Valid extensions
are .JFI, .JFIF, .JPE, .JPEG, .JPG. The default is JPG.
NOTE: When the preview file is retrieved to the user’s file system, the file
extension will be changed from “.JPG” to “.PJPG”, for example:
XXX_2000704_0001.PJPG. This will differentiate the new JPEG image
file from the JPEG preview file and also allow the user the ability to use
the common “.JPG” extension for the main image file.
Include date in filename - Click on this check box to have the current date
and an index number appended to the File Prefix name. Otherwise, only an
index number will be appended to the File Prefix. The following is an example
of a retrieved file name (image_001) that contains MYSCAN as the file prefix
and has the April 25, 2000 date in it. It will be saved to the C directory in the
“ACT Images” folder. You can change a file name by right clicking on it in the
Retrieved window, then selecting Rename.
C:\ACT Images \MYSCAN_20000425_0001.TIF
The Raster Editor section is where you specify which raster editor (such as
Photo Shop or Paint Shop Pro) you will be using for editing retrieved
documents before you save them.
Editor Path - In this text field enter the full path of where your raster editor’s
executable file is located. Use the Browse button to help select the location.
Options - Enter the Command line options to be used when running your
raster editor. This will let the image file name to be appended to the
command line options. For some editors, no entry is required.
AccXES Client Tools User Guide 35
Page 36

AccXES Client Tools User Guide 36
When you select a retrieved image file name in the Retrieved window,
and then press the Raster Edit Toolbar button, the raster editor which you
have specified in this section will be launched.
NOTES:
If the raster editor opens, but the retrieved file won’t open within the editor,
select File > Open in the editor. Then select your file, which was written to
your file system as the file was being transferred to the Retrieved window.
An “Invalid File Format” message will occur when raster editors do not support
certain file formats.
The bottom of the Retrieval Setup dialog contains the following buttons:
OK - Press this button to accept (and save) any changes made to the
Retrieval Setup parameters and exit this dialog.
Cancel - Press this button to ignore any changes made on the Retrieval
Setup dialog and exit the dialog.
Reset - Press this button to reset the parameters on the current window to the
factory defaults.
Help - Press this button to get help on the Retrieval Setup dialog and go to
hyperlinks to other topics.
Page 37

Document Submit Tool*
The Document Submit Tab is where you create a set of documents to send to
the printer as a single print job. The set can be saved as a single file on your
file system. As you add documents to this Document Submit window, default
document settings will be applied to them. An X will appear in the Default
column next to the file name. The Options column will contain any information
that you put in the Description field of the documents’ Setup tab.
Ÿ In the Job section at the bottom of the screen, you can specify your print job
name, the number of copies to print, the priority of the print job, and which
account number to assign to the print job. Collation and Reverse Print Order
options can also be chosen. Select the Job Options toolbar button to select
other print job options.
Ÿ You can change the documents default settings by selecting the Edit Default
Options toolbar button.
Ÿ You can double click on a file name in this Document Submit window to
change the document options for the selected document. An X will appear
in the Modified column next to the file name. The document will no longer
be using the defaults.
DST Toolbar Buttons
Cut
document(s)
Copy
document(s)
Paste
document(s)
Add
document(s)
Insert
document(s)
Print
document
set
*In addition to these toolbar buttons, you can access Document Submit
options through toolbar menus and by right clicking on a file name in the
Document Submit window. A summary of these choices is in the following
table.
AccXES Client Tools User Guide 37
*Edit Default
Options
*Job Options Help for this
screen
Page 38

AccXES Client Tools User Guide 38
Document Submit Toolbar Button and Menu Choices
Each of the DST main features is listed in the first column of the following table. Next to each feature is listed which toolbar button, toolbar menu, and/or right
mouse click menu you should use to access the feature.
DST Tab Feature Toolbar Button Toolbar Menu Right Click Menu
Account ID – add the assigned Account ID to which the print job’s media usage
should be logged. For AccXES firmware version less than 7.0, this would be
your account and sub-account numbers.
Add Document from file system to end of document set
Cancel document submission to the printer – click Cancel button
Clear the Document Submit window File > New or Edit >
Clear All – remove all documents from document set, but keep option
selections
Clear the Document Submit window of listed files and their options. File > New
Collate – Select the order for the pages within documents to print (see
Appendix 3 for how to combine this feature with Reverse Print Order)
Copies – Select number of copies to get printed.
Copy options of a selected document to the document set clipboard to paste to
another document
Copy selected document to the document set clipboard
Cut – remove document from document set to the document set clipboard
Document >
Add Document
Clear All
Edit > Clear All
Document > Copy
Options
Edit > Copy Copy
Edit > Cut Cut
Copy Options
Page 39

DST Tab Feature Toolbar Button Toolbar Menu Right Click Menu
Default – open – to replace the Document Options of the selected (highlighted)
documents with the Document Options of a named file.
Default – save default document options as a file Document > Save
Defaults – Save defaults from all of the Edit Job Option tabs.
Defaults – Save defaults from all Edit Default Document Print Options
Defaults – Save defaults from all Edit Document Print Options - Double click on
document title. Setup tab > Update Defaults button.
Default – use default options for selected document Document > Use Default Use Default
Default Document Options – to edit the Document Options dialog for the
current default Document Options
Document > Open
Default. Locat e the file
and open it.
Default As
>
Setup Tab >
Update Defaults
button
> Setup
Tab > Update
Defaults button
Document > Edit Default
Delete selected document(s). Edit > Delete Delete
Deselect All documents in document set Edit > Deselect All Deselect All
Document Options – double click on the document file name Document > Edit
Document Options – Edit the Document Options dialog for the selected
document
Document Options – Open – to replace the Document Options of the selected
(highlighted) documents with the Document Options of a named file.
AccXES Client Tools User Guide 39
Document > Edit
Document > Open
Page 40

AccXES Client Tools User Guide 40
DST Tab Feature Toolbar Button Toolbar Menu Right Click Menu
Document Options – Save As – Save the Document Options of the selected
(highlighted) document to a named file.
Insert Document from file system into document set
Job Name - Add name of print job. Document Submit Tab
Job Options
Open a saved document set File > Open
Orientation Plot - Print an orientation plot for the selected document (that is
listed on the DST).
Options column information in Document Submit window: Double click a
document title, or select the Edit Default Options button. Select the Setup tab >
Description field.
Paste - insert document from the document set clipboard into a document set.
Paste Options - Replace the Document Options of the selected (highlighted)
documents with the Document Options on the internal clipboard.
Document > Save As
Document >
Select Document.
Document > Paste
Insert Document
Job > Job Options
Document > Orientation
Plot
Document > Edit.
Select the Setup tab >
Description field.
Edit > Paste Paste
Options
Paste Options
Print document set
Reverse Print Order – to print documents listed on the Document Submit
Screen starting with the document at the bottom of the list.
Priority – Select priority of the print job.
Save selected document print options as an .xpt file Document > Save As
File > Print, or Job >
Print
Page 41

DST Tab Feature Toolbar Button Toolbar Menu Right Click Menu
Select All documents in a document set Edit > Select All Select All
User ID – For AccXES Firmware version 7.0 or greater, put in the User ID
assigned to you by the System Administrator.
Viewer Edit > Configure Viewer
Edit > Launch Viewer
AccXES Client Tools User Guide 41
Page 42

AccXES Client Tools User Guide 42
Using the Document Submit Tool
Creating a Set of Documents to Print as One Print
Job
Ÿ Check the default settings that will get applied to each document
that you add to the Documents window by selecting this toolbar button.
Change any settings on the Media, Setup, Transform, Composition,
Rendering, Labels, and Stamps tabs. (The Label and Stamp feature must
first be enabled on the Job Options Labels and Stamps tabs.) These
default settings will be applied to each document that you add to the
Documents window. An X will appear in the Default column, next to the
file name, which indicates that the default settings have been applied to
that document. All of these tabs are explained in detail in the “Default
Document Print Options ” section of this user guide.
NOTE: If you want to change the options of individual documents, double
click on the file name to go to the Edit Document Print Options tabs.
Any changes that you make will be applied only to the document that you
selected.
Ÿ Create a set of documents by doing any of the following:
- Drag & drop a file from your file system, such as from Windows
Explorer, to the Documents window on the Document Submit Tab.
- Use this Add Document toolbar button to create a list of
documents that you want to print as a single print job. In the “Add
Document” window, select the directory and then a file name that you
want to add to the set of documents. To select multiple documents,
hold down your keyboard CTL or Shift key while making your
selections in the order they appear in the window. Click the Add
button. The document will be added to the Document Submit window.
Repeat until all documents have been added. Click the Done button.
NOTE: Configure Viewer dialog: Select Edit > Configure Viewer. Enter the
path, and any optional parameters required for your viewer executable (external
to ACT). The viewer lets you view files that are listed on the DST.
Launch Viewer: Select a document listed on the Document Submit Tab. To
view it, select Edit > Launch Viewer.
To insert a document into a list of documents, select where in the
list you want to insert the document. Select the Insert Document toolbar
button. Select the directory and a file name. To select multiple documents,
hold down your keyboard CTL or Shift key while making your selections in the
order they appear in the window. Click the Insert button. The document(s)
will be added to the Document Submit window. Click the Done button.
- Open a saved set of documents file. You can add or delete
documents to modify a saved set. To open a saved set of
documents, select File > Open. In the “Open Document Set ”
window, select the file name and click the Open button. The
document file names that were saved as the set will appear in the
Document Submit window.
NOTE: If you deleted a file on your file system that was also saved in
a document set, then that file name will still appear in the Document
Submit window the next time you open the set. The title of the
deleted document will be highlighted and a message will appear
letting you know that the file could not be found. Highlight the file
name, right click, and select Delete to take it out of the list of files for
this Document Set.
- Transfer a scanned image from the Document Retrieve tab’s
Retrieved window to the Document Submit window. This is done by
selecting (highlighting) the file names in the Retrieved window. Select
Image > Merge Image . If you are transferring all of the retrieved
files select Image > Merge All.
Ÿ Go to the Job section at the bottom of the Document Submit screen.
Type in the name of your job. Indicat e the number of copies that you want
printed and the job priority. The defaults are priority 5 and one copy.
These same selections are on the Job Options Setup tab.
Page 43

- The AccXES compliant printers print documents face up; each
document that is sent to the printer will go on top of the previous
one. If you want the printed documents to result in the same
order as they are listed on the Document Submit screen, then
select the Reverse Print Order button.
- If you are going to print multiple copies, then make a Collate
selection from the pull down menu. When “None” is selected, the
first document will be printed with the desired number of copies,
followed by the copies for the second document, etc. When
“Forward” or “Reverse” are selected, the documents in the print
job will be printed in collated sets for the desired number of
copies. For collation of single page documents it is recommended
you enable Reverse Print Order and use “Reverse” collation. This
will provide the fastest results. Otherwise, for multiple page
documents, use the standard print order (unchecked Reverse
Print Order) and select “Reverse” collation. This collate option can
also be chosen on the Job Options Finishing tab. See Appendix
3 for a list of the various Collate and Reverse Print Option
selection combinations that can be made and the printed results
of doing so.
User ID and Account ID Values
If the device that you are connected to has AccXES firmware 7.0 or greater,
then both a User ID and Account ID need to be indicated. Put in the values
assigned to you by the System Administrator on the AccXES Account
Management Tool.
If the device that you are connected to has AccXES firmware less that 7.0,
then the Document Submit screen will show just the Account ID field, where
you should enter your account and sub-account number. The account number
is converted to the Account ID and the sub-account number is converted to
the User ID for versions 7.0 and greater.
firmware less than the 7.0 version.
The conversion process will also be attempted by the Document Submit Tool
when a user opens a document set that was previously saved in an AccXES
firmware version that is different than the currently selected printer's version. A
message will appear to let you know that this conversion is being attempted.
If the Document Submit Tool is not able to convert the values, an error
message will appear and you will need to type in the values.
Ÿ Customize Print Job Options
Select the Job Options toolbar button to change any print job
settings, that are not listed at the bottom of the Document screen, before
sending the set of documents to the printer. (Please note that the same
options that are on the Job Options, Setup tab, are also at the bottom of
the Document Submit tab.) Go to the “Job Print Options” section of this
user guide for more details about the Job Option features.
Ÿ Print a Set of Documents
To print your set of documents that are listed in the Document
Submit window, select the Print Document Set toolbar button, or Job >
Print.
NOTE:
When changing default printers from a printer that uses AccXES firmware
less than 7.0 to a printer that uses AccXES firmware 7.0 or greater, the ACT
software will attempt to convert the account and sub -account values into the
User ID and Account ID fields. The reverse is true if you go from a printer that
uses AccXES firmware version 7.0 and greater, to one that uses an AccXES
AccXES Client Tools User Guide 43
Page 44

AccXES Client Tools User Guide 44
Ÿ Save a Set of Documents as a Single File
- To save your list of documents in the Document Submit window as
one file, select File > Save . This will also save the job and
document settings with the set.
- Use the “Look In” arrow at the top of the Save screen to locate the
directory and folder where you want the file stored.
- Type in a file name and select the Save button.
- The file will open with the individual doc uments being listed in your
Document Submit window.
- Select the Print Document Set toolbar button, or Job > Print.
To observe the progress of the jobs being printed, click on the Printer Queue
Tab and press the “Get the list of active jobs in the print queue” toolbar
button.
- An .xds file will be created on your file system and the documents will
still show on the Document Submit screen.
Ÿ Clear the Document Submit window and reset the settings.
- To do so, select File > New.
Ÿ Print a Saved Document Set
- Select File > Open.
- On the “Open Document Set ” screen, use the “Look In” arrow to
locate the .xds file that you saved in your file system.
- Select the Open button.
Page 45

Document Submit Tool Options
The Document Submit Tool has three sets of Tab pages that you can access
to change either default document print options, individual document print
options, or job options.
The job or document options, in the group of tabs that are open, will be reset
to user defined defaults whenever the Reset button is pressed.
To reset all of the tabs, in the group of tabs that are open, to factory defaults,
press the Factory button.
Default Document Options
Select this toolbar button to go to the default document print
options. These default options, and any changes that you make to them, are
applied to the documents that are listed in the Document Submit window that
have an X in the default column. The options are also applied to any other
documents that you add to the Document Submit window.
Document Options
Double click on the file name in the Document Submit window to go to the
individual document print option tabs. This allows you to modify the default
options of individual documents.
Go to the “Document Print Options” section of this guide for more details.
Job Options
Select this toolbar button to access the job option tabs . These
options will apply to all of the documents within the document set.
Go to the “Job Print Options” section of this guide for more details.
Go to the “Default Document Print Options ” section of this guide for more
details.
AccXES Client Tools User Guide 45
Page 46

AccXES Client Tools User Guide 46
Default Document Print Options
Each file that you add to the Document Submit screen will have the default
print options applied to it. There will be an X in the Default column that
indicates this.
If you want to change the default print options, select the Edit
Default Options toolbar button. The “Edit Default Document Print Options ”
set of tabs will appear, which are explained in this section of the user guide.
NOTE: If you want to change print options for an individual document, double
click on the document title in the Document Submit window, or single click on
the title and then select Document > Edit. To change the same options for
multiple documents, without changing the default options for all documents,
highlight the file names in the Document Submit window, then select
Document > Edit. The tabs that appear will show the first document’s
options. These options are explained in this “Default Document Print Options”
section, but your choices will affect only the selected document(s).
Page 47

Media/Color Options – for Default Document Set tings
Navigational Paths:
Default Options: Go to Document Submit Tab> Edit Default
Options Button> Media Tab
Single Document Options: Go to Document Submit Tab> double
click a document title> Media Tab
The Media Tab is where you choose what media size, media type, color, and
media source should be used for your documents that will print out as
separate documents, or on one media using plot nesting.
Media Size – Choose the media size appropriate for your print job. The ANY
media selection enables the printer to select the best media size based on
the size of the image and the media installed in the printer. When a specific
paper size is selected, then “Scaled to fit” is added as an option in the Scaling
drop down menu, on the Transformation Tab.
NOTE: Also be sure that your selected media size is loaded in the printer.
Media Type – Click on this list box to select the media type. The choices
depend upon the device selected on the Device Manager Tab. Selecting Any
allows the printer to use any media type when printing this document. The
default setting is Bond for monoc hrome printers and Any for color printers.
NOTE: AccXES firmware does not fold vellum or film media. If they are
specified as your media type on the Document Set up Tab, and if a folder is
going to be used for the print job, then a warning message will appear when
you try to send the print job to the printer.
Media Source – Select the printer’s drawer location of the media that you
want used for your print job. If you select “Automatic Selection”, the printer
will select the widest roll installed in the printer to print the desired media size,
rotating the image if needed. If you select a specific size roll, the Media Type
and Media Size fields on this screen will be disabled.
AccXES Client Tools User Guide 47
Page 48

AccXES Client Tools User Guide 48
Color Section (only for color inkjet printers)
To specify ink limit and/or gamma settings for document or default options, a
specific media type that supports color must first be selected. Additionally,
these settings for document or default options cannot be specified unless they
have been enabled on the job options, Color Tab.
Ÿ Select the Override Job Settings box if you want to override the job color
settings for your default, or individual document options.
Ÿ Make Cyan, Magenta, Yellow, and Black color ink selections to set up the
ink limit and output gamma that will be applied to the image.
Ink Limit is used to change the maximum amount of ink used in printing.
Valid values for Ink Limit are 1% to 100%.
Gamma is used to adjust the entire color curve without moving the end
points of the curve. This adjusts the mid tones (higher gamma produces
darker mid tones), with minimal effect on shadows and highlights. Valid
values for Output Gamma are 0.5 to 2.2
Page 49

Setup Options – for Default Document Set tings
Description – Any informat ion that you type into the description field will
show in the Options column of the Document Submit screen.
Beginning with ACT version 8.0, the Media section from this page has been
moved to the new Media Tab.
File Format - Use the down arrow to display and select your file type.
The choices are Automatic Detection, CalComp, Cals1, Cals2, NIRS , HPGL,
HPGL/2, CGM, TIFF, JPEG, PDF (optional), PostScript (optional). Choosing
Automatic Detection allows the printer to determine the file format. If you have
another file type, then you will need to convert it to one of the allowed formats
before it will print. When CalComp, HPGL, or HPGL/2 are chosen, an
additional tab page of option choices is available to you.
PostScript Options
PDF Optimization - In the file format drop down list, first select the PDF file
type. This feature is selected by default to control some "behind the
scenes" processing inside the PostScript rendering path. If you have
problems printing a PDF file, unselect this feature to see if it fixes the issue.
CIE Color - In the file format drop down list, first select the PostScript file
type. If a color printer is attached, selecting this feature will produce vibrant
colors for Auto or Graphic document types . For Lines and Text document
types, the colors will look more saturated (bold). For Photo document types,
the colors will look truer to the original photograph. This feature works by
converting incoming color information to CIE color, then back to CMYK or
Gray through a Color Rendering dictionary.
Halftone Method (for Color Printers only) - In the file format drop down
list, first select the PostScript file type.
Halftone Screen renders images with a standard printing press
appearance. This is the factory default setting.
Error Diffusion renders images with more of a continuous tone
(photographic appearance). Note that error diffused images, which are
computationally intensive, take considerably longer to process.
Update Defaults - Select this button to save the current document settings
(from all of the Edit Default Document Print Option tabs or from all of the Edit
Document Print Options tabs) to be the system defaults. System default
values can be created for three different types of default printers: color,
monochrome, or unknown. These values will be used whenever the Reset
button is pressed on any of the Document tabs or whenever a new document
set is created.
AccXES Client Tools User Guide 49
Page 50

AccXES Client Tools User Guide 50
specify the scaling ratio. 100% represents a 1:1 ratio, or printing the
Transform Options – for Default Document Set tings
The Transform Tab allows you to specify scaling, rotation, mirroring, and
justification of a document.
image as its actual size. The image will print on the media size that is
selected on the Setup Tab with the image being clipped or justified as
needed.
Rotation – The rotation menu allows you to specify the image rotation in
90 degree increments. The image is rotated counter-clockwise.
Auto Rotate – If you select the Auto Rotate box, the printer will choose
the best rotation for the image for the allocated media space. The rotation
menu will be disabled and fixed rotation is ignored if you select Auto
Rotate.
Mirror: X, Y – The mirror X option allows the image to be mirrored around
the long edge axis of a standard sheet, or around the axis parallel to the
feed direction of a roll. The mirror Y option allows the image to be
mirrored around the short edge axis of a standard sheet, or around the
axis perpendicular to the feed direction of a roll.
Line Width: - Select the Line Scale Mode box to scale the line (pen)
widths along with the rest of the drawing.
Justification Options:
X, Y Position – Select the X,Y positions that will place the image where
you want it located within its allocated space on the media. The default is
that X and Y are centered, which will put the image in the center of the
allocated space.
Transformation Options:
Scaling – Specify the method of scaling as “Disabled”, “Fixed”, or “Scale
to Fit”. The Scale to Fit option shows only when a specific media size or
source (not the “ANY” choices) is selected on the Setup Tab. Scale to Fit
scales the image so that it will fit exactly on the media. When Disabled
is selected, the image is printed using the media size selected on the
Setup Tab. When Fixed is selected, a percentage needs to be entered to
NOTE: For documents that will print out separately, the allocated space
is the whole media on which the documents get printed. If the plot
nesting or page composition feature is used, then the allocated space is
the amount of space on the media that is being allocated for the printing
of the selected document.
Units – If you select absolute, put in the number of inches or millimeters
that the printer should use in placing the image within the allocated
space.
Page 51

Composition Options – for Default Document
Settings
The document Composition Tab lets you specify how the document (called a
“constituent page”) will be placed on the media (called the “Canvas ”) during
page composition.
This tab is only enabled when page composition is enabled on the Job
Options > Composition page, as follows.
Ÿ Select the Job Options toolbar button.
Ÿ Select the Composition tab.
Ÿ Set Plot Nesting to Off.
Ÿ In the Page Composition section, select the Overlay Images box.
Ÿ Click OK.
On the Job Options > Composition page, if you select Auto Compose, no
changes will be made on this “Edit default …Composition” page, but the
media size, rotation, and X,Y position settings will be automatically adjusted
on all of the documents listed in the Document Submit window. If you select
Scale to Fit on the Job Options > Composition page, your individual
documents will automatically have Scale to Fit also selected on the doc ument
Composition page. You can check on these changes by double clicking on a
document title, then select the Composition tab to view the changes.
NOTE: If you add documents to your set after you have selected Page
Composition features for the existing documents, you will need to apply the
page composition features to the added documents.
If you did not select Auto Compose or Scale to Fit on the Job Options >
Composition page, then you can make the following selections for the
documents within your document set. If you make the changes on the “Edit
default….” set of tabs, then your changes will apply to all documents in the
Document Submit window that are using the default settings, and to all
documents that you add that will use the default settings.
NOTE: If the selections that you make require more space than the overall
media size, and Scale to Fit is not selected, then some of the images will be
cropped to fit them on the media.
Media Size – Select the media size needed to be allocated on the Canvas for
the individual document to get printed. If you chose Auto Compose on the Job
AccXES Client Tools User Guide 51
Options > Composition page, then this size will be automatically selected for
you.
Rotation – If you want the constituent page to be rotated within its allocated
space on the media, indicate for it to be rotated 90, 180, or 270 degrees. If
you chose Auto Compose on the Job Options > Composition page, then the
rotation will be automatically selected for you.
Page 52

AccXES Client Tools User Guide 52
Scale to Fit – Make this selection for the printer to scale the constituent page
to fit on the allocated space. For roll media, the image is scaled so that the
width fits the media and the length is then cut to fit. For paper sheets, the
image is scaled to use as much of the media as possible without clipping or
changing the image. If you chose Auto Compose on the Job Options >
Composition page, then scale to fit will be automatically selected for you.
X, Y Positions – Make your X, Y selections to specify where on the Canvas
you want the selected Constituent Page to be located.
Units - Select if inches or mm are the units to be used when positioning the
documents on the media.
Page 53

Rendering for Jobs, Default Options, and Single
Document Options (starting with AccXES 8.0)
Navigational Paths:
Job Options: Go to Document Submit Tab >
Job Options Button> Rendering Tab
Default Document Options: Go to Document Submit Tab > Job
Options Button > Rendering Tab > check "Apply Rendering"
> OK > Edit Default Options Button > Rendering Tab
Single Document Options: Go to Document Submit Tab > Job
Options Button > Rendering Tab > check "Apply Rendering"
> OK > double click a document title > Rendering Tab
Apply Rendering checkbox - Select this checkbox to enable the rendering
features on this tab. The choices made on the Job Options Rendering tab will
apply to your entire print job and enable you to make rendering choices on the
default options or single document option's Rendering page.
Color and Monochrome
Document Type - Click on this list box to set the Document Type to
autoselect, graphics, photo, or lines & text.
Vector Halftone - This parameter sets the method to use when
processing halftone images. Select Area Fill for best reproduction of
large polygon fills. Select Line Optimized to accentuate fine lines,
AccXES Client Tools User Guide 53
Page 54

AccXES Client Tools User Guide 54
especially those drawn in filled areas. The factory default setting is Area
Fill.
Raster Halftone - This parameter allows the selection of the binarization
method used on multibit raster images. The Halftone Screen option offers
faster printing than Error Diffusion, but may produce prints with a grainy
appearance. The Error Diffusion setting generally produces a smoother print
image.
Minimum Line Width (pixels) – Use this setting to improve visibility of fine
lines. Depending on your printers resolution, lines that are only a few pixels
wide may appear light and/or be difficult to see. This setting allows you to
improve visiblility by setting the minimum width of drawn lines anywhere from 1
(the default) to 10 pixels. Lines made wider may no longer be considered fine
for the Fineline Pixel Thresh old feature. This setting will have no impact if
the data being rendered is in raster format .
Page 55

Fineline Grayscale Rendering - Select either Contone or Black as the
parameter to specify how fine lines should be rendered when the Render
Mode is set to Grayscale. In Grayscale Render Mode, fine lines that are
drawn in a light luminance color, such as yellow, will appear very light if
this parameter is set to Contone. Setting this parameter to Black will
cause these lines to appear as black.
Fineline Pixel Threshold - This parameter specifies the maximum line
width that will be processed as a fine line. The range is 1 - 25.
Contrast - Use this list box to adjust the contrast by specifying an integer
from -10 to +10. A value of "0" means that no contrast adjustment is
applied. Increasingly negative values reduce the contrast of the rendered
image, while increasingly positive values increase the contrast of the
rendered image.
Lightness - Specify the lightness adjustment in this list box. A value of
zero means that no lightness adjustment is applied. Increasingly negative
values reduce the lightness of the rendered image, which darkens the
image. Increasingly positive values increases the lightness of the rendered
image, which further lightens the image.
Color
This section is disabled if the default printer is monochrome.
Render Mode - Click on this list box to set the Render Mode for
color printers to color or grayscale. For monochrome printers,
grayscale is the only valid option.
Print Quality Mode - In general, the more bi-directional passes that
the printer makes to create the image, the higher quality the output
will be, but the longer it will take to produce it. The FAST selection is
a single pass bi-directional printing using RACER Technology,
NORMAL is 2-pass bi-directional printing, and BEST is 4-pass bi-
directional printing.
AccXES Client Tools User Guide 55
Page 56

AccXES Client Tools User Guide 56
Labels Options – for Default Document Set tings
The Default Document Labels Tab lets you create a label that will become part
of the default options that are applied to documents that you add to the
Document Submit window. To enable this feature you must first go to the
Job Options La bels page to select the Apply Label box and click the
OK button. Then come back to this Default Document Labels page and
select the Apply Label box. The various option selections to create the labels
are described after the following graphic. The default is no label.
Label - You can specify the text that you want used in the label by typing it
into the Label field. You can also right click your mouse button in the label
field to acces s the following items in the pop up menu. As you select each
one, the code for it will appear in the Labels field.
Date
Job name
File name
Page number
Time of day
Percent sign
Font - Select the desired label font from the drop down menu.
Page 57

Media Output
X Position, Y Position refers to the position of the label based on the
media output. When you stand to the left of the printer, with the printed
document sets coming out of the printer and going to your left, the X and Y
positions are as follows.
Label Location for Any Media Size , Any
Roll, & Leading Edge of Sheet =Short Edge
X=Left
Leading
Edge
Y=Top
X=Right
X,Y=Center
Y=Bottom
Media Output
Trailing
Edge
AccXES
printer
Stand
Here
Label Location for Leading Edge of Sheet
=Long Edge
Y=Right
If you select Absolute for the X or Y location, then you also need to enter a
number in the text box on the right to represent the absolute distance (inches
or millimeters) from the X or Y edge of the media.
Units – Select “inches” or “mm” as the units to be used when the label is
being positioned.
Rotation - Select the angle of rotation for the label relative to the image.
Size - Select the font point size for the label.
Shading - Enter the percentage of shading for the label. The range is from 0
to 100 percent. A value of 0 is no shading (white) and a value of 100 is all
black.
AccXES Client Tools User Guide 57
X=Top
X,Y =Center
Y=Left
X=Bottom
Stand
Here
Page 58

AccXES Client Tools User Guide 58
Stamps Options – for Default Document Set tings
The Stamps Tab is where you specify what stamp file you want applied to
your documents. Any stamp file that is loaded on the printer can be used.
Stamps can be any file format that the AccXES Client Tools supports, which
are listed in the File Format section of the Setup Tab, such as TIF, HPGL, and
Cals1. Examples of stamps are logos or a warning message across a
document.
This section of the user guide explains how to select a stamp that will get
assigned only to your default document settings . To enable this default
document feature you must first select the “Apply Stamp” box and
“OK” on the Job Options Stamps tab. The various option selections for
creating your default document stamps are described after the following
graphic. The default setting is no stamp.
NOTE: To change the stamp options for individual documents, first select the
Apply Stamp box on the Job Options Stamps tab. Then double click on the
document title in the Document Submit window to go to the Stamps feature
for the selected document.
To change stamp options for a whole document set (job) select the Job
Options toolbar button, then make your selections on the Stamps tab.
Sample Edit Default Document Stamps Tab
(with the name of a stamp that will appear on the center of all documents that
use the default settings)
Apply Stamp – Go to the Job Options Stamps tab and select the Apply
Stamp box to enable this feature. Then come back to this default document
Stamps tab and select this Apply Stamp box.
Page 59

Stamp – Type in the name of a stamp that exists on the printer, as follows:
Ÿ On the Web PMT, select Printer Defaults > Printer Setup >
Stamps.
Ÿ To use a stamp that is already on the printer, write down the
filename of one of the stamps listed in the Printer Resident Stamp
list, as shown in the following example.
Go back to the AccXES Client Tools Stamp field and type in the
same stamp file name into the Stamp field.
Ÿ To load a stamp onto the Web PMT so that it will be available
to use in the Resident Stamps list, go to the Web PMT’s
Accounting screen. Select Account Modes. Check that
Accounting Mode is not set to “Enabled.” If it is, change it to
“Optional” during the process of loading the stamp. Click the Load
Stamp button on the Web PMT Stamp page to locate the stamp
file. The following screen will appear.
Rotation - The rotation pull down menu allows you to specify the angle of
rotation of the stamp relative to the plot image.
Scaling - Select the scaling mode to be used for the stamp. Relative
scaling will scale the stamp relative to the paper size. Absolute scaling will
scale the stamp an absolute percentage of the stamp's normal size.
Scaling Percentage - Enter the scaling percentage. If the scaling mode is
Relative, the stamp will be scaled to this percentage of the printable area of
the page. A value of 100% is equivalent to auto scaling to the paper. If the
scaling mode is Absolute, this percentage is an absolute scaling percentage
that will be applied to the stamp.
X Position, Y Position – Selec t the location of the stamp. For Absolute
values, select the number in the text box on the right to represent the absolute
distance (inches or millimeters) from the X or Y edge of the media.
Units – Select if inches or mm are the units to be used where the stamp is
being positioned.
Use the Browse button to locate the file name.
Click on the Update Printer button.
A “File Uploaded Successfully” message will appear.
Go back to the Web PMT stamps page. The file will now be
listed in the Printer Resident Stamps list for you to use through
your AccXES Client Tools Stamps feature.
Return the Web PMT’s Accounting Mode back to its original state
if you had to change it to load a stamp.
AccXES Client Tools User Guide 59
Page 60

AccXES Client Tools User Guide 60
Finishing Tab for Default and Document Options
(Folding selections are only for monochrome printers with an attached
folder.)
If the finishing settings which show on this tab need to be changed for your
default or document settings, do the following.
Navigational Path:
Default Options: Go to Document Submit Tab> Job Options
Button> Finishing Tab> select folder type> (If the
printer selected on the Device Manager Tab has AccXES
firmware prior to version 9.0, and it supports bidirectional communication, you also need to select a
Folding Method.)> OK> Edit Default Options Button>
Finishing Tab> select Apply Finishing box
Single Document Options: Go to Document Submit Tab> Job
Options Button> Finishing Tab> select folder type> (If
the printer selected on the Device Manager Tab has
AccXES firmware prior to version 9.0, and it supports
bi-directional communication, you also need to select a
Folding Method.)> OK> double click a document title>
Finishing Tab> select Apply Finishing box
Apply Finishing box - First select the folder options on the Job Options
Finishing Tab, as indicated above. Select this box to make selections on this
tab for individual or default document settings, which will override the Finishing
Job Options.
Folding Method- Click on this list box to select folding method to use when
folding is requested. The folding method choices depend on the Folder Type
selection.
Sort Bin - Click on this list box to select the bin to use.
If the printer selected on the Device Manager Tab has AccXES firmware prior
to version 9.0, only the Title Block option can be selected (after the Apply
Finishing checkbox has been selected).
Page 61

Title Block - Click on this list box to select the location for the title block.
Intelligent Title Block - (If you are accessing a printer that is using an
AccXES Firmware version of 9.0 or greater.)
For folding documents with title blocks in standard corners: Check the
Intelligent Title Block box to adjust the location of the title block so that it is
visible once the document is folded.
For folding documents with title blocks that are not in an expected standard
corner: Leave the Intelligent Title Block box unchecked.
NOTE: To determine the document orientation and title block location, select
a document in the DST list. Select Document > Orientation Plot, or right
click and select from the popup menu. The print job will contain factory
default settings for job and document options except Auto Rotation will be
turned off and Rotation will be set to 0. Media Size will be set to 36 inches.
A brief description of the finisher program is given in a window at the bottom of
the Finishing Tab. The following check boxes report the operations included in
the finisher program for a selected Folding Method. Each check box will only
be enabled if the selected finisher program supports the associated option.
Cross Fold - When this box contains a mark, the finisher program
includes the first fold only option.
Margin - When this box contains a mark, a margin is included in the
finisher program.
Punch - When this box contains a mark, punching is included in the
finisher program.
Tab/Reinforcing - When this box contains a mark, a tab or reinforcing
strip is included in the finisher program.
AccXES Client Tools User Guide 61
Page 62

AccXES Client Tools User Guide 62
Individual Document Print Options*
If you want to change print options for an individual document, double click on
the document title in the Document Submit window, or single click on the title
and then select Document > Edit. To change the same options for multiple
documents, highlight the file names in the Document Submit window, then
select Document > Edit. However, any changes you make on this set of tabs
will only change the document print options of the selected document.
They will not change the default settings.
Ÿ After you have modified the document’s options, an X will show next to the
file name in the Modified column of the Document Submit window.
Ÿ If you want to apply these same document options to another document,
select (highlight) the document, in the Document Submit window, that has
the options you like. Right click on the title. Select Copy Options.
Select the document to which you want to copy the options. Right
click on the title. Select Paste Options.
Ÿ If you want to use default options on a modified document, right click on
the file name. Select Use Default.
For further details of each option, go to the “Default Document Print Option”
section of this guide. There you will find details of the same available options,
except that those default settings get applied to all documents that have, or
will have, default document settings applied to them.
Page 63

Job Print Options*
Job print options affect the entire print job, such as collation,
labels, page composition, plot nesting, and folding. The Job
Options editor allows you to modify these options to control
how a document set is printed. If you want to change the job
options, select this Job Options toolbar button. The job option
tabs are Setup, Finishing, Composition, Labels, Stamps, Rendering, and
Color. Each tab is explained here.
Setup Options - for Print Jobs
All of the information that you can enter on this Job Setup Tab, can also be
added on the bottom of the Document Submit Tab.
Job Information Section
Job Name – Enter your print job name. The default is the name of the
first document listed in the Document Submit window.
Copies – Enter the number of copies (1-999) that you want printed. If it is
more than one copy, then the multiple copies of each page will print
separately. If you select collate on the Finishing Tab, then each copy will
be a collated set.
Priority – Enter the printing priority (1-10). The higher the number, the
higher the priority.
Account Section
User ID and Account ID Values
If Accounting is enabled and the device that you are connected to has
AccXES firmware 7.0 or greater, then both a User ID and Account ID need
to be indicated. Put in the values as signed to you by the System
Administrator on the AccXES Account Management Tool.
If the device that you are connected to has AccXES firmware less that
7.0, then the Document Submit screen will show just the Account ID field,
where you should enter your account and sub-account number. The
account number is converted to the Account ID and the sub-account
number is converted to the User ID for versions 7.0 and greater.
System Default Section
Update Defaults - Select this button to save the current job option
settings (from all of the Edit Job Option tabs) to be the system defaults.
System default values can be created for three different types of default
printers: color, monochrome, or unknown. These values will be used
whenever the Reset button is pressed on any of the Job Options tabs or
whenever a new document set is created.
AccXES Client Tools User Guide 63
Page 64

AccXES Client Tools User Guide 64
Finishing Options - for Print Jobs
Sample Finishing Tab with Selected Options
Media Mismatch – A media mismatch occurs when the documents that you
send to the printer cannot print because the proper media size and type are
not installed in the printer. This media mismatch pull down menu allows you to
specify how media mismatches should be handled. The default is “Scale to
Fit”. The choices are:
Scale to Fit -scale the image to the closest matching media size of the
same type
Block Printing - stop printing until the correct media is installed
Substitute Media - substitute the media type with another (not available
for color media)
You can resolve the mismatch by selecting the file name of the
mismatched file in the Printer Queue, then select the Cancel button. You
can also go to the Web PMT print queue, on the main page, to select the
mismatched file. This will allow you to view a window that states how to
resolve the mismatch before the job can print .
NOTE: If media mismatch is enabled on the printer, the AccXES Client
Tools mismatch choices will override the printer’s mismatch options.
However, the printer mismatch feature needs to be enabled if you
want any of your mismatched print jobs to go to the mismatch
queue, which will allow the other print jobs to continue printing. To
enable the printer mismatch queue on the Web PMT, select Printer
Defaults > Processing Defaults > Media > Mismatch Queuing (select
the “Enabled” box).
Reverse Print Order - This check box allows documents in the Document
Submit window to be sent to the printer in the reverse order that they are
listed. This “Print Reverse Order” option is also available at the bottom of the
Document Submit tab.
Banner – Selecting this box enables banner pages for the job. A banner
page is an informational page that prints as the first page of a print job. The
banner page will contain the internally generated job ID, as well as all other
relevant, available information such as the job’s print time and date, the job’s
size in bytes, the job’s data format, and the job’s input port.
Collate - This pull down menu enables electronic collation on the printer.
When “Forward” or “Reverse” are selected, the documents in the print job will
be printed in collated sets for the desired number of copies. When set to
“None”, the first document will be printed with the desired number of copies,
followed by the copies for the second document, etc. For collation of single
page documents it is recommended you enable Reverse Print Order and use
“Reverse” collation. This collate option can also be chosen on the Document
Submit Tab.
NOTE: See Appendix 4 for the results of printing PostScript Files with
settings for collation and finishing options.
Page 65

Folder Options let you specify whether you want your prints folded, and
which folding method to use when folding is requested. (Folding selections
are only for monochrome printers with an attached folder.)
NOTE: To avoid paper jams, use only bond media with the AccXES folder.
AccXES firmware does not fold vellum or film media. If they are specified as
your media type on the Document Set up Tab, and if a folder is going to be
used for the print job, then a warning message will appear when you try to
send the print job to the printer.
Folder Type – Select the type of folder that is connected to the printer which
you have selected on the Device Manager Tool. If it is not listed, do the
following to add that type of folder to the Folder Type list.
Ÿ Select Add Folder.
Ÿ On the “Select a Finisher” screen, locate the .FIN file for your folder type.
The .FIN file is located where your ACT software is installed (e.g. Program
Files/AccXES/ACT 10.0/etc/finisher/Name of finisher you want to install.)
Click OK. The folder will be added to the Folder Type list.
NOTE: Go to Appendix 1 if you need to know how to create a FIN file for your
folder.
The appropriate folder methods for that type will be listed in the Folder Method
drop down menu. The last folder that has been added by the user will remain
in this Folder Type menu between sessions of using the AccXES Client Tools.
Folder Method - Click on the down arrow to display the list of folding
options available to you with the type of folder that is connected to your
printer. The default is whatever is set on the Web PMT. The selection is
limited to Folder Bypass when the folder equipment is not installed. A brief
description of the finisher program is given at the bottom of the Finishing tab.
Intelligent Title Block - (If you are accessing a printer that is using an
AccXES Firmware version of 9.0 or greater.)
For folding documents with title blocks in standard corners: Check the
Intelligent Title Block box to adjust the location of the title block so that it
is visible once the document is folded.
For folding documents with title blocks that are not in an expected
standard corner: Leave the Intelligent Title Block box unchecked.
The following check boxes indicate additional folder features that may be
available with your folder.
Cross Fold – The printed media will be folded in half at the end of the
folding process.
Margin – A margin will be left on one edge of the folded document (such
as, to punch holes in it to fit the printout into a notebook without punching
holes through the entire document).
Punch – Holes will be punched in the folded printout.
Tab/Reinforcing – A reinforcing strip will be added to an edge of the
folded document.
Sort Bin - Select which bin the folder should use.
Title Block - Select where the title blocks are located on your documents
so that they will be on the top after the job is folded.
AccXES Client Tools User Guide 65
Page 66

AccXES Client Tools User Guide 66
Composition Options - for Print Jobs
You can combine multiple documents onto one piece of media, using either
plot nesting or page composition options. The Page Composition options
made on this tab are for the overall media (called the “Canvas ”) on which the
individual images or documents (called “Constituent Pages”) will be printed.
NOTE: Choosing Auto Compose will automatically change the options of the
individual documents that will print out together on the single media. To
manually change the individual document options, double click on each
document title in the Document Submit window, then go to the Composition
tab.
Plot nesting – The “Off” setting will cause the printer to print out your
documents on individual pages. If you chose “Single Job”, the Controller will
automatically nest (group) your submitted documents, in a row, onto a single
media. Selecting “Default” will use the printer’s plot nesting default. You
must select “Off” in order to enable the page composition options on this
page, and the page composition options on the individual document’s
Composition page.
Single Page Job - With this feature, the printer will attempt to sequentially
print adjacent pages in a job that are the same width to produce a single long
copy for the job. Setting the feature to one of the roll sizes will override each
page's media selection, ensuring that the job will successfully print on a single
page. If a page's media width or type differs from the previous page, or if the
maximum printer length has been reached, the printer will cut the job between
pages. Setting the feature to “On” means that normal AccXES processing will
be used to select media. The default for this feature is “Off”. This feature can
be used with Plot Nesting to produce a matrix of images on a single sheet of
media.
Page Composition – You can specify the placement of images on the media
using the page composition option.
Overlay Images - Select the Overlay Images box to overlay your images on
top of each other. The media size, media type, and media source need to be
specified.
NOTE: The Overlay Images box needs to be selected on this Job Options
Composition Tab to enable individual document, or default document options,
on their Composition Tab.
Auto Compose - Select the Auto Compose box to access the predefined
Layout options. As you select a layout (2 UP, 4 UP, 8 UP), a sample layout
will be shown next to the selection to illustrate how your submitted documents
will be arranged on the media. The page composition options will also be
automatically adjusted for the documents that you have listed in the
Document Submit window. To check the changes, double click on each title
and go to the Composition tab to view what has changed.
Page 67

Scale to Fit - Select the Scale to Fit box to have the size of each
constituent page adjusted to fit its entire allocated space on the Canvas .
This also causes the Scale to Fit box to be selected on the individual
documents’ Composition tab.
NOTE: Auto Compose and Scale to Fit need to be selected when you add
more documents to an open set to which you have already applied these
options. The Auto Compose checkbox will be unselected upon any entry to
the Job Print Options Dialog.
AccXES Client Tools User Guide 67
Page 68

AccXES Client Tools User Guide 68
Labels Options - for Print Jobs
The Job Label options will add a label to every document in your set of
documents. The exception is those documents that are using a different
label. To enable this job feature you must select the Apply Label box. Go to
the “Labels Tab – for Default Document Set tings” section of this guide for an
explanation of the same Labels options.
NOTE: The Apply Label box needs to be first selected here on the Job
Options Label tab in order to enable the label options on the default
document labels and individual document labels tabs.
Stamps Option s - for Print Jobs
The Job Options Stamps Tab lets you choose to add a stamp for your entire
set of documents. The job options stamp will be applied to every document in
the current print job, except those documents that are using a document
specific stamp. The job stamp will override the printer’s default stamp.
To enable this job feature you must select the Apply Stamp box. Go to the
“Stamps Tab – for Default Document Set tings” section of this guide for an
explanation of the same Stamp options.
NOTE: The Job Options Apply Stamp box needs to be selected in order to
access the stamp options for default document stamps and individual
document stamps.
Page 69

Rendering Options – for Print Jobs
Apply Rendering checkbox - Select this checkbox to enable the rendering
features on this tab. The choices made on this Job Options Rendering tab will
apply to your entire print job and enable you to make rendering choices on the
default options or single document option's Rendering page.
For an explanation of the rendering options, see the page entitled, “Rendering
for Jobs, Default Opt ions, and Single Document Options”.
AccXES Client Tools User Guide 69
Page 70

AccXES Client Tools User Guide 70
and highlights. Valid values for Output Gamma are
Color Options – for Print Jobs
Printer default color settings are made on the Web PMT. Color settings for
individual print jobs , or individual documents, are made on the Document
Submit Tab as follows.
Navigational Paths:
Job Options: Go to Document Submit Tab >
Job Options Button > Color Tab
Color Default Document Options: Go to Document Submit
Tab > Job Options Button > Color Tab > OK > Edit
Default Options Button > Media Tab
Color Single Document Options: Go to Document Submit
Tab > Job Options Button > Color Tab > OK > double
click a document title > Media Tab
Media Type - Click on this list box to select the media type for which you
want to make color settings.
0.5 to 2.2.
Ÿ Select the Apply Ink Limit and Apply Gamma boxes to make color
settings for print jobs that use the selected media type. The user may
specify ink limit and/or gamma job option settngs for more than one
media type.
Ÿ Make Cyan, Magenta, Yellow, and Black color ink selections.
Ink Limit is used to change the maximum amount of
ink used in printing. Valid values for Ink Limit are 1%
to 100%.
Gamma is used to adjust the entire color curve
without moving the end points of the curve. This
adjusts the mid tones (higher gamma produces
darker mid tones), with minimal effect on shadows
Page 71

Ÿ You can repeat this process for each listed color media type
Ÿ Select OK.
AccXES Client Tools User Guide 71
Page 72

AccXES Client Tools User Guide 72
Printer Queue Tool*
Select the Printer Queue tab to view the status of documents that you have
sent to the printer from the Document Submit window. Through this tool you
can also cancel a print job. At the bottom of the Printer Queue Tool page are
listed the paper rolls that are in your AccXES printer.
The below graphic is a sample print queue with one job waiting to be printed.
There are 4 rolls of paper listed for the WIDE FORMAT PRINT SYSTEM 8855
to which the AccXES Client Tools is connected. Next to each roll are
columns of information about each roll: the width of the roll, the type of media
(bond, vellum, film) and the status of the roll (full, empty, low).
Printer Queue Toolbar Buttons
Get the list
of active and
completed
jobs in the
print queue.
NOTE: The Printer Queue Tab is disabled when the selected default printer
on the Device Manager Tab is print to file or a parallel port. The Printer
Queue Tab is also disabled when the default printer is a network device that
has the “AccXES to Client Communications” checkbox deselected. This is
because there is no bi-directional communication present for the queue
information to be retrieved from the printer.
Get the list
of active jobs
in the print
queue.
Change the
priority of the
selected
print job.
Cancel the
selected
print job.
Help for this
screen.
Sample Printer Queue Tool
Page 73

Using the Printer Queue Tool
Select this toolbar button to view all jobs in the print queue
(completed and active jobs). As the progress of the job submission
changes you need to select this button again to see the new progress status.
This is the same function as the Web PMT’s Get Status button.
Select this toolbar button to view only the active jobs. Continue to
select it to check the progress of the job submission.
To change the priority of a print job, highlight the job name in the
Printer Queue window and select this toolbar button.
To cancel a submitted job, highlight the job name in the Printer
Queue window. Select the Cancel toolbar button.
AccXES Client Tools User Guide 73
Page 74

AccXES Client Tools User Guide 74
Accounting Tool *
(The Accounting Tool is only enabled for AccXES Firmware Versions Less
Than 7.0)
Look in the Printer Identification section of the Device Manager Tab to locate
the Printer (AccXES Firmware) Version number of your selected device. For
AccXES firmware version 7.0 and greater, the Accounting Tab cannot be
accessed. Instead, the AccXES Account Management Tool will be tracking
the media usage details for multiple printers. See the Account Management
Tool Administrator’s Guide for Details.
The information in this “Accounting Tool” section is only for use with
AccXES firmware less than 7.0.
The Accounting Tool page is where you can query the AccXES controller for
printer and scanner media usage data. The Accounting Mode needs to be
set to “Enabled” or “Optional”, on both the sc anner and printer, for you
to keep track of media usage by specific account numbers. Otherwise all
media usage will be assigned to the default 0.1 system account. The
controller’s accounting information is ac cessed and displayed in the
accounting report window after you select the “Query…” toolbar button. Each
row in the accounting window will be the media usage for one account and
sub-account number. It is listed in square feet or square decimeters by the
amount of actual printed media type (bond, vellum or film) or scanned area
used. The queried data can be printed in a report.
Accounting Toolbar Buttons
Query the printer for
account data
Write the account
data to a file (to
create a report)
Help for this page.
Page 75

Accounting Options
PASSWORD – If a password is used at the printer or the scanner, type in the
same password into the password field. A password is needed when
accessing accounting information for multiple sub-accounts, or if the subaccount number is 0.
ACCOUNT ID – Type in the account.sub-account number for which you want
to retrieve usage data from the printer and the scanner. These account
numbers should be the same as were assigned to you by the system
administrator and are written as a decimal. The account number can be from 0
to 999999 and is written before the decimal point. The sub-account number
can be from 0 to 9999 and is after the decimal point. For example, 2.3 means
account number 2 and sub-account 3. Zero is saved for the system account.
NOTE: The account numbers that you query from the Account tab’s Account
ID field, will only access data that has accumulated from specific account
numbers that you created on the scanner or printer. You need to assign
these same account numbers on the scanner, Web PMT or printer user
interface, and on your Document Submit Job Options screen for your media
usage to go those accounts. If you do not enter in an account number on the
scanner, then the media usage data will get assigned to the default system
account of 0.1. To assign an account number for when you print a job, go to
the Document Submit tab > Job Options toolbar button > Setup tab >
Account ID field.
DISPLAY UNITS – Select whether you want the accounting report data
displayed in square feet or square decimeters.
AccXES Client Tools User Guide 75
Page 76

AccXES Client Tools User Guide 76
Using the Accounting Tool
Querying for Account Data
Ÿ Type in the password, if one is required on the scanner or printer (in the
printer user interface or Web PMT), or if you are accessing data from
multiple accounts.
Ÿ Check that the Account Mode is set to “Enabled” or “Optional” on
both the scanner and printer user interface, or Web PMT.
Ÿ Ask your system administrator which account and sub-account numbers
you should use when submitting, scanning, and retrieving documents. Be
sure to add these account numbers to the Account ID fields on the
Document Submit tab > Job Options toolbar button > Setup tab, and on
the Document Retrieve tab.
Ÿ On the Accounting tab, type in the account and sub-account
number for which you want to retrieve media usage data, such as 3.0.
If the account or sub-account is invalid then you will be presented with a
warning and no information will be retrieved.
To retrieve data for all accounts use the account number of –1.
If a non-zero value is entered for the sub-account then accounting
information will be retrieved for that specific account and sub-account
only. If a zero is entered for the sub-account then accounting information
will be retrieved for all the existing sub-accounts in the specified account
number.
The following shows an example of querying for account 3 data, which shows
all of the data for the main 3.0 account and each sub-account. In this case
3.3 was the only sub-account to which media (bond) usage was assigned.
NOTE: All documents that you scan in “scan to print” mode at the scanner
(the scanned documents get printed) will be tallied in the media usage
columns for Bond, Vellum, and Film. The Scan column displays data on
documents that were scanned in “scan to net” mode (the scanned document
is stored in the controller and is retrieved using the Document Retrieve Tool).
Ÿ Select if you want the data in square feet or square decimeters.
Ÿ Press the “Query” button to access the accounting data for
the account and sub-account(s) that you specified.
Page 77

Saving the Accounting Data
Ÿ After the queried scanning and printing usage data shows in the
Accounting page window, press the Write Account Data to File toolbar
button to invoke the Accounting Report dialog. This dialog is used to
specify the file format of the accounting data to be saved for generating a
report. This dialog is where you also specify the data filename, and where
you want the data file to be saved.
REPORT FORMAT
Delimiter – Choose if you want a tab or comma between each data column.
Quotes – Choose if you want quote marks around each set of data.
The following is an example of a report format that uses a comma as the
delimiter between data and double quotes around each piece of data. The
numbers indicate that account number 125 (column 1), sub-accounts 11, 12,
and 101 (column 2) were queried. The other columns give data for those
accounts in respect to media usage for bond, vellum, film, and scanned to net
documents respectively.
"125","11","364","44","0","0"
"125","12","274","48","0","0"
"125","101","0","0",“0","275"
Output File – Type in a report file name to use when saving the accounting
data. You can use the Browse button to select a directory and folder to
where you want the report to be saved. To save the data as an Excel file, add
an .xls file extension to your filename. To save it as a Microsoft Word file, add
a .doc file extension.
If no file extension is added to the filename it will be saved as a text
document, with the delimiters that you specified. It can be opened in
WordPad or in Excel. Otherwise, when you try to open the file without a file
extension you will be prompted to choose a file type.
AccXES Client Tools User Guide 77
Page 78

AccXES Client Tools User Guide 78
Creating and Printing an Accounting Report
Ÿ If you saved your accounting data with a file extension added to the
filename, then open the document in the software to which you saved it.
Ÿ Add any details you wish, such as a descriptive title or column headers,
to explain what these numbers represent.
Ÿ Save the file.
Ÿ Print the file as you normally would.
Deleting Data in an Account
Once you have saved the accounting data to a file, you may want to clear out
the account so that only new data will show in future queries.
Ÿ To reset an account back to 0, go to the Web PMT Accounting > Reset
Account option. Put in the account number and sub-account number for
which you want to reset the data back to 0. Select the Reset button.
Ÿ On the Accounting Tab of the AccXES Client Tools, do a query on the
same account and sub-account number that you reset. Verify that there
is no data left in the reset account. This query can also be done on the
Web PMT > Accounting > Reports screen.
Page 79

Appendix 1: Creating a .FIN File to Connect to a Folder
IMPORTANT NOTE: The folder must be connected to the printer and on so that the executable file can access the folder to create the correct .FIN file.
FIN File - Creating a file for your AccXES Client Tools to connect to the folder:
Ÿ Go to http://www.xerox.com.
Ÿ Choose Support & Drivers.
Ÿ Go to the Wide Format section.
Ÿ Select the hyperlink that refers to “AccXES 88xx/ X2-Tech/ 510/ 721P”.
Ÿ Under your type of driver, select Drivers & Downloads.
Ÿ Select your Operating System and Language. Press the Go button.
Ÿ In the Utilities & Applications section, choose the “Finisher File Creator”. Save the zip file to your PC,
Ÿ Open the downloaded .zip file and extract the xesfin.exe file. Save it in the [Install Folder – such as the Program Files]\AccXES\ACT10.0\etc\finisher (or
in the same location where you downloaded your ACT files). The executable file will create the .FIN file as follows.
Ÿ On your PC, go to the downloaded executable file by selecting Start > Run> >cmd.
Ÿ In the Command Prompt window, type in the location of the xesfin.exe file that you downloaded. The following screen illustrates the path of the
xesfin.exe file which was downloaded to the C:\Program Files\AccXES\ACT6.0\etc\finisher folder (see the arrows).
AccXES Client Tools User Guide 79
Page 80

AccXES Client Tools User Guide 80
Ÿ Selecting the executable xesfin.exe will generate the above instructions to create the FIN file, using the format of xesfin IP address folder.fin (see the
example in the circle above, where the IP address is 13.142,199.2). A “successfully created” message will show when the FIN file is created and you will be able
to select it in the AccXES Client Tools as follows.
Ÿ Go to Document Submit Tab > Job Options button > Finishing Tab.
Ÿ Select “Add Folder” in the Folder Type list.
Ÿ On the “Select a Finisher” dialog, locate the .FIN file that you just created in the Program Files/AccXES/ACT v#/etc/finisher folder (v# is the current ACT version
number). Click “OK”.
Ÿ The folder will be added to the Folder Type list and can now be selected. The appropriate folder methods for that folder type will be listed in the Folder Method
drop down menu.
NOTE: Only the last folder that has been added will remain in the Folder Type list between sessions of using the AccXES Client Tools. It will also remain after you
uninstall and install ACT.
Page 81

Appendix 2: Paper Sizes
Paper and Roll Sizes for AccXES Compliant Printers
To view the current list of sizes for your printer, in the Web PMT select
PRINTER DEFAULTS > PROCESSING DEFAULTS > Media > Media Size
and Media Type drop down menus (or go to Appendix 2 in the XEROX WIDE
FORMAT COPY SYSTEM User Guide).
AccXES Client Tools User Guide 81
Page 82

AccXES Client Tools User Guide 82
Appendix 3: Collate and Reverse Print Order
Collate and Reverse Print Order Combinations
Three documents (A, B, C) were sent from the Document Submit screen to a printer which prints the documents face up. Each page that comes out of the printer,
therefore, stacks face up on top of the last printed page. Two copies were requested and there were three pages in each of the three documents, as indicated below.
A document: Pages A1, A2, A3
B document: Pages B1, B2, B3
C document: Pages C1, C2, C3
The table below shows the various combinations of Collate and Reverse Print Order which can be chosen in the bottom section of the Document Submit tab, or on
the Job Options > Finishing tab. The highlighted row indicates the most commonly used choice for getting multiple copies of several documents. This
choice will give you a stack of printed documents that will be in the same document order and same page order as you have listed in the Document Submit window.
One sorted copy will print first, then the second sorted copy will print.
Collate Reverse Print Order Printer Output Order
None Unchecked A1,A1,A2,A2,A3,A3, B1,B1,B2,B2,B3,B3, C1,C1,C2,C2,C3,C3
Reverse Unchecked A1,A2,A3, B1,B2,B3, C1,C2,C3, A1,A2,A3, B1,B2,B3, C1,C2,C3
Forward Unchecked C3,C2,C1, B3,B2,B1, A3,A2,A1 C3,C2,C1, B3,B2,B1, A3,A2,A1
None Checked C1,C1,C2,C2,C3,C3, B1,B1,B2,B2,B3,B3, A1,A1,A2,A2,A3,A3
Reverse Checked C1,C2,C3, B1,B2,B3, A1,A2,A3, C1,C2,C3, B1,B2,B3, A1,A2,A3
Forward Checked A3,A2,A1, B3,B2,B1, C3,C2,C1, A3,A2,A1, B3,B2,B1, C3,C2,C1
NOTE: For single page plots, choose Reverse Collate and Reverse Print Order.
NOTE: Certain PostScript files may affect printer output results. See Appendix 4 for more detail.
Page 83

Appendix 4: Printing PostScript Files
The PostScript language supports the ability to modify copies, collation, and finishing options (Gera finishers only). These commands may apply to entire jobs, not
just the PostScript portions. This appendix describes the rules used to merge AccXES Client Tools and PostScript requests.
This appendix applies only if a PostScript file contains one or more of the following:
Ÿ Setting of the Collate page device parameter (via setpagedevice)
Ÿ Setting of the Fold page device parameter (via setpagedevice)
Ÿ Setting of the NumCopies page device parameter (via setpagedevice or by #copies)
NOTE: If your PostScript does not contain these operators, then this appendix may be disregarded.
Interaction between PostScript Copies, Collation, and Finishing Options
PostScript commands for Collate, Fold, and Copies may apply to 1) just the PostScript file or 2) the entire job:
Ÿ For a single data format job* which contains a PJL header and a PostScript file, the copies, collation, and finishing parameters specified in the PostScript file
take precedence for the job and behave according to PostScript Language Reference Manual. [If PostScript collation parameter is true, PostScript copies is a job
parameter – if PostScript collation is false, PostScript copies is a page parameter.]
Ÿ For a multiple data format job* which contains a PJL header, file 1 is any data format EXCEPT PostScript and files 2 (or later) are any data format including
PostScript. The PJL header parameters for copies, collation, and finishing will take precedence for all files in the job. If file 2 (or later) is a PostScript file which
specifies collation or finishing, then those PostScript values for collation and finishing are ignored. If the PostScript file specifies copies, that value is applied to
the Pos tScript file only.
Ÿ For a multiple data format job* which contains a PJL header, if file 1 is a PostScript job that specifies copies, collation or finishing, the PostScript values for
collation and finishing take precedence for ALL the files in the job and behave according to PostScript Language Reference Manual [see item 1].
Ÿ A PostScript setting of Collation = True maps to an AccXES setting of Collation = Auto.
*NOTE: If banner pages are enabled BEFORE the job, the job is treated as a multiple data format job with the banner page being file 1.
AccXES Client Tools Us er Guide 83
Page 84

AccXES Client Tools User Guide 84
Printing PostScript Files Using the DST in the AccXES Client Tools
If the PostScript file does not contain the settings for Collation, Folding, or Copies:
Ÿ The settings within the Document Submit Tool will always take precedence over the default printer settings, and will apply to the PostScript file(s).
If the PostScript file is the first file within the Document Submit Tool’s Document List and contains the settings for Collation and Folding:
Ÿ The settings within the PostScript file will always take precedence over what are set within Document Submit Tool and the settings within the printer. These
settings will also be used as JOB parameters and pertain to EVERY file within the Document Submit Tool print job.
If the PostScript file is the first file within the Document Submit Tool’s Document List and contains the settings for Copies and Collation:
Ÿ The Collate=False setting within the PostScript file will always take precedence over printer defaults, or what is set within Document Submit Tool.
Ÿ When Collate=False is used in combination with the Copies setting in a PostScript file, the Copies setting affects ONLY that PostScript file within the Document
List.
Ÿ If the setting for collation is true (e.g. Collate=True) the copies setting within the PostScript file is applied to EVERY file within the Document Submit Tool Job.
If the PostScript file is NOT the first file within the Document Submit Tool’s Document List and contains settings for Collation, Folding, and Copies:
Ÿ The settings within the Document Submit Tool will always take precedence over what is set within the PostScript file. The Document Submit settings will be
considered JOB parameters and be applied to EVERY file within the Document List.
Ÿ The setting for copies within the PostScript file is applied to ONLY the PostScript file regardless of the copies setting within Document Submit Tool.
Examples
EXAMPLES with Copies and Collation set in DST and PostScript file first in the Document List.
EXAMPLE 1:
Your settings are:
- In the Document Submit Tool, Copies = 2
In the PostScript file, Collate is FALSE
- In the PostScript file, Copies = 3.
- Documents within the Document List are:
<PostScript file>
<Non-PostScript file #1>
<Non-PostScript file #2>
Page 85

Your output is:
6 copies of - <PostScript file>
2 copies of - <Non-PostScript file #1>
2 copies of - <Non-PostScript file #2>
This is caused by the PostScript file containing the settings: Collation = False and Copies = 3
EXAMPLE 2:
Your settings are:
- In the Document Submit Tool, Copies =2
- In the PostScript file, Collate is TRUE
- In the PostScript file, copies = 3
- Documents within the Document List are:
<PostScript file>
<Non-PostScript file #1>
<Non-PostScript file #2>
Your output is:
1 copy of - <PostScript file>
1 copy of - <Non-PostScript file #1>
1 copy of - <Non-PostScript file #2>
1 copy of - <PostScript file>
1 copy of - <Non-PostScript file #1>
1 copy of - <Non-PostScript file #2>
1 copy of - <PostScript file>
1 copy of - <Non-PostScript file #1>
1 copy of - <Non-PostScript file #2>
This is caused by the PostScript file containing the settings: Collation = True and Copies = 3
AccXES Client Tools Us er Guide 85
Page 86

AccXES Client Tools User Guide 86
EXAMPLES With Folding set in DST and a PostScript file is first within the Document List.
EXAMPLE 3:
Your settings:
- In the Document Submit Tool include “Fold ISO - 210mm”
- PostScript file sets folding to OFF.
- Documents within the Document List are:
<PostScript file>
<Non-PostScript file #1>
<Non-PostScript file #2>
Your output is:
1 copy - <PostScript file>
1 copy - <Non-PostScript file #1>
1 copy - <Non-PostScript file #2>
ALL files are NOT folded. This is caused by the PostScript file containing a setting to NOT fold the documents and send the documents to the bridge.
EXAMPLE 4:
Your settings:
- In the Document Submit Tool “Fold - FOLDER BYPASS”
- PostScript file sets folding to ON.
- Documents within the Document List are:
<PostScript file>
<Non-PostScript file #1>
<Non-PostScript file #2>
Your output is:
1 copy - <PostScript file>
1 copy - <Non-PostScript file #1>
1 copy - <Non-PostScript file #2>
ALL files are FOLDED. This is caused by the PostScript file containing a setting to fold the documents and NOT to send the documents to the bridge.
Page 87

EXAMPLES With Collation set in DST and a PostScript file is first within the Document List.
EXAMPLE 5:
Your settings:
- In the Document Submit Tool include: Collation = FORWARD/REVERSE, Copies = 3
- In the PostScript file, Collation = OFF.
- Documents within the Document List are:
<PostScript file>
<Non-PostScript file #1>
<Non-PostScript file #2>
Your output is:
3 copies - <PostScript file>
3 copies - <Non-PostScript file #1>
3 copies - <Non-PostScript file #2>
This is caused by the PostScript file containing a setting to NOT collate the documents.
EXAMPLE 6:
Your settings:
- In the Document Submit Tool, Collation = NONE, Copies =3
- In the PostScript file, Collation = ON.
- Documents within the Document List are:
<PostScript file>
<Non-PostScript file #1>
<Non-PostScript file #2>
Your output is:
1 copy - <PostScript file>
1 copy - <Non-PostScript file #1>
1 copy - <Non-PostScript file #2>
1 copy - <PostScript file>
1 copy - <Non-PostScript file #1>
1 copy - <Non-PostScript file #2>
1 copy - <PostScript file>
1 copy - <Non-PostScript file #1>
1 copy - <Non-PostScript file #2>
This is caused by the PostScript file containing a setting to collate the documents.
AccXES Client Tools Us er Guide 87
Page 88

AccXES Client Tools User Guide 88
Appendix 5: Navigational Paths and Default Values
for AccXES Client Tools Options
FEATURE DEFAULT NAVIGATIONAL PATH TO LOCATE THE FEATURE
AccXES firmware version
in use by the printer
Account ID
Add documents to a set Click and drag the file name from your file system to the Document Submit window, or select the
Auto Compose Off
Auto Preview On (see Preview, Automatic)
Auto Rotate On
Automatic image retrieval
(Auto Poll)
Banner Off
Device Manager Tab > “Printer Version” field
GenericAccountID
Document Submit Tab or , (or Job > Job Options) > Setup tab. If Accounting is enabled and
your printer uses AccXES firmware version 7.0 or higher, you must also enter an assigned User ID.
Document Submit Tab > , (or select Document > Add Document). Use the keyboard “Ctrl” or
“Shift” keys to select multiple documents in the order they are listed. Click on the “Add” button.
Click on the “Done” button.
Document Submit Tab > , (or Job > Job Options) > Composition tab
Document Submit Tab > , or double click on file name > Transform Tab
15 seconds
Document Retrieve Tab > . To stop Auto Poll, select .
Document Submit Tab > , (or Job > Job Options) > Finishing tab
Page 89

FEATURE DEFAULT NAVIGATIONAL PATH TO LOCATE THE FEATURE
CalComp
Cals1, Cals2
Cancel print job
CGM
Checksum=On
EOM Text=13
EOP count=2
ForcePlot =On
Manual = Off
New Plot = Off
Pause = On
SearchAddress=both
StartPlot=On
StepSizeText=2032
SYNC count=2
SYNC Text=22
Top of Form=On
Document Submit Tab > , or double click on file name > Setup Tab (You can also select a
filename on the Document Submit window and then select Document > Edit.) > File Format: select
CalComp > CalComp Tab.
Document Submit Tab > , or double click on file name > Setup Tab (You can also select a
filename on the Document Submit window and then select Document > Edit.) > File Format: select
Cals1 or Cals2
Printer Queue Tab > select job title > , or Cancel button at bottom of print queue screen. If too
late, cancel at Web PMT main page (select file in print queue to go to cancel screen).
Document Submit Tab > , or double click on file name > Setup Tab > (You can also select a
filename on the Document Submit window and then select Document > Edit.) > File Format: select
CGM
Clear scanned list & keep
on exit
On
Document Retrieve Tab > > check box
Collate None
Document Submit Tab or , (or Job > Job Options) > Finishing tab
Color options – for a job
Job Options: Go to Document Submit Tab > > Color Tab
Color options – for default
document
Color Default Options: Go to Document Submit Tab> Job Options Button> Color Tab > Select media
type > Select Apply Ink Limit and/or Apply Gamma boxes > OK > Go to Document Submit Tab >
> select Media tab
AccXES Client Tools Us er Guide 89
Page 90

AccXES Client Tools User Guide 90
FEATURE DEFAULT NAVIGATIONAL PATH TO LOCATE THE FEATURE
Color options – for single
document(s)
Copies, number of 1
Copy doc options to
clipboard
Copy document that’s in a
set
Cut document from set
Date, include in scanned
file name
Default options for all
documents added to
document set
Default options for single
document, to change
Default options, save as a
file
Color Default Options: Go to Document Submit Tab> Job Options Button> Color Tab > Select media
Document Submit Tab > select a document title > Document (or right click on file name) > Copy
On
Document Submit Tab > double click document title, or select a filename > Document > Edit to get
Document Submit Tab > select a document title > Document > Save Default As
type > Select Apply Ink Limit and/or Apply Gamma boxes > OK > Go to Document Submit Tab >
double click on file name > Media tab
Document Submit Tab or , (or Job > Job Options) > Setup tab
Options
Document Submit Tab > select a document title (or right click on file name) > , or Edit > Copy
Document Submit Tab > select a document title (or right click on file name) > , or Edit > Cut
Document Retrieve Tab > > check box
Document Submit Tab >
to edit screens
Default options, to open
saved defaults
Defaults – Save as
defaults all current
selections from all of the
Edit Job Option tabs.
Document Submit Tab > Document > Open Default > select the default settings file
Document Submit Tab > > Setup Tab > Update Defaults button
Page 91

FEATURE DEFAULT NAVIGATIONAL PATH TO LOCATE THE FEATURE
Defaults – Save as
defaults all current
selections from all Edit
Default Document Print
Options
Defaults – Save as
defaults all current
selections from all Edit
Document Print Options
Delete all files in
document set
Delete document in a set Document Submit Tab > Highlight a document title > Edit > Delete, or right click on document title >
Delete scanned or
retrieved images
Deselect all document set
files
Devices available Device Manager Tab
Document default options
Document Submit Tab > > Setup Tab > Update Defaults button
Document Submit Tab > Double click on document title. > Setup tab > Update Defaults button.
Document Submit Tab > When files are listed on Document Submit window, select Edit > Clear All.
Delete
Document Retrieve Tab > select a document title > , or Edit > Delete
Document Submit Tab > Edit > Deselect All (This will deselect any highlighted file names.)
Document Submit Tab > , or select Document > Edit Default
Document options Document Submit Tab > double click on the filename, or select file name and select Document > Edit
Document Set, create a
set
Document Set, job options
Document Set, open
existing set
AccXES Client Tools Us er Guide 91
Document Submit Tab > File > New > Use the Add and Insert buttons. You can also
click and drag a file name from your file system or send a file from your Document Retrieve window to
the DST window.
Document Submit Tab > , or select Job > Job Options
Document Submit Tab > File > Open
Page 92

AccXES Client Tools User Guide 92
FEATURE DEFAULT NAVIGATIONAL PATH TO LOCATE THE FEATURE
Document, add to a set
Document Submit Tab > , (or select Document > Add Document)
Document, edit options Document Submit Tab > double click document title, or select a filename > Document > Edit to get
to edit screens
Document, insert into a
set
Document, open saved
document set
File Format Automatic Detection
File prefix for retrieved
images’ filenames
FIN file The .FIN file is located in the etc folder, where your ACT software is installed (e.g. Program
Finishing Options - for
print jobs
Finishing Options - for
default documents
Finishing Options – for
individual documents
Document Submit Tab > , or Document > Insert Document
File > Open
Document Submit Tab > , or double click on file name, (or select a filename > Document >
Edit) > Setup Tab > File Format drop down menu
MYSCAN Document Retrieve Tab
Files/AccXES/ACT 5.1/ etc/finisher/Name of finisher you want to install.) Click OK to add the folder.
Document Submit Tab > , or select Job > Job Options > Finishing tab
Document Submit Tab> > Finishing Tab> select folder type> (If the printer selected on the
Device Manager Tab has AccXES firmware prior to version 9.0, and it supports bi-directional
communication, you also need to select a Folding Method.)> OK> Edit Default Options Button>
Finishing Tab> select Apply Finishing box
Document Submit Tab> Job Options Button> Finishing Tab> select folder type> (If the printer
selected on the Device Manager Tab has AccXES firmware prior to version 9.0, and it supports bi-
directional communication, you also need to select a Folding Method.)> OK> double click a
document title> Finishing Tab> select Apply Finishing box
Page 93

FEATURE DEFAULT NAVIGATIONAL PATH TO LOCATE THE FEATURE
Folder
HPGL
Type = None
Method=Folder bypass
Crossfold, Margin,
Punch,Tab/Reinforcing =
finisher dependent
AF = On
AH = On
FR = On
NR = Off
PG = On
RP = On
S/SPO = Off
PlotterOffCondition=On
Detect Media from Drawn Area
= Off
Images, overlay Off
Insert document into set
IP address
IP Address=0.0.0.0
Job name
Document Submit Tab > , or select Job > Job Options > Finishing Tab
Document Submit Tab > , or double click on file name, (or select a filename > Document >
Edit) > Setup Tab > File Format: select HPGL > HPGL Tab
Document Submit Tab > , (or select Job > Job Options) > Composition tab
Document Submit Tab > , or Document > Insert Document
Device Manager Tab
Document Submit Tab or , or select Job > Job Options > Setup tab
Job options
Document Submit Tab > , or select Job > Job Options
JPEG
Document Submit Tab > , or double click on file name > Setup Tab > File Format: JPEG
Justification
Units = Inches
X, Y = Center
Text = 0.0
Document Submit Tab > , or double click on file name, (or select a filename > Document >
Edit) > Transform Tab
AccXES Client Tools Us er Guide 93
Page 94

AccXES Client Tools User Guide 94
FEATURE DEFAULT NAVIGATIONAL PATH TO LOCATE THE FEATURE
Label defaults
Apply Label = Off
Font = HP Stick Font
Rotation = 90 degrees
Shading = 100
Font Size = 14
Units = Inches
X position = Trailing
Y position = Bottom
X,Y text = 0.0
Labels - for a job
Labels – for default
document
Labels – for single
document(s)
Media mismatch Scale to fit
Media size, type, source job
Size= ANSI E
Color Type=Any
Monochrome Type = Bond
Source=Automatic Selection
Document Submit Tab > , (or select Job > Job Options) > select Apply Label, OK > , or
, or double click on file name, (or select a filename > Document > Edit) > Labels tab
Document Submit Tab > , (or select Job > Job Options) > Labels tab
Document Submit Tab > , (or select Job > Job Options) > select Apply Label, OK > >
Labels tab
Document Submit Tab > , (or select Job > Job Options. Select Apply Label, OK .
Then double click on file name, (or select a filename > Document > Edit) > Labels tab for individual
document labels.
Document Submit Tab > , (or select Job > Job Options > Finishing tab
Document Submit Tab > , (or select Job > Job Options) > Composition tab
AccXES compliant printers: Set same media types in the printer user interface for each roll.
WIDE FORMAT PRINT SYSTEM 8855: Press the media type buttons in the printer drawers next to
each roll: architectural or engineering, and paper, vellum, or film.
Media size, type, source
(defaults or single
document)
Size=Any
Color Type=Any
Monochrome Type = Bond
Source=Automatic
Selection
Document Submit Tab > , or double click on file name, (or select a filename > Document >
Edit) >
Media Tab
Media printing status
Printer Queue Tab > , or > see bottom of the screen
Page 95

FEATURE DEFAULT NAVIGATIONAL PATH TO LOCATE THE FEATURE
Mirror X, Y Off
Document Submit Tab > , or double click on file name > Transform Tab
Mismatch media Scale to fit
Document Submit Tab > , (or select Job > Job Options) > Finishing tab
Network connections
Network, retry connection
options
IP Address=0.0.0.0
Device Name = New Device
3 retry attempts Interval = 10
seconds
Device Manager Tab
Device Manager Tab > toolbar button > Adjust Retry Limit and Retry Interval
NIRS
Document Submit Tab > , or double click on file name > Setup Tab > File Format: NIRS
Open saved document set Document Submit Tab > File Menu > Open
Orientation Plot Document Submit Tab > double click on file name >
Document Menu> Orientation Plot
Overlay Images Off
Document Submit Tab > , (or select Job > Job Options) > Composition tab
Page Composition
For Job: Document Submit Tab > , (or select Job > Job Options) > Composition tab
For Documents: double click on filename, (or select a filename > Document > Edit) > Composition
tab
Paste copied document
options
Document Submit Tab > select a document title to which the copied options will get pasted >
Document > Paste Options (or right click on file name > Paste Options)
Paste document
Document Submit Tab > , (or right click on file name), or Edit > Paste
PDF
Document Submit Tab > , or double click on file name, (or select a filename > Document >
Edit) > Setup Tab > File Format: PDF and PDF Optimization.
Plot Nesting Printer default
Document Submit Tab > , (or select Job > Job Options) > Composition tab
AccXES Client Tools Us er Guide 95
Page 96

AccXES Client Tools User Guide 96
FEATURE DEFAULT NAVIGATIONAL PATH TO LOCATE THE FEATURE
Ports Device Manager Tab
PostScript This is an optional,
licensed feature Document Submit Tab > , or double click on file name, (or select a filename > Document >
Edit) > Setup Tab > File Format: select PostScript and CIE Color 7/or Halftone Method.
Preview, scanned image Document Retrieve Tab > double click a document title in the Scanned or Retrieved windows, (or
select a title, then select Image > Preview), or right click on file name > Preview. If preview does not
show, check that “Create Preview” is enabled on the scanner.
Preview, stop automatic
Document Retrieve Tab > , or Retrieve > Stop
Print job name, to create
Document Submit Tab > , (or select Job > Job Options) > Setup tab
Print job priority 5
Document Submit Tab or Printer Queue Tab > , (or Document Submit Tab > > Setup
Tab
Print jobs, active
Printer Queue Tab >
Print jobs, cancel
Print jobs, list all
Print jobs, print in reverse
print order
Print new document set
Print options - default
document
Print options – for print job
or set of documents
Printer Queue Tab > , or Web PMT main page print queue > select file to go to cancel screen
Printer Queue Tab >
Document Submit Tab or , (or Job > Job Options) Finishing tab
Document Submit Tab > Use to add documents to the window. Select or File > Print,
(or Job > Print)
Document Submit Tab > , or select a document and then Document > Edit Defaults
Document Submit Tab and , or select Job > Job Options
Page 97

FEATURE DEFAULT NAVIGATIONAL PATH TO LOCATE THE FEATURE
Print options – single
document(s)
Print queue Printer Queue Tab > use toolbar buttons to update the status of active and/or completed jobs (while
Print saved document set Document Submit Tab > File > Open > Select .xds file name. > Open button > Documents within the
Print to File Device Manager Tab
Printer, default Device Manager Tab
Priority of print job
Raster editor path
Rename scanned or
retrieved image
Rendering – for a job
Rendering – for default
document
Document Submit Tab > double click on file name, or select a document, and then Document > Edit
job is in the queue, after changing paper rolls, or after submitting more jobs)
set will be listed on the Document Submit window. > ,or File > Print, (or Job > Print)
Document Submit Tab or Printer Queue Tab> , or Document Submit Tab> , (or select
Job > Job Options> Setup Tab
Document Retrieve Tab > , or (Retrieve > Retrieval Setup) > Browse button to locate path of the
raster editor (like Photo Shop)
Document Retrieve Tab > right click on a document title > Rename, or highlight the document title
and select Edit > Rename
Document Submit Tab > > Rendering Tab
Default Options: Go to Document Submit Tab > > Rendering Tab > check "Apply Rendering" >
OK > Edit Default Options Button > Rendering Tab
Rendering – for single
document(s)
Retrieval Directory Document Retrieve Tab
Retrieval setup (user
preferences)
AccXES Client Tools Us er Guide 97
Single Document Options: Go to Document Submit Tab > > Rendering Tab > check "Apply
Rendering" > OK > double click a document title > Rendering Tab
Document Retrieve Tab >
Page 98

AccXES Client Tools User Guide 98
FEATURE DEFAULT NAVIGATIONAL PATH TO LOCATE THE FEATURE
Retrieve all scanned
images in specified
account
Retrieve scanned images
automatically
Retrieve selected scanned
images
Retrieved image, add to
document set
Retrieved images , add all
images to document set
Reverse Print Order
Rotation, Document
Rotation, Job Options
Document Retrieve Tab > , or Retrieve > Retrieve All
Document Retrieve Tab > , or Retrieve > Auto Poll.
Document Retrieve Tab >select images in Scanned window > Retrieve > Retrieve Image
Document Retrieve Tab > select retrieved filename > Image > Merge Image
Document Retrieve Tab > Image > Merge All
Document Submit Tab or , (or Job > Job Options) > Finishing tab
Transformation Auto Rotate =
on
Labels = 90 degrees
Stamps = 90 degrees
Composition = 0
Transformation = 0
Labels =90 degrees
Stamps=90 degrees
Document Submit Tab > , or double click on file name, (or select a filename > Document >
Edit) > select tab: Transform Tab, Composition Tab, Stamps Tab, Labels Tab
Document Submit Tab > , (or select Job > Job Options) > Stamps Tab, Labels Tab
Save document set Document Submit Tab > File > Save
Save document set with
Document Submit Tab > File > Save As
new name
Save retrieved images
Document Retrieve Tab > , or Image > Keep All, (or select images > Image > Keep Image)
Scale to Fit Off
Document Submit Tab > or double click job title, (or select a filename > Document > Edit) >
Composition Tab. If you select a specific Media Size on the Media tab, Scale to Fit will also be
added to the Scaling drop down menu on the Transform tab.
Page 99

FEATURE DEFAULT NAVIGATIONAL PATH TO LOCATE THE FEATURE
Scale to Fit, mismatch
queue
Scaling Stamp = Relative
Scaling factor 100
Scaling list box Disabled
Scan Directory 0.1 in the DRT, and
Scanned images, add to
document set
Scanned images, delete
Scanned images, list
Scale to Fit
Transform = Disabled
images at the scanner
Document Retrieve Tab > highlight a retrieved filename > Image > Merge Image (or right click >
Document Submit Tab > , (or select Job > Job Options) > Finishing Tab
Document Submit Tab > , (or select Job > Job Options) > Stamps Tab
Document Submit Tab > , or double click on file name, (or select a filename > Document >
Edit) > Transform Tab and Stamps Tab
Document Submit Tab > , or double click job title > Transform Tab
Document Submit Tab > , or double click job title > Transform Tab
Document Retrieve Tab
Select All > Image > Merge All). The document(s) will be copied to your Document Submit window,
removed from the Document Retrieval window, and get saved to your file system.
Document Retrieve Tab > highlight a filename in the Scanned or Retrieved window > , or Edit >
Delete
Document Retrieve Ta b > , or Retrieve > List
Scanned images, preview
Document Retrieve Tab > , or Image > Preview, (or right click > Preview)
Scanned images, retrieve
Document Retrieve Tab > , or Retrieve > Retrieve All, (or Retrieve > Retrieve Image)
Scanned images, save
retrieved images
Scanner, default Device Manager Tab
AccXES Client Tools Us er Guide 99
Document Retrieve Tab > , or Image > Keep All, (or Image > Keep Image), or right click > Keep
All
Page 100

AccXES Client Tools User Guide 100
FEATURE DEFAULT NAVIGATIONAL PATH TO LOCATE THE FEATURE
Select All Document Submit Tab > Edit > Select All, or right click > Select All
Document Retrieve Tool > Edit > Select All, or right click > Select All
Single Page Job
Stamp, for a default
document
Stamp, for a job
Stamp, for single
document(s)
Stamps defaults
TIFF
Title block, job options
Apply Stamp=Off
Rotation=90 degrees
Scaling = Relative
Text = 32
Units = Inches
X,YPosition=Center
X,Y Text = 0.0
Go to Document Submit Tab> Job Options Button> Composition Tab
Document Submit Tab > , (or select Job > Job Options) > select “Apply Stamp” box, OK> Edit
Default Options button > Stamps Tab
Document Submit Tab > , (or select Job > Job Options) > Stamps Tab
Document Submit Tab > , (or select Job > Job Options) > select “Apply Stamp” box, OK>
double click on file name, (or select a filename > Document > Edit) > Stamps tab
Document Submit Tab > ,or ,or double click on file name (or select a file name >
Document > Edit) > Stamps Tab
Document Submit Tab > , or double click on file name, (or select a filename > Document >
Edit) > Setup Tab > File Format: select TIFF
Document Submit Tab > > Finishing Tab
Title block , default
options
Title blocks on individual
Document Submit Tab > double click on file name > Transform Tab
documents
Trabalho de uma página
Document Submit Tab > > Transform Tab
 Loading...