

Page 1

21 Oct 2008
Xerox
®
490/980
TM
Color
Continuous Feed Printing System
Hints and Tips User Guide
Page 2

Page 3

Table of Contents
1 Hints and Tips . . . . . . . . . . . . . . . . . . . . . . . . . . . . . . . . . . . . . . . . . 1-1
Navigation . . . . . . . . . . . . . . . . . . . . . . . . . . . . . . . . . . . . . . . . . . . . . . . . . . . . . . . . . . . . . . . . 1-1
Printer Status . . . . . . . . . . . . . . . . . . . . . . . . . . . . . . . . . . . . . . . . . . . . . . . . . . . . . . . . . 1-1
Back/Forward Buttons (Upper right of screen) . . . . . . . . . . . . . . . . . . . . . . . . . . 1-1
Menu Screen . . . . . . . . . . . . . . . . . . . . . . . . . . . . . . . . . . . . . . . . . . . . . . . . . . . . . . . . . . 1-2
Properties - For Jobs and Queues . . . . . . . . . . . . . . . . . . . . . . . . . . . . . . . . . . . . . . . 1-3
Object Interactions . . . . . . . . . . . . . . . . . . . . . . . . . . . . . . . . . . . . . . . . . . . . . . . . . . . . 1-3
Other Selectable / Interaction Controls . . . . . . . . . . . . . . . . . . . . . . . . . . . . . . . . . 1-4
Active Access Button . . . . . . . . . . . . . . . . . . . . . . . . . . . . . . . . . . . . . . . . . . . . . . . 1-4
Active Toggle Buttons (act like radio buttons) . . . . . . . . . . . . . . . . . . . . . . . 1-4
Other Non-Interaction Objects . . . . . . . . . . . . . . . . . . . . . . . . . . . . . . . . . . . . . . . . . 1-4
Text Fields that are Read-only . . . . . . . . . . . . . . . . . . . . . . . . . . . . . . . . . . . . . . 1-4
Capacity indicator is Read-only . . . . . . . . . . . . . . . . . . . . . . . . . . . . . . . . . . . . 1-5
Status Display is Read-only . . . . . . . . . . . . . . . . . . . . . . . . . . . . . . . . . . . . . . . . . 1-5
Nomenclature Inconsistencies . . . . . . . . . . . . . . . . . . . . . . . . . . . . . . . . . . . . . . . . . . . . . 1-6
Terminology, Abbreviations and Units . . . . . . . . . . . . . . . . . . . . . . . . . . . . . . . . . . . . . . 1-6
Terminology . . . . . . . . . . . . . . . . . . . . . . . . . . . . . . . . . . . . . . . . . . . . . . . . . . . . . . . . . . 1-6
Abbreviations . . . . . . . . . . . . . . . . . . . . . . . . . . . . . . . . . . . . . . . . . . . . . . . . . . . . . . . . . 1-6
Units . . . . . . . . . . . . . . . . . . . . . . . . . . . . . . . . . . . . . . . . . . . . . . . . . . . . . . . . . . . . . . . . . 1-7
Input/Output Spool Sizes. . . . . . . . . . . . . . . . . . . . . . . . . . . . . . . . . . . . . . . . . . . 1-7
Paper Size . . . . . . . . . . . . . . . . . . . . . . . . . . . . . . . . . . . . . . . . . . . . . . . . . . . . . . . . . . . . . 1-8
Critical Information - Printer Status. . . . . . . . . . . . . . . . . . . . . . . . . . . . . . . . . . . . . . . . . 1-9
Corrections to UI . . . . . . . . . . . . . . . . . . . . . . . . . . . . . . . . . . . . . . . . . . . . . . . . . . . . . 1-10
Hints and Tips User Guide i
Page 4

Table of Contents Xerox 490/980 Color Continuous Feed Printing System
ii Hints and Tips User Guide
Page 5

Hints and Tips
1
Navigation
Printer Status
The Printer Status is the default view of the user interface. The main function of the Printer
Status window is to monitor the printer.
Back/Forward Buttons (Upper right of screen)
• Switch from one area to another (similar to Internet browser).
• Stores last three areas accessed.
You can quickly get back to the starting point of the Printer Status view by clicking the back
button multiple times. Alternately, the Printer Status screen is also available as the first access
button (top left) on the Menu screen.
Hints and Tips User Guide 1-1
Page 6
Hints and Tips Xerox 490/980 Color Continuous Feed Printing System
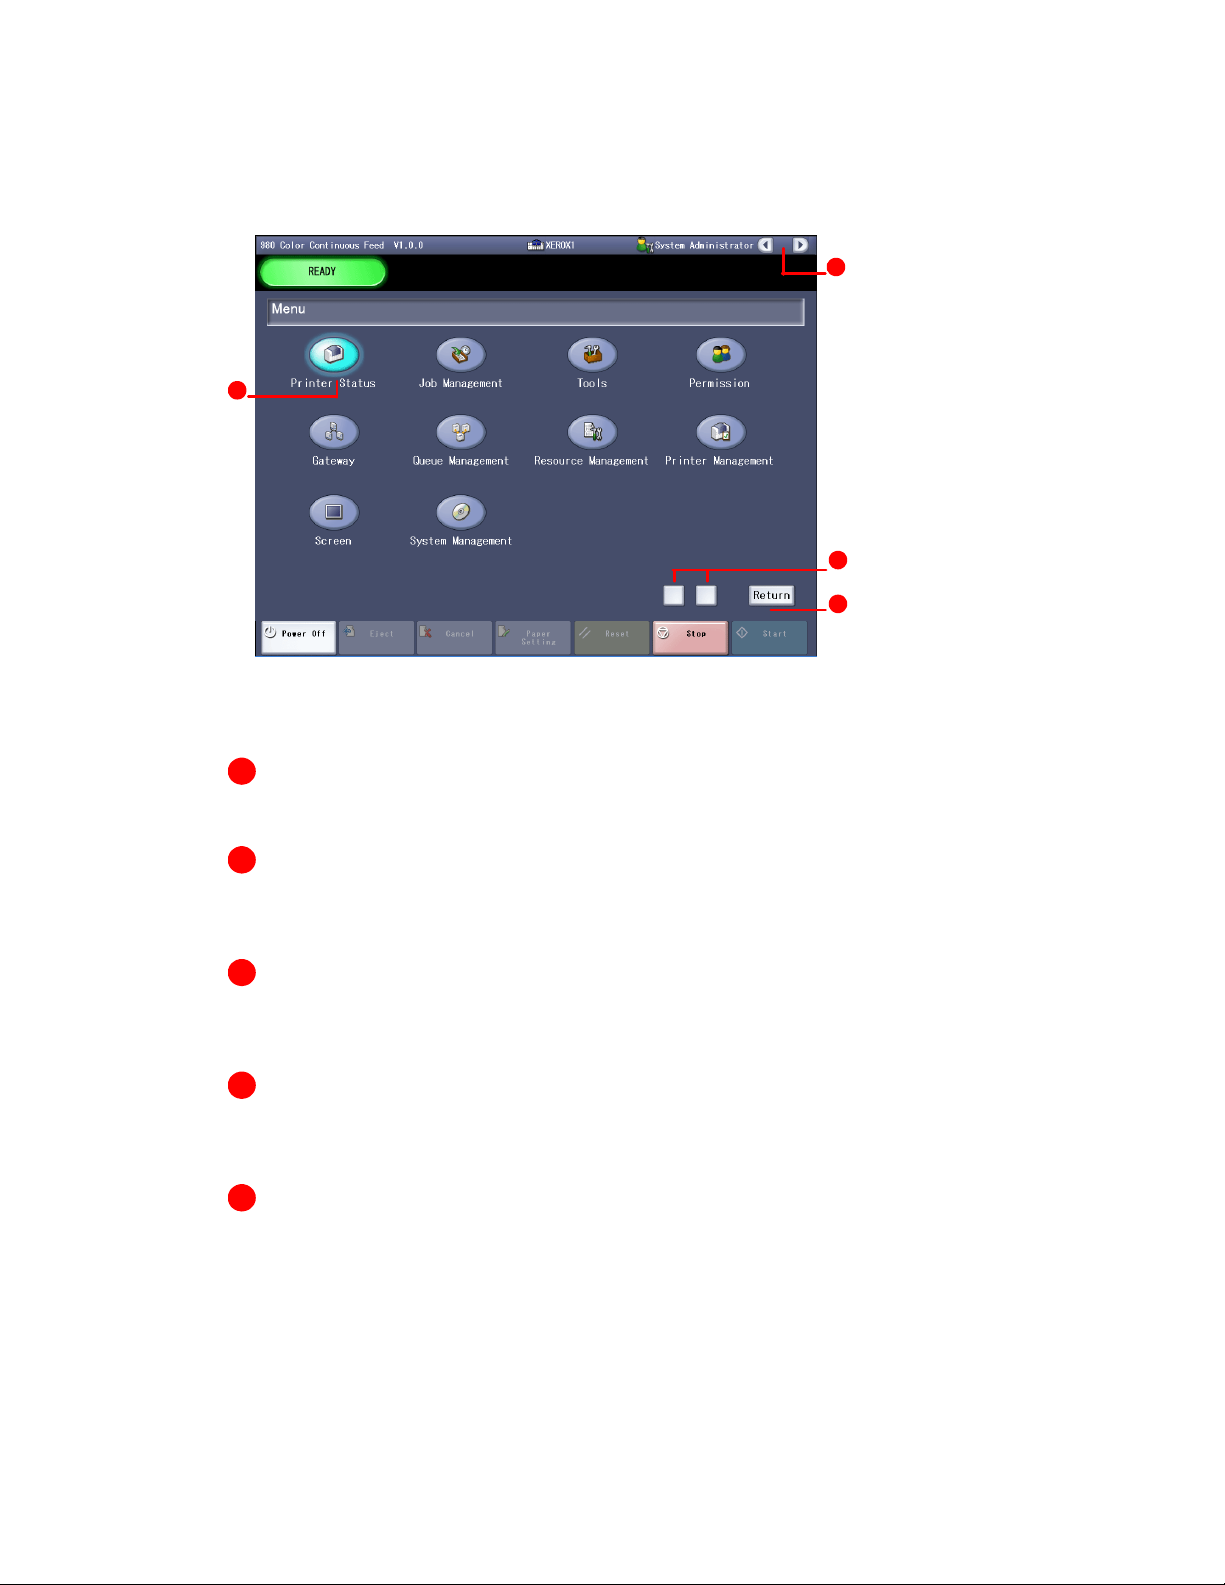
Menu Screen
A
B
C
D
The following information pertains to the previous Menu Screen. Specific areas are identified.
A
Back and forward buttons - Not applicable on the menu screen.
B
All service access buttons - Selecting a service button will advance you to the window for
that service.
C
Left square-shaped button - reduces the transparency of the Menu screen to view
previous user interface prior to opening Menu screen.
C
Right square-shaped button - Increases opacity allowing for ease-of-viewing Menu
options.
D
Return button - Switches interface back, prior to opening Menu screen (also highlighted
menu button).
1-2 Hints and Tips User Guide
Page 7
Xerox 490/980 Color Continuous Feed Printing System Hints and Tips
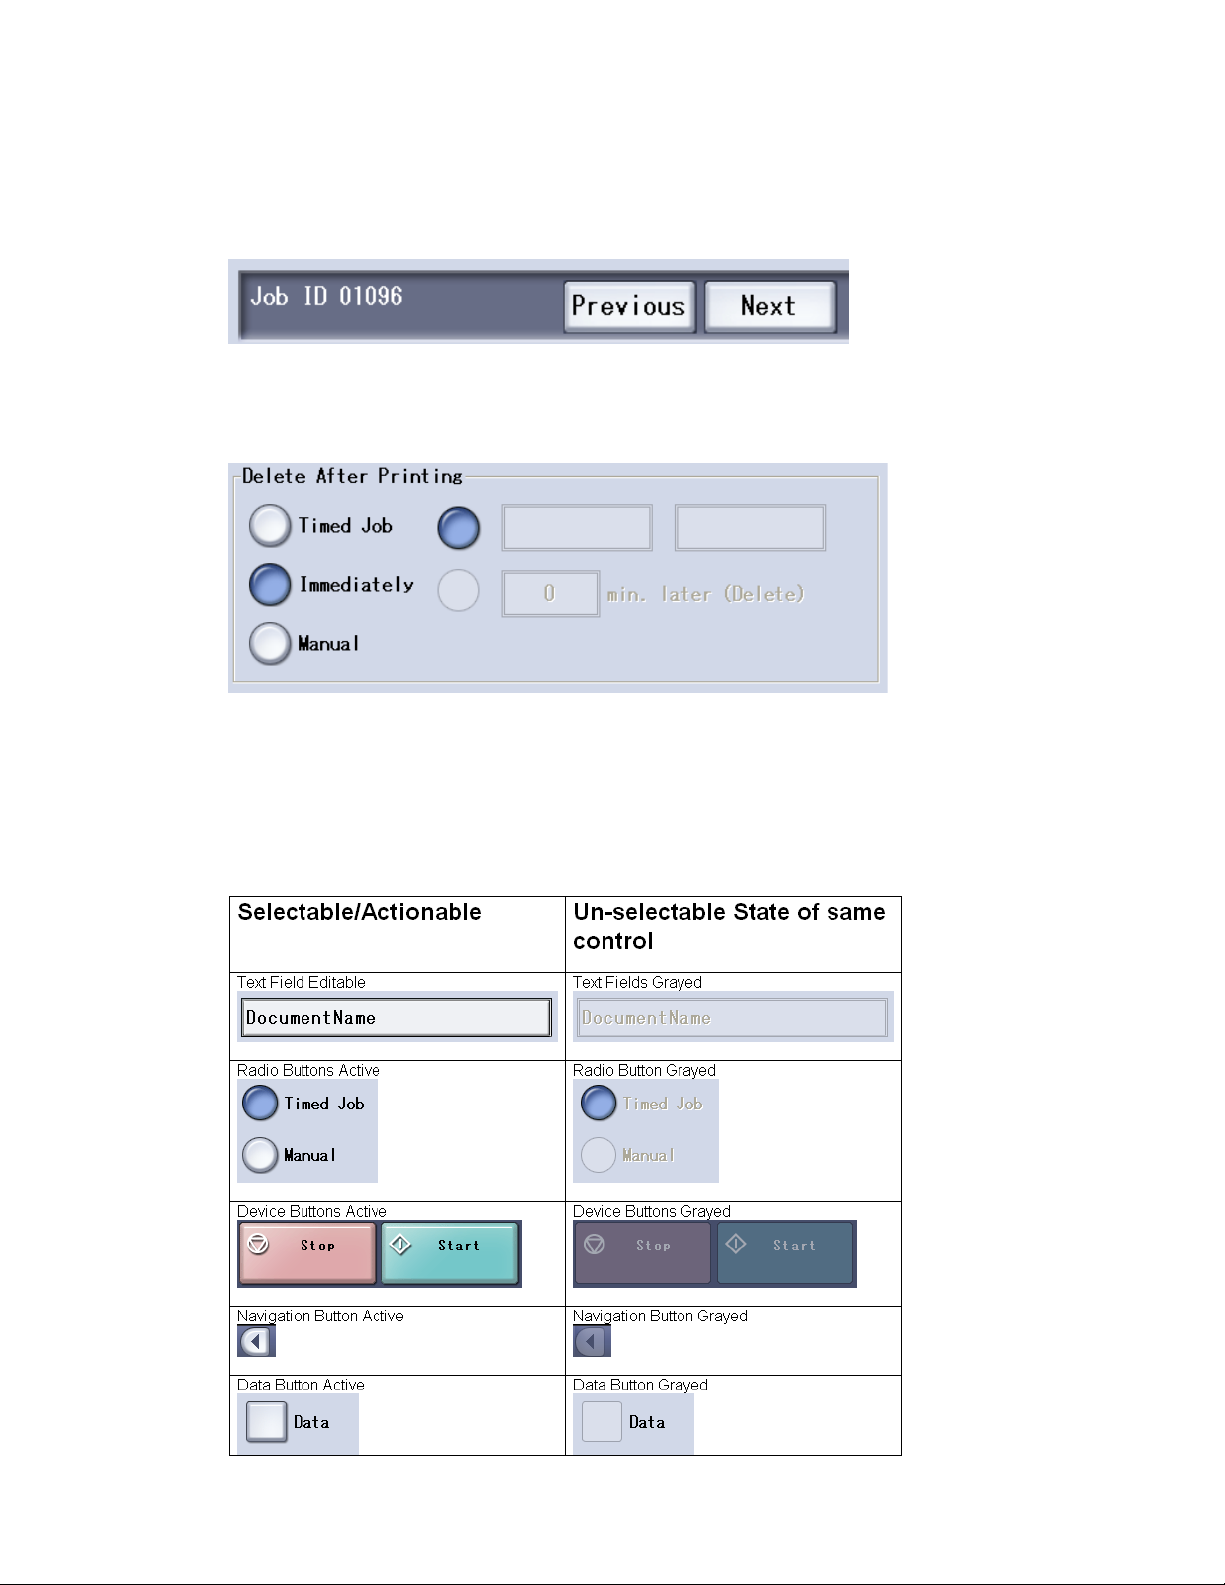
Properties - For Jobs and Queues
Use the [Previous] and [Next] buttons for switching the view between jobs. (Note: buttons will
not switch between tabs)
Radio buttons - Selected left to right due to interdependence.
Choose one option from the left before making a selection on the right, if applicable.
Object Interactions
User Interface Objects
• Selectable/actionable objects - Used for interaction.
• Un-selectable fields/buttons grayed - Viewing only.
Hints and Tips User Guide 1-3
Page 8
Hints and Tips Xerox 490/980 Color Continuous Feed Printing System
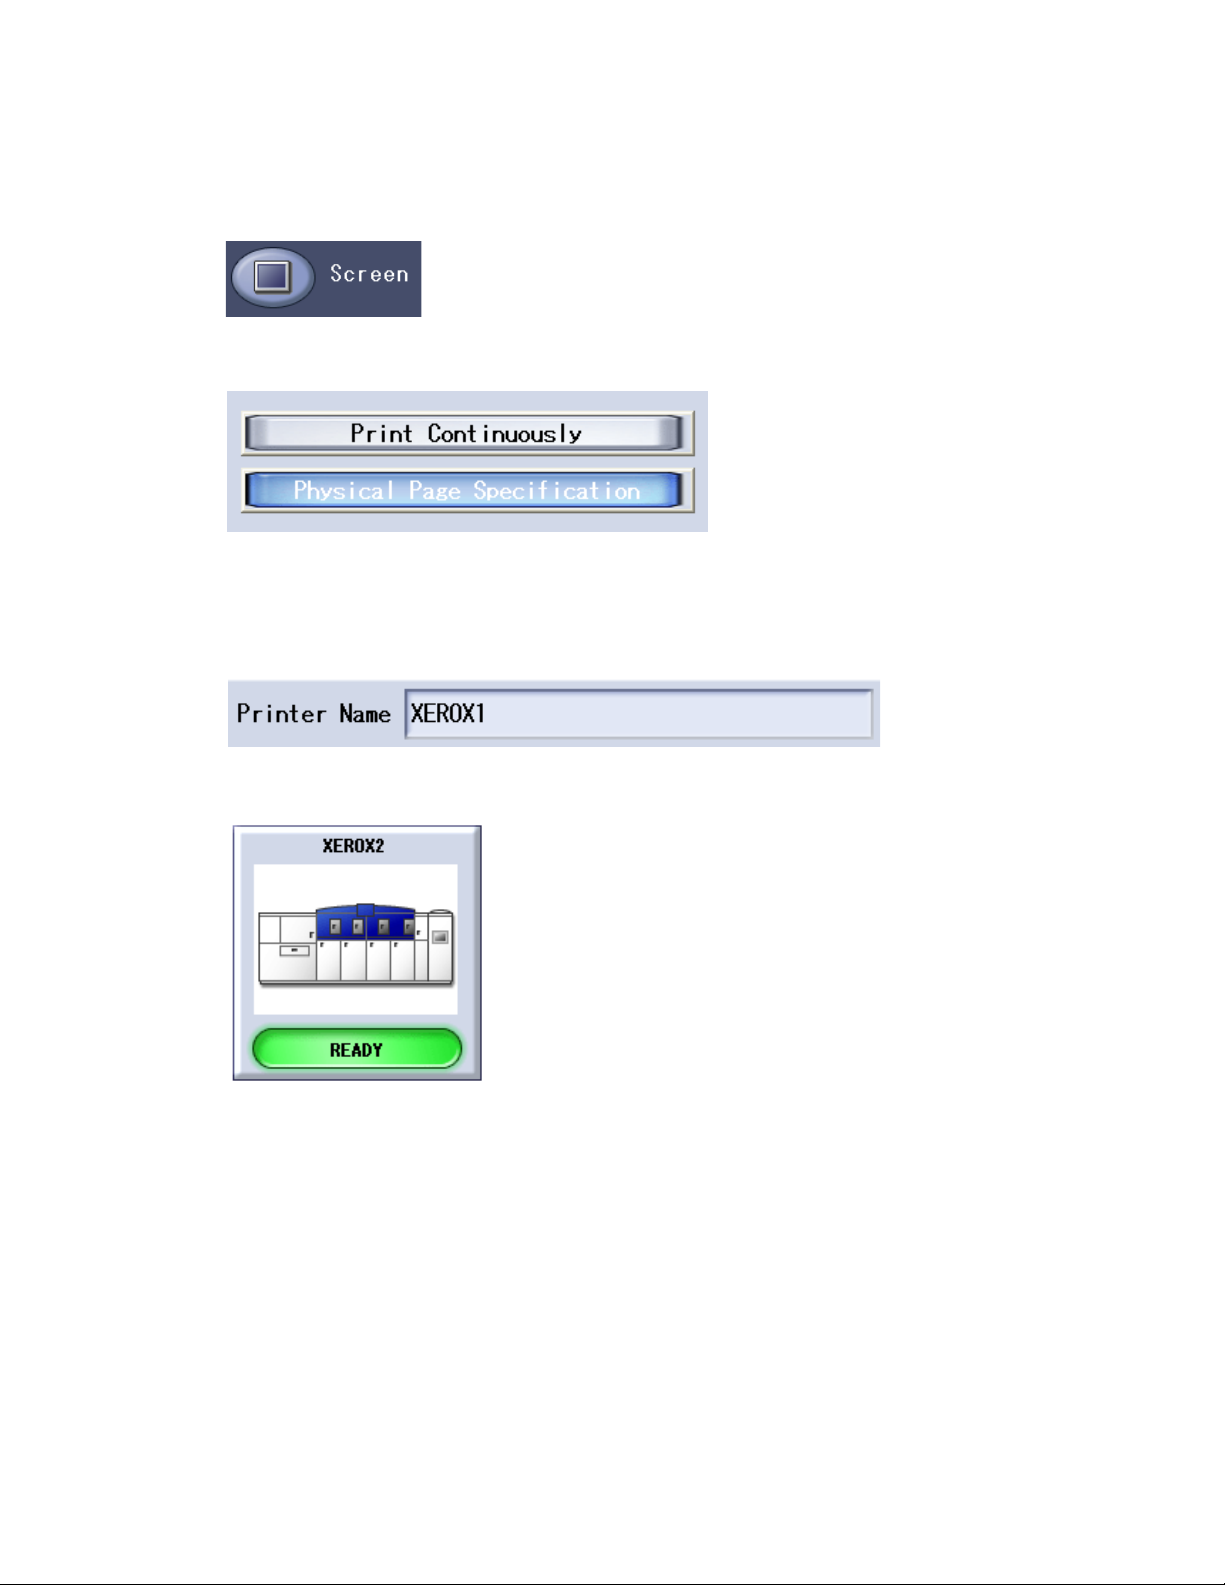
Other Selectable / Interaction Controls
Active Access Button
Active Toggle Buttons (act like radio buttons)
Other Non-Interaction Objects
Text Fields that are Read-only
Although this control appears to be a button, it is not. When viewed from the “Printer Status”
screen, it is meant to display the device status only.
1-4 Hints and Tips User Guide
Page 9

Xerox 490/980 Color Continuous Feed Printing System Hints and Tips
From the “Printer Configuration” tab of the Printer Management screen, this control may be
drag-and-dropped to change the configuration of the printing line.
Capacity indicator is Read-only
Status Display is Read-only
Hints and Tips User Guide 1-5
Page 10

Hints and Tips Xerox 490/980 Color Continuous Feed Printing System
Nomenclature Inconsistencies
• Fixation Adj. - should read Fuser Adj.
• Mark tab and Sensor tab under Printer Management are no longer available.
• Mark Printing tab should read Trans/Flash tab on UI/Paper Settings.
• System Management/System Environment should read Definition File tab.
• Transcription - should read Tra nsfer.
Terminology, Abbreviations and Units
Terminology
• Active Job - Lists all Active jobs.
• Completed Job - Lists the completed jobs.
• Do not accept - Indicates the job input is not accepted, if set in the job queue information.
• Do not release - Indicates the job input processing is not released, if set in the job queue
information.
• Forced Prin ting - Prints all data stored in RIP buffer.
• Held Job - Lists all held jobs.
• Input of Job Name - User inputs a job name here.
• Logical Pages - Data that can be printed on a physical sheet of paper. Same as “page”.
• mb - Megabytes “MB”.
• Paper setting tab - Paper settings are displayed/editable.
• Pin Fee Hole/Pin Feed Hole - Pin-fed paper stock.
• Physical Pages - Physical sheet of paper on which data prints. Same as “Sheet”.
• Reouput - Reprints the selected completed jobs.
• System Page - Displays data per job status.
• The displayed number of job is N - Total jobs in selected area.
• Timed Job - Scheduled printing of a job.
Abbreviations
• BS - Back Space.
• Config Change End - End printer configuration activity.
• Dens/Pos Adjust - Density/Position Adjust.
• DUP - Duplex (marks).
• EUC - Kanji code type.
• FTP- File Transfer Protocol.
• REG - Color Registration (Marks).
• ROC - Registration of Color.
• ROF - Registration of Form.
• TOF - Top of Form.
1-6 Hints and Tips User Guide
Page 11

Xerox 490/980 Color Continuous Feed Printing System Hints and Tips
Units
gsm - grams per meter squared; also used as label to indicate “paper weight”
Input/Output Spool Sizes
The following measures can be displayed in two parts.
Input Spool Size: 0 (MB) / 0 (MB) - The Input Spool Size is displayed as the amount of the input
spool currently used over the total capacity of the input spool (current used [MB] / total
capacity [MB]).
Output Spool Size: 0 (MB) / 0 (MB) - The Output Spool Size is displayed as the amount of the
output spool currently used over the total capacity of the output spool (current used [MB] /total
capacity [MB])
Copy Count Display: Copies: ___ / ___ (current number printed / of total).
Hints and Tips User Guide 1-7
Page 12

Hints and Tips Xerox 490/980 Color Continuous Feed Printing System
Paper Size
Paper size is specified in terms of whole inches and 1/6 inch (length), 1/10 inch (width) for
pinless paper. Pinfed paper width must be whole inch and 1/2 inch only:
Paper Length: __ __ / 6 inch
Paper Width: __. __ / 10 inch (pinless)/1/2 inch (pinfed)
The paper length and width are entered by specifying two values for each. The first value (on
the left) is in whole inches and the second value (on the right) is in fractions of an inch. Note
that length and width have different base denominators for the second value. The denominator
for length is 6 and for width is 10.
The sum of the two values is taken as the paper length or width value. For example, to enter 8.5”
as the paper length, you would enter 8 in the first box and 3 in the second box because 3/6” is
equivalent to 0.5”. To enter 8.5 as the paper length, you would enter 8 in the first box and 5 in
the second box because 5/10 is equivalent to 0.5”.
1-8 Hints and Tips User Guide
Page 13

Xerox 490/980 Color Continuous Feed Printing System Hints and Tips
Critical Information - Printer Status
For detailed information about the Printer Status view, refer to the Customer Documentation.
The Job Information and Paper Information displays may have been scrolled horizontally off
the display area. To view, use the scroll bar and scroll to the left.
Hints and Tips User Guide 1-9
Page 14

Hints and Tips Xerox 490/980 Color Continuous Feed Printing System
Corrections to UI
The following changes are being incorporated into the user documentation but are not
currently reflected on the UI.
Path from Main Menu Present Required Change Comments
Printer Status Paper identifier Imposition File Impacts the
majority of
screens
Printer Status/Paper
Setting/Trans/Flash
Paper Setting/Check Front
Job Management/
Active/Job/Hold
Job Management/Active
Job/Cancel
Job Management/Active
Job/Delete
Queue Management/
Delete
Trans cript ion
Fixation
Front Side
Back Side
Back
Hold for job was
selected. When printing
it stop print. Are you
sure you want to do
this?
Cancel for job was
selected. When printing
it stop print. Are you
sure you want to do
this?
Delete for job was
selected. When printing
it stop print. Are you
sure you want to do
this?
It will be deleted. Are
you sure you want to
delete it?
Transfer Fuser
Side 1
Side 2
Side 1
Side 2
Hold for job was selected.
Status of job has
changed. Are you sure
you want to do this?
Cancel for job was
selected. The job will be
cancelled. Are you sure
you want to do this?
Delete for Job was
Selected. The job will be
deleted. Are you sure you
want to do this?
Queue will be deleted.
Are you sure you want to
delete?
Resource Management/
System Resource/Stock
Set/Delete
Resource Management/
System Resource/Stock
Set/Rename
Resource Management/
Color Resource/Resource
Set/Delete
Resource Management/
Color Resource/Resource
Set/Rename
1-10 Hints and Tips User Guide
Cannot delete Stock Set
because it is a system
default.
Cannot rename the
specified Stock Set
because it is a system
default.
Cannot delete Resource
Set because it is a
system default.
Cannot rename the
specified Resource Set
because it is a system
default.
Stock Set is a system
default folder and cannot
be deleted.
Stock Set is a system
default folder and cannot
be renamed.
Resource Set is a system
default folder and cannot
be deleted.
Resource Set is a system
default folder and cannot
be renamed.
Page 15

Xerox 490/980 Color Continuous Feed Printing System Hints and Tips
Path from Main Menu Present Required Change Comments
Resource Management/
LCDS Resource
Printer Manager/Sensor Sensor Setting ROF Sensor Apply
Printer Manager/Mark Front Side
Printer Manager/
Consumables
Printer Manager/
Consumables/Black
Ton e r Ref i l l
Printer Manager/
Consumables/Black
Ton e r Ref i l l
Printer Manager/
Consumables/Black
Ton e r Ref i l l
LCDS Resource Delete the LCDS Tab
Side 1
Back Side
Setting
Replacement of
developer cannot be
cancelled once stated.
Are you sure you want
to start it?
*Check the labels for
toner container, toner
refill door, and toner
hopper. Then refill the
toner of the same color
2.Holding the knob (d)
pull out the toner
receptacle (3)
frontward.
3.Holding the handles
(f) remove the empty
toner cartridge upward.
*Keep the empty
cartridge because it will
be used as waste toner
container later. *After
removing the cartridge,
clean out dust and
residual around the
toner refill.
Side 2
Apply
Replacement of
developer cannot be
canceled once started.
Are you sure you want
to start? (Remove the
word it).
Step 1 second bullet:
*Ensure the labels for
toner container, toner
refill door, and toner
hopper are the same
color.
2.Holding the Handle (d)
pull the toner cartridge
drawer (e) forward.
3. Grasp the handles (f),
lift and remove the
empty toner cartridge.
First bullet: The empty
toner cartridge will be
used as waste toner
container.
2nd bullet: *After
removing the cartridge,
clean the residual toner
from the toner refill
area.
Same change for
all developer
colors.
Same change for
all Toner colors.
Same change for
all toner colors.
Same change for
all Toner colors.
Printer Manager/
Consumables/Black
Ton e r Ref i l l
Printer Manager/
Consumables/Black
Ton e r Ref i l l
Printer Manager/
Consumables/Black
Waste Toner Container
Hints and Tips User Guide 1-11
*Be sure to insert the
cartridge along the
guide (g).
6.Holding the knob (d)
push in the toner
cartridge (e) receptacle,
then close the toner
refill door.
1. On the back of the
printer station, make
sure the waste toner
container indicator (a)
is lit.
Step 5: delete bullet Same change for
all Toner colors.
6.Holding the handle (d)
push in the toner
cartridge drawer.
Add step 7. Close the
toner refill door.
1.On the back of the
printer station, make sure
the waste toner
container indicator lamp
(a) is lit.
Same change for
all Toner colors.
Same change for
all Waste Toner
Container colors.
Page 16

Hints and Tips Xerox 490/980 Color Continuous Feed Printing System
Path from Main Menu Present Required Change Comments
Printer Manager/
Consumables/Black
Waste Toner Container
Printer Manager/
Consumables/Black
Waste Toner Container
Printer Manager/
Consumables/Black
Waste Toner Container
Printer Manager/
Consumables/Black
Waste Toner Container
Printer Manager/
Consumables/Black
Waste Toner Container
2.Open the printer rear
cover (b) corresponding
to the illuminating
waste toner container
replacement indicator.
*If you replace the
container during
printing, install the new
container within 3
minutes after releasing
the level.
4. Hold and pull the
knob (d) frontward until
it stops.
up upward Same change for
6. Hold and push the
knob (d) in until it stops.
2.Open the printer rear
door corresponding to
the illuminating indicator
lamp.
Step 3: re-write bullet as
follows: *When replacing
the container during
print operation, install
the new container
within 3 minutes.
4. Hold and pull the
drawer handle (d)
forward until the drawer
stops.
6.Holding the drawer
handle (d) slide the toner
container into the
machine.
Same change for
all Waste Toner
Container colors.
Same change for
all Waste Toner
Container colors.
Same change for
all Waste Toner
Container colors.
all Waste Toner
Container colors
Same change for
all Waste Toner
Container colors.
Printer Manager/
Consumables/Black
Developer
Printer Manager/
Consumables/Smoke
Filter Replacement
cover
indicated
*Start the operation of
the replacement
procedure after a new
Smoke Filter is opened
before the Smoke Filter
is replaced while
printing, and it prepares
it in places exchanged
easily.
*Replace the Smoke
Filter after release the
lock lever of smoke
door, and complete the
operating procedure
(label display 2-8) until
the lock lever of smoke
door is set within 30
seconds.
Step 2:
door developer
re-write bullets as follows:
*Before starting this
procedure, ensure a new
Smoke Filter is opened
and ready to install.
*The new Smoke Filter
must be installed and
the lock lever reset
within 30 seconds after
removing the old smoke
filter.
Same change for
all Developer
colors.
1-12 Hints and Tips User Guide
Page 17

Xerox 490/980 Color Continuous Feed Printing System Hints and Tips
Path from Main Menu Present Required Change Comments
Printer Manager/
Consumables/Smoke
Filter Replacement
Printer Manager/
Consumables/Smoke
Filter Replacement
Printer Manager/
Consumables/Smoke
Filter Replacement
Printer Manager/
Consumables/Smoke
Filter Replacement
Printer Manager/
Consumables/Smoke
Filter Replacement
*You can replace the
Smoke Filter during
printing.
*Either the right or left
indicator is lit.
5.There is black packing
of new Smoke Filter (d)
up, and it inserts it in
the box. *Confirm the
label to avoid putting it
upside down.
interior
Step 7: Close the smoke
door, move the lever (b)
to the lock position.
*Refer to “End
procedure of 4.3.3
articles of consumption
exchange” for the end
procedure of the articles
of consumption
exchange
Step 2:
re-write bullets as follows:
*The Smoke Filter can
be replaced during
printing operation,
when either the right or
left indicator is lit.
Step 5: Install the new
Smoke Filter (d) with
the arrow pointing up.
Add warning symbol with
the following text: When
installing the Smoke
Filter, ensure that the
arrow on the label is
pointing up.
Step 6:
machine
Step 7: Close the smoke
filter door and move the
lever (b) to the lock
position.
Step 8: re-write bullet as
follows:
*Dispose the old smoke
filter as industrial waste.
Printer Manager/
Consumables/Kit A
(Black) Replace
Printer Manager/
Consumables/Kit A
(Black) Replace
Printer Manager/
Consumables/Kit A
(Black) Replace
Printer Manager/
Consumables/Kit A
(Black) Replace
Printer Manager/
Consumables/Kit A
(Black) Replace
Hints and Tips User Guide 1-13
cover
Step 2: Open the toner
filter box door (b).
frontward, then Step 3: forward and Same change for
4. Holding the toner
filter (e) on both sides,
pull it out frontward.
*After removing the
toner filter, wipe out
remaining dust and spilt
toner.
then Step 5:
Step 1:
door
Step 2: Open the bag
filter door (b).
4. Grasp the bag filter (e)
on both sides and
remove.
Re-write bullets as
follows:
*Clean dust and spilled
toner.
and
Same change for
all Kit A colors
Same change for
all Kit A colors.
all Kit A colors.
Same change for
all Kit A colors.
Same change for
all Kit A colors
Page 18

Hints and Tips Xerox 490/980 Color Continuous Feed Printing System
Path from Main Menu Present Required Change Comments
Printer Manager/
Consumables/Kit A
(Black) Replace
Printer Manager/
Consumables/Kit A
(Black) Replace
Printer Manager/
Consumables/Kit A
(Black) Replace
Printer Manager/
Consumables/Kit B
(Black) Replace
Printer Manager/
Consumables/Kit B
(Black) Replace
6. Place the new line
filter (g), push it in until
it stops, and then lower
the filter retainer (f).
7. Along the guide (h),
push in the toner filter
(e) until it stops.
8. Place the guide (h) in
the arrow direction.
Then holding the
handle (c), push it in to
secure the toner filter.
Close the toner filter
box door.
1. Open the printer front
cover (a) where the Kit B
you want to replace is
installed.
3. Pulls to the front with
the knob (d) of a
cleaner brush, and
removes from the brush
(e).
6. Insert the new line
filter (g) in the machine
and lower the filter
retainer (f).
7. Insert the bag filter (e)
along the guide (h).
8. Replace the guide (h)
in the arrow direction.
Push the handle (c) in to
secure the bag filter.
Close the bag filter door.
1. Open the printer front
door matching the Kit B
color.
3. Pull the knob (d)
forward to remove from
the brush (e).
Delete the bullet.
Same change for
all Kit A colors.
Same change for
all Kit A colors
Same change for
all Kit A colors.
Same change for
all Kit B colors.
Same change for
all Kit B colors.
Printer Manager/
Consumables/Kit B
(Black) Replace
Printer Manager/
Consumables/Kit B
Printer Manager/
Consumables/Kit B
(Black) Replace
4. Attach the collector
bag (that is included in
Kit B) (f) to the opening
of the cleaner brush.
Holding the collector
bar that is included in
the bag. Then push it in
to the extent the
Cleaner brush will be
pulled out with the bar.
5. Pull back the collector
bar along with the
cleaner brush (b) in
small steps. Contain the
Cleaner brush in the
bag (f) and then detach
the bag from the brush
opening.
*After removing the
cleaner brush, wipe out
dust, paper dust, and
spilt toner with nonwoven cloth.
Re-write Step 4 as
follows:
4. Attach the collector
bag (f) to the opening of
the cleaner brush.
Holding the collector bar
inside the bag, push the
bar firmly into the brush.
(refer to figure on the
next screen)
Delete the “5.” and start
with the *
Change number to 5 and
re-write as follows:
5. Slowly pull out the
collector bar along with
the cleaner brush (b).
Contain the Cleaner
Brush in the bag (f) and
remove the bag from the
brush opening.
Re-write bullet as follows:
*Clean dust and toner
with non-woven cloth.
Same changes or
all Kit B colors.
Same change for
all Kit B colors.
Same change for
all Kit B colors.
1-14 Hints and Tips User Guide
Page 19

Xerox 490/980 Color Continuous Feed Printing System Hints and Tips
Path from Main Menu Present Required Change Comments
Printer Manager/
Consumables/Kit B
(Black) Replace
Printer Manager/
Consumables/Kit B
(Black) Replace
Printer Manager/
Consumables/Kit B
(Black) Replace
Printer Manager/
Consumables/Kit B
(Black) Replace
Printer Manager/
Consumables/Kit B
(Black) Replace
Re-number to step 6 Same change for
8. Hold the Cleaner
Blade Knob (d) with
your left hand, pull it
slightly frontward, and
remove the knob.
9. Wrap up the Cleaner
Blade with the collector
bag (f). Pull out the bag
to take out the Cleaner
Blade into the bag.
10. Attach the knob to
the new Cleaner Blade
(b), insert it along the
guide, and tighten the
thumb nut.
, then cover Re-number to step 10
Re-number to step 7 and
re-write as follows:
7. Pull the Cleaner Bade
Knob (d) slightly forward
and remove.
Re-number to step 8 and
re-write as follows:
8. Insert the Cleaner
Blade into the collector
bag (f). Pull out the bag
removing the Cleaner
Blade.
Re-number to Step 9 and
re-write as follows:
9. Attach the knob to the
new Cleaner Blade (b) by
inserting along the guide
and tighten the thumb
nut.
and change:
and
door
all Kit B colors.
Same change for
all Kit B colors.
Same change for
all Kit B colors.
Same changes for
all Kit B colors
Same change for
all Kit B colors
Printer Manager/
Consumables/Transfer
Roller Cleaner (Black)
Replace
Printer Manager/
Consumables/Transfer
Roller Cleaner (Black)
Replace
Printer Manager/
Consumables/Transfer
Roller Cleaner (Black)
Replace
Maintenance/Software/
Software Info
1: Open the printer 1
top cover.
3: Holding the knobs (b),
slightly move the
Transfer Roller Cleaner
frontward (1), and then
lift it up (2).
5. Holding the knobs (b)
on the new Transfer
Roller Cleaner, install it
on the machine (1), (2).
Delete “1”
1. Open the printer top
cover.
Step 3: Holding the
handles (b), slightly
move the Transfer Roller
Cleaner forward (1), and
lift up (2).
Step 5: Holding the
handles (b), install the
new Transfer Roller
Cleaner in the machine
(1) and push toward the
rear of the machine (2).
Add a line space, and
add a caution symbol
for the following
statement: Be careful
not to touch damage the
guide roller on the new
Transfer Roller Cleaner.
Remove LCDS
information
Same change for
all Transfer Roller
Cleaner colors.
Same change for
all Transfer Roller
Cleaner colors.
Hints and Tips User Guide 1-15
Page 20

Hints and Tips Xerox 490/980 Color Continuous Feed Printing System
Path from Main Menu Present Required Change Comments
Maintenance/Fault Info/
Delete
Maintenance/Control
Info/Save
Maintenance/Control
Info/Restore
Maintenance/Control
Info/Initialize
Maintenance/Control
Info/Export
Maintenance/Control
Info/Print
Maintenance/Control
Info/Export
Maintenance/Printer
Config
It will be deleted. Are
you sure you want to
delete it?
Do you execute Save? Do you want to save the
Do you execute
Restore?
Do you execute
Initialize?
Do you execute Export? Do you want to export
Do you execute Print? Do you want to print the
Do you execute
Display?
Single Simplex
The log file will be
deleted. Are you sure you
want to delete?
information?
Do yo want to restore the
information?
Do you want to initialize? Same change for
the information?
information?
Do you want to display
the information?
Same change for
all the colors (K, C,
M, Y)
Same change for
all the colors (K,
C,M,Y)
all the colors
(K,C,M,Y)
Same change for
all the colors
(K,C,M,Y)
Same change for
all the colors
(K,C,M,Y)
Same change for
all the colors
(K,C,M,Y)
Software Upgrade killing to deleting
Resource Management/
Open a file
Paper Setting/Basic Info Front
Paper Setting/Preprinted Info
Select printer name and
System Properties is
displayed
CMS Option Tool/Print
Colorimetric Pattern
CMS Option Tool/
Customer Ink
Characteristics
CMS Option Tool/Paper
Information
Paper Identifier
Repaint
Front
Back
Back
Print Side
Print Back Side
Setting
Paper Identifier
Colorimetric Color Test
Ink Toner
Imposition File
Refresh
Side 1
Side 2
Side 1
Side 2
Print Side 1
Print Side 2
Apply
Imposition File
Delete the word Ink
Delete the word Ink
1-16 Hints and Tips User Guide
Page 21

Xerox 490/980 Color Continuous Feed Printing System Hints and Tips
Path from Main Menu Present Required Change Comments
CMS Option Tool/
Custom Ink
Characteristics
CMS Option Tool/ up
Maintenance/Printer
Management/Printer
Config
Maintenance/Printer
Management/Mark
Maintenance/Printer
Management/Sensor
Maintenance/Test Job/
CMYK/Delete
Maintenance/Test Job/
Multivalue/Delete
Maintenance/Test Job/
Image File (CMYK)/
Delete
TO1
TO2
Upstream
Downstream
dn
Setting Apply
Front Side
Back Side
Setting
Sensor
Setting
It will be deleted. Are
you sure you want to
delete it?
It will be deleted. Are
you sure you want to
delete it?
It will be deleted. Are
you sure you want to
delete it?
Standard
News Print
Side 1
Side 2
Side 1
Side 2
Side 1
Side 2
Apply
Change name to ROF
Sensor
Apply
The job will be deleted.
Are you sure you want to
delete?
The job will be deleted.
Are you sure you want to
delete?
The job will be deleted.
Are you sure you want to
delete?
Maintenance/Test Job/
Image File (Multivalue)/
Delete
It will be deleted. Are
you sure you want to
delete it?
The job will be deleted.
Are you sure you want to
delete?
Hints and Tips User Guide 1-17
Page 22

Hints and Tips Xerox 490/980 Color Continuous Feed Printing System
1-18 Hints and Tips User Guide
Page 23

Page 24

©2008 by Xerox Corporation. All rights reserved. Xerox® and the sphere of connectivity design and
TM
490/980
are trademarks of Xerox Corporation in the United States and/or other countries.
 Loading...