

Page 1

Xerox DocuPrint
96/4635/180/2000
Series NPS/IPS
Guide to Performing Routine Maintenance
721P90060
Version 8.0
October 2002
Page 2

Guide to Performing Routine Maintenance
Xerox Corporation
701 S. Aviation Boulevard
El Segundo, CA 90245
©2002 by Xerox Corporation. All rights reserved.
Copyright protection claimed includes all forms and matters of copyrightable
material and information now allowed by statutory or judicial law or hereinafter
granted, including without limitation, material generated from the software
programs which are displayed on the screen, such as icons, screen displays,
looks, etc.
Printed in the United States of America.
Publication number: 721P90060
Xerox® and all Xerox products mentioned in this publication are trademarks of
Xerox Corporation. Products and trademarks of other companies are also
acknowledged.
Changes are periodically made to this document. Changes, technical
inaccuracies, and typographic errors will be corrected in subsequent editions.
Page 3

Table of contents
Safety . . . . . . . . . . . . . . . . . . . . . . . . . . . . . . . . . . . . . . . . . . . . . . . . . v
Laser safety . . . . . . . . . . . . . . . . . . . . . . . . . . . . . . . . . . . . . . . . . . . . . . . . v
Ozone information: U. S. only . . . . . . . . . . . . . . . . . . . . . . . . . . . . . . . . . .vi
Operation safety: U. S. . . . . . . . . . . . . . . . . . . . . . . . . . . . . . . . . . . . . . . .vi
Operation safety: Europe . . . . . . . . . . . . . . . . . . . . . . . . . . . . . . . . . . . . vii
Warning markings . . . . . . . . . . . . . . . . . . . . . . . . . . . . . . . . . . . . . vii
Electrical supply . . . . . . . . . . . . . . . . . . . . . . . . . . . . . . . . . . . . . .viii
Ventilation . . . . . . . . . . . . . . . . . . . . . . . . . . . . . . . . . . . . . . . . . . .viii
Operator accessible areas . . . . . . . . . . . . . . . . . . . . . . . . . . . . . .viii
Maintenance . . . . . . . . . . . . . . . . . . . . . . . . . . . . . . . . . . . . . . . . . .ix
Before cleaning your product . . . . . . . . . . . . . . . . . . . . . . . . . . . . .ix
CE mark: Europe only . . . . . . . . . . . . . . . . . . . . . . . . . . . . . . . . . . . . . . . .ix
Radio and telecommunications equipment directive (Europe only) . . . . . x
For further information . . . . . . . . . . . . . . . . . . . . . . . . . . . . . . . . . . . . . . . .xi
Introduction . . . . . . . . . . . . . . . . . . . . . . . . . . . . . . . . . . . . . . . . . . . xiii
About this guide . . . . . . . . . . . . . . . . . . . . . . . . . . . . . . . . . . . . . . . . . . . .xiii
Contents . . . . . . . . . . . . . . . . . . . . . . . . . . . . . . . . . . . . . . . . . . . .xiii
Conventions . . . . . . . . . . . . . . . . . . . . . . . . . . . . . . . . . . . . . . . . .xiv
Related publications . . . . . . . . . . . . . . . . . . . . . . . . . . . . . . . . . . . . . . . . xv
1. Feeder trays . . . . . . . . . . . . . . . . . . . . . . . . . . . . . . . . . . . . . . . . . . .1-1
Checking feeder trays . . . . . . . . . . . . . . . . . . . . . . . . . . . . . . . . . . . . . . 1-1
Loading feeder trays . . . . . . . . . . . . . . . . . . . . . . . . . . . . . . . . . . . . . . . 1-2
Guidelines for loading paper . . . . . . . . . . . . . . . . . . . . . . . . . . . . 1-2
Loading trays 1 and 2 . . . . . . . . . . . . . . . . . . . . . . . . . . . . . . . . . 1-3
Loading trays 3, 4, 5, and 6 . . . . . . . . . . . . . . . . . . . . . . . . . . . . 1-6
2. Output trays and bins . . . . . . . . . . . . . . . . . . . . . . . . . . . . . . . . . . .2-1
Checking and unloading the sample tray . . . . . . . . . . . . . . . . . . . . . . . 2-1
Checking and unloading purge trays . . . . . . . . . . . . . . . . . . . . . . . . . . . 2-1
Checking and unloading high-capacity stacker (HCS) bins . . . . . . . . . 2-2
Unloading a stacker bin . . . . . . . . . . . . . . . . . . . . . . . . . . . . . . . 2-2
3. Fuser agent. . . . . . . . . . . . . . . . . . . . . . . . . . . . . . . . . . . . . . . . . . . .3-1
4. Adding dry ink . . . . . . . . . . . . . . . . . . . . . . . . . . . . . . . . . . . . . . . . .4-1
Guide to Performing Routine Maintenance iii
Page 4

Table of contents
5. Replacing the dry ink waste container . . . . . . . . . . . . . . . . . . . . . 5-1
6. Cleaning . . . . . . . . . . . . . . . . . . . . . . . . . . . . . . . . . . . . . . . . . . . . . .6-1
Cleaning the keyboard, monitor, and the exterior of the printer controller .
6-1
Cleaning the sensors and the reflective surfaces . . . . . . . . . . . . . . . . . 6-2
Cleaning the Q850 sensor . . . . . . . . . . . . . . . . . . . . . . . . . . . . . 6-3
Cleaning the Q1011 sensor and mirror . . . . . . . . . . . . . . . . . . . 6-5
Cleaning additional sensors . . . . . . . . . . . . . . . . . . . . . . . . . . . . 6-7
Sensor Q1107 . . . . . . . . . . . . . . . . . . . . . . . . . . . . . . . . . 6-7
Q1106 and Q1166 . . . . . . . . . . . . . . . . . . . . . . . . . . . . . . 6-8
Sensor Q1164 . . . . . . . . . . . . . . . . . . . . . . . . . . . . . . . . . 6-9
Cleaning the 4mm cartridge tape drive . . . . . . . . . . . . . . . . . . . . . . . . . 6-9
7. Maintenance and support services . . . . . . . . . . . . . . . . . . . . . . . .7-1
Xerox Customer Service Center . . . . . . . . . . . . . . . . . . . . . . . . . . . . . . 7-1
Xerox Documentation and Software Services . . . . . . . . . . . . . . . . . . . . 7-1
Xerox Font Center . . . . . . . . . . . . . . . . . . . . . . . . . . . . . . . . . . . . . . . . . 7-2
Operator training . . . . . . . . . . . . . . . . . . . . . . . . . . . . . . . . . . . . . . . . . . 7-2
Xerox Customer Education . . . . . . . . . . . . . . . . . . . . . . . . . . . . . . . . . . 7-3
Reporting billing meters . . . . . . . . . . . . . . . . . . . . . . . . . . . . . . . . . . . . . 7-3
iv Guide to Performing Routine Maintenance
Page 5

Laser safety
Safety
WARNING
Adjustments, use of controls, or performance of procedures
other than those specified herein may result in hazardous
light exposure.
The Xerox DocuPrint printers are certified to comply with the
performance stan dards of the U.S. Department of Health,
Education, and Welfare for Class 1 laser products. Class 1 laser
products do not emit hazardous radiation. The DocuPrint printers
do not emit hazardous radiation because the laser beam is
completely enclosed during all modes of customer operation.
The laser danger labels on the system are for Xerox service
representatives and are on or near panels or shields that must
be removed with a tool.
DO NOT REMOVE LABELED PANELS OR PANELS NEAR
LABELS. ONLY XEROX SERVICE REPRESENTATIVES HAVE
ACCESS TO THESE PANELS.
Guide to Performin g Routine Maintenance v
Page 6

Safety
Ozone information: U. S. only
This product produces ozone during normal operation. The
amount of ozone produced depends on copy volume. Ozone is
heavier than air. The environmental parameters specified in the
Xerox installation instructions ensure that concentration levels
are within safe limits. If you need additional informat ion
concerning ozone, call 1-800-828-6571 to request the Xerox
publicat ion 600P83222, OZONE.
Operation safety: U. S.
Your Xerox equipment and supplies have been designed and
tested to meet strict safety requirements. They have been
approved by safety agencies, and they comply with
environmental standards. Please observe the following
precautions to ensure your continued safety.
WARNING
Improper connection of the equipment grounding conductor
may result in risk of electrical shock.
• Always connect equipment to a properly grounded electrical
outlet. If in doubt, have the outlet checked by a qualified
electrician.
• Never use a ground adapter pl ug t o connect equipment to an
electrical outlet that lacks a ground connection terminal.
• Always place equipment on a solid support surface with
adequate strength for its weight.
• Always use materials and supplies specifically designed fo r
your Xerox equipment. Use of unsuitable materials may result
in poor performance and may create a hazardous situation.
• Never move either the printer or the printer controller without
first contacting Xerox for approval.
• Never attempt any maintenance that is not specifically
described in this documentation.
• Never remove any covers or guards that are fastened with
screws. Th ere are no oper ator-serviceable areas within these
covers.
• Never override electrical or mechanical interlocks.
vi Guide to Performing Routine Maintenance
Page 7
• Never use supplies or cleaning materials for other than the ir
intended purposes. Keep all materials out of the reach of
children.
• Never operate the equipment if you notice unusual noises or
odors. Disconnect the power cord from the electrical outlet
and call service to correct the problem.
If you need any additional safety information concerning the
equipment or materials Xerox supplies, call Xerox Product Safety
at the following toll-free number in the United States:
1-800-828-6571
For customers outside the United States, contact your loc al
Xerox representative or operating company.
Operation safety: Eur o pe
Safety
This Xerox product and supplies are manufactured, test ed and
certified to strict safety regulations, electromagnetic regulations
and established environmental standards.
Any unauthorised al teration, which may include the addition of
new functions or conn ection of external devices, may impact the
product certification.
Please contact your Xerox representative for more information.
Warning markings
All warning ins tructions ma rked on or supplied with the product
should be followed.
This WARNING alerts users to areas of the product where there
is the possibility of personal damage.
This WARNING alerts users to areas of the product where there
are heated surf ace s, which should not be touched.
Guide to Performing Routine Maintenance vii
Page 8
Safety
Electrical supply
This product shall be operated from the type of electrical supply
indicated on the product’s data plate label. If you are not sure
that your electrical supply meet s the requirem ents, please
consult your local power co mpany for advice.
WARNING
This product must b e connected t o a protectiv e earth circuit. This
product is supplied with a plug that has a protective earth pin.
This plug will fit only into an earthed electrical outlet. This is a
safety f eature . Always co nnect equipment to a properly gr ounded
electrical outlet. If in doubt, ha ve the ou tlet check ed b y a qualified
electrician.
To disconnect all electrical power to the product, the disconnect
device is the power cord. Remove the plug from the electrical
outlet.
Ventilation
Slots and ope ning in the enclosure of the product are provid ed
for ventilation. Do not block or cover the ventilation vents, as this
could result in the product overheating.
This product should not be placed in a built-in installation unless
proper ventilation is provided, please contact your Xerox
representative for advice.
Never push objects of any kind into the ventilation vents of the
product.
Operator accessible areas
This product has been designed to restrict operator access to
safe areas only. Operator access to hazardous areas is
restricted with covers or guards, which would require a tool to
remove. Never remove these covers or guards.
viii Guide to Performing Routine Ma intenance
Page 9

Maintenance
Any operator product maintenance procedures will be described
in the user docume ntation supplied with the product. Do not
carry out any maintenance on the product, which is not
described in the customer documentation.
Before cleaning your product
Before cleaning this product, unplug the product from the
electrical outlet. Always use materials specifically designated for
this product, the use of other materials may result in poor
performance and may create a hazardous situation. Do not use
aerosol cleaners , they may be flammable under certain
circumstances.
Safety
CE mark: Europe only
January 1, 1995: Council Directive 73/23/EEC, amended by
Council Directive 93/68/EEC, approximation of the laws of the
member states related to low voltage equipment.
January 1, 1996: Council Directive 89/336 /EEC, approximation
of the laws of the member states related to electr omagnetic
compatibility.
March 9, 1999: Council Directive 99/5/EC, on radio equipment
and telecommunications terminal equipment and the mutual
recognition of their conformity.
A full declaration of conformity, defining the relevant directives
and referenced standards, can be obtained from your Xerox
representative.
In order to allow this equipment to operate in proximity to
Industrial, Scientific and Medical (ISM) equipment, the external
radiation for the ISM equipment may have to be limited or special
mitigation measures taken.
This is a Class A product. In a domestic environment this product
may cause radio frequency interference, in which case the user
may be required to take adequate measures.
Shielded interface cables must be used with this product to
maintain compliance with Council Directive 89/36/EEC.
Guide to Performin g Routine Maintenance ix
Page 10

Safety
Radio and telecommunications equipment directive (Europe only)
Certification to 1999/5/EC Radio Equipment and
Telecommunications Terminal Equipment Directive:
This Xerox product has been self-certified by Xerox for panEuropean single terminal connection to the analog public
switched telephone network (PSTN) in accordance with Directive
1999/5/EC.
The product has been design ed to w ork with the nation al PSTNs
and compatible PBXs of th e following countries:
Austria Germany Luxembourg Sweden
Belgium Greece Netherlands Switzerland
Denmark Iceland Norway United Kingdom
Finland Ireland Portugal
France Italy Spain
In the event of problems, contact y our local Xe ro x r epres entative
in the first instance.
This product has bee n tested to, and is compliant with, TBR2 1, a
specification for terminal equipment for use on analog switched
telephone networks in the European Economic area.
The product may be configured to be compatible with other
country networks. Please contact your Xerox representative if
your product needs to be reconnected to a network in another
country. This product has no us er-adjustable settings.
NOTE: Although this product can use either loop disconnect
(pulse) or DTMF (tone) signaling, it should be set to use DTMF
signaling. DTMF signaling provides reliable and faster call setup.
Modification or connection to external control software, or to
external control apparatus not authorized by Xerox, invalidates
its certification.
x Guide to Perfo rming Routine Maint enance
Page 11

For further information
For more information on Enviro nment, Health and Safety in
relation to this Xerox product and supplies, please contact the
following customer help lines:
Europe:+44 1707 353434
USA:1 800 8286571
Canada:1 800 8286571
Safety
Guide to Performin g Routine Maintenance xi
Page 12

Safety
xii Guide to Performing Routine Maintena nce
Page 13

About this guide
Introduction
This guide provides information on how to perform basic
maintenance tasks on the Xerox DocuPrint 96, 4635, or 180.
NOTE: You may be using the DocuPrint NPS/IPS software
extension on a DocuPrint 2000 EPS system. The 2000 Series
printer models are the 100, 135, 155, and 180. These printers
are comparable in capabilities to the DocuPrint NPSIPS mode ls
96, 4635, an d 180.
This guide is designed for operators whose job consists of
operating each of the system components, running print jobs,
solving simple system problems, and performing basic
maintenance tasks, such as replenishing dry ink.
Contents
Refer to the entire list of documentation in th e “Related
publications” section for information on other tasks required for
printing with your NPS/IPS printer.
Users should have an understanding of printer controller
operations.
Before using this guide, become familiar with its contents and
conventions.
This section lists the contents of this guide.
• Chapter 1, “Feeder trays,” provides information on how to
load feeder trays for your DocuPrint printer.
• Chapter 2, “Output trays and bins,” describes how to unload
output trays for the DocuPrint printer.
• Chapter 3, “Fuser lubricant,” describes how to refill the fuser
agent reservoir, and how to replace the pressure roll wiper.
Guide to Performin g Routine Maintenance xiii
Page 14

Introduction
Conventions
• Chapter 4, “Adding dry ink,” describes how to add dry ink to
the printer.
• Chapter 5, “Replacing the dry ink waste container,” provides
information on how to replace the dry ink waste container.
• Chapter 6, “Cleaning,” provides instructions on how to clean
the various printing system components.
• Chapter 7, “Maintenance and support services,” provides
information on how to call for service, obtain documentation
and training, and report meter readings.
This guide uses the following conventions:
• All caps and angle brackets: Withi n procedures , the names
of keys are shown in all caps within angle brackets (for
example, press <ENTER>).
• Angle brackets: Variable information, or the positi on of a
specified argument in the command syntax, appears in angle
brackets (for example, List Fonts <Pattern>).
• Bold: Within procedures , te xt and number s that you e nter are
shown in bold (for example, enter privilege operator).
• The word “enter” within pr ocedures: The two-step process
of keying in data and p ressing <ENT ER> (for example,
enter y).
• Italics: Document and library names are shown in italics (for
example, the Xerox DocuPrint NPS/IPS Guide to Managing
Print Jobs).
• Quotation marks: Keywords you can enter as arguments
appear in quotes (for example, “USLetter”).
• Vertical bars: Alternatives to specifie d ar guments are
separated by vertical bars (for example, Set Time <Time |
Remote Host Name | IP Address>).
xiv Guide to Performing Routine Maintenance
Page 15

NOTE: Notes are hints that help you perform a task or
understand the text.
Cautions alert you to an action that could damage hardware or
software.
Warnings alert you to conditions that may affect the safety
of people.
Related publications
The Xerox DocuPrint NPS/IPS documentation set includes the
documents listed below.
Introduction
CAUTION
WARNING
NOTE: For a list of IBM reference manuals for IPDS printing,
refer to the Solutions Guide for IPDS Printing.
• Guide to Configuring and Managing the System
• Guide to Managing Print Jobs
• Guide to Performing Routine Maintenance
• Guide to Submitting Jobs from the Client
• Guide to Using Page Description Languages
• Installation Planning Guid e
• System Overview Guide
• Troubleshooting G uide
• Solutions Guide for IPDS Printing
• Decomposition Service and Tools Guide
• Glossary
• Master Index
• Generic MICR Fundamentals Guide
• Customer Information Quick Reference Card
• Printer Contr o ller Comman d s Qu ick Reference Ca r d
• Operator Quick Reference Card
• Submitting your Jobs from Macintosh Quick Reference Card
Guide to Performin g Routine Maintenance xv
Page 16

Introduction
• Submitting your Jobs from UNIX & DOS Quick Reference
Card
• Submitting your Jobs from Windows NT 4.0 (QuickPrint)
Quick Reference Card
• Submitting your Jobs Using Windows NT 4.0 Drivers Quick
Reference Card
The documentation set also includes an electronic version, the
DocuPrint NPS/IPS Interactive Custome r Documenta tion CD.
xvi Guide to Performing Routine Maintenance
Page 17
1. Feeder trays
This chapter shows the steps needed to load and check feeder
trays on t he Docu Print 96/4 635/1 80 N PS/IPS , and explains what
actions are necessary if paper stock is changed.
NOTE: The number of feeder trays on your system depends on
the number of feeder/stacker modules installed.
Checking feeder trays
Check the amount of paper remaining in each feeder tray by
examining the green lights above the icons on the door of the
tray.Each ligh t rep resents 2 5% of a rea m, or about 125 sh eets o f
20-pound or 80 gsm (grams per square meter) paper.
Guide to Performin g Routine Maintenance 1-1
Page 18

Feeder trays
• You can open and load any tray not currently in use without
• If you try to open a tra y currentl y in use, the feeding switches
• The printer does not f eed all t he paper out of a tra y. A stack of
Loading feeder trays
It is important to load paper properly in the feeder trays to
prevent jams and loss of production time. The following
guidelines will help ensure maximum efficiency of your printer’s
operation.
interrupting printing.
to a backup tray if one is available. If a backup tray is not
available, the printer stops.
approximately 1/4 inch / 6 mm remains in the tray.
Guidelines for loading paper
When you are loading the paper, follow these guidelines to
prevent pager jams:
• Remove damaged sheet s.
• Load the paper with the package wrapper seam side up.
• Make sure that the direction of the curl is consistent.
• Avoid fanning the paper unless the stock is predrilled.
• Do not load the paper above the MAX line on the length
guide.
• Place any paper left in the bottom of the tray on top of the
new paper stack.
• For tr ays 3, 4, 5 and 6, load paper with curl side up. If y ou do
not detect paper curl, load paper with the wrapper seam side
down.
Additional guidelines for loading special stocks:
• When loading predrilled paper, fan the paper and remove
loose paper plugs.
• Load transparencies into trays 1 and 2 only.
• When loading tab stock, remove deformed, bent, or
damaged stock.
1-2 Guide to Perf orming Routine Maintenance
Page 19

• Load preprinted paper in trays 3, 4, 5, and 6 only, in order
not to smudge the print. These trays are vacuum-type
feeders, unlike trays 1 and 2, which are friction-type.
Loading trays 1 and 2
Trays 1 and 2 are processor feeder trays.
Feeder trays
Follow these steps to load feeder trays 1 and 2.
1. Select the tray you want to load by pressing the Tray Unlock
button on the door of the paper tray or by touching the
appropriate unlock icon on the printer contro l console.
NOTE: If the printer has stopped due to a low paper
condition, you do not need to press the Tray Unlock button.
2. Wait until the Ready to Open indicator lights.
Guide to Performin g Routine Maintenance 1-3
Page 20

Feeder trays
3. Pull the feeder tray out until it stops.
4. Pull out an y p artially fed paper from the f e eder assemb ly an d
discard it. There will be some resistance.
5. Squeeze the lever against the back of the length guide and
slide the guide toward the back of the printe r.
6. Remov e any pa per remain ing in the tr a y and set it as ide to be
placed on top of the new paper.
7. Load paper, following the instructions on the labels of the
feeder tray and carefully positioning the paper in the right
front corner of the tray.
1-4 Guide to Perf orming Routine Maintenance
Page 21

Feeder trays
CAUTION
Do not load above the MAX line shown on the paper guide.
8. Pull the leng th guide forward to touch the ba ck of t he paper
stack.
Guide to Performin g Routine Maintenance 1-5
Page 22

Feeder trays
9. Latch the paper feeder assembly by pressing the green dot
next to the green release lever until the assembly clicks into
position.
10.Push the tray in slowly but firmly until it latches. Do not slam
the tra y clo sed. Thi s can cau se im proper lat ching or machi ne
damage.
11.If the printer stopped due to a low paper condition, press the
Continue button on the printer control console to resume
printing.
Loading trays 3, 4, 5, and 6
Follow these steps to load feeder trays 3,4,5, and 6:
1. Select the tray you want to load by pressing the Tray Unlock
button on the door of the paper tray or by touching the
appropriate unloc k i c on on the printer conso l e.
NOTE: If the printer has stopped due to a low paper
condition, you do not need to press the Tray Unlock button.
1-6 Guide to Perf orming Routine Maintenance
Page 23

Feeder trays
2. Wait until the Ready to Open indicator lights.
3. Pull the feeder tray out until it stops.
4. Slide both length guides away from the paper. For the rear
guide, squeeze the lever against the back of the length guide
and slide the guide toward the back of the printer.
5. Remov e any pa per remain ing in the tr a y and set it as ide to be
placed on top of the new paper.
6. Load paper, following the in structions o n the l abel a t the fr ont
of the feeder tray and carefully positioning the paper in the
right- front corner of the tray.
Guide to Performin g Routine Maintenance 1-7
Page 24

Feeder trays
NOTE: The way you load the paper depends on the paper
size required by the job. For paper longer than 14 inches,
load the long edge against the back guide.
7. Slide both length guides back against the paper.
8. Push the tray in slowly but firmly until it latches. Do not slam
the tra y clo sed. Thi s can cau se im proper lat ching or machi ne
damage.
1-8 Guide to Perf orming Routine Maintenance
Page 25

Feeder trays
9. If the printer has st opp ed du e to a low pap er condition, press
the Continue button on the printer console to resume printing.
Guide to Performin g Routine Maintenance 1-9
Page 26

Feeder trays
1-10 Guide to Performing Routine Maintenance
Page 27

2. Output trays and bins
Your print jobs are sent to output trays or bins which you must
unload. You can unload each of the output trays or bins while the
system is printing. This chapter discusses how to check and
unload the trays and bins.
If the printer has stopped d ue to a ful l output tr a y or bin and do es
not resume automatically when the tray or bin is emptied, press
the Continue button on the printer control console.
NOTE: The number of output bins on your system depends on
the number of feeder/stacker modules installed.
Checking and unloading the sample tray
The sample tray holds up to 100 sheets of paper from 7 by 10
inches / 178 by 254 mm to 17 b y 14 inch es / 432 by 356 mm. No
message appears when the sample tray is full. Since a paper
jam can occur if the tray is overfilled, empty the sample tray
regularly, if it is in use.
To empty the sample tray, simply remove the printed pages.
NOTE: Since the sample tray can receive waste sheets purged
after a paper jam, always clear the sample tray after clearing a
jam. This prevents waste sheets from being confused with good
sheets.
Checking and unloading purge trays
Aborted sheets (that is, sheets damaged during printing or
cleared before or after a paper jam) are sent to the purge tray.
Sheets may be purged before, during, or after print jobs. Sheets
are also sent to the purge tray following a fuser area jam. The
sheets purged at that time clean the fuser area, ensuring good
print quality for your subsequent jobs.
Guide to Performin g Routine Maintenance 2-1
Page 28

Output trays and bins
The purge tray holds up to 100 sheets of paper from 7 by 10
inches / 178 by 254 mm to 17 b y 14 inch es / 432 by 356 mm. No
message appears when the purge tray is full. Since a paper jam
can occur if the tray is overfilled, empty the purge tray at least
once a day.
To empty the purge tray, simply remove the printed pages.
Checking and unloading high-capacity stacker (HCS) bins
The 4635 and 180 NPS/IPS printers can have up to four highcapacity stacker (HCS) bins. The 96 NPS/IPS printer can have
up to two high-capacity stacker bins. Each high-capacity tray
holds 2500 sheets of 20lb (80 gsm) paper. (Refer to your Xerox
DocuPrint 96/4635/180 System Overview for additional
information on the high-capacity stacker bins.)
NOTE: If you use large paper sizes such as A3 or 11 by 17
inches, the stacker may hold less than 2500 sheets. This is to
ensure that the stack is at a safe weight for lifting and unloading
by the operator.
• You can lower, pull out, and unload any bin not currently in
use, without interrupting pr inting, as long as another HCS is
ready to receive paper.
• If you sel ect a bi n th at i s i n use, the printer beg ins st acking in
the next defined high-capacity stacker bin if it is available. If
no stacker bin is available, printing stops.
• Once a sheet is delivered to a stacker bin, each subsequent
sheet must be within 25 mm (approximately 1 inch) of the
length and width of the first sheet.
Unloading a stacker bin
To unload a stacker bin:
1. Select a bin for unloading by pressing the Bin Unload button
on the bin control panel. (You can also select the bin for
unloading through the printer mimic of the printer control
console.)
2-2 Guide to Perf orming Routine Maintenance
Page 29

Output trays and bins
In Use
Bin
Unload
Once a bin is selected, the bin elevator lowers and the bin
cannot be used until it is emptied completely. When the bin
elevator stops in the down position, the Ready to Unload
indicator lights.
2. Open the bin door s, pull the platform out until it sto ps, and lift
the paper stack off the platform to a nearby table or paper
cart.
CAUTION
Always use both hands to lift the paper stack out of the bin.
3. Firmly push the platfo rm back to its original position and
close the bin doors. The bin elevator rises, and the bin is
again ready for use.
NOTE: If the bin is not empty, the elevator remains down,
and a message appears on the printer control console and
printer controller display telling you to empty the bin.
Guide to Performin g Routine Maintenance 2-3
Page 30

Output trays and bins
2-4 Guide to Perf orming Routine Maintenance
Page 31

3. Fuser agent
The fuser is responsible for fusing the print image to the paper
with heat. It is critical that the fuser be kept lubricated with fuser
agent and that its reservoir be kept full. This chapter describes
the procedure for adding fuser lubricant in the printer.
To add fuser agent:
1. Open the right and left doors of the printer and locate the
fuser area.
2. Place a dropcloth on the floor under the fuser area.
3. Grasp the green handle on the fuser drawer and pull it out
until it stops.
Guide to Performin g Routine Maintenance 3-1
Page 32

Fuser agent
4. Put on gloves.
WARNING
Fuser agent contains silicone, which can cause irritation
upon contact with the eyes. Be sure to wash your hands
with soap and water after you finish this procedure.
5. Locate the fuser agent reservoir, pull it out until it stops, and
remove the reservoir cap by turning it counterclockwise.
3-2 Guide to Perf orming Routine Maintenance
Page 33

Fuser agent
6. Remove the cap from a new bottle of fuser agent and
carefully pour the fuser agen t into the reservoir, until the lev el
reaches the MAX line.
Guide to Performin g Routine Maintenance 3-3
Page 34

Fuser agent
WARNING
If any fuser agent spills on the floor, remove it immediately.
Fuser agent spills make the floor slippery. Use of Xerox
Film Remover (isopropynal alcohol) is recommended to
clean up spills.
CAUTION
The fuser reservoir has an anti-splash seal. Do not push the
fuser agent bottle into the reservoir with excessive force, as this
can damage th e seal.
7. Replace the re servoir cap by turning it clockwise and pus h
the fuser agen t reservoir in un til it stops.
8. Push the fuser drawer in until it latches in place.
3-4 Guide to Perf orming Routine Maintenance
Page 35

Fuser agent
9. Dispose of the dropcloth and any empty agent bottles in a
trash receptacle . If there is any agent left in the bott le, cap the
bottle and store it for future use.
10.Remove and dispose of the gloves in a trash receptacle,
being careful not to let any residue come in contact with your
skin.
11.Close the printer doors.
NOTE: The fuser agent message disappear s after the printer
prints between 32 and 40 sheets. Since the sheets must be
processed contin uously, you may wa nt to run 45 t est pages in
order to clear the message from the system (unless the
current print job contains at least 40 pages) .
12.Wash your hands to remove any fuser agent.
Guide to Performin g Routine Maintenance 3-5
Page 36

Fuser agent
3-6 Guide to Perf orming Routine Maintenance
Page 37

4. Adding dry ink
Dry ink (or toner) is the bl ack po wder that f orms the image o n the
printed page. This chapter describes the procedure for adding
dry ink to the printer.
When the printer is low on dry ink, the Attention light turns on,
and the message ADD DRY INK displays on th e printer cons ole.
Add dry ink at your earliest convenience.
If you do not add dry ink, the printer eventually stops printing. It
does not resume printing until you replace the dry ink bottle.
CAUTION
To prevent dry ink spillage, remove the cartridge only when
directed to do so by a message on the printer control console.
Use the procedure on the following pages to ad d dry ink to your
Xerox DocuPrint 96/4635/180/2000 Series NPS/IPS.
To add dry ink:
1. Open the printer doors and locate the dry ink area on the left
side of the printer.
Guide to Performin g Routine Maintenance 4-1
Page 38

Adding dry ink
2. Place a d r opcloth on the floor under the dry ink area.
3. Pull the empty dry ink c artridge out until it stops.
4. Move the gr een handle to the right (the unlat ched positi on) to
release the cartridge and lid.
4-2 Guide to Perf orming Routine Maintenance
Page 39

Adding dry ink
Remov e the em pty cartridge and discard it.
5. Turn a new, full cartridge of dry ink upside down and shake it
well to loosen the contents thoroughly.
6. Insert the new cartridge into the printer until it stops.
7. Move the green handle to the left (the latched position) to
secure the lid of the cartridge.
Guide to Performin g Routine Maintenance 4-3
Page 40

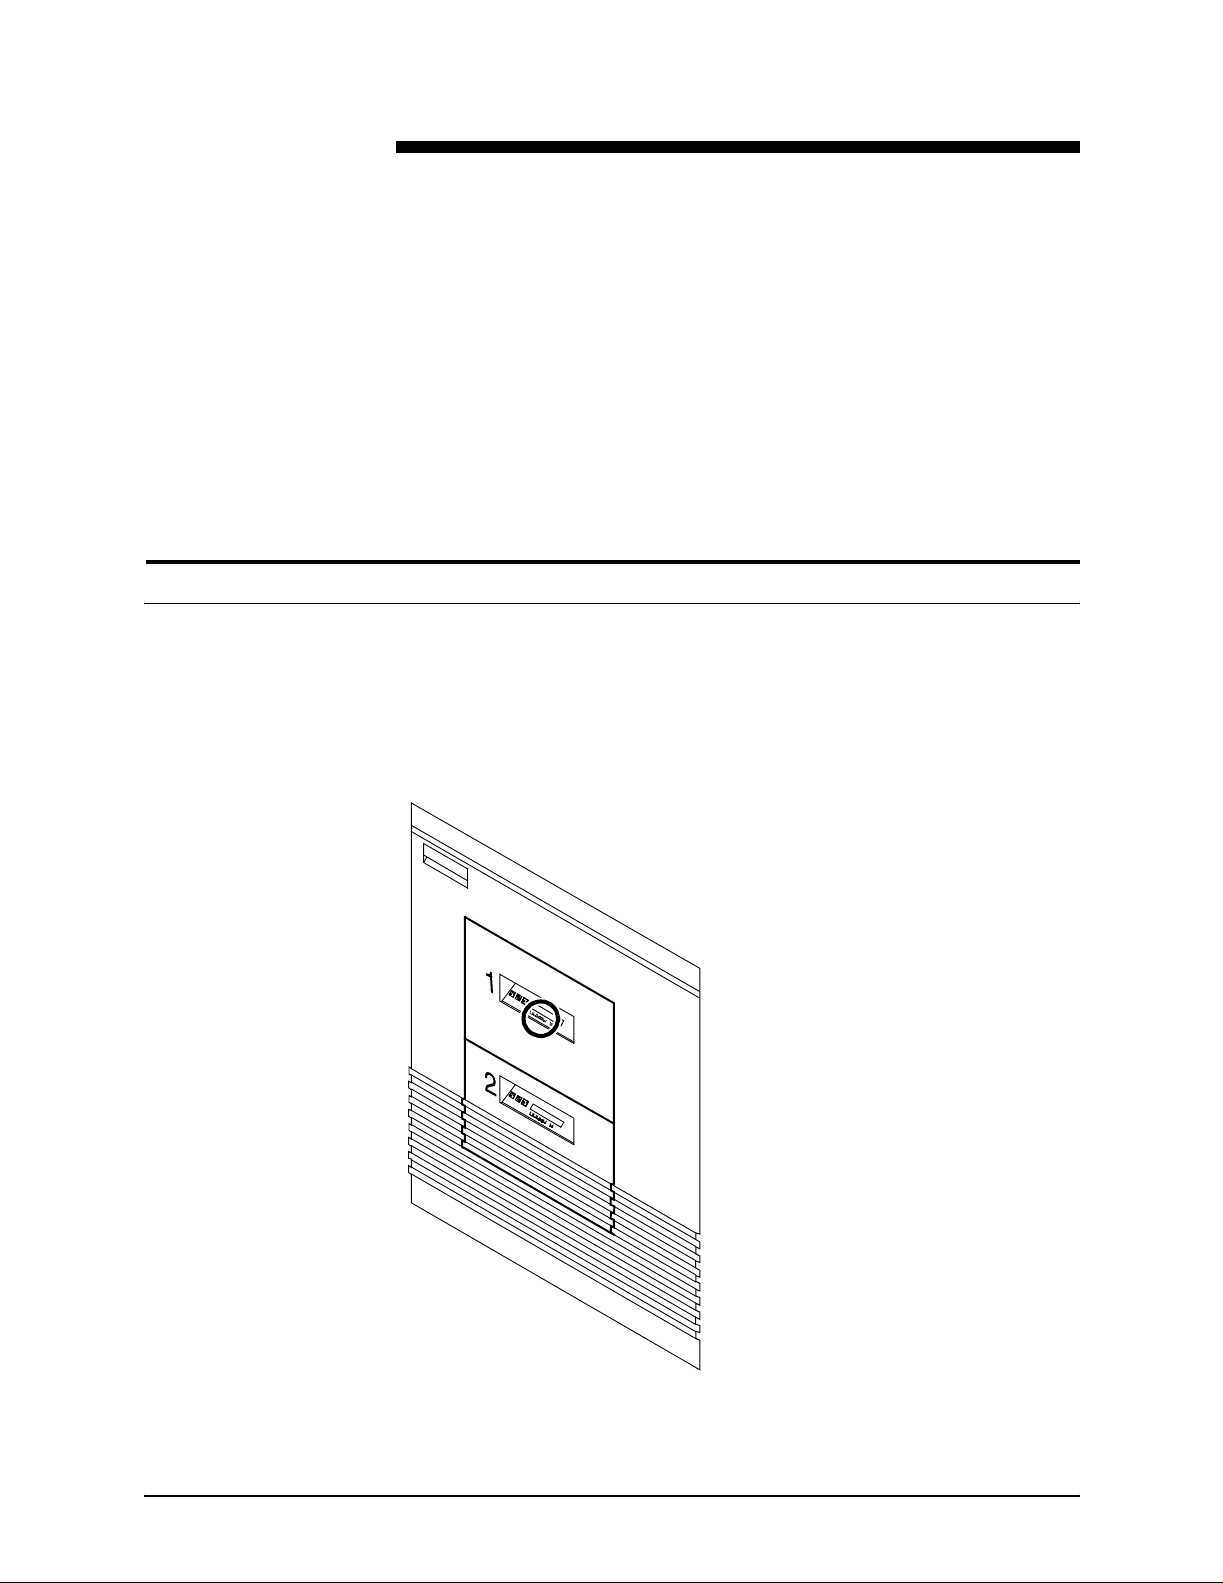
Adding dry ink
1
2
1. Dry ink cartridge
2. Green handle
8. Hold the cartridge in place and pull off the paper seal.
9. Discard the seal along with the dropcloth.
10.Close the printer doors.
CAUTION
If any dry ink gets on y our hands, wash them with soap an d co ld
water. Heat sets the ink permanently. If any dry ink gets on your
clothes, brush them with a dry paper towel or a stiff-bristled
brush. If this does not remove the ink immediately, launder with
detergent and cold water. Dr y cleaners should be told that the
spot is dry ink for a printer, so they will not use a solvent that sets
the stain.
NOTE: Do not discard damaged, unused dry ink bottles. Return
the bottles to Xerox for exchange (for credit in the USA).
4-4 Guide to Perf orming Routine Maintenance
Page 41

5. Replacing the dry ink waste container
The dry ink waste container receives the dry ink inside the
printer that does not fuse to pap er during printing. Thi s containe r
must be replaced when full.
To replace the dry ink waste container:
1. Open the right and left printer doors and locate the dry ink
waste containe r.
2. Place a dropcloth on the floor under the dry ink waste
container area.
Guide to Performin g Routine Maintenance 5-1
Page 42

Replacing the dry ink waste container
To prevent dry ink spills, do not tip or tilt the waste container.
3. Pull the full waste container out of the printer.
CAUTION
4. Remove the cap from the top of the full container and screw
the cap onto the mouth of the container.
5-2 Guide to Perf orming Routine Maintenance
Page 43

Replacing the dry ink waste container
5. Discard the waste material and container according to the
instructions on the label.
6. Slide a new, empty dry ink waste container into the printer
until it stops.
NOTE: Do not remove the cap from the container.
7. Close the printer doors.
8. Dispose of the dropcloth.
CAUTION
If any dry ink gets on y our hands, wash them with soap an d co ld
water. Heat sets the ink permanently. If any dry ink gets on your
clothes, brush them with a dry paper towel or a stiff-bristled
brush. If this does not remo ve the ink, launder wi th detergent and
cold water. Tell dry cleaners that the spot is dry ink for a printer
so they do not use a solvent that sets the stain.
Guide to Performin g Routine Maintenance 5-3
Page 44

Replacing the dry ink waste container
5-4 Guide to Perf orming Routine Maintenance
Page 45

6. Cleaning
This chapter describes the cleaning tasks you need to perform
regularly on your printing system.
Cleaning the keyboard, monitor, and the exterior of the printer controller
Clean the exterior surfaces of your printer controller including
monitor and keyboard, as required. Clean daily, if possible .
Use the following supplies to clean the exterior surfaces:
• Monitor: Use a soft, lint-free cloth dampened with a glass
cleaner . Do not spr ay t he liquid direct ly onto the monito r since
it may cause damage.
• Keyboard: Use a mild household detergent that has been
poured or sprayed onto a cloth lightly dampened with water.
Do not saturate the cloth; just dampen it.
• Exterior: Use a mild household deter ge nt that has been
poured or sprayed onto a cloth lightly dampened with water.
Do not saturate the cloth; just dampen it.
Guide to Performin g Routine Maintenance 6-1
Page 46

Cleaning
CAUTION
Do not allow liquids to drip onto anything electrical or
mechanical. For the same reason, never spray or pour the
cleaner directly onto the keyboard or the exterior surfaces of the
system.
Cleaning the sensors and the reflective surfaces
Sensors at various points along the paper path indicate where
sheets of paper are passing . Aft er a shee t ha s passed a se nsor,
if too much time elapses before another sheet arrives, the
system determines a jam has occurred, and printing stops. If a
sensor becomes dirty, it may not accurately detect sheets
passing and may give incorrect jam information. Therefore, it is
important to clean sensors regularly.
Sensors are usually cleaned by your Xerox service
representative as part of regular maintenance. However, under
certain conditions you may be directed to clean them yourself by
the Xerox Customer Support Center or by your local operating
company.
1. Brush or wipe the sensor window lightly.
NOTE: If the sensor is very dirty , clean it with a small amount
of alcohol on a swab.
2. Remove any paper dust present in the area.
CAUTION
Do not use any abrasives or strong solvents on the sensor.
6-2 Guide to Perf orming Routine Maintenance
Page 47

Cleaning the Q850 sensor
To clean the Q850 sensor:
1. Open the printer right and left doors and locate area 4.
2. Raise the area 4 green handle until it locks into place.
Cleaning
3. Locate the Q850 sensor and gently wipe the sensor with a
dry cleaning pad.
Guide to Performin g Routine Maintenance 6-3
Page 48

Cleaning
4. Lower the area 4 green handle.
5. Close the printer doors.
6-4 Guide to Perf orming Routine Maintenance
Page 49

Cleaning the Q1011 sensor and mirror
To clean the Q1011 sensor and mirror:
1. Open the right and left doors of the printer and locate the
Q1011 sensor.
Cleaning
2. Apply a small amount of len s and mirror cleane r to a cleaning
pad.
3. Gently wipe the sensor and mirror with the cleaning pad.
Guide to Performin g Routine Maintenance 6-5
Page 50

Cleaning
4. Close the printer doors.
6-6 Guide to Perf orming Routine Maintenance
Page 51

Cleaning additional sensors
Open the top cover of the high-capacity stacker. Locate and
clean the following sensors with a cleaning pad.
Sensor Q1107
Sensor Q1107 is at the right front corner of the stacker, shown
below.
Cleaning
NOTE: For systems with more than one stacker, clean each
Q1107 location.
Guide to Performin g Routine Maintenance 6-7
Page 52

Cleaning
Q1106 and Q1166
Raise the Bypass Transport upper baffle by lifting the green
handle. Sensors Q1106 and Q1166 are shown bel ow. Clean the
sensors gently, with a cleaning pad.
6-8 Guide to Perf orming Routine Maintenance
Page 53

Cleaning
Sensor Q1164
Sensor Q1164 is on the last feeder/stacker module (the one
containing the purge tray), as shown below. Clean the sensor
gently, with a cleaning pad.
Cleaning the 4mm cartridge tape drive
Clean the 4mm cartridge tape drive every 25 hours of actual tape
operation. Use only a cleaning cartridge designed for the 4mm
cartridge tape drive. No fluids or other preparations are
necessary with the use of these cartridges.
CAUTION
Do not use cleaning cartridges or any types of fluids designed for
use in audio devices as these can damage your tape drive.
To clean the tape drive:
1. Insert the cleaning cartridge into the tape drive as you would
a data tape c artridge.
Guide to Performin g Routine Maintenance 6-9
Page 54

Cleaning
2. Observe the green LED blinking slowly to indicate that the
tape drive is automatically performing a cleaning cycle.
NOTE : If the cleaning cartridge has been used f or more th an
approximately 30 cleaning cycles, the amber LED will blink
rapidly. Press the unload button to eject the cleaning
cartridge and discard it.
3.
Remove the cleaning cartridge after it is automatically
ejected following the cleaning cycle.
You can use the cartridge tape drive immediately after cleaning.
6-10 Guide to Performing Routine Maintenance
Page 55

7. Maintenance and support services
This chapter provi des information on the services Xero x provides
to help you keep your printer running efficiently. It describes the
services available to you and how to take advantage of these
services.
NOTE: The support ser vices described in this chapter apply to
the United States only. For information on the support services
available internationally, consult your Xerox representative.
Xerox Customer Service Center
Before calling your Customer Service Cente r, make sure you
have tried the corrective actions described in the Troubleshooting
Guide. If a problem persists, gather the necessary information
and call your customer service support center (or contact your
local Xerox operating company).
Refer to the Troubleshooting Guide chapter “Calling for service”
for the information you should have ready when you call.
In the United States, call the following number to report hardware
or software problems:
1-800-822-2979
NOTE: This phone number is attached to your printer at
installation time.
Xerox Documentation and Software Services
XDSS distributes the documents you need to in stall and use the
DocuColor NPS/IPS printer, other Xerox printers , and associate d
software. If you register for site subscription service, XDSS will
automatically send you updates and revisions as they become
available.
To order documen tation, call Xero x Docume ntation and Softwa re
services:
Guide to Performin g Routine Maintenance 7-1
Page 56

Maintenance and support service s
1-800-327-9753 (U.S. on ly) , between the h our s o f 6 : 00 a.m. and
4:00 p.m., Pacific time.
XDSS representatives will explain the services available, answer
your questions, and take orders for documentation.
You can also order on the web:
www.xdss.com
Xerox Font Center
The Xerox Font Center (or your local Xerox operating company)
can send you samples and catalogs of the fonts available for
your printer.
To receive font samples, obtain price information, obtain
technical support, or order licensed or custom fonts, call:
1-800-445- FONT (3668) between 6:00 a.m. and 5:00 p.m.,
Pacific time.
Operator training
You can get font information on the web at:
www.font.net
Operator training is conducted at your location shortly after your
printer is installed. Training takes approx im at el y tw o to four
hours, depending on the system configur a tion . It includ es han dson practice running basic jobs, performing routine maintenance,
and solving problems. Determine the number of operators you
want to attend the initial training, schedule training dates and
times through your Xerox sales representative.
Additional training classes, such as Advanced Customer T raining
(ACT) for operators, teach advanced service and maintenance
skills. A variety of classes and workshops are available through
Xerox Customer Education.
7-2 Guide to Perf orming Routine Maintenance
Page 57

Xerox Customer Education
Xerox offers instructor-led workshops that teach system
technical training curriculum. Workshops are designed to provide
a system overview, as well as forms creation, job control, and
increased productivity expertise. Courses are available for
operators, administrators, and for those who use Decompositi on
Service.
For detailed information about any of the courses, to enroll in
workshops, or to order the self-study courses, call Xerox
Customer Education at:
1-800-445-5554 (or your local Xerox operating company).
You can also access their web site at:
www.xerox.com/services/training/customer-ed
Maintenance and support ser v ic es
Reporting billing meters
On a regular basis , usua lly e very month, you n eed t o rep ort your
printer billing meter readings to Xerox.
To do this, you need the serial number for your system. The
serial number is located behind the middle door to the far left, at
the front of t he printer. If you are reporting meters for other Xerox
printers during the same call, make sure you have the serial
number available for each one before calling.
If you know how to read the billing meters for your system, you
can have that information ready when you call. Otherwise, the
service rep resentative will provide you with instructions when
you call. Refer to the Guide to Configuring and Managing the
System for more information.
To report billing meter readings, call 1-800-891-8405 (all U.S.
locations) or contact your local Xerox operating company.
Guide to Performin g Routine Maintenance 7-3
Page 58

Maintenance and support service s
7-4 Guide to Perf orming Routine Maintenance
Page 59

Index
Numerics
4mm cartridge tape dri ve, cleaning 6-9–6-10
A
Advanced Customer Training (ACT) 7-2
C
CE mark ix
checking
feeder trays 1-1
high-capacity stacker (HCS) bins 2-2
purge trays 2-1
sample trays 2-1
cleaning
4mm cartridge tape drive 6-9–6-10
keyboard 6-1
mirror 6-5
monitor 6-1
Printer Controller exterior 6-1
reflective surfaces 6-2
sensors
Q1011 6-5
Q1106 6-8
Q1107 6-7
Q1164 6-9
Q1166 6-8
Q850 6-3
conventions xiv
D
documentation xv
dry ink
adding 4-1–4-4
dry ink waste container
replacing 5-1–5-3
F
feeder trays 1-1–1-9
friction-type feeders 1-3
fuser agent, adding 3-1–3-5
G
guidelines, load i ng pap er1-2
H
high-capacity stacker (HCS) bins2-2
I
input trays, loading 1-1
K
keyboard, cleaning 6-1
L
laser safety v
Load 1-7
loading
feeder trays 1-1
paper 1-2
trays 1 and 2 1-3–1-6
trays 3,4,5, and 61-6–1-9
M
maintenance services 7-1–7-3
monitor, cleani ng 6-1
O
operation safety, Europevii–ix
operation safety, U. S. vi–vii
operator training 7-2
output trays 2-1
ozone production inform ation vi
P
paper
loading 1-2
predrilled 1-2
preprinted 1-3
paper feeder assembly 1-6
predrilled pa per 1-2
preprinted pa per 1-3
Printer Controller exterior, cleaning6-1
Guide to Performing Routine Maintenance INDEX-1
Page 60

INDEX
procedures
4mm cartridge t ape drive, cleaning 6-2
dry ink
adding 4-1–4-4
waste container, replacing 5-1–5-3
fuser agent, adding 3-1–3-5
sensors, cleaning
Q1011 6-5
Q850 6-3
stacker bins, unloading 2-2–2-3
trays 1 and 2, loading 1-3–1-6
trays 3, 4, 5, and 6, loading 1-6–1-9
publications xv
purge trays 2-1
Q
Q1011 sensor and mirror, cleaning6-5
Q1106 sensor, cleaning 6-8
Q1107 sensor, cleaning 6-7
Q1164 sensor, cleaning 6-9
Q1166 sensor, cleaning 6-8
Q850 sensor, cleaning 6-3
R
Ready to Open indic ator 1-3
Ready to Unload indicator 2-3
reflective surfaces, cleaning 6-2
Reporting billing meters 7-3
transparencies, loading 1-2
Tray Unlock button 1-3
trays
loading
1 and 2 1-3–1-6
3,4,5, and 6 1-6–1-9
feeder 1-1
output 2-1
purge 2-1
sample 2-1
U
unloading
high-capacity stacker (HCS) bins2-2
purge trays 2-1
sample trays 2-1
stacker bins 2-2–2-3
V
vacuum-type feeders1-3
X
Xerox Customer Education 7-3
Xerox Customer Service Center 7-1
Xerox Documentation and Software
Services (XDSS) 7-1
Xerox Font Center7-2
S
safety
hotline numbersvii
laser v
operation vi–ix
sample trays 2-1
sensors, cleaning
methods 6-2
Q1011 6-5
Q1106 6-8
Q1107 6-7
Q1166 6-8
Q850 6-3
service telephone number 7-1
stacker, unloading bins2-2–2-3
support services7-1–7-3
T
tab stock 1-2
training, operators 7-2
INDEX-2 Guide to Performing Routine Maintenance
 Loading...