

Page 1

Xerox DocuPrint 92C IPS
Troubleshooting Guide
Version 7.1
August 2000
721P89160
Page 2

Xerox Corporation
Printing Systems Documentation and Education
701 South Aviation Boulevard, ESM1-058
El Segundo, CA 90245
© 1997, 1998, 1999, 2000 by Xerox Corporation. All rights reserved.
Copyright protection claimed includes all forms and matters of
copyrightable material and information now allowed by statutory or
judicial law or hereinafter granted, including without limitation,
material generated from the software programs which are displayed
on the screen, such as icons, screen displays, looks, etc.
Printed in the United States of America
Publication number: 721P89160
Xerox® and all Xerox products mentioned in this publication are
trademarks of Xerox Corporation. Products and trademarks of other
companies are also acknowledged.
Changes are periodically made to this document. Changes, technical
inaccuracies, and typographical errors will be corrected in
subsequent editions.
Page 3

Laser safety
Warning: Adjustments, use of controls, or performance of
!
procedures other than those specified herein may result in
hazardous light exposure.
The Xerox DocuPrint printers are certified to comply with the
performance standards of the U.S. Department of Health, Education,
and Welfare for Class 1 laser products. Class 1 laser products do not
emit hazardous radiation. The DocuPrint printers do not emit
hazardous radiation because the laser beam is completely enclosed
during all modes of customer operation.
The laser danger labels on the system are for Xerox service
representatives and are on or near panels or shields that must be
removed with a tool. DO NOT REMOVE LABELED PANELS OR
PANELS NEAR LABELS. ONLY XEROX SERVICE
REPRESENTATIVES HAVE ACCESS TO THESE PANELS.
Ozone information
This product produces ozone during normal operation. The amount
of ozone produced depends on copy volume. Ozone is heavier than
air. The environmental parameters specified in the Xerox installation
instructions ensure that concentration levels are within safe limits. If
you need additional information concerning ozone, call 1-800-8286571 to request the Xerox publication 600P83222, OZONE.
XEROX DOCUPRINT 92C IPS TROUBLESHOOTING GUIDE iii
Page 4

Operation safety
Your Xerox equipment and supplies have been designed and tested
to meet strict safety requirements. They have been approved by
safety agencies, and they comply with environmental standards.
Please observe the following precautions to ensure your continued
safety.
• Always connect equipment to a properly grounded electrical
outlet. If in doubt, have the outlet checked by a qualified
electrician.
Warning: Improper connection of the equipment grounding
!
conductor may result in risk of electrical shock.
• Never use a ground adapter plug to connect equipment to an
electrical outlet that lacks a ground connection terminal.
• Always place equipment on a solid support surface with
adequate strength for its weight.
• Always use materials and supplies specifically designed for
your Xerox equipment. Use of unsuitable materials may result in
poor performance and may create a hazardous situation.
• Never move either the printer or the Printer Controller without
first contacting Xerox for approval.
• Never attempt any maintenance that is not specifically
described in this documentation.
• Never remove any covers or guards that are fastened with
screws. There are no operator-serviceable areas within these
covers.
• Never override electrical or mechanical interlocks.
• Never use supplies or cleaning materials for other than their
intended purposes. Keep all materials out of the reach of
children.
• Never operate the equipment if you notice unusual noises or
odors. Disconnect the power cord from the electrical outlet and
call service to correct the problem.
If you need any additional safety information concerning the
equipment or materials Xerox supplies, call Xerox Product Safety at
the following toll-free number in the United States:
1-800-828-6571
For customers outside the United States, contact your local Xerox
representative or operating company.
iv XEROX DOCUPRINT 92C IPS TROUBLESHOOTING GUIDE
Page 5

Table of contents
Laser safety iii
Ozone information iii
Operation safety iv
Introduction vii
About this guide vii
Contents vii
Conventions viii
Related publications ix
1. Calling for service 1-1
Information to have on hand when calling for service 1-1
Enabling and disabling the modem for remote service 1-2
Preparing your system for remote service 1-2
Enabling your modem 1-3
Disabling your modem 1-3
2. Clearing paper misfeeds and jams 2-1
Clearing a feeder tray fault 2-2
Frequent misfeeds 2-4
Clearing paper jams 2-6
Job recovery 2-9
Printer jam clearance areas 2-9
Clearing paper jams from areas 1 and 1A 2-10
Clearing paper jams from areas 2 and 2A 2-12
Clearing paper jams from area 3 2-14
Clearing paper jams from area 4 2-15
Clearing paper jams from area 5 2-17
Clearing paper jams from areas 6 and 6A 2-19
Clearing paper jams from area 7 2-20
Clearing paper jams from area 8 2-21
Clearing paper jams from area 9 2-22
Clearing stacker tray paper jams (dual stacker) 2-23
Clearing stitcher/stacker paper jams (areas A and B) 2-24
Clearing bypass transport paper jams 2-25
Adjusting dual stacker tray scuffer arms 2-26
3. Correcting stacker problems 3-1
XEROX DOCUPRINT 92C IPS TROUBLESHOOTING GUIDE v
Page 6

TABLE OF CONTENTS
4. System unresponsive 4-1
Index INDEX-1
vi XEROX DOCUPRINT 92C IPS TROUBLESHOOTING GUIDE
Page 7

About this guide
Introduction
This Xerox DocuPrint 92C IPS Troubleshooting Guide describes how
to solve some specific problems that may occur when you are using
the printing system.
This guide is designed for Xerox DocuPrint 92C IPS operators whose
job consists of the routine operation of one of these systems.
Users should have an understanding of Printer Controller operations.
Before using this guide, become familiar with its contents and
conventions.
Contents
This section lists the contents of this guide:
• Chapter 1, “Calling for service,” describes the information to
have on hand when calling for support service, and provides
information on using the Sixth Sense Technology.
• Chapter 2, “Clearing paper misfeeds and jams,” illustrates how
to clear paper misfeeds and jams from various parts of the
paper path.
• Chapter 3, “Correcting stacker problems,” provides solutions to
common stitcher/stacker and dual stacker problems.
• Chapter 4, “System unresponsive,” provides solutions to
specific printer problems.
An index is provided at the back of the guide.
XEROX DOCUPRINT 92C IPS TROUBLESHOOTING GUIDE vii
Page 8
INTRODUCTION
Conventions
This guide uses the following conventions:
• All caps and angle brackets—Within procedures, the names of
keys are shown in all caps within angle brackets (for example,
press <ENTER>).
• <Angle brackets> — Variable information, or the position of a
specified argument in the command syntax, appears in angle
brackets (for example, List Fonts <Pattern>).
• Bold — Within procedures, text and numbers that you enter are
shown in bold.
• “Enter” — Within procedures, the two-step process of keying in
data and pressing <ENTER> (for example, enter y).
• Italics — Document and library names are shown in italics (for
example, the Xerox DocuPrint 92C IPS Troubleshooting Guide).
• Capitalization of graphical user interface (GUI) window titles
matches the titles as they appear on the screen. In cases where
a window does not have a title, it is referenced using all lower
case. For example:
— At the graphical user interface, use the Output
Configuration window to group the trays.
— The main window displays the current system status.
Note: Notes are hints that help you perform a task or understand
the text.
Caution: Cautions alert you to an action that could damage
hardware or software.
Warning: Warnings alert you to conditions that could affect the
!
safety of people.
viii XEROX DOCUPRINT 92C IPS TROUBLESHOOTING GUIDE
Page 9

Related publications
Xerox documents Following is a list of all Xerox DocuPrint IPS documents. For a
INTRODUCTION
This document is part of the Xerox DocuPrint IPS publication set.
complete list and description of available Xerox documentation, refer
to the Xerox Customer Documentation Catalog (publication number
610P17517), or call your service representative.
Application Programmer/System Administrator Quick Reference
Card
Customer Information Quick Reference Card
Generic MICR Fundamentals Guide
Glossary
Guide to Configuring and Managing the System
Guide to Performing Routine Maintenance
Helpful Facts About Paper
Installation Planning Guide
Master Index
Messages Guide
Solutions Guide
System Overview Guide
Troubleshooting Guide
Xerox Standard Font Library Font User Guide
The documentation set also includes an electronic version, the
DocuPrint IPS Interactive Customer Documentation CD.
IBM documents Following are related IBM documents. Contact your local IBM
representative for ordering instructions for IBM AFP/PSF manuals
that might be useful for your specific installation.
IBM 3825 Page Printer Product Description
IBM Intelligent Printer Data Stream Reference
IBM Advanced Function Presentation Printer Summary
IBM ITSC Distributing AFP Printing from a Host System
IBM Advanced Function Printing Data Stream Reference
IBM Data Stream and Object Architectures: Mixed Object Document
Content Architecture Reference
Guide to Advanced Function Presentation
XEROX DOCUPRINT 92C IPS TROUBLESHOOTING GUIDE ix
Page 10

INTRODUCTION
x XEROX DOCUPRINT 92C IPS TROUBLESHOOTING GUIDE
Page 11

1. 1Calling for service
Before calling your customer service support center, make sure you
have read this chapter and have tried the corrective actions
described here. If the problem persists, gather the necessary
information and call the customer support center.
Information to have on hand when calling for service
To report DocuPrint hardware or software problems in the United
States, call the following number:
1-800-822-2979
For customers outside the United States, call your local service
representative.
Note: A model-specific phone number is attached to your printer at
installation time.
Before calling, make note of the following:
• Status code numbers and messages that appear on the
controller screen and the printer console
• Indicator lights that are lit
• Name of your printer: DocuPrint 92C IPS
• Serial number for your printing system (a 9-digit alphanumeric
code located on the frame inside the printer, behind the narrow
door to the far left, on the front of the printer).
• Problems you are having with the system.
Additional information you may wish to note prior to calling includes:
• An explanation of how output differs from what was expected.
• An assessment of whether the symptoms follow a pattern or
occur randomly.
• A list of special conditions that may be related to the problems:
— New applications
— Changes made to the software
— Recent service performed
— Previous conditions under which the application has
printed properly.
Give this information to a customer service representative, who will
discuss the information and give you an estimated time of arrival or
assist you over the phone to resolve the problem.
XEROX DOCUPRINT 92C IPS TROUBLESHOOTING GUIDE 1-1
Page 12

CALLING FOR SERVICE
Enabling and disabling the modem for remote service
Your system may be set up to use Sixth Sense Technology—a
remote communication capability. Sixth Sense Technology is a userfriendly suite of tools that allow service personnel to connect with a
customer system and evaluate its performance while the system is
being used. The Customer Service Engineer (CSE) can troubleshoot
problems remotely, transfer, apply, and remove patches remotely,
and, if an on-site call is required, arrive with the solution to fix the
problem.
An external modem allows your system to be accessed by remote
service technicians.
Caution: Depending on the commands used by the technician, the
printer may start up during the remote service session. You should
not attempt to operate the system or perform any tasks at the printer
during the remote service session.
Preparing your system for remote service
When making a service call, your Service Representative may ask
you to prepare your system for a remote service. If so, follow these
steps:
1. Upon request, provide the service representative with your
modem telephone number.
2. At the graphical user interface, place the system offline. This
will prohibit the printer from running a job while the service
representative is analyzing your IPS system.
3. Enable the modem (see “Enabling your modem” section later in
this chapter).
4. Answer the service representative’s questions as appropriate,
and make sure that no operators, users, or administrators use
the system while the service takes place.
5. When the service is complete, disable the modem (see
“Disabling your modem” section later in this chapter).
6. Place the system back online.
1-2 XEROX DOCUPRINT 92C IPS TROUBLESHOOTING GUIDE
Page 13
Enabling your modem
CALLING FOR SERVICE
Enable your modem at the graphical user interface following these
steps:
1. Select the Configuration pull-down menu of the IPS main
window.
2. Select the Modem Enable/Disable menu item.
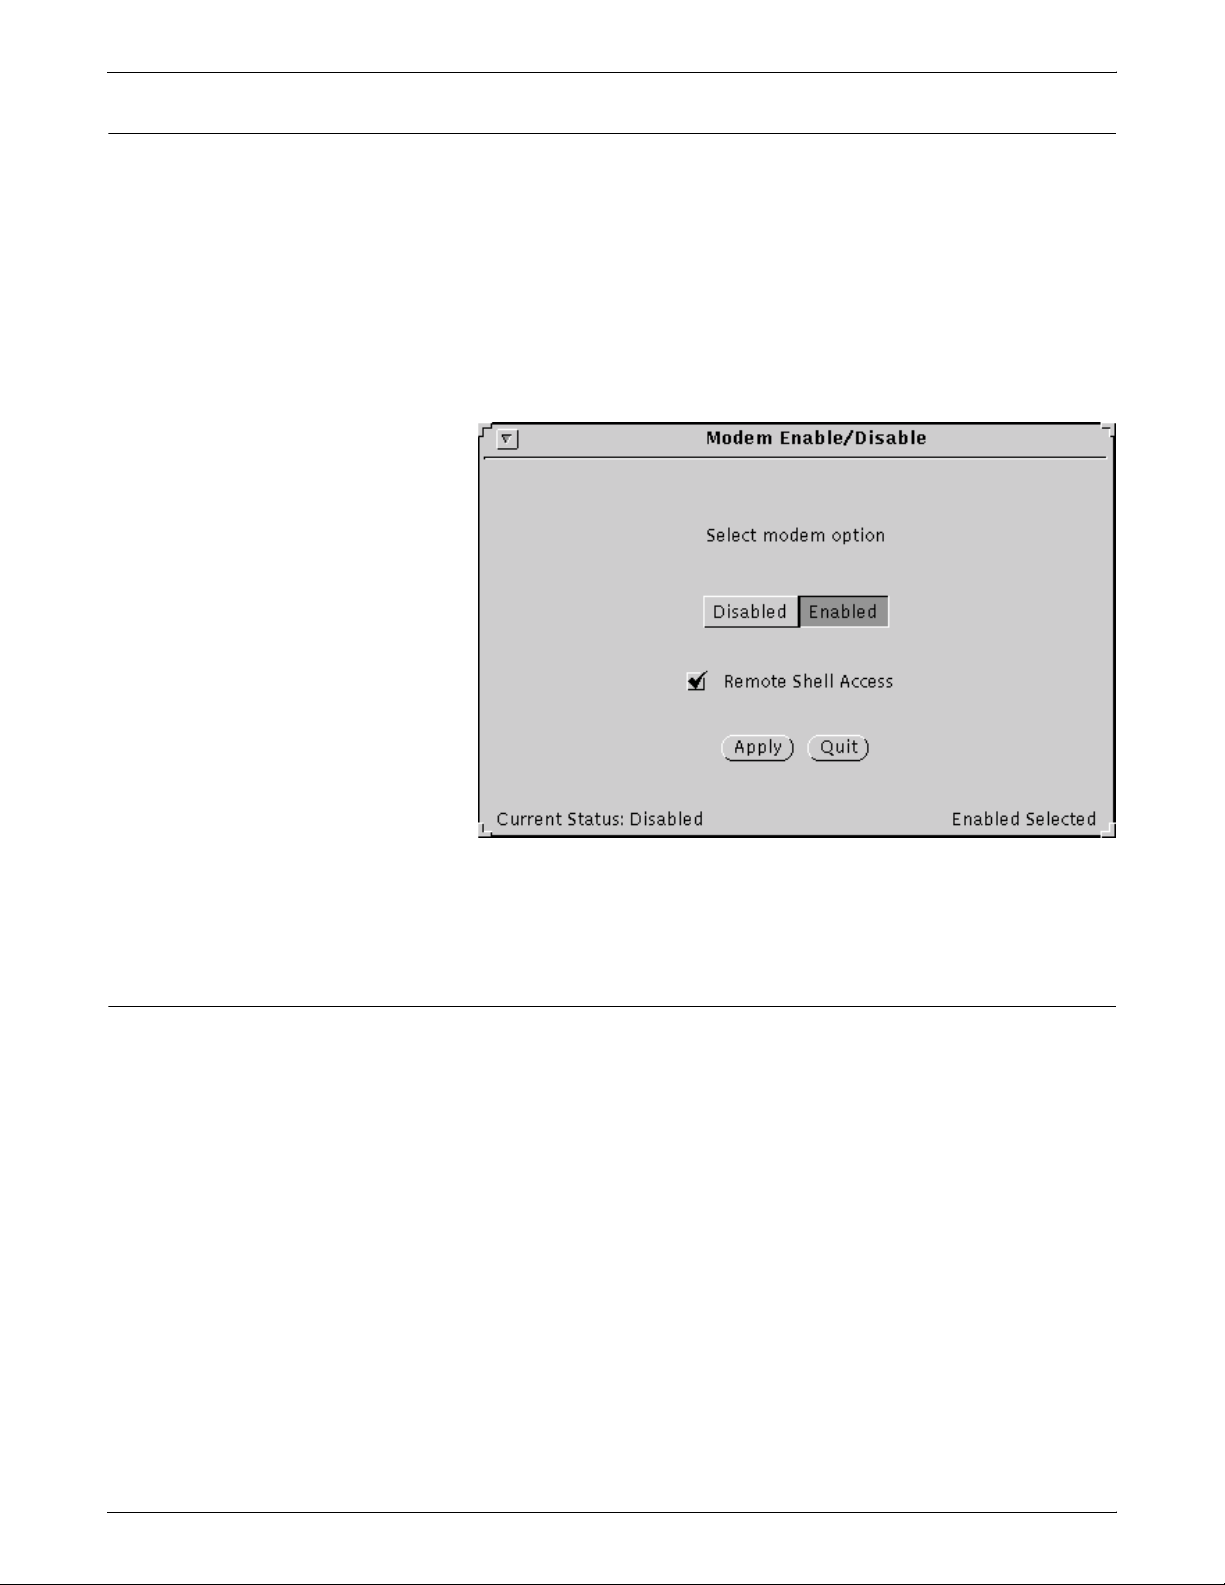
3. At the Modem Enable/Disable window, select Enabled, then
click Apply.
Figure 1-1. Modem Enable/Disable window
Disabling your modem
4. At the Password window, enter the root password, then confirm
your entry.
Disable your modem at the graphical user interface following these
steps:
1. Select the Configuration pull-down menu of the IPS main
window.
2. Select the Modem Enable/Disable menu item.
3. At the Modem Enable/Disable window, select Disabled, then
click Apply.
XEROX DOCUPRINT 92C IPS TROUBLESHOOTING GUIDE 1-3
Page 14

CALLING FOR SERVICE
1-4 XEROX DOCUPRINT 92C IPS TROUBLESHOOTING GUIDE
Page 15

2. 2Clearing paper misfeeds and
jams
Paper jams and misfeeds can be greatly reduced or eliminated if you
use the correct type of paper under the right conditions. Refer to
Helpful Facts About Paper for information on paper selection and
care.
XEROX DOCUPRINT 92C IPS TROUBLESHOOTING GUIDE 2-1
Page 16

CLEARING PAPER MISFEEDS AND JAMS
Clearing a feeder tray fault
When paper is misfed from the paper trays, complete the following
steps:
1. Go to the paper tray indicated by the message and graphic
displays of the printer control console.
2. Press the Tray Unlock button on the front left of the paper tray.
3. When the Ready To Open indicator is lit, pull the bar up and out
to open the tray. Pull the tray all the way out for best results.
2-2 XEROX DOCUPRINT 92C IPS TROUBLESHOOTING GUIDE
Page 17

CLEARING PAPER MISFEEDS AND JAMS
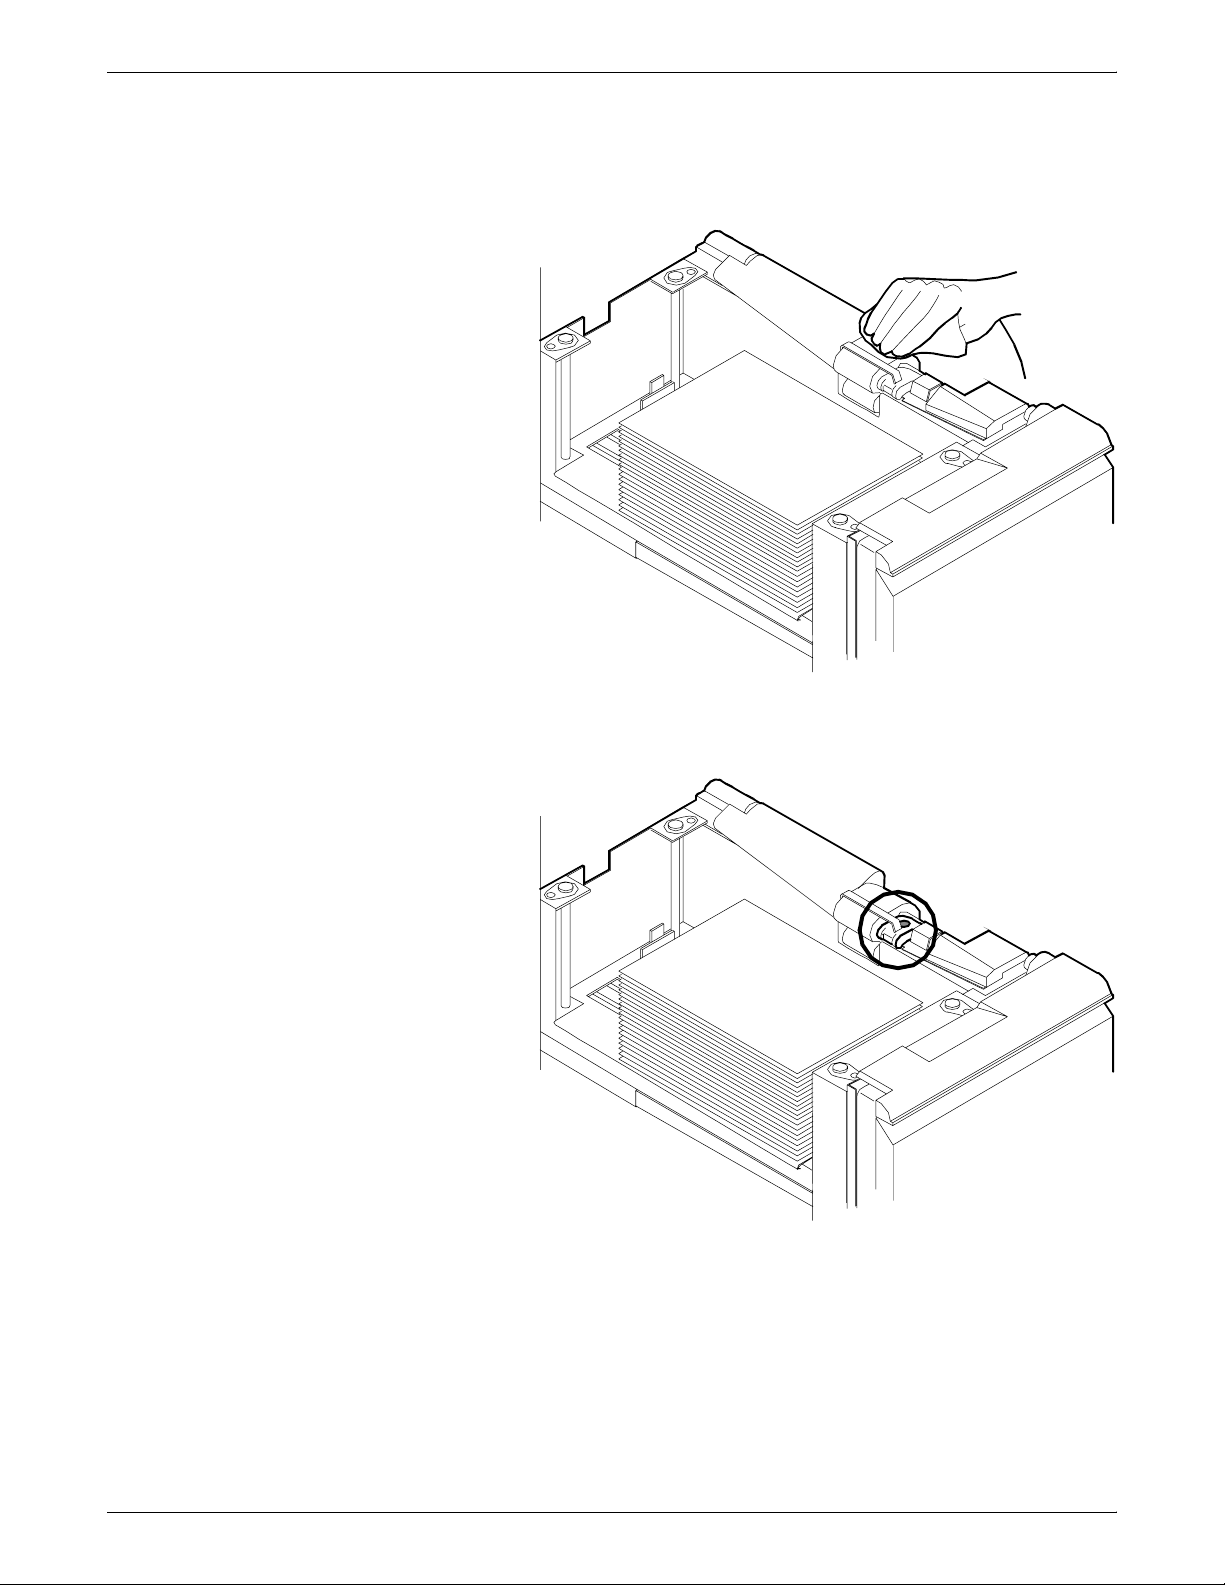
4. Press the green lever to unlatch the paper feeder assembly.
5. Remove and discard any partially fed paper. Make sure the
paper supply is neatly stacked and the stack is not higher than
the MAX line on the length guide. Make sure the length guide
is firmly touching the back edge of the stack.
6. Latch the paper feeder assembly by pressing the green dot until
the assembly clicks into place.
7. Slide the tray back into the printer until the tray latches and
press the Continue button to resume printing.
8. Discard any pages sent to the sample tray or unused stacker
tray when the paper jam was detected.
XEROX DOCUPRINT 92C IPS TROUBLESHOOTING GUIDE 2-3
Page 18

CLEARING PAPER MISFEEDS AND JAMS
Frequent misfeeds
Frequent misfeeds may be caused by a glazed feed belt, especially
if one tray feeds the same kind of paper better than another tray
does. (Glazing is caused by a buildup of the chemicals found on most
papers.)
If you suspect that the belt is glazed, try cleaning it with film remover
obtained from your service representative.
Caution: Clean the feed belt only to correct misfeeds, not as
routine maintenance. Because the belt is rubber, frequent cleaning
dries it out and makes it fail prematurely.
1. Clear any misfeeds that have occurred, but do not latch the
paper feeder assembly. If necessary, unlatch it by pressing
down on the bright green lever on the right side of the paper
tray.
2-4 XEROX DOCUPRINT 92C IPS TROUBLESHOOTING GUIDE
Page 19
CLEARING PAPER MISFEEDS AND JAMS
2. Lightly moisten a lint-free towel with film remover and
thoroughly wipe the outside surface of the feed belt in the same
direction as the ribs on the belt. (Wiping from side to side might
pull the belt off its track.) Allow a few seconds for the film
remover to evaporate.
3. Latch the paper feeder assembly by pressing down on the
bright green dot. Slide the paper tray completely back into the
printer.
Operate the system as usual. If you continue to experience misfeeds,
place a service call.
XEROX DOCUPRINT 92C IPS TROUBLESHOOTING GUIDE 2-5
Page 20

CLEARING PAPER MISFEEDS AND JAMS
Clearing paper jams
Paper sometimes jams as it leaves the feeder trays or moves through
the paper path. You must clear the paper jam before you can
continue to print. The two illustrations below show the areas along
the paper path in which jams may occur.
Figure 2-1. Areas along the simplex paper path
Figure 2-2. Areas along the duplex paper path
2-6 XEROX DOCUPRINT 92C IPS TROUBLESHOOTING GUIDE
Page 21

CLEARING PAPER MISFEEDS AND JAMS
Jam displays on printer control console In the event of a jam, the printer control console displays the following
information:
• The message display describes the areas of the printer you
must check and clear.
• The graphic display shows the location of the jams and the
doors you must open to access them.
Figure 2-3. Message and graphic displays on printer control
console
121
2
1 Message display
2 Graphic display
XEROX DOCUPRINT 92C IPS TROUBLESHOOTING GUIDE 2-7
Page 22

CLEARING PAPER MISFEEDS AND JAMS
Interior labels Message labels are located inside the printer at the point of need.
Figure 2-4. Message labels inside the printer
Each handle, lever, or knob you use to clear a paper jam is bright
green and marked with an arrow indicating the direction it moves.
When a paper jam occurs in the printer, clear only the area or areas
indicated by the message and graphic displays.
2-8 XEROX DOCUPRINT 92C IPS TROUBLESHOOTING GUIDE
Page 23

Job recovery
CLEARING PAPER MISFEEDS AND JAMS
When a jam occurs, the system controller and printer send damaged
or lost pages to the print queue. For severe jams, the Printer
Controller performs the recovery while the printer reinitiates a system
status check.
The next level of recovery is for Host Channel Unit (HCU) errors, on
channel-attached systems only. If these occur, reboot the Sun
workstation and the HCU. Job recovery restarts and resumes at the
last checkpoint held by the host.
Checking job integrity following a
paper jam
Printer jam clearance areas
When printing resumes following a paper jam, there is a slight
possibility that duplicate sheets may be printed or sheets may be
missing from a job. For that reason, you should check job integrity
once the job has been printed.
Follow this procedure:
1. The printer offsets the first sheet printed following a paper jam.
Locate that sheet.
2. Check the sheets immediately before and after the offset sheet
to see if there are any missing or duplicate sheets in the job.
3. Check the output for data missing from the pages.
The following figure shows all areas in which printer jams can occur.
Note: This diagram contains the jam clearance areas for both the
dual stacker (areas 8, 8A, and 9) and the stitcher/stacker (areas A
and B). The purpose of the diagram is to give you an overall
perspective of the locations of all the printer areas relative to each
other. Note that an actual printer cannot have both a dual stacker and
a stitcher/stacker.
Figure 2-5. Overview of all printer jam areas
6
5
4
XEROX DOCUPRINT 92C IPS TROUBLESHOOTING GUIDE 2-9
77
1
3
2
22
6A
3
4
2A2A
1A91A
8
A
B
Page 24

CLEARING PAPER MISFEEDS AND JAMS
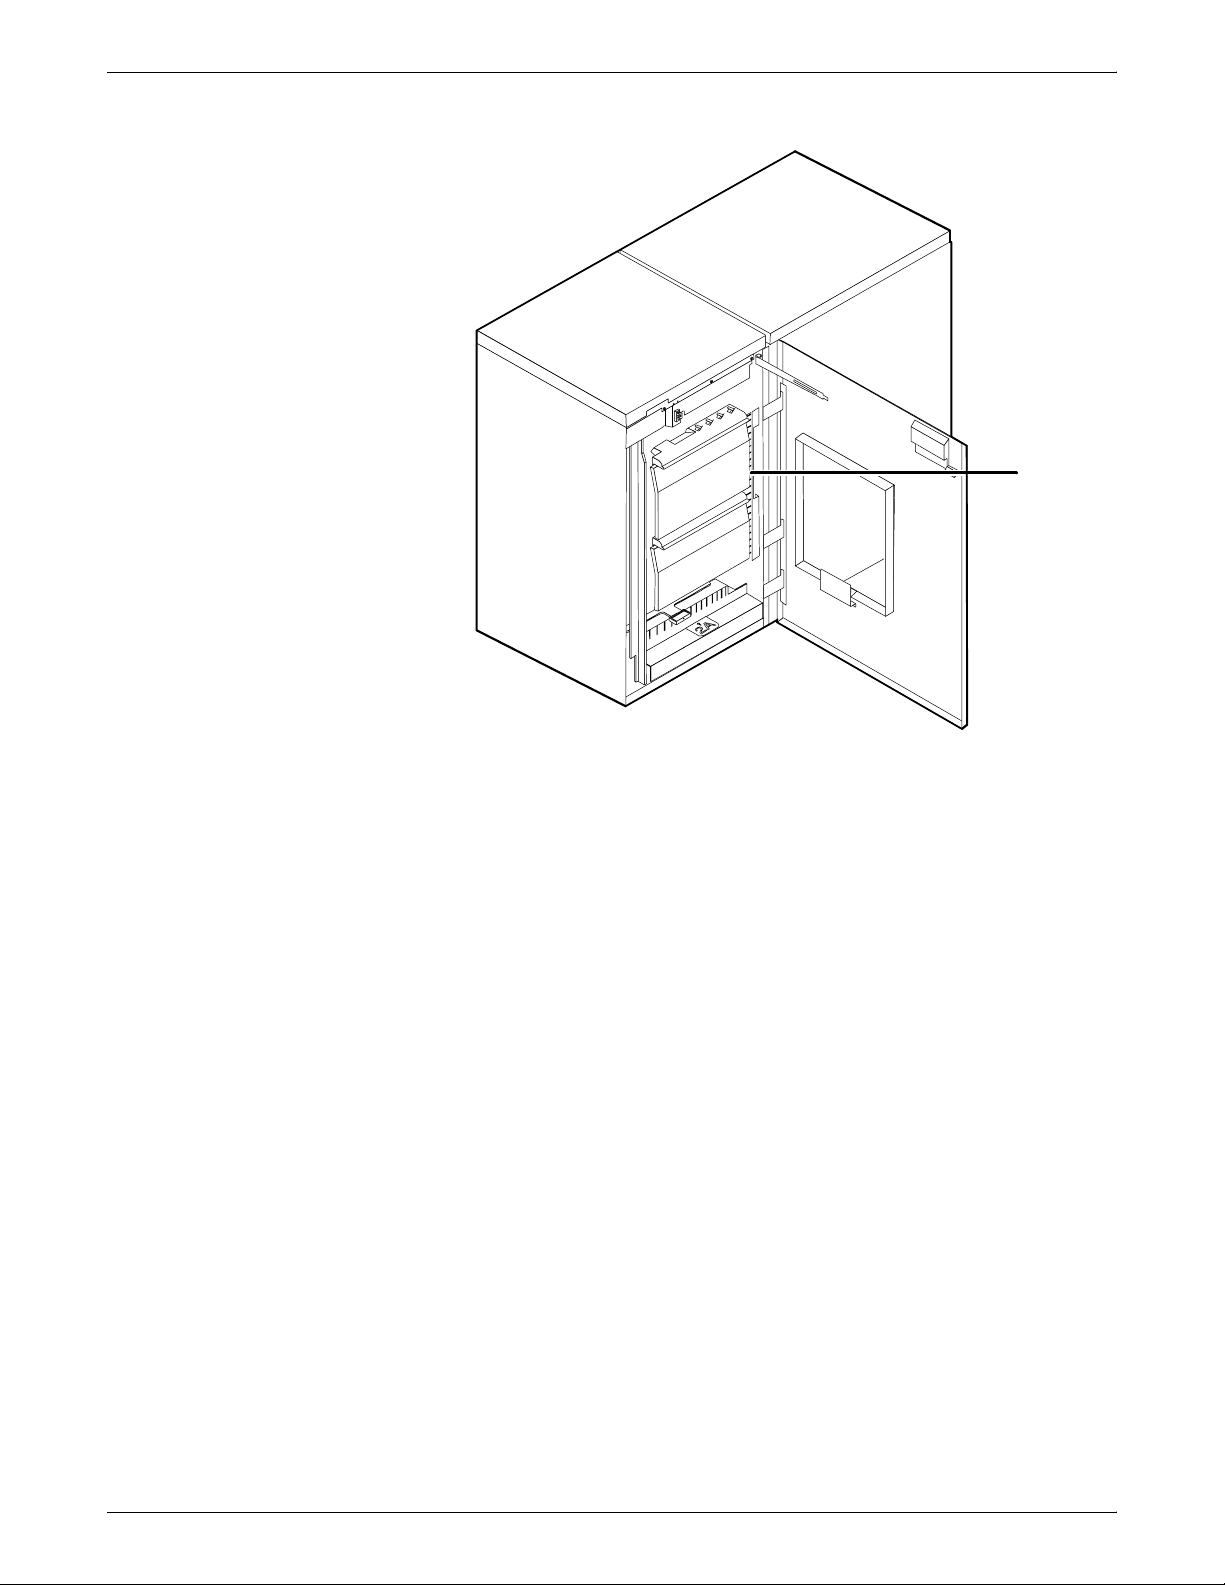
Clearing paper jams from areas 1 and 1A
To clear paper jams from areas 1 and 1A:
1. Open the middle door and locate area 1.
Area 1
2. Remove and discard any paper you find in the areas indicated.
Area 1
3. Close the door.
2-10 XEROX DOCUPRINT 92C IPS TROUBLESHOOTING GUIDE
Page 25
CLEARING PAPER MISFEEDS AND JAMS
4. Open the high-capacity feeder front door and locate area 1A.
Area 1A
5. Remove and discard any paper you find in the area 1A.
6. Close the door and press Continue to resume printing.
XEROX DOCUPRINT 92C IPS TROUBLESHOOTING GUIDE 2-11
Page 26

CLEARING PAPER MISFEEDS AND JAMS
Clearing paper jams from areas 2 and 2A
To clear paper jams from areas 2 and 2A:
1. Open the middle door and locate area 2.
2. Lift the three green handles one by one. Each time you lift a
handle, remove and discard any paper you find beneath the
open section.
3. Lower the handles and close the door.
2-12 XEROX DOCUPRINT 92C IPS TROUBLESHOOTING GUIDE
Page 27

CLEARING PAPER MISFEEDS AND JAMS
4. Open the high-capacity feeder front door and locate area 2A.
5. Lift the green handle. Remove and discard any paper you find in
this area.
6. Lower the handle, close the door, and press the Continue
button to resume printing.
XEROX DOCUPRINT 92C IPS TROUBLESHOOTING GUIDE 2-13
Page 28

CLEARING PAPER MISFEEDS AND JAMS
Clearing paper jams from area 3
Follow these steps to clear jams in area 3.
1. Open the middle door and locate area 3.
2. Push and hold the green handle to the right (in the direction of
the arrow marked on it).
3. Remove and discard any paper you find in this area.
4. Release the handle, close the door, and press the Continue
button to resume printing.
Note: When paper jams occur in areas 3 through 5, three extra
blank sheets are sent through the printer to ensure that the fuser
is clean. These sheets are sent to the top tray and should be
discarded. You are not charged for these sheets.
2-14 XEROX DOCUPRINT 92C IPS TROUBLESHOOTING GUIDE
Page 29

Clearing paper jams from area 4
CLEARING PAPER MISFEEDS AND JAMS
Follow these steps to clear jams from area 4.
1. Open the middle and left doors and locate area 4. Remember to
clear the jam in area 5 first, if you are directed to clear both
areas.
Warning: The laser safety label located on the inside left front
!
door of the printer advises you that the panel below it must not
be removed, except by a service representative.
2. With your left hand, move and hold the green latch to the right
(the direction of the arrow marked on it). With your right hand,
pull out the large green handle until the fuser unit latches in the
fully open position.
Warning: Take care not to touch any parts in this area. They
!
may be hot enough to cause burns.
XEROX DOCUPRINT 92C IPS TROUBLESHOOTING GUIDE 2-15
Page 30

CLEARING PAPER MISFEEDS AND JAMS
3. Raise the small green handle at the front of the fuser assembly.
4. Remove and discard any paper you find in this area.
Warning: Take care not to touch any parts in this area. They
!
may be hot enough to cause burns.
Caution: Do not use a sharp object to remove paper wrapped
around the fuser rolls. Attempting to do so could damage the
roller and require its replacement.
5. Return the small green handle to its original position.
6. Push down on the green release latch, and slide the fuser unit
back into the printer until it latches into the closed position.
7. Close the doors (left one first) and press the Continue button to
resume printing.
2-16 XEROX DOCUPRINT 92C IPS TROUBLESHOOTING GUIDE
Page 31

Clearing paper jams from area 5
CLEARING PAPER MISFEEDS AND JAMS
Follow these steps to clear jams in area 5.
1. Open the middle door and locate area 5.
2. If paper is caught in the rollers between areas 4 and 5, first turn
the green knob in the direction of the arrow marked on it. This
ensures that the paper has completely moved into area 5,
where you can remove it without tearing it.
XEROX DOCUPRINT 92C IPS TROUBLESHOOTING GUIDE 2-17
Page 32

CLEARING PAPER MISFEEDS AND JAMS
3. Push and hold the green handle to the left (in the direction of
the arrow marked on it). Remove and discard any paper you
find there.
4. Release the green handle.
5. Close the door and press the Continue button to resume
printing.
2-18 XEROX DOCUPRINT 92C IPS TROUBLESHOOTING GUIDE
Page 33

Clearing paper jams from areas 6 and 6A
Follow these steps to clear jams in areas 6 and 6A.
1. Open the printer left-most top cover. Remove and discard any
paper you find in this area.
2. Close the top cover.
CLEARING PAPER MISFEEDS AND JAMS
3. Open the top cover of the high-capacity feeder. (Open the top
cover of the stacker, too, if the printer control console message
display indicates it needs to be opened.)
4. Remove and discard any sheets under the high-capacity feeder
cover. If the printer control console message display also
indicates a problem in the output module, remove and discard
those sheets as well.
5. Close the top covers and press the Continue button to resume
printing.
XEROX DOCUPRINT 92C IPS TROUBLESHOOTING GUIDE 2-19
Page 34

CLEARING PAPER MISFEEDS AND JAMS
Clearing paper jams from area 7
Area 7 of the paper path is used only during two-sided (duplex)
printing.
1. Open the middle door and locate area 7.
2. Pull the block-shaped set separator toward you and hold it in
that position.
3. Remove and discard any paper in the duplex tray.
4. Return the set separator to its upright position.
5. Close the door and press the Continue button to resume
printing.
2-20 XEROX DOCUPRINT 92C IPS TROUBLESHOOTING GUIDE
Page 35

Clearing paper jams from area 8
CLEARING PAPER MISFEEDS AND JAMS
Note: If your printer has a stitcher/stacker, see the “Correcting
stacker problems” chapter.
1. Open the top cover of the output module, as indicated on the
graphic display of the printer control console.
2. Remove and discard any paper you find in this area.
3. Lower the lid and press the Continue button to resume printing.
XEROX DOCUPRINT 92C IPS TROUBLESHOOTING GUIDE 2-21
Page 36
CLEARING PAPER MISFEEDS AND JAMS
Clearing paper jams from area 9
Note: If your printer has a stitcher/stacker, see the “Correcting
stacker problems” chapter in this guide.
1. Open the right door and locate the green handle on the upper
right side of area 9.
2. Pull the green handle down and to the left (in the direction of the
arrow marked on it) to hold the assembly open while you
remove and discard any paper you find in this area.
3. Return the handle to its original position and close the door.
4. Press the Continue button to resume printing.
2-22 XEROX DOCUPRINT 92C IPS TROUBLESHOOTING GUIDE
Page 37
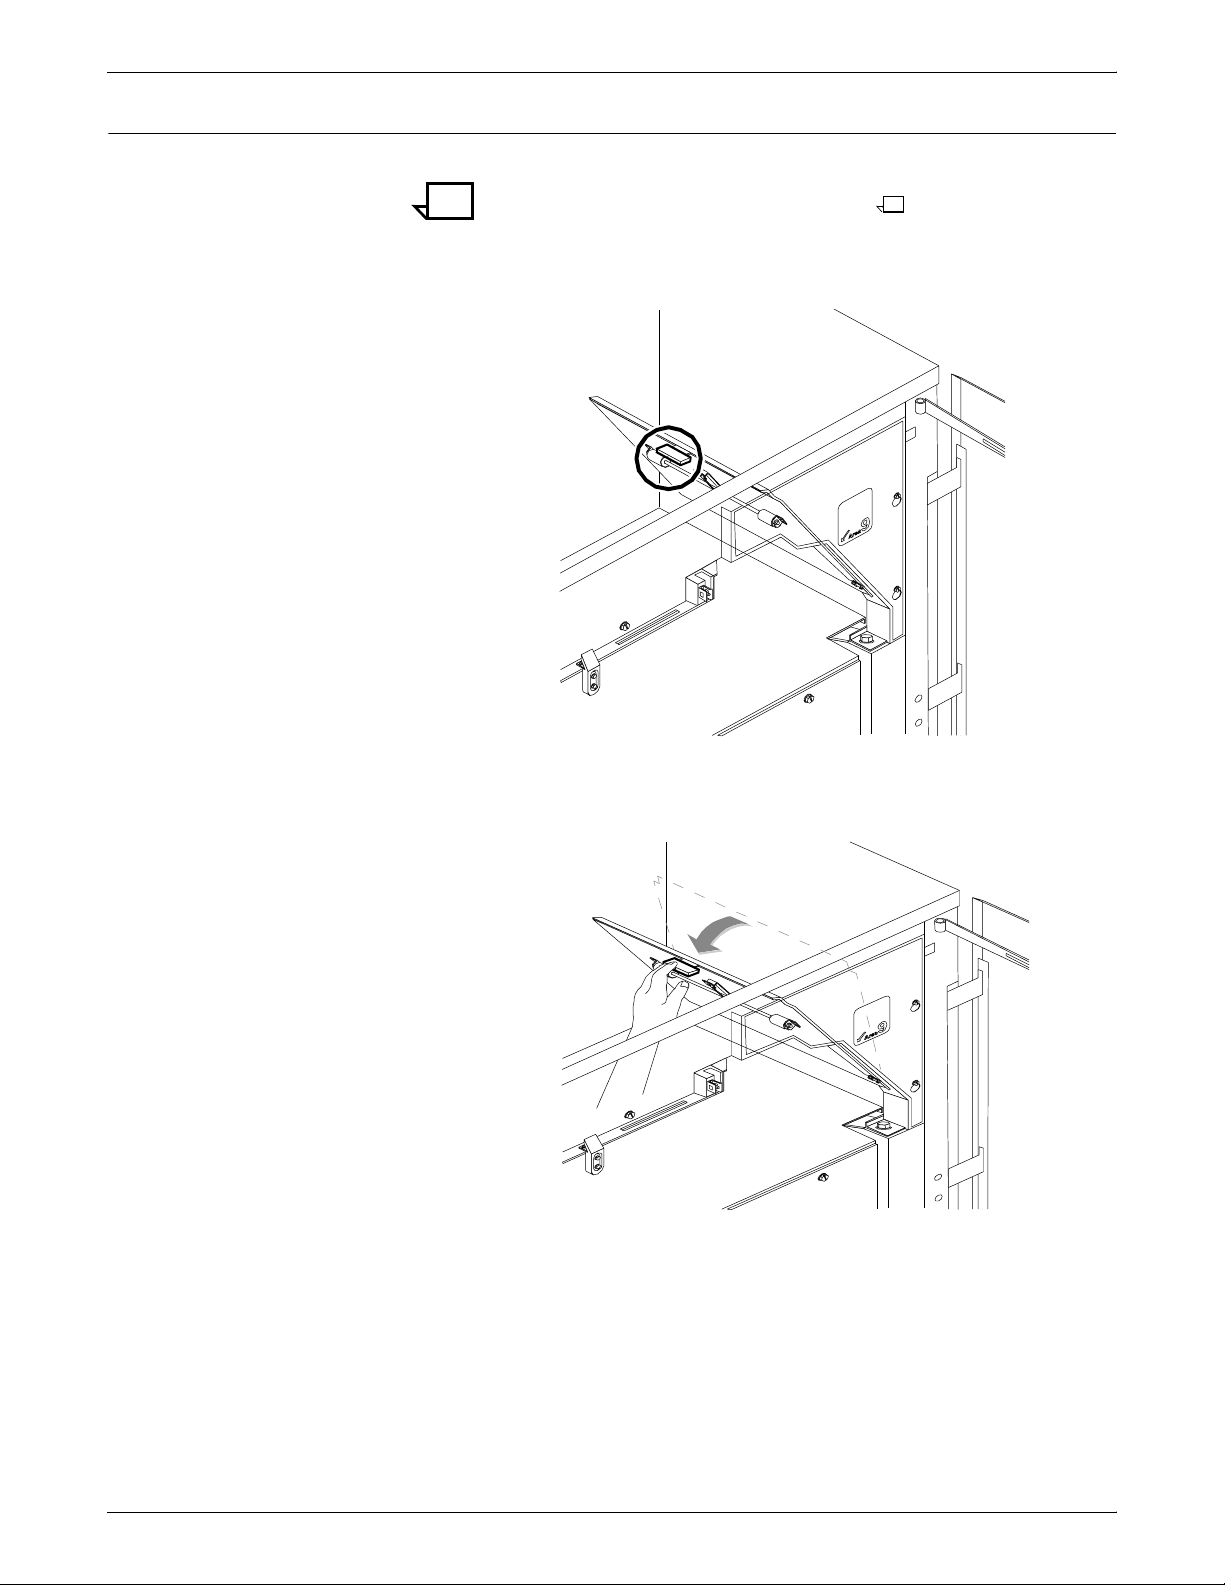
Clearing stitcher/stacker paper jams (areas A and B)
Follow these steps to clear stitcher/stacker jams in areas A and B.
1. Open the top cover of the stitcher/stacker and locate area A in
the center.
CLEARING PAPER MISFEEDS AND JAMS
Area A
2. Remove and discard the paper under the paper guide. The
paper guide is a spring-loaded, heavy wire form guide that pops
up when you open the cover.
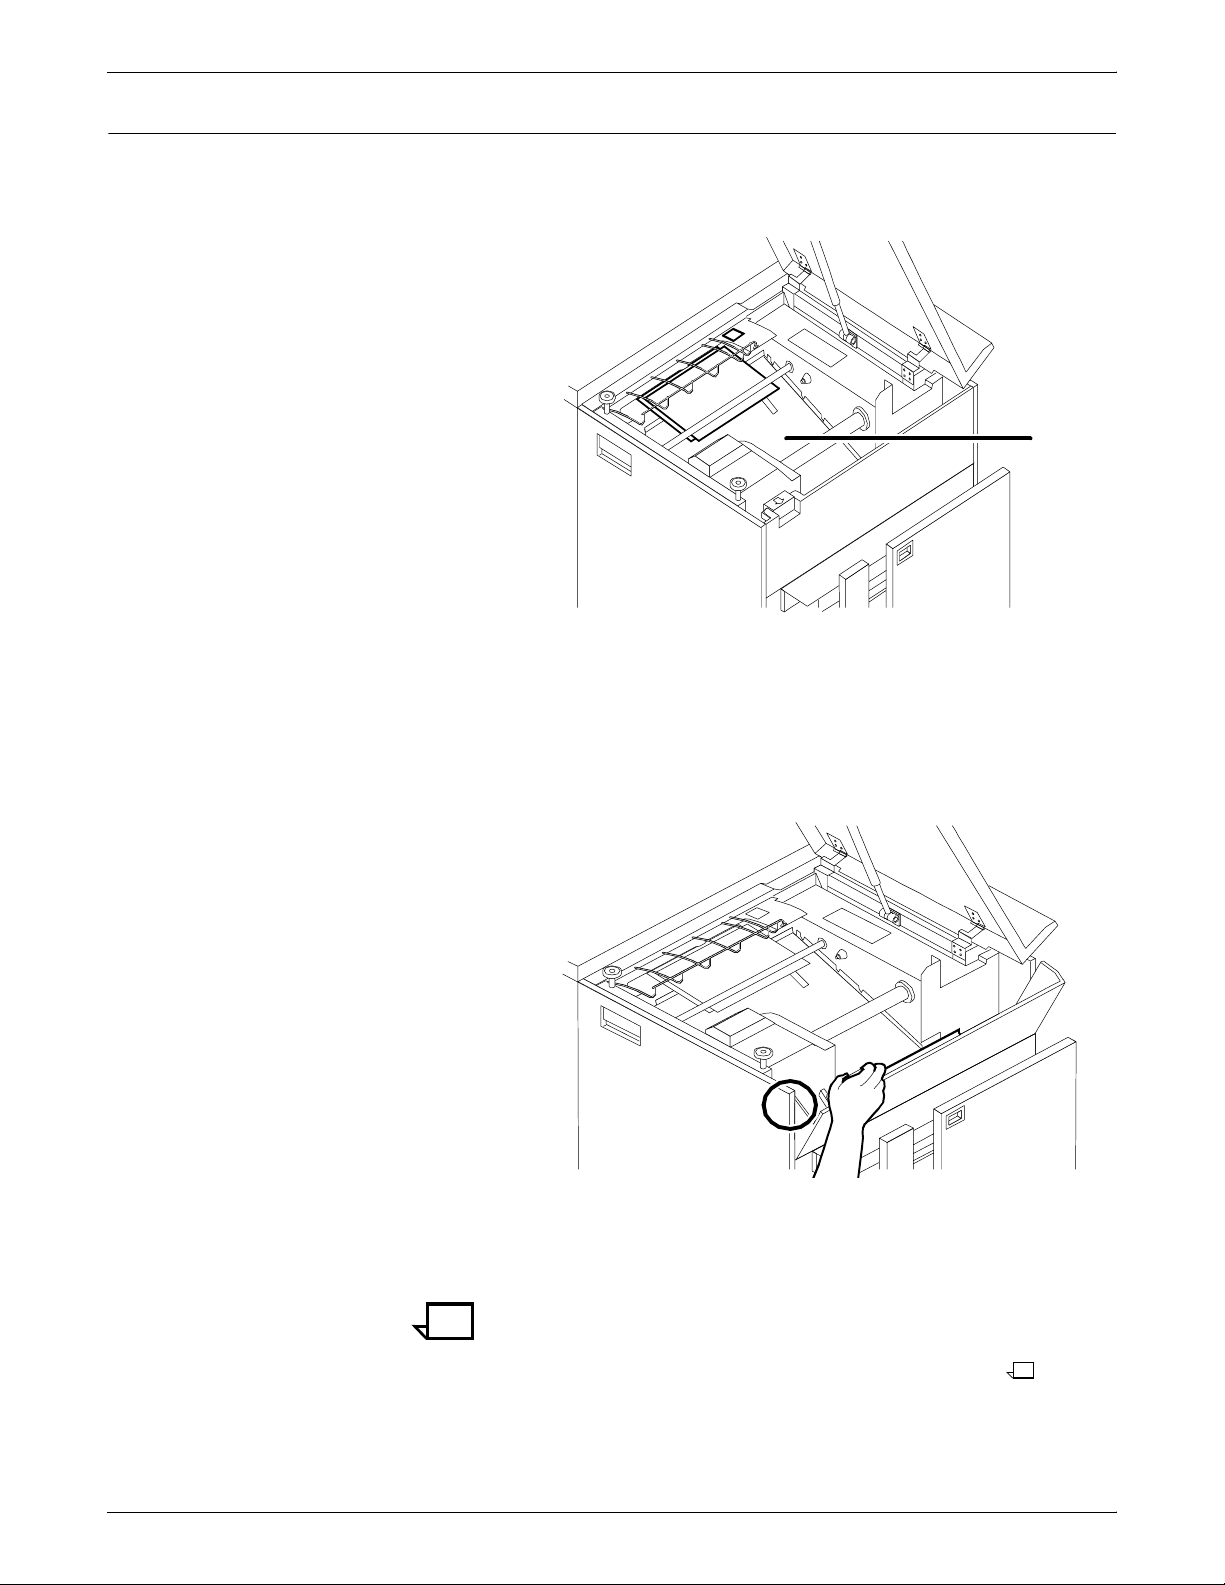
3. Locate the side cover of area B on the right.
4. Push the cover to the right (in the direction of the large green
arrow at the front of the cover) to open it.
5. Remove only the set of pages leaving the stitcher/stacker at the
right, and place it on the output in the stacker tray. Do not
remove any other pages from this area.
Note: The pages were compiled by the stitcher/stacker into a
set (stapled or not), but something prevented the set from being
delivered to the stacker. You put the set in the stacker tray
because the system has counted it as completed.
6. Close the side and top covers.
7. Press the Continue button to resume printing.
XEROX DOCUPRINT 92C IPS TROUBLESHOOTING GUIDE 2-23
Page 38
CLEARING PAPER MISFEEDS AND JAMS
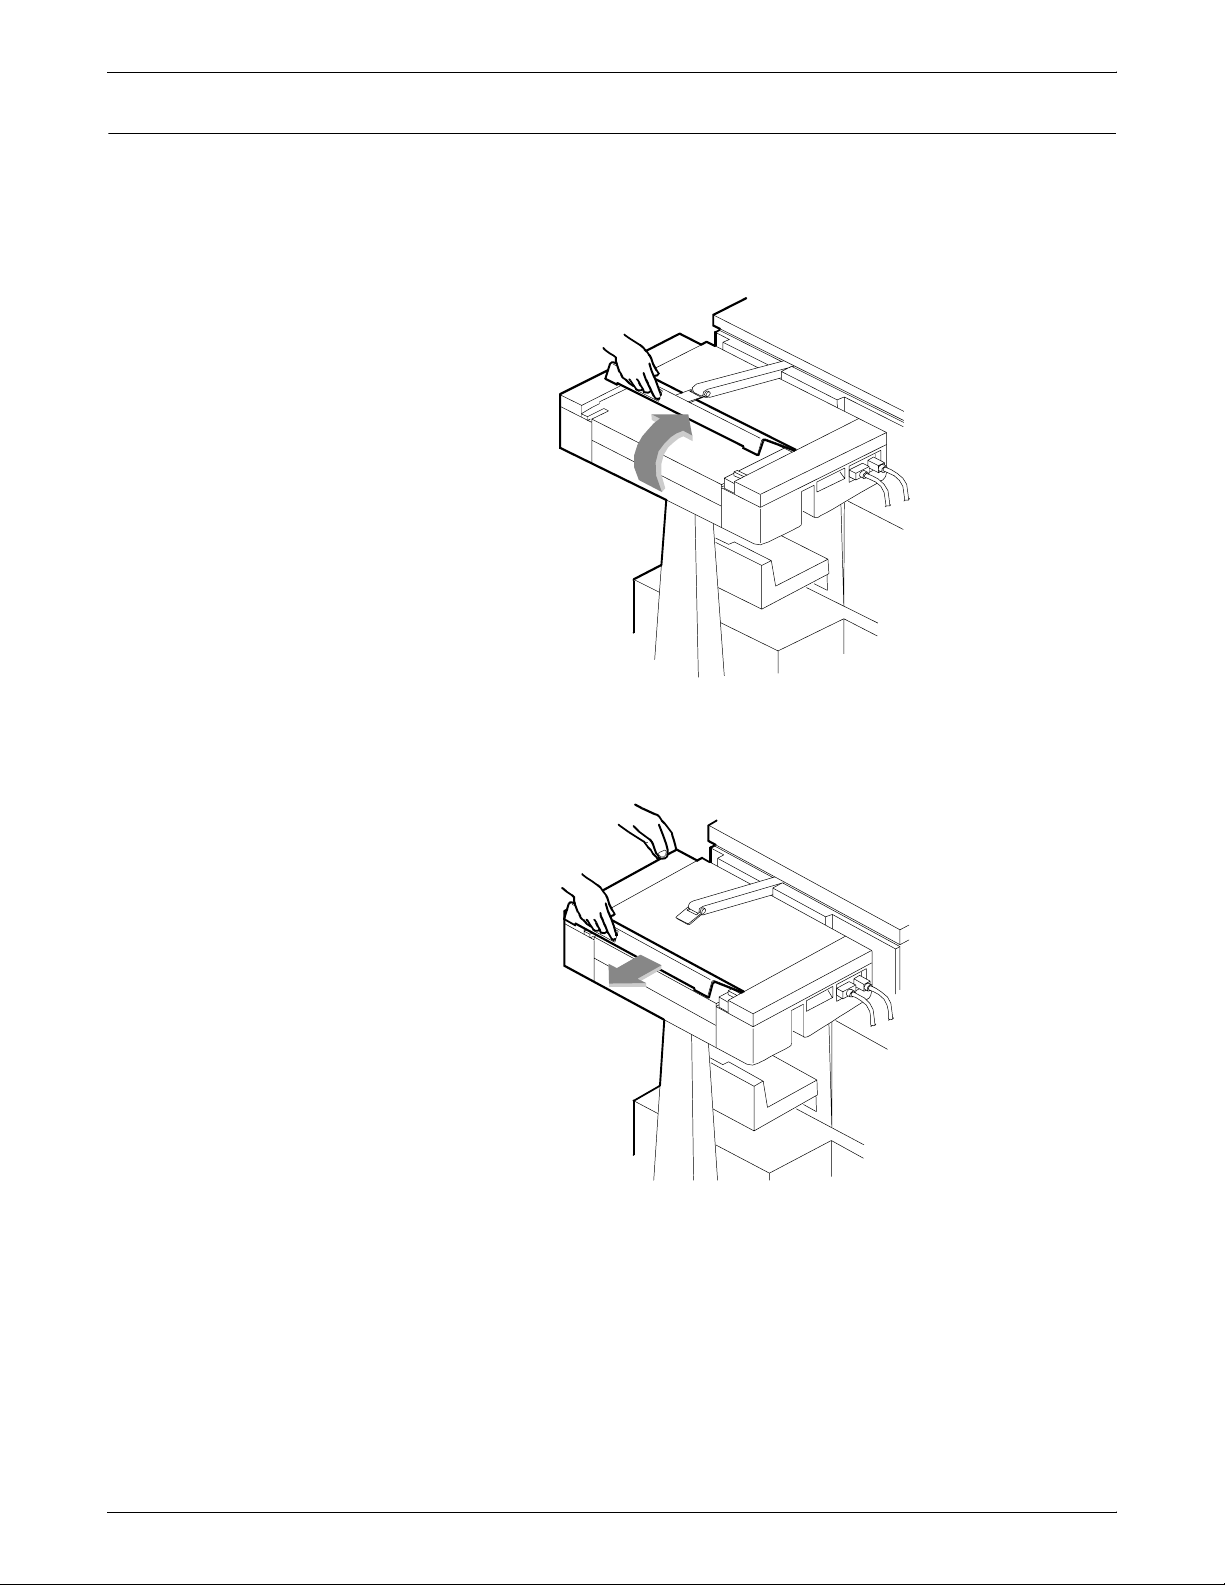
Clearing bypass transport paper jams
To clear bypass transport paper jams:
1. Verify that a sheet is caught between the bypass transport and
the finishing device. If a sheet is there, remove it and discard it.
2. Open the top cover of the bypass transport by lifting upward on
the recessed handle.
3. Remove and discard any paper you now see in the bypass
transport.
4. Grasp the handle again and slide the top cover to the right. This
exposes the remainder of the bypass transport paper path.
5. Remove and discard any paper you see.
6. Push the cover back to the left and close it tightly. The cover
snaps shut.
7. Press the Continue button on the printer control console to
resume printing.
8. Discard any sheets sent to the sample tray when the jam was
detected.
2-24 XEROX DOCUPRINT 92C IPS TROUBLESHOOTING GUIDE
Page 39

Adjusting dual stacker tray scuffer arms
Paper jams can occur when the paper does not stack smoothly in the
dual stacker trays. If some papers stack well while others do not, the
weights under the scuffer arms may need to be adjusted.
Note: The scuffer arm weights on some printers are bolted in place.
These must be adjusted by a service representative.
The adjustable weights are located on the underside of the scuffer
arms, on a track down the center. To adjust them:
1. Slide the weight right or left along its track under the scuffer
arm.
• If the paper is driven too far up the outside edge of the tray,
• If the paper is not driven far enough into the tray, move the
CLEARING PAPER MISFEEDS AND JAMS
move the weight toward the machine.
weight away from the machine.
Note: For lightweight paper, move the weight toward the
machine; for heavyweight paper move the weight away
from the machine.
Figure 2-6. Adjusting scuffer arm weights
1
1 Scuffer arm
2. Clear all paper jams, following the jam clearance instructions
provided by the message and graphic displays on the printer
control console.
3. Discard any pages sent to the sample tray or to a stacker tray
when the jam was detected.
4. Press the Continue button on the printer control console to
resume printing.
XEROX DOCUPRINT 92C IPS TROUBLESHOOTING GUIDE 2-25
Page 40

CLEARING PAPER MISFEEDS AND JAMS
2-26 XEROX DOCUPRINT 92C IPS TROUBLESHOOTING GUIDE
Page 41

3. 3Correcting stacker problems
This chapter describes problems with the stitcher/stacker and the
dual stacker, other than paper jams. It suggests corrective actions
when printed sets are not stitched. (See “Clearing paper misfeeds
and jams” for stacker paper jams.)
Symptom Probable cause Action
Printed sets are not stitched. Stitcher/stacker is out of wire
(fault code L152), or is
jammed (fault code L172), or
stitching head has
malfunctioned (various fault
codes).
Printing stops and the printer
console displays a message
indicating that an incorrect
paper size is loaded in a
feeder tray.
The number displayed in the
Wire Percentage indicator of
the printer console begins to
flash, and the message
STITCHER LOW ON WIRE
appears when you start a new
print job.
Printer console displays the
message
OFFSET FAILED, SET IN
OUTPUT BIN NOT OFFSET,
Incorrect paper size or a
damaged sheet.
Stitching wire has decreased
to the percentage that was
preset by the service
representative.
Faulty component in the
offsetting mechanism of the
stitcher.
If you have completed Advanced Customer
Training (ACT), follow the recommended
procedures to correct the problem. If not,
contact your supervisor or your service
representative. Until the problem is fixed, you
can continue printing without stitching the
output.
1. Check the paper in the indicated tray.
2. If the paper is not the correct size, load
the correct size paper or select another
feeder tray containing the correct paper
size.
If the paper size is correct, press the
Continue button to resume printing.
If you have completed Advanced Customer
Training (ACT), follow the recommended
procedures to correct the problem. If not,
contact your supervisor or your service
representative. You can continue printing, but
the stitcher may run out of wire.
One percent of the wire will stitch about 300
sets (maximum).
1. Clear the message by pressing the
Continue button on the printer console.
2. Call customer service for further
assistance.
but the printed sheets in the
stitcher/stacker tray are offset
normally.
Paper does not stack evenly in
the dual stacker trays.
XEROX DOCUPRINT 92C IPS TROUBLESHOOTING GUIDE 3-1
Scuffer arm weights are out of
adjustment.
If printer has adjustable weights under the
scuffer arms, slide them to the right or the left.
(Refer to “Clearing paper misfeeds and jams”
chapter in this guide.)
If the weights are bolted in place, ask your
service representative to adjust them.
Page 42

CORRECTING STACKER PROBLEMS
3-2 XEROX DOCUPRINT 92C IPS TROUBLESHOOTING GUIDE
Page 43

4. 4System unresponsive
This chapter describes problems in which your monitor shows no
image, the printer does not respond when you press the Continue
button, or the IPS main window does not respond.
Symptom Probable cause Action
Blank display: pressing a key
fails to restore image.
You have cleared all faults that
are listed on the printer control
console, but the Attention light
is still on and the following
message is displayed:
Output is stopped. See
message at the System
Display
Printer main window does not
respond (lockout).
Printer console displays the
message:
Press continue to
resume printing,
but the printer does not
respond to the Continue
button.
Monitor is switched off;
brightness and contrast
controls are misadjusted; or
there is a more serious
problem.
There is an uncleared output
fault.
Someone accessed the
System Meter Readings
display from the System
Options menu while the printer
cable was disconnected.
An internal error has occurred. 1. Be sure you have pressed the Continue
1. Make sure that the monitor is switched
on.
2. Make sure that the brightness and
contrast controls (if available) are turned
far enough to the left to brighten the
screen.
3. If switch is on and controls are turned to
the left, call the service representative.
Follow the instructions in the output message
and press the Continue button.
Call for service. Tell the representative if the
printer cable is connected to the printer and the
Printer Controller.
Caution: Do not attempt to reconnect the
cable yourself.
button on the printer, instead of clicking
the button on the screen.
2. Power the printer off and on to reset the
printer.
3. Reboot the Sun workstation.
Caution: Do not power off the Sun workstation
to reboot it. Use the rebooting procedure
described in the Xerox DocuPrint 92C IPS
Guide to Configuring and Managing the
System.
XEROX DOCUPRINT 92C IPS TROUBLESHOOTING GUIDE 4-1
Page 44

SYSTEM UNRESPONSIVE
Symptom Probable cause Action
Printer console displays the
messages
Black housing is not
ready
and
Color housing is not
ready,
and printing does not start.
When the system is being
started up, the IPS main
window does not open.
Instead, the Input
Configuration window is
displayed, along with an error
message window displaying:
Loading of the Input
Configuration failed.
Please verify each tray
contains the proper
media and that media is
loaded correctly in the
tray.
The system requires a PQA
(print quality adjustment).
The printer has not warmed
up; therefore, the controller
has not received information
on what paper is loaded in the
trays.
Perform a manual PQA from the Printing
Samples screen. See Xerox DocuPrint 92C
IPS Guide to Configuring and Managing the
System for more information.
1. Click OK on the message window to close
it.
2. Wait until the printer control console
displays READY TO PRINT.
3. Click Quit on the Input Configuration
window. The IPS main window should
appear.
4. If the Input Configuration window does
not close, check the printer trays against
the displayed configuration for a possible
mismatch.
5. If there is a feeder tray mismatch, either
change the input configuration or load
paper in the trays to match what the
configuration specifies. (Refer to “Setting
up the system configuration” in your
Xerox DocuPrint 92C IPS Guide to
Configuring and Managing the System.)
IPS main window temporarily
freezes after entering a new
date on the SUN.
The following message
appears on the User Interface
of a dual mode system:
Media Definition
Conflict
This behavior occurs when a
new date with a year is
entered right after opening a
command tool.
System does not recognize
the NPS mode.
Reboot the system after the date change.
Start your system and set trays in NPS mode.
4-2 XEROX DOCUPRINT 92C IPS TROUBLESHOOTING GUIDE
Page 45

SYSTEM UNRESPONSIVE
Restarting the IPS
after an error condition
To restart the IPS after you have cleared an error condition:
1. Drain the printer at the host. (Follow procedures for your host
system.)
2. In an MVS environment, cancel the FSS (Functional
Subsystem), which automatically drains the printer.
3. Reboot the Printer Controller using the following procedure:
a. Move the pointer to the background on the IPS screen,
ensuring that it is not on any window or icon.
b. Hold down the right mouse button to display the workspace
pull-down menu.
c. Select Restart. A confirmation prompt window appears.
d. Select Restart again from the confirmation prompt window.
4. Restart the printer at the host.
XEROX DOCUPRINT 92C IPS TROUBLESHOOTING GUIDE 4-3
Page 46

SYSTEM UNRESPONSIVE
4-4 XEROX DOCUPRINT 92C IPS TROUBLESHOOTING GUIDE
Page 47

Index
A
area 3, clearing paper jams, 2-14
area 4, clearing paper jams, 2-15–2-16
area 5, clearing paper jams, 2-17–2-18
area 7, clearing paper jams, 2-20
area 8, clearing paper jams, 2-21
area 9, clearing paper jams, 2-22
areas 1 and 1A, clearing paper jams, 2-10–2-11
areas 2 and 2A, clearing paper jams, 2-12–2-13
areas 6 and 6A, clearing paper jams, 2-19
areas A and B, clearing stitcher/stacker tray paper
jams, 2-23
B
bypass transport, clearing paper jams, 2-24
C
clearing
bypass transport paper jams, 2-24
feeder trays, 2-2–2-3
paper jams
area 3, 2-14
area 4, 2-15–2-16
area 5, 2-17–2-18
area 7, 2-20
area 8, 2-21
area 9, 2-22
areas 1 and 1A, 2-10–2-11
areas 2 and 2A, 2-12–2-13
areas 6 and 6A, 2-19
stacker tray paper jams, 2-25
stitcher/stacker tray paper jams (areas A and B),
2-23
Continue button, no response, 4-1
D
F
feed belt, cleaning, 2-4–2-5
feeder trays, clearing faults, 2-2–2-3
G
glazing, 2-4
H
HCU errors, 2-9
hotlines
ozone information, iii
safety, iv
J
job integrity, checking after paper jam, 2-9
L
labels, danger, iii
laser safety, iii
M
messages
labels, 2-8
paper jams, 2-7
misfeeds, frequent, 2-4–2-5
modem
enable and disable, 1-2
monitor, blank display, 4-1
O
operation safety, iv
ozone, iii
danger labels, iii
documentation
other, ix
E
error condition, restarting printer, 4-3
XEROX DOCUPRINT 92C IPS TROUBLESHOOTING GUIDE INDEX-1
P
paper
clearing jams
area 3, 2-14
area 4, 2-15–2-16
area 5, 2-17–2-18
area 7, 2-20
area 8, 2-21
Page 48

INDEX
area 9, 2-22
areas 1 and 1A, 2-10–2-11
areas 2 and 2A, 2-12–2-13
areas 6 and 6A, 2-19
bypass transport, 2-24
stacker tray, 2-25
stitcher/stacker tray (areas A and B), 2-23
jams
graphic display, 2-7
message display, 2-7
jams, clearing
checking job integrity, 2-9
types, 2-1
print jobs, automatic recovery, 2-9
printers
restarting, 4-3
procedures
feed belt, cleaning, 2-4–2-5
paper trays, clearing misfeeds, 2-2–2-3
printers, restarting, 4-3
publications, related, ix
R
Ready To Open indicator, 2-2
remote service, 1-2
S
safety
hotline, iv
laser, iii
precautions, iv
standards, iii
scuffer arms
adjusting, 2-25
service call, required information, 1-1
Sixth Sense Technology, 1-2
disabling a modem, 1-3
enabling a modem, 1-3
remote service, 1-2
stacker tray, clearing paper jams, 2-25
stitcher/stacker
problems, 3-1
tray, clearing paper jams (areas A and B), 2-23
system unresponsive, 4-1
T
Tray Unlock button, 2-2
W
Wire Percentage indicator, 3-1
INDEX-2 XEROX DOCUPRINT 92C IPS TROUBLESHOOTING GUIDE
Page 49

../../../IPS & LPS Graphics/DPC0010A.CGM iii
../../../IPS & LPS Graphics/70 -- modem.TIF @ 83 dpi 1-3
../../../IPS & LPS Graphics/dpc0087a.cgm 2-2
../../../IPS & LPS Graphics/DPC0088A.CGM 2-3
../../../IPS & LPS Graphics/DPC0089A.CGM 2-3
../../../IPS & LPS Graphics/DPC0090A.CGM 2-4
../../../IPS & LPS Graphics/DPC0091A.CGM 2-5
../../../IPS & LPS Graphics/DPC0089A.CGM 2-5
../../../IPS & LPS Graphics/Dpc0485b.eps 2-6
../../../IPS & LPS Graphics/dpc0486b.eps 2-6
../../../IPS & LPS Graphics/dpc0534a.eps 2-7
../../../IPS & LPS Graphics/DPC0085A.EPS 2-8
../../../IPS & LPS Graphics/DPC0488A.EPS 2-9
../../../IPS & LPS Graphics/DPC0093A.EPS 2-10
../../../IPS & LPS Graphics/DPC0094A.EPS 2-10
../../../IPS & LPS Graphics/DPC0095A.EPS 2-11
../../../IPS & LPS Graphics/DPC0096A.CGM 2-12
../../../IPS & LPS Graphics/DPC0097A.CGM 2-12
../../../IPS & LPS Graphics/DPC0097A.CGM 2-12
../../../IPS & LPS Graphics/DPC0098A.CGM 2-13
../../../IPS & LPS Graphics/DPC0099A.CGM 2-13
../../../IPS & LPS Graphics/DPC0100A.EPS 2-14
../../../IPS & LPS Graphics/DPC0086A.CGM 2-14
../../../IPS & LPS Graphics/DPC0101A.CGM 2-15
../../../IPS & LPS Graphics/DPC0010A.CGM 2-15
../../../IPS & LPS Graphics/DPC0103A.CGM 2-16
../../../IPS & LPS Graphics/DPC0104B.cgm 2-16
../../../IPS & LPS Graphics/DPC0105A.CGM 2-17
../../../IPS & LPS Graphics/DPC0106A.CGM 2-17
../../../IPS & LPS Graphics/DPC0107A.CGM 2-18
../../../IPS & LPS Graphics/DPC0108A.CGM 2-19
../../../IPS & LPS Graphics/DPC0109A.CGM 2-19
../../../IPS & LPS Graphics/DPC0110A.CGM 2-20
../../../IPS & LPS Graphics/DPC0111A.CGM 2-20
../../../IPS & LPS Graphics/DPC0111A.CGM 2-20
../../../IPS & LPS Graphics/Dpc0479a.cgm 2-21
../../../IPS & LPS Graphics/DPC0113A.CGM 2-22
../../../IPS & LPS Graphics/DPC0114A.CGM 2-22
../../../IPS & LPS Graphics/DPC0092A.EPS 2-23
../../../IPS & LPS Graphics/DPC0115A.CGM 2-24
../../../IPS & LPS Graphics/DPC0116A.CGM 2-24
../../../IPS & LPS Graphics/DPC0117A.CGM 2-25
../../../IPS & LPS Graphics/DPC0118A.CGM 2-25
../../../IPS & LPS Graphics/DPC0118A.CGM 2-25
../../../IPS & LPS Graphics/DPC0092A.EPS 2-26
DOUBLE-CLICK ON THIS TEXT FROM ANY MASTER PAGE AND EDIT THE DEFINITION -1
 Loading...