

Page 1

Version 2.0
09 2009
Xerox ColorQube™ 9201/9202/9203
System Administrator Guide
Page 2

© 2009 Xerox Corporation. All rights reserved. Xerox® and the sphere of connectivity design are trademarks of Xerox Corporation in
the US and/or other countries.
Product names and trademarks of other companies are hereby acknowledged.
Changes are periodically made to this document. Changes, technical inaccuracies, and typographic errors will be corrected in
subsequent editions.
Document Version: 2.0 (09/09).
Page 3

Table of Contents
1Introduction
Xerox ColorQube™ Series. . . . . . . . . . . . . . . . . . . . . . . . . . . . . . . . . . . . . . . . . . . . . . . . . . . . . . . . . . . . . . . . . 10
Related Information Sources . . . . . . . . . . . . . . . . . . . . . . . . . . . . . . . . . . . . . . . . . . . . . . . . . . . . . . . . . 10
Customer Support . . . . . . . . . . . . . . . . . . . . . . . . . . . . . . . . . . . . . . . . . . . . . . . . . . . . . . . . . . . . . . . . . . . 11
2 Device Connection and Quick Setup
Front View . . . . . . . . . . . . . . . . . . . . . . . . . . . . . . . . . . . . . . . . . . . . . . . . . . . . . . . . . . . . . . . . . . . . . . . . . . . . . . 14
Rear View. . . . . . . . . . . . . . . . . . . . . . . . . . . . . . . . . . . . . . . . . . . . . . . . . . . . . . . . . . . . . . . . . . . . . . . . . . . . . . . 15
Inserting the SIM Card. . . . . . . . . . . . . . . . . . . . . . . . . . . . . . . . . . . . . . . . . . . . . . . . . . . . . . . . . . . . . . . 15
Device Control Panel Overview . . . . . . . . . . . . . . . . . . . . . . . . . . . . . . . . . . . . . . . . . . . . . . . . . . . . . . . 16
Initial Connection . . . . . . . . . . . . . . . . . . . . . . . . . . . . . . . . . . . . . . . . . . . . . . . . . . . . . . . . . . . . . . . . . . . 16
Install Wizard . . . . . . . . . . . . . . . . . . . . . . . . . . . . . . . . . . . . . . . . . . . . . . . . . . . . . . . . . . . . . . . . . . . . . . . 16
The Welcome Page . . . . . . . . . . . . . . . . . . . . . . . . . . . . . . . . . . . . . . . . . . . . . . . . . . . . . . . . . . . . . . . . . . 18
Ethernet Configuration . . . . . . . . . . . . . . . . . . . . . . . . . . . . . . . . . . . . . . . . . . . . . . . . . . . . . . . . . . . . . . 19
Enable TCP/IP and HTTP at the Device. . . . . . . . . . . . . . . . . . . . . . . . . . . . . . . . . . . . . . . . . . . . . . . . 19
Internet Services . . . . . . . . . . . . . . . . . . . . . . . . . . . . . . . . . . . . . . . . . . . . . . . . . . . . . . . . . . . . . . . . . . . . . . . . 21
System Configuration. . . . . . . . . . . . . . . . . . . . . . . . . . . . . . . . . . . . . . . . . . . . . . . . . . . . . . . . . . . . . . . . 21
How to Verify the IP Address . . . . . . . . . . . . . . . . . . . . . . . . . . . . . . . . . . . . . . . . . . . . . . . . . . . . . . . . . 21
Set a Description for the Device . . . . . . . . . . . . . . . . . . . . . . . . . . . . . . . . . . . . . . . . . . . . . . . . . . . . . . 25
To Enable Services . . . . . . . . . . . . . . . . . . . . . . . . . . . . . . . . . . . . . . . . . . . . . . . . . . . . . . . . . . . . . . . . . . . 25
To Install Print Drivers . . . . . . . . . . . . . . . . . . . . . . . . . . . . . . . . . . . . . . . . . . . . . . . . . . . . . . . . . . . . . . . 26
Configure Services . . . . . . . . . . . . . . . . . . . . . . . . . . . . . . . . . . . . . . . . . . . . . . . . . . . . . . . . . . . . . . . . . . . 26
3 General Setup
Administrator Tools Password . . . . . . . . . . . . . . . . . . . . . . . . . . . . . . . . . . . . . . . . . . . . . . . . . . . . . . . . . . . . 27
New Administrator Password . . . . . . . . . . . . . . . . . . . . . . . . . . . . . . . . . . . . . . . . . . . . . . . . . . . . . . . . . 27
Configuration Page . . . . . . . . . . . . . . . . . . . . . . . . . . . . . . . . . . . . . . . . . . . . . . . . . . . . . . . . . . . . . . . . . . 28
Configure Print Protocols. . . . . . . . . . . . . . . . . . . . . . . . . . . . . . . . . . . . . . . . . . . . . . . . . . . . . . . . . . . . . 29
Cloning . . . . . . . . . . . . . . . . . . . . . . . . . . . . . . . . . . . . . . . . . . . . . . . . . . . . . . . . . . . . . . . . . . . . . . . . . . . . . 31
Date and Time . . . . . . . . . . . . . . . . . . . . . . . . . . . . . . . . . . . . . . . . . . . . . . . . . . . . . . . . . . . . . . . . . . . . . . 33
Image Settings . . . . . . . . . . . . . . . . . . . . . . . . . . . . . . . . . . . . . . . . . . . . . . . . . . . . . . . . . . . . . . . . . . . . . . 34
Job Deletion . . . . . . . . . . . . . . . . . . . . . . . . . . . . . . . . . . . . . . . . . . . . . . . . . . . . . . . . . . . . . . . . . . . . . . . . 38
Internationalization . . . . . . . . . . . . . . . . . . . . . . . . . . . . . . . . . . . . . . . . . . . . . . . . . . . . . . . . . . . . . . . . . 38
Extensible Services Setup . . . . . . . . . . . . . . . . . . . . . . . . . . . . . . . . . . . . . . . . . . . . . . . . . . . . . . . . . . . . 39
SMart eSolutions . . . . . . . . . . . . . . . . . . . . . . . . . . . . . . . . . . . . . . . . . . . . . . . . . . . . . . . . . . . . . . . . . . . . 40
Energy Saver . . . . . . . . . . . . . . . . . . . . . . . . . . . . . . . . . . . . . . . . . . . . . . . . . . . . . . . . . . . . . . . . . . . . . . . . 44
Network Log . . . . . . . . . . . . . . . . . . . . . . . . . . . . . . . . . . . . . . . . . . . . . . . . . . . . . . . . . . . . . . . . . . . . . . . . 45
Alert Notification . . . . . . . . . . . . . . . . . . . . . . . . . . . . . . . . . . . . . . . . . . . . . . . . . . . . . . . . . . . . . . . . . . . . 47
Billing Information and Usage Counters . . . . . . . . . . . . . . . . . . . . . . . . . . . . . . . . . . . . . . . . . . . . . . 50
Banner Sheet. . . . . . . . . . . . . . . . . . . . . . . . . . . . . . . . . . . . . . . . . . . . . . . . . . . . . . . . . . . . . . . . . . . . . . . . 50
Saving and Reprinting Jobs. . . . . . . . . . . . . . . . . . . . . . . . . . . . . . . . . . . . . . . . . . . . . . . . . . . . . . . . . . . 51
Online / Offline . . . . . . . . . . . . . . . . . . . . . . . . . . . . . . . . . . . . . . . . . . . . . . . . . . . . . . . . . . . . . . . . . . . . . . 52
Xerox ColorQube™ 9201/9202/9203
System Administrator Guide
3
Page 4

Table of Contents
Auxiliary (Foreign Device) Interface Kit . . . . . . . . . . . . . . . . . . . . . . . . . . . . . . . . . . . . . . . . . . . . . . . 53
SNMP (Simple Network Management Protocol) . . . . . . . . . . . . . . . . . . . . . . . . . . . . . . . . . . . . . . . 53
Software Upgrade via Network Connection . . . . . . . . . . . . . . . . . . . . . . . . . . . . . . . . . . . . . . . . . . . 55
4Internet Services
Status . . . . . . . . . . . . . . . . . . . . . . . . . . . . . . . . . . . . . . . . . . . . . . . . . . . . . . . . . . . . . . . . . . . . . . . . . . . . . . 60
Consumables. . . . . . . . . . . . . . . . . . . . . . . . . . . . . . . . . . . . . . . . . . . . . . . . . . . . . . . . . . . . . . . . . . . . . . . . 61
Jobs . . . . . . . . . . . . . . . . . . . . . . . . . . . . . . . . . . . . . . . . . . . . . . . . . . . . . . . . . . . . . . . . . . . . . . . . . . . . . . . . 63
Print . . . . . . . . . . . . . . . . . . . . . . . . . . . . . . . . . . . . . . . . . . . . . . . . . . . . . . . . . . . . . . . . . . . . . . . . . . . . . . . . 64
Properties . . . . . . . . . . . . . . . . . . . . . . . . . . . . . . . . . . . . . . . . . . . . . . . . . . . . . . . . . . . . . . . . . . . . . . . . . . . 65
General Setup . . . . . . . . . . . . . . . . . . . . . . . . . . . . . . . . . . . . . . . . . . . . . . . . . . . . . . . . . . . . . . . . . . . . . . . 66
Ethernet Configuration using Internet Services . . . . . . . . . . . . . . . . . . . . . . . . . . . . . . . . . . . . . . . . 67
Support . . . . . . . . . . . . . . . . . . . . . . . . . . . . . . . . . . . . . . . . . . . . . . . . . . . . . . . . . . . . . . . . . . . . . . . . . . . . . 67
Other features and Services . . . . . . . . . . . . . . . . . . . . . . . . . . . . . . . . . . . . . . . . . . . . . . . . . . . . . . . . . . 68
5 Network Installation
TCP/IP Settings . . . . . . . . . . . . . . . . . . . . . . . . . . . . . . . . . . . . . . . . . . . . . . . . . . . . . . . . . . . . . . . . . . . . . . . . . 70
Configure Static Addressing using the Device. . . . . . . . . . . . . . . . . . . . . . . . . . . . . . . . . . . . . . . . . . 70
Configure Dynamic Addressing . . . . . . . . . . . . . . . . . . . . . . . . . . . . . . . . . . . . . . . . . . . . . . . . . . . . . . . 72
IPv4 . . . . . . . . . . . . . . . . . . . . . . . . . . . . . . . . . . . . . . . . . . . . . . . . . . . . . . . . . . . . . . . . . . . . . . . . . . . . . . . . 73
IPv6 . . . . . . . . . . . . . . . . . . . . . . . . . . . . . . . . . . . . . . . . . . . . . . . . . . . . . . . . . . . . . . . . . . . . . . . . . . . . . . . . 74
SNMP. . . . . . . . . . . . . . . . . . . . . . . . . . . . . . . . . . . . . . . . . . . . . . . . . . . . . . . . . . . . . . . . . . . . . . . . . . . . . . . 79
SSDP . . . . . . . . . . . . . . . . . . . . . . . . . . . . . . . . . . . . . . . . . . . . . . . . . . . . . . . . . . . . . . . . . . . . . . . . . . . . . . . 84
Microsoft Networking . . . . . . . . . . . . . . . . . . . . . . . . . . . . . . . . . . . . . . . . . . . . . . . . . . . . . . . . . . . . . . . . 84
AppleTalk . . . . . . . . . . . . . . . . . . . . . . . . . . . . . . . . . . . . . . . . . . . . . . . . . . . . . . . . . . . . . . . . . . . . . . . . . . . 86
Windows XP . . . . . . . . . . . . . . . . . . . . . . . . . . . . . . . . . . . . . . . . . . . . . . . . . . . . . . . . . . . . . . . . . . . . . . . . . . . . 90
Configure TCP/IP and SLP Settings . . . . . . . . . . . . . . . . . . . . . . . . . . . . . . . . . . . . . . . . . . . . . . . . . . . 90
Apple Talk . . . . . . . . . . . . . . . . . . . . . . . . . . . . . . . . . . . . . . . . . . . . . . . . . . . . . . . . . . . . . . . . . . . . . . . . . . 96
NetWare . . . . . . . . . . . . . . . . . . . . . . . . . . . . . . . . . . . . . . . . . . . . . . . . . . . . . . . . . . . . . . . . . . . . . . . . . . . 101
AS400 Raw TCP/IP Printing to Port 9100 (CRTDEVPRT) . . . . . . . . . . . . . . . . . . . . . . . . . . . . . . . 103
UNIX . . . . . . . . . . . . . . . . . . . . . . . . . . . . . . . . . . . . . . . . . . . . . . . . . . . . . . . . . . . . . . . . . . . . . . . . . . . . . . 106
6 Print Drivers
Windows 2000/2003 Server. . . . . . . . . . . . . . . . . . . . . . . . . . . . . . . . . . . . . . . . . . . . . . . . . . . . . . . . . . . . . 114
Xerox Printer Installer . . . . . . . . . . . . . . . . . . . . . . . . . . . . . . . . . . . . . . . . . . . . . . . . . . . . . . . . . . . . . . . 114
Windows 2000 Professional. . . . . . . . . . . . . . . . . . . . . . . . . . . . . . . . . . . . . . . . . . . . . . . . . . . . . . . . . . . . . 116
Xerox Printer Installer . . . . . . . . . . . . . . . . . . . . . . . . . . . . . . . . . . . . . . . . . . . . . . . . . . . . . . . . . . . . . . . 116
Windows XP . . . . . . . . . . . . . . . . . . . . . . . . . . . . . . . . . . . . . . . . . . . . . . . . . . . . . . . . . . . . . . . . . . . . . . . . . . . 119
Xerox Printer Installer . . . . . . . . . . . . . . . . . . . . . . . . . . . . . . . . . . . . . . . . . . . . . . . . . . . . . . . . . . . . . . . 119
Windows Vista . . . . . . . . . . . . . . . . . . . . . . . . . . . . . . . . . . . . . . . . . . . . . . . . . . . . . . . . . . . . . . . . . . . . . . . . . 122
Xerox Printer Installer . . . . . . . . . . . . . . . . . . . . . . . . . . . . . . . . . . . . . . . . . . . . . . . . . . . . . . . . . . . . . . . 122
Apple Macintosh 10.X . . . . . . . . . . . . . . . . . . . . . . . . . . . . . . . . . . . . . . . . . . . . . . . . . . . . . . . . . . . . . . . . . . 125
7 Authentication
Authentication Overview . . . . . . . . . . . . . . . . . . . . . . . . . . . . . . . . . . . . . . . . . . . . . . . . . . . . . . . . . . . . 127
Authentication Configuration . . . . . . . . . . . . . . . . . . . . . . . . . . . . . . . . . . . . . . . . . . . . . . . . . . . . . . . 128
4
Xerox ColorQube™ 9201/9202/9203
System Administrator Guide
Page 5

Tab le o f Co nte nts
Authentication Configuration (Network Authentication) . . . . . . . . . . . . . . . . . . . . . . . . . . . . . . 129
Xerox Secure Access . . . . . . . . . . . . . . . . . . . . . . . . . . . . . . . . . . . . . . . . . . . . . . . . . . . . . . . . . . . . . . . . 142
8Security
Security @ Xerox . . . . . . . . . . . . . . . . . . . . . . . . . . . . . . . . . . . . . . . . . . . . . . . . . . . . . . . . . . . . . . . . . . . . . . . 148
User Data Encryption . . . . . . . . . . . . . . . . . . . . . . . . . . . . . . . . . . . . . . . . . . . . . . . . . . . . . . . . . . . . . . . . . . . 149
User Information Database . . . . . . . . . . . . . . . . . . . . . . . . . . . . . . . . . . . . . . . . . . . . . . . . . . . . . . . . . 149
Admin Password. . . . . . . . . . . . . . . . . . . . . . . . . . . . . . . . . . . . . . . . . . . . . . . . . . . . . . . . . . . . . . . . . . . . 152
IP Filtering . . . . . . . . . . . . . . . . . . . . . . . . . . . . . . . . . . . . . . . . . . . . . . . . . . . . . . . . . . . . . . . . . . . . . . . . . 153
Audit Log . . . . . . . . . . . . . . . . . . . . . . . . . . . . . . . . . . . . . . . . . . . . . . . . . . . . . . . . . . . . . . . . . . . . . . . . . . 154
Machine Digital Certificate Management . . . . . . . . . . . . . . . . . . . . . . . . . . . . . . . . . . . . . . . . . . . . 157
IP Sec. . . . . . . . . . . . . . . . . . . . . . . . . . . . . . . . . . . . . . . . . . . . . . . . . . . . . . . . . . . . . . . . . . . . . . . . . . . . . . 160
Trusted Certificate Authorities . . . . . . . . . . . . . . . . . . . . . . . . . . . . . . . . . . . . . . . . . . . . . . . . . . . . . . . . . . 166
To Access the Trusted Certificated Authorities Screen . . . . . . . . . . . . . . . . . . . . . . . . . . . . . . . . . 166
802.1X . . . . . . . . . . . . . . . . . . . . . . . . . . . . . . . . . . . . . . . . . . . . . . . . . . . . . . . . . . . . . . . . . . . . . . . . . . . . . . . . 168
On Demand Overwrite . . . . . . . . . . . . . . . . . . . . . . . . . . . . . . . . . . . . . . . . . . . . . . . . . . . . . . . . . . . . . . . . . . 171
Overview. . . . . . . . . . . . . . . . . . . . . . . . . . . . . . . . . . . . . . . . . . . . . . . . . . . . . . . . . . . . . . . . . . . . . . . . . . . 171
Immediate Image Overwrite . . . . . . . . . . . . . . . . . . . . . . . . . . . . . . . . . . . . . . . . . . . . . . . . . . . . . . . . . . . . 175
Overview. . . . . . . . . . . . . . . . . . . . . . . . . . . . . . . . . . . . . . . . . . . . . . . . . . . . . . . . . . . . . . . . . . . . . . . . . . . 175
PostScript (R) Passwords . . . . . . . . . . . . . . . . . . . . . . . . . . . . . . . . . . . . . . . . . . . . . . . . . . . . . . . . . . . . . . . . 177
9 Workflow Scanning
Workflow Scanning User Authentication . . . . . . . . . . . . . . . . . . . . . . . . . . . . . . . . . . . . . . . . . . . . . 179
Information Checklist. . . . . . . . . . . . . . . . . . . . . . . . . . . . . . . . . . . . . . . . . . . . . . . . . . . . . . . . . . . . . . . 179
Configure General Settings. . . . . . . . . . . . . . . . . . . . . . . . . . . . . . . . . . . . . . . . . . . . . . . . . . . . . . . . . . 180
Configure a File Repository. . . . . . . . . . . . . . . . . . . . . . . . . . . . . . . . . . . . . . . . . . . . . . . . . . . . . . . . . . 181
Configuring Validation Servers . . . . . . . . . . . . . . . . . . . . . . . . . . . . . . . . . . . . . . . . . . . . . . . . . . . . . . 188
Scanning Web Service . . . . . . . . . . . . . . . . . . . . . . . . . . . . . . . . . . . . . . . . . . . . . . . . . . . . . . . . . . . . . . 190
Configuring the Default Template . . . . . . . . . . . . . . . . . . . . . . . . . . . . . . . . . . . . . . . . . . . . . . . . . . . 191
Display Settings . . . . . . . . . . . . . . . . . . . . . . . . . . . . . . . . . . . . . . . . . . . . . . . . . . . . . . . . . . . . . . . . . . . . 200
Update List of Templates . . . . . . . . . . . . . . . . . . . . . . . . . . . . . . . . . . . . . . . . . . . . . . . . . . . . . . . . . . . 200
Custom File Naming . . . . . . . . . . . . . . . . . . . . . . . . . . . . . . . . . . . . . . . . . . . . . . . . . . . . . . . . . . . . . . . . 201
Set up Remote Template Pool Repository . . . . . . . . . . . . . . . . . . . . . . . . . . . . . . . . . . . . . . . . . . . . 202
10 Scan to Home
Information Checklist. . . . . . . . . . . . . . . . . . . . . . . . . . . . . . . . . . . . . . . . . . . . . . . . . . . . . . . . . . . . . . . 207
Enable and Configure Scan to Home. . . . . . . . . . . . . . . . . . . . . . . . . . . . . . . . . . . . . . . . . . . . . . . . . 208
11 Scan to Mailbox
Information Checklist. . . . . . . . . . . . . . . . . . . . . . . . . . . . . . . . . . . . . . . . . . . . . . . . . . . . . . . . . . . . . . . 211
Enable Scan to Mailbox . . . . . . . . . . . . . . . . . . . . . . . . . . . . . . . . . . . . . . . . . . . . . . . . . . . . . . . . . . . . . 211
Create a New Mailbox . . . . . . . . . . . . . . . . . . . . . . . . . . . . . . . . . . . . . . . . . . . . . . . . . . . . . . . . . . . . . . 212
Personalize Settings or Modify Settings . . . . . . . . . . . . . . . . . . . . . . . . . . . . . . . . . . . . . . . . . . . . . . 213
Configure Scan to Mailbox . . . . . . . . . . . . . . . . . . . . . . . . . . . . . . . . . . . . . . . . . . . . . . . . . . . . . . . . . . 218
12 E-mail
Xerox ColorQube™ 9201/9202/9203
System Administrator Guide
5
Page 6

Table of Contents
E-mail Addressing . . . . . . . . . . . . . . . . . . . . . . . . . . . . . . . . . . . . . . . . . . . . . . . . . . . . . . . . . . . . . . . . . . 223
E-mail Authentication. . . . . . . . . . . . . . . . . . . . . . . . . . . . . . . . . . . . . . . . . . . . . . . . . . . . . . . . . . . . . . . 223
Configuring Public and Internal Address Books (LDAP) . . . . . . . . . . . . . . . . . . . . . . . . . . . . . . . . 228
LDAP Addressing - Internal Address Book . . . . . . . . . . . . . . . . . . . . . . . . . . . . . . . . . . . . . . . . . . . . 229
Public Address Book . . . . . . . . . . . . . . . . . . . . . . . . . . . . . . . . . . . . . . . . . . . . . . . . . . . . . . . . . . . . . . . . 232
13 Internet Fax
Using Mixed Size Originals . . . . . . . . . . . . . . . . . . . . . . . . . . . . . . . . . . . . . . . . . . . . . . . . . . . . . . . . . . 237
Internet Fax Addressing . . . . . . . . . . . . . . . . . . . . . . . . . . . . . . . . . . . . . . . . . . . . . . . . . . . . . . . . . . . . 237
Internet Fax Authentication and Authorization . . . . . . . . . . . . . . . . . . . . . . . . . . . . . . . . . . . . . . . 237
Information Checklist. . . . . . . . . . . . . . . . . . . . . . . . . . . . . . . . . . . . . . . . . . . . . . . . . . . . . . . . . . . . . . . 237
Enable Internet Fax. . . . . . . . . . . . . . . . . . . . . . . . . . . . . . . . . . . . . . . . . . . . . . . . . . . . . . . . . . . . . . . . . 238
14 Embedded Fax
Information Checklist. . . . . . . . . . . . . . . . . . . . . . . . . . . . . . . . . . . . . . . . . . . . . . . . . . . . . . . . . . . . . . . 245
Setting Fax Defaults . . . . . . . . . . . . . . . . . . . . . . . . . . . . . . . . . . . . . . . . . . . . . . . . . . . . . . . . . . . . . . . . 248
15 Server Fax
Server Fax Authentication and Authorization . . . . . . . . . . . . . . . . . . . . . . . . . . . . . . . . . . . . . . . . . 259
Configure a Server Fax Repository . . . . . . . . . . . . . . . . . . . . . . . . . . . . . . . . . . . . . . . . . . . . . . . . . . . 260
16 LAN Fax
Information Checklist. . . . . . . . . . . . . . . . . . . . . . . . . . . . . . . . . . . . . . . . . . . . . . . . . . . . . . . . . . . . . . . 269
Enable LAN Fax (Windows Print Driver) . . . . . . . . . . . . . . . . . . . . . . . . . . . . . . . . . . . . . . . . . . . . . . 269
Using LAN Fax . . . . . . . . . . . . . . . . . . . . . . . . . . . . . . . . . . . . . . . . . . . . . . . . . . . . . . . . . . . . . . . . . . . . . 270
17 Reprint Saved Jobs
Information Checklist. . . . . . . . . . . . . . . . . . . . . . . . . . . . . . . . . . . . . . . . . . . . . . . . . . . . . . . . . . . . . . . 275
Enable Reprint Saved Jobs . . . . . . . . . . . . . . . . . . . . . . . . . . . . . . . . . . . . . . . . . . . . . . . . . . . . . . . . . . 275
Back-up Jobs . . . . . . . . . . . . . . . . . . . . . . . . . . . . . . . . . . . . . . . . . . . . . . . . . . . . . . . . . . . . . . . . . . . . . . . 276
Restore Jobs. . . . . . . . . . . . . . . . . . . . . . . . . . . . . . . . . . . . . . . . . . . . . . . . . . . . . . . . . . . . . . . . . . . . . . . . 277
Manage Folders . . . . . . . . . . . . . . . . . . . . . . . . . . . . . . . . . . . . . . . . . . . . . . . . . . . . . . . . . . . . . . . . . . . . 278
Saving a Job . . . . . . . . . . . . . . . . . . . . . . . . . . . . . . . . . . . . . . . . . . . . . . . . . . . . . . . . . . . . . . . . . . . . . . . 279
18 Custom Services
Validation Options . . . . . . . . . . . . . . . . . . . . . . . . . . . . . . . . . . . . . . . . . . . . . . . . . . . . . . . . . . . . . . . . . . . . . 281
19 Extensible Services Setup
Information Checklist. . . . . . . . . . . . . . . . . . . . . . . . . . . . . . . . . . . . . . . . . . . . . . . . . . . . . . . . . . . . . . . 283
20 WSD (Web Services for Devices)
Enable WSD (Web Services for Devices) . . . . . . . . . . . . . . . . . . . . . . . . . . . . . . . . . . . . . . . . . . . . . . . . . . 287
21 Xerox Standard Accounting
Information Checklist. . . . . . . . . . . . . . . . . . . . . . . . . . . . . . . . . . . . . . . . . . . . . . . . . . . . . . . . . . . . . . . 289
Enable Xerox Standard Accounting . . . . . . . . . . . . . . . . . . . . . . . . . . . . . . . . . . . . . . . . . . . . . . . . . . 289
6
Xerox ColorQube™ 9201/9202/9203
System Administrator Guide
Page 7

To Create a General Account . . . . . . . . . . . . . . . . . . . . . . . . . . . . . . . . . . . . . . . . . . . . . . . . . . . . . . . . 292
22 Network Accounting
Information Checklist. . . . . . . . . . . . . . . . . . . . . . . . . . . . . . . . . . . . . . . . . . . . . . . . . . . . . . . . . . . . . . . 297
Enable and Configure Network Accounting . . . . . . . . . . . . . . . . . . . . . . . . . . . . . . . . . . . . . . . . . . . 297
23 Xerox Secure Access
Secure Access and Accounting. . . . . . . . . . . . . . . . . . . . . . . . . . . . . . . . . . . . . . . . . . . . . . . . . . . . . . . 301
24 Software Upgrade
When Should I Upgrade the Software? . . . . . . . . . . . . . . . . . . . . . . . . . . . . . . . . . . . . . . . . . . . . . . 307
How Do I Upgrade the Software?. . . . . . . . . . . . . . . . . . . . . . . . . . . . . . . . . . . . . . . . . . . . . . . . . . . . 307
To Upgrade Using the Internet Services. . . . . . . . . . . . . . . . . . . . . . . . . . . . . . . . . . . . . . . . . . . . . . 308
25 Troubleshooting
Troubleshooting: Workflow Scanning . . . . . . . . . . . . . . . . . . . . . . . . . . . . . . . . . . . . . . . . . . . . . . . . 311
Troubleshooting: E-mail . . . . . . . . . . . . . . . . . . . . . . . . . . . . . . . . . . . . . . . . . . . . . . . . . . . . . . . . . . . . . 313
Troubleshooting: Internet Fax . . . . . . . . . . . . . . . . . . . . . . . . . . . . . . . . . . . . . . . . . . . . . . . . . . . . . . . 315
Troubleshooting: Server Fax . . . . . . . . . . . . . . . . . . . . . . . . . . . . . . . . . . . . . . . . . . . . . . . . . . . . . . . . . 317
Troubleshooting: Embedded Fax . . . . . . . . . . . . . . . . . . . . . . . . . . . . . . . . . . . . . . . . . . . . . . . . . . . . 319
Troubleshooting: Network Accounting . . . . . . . . . . . . . . . . . . . . . . . . . . . . . . . . . . . . . . . . . . . . . . . 319
Font Management Utility and Unicode . . . . . . . . . . . . . . . . . . . . . . . . . . . . . . . . . . . . . . . . . . . . . . 321
Tab le o f Co nte nts
Index
Xerox ColorQube™ 9201/9202/9203
System Administrator Guide
7
Page 8

Table of Contents
8
Xerox ColorQube™ 9201/9202/9203
System Administrator Guide
Page 9

1
Introduction
This guide has been created for System Administrators who need to install, set up and manage printers
and other services on their network.
To use the procedures in this Guide effectively, System Administrators must have previous experience
working in a network environment and must possess Supervisor, Administrator, Account Operator, or
equivalent rights to the network. They must also have prior knowledge of how to create and manage
network user accounts.
Xerox ColorQube™ 9201/9202/9203
System Administrator Guide
9
Page 10

Introduction
Xerox ColorQube™ Series
These models have copying, printing, scanning and faxing capabilities. The devices supports scanning
too and has the capability of storing print, copy and scan files on the device. It copies and prints at
38/45/50 pages per minute depending on the model.
A Document Feeder, Bypass Tray and Paper Trays 1, 2 and 3 are supplied as standard.
ColorQube™
9201
Digital Copying Standard Standard Standard
Network Printing Standard Standard Standard
Scanning Standard Standard Standard
E-mail Standard Standard Standard
Fax Option Option Option
Paper Tray 1, 2 & 3 Standard Standard Standard
High Capacity Feeder Option Option Option
Offset Catch Tray Option Option Option
80 GB Hard Drive - Standard Standard
USB Thumb Drive * Standard Standard Standard
Low Capacity Stapler Stacker (LCSS) Option Option Option
High Volume Finisher (HVF) Option Option Option
HVF with Booklet Maker / Post
Processor & Trifolder
Option Option Option
ColorQube™
9202
ColorQube™
9203
Foreign Device Interface Option Option Option
* USB Thumb Drive is standard on the ColorQube series, and is only used for service engineering.
Related Information Sources
Information available for this product series consists of:
•The System Administrator Guide (this guide)
•The Quick Use Guide
•The Interactive User Guide
•The Advanced User Guide
•The Xerox website www.xerox.com
10
Xerox ColorQube™ 9201/9202/9203
System Administrator Guide
Page 11

Introduction
Customer Support
If you need assistance during or after product installation, please visit the Xerox website for online
solutions and support:
http://www.xerox.com
Xerox ColorQube™ 9201/9202/9203
System Administrator Guide
11
Page 12

Introduction
12
Xerox ColorQube™ 9201/9202/9203
System Administrator Guide
Page 13

2
Device Connection and Quick Setup
This chapter describes how to connect your device to a network and configure Ethernet settings.
Xerox ColorQube™ 9201/9202/9203
System Administrator Guide
13
Page 14
Device Connection and Quick Setup
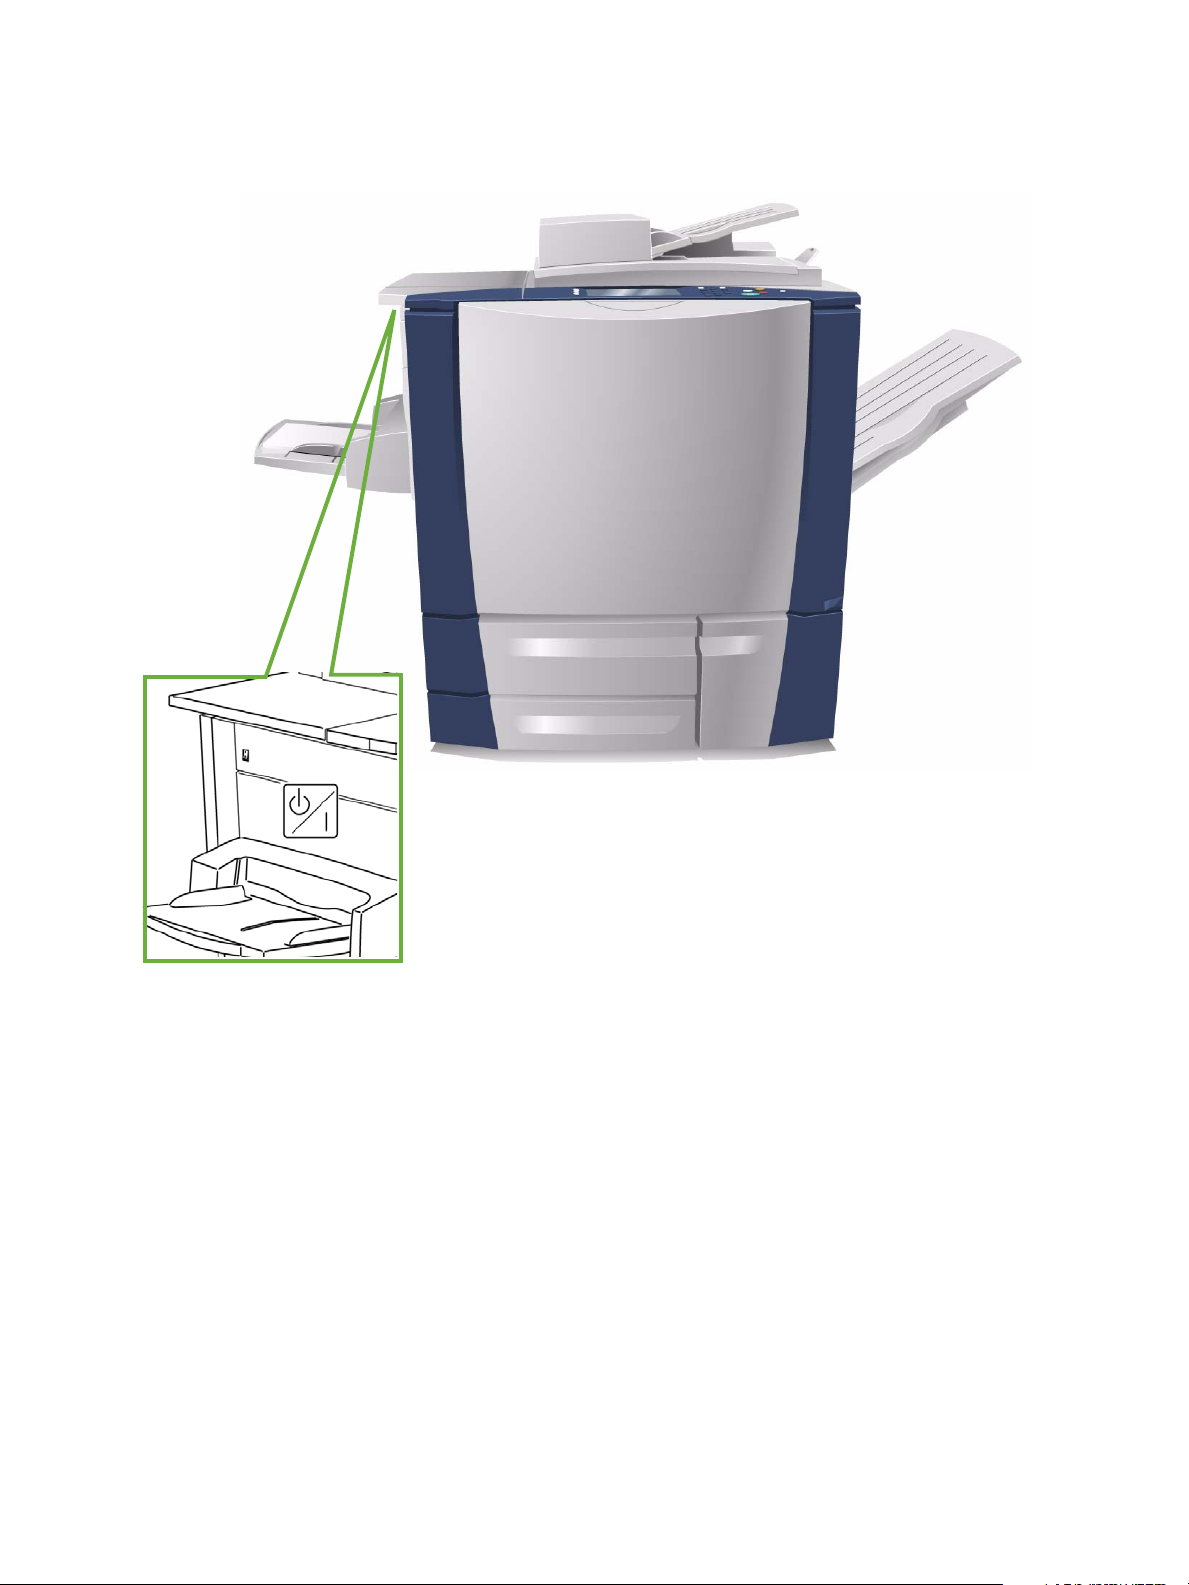
Power On/Off Switch
Front View
14
Xerox ColorQube™ 9201/9202/9203
System Administrator Guide
Page 15
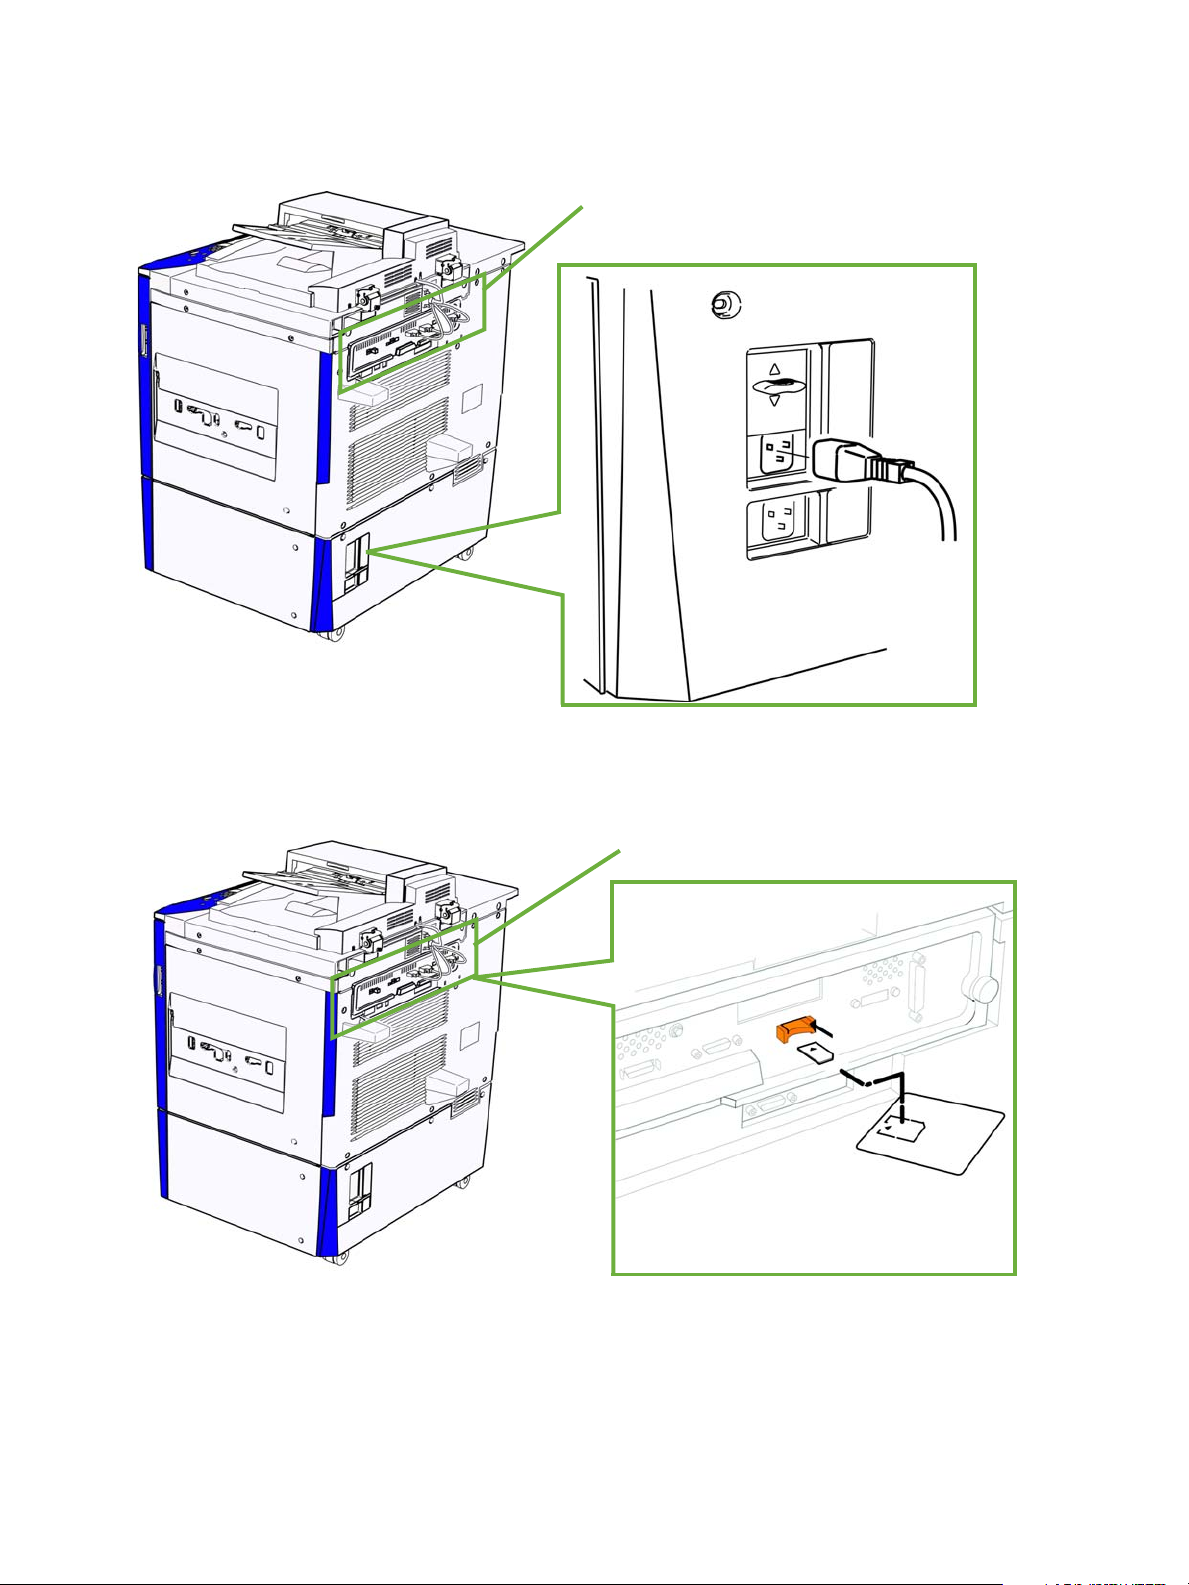
Rear View
Connection Panel
Power Cable
Inserting the SIM Card
Connection Panel
Device Connection and Quick Setup
Inserting the SIM Card
Xerox ColorQube™ 9201/9202/9203
System Administrator Guide
15
Page 16
Device Connection and Quick Setup
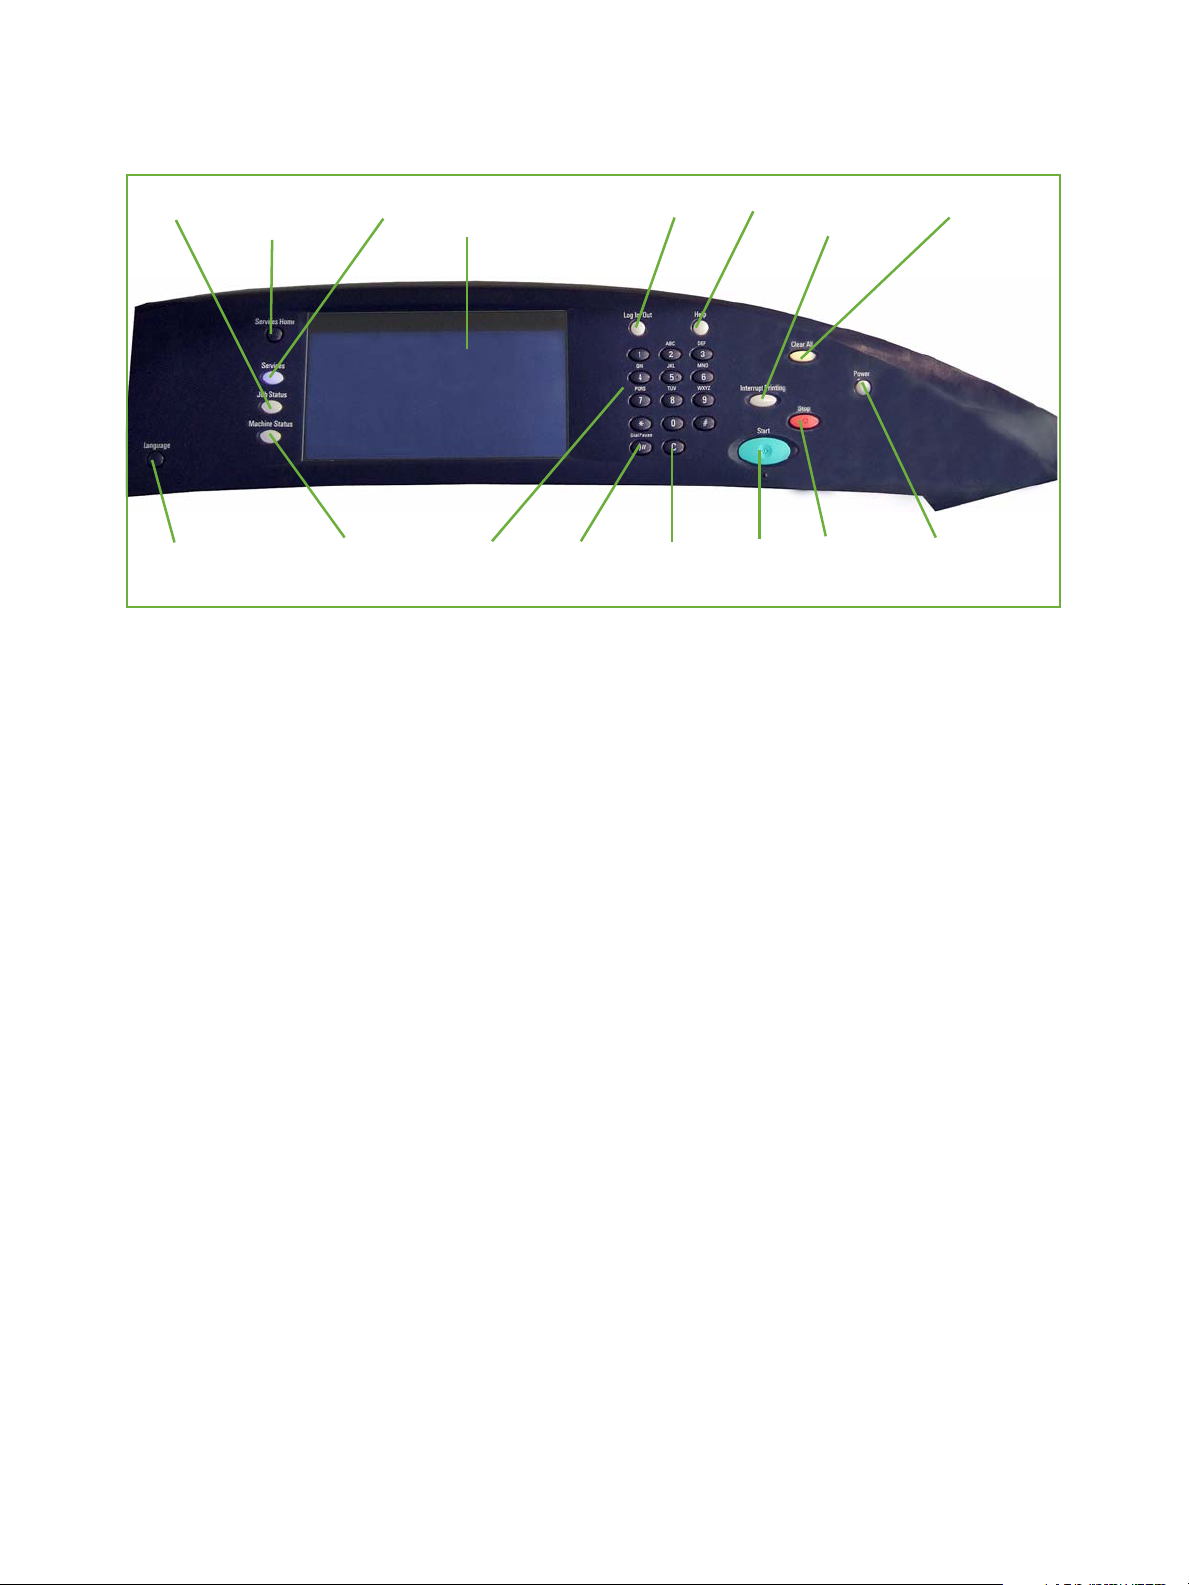
Services
Home
Job Status
Machine Status
Display and Touch
Screen
Log In/Out Help
CancelNumeric
Keypad
StopStart Power
Clear AllInterrupt
Printing
Language
Services
Dial Pause
Device Control Panel Overview
Initial Connection
Follow these steps to physically connect your device to the network.
1. Connect the Power Cable
Ensure the device is connected to a suitable power supply and that the power cord is fully plugged
in to the electrical outlet.
2. Connect the Ethernet Cable
Connect a 10/100/1000 BaseT Ethernet cable to the Ethernet port at the rear of the device and
the other end of the cable to your network port.
3. Insert the SIM Card
Insert the SIM Card before powering On the device, the SIM slot is located at the rear of the
device.
4. Power On the Device
The Power On button is located at the left-side of the device.
Install Wizard
If this is the first time the device has been powered on, the Install Wizard will run. If this screen does
not appear, proceed to Network Connectivity in this chapter.
The install wizard will prompt you with questions to help with the configuring of your device.
Before the Install Wizard
1. At the device, before the Install Wizard begin, the Installed Optional Hardware screen displays,
touch the [Next] button.
2. The Machine Location screen displays, select one of the following location and to allow the ink
sticks to heat before the machine can be used:
16
Xerox ColorQube™ 9201/9202/9203
System Administrator Guide
Page 17

Device Connection and Quick Setup
• Distribution Centre - this option leaves the ink sticks cold. The device will power down when
the [Next] button is touched.
• Ready to Ship - this option allows the device to power down when the [Next] button is
touched, and when next powered on the ink sticks will be heated and the Installation Wizard
will begin again.
• Customer Site - this option begins heating the ink sticks and continues with the Install
Wizard when the [Next] button is touched.
Note: To prevent internal ink spillage, once the ink is heated, do not move the machine for 30
minutes from power down.
3. Touch the [Next] button, the device will power up and launch.
4. The Languages screen displays, select the required language, and touch the [OK] button.
5. A profile selection screen displays, select one of the following:
• Trained Xerox Installer
• Customer
If the network cable is not connected, the Network Connection Not Detected screen displays
6. In the Passcode Required screen, enter the 4 digit Passcode you received with the device in the
[Enter PagePack Passcode] field using the numerical keypad.
7. A Billing Plan is currently set to default plan for you device, to keep this plan, in the Billing Plan
screen touch the [Next] button.
If you have been provided with an alternative Billing Plan Passcode, touch the [I Have a
Passcode].
8. The Install Wizard Welcome screen displays.
Install Wizard
1. At the Welcome screen, touch the [Next] button.
2. The Tools Access screen displays, to proceed:
a. Select one of the following access rights for the device configuration tools:
• Locked Restricted Access - this option requires a login to access configuration tools.
• Unlocked Open Access - this option allows all users to access the device configuration
tools.
Note: Access rights can be modified using the Internet Services, for more information, refer to
Password Settings on page 151.
b. Touch the [Next] button.
3. The Paper Size Preference screen will display, to proceed:
a. Select one of the following paper size format that most frequently will be used on this device:
• Inches
• Metric
b. Touch the [Next] button.
4. The GMT Offset screen displays, using the left and right arrow button set the Greenwich
Meantime Offset according to the country you are in. Touch the [Next] button.
5. The Date screen displays:
a. For Format select one of the following date format:
Xerox ColorQube™ 9201/9202/9203
System Administrator Guide
17
Page 18

Device Connection and Quick Setup
• MM/DD/YYYY
• DD/MM/YYYY
• YYYY/MM/DD
b. Set the date by touching the left and right arrow buttons. Touch the [Next] button.
6. The Time screen displays:
a. Set the time by touching the left and right arrow buttons.
b. Touch the [Display 24-Hour Clock] box to display 24-Hour format.
c. Touch the [Next] button.
7. The Quick Setup Home screen displays, this will display the Features and its Status, touch the
[Next] button
8. The Device Setup Complete screen will display with the message ‘Your Xerox machine is now:
Ready to Copy’. Touch the [Finished] button. The device will save the settings and reboot. If
enabled a configuration report will print.
The Welcome Page
A Welcome Page is enabled as the opening page of the device's Internet Services web pages. You can
click [Configure Device] on this Welcome Page, or click the Configuration Overview link on the
Properties tab, to go directly to the Install Wizards for configuring protocols and optional services.
A [I Have a Cloning File...] button on the Welcome Page lets you copy configuration settings from a
compatible Xerox system and apply them to this system.
To stop displaying the Welcome Page, check the [Don’t Show Welcome Page Again] checkbox.
To access the Welcome Page or Properties tab of Internet Services, TCP/IP and HTTP must be enabled
on the device as described in the Introduction on page 9 of this guide.
Administrator Access for the Tools Menu
The <Log In/Out> button provides access to the Administrator Tools area. Administrator access is
required to change settings such as network information on the device.
1. Press the <Log In/Out> button on the Control Panel.
2. Enter the Administrator’s User Name [admin], touch [Next], enter the Password [1111], then
touch [Enter].
3. Press the <Machine Status> button.
4. Touch the [Tools] tab.
Print a Configuration Report to Verify Current Device Settings
A Configuration Report will automatically print when the device is powered off, then on, during Power
Cable and Ethernet Cable installation. If necessary, perform the following steps:
1. Press the <Machine Status> button on the device.
2. Touch the [Machine Information] tab.
3. Touch [Information Pages].
18
Xerox ColorQube™ 9201/9202/9203
System Administrator Guide
Page 19

Device Connection and Quick Setup
4. Touch [Configuration Report].
5. Touch [Print], then touch [Close].
If you want to disable automatic printing of a Configuration Report at Startup, refer to To Prevent the
Configuration Report to Print at Power On on page 28.
Ethernet Configuration
Ethernet Port
The Ethernet Interface is set to auto detect the speed of your network. The device supports the
following selectable speeds:
•Auto
• 10Mbps Half-Duplex
• 10Mbps Full-Duplex
•100 Mbps Half-Duplex
• 100 Mbps Full-Duplex
• 1 Gbps Half-Duplex.
• 1 Gbps Full-Duplex
Note: If your network has hubs that have Auto-Sensing enabled and the device Ethernet speed is
set to Auto, it is possible that the hub will not arbitrate to the correct speed.
Setting the Ethernet Speed at the Device
1. Press the <Log In/Out> button to enter the Tools pathway.
2. Enter the Administrator’s User Name [admin], touch [Next], enter the Password [1111], then
touch [Enter].
3. Press the <Machine Status> button.
4. Touch [Tools].
5. Touch [Network Settings].
6. Touch [Advanced], if a warning message appears, touch [Continue].
7. Touch [Ethernet Physical Media].
8. Select the required Ethernet Physical Media speed to match the speed set on your hub or switch.
9. Touch [Save], touch [Close].
10. Press the <Log In/Out> button.
11. Touch [Logout] to exit the Tools Pathway.
Enable TCP/IP and HTTP at the Device
Look at the Configuration Report, verify whether the addressing shown under TCP/IP Settings will
enable this device to communicate over your network. Also, verify that HTTP is enabled under HTTP
Xerox ColorQube™ 9201/9202/9203
System Administrator Guide
19
Page 20

Device Connection and Quick Setup
Settings, to enable use of the device's web user interface for network and options configuration. If
necessary, reset TCP/IP addressing (including DHCP and DNS settings) and enable HTTP as follows:
1. At the device and press the <Log In/Out> button to enter the Tools pathway.
2. Enter the Administrator’s User Name [admin], touch [Next], enter the Password [1111], then
touch [Enter].
Tip: This password can be changed by following the steps provided in the Administrator Tools
topic in the General Setup section of this guide.
3. Press the <Machine Status> button, and then the [Tools] tab.
4. Wait for the screen to refresh, touch [Network Settings], touch [Advanced], if a warning message
appears, touch [Continue].
5. Touch the [HTTP Settings] button, touch [Enable], touch [Save], then touch [Close] to return to
the Network Setting screen.
6. Touch [TCP/IP Settings].
7. Configure TCP/IP settings, including DHCP (Dynamic Addressing) and DNS, touch [Save], touch
the [Close] button to return to the Network Setting screen.
Note: This device supports IPv6 addressing, with an automatically-built Link Local Address for
broadcasting to routers that can supply the network-layer configuration parameters. See
Configure Network connectivity Protocols with Internet Services on page 24.
Quick Setup
When your device is configured with an IP address and HTTP is enabled, you can configure network
information from your web browser via Internet Services. Enter the IP address of the device in your web
browser to access Internet Services.
20
Xerox ColorQube™ 9201/9202/9203
System Administrator Guide
Page 21

Device Connection and Quick Setup
Internet Services
Internet Services is the embedded HTTP server application that resides in the device. Internet Services
allows Administrators to change network and system settings on the device from the convenience of
their desktops.
Many of the features available within Internet Services will require an Administrator User Name and
Password. The default User Name is admin and the default Password is 1111. A user will only be
prompted for an Administrator’s User Name and Password once in a single browser session.
System Configuration
To use Internet Services, you need to enable both TCP/IP and HTTP on the device. See To Add or
Change a Static IP Address when there is no DHCP Server Available on page 21.
How to Verify the IP Address
The device is configured by default to request an IP address from a DHCP server. If your DHCP server
provides a valid IP address you will not need to configure the device with an IP address. HTTP is also
enabled by default. Print a Configuration Report to verify the IP address.
To print a Configuration Report on demand, go to the device:
1. Press the <Machine Status> button on the device.
2. Touch the [Machine Information] tab.
3. Touch [Information Pages].
4. Touch [Configuration Report].
5. Touch [Print], then touch [Close].
To Add or Change a Static IP Address when there is no DHCP Server Available
At the Device:
1. Press the <Log In/Out> button.
2. Enter the Administrator’s User Name [admin], touch [Next], enter the Password [1111], then
touch [Enter].
3. Touch the <Machine Status> button.
4. Touch [Tools].
5. Touch [Network Settings].
6. Touch [TCP/IP Settings].
7. Touch [Dynamic Addressing].
a. Touch [Disable] to disable DHCP, and touch [Save].
8. Touch [IP Address/Host Name].
a. Touch [IP Address] and enter a valid IP Address and touch [Save].
b. Touch [Host Name] and enter host name and touch [Save].
Xerox ColorQube™ 9201/9202/9203
System Administrator Guide
21
Page 22
Device Connection and Quick Setup
c. Touch [Close].
9. Touch [Subnet and Gateway].
a. Touch [IP Gateway] and enter a valid gateway address and touch [Save].
b. Touch [Subnet Mask] and enter a valid subnet mask address and touch [Save].
c. Touch [Close].
10. Touch [TCP/IP Enablement], ensure it is enabled and touch [Save].
11. Touch [Close].
12. Press the <Log In/Out> button.
13. Touch [Logout] to exit the Tools pathway.
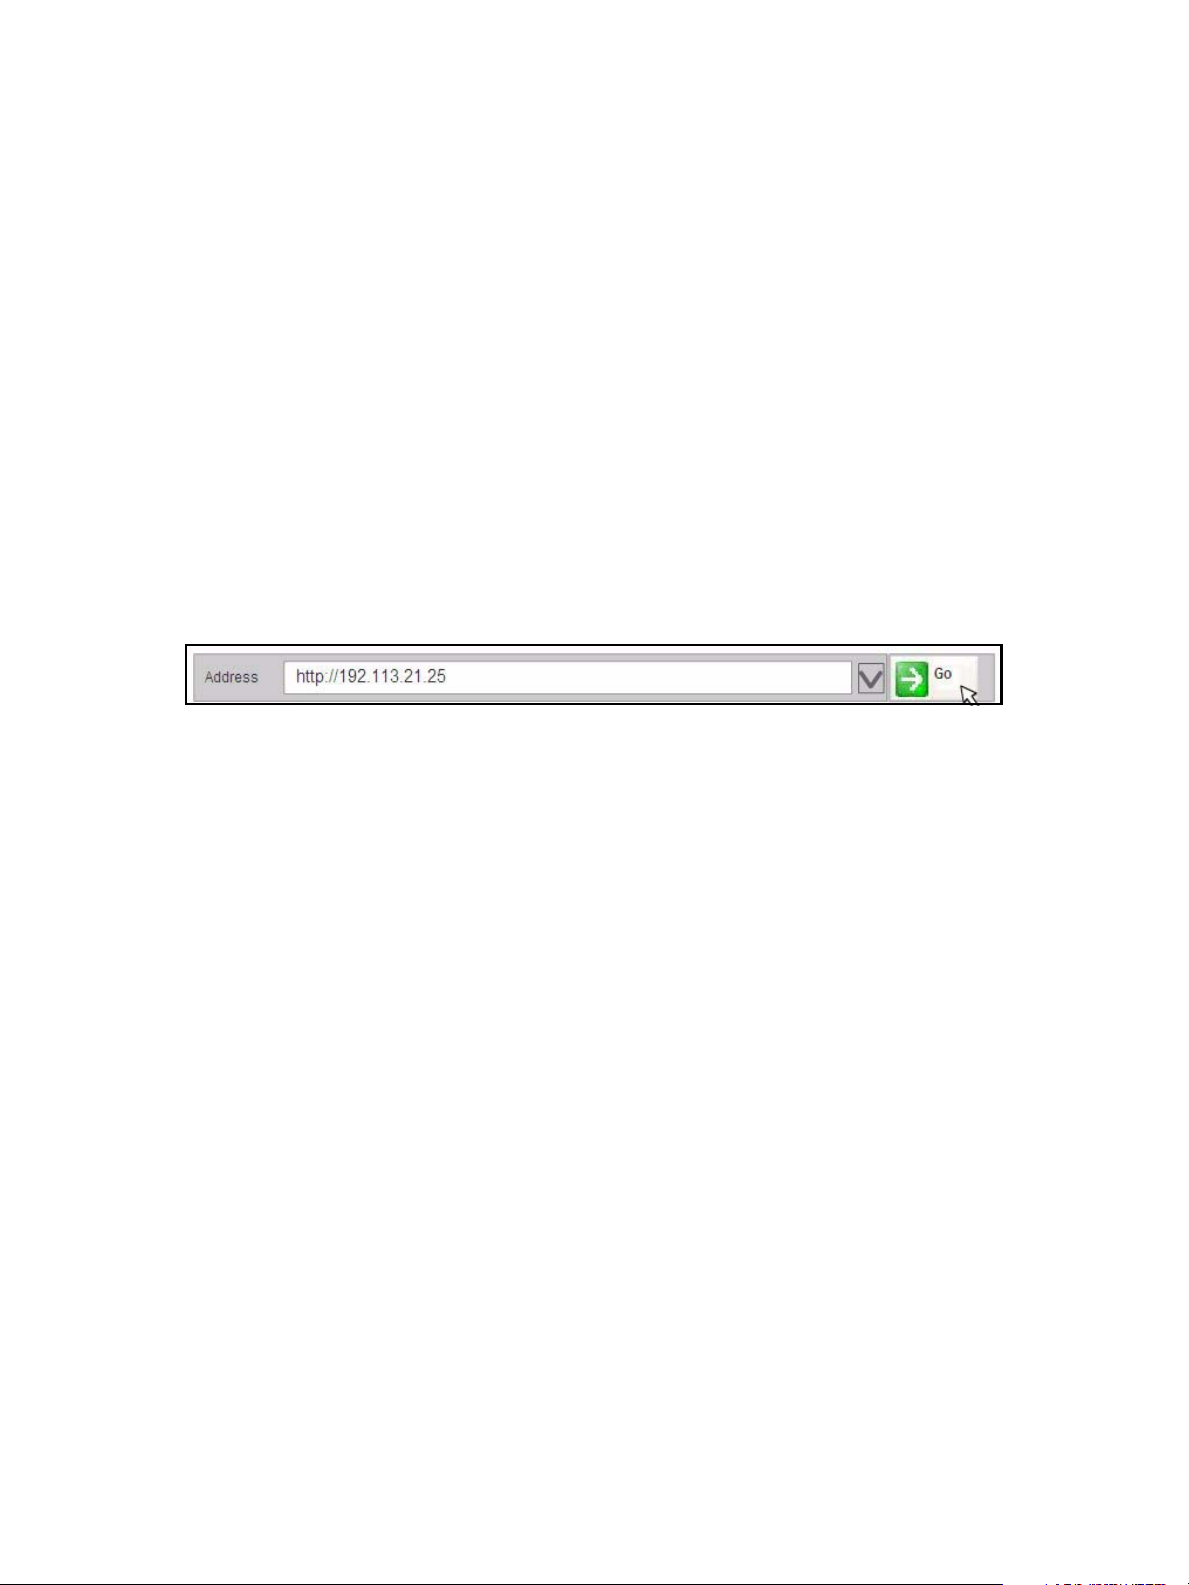
To Access Internet Services
To v iew the [Internet Services Welcome] screen:
1. Enter the device's IP Address in the web browser.
2. Press [Enter] or click on the [Go] button. For example:
22
Xerox ColorQube™ 9201/9202/9203
System Administrator Guide
Page 23

The Welcome screen displays.
Main PanelMenu Panel
Header Panel
Device Connection and Quick Setup
The Internet Services home page contains three panels without visible boundaries.
• Header Panel: displays the header for all pages. The header includes the Internet Services logo
and model of the device. The header for the ColorQube series also includes a user mode icon, and
the name or type of a logged-in user. Below this panel on most pages is the tab bar which
corresponds to the seven functions or page buttons. These are [Status], [Jobs], [Print], [Scan],
[Address Book], [Properties], and [Support]. You can navigate through the pages when you click
the text on each tab.
• Menu Panel: Displays a navigation tree, listing the items available within each category, with the
currently displayed item highlighted.
• Main Panel: Displays information and settings for an item selected on the Menu Panel.
When you open Internet Services, a welcome screen is displayed. If you click the [Configure Device...]
button, a Configuration Overview screen opens which provides links to the printing protocols and
services that you can configure on the device.
If you click the [I have a Cloning File...] button, you can copy settings from one device and transfer
them to another device with the same version of system software.
Xerox ColorQube™ 9201/9202/9203
System Administrator Guide
23
Page 24

Device Connection and Quick Setup
To S et up HTTP
The Internet Services HTTP screen enables the System Administrator to specify the Keep Alive
Timeout, Maximum Connections, Port Number and Secure HTTP (SSL) settings.
1. At your Workstation, open the web browser, enter the IP Address of the device in the Address bar,
and press [Enter].
2. Click on the [Properties] tab.
3. If prompted, enter the Administrator User ID and Password. The default is [admin] and [1111].
4. Click on the [Login] button.
5. Click on the [Connectivity] link.
6. Click on the [Protocols] link.
7. Select [HTTP] in the directory tree.
8. In the Configuration area:
a. The [Keep Alive Timeout] setting determines how long the device's Internet Services pages
will wait for a response from a connected user before terminating the connection. Enter the
required number of seconds (1 - 60) in the [Keep Alive Timeout] field.
Note: Generally, user connections will be adversely affected (slow or kept busy) if the Keep Alive
Timeout is set for a longer period of time.
The [Maximum Connections] setting is the maximum number of simultaneous connections that
can occur at any given moment to Internet Services. Enter a number from 8 - 32 to indicate the
maximum number of clients that can be connected (for example, with open sockets) to the HTTP
server at any one time in the [Maximum Connections] field.
Note: In order for the device to operate in Secure HTTP (or HTTPS/SSL) mode, the device must
possess a correctly configured Machine Digital Certificate. For information on Machine Digital
Certificate, see Machine Digital Certificate Management on page 157.
b. For Secure HTTP (SSL), select [Enabled] to set the HTTP Security Mode.
c. Change the Port Number if required. The default is 443.
d. Click on the [Apply] button to accept the changes.
Configure Network connectivity Protocols with Internet Services
Internet Services is a series of web pages, hosted on the embedded HTTP server of the device, allowing
configuration of services and settings using a web browser.
Refer to the Protocols section of this guide and follow the instructions to configure protocols.
To configure individual protocols only, using your web browser, perform the following steps:
1. At your Workstation, open the web browser and enter the IP address of the device in the Address
bar, and press [Enter].
2. Click on the [Properties] tab.
3. If prompted, enter the Administrator User ID and Password. The default is [admin] and [1111].
4. Click on the [Login] button.
24
Xerox ColorQube™ 9201/9202/9203
System Administrator Guide
Page 25

Device Connection and Quick Setup
5. Click on the [Connectivity] link, then click on the [Protocols] link.
Note: To see IPv6 addressing parameters, if desired, click IP (Internet Protocol) in the list of
Protocols, then click on IP (v6).
6. Select your individual protocol of interest from the displayed list and modify settings to your
requirements, for further information refer to Network Installation on page 69.
Set a Description for the Device
The Internet Services Properties Description page contains information that identifies a specific device
model, name and physical location.
1. At your Workstation, open the web browser and enter the IP address of the device in the Address
bar, and press [Enter].
2. Click on the [Properties] tab.
3. If prompted, enter the Administrator User ID and Password. The default is [admin] and [1111].
4. Click on the [Login] button.
5. Select [Description] in the directory tree.
6. In the Identification area:
a. Type a name of your choice for the device in [Device Name].
b. Type the site location for the device in [Location].
c. Click on the [Apply] button to accept the changes or [Undo] to return the settings to their
previous values.
To Enable Services
Services are pre-installed on the device, and must be enabled using the Service Registration screen in
on Internet Service.
1. At your Workstation, open the web browser and enter the IP address of the device in the Address
bar, and press [Enter].
2. Click on the [Properties] tab.
3. If prompted, enter the Administrator User ID and Password. The default is [admin] and [1111].
4. Click on the [Login] button.
5. Click on the [Services] link.
6. Select [Service Registration] in the directory tree.
7. In the Service Registration area:
a. Either click on the [Enable All] button to ensure all the listed services are enabled, or check
the required services checkbox you want to be displayed on the device’s touch screen.
b. Click on the [Apply] button.
To View the Service Status at the Device
To view the service status at the device.
Xerox ColorQube™ 9201/9202/9203
System Administrator Guide
25
Page 26

Device Connection and Quick Setup
At the Device:
1. Press the <Machine Status> button.
2. Touch the [Machine Information] tab.
3. Touch the [Installed Options] button.
4. All the services selected on the Internet Services page are displayed and the Status will display
either Enabled or Disabled.
To Install Print Drivers
Refer to Print Drivers on page 113 of this guide and follow the instructions provided.
Configure Services
If you have installed one or more optional service on your device you can configure the service from
Internet Services.
If you need more specific information about services and how to configure them, refer to the following
chapters for each service:
• Workflow Scanning on page 179
• E-mail on page 223
• Internet Fax on page 237
• Server Fax on page 259
• Embedded Fax on page 245
• LAN Fax on page 269
• Network Accounting on page 297
1. At your Workstation, open the web browser and enter the IP address of the device in the Address
bar, and press [Enter].
2. Click on the [Properties] tab.
3. If prompted, enter the Administrator User ID and Password. The default is [admin] and [1111].
4. Click on the [Login] button.
5. Select [Configuration Overview] in the directory tree.
6. Click on the [Settings] button next to the service that you want to configure, for example E-mail.
Note: If you cannot see any services, then they have not been installed on your device.
7. Click the [Configure] button next to each step and enter the information to configure your
service. Click on the [Save] button when you have finished with each screen.
8. If you have more than one service to configure, click on the [Configure Next Service] button.
Otherwise, click [Close].
Test your service at the device to verify that it is configured correctly.
26
Xerox ColorQube™ 9201/9202/9203
System Administrator Guide
Page 27

3
General Setup
Administrator Tools Password
The Administrator password is required to access the administrator tools function both from the device
touch screen and Internet Services. Access to the administrator tools is necessary to configure the
device, network connectivity and optional settings.
Note: Note that the web user interface (Internet Services) is now protected by the Administrator
password, so that you will need to log in with the User ID and Password, the default is admin and
1111. BEFORE modifying any settings. After working with settings, make sure to log out by
clicking on [admin-Logout] in the upper right corner of the Internet Services screen, then click on
the [Logout] button.
We recommend that you change the Administrator password immediately after device installation. A
password of at least 9 characters in length should be sufficient for a year. Once changed, ensure the
password is kept in a secure place for future use.
New Administrator Password
1. At your Workstation, open the web browser and enter the IP address of the device in the Address
bar, and press [Enter].
2. Click on the [Properties] tab.
3. If prompted, enter the Administrator User ID and Password. The default is [admin] and [1111].
4. Click on the [Login] button.
5. Click on the [Security] link.
6. Select [Admin Password] in the directory tree.
7. Ensure New Password tab is highlighted on the top of the screen.
8. Enter detail in the [New Password] and [Retype New Password] fields.
9. Click on the [Apply] button.
Note: The user name “admin” is reserved for the Device System Administrator Account.
Do NOT use the username “admin” for any local or network accounts on the device.
Xerox ColorQube™ 9201/9202/9203
System Administrator Guide
27
Page 28

General Setup
Configuration Page
The Configuration page allows you to view device setup details, for example Network Setup and
Workflow Scanning Setup.
Note: These details can also be printed by clicking on the [Print Configuration Page] button.
1. At your Workstation, open the web browser and enter the IP address of the device in the Address
bar, and press [Enter].
2. Click on the [Status] tab.
3. Select [Configuration Report] in the directory tree.
4. To view information about a setting select the required configuration setting from the list.
5. To print the Configuration details, click on the [Print Configuration Page] button.
Configuration Report
Note: The following instructions are assuming that printing a Configuration Report is open to all
users.
The Configuration Report details the device software versions and network settings configured for the
device. The Configuration Report automatically prints when the device is rebooted or powered on. You
can print a Configuration Report by following the instructions below.
At the Device:
1. Press the <Machine Status> button on the device.
2. Touch the [Machine Information] tab.
3. Touch [Information Pages].
4. Touch [Configuration Report].
5. Touch [Print], then touch [Close].
To Prevent the Configuration Report to Print at Power On
At the Device:
1. Press the <Log In/Out> button to enter the Tools pathway.
2. Enter the Administrator’s User Name [admin], touch [Next], enter Password [1111], touch
[Enter].
3. Press the <Machine Status> button, then touch the [Tools] tab.
4. Touch [Device Settings].
5. Scroll down by touching the scroll down arrow, touch [Configuration/Information Pages].
a. Touch the [No] button under Print Configuration at Power On.
b. Touch [Save].
6. Press the <Log In/Out> button, then touch [Logout] to exit the Tools pathway.
At your Workstation:
1. Open the web browser and enter the IP address of the device in the Address bar, and press
[Enter].
28
Xerox ColorQube™ 9201/9202/9203
System Administrator Guide
Page 29

General Setup
2. Click on the [Properties] tab.
3. If prompted, enter the Administrator User ID and Password. The default is [admin] and [1111].
4. Click on the [Login] button.
5. Click on the [Services] link.
6. Click on the [Printing] link.
7. Select [General] in the directory tree.
8. In the General area:
a. for Configuration Report uncheck the [Print at power on] checkbox.
b. Click on the [Apply] button to save your settings.
c. Click on the [OK] button when you see the message “Properties have been successfully
modified”.
To Restrict Configuration Report to System Administrator
You can restrict any printing of the Configuration Report to a logged-in System Administrator.
1. At your Workstation, open the web browser and enter the IP address of the device in the Address
bar, and press [Enter].
2. Click on the [Properties] tab.
3. If prompted, enter the Administrator User ID and Password. The default is [admin] and [1111].
4. Click on the [Login] button.
5. Click on the [Services] link.
6. Click on the [Printing] link.
7. Select [General] in the directory tree.
8. In the General area:
a. For Configuration / Information Pages Report, check the [Restrict to SA] checkbox.
b. Click on the [Apply] button to save you settings.
c. Click on the [OK] button when you see the message “Properties have been successfully
modified”.
Note: If Configuration Report is restricted to System Administrator only, the Configuration button
in the Machine Information screen will be greyed out and will require you to log into the device
to access the Configuration Report.
Configure Print Protocols
1. At your Workstation, open the web browser and enter the IP address of the device in the Address
bar, and press [Enter].
2. At the welcome page, click on the [Configure Device] button.
3. If prompted, enter the Administrator User ID and Password. The default is [admin] and [1111].
4. Click on the [Login] button.
5. If you want to use the checklist, click on the [View Checklist] button and click on the [Print]
button. Scroll to the bottom of the screen and click on the [Close] button.
6. Click on the [Settings] button next to Print Protocols.
7. Click on the [Configure] button next to General Settings to configure general print settings.
Xerox ColorQube™ 9201/9202/9203
System Administrator Guide
29
Page 30

General Setup
8. In the General area:
a. For Configuration Report, check the [Print at Power on] checkbox to enable a configuration
report to print at power on.
b. For Configuration/Information Pages Report, check the [Restrict to SA] checkbox to restrict
Configuration Report and Information Pages to the System Administrator.
c. Enter the time to pass, in minutes, for the device to timeout in the [Timeout] field. The range
is 0-7200, the default is 30 minutes.
9. In the Banner Sheet area:
a. For Print Banner Sheets, select [Yes] to allow a banner sheet to print with every print job.
b. For Allow the Print Driver to Override, select [Yes] to allow the print driver to override the
banner sheet option.
c. For Banner Sheet Identification, select one of the following:
• Job Owner User ID and Job Name
• Xerox Network Accounting User ID and Job Name
• Generic User ID and Job Number
10. In the Secure Print area:
The Secure Print requires a user to be authenticated as the owner of a print job using a passcode,
printing will only begin when the secure passcode is entered at the device,
a. For Secure Print Passcode Length, enter the minimum required length of the Secure Print
Passcode.
b. For Release Behavior, select one of the following:
• Release all owner’s jobs with passcode - this will release all jobs associated with the
user, with the supplied passcode.
• Release only the selected job - this will release only a selected job with a supplied
passcode.
11. In the Defaults area, select the required settings for the following options:
• Copies - allows you to set the default number of copies output by the device, the range is 1-
9999.
• Job Type - allows you to select the default job type.
• Paper Size - allows you to specify the default paper size from the drop-down menu.
• Paper Color - allows you to specify the default paper color from the drop-down menu.
• Paper Feed Edge Default - allows you to select either long or short edge feed.
• 2 Sided Printing - allows you to select either 1-Sided Print, 2-Sided Print or 2-Sided Print Flip
on short edge.
• Output Color - allows you to select whether the output is color.
• Collate - allows you to enable or disable the collation.
• Staple - allows you to set the default staple position.
12. Click on the [Save] button to return to the Print Protocols screen.
13. Click on the [C
onfigur
e] button next to the IP (Internet Protocol), to enable on the device to
support your network environment.
14. Enter the information for your chosen protocol. If you need more information on how to configure
protocol information refer to Network Installation on page 69.
30
Xerox ColorQube™ 9201/9202/9203
System Administrator Guide
Page 31

General Setup
15. Click on the [Save] button. You have finished configuring the protocol information, click on the
[Close] button.
16. To print to the device, install the Print Drivers on your workstation. If you need more information
refer to Print Drivers on page 113.
Cloning
Cloning enables you to copy the settings and web generated scan templates of one device and transfer
them to other devices operating with the same version of system software. Depending on the optional
features installed on the device, groups of settings can be cloned. For example, scan settings will be
available for cloning only if the Workflow Scanning optional feature is already installed on the source
device.
After selecting the settings to be cloned, a configuration cloning file is created and saved with the
extension .dlm (downloadable module).
The configuration cloning file can then be submitted to other devices using Internet Services via a web
browser. The settings are transferred and applied to the recipient device.
Note: Optional features must be installed on the recipient device in order to accept cloned
settings. In other words, it is not possible to install an optional feature (for example, Workflow
Scanning or E-mail) through the process of cloning.
Cloning feature creates a .dlm file script that can be used to configure other devices. All devices
must have the same version of software for the .dlm file to be accepted.
To Verify the Software Version
1. At your Workstation, open the web browser and enter the IP address of the device in the Address
bar, and press [Enter].
2. Click on the [Properties] tab.
3. If prompted, enter the Administrator User ID and Password. The default is [admin] and [1111].
4. Click on the [Login] button.
5. Click on the [General Setup] link.
6. Select [Configuration Report] in the directory tree.
7. Scroll down to the Software Versions area and view the System Software version.
To C lo ne a Devi ce
1. At your Workstation, open the web browser and enter the IP address of the device in the Address
bar, and press [Enter].
2. Click on the [Properties] tab.
3. If prompted, enter the Administrator User ID and Password. The default is [admin] and [1111].
4. Click on the [Login] button.
5. Click on the [General Setup] link.
6. Select [Cloning] in the directory tree.
7. In the Create Clone File area:
Xerox ColorQube™ 9201/9202/9203
System Administrator Guide
31
Page 32

General Setup
c. By default all features are selected, click on the [Clear All] button, and check the following
feature checkboxes to select the features that you wish to clone:
•Accounting •Security
• Administration • SMart eSolution
• Audit Log • System Disk
• Authentication & Authorization
Configuration
• Connectivity Settings • Print Settings
• E-mail • Workflow Scanning
•Fax •Templates
•Internet Fax •Device Upgrade
• Internationalization • Web Services
• Job Management • Public Address Book
•Power Saver
d. To select all the features, click on the [Select All] button.
e. Click on the [View feature Details] link to view the specific parameters that can be cloned
for any of the feature.
f. Click on the [Clone] button.
8. In the Cloning Instructions area:
a. Right-click on the [“Cloning.dlm”] link that appears and select [Save Target As].
b. A dialog box will prompt you to specify a name and location for the cloned file. Ensure the
extension reads ‘.dlm’.
c. Click on the [Save] button. The ‘.dlm’ file can now be used to clone other devices.
To Install the Clone File on Another Device
Note: This procedure will cause the device to reboot and will be unavailable over the network for
several minutes.
1. Click on the [Status] tab.
2. Select [Welcome] in the directory tree.
3. Click on the [I Have A Cloning File] button.
4. If prompted, enter the Administrator User ID and Password. The default is [admin] and [1111].
5. Click on the [Login] button.
6. In the Install Clone File area, click on the [Browse] button.
7. Locate your file and click on the [Open] button
8. Click on the [Install] button.
The device will be unavailable over the network for several minutes. Once rebooted a Configuration
Report will print, if enabled.
32
Xerox ColorQube™ 9201/9202/9203
System Administrator Guide
Page 33

General Setup
Date and Time
This feature enables the System Administrator to set the Date and Time (including Time Zone for
Daylight Saving Time) for the system. It can automatically be set up via NTP, if enabled on the internet
services, or it can be manually set on the device interface.
Automatic Setup Using NTP
Note: If Setup is set to Automatic using NTP, the date and time of the system can be set using a
network time server (NTP). The system will check the server at boot time, every subsequent 24
hours, and any time the NTP parameters are modified.
1. At your Workstation, open the web browser and enter the IP address of the device in the Address
bar, and press [Enter].
2. Click on the [Properties] tab.
3. If prompted, enter the Administrator User ID and Password. The default is [admin] and [1111].
4. Click on the [Login] button.
5. Click on the [General Setup] link.
6. Click on the [Date and Time] link from the directory tree.
7. In the Setup area select [Automatic using NTP] from the Date and Time Setup drop-down
menu to use an NTP server.
8. In the NTP Server Settings area, select one of the following:
• IPv4 Address and enter the IP Address and Port and the Alternate IP Address and Port
details in the required fields. The default port number is 123
• Host Name and enter the Host Name and Port and the Alternate Host Name and Port
details in the required fields. The default port number is 123.
Note: Any changes to these settings will require the device to reboot.
9. In the Date & Time area:
a. For Format, select one of the following:
• MM/DD/YYYY
• DD/MM/YYYY
• YYYY/MM/DD
b. Using the Up and Down arrow select the required value for the following:
• Day - the range will be dependant on the selected month.
• Month - the range is from 1 to 12.
• Year - the range is from 2007 to 2033.
c. Check the [Display 24 hour clock] checkbox if you require a 24 hour format, if unchecked, a
12 hour format is displayed.
n ar
d. Using the Up and Dow
• Hours - for a 12 hour format the range is 1 to 12 and for a 24 hour format the range is 0
to23.
• Minutes - the range is 00 to 59.
• If 12 hour format is selected, select either AM or PM from the drop-down menu.
e. In the Time Zone area, select a time zone from the drop-down menu.
row select the required value for the following:
Xerox ColorQube™ 9201/9202/9203
System Administrator Guide
33
Page 34

General Setup
10. Click on the [Apply] button, the system will reboot.
Manual Setup
1. At your Workstation, open the web browser and enter the IP address of the device in the Address
bar, and press [Enter].
2. Click on the [Properties] tab.
3. If prompted, enter the Administrator User ID and Password. The default is [admin] and [1111].
4. Click on the [Login] button.
5. Click on the [General Setup] link.
6. Click on the [Date and Time] link from the directory tree.
7. In the Setup area select [Manual (NTP Disabled)] from the Date and Time Setup drop-down
menu to use an NTP server.
8. In the Date & Time area:
a. For Format, select one of the following:
• MM/DD/YYYY
• DD/MM/YYYY
• YYYY/MM/DD
b. Using the Up and Down arrow select the required value for the following:
• Day - the range will be dependant on the selected month.
• Month - the range is from 1 to 12.
• Year - the range is from 2007 to 2033.
c. Check the [Display 24 hour clock] checkbox if you require a 24 hour format, if unchecked, a
12 hour format is displayed.
d. Using the Up and Down arrow select the required value for the following:
• Hours - for a 12 hour format the range is 1 to 12 and for a 24 hour format the range is 0
to23.
• Minutes - the range is 00 to 59.
• If 12 hour format is selected, select either AM or PM from the drop-down menu.
Note: Any changes to these settings will require the device to reboot.
e. In the Time Zone area, select a time zone from the drop-down menu.
9. Click on the [Apply] button.
10. Click on the [OK] button when you see the message “Properties have been successfully
modified”.
Image Settings
The Image Settings screen allows you to set preferences for the various file formats that the device is
capable of creating when features such as E-mail and Internet Fax are used at the device.
34
Xerox ColorQube™ 9201/9202/9203
System Administrator Guide
Page 35

General Setup
To Configure Image Settings for Email & Internet Fax Only
1. At your Workstation, open the web browser and enter the IP address of the device in the Address
bar, and press [Enter].
2. Click on the [Properties] tab.
3. If prompted, enter the Administrator User ID and Password. The default is [admin] and [1111].
4. Click on the [Login] button.
5. Click on the [General Setup] link.
6. Select [Image Settings] in the directory tree, the Image Setting (Email & Internet Fax Only
screen will display.
7. In the TIFF Settings area, for TIFF Color Compression, select one of the following options to
specify the file compression method used for color TIFF images when the device saves them for
Email attachment or Internet fax:
• TIFF 6.0 (old JPEG) - this version utilizes the most universally compatible version of the JPEG
compression format.
• TIFF Specification Supplement 2 (New JPEG) - this is an update to the TIFF 6.0
specification and provides a more fault-free JPEG compression algorithm, but may not be
compatible with older graphics software.
• LZW - This is a lossless compression method yielding very high compression efficiency, LZW
works best for files containing repetitive data, such as is the case with text and monochrome
images. LZW has long been associated with TIFF and GIF images. This compression
algorithm was widely used in Adobe Photoshop, until version 6, and Adobe Acrobat, until
version 5.
8. In the PDF & PDF/A Settings area, select the following compression types for PDF and PDF/A
documents:
a. For Optimization for Fast Web Viewing, check the [Enabled] checkbox.
If enabled, this option will create linearized PDF files. Linearized PDF files allow the first page
of the PDF file to be displayed in a user's web browser, before the entire file is downloaded
from the web server. This fast first page display helps to alleviate Internet user frustration in
waiting for an entire file to download before displaying the file's contents.
This option will produce relatively small files with a very short encoding delay per page,
however the image detail may appear more grainy when printed.
Note: Regarding Searchable PDF and PDF/A: If this option is available, by enabling the selection
you will provide Workflow Scanning, E-mail, and Internet Fax users with the ability to choose
[Searchable] as an option for their PDF and PDF/A file formats. The Searchable Format provides a
second layer of data with the text of the scanned document. The second layer is converted to an
optical character readable format, enabling the text of the document to be searched on, copied,
and pasted, as desired.
b. JBIG is a standard algorithm for lossless compression of bi-level images (two color images),
specializing in the preservation of thin lines. JBIG2 compression is usually used for text and
halftone documents, and is claimed to be able to compress scanned documents up to 10
times smaller than with TIFF G4. A further claim is that it allows scanned manuals, books,
check images, and other document types to be viewed and manipulated efficiently over the
Internet. This method yields a very small black and white file size with fast viewing
Xerox ColorQube™ 9201/9202/9203
System Administrator Guide
35
Page 36

General Setup
performance. This compression format requires Acrobat 5, with PDF version 1.4 or greater.
There are two encoding methods for JBIG2, select both of the following options for optimal
compression:
• Enable Arithmetic Encoding
• Enable Huffman Encoding
Select one option for good compression and improved speed, if neither is selected, there will be no
compression or optimal speed.
c. For Flate Compression, check the [Enabled] checkbox.
Flate Compression is a lossless compression format that combines LZ77 (the first LZW) and
adaptive Huffman encoding (RFC 1951). Huffman compression is a lossless algorithm ideal
for compressing text. LZ77 works well with files containing lots of repetitive data, such as text
and monochrome image (TIFF and GIF) files. When used for PDF documents, Flate
compression is applied after JPEG compression. It is also used in place of G3 compression for
monochrome PDF images in Photo and Magazine mode.
d. For MRC Compression, check the [Enabled] checkbox to divide the scanned image based on
content, and then compress each area in the optimal manner for that image area. This
option allows for smaller output files with better image quality.
e. When MRC Compression is enabled, select one of the following MRC Compression Format
option:
• Multi-Mask Compression - tends to produce cleaner and sharper pages. On a multi-
mask MRC compressed page, contents with similar colors are extracted, combined and
encoded as masks. However, occasional mistakes can be made causing image artifacts
such as lines and text shifting colors.
• 3-layer Compression - segments the image into a layer with the image’s sharp edges
(generally known as the text or mask layer), a graphic (background) layer, and a
foreground layer that defines the colors of the text in the mask layer. The mask layer is
compressed using JBIG2 (PDF) or Flate (XPS) compression as configured by the SA. The
background layer is compressed using either JPEG or Flate compressed-JPEG. The
foreground layer is compressed using a lower quality JPEG compression than the
background layer since the only data that is to be retained are the colors of the text in
the Mask layer. The layers are re-assembled as a PDF, PDF/A or XPS page for export.
9. XPS is Microsoft's new electronic paper format, an alternative to PDF. XPS is currently supported
as a saved file format in Microsoft Office 2007, with an XPS viewer built into Windows Vista.
Microsoft states that Windows vista uses the XPS format as a document format, a windows spool
file format, and a page description language for printers.
In the XPS Setting (Email Only) area, for MRC Compression:
a. Check the [Enabled] checkbox.
b. If enabled, select one of the following MRC Compression Format option:
• Multi-Mask Compression
• 3-layer Compression
Note: Regarding Searchable XPS: If this option is available, by enabling the selection you will
provide Workflow Scanning, E-mail, and Internet Fax users with the ability to choose [Searchable]
as an option for their XPS file format. The Searchable Format provides a second layer of data with
the text of the scanned document. The second layer is converted to an optical character readable
format, enabling the text of the document to be searched on, copied, and pasted, as desired.
10. Click on the [Apply] button.
36
Xerox ColorQube™ 9201/9202/9203
System Administrator Guide
Page 37

General Setup
11. Click on the [OK] button when you see the message “Properties have been successfully
modified”.
Accessing Image Settings for Workflow Scanning
1. At your Workstation, open the web browser and enter the IP address of the device in the Address
bar, and press [Enter].
2. Click on the [Properties] tab.
3. If prompted, enter the Administrator User ID and Password. The default is [admin] and [1111].
4. Click on the [Login] button.
5. Click on the [Services] link.
6. Click on the [Workflow Scanning] link.
7. Select [Default Template] in the directory tree.
8. Scroll to the Workflow Scanning area, click on the [Edit] button.
9. In the Workflow Scanning area:
a. For Original Type, select either the [Photo & Text], [Photo], [Text], [Map] or
[Newspaper/Magazine].
b. Select [for OCR] option for Scan Presets.
c. Click on the [Apply] button.
10. Scroll to Filing Options area, click on the [Edit] button.
11. Within Filing Options area:
a. For File Format, select either [TIFF], [mTIFF], [JPEG], [PDF], [PDF/A] or [XPS].
b. For Searchable Options, select [Searchable].
c. Click on the [Apply] button.
12. Scroll to the Workflow Scanning Image Settings area, click on the [Edit] button.
13. In the Searchable XPS PDF & PDF/A Defaults area:
n
a. For Searchable Options, select [Searchable] a
d then select one of the following correct
languages for your device options:
• Use Language Displayed on the Device User Interface
• Use this Language - select the language used at the device from the drop-down menu.
b. Click on the [Apply] button.
At the Device:
1. Press the <Services> button.
2. Touch the [Workflow Scanning] icon.
3. Input documents to scan and touch the [Start] button.
Accessing Workflow Scanning, E-mail, or Internet Fax Settings
1. At your Workstation, open the web browser and enter the IP address of the device in the Address
bar, and press [Enter].
2. Click on the [Properties] tab.
3. If prompted, enter the Administrator User ID and Password. The default is [admin] and [1111].
4. Click on the [Login] button.
Xerox ColorQube™ 9201/9202/9203
System Administrator Guide
37
Page 38

General Setup
5. Click on the [Services] link.
6. Click on either [Workflow Scanning], [E-mail], or [Internet Fax] link.
7. For Workflow Scanning, select [Default Template] in the directory tree, then click on the [Edit]
button within the Filing Options area. Select the [Searchable] radio button under Searchable
Options.
8. For E-mail or Internet Fax, select [Defaults], then select the [Edit] button within Filing Options.
Select the [Searchable] radio button under [Searchable Options] within Document Format as
the user presented scanning default.
9. When done, click on the [Apply] button to save changes or [Undo] to remove changes and refresh
the page.
Job Deletion
The Job Deletion page allows you to set permission that allow System Administrators or nonadministrator users to delete jobs from the device print queue.
Note: System Administrators can always delete any job, regardless of the setting selected on the
Job Deletion page.
At the Device:
1. Press the <Log In/Out> button to enter the Tools pathway.
2. Enter the Administrator’s User Name [admin], touch [Next], enter Password [1111], touch
[Enter].
3. Press the <Machine Status> button.
4. Touch the [Tools] tab.
5. Touch [Security Settings].
6. Touch [Authentication].
7. Touch [Job Deletion].
8. Touch either:
• [All Users] to allow any user to delete any job in the job list. There is no authentication
needed when the user clicks on a job in the job list and selects Delete.
• [System Administrators Only] to allow only users with administrative access (password) to
delete jobs. The System Administrator must provide a username and password when deleting
a job.
9. Touch [Save] button.
10. Press the <Log In/Out> button, then touch [Logout] to exit the Tools pathway.
Internationalization
Internationalization allows administrators to specify the locale where the device is situated. This is
used to determine the type of coding used by the device to interpret data, such as print jobs.
1. At your Workstation, open the web browser and enter the IP address of the device in the Address
bar, and press [Enter].
2. Click on the [Properties] tab.
3. If prompted, enter the Administrator User ID and Password. The default is [admin] and [1111].
38
Xerox ColorQube™ 9201/9202/9203
System Administrator Guide
Page 39

General Setup
4. Click on the [Login] button.
5. Click on the [General Setup] link.
6. Click on the [Internationalization] in the directory tree.
7. If you want to specify the locale, select the required setting from the [Select Locale] drop-down
menu. The device will make an assumption on the encoding that are most likely used.
8. If you want to enter the specific encoding of user strings provided for the device, select [Custom]
from the [Select Locale] drop-down menu, and select the required encoding priority order.
9. Click on the [Apply] button to save your changes.
10. Click on the [OK] button when you see the message “Properties have been successfully
modified”.
Extensible Services Setup
This feature allows the System Administrator to set up and enable extensible services on the device.
Extensible Services enables independent software vendors and partners to develop customized
programs to access directly from the device’s control panel. Users can enter their authentication login
at the device, and access a set of features and options designed specifically for their business need.
Information Checklist
Before starting the procedure, please ensure the following items are available or have been performed:
• Ensure the device is fully functioning on the network.
• TCP/IP and HTTP protocols must be enabled on the device so that the device’s web browser can be
accessed.
• Ensure Extensible Service Registration must be configured.
To Enable Extensible Services
1. At your Workstation, open the web browser and enter the IP address of the device in the Address
bar, and press [Enter].
2. Click on the [Properties] tab.
3. If prompted, enter the Administrator User ID and Password. The default is [admin] and [1111].
4. Click on the [Login] button.
5. Click on the [General Setup] link.
6. Select [Extensible Service Setup] in the directory tree.
7. In the Setup (Required) area, ensure HTTP (SSL) and Extensible Service Registration have been
configured to enable Extensible Services. If they have not been enabled, click on the [Settings]
button and configure the settings and click on the [Apply] button.
8. In the Enable Extensible Services area check the [Export password to Extensible Services]
checkbox to send passwords to Extensible Services.
9. In the Browser Settings area, check the following required checkboxes to enable options for
Extensible Services:
• Enable the Extensible Services Browser
Xerox ColorQube™ 9201/9202/9203
System Administrator Guide
39
Page 40

General Setup
• Verify Server Certificates - if this option is enabled, Extensible Services will check and require
valid server certificates.
10. Click on the [Apply] button to save your changes.
11. Click on the [OK] button when you see the message “Properties have been successfully
modified”.
SMart eSolutions
SMart eSolutions provides a setup page to guide you through the steps required to configure the
device for automatic meter readings. SMart eSolutions enables the device to automatically send data
to Xerox to be used for billing (Meter Assistant) and solid ink (Supplies Assistant).
SMart eSolutions provides the following features:
• MeterAssistant™ - submits meter reads to Xerox from network devices. This ends the need to
collect and report meter read information manually.
• SuppliesAssistant™ - allows to manages ink supplies for network equipment, and also monitor
actual usage.
• MaintenanceAssistant™ - allows you to troubleshoot your device. You can send detailed
diagnostic information to Xerox, start online troubleshooting sessions with Xerox, and download
usage information to your computer in .csv format.
There are three ways to register the device for SMart eSolutions:
• Client Direct registration - this is available as a standard feature on the device.
• SMart eSolutions Windows Client - this is an optional feature and the Windows Client can be
downloaded, visit www.xerox.com/smartesolutions.
• Internet Services - this is a web based software that manages, configure, installs and reports for
network installed devices, for further information, see www.xerox.com/centrewareweb.
Note: SMart eSolutions is not available in all countries. Refer to your Xerox Representative for
further information.
Information Checklist
Before registering the device for Meter Assistant, please ensure the following items are available or
have been performed.
• Create an account on Xerox.com. Add all devices in inventory that you wish to register for
Automatic Meter Readings to your account, visit www.xerox.com/meterreads.
• Ensure the device is fully functioning on the network.
• TCP/IP and HTTP protocols must be enabled on the device so that the device’s web browser can
be accessed.
• Enable SNMP (Smart eSolutions Client and Internet Services). If you want to use Smart eSolutions
Windows Client or Internet Services. Visit www.xerox.com/smartesolutions for further instructions
and to download the software.
40
Xerox ColorQube™ 9201/9202/9203
System Administrator Guide
Page 41

General Setup
SMart eSolutions Information
1. At your Workstation, open the web browser and enter the IP address of the device in the Address
bar, and press [Enter].
2. Click on the [Properties] tab.
3. If prompted, enter the Administrator User ID and Password. The default is [admin] and [1111].
4. Click on the [Login] button.
5. Click on the [General Setup] link.
6. Select [SMart eSolutions] in the directory tree.
7. In the Enrollment area, for SMart eSolution Enrollment ensure [Enrolled] is selected.
8. In the Communication Setup area:
a. For Daily Transmission Time, click in the time box and enter the time (hour and minute) of
day you want the device to perform its daily communication with Xerox.
b. For HTTP Proxy Server, click on the [Configure] or [Edit] button to configure or update the
internet proxy settings.
9. In the HTTP Proxy Server area:
a. Check the [Enabled] checkbox.
b. Select either [IPv4 Address], [IPv6 Address] or [Host Name].
c. Enter the Proxy Server address and port number in the [Proxy Server Address] field.
d. Click on the [Save] button to return to the SMart eSolution Setup page.
e. Click on the [Apply] button.
Note: HTTP Proxy Server settings are used for the following features:
• SMart eSolution Setup
• HTTP(S) File Destinations
• HTTP(S) Template Pool.
Meter Assistant
Meter Assistant is a feature of SMart eSolutions. It provides detailed information, including dates,
times, and counts of impressions sent in the last billing meter transmission.
The meter data is recorded in the Xerox service management system. It is used for the invoicing of
metered service agreements, and also for evaluating consumable usage against printer performance.
The automatic collection of the meter reads will ensure quality and reliability of the data we use to
manage your service agreements.
To enable Meter e-mail alert:
Up to three groups can be sent email alerts regarding the device status.
Sending device data to Xerox immediately:
1. At your Workstation, open the Web browser and enter the IP address of the device in the Address
bar, and press [Enter].
2. Click on the [Status] tab.
3. Select [SMart eSolutions] in the directory tree.
Xerox ColorQube™ 9201/9202/9203
System Administrator Guide
41
Page 42

General Setup
4. Click on the [Meter Assistant] tab.
5. For Meter E-mail Alerts, click on the [Configure] button (initial use) or [Edit] button (subsequent
use).
6. If prompted, enter the Administrator User ID and Password. The default is [admin] and [1111].
7. Click on the [Login] button to display the E-mail Alerts screen.
f. In the [Recipient Group Addresses] area, check the required Group.
g. Click the field under E-mail Addresses, and enter e-mail address or addresses.
h. Continue to add e-mail addresses to create your Alert Notification group, as required.
i. In the [Reply to E-mail Address] field, enter the address of the administrator or user who is
designated to receive any reply e-mails that are sent by users who are listed in the Alert
Notification group.
Note: This is normally set to the System Administrator’s e-mail address.
j. In the Recipient Group Preferences area. By default, a group will be notified of all device
alerts. If you want to select specific alerts, select the alerts checkbox that you want the Group
to be notified of.
k. Enter how many minutes (0 - 60) in the field for Set jam timer for release of status to
selected groups to wait after a jam has been detected before an email status is sent. If the
jam is cleared before the timer completes, no jam message will be sent.
l. Click on [Apply] to save the changes.
8. If prompted, enter the User ID and Password of the Administrator’s account and click on [Login].
9. The Settings Confirmed. Send Test e-mail? window will appear. Click [OK] if you wish to send a
test e-mail to the Alert Notification recipient(s), or [Cancel] to return to the Alert Notification
page.
Supplies Assistant
Eligible devices will automatically be enabled for Supplies Assistant once the device is registered with
Xerox. When you call to order supplies, let the representative know the on-hand balance and that you
would like to use Supplies Assistant.
Maintenance Assistant
Maintenance Assistant is a useful feature in troubleshooting device related problems. It is a
monitoring and reporting program that runs on your device and communicates with Xerox through
you network.
When calling for assistance you can send up-to- the minute performance related data to Xerox to help
diagnose problems. You can also open an online diagnostic session with Xerox directly with
Maintenance Assistant. This feature sends your device’s diagnostic information to Xerox to be
immediately analyzed and matched with solutions to resolve detected issues.
You can also download usage information to your workstation. The downloaded file is in CSV format
which can be opened in a spreadsheet program.
42
Xerox ColorQube™ 9201/9202/9203
System Administrator Guide
Page 43

General Setup
Sending Device Data to Xerox Immediately:
1. At your Workstation, open the Web browser and enter the IP address of the device in the Address
bar, and press [Enter].
2. Click on the [Status] tab.
3. Select [SMart eSolutions] in the directory tree.
4. Click on the [Maintenance Assistant] tab.
5. Click on the [Send Diagnostic Information to Xerox] bar. A “Sending Diagnostic Information”
message will display. When the transmission is complete a success message will be displayed.
Note: The Send Diagnostic Information to Xerox button is not available if the device is not
enrolled in SMart eSolutions.
6. Click on the [Close] button.
To Open an Online Troubleshooting Session with Xerox:
1. At your Workstation, open the Web browser and enter the IP address of the device in the Address
bar, and press [Enter].
2. Click on the [Status] tab.
3. Select [SMart eSolutions] in the directory tree.
4. Click on the [Maintenance Assistant] tab.
5. Click on the [Start an Online Troubleshooting Session at www.xerox.com] bar. A “Starting
Online Troubleshooting Session” message will display. When transmission is complete your
browser will automatically be redirected to Xerox.com for online assistant.
Note: If there are any communication problems, a message window will display. Check your
configuration and communication settings by clicking the [Settings] button. This will take you to
the SMart eSolution Setup page.
To Download File to Your Workstation:
1. At your Workstation, open the Web browser and enter the IP address of the device in the Address
bar, and press [Enter].
2. Click on the [Status] tab.
3. Select [SMart eSolutions] in the directory tree.
4. Click on the [Maintenance Assistant] tab.
5. Click on the [Download File to Your Computer] bar. The Generating Diagnostic Information
screen will display, showing “This may take a few minutes”.
6. Once the file is ready, File Ready screen will display, indicating “File Successfully generated”.
Right-click on the link [UsageLog.csv] to download the file.
7. Select [Save Target As....].
8. Select the folder you want to save the file in and click on [Save].
9. Click on the [Close] button.
Note: If there are any communication problems, a message window will display. Check your
ation
configur
and communication settings by clicking the [Settings] button. This will take you to
the SMart eSolution Setup page.
Xerox ColorQube™ 9201/9202/9203
System Administrator Guide
43
Page 44

General Setup
Energy Saver
This feature allows you to set the device to save energy when not in use. This feature can be set at the
device as well as at the web browser.
At your Workstation:
1. Open the web browser and enter the IP address of the device in the Address bar, and press
[Enter].
2. Click on the [Properties] tab.
3. If prompted, enter the Administrator User ID and Password. The default is [admin] and [1111].
4. Click on the [Login] button.
5. Click on the [General Setup] link.
6. Click on [Energy Saver] in the directory tree.
7. In the Energy Saver Mode area, select one of the following mode for [Energy Saver Mode]:
• Intelligent Ready - the device wakes up and sleeps automatically based on previous usage.
• Job Activated - the device wakes up when an activity is detected.
• Scheduled - the device wakes up and sleeps at set time on a daily basis.
8. If you select either Intelligent Ready or Job Activated, you can select [On] or [Off] for Fast
Resume. This option reduces the time taken for the device to wake up. This option will change the
default sleep or low time-outs and increase energy usage.
9. If you select Scheduled, then select the specific day you want the device to wake up by selecting
[Time] form the Scheduled Based on drop-down menu. Select the time you want it to warm
(wake) up from the [Warm Up] drop-down menu and select the time you want the device to sleep
to save energy form the [Energy Saver] drop-down menu.
10. Click on the [Apply] button to accept the changes.
At the Device:
1. Press the <Log In / Out> button to enter the Tools pathway.
2. Enter the Administrator’s User Name [admin], touch [Next], enter Password [1111], touch
[Enter].
3. Press <Machine Status>, then touch the [Tools] tab.
4. Touch [Device Settings].
5. Touch [General].
6. Touch [Energy Saver].
7. Select one of the following type of mode under [Energy Saver Mode]:
e
• Int
lligent Ready
• Job Activated
• Scheduled
8. If you select either Intelligent Ready or Job Activated, you can select [On] or [Off] for Fast
Resume. This option reduces the time taken for the device to wake up. This option will change the
default sleep or low time-outs and increase energy usage.
9. If you select Scheduled, touch [Scheduled Settings].
44
Xerox ColorQube™ 9201/9202/9203
System Administrator Guide
Page 45

General Setup
10. In the Scheduled Settings page, select the day you want the schedule to start.
a. Select either [Activity] or [Time] for Schedule Based On.
b. If you select [Time], select time from the [Warm Up Time] drop-down menu.
c. Select time from the [Energy Saver Time] drop-down menu.
d. Repeat step a to c for the rest of the week.
11. Touch [Save].
12. Touch [Save].
13. Press the <Log In/Out> button, touch [Logout] to exit the Tools Pathway.
Network Log
The Network Logs feature allows customer the following ability:
• Control the amount information gathered within the log files.
• Download the log files to a USB drive.
Note: Customers will only use this feature if requested by Xerox Customer Support. The Log files
are only meaningful to a trained Xerox personnel. The level of information gathered will be
specific to Xerox Customer Representative.
You can download Network Log from the device which will only provide the current network logs. Or
from the device web browser, where the customer has the option to download the current network log
as well as downloading the following information:
• Configuration Report
• Fault Logs
• Archive Logs (the last 10 Logs that have been saved).
Note: Network Logs are saved to the archive collection every time the device is restarted and when
the [Download] button is selected within the Network Log feature.
Note: When Network Log is downloaded form the device the downloaded file is not encrypted, but
is encrypted if downloaded from the device web browser.
Procedure to Download Network Logs
At your Workstation:
1. Open the web browser and enter the IP address of the device in the Address bar, and press
[Enter].
2. Click on the [Properties] tab.
3. If prompted, enter the Administrator User ID and Password. The default is [admin] and [1111].
4. Click on the [Login] button.
5. Click on the [General Setup] link.
6. Click on [Network Logs] in the directory tree.
7. In the Information Level area, select one of the following options:
• Basic - records a minimum list of network actions that have occurred on the machine.
Xerox ColorQube™ 9201/9202/9203
System Administrator Guide
45
Page 46

General Setup
• Enhanced - records a detailed list of network actions that have occurred on the machine.
Note: Job processing times will increase as long as this option is selected.
8. Click on the [Save] button to save changes.
9. In the Download Files area, for Log Content, Basic Network Logs is automatically selected. You
can select additional reports, from the Additional Content as follows:
• Configuration Report
• Faul t Logs
• Archive Logs
10. When you selected the required reports you want to download, click on the [Start Download]
button.
11. The Download Status screen will display, after a brief moment, the information requested will be
organized into one file, click on the [Download File Now] button, in the File Download window
click on the [Save] button, select the place on the workstation you want to save the file to and
click on the [Save] button to save the file.
12. Click on the [Close] button.
At the Device:
Note: Ensure you have an USB memory device to save the network log.
1. Press the <Log In / Out> button to enter the Tools pathway.
2. Enter the Administrator’s User Name [admin], touch [Next], enter Password [1111], touch
[Enter].
3. Press <Machine Status>, then touch the [Tools] tab.
4. Touch [Network Settings].
5. Touch [Network Logs].
6. In the Network Logs screen, under [Information Level] select either [Basic] or [Enhanced].
a. If you select [Basic], follow the steps below:
• Click on the [Download Basic Log File] button.
• A note will display, if USB drive is not detected, insert your USB drive and touch the [OK]
button. The file will download onto the USB drive.
b. If you select [Enhanced], follow the steps below:
•Touch the [Save] button, a pop-up dialog will appear, displaying “A system restart is
required for your changes to take effect.” If USB drive is inserted, remove the USB drive
before touching the [Restart] button.
•
pop-up dialog will appear displaying System Restart.
A
• Once the system has restarted, insert your USB drive, and click on the [OK] button. The
file will download onto the USB drive.
7. A pop-up dialog will appear, displaying download is complete. Remove your USB drive and touch
the [Close] button.
8. Press the <Log In/Out> button, touch [Logout] to exit the Tools Pathway.
46
Xerox ColorQube™ 9201/9202/9203
System Administrator Guide
Page 47

General Setup
Alert Notification
In the Alert Notification section you can set up groups to notify (by e-mail) when problems occur on
the device. Alert notification is configured via Internet Services.
Customers can set the Xerox device to notify users or operators of problems as they occur on the
device. Alert Notification is configured via Internet Services.
E-mail Alerts
1. At your Workstation, open the web browser and enter the IP address of the device in the Address
bar, and press [Enter].
2. Click on the [Properties] tab.
3. If prompted, enter the Administrator User ID and Password. The default is [admin] and [1111].
4. Click on the [Login] button.
5. Click on the [General Setup] link.
6. Click on the [Alert Notification] link.
7. Click on the [E-mail Alerts] in the directory tree.
8. In the [Recipient Group Addresses] area:
a. Check the required Group.
b. Click the field under E-mail Addresses, and enter e-mail address or addresses.
c. Continue to add e-mail addresses to create your Alert Notification group, as required.
d. In the [Reply to E-mail Address] field, enter the address of the administrator or user who is
designated to receive any reply e-mails that are sent by users who are listed in the Alert
Notification group.
Note: This is normally set to the System Administrator’s e-mail address.
e. Click on [Apply] to save the changes.
f. If prompted, enter the User ID and Password of the Administrator’s account and click on
[Login].
g. The Settings Confirmed. Send Test e-mail? window will appear. Click [OK] if you wish to
send a test e-mail to the Alert Notification recipient(s), or [Cancel] to return to the Alert
Notification page.
h. If you want to create more than one Alert Notification group, select the group number and
add e-mail addresses to the group.
9. To Assign Notification Alerts to a Group:
a. Scroll down to the Recipient Group Preferences area. By default, a group will be notified of
all device alerts. If you want to select specific alerts, check the alerts checkbox that you want
Group 1 to be notified of.
Alerts that can be selected are:
• Billing meter reads reported: An alert is generated when billing meter readings have
taken place. You can set up your device so that it will automatically offer meter readings
when requested by the Xerox Communication Server.
• Machine or some services are not available: An alert is generated when the device has
stopped all functions or has been turned off.
Xerox ColorQube™ 9201/9202/9203
System Administrator Guide
47
Page 48

General Setup
• Potential persistent problems exist: An alert is generated when a problem area in the
device does not receive proper attention.
• Machine requires administrator assistance: An alert is generated when an authorized
System Administrator is needed to address a problem.
• Machine is operational, but degraded: An alert is generated when device is running at
reduced efficiency and needs immediate attention.
• Paper supply is low: An alert is generated when paper is running low or wrong size is
allocated.
• Paper jam is detected: An alert is generated when a paper jam is in need of attention in
specified area if you have been notified.
• Supplies or CRUs are low: An alert is generated when any Customer Replaceable Units
(CRUs) have reached their low marker.
• SMart eSolution enrollment is cancelled: An alert is generated when the state is
changed from “Enrolled” to “Not Enrolled.” Clicking this link will take you to the SMart
eSolution page to get more information about the enrollment state.
b. Set jam timer for release of status to selected groups: Enter how many minutes (0 - 60) in
the field to wait after a jam has been detected before an email status is sent. If the jam is
cleared before the timer completes, no jam message will be sent.
c. Click the Glossary link next to Status Codes in the Recipient Group Preferences area for
further information about the Status Codes, as below:
• Machine is stopped: device has stopped all functions or has been turned off.
• Potential persistent problems exist: If area specified does not receive attention
problems may re-occur.
• Machine requires administrator assistance: Authorized System Administrator must
address problem.
• Machine is operational, but degraded: device is running at reduced efficiency, needs
immediate attention.
• Paper supply is low: Paper is running low or wrong size is allocated.
• Supplies or CRUs are low: CRU/Solid Ink Sticks or other usable item needs attention (see
LUI).
• Paper jam is detected: Paper jam is in need of attention in specified area if you have
been notified.
d. If you have created more than one group, repeat this exercise for each group.
e. Select [Apply] to save your settings or [Undo] to cancel.
Local UI Alerts
You can configure the device to display a notice on the user interface screen when the scan disk
memory is low. The scan disk memory decreases according to the number of pages scanned with the
Workflow Scanning, Internet Fax, E-mail or Server Fax features (when these features are installed on
the device).
When the scan disk memory is low, scan jobs may slow down or the device may cancel the job.
48
Xerox ColorQube™ 9201/9202/9203
System Administrator Guide
Page 49

General Setup
When a user attempts to scan more pages than the Scan Job Memory Notification setting, the device
will display a message to show how many pages can be scanned before the device will slow down or be
forced to cancel the job. The default is 30 scanned pages.
To Set up the Local UI Alert
1. At your Workstation, open the web browser and enter the IP address of the device in the Address
bar, and press [Enter].
2. Click on the [Properties] tab.
3. If prompted, enter the Administrator User ID and Password. The default is [admin] and [1111].
4. Click on the [Login] button.
5. Click on the [General Setup] link.
6. Click on the [Alert Notification] link.
7. Select [Local UI Alerts] in the directory tree.
8. In the Scan Disk Memory Warning area, select one of the following option to display a warning
when it is estimated that the scan disk cannot hold more than:
• 10 scanned pages
• 30 scanned pages
• Custom - when selected, enter an amount between 0 - 75 in the [Custom] field.
Note: The higher the page number, the more frequent the warnings will appear.
9. Click on the [Apply] button to accept the changes or [Undo] to return the settings to their
previous values.
10. Click on the [OK] button when you see the message “Properties have been successfully
modified”.
Low Supply Warning
System Administrators can set the device to display a low warning message about a supplies level, for
example, ColorQube Ink, Cleaning Unit and Document Feeder Feed Roller.
1. At your Workstation, open the web browser and enter the IP address of the device in the Address
bar, and press [Enter].
2. Click on the [Properties] tab.
3. If prompted, enter the Administrator User ID and Password. The default is [admin] and [1111].
4. Click on the [Login] button.
5. Click on the [General Setup] link.
6. Click on the [Alert Notification] link.
7. Select [Low Supply Warning] in the directory tree.
8. In the Days Remaining area, select a value from either ColorQube Ink, Cleaning Unit or/and
Document Feeder Feed Roller drop-down menu.
Note: If you set the value to ‘0’, then the user will get a ‘NO WARNING MESSAGE’ that the
Supply is getting low.
9. Click on the [Apply] button to accept the changes or [Undo] to return the settings to their
previous values.
Xerox ColorQube™ 9201/9202/9203
System Administrator Guide
49
Page 50

General Setup
10. Click on the [OK] button when you see the message “Properties have been successfully
modified”.
Billing Information and Usage Counters
The Billing and Counters page provides the Billing information for the device, including number of
impressions printed or copied.
1. At your Workstation, open the web browser and enter the IP address of the device in the Address
bar, and press [Enter].
2. Click on the [Status] tab.
3. Select [Billing Information] in the directory tree to view Current Billing information. and click on
the [Refresh] button to refresh Billing information.
4. Select [Usage Counters] in the directory tree to view the counts from the Usage Counters; click on
the [Refresh] button to refresh the Usage Counters.
Banner Sheet
When documents are sent to print at the device, a banner sheet is printed identifying the PC that sent
the print job. It is possible to disable this setting both within the print driver and from the device
administrator tools. These instructions describe how to disable the banner sheet from the device.
At the Device:
1. Press the <Log In/Out> button to enter the Tools pathway.
2. Enter the Administrator’s User Name [admin], touch [Next], enter Password [1111], touch
[Enter].
3. Press the <Machine Status> button, then the [Tools] tab.
4. Touch [Service Settings].
5. Touch [Job Sheets].
6. Touch [Banner Sheets].
7. Touch the [Disabled] button.
8. Touch [Save].
9. Press the <Log In/Out> button, then press [Logout] to exit the Tools pathway.
At your Workstation:
1. Open the web browser and enter the IP address of the device in the Address bar, and press
[Enter].
2. Click on the [Properties] tab.
3. If prompted, enter the Administrator User ID and Password. The default is [admin] and [1111].
4. Click on the [Login] button.
5. Click on the [Services] link.
6. Click on the [Printing] link.
7. Select [General] in the directory tree.
8. In the Banner Sheet area:
a. For Print Banner Sheet, select [Yes] to enable the feature.
50
Xerox ColorQube™ 9201/9202/9203
System Administrator Guide
Page 51

General Setup
b. For Allow the Print Driver to Override, select [Yes] to allow your print driver to override this
option.
c. From the Banner Sheet Identification drop-down menu, select one of the following:
d. For Use Generic User Name and Job Name, check the [Enabled] checkbox to enable Banner
Sheet or uncheck to disable.
9. Click on the [Apply] button to accept the changes or [Undo] to return the settings to their
previous values.
10. Click on the [OK] button when you see the message “Properties have been successfully
modified”.
Saving and Reprinting Jobs
The Save Job for Reprint feature allows users to store print jobs on the device from their print driver, or
the Print page of Internet Services, then select the job from the device’s user interface for reprinting.
This feature can be enabled and configured by the System Administrator from the Properties page of
Internet Services (the series of web pages, hosted on the embedded HTTP server of the device).
Enabling the Feature at a TCP/IP Networked Workstation
1. At your Workstation, open the web browser and enter the IP address of the device in the Address
bar, and press [Enter].
2. Click on the [Properties] tab.
3. if prompted, enter the administrator User ID and Password. The default is [admin] and [1111],
and click on the [Login] button.
4. Click on the [Services] link.
5. Click on the [Reprint Saved Jobs] link.
6. Select [Enablement] in the directory tree.
7. Click the [Enabled] radio button to enable the feature, and click on the [Apply] button.
Backup Saved Jobs
1. Select [Backup Jobs] in the directory tree to back up saved jobs stored on the system.
2. Under Settings, from the [Protocol] drop-down menu, note that only FTP is available.
3. Select either the [IPv4 Address], [IPv4 Address] or [Host Name] radio button for your FTP server.
4. Specify the IP address or host name of the repository.
5. For [Document Path], specify the path to the file repository.
6. For [File Name], type the file name for the backup. This name will be appended onto the end of
the document path.
7. For [Login Name], if you selected System for Login Credentials (referring to FTP repository in the
Workflow Scanning topic), then you must specify the system login name here.
8. For [Password] and [Retype Password], if you selected System for the login credentials, then you
can specify and confirm the system password here. The password may be blank.
Xerox ColorQube™ 9201/9202/9203
System Administrator Guide
51
Page 52

General Setup
9. Check [Select to Save New Password] for an existing Login Name. You must then click the [Start]
button at the bottom of the page to implement the password change, or [Undo] to cancel any
changes.
Restore Saved Jobs
1. Select [Restore Jobs] in the directory tree to restore saved jobs stored on a repository.
Note: When Saved Jobs are restored, all current Saved Jobs data will be immediately deleted. The
restore process may take considerable time to complete depending on how many files were
backed up. The restored Saved Jobs data is not appended to the existing Saved Jobs If the restore
is aborted, the Default Public Folder will be empty.
2. Note that only FTP is available in the [Protocol] drop-down menu under Settings.
3. Select either the [IP Address], [IPv4 Address] or [Host Name] radio button for your FTP server.
4. Specify the IP address or host name of the repository.
5. For [Document Path], specify the path to the file repository.
6. For [File Name], type the file name for the backup to restore. This name will be appended to the
document path.
7. For [Login Name], if you selected System for Login Credentials (referring to FTP repository in the
Workflow Scanning topic), then you must specify the system login name here.
8. For [Password] and [Retype Password], if you selected System for the login credentials, then you
can specify and confirm the system password here. The password may be blank.
9. Click [Select to Save New Password] for an existing Login Name. You must then click on the
[Start] button at the bottom of the page to implement the password change, or [Undo] to cancel
any changes.
Online / Offline
The Online/Offline window allows the System Administrator to stop and resume the system from
receiving or sending jobs over the network.
At the Device:
1. Press the <Log In/Out> button to enter the Tools pathway.
2. Enter the Administrator’s User Name [admin], touch [Next], enter Password [1111], touch
[Enter].
3. Press the <Machine Status> button.
4. Touch the [Tools] tab.
5. Touch [Network Settings].
6. Touch [Online/Offline].
7. To stop the device receiving or sending jobs over the network touch the [Offline] button. Any
installed optional features using the network (for example Workflow Scanning) will not be
available until the device is set to Online.
Note: To enable the device to receive or send jobs over the network touch the [Online] button.
8. Touch [Close].
9. Press the <Log In/Out> button, then touch [Logout] to exit the Tools pathway.
52
Xerox ColorQube™ 9201/9202/9203
System Administrator Guide
Page 53

General Setup
Auxiliary (Foreign Device) Interface Kit
A third party access and accounting device, such as a coin operated device or a card reader can be
attached to the device. To enable this option, the Foreign Device Interface Kit must be installed. After
the kit is installed the administrator must enable Auxiliary Access as the Accounting Mode from the
Tools menu of the device, as follows:
1. Press the <Log In/Out> button.
2. Enter the Administrator’s User Name [admin], touch [Next], enter Password [1111], touch
[Enter].
3. Press the <Machine Status> button.
4. Touch the [Tools] tab.
5. Touch [Accounting Settings].
6. Touch [Accounting Mode].
7. Select [Auxiliary Access].
8. Select the required [Auxiliary Device Configuration] and configure your device and touch [Save].
9. Touch [Save].
10. Press the <Log In/Out> button, then touch [Logout] to exit the Tools pathway.
For further instructions on Auxiliary (Foreign Device) Interface Setup options refer to the Interactive
User Guide delivered with your device.
SNMP (Simple Network Management Protocol)
It is possible to remotely define and modify GET, SET, and TRAP SNMP (Simple Network Management
Protocol) community names for the device. You can also configure SNMP trap destinations for TCP/IP
and NetWare (IPX) that will receive traps from any device on the network.
SNMP Community Name properties that can be configured are:
• GET Returns the password for SNMP GET requests to the device. Applications obtaining
information from the device via SNMP, such as Xerox PrinterMap or Internet Services, use this
password.
• SET Returns the password for SNMP SET requests to the device. Applications that set information
on the device via SNMP, such as Xerox PrinterMap or Internet Services, use this password.
• TRAP Returns the password for SNMP TRAPS from the device. This is the default password for
SNMP TRAPS sent from the device via SNMP.
Configure SNMP Community Names
1. At your Workstation, open the web browser and enter the IP address of the device in the Address
bar, and press [Enter].
2. Click on the [Properties] tab.
3. If prompted, enter the Administrator User ID and Password. The default is [admin] and [1111].
4. Click on the [Login] button.
5. Click on the [Connectivity] button.
6. Click on the [Protocols] link.
Xerox ColorQube™ 9201/9202/9203
System Administrator Guide
53
Page 54

General Setup
7. Select [SNMP] in the directory tree.
8. Check the [Enable SNMP v1/v2c Protocol] and/or [Enable SNMP v3 Protocol] checkbox to
enable the protocol.
9. To edit SNMP properties click either [Edit SNMP v1/v2c Properties] or [Edit SNMP v3 Properties].
Note: Configure HTTPS before editing SNMP v3 Properties. Configuring this feature requires
secure web page communication.
Note: Turning off the SNMP protocols will cause an interruption in the communication between
the device and remote client applications.
For Edit SNMP v1/v2c Properties:
a. Enter a name (up to 256 characters) for the [GET Community Name]. The default is public.
b. Enter a name (up to 256 characters) for the [SET Community Name]. The default is private.
Note: Changes made to the GET or SET community names for this device will require
corresponding GET or SET community name changes for each application which uses the SNMP
protocol to communicate with this device (for example, Xerox PrinterMap, Xerox Internet Services,
any 3rd party network management applications).
CAUTION: If you change the GET and/or SET Community Names, you must change all network
applications that are communicating via SNMP with this device to use the new GET/SET names.
c. Enter a name (up to 256 characters) for the default [TRAP Community Name]. The default is
SNMP_trap.
Note: The Default TRAP community name is used to specify the default community name for all
traps generated by this device.
d. Click [Save], to apply the changes or [Undo] to return to the previous settings.
For Edit SNMP v1/v2c Properties:
e. Use this page to configure Authentication Password and Privacy Password for the
Administrator Account.
f. In the Administrator Account area, check the [Account Enabled] checkbox to create an
administrator account that can be used to provide more extensive access to the objects on
the printer.
g. Enter details for Authentication Password and Privacy Password as desired.
h. Check the [Select to save new password] checkbox.
i. In the Print Drivers / Remote Clients Account area, check on the [Account Enabled]
checkbox, to create an account for bi-directional Print Drivers and Xerox Remote Clients.
Note: This account allows Xerox Clients and Drivers a limited amount of access to objects on the
device. If the device does not have SNMP v1/v2c enabled, and does not have this account
enabled, Xerox SNMP based clients will not be able to communicate with it. The default passwords
should be used, unless the passwords have been changed on the client.
j. Click [Save], to apply the changes or [Undo] to return to the previous settings.
10. In the Authentication Failure Generic Traps area, check the [Enabled] checkbox if you want the
machine to generate a trap for every SNMP request that is received by the machine which
contains an invalid community name.
11. Click on the [Apply] button to accept the changes or [Undo] return to the previous settings.
54
Xerox ColorQube™ 9201/9202/9203
System Administrator Guide
Page 55

General Setup
12. Click on the [OK] button when you see the message “Properties have been successfully
modified”.
Software Upgrade via Network Connection
WARNING: This procedure will delete any current jobs in the device print queue and prevent
further jobs from printing until the upgrade has completed. If you wish to preserve these jobs,
allow them to complete before upgrading your software. All configured network settings and
installed options will be retained by the device after the Software Upgrade process.
Prepare for the Upgrade
Obtain the new software upgrade file for your device from the www.xerox.com website or from your
Xerox Customer Support Representative. Download the upgrade file to a local or network drive. You will
be able to delete the file after the upgrade procedure.
It is important to obtain the correct upgrade file for your device. Determine the software version you
are currently running, as follows.
1. At your Workstation, open the web browser and enter the IP address of the device in the Address
bar, and press [Enter].
2. Click the [Properties] tab.
3. If prompted, enter the Administrator User ID and Password. The default is [admin] and [1111].
4. Click on the [Login] button.
5. Click on the [General Setup] link.
6. Select [Configuration Report] in the directory tree, scroll down to the Common User Data section
to see your System Software Version.
Upgrades
The Software Upgrade feature allows the customers to upgrade the device software as requested by a
Xerox Customer Support Center Representative, without needing a Customer Service Representative to
be present.
To enable or disable software upgrades on the device, follow the procedure below:
1. At your Workstation, open the web browser and enter the IP address of the device in the Address
bar, and press [Enter].
2. Click the [Properties] tab.
3. If prompted, enter the Administrator User ID and Password. The default is [admin] and [1111].
4. Click on the [Login] button.
5. Click on the [General Setup] link.
6. Click on the [Machine Software] link.
7. Select [Upgrades] in the directory tree.
8. In the Upgrades area, check the [Enabled] checkbox to enable Machine Software upgrade.
9. Click on the [Apply] button.
Xerox ColorQube™ 9201/9202/9203
System Administrator Guide
55
Page 56

General Setup
Manual Upgrade
1. At your Workstation, open the web browser and enter the IP address of the device in the Address
bar, and press [Enter].
2. Click on the [Properties] tab.
3. If prompted, enter the Administrator User ID and Password. The default is [admin] and [1111].
4. Click on the [Login] button.
5. Click on the [General Setup] link.
6. Click on the [Machine Software] link.
7. Select [Manual Upgrade] in the directory tree.
Note: Note the current software level in the Last Successful Upgrade box.
8. In the Manual Upgrade area, click on [Browse] to locate the software upgrade file obtained
earlier.
9. Select the file and click [Open].
10. Click on the [Install Software] button to proceed with the upgrade. The file will be sent to the
printer and will disable the printing functionality. The web browser will become inactive and you
will not be able to access the device via this method until the upgrade has completed and the
device has rebooted. The upgrade should take no longer than 15 minutes.
11. Once the device has completed the upgrade it will reboot automatically. The configuration report
will print (if it was enabled in the Tools set up). When the device is accessible from a web browser,
view the software version on Internet Services Manual Upgrade page, or check the configuration
report to verify that the software level has changed.
Note: Your device can be set to automatically schedule device software upgrades from a central
server at a specific time on a regular basis. For instructions click the Software Upgrade link to the
left of the page and select Auto.
You have completed the steps to perform a manual software upgrade.
Software Upgrade: Auto
Your device can be set to automatically schedule device software upgrades from a central server.
WARNING: This procedure will delete any current jobs in the device print queue and prevent
further jobs from printing until the upgrade has completed. If you wish to preserve these jobs,
allow them to complete before upgrading your software. All configured network settings and
installed options will be retained by the device after the Software Upgrade process.
Determine your current System Software Version number.
1. At your Workstation, open the web browser and enter the IP address of the device in the Address
bar, and press [Enter].
2. Click on the [Properties] tab.
3. If prompted, enter the Administrator User ID and Password. The default is [admin] and [1111].
4. Click on the [Login] button.
5. Click on the [General Setup] link.
56
Xerox ColorQube™ 9201/9202/9203
System Administrator Guide
Page 57

General Setup
6. Select [Configuration Report] in the directory tree, scroll down to the Common User Data section
to see your System Software Version.
7. Contact your Xerox Customer Support Representative to make certain that Auto Upgrading is
appropriate for your device. If it is not, refer to the Software Upgrade via Network Connection
topic for manual upgrade instructions.
8. Press the <Log In/Out> button, then touch [Logout] to exit the Tools pathway.
Set the Auto Upgrade Time
1. At your Workstation, open the web browser and enter the IP address of the device in the Address
bar, and press [Enter].
2. Click on the [Properties] tab.
3. If prompted, enter the Administrator User ID and Password. The default is [admin] and [1111].
4. Click on the [Login] button.
5. Click on the [General Setup] link.
6. Click on the [Machine Software] link.
7. Select [Auto Upgrade] in the directory tree.
8. Check the [Enabled] checkbox to enable the Auto Upgrade feature.
9. Select either [Hourly] or [Daily] to activate the feature accordingly, in the Refresh Start Time
section.
10. If [Daily] has been selected, enter the required time for the upgrade to be performed.
11. Select either [IPv4 Address], [IPv6 Address] or [Host Name] for Protocol.
12. If IP Address is selected, enter details in the IP address and Port of the server where the software
upgrade file (obtained earlier) is located, in the [IP Address] and [Port] field (the default port
number is 21) and if Host Name is selected, enter details in the [Host Name] and [Port] field (the
default port number is 21).
13. Enter the path to the upgrade file on the server in the [Directory Path] field.
14. Enter the [Login Name] and [Password] for the server, retype the password.
15. Click on the [Apply] button to accept the changes.
The upgrade will now be performed automatically on the device at the time specified. Once the
upgrade process starts network connectivity with the device will be unavailable, including access from
Internet Services. The upgrade progress can be monitored from the device screen interface.
You have completed the steps to automatically upgrade the device software.
Xerox ColorQube™ 9201/9202/9203
System Administrator Guide
57
Page 58

General Setup
58
Xerox ColorQube™ 9201/9202/9203
System Administrator Guide
Page 59

4
Internet Services
This chapter explains how to enable and use the Internet Services feature of the device.
The Internet Services feature uses the embedded HTTP Server on the device. This allows you to
communicate with the device through a web browser and gives you access to the Internet or intranet.
Entering the IP Address of the device as the URL (Universal Resource Locator) in the browser provides
direct access to the device.
Internet Services not only allow you to change basic settings as in the Control Panel, but also allows
you to change more specialized settings for the device.
Information Checklist
Before accessing Internet Services, please ensure the following items are available or have been
performed:
• The device must be physically connected to the network with TCP/IP enabled so that Internet
Services can be accessed from a web browser.
• An existing operational workstation with TCP/IP Internet or Intranet accessibility is required.
• HTTP (HyperText Transfer Protocol) should be enabled on the device. HTTP is enabled by default.
If you need to enable HTTP, see Enable HTTP on the device on page 59.
Enable HTTP on the device
HyperText Transfer Protocol (HTTP) must be enabled on the device in order to access the embedded
HTTP server.
1. Press the <Log In / Out> button to enter the Tools pathway.
2. Enter the Administrator’s User Name [admin], touch [Next], enter Password [1111], touch
[Enter].
3. Press <Machine Status>, then touch the [Tools] tab.
4. Touch [Network Settings].
5. Touch [Advanced Settings].
6. Touch [Continue].
7. Touch [HTTP Settings].
a. Touch [Enable].
b. Touch [Save].
8. Touch [Close].
9. Press the <Log In/Out> button, touch [Logout] to exit the Tools Pathway.
Xerox ColorQube™ 9201/9202/9203
System Administrator Guide
59
Page 60

Internet Services
Access Internet Services
Instructions to access Internet Services:
1. Open the web browser from your Workstation.
2. In the URL field, enter http:// followed by the IP Address of the device. For example: If the IP
address is 192.168.100.100, enter the following into the URL field: http://192.168.100.100.
3. Press [Enter] to view the Home page.
4. Click a tab to access the desired page, or click on the Index icon at the top of the device web page
to access the index and contents list.
Many of the features available within Internet Services will require the System Administrator Login
ID and Passcode. The default being [admin] and [1111]. A user will only be prompted for the
Administrator User ID and Password once in a single browser session.
Status
Description and Alerts
The Description and Alerts page allows you to view the Device Model, Name, location, IP Address and
Status of the device.
1. At your Workstation, open the web browser and enter the IP address of the device in the Address
bar, and press [Enter].
2. Click on the [Status] tab.
3. Click on the [Description and Alerts] link.
Alerts
The Alerts page allows you to view all current alert messages. Each alert will specify what the problem
is and a solution to the problem.
1. At your Workstation, open the web browser and enter the IP address of the device in the Address
bar, and press [Enter].
2. Click on the [Status] tab.
3. Click on the [Description & Alerts] in the directory tree.
The following information is displayed in the Alerts field:
• Severity - The importance or impact of the problem.
• Status Code - If the problem needs a Service Representative to fix it then let them know this code
when you talk to them.
• Description - Displays a warning or the problem and how to fix it.
• Skill Level - Displays the suggested skill level needed to fix this problem. The levels are:
• Trained - System Administrator needed to fix this problem
• Untrained - Normal user can fix this problem
• Field Service - Xerox Support needed to fix this problem
• Management - Network Administrator needed to fix this problem
• No intervention required - A normal device status.
60
Xerox ColorQube™ 9201/9202/9203
System Administrator Guide
Page 61

Internet Services
To set Alert Notification, refer to E-mail Alerts on page 47.
To Re b oot the De vic e
It is possible to reboot the device from Internet Services.
1. Click on the [Status] tab.
2. Click on the [Description & Alerts] in the directory tree.
3. Click on the [Reboot Machine] button and click [OK] to reboot the device. The network controller
takes approximately 5 minutes to reboot and network connectivity will be unavailable during this
time.
Billing Information and Usage Counters
The Internet Services Billing Information page displays the total number of impressions copied,
printed, scanned or faxed by the device. The Usage Counters page shows you the number of
impressions and images sent by the device.
Billing Information
The Billing Information page provides current and previous readings of all device counters.
1. At your Workstation, open the web browser and enter the IP address of the device in the Address
bar, and press [Enter].
2. Click on the [Status] tab.
3. Click on the [Billing Information] in the directory tree.
4. Click on the [Refresh] button to view the current billing information in the Total Impressions area.
Usage Counters
The Billing Meter area shows the date and number of impressions that were notified to the Xerox
Communication Server, if this has been set up.
1. At your Workstation, open the web browser and enter the IP address of the device in the Address
bar, and press [Enter].
2. Click on the [Status] tab.
3. Click on the [Usage Counters] link.
4. Click on the [Refresh] button to view the current usage in the Usage Counters area.
Consumables
The Consumables page allows you to view the status of the Customer Replaceable Units (CRUs) within
the device.
1. At your Workstation, open the web browser and enter the IP address of the device in the Address
bar, and press [Enter].
2. Click on the [Status] tab.
3. Click on the [Consumables] in the directory tree.
4. The [Consumables] screen will show consumable information for:
• ColorQube Stick
Xerox ColorQube™ 9201/9202/9203
System Administrator Guide
61
Page 62

Internet Services
• Cleaning Unit
• Document Feeder Feed Roller
One of the following Status message is displayed:
• OK
• Reorder (Supply is getting low)
• Replace (Unit Supply is used up and requires immediate replacement).
For each unit, the [Life Remaining] icon describes the current supply level as a percentage and
provides a bar graph visual display.
Trays
The Trays page allows you to view paper supply setup and paper output.
1. At your Workstation, open the web browser and enter the IP address of the device in the Address
bar, and press [Enter].
2. Click on the [Status] tab.
3. Click on the [Trays] in the directory tree.
4. The [Trays] page displays the current paper supply.
Instructions for changing the paper stock are contained in the Interactive User Guide delivered with
your device.
Information Pages
The Information Pages feature allows users to print out a sheet that summarizes useful information
about the device.
The following information is available to print:
• Configuration Report
• Paper Tips Page
• Billing Summary
• Copying Guide
• Scanning Guide
• Faxing Guide
• Office Demo Page
•Graphics Demo Page
•2-Sided Demo Page
• CMYK Sampler Pages
•RGB Sampler Pages
• Spot Color Sampler Pages
•PCL Font List
• PostScript Font List
62
Xerox ColorQube™ 9201/9202/9203
System Administrator Guide
Page 63

Internet Services
At your Workstation:
1. Open the web browser and enter the IP address of the device in the Address bar, and press
[Enter].
2. Click on the [Status] tab.
3. Click on the [Information Pages] in the directory tree.
4. In the Page Name area select the required information page and click on the [Print] button.
At the Device:
5. Press the <Machine Status> button.
6. Touch the [Machine Information] tab.
7. Touch [Information Pages].
8. Select the required information and touch the [Print] button.
9. Touch [Close].
Jobs
The [Jobs] tab displays a list of active and completed jobs. You can also delete jobs in this tab.
Note: The details displayed may differ from those shown on the device’s touch screen.
Active Jobs
The Active Jobs page displays information about the active job list on the device:
1. At your Workstation, open the web browser and enter the IP address of the device in the Address
bar, and press [Enter].
2. Click on the [Jobs] tab, [Active Jobs] will display.
3. Click on the [Refresh] button to update the information in the table.
The following information is shown:
• Job Name - The title of the print job
• Owner - The person submitting the job
• Status - The current status of the job
• Type - Displays whether the job is print, scan or fax
• Copy Count - Displays the number of copies requested for the job
Saved Jobs
Within the Jobs tab screen select the [Saved Jobs] tab.
The screen will display the Saved Jobs, the memory used on the device, you can also create new saved
job folders and manage saved job folders.
Create a New Folder
1. Click on [Create New Folder] link in the Folder Operation area.
2. In the New Folder area, enter details in the [Name] field.
Xerox ColorQube™ 9201/9202/9203
63
System Administrator Guide
Page 64

Internet Services
3. Select the type of permission from the [Folder Permissions] drop-down menu. There are three
types of folder permissions as follows:
• Public Folder - allows any user to access the folder and the folder contents.
• Read Only - allows access to read any of the contents of the folder, but the contents of the
folder can not be deleted or have their settings changed.
• Private - allows only the creator of the folder or the System Administrator to access the
folder and its contents.
4. Click on the [Apply] button to create the folder. The folder will appear in the Folders list
Manage Folders
The manage Folder screen allows you to manage folders on the device, you can rename a folder,
delete a folder and change folder permissions.
1. Click on the [Manage Folder] link in the Folders Operation area.
2. To D ele te :
a. Check the checkbox for the folder you want to delete.
b. Click on the [Delete] button.
3. To Rename a folder or and change Folder Permission:
a. Click on the Pencil icon next to the folder you want to rename.
b. In the Folder properties area, enter new name on the folder in the [New name] field.
c. Select the type of permission required for the folder from the [Folder Permissions] drop-
down menu.
d. Click on the [Apply] button to accept the changes.
4. To P ri nt, Copy, Move or Delete a file within a folder:
a. Click on the required folder in the Folders area.
b. Check the checkbox for the file you want to Print, Copy, Move or Delete.
c. From the drop-down menu select either [Print Job], [Copy Job], [Move Job] or [Delete Job].
• If you select [Print Job], enter how many print you require and click on the [Go] button.
• If you select [Delete Job], click on the [Go] button, click on the [OK] to delete or
[Cancel] to return to the previous page.
• If you select [Copy Job] or [Move Job], click on the [Go] button. Select the folder you
[Mo
want the Job to be copied or moved to, click on the [Copy Job] or
ve Job] button.
5. To refresh the page, click on the [Refresh] button.
Print-ready documents can be quickly and easily submitted for printing using the Job Submission page.
A print-ready document is a file that has been formatted and saved for printing from the source
application or the Print to File checkbox was selected in the printer driver.
The following file formats can be printed from the Job Submission page:
•PCL® 5e
•PCL® XL
64
Xerox ColorQube™ 9201/9202/9203
System Administrator Guide
Page 65

Internet Services
• PostScript® Level 2 and 3
•TIFF
• ASCII Text
•PDF
•JPEG
Note: ASCII text files, from systems other than PCs, may not print correctly if hard carriage returns
(ASCII Control-M) are not used as line delimiters in the text.
Large print jobs need adequate space on your hard drive when printing through Internet Services.
1. At your Workstation, open the web browser from your Workstation. Enter the IP address of the
device in the Address bar. Click on [Enter].
2. Click on the [Print] tab.
3. In the [File Name] area at the bottom of the screen, enter the name of the document that you
want to print, or click the [Browse] to locate the document on your workstation.
4. In the [Printing] area, enter the number of [Copies] required (between 1 - 9999).
5. Select the required [Job Type]:
• Normal Print
• Secure Print - you will need to enter a 4 - 10 digit number which you will use at the device’s
user interface to release the document for printing
• Sample Set- if several copies of the document have been selected, one copy only will print to
allow the reader to check for errors. Once validated, the remaining copies can be released
from the device’s user interface
• Save Job for Reprint - the document will be saved for reprinting.
• Delayed Print - specify a time for your document to print
6. Select the required Printing options from the drop-down menu for 2 Sided Printing, Output Color,
Collate, Orientation, Staple and Output Destination.
If Network Accounting is installed, then enter your Account and User ID for accounting purposes.
(The Accounting fields are only visible if accounting is enabled on your device).
Note: Printing options are only valid for jobs that do not contain the settings already.
7. When finished with your selections, click on the [Submit Job] button to send your document to
the printer. Wait for the Job Submission confirmation window to appear before exiting or
navigating to a different screen, so your print job will not be deleted.
8. Retrieve the printed document(s) from the device.
Properties
This tab allows you to view and set the device properties. These include the device details and
configuration, Internet Services settings, the port settings, protocol settings, emulation settings, and
the memory settings. The items displayed will depend on the model and configuration of the device.
Xerox ColorQube™ 9201/9202/9203
System Administrator Guide
65
Page 66

Internet Services
Configuration Overview
This page displays the device configuration overview, displays information on Connectivity and
Printing, if Services are configured or not, if Cloning is configured or not.
1. At your Workstation, open the web browser and enter the IP address of the device in the Address
bar, and press [Enter].
2. Click on the [Properties] tab.
3. If prompted, enter the Administrator User ID and Password. The default is [admin] and [1111].
4. Click on the [Login] button.
5. Click on the [Configuration Overview] link.
Description
This page displays the following information and allows you to set and view information related to the
device, such as the name and installation location of the device:
• Machine Model
• Product Code/Serial Number
• Device Name
• Location
1. At your Workstation, open the web browser and enter the IP address of the device in the Address
bar, and press [Enter].
2. Click on the [Properties] tab.
3. If prompted, enter the Administrator User ID and Password. The default is [admin] and [1111].
4. Click on the [Login] button.
5. Click on the [Description] link.
6. If [Device Name] and [Location] are changed, click on the [Apply] button, to accept the
changes.
General Setup
Configuration Report
The Configuration page displays the following information:
• Report Profile
• Common User Data
• Machine Profile
• Machine Hardware
• General Setup
•Software Versions
• Connectivity Physical Connections
• Connectivity Protocols
•Services
66
Xerox ColorQube™ 9201/9202/9203
System Administrator Guide
Page 67

Internet Services
• Accounting
• Security
• Media Trays
1. At your Workstation, open the web browser and enter the IP address of the device in the Address
bar, and press [Enter].
2. Click on the [Properties] tab.
3. If prompted, enter the Administrator User ID and Password. The default is [admin] and [1111].
4. Click on the [Login] button.
5. Click on the [General Setup] link.
6. Click on the [Configuration Report] link from the directory tree.
7. To print a configuration report from this screen, press the [Print Configuration Report] button.
Ethernet Configuration using Internet Services
The Ethernet can be configured from the Internet Services as well as at the device.
1. At your Workstation, open the web browser and enter the IP address of the device in the Address
bar, and press [Enter].
2. Click on the [Properties] tab.
3. If prompted, enter the Administrator User ID and Password. The default is [admin] and [1111].
4. Click on the [Login] button.
5. Click on the [Connectivity] link.
6. Click on the [Physical Connections] link.
7. Click on [Ethernet] in the directory tree.
8. In the General area, select the speed from the [Rated Speed] drop-down menu.
9. Click on the [Apply] button, then click on the [OK] button when you see the message “Properties
have been successfully modified”.
Note: When you change the settings, you must restart the device to see the new values. If you
return to this page before the device has been restarted, the old setting will display.
Support
The Internet Services Support page provides easy access to the Xerox website. The page can also be
set up to show Xerox support telephone numbers and the contact details for the System Administrator.
To Edit Xerox or Administrator Support Contact Details.
1. Open the web browser and enter the IP address of the device in the Address bar, and press
[Enter].
2. Click on the [Support] tab.
3. Click on the [Edit Settings] link.
4. Enter the contact details in the entry fields.
Xerox ColorQube™ 9201/9202/9203
System Administrator Guide
67
Page 68

Internet Services
5. Click on the:
a. [Save] button to accept the settings If prompted, enter the User ID and Password of the
Administrator’s account and click on [Login].
b. [Undo] button to revert back to previous details
c. [Cancel] button to cancel the changes.
Other features and Services
Other features and service that can be configured and is supported by Internet Services are explained
throughout this guide.
68
Xerox ColorQube™ 9201/9202/9203
System Administrator Guide
Page 69

Network Installation
This chapter explains how to set up the device to operate in different network environments.
• TCP/IP Settings on page 70
• Windows XP on page 90
• Apple Talk on page 96
• NetWare on page 101
• AS400 Raw TCP/IP Printing to Port 9100 (CRTDEVPRT) on page 103
• UNIX on page 106
5
Xerox ColorQube™ 9201/9202/9203
System Administrator Guide
69
Page 70

Network Installation
TCP/IP Settings
This section explains how to set up the device to operate in a Windows TCP/IP environment. The
following information is provided:
• IPv4 on page 73
• IPv6 on page 74
• Supporting LPR Printing on page 76
• Configure Raw TCP/IP Printing on page 77
• Configure SLP on page 78
• SNMP on page 79
• SSDP on page 84
• Microsoft Networking on page 84
• AppleTalk on page 86
• Create an IPP Printer (Internet Printing Protocol) on page 86
• Microsoft Networking on page 84
The device supports IP versions 4 and 6. IPv6 can be used instead of or in addition to IPv4.
IPv4 Settings can be configured directly at the device user interface, or remotely, via a web browser
using Internet Services. IPv6 can only be configured using Internet Services. To configure TCP/IP
Settings using Internet Services, see Configure TCP/IP Settings using Internet Services on page 73.
Configure Static Addressing using the Device
Information Checklist
Before starting the procedure, please ensure the following items are available or have been performed:
• Existing operational network utilizing the TCP/IP protocol.
• Ensure that the device is connected to the network.
• Static IP Address for the device.
• Subnet Mask Address for the device.
• Gateway Address for the device.
• Host Name for the device.
Enter a Static IP Address
1. At the device and press the <Log In/Out> button to enter the Tools pathway.
2. Enter the Administrator’s User Name [admin], touch [Next], enter Password [1111], touch
[Enter].
3. Press the <Machine Status> button, and then the [Tools] tab.
4. Touch [Network Settings].
5. Touch [TCP/IP Settings].
70
Xerox ColorQube™ 9201/9202/9203
System Administrator Guide
Page 71

Network Installation
6. Touch [TCP/IP Enablement].
a. Touch [Enable] for IPv4 and IPv6.
b. Touch [Save].
7. Touch [Dynamic Addressing].
a. Touch [Disabled] to disable DHCP.
b. Touch [Save].
8. Touch [IP Address/Host Name].
a. Touch button under the [IPv4 Address] heading
b. Enter the IP Address using the on-screen keypad and touch [Save].
c. Touch button under the [Host Name].
d. Type the host name EXACTLY as you want it to appear. To access more characters, touch
[123] on the user interface.
e. Touch [Save], then touch [Close].
9. Touch [Subnet and Gateway].
a. Touch [Subnet Mask], enter the Subnet Mask address using the on-screen keypad.
b. Touch [Save].
c. Repeat this process for the IP Gateway. When you are finished, touch [Save] to accept the
changes and return to the TCP/IP Settings screen.
d. Touch [Close] twice to return to the feature menu.
10. Touch [Advanced Settings].
11. Touch [Continue].
12. Touch [HTTP Settings].
a. Ensure Enable is selected. If not, touch [Enable].
b. Touch [Save], then touch [Close] twice to return to the Tools menu.
DNS/DDNS Configuration
1. From the Too ls menu,
2. Touch [Network Settings].
3. Touch [TCP/IP Settings].
4. Touch [DNS Configuration]. This feature will be inaccessible (grayed out) if TCP/IP protocol is not
enabled.
a. Touch the [Domain Name] button.
b. Touch the button under Domain Name.
c. Touch the [Clear Text] button to remove the default name before entering the new name
using the on screen keyboard.
d. Touch [Save].
e. Touch [Close].
5. Touch [Preferred DNS Server].
a. Touch the button under Preferred DNS Server #1, enter the DNS Server IP Address using the
on-screen keypad.
b. Touch [Save], then touch [Close].
Xerox ColorQube™ 9201/9202/9203
System Administrator Guide
71
Page 72

Network Installation
6. Touch [Alternate DNS Servers] if required.
a. Touch the button under Alternate DNS Server, enter the Alternate DNS Server IP Address
using the on-screen keypad.
b. Touch [Save].
Note: If DHCP is enabled, the Alternate DNS server information is not available as a feature
summary.
c. Touch [Close] to return to the DNS Configuration screen.
Enable Dynamic DNS Registration
Note: If your DNS server does not support dynamic updates, then this function does not need to
be enabled.
7. Touch [Dynamic DNS Registration].
a. Click on [Enable], then [Save].
8. Touch [Close] twice.
9. Press the <Log In/Out> button, touch [Logout] to exit To ol s mode.
Configure Dynamic Addressing
Information Checklist
Before starting the procedure, please ensure the following items are available or have been performed:
• Existing operational network utilizing the TCP/IP protocol.
• DHCP or BOOTP Server should be available on the network.
• Device must be connected to the network via Ethernet Cable.
Installation via DHCP (Dynamic Host Configuration Protocol)
DHCP is enabled on the device by default. If the device is connected to the network, the TCP/IP
information will be configured when the device is powered on and no further configuration is required.
Print a Configuration Report to verify that TCP/IP information is correct.
1. Press the <Machine Status> button on the device.
2. Touch the [Machine Information] tab.
3. Touch [Information Pages].
4. Touch [Configuration Report].
5. Touch [Print], then touch [Close].
The Configuration Report is printed, verify the TCP/IP information under Connectivity Protocols.
Installation via BOOTP or DHCP
Ensure your device is connected to the network with Ethernet cabling.
1. Go to the device and press the <Log In/Out> button to enter the Tools pathway.
72
Xerox ColorQube™ 9201/9202/9203
System Administrator Guide
Page 73

Network Installation
2. Enter the Administrator’s User Name [admin], touch [Next], enter Password [1111], touch
[Enter].
3. Press the <Machine Status> button, and then the [Tools] tab.
4. Touch [Network Settings].
5. Touch [TCP/IP Settings].
6. Touch [Dynamic Addressing]. By default, DHCP is selected.
7. Select the required Dynamic Addressing method:
•BOOTP
•DHCP
8. Touch [Save].
9. Touch [Close].
10. Press the <Log In/Out> button, touch [Logout] to exit Too ls mode.
IPv4
Configure TCP/IP Settings using Internet Services
Note: TCP/IP and HTTP should have been initially configured, refer to Enable TCP/IP and HTTP at
the Device on page 19 of this guide.
1. At your Workstation, open the web browser and enter the IP address of the device in the Address
bar, and press [Enter].
2. Click on the [Properties] tab.
3. If prompted, enter the Administrator User ID and Password. The default is [admin] and [1111].
4. Click on the [Login] button.
5. Click on the [Connectivity] link.
6. Click on the [Protocols] link.
7. Select [IP (Internet Protocol)] in the directory tree.
8. Ensure that [IPv4] is selected.
9. In the General area:
a. The [Enabled] checkbox for Protocol will be enabled.
Note: If the [Enabled] checkbox for Protocol is not checked, you will not be able to access Internet
Services. TCP/IP must then be enabled from the device's user interface.
CAUTION: Disabling TCP/IP or changing the IP address will affect SLP, SNMP, NetBIOS/IP, Raw
TCP/IP Printing, SMTP, LDAP, POP3, HTTP and NTP. If TCP/IP is disabled, Internet Services will not
be available until TCP/IP is enabled from the device’s control panel. If you change the IP address,
you must reference the new address within your web browser to locate the device.
b. Physical Connection will display the physical network connection. This will display
“Ethernet”.
c. Select one of the following method for obtaining a Dynamic IP address from the [IP Address
Resolution] drop-down menu:
• DHCP (Dynamic Host Configuration Protocol).
Xerox ColorQube™ 9201/9202/9203
System Administrator Guide
73
Page 74

Network Installation
• RARP (Reverse Address Resolution Protocol).
• BOOTP (Bootstrap Protocol).
• Static (fixed, User-defined), this is the default selection.
d. Enter a name which corresponds to the IP address of the device in the [Host Name] field.
e. If you select [Static], type the IP addresses that applies in [Machine IP Address], [Subnet
Mask], and [Gateway Address].
Note: If BOOTP or DHCP address resolution mode is selected, you cannot change the IP address,
Subnet Mask, or default gateway. If RARP address resolution mode is selected, you cannot change
the IP address. Select [Static] if you wish to disable dynamic addressing.
f. Enter details of an identifier of the IP site to which the device is connected in the [Domain
Name] field.
g. If DNS configuration is required, enter IP address for the [Primary DNS Server]. Enter an IP
address for [Alternate DNS Servers 1] and [Alternate DNS Servers 2].
Note: If DHCP or BOOTP is the IP Address Resolution setting, you cannot change the Domain
Name, Primary DNS Server, Alternate DNS Server 1, and Alternate DNS Server 2 settings.
h. Check the [Enabled] checkbox to enable [Dynamic DNS Registration (DDNS)].
Note: If your DNS Server does not support dynamic updates there is no need to enable DDNS.
10. In the DHCP/DDNS area:
a. Check the [Enabled] checkbox for Release Registration ONLY if you wish to release this
device's IP address upon reboot. Default is unchecked.
11. In the Zero-Configuration Networking area:
a. Check the [Enabled] checkbox for Self Assigned Address, to support communicating with
other devices using 169.254/16 IPv4 addressing, over the same physical or logical link (such
as in ad hoc, or isolated (non- DHCP) networks). Refer to the IETF website for zeroconf details.
b. Check the [Enabled] checkbox for Multicast DNS to resolve host names to IPv4 addresses
without using a conventional DNS server.
12. Click on the [Apply] button to accept changes or [Undo] to return the settings to their previous
value.
13. Click on the [OK] button when you see the message “Properties have been successfully
modified”.
Note: Changing
e device IP Address will impact other protocols: NetBIOS/IP, LPR/LPD, FTP,
th
SNMP and Raw TCP/IP Printing. These protocols will need to reference the new IP Address.
Disabling TCP/IP will impact other protocols: NetBIOS/IP, LPR/LPD, FTP, SNMP and Raw TCP/IP
Printing. This web user interface will be disabled until TCP/IP is re-enabled from the local user
interface.
IPv6
Note: IPv6 is optional. It may be used in addition to, or in place of IPv4.
1. At your Workstation, open the web browser and enter the IP address of the device in the Address
bar, and press [Enter].
Note: TCP/IP and HTTP should have been initially configured refer to Enable TCP/IP and HTTP at
the Device on page 19 of this guide.
74
Xerox ColorQube™ 9201/9202/9203
System Administrator Guide
Page 75

Network Installation
2. Click on the [Properties] tab.
3. If prompted, enter the Administrator User ID and Password. The default is [admin] and [1111].
4. Click on the [Login] button.
5. Click on the [Connectivity] link.
6. Click on the [Protocols] link.
7. Select [IP (Internet Protocol)] in the directory tree.
8. Ensure that [IPv6] is selected.
9. In the General area:
a. Check the [Enabled] checkbox for Protocol to enable the TCP/IP protocol.
Note: If you do not check the [Enabled] checkbox for Protocol, you will not be able to access
Internet Services. TCP/IP must then be enabled from the device's user interface.
Note: If you uncheck the [Enabled] checkbox for [Protocol], the Network Controller will reboot.
This may require several minutes, during which time all network services will be unavailable.
b. Enter a name which corresponds to the IP address of the device in the [Host Name] field.
c. [Physical Connection] will display the physical network connection. This will display
“Ethernet”.
d. Enter details of an identifier of the IP site in which the device is connected in the [Domain
Name] field.
10. In the Stateless Addresses area:
a. The Link-Local Address is automatically populated.
This is a network address which is intended only for use in a local data link layer network, and
not routed beyond that network. Link-local addresses are often used for network address
auto-configuration where no external source of network addressing information is available.
The printer's IPv6 Link-local address is automatically generated, and displayed here. Linklocal addresses always begin with “fe80”.
b. Check the [Use Router Supplied Prefixes] checkbox if router advertisements are used.
A router-supplied prefix is the 64-bit (sub-) network address. If routers are present, they will
periodically send Router Advertisement packets containing address prefixes. These prefixes
determine what sort of auto configuration can be done by the device. Select this setting to
use Router Supplied Prefixes. When enabled, Global Addresses associated with this device are
displayed. If there are no routers on the network, this setting can be disabled.
c. The [Global Addresses] will display any global addresses associated with the device. Global
addresses are equivalent to public IPv4 addresses. They are globally routable and reachable
on the IPv6 internet.
11. The device performs auto-address DHCP configuration every time it powers up. This is used for
neighbour discovery and address resolution on the local IPv6 subnet.
However, you can choose to use manual configuration, automatic configuration or a combination
of automatic and manual configuration.
Default Dynamic Host Configuration Protocol (DHCP) Settings area:
a.
Select o
ne of the following options:
• Use DHCP as directed by a router - this option is fully automatic. The DHCPv6 Address
will be obtained and displayed on the screen.
Xerox ColorQube™ 9201/9202/9203
System Administrator Guide
75
Page 76

Network Installation
• Always Enable DHCP for address assignment and other configuration data - this
option is fully automatic. The DHCPv6 Address will be obtained and displayed on the
screen.
• Always Enable DHCP for other configuration data only - this is the semi-automatic
configuration. The DHCPv6 Address will be obtained and displayed on the page.
• Never use DHCP - when this option is selected, you must configure the Manual Address
Options and DNS separately.
b. If you select either [Use DHCP as directed by a router] or [Always Enable DHCP for address
assignment and other configuration data] you have the option to enable the release of
DHCPv6 Address at Power Down. This option instructs the printer to send a DHCP release
message to the router when the device is powering-down. This releases the current DHCP
configuration and discards the printer’s IP address configuration.
To select this option check the [Release DHCPv6 Address at Power Down] checkbox for
DHCPv6 Address.
12. In the DNS Configuration area:
a. Enter an IP address for the [Primary DNS Server]. Enter an IP address for [Alternate DNS
Server 1] and [Alternate DNS Server 2].
b. Check to enable [Prefer IPv6 Address over IPv4].
By default, the printer will prefer an IPv4 address over IPv6 address if both are enabled. For
example, when querying the DNS, the printer will normally use the IPv4 address if an IPv6
address is also provided. By selecting this checkbox, this will change the preference to IPv6.
13. The Default Gateway will displays the link-local address of the router (known in IPv4 as the
default gateway).
14. The device can be configured with up to 4 manual IPv6 addresses, in the Manual Address
Options area:
a. Check the [Enable Manual Address] checkbox to enable Router Prefix attachment.
b. The Router Prefix is derived from router advertisements. Select a router address prefix from
the list supplied in the [Router Prefix] drop-down menu to populate the prefix for manual
entry address.
c. Click on the [Add] button to add your address.
15. Click on the [Apply] button to accept changes or [Undo] to return the settings to their previous
value.
16. Click on the [OK] button when you see the message “Properties have been successfully
modified”.
Supporting LPR Printing
This page allows the System Administrator to select and edit LPR/LPD (Line Printer Remote/Line Printer
Daemon) options. LPR/LPD is a common TCP/IP printing protocol in Unix environment to establish
connections between the device and the workstations on a network.
Note: TCP/IP and HTTP should have been initially configured, refer to Enable TCP/IP and HTTP at
the Device on page 19 of this guide and follow the steps provided.
1. At your Workstation, open the web browser and enter the IP address of the device in the Address
bar, and press [Enter].
2. Click on the [Properties] tab.
76
Xerox ColorQube™ 9201/9202/9203
System Administrator Guide
Page 77

Network Installation
3. If prompted, enter the Administrator User ID and Password. The default is [admin] and [1111].
4. Click on the [Login] button.
5. Click on the [Connectivity] link.
6. Click on the [Protocols] link.
7. Select [LPR/LPD] in the directory tree.
8. In the General area:
a. For Protocol, check the [Enabled] checkbox to enable LPR/LPD.
Note: Disabling LPR/LPD will affect clients printing to the device over TCP/IP using the LPR printing
port.
b. Physical Connection displays the physical network connection, this will always display
“Ethernet”.
c. In the Port Number, enter an LPR/LPD port number. The default is 515.
9. In the Advanced Settings area:
a. Check the [Enabled] checkbox to enable PDL Switching. PDL switching allows the device to
process print jobs which contain two or more printer languages, for example: PCL and
PostScript, or ASCII and PostScript.
b. Check the [Enabled] checkbox to enable PDL banner page attributes override LPR control
file attributes for job name and owner. This feature allows you to replace the standard
information displayed on a banner page, and substitute the user name and job name taken
from the print job.
Note: Banner pages print if banners are set to On at the file server, even if banners are set to Off in
the device.
c. Select the required option from the [Place temporary hold on which jobs:] drop-down menu.
This feature allows you to set the device to hold certain jobs before printing, until the
complete job is received. This delay helps to ensure that the banner page information prints
correctly. Some banner sheet information is contained in the job's control file which may not
always be the first part of a print job the device receives. The following options are available:
• Only those with data file received 1st - The device holds the job if the job's data file is
received first. This ensures the device waits to receive the job's control file information so
that the banner sheet contains accurate information.
• All (consistent with older implementations) - This option puts all jobs on hold. All data
is received before a job begins to print. This setting can cause jobs to print slowly but will
result in accurate banner sheet information.
• None (Use printer's default banner sheet job name if data file 1st) - The device will
not wait to receive the job control information. This selection may cause banner sheet
information to print incorrectly.
10. Click on the [Apply] button to accept changes or [Undo] to return the settings to their previous
value.
11. Click on the [OK] button when you see the message “Properties have been successfully
modified”.
Configure Raw TCP/IP Printing
Note: TCP/IP must be enabled before Raw TCP/IP Printing is enabled.
Xerox ColorQube™ 9201/9202/9203
77
System Administrator Guide
Page 78

Network Installation
Raw TCP/IP is a printing method used to open a TCP socket-level connection, over Port 9100, to stream
a print-ready file to the printer's input buffer, and then to close the connection after sensing an End Of
Job indicator in the Page Description Language, or after expiration of a preset timeout value. Port
9100 printing does not require a Line Printer Request (LPR) from the workstation, or the use of a Line
Printer Daemon (LPD) running on the printer. Raw TCP/IP printing is selected in Windows 2000 as the
Standard TCP/IP port.
1. At your Workstation, open the web browser and enter the IP address of the device in the Address
or Location field. Press [Enter].
2. Click on the [Properties] tab.
3. If prompted, enter the Administrator User ID and Password. The default is [admin] and [1111].
4. Click on the [Login] button.
5. Click on the [Connectivity] link.
6. Click on the [Protocols] link.
7. Select [Raw TCP/IP Printing] in the directory tree.
8. In the General area:
a. For Protocol, check the [Enabled] checkbox to enable Raw TCP/IP Printing.
Physical Connection displays the physical network connection, this will always display
“Ethernet”.
9. Upto three ports may be enabled and configured, in the Port Information area:
a. For Port 1 Leave the [TCP Port Number] set to 9100. If two additional ports are available,
click the [Default All] button to check if they set to 9101 and 9102 respectively (emulating
HP JetDirect EX Plus 3).
b. Leave the [Bidirectional] checkboxes and [Maximum Connections per Port] settings at their
default values.
c. Set the [End of Job Timeout] to the number of seconds to wait before processing a job
without an End Of Job indicator. The range is from 1 to 65535, and the default is 300.
d. Leave the [PDL Switching] Enabled checkbox at its default value.
Note: Do not check the [Enabled] checkbox for PDL Switching, when Windows clients print is
using port 9100. this prevents each print job from generating a banner page.
10. Click on the [Apply] button to accept the changes or [Undo] to return the settings to their
previous values, or [Default All] to enter printer defaults for all settings (recommended).
11. Click on the [OK] button when you see the message “Properties have been successfully
modified”.
Note: The settings are not applied until you restart the device.
12. Click on the [Sta
tus] tab, select [Description & Alerts] in the directory tree.
13. Scroll down and click the [Reboot Machine] button and click [OK] to reboot the device. The
network controller takes approximately 5 minutes to reboot and network connectivity will be
unavailable during this time.
Configure SLP
Configure Service Location Protocol (SLP) if needed to support CUPS, Mac OS, and NetWare.
78
Xerox ColorQube™ 9201/9202/9203
System Administrator Guide
Page 79

Network Installation
SLP is used to announce and look up services on a local network. When SLP is enabled, the device
becomes a Service Agent (SA) and announces its services to a User Agents (UA) via SLP.
1. At your Workstation, open the web browser and enter the IP address of the device in the Address
bar, and press [Enter].
2. Click on the [Properties] tab.
3. If prompted, enter the Administrator User ID and Password. The default is [admin] and [1111].
4. Click on the [Login] button.
5. Click on the [Connectivity] link.
6. Click on the [Protocols] link.
7. Select [SLP] in the directory tree.
8. In the General area:
a. For Protocol, check the [Enabled] checkbox to enable Service Location Protocol (SLP).
b. Enter an IP address for the [Directory Agent], if required. This will specify the address of a
single Directory Agent (DA) to be added to the list of Directory Agents in the device’s DA list.
c. Enter the required name(s) for [Scope 1,2,3], this allows the System Administrator to set one
of the three manually configurable scope names. A scope is a searchable group or container
to which an agent may be associated. The default scope is called “DEFAULT”.
d. For Message Type, select either [Multicast] or [Broadcast] from the drop-down menu. This
setting defines whether SLP will use multicast or broadcast in communications. Multicast
packets are routed between subnets as needed, but broadcast are not.
e. Enter a value for Multicast Radius (0-255), the default is 255. This allows the System
Administrator to reconfigure the Multicast Radius for SLP. This is similar to the Time To Live
(TTL) in the TCP/IP parameter, and defines how many routers the multicast packet may cross.
f. Enter a value for MTU to set the Maximum Transmission Unit (484 - 32768), with 1400 as
the default. This allows the System Administrator to set the maximum packet size for SLP.
g. Version will display the SLP version number supported by the device.
h. Port Number will display the socket (port) that all SLP communications will use. All devices
are required to listen on port 427 for UDP and TCP packets.
i. Character Set will display the character set in use. The default is US-ASCII.
9. Click on the [Apply] button to accept the changes or [Undo] to return the settings to their
previous values.
10. Click on the [OK] button when you see the message “Properties have been successfully
modified”.
Note: The settings are not applied until you restart the device.
11. Click on the [Status] tab, select [Description & Alerts] in the directory tree.
12. Scroll down and click the [Reboot Machine] button and click [OK] t
o reboot the device. The
network controller takes approximately 5 minutes to reboot and network connectivity will be
unavailable during this time.
SNMP
The System Administrator uses this page to enable or disable Simple Network Management Protocol
(SNMP).
Xerox ColorQube™ 9201/9202/9203
System Administrator Guide
79
Page 80

Network Installation
You can also enable or disable Authentication Failure Generic Traps on the device. SNMPv3 can be
enabled to create an encrypted channel for secure device management.
SNMP is a set of protocols designed to help manage complex networks. SNMP compliant devices store
data about themselves in MIBs and return this data to the SNMP requesters. The SNMP Configuration
pages provide control over SNMP security, including methods to configure:
• Administrative and Key User accounts with privacy and authentication protocols and key
associated with each account.
• SNMP user account read or read/write access.
• An access control list that limits SNMP access to the printer to specific hosts.
To c on fi gure SNMP v1/v2c
1. At your Workstation, open the web browser and enter the IP address of the device in the Address
bar, and press [Enter].
2. Click on the [Properties] tab.
3. If prompted, enter the Administrator User ID and Password. The default is [admin] and [1111].
4. Click on the [Login] button.
5. Click on the [Connectivity] link.
6. Click on the [Protocols] link.
7. Select [SNMP] in the directory tree.
Note: For security purposes, Xerox recommends that the administrator changes the SNMP v1/V2c
public/private community strings from their default string names to random string names.
8. In the SNMP Properties area:
a. Check to ensure the [Enable SNMP v1/v2c Protocols] checkbox is selected.
b. Click on the [Edit SNMP v1/v2c Properties] button.
The System Administrator uses the Edit SNMP v1/v2c Properties page to edit the GET, SET,
and TRAP community names for the device.
c. In the Community Names area, enter a name in the [GET Community Name] field. The
default is public.
d. Enter a name in the [SET Community Name] field. The default is private.
Note: Changes made to the GET or SET community names for this device will require
corresponding GET or SET community name changes for each application which uses the SNMP
protocol to communicate with this device (for example, Xerox PrinterMap, Xerox Internet Services,
any 3rd party network management applications).
e. In the Default Trap Community Name, enter a name in the [TRAP Community Name] field.
The default is SNMP_trap.
Note: The Default TRAP community name is used to specify the default community name for all
traps generated by this device. The Default TRAP community name can be overridden by the TRAP
community name specified for each individual TRAP destination address. The TRAP community
name for one address may not be the same TRAP community name specified for another address.
f. Click on the [Save] button to accept the changes and return to the SNMP page.
80
Xerox ColorQube™ 9201/9202/9203
System Administrator Guide
Page 81

Network Installation
9. In the Authentication Failure Generic Traps area, check the [Enable] checkbox to enable
Authentication Failure Generic Traps to generate a trap for every SNMP request by the device
which contains an invalid community name.
Note: When the Authentication Failure Generic Trap is enabled, this machine will generate a trap
for every SNMP request that is received by the machine which contains an invalid community
name.
10. Click on the [Apply] button to save changes, or click on the [Advanced Settings] button to add or
edit an IP or IPX address, for further information refer to SNMP Advanced Settings on page 82.
To c on fi gure SNMP v3
1. At your Workstation, open the web browser and enter the IP address of the device in the Address
bar, and press [Enter].
2. Click on the [Properties] tab.
3. If prompted, enter the Administrator User ID and Password. The default is [admin] and [1111].
4. Click on the [Login] button.
5. Click on the [Connectivity] link.
6. Click on the [Protocols] link.
Note: SSL (Secure Socket Layer) must be enabled before you can configure SNMP v3. Click the
[Configure HTTPS] link on the SNMP Internet Services screen to complete this task. Once SSL is
enabled, return to the SNMP screen.
Before, enabling the HTTP Security Mode, the device must have a Machine Digital Certificate
configured. For information on Machine Digital Certificate, see Machine Digital Certificate
Management on page 157.
7. Select [HTTP] in the directory tree.
a. Select enable for the [Secure HTTP (SSL)] option.
b. Change the [Secure HTTP (SSL) Port Number] if required. The default is 443.
c. Click on the [Apply] button to accept the changes.
8. Select [SNMP] in the directory tree.
9. To configure SNMP v3, in the SNMP Properties area:
a. Check to ensure the [Enable SNMP v3 Protocols] checkbox is selected.
b. Click on the [Edit SNMP v1/v2c Properties] button.
System Administrator uses the Edit SNMP v3 Properties page to configure Authentication
Password and Privacy Password for the Administrator Account.
10. In the Administrator Account area:
a. Check the [Account Enable] checkbox to create an administrator account that can be used
to provide more extensive access to the objects on the device.
b. Enter the required data in the [Authentication Password] and [Confirm Authentication
Password] fields.
c. Enter the required data in the [Privacy Password] and [Confirm Privacy Password] field.
11. In the Print Drivers/Remote Clients Account area:
a. Check the [Account Enabled] checkbox to Create an account for bi-directional print drivers
and Xerox remote clients.
Xerox ColorQube™ 9201/9202/9203
System Administrator Guide
81
Page 82

Network Installation
b. If you want to reset to the default Password, click on the [Reset] button.
Note: This account allows Xerox Clients and Drivers a limited amount of access to objects on the
device. If the device does not have SNMP v1/v2c enabled, and does not have this account
enabled, Xerox SNMP based clients will not be able to communicate with it. The default passwords
should be used, unless the passwords have been changed on the client.
c. Click on the [Save] button to save changes and return to the SNMP page.
12. In the Authentication Failure Generic Traps area:
a. Check the [Enable] checkbox to enable Authentication Failure Generic Traps to generate a
trap for every SNMP request by the device which contains an invalid community name.
Note: When the Authentication Failure Generic Trap is enabled, this machine will generate a trap
for every SNMP request that is received by the machine which contains an invalid community
name.
13. Click on the [Apply] button to save changes, or click on the [Advanced Settings] button to add or
edit an IP or IPX address, for further information refer to SNMP Advanced Settings on page 82.
SNMP Advanced Settings
To Add or Edit an IP Address:
The System Administrator can add or delete IP and IPX addresses for the Network Management
Workstations that receive Traps from the device.
1. From the SNMP page, click on the [Advanced Settings] button.
2. To add or edit an IP Address, in the Trap Destination Addresses area, click on the [Add IP
Address] button or the [Edit] button for the required address.
3. In the Required Information area:
a. For [IP Address], enter the IP destination address of the SNMP manager that you are setting
up to receive traps for.
b. For [UDP Port Number], enter port number for the UDP destination port of the SNMP
manager that you are setting up to receive traps for.
c. For [SNMP Version], select the SNMP version that matches the SNMP manager with which
the device is communicating with.
4. In the Trap s area:
a. The [TRAP Community Name] will display the default value for the TRAP Community Name.
b. For [Traps to be Received], check the checkbox for the type of traps sent by this device to the
Destination Address indicated by the IP Address and UDP port number entered by the user.
The choices are:
•Printer Traps
• Job Monitoring Traps
• Cold Start Generic Traps
• Warm Start Generic Traps
• Authentication Failure Generic Traps (Status: Enabled)
82
Xerox ColorQube™ 9201/9202/9203
System Administrator Guide
Page 83

Network Installation
Note: When Authentication Failure Generic Traps is disabled, traps of this type will not be sent
by this Device. To enable Authentication Failure Generic Traps, go to SNMP Properties from the
main SNMP Configuration page.
5. Click on the [Save] button to save settings and return to the Advanced Settings page.
6. Click on the [Back] button to return to the SNMP page.
7. Click on the [Apply] button to accept the changes or [Undo] to return the settings to their
previous values.
8. Click on the [OK] button when you see the message “Properties have been successfully
modified”.
To Add or Edit an IP Address:
The system administrator uses this page to add or edit an Internetwork Packet Exchange (IPX) trap
destination address for this printer. IPX is a routing protocol used in Novell NetWare environments.
Default values are shown when adding an address.
1. From the SNMP page, click on the [Advanced Settings] button.
2. To add an IP Address or edit, in the Trap Destination Addresses area, click on the [Add IPX
Address] button or the [Edit] button for the required address.
3. In the Required Information area:
a. For [IPX External Network Number], enter the IPX number of the device that is set to receive
traps.
b. For [Physical MAC Address], enter MAC address of the printer that is receiving the trap.
c. For [IPX Socket Number], enter the socket number of the running application that is
listening for the information.
d. For [SNMP Version], select the SNMP version that matches the SNMP manager with which
the device is communicating with.
4. In the Trap s area:
a. The [TRAP Community Name] will display the default value for the TRAP Community Name.
b. For [Traps to be Received], check the checkbox for the type of traps sent by this device to the
Destination Address indicated by the IP Address and UDP port number entered by the user.
The choices are:
•Printer Traps
• Job Monitoring Traps
• Cold Start Generic Traps
• Warm Start Generic Traps
• Authentication Failure Generic Traps (Status: Enabled)
Note: When Authentication Failure Generic Traps is disabled, traps of this type will not be sent
by this Device. To enable Authentication Failure Generic Traps, go to SNMP Properties from the
main SNMP Configuration page.
5. Click on the [Save] button to save settings and return to the Advanced Settings page.
6. Click on the [Back] button to return to the SNMP page.
7. Click on the [Apply] button to accept the changes or [Undo] to return the settings to their
previous values.
Xerox ColorQube™ 9201/9202/9203
System Administrator Guide
83
Page 84

Network Installation
8. Click on the [OK] button when you see the message “Properties have been successfully
modified”.
SSDP
Allows you to configure the SSDP (Simple Service Discovery Protocol) for Universal Plug and Play
settings on the device. SSDP provides a mechanism where by network clients, with little or no static
configuration, can discover network services. SSDP accomplishes this by providing for multicast
discovery support as well as server based notification and discovery routing.
1. At your Workstation, open the web browser and enter the IP address of the device in the Address
bar, and press [Enter].
2. Click on the [Properties] tab.
3. If prompted, enter the Administrator User ID and Password. The default is [admin] and [1111].
4. Click on the [Login] button.
5. Click on the [Connectivity] link.
6. Click on the [Protocols] link.
7. Select [SSDP] in the directory tree.
8. In the [General] area:
a. For Protocol, check the [Enabled] checkbox to enable SSDP.
b. Enter the discovery expiration Cache Control, in minutes in the [Cache Control] field. The
range is from 1 to 43200 and default is 1440.
c. Enter the discovery advertisement Time to Live, measured in router hops in the [Time to Live]
field. the range is from 1 to 60 and the default is 4.
9. Click on the [Apply] button to accept the changes or [Undo] to return the settings to their
previous values.
10. Click on the [OK] button when you see the message “Properties have been successfully
modified”.
Microsoft Networking
Configure Microsoft Networking
1. At your Workstation, open the web browser and enter the IP address of the device in the Address
bar, and press [Enter].
2. Click on the [Properties] tab.
3. If prompted, enter the Administrator User ID and Password. The default is [admin] and [1111].
4. Click on the [Login] button.
5. Click on the [Connectivity] link.
6. Click on the [Protocols] link.
7. Select [Microsoft Networking] in the directory tree.
8. In the General area:
a. For Protocol, check the [Enabled] checkbox to enable Microsoft Networking.
b. Enter the device’s workgroup in the [Workgroup] field.
84
Xerox ColorQube™ 9201/9202/9203
System Administrator Guide
Page 85

Network Installation
c. Enter the device’s SMB (Server Message Block protocol) host name in the [SMB Host Name]
field.
d. Enter a descriptive host name comment in the [SMB Host Name Comment] field (if
required).
e. Enter the device’s share name in the [Share Name] field.
f. Enter a descriptive share name comment in the [Share Name Comment] field.
Physical Connection displays the physical network connection, and will display “Ethernet”.
Transport displays the current transport layer protocol, and will display “TCP/IP”.
g. Enter the maximum number of simultaneous connections the server is allowed in the
[Maximum Connections] field. The range is 10 - 30, and the default is 30.
h. Enter the timeout value for outgoing connection attempts in the [Connection Timeout] field.
The range is 1 - 32767 seconds, and the default is 600 seconds.
9. If you do not need to configure WINS, then click on the [Apply] button to accept the changes or
[Undo] to return the settings to their previous values.
10. Click on the [OK] button when you see the message “Properties have been successfully
modified”.
Configure WINS (if used)
When running WINS the device registers its IP address and NetBIOS Hostname with a WINS server.
WINS allow the device to communicate using hostname only, removing a significant overhead from
the systems administrators.
WINS server address is stored in the file /smart/etc/wins.Name.
It is possible to manually enable WINS and configure primary and secondary WINS servers through
Internet Services.
1. In the Microsoft Networking page, scroll down to the WINS section.
2. In the Server Information area for WINS:
a. For Protocol, check the [Enabled] checkbox to enable WINS.
b. Enter the IP Address in the [Primary Server IP Address] of a Primary Server.
c. Enter the IP Address in the [Secondary Server IP Address] of a Secondary Server.
Note: If DHCP is configured, WINS IP Address(es) will be overridden.
Note: WINS may be used for Address Resolution in addition to DNS. Microsoft Networking needs
to be enabled for the device to register services with WINS.
3. Click on the [Apply] button to accept the changes or [Undo] to return the settings to their
previous values.
4. Click on the [OK] button when you see the message “Properties have been successfully
modified”.
Note: The settings are not applied until you reboot the device.
5. Click on the [Status] tab, select [Description & Alerts] in the directory tree.
6. Click the [Reboot Machine] button
and click [OK] to
reboot the machine. The network controller
takes approximately 5 minutes to reboot and network connectivity will be unavailable during this
time.
Xerox ColorQube™ 9201/9202/9203
System Administrator Guide
85
Page 86

Network Installation
AppleTalk
To Enable AppleTalk on the Device
1. At your Workstation, open the web browser and enter the IP address of the device in the Address
bar. Press [Enter].
2. Click on the [Properties] tab.
3. If prompted, enter the Administrator User ID and Password. The default is [admin] and [1111].
4. Click on the [Login] button.
5. Click on the [Connectivity] link.
6. Click on the [Protocols] link.
7. Select [AppleTalk] in the directory tree.
8. In the General area:
a. For Protocol, check the [Enabled] checkbox to enable the AppleTalk.
b. Type a name for the device in [Printer Name]. The default name is based on the device’s
Ethernet MAC address.
c. Enter details in the [Zone Name] filed. An AppleTalk zone is a logical group of nodes or
networks. Zones are assigned according to a logical scheme such as organizational
departments or physical locations.
Note: The default local zone is identified as “*”. This should only be changed if you have defined
zones on your network.
• Physical Connection displays physical network connection. This will display “Ethernet”.
• Printer Type displays the current assigned printer type. This will display “LaserWriter”.
9. Click on the [Apply] button to accept the changes or [Undo] to return the settings to their
previous values.
10. Click on the [OK] button when you see the message “Properties have been successfully
modified”.
Note: The settings are not applied until you reboot the device.
11. Click on the [Status] tab, select [Description & Alerts] in the directory tree.
12. Click the [Reboot Machine] button and click [OK] to reboot the machine. The network controller
takes approximately 5 minutes to reboot and network connectivity will be unavailable during this
time.
Create an IPP Printer (Internet Printing Protocol)
Information Checklist
Before starting the procedure, please ensure the following items are available or have been performed:
• Ensure TCP/IP and HTTP are configured on the device as per Enable TCP/IP and HTTP at the
Device on page 19, so that the web user interface (Internet Services) can be accessed.
• Ensure that the DNS settings are configured.
86
Xerox ColorQube™ 9201/9202/9203
System Administrator Guide
Page 87

Network Installation
Enable Port 9100 as Additional support for HTTP (IPP) printing
1. At your Workstation, open the web browser and enter the IP address of the device in the Address
bar, and press [Enter].
2. Click on the [Properties] tab.
3. If prompted, enter the Administrator User ID and Password. The default is [admin] and [1111].
4. Click on the [Login] button.
5. Click on the [Connectivity] link.
6. Click on the [Protocols] link.
7. Select [Raw TCP/IP Printing] in the directory tree.
8. In the General area:
a. For Protocol, check the [Enabled] checkbox to enable Raw TCP/IP Printing.
b. Physical Connection displays the physical network connection, this will always display
“Ethernet”.
9. Upto three ports may be enabled and configured, in the Port Information area:
a. For Port 1 Leave the [TCP Port Number] set to 9100. If two additional ports are available,
click [Default All] to see if they set to 9101 and 9102 respectively (emulating HP JetDirect EX
Plus 3).
b. Leave the [Bidirectional] checkboxes and [Maximum Connections per Port] settings at their
default values.
c. Set the [End of Job Timeout] to the number of seconds to wait before processing a job
without an End Of Job indicator. The range is from 1 to 65535, and the default is 300.
d. Leave the [PDL Switching] Enabled checkbox at its default value.
Note: Do not check the [Enabled] checkbox for PDL Switching, when Windows clients print using
port 9100. this prevents each print job from generating a banner page.
10. Click on the [Apply] button to accept the changes or [Undo] to return the settings to their
previous values, or [Default All] to enter printer defaults for all settings (recommended).
11. Click on the [OK] button when you see the message “Properties have been successfully
modified”.
Note: The settings are not applied until you restart the device.
12. Click on the [Status] tab, select [Description & Alerts] in the directory tree.
13. Click the [Reboot Machine] button and click [OK] to reboot the machine. The network controller
akes approximately 5 minutes to reboot and network connectivity will be unavailable during this
t
time.
Create an IPP Printer at Your Workstation
Verify the correct software is loaded
1. At the Desktop, right-click the [My Network Places] icon.
2. Select [Properties].
3. Right-click the [Local Area Connection] icon.
4. Click [Properties].
5. Verify that the [Internet Protocol (TCP/IP)] protocol has been loaded.
Xerox ColorQube™ 9201/9202/9203
System Administrator Guide
87
Page 88

Network Installation
Install the Print Driver
1. From the [Start] menu, select [Settings] and then [Printers] (Windows 2000) or [Printers and
Faxes] (Windows XP). The Vista path is Start\Control Panel\Printer(s).
2. Double-click the [Add Printer] icon and click [Next].
3. Verify that [Network Printer] is selected and click [Next].
The [Locate Your Printer] (Windows 2000) or [Specify a Printer] (Windows XP) screen will
appear.
4. To create an IPP printer select [Connect to a printer on the Internet or on your intranet].
5. Type HTTP://... followed by the printer's fully qualified Domain name or IP address in the URL field.
The Printer Name can be either the Host Name or the SMB Host Name as shown on the device
configuration report, depending on the name resolution used by your network (WINS or DNS).
6. Click [Next].
7. Select [Have Disk] and browse to the location of the print driver (.INF).
8. Click [OK] to install the print driver.
9. Select the Printer Model and click [Next].
10. Select [Yes] if you wish to make this the default printer.
11. Select [Yes] to print a Test Page. Verify that it prints at the device.
12. Click [Finish].
Internet Services
Once installed an IPP printer should provide a link directly to the Internet Services web pages.
To Access Internet Services
1. From the [Start] menu select [Settings] and then [Printers].
2. Click on the device printer icon and a ‘Get More Info’ link will appear in the left hand pane of the
window.
3. Click the [Get More Info] link to go to straight to the device home page.
You have completed the installation of an IPP port and print drivers.
At the Windows 2000 Desktop:
1. Right-click the [My Network Places] icon.
2. Select [Properties].
3. Right-click on the network connection you want to configure AppleTalk on, and then click
[Properties]. The Connection Properties dialog box opens.
4. On the General tab, if the AppleTalk Protocol is in the list of installed protocols, make sure that it is
selected. If the AppleTalk protocol is not listed, install it using the documentation provided by
Microsoft. Then return to the next step in this document.
rs].
5. Click [Start], [Settings], then [P
rinte
6. Double-click the [Add Printer] icon to start the Add Printer Wizard.
7. Click [Next].
8. Click [Local Printer]. Deselect the Automatically detect and install my Plug and Play printer
option.
88
Xerox ColorQube™ 9201/9202/9203
System Administrator Guide
Page 89

Network Installation
9. Click [Next].
10. Click [Create a New Port].
11. Select [AppleTalk Printing Devices] and click [Next].
12. In the Available AppleTalk Printing Devices box, click the printer you want to connect to. It may be
necessary to double-click the required Zone to locate the printer. Click [OK].
Note: You may be asked whether you want to capture the AppleTalk print device. If you are
prompted to do this and you are unsure how to respond, click the Help button and read the help
file for an explanation of capturing AppleTalk print devices.
Note: Capturing the printer may prevent other computers from printing to this printer. For more
information refer to Microsoft.
13. Click [Have Disk]. Load the Internet Services Print and Fax Drivers CD into your CD drive.
14. Click [Browse] and locate the CD drive.
15. Locate the folder containing print drivers on the CD and select the required Windows 2000 print
driver.
16. Select [Open].
17. Select [Open] again, if necessary.
18. Select [OK].
19. Select your printer model from the list and click [Next].
20. Type a name for the printer (or accept the default name), and then click [Next].
21. If you want this to be your default printer click [Yes].
22. Click [Next].
23. If you want to share this printer from your computer, click [Share As:]. Enter a share name (or
accept the default name), then click [Next].
24. If you want to print a test page, click [Yes], then click [Finish].
Xerox ColorQube™ 9201/9202/9203
System Administrator Guide
89
Page 90

Network Installation
Windows XP
Configure TCP/IP and SLP Settings
1. At your Workstation, open the web browser and enter the IP address of the device in the Address
bar, and press [Enter].
Note: TCP/IP and HTTP should have been initially configured, refer to Enable TCP/IP and HTTP at
the Device on page 19 of this guide and follow the steps provided.
2. Click on the [Properties] tab.
3. If prompted, enter the Administrator User ID and Password. The default is [admin] and [1111].
4. Click on the [Login] button.
5. Click on the [Connectivity] link.
6. Click on the [Protocols] link.
7. Select [IP (Internet Protocol)] in the directory tree.
8. In the General area:
CAUTION: Disabling TCP/IP or changing the IP address will affect NetBIOS/IP, LPR/LPD, FTP,
SNMP and Raw TCP/IP printing. If TCP/IP is disabled, Internet Services will not be available until
TCP/IP is enabled from the device’s control panel. If you change the IP address, you must
reference the new address within you web browser to locate the device.
a. Check the [Enabled] checkbox to enable the TCP/IP protocol.
b. Physical Connection will display the physical network connection. This will display
“Ethernet”.
c. Select the on of the following method for obtaining a Dynamic IP address from the [IP
Address Resolution] drop-down list:
• DHCP (Dynamic Host Configuration Protocol)
• RARP (Reverse Address Resolution Protocol)
• BOOTP (Bootstrap Protocol)
• Static (fixed, User-defined), this is the default selection.
d. Enter a name which corresponds to the IP address of the device in the [Host Name] field.
e. If you select [Static], type the IP addresses that applies in [Machine IP Address], [Subnet
Mask], and [Gateway Address].
Note: If BOOTP or DHCP address resolution mode is selected, you cannot change the IP address,
Subnet Mask, or default gateway. If RARP address resolution mode is selected, you cannot change
the IP address. Select [Static] if you wish to disable dynamic addressing.
f. Enter details of an identifier of the IP site in which the device is connected in the [Domain
Name] field.
g. If DNS configuration is required, enter IP address for the [Primary DNS Server]. Enter an IP
address for [Alternate DNS Servers 1] and [Alternate DNS Servers 2].
Note: If DHCP or BOOTP is the IP Address Resolution setting, you cannot change the Domain
Name, Primary DNS Server, Alternate DNS Server 1, and Alternate DNS Server 2 settings.
90
Xerox ColorQube™ 9201/9202/9203
System Administrator Guide
Page 91

Network Installation
h. Check the [Enabled] checkbox to enable [Dynamic DNS Registration (DDNS)].
Note: If your DNS Server does not support dynamic updates there is no need to enable DDNS.
9. In the DHCP/DDNS area, check the [Enabled] checkbox for Release Registration ONLY if you
wish to release this device's IP address upon reboot. Default is unchecked.
10. In the Zero-Configuration Networking area:
a. Check the [Enabled] checkbox for Self Assigned Address, to support communicating with
other devices using 169.254/16 IPv4 addressing, over the same physical or logical link (such
as in ad hoc, or isolated (non- DHCP) networks). Refer to the IETF website for zeroconf details.
b. Check the [Enabled] checkbox for Multicast DNS to resolve host names to IPv4 addresses
without using a conventional DNS server.
11. Click on the [Apply] button to accept changes or [Undo] to return the settings to their previous
value.
12. Click on the [OK] button when you see the message “Properties have been successfully
modified”.
Note: Changing the device IP Address will impact other protocols: NetBIOS/IP, LPR/LPD, FTP,
SNMP and Raw TCP/IP Printing. These protocols will need to reference the new IP Address.
Disabling TCP/IP will impact other protocols: NetBIOS/IP, LPR/LPD, FTP, SNMP and Raw TCP/IP
Printing. This web user interface will be disabled until TCP/IP is re-enabled from the local user
interface.
Supporting LPR Printing
1. At your Workstation, open the web browser and enter the IP address of the device in the Address
bar, and press [Enter].
2. Click on the [Properties] tab.
3. If prompted, enter the Administrator User ID and Password. The default is [admin] and [1111].
4. Click on the [Login] button.
5. Click on the [Connectivity] link.
6. Click on the [Protocols] link.
7. Select [LPR/LPD] in the directory tree.
8. In the General area:
a. For Protocol, check the [Enabled] checkbox to enable LPR/LPD.
Note: Disabling LPR/LPD will affect clients printing to the device over TCP/IP using the LPR printing
port.
b. Physical Connection displays the physical network connection, this will always display
“Ethernet”.
c. In the Port Number, enter an LPR/LPD port number. The default is 515.
9. In the Advanced Settings area:
a. Check the [Enabled] checkbox to enable PDL Switching. PDL switching allows the device to
process print jobs which contain two or more printer languages, for example: PCL and
PostScript, or ASCII and PostScript.
Xerox ColorQube™ 9201/9202/9203
System Administrator Guide
91
Page 92

Network Installation
b. Check the [Enabled] checkbox to enable PDL banner page attributes override LPR control
file attributes for job name and owner. This feature allows you to replace the standard
information displayed on a banner page, and substitute the user name and job name taken
from the print job.
Note: Banner pages print if banners are set to On at the file server, even if banners are set to Off in
the device.
c. Select the required option from the [Place temporary hold on which jobs:] drop-down menu.
This feature allows you to set the device to hold certain jobs before printing, until the
complete job is received. This delay helps to ensure that the banner page information prints
correctly. Some banner sheet information is contained in the job's control file which may not
always be the first part of a print job the device receives. The following options are available:
• Only those with data file received 1st - The device holds the job if the job's data file is
received first. This ensures the device waits to receive the job's control file information so
that the banner sheet contains accurate information.
• All (consistent with older implementations) - This option puts all jobs on hold. All data
is received before a job begins to print. This setting can cause jobs to print slowly but will
result in accurate banner sheet information.
• None (Use printer's default banner sheet job name if data file 1st) - The device will
not wait to receive the job control information. This selection may cause banner sheet
information to print incorrectly.
10. Click on the [Apply] button to accept changes or [Undo] to return the settings to their previous
value.
11. Click on the [OK] button when you see the message “Properties have been successfully
modified”.
Configure SLP
Configure Service Location Protocol (SLP) (if needed to support CUPS, Mac OS, and NetWare).
SLP is used to announce and look up services on a local network. When SLP is enabled, the device
becomes a Service Agent (SA) and announces its services to User Agents (UA) via SLP.
1. At your Workstation, open the web browser and enter the IP address of the device in the Address
bar, and press [Enter].
2. Click on the [Properties] tab.
3. If prompted, enter the Administrator User ID and Password. The default is [admin] and [1111].
4. Click on the [Login] button.
5. Click on the [Connectivity] link.
6. Click on the [Protocols] link.
7. Select [SLP] in the directory tree.
8. In the General area:
a. For Protocol, check the [Enabled] checkbox to enable Service Location Protocol (SLP).
b. Enter an IP address for the [Directory Agent], if required. This will specify the address of a
single Directory Agent (DA) to be added to the list of Directory Agents in the device’s DA list.
92
Xerox ColorQube™ 9201/9202/9203
System Administrator Guide
Page 93

Network Installation
c. Enter the required name(s) for [Scope 1,2,3], this allows the System Administrator to set one
of the three manually configurable scope names. A scope is a searchable group or container
to which an agent may be associated. The default scope is called “DEFAULT”.
d. Select the Message type from the drop-down menu for [Multicast or Broadcast]. This setting
defines whether SLP will use multicast or broadcast in communications. Multicast packets are
routed between subnets as needed, but broadcast are not.
e. Enter a value for [Multicast Radius] (0-255), the default is 255. This allows the System
Administrator to reconfigure the Multicast Radius for SLP. This is similar to the Time To Live
(TTL) in the TCP/IP parameter, and defines how many routers the multicast packet may cross.
f. Enter a value for MTU to set the Maximum Transmission Unit (484 - 32768), with 1400 as
the default. This allows the System Administrator to set the maximum packet size for SLP.
g. Version will display the SLP version number supported by the device.
h. Port Number will display the socket (port) that all SLP communications will use. All devices
are required to listen on port 427 for UDP and TCP packets.
i. Character Set will display the character set in use. The default is US-ASCII.
9. Click on the [Apply] button to accept the changes or [Undo] to return the settings to their
previous values.
10. Click on the [OK] button when you see the message “Properties have been successfully
modified”.
Note: The settings are not applied until you restart the device.
11. Click on the [Status] tab, select [Description & Alerts] in the directory tree.
12. Scroll down and click the [Reboot Machine] button and click [OK] to reboot the device. The
network controller takes approximately 5 minutes to reboot and network connectivity will be
unavailable during this time
Configure Raw TCP/IP Printing
Note: TCP/IP must be enabled before Raw TCP/IP Printing is enabled.
Raw TCP/IP is a printing method used to open a TCP socket-level connection, over Port 9100, to stream
a print-ready file to the printer's input buffer, and then to close the connection after sensing an End Of
Job indicator in the Page Description Language, or after expiration of a preset timeout value. Port
9100 printing does not require a Line Printer Request (LPR) from the workstation, or the use of a Line
Printer Daemon (LPD) running on the printer. Raw TCP/IP printing is selected in Windows 2000 as the
Standard TCP/IP port.
1. At your Workstation, open the web browser and enter the IP address of the device in the Address
or Location field. Press [Enter].
2. Click on the [Properties] tab.
3. If prompted, enter the Administrator User ID and Password. The default is [admin] and [1111].
4. Click on the [Login] button.
5. Click on the [Connectivity] link.
6. Click on the [Protocols] link.
7. Select [Raw TCP/IP Printing] in the directory tree.
8. In the General area:
a. For Protocol, check the [Enabled] checkbox to enable Raw TCP/IP Printing.
Xerox ColorQube™ 9201/9202/9203
System Administrator Guide
93
Page 94

Network Installation
b. Physical Connection displays the physical network connection, this will always display
“Ethernet”.
9. Up to three ports may be enabled and configured, in the Port Information area:
a. For Port 1 Leave the [TCP Port Number] set to 9100. If two additional ports are available,
click [Default All] to see if they set to 9101 and 9102 respectively (emulating HP JetDirect EX
Plus 3).
b. Leave the [Bidirectional] checkboxes and [Maximum Connections per Port] settings at their
default values.
c. Set the [End of Job Timeout] to the number of seconds to wait before processing a job
without an End Of Job indicator. The range is from 1 to 65535, and the default is 300.
d. Leave the [PDL Switching] Enabled checkbox at its default value.
Note: Do not check the [Enabled] checkbox for PDL Switching, when Windows clients print using
port 9100. this prevents each print job from generating a banner page.
10. Click on the [Apply] button to accept the changes or [Undo] to return the settings to their
previous values, or [Default All] to enter printer defaults for all settings (recommended).
11. Click on the [OK] button when you see the message “Properties have been successfully
modified”.
Note: The settings are not applied until you restart the device.
12. Click on the [Status] tab, select [Description & Alerts] in the directory tree.
13. Scroll down and click the [Reboot Machine] button and click [OK] to reboot the device. The
network controller takes approximately 5 minutes to reboot and network connectivity will be
unavailable during this time
Create an IPP Printer (Internet Printing Protocol)
Information Checklist
Before starting the procedure, please ensure the following items are available or have been performed:
• Ensure TCP/IP and HTTP are configured on the device as per Enable TCP/IP and HTTP at the
Device on page 19, so that the web user interface (Internet Services) can be accessed.
• Ensure that the DNS settings are configured.
Enable Port 9100 as additional support for HTTP (IPP) printing
1. At your Workstation, open the web browser and enter the IP address of the device in the Address
bar, and press [Enter].
2. Click on the [Properties] tab.
3. If prompted, enter the Administrator User ID and Password. The default is [admin] and [1111].
4. Click on the [Login] button.
5. Click on the [Connectivity] link.
6. Click on the [Protocols] link.
7. Select [Raw TCP/IP Printing] in the directory tree.
8. In the General area, ensure the [Enabled] checkbox for Protocol is checked to enable Raw TCP/IP
Printing.
94
Xerox ColorQube™ 9201/9202/9203
System Administrator Guide
Page 95

Network Installation
9. In the Port Information area:
a. Leave the [TCP Port Number] set to 9100 for Port 1. If two additional ports are available,
click [Default All] to see if they set to 9101 and 9102 respectively (emulating HP JetDirect EX
Plus 3).
b. Leave the [Bidirectional] and [Maximum Connections] settings at their default values.
c. Set the [End of Job Timeout] to the number of seconds to wait before processing a job
without an End Of Job indicator.
d. Leave the [PDL Switching] Enabled box at its default value.
10. Click on the [Apply] button to accept the changes.
11. Click on the [OK] button when you see the message “Properties have been successfully
modified”.
Note: The settings are not applied until you restart the device.
12. Click on the [Status] tab, select [Description & Alerts] in the directory tree.
13. Click the [Reboot Machine] button and click [OK] to reboot the device. The network controller
takes approximately 5 minutes to reboot and network connectivity will be unavailable during this
time
14. A Configuration Report should have printed (by default) when the device rebooted. If the
Configuration Report did not print, go to the device:
a. Press the <Machine Status> button.
b. Touch the [Machine Information] tab.
c. Touch [Information Pages].
d. Touch [Configuration Report].
e. Touch [Print], then touch [Close].
15. Review the settings for Raw TCP/IP Printing under the heading TCP/IP Settings. These settings
should read as follows:
a. Raw TCP/IP Printing Enabled: Enabled
b. Raw TCP/IP Port Number: 9100
Create an IPP Printer at your Workstation
Verify the correct software is loaded
1. At your Workstation, right-click the [My Network Places] icon.
2. Select [Properties].
3. Right-click on the [Local Area Connection] icon.
4. Click [Properties].
5. Verify that the [Internet Protocol (TCP/IP)] protocol has been loaded.
Install the Print Driver
1. From the [Start] menu, select [Settings] and then [Printers] (Windows 2000) or [Printers and
Faxes] (Windows XP). The Vista path is Start\Control Panel\Printer(s).
2. Double-click the [Add Printer] icon and click [Next].
V
erify that [Network Printer] is selected and click [Next].
3.
Xerox ColorQube™ 9201/9202/9203
System Administrator Guide
95
Page 96

Network Installation
4. The [Locate Your Printer] (Windows 2000) or [Specify a Printer] (Windows XP) screen will
appear.
5. To create an IPP printer select [Connect to a printer on the Internet or on your intranet].
6. Type HTTP:// followed by the printer's fully qualified Domain name or IP address in the URL
field. The Printer Name can be either the Host Name or the SMB Host Name as shown on the
device Configuration Report, depending on the name resolution used by your network (WINS or
DNS).
7. Click [Next].
8. Select [Have Disk] and browse to the location of the print driver (.INF).
9. Click [OK] to install the print driver.
10. Select the Printer Model and Click [Next].
11. Select [Yes] if you wish to make this the default printer.
12. Select [Yes] to print a Test Page. Verify that it prints at the device.
13. Click [Finish].
Internet Services
Once installed, an IPP printer will provide a link directly to the Internet Services web pages.
To Access Internet Services
1. From the [Start] menu select [Printers and Faxes].
2. Click on the device printer icon and a Get More Info link will appear in the left hand pane of the
window.
3. Click the [Get More Info] link to go to straight to the device home page.
You have completed the installation of an IPP port and print drivers.
Apple Talk
Information Checklist
Before starting the procedure, please ensure the following items are available or have been performed:
• An existing operational AppleTalk network with Macintosh workstation computers equipped with
Ethernet network interface cards.
• The AppleTalk Name you wish to assign to your printer.
• The AppleTalk Zone (if used) in which your printer will reside.
• Ethernet Cable.
• The Internet Services Print and Fax Drivers CD (delivered with your device). Review any README
file contained with the print drivers.
Enabling AppleTalk on the device
1. At your Workstation, open the web browser and enter the IP address of the device in the Address
bar. Press [Enter].
2. Click on the [Properties] tab.
96
Xerox ColorQube™ 9201/9202/9203
System Administrator Guide
Page 97

Network Installation
3. If prompted, enter the Administrator User ID and Password. The default is [admin] and [1111].
4. Click on the [Login] button.
5. Click on the [Connectivity] link.
6. Click on the [Protocols] link.
7. Select [AppleTalk] in the directory tree.
8. In the General area:
a. For Protocol, check the [Enabled] checkbox to enable the AppleTalk.
b. Type a name for the device in [Printer Name]. The default name is based on the device’s
Ethernet MAC address.
c. Enter details in the [Zone Name] filed. An AppleTalk zone is a logical group of nodes or
networks. Zones are assigned according to a logical scheme such as organizational
departments or physical locations.
Note: The default local zone is identified as “*”. This should only be changed if you have defined
zones on your network.
d. Physical Connection displays physical network connection. This will display “Ethernet”.
e. Printer Type displays the current assigned printer type. This will display “LaserWriter”.
9. Click on the [Apply] button to accept the changes or [Undo] to return the settings to their
previous values.
10. Click on the [OK] button when you see the message “Properties have been successfully
modified”.
Note: The settings are not applied until you reboot the device.
11. Click on the [Status] tab, select [Description & Alerts] in the directory tree.
12. Click the [Reboot Machine] button and click [OK] to reboot the machine. The network controller
takes approximately 5 minutes to reboot and network connectivity will be unavailable during this
time.
Install the Print Driver
Refer to the Print and Fax Drivers Guide for Macintosh on the Internet Services Print and Fax Drivers CD
for detailed instructions.
1. View the Configuration Report and note the Name given to the device under AppleTalk Settings.
At the Macintosh Workstation
2. Load the Internet Services Print and Fax Drivers CD-ROM into your CD drive.
3. Open the CD and locate the [Drivers] folder.
4. Locate and open the [Mac] folder.
Instructions for Version 10.x (OS X)
1. Double-click to open the folder containing the drivers for version 10.x.
2. Double-click to open the [machine model.dmg].
3. Double-click to open the [machine model.pkg] file.
4.
n the Welcome screen displays, click [Continue].
Whe
5. Click [Continue], then [Agree] to accept the License Agreement.
Xerox ColorQube™ 9201/9202/9203
System Administrator Guide
97
Page 98

Network Installation
6. Select the required disk (if necessary) where you want to install the printer. Click [Continue].
7. Click [Install].
8. Click [Close], and restart the workstation.
9. When the workstation has restarted, double click the hard drive icon.
10. Double-click the [Applications] icon.
11. Double-click the [Utilities] folder.
12. Double-click [Print Center] icon.
13. Double-click [Add] to add a new printer.
14. Select AppleTalk as your network protocol.
15. Select the required AppleTalk zone.
16. Select the printer that you wish to set up.
17. Select the Printer Model (that is, choose the PPD for your printer).
18. Click [Add].
19. Print a document from an application to verify that the printer is installed correctly.
View the Macintosh Printer Utility on the Internet Services Print and Fax Drivers CD.
The device Internet Services is a suite of applications used for installing, maintaining and using the
Xerox devices. The device Internet Services Macintosh Printer Utility is a Internet Services application
that enables network administrators to rename and rezone Xerox systems that are configured for
AppleTalk connectivity. Locate the Internet Services Print and Fax Drivers CD-ROM delivered in the
Internet Services Network Services Pack with your device follow the instructions contained in the
Internet Services Print and Fax Drivers Guide for Macintosh.
Apple Macintosh (TCP/IP)
Information Checklist
Before starting the procedure, please ensure the following items are available or have been performed:
• An existing operational TCP/IP network with Macintosh workstation computers equipped with
Ethernet network interface cards.
• Macintosh Operating System of 10.x or higher.
• A live network drop and Ethernet Cable for the Macintosh workstation.
• The printing device should already be configured with a static IP address (preferred), Subnet
Mask, and Gateway Address, as well as with a Host Name.
• The Internet Services Print and Fax Drivers CD (delivered with your device). Review any README
file contained with the print drivers.
Enabling TCP/IP on the device
1. At your Workstation, open the web browser and enter the IP address of the device in the Address
bar, and press [Enter].
2. Click the [Properties] tab.
3. If prompted, enter the Administrator User ID and Password. The default is [admin] and [1111].
4. Click on the [Login] button.
98
Xerox ColorQube™ 9201/9202/9203
System Administrator Guide
Page 99

Network Installation
5. Click on the [Connectivity] link.
6. Click on the [Protocols] link.
7. Select [TCP/IP] in the directory tree.
8. Verify that the printing device has been configured with a static IP address (preferred), Subnet
Mask, Gateway Address, and Host Name.
9. Verify that the Domain Name for your network has been supplied, and that DNS is enabled and
configured to resolve Host Names to IP Addresses.
Note: Changing the device IP Address will impact other protocols: NetBIOS/IP, LPR/LPD, FTP,
SNMP and Raw TCP/IP Printing. These protocols will need to reference the new IP Address.
Disabling TCP/IP will impact other protocols: NetBIOS/IP, LPR/LPD, FTP, SNMP and Raw TCP/IP
Printing. This web user interface will be disabled until TCP/IP is reenabled from the local user
interface.
10. If any of the above items are incorrectly set, reset them and click on the [Apply] button.
11. Click on the [OK] button when you see the message “Properties have been successfully
modified”.
12. Select [LPR/LPD] in the directory tree and verify that the Protocol is Enabled, and the Port
Number is set to 515.
Note: The settings are not applied until you restart the device.
13. Click on the [Status] tab, select [Description & Alerts] in the directory tree.
14. Click the [Reboot Machine] button and click [OK] to reboot the device. The network controller
takes approximately 5 minutes to reboot and network connectivity will be unavailable during this
time.
15. A Configuration Report should have printed by default when the device rebooted. Look at the
report to verify TCP/IP settings. If the Configuration Report did not print, go to the device:
a. Press the <Machine Status> button.
b. Touch the [Machine Information] tab.
c. Touch [Information Pages].
d. Touch [Configuration Report].
e. Touch [Print], then touch [Close].
The Configuration Report will print, check under the Connectivity Protocol heading for TCP/IP
settings.
Select the PPD - PostScript® Printer Definition
1. Insert the Internet Services Print and Fax Drivers CD into your CD drive.
2. Double-click the printer icon on your desktop.
3. Select [Printing].
4. Select [Change Setup].
5. Select [Change].
6. Locate the [Drivers] folder on the CD.
7. Select the appropriate PPD for OS 10.x.
8. Select the options according to those installed on your device.
9. Click [OK].
Xerox ColorQube™ 9201/9202/9203
System Administrator Guide
99
Page 100

Network Installation
10. Print a document from an application to verify that the printer is installed correctly.
Set up LPR (Line Printer Remote) Printing in Mac OSX
1. Load the Internet Services Print and Fax Drivers CD-ROM into your CD drive.
2. Open the CD and select the required language.
3. Double-click to open the [Drivers] folder.
4. Double-click to open the [Mac] folder.
Note: There may be more than one Print and Fax Drivers CD. If the Mac folder does not appear,
check for another Print and Fax Drivers CD.
5. Double-click to open the folder containing the drivers for version 10.x.
6. Double-click to open the [machine model.dmg] file.
7. Double-click to open the [machine model.pkg] file.
8. The Welcome to the Installer dialog box appears. Click [Continue]
9. Click [Continue] and then [Agree] to accept the License Agreement.
10. Select the required disk (if necessary) where you want to install the printer. Click [Continue].
11. Click [Install].
12. Click [Close].
13. Restart your computer.
14. When your computer has restarted, open Print Centre. To do this:
15. Double-click the hard drive icon on the desktop.
16. Double-click to open [Applications]
17. Double-click to open [Utilities].
18. Double-click to open [Print Center].
19. Double-click [Add] to add a new printer.
20. Select [IP Printing] from the menu.
21. Enter the IP address of the printer.
22. Select [Xerox] from the printer model list.
23. Select Xerox ColorQube 9201/9202/9203 (according to your model) from the model name list.
24. Click [Add].
25. Print a document from an application to verify that the printer is installed correctly.
View the Macintosh Printer Utility on the Internet Services Print and Fax Drivers CD
The device Internet Services is a suite of applications used for installing, maintaining and using the
Xerox devices. the device Internet Services Macintosh Printer Utility is a Internet Services application
that enables network administrators to rename and rezone Xerox systems that are configured for
AppleTalk connectivity. Locate the Internet Services Print and Fax Drivers CD-ROM delivered in the
Internet Services Network Services Pack with your device and follow the instructions contained in the
Internet Services Print and Fax Drivers Guide for Macintosh.
100
Xerox ColorQube™ 9201/9202/9203
System Administrator Guide
 Loading...