

Page 1

XEROX
WorkCentre Pro 665, 685, 765, 785
System Administrator’s Guide
Page 2

Xerox Limited,
Global knowledge and Language Services,
Enterprise Centre,
Bessemer Road,
WELWYN GARDEN CITY,
AL7 1HL
United Kingdom
©1999 by Xerox Corporation. All rights reserved.
Xerox®, Xerox Limited® and all the products mentioned in this
publication are trademarks of Xerox Corporation and Xerox Limited.
Products and trademarks of other companies are also acknowledged.
Copyright protection claimed includes all forms and matters of
copyrightable material and information now allowed by statutory or
judicial law or hereinafter granted, including without limitation,
material generated from the software programs which are displayed
on the screen such as icons, screen display looks, etc.
Changes are periodically made to the document. Revisions, changes,
any technical inaccuracies, and typographical errors will be corrected
in any subsequent editions
Page 3

Table of Contents
Chapter 1 Introduction............................................................................1-1
Finding Information in the System Administrator’s Guide (SAG)................1-1
Information provided by the User’s Guide..................................................1-3
Document Conventions..............................................................................1-5
Notes, Cautions, and Warnings.......................... ..... .... ..... ..........................1-6
Chapter 2 Programming the Machine....................................................2-1
Using the Menu Mode...............................................................................2-1
Keys used in Menu Mode Operation..................................................2-2
Menu Flow Map .................................................................................2-4
Character Entries......................... .... ..... ..... .................................................2-7
Keys used to Enter Characters...........................................................2-7
Character Code Table........................................................................2-8
Entering Characters............................................................................2-9
Correcting Characters ........................................................................2-9
Deleting or Inserting Characters...............................................2-10
Direct Access Function Keys....................................................................2-11
Setting Up the Phonebook........................................................................2-13
Planning the Phonebook .......................................... ..... .... ..... ..........2-13
Pre-setting Speed Dial Numbers......................................................2-14
Modifying or Deleting Speed Dial Numbers......................................2-21
Pre-setting One Touch Numbers......................................................2-22
WorkCentre Pro 665/685/765/785 i
Page 4

Modifying or Deleting One Touch Dial Numbers..............................2-28
Pre-setting Group Numbers ............................................................2-29
Programming Group Send .................................................. ..... ........2-31
Deleting or Modifying a Group Number....................................2-32
Filling out the One Touch Label................................................2-33
Setting the Department Codes........................................... .... ..... .............2-34
To setup Department Codes............................................... ..... .... ....2-34
Changing the Department Code Settings.........................................2-38
Setting the Machine Default Settings.......................................................2-40
Error Correct - ECM Default Setting.................................................2-40
Long Original Setting........................................................................2-41
Bypass Tray Paper Size Setting...............................................................2-42
Redial Count and Interval Setting*...................................................2-43
Receive Interval................................................................................2-45
Resolution and Contrast Setting.......................................................2-46
Power Saver Setting.........................................................................2-48
Print Density.....................................................................................2-50
Refuse Junk Mail Setting..................................................................2-51
Ringer Volume Setting .....................................................................2-52
Alarm Volume Setting.......................................................................2-53
Key Touch Volume Setting...............................................................2-54
Monitor Volume Setting....................................................................2-55
Send After Scan Default Setting.......................................................2-56
Remote Service Setting................................ .... ..... ..... ......................2-57
Remote Access............................... .........................................2-57
Download ......................... .... ............................................................2-58
RDC Password.................................................................................2-59
Supplies Order .................................................................................2-60
Separator Page Default Setting........................................................2-61
Line Monitor Default Setting................................................ ..... .... ....2-63
ii WorkCentre Pro 665/685/765/785
Page 5

Chapter 3 Receiving Documents ............................................................3-1
Basic Receive.............................................................................................3-2
Setting the Answer Mode (Line 1)......................................................3-2
Setting the Answer Mode (Line 2)......................................................3-3
Auto Receive......................................................................................3-5
Manual Receive.......................................... ........................................3-5
Advanced Receive......................................................................................3-6
Collate Fax .........................................................................................3-6
Reduce Incoming Fax Setting ............................................................3-7
Receive to Memory.............................................................................3-8
Secure Receive..................................................................................3-9
Automatic Secure Receive Setup...............................................3-9
Manual Secure Receive.......................... .... ..... ........................3-13
Printing the Stored Document in Secure Receive Mode..........3-14
Discard Extra Setting* ................................................... .... ..... ..... .....3-15
Chapter 4 Dialing Methods......................................................................4-1
Dialing Methods..........................................................................................4-1
Manual Dial (On-hook and Off-hook Dialing)......................................4-2
Alpha Dialing ......................................................................................4-4
Speed Dialing.....................................................................................4-6
One Touch Dialing...................................... ........................................4-7
Keypad Dialing ...................................................................................4-8
Automatic Redialing*..........................................................................4-9
Manual Redial Last Number (Off-hook)............................. ..... ............4-9
Manual Redial Last 5 Numbers (On-hook)*......................................4-10
Chain Dialing....................................................................................4-11
Charge Card Tran smission s...................................... ...............4-12
* Not available in all markets.
WorkCentre Pro 665/685/765/785 iii
Page 6

Manual Group Dialing.......................................................................4-13
Chapter 5 Transmitting Documents .......................................................5 -1
Memory Send or Direct Send Default Mode...............................................5-3
Memory Send .............................. ..... ..... .... ................................................5-4
Direct Send ................................................................................................5-6
Direct Send with Memory Send Selected...........................................5-7
Manual Send..............................................................................................5-8
Delayed Start..............................................................................................5-8
Priority Transmission.................................. ................................................5-9
Line Selection............................... ..... .......................................................5-10
Charge Codes..........................................................................................5-11
Cover Sheet .............................................................................................5-12
Cover Sheet Setup...........................................................................5-13
Sending a Document with a Cover Sheet ........................................5-14
Batching ...................................................................................................5-16
Confirming a Transmission.......................................................................5-17
One Time Fax Options........................... .... ..... .........................................5-18
Number of Pages .............................................................................5-19
Listen to Dial.....................................................................................5-20
Send then Poll..................................................................................5-21
ECM Disable ....................................................................................5-23
Secure Send Transmission .............................................................5-24
Send After Scan Enable...................................................................5-25
Advanced Transmissions.........................................................................5-27
Using an Account Code....................................................................5-27
Account Code Default Setting..........................................................5-28
Transmitting Using a Department Code...........................................5-29
Resend Stored Fax Default Setting..................................................5-30
iv WorkCentre Pro 665/685/765/785
Page 7

Resending a Stored Fax...........................................................5-31
Secure Send Setting.........................................................................5-33
ITU-T Relay Communications ..................................................................5-34
ITU-T Relay Transmission................................................................5-34
Presetting ITU-T Relay Box..............................................................5-37
Deleting a Relay Box........................................................................5-41
Chapter 6 Cancelling Jobs ......................................................................6-1
Stop Key.....................................................................................................6-1
Job Status Key ...........................................................................................6-1
Cancel Job Key ..........................................................................................6-2
Direct Send Jobs........................................................................................6-5
Chapter 7 Polling......................................................................................7-1
Polling Communications.............................................................................7-1
Storing a Document to be Polled........................................................7-2
Storing a Document to be Polled in a Poll-once Box..................7-3
Storing a Document to be Polled in a Multi-poll Box ..................7-5
Cancelling Documents Stored in a Polling Box..........................7-6
Modifying Documents Stored in a Polling Box............................7-6
Polling a Remote Document (Poll-once or Multi-poll Box)..................7-8
Group Polling..................................... .................................................7-9
Continuous Polling*..........................................................................7-11
Deleting Continuous Poll Jobs.................................................7-13
Chapter 8 Mailbox Communications ......................................................8-1
Mailbox ITU-T Communications.................................................................8-1
Local Mailbox (ITU-T).........................................................................8-2
* Not available in all markets.
WorkCentre Pro 665/685/765/785 v
Page 8

Creating an ITU-T Mailbox.........................................................8-2
Deleting an ITU-T Mailbox .........................................................8-4
Storing a Document in a Local ITU-T Mailbox ...........................8-5
Printing a Document Stored in a Local ITU-T Mailbox...............8-7
Deleting a Document Stored in a Local ITU-T Mailbox .............8-9
Remote ITU-T Mailbox................................. .... ..... ...........................8-10
Sending to a Remote ITU-T Mailbox........................................8-10
Polling a Remote ITU-T Mailbox..............................................8-13
Attaching an ITU-T Sub Address......................................................8-15
Transmitting a Document to an ITU-T Sub Address ................8-16
Polling a Document Using a Sub Address...............................8-17
Chapter 9 Reports....................................................................................9-1
Setting Up Reports and Lists......................................................................9-1
Activity Report Setup..........................................................................9-2
Confirmation Report Setup.................................................................9-5
Confirmation Report...................................................................9-6
Confirmation Report - Memory Send .........................................9-7
Group Send Report.................... ..... ..... .... ..................................9-9
Group Poll Report ........................... ..... ....................................9-11
Relay Originator Report ...........................................................9-12
Relay Station Report................................................................9-14
Relay Destination Report.........................................................9-16
Confirmation Report Override..........................................................9-18
Reception Report Setup...................................................................9-19
Printing Reports and Lists........................................................................9-21
Activity Report..................................................................................9-21
ITU-T Mailbox Report.......................................................................9-22
vi WorkCentre Pro 665/685/765/785
Page 9

Pending Jobs Report........................................................................9-23
Department Code Report.................................................................9-24
Power Failure List.............................................................................9-25
Menu Map.........................................................................................9-26
Settings Report.................................................................................9-27
Chapter 10 Copying Documents ..........................................................10-1
Making Copies..........................................................................................10-1
Chapter 11 Scan Functionality..............................................................11-1
Chapter 12 PCL Printing Functionality.................................................12-1
Chapter 13 Network Functionality ........................................................13-1
Chapter 14 Internet FAX Functionality.................................................14-1
Chapter 15 Using the ControlCentre ....................................................15-1
Setting up the WorkCentre.......................................................................15-2
Setting the Machine Defaults............................................................15-2
Setting up the Telephone Lines........................................................15-3
Using the Power Save features........................................................15-4
Setting the PC’s Date and Time on the WorkCentre........................15-5
Changing Your ControlCentre Password .........................................15-5
Setting the Fax Send Options...................................................................15-6
Setting the Cover Sheet and Send Header Options.........................15-6
Choosing How to Send Faxes..........................................................15-6
Sending Faxes Using Security.........................................................15-7
Setting the Redial Options............................... .................................15-7
Faxing Long Originals.......................................................................15-8
* Not available in all markets.
WorkCentre Pro 665/685/765/785 vii
Page 10

Setting the Fax Receive Options..............................................................15-9
Setting the Receive Footer Option...................................................15-9
Receiving Faxes when the Printer is Unavailable............................15-9
Receiving Secure Faxes ......................... .........................................15-9
Setting the Receive Interval...........................................................15-10
Receiving Faxes f rom the Fax Numbers Assigned to You r Phonebook Only
15-11
Collating and Reducing Incoming Faxes........................................15-11
Receiving Oversized Faxes................................... ..... .... ................15-11
Receiving Faxes to Your PC..........................................................15-12
Setting up a Phonebook.........................................................................15-12
Assigning an Individual Fax Number to a One Touch Key .............15-12
Assigning a Speed Dial or Group Dial Number to a One Touch Key15-14
Editing a One Touch Key Entry......................................................15-14
Deleting One Touch Key Entries....................................................15-15
Presetting a Speed Dial Number....................................................15-15
Editing a Speed Dial Number.........................................................15-16
Deleting Speed Dial Numbers........................................................15-17
Presetting a Group Dial Number....................................................15-17
Editing a Group Dial Number .........................................................15-18
Deleting Group Dial Numbers ........................................................15-18
Saving a Phonebook to Your PC....................................................15-19
Opening a Phonebook File.............................................................15-19
Creating Mailboxes.................................................................................15-20
Creating a Mailbox .........................................................................15-20
Editing a Mailbox............................................................................15-21
Deleting a Mailbox..........................................................................15-22
Using Department Codes.......................................................................15-22
Setting up Department Codes........................................................15-22
Changing a Department Code........................................................15-23
viii WorkCentre Pro 665/685/765/785
Page 11

Deleting a Department Code..........................................................15-23
Printing Reports........................... .... .......................................................15-24
Activity Report Setup......................................................................15-24
Confirmation Reports Setup...........................................................15-24
Reception Reports Setup ...............................................................15-25
Printing the Settings Report............................................................15-25
Saving the WorkCentre Settings............................................................15-26
Saving WorkCentre Settings to a File.............................................15-26
Opening a Saved WorkCentre Settings File...................................15-26
Creating a New WorkCentre Settings File......................................15-26
Enabling Xerox personnel to perform remote tests................................15-27
Setting up automatic supply ordering.....................................................15-27
Firmware Download................................................................................15-28
Chapter 16 Troubleshooting..................................................................16-1
Self Test ...................................................................................................16-1
Calling for Service ....................................................................................16-3
Error Messages and Codes......................................................................16-3
Error Codes..............................................................................................16-6
Device Error Codes..................................................................................16-8
Paper Jam................................................................................................16-9
Document Jam .......................................................................................16-15
Status Code Table..........................................................................16-18
Transmission Problems..........................................................................16-19
Reception Problems...............................................................................16-20
Image Quality ................................................ .........................................16-21
Problems with envelopes........................................................................16-21
Communications failure..........................................................................16-21
Appendix A Ordering Supplies ..............................................................A-1
* Not available in all markets.
WorkCentre Pro 665/685/765/785 ix
Page 12

Ordering Supplies...................................................................................... A-1
Ordering Supplies Automatically................................................. ..... ......... A-2
Setting-up Automatic Supplies Ordering........................................... A-2
Setting up the destination.......................................................... A-2
Entering the part details............................................................ A-4
Entering ordering details........................................................... A-6
Printing the order form .............................................................. A-8
Appendix B Maintaining the Product ....................................................B-1
Replacing the Paper.......................................................................... B-1
Replacing the Toner Cartridge and Fuser Cleaner........................... B-4
Replacing the Drum Unit................................................................. B-15
Cleaning the Machine.............................................................................. B-20
Cleaning the Cabinet and Ozone Filter........................................... B-20
Cleaning the Document Scanner.................................................... B-21
Cleaning the Developer Assembly and the Surrounding Parts....... B-23
Cleaning the Charger Wire and the Laser Beam Window ...... B-31
Cleaning the Components as Needed.................................... B-38
Installing the maintenance kit.................................................................. B-46
Appendix C Product Data Sheet............................................................ C-1
Appendix D Safety Certification and Environmental Compliance ...... D-1
Laser Safety Information...................................................................D-3
Third Party Certification.....................................................................D-4
Radio Frequency Emissions USA.....................................................D-4
Unique European Certification ..................................................................D-5
Approvals and Certification ...............................................................D-5
UK Electricity at Work Regulation ..................................................... D-6
x WorkCentre Pro 665/685/765/785
Page 13

Environmental Compliance...................................... ..................................D-9
ENERGY STAR® ..............................................................................D-9
Environmental ChoiceM ................................................ .... ..... ...........D-9
SWISS ENERGY 2000......................................................................D-9
Telecommunications Requirements........................................................D-10
European Fax Approvals and Certification......................................D-10
FCC Regulations.............................................................................D-11
Send Header Requirements.................................................... D-11
Data Coupler Information........................................................ D-11
Canadian Certification................................................... .... ..... .........D-13
* Not available in all markets.
WorkCentre Pro 665/685/765/785 xi
Page 14

xii WorkCentre Pro 665/685/765/785
Page 15

Introduction
1 Introduction
Thank you for purchasing the Xerox WorkCentre Pro. The
WorkCentre is designed for ease of use, but to use your machine to
its fullest potential, take some time to read the Documentation.
You will be ready to send and receive faxes and make copies with
your machine as soon as you have read the User Guide. You can
then refer to topics in this System Administrator’s Guide as needed.
Finding Information in the System Administrator’s Guide (SAG)
The System Administrator’s Guide contains the following sections:
Table of Contents
Use the Table of Contents to find topics easily.
Introduction - Chapter 1
Describes the information in this User’s Guide and System
Administrator’s Guide.
Programming the Machine - Chapter 2
Describes Menu Mode operation and the steps required to enter
information when programming the machine. Instructions for storing
frequently dialed numbers are also provided.
Receiving Documents - Chapter 3
Describes the Receive functions and instructs how to perform each
function.
Dialing Methods - Chapter 4
Describes the Dialing methods and instructs how to use each
method.
Transmitting Document s - Chapter 5
Describes the Transmit functions and instructs how to perform each
function.
Cancelling Jobs - Chapter 6
Provides the instructions for cancelling the various types of jobs.
WorkCentre Pro 665/685/765/785 1-1
Page 16

Introduction
Polling - Chapter 7
Describes the Polling functions and instructs how to perform each
function.
Mailbox Communications - Chapter 8
Describes both the Xerox Mailbox system and the standard ITU-T
Mailbox system and instructs how to use the mailbox functions for
each system.
Reports - Chapter 9
Describes the reports and lists and instructs how to setup or print
each report.
Copying Documents - Chapter 10
Describes the Copy functions and instructs how to perform each
function.
Scan Functionality - Chapter 11
Describes the TWAIN settings.
PCL Printing Functionality - Chapter 12
This option will be made available soon.
Network Functionality - Chapter 13
This option will be made available soon.
Internet FAX Functionality - Chapter 14
This option will be made available soon.
Control Centre and Web Control Centre - Chapter 15
Describes how to use Control Centre and Web Control Centre
software to set up the WorkCentre
Troubleshooting - Chapter 16
Guides the user through problem solving and provides a list of error
codes, messages, and recommended corrective actions.
Ordering Supplies - Appendix A
Provides contact addresses and telephone numbers for ordering
consumable supplies.
1-2 WorkCentre Pro 665/685/765/785
Page 17

Maintaining the Product - Appendix B
Provides procedures to clean and maintain the machine. Includes
detailed procedures for replacing the consumables.
Product Data Sheet - Appendix C
Environmental Specifications - Appendix D
Provides the safety, data coupler, and Canadian certification
information.
Index
Refer to the Index to locate specific information.
Information provided by the User’s Guide
In addition, the User’s Guide contains the following sections:
Table of Contents
Use the Table of Contents to find topics easily.
Introduction - Chapter 1
Introduction
Describes the information in this User’s Guide and System
Administrator’s Guide.
Machine Requirements - Chapter 2
Describes the system and space requirements.
Machine Overview - Chapter 3
Describes the system and hardware features of the machine and
provides an overview of how the machine operates. Each key on the
Control Panel is described.
Getting Started - Chapter 4
Includes the procedures for setting up the basic machine information
such as date, time, language, machine ID, send header and receive
footer. Simple instructions to send, receive, print, and copy are also
provided.
WorkCentre Pro 665/685/765/785 1-3
Page 18

Introduction
Basic Troubleshooting - Chapter 5
Guides the user through problem solving, and recommended
corrective actions.
Environment Specifications - A
Provides the safety, data coupler, and Canadian certification
information.
Index
Refer to the Index to locate specific information.
1-4 WorkCentre Pro 665/685/765/785
Page 19
Document Conventions
A document convention is simply a way of presenting information.
This section explains the conventions used in the WorkCentre Pro
User’s Guide.
Many procedures require you to press a key to perform a function;
these keys appear in bo ldface type.
For example:
When you use the Menu Mode, you may have to press a series of
keys before arriving at the desired menu. The resulting screen
message for each step appears next to the series of keys pressed.
For example:
appear as follows:
To enable the send header:
1. Press:
Menu
Introduction
Press
The procedure to enable the Send Header would
Start
to send a fax.
Send header
1. Inside
2. Outside
3. Off
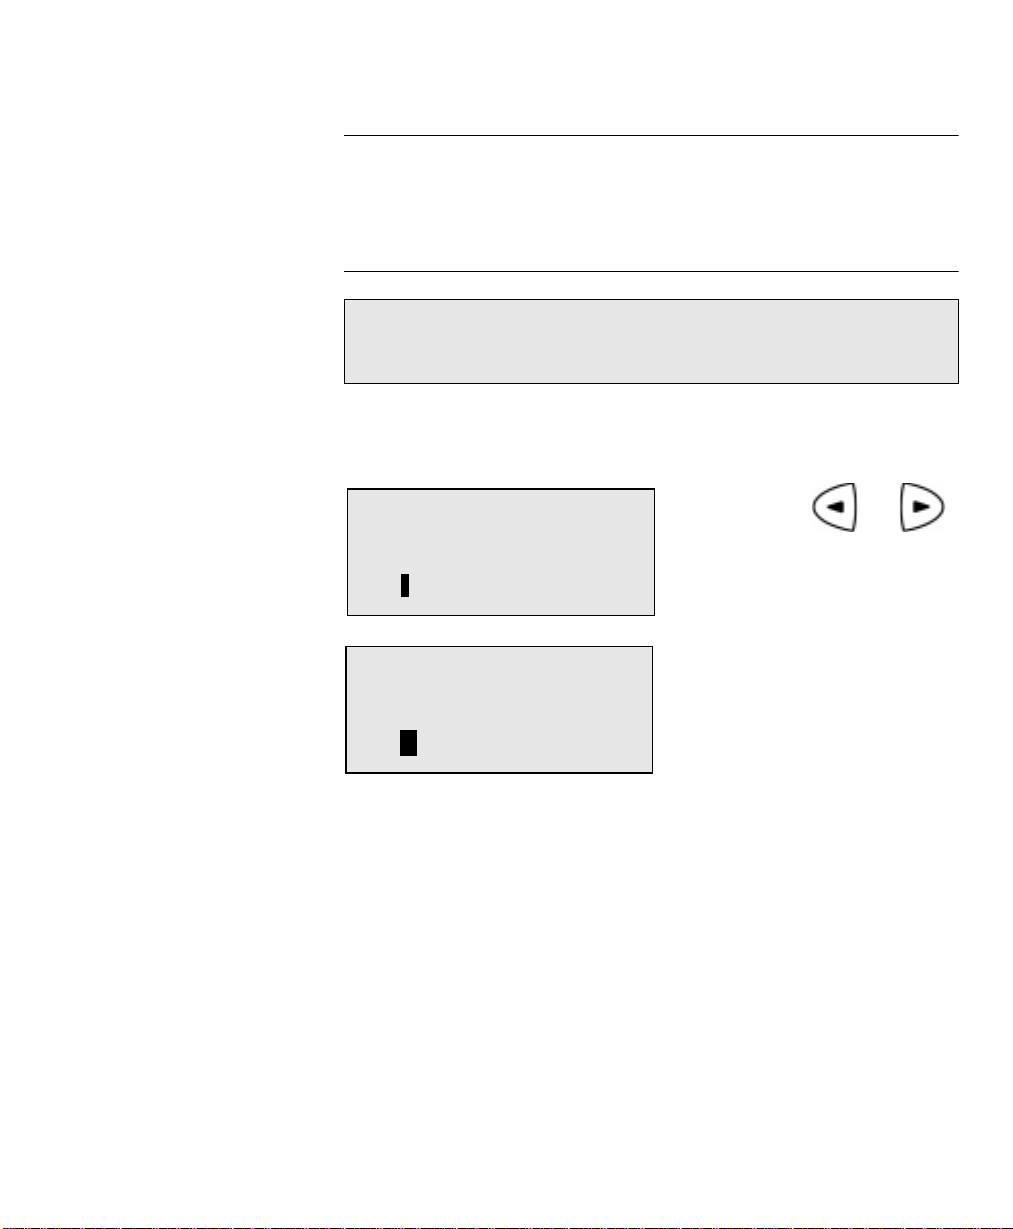
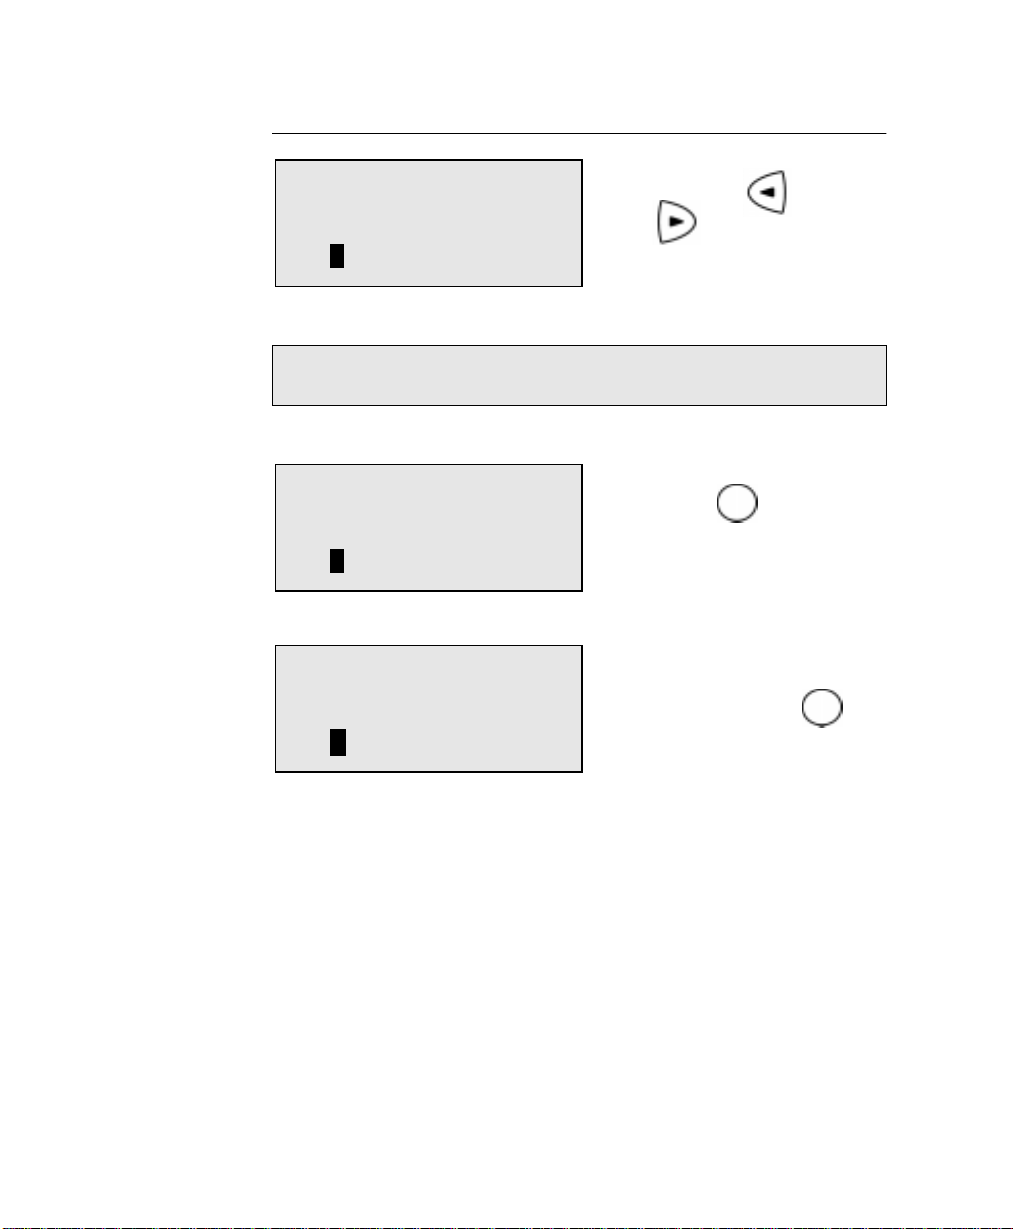
2. Select where you want the fax header to be printed:
To print the header in the document area, press .
To print the header above the document area, press .
To not print a header, press .
3. The menu selection screen redisplays. Press
the Standby Mode.
WorkCentre Pro 665/685/765/785 1-5
Stop
to return to
Page 20

Introduction
Notes, Cautions, and Warnings
This manual uses notes, cautions, and warnings to emphasize
information the reader needs. Notes contain information that
supplements the text. Notes are emphasized with italics. The
following is an example of a note:
Note: Notes are provided as additional information.
The following are examples of a caution and a warning:
CAUTION
Do not touch the green drum surface. Touching the
drum could reduce the print quality.
WARNING
Do not touch the heater unit inside the machine.
The heater unit is hot while the machine is
operating.
1-6 WorkCentre Pro 665/685/765/785
Page 21
2 Programming the Machine
This chapter contains detailed instructions for programming the
WorkCentre from the Control Panel. Step-by-step instructions are
provided for programming features using the Menu Mode, storing
frequently used numbers to automatic dialing keys, and setting
machine defaults.
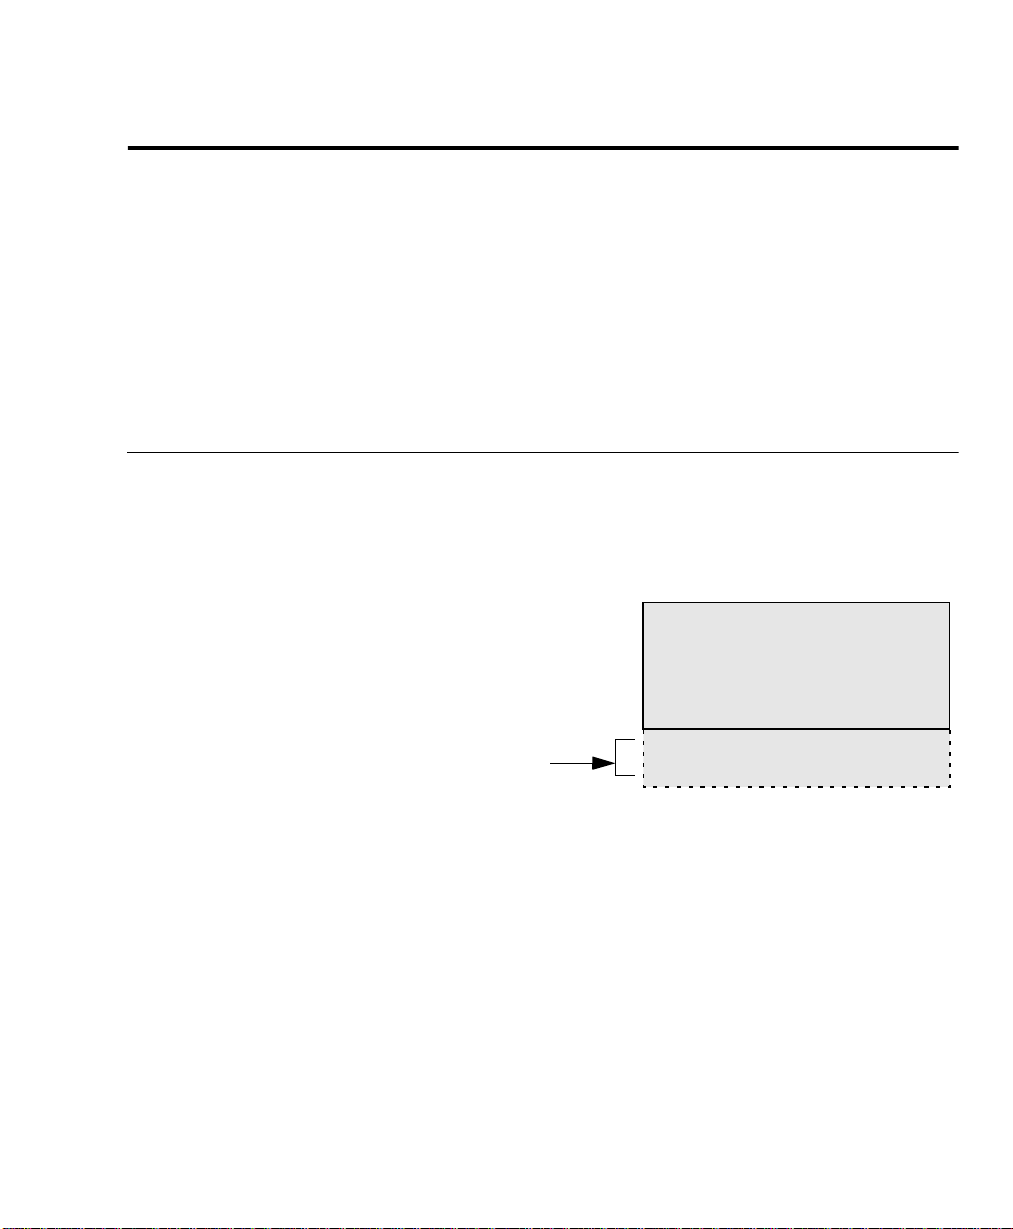
Using the Menu Mode
Various functions of the WorkCentre are available by selecting menu
items with the menu screen displayed on the Control Panel. The
menu uses a multi-layered structure, each layer containing multiple
features. Since 4 lines are displayed at a time, additional features are
displayed one line at a time as you scroll down the list.
Programming the Machine
Confidential
1. Print mailbox
2. Send to mailbox
3. Poll from mailbox
Additional features
WorkCentre Pro 665/685/765/785 2-1
4. Store to mailbox
5. Delete contents
Page 22

Programming the Machine
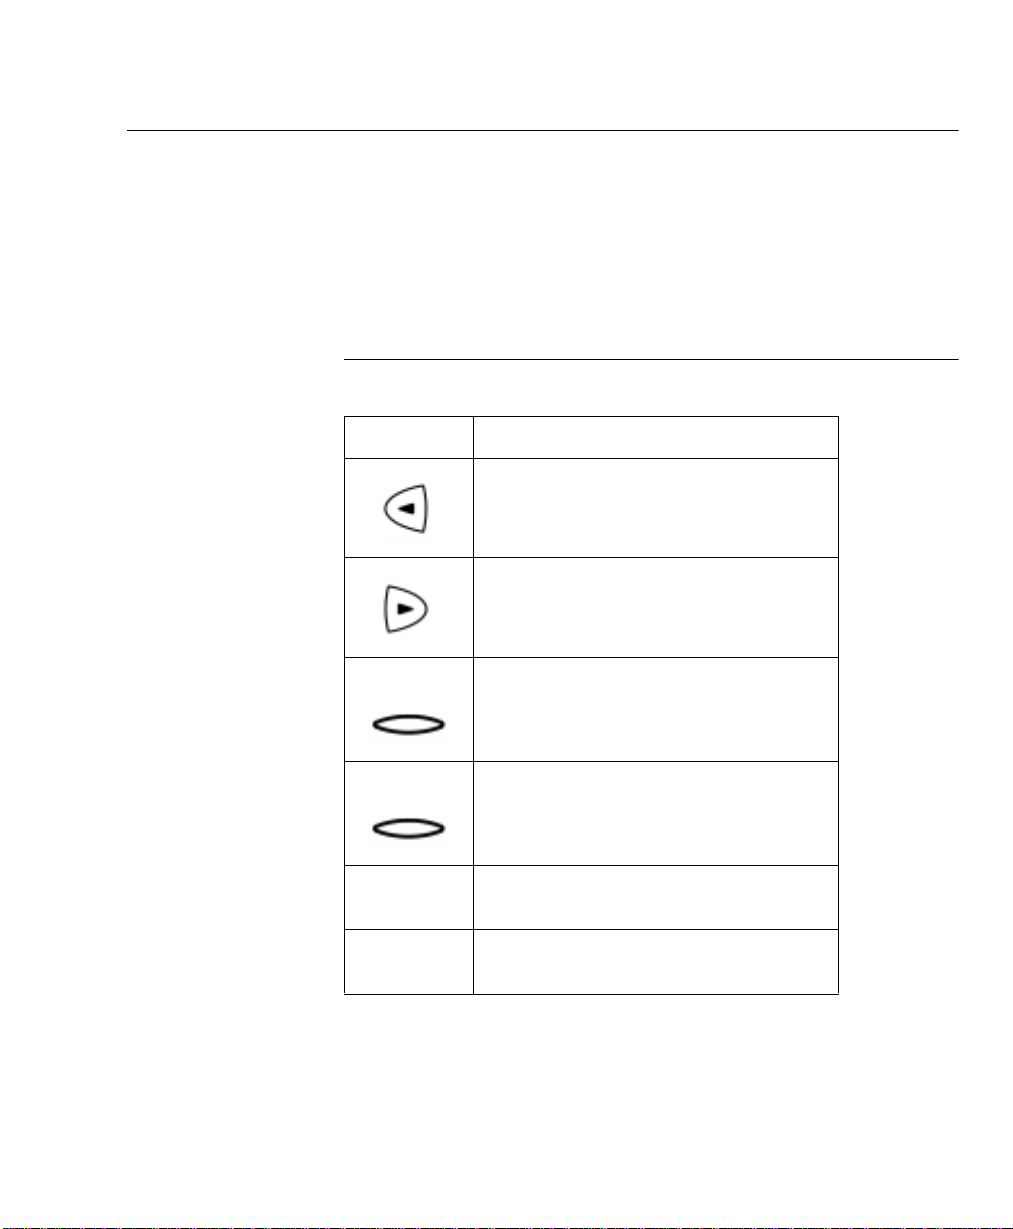
Keys used in Menu Mode Operation
The following table lists the keys commonly used when programming
the machine in Menu Mode.
Key Key Description
Menu
Enter
Exit
Press the
Standby Mode to the menu screen. When the
menu screen is already displayed, press this key
to scroll up through the menu selections.
When a menu screen is displayed, press the
Down
selections.
When the menu screen is displayed, press the
Left
When entering characters, use this key to move
the cursor to the left.
When entering characters, use the
key to move the cursor to the right.
When the currently highlighted menu has
sub-items, press the
screen of sub-items.
Press the
Menu
key to change the display from
arrow key to scroll down through the menu
arrow key to display the preceding menu.
Right
arrow
Enter
key to display the
Exit
key to exit the menu mode.
Numeric Keypad The Numeric Keypad is used to enter numeric
information.
Keyboard The Keyboard is used to enter alpha and special
character s information.
2-2 WorkCentre Pro 665/685/765/785
Page 23
Programming the Machine
Menu
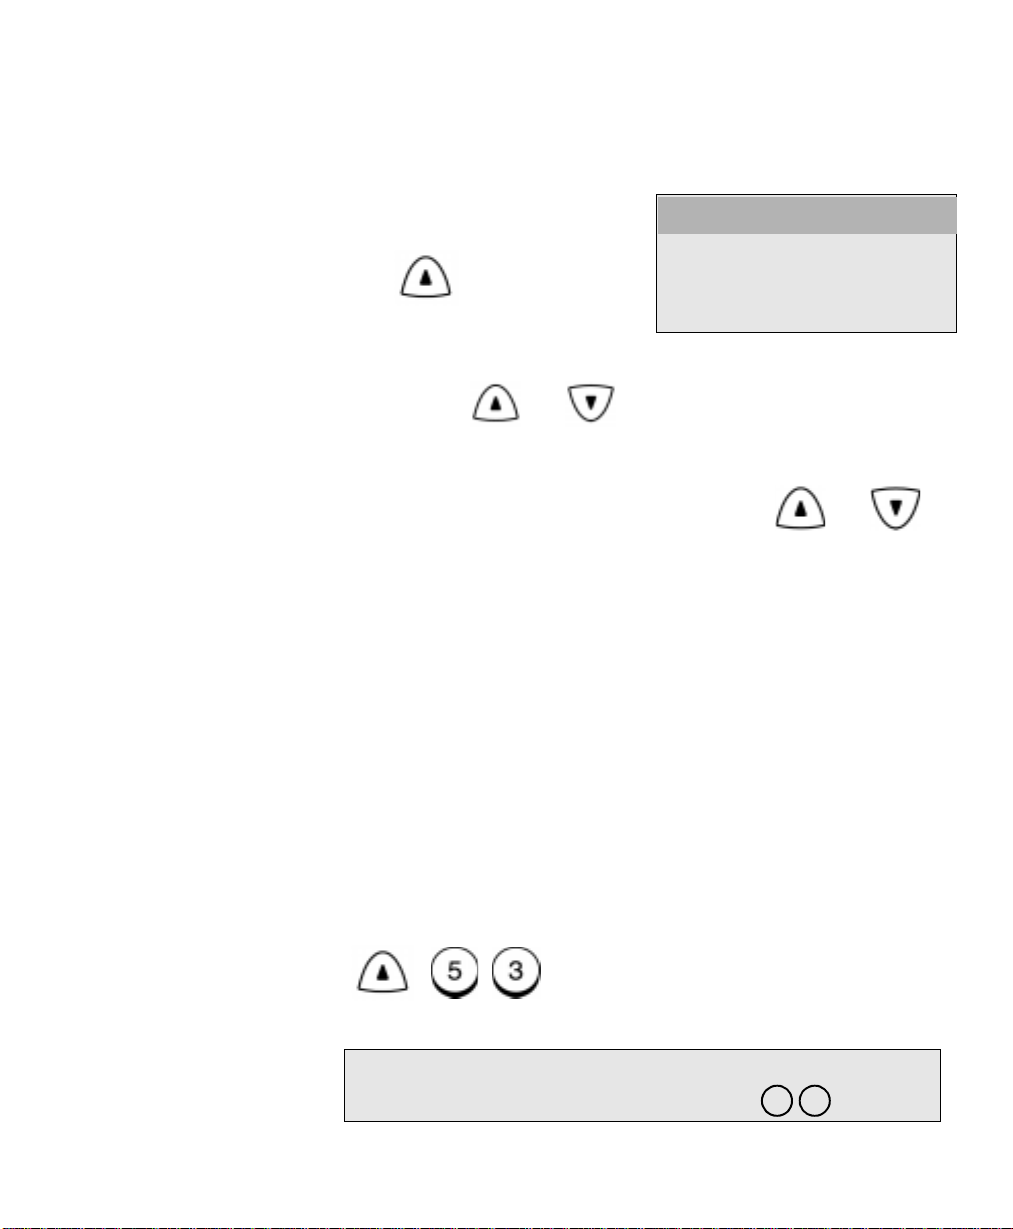
To program a Menu feature using the scroll keys:
1. From the Standby Mode, press:
1. Fax features
2. Print reports
3. Phonebook setup
4. Self test
The active item is highlighted.
2. Using the and arrow keys, scroll through the list until
the feature you wish to program is highlighted, then press the
Enter
key.
3. The next menu layer is displayed. Using the and
arrow keys, scroll through the list until the feature you wish to
program is highlighted, then press the
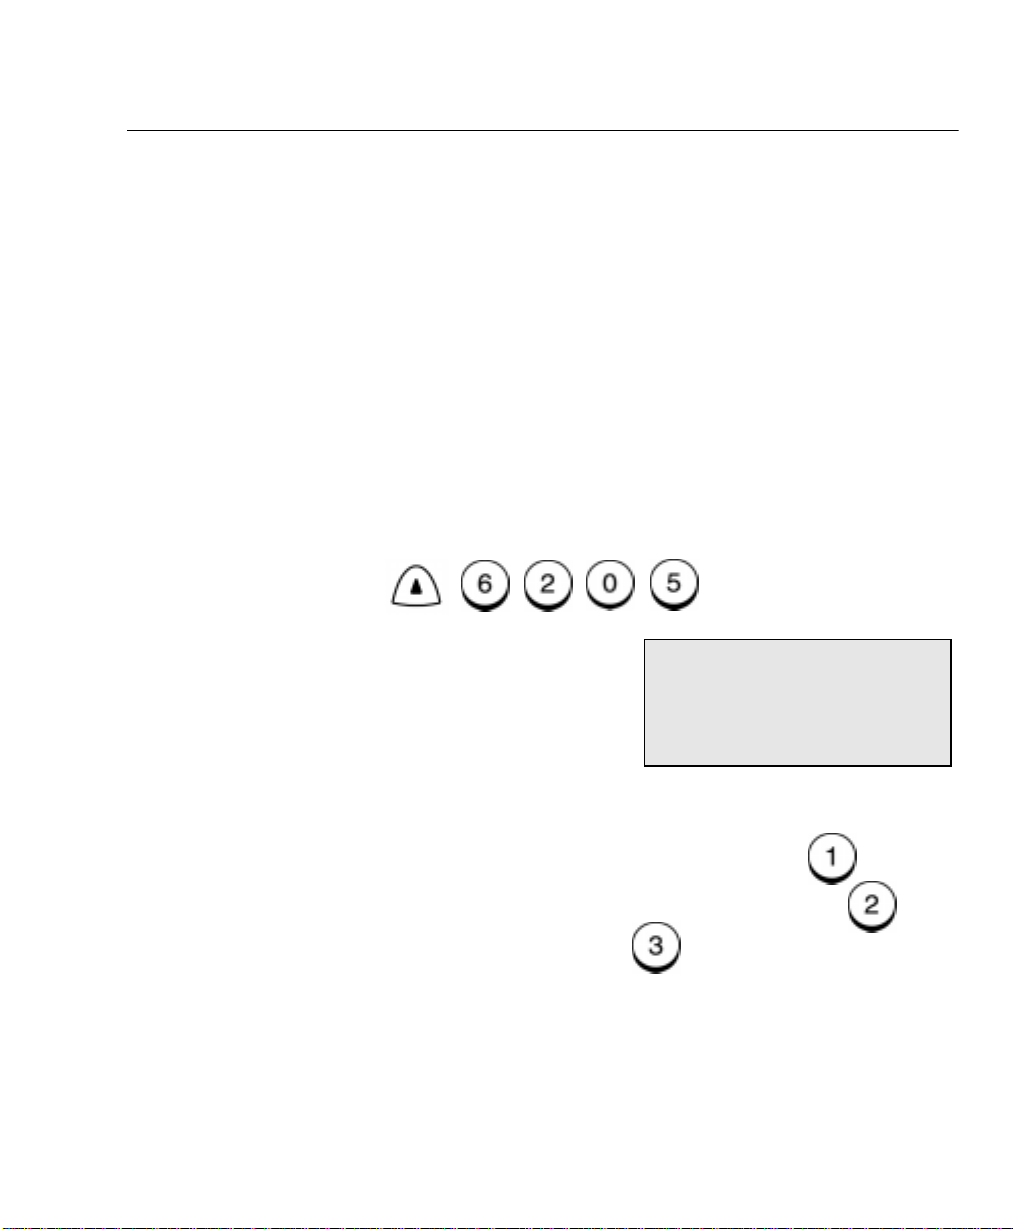
To program a Menu feature using the Menu Numbers:
Most Menu features are assigned a sequence number. You can
select the feature you wish to program quickly by pressing
the sequence numbers.
Refer to the Menu Flow Map on the pages that follow, or to print a
Menu Map, press
Menu, 7
. Menu map can also be printed by a direct
access key under the access cover.
Locate the feature you wish to program on the Menu Map and note
the number sequence.
For example:
The Machine ID feature is accessed by first selecting
Initial Setup (5), then Machine ID (3).
Therefore, to access this menu item, press:
Menu
Enter
key.
Menu
and
Note: Double digit menu numbers (01. Speaker volume)
require 2 entries and are shown as 0 1.
WorkCentre Pro 665/685/765/785 2-3
Page 24
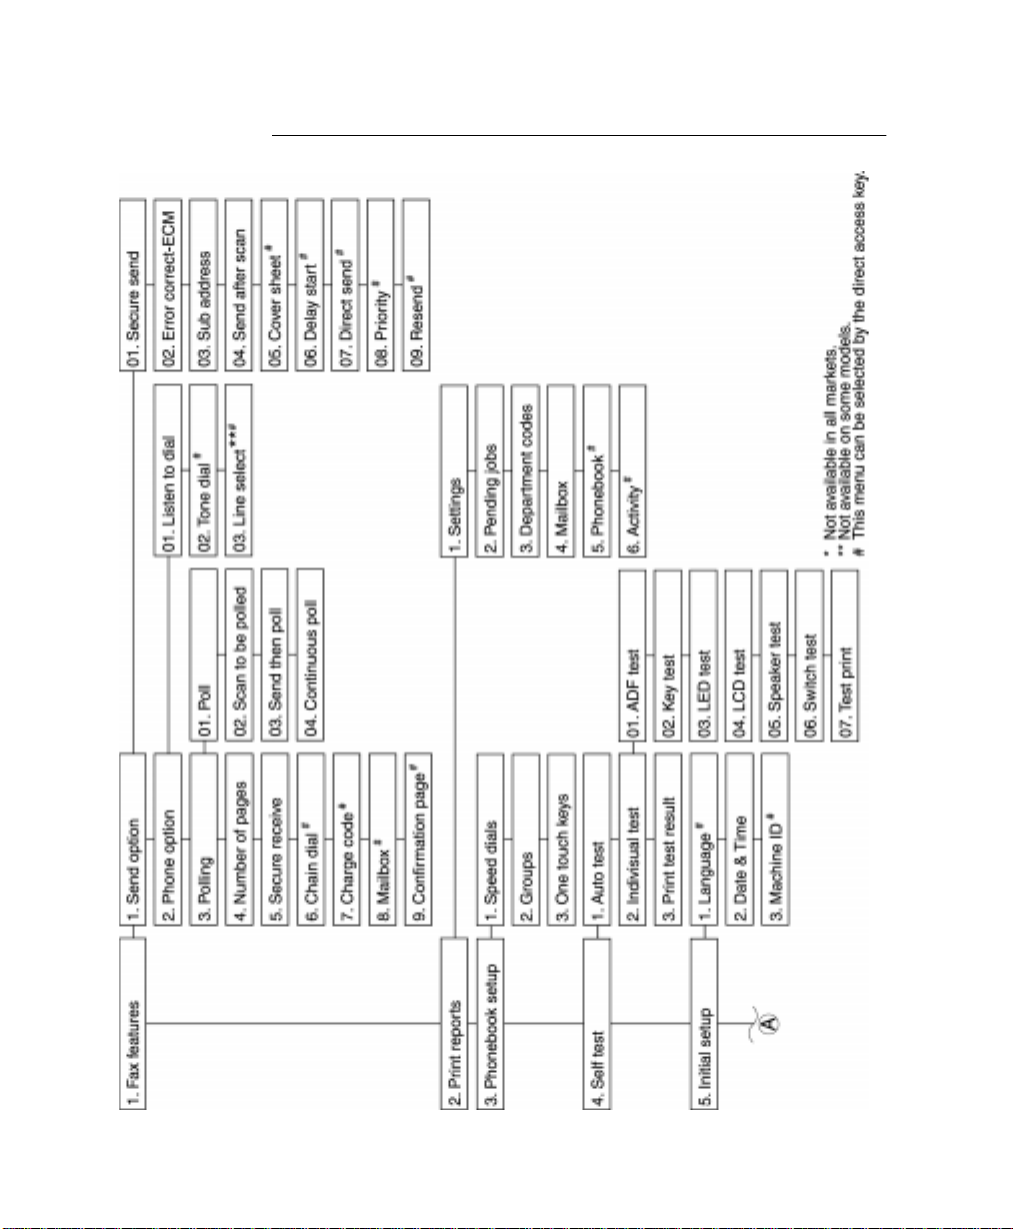
Programming the Machine
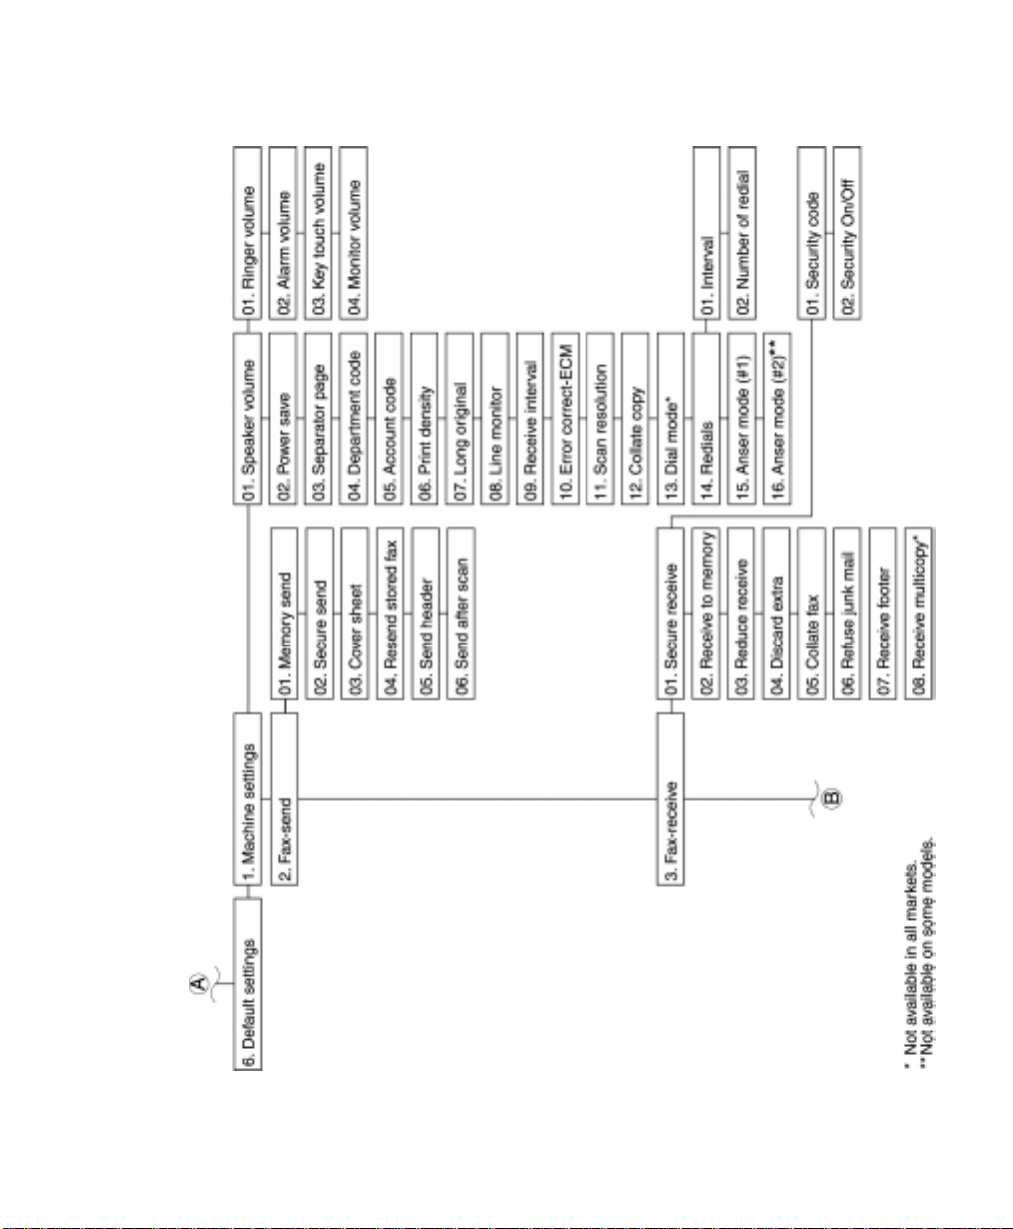
Menu Flow Map
2-4 WorkCentre Pro 665/685/765/785
Page 25
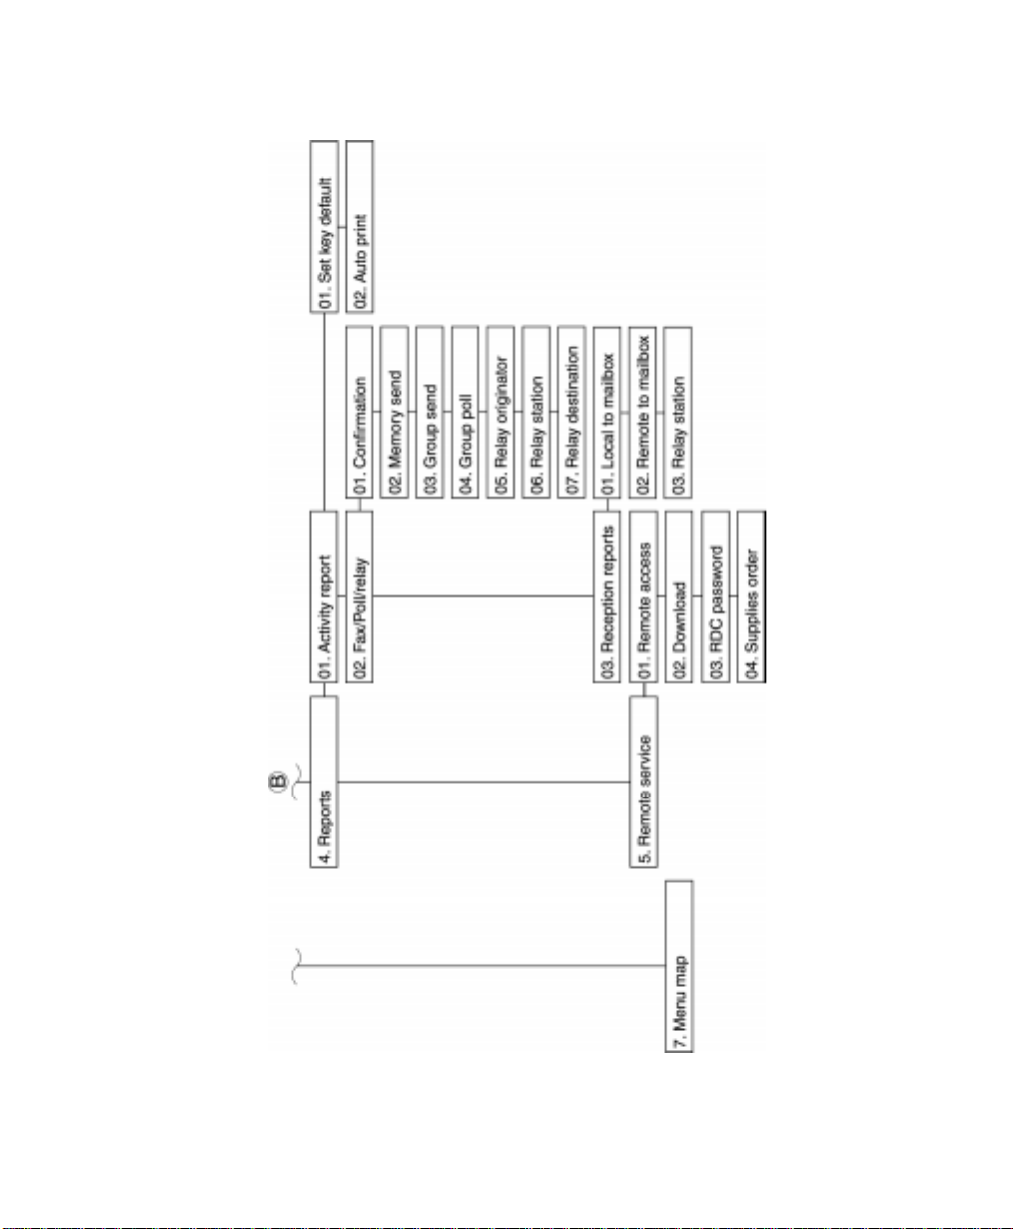
Programming the Machine
WorkCentre Pro 665/685/765/785 2-5
Page 26
Programming the Machine
2-6 WorkCentre Pro 665/685/765/785
Page 27
Character Entries
Programming the Machine
When programming your Machine ID or names assigned to Speed
Dial numbers and One Touch Keys, you enter characters. Also, many
features programmed in the Menu Mode require text entries.
The following table lists the keys used to enter characters. For more
information on entering characters, refer to the character entry
procedures later in this chapter.
Keys used to Enter Characters
Key Function
Moves the cursor to the left to delete,
change or add characters.
Moves the cursor to the right to delete,
change or add characters or spaces.
Insert
Delete
Numeric
KeyPad
Keyboard Provides the user interface for entering
Inserts a character between existing
characters.
Deletes an existing character.
Provides the user interface for entering
numeric characters .
alpha and special characters.
WorkCentre Pro 665/685/765/785 2-7
Page 28
Programming the Machine
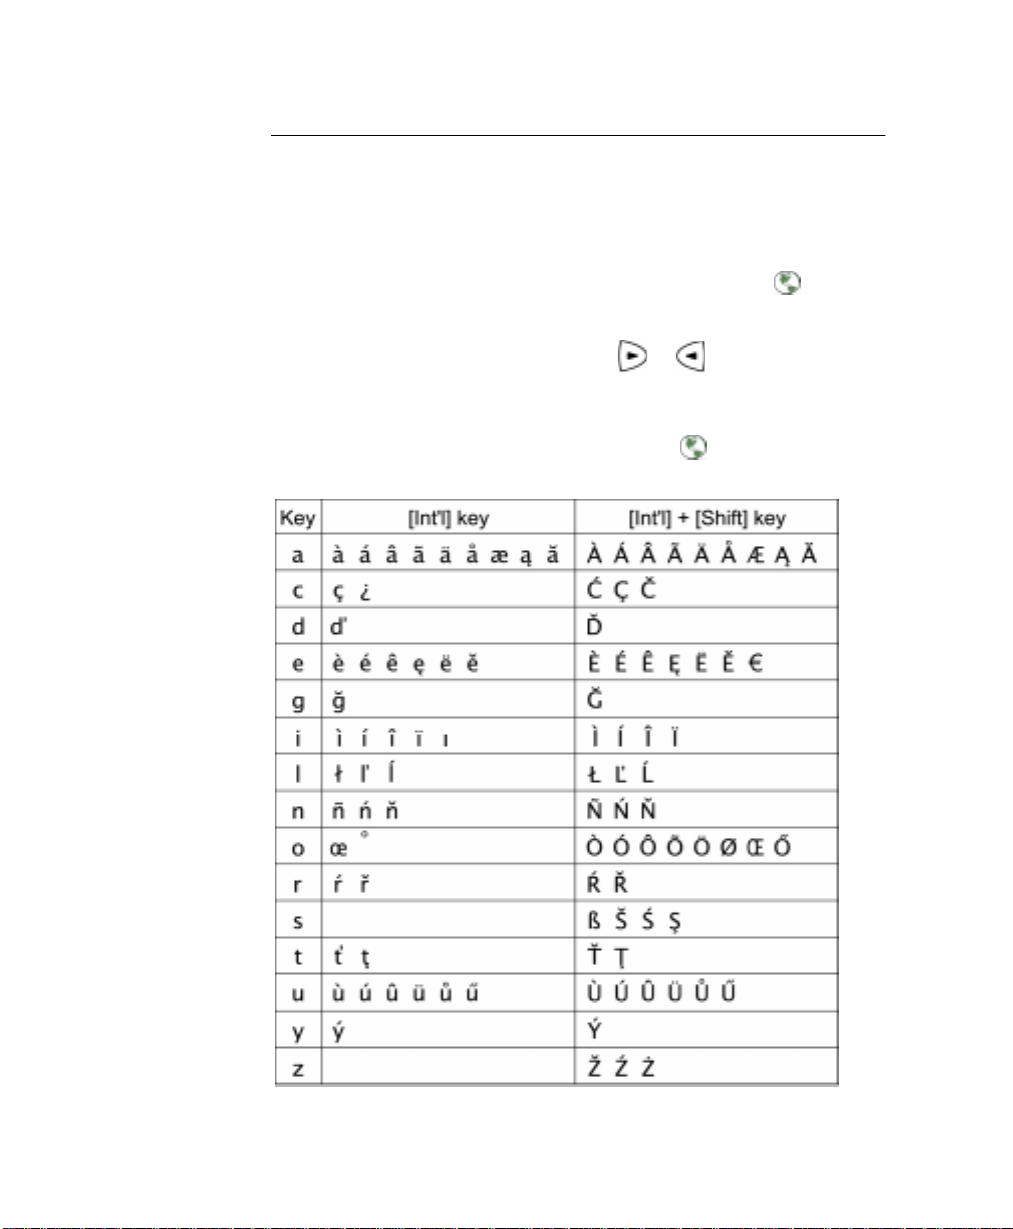
Character Code Table
The Character Code Table lists special characters that can be
entered when programming the WorkCentre.
The table lists the alpha keys in the left column and the characters
that correspond to each key in the right column.
To enter the special characters entry mode, press
the keyboard.
Pressing the alpha key displays the special characters you can enter.
Select your desired character by using or arrow keys, and
press
Uppercase special characters can be selected by pressing the alpha
key while holding down
Enter
Int’l
or key on
.
Shift
key after
Int’l
or key is pressed.
2-8 WorkCentre Pro 665/685/765/785
Page 29
Programming the Machine
Entering Characters
Using the Keyboard and the Numeric Keypad to enter characters:
Correcting Characters
Note: You may need to move the cursor to the left or right, then
reposition the cursor prior to entering or deleting a new
character.
Replacing Characters
Input correct characters over the existing characters.
Enter name
XERIX
I
Enter name
O
XEROX
1. Using the and
arrow keys, position the
cursor at the character to
be corrected.
2. Enter the desired
character.
WorkCentre Pro 665/685/765/785 2-9
Page 30
Programming the Machine
Deleting or Inserting Characters
Enter name
1. Using the and
arrow keys, position
XERX
X
the cursor at the character
to be deleted or at the
point of insertion.
Note: If you are not in the insert mode, pressing Delete deletes
the character, but the spaces remain.
Enter name
[Insert]
2. Press: .
Insert
The message “Insert” is
X
XERX
displayed.
3.To insert, enter the correct
Enter name
character(s).
Delete
To delete, press .
O
XEROX
2-10 WorkCentre Pro 665/685/765/785
Page 31

Direct Access Function Keys
The 14 Direct Access Function Keys, located in the left of the Control
Panel, are programmed to perform some of the most frequently used
features automatically . Several of these keys use multi-layered
menus similar to the Menu Mode. The following maps illustrates the
Direct Access Function Keys displaying the available programmable
features.
Programming the Machine
WorkCentre Pro 665/685/765/785 2-11
Page 32

Programming the Machine
2-12 WorkCentre Pro 665/685/765/785
Page 33

Setting Up the Phonebook
Remote telephone numbers can be assigned to Speed Dial numbers
and/or One Touch Keys in the Phonebook. The numbers are used for
Alpha Dialing, Speed Dialing, One Touch Dialing, Chain Dialing,
Group Dialing and Polling Operations. Once preset, these features
allow you to send documents or make a telephone call to frequently
called numbers by pressing a few keys.
To program the Group features, the remote telephone number must
be assigned to a Speed Dial Number or a One Touch Key.
Planning the Phonebook
When programming the remote telephone number in a Speed Dial
Number or a One Touch Key, you can include many fax options to
use during the communication. Please read this section carefully and
refer to the suggested chapters for detail feature descriptions.
Use the following list as an aid in planning the Phonebook:
• Phonebook Reports can be printed listing the numbers assigned
to Speed Dial numbers and One Touch keys. Press Phonebook
to print the desired report.
Programming the Machine
• Determine which phonebook number you want to assign to each
One Touch (up to 68) or Speed Dial (up to 300) number.
• Determine if you want to store a pause in the telephone number.
If your machine is connected to a PBX system, you may need to
enter a pause so the system can connect to an outside line.
Multiple 3 second pauses can be entered. To enter a pause,
press the
Pause
key.
• Determine if you want to store a Charge Code. To enter and hide
a charge code, press the Charge Code key after you have
entered the telephone number.
WorkCentre Pro 665/685/765/785 2-13
Page 34

Programming the Machine
• Determine which fax options you want to store with the One
Touch or Speed Dial telephone number. The following options
are available:
Send Later: Select this option to designate the time you want to
begin the job.
Confirm Report: Select this option to print a confirmation report
after the job.
Listen to Dial: Select this option to turn the monitor speaker on.
Fax Speed: Select this option to send documents at a slower
speed. The slower speeds are used for sending to a number with
questionable line conditions. The communication speed will be
slower but the chance of communication errors will be reduced.
Sub address: Select this option to store a sub address with the
number. This feature sends a document to a compatible remote
fax machine and requests that machine to forward the document
to a network user or to a ITU-T mailbox. This feature can also be
used to poll/store a document in a ITU-T mailbox of remote
compatible machines. Refer to “Attaching an ITU-T Sub Address”
in Chapter 8.
Line Selection: Select this option to designate line 1 or line 2.
• Program the telephone numbers and fax options in the one touch
or speed dial phonebook directories. Refer to the “Character
Entries” section to enter characters.
• After programming the numbers, print the Phonebook Reports to
confirm the numbers are entered correctly.
• Record the names associated with the One Touch Numbers on
the One Touch Label.
Pre-setting Speed Dial Numbers
Up to 300 numbers can be assigned to Speed Dial numbers 001 to
999.
An alternate telephone number may be stored with the speed dial
number. If the number dialed is busy, the alternate number is dialed
after the redial attempts. The alternate number dialing function is not
performed in Relay transmissions, polling receptions, or mailbox
transmissions.
2-14 WorkCentre Pro 665/685/765/785
Page 35

Programming the Machine
Once you assign a Speed Dial number and select Fax Options for
that number, you can link the Speed Dial number to a One Touch
Dialing Key for faster dialing. If you link the speed dial number to a
one touch key, you can dial the number using both methods.
Hint: To print a list of all assigned Speed Dial numbers, press:
Phonebook
(See the User’s Guide.)
To assign Speed Dial numbers:
1. Press:
Menu
***
2. Enter the desired Speed Dial number (1-999)
3. Press
Enter
.
Enter speed dial nbr
or
[<] Back to previous
STOP to complete
.
Speed dial number
Speed dial (1-999):
Note: If you select an assigned Speed Dial number, you have the
option of deleting, modifying or retaining the information
stored with the number. Refer to “Modifying or Deleting
Speed Dial Numbers” later in this section.
001
*** Menu item numbers may vary according to configurations.
WorkCentre Pro 665/685/765/785 2-15
Page 36

Programming the Machine
4. Using the Keyboard and Numeric Keypad, enter the name (max.
20 characters) you want to assign to this Speed Dial number,
then press
Enter
.
Speed dial: 001
Name (20 max):
Enter name
After 2 seconds...
Hint:
5. Using the Numeric Keypad, enter the fax telephone number
You can enter a pause or charge code in the primary and
alternate telephone numbers. To enter a pause, press the
Pause
key. To enter a charge code, press the
Code
key after entering the telephone number.
(max. 128 digits) you want to assign to the Speed Dial number,
then press
Enter
.
Name (20 max):
Charge
Speed dial: 001
Fax number (128 max):
Speed dial: 001
Alternate fax nbr:
2-16 WorkCentre Pro 665/685/765/785
Page 37

Programming the Machine
6. Using the Numeric Keypad, enter the alternate telephone
Enter
number, then press
7. To skip the Fax Options, press and go to step 25 to
complete the procedure.
To program the Fax Options, press .
; or to skip this step, press
Fax options?
1. Yes
2. No
Fax options
1. Done
2. Send later
3. Confirm report
4. Listen to dial
5. Fax speed
6. Subaddress
7. Line selection
Enter.
8. Select the Fax Option you want to assign to this Speed Dial:
To exit this option, press , and go to step 25 to complete the
procedure.
To select
To select
To select
To select
To select
To select
WorkCentre Pro 665/685/765/785 2-17
Send later
, press , and go to step 9.
Confirm report
Listen to dial
Fax speed
, press , then go to step 15.
Sub address
Line selection
, press , then go to step 11.
, press , then go to step 13.
, press , then go to step 17.
, press , then go to step 23.
Page 38

Programming the Machine
Send Later
9. Enter the desired time you want to start the job (within 24 hours).
For the 12 hour format, select AM/PM, then press
10. To add an additional option, go to step 8. To exit, press and
go to step 25 to complete the procedure.
Confirm Report
11. To print a confirmation report after each transaction, press .
To disable this option, press .
12. To add an additional option, go to step 8. To exit, press and
go to step 25 to complete the procedure.
Listen to Dial
13. To enable the Listen to Dial option, press .
To disable this option, press .
14. To add an additional option, go to step 8. To exit, press and
go to step 25 to complete the procedure.
Enter
.
Fax Speed
15. To select 14400bps, press .
To select 9600bps, press .
To select 4800bps, press .
To skip this option, press .
16. To add an additional option, go to step 8. To exit, press and
go to step 25 to complete the procedure.
2-18 WorkCentre Pro 665/685/765/785
Page 39

Programming the Machine
Sub address
17. To exit this option, press .
To send a document to a sub address location, press to
select SUB.
To poll a document from a sub address location, press to
select SEP.
Subaddress
SUB (20 max):
18. Enter the numeric remote sub address, then press
.
Enter.
Note: Secure address locations require a password if the
address is secure. Go to Step 19. If not go to Step 21.
19. To add a password to the sub address,
press to select PWD, or to exit this option, go to step 21.
Subaddress
PWD (20 max):
20. Enter the numeric remote sub address password, then press
Enter.
21. To exit the sub address option, press .
22. To add an additional option, go to step 8. To exit, press and
go to step 25 to complete the procedure.
WorkCentre Pro 665/685/765/785 2-19
Page 40

Programming the Machine
Line Selection**
23. To select either line, press .
To select Line #1, press .
To select Line #2, press .
24. To add an additional option, go to step 8. To exit, press and
go to step 25 to complete the procedure.
25. To link this Speed Dial Number to a One Touch key, press the
desired
Note: If you select an assigned One Touch number, you have the
Speed dial: 001
Press one touch key
to enter or
ENTER to skip
One Touch Key;
or to skip this step, press
Enter
.
option of deleting or retaining the information previously
stored.
26. To assign additional Speed Dial numbers, repeat steps 2-26.
27. When you have completed the Speed Dial assignment, press
Exit
or
Stop
to return to the Standby Mode.
** Not available on some models.
2-20 WorkCentre Pro 665/685/765/785
Page 41

Programming the Machine
Modifying or Deleting Speed Dial Numbers
Use this procedure to change or delete a previously assigned Speed
Dial number. When you enter the Speed Dial number you want to
change or delete, the “Speed dial number Already assigned”
message displays.
To modify or delete a Speed Dial number:
1. Press:
Menu
***
2. Enter the Speed Dial number you want to modify, then press
Enter
.
3. To delete the Speed Dial number, press .
To modify the number information, press .
To retain the number information, press .
Refer to the previous procedure, “Presetting Speed Dial
Numbers,” to update the speed dial information.
4. The Enter Speed Dial screen redisplays. Press
return to the Standby Mode.
Enter speed dial nbr
or
[<] Back to previous
STOP to complete
Speed dial number
1. Delete
2. Modify
3. Retain
Exit
or
Stop
to
Note: When modifying a Speed Dial number that is tied to a One
Touch key, you do not have to re-apply the number to the
One Touch. If you do, the machine prompts you to
retain/delete the original one touch setting.
*** Menu item numbers may vary according to configurations.
WorkCentre Pro 665/685/765/785 2-21
Page 42

Programming the Machine
Pre-setting One Touch Numbers
Fifty One-Touch Keys can be programmed to dial a single telephone
number, a Speed Dial number or a Group of numbers.
An alternate telephone number can be stored with the One Touch
key. If the number dialed is busy, the alternate number is dialed after
the redial attempts. The alternate number dialing function is not
performed in Relay, Polling, or Mailbox communications.
Hint: To print a list of assigned One Touch dial numbers, press:
Phonebook
To assign One Touch numbers:
1. Press:
Menu
(See Chapter 9, “Reports”.)
***
Press one touch key
or
[<] back to previous
STOP to complete
2. Press the desired One Touch key.
Note: If you select an assigned One Touch key, you have the
option of deleting, modifying or retaining the information
stored with the number. Refer to “Modifying or Deleting
One Touch Numbers” later in this section.
*** Menu item numbers may vary according to configurations.
2-22 WorkCentre Pro 665/685/765/785
Page 43

Programming the Machine
3. Using the Keyboard and Numeric Keypad, enter the name (max.
20 characters) you want to assign to this One Touch number,
Enter
then press
.
One Touch key: 03
Name (20 max):
Enter name
After 2 seconds
Hint:
You can enter a pause or charge code in the primary and
alternate telephone numbers. To enter a pause, press the
Pause
Code
4. Using the Numeric Keypad, enter the remote fax telephone
number (max. 128 digits), then press
…
key. To enter a charge code, press the
key after you enter the telephone number.
Name (20 max):
One touch key: 001
Fax number (128 max):
Enter
.
One touch key: 03
Alternate fax nbr:
Charge
WorkCentre Pro 665/685/765/785 2-23
Page 44

Programming the Machine
5. Using the Numeric keypad, enter the alternate telephone number,
then press
6. To program the Fax Options, press and go to step 7.
To skip the Fax Options, press and go to step 22.
Enter;
or to skip this step, press
Fax options?
1. Yes
2. No
Fax options
1. Done
2. Send later
3. Confirm report
4. Listen to dial
5. Fax speed
6. Sub address
7. Line selection
Enter.
7. Select the Fax Option you want to assign to this One Touch:
To exit the Fax Option, press , and go to step 22.
To select
To select
To select
To select
To select
To select
2-24 WorkCentre Pro 665/685/765/785
Send later
, press , and go to step 8.
Confirm report
Listen to dial
Fax speed
, press , then go to step 14.
Sub address
Line selection
, press , then go to step 10.
, press , then go to step 12.
, press , then go to step 16.
, press , then go to step 2.
Page 45

Programming the Machine
Send Later
8. Enter the desired time (within 24 hours) you want to start the job.
For 12 hour format, select AM/PM, then press
Send later
9. To add an additional option, go to step 7. To exit press and
go to step 22.
Confirm Report
10. To print a confirmation report after each transaction, press .
To disable this option, press .
11. To add an additional option, go to step 7. To exit press and
go to step 22.
Enter
.
Time HH:MM
23:40
Listen to Dial
12. To enable the Listen to Dial option, press .
To disable this option, press .
13. To add an additional option, go to step 7. To exit, press and
go to step 22.
WorkCentre Pro 665/685/765/785 2-25
Page 46

Programming the Machine
Fax Speed
Note: Off selects the highest speed possible.
14. To select
15. To select 14400bps, press .
To select 9600bps, press .
To select 4800bps, press .
16. To add an additional option, go to step 7. To exit, press and
go to step 22.
Off,
press .
Sub address
17. To skip this option, press . Go to step 21.
To send a document to a sub address location, press to
select SUB.
To poll a document from a sub address location, press to
select SEP.
Subaddress
SUB (20 max):
18. Enter the numeric remote sub address, then press
Note: Secure address locations require a password if the
address is secure. Go to Step 18. If not go to Step 20.
2-26 WorkCentre Pro 665/685/765/785
Enter
.
Page 47

Programming the Machine
19. To add a password to the sub address,
press to select PWD; or to exit this option, go to step 20.
Subaddress
PWD (20 max):
20. Enter the numeric remote sub address password, then press
Enter.
21. To exit the sub address option, press .
22. To add an additional option, go to step 7. To exit, press and
go to step 25.
Line Selection**
23. To select either line, press .
To select Line #1, press .
To select Line #2, press .
24. To add an additional option, go to step7. To exit, press and
go to step 25 to complete the procedure.
25. To assign additional One Touch numbers, repeat steps 2-24.
26. When you have completed the One Touch Key assignments,
press
Exit
or
Stop
to return to the Standby Mode.
** Not available on some models.
WorkCentre Pro 665/685/765/785 2-27
Page 48

Programming the Machine
Modifying or Deleting One Touch Dial Numbers
Use this procedure to change or delete a previously assigned One
Touch number. When you press the One Touch key you want to
change or delete, the “One Touch number Already assigned”
message displays.
To modify or delete a One Touc h numbe r:
1. Press:
Menu
2. Press the One Touch key you want to modify or delete.
Press one touch key
or
[<] back to previous
STOP to complete
One touch key
1. Delete
2. Modify
3. Retain
3. To delete the One Touch number, press .
To modify the number information, press .
To retain the key assignment, press .
Refer to the previous procedure, “Presetting One Touch
Numbers,” to update the one touch information.
4. The Enter One Touch screen redisplays. Press
return to the Standby Mode.
2-28 WorkCentre Pro 665/685/765/785
Exit
or
Stop
to
Page 49

Programming the Machine
Pre-setting Group Numbers
If you frequently send faxes to the same group of telephone numbers,
you can assign these numbers to a Group. Only Speed Dial or One
Touch numbers can be assigned to a group. Preset group numbers
can also be used for polling.
Hint: To print the Group Phonebook, press:
Phonebook
(See Chapter 9, “Reports”.)
It is a good idea to create the list of names and numbers before you
actually start programming the machine. The following table lists the
information that will be requested and comments on each of the
fields.
Fields Comments
Group Number Any 50 numbers between 1 and 1999 (50 groups
maximum).
Group Name Maximum of 20 characters for each group.
Telephone Number
Designation
One Touch Key
Assigning
Designate telephone numbers from those assigned
to Speed Dial or One Touch dialing numbers.
Maximum of 300 Speed Dial or 68 One Touch
dialing numbers can be entered in a group.
Each group can be assigned to a One Touch dialing
key.
To preset numbers to a group:
1. Press:
Menu
***
Enter group number
or
[<] back to previous
STOP to complete
*** Menu item numbers may vary according to configurations.
WorkCentre Pro 665/685/765/785 2-29
Page 50

Programming the Machine
2. Using the Numeric Keypad, enter the number (1-1999) you want
to assign to this group.
3. Press:
Enter group number
Group nbr (1-1999):
25
Enter
4. Using the Keyboard and Numeric Keypad, enter the Group name,
Enter
then press
5. Press the One Touch number you want to include in this Group,
or enter the Speed Dial number and press
6. Repeat step 5 to enter additional numbers.
.
Group number: 0025
Group name (20 max):
Enter name
Group name (20 max):
Enter
.
Group number: 0025
Enter speed dial
or OT
ENTER to complete
7. When you entered each number you want to include in this
group, press
2-30 WorkCentre Pro 665/685/765/785
Enter
.
Group number: 0025
Press one touch key
to enter or
ENTER to skip
Page 51

Programming the Machine
Hint: Group Transmissions are easier if a group is linked to a
One Touch Key.
8. To assign this group to a One Touch key, press the
key. To skip this step, press
9. The Enter Group Number screen redisplays. Press
to return to the Standby Mode.
Enter
.
One Touch
Exit
or
Stop
Programming Group Send
The Programmed Group Send feature allows you to send a document
to multiple remote parties in a single operation. Using this process
eliminates the time and labor required to dial and scan the same
document for separate transmissions to different locations.
If a number is busy, the machine dials the rest of the numbers before
returning to the busy number.
To preset a group, see “Presetting Group Numbers” in this Chapter.
Note: You can save dialing steps if you preassign a group
number to a One Touch dial key when you program that
group.
To send a document to a programmed group:
1. Load the document face down in the Document Tray.
2. Select the desired
3. Press
Phonebook
4. Press .
Phonebook
Resolution
.
and
Contrast
Phonebook
1. By name
2. Speed dial
3. Group dial
.
Note: If the group is assigned to a One Touch Key, press that
One Touch Key.
WorkCentre Pro 665/685/765/785 2-31
Page 52

Programming the Machine
5. Using the Numeric Keypad, enter the group number you want to
use to send the document, then press
The machine dials each number in the group and sends the
document.
Deleting or Modifying a Group Number
1. Press:
Group nbr (1-1999):
Enter
.
Menu
***
2. Using the Numeric Keypad, enter the number of the Group you
want to delete or modify, then press
3. Select the Change option:
To delete this group, press .
To modify this group, press . (Refer to “Presetting Group
Numbers” if necessary.)
To exit without changing this group, press
Enter group number
or
[<] back to previous
ENTER to complete
Enter
.
Enter group number:
1. Delete
2. Modify
3. Retain
4. The Enter Group Number screen redisplays. Press
to return to the Standby Mode.
*** Menu item numbers may vary according to configurations.
2-32 WorkCentre Pro 665/685/765/785
Exit
or
Stop
Page 53

Programming the Machine
Filling out the One Touch Label
As you assign phone numbers to the One Touch keys, use a pencil to
fill in the location name on the One Touch Label.
One Touch Label
061
WorkCentre Pro 665/685/765/785 2-33
Page 54

Programming the Machine
Setting the Department Codes
Use of the machine can be limited to authorized personnel within
each department by setting up a Master Department Code and
individual Department Codes. You can assign one Master Code and
up to 98 Department Codes. The WorkCentre can then monitor the
usage for each department.
The Master Department Code is used to setup and modify the
Department Code information. During the setup procedure, you are
prompted to enter a 5-digit Master Department Code. This code is
required to perform any modifications; it is used as a Supervisory
master key. The Master Code department number is preset to 01 by
the WorkCentre.
The individual Department Codes are used to access and operate the
WorkCentre. During the setup procedure, you can assign Department
Numbers from 2-99. You are also prompted to enter a 5-digit
Department Code for each department. As each department enters
their assigned department code to access and operate the
WorkCentre, the usage for each department is recorded on the
Department Code Report. Refer to Chapter 9, “Reports”.
To setup Department Codes
1. Press:
Menu
CAUTION
If a master code has been assigned, selecting 2
disables the programmed Master Code.
***Menu item numbers may vary according to configurations.
2-34 WorkCentre Pro 665/685/765/785
***
Set dept. code
1. Yes
2. No
Page 55

Programming the Machine
Note: To reset the Department Code, the following is displayed.
To recover the Department Code already being set, press
1. To set a new Department Code, press 2.
Set dept. code
1. Recover old data
2. New
2. To setup the Master Department Code, press .
To disable the Department Control feature, press . Press
Exit
or
Stop.
Note: If the Master Number is assigned, go to step 6 to set
additional Department Code s.
Enter master code
Dept. number: 01
Dept. name (20 max):
Note: Department code 01 is reserved for the Master Code.
Enter name
After 2 seconds…
WorkCentre Pro 665/685/765/785 2-35
Dept. name (20 max):
Page 56

Programming the Machine
3. Using the Keyboard and Numeric Keypad, enter the name to
assign to the Master Department, then press
After 2 seconds…
4. Using the Numeric Keypad, enter the 5-digit master code to
assign to the Master Department, then press
Note: The 5-digit Master Code is required to access the
5. The Master Department Code entry is completed. To setup
individual Department Codes, go to step 6. To exit this feature,
press
Enter.
Enter master code
Dept. number: 01
SERVICE
Enter master code
Dept. number: 01
Master code:
Enter.
Department Code feature to perform any modifications.
Please remember your Master Code.
Stop
.
Set dept. code
Dept. number (1-99):
6. Enter a number between 2 and 99 to assign to this Department,
then press
2-36 WorkCentre Pro 665/685/765/785
Enter.
Page 57

Programming the Machine
7. Using the Keyboard and Numeric Keypad, enter the name to
assign to this Department (max 20 characters), then press
Refer to the “Character Entries” Section.
Set dept. code
Dept. number: 04
Dept. name (20 max):
Enter name
Enter
.
After 2 seconds
After 2 seconds…
8. Using the Numeric Keypad, enter the 5-digit Department Code to
assign to this Department, then press
…
Set dept. code
Dept. number: 04
SALES
Set dept. code
Dept. number: 04
Dept. code:
Enter
.
Note: The 5-digit Department Code is required to access and
operate the WorkCentre.
9. The Department Code entry is completed. To set additional
Department codes, repeat steps 6 through 8. To exit this feature,
press
Exit
or
Stop
.
WorkCentre Pro 665/685/765/785 2-37
Page 58

Programming the Machine
Changing the Department Code Settings
The “Master Department Code” is required to add, change, or delete
the Department Code settings. This menu is not available to other
department codes.
To add or change the Department Code settings:
1. From the “Enter dept. code” screen, enter the Master Department
Code, then press
2. Press:
Enter
.
Menu
3. Select the Dept. Code option:
To add or change Dept. codes, press , then go to step 4.
CAUTION
To disable the Department Control feature, press
, then press
Standby Mode.
Exit
or
***
Set dept. code
1. Yes
2. No
Stop
to return to the
*** Menu item numbers may vary according to configurations.
2-38 WorkCentre Pro 665/685/765/785
Page 59

Programming the Machine
4. To modify the Department Codes currently set, press and
go to Step 5.
To set new Department Codes, press . Setting the
information as desired. If needed, refer to “Setting the
Department Codes” procedure.
Set dept. code
1. Recover old data
2. New
Enter
5. Enter the Department number to change, then press
Set dept. code
Already assigned
Dept. number: 02
Dept.
.
After 2 seconds
6. To delete this Dept. code, press .
To modify this Dept. code, press .
To exit without changing this Dept. code, press .
7. Modify the information as desired. If needed, refer to “Setting the
Department Codes” procedure. Press
WorkCentre Pro 665/685/765/785 2-39
…
Dept. number
1. Delete
2. Modify
3. Retain
Exit
or
Stop
to exit.
Page 60

Programming the Machine
Setting the Machine Default Settings
Error Correct - ECM Default Setting
Error Correction Mode (ECM) is an internationally-recognized error
correction system. It enables communications with clean images
since it automatically re-sends any portion of the document affected
by line noise or distortion.
This feature cannot be accessed if a document is stored in memory.
Note: ECM must be set to On when the 33.6K BPS Modem is in
your machine.
• Both the sender and the receiver must have the ECM feature to
perform ECM communications.
• Communication time is longer when transmissions are affected
by interference.
To set the Error Correct-ECM default mode:
1. Press:
Menu
***
Error correct-ECM
1. On
2. Off
2. To enable ECM, press .
To disable ECM, press .
3. The menu selection screen redisplays. Press
return to the Standby Mode.
*** Menu item numbers may vary according to configurations.
2-40 WorkCentre Pro 665/685/765/785
Exit
or
Stop
to
Page 61

Programming the Machine
Long Original Setting
Using the Long Original setting enables the WorkCentre to scan long
documents. The available length options are:
1 M: Allows document sizes up to 1 Meter in length (39.4
inches). If a document longer than 1M is scanned, a
“Paper Jam” occurs.
Any Length: Allows any length document to be scanned.
Note: Selecting Any length turns off the document jam sensor.
To set the Long Original setting:
1. Press:
Menu
***
Long original
1. 1m (39 Inches)
2. Any length
2. Select the Long Original option:
To select 1m, press .
To select Any length, press .
3. The menu selection screen redisplays. Press
return to the Standby Mode.
*** Menu item numbers may vary according to configurations.
Exit
or
Stop
to
WorkCentre Pro 665/685/765/785 2-41
Page 62

Programming the Machine
Bypass Tray Paper Size Setting
1. Select the paper size using the slider at the side of the bypass tray.
Paper size se tting:
LGL: Select when you load Legal size paper.
LTR: Select when you load letter size paper.
A4: Select when you load A4 size paper.
: This should only be selected when used with PC Printing.
You select this size when you wish to use another paper size
other than Legal Letter or A4, such as envelopes or labels.
2. Adjust the paper guides to the paper size.
Note: You can load up to 100 sheets of paper (80gsm/20 lbs.) in
the Bypass Tray.
You can print the following paper sizes from the Bypass
Tray.
PC Print: You can select any size of paper within the
specification.
Copy: You can only select A4, Letter, or Legal size paper.
Fax Reception and Report Print: You cannot select the
Bypass Tray.
When printing onto pre-glued C5 envel ope s, yo u may
experience the trailing edge being folded back. If this
happens, please try an envelope where all the edges of the
envelope, other than the opening, are fully glued, leaving
no unglued edges.
Paper Guide
Slider
Exit Tray
08-05
2-42 WorkCentre Pro 665/685/765/785
Page 63

Programming the Machine
Redial Count and Interval Setting*
When a document is reserved in memory and a job number is
assigned, the machine automatically attempts to send the document
according to the redial setting.
Using this procedure, you can set the length of time between redial
attempts (Interval), and the number of times your machine redials a
number.
The redial interval range is from 1 to 15 minutes, and the number of
redials can be set between 0 and 14 attempts.
If the Resend Stored Fax feature is active and the machine exceeds
the number of redials, your document is retained in memory (see
Chapter 5, “Transmitting Documents”).
To change the Interval and Number of redials:
1. Press:
Menu
***
01. Interval
02. Number of redials
2. Select the Redial Mode you want to change:
To select Interval, press , then go to step 3.
To select Number of redials, press , then go to step 5.
* Not allowed in all markets.
*** Menu item numbers may vary according to configurations.
WorkCentre Pro 665/685/765/785 2-43
Page 64

Programming the Machine
3. Using the Numeric Keypad, enter the number of minutes you want
the machine to wait before redialing, then press
use a leading 0.
4. The menu selection screen redisplays. If you selected ,
press
go to redials screen again.
5. If you selected , use the Numeric Keypad to enter the
number of times you want the machine to redial the number, then
press
Exit
or
Enter.
Enter.
Redials
Interval (01-15) min.
Stop
to return to the Standby Mode, or enter 06 to
Must use leading 0.
Redials
You must
01
Redials: (00-14):
01
6. The menu selection screen redisplays. Press
return to the Standby Mode, or enter 06 to go to redials screen
again.
2-44 WorkCentre Pro 665/685/765/785
Exit
or
Stop
to
Page 65

Programming the Machine
Receive Interval
You can set a certain interval to try to receive an incoming document
when transmitting an outgoing document consecutively from the
same phone line. The interval set by this procedure is inserted after
every fourth transmission.
1. Press:
Menu
Receive interval
Interval (00-15)min:
3
2. Using the Numeric Keypad, enter the number of minutes you
want the machine to wait before transmitting the 5th document.
Then, press
Enter
.
3. The menu selection screen redisplays. Press
return to the Standby Mode.
WorkCentre Pro 665/685/765/785 2-45
Exit
or
Stop
to
Page 66

Programming the Machine
Resolution and Contrast Setting
The default settings can be changed during a transmit or copy
operation by pressing the
Control Panel.
The following tables define the available default Contrast and
Resolution settings:
Resolution
selection Description
Standard Use for sending normal text and graphics.
Fine Use for documents with small characters
Superfine Use for documents containing very detailed print.
Contrast selection Description
Contrast
Selected when Resolution LED is off.
(newspaper print, etc.).
and
Resolution
keys on the
Normal Use for documents printed with ordinary image
density.
Selected when the Contrast LED is off.
Lighten Use for documents with dark print that need to be
adjusted to print lighter.
Darken Use for documents with light or faint print that need
to be adjusted to print darker.
2-46 WorkCentre Pro 665/685/765/785
Page 67

Programming the Machine
To change the Contrast and Resolution:
1. Press:
Menu
Resolution
1. Standard
2. Fine
3. Superfine
2. Select the Resolution:
To select Standard, press .
To select Fine, press .
To select Superfine, press .
***
Contrast
1. Normal
2. Darken
3. Lighten
3. Select the Contrast:
To select Normal, pres s .
To select Darken, press .
To select Lighten, press .
Exit
or
Stop
4. The menu selection screen redisplays. Press
return to the Standby Mode.
*** Menu item numbers may vary according to configurations.
WorkCentre Pro 665/685/765/785 2-47
to
Page 68

Programming the Machine
Power Saver Setting
The Power Saver function allows you to turn the power off to save
power consumption. If the Power Saver function is On, a warm up
period is needed before printing occurs. There are two Power Save
modes with this machine, Super Power Save and Printer Power
Save.
• Super Power Save - Turns all the power off to minimize power
consumption. Select one of three modes, Automatic, Manual or
Off:
Automatic mode: Enters the Power Saver Mode automatically
Manual Mode: Enters the Power Saver Mode when the Power
Off: Disables the Super Power Saver mode and the
1. Press:
Menu
when in the Standby Mode for the pre-set time
period.
Save key on the control panel is pressed. If the
machine is in the Standby Mode when the
Power Save key is pre ssed, it enters the
Power Saver Mode immediately. If the Power
Save key is pressed while the machine is not in
the Standby Mode, it enters the Power Saver
Mode after returning to the Standby Mode.
Printer Power Saver mode button on the
control panel.
***
Super power save
1. Automatic
2. Manual
3. Off
2. Select the Super Power Save mode:
To select the Automatic mode, press . Then, go to Step 3.
To select the Manual mode, press . Then, go to Step 4.
To select Off, press . Then, go to Step 4.
*** Menu item numbers may vary according to configurations.
2-48 WorkCentre Pro 665/685/765/785
Page 69

Programming the Machine
Entering time
Time (01-60min)
03
3. When you select the Automatic mode, using the Numeric
Keypad, enter the time period (in minutes) for standby before the
machine enters the Super Power Save mode automatically.
4. When you select the Manual mode or Off, select the default for
the Printer Power Save mode
• Printer Power Save - Turns the printer heater off to save power
consumption.
Press:
Menu
***
Select the Manual mode, press . Then, go to Step 4.
Printer power save
1. On
2. Off
To enable the Printer Power Save mode, press .
To disable the Printer Power Save mode, press .
5. The menu selection screen redisplays. Press
return to the Standby Mode.
*** Menu item numbers may vary according to configurations.
WorkCentre Pro 665/685/765/785 2-49
Exit
or
Stop
to
Page 70

Programming the Machine
Print Density
The print density for reception, copy, PC printing, and report printing
can be set. Five density levels are available from -2 (lighter print) to
+2 (darker print).
1. Press:
Menu
Set print density
Density (-2 to +2):
Lighter Darker
-2 -1 0 +1 +2
2. Using or keys, select the print density, then press
3. The menu selection screen redisplays. Press
return to the Standby Mode.
Exit
or
Stop
Enter
to
.
2-50 WorkCentre Pro 665/685/765/785
Page 71

Programming the Machine
Refuse Junk Mail Setting
This feature prevents your machine from receiving documents from
unknown parties. Documents are received only from those parties
whose telephone numbers are assigned to your machine phonebook.
Refuse Junk Mail is effective only on incoming calls in the Auto
Receive Mode. (See “Setting the Answer Mode” in chapter 3.)
To enable the Refuse Junk Mail feature:
1. Press:
Menu
***
Refuse junk mail
1. On
2. Off
2. Select the Refuse Junk Mail option:
To enable the Refuse Junk Mail feature, press .
To disable the Refuse Junk Mail feature, press .
3. The menu selection screen redisplays. Press
return to the Standby Mode.
Exit
or
Stop
to
*** Menu item numbers may vary according to configurations.
WorkCentre Pro 665/685/765/785 2-51
Page 72

Programming the Machine
Ringer Volume Setting
Use this feature to adjust the WorkCentre Ringer Volume. The
volume range is from 0 (off) to 7 (high).
To adjust the Ringer volume:
1. Press:
Menu
Ringer volume
Volume (0-7):
0 1 2 3 4 5 6 7
Note: The current setting is displayed on the bottom of the
display.
2. Using the Numeric Keypad, enter the Ringer Volume setting from
0-7, then press
3. The menu selection screen redisplays. Press
return to the Standby Mode.
Enter
.
***
Exit
or
Stop
to
*** Menu item numbers may vary according to configurations.
2-52 WorkCentre Pro 665/685/765/785
Page 73

Programming the Machine
Alarm Volume Setting
Use this feature to adjust the WorkCentre Alarm Volume. The volume
range is from 0 (off) to 7 (high).
To adjust the Alarm volume:
1. Press:
Menu
Alarm volume
Volume (0-7):
0 1 2 3 4 5 6 7
Note: The current setting is displayed on the bottom of the
display.
2. Using the Numeric Keypad, enter the Alarm Volume setting from
0-7, then press
3. The menu selection screen redisplays. Press
return to the Standby Mode.
Enter
.
***
Exit
or
Stop
to
*** Menu item numbers may vary according to configurations.
WorkCentre Pro 665/685/765/785 2-53
Page 74

Programming the Machine
Key Touch Volume Setting
Use this feature to adjust the WorkCentre Key Touch Volume. The
volume range is from 0 (off) to 7 (high).
To adjust the Key Touch volume:
1. Press:
Menu
Key touch volume
Volume (0-7):
0 1 2 3 4 5 6 7
Note: The current setting is displayed on the bottom of the
display.
2. Using the Numeric Keypad, enter the Key Touch Volume setting
from 0-7, then press
3. The menu selection screen redisplays. Press
return to the Standby Mode.
Enter
.
***
Exit
or
Stop
to
*** Menu item numbers may vary according to configurations.
2-54 WorkCentre Pro 665/685/765/785
Page 75

Programming the Machine
Monitor Volume Setting
Use this feature to adjust the WorkCentre Monitor Volume. The
volume range is from 0 (off) to 7 (high).
To adjust the Monitor volume:
1. Press:
Menu
Monitor volume
Volume (0-7):
0 1 2 3 4 5 6 7
Note: The current setting is highlighted on the bottom of the
display.
2. Using the Numeric Keypad, enter the Monitor Volume setting
from 0-7, then press
3. The menu selection screen redisplays. Press
return to the Standby Mode.
Enter
.
***
Exit
or
Stop
to
*** Menu item numbers may vary according to configurations.
WorkCentre Pro 665/685/765/785 2-55
Page 76

Programming the Machine
Send After Scan Default Setting
This feature enables you to determine whether the dialing starts while
the machine is scanning the documents or after the machine has
scanned all documents in the Memory Send mode.
Also, if the dialing after scanning is selected, you can select to delete
or send the scanned pages when the memory becomes full during
scanning.
To set the Send After Scan default mode:
1. Press:
Menu
***
Type of send
1. Dial while scan
2. Dial after scan
2. To disable Send After Scan, press , then go to step 4.
To enable Send After Scan, press , then go to step 3.
When memory full
1. Delete scan pages
2. Send scan pages
3. Select the memory full option.
To delete the pages being scanned, press .
To send the pages being scanned, press .
4. The menu selection screen redisplays. Press
return to the Standby Mode.
*** Menu item numbers may vary according to configurations.
2-56 WorkCentre Pro 665/685/765/785
Exit
or
Stop
to
Page 77

Programming the Machine
Remote Service Setting
Remote Access
This feature allows a remote Xerox test facility or service center to
perform diagnostic tests on your machine.
There are three Remote Access selections: Always On, One Time
Access, and Always Off.
1. Press:
Menu
***
Remote access
1. On
2. Off
To select On, press .
To select Off, press .
2. The menu selection screen redisplays. Press
return to the Standby Mode.
*** Menu item numbers may vary according to configurations.
Exit
or
Stop
to
WorkCentre Pro 665/685/765/785 2-57
Page 78

Programming the Machine
Download
This selection is used to enable firmware to be downloaded to the
machine. The options are anytime or If no job in memory.
There are two Download selections: No Job in Memory and Any
Time.
1. Press:
Menu
***
Download firmware
1. No job in memory
2. Anytime
To download the firmware when there is no job in memory, press
.
To download the firmware at anytime, press .
2. The menu selection screen redisplays. Press
return to the Standby Mode.
*** Menu item numbers may vary according to configurations.
Exit
or
Stop
to
2-58 WorkCentre Pro 665/685/765/785
Page 79

Programming the Machine
RDC Password
Allows you to password protect the machine from any unauthorized
person dialing into the machine. This should be used as security to
allow only Xerox authorized service persons to use RDC (remote
diagnostics centre) to dial into the machine to retrieve information.
You should advise the Xerox authorized service persons of the
password in order to do this
There are two RDC Password selections: Set RDC Password and
Password.
1. Press:
Menu
***
RDC password
1. Set RDC password
2. Password (20 max)
To set the RDC password, press and enter the password.
To enter your password, press and enter your password.
2. The menu selection screen redisplays. Press
return to the Standby Mode.
*** Menu item numbers may vary according to configurations.
Exit
or
Stop
to
WorkCentre Pro 665/685/765/785 2-59
Page 80

Programming the Machine
Supplies Order
Allows the option of the supplies order report to be sent automatically.
The report is sent out to order more supplies (Drum and Toner) when
you select On. Setting up Auto supply ordering details is described in
Appendix A.
1. Press:
Menu
***
Auto supply ordering
1. On
2. Off
To select On, press .
To select Off, press .
2. The menu selection screen redisplays. Press
return to the Standby Mode.
*** Menu item numbers may vary according to configurations.
Exit
or
Stop
to
2-60 WorkCentre Pro 665/685/765/785
Page 81

Programming the Machine
Separator Page Default Setting
When this feature is set to “On”, the WorkCentre prints a page
between each received fax, Copy and PC print. Each Separator Page
contains the following information:
Fax: Sending machines telephone number, fax received time
and the number of pages.
Copy: Copy start time and the number of pages copied.
PC Print: Name of PC, print start time and the number of pages
printed.
To set the Separator Page feature for Fax, Copy and PC Print in
sequence:
1. Press:
Menu
2. Select the Fax Separator Page option:
To enable the Fax Separator Page feature, press .
To disable the Fax Separator Page feature, press .
***
Fax separator page
1. On
2. Off
Copy separator page
1. On
2. Off
WorkCentre Pro 665/685/765/785 2-61
Page 82

Programming the Machine
3. Select the Copy Separator Page option:
To enable the Copy Separator Page feature, press .
To disable the Copy Separator Page feature, press .
4. Select the PC Print Separator Page option:
To enable the PC Print Separator Page feature, press .
To disable the PC Print Separator Page feature, press .
5. The menu selection screen redisplays. Press
return to the Standby Mode.
PC separator page
1. On
2. Off
Exit
or
Stop
to
*** Menu item numbers may vary according to configurations.
2-62 WorkCentre Pro 665/685/765/785
Page 83

Programming the Machine
Line Monitor Default Setting
Enable this feature to listen to the initial call sequence during all send
and polling operations. To enable this feature for a single operation,
refer to “Listen to Dial in chapter 5".
To set the Line Monitor feature:
1. Press:
Menu
2. Select the Line Monitor option:
To enable the Line Monitor feature, press .
To disable the Line Monitor feature, press .
3. The menu selection screen redisplays. Press
return to the Standby Mode.
***
Line monitor
1. Always
2. Off
Exit
or
Stop
to
*** Menu item numbers may vary according to configurations.
WorkCentre Pro 665/685/765/785 2-63
Page 84

Programming the Machine
2-64 WorkCentre Pro 665/685/765/785
Page 85

3 Receiving Documents
The WorkCentre can receive documents automatically or manually.
Various features are available for customizing your document
receiving operation. You can specify a reduction mode for use when
oversized documents are received, collate received documents or
receive to memory.
The following receiving modes are available:
Receiving
Mode Situation for Selection Sequence of Operation
Receiving Documents
Auto
Receive
Manual
Receive
Receive to
Memory
Secure
Receive
Use when the machine is
connected to a dedicated
telephone line for facsimile use
only.
Use when the machine is
connected to a line that is
primarily used for voice.
User selectable option. Use
when the machine is out of
paper or toner.
User selectable option. Use for
Secure Receptions.
Upon receiving a call, the machine
answers and receives a document
automatically.
Upon receiving an incoming call, pick
up the telephone handset to talk with
the remote party before starting any
fax communication.
When enabled, the machine
automatically receives documents to
memory if the printer becomes
unavailable unti l memory b ecom es full .
When enabled, the machine receives
all documents into memory during the
specified time. The documents
automatically print at the end of the
specified time.
WorkCentre Pro 665/685/765/785 3-1
Page 86

Receiving Documents
Basic Receive
The WorkCentre can receive documents automatically or manually
depending on the Answer Mode you have selected. If the Answer
Mode is set to Auto, the machine receives a document automatically
upon receiving a call.
If the Answer Mode is set to Manual, the machine will not receive a
document until you press the
use the machine as a telephone, yet receive documents when
desired.
The default Answer Mode is Auto.
Setting the Answer Mode (Line 1)
When the answer mode is set to auto receive, the machine
automatically answers and receives incoming fax calls. Use the Auto
Answer mode if you have a dedicated phone line.
Use the Manual Answer mode if you have a single line for fax and
voice communications. The Manual Answer mode allows you to
answer incoming calls manually. If an incoming call is a fax, you can
receive the fax by pressing the
Start
key. This mode enables you to
Start
key.
To set the Line 1 Answer Mode:
1. Press:
Menu
Answer mode
1. Auto answer
2. Manual answer
2. Select the Answer Mode:
To select Auto answer, press , then go to Step 3.
To select Manual answer mode, press , then press
Stop
to return to the Standby Mode.
3-2 WorkCentre Pro 665/685/765/785
Exit
or
Page 87

Receiving Documents
3. If set to Auto answer, using the Numeric Keypad, enter the
number of times the phone must ring before the machine
Enter
answers, then press
Note: When the machine is set to auto answer and the set
number of rings occurs, the machine answers with a fax
signal tone and enters the Auto Receive mode.
(you must use 2 digits).
Rings to answer
Rings (01-*10)
01
4. The menu selection screen redisplays. Press
return to the Standby Mode.
Exit
or
Stop
to
Setting the Answer Mode (Line 2)
If Your WorkCentre has the 2nd line you can designate the type of
communications you would like to occur on that line (transmission or
receptions).
When the Answer Mode for Line 2 is set to Send and Receive, a
transmission is usually connected through line 2. If line 2 is busy, line
1 will be used.
A manual line selection can be made to override the default setting
for a current transmission (see Chapter 5, “Line Selection”).
The line select setting can be stored in the Speed Dial and One
Touch Key setup procedures if communications with a certain remote
party always requires this setting (refer to Chapter 2, “Setting up the
Phone book”).
* This number varies in some Countries.
WorkCentre Pro 665/685/765/785 3-3
Page 88

Receiving Documents
To set the Line 2 Answer Mode:
1. Press:
2. Select the Answer Mode:
Menu
Answer mode (Line 2)
1. Send & receive
2. Receive only
3. Set receive time
To use line 2 for both transmitting and receiving, press .
Exit
or
Stop
Then press
to return to the Standby mode.
To use line 2 to receive only, press . Then press
return to the Standby mode.
To set a specified time period for receiving documents on line 2,
press .
3. Using the Numeric Keypad, enter the time period you want to
receive documents on line 2, then press
format is set, select AM/PM.
Receive only
Start/Stop time:
4. The menu selection screen redisplays. Press
return to the Standby Mode.
Enter
. If the 12-hour
00:00 - 00:00
Exit
or
Stop
Stop
to
to
3-4 WorkCentre Pro 665/685/765/785
Page 89

Receiving Documents
Auto Receive
When the Answer Mode is set to Auto, your documents are received
automatically. Various advanced features are available for receiving
documents, refer to the Advanced Receive section later in this
Chapter.
Manual Receive
When the Answer Mode is set to Manual, you can establish voice
contact first and then start receiving a fax by pressing the
This feature is not available in all markets.
To use this feature, the machine must be set to “Manual Answer.”
Refer to “Setting the Answer Mode (Line 1)” earlier in this chapter.
Note: Manual Receive mode does not function if a Mailbox or
Polling function is in use (see “Chapter 7, “Polling” and
Chapter 8, “Mailbox Communications”).
To receive manually:
1. When the telephone rings, pick up and talk with the remote
operator. (If a fax tone is heard, press the
Start
key).
Start
key.
2. When you finish talking and are ready to receive the document,
and the remote party is ready to send, press the
3. Hang up the handset. The document is received.
WorkCentre Pro 665/685/765/785 3-5
Start
key.
Page 90

Receiving Documents
Advanced Receive
Various advanced receive modes and features are available on the
WorkCentre to fit your individual needs.
The following advanced modes and features are available:
Collate Fax
Modes and Features Description
Collate Fax When enabled, received documents are collated
with the last page on bottom, first page on top.
Reduce Fax Selects whether to reduce or divide long
documents.
Receive to Memory When enabled, documents are received to
memory when the printer is unavailable.
Secure Receive When enabled, documents are received to
memory during specified times.
Discard ex tra When enabled, dis c ards up to 10mm of the lower
portion of a long document.
When the collate fax feature is selected, all received documents are
automatically collated. This means the last page is on the bottom and
the first page on top of the stack in the output tray.
To enable the Collate fax function:
1. Press:
Menu
Collate fax
1. On
2. Off
3-6 WorkCentre Pro 665/685/765/785
Page 91

Receiving Documents
2. Select the collate fax option:
To enable the collate option, press .
To disable the collate option, press .
Exit
or
Stop
3. The menu selection screen redisplays. Press
return to the Standby Mode.
to
Reduce Incoming Fax Setting
This function allows a reduction of the received image. When this
feature is set to On and letter/A4 size copy paper is installed, the
WorkCentre reduces longer size documents to fit on the paper.
If Off is selected the longer size document prints on 2 pages.
To set the Reduce Incoming Fax default setting:
1. Press:
Menu
Reduce incoming fax
1. On
2. Off
2. Select the Reduce incoming fax option:
To automatically reduce oversized documents, press .
To automatically divide oversized documents into multiple pages,
press .
3. The menu selection screen redisplays. Press
return to the Standby Mode.
WorkCentre Pro 665/685/765/785 3-7
Exit
or
Stop
to
Page 92

Receiving Documents
Receive to Memory
When this feature is enabled and the printer is not available, the
machine automatically receives the document to memory. If this
feature is disabled, the machine does not answer the phone. A
receive to memory operation occurs if the paper tray is empty, the
paper is jammed, or the toner is empty. The message “Document in
Memory” displays when you have documents stored in memory. The
machine automatically prints when the problem is corrected.
If the memory becomes full while the machine is receiving a
document, the machine terminates the operation but retains the
pages it received successfully.
To enable the Receive to Memory feature:
1. Press:
Note: Receive to Memory does not occur when the Free Memory
is zero or 100 jobs have been received. If the Free Memory
becomes zero during Receive to Memory, document
reception stops and no further receptions are possible until
memory becomes available.
Menu
Receive to memory
1. On
2. Off
3-8 WorkCentre Pro 665/685/765/785
Page 93

Receiving Documents
2. Select the Receive to Memory option:
To enable the Receive to Memory mode, press .
To disable the Receive to Memory mode, press .
Exit
or
Stop
3. The menu selection screen redisplays. Press
return to the Standby Mode.
to
Secure Receive
The Secure Receive feature allows you to set specified times when
documents can be received to memory. This feature is useful when
private documents are expected. All documents are received to
memory during the specified time, then automatically printed at the
end of the time period.
In addition to the Automatic Secure Receive feature, you can
manually enable the machine to Secure Receive at any time. (See
“Manual Secure Receive” in this section.)
To stop a Secure Receive time period and immediately print all
received documents, refer to “Ending the Secure Receive Mode”.
Automatic Secure Receive Setup
To enable the Automatic Secure Receive Mode, enter a 4-digit
security code and designate the time period for receiving documents
to memory.
To setup the Secure Receive Mode:
1. Press:
Menu
01. Security code
02. Security On/Off
WorkCentre Pro 665/685/765/785 3-9
Page 94

Receiving Documents
2. To set a security code for the first time, or to change your security
code, press then press .
To enable or disable the Secure Receive feature, press
then press , then go to Step 5.
Security code
Enter new code
Security code:
Security code
– or –
Enter existing code
Security code:
Note: If you enter an existing code, the “Enter new code” screen
will redisplay, allowing you to enter a new security code.
Enter your new code and press Enter.
3. Enter a new 4-digit security code, or your existing security code,
Enter
then press
4. To enable or disable the Secure Receive feature, press .
The menu selection screen redisplays.
3-10 WorkCentre Pro 665/685/765/785
.
Secure receive
1. Security code
2. Security On/Off
Secure receive
Security code:
Page 95

Receiving Documents
Enter
5. Enter your security code and press
Secure receive
1. On
2. Off
6. Select the Secure Receive option:
To disable the Secure Receive Mode, press , then press
Exit
or
Stop
to return to the Standby Mode.
To enable the Secure Receive Mode and designate the time
period to receive private documents, press .
Secure receive
Start/Stop time
6:00 – 09:00
.
1
Note: The time period displays in 12 hour format if you have “12
hour” selected in the Date and Time Setup. (See the
User’s Guide.)
7. Enter the time period during which you want the WorkCentre to
receive Secure documents each day, then press
Secure recv. all day
For each day?
1.Yes
2. No
WorkCentre Pro 665/685/765/785 3-11
Enter
.
Page 96

Receiving Documents
8. Select the days of the week subject to the time period designated
9. Select the Secure Receive option for this day:
in Step 7.
To enable the WorkCentre to Secure Receive documents during
the designated time period every day, press . The setting is
Exit
enabled. The menu selection screen redisplays. Press
Stop
to return to the Standby Mode.
To select the days of the week that the WorkCentre uses Secure
Receive for documents at the specified time period, press .
Monday
Secure all day:
1. Yes
2. No
or
To enable the Secure Receive Mode for this day, press .
To disable the Secure Receive Mode for this day, press .
The display for the next weekday displays.
10. Repeat Step 9 to set the Secure Receive for each day of the
week.
11. The menu selection screen redisplays. Press
return to the Standby Mode.
3-12 WorkCentre Pro 665/685/765/785
Exit
or
Stop
to
Page 97

Receiving Documents
Manual Secure Receive
Once the Secure Receive Mode is enabled (see “Automatic Secure
Receive Setup”) you can enforce the mode at any time (even outside
of the time period specified in “Automatic Secure Receive Setup”).
To manually enforce Secure Receive Mode:
1. Press:
Menu
Secure receive
1. Start
2. Stop
2. To start the Secure Receive Mode, press .
The Secure Receive Mode is activated and the machine returns to
the Standby Mode.
WorkCentre Pro 665/685/765/785 3-13
Page 98

Receiving Documents
Printing the Stored Document in Secure Receive Mode
Once the Secure Receive Mode is activated, either automatically or
manually, you can immediately print the stored documents.
To print all received documents:
1. Press:
2. To print all documents, press .
Menu
Secure receive
1. Start
2. Stop
Secure receive
Security code:
3. Enter your 4-digit security code and press
12-01-1999 15:47
Ready
Free memory: 80%
Printing:
The machine prints all documents received during the Secure
Receive Mode, then returns to the Secure Receive Mode.
3-14 WorkCentre Pro 665/685/765/785
Enter
.
Page 99

Receiving Documents
Discard Extra Setting*
When the Discard Extra Setting feature is enabled, any portion of the
document, up to 10mm, that is longer than the recording area is
discarded. If the excess portion is greater than 10mm, the document
is printed on 2 pages. This allows for remote machines that have
scanners that are slight slipping to fit the image on one page. This
feature not allowed in all markets.
In some cases the lower part of the document data may be lost.
To set the Discard Extra selection:
1. Press:
Menu
Discard extra
1. On
2. Off
2. Select the Discard Extra selection:
To discard the portion of the document exceeding the recording
area, press .
To automatically divide oversized documents into multiple pages,
press .
3. The menu selection screen redisplays. Press
Exit
or
Stop
to
return to the Standby Mode.
* Not available in all markets.
WorkCentre Pro 665/685/765/785 3-15
Page 100

Receiving Documents
Notes:
3-16 WorkCentre Pro 665/685/765/785
 Loading...