

Page 1

Xerox Wide Format 6705 System
User Guide
Page 2

Mac OS is a trademark of Apple Inc., registered in the United States and other countries.
Active Directory, Internet Explorer, Microsoft, Windows, Windows Server, and Windows Vista are
trademarks or registered trademarks of Microsoft Corporation in the U.S. and other countries.
Adobe, Acrobat, Adobe PostScript 3, PostScript, and PostScript logo are
trademarks or registered trademarks of Adobe Systems Incorporated in the U.S. and other countries.
HP, HP-GL, HP-GL/2, and HP-RTL are registered trademarks of Hewlett-Packard Corporation.
MontaVista Linux is a registered trademark of MontaVista Software, Inc.
RSA and BSAFE are either registered trademarks or trademarks of EMC Corporation in the United States and/or other countries.
All product/brand names are trademarks or registered trademarks of the respective holders.
Microsoft product screen shot(s) reprinted with permission from Microsoft Corporation.
In this manual, safety instructions are preceded by the symbol . Always read and follow the instructions before
performing the required procedures.
If a malfunction occurs with the machine's hard disk or other storage media, any received or stored data including registered
configurations may be lost. Xerox is not responsible for any direct or indirect damages arising from or caused by such data
loss.
Xerox is not responsible for any breakdown of machines due to infection of computer virus or computer hacking.
Important
1. This manual is copyrighted with all rights reserved. Under the copyright laws, this manual may not be copied or modified
in whole or part, without the written consent of the publisher.
2. Parts of this manual are subject to change without prior notice.
3. We welcome any comments on ambiguities, errors, omissions, or missing pages.
4. Never attempt any procedure on the machine that is not specifically described in this manual. Unauthorized operation
can cause faults or accidents. Xerox is not liable for any problems resulting from unauthorized operation of the equipment.
An export of this product is strictly controlled in accordance with Laws concerning Foreign Exchange and Foreign Trade of
Japan and/or the export control regulations of the United States.
®
and Xerox and Design® and CentreWare are trademarks of Xerox Corporation in the United States and/or
Xerox
other countries.
Page 3

1
3
2
5
4
7
6
9
8
11
10
13
12
15
14
16
18
17
20
19
Xerox Wide Format 6705 System
User Guide
Preface
Before Using the Machine
Thank you for selecting the Xerox Wide Format 6705 System.
This guide describes operating instructions and precautions
for using the Xerox Wide Format 6705 System. To get the
most out of the system and to use it effectively, be sure to
read this User Guide before use.
This guide is intended for first-time users of the machine, and
describes how to use the Copy/Print/Scan features, how to
clear paper jams, the daily maintenance procedures, how to
set various setting items, and various precautions.
This guide assumes that you have a basic understanding and
operating knowledge of your personal computer and network
environment. For the basic information and operating
instructions of your personal computer and network
environment, refer to the documentation provided for your
personal computer, operating system, and network system.
Table of Contents
Copy
Scan
Stored Programming
Computer Operations
Configuration
Authentication
Problem Solving
System Settings
Appendix
After reading this guide, be sure to keep this guide so you can
refer to it handy for quick reference whenever you have
trouble with the machine's operation or some failure occurs
while using the machine.
Xerox shares the global concern about environmental
conservation and has integrated that concern in its
business activities from research and development to
disposal. We have implemented a number of programs
to lessen the burden on the environment. For example,
we have totally eliminated ozonedepleting
chlorofluorocarbons from our manufacturing facilities.
We are committed to leadership in the conservation of
resources by reusing and recycling post-consumer
waste material such as paper, cartridges, and parts
from our customer's copiers and printers. Along with
our efforts to make environmental values a part of the
Xerox culture, Xerox Wide Format 6705 System adopts
recycled components that satisfy our strict quality
standards.
Index
Page 4

4
Preface
Page 5

Table of Contents
Table of Contents
Preface .........................................................................................................................................................................................................................3
Table of Contents....................................................................................................................................................................................................5
Types of Manuals ................................................................................................................................................................................................. 13
Using This Guide ................................................................................................................................................................................................... 14
Safety Notes ........................................................................................................................................................................................................... 17
Environment............................................................................................................................................................................................................ 26
Regulation ...............................................................................................................................................................................................................27
Legal Notice ............................................................................................................................................................................................................ 28
Chapter 1 Before Using the Machine.....................................................................................29
1.1 Machine Components............................................................................................................................................................. 30
1.2 Power Source ..............................................................................................................................................................................33
1.2.1 Switching the Power On........................................................................................................................................................33
1.2.2 Switching the Power Off .......................................................................................................................................................34
1.2.3 Saving Power Consumption While the Machine is not in Use...............................................................................35
1.3 Energy Saver Mode .................................................................................................................................................................. 36
1.3.1 Entering the Energy Saver Mode.......................................................................................................................................36
1.3.2 Exiting the Energy Saver Mode..........................................................................................................................................37
1.4 Control Panel .............................................................................................................................................................................. 38
1.4.1 Screens and Buttons Displayed..........................................................................................................................................40
1.5 [Services Home] Screen......................................................................................................................................................... 41
1.5.1 Adjusting Screen Brightness................................................................................................................................................43
1.6 Text Entry..................................................................................................................................................................................... 44
1.7 Loading/Replacing Paper....................................................................................................................................................... 45
1.7.1 Replacing/Cutting Roll Paper ..............................................................................................................................................45
1.7.2 Loading Cut Sheet Paper (Bypass)....................................................................................................................................48
1.7.3 Switching Between Trays......................................................................................................................................................48
1.8 Billing Information................................................................................................................................................................... 50
1.9 Replacing Consumables ......................................................................................................................................................... 51
1.9.1 Loading Toner ...........................................................................................................................................................................52
1.9.2 Replacing the Waste Toner Container............................................................................................................................55
1.10 Calibrating the Scan Sensor Gap........................................................................................................................................ 57
1.10.1 Performing Auto Adjustment..............................................................................................................................................57
1.10.2 Performing Optional Adjustment......................................................................................................................................58
1.10.3 Initializing Adjustment Values...........................................................................................................................................60
1.10.4 Error Code ...................................................................................................................................................................................61
1.11 Cleaning the Machine............................................................................................................................................................. 62
Table of Contents
5
Page 6

TableofContents
1.12 Machine Status.......................................................................................................................................................................... 64
1.13 Job Status..................................................................................................................................................................................... 67
1.14 Logging in as Authorized User............................................................................................................................................. 69
1.15 About Originals .......................................................................................................................................................................... 72
1.16 Media Types................................................................................................................................................................................ 73
1.12.1 Checking the Machine Information.................................................................................................................................64
1.12.2 Supplies........................................................................................................................................................................................66
1.13.1 Checking Job Status................................................................................................................................................................67
1.13.2 Checking Current/Pending Jobs.........................................................................................................................................67
1.13.3 Checking Completed Jobs ....................................................................................................................................................68
1.14.1 Logging In/Out through Control Panel Authentication with User ID.................................................................70
1.15.1 Usable Originals........................................................................................................................................................................72
1.15.2 Originals that Require the Use of the Document Carrier (Optional) ..................................................................72
1.15.3 Precautions When Handling Originals.............................................................................................................................72
1.16.1 Media Type.................................................................................................................................................................................73
1.16.2 Unusable Media .......................................................................................................................................................................74
1.16.3 Handling and Storing Media...............................................................................................................................................75
Chapter 2 Copy ...............................................................................................................................77
2.1 Copying Procedure ................................................................................................................................................................... 78
2.1.1 Step 1 Selecting Functions...................................................................................................................................................78
2.1.2 Step 2 Entering a Quantity..................................................................................................................................................79
2.1.3 Step 3 Starting the Copy Job..............................................................................................................................................80
2.2 Canceling the Copy Job.......................................................................................................................................................... 82
2.3 Copying in the Specified Paper Size (Auto Mode)....................................................................................................... 83
2.4 Making Adjustments to Color on the Original ..............................................................................................................84
2.4.1 Adjusting Individual Color Density (Adjust Color Density).....................................................................................84
2.4.2 Eliminating the Specified Color on the Original (Disabling Color).......................................................................85
2.5 Scanning to Copy Documents in Maximum Width..................................................................................................... 86
2.6 Loading Paper Manually (Bypass Copying) ................................................................................................................... 88
2.7 Copying Long Documents ..................................................................................................................................................... 90
2.8 Copying Multiple Documents (Collation)........................................................................................................................ 91
2.9 Running Sample Copies.......................................................................................................................................................... 93
2.10 Copying from Memory............................................................................................................................................................ 95
2.11 Running an Interrupt Copy................................................................................................................................................... 97
2.12 [Copy (Auto Mode)] Screen .................................................................................................................................................. 98
2.12.1 Original Orientation (Specifying the Document Feeding Orientation) .............................................................99
2.12.2 Mapping Table between Original Sizes and Paper Sizes (Matrix)........................................................................99
2.12.3 Paper Orientation (Specifying the Target Paper Orientation)........................................................................... 100
6
Table of Contents
Page 7

Table of Contents
2.13 [Copy (Manual Mode)] Screen ..........................................................................................................................................101
2.13.1 Reduce/Enlarge (Making Enlarged/Reduced Copies).............................................................................................102
2.13.2 Paper Supply (Selecting the Paper Supply Source)................................................................................................. 104
2.13.3 Paper Cut Mode (Selecting How to Cut Delivered Paper)....................................................................................105
2.13.4 Original Type (Selecting the Document Type).......................................................................................................... 106
2.13.5 Original Width (Scanning to Copy Documents in Maximum Width) ..............................................................106
2.13.6 Lighten / Darken (Adjusting Copy Density)................................................................................................................106
2.14 Copy - [Image Quality] Screen ..........................................................................................................................................107
2.14.1 Original Type (Selecting the Document Type).......................................................................................................... 108
2.14.2 Image Options (Adjusting the density, sharpness, and contrast of images) ...............................................109
2.14.3 Background Suppression (Preventing Background Colors from Appearing on the Copied Output)... 110
2.14.4 Threshold Sort (Classifying Halftones on the Document).................................................................................... 111
2.14.5 Adjust Color Density (Adjusting Density Level for Individual Colors) .............................................................111
2.15 Copy - [Layout Adjustment] Screen.................................................................................................................................112
2.15.1 Original Width (Scanning to Copy Documents in Maximum Width) ..............................................................113
2.15.2 Image Shift (Shifting the Position of Document Images)...................................................................................114
2.15.3 Scan Start Position (Specifying Where to Start Scanning)..................................................................................115
2.15.4 Edge Erase (Erasing Edges and Margin Shadows of the Original).................................................................... 116
2.15.5 Invert Image (Making Copies with Inverted Images)........................................................................................... 117
2.15.6 Scan Speed (Specifying Scanning Speed)...................................................................................................................117
2.15.7 Image Rotation (Setting the Orientation to Apply When Image is Rotated) .............................................118
2.16 Copy - [Output Format] Screen .........................................................................................................................................119
2.16.1 Copy Output (Specifying Finishing Options).............................................................................................................120
2.16.2 Lead & Tail Margins (Adding Margins to Top/Bottom Edges of Document) ............................................... 121
2.16.3 Sample Copy (Determining the Optimal Settings Before Running the Whole Copy Job) ......................121
Chapter 3 Scan............................................................................................................................. 123
3.1 Scanning Procedure ...............................................................................................................................................................124
3.1.1 Step 1 Selecting the Feature............................................................................................................................................124
3.1.2 Step 2 Starting the Scan Job............................................................................................................................................127
3.1.3 Step 3 Importing Scanned Data.....................................................................................................................................128
3.2 Stopping the Scan Job ..........................................................................................................................................................129
3.3 Color Scanning.........................................................................................................................................................................130
3.4 Encrypting Scanned Data....................................................................................................................................................131
3.5 Scanning Multiple Documents as One File...................................................................................................................132
3.6 Running an Interrupt Scan..................................................................................................................................................134
Table of Contents
7
Page 8

TableofContents
3.7 [Store to Folder] Screen........................................................................................................................................................135
3.8 [Scan to PC] Screen ................................................................................................................................................................145
3.9 [Multi Send Scan] Screen.....................................................................................................................................................148
3.10 Scan - [Advanced Settings] Screen ..................................................................................................................................151
3.11 Scan - [Layout Adjustment] Screen .................................................................................................................................155
3.7.1 Folder (Select the Destination Folder to Save Scanned Data)........................................................................... 136
3.7.2 Viewing/Deleting Documents in a Folder ...................................................................................................................137
3.7.3 Color Scanning (Selecting the Color Mode for Scanning) .................................................................................... 138
3.7.4 Resolution (Specifying the Scanning Resolution)....................................................................................................139
3.7.5 Original Type (Selecting the Document Type).......................................................................................................... 139
3.7.6 File Format (Selecting a File Format for Output Data) .........................................................................................141
3.8.1 Server Save Destination (Specifying the Save Destination PC) ......................................................................... 146
3.8.2 Browse (Browsing Network PCs and Folders to Specify Save Destination)................................................... 147
3.9.1 Multi Send Address (Specifying the Destination).................................................................................................... 149
3.10.1 Image Options (Adjusting the Scan Density, and Sharpness and Contrast of Images).......................... 152
3.10.2 Background Suppression (Preventing Background Colors from Appearing on the Copied Output)... 153
3.10.3 Threshold Sort (Classifying Halftones on the Document).................................................................................... 154
3.10.4 Adjust Color Density (Adjusting Density Level for Individual Colors) .............................................................154
3.11.1 Reduce / Enlarge (Specifying the Scanning Magnification)................................................................................ 156
3.11.2 Original Size (Specifying the Area Size to be Scanned) ........................................................................................ 156
3.11.3 Edge Erase (Erasing Edges and Margin Shadows of the Original).................................................................... 158
3.11.4 Scan Start Position (Specifying Where to Start Scanning)..................................................................................159
3.11.5 Scan Speed (Specifying Scanning Speed)...................................................................................................................160
3.12 Scan - [Filing Options] Screen ............................................................................................................................................161
3.12.1 Quality / File Size (Specifying Image Compression Ratio Used When Scanning Documents) ............. 161
Chapter 4 Stored Programming ............................................................................................163
4.1 Stored Programming Overview .........................................................................................................................................164
4.2 Registering/Deleting/Changing a Stored Program ...................................................................................................165
4.2.1 Registering a Stored Program..........................................................................................................................................165
4.2.2 Deleting a Stored Program ............................................................................................................................................... 166
4.2.3 Registering/Changing the Name for a Stored Program........................................................................................167
4.3 Calling up a Stored Program ..............................................................................................................................................168
Chapter 5 Computer Operations...........................................................................................169
5.1 Features Overview ..................................................................................................................................................................170
8
Table of Contents
Page 9

Table of Contents
5.2 CentreWare® Internet Services........................................................................................................................................171
5.2.1 What is CentreWare Internet Services?.......................................................................................................................171
5.2.2 Setting Up for Using CentreWare Internet Services............................................................................................... 172
5.2.3 Starting CentreWare Internet Services........................................................................................................................ 173
5.2.4 CentreWare Internet Services Screen Components................................................................................................174
5.3 Printing........................................................................................................................................................................................176
5.3.1 Main Print Features.............................................................................................................................................................. 176
5.3.2 Printable Data Format........................................................................................................................................................177
5.3.3 Preparation for Printing...................................................................................................................................................... 177
5.3.4 Printing Using the Print Driver......................................................................................................................................... 178
5.3.5 Canceling Print Jobs............................................................................................................................................................. 179
Chapter 6 Configuration .......................................................................................................... 199
5.4 Confidential Print....................................................................................................................................................................180
5.4.1 Secure Print.............................................................................................................................................................................. 182
5.4.2 Private Charge Print............................................................................................................................................................. 185
5.5 Importing Scanned Data.....................................................................................................................................................191
5.5.1 Import from a TWAIN-compliant Application..........................................................................................................191
5.5.2 Importing from Stored File Manager 3 .......................................................................................................................194
5.5.3 Importing Using CentreWare Internet Services.......................................................................................................197
6.1 Setup............................................................................................................................................................................................200
6.1.1 Create Folder .......................................................................................................................................................................... 201
6.1.2 Server (PC Save Address) ...................................................................................................................................................203
6.1.3 Printer (Multi Send Address)............................................................................................................................................. 205
6.1.4 Multi Send Address (Group Address) ............................................................................................................................206
6.1.5 Paper Tray Series / Paper Type........................................................................................................................................ 208
6.2 Setting the IP Address ..........................................................................................................................................................209
6.3 Scanner Environment Settings ..........................................................................................................................................210
6.3.1 Setting Up the Store to Folder Feature........................................................................................................................ 210
6.3.2 Setting Up the Scan to PC Feature................................................................................................................................211
Chapter 7 Authentication........................................................................................................215
7.1 Overview of the Authentication Features.....................................................................................................................216
7.2 Authentication Features ......................................................................................................................................................217
7.2.1 Authentication for Each User Types .............................................................................................................................217
7.2.2 Types of Authentication .................................................................................................................................................... 218
7.3 Services Controlled by Authentication ...........................................................................................................................219
Table of Contents
9
Page 10

TableofContents
7.4 Folder Authentication ...........................................................................................................................................................220
7.4.1 Overview ...................................................................................................................................................................................220
7.4.2 When Authentication is Disabled...................................................................................................................................221
7.4.3 When Authentication is Enabled.................................................................................................................................... 222
7.5 Enabling Local Authentication ..........................................................................................................................................223
7.5.1 Set the Authentication Method to "Local Authentication".................................................................................. 223
7.5.2 Setting Access Restriction.................................................................................................................................................. 225
7.5.3 Registering a User.................................................................................................................................................................225
7.5.4 Batch Registering Users .....................................................................................................................................................226
7.6 Enabling Remote Authentication.....................................................................................................................................233
7.6.1 Set the Authentication Method to "Login to Remote Accounts"....................................................................... 233
7.6.2 Setting Access Restriction.................................................................................................................................................. 235
7.6.3 Saving Remote Authentication Information on the Machine............................................................................235
7.6.4 Configuring the Authentication Server........................................................................................................................236
Chapter 8 Problem Solving......................................................................................................245
8.1 Troubleshooting ......................................................................................................................................................................246
8.2 Machine Problems ..................................................................................................................................................................247
8.3 Paper Jam Problems ..............................................................................................................................................................248
8.4 Image Quality Problems ......................................................................................................................................................249
8.5 Problems during Copying.....................................................................................................................................................254
8.6 Problems during Scanning...................................................................................................................................................255
8.7 Problems during Printing .....................................................................................................................................................258
8.8 Problems with CentreWare Internet Services..............................................................................................................259
8.9 Error Messages.........................................................................................................................................................................260
8.10 When a Paper Jam Occurs...................................................................................................................................................264
8.6.1 Unable to Scan with the Machine.................................................................................................................................. 255
8.6.2 Unable to Import Scanned Data to the Computer.................................................................................................256
8.6.3 Unable to Send Scanned Data over the Network (SMB/LPR)............................................................................. 257
8.10.1 Paper Jams in the Roll Unit...............................................................................................................................................265
8.10.2 Paper Jams in the Bypass (Manual) Feed Table ...................................................................................................... 266
8.10.3 Paper Jams in the Upper Unit..........................................................................................................................................266
8.10.4 Paper Jams in the Fusing Unit......................................................................................................................................... 268
10
8.11 When a Document Jam Occurs.........................................................................................................................................270
8.12 Finding More.............................................................................................................................................................................272
8.12.1 To Increase Duration Before Auto Clear..................................................................................................................... 272
8.12.2 To Increase Duration Before Energy Saver Mode Turns On (Changing Energy Saver Timers).............274
8.12.3 To Customize the Default Screen................................................................................................................................... 275
8.12.4 To Display the Auto Mode Screen by Default...........................................................................................................276
Table of Contents
Page 11

Table of Contents
8.12.5 To Go to the Target Screen with a Single Button Press (Assigning the Custom Buttons) ...................... 277
8.12.6 To Change the Default Output File Format of Scanned Data ........................................................................... 278
8.12.7 To Calibrate Gaps Appearing on the Copied or Scanned Output.....................................................................279
Chapter 9 System Settings...................................................................................................... 281
9.1 System Settings Procedure .................................................................................................................................................282
9.1.1 Step 1 Entering System Administration Mode.......................................................................................................... 282
9.1.2 Step 2 Selecting the Desired Item................................................................................................................................. 283
9.1.3 Step 3 Configuring a Feature........................................................................................................................................... 284
9.1.4 Step 4 Exiting System Administration Mode.............................................................................................................285
9.2 Tools Menu List........................................................................................................................................................................286
9.3 Common Service Settings....................................................................................................................................................289
9.3.1 Machine Clock / Timers ...................................................................................................................................................... 289
9.3.2 Audio Tones ............................................................................................................................................................................291
9.3.3 Screen / Button Settings .................................................................................................................................................... 292
9.3.4 Paper Tray Settings..............................................................................................................................................................293
9.3.5 Color Scan Settings ..............................................................................................................................................................294
9.3.6 Attention Light....................................................................................................................................................................... 295
9.3.7 Maintenance...........................................................................................................................................................................296
9.3.8 Other Settings ........................................................................................................................................................................296
9.3.9 Detailed Settings...................................................................................................................................................................299
9.4 Copy Service Settings............................................................................................................................................................301
9.4.1 Copy Tab - Features Allocation.......................................................................................................................................302
9.4.2 Preset Buttons........................................................................................................................................................................302
9.4.3 Copy Defaults.........................................................................................................................................................................303
9.4.4 Auto Tray Switching............................................................................................................................................................. 304
9.4.5 Variable Length Settings ...................................................................................................................................................305
9.4.6 Auto Mode Paper Type....................................................................................................................................................... 306
9.4.7 Auto Mode Rotate Direction ............................................................................................................................................ 307
9.4.8 Detailed Settings...................................................................................................................................................................308
9.5 Connectivity & Network Setup ..........................................................................................................................................309
9.5.1 Port Settings............................................................................................................................................................................310
9.5.2 Protocol Settings ................................................................................................................................................................... 311
9.5.3 Remote Authentication / Directory Service................................................................................................................ 313
9.5.4 SSL / TLS Settings..................................................................................................................................................................316
9.5.5 Detailed Settings...................................................................................................................................................................317
9.6 Scan Service Settings.............................................................................................................................................................318
9.6.1 Preset Buttons........................................................................................................................................................................319
9.6.2 Scan Defaults .........................................................................................................................................................................319
9.6.3 Other Settings ........................................................................................................................................................................321
9.6.4 Detailed Settings...................................................................................................................................................................322
9.7 Stored File Settings ................................................................................................................................................................323
9.7.1 Stored File Settings ..............................................................................................................................................................324
Table of Contents
11
Page 12

TableofContents
9.8 Print Service Settings.............................................................................................................................................................326
9.8.1 Job Recovery...........................................................................................................................................................................326
9.8.2 Other Settings ........................................................................................................................................................................327
9.8.3 Detailed Settings...................................................................................................................................................................329
9.9 Authentication / Security Settings...................................................................................................................................330
9.9.1 System Administrator Settings........................................................................................................................................330
9.9.2 Authentication .......................................................................................................................................................................332
9.9.3 Job Status Default................................................................................................................................................................338
9.9.4 Overwrite Hard Disk ............................................................................................................................................................. 339
9.9.5 Detailed Settings...................................................................................................................................................................341
Chapter 10 Appendix ...................................................................................................................343
10.1 Specifications ...........................................................................................................................................................................344
10.2 Optional Components...........................................................................................................................................................351
10.3 Notes and Restrictions..........................................................................................................................................................352
Index........................................................................................................................................................................................................................359
10.3.1 Notes and Restrictions on the Use of the Machine ................................................................................................352
10.3.2 Notes and Restrictions on the Use of the Copy Feature.......................................................................................353
10.3.3 Notes and Restrictions on the Use of the Scan Feature ....................................................................................... 354
10.3.4 Notes and Restrictions on the Use of the Print Feature........................................................................................ 356
10.3.5 Notes and Restrictions for IPv6 Connection.............................................................................................................. 357
12
Table of Contents
Page 13

Types of Manuals
The following Guides are available.
Guides for the Machine
User Guide <this guide>
Describes the daily maintenance procedures, how to use the Copy/Scan/Print features, how to clear paper jams, how
to set various setting items, and notes and restrictions.
Guides for the Optional Components
The guides for the optional components provide information such as how to operate the optional components, and
how to install software.
Types of Manuals
13
Page 14

Using This Guide
This guide gives you information on how to use the Copy/Print/Scan and other features of the machine.
Organization of This Guide
This guide consists of the following chapters:
Chapter 1 Before Using the Machine
This chapter identifies the machine components, and describes the basic operations of the machine, such as how to
turn the power on and off, how to operate the control panel, and how to exit the Energy Saver mode.
Chapter 2 Copy
This chapter describes the basic operations and functions of the Copy feature.
Chapter 3 Scan
This chapter describes the basic operations and functions of the Scan feature.
Chapter 4 Stored Programming
This chapter describes the Stored Programming feature that enables you to store customized settings.
Chapter 5 Computer Operations
This chapter covers computer operations, such as how to use CentreWare Internet Services, how to print documents,
how to import scanned data, and how to use the Direct Scan feature.
Chapter 6 Configuration
This chapter describes how to create folders, register IP addresses, and set up save destinations, as well as change
those settings.
Chapter 7 Authentication
This chapter describes the authentication features available for the machine.
Chapter 8 Problem Solving
14
This chapter describes solutions to various problems you may have with the machine.
Chapter 9 System Settings
This chapter describes how to configure the system defaults with the System Settings feature.
Using This Guide
Page 15

Chapter 10 Appendix
This chapter describes the machine specifications, optional components, and notes and restrictions.
Conventions
This guide uses the following marks depending on the described contents.
Important
Provides important information that you should know and check before using or operating the
machine.
Note
Refer
Provides information that may be useful when you are using or operating the machine.
Provides cross-references to the content.
The following symbols are used in this guide.
" "
[ ]
< >
>
A cross-reference included in this guide.
Indicates the names of features, input values, input examples, and the messages displayed on
the touch screen.
Indicates the names of the screens, menus, buttons, and tabs displayed on the touch screen.
Indicates the names of the menus, windows, dialog boxes, buttons, tabs, files, and folders
displayed on your computer screen.
Indicates the buttons and indicators on the control panel.
Indicates the keys on your computer keyboard.
Indicates the order of selecting the menu items.
Example: Select [Start] > [All Programs].
Orientation of documents or paper is described in this guide as follows:
Portrait
Loading the document or paper in portrait orientation when viewed from the front of the
machine.
Landscape
Loading the document or paper in landscape orientation when viewed from the front of the
machine.
LEF - Portrait Orientation SEF - Landscape Orientation
A
A
Paper feed direction
A
A
Paper feed direction
The screen shots and machine illustrations in this guide are of the machine with various optional components
installed. Some of the items and features on the screen shots or illustrations may not be displayed or available on
your machine depending on its configuration.
Using This Guide
15
Page 16

The information on various drivers and utility software in this guide may not apply to your drivers and utility
software depending on their version upgrade.
In this guide, "personal computer" and "work station" are collectively called "computer".
Microsoft
®
Windows® Operating System is referred to as "Windows".
Product names are referred to as follows:
ApeosWare Device Management is abbreviated as "Device Management".
ApeosWare Authentication Management is abbreviated as "Authentication Management".
The description of operations in this guide are mainly based on Windows® 7. If using an operating system other
than Windows
®
7, the operating procedures and the screen appearance may be different in your environment.
16
Using This Guide
Page 17
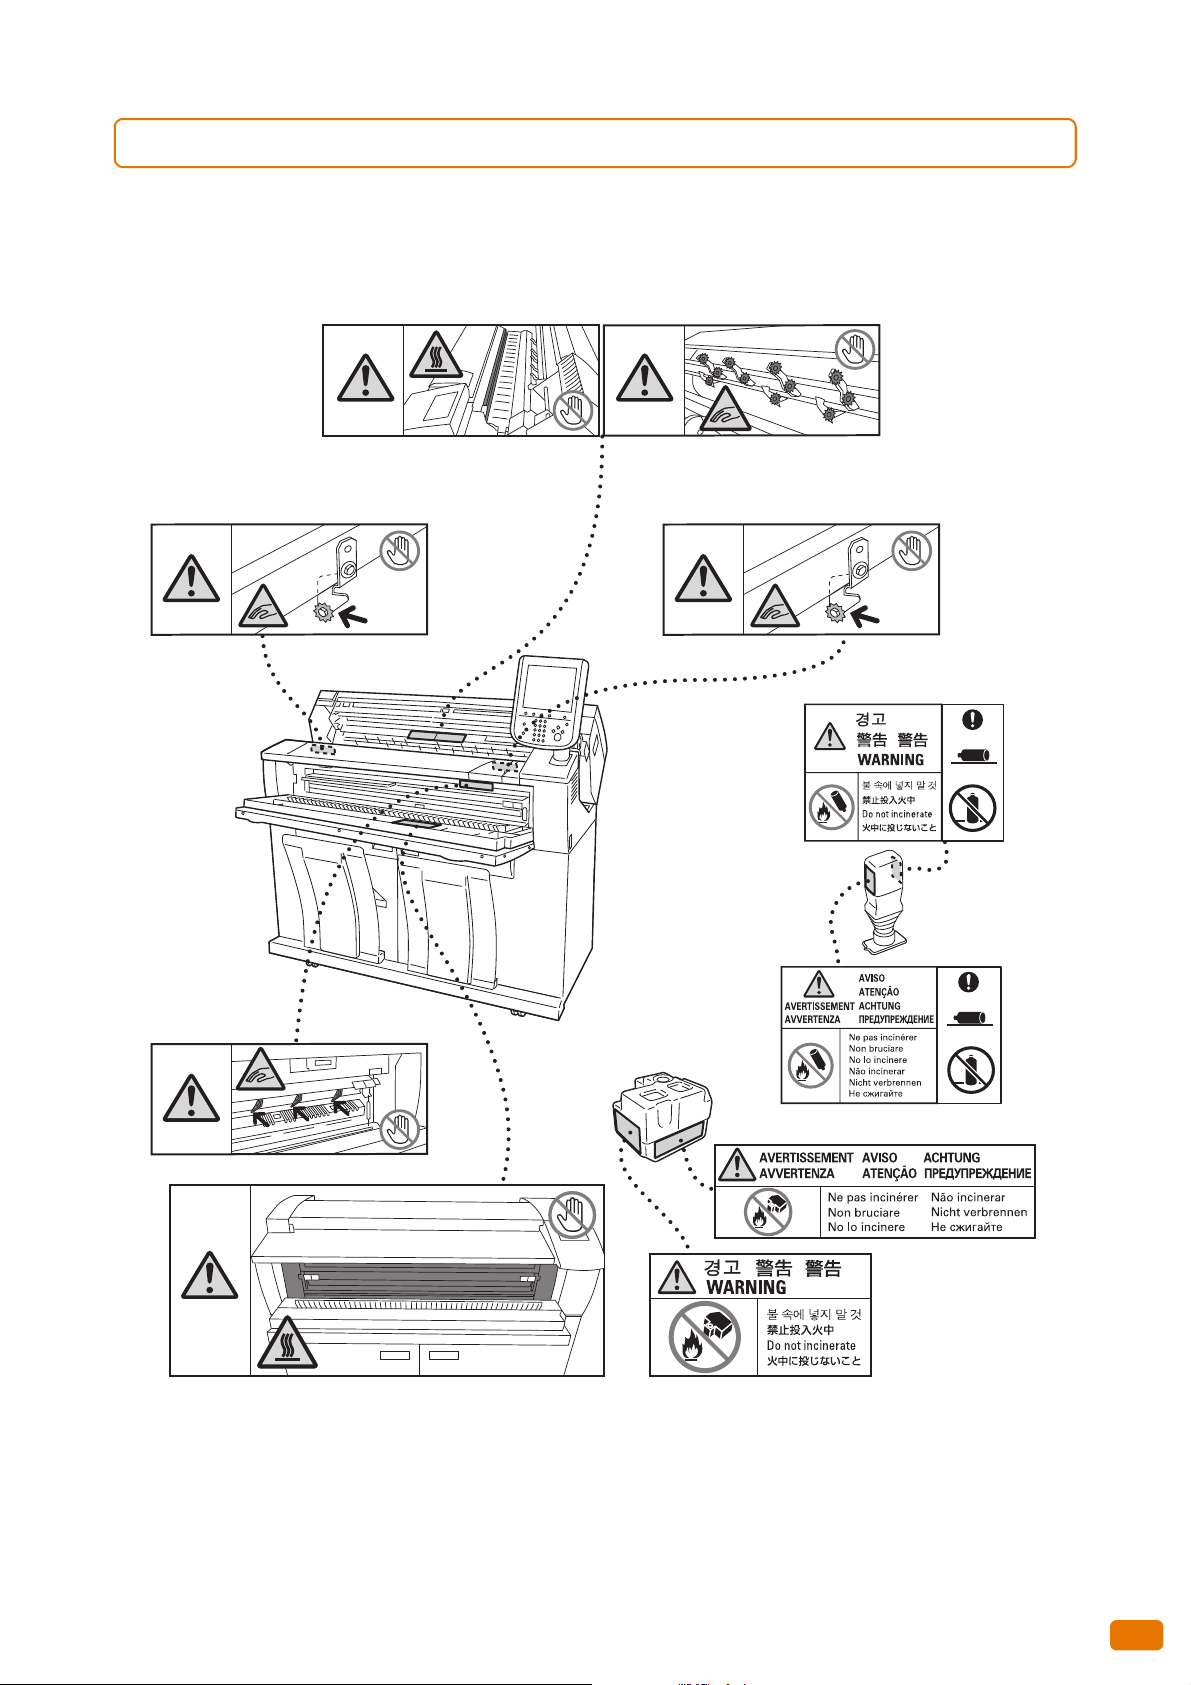
Safety Notes
Flammable Explodable Electric
shock
Heated
surface
Moving
object
Pinched
fingers
Caution
Prohibited No fire Do not
touch
Do not use
in bathroom
Do not tear
down
Keep away
from wet
Never touch
with wet hand
Instructions Unplug Ground/
Earth
Before using this product, read "Safety Notes" carefully for safety use.
This product and recommended supplies have been tested and found to comply with strict safety requirements
including safety agency approvals and compliance with environmental standards. Follow the following instructions
for safety use.
Any unauthorized alteration including an addition of new functions or connection to external devices may not be covered by
the product warranty. Contact your local Xerox representative for more information.
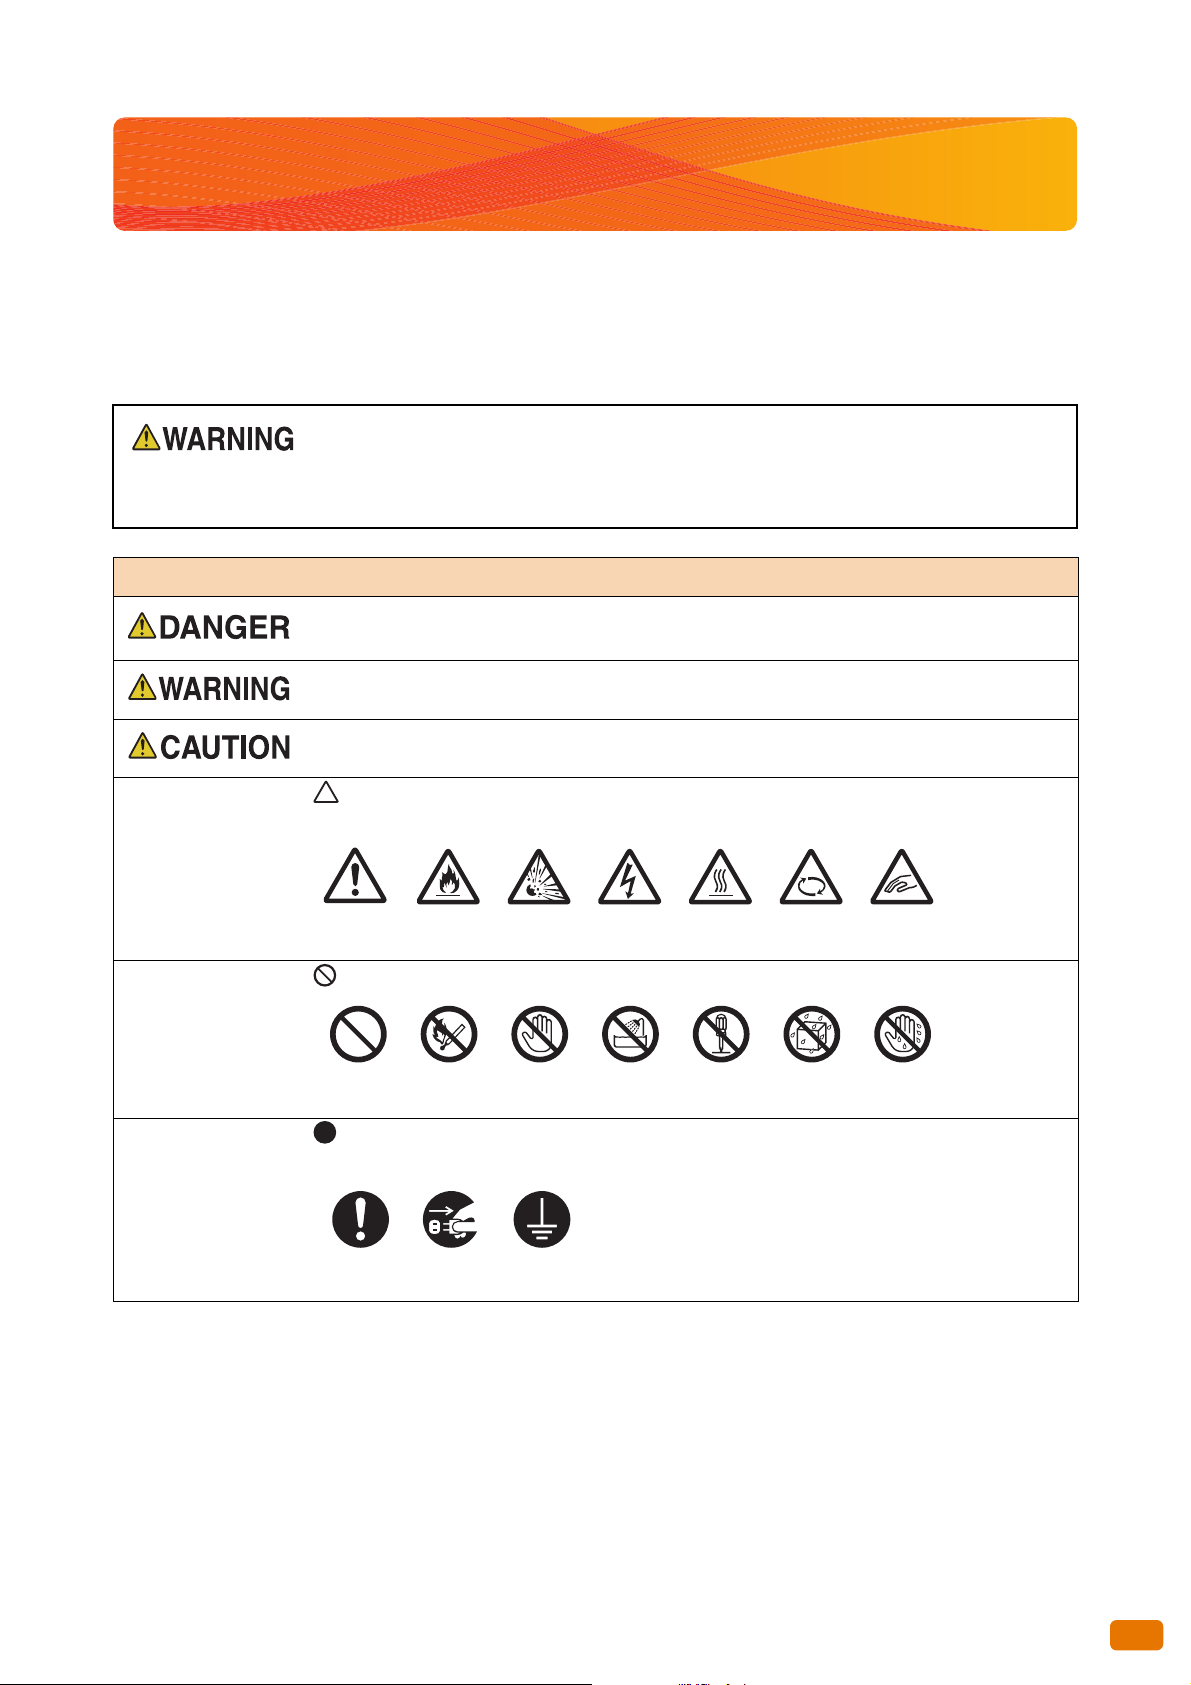
Follow all warning instructions marked on this product. The warning marks stand for the followings:
Used for item that if not followed strictly, can lead death or severe or fatal injuries and the possibility
to do it is comparatively high.
Used for items that if not followed strictly, can lead to severe or fatal injuries.
Used for items that if not followed strictly, can cause injuries to user or damages to machine.
: A symbol for items to pay attention to when handling machine. Follow instructions carefully to
use machine safely.
: A symbol for prohibited items. Follow instructions carefully to avoid any dangerous acts.
: A symbol for items that must be performed. Follow instructions carefully to carry out these
essential tasks.
Safety Notes
17
Page 18

Electrical Safety
WARNING
This product shall be operated by the power source as indicated on the product's data plate. Consult your local
power company to check if your power source meets the requirements.
WARNING: Connect this product to a protective earth circuit.
This product is supplied with a plug that has a protective earth pin. The plug fits only into an earthed electrical outlet. This is a safety feature. If the plug doesn't fit to the outlet, contact an electrician to replace
the outlet to avoid risk of electric shock. Never use an earthed adapter plug to connect the product to the
electrical outlet that has no earth connection terminal.
Improper connection of a grounding conductor may cause electric shock.
Plug the power cord directly into a grounded electrical outlet. To prevent overheat and a fire accident, do
not use an extension cord, a multi-plug adaptor or a multiple connector. Consult your local Xerox
representative to check if an outlet is grounded.
Connect this product to a branch circuit or an outlet that has larger capacity than the rated ampere and
voltage of this product. See the data plate on the rear panel of this product for its rated ampere and
voltage.
Never touch the power cord with wet hands. It may cause electric shock.
Do not put an object on the power cord.
Always keep the plug connection free of dust. The dusty and damp environment may bring about minute
electric current in a connector. It may generate heat and eventually cause a fire accident.
To avoid the risk of electric shock and a fire accident, only use the power cord supplied with this product or
the ones designated by Xerox.
The power cord is exclusive use for this product. Do not use it for any other product.
Do not damage or alter the power cord. Damage and alteration may generate heat and eventually cause
electric shock or a fire accident.
If the power cord is damaged or insulated wires are exposed, contact your local Xerox representative for
its replacement. Do not use a damaged or uninsulated cord to avoid the risk of electric shock and a fire
accident.
18
Safety Notes
Page 19
CAUTION
When cleaning this product, always switch off and unplug it. Access to a live machine interior may cause
WARNING
CAUTION
electric shock.
Do not unplug or re-plug this product with the switch on. Plugging and unplugging a live connector may
deform the plug and generate heat, and eventually cause a fire accident.
Hold the plug not the cord when unplugging this product, or it may damage the cord and cause electric
shock or a fire accident.
Always switch off and unplug the machine when it is not used over weekends or long holidays. It may
cause deterioration of insulations and eventually electric shock or a fire accident.
Once a month, switch off this product and check if
the power cord is plugged firmly into an electrical outlet;
the plug is not excessively heated, rusted or bent;
the plug and electrical outlet are free of dust; and
the power cord is not cracked or worn down.
Once you notice any unusual condition, switch off and unplug this product first and contact your local
Xerox representative.
Machine Installation
Do not locate this product where people might step on or trip over the power cord. Friction or excessive
pressure may generate heat and eventually cause electric shock or a fire accident.
Never locate this product in the following places:
Near radiators or any other heat sources
Near volatile flammable materials such as curtains
In the hot, humid, dusty or poorly ventilated environment
In the place receiving direct sunlight
Near cookers or humidifiers
Locate this product on a level and sturdy surface that can withstand a weight of 300 Kg. Otherwise, if
tilted, the product may fall over and cause injuries.
Safety Notes
19
Page 20

Locate this product in a well-ventilated area. Do not obstruct ventilation openings of the product.
OTHERS
650mm
600mm
800mm
800mm
2760mm
2110mm
Keep the minimum clearance as follows for ventilation and an access to the power plug. Unplug the
product if an abnormal condition is noted.
Do not incline the product at more than 10 degree angle. Otherwise, it may fall over and cause injuries.
10
10
Always lock the wheels of this product after installation. Otherwise, it may fall over or slide and cause
injuries.
When moving this product, always switch off and unplug it. Otherwise, a power cord may be cracked and
overheated, and eventually may cause electric shock and a fire accident.
To keep this product in a good performance and condition, always use it in the following environment:
Temperature: 10 - 32 °C
Humidity: 15 - 85 %
The humidity should be 47.5 % or less at a temperature of 32 °C; the temperature should be 27.8 °C or
less at a humidity of 85 %.
When the product is left in a chilly room and the room is rapidly warmed up by heater, dew condensation
may form inside the product and cause a partial deletion on printing.
20
For measures to prevent the machine from moving and overturning in case of earthquake, please consult
with your local Xerox representative.
Safety Notes
Page 21

Operational Safety
WARNING
The operator's product maintenance procedures are described in the customer documentation supplied
with this product. Do not carry out any other maintenance procedures not described in the
documentation.
This product features safety design not to allow operators access to hazard areas. The hazard areas are
isolated from operators by covers or protectors which require a tool to remove. To prevent electric shock
and injuries, never remove those covers and protectors.
To avoid the risk of electric shock and a fire accident, switch off and unplug the product promptly in the
following conditions, then contact your local Xerox representative.
The product emits smoke or its surface is unusually hot.
The product emits unusual noise or odor.
The power cord is cracked or worn down.
A circuit breaker, fuse or any other safety device becomes activated.
Any liquid is spilled into the product.
The product is soaked in water.
Any part of the product is damaged.
Be careful not to injure your fingers when using the cutter to cut the roll paper.
Do not insert any object into slots or openings of this product.
Do not put any of the followings on the product:
Liquid container such as flower vases or coffee cups
Metal parts such as staples or clips
Heavy objects
If liquid is spilled over or metal parts are slipped into the product, it may cause electric shock or a fire
accident.
Do not use conductive paper such as origami paper, carbonic paper or conductively-coated paper. When
paper jam occurs, it may cause short-circuit and eventually a fire accident.
When cleaning this product, use the designated cleaning materials exclusive to it. Other cleaning
materials may result in poor performance of the product. Never use aerosol cleaners to avoid catching fire
and explosion.
Never play the DVD-ROM supplied with the product on an audio player. Always use a DVD-ROM player.
Otherwise, large sound may damage audio players or your ears.
Do not lubricate the movable parts of the touch panel display. If the fluid enters the electronic part of the
monitor, it can cause damage or fire.
Safety Notes
21
Page 22
CAUTION
Always follow all warning instructions marked on or supplied with this product.
Power Breaker
Test Button
To avoid the risk of burn injuries and electric shock, never touch the area with the "High Temperature" or
"High Voltage" marks on.
Do not apply impact on the surface of the LCD panel, such as by hitting it with a hard object. It can
damage the panel and cause injury.
When adjusting the moving parts at the base of the touch panel display, be careful not to pinch your
fingers. It can cause injury.
Keep electrical and mechanical safety interlocks active. Keep the safety interlocks away from magnetic
materials. Magnetic materials may accidentally activate the product and cause injuries or electric shock.
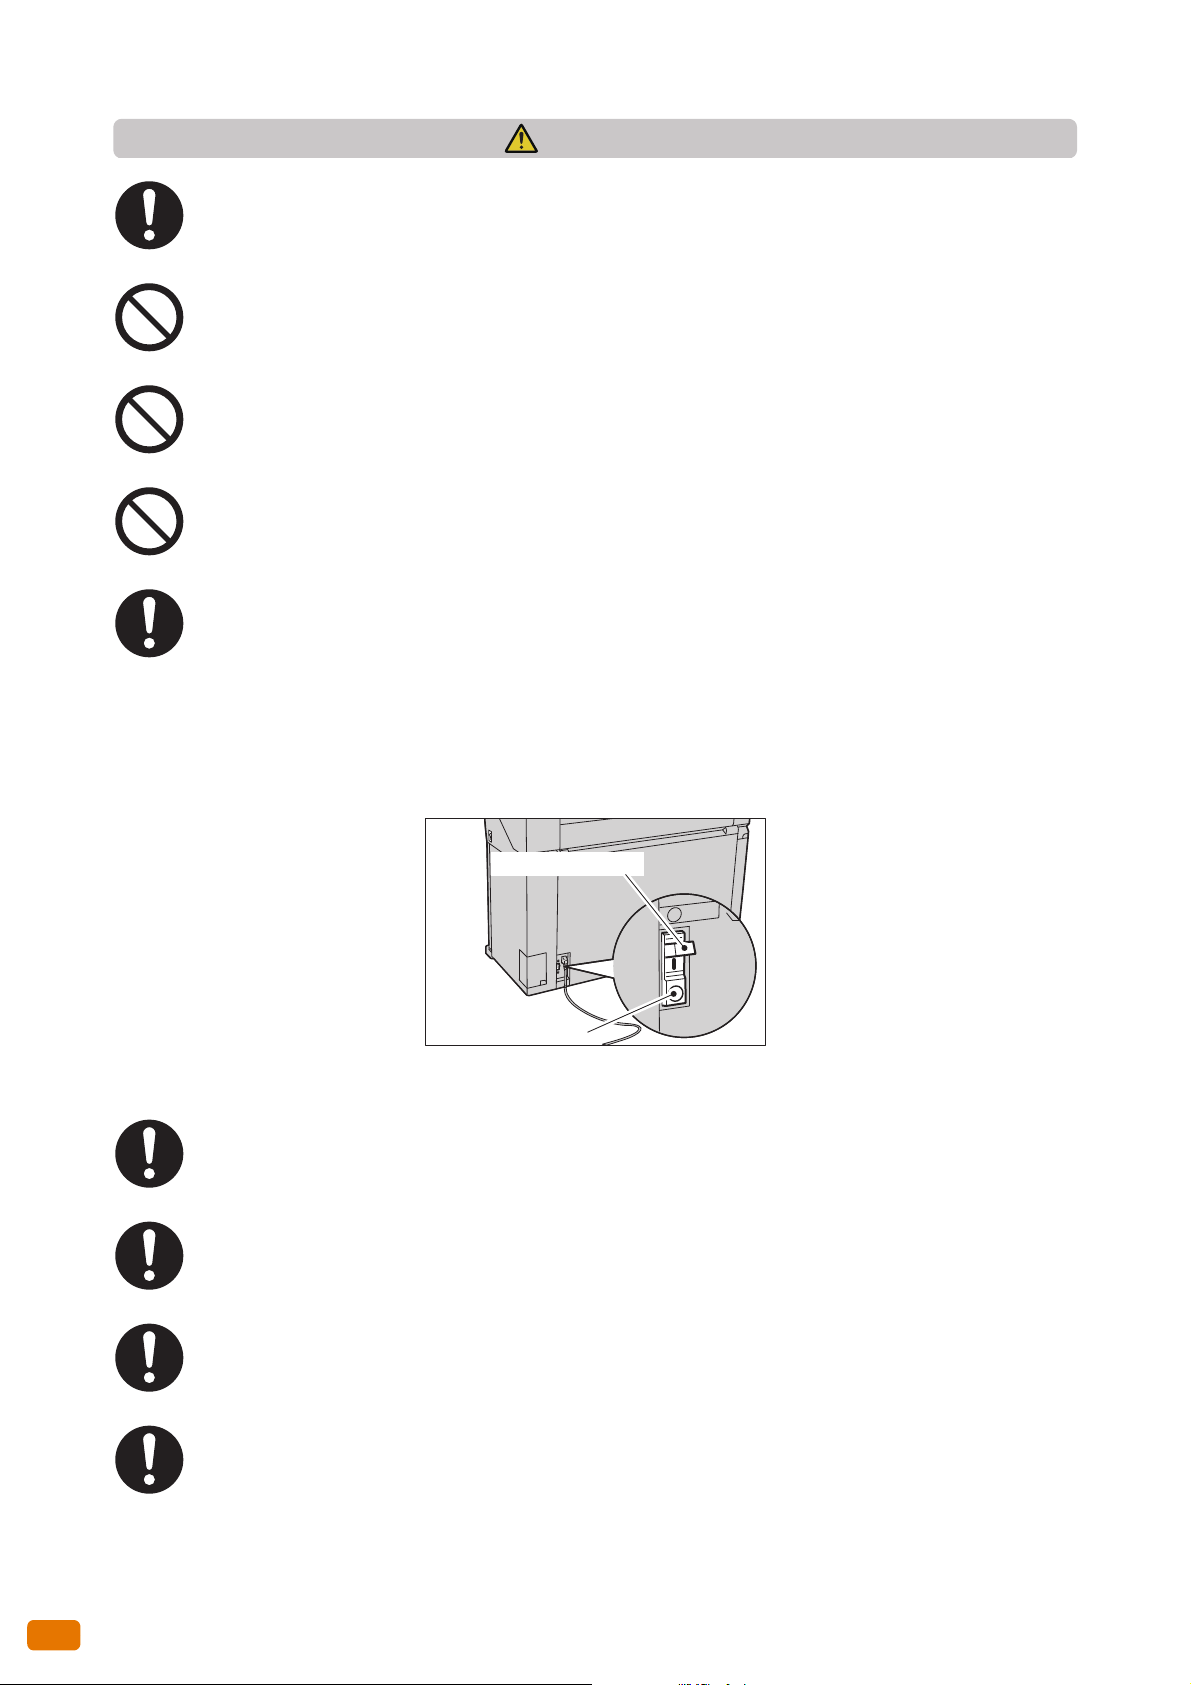
A ground fault interrupter is embedded in this product. If current leakage occurs, the ground fault
interrupter automatically cuts off power circuit to prevent electric shock and a fire accident. The ground
fault interrupter is normally ON [(indicated as "|")]. Check once a month if the ground fault interrupter
works properly in accordance with the following procedures:
(1) Press TEST button to turn off the ground fault interrupter.
(2) Check the indication ("O"). It means that the ground fault interrupter circuit works properly.
(3) Return the ground fault interrupter switch to ON ("|").
If the circuit does not work properly, contact your local Xerox representative.
Do not attempt to remove a paper deeply jammed inside the product, particularly a paper wrapped
around the fusing unit or the heat roller. Otherwise, it may cause injuries or burns. Switch off the product
immediately and contact your local Xerox representative.
For continuous operation more than 1 hour, take a 10 - 15 minute break every hour to rest your eyes.
When pulling out the roll unit, do it gently. If pulled out with too much force, the unit can hit and injure
your knees.
22
When removing jammed paper or performing maintenance service, be careful not to touch the protruding
objects and its surroundings. It may cause injury.
Safety Notes
Page 23
When removing jammed paper or performing maintenance service, be careful not to get your necktie or
WARNING
necklace entangled in the mechanical parts.
To move this product to another location, contact your local Xerox representative.
You must follow the steps described in "Switching the Power Off" (p. 34) in this guide whenever you turn
off the machine. Do not easily attempt to unplug the power cord or power adapter to turn the machine
off. Otherwise, it can cause damage to the hard disk or loss of data.
Ventilate well during extended operation or mass copying. It may affect the office air environment due
to odor such as ozone in a poorly ventilated room. Provide proper ventilation to ensure the comfortable
and safe environment.
The surface of the touch panel display cover is made up mostly of plastic. Do not use benzene, paint
thinner, or other organic solvents to clean the surface since the coating could peel off. (When using a
chemical dust cloth, follow the instructions that came with the cloth.
Do not allow rubber and vinyl products to remain in contact with the surface of the machine for long
periods of time. This may damage the surface of or discolor the cabinet.
Before cleaning the touch panel display, unplug the product from the electrical outlet.
When cleaning, gently wipe the exterior with a soft cloth. If it is difficult to remove dirt, try gently wiping
with a firmly wrung soft cloth moistened with a small amount of neutral detergent. Then, wipe with a
dried cloth.
Consumable
Store all consumables in accordance with the instructions given on its package or container.
Never use a vacuum cleaner for spilled toner and residual toner in this product, toner cartridge or toner
bottle.
It may catch fire by electric sparks inside a vacuum cleaner and cause explosion.
Use a broom or a wet cloth to wipe off the spills. If you spill a large volume of toner, contact your local
Xerox representative.
Never throw a toner cartridge into an open flame. Remaining toner in the cartridge may catch fire and
cause burn injuries or explosion.
If you have a used toner cartridge no longer needed, dispose of in accordance with local regulations.
Never throw a waste toner bottle into an open flame. Toner may catch fire and cause burn injuries or
explosion.
If you have a used waste toner bottle no longer needed, dispose of in accordance with local regulations.
Safety Notes
23
Page 24

CAUTION
Keep drum and toner cartridges out of the reach of children. If a child accidentally swallows toner, spit it
out, rinse mouth with water, drink water and consult a physician immediately.
When replacing drum and toner cartridges, be careful not to spill the toner. In case of any toner spills,
avoid contact with clothes, skin, eyes and mouth as well as inhalation.
If toner spills onto your skin or clothing, wash it off with soap and water.
If you get toner particles in your eyes, wash it out with plenty of water for at least 15 minutes until
irritation is gone. Consult a physician if necessary.
If you inhale toner particles, move to a fresh air location and rinse your mouth with water.
If you swallow toner, spit it out, rinse your mouth with water, drink plenty of water and consult a physician
immediately.
This product uses roll printing paper. Be careful not to drop it as it is heavy and may cause injuries.
Do not lay the paper roll on the machine or on any unstable surface. The paper roll can fall, causing
injuries.
24
Safety Notes
Page 25
Location of Warning and Caution Labels
Always follow all warning instructions marked on or supplied with this product.
To avoid the risk of burn injuries and electric shock, never touch the area with the "High Temperature" or "High
Voltage" marks on.
Safety Notes
25
Page 26

Environment
Dispose of used toner cartridges, waster toner bottles, and drums in accordance with local regulations.
26
Environment
Page 27

Regulation
Radio Frequency Emissions (Class A)
This product has been tested and found to comply with the limits for a class A digital device, pursuant to
International Standard for Electromagnetic Interference (CISPR Publ. 22) and Radiocommunication Act
1992 in Australia/New Zealand. These limits are designed to provide reasonable protection against
harmful interference when the product is operated in a commercial environment. This product generates,
uses, and can radiate radio frequency energy and, if not installed and used in accordance with the
customer documentation, may cause harmful interference to radio communications. Operation of this
product in a residential area is likely to cause harmful interference in which case the user is required to
correct the interference at their own expense.
Changes and modifications to this product not specifically approved by Xerox may void the user's
authority to operate this equipment.
Product Safety Certification (UL, CB)
This product is certified by the following agency using the safety standards listed.
Agency
TUV IEC60950-1:ed. 2
Standard
Regulation
27
Page 28

Legal Notice
Copying or printing certain documents may be illegal in your country. Penalties of fines or imprisonment
may be imposed on those found guilty. The following are examples of items that may be illegal to copy or
print in your country.
Currency
Banknotes and checks
Bank and government bonds and securities
Passports and identification cards
Copyright material or trademarks without the consent of the owner
Postage stamps and other negotiable instruments
This list is not inclusive and no liability is assumed for either its completeness or accuracy. In case of
doubt, contact your legal counsel.
28
Legal Notice
Page 29

Chapter 1 Before Using the Machine
This chapter identifies the machine components, and describes the basic operations of the machine, such as how to
turn the power on and off, how to operate the control panel, and how to configure Energy Saver.
1.1 Machine Components................................................................................................................................. 30
1.2 Power Source................................................................................................................................................... 33
1.3 Energy Saver Mode.......................................................................................................................................36
1.4 Control Panel...................................................................................................................................................38
1.5 [Services Home] Screen .............................................................................................................................. 41
1.6 Text Entry.......................................................................................................................................................... 44
1.7 Loading/Replacing Paper ........................................................................................................................... 45
1.8 Billing Information ....................................................................................................................................... 50
1.9 Replacing Consumables.............................................................................................................................. 51
1.10 Calibrating the Scan Sensor Gap ............................................................................................................ 57
1.11 Cleaning the Machine ................................................................................................................................. 62
1.12 Machine Status .............................................................................................................................................. 64
1.13 Job Status.........................................................................................................................................................67
1.14 Logging in as Authorized User................................................................................................................. 69
1.15 About Originals .............................................................................................................................................. 72
1.16 Media Types ....................................................................................................................................................73
Page 30

1
Before Using the Machine
1.1 Machine Components
This section describes the machine components and their functions.
No. Component Function
1 Document table Load documents here.
2 Document cover Remove this cover to clean the reflector on the back of the cover or the surface of the
scanning glass, and to clear a paper jam.
3 Document guide Align the right edge of the document with this guide.
4 Scanner Catch Tray Holds documents flatly after they are ejected rearward from the machine. (Optional)
5 Control panel Allows you to operate the machine by directly touching the buttons and tabs
displayed on the touch screen. An operator can adjust the tilt angle for better
visibility, by swiveling left or right 45 degrees, up 35 degrees, or down 10 degrees.
Refer
6 Exit tray Copied or printed media are output here face up.
7 Front door Open this door to replace a paper roll or to clear a paper jam.
8 Caster Used when moving the machine. Be sure to lock these casters after you have moved
the machine to its installation location.
For more information, refer to "Control Panel" (p. 38).
30
1.1 Machine Components
Page 31
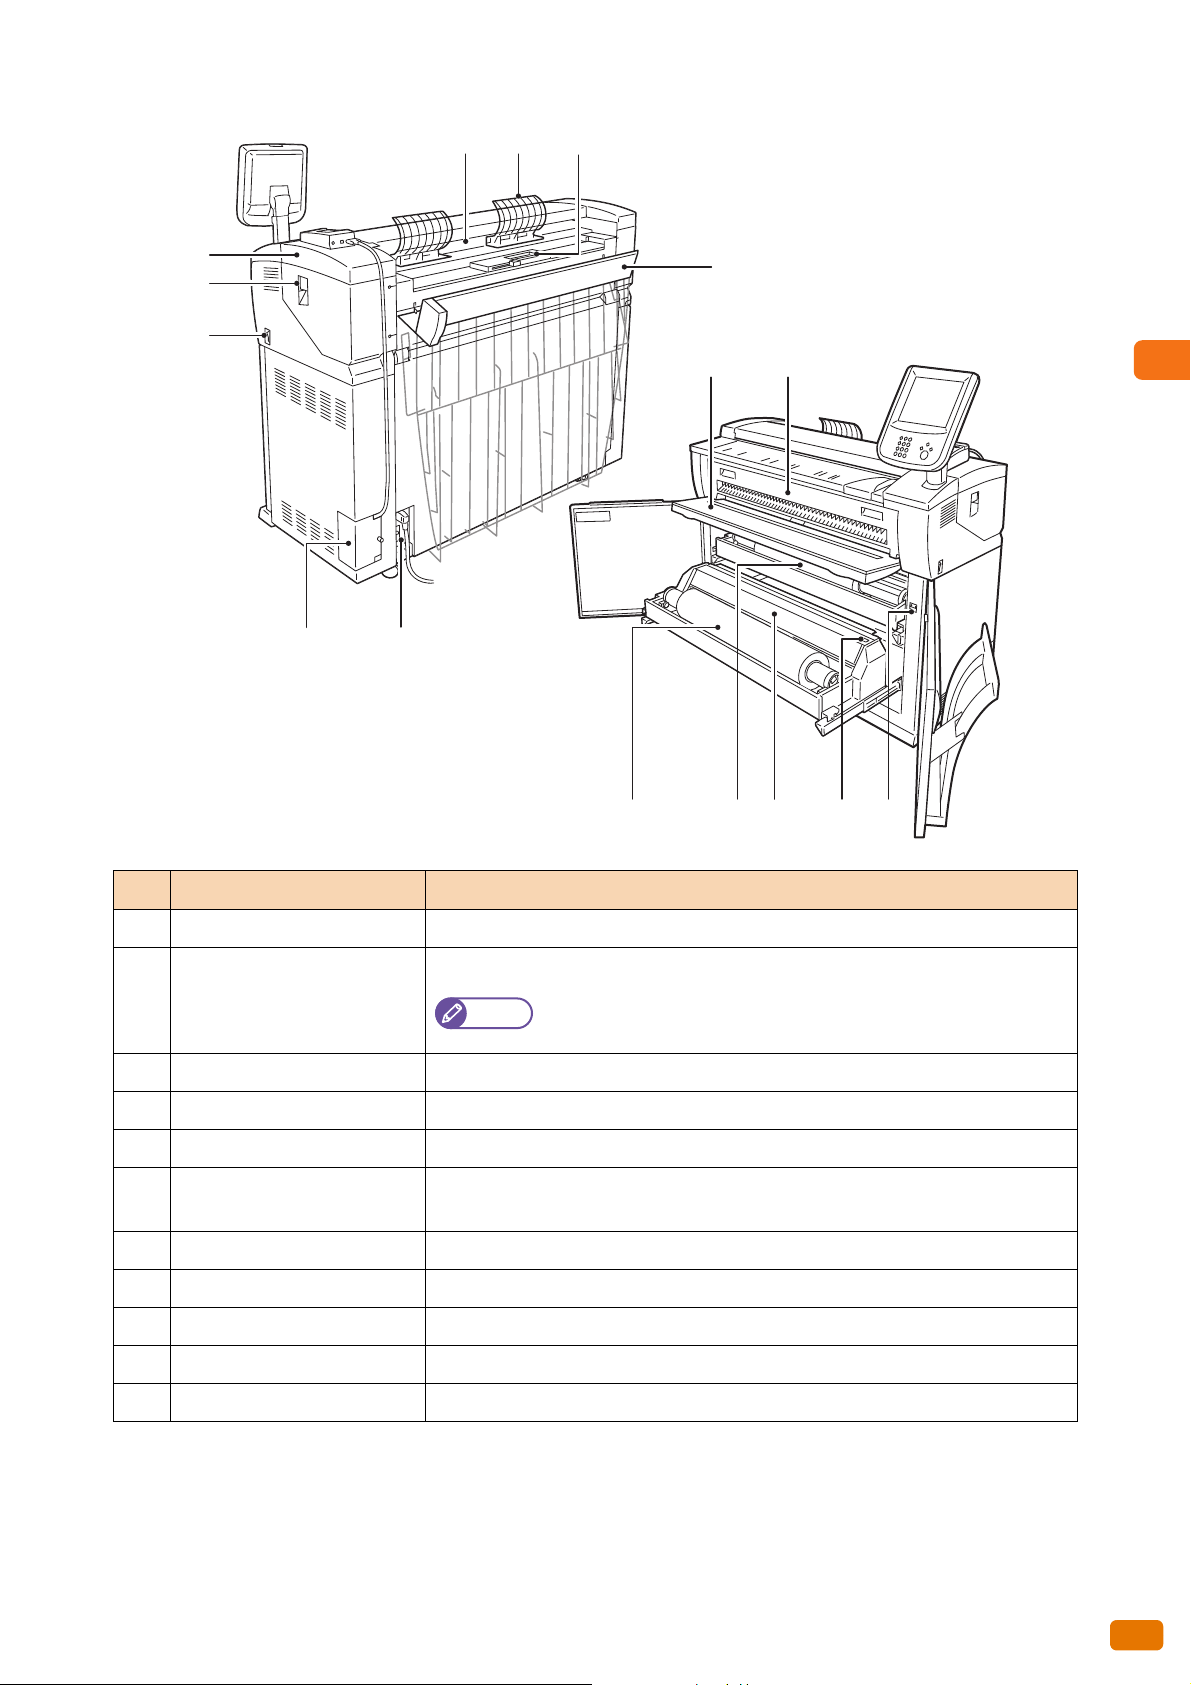
Before Using the Machine
1
13 14 15
16
17
22 23
24252628 27
20
21
19
18
No. Component Function
13 Exit tray Scanned documents are fed out here.
14 U-turn output guide Enables scanned documents to return to the front instead of to the rear.
15 Toner supply port Toner is replenished in the machine through this port.
16 Rear cover Open this to replenish the toner.
17 Power breaker Used to switch the main power to the machine on/off.
Note
This guide needs to be removed before you can install the Scanner
Catch Tray (optional).
18 Interface cover Contains the LAN port and service port.
Do not use the service port. It is intended to be used only by our customer engineers.
19 Power switch Used to switch the power to the machine on/off.
20 Upper unit releasing lever Lift this lever to open the upper unit.
21 Upper unit Open this to replace waste toner containers or to clear a paper jam.
22 Bypass (Manual) feed table Load media here when making copies or prints onto cut sheet.
23 Fusing unit cover Open this to clear a paper jam.
1.1 Machine Components
31
Page 32

1
Before Using the Machine
No. Component Function
24 Media heater switch Switches the power to the media heater on/off.
By switching on the media heater in a humid environment, for example during a
rainy period, the paper loaded in the machine can be dehumidified.
Note
Normally, the media heater should be switched off.
25 Cutter button Trims the lead edge of roll media.
26 Cutter cover Covers the cutter used to trim media. Normally, do not open this cover.
27 Roll 1 Load roll media here.
28 Roll 2 Load roll media here.
32
1.1 Machine Components
Page 33

Before Using the Machine
1
1.2 Power Source
Important
Note
Steps
Note
1.2.1 Switching the Power On
The following describes how to switch the power on.
The machine warms up and becomes ready to copy or print within about 145 seconds after being powered on.
The Energy Saver feature allows you to reduce the power consumption of the machine, saving electricity.
Refer
Do not turn off the power straight after turning the power switch off. If you turn the power off before the menu
screen is displayed on the touch screen, the system could be damaged.
The machine has a power consumption of 7W or less even when the power switch is turned off. To avoid
consuming (or save) this standby power, turn the power breaker OFF. For information on how to do this, refer to
"Saving Power Consumption While the Machine is not in Use" (p. 35).
For information on the Energy Saver feature, refer to "Energy Saver Mode" (p. 36).
1.
Press the power switch to the [|] position to switch the power on.
The "Please wait..." message indicates that the machine
is warming up. The machine cannot be used while it is
warming up.
1.2 Power Source
33
Page 34

1
Before Using the Machine
1.2.2 Switching the Power Off
Steps
Important
The following describes how to switch the power off.
Switch the power off at the end of a day or if the machine is not used for a long time.
1.
Press the power switch to the [ ] position.
The power switches off after the following message appears on the touch screen: “Please wait until the machine
shuts down. Do not power off until the main power lamp goes off.”
Do not switch the power off in the following conditions.
Otherwise, the data being processed may be erased.
- Data is being received (The <Data> indicator on the
control panel is blinking)
- Printing is being processed
- Copying is being performed
- Scanning is being performed
After paper is completely output, wait for five seconds
or more before switching the power off.
When switching the power off and then on, make sure that the <Main Power> indicator on the control
panel is turned off before you switch the power back on.
Do not switch the power breaker off while the power switch is on. Doing so may cause malfunctions.
34
1.2 Power Source
Page 35

Before Using the Machine
1
1.2.3 Saving Power Consumption While the Machine is not in Use
Steps
Steps
The machine consumes 7W or less even when the power switch is turned off. To avoid consuming (or save) this
standby power, follow the steps below to turn the power breaker OFF.
Important
Turning the Power Breaker Off
When turning the power breaker on/off, be sure to follow the steps below.
1.
2.
Switch the power off.
After making sure that the <Main Power> indicator on the control panel is unlit, turn the power breaker off.
Turning the Power Breaker On
1.
2.
Turn the power breaker on.
Switch the power on.
1.2 Power Source
35
Page 36

1
Before Using the Machine
1.3 Energy Saver Mode
Steps
Note
123
456
789
0
#
C
Services Home
Copy (Not In Use) Review
Job Status
Machine Status
Dial Pause Speed Dial
ABC DEF
GHI JKL MNO
PQRS TUV WXYZ
Interrupt
Start
Stop
Clear All
Log In / Out
Energy Saver
<Energy Saver> button
The machine is equipped with an Energy Saver feature that reduces the power consumption of the machine if no
copy or print data is received for a certain duration.
The Energy Saver feature has two modes: Low Power mode and Sleep mode.
If the machine is left unused for a preset period of time, the machine enters the Low Power mode.
The machine then enters the Sleep mode if a further preset time elapses.
To enable the Energy Saver feature, press the <Energy Save> button on the control panel.
Low Power Mode
In this mode, the power to the control panel and print engine is lowered to save power.
The touch screen goes out, and the <Energy Save> button on the control panel lights up. To use the machine, press
the <Energy Save> button. The <Energy Save> button goes out to indicate that the Low Power mode is exited.
Sleep Mode
The touch screen goes out, and the <Energy Save> button on the control panel lights up. To use the machine, press
the <Energy Save> button. The <Energy Save> button goes out to indicate that the Sleep mode is exited.
1.3.1 Entering the Energy Saver Mode
The following describes how to enter the Energy Saver mode.
In this mode, the power is lowered even more than in the Low Power mode.
Note
1.
Press the <Energy Save> button on the control panel.
Specify a longer time period in [From Last Operation to Sleep Mode] than in [From Last Operation to Low Power
Mode] under [Energy Saver Timers]. For information on how to set the duration for [Energy Saver Timers], refer to
"Energy Saver Timers" (p. 290).
The machine may not immediately enter the
Energy Saver mode when you press the
<Energy Save> button depending on the
state of the machine. In this case, wait for a
while and then press the <Energy Save>
button.
36
1.3 Energy Saver Mode
Page 37

Before Using the Machine
1
1.3.2 Exiting the Energy Saver Mode
Steps
123
456
789
0
#
C
Services Home
Copy (Not In Use) Review
Job Status
Machine Status
Dial Pause Speed Dial
ABC DEF
GHI JKL MNO
PQRS TUV WXYZ
Interrupt
Start
Stop
Clear All
Log In / Out
Energy Saver
<Energy Saver> button
The following describes how to exit the Energy Saver mode.
The Energy Saver mode is exited when:
The <Energy Save> button is pressed
A job is received
1.
Press the <Energy Save> button on the control panel.
1.3 Energy Saver Mode
37
Page 38

1
Before Using the Machine
1.4 Control Panel
Note
Refer
Job Status
Machine Status
Data
Error
Services Home
Copy (Not In Use) Review
123
456
789
0
#
C
Main Power
ABC DEF
GHI JKL MNO
PQRS TUV WXYZ
Dial Pause Speed Dial
Log In / Out
Energy Saver
Clear All
Start
Interrupt Stop
1 2 3 4
20
18
19
14
5
6
7
8
9
10
11
12
131617 15
The following describes the names and functions of components on the control panel.
No. Component Function
Touch screen Displays messages and buttons required for the operation of various features. You
1
can access the machine features by directly touching the touch screen.
<Data> indicator Blinks when the machine is sending or receiving data to or from a client. This
2
indicator lights up when data is stored in the machine's memory,
<Error> indicator Blinks if a system error occurs.
3
This indicator lights up when a problem other than a system error occurs with the
machine, including paper jams and running out of paper.
If the <Error> indicator blinks, consult the error message displayed
on the touch screen for actions to be taken.
For information on corrective actions to be taken when a paper
jam or running out of paper occurs, refer to "Problem Solving" (p.
245).
38
1.4 Control Panel
Page 39

Before Using the Machine
1
Refer
Refer
Refer
Refer
No. Component Function
<Main Power> indicator Lights up when the main power is switched on.
4
<Custom Button 1> (Copy)
5
*
"Copy" is assigned to this button by default.
Press this button to display the [Copy] screen.
For information on how to change the feature assigned to the
button, refer to "Custom Buttons 1 to 3" (p. 292).
<Custom Button 2>
6
(unregistered)
<Custom Button 3> (Review)
7
<Log In/Out> button Lights up when the user is authenticated in the System Administration mode or the
8
<Clear All> button Press to restore all the settings on the screen that is currently displayed to their
9
Press this button to call up its associated feature.
*
No feature is assigned to this button by default.
For information on how to assign a feature to the button, refer to
"Custom Buttons 1 to 3" (p. 292).
*
Although "Review" is shown as the label for the button, no feature is assigned to the
button by default.
Assign a feature to the button and attach the label for it as necessary.
For information on how to assign a feature to the button, refer to
"Custom Buttons 1 to 3" (p. 292).
Authentication mode.
Press this button to display the User ID entry screen for entering the System
Administration mode or the Authentication mode.
When you have already logged in as an authorized user, press this button to exit
from the mode.
For information on how to log in as authorized user, refer to
"Logging in as Authorized User" (p. 69).
default.
<Energy Save> button When the Energy Saver feature is enabled and when the machine is not used for a
10
while, the machine enters the Energy Saver mode to reduce power consumption.
When the machine is in the Energy Saver mode, the button lights up. Press this
button to enter or exit the Energy Saver mode.
<Interrupt> button Press this button to suspend a continuous copy or print job in progress to have the
11
machine process another job. During the Interrupt mode, the <Interrupt> button
lights up. Pressing the <Interrupt> button again exits the Interrupt mode and
resumes the suspended job.
<Stop> button Press this button to urgently stop document feeding for the current copy or scan
12
job.
<Start> button Press this button to start scanning a document, to store a job program into
13
memory, and to copy from memory.
Numeric keypad Use the numeric buttons on the keypad to enter the number of copies, the value to
14
be set, and other numerical values.
<Speed Dial> button This button does not function.
15
<C (Clear)> button Press this button to cancel a numerical value you have entered with the numeric
16
keypad.
<Dial Pause> button This button does not function.
17
<Machine Status> button Press this button to check the machine status and meters, or to check the status of
18
consumables.
1.4 Control Panel
39
Page 40

1
Before Using the Machine
No. Component Function
<Job Status> button Press this button to check the status of the current job, or to check the completed
19
jobs.
<Services Home> button Press this button to display the [Services Home] screen.
20
* If you have changed the feature assigned to the button, you can use the spare label set for feature names that came with the
machine to label an appropriate one to facilitate identifying the button feature. If you have changed the feature and the
corresponding feature name is not found in the spare labels set, please use a blank label where you can write the feature name
by hand with an oil-based pen.
Please note that the spare labels set may include labels corresponding to the features that are not supported or are optional for
the machine.
1.4.1 Screens and Buttons Displayed
You can customize the features displayed on the touch screen at power on and the functionality assigned to a
button, as described below.
Customizing the Initial Screen
You can customize the screen displayed when the power is turned on, when the machine exits the Energy Saver
mode, or when the Auto Clear feature is turned on.
Refer
Setting the Screen Displayed after Auto Clear
You can select [Last Selection Screen] or [Screen Default] for the screen to be displayed after Auto Clear.
Refer
For information on how to do this, refer to "Screen Default" (p. 292).
For information on how to do this, refer to "Screen After Auto Clear" (p. 292).
40
Assigning Features to the Custom Buttons
You can assign features to the Custom buttons on the control panel: Custom 1 to Custom 3.
By assigning frequently-used features to the Custom buttons, you can switch to the features without returning to the
[Services Home] screen.
Note
Refer
1.4 Control Panel
By default, "Copy" is assigned to <Custom Button 1>, and no feature is assigned to both the <Custom Button 2>
and <Custom Button 2> buttons.
For information on how to do this, refer to "Custom Buttons 1 to 3" (p. 292).
Page 41

Before Using the Machine
1
1.5 [Services Home] Screen
Additional feature buttons
Message field
Feature buttons
This section describes the [Services Home] screen, which can be displayed by pressing the <Services Home> button.
Message field
Displays a message.
Feature buttons
Allows you to configure the features.
Copy
Allows you to configure the Copy feature.
Refer
Store to Folder
Allows you to scan documents and save the scanned data in a folder of the machine.
Refer
Scan to PC
Allows you to scan documents and send the scanned data to a computer on the network (server).
Refer
For more information, refer to "Copy" (p. 77).
For more information, refer to "Store to Folder" (p. 124).
For more information, refer to "Scan to PC" (p. 125).
1.5 [Services Home] Screen
41
Page 42

1
Before Using the Machine
Multi Send Scan
Refer
Refer
Allows you to scan documents and send the scanned data to a pre-registered destination group consisting of specific
computers (servers) and printers.
Refer
For more information, refer to "Multi Send Scan" (p. 125).
Stored Copy Program
Allows you to call up a pre-registered stored program for Copy job.
Stored Program is a feature that allows you to store settings that you expect to use frequently and call them up with
a single button operation.
Refer
For more information, refer to "Stored Programming" (p. 163).
Stored Scan Program
Allows you to call up a pre-registered stored program for Scan job.
Stored Program is a feature that allows you to store settings that you expect to use frequently and call them up with
a single button operation.
Additional Feature Buttons
Allows you to set the additional features related to jobs.
Screen Brightness
Allows you to adjust the brightness of the touch screen.
Refer
Setup
Allows you to register or change stored programs, folders, and destination addresses.
Secure Print/Private Charge Print
For more information, refer to "Stored Programming" (p. 163).
For more information, refer to "Adjusting Screen Brightness" (p. 43).
For more information, refer to "Configuration" (p. 199).
42
Allows you to print and delete documents stored via features such as Secure Print and Private Charge Print.
Secure Print/Private Charge Print is a feature that allows you to submit a job to be temporarily stored on the
machine, and to print it at your convenience using the print command from the machine's control panel.
Note
Refer
1.5 [Services Home] Screen
[Secure Print] and [Private Charge Print] are mutually exclusive. For more information, refer to "Private Charge
Print Settings" (p. 337).
For more information, refer to "Confidential Print" (p. 180).
Page 43

Before Using the Machine
1
Language
Steps
Allows you to select the display language.
This language setting is reset once the machine is turned off.
Important
Note
Scan Sensor Gap Calibration
Allows you to calibrate the gap between scanning sensors with the calibration chart.
Note
1.5.1 Adjusting Screen Brightness
You can adjust the brightness of the touch screen.
When you select English as the display language and entries such as Address Name contain characters other
than ASCII, they may not be displayed appropriately.
The initial default language, which is displayed on the touch screen when the power is switched on, can be
selected in [Default Language] under [System Settings]. For information on how to do this, refer to "Default
Language" (p. 292).
For more information, refer to "Calibrating the Scan Sensor Gap" (p. 57).
1.
2.
3.
Press [Screen Brightness] on the [Services Home] screen.
Press [+] or [-] to adjust the screen brightness.
Press [Close].
1.5 [Services Home] Screen
43
Page 44
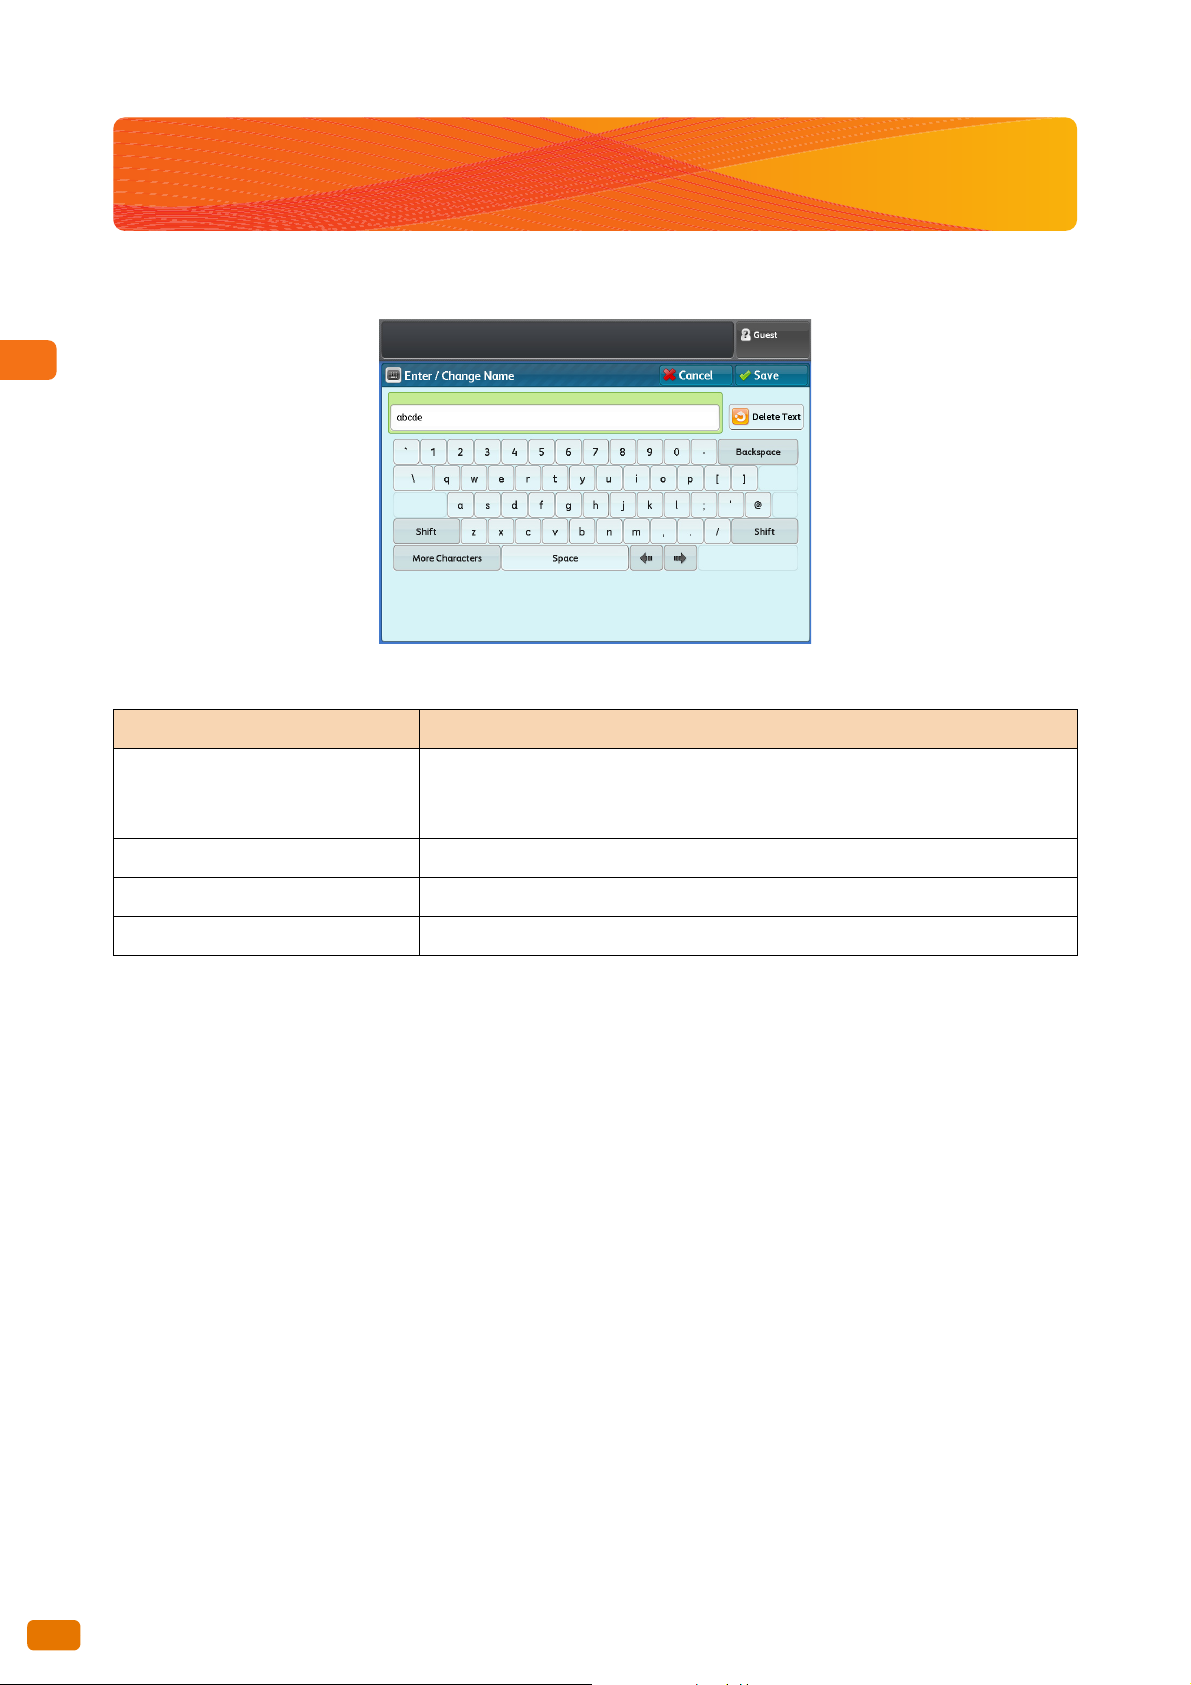
1
Before Using the Machine
1.6 Text Entry
During operations, you may encounter a screen requesting text to be entered. This section describes how to enter
text on the touch screen.
Numerals, alphabet, and symbol characters are allowed.
Entering alphabets and numerals
Item Description
Press [Standard Characters].
To enter upper-case alphabets, press [Shift]. To toggle to the previous mode, press
[Shift] again.
Entering symbols
Entering a space
Deleting characters
Press [More Characters].
Press [Space].
Press [Backspace]. This deletes one character at one time.
44
1.6 Text Entry
Page 45

Before Using the Machine
1
1.7 Loading/Replacing Paper
Steps
Note
CAUTION
1.7.1 Replacing/Cutting Roll Paper
Load roll paper in the Roll 1 or Roll 2.
Once the paper has been loaded, cut the leading edge of the paper.
Roll paper is heavy. When lifting roll paper, make sure to hold it with both hands, and bend your knees enough so
as not to hurt your back.
Dropping or toppling roll paper may cause injury. Be sure to handle roll paper with extra care.
Important
When loading roll paper, be careful not to pinch your fingers.
When removing the piece of tape holding the edge of the roll paper from unraveling, make sure to completely
remove the adhesive. If the adhesive gets inside the machine, print quality may decrease.
Do not open the Roll 1 or Roll 2 cutter cover.
When loading paper of different type, size, or weight, change the paper settings after you finish loading the
paper. For information on how to do this, refer to "Paper Tray Settings" (p. 293).
Have a new roll paper ready, and replace the old roll paper using the following procedure.
1.
2.
Open the front door.
Pull out the roll unit with both hands.
When you want to just cut the leading edge of the roll
paper without replacing with new roll paper, go to Step
8.
1.7 Loading/Replacing Paper
45
Page 46

1
Before Using the Machine
3.
Note
Important
Important
2
1
1
2
1
1
Remove the shaft of the roll paper.
4.
While pulling up the lock release lever at the end of the shaft
( ), pull out the shaft from the core of the roll paper ( ).
5.
6.
While pulling up the lock release lever at the end of the shaft
( ), attach new roll paper onto the shaft according to the paper
size guide on the shaft ( ).
Make sure that the roll paper's winding direction is correct, and
place the shaft onto the shaft guide.
2
Pulling up the lock release lever unlocks the roll paper,
enabling you to pull out the shaft.
2
When attaching the roll paper onto the shaft, do it on a
stable surface such as the floor so that it will not fall
down or topple over.
46
7.
1.7 Loading/Replacing Paper
Rotate the roll paper until the leading edge of the paper touches
the roller.
The roll paper is automatically conveyed and stops.
When the roll paper is not fed smoothly because its
leading edge is damaged, cut the leading edge using a
cutter knife or a similar tool before loading the paper.
Page 47

Before Using the Machine
1
8.
Note
Press the <Cutter> button.
The leading edge of the paper is cut.
If you press the <Cutter> button once, 210 mm of the
paper is cut. If you hold down the <Cutter> button, the
paper comes out until you release the button, and it is
cut at the position where you release the button.
9.
Remove the trimmed piece of paper.
10.
11.
Gently push the roll unit back into the machine all the way until it
stops.
Close the front door.
1.7 Loading/Replacing Paper
47
Page 48

1
Before Using the Machine
1.7.2 Loading Cut Sheet Paper (Bypass)
Steps
Important
Steps
When using cut sheets for copy or print, load the cut sheet via the bypass (manual) feed table.
Important
Note
When changing the media type, size, or weight, make sure that you change the media settings before
proceeding operations. For information on how to do this, refer to "Paper Tray Series / Paper Type" (p. 208).
Paper of up to 2,000 mm in length can be loaded.
1.
Fold the bypass (manual) feed table toward you to open it.
2.
Align the right edge of the paper against the scale, and insert the
paper until you hear a beep.
The paper is automatically conveyed and stops.
Load paper one sheet at one time.
If paper is curled, hold the curled corners with both
hands when inserting the paper.
Do not release your hands from the paper until it is
conveyed. If you release your hands when you hear a
sound, the paper may get jammed.
48
1.7.3 Switching Between Trays
When the selected tray has run out paper, you can manually switch to another tray to continue printing.
1.
1.7 Loading/Replacing Paper
Press [Paper Supply].
Page 49

Before Using the Machine
1
2.
Select the paper tray you want to use, and press [Close].
Printing is resumed.
1.7 Loading/Replacing Paper
49
Page 50

1
Before Using the Machine
1.8 Billing Information
Steps
123
456
789
0
#
C
Services Home
Copy (Not In Use)Review
Job Status
Machine Status
Dial Pause Speed Dial
ABC DEF
GHI JKL MNO
PQRS TUV WXYZ
Interrupt
Start
Stop
Clear All
Log In / Out
Energy Saver
<Machine Status> button
On the [Billing Information] screen, you can check the number of printed pages measured by individual meters.
1.
Press the <Machine Status> button on the control panel.
2.
3.
Press the [Billing Information] tab.
Check each meter on the displayed screen.
Serial Number
Displays the serial number of the machine.
Meter 1
Displays the sum total of the surface area printed by the
machine so far. (Unit: m
Meter 2
Displays the sum total of the length printed by the machine
so far. (Unit: m or 0.1 m)
2
)
50
1.8 Billing Information
Page 51

Before Using the Machine
1
1.9 Replacing Consumables
WARNING
We recommend you to use the following consumables as they are manufactured to meet the specifications of the
machine.
Type of Consumables Product Code Quantity/Box
Toner cartridge
Waste toner container
Important
Note
Handling consumables
Always store consumables in their boxes in a horizontal position, and always follow the instructions on the
packaging.
Do not unpack consumables before use. Avoid storing consumables in the following locations:
- In high temperature and humid locations
- Near heat-generating devices
- Areas exposed to direct sunlight
- Dusty areas
When using consumables, carefully read precautions for use that are instructed on their bodies or packages.
When calling your local Xerox representative to order consumables, have the product codes ready.
6R1238 1 unit/box
8R13014 1 unit/box
The use of consumables not recommended by Xerox may degrade image quality and performance. Use only
consumables recommended by Xerox.
We recommend that you always keep spare consumables available.
The way you order the waste toner container varies depending on your contract.
Dispose of used toner cartridges and waste toner bottles in accordance with local regulations.
Never use a vacuum cleaner for spilled toner and residual toner in this product, toner cartridge or toner bottle.
It may catch fire by electric sparks inside a vacuum cleaner and cause explosion.
Use a broom or a wet cloth to wipe off the spills. If you spill a large volume of toner, contact your local Xerox
representative.
Never throw a toner cartridge into an open flame. Remaining toner in the cartridge may catch fire and cause
burn injuries or explosion.
If you have a used toner cartridge no longer needed, dispose of in accordance with local regulations.
Never throw a waste toner bottle into an open flame. Toner may catch fire and cause burn injuries or
explosion.
If you have a used waste toner bottle no longer needed, dispose of in accordance with local regulations.
1.9 Replacing Consumables
51
Page 52

1
Before Using the Machine
Important
CAUTION
Keep drum and toner cartridges out of the reach of children. If a child accidentally swallows toner, spit it out,
rinse mouth with water, drink water and consult a physician immediately.
When replacing drum and toner cartridges, be careful not to spill the toner. In case of any toner spills, avoid
contact with clothes, skin, eyes and mouth as well as inhalation.
Take emergency measures according to the following:
If toner spills onto your skin or clothing, wash it off with soap and water.
If you get toner particles in your eyes, wash it out with plenty of water for at least 15 minutes until irritation
is gone. Consult a physician if necessary.
If you inhale toner particles, move to a fresh air location and rinse your mouth with water.
If you swallow toner, spit it out, rinse your mouth with water, drink plenty of water and consult a physician
immediately.
When loading toner or replacing the waste toner container, the toner may spill and soil the floor. We recommend
you to lay paper or anything similar on the floor beforehand.
Collecting Used Consumables
We collect used consumables and recycle them to protect the environment and to utilize the resources effectively.
Used consumables need proper treatment. Make sure to return them to our local Xerox representative.
1.9.1 Loading Toner
When the toner becomes low, one of the following messages appears on the touch screen. Take appropriate actions
according to the message.
Load toner soon.
Load toner.
Note
The number of pages that the machine can copy or
print after this message is displayed is approximately
500 pages.
The remaining page yield for copy/print jobs is
applicable when A4 size documents with image
density of 6% are used. The value is only an estimate
and varies depending on the conditions such as the
content printed, paper size, paper type, and the
machine operating environment.
52
1.9 Replacing Consumables
Page 53

Before Using the Machine
1
Load Toner
Steps
Note
Note
Toner supply port
2
1
2
1
Toner supply port
Notch
1
2
Load toner.
The machine can no longer copy or print if this message is
displayed.
Note
Have a new toner cartridge ready, and load toner using the following procedure.
1.
Make sure that the machine is not operating, and open the rear
cover.
When the toner is low, the machine might stop during
printing and displays a message. In such case, the
machine continues to copy or print if you refill the
toner.
2.
3.
If the Scanner Catch Tray is being used, fold it closed.
Shake the new toner cartridge well so that the toner can be
loaded smoothly.
Shake the new toner cartridge approximately 20 times.
Attach the toner cartridge to the toner supply port.
(1) Align the notch of the toner cartridge against the right side
of the toner supply port ( ).
(2) Lower the left side of the toner cartridge, and push it into
the toner supply port until it clicks into place ( ).
1.9 Replacing Consumables
53
Page 54

1
Before Using the Machine
4.
Important
Lever
2
1
1
Slide the lever to the left, and align it to the position.
5.
Gently tap the top of the toner cartridge until all the toner inside
gone.
6.
7.
8.
Slide the lever to the right, and align it to the position ( ).
Remove the toner cartridge ( ).
Close the rear cover.
2
The bottom of the used toner cartridge may have toner
adhered to it. Take care not to get the toner on your
hands or clothes.
Dispose of used toner cartridge in accordance with local
regulations.
54
1.9 Replacing Consumables
Page 55

Before Using the Machine
1
1.9.2 Replacing the Waste Toner Container
Steps
Upper unit release lever
When the waste toner container is full of toner, one of the following messages appears on the touch screen. Take
appropriate actions according to the message.
Replace the Waste Toner Bottle soon.
Replace the waste toner container.
Note
Replace the Waste Toner Bottle.
Replace the waste toner container.
The machine can no longer copy or print if this message is
displayed.
The number of pages that the machine can copy or
print after this message is displayed is approximately
2,000 pages.
The remaining page yield for copy/print jobs is
applicable when A4 size documents with image density
of 6% are used. The value is only an estimate and
varies depending on the conditions such as the content
printed, paper size, paper type, and the machine
operating environment.
Have a new waste toner container ready, and replace the old waste toner container using the following procedure.
1.
Make sure that the machine is not operating. Pull the upper unit
release lever to open the upper unit.
1.9 Replacing Consumables
55
Page 56

1
Before Using the Machine
2.
Important
Important
Gently remove the waste toner container.
3.
Use the cap attached to the waste toner container you just
removed to cap its opening.
4.
5.
Attach the new waste toner container.
Close the upper unit.
Put the used waste toner container into the supplied bag,
and dispose of in accordance with local regulations.
Be careful not to pinch your fingers.
Make sure to attach the waste toner container correctly.
Otherwise, a message appears even after you close the
upper unit and the machine does not operate.
56
1.9 Replacing Consumables
Page 57

Before Using the Machine
1
1.10 Calibrating the Scan Sensor Gap
Steps
Note
Environmental variations such as temperature and humidity may affect the positioning of each scanning sensors,
and this can result in gaps at joints between adjacent sensors.
In such a case, you can calibrate the gaps using functions under [Scan Sensor Gap Calibration].
1.10.1 Performing Auto Adjustment
Use these steps to automatically adjust the gaps by using the calibration chart that came with the machine.
1.
2.
3.
Press [Scan Sensor Gap Calibration] on the [Services Home] screen.
Press [Auto Adjust].
Load the calibration chart face down on the document
table, and press the <Start> button on the control panel.
The gaps between the scanning sensors are automatically
calibrated.
After auto calibration has completed, check the
calibration result by using your documents.
If auto calibration has failed with an error, take
corrective actions according to the error code,
and perform auto calibration again. For more
information on error codes, refer to "Error Code"
(p. 61).
1.10 Calibrating the Scan Sensor Gap
57
Page 58

1
Before Using the Machine
Printing the calibration chart
Steps
Note
Steps
Note
If the calibration chart is not at hand, you can print it using these steps.
1.
2.
Press [Print Calibration Chart] on the [Scan Sensor Gap Calibration] screen.
Select paper tray, and press the <Start> button on the
control panel.
The calibration chart is printed out.
1.10.2 Performing Optional Adjustment
If you are not satisfied with the result of Auto Adjust, you can perform the calibration manually.
Up to three adjustment values derived from the calibration can be registered to the machine.
The sizes of paper loaded in the trays are
displayed. Make sure that you select A0 (841
mm) or larger size paper.
Step 1: Registering adjustment values
1.
2.
3.
Press [Option Adjust] on the [Scan Sensor Gap Calibration] screen.
Select [Adjustment Value1], [Adjustment Value2], or
[Adjustment Value3].
If you choose not to register these adjustment
values, select [Off].
Press [Edit].
58
1.10 Calibrating the Scan Sensor Gap
Page 59

Before Using the Machine
1
4.
Important
Press [+] or [-] to set the adjustment value in the range of
-5 to +5 steps.
Each gap is adjusted by the amount equivalent
to the sum of Auto Adjust, Adjust All, and Adjust
By Gap.
Adjust All
Use this option to adjust the scanning speed (document
feed speed of the motor) to calibrate all the gaps.
Adjust By Gap
Use this option to adjust the individual gaps between
scanning sensors (digital calibration).
0 mm
0 mm
Gap1
(183 mm)
Gap1
(183 mm)
Gap2
(386 mm)
To move (calibrate) the image of the areas
corresponding to [Gap2] and [Gap4] in the
arrow direction by increasing the scanning
speed, set a positive value in [Adjust All].
Gap2
(386 mm)
Gap3
(548 mm)
Gap3
(548 mm)
Gap4
(731 mm)
Gap4
(731 mm)
5.
Press [Save].
To move (calibrate) the image of this
area in the arrow direction, set a
positive value in [Gap3].
1.10 Calibrating the Scan Sensor Gap
59
Page 60

1
Before Using the Machine
Step 2 Performing Optional Adjustment
Steps
Note
Note
Steps
Note
1.
2.
Select a registered adjustment value.
Press [Save].
Calibration of gaps is performed using the adjustment
values you have set.
1.10.3 Initializing Adjustment Values
Use these steps to restore all of the adjustment values to their factory defaults.
Important
If you choose not to use the registered
adjustment values, select [Off], return to "Step
1: Registering adjustment values" (p. 58), and
set an adjustment value.
After Option Adjust has completed, check the
calibration result by using your documents.
If Option Adjust has failed with an error, take
corrective actions according to the error code, and perform Option Adjust again. For more information on
error codes, refer to "Error Code" (p. 61).
The adjustment values for Auto Adjust are also reset to the factory defaults.
1.
2.
Press [Initialize Value] on the [Scan Sensor Gap Calibration] screen.
Select [Yes].
The adjustment values are reset to the factory defaults.
If you choose not to reset the adjustment
values to the factory defaults, select [No].
60
1.10 Calibrating the Scan Sensor Gap
Page 61

Before Using the Machine
1
1.10.4 Error Code
An error code is displayed if calibration has failed with an error.
Refer to the error codes in the following table to resolve problems.
Error Code Cause Remedy
062-702
062-714
062-713
062-725
062-735
Others
The <Stop> button was pressed while the
Load the calibration chart again.
calibration chart was still being scanned.
A paper jam occurred.
The calibration chart is loaded wrong side up.
The calibration chart is loaded in an incorrect
orientation.
The calibration chart is torn.
The position of the document guide is being
shifted to the right.
The right edge of the calibration chart is not
aligned with the document guide.
The calibration chart was fed skewed.
The calibration chart was not printed in its
Check that the calibration chart is free of dirt and is
not torn, and load it face down on the document
table.
Check whether the document guide is at the correct
position.
Check that the calibration chart is free of dirt and is
not torn, and load it face down on the document
table.
entirety or is torn.
The calibration chart is not being fed at the
constant speed.
Make sure that you do not apply external force on
or pull the calibration chart while it is being
scanned.
*
Auto Adjust failed.
Check the remedies above again, and load the
calibration chart.
If the trouble persists even after performing the
suggested actions, contact your local Xerox repre-
sentative.
* Any other codes between 062-701 and 062-754
1.10 Calibrating the Scan Sensor Gap
61
Page 62

1
Before Using the Machine
1.11 Cleaning the Machine
Important
Steps
Important
WARNING
CAUTION
2
1
1
2
This section describes how to clean the machine.
If the reflector on the back of the document cover or the surface of the scanning glass is dirty, it may result in black
lines or streaks on the entire copies.
When cleaning this product, use the designated cleaning materials exclusive to it. Other cleaning materials may
result in poor performance of the product. Never use aerosol cleaners, or it may catch fire and cause explosion.
When cleaning this product, always switch off the power, and unplug the product. Access to a live machine
interior may cause electric shock.
Do not use benzene, paint thinner, or other volatile liquids or spray insect repellent on the machine as doing so
may discolor, deform, or crack covers.
If it is difficult to remove dirt, try gently wiping with a firmly wrung soft cloth moistened with a small amount of
neutral detergent. Then, wipe with a dried cloth.
Do not use cleaning agents other than water or neutral detergent.
Cleaning the machine with an excessive amount of water may cause the machine to malfunction or damage
originals during copying.
62
1.
Turn off the power switch ( ) and the power breaker of the
machine ( ).
Turn off the power switch and the power breaker when
cleaning to avoid the risk of electric shock.
2.
Pull the document cover toward you until it stops, and lift it up to
remove it.
1.11 Cleaning the Machine
Page 63

Before Using the Machine
1
3.
Important
Important
Scanning glass
Roller
Document feed path
Wipe the white reflection plate on the back of the document
cover with a dried cloth.
If streaks appear on the
prints,
wipe the reflection plate.
4.
Wipe the surface of the scanning glass with a dried cloth.
5.
Wipe the document feed path with a dried cloth.
If spots appear on the
prints,
wipe the surface of the
scanning glass.
Do not use excessive force on the glass, it may result in
malfunctions or physical damage.
If streaks appear on the
prints,
wipe the document feed
path.
Do not wipe the roller. Oil on the roller can adhere to the
document feed path, and this may causing originals to slip on the path during feeding.
6.
Put the document cover back to the original position.
1.11 Cleaning the Machine
63
Page 64

1
Before Using the Machine
1.12 Machine Status
Steps
123
456
789
0
#
C
Services Home
Copy (Not In Use)Review
Job Status
Machine Status
Dial Pause Speed Dial
ABC DEF
GHI JKL MNO
PQRS TUV WXYZ
Interrupt
Start
Stop
Clear All
Log In / Out
Energy Saver
<Machine Status> button
This section describes the features for checking the machine status.
Refer to the following subsections for more information on each item:
Checking the Machine Information................................................................................................................................................. p. 64
Supplies........................................................................................................................................................................................................ p. 66
Refer
For more information on the billing meters, refer to "Billing Information" (p. 50).
1.12.1 Checking the Machine Information
The [Machine Information] screen allows you to check the machine configuration and to switch between the print
modes.
Refer to these subsections for more information on each function.
Machine Information............................................................................................................................................................................. p. 65
Print Mode .................................................................................................................................................................................................. p. 66
1.
2.
Press the <Machine Status> button on the control panel.
This screen allows you to view information on the
machine.
64
1.12 Machine Status
Page 65

Before Using the Machine
1
Machine Information
Steps
You can check the machine serial number, machine configuration, and software version on the [Machine
Information] screen.
1.
Check the general information on the machine.
Website:
Tells you whom to contact when making inquiries about maintenance and operation.
Machine Serial Number
Indicates the serial number of the machine.
MAC Address
Indicates the MAC address of the machine.
Machine Configuration
Press [Machine Configuration] to display the [Machine
Configuration] screen.
You can check the following information:
Configuration Code
Memory Size
Software Version
Press [Software Version] to display the [Software Version]
screen.
You can check the following information:
Controller ROM
IOT ROM
IIT ROM
1.12 Machine Status
65
Page 66

1
Before Using the Machine
Print Mode
Steps
Steps
The following describes how to switch the print mode between online and offline.
1.
2.
Press [Print Mode].
Select the print mode.
Off-line
The machine stops receiving data from computers. Any data
that the machine has already received will be printed, and
the subsequent data will not be received.
On-line
The machine receives data from computers.
1.12.2 Supplies
The [Supplies] screen allows you to check the status of consumables. The status of consumables is shown as "OK",
"Replace Now", etc.
This following describes how to check the status of consumable.
Refer
For information on how to replace consumables, refer to "Replacing Consumables" (p. 51).
1.
2.
Press the <Machine Status> button.
Press the [Supplies] tab to check the status of
consumables.
You can check the following information on the [Supplies]
screen:
To n e r
Waste Toner Container
66
1.12 Machine Status
Page 67

Before Using the Machine
1
1.13 Job Status
Steps
Refer
Refer
Steps
123
456
789
0
#
C
Services Home
Copy (Not In Use)Review
Job Status
Machine Status
Dial Pause Speed Dial
ABC DEF
GHI JKL MNO
PQRS TUV WXYZ
Interrupt
Start
Stop
Clear All
Log In / Out
Energy Saver
<Job Status> button
1.13.1 Checking Job Status
You can check current, pending, and completed jobs on the [Job Status] screen.
1.
Press the <Job Status> button on the control panel.
The [Job Status] screen allows you to perform the following
actions:
Checking current/pending jobs
A list of current and pending jobs can be displayed.
Checking completed jobs
The status of completed jobs can be displayed.
1.13.2 Checking Current/Pending Jobs
This following describes how to check current and pending jobs.
For more information, refer to "Checking
Current/Pending Jobs" (p. 67).
For more information, refer to "Checking Completed Jobs" (p. 68).
1.
2.
Press the <Job Status> button.
Check current and pending jobs on the displayed screen.
my Job Status Progress
Copy Copying The number of copies already
output/Total number of copies
specified
Copy Print Wait 0/The number of copies ready
to print
Print Job — The number of spools ready to
print
1.13 Job Status
67
Page 68

1
Before Using the Machine
Note
Steps
Note
Press [ ] to display the previous screen, and press [ ] to display the next screen.
Press [Refresh] to refresh the display.
Print jobs are displayed at the end of the list.
3.
Press [Close] after the confirmation.
1.13.3 Checking Completed Jobs
This following describes how to check completed jobs.
You can check whether a job has been completed successfully. Selecting a job allows you to see its details.
1.
2.
3.
Press the <Job Status> button.
Press the [Completed Jobs] tab to check the status of
completed jobs.
Select a job to see the details.
Press [ ] to display the previous screen, and
press [ ] to display the next screen.
Press [Refresh] to refresh the display.
4.
Press [Close] after the confirmation.
68
1.13 Job Status
Page 69

Before Using the Machine
1
1.14 Logging in as Authorized User
Important
Refer
When logging into the machine via Control Panel Authentication, User ID must be entered. A password is also
required when [Password Entry from Control Panel] is set to [On] in [Authentication] under [Authentication/Security
Settings].
Note
When the Auto Clear feature is enabled in [Auto Clear] under [System Settings] > [Common Service Settings] >
[Machine Clock / Timers], authentication is automatically canceled when the preset time elapses. For
information on how to do this, refer to "Auto Clear" (p. 290).
When Auto Clear is disabled, any user can access the machine features if the previous authorized user failed to
log out from the machine. After you are done using the machine, make sure to log out of the authenticated
mode.
If some of the features are restricted based on the authentication settings, the process currently being
performed still continues even when the user has logged out of the authenticated mode. After all the Copy/Scan/
Print jobs have been completed, the screen returns to the [Services Home] screen.
For details on how to make settings for [Password Entry from Control Panel], refer to "Password Entry from
Control Panel" (p. 336).
For details on how to register users on the touch screen, refer to "Registering a User" (p. 225).
1.14 Logging in as Authorized User
69
Page 70

1
Before Using the Machine
1.14.1 Logging In/Out through Control Panel Authentication with User ID
Steps
Important
Note
Note
Note
User ID Authentication
1.
2.
Press the <Log In/Out> button on the control panel.
Enter your User ID and the password (if required), by
using the numeric keypad or the keyboard displayed on
the screen, and select [Enter].
Once authentication is successful, your User ID is displayed
at the upper right on the [Services Home] screen, and the
<Log In/Out> button on the control panel lights up.
Interrupt mode does not function in
conjunction with Authentication mode.
You must log out of the authenticated mode
before you can exit the Interrupt mode.
The [Login] screen may appear when you select
a service on which a usage restriction has been
applied. In this case, enter your User ID and
password to continue.
70
Selecting the target domains (realm names)
When Remote Authentication is enabled and Authentication Management is being used on the authentication
server, you can select the target domains (realm names) by following the steps below.
"Realm" is an area to which authentication is applied.
(1) Press [ ].
When Remote Authentication is enabled,
[ ] appears.
1.14 Logging in as Authorized User
Page 71

Before Using the Machine
1
(2) Select the target domains.
Note
Steps
Note
(3) Press [Close].
Logging out of the authenticated mode
1.
Press the <Log In/Out> button on the control panel.
Press [Refresh] to refresh the display.
Press [ ] to display the previous screen,
and press [ ] to display the next screen.
When you are logged out of the authenticated mode, the <Log In/Out> button goes out.
1.14 Logging in as Authorized User
71
Page 72

1
Before Using the Machine
1.15 About Originals
1.15.1 Usable Originals
Originals that meet the following conditions can be used.
Original Size Paper Weight
Original width
176 - 914.4 mm (Maximum allowable width: 945 mm)
Original length
210 - 15,000 mm (Maximum length)
*1 When the U-turn output guide is installed
*2 It is possible to scan a flat and hard original (styrene board, heavy paper) whose thickness exceeds 0.2 mm, up to 1 mm thick.
The flat and hard original must be supported by your hand while scanning. However, the document transportation and the
output image quality is not guaranteed.
When scanning a thick original whose thickness is between 1 and 5 mm, the optional Heavy Document KIT is used. For
information on how to do this, refer to "When Scanning Thick Documents" (p. 81).
1.15.2 Originals that Require the Use of the Document Carrier (Optional)
Use the document carrier for the following types of originals.
Documents that have been perforated, creased, heavily curled, or have holes
Documents that are stapled together
Documents with glue, or adhesive tape or filing strips.
When ejecting frontward
0.05 - 0.2 mm*
When ejecting rearward
0.05 - 5 mm*
1
2
72
1.15.3 Precautions When Handling Originals
Observe the following precautions when handling originals.
The scanning area may become soiled if documents contaminated by glue or adhesive tape, or documents on
which correction fluid has been used are placed in the scanner. Be very careful when using stick-type glue or glue
spray.
Soiling of the scanning area can cause black lines on copies.
Do not use documents that have been folded, wrinkled, perforated or had holes punched in them. It may result in
paper jams and tearing. When using originals that have been folded, wrinkled, perforated or had holes punched in
them, the document carrier (optional) must be used.
When rolled originals are to be used, ensure that the diameter of the rolled original is 40 mm or larger. Rolled
originals with a diameter of less than 40 mm must be flattened out at the lead edge.
When scanning thick originals, hold them with your hands while scanning them.
1.15 About Originals
Page 73

Before Using the Machine
1
1.16 Media Types
WARNING
This section describes the types of media that can be used with this machine.
Use of unrecommended media may result in paper jams, lower print quality, malfunctions, or damage to the
machine. To achieve optimum performance of the machine, we recommend that you use only media recommended
by Xerox.
If you wish to use media other than that recommended by Xerox, contact your local Xerox representative.
Do not use conductive paper such as origami paper, carbonic paper or conductively-coated paper. When paper
jam occurs, it may cause short-circuit and eventually a fire accident.
Important
1.16.1 Media Type
When using generally used paper (known as printable paper) for copies or printing, ensure that it complies with the
following specifications. However, it is encouraged that you use the recommended media to achieve clear copy and
print results.
Media
Source
Roll paper
The printed image may fade due to moisture such as water, rain or vapor. For more information, contact your
local Xerox representative.
Media Type/Weight
Plain paper
60 - 110 g/m
Vellum
90 - 112 g/m
Film
75 - 100 m
2
2
Loadable
Media Size
A0, A1, A2, A3 (width)
JIS B1, JIS B2, JIS B3 (width)
ISO B1, ISO B2, SO B3 (width)
Special A0 (880/860 mm) (width)
Special A1 (620/625 mm) (width)
Special A2 (440/435 mm) (width)
Special A3 (310 mm) (width)
34", 22", 17", 11"
36", 24", 18", 12"
30", 15"
Premium 75 g/m
Premium Tracing 90 90 g/m
Premium Translucent 75
Premium Translucent 100
Recommended Media
Name G.S.M.
2
2
—
Width: 279.4 - 914.4 mm
Outside diameter of the roll: 185 mm or
less
1.16 Media Types
73
Page 74

1
Before Using the Machine
Media
Source
Manual
feed
Media Type/Weight
Plain paper
60 - 110 g/m
2
Vellum
90 - 112 g/m
2
Loadable
Media Size
A0, A1, A2, A3, A4
JIS B1, JIS B2, JIS B3, JIS B4
ISO B1, ISO B2, ISO B3, ISO B4
Special A0 (880/860 mm)
Special A1 (620/625 mm)
Premium 75 g/m
Premium Tracing 90 90 g/m
Premium Translucent 75
Premium Translucent 100
Recommended Media
Name G.S.M.
2
2
—
Special A2 (440/435 mm)
Film
75 - 100
m
Special A3 (310 mm)
34", 22", 17", 11", 8.5"
36", 24", 18", 12", 9"
30", 15"
Width: 210 - 914.4 mm
Length: 210 - 2,000 mm
Important
Printing on paper that differs from the paper type and size selected in the print driver, or printing from a tray that
does not support the loaded paper may result in a paper jam. To ensure correct printing, select the correct paper
size, paper type, and paper tray.
1.16.2 Unusable Media
Using media/vellum/film not recommended by Xerox may cause a paper jam or machine malfunction. Use media/
vellum/film recommended by Xerox.
Transparencies
Coated paper of 126 g/m2 or less
NK special simplex art paper (127/157/209 g/m2)
Art flux (cross)
High class Japanese paper for color copy
Color cloth transfer paper
Super tracing paper 55/60
High class tracing paper
Paper only for an ink jet printer
Labels
Kent paper
Carbon paper
Xerographic photo paper
Electric spectaculars film
Digital coated paper (glossy type)
Peel-off film (transparent/white/strong&white)
Bookbinding paper (210 g/m2)
Cloth transfer paper
Aqua-transfer paper
Star tracing paper
OK top-coat paper (128g/m2)
Heat-sensitive paper
Black origami paper
Chemical Japanese paper
Paper with piping
Paper which is tightly stuck together due to static
electricity
74
Paper which has been previously printed with ink that will
change in quality at 155 ºC
Paper with staples, clips, ribbons, or tape
Paper with non-smooth face such as rough printing paper or
fibered paper
1.16 Media Types
Specially-coated paper
Paper which was printed once by an other printer or
copy machine
Wrinkled, creased, or torn paper
Page 75

Before Using the Machine
1
Paper pasted up with glue, adhesive paper
Paper that is too thick or thin
Damp or wet paper
When you use acid paper, the print result may blur.
If this happens, change the paper to acidfree paper.
1.16.3 Handling and Storing Media
Handling Media
Do not use media that has been folded, creased, or heavily curled. It may result in paper jams.
Storing Media
The optimum environment for storing media is a place where the humidity is 40 to 45%. Keep the followings in
mind when storing media:
Moisture is not good for media. For storage, keep the media in the document wrapping and store it in a
comparatively dry place. Vellum especially should be put into a plastic or moisture-proof bag.
When the machine is not used for extended intervals, remove the media and store it accordingly.
Treated colored paper
1.16 Media Types
75
Page 76

1
Before Using the Machine
76
1.16 Media Types
Page 77

Chapter 2 Copy
This chapter describes the basic operations and functions of the Copy feature.
2.1 Copying Procedure........................................................................................................................................ 78
2.2 Canceling the Copy Job.............................................................................................................................. 82
2.3 Copying in the Specified Paper Size (Auto Mode) ........................................................................... 83
2.4 Making Adjustments to Color on the Original................................................................................... 84
2.5 Scanning to Copy Documents in Maximum Width......................................................................... 86
2.6 Loading Paper Manually (Bypass Copying)........................................................................................ 88
2.7 Copying Long Documents ......................................................................................................................... 90
2.8 Copying Multiple Documents (Collation)............................................................................................ 91
2.9 Running Sample Copies.............................................................................................................................. 93
2.10 Copying from Memory................................................................................................................................ 95
2.11 Running an Interrupt Copy ....................................................................................................................... 97
2.12 [Copy (Auto Mode)] Screen....................................................................................................................... 98
2.13 [Copy (Manual Mode)] Screen...............................................................................................................101
2.14 Copy - [Image Quality] Screen...............................................................................................................107
2.15 Copy - [Layout Adjustment] Screen.....................................................................................................112
2.16 Copy - [Output Format] Screen..............................................................................................................119
Page 78

2
Copy
Steps
123
456
789
0
#
C
Services Home
Copy (Not In Use) Review
Job Status
Machine Status
Dial Pause Speed Dial
ABC DEF
GHI JKL MNO
PQRS TUV WXYZ
Interrupt
Start
Stop
Clear All
Log In / Out
Energy Saver
<Services Home> button
2.1 Copying Procedure
This section describes the basic copy procedure. Refer to the following subsections for more information on each
item:
Step 1 Selecting Functions................................................................................................................................................................... p. 78
Step 2 Entering a Quantity .................................................................................................................................................................. p. 79
Step 3 Starting the Copy Job .............................................................................................................................................................. p. 80
2.1.1 Step 1 Selecting Functions
Select functions to set on the [Copy] screen.
1.
Press the <Services Home> button on the control panel.
2.
78
2.1 Copying Procedure
Press [Copy] on the [Services Home] screen.
Page 79

Copy
2
Refer
Steps
123
456
789
0
#
C
Services Home
Copy (Not In Use)Review
Job Status
Machine Status
Dial Pause Speed Dial
ABC DEF
GHI JKL MNO
PQRS TUV WXYZ
Interrupt
Start
Stop
Clear All
Log In / Out
Energy Saver
Numeric keypad
123
456
789
0
#
C
Services Home
Copy (Not In Use) Review
Job Status
Machine Status
Dial Pause Speed Dial
ABC DEF
GHI JKL MNO
PQRS TUV WXYZ
Interrupt
Start
Stop
Clear All
Log In / Out
Energy Saver
<C (Clear)> button
3.
Select functions to set on each tab as necessary.
For details on each tab, refer to these subsections.
"[Copy (Auto Mode)] Screen" (p. 98)
"[Copy (Manual Mode)] Screen" (p. 101)
"Copy - [Image Quality] Screen" (p. 107)
"Copy - [Layout Adjustment] Screen" (p. 112)
"Copy - [Output Format] Screen" (p. 119)
2.1.2 Step 2 Entering a Quantity
The following describes how to enter the number of copies to be made. You can specify up to 99 for the number of
copies.
1.
Enter the number of copies, by using the numeric keypad
on the control panel.
The entered number of copies is displayed on the upper
right of the touch screen.
2.
If you have entered an incorrect value, press the <C
(Clear)> button and then enter the correct value.
2.1 Copying Procedure
79
Page 80

2
Copy
2.1.3 Step 3 Starting the Copy Job
Steps
Note
Important
Note
The following describes how to load the document and start copying.
Important
If you hold down or pull the document while it is being scanned, the document may get jammed.
When loading a hole-punched document, insert the edge with the holes last. If you insert the edge with the holes
first, the document may get jammed.
1.
Align the document against the document guide with the side
to be copied face down, and insert it all the way until it stops.
You can shift the document guide to the right to shift
the scanning position of the document.
The document is automatically conveyed and stops momentarily.
Then the machine automatically starts scanning the
document.
Do not release your hands from the document
until it is conveyed. If the document is long, it
might fall off the machine.
When the scan start mode is set to [Manual
Start] under System Settings, press the <Start>
button on the control panel.
For information on how to set Manual Start,
refer to "Scan Start Mode" (p. 297).
When a problem occurs, an error message is
displayed on the touch screen. Resolve the
problem according to the message.
Document guide
80
2.
2.1 Copying Procedure
Remove the document that is output.
Page 81

Copy
2
When Scanning Thick Documents
Steps
The optional Heavy Document KIT allows you to scan a thick document whose thickness is up to 5 mm.
1.
2.
3.
4.
Remove the U-turn output guide.
Pull the document cover toward you until it stops, and lift it up
to remove it.
Install the Heavy Document KIT in the reverse order of the
procedure for removing the document cover.
Load the document.
2.1 Copying Procedure
81
Page 82

2
Copy
2.2 Canceling the Copy Job
Steps
Note
This section describes how to cancel the current copy job.
1.
2.
Press the <Stop> button on the control panel. Alternatively, press [Stop] on the touch screen.
Pressing the <Stop> button on the control panel allows you to stop document feeding urgently.
Press [Delete].
82
2.2 Canceling the Copy Job
Page 83

Copy
2
2.3 Copying in the Specified Paper Size (Auto
Steps
Note
Mode)
Auto Mode is a feature that allows you to pre-configure an output paper size for each document size using a matrix.
The feature automatically reduces/enlarges images based on this configuration when copying.
The following describes an example of how to insert an A2 standard-size document in the portrait orientation, and to
make its enlarged copies (141.4%) on A1 paper (A1 roll paper in the portrait orientation) (The value surrounded
with a square is the set value).
A1
1.
2.
3.
On the menu screen, press [Copy].
Select the [Auto Mode] check box.
On the matrix, select [A2] for [Original Size] and [A1] for
[Paper Supply].
If the orientation of your original does not
match that of the paper loaded, for example,
when [Original Orientation] is set to [Standard
Portrait] though [Paper Orientation] is set to
[Landscape], the image will be printed on the
paper with the image orientation rotated
according to the settings specified in [Auto
Mode Rotate Direction] under [System
Settings]. For information on how to set the
function, refer to "Auto Mode Rotate Direction"
(p. 307).
A2
Document
Enlarging
Copied output
4.
5.
6.
Set other features as necessary.
Enter the number of copies using the numeric keypad.
Load the document.
2.3 Copying in the Specified Paper Size (Auto Mode)
83
Page 84

2
Copy
2.4 Making Adjustments to Color on the Original
Steps
Note
2.4.1 Adjusting Individual Color Density (Adjust Color Density)
When copying a color document, this feature allows you to change the copy-density level for each of the color com-
ponents.
The Color Board & Page Memory for IIT is required to use this feature.
1.
2.
3.
4.
5.
6.
7.
8.
On the menu screen, press [Copy].
Press the [Image Quality] tab.
Press [Adjust Color Density].
Select the [Adjust] check box.
Select density level for each color components.
Set other features as necessary.
Enter the number of copies using the numeric keypad.
Load the document.
84
2.4 Making Adjustments to Color on the Original
Page 85

Copy
2
2.4.2 Eliminating the Specified Color on the Original (Disabling Color)
Steps
When copying a color document, this feature allows you to make a copy leaving out those parts that correspond to a
specified color.
1.
2.
3.
4.
5.
6.
7.
8.
On the menu screen, press [Copy].
Press the [Image Quality] tab.
Press [Adjust Color Density].
Select the [Adjust] check box.
Select the check box for a color to eliminate the color
from being copied.
Set other features as necessary.
Enter the number of copies using the numeric keypad.
Load the document.
2.4 Making Adjustments to Color on the Original
85
Page 86

2
Copy
Steps
2.5 Scanning to Copy Documents in Maximum
Width
Selecting [Maximum Width] allows you to scan and copy documents in maximum width (914.4 mm). This function is
useful when you scan non-standard size originals and you do not want to worry about the scan width.
This function works when the manual mode is selected. It does not function in the auto mode.
When scanning documents in maximum width, the following functions may not work.
- Image Shift
-Edge Erase
- Mirror Image
- Negative Image
1.
Important
On the menu screen, press [Copy].
2.
3.
4.
Make sure that the [Auto Mode] check box is deselected.
Press the [Layout Adjustment] tab.
Press [Original Width].
86
2.5 Scanning to Copy Documents in Maximum Width
Page 87

Copy
2
5.
Press [Maximum Width].
6.
7.
8.
Set other features as necessary.
Enter the number of copies using the numeric keypad.
Load the document.
2.5 Scanning to Copy Documents in Maximum Width
87
Page 88

2
Copy
Important
Steps
2.6 Loading Paper Manually (Bypass Copying)
Non-standard size paper and paper of sizes you do not use very often can be copied from the bypass (manual) feed
table.
If you load paper of a size that is different from the one you specified, part of the image may be lost, or the
image may be copied with unwanted margins.
Note
The following functions cannot be used in conjunction with bypass copying.
- Image Shift. (Auto Center, Corner Shift)
-Image Rotation
- Copy Output (Collated)
- Lead & Tail Margins
- Sample Copy
1.
2.
3.
4.
5.
On the menu screen, press [Copy].
Make sure that the [Auto Mode] check box is deselected.
Press [ ].
Select [Paper Series], [Paper Type], and [Paper Weight].
Press [Close].
Set other features as necessary.
88
2.6 Loading Paper Manually (Bypass Copying)
Page 89
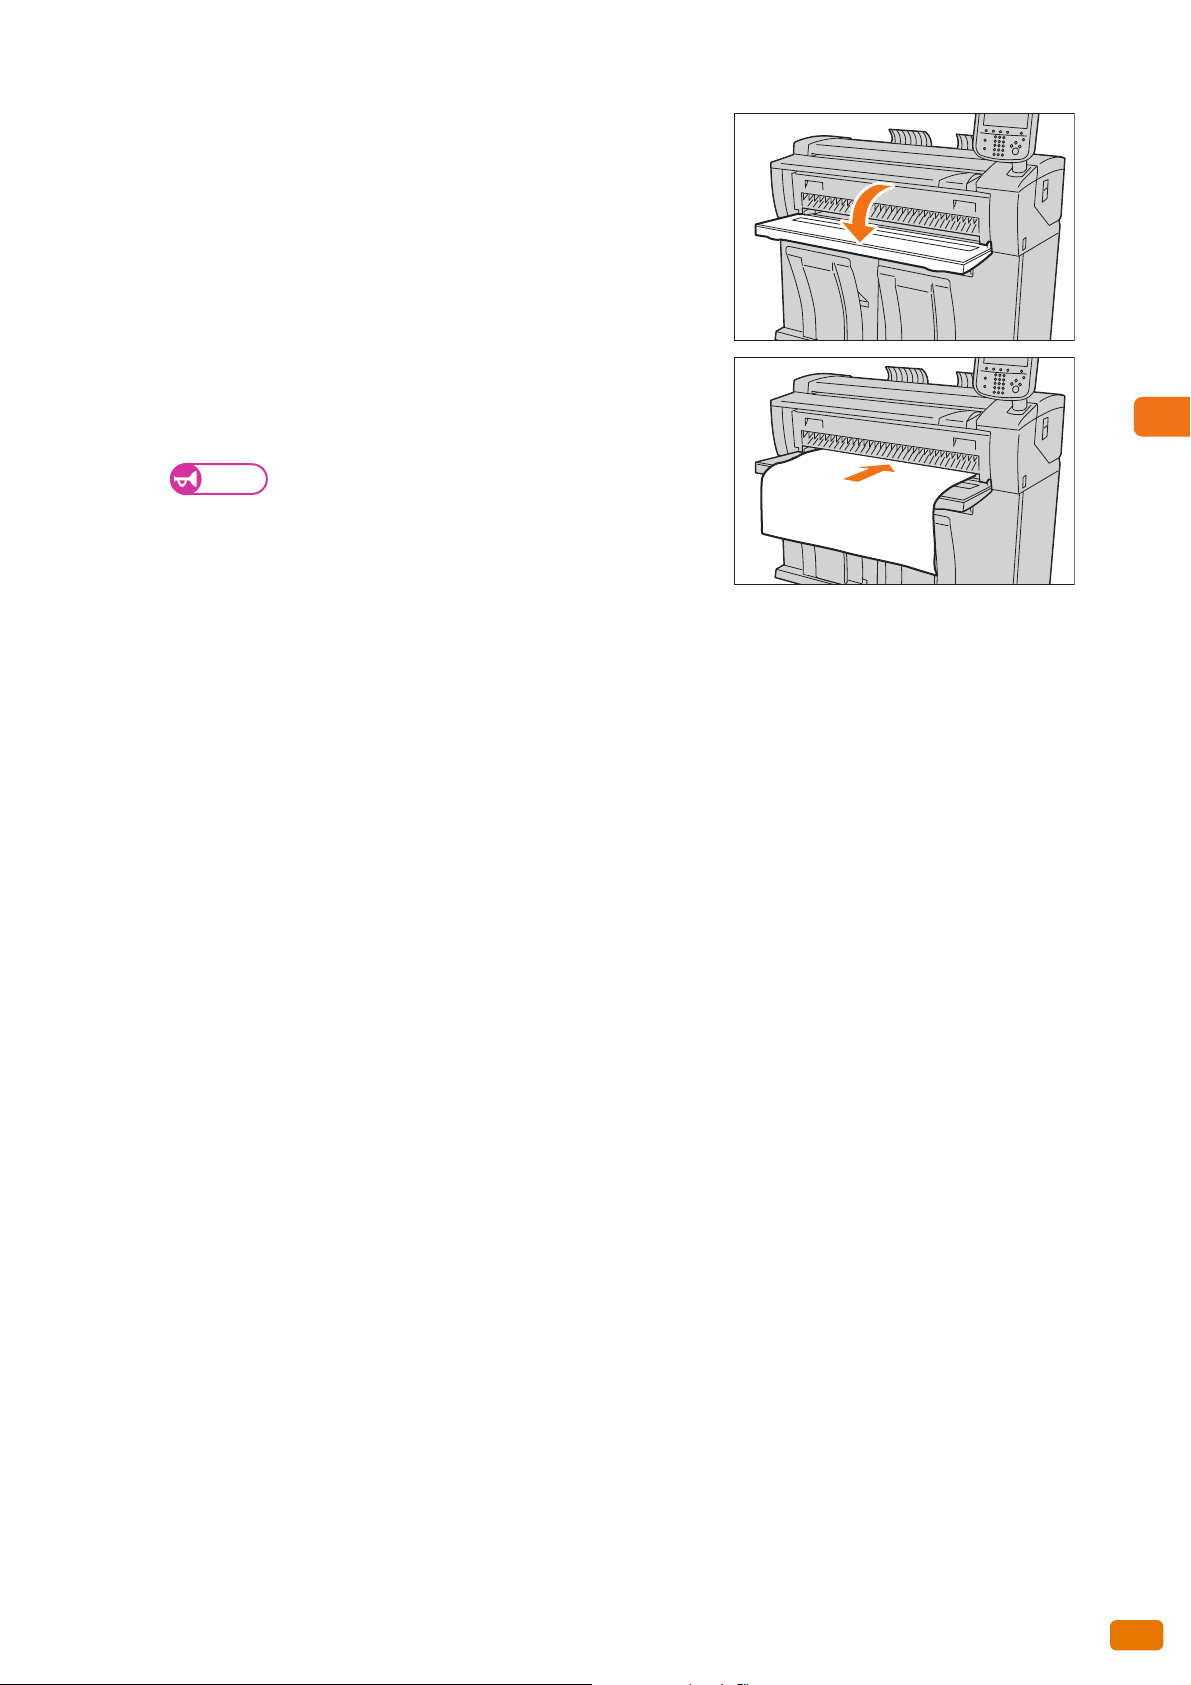
Copy
2
6.
Important
Fold the bypass (manual) feed table toward you to open it.
7.
8.
9.
Align the right edge of the paper against the scale, and insert the
paper until you hear a beep.
The paper is automatically conveyed and stops.
Load paper one sheet at one time.
If paper is curled, hold the curled corners with both
hands when inserting the paper.
Do not release your hands from the paper until it is
conveyed. If you release your hands when you hear a
sound, the paper may get jammed.
Load the document.
When copying is finished, put the bypass (manual) feed table back to the original position.
2.6 Loading Paper Manually (Bypass Copying)
89
Page 90

2
Copy
2.7 Copying Long Documents
Steps
Note
The following describes an example of how to copy an A1 width 3,000 mm length document onto A1 roll paper in
the same width and length.
1.
2.
3.
4.
5.
6.
7.
On the menu screen, press [Copy].
Select the [Auto Mode] check box.
Press [Synchronized].
On the matrix, make sure that [A1] is selected for both
[Original Size] and [Paper Supply].
Set other features as necessary.
Scanning long size documents at a low speed
helps preventing skewing. For information on
how to set the function, refer to "Scan Speed
(Specifying Scanning Speed)" (p. 117).
Enter the number of copies using the numeric keypad.
Load the document.
90
2.7 Copying Long Documents
Page 91

Copy
2
2.8 Copying Multiple Documents (Collation)
Steps
Refer
Multiple documents can be collated into sets when their copies are output.
1.
2.
3.
4.
5.
On the menu screen, press [Copy].
Press the [Output Format] tab.
Press [Copy Output].
Press [Collated].
Set the desired items under [Banner Sheet] and
[Collation Order].
Banner Sheet
Select [Yes] to insert a banner sheet. The banner sheet will
have the copy quantity and time printed on it.
6.
7.
Collation Order
Select [In Order] to output copies in the order in which the
documents were scanned or [Reverse Order] to output from
the last document that was scanned.
For more information, refer to "Copy Output
(Specifying Finishing Options)" (p. 120).
Press [Close].
Set other features as necessary.
Enter the number of copies using the numeric keypad.
2.8 Copying Multiple Documents (Collation)
91
Page 92

2
Copy
8.
9.
Load the first document.
The scanning starts.
Delete
Press to cancel the copy job.
Last Original
Press this button after all documents have been scanned.
Next Original
This button is selected by default.
Delete Previous Image
Press this button to delete images of the previously scanned
documents.
Change Settings
Press this button to change the magnification ratio, the settings such as image quality, and the number of copies
to be made, for the next document.
Load the next document.
Repeat this step if you have more documents.
10.
When all documents have been scanned, press [Last Original].
92
2.8 Copying Multiple Documents (Collation)
Page 93

Copy
2
Document
Sample Copy -
Density list
Light -4
Light -3
Light -2
Light -1
Normal
Dark +1
Dark +2
Dark +3
Dark +4
Copy from Memory -
Output
Scan Start Position
Measurement
2.9 Running Sample Copies
This section describes how to run a sample copy of an area of a document with several settings applied, in order to
determine the optimal settings. Any portion on the document can be specified as the sample area. This sample area
can be printed with a variety of settings such as the enlarge/reduce ratio, density level, and original type, applied.
The sample copy can show a list of effects of nine levels of density, seven types of image quality, or seven levels of
auto background suppression.
Important
Note
The Sample Copy function cannot be used when:
- [Copy Output] is set to [Collated], and [Change Settings] is applied to the next document
- Copy is running in the auto mode
- You are loading paper manually (bypass copying)
- Copy from memory is running
- Interrupt copy is running
When [Original Type] is set to [Printed Original] or [Photograph], the Background Suppression List cannot be
output.
T Color Board & Page Memory for IIT is required to use this feature.
he
The following describes an example of how to run a sample copy for reviewing a listing of available densities, and
then print the entire image with the optimal density.
2.9 Running Sample Copies
93
Page 94

2
Copy
Steps
1.
Refer
Note
Press [Copy] on the [Services Home] screen.
2.
3.
4.
5.
6.
Press the [Output Format] tab.
Press [Sample Copy].
Press [Lighten / Darken List].
Set [Scan Start Position] and [Measurement] as
necessary, and press [close].
"Sample Copy (Determining the Optimal
Settings Before Running the Whole Copy Job)"
(p. 121)
Set other features as necessary.
7.
8.
9.
Load the document.
The sample copy with the specified settings applied is
output.
To run another sample copy, repeat Steps 2. to 7..
Settings are not kept between sample copies. To run another sample copy, press [Sample Copy] again.
Once you have determined which density is optimal for the document, change the setting for [Lighten /
Darken] appropriately.
Press [Copy from Memory] and then press [Start].
The entire image with the specified settings applied is output.
94
2.9 Running Sample Copies
Page 95

Copy
2
2.10 Copying from Memory
Steps
The Copy from Memory function allows you make additional copies of the last copied document without reloading.
When you have selected [Collated] for the last copy job, the same collated set of the document will be additionally
output.
The Copy from Memory function is disabled if:
You press the <Clear All> button or the machine enters the Auto Reset state.
You turn the power off or the machine enters the Energy Saver mode.
You load the next document.
You return the screen to the [Services Home] screen.
You run an Interrupt copy.
You pull out the card (DocuLyzer).
You log out of the authenticated mode.
The Copy from Memory function cannot be used when:
Image data for the last document has been lost due to a problem such as a paper jam.
Important
Note
The following functions cannot be used in conjunction with the Copy from Memory function.
- The custom buttons on the control panel (Calling the associated feature)
- Interrupt Copy
- Sample Copy
- Adjust Color Density
- Original Scanning Speed
-Copy Output
The Color Board & Page Memory for IIT is required to use this feature.
1.
After running a copy job, press [Copy from Memory].
2.10 Copying from Memory
95
Page 96

2
Copy
Note
2.
Set the functions as necessary.
To restore the settings for the last copy job,
press the <Clear All> button.
When you have selected [Collated] for the last
copy job, only the number of copies can be
changed.
3.
4.
5.
Enter the number of copies using the numeric keypad.
Press the <Start> button.
The image data from memory is output.
After you finish copying from memory, press [Copy from Memory] again.
The Copy from Memory mode is exited.
96
2.10 Copying from Memory
Page 97
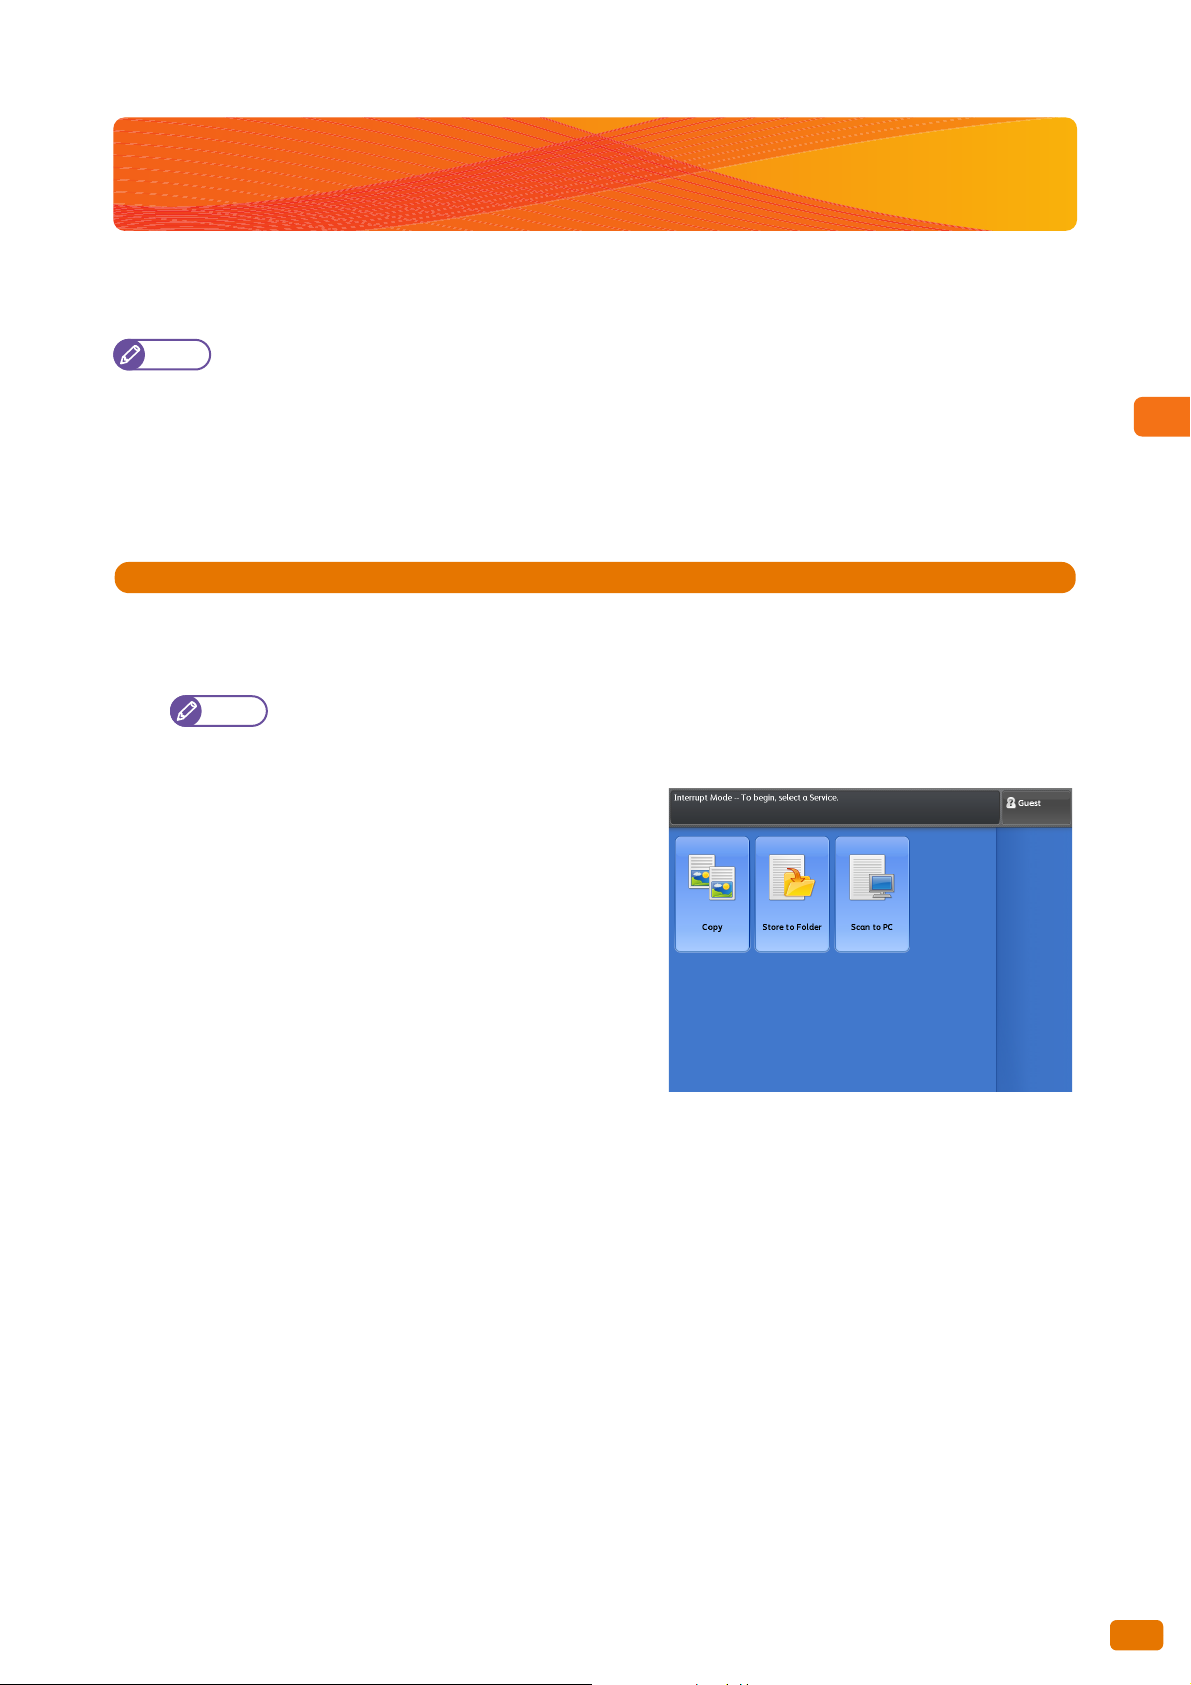
Copy
2
Note
Steps
Note
2.11 Running an Interrupt Copy
This section describes how to interrupt an ongoing continual copy or print job to run an urgent copy job. The settings
for the ongoing job are kept and will be restored immediately after you exit the Interrupt Copy mode.
The following operations cannot be used during the Interrupt Copy mode.
- Interrupting another copy job
- Sample Copy
- Copy from Memory
- Collation
The Interrupt Copy function cannot be used when you are running a sample copy or scanning job.
1.
Press the <Interrupt> button on the control panel.
The <Interrupt> button lights up, indicating the Interrupt mode is enabled.
When you press the <Interrupt> button while a job is being performed, the <Interrupt> button blinks,
indicating the Interrupt mode will be enabled after the current job is completed (reserve mode). Once the
current job is completed, the <Interrupt> button lights up, indicating the Interrupt mode is enabled.
2.
3.
4.
5.
6.
During a print job, the [Services Home] screen appears.
Press [Copy].
Set other features as necessary.
Enter the number of copies using the numeric keypad.
Load the document.
After you finish the interrupt copying, press the
[Interrupt] button.
The <Interrupt> button goes out, indicating the Interrupt
mode is exited.
The suspended print or copy job resumes.
2.11 Running an Interrupt Copy
97
Page 98

2
Copy
2.12 [Copy (Auto Mode)] Screen
Steps
This section describes functions that can be set on the [Copy (Auto Mode)] screen. Refer to the following subsections
for more information on each item:
Original Orientation (Specifying the Document Feeding Orientation).............................................................................. p. 99
Mapping Table between Original Sizes and Paper Sizes (Matrix) ........................................................................................ p. 99
Paper Orientation (Specifying the Target Paper Orientation) .............................................................................................p. 100
1.
2.
3.
On the menu screen, press [Copy].
Select the [Auto Mode] check box.
Select the desired function on the [Copy (Auto Mode)]
screen.
98
2.12 [Copy (Auto Mode)] Screen
Page 99

Copy
2
2.12.1 Original Orientation (Specifying the Document Feeding Orientation)
Steps
Note
Steps
The following describes how to tell the machine the orientation in which the document is placed.
For each of the document orientations (Standard Portrait, Standard Landscape, and Synchronized), the mapping
table between original sizes and paper sizes (Matrix) can be predefined.
1.
Select the original orientation.
Standard Portrait
Select this when loading standard size documents in the
portrait orientation.
Standard Landscape
Select this when loading standard size documents in the
landscape orientation.
Synchronized
Select this when loading non-standard size documents.
Image rotation is not applied.
2.12.2 Mapping Table between Original Sizes and Paper Sizes (Matrix)
This following describes how to select the target paper size corresponding to the original size.
In Auto Mode, the machine automatically selects the appropriate magnification ratio and the paper tray according
to the scanned original, based on the predefined mapping table between original sizes and paper sizes (Matrix).
1.
Select the target paper size corresponding to the original
size from the matrix.
2.12 [Copy (Auto Mode)] Screen
99
Page 100

2
Copy
2.12.3 Paper Orientation (Specifying the Target Paper Orientation)
Steps
Note
This following describes how to select the target paper orientation.
With the machine, you can predefine the target paper orientation for individual paper sizes. This function allows you
to simplify the way you select the orientation of documents and the target paper supply. For example, you can
always load documents in the portrait orientation regardless of the size, and select landscape only when using A2
size documents for better output performance of the folded paper.
1.
2.
Press [Paper Orientation] that corresponds to the desired
paper size.
The supply orientation of A0 size paper is fixed
to [Portrait] by default.
Select the paper orientation from [Portrait], [Landscape],
and [Auto Select].
Portrait
Select this to deliver standard size paper in the portrait
orientation.
Landscape
Select this to deliver standard size paper in the landscape
orientation.
Auto Select
Select this to prioritize delivering paper in the same
orientation as the document.
100
2.12 [Copy (Auto Mode)] Screen
 Loading...