

Page 1

Quick
Use Guide
Phaser® 6115MFP
multifunction product
More Information
www.xerox.com/office/6115support
-English- Rev A
Copyright © 2007 Xerox Corporation. All rights reserved.
Visit the Support website for:
Print and Scan drivers and utilities
User manuals and instructions
Online Support Assitant
Safety specifications (in User Guide)
Material Safety Data Sheets
www.colorconnection.xerox.com
Visit the
for templates, tips, and tutorials.
Color Connection website
www.xerox.com/office/6115support
Page 2

Product Features 2
Printing 5
Product Features
Product TourContents
ScannerScanner
Automatic Document Feeder (ADF)Automatic Document Feeder (ADF)
Copying 8
Scanning 10
Faxing 13
Troubleshooting 16
Output TrayOutput Tray
ay 1Tray 1
Tr
OptionsOptions
1
2
Duplex UnitDuplex Unit 500-Sheet Feeder500-Sheet Feeder
2
Page 3

Product Features
Product Features
Scanner Latch
Top Cover
FuserFuser
Toner CartridgesToner Cartridges
Select toner from the control panel to
rotate into position for replacement.
Transfer BeltTransfer Belt
Imaging UnitImaging Unit
www.xerox.com/office/6115supplies
For ordering supplies, contact your local reseller,
or visit the
Xerox Supplies website.
Front CoverFront Cover
www.xerox.com/office/6115support 3
Page 4

Control Panel
Product Features
Product Features
Auto Receive Resolution
Redial / Pause Speed Dial
01 02 03
04 05 06
07 08 09
Navigate/Adjust buttons
Copy Settings
On Hook
Error Display
QualityFunction
2 in 1
Reduce / Enlarge
Light / Dark
Collate
Phaser 6115MFP
MIX x1.00 1
1A4
Y M C K
Menu
Select
1. Document type 2. Zoom ratio 3. Number of copies
MIX x1.00 1
4. Output density 5. Media tray/size 6. Status/warnings
1A4
Menu
Select
C
Alphanumeric keypad
.@_-
1
2
GHI4JKL5MNO
PQRS
C
7
Keypad Mode
[1] / [A
0 #
]
DEF
ABC
3
6
TUV8WXYZ
9
Fax Scan
Start
Mode buttons
Copy
Stop / Reset
Color or B/W Start and Stop/Reset buttonsFax controls
Press Display to view toner levels
and print report pages.
Display
Display
Quality
Quality
Reduce / Enlarge
Phaser 6115MFP
TONER REMAI NI NG
Y M C K
Menu
Toner Change button
Menu/Select button Cancel/Back button
To print a Menu Map, press the
print a Menu Map, press the
To
Display button, and then scroll
Display button, and then scroll
down to select Menu Map.
down to select Menu Map.
www.xerox.com/office/6115support 4
Page 5
Printing
Phaser 6115MFP Software and
Documentation CD-RO
M
www.xerox.com/office/6115support
To learn about advanced printing techniques,
learn about advanced printing techniques,
To
see the Printing Basics chapter in the User Guide.
see the Printing Basics chapter in the User Guide.
Click the Recommended Media List link for a
Click the Recommended Media List link for a
complete list of media for your product.
complete list of media for your product.
Print and Scan
Drivers and Utilities
Installation Vide
e
User guid
Windows
,
Mac OS
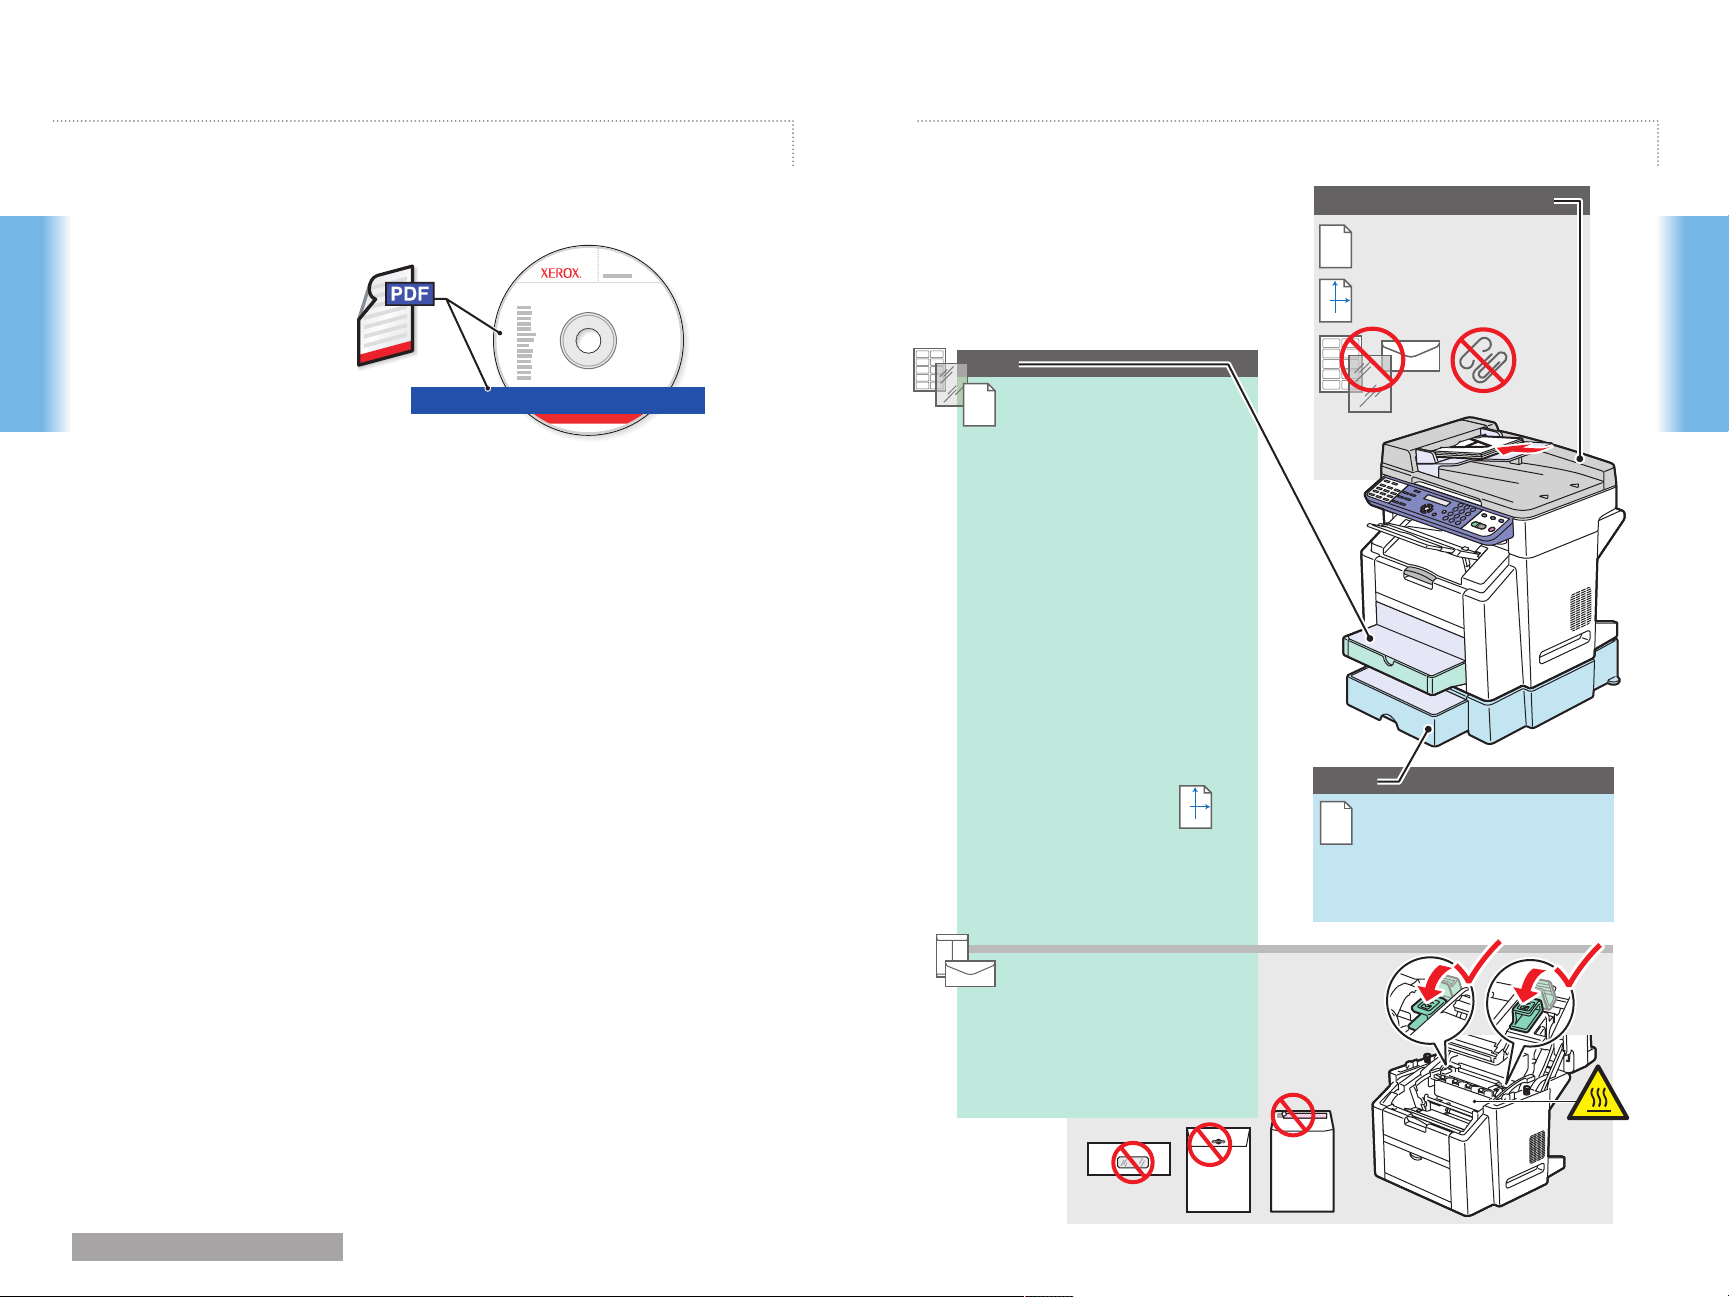
Supported PapersPrinting
Automatic Document Feeder
60 – 90 g/m
(16 – 24 lb. Bond)
W: 140– 216 mm (5.5 – 8.5 in.)
W
H: 148 – 356 mm (5.83 – 14 in.)
o
H
Tray 1
60 – 200 g/m
2
(16 – 53 lb. Bond/
50 – 75 lb. Cover)
Photo Size 4 x 6....... 4.0 x 6.0 in. 4X6
Statement................ 5.5 x 8.5 in. ST
Executive................. 7.25 x 10.5 in. EX
UK Quatro................ 8.0 x 10.0 in. UKQ
Gov. Letter.............. 8.0 x 10.5 in. GLT
Foolscap................. 8.0 x 13.0 in. FLS
Letter....................... 8.5 x 11.0 in. LT
Letter Plus............... 8.5 x 12.69 in. LTP
Gov. Legal............... 8.5 x 13.0 in. GLG
Legal....................... 8.5 x 14.0 in. LG
Photo Size 10 x 15... 102 x 152 mm PHO
A5............................ 148 x 210 mm A5
B5 ISO..................... 176 x 250 mm B5
A4............................ 210 x 297 mm A4
SP Folio................... 210 x 330 mm FOL
Tray 2
Custom.................... (W) x (H)
W
H
W: 3.6 – 8.5 in
92 – 216 mm
H: 5.8 – 14.0 in.
148 – 356 mm
60 – 90 g/m
(16 – 24 lb. Bond)
Letter....................... 8.5 x 11.0 in. LT
A4............................ 210 x 297 mm A4
2
Printing
2
Monarch.................. 3.87 x 7.5 in.
MON
Com# 10.................. 4.12 x 9.5 in. #10
DL............................ 110 x 220 mm DL
C6............................ 114 x 162 mm C6
C5............................ 162 x 229 mm C5
www.xerox.com/office/6115support 5
Page 6

Basic Printing
Printing
Printing
1 2
3
1 2 3 4
4 5
PC
Mac
Select special features
in the Xerox printer driver
.
www.xerox.com/office/6115support 6
Page 7

Printing Envelopes
Printing
Monarch... 3.87 x 7.5 in.
# 10.......... 4.12 x 9.5 in.
DL.............110 x 220 mm
C6............. 114 x 162 mm
C5............. 162 x 229 mm
Printing
1
2
3
4
1–10
1–10
5
PC
Mac
Select envelope size in the Xerox printer driver.
After printing: Lower both fuser levers.
www.xerox.com/office/6115support 7
Page 8

Phaser 6115MFP Software and
Documentation CD-RO
M
Print and Scan
Drivers and Utilitie
Installation Video
User guid
e
Windows,
Mac OS
Basic CopyingCopying
CopyFax Scan
s
Copying
www.xerox.com/office/6115support
See the Copying chapter in the User Guide
See the Copying chapter in the User Guide
to learn about advanced copying techniques:
to learn about advanced copying techniques:
Adjusting image quality
Adjusting image quality
Reducing or enlarging
Reducing or enlarging
Copying 2 sides to 1 side (2 in 1)
Copying 2 sides to 1 side (2 in 1)
Making 2-sided copies (duplex option)
Making 2-sided copies (duplex option)
Making booklets
Making booklets
1
60 – 90 g/m
2
(16 – 24 lb. Bond)
W:
140– 216 mm (5.5 – 8.5 in.)
W
H: 148 – 356 mm (5.83 – 14 in.)
H
Copying
Load original.Load original.
www.xerox.com/office/6115support 8
Page 9

6
K
2
3
.@_-
ABC
1 2 3
DEF
Function: Access to optional features
Copying
Select settings.Select settings.
Quality: Document type (1x)/Resolution (2x)
Error Display
1x 2x
GHI JKL MN
4 5
S
PQR
7 8
Keypad Mode
0 #
[1] / [A
]
TUV WXYZ
O
6
9
Select number of copies.Select number of copies.
QualityFunction
Copying
2 in 1
Reduce / Enlarge
x0.50
Collate
Light / Dark
x2.00
x1.00
2
1
2
1
x: ±0.01
Menu
Selec
t
4
Menu
Select
Stop / Reset Start
Use the Stop/Reset button to stop copying
or restore default settings.
1. Document type 2. Zoom ratio 3. Number of copies
MIX x1.00 1
4.
Output density 5. Media tray/size 6. Status/warnings
www.xerox.com/office/6115support 9
1A4
Press Color or B/W Start button.Press Color or B/W Start button.
Page 10

Scanning
Loading Original
www.xerox.com/office/6115support
To learn about advanced scanning techniques,
To learn about advanced scanning techniques,
see the Scanning chapter in the User Guide.
see the Scanning chapter in the User Guide.
Phaser 6115MFP Software and
Documentation CD-RO
M
Print and Scan
Drivers and Utilitie
Installation Vide
User guide
Windows
,
Mac OS
60 – 90 g/m
2
(16 – 24 lb. Bond)
W: 140– 216 mm (5.5 – 8.5 in.)
W
H: 148 – 356 mm (5.83 – 14 in.)
H
s
o
Scanning
Scanning
USB (TWAIN/WIA) and Network (email) scanning function
USB (TWAIN/WIA) and Network (email) scanning function
differently. To setup scanning for your connection, see the
differently. To setup scanning for your connection, see the
(printed booklet or PDF online).
Features Setup Guide
Features Setup Guide
www.xerox.com/office/6115support 10
(printed booklet or PDF online).
Page 11

USB: Scan via TWAIN driver
3
1
Launch application to scan from, and then start the TWAIN driver
Launch application to scan from, and then start the TWAIN driver
(import method varies with application).
(import method varies with application).
2
PC
Click the Prescan button for a preview.Click the Prescan button for a preview.
4
Mac
The ADF cannot prescan.
Scanning
Scanning
Select settings.Select settings. Click the Scan button.Click the Scan button.
www.xerox.com/office/6115support 11
PC
Mac
PC
Mac
Page 12

Network: Scan to Email
1
Press Scan mode button.Press Scan mode button.
2
2.1
TO: ABC@XYZ.COM_
OK=SEL [A]
Scanning
2.2
TO: ABC@XYZ.COM_
OK=SEL [A]
Menu
Select
ADF scans to email in black and white only.
CopyFax Scan
.@_–1 0ABC2abc
DEF
3
MNO
6
WXYZ
9
1
4
PQRS
7
Keypad Mode
[1] / [A
]
.@_-
GHI
ABC
2
JKL
5
TUV
8
0 #
# + & / = ! ? ( ) % [ ] ˆ
‘ ’ { } | ˜ $ , : ; < > “ ¿ £
[A]
Star ( ) toggles alpha/numeric mode.
3
3.1
[1]
Phaser 6115MFP
SUBJ.=scan to Email
OK=SEL [1]
Y M C K
XYZ.CO_
ABC
2
ДдЕеЖжаЗз
DEF
3
Ééè
GHI
4
ìíî
Extra characters for metric defaults
MNO
6
СсЦцШшт
PQRS
7
ß
TUV
8
Üüùú
Stop / Reset Start
3.2
Scanning
Menu
Select
Auto Receive Resolution
Redial / Pause Speed Dial
Enter Email address.Enter Email address.
www.xerox.com/office/6115support 12
01 02 03
04 05 06
07 08 09
Stored Email addresses can also be selected.
On Hook
Follow prompts to specify subject, more addresses, and scan settings.
Follow prompts to specify subject, more addresses, and scan settings.
Press Start at any time to accept remaining defaults and send the scan.
Press Start at any time to accept remaining defaults and send the scan.
Menu
Select
Page 13

Basic FaxingFaxing
www.xerox.com/office/6115support
To learn about advanced Faxing techniques,
learn about advanced Faxing techniques,
To
see the Faxing chapter in the User Guide.
see the Faxing chapter in the User Guide.
Also see the Faxing chapter to learn how listings and
Also see the Faxing chapter to learn how listings and
settings can be managed from your computer using MFP
settings can be managed from your computer using MFP
ControlCentre® (PC via USB) or CentreWare® Internet
ControlCentre® (PC via USB) or CentreWare® Internet
Services (Mac/PC via Ethernet).
Services (Mac/PC via Ethernet).
Phaser 6115MFP Software and
Documentation CD-RO
M
Print and Scan
Drivers and Utilitie
Installation Vide
User guid
e
,
Windows
Mac OS
60 – 90 g/m
2
(16 – 24 lb. Bond)
W: 140– 216 mm (5.5 – 8.5 in.)
W
H: 148 – 356 mm (5.83 – 14 in.)
s
o
1
H
PC: USB Mac/PC: Ethernet
CentreWare
CentreWare
Internet Services
Internet Services
Load original.Load original.
2
CopyFax Scan
Faxing
Press Fax mode button. Press Fax mode button.
www.xerox.com/office/6115support 13
Faxing
Page 14

3
Enter Fax number.
.@_-
1
7
Keypad Mode
[1] / [A
Auto Receive Resolution
ABC
2
GHI4JKL5MNO
PQRS
TUV8WXYZ
0 #
]
DEF
3
6
9
Auto Receive Resolution
Redial / Pause Speed Dial
01 02 03
On Hook
Redial/Pause: Insert a pause (P)
When faxing from document glass (“BOOK”):
4
Faxing
Press either Start button.
Redial / Pause Speed Dial
01 02 03
04 05 06
07 08 09
On Hook
Stored Fax numbers can also be selected.
Stop / Reset Start
Use the Stop/Reset button to stop faxing
or restore default settings.
5
5.1
Phaser 6115MFP
SCAN BOOK (A4)
SCAN=SEL (SIZE= )
Y M C K
Menu
t
Selec
Follow prompts to select document size and additional pages.
Press Select to scan, and then Start to send fax.
5.2
Stop / Reset Start
Faxing
www.xerox.com/office/6115support 14
Page 15

M
M
Adding Speed Dial Entries
1
1.1
MACHINE SETUP?
1.2
FAX DIAL SETUP?
1.3
2 SPEED DIAL?
Menu
Select
enu
Select
Menu
Select
enu
Select
Menu
Select
3x
1x
3
.@_–1 0ABC2abc
.@_-
1
GHI
4
PQRS
7
Keypad Mode
[1] / [A]
[A]
Star ( ) toggles alpha/numeric mode.
ABC
2
JKL
5
TUV
8
0 #
[1]
2
DEF
3
MNO
6
WXYZ
ДдЕеЖжаЗз
3
Ééè
4
ìíî
Extra characters for metric defaults
9
# + & / = ! ? ( ) % [ ] ˆ
‘ ’ { } | ˜ $ , : ; < > “ ¿ £
ABC
DEF
GHI
MNO
6
СсЦцШшт
PQRS
7
ß
TUV
8
Üüùú
555121_
Follow prompts to enter name, Fax number, and modem starting rate.Follow prompts to enter name, Fax number, and modem starting rate.
Navigate to Speed Dial menu.Navigate to Speed Dial menu.
2
2.1
SPEED DIAL= 010
Faxing
.@_-
1
2
GHI4JKL5MNO
PQRS
7
Keypad Mode
0 #
]
[1] / [A
ABC
3
6
TUV8WXYZ
9
Choose a new 3 digit listing number.Choose a new 3 digit listing number.
www.xerox.com/office/6115support 15
2.2
DEF
Menu
Select
4
Add more listings at prompt, or press Cancel.Add more listings at prompt, or press Cancel.
Faxing
Page 16

Paper Jams
www.xerox.com/office/6115support 16
Troubleshoooting
Troubleshoooting
 Loading...