

Page 1
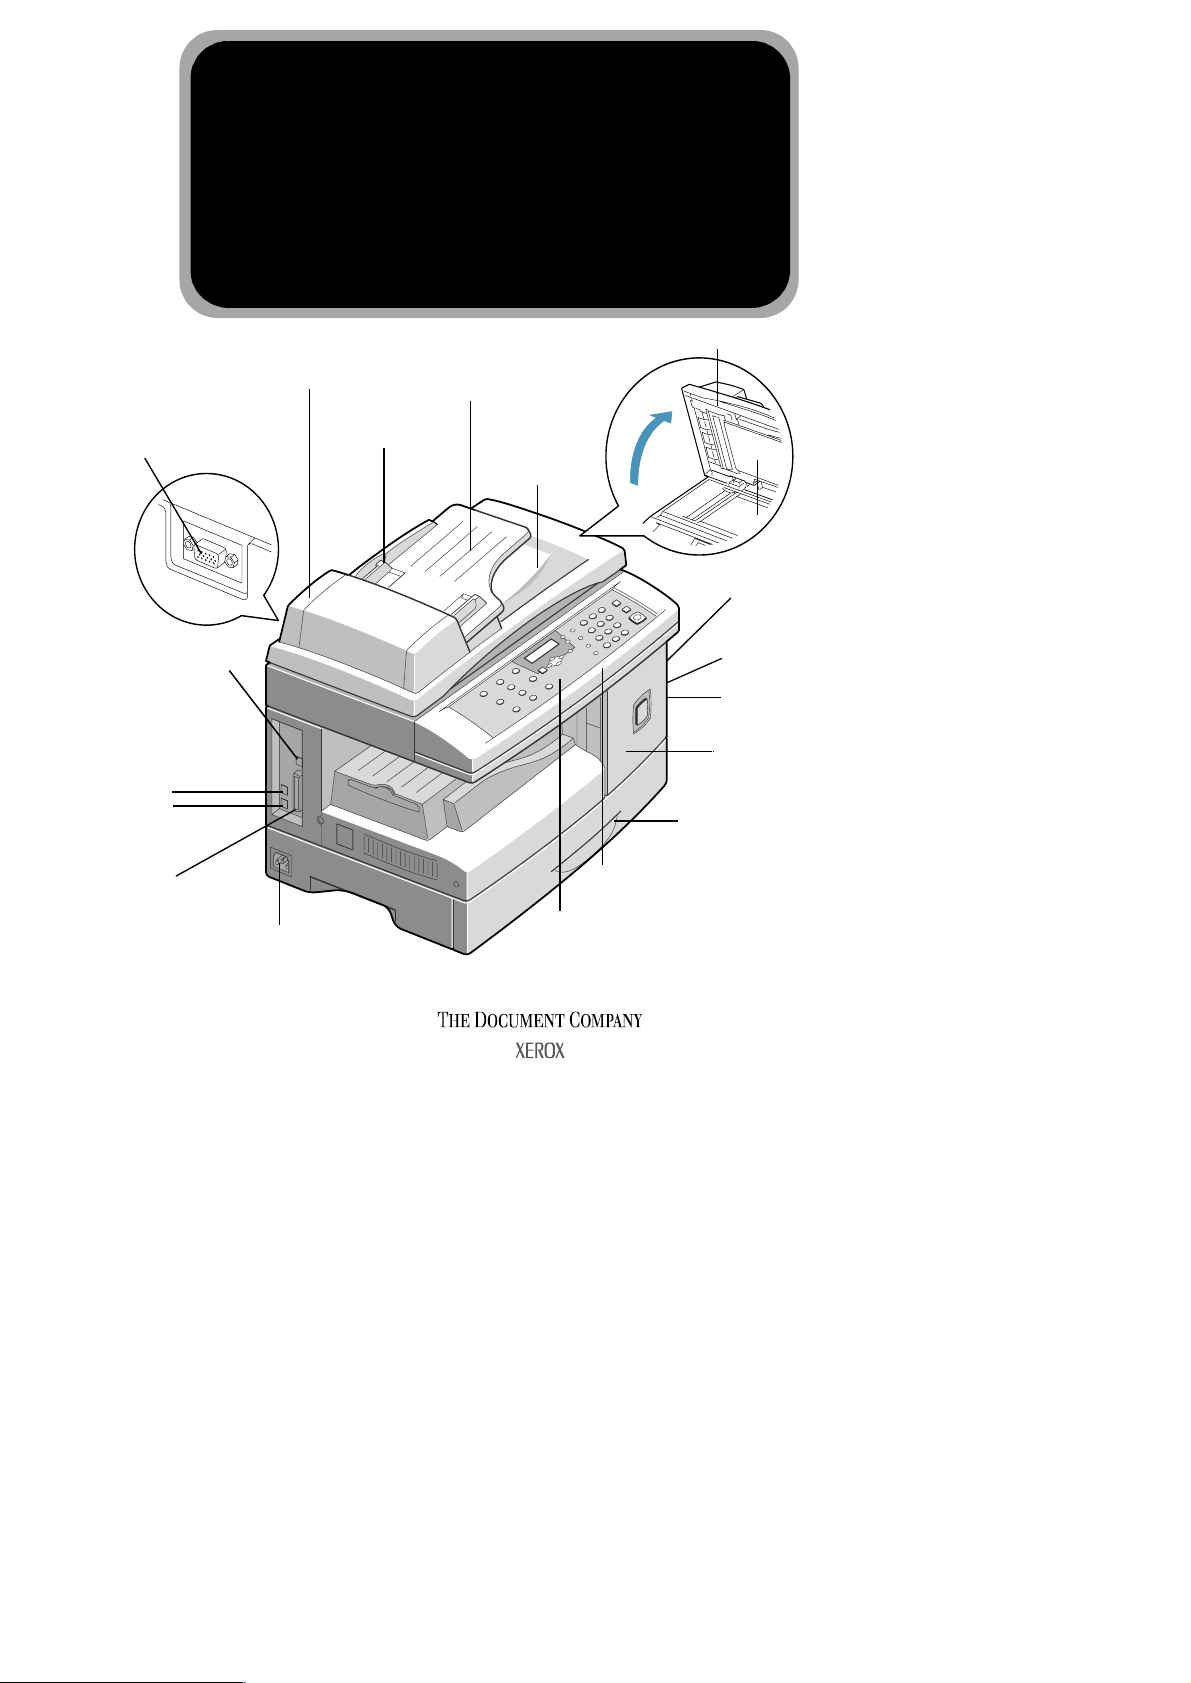
Scan Module
Connector
Xerox WorkCentre Pro 412
Quick Start Guide
Automatic Document
Feeder
Document
Guides
610E35560
Document
Input Tray
Document
Output
Tray
Document Cover
Document Glass
Side Cover
USB Connector
Telephone
Connections:
EXT.
LINE
Parallel
Connector
AC Power Cord
Connector
Bypass Tray
Release Latch
Front Cover
Paper Cassette
Scanner Module
Control Panel
X
Page 2

Welcome to your WorkCentre Pro 412....
Thank you for choosing the Xerox WorkCentre Pro 412.
To support the delivery of your new machine please refer to the following:
½
Quick Start Guide
½
Installation Sheet
½
Customer Documentation CD for use by End Users/Key Operators
The following pages contain an overview of the main features to help you get
started. If you require more detailed information about any of the features
available on your WorkCentre Pro 412, please refer to the enclosed CD which
contains viewable print ready files of the complete documentation suite that
supports your machine. Copy these documents onto your server to provide
your users with easy access.
The Document Company Xero x
GKLS European Operations
Bessemer Road
Welwyn Garden City
Hertfordshire
AL7 1HE
ENGLAND
©2001 by Xerox Corporation. All rights reserved.
Copyright protection claimed includes all forms and matters of copyrighted material
by statutory or judicial law or hereinafter granted, including without limitations, material generated from the
software programs which are displayed on the screen, such as icons, screen displays, looks etc.
®
, The Document Company®, the digital X® and all Xerox products mentioned in this publication are
Xerox
trademarks of Xerox Corporation. Product names and trademarks of other companies are hereby acknowledged.
Page 2
and information now allowed
Page 3
Working around the control panel....
Key Function
Pause PC
1
Printing
Reports Use to display a list of available
2
2-Sided
3
Copy
Output Use to collate outputs in copy
4
Reduce/
5
Enlarge
Lighten/
6
Darken
Paper
7
Supply
Resolution Use to adjust the resolution or
8
Original
9
Type
Scan
10
Options
Mode Key Use to select the required Mode,
11
LCD Shows the current status and
12
Use to pause a print job
reports for printing
Use to make one or two-sided
copies
mode
Use to reduce or enlarge the
image
Use to adjust image contrast level
Use to select the required paper
supply source
sharpness for Fax and Scan jobs
Use to select the type of original
being scanned
Use to select COLOR, B&W or
GRAY mode for scanning
In Fax mode, B&W or COLOR
mode is selectable
COPY, FAX or SCAN
guides the user through various
tasks
Key Function
Navigation
13
Keys
Select Saves a current selection
14
Job Status Displays current job status and
15
Menu/Exit Use to enter or exit Menu mode
16
Manual
17
Group
Manual
18
Dial
Speed Dial Use to enter a 2 digit Speed Dial
19
Pause/
20
Redial
Numeric
21
Keypad
Start Use to start a job
22
Stop Use to stop an operation
23
Clear/
24
Clear All
Machine
25
Graphic
Use to navigate the menu list
vertically and horizontally
pending jobs
Use to send a fax job to multiple
destinations
Use for manual dialing
number which has been stored in
the machine’s phone book
memory
Use to redial the last phone
number called or to add a pause
Use to enter characters, or to
choose special functions in
conjunction with the Menu button
Use to clear selections and entries
Illuminates when a system error
occurs
Page 3
Page 4
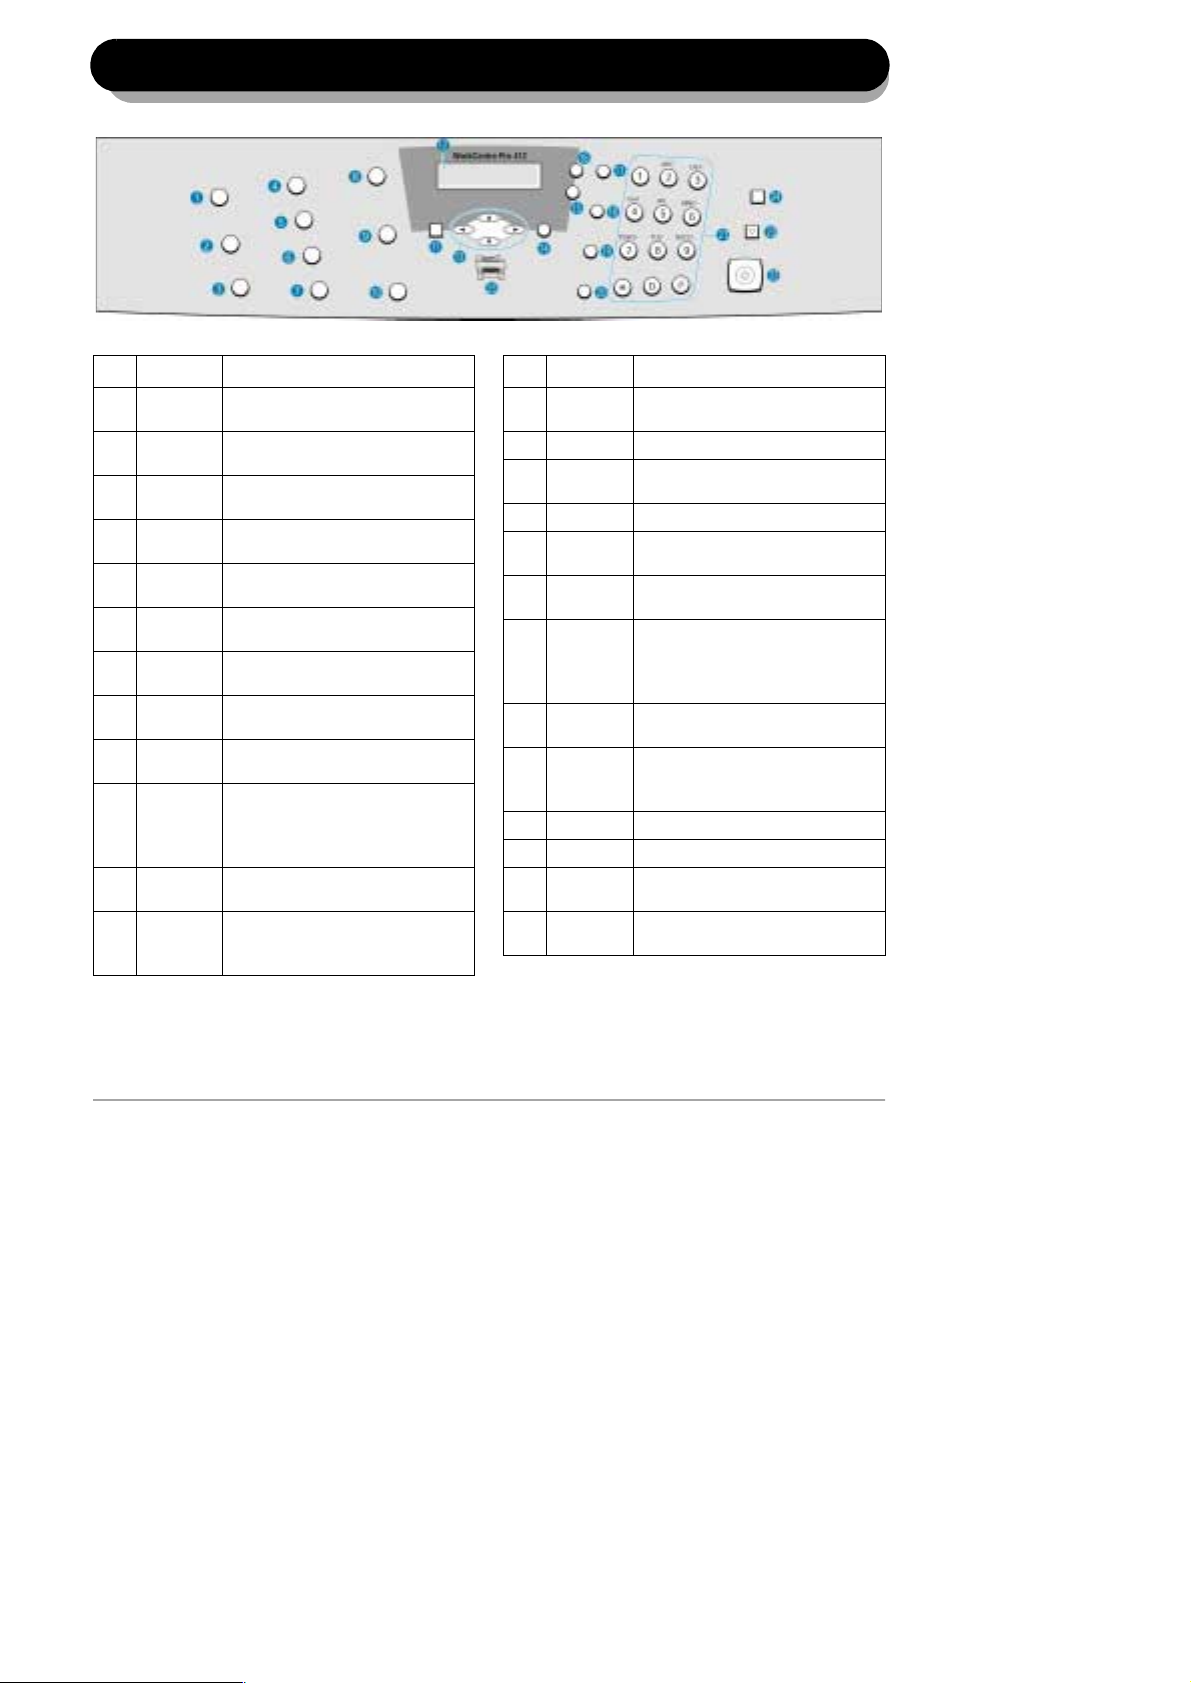
Making connections....
If required, connect your
answering machine and/or
1
2
telephone to the EXT jack
and connect the telephone
line cord from the wall jack
to the LINE jack.
CAUTION:Shut down your
computer before connecting
the cable.
Connect the USB Cable
directly to your computer.
OR
Connect a Parallel Port
Cable (sold separately).
CAUTION:Pull the scan
unlock switch toward you to
3
unlock the scanner before
connecting the power.
Connect the AC Power
Cord to your machine and
a power outlet. When
plugged in, the WorkCentre
Pro 412 is switched on.
Page 4
Page 5
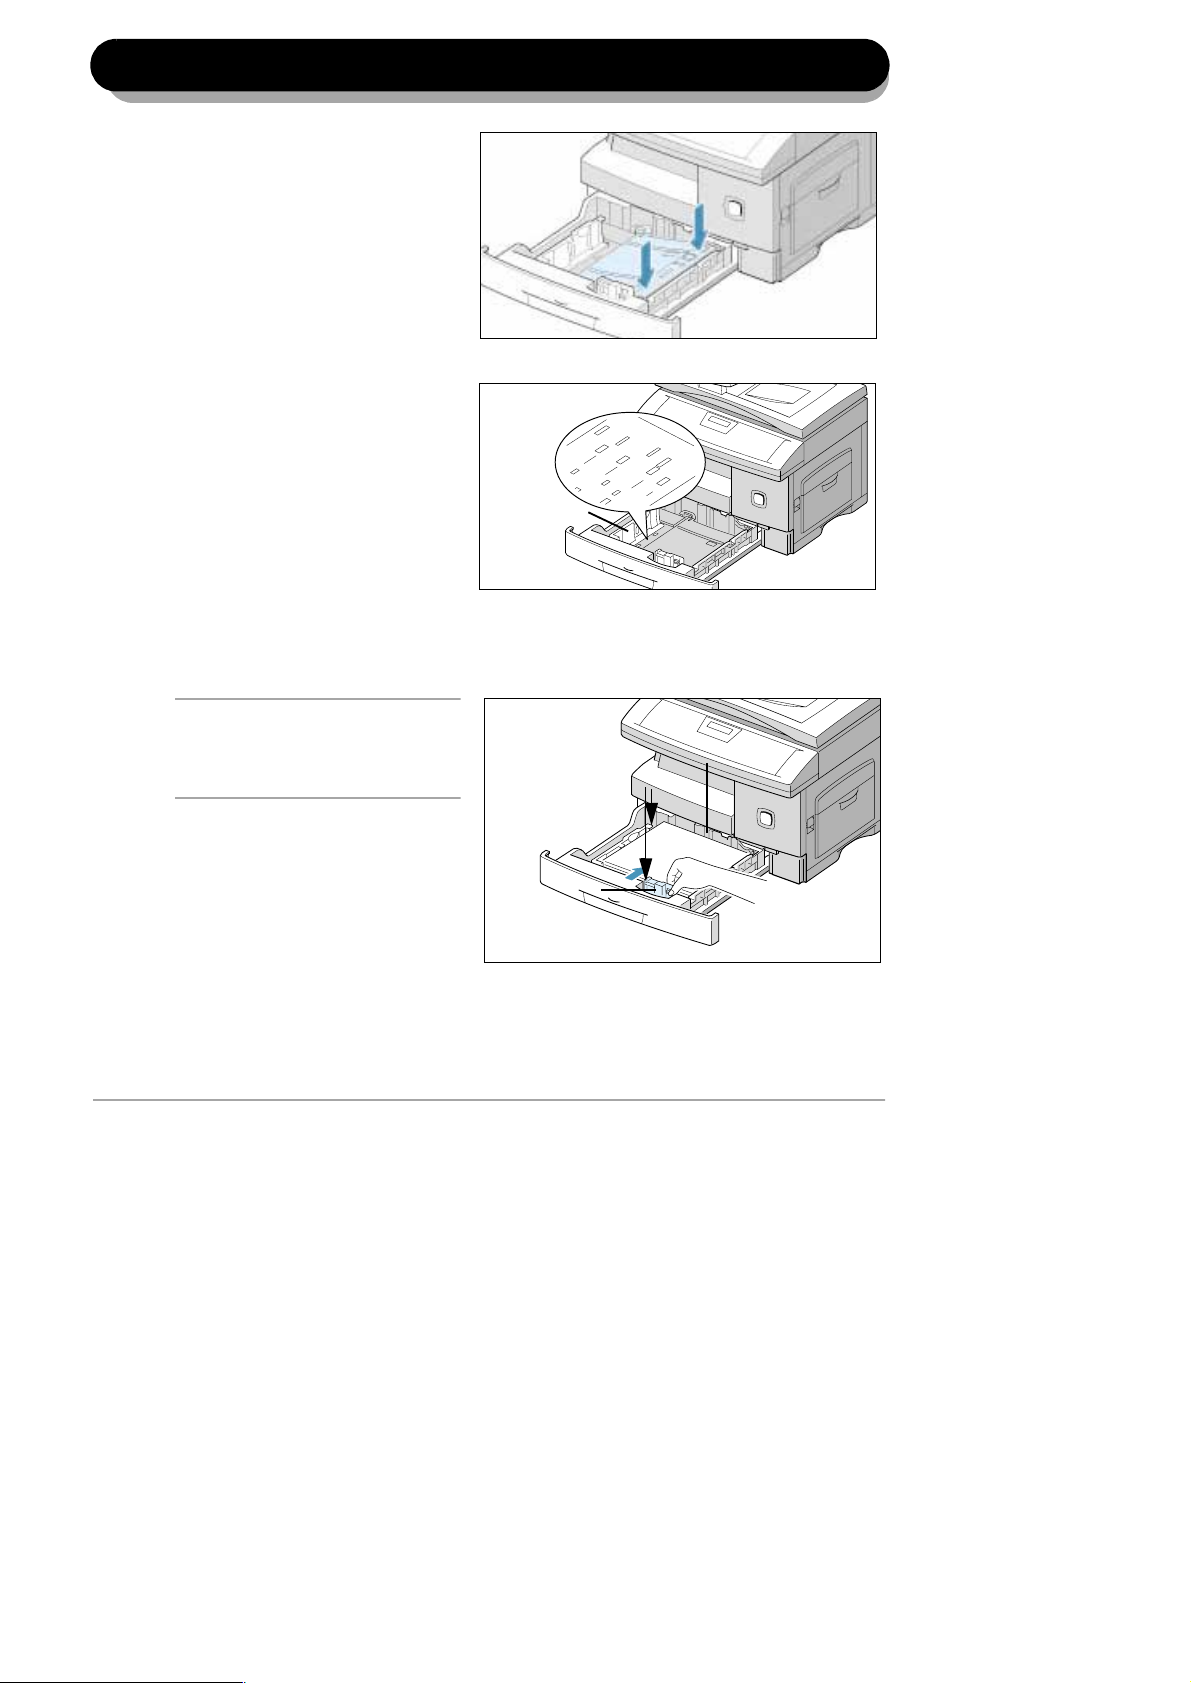
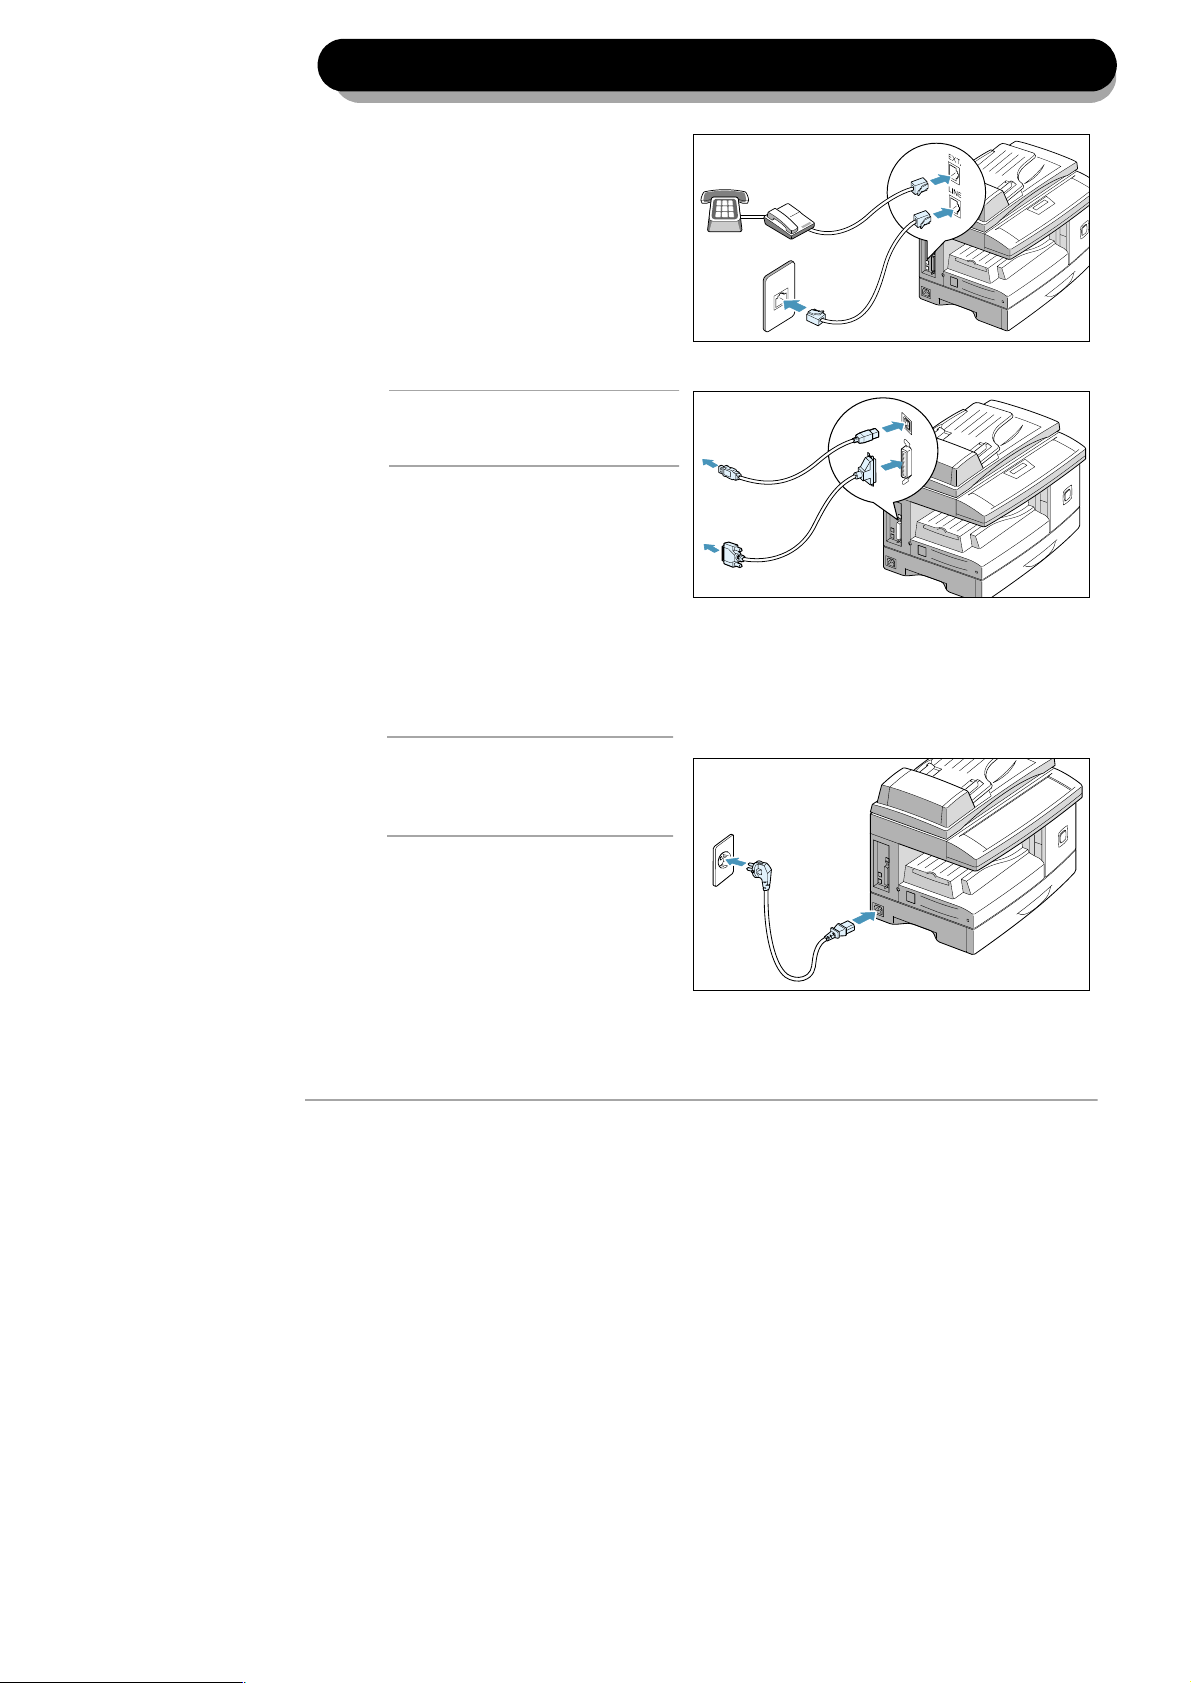
Loading paper....
LGL
FOLIO
A4
LTR
Pull open the paper
cassette and push down
1
2
on the pressure plate until
it locks into position.
Adjust the rear paper guide
to the required paper
length.
To load a different size
paper, lift and insert the
rear guide into the
corresponding position.
Fan the paper and insert
into the cassette.
Rear Guide
NOTE: Ensure the paper
corners are under the snubbers
3
and do not fill above the max fill
line.
While squeezing the side
guide, move it toward the
stack of paper until it
gently touches the stack
and then close the paper
cassette.
Max Fill Line
Snubbers
Side Guide
Page 5
Page 6

Setting the language....
1
Press [Menu/Exit] on the control panel.
The display shows the first menu
2
‘SYSTEM DA TA’ .
Scroll to the ‘SYSTEM SETUP’ menu by
pressing repeatedly, then press
[Select].
Scroll to the ‘SELECT LANGUAGE’
option by pressing repeatedly.
3
Using the and navigation keys,
select the required language option and
4
press [Select].
The language will change to the required
setting.
5
Press [Menu/Exit] to exit.
Page 6
Page 7

Installing software....
Switch on your PC and start Windows.
NOTE: If a window appears concerning New
1
2
3
Hardware, select Cancel.
Insert the Setup CD into the CD-ROM
drive of your PC. If the Xerox screen
appears automatically, go to step 4.
From the Start menu, select [Run]. Type
D:\XINST ALL. EXE (where “D” is the lett er
of your CD-ROM drive), then click [OK].
Follow the on-screen instructions to
complete the software installation.
4
5
After installing all of your software,
reboot your PC. For Windows 95/98,
upon restart eject the CD.
Page 7
Page 8
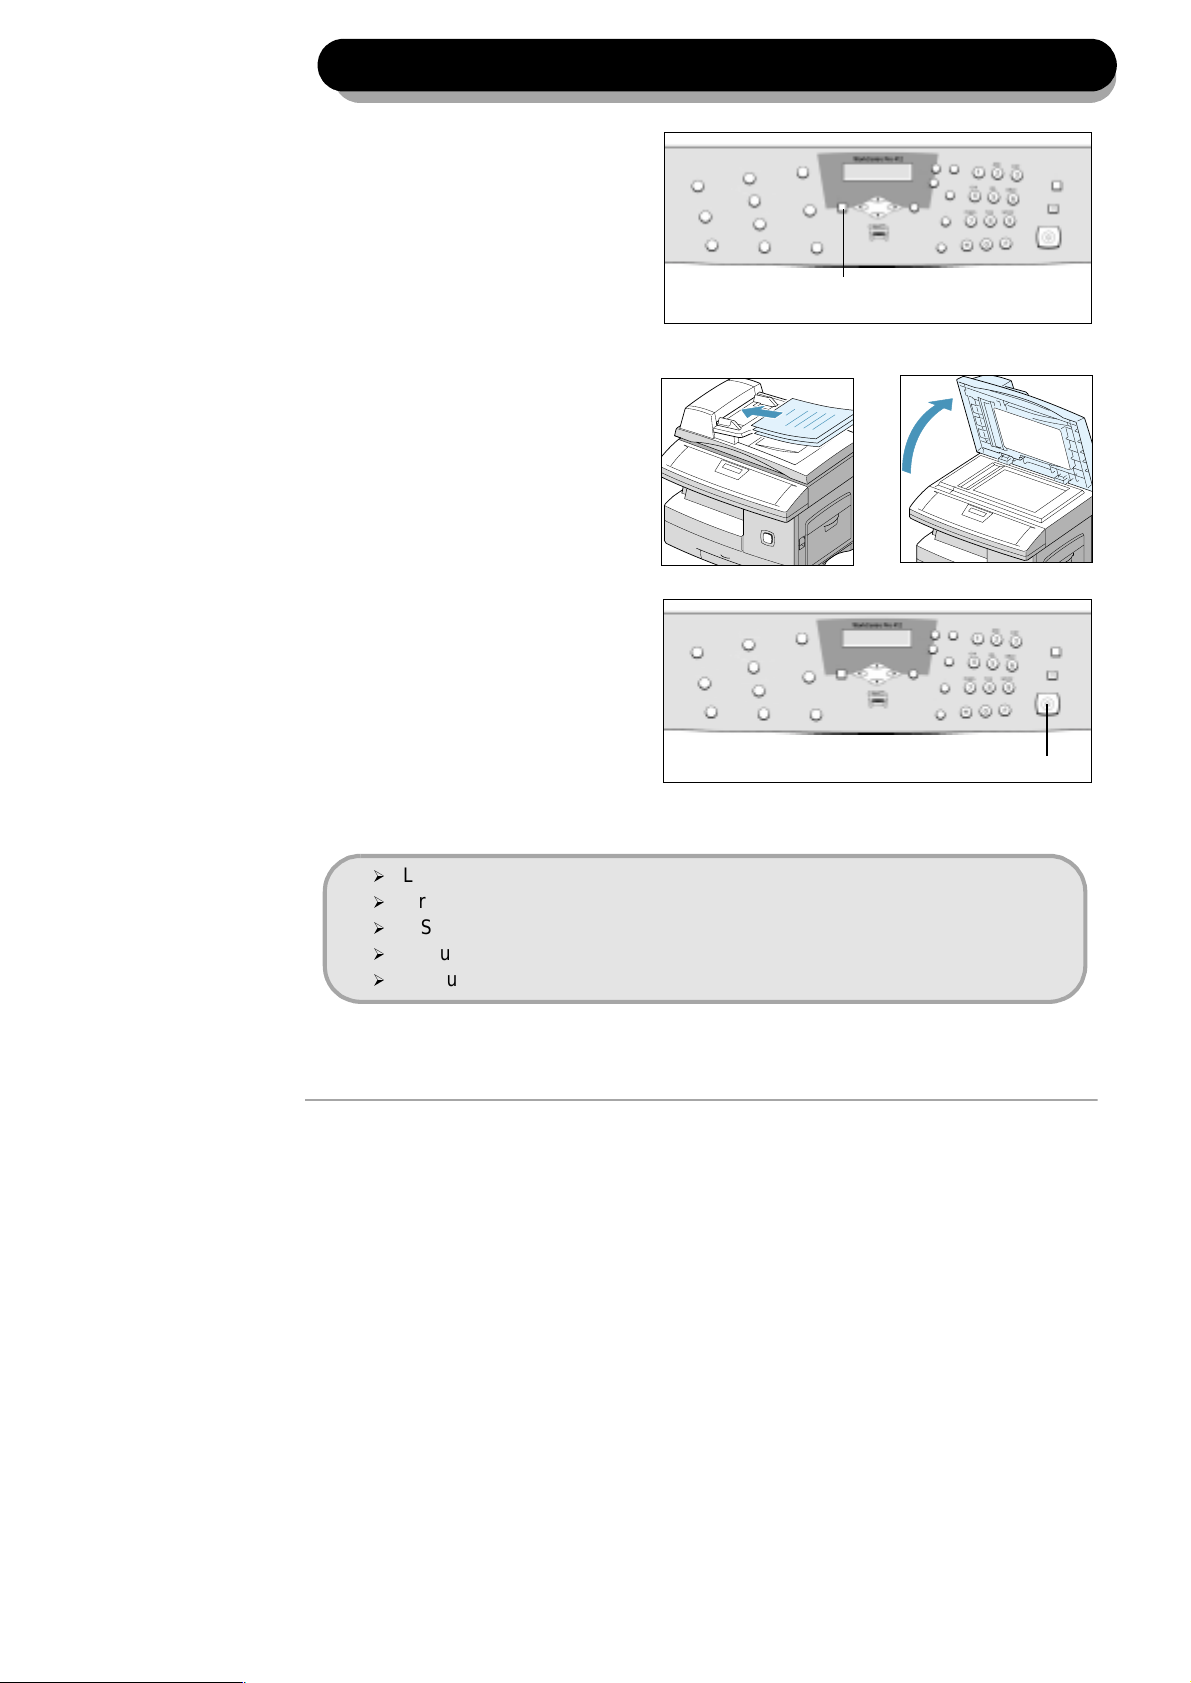
Making copies....
Ensure the LCD displays
‘READY TO COPY’. If not,
1
2
3
press the [Copy/Fax/
Scan] Key repeatedly
until COPY MODE
displays and press
[Select].
Load the originals
using the automatic
document feeder or the
document glass.
Select Copy features,
enter the copy
quantity required and
press [Start].
Copy/Fax/Scan
Key
or
Copy features include....
½
Lighten/Darken
½
Original Type
½
2-Sided Copy
½
Reduce/Enlarge
½
Output
Start K ey
Page 8
Page 9

Printing from an application....
The following steps describe the typical process to print from a Windows environment.
Steps may vary depending on the application being used.
Ensure that your WorkCentre Pro 412 is
properly connected to the computer, the
1
machine is powered on, and there is
paper loaded.
Verify that you have installed the printer
driver software for your machine.
2
Start the program you are using t o create
the document, and create or open the
3
document you want to print.
4
5
Choose [Print] or [Page Setup] from the
File menu. Ensure the WorkCentre Pro
412 is selected as your default printer.
Make any programming adjustments that
are appropriate for printing your
document.
Click [OK] to close the Properties dialog
box. After making any necessary
changes to the printing para meters, cl ick
[OK] to start the print job.
Page 9
Page 10

Sending a fax....
Load the originals
using the automatic
1
2
3
document feeder or the
document glass.
Ensure the LCD displays
the date and time. If not,
press the [Copy/Fax/
Scan] Key repeatedly
until FA X Mode displays
and press [Select].
Select Fax features,
enter the fax number
and press [Start].
or
Copy/Fax/Scan
Key
Fax features include....
½
Resolution
½
Scan Options
½
Original Type
½
Lighten/Darken
Start K ey
Page 10
Page 11

Scanning a document to a file....
Load the originals using
the automatic document
1
feeder or the document
glass.
Ensure the ScanToPC Program is running. Click the Wi ndows Start
button then select Programs>Xerox WorkCentre Pro
412>ScanToPC
2
Ensure the LCD displays READY TO SCAN. If not, press the [Copy/
Fax/Scan] Key repeatedly until SCAN MODE displays and press
[Select].
3
or
Select Scan features and press [Start].
4
Scan features include....
½
Resolution
½
Scan Options
½
Original Type
½
Lighten/Darken
½
Reduce/Enlarge
Page 11
Page 12

Using ControlCentre 5.0....
When you install Xerox WorkCe ntre Pro 412 software, Xerox WorkCentre Pro 412
ControlCentre 5.0 utility is automatically installed. Use the following instructions to run
ControlCentre 5.0:
Click the [Start] button on your desktop
computer.
1
From Programs, select [Xerox WorkCentre
Pro 412], then [ControlCentre 5.0].
2
The Xerox WorkCentre Pro 412
ControlCentre 5.0 screen appears.
To exit ControlCentre 5.0, click the [Exit]
button in the bottom of each tab screen.
3
The ControlCentre 5.0 screen provides five tabs:
½
Settings: Used to configure Fax System Data settings.
½
Advanced: Used to change the default Fax System Setup options.
½
Phonebook: Used to create and edit phonebook entries.
½
Information: Used to view the software version information and various
counters.
½
Firmware: Used by authorized Xerox personnel to update the firmware of
your machine.
For further details, click t he [Help] button in the bot tom of each tab screen.
Page 12
Page 13

For further assistance....
If after product installation further assistance is required, please call our experts at the
Xerox Welcome Centre or your local representative.
When telephoning, please quote the machine serial number.The serial number is located
on the machine, behind the front door. Open the side cover using the release latch and then
open the front door:
You will be provided with the Xerox Welcome Centre or local representative telephone
number when the WorkCentre Pro 412 is installed.
For convenience and future reference, please record the telephone number in the space
below:
Xerox Welcome Centre / Local Representative:
#
Xerox US Welcome Center:
1-800-821-2797
Xerox Canada Welcome Center:
1-800-93-XEROX (1-800-939-3769)
Page 13
Page 14

Safety Notes
Your Xerox product and supplies have been designed
and tested to meet strict safety requirements. These
include Safety Agency approval, and compliance to
established environmental standards. Please read the
following instructions carefully before operating the
product and refer to them as needed to ensure the
continued safe operation of your product.
The safety testing and performance of this product
have been verified using XEROX materials only.
Follow all warnings and instructions marked on, or
supplied with the product.
This WARNING Mark alerts users to the possibility of
personal injury.
This WARNING Mark alerts users to heated surfaces.
WARNING: This product must be connected to a
protective earthing circuit.
This product is equipped with a 3-wire type plug,
provided with a protective earthing pin. This plug will fit
only into an earthed power outlet. This is a safety
feature. To avoid risk of electric shock, contact your
electrician to replace the receptacle if you are unable
to insert the plug into the outlet. Never use an earthed
adapter plug to connect the product to a power source
receptacle that lacks an earth connection terminal.
This product should be operated from the type of
power source indicated on the marking label. If you are
not sure of the type of power available, consult your
local power company.
Do not allow anything to rest on the power cord. Do
not locate the product where persons will step or trip
on the cord.
Page 14
Page 15

Use of an extension cord with this product is not
recommended or authorized. Users should check
building codes and insurance requirements if a
properly earthed extension cord is to be used. Ensure
that the total ampere ratings of the products plugged
into the extension cord do not exceed the extension
cord ampere rating. Also, make sure that the total
amperage of all products plugged into the wall outlets
does not exceed the outlet rating.
Disconnect Device for this product is the power cord.
To remove all electrical power to the product,
disconnect the power cord from the power receptacle.
Your equipment is equipped with an energy saving
device to conserve power when the machine is not in
use. The machine may be left on continuously.
Unplug this product from the wall outlet before
cleaning. Always use materials specifically designated
for this product. Use of other materials may result in
poor performance and could create a hazardous
situation.
Do not use aerosol cleaners. Follow the instructions in
the User Guide for proper cleaning methods.
Never use supplies or cleaning materials for purposes
other than those for which they were intended. Keep
all supplies and materials out of rea ch of childre n.
Do not use this product near water, wet locations, or
outdoors.
Do not place this product on an unstable cart, stand or
table. The product may fall, causing personal injury or
serious damage to the product
Slots and Openings in the cabinet and in the back
and sides of the product are provided for ventila tion.
To ensure reliable operation of the product and to
protect it from overheating, these openings must not
be blocked or covered. The product should never be
located near or over a radiator or heat register. This
product should not be placed in a built-in installation
unless proper ventilation is provided.
Page 15
Page 16

Never push objects of any kind into the slots of the
product as they may touch dangerous voltage points
or short out parts which could result in a fire or electric
shock.
Never spill liquid of any kind on the product.
Never remove covers or guards that require a tool for
removal, unless directed to do so in a Xerox approved
maintenance kit.
Never defeat interlock switches. Machines are
designed to restrict operator access to unsafe areas.
Covers, guards and interlock switches are provided to
ensure that the machine will not operate with covers
opened.
Do not put your hands into the fuser area, located just
inside the exit tray area, as you may be burned.
Quality Standards: The product is manufactured
under a registered ISO9002 Quality system.
If you need additional safety information concerning
this XEROX product or XEROX supplied materials you
may call the following number:
EUROPE +44 (0) 1707 353434
USA/CANADA 1 800 928 6571
Safety Standards
EUROPE This XEROX product is certified by the following
USA/CANADA This XEROX product is certified by the following
Agency using the Safety Standards listed.
Agency: TUV Rheinland
Standard: IEC60950 3rd Edition Amendments A1, A2,
A3, A4 and A11.
Agency using the Safety Standards listed.
Agency: UNDERWRITERS LABORATORIES
Standard: UL 1950 3rd Edition. Certification is based
on reciprocity agreements, which include
requirements for Canada.
Page 16
Page 17

Regulator y Information
January 1, 1995: Council Directive 73/23/EEC amended by Council
January 1, 1996: Council Directive 89/336/EEC, approximation of the
March 9, 1999 Council Directive 99/5/EC, on radio equipment and
The CE marking applied to this product symbolizes
Xerox Limited Declaration of Conformity with the
following applicable Directives of the European Union
as of the dates indicated:
Directive 93/68/EEC, approximation of the laws of the
member states related to low voltage equipment.
laws of the member states related to electromagnetic
compatibility.
telecommunications terminal equipment and the
mutual recognition of their conformity.
A full declaration, defining the relevant directives and
referenced standards can be obtained from your Xerox
representative or by co ntac ting:
Environment, Health and Safety
Xerox Limited
PO Box 17
Bessemer Road
Welwyn Garden City
Herts
AL7 1HE
England
Tel Number +44 (0) 1707 353434
WARNING:This is a Class A product. In a
domestic environment this product may cause
radio frequency interference, in which case the
user may be required to take adequate measures.
WARNING:This product is certified manufactured
and tested in compliance with strict safety and
radio frequency interference regulations. Any
Page 17
Page 18

unauthorized alteration which includes the
addition of new functions or the connection of
external devices may impact this certification.
Please contact your local XEROX Limited
representative for a list of approved accessories.
WARNING:In order to allow this equipment to
operate in proximity to Industrial, Scientific and
Medical (ISM) equipment, the external radiation
from the ISM equipment may have limited or
special mitigation measures taken.
WARNING:Shielded cables must be used with this
equipment to maintain compliance with Council
Directive 89/336/EEC.
FCC Part 15 This equipment has been tested and found to comply
with the limits for a Class A digital device, pursuant to
Part 15 of the FCC Rules. These limits are designed
to provide reasonable protection against harmful
interference when the product is operated in a
commercial environment. This equipment generates,
uses, and can radiate radio frequency energy and, if
not installed and used in accordance with the
instruction manual, may cause harmful interference to
radio communications. Operation of this equipment in
a residential area is likely to cause harmful
interference in which case the user will be required to
correct the interference at his own expense.
Reference CFR 47 Part 15
Section 15.21
Changes or modifications to this equipment not
specifically approved by the XEROX Corporation may
void the user’s authority to operate this equipment.
Shielded cables must be used with this equipment to
maintain compliance with FCC regulations.
Page 18
Page 19

Laser Safety
WARNING:Use of controls or adjustments or
performance of procedures other than those
specified herein may result in hazardous radiation
exposure.
With specific regard to lasers, the equipment complies
with laser product performance standards set by
governmental, national and international agencies as
a Class 1 Laser Product. It does not emit hazardous
radiation as the beam is totally enclosed during all
phases of customer operation and maintenance.
The Electricity at Work Regulations - UK ONLY
The Electricity at Work Regulation 1989 came into
force in England and Wales on the 1 April 1990. This
1989 Regulation places a duty on all employers and
self-employed persons to ensure the electrical system
in their premises is constructed, mai nta ine d and
operated in such a manner as to prevent, so far as
reasonably practical, danger. This includes ensuring
all electrical equipment connected to such electrical
systems safely constructed, maintained and operated.
All Xerox equipment has been designed to exacting
safety standards and has undergone a variety of
stringent safety tests including earth bond, insulation
resistance and electrical strength tests. Xerox Limited
manufacturing plants have been awarded ISO 9000
quality certification and are subject to regular audits by
the British Standards Institution or equivalent national
standards body.
Page 19
Page 20

Xerox equipment which has been properly and
regularly serviced and maintained should not have to
undergo additional specific safety tests pursuant to the
1989 Regulation. Customers wishing to complete
safety testing should contact Xerox Limited Technical
Centre (see page B22) for advice prior to any test
implementation.
XEROX equipment should, however, be properly and
regularly serviced and maintained at all times.
QUESTION: What is the Electricity at Work
Regulation?
ANSWER: The Electricity at Work Regulation
1989 came into force in England and Wales on the 1
April 1990. This 1989 Regulation places a duty on all
employers and self-employed persons to ensure
the electrical systems in their premises are
constructed, maintained and operated in such a
manner as to prevent, so far as reasonably
practicable, danger. This includes ensuring that all
electrical products connected to such electrical
systems are safely constructed, maintained and
operated.
QUESTION: Does XEROX Limited comply with
the Electricity at Work Regulation?
ANSWER: The regulation places a duty on all
employers and self-employed persons to ensure
the electr ical sy stems in th eir pr emises a re, eff ectively
safe.
The regulation does not impose on, amongst others,
manufacturers or suppliers of such electrical
systems. Howe ver , re st assu re d tha t all XE R O X
equipment which XEROX Limited and its authorized
distributors supplies to customers, conforms with all
the relevant safety legislation and standards.
QUESTION: Is XEROX equipment safe?
ANSWER: All XEROX equipment supplied by
XEROX Limited and their authorized distributors
conforms to all relevant safety legislation and
standards.
Page 20
Page 21

QUESTION: Is the XEROX equipment in my
premises safe?
ANSWER: All XEROX equipment supplied by
XEROX Limited and their authorized distributors
conforms to all relevant safety legislation and
standards. However, like all electrical equipment, they
have to be regularly serviced and maintained by
competent persons.
XEROX Limited Customer Service Engineers ensure
XEROX equipment is serviced and maintained to
exacting XEROX safety standards. If you would like
your XEROX equipment to be serviced and
maintained to such high standards, please contact
your local XEROX Limited Customer Service
Organization. They will be pleased to assist you.
QUESTION: Does the XEROX equipment in my
premises comply with the Electricity at Work
Regulations?
ANSWER: All employers and self-employed
persons must ensure that the electrical systems in
their premises are safe. This will include ensuring
XEROX equipment in such premises is safe.
XEROX Limited’s Product Safety function has
prepared a guide which contains a list of tests which
may be completed by your XEROX Limited Customer
Service Organization.
THESE TESTS MUST BE CARRIED OUT ONLY BY
PERSONS WHO POSSESS THE R ELEVANT SKILL,
KNOWLEDGE AND EXPERIENCE TO CARRY OUT
SUCH TESTS.
Please conta ct the XE ROX Li mited C ustom er Serv ice
Organization for further information.
THE USE OF INAPPROPRIATE TEST
PROCEDURES AND TEST EQUIPMENT MAY
PROVIDE MISLEADING RESULTS AND MAY
CAUSE DEATH, PERSONAL INJURY AND/OR
DAMAGE TO PROPERTY.
Page 21
Page 22

QUESTION: I would like to carry out my own
safety tests on the XEROX equipment in my
premises.
ANSWER: You may, of course, request such
tests as you deem necessary to satisfy yourself that
your XEROX equipment is safe. Your XEROX Limited
Customer Support will be pleased to advise you on
such testing.
QUESTION: I require records of all tests.
ANSWER: After safety testing, your XEROX
Limited Customer Service Engineer will provide you
with a certificate which details the results of all tests
completed.
In the event of any defect being noted, the XEROX
equipment will be switched off and disconnected from
the supply until the defect has been corrected. You will
be advised of such action to enable such defects to be
corrected.
PLEASE NOTE: YOU MUST ENSURE THAT YOUR
XEROX EQUIPMENT IS SAFE AT ALL TIMES.
Please contact us if you have any queries regarding
the information provided in this document.
Environment, Health and Safety
XEROX Limited
PO Box 17
Bessemer Road
Welwyn Garden City
Herts
AL7 1HE
England
Tel Number +44 (0) 1707 353434
Page 22
Page 23

Certification to 1999/5/EC
Radio Equipment & Telecommunications
Terminal Equipment Directive
This Xerox product has been self-certified by Xerox for
pan-European single terminal connection to the
analogue public switched telephone network (PSTN)
in accordance with Directive 1999/5/EC.
The product has been designed to work with the
national PSTNs and compatible PBXs of the following
countries:
Austria Germany Luxembourg Sweden
Belgium Greece Netherlands Switzerland
Denmark Iceland Norway United Kingdom
France Ireland Portugal
Finland Italy Spain
In the event of problems, you should contact your local
Xerox representative in the first instance.
This product has been tested to and is compliant with
TBR21, a technical specification for terminal
equipment for use on analogue switched telephone
networks in the European Economic Area.
The product may be configured to be compatible with
other country networks. Please contact your Xerox
representative if it needs to be reconnected to another
country’s network. There are no user-adjustable
settings in the product.
NOTE: Although this product can use either loop
disconnect (pulse) or DTMF (tone) signalling it is
recommended that it is set to use DTMF signalling.
DTMF signalling provides reliable and faster call setup.
Modification, connection to external control software or
to external control apparatus not authorized by Xerox,
will invalidat e its certification.
Page 23
Page 24

FCC Regulations
Send Header Requirements
Federal Communications Commission (FCC)
regulations require all persons within the United States
who send any message via a facsimile machine to
include an identifying message in the transmission.
The message must clearly contain an identifier and
telephone number for the entity (business or
individual) sending the message.
This facsimile machine provides the local ID and name
features required for the FCC regulation. To satisfy the
FCC regulation, the telephone number and name must
be included with the printed document. To comply with
the FCC rules, carefully read and follow the
instructions listed in this document to program the
local ID and name.
Data Coupler Information
This Xerox machine contains an internal data coupler.
Its use is restricted by the FCC (Federal
Communications Commission). To comply with the
FCC rules, you must carefully read and follow the
instructions listed below.
This equipment complies with Part 68 of the FCC
rules. On the rear of this equipment is a label that
contains, among other information, the FCC
registration number and Ringer Equivalence Number
(REN). If requested, provide this information to your
telephone company.
Page 24
Page 25

The REN is useful to determine the quantity of devices
you may connect to your telephone line and still have
all of those devices ring when your number is called. In
most, but not all areas, the sum of the RENs of all
devices should not exceed five (5.0). To be certain of
the number of devices you may connect to your line, as
determined by the REN, you should call your local
telephone company to determine the maximum REN
for your calling area.
WARNING:Ask your local telephone company for
the modular jack type installed on your line.
Connecting this machine to an unauthorized jack
can severely damage telephone company
equipment. You, not Xerox, assume all
responsibility and/or liability for any damage
caused by the connection of this machine to an
unauthorized jack.
You may safely connect the machine to the following
standard modular jack: USOC RJ-11C. Use the
standard line cord (with modula r plu gs ) provided with
the installation kit to connect it.
An FCC compliant telephone cord and modular plug is
provided with this equipment. This equipment is
designed to be connected to the telephone network or
premises wiring using a compatible modular jack
which is Part 68 compliant.
Do not connect this machine to a party or coin
operated phone line.
Repairs to the machine should be made only by a
Xerox representative or an authorized Xerox service
agency. This applies at any time during or after the
service warranty period. If unauthorized repair is
performed , the rem ainder of the warr anty pe riod is n ull
and void.
Page 25
Page 26

If you find the telephone line is damaged or the
telephone company notifies you that your machine is
causing damage, disconnect the machine from the
telephone line and call for service. Do not reconnect
the machine until necessary repairs are made.
The telephone company will, where practical, notify
you when they need to temporarily disconnect service.
However, if action is reasonable and necessary, but
prior notice is not practical, they may still temporarily
disconnect your service. In such cases they must:
- Immediately notify you of their temporary action.
- Reconnect service when the source of damage
is removed.
- Inform you of your rights to bring a complaint to
the FCC under FCC rules.
The telephone company may make changes to its
communications facilities, equipment, operations, or
procedures. Such action must be reasonable, required
in the operation of their business, and consistent with
FCC rules. They must give you prior written notification
if the changes can:
- Make your machine incompatible with their
equipment.
- Require modification or alteration of the
machine.
- Otherwise physically affect performance of the
machine.
WARNING:When programming emergency
numbers and/or making test calls to emergency
numbers:
Remain on the line and briefly explain to the
dispatcher the reason for the call before hanging
up.
Perform such activities in the off-peak hours,
such as early morning hours or late evenings.
Page 26
Page 27

Canadian Certification
Notice: The Industry Canada Label on the machine
identifie s certi fied eq uipme nt. T his cer tific atio n means
that the equipment meets certain telecommunications
networks protective, operational and safety
requirements. Industry Canada does not guarantee
the equipment will operate to the user’s satisfaction.
Before installing this equipment, users should ensure
that it is permissible to be connected to the facilities of
the local telecommunications company. The
equipment must also be installed using an acceptable
method of connection. In some cases, the company’s
inside wiring associated with a single line individual
service may be extended by means of a certified
connector assembly (telephone extension cord).
The customer should be aware that compliance with
the above conditions may not prevent degradation of
service in some situations.
Repairs to certified equipment should be made by an
authorized Canadian maintenance facility designated
by the supplier. Any repairs or alterations made by the
user to this equipment, or equipment malfunctions,
may give the telecommunications company cause to
request the user to disconnect the equipment.
Users should ensure for their own protection the
electrical ground connections of the power utility,
telephone lines and internal metallic water pipe
system, if present, are connected together. This
precaution may be particularly important in rural areas.
CAUTION:Users should not attempt to make such
connections themselves, but should contact the
appropriate electric inspection authority or
electrician, as appropriate.
Page 27
Page 28

Notice: The Ringer Equivalence Number (REN)
assigned to each terminal device provides an
indication of the maximum number of terminals
allowed to be connected to a telephone interface. The
termination on an interface may consist of any
combination of devices subject only to the requirement
that the sum of the Ringer Equivalence Numbers of all
the devices does not exceed 5.
Environmental Compliance
Energy Star
®
XEROX Corporation designed this product to comply
with the guidelines of the ENERGY STAR
the Environmental Protection Agency. As an ENERGY
®
STAR
product meets the ENERGY STAR
energy efficiency.
Partner, XEROX has determined that this
®
program of
®
guidelines for
Page 28
 Loading...