

Page 1

User Guide
WorkCentre 5016, 5020/B, 5020/DB
XE3025EN0-1
www.xerox.com/support
Page 2

© 2008 by Fuji Xerox Co., Ltd. All rights reserved.
Copyright protection claimed includes all forms and matters of copyrighted material and
information now allowed by statutory or judicial law or hereinafter granted, including without
limitations, material generated from the software programs which are displayed on the screen,
such as icons, screen displays, looks, etc.
®
Xerox
and all Xerox products mentioned in this publication are trademarks of Xerox
Corporation. Product names and trademarks of other companies are hereby acknowledged.
The information in this document is correct at the time of publication. Xerox reserves the right
at any time to change the information without notice. Changes and technical updates will be
added in subsequent editions of the documentation. For the latest information, go to
www.xerox.com
.
Products Subject To Ordinary Export Regulations
An export of this product is strictly limited in accordance with Laws concerning Foreign
Exchange and Foreign Trade of Japan and/or the export control regulations of the United
States. You must obtain, if you wish to export this product, any appropriate export license from
the Japanese Government or its agency and/or re-export approval from the U.S. Government
or its agency.
Products Subject To Supplementary Export Regulations
An export of this product is strictly limited in accordance with Laws concerning Foreign
Exchange and Foreign Trade of Japan and/or the export control regulations of the United
States. You must obtain, if you know the product is to be used, or was used for development,
manufacturing or use of any mass destructive weapons including nuclear weapon, chemical
weapon or biological weapon because of a dealing document such as legal contract or
information from the importer, any appropriate export license from the Japanese Government
or its agency and/or re-export approval from the U.S. Government or its agency.
Page 3

Table of Contents
1 Before Using the Machine .....................................................................7
Xerox Welcome Center ............................................................................7
Serial Number......................................................................................7
Conventions .............................................................................................8
Related Information Sources....................................................................8
Safety Notes .............................................................................................9
WARNING - Electrical Safety Information .........................................10
Laser Safety Information....................................................................10
Operational Safety Information..........................................................11
Maintenance Information ...................................................................11
Ozone Information .............................................................................12
For Consumables ..............................................................................12
Radio Frequency Emissions (Class A digital device) ........................12
Product Safety Certification ...............................................................13
Regulatory Information ...........................................................................13
Certifications in Europe (CE) .............................................................13
Environmental Compliance ....................................................................14
USA ...................................................................................................14
Illegal Copies..........................................................................................14
Battery Recycling and Disposal..............................................................14
Product Recycling and Disposal.............................................................15
All Countries, North America - USA/Canada .....................................15
European Union.................................................................................15
2 Product Overview.................................................................................16
Machine Components ............................................................................16
Front View..........................................................................................16
Inside View ........................................................................................18
Rear View ..........................................................................................19
Control Panel..........................................................................................20
Display ...............................................................................................20
<Display Switch> button/indicators....................................................20
<Copy> button ...................................................................................20
<Scan> button ...................................................................................21
Numeric Keypad ................................................................................21
<Log In/Out> button...........................................................................21
<Power Saver> button .......................................................................21
<All Clear> button ..............................................................................22
<Stop> button ....................................................................................22
<Start> button....................................................................................22
<Scan Completed> button .................................................................22
3
Page 4

<Paper Supply> button......................................................................23
Machine Diagram (mimic)..................................................................24
Copy Features ...................................................................................24
Switching On / Off ..................................................................................31
Switching On......................................................................................31
Switching Off......................................................................................31
Power Saver ......................................................................................32
Recycled Paper ......................................................................................33
3 Installing Drivers ..................................................................................34
Installing the Print Driver and the Scan Driver (TWAIN driver) ..............34
Installing the Scanner Application (Button Manager) .............................38
4 Loading Paper ......................................................................................40
Supported Paper Sizes and Types.........................................................40
Supported Paper Sizes......................................................................40
Supported Paper Types.....................................................................41
Storing and Handling Paper...............................................................41
Loading Paper in the Trays ....................................................................42
Loading Paper in Tray 1 ....................................................................42
Loading Paper in Tray 2 ....................................................................43
Loading Paper in the Bypass Tray.....................................................44
Changing the Size and Orientation of Paper in the Trays......................46
Changing the Size and Orientation of Paper in Tray 1 ......................46
Changing the Size and Orientation of Paper in Tray 2 ......................48
Specifying the Size and Orientation of Paper Loaded in the Trays ...49
5 Copying .................................................................................................52
Copying Procedure.................................................................................52
Loading Documents ...............................................................................55
Document Glass ................................................................................55
Document Feeder..............................................................................56
Clearing All the Features ........................................................................56
Canceling a Copy Job ............................................................................57
Making Special Copies ...........................................................................57
4-up/2-up Copies (Copying Multiple Pages onto a Single Sheet)......57
ID Card Copies (Copying an ID Card-shaped Document
onto a Sheet) .....................................................................................63
6 Managing Accounts .............................................................................65
Account Mode Overview ........................................................................65
Selecting the Account Mode on the Machine ....................................65
Single Account Mode .............................................................................68
Logging in to the Machine..................................................................68
Multiple Account Mode...........................................................................69
Logging in to the Machine..................................................................69
4
Page 5

Changing the Password.....................................................................71
Setting Copy Job Limits on a User Account ......................................74
Reviewing the Total Number of Copies .............................................77
7 Printing ..................................................................................................78
Setting Up the Printer .............................................................................78
Setting the Printer Preferences..........................................................78
Specifying the Custom Paper Size ....................................................79
Printing Procedure..................................................................................80
Printing on the Custom Size Paper....................................................81
Canceling a Print Job .............................................................................82
8 Scanning ...............................................................................................83
The Scan Driver (TWAIN driver) and Button Manager...........................83
Scanning Procedure (Using the TWAIN driver)......................................83
Canceling a Scan Job (TWAIN driver)...............................................86
Scanning Procedure (Using Button Manager)........................................87
Canceling a Scan Job (Button Manager)...........................................89
9 Troubleshooting...................................................................................90
Fault Clearance Procedure ....................................................................90
Machine Diagram (mimic) .................................................................90
Error Codes .......................................................................................92
Troubleshooting Table.......................................................................98
Paper Jams ..........................................................................................102
E1: Paper Jam around the Fuser Unit and in the Left Side Cover...102
E2: Paper Jam in the Left Side Cover .............................................104
E4: Paper Jam in the Left Side Cover .............................................105
C1: Paper Jam in Tray 1..................................................................106
C2: Paper Jam in Tray 2..................................................................107
E3: Paper Jam in Tray 2 ..................................................................107
C3: Paper Jam in the Bypass Tray ..................................................108
A1: Document Jams .............................................................................109
10 Maintenance........................................................................................110
Replacing Consumables ......................................................................110
Adding Toner to the Drum Cartridge................................................111
Replacing the Drum Cartridge .........................................................114
Cleaning the Machine...........................................................................116
Cleaning the Exterior .......................................................................116
Cleaning the Document Cover and Document Glass......................116
Cleaning the Film and Constant Velocity Transport Glass ..............117
Cleaning the Document Feeder Roller ............................................117
Cleaning the Corotron Wire .............................................................118
11 Appendix .............................................................................................119
Specifications .......................................................................................119
5
Page 6

Printable Area ..................................................................................122
System Settings ...................................................................................123
System Setting List ..........................................................................124
Additional System Settings
(When Selecting the Single Account Mode) ....................................127
Additional System Setting List
(When Selecting the Multiple Account Mode)..................................128
Document Sizes Detectable by the Document Feeder....................130
Optional Accessories............................................................................130
12 Index ....................................................................................................131
6
Page 7

1 Before Using the Machine
Welcome to the Xerox family of WorkCentre products.
This User Guide provides detailed information, technical specifications, and
procedures for using the integral features of the machine.
This chapter provides information which users should be aware of before using the
machine.
Xerox Welcome Center
If you need assistance during or after product installation, visit the Xerox website for
online solutions and support.
http://www.xerox.com/support
If you require further assistance, contact our experts at the Xerox Welcome Center. A
local representative telephone number may have been provided when the product was
installed. For convenience and future reference, please record the telephone number
in the space below.
Welcome Center or local representative telephone number:
#
Xerox US Welcome Center:1-800-821-2797
Xerox Canada Welcome Center:1-800-93-XEROX (1-800-939-3769)
Serial Number
When you call the Xerox Welcome Center,
you will need the serial number which is
located inside of the Left Side Cover as
shown in the diagram.
For your convenience, record the serial
number in the space below.
Serial Number:
Keep a record of any error codes. This
information helps us solve problems faster.
Xerox WorkCentre 5016/5020 User Guide 7
Page 8
Conventions
This section describes the conventions that are used throughout this User Guide.
WARNING: indicates statements that alert you to the possibility of personal harm.
CAUTION: indicates statements that suggest the possibility of mechanical damages
Important: indicates important information that a user should be aware of.
Note: indicates additional information on operations or features.
" ": indicates cross-references within this guide and input text
[ ]: indicates the values and error codes appear in the Display, and also
< >: indicates hardware buttons on the Control Panel of the machine and keys
This section also describes terms that are used throughout this User Guide.
Conventions
as a result of an action.
indicates the names of menus, windows, dialog boxes, buttons, and other
items displayed on a computer monitor.
on a computer keyboard.
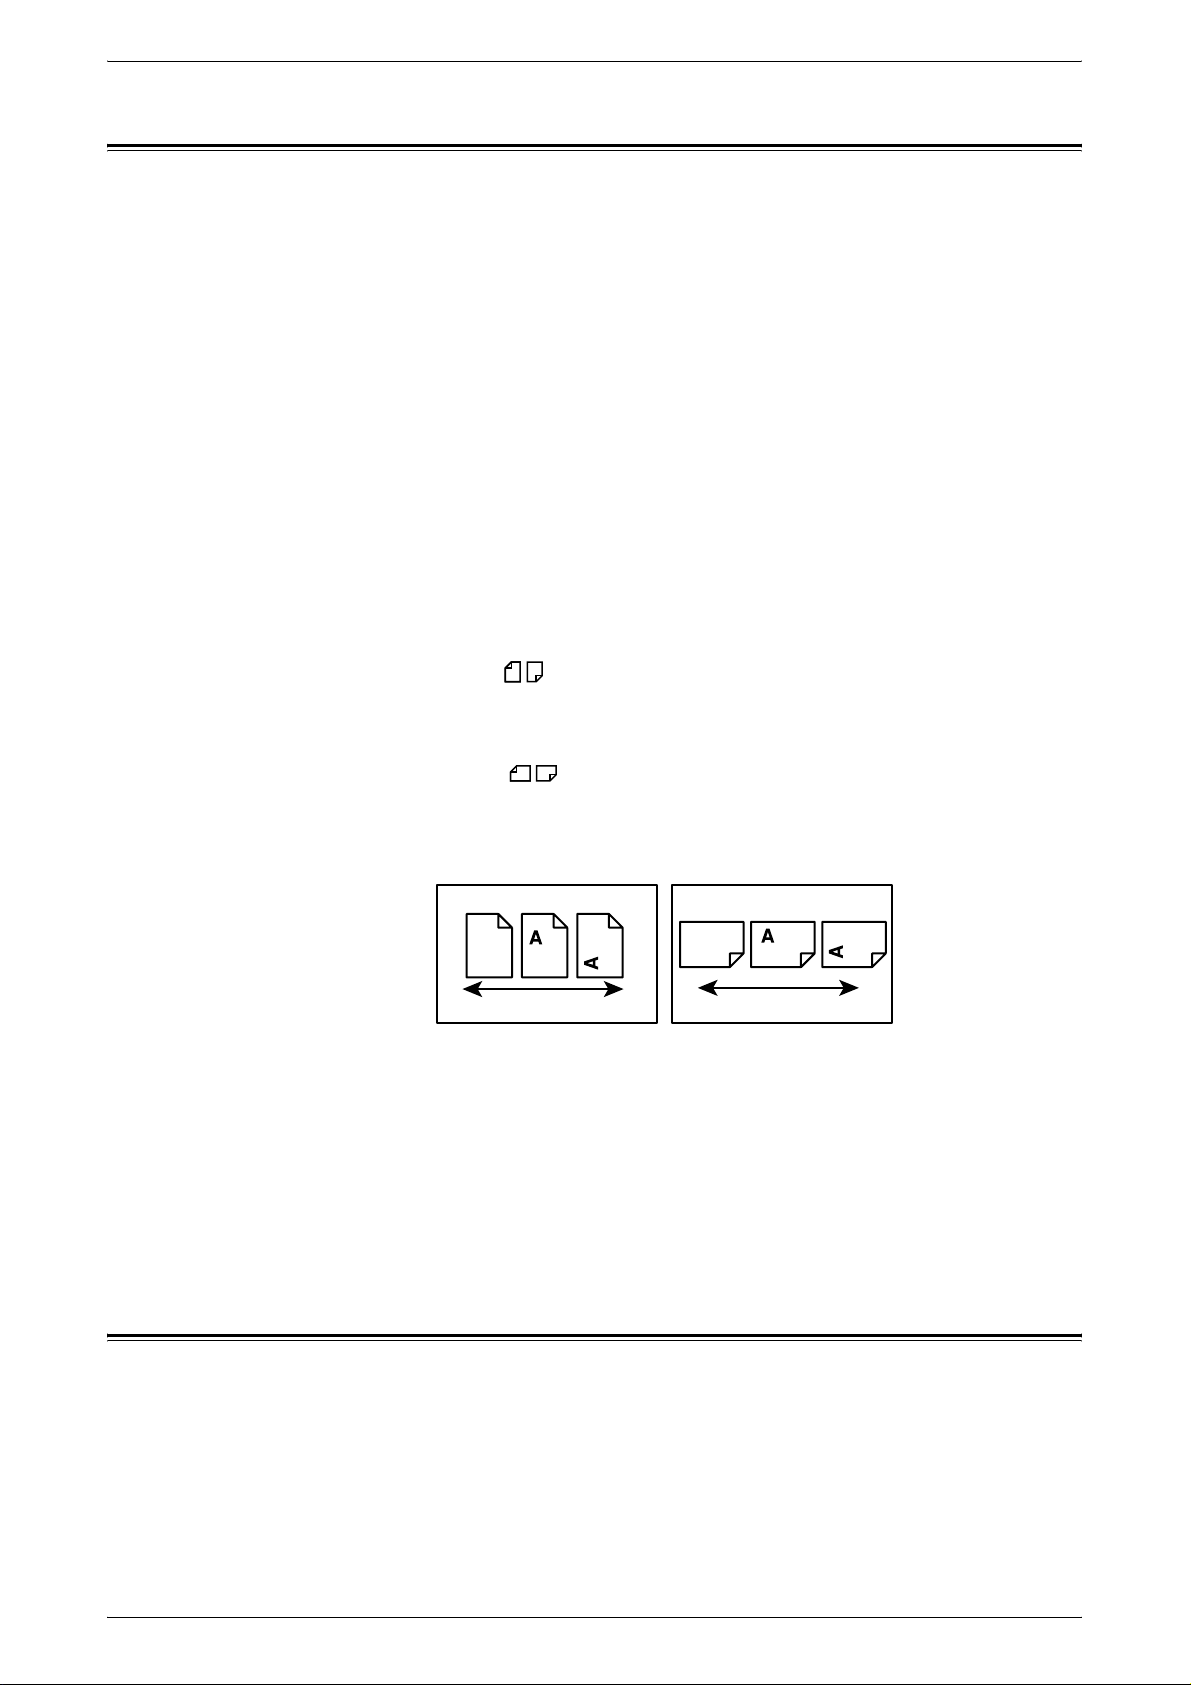
• Orientation is used to mean the direction of images on the page.
• LEF (Long Edge Feed)
Loading documents and paper with one of the long edges to be fed into the machine
first.
• SEF (Short Edge Feed)
Loading documents and paper with one of the short edges to be fed into the machine
first.
LEF Orientation
Paper feed direction
SEF Orientation
Paper feed direction
• Paper is synonymous with media, and is used interchangeably.
• Machine is synonymous with Xerox WorkCentre 5016, 5020/B, 5020/DB, and is
used interchangeably.
• Computer refers to a personal computer or workstation.
• System Administrator refers to a person who is responsible for maintaining the
machine, such as setting up the machine, installing the print drivers, and managing
software.
Related Information Sources
The following sources of information are available for the machine:
•User Guide
• Installation Guide
• Quick Use Guide
Note • Please note that diagrams used in this User Guide apply to a fully configured machine and
therefore may not exactly represent the configuration being used.
Xerox WorkCentre 5016/5020 User Guide 8
Page 9
Safety Notes
Read these safety notes carefully before using this product to make sure you operate
the equipment safely.
Your Xerox product and recommended supplies have been designed and tested to
meet strict safety requirements. These include safety agency approval, and
compliance to established environmental standards. Please read the following
instructions carefully before operating the product and refer to them as needed to
ensure the continued safe operation of your product.
The safety and environment testing and performance of this product have been verified
using Xerox materials only.
WARNING: Any unauthorized alteration, which may include the addition of new
functions or connection of external devices, may impact the product
certification. Please contact your authorized Service Provider for more
information.
Safety Notes
• All the screen shots used in this User Guide are taken on Windows XP.
Warning Markings
All warning instructions marked on or supplied with the product should be followed.
Electrical Supply
This product shall be operated from the type of electrical supply indicated on the
product’s data plate label. If you are not sure that your electrical supply meets the
requirements, please consult your local power company for advice.
This product is supplied with a plug that has a protective earth pin. This plug will fit only
into an earthed electrical outlet. This is a safety feature. To avoid risk of electric shock,
contact your electrician to replace the electrical outlet if you are unable to insert the plug
into it. Never use an earthed adapter plug to connect the product to an electrical outlet
that lacks an earth connection terminal.
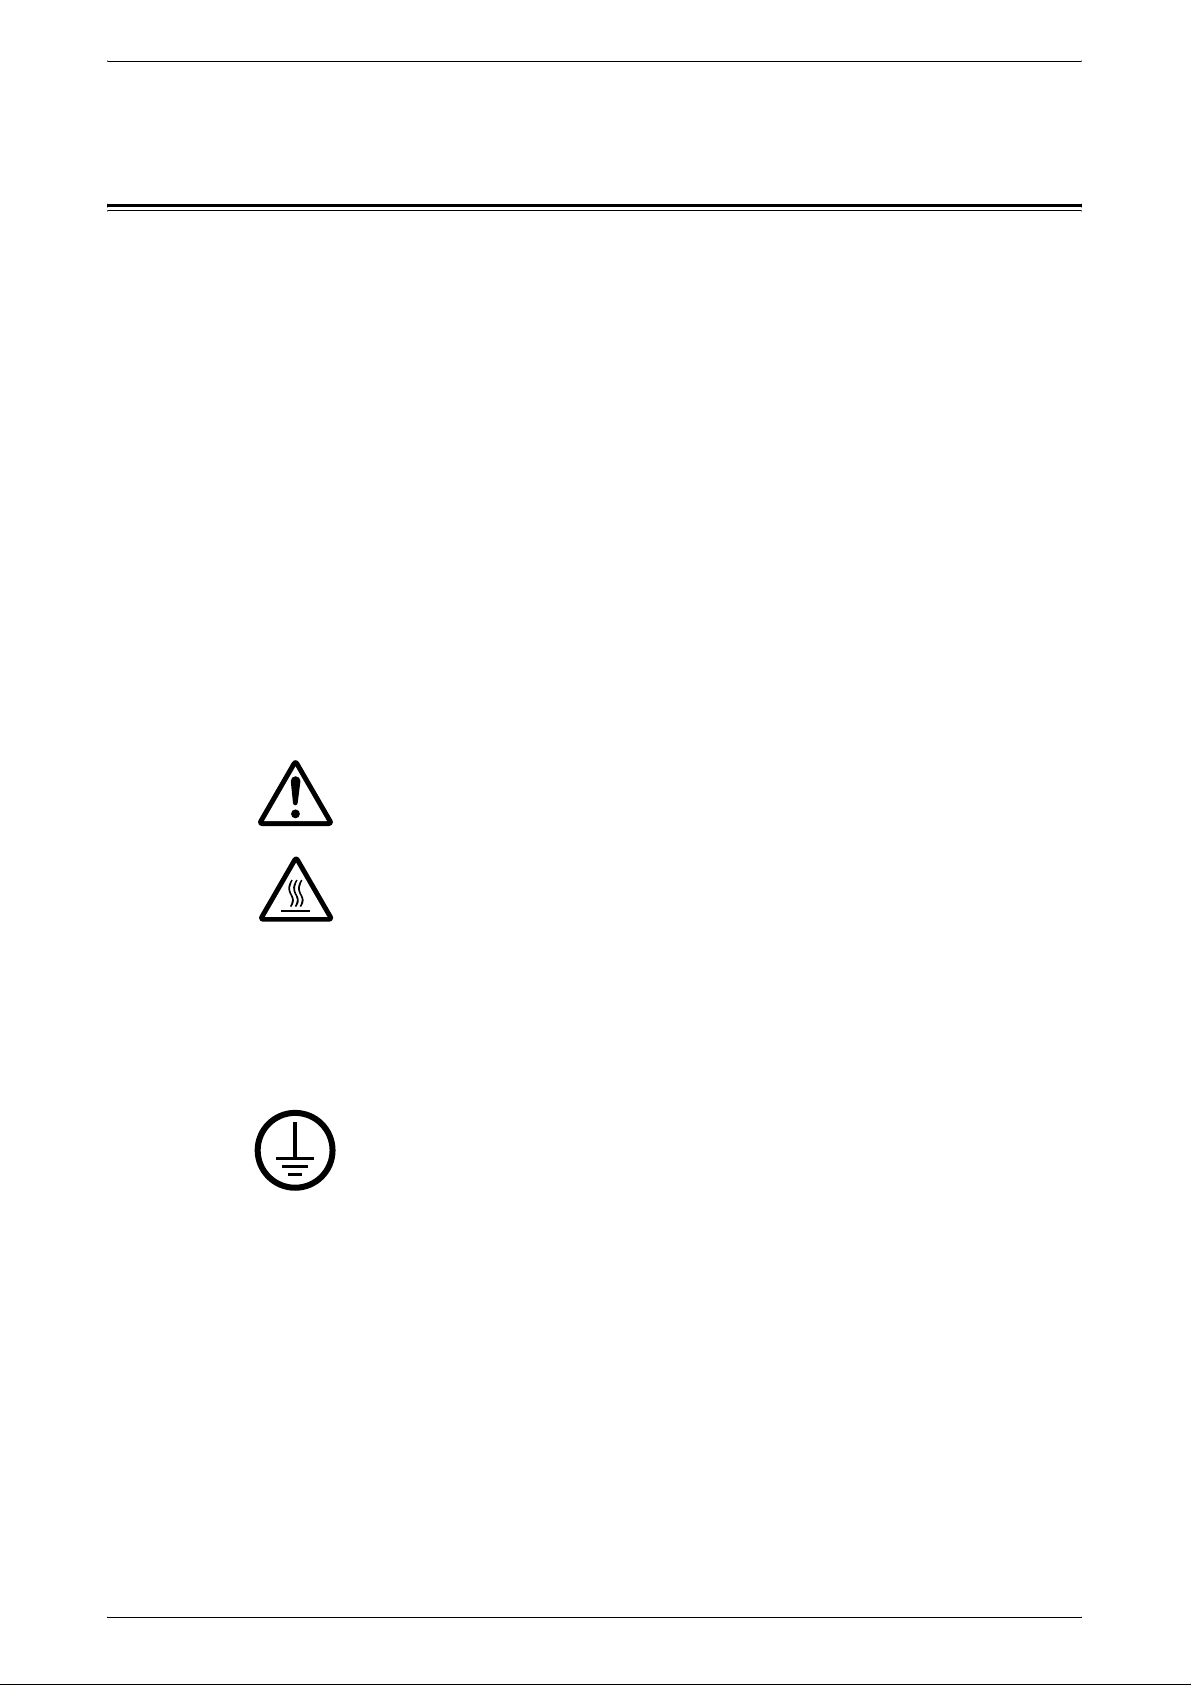
WARNING This WARNING alerts users to areas of the product where there is
the possibility of personal injury.
WARNING This WARNING alerts users to areas of the product where there
are heated surfaces, which should not be touched.
WARNING: This product must be connected to a protective earth
circuit.
Operator Accessible Areas
This equipment has been designed to restrict operator access to safe areas only.
Operator access to hazardous areas is restricted with covers or guards, which would
require a tool to remove. Never remove these covers or guards.
Xerox WorkCentre 5016/5020 User Guide 9
Page 10

Maintenance
Any operator product maintenance procedures will be described in the customer
documentation supplied with the product. Do not carry out any maintenance
procedures on this product which are not described in the customer documentation.
Cleaning Your Product
Before cleaning this product, unplug the product from the electrical outlet. Always use
materials specified for this product. The use of other materials may result in poor
performance and may create a hazardous situation. Do not use aerosol cleaners, they
may be explosive and flammable under certain circumstances.
WARNING - Electrical Safety Information
Z Only use the power cord supplied with the equipment.
Z Plug the power cord directly into a grounded electrical outlet easily accessible. Do
not use an extension cord. If you do not know whether an outlet is grounded, consult
a qualified electrician.
Z Improper connection of the equipment-grounding conductor can result in an electric
shock.
X Do not place this equipment where people might step on or trip over the power cord.
X Do not override or disable electrical or mechanical interlocks.
X Do not obstruct the ventilation openings.
X Never push objects of any kind into slots or openings on the equipment.
Z If any of the following conditions occur, switch off the power to the machine
immediately and disconnect the power cord from the electrical outlet. Call an
authorized local service representative to correct the problem.
Safety Notes
– The equipment emits unusual noises or odors.
– The power cord is damaged or frayed.
– A wall panel circuit breaker, fuse, or other safety device has been tripped.
– Liquid has spilled into the equipment.
– The equipment is exposed to water.
– Any part of the equipment is damaged.
Disconnect Device
The power cable is the disconnect device for this equipment. It is attached to the back
of the machine as a plug-in device. To remove all electrical power from the equipment,
disconnect the power cable from the electrical outlet.
Laser Safety Information
CAUTION: Use of controls, adjustments or performance of procedures other
than those specified herein may result in hazardous light exposure.
With specific regard to laser safety, the equipment complies with performance
standards for laser products set by government, national and international agencies as
a Class 1 laser product. It does not emit hazardous light, as the beam is totally enclosed
during all phases of customer operation and maintenance.
Xerox WorkCentre 5016/5020 User Guide 10
Page 11

Operational Safety Information
To ensure the continued safe operation of your Xerox equipment, follow these safety
guidelines at all times.
Do These:
• Always connect equipment to a correctly grounded power outlet. If in doubt, have
the outlet checked by a qualified electrician.
• This equipment must be connected to a protective earth circuit.
This equipment is supplied with a plug that has a protective earth pin. This plug will
fit only into an earthed electrical outlet. This is a safety feature. To avoid risk of
electric shock, contact your electrician to replace the electrical outlet if you are
unable to insert the plug into it. Never use a plug that lacks an earth connection
terminal to connect the product to an electrical outlet.
• Always follow all warnings and instructions that are marked on or supplied with the
equipment.
• Always locate the equipment in an area that has adequate ventilation, and space for
servicing. See installation instructions for minimum dimensions.
Safety Notes
• Always use materials and supplies specifically designed for your Xerox equipment.
Use of unsuitable materials may result in poor performance.
• Always unplug this equipment from the electrical outlet before cleaning.
Do Not Do These:
• Never use a plug that lacks an earth connection terminal to connect the product to
an electrical outlet.
• Never attempt any maintenance procedures that are not specifically described in the
customer documentation.
• This equipment should not be placed in a built-in unit unless proper ventilation is
provided. Please contact your authorized local dealer for further information.
• Never remove covers or guards that are fastened with screws. There are no
operator serviceable areas within these covers.
• Never locate the equipment near a radiator or any other heat source.
• Never push objects of any kind into the ventilation openings.
• Never override or “cheat” any of the electrical or mechanical interlock devices.
• Never operate the equipment if you notice unusual noises or odors. Disconnect the
power cord from the electrical outlet and contact your local Xerox Service
Representative or Service Provider immediately.
Maintenance Information
Do not attempt any maintenance procedures that are not specifically described in the
customer documentation supplied with your machine.
• Do not use aerosol cleaners. The use of cleaners that are not approved may cause
poor performance of the equipment, and could create a dangerous condition.
• Use supplies and cleaning materials only as directed in the customer
documentation. Keep all these materials out of the reach of children.
Xerox WorkCentre 5016/5020 User Guide 11
Page 12

• Do not remove covers or guards that are fastened with screws. There are no parts
behind these covers that you can maintain or service.
• Do not perform any maintenance procedures unless you have been trained to do
them by an authorized local dealer or unless a procedure is specifically described in
the user manuals.
Ozone Information
This product produces ozone during normal operation. The ozone produced is heavier
than air and is dependent on copy volume. Install the system in a well-ventilated room.
If you need additional information about ozone, please request the Xerox publication
Facts About Ozone (part number 610P64653) by calling 1-800-828-6571 in the United
States and Canada. In other markets, please contact your local Xerox representative.
For Consumables
• Store all consumables in accordance with the instructions given on its package or
container.
Safety Notes
• Use a broom or a wet cloth to wipe off spilled toner. Never use a vacuum cleaner for
the spills.
• Keep the Toner Bottle out of the reach of children. If a child accidentally swallows
toner, spit it out, rinse mouth with water, drink water and consult a physician
immediately.
• When adding toner to the Drum Cartridge, be careful not to spill the toner. In case
of any toner spills, avoid contact with clothes, skin, eyes and mouth as well as
inhalation.
• If toner spills onto your skin or clothing, wash it off with soap and water.
• If you get toner particles in your eyes, wash it out with plenty of water for at least 15
minutes until irritation is gone. Consult a physician if necessary.
• If you inhale toner particles, move to a fresh air location and rinse your mouth with
water.
• If you swallow toner, spit it out, rinse your mouth with water, drink plenty of water
and consult a physician immediately.
Radio Frequency Emissions (Class A digital device)
European Union
WARNING: In order to allow this equipment to operate in close proximity to
Industrial, Scientific and Medical (ISM) equipment, the external radiation from
ISM equipment may have to be limited or special mitigation measures taken.
Changes or modifications to this equipment not specifically approved by the Xerox
Corporation may void the user's authority to operate this equipment.
WARNING: This is a Class A product. In a domestic environment this product
may cause radio interference in which case the user may be required to take
adequate measures.
Xerox WorkCentre 5016/5020 User Guide 12
Page 13

USA
NOTE: This equipment has been tested and found to comply with the limits for a Class
A digital device, pursuant to Part 15 of the FCC Rules. These limits are designed to
provide reasonable protection against harmful interference when the equipment is
operated in a commercial environment. This equipment generates, uses, and can
radiate radio frequency energy and, if not installed and used in accordance with the
instruction manual, may cause harmful interference to radio communications.
Operation of this equipment in a residential area is likely to cause harmful interference
in which case the user will be required to correct the interference at his own expense.
Changes or modifications to this equipment not specifically approved by the Xerox
Corporation may void the user's authority to operate this equipment.
Product Safety Certification
This product is certified by the following Agency using the Safety standards listed.
Agency Standard
TUV Rheinland UL60950-1 1st (2003) (USA/Canada)
Regulatory Information
CQC IEC60950-1 Edition 1 (2001)
This product was manufactured under a registered ISO9001 Quality system.
Regulatory Information
Certifications in Europe (CE)
The CE mark applied to this product, symbolizes XEROX's declaration of conformity
with the following applicable European Union Directives, as of the dates indicated:
December 12, 2006: Council Directive 2006/95/EC as amended. Approximation of the
laws of the member states related to low voltage equipment.
December 15, 2004: Council Directive 2004/108/EC as amended. Approximation of the
laws of the member states related to electromagnetic compatibility.
March 9, 1999 Council Directive 99/5/EC, on radio equipment and telecommunications
terminal equipment and the mutual recognition of the conformity.
A full declaration of conformity, defining the relevant directives and referenced
standards, can be obtained from your XEROX Limited representative.
Xerox WorkCentre 5016/5020 User Guide 13
Page 14

Environmental Compliance
USA
ENERGY STAR
As an ENERGY STAR® partner, Xerox Corporation has determined that the basic
configuration of this product meets the ENERGY STAR guidelines for energy
efficiency.
The ENERGY STAR and ENERGY STAR MARK are registered United States
trademarks.
The ENERGY STAR Imaging Equipment Program is a team effort between U.S.,
European Union and Japanese governments and the imaging equipment industry to
promote energy-efficient copiers, printers, fax, and multifunction machine. Reducing
product energy consumption helps combat smog, acid rain and long-term changes to
the climate by decreasing the emissions that result from generating electricity.
Environmental Compliance
Illegal Copies
Copying certain documents may be illegal in your country. Penalties of fine or
imprisonment may be imposed on those found guilty of making such reproductions.
• Currency notes
• Bank notes and cheques
• Bank and government bonds and securities
• Passports and identification cards
• Copyright material or trademarks without the consent of the owner
• Postage stamps and other negotiable instruments
This list is not inclusive and no liability is assumed for either its completeness or
accuracy. In case of doubt, contact your legal counsel.
Battery Recycling and Disposal
Dispose of all batteries in accordance with local legislation.
For recovery of scarce resources, Xerox reuses the rechargeable batteries used in this
product after the product is returned. Those batteries can be reused to make recycle
materials and energy recovery.
Xerox WorkCentre 5016/5020 User Guide 14
Page 15

Product Recycling and Disposal
All Countries, North America - USA/Canada
Xerox operates a worldwide equipment takeback and reuse/recycle program. Contact
your Xerox sales representative at (1-800-ASK-XEROX) to determine whether this
Xerox product is part of the program. For more information about Xerox environmental
programs, visit www.xerox.com/environment.
If you are managing the disposal of your Xerox product, please note that the product
contains lamp(s) with mercury, and may contain lead, Perchlorate and other materials
whose disposal may be regulated due to environmental considerations. The presence
of these materials is fully consistent with global regulations applicable at the time that
the product was placed on the market. For recycling and disposal information, contact
your local authorities. In the United States, you may also refer to the Electronic
Industries Alliance web site:
www.eiae.org <http://www.eiae.org>.
Perchlorate Material - This product may contain one or more Perchlorate-containing
devices, such as batteries. Special handling may apply, please see:
Product Recycling and Disposal
www.dtsc.ca.gov/hazardouswaste/perchlorate.
European Union
WEEE Domestic/Household
Application of this symbol on your equipment is confirmation that you
should not dispose of the equipment in the normal household waste
stream. In accordance with European legislation, end of life electrical
and electronic equipment subject to disposal must be segregated
from household waste.
Private households within EU member states may return used electrical and electronic
equipment to designated collection facilities free of charge. Please contact your local
disposal authority for information.
In some member states, when you purchase new equipment, your local retailer may be
required to take back your old equipment free of charge. Please ask you retailer for
information.
Prior to disposal, please contact your local dealer or Xerox representative for end of life
takeback information.
WEEE Professional/Business
Application of this symbol on your equipment is confirmation that you
must dispose of this equipment in compliance with agreed national
procedures. In accordance with European legislation, end of life
electrical and electronic equipment subject to disposal must be
managed within agreed procedures.
Private households within EU member states may return used electrical and electronic
equipment to designated collection facilities free of charge. Please contact your local
disposal authority for information.
Xerox WorkCentre 5016/5020 User Guide 15
Page 16
2 Product Overview
This chapter describes each component of the machine, explains how to switch the
machine on and off, and provides information on the use of recycled paper.
Machine Components
This section describes machine components and their functions.
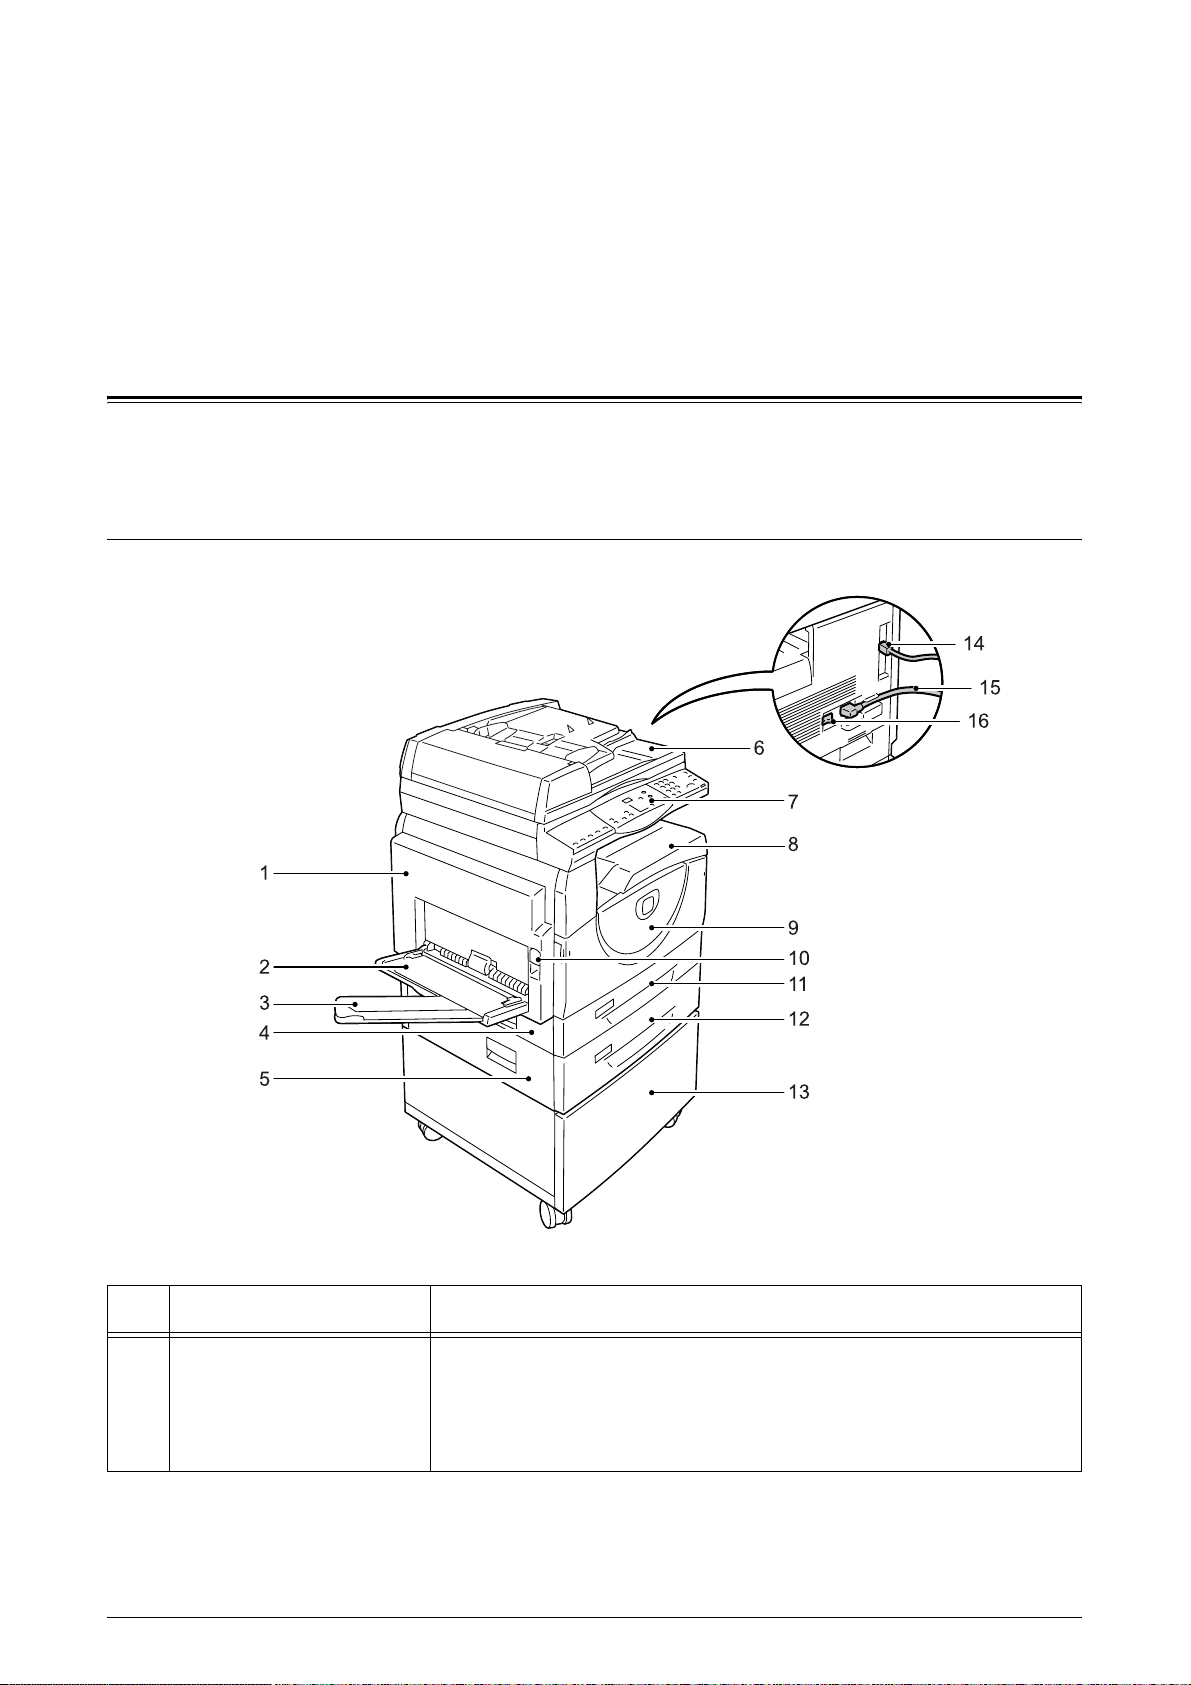
Front View
No. Component Function
1 Left Side Cover Open this cover when a paper jam occurs in the machine and when
replacing consumables.
For information on how to clear paper jams, refer to "Paper Jams" (P.102).
For information on how to replace consumables, refer to "Replacing
Consumables" (P.110).
Xerox WorkCentre 5016/5020 User Guide 16
Page 17

Machine Componen ts
No. Component Function
2 Bypass Tray Load standard size paper and non-standard size paper. It holds special
media such as thick stock paper or other special media that cannot be
loaded in Tray 1 or Tray 2.
For more information on the supported paper types and capacity of the Bypass
Tray, refer to "Supported Paper Sizes and Types" (P.40).
3 Extension Flap Supports paper that is loaded in the Bypass Tray. Slide out this flap
before loading paper in the Bypass Tray.
4 Access Cover 1 Open this cover to remove paper jams in and around Tray 1 and Tray 2.
For more information on how to clear paper jams, refer to "Paper Jams"
(P.102).
5 Access Cover 2 Open this cover to remove paper jams in and around Tray 2.
Note • The Access Cover 2 is a part of the optional Paper Tray 2.
For more information on how to clear paper jams, refer to "Paper Jams"
(P.102).
6 Document Feeder Automatically feeds documents that are loaded to be scanned for a copy
or a scan job.
Note • The Document Feeder may not be fitted depending on the machine
model in use.
7 Control Panel Consists of the Display, the Machine Diagram (mimic), buttons and
indicators.
For more information on the Control Panel, refer to "Control Panel" (P.20).
8 Output Tray Copies and prints are delivered here, face down.
9 Front Cover Open this cover to replace the Drum Cartridge and to add toner.
10 Left Side Cover Latch Pull up this latch to open the Left Side Cover.
11 Tray 1 Load standard size paper. It holds up to 250 sheets of plain paper.
For more information on supported paper types and tray capacity, refer to
"Supported Paper Sizes and Types" (P.40).
12 Paper Tray 2 (optional) Adds an additional tray that can be used as Tray 2. Load standard size
paper. It holds up to 500 sheets of plain paper.
Note • Paper Tray 2 is an optional accessory.
For more information on supported paper types and tray capacity, refer to
"Supported Paper Sizes and Types" (P.40).
13 Stand (optional) Elevates and stabilizes the machine for optimum use. The attached
casters allow you to move the machine easily.
Note • The stand is an optional accessory.
14 USB Interface Connector Connects the USB cable to the machine.
15 Power Cord Connector Connects the power cord to the machine.
16 Power Switch Switches the power to the machine on and off.
Xerox WorkCentre 5016/5020 User Guide 17
Page 18
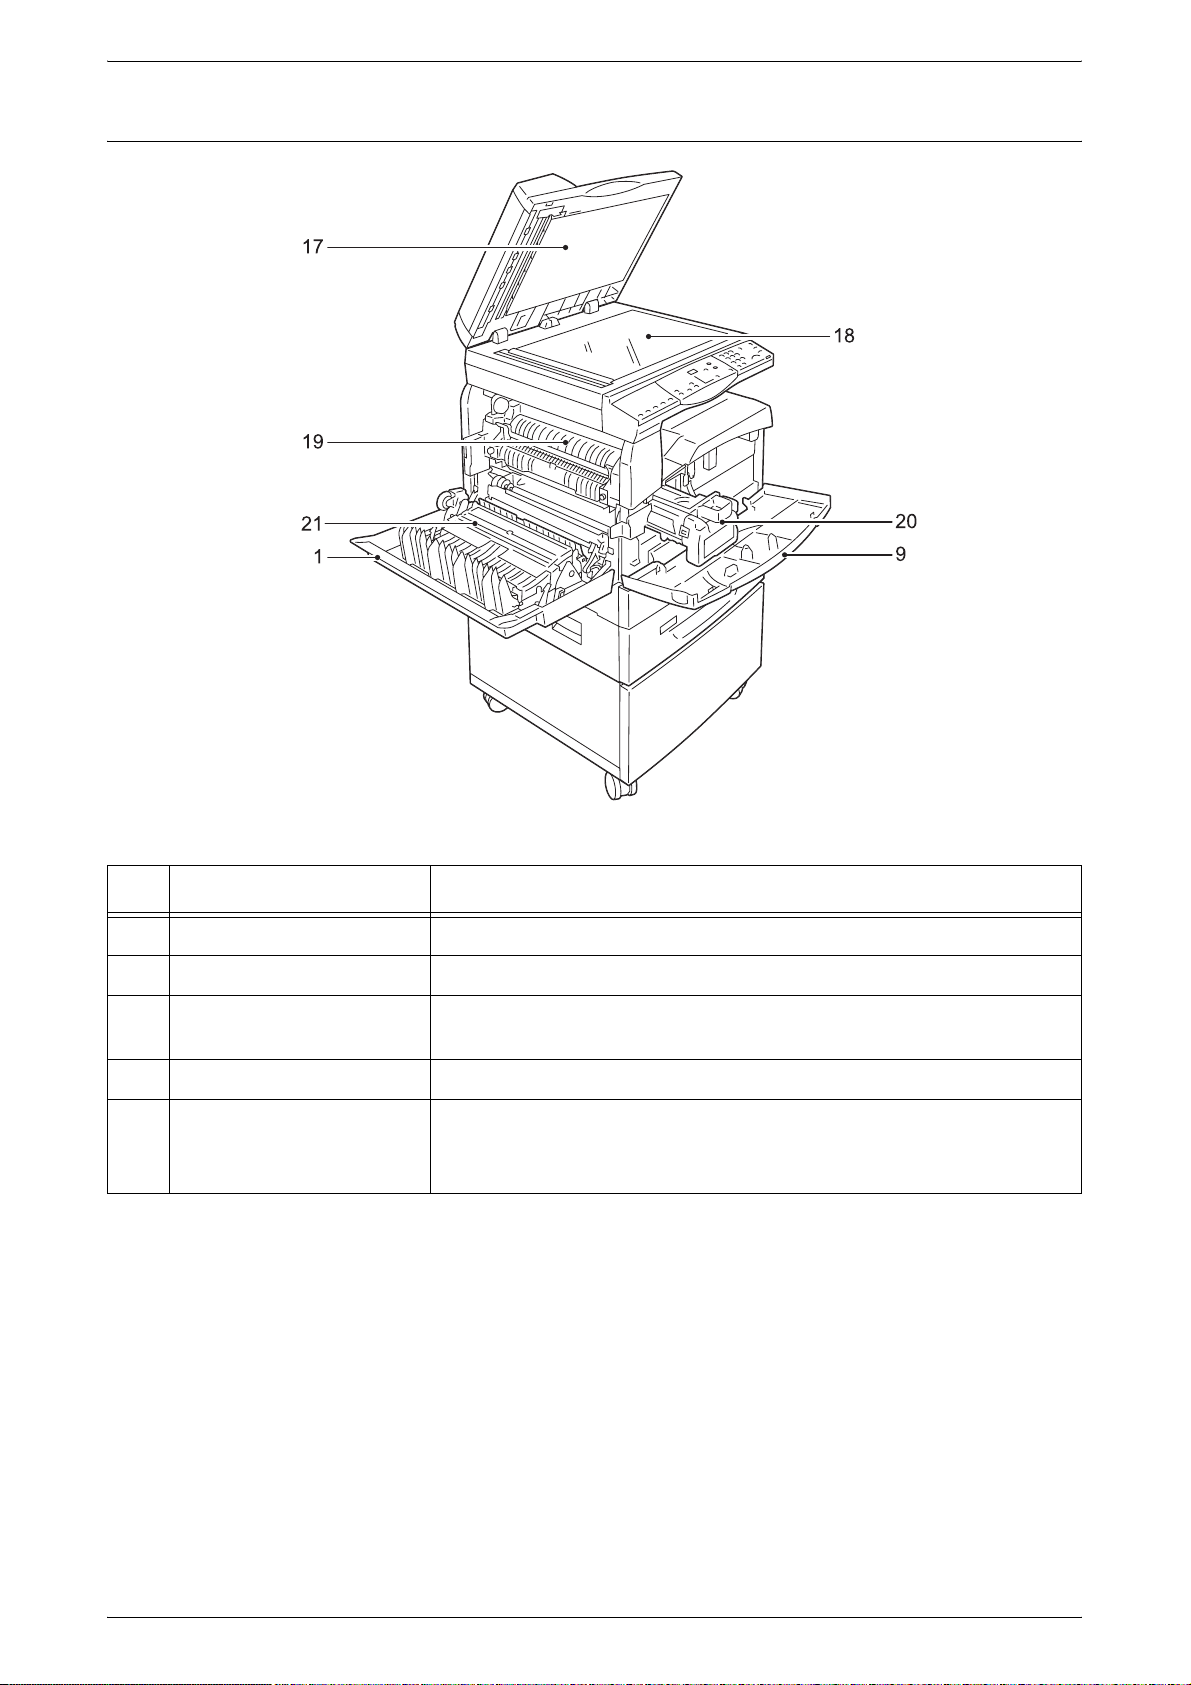
Inside View
Machine Componen ts
No. Component Function
17 Document Cover Close this cover when scanning a document on the Document Glass.
18 Document Glass Place a document here, face down.
19 Fuser Unit Fuses toner onto the paper by applying heat and pressure. Do not touch
this unit. It may become extremely hot.
20 Drum Cartridge Contains toner and photoconductor used to transfer the toner.
21 Duplex Module Copies and prints on both sides of paper.
Note • The Duplex Module may not be fitted depending on the machine
model in use.
Xerox WorkCentre 5016/5020 User Guide 18
Page 19

Rear View
Machine Componen ts
No. Component Function
22 Data Label Contains the machine information.
Xerox WorkCentre 5016/5020 User Guide 19
Page 20

Control Panel
This section describes Control Panel components and their functions.
Display
Displays the copy quantity, zoom ratio, error
code, machine status, or numerical values.
<Display Switch> button/indicators
Control Panel
Display
Press this button to switch the Display
between the copy quantity and the zoom
ratio. The indicator lights up to show which
is currently being displayed.
When the machine is in the Paper Setting
Mode, press this button to scroll through
paper sizes.
Note • To enter the Paper Setting Mode, hold
<Copy> button
Press this button to switch the machine to
the Copy Mode. The button lights up when
the machine is ready to process a copy job.
<Display Switch> button
down the <Paper Supply> button for
four seconds. For information on the
<Paper Supply> button, refer to "<Paper Supply> button" (P.23).
<Copy> button
Xerox WorkCentre 5016/5020 User Guide 20
Page 21
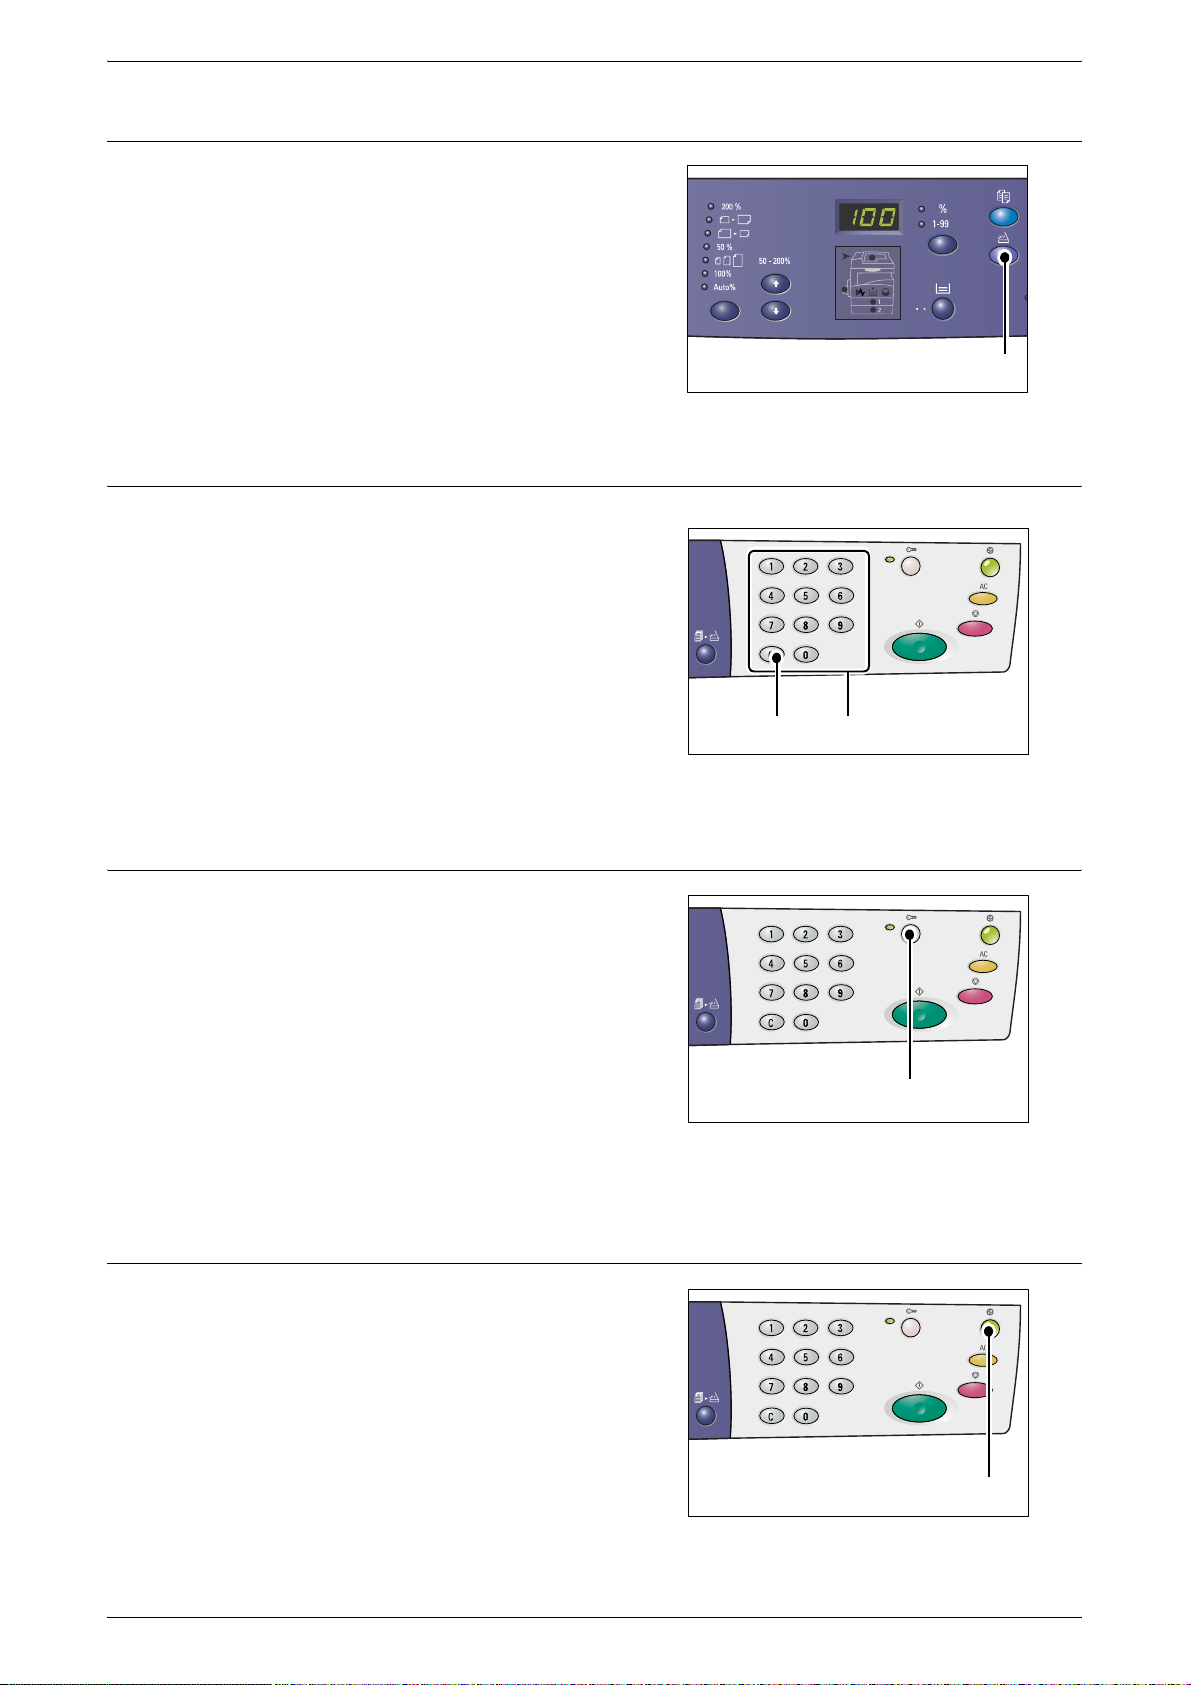
<Scan> button
Press this button to switch the machine to
the Scan Mode. The button lights up when
the machine is ready to process a scan job.
When the machine enters the Scan Mode,
[Scn] appears in the Display.
Numeric Keypad
Numeric keys
Use the numeric keys to enter the copy
quantity, password, and other numerical
values.
Control Panel
<Scan> button
<C (clear)> button
Press this button to clear a wrongly entered
numerical value.
Note • In this manual, this button is indicated
as the <C> button.
<Log In/Out> button
Hold down this button for four seconds to
enter the System Setting Mode, which
allows you to configure the system settings.
Note • When the machine is in the Single
Account Mode or the Multiple Account
Mode, you must first log in to the
machine before holding down this
button to enter the System Setting
Mode. For more information on how to
log in to the machine, refer to "Single
Account Mode" (P.68) and "Multiple
Account Mode" (P.69). For more
information on system settings, refer to "System Settings" (P.123).
<Power Saver> button
<C> button
Numeric keys
<Log In/Out>
button
To minimize power consumption, the Power
Saver feature is automatically activated
during periods of machine inactivity.
For more information on the Power Saver feature, refer to
"Power Saver" (P.32).
<Power Saver>
button
Xerox WorkCentre 5016/5020 User Guide 21
Page 22

<All Clear> button
Press this button to clear the previously
selected features, and to restore the default
values of the features.
<Stop> button
Press this button to cancel a job.
Control Panel
<All Clear>
button
<Start> button
Press this button to start a copy or scan job,
and to confirm the specified values.
<Scan Completed> button
This button is selectable when using the
Document Glass with certain copy features,
such as Collate, 2-sided, and N-up.
<Stop> button
<Start> button
The indicator next to the <Scan Completed>
button blinks after the first document is
scanned. The machine allows you to scan
the next document while this button is
blinking. After scanning the last document,
press this button.
Xerox WorkCentre 5016/5020 User Guide 22
<Scan Completed>
button
Page 23

<Paper Supply> button
The <Paper Supply> button has the following two functions.
Selecting a tray
Press this button to select a tray for a copy
job. The Machine Diagram (mimic) shows
you which tray is currently selected. Press
this button repeatedly until the desired tray
is lit on the Machine Diagram (mimic).
Changeover sequence:
Control Panel
Tray 1 & Tray 2 (Automatic Paper
Selection), Tray 1, Tray 2, Bypass Tray
<Paper Supply>
button
Tray 1 & Tray 2 (Automatic Paper Selection)
The machine automatically selects paper that is loaded in either Tray 1 or Tray 2.
Note • This option is only available when using the Document Feeder for the machines that are
fitted with the optional Paper Tray 2.
• If the Automatic Paper Selection (menu number: 7) is enabled in the system settings, this
option is automatically selected when a document is loaded in the Document Feeder. For
information on the system settings, refer to "System Settings" (P.123).
Tray 1
Uses paper that is loaded in Tray 1.
Tray 2
Uses paper that is loaded in Tray 2.
Note • This option is only available when Paper Tray 2 (optional) is fitted on the machine.
Bypass Tray
Uses paper that is loaded in the Bypass Tray.
Entering the Paper Setting Mode
Hold down this button for four seconds to enter the Paper Setting Mode. After loading
paper in any trays, you must enter the Paper Setting Mode to specify the size and
orientation of the paper.
Once the machine enters the Paper Setting Mode, press the <Display Switch> button
to scroll through paper sizes.
Changeover sequence is shown below. It shows what appears in the Display followed
by an actual size of paper in parentheses.
Changeover sequence:
inch: 11L (8.5 x 11” LEF), 11 (8.5 x 11” SEF), 134 (8.5 x 13.4” SEF), A3 (A3 SEF),
A4L (A4 LEF), A4 (A4 SEF), b4 (B4 SEF), b5L (B5 LEF), b5 (B5 SEF),
55 (5.5 x 8.5” SEF), A5 (A5 SEF), 17 (11x 17” SEF), 14 (8.5 x 14” SEF),
13 (8.5 x 13” SEF)
mm: A4L (A4 LEF), A4 (A4 SEF), b4 (B4 SEF), b5L (B5 LEF), b5 (B5 SEF),
C8 (8K SEF), 16L (16K LEF), 16S (16K SEF), A5 (A5 SEF), 17 (11 x 17” SEF),
14 (8.5 x 14” SEF), 13 (8.5 x 13” SEF), 11L (8.5 x 11” LEF), 11 (8.5 x 11” SEF),
55 (5.5 x 8.5” SEF), A3 (A3 SEF)
Xerox WorkCentre 5016/5020 User Guide 23
Page 24

Note • You can switch the measuring unit between metric and inches when the machine is in the
System Setting Mode (menu number: 15). For more information, refer to "System Settings"
(P.123).
For more information on how to specify the size and orientation of paper that is loaded in the tray, refer to
"Specifying the Size and Orientation of Paper Loaded in the Trays" (P.49).
Machine Diagram (mimic)
The Machine Diagram (mimic) consists of
indicators.
The indicators flash or light up to display the
machine status.
For more information on the Machine Diagram (mimic),
refer to "Machine Diagram (mimic)" (P.90).
Control Panel
Copy Features
<Variable Ratio> button
Press the < > and < > buttons to specify
the zoom ratio within the range of 50 to
200% in 1% increments.
The currently selected zoom ratio appears
in the Display.
Note • Pressing these buttons automatically
switches the Display to show the zoom
ratio.
<Reduce/Enlarge> button
Press this button to select the zoom ratio.
The currently selected zoom ratio appears
in the Display.
Note • Pressing this button automatically
switches the Displays to show the
zoom ratio.
With
Document Feeder
< > and < >
buttons
Without
Document Feeder
• The measuring unit can be switched
between metric and inches when the
machine is in the System Setting Mode
(menu number: 15). The following
options change depending on the selected measuring unit. For more information on the
system settings, refer to "System Settings" (P.123).
<Reduce/Enlarge> button
When the measuring unit is in inches
200%
Enlarges a document by 200%.
5.5 x 8.5" 11 x 17"
Xerox WorkCentre 5016/5020 User Guide 24
Page 25

Control Panel
129%
Enlarges a document by 129.4%.
5.5 x 8.5" 8.5 x 11", 8.5 x 11" 11 x 17"
78%
Reduces a document by 78.5%.
8.5 x 14" 8.5 x 11"
50%
Reduces a document by 50%.
11 x 17" 5.5 x 8.5"
Preset
Enlarges or reduces a document by any zoom ratio that has been
preset.
Note • You can specify the preset zoom ratio when the machine is in the System Setting Mode
(menu number: 8). For more information, refer to "System Settings" (P.123).
• The default preset zoom ratio is 64%.
100%
Makes copies of an original document at the same size.
Auto%
The machine automatically selects the zoom ratio based on the original
document size and the paper size in the selected tray.
Note• This option is selectable only when using the Document Feeder.
When the measuring unit is in metric
200%
Enlarges a document by 200%.
A5 A3
141%
Enlarges a document by 141.4%.
A5 A4, A4
A3, B5 B4
70%
Reduces a document by 70.7%.
A3 A4, A4 A5, B4 B5
50%
Reduces a document by 50%.
A3 A5
Preset
Enlarges or reduces a document by any zoom ratio that has been
preset.
Xerox WorkCentre 5016/5020 User Guide 25
Page 26

Note • You can specify the preset zoom ratio when the machine is in the System Setting Mode
(menu number: 8). For more information, refer to "System Settings" (P.123).
• The default preset zoom ratio is 82%.
<Lighten/Darken> button
Press the < > or < > button to select the
density of the output copies.
Control Panel
100%
Makes copies of an original document at the same size.
Auto%
The machine automatically selects the zoom ratio based on the original
document size and the paper size in the selected tray.
Note• This option is selectable only when using the Document Feeder.
<Original Size> button
When selecting the N-up feature, press this
button to select the original document size.
For more information on the N-up feature, refer to "4-up/2up Copies (Copying Multiple Pages onto a Single Sheet)"
(P.57).
Important • This button is selectable only when
<Lighten/Darken>
button
Lightest
The density of the output copies decreases to the lightest level.
Light
The density decreases on the output copies.
Normal
The density of the output copies stays the same as the original
documents.
Dark
The density increases on the output copies.
Darkest
The density of the output copies increases to the darkest level.
using the Document Glass with the Nup feature. The button is not selectable
when using the Document Feeder as
the size of the original document is
automatically detected.
• The measuring unit can be switched between metric and inches when the machine is in the
System Setting Mode (menu number: 15). The following three options change depending
on the selected measuring unit.
<Original Size>
button
Xerox WorkCentre 5016/5020 User Guide 26
Page 27

When the measuring unit is in inches
11 x 17” SEF, 8.5 x 13” SEF, 8.5 x 14” SEF
Select this option if the size and orientation of an original document is
11 x 17” SEF, 8.5 x 13” SEF, 8.5 x 14” SEF when using the N-up feature.
8.5 x 11” SEF
Select this option if the size and orientation of an original document is
8.5 x 11” SEF.
8.5 x 11” LEF
Select this option if the size and orientation of an original document is
8.5 x 11” LEF.
When the measuring unit is in metric
A3 SEF, B4 SEF
Select this option if the size and orientation of an original document is
A3 SEF, B4 SEF.
A4 SEF, B5 SEF
Select this option if the size and orientation of an original document is
A4 SEF or B5 SEF.
Control Panel
A4 LEF, B5 LEF
Select this option if the size and orientation of an original document is
A4 LEF or B5 LEF.
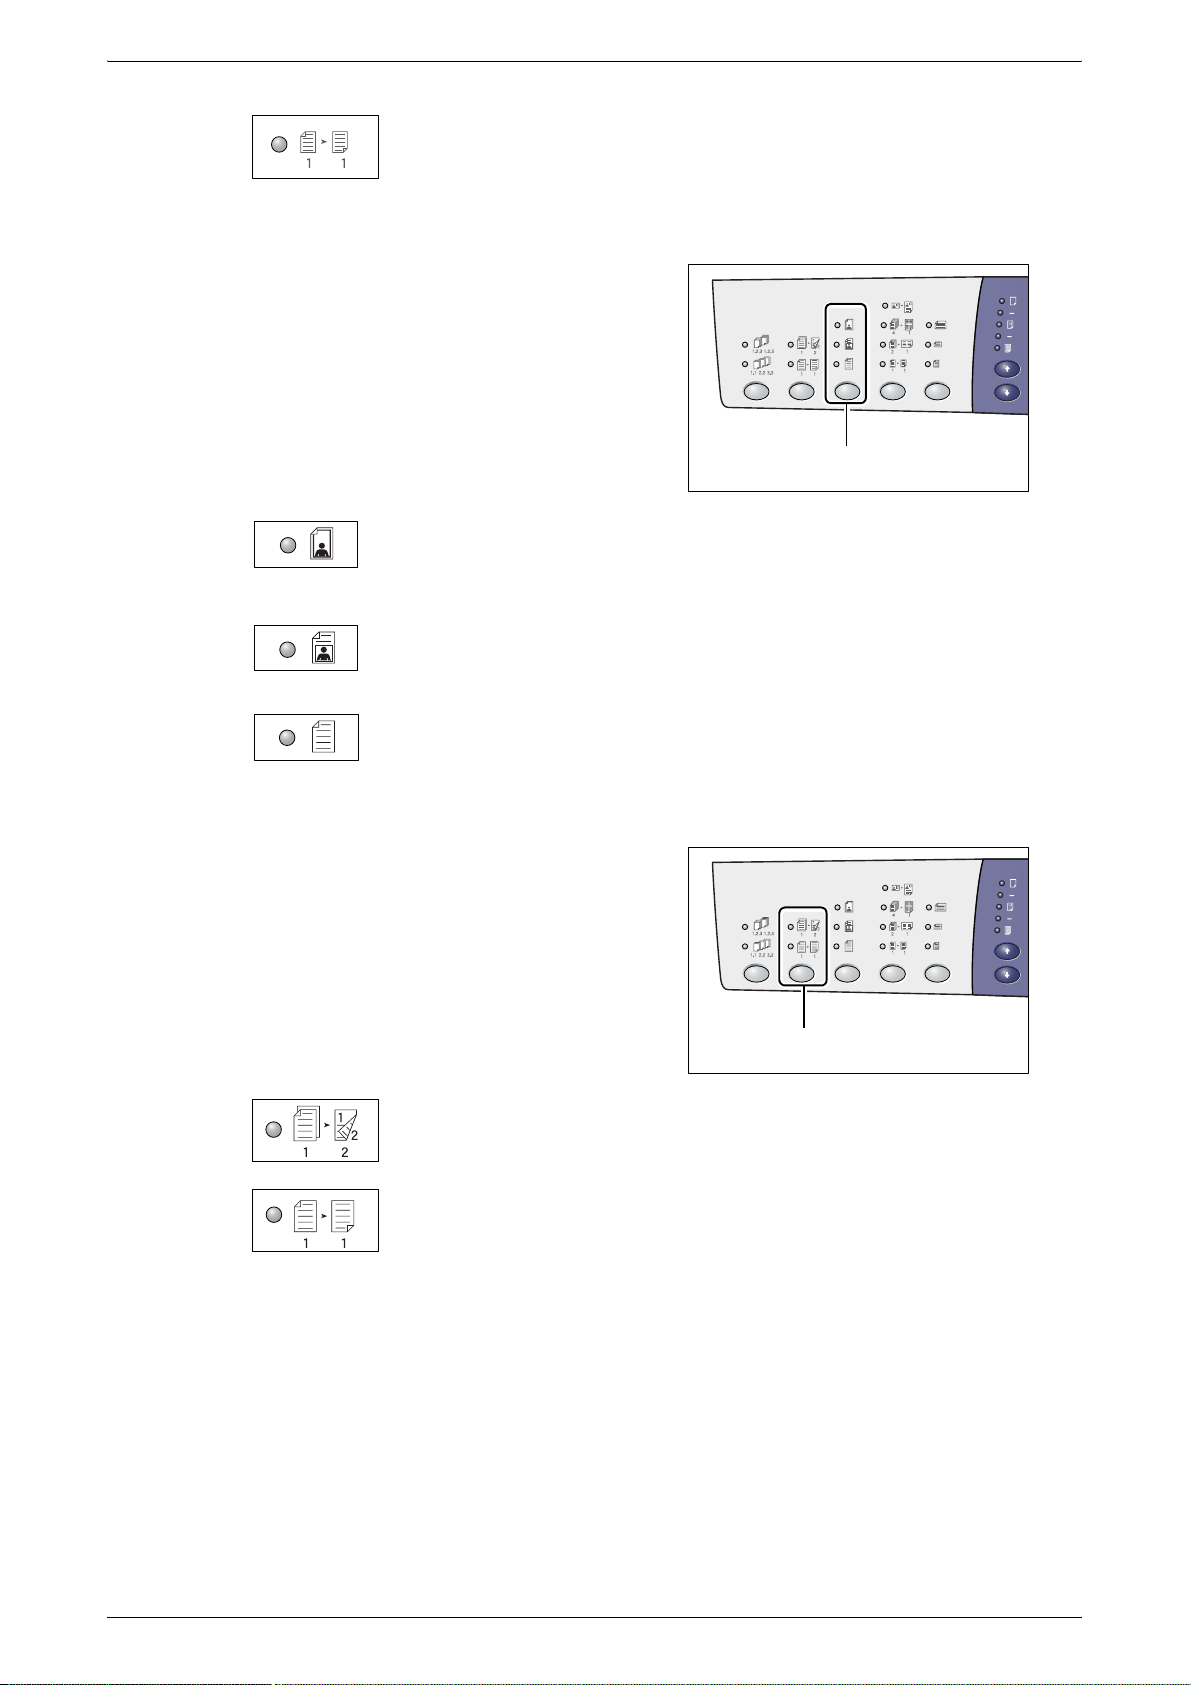
<N-up/ID Card Copy> button
Press this button to select the N-up feature
or ID Card Copy feature.
Note • When the N-up feature is selected, the
zoom ratio is fixed, and it cannot be
changed manually.
ID Card Copy
Copies an ID card-shaped document onto one side of a single sheet.
For more information on the ID Card Copy feature, refer to "ID Card Copies (Copying an ID
Card-shaped Document onto a Sheet)" (P.63).
4-up
Copies four pages of the original documents onto one side of a single
sheet.
For more information on the N-up feature, refer to "4-up/2-up Copies (Copying Multiple Pages
onto a Single Sheet)" (P.57).
<N-up/ID Card Copy>
button
2-up
Copies two pages of the original documents onto one side of a single
sheet.
For more information on the N-up feature, refer to "4-up/2-up Copies (Copying Multiple Pages
onto a Single Sheet)" (P.57).
Xerox WorkCentre 5016/5020 User Guide 27
Page 28
<Original Type> button
Press this button to select the original
document type.
Control Panel
Off
Disables the N-up and ID Card Copy features.
<Original Type>
button
Photo
Suitable for copying documents that contain only photo images.
<2-sided> button
Press this button to select whether to copy
on one side or both sides of the sheet.
Note • 2-sided feature is only available if the
Text & Photo
Suitable for copying documents that contain both text and photo images.
Text
Suitable for copying documents that contain only text.
Duplex Module is installed on the
machine.
<2-sided>
button
2-sided
Makes 2-sided copies (making copies on both sides of the sheet).
1-sided
Makes 1-sided copies (making copies on one side of the sheet).
Xerox WorkCentre 5016/5020 User Guide 28
Page 29
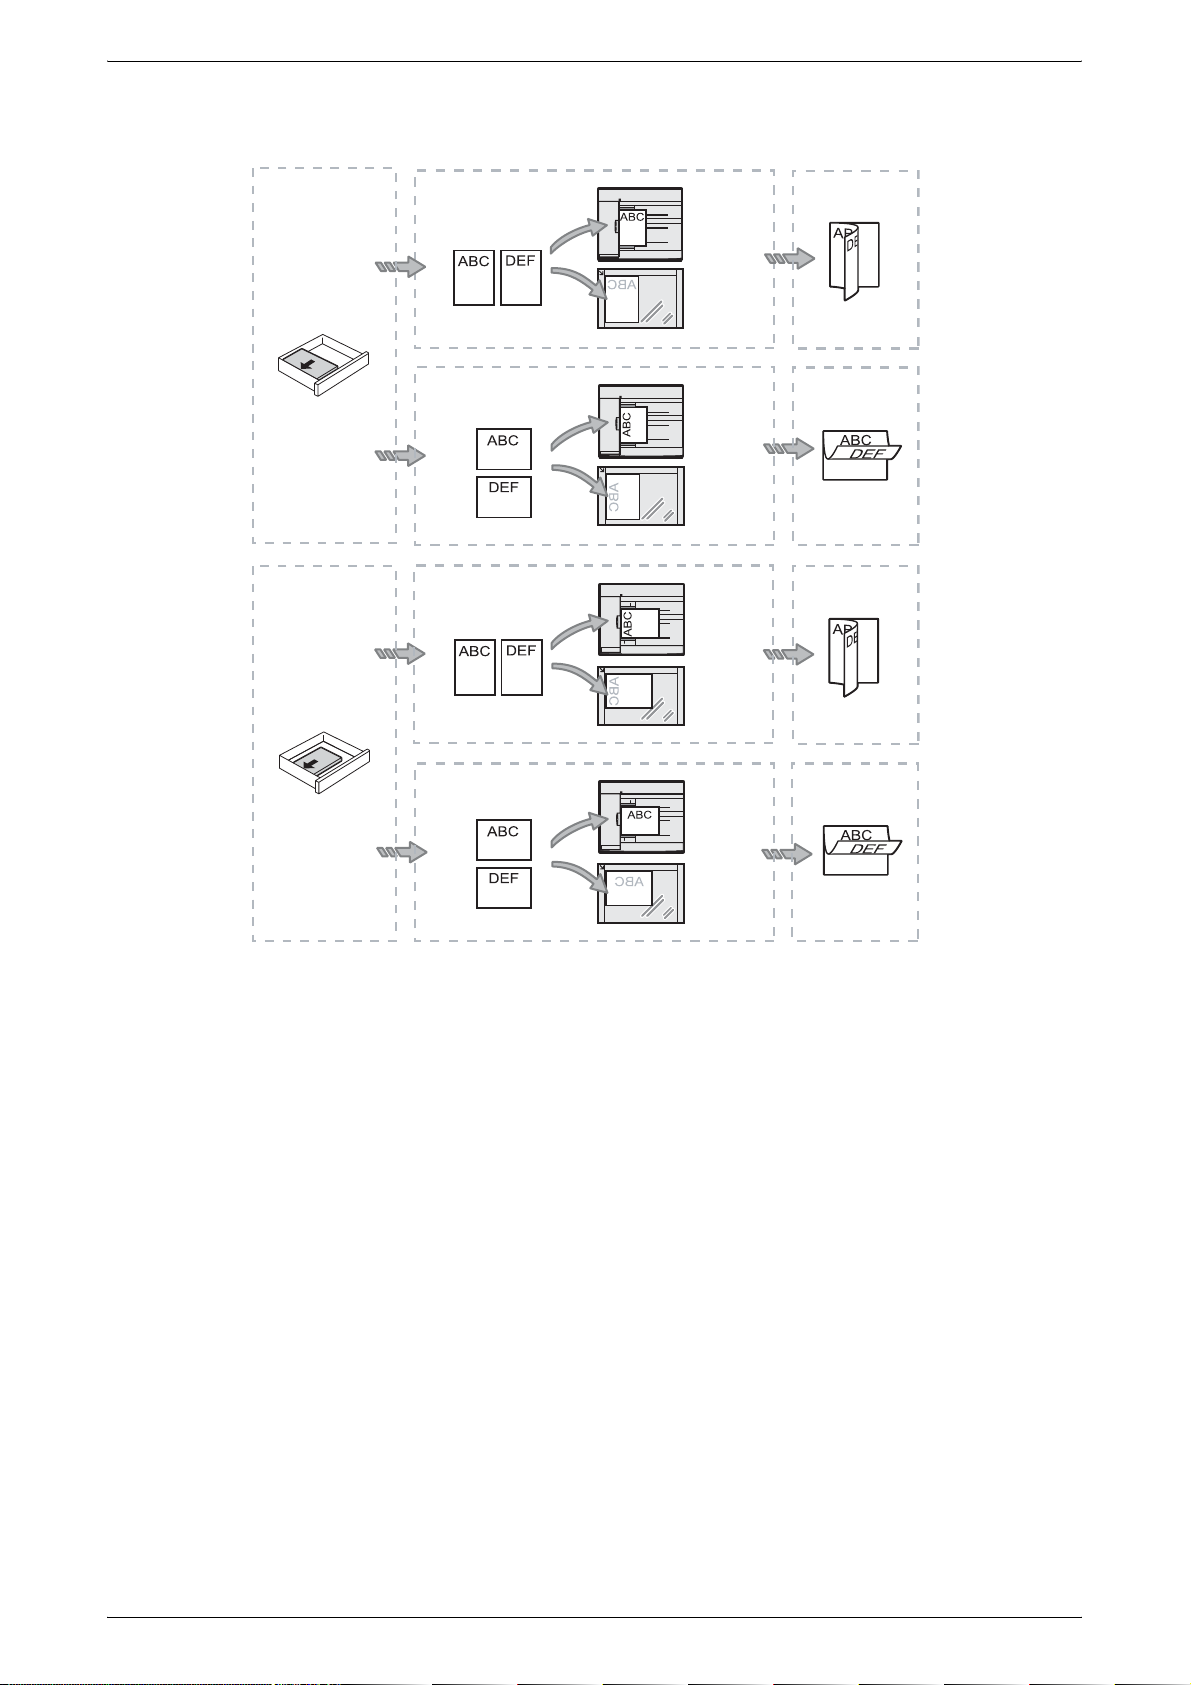
Control Panel
The following chart shows how to load the original document on the Document Glass
or in the Document Feeder when making 2-sided copies.
Paper Orientation
in the Tray
How to Scan
Copied Output
LEF
Paper Orientation
in the Tray
SEF
Portrait
How to Scan
Landscape
How to Scan
Portrait
How to Scan
Landscape
Document
Feeder
Document
Glass
Document
Feeder
Document
Glass
Document
Feeder
Document
Glass
Document
Feeder
Copied Output
Copied Output
Copied Output
Document
Glass
Xerox WorkCentre 5016/5020 User Guide 29
Page 30

<Copy Output> button
Press this button to select whether or not to
collate the output copies.
Control Panel
<Copy Output>
button
Collate
•When 1-sided is selected
Delivers the specified number of copy sets in the same order as the
original documents.
•When 2-sided is selected
Delivers the specified number of copy sets in the same order as the
original documents, and copies are made on both sides of the sheets.
Note • 2-sided feature is only available if the Duplex Module is installed on the machine.
Uncollate
•When 1-sided is selected
Delivers the copies in stacks based on the number of copies for each
set.
•When 2-sided is selected
Delivers the copies in stacks based on the number of copies for each
set, and copies are made on both sides of the sheets.
Note • 2-sided feature is only available if the Duplex Module is installed on the machine.
Xerox WorkCentre 5016/5020 User Guide 30
Page 31

Switching On / Off
This section describes how to switch the machine on and off, and explains the Power
Saver feature.
The machine is ready within 27 seconds after the machine is switched on. The time
required for the machine to warm up may vary, depending on the machine configuration
and the machine environment.
The machine automatically enables the Power Saver feature during inactivity to
minimize power consumption. It is recommended to switch off the machine at the end
of the day or when it is not in use for a long period of time.
Important • Switching off the machine may cause loss of data currently being processed.
For information on the Power Saver feature, refer to "Power Saver" (P.32)
Switching On
The following procedure describes how to switch on the power to the machine.
Switching On / Off
1.
Switching Off
The following procedure describes how to switch off the power to the machine.
Important • Switching off the machine may cause loss of data currently being processed.
1.
Press the Power Switch to the
[ ] position.
Note • [1] appears in the Display when
the machine is ready.
• If you attempt to run a job during
warm-up, the job will be processed
once the machine is ready.
Before switching off the machine, make sure that all jobs have been processed
completely.
Important • Never switch off the machine in the following instances:
-While data is being received
-While jobs are being printed
-While jobs are being copied
-While jobs are being scanned
2.
Press the Power Switch to the [ ]
position.
Important • After pressing the Power Switch to
the [ ] position, wait for a few
seconds before removing the
power cord from the power outlet
until the machine powers off
completely.
• After switching off the machine,
wait for a few seconds before
switching the machine back on
again.
Xerox WorkCentre 5016/5020 User Guide 31
Page 32

Power Saver
The machine has a power-efficient feature called Power Saver to minimize power
consumption during inactivity. When the machine is inactive for a specified period of
time, it activates the Power Saver feature.
The Power Saver feature has two stages: Low Power Mode and Sleep Mode.
The machine enters the Low Power Mode first if it remains inactive for a preset period
of time. Then it enters the Sleep Mode to further reduce power consumption.
Low Power Mode
When the machine enters the Low Power Mode, the machine reduces the power to the
Fuser Unit.
It may not be noticeable that the machine switches to the Low Power Mode, because
no change is visible on the surface. When the machine is in the Low Power Mode, no
particular action is required in order to use the machine. The machine simply exits this
mode when you press any buttons on the Control Panel or when you send a print job
or a scan job.
You can specify how long it takes to enable the Power Saver feature when the machine is in the System Setting
Mode (menu number: 11). For more information, refer to "System Settings" (P.123).
Switching On / Off
Sleep Mode
When the machine enters the Sleep Mode, the machine further reduces its power
consumption.
While the machine is in this mode, the Display goes out, and the <Power Saver> button
is lit. To exit the Sleep Mode to use the machine, press the <Power Saver> button.
You can specify how long it takes to enable the Power Saver feature when the machine is in the System Setting
Mode (menu number: 12). For more information, refer to "System Settings" (P.123).
Exiting the Sleep Mode
The machine exits the Sleep Mode in the following two instances:
• When pressing the <Power Saver> button
• When the machine receives a print job or a scan job
The following procedure describes how to exit the Sleep Mode manually.
1.
Press the <Power Saver> button.
<Power Saver>
button
Xerox WorkCentre 5016/5020 User Guide 32
Page 33

Recycled Paper
The use of recycled paper in the machine benefits the environment with no degradation
in performance. Xerox recommends recycled paper with a 20% post consumer content
which can be obtained both through Xerox and other office suppliers. Contact your
Xerox representative or go to www.xerox.com for more information on other types of
recycled paper.
Recycled Paper
Xerox WorkCentre 5016/5020 User Guide 33
Page 34

3 Installing Drivers
This chapter describes how to install the print and scan drivers, and scanner application
on a computer. If an USB cable has already been connected to the machine and the
computer, and if a wizard dialog box is displayed on the computer screen, close the
wizard dialog box, disconnect the USB cable, and proceed to the procedure below.
Installing the Print Driver and the Scan Driver (TWAIN driver)
The following procedure describes how to install the print and scan drivers on a
computer.
Important • You must log in to a computer using a user account with administrative privileges.
1.
Disconnect the USB cable from the machine or from the computer.
Important • If the USB cable has already been connected to the machine and the computer, and if
a wizard dialog box has appeared on the screen, close the wizard dialog box by
canceling, disconnect the USB cable, and proceed to the next step this procedure.
2.
Insert the WorkCentre 5016/5020 driver CD-ROM into the CD-ROM drive of a
computer.
Note • When using Windows Vista, depending on the security settings, another dialog box
may appear after Step 2, confirming whether or not you want to run [WorkCentre 5016/
5020 CD-ROM AutoRun]. Select an option to allow the program to run, in order to
display the [WorkCentre 5016/5020 CD-ROM AutoRun] dialog box and to proceed to
Step 3.
3.
Click [Language] to select an appropriate language if necessary.
The language switches to the selected language.
Note • You can select a language depending on the machine model in use, or the region of
use.
4.
Click [Install All Drivers].
Note • Selecting [Install All Drivers] allows
you to install the print and scan
drivers together. If you wish to
install either one, select [Install
Print Driver] or [Install Scan Driver]
instead.
A message dialog box appears.
5.
Click [Yes] to proceed with the
installation of the print and scan drivers.
Note • If you select [No], this dialog box
closes.
The [License Agreement] dialog box appears.
Xerox WorkCentre 5016/5020 User Guide 34
Page 35

Installing the Print Driver and the Scan Driver (TWAIN driver)
6.
Read the contents of the license
agreement carefully, and select
[Accept] to accept the terms of the
license agreement, and click [Install].
Note • If you select [Decline] and click
[Cancel], the [License Agreement]
dialog box closes.
• A dialog box may appear
hereinafter, warning you that the
software that you are installing has
not passed Windows Logo testing.
Select the option to continue the installation to install the software. If you do not want to
install the software, select the option to stop the installation.
• When using Windows Vista, depending on the security settings, another dialog box
may appear after Step 6, confirming whether or not you want to continue the installation
of the print and scan drivers. Select an option to continue the installation, in order to
proceed to Step 7.
7.
The message dialog box appears,
prompting you to connect the USB
cable. Click [OK].
The dialog box closes.
8.
Connect the USB cable to the machine and to the computer.
Note • When using Windows Vista, Steps 9 to 14 will be performed automatically without
displaying the wizard dialog box. Once the system displays a message, notifying that
the installation has been completed. Make sure the printer icon and scanner icon has
been created in the respective folders.
9.
The scan driver installation wizard
dialog box appears. Select [No, not this
time], and click [Next].
10.
Select [Install the software
automatically], and click [Next].
Note • If a dialog box appears after this
step, warning you that the software
that you are installing has not
passed Windows Logo testing, if
you do not want to install the
software, select the option to stop
the installation, and select
[Remove Print Driver] and
[Remove Scan Driver] in the
[WorkCentre 5016/5020 CD-ROM
AutoRun] dialog box to completely
remove the software. If you want to install the software, select the option to continue the
installation.
Xerox WorkCentre 5016/5020 User Guide 35
Page 36

Installing the Print Driver and the Scan Driver (TWAIN driver)
The scan driver installation starts.
11.
The installation of the scan driver is
now complete. Click [Finish].
The scan driver installation wizard
dialog box closes.
12.
The print driver installation wizard
dialog box appears. Select [No, not this
time], and click [Next].
13.
Select [Install the software
automatically], and click [Next].
Note • If a dialog box appears after this
step, warning you that the software
that you are installing has not
passed Windows Logo testing, if
you do not want to install the
software, select the option to stop
the installation, and select
[Remove Print Driver] and
[Remove Scan Driver] in the
[WorkCentre 5016/5020 CD-ROM
AutoRun] dialog box to completely
remove the software. If you want to install the software, select the option to continue the
installation.
Xerox WorkCentre 5016/5020 User Guide 36
Page 37

Installing the Print Driver and the Scan Driver (TWAIN driver)
The print driver installation starts.
14.
The installation of the print driver is now
complete. Click [Finish].
The print driver installation wizard
dialog box closes.
15.
Click [Exit] on the [WorkCentre 5016/
5020 CD-ROM AutoRun] dialog box.
The [WorkCentre 5016/5020 CD-ROM
AutoRun] dialog box closes.
Note • To remove the print driver, select
[Remove Print Driver] in the
[WorkCentre 5016/5020 CD-ROM
AutoRun] dialog box.
• To remove the scan driver, select
[Remove Scan Driver] in the
[WorkCentre 5016/5020 CD-ROM
AutoRun] dialog box.
Xerox WorkCentre 5016/5020 User Guide 37
Page 38

Installing the Scanner Application (Button Manager)
Installing the Scanner Application (Button Manager)
The following procedure describes how to install Button Manager on a computer.
Important • The TWAIN driver must be installed before installing Button Manager.
1.
Insert the WorkCentre 5016/5020 driver CD-ROM into the CD-ROM drive of a
computer.
Note • When using Windows Vista, depending on the security settings, another dialog box
may appear after Step 1, confirming whether or not you want to run [WorkCentre 5016/
5020 CD-ROM AutoRun]. Select an option to allow the program to run, in order to
display the [WorkCentre 5016/5020 CD-ROM AutoRun] dialog box and to proceed to
Step 2.
2.
Click [Install Button Manager].
3.
Click [Next] to proceed with the
installation of Button Manager.
The [License Agreement] dialog box
appears.
4.
Select [I accept the terms of the license
agreement], and click [Next].
Xerox WorkCentre 5016/5020 User Guide 38
Page 39

5.
Specify the path to a folder to install
files. If you want to install files in the
default location, click [Next]. To install
files in another location, click [Change]
to select another location.
The installation process begins.
Installing the Scanner Application (Button Manager)
6.
The installation is now complete.
Click [Finish].
The installation wizard dialog box
closes.
7.
Click [Exit] on the [WorkCentre 5016/
5020 CD-ROM AutoRun] dialog box.
The [WorkCentre 5016/5020 CD-ROM
AutoRun] dialog box closes.
Note • To remove Button Manager, select
[Start] > [Control Panel] > [Add or
Remove Programs], then select
Button Manager, and click
[Remove]. (Because this procedure
to remove Button Manager uses
Windows XP as an example, the
procedure may not apply,
depending on the operating system
in use. Refer to a guide provided
with the operating system for more information.)
Xerox WorkCentre 5016/5020 User Guide 39
Page 40

4 Loading Paper
This chapter describes the sizes and types of paper that can be used with the machine,
and provides information on how to load paper in the trays and how to specify the size
and orientation of paper in the trays.
Supported Paper Sizes and Types
This section lists the sizes and types of paper that can be used with the machine, and
explains simple rules for storing paper and loading paper in the trays.
Using paper that is not listed here may result in paper jams, lower print quality, or
machine malfunctions.
If you wish to use paper other than those recommended by Xerox, contact the Xerox
Welcome Center.
Important • The printed image may fade when paper absorbs moisture in the air. For more information
on fading of printed images, contact the Xerox Welcome Center.
Supported Paper Sizes
The following table shows the supported paper types, such as tray capacity and paper
sizes of the trays.
Paper
Tray
Tray 1 60 - 90 g/m
Tray 2 60 - 90 g/m
Bypass
Tray
60 - 110 g/m
Weight Quantity Paper Size
2
2
2
250 sheets
(70 g/m
500 sheets
(70 g/m
50 sheets
(70 g/m
2
)
2
)
2
)
B5 LEF, B5SEF, A4 LEF, A4 SEF,
8.5 x 11" LEF, 8.5 x 11" SEF,
8.5 x 13" SEF, 8.5 x 13.4" SEF,
8.5 x 14" SEF, B4 SEF, 16K LEF,
16K SEF, 8K SEF, A3 SEF,
11 x 17" SEF
B5 LEF, B5SEF, A4 LEF, A4 SEF,
8.5 x 11" LEF, 8.5 x 11" SEF,
8.5 x 13" SEF, 8.5 x 13.4" SEF,
8.5 x 14" SEF, B4 SEF, 16K LEF,
16K SEF, 8K SEF, A3 SEF,
11 x 17" SEF
A4 LEF, A4 SEF, A3 SEF, B5 LEF,
B5 SEF, B4 SEF, 8K SEF,
16K LEF, 16K SEF, 8.5 x 11" LEF,
8.5 x 11" SEF, 8.5 x 13" SEF,
8.5 x 13.4" SEF, 8.5 x 14" SEF,
11 x 17" SEF, 5.5 x 8.5" SEF,
A5 SEF,
Custom size paper
(Width: 139.7 - 297.0 mm;
Length: 182.0 - 431.8 mm)
Xerox WorkCentre 5016/5020 User Guide 40
Page 41

Supported Paper Types
The following table shows the paper types that are supported with each of the trays and
Duplex Module.
Supported Paper Sizes and Types
Paper Type
Plain Paper 60 - 90 O O O O*
Recycled Paper O O O O
Transparency - X X O X
Labels - O O O X
Heavyweight 90 - 110 X X O X
O: Available
X: Not available
*: Paper weight is 70 - 90 g/m
Storing and Handling Paper
Storing paper
• Store paper in dry conditions. Paper that has absorbed moisture can cause paper
jams and image quality deterioration.
• Once you remove the packaging from paper, keep the unused paper wrapped. To
reduce moisture, apply preventive measures such as by placing desiccant (moisture
absorber) in the storage area.
Weight
2
)
(g/m
2
for the Duplex Module
Tray 1 Tray 2
Bypass
Tray
Duplex
Module
• Paper should be stored on a flat surface to prevent creasing or warping.
Loading paper into the trays
• Align the edges of the paper stack neatly before loading it in the trays.
• Do not use paper that is folded, creased, curled, or heavily damaged.
• Do not load paper of mixed sizes together in the trays.
• Transparency paper and label paper often cause paper jams if any sheets of paper
are stuck together. Fan the edges of these types of paper well before loading.
• When continuously printing onto transparencies, remove transparencies from the
Output Tray every 20 sheets or so to prevent them from sticking to one another.
• When loading label paper in the tray, if any labels have already been peeled off or
cut off, it may cause a paper jam.
Xerox WorkCentre 5016/5020 User Guide 41
Page 42

Loading Paper in the Trays
This section describes how to load paper in the trays.
Paper loaded in the trays
After loading paper in the trays, you need to manually specify the size and orientation
of paper on the machine.
For information on how to set the size and orientation of paper that is loaded in the trays, refer to "Specifying the
Size and Orientation of Paper Loaded in the Trays" (P.49).
Automatic Tray Switching
If the machine runs out of paper during a copy job, this feature also allows the machine
to automatically select an alternative tray that is loaded with the same size and
orientation of the paper.
To use this feature, enable Automatic Tray Switching (menu number: 6) of the system
settings. If two trays are loaded with paper of the same size and orientation, the
machine selects a tray based on the priority set under Tray Priority (menu number: 2)
of the system settings.
For information on how to configure the system settings, refer to "System Settings" (P.123).
Note • Automatic Tray Switching does not include the Bypass Tray.
Loading Paper in the Trays
Loading Paper in Tray 1
If the machine runs out of paper in Tray 1 during copying or printing, the Tray 1 indicator
flashes on the Machine Diagram (mimic), and the error code appears in the Display.
Copying or printing automatically resumes when sufficient amount of paper is loaded
in Tray 1.
The following procedure describes how to load paper in Tray 1.
Note • Before loading paper in the tray, fan the edges. This separates any sheets of paper that are
stuck together, and reduces the possibility of paper jams.
1.
Pull out Tray 1 towards you.
Important • While the machine processes a
job, do not pull out the tray in use.
2.
Push down the metal plate to the
bottom of the tray.
Important • Do not add a new stack of paper
on top of the remaining paper in the
tray. Remove the remaining paper
in the tray, put it together with a
new stack of paper, align the edges
neatly, then load the stack of paper
in the tray. This reduces the
possibility of paper jams.
Xerox WorkCentre 5016/5020 User Guide 42
Page 43

3.
Load paper neatly and tightly against
the left corner of the tray with the side
to be printed facing up.
Important • Do not load paper above the
maximum fill line. It may cause
paper jams or may lead to machine
malfunctions.
4.
Adjust the three paper guides to just
touch the edges of the paper, and align
the arrow on the right paper guide with
the appropriate paper size marking on
the label.
Important • If you do not adjust the paper
guides correctly, it may result in a
paper jam.
Note • If loading a relatively thin stack of
paper in the tray, when tightly
adjusting the right paper guide up
against the edge of the paper, the stack of paper can be warped. This will not result in a
paper jam as long as the paper guide arrow is correctly aligned with the appropriate
paper size marking on the label.
5.
Push Tray 1 gently back into position.
Loading Paper in the Trays
Loading Paper in Tray 2
If the machine runs out of paper in Tray 2 during copying or printing, the Tray 2 indicator
on the Machine Diagram (mimic) flashes, and the error code appears in the Display.
Copying or printing automatically resumes when a sufficient amount of paper is loaded
in Tray 2.
The following procedure describes how to load paper in Tray 2.
Important • Paper Tray 2 is an optional accessory that can be used as Tray 2.
• Before loading paper in the tray, fan the edges. This separates any sheets of paper that
are stuck together, and reduces the possibility of paper jams.
1.
Pull out Tray 2 towards you.
Important • While the machine processes a
job, do not pull out the tray in use.
Xerox WorkCentre 5016/5020 User Guide 43
Page 44

2.
Load paper neatly and tightly against
the left corner of the tray with the side
to be printed facing up.
Important • Do not load paper above the
maximum fill line. It may cause
paper jams or may lead to machine
malfunctions.
• Do not add a new stack of paper
on top of the remaining paper in the
tray. Remove the remaining paper
in the tray, put it together with a
new stack of paper, align the edges
neatly, then load the stack of paper
in the tray. This reduces the possibility of paper jams.
3.
Adjust the three paper guides to just
touch the edges of the paper, and align
the arrow on the right paper guide with
the appropriate paper size marking on
the label.
Important • If you do not adjust the paper
guides correctly, it may result in a
paper jam.
Note • If loading a relatively thin stack of
paper in the tray, when tightly
adjusting the right paper guide up
against the edge of the paper, the stack of paper can be warped. This will not result in a
paper jam as long as the paper guide arrow is correctly aligned with the appropriate
paper size marking on the label.
4.
Push in Tray 2 gently back into position.
Loading Paper in the Trays
Loading Paper in the Bypass Tray
When printing on paper that cannot be loaded into Tray 1 or Tray 2, such as nonstandard size paper, use the Bypass Tray.
The following procedure describes how to load paper in the Bypass Tray.
Important • Do not load a new stack of paper until the remaining paper in the tray runs out completely.
Alternatively, remove the remaining paper before loading a new stack of paper.
Note • Before loading paper in the tray, fan the edges. This separates any sheets of paper that are
stuck together, and reduces the possibility of paper jams.
• When using non-standard size paper for a print job, you must register its paper size in the
print driver in advance.
For information on how to specify a custom paper size in the print driver, refer to
"Specifying the Custom Paper Size" (P.79).
1.
Open the Bypass Tray.
Xerox WorkCentre 5016/5020 User Guide 44
Page 45

2.
Slide out the Extension Flap.
3.
Load paper with the side to be copied
or printed facing down.
Important • Do not load mixed types or mixed
sizes of paper together in the
Bypass Tray.
• Do not load paper above the
maximum fill line. It may cause
paper jams or may lead to machine
malfunctions.
• Depending on the type of paper,
paper may not be fed into the
machine properly, or may cause image quality deterioration.
Loading Paper in the Trays
4.
Adjust the paper guides to just touch
the edges of the paper.
Important • If you do not adjust the paper
guides correctly, it may result in a
paper jam.
Note • If paper runs out in the Bypass
Tray during a job, open and close
the Left Side Cover once, and
reload paper in the Bypass Tray.
Xerox WorkCentre 5016/5020 User Guide 45
Page 46

Changing the Size and Orientation of Paper in the Trays
Changing the Size and Orientation of Paper in the Trays
This section describes how to replace paper in the trays with a different size and
orientation of paper, and how to specify the size and orientation of paper.
Note • When using non-standard size paper for a print job, load the paper in the Bypass Tray.
You must register the paper size in the print driver in advance.
For information on how to specify a custom paper size in the print driver, refer to
"Specifying the Custom Paper Size" (P.79).
Changing the Size and Orientation of Paper in Tray 1
The following procedure describes how to change the size and orientation of paper in
Tray 1.
1.
Pull out Tray 1 towards you.
Note • While the machine processes a
job, do not pull out the tray in use.
2.
Remove the remaining paper.
3.
Push down the metal plate to the
bottom of the tray.
4.
Slide paper guides towards the front
and back of the tray.
Xerox WorkCentre 5016/5020 User Guide 46
Page 47

5.
Slide the paper guide to the right.
6.
Load paper neatly and tightly against
the left corner of the tray with the side
to be printed facing up.
Important • Do not load mixed types or mixed
sizes of paper together in Tray 1.
• Do not load paper above the
maximum fill line. It may cause
paper jams or machine
malfunctions.
Changing the Size and Orientation of Paper in the Trays
7.
Adjust the paper guides to just touch
the edges of the paper, and align the
arrow on the right paper guide with the
appropriate paper size marking on the
label.
Important • If you do not adjust the paper
guides correctly, it may result in a
paper jam.
Note • If loading a relatively thin stack of
paper in the tray, when tightly
adjusting the right paper guide up
against the edge of the paper, the stack of paper can be warped. This will not result in a
paper jam as long as the paper guide arrow is correctly aligned with the appropriate
paper size marking on the label.
8.
Push Tray 1 gently back into position.
9.
Specify the paper size and orientation on the Control Panel.
For information on how to specify the paper size and paper orientation, refer to "Specifying the Size and Orientation
of Paper Loaded in the Trays" (P.49).
Xerox WorkCentre 5016/5020 User Guide 47
Page 48

Changing the Size and Orientation of Paper in the Trays
Changing the Size and Orientation of Paper in Tray 2
The following procedure describes how to change the size and orientation of paper in
Tray 2.
1.
Pull out Tray 2 towards you.
Note • While the machine processes a
job, do not pull out the tray in use.
2.
Remove the remaining paper.
3.
Slide paper guides towards the front
and back of the tray.
4.
Slide the paper guide to the right.
5.
Load a new stack of paper neatly and
tightly against the left corner of the tray
with the side to be printed facing up.
Important • Do not load mixed types or mixed
sizes of paper together in Tray 2.
• Do not load paper above the
maximum fill line. It may cause
paper jams or machine
malfunctions.
Xerox WorkCentre 5016/5020 User Guide 48
Page 49

Changing the Size and Orientation of Paper in the Trays
6.
Adjust the paper guides to just touch
the edges of the paper, and align the
arrow on the right paper guide with the
appropriate paper size marking on the
label.
Important • If you do not adjust the paper
guides correctly, it may result in a
paper jam.
Note • If loading a relatively thin stack of
paper in the tray, when tightly
adjusting the right paper guide up against the edge of the paper, the stack of paper can
be warped. This will not result in a paper jam as long as the paper guide arrow is
correctly aligned with the appropriate paper size marking on the label.
7.
Push Tray 2 gently back into position.
8.
Specify the paper size and orientation on the Control Panel.
For information on how to specify the paper size and paper orientation, refer to "Specifying the Size and Orientation
of Paper Loaded in the Trays" (P.49).
Specifying the Size and Orientation of Paper Loaded in the Trays
After loading paper in the trays, you must manually specify the size and orientation of
the paper.
The following procedure describes how to specify on the Control Panel the size and
orientation of the paper.
1.
Hold down the <Paper Supply> button
for four seconds.
The machine enters the Paper Setting
Mode.
<Paper Supply>
button
2.
Press the <Paper Supply> button
repeatedly until the desired tray
indicator lights up on the Machine
Diagram (mimic).
Note • When pressing the <Paper
Supply> button, the size and
orientation of paper of the selected
tray appears in the Display.
With
Document Feeder
Without
Document Feeder
3.
Press the <Display Switch> button to
scroll through the selections for size
and orientation of the paper.
Note • When loading the custom size
paper in the Bypass Tray for a print
job (the custom size paper cannot
be used for a copy job), you do not
need to specify the size of paper on
the Control Panel. Instead, you
<Display Switch> button
Xerox WorkCentre 5016/5020 User Guide 49
Page 50

Changing the Size and Orientation of Paper in the Trays
need to register the size of the custom paper on the print driver. For more information,
refer to "Specifying the Custom Paper Size" (P.79).
If you do not know in which orientation the paper is loaded in the trays
Note • Load the custom size paper in the Bypass Tray. Do not load the custom size paper in Tray
1 or Tray 2.
• If paper is loaded as shown in the diagrams below, the orientation is LEF.
• If paper is loaded as shown in the diagrams below, the orientation is SEF.
• Changing sequence when the measuring unit is in inches
Sequence
1
What ap pears
in the Display
Size /
Orientation
8.5 x 11” /
Sequence
8
LEF
2
8.5 x 11” /
9
SEF
3
8.5 x 13.4” /
10
SEF
4
5
6 A4 / SEF 13
7 B4 / SEF 14
A3 / SEF
A4 / LEF
11
12
What appears
in the Display
Size /
Orientation
B5 / LEF
B5 / SEF
5.5 x 8.5” /
SEF
A5 / SEF
11 x 17” /
SEF
8.5 x 14” /
SEF
8.5 x 13” /
SEF
Note • When Tray 1 or Tray 2 is selected, [A5] and [55] do not appear in the Display.
Xerox WorkCentre 5016/5020 User Guide 50
Page 51

Changing the Size and Orientation of Paper in the Trays
• Changing sequence when the measuring unit is in metric
Sequence
1 A4 / LEF 9
2 A4 / SEF 10
3 B4 / SEF 11
4
5
6
7
8
What appears
in the Display
Size /
Orientation
B5 / LEF
B5 / SEF
8K / SEF
16K / LEF
16K / SEF
Sequence
12
13
14
15
16 A3 / SEF
What appears
in the Display
Size /
Orientation
A5 / SEF
11 x 17” /
SEF
8.5 x 14” /
SEF
8.5 x 13” /
SEF
8.5 x 11” /
LEF
8.5 x 11” /
SEF
5.5 x 8.5” /
SEF
Note • When Tray 1 or Tray 2 is selected, [A5] and [55] do not appear in the Display.
• You can switch the measuring unit between metric and inches when the machine is in
the System Setting Mode (menu number: 15). For more information, refer to "System
Settings" (P.123).
4.
Press the <Start> button to confirm the
selected size and orientation of paper.
The machine exits the Paper Setting
Mode.
<Start> button
Xerox WorkCentre 5016/5020 User Guide 51
Page 52

5 Copying
This chapter describes the basic copying procedure and copy features available on the
machine.
Copying Procedure
This section describes the basic copy procedure.
• If the machine is in the No Account Mode, proceed to Step 1.
• If the machine is in the Single Account Mode, refer to "Logging in to the Machine"
(P.68) under "Single Account Mode" to log in to the machine before proceeding to
Step 1.
• If the machine is in the Multiple Account Mode, refer to "Logging in to the Machine"
(P.69) under "Multiple Account Mode" to log in to the machine before proceeding to
Step 1.
1.
Load a document.
• When copying a document from the Document Feeder
1) Place a document face up in the
center of the Document Feeder.
Note • The indicator on the Machine
Diagram (mimic) lights up when a
document is loaded correctly in the
Document Feeder.
2) Adjust the document guides to just
touch the edges of the loaded
document.
Note • If the size of the loaded document
is smaller than any standard sizes,
the edges of the loaded document
may create shadow, and may
appear to have an outline on the
copied output.
Xerox WorkCentre 5016/5020 User Guide 52
Page 53

• When copying a document from the Document Glass
1) Open the Document Cover.
2) Place a document face down on the
Document Glass, and align it with
the top left corner.
Note • If the size of the loaded document
is smaller than any standard sizes,
the edges of the loaded document
may create shadow, and may
appear to have an outline on the
copied output.
Copying Procedure
3) Close the Document Cover.
2.
Specify copy features as necessary.
<Reduce/Enlarge> button / <Variable Ratio> button
Select the zoom ratio.
For more information, refer to "<Reduce/Enlarge> button" (P.24) and "<Variable Ratio> button" (P.24).
<Lighten/Darken> button
Select the density of the output copies.
For more information, refer to "<Lighten/Darken> button" (P.26).
<Original Size> button
Select the original document size when selecting the N-up feature.
For more information, refer to "<Original Size> button" (P.26).
<N-up/ID Card Copy> button
Select the N-up feature or the ID Card Copy feature.
For more information on the N-up and ID Card Copy features, refer to "<N-up/ID Card Copy> button" (P.27).
For information on how to make copies using the N-up feature, refer to "4-up/2-up Copies (Copying Multiple Pages
onto a Single Sheet)" (P.57).
For information on how to make copies using the ID Card Copy feature, refer to "ID Card Copies (Copying an ID
Card-shaped Document onto a Sheet)" (P.63).
<Original Type> button
Select the original document type.
For more information, refer to "<Original Type> button" (P.28).
<2-sided> button
Select whether to copy on one side or both sides of a sheet.
For more information, refer to "<2-sided> button" (P.28).
Xerox WorkCentre 5016/5020 User Guide 53
Page 54

<Copy Output> button
Select whether or not to collate the output.
For more information, refer to "<Copy Output> button" (P.30).
3.
Press the <Paper Supply> button to
select a tray.
Note • Press the <Paper Supply> button
repeatedly until the desired tray is
lit on the Machine Diagram (mimic).
For information on the <Paper
Supply> button, refer to "<Paper
Supply> button" (P.23).
• When Tray 1 and Tray 2 are lit
simultaneously, the machine
selects a tray automatically.
• When pressing the <Paper Supply> button, the size and orientation of paper of the
selected tray appears in the Display for three seconds. After that, the Display switches
back to the previously displayed value.
Copying Procedure
<Paper Supply>
button
4.
Enter the copy quantity using the
numeric keypad. The entered number
appears in the Display.
Note • If you enter an incorrect value,
press the <C> button to clear a
wrongly entered value.
5.
Press the <Start> button to start the
copy job.
Note • When using the Document Glass
with certain copy features, such as
Collate, 2-sided, and N-up, the
indicator next to the <Scan
Completed> button blinks after the
first document has been scanned.
Load and scan the next document
while the button is blinking. After
scanning the last document, press
the <Scan Completed> button.
<C> button
<Scan Completed>
button
Numeric keys
<Start> button
Xerox WorkCentre 5016/5020 User Guide 54
Page 55

Loading Documents
When loading an original document to copy, you can place it on the Document Glass,
or load it in the Document Feeder. This section describes how to place documents on
the Document Glass and in the Document Feeder. Information is also given on the
paper capacity and the supported paper types for the Document Glass and the
Document Feeder.
Document Glass
The Document Glass supports a single sheet, a book, and other similar types of original
documents in sizes up to 297 x 432 mm. The machine does not automatically detect
the size of the original document that is placed on the Document Glass.
Important • Close the Document Cover while scanning a document on the Document Glass. Do not
leave the Document Cover open when not in use.
1.
Open the Document Cover.
Loading Documents
2.
Place the document face down on the
Document Glass, and align it with the
top left corner.
Note • If the size of the loaded document
is smaller than any standard sizes,
the edges of the loaded document
may create shadow, and may
appear to have an outline on the
copied output.
3.
Close the Document Cover.
LEF orientation
SEF orientation
Xerox WorkCentre 5016/5020 User Guide 55
Page 56

Document Feeder
The Document Feeder automatically feeds and scans a single-sheet document in sizes
from 148 x 210 mm (A5) to 297 x 432 mm (A3, 11 x 17”), and sequentially feeds and
scans multiple-sheet documents in sizes from 148 x 210 mm to 297 x 432 mm. It is
capable of detecting the standard document sizes, and supports up to 50 sheets of 80
2
g/m
paper.
If you have non-standard size documents, use the Document Glass instead.
1.
Remove any paper clips and staples from the original documents before loading.
2.
Place documents face up in the center
of the Document Feeder.
Note • The indicator on the Machine
Clearing All the Features
LEF orientation
Diagram (mimic) lights up when a
document is loaded correctly in the
Document Feeder.
SEF orientation
3.
Adjust the document guides to just
touch the edges of the loaded
document.
Note • If the size of the loaded document
is smaller than any standard sizes,
the edges of the loaded document
may create shadow, and may
appear to have an outline on the
copied output.
Clearing All the Features
This section explains how to clear the specified copy features.
1.
Press the <All Clear> button.
<All Clear>
button
Xerox WorkCentre 5016/5020 User Guide 56
Page 57

Canceling a Copy Job
The following procedure describes how to cancel a copy job.
1.
Press the <Stop> button.
Making Special Copies
Canceling a Copy Job
<Stop> button
This section explains how to make copies using the N-up feature and the ID Card copy
feature.
4-up/2-up Copies (Copying Multiple Pages onto a Single Sheet)
The following procedure describes how to copy multiples pages of documents onto one
side of a single sheet of paper.
1.
Press the <N-up/ID Card Copy> button
to select the N-up feature.
<N-up/ID Card Copy>
button
4-up
Copies four pages of the original documents onto one side of the
sheet.
2-up
Copies two pages of the original documents onto one side of the
sheet.
2.
Press the <Original Size> button to
select the original document size, and
load the document in reference to the
charts below.
Note • This button is selectable only when
using the Document Glass with the
N-up feature. The button is not
selectable when using the
Document Feeder as the size of
the original document is
automatically detected.
Xerox WorkCentre 5016/5020 User Guide 57
<Original Size>
button
Page 58

Making Special Copies
• The measuring unit can be switched between metric and inches when the machine is
in the System Setting Mode (menu number: 15). The following three options change
depending on the selected measuring unit. For more information on the system
settings, refer to "System Settings" (P.123).
Inches: 11 x 17” SEF, 8.5 x 13” SEF, 8.5 x 14” SEF
Metric: A3 SEF, B4 SEF
Select this when the document size is 11 x 17", 8.5 x 14", 8.5 x 13",
A3, or B4, and when scanning documents in the SEF orientation.
Inches: 8.5 x 11” SEF
Metric: A4 SEF, B5 SEF
Select this when the document size is 8.5 x 11", A4, or B5, and when
scanning documents in the SEF orientation.
Inches: 8.5 x 11” LEF
Metric: A4 LEF, B5 LEF
Select this when the document size is 8.5 x 11", A4, or B5, and when
scanning documents in the LEF orientation.
If the document is 11 x 17” SEF, 8.5 x 14” SEF, or 8.5 x 13” SEF
(A3 SEF or B4 SEF if the measuring unit is in metric)
4-up
Making
4-up copies
<Original Size>
button
Paper Orientation
in the Tray
LEF
Refer to "Changing the Size and
Orientation of Paper in the Trays" (P.46)
to change the orientation of paper.
How to Scan
Document
Glass
Document
Feeder
Document
Glass
Document
Feeder
2-up
Making
2-up copies
<Original Size>
button
SEF
Paper Orient ation
in the Tray
LEF
SEF
Top
Left
Bottom
How to Scan
Top
Left
Bottom
Refer to "Changing the Size and
Orientation of Paper in the Trays" (P.46)
to change the orientation of paper.
Right
Right
Note • The 2-up copies of 8.5 x 14" SEF or 8.5 x 13" SEF cannot be made. A3 SEF, B4 SEF, and
11 x 17" SEF can only be made into the 2-up copies.
Important • The <Original Size> button is not selectable when using the Document Feeder as the size
of the original document is automatically detected.
Xerox WorkCentre 5016/5020 User Guide 58
Page 59

If the document is 8.5 x 11” SEF
(A4 SEF or B5 SEF if the measuring unit is in metric)
4-up
Making
4-up copies
<Original Size>
button
Paper Orientation
in the Tray
LEF
SEF
How to Scan
Top
Left
Bottom
Making Special Copies
Refer to "Changing the Size and
Orientation of Paper in the Trays" (P.46)
to change the orientation of paper.
Document
Glass
Right
Document
Feeder
2-up
Making
2-up copies
<Original Size>
button
<Original Size>
button
Paper Orientation
in the Tray
LEF
SEF
Paper Orientation
in the Tray
LEF
SEF
How to Scan
Top
Left
Right
Bottom
Refer to "Changing the Size and
Orientation of Paper in the Trays" (P.46)
to change the orientation of paper.
Refer to "Changing the Size and
Orientation of Paper in the Trays" (P.46)
to change the orientation of paper.
How to Scan
Top
Left Right
Bottom
Document
Glass
Document
Feeder
Document
Glass
Document
Feeder
Note • The <Original Size> button is not selectable when using the Document Feeder as the size
of the original document is automatically detected.
Xerox WorkCentre 5016/5020 User Guide 59
Page 60

If the document is 8.5 x 11” LEF
(A4 LEF or B5 LEF is the measuring unit is in metric)
4-up
Making
4-up copies
<Original Size>
button
Paper Orientation
in the Tray
LEF
How to Scan
Top
Left
Right
Making Special Copies
Document
Glass
2-up
Making
2-up copies
<Original Size>
button
<Original Size>
button
SEF
Paper Orientation
in the Tray
LEF
SEF
Paper Orient ation
in the Tray
LEF
Bottom
Refer to "Changing the Size and
Orientation of Paper in the Trays" (P.46)
to change the orientation of paper.
Refer to "Changing the Size and
Orientation of Paper in the Trays" (P.46)
to change the orientation of paper.
How to Scan
Top
Left
Bottom
How to Scan
Top
Left
Right
Right
Document
Feeder
Document
Glass
Document
Feeder
Document
Glass
Bottom
SEF
Refer to "Changing the Size and
Orientation of Paper in the Trays" (P.46)
to change the orientation of paper.
Document
Feeder
Note • The <Original Size> button is not selectable when using the Document Feeder as the size
of the original document is automatically detected.
3.
Press the <Paper Supply> button to
select a tray that is loaded with an
appropriate size and orientation of
paper, in reference to the tables below.
<Paper Supply>
button
Xerox WorkCentre 5016/5020 User Guide 60
Page 61

Making Special Copies
When the measuring unit is in inches
N-up Document Size Paper Size in the Tray
4-up 11 x 17” SEF 11 x 17” SEF
8.5 x 14” SEF 8.5 x 14” SEF
8.5 x 13” SEF 8.5 x 13” SEF
8.5 x 11” SEF 8.5 x 11” SEF, 8.5 x 13” SEF, 8.5 x 13.4” SEF, 8.5 x 14” SEF,
11 x 17” SEF, A3 SEF, B4 SEF
8.5 x 11” LEF 8.5 x 11” LEF
2-up 11 x 17” SEF 8.5 x 11” LEF
8.5 x 11” SEF 8.5 x 11” LEF, A4 LEF, B5 LEF
8.5 x 11” LEF 8.5 x 11” SEF, 8.5 x 13” SEF, 8.5 x 13.4” SEF, 8.5 x 14” SEF,
11 x 17” SEF, A4 SEF, A3 SEF, B5 SEF, B4 SEF
When the measuring unit is in metric
N-up Document Size Paper Size in the Tray
4-up A3 SEF A3 SEF
B4 SEF B4 SEF
A4 SEF A4 SEF, A3 SEF, 8K SEF, 8.5 x13” SEF, 8.5 x 13.4” SEF,
8.5 x 14” SEF, 11 x 17” SEF
B5 SEF B5 SEF, B4 SEF
A4 LEF A4 LEF
B5 LEF B5 LEF
2-up A3 SEF A4 LEF
B4 SEF B5 LEF
A4 SEF A4 LEF, 16K LEF, 8.5 x 11” LEF, B5 LEF
A4 LEF A5 SEF, A4 SEF, A3 SEF, 16K SEF, 8K SEF, 8.5 x 11" SEF,
8.5 x 13" SEF, 8.5 x 14" SEF, 8.5 x 13.4 SEF, 11 x 17" SEF
B5 SEF B5 LEF
B5 LEF B5 SEF, B4 SEF
If using the Document Feeder to scan documents
1) Press the <Start> button to start
copying.
<Start> button
Xerox WorkCentre 5016/5020 User Guide 61
Page 62

If using the Document Glass to scan documents
1) Press the <Start> button to scan the
loaded document.
The indicator next to the <Scan
Completed> button blinks.
Making Special Copies
<Start> button
<Scan Completed>
button
2) Load the next document on the
Document Glass in the same
orientation as the previously
scanned document.
3) Press the <Start> button to scan the
loaded document.
Note • After scanning the last document,
press the <Scan Completed>
button to start copying.
LEF orientation
SEF orientation
<Start> button
Xerox WorkCentre 5016/5020 User Guide 62
Page 63

Making Special Copies
ID Card Copies (Copying an ID Card-shaped Document onto a Sheet)
ID Card Copy feature is used to copy both sides of an ID card-shaped document onto
one side of a sheet. The following procedure describes how to copy an ID card-shaped
document.
Important • When selecting the ID Card Copy feature, the zoom ratio is fixed to 100%.
1.
Press the <N-up/ID Card Copy> button
to select the ID Card Copy feature.
<N-up/ID Card Copy>
button
ID Card Copy
Copies an ID card-shaped document onto one side of a single
sheet.
2.
Place an ID card-shaped document
face down on the Document Glass, and
align it with the top left corner.
3.
Press the <Start> button to start
scanning one side of the ID cardshaped document.
The indicator next to the <Scan
Completed> button blinks.
<Start> button
<Scan Completed>
button
Xerox WorkCentre 5016/5020 User Guide 63
Page 64

4.
Flip over the ID Card-shaped
document, and align it with the top left
corner of the Document Glass.
5.
Press the <Start> button to start
scanning the loaded ID card-shaped
document and to start copying.
Making Special Copies
<Start> button
Both sides of the ID card-shaped
document are copied onto one side of a
single sheet.
When copying on
paper that is loaded in
the LEF orientation
When copying on
paper that is loaded
in the SEF orientation
Xerox WorkCentre 5016/5020 User Guide 64
Page 65

6 Managing Accounts
This section describes three different account modes that the machine offers in order
to manage accounts effectively for copy jobs, and describes how to log in to the
machine.
Account Mode Overview
You can select one of the following account modes: No Account Mode, Single Account
Mode, or Multiple Account Mode.
No Account Mode
No password is set on the machine in the No Account Mode, allowing all users to run
a copy job without logging in.
Single Account Mode
A single password can be set on the machine in the Single Account Mode. Only those
who have the password can run a copy job on the machine.
Important • Password entry is only required for copy jobs. You do not need to enter a password to log
in to the machine for a print or scan job.
Multiple Account Mode
Up to 11 user accounts and their corresponding passwords can be set on the machine
in the Multiple Account Mode (one for the System Administrator, and the rest for 10
different users/user groups). Users are required to enter their account number and
password to log in to the machine. The System Administrator can set the copy job limit
on each user account, and also review the total number of copies made by each
account.
Important • Password entry is only required for copy jobs. You do not need to enter a password to log
in to the machine for a print or scan job.
Selecting the Account Mode on the Machine
The following procedure describes how to select the account mode.
• If the machine is in the No Account Mode, proceed to Step 1.
• If the machine is in the Single Account Mode, refer to "Logging in to the Machine"
(P.68) under "Single Account Mode" to log in to the machine, then proceed to Step
1 of the following procedure to select the account mode.
• If the machine is in the Multiple Account Mode, refer to "Logging in to the Machine"
(P.69) under "Multiple Account Mode" to log in to the machine under the System
Administrator’s account, then proceed to Step 1 of the following procedure to select
the account mode.
Important • The machine is in the No Account Mode by default.
Xerox WorkCentre 5016/5020 User Guide 65
Page 66

1.
Press the <Log In/Out> button for four
seconds.
The machine enters the System Setting
Mode.
The letter [P] appears blinking in the
Display.
2.
Enter "70" using the numeric keypad.
Note • The system setting menu number
for selecting an account mode is
"70".
For information on the system settings, refer to
"System Settings" (P.123).
Account Mode Overview
<Log In/Out>
button
3.
Press the <Start> button to confirm the
entered menu number.
The currently-set value appears
blinking in the Display.
Numeric keys
<Start> button
Xerox WorkCentre 5016/5020 User Guide 66
Page 67

4.
Enter the desired value using the
numeric keypad.
• 0 - No Account Mode
• 1 - Single Account Mode
• 2 - Multiple Account Mode
Note • "2" (Multiple Account Mode) is
used as an example in this
procedure.
5.
Press the <Start> button to confirm the
entered account mode.
Account Mode Overview
Numeric keys
The letter [P] appears blinking in the
Display.
6.
Press the <Log In/Out> button.
The machine exits the System Setting
Mode.
<Start> button
<Log In/Out>
button
Xerox WorkCentre 5016/5020 User Guide 67
Page 68

Single Account Mode
This section describes how to log in when the machine is in the Single Account Mode.
Logging in to the Machine
The following procedure describes how to log in when the machine is in the Single
Account Mode.
1.
When the machine is in the Single
Account Mode, [---] appears in the
Display. Enter a three-digit password
using the numeric keypad.
Single Account Mode
For security reasons, as you enter each
digit of the password, a hyphen appears
in the Display instead of the actual
number that you enter.
2.
Press the <Start> button to confirm the
entered password.
If the entered password is correct, the
machine enters the Copy Mode, and [1]
appears in the Display.
Numeric keys
<Start> button
Xerox WorkCentre 5016/5020 User Guide 68
Page 69

The indicator next to the <Log In/Out>
button is lit while you are logged in to
the machine.
Note • You do not need to log in to the
machine for a scan job or print job.
If you wish to run a scan job after
logging in, simply press the
<Scan> button to switch the
machine to the Scan Mode.
Multiple Account Mode
This section describes how to log in when the machine is in the Multiple Account Mode.
Logging in to the Machine
The following procedure describes how to log in when the machine is in the Multiple
Account Mode.
Note • The System Administrator’s account number is "0", and its default password is "111".
Multiple Account Mode
<Log In/Out>
button
1.
When the machine is in the Multiple
Account Mode, [Id] appears blinking in
the Display. Enter an account number
using the numeric keypad.
The account number that you enter
appears in the Display.
Note • The account number "1" is used as
an example in this procedure.
Numeric keys
2.
Press the <Start> button to confirm the
entered account number.
<Start> button
Xerox WorkCentre 5016/5020 User Guide 69
Page 70

3.
Enter a three-digit password which
corresponds to the account number
that you just entered using the numeric
keypad.
Multiple Account Mode
For security reasons, as you enter each
digit of the password, a hyphen appears
in the Display instead of the actual
number that you enter.
4.
Press the <Start> button to confirm the
entered password.
If the entered password is correct, the
machine enters the Copy Mode, and [1]
appears in the Display.
<C> button
Numeric keys
<Start> button
The indicator next to the <Log In/Out>
button is lit while you are logged in to
the machine.
Note • You do not need to log in to the
machine for a scan job or print job.
If you wish to run a scan job after
logging in, simply press the
<Scan> button to switch the
machine to the Scan Mode.
<Log In/Out>
button
Xerox WorkCentre 5016/5020 User Guide 70
Page 71

Changing the Password
To change a password that has been set for a user account, you must first log in to the
machine under the System Administrator’s account, and then enter the System Setting
Mode.
The following procedure describes how to change the password using the System
Administrator’s account.
1.
When the machine is in the Multiple
Account Mode, [Id] appears blinking in
the Display. Enter the System
Administrator’s account number “0”
using the numeric keypad.
Multiple Account Mode
[0] appears in the Display.
2.
Press the <Start> button to confirm the
entered account number.
3.
Enter the System Administrator’s
password using the numeric keypad.
Note • The default System Administrator’s
password is "111".
Numeric keys
<Start> button
Numeric keys
For security reasons, as you enter each
digit of the password, a hyphen appears
in the Display instead of the actual
number that you enter.
Xerox WorkCentre 5016/5020 User Guide 71
Page 72

4.
Press the <Start> button to confirm the
entered password.
If the entered password is correct, the
machine enters the Copy Mode, and [1]
appears in the Display.
5.
Hold down the <Log In/Out> button for
four seconds.
The machine enters the System Setting
Mode.
Multiple Account Mode
<Start> button
<Log In/Out>
button
The letter [P] appears blinking in the
Display.
6.
Enter the menu number using the numeric keypad.
Menu
Number
200 Specify a three-digit password of the System Administrator within a range of 000 -
999. (Default: 111)
201 Specify a three-digit password of the account number 1 within a range of 000 - 999.
202 Specify a three-digit password of the account number 2 within a range of 000 - 999.
203 Specify a three-digit password of the account number 3 within a range of 000 - 999.
204 Specify a three-digit password of the account number 4 within a range of 000 - 999.
205 Specify a three-digit password of the account number 5 within a range of 000 - 999.
Description
206 Specify a three-digit password of the account number 6 within a range of 000 - 999.
207 Specify a three-digit password of the account number 7 within a range of 000 - 999.
208 Specify a three-digit password of the account number 8 within a range of 000 - 999.
209 Specify a three-digit password of the account number 9 within a range of 000 - 999.
210 Specify a three-digit password of the account number 10 within a range of 000 -
999.
Xerox WorkCentre 5016/5020 User Guide 72
Page 73

7.
Press the <Start> button to confirm the
entered menu number.
The currently-set password for that
particular account appears blinking in
the Display.
8.
Enter a new three-digit password using
the numeric keypad.
Multiple Account Mode
<Start> button
Numeric keys
9.
Press the <Start> button to confirm the
new password.
The letter [P] appears blinking in the
Display.
10.
Press the <Log In/Out> button.
The machine exits the System Setting
Mode.
<Start> button
<Log In/Out>
button
Xerox WorkCentre 5016/5020 User Guide 73
Page 74

Setting Copy Job Limits on a User Account
To set the copy job limit on a user account, you must first log in to the machine under
the System Administrator’s account, and then enter the System Setting Mode.
The following procedure describes how to set a copy job limit on a particualr user
account using the System Administrator’s account.
1.
When the machine is in the Multiple
Account Mode, [Id] appears blinking in
the Display. Enter the System
Administrator’s account number “0”
using the numeric keypad.
Multiple Account Mode
[0] appears in the Display.
2.
Press the <Start> button to confirm the
entered account number.
3.
Enter the System Administrator’s
password using the numeric keypad.
Note • The default System Administrator’s
password is "111".
Numeric keys
<Start> button
Numeric keys
For security reasons, as you enter each
digit of the password, a hyphen appears
in the Display instead of the actual
number that you enter.
Xerox WorkCentre 5016/5020 User Guide 74
Page 75

4.
Press the <Start> button to confirm the
entered password.
If the entered password is correct, the
machine enters the Copy Mode, and [1]
appears in the Display.
5.
Hold down the <Log In/Out> button for
four seconds.
The machine enters the System Setting
Mode.
Multiple Account Mode
<Start> button
<Log In/Out>
button
The letter [P] appears blinking in the
Display.
6.
Enter the menu number using the numeric keypad.
Menu
Number
301 Specify the maximum number of pages allowed to copy for the account number
1 within a range of 0 - 60 (0 - 60,000).
302 Specify the maximum number of pages allowed to copy for the account number
2 within a range of 0 - 60 (0 - 60,000).
303 Specify the maximum number of pages allowed to copy for the account number
3 within a range of 0 - 60 (0 - 60,000).
304 Specify the maximum number of pages allowed to copy for the account number
4 within a range of 0 - 60 (0 - 60,000).
Description
305 Specify the maximum number of pages allowed to copy for the account number
5 within a range of 0 - 60 (0 - 60,000).
306 Specify the maximum number of pages allowed to copy for the account number
6 within a range of 0 - 60 (0 - 60,000).
307 Specify the maximum number of pages allowed to copy for the account number
7 within a range of 0 - 60 (0 - 60,000).
308 Specify the maximum number of pages allowed to copy for the account number
8 within a range of 0 - 60 (0 - 60,000).
Xerox WorkCentre 5016/5020 User Guide 75
Page 76

Multiple Account Mode
Menu
Number
309 Specify the maximum number of pages allowed to copy for the account number
9 within a range of 0 - 60 (0 - 60,000).
310 Specify the maximum number of pages allowed to copy for the account number
10 within a range of 0 - 60 (0 - 60,000).
7.
Press the <Start> button to confirm the
Description
entered menu number.
The currently-set copy job limit for that
particular account number appears
blinking in the Display.
<Start> button
8.
Set a new copy job limit using the
numeric keypad.
9.
Press the <Start> button to confirm the
new copy job limit.
The letter [P] appears blinking in the
Display.
Note • If an incorrect value is specified in
step 8, [0] appears in the Display
instead of the letter [P].
10.
Press the <Log In/Out> button.
The machine exits the System Setting
Mode.
Numeric keys
<Start> button
<Log In/Out>
button
Xerox WorkCentre 5016/5020 User Guide 76
Page 77

Reviewing the Total Number of Copies
The following procedure describes how to review the total number of copies made by
each account.
1.
Log in to the machine.
For information on how to log in to the machine, refer to "Logging in to the Machine" (P.69) under "Multiple
Account Mode" (P.69).
2.
Hold down the <Stop> button, and
while holding down the <Stop> button,
press <3> button.
• If you have logged in under the System
Administrator’s account
An account number, copy job limit set
for the account, and the current number
of copies made under the account
appear sequentially in the Display
starting from the account number 1 to
10.
Multiple Account Mode
<Stop> button<3> button
• If you have logged in under any account other than the System Administrator’s
An account number that has been used to log in, the copy job limit set for the
account, and the current number of copies made under the account, appear
sequentially in the Display.
If the displayed value has more than three digits
The following describes how a numerical value, which has more than three digits,
appears in the Display.
1.
First two digits of the value appears in
the Display.
2.
Press the <Start> button to display the
rest.
<Start> button
The second half of the numerical value
appears in the Display.
The value shown in this example is
“21100”.
Xerox WorkCentre 5016/5020 User Guide 77
Page 78

7Printing
This chapter describes the basic flow of a print job, starting from setting up the printer,
and the basic printing procedure.
Important • You must install the print driver in advance. For information on how to install the print
driver, refer to "Installing the Print Driver and the Scan Driver (TWAIN driver)" (P.34).
Setting Up the Printer
This section describes how to set up the printer preferences and how to specify the
custom paper size.
Setting the Printer Preferences
The following procedure describes how to specify the printer preferences.
1.
Select [Start] at the bottom of the screen, then select [Printers and Faxes].
The [Printers and Faxes] dialog box appears.
2.
Right-click on the [Xerox WorkCentre 5016], [Xerox WorkCentre 5020/B], or
[Xerox WorkCentre 5020/DB] printer, and select [Properties] from the displayed
pop-up menu.
Note • Because this procedure to open the [Properties] dialog box uses Windows XP as an
example, you may have to open the [Properties] dialog box in different ways,
depending on the operating system in use. Refer to a guide provided with the operating
system for more information.
The [Properties] dialog box appears.
3.
Click [Printing Preferences].
Xerox WorkCentre 5016/5020 User Guide 78
Page 79

The [Printing Preferences] dialog box
appears.
4.
Configure any printer settings as
necessary.
5.
Click [OK] to save the specified
settings.
The [Printing Preferences] dialog box
closes.
6.
Click [OK] on the [Properties] dialog
box.
The [Properties] dialog box closes.
Specifying the Custom Paper Size
When using non-standard sized paper for any print job, you must first specify its size in
the print driver.
Setting Up the Printer
The following procedure describes how to specify the non-standard custom paper size
in the print driver.
Important • You must use the Bypass Tray to load non-standard sized paper.
1.
Select [Start] at the bottom of the screen, then select [Printers and Faxes].
The [Printers and Faxes] dialog box appears.
2.
Right-click the [Xerox WorkCentre 5016], [Xerox WorkCentre 5020/B], or [Xerox
WorkCentre 5020/DB] printer, and select [Properties] from the displayed pop-up
menu.
The [Properties] dialog box appears.
Xerox WorkCentre 5016/5020 User Guide 79
Page 80

3.
Click the [Configuration] tab, and select
[Custom Paper Size].
4.
Specify the paper size in the [Custom
Paper Size] dialog box.
5.
Click [OK] to save the specified custom
paper size.
Printing Procedure
The [Custom Paper Size] dialog box
closes.
6.
Click [OK] on the [Properties] dialog
box.
The [Properties] dialog box closes.
Printing Procedure
The following procedure describes how to run a print job.
Important • The printing procedure varies depending on the application in use. For details, refer to the
respective manuals provided with the application.
• For more information on the print driver, refer to Help in the print driver.
1.
Select [Print] from the menu on the application.
2.
Select the machine name in [Name],
and click [Properties].
Xerox WorkCentre 5016/5020 User Guide 80
Page 81

The [Properties] dialog box appears.
3.
Specify features as necessary in the
[Properties] dialog box.
4.
Click [OK] to save the specified
settings.
The [Properties] dialog box closes.
5.
Click [OK] on the [Print] dialog box.
The [Print] dialog box closes, and the
print job starts.
Printing on the Custom Size Paper
The following procedure describes how to print on a custom sized paper.
1.
Select [Print] from the menu on the application.
Printing Procedure
2.
Select the machine name in [Name].
3.
Click [Properties].
The [Properties] dialog box appears.
4.
Select the document size in [Paper
Size].
5.
Select the desired custom paper size in
[Output Size].
Note • The custom paper sizes that
appear under [Output Size] have
been registered in advance. For
information on how to register the
custom paper size, refer to
"Specifying the Custom Paper
Size" (P.79).
6.
Specify other features as necessary.
7.
Click [OK] in the [Properties] dialog box to save specified settings.
The [Properties] dialog box closes.
8.
Click [OK] in the [Print] dialog box.
The [Print] dialog box closes, and the print job starts.
Xerox WorkCentre 5016/5020 User Guide 81
Page 82

Canceling a Print Job
You can cancel a print job before the machine delivers the output copies. There are two
ways to cancel a print job:
• Canceling a print job on a computer
• Canceling a print job on the Control Panel
Canceling a print job on a computer
The following procedure describes how to cancel a print job on a computer.
1.
Double-click the printer icon.
A dialog box appears listing all the queued jobs.
2.
Select the print job that needs
to be canceled.
The selected print job is
highlighted.
Canceling a Print Job
3.
Select [Cancel] from the
[Document] menu.
The selected job is canceled.
Canceling a print job on the Control Panel
The following procedure describes how to cancel a print job on the Control Panel.
1.
Press the <Stop> button while the
machine is processing a print job that
needs to be canceled.
<Stop> button
Xerox WorkCentre 5016/5020 User Guide 82
Page 83

8 Scanning
This chapter describes the scan driver (TWAIN driver) and the scan application (Button
Manager), and provides the basic scanning procedure.
The Scan Driver (TWAIN driver) and Button Manager
This section provides information on the TWAIN driver and Button Manager.
TWAIN driver
The TWAIN driver allows you to acquire an image that is scanned on the machine. You
can import a scanned image to a computer through the TWAIN driver.
For information on how to install the scan driver (TWAIN driver), refer to "Installing the Print Driver and the Scan
Driver (TWAIN driver)" (P.34).
Button Manager
Button Manager is a scanner application that can be installed on a computer, which
allows you to scan a document that has been loaded on the machine, and to convert
the scanned document into a BITMAP file, a PDF file, or a TIFF file. This scanner
application uses the TWAIN driver to acquire images scanned on the machine, so the
TWAIN driver must be installed on the computer in order to use this application.
For information on how to install Button Manager, refer to "Installing the Scanner Application (Button Manager)"
(P.38).
Scanning Procedure (Using the TWAIN driver)
The following procedure describes a basic scanning procedure when using the TWAIN
driver.
1.
Load a document.
• When scanning a document from the Document Feeder
1) Place a document face up in the
center of the Document Feeder.
Note • The indicator on the Machine
Diagram (mimic) lights up when a
document is loaded correctly in the
Document Feeder. If the indicator
does not light up, the document
may not be loaded properly in the
Document Feeder.
Xerox WorkCentre 5016/5020 User Guide 83
Page 84

Scanning Procedure (Using the TWAIN driver)
2) Adjust the document guides to just
touch the edges of the loaded
document.
Note • If the size of the loaded document
is smaller than any standard sizes,
the edges of the loaded document
may create shadow, and may
appear to have an outline on the
scanned image.
• When scanning a document from the Document Glass
1) Open the Document Cover.
2) Place a document face down on the
Document Glass, and align it to the
top left corner.
Note • If the size of the loaded document
is smaller than any standard sizes,
the edges of the loaded document
may create shadow, and may
appear to have an outline on the
scanned image.
3) Close the Document Cover.
2.
Start any TWAIN-compliant application on the computer.
3.
Select a command from the menu in the TWAIN-compliant application to display
the 5016/5020 Scanner driver.
Note • For more information on how to acquire an image using the TWAIN driver on an
application, refer to the manual provided with the application in use.
• If the WIA (Windows Image Acquisition) driver is displayed instead of the TWAIN driver,
close the WIA driver, and select the TWAIN driver correctly.
The TWAIN driver appears.
4.
Click [Preview] to create a preview
image.
Xerox WorkCentre 5016/5020 User Guide 84
Page 85

Scanning Procedure (Using the TWAIN driver)
The preview image appears in the
preview window.
5.
Configure the scan settings.
Item Value
[Scan from] Select whether to use the Document Glass or Document Feeder.
[Document Glass], [Document Feeder]
[Resolution] Select the resolution.
[100 dpi], [150 dpi], [200 dpi], [300 dpi], [400 dpi], [600 dpi]
[Auto Exposure]
check box
[Original Type] Select the type of an original document.
[Threshold] Adjust the threshold level.
[Input Level]
[Output Level]
[Unit] Select a measuring unit.
[Area Size] Specify a scanning area by selecting one of the following standard
Select whether or not to suppress the background color.
Checked - Suppresses the background color.
Unchecked - Does not suppress the background color.
[Text] - Suitable for a document which only contains text.
[Photo] - Suitable for a document which only contains photo images.
[Text & Photo] - Suitable for a document which contains both text and
photo images.
Note • This item appears when selecting [Text] under [Original Type].
Adjust the input and output image tone.
[Input Level] - Adjusts the input image tone.
[Output Level] - Adjusts the output image tone.
Note • These two items appear when selecting [Photo] or [Text & Photo]
under [Original Type].
[Inches], [Millimeters], [Pixels]
document sizes.
[A3 (297 x 420 mm)], [A4 (210 x 297 mm)], [A5 (148 x 210 mm)],
[B4 (257 x 364 mm)], [B5 (182 x 257 mm)], [8.5 x 11"] (Letter),
[8.5 x 14"] (Legal), [11 x 17"] (Ledger/Tabloid),
[7.25 x 10.5"] (Executive)
Preview window Specify a scanning area manually in this area. Also the previewed
image appears in this area.
[Preview] button Scans a loaded document to create a preview image, which appears in
the preview window.
[Scan] button Starts scanning a loaded document within the specified scanning area.
[Close] button Closes the [TWAIN Driver] dialog box.
Note • For more information on each item, click [Help] displayed in the scan driver.
Xerox WorkCentre 5016/5020 User Guide 85
Page 86

6.
Click [Scan].
The machine starts to scan the
document, and a scanning progress
dialog box appears.
The scanned image is imported into the
application.
Note • Regardless of the actual size of the
loaded document, the size set in the
preview window or any document
size selected under [Area Size] of
the scan driver in Step 5 becomes
the size of the scanned image.
Canceling a Scan Job (TWAIN driver)
When using a TWAIN-compliant application, you can cancel a scan job while the
machine is scanning a document. There are two ways to cancel a scan job:
Scanning Procedure (Using the TWAIN driver)
• Canceling a scan job on a computer
• Canceling a scan job on the Control Panel
Canceling a job on the computer
1.
Click [Cancel] in the scanning progress
dialog box.
Canceling a job on the Control Panel
1.
Press the <Stop> button.
<Stop> button
Xerox WorkCentre 5016/5020 User Guide 86
Page 87

Scanning Procedure (Using Button Manager)
Scanning Procedure (Using Button Manager)
The following procedure describes a basic scanning procedure when using Button
Manager.
1.
Click the [Start] button, and select [All Programs] > [Xerox] > [WorkCentre 5016 &
5020 Scan Button Manager] > [Scan Button Manager] to start Button Manager.
Note • Pressing the <Scan> button on the Control Panel triggers Button Manager to start up on
a computer that is connected to the machine.
2.
Specify the scan settings on the
[WorkCentre 5016/5020 Scan Button
Manager] dialog box.
Item Value/Description
[Scan from] Select whether to use the Document Glass or Document Feeder.
[Document Glass], [Document Feeder]
[Original Type] Select the type of an original document.
[Text] - Suitable for a document which only contains text.
[Photo] - Suitable for a document which only contains photo images.
[Text & Photo] - Suitable for a document which contains both text and
photo images.
[Resolution] Select the resolution.
[100 dpi], [150 dpi], [200 dpi], [300 dpi], [400 dpi], [600 dpi]
[Output Format] Select the output format of a scanned image file.
[BMP] (.bmp), [TIFF] (.tiff), [PDF] (.pdf)
[Paper Size] Specify a scanning area by selecting one of the following standard
document sizes.
[A3 (297 x 420 mm)], [A4 (210 x 297 mm)], [A5 (148 x 210 mm)],
[B4 (257 x 364 mm)], [B5 (182 x 257 mm)], [Letter (8.5 x 11")],
[Executive (7.25 x 10.5")], [Legal (8.5 x 14")], [Tabloid (11 x 17")]
[Output
Destination]
[Open the Output
Image File] check
box
Specify a destination folder path using up to 256 characters.
Or click the [Browse] button to select a destination folder.
Select whether or not to open a scanned image file on the computer
screen.
Checked - Opens the scanned image automatically after scanning.
Unchecked - Simply saves the scanned image file into the specified
destination folder after scanning.
[OK] button Starts scanning a loaded document.
[Cancel] button Cancels all the specified values, and closes the [WorkCentre 5016/5020
Scan Button Manager] dialog box.
[Help] button Displays the Button Manager Help.
Xerox WorkCentre 5016/5020 User Guide 87
Page 88

Scanning Procedure (Using Button Manager)
Note • For more information on each item, click the [Help] button in the scan driver.
3.
Select [OK] to save the specified
settings in Button Manager.
The [WorkCentre 5016/5020 Scan
Button Manager] dialog box closes.
4.
Press the <Scan> button.
5.
Load a document.
• When scanning a document from the Document Feeder
1) Place a document face up in the
center of the Document Feeder.
Note • The indicator on the Machine
Diagram (mimic) lights up when a
document is loaded correctly in the
Document Feeder. If the indicator
does not light up, the document
may not be loaded properly in the
Document Feeder.
2) Adjust the document guides to just
touch the edges of the loaded
document.
Note • If the size of the loaded document
is smaller than any standard sizes,
the edges of the loaded document
may create shadow, and may
appear to have an outline on the
scanned image.
<Scan> button
Xerox WorkCentre 5016/5020 User Guide 88
Page 89

Scanning Procedure (Using Button Manager)
• When scanning a document from the Document Glass
1) Open the Document Cover.
2) Place a document face down on the
Document Glass, and align it with
the top left corner.
Note • If the size of the loaded document
is smaller than any standard sizes,
the edges of the loaded document
may create shadow, and may
appear to have an outline on the
scanned image.
3) Close the Document Cover.
6.
Press the <Start> button to start
scanning.
The machine starts to scan the
document, and the scanned image is
saved in the location that you specified
under [Output Destination] of the
[WorkCentre 5016/5020 Scan Button
Manager] dialog box in Step 2.
Note • Regardless of the actual size of the
loaded document, any size selected
under [Paper Size] in the
[WorkCentre 5016/5020 Scan
Button Manager] dialog box in Step 2 becomes the size of the scanned image.
Canceling a Scan Job (Button Manager)
The following procedure describes how to cancel a scan job.
1.
Press the <Stop> button while the
machine is scanning a document.
<Start> button
<Stop> button
Xerox WorkCentre 5016/5020 User Guide 89
Page 90

9 Troubleshooting
This chapter describes what needs to be done when a problem occurs with the
machine. It provides information on how to troubleshoot a problem by referring to the
Machine Diagram (mimic), Error Code Label, and Troubleshooting Table. It also
explains how to clear paper jams.
Fault Clearance Procedure
When you encounter a problem when using the machine, follow each step to identify
the cause of the problem, then apply the suggested solution.
• Machine Diagram (mimic)
If any indicator is lit or flashing, refer to "Machine Diagram (mimic)" (P.90).
• Error code in the Display
Check the error code shown in the Display. Most error codes are listed on the Error
Code Label. Refer to the Error Code Label for the error description, and apply the
suggested solution.
If the displayed error code is not listed in the Error Code Label, refer to "Error Codes"
(P.92).
• Troubleshooting Table
If any problem persists after applying the suggested solution, refer to
"Troubleshooting Table" (P.98). Diagnose the symptom, then apply the appropriate
solutions.
• Assistance from the System Administrator
Alternatively, contact the System Administrator for assistance.
• Switching the machine on /off
In some cases, a problem can be solved by simply switching the machine on and
off. For information on how to switch the machine on and off, refer to "Switching On
/ Off" (P.31).
• Xerox Welcome Center
If a problem persists after applying all the suggested solutions, contact the Xerox
Welcome Center.
Machine Diagram (mimic)
The Machine Diagram (mimic) consists of
the following indicators to display the
machine status.
With
Document Feeder
Xerox WorkCentre 5016/5020 User Guide 90
Without
Document Feeder
Page 91

Fault Clearance Procedure
Document Feeder Jam
The red indicator flashes when a document jams in the Document
Feeder.
For information on how to clear document jams in the Document Feeder, refer to "A1: Document
Jams" (P.109).
Processor Jam
The red indicator flashes when a paper jam occurs in the machine. Check
the error code that appears in the Display. Refer to the "Error Codes"
(P.92) for the solution.
Toner
The red indicator lights up when the amount of toner left in the Drum
Cartridge is low. Prepare a new toner bottle. No error code is displayed
at this point.
The red indicator flashes when toner runs out. Add toner into the Drum
Cartridge. The error code [J1] appears in the Display.
For information on how to add toner into the Drum Cartridge, refer to "Adding Toner to the Drum
Cartridge" (P.111).
Replace Drum Cartridge
The red indicator lights up when the Drum Cartridge needs to be replaced
in the near future. Prepare a new Drum Cartridge. No error code is
displayed at this point.
The red indicator flashes when the Drum Cartridge needs to be replaced
immediately. Replace the Drum Cartridge with a new one. The error code
[J6] appears in the Display.
For information on how to replace the Drum Cartridge, refer to "Replacing the Drum Cartridge"
(P.114).
Tray 1
The green indicator lights up when Tray 1 is selected.
The green indicator flashes when paper runs out in Tray 1 or when a
paper jam occurs in Tray 1.
For information on how to load paper in Tray 1, refer to "Loading Paper in Tray 1" (P.42).
For information on how to clear paper jams in Tray 1, refer to "C1: Paper Jam in Tray 1" (P.106).
Tray 2
The green indicator lights up when Tray 2 is selected.
The green indicator flashes when paper runs out in Tray 2 or when a
paper jam occurs in Tray 2.
For information on how to load paper in Tray 2, refer to "Loading Paper in Tray 2" (P.43).
For information on how to clear paper jams in Tray 2, refer to "C2: Paper Jam in Tray 2" (P.107).
Note • This indicator is only available when Paper Tray 2 (optional) is fitted on the machine.
Bypass Tray
The green indicator lights up when the Bypass Tray is selected.
For information on how to load paper in the Bypass Tray, refer to "Loading Paper in the Bypass
Tray " (P.44).
For information on how to clear paper jams in the Bypass Tray, refer to "C3: Paper Jam in the
Bypass Tray" (P.108).
Xerox WorkCentre 5016/5020 User Guide 91
Page 92

Note • This option is only available when the Document Feeder is fitted on the machine.
Error Codes
A Codes
Fault Clearance Procedure
Document Present
The green indicator lights up when a document is loaded correctly in the
Document Feeder.
Error Code Description Remedy
A1 Documents jammed in the
Document Feeder.
A2 The size of documents that are
loaded in the Document Feeder is
not supported, and resulted in a
document jam.
A5 The Document Feeder Cover is
open.
When leaving the Document Cover
slightly open to scan a document
with a certain thickness such as a
book on the Document Glass, if
another document is also loaded in
the Document Feeder, the machine
does not allow you to scan a
document on the Document Glass.
Remove the jammed document
carefully.
For information on how to remove the
jammed document, refer to "A1:
Document Jams" (P.109).
Remove the jammed document
carefully, and use the Document
Glass instead.
For information on how to remove the
jammed document, refer to "A1:
Document Jams" (P.109).
Close the Document Feeder Cover.
Remove the document in the
Document Feeder before starting to
scan the document on the Document
Glass.
Xerox WorkCentre 5016/5020 User Guide 92
Page 93

Fault Clearance Procedure
C Codes
Error Code Description Remedy
C0 When using the Document Feeder to
scan a document, the scanned
image that is enlarged or reduced by
the specified zoom ratio does not fit
entirely on the paper that is loaded in
the tray that you specified.
When Automatic Paper Selection
(menu number: 7) is enabled, the
machine is unable to select a tray,
because none of the trays are
loaded with the appropriate size of
paper.
C1 Paper jammed in Tray 1. Remove the jammed paper. Check
Stop the job. Specify the smaller zoom
ratio, or load the bigger sized paper in
the tray before running the job again.
For information on how to specify the
zoom ratio, refer to "<Variable Ratio>
button" (P.24) or "<Reduce/Enlarge>
button" (P.24).
For information on how to change the size
of paper in the tray, refer to "Changing the
Size and Orientation of Paper in Tray 1"
(P.46) and "Changing the Size and
Orientation of Paper in Tray 2" (P.48).
Press the <Stop> button to cancel the
job. Load a tray with the desired size
of paper.
For information on how to load paper in
the trays, refer to "Loading Paper in the
Trays" (P.42).
that the paper guides are adjusted
correctly.
For information on how to clear paper
jams in Tray 1, refer to "C1: Paper Jam in
Tray 1" (P.106).
For information on how to correctly adjust
the paper guides, refer to Step 4 of the
procedure "Loading Paper in Tray 1"
(P.42).
C2 Paper jammed in Tray 2. Remove the jammed paper. Check
that the paper guides are adjusted
correctly.
For information on how to clear paper
jams in Tray 2, refer to "C2: Paper Jam in
Tray 2" (P.107).
For information on how to correctly adjust
the paper guides, refer to Step 3 of the
procedure "Loading Paper in Tray 2"
(P.43).
C3 Paper jammed in the Bypass Tray. Remove the jammed paper. Check
that the paper guides are adjusted
correctly.
For information on how to clear paper
jams in the Bypass Tray, refer to "C3:
Paper Jam in the Bypass Tray" (P.108).
The Bypass Tray is out of paper. Open and close the Left Side Cover
once, and load paper in the Bypass
Tray.
For information on how to load paper in
the Bypass Tray, refer to "Loading Paper
in the Bypass Tray" (P.44).
Xerox WorkCentre 5016/5020 User Guide 93
Page 94

Fault Clearance Procedure
Error Code Description Remedy
C5 Tray 1 is out of paper. Load paper in Tray 1.
For information on how to load paper in
Tray 1, refer to "Loading Paper in Tray 1"
(P.42).
Tray 1 has been selected in a print
job; however, the size/orientation of
paper that is loaded in Tray 1 does
not match the paper size/orientation
of the print job.
C6 Tray 2 is out of paper. Load paper in Tray 2.
Tray 2 has been selected in a print
job; however, the size/orientation of
paper that is loaded in Tray 2 does
not match the paper size/orientation
of the print job.
Load Tray 1 with the same sized
paper as specified in the print job.
Specify the correct size/orientation of
paper that is loaded in Tray 1.
For information on how to reload Tray 1
with a different sized paper, refer to
"Changing the Size and Orientation of
Paper in Tray 1" (P.46).
For information on how to specify the size
and orientation of paper that is loaded,
refer to "Specifying the Size and
Orientation of Paper Loaded in the Trays"
(P.49).
For information on how to load paper in
Tray 2, refer to "Loading Paper in Tray 2"
(P.43).
Load Tray 2 with the same sized
paper as specified in the print job.
Specify the correct size/orientation of
paper that is loaded in Tray 2.
For information on how to reload Tray 2
with a different sized paper, refer to
"Changing the Size and Orientation of
Paper in Tray 2" (P.48).
For information on how to specify the size
and orientation of paper that is loaded,
refer to "Specifying the Size and
Orientation of Paper Loaded in the Trays"
(P.49).
C7 The Bypass Tray has been selected
in a print job; however, the size/
orientation of paper that is loaded in
the Bypass Tray does not match the
paper size/orientation of the print
job.
Load the Bypass Tray with the same
sized paper as specified in the print
job. Specify the correct size/
orientation of paper that is loaded in
the Bypass Tray.
For information on how to load paper in
the Bypass Tray, refer to "Loading Paper
in the Bypass Tray" (P.44).
For information on how to specify the size
and orientation of paper that is loaded,
refer to "Specifying the Size and
Orientation of Paper Loaded in the Trays"
(P.49).
E Codes
Error Code Description Remedy
E0 During a copy job, the machine
erased already-scanned images
before outputting on the paper.
Press the <Stop> button to cancel the
copy job, and try again.
Xerox WorkCentre 5016/5020 User Guide 94
Page 95

Fault Clearance Procedure
Error Code Description Remedy
E1 Paper jammed around the Fuser
Unit and in the Left Side Cover.
E2 Paper jammed in the Left Side
Cover.
E3 Paper jammed in or around Tray 2. Remove the jammed paper.
E4 Paper jammed in the Left Side
Cover.
E5 The Left Side Cover or the Front
Cover is open.
E6 Access Cover 1 and Access Cover 2
are open.
Remove the jammed paper.
For information on how to remove the
jammed paper around the Fuser Unit,
refer to "E1: Paper Jam around the Fuser
Unit and in the Left Side Cover" (P.102).
Remove the jammed paper.
For information on how to remove the
jammed paper in and around Tray 1, refer
to "E2: Paper Jam in the Left Side Cover"
(P.104).
For information on how to remove the
jammed paper, refer to "E3: Paper Jam in
Tray 2" (P.107).
Remove the jammed paper.
For information on how to remove the
jammed paper, refer to "E4: Paper Jam in
the Left Side Cover" (P.105).
Close the Left Side Cover or the Front
Cover.
Close Access Cover 1 and Access
Cover 2.
Access Cover 1 is open. Close Access Cover 1.
Access Cover 2 is open. Close Access Cover 2.
E8 When using the N-up feature, the
zoom ratio required to fit the
specified number of pages on a
sheet is beyond the range of 50 200%.
When using the N-up feature, there
is a mismatch between the
orientation of the loaded documents
and paper in a tray.
There is a mismatch between the
orientation of the loaded document
and that of paper in a tray.
E9 The zoom ratio required to fit the
image on the paper under the
specified settings is beyond its range
of 50 - 200%.
Press one of the following buttons to
clear the error: the <All Clear> button,
the <Paper Supply> button, the <Nup/ID Card Copy> button, or the
<Original Size> button.
Press one of the following buttons to
clear the error: the <All Clear> button,
the <Paper Supply> button, the <Nup/ID Card Copy> button, or the
<Original Size> button.
Press the <Stop> button to cancel the
job.
Press one of the following buttons to
clear the error: the <All Clear> button,
the <Paper Supply> button, <Variable
Zoom Ratio> button, or the <Reduce/
Enlarge> button.This error code can
also be cleared when you remove the
loaded document from the Document
Feeder.
Xerox WorkCentre 5016/5020 User Guide 95
Page 96

Fault Clearance Procedure
H Code
Error Code Description Remedy
H9 An internal communication error
occurred in the machine.
Switch the machine off and on. If the
error persists, contact the Xerox
Welcome Center.
J Codes
Error Code Description Remedy
J1 Out of toner. Add toner.
For information on how to add toner, refer
to "Adding Toner to the Drum Cartridge"
(P.111).
J3 The machine cannot correctly sense
the connection to the Drum
Cartridge, or the Drum Cartridge
may not be installed at all.
The Drum Cartridge that is currently
being installed in the machine is not
supported.
If the Drum Cartridge is installed in the
machine, pull it out halfway, and push
it back in again.
If the Drum Cartridge is not installed in
the machine at all, install the
recommended Drum Cartridge.
For information on the Drum Cartridge,
refer to "Replacing Consumables"
(P.110).
Replace the Drum Cartridge.
For information on the Drum Cartridge,
refer to "Replacing Consumables"
(P.110).
J6 The Drum Cartridge needs to be
replaced.
J7 The Drum Cartridge is defective. Replace the Drum Cartridge.
Replace the Drum Cartridge.
For information on how to replace the
Drum Cartridge, refer to "Replacing the
Drum Cartridge" (P.114).
For information on the Drum Cartridge,
refer to "Replacing Consumables"
(P.110).
For information on how to replace the
Drum Cartridge, refer to "Replacing the
Drum Cartridge" (P.114).
L Code
Error Code Description Remedy
L9 When the machine is in the Multiple
Account Mode, it reached the copy
job limit that has been set for a
particualr user account.
Press the <Stop> button to cancel the
job. Break up the job into smaller
segments.
Xerox WorkCentre 5016/5020 User Guide 96
Page 97

Fault Clearance Procedure
N Codes
Error Code Description Remedy
n1 Memory is full. Press the <Stop> button to cancel the
job. Reload the unscanned
documents, and press the <Start>
button to resume scanning the rest of
the documents.
n4 A data transmission error occurred
during a print job or a scan job.
The file that you sent to be printed
has an error.
The machine does not accept the file
that has been sent to the machine to
be printed.
n5 A communication error occurred
between the machine and the
scanner application. Alternatively,
after starting the scan application, no
scan job has been sent from the
computer.
n9 An internal communication error
occurred in the machine.
Press the <Stop> button to cancel the
job.
Press the <Stop> button to cancel the
job, and check the file to be printed.
Press the <Stop> button to cancel the
job.
The machine automatically resolves
this error after a certain amount of
time.
Switch the machine off and on. If the
error persists, contact the Xerox
Welcome Center.
U Codes
Error Code Description Remedy
U0, U1, U2,
U3, U4, U6,
U7, U8, U9
An internal error occurred in the
machine.
Switch the machine off and on. If the
error persists, contact the Xerox
Welcome Center.
Xerox WorkCentre 5016/5020 User Guide 97
Page 98

Troubleshooting Table
If you are experiencing any difficulties using the machine, check the table below for the
recommended solutions.
Fault Clearance Procedure
Symptom Recommendation
The machine will not switch on.
An error is indicated on the Machine Diagram
(mimic).
The document will not feed through the
Document Feeder.
The machine does not accept documents into
memory.
All the indicators on the Control Panel are off.
(The <Power Saver> button is lit.)
Failed to run a print job.
z
Check the power cord.
z
Check that the Power Switch is pressed on
to the [ ] position.
z
Check that the AC outlet is supplying
voltage. Connect another appliance to the
outlet to verify the voltage supply.
z
If any indicators on the Machine Diagram
(mimic) are lit or flashing, apply the
appropriate solutions.
z
If an error code appears in the Display,
refer to the Error Code Label, and apply the
suggested solutions.
z
Check that the Document Feeder is not
overloaded. The Document Feeder can
hold up to 50 sheets.
z
Check that the document is fully inserted
into the Document Feeder.
z
Using a lint-free cloth, lightly wipe the
underside of the Document Cover.
z
Load the documents, and then check that
the side guides are not too tight.
z
If the document is curled, make sure to
straighten it before loading it again in the
Document Feeder.
z
If memory is at its maximum capacity, print
and delete unnecessary files.
z
Touch the <Power Saver> button on the
Control Panel to disable the Sleep Mode.
For information on the Sleep Mode, refer to
"Sleep Mode" (P.32) under "Power Saver".
For information on how to change the Sleep Mode
setting, refer to "System Settings" (P.123).
z
Delete the print job, and run the print job
again.
z
Switch off the machine. Wait for five
seconds, then switch on the machine.
Xerox WorkCentre 5016/5020 User Guide 98
Page 99

Fault Clearance Procedure
Symptom Recommendation
A print job is sent to the machine correctly,
but the machine does not start printing.
Failed to print on the paper in the tray that
you selected.
Damaged or deformed transparencies
Blank output
z
Make sure the application that you are
trying to send a print job from is working
properly on the computer.
z
Make sure that the appropriate printer
cable is used.
z
Make sure that the printer cable is
connected securely.
z
Check to see if the size of paper loaded in a
tray matches the size of paper that you
specified in the print driver.
z
Print data is still being transmitted. The
machine does not start printing unless it
receives the full data. If printing a graphicintensive document, wait for a while. Data
transmission may take a while.
z
Check to see if the paper size that you
have specified in the print driver matches
the size of paper that is actually loaded in
the tray.
z
Make sure that paper is loaded correctly in
the tray.
z
Transparencies can be loaded only in the
Bypass Tray.
z
Check that the document is loaded face up
in the Document Feeder.
z
Check that the document is placed face
down on the Document Glass.
z
If toner has recently been added to the
Drum Cartridge, it may not be dispersed
properly. Run the job again.
z
Check that the sealing tape has been
removed from the new Drum Cartridge.
z
Reinstall the Drum Cartridge.
z
Replace the Drum Cartridge.
z
Add toner if the toner indicator on the
Machine Diagram (mimic) flashes or the
error code indicating that toner needs to be
added appears in the Display.
Xerox WorkCentre 5016/5020 User Guide 99
Page 100

Fault Clearance Procedure
Symptom Recommendation
Streaks, solid or dotted lines, or spots
Paper delivered to an Output Tray is curled,
and it is not properly stacked up.
Output is too light or too dark.
Output is too light.
Uneven print
Blurred images
Missing characters
Gloss variations (coining)
Light copies when scanning glossy, shiny, or
coated documents through the Document
Feeder.
z
Clean the Corotron Wire.
For information on how to clean the Corotron
Wire, refer to "Cleaning the Corotron Wire"
(P.118).
z
Clean the Document Glass, Constant
Velocity Transport Glass (the narrow strip
of glass located at the left hand side of the
Document Glass), the Document Feeder,
and the paper guides.
For information on how to clean the machine,
refer to "Cleaning the Machine" (P.116).
z
Check the quality of the document.
z
Run the job using the Document Glass.
z
If the machine has been idle for an
extended period of time, if the toner has
recently been added, or the Drum Cartridge
has recently been replaced, run the job
again.
z
Load fresh paper.
z
Check the humidity in the location of the
machine.
z
Replace the Drum Cartridge.
z
Flip the paper stack over in the tray.
z
Rotate the paper stack head to toe in the
tray.
z
Set the density feature to a lighter or darker
setting.
z
Check the quality of the document.
z
Load fresh paper.
z
Run off more prints until the copy quality
improves.
z
Replace the Drum Cartridge.
z
Set the density feature to a darker setting.
z
If toner has recently been added to the
Drum Cartridge, toner may not be
dispersed properly. Run the job again.
z
Remove the Drum Cartridge, and shake it
gently (away from clothing and carpet).
Note • Shake the Drum Cartridge gently
without spilling toner.
z
Load fresh paper.
z
Replace the Drum Cartridge.
z
Load fresh paper.
z
Replace the Drum Cartridge.
z
Load fresh paper.
z
Replace the Drum Cartridge.
z
Check the quality of the document.
z
If the document has large areas of solid
density, adjust the density feature for the
contrast.
z
Use the Document Glass instead of the
Document Feeder.
Xerox WorkCentre 5016/5020 User Guide 100
 Loading...