

Page 1

Version 1.0
July 2008
DocuColor 5000AP
Administrator
Guide
Page 2

©
Copyright 2008 by Xerox Corporation. All Rights Reserved.
Copyright protection claimed includes all forms and matters of copyrighted material and information now allowed by statutory or
judicial law or hereinafter granted, including without limitation, material generated from the software programs that are displayed on
the screen such as styles, templates, icons, screen displays, looks, etc.
®
Xerox
and all Xerox product names and product numbers mentioned in this publication are trademarks of XEROX CORPORATION.
Other company brands and product names may be trademarks or registered trademarks of the respective companies and are also
acknowledged.
This product includes software developed by the Apache Software Foundation (http://www.apache.org/
http://www.apache.org/).
Page 3

Table of contents
1. Administrator overview 1-1
Overview . . . . . . . . . . . . . . . . . . . . . . . . . . . . . . . . . . . . . . . . . . 1-1
Logging on as Administrator. . . . . . . . . . . . . . . . . . . . . . . . . . . 1-1
Finishing System Profiles overview . . . . . . . . . . . . . . . . . . . . . 1-3
2. System Settings 2-1
Overview . . . . . . . . . . . . . . . . . . . . . . . . . . . . . . . . . . . . . . . . . . 2-1
User Interface . . . . . . . . . . . . . . . . . . . . . . . . . . . . . . . . . . . . . . 2-2
Fault Details window. . . . . . . . . . . . . . . . . . . . . . . . . . . . . . 2-3
Change Password . . . . . . . . . . . . . . . . . . . . . . . . . . . . . . . 2-5
Setting the Date & Time . . . . . . . . . . . . . . . . . . . . . . . . . . . . . . 2-8
System . . . . . . . . . . . . . . . . . . . . . . . . . . . . . . . . . . . . . . . . . . . 2-9
Productivity Setting. . . . . . . . . . . . . . . . . . . . . . . . . . . . . . 2-10
Productivity charts. . . . . . . . . . . . . . . . . . . . . . . . . . . . 2-11
All Weights Rated Speed . . . . . . . . . . . . . . . . . . . 2-11
Mixed Paper Weight . . . . . . . . . . . . . . . . . . . . . . . 2-12
Power Saver . . . . . . . . . . . . . . . . . . . . . . . . . . . . . . . . . . . 2-13
Exit Power Saver . . . . . . . . . . . . . . . . . . . . . . . . . . . . 2-14
Auto Resume After . . . . . . . . . . . . . . . . . . . . . . . . . . . . . . 2-15
Fault Clearance. . . . . . . . . . . . . . . . . . . . . . . . . . . . . . 2-15
Pause . . . . . . . . . . . . . . . . . . . . . . . . . . . . . . . . . . . . . 2-16
Job Spacing . . . . . . . . . . . . . . . . . . . . . . . . . . . . . . . . . . . 2-17
Auto Logoff . . . . . . . . . . . . . . . . . . . . . . . . . . . . . . . . . . . . 2-18
NVM Read/Write. . . . . . . . . . . . . . . . . . . . . . . . . . . . . . . . 2-19
Tray Options . . . . . . . . . . . . . . . . . . . . . . . . . . . . . . . . . . . . . . 2-23
Auto Tray Switching, Auto Paper Selection, and Do Not
Include . . . . . . . . . . . . . . . . . . . . . . . . . . . . . . . . . . . . . . . 2-24
Paper Tray Assist . . . . . . . . . . . . . . . . . . . . . . . . . . . . . . . 2-25
Tray Priority. . . . . . . . . . . . . . . . . . . . . . . . . . . . . . . . . . . . 2-28
DocuColor 5000AP Administrator Guide
i
Page 4

Table of contents
3. Profiles 3-1
Overview . . . . . . . . . . . . . . . . . . . . . . . . . . . . . . . . . . . . . . . . . . 3-1
Alignment . . . . . . . . . . . . . . . . . . . . . . . . . . . . . . . . . . . . . . . . . 3-1
Alignment Adjustment Profile procedure. . . . . . . . . . . . . . . 3-2
Selecting the Registration options . . . . . . . . . . . . . . . . 3-5
Selecting the Perpendicularity options . . . . . . . . . . . . . 3-6
Selecting the Skew options . . . . . . . . . . . . . . . . . . . . . . 3-7
Selecting the Magnification options . . . . . . . . . . . . . . . 3-8
Running test prints . . . . . . . . . . . . . . . . . . . . . . . . . . . . 3-9
Custom Paper. . . . . . . . . . . . . . . . . . . . . . . . . . . . . . . . . . . . . 3-11
Custom Paper procedure . . . . . . . . . . . . . . . . . . . . . . . . . 3-11
Selecting the desired paper type . . . . . . . . . . . . . . . . 3-13
Selecting the desired paper weight. . . . . . . . . . . . . . . 3-14
Second Bias Transfer Belt . . . . . . . . . . . . . . . . . . . . . . . . 3-20
Aligner Roll Pressure . . . . . . . . . . . . . . . . . . . . . . . . . . . . 3-24
Paper Tray Air Assist . . . . . . . . . . . . . . . . . . . . . . . . . . . . 3-25
Decurler Overview . . . . . . . . . . . . . . . . . . . . . . . . . . . . . . . . . 3-26
Decurler paper path . . . . . . . . . . . . . . . . . . . . . . . . . . . . . 3-27
Decurler A-D Profile settings . . . . . . . . . . . . . . . . . . . . . . . . . 3-28
Decurler A-D Profile procedure. . . . . . . . . . . . . . . . . . . . . 3-28
Custom Decurler Profiles . . . . . . . . . . . . . . . . . . . . . . . . . . . . 3-30
Entering values in the Custom Decurler Profile fields. . . . 3-34
Creating a Custom Decurler Profile . . . . . . . . . . . . . . . . . 3-36
ii
DocuColor 5000AP Administrator Guide
Page 5
1. Administrator overview
Overview
The Administrator mode allows you to set the default settings for
your digital press in order to fit your individual requirements. You
can change the settings for a variety of features, such as the
language to display on the UI, timers, changing the Administrator
password, creating custom paper and alignment profiles, and
more.
Logging on as Administrator
Use the following procedure to enter and exit the Administrator
mode:
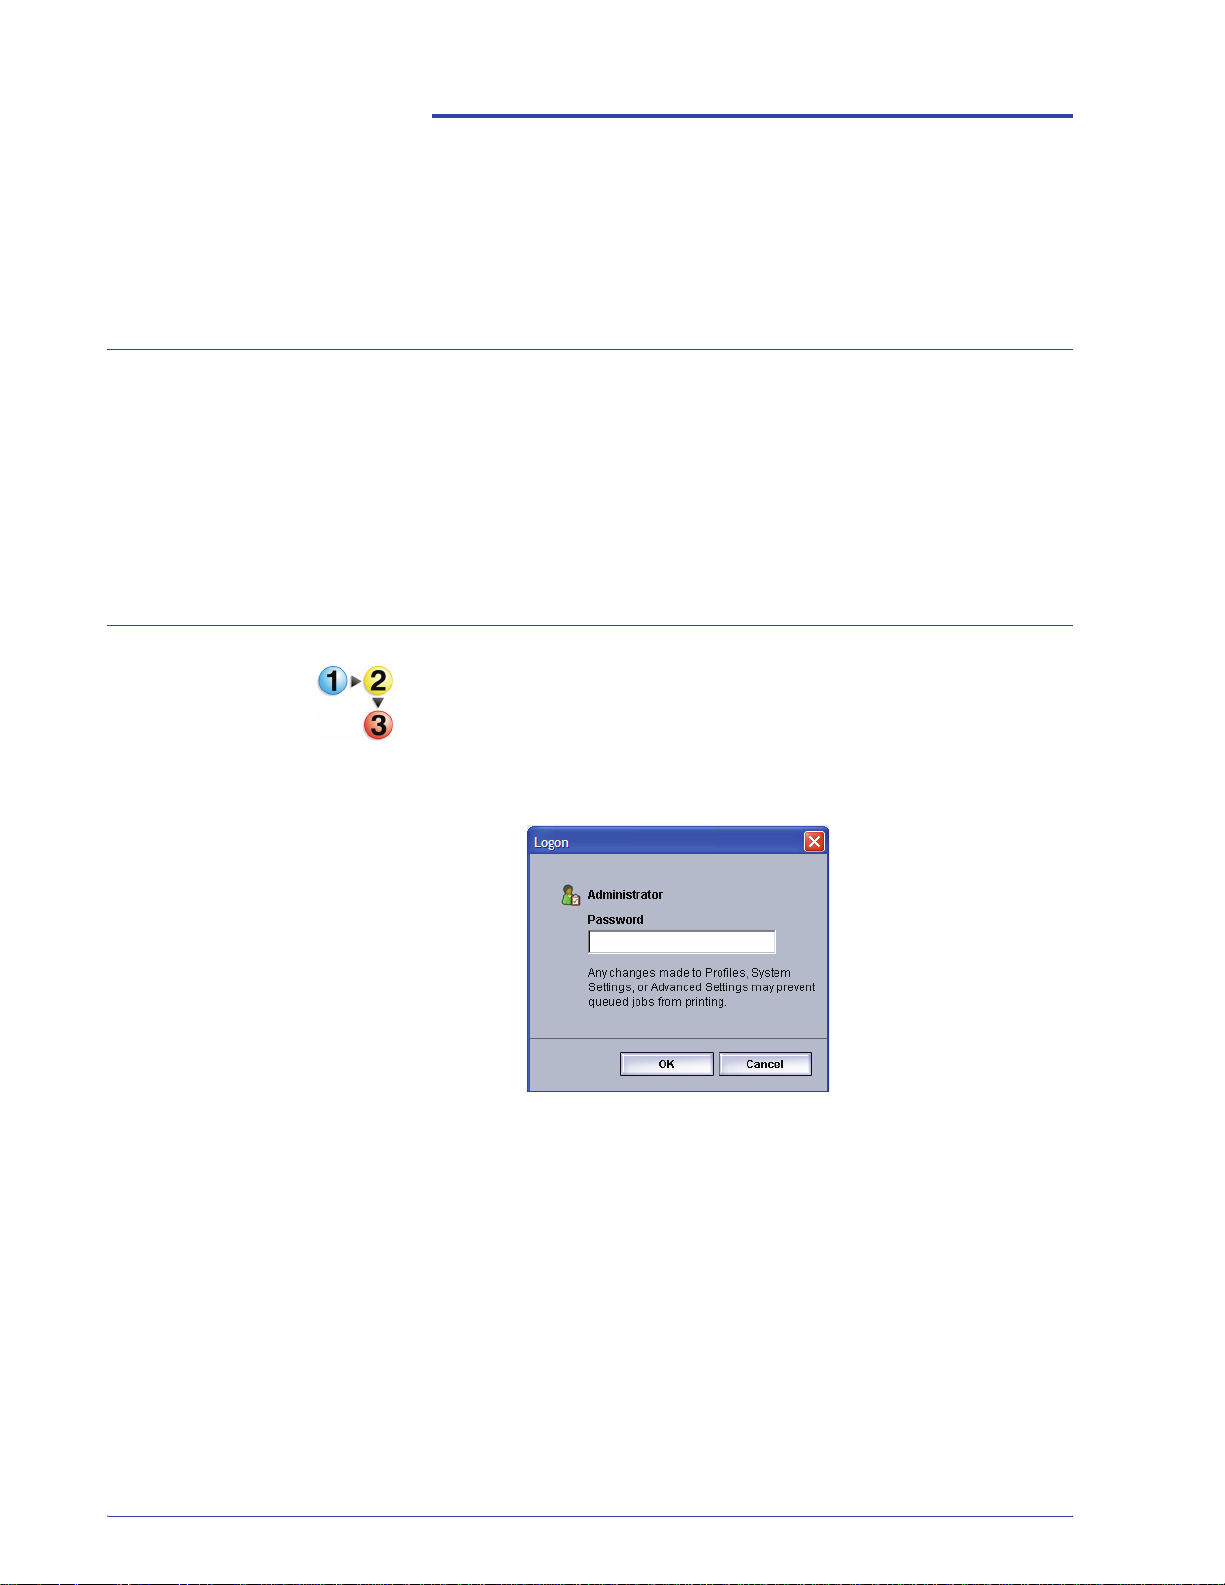
1. Select the Logon button from the main UI window. The
Logon screen appears.
2. Use the keyboard to enter the Administrator password.
The default password is five ones (11111).
For security reasons, only asterisks are displayed on the
screen.
DocuColor 5000AP Administrator Guide
1-1
Page 6
1. Administrator overview
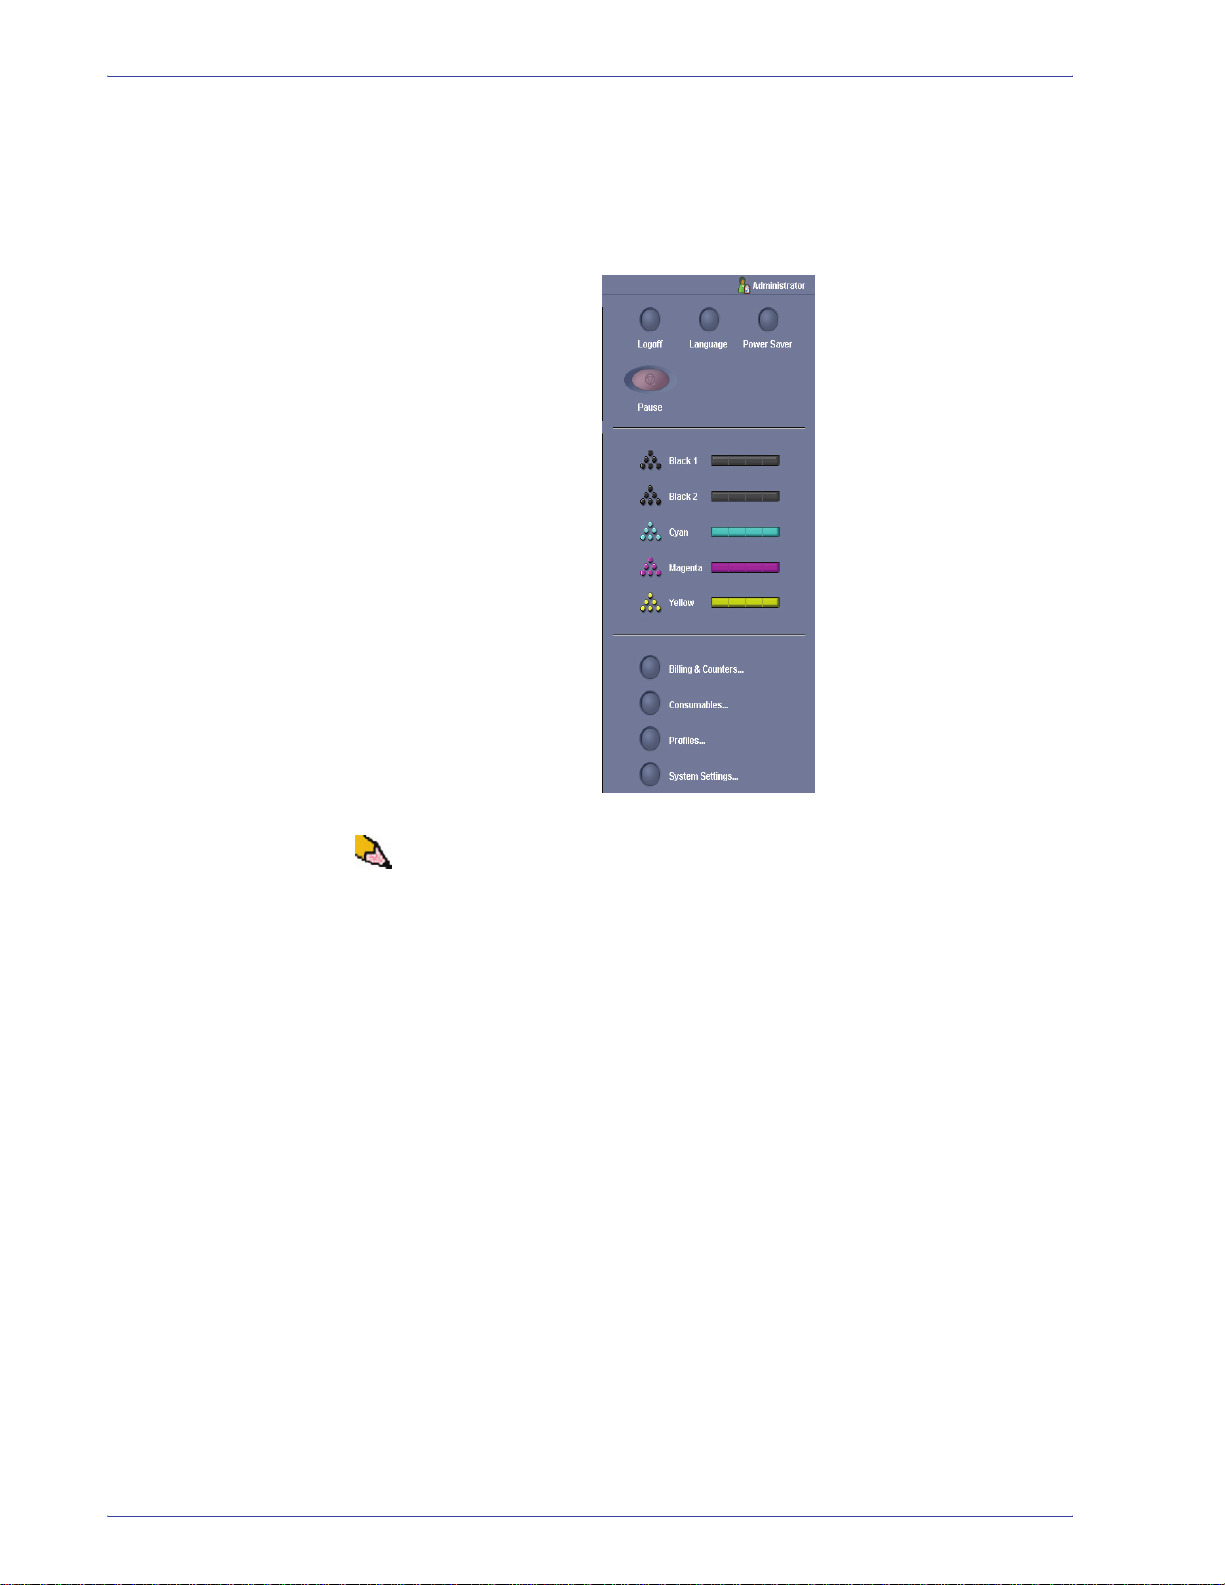
3. Select the OK button.
The main UI screen now displays additional options and
indicates in the upper right that you are in the Administrator
mode.
NOTE: It is recommended that you change the Administrator
password as soon as possible after installing the digital press in
order to prevent unauthorized access to the Administrator mode.
The procedure for changing the password is on page 2-5 of this
book.
4. To exit the Administrator mode, select the Logoff button.
1-2
DocuColor 5000AP Administrator Guide
Page 7
Finishing System Profiles overview
1. Administrator overview
If your digital press has an optional, third-party, Digital Finishing
Architecture (DFA) device finishing, then the Finishing System
Profiles option is available to you.
TIP: This feature is available only if you are logged on as the
Administrator.
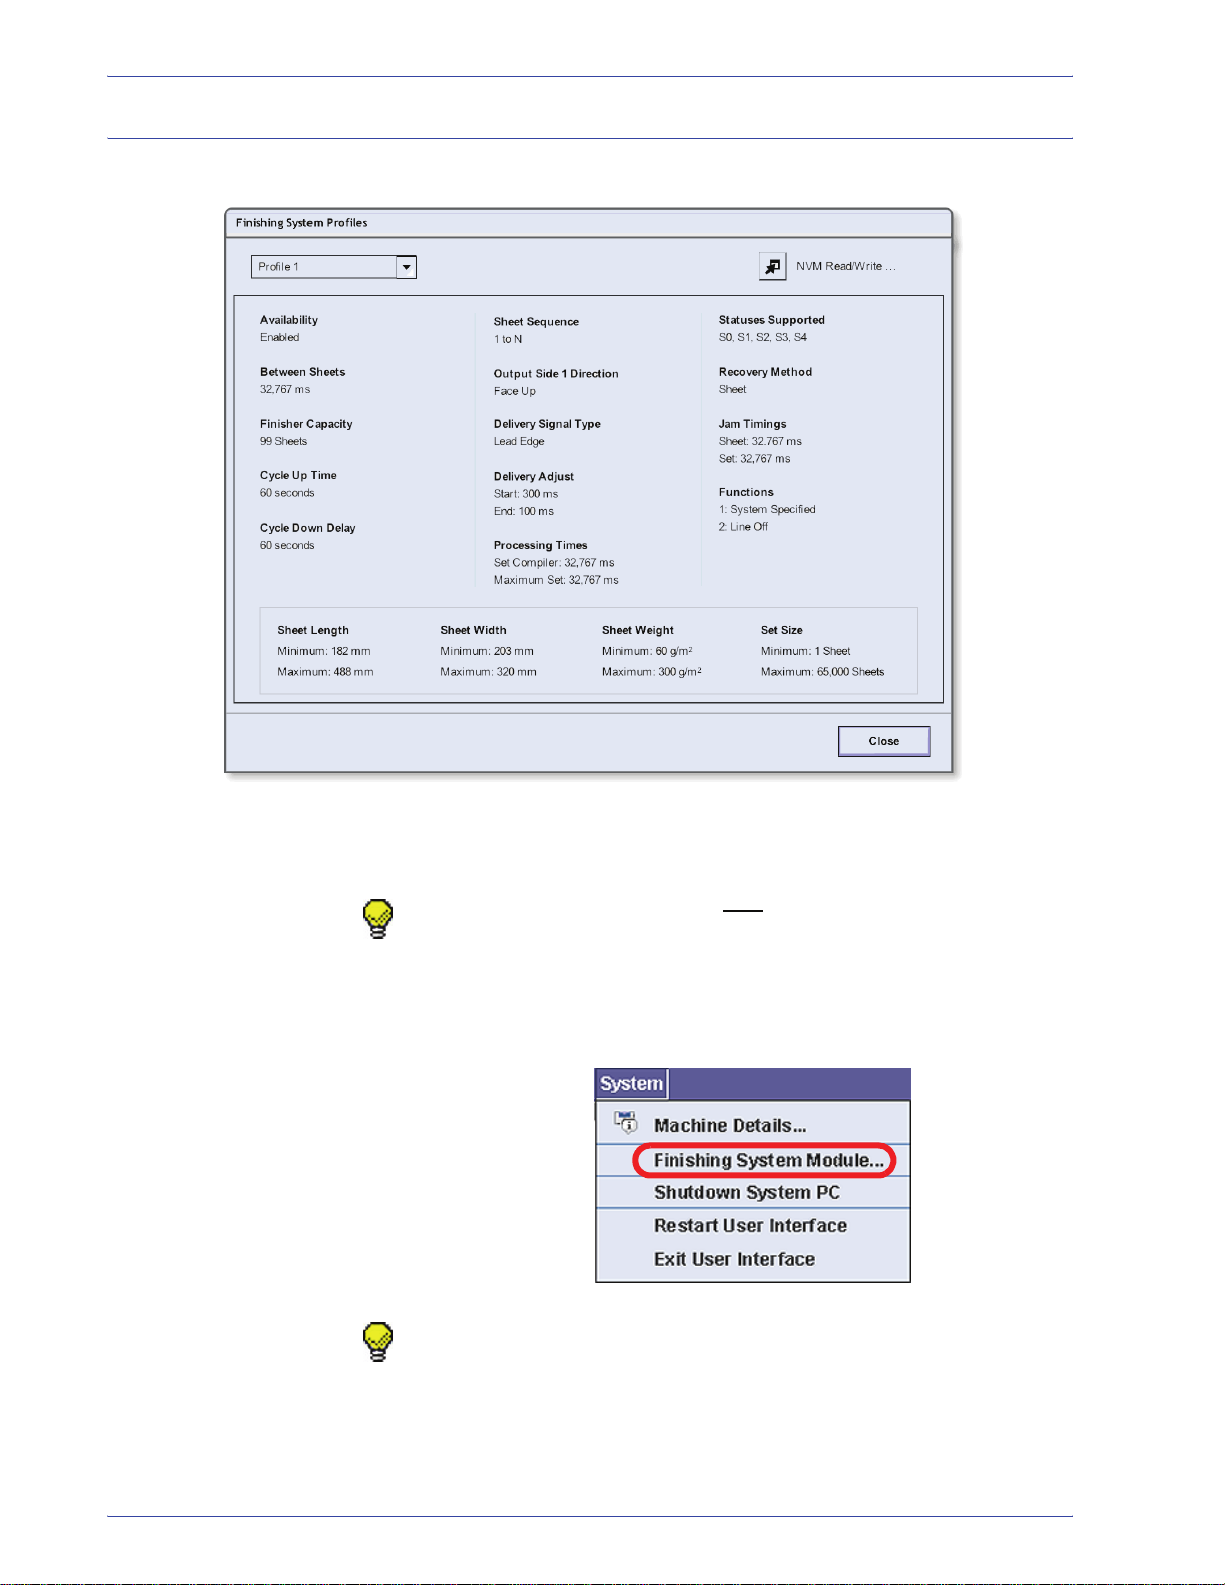
Once your system is configured for the optional finishing
accessory, the Finishing System Profiles option is accessed from
the System pull-down menu on the main UI screen.
TIP: This window is ready-only; you cannot change the
information shown on this screen. If you have more than one
finishing device connected to your digital press, you can select the
desired profile from the pull-down menu at the upper-left portion of
the Finishing System Profiles window.
DocuColor 5000AP Administrator Guide
1-3
Page 8

1. Administrator overview
1-4
DocuColor 5000AP Administrator Guide
Page 9

Overview
2. System Settings
The System Settings feature allows you to make changes to the
following features:
• User Interface
• Date and Time
•System
• Tray Options
DocuColor 5000AP Administrator Guide
2-1
Page 10
2. System Settings
User Interface
The User Interface feature allows you to make changes to the
following:
• Fault Detail Window
• Changing the Administrator password
2-2
DocuColor 5000AP Administrator Guide
Page 11
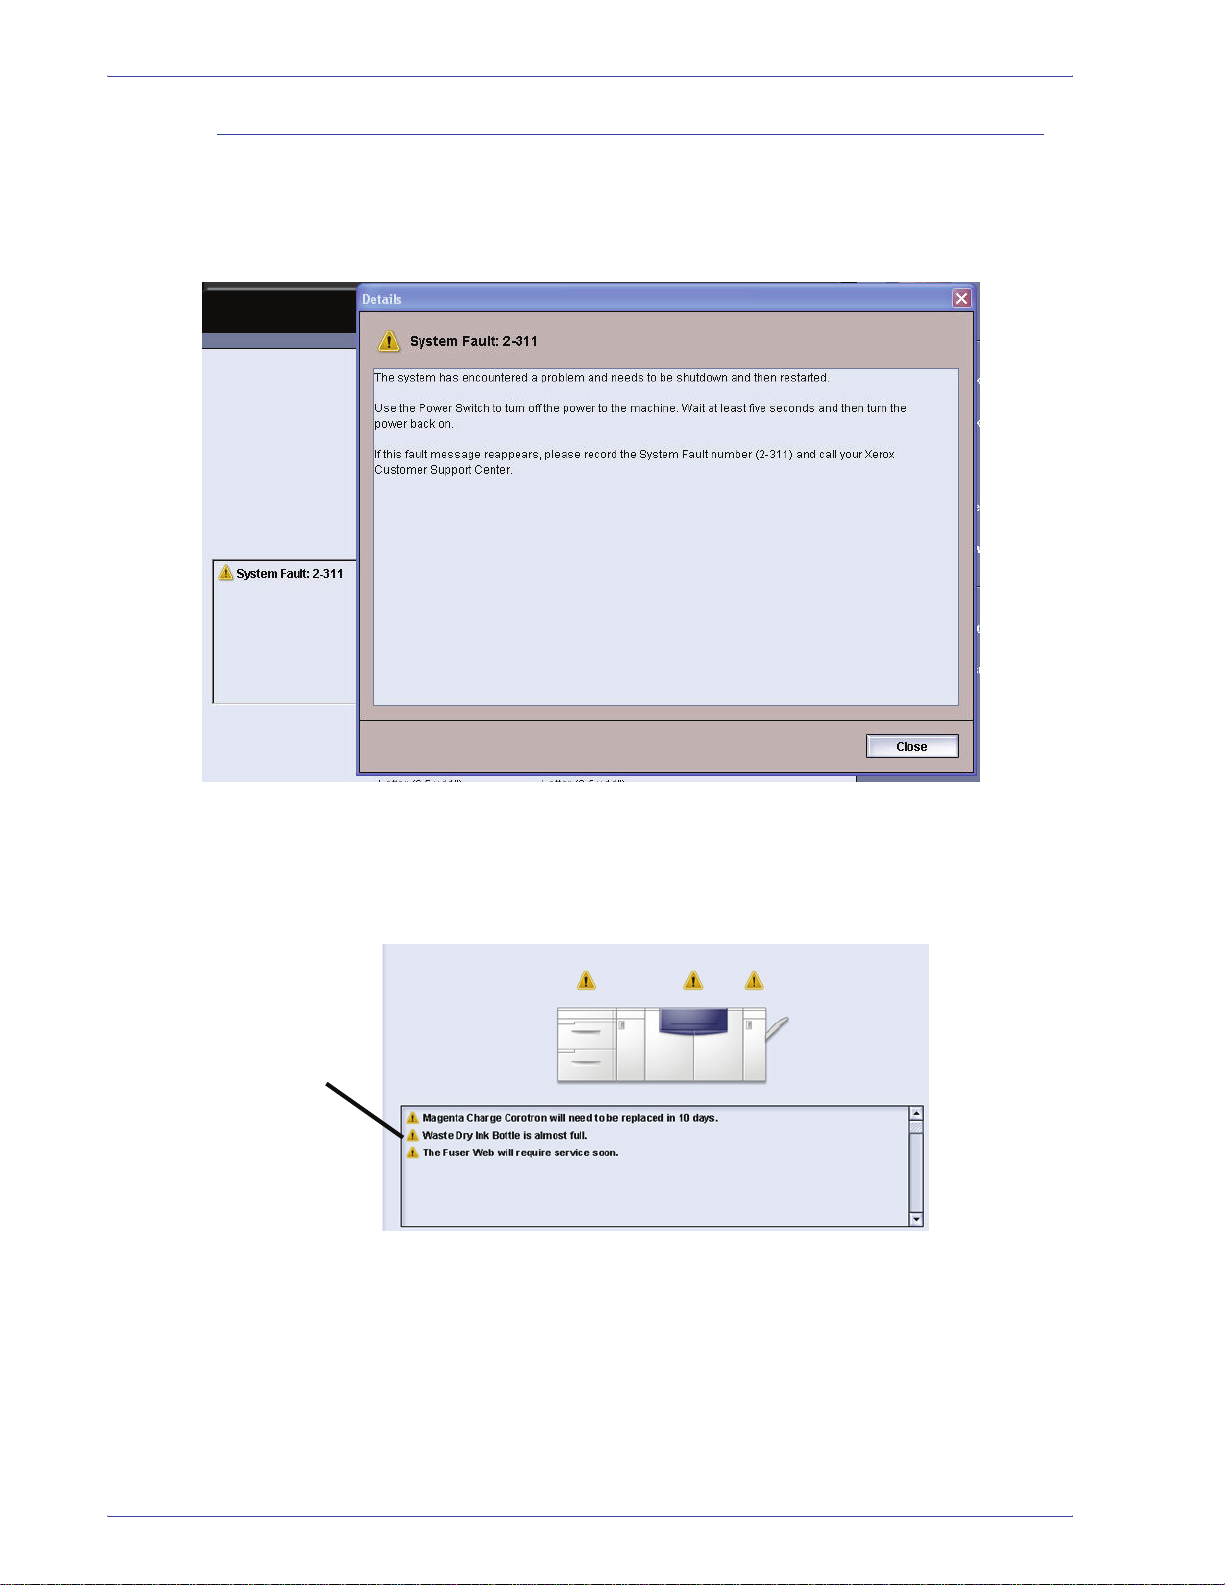
Fault Details window
By default, the UI automatically opens a Details window which
provides additional information about the alert, warning, or fault
(as shown in the following illustration).
2. System Settings
Machine
mimic and
Message
area
However, you can select whether or not you want this window
open automatically or to open only when the user clicks on the
alert, warning, or fault message in the machine mimic and
message area of the UI.
DocuColor 5000AP Administrator Guide
2-3
Page 12
2. System Settings
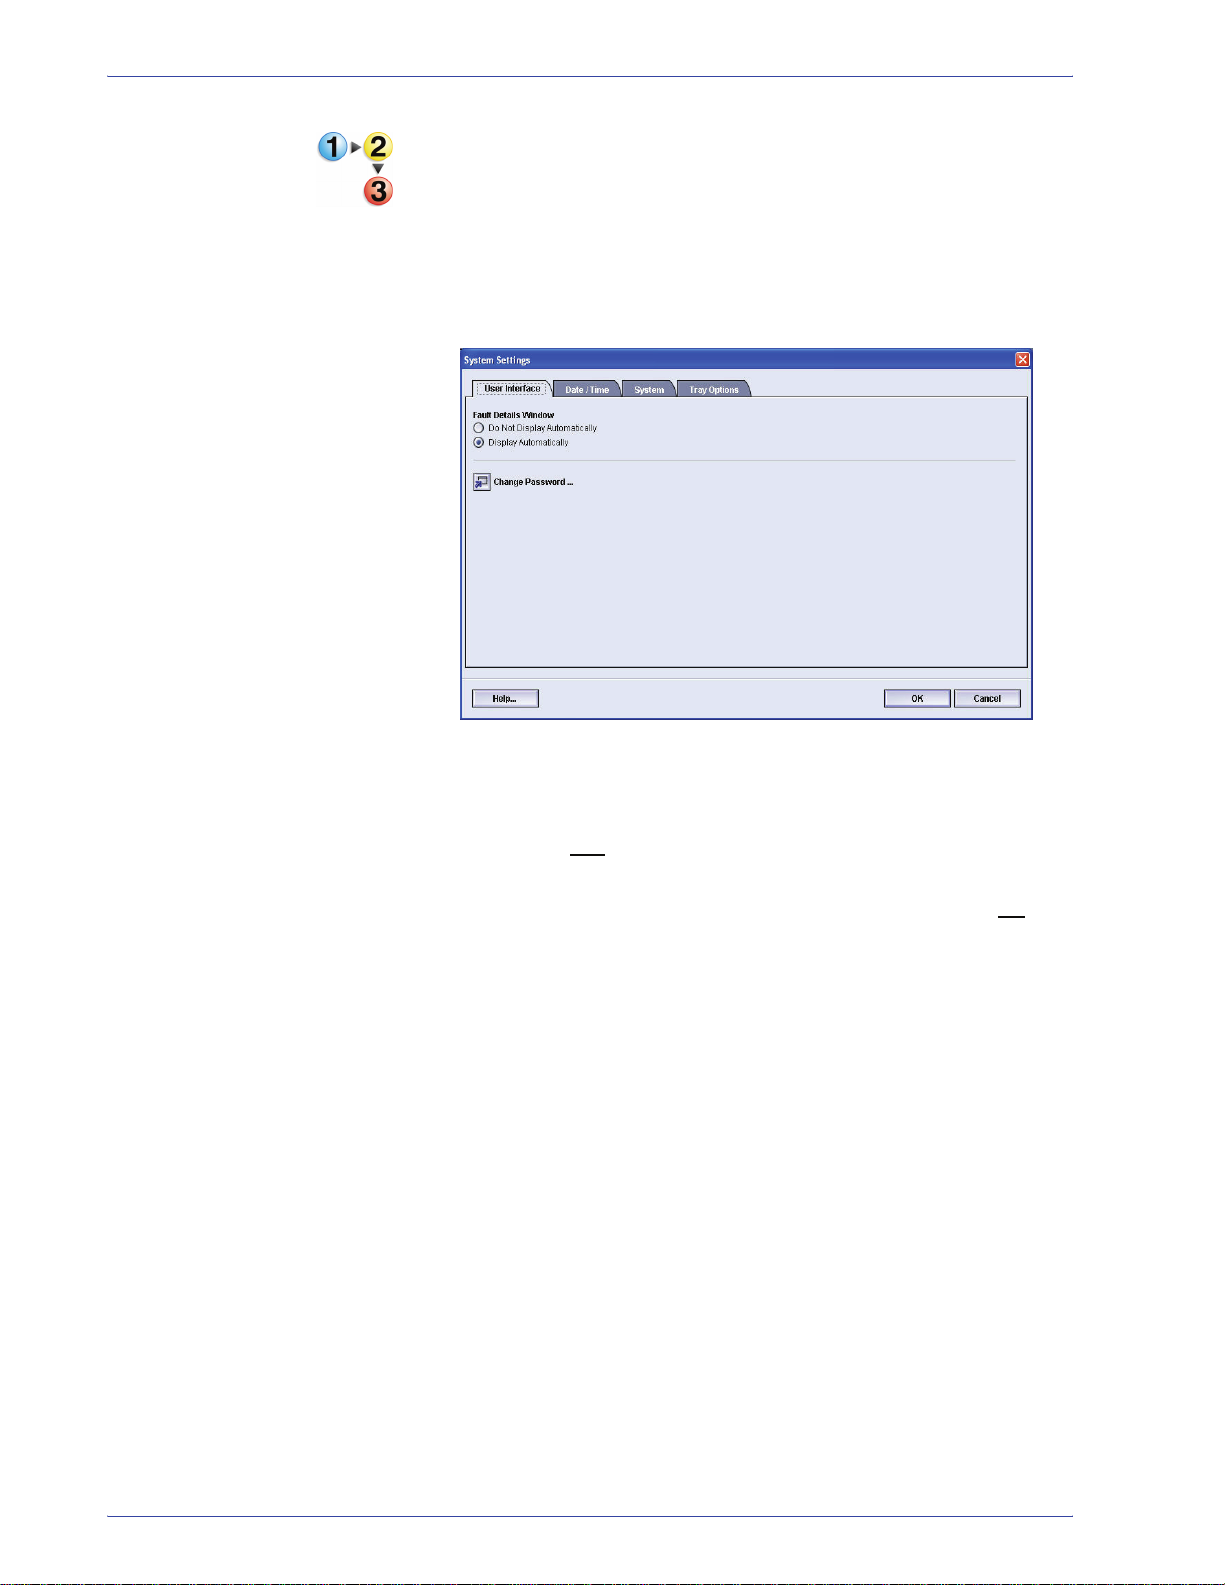
Use the following procedure to choose the default setting for this
feature.
1. Select the Logon button from the UI and logon as the
Administrator.
2. Select the System Settings button; the System Settings
window opens.
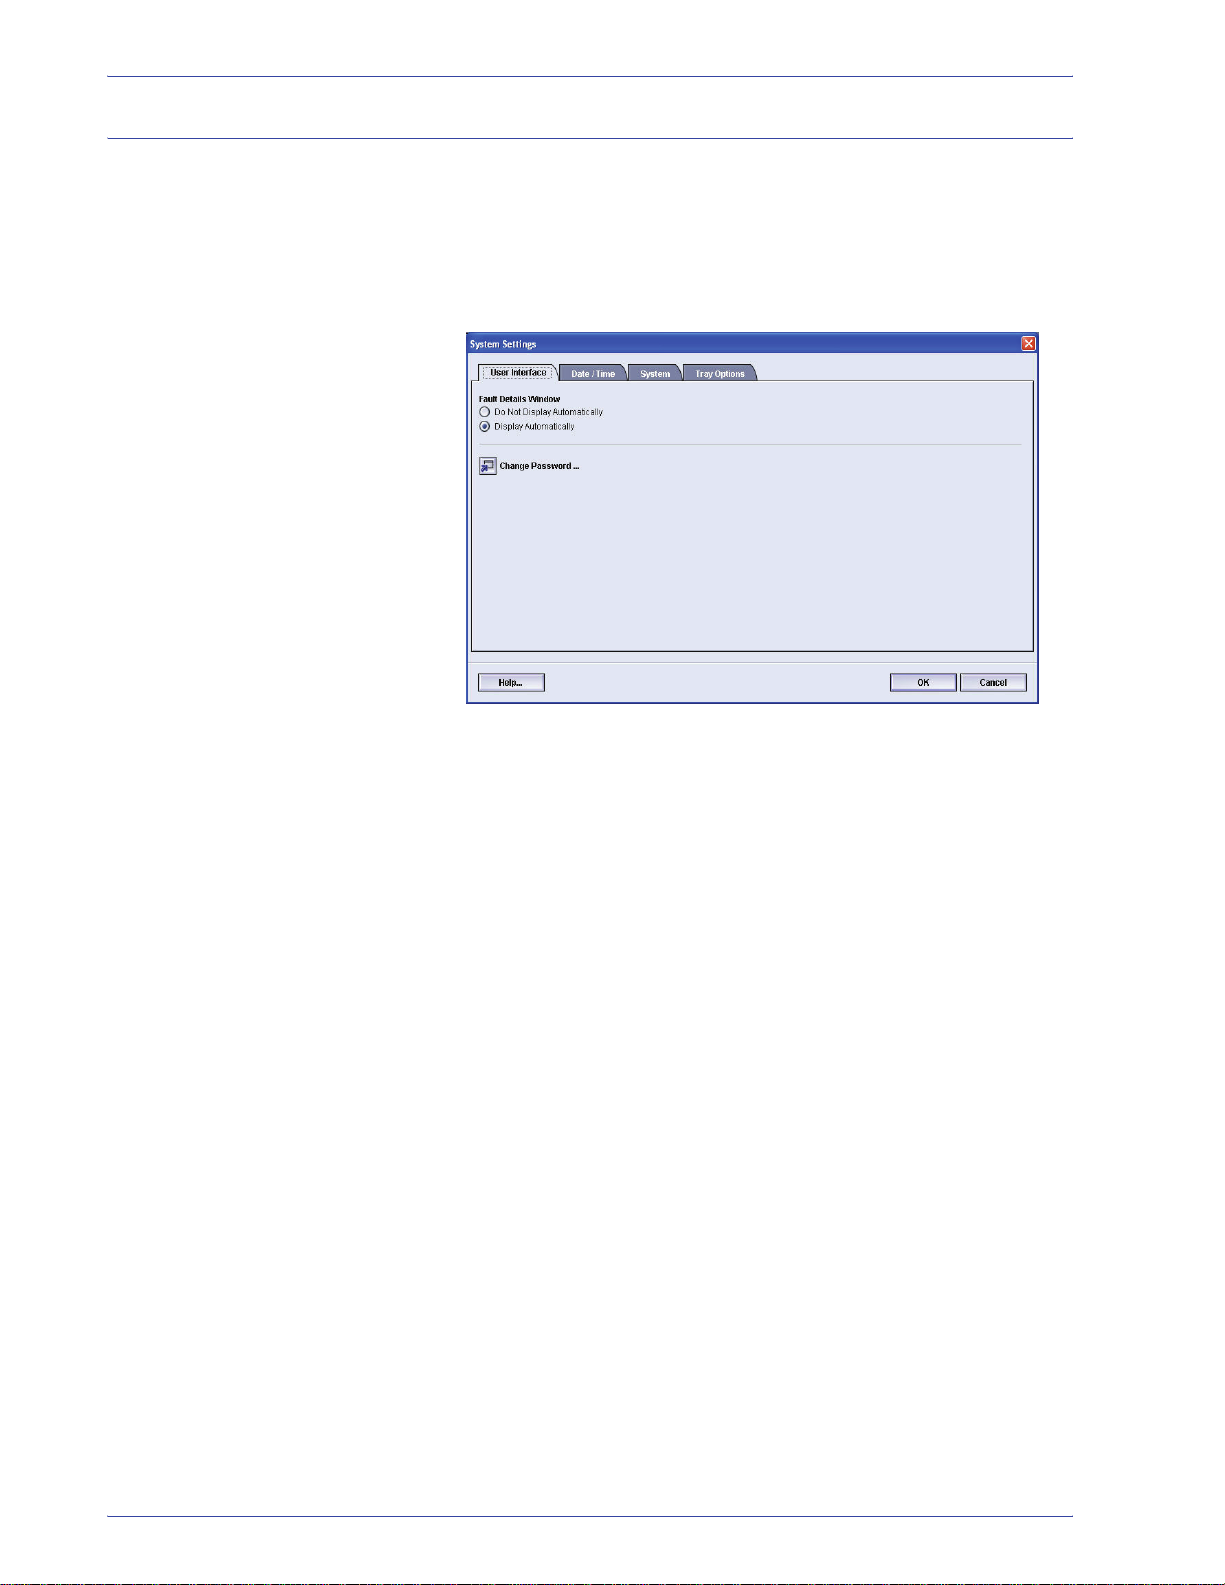
3. Select whether or not you want any machine faults to
automatically display on the UI when they occur.
• Do Not Display Automatically: Select this option if you
do not
automatically when an alert, warning, or fault occurs.
• Display Automatically: Select this option if you do
want the fault Details window to open automatically
when an alert, warning, or fault occurs.
want the fault Details window to open
4. Select OK to save the change and close the System
Settings window.
2-4
DocuColor 5000AP Administrator Guide
Page 13
Change Password
2. System Settings
Select the Change Password button if you want to change the
Administrator password.
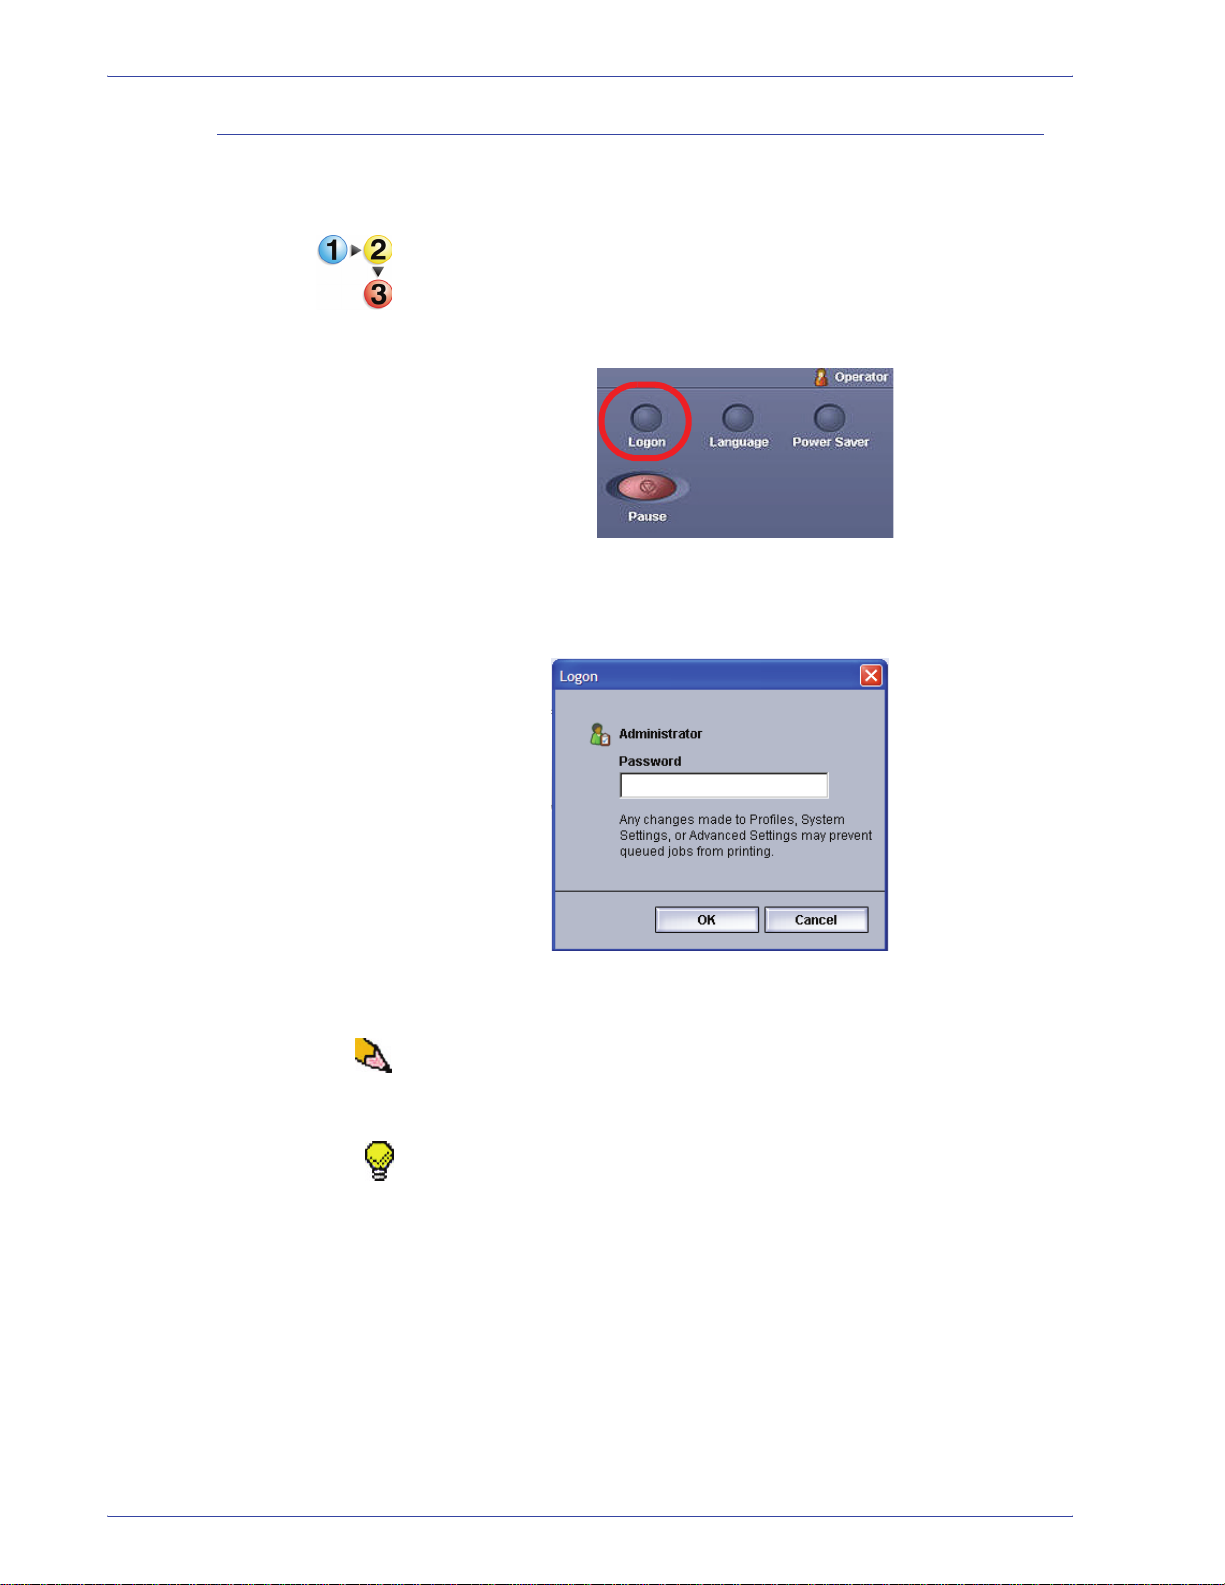
Use the following procedure to change the Administrator
password.
1. Select the Logon button from the main UI window.
2. From the Logon window, enter the Administrator password
and select OK.
For security reasons, only asterisks are displayed on the
screen.
NOTE: The digital press arrives from the fac tory with a default
Administrator password of five ones ( 11111). Use this default
password to logon.
TIP: For security reasons, you should change the Administrator
password from its default password to a new one.
DocuColor 5000AP Administrator Guide
2-5
Page 14
2. System Settings
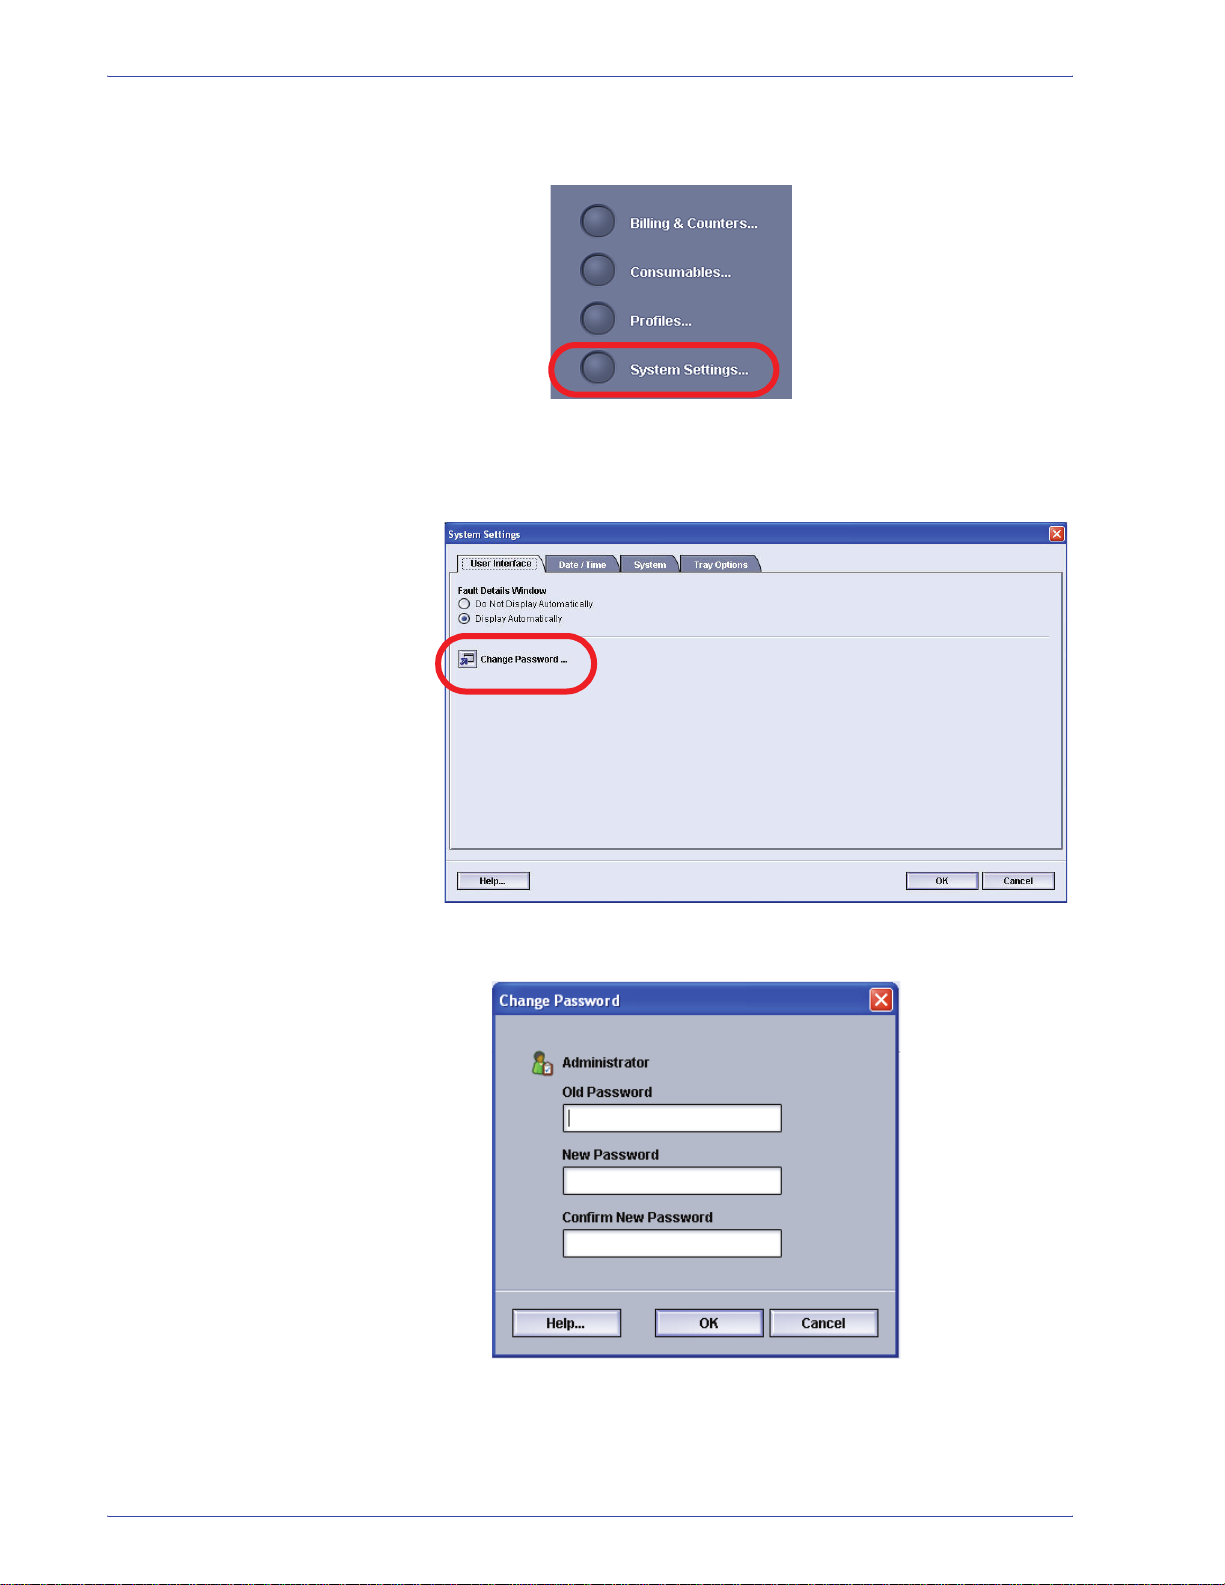
3. Select the System Settings button.
4. From the System Settings window, select the Change
Password button from the User Interface tab.
The Change Password window opens.
2-6
DocuColor 5000AP Administrator Guide
Page 15

2. System Settings
TIP: Use numbers only for creating your new password. Alpha
characters (letters and other characters, such as !*& are not
allowed). A maximum of twelve numbers can be entered for your
password.
5. From the Change Password window, enter:
a. The old (current) password
b. The new password
c. Reenter the new password in the Confirm New
Password area
d. Select OK
NOTE: For security reasons, only asterisks are displayed on the
screen.
6. Select OK from the System Settings window to return to the
main UI window.
DocuColor 5000AP Administrator Guide
2-7
Page 16
2. System Settings
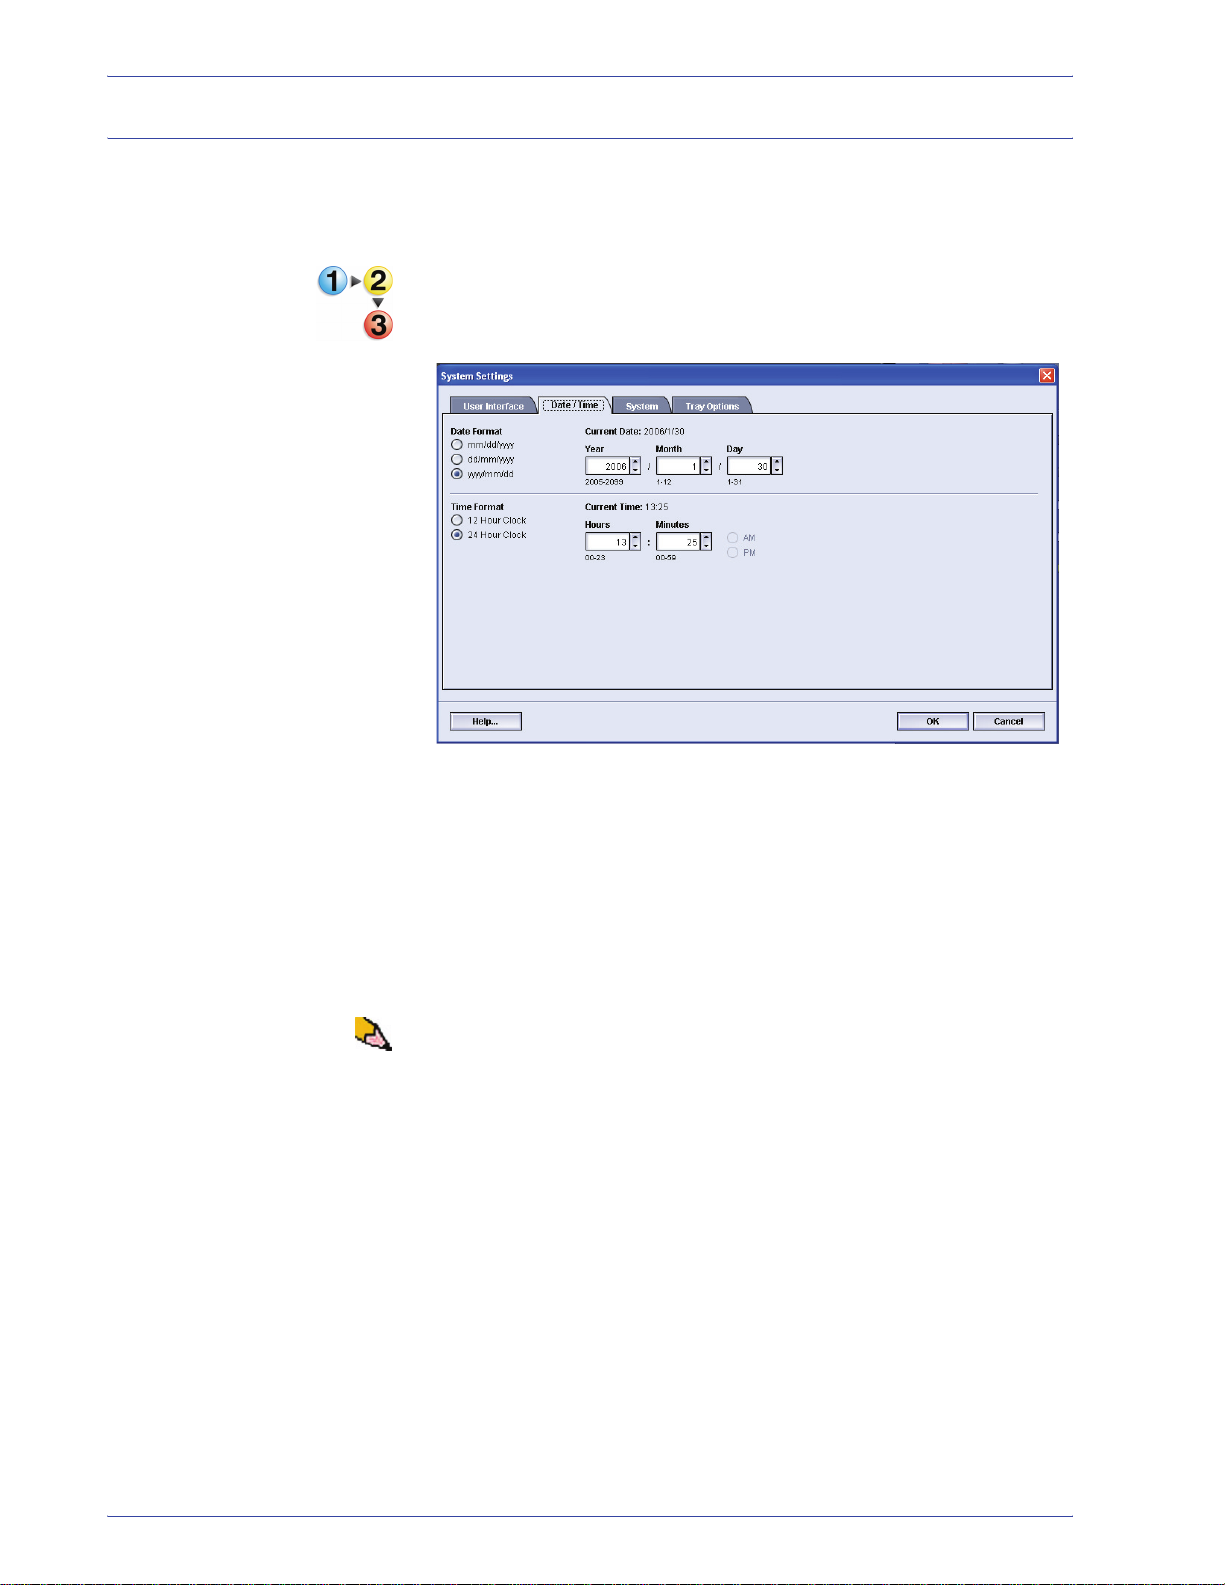
Setting the Date & Time
Use this feature to set the date and time for the system. The date
and time is displayed on the Machine Details screen on both the
Installed Soft ware and Error Log screens.
1. From the System Settings window, select the Date/Time
tab.
2. Select the Date Format you wish to use.
3. Use the up or down arrow buttons to enter the correct year,
month, and day.
4. Select the Time Format you wish to use.
5. Use the up or down arrow buttons to set the correct hour
and minutes.
NOTE: If you selected the 12 Hour Clock, touch the AM or PM
button.
6. Select OK to save your changes and close the System
Settings window.
2-8
DocuColor 5000AP Administrator Guide
Page 17
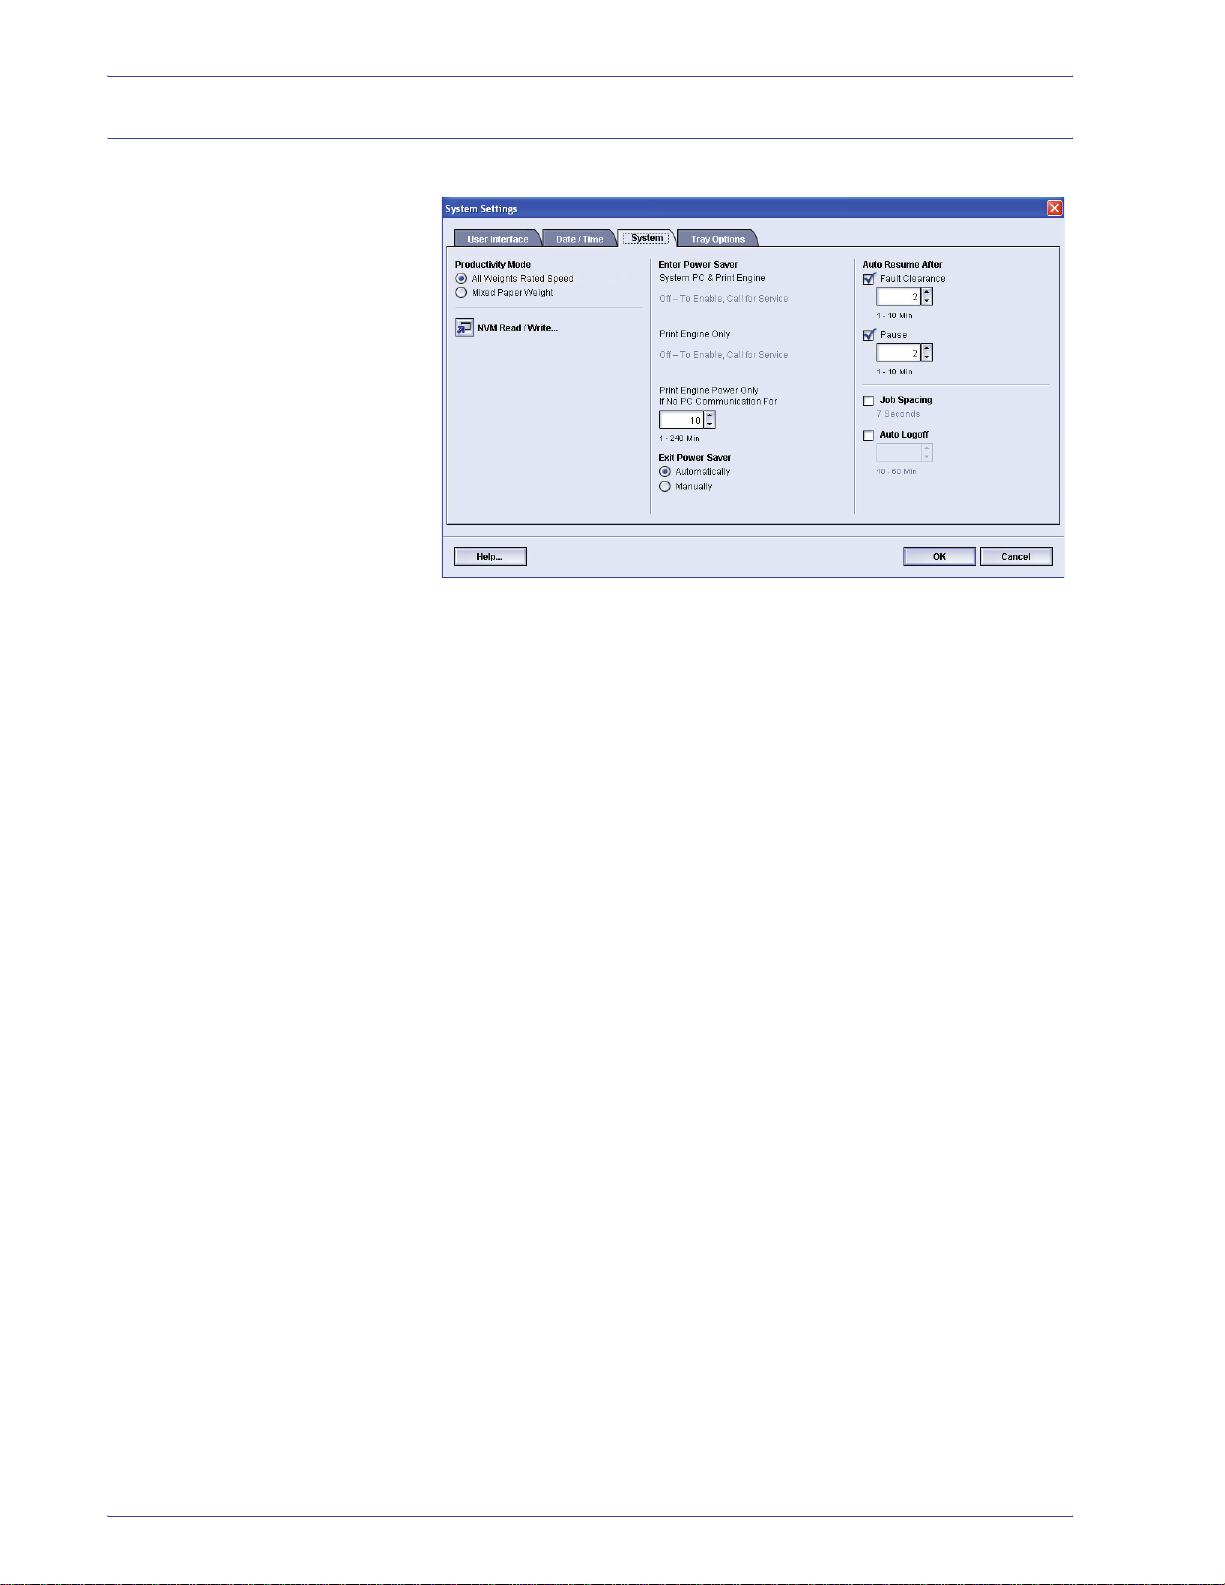
System
2. System Settings
Use this feature to change the factory default settings for the
following:
• Productivity Mode
• Power Saver (Enter and Exit options)
• Auto Resume
• Job Spacing
• Auto Logoff
The System feature also allows you to enter NVM Read/Write
values when using specialized media. This is discussed in more
detail on page 2-19.
DocuColor 5000AP Administrator Guide
2-9
Page 18
2. System Settings
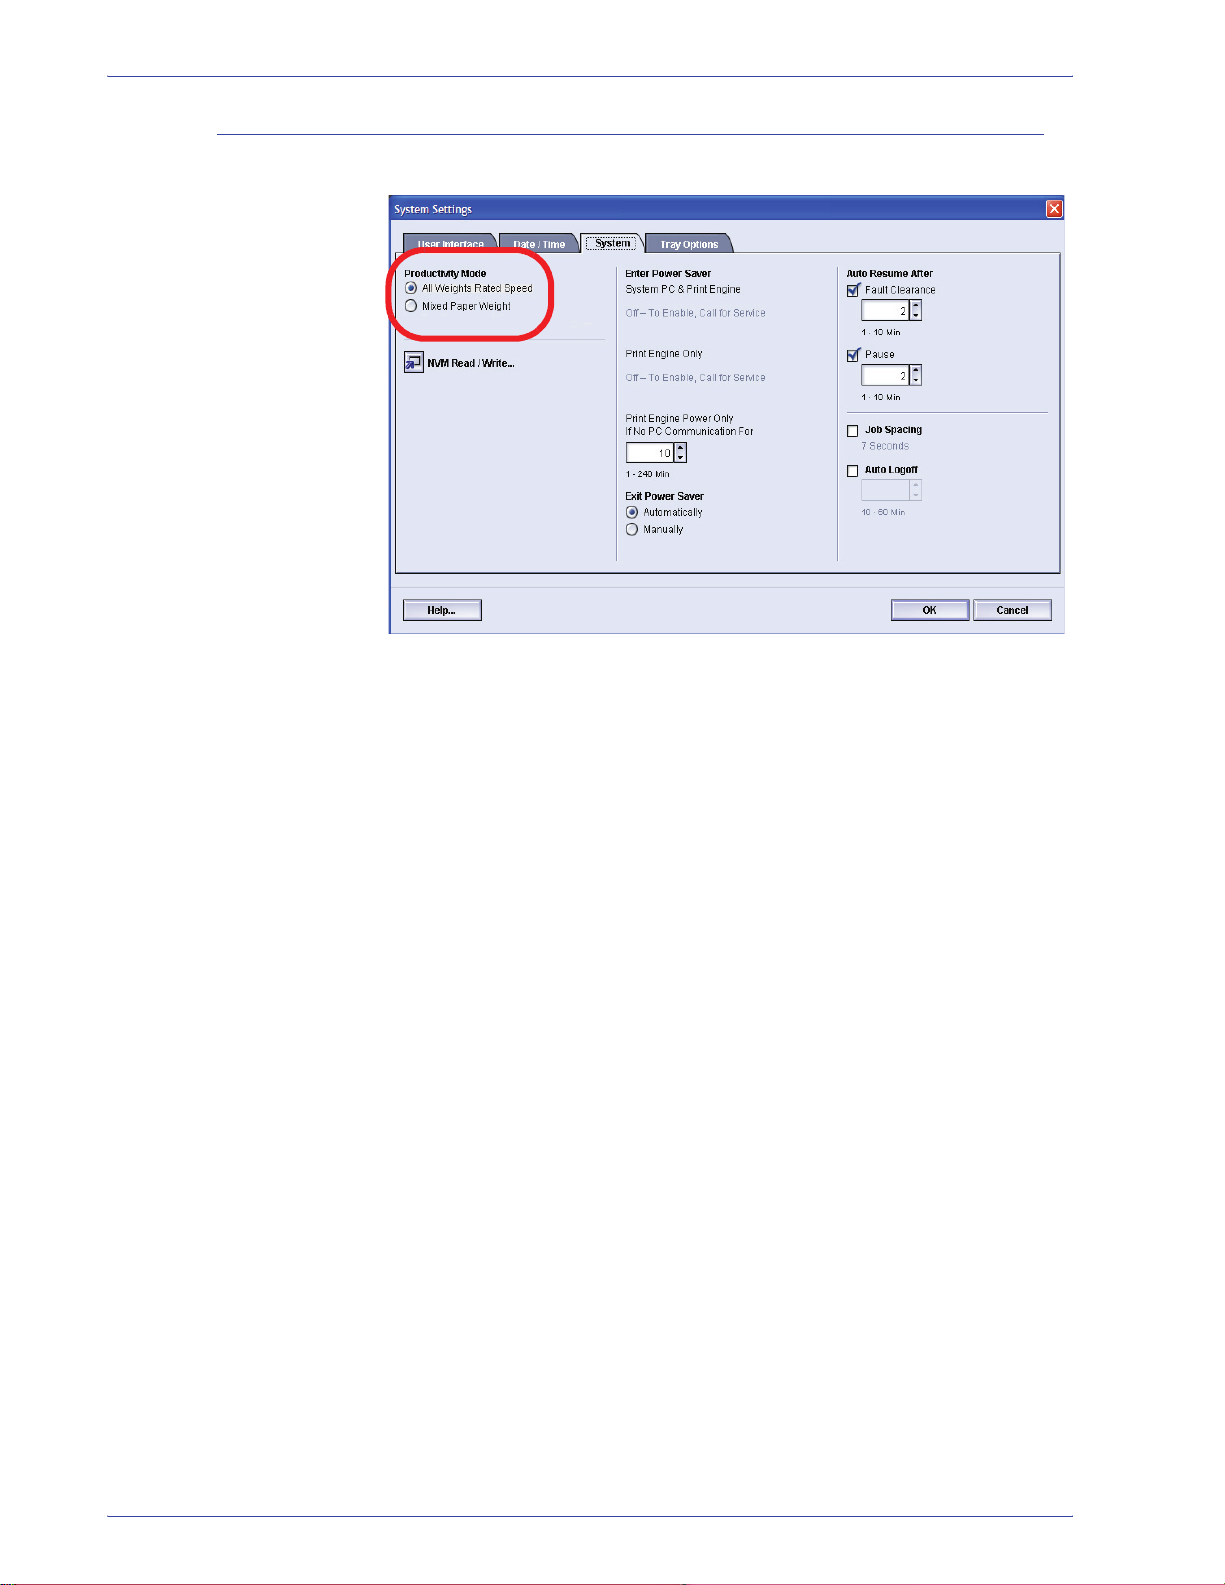
Productivity Setting
The productivity of the digital press relates to the continuous
speed of the media output as measured in prints per minute
(ppm). The continuous speed is dependent on paper size, paper
weight, and fuser temperature.
Use this setting to optimize the throughput speed for the type of
paper you run most frequently. Productivity Setting options
include:
• All Weight s Rated Speed: This setting runs all jobs at the
same speed regardless of the paper weight. Gloss levels may
appear lower on heavier weight media.
• Mixed Paper Weight: This setting optimizes the throughput
speed of print jobs that contain mixed media weights from
different paper trays.
Select the setting that best fits your printing environment and that
you use most frequently.
2-10
DocuColor 5000AP Administrator Guide
Page 19
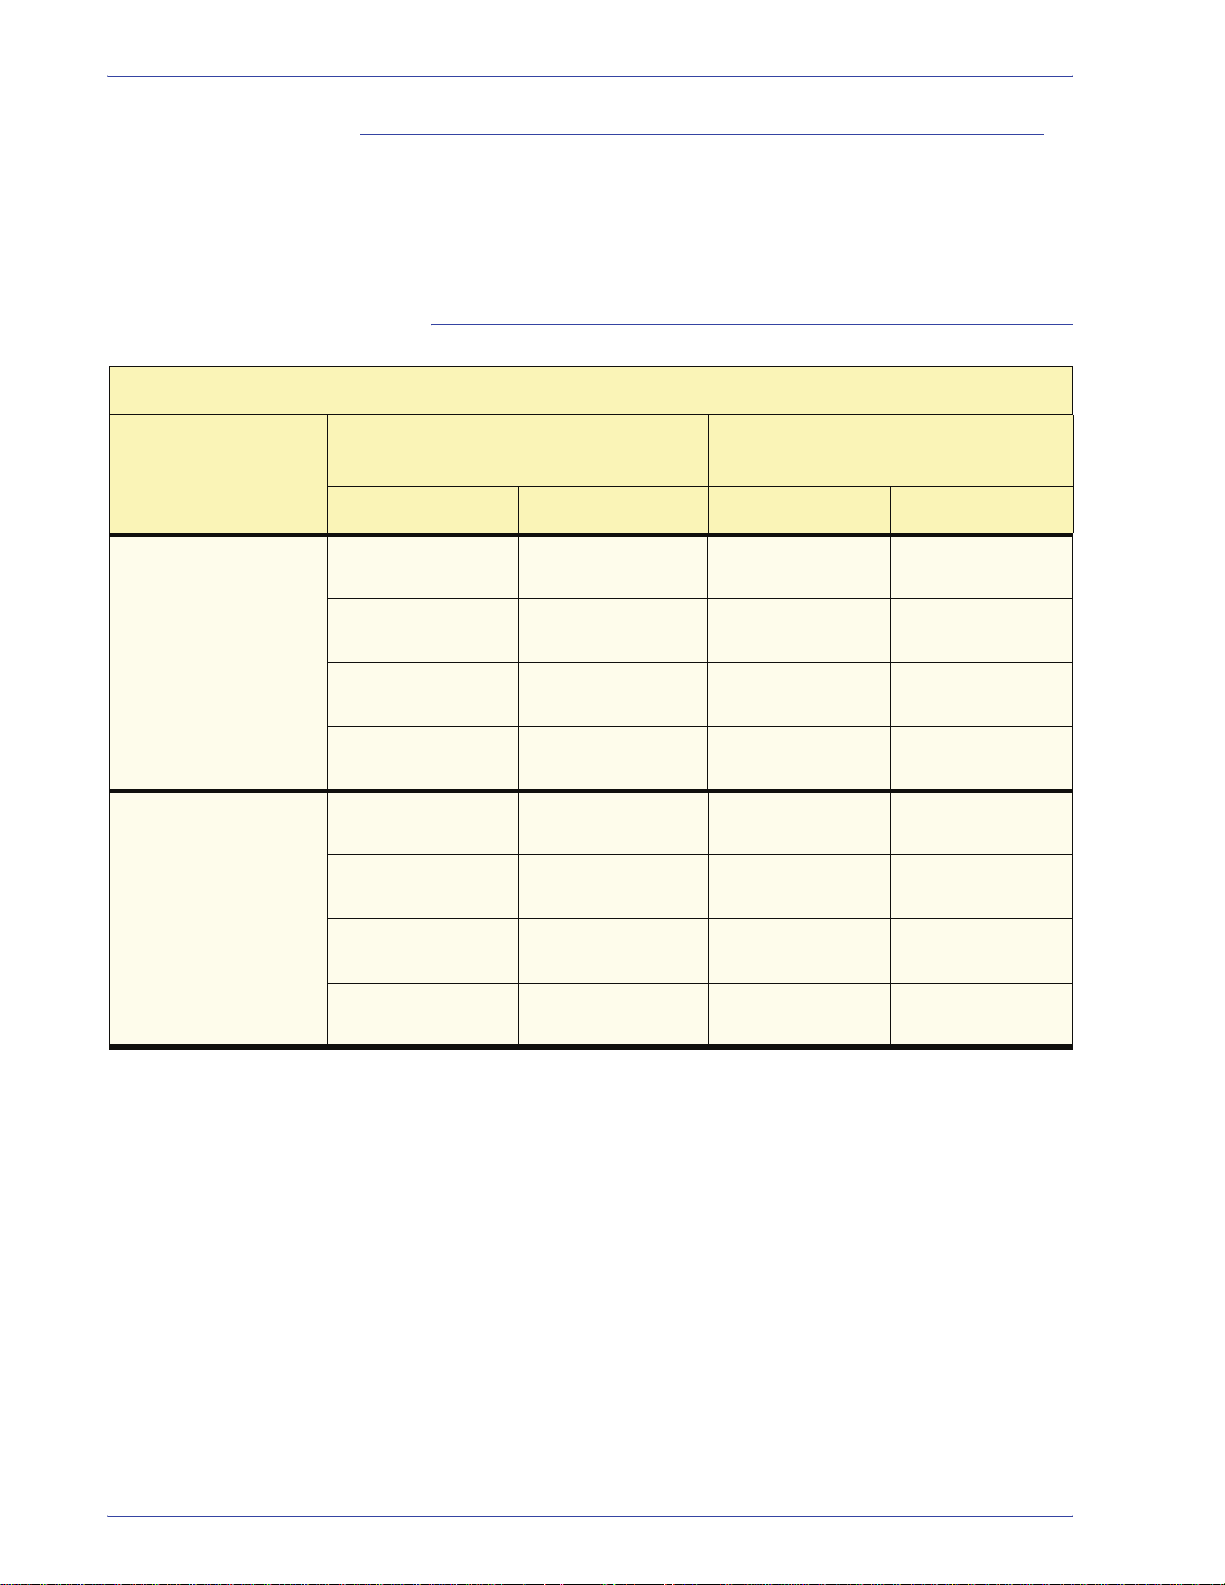
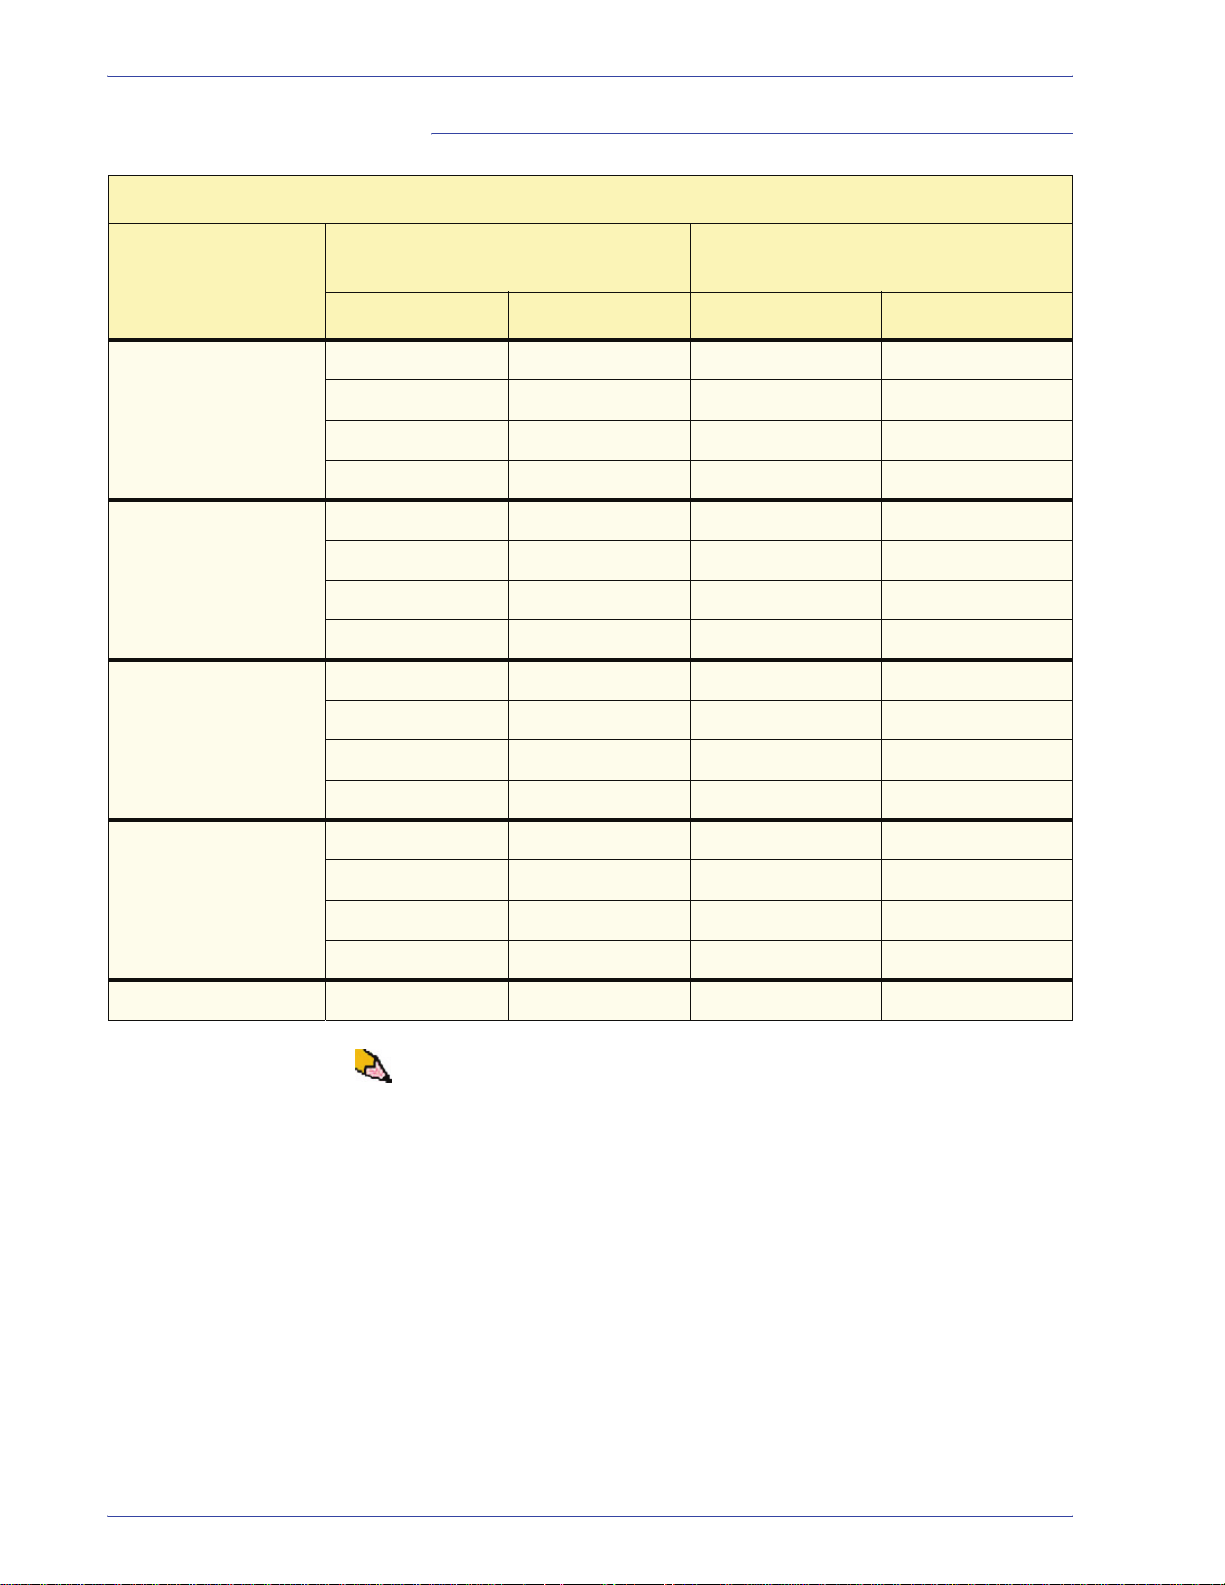
Productivity charts
The following productivity charts lists the various paper weights
and sizes and their related print speeds for 1 Sided and 2 Sided
output. Each chart outlines the print speed parameters for the
productivity settings.
All Weights Rated Speed
All Weights Rated Speed Mode
2. System Settings
Paper Weight
36 - 135 lb (60 - 220
2)
g/m
136 - 184 lb (221 300 g/m
2)
Paper Size (Feed direction length)
[inches/mm]
Min. Max 1 Sided 2 Sided
7.16 in. (182.0
mm)
8.51 in. (216.1
mm)
11.7 in. (297.1
mm)
18.1 in. (458.1
mm)
7.16 in. (182.0
mm)
8.51 in. (216.1
mm)
11.7 in. (297.1
mm)
18.1 in. (458.1
mm)
8.5 in. (216.0 mm) 50 25
11.69 in. (297.0
mm)
18 in. (458.0 mm) 50 25
19.2 in. (488.0
mm)
8.5 in. (216.0 mm) 50 25
11.69 in. (297.0
mm)
18 in. (458.0 mm) 50 25
19.2 in. (488.0
mm)
(prints per minute = ppm)
Print Speed
50 25
50 25
50 25
50 25
DocuColor 5000AP Administrator Guide
2-11
Page 20
2. System Settings
Mixed Paper Weight
Mixed Paper Weight Mode
Paper Weight
60 - 135 g/m
136 - 186 g/m
187 - 220 g/m
Paper Size (Feed direction length)
[mm]
Print Speed
Min. Max 1 Sided 2 Sided
2
182.0 216.0 50 25
216.1 297.0 33.3 16.7
297.1 458.0 25 12.5
458.1 488.0 20 10
2
182.0 216.0 33.3 16.7
216.1 297.0 25 12.5
297.1 458.0 16.7 8.3
458.1 488.0 12.5 6.3
2
182.0 216.0 33.3 16.7
216.1 280.0 20 10
280.1 432.0 16.7 8.3
432.1 488.0 12.5 6.3
221 - 300 g/m
2
182.0 216.0 25* --
216.1 280.0 16.7* --
280.1 458.0 12.5* --
458.1 488.0 10* --
Transparency 210.0 216.0 25 --
NOTE: *Print speeds may decrease due to printer setup
operations, which are based on environment al conditions and
specific interval volume of continuous printing.
2-12
DocuColor 5000AP Administrator Guide
Page 21
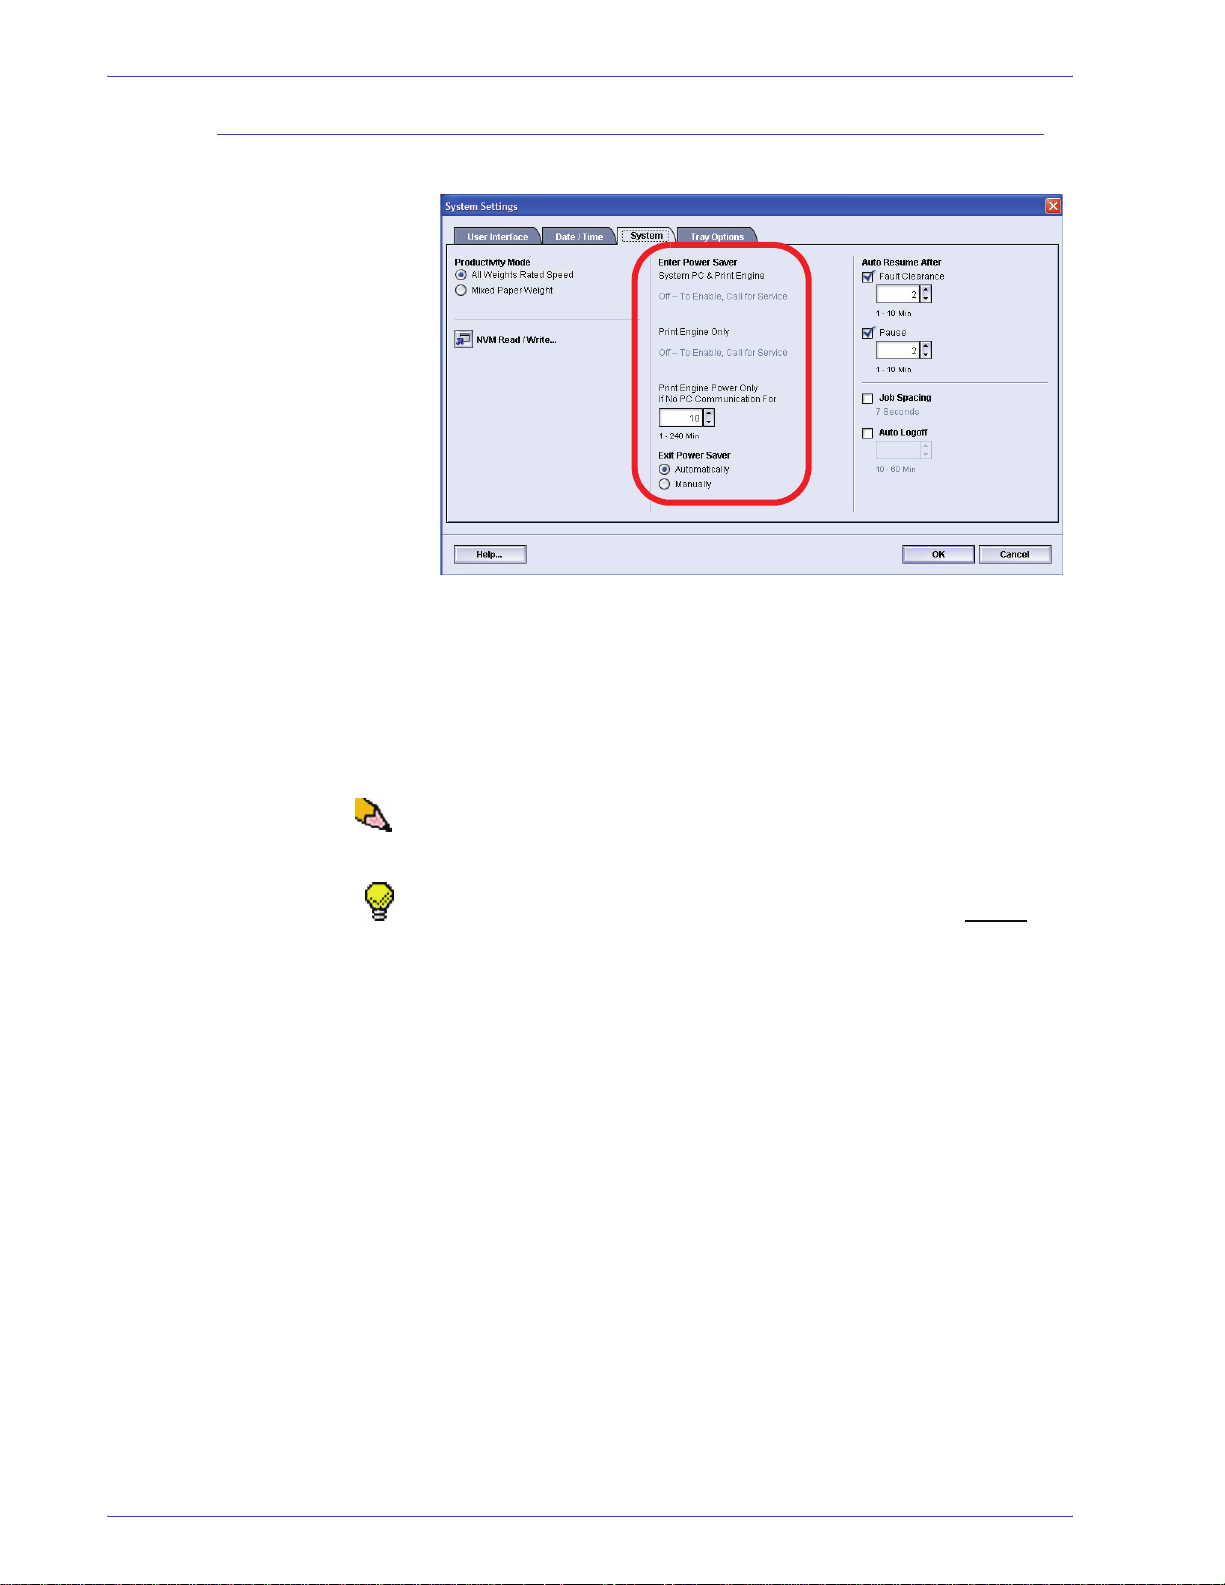
Power Save r
2. System Settings
Use this feature to set the time that elapses until the digital press
and System PC enter a reduced power consumption mode. The
timers are activated when all print jobs have been completed and
there are no jobs in the job queue.
The digital press and/or System PC exits the Power Saver mode
when a job is sent to be printed or the UI on the System PC is
activated.
NOTE: To manually exit Power Saver mode, quickly press the
power button on the System PC.
l
TIP: The System PC & Print Engine and Print Engine Only
features must be enabled by your Xerox representative before
can use them. If these features are not enabled, call your Xerox
representative for more information.
you
DocuColor 5000AP Administrator Guide
2-13
Page 22
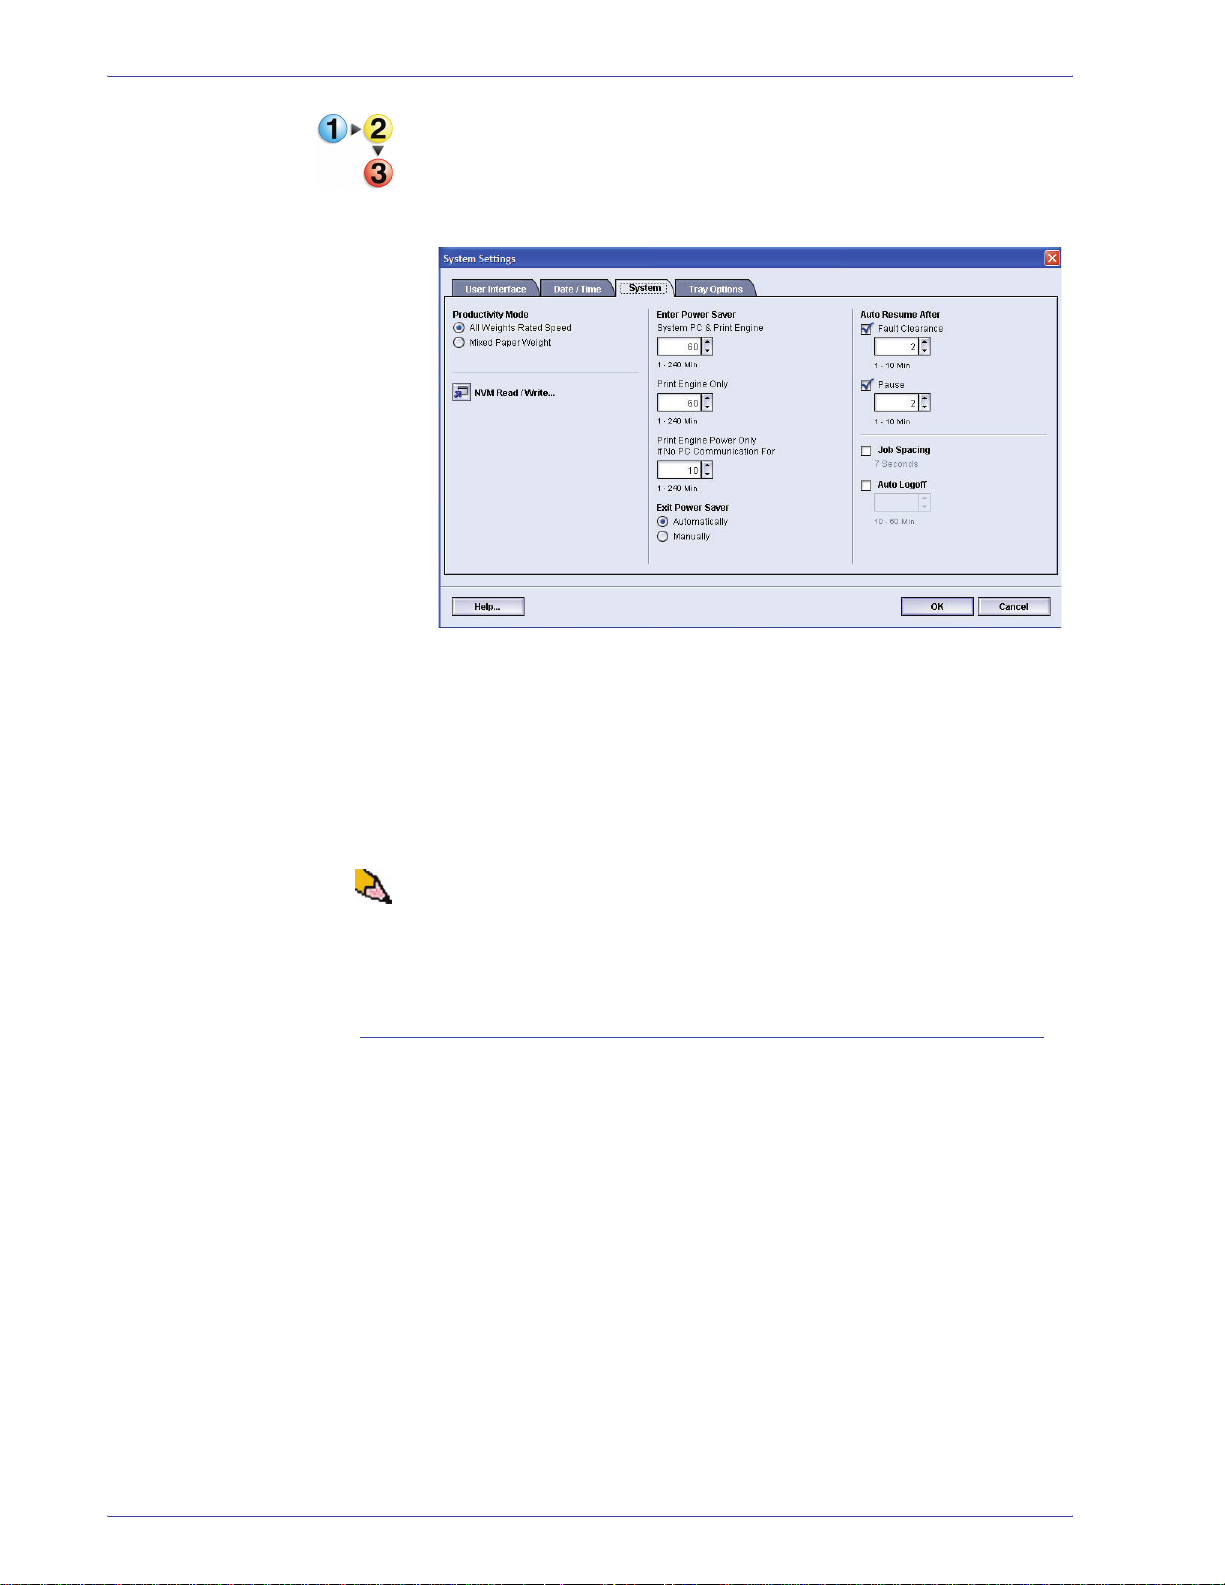
2. System Settings
To change the time for each power saver feature, use the following
procedure.
1. From the System Settings window, select the System tab.
2. Use the up or down arrow buttons to change the time for
each of the power saver features:
• System PC & Print Engine
• Print Engine Only
• Print Engine Power Only If No PC Communication For
The range available is 1-240 minutes.
NOTE: The system default time is sixty minutes.
3. Select OK to save your changes and close the System
Settings window.
Exit Power Saver
Select one of two options:
• Automatically: Select this option if you want the system to
automatically exit from power saver mode whenever the
mouse, keyboard, or PC Power Switch is activated.
• Manually: Select this option if you want to manually exit the
system from power saver mode when the Power Saver button
on the main UI screen is selected.
2-14
DocuColor 5000AP Administrator Guide
Page 23

Auto Resume After
Fault Clearance
2. System Settings
Use the Auto Resume After Fault Clearance feature to restart a
job automatically after a fault is cleared and a job received over
the network is waiting for user instruction.
1. From the System tab of the System Settings window, select
the checkbox to the left of Fault Clearance.
2. Use the up or down arrow buttons to change the time. The
range available is 1-10 minutes.
NOTE: The system default time is two minutes.
3. Select OK to save your changes and close the System
Settings window.
DocuColor 5000AP Administrator Guide
2-15
Page 24
2. System Settings
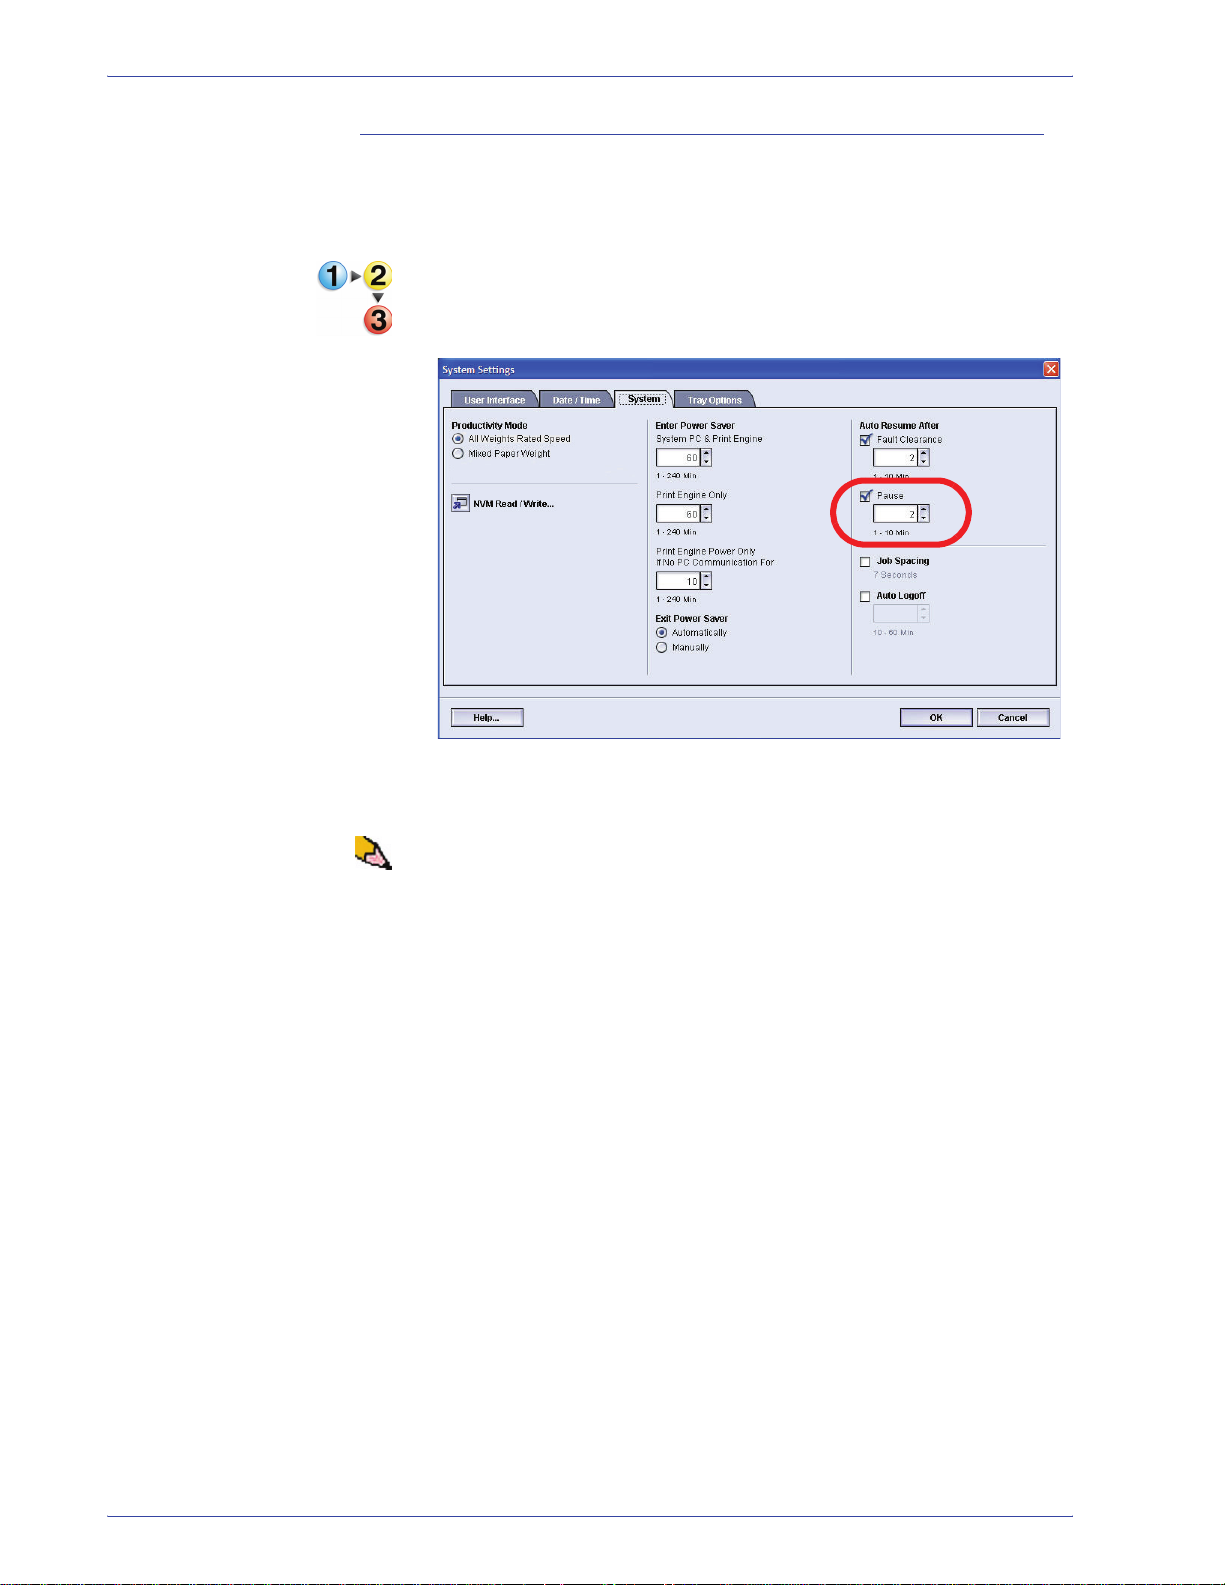
Pause
Use the Auto Resume After Pause feature to restart a job
automatically after the Pause button is selected on the UI and the
job is waiting for user instruction.
1. From the System tab of the System Settings window, select
the checkbox to the left of Pause.
2. Use the up or down arrow buttons to change the time. The
range available is 1-10 minutes.
NOTE: The system default time is two minutes.
3. Select OK to save your changes and close the System
Settings window.
2-16
DocuColor 5000AP Administrator Guide
Page 25

Job Spacing
2. System Settings
Use the Job Spacing feature when there are multiple jobs queued
and you would like to allow seven seconds to unload prints from a
finishing device before the next job starts printing.
1. From the System tab of the System Settings window, select
the checkbox to the left of Job Spacing.
Seven seconds is the standard and only time for this option.
2. Select OK to save your changes and close the System
Settings window.
DocuColor 5000AP Administrator Guide
2-17
Page 26

2. System Settings
Auto Logoff
Use the Auto Logoff feature to have the digital press automatically
return to the printing mode when no action is taken from any of the
Administrator functions after the set amount of time.
1. From the System tab of the System Settings window, select
the checkbox to the left of Auto Logoff.
2. Use the up or down arrow buttons to change the time. The
range available is 10-60 minutes.
NOTE: The system default time is ten minutes.
3. Select OK to save your changes and close the System
Settings window.
2-18
DocuColor 5000AP Administrator Guide
Page 27
NVM Read/Write
2. System Settings
Your Xerox service representative uses this feature to change
certain system settings. It also may occasionally be used by
system administrators.
Special Media Setting for
Drilled Papers
Special Media Setting for
LEF Tab Stock
Carbonless Media
Enablement
Under most conditions, this feature is not used by system
administrators; however, there are limited circumstances under
which this feature is used. These circumstances include:
If you use 3-hole, predrilled paper on a regular basis and
continually encounter an inordinate amount of paper jams, and/or
If you regularly run tab stock and continually encounter paper
jams.
• Carbonless papers are coated with several functional coatings
which promote the image transfer through the form set and
enable the form sets to separate appropriately after padding
with a special adhesive. Each supplier of xerographic
carbonless paper has developed their own unique chemistry,
which is why the following procedure enabling this application,
works best with Xerox Premium Digital Carbonless Paper.
• In order to avoid problems when running carbonless media,
you may use the NVM Read/Write feature to switch on the
carbonless media feature.
If any of the above conditions exist in your environment, you may
use the NVM Read/Write feature to switch on a feature.
CAUTION: Do not enter any numbers on this screen other than
the ones described in this procedure. Entering and saving
numbers, other than the ones described, changes the system
settings which may result in a service call to restore the system to
the correct settings.
DocuColor 5000AP Administrator Guide
2-19
Page 28

2. System Settings
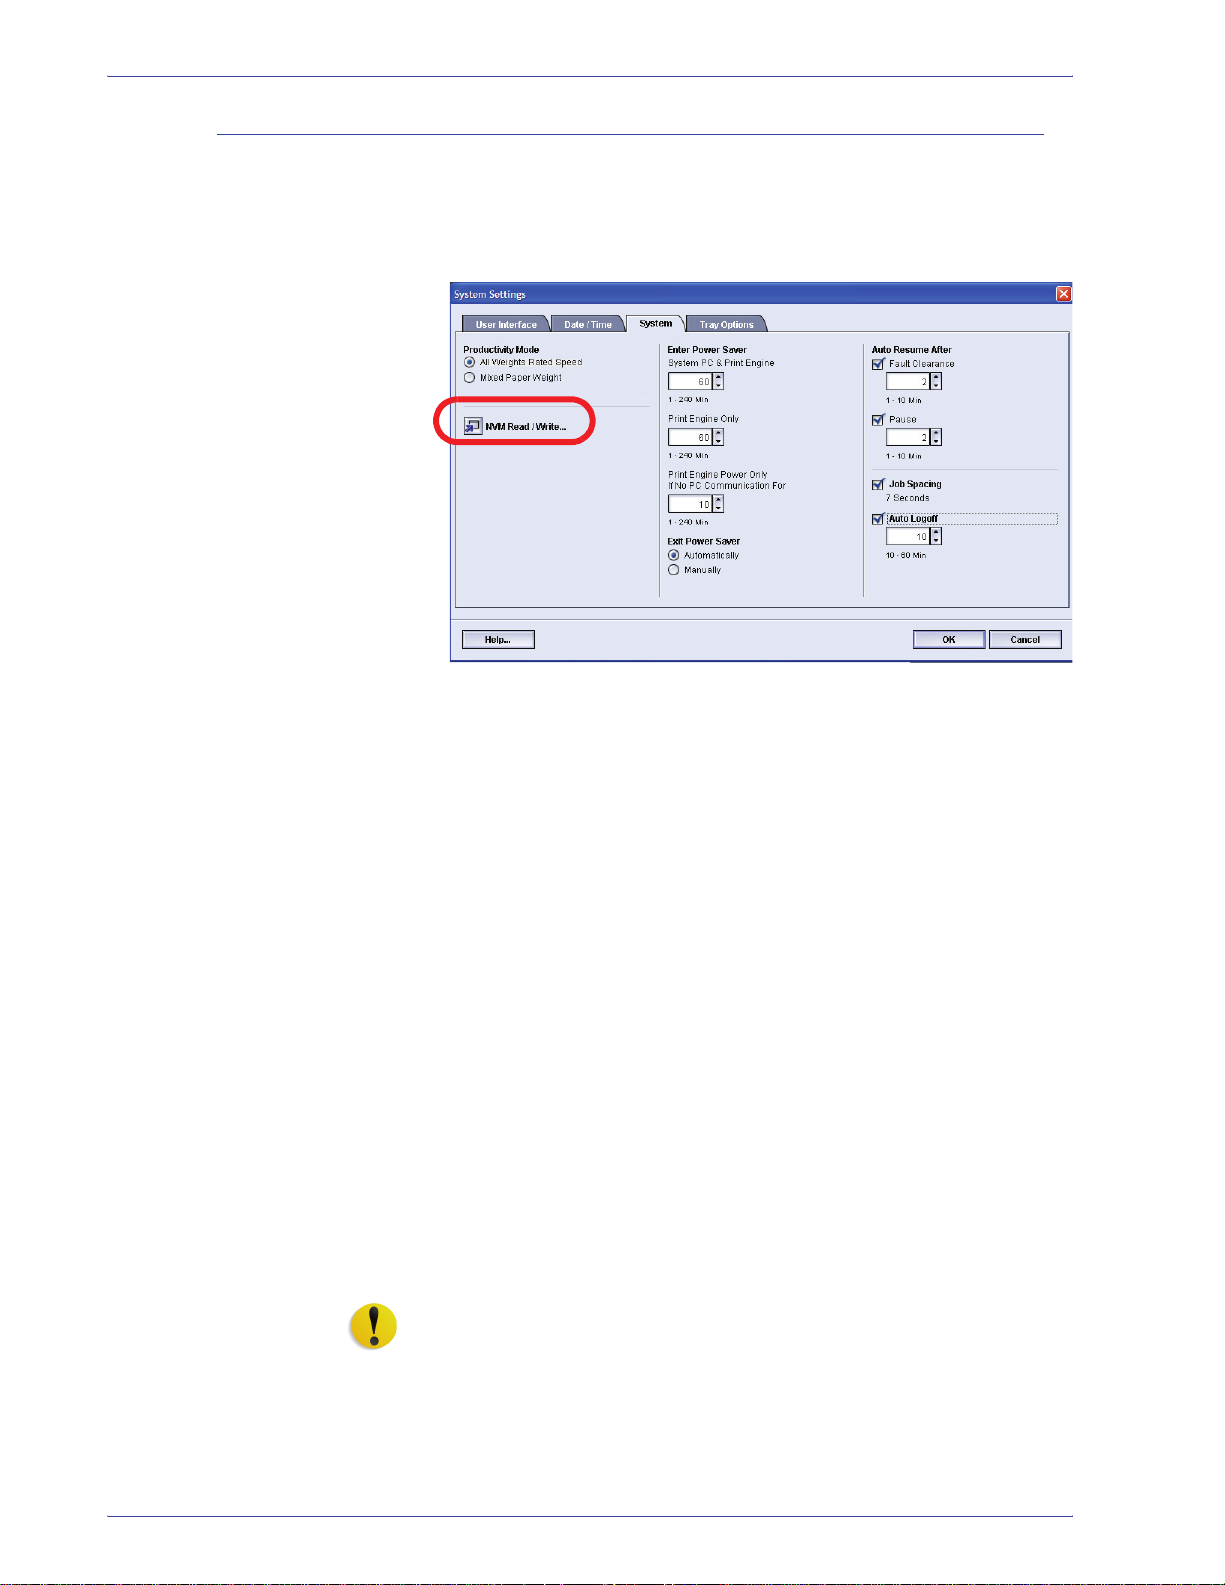
To s w it c h on a feature, perform the following:
1. From the System tab on the System Setting window, select
the NVM Read/Write button.
The NVM Read/Write window opens.
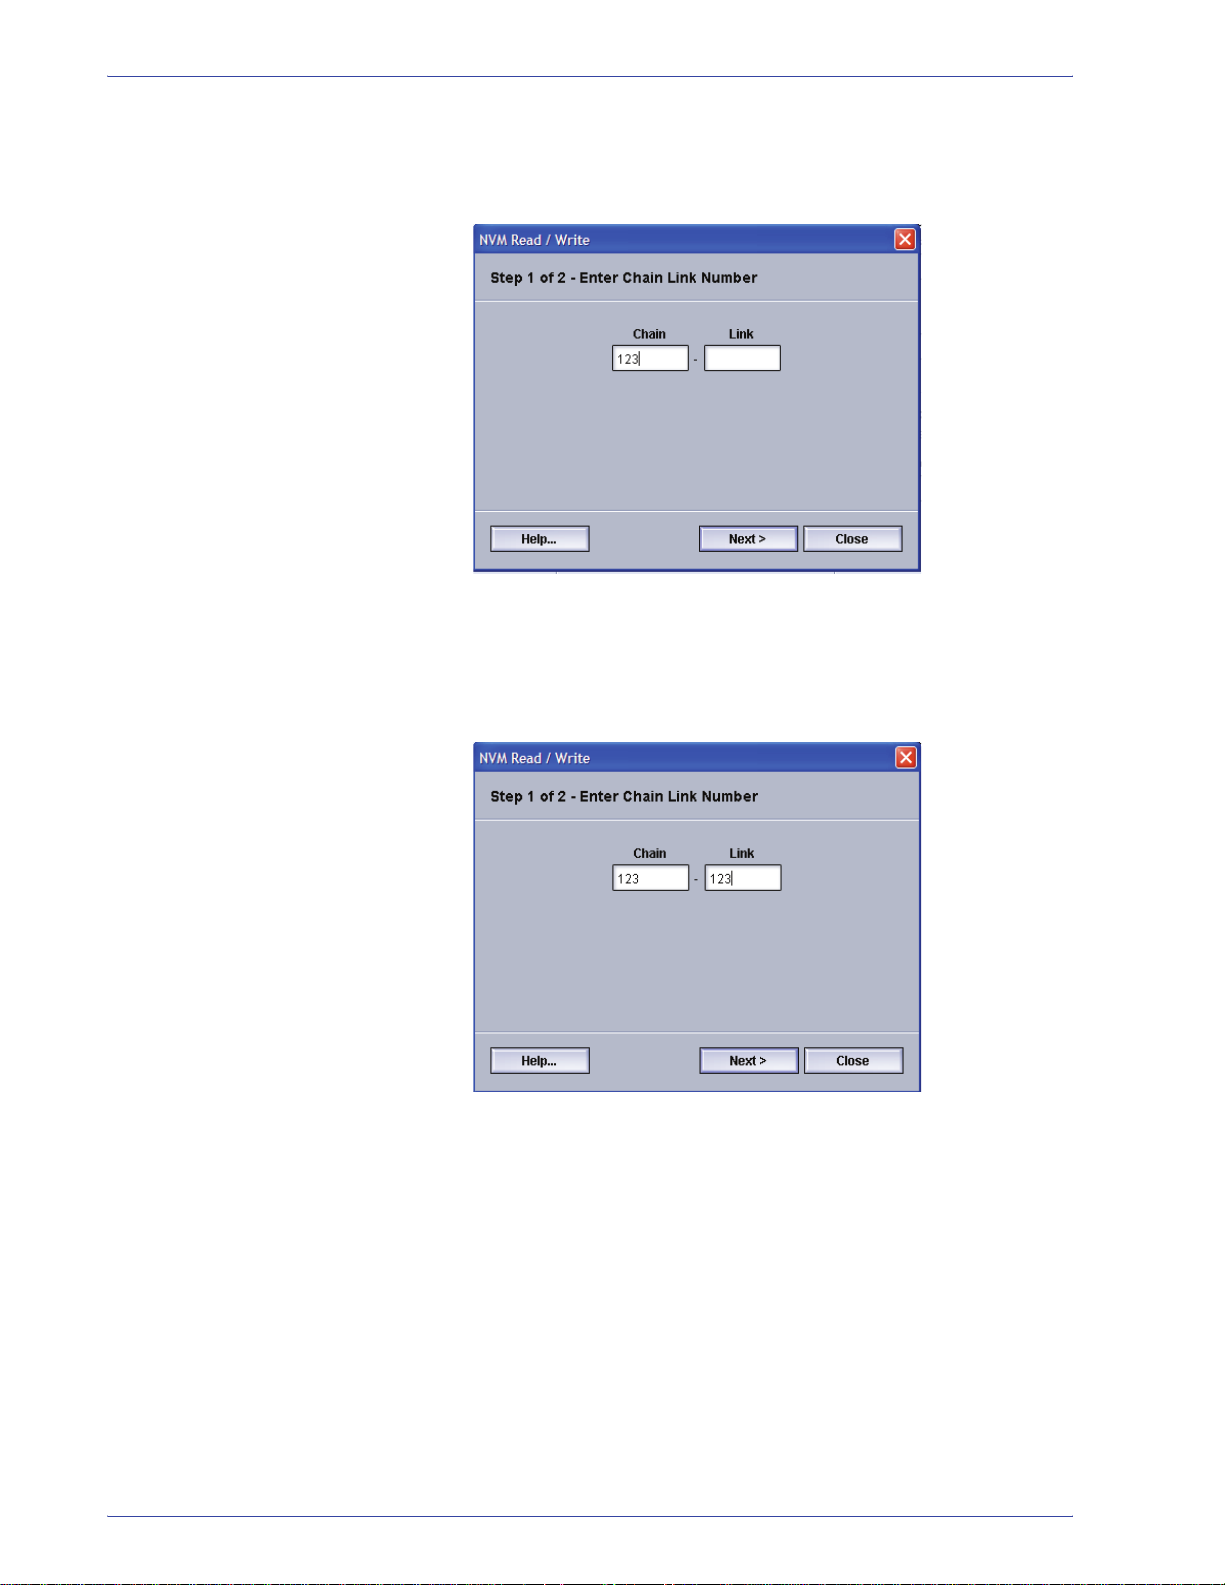
2. Enter the desired Chain Link Number:
• The Chain Link Number for Special Media Setting for
Drilled Papers is 700 545.
• The Chain Link Number for Special Media Setting for
LEF Tab Stock is 700 546.
2-20
• The Chain Link Number for Carbonless Media
Enablement is 700-920.
NOTE: For the purpose of this procedure, the following screens
show an example
New Value; this exampl e does not represent an actual Chain Link
Number. The Current Value and New Value numbers will vary
depending on the Chain Link Number entered.
of a Chain Link Number, Current Value, and
DocuColor 5000AP Administrator Guide
Page 29
2. System Settings
a. Using the numbers on the keyboard, enter the Chain
Number (the following example uses 123 as the Chain
number).
b. Press the Tab button on the keyboard to advance to
the Link field.
c. Enter the Link number (the following example uses 123
as the Link number).
d. Select the Next button.
DocuColor 5000AP Administrator Guide
2-21
Page 30

2. System Settings
3. Using the keyboard, enter the New Value (the following
example uses 234 as the New Value number).
TIP: To s w it c h on a feature, enter the appropriate value from the
keyboard:
• For Special Media Setting for Drilled Papers
the New Value.
• For Special Media Setting for LEF Tab Stock
the New Value.
• For Carbonless Media
, enter 1 for the New Value.
, enter 0 for
, enter 1 for
4. Select the Apply button. The NVM Read/Write window
displays the entered value as the Current Value.
2-22
5. Select Close to save and close your new setting.
6. Select OK to close the System Settings window.
DocuColor 5000AP Administrator Guide
Page 31

2. System Settings
TIP: After running your print job, reenter Administrator mode,
System Settings, NVM Read/Write, and switch off
that is currently on. Follow the steps outlined in this procedure
and use these settings for the New Value number:
the feature
Tray Options
• To switch off the Special Media Setting for Drilled Papers
enter 1000.
• To switch off the Special Media Setting for LEF Tab Stock
enter 0.
• To switch off the Carbonless Media
TIP: To prevent paper jams from occurring with stock types other
than the ones mentioned in this procedure, you must switch off
the NVM Read/Write feature before running other print jobs.
Use this feature to change the factory default settings for the
following:
• Auto Tray Switching
• Auto Paper Selection
• Do Not Include
• Paper Tray Air Assist
•Tray Priority
, enter 0.
,
,
DocuColor 5000AP Administrator Guide
2-23
Page 32
2. System Settings
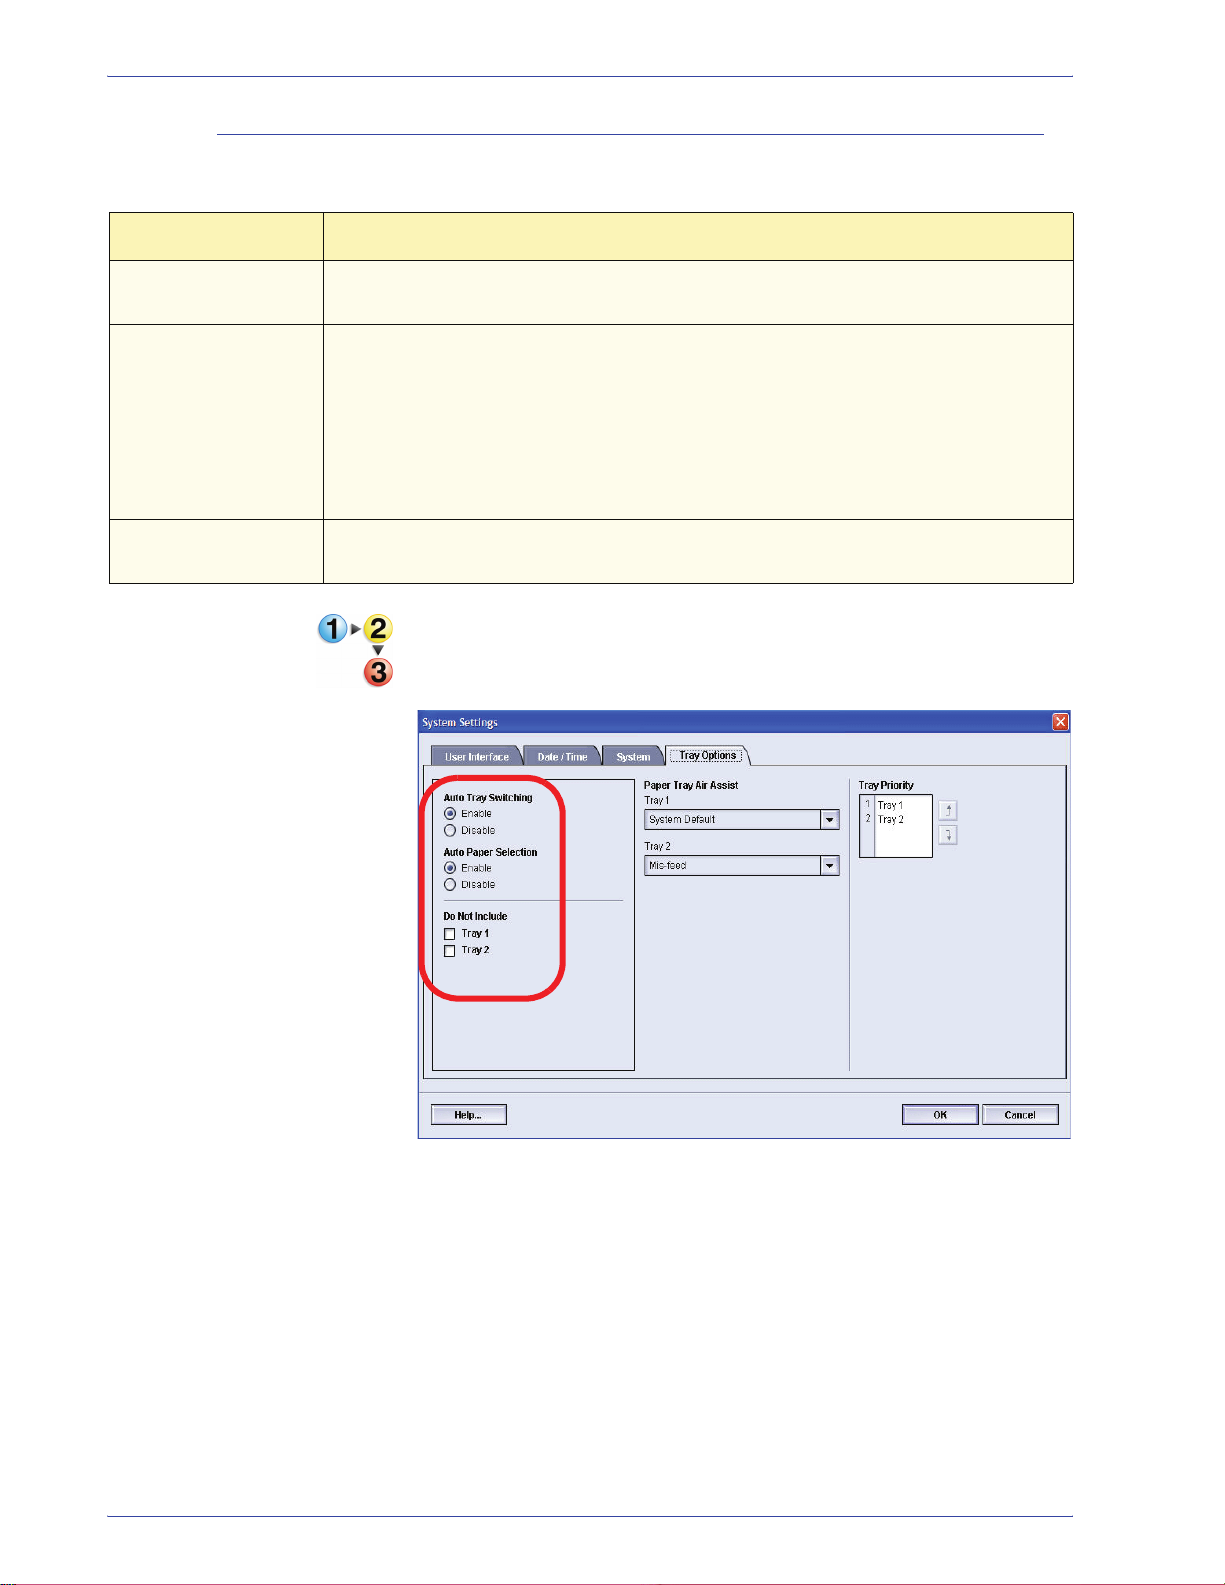
Auto Tray Switching, Auto Paper Selection, and Do Not Include
Choose the default settings for the following options:
Default Setting What the Default Does
Auto Tray Switching
(ATS)
Auto Paper Selection
(APS)
Do Not Include Selecting a tray or trays in this option tells the machine to ignore any selections
Allows the digital press to automatically select another paper tray, containing the
appropriate paper, if the selected paper tray becomes unusable.
Allows the digital press to automatically select the appropriate paper size for the
job being processed, without a specific paper tray being selected.
When Single Paper Weight is selected as the default setting, Auto Paper selects
only 81-105 g/m
Productivity Setting is enabled, Auto Paper selects only 106-135 g/m
correct size.
that were made in the Auto Tray Switching or the Auto Paper Selection options.
2
paper in the correct size. When the Mixed Paper Weight
2
paper in the
1. From the System Setting window, select the Tray Options
tab.
2-24
2. Select either the Enable or Disable button for the Auto Tray
Switching option.
3. Select either the Enable or Disable button for the Auto
Paper Selection option.
4. To instruct the digital press to bypass (ignore) one or more
of the paper trays, select the checkbox to the left of the
desired paper pray in the Do Not Include area.
5. Select OK to close the System Settings window.
DocuColor 5000AP Administrator Guide
Page 33
Paper Tray Assist
2. System Settings
Blowers help control the environmental conditions in the paper
trays to ensure optimum print capability:
• Each paper tray has two blowers and two fans. The
blowers are located in the front of each tray, while the two
fans are located on the right-side of the tray.
• The lead edge blower is on at all times and produces
heated air if one of the following selections are
made: Coated paper, Transparencies, or Plain paper 106
2
g/m
or heavier. The trail edge blower is on at all times and
does not produce heated air.
• The paper trays also have air adjustment levers on the
drawer to regulate the direction of the air:
2
– If the paper weight is between 60 and 256 g/m
, the
position of the air adjustment levers should be toward
the front of the tray.
– If the paper weight is between 257 and 300 g/m
2
, the
position of the air adjustment levers should be
positioned toward the rear of the tray.
DocuColor 5000AP Administrator Guide
2-25
Page 34
2. System Settings
If you adjust the blowers on the tray to accommodate a particular
type of paper (for example, thin or thick), you want to make
adjustments on the Tray Options window from the Administrator
mode. This will provide optimal output quality of your prints. To
make these adjustments, use the following procedure:
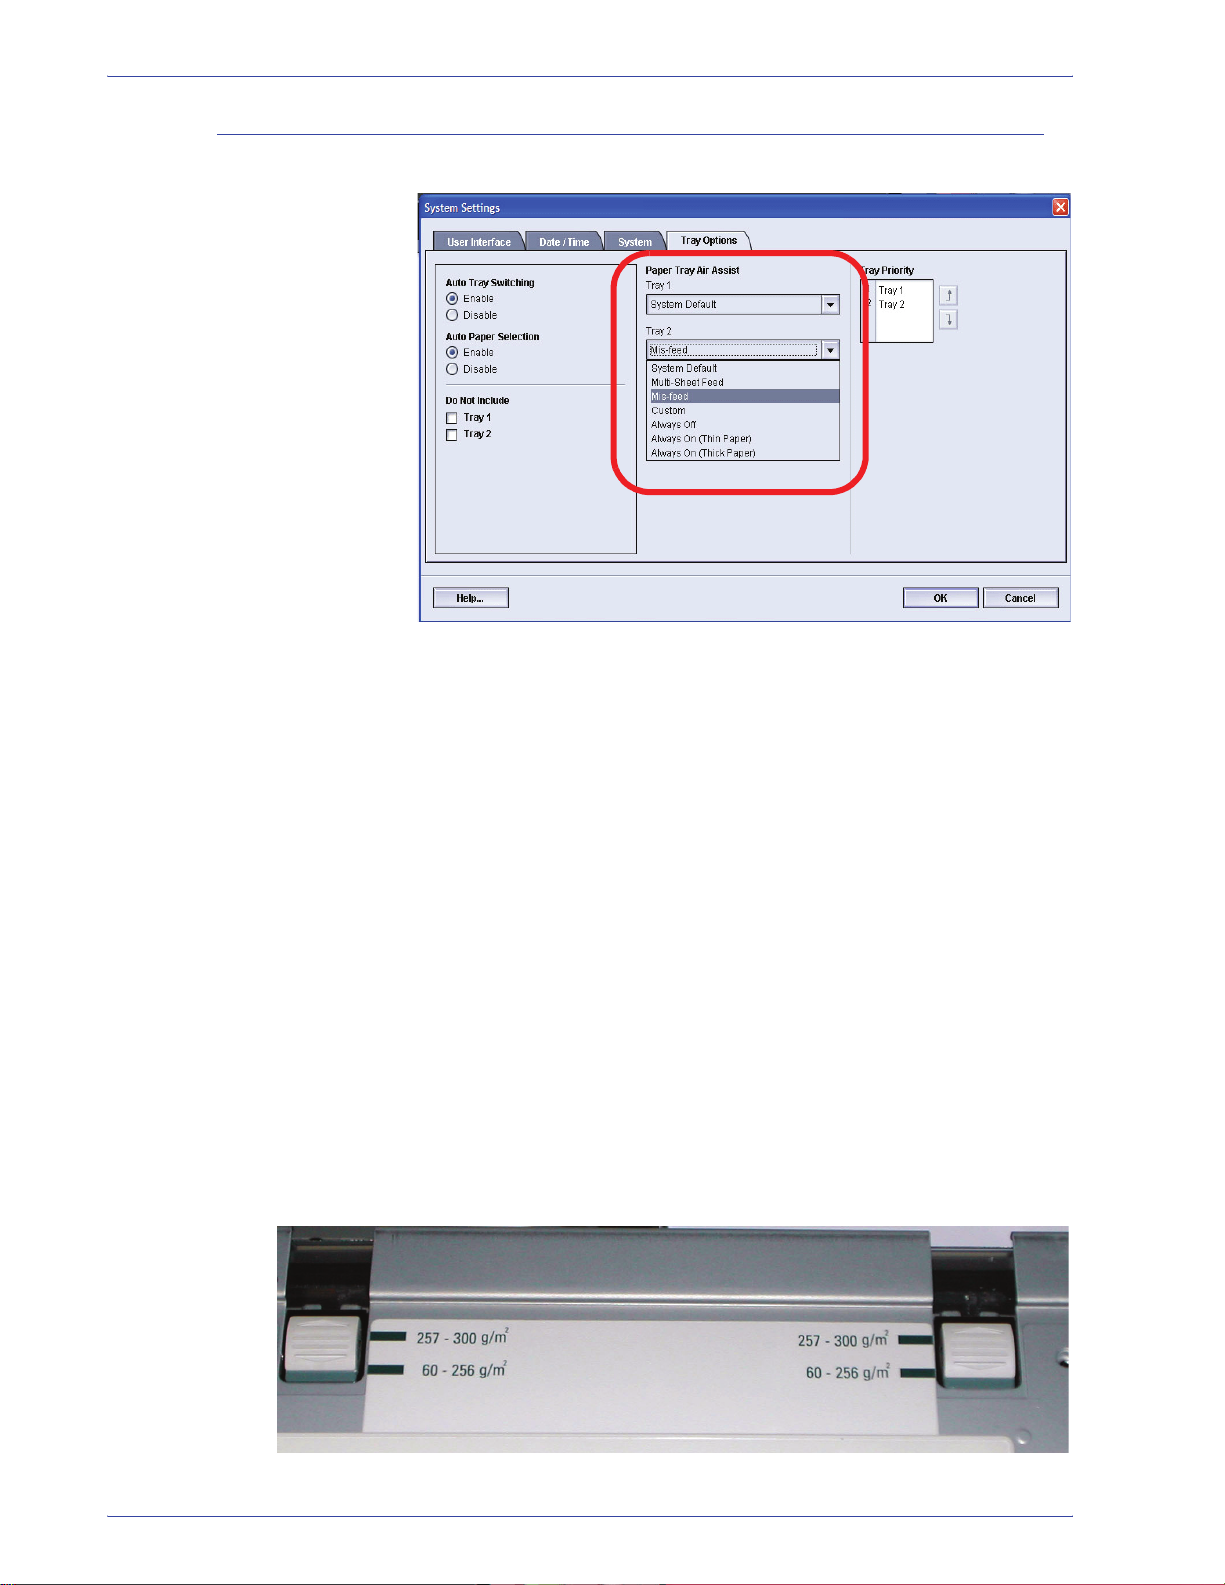
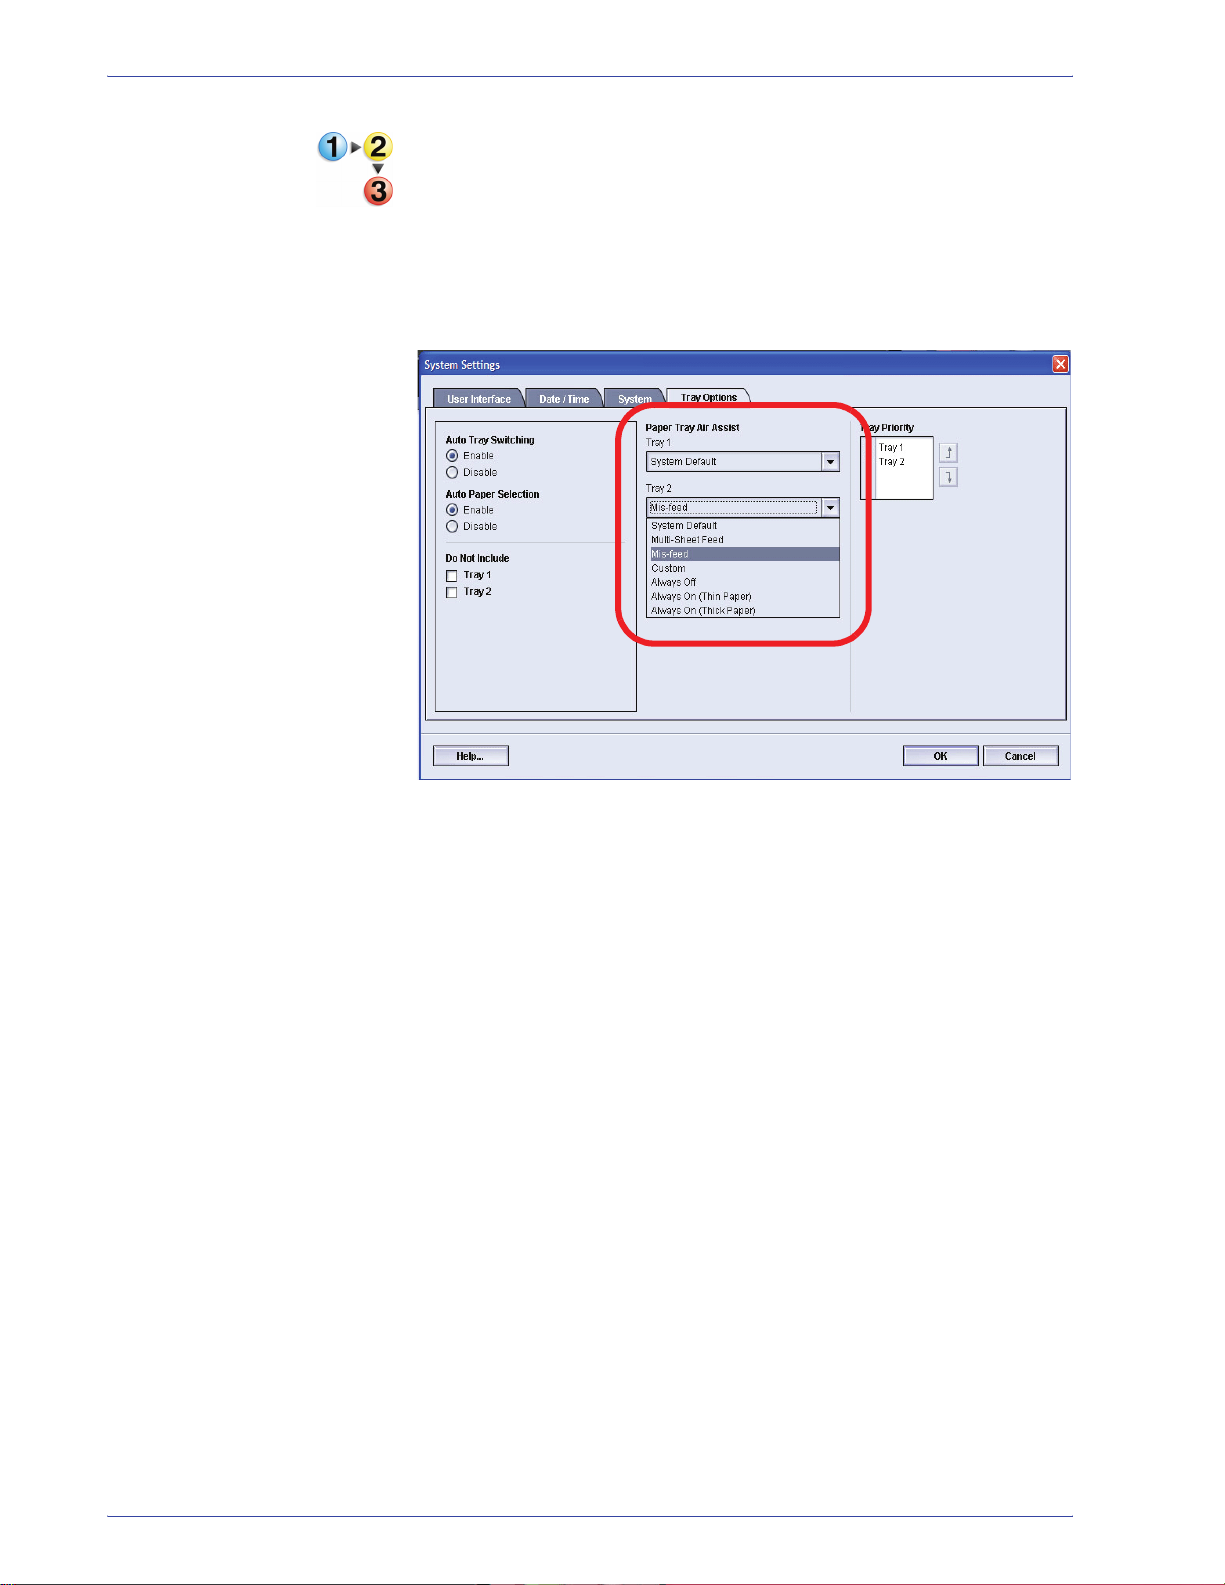
1. From the System Setting window, select the Tray Options
tab.
2. Select either the desired tray.
3. From the pull-down menu, select the option which best
correlates with the selected paper for that tray and the
adjustments made to the tray air adjustment levers.
The options include the following:
• System Default: This option is the default setting. With
this option the paper tray blowers automatically adjust
using settings that are optimized for Xerox papers.
• Multi-Sheet Feed: Select this option if you want the
paper tray blower automatic settings to incrementally
adjust in order to reduce multifeeds.
• Mis-feed: Select this option if you want the paper tray
blower automatic settings to incrementally adjust in
order to reduce misfeeds.
• Custom: With this option, the paper tray blowers are
controlled by parameters that are set by your Service
Representative.
• Always Off: Select this option if you want the paper
tray blowers always switched off; in this mode, the
blowers are not automatically controlled. This mode is
reserved for special media.
2-26
DocuColor 5000AP Administrator Guide
Page 35

2. System Settings
• Always On (Thin Paper): With this option, the paper
tray blowers are not automatically controlled, but the
are always switched on. This mode is also reserved
for special media.
• Always On (Thick Paper): With this option, the paper
tray blowers are not automatically controlled, but they
are always switched on. This mode is reserved for
special media.
4. Select OK to close the System Settings window.
DocuColor 5000AP Administrator Guide
2-27
Page 36

2. System Settings
Tray Priority
Select the priority order for each paper tray. If the Auto Tray
Switching feature is enabled and each paper tray contains the
same paper size and weight, the digital press feeds paper from
the tray set at Priority 1. If there is no paper in the Priority 1 tray,
the Priority 2 tray is automatically selected and so on.
Use the following procedure to set the priority for each paper tray.
1. From the System Setting window, select the Tray Options
tab.
2. Click once on a desired paper tray.
3. Click the up or down arrow button to the right of it in order to
move it up or down in the priority list.
4. Repeat this procedure for each Priority. You cannot set the
same paper tray for more than one Priority at a time.
5. Select OK to save your settings and close the System
Settings window.
2-28
DocuColor 5000AP Administrator Guide
Page 37

Overview
Alignment
3. Profiles
Profiles allows you to create and customize profiles for Custom
Paper, Alignment, and Decurler. These profiles are used at the
point of need for specialized print jobs which may require different
types of media, such as lightweight or heavy stock. Using a
customized profile can provide optimum image and output quality.
NOTE: The Profiles features can only be accessed from the
Administrator mode.
When printing duplex jobs and using different media types
(including paper type, weight, and coating/uncoating), the output
may require specific handling by the digital press as it is moving
through the paper path. With certain media types and duplex jobs,
the images on Side 1 and/or Side 2 may be misregistered,
skewed, perpendicularly misaligned, or stretched.
The Alignment Adjustment feature allows you to create and store
a maximum of twenty different Alignment Adjustment
Profiles. These profiles allow you to accommodate different
media types and how the image is registered, aligned, or
magnified for Side 1 and Side 2 output. These profiles may be
used at point of need in order to ensure optimum output quality of
your print.
NOTE: You can create Alignment Profiles without associating
them to a specific Cust om Paper Profile. The reverse is also
true: You can create an Alignment Profile and associate it to a
specific Custom Paper Profile. For example, Custom Paper
Profile 2 may be affiliated with Alignment Profile 2, so that when
Custom Paper Profile 2 is in use, Alignment Profile 2 is also in
use.
DocuColor 5000AP Administrator Guide
3-1
Page 38

3. Profiles
When creating Alignment Profiles for Side 1 and/or Side 2 prints,
be aware of the following:
• Side 1/Side 2 images may be misregistered because the
paper is not the exact same size. It may vary slightly, with
differences of plus or minus 1mm, causing the image to be
misregistered. To reduce the possibility of size differences, it is
recommended that you use paper from the same lot when
running duplex jobs.
• During the fusing process, the heat and pressure applied to
the paper causes the paper to stretch. If the images on Sides 1
and 2 are the same size, the stretching of the paper may
cause the image on Side 1 to be slightly larger than the image
on Side 2.
• Creating an Alignment Profile for these types of jobs allows
you to reduce or eliminate the images being larger on Side1
than on Side 2 prints.
NOTE 1:Your Alignment Profile may or may not be af filiated with a
Custom Paper Profile.
NOTE 2:Once an Alignment Profile is set and in use, your color
server will not reflect that profil e in the print options for print jobs.
NOTE 3:After an Alignment Profile is set, it remains active until
you reenter Administrator mode and switch it off. If an active
Alignment Profile is not associat ed with a Custom Paper Profil e, it
is used for each paper tray to which it is assigned.
Alignment Adjustment Profile procedure
Use the following procedure to create/modify an Alignment Profile
for adjusting Side 1/Side 2 image output.
NOTE: If you require a Custom Paper Profile associated with this
Alignment Profile, you can set the Custom Paper Profi le
information either now or af ter you create the Alignment Profile.
1. Select the Logon button from the main UI window.
3-2
DocuColor 5000AP Administrator Guide
Page 39
3. Profiles
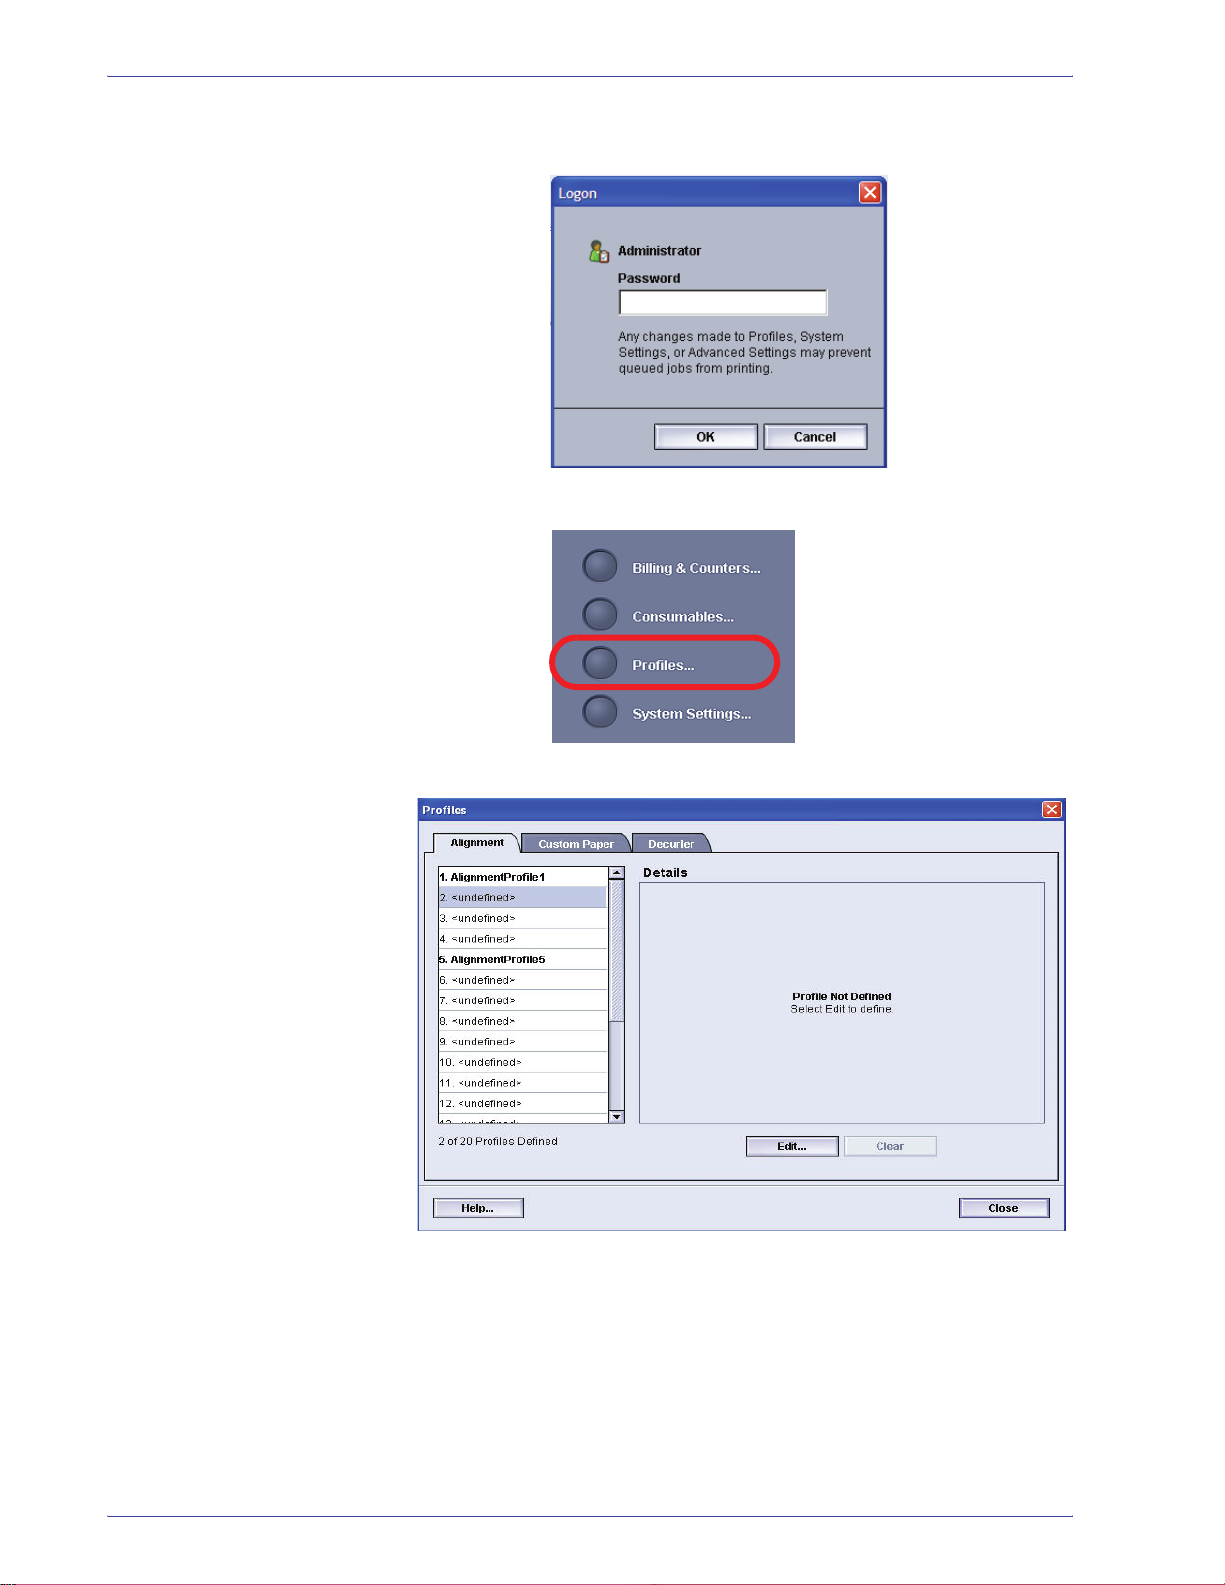
2. From the Logon window, enter the Administrator password
and select OK.
3. Select the Profiles button.
4. From the Profiles window, select the Alignment tab.
DocuColor 5000AP Administrator Guide
3-3
Page 40
3. Profiles
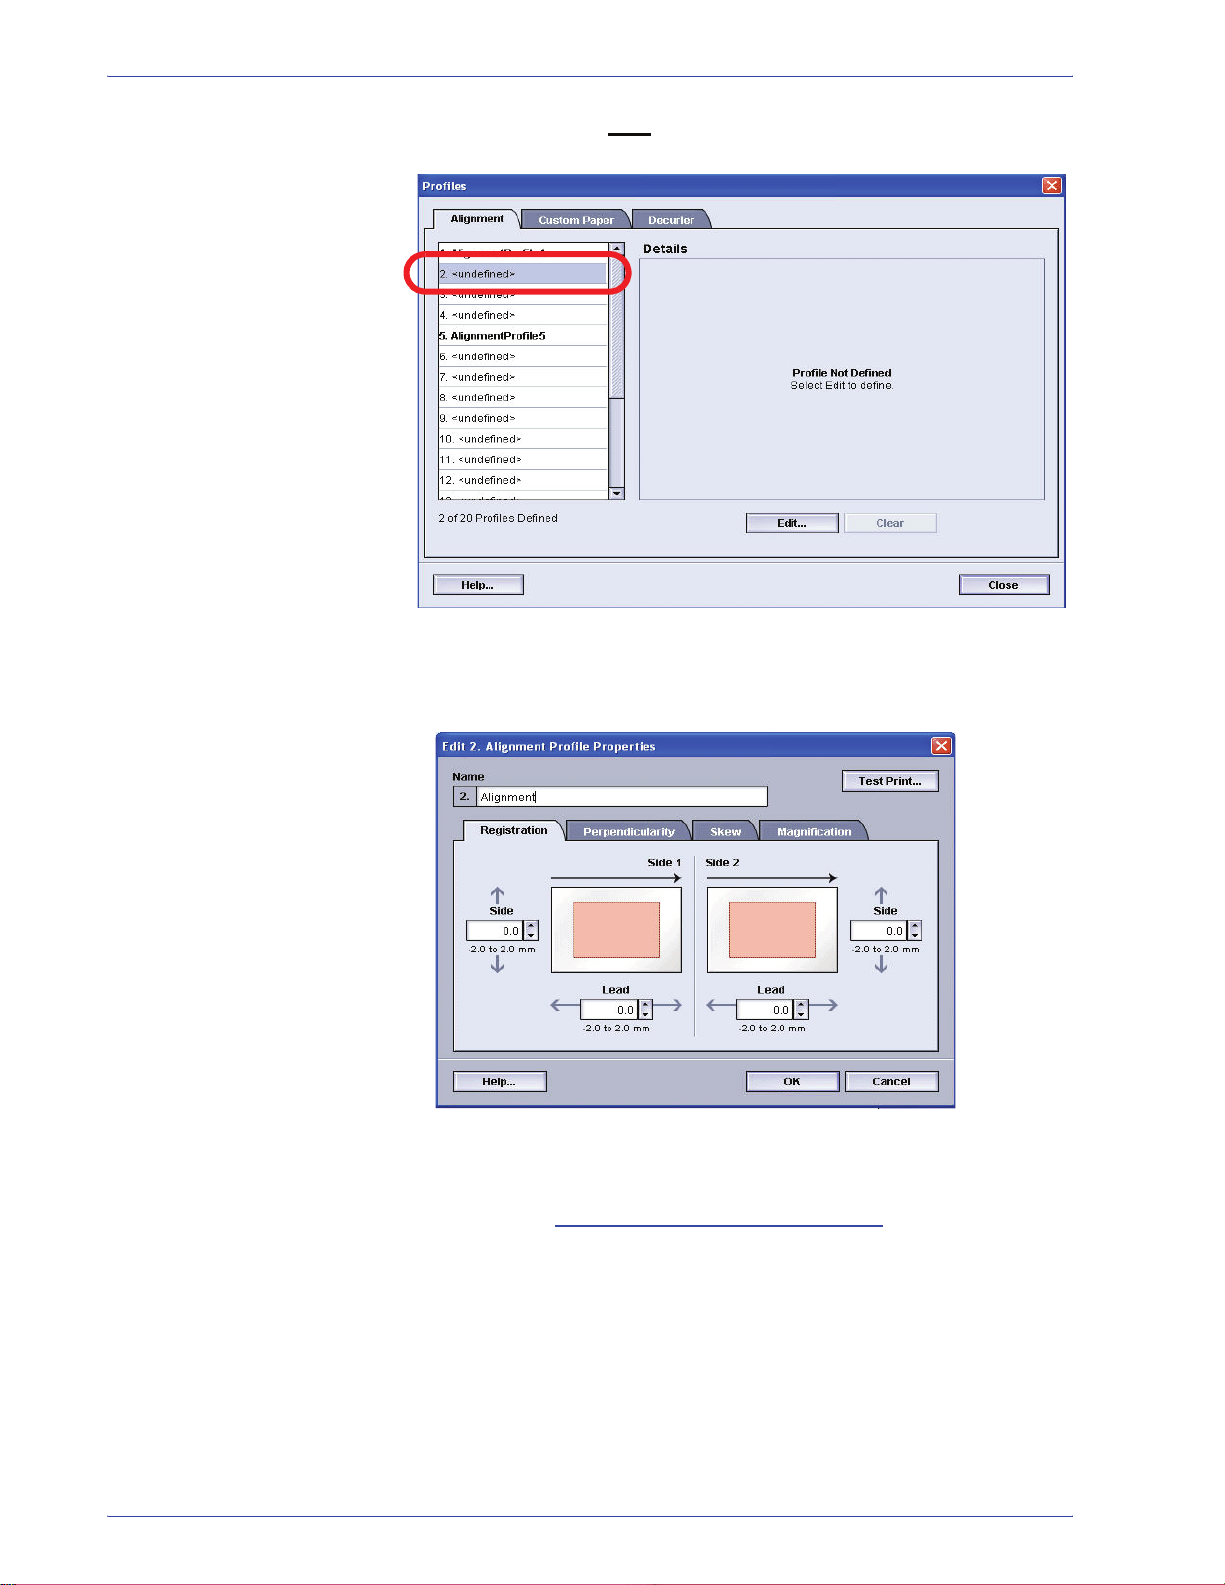
5. To create a new alignment procedure, select a undefined
profile.
If you are editing an existing profile, go to Step 6.
6. Click the Edit button; the Alignment Profile Properties
window opens.
7. Type a name for this profile (the example in this procedure
uses the name “AlignmentProfile2”).
8. Next: Selecting the Registration options.
3-4
DocuColor 5000AP Administrator Guide
Page 41
Selecting the Registration options
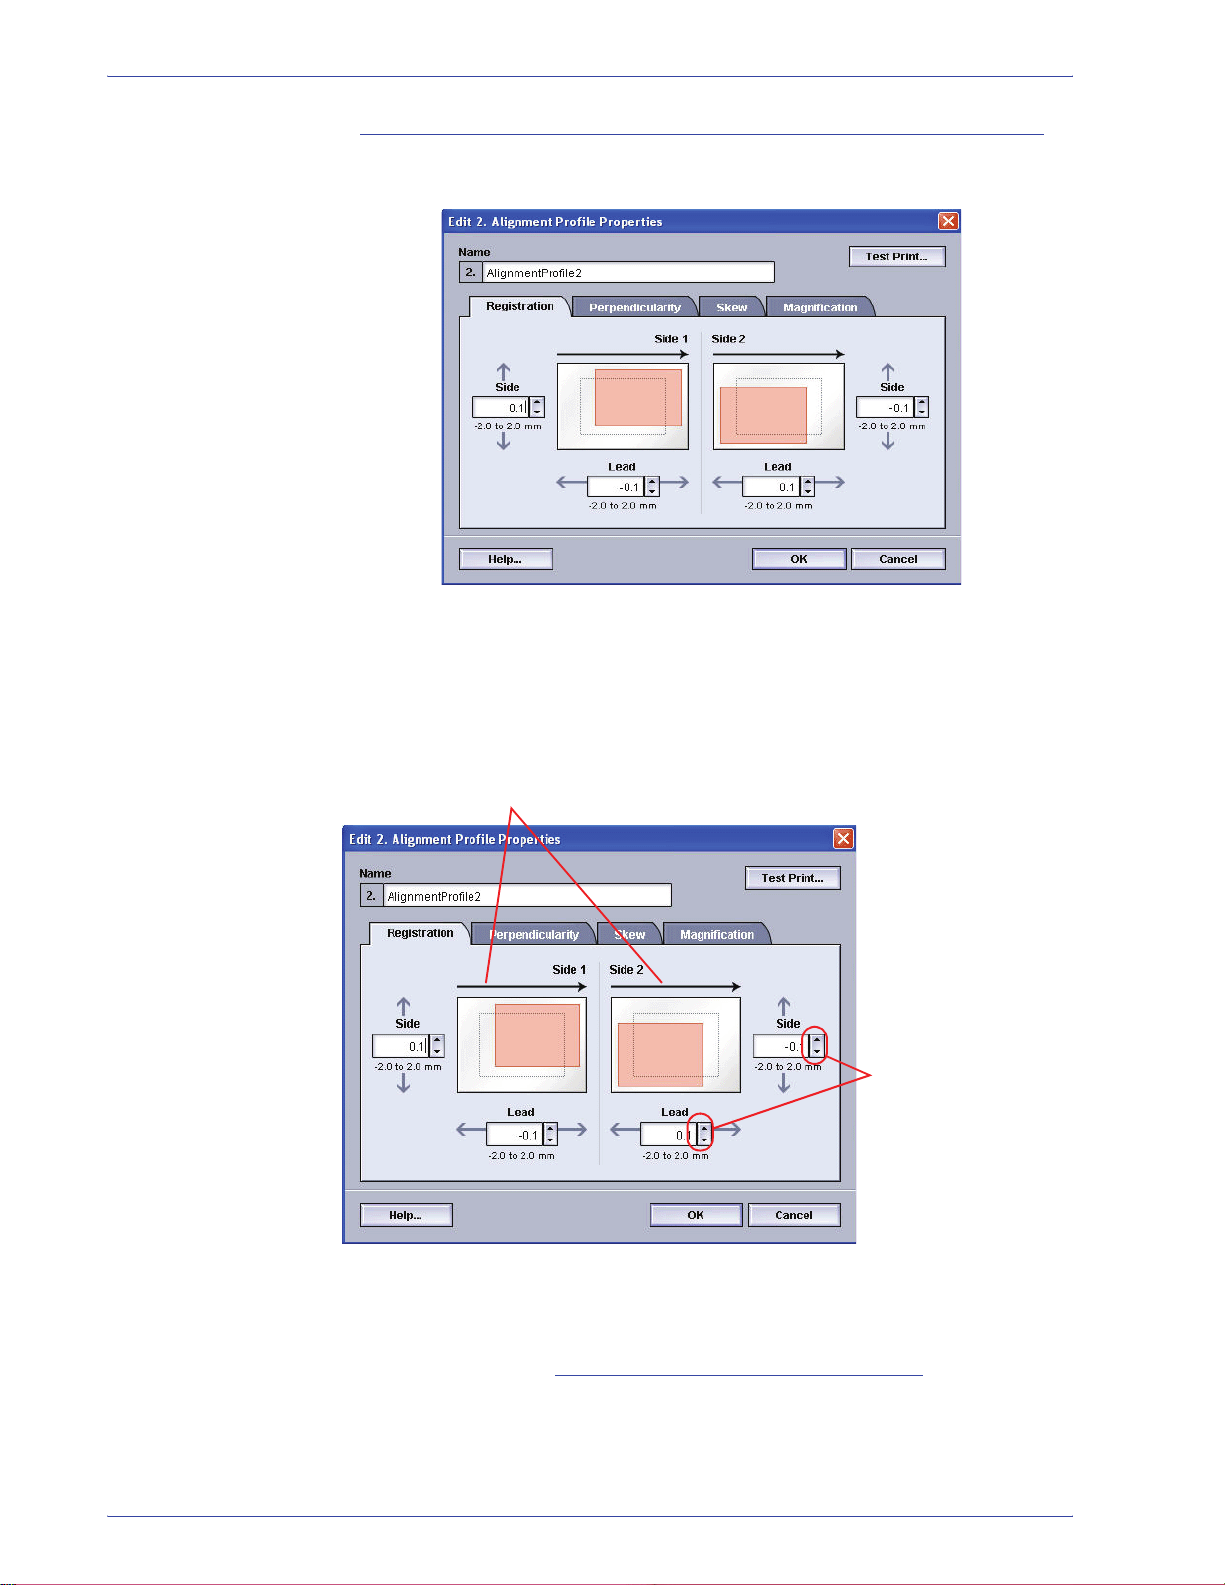
9. Make the desired selections to the Registration option.
• Lead Registration: Use this feature to adjust the lead
edge of the image for Side 1 and/or Side 2 registration.
3. Profiles
• Side Registration: Use this feature to adjust the side
edge of the image for Side 1 and/or Side 2 registration.
The factory default setting is zero (0).
These arrows indicate the
paper feed direction
Use the up/down
arrow buttons to
make the desired
selections.
10. Next: Selecting the Perpendicularity options.
DocuColor 5000AP Administrator Guide
As you click the up/down arrow buttons, the illustration
moves indicating the direction that the image will move
on the paper.
3-5
Page 42

3. Profiles
Selecting the Perpendicularity options
11. Make the desired selections to the Perpendicularity
option. Use this feature to adjust the image digitally on the
drum so that it will align with the paper for both Side 1 and
Side 2.
The factory default is zero (0).
These arrows indicate the
paper feed direction
Use these to make
the desired
selections. As you
click on the up or
down arrows, the
illustration moves
indicating the
direction that the
image will move on
the paper.
12. Next: Selecting the Skew options.
3-6
DocuColor 5000AP Administrator Guide
Page 43
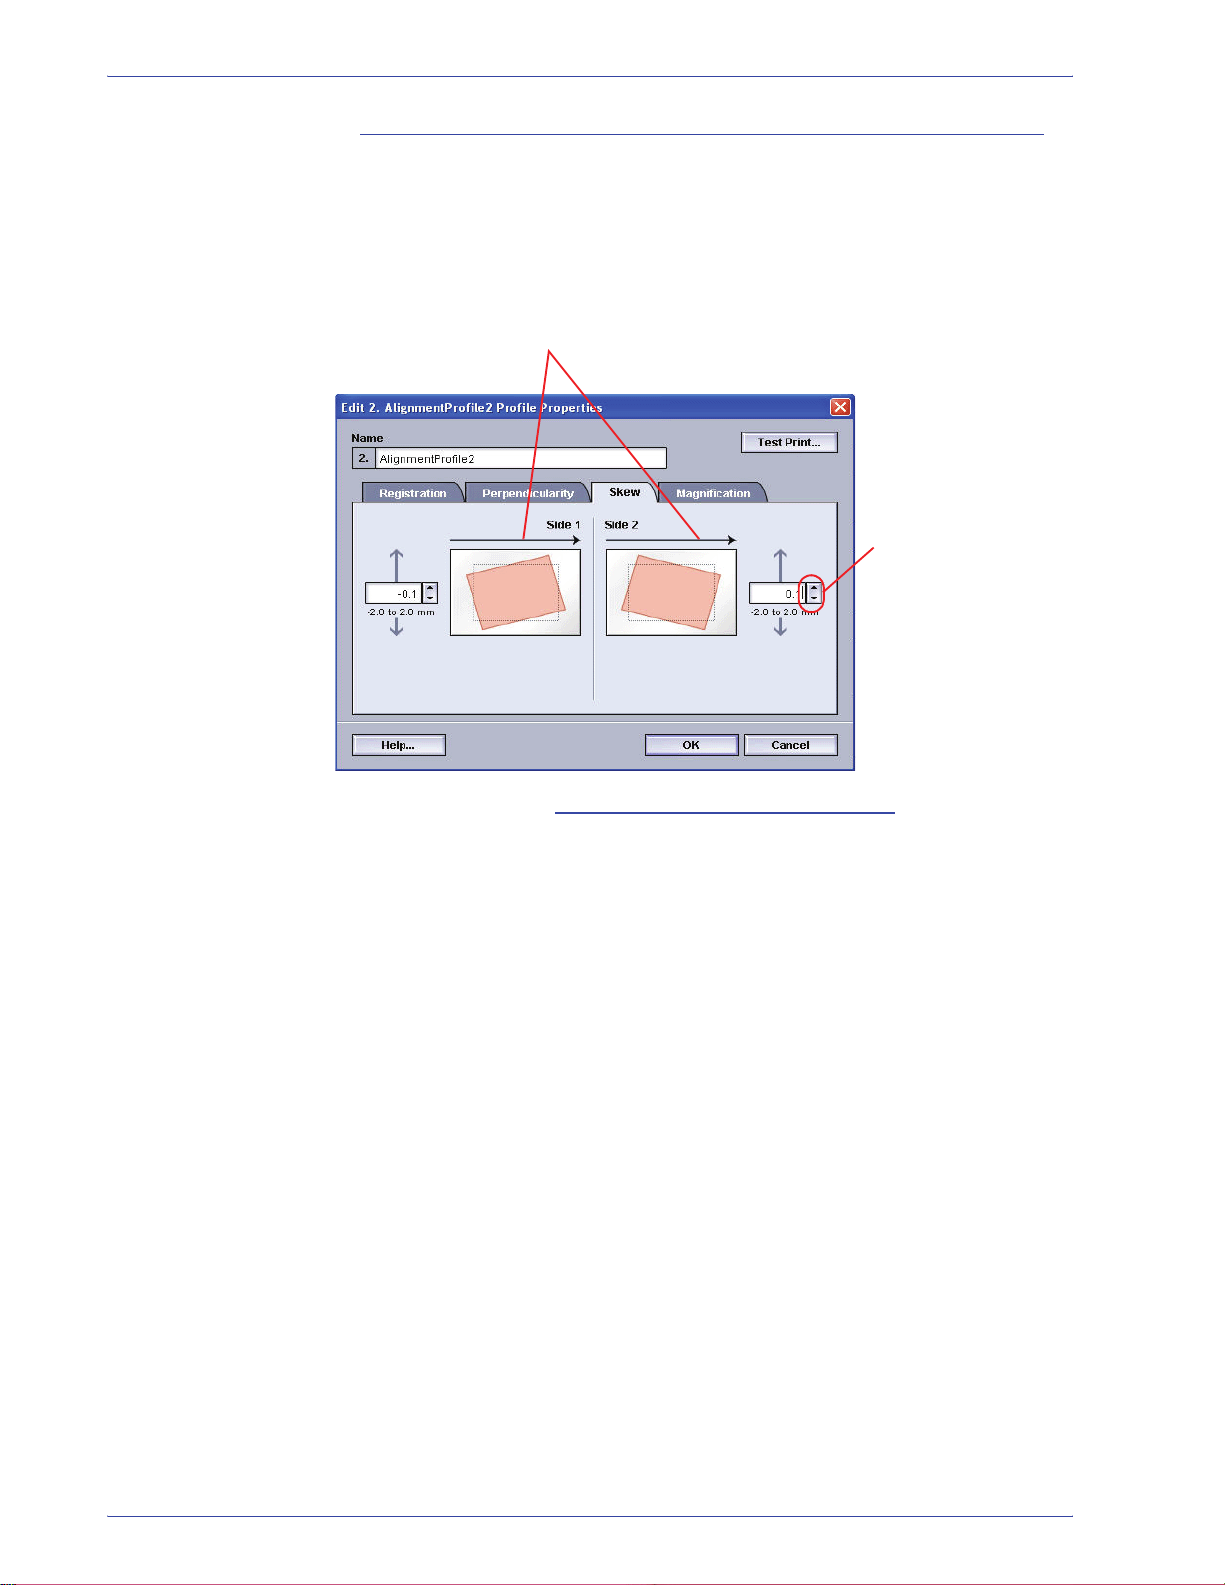
Selecting the Skew options
13. Make the desired selections to the Skew option. Use this
feature to adjust the paper so that the image for Side 1 and/
or Side 2 are not skewed but aligned with each other.
The factory default is zero (0).
These arrows indicate the
paper feed direction
3. Profiles
Use these to make
the desired
selections. As you
click on the up or
down arrows, the
illustration moves
indicating the
direction that the
image will move on
the paper.
14. Next: Selecting the Magnification options.
DocuColor 5000AP Administrator Guide
3-7
Page 44

3. Profiles
Selecting the Magnification options
15. Make the desired selection to the Magnification option. Use
this feature to correct for image stretch from Side 1 to Side
2. The image may be enlarged or reduced as necessary.
The factory default is zero (0).
These arrows indicate the
paper feed direction
Use these to make
the desired
selections. As you
click on the up or
down arrows, the
illustration moves
indicating the
direction that the
image will move on
the paper.
TIP: It is recommended that you choose only one Alignment
Profile feature (such as Registration), and then run a set of Test
Prints to evaluate the registration on that output. If you want
multiple Alignment Profile features selected, individually select
each feature, run Test Prints for that feature, and evaluate the
output. After you determine that the output for the selected
feature is acceptable, then you can select another Alignment
Profile feature to adjust.
16. Next: Running test prints.
3-8
DocuColor 5000AP Administrator Guide
Page 45

Running test prints
17. Select the T est Print button; a new window opens.
3. Profiles
a. Select the 2 Sided button.
NOTE:If you want to check the registration for 1 Sided
prints only, select the 1 Sided button.
b. Select 10 test prints by clicking the Up arrow button to
change the number of test prints generated.
c. Select the desired paper tray from the pull-down list.
d. If necessary, select the Tray Properties button and
make any desired settings.
e. Select Start. The UI displays this message after the
test prints are printed:
f. Retrieve your prints.
g. Discard the first few prints, as inconsistency tends to
DocuColor 5000AP Administrator Guide
be greater with these images.
3-9
Page 46

3. Profiles
18. Evaluate the test prints by holding your 2 Sided output at
eye level near a light source. This will allow you to see the
registration marks for both Side 1 and Side 2 of the output.
a. If you determine that the registration between Side 1
and Side 2 is unacceptable and needs adjusting,
repeat this procedure starting at Selecting the
Registration options.
TIP: You may need to repeat this procedure numerous times until
you achieve acceptable output prints.
b. If the printed output for both Sides 1 and 2 is
acceptable, select OK to save and close the Profiles
window.
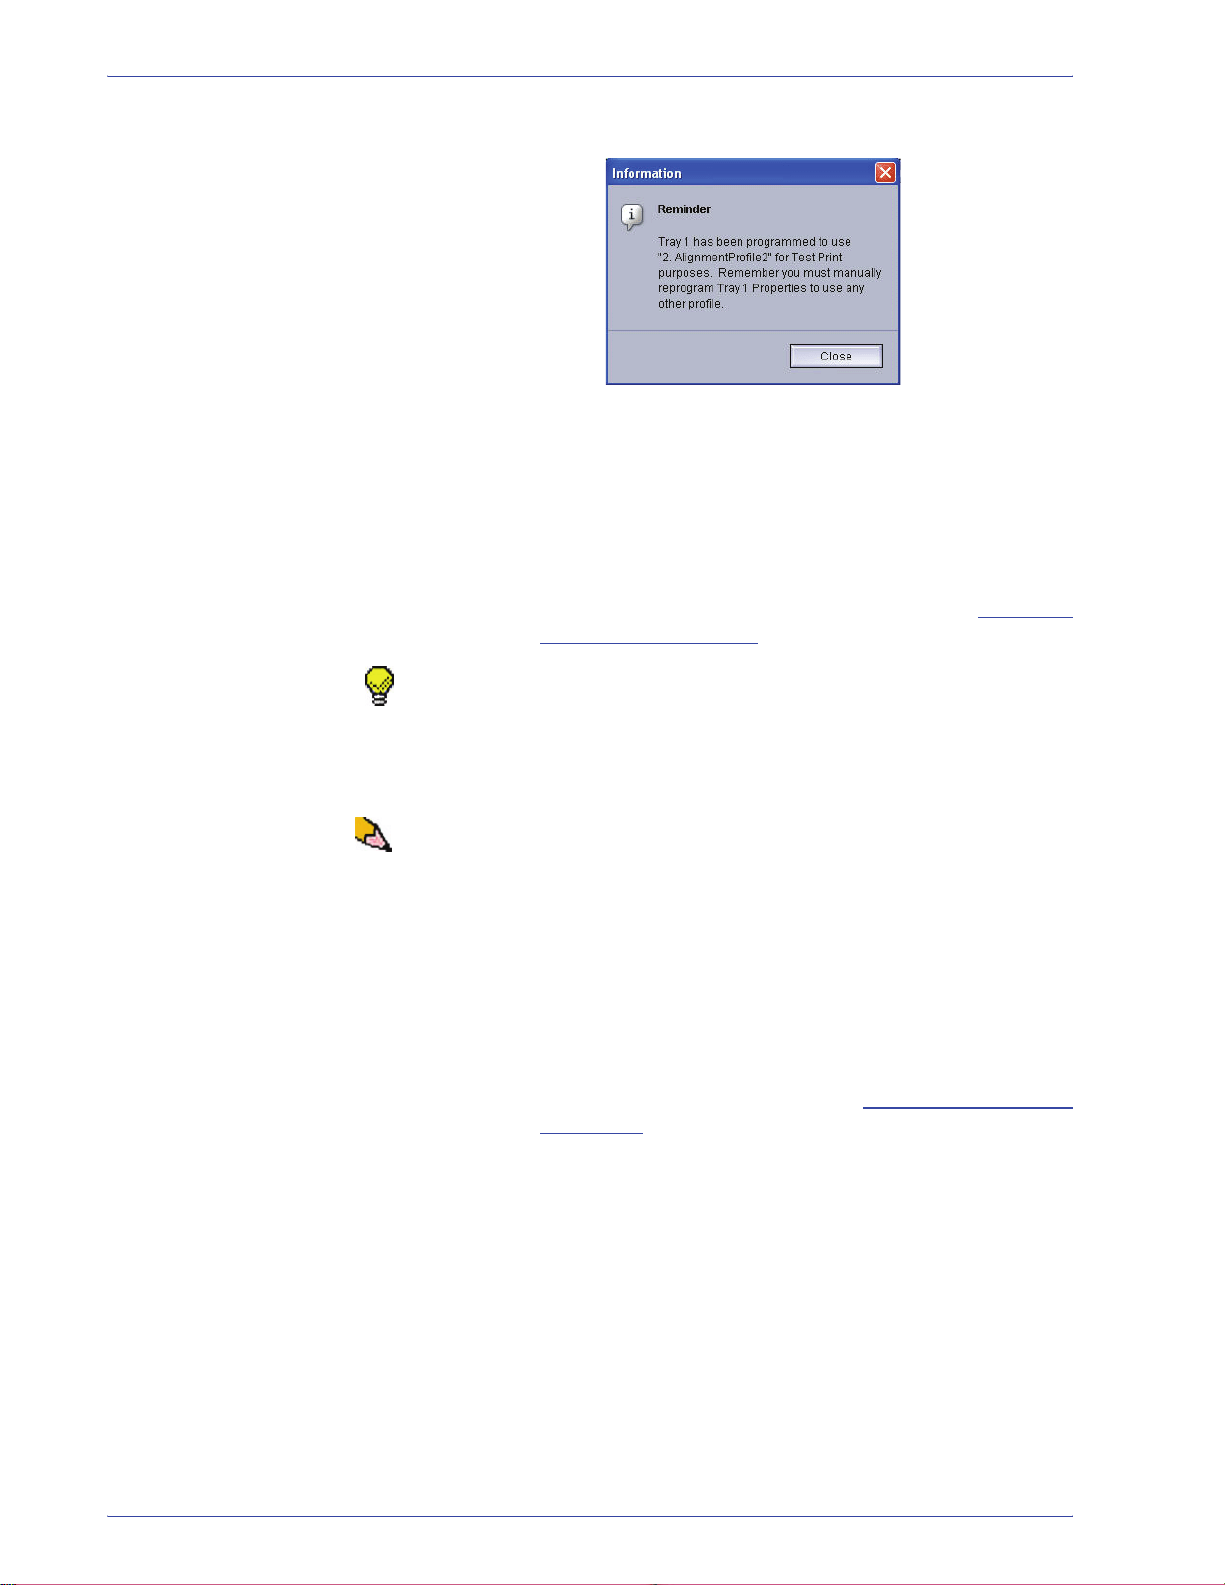
NOTE: Once you have selected OK to save and close the Pr ofiles
window, the new profile procedure (for example,
AlignmentProfile2) can be sele cted from the Tray Properties
window whenever you want to run a job using this profile.
19. If you are editing an existing Alignment profile:
a. From the Profiles window, Alignment tab, select the
desired profile.
b. Click the Edit button.
c. Repeat this procedure starting at Selecting the
Registration options.
3-10
DocuColor 5000AP Administrator Guide
Page 47

Custom Paper
3. Profiles
Different media (including paper type, weight, and coating/
uncoating) may require specific handling by the digital press as it
is moving through the paper path. For example, some media
types may skew or curl as they progress through the printing path
of the digital press. This may occur on frequently-run jobs and/or
jobs with a high volume output.
The Custom Paper feature allows you set custom paper profiles
for different types of media and jobs, such as outlined in the above
paragraph. These profiles may be used at point of need in order
to ensure optimum output quality of your prints/jobs.
By setting custom paper profiles for specific media types, you can
avoid output prints that are skewed, curled, have too much toner
or not enough toner in areas, or images that are not registered
properly on the output print, such as Side 1 and/or Side 2 images
that are misregistered.
NOTE 1:Once a Custom Paper Profile is created, the digital press
passes this information on to your color server. The color server
in turn reflects this information in the print options for print jobs.
NOTE 2:Adjusting registration for Side 1 and/or Side 2 images is
discussed in detail in the Alignment feature. Refer to the
Alignment feature.
Custom Paper procedure
Use the following procedure for creating/modifying a Custom
Paper Profile.
1. From the Profiles window, select the Custom Paper tab.
DocuColor 5000AP Administrator Guide
3-11
Page 48
3. Profiles
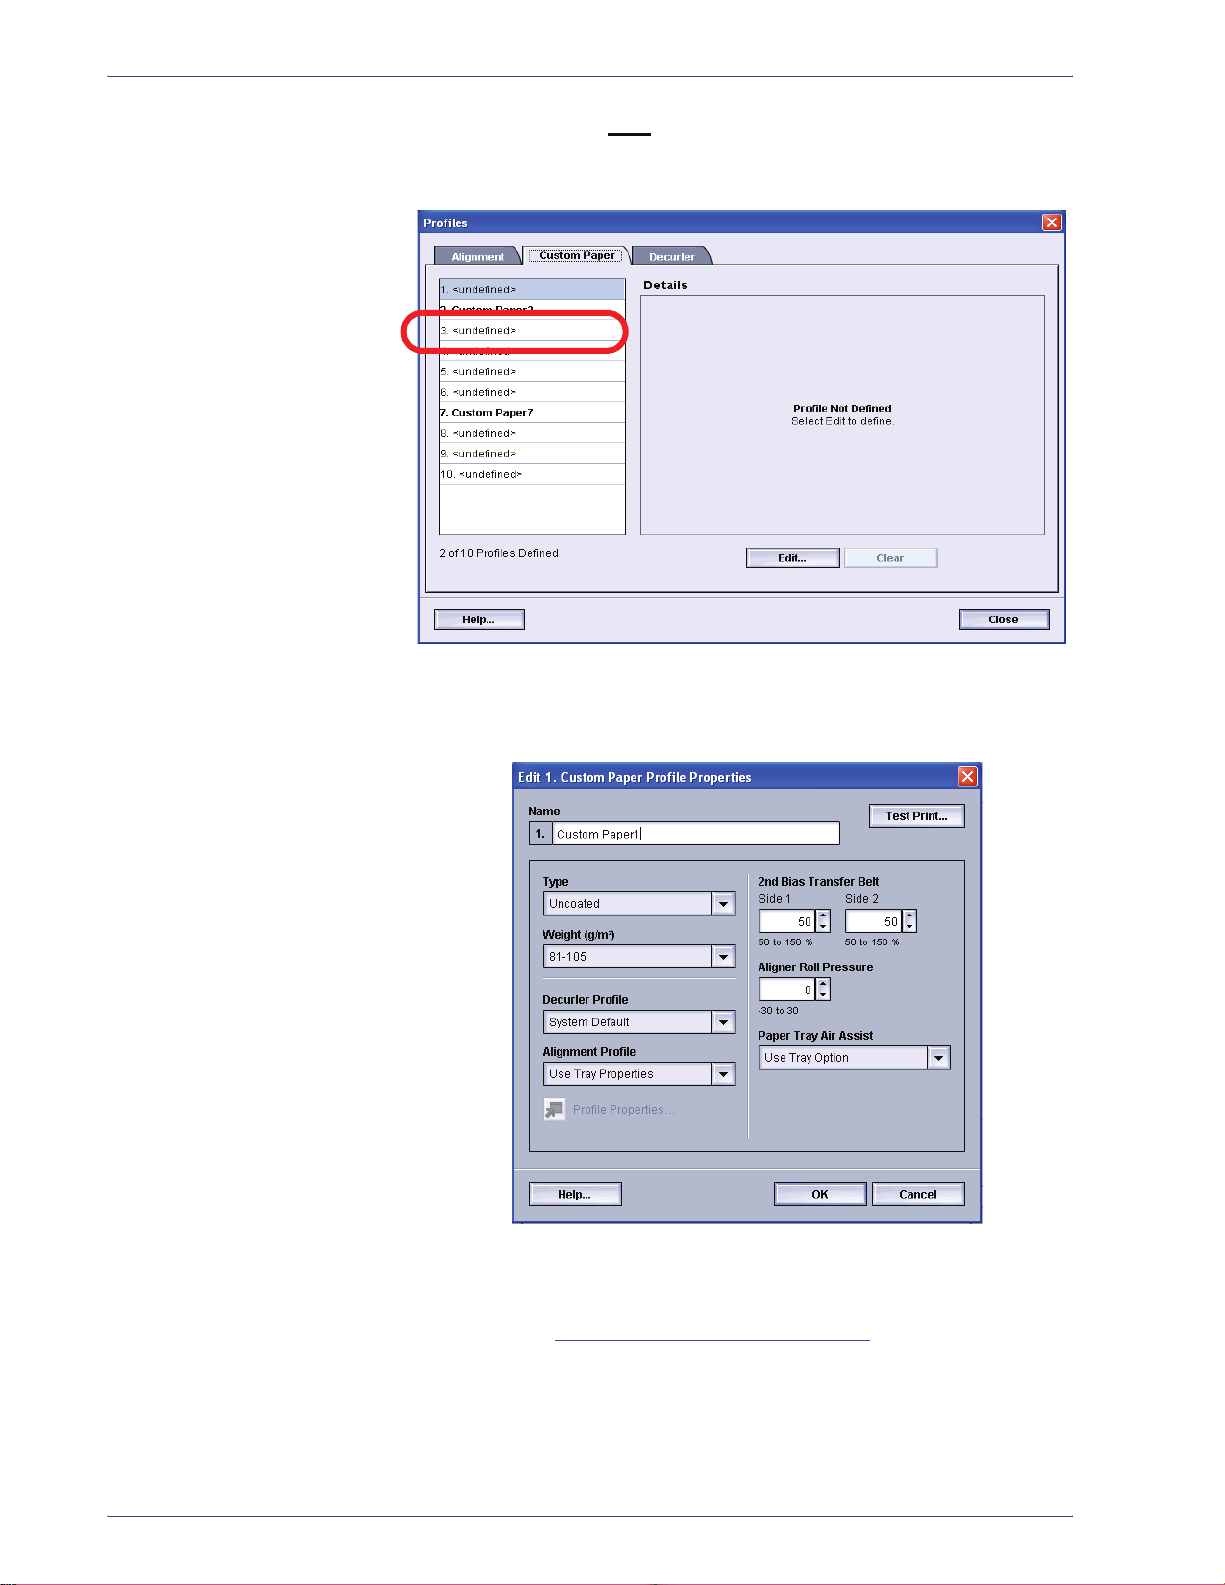
2. To create a new custom paper procedure, select a
undefined profile.
If you are editing an existing profile, go to Step 4.
3. Click the Edit button; the Custom Paper Profile Properties
window opens.
3-12
4. Type a name for this profile (the example in this procedure
uses the name “Custom Paper1”).
5. Next: Selecting the desired paper type.
DocuColor 5000AP Administrator Guide
Page 49

Selecting the desired paper type
6. Select the desired paper Type from the pull-down menu.
3. Profiles
TIP: The paper type does not have to match the actual type of
paper you are loading in the tray. When creating a Custom Paper
Profile, select a paper type that is rarely or never
standard paper types. This ensures that when running commonly
used paper types, the digital press does not load a Custom Paper
Profile for those types.
used as your
7. Next: Selecting the desired paper weight.
DocuColor 5000AP Administrator Guide
3-13
Page 50

3. Profiles
Selecting the desired pa per weight
8. Select the desired paper Weight from the pull-down menu.
9. If required, select a Decurler Profile from the pull-down
menu.
TIP: The default setting is System Default. It is recommended
that you leave this option at its default setting until you run test
prints and evaluate the output of the prints. Test Print is discussed
in more detail in Step 16.
3-14
NOTE: Use the Decurler feature in order to compens ate f or p aper
curl in your output prints. For Decurler information, refer to
page 3-26.
DocuColor 5000AP Administrator Guide
Page 51

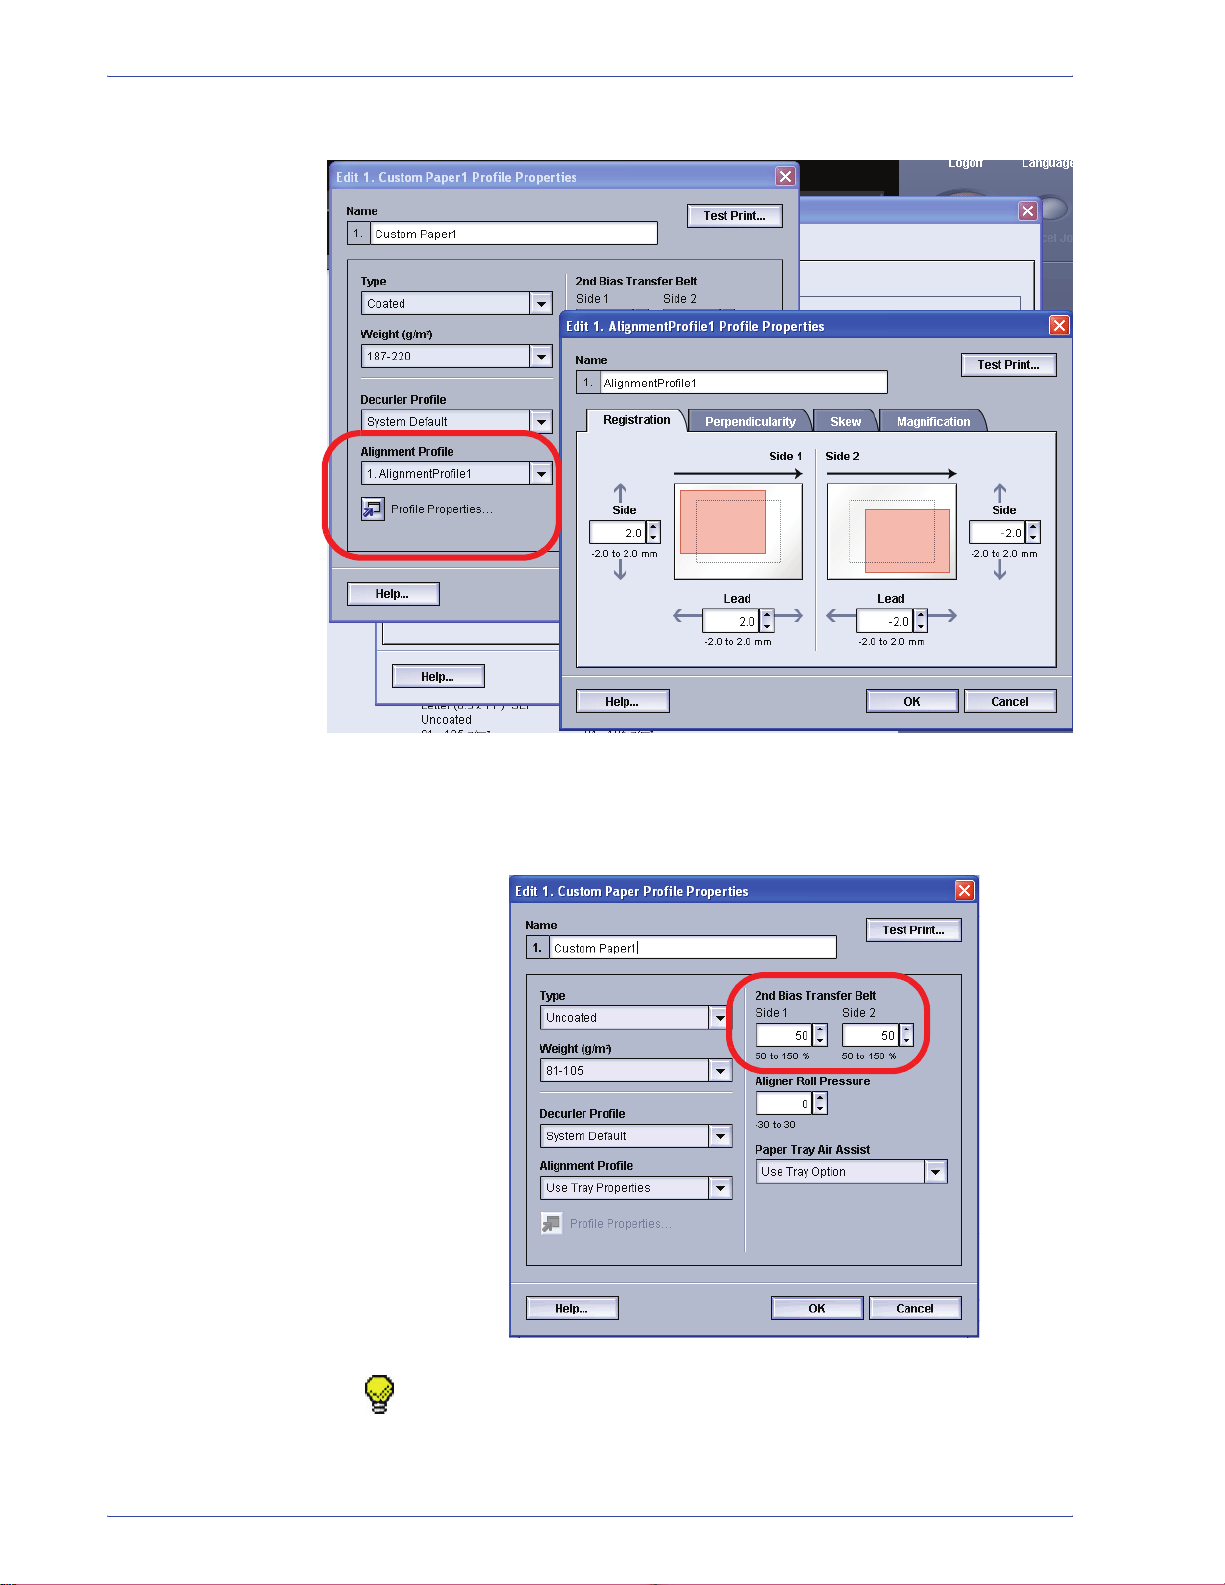
3. Profiles
10. If required, select an Alignment Profile from the pull-down
menu.
TIP: The default setting is Use Tray Properties. It is
recommended that you leave this option at its default setting until
you run test prints and evaluate the output of the prints. Test Print
is discussed in more detail in Step 16.
NOTE: If you select a specific Alignment Profile, the Profiles
Properties button becomes accessible. By clicking on this button,
the UI opens the Alignment Profile wi ndow for the sel ected pro file,
and you can edit that Alignment Profile if necessar y.
DocuColor 5000AP Administrator Guide
3-15
Page 52
3. Profiles
NOTE: For Alignment information, refer to page 3-1.
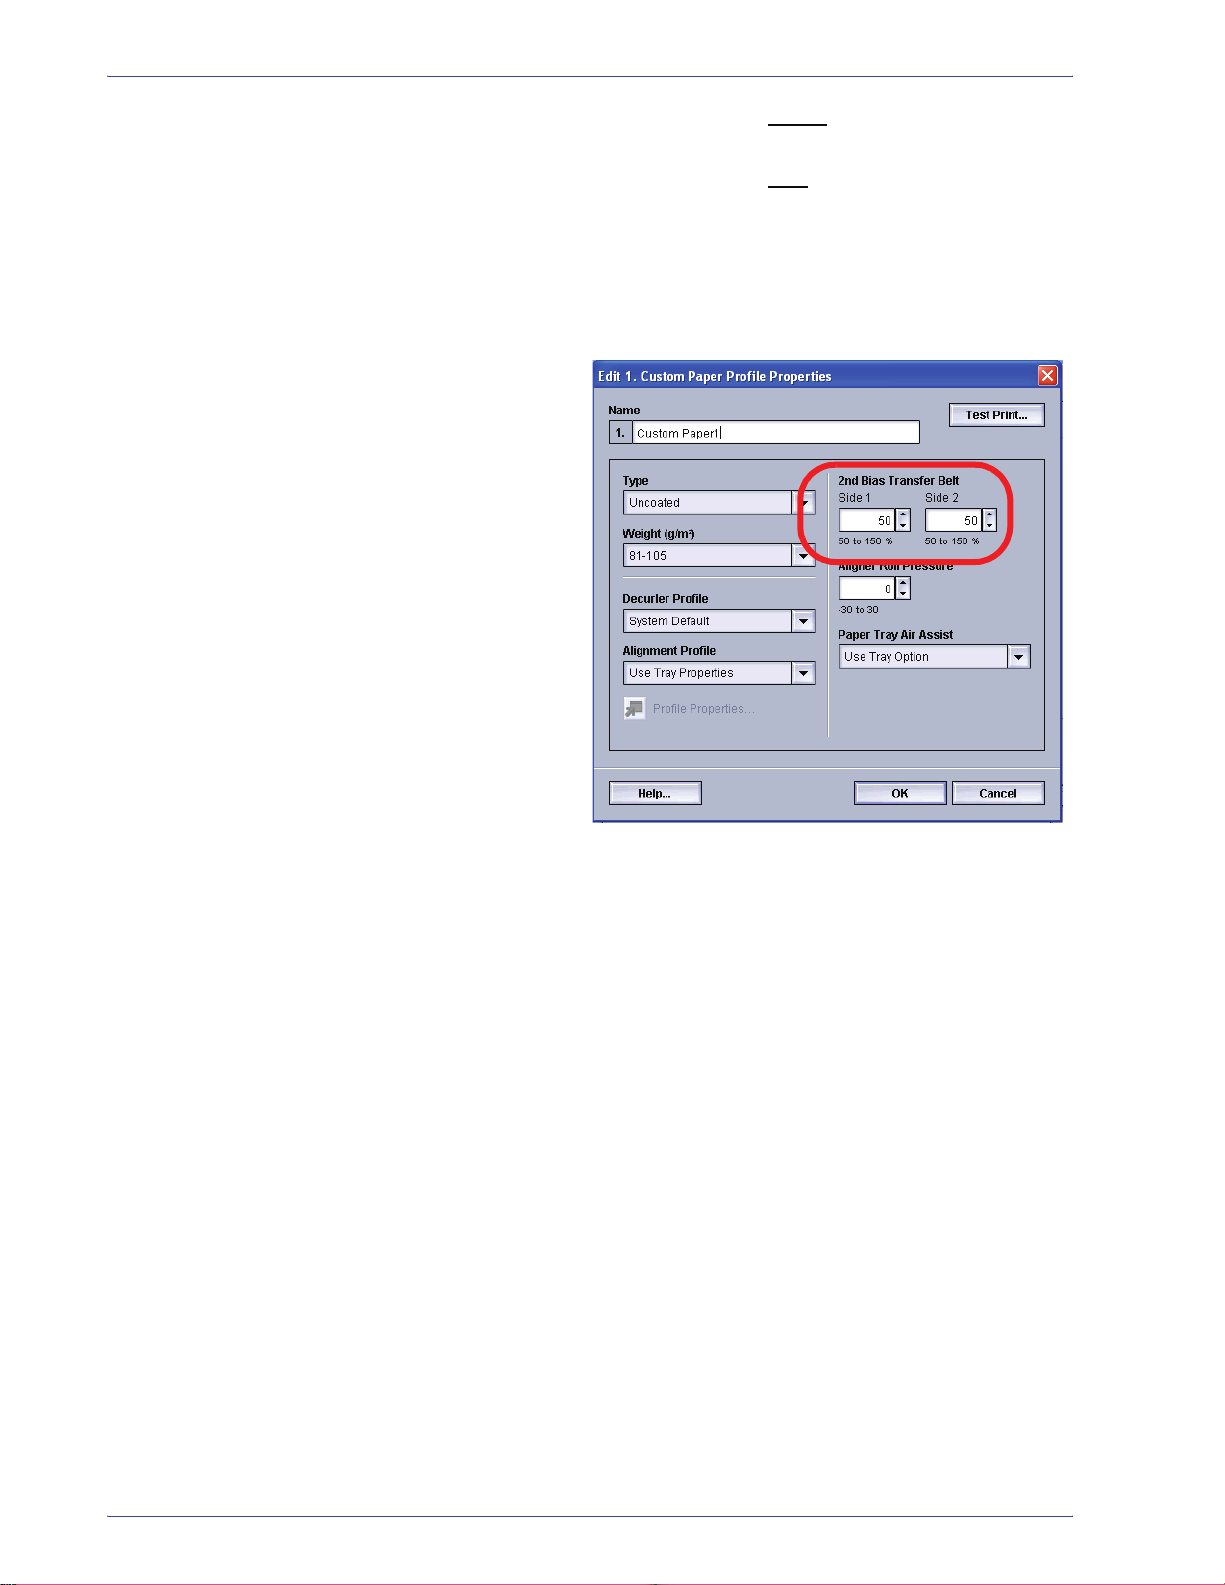
11. If required, choose 2nd Bias Transfer Roll settings for Sides
1 and 2.
TIP: The default setting for both Sides 1 and 2 is 100%. It is
recommended that you leave this option at its default setting until
you run test prints and evaluate the output of the prints. Test Print
is discussed in more detail in Step 16.
3-16
DocuColor 5000AP Administrator Guide
Page 53

3. Profiles
NOTE: Refer to page 3-20 for information on the 2nd Bias
Transfer Belt.
12. If required, choose an Aligner Roll Pressure setting.
TIP: The default setting is 0. It is recommended that you leave
this option at its default setting until you run test prints and
evaluate the output of the prints. Test Print is discussed in more
detail in Step 16.
NOTE: Refer to page 3-24 for information on the Aligner Roll
Pressure.
13. If required, choose a Paper Tray Air Assist option from the
pull-down menu.
DocuColor 5000AP Administrator Guide
3-17
Page 54

3. Profiles
TIP: The default setting Use Tray Option. It is recommended that
you leave this option at its default setting until you run test prints
and evaluate the output of the prints. Test Print is discussed in
more detail in Step 16.
NOTE: Refer to page 3-25 for information on the Paper Tray Air
Assist.
14. Load your custom paper in the desired paper tray.
15. Ensure that you select the correct paper information in the
Tray Properties window (size, weight, type). From the Type
pull-down menu, select the correct Custom Paper Profile.
16. Select the T est Print button; a new window opens.
3-18
a. Select the 2 Sided button.
NOTE:If you want to check the registration for 1 Sided
prints only, select the 1 Sided button.
b. Select 10 test prints by clicking the Up arrow button to
change the number of test prints generated.
c. Select the desired paper tray from the pull-down list.
d. If necessary, select the Tray Properties button and
make any desired settings.
DocuColor 5000AP Administrator Guide
Page 55
3. Profiles
e. Select Start. The UI displays this message after the
test prints are printed:
f. Retrieve your prints.
g. Discard the first few prints, as inconsistency tends to
be greater with these images.
17. Evaluate the test prints by holding your 2 Sided output at
eye level near a light source.
a. If you determine that further custom paper adjustments
are required, repeat this procedure starting at Selecting
the desired paper type.
TIP: You may need to repeat this procedure numerous times until
you achieve acceptable output prints.
b. If the printed output for both Sides 1 and 2 is
acceptable, select OK to save and close the Profiles
window.
NOTE: Once you have selected OK to save and close the Pr ofiles
window , the new profile procedure (for example, Cust om Paper1)
can be selected from the Tray Properties window, the Type
feature, whenever you want to run a job using this profile.
18. If you are editing an existing Custom Paper profile:
a. From the Profiles window, Custom Paper tab, select
the desired profile.
b. Click the Edit button.
c. Repeat this procedure starting at Selecting the desired
paper type.
DocuColor 5000AP Administrator Guide
3-19
Page 56

3. Profiles
Second Bias Transfer Belt
The Second Bias Transfer Belt is where the image is transferred
from the belt to the paper. The Second Bias Transfer Belt feature
is normally used with heavier weight paper, such as 220 g/m
greater, 10 pt, or 12 pt, which are just three examples; however
there are times when it is also used with lighter weight paper as
well.
When using either heavier or lighter weight paper, you may want
or need to adjust Side 1 for all 1-sided jobs. If defects continually
occur in a printed job when using heavier weight paper, perform
the following steps to determine if a Custom Paper Profile with
Side 1 or Side 2 (2nd Bias Transfer Belt) adjustments are
appropriate.
2
and
1. If the job is printed face down or 1-N, check Side 1 for
defects on the topside (upper portion) of the stacked sheets,
and check Side 2 for defects on the downside (lower
portion) of the stacked sheets.
2. If the job is printed face up or N-1, check Side 2 for defects
on the topside (upper portion) of the stacked sheets, and
check Side 1 for the downside (lower portion) of the stacked
sheets.
3-20
DocuColor 5000AP Administrator Guide
Page 57

3. Profiles
No Mottle
Mottle
3. Use the 2nd Bias Transfer Belt feature when your:
a. Prints may have mottle
coverage that occurs when printing large, solid areas
of flat color.
, which is uneven spotty toner
DocuColor 5000AP Administrator Guide
3-21
Page 58
3. Profiles
If mottle exists and it is heavy weight paper, increase
one or both of the 2nd BTB values.
If mottle exists and it is light
weight paper, increase
one or both of the 2nd BTB values. Evaluate the
image quality. If the image quality is equal to or worse
than the 100% default setting, decrease one or both of
the 2nd BTB values until a satisfactory image quality is
obtained.
3-22
DocuColor 5000AP Administrator Guide
Page 59
3. Profiles
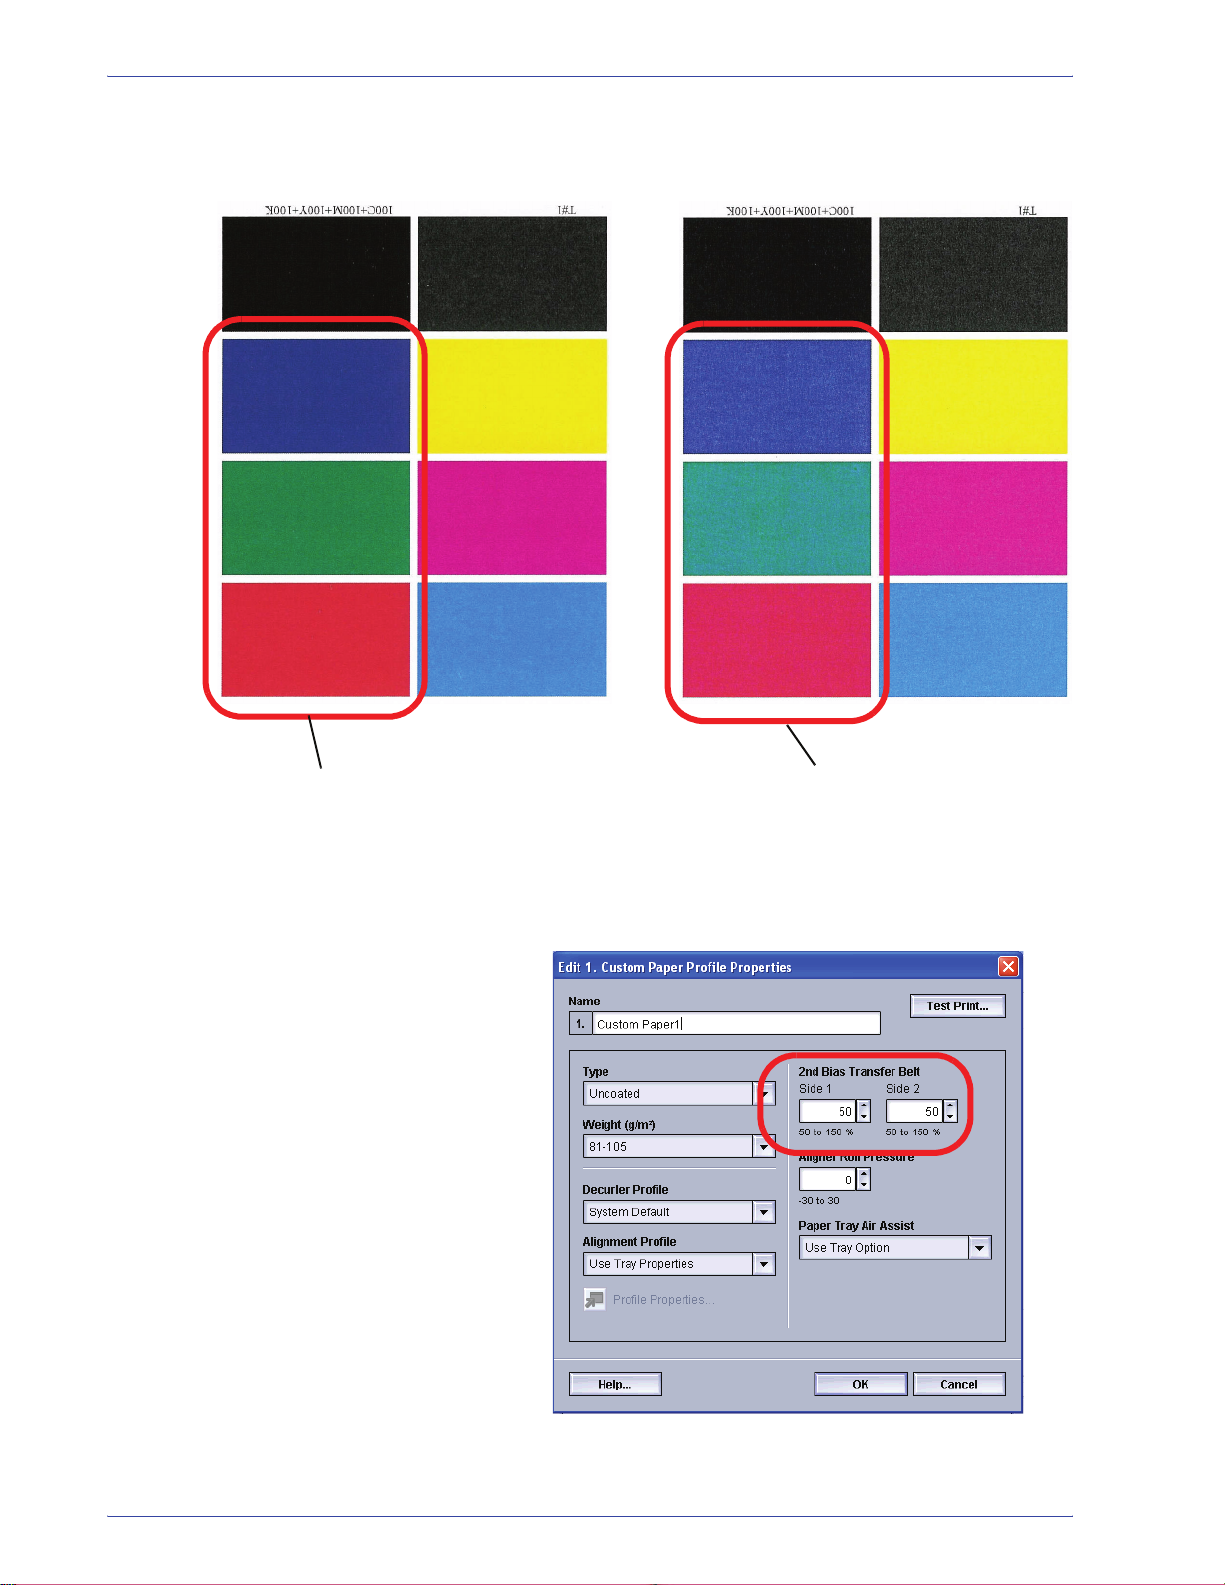
b. Prints have a color shift where the colors are much
different than what you desire.
This test pattern represents an
output with the desired colors.
This test pattern represents an output
with a shift in colors, and thereby an
undesired output.
If mottle color shift exists, increase one or both of the
2nd BTB values.
DocuColor 5000AP Administrator Guide
3-23
Page 60

3. Profiles
Aligner Roll Pressure
Use this feature with paper types that slip and skew or have
damaged edges.
Examples:
• Some coated paper types slip and skew, thereby
misregistering the image on the output prints. In this case, you
may want to increase
the roll pressure in order to compensate
for the slippage and skewing.
• Some light-weight papers may have too much roll pressure
applied to them, thereby causing edge damage to the output
prints. In this case, you may to decrease
the roll pressure.
• If you are experiencing numerous 8-154 faults, increase the
roll pressure and continue to run the digital press.
TIP: Increasing the roll pressure for numerous 8-154 faults,
allows you to postpone a service call. However, call your service
representative as soon as possible in order to restore the digital
press to its full feeding capabilities.
3-24
DocuColor 5000AP Administrator Guide
Page 61

Paper T ra y Air Assi st
Use this feature to switch on or switch off the fans in a paper tray
in order to eliminate misfeeds, paper jams, or other possible tray
feeding problems. You can also select System Default or Use
Tray Option if you want the digital press to decide whether or not
to switch on or off the fans for a paper tray.
3. Profiles
NOTE:The default setting is Use Tray Option.
Refer to page 2-26 of this book for information on each one of the
Paper Tray Air Assist settings.
DocuColor 5000AP Administrator Guide
3-25
Page 62

3. Profiles
Decurler Overview
TIP: Please read all the Decurler information before using the
Custom Decurler Profile procedure.
When paper is exposed to heat, the paper loses moisture and
curls toward the heat source. High toner coverage jobs tend to
curl more due to the toner plastification effect on the paper
surface. The system tries to reduce this by using mechanical
devices within the paper path called Decurlers.
Paper curl is caused by many variables, including:
• The weight of the paper and whether it is coated or uncoated.
• The amount of dry ink/toner and the area being covered on a
sheet: the heavier the coverage, the greater the tendency to
curl.
• How the paper is loaded in the tray. Make sure you load the
paper as instructed on the ream wrapper.
• The atmospheric conditions of the room where the paper is
stored, especially those related to humidity and temperature.
• The atmospheric conditions of the room where the printer is
located, especially those related to humidity and temperature.
• The heat generated during the fusing processes.
Your system is designed with several automated settings to
control curl. When using these settings the machine automatically
sends paper through the proper Decurler:
• System Default: Automatically determines the amount of
pressure needed at the different decurlers in order to reduce
the output curl of the paper.
• A, B, C, and D settings: Preset Decurler settings.
With some print jobs, the output prints still may be curled more
than you desire even after using the Decurler A-D Settings. In
those cases, use the Custom Decurler Profile feature to
compensate for paper curl in your prints. Custom Decurler Profile
settings are based on job type and image density ratio. These
settings are manually entered.
NOTE: If a decurler profile is changed, it remains at that setting
until changed again manually. As an example, if you decide to use
the B decurler setting, t he setting will remain at B unt il you change
it to another setting.
3-26
NOTE: It is important to remember that a successful decurler
setting used today may not be the same setting that you would
use on another day . This is especially relevant if the room in which
printer is located experiences changes in temperature and
humidity.
DocuColor 5000AP Administrator Guide
Page 63

Decurler paper path
3. Profiles
The Decurler has both upper and lower adjustment arms that
apply pressure to the paper based on system defaults, selections
made on the Tray Properties screen (A-D settings), or based on
entries made on the Decurler Profile screen. The degree of
pressure is applied independently to the upward and downward
Decurler arms.
DocuColor 5000AP Administrator Guide
3-27
Page 64
3. Profiles
Decurler A-D Profile settings
If paper curl is a problem, using one of the preset Decurler A-D
Profile settings usually eliminates the problem. However, due to
the broad range of paper variables, image coverage, and
environmental factors, these default settings may not result in
satisfactory performance.
Visit the www.xerox.com
Recommended Materials List (RML) for your digital press:
• To determine if Xerox has tested your paper type and weight
• View the recommended Decurler A - D Profile settings for
particular paper types.
NOTE: The settings recommended in the in the “Recommended
Materials List for DocuColor 5000” were developed from testing a
wide range of paper samples, toner area coverages, and
environments. The outcome of this testing is the preset
parameters shown in the list, and these parameters refer to how
particular papers interact with the digit al press decurling system.
Decurler A-D Profile procedure
If after using the System Default setting paper curl is still
unacceptable, select an alternate Decurler Type A - D Profile
setting:
1. At the controller, logon as Administrator.
a. Select the Logon button.
web site and refer to the latest
b. Select Administrator and enter a password.
c. Select [OK].
3-28
DocuColor 5000AP Administrator Guide
Page 65

3. Profiles
2. To use an A-D Profile, select the Tray button that contains
the stock that you are using for your job. In this exercise,
select Tray 2. The Tray Properties window opens.
3. From the Decurler Profile menu, select one of the Decurler
A-D settings.
4. Select [OK].
5. Run the same print job again, and retrieve the output from
the exit area of the digital press.
DocuColor 5000AP Administrator Guide
3-29
Page 66
3. Profiles
6. Check the output for curl.
a. If the curl is eliminated, you are finished. Continue
running your prints using the specific Decurler A-D
setting.
b. If the curl is still persistent, try another Decurler Paper
Type (A-D).
Custom Decurler Profiles
c. If the curl continues after using each
Type A-D setting, continue to the Custom Decurler
Profile procedure.
NOTE: If a decurler profile is changed, it remains at that setting
until changed again manually. As an example, if you decide to use
the B decurler setting, t he setting will remain at B unt il you change
it to another setting.
While the system is programmed to correct for curl under most
conditions, there may be instances where the pre programmed
settings (System Default and A-D) may not meet your curl
requirements. Using Custom Decurler Profiles allows you to enter
an image density ratio range to help eliminate curl.
NOTE: The examples that follow are designed to give you an
understanding of programming the Custom Decurl er Profile option
to obtain optimal results, but due to various job stock and
environmental conditions the manner in which you achieve the
best results may vary.
Decurler Paper
The most important aspect for creating a Custom Decurler Profile
is determining the image density ratio on the curled paper. A
sampling of image density ratio on some typical customer
documents follows.
3-30
DocuColor 5000AP Administrator Guide
Page 67
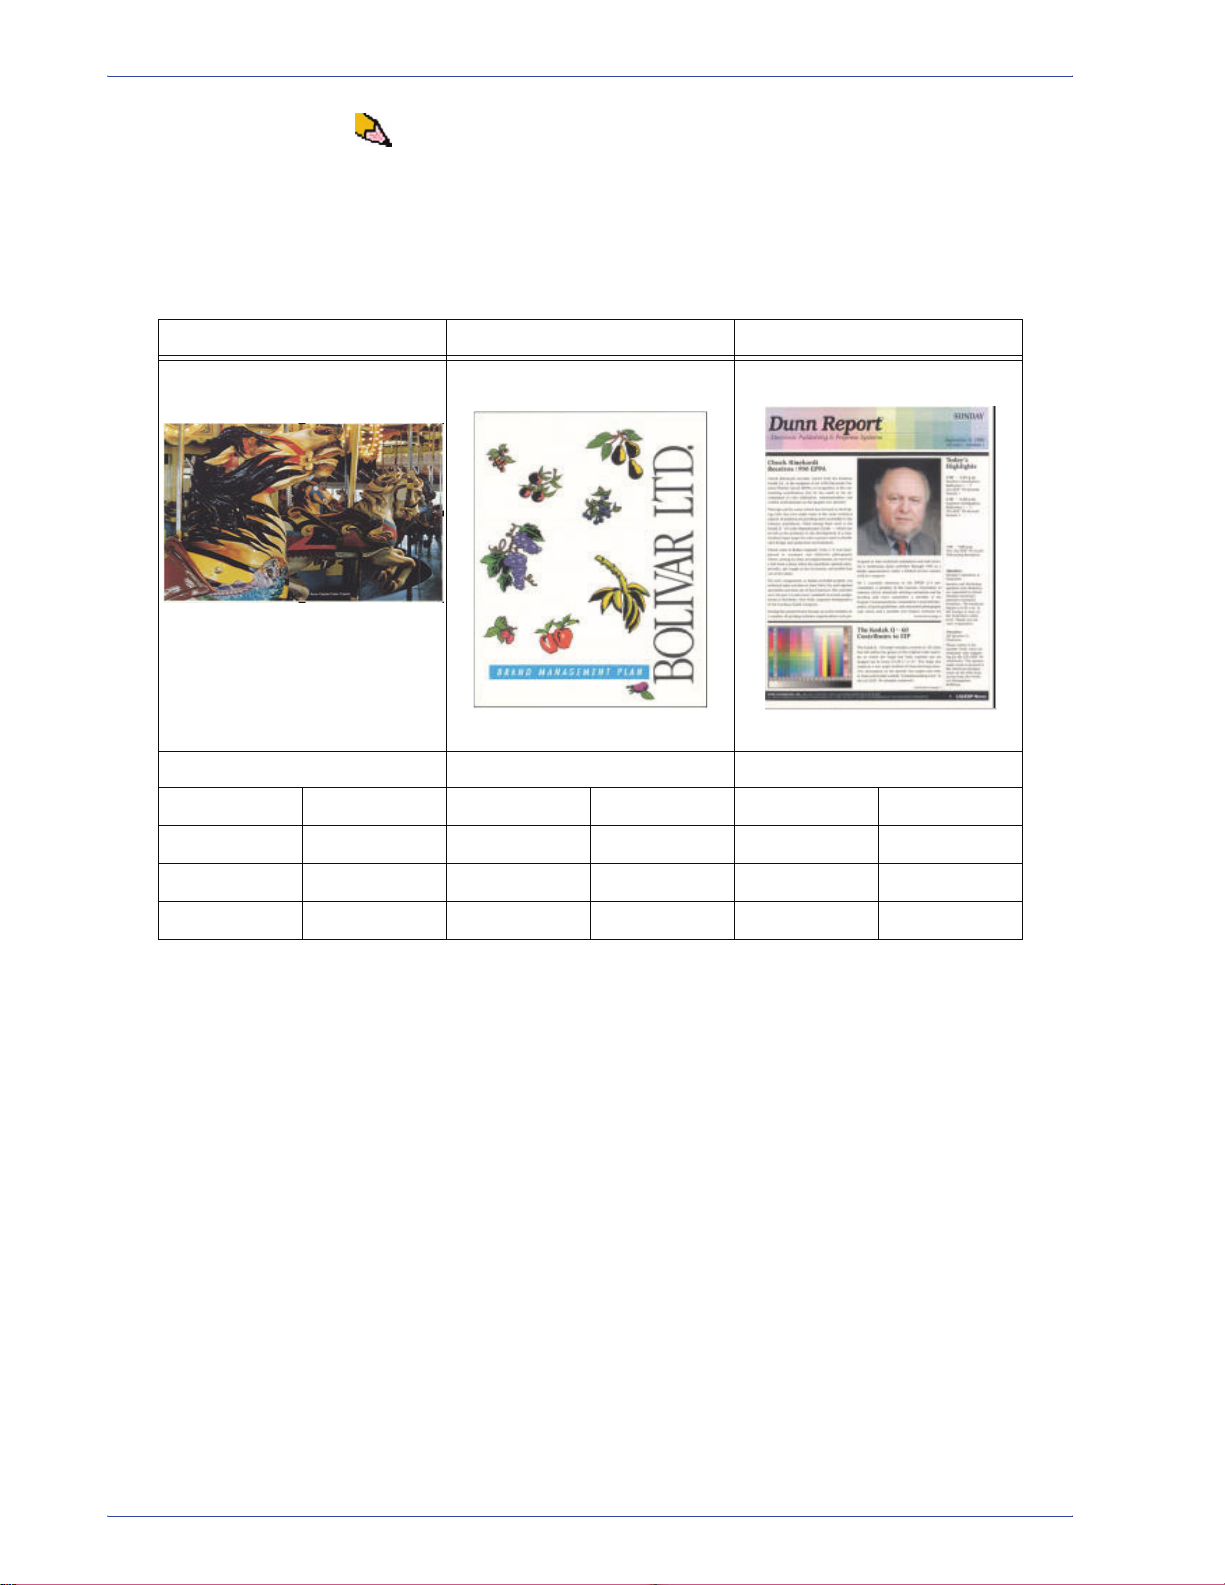
NOTE: The following image density ratios have been measured
using appropriate devices. If you do not have acces s to devi ces
that measure image density ratios, make your estimate using the
following examples as a guide. Your estimates will be used when
entering Custom Decurler Profile values, which is explained later
in this section.
Image Density Ratio examples
Carousel Horses Bolivar Ltd. Dunn Report
3. Profiles
Image Density Ratio per Color Image Density Ratio per Color Image Density Ratio per Color
Black 30.5% Black 5.4% Black 10.8%
Magenta 28.1% Magenta 4.3% Magenta 8.5%
Cyan 23.8% Cyan 6.0% Cyan 8.5%
Yellow 29.5% Yellow 6.7% Yellow 7.2%
DocuColor 5000AP Administrator Guide
3-31
Page 68

3. Profiles
Image Density Ratio examples (continued)
Upholstery by Morris Alpine Nursery Tulips
Image Density Ratio per Color Image Density Ratio per Color Image Density Ratio per Color
Black 11.6% Black 4.5% Black 27.8%
Magenta 11.9% Magenta 5.1% Magenta 24.7%
Cyan 11.1% Cyan 4.3% Cyan 23.8%
Yellow 11.4% Yellow 6.0% Yellow 28.8%
Determine if curl is upward (“cupped”) or curled downward
(“bridged”).
3-32
DocuColor 5000AP Administrator Guide
Page 69
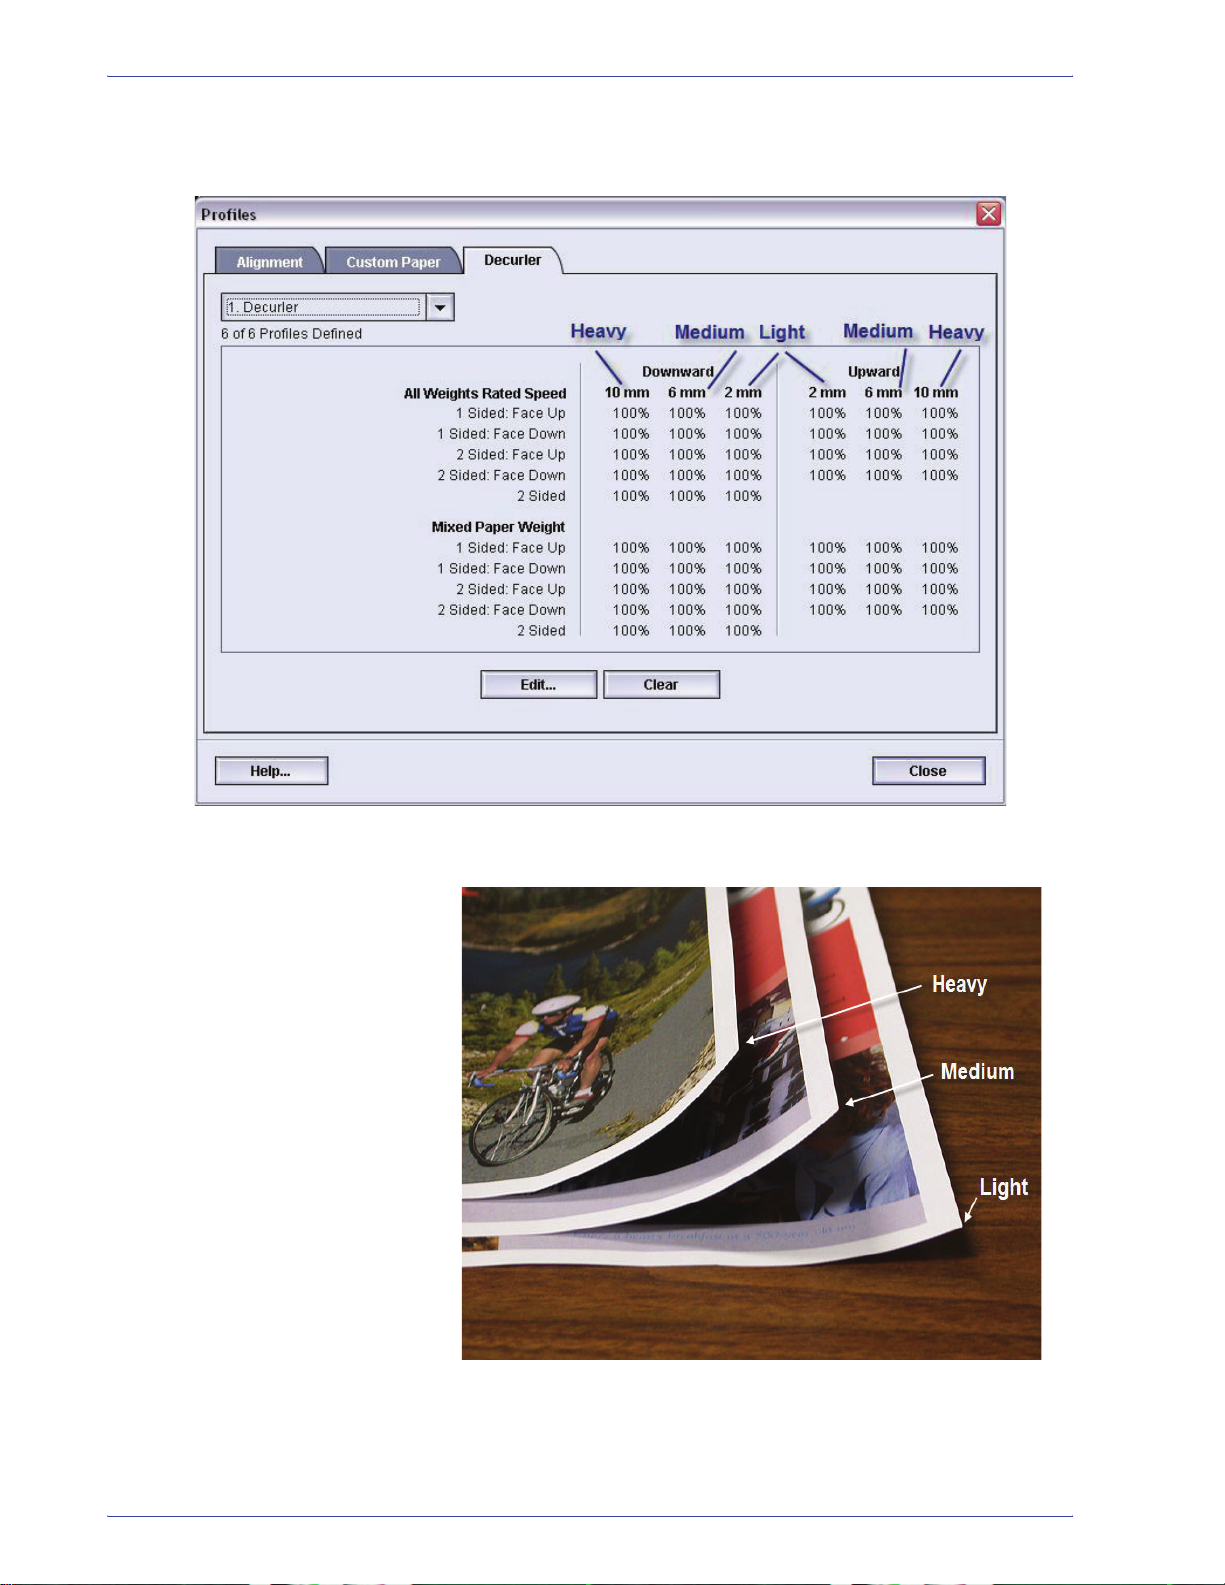
3. Profiles
Light, Medium and Heavy curl refer to the 2 mm (Light), 6 mm
(Medium) and 10 mm (Heavy) curl selections in the Downward
and Upward fields of the Custom Decurler Profile window.
Use the following example as a guide when determining if your
curl is Light, Medium, or Heavy.
DocuColor 5000AP Administrator Guide
3-33
Page 70
3. Profiles
Entering values in the Custom Decurler Profile fields
IMPORTANT! It is important to understand that when entering
image density ratio values within the Decurler Profile Properties
window that the maximum allowed entry is 100%.
When determining what values to enter, do not total all CMYK
image density ratios, but instead determine the largest CMYK
image density ratio value. Take a look at the following examples
for further explanation:
• If your job contains image density ratios of 100% cyan, 100%
magenta, 100% yellow, and 100% black, the maximum image
density ratio value is 100%. If your job contains 100% cyan,
20% magenta, 20% yellow, and 20% black, the maximum
value is still 100%.
• If your job contains image density ratios of 50% cyan, 50%
magenta, 50% yellow, and 50% black, the maximum image
density ratio value is 50%. If your job contains 50% cyan, 10%
magenta, 10% yellow, and 10% black, the maximum value is
still 50%.
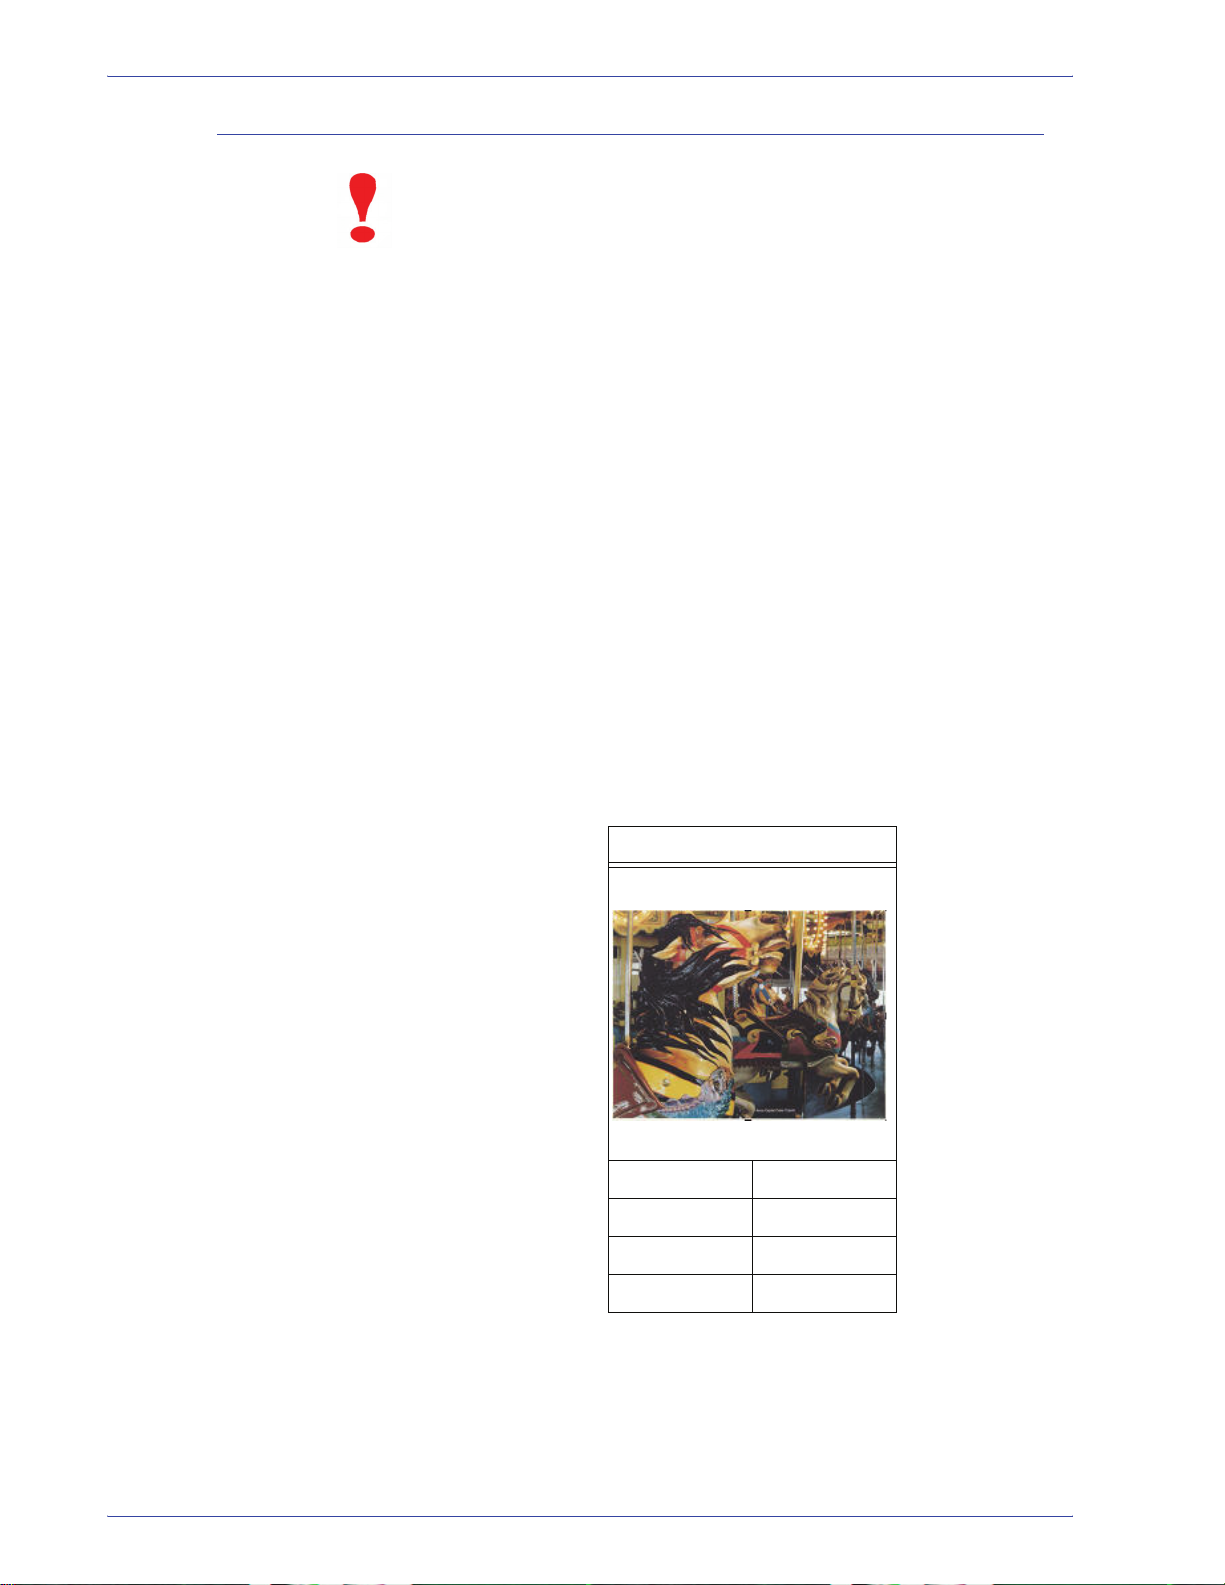
• Consider the Carousel Horses image density ratios shown
below. When entering image density ratio values to control
curl, you will use the black 30.5% value, not the combined total
of all CMYK values.
Image Density Ratios
Carousel Horses
Black 30.5%
Magenta 28.1%
3-34
Cyan 23.8%
Yellow 29.5%
DocuColor 5000AP Administrator Guide
Page 71

3. Profiles
Within the Decurler Profile Properties window, you must enter
Decurler values in ascending or descending order. If you do not
enter values in ascending or descending order, the following
screens display, which informs you to reenter the values correctly.
In the following example, 100% was followed by 80% and 90%,
respectively. The correct sequence would need to be 100%,
followed by 90% and then 80%. The conflicting values are
highlighted in red.
The exercise on the following pages will show you an example of
how to enter Decurler values correctly.
DocuColor 5000AP Administrator Guide
3-35
Page 72

3. Profiles
Creating a Custom Decurler Profile
To program a Custom Decurler Profile, perform the following:
1. At the controller, logon as Administrator.
a. Select the Logon button.
b. Select Administrator and enter a password.
a. Select [OK].
2. Select the [Profiles…] button.
3-36
NOTE: You can create up to six different Custom Decurler
Profiles.
DocuColor 5000AP Administrator Guide
Page 73

3. From the Profiles window, select the Decurler tab.
3. Profiles
4. You can edit an existing Custom Decurler Profile or create a
new one. For the following exercise you will create a new
profile.
a. From the Decurler drop-down menu, select <undefined>.
b. Select [Edit…] to define a new profile. The Decurler Profile
Properties window opens.
DocuColor 5000AP Administrator Guide
3-37
Page 74
3. Profiles
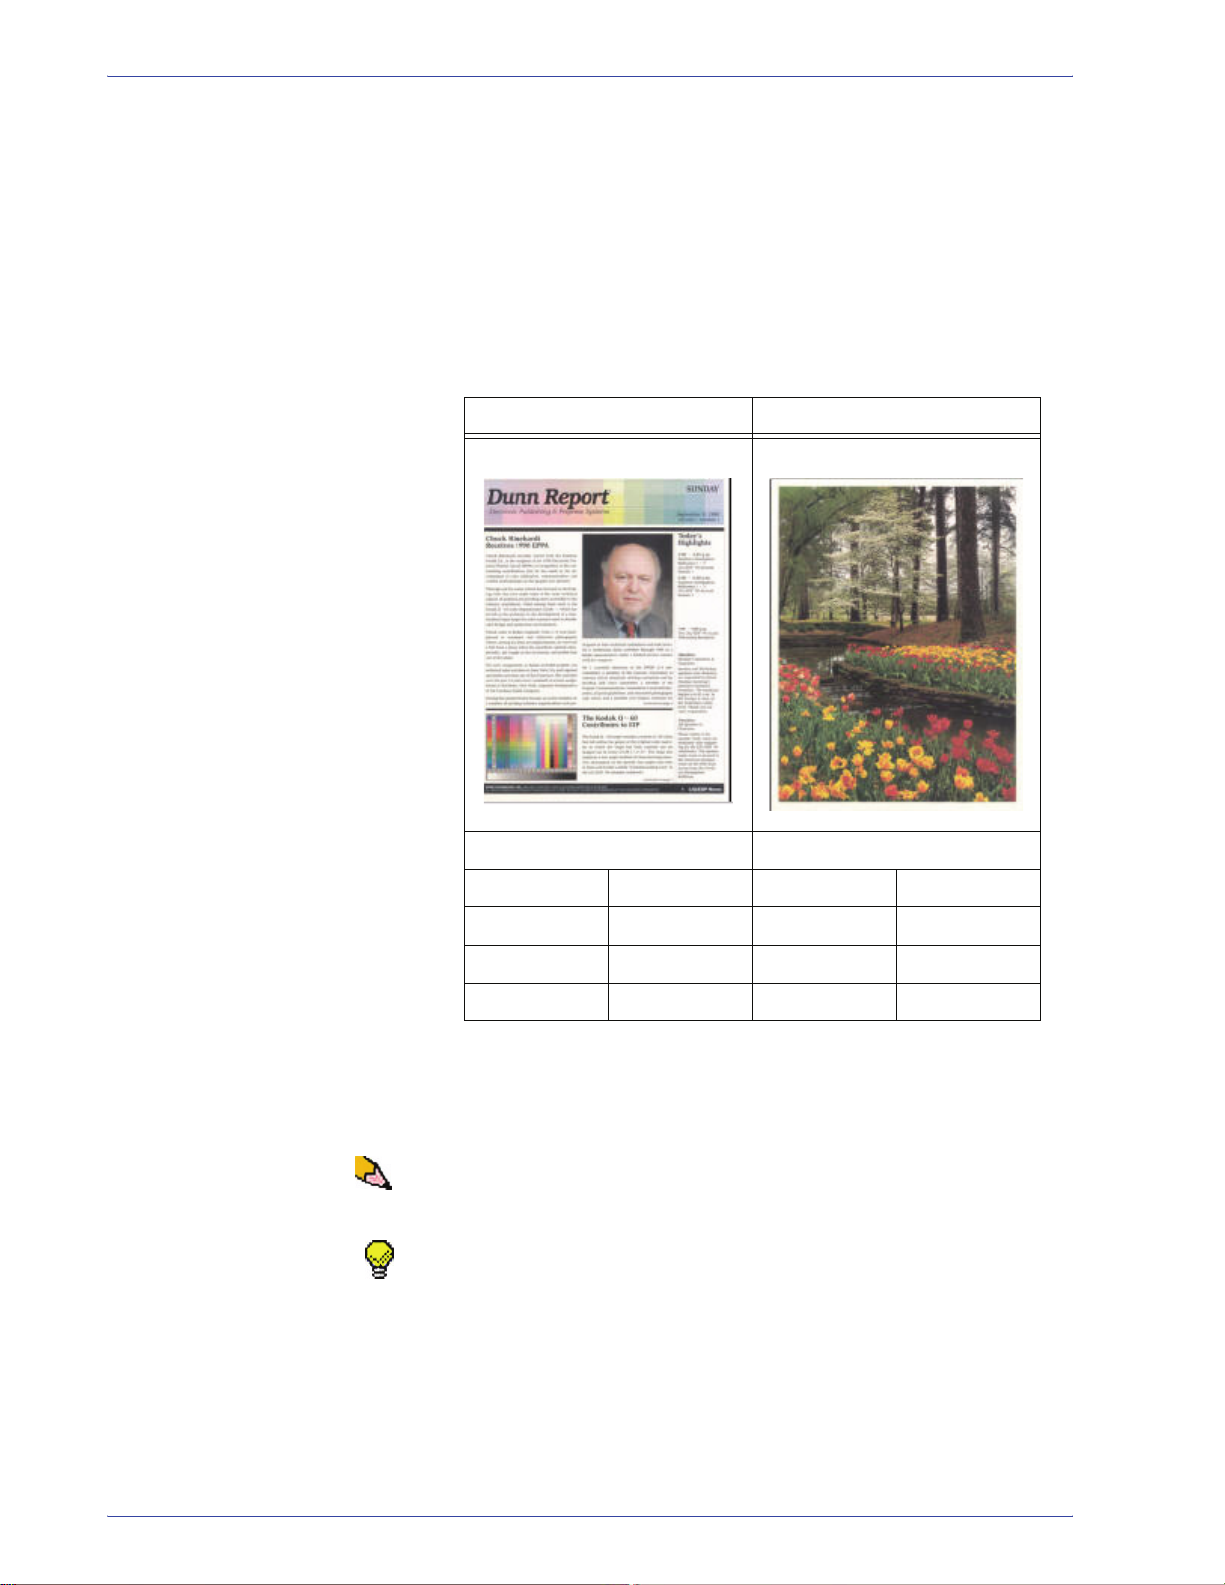
5. In this example, you are running a 10-page, 1 Sided: Face
Up job, which shows downward (bridged) curl. The job
contains:
• Six pages with maximum image density ratio of 10.8%
(Dunn Report) show light downward curl.
• Four pages with maximum image density ratio of 28.8%
(Tulips) show medium downward curl.
Image Density Ratios
Dunn Report Tulips
Image Density Ratio per Color Image Density Ratio per Color
Black 10.8% Black 27.8%
Magenta 8.5% Magenta 24.7%
Cyan 8.5% Cyan 23.8%
Yellow 7.2% Yellow 28.8%
You have tried the System Default and the A through D settings,
but curl remains. As a result, you need to program the Decurler to
use the downward Decurler path to remove the downward
(bridged) curl.
NOTE: Conversely, you would program the Decurler to use the
upward Decurler path to remove upward (cup ped) curl.
TIP: Paper that is curled upwards is adjusted using the Upward
category values. Paper that is curled downwards is adjusted
using the Downward category values.
3-38
DocuColor 5000AP Administrator Guide
Page 75
3. Profiles
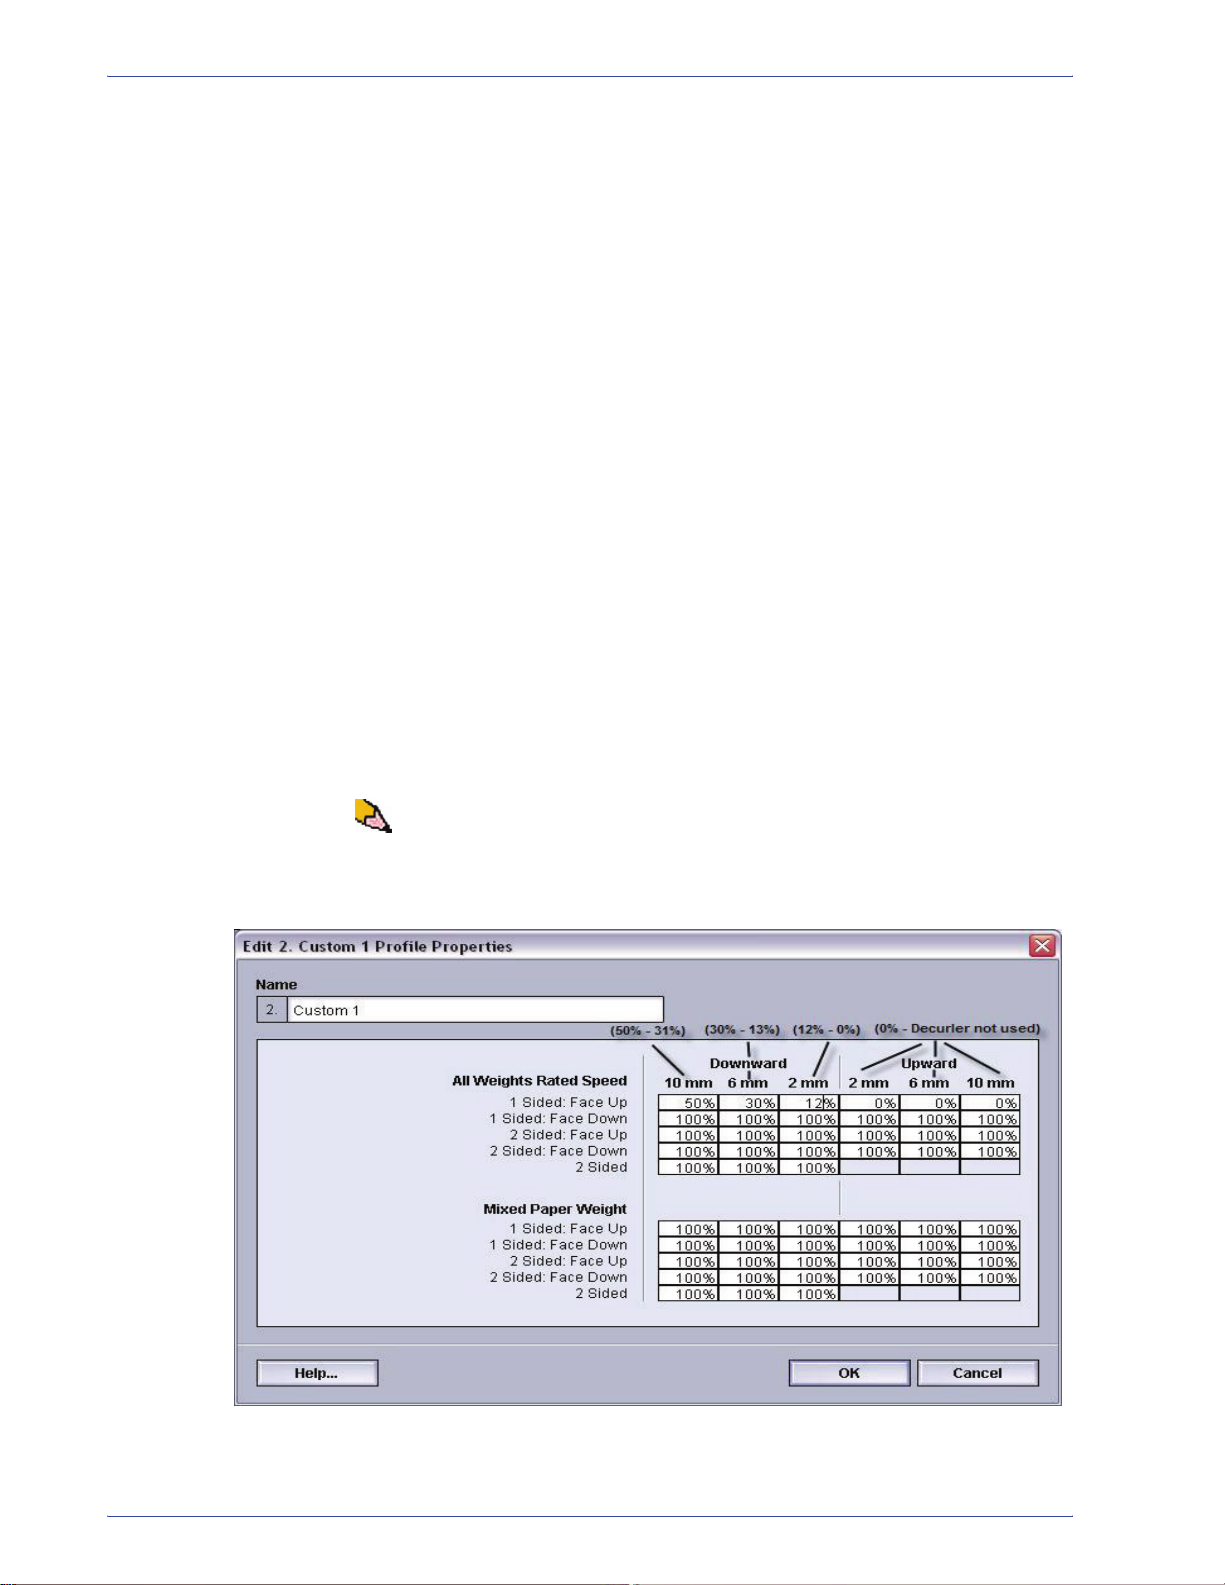
6. In the Decurler Profile Properties window, you can give the
Custom Decurler Profile a new name. In this example we
rename the Custom Decurler Profile to Custom 1.
7. In the Decurler Profile Properties window, enter the
following values in the All Weights Rated Speed, 1 Sided:
Face Up fields:
• Since your job shows downward curl, you do not want to
use the Upward Decurler. As a result, in the Upward
fields you must enter values in descending order, or in
equal values less than 12% (the next value you will
enter). For this exercise we will use 0%, 0% and 0%.
• In the Downward 2 mm (Light curl) field enter 12%. This
means that all pages with a 0% through 12% image
density ratio, which includes the Dunn Report maximum
of 10.8%, will be sent to the 2 mm downward Decurler
path.
• In the Downward 6 mm (Medium curl) field, enter 30%.
This means that all pages with 13% to 30% image
density ratio, which includes the Tulips 28.8%, will be
sent to the 6 mm downward Decurler path.
• In the Downward 10 mm (Heavy curl) field, enter 50%.
Since none of your job pages have 31% through 50%
image density ratio, this Decurler will not be used.
NOTE:Remember, all fields have to be considered
(Downward and Upward) when entering Custom Decurler
Profile values.
The following screen shows how the values would be entered:
DocuColor 5000AP Administrator Guide
3-39
Page 76

3. Profiles
8. To save your Custom Decurler Profile, select [OK] after you
have entered all required values. The Custom Profiles
Properties window closes and the Profiles window displays.
9. Confirm that the values that you entered are correct in the
Profiles window. Select [Close] to exit the window and save
your profile.
3-40
DocuColor 5000AP Administrator Guide
Page 77
3. Profiles
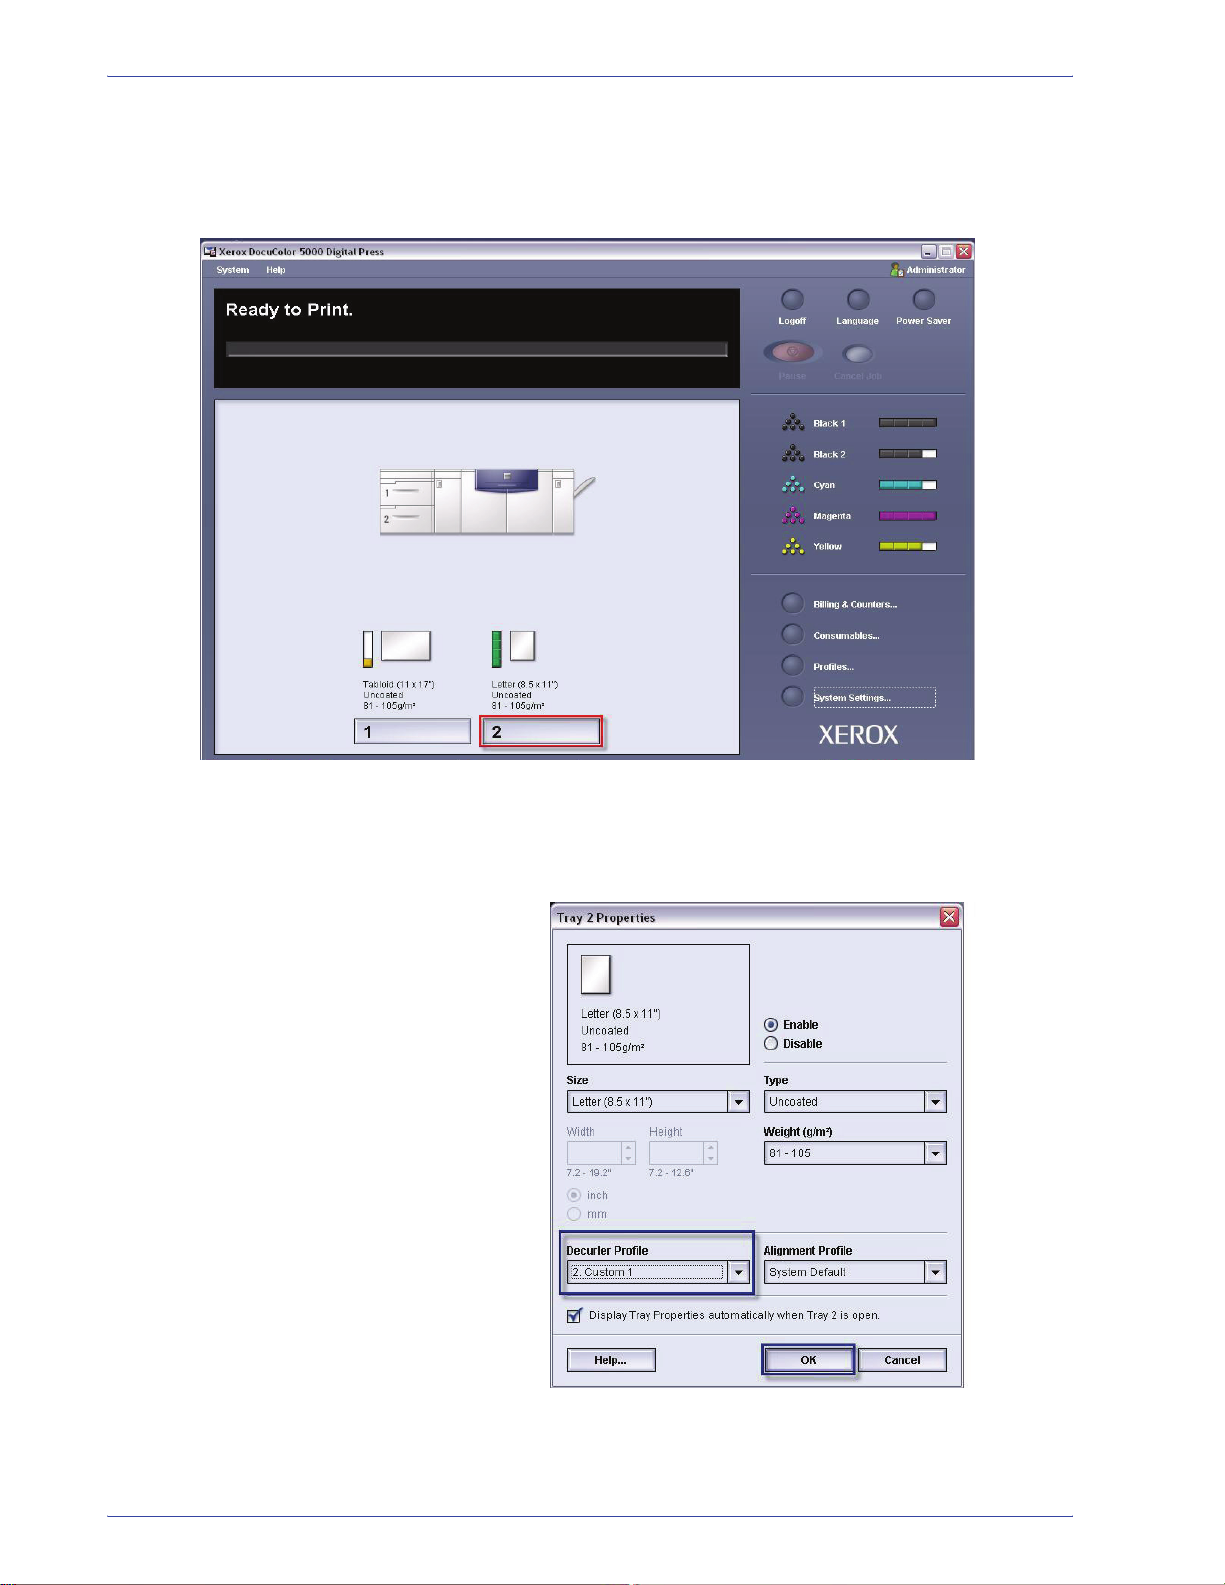
10. To use the newly created Custom Decurler Profile, select
the Tray button that contains the stock that you are using on
your job. For this exercise, select Tray 2. The Tray
Properties window opens.
11. From the Decurler Profiles menu, select the Custom 1
profile you created.
12. Select [OK] to activate the Custom 1 profile.
DocuColor 5000AP Administrator Guide
3-41
Page 78

3. Profiles
13. Print your job and determine if the curl has been eliminated.
a. If the curl is eliminated in the new output stack, continue
printing the job and you are finished
b. If the curl remains, you may have to repeat this procedure
and adjust the image density ratios entered in the Custom
Decurler Profile window until you achieve acceptable
output prints.
.
14. If curl remains after trying various value entries in the
Custom Decurler Profile window, call your Xerox service
representative.
NOTE: If a decurler profile is changed, it remains at that setting
until changed again manually. As an example, if you decide to use
the Decurler Profile named Custom 1, the setting will remain at
Custom 1 until you change it to another setting.
3-42
DocuColor 5000AP Administrator Guide
Page 79

Page 80

 Loading...