

Page 1
GI WLAN XEROX 6 langues.fm Page 1 Vendredi, 19. décembre 2008 3:44 15
Wireless adapter installation instructions Instructions d’installation de l’adaptateur sans fil
• Ensure the "Xerox Phaser 3100MFP Documentation and
Companion Pro Software" CD is installed on your computer
• Do not install the "Xerox Phaser 3100MFP WLAN" CD until
directed to do so.
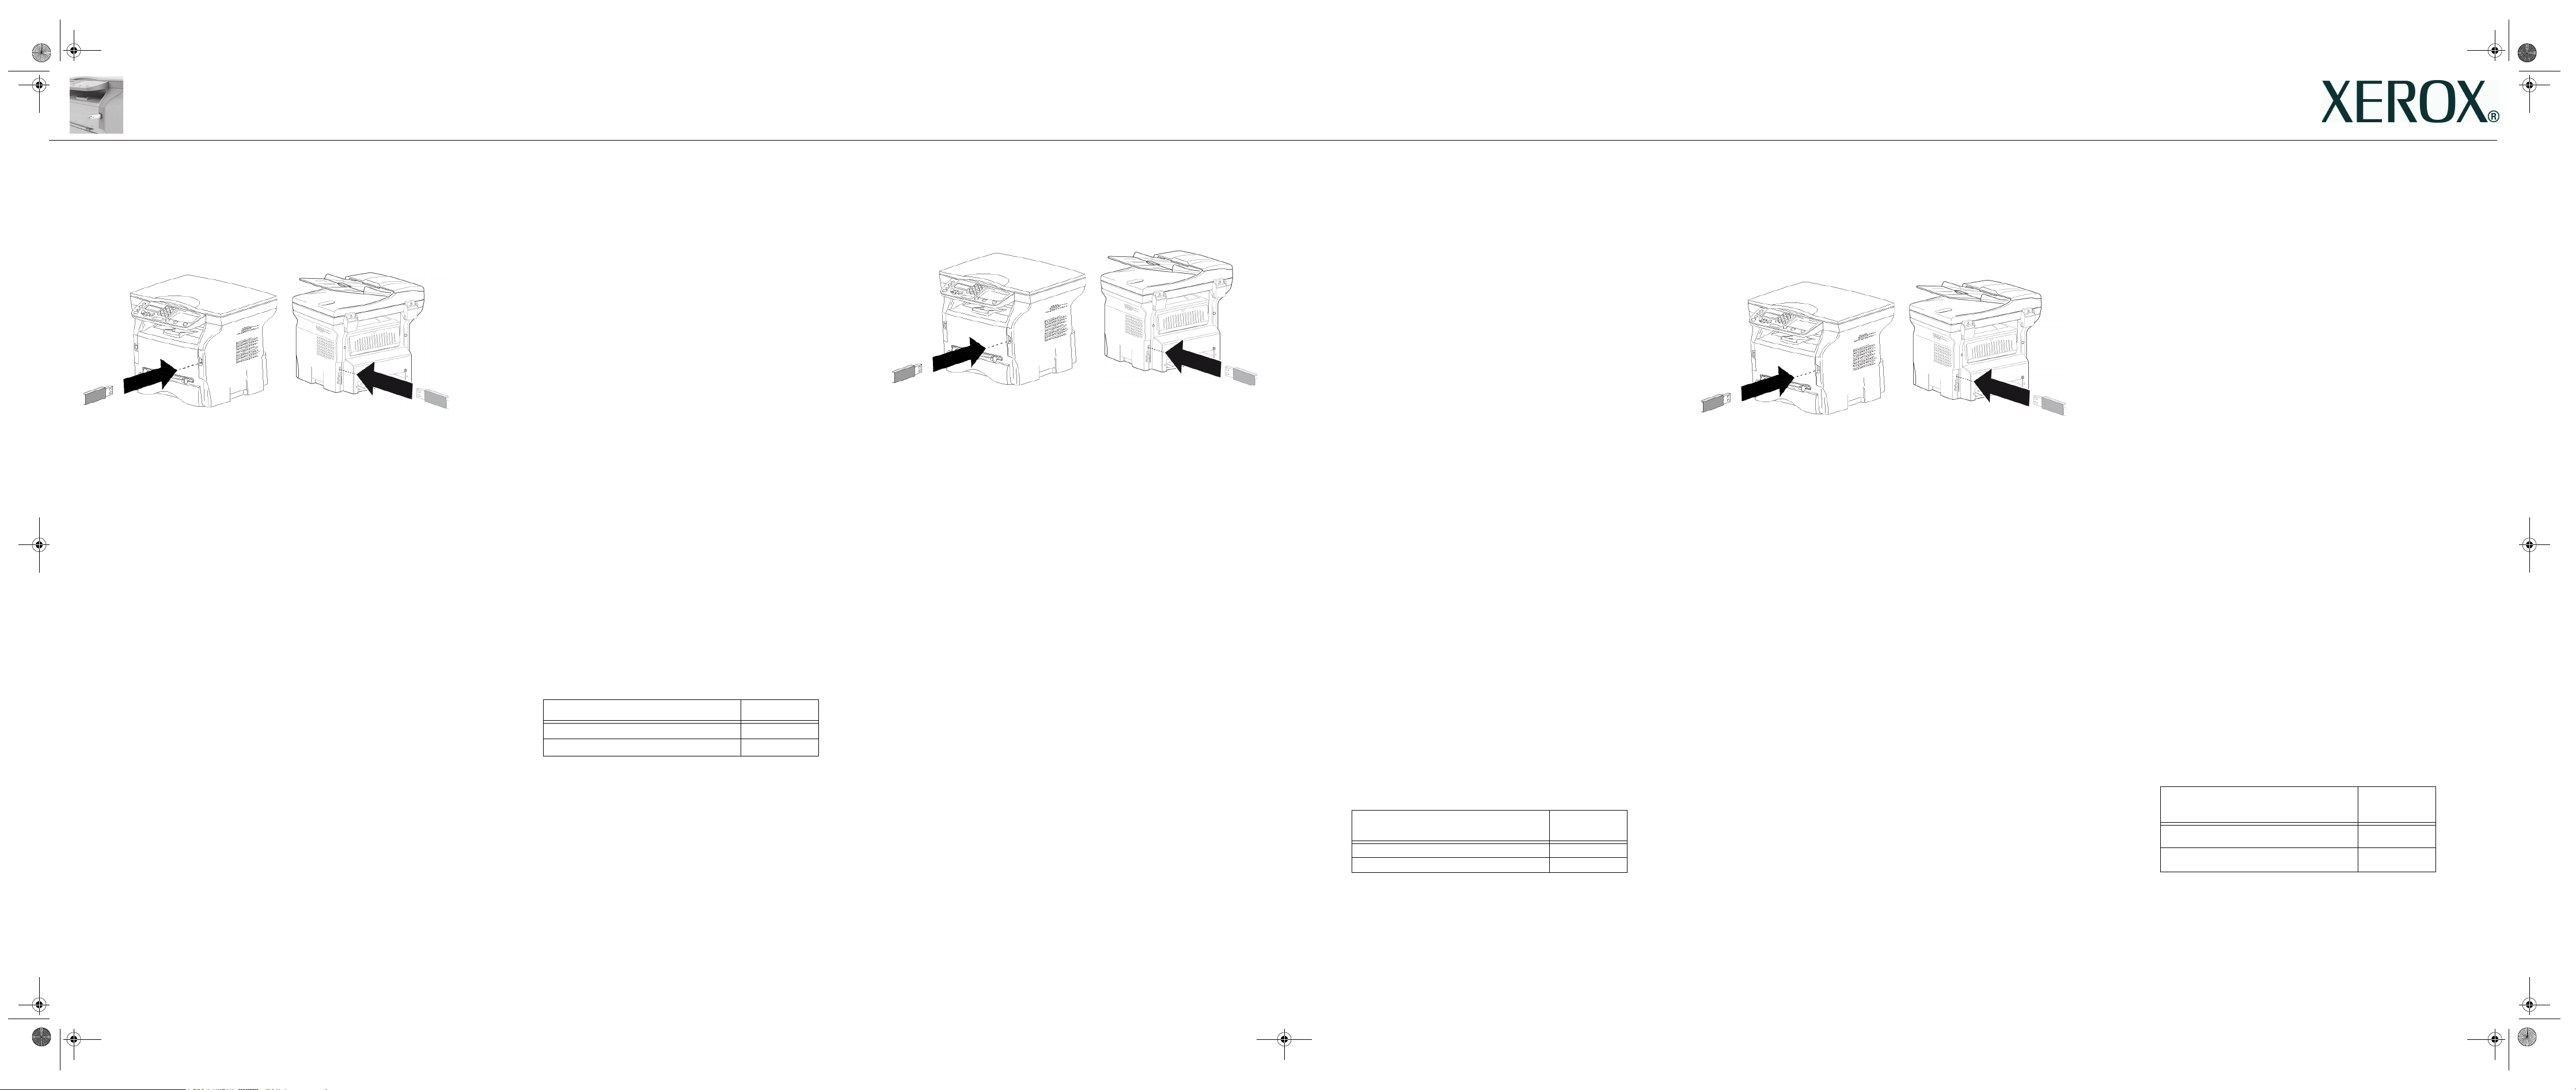
1.Insert the Wireless Adapter into the MFP
2.Configuring the Wireless Adapter
There are two methods of configuring the Wireless Adapter :
If you have a wireless router and want to use it then choose the Infrastructure
method, otherwise choose the Ad-Hoc method.
Infrastructure Method
1. On the Phaser 3100MFP press , select SETUP using the keys or
and confirm with OK.
2. Select WLAN using the keys
3. Select SETUP WIZARD using the keys
4. Select your existing wireless network name in the list using the keys
and confirm with OK.
Note: If your network does not appear in the list, you have to select NEW
NETWORK at the end of the list and then enter SSID (the name of
your network using the numerical keypad, (32 characters maximum)
and select mode INFRA.
5. If your wireless network has a encryption key (WEP or WPA) you must
enter the key you are using in the network from the control panel. For
more details see the user guide of your gateway or computer.
6. IP CONF.: MANU or IP CONF.: AUTO appears on the screen.
It is recommended to use an Automatic IP Address by selecting IP
CONF.:AUTO using the keys
If you choose to set up the system manually enter the parameters IP
ADDRESS, SUBNET MASK and GATEWAY.
7. When you press OK, the machine reboots to take into account the new
WLAN parameters. Once the network has been set up, the LED of the
Wireless Adapter should be on.
Ad-Hoc Method
1. On the Phaser 3100MFP press , select SETUP using the keys or
and confirm with OK.
2. Select WLAN using the keys
3. Select SETUP WIZARD using the keys
4. Select NEW NETWORK using the keys
5. SSID appears on the screen, enter the name of your network using the
numerical keypad, pressing the keys one after the other until you obtain
the name you want (32 characters maximum) and confirm with OK.
6. MODE AD-HOC or MODE INFRA appears on the screen. Select AD-HOC
253xxxxxxA
MODE and confirm with OK.
or and confirm with OK.
or and confirm with OK.
or and confirming with OK.
or and confirm with OK.
or and confirm with OK.
or and confirm with OK.
7. The sub-menu CHANNEL appears, enter a figure between 1 and 11 and
confirm with OK.
8. Select your encryption method, W/O Security or WEP Encryption, and
confirm with OK. If you choose WEP, enter the WEP key that you wish to
use on your network.
9. IP CONF.: MANU or IP CONF.: AUTO appears on the screen.
It is recommended to use Automatic IP Address by selecting IP CONF.:
AUTO using the keys
If you choose to set up the system manually enter the parameters IP
ADDRESS, SUBNET MASK and GATEWAY.
10.You should now return to the main menu of SETUP WIZARD. When you
press OK, the machine reboots to take into account the new WLAN
parameters. Once the network has been set up, the LED of the Wireless
Adapter should be on.
11.Open up your PC wireless connections and select your SSID name (set up
earlier) and select connect. Wait until connected is displayed. This may
take several minutes.
12.If your SSID name does not appear verify Ad-Hoc steps 1-12.
or and confirm with OK.
3.After Configuring the Wireless Adapter
1. Insert Phaser 3100MFP Wireless Adapter CD in the computer.
2. Select Yes, Next, I accept, Next and follow the instructions. Depending
on your PC configuration it may reboot. Once the reboot is complete verify
the Companion Monitor is loaded (two Xerox Icons will appear on your
desktop) if not retry.
3. Connect USB cable. Drivers installation will start automatically. Wait for
the end of the installation.
4. Follow instructions to update the firmware of the MFP and wait for the
reboot of the MFP then remove the USB cable.
4.Add the printer to the PC Wireless Networks list
or
1. If you used the Ad-hoc method. Depending on your PC configuration you
may have to open up your PC wireless connections and select your SSID
name (set up earlier) and select Connect. Wait until connected is
displayed. This may take several minutes. If you used the Infrastructure
method go to step 2.
2. Double click on the Xerox Companion Monitor Icon and in the tab
Device selection, select +Add.
Wait for the screen to refresh. This may take several minutes
3. Select your device (i.e. MF_XXXXXXXXXXXX) from the list and select
Next.
4. Depending on the Operating System of your PC and the model of your
machine, choose the printer driver to install and click Next, then check
the technical settings and click Next and Finish.
5. Enter a registration name for your PC, click OK and follow the instructions.
6. Select the printer you want to use on Companion monitor.
Printer ans scanner driver name Connection
Xerox Phaser 3100 MFP USB
Phaser 3100MFP WLAN WLAN
For more details: Click on the Companion Director icon on your desktop to
open Companion Director. Click on the Help button to view the
comprehensive user guide. see chapter PC features / Companion Monitor
/ Device Management / Adding a device connected to the network.
Important : Only print and scan functions are available when you use the
WLAN. The WLAN adaptor and DECT are not compatible, do not use them
together.
• Assurez-vous que le CD « Xerox Phaser 3100MFP Documentation
and Companion Pro Software » est installé sur votre ordinateur.
• N’installez pas le CD « Xerox Phaser 3100MFP WLAN » avant qu’il
vous le soit demandé.
1.Insérer l’adaptateur sans fil dans la MFP
2.Configuration de l’adaptateur sans fil
Voici deux méthodes de configuration de l’adaptateur sans fil :
Si vous disposez d’un routeur sans fil et que vous souhaitez l'utiliser,
choisissez alors la méthode Infrastructure, sinon choisissez la méthode AdHoc.
Méthode Infrastructure
1. Sur le Phaser 3100MFP, appuyez sur , sélectionnez REGLAGES à l’aide
de la touche ou et validez en appuyant sur OK.
2. Sélectionnez WLAN à l’aide de la touche
sur OK.
3. Sélectionnez ASS. CONFIG. à l’aide de la touche
appuyant sur OK.
4. Sélectionnez le nom de votre réseau sans fil existant dans la liste à l’aide
de la touche
ou et validez en appuyant sur OK.
Remarque : Si votre réseau n’apparaît pas dans la liste, vous devez
sélectionner NOUVEAU RESEAU à la fin de la liste puis entrer SSID
(le nom de votre réseau à l’aide du clavier numérique, (32 caractères
maximum) et sélectionnez le mode INFRA.
5. Si votre réseau sans fil dispose d’une clé de cryptage (WEP ou WPA),
vous devez entrer la clé utilisée sur le réseau sur le panneau de
commande. Pour obtenir plus d’informations détaillées, reportez-vous au
Guide utilisateur de votre passerelle ou de votre ordinateur.
6. CONF. IP : MANU ou CONF. IP : AUTO apparaît à l’écran.
Il est recommandé d’utiliser une adresse IP automatique en sélectionnant
CONF. IP : AUTO à l’aide de la touche
OK.
Si vous choisissez de configurer le système manuellement, entrez les
paramètres ADRESSE IP, MSK SS RES et PASSERELLE.
7. Lorsque vous appuyez sur OK, le terminal redémarre pour prendre en
compte les nouveaux paramètres WLAN. Une fois le réseau configuré, la
LED de l’adaptateur sans fil doit être allumée.
Méthode Ad-Hoc
1. Sur le Phaser 3100MFP, appuyez sur , sélectionnez REGLAGES à l’aide
de la touche
2. Sélectionnez WLAN à l’aide de la touche
sur OK.
3. Sélectionnez ASS. CONFIG. à l’aide de la touche
appuyant sur OK.
4. Sélectionnez NOUVEAU RESEAU à l’aide de la touche
en appuyant sur OK.
5. SSID apparaît à l’écran, saisissez le nom de votre réseau à l’aide du
clavier numérique en appuyant successivement sur les touches jusqu’à
l’obtention du nom voulu (32 caractères maximum) et validez en appuyant
sur OK.
6. MODE AD-HOC ou MODE INFRA apparaît à l’écran. Sélectionnez MODE
AD-HOC et validez en appuyant sur OK.
7. Le sous-menu CANAL apparaît, entrez un chiffre entre 1 et 11 et validez
en appuyant sur OK.
8. Sélectionnez votre méthode de cryptage, AUCUNE ou WEP, et validez en
appuyant sur OK. Si vous choisissez WEP, entrez la clé WEP que vous
souhaitez utiliser sur votre réseau.
ou et validez en appuyant sur OK.
ou et validez en appuyant
ou et validez en
ou et validez en appuyant sur
ou et validez en appuyant
ou et validez en
ou et validez
9. CONF. IP : MANU ou CONF. IP : AUTO apparaît à l’écran.
Il est recommandé d’utiliser l’adresse IP automatique en sélectionnant
CONF. IP : AUTO à l’aide de la clé
Si vous choisissez de configurer le système manuellement, entrez les
paramètres ADRESSE IP, MSK SS RES et PASSERELLE.
10.Vous devez à présent revenir au menu principal de l’ASSISTANT DE
CONFIGURATION. Lorsque vous appuyez sur OK, le terminal redémarre
pour prendre en compte les nouveaux paramètres WLAN. Une fois le
réseau configuré, la LED de l’adaptateur sans fil doit être allumée.
11.Activez les connexions sans fil de votre PC et sélectionnez le nom de votre
SSID (configuré précédemment) et sélectionnez Connecter. Patientez
jusqu’à ce que Connecté s’affiche. Cette opération peut prendre plusieurs
minutes.
12.Si le nom de votre SSID n’apparaît pas, vérifiez les étapes Ad-Hoc 1 à 12.
ou et validez en appuyant sur OK.
3.Après avoir configuré l’adaptateur sans fil
1. Insérez le CD Phaser 3100MFP Wireless Adapter dans l’ordinateur.
2. Sélectionnez Oui, Suivant, J’accepte, Suivant et suivez les instructions.
En fonction de la configuration de votre PC, il se peut que celui-ci
redémarre. À l’issue du redémarrage, vérifiez que le Companion Monitor
est chargé (deux icônes Xerox apparaîtront sur votre bureau). Si ce n’est
pas le cas, réessayez.
3. Connectez le câble USB. L’installation des pilotes démarrera
automatiquement. Patientez jusqu’à la fin de l’installation.
4. Suivez les instructions pour mettre à jour le firmware de la MFP et
attendez que la MFP redémarre, puis retirez le câble USB.
4.Ajouter l’imprimante à la liste des réseaux sans
fil du PC
1. Si vous avez utilisé la méthode Ad-hoc. En fonction de la configuration de
votre PC, il se peut que deviez activer les connexions sans fil de votre PC
et sélectionner le nom de votre SSID (configuré précédemment) puis
Connecter. Patientez jusqu’à ce que Connecté s’affiche. Cette opération
peut prendre plusieurs minutes. Si vous avez utilisé la méthode
Infrastructure, passez à l’étape 2.
2. Double cliquez sur l’icône Xerox Companion Monitor et sous l’onglet
Sélection du périphérique, sélectionnez +Ajouter.
Patientez jusqu’à ce que l’écran soit mis à jour. Cette opération peut
prendre plusieurs minutes.
3. Sélectionnez votre périphérique (soit MF_XXXXXXXXXXXX) dans la liste et
sélectionnez Suivant.
4. En fonction du système d’exploitation de votre PC et du modèle de votre
terminal, choisissez le pilote de l’imprimante à installer et cliquez sur
Suivant, puis vérifiez les paramètres techniques et cliquez sur Suivant
et Terminer.
5. Entrez un nom d’enregistrement pour votre PC, cliquez sur OK et suivez
les instructions.
6. Sélectionnez l’imprimante que vous souhaitez utiliser sur Companion
monitor.
Nom du pilote de l’imprimante et du
scanner
Xerox Phaser 3100 MFP USB
Phaser 3100MFP WLAN WLAN
Pour obtenir plus d’informations détaillées : Cliquez sur l’icône Companion
Director sur votre bureau pour ouvrir Companion Director. Cliquez sur le
bouton Aide pour afficher le Guide utilisateur dans son intégralité. Reportezvous au chapitre Fonctions PC / Companion Monitor / Gestion des
périphériques / Ajout d’un périphérique connecté au réseau.
Important : Seules les fonctions d’impression et de numérisation sont
disponibles lorsque vous utilisez le WLAN. L’adaptateur WLAN et le DECT ne
sont pas compatibles, ne les utilisez pas simultanément.
Connexion
Instrucciones de instalación del adaptador inalámbrico
• Compruebe que el CD de "Documentación del Xerox Phaser
3100MFP y del programa Companion Pro" está instalado en su
ordenador.
• No instale el CD "WLAN del Xerox Phaser 3100MFP" hasta que le
indique que lo haga.
1.Introduzca el adaptador inalámbrico en el MFP
2.Configuración del adaptador inalámbrico
Existen dos métodos para configurar el adaptador inalámbrico:
si tiene un enrutador inalámbrico y desea utilizarlo, elija el método de
infraestructura, o de lo contrario, elija el método Ad-hoc.
Método de infraestructura
1. En el Phaser 3100MFP pulse , seleccione PARAMETROS utilizando las
teclas
2. Seleccione WLAN utilizando las teclas
3. Seleccione ASIS. CONFIG. utilizando las teclas o y confirme con OK.
4. Seleccione el nombre de su red inalámbrica existente en la lista, utilizando
las teclas
Nota: Si su red no aparece en la lista, tendrá que seleccionar NUEVA RED
al final de la lista y a continuación, indicar SSID (el nombre de su
red utilizando el teclado numérico, de 32 caracteres como máximo)
y seleccione el modo INFRA.
5. Si su red inalámbrica tiene una clave de codificación (WEP o WPA),
deberá indicar la clave que esté utilizando en la red a partir del panel de
control. Si desea más información, véase la guía de usuario de la puerta
de salida o del ordenador.
6. CONFIG. IP: MANU o CONF. IP: AUTO aparecerá en pantalla.
Se le aconseja que utilice una Dirección IP automática seleccionando
CONF. IP:AUTO utilizando las teclas
Si elije configurar el sistema manualmente, indique los parámetros
DIRECCIÓN IP, MÁSCARA DE SUBRED y GATEWAY.
7. Cuando pulse OK, la máquina se reinicia para tener en cuenta los nuevos
parámetros WLAN. Una vez que haya configurado la red, la LED del
adaptador inalámbrico deberá estar encendida.
Método Ad-Hoc
8. v y confirme con OK.
9. Seleccione NUEVA RED utilizando las teclas o y confirme con OK.
10.SSID aparece en pantalla, indique el nombre de su red utilizando el
teclado numérico, pulsando las teclas una tras la otra hasta que obtenga
el nombre que desee (32 caracteres como máximo) y confirme con OK.
11.MODO AD-HOC o MODO INFRA aparece en pantalla. Seleccione MODO
AD-HOC y confirme con OK.
12.Aparecerá el submenú de CANAL, indique un número entre el 1 y el 11,
y confirme con OK.
13.Seleccione su método de codificación, Seguridad W/O o la
CodificaciónWEP, y confirme con OK. Si elije WEP, indique la clave WEP
que desea utilizar en su red.
o y confirme con OK.
o y confirme con OK.
o y confirme con OK.
o y confirmando con OK.
14.CONFIG. IP: MANU o CONF. IP: AUTO aparecerá en pantalla.
Le aconsejamos que utilice una Dirección IP automática seleccionando
CONF IP: AUTO utilizando las teclas
Si elije configurar el sistema manualmente, indique los parámetros
DIRECCIÓN IP, MÁSCARA DE SUBRED y GATEWAY.
15.Ahora deberá regresar al menú principal del ASIS. CONFIG. Cuando
pulse OK, la máquina se reinicia para tener en cuenta los nuevos
parámetros WLAN. Una vez que haya configurado la red, la LED del
adaptador inalámbrico deberá estar encendida.
16.Abra sus conexiones inalámbricas de PC y seleccione su nombre SSID
(configurado previamente) y seleccione conectar. Espere hasta que
aparezca un mensaje "conectado" en pantalla. Esto podrá tardar varios
minutos.
17.Si su nombre SSID no aparece, compruebe las etapas 1-12 Ad-Hoc.
o y confirme con OK.
3.Tras configurar el adaptador inalámbrico
1. Introduzca el CD del Adaptador inalámbrico Phaser 3100MFP en el
ordenador.
2. Seleccione Sí, Siguiente, Acepto, Siguiente y siga las instrucciones. En
función de la configuración de su PC, quizás deba reiniciarlo. Una vez que
haya completado el reinicio, compruebe que el Monitor de Companion se
ha cargado (aparecerán dos iconos de Xerox en su escritorio), de lo
contrario, inténtelo de nuevo.
3. Conecte el cable USB. La instalación de los pilotos empezará
automáticamente. Espere a que termine la instalación.
4. Siga las instrucciones para actualizar el firmware del MFP y espere a que
se reinicie el MFP y a continuación, retire el cable USB.
4.Añada la impresora a la lista de redes
inalámbricas del PC.
1. Si utilizó el método Ad-hoc. En función de la configuración de su PC, quizás
tenga que abrir sus conexiones inalámbricas de PC y seleccionar su
nombre SSID (configurado previamente) y seleccionar Conectar. Espere
hasta que aparezca un mensaje "conectado" en pantalla. Esto podrá
tardar varios minutos. Si utilizó el método de Infraestructura, vaya a la
etapa 2.
2. Haga doble clic en el icono del Monitor de Xerox Companion y en la
pestaña Selección del dispositivo, seleccione+Añadir.
Espere a que la pantalla se actualice. Esto podrá tardar varios minutos.
3. Seleccione su dispositivo (por Ej. MF_XXXXXXXXXXXX) a partir de la lista
y seleccione Siguiente.
4. En función del sistema operativo de su PC y del modelo de su ordenador,
elija el piloto de la impresora que va a instalar y pulse en Siguiente, a
continuación, compruebe la configuración técnica y pulse en Siguiente y
Terminar.
5. Indique un nombre de registro para su PC, pulse en OK y siga las
instrucciones.
6. Seleccione la impresora que desea utilizar en el monitor de Companion.
Nombre del piloto del escáner e
impresora
Xerox Phaser 3100 MFP
Phaser 3100MFP WLAN
Para más información: Pulse en el icono de Companion Director ubicado en
su escritorio para abrir el Companion Director. Pulse el botón de Ayuda para
ver la guía de usuario al completo. Véase el capítulo Funciones del PC/
Monitor Companion / Gestión del dispositivo / Añadir un dispositivo
conectado a la red.
Importante: Sólo las funciones de impresión y escáner se encuentran
disponibles cuando utiliza el WLAN. El adaptador WLAN y DECT no son
compatibles, no los utilice juntos.
Conexión
USB
WLAN
Page 2
GI WLAN XEROX 6 langues.fm Page 2 Vendredi, 19. décembre 2008 3:44 15
Istruzioni per l'installazione dell'adattatore Wireless Installationsanweisungen für Wireless-Adapter Kablosuz adaptör kurulum talimatları
• Assicurarsi che il CD "Documentazione Xerox Phaser 3100MFP e
Companion Pro Software" sia installato sul proprio computer.
• Non procedere all'installazione del CD "Xerox Phaser 3100MFP
WLAN" fino a quando non sia chiaramente indicato.
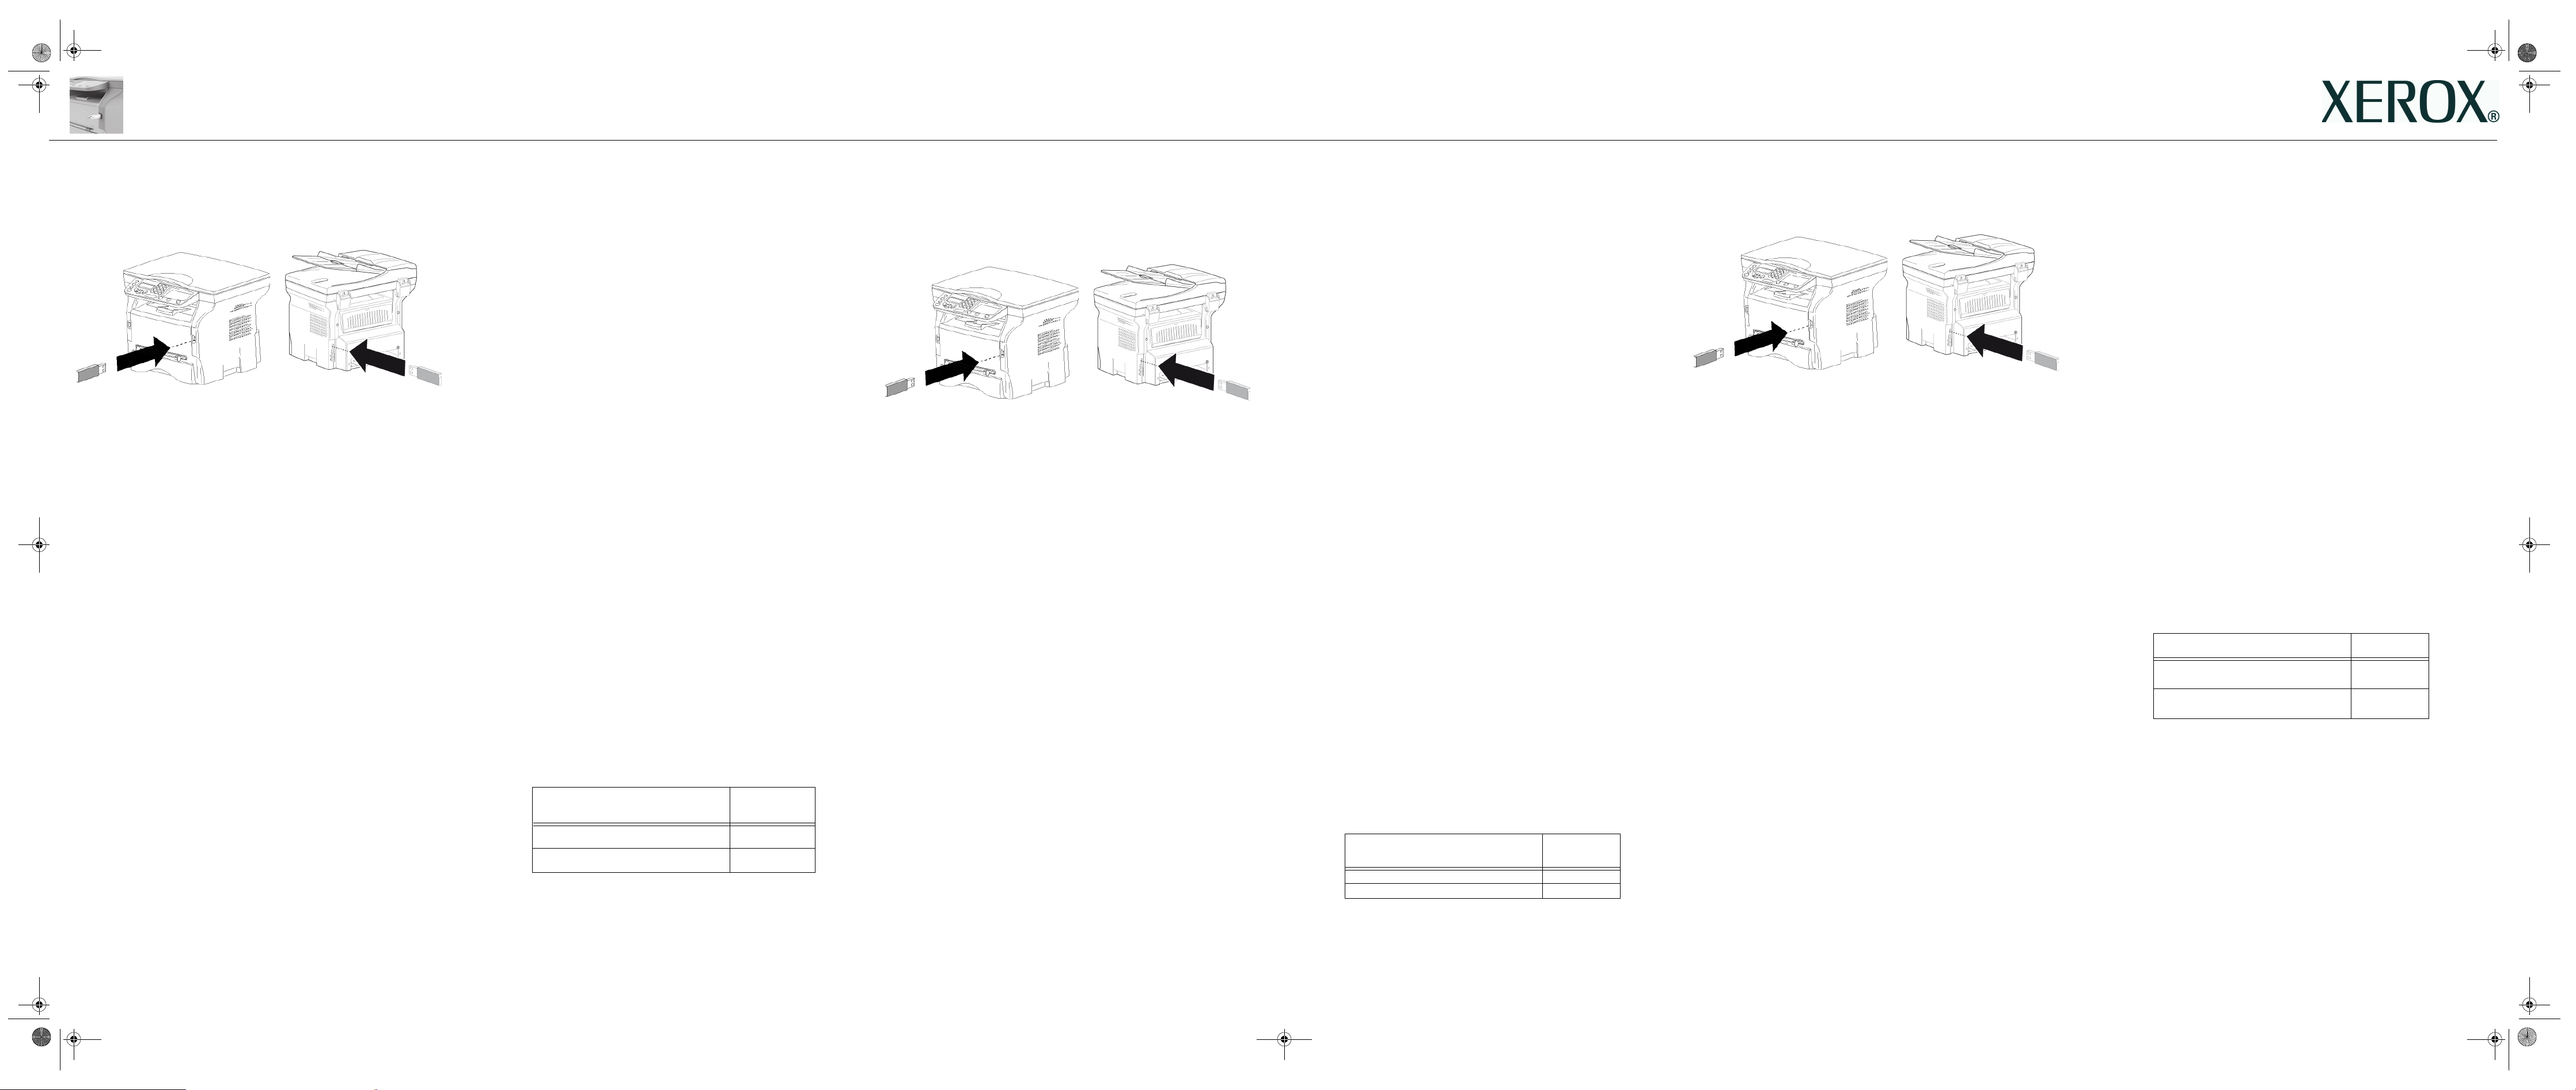
1.Inserire l'adattatore Wireless nel MFP
2.Configurare l'adattatore Wireless
Esistono due metodi per configurare l'adattatore Wireless:
Se si possiede un router wireless e o si vuole utilizzare alla scegliere il metodo
Infrastruttura, altrimenti scegliere il metodo Ad hoc.
Metodo Infrastruttura
1. Sul Phaser 3100MFP premere , selezionare IMPOSTAZIONI con i tasti
o e confermare con OK.
2. Selezionare WLAN con i tasti
3. Selezionare CONFIG. ASS. con i tasti
4. Selezionare nell'elenco dei nomi di reti disponibili quello che interessa con
i tasti o e confermare con OK.
Nota: In caso la propria rete non appaia nell'elenco, selezionare NUOVA
RETE in basso all'elenco e quindi inserire SSID (Il nome della propria
rete mediante la tastiera numerica, (32 caratteri max.) e selezionare
la modalità INFRA.
5. Se la propria rete wireless ha una chiave crittografica (WEP or WPA)
questa deve essere inserita a partire dal pannello di configurazione in rete
. Per ulteriori dettagli si vedano le istruzioni per l'uso della propria gateway
o computer.
6. CONF IP: MANU o CONF. IP: AUTO appaiono sullo schermo.
Si raccomanda l'utilizzo dell'indirizzo IP in modo automatico, selezionando
CONF. IP: AUTO con i tasti
Se si sceglie di impostare il sistema in modo manuale, cambiare i propri
parametri di rete e inserire i parametri INDIRIZZO IP, SUBNET MASK
e GATEWAY.
7. Quando si preme OK, il terminale si reinizzializza per registrare i nuovi
parametri WLAN. Una volta configurata la rete, la spia led della chiave
USB WLAN dovrebbe essere accesa.
Metodo Ad hoc
1. Sul Phaser 3100MFP premere , selezionare IMPOSTAZIONI con i tasti
o e confermare con OK.
2. Selezionare WLAN con i tasti
3. Selezionare CONFIG. ASS. con i tasti
4. Selezionare NUOVA RETE con i tasti
5. SSID appare sullo schermo, immettere il nome della rete mediante la
tastiera numerica premendo successivamente i tasti fino ad ottenere il
nome voluto (32 caratteri max.) e confermare con OK.
6. MOD.AD HOC o MOD. INFRA. appare sullo schermo. Selezionare MOD.
AD HOC e confermare con OK.
7. Appare il sotto menu CANALE, inserire un numero compreso tra 1 e 11
e confermare con OK.
8. Selezionare il proprio metodo Sicurezza W/O o crittografia WEP e
confermare con OK. Se si sceglie WEP, inserire la chiave WEP che si sta
usando sulla propria rete.
o e confermare con OK.
o e confermare con OK.
o e confermare con OK.
o e confermare con OK.
o e confermare con OK.
o e confermare con OK.
9. CONF IP: MANU o CONF. IP: AUTO appaiono sullo schermo.
Si raccomanda l'utilizzo dell'indirizzo IP automatico con la selezione di
CONF. IP: AUTO con i tasti
Se si sceglie di impostare il sistema in modo manuale, cambiare i propri
parametri di rete e inserire i parametri INDIRIZZO IP, SUBNET MASK
e GATEWAY.
10.Si dovrebbe tornare al menu principale del CONFIG. ASS.. Quando si
preme OK, il terminale si reinizzializza per registrare i nuovi parametri
WLAN. Una volta configurata la rete, la spia led della chiave USB WLAN
dovrebbe essere accesa.
11.Aprire la connessione wireless del proprio pc e selezionare il nome SSID
(impostato prima) e selezionare collegare. Attendere fino a quando venga
visualizzata la connessione. Questo puo' prendere qualche minuto.
12.Se il nome SSID attribuito non apparisse, verificare i passaggi 1-12 della
modalità Ad hoc.
o e confermare con OK.
3.Dopo aver configurato l'adattatore Wireless
1. Inserire il CD Phaser 3100MFP Wireless Adapter nel computer.
2. Selezionare Si', Seguente, Accetto, Seguente e seguire le istruzioni. A
seconda della configurazione il pc potrebbe riavviarsi. Una volta riavviato,
verificare che il Companion Monitor sia stato scaricato (appariranno sul
desktop due icone Xerox) altrimenti riprovare.
3. Collegare il cavo USB. L'installazione dei driver si avvia automaticamente.
Attendere la fine dell'installazione.
4. Seguire le istruzioni per aggiornare il firmware del MFP e attendere il
riavvio dell'MFP, quindi rimuovere il cavo USB.
4.Aggiungere la stampante all'elenco reti PC
wireless
1. Se si utilizza il metodo Ad hoc. A seconda della configurazione del proprio
pc é possibile che si debba aprire la connessione wireless e selezionare il
nome SSID (già impostato in precedenza) e selezionare Collega.
Attendere fino a quando venga visualizzata la connessione. Questo puo'
prendere qualche minuto. Se si utilizza il metodo Infrastruttura andare al
passaggio 2.
2. Fare doppio clic sull'icona Xerox Companion Monitor e sulla scheda
Selezione periferica, selezionare +Agg..
Attendere che lo schermo si aggiorni. Questo puo' prendere qualche
minuto.
3. Selezionare la propria periferica (ad es. MF_XXXXXXXXXXXX) nell'elenco
e selezionare Seguente.
4. A seconda del sistema operativo del proprio PC e del modello del proprio
terminale, scegliere il driver della stampante da installare e premere
Seguente, quindi verificare le impostazioni tecniche e cliccare Seguente
e Fine.
5. Inserire un nome per la registrazione del proprio PC, cliccare su OKe
seguire le istruzioni.
6. Selezionare la stampante desiderata sul Companion monitor
Nome del driver della stampante e
dello scanner
Xerox Phaser 3100 MFP
Phaser 3100MFP WLAN
Per ulteriori dettagli: Cliccare sull'icona "Companion Director" sul proprio
desktop per aprire Companion Director. Cliccare sul pulsante "Aiuto" per
visualizzare la guida utente completa. Si veda il capitolo "Funzionalità PC /
Companion Monitor / Gestione periferica / Aggiungere una periferica
collegata alla rete ".
Importante: Quando si utilizza il WLAN, solo le funzioni di stampa e di scan
sono disponibili. L'adattatore WLAN e DECT non sono compatibili
simultaneamente, non utilizzarli assieme.
Collegamento
USB
WLAN
• Stellen Sie sicher, dass die CD-ROM „Xerox Phaser 3100MFP
Documentation and Companion Pro Software“ auf dem Computer
installiert ist.
• Installieren Sie die CD-ROM „Xerox Phaser 3100MFP WLAN“ erst,
wenn Sie dazu aufgefordert werden.
1.Stecken Sie den USB-WLAN-Stick in das
Multifunktionsgerät ein
2.Konfiguration des USB-WLAN-Sticks
Für die Konfiguration des USB-WLAN-Sticks sind zwei verschiedene Modi
verfügbar,
Wenn Sie einen bereits in Ihrem Netzwerk vorhandenen WLAN-Router
verwenden möchten, wählen Sie den Infrastrukturmodus. Wählen Sie
ansonsten den Ad-Hoc-Modus.
Infrastrukturmodus
1. Drücken Sie auf dem Phaser 3100MFP , wählen Sie mit Hilfe der Tasten
bzw. das Menü EINSTELLUNGEN, und bestätigen Sie die Auswahl
mit OK.
2. Wählen Sie mit Hilfe der Tasten
bestätigen Sie die Auswahl mit OK.
3. Wählen Sie mit Hilfe der Tasten
bestätigen Sie die Auswahl mit OK.
4. Wählen Sie mit Hilfe der Tasten
und bestätigen Sie die Auswahl mit OK.
Hinweis: Wenn Ihr Netzwerkname in der Liste nicht aufgeführt ist, wählen
Sie unten in der Liste die Option NEUES NETZWERK (Neues
Netzwerk). Geben Sie dann über den Ziffernblock die SSID (bis zu
32 Zeichen langer Netzwerkname) an, und wählen Sie als Modus
INFRA (Infastrukturmodus).
5. Wenn Ihr WLAN verschlüsselt ist (WEP oder WAP), müssen Sie über die
Steuerung den Schlüssel für das Netzwerk eingeben. Weitergehende
Informationen finden Sie im Benutzerhandbuch Ihres Gateways oder
Computers.
6. Auf dem Display werden die beiden Optionen IP CONF.: MANU und IP
CONF.: AUTO angezeigt.
Es wird empfohlen, die IP-Adresse automatisch festzulegen. Wählen Sie
dazu mit Hilfe der Tasten
bestätigen Sie die Auswahl mit OK.
Wenn Sie die manuelle Konfiguration wählen, geben Sie die Werte für die
Parameter IP ADDRESS, SUBNET MASK und GATEWAY ein.
7. Drücken Sie dann auf OK, um das Gerät mit den geänderten WLAN-
Einstellungen neu zu starten. Wenn das Netzwerk erfolgreich konfiguriert
ist, sollte die LED-Anzeige des USB-WLAN-Sticks aufleuchten.
Ad-hoc-Modus
1. Drücken Sie auf dem Phaser 3100-Multifunktionsgerät , wählen Sie mit
Hilfe der Tasten
Sie die Auswahl mit OK.
2. Wählen Sie mit Hilfe der Tasten bzw. die Option WLAN, und
bestätigen Sie die Auswahl mit OK.
3. Wählen Sie mit Hilfe der Tasten bzw. das Menü CONFIG ASS.,
und bestätigen Sie die Auswahl mit OK.
4. Wählen Sie mit Hilfe der Tasten bzw. die Option NEW NETWORK
(Neues Netzwerk), und bestätigen Sie die Auswahl mit OK.
5. Auf dem Display wird die Eingabeaufforderung SSID angezeigt. Geben Sie
mit Hilfe des Ziffernblocks den Namen des neuen Netzwerks ein, indem Sie
bis zur Erlangung des gewünschten Namens auf die Tasten drücken (max.
32 Zeichen) und bestätigen Sie mit OK.
6. Auf dem Display werden die Optionen AD-HOC MODE und MODE INFRA.
angezeigt. Wählen Sie die Option AD-HOC MODE, und bestätigen Sie die
Einstellung mit OK.
bzw. das Menü EINSTELLUNGEN, und bestätigen
bzw. die Option WLAN, und
bzw. das Menü
bzw. Ihr WLAN aus der Liste aus,
bzw. die Option IP CONF.:AUTO, und
CONFIG ASS.
, und
7. Das Untermenü KANAL wird angezeigt. Geben Sie eine Zahl zwischen 1
und 11 ein, und bestätigen Sie die Eingabe mit OK.
8. Wählen Sie aus den Optionen OHNE und WEP die gewünschte Option für
die Verschlüsselung aus, und bestätigen Sie die Auswahl mit OK. Wenn
Sie WEP wählen, geben Sie den WEP-Schlüssel ein, den Sie in Ihrem
Netzwerk verwenden.
9. Auf dem Display werden die beiden Optionen IP CONF.: MANU und IP
CONF.: AUTO angezeigt.
Es wird empfohlen, die IP-Adresse automatisch festzulegen. Wählen Sie
dazu mit Hilfe der Tasten
bestätigen Sie die Auswahl mit OK.
Wenn Sie die manuelle Konfiguration wählen, geben Sie die Werte für die
Parameter IP ADDRESS, SUBNET MASK und GATEWAY ein.
10.Nun sollte wieder das Hauptmenü
Drücken Sie dann auf OK, um das Gerät mit den geänderten WLANEinstellungen neu zu starten. Wenn das Netzwerk erfolgreich konfiguriert
ist, sollte die LED-Anzeige des USB-WLAN-Sticks aufleuchten.
11.Öffnen Sie das Dialogfeld zur Konfiguration des WLANs auf dem Computer,
wählen Sie die oben eingerichtete SSID aus, und stellen Sie eine
Verbindung zu diesem Netzwerk her, indem Sie auf „Verbinden“ klicken.
Warten Sie, bis die Verbindung hergestellt ist. Dies kann ggf. einige
Minuten dauern.
12.Wenn die fetgelegte SSID nicht angezeigt wird, überprüfen Sie die
Schritte für die Einrtichtung des Ad-hoc-Modus 1-12.
bzw. die Option IP CONF.:AUTO, und
CONFIG ASS.
angezeigt werden.
3.Abschluss der Konfiguration des USB-WLANSticks
1. Legen Sie die CD-ROM Phaser 3100MFP Wireless Adapter in das
Laufwerk des Computers ein.
2. Wählen Sie dann auf den angezeigten Dialogfeldern nacheinander die
Optionen Yes (Ja), Next (Weiter), I accept (Annehmen) und Next, und
folgen Sie den auf dem Bildschirm angezeigten Anweisungen. Je nach
Konfiguration Ihres Computers werden Sie möglicherweise dazu
aufgefordert, einen neustart durchzuführen. Überprüfen Sie anschließend,
ob Companion Monitor geladen wurde (in diesem Fall werden auf dem
Desktop zwei Xerox-Symbole angezeigt). Wiederholen Sie andernfalls die
Installation.
3. Schließen Sie das USB-Kabel an Die Treiber daraufhin werden automatisch
installiert. Warten Sie, bis die Installation der Treiber abgeschlossen ist.
4. Führen Sie das Firmwareupgrade für das Multifunktionsgerät durch, indem
Sie den Anweisungen am Bildschirm folgen, und starten Sie das Gerät neu.
Entfernen Sie dann das USB-Kabel.
4.Hinzufügen des Druckers zu der Liste der WLANs
des Computers
1. Wenn Sie das Gerät für den Ad-hoc-Modus konfiguriert haben, müssen Sie
möglicherweise (je nach Konfiguration des Computers) das Dialogfeld zur
Konfiguration des WLANs auf dem Computer öffnen, die oben
eingerichtete SSID auswählen, und eine Verbindung zu diesem Netzwerk
herstellen, indem Sie auf „Verbinden“ klicken. Warten Sie, bis die
Verbindung hergestellt ist. Dies kann ggf. einige Minuten dauern. Wenn
Sie das Gerät für den Infrastrukturmodus konfiguriert haben, fahren Sie
mit Schritt 2 fort.
2. Doppelklicken Sie auf das Symbol Xerox Companion Monitor, und
wählen Sie dann in der Registerkarte Device selection (Geräteauswahl)
die Option +Add (Hinzufügen).
Warten Sie, bis die Anzeige aktualisiert wird. Dies kann ggf. einige
Minuten dauern.
3. Wählen Sie in der Liste das Gerät (der Name entspricht
„MF_XXXXXXXXXXXX“), und klicken Sie auf Next.
4. Wählen Sie abhängig von dem Betriebssystem Ihres Computers und der
Baureihe des Geräts den gewünschten Druckertreiber zur Installation aus,
und klicken Sie auf Next. Überprüfen Sie in dem anschließend
angezeigten Dialogfeld die Einstellungen, und klicken Sie erneut auf Next
und dann auf Finish (Fertigstellen).
5. Geben Sie einen Namen für den Computer ein, klicken Sie auf OK, und
folgen Sie den Anweisungen am Bildschirm.
6. Wählen Sie den gewünschten Drucker für Companion Monitor aus.
Name des Drucker- bzw.
Scannertreibers
Xerox Phaser 3100 MFP USB
Phaser 3100MFP WLAN WLAN
Weitergehende Informationen erhalten Sie, indem Sie auf das Symbol
Companion Director auf Ihrem Desktop klicken, um Companion Director zu
öffnen. Klicken Sie auf die Schaltfläche Help (Hilfe), um die Betriebsanleitung
zu öffnen. Wichtige Informationen finden Sie unter Computer-Funktionen/
Companion Monitor/Geräteverwaltung/Hinzufügen eines
Netzwerkgeräts.
Achtung: Bei einer Netzwerkanbindung über das WLAN sind ausschließlich
die Funktionen zum Drucken und Scannen verfügbar. Der WLAN-USB-Stick ist
nicht mit DECT kompatibel, verwenden Sie daher nicht beide Technologien
gleichzeitig.
Verbindung
• Xerox Phaser 3100MFP Documentation and Companion Pro Software"
CD’sinin bilgisayarınızda kurulu olduğundan emin olun
•
Sizden kurmanız isteninceye kadar "Xerox Phaser 3100MFP WLAN" CD’sini
kurmayın
.
1. Kablosuz Adaptörü MFP’ye yerleştirin
2. Kablosuz Adaptör Yapılandırması
Kablosuz Adaptör yapılandırması için iki yöntem mevcuttur:
Kablosuz router’ınız varsa ve router kullanmak istiyorsanız, Altyapı metodunu aksi
halde Ad-Hoc metodunu seçin.
Altyapı Yönetemi
1. Phaser 3100MFP üzerindeki ’e basın, ya da tuşları yardımıyla
KURULUM seçin ve OK ile onaylayın.
2. ya da tuşları yardımıyla WLAN seçin ardından OK ile onaylayın.
3. ya da tuşları yardımıyla
CONFIG. ASS.
4. ya da tuşları yardımıyla listeden kablosuz varolan ağın adını seçin
ardından OK ile onaylayın.
Not: Ağınız listede görünmüyorsa, listenin sonunda YENĐ AĞ seçeneğini seçip
ardından SSID (sayısal tuş takımını kullanarak ağ adını maksimum 32 karakter
olarak) girin ve INFRA modunu seçin.
5. Eğer kablosuz ağınız bir kriptolama anahtarına sahipse (WEP ya da WPA),
ağınızın kullandığı anahtarı kontrol panosundan girmeniz şarttır. Daha fazla bilgi
için ağ geçidi ya da bilgisayar kılavuzuna bakınız.
6. IP AYAR : EL ĐLE ya da IP AYAR.: OTOM. ekranda belirir.
ya da tuşları yardımıyla IP AYAR:OTOM seçeneğini seçerek Otomatik IP
adresini kullanmanızı öneririz ardından OK ile onaylayın.
Sistemi elle kurmayı seçerseniz,
GEÇĐDĐ
parametrelerini girin.
IP ADRESĐ, ALT AĞ MASKESĐ ve AĞ
7. OK’e bastığınızda, yeni WLAN parametrelerinin geçerli olmaları için aygıt
yeniden başlatılır. Ağ kurulumu yapıldığında Kablosuz Adaptör LED’i
yanmalıdır.
Ad-Hoc Yönetemi
1. Phaser 3100MFP üzerindeki ’e basın, ya da tuşları yardımıyla
KURULUM seçin ve OK ile onaylayın.
2. ya da tuşları yardımıyla WLAN seçin ardından OK ile onaylayın.
3. ya da tuşları yardımıyla
4. ya da tuşları yardımıyla YENĐ AĞ seçin ve OK ile onaylayın.
5. Ekranda SSID görünür, sayısal tuş takımını kullanarak ve istediğiniz adı elde
edinceye kadar tuşlara arka arkaya basarak ağ adını girin (maksimum 32
karakter) ve OK ile onaylayın.
6. AD-HOC MODU ya da MOD INFRA ekranda görünür. AD-HOC MOD’unu seçin
ve OK ile onaylayın.
7. KANAL alt menüsü belirir, 1 ile 11 arasında bir sayı girin ve OK ile onaylayın.
8. Kriptolama yönetiminizi seçin, W/O Güvenlik ya da WEP Kriptolama, ardından
OK ile onaylayın. Eğer WEP’i seçerseniz, ağınızda kullanmak istediğiniz WEP
anahatarını girin.
CONFIG. ASS.
seçin ve OK ile onaylayın.
seçin ve OK ile onaylayın.
9. IP AYAR : EL ĐLE ya da IP AYAR.: OTOM. ekranda belirir.
ya da tuşları yardımıyla IP AYAR:OTOM seçeneğini seçerek Otomatik IP
adresini kullanmanızı öneririz ardından OK ile onaylayın.
Eğer sistemi el ile kurmayı seçerseniz, I
AĞ GEÇĐDĐ
10.Artık
CONFIG. ASS.
ayarlarını girin.
'ın ana bölümüne dönmenizi öneririz. OK’ye bastığınız
P ADRESĐ, ALT AĞ MASKESĐ ve
anda yeni WLAN ayarlarını içermek için aygıt yeniden başlar. Ağın kurulduğu
anda, kablosuz adaptatörün LED ışığı yanar.
11.PC kablosuz bağlantılarınızı açın ve SSID adınızı (daha önce belirlenmiş olan)
ve bağlan’ı seçin. Bağlandı yazısı ekrana gelinceye kadar bekleyin. Bu işlem
birkaç dakika sürebilir.
12.SSID adınız görünmezse Ad-Hoc 1-12. adımlarını doğrulayın.
3. Kablosuz Adaptörü Yapılandırdıktan Sonra
1. Phaser 3100MFP Wireless Adapter CD’sini bilgisayarınıza takın.
2. Evet, Đleri, Kabul ediyorum, Đleri seçeneklerini seçin ve talimatları izleyin. PC
yapılandırmasına bağlı olarak bilgisayar yeniden başlatılabilir. Yeniden
başlatıldıktan sonra Companion Monitor’un yüklendiğini doğrulayın
(masaüstünde iki adet Xerox simgesi görünmelidir), aksi halde yeniden deneyin.
3. USB kabloyu bağlayın. Sürücü kurulumu otomatik olarak başlayacaktır.
Kurulumun sonunu bekleyin.
4. MFP ürün bilgisini güncellemek için talimatları izleyin ve MFP’nin yeniden
başlatılmasını bekleyin, ardından USB kabloyu çıkarın.
4. PC Kablosuz Ağ listesine yazıcı ekleme
1. Ad-hoc yöntemini kullanırsanız. PC yapılandırmasına bağlı olarak PC kablosuz
bağlantılarını açmanız ve SSID adınızı (daha önce belirlenmiş olan) ve Bağlan’ı
seçmeniz gerekebilir. Bağlandı yazısı ekrana gelinceye kadar bekleyin. Bu işlem
birkaç dakika sürebilir. Altyapı yöntemini kullanırsanız 2. adıma gidin.
2. Aygıt seçimi sekmesinde Xerox Companion Monitor simgesine çift tıklayın ve
+Ekle’yi seçin.
Ekranın yenilenmesini bekleyin. Bu işlem birkaç dakika sürebilir.
3. Listeden aygıtınızı seçin (örn. MF_XXXXXXXXXXXX) ve ardından Đleri’ye
tıklayın.
4. Bilgisayarınızdaki Đşletim Sistemine ve makinenizin modeline bağlı olarak
yüklenecek yazıcı sürücüsünü seçin ve Đleri’ye tıklayın. Ardından teknik ayarları
kontrol edin, Đleri ve Son’a tıklayın.
5. Bilgisayarınız için bir kayıt adı girin, OK’e tıklayın ve talimatları izleyin.
6. Companion monitörde kullanmak istediğiniz yazıcıyı seçin.
Yazıcı ve tarayıcı sürücü adları Bağlantı
Xerox Phaser 3100 MFP USB
Phaser 3100MFP WLAN WLAN
Daha fazla bilgi için: Masaüstünde bulunan "Companion Director" simgesine
tıklayarak Companion Director’ü açın. Ayrıntılı kullanıcı kılavuzunu görüntülemek
için "Yardım" düğmesine tıklayın. Bkz. bölüm "PC özellikleri / Companion Monitor
/ Aygıt Yönetimi / Ağa bağlı bir aygıt ekleme.
Önemli: WLAN kullandığınızda sadece yazdırma ve tarama fonksiyonları
kullanılabilir. WLAN adaptör ve DECT uyumlu değildir, birlikte kullanmayın.
 Loading...