

Page 1
Page 2

Page 3

Notices and Compliance...............................................................................................7
Notices...............................................................................................................................................................7
FCC Statement........................................................ ............................................................................................8
Environment .......................................................................................................................................................8
CE Declaration of Conformity................................................................................................................................8
Copyright and Trademark Notice...........................................................................................................................8
1 X2020 Introduction....................................................................................................9
Package Contents................................................................................................................................................10
Button LED Indication................. .........................................................................................................................14
Back View..................... ......................................................................................................................................16
Ethernet and Power Port on the Back of the Telephone ................ ..........................................................................17
Phone Adjustments..............................................................................................................................................18
2 Installation ...............................................................................................................19
Sidecar...............................................................................................................................................................20
Getting Started....................................................................................................................................................22
XBLUE Wireless Universal Adapter ........................................................................................................................25
3 Getting to know your way around...............................................................................27
Placing a call.......................................................................................................................................................28
Review Call Records.............................................................................................................................................32
Using your Sidecar...............................................................................................................................................33
1
4 Telephone Feature Description Table...........................................................................35
Agent Log On/Off - UCD Group ................................................................................................ ............................41
Alphanumeric Display ................. ............................................... ..........................................................................41
Automatic Hold ...................................................................................................................................................41
Busy Callback......................................................................................................................................................42
Call Forking.........................................................................................................................................................42
Call Forward........................................................................................................................................................43
Call Hold.............................................................................................................................................................46
Call Log ..............................................................................................................................................................46
Call Park.............................................................................................................................................................47
Call Pickup..........................................................................................................................................................47
Call Waiting.........................................................................................................................................................47
Call Blocking .......................................................................................................................................................48
Conference - 3 Way............................... ..............................................................................................................48
Class of Service - Traveling...................................................................................................................................49
Distinctive Ringing...............................................................................................................................................49
Do Not Disturb (DND)..................................................................... .....................................................................50
Extension Feature Reset.......................................................................................................................................50
Feature (Flexible) Button Programming.................................................................................................................51
Feature Button Reset................................................................. ..........................................................................53
Hold Reminder....................................................................................................................................................53
LCD & Interactive Buttons....................................................................................................................................53
Multi-Line Appearance ................ .........................................................................................................................54
Mute ..................................................................................................................................................................54
XBLUE Networks
3
Page 4

1
On-Hook Dialing ..................................................................................................................................................55
Paging................................................................................................................................................................55
Paging Allow/Deny........................................................................................ .......................................................55
Phonebook..........................................................................................................................................................56
Phone Lock/Unlock ..............................................................................................................................................58
Plug and Play .......................................................................................... ............................................................58
Reminder Tone....................................................................................................................................................58
Service Mode..................................................... ..................................................................................................59
Telephone Line Flash............................................................................................................................................59
Transfer..............................................................................................................................................................60
Volume Control....................................................................................................................................................60
Web Management................................................................................................................................................60
5 Programming with the Telephone................................................................................61
Getting Started....................................................................................................................................................62
• Menu Programming....................................................................................................64
1. Call Log............. ..............................................................................................................................................64
2. Speed Dialing ................................................................................................ ..................................................65
3. Ring Type........................................................................................................................................................65
4. Volume ............................................................................................... ............................................................65
5. Time Zone.......................................................................................................................................................66
6. Info ................................................................................................................................................................66
7. Call Forward ............................................................................................. .......................................................66
8. Do Not Disturb (DND) ......................................................................................................................................67
9. Call Waiting.....................................................................................................................................................67
10. Auto Answer..................................................................................................................................................67
11. Tone Type .......................................................................... ...........................................................................67
12. Ping... ...........................................................................................................................................................67
13. Phonebook ....................................................... .............................................................................................67
14. Hotline..........................................................................................................................................................67
15. Call Blocking..................................................................................................................................................68
16. Admin...........................................................................................................................................................68
17. Reset to Default.............................................................................................................................................68
18. Reboot..................................................... .....................................................................................................68
• Admin.......................................................................................................................69
1. Account...........................................................................................................................................................69
2. Network..........................................................................................................................................................69
4. Dial Timeout....................................................................................................................................................70
5. Language........................................................................................................................................................70
6. NAT - Network Address Translation ...................................................................................................................70
7. SIP .................................................................................................................................................................71
4. Authentication .................................................................................................................................................71
5. DTMF............................................... ...............................................................................................................71
6. Codec ....... ......................................................................................................................................................71
7. Packet Time.....................................................................................................................................................72
8. Payload...........................................................................................................................................................72
4
XBLUE Networks
Page 5

6 Programming with an Internet Browser.......................................................................73
Information Page.................................................................................................................................................74
Network Page .....................................................................................................................................................75
Phone.................................................................................................................................................................77
Software Upgrade................................................................................................................................................85
SIP.....................................................................................................................................................................89
System...............................................................................................................................................................96
Phonebook..........................................................................................................................................................99
7 Getting to Know your Voice Mailbox............................................................................101
Setting up your Voice Mailbox...............................................................................................................................102
Using your Voice Mailbox ................................................... .............................................. ....................................102
Remote Message Pickup...................... .................................................................................................................103
1
XBLUE Networks
5
Page 6

1
Notes:
6
XBLUE Networks
Page 7

NoticesandCompliance
Versio n Sup ersed es Desc rip tion
Version 1.0 Initial Release
Reproduction, publication, or duplication of this manual, or any part thereof, in any manner, mechanically, electronically, or photographically , is strictly prohibited.
© Copyright XBLUE Networks, LLC. All rights reserved.
Notices
Hearing Aid Compatibility
The X-2020 telephone endpoints are hearing aid compatible, as defined in section 68.316 of Part 68 FCC Rules and
Regulations.
UL/CSA Safety Compliance
The X-25 system has met all safety requires, and found to be in compliance with the Underwriters Laboratories (UL)
60950-1.
Documentation Disclosure
The information contained in this document is subject to change without notice and should not be construed as a
commitment by XBLUE Networks, LLC. The information contained herein is supplied without representation or
warranty of any kind. XBLUE Networks, reserves the right, without notice, to make changes to the equipment,
equipment design, and documentation as advances in engineering and manufacturing methods warrant, and assumes
no responsibility and shall have no lia bility of any kind arising from the supply or use of this document or the material
contained herein.
Warning: This documented information is designed to assist in the installation of the new XBLUE products. XBLUE
networks has done its best to give adequate warnings and cautions to advise both technical and non-technical
individuals, but it is very important to use common sense when installing all electrical equipment.
• The use of this system may result in local, long distance, Internet access or data transfer charges,
which are the sole responsibility of the user/owner of the equipment.
• Wireless access has been added for convenience, however, XBLUE does not warrant or guarantee,
written or implied, that the wireless will work in every location. It is the responsibility of the owner to
enable security to stop unwanted access to the network.
Notices
2
XBLUE Networks
7
Page 8
FCCStatement
ISO-9001ISO-9001
This equipment generates, uses and can radiate r adio frequency energy, and if not installed and used properly , that
is, in strict accordance with the instruction manual, may cause interference to radio and television reception. This
equipment has been tested and found to comply with the limits f or a Cla ss B computing device in Subject J of P art
15 of FCC rules, which are designed to provide reasonable protection against such interference when operated.
However, there is not guarantee or warranty, written or implied, that interference will not occur in a particular
installation. If this equipment causes or receives interference or fails to operate correctly, due to radio frequency
interference (RFI) or electromagnetic interference (EMI), it will be fixed at the owners expense.
Environment
All electronic equipment must be disposed of at an approved electronic recycling center.
FCC Statement
CEDeclarationofConformity
This equipment complies with the requirements relating to electromagnetic compatibility, EN55022 class B for ITE
and EN 50082-1. This meets the essential protection requirements of the European Council Directive 89/336/EEC
on the approximation of the laws of the Member States relating to electromagnetic compatibility.
2
CopyrightandTrademarkNotice
All right reserved. No part of this publication may be reproduced, transmitted, transcribed, stored in retrieval
system, photographically or translated into any language or computer language, in any form or by any means,
electronic, mechanical, magnetic, optical, chemical, manual or otherwise, without the prior written permission of
XLBUE Networks, LLC.
Windows 98/NT/2000/XP/7™ and Internet Explorer™ are registered trademarks of Micr osoft Corpor ation. All other
company, brand and product names, like Netscape Navigator™ are trademarks or registered trademarks of their
respective owners.
Part Numbers
Below is a list of component part numbers:
TABLE 2.1 Componet Part Numbers
SKU/Part Number Description
47-2501 X-25 Telpehone System Gateway
47-9001 X-50 Telephone System Gateway
47-9002 X-2020 SIP Telephone Endpoint
47-9003 24 Button Sidecar, Electronic Dialing Module (EDM)
47-9004 8 Port 10/100 Ethernet Switch
47-9005 XBLUE Neteworks X-50 Universal Wireless Adapter
47-9006 6+ Foot Ethernet Cable
8
XBLUE Networks
Page 9
1Introduction
Introduction
X2020Introduction
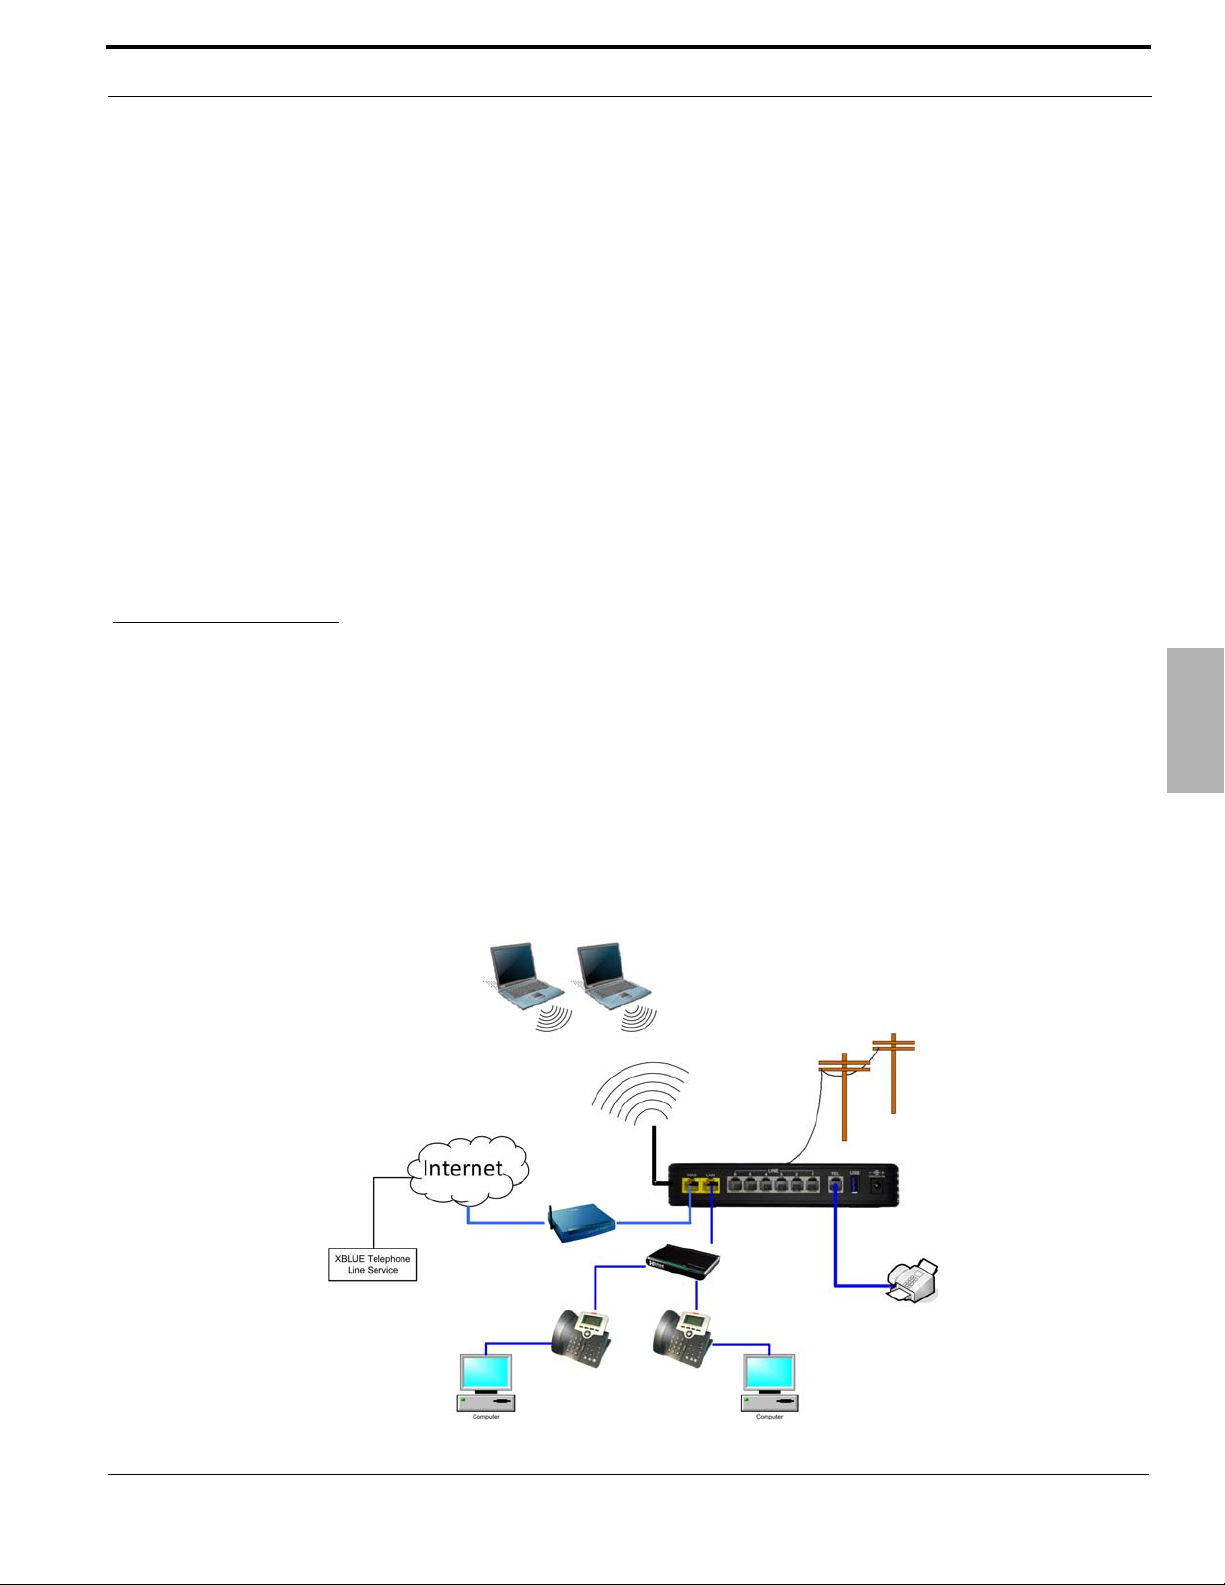
The X2020 is a full featured Session Initiated Protocol (SIP) telephone endpoint, which is fully integr ated with the X25 system and will work with most standard SIP systems. The X2020 connects to a Local Area Network (LAN) (10/
100 base-T) and uses Internet Protocol (IP) to process voice calls, which is known as Voice over Internet Protocol
(VoIP). SIP, is the most comprehensive protocol used to transport VoIP calls and allows the X-25 system to offer the
most used telephone system features over a Local A rea Network (LAN).
Because the X2020 telephone works like a network switch your office only needs a single Category 5 or 6 cable to
transmit both voice and data. Plug the X2020 into your LAN and a Personal Computer (Desktop or Laptop) into the
X2020 telephone end point.
1
XBLUE Networks
9
Page 10
Introduction
PackageContents
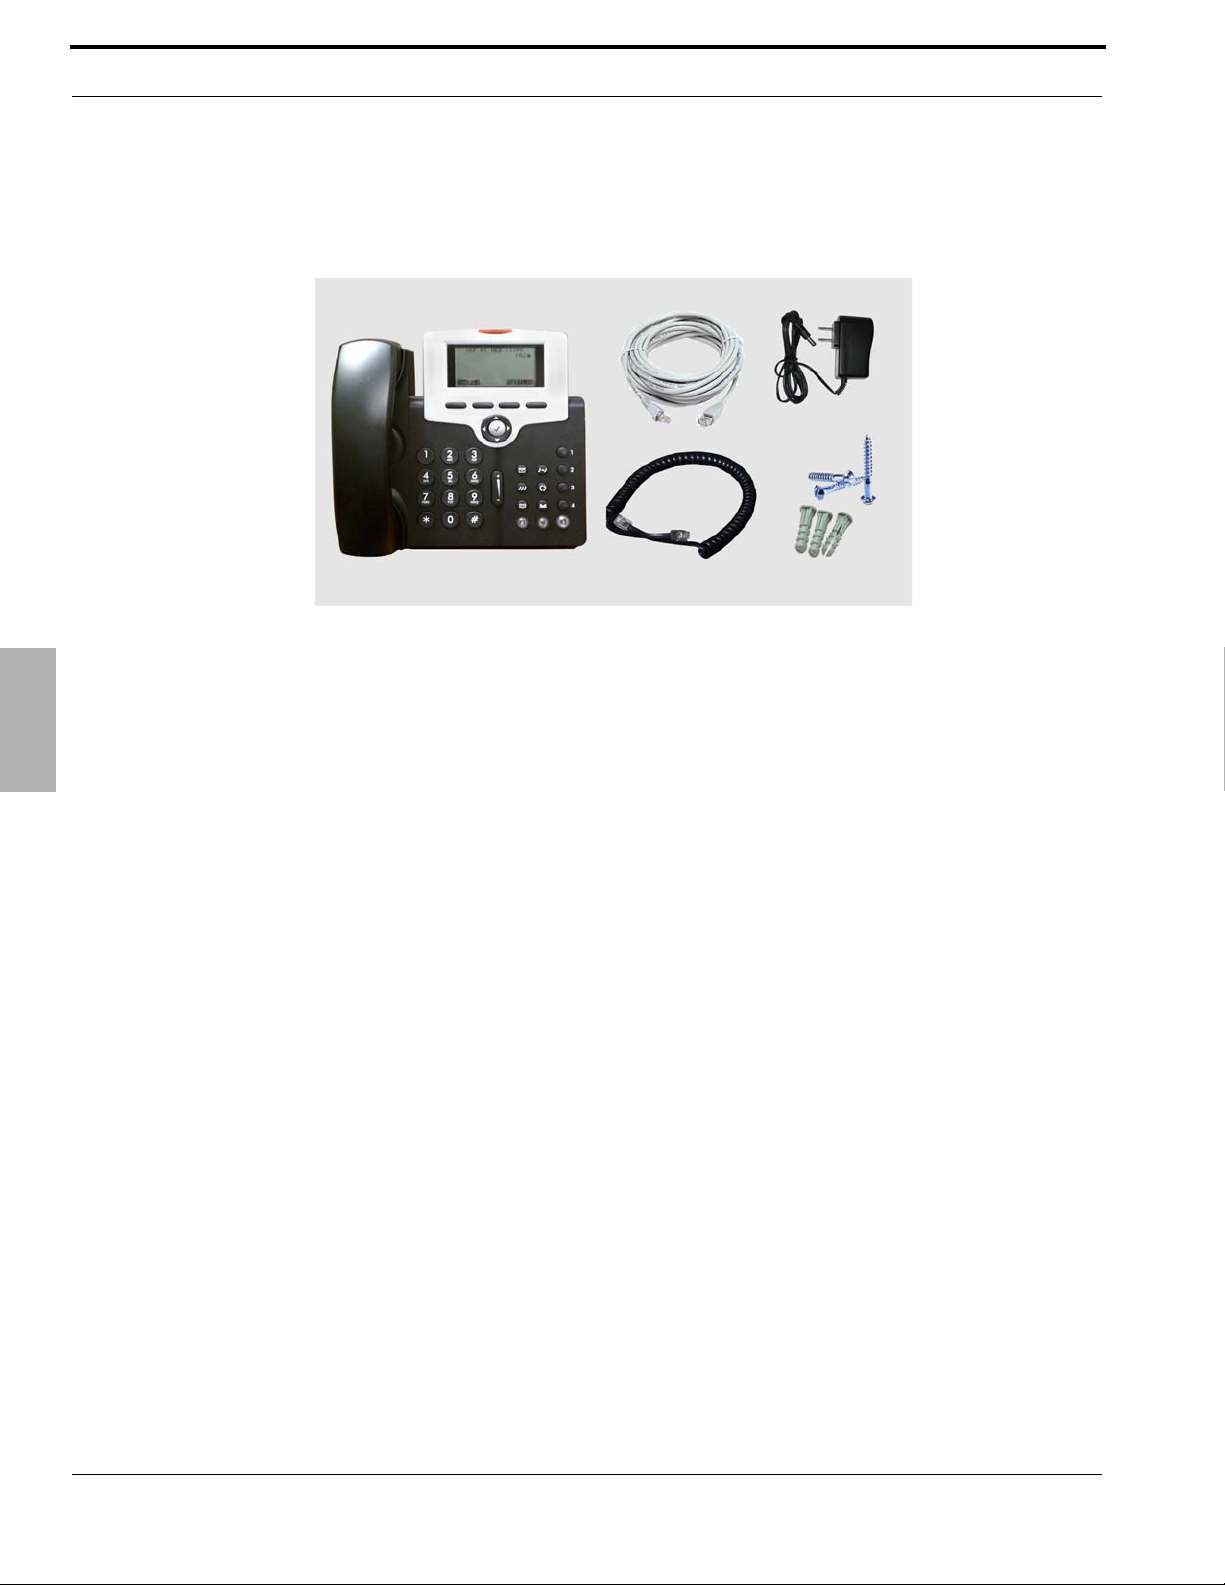
The X2020comes with everything that you need to connect it to an existing Local Area Network (LAN).
Package Contents
1
• X2020 SIP Telephone
• 6 ft Ethernet Patch Cable
• Power Supply
• Coiled Handset Cord
• Wall mount screw kit - See appendix A for Wall Mount Template
10
XBLUE Networks
Page 11
Introduction
Package Contents
1
XBLUE Networks
11
Page 12
Introduction
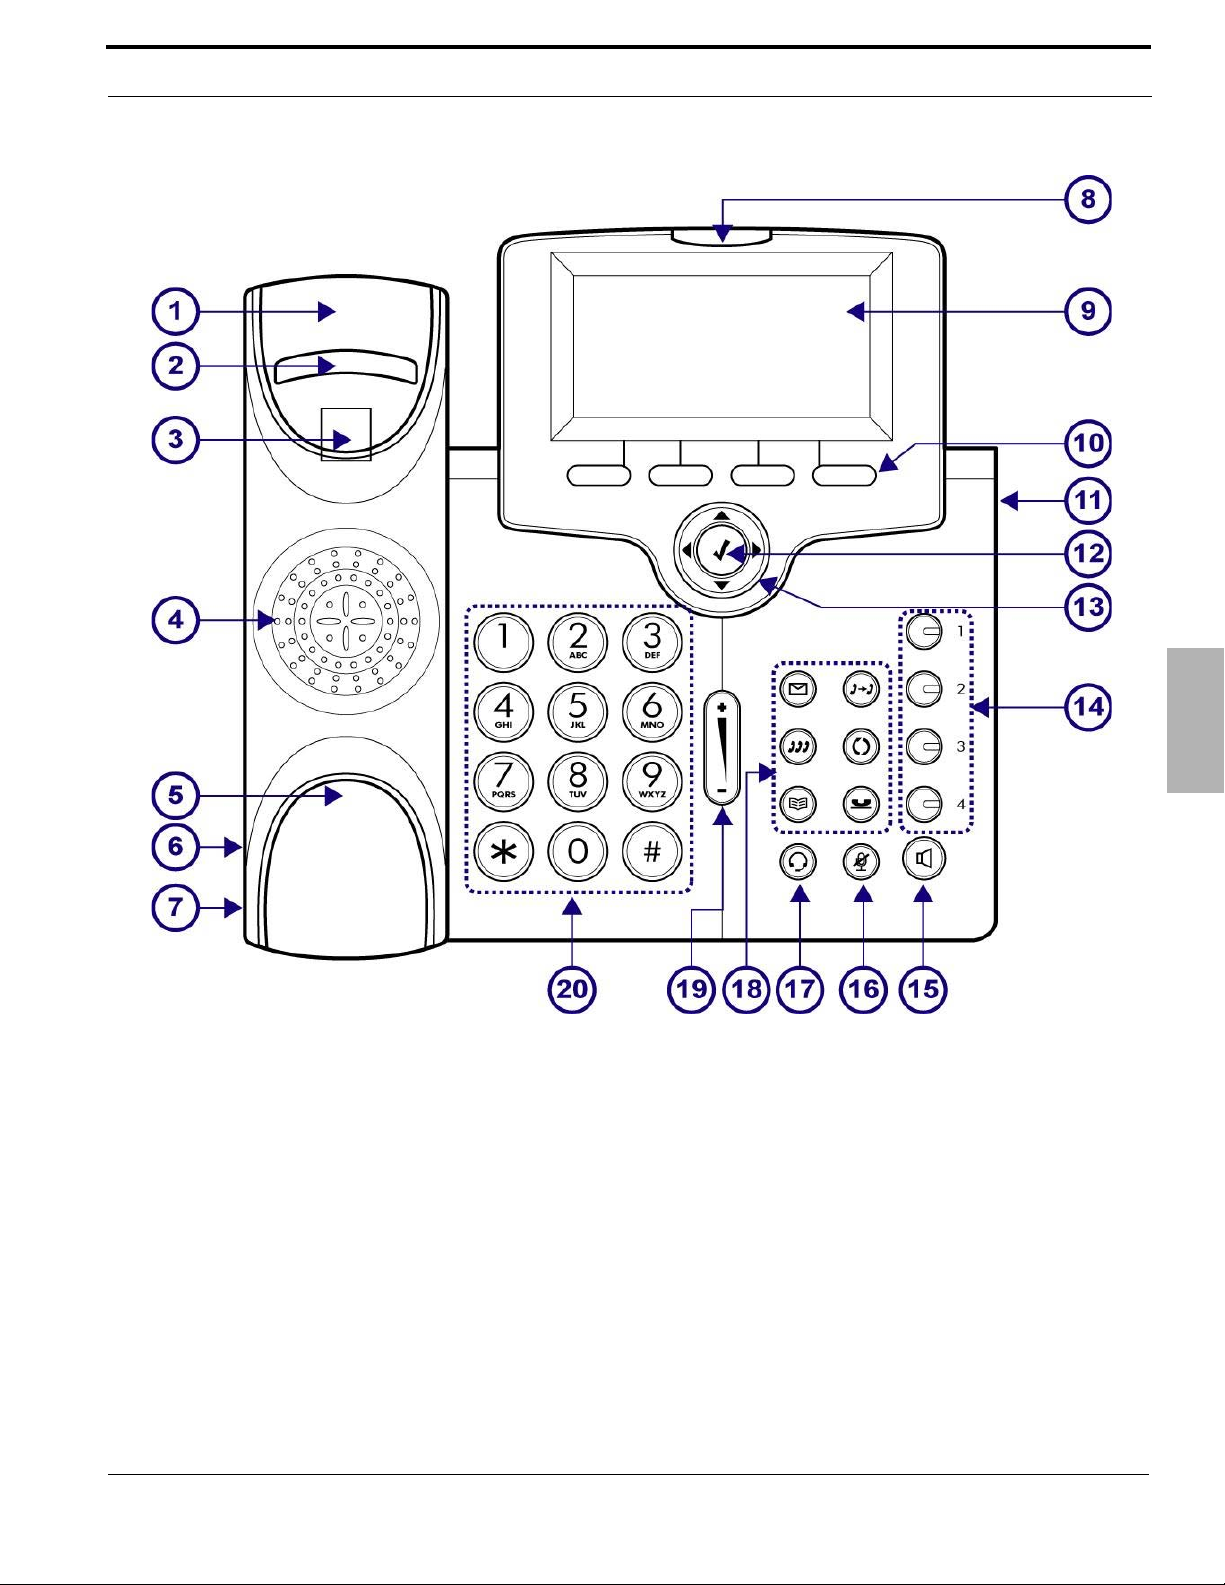
TABLE 1.1
No. Part Nam e Desc rip tion
1 Handset Top Cradle For placement of the Handset
2 Hook Switch For hanging up your handset
3 Cradle Latch Used to Secure the handset to the base unit
4 Speaker Speaker output for handsfree operation
5 Handset Bottom Cradle for the bottom of the handset
6 Handset Cord Port Used to connect the handset to the telephone base
Package Contents
7 Headset Wire Port Used to connect an ancillary headset to the telephone base
8 Message LED Light Bar Flashes for a new call and when there is a new Voice Mail Message
9 Graphic LCD LCD display showing date, time, phone number, Caller ID, line status etc.
1
10
11 EMD (DSS Sidecar) A special module that connects an additional 24 programmable buttons
Navigation OK or Select Key
12
Navigator Control Keys
13
Soft Keys
Soft keys change as the phone is being used, which will assist you with
the most used featur es
The center “Check” button of the “Cell-Phone-Like” navigation keys, is
used to “select” or to select “OK”
Navigation, left, down, up and right are used to
navigate through menu programming and during the normal
operation.
Programmable buttons - such
as line keys
These keys are customizable allowing you to activate a feature with a
14
single button press. These buttons can be progr ammed a s a direct access
to a telephone line, extension, DND, Speed dial, Call Park, Live Record, or
a direct dial number.
12
15
16
17
Speaker Button
Mute Button
Headset Button
Press the speaker button to answer a ringing call. The button will turn
green when the speakerphone is active.
Press the Mute button to suspend the transmission of your voice to speak
privately with someone in your office. When the Button is red it is active
and not transmitting, when the LED is out it will transmit your voice.
Once an ancillary headset is connected to the phone, press the Headset
button to activate, and the speakerphone to answer the call.
XBLUE Networks
Page 13
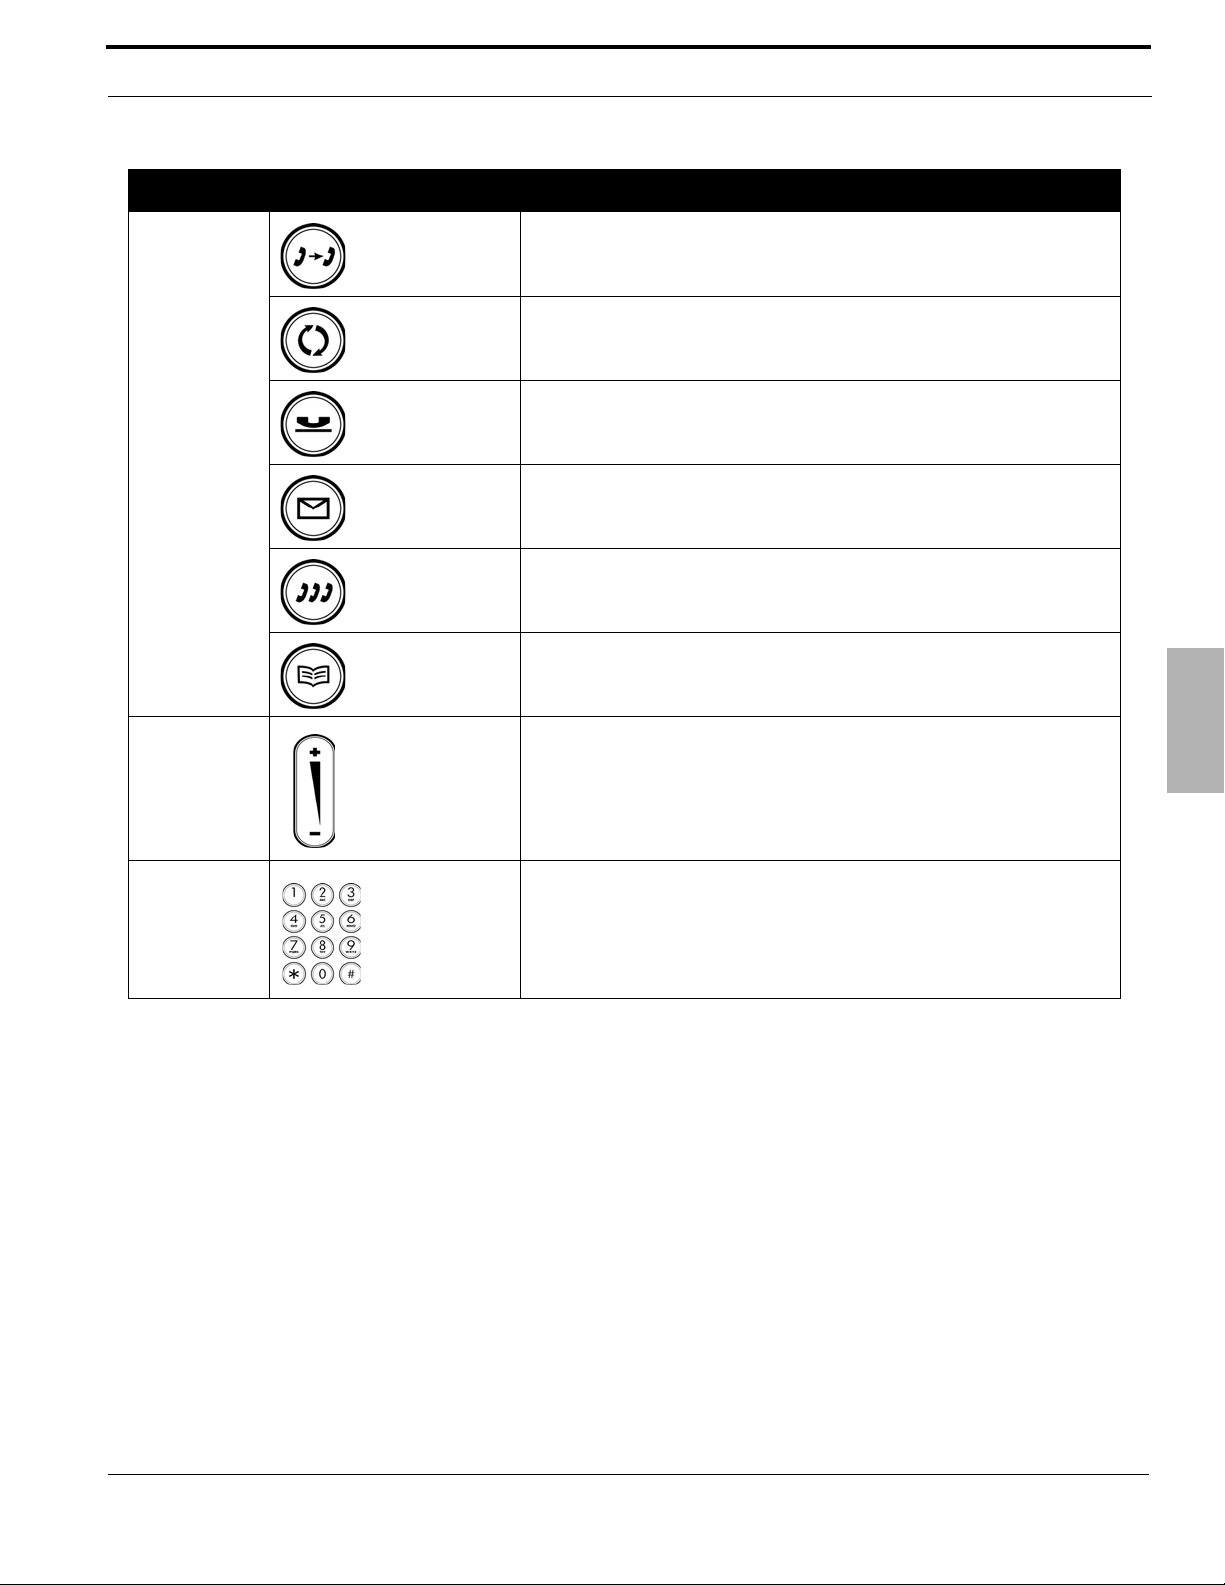
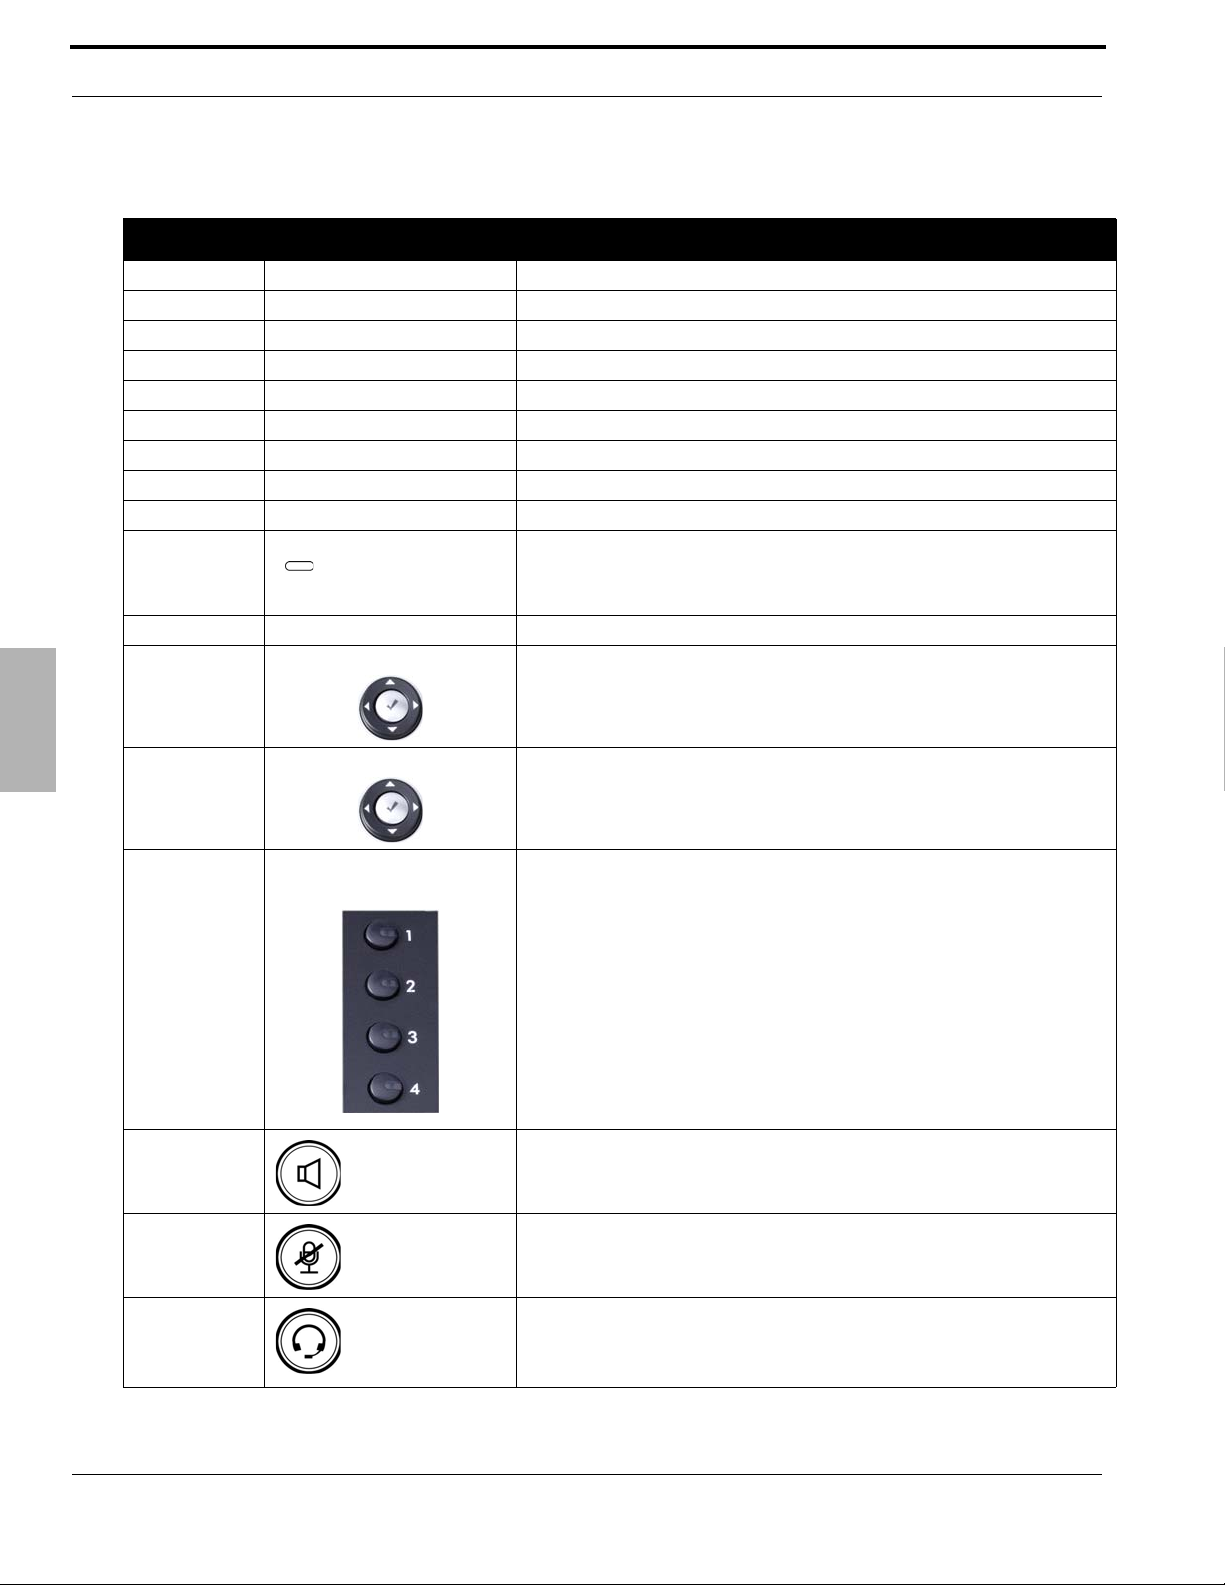
TABLE 1.1
No. Part Nam e Desc rip tion
Introduction
18
19
Transfer Bu tton
Redial button
Hold button
Message Button
Conference Button
Phonebook Button
Volume Bar
Press the transfer button to transfer an intercom or telephone line call to
a different extension, UCD group or across the voice network.
Press the redial button and use the down navigation key to scroll down
and the center navigation button to dial the desired telephone number.
Press the hold button to place an intercom or telephone line call on hold.
If the device is programmed on a button the button will flash slowly.
Press the message button to access V oic e Mail to send or retrieve a voice
mail message.
Use the Conference Button to create a 2 or 3 party conference.
Package Contents
Press the Phonebook Button to dial or add personal contacts to your
phonebook.
1
Use the volume bar to increase or decrease the volume of the handset,
headset and speakerphone, whichever is active. Also, when the phone is
ringing you can increase or decrease the ring volume.
20
Dial Pad
Use the dial pad (Numeric Keypad) to dial digits.
XBLUE Networks
13
Page 14
Introduction
Red
Green
Red
Green
Green
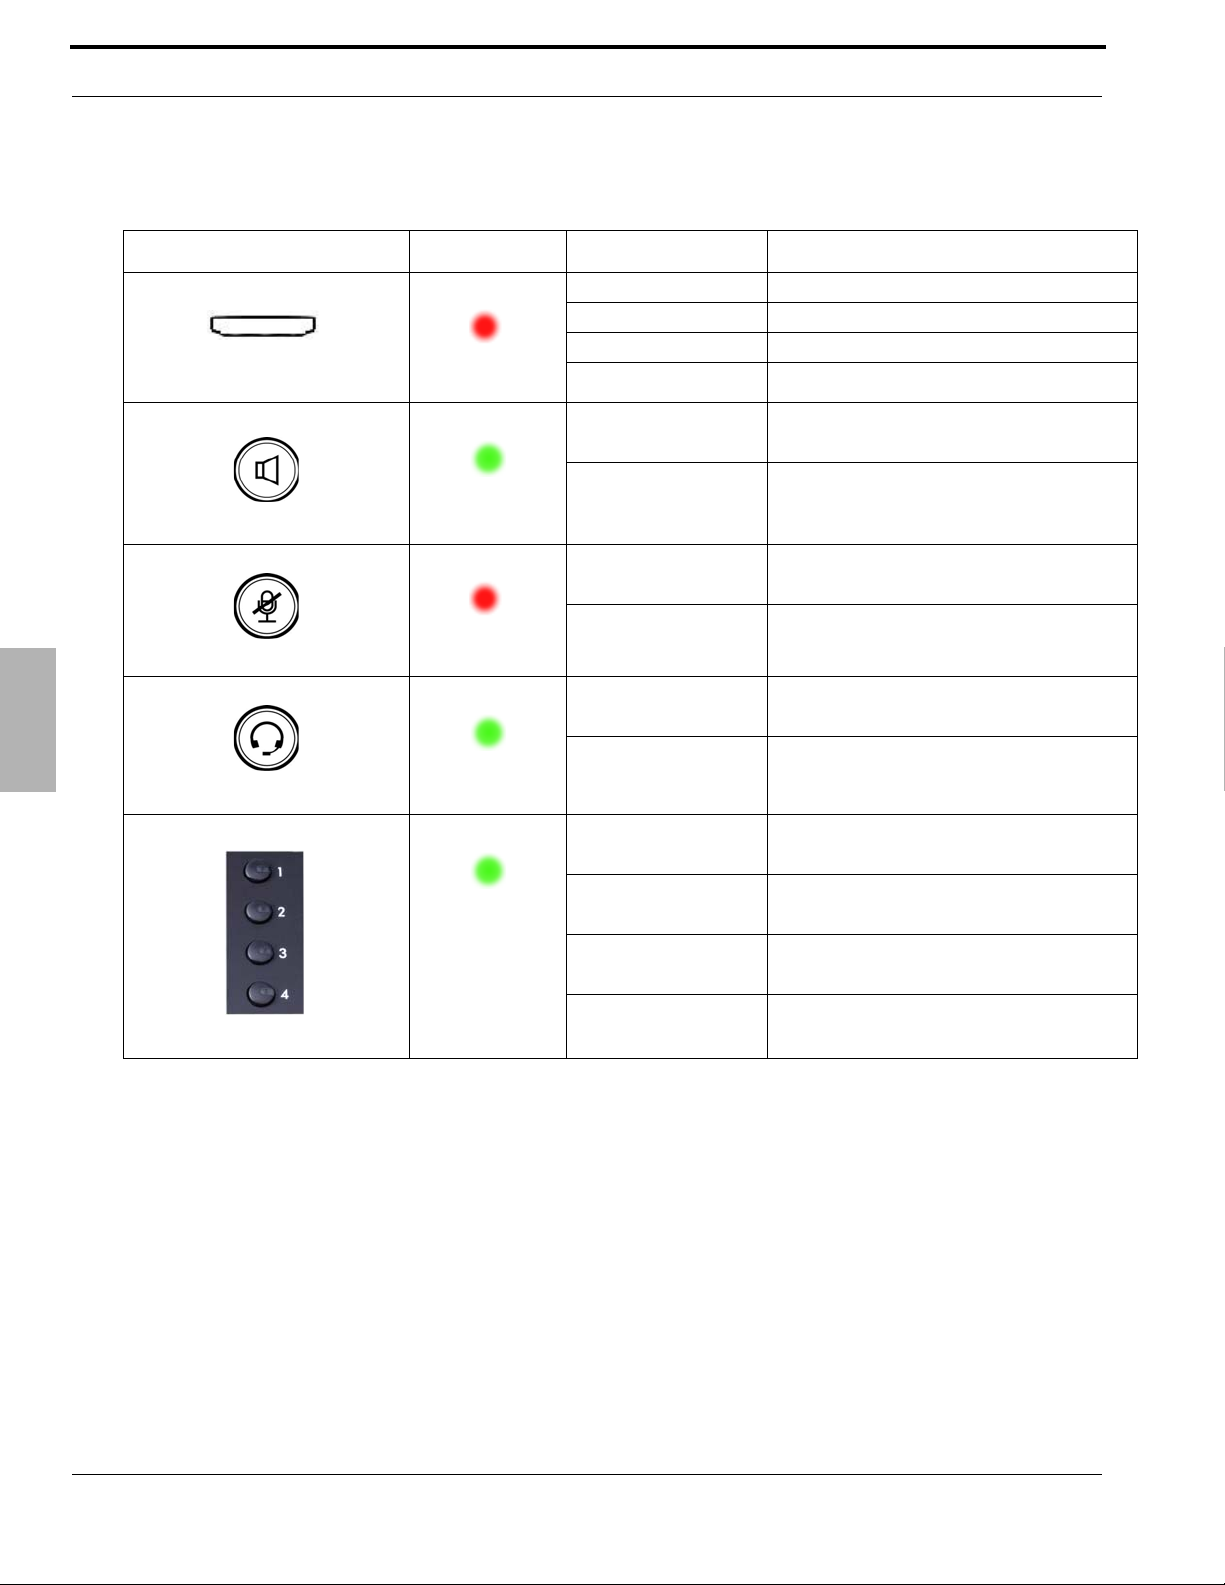
ButtonLEDIndication
LED C o lo r Status Description
Light Bar
Off Idle or No New Messages
Blinking Slowly New Voice Message Indication
Blinking Rapidly There is an incoming Call
Blinking Continuously Not Registered with the Gateway
Button LED Indication
1
Off Speakerphone Idle
On Steady Speakerphone engaged
Speaker Button
Off Microphone is active
On Steady Microphone is inactive
Mute Button
Off Headset is disabled
On Steady Headset is active
Headset Button
Off Trunk is Idle
Steady On Trunk is Active (Busy)
Blinking Slowly Line is on Hold
14
Blinking Rapidly Line is ringing
Line Buttons
XBLUE Networks
Page 15
Introduction
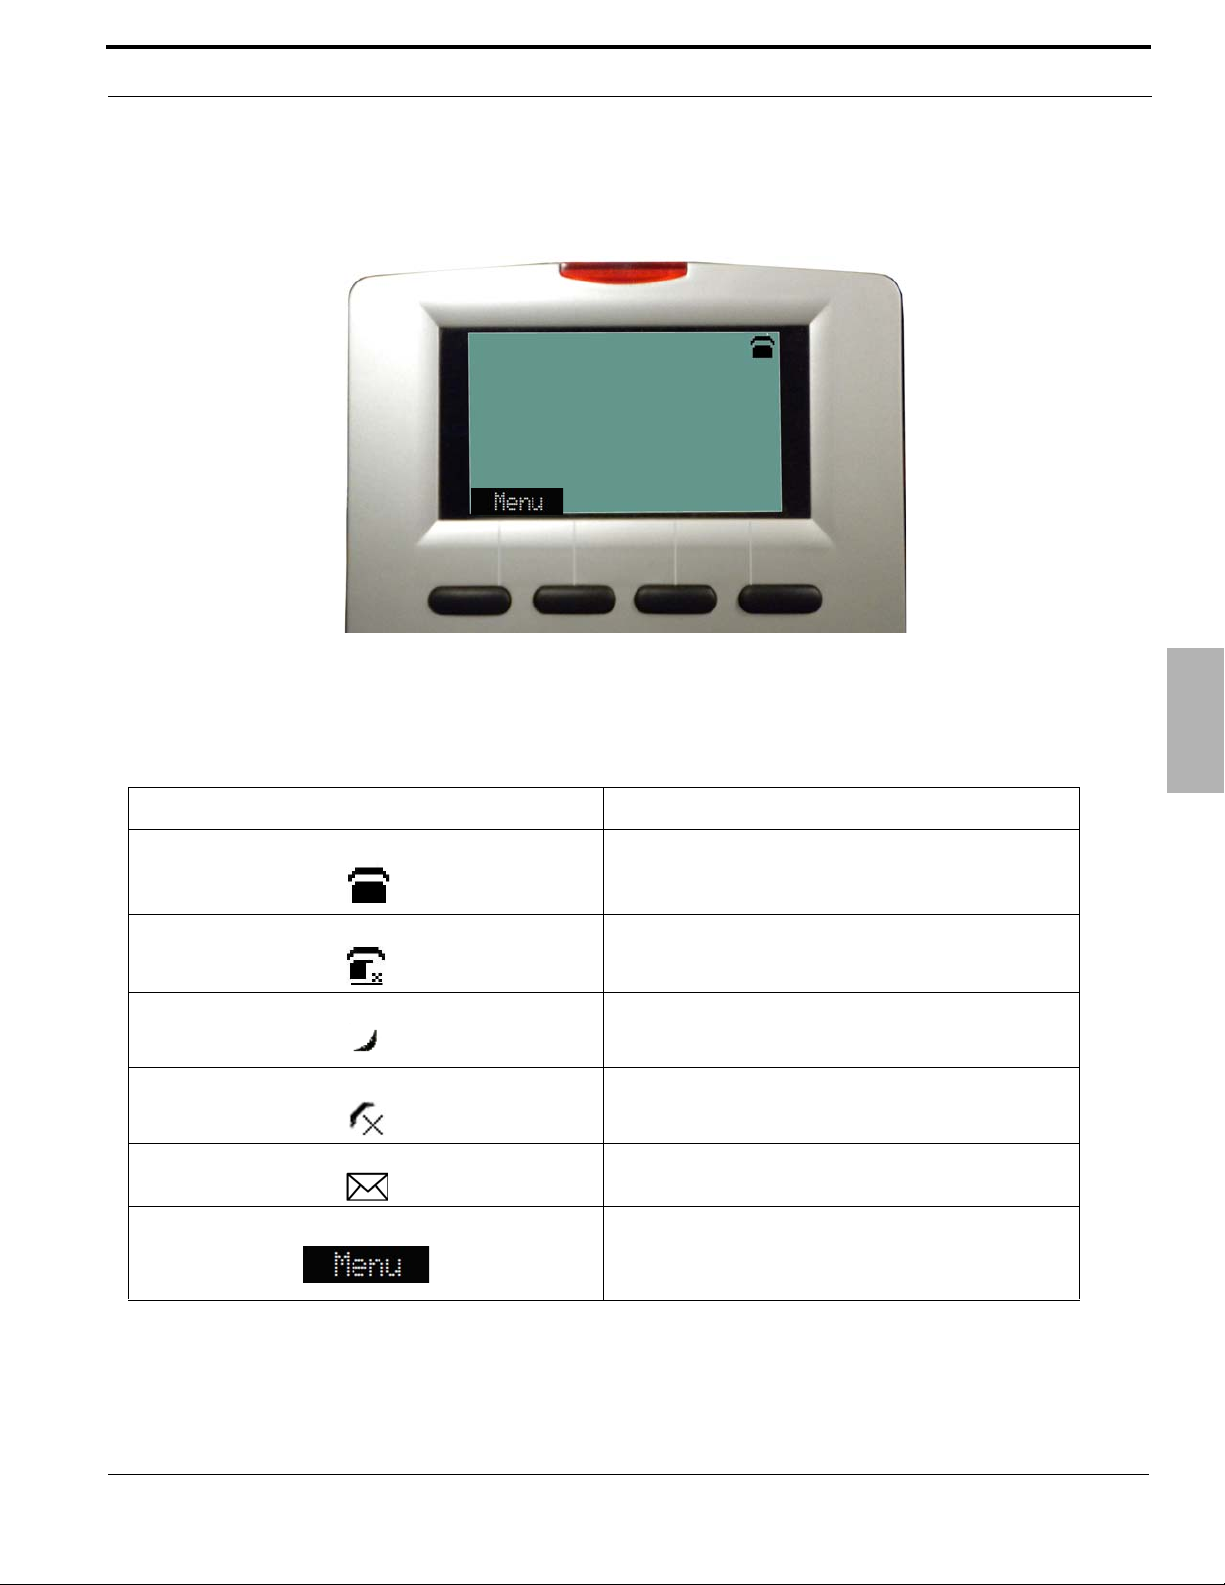
10/12/12 11:45
101
The Display will show the Date and Time, the extension number and special ICONS showing the status of your
Telephone.
Button LED Indication
ICON Description
The telephone is connected to the X-25 system
The telephone is not connected to the X-25 system
Service Mode - The system is in after hours (night) mode
The telephone is in Do Not Disturb (DND) mode
Indication of a new message, as well as the new message count
Press the soft button under the word “Menu” to enter the
programming mode.
1
XBLUE Networks
15
Page 16
Back View
Introduction
BackView
1
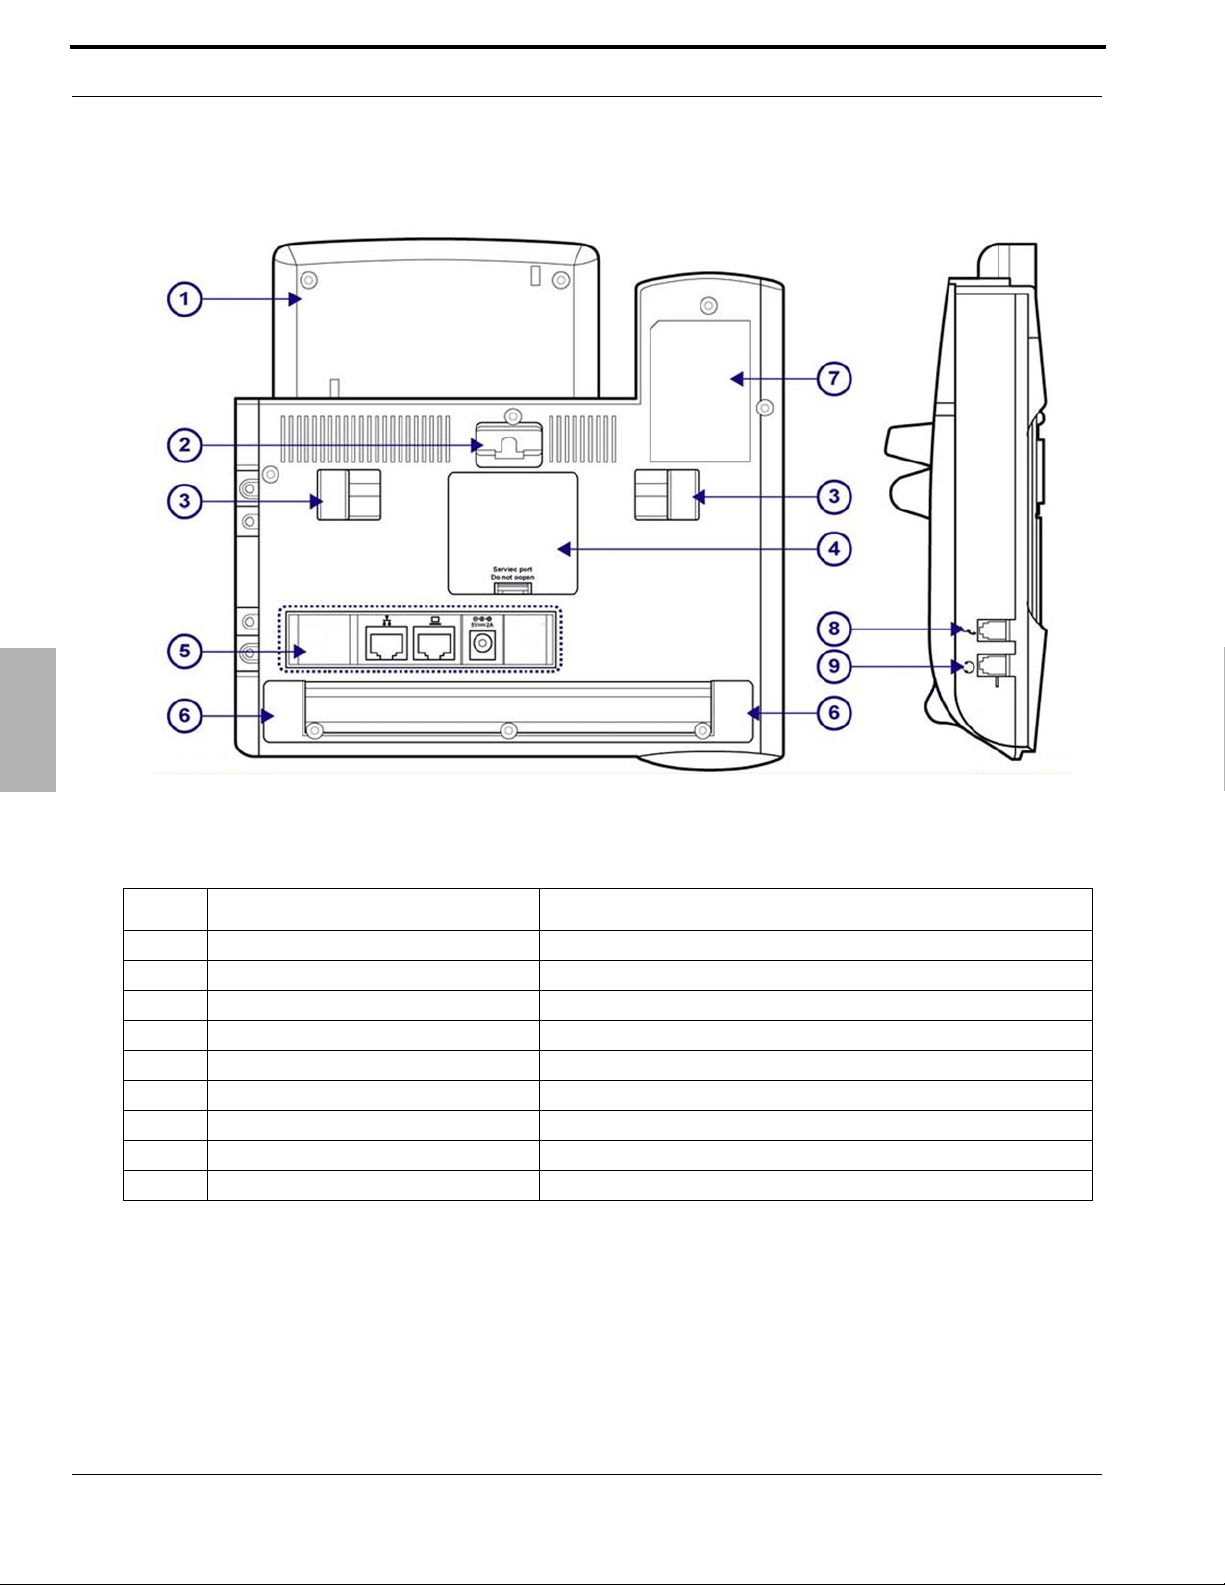
No. Part Num b er Desc rip tion
1 LCD Back Cover Secures the back of the LCD
2 Wall Mount Holes Used to secure the telephone to the wall
3 Hinge of Stand Used to adjust the angle of the telephone
4 Secure Door Used for service only
5 Input/Output Ports Ethernet and Computer ports
6 Hinge of Chassis Supports different angles
7 Product Label Product information
8 Handset Cord Port Plug the handset into the telephone
9 Headset Ports Headset Port RJ9
16
XBLUE Networks
Page 17
EthernetandPowerPortontheBackoftheTelephone
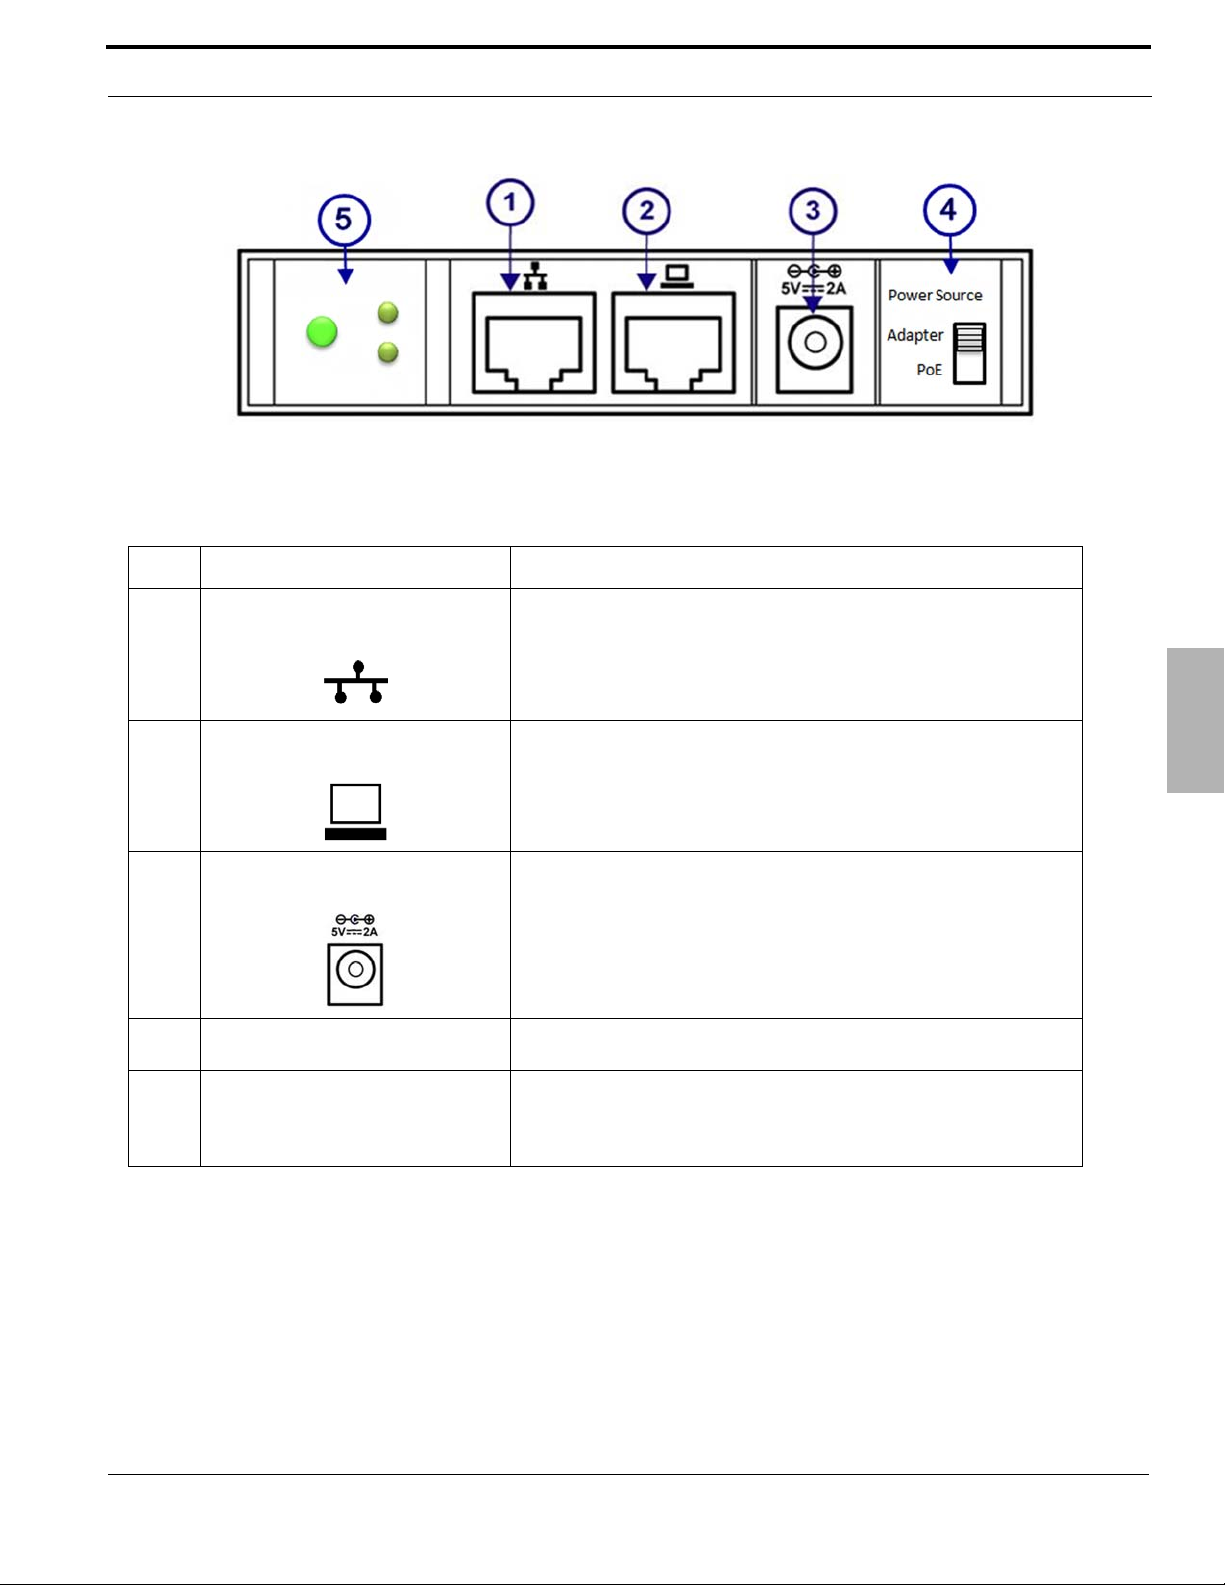
No Port Descrip tion
1 Ethernet LAN Port Connect to the Local Area Network
Introduction
Ethernet and Power Port on the Back of
2 Ethernet Computer Port
3 Power Connection Plug in the supplied power supply after plugging in the LAN etherne t
4 Power Source Set to “Adapter” to use the supplied 5V 2A power supply, or set to
5 Network Activity LED’s and Reset
Button
Connect to your Personal Computer, the
switch.
port
“POE” to use a Power Over the Ethernet switch
There are two Green LED’s, one that shows the connection to the
network and the other shows the connection to any attached device,
such as a Personal Computer. In addition, there is a default button
that allows you to set the telephone back to factory default.
X2020 works as a network
1
XBLUE Networks
17
Page 18
Introduction
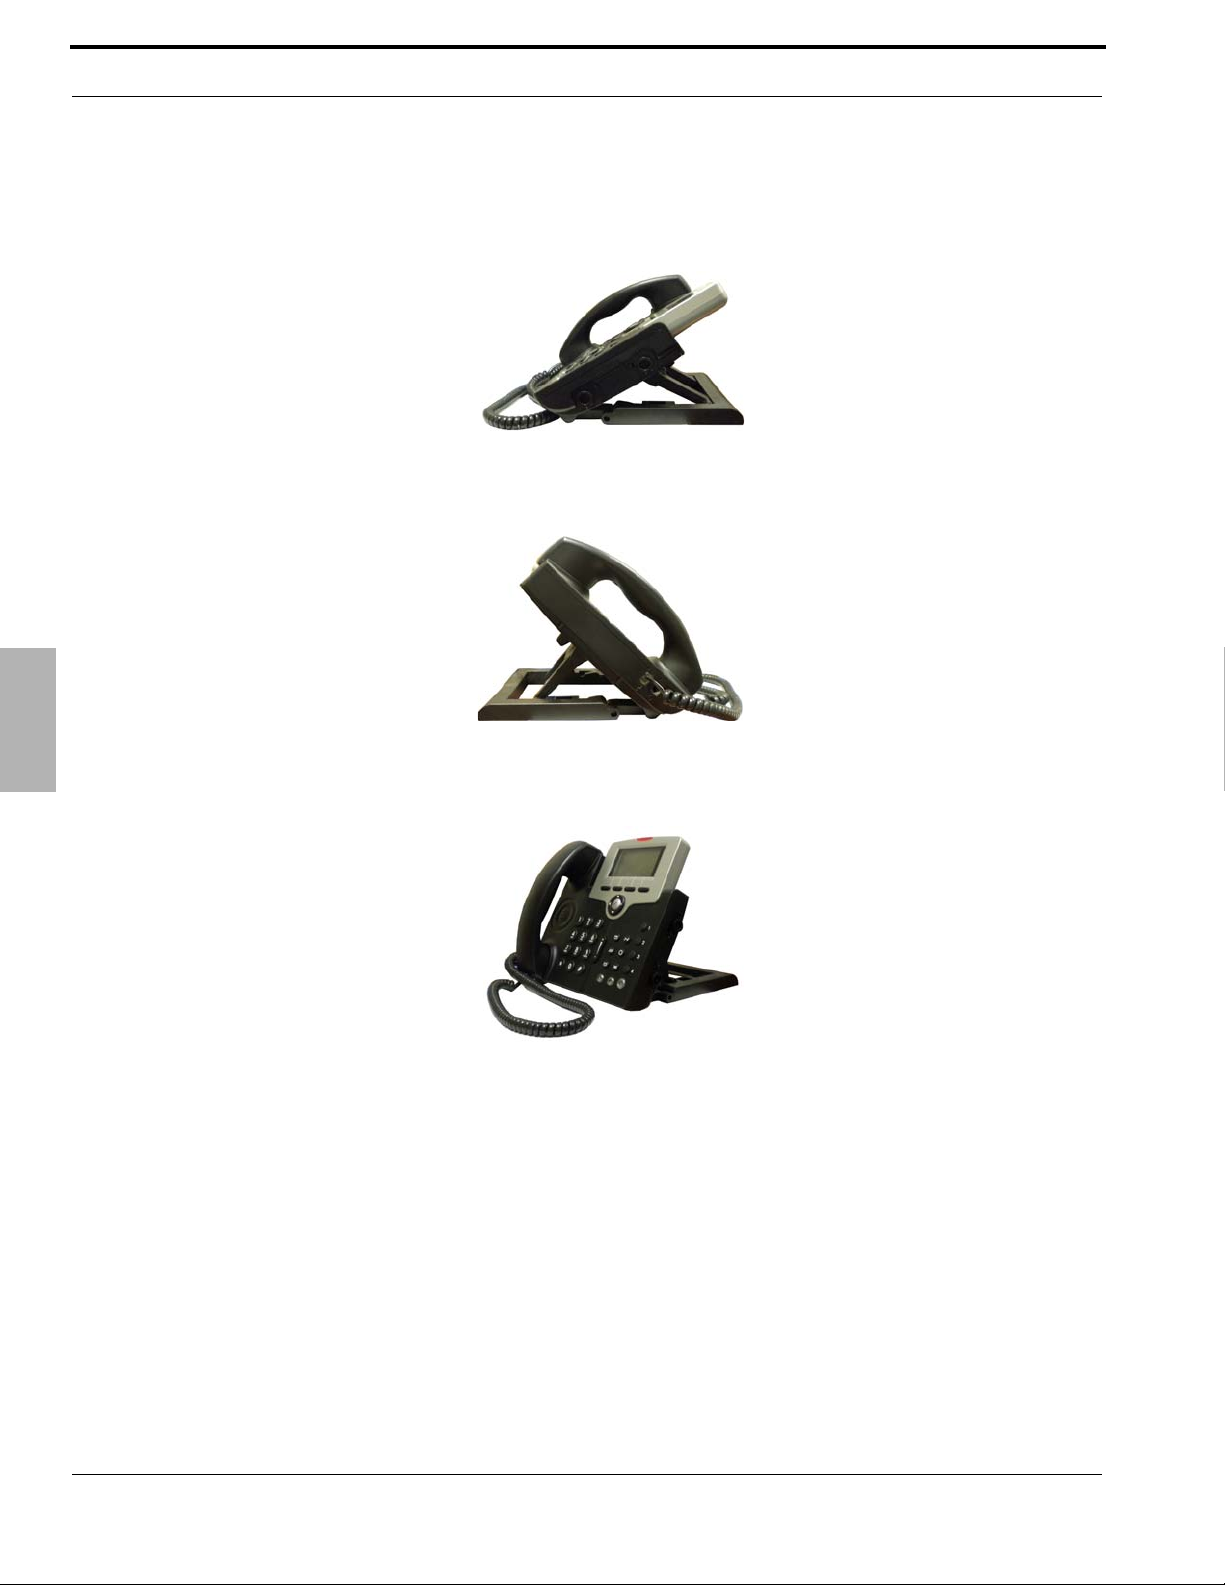
PhoneAdjustments
The X2020 telephone can be set in several different positions or angles.
Low Angle
Phone Adjustments
Medium Angle
1
High Angle
18
XBLUE Networks
Page 19
2Setup
Installation
Setup
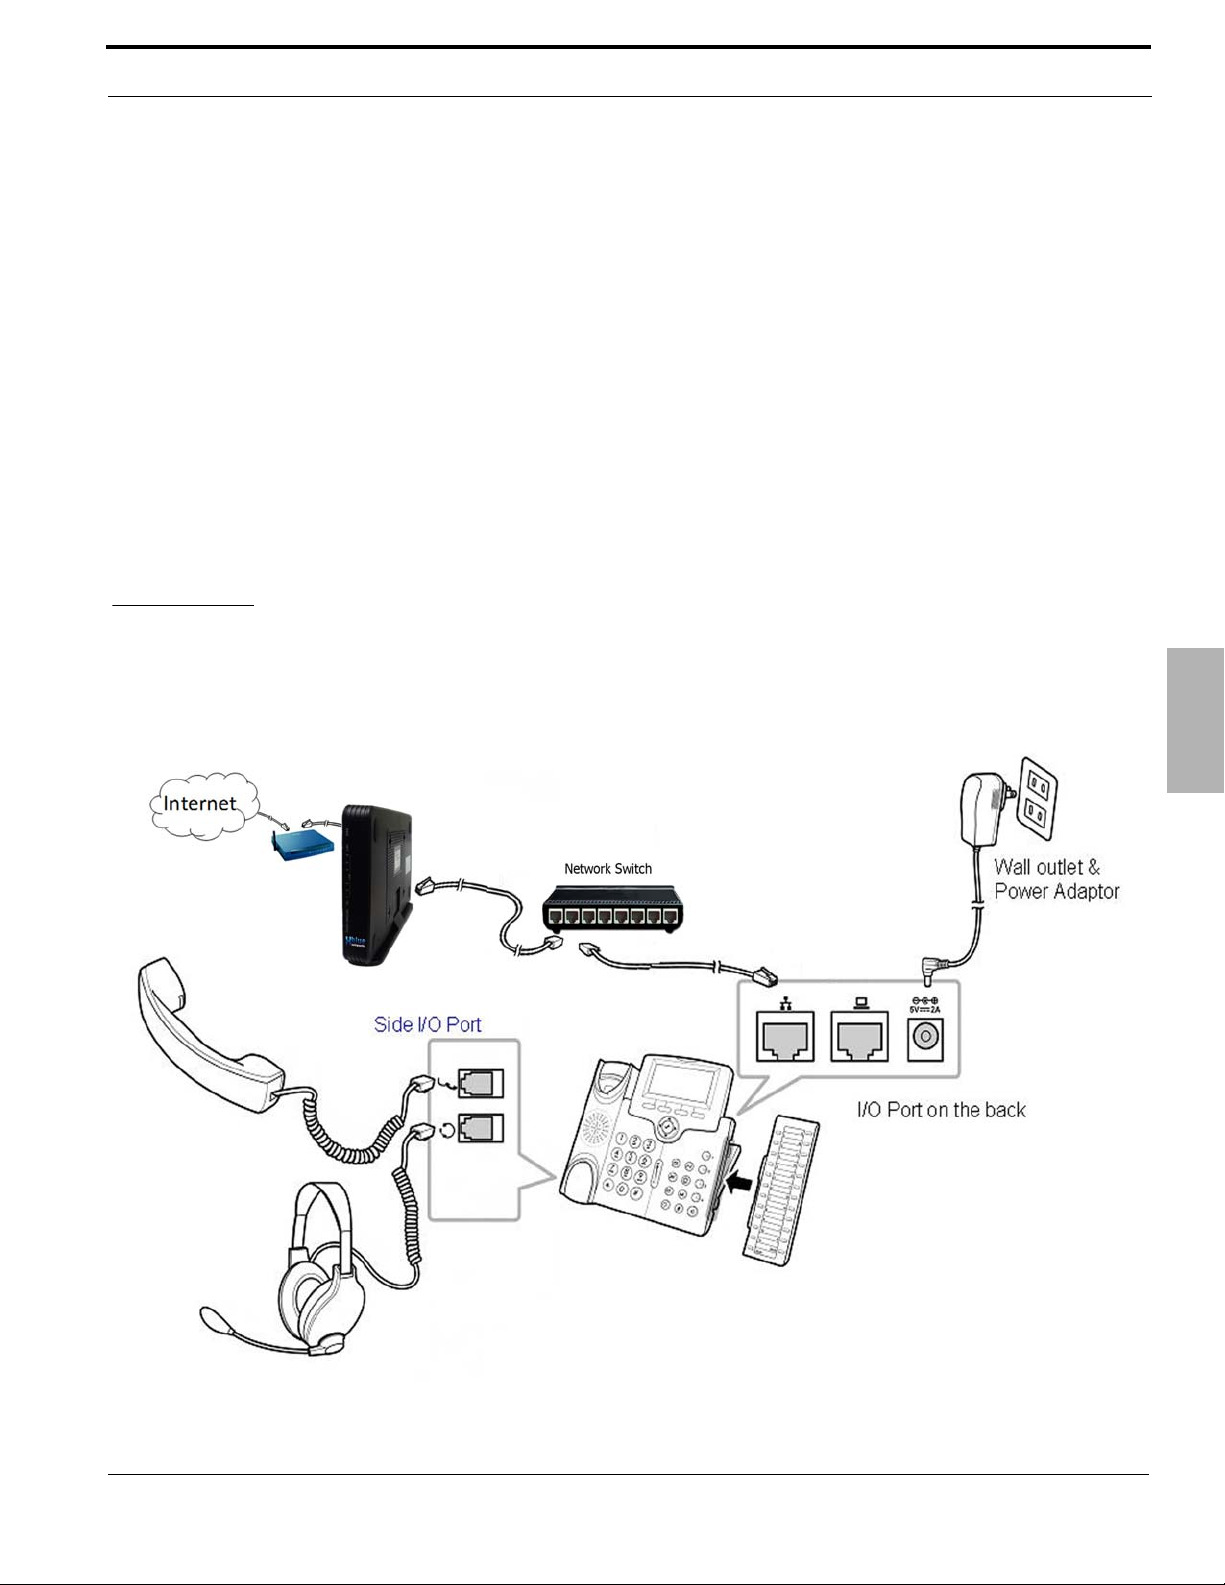
Connecting the X2020 Telephone to the X-25 only takes a few steps.
2
XBLUE Networks
19
Page 20
Setup
Caution:
It is not a good idea to install any electrical devices during an
electrical storm.
It is a good idea to plug the X2020 into an uninterrupted power supply (UPS), which will keep it functioning
during a power outage.
• Step 1 - Remove the contents from the box
• Connect the Sidecar to the phone using the Sidecar directions.
• Step 2 - Connect the Ethernet cable from the Port on the X2020 to the LAN port in the wall
• Step 3 - Connect the Coiled handset cord to the port with the ICON on the X2020 telephone
2
Sidecar
• If you have a headset, connect it to the port with the ICON
• Step 4 - Connect the supplied power supply from the X2020 to the electrical outlet or into the ancillary
UPS System.
Sidecar
The Sidecar (Electronic Data Module EDM) has 24 programmable buttons that allows each user to customize how
their telephone will operate. Each button on the sidecar, and the 4 on the telephone, can be programmed with one
of the following features:
Feature Description
None When pressed the button does nothing
Extension Number This will show when an extension is busy or idle
Telephone Line (Trunk) Number This will show when an extension is busy or idle
Park Number This allows the user to place a call in a park location
Feature Code This allows a feature to be used by pressing the button. See page 35
Do Not Disturb (DND) This allows the user to press this button and place the telephone into DND
Live Record This allows the user to press the button and record the current conversation
Others This allows the user to program another task such as a telephone number
20
XBLUE Networks
Page 21
Connecting the Sidecar
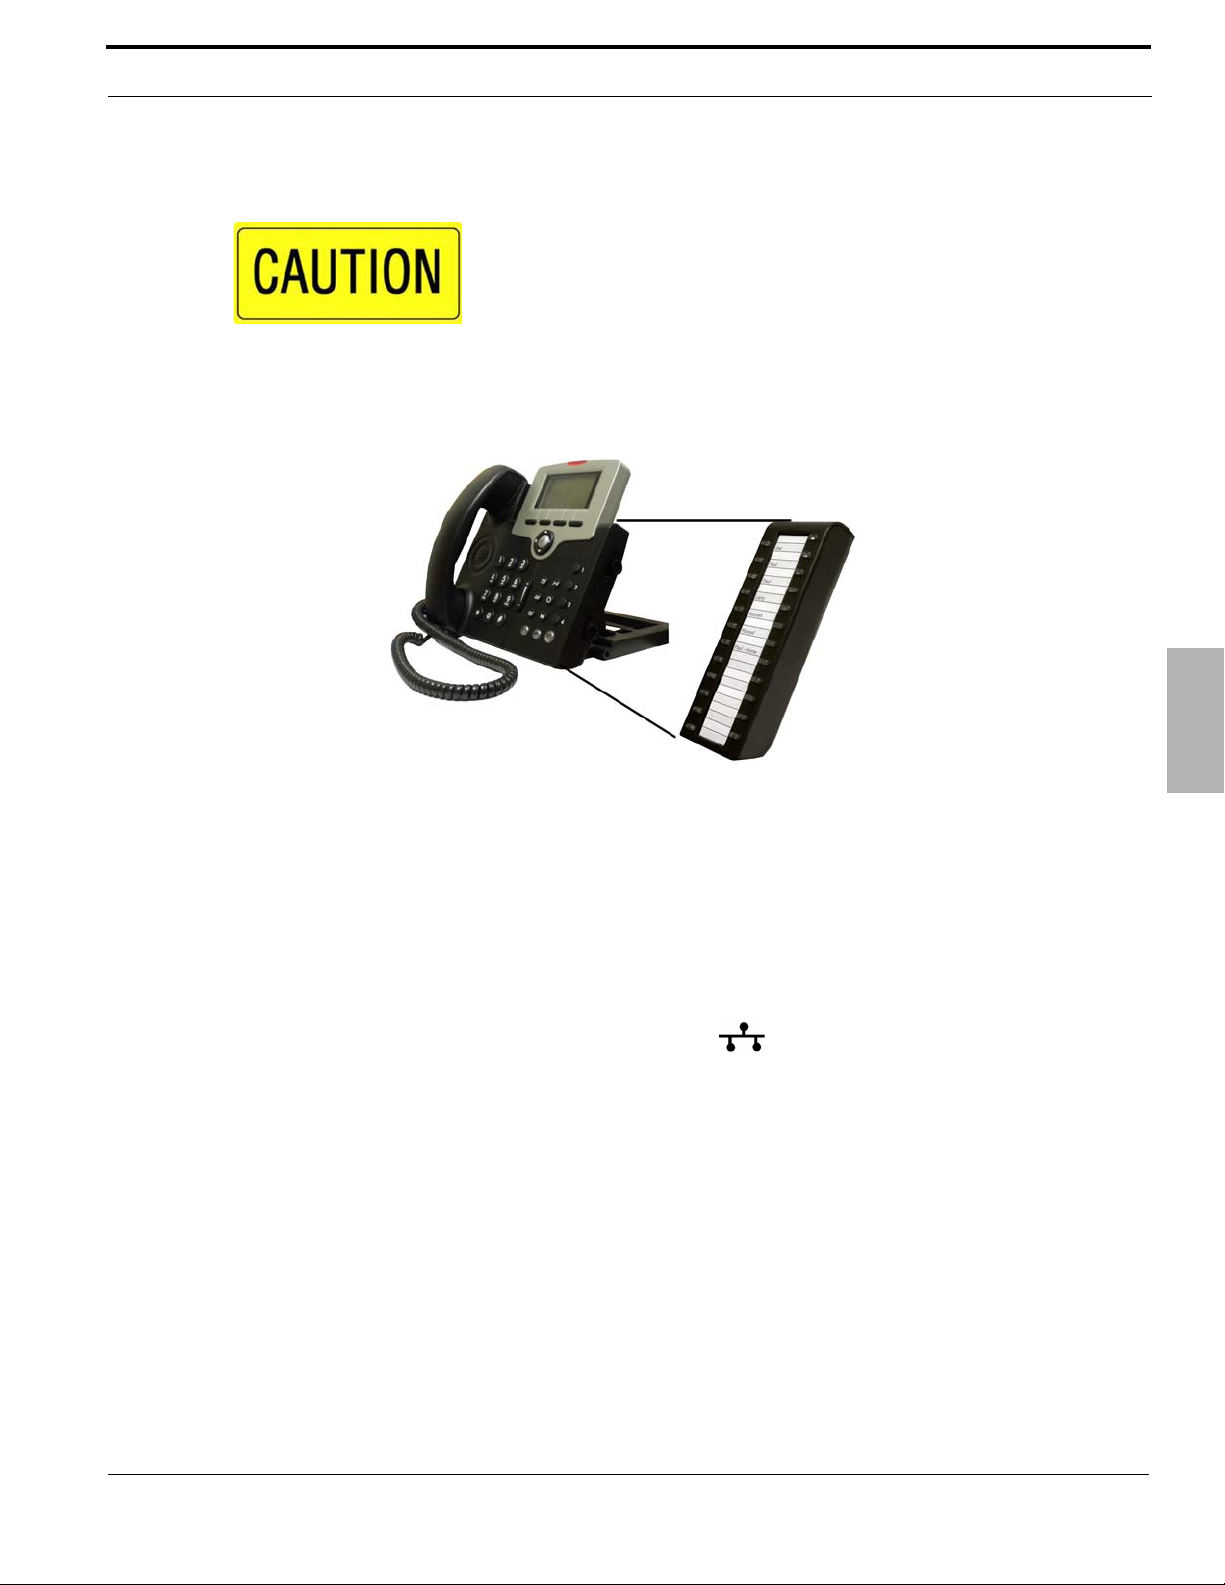
Caution:
Before Connecting the Sidecar to an existing telephone be
sure that it is unplugged! Failure unplug the telephone will
do damage to both the telephone and sidecar and is not
covered under warranty!
Setup
Sidecar
• Step 1 - Remove the contents from the box
• Step 2 - Remove the power from the telephone
• Step 3 - Remove the rubber protector from the pins on the Sidecar
• Step 4 - Securely connect the Sidecar to the telephone by inserting the pins and aligning the plastic posts.
• Step 5 - Secure the Sidecar to the phone using the supplied screws.
• Step 6 - Plug the network connection into the telephone and then plug it into the AC outlet.
2
XBLUE Networks
21
Page 22
Setup
GettingStarted
At default, the X2020 is programmed as DHCP. Therefore, when it located on the same LAN as the X-25, it will
automatically authenticate and be assigned an extension number. The extension number can be reassigned to
accommodate specific numbering plans using either the telephone or a standard windows Internet browser such
as Windows Internet Explorer.
Getting Started
2
Programming with the
Use the following steps to change an extension’s telephone number when it is connected to the LAN:
• Step 1 - Press the menu soft button
• Step 2 - Use the down navigation key to locate “16. Admin”
• Step 3 - Press the center navigation key and then enter the Admin Password (default is 1234)
• Step 4 - Press the center navigation key and then use the down navigation key to locate “7. SIP”
• Step 5 - Use the down navigation key to locate “4. Authentication”
• Step 6 - Press the center na vigation key. There are two options Authorized ID and Authorized Password
• Step 7 - Select “Authorized ID” to enter the new extension number . This ext ension number must be pre-
programmed into the X-25 system.
• Step 8 - Select “Authorized Password” to enter the password for the entered extension number.
X2020
telephone
22
XBLUE Networks
Page 23

Use the following steps to program a X2020 that is going to be used remotely (WAN):
• Step 1 - Press the menu soft button
• Step 2 - Use the down navigation key to locate “16. Admin”
• Step 3 - Press the center navigation key and then enter the Admin Password (default is 1234)
• Step 4 - Press the center navigation key and then use the down navigation key to locate “7. SIP”
• Step 5 - Locate “1. SIP Server” and press the center navigation key
• Step 6 - Locate the “SIP Proxy” and press the center navigation key. Press back space (Backsp) to delete
the existing number and enter the IP Address of the X-25 and then press the center navigation key.
• Step 7 - Use the down navigation key to locate “Outbound Proxy” and then press the center navigation
key. Press the back space (Backsp) to delete the existing number a nd enter the IP Address of the X-25
and then press the center navigation key.
• Step 8 - Use the down navigation key to locate “Registrar Server” and then press the center navigation
key. Press the back space (Backsp) to delete the existing number a nd enter the IP Address of the X-25
and then press the center navigation key.
• Step 9 - Use the down navigation key to locate “Registrar Outbound” and then press the center naviga-
tion key. Press the back space (Backsp) to delete the existing number and enter the IP Address of the X25 and then press the center navigation key.
• Step 10 - Press the left navigation key once and use the down navigation key to locate “4. Authenti-
cation”
• Step 11 - Press the center navigation key. There are two options Authorized ID and Authorized Password
• Step 12 - Select “Authorized ID” to enter the new extension number. This extension number must be pre-
programmed into the X-25 system.
• Step 13 - Select “Authorized Password” to enter the password for the entered extension number.
• Step 14 - Press the left navigation key until it asks “Do you want to quit?” Press the center navigation
key, and select “Yes”. The telephone will reboot, and connect to the X-25 gateway.
Setup
Getting Started
2
XBLUE Networks
23
Page 24
Setup
Change Extension Number
Registering WAN Extensions
Programming with an Internet Browser
Use the following steps to change an extension’s telephone number connected to the LAN:
Getting Started
• Step 1 - On the telephone - Press the menu soft button
• Step 2 - Use the down navigation key to locate “6. Info”
• Step 3 - Press the center navigation button and then use the down navigation key to locate “IP
Address” and make a note of the address.
• Step 4 - On a computer connected to the same network, open an Internet Browser
• Step 5 - Enter the IP address in the address bar and press enter.
• Step 6 - Enter Admin as the Login Name, and enter the Admin password (default 1234).
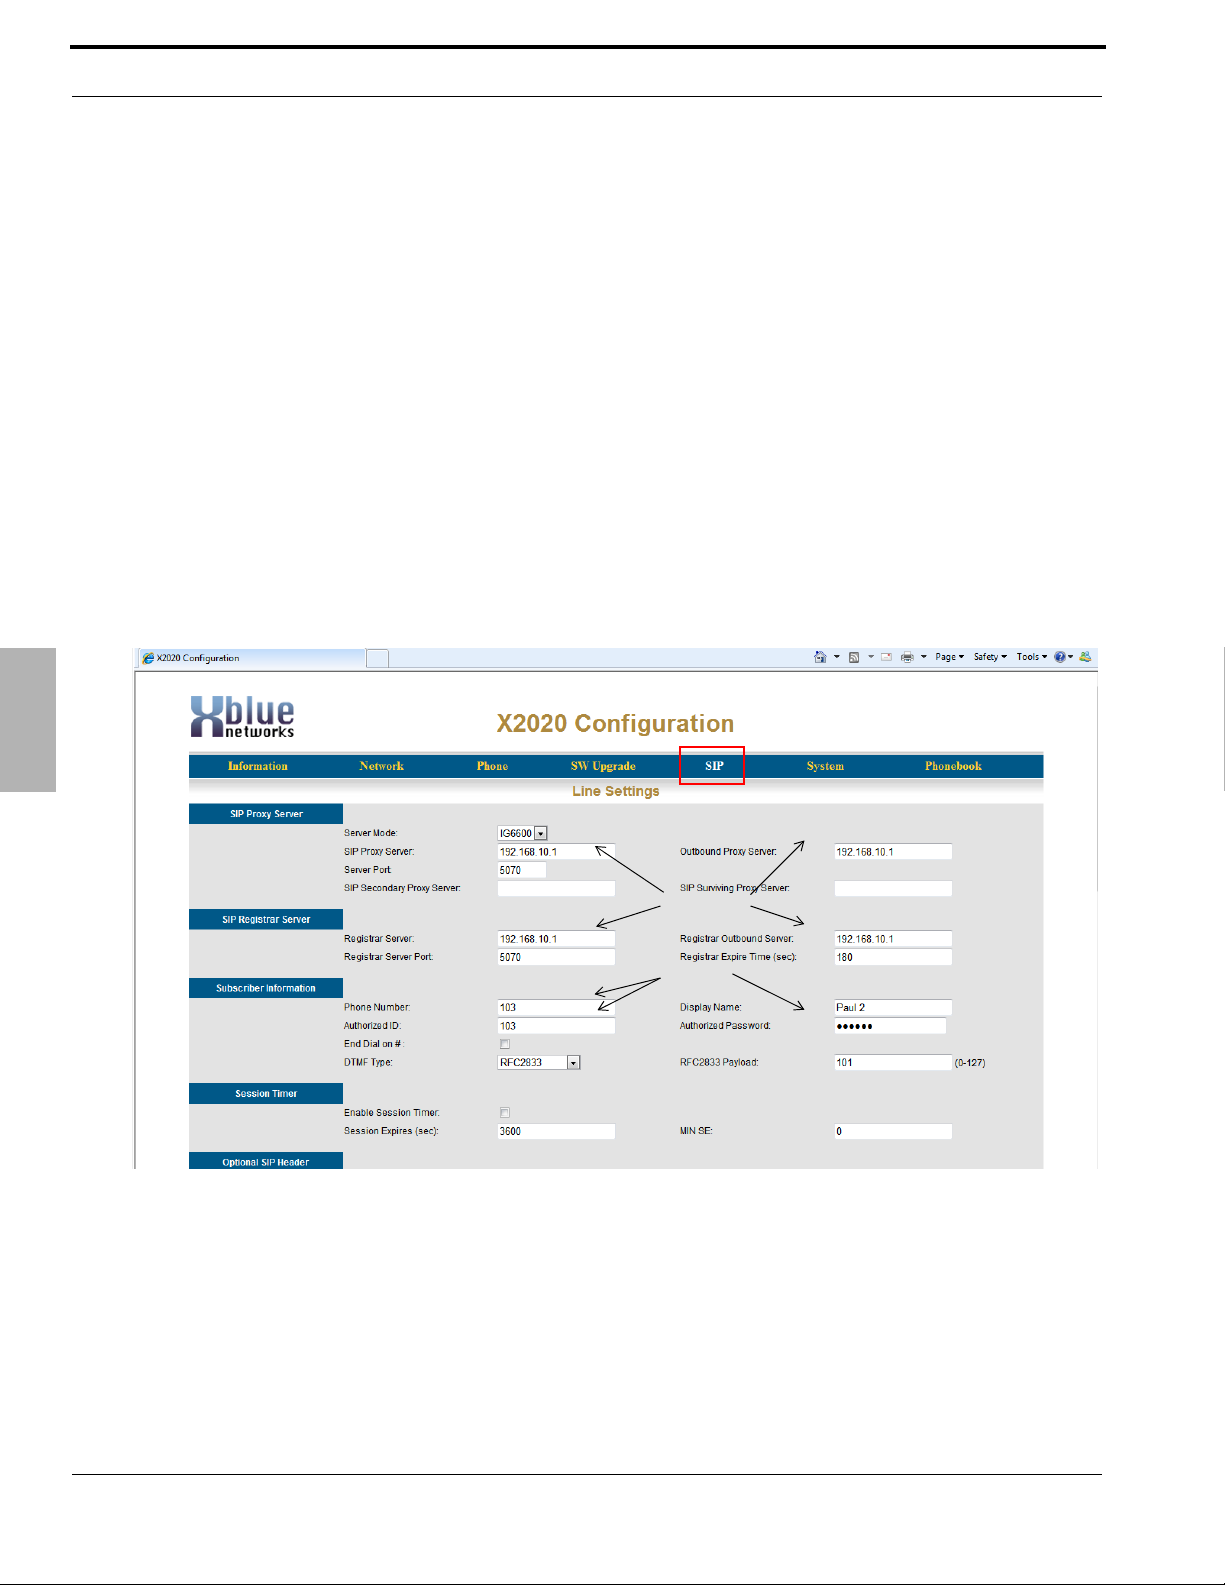
• Step 7 - Select the “SIP” tab at the top of the configuration page.
• For LAN programming locate “Phone Number”, “Authorized ID” and “Authorized Password”.
• For WAN also locate “SIP Proxy Server”, “Outbound Proxy Server”, “Registrar Server” and “Registrar
Outbound Server”.
• Step 8 - Click “Save Settings” at the bottom of the page.
2
24
XBLUE Networks
Page 25
Setup
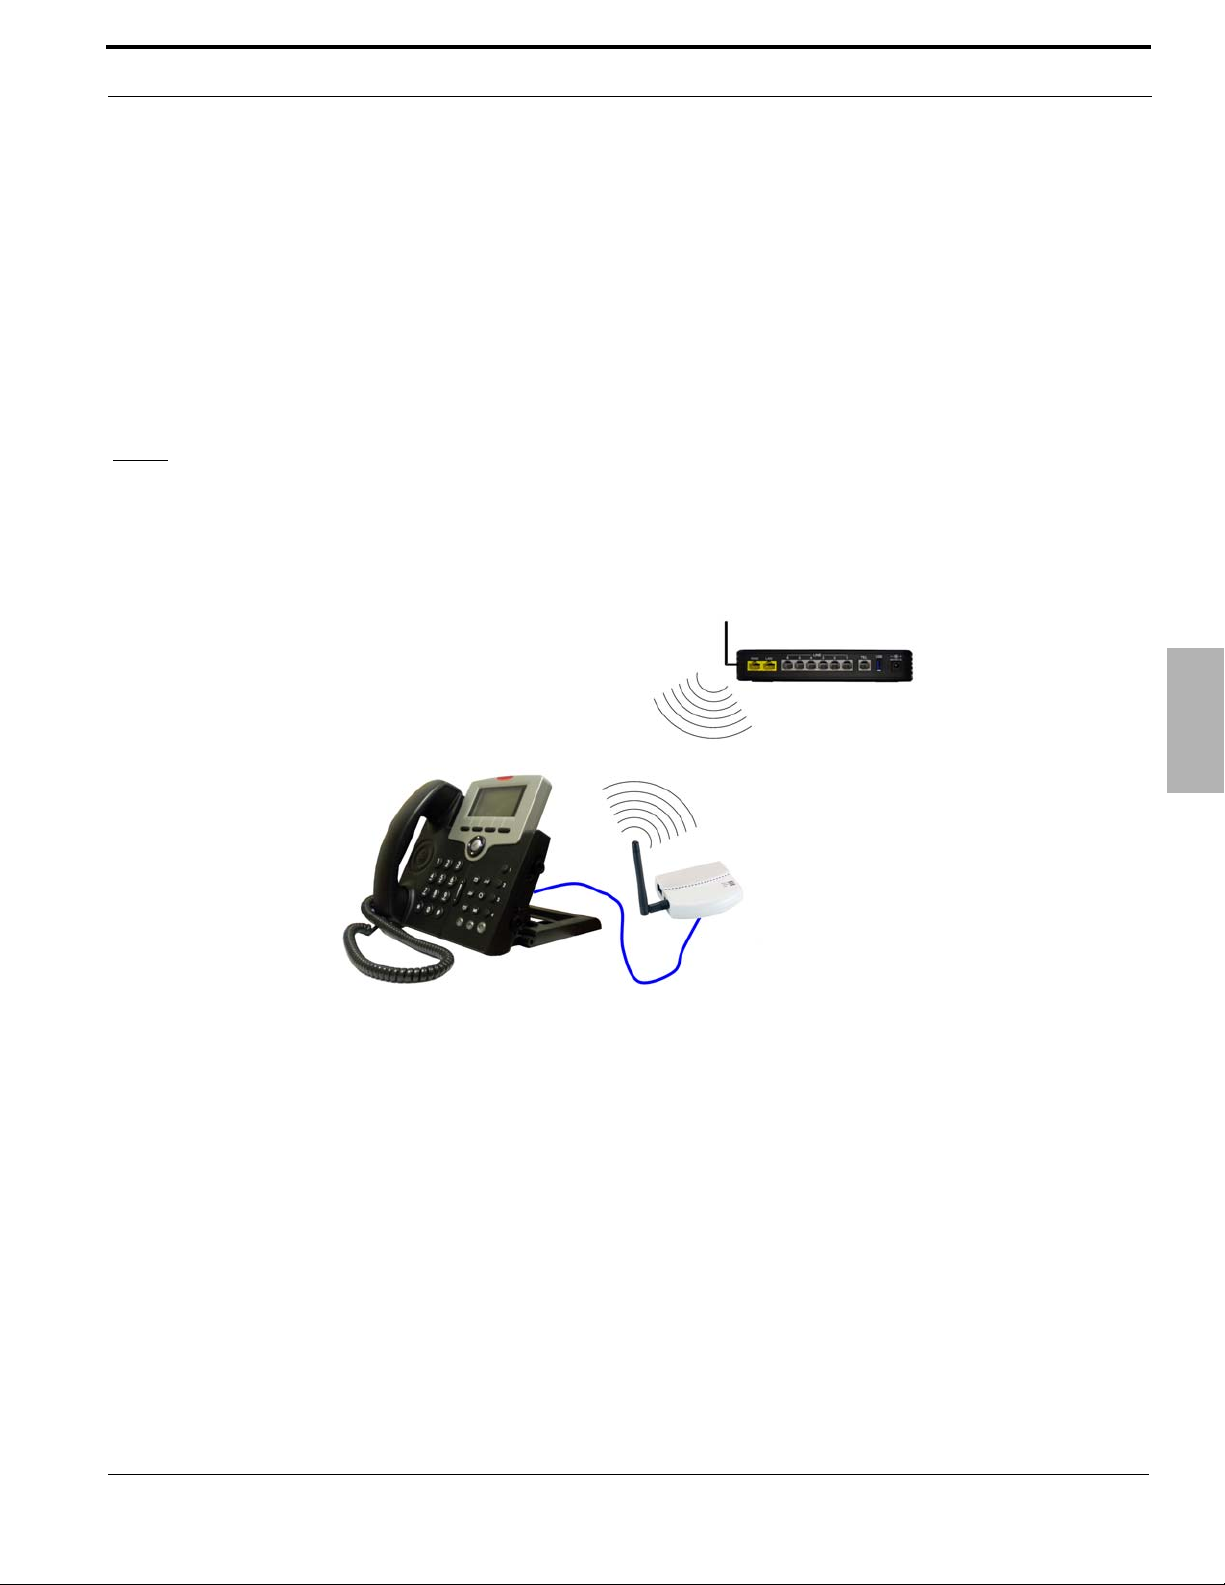
XBLUEWirelessUniversalAdapter
Because there is not always an Ethernet port where you wa nt to put a telephone, XBLUE suggests an XBLUE Wireless
Universal Adapter. Just program the wireless adapter to connect to the X-25, and then connect the adapter to the
network port of the X2020. The phone will authenticate to the X-25 just like a wired telephone.
Getting Started
1. Make sure that the wireless on the X-25 is on line and operational.
2. Connect the Ethernet cable from the Wireless adapter to the X2020 telephone’s network connection.
3. The integrated wireless adapter will automatically locate the X-25, and authenticate, and download the
security password.
Note:
The quality of your wireless connection may affect the quality of the voice connection. There is no guarantee, written
or implied, that the XBLUE Wireless adapter will work 100 percent of the time.
XBLUE Wireless Universal Adapter
2
XBLUE Networks
25
Page 26

Setup
Notes:
XBLUE Wireless Universal Adapter
2
26
XBLUE Networks
Page 27
3 Using your Telephone
Gettingtoknowyourwayaround
Once the X2020 telephone is connected to the X-25 Gateway it will be ready to be used. The X2020
allows you to make calls using the handset, speakerphone or using an ancillary headset connected to
the headset jack. In addition, the X2020 has a “Hot Keypad” which allows you to dial a number
without lifting the handset or pressing the speaker button. Just dial the number and the X-25 will do
the rest.
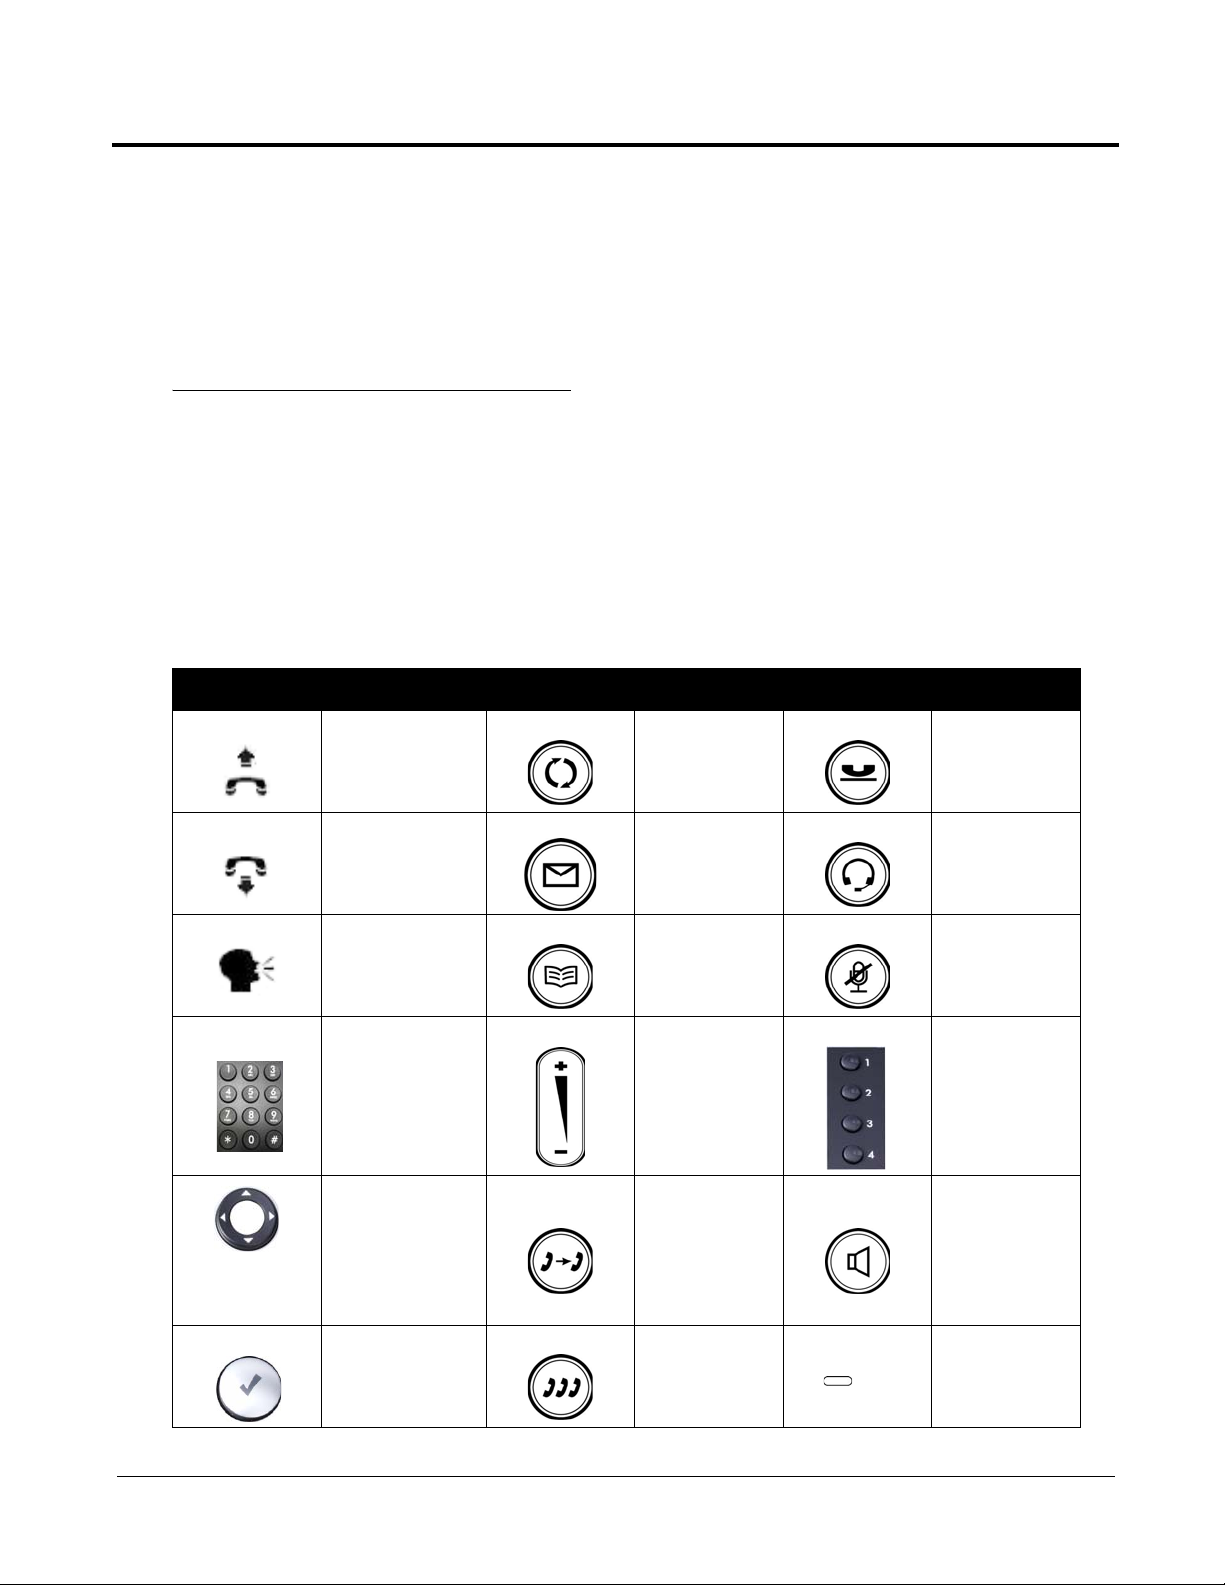
The following ICONS will be used to help you get to know your new X2020 telephone.
TABLE 3.1 ICONS being used in this m anual
ICON Desc rip tion ICON Desc rip tion ICON Desc rip tion
Off Hook Redial Key Hold Key
shown as
On Hook Message Key Headset Key
Speaking Phonebook Key Mute Key
Dial or Key Pad Volume Bar
Down, Up, Right
and Left Navigation keys
Center Navigation
key - Used for
Select or OK
Transfer Key Speakerphone
Conference Key Soft Key
Programmable Line Buttons
XBLUE Networks
27
Page 28
Using your Telephone
Placingacall
There are two types of calls, internal or Intercom and external or over the telephone line. In either case, you can
simply dial the desired telephone number and the X-25 will automatically route the call. If the dialed number is
part of the internal numbering plan such as an extension, which are numbered 101 through 125, at def ault, the call
will ring the appropriate extension. If the number is not within the numbering plan, the X-25 will automatically
connect to a telephone line or you can select a specific telephone line, and the call will be placed.
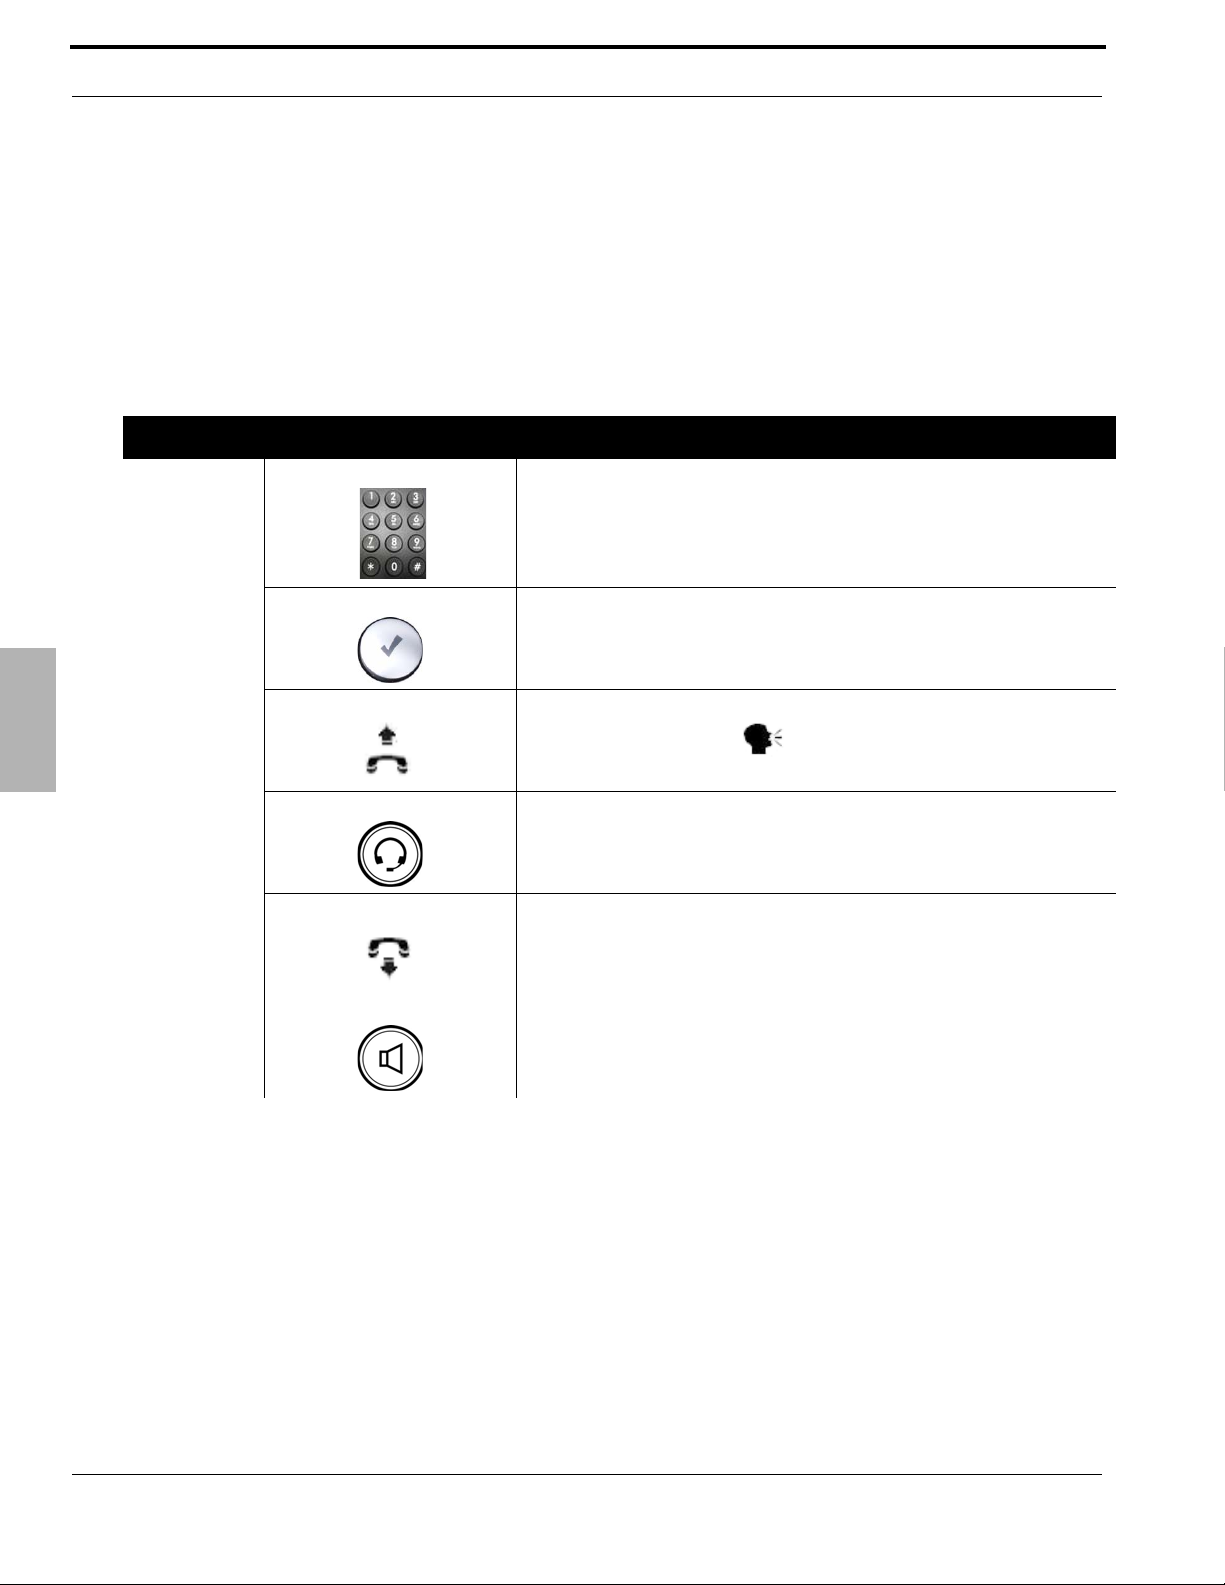
TABLE 3.2 Basi c O p erations
Operatio n Desc rip tion
3
Placing a call
Place a Call
Dial the desired telephone number. The number will appear in the display
but not sent to the telephone line provider, allowing you to delete
(backsp) any incorrect numbers.
Wait 5 seconds or press the center navigation ke y when yo u a r e satisf ied
with the entered telephone number
Lift the handset to speak privately or remain on speakerphone.
If the headset is enabled, it is automatically used if the handset is not
removed from the cradle
Replace the handset, or press the speaker button to end the call
28
XBLUE Networks
Page 29
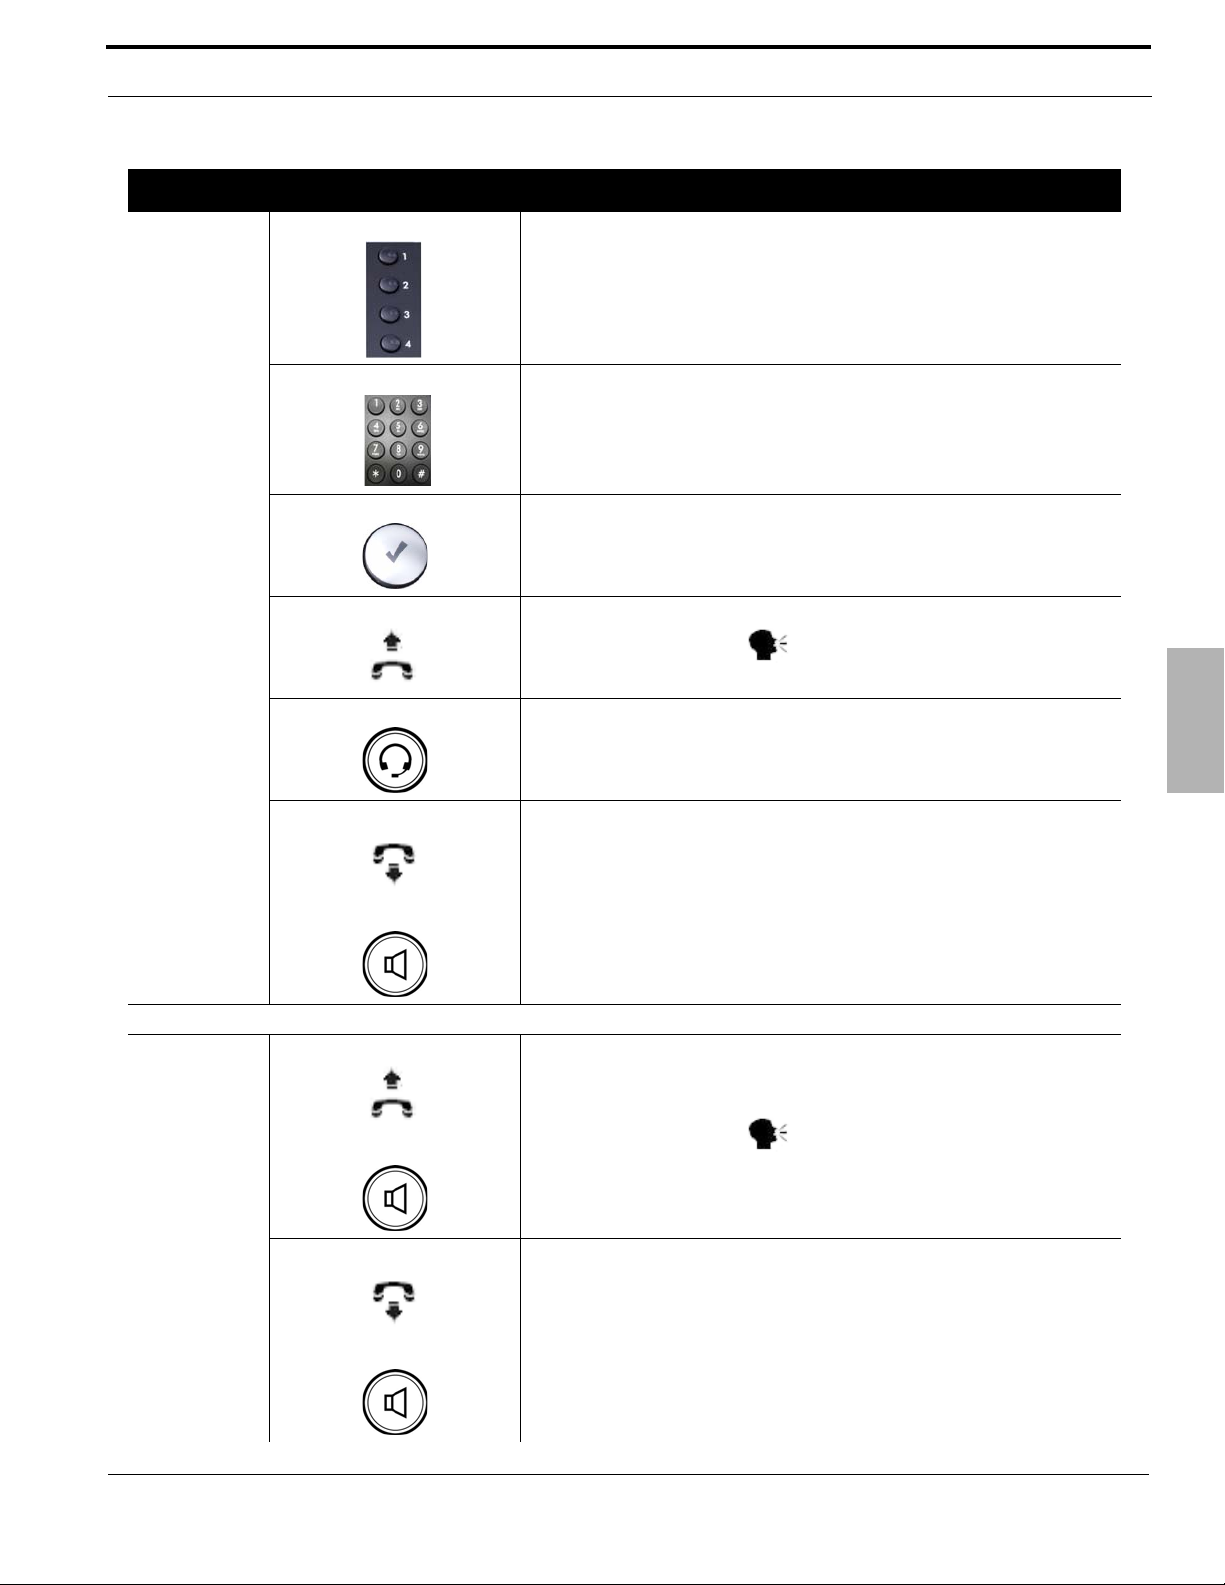
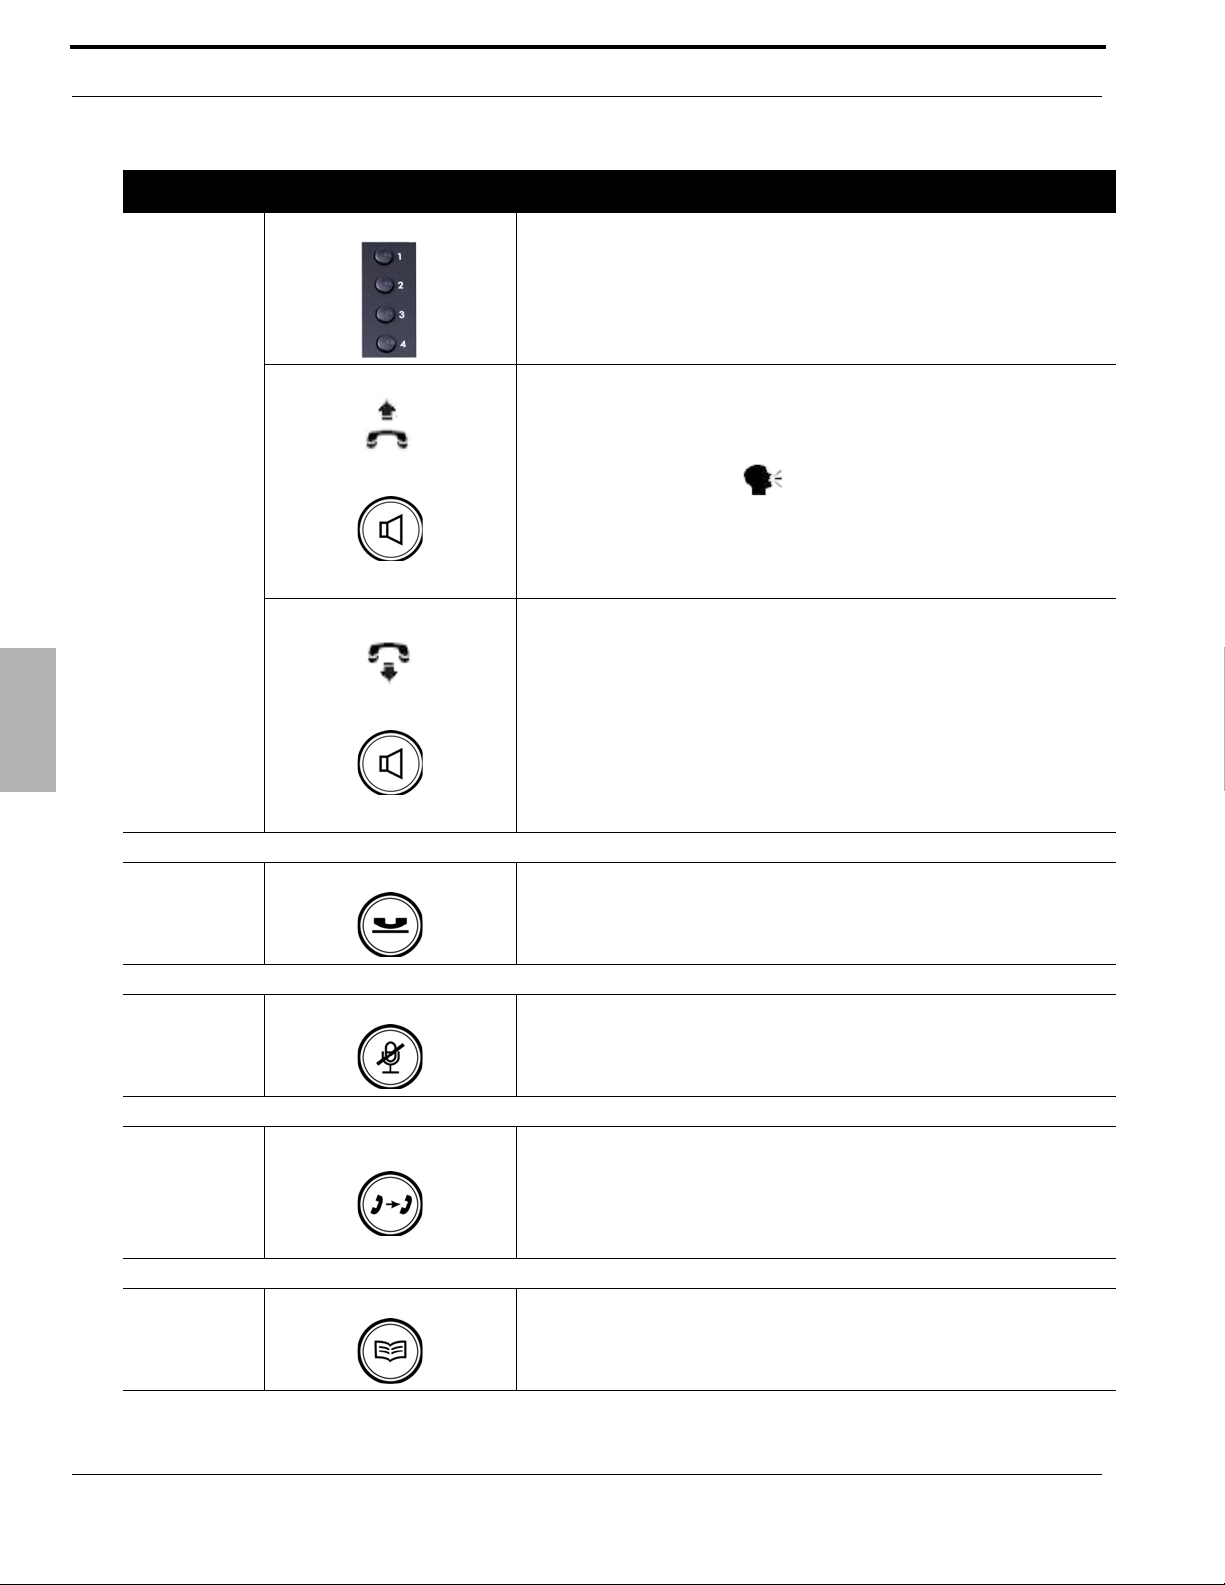
TABLE 3.2 Basi c O p erations
Operatio n Desc rip tion
Press the desired telephone line
Dial the desired telephone number. The number will appear in the display
but not sent to the telephone line provider, allowing you to delete
(backsp) any incorrect numbers.
Wait 5 seconds or press the center navigation ke y when yo u a r e satisf ied
with the entered telephone number
Make a call
using a specific
telephone line
Lift the handset to speak privately or remain on speakerphone.
Using your Telephone
Placing a call
Answer a Call
If the headset is enabled, it is automatically used if the handset is not
removed from the cradle
Replace the handset, or press the speaker button to end the call
Lift the handset to speak privately or remain on speakerphone.
3
Replace the handset, or press the speaker button to end the call
XBLUE Networks
29
Page 30
Using your Telephone
TABLE 3.2 Basi c O p erations
Operatio n Desc rip tion
Press the telephone line that you wish to answer.
3
Placing a call
Answer a
specific
telephone line
Placing a call
on Hold
Using Mute
Lift the handset to speak privately or remain on speakerphone.
Replace the handset, or press the speaker button to end the call
While on an Intercom or telephone line call press the hold button. Press
the hold button again, or press the telephone line to pick up the held call.
Press the mute button, which will light red when active to stop transmitting, and speak privately. Press the mute button again, unlit, to begin
speaking to the outside party again.
30
Transfer a Call
Phonebook
Telephone line calls can be answered at one extension and transferred to
another destination such as an extension or UCD group. While on a call,
press the transfer button and the prepr o grammed extension button...
or press the down
ber.
Press the phonebook button to store or dial one of 200 personal phonebook (address book) entries.
navigation key and dial the desired extension num-
XBLUE Networks
Page 31

TABLE 3.2 Basi c O p erations
Operatio n Desc rip tion
Redial stores the last 30 numbers that you dialed. Press the redial
button and then use the down
desired telephone number.
Redial
Press the center navigation button to dial the selected telephone number
Use the message button to pick up new messages. You will know
Message
Button
that you have a new message when the light bar at the top of the
display is flashing. When checking voicemail messages, you will
have to enter your mailbox password.
There are two types of conference, supervised and unsupervised.
A supervised conference is when the initiator (the person creating
the conference) remains in the conference. An unsupervised
conference is when the initiator (the person creating the
conference) disconnects from the conference.
Using your Telephone
navigation button to find the
Placing a call
Conference
Volume Button
Use the following steps to create a conference
• While on a call press the hold button
• Press the down navigation key. This will open a
second communications path, allowing you to place a
second internal or external call.
• Dial the desired telephone number
• after the second call is answered and you are ready to
establish the conference, press the conference
button, and you and the other two parties will be
joined in a single conversation.
Each X2020 telephone comes with a volume adjust bar, which is
used to increase (press up) or decrease (press down) the volume.
For example, when the telephone is ringing, press up to increase
or down to decrease the volume of ring.
When speaking on the handset, press up to increase or down to
decrease the volume of the handset, etc.
3
XBLUE Networks
31
Page 32

Using your Telephone
1. Dialed Calls
2. Received Calls
3. Missed Calls
ReviewCallRecords
From an idle telephone press the up navigation key, allowing you to review three different call record types;
Dialed Calls, Missed Calls, and Received Calls.
Review Call Records
3
1. Dialed Calls - These are calls that were dialed from the telephone.
2. Missed Calls - These are calls that rang at the telephone but was not answered.
3. Received Calls - These are calls that rang at the telephone and were answered.
32
XBLUE Networks
Page 33

Using your Telephone
1
0
1
-
1
1
2
1
1
3
-
1
2
4
UsingyourSidecar
If you have a “Sidecar”, also known as a Direct Station Select (DSS) Console attached to your telephone, you have
access to twenty-four (24) additional programmable buttons. At default, all 24 buttons are programmed as station
appearances, known as Busy Lamp Field (BLF). However, these buttons can be customized to allow you to program
the features that you use most.
Each button can be programmed as a Blank button, which does nothing, an Extension to show when an extension is
busy or idle, a PSTN or SIP Trunk, a Call Park button, a Feature button - requires the feature code to be entered, an
Others button which can be a Cellular telephone number or an extension on another system within a voice network, a
single button DND, or a Live Record button to record active conversations.
Programming Your Sidecar
Telephone Programming
Programming the buttons on the sidecar can be done using the telephone and dialing specific codes or it can be done
using an Internet Web Browser, which you may find easier, such as Internet Explorer.
Using your Sidecar
Programming the Sidecar can be done using the telephone or through an Internet Browser.
• Dial *70 + BN + FT
• BN = the button to be programmed;
• 01 - 04 on the telephone
• 05 - 28 on the DSS (Sidecar) Console
• FT = the numeric value for the next 6 feature types:
• 00=Blank button
• 01=Extension; can be a physical LAN or a Virtual Extension
• 02=Trunk; can be either a PSTN or SIP Trunk or Trunk Group
• 03=Call Park; enter the call park dial code
• 04=Feature Key; enter the feature code such as *91 Agent log on
• 05=Others; such as a speed dial number or a specific outside number
• 06=Do Not Disturb; No need to enter *4 (only if enabled by the administrator)
• 07=Live Record
• 08=Virtual Mailbox
3
XBLUE Networks
33
Page 34

Using your Telephone
Web Browser Programming
Enter the IP address of the telephone and select “EDM” to program the buttons on the sidecar
Using your Sidecar
3
• Using the dropdown box select the feature y ou would like to have on each button. Refer to the Feature
Description Chapter for specific feature Codes.
34
XBLUE Networks
Page 35

4 Telephone Feature
Description Table
Tel ep ho ne FeatureDescriptionTabl e
Although the X-25 system uses standard SIP protocol it also has some special fe atures t hat only work
with the X2020 SIP Telephone Endpoints.
Feature P ro g ram m in g Seq u enc e Page
Agent Log on/off - UCD Group Log On *91
Log Off **91
Alphanumeric Display Phone Specific page 41
Automatic Hold X2020 only page 41
Busy Callback Call ext + 6
Cancel *66
Call Forking (Requires SIP Trunk) *26 + t + Ext
t=
0=ICM
1=Outside
2=Both
Ext = Extension Number
Cancel **26
Call Forward - Direct *21+t+D
t=
0=ICM
1=Outside
page 41
page 42
page 42
page 43
XBLUE Networks
2=Both
D=
EXT or Voicemail or UCD
Cancel **21
35
Page 36

Telephone Feature Description Table
Feature P ro g ram m in g Seq u enc e Page
Call Forward - Busy *22 + t + D
Call Forward - No Answer *23 + t + D
4
page 43
t=
0=ICM
1=Outside
2=Both
D=
EXT or VVA or UCD
Cancel **22
page 43
t=
0=ICM
1=Outside
2=Both
D=
EXT or Voicemail or UCD
Cancel **23
Call Forward - DND *24 + t + D
t=
0=ICM
1=Outside
2=Both
D=
EXT or Voicemail or UCD
Cancel **24
page 43
36
XBLUE Networks
Page 37

Telephone Feature Description Table
Feature P ro g ram m i ng Seq u enc e Pag e
Call Forward - Fo llow Me - From the new
extension....
*25 + t + Ext + * + pswd
t=
0=ICM
1=Outside
2=Both
Ext=
Your Extension Number
pswd
Your extension password
Default is 0000
Cancel **25 + Ext + * + pswd
page 43
Call Forward Remote *21 + t + * + pswd + * + O
*22 + t + * + pswd + * + O
*23 + t + * + pswd + * + O + * + T
*24 + t + * + pswd + * + O
*25 + t + * + pswd + * + O
t=
0=ICM
1=Outside
2=Both
pswd = VM Password
O=
Outside number
T=
Time to wait
page 43
4
Cancel
**2x
x= 1~5
XBLUE Networks
37
Page 38

Telephone Feature Description Table
Feature P ro g ram m in g Seq u enc e Page
Call Hold Hold Button page 46
Call Log X2020 only page 46
Call Park/Call Park Answer Defined by Numbering Plan (The default
is 731, 732, 733 and 734)
Call Pickup *53 + Extension page 47
Call Waiting *98
Cancel **98
Call Block page 48
page 47
page 47
4
Class of Service - Traveling *55 + ext + pswd
ext=
extension
pswd=
extension password
Conference (3 way) Press Hold while on a call
Press the down navigation key
Make second call
Press the Conference button
Distinctive Ringing Use Ring Type (Admin Menu or Web) page 49
Do Not Disturb (DND) *4
Cancel **4
Extension Feature Reset *69 + Extension or Administrator Pass-
word
page 49
page 48
page 50
page 50
38
XBLUE Networks
Page 39

Telephone Feature Description Table
Feature P ro g ram m i ng Seq u enc e Pag e
Feature Button Programming *70 + BN + FT
BN=
Telephone - 01~04
Sidecar 05~28)
FT=
Feature Type:
00=Null
01=Extension (Virtual) Number
02=Trunk Number (PSTN or SIP
Trunk)
03=Call Park Dial Code
04=Feature Key (Feature Access Code)
05=Others (such as outside num-
ber)
06=Do Not Disturb)
07=Live Record
page 51
4
08=Virutal Mailbox
Extension Feature Reset *69 + ad-pswd
ad-pswd=
admin password
Feature Button Reset *68 + pswd
pswd=
extension password
LCD interactive X2020 only page 53
Multi-Line Appearance X2020 only page 54
Mute Mute Button page 54
On-Hook dialing X2020 only page 55
Page Answer (Meet Me Page) - X2020 only Press “Answer” button under LCD page 55
Page Allow/Deny *99 Page denied
**99 Page Allowed
Phonebook X2020 only page 56
Phone Lock/Unlock *97 + pswd
**97 + pswd
pswd=
page 50
page 53
page 55
page 58
extension password
Plug & Play (PnP) X2020 only page 58
XBLUE Networks
39
Page 40

Telephone Feature Description Table
Feature P ro g ram m in g Seq u enc e Page
Reminder Tone (Stutter Dial Tone) Whenever a feature is enabled page 58
Agent Log On/Off - UCD Group
4
Service Mode (attendant only) *790 - Toggle between each mode
Go directly to a Mode
*791 - Day Mode
*792 - Night Mode
*793 - Time Mode
Telephone Line Flash page 59
Transfer Recall page 60
Volume Control page 60
Web management page 60
Some features require two buttons, one to activate and one to cancel a feature.
page 59
AgentLogOn/Off‐UCDGroup
• *91 - Agent log On
40
XBLUE Networks
Page 41

Telephone Feature Description Table
• **91 - Agent Log Out
Description:
Any extension programmed into a UCD group is considered an “Agent”. At times, an extension ma y want to stop their
extension from ringing so they can simply “Log Out” of the UCD Group.
Operation:
From an Idle X2020 Telephone Dial **91 to log out of a UCD group, dial *91 to log back into the UCD group.
Notes:
1. The extension must be programmed as a member of one or more UCD Groups.
2. When an agent logs out, they log out of all UCD groups.
3. When an agent logs in, they log out of all groups
4. There is no visual indication (lamp or LCD) when an agent is logged off.
AlphanumericDisplay
Description
The XBLUE X2020 telephone comes standard with a graphic LCD display that supports 64 alphanumeric characters.
Operation:
N/A
Notes:
AutomaticHold
Description:
This feature helps simplify the call handling process by allowing you to answer a call and then press a preprogrammed
extension button without pressing the hold button first. The answered call will automatically be placed on hold. to
pickup the held call you just press the hold button or another extension can press the preprogrammed telephone line
button.
Operation:
Alphanumeric Display
4
This is an automatic feature in the X2020 telephone.
Notes:
1. This will work when you are on a Intercom or telephone line call
2. Automatic Hold can be disabled by the administrator in the X-25 system. It is found in the “Programmable
Line Key” parameter in the “Voice” --> “Phone Section”.
XBLUE Networks
41
Page 42

Telephone Feature Description Table
This feature requires SIP Trunks - It will not work with PSTN Lines.
BusyCallback
Description:
The X2020 supports busy callback to an extension. This allows you to dial 6 when you call an extension and get a
busy signal. Once Busy Callback is activated, the called extension will ring your extension when it becomes idle.
You can also cancel the Callback by dialing *66.
Operation:
A confirmation tone is heard once the busy callback feature is enabled.
You can dial *66 to cancel a busy callback.
Busy Callback
4
Notes:
1. Busy callback will not work if the called extension has busy call forward enabled.
CallForking
Description:
This feature will allow a transferred telephone line or intercom call to ring at two simultaneous destinations, such
as an extension (LAN/WAN) or a cellular telephone. When one party answers the call the other ring telephone will
stop ringing.
Operation:
To activate:
• *26 + t + Extension Number
• * + 26 + t + * + (pswd) + * + Outside Number
42
• t= 0 for intercom
• 1 for outside line
• 2 for both intercom and outside line
To cancel
• **26
Notes:
1. This feature will not work when the extension is programmed as the attendant or alternate attendant.
2. This feature will not work for a call that rings to a UCD group.
3. Telephone line calls must be transferred to activate this feature.
4. This feature will only work with one or more SIP Trunks .
XBLUE Networks
Page 43

Telephone Feature Description Table
CallForward
Description:
There are four different types of call forwarding; Always (Direct), Busy, No Answer, and DND each call can be
forwarded to an internal extension, Voicemail, UCD or to an external telephone number such as a cellular telephone.
This allows you to customize how calls to your extension will forwarded. In addition, intercom and telephone line calls
can be programmed to go to the same or different locations.
Operation:
There are two programming procedures. One for internal and one for external. These can also be programmed using
a standard Internet Web Browser.
Call Forward - Internal
Internal Procedure - * + CFW + t + DDD
• CFW =
• 21 = Always (Direct) Forward
• 22 = Busy Call Forward
• 23 = No Answer Call Forward
• * + CFW + t + DDD + T
• 24 = Do Not Disturb (DND)
Call Forward
4
• t =
• 0 for intercom
• 1 for outside line
• 2 for both intercom and outside line
• DDD =
• Extension - Real or Virtual
• Auto Attendant
• UCD Group
• T = Wait Time (0 - 60 seconds)
Examples:
*21 2 450 - Direct Forward to VM, *22 2 124 - Busy call forward to extension 124
To Cancel the Forwarding any Forwarding Dial - ** + CFW
Cancel Example
** 21 - Cancel Direct Call Forward
XBLUE Networks
43
Page 44

Telephone Feature Description Table
Call Forward - Follow Me
Follow Me Forward allows you to use a different telephone extension without missing any of your calls. Go to your
new location and enter the following information. Don’t forget to dial the “*” before the password or the entry will
not work.
Follow Me Forward - * 25 + t + EXT + * + pswd
• t =
• 0 for intercom
• 1 for outside line
• 2 for both intercom and outside line
Call Forward
• EXT = Your Extension Number
4
• pswd =
• Your extension password (Default 0000)
To Disable enter ** + 25 + Extension Number + * + Password
44
XBLUE Networks
Page 45

Call Forward - External
External Procedure - * + CFW + t + * + pswd + * + Outside Number
• CFW =
• 21 = Always (Direct) Forward
• 22 = Busy Call Forward
• 23 = No Answer Call Forward
• *23 + CFW + t+ * pswd + * + Outside Number + T
• 24 = Do Not Disturb (DND)
• t =
• 0 for intercom
• 1 for outside line
• 2 for both intercom and outside line
• pswd =
• Extension Password (Default 0000)
Telephone Feature Description Table
Call Forward
• Outside Number =
• Any 7 or 10 digit number such as a home or cellular telephone
• T = (No Answer time delay
• Waiting Time (0 - 60 seconds)
To Cancel the Forwarding any External Forwarding Dial - ** + CFW
Notes:
1. Follow me forward is an intercom function only.
2. Direct call forward overrides all other forwarding, followed by DND and then busy/no answer forwarding.
4
XBLUE Networks
45
Page 46

Telephone Feature Description Table
CallHold
Description:
Both intercom and telephone line calls (PSTN or SIP Trunk) can be placed on hold. Once on hold the held party will
receive Music on Hold (MOH).
Operation:
While on a call you just press the hold button .
Use the flash key on an analog (Single Line) telephone to place a call on hold.
Notes:
Call Hold
4
1. When using an analog (Single Line) telephone without a “Flash” key may cause erratic operation.
2. Music on Hold is a file that is stored in the X-25 System and not in the telephone. If using the
X2020 telephone on a different gateway, Music on Hold may not work the same way.
CallLog
Description:
The X2020 stores a list of missed, received and dialed calls, which you can used to make or return calls.
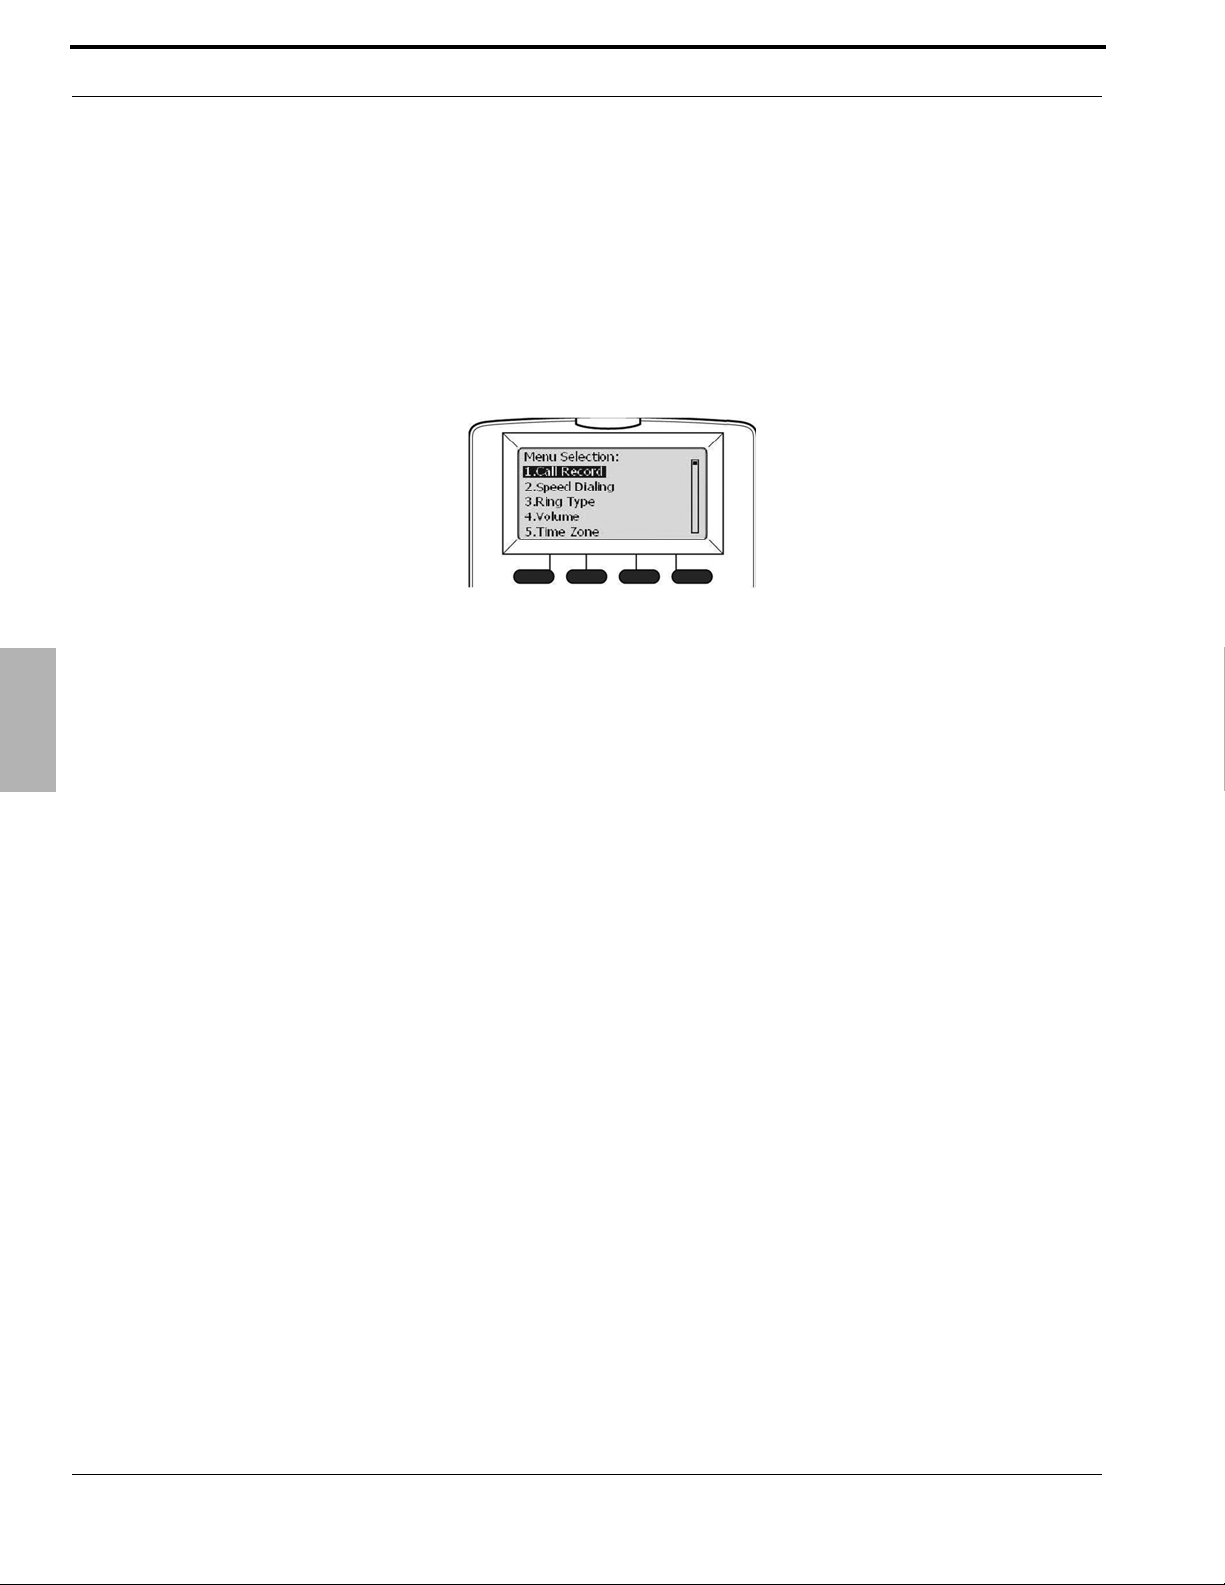
Operation:
Press the “Menu” softkey and then press the check button , Call Log will be highlighted. Press the Check
button , and scroll down
button twice to recall or callback the selected number.
to select the desired call log. Select the desired number and press the check
Notes:
1. The call log numbers will reference the extension’s class of service, call restriction and call routing rules
before the call is placed.
2. Your local area code must be programmed into the Call Routing Tables in the X-25 system.
46
XBLUE Networks
Page 47

Telephone Feature Description Table
CallPark
Description:
Call Park often referred t o as “put ting a call into orbit” allows extensions to place a call into a special holding area that
can be retrieved by any other extension in the system by dialing the park answer call.
Operation:
While on a telephone line call, the extension pressed a preprogrammed call park button to park the call. Any other
extension in the system can dial the park code or press their preprogrammed call park button to retrieve the call.
Notes:
1. Only extensions with a programmed Call Park button is allowed to park a call.
2. Any extension that dials the park code while a call is in the park location, is able to retrieve a call.
3. A Call placed into a park location will receive Music on Hold.
CallPickup
Description:
This feature allows you to pickup a call that is ringing at another extension.
Operation:
While a call is ringing at another extension, press the preprogrammed Call Pickup call or dial the call pickup code, * 53
+ extension number.
Notes:
1. Call pickup does not work with analog telephones
CallWaiting
Description:
Your X2020 SIP telephone can be programmed to receive special a l ert ring whenever a second call rings at your
extension. If you would rather not received the special ringing - just disable Call Waiting. If disabled, calls to your
extension will receive a busy tone.
Call Park
4
Operation:
To enable call waiting - allows a second call to ring at your extension - dial *98
To disable call waiting - does not allow a second call to ring at your extension - dial **98
Notes:
1. This feature is only available for the X2020 SIP telephone.
XBLUE Networks
47
Page 48

Telephone Feature Description Table
CallBlocking
Description:
The X2020 has the ability to block up to 10 different telephone numbers.
Operation:
Using a calls’ inbound caller ID the X2020 telephone allows you to block up to 10 different telephone numbers,
each can contain up to 31 digits. When using Caller Blocking Settings, it is important to use as many digits of the
number to be blocked as possible. This will avoid inadvertently blocking large groups of numbers. For example, if
you only enter “913”, then all calls with the area code 913 (Kansas) will be blocked.
• Enable Call Block: - Click on the Check Box to enable all 10 of the call Blocking Entries.
• Calle r Blocking Entry x: (x = 0 - 9: - Enter the te lephone numbers that y ou w ant to block. R emember to
Call Blocking
This parameter can be programmed using a standard Internet Web Browser.
use as much of the telephone number as you can.
Notes:
4
1. This feature is only available for the X2020.
Conference‐3Way
Description:
The conference feature allows you to connect two additional callers in a single conversation. There are two types
of conference, supervised and unsupervised. A supervised conference is when the initiator (the person creating the
conference) remains in the conference. An unsupervised conference is when the initiator (the person creating the
conference) disconnects from the conference.
Operation:
Use the following steps to create a conference
• While on a call press the hold button
• Press the down navigation key. This will open a second communications path, allowing you to place
a second internal or external call.
• Dial the desired telephone number
• after the second call is answered and you are ready to establish the conference, press the conference
button, and you and the other two parties will be joined in a single conversation.
Notes:
This feature is accessed through the menu on the LCD Display.
48
XBLUE Networks
Page 49

Telephone Feature Description Table
ClassofService‐Traveling
Description:
This feature allows you to roam from on e extension to another while retaining your dialing privileges, regardless of the
telephone’s programmed Class of Service.
Operation:
When making a call from a telephone with a more restrictive class of service, enter * 55 + your extension number +
your voicemail password (Default is 0000) and then place your call. This extension retains your Class of Service for
one minute after you have disconnected the call.
Notes:
DistinctiveRinging
Description:
At default all of the X2020 extensions ring in the same way. However, you can select from eleven (11) different ring
tones making it easier to determine when your telephone is ringing. In addition, each telephone line (PSTN or SIP
trunk) can be programmed with a Distinctive Ring tone making it easier to determine which line is ringing.
Operation:
This can be programmed using the telephone menu or using a standard Internet Web Browser.
Notes:
1. In the event that both a telephone line and a telephone is set to have a Distinctive ring, the telephone line
ring assignment takes precedence.
2. Priority of Distinctive ringing:
3. Caller ID Ring type is referenced first
4. Telephone line ringing is referenced second
5. Te lephone extension is referenced third
Class of Service - Traveling
4
XBLUE Networks
49
Page 50

Telephone Feature Description Table
DoNotDisturb(DND)
Description:
When Do Not Disturb (DND) is active all calls to your tele phone is blocked. When DND call forw ar d is set, calls will
forward to the DND destination such as voice mail.
Operation:
From an idle extension dial * 4 to enable DND
4
Do Not Disturb (DND)
From an idle extension dial **4 to disable DND
Notes:
1. DND forwarding overrides all other forwarding, when DND is enabled, except Direct Call Forward
2. This feature can be disabled by the system administrator
3. When DND is enabled, you will receive stutter dial tone when you go off hook.
4. When you are in DND, a special ICON will be displayed showing that you are in DND.
5. Other extensions will not receive an indication that you are in DND until they call your extension
ExtensionFeatureReset
Description:
This feature is a quick way to deactivate several features that have been changed from factory default.
Operation:
From the extension dial *69 + your voicemail password or the administrator password
The following will be set back to factory default:
• Call Waiting
• Paging Accept
• All programmed buttons are returned to default
• Phone Lock is disabled
• All programmed call forwarding is removed
• DND is disabled
• The extension (Agent) is logged into all programmed groups
• Auto Answer is disabled
• All programmed Distribution List are deleted
50
Notes:
1. This is good when troubleshooting extension anomalies
XBLUE Networks
Page 51

Telephone Feature Description Table
Feature(Flexible)ButtonProgramming
Description:
The four buttons on the X2020 and any of the buttons on the Sidecar (DSS Console) can be reprogrammed to
accommodate a telephone PSTN or SIP T runk Line, a feature or another extension. At def ault, the f our buttons on the
telephone are set to the first four PSTN telephone lines (701, 702, 703, and 704) and all of the buttons on the Sidecar
are set to extensions 101~124.
Operation:
These features can be programmed using these codes or using a standard Internet Web Browser.
• Dial *70 + BN + FT
• BN = the button to be programmed; 01 - 04 on the telephone and 05 through 28 on the DSS Console,
going vertically down the left side, and then the right.
• FT = the numeric value for the next 6 feature types:
• 00=Blank button
• 01=Extension; can be a physical LAN telephone
• 02=Trunk; can be either a PSTN or SIP Trunk or Trunk Group
• 03=Call Park; enter the call park dial code
• 04=Feature Key; enter the feature code such as *91 Agent log on
• 05=Others; such as a WAN extension, a speed dial number or a specific outside telephone number
• 06=Do Not Disturb; No need to enter *4 (Administrator can disable this feature)
• 07=Live Record
• 08=Virtual Mailbox (Virtual (Phantom) Extension - Group Mailbox)
Feature (Flexible) Button Programming
4
Notes:
1. Most features can be programmed on a button
2. Some features require one button to enable and another to disable the feature
Examples:
Enter the following code to create a page button on button 4 - on the telephone:
TABLE 4.1 Dialing C od es
BN Prog ram BN Num b er Others Pag e Code
*70 04 05 400
Enter the following code to create a Call Park button on button 1 - on the telephone:
TABLE 4.2 Dialing C od es
BN Prog ram BN Num b er Call Park Park Lo c ation C ode
*70 01 03 731
XBLUE Networks
51
Page 52

Telephone Feature Description Table
Enter the following code to create a SIP IP Trunk button (SIP T runk 1 = 711) on button 17 - on the Sidecar - Upper
Right - first button:
TABLE 4.3 Dialing C od es
4
Feature (Flexible) Button Programming
BN Prog ram BN Num b er Tru n k Page Code
*70 13 02 711
Enter the following code to create an Agent Log Off button on button 15 and an Agent Log On button on button 16
- on the Sidecar - Last two on the Lower Left buttons:
TABLE 4.4 Dialing C od es
BN Prog ram BN Num b er Feature Log on/off Code Feature
*70 15 04 **91 Log Off
*70 16 04 *91 Log On
Enter the following code to create a Do Not Disturb button on button 28 - on the sidecar - Lower Right - last
button:
TABLE 4.5 Dialing C od es
BN Prog ram BN Num b er DND No Code need ed
*70 28 06
Enter the following code to create a DND Call Forward button on button 4 - on the telephone - the forward
destination is voicemail (450):
TABLE 4.6 Dialing C od es
BN Prog ram BN Num b er Others DND Forward Code Type - Both Destination Vo ic em ail
*70 04 04 *24 2 450
Enter the following code to create a DND Call Forward button on button 4 - on the telephone - to an Outside
Number such as a cellular telephone:
TABLE 4.7 Dialing C od es
BN
Prog ram
*70 04 04 *24 2 * 0000 * 5992583
BN
Num b er
Others
DND
F orw ard Code
Type - Both
Outsid e
Indic ator
VM
Passw ord
Confirm
P assw o rd
Outsi d e
Num b er
The Operator (The extension that rings when 0 is dialed) can create a button to man ually switch from Day to Night
mode. Enter the following code to create a Service Mode button on button 5 of the Operator’s Sidecar This will be
the top button, on the left side:
TABLE 4.8 Dialing C od es
BN Prog ram BN Nu m ber Feature Buttons Feature Code
*70 05 04 *790
52
XBLUE Networks
Page 53

Telephone Feature Description Table
FeatureButtonReset
Description:
The feature is used to bring the programmed buttons back to factory def ault. If the X2020 is connected to the X-25
system the telephone will reference the X-25 for the current default button settings.
Operation:
Dial *68 + the extension (mailbox) password to default the programmable feature button
Notes:
HoldReminder
Description:
Each time the programmable “Hold Reminder” timer is exceeded, a reminder tone will be heard at the extension that
placed the call on hold.
Operation:
Feature Button Reset
Each extension can enable or disable the Hold Reminder as well as adjust the length of the timer.
Notes:
1. These features can be programmed using the telephone or using a standard Internet Web Browser.
LCD&InteractiveButtons
Description:
The X2020 has four interactive “Soft Buttons” that changes as the phone is being used. These soft buttons will assist
you with the operation and programming of your telephone.
Operation:
Notes:
4
XBLUE Networks
53
Page 54

Telephone Feature Description Table
Multi‐LineAppearance
Description:
At default, all of the X2020 telephones are programmed with the first four PSTN lines (701, 702, 703 and 704). All
telephone lines can also be programmed on the Sidecar.
The button, once programmed, uses the LED to indicate the current state of the telephone line. For example, when
the line is busy, the light will be lit solid.
TABLE 4.9 Telephone Line status
Multi-Line Appearance
LED Descrip tion
Dark Idle
Fast Flash Ringing
Slow Flash Line is on hold
Wink Flash Call is recalling
Lit Solid Line is Busy
4
Operation:
When making an outside call, you may press one of the programmed telephone line button and then dial the
desired telephone number or just dial the telephone number and let the X-25 system automatically route the call.
Notes:
Mute
Description:
Each X2020 has a mute button that is used to temporarily disable the telephone’s microphone.
Operation:
Press the Mute button to disable the telephone’s microphone, which will light Red. Press the Mute button again to
disable Mute and resume your conversation. When Mute is disabled, the LED will not be lit.
Notes:
1. The Mute button may not mute a headset
54
XBLUE Networks
Page 55

Telephone Feature Description Table
On‐HookDialing
Description:
On hook dialing, also known as Hot Keypad, allows your to dial a number without lifting the handset or pressing the
speaker button.
Operation:
Simply dial an extension or outside telephone number without lifting the handset or pre ssing the speak er button. You
may press the check button or wait 5 seconds (programmable) for the system to evaluate the dialed number
and then process it according to any routing rules.
Notes:
Paging
Description:
There are two types of paging; All Call Paging and Group Paging. All Call Page, allows an extension to dial a single
code and broadcast a message to all idle X2020 telephone within the same subnet. There are three Group Paging
groups, each can have up to 24 extensions. When the group number is dialed all id le e xtensio ns wi thin t he gr ou p and
Subnet, will receive a broadcast message.
On-Hook Dialing
4
Operation:
Both All Call Page and Group Paging can be set to either L AN, W AN and both. When the All Call or Group P age code or
button is pressed, all idle X2020 telephones will receive the page. X2020 telephones users can press the soft button
under the word “Answer” to connect directly to the extension performing the page.
Notes:
1. With the paging parameter the “WAN” refers to any phone connected to the WAN port, but within the
same subnet
PagingAllow/Deny
Description:
This feature allows you to enter a code to allow or deny paging at your extension.
Operation:
To enable paging deny (thus block paging) dial *99
To disable paging deny (thus allowing paging) dial **99
Notes:
XBLUE Networks
55
Page 56

Telephone Feature Description Table
Create a backup
Phonebook
Description:
Each extension has a personal and public phonebook that contains the contact name, phone number, ringing tone,
and group.
Operation:
Your te lephone has bot h a Private and Public Phonebook. The Private Phonebook is for your personal use, and the
Public Phonebook is synchronize with a CSV file, which can be located in a centralized location. Currently, the
Phonebook feature does not support Microsoft Excel’s CSV files.
Private:
The Private Phonebook is for your personal use. You can enter each number individually or you can use a CSV File
Phonebook
to upload them all at once.
4
Enter the four parameters and then press the “Add” button, to add new entries.
• User Name: - Enter the user name that will be associated with this entry.
• Phone Number: - Enter the phone number (up to 64) digits.
• Ring Type: - There are eleven different ring tones that can be used to differentiate the entered
telephone number when it calls into the system.
• Select the Group that will be associated with the entered telephone number. Select between Family,
Friends, Colleague, VIP or None.
Once you are done entering your personal Phonebook, click on the “SW Upgrade” tab to create a backup.
Click on the “Backup Button” and save it in a location that is easy to locate when needed.
56
XBLUE Networks
Page 57

Telephone Feature Description Table
Public
The Public phonebook gets linked to a CSV file in a centralized location, allowing an administr ator to update all phones
connected to the system with a single file. There are several ways to create a CSV file. One way is to use the backup
created from the personal phonebook. Another way to create the file is using Windows Notepad. Once cr eated sa v e it
with a name such as “Publicphonebook.csv, and place it in a location that you can easily find.
The format of this file is very important:
Name,Number,Ring,Group,
Anne Sweeney,1924020842,0,family,
Alan Booker,769011,0,Friends,
Bob Smith,12122641501,0,Colleague,
Donald Kilroy,18752250474,0,VIP,
One the file is ready to be uploaded, click on the “SW Upgrade” tab.
Phonebook
Notes:
4
• Locate the “Public Phonebook File:” and click on the Browse... button
• Locate the saved file
• Click on the Update button
• Click on “OK” to complete the upload or “Cancel” to stop the upload.
• Click on the Phonebook tab, and then the Public Page tab. If the file format is correct, the information will
be visible. If the numbers are not visible recheck the file format.
XBLUE Networks
57
Page 58

Telephone Feature Description Table
PhoneLock/Unlock
Description:
The phone Lock/Unlock feature allows you to lock their extension to prevent someone from making unauthorized
calls from your extension. The phone lock/unlock feature does not block intercom or emer gency calls, it only blocks
telephone line (PSTN or SIP Trunk) calls.
Operation:
• To lock the phone dial *97 + extension (mailbox) password
• To unlock the phone dial **97 + extension (mailbox) password
Phone Lock/Unlock
Notes:
PlugandPlay
Description:
4
When connecting an X2020 to the X-25 system over the LAN it will automatically authenticate and be assigned
an extension number and activate the mailbox. An extension connecting ov er the WAN port will also automatically
authenticate, be assigned an extension number, and activate the mailbox but requires some basic programming.
Operation:
Connect the X2020 telephone to the LAN port, no other programming is required. When Connecting over the
WAN port, there are four parameters that need to be programmed; the SIP Proxy Server, Outbound Proxy Server,
Registrar Server, Registrar Outbound Server. This programming can be done using the telephone menu or using a
standard Internet Web Browser.
Notes:
1. Locked extensions can only make intercom or emergency calls
1. Although WAN extensions will automatically received an extension number it is a good idea to enter
their extensions manually to make them more permanent. It has been found that after a power outage,
for example, the extension numbers may change.
ReminderTone
Description:
When the extension goes off hook, speaker or handset, stutter dial tone will be heard when DND, MWI or Call
Forward is enabled.
Operation:
This is an automatic feature
Notes:
58
XBLUE Networks
Page 59

Telephone Feature Description Table
ServiceMode
Description:
The Operator has the ability to change the mode of the system from day mode to night mode or timed mode. When
the system is set to day mode, the Auto Attendant will only play the day greeting and extensions will use the day Class
of Service for dialing privileges. When the system is in night mode, the Auto Attendant will only play the night greeting
and extensions will use the night Class of Service for dialing privileges. When the system is in timed mode the system
will automatically switch between day, lunch and night modes using the service mode settings in the X-25 system.
Operation:
Only the attendant has the ability to swap between the service modes:
• Dial: *790 - displays the current mode
• Dial: *791 - changes the system into Day mode
• Dial: *792 - changes the system into Night mode
• Dial: *793 - changes the system into time mode to automatically change between modes.
Notes:
1. This feature only works with the attendant extension
TelephoneLineFlash
Description:
The flash command is used to activate a telephone line feature, such as call waiting or three way calling.
Operation:
While on a telephone line call, X2020 telephone users may press the software button under the word “Flash”.
Notes:
1. When using an analog (Single Line) telephone without a “Flash” key may cause erratic operation.
2. Use *790 when programming a button to toggle between day and night modes.
Service Mode
4
XBLUE Networks
59
Page 60

Telephone Feature Description Table
Transfer
Description:
Calls can be transferred from an extension to another destination, such as another extension, voice mail, or an
outside number. In addition, transfers can be blind, without announcing the call, supervised, listening for call
supervision, or screened where the transferring extension can announce the call.
Operation:
• While on a telephone line call press the transfer button
• Press the preprogrammed DSS button or dial the desired destination
• Hang up to release the call, or remain on the line to announce the call
Notes:
4
Transfer
1. If the receiving extension is forwarded, the transferred call will follow the forwarding
2. If the receiving extension is not forwarded, and goes unanswered, it will recall at the extension that
transferred the call
Vol u m e Control
Description:
The X2020 system is equipped to adjust the volume levels of the following settings:
• Ringing (extension and telephone line)
• Handset
• speaker
• Headset
Operation:
Press the volume up to increase or down to decrease the volume of the currently used feature. For example, while
the telephone is ringing use the volume button to increase or decrease the ringing volume.
Notes:
WebManagement
Description:
The X2020 can be programmed using the L CD menu or using a standard Internet W eb Browser, such as Windows
Internet Explorer.
Operation:
Enter the IP Address in the browser address bar to access the Web interface page for programming.
Notes:
60
XBLUE Networks
Page 61

5 Telephone Programming
ProgrammingwiththeTele ph on e
The X2020 telephone can be progr ammed using the telephone or through an Inte rnet We b Browser or
using a combination of both. T elephone programming is done through a series of menus. There are two
different levels of menu, General and Administration. The General Menu is used when programming
basic information for a specific extension. The Administration menu is used to program network and
account information parameters.
1. Call Log
2. Speed Dial
3. Ring Type
4. Volume
5. Time Zone
6. Info (Reference only)
7. Call Forward
8. DND
9. Call Waiting
10. Auto Answer
11. Tone Type
12. Ping
13. Phonebook
14. Hotline
15. Call Blocking
16. Admin (Admin Menu Access)
17. Reset to Default
18. Reboot
Select 16 to access the Admin Menu
Enter the Admin Password <1234>
1. Account
2. Network
3. QOS
4. Dial Timeout
5. Language
6. NAT
7. SIP
XBLUE Networks
61
Page 62

Telephone Programming
Before you begin connecting a remote telephone, you will need to know:
• The Local Network IP Address (es), Subnet Mask and Default Gateway
• The Target Network’s Static IP Address
• Your Local Telephone Extension Number
• The Authorization Password
This information is easily found by going to a computer on your local network and
clicking on “Start” --> “Run” --> type <CMD> and press enter. This will open a DOS
Window.
Type <ipconfig> and press enter
This will give you all of the information that you need about your Local Area
Network.
GettingStarted
Your telephone will automatically come on line and be operational when connecting X2020 telephones to a Local
Area Network behind the X-25 Gateway. You will have to do some programming if you are connecting remotely
through a WAN port or if you want to customize your settings.
Remote Phone
When connecting a phone remotely to the X-25 Gateway you will need some basic networking parameters.
Getting Started
5
At default, the X2020 telephone is set to DHCP, so you may not need to know your Local Area Network IP
Addresses, but it is a good idea to make a note of this information.
Begin by pressing the button under the word “Menu” in the display.
Press the down navigation key until you see “16. Admin”
Press the center navigation key
You will be prompted for the password <1234>
Press the center navigation key
Press the down naviagation key to locate “7. Sip”
Press the center navigation key
Select 1. SIP Server
Press the center navigation key
The next 4 entries (SIP Proxy, Outbound Proxy, Registrar Server, and Registrar Outbound, will use the same
information, which can be an IP Address such as 71.153.203.244 or a URL address, such as
your”companyphones.com” or even a Dynamic DNS address such as yourcompnay.dyndns.org.
62
XBLUE Networks
Page 63

Once completed Press the left navigation button
Select “2. Phone Number”
Enter your extension telephone number
Press the center navigation key
Press the down navigation key and select “3. Display Name”
Enter the name to be displayed when you are ringing another extension
Press the center navigation key
Press the down navigation key “4. Authentication”
Press the center navigation key
Press the center navigation key to select “Authorized ID”
Enter the Extension’s ID - this could be a number or a name
Press the center navigation key
Press the down navigation key to select “Authorized Password”
Press the center navigation key
Enter the Extension’s Password - this could be a number or a name or a string of numbers and letters
Press your left navigation key until it asks if you want to exit Administration.
Select “Yes” to exit Admin
At this time you will have to reboot the telephone.
Telephone Programming
Getting Started
When the phone reboots, it will connect to the X-25 and will be operational. This programming can be done at the
office, so that when the phone is plugged it at the remote location, it will come on line automatically.
5
XBLUE Networks
63
Page 64

Telephone Programming
Clue:
For proper operation, this feature requires that the X-25
Gateway has the home and local area code programming
correct.
MenuProgramming
Press the softkey under the word “Menu” to get into menu programming. There are two levels of programming,
the standard menu, which does not require a password and Admin, option “16. Admin” which requires a password.
Press Menu to begin:
1.CallLog
There are three types of call log, Dialed Calls, Missed Call, and Received Calls.
Deleting a Call Log
While reviewing any one of these call logs - You may delete a single entry by highlighting the entry and pressing
the “DEL” softkey or to delete all entries press the “DelAll” softkey.
1. Call Log
1. Dialed Calls
Similar to Redial, each telephone stores up to 30 dialed telephone numbers. These numbers can be used to redial
a previously dialed telephone number. Scroll through the numbers and press the center navigation key to dial the
desired telephone number.
5
2. Missed Calls
Each telephone will store up to 30 missed calls to the extension. These are calls that rang at your extension but
were not forwarded or answered. Scroll through the numbers, and press the center navigation key to dial the
desired telephone number.
3. Received Calls
Each telephone can store up to 30 received calls to the extension. These are calls that were answered at your
extension. Scroll through the numbers, and press the center navigation key to dial the desired telephone number.
64
XBLUE Networks
Page 65

Telephone Programming
2.SpeedDialing
The telephone can store up to ten (0~9) speed dial numbers, which are accessed through this menu or by pressing
the down navigation key from an idle telephone. Press the softkey under “Dial” to dial the entered number or press
the softkey under “Edit” to enter or modify the existing entry.
3.RingType
The telephone has 11 different ring tones, the default is zero (0) and 10 additional ring tones, which can be used to
differentiate your extension’s ringing from others in the same area. Once in the entry screen, enter 0~9 or press
backspace and enter 10. Press the center navigation key. Call your extension fr om another extension, to determine the
ringing that you would like to use.
4.Vol u m e
The volume on the telephone can “on the fly” be increased or dec r eased using the Volume button in the center of the
telephone. You can also mak e the changes “more permanent” by adjusting them in the menu set tings. There ar e f our
(4) different volumes that can be set; Ring Volume, Handset Speaker, Handsfree Speaker, Headset speaker.
1. Ring Volume
2. Speed Dialing
This is the volume that is used when your phone is receiving a Telephone Line or Intercom call. Select between zero
(0) bars for no ringing volume and nine (9) bars for loud ringing volume. Use the Arrow up to increase and the arrow
down to decrease the ringing volume. Press the center navigation key to save the entry.
2. Handset Speaker
This is the volume that you will hear while off hook on your handset. Select between zero (0) bars for no volume and
nine (9) bars for loud volume. Use the Arrow up to increase and the arrow down to decrease the volume. Press the
center navigation key to save the entry.
3. Handsfree Speaker
This is the handsfree (speakerphone) volume that you will hear while using the speakerphone. Select between zero
(0) bars for no volume and nine (9) bars for loud volume. Use the Arrow up to increase and the arrow down to
decrease the volume. Press the center navigation key to save the entry.
4. Headset Speaker
This is the headset volume that you will hear while on your headset. Your headset also may have a volume
adjustment. Select between zero (0) bars for no volume and nine (9) bars for loud volume. Use the Arrow up to
increase and the arrow down to decrease the volume. Press the center navigation key to save the entry.
5
XBLUE Networks
65
Page 66

Telephone Programming
5.TimeZone
Select Time zone to adjust the time in your display . You will select the “GMT offset”, which is the time in Greenwich
England, plus or minus your distance away. The Eastern Time Zone of the United States, for example, is “GMT 05:00”, Central time is “GMT -06:00”, etc.
6.Info
There are eight (reference only) parameters that are visible, but not changeable in the Info menu.
5. Time Zone
• Model Name - X-2020
• Firmware Number - V0.x.x.x.x
• MAC Address - 00-19-15-xx-xx-xx
• Network Type - DHCP/Static IP
• IP Address - 192.168.10.x
• Subnet Mask - 255.255.255.0
• Default Gateway - 192.168.10.1
• DSN Server - 192.168.10.1
5
7.CallForward
At default, each telephone is automatically forwarded to voicemail. Any transferred calls to your extension will
automatically forward the tr ansferred call to voicemail. Howev er, calls can also be forwarded to another destination
such as another extension or even externally to a cellular or home telephone.
There are four (4) different types of forwarding; Always, Busy , No Answer and Do Not Disturb (DND). Each of these
forwarding types can be set to use “ICM” Intercom, “Outside” Telephone Line Calls, or “Both” Internal and External
calls.
1. Always Forward
This type of call forwarding will immediately forward any call that is transferred to your extension. Calls that
forward can be set to forward only Intercom calls, only Outside Line calls or both types of calls.
2. Busy Forward
This type of call forwarding will only forward a call if your extension is busy. Calls that forward can be set to
forward only Intercom calls, only Outside Line calls or both types of calls.
3. No Answer
This type of call forwarding will only forward calls when, the call forward timer expires, and the transferred call
goes unanswered. Calls that forward can be set to forward only Intercom calls, only Outside Line calls or both
types of calls.
4. DND Call Forward
This type of call forwarding will only forward calls when the extension is in Do Not Disturb (DND). Calls that
forward can be set to forward only Intercom calls, only Outside Line calls or both types of calls.
66
XBLUE Networks
Page 67

Telephone Programming
Caution:
Enabling this feature will result in all calls into the system to
be automatically be answered by any telephone with Auto
Answer enabled.
8.DoNotDisturb(DND)
Select “Yes” to place your telephone into Do Not Disturb. If DND Forward is not enabled calls will not be able to be
transferred to your extension.
9.CallWaiting
Select “On” to enable Call Waiting, and “Off” to disable Call Waiting. If Call Waiting is disabled and your extension is
not Busy Call Forwarded your extension will not accept transferred calls.
10.AutoAnswer
Select “On” to enable auto answer and “Off” to disable Auto Answer. If Auto Answer is enabled all calls, intercom and
telephone line will be automatically answered.
8. Do Not Disturb (DND)
11.ToneType
Unless the telephone is installed in a different country, the Tone Type should be set to USA.
12.Ping
Ping is a troubleshooting tool that is used to locate other devices on a network. Enter the IP Address to ping and then
press the center navigation (Check) key . “Ping Success” is seen when the location is successfully pinged, “Ping F ailure”
will be seen if the location is unsuccessfully pinged.
13.Phonebook
The phonebook holds up to 200 telephone numbers that can be sorted by Item (in the order that the numbers are
entered), Name (Alphabetical by the first name entered), Group (None, Family, Friends, Colleague, or VIP.
14.Hotline
Hotline, sometimes call ed a “Ringdown”, is used to force the telephone to do the same thing each time the user goes
off hook by lifting the handset or pressing the speaker button. For example, each time a telephone located in a lobby
goes off hook it dials the operator. It can also be programming to automatically access a telephone line or call an
external telephone number. Just enter the Hotline Number, from 1 to 15 digits. In addition, the phone can be
programmed to wait from zero - no waiting to eight seconds prior to taking the programmed action.
5
XBLUE Networks
67
Page 68

Telephone Programming
15.CallBlocking
Call Blocking uses Incoming Caller ID (may require a subscription) to stop specific telephone numbers from ringing
an extension. If only a number matches a Call Blocking Entry, and that extension is the only telephone
programmed to ring, the line will flash but not ring and the caller will not follow ing call forwarding. Calls to a Direct
Inward Dial (DID) telephone number are not blocked even if the incoming Caller ID matches one of the Call
Blocking entries.
16.Admin
See Admin
5
15. Call Blocking
17.ResettoDefault
Select “Reset to Default” to reset the telephone’s programmed parameters back to factory default. This includes,
the Phonebook, Call Records, and all Configuration parameters.
18.Reboot
Use the “Reboot” feature to restart the telephone without losing any programming parameters.
68
XBLUE Networks
Page 69

Telephone Programming
Admin
1.Account
There are two levels of programming, “Admin” and “User”, which can be accessed when connecting to the telephone
using an Internet Browser. Use “Admin” - which allows all parameters to be modified, when installing or resetting
network parameters. Use “User” - which is more restrictive, to change individual telephone parameters and call
blocking parameters. Only the “Admin” login has access to these parameters.
1. Admin
1. Name
2. Password
2. User
1. Name
2. Password
2.Network
1. Account
1. Network Type
1. Static IP - Enter the Static IP Address that the telephone will use to connect to the Local Area Network (LAN).
2. DHCP - The default, DHCP is used to automatically receive a dynamic IP Address from the DHCP Server on the LAN.
3. Point to Point Protocol over Ethernet (PPPoE) - Although rarely used, this allows the telephone to authenticate directly with the ISP.
2. Static IP
1. IP Address - Enter the Static IP Address that the telephone will use to connect to the Local Area Network (LAN).
2. Subnet Mask - Enter the Subnet Mask for the LAN. Generally, this is 255.255.255.0.
3. Default Gateway - Enter the IP Address of the default gateway. The default gateway refers to the gateway device that connects the
Local Area Network to the Internet. Basically, it is the doorway to the Internet.
4. Domain Name System (DNS) - The telephone will accept up to three DNS servers, which provides redundancy in the event that one
or more stop functioning.
1. Primary DNS
2. Secondary DNS
3. Third DNS
3. PPPoE
1. Name - Enter the name that is required to authenticate on the ISP’s Network. This will be provided by the ISP.
5
2. Password - Enter the password that is required to authenticate on the ISP’s Network. This will be provided by the ISP.
Notes:
This parameter is rarely used by a telephone endpoint.
XBLUE Networks
69
Page 70

Telephone Programming
4. SNTP - Simple Network Time Protocol
5. VLAN - Virtual Local Area Network
1. VLAN Mode - Select between None or Static. Once the selection is made, the “VLAN Settings” will become visible.
2. VLAN ID - Enter the VLAN ID that all of the devices on this “LAN” will use to authenticat e.
3. VLAN Priority - Enter the VLAN priority that the devices on this “LAN” will use
3. QoS (Quality of Service)
1. DSCP For RTP - Select the Differentiated Services Code Point for the Real-time Transport Protocol. The DSCP is a 6-bit IP
header used to prioritize voice packets.
Use the default “Best Effort” or select between the other 13 settings. Make sure that all devices have the same settings.
4. Dial Timeout
2. DSCP For SIP - Select the Differentiate d Services Code Point for Session Init iated Protocol. The DSCP is a 6-bit IP header used
to prioritize voice packets.
Use the default “Best Effort” or select between the other 13 settings. Make sure that all devices have the same settings.
4.DialTimeout
5
Enter the number of seconds that the phone should pause before processing the entered digits. This timer is used
after all digits are entered and the amount of time the user has between each digit dialed. This timer can be by
passed by pressing the center “Check” button.
5.Language
Select which language the phone should use to interact with the user.
6.NAT‐NetworkAddressTranslation
1. NAT Type
Select the type of NAT between None, STUN, SIP Ping, Port Mapping and UDP Heartbeat to be used.
2. STUN
1. STUN Server IP - Although rarely used, Enter the IP Address of the server that will support STUN
2. STUN Port - Enter the port the STUN IP server uses.
3. SIP PING
Select the amount of time, in milliseconds, that will be used between each PING.
4. Port Mapping
1. External Router IP - Enter the IP Address of the external router
2. Signal Port - Enter the port that will be used. The Default is 5060.
3. RTP Port Base - Enter the port that will be used as a RTP port base. The default is 10002.
70
XBLUE Networks
Page 71

7.SIP
1. SIP Server
1. SIP Proxy - Enter the IP address of the SIP Server. Mostly likely this will be the X-25 Gateway.
Telephone Programming
2. SIP Outbound Proxy - Enter the IP Address of the Outbound Server. Mostly likely this will be the
3. Registrar Server - Enter the IP Address of the Registrar Server. Mostly likely this will be the
4. Registrar Outbound - Enter the IP Address of the Registrar Outbound Server. Mostly likely this will be the
5. Port
1. Server Port - Enter the server port that will be used. The default is set to 5070.
2. Registrar Port - Enter the registrar port that will be used.The default is set to 5070.
X-25 Gateway.
X-25 Gateway.
X-25 Gateway.
2. Phone Number
Enter the extension’s telephone number. This number must fall within the extension range as defined in the
“Numbering Plan”.
3. Display Name
Enter the name that will be displayed when calling another extension.
4.Authentication
1. Authorized ID
Enter the number that will be used to authenticate the telephone extension. This number must fall within the
extension range as defined in the “Numbering Plan”.
7. SIP
5
2. Authorized Password
Enter the password that is used to authenticate the telephone to the X-25 Gateway.
5.DTMF
Dual-tone Multi-frequency - also known as Touch Tone® - Select the way that tones will be process in the X-25. There
are three options; Tone (In Band), RFC2833 and SIP Info. The default RFC2833 should not be changed without
speaking to a technical support representative. Changing this parameter may cause erratic operation.
6.Codec
A codec is an agreed upon protocol that is used between two or more devices. The Codec’s job is to “Code” a signal
and send it over the network to another device which, using the same prot ocol, will “Decode ” the signal. The protoc ol
used is not as important as making sure that both devices are using the same protocol.
1. G.711 µ-law - Pronounced “Mu-Law” (like new with an M) and generally written µ-law is the algorithm used by telephone communications products in the United States. This algorithm allows us to send communications signals down long expanses of wires with
very little distortion.Enter the IP address of the SIP Server. Mostly likely this will be the X-25 Gateway.
XBLUE Networks
71
Page 72

Telephone Programming
2. Codec G7.11 a-law
The a-law algorithm is used in many European telecommunications products. This algorithm also allows communication signals to
be send down long expanses wires with very little distortion but a-law does not have as many different frequency ranges that µlaw, so the signal decreases faster over a shorter distance.
3. Codec G.726-xx
• G.726 is an Adaptive Differential Pulse-code Modulation (ADPCM) protocol that reduces the amount of bandwidth needed by
over 50 percent, with minimal loss of voice quality. This protocol can be used with both µ-law and a-law devices.
• There are four G.726 protocol or compression rates; G.726-40, G.726-32, G.726-24 and G.726-16. The lower the number, (40,
32, 24, 16) the higher the compression. Thus, the lower the bandwidth requirements. Therefore, G.726-16 has the most compression and G.726-40 has the least.
7.PacketTime
5
7. Packet Time
There are two ways to determine when information will be sent between devices. Packet Time and Payload. Packet
time is based on a specific time between transmissions, whereas payload depends on the amount of information,
and not the time.
G.711 µ-law
Select the amount of time, in milliseconds, between data transmissions from 10 and 80.
G.711 a-Law
Select the amount of time, in milliseconds, between data transmissions from 10 to 80.
8.Payload
There are two ways to determine when information will be sent between devices. Packet Time and Payload. Packet
time is based on a specific time between transmissions, whereas payload depends on the amount of information,
and not the time.
Select the size of the payload that will be used when transmit ting data between devices on the network. There are
five different protocols that can be used, the default “DTMF Payload” which requires the most amount of
bandwidth, and G.726-xx (xx=40, 32, 24 and 16). The lower the “xx” number, the higher the compression, the less
bandwidth required.
72
XBLUE Networks
Page 73

6Web Programming
ProgrammingwithanInternetBrowser
The X2020 telephone can be programmed using the telephone or using an Internet Browser such as
Windows Internet Explorer. Once connected to a Local Area Network (LAN) a computer can access the
telephone’s Web page by entering its IP Address.
Enter the IP address of the telephone into the
The Password page will appear.
User Nam e P assw o rd
Admin 1234
User 1111
Once you log into the telephone, you will hav e either seve n programming tabs, or if you hav e a Sidecar,
you will have an eighth tab that shows “EDM”, which is how you program the Sidecar’s buttons.
After you log in, you will start on the Information Page.
XBLUE Networks
73
Page 74

Web Programming
InformationPage
Information Reference Page
Information Page
6
Network Information
• Network Type - Default is set to DHCP
• Current IP - Shows the current IP address of the telephone
• Subnet Mask - Shows the current subnet mask of the telephone
• Default Gateway - Shows the IP address of the Default Gateway
• Primary DNS - Shows the Primary DNS address to be used for address resolution
• Secondary DNS - Shows the Secondary DNS address to be used for address resolution
Product Information
• Product Name - Shows the production name of the telephone
• Software Version - Shows the software version of the telephone
• MAC Address - Shows the MAC address of the telephone
Line 1 Status
• Phone Number - The extension number of the telephone
• Registr ation State - This will show “Registered” when the phone is connected to the X-25 system, and
“Unregistered” when it is not connected successfully.
• SIP Prox y Server - Shows the regist ered SIP proxy addr ess number (The LAN or W AN port of the X-25
system.)
74
XBLUE Networks
Page 75

NetworkPage
• Enter the specific IP Address to be used f or this telephone , f ollowed b y the
Subnet Mask, Default Gateway, and primary, secondary, and third DSN for
the network.
The network page is used to manually enter the telephone’s network addresses
Web Programming
Network
Static IP
• Network Type - There are three network types DHCP, Static and PPPoE.
• DHCP - When set to DHCP, the X-25 system will automatically assign the telephone’s IP Address (as
seen above)
• Static - When set to Static, you will have to enter the IP Address manually.
Network Page
6
XBLUE Networks
75
Page 76

Web Programming
QoS Settings
Use this parameter to match the QoS protoc ol that is set on the network. If QoS is not set, both parameters should
remain as “Best Effort”.
Network Page
• PPPoE - This is most commonly used with hosted IP applications.
• Time Server - If desired, you may ent er a different time server, which is used to synchronize the time on
your telephone +
GMT
6
• DSCP for RTP - Match the route set in the X-25 system
• DSCP for SIP - Match the route set in the X-25 system
VLAN Items
Virtual Local Area Network (Virtual LAN) allows devices to be configured through software, regardless of location,
and have them “appear” as though they are on the same network switch.
76
XBLUE Networks
Page 77

Phone
Web Programming
Phone
6
XBLUE Networks
77
Page 78

Web Programming
Be careful when enabling this feature because all internal and
external calls will be automatically answered by your telephone.
Volume Control
There are 7 different volume levels that can be customized, on the fly, by the user. Each parameter has 10 different volume levels to choose from.
Phone
• Handset Mic: - Select the proper volume, between 1 and 10. One (1) being the lowest and ten (10)
being the highest volume. The Handset Mic is set to 5 at default.
• Handset Speaker: - Select the pr oper v olume, bet ween 0 and 9. Zero (0) being the lowest and nine (9)
being the highest volume. The Handset Speaker is set to 4 at default.
• Ring Volume: - Select the proper volume, between 0 and 9. Zero (0) being the lowest and nine (9)
being the highest volume. The Ring Volume is set to 4 at default.
• Handsfree Mic: - Select the proper volume, between 1 and 10. One (1) being the lowest and ten (10)
being the highest volume. The Handsfree Mic is set to 5 at default.
• Handsfree Speaker: - Select the proper volume, between 0 and 0. Zero (0) being the lowest and nine
(9) being the highest volume. The Handsfree Speaker is set to 4 at default.
• Headset Mic: - Select the proper volume, between 1 and 10. One (1) being the lowest and ten (10)
being the highest volume. The Headset Mic is set to 5 at default.
• Headset Speaker: - Select the proper volume, betwee n 0 and 9. Zero (0) being the lowest and nine (9)
being the highest volume. The Headset Speaker is set to 4 at default.
6
Tone/Ring Selection
• Select the Country where the telephone will be installed. The default settings is “United States”.
• Personalize the ring tone by selecting one of eleven (11) different ring tones. Select between zero (0),
the default, and ten (10).
Voice Parameters
• Enable Echo Canceller: - Check to enable “Echo Cancellation” which will eliminate unwanted echo.
• Enable Silence Suppression: - Check to enable “Silence Suppression” which will eliminate the transmis-
sion of the normal “Comfort Noise”. Once enabled the phone will not transmit any noise, giving the
impression that the line has gone dead.
• Enable VAD+CNG: - Check to enable “Voice Activity Detection (VAD)” and “Comfort Noise Generation
(CNG)”.
Phone Features
• Enable Auto Answer: Check to enable “Auto Answer”, which will automatically answer any (Inter com or
Telephone Line) calls that are programmed to ring at your extension.
78
• Enabled DND: - Check this parameter to place the telephone into Do Not Disturb. If the “DND Forward-
ing” is enabled, calls to your telephone will be sent directly to voice mail. If not, the call will not
transfer.
• Enable CLIP: - Check this parameter to enable “Calling Line Identity Presence (CLIP)”. When enabled
the Caller ID of incoming calls will show on your telephones LCD Display.
XBLUE Networks
Page 79

Web Programming
This timer also represents the amount of time that you can
pause between dialing digits in a telephone number.
Therefore, if this timer is set too short a call may begin
dialing if you pause or if you are looking up a number.
This parameter is used to make your telephone automatically
dial a number, feature or parameter, whenever the handset is
lifted or the speaker button is press. This may be used to
automatically access an outside telephone line, rather than
intercom.
• Enable Call Waiting: - Check to enable “Call Waiting”, which allows your telephone to receive a second
telephone call, when you are busy on a call.
• Enable Call Waiting Tone: - Check this parameter to enable the “Call Waiting Tone”, which is heard when
call waiting is enabled and a second call is programmed to ring on your extension.
• Enable Hold Reminder: - Check this parameter to enable “Hold Reminder” which will remind you, with a
single tone burst, each time the Hold Reminder Time Expires.
• Hold Reminder Time (sec): - Select how often, in seco nds from zero (0) never to sixty (60) seconds, which
is how often the hold reminder tone should play.
• Dial Timeout (sec): - This timer, in seconds, is the amount of time that passes after you dial a digit and the
call is placed.
• Enable Block Anonymous Call: - Check this parameter to block calls that hav e a Ca ller ID that shows “Anon-
ymous.
• LCD Backlit Time: - Check this parameter to limit the amount of time that a backlit display will be active.
• Hotline Delay Time: Enter the amount of time that will pass after you pick up the handset or press the
speaker button, before dialing the “Hotline Number”.
• Hotline Number: - Enter the number that should be dialed when the Hotline Delay Timer expires.
Phone
6
XBLUE Networks
79
Page 80

Web Programming
Phone
6
Forwarding Settings
It is possible to forward your calls to a different location such as a voice mailbox when you are unavailable, busy or
in Do not Disturb. With SIP Trunks you can even use “Call Forking” which allows you to ring your extension and up
to two different telephone numbers, such as cell phones. In addition, you can select which types of calls, Interc om
(internal), Outside (telephone line) or both, will following the forwar ding for each of these forw arding conditions. It
is possible to use more than one forwarding type. When a call matches a forwarding condition, the call will be
forwarded. If not, the system will review the next forwarding condition. If no forwarding condition matches, the
call will not forward.
Click on the check Box to enable the type of call forwarding that you would like to use.
Always Call Forwarding:
This feature forwards call calls, based on the forward type, without ringing your telephone or giving you a chance
to answer the call. In addition, there is no indication that a call is “ringing” your extension.
• Always Call Forwarding Type: - Select which type of calls to your extension should be forwarded, ICM
(Internal), Outside (telephone line calls), or Both. When a call rings your extension and matches this
entry , the call will be forwarded to the entered destination. Otherwise, it will check the next forwarding
condition. If no match is found, the call will not forward.
• Always Forward Destination: - Enter the forw ard destination. This can be another ext ension, vo icemail,
or an external telephone number such as a cell phone. Direc t Inward Dial numbers (Requires SIP
Trunks) will follow the “Outside” forwarding Condition.
Busy Call Forward:
This feature will forward calls when you are busy on your telephone and overrides the “Call Waiting” feature.
• Busy Call Forward Type: - Select which type of calls to your extension should be forwarded, ICM (Inter-
nal), Outside (telephone line calls), or Both. When a call rings your extension and matches this entry,
the call will be forwarded to the entered destination. Otherwise, it will check the next forwarding condition. If no match is found, the call will not forward.
• Busy F orward Destination: - Enter the forward destination. This can be another extension, voic email, or
an external telephone number such as a cell phone. Direct Inward Dial numbers (requires SIP Trunks)
will follow the “Outside” forwarding Condition.
No Answer Call Forward:
This feature will only forward unanswered calls. At default, this feature is enabled, with a forwarding type set to
“Both” internal and external calls.
• No Answer Call Forward Type: - Select which type of calls to your extension should be forwarded, ICM
(Internal), Outside (telephone line calls), or Both. When a call rings your extension and matches this
entry , the call will be forwarded to the entered destination. Otherwise, it will check the next forwarding
condition. If no match is found, the call will not forward.
• No Answer Call Forward Destination: - Enter the forward destination. This can be another extension,
voicemail, or an external telephone number such as a cell phone. Direct I nward Dial numbers (R equires
SIP Trunks) will follow the “Outside” forwarding Condition.
• No Answer Time (sec): - This is the amount of time that a call will ring at your extension before it is
considered a “No Answer” call. At the expiration of this timer, the call will be forwarded to the entered
destination.
80
XBLUE Networks
Page 81

Web Programming
It is a good idea to enable DND forwarding when using
the DND Feature.
Call Forking requires one or more SIP Trunks.
DND Call Forwarding:
Do Not Disturb is a “Real Time” setting that stops calls from ringing at your extension. When DND is enabled, calls will
be sent directly to the entered DND destination. If an extension has DND enabled and DND Call forward is disabled,
any call transferred to your extension will immediately ring back to the transferring extension. In addition, a Direct
Inward Dial (DID) call (requires a SIP Trunk) that is assigned to your extension rings while you are in DND, and DND
call forward is disabled, the call will ring until it is disconnected.
• DND Call Forwarding Type: - Select which type of calls to your extension should be forwarded, ICM (Inter-
nal), Outside (telephone line calls), or Both. When a call rings your extension and matches this entry, the
call will be forwarded to the entered destination. Otherwise, it will check the next forwarding condition. If
no match is found, the call will not forward.
• DND Forward Destination: - Enter the forward destination. This can be another extension, voicemail, or an
external telephone number such as a cell phone. Direct Inward Dial numbers (Requires SIP Trunks) will
follow the “Outside” forwarding Condition.
Forking Call Forwarding:
Phone
Call Forking, which requires a SIP Trunk, will allow you to ring your telephone extension and one additional telephone
simultaneously . You can enter two different numbers. Your extension and the first entered telephone number will ring.
If the call goes unanswered the second entered telephone number will ring.
Note:
If the No Answer Destination is set to Both or External the call will forward when the No Answer Timer expires.
• Forking Call Forwarding Type: - Select which type of calls to your extension should be forwarded, ICM
(Internal), Outside (telephone line calls), or Both. When a call rings your extension and matches this entry,
the call will be forwarded to the entered destination. Otherwise, it will check the next f orwarding condition.
If no match is found, the call will not forward.
• Forking Forward Destination: - Enter the forward destination. This can be another extension, voicemail, or
an external telephone number such as a cell phone. Di rect In ward Dial numbers (R equir es SIP Trunks) will
follow the “Outside” forwarding Condition.
• Forking Secondary Forward Destination: - Enter the forward destination. This can be another extension,
voicemail, or an external telephone number such as a cell phone. Direct Inward Dial numbers (Requires
SIP Trunks) will follow the “Outside” forwarding Condition.
** This feature will only work with one or more SIP Trunks.
6
XBLUE Networks
81
Page 82

Web Programming
Phone
6
Alarm Clock Settings
• Alarm Play Time (Min): - This is the amount of time that an alarm will play once the alarm time has
been reached.
• Alarm Sleep Time (Min): - This is the “Snooze” time; the amount of time that will pass when the user
presses the sleep soft button, in the display.
• Alarm Repeat Times: - Select the number of times that the alarm should repeat.
• Alarm Tone Type: - Select the alarm tone that will be heard when the alarm is activated
• Enable Alarm 1: - Click on the check box to enable the alarm.
• Start Time Alarm 1: - Enter the alarm start time, in HH:MM, in 24 hour format. Enter the hour 00-23
and minutes 00-59. The time 4:00 pm, will be entered as 16:00, 5:00pm will be entered as 17:00.
• Play Type Alarm 1: - Select “Once” to play the alarm once, or “always” to play the alarm every time the
time matches the “Alarm Start Time”.
• Prompt Alarm 1:
• Enable Alarm 2: - Click on the check box to enable the alarm.
• Start Time Alarm 2: - Enter the alarm start time, in HH:MM, in 24 hour format. Enter the hour 00-23
and minutes 00-59. The time 4:00 pm, will be entered as 16:00, 5:00pm will be entered as 17:00.
• Play Type Alarm 2: - Select “Once” to play the alarm once, or “always” to play the alarm every time the
time matches the “Alarm Start Time”.
• Prompt Alarm 2:
• Enable Alarm 3: - Click on the check box to enable the alarm.
• Start Time Alarm 3: - Enter the alarm start time, in HH:MM, in 24 hour format. Enter the hour 00-23
and minutes 00-59. The time 4:00 pm, will be entered as 16:00, 5:00pm will be entered as 17:00.
• Play Type Alarm 3: - Select “Once” to play the alarm once, or “always” to play the alarm every time the
time matches the “Alarm Start Time”.
• Prompt Alarm 3:
82
XBLUE Networks
Page 83

Web Programming
Speed Dialing Settings
Your telephone has ten (10) personal speed bins, for commonly dialed numbers, each that can hold 31 digits. To
access the numbers, go off hook, or press the speaker button and then press the soft button under the word “SPD”
from an idle telephone press the down navigation button.
Select the Speed Dialing Entry 0 - 9.
Line Keys
Each X2020 telephone has four (4) line keys, each that can be programmed as None, giving the key no action,
Extension Number, Trunk Number, Park Number, Feature Code, Do Not Disturb, Voice Recording, Virtual Mailbox, or
Others.
At default, each button is programmed with one of the first four (4) PSTN lines. This can easily be changed using the
Drop Down Menu, where you can select the feature will be programmed on the button.
Phone
Default codes are shown, but your may vary depending on the systems numbering plan
Feature Default Codes
Extension Number 101 ~ 125
Trunk Number PSTN 701 ~ 705
SIP 711 ~ 717
Park Number 731 ~ 734
Feature Code See Feature Codes on page 35
Do Not Disturb *4
Voice Recording No Code Needed
Virtual Mailbox 830 ~ 849
Others Number sequences su ch as, UCD Group 430 ~ 433, Paging 400 ~ 403, Pickup
group 440 ~ 443, Speed Bin 600 ~ 699, any extension number of other
X2020 telephones within a voice network, a telephone number, such as a
home or cellular telephone number.
6
XBLUE Networks
83
Page 84

Web Programming
Voicemail Distribution
Each telephone can be assigned a voice mailbox with the ability to send a single message to several mailboxes at
the same time using a distribution list. Each distribution list may contain up to 10 (LAN or WAN) members.
Using a Distribution list:
Phone
Sending a new message:
• Log into your voice mailbox
• Press 6 to send a message
• Enter the distribution list number 1, 2, 3 or 4 - an entry of zero will send the message to all mailboxes
• Record the message and then press # to send the message
Forwarding a voicemail message:
• Log into your voice mailbox
• Press 1 to listen to your new/saved voicemail messages
• After listening to the message
• Press 6 to copy the message
• Enter the distribution list number 1, 2, 3 or 4 - an entry of zero will send the message to all mailboxes
• Press # to send the message
6
84
XBLUE Networks
Page 85

SoftwareUpgrade
To ensure that your X2020 telephone has the newest
software go to www.xbluenetworks.com/x-2020software
Backup your configuration
Web Programming
Software Upgrade
HTTP Upgrade
Occasionally it is a good idea to update the software on your telephone. However, before doing any upgrade it is a
good idea to create a backup.
• To download a new software upgrade file, go to www.xbluenetworks.com/x-2020software double-click, and
save the file in a location that you can easily find.
• Before you do the upgrade, remember to create a backup. This will ensure that you do not lose your con-
figuration, Private and Public Phone Book entries.
To begin the backup click the “SW Upgr ade” tab and then locate the “Configur ation File” Backup Button and click on it.
Save the file in a location that is easy for you to find.
Backing up your configuration
6
XBLUE Networks
85
Page 86

Web Programming
Software File Browse Button
Software Upgrade
6
• Press Save
• Select a location that is easy to find and save the file.
Installing the upgrade:
• On the same page, click on the “Software File” Browse button
86
• Locate the update file that you downloaded earlier
• Double click on the file that you downloaded.
• Then press the “Update Button”
XBLUE Networks
Page 87

• Click on Update
Press the Update Button
Web Programming
• Click on “OK” to begin the update process
• After the upgrade the phone will automatically reboot
• When the phone comes up, everything should be operational.
• However, if everything does not look correct, then you will want to update the configuration file using the
backup that you did in the first section.
Software Upgrade
6
XBLUE Networks
87
Page 88

Web Programming
TFTP/FTP Upgrade
Software Upgrade
• Software upgrade Parameters
6
88
XBLUE Networks
Page 89

SIP
Web Programming
SIP
6
XBLUE Networks
89
Page 90

Web Programming
SIP
6
SIP Proxy Server
• Server mode: - The X2020 can be set to two different server types, Normal - used when you are not
connecting to the X-25 system or X-25 when you are connected to a X-25 system.
• SIP Proxy Server - Enter the LAN or WAN IP address of the SIP Proxy Server.
• Outbound Proxy Server: - Enter the LAN or WAN IP address of the SIP Proxy Server.
• Server Port: - Enter the port number that will be used when connecting to the SIP proxy Server. If con-
necting to an X-25 use port 5070.
• SIP Secondary Pr oxy Server: - Enter a dif ferent L AN or W AN IP address, from the Primary SIP Server, to
connect to in the even that the primary SIP Proxy Server is offline.
• SIP Surviving Pr oxy Server: - Enter a diff erent L AN or W AN IP address, from the Primary and Secondary
SIP Server, to connect to in the even that both the primary and Secondary SIP Proxy Server is offline.
SIP Registrar Server
• Registrar Server: - Enter the LAN or WAN IP address of the Registrar Server. The Default, when con-
necting to the LAN is 192.168.10.1
• Registrar Outbound Server: - Enter the LAN or WAN IP address of the Outbound Server. The Default,
when connecting to the LAN is 192.168.10.1
• Registrar Server Port: - Enter the port number that will be used when connecting to the SIP proxy
Server. If connecting to an X-25 use port 5070.
• Registrar Expire Time (sec): - Enter the Expire Time for the Registrar SIP Server
Subscriber Information
• Phone Number: - Enter the extension number (up to four digits) that will be used when calling your
extension.
• Display Name: - Enter the Name (up to thirty characters) that will appear in the display when you are
calling other extensions.
• Authorized ID: - Enter the name or number (up to four characters) that will be used to authenticate
your extension with the SIP Proxy Server.
• Authorized Password: - Enter the password (up to eighteen char acters) that will be used to authenticate
your extension with the SIP Proxy Server.
• End Dial on #: - Check this feature if you would like to end every dial string with the # Key.
• DTMF Type: - There are three settings for DTMF type; RFC2833, which is used in the United States,
Tone (InBand) and SIP-Info, which are used in other locations.
• RFC2833 P ayload: - The payload is the amount of info rmation that one packet will cont ain. Change this
setting may cause erratic operation.
Session Timer
This timer is mostly used with remote or WAN telephones. Each time this timer expires, the remote telephone will
send the X-25 gateway notification that it is still up and operational; this is commonly called a “Keep Alive Signal”.
Generally, telephones installed on the LAN, especially with static IP addresses, will not have to use this timer.
• Enable Session Timer: Click on the Check Box to enable the Session Timer. This timer is usually used
with WAN phones but not LAN phones.
90
XBLUE Networks
Page 91

Web Programming
Caution:
Changing this parameter may cause erratic operation.
Caution:
Changing this parameter may cause erratic operation.
• Session Expires (sec): - The default, 3600 should be fine for most applications, however, with remote tele-
phones connected to a residential router, you may want to set this timer to 20 seconds.
• MIN SE: - (Minimum Session Expiration Time) is the amount of delay before signalling the X-25 gateway
that the Telephone Session Timer has expired. The X-25 gateway will then communicate with the
telephone and establish a new initial invite request. This timer should be set to zero and not be changed.
Optional SIP Header
Some SIP Gateways require different SIP headers. The X2020 telephones are equipped to handle two different
headers, when needed.
• Optional Header1: - Enter the required optional header information.
• Optional Header2: - Enter the required optional header information.
SIP
RTP Parame ters
• RTP Port Base: - Enter the base port to be used for the (Real-time Transport Protocol).
• Enable Statistic: - Click on the Check Box to enable the statistic RTP server.
• Statistic Server: - Enter the statistic server IP Address.
• Statistic Port: - Enter the statistic port that will be used for the RTP server.
Codec Settings
A Codec is a coding and decoding protocol that allows two devices to transmit information between them using an
agreed upon protocol. A commonly used codec is G.711, which has no compression but delivers the best sound
reproduction and it also uses the most bandwidth. The X2020 telephone can, on the fly, change codecs to match the
other device; making it extremely flexible. The X-25 gateway will, in descending order, try to use the codec that is set
to “First” then “Second” then “Third” and so on, until a match is found. Once a match is found the connection is
established.
6
XBLUE Networks
91
Page 92

Web Programming
SIP
6
Once the codec is determined, it is important to know how often to send or what size the payload of information
should be before it is considered the right size to send. G.711 uses a timer, how often should the information be
sent. Therefore, both devices know how often to look for more information but neither device knows how much
information will be contained in the packet. All four G.726 protocols use the packet size rather than the time to
transmit. Therefore, both devices know how much information will be coming, but neither knows when to expect
the packets.
Codec G.711 u-law
• Pronounced “Mu-Law” (like new with an M) and generally written µ-law is the algorithm used by
telephone communications products in the United States. This algorithm allows us to send
communications signals down long expanses of wires with very little distortion.
Codec G7.11 a-law
• The a-la w algorithm is used in many European tele communications products. This algorithm also allows
communication signals to be send down long expanses wires with very little distortion but a-law does
not have as many different frequency ranges that µ-law, so the signal decreases faster over a shorter
distance.
Codec G.726-xx
• G.726 is an Adaptive Differential Pulse-code Modulation (ADPCM) protocol that reduces the amount of
bandwidth needed by over 50 percent, with minimal loss of voice quality. This protocol can be used
with both
• There are four G.726 protocol or compression rates; G.726-40, G.726-32, G.726-24 and G.726-16. The
lower the number, (40, 32, 24, 16) the higher the compression. Thus, the lower the bandwidth requirements. Therefore, G.726-16 has the most compression and G.726-40 has the least.
µ-law and a-law devices.
92
XBLUE Networks
Page 93

Web Programming
NAT Settings
Network Address translation (NAT) is used to route class A or class B IP addresses directly to a device located on a
Local Area Network (LAN) Class C. It is not common to use the NAT Settings feature on the telephone.
• NAT Type: - The X2020 has four different NAT types; STUN, SIP Ping, Port Mapping and UDP Heartbeat.
• STUN - Simple Traversal of User Datagram Protocol - This protocol requires assistance from a 3rd-Party
network server (STUN Server) located on the public side of the NAT.
• SIP Ping -
• Port Mapping - This protocol allows the X2020 to automatically contact and configure a remote router,
which is essentially the same as doing port forwarding in the remote router.
• UDP Heartbeat -
• SIP PING Interval Time (ms): - This is the amount of time, in milliseconds, that it takes to communicate
with the server.
• STUN Server IP: - Enter the IP Address of the STUN IP Server. (This is not a common setup)
• STUN Server Port: - This port must match the port programmed on the STUN Server. (This is not a common
setup)
• Extern Router IP: - Used with Port Mapping - Enter the IP Address of the external router. (This is not a
common setup)
• Extern Signal Port: - Used with P ort Mapping - This port must match the port pr ogrammed on the external
router. (This is not a common setup)
• Extern RTP Port Base: - Enter the RTP Base Port. (This is not a common setup)
SIP
6
XBLUE Networks
93
Page 94

Web Programming
Caller Blocking Settings:
Using a calls’ inbound Caller ID the X2020 telephone allows you to block up to 10 different telephone numbers,
each can contain up to 31 digits. When using Caller Blocking Settings, it is important to use as many digits of the
number to be blocked as possible. This will avoid inadvertently blocking large groups of numbers. For example, if
you only enter “913”, then all calls with the area code 913 (Kansas) will be blocked.
Prefix Entry Settings
This allows each telephone the ability to evaluate any digits dialed before sending them to the system for
processing. When a dialed number matches an “Entry Pattern” the X2020 telephone can be programmed to add
digits to the dialed number or replace the dialed digits with a new set of digits.
Use the drop down menu to select between Disabled, add or Replace
SIP
• Enable Call Block: - Click on the Check Box to enable all 10 of the call Blocking Entries.
• Calle r Blocking Entry x: (x = 0 - 9: - Enter the te lephone numbers that y ou w ant to block. R emember to
use as much of the telephone number as you can.
6
• Prefix Entry x Type: (x = 0 - 9) - Enter the digit or digits that will be evaluated when they are dialed.
This can be helpful with phones that are in public areas. When a number is dialed, the X2020 will
evaluate the number to see if there is a match one of the Prefix Entry Settings. If a match is found it
can add a number, such as a “1” for a long distance number or replace a number to send it to a remote
X-25 system rather than through the PSTN.
• Prefix Entry x Pattern: Enter the numbers to be evaluated before sending the call to the X-25 system
for processing.
• Prefix Entry x Replace: Ente r the digits that will re place the dialed digits when a pat tern match is f ound.
94
XBLUE Networks
Page 95

Web Programming
Caution:
It is not a good idea to use 1xx because it could block long
distance telephone numbers such as 1207... A bet ter entry is
10x|11x.
Dial Plan:
The Dial Plan is used to make calling faster by comparing the dialed number with an entry in the Dial Plan. When a
dialed number matches one of the entries, the call is immediately placed. If no match is found, the call will wait until
the “Dial Timeout” timer has expired. You can always press the “Check Button” to place the call without
waiting.
Dial Plan: - Use the following rules to establish a dial plan.
• An entry of “X” represents all digits from 0~9. For example, and entry of 2xx represents all three digit
numbers that begin with the number 2 - 200~299.
• From [Digit to Digit] - represents all digits from within the entered range. This used to define a specific
range within a entry. For example, an entry of 20[0-9] represents three digits numbers from 200 through
209.
• An [Entered Digit] - represents the specific digit in the location that it is entered. For example, an entry of
20[1234] represents specific numbers 201, 202, 203 and 204.
• The use of the “|” - separates each rule in the dial plan.
TABLE 6.1 Dial P lan En tries
Entry Result
2xx|3xx All three digit numbers between 200 and 399
10x|11x All three digit numbers between 100 and 119
30[6-9] The specific numbers 306, 307, 308 and 309
10[45] The specific numbers 104 and 105
10x|11x|20[0-5|22[0123]|35x This entry will dial 100~109 | 110~119 | 200, 201, 202, 203, 204, 205 | 220,
221, 222, 223 | 350~359
SIP
6
XBLUE Networks
95
Page 96

Web Programming
System
The system programming area is used to assign account names and passwords, specify your time zone, and where
you go to do a warm boot or default the telephone back to factory default.
System
6
Admin Settings
Each telephone has two different accounts - Admin, which gives you access to all of the programming parameters
and User, which limits access to specific pages. For example, a “User” has no access to the software upgrade page,
specific parts of the SIP page, and cannot reassign the Admin or User passwords.
TABLE 6.2 Account U ser P assw ord s
Account Passw ord
admin 1234
user 1111
96
XBLUE Networks
Page 97

• Enable Log Server - Click on the Check Box to enable the telephone log.
• Log Level - Select which of the eight log levels, will be used when collecting information.
TABLE 6.3 Lo g Levels
Level Inf orm ation
Emergency (default) Logs only information that is considered to be a emergency by the telephone,
and most likely caused a total failure.
Alert Logs emergency information and any information that may alert the telephone
of a pending problem.
Critical Logs the above information and any critical information that the telephone is
not responding correctly.
Error Logs the above information and any errors in programming or performance of
the telephone.
Warning Logs the above information and any warning or pending problems
Notice Logs the above information and all notices from SIP and the network.
Informational Logs the above information and any SIP information, including setup, tear down
and network information.
Debug Logs the above information and all interaction between the telephone the net-
work and the gateway.
The use of “Debug” may interfere with the performance of the telephone.
Web Programming
System
6
• System Log Address: - Enter the IP address where the log file will sent while it is active.
• System Log Port: - Enter the port to be used while the log is begin recorded. The default is set to Port 514.
• System Language: - Select the language to be used. Currently, English is the only language supported.
Time Settings:
If you are connected to the Internet and have a time server programming into the “Time Server” parameter on the
“Network” page. You may skip the Auto DST, Daylight Savings Time, Starts on and End on parameters.
• Auto DST: - Click the check box to enable automatic Daylight Savings Time.
• Daylight Savings Time: - Select to add or subtract 1 hour from the current time.
• Starts on: Enter the date that Daylight Savings Time starts.
• Ends on: Enter the date that Daylight Savings Time ends.
• Time format: - Select how you would like to see the time in your display. The default is “USA Time 12
Hours, which shows the date and time in MM/DD/YY HH:MM AM/PM settings.
TABLE 6.4
Setting Disp lay
USA Time 12 Hour (Default) MM/DD/YY HH:MM AM/PM
USA Time 24 Hour MM/DD/YY HH:MM - 1:00=12:00, 2:00=14:00, 3:00=15:00 etc.
European Time 24 Hour DD/MM/YY HH:MM - 1:00=12:00, 2:00=14:00, 3:00=15:00 etc.
European Time 12 Hour DD/MM/YY HH:MM AM/PM
XBLUE Networks
97
Page 98

Web Programming
Reboot Phone
Restore to Default
Diagnostics
System
• Time Zone: - Because each telephone can be installed anywhere in the world, each telephone should
select their own time zone.
• Press the reboot button to re boot your telephone. This should not change an y of y our existing program-
ming.
• Press the “Reset Configuration” button to reset only the telephone’s configuration.
• Press the “Reset Phonebook” button to reset only the phonebook’s entries.
• Press the “Reset All” button to set the telephone back to factory default.
• Download System Log: - Press the download log button to download the current telephone log file. This
information is used when troubleshooting the telephone.
• View SIP Messages: - Press the View SIP Message button to view recent SIP Messages.
6
98
XBLUE Networks
Page 99

Web Programming
Create a backup
Phonebook
Your telephone has both a Private and Public Phonebook. The Private Phonebook is for your personal use, and the
Public Phonebook is synchronize with a CSV file, which can be located in a centralized location. Currently, the
Phonebook feature does not support Microsoft Excel’s CSV files.
Private:
The Private Phonebook is for your personal use. You can enter each number individually or you can use a CSV File to
upload them all at once.
Phonebook
Enter the four parameters and then press the “Add” button, to add new entries.
• User Name: - Enter the user name that will be associated with this entry.
• Phone Number: - Enter the phone number (up to 64) digits.
• Ring Type: - There are eleven different ring tones that can be used to differentiate the entered telephone
number when it calls into the system.
• Select the Group that will be associated with the entered telephone number. Select between Family,
Friends, Colleague, VIP or None.
Once you are done entering your personal Phonebook, click on the “SW Upgrade” tab to create a backup.
Click on the “Backup Button” and save it in a location that is easy to locate when needed.
6
Public
The Public phonebook gets linked to a CSV file in a centralized location, allowing an administr ator to update all phones
connected to the system with a single file. There are several ways to create a CSV file. One way is to use the backup
XBLUE Networks
99
Page 100

Web Programming
created from the personal phonebook. Another way to create the file is using Windows Notepad. Once created
save it with a name such as “Publicphonebook.csv, and place it in a location that you can easily find.
The format of this file is very important:
Name,Number,Ring,Group,
Anne Sweeney,1924020842,0,family,
Alan Booker,769011,0,Friends,
Bob Smith,12122641501,0,Colleague,
Donald Kilroy,18752250474,0,VIP,
Phonebook
6
One the file is ready to be uploaded, click on the “SW Upgrade” tab.
• Locate the “Public Phonebook File:” and click on the Browse... button
• Locate the saved file
• Click on the Update button
• Click on “OK” to complete the upload or “Cancel” to stop the upload.
• Click on the Phonebook tab, and then the Public Page tab. If the file format is correct, the information
will be visible. If the numbers are not visible recheck the file format.
100
XBLUE Networks
 Loading...