


 Loading...
Notices and Compliance............................................................................................... |
7 |
Notices ............................................................................................................................................................... |
7 |
FCC Statement .................................................................................................................................................... |
8 |
Environment ....................................................................................................................................................... |
8 |
CE Declaration of Conformity................................................................................................................................ |
8 |
Copyright and Trademark Notice........................................................................................................................... |
8 |
1 X2020 Introduction.................................................................................................... |
9 |
Package Contents................................................................................................................................................ |
10 |
Button LED Indication.......................................................................................................................................... |
14 |
Back View........................................................................................................................................................... |
16 |
Ethernet and Power Port on the Back of the Telephone .......................................................................................... |
17 |
Phone Adjustments.............................................................................................................................................. |
18 |
2 Installation ............................................................................................................... |
19 |
Sidecar ............................................................................................................................................................... |
20 |
Getting Started.................................................................................................................................................... |
22 |
XBLUE Wireless Universal Adapter ........................................................................................................................ |
25 |
3 Getting to know your way around............................................................................... |
27 |
Placing a call....................................................................................................................................................... |
28 |
Review Call Records............................................................................................................................................. |
32 |
Using your Sidecar............................................................................................................................................... |
33 |
4 Telephone Feature Description Table........................................................................... |
35 |
Agent Log On/Off - UCD Group ............................................................................................................................ |
41 |
Alphanumeric Display .......................................................................................................................................... |
41 |
Automatic Hold ................................................................................................................................................... |
41 |
Busy Callback...................................................................................................................................................... |
42 |
Call Forking......................................................................................................................................................... |
42 |
Call Forward........................................................................................................................................................ |
43 |
Call Hold............................................................................................................................................................. |
46 |
Call Log .............................................................................................................................................................. |
46 |
Call Park ............................................................................................................................................................. |
47 |
Call Pickup .......................................................................................................................................................... |
47 |
Call Waiting......................................................................................................................................................... |
47 |
Call Blocking ....................................................................................................................................................... |
48 |
Conference - 3 Way ............................................................................................................................................. |
48 |
Class of Service - Traveling................................................................................................................................... |
49 |
Distinctive Ringing............................................................................................................................................... |
49 |
Do Not Disturb (DND).......................................................................................................................................... |
50 |
Extension Feature Reset....................................................................................................................................... |
50 |
Feature (Flexible) Button Programming ................................................................................................................. |
51 |
Feature Button Reset ........................................................................................................................................... |
53 |
Hold Reminder .................................................................................................................................................... |
53 |
LCD & Interactive Buttons .................................................................................................................................... |
53 |
Multi-Line Appearance ......................................................................................................................................... |
54 |
Mute .................................................................................................................................................................. |
54 |
1
XBLUE Networks |
3 |

1
On-Hook Dialing .................................................................................................................................................. |
55 |
|
Paging ................................................................................................................................................................ |
55 |
|
Paging Allow/Deny............................................................................................................................................... |
55 |
|
Phonebook.......................................................................................................................................................... |
56 |
|
Phone Lock/Unlock .............................................................................................................................................. |
58 |
|
Plug and Play ...................................................................................................................................................... |
58 |
|
Reminder Tone .................................................................................................................................................... |
58 |
|
Service Mode....................................................................................................................................................... |
59 |
|
Telephone Line Flash............................................................................................................................................ |
59 |
|
Transfer .............................................................................................................................................................. |
60 |
|
Volume Control.................................................................................................................................................... |
60 |
|
Web Management................................................................................................................................................ |
60 |
|
5 Programming with the Telephone................................................................................ |
61 |
|
Getting Started.................................................................................................................................................... |
62 |
|
• Menu Programming.................................................................................................... |
64 |
|
1. |
Call Log........................................................................................................................................................... |
64 |
2. |
Speed Dialing .................................................................................................................................................. |
65 |
3. |
Ring Type........................................................................................................................................................ |
65 |
4. |
Volume ........................................................................................................................................................... |
65 |
5. |
Time Zone....................................................................................................................................................... |
66 |
6. |
Info ................................................................................................................................................................ |
66 |
7. Call Forward .................................................................................................................................................... |
66 |
|
8. |
Do Not Disturb (DND) ...................................................................................................................................... |
67 |
9. |
Call Waiting ..................................................................................................................................................... |
67 |
10. Auto Answer .................................................................................................................................................. |
67 |
|
11. Tone Type ..................................................................................................................................................... |
67 |
|
12. Ping .............................................................................................................................................................. |
67 |
|
13. Phonebook .................................................................................................................................................... |
67 |
|
14. Hotline .......................................................................................................................................................... |
67 |
|
15. Call Blocking .................................................................................................................................................. |
68 |
|
16. Admin ........................................................................................................................................................... |
68 |
|
17. Reset to Default ............................................................................................................................................. |
68 |
|
18. Reboot .......................................................................................................................................................... |
68 |
|
• Admin....................................................................................................................... |
69 |
|
1. |
Account........................................................................................................................................................... |
69 |
2. |
Network .......................................................................................................................................................... |
69 |
4. |
Dial Timeout.................................................................................................................................................... |
70 |
5. |
Language ........................................................................................................................................................ |
70 |
6. |
NAT - Network Address Translation ................................................................................................................... |
70 |
7. SIP ................................................................................................................................................................. |
71 |
|
4. |
Authentication ................................................................................................................................................. |
71 |
5. DTMF.............................................................................................................................................................. |
71 |
|
6. |
Codec ............................................................................................................................................................. |
71 |
7. Packet Time..................................................................................................................................................... |
72 |
|
8. |
Payload ........................................................................................................................................................... |
72 |
4 |
XBLUE Networks |

6 Programming with an Internet Browser....................................................................... |
73 |
Information Page................................................................................................................................................. |
74 |
Network Page ..................................................................................................................................................... |
75 |
Phone................................................................................................................................................................. |
77 |
Software Upgrade................................................................................................................................................ |
85 |
SIP..................................................................................................................................................................... |
89 |
System ............................................................................................................................................................... |
96 |
Phonebook.......................................................................................................................................................... |
99 |
7 Getting to Know your Voice Mailbox............................................................................ |
101 |
Setting up your Voice Mailbox............................................................................................................................... |
102 |
Using your Voice Mailbox ..................................................................................................................................... |
102 |
Remote Message Pickup....................................................................................................................................... |
103 |
1
XBLUE Networks |
5 |

Notes:
1
6 |
XBLUE Networks |

Notices and Compliance
Version |
Sup ersedes |
Descrip tion |
|
|
|
Version 1.0 |
|
Initial Release |
|
|
|
|
|
|
|
|
|
Reproduction, publication, or duplication of this manual, or any part thereof, in any manner, mechanically, electronically, or photographically, is strictly prohibited.
© Copyright XBLUE Networks, LLC. All rights reserved.
Notices
Hearing Aid Compatibility
The X-2020 telephone endpoints are hearing aid compatible, as defined in section 68.316 of Part 68 FCC Rules and Regulations.
UL/CSA Safety Compliance
The X-25 system has met all safety requires, and found to be in compliance with the Underwriters Laboratories (UL) 60950-1.
Documentation Disclosure
The information contained in this document is subject to change without notice and should not be construed as a commitment by XBLUE Networks, LLC. The information contained herein is supplied without representation or warranty of any kind. XBLUE Networks, reserves the right, without notice, to make changes to the equipment, equipment design, and documentation as advances in engineering and manufacturing methods warrant, and assumes no responsibility and shall have no liability of any kind arising from the supply or use of this document or the material contained herein.
Warning: This documented information is designed to assist in the installation of the new XBLUE products. XBLUE networks has done its best to give adequate warnings and cautions to advise both technical and non-technical individuals, but it is very important to use common sense when installing all electrical equipment.
•The use of this system may result in local, long distance, Internet access or data transfer charges, which are the sole responsibility of the user/owner of the equipment.
•Wireless access has been added for convenience, however, XBLUE does not warrant or guarantee, written or implied, that the wireless will work in every location. It is the responsibility of the owner to enable security to stop unwanted access to the network.
2 Notices
XBLUE Networks |
7 |

Statement FCC
FCC Statement
This equipment generates, uses and can radiate radio frequency energy, and if not installed and used properly, that is, in strict accordance with the instruction manual, may cause interference to radio and television reception. This equipment has been tested and found to comply with the limits for a Class B computing device in Subject J of Part 15 of FCC rules, which are designed to provide reasonable protection against such interference when operated.
However, there is not guarantee or warranty, written or implied, that interference will not occur in a particular installation. If this equipment causes or receives interference or fails to operate correctly, due to radio frequency interference (RFI) or electromagnetic interference (EMI), it will be fixed at the owners expense.
Environment
All electronic equipment must be disposed of at an approved electronic recycling center.
CE Declaration of Conformity
This equipment complies with the requirements relating to electromagnetic compatibility, EN55022 class B for ITE and EN 50082-1. This meets the essential protection requirements of the European Council Directive 89/336/EEC on the approximation of the laws of the Member States relating to electromagnetic compatibility.
2
Copyright and Trademark Notice
All right reserved. No part of this publication may be reproduced, transmitted, transcribed, stored in retrieval system, photographically or translated into any language or computer language, in any form or by any means, electronic, mechanical, magnetic, optical, chemical, manual or otherwise, without the prior written permission of XLBUE Networks, LLC.
Windows 98/NT/2000/XP/7™ and Internet Explorer™ are registered trademarks of Microsoft Corporation. All other company, brand and product names, like Netscape Navigator™ are trademarks or registered trademarks of their respective owners.
ISO-9001 |
Part Numbers
Below is a list of component part numbers:
TABLE 2.1 Componet Part Numbers
|
SKU/Part Number |
Description |
|
|
|
|
|
|
47-2501 |
X-25 Telpehone System Gateway |
|
|
|
|
|
|
47-9001 |
X-50 Telephone System Gateway |
|
|
|
|
|
|
47-9002 |
X-2020 SIP Telephone Endpoint |
|
|
|
|
|
|
47-9003 |
24 Button Sidecar, Electronic Dialing Module (EDM) |
|
|
|
|
|
|
47-9004 |
8 Port 10/100 Ethernet Switch |
|
|
|
|
|
|
47-9005 |
XBLUE Neteworks X-50 Universal Wireless Adapter |
|
|
|
|
|
|
47-9006 |
6+ Foot Ethernet Cable |
|
|
|
|
|
|
|
|
|
8 |
XBLUE Networks |
Introduction
1 Introduction
X2020 Introduction
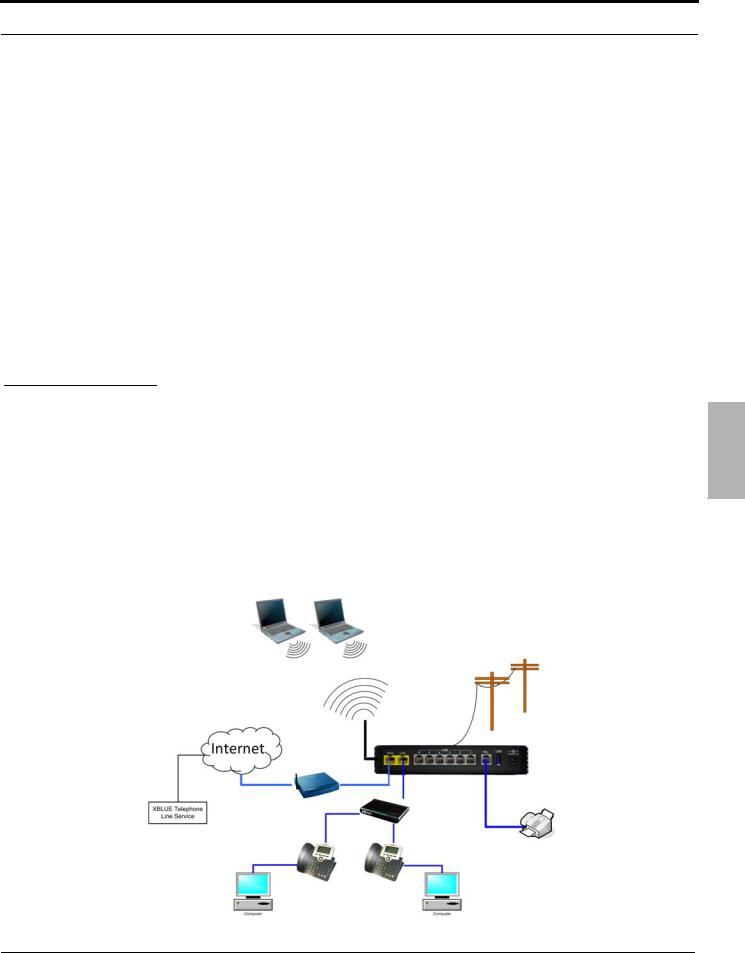
The X2020 is a full featured Session Initiated Protocol (SIP) telephone endpoint, which is fully integrated with the X- 25 system and will work with most standard SIP systems. The X2020 connects to a Local Area Network (LAN) (10/ 100 base-T) and uses Internet Protocol (IP) to process voice calls, which is known as Voice over Internet Protocol (VoIP). SIP, is the most comprehensive protocol used to transport VoIP calls and allows the X-25 system to offer the most used telephone system features over a Local Area Network (LAN).
Because the X2020 telephone works like a network switch your office only needs a single Category 5 or 6 cable to transmit both voice and data. Plug the X2020 into your LAN and a Personal Computer (Desktop or Laptop) into the X2020 telephone end point.
1
XBLUE Networks |
9 |
Introduction
1 Contents Package
Package Contents
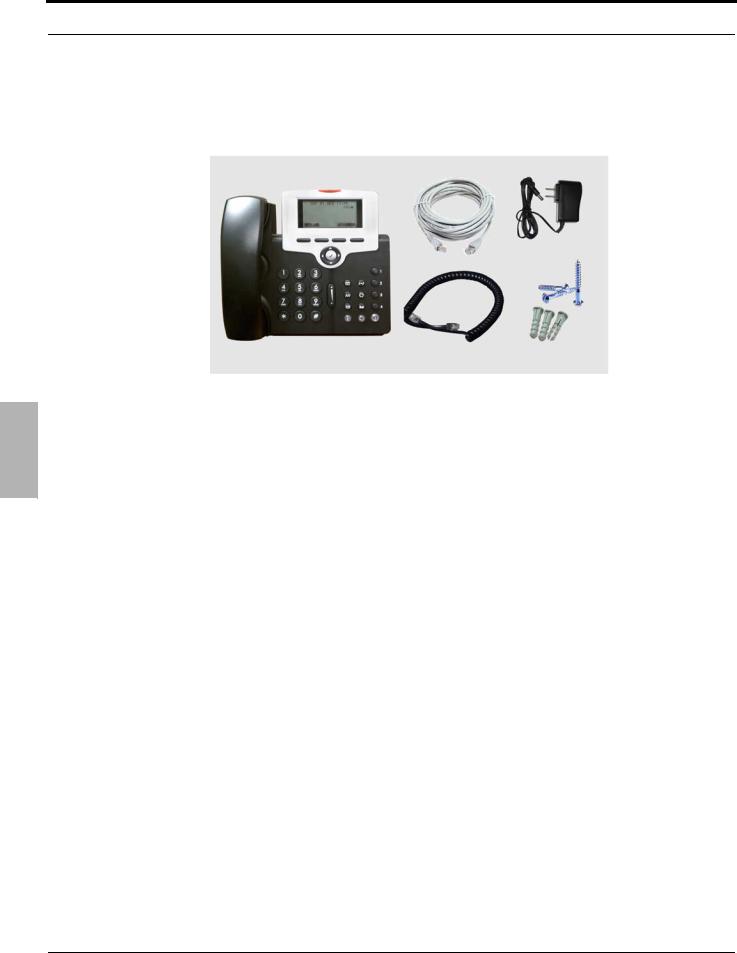
The X2020comes with everything that you need to connect it to an existing Local Area Network (LAN).
•X2020 SIP Telephone
•6 ft Ethernet Patch Cable
•Power Supply
•Coiled Handset Cord
•Wall mount screw kit - See appendix A for Wall Mount Template
10 |
XBLUE Networks |

Introduction
1 Package Contents
XBLUE Networks |
11 |
Introduction
TABLE 1.1
|
|
No. |
PartNam e |
Descrip tion |
|
|
|
|
|
|
|
|
|
|
|
1 |
Handset Top Cradle |
For placement of the Handset |
|
|
|
|
|
|
|
|
|
|
|
2 |
Hook Switch |
For hanging up your handset |
|
|
|
|
|
|
|
|
|
|
|
3 |
Cradle Latch |
Used to Secure the handset to the base unit |
|
|
|
|
|
|
|
|
|
|
|
4 |
Speaker |
Speaker output for handsfree operation |
|
|
|
|
|
|
|
|
|
|
|
5 |
Handset Bottom |
Cradle for the bottom of the handset |
|
|
|
|
|
|
|
|
|
|
|
6 |
Handset Cord Port |
Used to connect the handset to the telephone base |
|
|
|
|
|
|
|
||
|
|
7 |
Headset Wire Port |
Used to connect an ancillary headset to the telephone base |
||
Package |
|
|
|
|
||
8 |
Message LED Light Bar |
Flashes for a new call and when there is a new Voice Mail Message |
||||
|
|
|||||
|
|
|
|
|
||
|
|
9 |
Graphic LCD |
LCD display showing date, time, phone number, Caller ID, line status etc. |
||
|
|
|
|
|
||
Contents |
11 |
EMD (DSS Sidecar) |
Soft keys change as the phone is being used, which will assist you with |
|||
A special module that connects an additional 24 programmable buttons |
||||||
|
|
10 |
Soft Keys |
the most used features |
|
|
|
|
|
|
|||
|
|
|
|
|
|
|
|
|
12 |
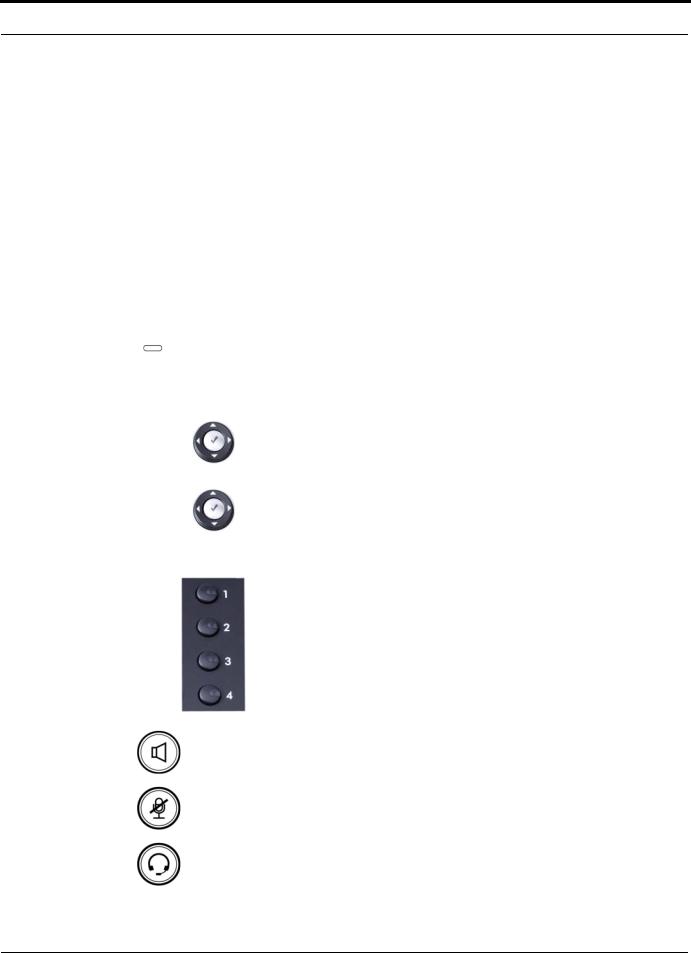
Navigation OK or Select Key |
The center “Check” button of the “Cell-Phone-Like” navigation keys, is |
||
1 |
|
|||||
|
|
|||||
|
|
used to “select” or to select “OK” |
|
|||
|
|
|
|
|||
|
|
|
|
|
||
|
|
|
|
|
|
|
|
|
|
Navigator Control Keys |
Navigation, left, down, up and right |
are used to |
|
|
|
|
|
|||
|
|
13 |
|
navigate through menu programming and during the normal |
||
|
|
|
||||
|
|
|
|
operation. |
|
|
|
|
|
|
|
|
|
|
|
|
Programmable buttons - such |
|
|
|
|
|
|
as line keys |
|
|
|
|
|
|
|
These keys are customizable allowing you to activate a feature with a |
||
|
|
14 |
|
single button press. These buttons can be programmed as a direct access |
||
|
|
|
to a telephone line, extension, DND, Speed dial, Call Park, Live Record, or |
|||
|
|
|
|
|||
|
|
|
|
a direct dial number. |
|
|
|
|
|
|
|
||
|
|
15 |
Speaker Button |
Press the speaker button to answer a ringing call. The button will turn |
||
|
|
green when the speakerphone is active. |
|
|||
|
|
|
|
|||
|
|
|
|
|
||
|
|
|
|
Press the Mute button to suspend the transmission of your voice to speak |
||
|
|
16 |
Mute Button |
privately with someone in your office. When the Button is red it is active |
||
|
|
|
and not transmitting, when the LED is out it will transmit your voice. |
|||
|
|
|
|
|||
|
|
|
|
|
||
|
|
17 |
|
Once an ancillary headset is connected to the phone, press the Headset |
||
|
|
|
button to activate, and the speakerphone to answer the call. |
|||
|
|
|
Headset Button |
|||
|
|
|
|
|
||
|
|
|
|
|
|
|
12 |
XBLUE Networks |

|
|
|
Introduction |
|
|
|
|
|
|
|
|
|
|
|
TABLE 1.1 |
|
|
|
|
|
|
|
|
|
|
|
|
|
No. |
PartNam e |
Descrip tion |
|
|
|
|
|
|
|
|
|
|
|
|
Transfer Button |
Press the transfer button to transfer an intercom or telephone line call to |
|
|
|
|
|
|
a different extension, UCD group or across the voice network. |
|
|
|
|
|
|
|
|
|
|
|
|
Redial button |
Press the redial button and use the down navigation key to scroll down |
|
|
|
|
|
and the center navigation button to dial the desired telephone number. |
|
|
|
|
|
|
|
|
|
|
|
|
|
|
|
|
|
|
|
|
Hold button |
Press the hold button to place an intercom or telephone line call on hold. |
|
|
|
|
|
|
If the device is programmed on a button the button will flash slowly. |
|
|
|
|
18 |
|
|
|
|
Contents |
|
Message Button |
Press the message button to access Voice Mail to send or retrieve a voice |
|
|
||
|
|
|
|
|||
|
|
|
mail message. |
|
|
|
|
|
|
|
|
|
Package |
|
|
Conference Button |
Use the Conference Button to create a 2 or 3 party conference. |
|
|
|
|
|
|
|
|
||
|
|
|
|
|
|
|
|
|
|
|
|
|
|
|
|
Phonebook Button |
Press the Phonebook Button to dial or add personal contacts to your |
|
|
|
|
|
|
|
|
||
|
|
|
phonebook. |
|
|
|
|
|
|
|
|
|
1 |
|
19 |
|
|
|
|
|
|
|
|
Use the volume bar to increase or decrease the volume of the handset, |
|
|
|
|
|
Volume Bar |
headset and speakerphone, whichever is active. Also, when the phone is |
|
|
|
|
|
|
|
|||
|
|
ringing you can increase or decrease the ring volume. |
|
|
|
|
|
|
|
|
|
|
|
|
|
|
|
|
|
|
|
20 |
|
|
|
|
|
|
|
Dial Pad |
Use the dial pad (Numeric Keypad) to dial digits. |
|
|
|
|
|
|
|
|
|
|
|
|
|
|
|
|
|
XBLUE Networks |
13 |
Introduction
Button LED Indication
|
|
LED |
Color |
Status |
Descrip tion |
|
|
|
|
|
|
|
|
|
|
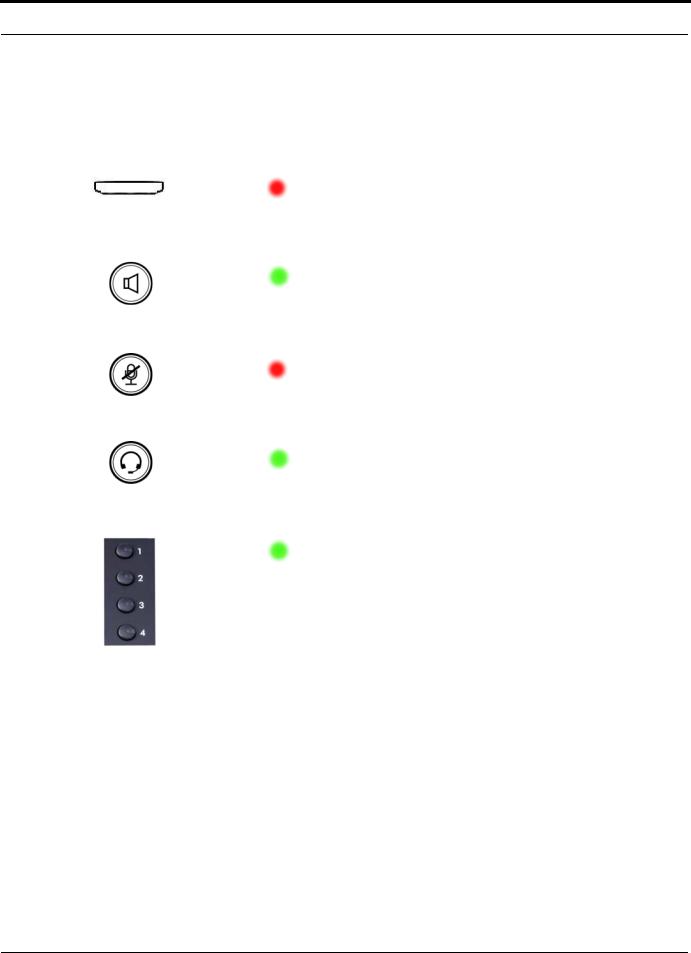
Off |
Idle or No New Messages |
|
|
|
|
|
|
|
|
|
|
Blinking Slowly |
New Voice Message Indication |
|
|
|
|
|
|
|
|
|
Red |
Blinking Rapidly |
There is an incoming Call |
|
|
Light Bar |
|
|
|
|
|
Blinking Continuously |
Not Registered with the Gateway |
||
|
|
|
|||
|
|
|
|
|
|
|
|
|
|
Off |
Speakerphone Idle |
Button |
|
|
|
|
|
|
Green |
On Steady |
Speakerphone engaged |
||
|
|
|
|||
LED |
|
|
|
||
Speaker Button |
|
|
|
||
Indication |
|
|
|
|
|
|
|
Off |
Microphone is active |
||
|
|
|
|
||
|
|
|
|
|
|
|
|
|
Red |
On Steady |
Microphone is inactive |
|
|
|
|
|
|
|
|
Mute Button |
|
|
|
|
|
|
|
|
|
1 |
|
|
|
Off |
Headset is disabled |
|
|
|
|
|
|
|
|
|
|
|
|
|
|
|
Green |
On Steady |
Headset is active |
|
|
Headset Button |
|
|
|
|
|
|
|
|
|
|
|
|
|
|
|
|
|
|
|
|
|
|
|
|
|
Off |
Trunk is Idle |
|
|
|
|
|
|
|
|
|
Green |
Steady On |
Trunk is Active (Busy) |
|
|
|
|
|
|
|
|
|
|
|
|
|
|
|
|
Blinking Slowly |
Line is on Hold |
|
|
|
|
|
|
|
|
|
|
Blinking Rapidly |
Line is ringing |
|
|
Line Buttons |
|
|
|
|
|
|
|
|
|
14 |
XBLUE Networks |
Introduction
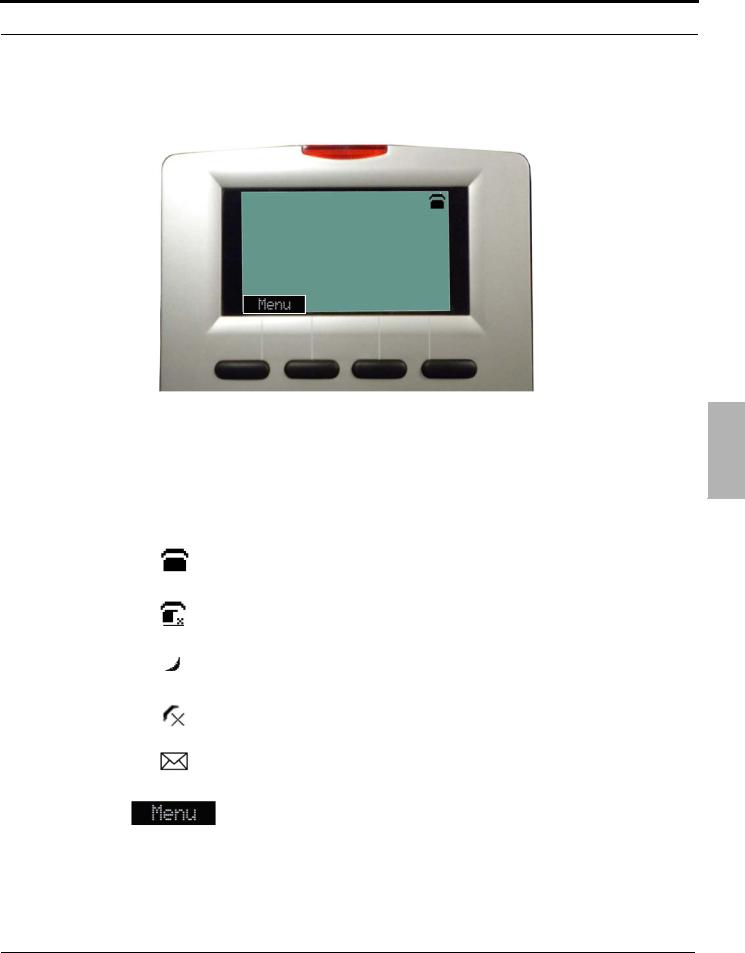
The Display will show the Date and Time, the extension number and special ICONS showing the status of your Telephone.
10/12/12 11:45 101
1 Button LED Indication
ICON |
Descrip tion |
|
|
|
The telephone is connected to the X-25 system |
|
|
|
The telephone is not connected to the X-25 system |
|
|
|
Service Mode - The system is in after hours (night) mode |
|
|
|
The telephone is in Do Not Disturb (DND) mode |
|
|
|
Indication of a new message, as well as the new mes- |
|
sage count |
|
|
|
Press the soft button under the word “Menu” to enter the |
|
programming mode. |
|
|
XBLUE Networks |
15 |
Introduction
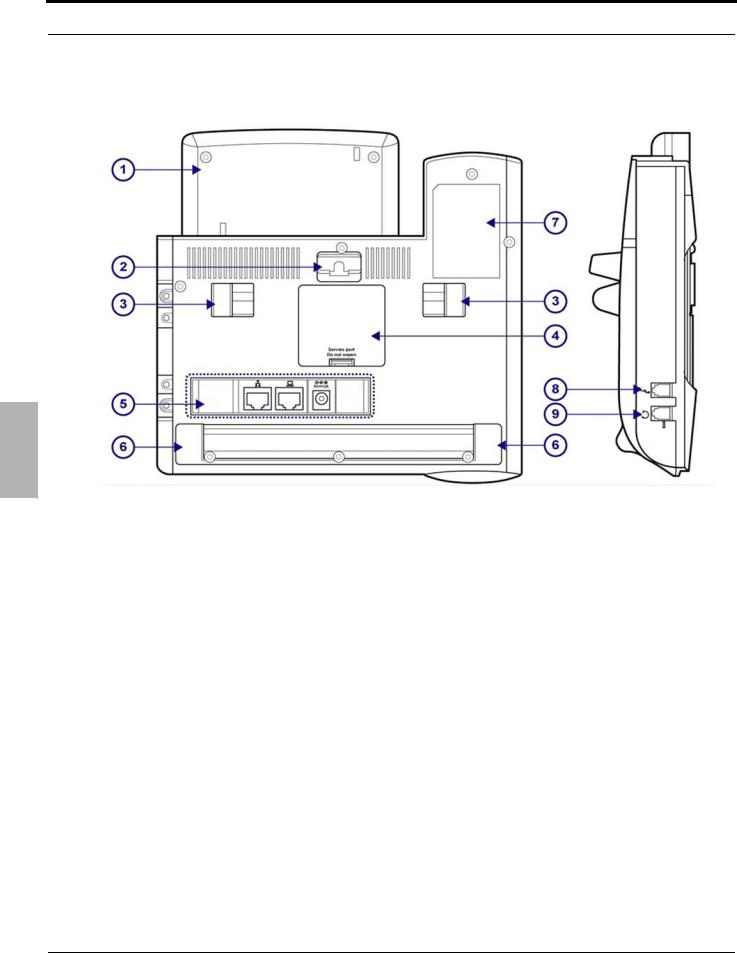
Back View
1 View Back
No. |
PartNum ber |
Descrip tion |
|
|
|
1 |
LCD Back Cover |
Secures the back of the LCD |
|
|
|
2 |
Wall Mount Holes |
Used to secure the telephone to the wall |
|
|
|
3 |
Hinge of Stand |
Used to adjust the angle of the telephone |
|
|
|
4 |
Secure Door |
Used for service only |
|
|
|
5 |
Input/Output Ports |
Ethernet and Computer ports |
|
|
|
6 |
Hinge of Chassis |
Supports different angles |
|
|
|
7 |
Product Label |
Product information |
|
|
|
8 |
Handset Cord Port |
Plug the handset into the telephone |
|
|
|
9 |
Headset Ports |
Headset Port RJ9 |
|
|
|
16 |
XBLUE Networks |
Introduction
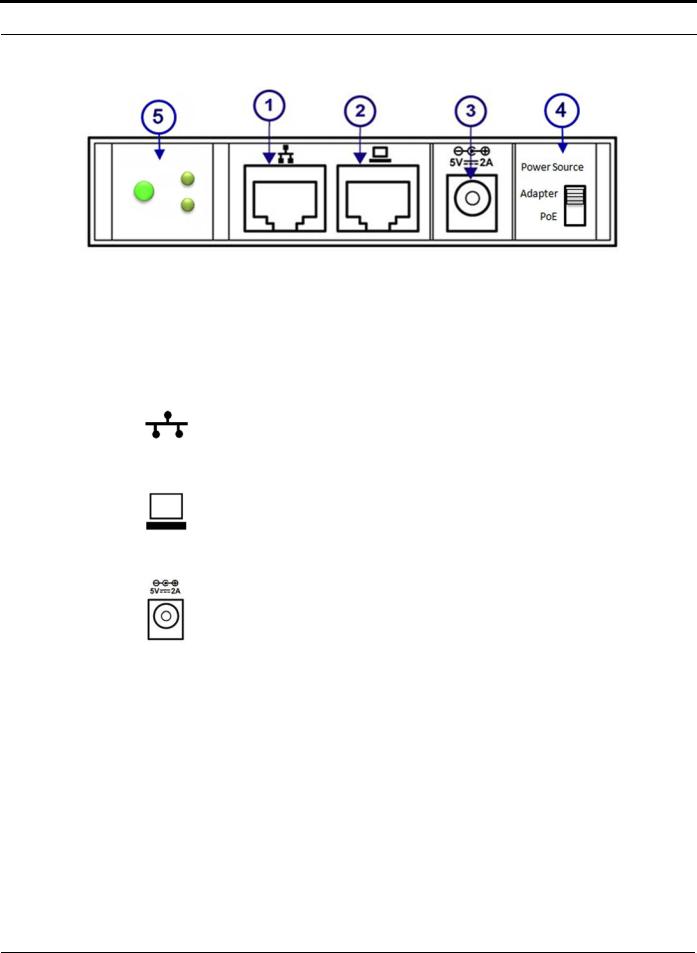
Ethernet and Power Port on the Back of the Telephone
|
|
|
|
and Power Port on the Back of |
|
|
|
|
|
No |
Port |
Descrip tion |
|
Ethernet |
|
|
|||
|
|
|
|
|
1 |
Ethernet LAN Port |
Connect to the Local Area Network |
|
|
|
|
|
|
|
|
|
|
|
1 |
2 |
Ethernet Computer Port |
Connect to your Personal Computer, the X2020 works as a network |
|
|
|
|
switch. |
|
|
|
|
|
|
|
|
|
|
|
|
3 |
Power Connection |
Plug in the supplied power supply after plugging in the LAN ethernet |
|
|
|
|
port |
|
|
|
|
|
|
|
4 |
Power Source |
Set to “Adapter” to use the supplied 5V 2A power supply, or set to |
|
|
|
|
“POE” to use a Power Over the Ethernet switch |
|
|
|
|
|
|
|
5 |
Network Activity LED’s and Reset |
There are two Green LED’s, one that shows the connection to the |
|
|
|
Button |
network and the other shows the connection to any attached device, |
|
|
|
|
such as a Personal Computer. In addition, there is a default button |
|
|
|
|
that allows you to set the telephone back to factory default. |
|
|
|
|
|
|
|
XBLUE Networks |
17 |
Introduction
1 Adjustments Phone
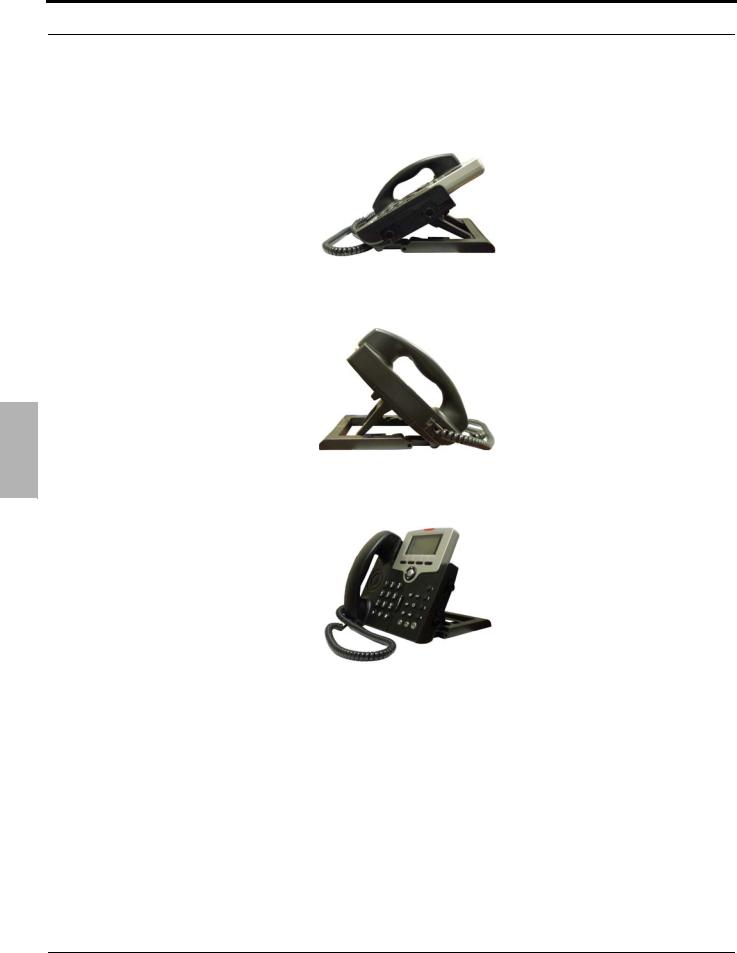
Phone Adjustments
The X2020 telephone can be set in several different positions or angles. Low Angle
Medium Angle
High Angle
18 |
XBLUE Networks |
Setup
2 Setup
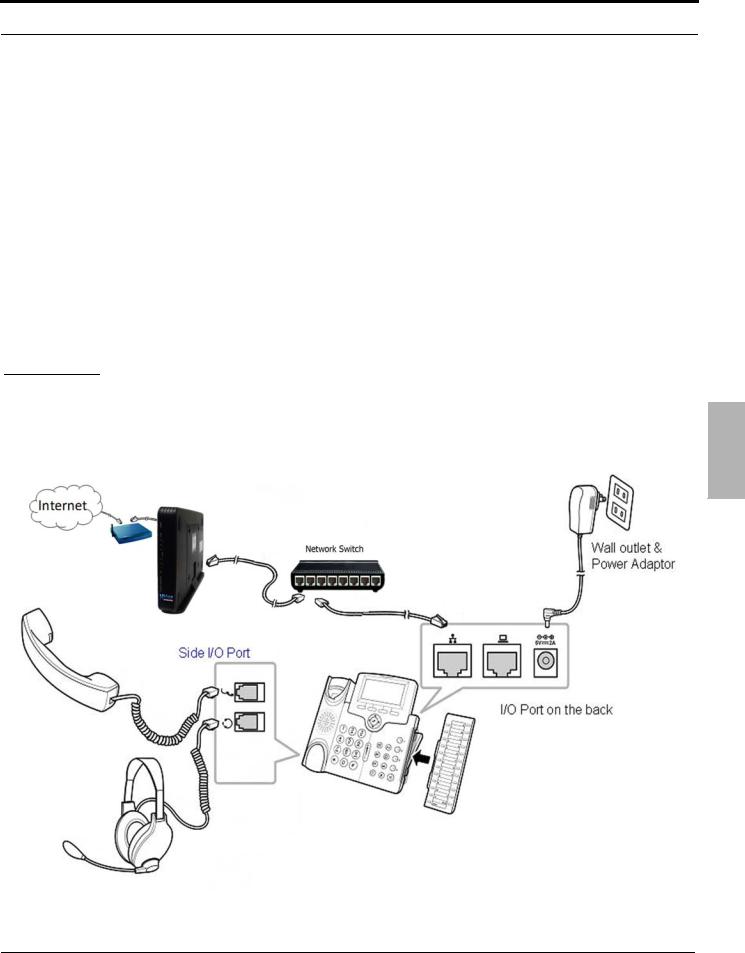
Installation
Connecting the X2020 Telephone to the X-25 only takes a few steps.
2
XBLUE Networks |
19 |

Setup
Caution:
It is not a good idea to install any electrical devices during an electrical storm.
It is a good idea to plug the X2020 into an uninterrupted power supply (UPS), which will keep it functioning during a power outage.
|
• Step 1 |
- Remove the contents from the box |
|
|
|
||
|
• Connect the Sidecar to the phone using the Sidecar directions. |
|
|||||
|
• Step 2 |
- Connect the Ethernet cable from the |
Port on the X2020 to the LAN port in the wall |
||||
|
• Step 3 |
- Connect the Coiled handset cord to the port with the |
ICON on the X2020 telephone |
||||
Sidecar |
• |
If you have a headset, connect it to the port with the |
ICON |
|
|||
• |
Step 4 - Connect the supplied power supply from the X2020 to the electrical outlet or into the ancillary |
||||||
|
|||||||
UPS System.
2
Sidecar
The Sidecar (Electronic Data Module EDM) has 24 programmable buttons that allows each user to customize how their telephone will operate. Each button on the sidecar, and the 4 on the telephone, can be programmed with one of the following features:
F eature |
Descrip tion |
|
|
None |
When pressed the button does nothing |
|
|
Extension Number |
This will show when an extension is busy or idle |
|
|
Telephone Line (Trunk) Number |
This will show when an extension is busy or idle |
|
|
Park Number |
This allows the user to place a call in a park location |
|
|
Feature Code |
This allows a feature to be used by pressing the button. See page 35 |
|
|
Do Not Disturb (DND) |
This allows the user to press this button and place the telephone into DND |
|
|
Live Record |
This allows the user to press the button and record the current conversation |
|
|
Others |
This allows the user to program another task such as a telephone number |
|
|
20 |
XBLUE Networks |
Setup
Connecting the Sidecar
Caution:
Before Connecting the Sidecar to an existing telephone be sure that it is unplugged! Failure unplug the telephone will do damage to both the telephone and sidecar and is not covered under warranty!
2 Sidecar
•Step 1 - Remove the contents from the box
•Step 2 - Remove the power from the telephone
•Step 3 - Remove the rubber protector from the pins on the Sidecar
•Step 4 - Securely connect the Sidecar to the telephone by inserting the pins and aligning the plastic posts.
•Step 5 - Secure the Sidecar to the phone using the supplied screws.
• Step 6 - Plug the network connection into the telephone |
and then plug it into the AC outlet. |
XBLUE Networks |
21 |
Setup
2 Started Getting
Getting Started
At default, the X2020 is programmed as DHCP. Therefore, when it located on the same LAN as the X-25, it will automatically authenticate and be assigned an extension number. The extension number can be reassigned to accommodate specific numbering plans using either the telephone or a standard windows Internet browser such as Windows Internet Explorer.
Programming with the X2020 telephone
Use the following steps to change an extension’s telephone number when it is connected to the LAN:
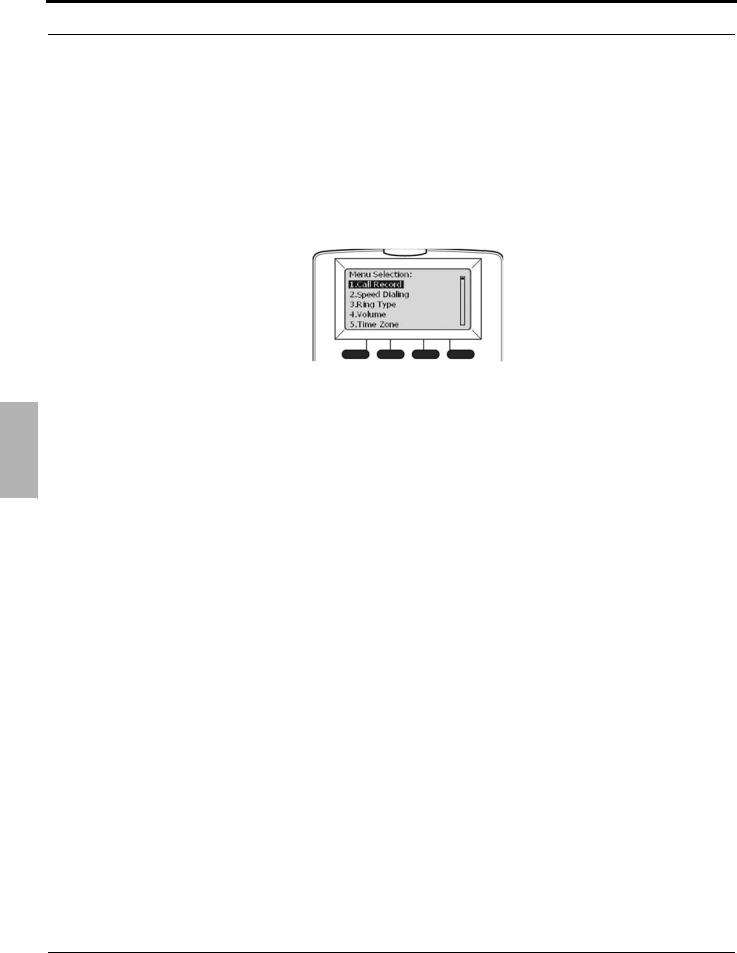
• Step 1 - Press the menu soft button
• Step 2 |
- Use the down |
navigation key to locate “16. Admin” |
|
• Step 3 |
- Press the center navigation key and then enter the Admin Password (default is 1234) |
||
• |
Step 4 |
- Press the center navigation key and then use the down navigation key to locate “7. SIP” |
|
• |
Step 5 |
- Use the down |
navigation key to locate “4. Authentication” |
•Step 6 - Press the center navigation key. There are two options Authorized ID and Authorized Password
•Step 7 - Select “Authorized ID” to enter the new extension number. This extension number must be preprogrammed into the X-25 system.
•Step 8 - Select “Authorized Password” to enter the password for the entered extension number.
22 |
XBLUE Networks |

Setup
Use the following steps to program a X2020 that is going to be used remotely (WAN):
• Step 1 |
- Press the menu soft button |
|
• Step 2 |
- Use the down navigation key to locate “16. Admin” |
|
• |
Step 3 |
- Press the center navigation key and then enter the Admin Password (default is 1234) |
• |
Step 4 |
- Press the center navigation key and then use the down navigation key to locate “7. SIP” |
•Step 5 - Locate “1. SIP Server” and press the center navigation key
•Step 6 - Locate the “SIP Proxy” and press the center navigation key. Press back space (Backsp) to delete the existing number and enter the IP Address of the X-25 and then press the center navigation key.
• Step 7 - Use the down navigation key to locate “Outbound Proxy” and then press the center navigation key. Press the back space (Backsp) to delete the existing number and enter the IP Address of the X-25 and then press the center navigation key.
• Step 8 - Use the down navigation key to locate “Registrar Server” and then press the center navigation key. Press the back space (Backsp) to delete the existing number and enter the IP Address of the X-25 and then press the center navigation key.
• Step 9 - Use the down navigation key to locate “Registrar Outbound” and then press the center navigation key. Press the back space (Backsp) to delete the existing number and enter the IP Address of the X- 25 and then press the center navigation key.
• Step 10 - Press the left |
navigation key once and use the down navigation key to locate “4. Authenti- |
cation” |
|
•Step 11 - Press the center navigation key. There are two options Authorized ID and Authorized Password
•Step 12 - Select “Authorized ID” to enter the new extension number. This extension number must be preprogrammed into the X-25 system.
•Step 13 - Select “Authorized Password” to enter the password for the entered extension number.
• Step 14 - Press the left navigation key until it asks “Do you want to quit?” Press the center navigation key, and select “Yes”. The telephone will reboot, and connect to the X-25 gateway.
2 Getting Started
XBLUE Networks |
23 |
Setup
Programming with an Internet Browser
|
Use the following steps to change an extension’s telephone number connected to the LAN: |
|||
|
• Step 1 - On the telephone - Press the menu soft button |
|||
|
• Step 2 - Use the down navigation key to locate “6. Info” |
|||
|
• Step 3 - Press the center navigation button and then use the down navigation key to locate “IP |
|||
|
|
Address” and make a note of the address. |
||
|
• Step 4 - On a computer connected to the same network, open an Internet Browser |
|||
|
• Step 5 |
- Enter the IP address in the address bar and press enter. |
||
|
• Step 6 |
- Enter Admin as the Login Name, and enter the Admin password (default 1234). |
||
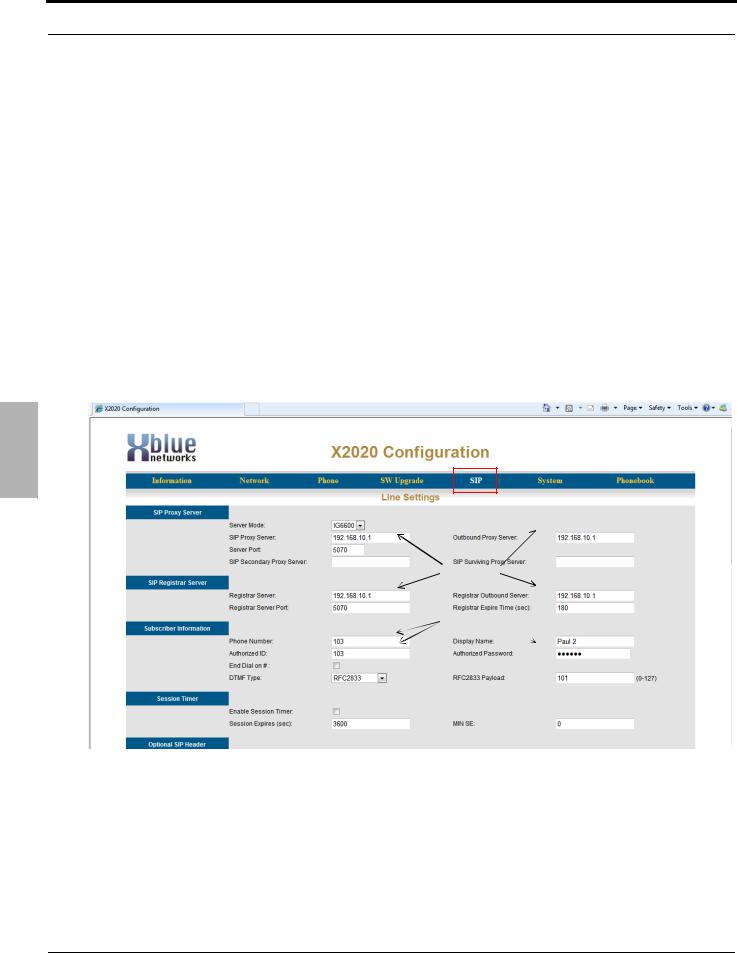
|
• Step 7 |
- Select the “SIP” tab at the top of the configuration page. |
||
Getting |
• For LAN programming locate “Phone Number”, “Authorized ID” and “Authorized Password”. |
|||
• |
For WAN also locate “SIP Proxy Server”, “Outbound Proxy Server”, “Registrar Server” and “Registrar |
|||
|
||||
|
|
Outbound Server”. |
||
Started |
• Step 8 |
- Click “Save Settings” at the bottom of the page. |
||
|
|
|
||
2
Registering WAN Extensions
Change Extension Number
24 |
XBLUE Networks |
Setup
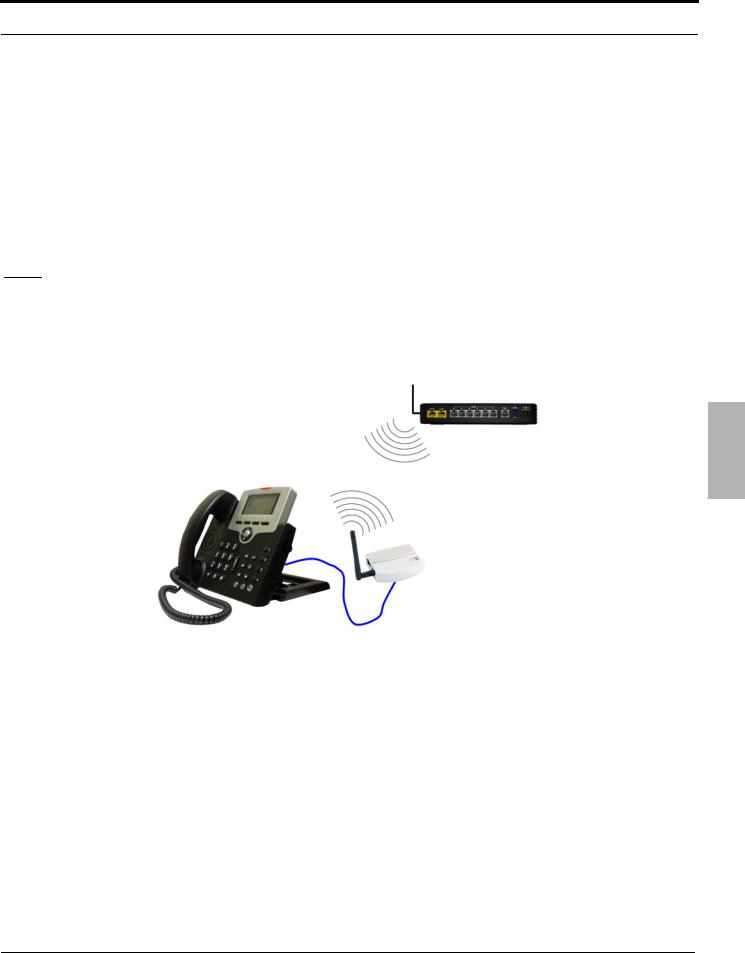
XBLUE Wireless Universal Adapter
Because there is not always an Ethernet port where you want to put a telephone, XBLUE suggests an XBLUE Wireless Universal Adapter. Just program the wireless adapter to connect to the X-25, and then connect the adapter to the network port of the X2020. The phone will authenticate to the X-25 just like a wired telephone.
Getting Started
1.Make sure that the wireless on the X-25 is on line and operational.
2.Connect the Ethernet cable from the Wireless adapter to the X2020 telephone’s network connection.
3.The integrated wireless adapter will automatically locate the X-25, and authenticate, and download the security password.
Note:
The quality of your wireless connection may affect the quality of the voice connection. There is no guarantee, written or implied, that the XBLUE Wireless adapter will work 100 percent of the time.
2 XBLUE Wireless Universal Adapter
XBLUE Networks |
25 |

Setup
Notes:
2 Adapter Universal Wireless XBLUE
26 |
XBLUE Networks |
3 Using your Telephone
Getting to know your way around
Once the X2020 telephone is connected to the X-25 Gateway it will be ready to be used. The X2020 allows you to make calls using the handset, speakerphone or using an ancillary headset connected to the headset jack. In addition, the X2020 has a “Hot Keypad” which allows you to dial a number without lifting the handset or pressing the speaker button. Just dial the number and the X-25 will do the rest.
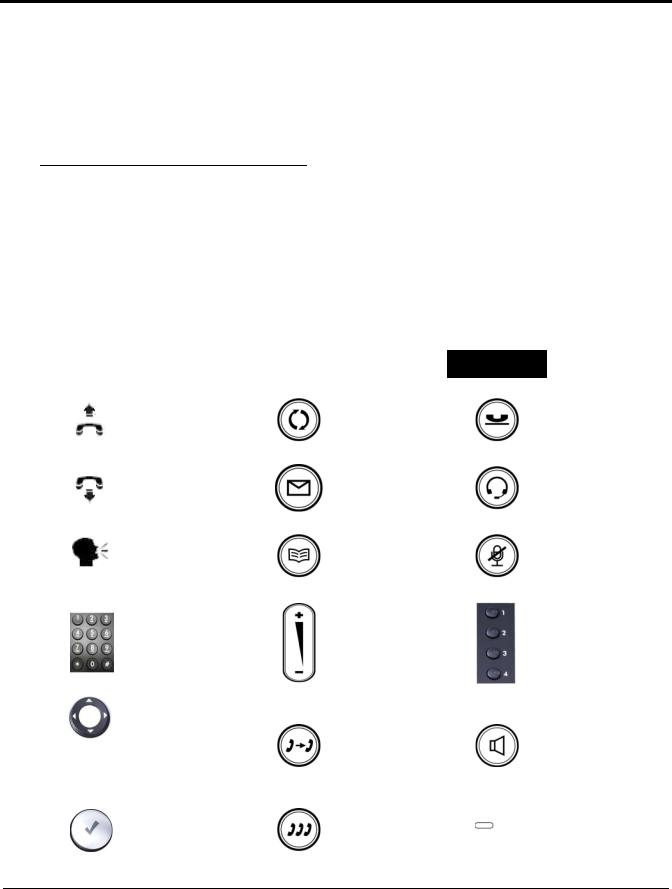
The following ICONS will be used to help you get to know your new X2020 telephone.
TABLE 3.1 ICONSbeing used in this m anual
ICON |
Descrip tion |
ICON |
Descrip tion |
ICON |
Descrip tion |
|
|
|
|
|
|
|
Off Hook |
|
Redial Key |
|
Hold Key |
|
|
|
|
|
|
|
On Hook |
|
Message Key |
|
Headset Key |
|
|
|
|
|
|
|
Speaking |
|
Phonebook Key |
|
Mute Key |
|
|
|
|
|
|
|
Dial or Key Pad |
|
Volume Bar |
|
Programmable - |
|
|
|
Line Buttons |
||
|
|
|
|
|
|
|
|
|
|
|
|
|
Down, Up, Right |
|
|
|
|
|
and Left Naviga- |
|
Transfer Key |
|
Speakerphone |
shown as |
tion keys |
|
|
|
|
|
|
|
|
|
|
|
Center Navigation |
|
|
|
|
|
key - Used for |
|
Conference Key |
|
Soft Key |
|
Select or OK |
|
|
|
|
|
|
|
|
|
|
XBLUE Networks |
27 |
Using your Telephone
Placing a call
There are two types of calls, internal or Intercom and external or over the telephone line. In either case, you can simply dial the desired telephone number and the X-25 will automatically route the call. If the dialed number is part of the internal numbering plan such as an extension, which are numbered 101 through 125, at default, the call will ring the appropriate extension. If the number is not within the numbering plan, the X-25 will automatically connect to a telephone line or you can select a specific telephone line, and the call will be placed.
3 call a Placing
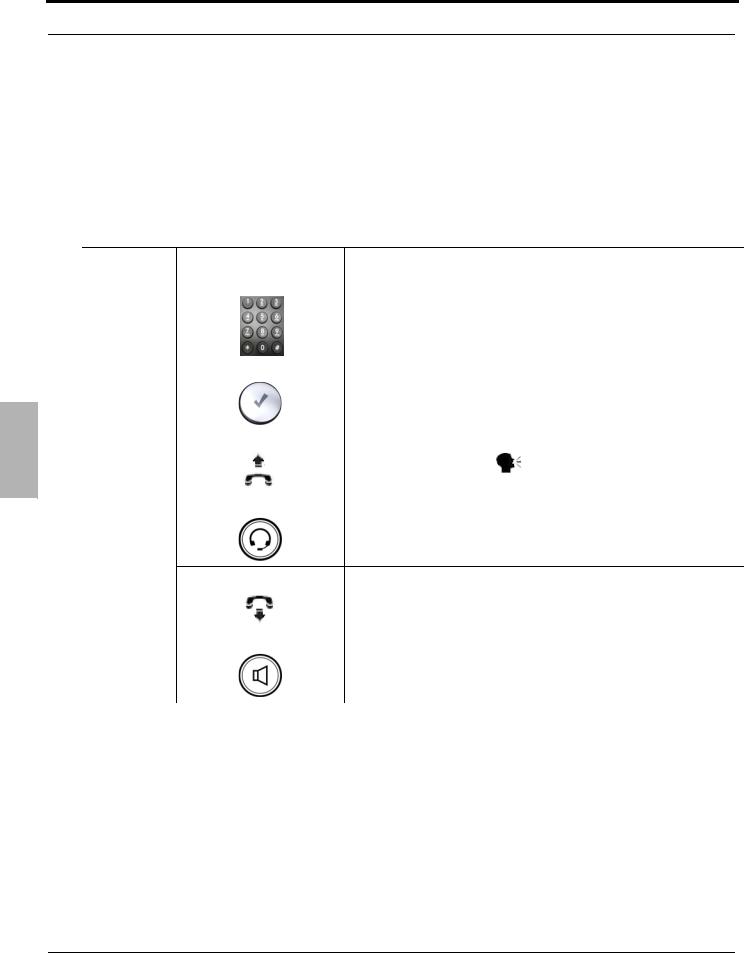
TABLE 3.2 Basic Op erations
Op eration |
Descrip tion |
|
|
|
|
|
Dial the desired telephone number. The number will appear in the display |
|
|
but not sent to the telephone line provider, allowing you to delete |
|
|
(backsp) any incorrect numbers. |
|
|
|
|
|
Wait 5 seconds or press the center navigation key when you are satisfied |
|
|
with the entered telephone number |
|
|
|
|
|
Lift the handset to speak |
privately or remain on speakerphone. |
Place a Call |
|
|
|
|
|
|
If the headset is enabled, it is automatically used if the handset is not |
|
|
removed from the cradle |
|
Replace the handset, or press the speaker button to end the call
28 |
XBLUE Networks |
Using your Telephone
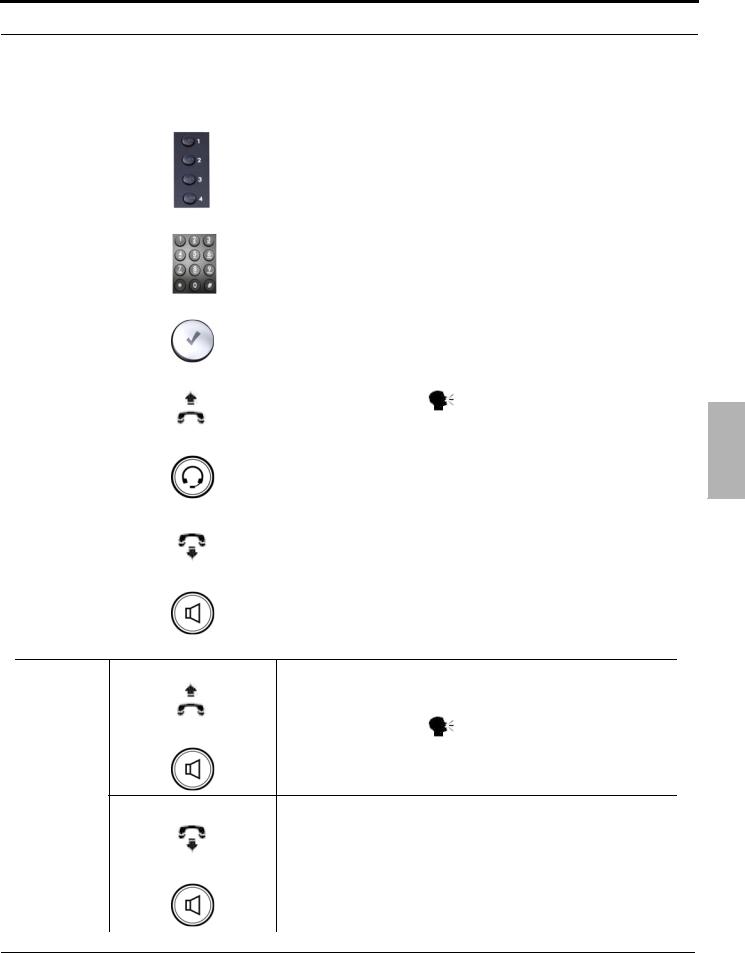
TABLE 3.2 Basic Op erations
Op eration |
|
Descrip tion |
|
|
|
|
|
|
|
Press the desired telephone line |
|
|
|
|
|
|
|
Dial the desired telephone number. The number will appear in the display |
|
|
|
but not sent to the telephone line provider, allowing you to delete |
|
|
|
(backsp) any incorrect numbers. |
|
|
|
|
|
|
|
Wait 5 seconds or press the center navigation key when you are satisfied |
|
|
|
with the entered telephone number |
|
Make a call |
|
|
|
using a specific |
|
|
|
telephone line |
|
Lift the handset to speak |
privately or remain on speakerphone. |
|
|
||
|
|
|
|
|
|
If the headset is enabled, it is automatically used if the handset is not |
|
|
|
removed from the cradle |
|
|
|
|
|
|
|
Replace the handset, or press the speaker button to end the call |
|
|
|
|
|
3 Placing a call
Lift the handset to speak |
privately or remain on speakerphone. |
Answer a Call
Replace the handset, or press the speaker button to end the call
XBLUE Networks |
29 |
Using your Telephone
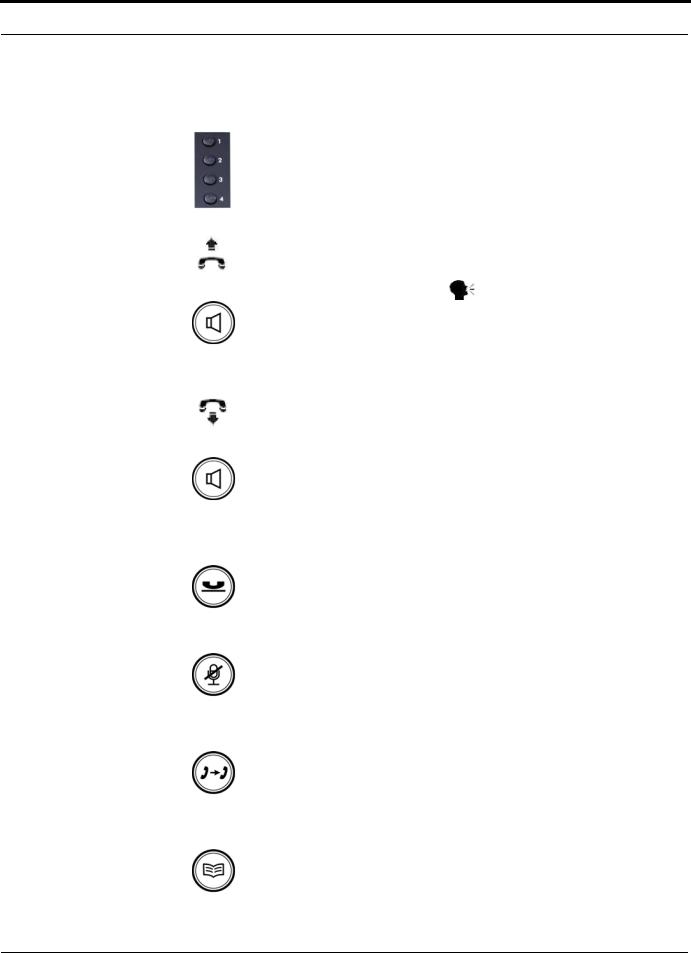
TABLE 3.2 Basic Op erations
|
|
Op eration |
|
Descrip tion |
|
|
|
|
|
|
|
||
|
|
|
|
Press the telephone line that you wish to answer. |
||
|
|
|
|
|
|
|
|
|
Answer a |
|
Lift the handset to speak |
privately or remain on speakerphone. |
|
|
|
|
|
|
|
|
callaPlacing |
specific |
|
|
|
|
|
telephone line |
|
|
|
|
||
|
|
|
|
|
|
|
|
|
|
|
|
||
|
|
|
|
|
|
|
3 |
|
|
|
Replace the handset, or press the speaker button to end the call |
||
|
|
|
|
|
|
|
|
|
|
|
|
||
|
|
|
|
|
||
|
|
|
|
|
||
|
|
Placing a call |
|
While on an Intercom or telephone line call press the hold button. Press |
||
|
|
on Hold |
|
the hold button again, or press the telephone line to pick up the held call. |
||
|
|
|
|
|
||
|
|
|
|
|
||
|
|
|
|
Press the mute button, which will light red when active to stop transmit- |
||
|
|
Using Mute |
|
ting, and speak privately. Press the mute button again, unlit, to begin |
||
|
|
|
|
speaking to the outside party again. |
||
|
|
|
|
|
||
|
|
|
|
|
||
|
|
|
|
Telephone line calls can be answered at one extension and transferred to |
||
|
|
|
|
another destination such as an extension or UCD group. While on a call, |
||
|
|
Transfer a Call |
|
press the transfer button and the preprogrammed extension button... |
||
|
|
|
|
|
|
|
|
|
|
|
or press the down |
navigation key and dial the desired extension num- |
|
|
|
|
|
ber. |
|
|
|
|
|
|
|
||
|
|
|
|
|
||
|
|
Phonebook |
|
Press the phonebook button to store or dial one of 200 personal phone- |
||
|
|
|
book (address book) entries. |
|
||
|
|
|
|
|
||
|
|
|
|
|
|
|
30 |
XBLUE Networks |
Loading...