

Page 1

XBLUE QB
Setup Guide
20180406001
QB1
QB2
Page 2

XBLUE QB Setup Guide
2/17
Content
About This Guide ........................................................................................................................................................... 3
Defaults (what is set at the factory): ................................................................................................................. 3
Before You Start ............................................................................................................................................................ 4
Package Contents ............................................................................................................................................ 4
Online aids ........................................................................................................................................................ 4
Hardware Overview .......................................................................................................................................... 5
LED Indicators – Resource and Port Description/Status .................................................................................. 6
Installation .................................................................................................................................................................... 7
Safety Precaution and Installation Warnings .................................................................................................... 7
Module Installation ............................................................................................................................................ 7
Desktop Installation – QB1 ............................................................................................................................... 8
Connecting the Equipment ............................................................................................................................................ 8
Configuration of QB and Get Phones Working ............................................................................................................... 9
To find the IP Address of the QB1 .................................................................................................................... 9
Access the QB server programming interface ................................................................................................ 11
Getting your XBLUE IP Phones working ........................................................................................................ 12
Ensure Dedicated spot for QB on your network .......................................................................................................... 14
Secure the QB Server IP Address on your network ....................................................................................... 14
Revision History
Revision
Date Released
Changes
20180406001
May 28, 2018
Initial release
Page 3

XBLUE QB Setup Guide
3/17
About This Guide
Thank you for choosing a XBLUE QB PBX (Quad-Band PBX) server. XBLUE QB Series PBX
servers are a stand-alone telephone system providing the user with an on-premise, fully-featured
business telephone system. Your XBLUE QB PBX is an advanced application telephone system in
an IP server format connected using your local area network. QB Series PBX’s are hybrids capable
of PSTN (Regular Phone Lines), VoIP Phone Lines, GSM Telephone Lines, or LTE Telephone
Lines/Data Circuit (for voice communications). The configuration of your server depends upon the
Package you’ve purchased.
This guide is intended to get your telephone system functioning quickly. XBLUE pioneered the selfinstall business telephone system in 2007 and continues to deliver easy to install and administer
business phone systems in a DIY fashion to save you money. However, if you need help, we are
available to assist you. Call us for a conversation with a live, technically-capable person if needed at
866-925-8312. This guide will cover connection and access of the server and XBLUE IP Phones
and connection of analog telephone lines.
Your QB PBX is an advanced application product that is best adapted into a network by preparing
for the installation. First gather information about your office network to prepare to connect your QB
PBX into that environment.
Synopsis of what follows to get your telephone system functional:
1. Find your network IP Address scheme (Subnet)…
a. A LAN (Local Area Network) is a Private network that cannot be navigated via the
internet. Private IP Address segments begin with 192.168.x.x, or 172.16-31.x.x, or
10.x.x.x
2. Find the IP Address of your router
3. Connect LAN port of the QB server to the existing network.
4. Connect all XBLUE IP7g telephones to the existing network.
5. Using an internet browser (Chrome, Firefox, Microsoft Edge, Safari) visit the Advanced IP
Scanner website and use that utility to discover the IP Address that your network has
assigned to the QB server.
6. Set that IP as RESERVED in your network router. [If you use an ISP router (Comcast, Time
Warner, Frontier, etc.) you can contact them for help with this step.]
7. Using your browser, log into the QB server using the IP Address discovered.
8. Run QB Server Auto Provisioning application to set the extension numbers of each of the
phones connected.
After completing these steps, the QB server and IP7g telephones will be functional for the usual
operations required in business communications. There are many ways to customize your caller
experiences and many features available. Enjoy your QB server, IP7g telephones and all that is
possible using the guides we’ve loaded on our website for easy reference.
Defaults (what is set at the factory):
• Extension range is set 101 – 599
• All extensions have an associated voicemail box with a password that is the extension
number
• Extensions assigned are 101 – 199 depending on the server
• All telephone lines are set to ring into Queue 6700
• When no one answers an incoming call, after 25 seconds that caller is routed to the IVR
(Auto Attendant) where they hear the default greeting for the Day answering mode
• All outward calling is limited to numbers beginning with a 2-9 or numbers that begin with a
“1” but no longer than 11-digits
• Paging Group 6300 is set for the first 25 extensions
• Voice CODEC usage is set for G.711u as the first choice and G.722 as the second choice
Page 4
XBLUE QB Setup Guide
4/17
Related Documents
This Installation Guide explains the installation of XBLUE QB PBX telephony Server and getting
XBLUE telephones working. The documents below should also be referenced and will aid in specific
programming and user information:
Document
Description
XBLUE QB Series Datasheet
Datasheet for the XBLUE QB Series IP PBX.
XBLUE QB Series Administrator Guide
Refer to this manual for instructions on how to
configure, operate, monitor, and maintain the XBLUE
QBPBX.
XBLUE QB Series Extension User Guide
This extension Users Guide is reference to the
instructions on how to log into the user portal,
configure their account, listen to call recordings,
check voicemail messages, and other extension
related operations.
Before You Start
Before you begin to install your QB PBX server, please check the package contents to verify that
you have received the items below. If there is any problem, please contact your provider.
Package Contents
(1) QB PBX*
(1) Power Adapter*
(1) Network Cable
(2) Telephony Line
(4) Rubber Feet*
(1) Warranty Card
(1) Quick Installation Guide
* Note that the PBX model will vary depending on the package purchased. Note also that “Rubber
Feet” and “Power Adapter” apply only the QB1 PBX server. QB1 & 3 PBX servers include mounting
hardware and power cord.
Online aids
We are continually developing online aids for installation assistance.
Please check our website for updates on a regular basis.
Xblue.com/customer-support-service/qb-support/
You can use your smart phone to scan this URL with a QR Scanner.
Page 5

XBLUE QB Setup Guide
5/17
Hardware Overview
Front Panel – QB1
Rear Panel – QB1
Front Panel – QB2
Rear Panel – QB2
Page 6
XBLUE QB Setup Guide
6/17
LED Indicators – Resource and Port Description/Status
LED
Status
Status
Description
POWER
Power status
On - Green
Power ON
Off
Power OFF
System
System status
Blinking – Green
The system is running properly
Steady/Off
The system is not running properly
WAN
WAN status
Steady – Green
Network Link is active
Blinking – Green
Data Traffic detected (normal)
Off
Off-line
LAN
LAN status
Steady – Green
Linked normally
Blinking – Green
Data Traffic detected (normal)
Off
Off-line
Analog Port
Status
Analog
Extension (FXS)
Green Steady
Green Blinking
• The port is idle
• There is an ongoing call on the port
Analog Line
(FXO)
Red Steady
Red Slow Flash
Red Fast Flash
• PSTN Line is idle
• No PSTN line is connected to the port
• The PSTN line is busy
Cellular
GSM/CDMA/3G
Red Steady
Red Slow Flash
Red Fast Flash
• Line is idle
• No SIM card detected
• Line is in use
Page 7

XBLUE QB Setup Guide
7/17
Installation
Safety Precaution and Installation Warnings
To avoid personal injury or device of the damage:
Power
• Use only the power adapter/cord provided with the QB PBX.
• Keep the power OFF during installation and while installing/changing modules.
• Do not open or remove the cover of QB PBX when it is in operation.
• Remove the cover ONLY when power is disconnected.
• Before cleaning the device, turn OFF the power supply.
o To clean; use a damp soft cloth as a routine maintenance.
o Avoid contact with the port connectors. If port connections become wet allow them to
dry COMPLETELY before restoring power.
Environment
• This device is intended for inside use only.
• Install the XBLUE QB PBX in a location that is clean, free from vibration, electric shock,
static electricity and temperature/humidity extremes.
o The operating temperature should be kept below 104°F (40°C).
o The humidity should be less than 95% and NON-Condensing.
• Do NOT install in a moist or wet environment.
• Install in a location where the device is easily accessed for periodic maintenance.
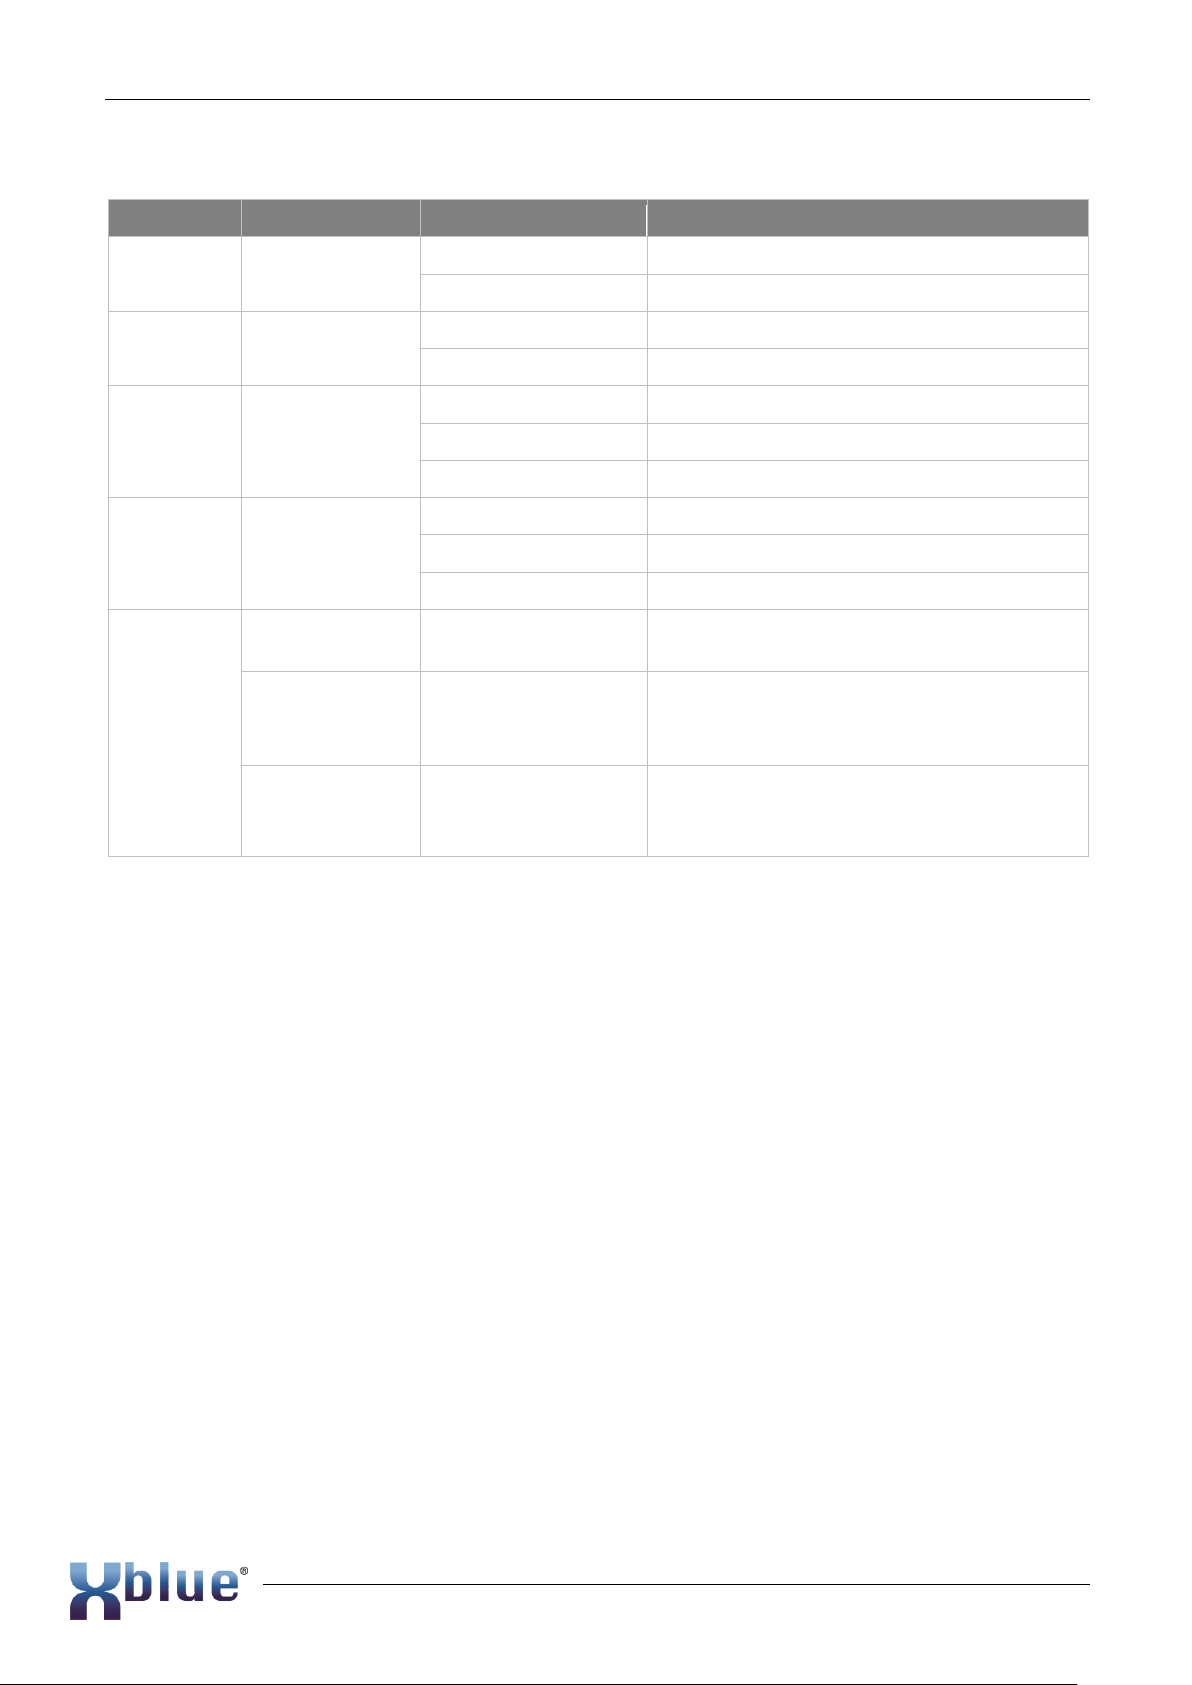
Module Installation
XBLUE QB servers support installing modules as illustrated in the table. The optional modules are
installed in Module Slots inside each server.
Modules
Server
Quantity of Modules possible
• QBS2 Port Module
• QBO2 Port Module
• QBSO Port Module
• QBGSM Port Module
• QBLTE Module
• QBXP8 (QB3&4 only)
QB1
QB2
QB3
2 Slots, 2 Module Max
4 Slots, 4 Modules Max
8 Slots possible, 8 Modules
Max. Note: QB3&4 require
Module mounting boards
QBXP8 which allow 4 slots
each when installed.
Notes
• If the bundle you’ve ordered includes a XBSO Module (one
line and one analog phone port) it will be installed in the
first position and PORT1 of you server will be the ANALOG
PHONE PORT.
• Line PORTS begin at PORT1 or 2 if the XBSO is installed.
• If port configuration is to be changed, pre-installed modules
must first be removed.
Page 8

XBLUE QB Setup Guide
8/17
Desktop Installation – QB1
WARNING
• Ensure that a space of 5~10cm (2-4 inches) is maintained around the
QB device for air circulation.
• Do NOT stack anything on top of the QB device.
• The QB2 and QB3 are best installed – wall-mounted or rack mounted.
QB1 is a desk-mounted device and shipped with rubber feet to keep it stable on the desktop. The
rubber feet cover the device’s assembly screws when installed. These screws are accessible when
shipped to allow Module configuration changes if desired.
• STEP 1 Place the QB1 server upside-down on a stable surface.
• STEP 2 Remove the adhesive backing paper from the rubber feet provided.
• STEP 3 Attach the rubber feet to the recessed areas on the bottom at each corner of the
device.
Connecting the Equipment
STEP 1 Connect one end of a network cable (provided) to the LAN port of XBLUE QB1, and the
other end to any LAN port of your company’s LAN data-switch or router. It must be
connected to the same network to which the XBLUE IP Phones are connected.
STEP 2 Connect the telephone lines from your service provider interface to the ports of the QB
(QB1: 1~4)(QB2: 1~8). Note: VoIP Lines have no cable/wire connections, they are
programmed into the server.
Modules
Installed
Chassis
Port
Description
QBSO and
QBO2
1
2
3
4
Connect phone cable to Analog Phone/Speakerphone/Cordless
Connect phone cable to Telephone Line (Provider)
Connect phone cable to Telephone Line (Provider)
Connect phone cable to Telephone Line (Provider)
QBO2 (2x)
1
2
3
4
Connect phone cable to Telephone Line (Provider)
Connect phone cable to Telephone Line (Provider)
Connect phone cable to Telephone Line (Provider)
Connect phone cable to Telephone Line (Provider)
Page 9

XBLUE QB Setup Guide
9/17
STEP 3 Plug the provided power adapter into the power jack on QB1 and the other end to a
standard electrical wall socket. Wait for the system to boot up which is indicated by blinking
SYSTEM LED.
Configuration of QB and Get Phones Working
XBLUE QB IP Telephony Servers are administered using a web browser. When the QB is
connected to your network it will obtain an IP Address from your network. To begin you must find
that IP Address given to the server by your network. You may also use your router to discover the IP
Address of the XBLUE QB Server. This is done using your router’s Connected Device function
however since there are many variations of routers we will use the network scanner approach in this
guide.
Steps to logging in…
• Download a network scanner
• Find the IP Address scheme (subnet) or your network
• Use the network scanner to find the IP Address of the QB PBX Server
• Secure the QB Server IP Address on your network
• Access the QB server Web GUI
• Configure the QB server Web Desktop
To find the IP Address of the QB1
Download a network scan tool
We have successfully used a utility that is available free of charge called Advanced IP Scanner. Use
your browser to download this scanner.
1. Go to https://www.advanced-ip-scanner.com
2. Click on the Free Download button
3. Use your PC’s download function to save
the SW on your PC and then select Run.
Advanced IP Scanner
Once the scanner is loaded it can be used to
scan your network to discover all the devices
connected including the XBLUE QB Server.
1. Advanced IP Scanner will normally
determine your network IP Address
scheme and propagate the scan range for you. If it does not you’ll need to discover your
network scheme using your PC’s network interface discovery function.
2. Input into the IP scanner range bar the network range to scan (e.g. Some usual ranges are:
10.x.x.1-10.x.x.256, 192.168.x.1-192.168.x.256, 172.y.x.1-172.y.x.256 where “x” is any
number between 1-255 and “y” is any number between 16-31).
Page 10

XBLUE QB Setup Guide
10/17
3. Click on the Scan button.
4. Once the scan is complete find the device on the list by matching
the MAC Address of the server to the MAC Address in the list.
5. Input the IP Address into the web browser address bar (where you
input web pages names).
6. The first time you access the QB server you will be prompted to
validate the connection as secure.
7. To do so, click the Advanced button and then Add Exception. This
will avoid this prompt for all future connections to the server.
Figure 1 Server Label
Page 11

XBLUE QB Setup Guide
11/17
Access the QB server programming interface
Once the IP Address of the QB server
is known, input into your browser and
Exception added, you will be able to
access the administration of the QB
server and begin setting up your
XBLUE IP Telephone System.
1. QB administration is password
protected.
2. At the login screen input the
preloaded username and
password:
a. Username: admin
b. Password: XBLUEqb2
3. The Desktop of the QB server is shown.
4. All of the configuration settings of your QB server can be accessed using the Settings icon.
Additional applications are also available by clicking on the Main Menu (dot-cube) in the
upper left of the Desktop. One such application is the Auto Provisioning icon. Any of these
applications can be placed on the Desktop for quick access. Just Ring-Click on an
application and select “Add to Desktop”.
5. The figure at the right shows the
desktop with the open Apps:
a. Maintenance
b. CDR and Recordings
c. Settings app open.
6. The figure below shows these Apps
open in the task bar at the top. Short
definitions are given.
Page 12

XBLUE QB Setup Guide
12/17
Getting your XBLUE IP Phones working
From the Main Menu or from the Desktop start the Auto Provisioning App to get
your XBLUE IP Telephones functional on the QB Server. “Provisioning” is the
process of loading the unique configuration for the phone for system use. The Auto
Provisioning application makes finding connected telephones on the network easy.
It will also allow you to assign extension numbers to the phones. Extension
numbers are an ID of that telephone on the system and provide for inter-office calling between the
telephones of the system.
Connect your XBLUE IP Phones
1. If your XBLUE IP Phones aren’t already connected to the
network, connect them now.
a. Use the diagram as a guide to connect your
XBLUE IP Phones to your network.
The NETWORK connector is in the
center and is connected to the
network wall jack.
b. You can use the PC connector to connect your
computer to the same network.
c. IP Phones must be connected to the same network as the QB Server. (The wall jack
must go to the same data-switch and router to which the QB server is connected.
d. IP7g telephones are pre-loaded with XBLUE functions to allow seamless operation
with the QB server.
2. Once all telephones are connected to the network and powered up, click
the Auto Provisioning icon to start the App.
3. The App will open and immediately perform a network scan to find the
XBLUE IP Phones.
4. Once the scan is complete the list of phones discovered will appear. Pick
any one telephone on this list to assign it an extension number and
registered to the QB server.
a. Note: if phones are not discovered they are either on a different
network or connected by a router that is isolating them form the network to which the
QB server is connected.
Page 13

XBLUE QB Setup Guide
13/17
5. Select the Edit button for the phone you wish to provision.
6. In the edit box of the selected phone click on the Model of the phone. The IP7g XBLUE
telephone is one of the “F4” family of telephones. Select “F4” from the list for the IP7g
telephone.
7. Along the left column “Accounts there are boxes used to assign the IP Phone an extension
number. Check the first box in the upper left to assign one extension number to this
telephone.
8. Select Preferences
9. In Preferences select:
a. Time Zone
b. Daylight Savings Time mode
c. Location (specific within region)
d. Time Format, and
Page 14

XBLUE QB Setup Guide
14/17
e. Date Format you desire.
10. Click Save.
11. At the prompt; “Restart Telephone” select Yes.
a. This action will cause the specific phone extension configuration data to be sent to
the IP Phone. Once the data is sent the phone will restart and become functional as
that extension number on the QB server.
12. Continue these Steps (form Step 5) for all the phones connected to the network.
Ensure Dedicated spot for QB on your network
The QB is shipped so that it will become operational on your network regardless of how your
network is configured. It is VERY important that the QB Server (as any server) be given a dedicated
position on your network to ensure that it does not get assigned a new location by chance. If this
were to happen the IP Phones registered to the server would no longer function. To ensure this
doesn’t happen a fixed position on your network must be established. This is done using Static IP
Address assignment or by RESERVING the position in your router that was given by your router.
This is often the easiest technique since Static IP Address assignment requires in-depth knowledge
of the network configuration and router setup. Since your server is now functional on your network
we’ll cover RESERVING the position on your network in your router – which can also be
accomplished by contacting your ISP (Internet Service Provider) and asking them to do it for you if it
is their router that you are using. The following steps are taken using a typical router on a widely
known ISP.
Secure the QB Server IP Address on your network
It is important that you secure the IP Address given to your QB server
so that the automatic functions of your network do not change the
address. Your choices to do this:
• Access your network router and Reserve the IP Address
• Contact your ISP (Internet Service Provider) and request that
they access your router and reserve the address for you. (This
only applies if the router in use was provided by the ISP.)
Page 15

XBLUE QB Setup Guide
15/17
Example of Reserving the IP Address
(This is one example of many possible routers.)
1. Use a browser and access your router, this is usually the IP Address listed as the “Gateway”
in the network discovery. Once the credentials (Username and Password*) are input the
various GUI pages of the router will be seen. Find the Connected Devices list in your router.
*If you don’t know your router’s UN and PSWD contact your network administrator or ISP
2. Find the QB PBX server on the list by locating the QB Server MAC Address. Click on the
device MAC Address to open the to view the device details and then click on Edit.
Page 16

XBLUE QB Setup Guide
16/17
3. This opens the page in your router for the QB PBX device. Make appropriate notes about the
device on this page of your router and select Reserved IP to secure this IP Address for the
QB server.
Page 17

XBLUE QB Setup Guide
17/17
4. Click Save.
NOTE
If you have made any changes in the QB server be sure to click on the Apply
button in the upper-right of the Desktop since changes you make are simply
stored in a file until loaded to the server for use. The process invoked with the
“Apply” button at the top-right corner makes the changes take effect. Depending on the changes
made and the activity on the server your changes may take a few seconds to load.
[END]
 Loading...