

Page 1
Freedom HF Install Guide.book Page i Friday, December 21, 2007 9:57 PM
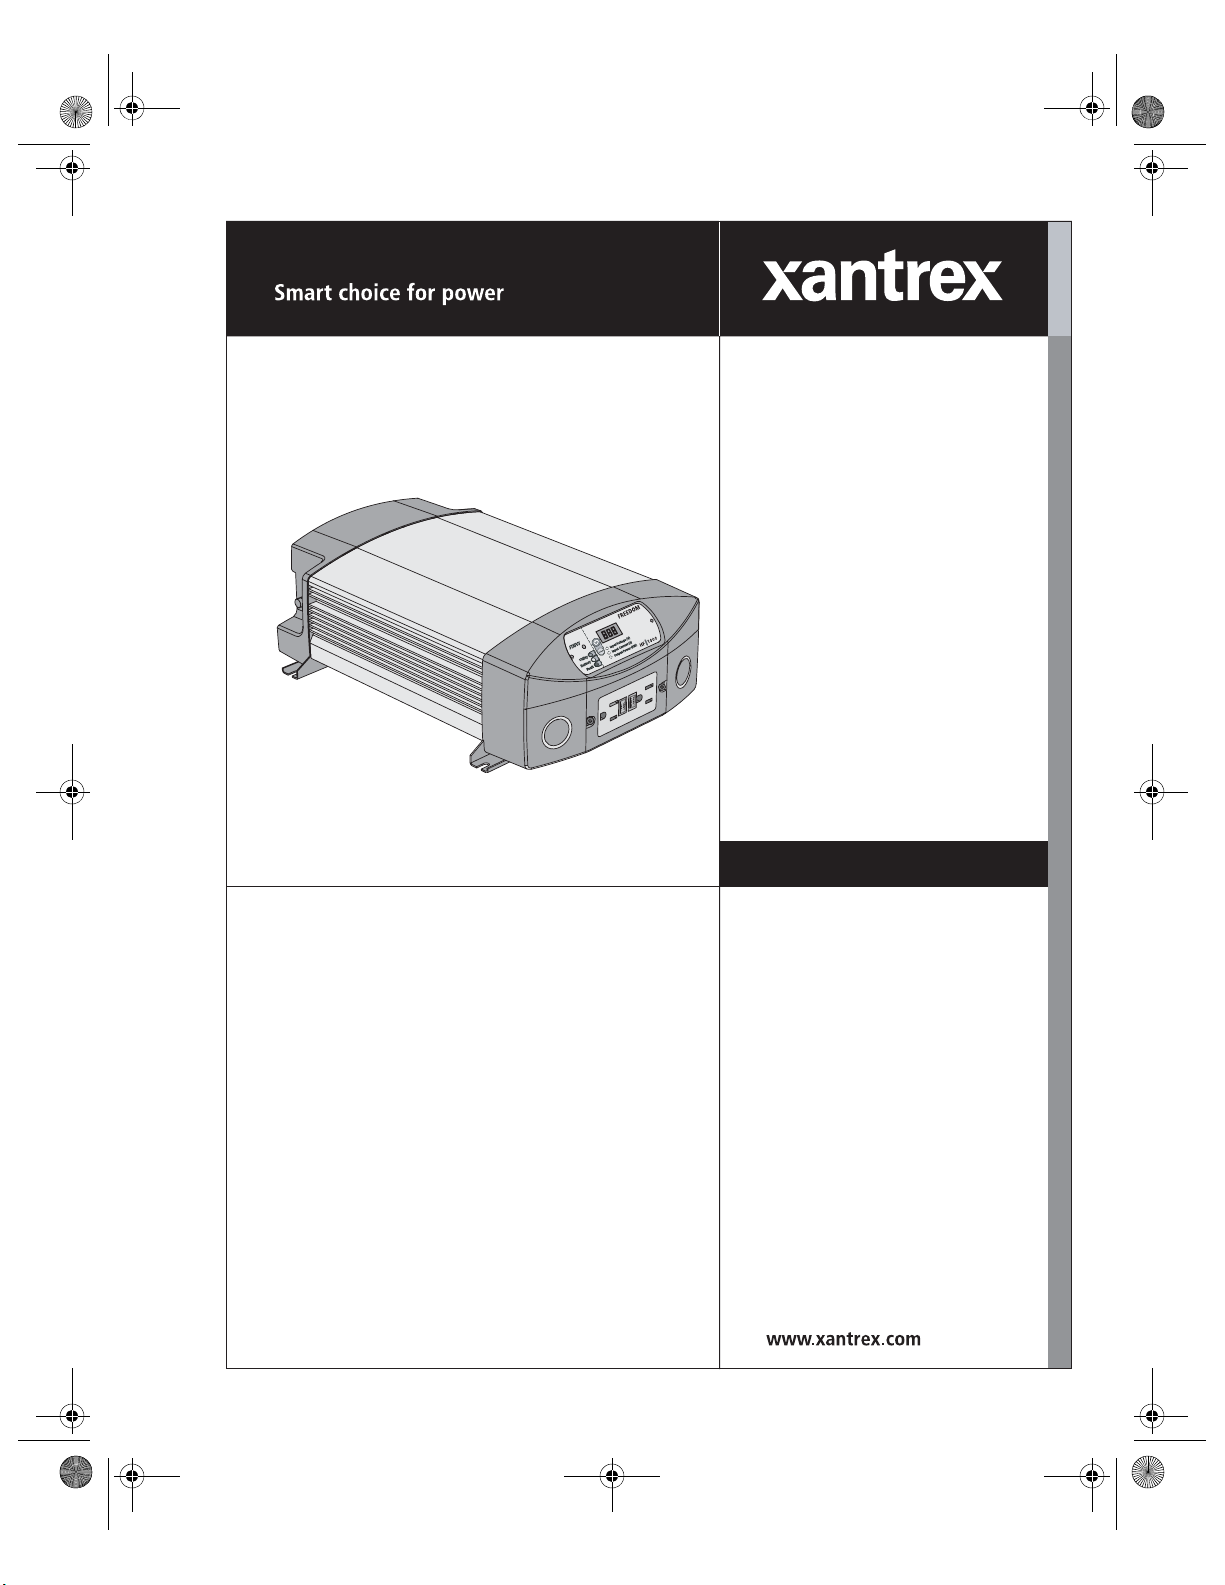
Freedom HF
Inverter/Charger
Freedom HF 1000
Freedom HF 1800
Installation Guide
Page 2

Freedom HF Install Guide.book Page ii Friday, December 21, 2007 9:57 PM
Page 3

Freedom HF Install Guide.book Page i Friday, December 21, 2007 9:57 PM
Freedom HF
Inverter/Charger
Installation Guide
This guide for use by qualified installers only
Page 4

Freedom HF Install Guide.book Page ii Friday, December 21, 2007 9:57 PM
About Xantrex
Xantrex Technology Inc. is a world-leading supplier of advanced power electronics and controls with
products ranging from small mobile units to utility-scale systems for wind, solar, batteries, fuel cells,
microturbines, and backup power applications in both grid-connected and stand-alone systems. Xantrex
products include inverters, battery chargers, programmable power supplies, and variable speed drives
that convert, supply, control, clean, and distribute electrical power.
Trademarks
Freedom HF Inverter/Charger is a trademark of Xantrex International. Xantrex is a registered trademark
of Xantrex International.
Other trademarks, registered trademarks, and product names are the property of their respective owners
and are used herein for identification purposes only.
Notice of Copyright
Xantrex Freedom HF Inverter/Charger Installation Guide © December 2007 Xantrex International. All
rights reserved.
Exclusion for Documentation
UNLESS SPECIFICALLY AGREED TO IN WRITING, XANTREX TECHNOLOGY INC. (“XANTREX”)
(
A) MAKES NO WARRANTY AS TO THE ACCURACY, SUFFICIENCY OR SUITABILITY OF ANY TECHNICAL OR
OTHER INFORMATION PROVIDED IN ITS MANUALS OR OTHER DOCUMENTATION.
(
B) ASSUMES NO RESPONSIBILITY OR LIABILITY FOR LOSSES, DAMAGES, COSTS OR EXPENSES, WHETHER
SPECIAL, DIRECT, INDIRECT, CONSEQUENTIAL OR INCIDENTAL, WHICH MIGHT ARISE OUT OF THE USE OF
SUCH INFORMATION. THE USE OF ANY SUCH INFORMATION WILL BE ENTIRELY AT THE USER’S RISK; AND
(C) REMINDS YOU THAT IF THIS MANUAL IS IN ANY LANGUAGE OTHER THAN ENGLISH, ALTHOUGH
STEPS HAVE BEEN TAKEN TO MAINTAIN THE ACCURACY OF THE TRANSLATION, THE ACCURACY CANNOT
BE GUARANTEED. APPROVED XANTREX CONTENT IS CONTAINED WITH THE ENGLISH LANGUAGE
VERSION WHICH IS POSTED AT WWW.XANTREX.COM.
Date and Revision
December 2007 Rev A
Part Number
975-0395-01-01
Product Numbers
806-1020 (Freedom HF 1000)
806-1840 (Freedom HF 1800)
Contact Information
Telephone: 1 800 670 0707 (toll free North America)
Fax: 1 800 994 7828 (toll free North America)
Email: customerservice@xantrex.com
Web: www.xantrex.com
1 408 987 6030 (direct)
This guide for use by qualified installers only
Page 5

Freedom HF Install Guide.book Page iii Friday, December 21, 2007 9:57 PM
About This Guide
Purpose
The purpose of this Installation Guide is to provide explanations and
procedures for setting up and installing a Freedom HF Installation*.
For complete information on how to operate, maintain, and troubleshoot
the Freedom HF unit, see the Freedom HF Inverter/Charger Owner’s
Guide (Doc. Part Number: 975-0390-01-01)
* Recreational, Fleet Vehicle, or Marine installation.
Scope
Audience
Organization
The Guide provides safety guidelines, detailed planning and setup
information, as well as procedures for installing the inverter/charger unit.
It does not provide details about particular brands of batteries. You need
to consult individual battery manufacturers for this information.
The Guide is intended for anyone who needs to install a Freedom HF
Inverter/Charger installation. Installers should be technicians or
electricians who are certified for the type of specific installation.
This Guide is organized into two chapters and two appendixes.
Chapter 1 provides information to help in installing a Freedom HF
Inverter/Charger Installation.
Chapter 2 explains how to configure the Freedom HF to best meet your
electrical system requirements.
Appendix A contains electrical performance information and product
specifications.
Appendix B illustrates a typical marine installation for the Freedom HF.
iii
This guide for use by qualified installers only
Page 6
Freedom HF Install Guide.book Page iv Friday, December 21, 2007 9:57 PM
About This Guide
Conventions Used
The following conventions are used in this guide.
WARNING
Warnings identify conditions or practices that could result in personal injury or
loss of life
CAUTION
Cautions identify conditions or practices that could result in damage to the unit or
other equipment.
Important:
but not as serious as a caution or warning.
Related Information
You can find more information about Xantrex Technology Inc. as well as
its products and services at www.xantrex.com
These notes describe things which are important for you to know,
iv 975-0395-01-01
This guide for use by qualified installers only
Page 7

Freedom HF Install Guide.book Page v Friday, December 21, 2007 9:57 PM
Important Safety Instructions
IMPORTANT: Read and save this Installation Guide
for future reference.
This chapter contains important safety and installation instructions
for the Freedom HF Inverter/Charger units
Freedom HF 1800.
WARNING: Limitations on use
The Freedom HF is not intended for use in connection with life support systems
or other medical equipment or devices.
–Freedom HF 1000 and
EFORE INSTALLING AND USING THE FREEDOM HF, READ ALL
1. B
INSTRUCTIONS AND CAUTIONARY MARKINGS ON THE FREEDOM HF,
THE BATTERIES, AND ALL APPROPRIATE SECTIONS OF THIS GUIDE.
CAUTION: Risk of injury
To reduce the risk of injury, charge only 12 Vdc lead-acid (GEL, AGM, and
Flooded) rechargeable batteries. Other battery types may burst, causing personal
injury and damage.
2. Do not expose the Freedom HF to rain, snow, spray, or bilge water.
To reduce risk of fire hazard, do not cover or obstruct the ventilation
openings. Do not install the Freedom HF in a zero-clearance
compartment. Overheating may result.
3. To avoid a risk of fire and electric shock, make sure that existing
wiring is in good condition and that wire is not undersized. Do not
operate the Freedom HF with damaged or substandard wiring.
4. The use of any attachments not recommended or sold by Xantrex,
may result in risk of fire, electric shock, or injury to persons.
5. Do not operate the Freedom HF if it has received a sharp blow, been
dropped, or otherwise damaged in any way. If the Freedom HF is
damaged, see the Warranty section.
v
This guide for use by qualified installers only
Page 8
Freedom HF Install Guide.book Page vi Friday, December 21, 2007 9:57 PM
6. Do not disassemble the Freedom HF. It contains no user-serviceable
parts. See Warranty for instructions on obtaining service. Attempting
to service the Freedom HF yourself may result in a risk of electrical
shock or fire and will void your warranty. Internal capacitors remain
charged after all power is disconnected.
7. To reduce the risk of electrical shock, disconnect both AC and DC
power from the Freedom HF before attempting any maintenance or
cleaning or working on any circuits connected to the Freedom HF.
Turning off controls will not reduce this risk.
8. The Freedom HF must be provided with an equipment-grounding
conductor connected to the AC input ground.
WARNING: Explosion hazard
ORKING IN THE VICINITY OF BATTERIES IS DANGEROUS. BATTERIES
1. W
GENERATE EXPLOSIVE GASES DURING NORMAL OPERATION.
HEREFORE, IT IS OF UTMOST IMPORTANCE THAT EACH TIME BEFORE
T
SERVICING THE UNIT IN THE VICINITY OF THE BATTERY, THAT YOU
READ THIS MANUAL AND FOLLOW THE INSTRUCTIONS EXACTLY.
2. This equipment contains components which tend to produce arcs or
sparks. T o prevent fire or explosion, do not install the Freedom HF in
compartments containing batteries or flammable materials, or in
locations that require ignition-protected equipment. This includes any
space containing gasoline-powered machinery, fuel tanks, as well as
joints, fittings, or other connections between components of the fuel
system.
3. To reduce the risk of battery explosion, follow these instructions and
those published by the battery manufacturer and the manufacturer of
any unit you intend to use in the vicinity of the battery.
vi 975-0395-01-01
This guide for use by qualified installers only
Page 9
Freedom HF Install Guide.book Page vii Friday, December 21, 2007 9:57 PM
Personal Precautions When Working With Batteries
WARNING: B
URN FROM HIGH SHORT-CIRCUIT CURRENT
B
XPLOSION FROM VENTED GASES
E
RECAUTIONS
P
1. Study and follow all of the battery manufacturer's specific
precautions, such as removing or not removing cell caps while
charging, and recommended rates of charge.
2. Add distilled water in each cell until battery acid reaches the level
specified by the battery manufacturer. This helps to purge excessive
gas from cells. Do not overfill. For a battery without cell caps,
carefully follow manufacturer's recharging instructions.
3. Make sure the area around the battery is well ventilated.
4. Never smoke or allow a spark or flame near the engine or batteries.
5. Use extra caution to reduce the risk or dropping a metal tool on the
battery. It could spark or short circuit the battery or other electrical
parts and could cause an explosion.
6. Remove all metal items, like rings, bracelets, and watches when
working with batteries. Batteries can produce a short circuit current
high enough to weld metal to skin, causing a severe burn.
7. Have someone within range of your voice or close enough to come to
your aid when you work near a lead-acid battery.
ATTERIES PRESENT RISK OF ELECTRICAL SHOCK
, F
. O
BSERVE PROPER
IRE OR
.
,
8. Have plenty of fresh water and soap nearby in case battery acid
contacts skin, clothing, or eyes.
9. Wear complete eye protection and clothing protection. Avoid
touching your eyes while working near batteries.
10. If battery acid contacts skin or clothing, wash immediately with soap
and water. If acid enters your eye, immediately flood it with running
cold water for at least twenty minutes and get medical attention
immediately.
11. If you need to remove a battery, always remove the ground terminal
from the battery first. Make sure all accessories are off so you don’t
cause an arc.
975-0395-01-01 vii
This guide for use by qualified installers only
Page 10

Freedom HF Install Guide.book Page viii Friday, December 21, 2007 9:57 PM
12. Never charge a frozen battery.
13. Clean battery terminals. Be careful to keep corrosion from coming
into contact with your eyes.
MARINE UNIT LOCA TION
14. Locate the Freedom HF unit away from batteries in a separate, well
ventilated compartment.
15. Never place the Freedom HF unit directly above batteries; gases from
a battery will corrode and damage the unit
16. Never allow battery acid to drip on the unit when reading gravity, or
filling battery.
17. Do not operate the unit in a closed in area, or restrict the ventilation in
any way.
DC CONNECTION PRECAUTION
18. Connect and disconnect DC output connections only after setting any
marine unit switches to off position and opening AC disconnect
19. FOR MARINE INSTALLATIONS, EXTERNAL CONNECTIONS
TO THE UNIT SHALL COMPLY WITH THE UNITED STATES
COAST GUARD ELECTRICAL REGULATIONS(33CFR183, SUB
PART I)
20. PROPER DISPOSAL OF BATTERIES IS REQUIRED. REFER TO
YOUR LOCAL CODES FOR DISPOSAL REQUIREMENTS.
viii 975-0395-01-01
This guide for use by qualified installers only
Page 11
Freedom HF Install Guide.book Page ix Friday, December 21, 2007 9:57 PM
Precautions for Using Rechargeable Appliances
CAUTION: Equipment damage
Most rechargeable battery-operated equipment uses a separate charger or
transformer that is plugged into an AC receptacle and produces a low
voltage charging output.
Some chargers for small rechargeable batteries can be damaged if
connected to the Freedom HF. Do not use the following with the Freedom
HF:
• Small battery-operated appliances like flashlights, razors, and night
lights that can be plugged directly into an AC receptacle to recharge.
• Some chargers for battery packs used in power hand tools. These
affected chargers display a warning label stating that dangerous
voltages are present at the battery terminals.
Important:
the Freedom HF, contact the equipment manufacturer to find out if the appliance
is acceptable for use with modified sine wave input voltage. See the detailed
description of the Freedom HF waveform in Appendix A, “Specifications” under
“Electrical Specifications: Inverter Mode” on page A–2.
If you are unsure about using your rechargeable appliance with
975-0395-01-01 ix
This guide for use by qualified installers only
Page 12

Freedom HF Install Guide.book Page x Friday, December 21, 2007 9:57 PM
x 975-0395-01-01
This guide for use by qualified installers only
Page 13

Freedom HF Install Guide.book Page xi Friday, December 21, 2007 9:57 PM
Contents
Important Safety Instructions
1
Installation
Materials List- - - - - - - - - - - - - - - - - - - - - - - - - - - - - - - - - - - - - - - - - - - - - - - - - 1–2
Safety Instructions - - - - - - - - - - - - - - - - - - - - - - - - - - - - - - - - - - - - - - - - - - - - -1–3
Installation Codes - - - - - - - - - - - - - - - - - - - - - - - - - - - - - - - - - - - - - - - - - - - 1–3
Installation Tools and Materials - - - - - - - - - - - - - - - - - - - - - - - - - - - - - - - - - - - -1–4
High Level Overview of Installation Steps - - - - - - - - - - - - - - - - - - - - - - - - - - - - - 1–4
Basic Installation Procedures - - - - - - - - - - - - - - - - - - - - - - - - - - - - - - - - - - - - - - 1–5
Step 1: Designing the Installation - - - - - - - - - - - - - - - - - - - - - - - - - - - - - - - -1–6
Step 2: Choosing a Location for the Freedom HF - - - - - - - - - - - - - - - - - - - - 1–12
Step 3: Mounting the Freedom HF - - - - - - - - - - - - - - - - - - - - - - - - - - - - - - 1–13
Connecting the Equipment Ground - - - - - - - - - - - - - - - - - - - - - - - - - - - 1–14
Grounding Locations - - - - - - - - - - - - - - - - - - - - - - - - - - - - - - - - - - - - - 1–14
Step 4: Connecting the AC Input Wires - - - - - - - - - - - - - - - - - - - - - - - - - - - 1–15
General AC Wiring Considerations - - - - - - - - - - - - - - - - - - - - - - - - - - - 1–15
AC Input Connections - - - - - - - - - - - - - - - - - - - - - - - - - - - - - - - - - - - - 1–16
Step 5: Connecting AC Output to an Existing AC Circuit - - - - - - - - - - - - - - - 1–19
Step 6: Connecting the DC Cables - - - - - - - - - - - - - - - - - - - - - - - - - - - - - - 1–24
DC Grounding - - - - - - - - - - - - - - - - - - - - - - - - - - - - - - - - - - - - - - - - - 1–27
Step 7: Mounting the Display Panel - - - - - - - - - - - - - - - - - - - - - - - - - - - - - 1–28
Step 8: Testing Your Installation - - - - - - - - - - - - - - - - - - - - - - - - - - - - - - - - 1–29
Testing in Invert Mode - - - - - - - - - - - - - - - - - - - - - - - - - - - - - - - - - - - 1–29
Testing in Shore Power Mode - - - - - - - - - - - - - - - - - - - - - - - - - - - - - - - 1–30
Drip Shield Installation (For Marine Installations) - - - - - - - - - - - - - - - - - - - - - - - 1–31
- - - - - - - - - - - - - - - - - - - - - - - - - - - - - - - - - - -v
2.
Configuration
Setting Battery Types on the Main Unit - - - - - - - - - - - - - - - - - - - - - - - - - - - - - - - 2–2
Adjusting Display, Alarm, and Charging Current Settings- - - - - - - - - - - - - - - - - - - 2–3
975-0395-01-01 xi
This guide for use by qualified installers only
Page 14

Freedom HF Install Guide.book Page xii Friday, December 21, 2007 9:57 PM
A
Specifications
Electrical Specifications: Inverter Mode- - - - - - - - - - - - - - - - - - - - - - - - - - - - - - -A–2
Electrical Specifications: Charge Mode - - - - - - - - - - - - - - - - - - - - - - - - - - - - - - -A–3
Environmental Specifications- - - - - - - - - - - - - - - - - - - - - - - - - - - - - - - - - - - - - -A–4
System Specifications - - - - - - - - - - - - - - - - - - - - - - - - - - - - - - - - - - - - - - - - - - -A–4
Physical Specifications - - - - - - - - - - - - - - - - - - - - - - - - - - - - - - - - - - - - - - - - - -A–4
Regulatory Approvals - - - - - - - - - - - - - - - - - - - - - - - - - - - - - - - - - - - - - - - - - - -A–4
Inverter Overload Operation- - - - - - - - - - - - - - - - - - - - - - - - - - - - - - - - - - - - - - -A–5
Invert Power Derating vs. Ambient Temperature- - - - - - - - - - - - - - - - - - - - - - - - -A–6
Charger Output Current vs. AC Input Voltage- - - - - - - - - - - - - - - - - - - - - - - - - - -A–7
B
Marine Installation Diagram
Marine Installation - - - - - - - - - - - - - - - - - - - - - - - - - - - - - - - - - - - - - - - - - - - - -B–2
xii
This guide for use by qualified installers only
Page 15

Freedom HF Install Guide.book Page xiii Friday, December 21, 2007 9:57 PM
Figures
Figure 1-1 What’s In The Box - - - - - - - - - - - - - - - - - - - - - - - - - - - - - - - - - - - - - 1–2
Figure 1-2 Typical Recreational Vehicle and Fleet Vehicle Installation - - - - - - - - - - 1–6
Figure 1-3 Approved Mounting Orientations- - - - - - - - - - - - - - - - - - - - - - - - - - - - 1–13
Figure 1-4 DC Panel Connections - - - - - - - - - - - - - - - - - - - - - - - - - - - - - - - - - - - 1–14
Figure 1-5 Freedom HF AC Wiring Compartment - - - - - - - - - - - - - - - - - - - - - - - - 1–17
Figure 1-6 AC Wiring Diagram with an Inverter Subpanel - - - - - - - - - - - - - - - - - - 1–22
Figure 1-7 AC Wiring Diagram without an Inverter Subpanel - - - - - - - - - - - - - - - - 1–23
Figure 1-8 DC End - - - - - - - - - - - - - - - - - - - - - - - - - - - - - - - - - - - - - - - - - - - - - 1–24
Figure 1-9 DC Cable Connections- - - - - - - - - - - - - - - - - - - - - - - - - - - - - - - - - - - 1–27
Figure 1-10 Drip Shields - - - - - - - - - - - - - - - - - - - - - - - - - - - - - - - - - - - - - - - - - - 1–31
Figure 1-11 Typical Drip Shield Placement on a Freedom HF 1800 - - - - - - - - - - - - - 1–32
Figure 2-1 Dip Switches (Default Settings Shown) - - - - - - - - - - - - - - - - - - - - - - - 2–2
Figure 2-2 Display Panel - - - - - - - - - - - - - - - - - - - - - - - - - - - - - - - - - - - - - - - - - 2–3
Figure B-1 Typical Marine Installation- - - - - - - - - - - - - - - - - - - - - - - - - - - - - - - - B–3
975-0395-01-01 xiii
This guide for use by qualified installers only
Page 16

Freedom HF Install Guide.book Page xiv Friday, December 21, 2007 9:57 PM
xiv
This guide for use by qualified installers only
Page 17

Freedom HF Install Guide.book Page xv Friday, December 21, 2007 9:57 PM
Tables
Table 1-1 Required AC Wire Size vs Breaker Rating - - - - - - - - - - - - - - - - - - - - - 1–9
Table 1-2 Recommended Cable Sizes- - - - - - - - - - - - - - - - - - - - - - - - - - - - - - - - 1–10
Table 1-3 Recommended Equipment Ground Cable size - - - - - - - - - - - - - - - - - - - 1–14
Table 1-4 Required AC wire size vs. required breaker rating - - - - - - - - - - - - - - - - 1–16
Table 1-5 Color codes for typical AC wiring - - - - - - - - - - - - - - - - - - - - - - - - - - - 1–16
Table 2-1 Charging Current Guidelines- - - - - - - - - - - - - - - - - - - - - - - - - - - - - - - 2–5
Table A-1 Charging Voltage - - - - - - - - - - - - - - - - - - - - - - - - - - - - - - - - - - - - - - A–7
975-0395-01-01 xv
This guide for use by qualified installers only
Page 18

Freedom HF Install Guide.book Page xvi Friday, December 21, 2007 9:57 PM
xvi
This guide for use by qualified installers only
Page 19

FreedomHF_IC_01-Installation.fm Page 1 Monday, December 24, 2007 9:47 AM
1 Installation
Chapter 1 provides information to help in installing a
Freedom HF Inverter/Charger Installation.
It covers the following:
• Materials list.
• Safety instructions and various installation codes
that may be applicable to your installation.
• Sample installation tools and materials.
• High level overview of installation steps.
• Installation procedures starting on page 1–5
including mounting and connecting the equipment
ground, AC cabling, DC cabling, and grounding
steps.
• Drip shields installation (For Marine Installations).
This guide for use by qualified installers only
1–1
Page 20

FreedomHF_IC_01-Installation.fm Page 2 Monday, December 24, 2007 9:47 AM
Materials List
Your Freedom HF Inverter/Charger package includes the items listed
below.
•1 Freedom HF Inverter/Charger unit
• 1 Display panel with 7-inch (0.17 m) cable
• 1 Communications cable (25 feet) (7.5 m)
• 2 DC terminal covers
• 2 Strain-relief clamps (for AC input and output wiring)
• 1 Blanking plate
• 2 Reference materials–an Owner’s Guide and an Installation Guide
• 1 Set of mounting templates
• 1 Set of lock washers and nuts (not shown)
Freedom HF unit
blanking plate strain-relief clamps
Figure 1-1
What’s In The Box
Display panel is
attached to the unit.
communications cable
m
o
u
e
d
i
u
G
s
’
r
e
n
w
O
I
G
n
o
i
t
a
l
l
a
t
ns
n
t
i
n
g
t
e
m
p
l
a
t
e
d
i
u
e
DC terminal covers
1–2 975-0395-01-01
This guide for use by qualified installers only
Page 21

FreedomHF_IC_01-Installation.fm Page 3 Monday, December 24, 2007 9:47 AM
Safety Instructions
WARNING: Shock hazard
Xantrex Technology recommends that all wiring be done by a certified technician
or electrician to ensure adherence to the applicable electrical safety wiring
regulations.
• Before you begin the installation, review the “Important Safety
Instructions” on page v, and read this entire “Installation” section so
you can plan your installation from beginning to end.
• Disconnect all AC and DC power sources to prevent accidental
shock. Disable and secure all AC and DC disconnect devices and
automatic generator starting devices.
Installation Codes
Safety Instructions
Governing installation codes vary depending on the specific location and
application of the installation. Some examples include the following:
• The U.S. National Electrical Code (NEC)
• The Canadian Electrical Code (CEC)
• The U.S. Code of Federal Regulations (CFRs)
• Canadian Standards Association (CSA) and the RV Industry
Association (RVIA) for installations in RVs
• The American Boating and Yachting Committee (ABYC) for Marine
installations in the U.S.
It is the installer’s responsibility to ensure that all applicable installation
requirements are met.
975-0395-01-01 1–3
This guide for use by qualified installers only
Page 22

FreedomHF_IC_01-Installation.fm Page 4 Monday, December 24, 2007 9:47 AM
Installation Tools and Materials
You will need the following to install the Freedom HF:
❐ W ire stripper
❐ Mounting screws or bolts
❐ #2 Phillips screwdriver
❐ Wrench for DC terminals (1/2 inch or 13mm or adjustable)
❐ AC cable (i.e. 2-conductor-plus-ground cable), sized appropriately
for load and application
❐ Wire nuts or crimp connectors for AC wire and appropriate tools
❐ Two 1/2 inch strain-relief clamps (supplied) for AC cables
❐ DC cable, sized appropriately for load and application
❐ Lugs for DC cables to fit 8 mm (5/16 in.) DC stud terminals) as well
as appropriate tools (e.g. crimping tool)
❐ AC and DC disconnects and over-current protective devices
High Level Overview of Installation Steps
Installing the Freedom HF includes the following steps.
1. Ensure that AC and DC power are both OFF.
2. Mount the inverter securely and permanently in one of the acceptable
orientations.
3. Connect the Equipment Grounding T e rminal to the equipment ground
bus.
4. Connect the AC input wiring to the AC source panel.
5. Connect the AC output wiring to the AC load panel.
6. Connect one end of the DC negative cable to the negative of the
battery, and the other to the negative terminal of the unit.
7. Install an appropriately sized fuse and DC disconnect in the positive
cable.
8. Connect the DC positive cable to the positive of the battery , and to the
positive terminal of the unit.
9. Close the DC disconnect switch.
Do not proceed with installation until you have read “Safety Instructions”
on page 1–3.
1–4 975-0395-01-01
This guide for use by qualified installers only
Page 23

FreedomHF_IC_01-Installation.fm Page 5 Monday, December 24, 2007 9:47 AM
Basic Installation Procedures
Xantrex recommends that you have your installation performed by a
qualified technician or electrician.
This section provides sample installation information as a guide for your
installation. For your convenience, the overall procedure is divided into
ten main steps:
❐ Step 1: Designing an installation. (Start on page 1–6.)
❐ Step 2: Choosing a location for the Freedom HF.
(Start on page 1–12.)
❐ Step 3: Mounting the Freedom HF. (Start on page 1–13.)
❐ Step 4: Connecting the AC input wires. (Start on page 1–15.)
❐ Step 5: Connecting the AC output wires. (Start on page 1–19.)
❐ Step 6: Connecting the DC cables. (Start on page 1–24.)
Basic Installation Procedures
❐ Step 7: Mounting the display panel. (Start on page 1–28.)
❐ Step 8: Testing your installation. (Start on page 1–29.)
975-0395-01-01 1–5
This guide for use by qualified installers only
Page 24

FreedomHF_IC_01-Installation.fm Page 6 Monday, December 24, 2007 9:47 AM
Step 1: Designing the Installation
Most Freedom HF installations share common components, and
some of these are briefly described below. Figure 1-2 shows some
components and their relationship to each other in a typical
recreational vehicle or fleet vehicle installation. (Also, see “Marine
Installation Diagram” on page B–1.)
DC Fuse /
Disconnect or
Circuit Breaker
12V Deep Cycle
Battery
Equipment Ground
HF| 1000
FREEDOM
l
Equipment Ground
Figure 1-2
AC Load Panel
+
Vehicle Starting
Battery
–
Generator
to engine
AC Source Panel
Automatic or Manual AC
Source Select or Switch
Shorepower
Typical Recreational Vehicle and Fleet Ve hicle Installation
1–6 975-0395-01-01
This guide for use by qualified installers only
Page 25

FreedomHF_IC_01-Installation.fm Page 7 Monday, December 24, 2007 9:47 AM
AC shore power A source of 120 V, 60Hz sine wave alternating current is needed to
provide energy to charge batteries and pass power through to AC loads.
This source is usually the utility grid (power company) or an AC
generator. An automatic or manual AC source selector switch can be used
to switch between the multiple sources of shore power to the Freedom HF
system.
The AC source feeding the Freedom HF must have the neutral conductor
bonded to ground. When the inverter passes shore power through, it will
lift the bonding relay on the output and will rely on the input being
bonded in order to ensure that the power delivered to a sub panel is
properly bonded. See “AC Output Neutral Bonding” on page 1–9 for
more information on bonding relay operation.
Basic Installation Procedures
Important:
input power from a utility grid, generator, or other AC source.
Throughout this manual, the term “shore power” refers to AC
Generator The Freedom HF is compatible with most generators which produce
nominal 120 Vac 60Hz sine wave AC power.
Since the DC charging current limit of the Freedom HF may be
configured to provide as little as 2A it is possible to use very small
generators with the Freedom HF to charge batteries. The Freedom HF has
been tested with generators of various sizes, including some as small as
700W.
AC Disconnect
and OverCurrent
Most safety requirements and electrical codes require the Freedom HF’s
AC and DC inputs and outputs to be provided with over-current
protection (such as circuit breakers or fuses) and disconnect devices.
Protection
Device
AC Input: The circuit breaker or fuse (connected through hard
wiring) that is used to supply the Freedom HF must be rated at no
more than 30A and must be approved for use on 120 Vac branch
circuits. The wire used between the breaker and the Freedom HF
input must be sized adequately to carry current up to the rating of the
input breaker and in accordance with the electrical codes or
regulations applicable to your installation.
975-0395-01-01 1–7
This guide for use by qualified installers only
Page 26

FreedomHF_IC_01-Installation.fm Page 8 Monday, December 24, 2007 9:47 AM
AC Output: The circuit breaker or fuse must be rated at no more than
the rating of the input breaker in the installation and must be
approved for use on 120 Vac branch circuits. The wire used between
the Freedom HF and the AC output breaker must be of adequate size
to match the AC input circuit breaker’s rating. The wiring from each
AC output breaker to each of the loads must be adequately sized to
carry the current rating of the individual AC output breaker.
Disconnect Devices: Each system requires a method of
disconnecting the AC circuits. If the over-current protection devices
are circuit breakers, they will also serve as the disconnects. If fuses
are used, separate AC disconnect switches will be needed ahead of
the fuses. These will have to be a branch circuit rated for 120 Vac and
have an appropriate current rating.
AC Distribution
Panels
Most systems incorporate distribution centers both ahead of the Freedom
HF (the AC source panel) and between the Freedom HF and the loads (the
AC load panel). An AC source panel includes a main circuit breaker,
which serves as over-current protection and as a disconnect for the AC
shore power supply line. Additional circuit breakers serve individual
circuits, one of which serves the Freedom HF. The AC load panel can
incorporate an AC output circuit breaker and breakers for individual load
circuits.
CAUTION: Equipment damage
Do not connect the output of the Freedom HF to what is known as a “multi-wire
branch circuit”. These are four-wire circuits consisting of a ground, neutral, and
two lines that are 180 degrees out of phase with each other (from a standard 120/
240V “split phase” circuit). These circuits are commonly used in kitchens to
power “split receptacles” where the top and bottom halves of a duplex receptacle
are connected to different lines.
AC Cabling AC cabling includes all the wires and connectors between the AC source
and the Freedom HF, as well as all cabling between the Freedom HF and
the AC output panels, circuit breakers, and loads. The type an d size of the
wiring varies with the installation and load. For example, in high
vibration environments, such as marine or R V applications, wire nuts may
not be acceptable, so crimp splices would be required. In other
applications, flexible multiple-strand wire may be required. Installation
codes usually specify solid or stranded, overall size of the conductors, and
type and temperature rating of the insulation around the wire.
1–8 975-0395-01-01
This guide for use by qualified installers only
Page 27

FreedomHF_IC_01-Installation.fm Page 9 Monday, December 24, 2007 9:47 AM
AC breakers and fuses must be sized to adequately protect the wiring that
is installed on the input and output AC circuits of the Freedom HF. All
breakers and wiring must be sized and connected in accordance with the
electrical codes or regulations applicable to your installation. Table 1-1
gives some examples of wiring sizes based on the U.S. National Electrical
Code and the Canadian Electrical Code. These examples are based on
using a 2-conductor-plus-ground cabl e rated at 75 °C, and assuming an
ambient temperature of up to 30 °C. Ensure that your breakers, and fuses
have suitable temperature ratings for your wiring. Other codes and
regulations may also be applicable to your installation.
Basic Installation Procedures
AC Output
Neutral
Bonding
Table 1-1
Breaker Size
Minimum Wire Size
The neutral conductor of the Freedom HF’s AC output circuit (i.e., AC
Output Neutral) is automatically connected to the safety ground during
inverter operation. When AC utility power is present and the Freedom HF
Required AC Wire Size vs Breaker Rating
10A 15A 20A 30A
14AWG 14AWG 12AWG 10AWG
is charging, this connection is not present, so that the utility neutral (i.e.,
AC Input Neutral) is only connected to utility ground at your source. This
conforms to National Electrical Code, which requires that separately
derived AC sources (such as inverters and generators) to have their
neutral conductors tied to ground in the same way that the neutral
conductor from the utility is tied to ground in only one place. Check the
regulations for your specific application to ensure that the installation will
comply with the necessary requirements. In other words, the AC Input
Neutral and Output Neutral must be isolated from each other.
DC Cabling This includes all the cables and connectors between the batteries, the DC
disconnect and over-current protection device, and the Freedom HF. Most
mobile installations require multi-strand insulated cables for flexibility
and durability in high vibration environments and require disconnects and
over-current devices. Electrical wiring sizes are indicated by AWG
notation. Under the AWG standard, a larger gauge number indicates a
smaller wire diameter. Wire size is usually marked on the larger sized
cables. Table 1-2 specifies the minimum recommended DC cable size and
maximum fuse size for the Freedom HF. The DC cables must be copper
and must be rated 75 °C minimum. The cables should be terminated
with lugs that fit the DC stud terminals snugly (8 mm or 5/16 in. hole
size).
975-0395-01-01 1–9
This guide for use by qualified installers only
Page 28

FreedomHF_IC_01-Installation.fm Page 10 Monday, December 24, 2007 9:47 AM
Table 1-2
Inverter/Charger
Freedom HF 1000 Less than 5 feet (1.5
Freedom HF 1800 Less than 5 feet (1.5
Note: Xantrex recommends not using a cable longer than 5 feet (1.5 meters) in each direction. Cable
sizes above are based on the US National Electrical Code Table 310.17 - 75C cables, assuming an
ambient temperature of 30
DC Disconnects
and OverCurrent Devices
Recommended Cable Sizes
Cable Length: Battery
to Inverter (one way) Minimum Cable Size
meters)
meters)
°C cables.
Important:
performance of the Freedom HF unit. When starting a heavy load the Freedom
HF can draw current surges from the battery of up to 400A. If the DC wiring is
too small the voltage drop from this surge will result in a voltage at the Freedom
HF terminals that is too low for the Freedom HF to operate correctly. The
Freedom HF may appear to operate correctly with smaller cables until a heavy
load such as a microwave or refrigerator attempts to start - then the unit may
work correctly sometimes and not work correctly other times.
Using the correct cable size is critical to achieving the rated
The DC circuit from the battery to the Freedom HF must be equipped
with a disconnect and over-current device. This usually consists of a
circuit breaker, a “fused-disconnect,” or a separate fuse and DC
Maximum battery Fuse
Size
No. 2 AWG 150 Adc
No. 2/0 AWG 250 Adc
disconnect. Do not confuse AC circuit breakers with DC circuit breakers.
They are not interchangeable. The rating of the fuse or breaker must be
matched to the size of cables used in accordance with the applicable
installation codes. The breaker or disconnect and fuse should be located
as close as possible to the battery, in the positive cable. Applicable codes
may limit how far the protection can be from the battery.
Batteries The Freedom HF uses 12-volt battery banks. Every Freedom HF system
requires a deep-cycle battery or group of batteries that provide the DC
current that the Freedom HF converts to AC.
1–10 975-0395-01-01
This guide for use by qualified installers only
Page 29

FreedomHF_IC_01-Installation.fm Page 11 Monday, December 24, 2007 9:47 AM
Basic Installation Procedures
Ground Fault
Circuit
Interrupters
(GFCIs)
A GFCI is a device that de-energizes a circuit when a current to ground
exceeds a specified value that is less than that required to blow the circuit
breaker. GFCIs are intended to protect people from electric shocks and
are usually required in wet or damp locations.
Installations in marine and recreational vehicles require GFCI protection
of branch circuits connected to the AC output of the Freedom HF.
The modified sine wave output of the Freedom HF is not equivalent to the
waveform provided by electric utilities, and compliance with UL and
CSA standards requires that Xantrex test and recommend specific GFCIs
that will work correctly with the Freedom HF.
For more information about GFCIs, see the application note "Using GFCI
Receptacles on Xantrex Inverters and Inverter/Chargers" in the Document
Library at www.xantrex.com/support.
975-0395-01-01 1–11
This guide for use by qualified installers only
Page 30

FreedomHF_IC_01-Installation.fm Page 12 Monday, December 24, 2007 9:47 AM
Step 2: Choosing a Location for the Freedom HF
WARNING: Fire and explosion hazard
This equipment contains components that tend to produce arcs or sparks. To
prevent fire or explosion, do not install the Freedom HF in compartments
containing batteries or flammable materials, or in locations that require ignitionprotected equipment. This includes any space containing gasoline-powered
machinery, fuel tanks, or joints, fittings, or other connections between
components of the fuel system.
WARNING: Fire hazard
To reduce the risk of fire, do not cover or obstruct the ventilation openings. Do
not install the Freedom HF in a zero-clearance compartment. Overheating may
result.
The Freedom HF should only be installed in locations that meet the
following requirements:
❐ Dry. Do not allow water or other fluids to drip or splash on the
Freedom HF. Do not mount the Freedom HF in an area subject to
splashing water or bilge water.
❐ Cool. Normal air temperature should be between 32 °F and 104 °F
(0 °C and 40 °C)—the cooler the better.
❐ Ventilated. Allow at least 5 in. (13cm) of clearance at the DC end of
the Freedom HF for air flow, 1 in. (2.5cm) on each side, and 2 in.
(5cm) at the AC end. The more clearance for ventilation around the
unit, the better the performance. Do not allow the ventilation
openings on the ends of the unit to become obstructed.
❐ Safe. Do not install the Freedom HF in the same compartment as
batteries or in any compartment capable of storing flammable liquids
like gasoline.
❐ Close to the battery compartment and the AC source and load
panels. Avoid excessive cable lengths (which reduce input and output
power due to wire resistance). Use the recommended cable lengths
and sizes, especially between the battery banks and the Freedom HF.
❐ Protected from battery acid and gases. Never allow battery acid to
drip on the Freedom HF or its wiring when reading specific gravity or
filling the battery. Also do not mount the unit where it will be
exposed to gases produced by the batteries. These gases are very
corrosive, and prolonged exposure will damage the Freedom HF.
1–12 975-0395-01-01
This guide for use by qualified installers only
Page 31

FreedomHF_IC_01-Installation.fm Page 13 Monday, December 24, 2007 9:47 AM
Step 3: Mounting the Freedom HF
To mount the Freedom HF:
1. Remove the Freedom HF from its shipping container, verify that all
components are present, and record relevant product information on
“Information About Your System” on page WA–4.
2. Select an appropriate mounting location and orientation. (See Figure
1-3 below.) To meet regulatory requirements, for use in on-land
applications, the Freedom HF must be mounted in one of the
following orientations:
• Under a horizontal surface (see 1)
• In a horizontal position on a vertical surface (see 2)
Note: For marine installations, only this orientation is allowed,
due to the probability of moisture finding access into the
enclosure.
Basic Installation Procedures
• On a horizontal surface (see 3)
See page 1–31 for drip
shield installation on
Marine applications.
Figure 1-3
1
2
3
Approved Mounting Orientations
3. Look for the mounting template and unfold. Tape it to the mounting
surface and pilot-drill the desired number of mounting holes. Remove
the template.
4. Fasten the Freedom HF to the mounting surface. If you are mounting
the unit on a wall or bulkhead, use #12 or #14 pan-head wood or sh eet
metal screws to secure it to the framing behind the wall or bulkhead.
Alternatively, use nut inserts and 1/4-20 machine screws.
975-0395-01-01 1–13
This guide for use by qualified installers only
Page 32

FreedomHF_IC_01-Installation.fm Page 14 Monday, December 24, 2007 9:47 AM
Connecting the Equipment Ground
WARNING: Fire hazard
Never operate the Freedom HF without properly connecting the equipment
ground. A fire hazard could result from improper grounding.
The Freedom HF has a ground stud on the side of the unit as shown in
Figure 1-4. Follow the guidelines in “Grounding Locations” to connect
the inverter’s chassis to the ground.
Equipment
ground stud
Figure 1-4
Grounding Locations
You must con nect the equipment ground stud to a grounding point—
usually the vehicle’s chassis or DC negative bus ground—using
recommended copper wire (if insulated then green insulation with or
without one or more yellow stripes) or larger.
For recommended equipment ground cable size, see below.
Table 1-3
Application
Recreational Vehicle
Marine
Note: There are no restrictions on length for the equipment ground cable.
In general, the equipment ground cable size must not be smaller than one
AWG size than the supply cable.
DC Panel Connections
Recommended Equipment Ground Cable size
Minimum equipment ground cable size
(Stranded cable is recommended)
a
No. 8 AWG
b
a.Based on US National Electrical Code NFPA70, Article 551, par. 551-20c 2005
version.
b.Based on ABYC E-11 11.18 dated 07/03
No. 3 AWG (Freedom HF 1000)
No. 1/0 A WG (Freedom HF 1800)
1–14 975-0395-01-01
This guide for use by qualified installers only
Page 33

FreedomHF_IC_01-Installation.fm Page 15 Monday, December 24, 2007 9:47 AM
Step 4: Connecting the AC Input Wires
WARNING: Fire, Shock and Energy hazards
Make sure wiring is disconnected from all electrical sources before handling. All
wiring must be done in accordance with local and national electrical wiring
codes. Do not connect the output terminals of the Freedom HF to any incoming
AC source.
General AC Wiring Considerations
Basic Installation Procedures
AC Wiring
Connectors
AC and DC
Wiring
Separation
AC Wiring
Compartment
AC Wiring and
GFCIs
Connect AC wires with crimp-on splice connectors.
The amount of insulation you strip off individual wires will be specified
by the connector manufacturer and is different for different types of
connectors.
Do not mix AC and DC wiring in the same conduit or panel. Where DC
and AC wires must cross, make sure they do so at 90° to one another.
Consult applicable codes for details about DC and AC wiring in close
proximity to each other.
For your reference, the AC Wiring Compartment is shown in Figure 1-5.
You can plug loads (12 A continuous, 15 A maximum) directly into the
GFCI receptacle on the front panel of the Freedom HF. You can also
connect the inverter to an existing AC installation and then plug loads into
GFCI receptacles connected to that circuit.
If you plan to use the Freedom HF with the GFCI installed on the unit,
proceed to “Step 6: Connecting the DC Cables” on page 1–24.
If you plan to hard wire the Freedom HF AC input and output to an
existing AC installation, read this section.
AC wiring includes all the wires and connectors between the AC source
and the Freedom HF and all wiring between the inverter, the AC panels,
circuit breakers, and the GFCIs. The type and size of the wiring varies
with the installation and load. For some RV applications, flexible
multiple-strand wire is required.
975-0395-01-01 1–15
This guide for use by qualified installers only
Page 34

FreedomHF_IC_01-Installation.fm Page 16 Monday, December 24, 2007 9:47 AM
AC wiring must be sized appropriately to carry full load current on the
input and output AC circuits in accordance with the electrical codes or
regulations applicable to your installation. Table 1-4 is based on the U.S.
National Electrical Code, 2003 Ed. and the Canadian Electrical Code,
assuming 2-conductor-plus-ground cable, using 75 °C wiring, at an
ambient temperature of 30 °C. Other codes and regulations may be
applicable to your installation.
Table 1-4
Freedom HF
Required AC wire size vs. required breaker rating
Required Breaker Size Required Wire Size
30 A maximum 10 AWG
There are two knockouts on the front panel for AC input and output
wiring. Use the supplied strain relief clamps to prevent damage to the
wiring from tension being applied.
CAUTION: Equipment damage
The AC wiring terminal block is split into input and output sections. Damage to
the inverter will occur if the unit is wired incorrectly.
When making the AC input and AC output connections, observe the
correct color code for the appropriate AC wire, as described in Table 1-5.
Table 1-5
Color AC Wire
Black or Brown Line
White or Blue Neutral
Green, Green/Yellow,
or bare copper
Color codes for typical AC wiring
Ground
AC Input Connections
1. Ensure that AC and DC power are both OFF.
2. Install the required circuit breaker in the AC output panel supplying
the unit (See Figure 1-6 on page 1–22).
3. Remove the screws securing the GFCI AC receptacle and remove it
from the front panel.
4. Disconnect the GFCI wiring, if desired.
1–16 975-0395-01-01
This guide for use by qualified installers only
Page 35

FreedomHF_IC_01-Installation.fm Page 17 Monday, December 24, 2007 9:47 AM
5. Remove the left-hand side AC wiring knockout from the front panel
of the unit (see Figure 1-5 on page 1–17).
6. Install one of the supplied strain-relief clamps in the AC knockout.
7. Locate the terminal block.
The two input terminals are labeled as follows:
• AC Input (L)
• AC Input (N)
A separate screw is provided to connect the AC input ground (see
Figure 1-5 on page 1–17).
Basic Installation Procedures
AC input
ground screw
AC knockout
Figure 1-5
STATUS
Battery
Utili ty
Fault
Inpu tVoltag e( V)
Select
Inpu tC urre nt (A)
Outpu t Pow er (W )
CAUTION!
other source of power . Damage to unit may occur .
AC OUTPUT
Do not connect the AC OUT to any
L GND
AC INPUT
N
Freedom HF AC Wiring Compartment
8. Strip about 2 inches (50 mm) from the jacket of the AC input cable.
The AC input cable may be either solid or stranded (as required), but
must have three conductors and be sized as in
(The AC terminal block accepts wire sizes up to No. 10 AWG.)
9. Strip approximately 3/8 inch (10 mm) from the insulation of each
conductor.
10. Run the AC cable through the right-hand side strain-relief clamp and
into the wiring compartment.
11. Fasten the Ground wire to the grounding screw.
12. Using the 1/8 inch slot screwdriver, loosen the wire attachment
screws on the terminals.
N
L GND
AC output
ground screw
FREEDOM HF1000
AC knockout
T abl e 1-4 on page 1–16.
CAUTION: Reverse polarity
Improper connections (connecting a line conductor to a neutral conductor, for
example) will cause the Freedom HF to malfunction and may permanently
damage the inverter. Damage caused by a reverse polarity connection is not
covered by your warranty.
975-0395-01-01 1–17
This guide for use by qualified installers only
Page 36

FreedomHF_IC_01-Installation.fm Page 18 Monday, December 24, 2007 9:47 AM
13. Insert the Line and Neutral wires into the corresponding terminals.
14. Tighten the wire attachment screws to a torque of 1.3–1.8 lbf-ft
(1.76–2.44 Nm). Leave some wiring slack inside the wiring
compartment.
15. Secure the AC cable by adjusting the strain-relief clamps.
If you do not plan to proceed with “Step 5: Connecting AC Output to
an Existing AC Circuit” on page 1–19, follow the succeeding substep.
16. Install the GFCI back into the front panel of the unit.
Alternatively , if you do not reinst all the GFCI, make sure that you cap
the exposed wires and install a blanking plate to cover the space
vacated by the GFCI.
1–18 975-0395-01-01
This guide for use by qualified installers only
Page 37

FreedomHF_IC_01-Installation.fm Page 19 Monday, December 24, 2007 9:47 AM
Step 5: Connecting AC Output to an Existing AC Circuit
WARNING: Shock, fire, and energy hazards
Make sure wiring is disconnected from all electrical sources before handling. All
wiring must be done in accordance with applicable local and national electrical
wiring codes.
WARNING: Shock hazard and equipment damage
Do not connect any AC source (such as a generator or utility power) to the
AC wiring output of the Freedom HF.
The Freedom HF will not operate if its output is connected to AC voltage from
another source, and potentially hazardous or damaging conditions may occur.
These conditions can occur even if the inverter is off.
Do not connect the Freedom HF to an AC branch circuit that has
high-power consumption loads.
The Freedom HF will not operate electric heaters, air conditioners, stoves,
and other electrical appliances that consume more than 1000 watts
(Freedom HF 1000) or 1800 watts (Freedom HF 1800).
Basic Installation Procedures
A Xantrex-tested and approved GFCI must be connected to the Freedom
HF AC output, and on every receptacle connected to the AC hard wired
installation. Other types may fail to operate properly when connected to
the Freedom HF. Although you can reuse the factory-installed GFCI,
Xantrex has also tested and approved the following GFCIs for use with
the Freedom HF:
Make Model
Hubbell GFR5252
Leviton 6598
8598
For more information about GFCIs, see the application note “Using GFCI
Receptacles on Xantrex Inverters and Inverter/Chargers” in the Document
Library at www.xantrex.com.
975-0395-01-01 1–19
This guide for use by qualified installers only
Page 38

FreedomHF_IC_01-Installation.fm Page 20 Monday, December 24, 2007 9:47 AM
WARNING: Shock, fire, and energy hazards
Make sure wiring is disconnected from all electrical sources before handling. All
wiring must be done in accordance with applicable local and national electrical
wiring codes. Do not connect the output leads of the inverter to any incoming AC
source.
To make a permanent connection to existing AC wiring (continuing
from # 15 of “Step 4: Connecting the AC Input Wir es” on page 1–15):
1. Ensure that AC and DC power are both OFF.
2. Install the required value of circuit breaker in the AC load panel (see
Figure 1-6 on page 1–22 and Figure 1-7 on page 1–23).
3. Remove the left-hand side AC wiring knockout from the front of the
unit.
Important:
IN and AC OUT wiring through the same AC knockout.
The applicable installation code may not allow you to run the AC
4. Install one of the supplied strain-relief clamps in the AC knockout.
5. Locate the terminal block.
The two output terminals are labeled as follows:
•AC Output (L)
•AC Output (N)
A separate screw is provided to connect the AC output ground.
6. Strip about 2 inches (50 mm) from the jacket of the AC output cable.
The AC output cable may be either s olid or stranded (as required), but
must have three conductors and sized as in Table 1-4 on page 1–16.
(The AC terminal block accepts wire sizes up to No. 10 AWG.)
7. Strip approximately 3/8 inch (10 mm) off the insulation of each
conductor.
8. Run the AC cable through the left-hand side strain-relief clamp and
into the wiring compartment.
9. Fasten the Ground wire to the grounding screw.
10. Using the 1/8 inch slot screwdriver, loosen the wire attachment
screws on the terminals.
1–20 975-0395-01-01
This guide for use by qualified installers only
Page 39

FreedomHF_IC_01-Installation.fm Page 21 Monday, December 24, 2007 9:47 AM
CAUTION: Reverse polarity
Improper connections (connecting a line conductor to a neutral conductor, for
example) will cause the Freedom HF to malfunction and may permanently
damage the inverter. Damage caused by a reverse polarity connection is not
covered by your warranty.
11. Insert the Line and Neutral wires into the corresponding terminals.
12. Tighten the wire attachment screws to a torque of 1.3–1.8 lbf-ft
(1.76–2.44 Nm). Leave some wiring slack inside the wiring
compartment.
Ensure you have maintained correct polarity and that there are no
loose strands of wire.
13. Secure the cable by adjusting the strain-relief clamps.
14. Install the GFCI back into the front panel of the unit.
Alternatively , if you do not reinst all the GFCI, make sure that you cap
the exposed wires and install a blanking plate to cover the space
vacated by the GFCI.
Basic Installation Procedures
15. Connect the outgoing AC wires to the AC load panel.
975-0395-01-01 1–21
This guide for use by qualified installers only
Page 40

FreedomHF_IC_01-Installation.fm Page 22 Monday, December 24, 2007 9:47 AM
CAUTION: Equipment damage
Do NOT connect the AC OUT Neutral and Line
to the AC IN Neutral and Line.
See Important note below.
Figure 1-6
AC Wiring Diagram with an Inverter Subpanel
In this wiring diagram, the AC input to the Freedom HF comes from the
main AC panel which contains the input circuit breaker. The AC output
wiring is routed to a separate inverter subpanel with a dedicated circuit
breaker.
Important:
bonded, a bonding jumper must be installed between the neutral and ground at
the generator’s output or at the generator side of the transfer switch.
Also, both the main AC panel and the inverter subpanel must not have a
permanent neutral to ground bonds installed.
The generator must have its neutral bonded to ground. If it is not
See Important
note below.
See Important
note below.
1–22 975-0395-01-01
This guide for use by qualified installers only
Page 41

FreedomHF_IC_01-Installation.fm Page 23 Monday, December 24, 2007 9:47 AM
CAUTION: Equipment damage
Do NOT connect the AC OUT Neutral and Line
to the AC IN Neutral and Line.
See Important note below.
Basic Installation Procedures
Figure 1-7
Input breakers must
be provided by
installers.
AC Wiring Diagram without an Inverter Subpanel
In this wiring diagram, the AC input to the Freedom HF comes directly
from an AC source. The AC source input wiring must be protected by an
AC breaker of 30 A max. The output wiring is routed to the main AC
panel which is also protected by AC breakers or circuit breakers.
Important:
bonded, a bonding jumper must be installed between the neutral and ground at
the generator’s output or at the generator side of the transfer switch.
Also, the main AC panel must not have a permanent neutral to ground bond
installed.
The generator must have its neutral bonded to ground. If it is not
See Important
note below.
975-0395-01-01 1–23
This guide for use by qualified installers only
Page 42

FreedomHF_IC_01-Installation.fm Page 24 Monday, December 24, 2007 9:47 AM
Step 6: Connecting the DC Cables
CAUTION
Before making the final DC connection, check cable polarity at both the battery
and the Freedom HF. Positive must be connected to positive; negative must be
connected to negative.
Reversing the positive and negative battery cables will damage the Freedom HF
and void your warranty. This type of damage is easily detected.
WARNING: Fire hazard
Use only copper wire rated 75 °C minimum. Make sure all DC connections are
tight to a torque of 216–240 inch-pounds (24–27Nm). Loose connections will
overheat.
Follow the procedure given below to connect the battery leads to the
terminals on the DC end. The cables should be as short as possible and
large enough to handle the required current, in accordance with the
electrical codes or regulations applicable to your installation. Table 1-2 on
page 1–10 specifies the minimum DC cable size and maximum fuse size
for the Freedom HF.
Do not route your DC cables through an electrical distribution panel,
battery isolator, or other device that will cause additional voltage drops.
Figure 1-8 shows the DC end for your reference.
Figure 1-8
DC End
1–24 975-0395-01-01
This guide for use by qualified installers only
Page 43

FreedomHF_IC_01-Installation.fm Page 25 Monday, December 24, 2007 9:47 AM
To make the DC connections
Refer to Figure 1-9.
1. Make sure the inverter is off and no AC or DC is connected to the
unit.
2. Remove the nuts and washers from the Freedom HF positive and
negative DC terminals.
3. Strip 1/2 inch (13 mm) to 3/4 inch (19 mm) insulation from one end
of each cable. The amount stripped off will depend on the terminals
chosen.
4. Attach the connectors that will secure the cables to the battery, to the
disconnect/battery selector switch, and the fuse block. The connectors
you use must create a permanent, low-resistance connection.
If crimp connectors are required, Xantrex recommends using
approved and certified connectors, and to use the tool recommended
by the terminal manufacturer . Make sure no stray wires protrude from
the connector or terminal.
(You may find it more convenient to have the crimp connectors
attached by the company that sells you the cable and/or connectors.)
5. For each cable end that will be connected to the inverter, strip 1/2
inch (13 mm) to 3/4 inch (19 mm) of insulation from the cable. The
amount stripped off will depend on the terminals chosen.
6. Thread a supplied DC terminal cover over the positive and negative
cables. The red cover goes on the positive cable; the black cover on
the negative cable.
Basic Installation Procedures
7. Attach the connector that will join the cable to the inverter DC
terminal.
8. Install a fuse and fuse holder in the cable that will be used for the
positive side of the DC circuit.
The fuse must:
• be as close to the battery positive terminal as possible,
• be rated for DC circuits,
• have an Ampere Interrupting Capacity (AIC) that exceeds the
short-circuit current available from the battery (i.e., Class T fuse).
975-0395-01-01 1–25
This guide for use by qualified installers only
Page 44

FreedomHF_IC_01-Installation.fm Page 26 Monday, December 24, 2007 9:47 AM
9. To prevent sparking when making the connection, ensure the
disconnect/battery selector switch is off.
10. Attach the connector on the positive cable to the positive DC terminal
on the inverter.
11. Install the lock washer and nut that are supplied with the inverter.
Tighten the nut to a torque of 108–120 in-lbf (12.2–13.6 N-m). Make
the connection snug enough so the ring terminal does not move
around on the DC terminal, but do not overtighten. See Figure 1-9,
“DC Cable Connections” on page 1–27.
CAUTION
Loose connections cause excessive voltage drop and may cause overheated wires
and melted insulation.
CAUTION
Do not over-tighten the nut on the DC input terminals. Damage to the DC input
terminals may result.
The maximum torque setting is 120 in-lbf (13.6 N-m).
CAUTION: Reverse polarity
DC power connections to the Freedom HF must be positive to positive and
negative to negative.
A reverse polarity connection (positive to negative) will blow a fuse in the
inverter and may permanently damage the inverter. The fuse is not user
replaceable and the inverter may need to be returned for servicing.
Damage caused by a reverse polarity connection is not covered by your warranty.
12. Before proceeding, double check that the cable you have just installed
connects the positive DC terminal of the inverter to the disconnect/
battery selector switch, fuse holder, and that the other end of the fuse
holder is connected to the positive terminal of the battery.
.
WARNING: Explosion or fire
Do not complete the next step if flammable fumes are present. Explosion or fire
may result if the disconnect/battery selector switch is not in the off position.
Thoroughly ventilate the battery compartment before making this connection.
13. Connect the cable from the negative post of the battery to the negative
DC terminal of the inverter.
1–26 975-0395-01-01
This guide for use by qualified installers only
Page 45

FreedomHF_IC_01-Installation.fm Page 27 Monday, December 24, 2007 9:47 AM
14. Install the lock washer and nut that are supplied. Tighten the nut to a
torque of 108–120 in-lbf (12.2–13.6 N-m). Make the connection snug
enough so the ring terminal does not move around on the DC
terminal, but do not overtighten.
15. Slip the DC terminal covers over the Freedom HF DC terminals.
Basic Installation Procedures
DC Grounding
Figure 1-9
DC Cable Connections
To connect the DC ground:
The equipment grounding lug on the DC end of the Freedom HF is used
to connect the chassis of the Freedom HF to your system’s DC negative
connection or grounding bus point as required by electrical regulations.
Use copper wire that is either bare or provided with green insulation. Do
not use the DC Ground Lug for your AC grounding. (See the AC wiring
instructions in this section.)
Follow the guidelines below that correspond to the specific type of
installation. These guidelines assume you are using the DC supply cable
and fuse sizes recommended in this manual. If you are using different
sizes, refer to the applicable installation code for DC grounding details.
•
Recreational Vehicle Use 8AWG copper wire and connect it
between the Chassis Ground lug and the vehicle’s DC grounding
point (usually the vehicle chassis or a dedicated DC ground bus).
Marine Use copper wire that is bare or has insulation rated min.
•
°C, and connect it between the Chassis Ground lug and the boat’s
105
DC grounding bus or engine negative bus. For the Freedom HF 1000,
use a wire of gauge 4AWG minimum. For the Freedom HF 1800, use
a wire of gauge 1/0AWG minimum.
975-0395-01-01 1–27
This guide for use by qualified installers only
Page 46

FreedomHF_IC_01-Installation.fm Page 28 Monday, December 24, 2007 9:47 AM
Step 7: Mounting the Display Panel
The communications cable supplied with the display panel is 25 feet (7.62
meters) long. If you want to replace the cable with one that is shorter, use
a high quality, 6-wire telephone extension cable.
Flush mounting the panel on a wall, bulkhead, or panel requires an
opening that is approximately 3.25 × 1.25 inches (8.25 × 3.18 cm). About
1.5 inches (3.81 cm) of free space is required within the wall to
accommodate the depth of the panel. Be sure there is no wiring or other
obstructions within the wall before you make an opening.
To mount the display panel:
1. Choose a location that is dry, out of direct sunlight, free from
corrosive or explosive fumes, and otherwise appropriate for mounting
an electronic device.
2. Tape the mounting template (in the Freedom HF package) to the
mounting surface and mark the locations of the mounting holes and
the area to be cut away.
3. Pilot-drill the mounting holes and cut out the hole in which the panel
will be inserted.
4. Route the communications cable(s) inside the wall and through the
opening.
5. Insert one of the cable’s connectors in either jack on the bottom of the
panel.
6. Place the panel in the opening and secure it with appropriate
fasteners.
7. Route the communications cable to the Freedom HF and insert the
connector in the jack located near the battery select dip switch.
Important:
with the AC and DC wires. In situations where the cable must cross with the AC
and DC wires, make sure they cross at a 90° angle to each other.
Do not route the communications cable in parallel and in conduit
1–28 975-0395-01-01
This guide for use by qualified installers only
Page 47

FreedomHF_IC_01-Installation.fm Page 29 Monday, December 24, 2007 9:47 AM
Step 8: Testing Your Installation
WARNING: Shock hazard
Pressing the Inverter button to turn OFF the Freedom HF inverter function on
display panel does not disconnect DC or AC input power to the Freedom HF. If
shore power is present at AC input terminals, it will pass through to the AC
output.
There are two tests to be performed. The first test verifies that the
Freedom HF is inverting DC battery power and delivering AC power to
its output.
The second test is intended for installations where AC input and output is
hard wired to the Freedom HF. This test verifies that the Freedom HF
transfers from inverter power to shore power when shore power is
present.
Basic Installation Procedures
Note: Shore power (pass-through) refers to the AC input power from a utility
grid, generator or external AC source.
When you are ready to test your installation and op erate the Freedom HF,
close the DC fuse and Disconnect or the DC circuit breaker to supply DC
power to the Freedom HF.
Testing in Invert Mode
To test the Freedom HF in invert mode:
1. For hard wired installations, ensure shore power is not present.
2. Press the Inverter button to turn the inverter on.
3. Plug an appliance within the power rating of the inverter into the
4. Turn the appliance on to verify that it operates.
If the appliance operates, your installation is successful. If your
installation has AC input and output hard wired to the Freedom HF,
proceed to “Testing in Shore Power Mode”.
If the status LED on the display panel glows red, see the Troubleshooting
chapter.
The status LED on the display panel glows yellow and the LED
display illuminates.
Freedom HF GFCI or an AC outlet hard wired to the Freedom HF.
975-0395-01-01 1–29
This guide for use by qualified installers only
Page 48

FreedomHF_IC_01-Installation.fm Page 30 Monday, December 24, 2007 9:47 AM
Testing in Shore Power Mode
To test the Freedom HF in shore power mode:
◆ With the appliance from the previous test still connected and
operating, connect the shore power source.
The Freedom HF transfers the appliances to shore power. The status
LED on the display panel will change from yellow to a ten-second
flashing yellow and then green.
If the appliance operates, your installation is successful.
Note: If the Inverter button on the Freedom HF is turned ON, the Freedom HF
will automatically supply the appliances with inverter power if the shore power
source fails or becomes disconnected.
If the Inverter button on the Freedom HF is turned ON and shore power voltage is
too low (less than 90 volts AC), the unit will transfer to inverter power to continue
running your appliances.
WARNING: Shock hazard
Whether or not the Inverter button is turned ON, shore power will pass through
the Freedom HF to the output when shore power is within normal operating
range.
1–30 975-0395-01-01
This guide for use by qualified installers only
Page 49

FreedomHF_IC_01-Installation.fm Page 31 Monday, December 24, 2007 9:47 AM
Drip Shield Installation (For Marine Installations)
The drip shield helps to protect the unit from dripping or splashing
liquids, which will cause a shock hazard. Drip shields are especially
useful in marine installations where water from condensation, rain, or sea
may come into contact with the Freedom HF.
WARNING: Shock hazard
This product is intended only for use in dry areas. Operating the unit under wet
conditions may expose you to a shock hazard. Installing drip shields may not
entirely protect you from this hazard. Do not operate the unit when it is wet.
You may purchase the drip shield set by contacting Xantrex. When
ordering, mention part number 808-9531.
Drip Shield Installation (For Marine Installations)
Different Views)
Drip Shield set part# 808-9531
Figure 1-10
Drip Shields
To install the drip shields:
1. Gather the four screws needed to fasten a single drip shield to a wall.
2. Locate an appropriate setting for the drip shields above the Freedom
HF making sure you cover the entire width of the unit.
You can overlay the shields as shown in Figure 1-11 below.
975-0395-01-01 1–31
This guide for use by qualified installers only
Page 50

FreedomHF_IC_01-Installation.fm Page 32 Monday, December 24, 2007 9:47 AM
3. Fasten the screws through the holes in the drip shield into the wall.
See Figure 1-10.
HF| 1000
FREEDOM
Figure 1-11
Typical Drip Shield Placement on a Freedom HF 1800
1–32 975-0395-01-01
This guide for use by qualified installers only
Page 51

FreedomHF_IC_02-Configuration.fm Page 1 Monday, December 24, 2007 9:48 AM
2 Configuration
Chapter 2 explains how to configure the Freedom HF to
best meet your electrical system requirements.
It covers the following:
• Setting battery types on the main unit on page 2–2.
• Adjusting display, alarm, and charging current
settings on page 2–3.
This guide for use by qualified installers only
2–1
Page 52

FreedomHF_IC_02-Configuration.fm Page 2 Monday, December 24, 2007 9:48 AM
Setting Battery Types on the Main Unit
You can attach different types of lead-acid batteries to the Freedom HF.
Before installing batteries make sure that you configure the unit to
optimize the charging process.
WARNING: Fire hazard
Incorrectly setting the battery type can lead to battery damage and a risk of fire.
The settings can be changed by adjusting the dip switches found on the
main unit behind the display panel.
Battery
Type
Fixed OFF|OFF 13.5 13.5
Flooded OFF|ON (default) 14.4 13.5
GEL ON|OFF 14.2 13.8
AGM ON|ON 14.3 13.4
Dip Switch Setting
Switch 1|Switch 2
Bulk/Absorption Float
To adjust the battery type setting:
By default the battery type is set to Flooded (OFF|ON) .
1. Detach the Display Panel to expose the Dip Switches.
2. Use the tip of your fingernail or a small screw driver with a flat tip to
adjust the switches.
ONOFF
Switch 1 | Switch 2
Figure 2-1
2–2 975-0395-01-01
Dip Switches (Default Settings Shown)
This guide for use by qualified installers only
Page 53
FreedomHF_IC_02-Configuration.fm Page 3 Monday, December 24, 2007 9:48 AM
Adjusting Display, Alarm, and Charging Current Settings
Adjusting Display, Alarm, and Charging Current
Settings
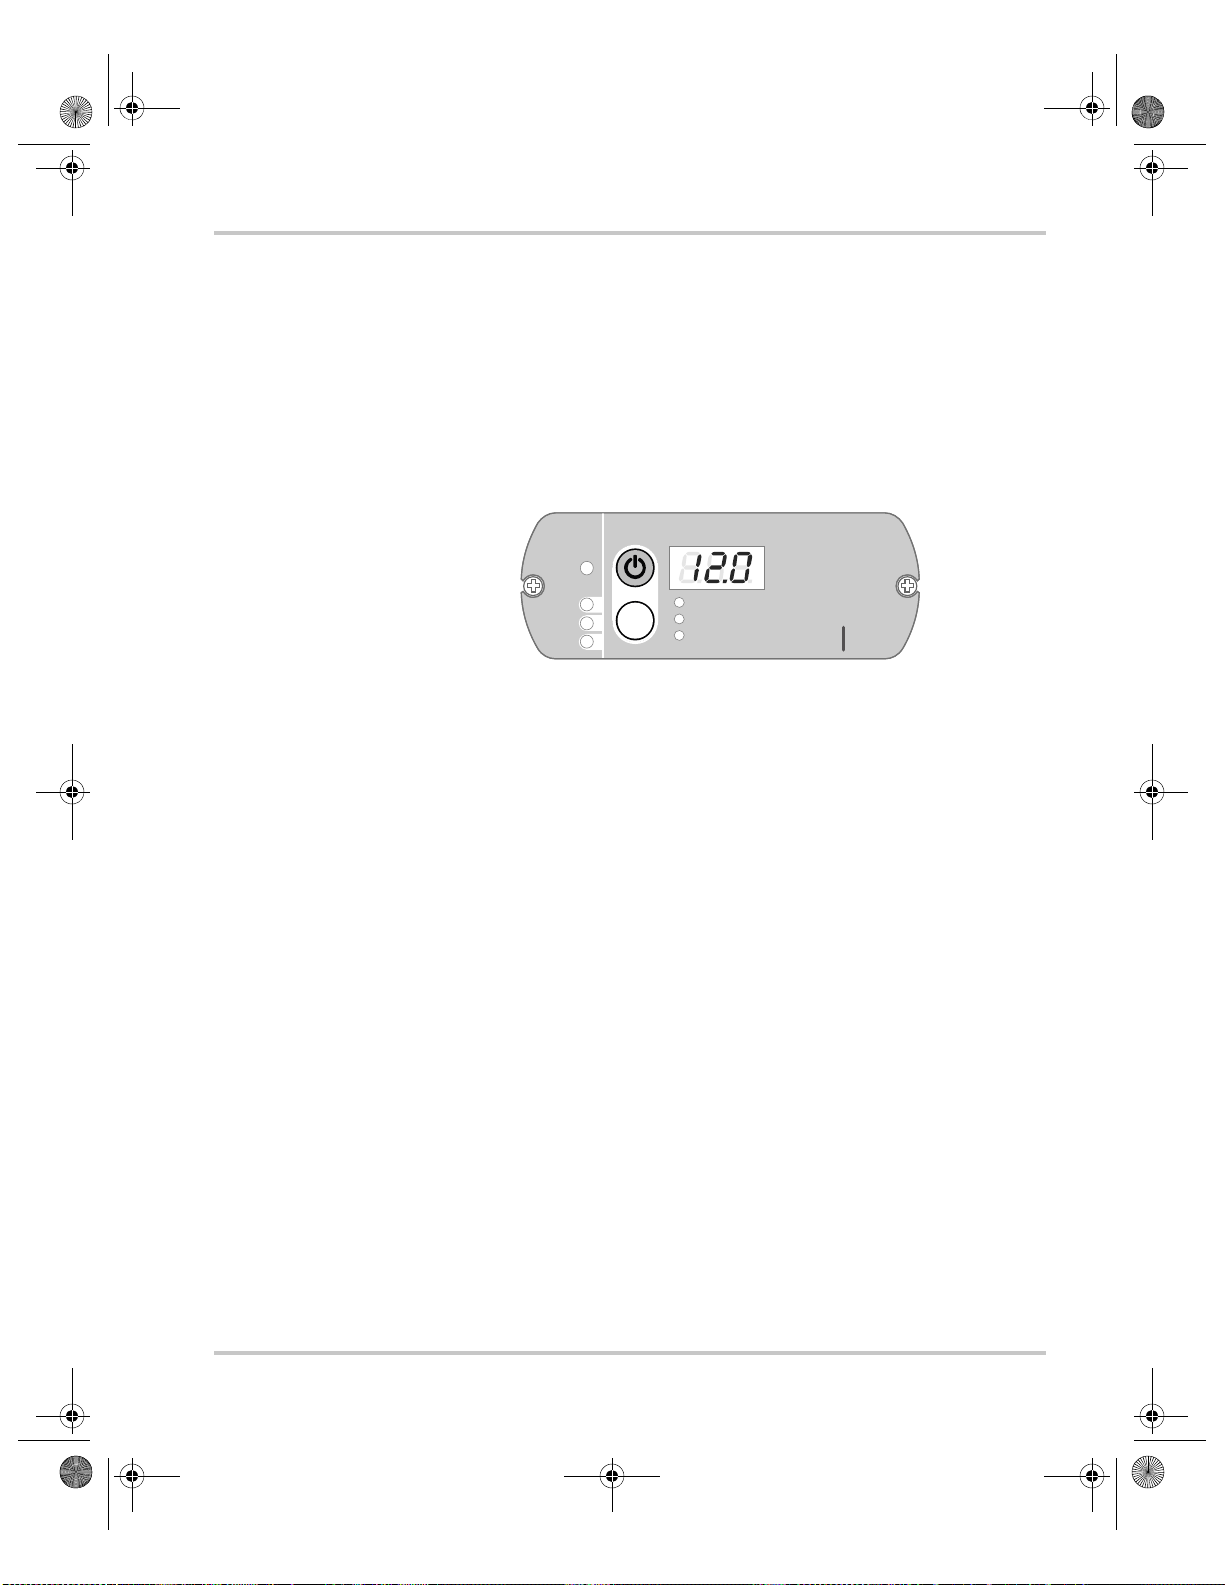
The two display panel buttons can be used to adjust the following:
• What is being displayed on the screen,
• To disable or enable the audible alarm, and
• To change the charging current.
STATUS
Input Voltage (V)
Input Current (A)
Output Power (kW)
HF 1000
Figure 2-2
Utility
Battery
Fault
Display Panel
Select
To adjust what is being displayed on the screen:
By default the screen displays the Input Voltage value in Volts and the
Input Voltage LED is illuminated.
1. Press the Select button once.
The display will show the DC Input Current and the DC Input
Current LED will illuminate.
The value is displayed on the screen as Amps.
2. Press the Select button once again.
The display will show the AC Output Power and the AC Output
Power LED will illuminate.
The value is displayed on the screen as kWatts.
3. Press the Select button once again.
The display will show the DC Input Voltage and the DC Input
Voltage LED will illuminate.
The value is displayed on the screen as Volts.
FREEDOM
975-0395-01-01 2–3
This guide for use by qualified installers only
Page 54

FreedomHF_IC_02-Configuration.fm Page 4 Monday, December 24, 2007 9:48 AM
To adjust the alarm setting:
By default the alarm is set to ON.
• Press and hold the Select button for two seconds.
The display shows “AL0” indicating that the alarm is OFF.
The display shows “AL1” indicating that the alarm is ON.
Whenever the alarm setting is changed, the display will temporarily show
either “AL0” or “AL1” and after a few seconds will return to displaying
what was on the screen prior to the adjustment.
Note: The alarm setting will reset to its default setting when the
Freedom HF’s Inverter button is turned OFF then turned ON
again.
To adjust the charging current:
By default the charging current is set to:
• 20A for the Freedom HF 1000
• 40A for the Freedom HF 1800
1. Press and hold the Inverter button for five seconds.
The unit will go into Charge Current Setting Mode.
2. Press the Select button to toggle between the different Amp ratings.
• 2 — 5 — 10 — 20 for the Freedom HF 1000
• 2 —10 — 20 — 40 for the Freedom HF 1800
3. Choose the desired charging current by stopping at the value shown
on the display. To maximize unit performance, see Table 2-1
“Charging Current Guidelines” below.
Wait for five seconds and the charging current is set.
2–4 975-0395-01-01
This guide for use by qualified installers only
Page 55

FreedomHF_IC_02-Configuration.fm Page 5 Monday, December 24, 2007 9:48 AM
Adjusting Display, Alarm, and Charging Current Settings
After the charging current is set, the display will return to displaying what
was on the screen prior to the adjustment.
Table 2-1
AC Input Circuit
Breaker or fuse
size (Amps)
Charging Current Guidelines
Charger DC Current Setting
(Amps)
Freedom HF 1000 Freedom HF 1800 Freedom HF 1000 Freed om HF 1800
Maximum By-pass AC
Current Available (Amps)
15 2 2 13.5 13.5
5 10 12.5 11.0
10 20 11.0 8.5
20 40 8.5 3.5
20 2 2 18.5 18.5
5 10 17.5 16
10 20 16 13.5
20 40 13.5 8.5
30 2 2 28.5 28.5
5 10 27.5 26
10 20 26 23.5
20 40 23.5 18.5
975-0395-01-01 2–5
This guide for use by qualified installers only
Page 56

FreedomHF_IC_02-Configuration.fm Page 6 Monday, December 24, 2007 9:48 AM
2–6
Page 57

FreedomHF_IC_A-Specifications.fm Page 1 Monday, December 24, 2007 9:48 AM
A Specifications
Appendix A contains electrical performance
information and product specifications.
Important:
Specifications are subject to change without notice.
This guide for use by qualified installers only
A–1
Page 58

FreedomHF_IC_A-Specifications.fm Page 2 Monday, December 24, 2007 9:48 AM
Electrical Specifications: Inverter Mode
DC Input Freedom HF 1000 Freedom HF 1800
Operating voltage range 10.5V–15.5V 10.5V–15.5V
Safe non-operating voltage range 0–16 Vdc 0–16 Vdc
Normal voltage 12.5V 12.5V
Nominal current at full load 100A 180A
AC Output Freedom HF 1000 Freedom HF 1800
Output voltage 115 Vac 115 Vac
Continuous power 1.0kW @ 25 °C 1.8kW @ 25 °C
Surge power 17A
(2kW for 200 ms)
Max short-circuit current 55A peak 55A peak
Frequency 60 Hz 60 Hz
Wave shape Modified Sinewave Modified Sinewave
Power derating above 40 °C ambient
temp
Peak efficiency ≥87% ≥87%
Full load efficiency ≥80% ≥80%
Other Freedom HF 1000 Freedom HF 1800
No load input power (producing
output voltage)
Off mode current draw ≤1mA ≤1mA
See “Invert Power Derating vs. Ambient
Temperature” on page A–6.
≤10W ≤10W
30A
(3.6kW for 300 ms)
A–2 975-0395-01-01
This guide for use by qualified installers only
Page 59

FreedomHF_IC_A-Specifications.fm Page 3 Monday, December 24, 2007 9:48 AM
Electrical Specifications: Charge Mode
AC Input Freedom HF 1000 Freedom HF 1800
Operating voltage range 90–130 Vac 90–130 Vac
Electrical Specifications: Charge Mode
Nominal current 5Aac at 20A charge,
120 Vac in
Nominal frequency 60 Hz 60 Hz
DC Output Freedom HF 1000 Freedom HF 1800
Nominal voltage 12.0 Vdc 12.0 Vdc
Min battery voltage for charging 0.0 Vdc 0.0 Vdc
Max output voltage 14.4 Vdc 14.4 Vdc
Nominal output current User selectable:
2A, 5A, 10A, 20A
Charger current derating Automatically reduce charger current as
internal temperature exceeds 80 °C, and
input Vac approaches low transfer.
Efficiency at nominal output ≥75% ≥75%
Other Freedom HF 1000 Freedom HF 1800
Battery type settings Flooded (default), Gel, AGM, or
Fixed (13.5V)
Charge algorithms Three stages (Bulk, Absorption, and Float)
Independent battery banks 1 1
10Aac at 40A
charge, 120 Vac in
User selectable:
2A, 10A, 20A, 40A
975-0395-01-01 A–3
This guide for use by qualified installers only
Page 60

FreedomHF_IC_A-Specifications.fm Page 4 Monday, December 24, 2007 9:48 AM
Environmental Specifications
Ambient Temperature:
Operating Temperature Range
Storage Temperature Range
Humidity: Operation/Storage 5–95% RH, non-condensing
System Specifications
Transfer relay rating 30A, 2.0hp
Transfer time <30ms
Transfer on bad voltage 90–100V for low AC and
Cooling Fan, activated by any of the following:
Physical Specifications
Unit Dimensions and Weight Freedom HF 1000 Freedom HF 1800
0–40 ºC
-20–60 ºC, with output derated above 25 °C
-40–70 ºC
130–140 for high AC
• High internal temperature
• High AC output power
Length 15.5” (393mm) 18.0” (457mm)
Width 9.5” (241mm) 9.5” (241mm)
Height 4.2” (106mm) 4.2” (106mm)
Weight 10 lbs (4.5 kg) 12.8 lbs (5.8 kg)
Regulatory Approvals
ETL approved to CSA 107.1, UL458, and UL458 Marine Supplement (drip shield
with product number 808-9531 required).
A–4 975-0395-01-01
This guide for use by qualified installers only
Page 61

FreedomHF_IC_A-Specifications.fm Page 5 Monday, December 24, 2007 9:48 AM
Inverter Overload Operation
This graph shows how long (measured in seconds) the Freedom HF will
operate for a given output current (measured in Amps).
Both Freedom HF 1000 and Freedom HF 1800 are represented in the
illustration below.
The graph illustrates inverter operation at 25 °C.
Inverter Overload Operation
Time (sec)
4000
.
.
.
1600
1400
1200
1000
800
600
400
200
0
Freedom HF 1000
Freedom HF 1800
10 12 14 16 18 20 30 40 50
Output Current (Amps)
975-0395-01-01 A–5
This guide for use by qualified installers only
Page 62

FreedomHF_IC_A-Specifications.fm Page 6 Monday, December 24, 2007 9:48 AM
Invert Power Derating vs. Ambient Temperature
If the unit is in inverter mode and in elevated ambient temperature above
25 °C, you will have to reduce power draw according to the following
chart to avoid over-temperature shutdown.
Freedom HF 1000
Watts
1000
900
750
0
Freedom HF 1800
Watts
1800
1600
1000
@ 12.5 V
@ 11.5 V
@ 12.5 V
@ 11.5 V
30 °C
~33 °C
30 °C
~33 °C
900 W
850 W
1450 W
1350 W
800 W
750 W
50 °C25 30 35 40 45
1100 W
1000 W
0
50 °C25 30 35 40 45
A–6 975-0395-01-01
This guide for use by qualified installers only
Page 63

FreedomHF_IC_A-Specifications.fm Page 7 Monday, December 24, 2007 9:48 AM
Charger Output Current vs. AC Input Voltage
When the Freedom HF is charging batteries from a weak shore power
source the AC voltage may fall as the Freedom HF draws current. To
reduce the chance of the shore power voltage collapsing below the
configured transfer level the Freedom HF will reduce the charging current
at low shore power voltage according to the following graph:
Freedom HF 1000 Freedom HF 1800
Charger Output Current vs. AC Input Voltage
20A
16A
90V 105V 135V
Table A-1
Battery Type Bulk/Absorption (Volts) Float (Volts)
Flooded 14.4 13.5
GEL 14.2 13.8
AGM 14.3 13.4
Fixed 13.5 13.5
Charging Voltage
40A
32A
975-0395-01-01 A–7
This guide for use by qualified installers only
Page 64

FreedomHF_IC_A-Specifications.fm Page 8 Monday, December 24, 2007 9:48 AM
A–8
Page 65

Freedom HF Install Guide.book Page 1 Friday, December 21, 2007 9:57 PM
B Marine Installation Diagram
Appendix B illustrates a typical marine installation for
the Freedom HF.
For a typical RV or Fleet installation, see Figure 1-2,
“Typical Recreational Vehicle and Fleet Vehicle
Installation” on page 1–6.
This guide for use by qualified installers only
B–1
Page 66

Freedom HF Install Guide.book Page 2 Friday, December 21, 2007 9:57 PM
Marine Installation
Figure B-1 illustrates a typical marine installation with the following
components:
1. AC power supplied from a shore power connector
2. An AC source panel that includes a Max 30A circuit breaker that
supplies the Freedom HF
3. An AC load panel with branch circuit breakers that supply only loads
that run off the Freedom HF
4. Engine negative bus / DC ground bus
5. DC power supplied by a battery bank and protected by a DC fuse in
the positive cable
6. Battery isolator
7. DC alternator
8. Starting battery
9. Drip shield (not shown)
B–2 975-0395-01-01
This guide for use by qualified installers only
Page 67

l
Freedom HF Install Guide.book Page 3 Friday, December 21, 2007 9:57 PM
DC Fuse /
disconnect or
circuit breaker
12V Deep Cycle
Battery
Marine Installation
HF| 1000
FREE DOM
AC Load Pane
AC Source Panel
Starting Battery
Shorepower
Figure B-1
Typical Marine Installation
975-0395-01-01 B–3
This guide for use by qualified installers only
Page 68

Freedom HF Install Guide.book Page 4 Friday, December 21, 2007 9:57 PM
B–4
Page 69

Freedom HF Install Guide.book Page 5 Friday, December 21, 2007 9:57 PM
Page 70

Freedom HF Install Guide.book Page 6 Friday, December 21, 2007 9:57 PM
Xantrex Technology Inc.
1 800 670 0707 Tel toll free NA
1 408 987 6030 Tel direct
1 800 994 7828 Fax toll free NA
customerservice@xantrex.com
www.xantrex.com
975-0395-01-01
Printed in China
 Loading...