

Page 1
Easy Shunt™ Installation
Instructions
The Easy Shunt™ (Part #: 808-8020-00) is an option that you can purchase for use with
your XC Series or BC Series battery charger. It is installed on Bank 1 and acts as a
temperature se nsor during no rmal operati on, provi ding improve d batte ry volt age cha rge
control. It also provides an Amp-Hour usage indicator (a "fuel gauge" for your main
battery bank) via your XC Series or BC Series charger when the charger is off.
Precautions When Working With Batteries
WARNING: Explosion or fire hazard
1. Follow all instruc tions published by the battery manufac tur er and the manufacturer
of the equipment in which the battery is installed.
For Xantrex XC Series
and BC Series Battery
Chargers
975-0191-01-01
Revision C
2. Make sure the area around the battery is well ventilated.
3. Never smoke or allow a spark or flame near the engine or batteries.
4. Use caution to reduce the risk of dropping a metal tool on the battery. It could spark
or short circuit the batte ry or other electrical parts and could cause an explos ion.
5. Remove all metal items, like rings, bracelets, and watches when working with leadacid batteries. Lead-acid batteries produce a short circuit current high enough to
weld metal, causing a severe skin burn.
6. Have someone within range of your voice or close enough to come to your aid
when you work near a lead-acid battery.
7. Have plenty of fresh water and soap nearby in case battery acid contacts skin,
clothing, or eyes.
8. Wear complete eye protection and clothing protection. Avoid touching your eyes
while working near batter ies.
9. If battery acid contac ts skin or clothing, wash immediately with soap and water. If
acid enters your eye, immediately flood it with running cold water for at least
twenty minutes and get medical attention immediately.
10. If you need to re move a batte ry, al ways remove t he negati ve (groun d) term inal fr om
the battery first . Make sure all accessories are off so you don’t cause a spark.
Page 2
Xantrex XC Series and BC Series Battery Charger
Installing the Easy Shunt™ Sensor
To install the Ea sy Shunt™:
1. Switch off all devi ces operating from the battery. Disconnect all the wires f rom the
negative terminal of the battery (which is connected to Bank 1 on the XC or BC
Series charger).
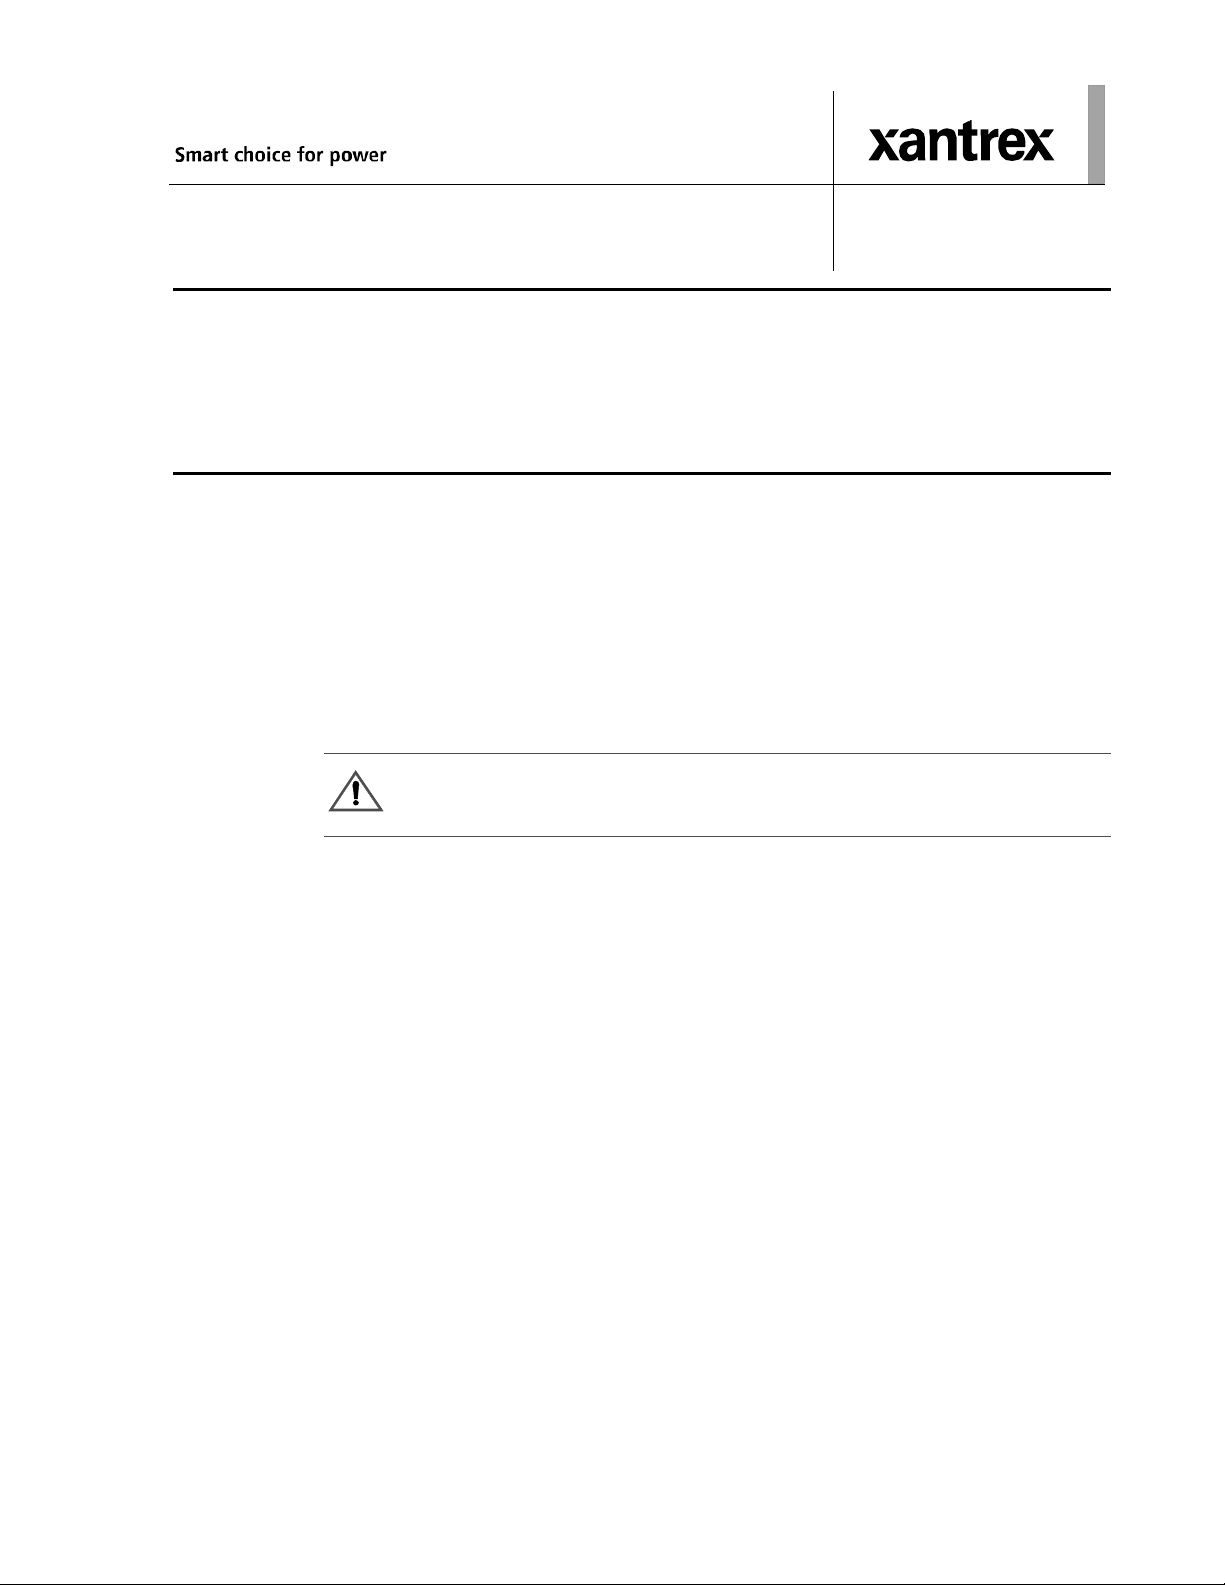
Battery Positive Ring
Connector
Telephone-style Connector
(to Bank 1 Connector on
Rear Panel of XC Series or
BC Series)
Battery Negative
Cable Connection
(battery terminal)
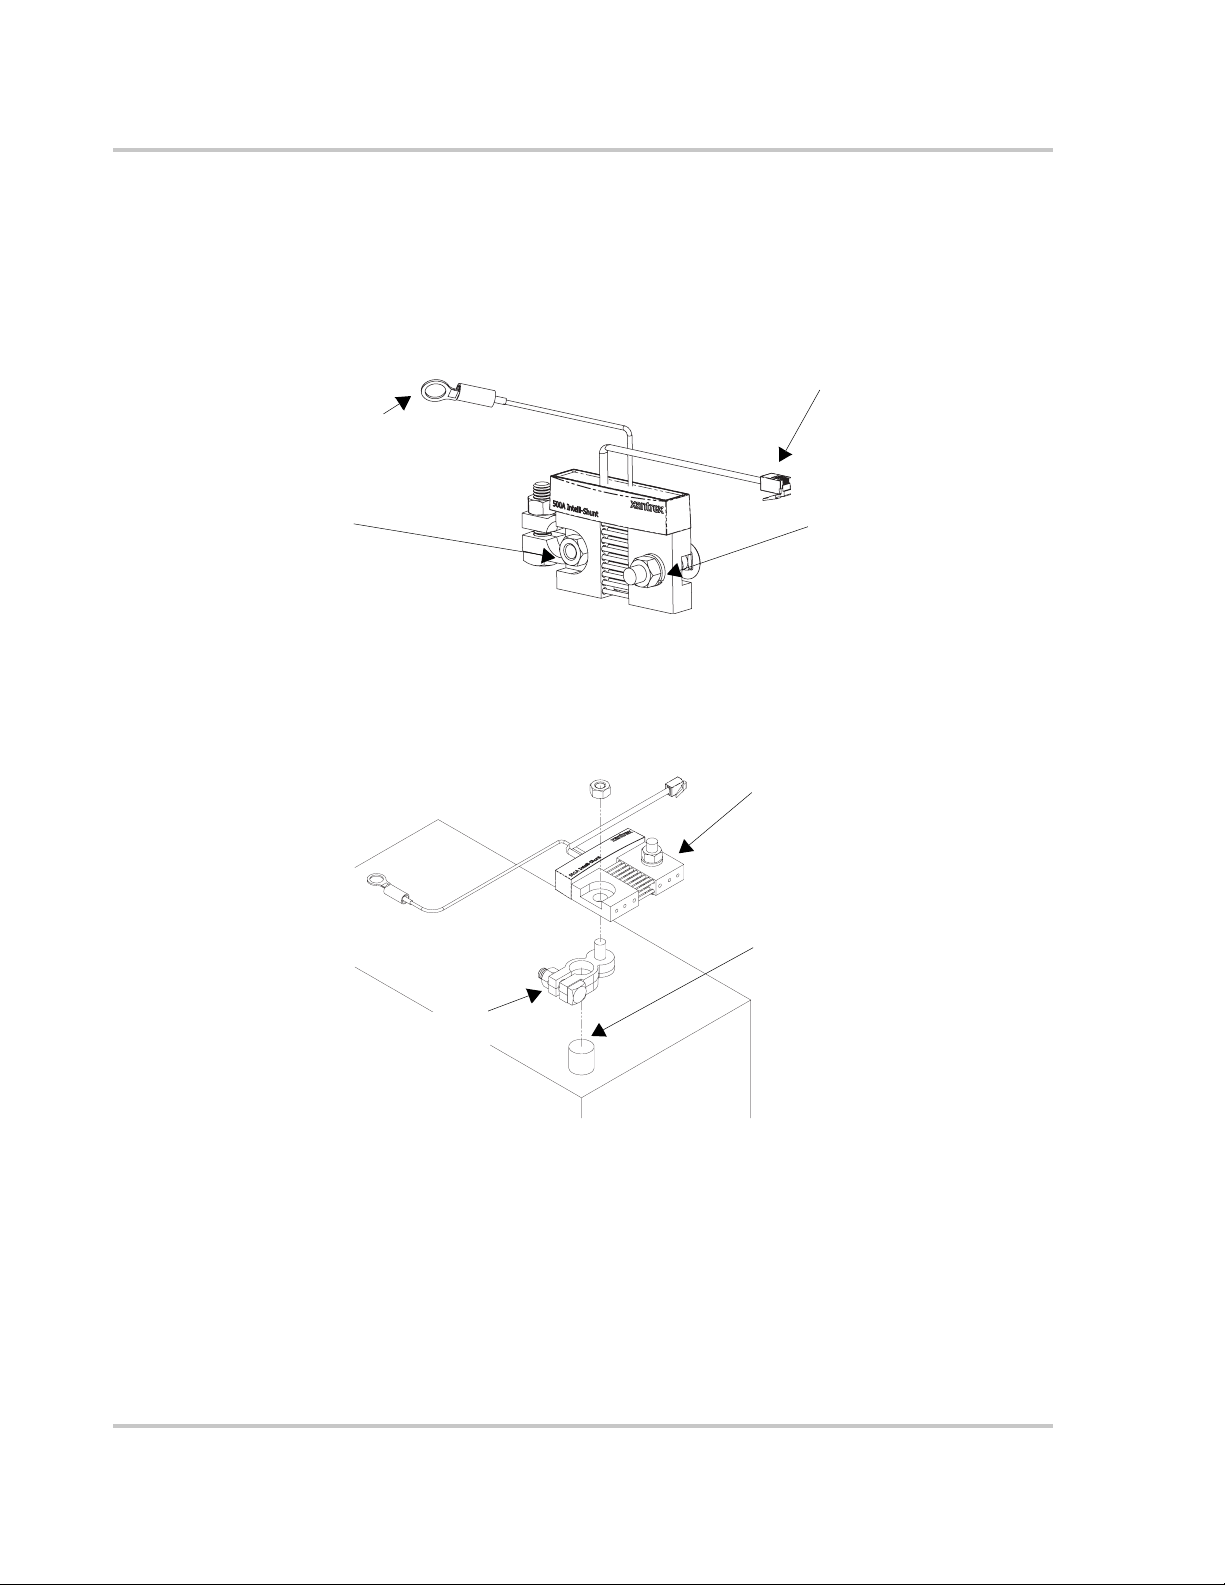
2. Connect the "battery end" of the shunt which has the "D" shaped cutout to the
negative battery stud. I f you have a round-post style battery use the round post to
stud battery terminal adapter provided. If you have a battery with a threaded stud,
remove the post adapter.
Round Post to Stud
Battery Terminal
Adapter
XC Series or BC Series
Negative Cable Connection
(load terminal)
Easy Shunt™
Battery Negative
Terminal
3. Loosen the nut from the bolt located in the opposite "load side" shunt terminal.
Adjust the round-headed (carriage) bolt until it contacts the top of the battery case
to provide support against the weight of the heavy wiring and any vibration that
may be transmitted to it.
2 975-0191-01-01
Page 3

Round-headed
carriage bolt
4. Attach all wires removed in step 1 back onto thi s new "load" shunt terminal.
5. Tight en the nuts to 8 – 9 Nm (6 – 7 ft-lbs) to secure these electrical connections.
6. Route the sensor cable to the charger and plug it into the Bank 1 connector on the
rear panel of the XC Series or BC Series Charg er.
7. Connect the batte ry posi tive r ing connec tor to the posit ive te rminal o f the batte ry , or
to another round post to stud battery terminal adapter if needed.
Using the Easy Shunt™ Sensor
Easy Shunt™ Installation Instructions
In order to use the Easy Shunt™, AC power must be disconnected from the XC Series
or BC Series Charger. In addition, the Amp-Hours will only reset to zero and give an
accurate usage gauge if bank 1 has reached float (3 stage charging) or rest (2 stage
charging).
To display the Amp-Hours that have been used since Bank 1 was last fully
charged:
1. Ensure the charger is off and AC power has been disabled.
2. Press
ON/STANDBY.
The remote display will scrol l the following information, in order, for bank 1.
• Highest priority charger fault or warning (if present)
• Highest priority bat tery fault or warning (if present)
• Battery voltage
• Amp-hours used (the Ah units indica tor light on the remote display will
illuminate)
975-0191-01-01 3
Page 4

Xantrex XC Series and BC Series Battery Charger
3. The remote display will scrol l the following information, in order, on Bank 2 and
then Bank 3:
• Highest priority charger fault or warning (if present)
• Highest priority bat tery fault or warning (if present)
• Battery voltage
Amp-hours used is not available for Bank 2 or Bank 3.
4. After running th rough the se quence once , the di splay wil l switch i tse lf off . Pre ss the
ON/STANDBY switch to show the sequence again at any time until AC is enabled.
Notice of Copyright
Easy Shunt™ Installation Instructions © August 2005 Xa ntrex International. All rig hts reserved.
Warranty
This pro duct has a 24 month limited warranty from the date of fir st sale which covers defects in wor km anship and materials.
Retain proof of p u rchase. F o r full details on this limited w a rranty visit our website at www.xantrex.com or call
1-800-670-0707.
It is important that you read the limited warranty as it restr icts your legal rights. If you are not satisfied with the limited
warrant y you may return this product to Xantrex with 30 days of the date of purchase for a fu ll refund.
Date and Revision
August 200 5 Revision C
Part Number
975-0191-01-01
Contact Information
Phone: 1 800 670 0707 (to ll free North America)
Fax: 1-800 994 7828 (toll free North Amer ica)
Email: customerservice@xantrex.com (North America and rest of world)
Web: www.xantrex.com
+34 93 470 5330 (Europe)
1 360 925 5097 (direct and rest of world)
+34 93 473 6093 (Europe)
1 360 925 5143 (direct and rest of world)
support.europe@xantrex.com (Europe)
4 975-0191-01-01
 Loading...