

Page 1
Portable DVB-T receiver
Instruction manual
Page 2

2
3
Table of contents
5 Chapter 1 Intended use
6 Chapter 2 Safety information
7 Maintenance, cleaning and disposal
9 Chapter 3 Device
9 Receiver
10 Remote control
12 Chapter 4 Power supply
12 Mains supply
12 Power supply via car adapter
13 Chapter 5 Basic Functions
13 To put into operation
14 Volume regulations/Mute function
14 Selecting a channel
15 Chapter 6 Operation
15 Main menu
16 Installation
19 Channel search
20 Channel edit
23 Chapter 7 Favorites
25 Chapter 9 Subtitles
26 Chapter 10 EPG (Electronic program guide)
27 Chapter 11 The antenna
28 Chapter 12 Troubleshooting
30 Chapter 13 Specications
30 Technical data
30 Delivery contents
31 Chapter 14 Service
24 Chapter 8 Videotext
Page 3

4
5
Intended use
1
Dear customer,
thank you for deciding on purchasing the X-Cept Mini from X4-TECH. This
instruction manual will give you a general idea of how this multimedia de
vice operates, as well as provide you with information on cleaning and safety
procedures. To maintain this products condition and ensure safe operation,
we would like to request the owner to take time to read and follow all instruc
tions found in this manual carefully! Should you have any questions about
this device or should any suggestions arise, then please contract your local
dealer for further information. We look forward to you recommending us to
others and hope you enjoy using this DVB-T receiver! Your X4-TECH team
This product is EMV-certied and fullls all European and National guideline
requirements. A declaration of CE conformity has been established for this
product. Certication has been documented and entrusted to the manuf
acturer.
Copyright Information
All company and product names mentioned in this document are a service
brand, mark or registered trademark of their respective owners. All rights
reserved. Any mentioned products, not manufactured or distributed by X4TECH, have only been intended to provide information of a general kind and
have not been displayed for commercial purposes. Reproduction, copying, as
well as the distribution of copyright protected material, without explicit aut
horization, is strictly prohibited. Oenders will be held liable for any damage
and prosecuted. It is prohibited to misuse this device for any other purposes
other than mentioned in this document.
Licensing terms
This device, as described in this instruction manual, is protected through third
party copyright. Application of this protected technology in other products
requires permission and an existing license of the copyright holder. The user
license connes this device to private use only, thus consumers do not have
the right to exploit or use this device in a non-commercial way. In accordance
with the mentioned license, commercial use has not been intended for this
device.
The X4-TECH X-Cept Mini is a mobile receiver intended for the recep-
-
-
-
-
tion of terrestrial digital television (DVB-T). It is completely remotecontrolled and operates with all common mobile and non-mobile
television sets.
Chapter 1 Intended use
Page 4

6
7
Safety information
2
We assume no liability for damage occurred as a result of improper
use or damage resulting from the failure to comply with the safety
instructions, improper operation and handling. Under such circum
stances, all claims under warranty will become void.
We assume no liability for consequential damage!
We assume no liability for personal or property damage resulting
from the failure to comply with the safety instructions, improper
operation and handling. Under such circumstances, all claims under
warranty will become void. Complying with the essential require
ments of the European health, safety and environmental protection
legislation (CE), any unauthorized modication and/or change on
the device is prohibited and will void the warranty and all warranty
claims.
› This device is not a toy and is not intended for children. Keep it away
from children at all times to avoid possible injury, as they can not
judge the risk of danger when handling electrical devices. Further
more, this product contains small parts that could be swallowed.
› This device should never come in contact with water or moisture!
Condensation can build up suddenly, when this device is brought
from a colder into a warmer area (e.g. when transporting). Should
this happen, allow the device to warm up to room temperature
rst before using. Care should be taken that liquids do not come in
contact with the interior, this is why containers containing liquids,
e.g. buckets, vases or plants should never be placed anywhere near
this product. This can not only damage the device, but also become
a re hazard.
› Never place any sources of re on top of or near the device (e.g.
lighted candle).
› Operate this device in a moderate climate and never expose to ex
treme temperatures, such as high humidity.
› Do not bend or place any heavy objects on the cable.
› Never leave packaging material lying around unsupervised. For
-
children it could become a hazardous toy and lead to serious injury.
-
Maintenance, cleaning and disposal
This is a maintenance-free product and should never be opened or
disassembled. Any repairs are to be looked after by qualied service
-
personnel or a specialty workshop. Otherwise, there is the possible
risk of destroying/damaging this product. This will forfeit the opera
ting license (CE) and warranty/all warranty claims. Use a soft, clean,
dry and fuzz-free cloth to clean.
Never use any chemical cleaning agents; the plastic housing and any
markings/labels found on the device could become damaged. Dust
can be easily removed with a clean and soft brush or with a vacuum
cleaner.
-
Chapter 2 Safety informationChapter 2 Safety information
Page 5
8
9
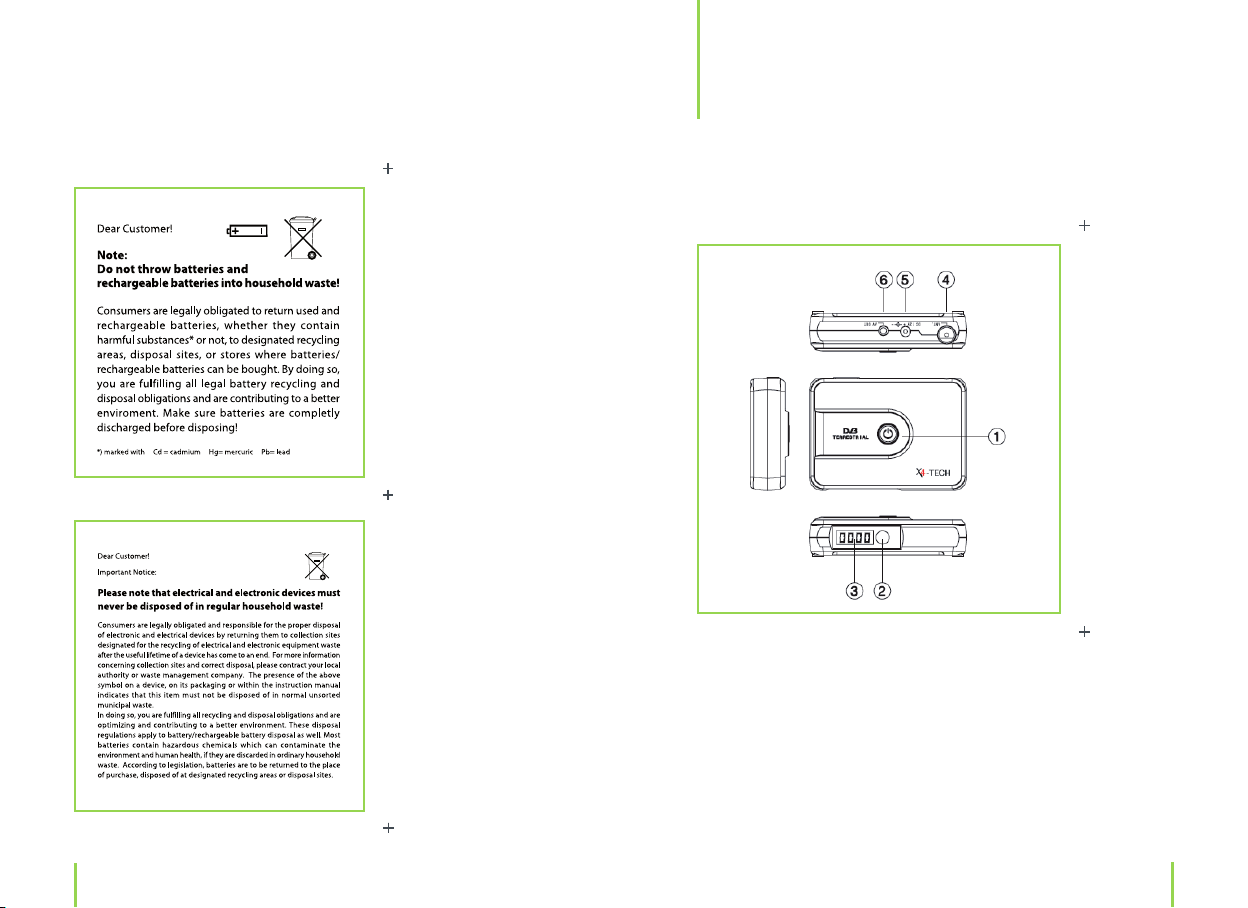
Device
Receiver
3
1. Power button: To bring the device out of a standby mode.
2. Infrared sensor
3. Digital display
4. Antenna connection
5. Power supply
6. Audio/video output
Chapter 3 DeviceChapter 2 Safety information
Page 6
10
11
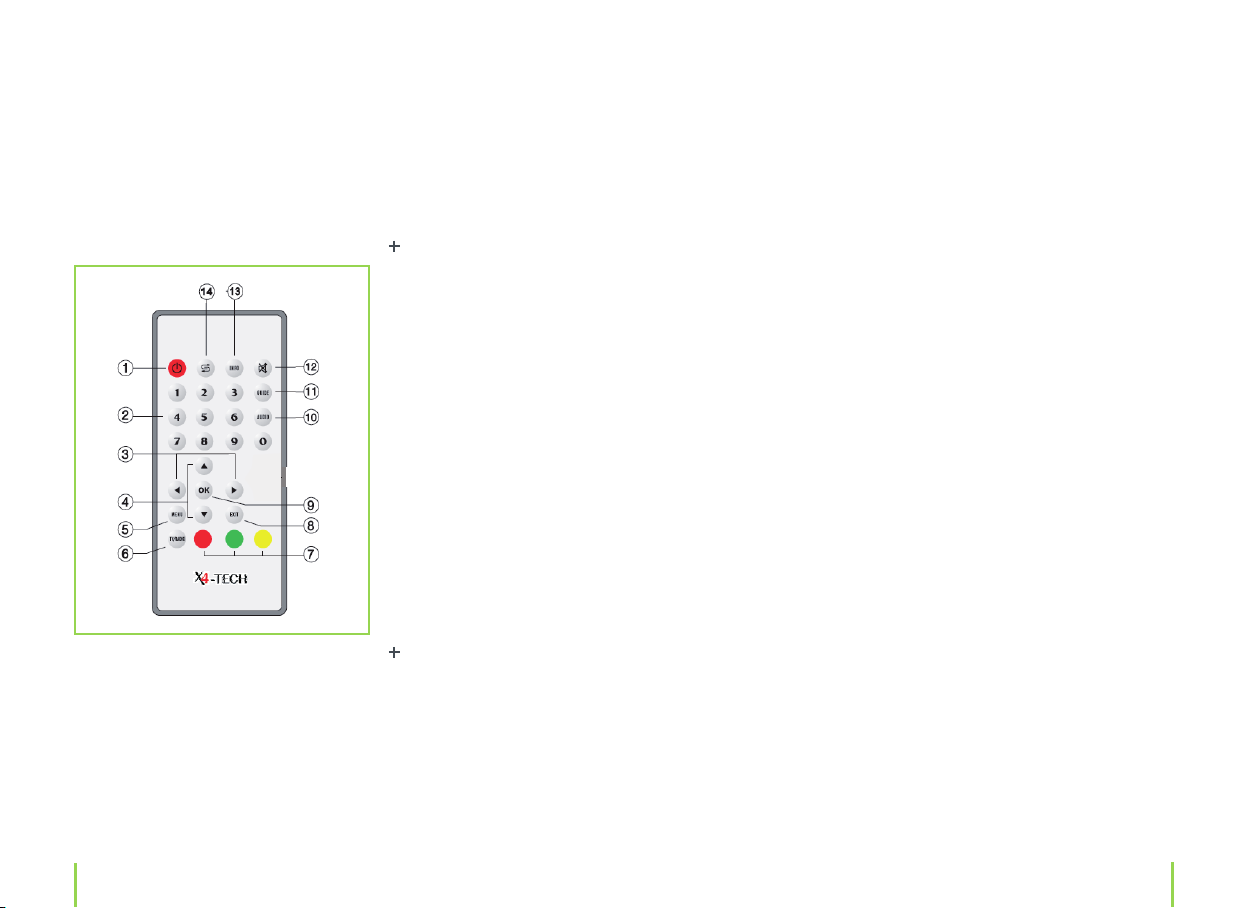
Remote control
1. Power ON/Power OFF
2. Numerical pad
3./4. Menu navigation buttons:
ÅÇ" To change programs
3.
ÉÑ " To adjust the volume
4.
" Channel selection
5. MENU button: Selects and displays the main menu
6. TV/Radio: Switches between a TV and radio mode
7. Function buttons: Red/green/yellow
Red: Favorite button
Green: Videotext
Yellow: Subtitle
8. EXIT: To exit a menu/submenu
9. OK button: Conrmation/Selection
10. Audio button
11. Guide: Electronic program guide
12. Mute button (to deactivate the sound)
13. Info: Displays the current channel and reception quality
14. Recall: Returns to the previously viewed channel
ÉÑÅÇ
Chapter 3 DeviceChapter 3 Device
Page 7

12
13
Power supply
4
Basic functions
5
Mains supply
Use the included adapter to provide your DVB-T receiver with power
via a domestic power outlet (230 V). The adapter’s output voltage
amounts to 12 V DC.
Power supply via car adapter
Use the included 12 volt car cigarette adapter to supply your receiver
with power via cigarette lighter in your car, caravan, camper, tent ...
Warning:
Never watch television while driving! This could divert one’s attenti
on and lead to accidents!
To put into operation
Connect the adapter to the device rst and then plug the adapter
into a domestic power outlet. The device will automatically turn on
and the following can be seen on display:
The boot sequence is completed when the following appears on
display:
The device is now turned on and ready for use. Press the „
-
ton on the remote control or on the device for at least 3 seconds to
switch to a standby mode. The following can be seen on display in
a standby mode:
Note:
The receiver will continue to draw a small amount of power in a
standby mode. Unplug the adapter from the power outlet, if the de
vice is not in use for a longer period of time.
“ ut-
-
Chapter 5 Basic functionsChapter 4 Power supply
Page 8

14
15
4.1 Verbinden Sie das Gerät mit dem Netzstecker und dann
den Netzstecker mit Ihrer Haushaltssteckdose. Das Gerät
schaltet sich automatisch ein, das Display zeigt:
Der X-Cept Mini startet nun die Betriebssoftware. Der Bootvorgang
ist abgeschlossen, wenn auf dem Display
erscheint. Das Gerät ist nun eingeschaltet und kann benutzt
werden. Drücken Sie die Taste auf der Fernbedienung oder auf
dem Gerät mind. 3 Sekunden, um in den StandBy -Modus zu
wechseln. Im StandBy – Modus zeigt das Display an.
Hinweis: Im StandBy- Zustand verbraucht der Receiver eine
geringe Menge Strom. Ziehen Sie das Netzteil aus der Steckdose
wenn Sie das Gerät längere Zeit nicht benutzen.
4.2 Einstellen der Lautstärke und Lautlosfunktion
Taste Aktion
► Erhöht die Lautstärke
◄ Vermindert die
Lautstärke
Stellt das Gerät auf
lautlos, erneutes
Drücken der Taste
Operation
6
Volume regulation/Mute function
Button Function
Ñ Increases the volume
É Decreases the volume
Deactivates the sound.
Press the „
„
sound again.
A volume bar indicating the current set volume level will be displa
yed on screen.
If the sound has been deactivated, then the word „MUTE“ can be
seen on the top right side of the screen.
Selecting a channel
You can choose a channel either by
a) directly entering a channel number (up to a 4-digit channel numb
er) on the remote controls numerical pad
b) or by pressing the „
change channels.
No channels are stored in a delivered state. Please carry out an au
tomatic channel search.
„ button or the „Ñ“ and
É“ button respectively to activate the
Å “ or „Ç“ button on the remote control to
Main menu
Press the „MENU“ button once on the remote control to open and
display the „MAIN MENU“ on screen.
-
-
Navigate with the „
lect a function. After a function has been selected, press the „OK“
-
button to conrm.
Å “ and „Ç“ buttons in the „MAIN MENU“ to se-
Chapter 6 OperationChapter 5 Basic functions
Page 9
16
17
In the main menu you have the opportunity to select one of the fol
lowing submenu options:
1. Installation " Diverse settings
2. Channel search " Searches for channels
3. Channel edit " Channel editing
Installation
Navigate with the „Å “ and „Ç“ buttons in the main menu to „Instal-
lation“ and press the „OK“ button to conrm.
-
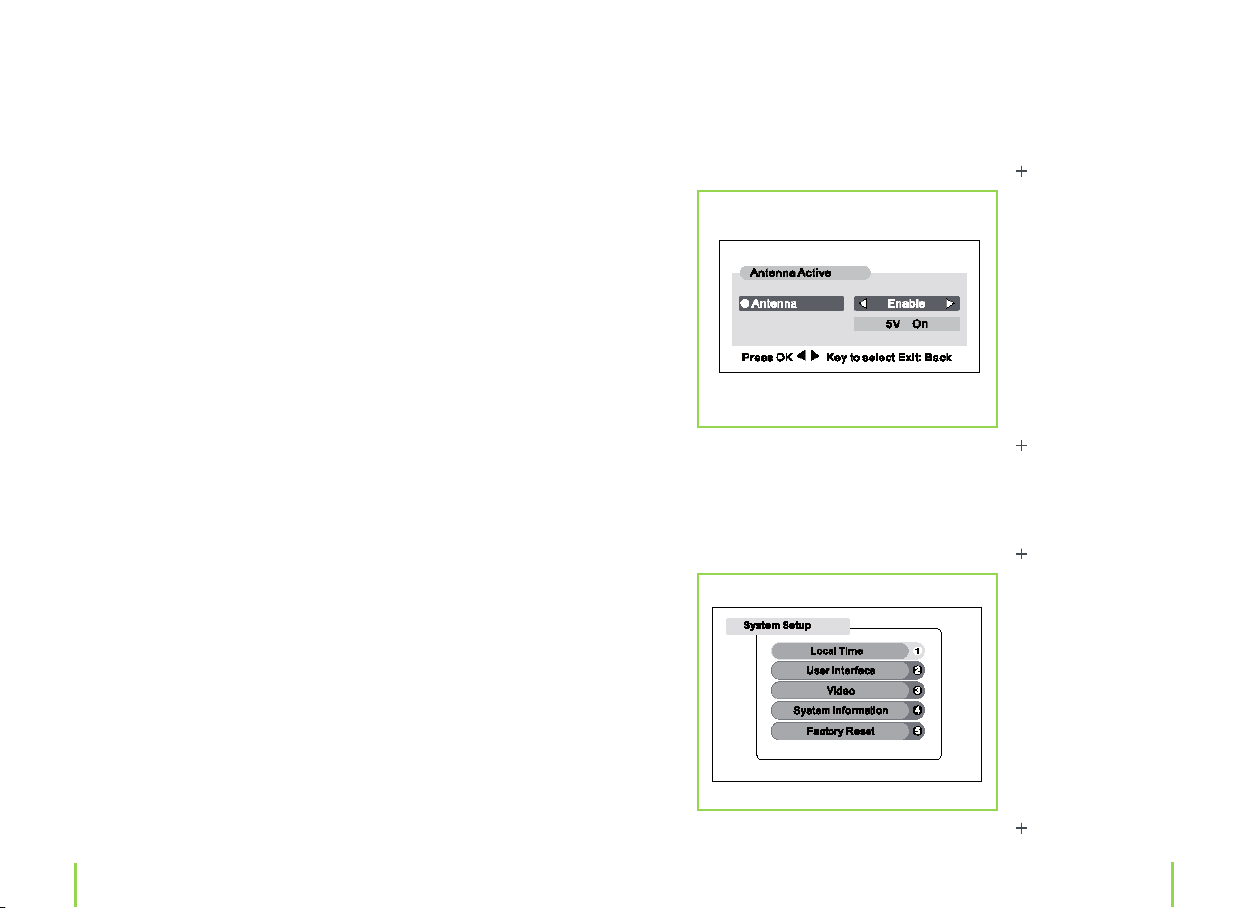
Now you have the opportunity to select between „System setup“
and „Active antenna“ settings.
The X-Cept can supply an active antenna with 5 V remote power,
so that no other external power supply is needed. Select „Active an
tenna“ and press the „OK“ button to conrm. Press the „
Ñ“ or „É“
button to select between „Enable“ and „Disable“ and then the „OK“
button to conrm.
Select „System setup“ to display and choose between one of the following submenus on screen:
-
Chapter 6 OperationChapter 6 Operation
Page 10

18
19
Navigate with the „Å “ and „Ç“ buttons (you also have the alternati-
ve to press the corresponding number on the numerical pad) to the
desired submenu and press the „OK“ button to conrm.
1. Local time
This submenu is for selecting the local time, please note that the
initial setting used in Germany is „GMT + 1”.
2. User interface
This submenu is for language selection, as well as display transpar
ency settings.
3. Video
This submenu is for setting the video output signal (standard setting
in Germany is PAL), screen ratio (4:3, 16:9), as well as a 16:9 full screen
picture.
4. System information
This submenu (conrm by pressing the „OK“ button) displays system
information (software information, date of the last update).
5. Factory reset
This submenu returns all previously stored receiver settings to a
factory default setting. A new program search and reprogramming
programs will once again be necessary. This function should only be
used when absolutely necessary.
Channel search
Navigate with the „Å “ and „Ç“ buttons in the main menu to „Chan-
nel search“ and press the „OK“ button to conrm and enter this
menu setting.
Automatic channel search
1. Enter the main menu (by pressing the „MENU“ button) and select
-
the menu item „Channel search“. Press the „OK“ button to conrm.
2. Now you can select the country zone. For Germany, please select
the country zone „Europe“. Following this, navigate with the „
Ç“
button to the menu item „Automatic channel search“. The receiver
will carry out an automatic channel search and automatically store
channels found. Now, all channels within your reception area will be
available to you. The submenu „Channel edit“ allows you to make
channel list settings.
Manual channel search
As an alternative to an automatic channel search you have the op
portunity to select channels manually. Select the menu item „Chan
nel search“ in the main menu as you initially would for an automatic
channel search and press the „OK“ button to conrm. Now channels
can be manually set.
It is recommended to carry out an automatic search rst, before ma
king any manual channel list changes. Principally, a manual channel
search is not necessary in areas with a normal to high quality, since
-
-
-
Chapter 6 OperationChapter 6 Operation
Page 11

20
21
an automatic channel search will independently nd all channels.
Programs can be comfortably moved or deleted in the submenu
„Channel edit“ after an automatic search has been carried out.
Channel edit
Navigate with the „Å “ and „Ç“ buttons in the main menu to „Chan-
nel edit“ and press the „OK“ button to conrm and enter.
Now you have the opportunity to select between editing radio and
television programs.
Note:
Radio programs via DVB-T may still not be available in several areas.
Before programs can be edited, an automatic or manual channel
search should be carried out rst.
This submenu allows you to make channel list settings. Channels will
be displayed on individual lines.
Navigate to a channel with the „
control. Use the „
Ñ“ and „É“ button to scroll through channels 10
Å “ and „Ç“ buttons on the remote
at a time.
After a channel has been selected, press one of the numerical buttons to choose one of the following actions:
Button
Action
number
0 Skip (If a channel has been set to „Skip Edit“ then this
channel will be omitted when browsing through chan
nels.) Select a channel with the „
Å “ or „Ç“ button and
-
press the „OK“ button to conrm.
1 Delete (Deletes channels)
Select a channel with the „
Å “ or „Ç“ button and press
the „OK“ to conrm and delete the selected channel.
Chapter 6 OperationChapter 6 Operation
Page 12

22
23
Favorites
7
2 Move (Moves a channel to a dierent channel spot)
Select the channel to be moved with th
utton and press the „OK“ button to conrm. Now use
Å “ or „Ç“ button to select the intended spot,
the „
where the channel is to be moved to.
3 Name (Renaming channels)
Select the channel to be renamed with the „
button and press the „OK“ to conrm. An alphabetical
pad will be displayed on screen, after which you can
ÉÑÅÇ“ buttons to choose letters.
use the „
4 Sort (Sorts channels)
Select the channel to be sorted with the „
button and press the „OK“ to conrm. 5 dierent op
tions for sorting your program are now available to
you. Press the respective button number to select the
desired action.
5 Favorite (Favorite channels are easily accessed by
pressing the red button on the remote control after
exiting the setup menu.)
Select the channel to be added to your favorite list
by using the „
conrm. The channel will be added to your favorite list
and marked with a heart symbol.
Å “ or „Ç“ button and press the „OK“ to
e „Å “ or „Ç“
Å “ or „Ç“
Å “ or „Ç“
Pressing the red function button „
able access to the favorite list. The channels selected and added to
your favorite list under „Channel edit“ will be displayed on screen.
Use the „
favorite lists and press the „OK“ button to conrm your selection.
-
Now a list of your favorite channels will be available to you.
Å “ or „Ç“ button to select between one of the 6 dierent
l“ on the remote control will en-
Chapter 7 Favorites Chapter 6 Operation
Page 13

24
25
Videotext
8
Subtitle
9
Videotext displays important information, such as news and program information. Press the green function button „
mote control. Now you can select „Start Videotext“ to access this
function. Videotext will start with page 100 of the relevant television
station.
Warning:
Please note that not all selected channels support videotext!
Now you can use the numerical pad to call up the desired videotext
page. Press the „EXIT“ button to exit the videotext function.
l“ on the re-
Press the yellow function button „l“ on the remote control. Following this, subtitles (when available) will be displayed on screen.
Note:
Subtitle signals are broadcasted only very seldom and mostly with
movies. In all other cases „No subtitles“ will appear on screen.
Chapter 9 SubtitleChapter 8 Videotext
Page 14

26
27
EPG (Electronic program
guide)
10
This DVB-T receiver comes with an electronic program guide. This
useful service is designed to oer you more information about tele
vision programs and for more exciting and comfortable viewing. The
EPG function can be accessed during normal television by pressing
the „GUIDE“ button on the remote control. This function provides
you with program information about channels available, starting
and ending time and much more.
You have the following navigation opportunities during an EPG
mode:
Use the „
a certain program.
Press the „OK“ button to display information about this program.
Å “ and „Ç“ buttons to select and access information about
The antenna
11
The included magnetic base antenna suciently reaches into core
-
areas where digital television reception DVB-T (most urban areas)
is available. If you live outside the core area of digital television re
ception, then you may have to switch to an indoor antenna ampli
er or a terrestrial outdoor antenna. Contact a local dealer for more
information.
Please note that there is the possibility that DVB-T reception is not
available in all coverage areas. In this case, even the strongest anten
na available will be insucient.
-
-
-
Chapter 11 The antennaChapter 10 EPG (Electronic program guide)
Page 15

28
29
Troubleshooting
12
Problem Lösung
The receiver is not
functioning any
more, although
turned on with the
control lamp lit up.
The device can not
be turned on.
The remote control
is not functioning.
The automatic
channel search
function can not
nd any channels/
only a xed image is
displayed on screen
and the audio quali
ty is poor
Unplug the device and plug it back into a
wall outlet again.
Make sure the adapter has been connected
properly to the device and to a wall outlet.
Check the wall outlets voltage supply, by
plugging in and testing a dierent device
with this wall outlet.
Check that nothing is between/or blo
cking the IR sensor on the receiver and the
remote control. Change batteries if neces
sary (3 V, CR2025).
Replace the included magnetic base an
tenna with an indoor antenna or a terre
strial outdoor antenna. When using an an
tenna or indoor antenna try setting it up in
dierent places. Rotate the individual rods
on the indoor antenna (not included in
-
delivery) in dierent directions (horizontal
and vertical) until reception is at an opti
mum. Inquire if digital television (DVB-T) is
available in your region.
Check if the „MUTE“ button has been activated. Increase the volume on the TV and
receiver.
Poor signal quality/
No channel program
information is availa
ble
No television sound Make sure that the connection cable bet
Distorted colors are
-
-
-
-
-
-
displayed.
See solution no. 3/Try a dierent channel.
-
ween receiver and TV has been connected
properly.
Make sure, that your T V is set to PAL, if you
are in Europe.
Chapter 12 Troubleshooting Chapter 12 Troubleshooting
Page 16

30
31
Specications
13
Service
14
Technical data
› Power supply: 12 V/6 W
› Video decoding: MPEG-2 MP@ML
› Audio decoding: MPEG-1 Layer I and II
› Reception frequencies: VHF/UHF
› Bandwidth: 6/7/8 MHz
› Data stream: ISO/IEC13818
› Data volume: 2 – 8k Mode
› Outputs: FBAS,L,R
Delivery contents
› DVB-T receiver X4-TECH „X-Cept Mini“
› Remote control
› Magnetic base antenna
› Adapter 230 V AC/12 V DC
› 12 V car adapter for a cigarette lighter
› A/V connection cable
› Instruction manual (German, English)
Should questions arise then please contact our service hotline:
Hotline: +49 (0) 53 02/8 06-450
Address: x-services.eu gmbh
Service department X4-TECH
Brackestraße 3 · 38159 Vechelde/Germany
Information and updates: http://www.x4-tech.de
› We reserve the right to alter specications and information con
tained in this manual without notice.
› All brands mentioned are property of X4-TECH or of their respec
tive owners.
› X4-TECH assumes no responsibility or liability for any errors or inac
curacies that may appear in this instruction manual.
© 2008 X4-TECH All Rights Reserved
Manufacturer information
x-peer.de GmbH · Brackestraße 3 · D-38159 Vechelde
Telephone +49 (0) 53 02/8 06-400 · Fax +49 (0) 53 02/8 06-499
www.x-peer.de · E-Mail: info@x-peer.de
-
-
-
Chapter 14 ServiceChapter 13 Specications
Page 17

Version 1.0 – 7/2008
ww w.x4- tec h.d e
 Loading...