

Page 1

Users Guide
Wyse® Mobile Thin Computer, X90L/X90Le
Issue:030708
PN: 883908-01 Rev. A
Page 2

ii
Copyright Notice
© 2008, Wyse Technology Inc. All rights reserved.
This manual and the software and firmware described in it are copyrighted. You may not reproduce, transmit,
transcribe, store in a retrieval system, or translate into any language or computer language, in any form or by any
means, electronic, mechanical, magnetic, optical, chemical, manual or otherwise, any part of this publication
without express written permission.
End User License Agreement (“License”)
A printed copy of the Wyse Technology End User License Agreement is included in the shipping box and
provided for your reference only. The License at http://www.wyse.com/license
controlling licensing agreement. By copying, using, or installing the software or the product, you agree to be
bound by those terms.
Trademarks
Wyse and Winterm are registered trademarks, and the Wyse logo and Winterm logo are trademarks of Wyse
Technology Inc. ICA is a registered trademark and MetaFrame is a trademark of Citrix Systems Inc. Microsoft
and Windows are registered trademarks of Microsoft Corporation. All other products are trademarks and/or
registered trademarks of their respective companies. Specifications subject to change without notice.
Patents
This product and/or associated software are protected by copyright, international treaties, and various patents,
including the following U.S. patents: 6,836,885 and 5,918,039.
as of the purchase date is the
Restricted Rights Legend
You acknowledge that the Software is of U.S. origin. You agree to comply with all applicable international and
national laws that apply to the Software, including the U.S. Export Administration Regulations, as well as
end-user, end-use and country destination restrictions issued by U.S. and other governments. For additional
information on exporting the Software, see http://www.microsoft.com/exporting
Ordering Information
For availability, pricing, and ordering information in the United States and Canada, call 1-800-GET-WYSE
(1-800-438-9973) or visit us at http://www.wyse.com
FCC Statement
This equipment has been tested and found to comply with the limits for either Class A or Class B digital devices
(refer to "Regulatory Compliance for Thin Computers"), pursuant to Part 15 of the FCC Rules. These limits are
designed to provide reasonable protection against harmful interference in a residential installation. This
equipment generates, uses, and can radiate radio frequency energy and, if not installed and used in accordance
with the instructions, may cause harmful interference to radio communications. However, there is no guarantee
that interference will not occur in a particular installation. If this equipment does cause harmful interference to
radio or television reception, which can be determined by turning the equipment off and on, the user is
encouraged to try to correct the interference by one or more of the following measures:
• Reorient or relocate the receiving antenna.
• Increase the separation between the equipment and the receiver.
• Connect the equipment into an outlet on a circuit different from that to which the receiver is connected.
• Consult the dealer or an experienced radio/TV technician for help.
Shielded interconnect cables and shielded AC power cable must be employed with this equipment to insure
compliance with the pertinent RF emission limits governing this device. Changes or modifications not expressly
approved by the system's manufacturer could void the user's authority to operate the equipment.
.
. In all other countries, contact your sales representative.
Page 3

Caution
Changes or modifications not covered in this manual must be approved in writing by the
manufacturer’s Regulatory Engineering department. Changes or modifications made without
written approval may void the user’s authority to operate the equipment.
Regulatory Compliance for Thin Computers
EMC and Safety Requirements
Thin computers are compliant with the regulatory requirements in the regions listed below.
U.S.A. - FCC Part 15 (class B)
Canada - CAN/CSA-C22 No. 60950
Europe - EN 55022 (class B), EN 61000-3-2 (class A), EN 61000-3-3, EN 90650-1:2000+ALL
Canadian DOC Notices
Class A
This digital apparatus does not exceed the Class A limits for radio noise emissions from digital apparatus set out in
the Radio Interference Regulations of the Canadian Department of Communications.
Le présent appareil numérique n’émet pas de bruits radioélectriques dépassant les limites applicables aux
appareils numériques de la classe A prescrites dans le Réglement sur le brouillage radioélectrique édicté par le
Ministère des Communications du Canada.
iii
Class B
This digital apparatus does not exceed the Class B limits for radio noise emissions from digital apparatus set out in
the Radio Interference Regulations of the Canadian Department of Communications.
Le présent appareil numérique n’émet pas de bruits radioélectriques dépassant les limites applicables aux
appareils numériques de la classe B prescrites dans le Réglement sur le brouillage radioélectrique édicté par le
Ministère des Communications du Canada.
IEC/EN Notice
These products conform to the requirements of IEC950 and EN60950.
These products conform to requirements of EN55022 for Class A equipment or EN55022 for Class B equipment
(refer to "Regulatory Compliance for Thin Computers").
Wireless Usage and Requirements
Radio transmitting type devices (RF module) are present as a standard option. These devices operate in the 2.4
GHz band (i.e. 802.11b/g/n WLAN & Bluetooth).
As a general guideline, a separation of 20 cm (8 inches) between the wireless device and the body, for use of a
wireless device near the body (this does not include extremities) is typical. This device should be used more than
20 cm (8 inches) from the body when wireless devices are on and transmitting.
Some circumstances require restrictions on wireless devices. Examples of common restrictions include:
• When in environments where you are uncertain of the sanction to use wireless devices, ask the applicable
authority for authorization prior to use or turning on the wireless device.
• Every country has different restrictions on the use of wireless devices. Since your system is equipped with a
wireless device, when traveling between countries with your system, check with the local Radio Approval
authorities prior to any move or trip for any restrictions on the use of a wireless device in the destination
country.
• Wireless devices are not user-serviceable. Do not modify them in any way. Modification to a wireless device
will void the authorization to use it. Please contact the manufacturer for service.
Page 4

iv
Cable Notice
The use of shielded I/O cables is required when connecting this equipment to any and all optional peripheral or
host devices. Failure to do so may cause interference and violate FCC and international regulations for
electromagnetic interference.
Device Power Supply
Wyse X class thin computers use an external power adapter. Use only with Wyse approved power adapters
(refer to the Wyse Web site).
Caution
Replace power adapter with the same or equivalent type as recommended by the manufacturer.
Battery Information
Wyse X class thin computers contain a replaceable battery. The battery is designed to work with your Wyse thin
computer. Do not use a battery from other thin computers with your thin computer. Replace the battery only with
a compatible battery purchased from Wyse (refer to the Wyse Web site).
Warning
There is a risk of explosion if the battery is replaced by an incorrect type. Always dispose of used
batteries according to the instructions accompanying the battery.
Caution
Misuse of the battery may increase the risk of fire of chemical burn. Do not puncture, incinerate,
disassemble, or expose the battery to temperatures above 65°C (149°F). Keep the battery away
from children. Handle damaged or leaking batteries with extreme care. Damaged batteries may
leak and cause personal injury or equipment damage.
Page 5

Content s
1 About This Guide
About this Guide 1
Organization of this Guide 1
Finding Information in this Guide 1
Important Safeguards 2
Caution Statements 2
Wyse Technical Support 3
Links to Related Documentation and Services 3
2 Introducing Your Thin Computer
Check the Package Contents 5
Features 5
Inside View 6
Front View 6
Back View 7
Right Side View 7
Left Side View 8
Bottom View 8
3 Getting Started
Setting Up Your Thin Computer 9
Step 1 - Install the Battery 9
Step 2 - Connect th e Power Cable 9
Step 3 - Turn On the Thin Computer 10
Turning Off the Thin Computer 10
Removing the Battery 10
Adjusting the Brightness 11
Adjusting the Volume 11
System Indicator Lights 11
Keyboard Function Keys for System Control 12
Numeric Keypad 12
Touch Pad 13
Dragging 14
Scrolling 14
Touch Pad Precautions 14
Connecting a Printer 14
Power Management 14
Monitoring Battery Power 15
Low Battery Alarms 15
Battery Charging 16
When to Replace the Battery 17
Changing the Battery 17
Power Saving Modes 17
Standby Mode 18
Initiating Standby Mode 18
Power Button Settings 18
Page 6

vi
Power Saving Tips 18
Heat Considerations 19
Graphics System 19
Screen Controls 19
Connecting to an External Monitor 19
4 Making Connections
Wired Net/LAN 21
Wi-Fi 21
Making a Connection 21
Adding a Certificate 21
Express Card 22
Installing a Card 22
Removing a Card 23
Express Card Size Restrictions 23
Bluetooth 23
Creating a Partnership Between Phone and Thin Computer 23
Establishing the connection 24
Enabling the Bluetooth device for connecting to the Internet: 25
Connecting to a Network through a DUN-Capable Mobile Phone 26
Disconnecting Windows Bluetooth DUN 29
5 Establishing a Server Environment
Setting Up Access to the Enterprise Servers 31
6 Frequently Asked Questions
List of Figures
List of Tables
Page 7

1 About This Guide
The Wyse X90L and X90Le are wireless mobile thin computers in the Wyse X class of
mobile thin computers. The Wyse X90L and X90Le use the Windows™ XP Embedded
(XPe) operating system. These thin computers provide access to applications, files, and
network resources made available on machines hosting Citrix™ ICA and Microsof t™ RDP
session services. Generally, the keyboard, mouse, audio/video, and display data are
transmitted over the network between the thin computer and session servers. Locally
installed software permits remote administration of the thin computers and provides local
maintenance functions.
About this Guide
This users guide is written primarily for desktop users. It contains detailed information you
need to use and troubleshoot your mobile thin computer.
Organization of this Guide
This guide is organized as follows:
Chapter 2, "Introducing Your Thin Computer," provides package contents, features, and
detailed views of your mobile thin computer.
Chapter 3, "Getting Started," provides information on setting up and using your thin
computer, power management, and the graphics system.
Chapter 4, "Making Connections," provides information about the various ways your thin
computer makes connections.
Chapter 5, "Establishing a Server Environment," provides information on the network
architecture and enterprise server environment needed to provide network and session
services enabling Wyse X class thin computers’ network connection. It also includes
information to help you address important considerations when configuring access to the
server environment and when configuring the services to be provided by the server
environment.
Chapter 6, "Frequently Asked Questions," contains information and help on installation,
setup, conflicts, and general troubleshooting.
Finding Information in this Guide
Use the bookmarks and search features in Acrobat Reader:
• Choose Edit | Find or Edit | Search to search in the docume nt for inform ation about a
specific topic.
• Click the Bookmarks button (if necessary) to open the Bookmarks pane, and then
click the names of chapters or headings to go from place to place in the document.
Click the plus sign next to a chapter name to display its headings.
Page 8

2 Chapter 1
Important Safeguards
Please follow these important safeguards:
• Follow all warnings and instructions noted in this documentation and in the Windows
Help program.
• The first time you use your thin computer, carefully read the "Introducing Your Thin
Computer" section of this manual and initialize the battery to ensure optimum battery
performance.
• To clean your thin computer, first disconnect it from the electrical outlet, and then use a
soft cloth dampened with water for cleaning. Do not use aerosols, solvents, or strong
detergents.
• Do not use the thin computer near open water or other liquids. Never spill liquid onto
the thin computer.
• Do not place the thin computer in an unstable location where it might slip or be
knocked over. Serious damage could result from a fall.
• Slots and openings in the system cabinet are for ventilation purposes. Do not block or
cover these openings or the system could overheat. Do not use or store the thin
computer near a source of heat or dust.
• On the bottom of this thin computer, there is a label with information on the power
requirements of this system. These requirements must be followed. If you are unsure
of your local power supply, consult your dealer or local power company.
• Do not step on or place anything on the power cable or power adapter.
• If you use the thin computer with an extension cord, ensure that the total ampere
ratings of all the devices sharing the extension do not exceed the rating of the
extension cord or the rating of the wall outlet.
• Never push foreign objects into the thin computer through any o f the slots or openings.
Dangerous voltages are present, which could cause electric shock or fire, or damage
sensitive components.
• For best results, use a power strip with a built-in surge protector. Do not use inferior
extension cords as this may result in damage to your thin computer.
Caution Statements
Improper connection or use of this product could result in component failure or undesired
interference. Read the following caution statements before setting up and operating your
thin computer.
Setup
• Do not force a connector into its socket. If any undue resistance is encountered,
ensure that the connector is correctly oriented to the receptacle.
• The main unit is not user serviceable; opening or accessing the case may violate your
warranty.
• For wireless usage and requirements, refer to the regulatory notices in the thin
computer’s documentation.
Venting and Care
• Allow sufficient space around your thin computer for ventilation; do not place your thin
computer in any enclosure that restricts airflow around the device, such as a closed
briefcase, while the computer is turned on. Restricting airflow can damage your thin
computer or cause a fire; do not place any objects o n the device or block th e vent holes
Page 9

About This Guide 3
under the device. Find environmental operating specifications in the thin computer’s
datasheet located at http://www.wyse.com/products.
• Do not allow your thin computer to rest directly on exposed skin for extended periods of
time during operation. The base surface temperature will rise during normal operation
(particularly when AC power is used). Prolonged contact with exposed skin can cause
discomfort or a burn.
Power Sources
• To ensure regulatory compliance, use only the power adapte r included in the shipping
carton, or a Wyse-approved equivalent, with your thin computer. Refer to the regulatory
notices in your thin computer’s documentation.
• You can connect the power adapter at any time with the thin computer turned either on
or off.
• Do not hard reset your thin computer by holding down the power button during normal
operation.
• When turning off your thin computer, be sure to perform a complete shutdown (via the
user interface). Do not disconnect the AC power cable, DC power adapter cable, or
shut off power at a circuit breaker (including power strips), etc., to turn off the device.
• Surge protectors for electrical devices ar e re co m me n ded in ar ea s of ligh tn in g.
However, wh en lightning is occurring, your equipment should be properly shut down
and unplugged from AC power until the storm has passed.
• Dispose of your battery properly when it no longer holds a charge or is damaged.
Contact your local waste or environmental agency for instructions.
Warning
The X class mobile thin computers contain a replaceable battery. There is a
risk of explosion you replace the battery with an incorrect type. Always
dispose of used batteries according to the manufacturer’s instructions.
Wyse Technical Support
To access Wyse technical resources, visit http://support.wyse.com.If you still have
questions, you can submit your questions using the Wyse Self-Service Center
Customer Support at 1-800-800-WYSE (toll free in U.S. and Canada). Hours of operation
are from 6:00 am. to 5:00 pm. PST, Monday through Friday.
To access international support, visit http://www.wyse.com/global
Links to Related Documentation and Services
Wyse mobile thin computer features can be found in the Datasheet for your specific thin
computer model. Datasheets are available on the Wyse Web site at:
http://www.wyse.com/products
Administrator and User documentation for your thin computer model are available on the
Wyse Web site at: http://www.wyse.com/manuals
Wyse Thin Computing Software is available on the Wyse Web site at:
http://www.wyse.com/products/software
or call
.
.
.
Page 10

4 Chapter 1
If you need to upgrade your XPe operating system, contact Wyse Customer Support at:
http://www.wyse.com/support
.
Page 11

2 Introducing Your Thin Computer
This section provides package contents, features, and detailed views of your thin
computer.
Check the Package Contents
After opening the package, carefully inspect the contents. If any of the items is missing or
appear damaged, contact your dealer. The shipping carton should contain the following:
• Thin computer
• Battery
• Power adapter with AC power cable
Caution
When purchasing any of the accessories listed above, purchase only those
accessories that are approved for use with your thin computer. The above
accessories are proprietary items. Your system vendor can obtain these
approved accessories. If you use items that are not approved for use with
this thin computer, you may cause your thin computer to malfunction, or to
emit or receive electromagnetic radiation in excess of local regulations. For
non-proprietary accessories such as PC cards or printers, ensure that the
accessory functions properly in your thin computer before making the
purchase. Your system vendor may be able to recommend reliable brands
and models.
Features
Features that the thin computer include:
• LAN Capability - A built-in 10/100/1000 Mbps Ethernet port allows you to access the
Internet or a local area network (LAN).
• LCD - Your thin computer has an easy-to-view 15.4-inch (Metric equivalent) WXGA
LCD panel.
• Built-in Stereo Speakers - The stereo speakers enable you to run a variety of
multimedia applications.
• Convenient Audio Control - The conveniently located audio control keys enable you
to easily adjust the volume of the stereo speakers.
Page 12
6 Chapter 2
Inside View
Front View
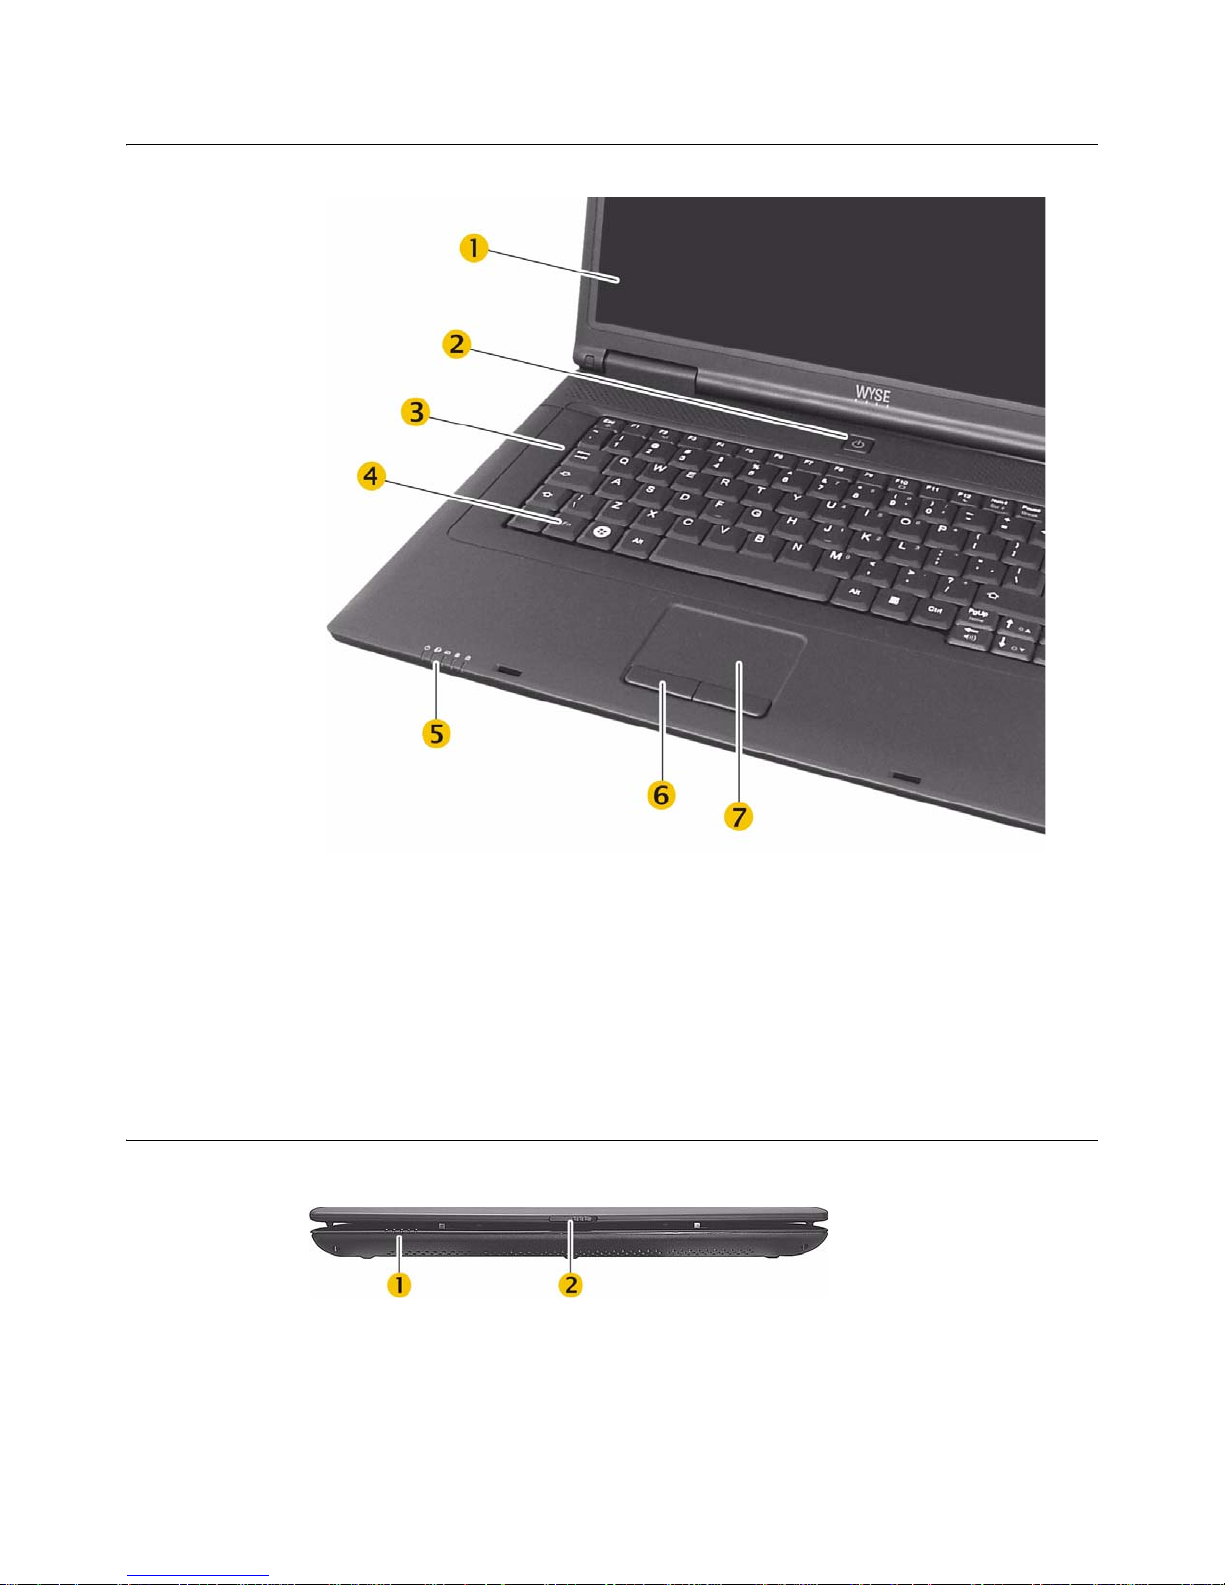
(1) Display (5) System indicator lights
(2) Power On/Off button (6) Touch pad button (2)
(3) Keyboard* (7) Touch pad
(4) Function key
* International keyboard shown.
(1) System indicator lights
(2) Release latch
Page 13
Introducing Your Thin Computer 7
Back View
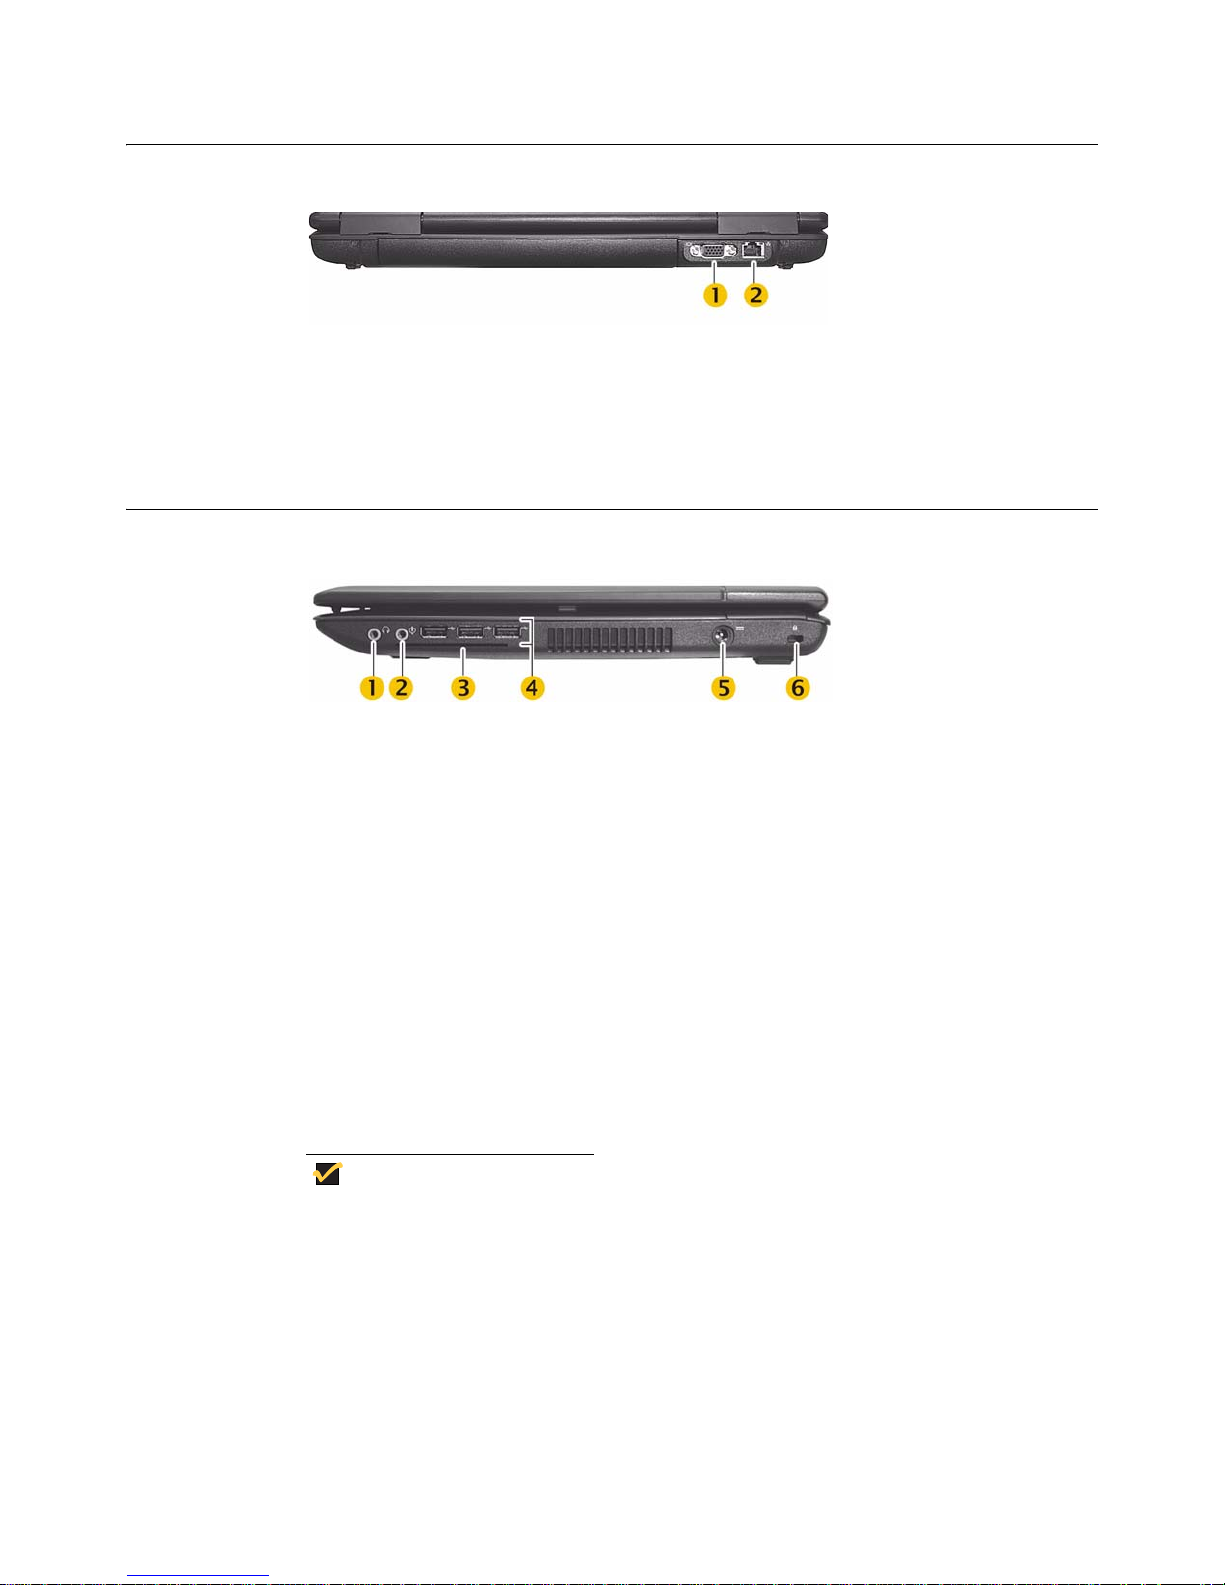
(1) VGA Port - Connect an analog monitor.
(2) LAN RJ-45 Network Port - With the built-in Ethernet LAN combo, you can make LAN
connections. Connection speed is up to 1 Gbps.
Right Side View
(1) Line out/Headset out - Connect a stereo headset or external speakers to this port to
listen to multimedia.
(2) Microphone In - Connect a microphone to this port to record.
(3) Smart card slot - Smart card slot is a feature for X90Le; insert with electrical contacts
facing upward.
(4) USB 2.0 port (3)- Use for attaching monitors, input devices, scanners, and other
devices to the thin computer.
(5) Power adapter input - Connect the DC power cable from the power adapter to this
port.
(6) Kensington lock slot - Your thin computer includes a Kensington lock hol e to be used
with a standard Kensington lock. You can connect the thin computer to a large object with
the Kensington lock to prevent theft of your thin computer. See the documentation that
comes with your Kensington lock for more information.
Note
The USB 2.0 port constantly supplies 5V power to the external USB device
even when the system is at power off state. This enables external USB
device to be charged at any time without turning on the system. To prevent
draining the battery power when the system is powered off, remove the
external USB device when not in use.
Page 14
8 Chapter 2
Left Side View
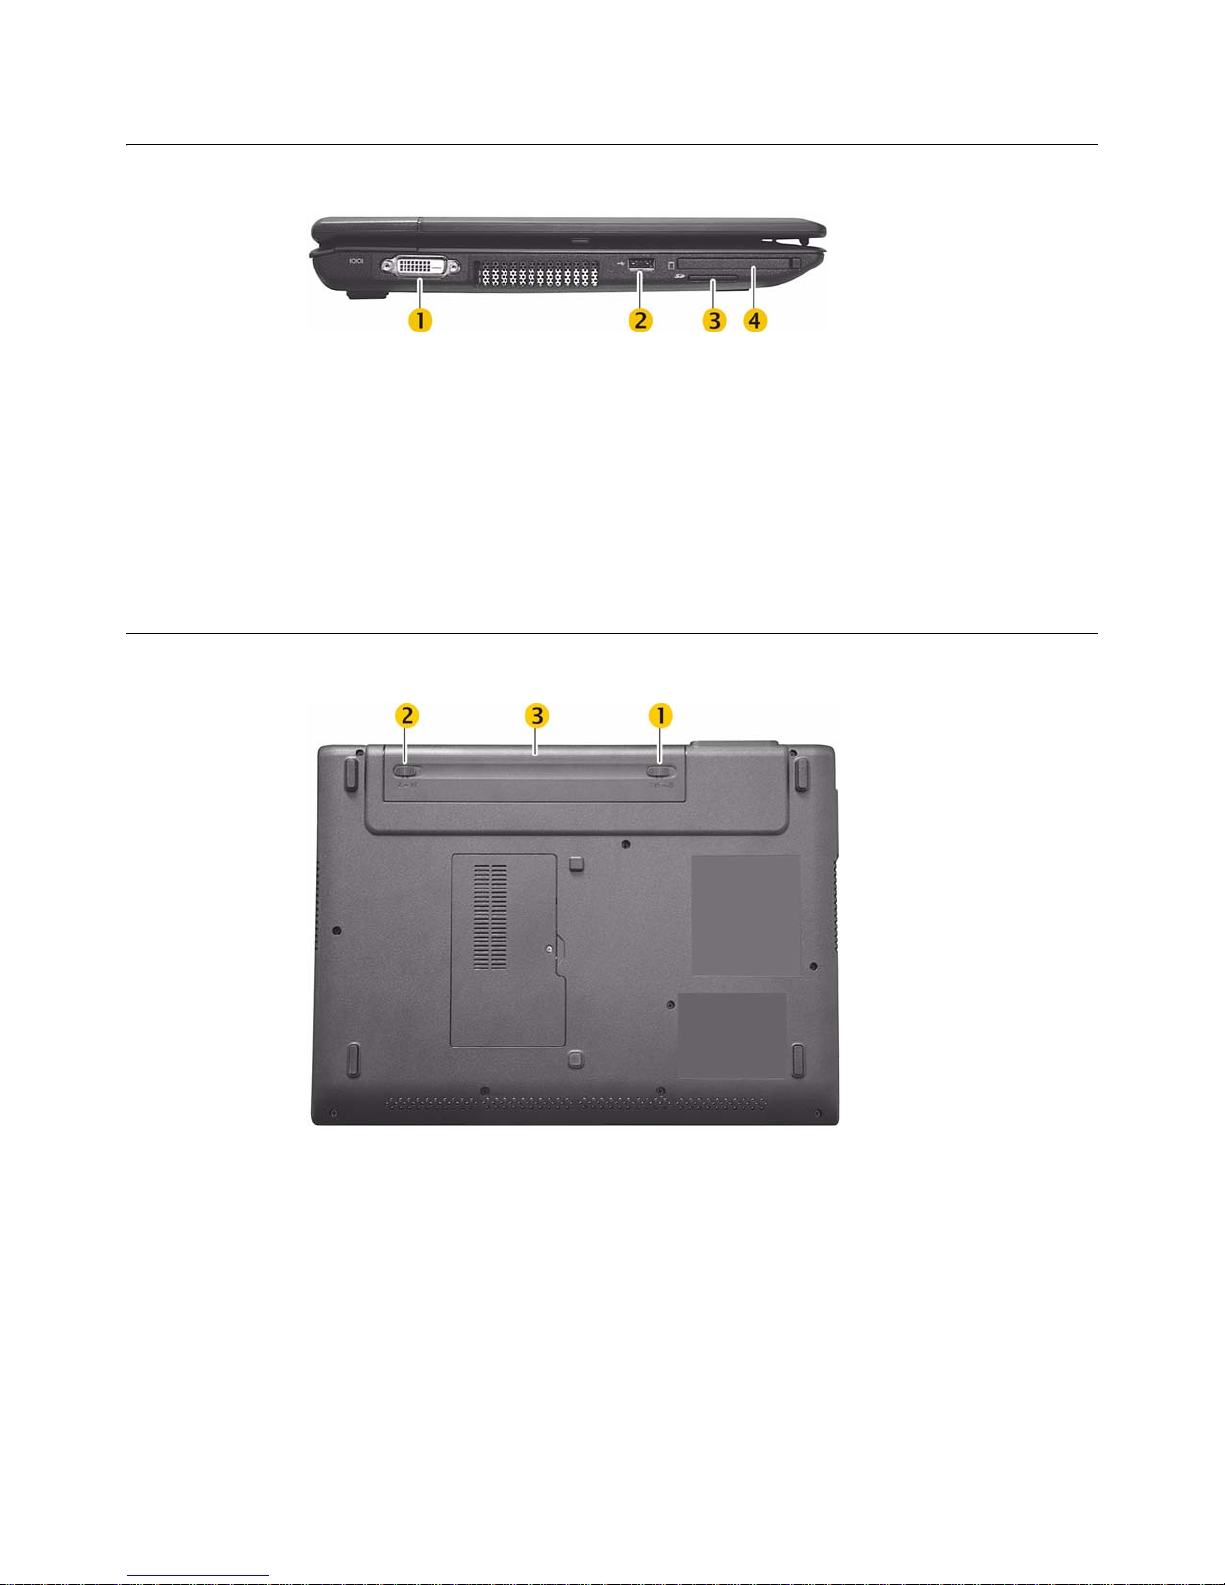
(1) DVI port - Connect to a digital monitor.
(2) USB 2.0 port - Attach a computer peripheral.
(3) SD card slot - Attach a Secure Digital (SD) memory card. You can use this card as a
second hard drive to store data files, photographs, and video.
(4) Express card slot - This slot is where an ExpressCard/34 or Express Card/54 card is
inserted.
Bottom View
(1) Battery lock - Slide to unlock.
(2) Battery release latch - Slide and hold to unlatch.
(3) Battery
Page 15

3 Getting St arted
This section provides information on setting up and using your thin computer, power
management, and the graphics system.
Setting Up Your Thin Computer
To quickly set up your thin computer follow the next three simple steps.
Step 1 - Install the Battery
With your thin computer turned off, insert battery in the battery compartment located on
the underside of the thin computer and secure it by sliding the latches.
1. Slide the battery lock (3) to unlock.
2. Slide and hold the battery release latch (1) as you gently insert the battery (2) into the
battery compartment. Make sure the battery is properly orientated.
3. Make sure that the battery lock (3) locks back into position.
Figure 3-1 Battery Latches
Step 2 - Connect the Power Cable
Plug the power adapter connector to the thin computer as shown. Plug the AC power
cable to the power adapter , and then p lug the other end of the p ower cable to a wa ll outlet.
Page 16

10 Chapter 3
Figure 3-2 Connecting the Power Cable
Note
Y ou can connect the power ada pter at any time with the thin computer turned
either on or off.
Step 3 - Turn On the Thin Computer
Raise and adjust the lid, and press the power on/off button for two seconds. When you
release the power on/off button , the power LED on the system indicators lights up.
After power-on, the thin computer goes throug h several boot sequ ence procedur es before
the operating system loads. See "Setting Up Access to the Enterprise Servers" for
information about setting up your server environment. Additional information is available in
the thin computers’ operating system documentation, Administrators Guide: Wyse
Series, Based on Microsoft
Turning Off the Thin Computer
Press the power on/off button for two seconds, or go to Start | Shut Down, choose Shut
Down in the Shut Down Windows dialog box, and click OK.
Removing the Battery
With your thin computer turned off, slide the battery lock to unlock, and then slide and hold
the battery release latch to gently pull the battery out of the battery compartment.
®
Windows® XP Embedded.
®
9
Caution
Before removing battery, turn off the thin computer and disconnect the power
adapter from the electrical outlet.
Page 17

Getting Started 11
Adjusting the Brightness
Use the following hot key combinations to adjust the display panel brightness:
• Fn + ↓ decreases the brightness
• Fn + ↑ increases the brightness
Adjusting the Volume
There are two ways in which to adjust the volume:
• You can adjust the volume with the hot key combinations as follows:
• Fn + ← decreases the volume
• Fn + → increases the volume
• Fn + Esc mutes the volume
• Alternatively, you can adjust the volume with the Windows volume control located on
the taskbar.
System Indicator Lights
The system indicator lights for status and power are in the lower-right corner of the
keyboard. The status indicators light up when a particular function of the thin computer is
active. Each indicator is marked with a symbol. The power indicators show which power
source the system is using. The power indicators remain active and viewable even when
the display panel is closed.
Table 3-1 System Indicator Lights for Status and Power
Icon Color Description
Blue Thin computer is powered on
Blue Wireless signal is enabled
Amber
Amber flash
Green Keyboard Caps Lockis on
Green Keyboard Num Lock is on
Battery is charging
Battery is low (5% remaining)
Page 18

12 Chapter 3
Keyboard Function Keys for System Control
The numeric keypad numbers and symbols are printed in blue on the keypad keys. Press
and hold the Fn key while pressing the appropriate function key.
Table 3-2 Keyboard Function Keys for System Control
Icon Key Description
Fn Fn Function Key
Fn + Esc Volume mute
Fn + F2 Wireless and Bluetooth (X90Le) - on/off
Fn + F10 Display switch - LCD / LCD+CRT / CRT*
Fn +F12 Standby
Scr Fn + Num Scroll lock - on/off
Break Fn + Pause Break
Prt Scr FN + Insert Print screen
SysRq FN + Delete System request
Home Fn + PgUp Home
End Fn + PgDn End
* In order to get the output to DVI, you must first go to Advance Settings in the Display control panel
and change the default output setting to DVI, not VGA.
Numeric Keypad
The embedded numeric keypad consists of sixteen keys that make number inten sive input
more convenient. Press Num to enable or disable the num eric keypad.
Fn + ↓ Brightness - decrease
Fn + ↑ Brightness - increase
Fn + ← Volume - decrease
Fn + → Volume - increase
Page 19

Touch Pad
Getting Started 13
Figure 3-3 Numeric Keypad
.
The touch pad is a pressure-sensitive pointing device that provides all the features of a
two-button mouse. Its primary function is to move the cursor around the screen.
Figure 3-4 Touch Pad
To use the touch pad:
1. Place your fingers on the keyboard in the normal typing position. The touch pad is
easily accessible by moving either your left or right thumb off the space bar and on to
the touch pad.
2. Gently move your thumb across the pressur e-sensitive touch pad in the direction you
want the cursor to move. The pad detects the change in pressure and moves the
cursor in the corresponding direction.
3. The touch pad offers another method of making selections in a software program. It is
called double-tapping. This function corresponds to double-clicking with a mouse.
Once the cursor has been moved to the object you want to select, lightly double-tap the
pressure-sensitive touch pad. This double-tapping on the touch pad will select the
desired item and prompt the software to perform the related operation.
4. The buttons located directly below the touch pad are the same in function as those on
a two-buttoned mouse. Clicking these buttons makes selections, drags objects, or
performs a variety of other functions depending on the software. To select an object,
Page 20

14 Chapter 3
first move the pointer over the object you want to select, and then press the left button
one time. The functions of these buttons are software specific.
5. Double-clicking is a common technique for selecting objects or launching programs
from icons. Once you have moved the pointer over the object you wish to select,
rapidly press the left button two times. This action is commonly referred to as
“double-clicking” an object.
Dragging
There are two ways to drag:
• Move the pointer to the desired location then press down the left button. While still
holding down the left button, move the pointer to the desired location. Release the
button.
• Move the pointer to the desired location. T ap the touch p ad twice quickly as if you were
double-clicking; however do not remove your finger after the second tap. Move the
cursor to the desired location. Lift your finger to finish dragging.
Adjust the touch pad settings by clicking Start | Settings | Control Panel | Mouse |
Buttons. These settings allow you to change the orientation of the touch pad from
right-handed to left-handed and fine tune the pointer movement and timing of clicks.
Scrolling
When you want to scroll through a document, you may scroll with the touch pad. To scroll
vertically, drag your finger along the right side of the touch pad. Making this motion is the
same as dragging the vertical scroll box with your mouse.
Touch Pad Precautions
The touch pad is a pressure-sensitive device. If not properly cared for, it can be easily
damaged. Please take note of the following precautions:
• Make sure the touch pad does not come into contact with dirt, liquids or grease.
• Do not touch the touch pad if your fingers are dirty.
Do not rest heavy objects on the touch pad or the touch p ad buttons.
Connecting a Printer
To connect a parallel printer to your thin computer via the USB port, you will need a
USB-to-printer adapter cable (not included). Be fore use, you may ne ed to install th e driver
for the printer.
Power Management
Proper power management should prolong the life of the batter y and enable the thin
computer to run at a cooler temperature. This section explains how to monitor battery
power, when to replace the battery, and how to make your battery last long er.
Page 21

Getting Started 15
Note
In order to access the power management options in the Power Options
Properties dialog box, you must be logged in as an Administrator.
Monitoring Battery Power
There are two ways to display battery properties and monitor how much power th e battery
has left:
• Click Start | Settings | Control Panel | Power Options, and then click the Power
Meter tab.
• Double-click the battery icon in the taskbar to display battery properties.
Figure 3-5 Power Option Properties - Power Meter
If you do not see the battery icon, enable it in Start | Settings | Control Panel | Power
Options. Choose the Advanced tab and click Always show icon on the taskbar.
Low Battery Alarms
How your thin computer responds to a low battery condition is set under St ar t | Se ttings |
Control Panel | Power Options | Alarms.
Two different power alarms can be enabled or disabled: the Low Battery Alarm (0%), and
the Critical Battery Alarm (100%). Use the slidebar to set the power level at which the
alarms are activated. Click on the Alarm Action button to choose whether the ala rm
sounds, displays a message, or both.
Page 22

16 Chapter 3
Figure 3-6 Power Option Properties - Alarms
Warning
When battery power is low, the thin computer will display a warning on the
screen. Take immediate action, such as saving files or connecting to the
power adapter, or data may be lost.
When the thin computer alerts you that the battery is low, immediately do one of the
following:
• Connect the power adapter
• Save your work, turn off the thin computer and replace the discharged battery with a
charged battery (See
Note
Do not restart the thin computer until you have connected to the power
adapter, or replaced the discharged battery with a charged battery.
"Changing the Battery").
Battery Charging
When you use the power adapter to connect your thin computer to a power outlet, the
internal battery will automatically begin to recharge. While the battery is charging, the
Battery Charge icon on the Indicator panel will be act ive. When the battery is fully
charged, the Battery Charge icon will turn off.
If your thin computer is turned off or standby mode, a fully discharged battery will take
about three hours to recharge.
Note
A fully charged battery can run the thin computer for approximately 3.5
hours.
Page 23

Getting Started 17
When to Replace the Battery
Over time, the battery's capacity gradually decreases. We recommend that you replace
your battery when you notice that it begins to store significantly less charge.
Changing the Battery
Change the main battery pack as follows:
1. Turn off the thin computer and disconnect the power adapter from the electrical outlet.
2. Close the display cover and turn the thin computer over.
3. Slide the battery lock (3) to unlock.
4. Slide and hold the battery release latch (1) away from the battery (2) as you gently pull
the battery out of the battery compartment.
5. Slide and hold the battery release latch (1) and then insert the new battery into the
battery compartment. Make sure the replacement battery is properly or ienta ted. Check
that the battery lock (3) locks back into position.
Figure 3-7 Battery Latches
Power Saving Modes
Adjust the default power management settings in the Advanced tab of the Power Opti ons
Properties dialog box (click Start | Settings | Control Panel | Power Options |
Advanced). The Power Options Properties dialog box allows you to set different actions
to take when the thin computer is left idle for a certain amount of time.
Page 24

18 Chapter 3
Figure 3-8 Power Option Properties - Advanced
Standby Mode
Select the settings for S tandby mode in the Po wer Management dialo g box. You may have
the thin computer stand by or you can power off th e thin computer altogether.
Initiating Standby Mode
There are four ways to initiate Standby mode. The settings can be adjusted in the Power
Management dialog box by:
• Clicking the Standby button in the Shut Down Windows dialog box
• Closing the screen cover (assuming no external monitor has been connected)
• Clicking the Power on/off button (if enabled in power settings)
• Pressing the Standby function key Fn + F12
Note
The thin computer will automatically enter Standby mode when not used for a
set period of time.
Power Button Settings
The function of the power on/off button can be set to Shutdown or Standby in the Power
Management Properties dialog box in the Windows Control Panel.
Power Saving Tips
To save power:
• Avoid operating the audio and video applications when usin g battery power. Operating
video or audio equipment increases the thin computer's power require ments.
• Decreasing display brightness can also save power. Decrease brightness by pressing
Fn + ↓. Increase it by pressing Fn + ↑.
• Remove external USB devices when not in use when the thin computer is turned off.
Page 25

Getting Started 19
Heat Considerations
The thin computer's processor has been specially designed to consume little power, and
generates very little heat. However, working in a hot environment, or working for long
periods may raise the temperature. Your thin computer takes the following step to lower
temperature:
• If the temperature continues to rise, processor activity will be reduced. You may notice
a slight loss of performance when this happens.
Graphics System
Your thin computer has a high-performance graphics system, wh ich can ea sily han dle the
demands of today's multimedia computing.
Screen Controls
Your screen can be adjusted for brightness and resolution.
Brightness
Function keys can increase or decrease the brightness of the display:
• Fn + ↓ decreases the display brightness
• Fn + ↑ increases the display brightness
Resolution
To adjust the resolution settings:
1. Click Start | Settings | Control Panel, and select the Display icon.
2. Click the Settings tab. The dialog box indicates the display resolution.
3. Use the slide bar to adjust the resolution. Normally, you should use 1280 x 800, the
resolution that was designed for the display.
High Resolution with an external monitor
Higher resolution modes may be used, as long as the external monitor supports them.
Connecting to an External Monitor
The thin computer has a VGA (analog) and DVI (digital) monitor port for connecting your
thin computer to an external monitor. After the connection is made, the external monitor
mirrors what is on your thin computer’s monitor. To connect an external monitor to your
thin computer:
1. Locate the VGA monitor port on the back side of your thin computer, or the DVI monitor
on the left side of your thin computer.
2. Connect the video signal cable from the external monitor (or the VGA adapter) to the
monitor port.
3. Connect the power cable from the external monitor to a power outlet and turn on the
monitor.
Page 26

20 Chapter 3
4. On your thin computer, click Start | Settings | Control Panel, and select the Display
icon to open the Display Properties window.
5. In the Display Properties window, click Advanced in the Settings tab.
6. Click the S3Display tab.
Figure 3-9 S3Display tab
7. Under Display Devices, choose CRT or DVI and click OK.
8. Click OK in the message box that says your settings will now be applied.
9. Click Yes in the message box that asks whether you want to keep the new settings.
Page 27

4 Making Connections
This section provides information about the various ways your thin computer makes
connections.
Your mobile thin computer makes connection through:
• Wired Net/LAN
• Built-in Wi-Fi (802.11b/g/n wireless LAN)
• Express card provided by data carriers
• Bluetooth*
*Bluetooth is a feature for X90Le.
Wired Net/LAN
To attach to a wired network, insert the network cable into the LAN RJ-45 network port at
the back of the thin computer.
Wi-Fi
The thin computer uses Microsoft Wireless Zero Configuration. Follow the on screen
instructions to connect to an existing wireless LAN.
Making a Connection
To make a connection to an existing wireless LAN:
1. Press Fn + 2 to turn on wireless LAN in your thin computer. The indicator light for
wireless activity lights up and remains active.
2. Hover over the wireless network icon in the taskbar to see if a wireless network
connection is available, and then click the icon to open the Network Connections di alog
box.
3. Click the Wireless Network Connection icon.
4. Click Enabel This Network Device under Network Tasks on the left side of the
window.
Adding a Certificate
To add a certificate for certificate-based wireless networks:
1. Open Internet Explorer | Tools | Internet Options, and select the Content tab.
Page 28

22 Chapter 4
2. On the Contents tab, select Certificates.
3. Click on Import to open the Certificate Import Wizard window
4. Click Next and browse to the file where the certificate resides.
5. Follow the on screen instructions.
Express Card
The express card slot can be used as an interface between your thin computer and a
variety of communications devices, such as network adapters, or can provide additional
data storage capacity.
Installing a Card
To install a Card:
1. The top side of a express card is usually identified with a label. Insert the card into the
slot with the label side up and the edge with pinhole contacts going in first.
2. Insert the card into the slot. You will feel some resistance as the card slides into the
back of the slot.
3. Express cards require drivers, or a program that allows the operating system to use a
specific device. Many drivers are included with Windows, but if not, you will be
prompted to install the driver included with your card.
4. The thin computer will beep twice to indicate successful installation.
Figure 4-1 Installing an Express Card
Page 29

Making Connections 23
Note
Please read the instructions included with individual express cards. Some
cards may be inserted with power on, while others require that the thin
computer be turned off.
Removing a Card
Press the card again to release the card.
Express Card Size Restrictions
The card will not be able to eject if it is less the 75mm.
Figure 4-2 Express Card Size Restrictions
Bluetooth
Bluetooth is a feature for Wyse X90Le. The prerequisite for making this connection is a
Bluetooth-enabled phone with Dial-Up Networking (DUN) capability and the Wyse X90Le
thin computer.
Note
To establish a connection to a Bluetooth de vice, you must be log ged in as an
Administrator.
Creating a Partnership Between Phone and Thin Computer
To make a connection from your thin computer to the Internet through a Bluetooth device
(your mobile phone), first establish the connection and then enable the use of the device.
Page 30

24 Chapter 4
Note
Before you start, make sure that your thin computer and phone are tur ned on
and the batteries are fully charged.
Establishing the connection
To make the connection between your thin computer and a Bluetooth device:
1. Turn on Bluetooth in your mobile phone as instructed by the mobile phone manual.
2. Press Fn + 2 to turn on Bluetooth in your thin computer. The indicator light for wireless
activity lights up and remains active.
3. Click on the Bluetooth icon in the taskbar to open the Bluetooth Devices window.
4. Click the Add button to open the Add Bluetooth Device Wizard.
Figure 4-3 Welcome to the Add Bluetooth Device Wizard
5. Click the check box My device is set up and ready to be found and click Next.
6. If the following window appears, read and follow the directions, making sure your
phone’s Bluetooth is on and discoverable, and then press Search Again.
Page 31

Making Connections 25
Figure 4-4 Add Bluetooth Device Wizard
7. If the mobile device is detected on your thin computer , se lect the device an d click Next.
8. Select the option Don’t Use Passkey and click Next.
9. The mobile device will be detected on the Bluetooth Devices window.
Figure 4-5 Bluetooth Devices Window
Enabling the Bluetooth device for connecting to the Internet:
To enable the Bluetooth device so it can connect to the Internet:
1. Select the device icon.
2. Click the Properties button
3. Select the Services tab. You see a list of services.
4. Click the Dial-up Networking (Dun) check box.
Page 32

26 Chapter 4
Connecting to a Network through a DUN-Capable Mobile Phone
To connect to a network through a DUN-capable mobile phone:
1. Click Start | Settings | Control Panel | Network Connections to open the Network
Connections Window.
2. Click on Create a new connection to open the Network Connection Wizard and click
Next.
3. Select the radio button Connect to the Internet and click Next.
4. Select the radio button Setup my Connection manually and click Next.
Figure 4-6 New Connection Wizard
5. Select the radio button Connect using a dial-Up modem, and click Next to open the
New Connection Wizard.
Figure 4-7 Connection Name
6. Enter the ISP name and click Next. The ISP name is a user-friendly name (in this
example, “Connect” was used).
Page 33

Making Connections 27
7. Enter the ISP’s phone number.
Note
The ISP (Internet Service Provider) phone number is provided by your
mobile phone provider and may require a special data plan.
8. Click Finish to finish the New Network Connection Wizard setup. A connection window
opens.
Figure 4-8 Connection Window
9. Enter Username and Password and click Dial to open the Opening Port window.
Caution
You can expect a delay for the Opening Port window to appear. Do not click
on the Cancel button.
Page 34

28 Chapter 4
Figure 4-9 Opening Port
10.Click on the message pointing to the Bluetooth icon in the taskbar. The following
window opens for entering a passcode.
Figure 4-10 Entering a Passcode, when Needed
11. Enter the Passkey number and click Next. Within a few moments the mobile phone
also asks for the Passkey. Enter the same key.
12.In the taskbar the Connect is now connected message appears.
Page 35

Making Connections 29
Disconnecting Windows Bluetooth DUN
To disconnect a Bluetooth device:
1. In the Network Connections window under Dial-up, find the connection yo u p revio usly
created for your Bluetooth DUN connection.
Note
“Connect“ is the name given as the ISP Name (as shown in Figure 4-7).
Figure 4-11 Network Connection
2. Right-click on the Connect Icon and then click on Disconnect.
Page 36

30 Chapter 4
This page intentionally blank.
Page 37

5 Est ablishing a Server Environment
This section contains information on the network architecture and enterprise server
environment needed to provide network and session services enabling Wyse X class thin
computers network connection. It also includes information to help you to address
important considerations when configuring access to the server environment and when
configuring the services to be provided by the server environment.
Setting Up Access to the Enterprise Servers
There are five basic methods of access to the enterprise server environment available to
the thin computer. Except for Ethernet Direct, all o f the a ccess m ethods re quire that some
local settings be made on the thin computer. These local settings are retained and are
available for the next thin computer system start. Activating these local settings and the
defined connections can also be automated at thin computer system start.
Methods of access include:
• Ethernet Direct - This is a connection from the thin computer Ethernet port directly to
the enterprise intranet. No additional hardware is required. In this configuration all
network services may be used, including the enterprise DHCP server. A DHCP server
on the network can provide not only the thin computer IP address, but also the location
of the file server containing the software updates.
• Wireless Direct - A supported wireless adapter (or the optional internal wireless
feature) can be used to access the enterprise intranet. A wireless adapter uses
short-range wide-band radio to communicate with a wireless access point. Typically,
wireless access points are located at several locations in the enterprise within range of
the wireless adapters and directly connected to the enterprise intranet.
• PPPoE - Thin computer support for Point-to-Point Protocol over Ethernet (PPPoE) is
intended for devices which connect to the Internet directly from remote locations. The
New Connection Wizard can be used (available from Network Connections in the
Control Panel) to configure and invoke a PPPoE connection. Once connected, all
packets are through a PPP connection over Ethernet to the DSL modem. For more
information on the New Connection Wizard, refer to documentation on the Microsoft
Web site at:
http://www.microsoft.com.
• Dial-up Modem - A dial-up modem can be used with the thin computer to access a
dial-up server. The dial-up server must be a Microsoft Remote Access Server or
another server that supports industry-standard protocols. The dial-up server can
provide either of the following methods of access to the enterprise intranet:
• Direct access - An enterprise dial-up server directly co nn e cts to the ente rp ris e
intranet.
• Indirect access - An Internet Service Provider (ISP) dial-up server simply provides
access to the Internet, from which the thin computer accesses an enterprise PPTP
VPN server that connects to the enterprise intranet.
Page 38

32 Chapter 5
• VPN (PPTP) - PPTP (Point-to-Point Tunneling Protocol) is a network protocol that
enables the secure transfer of data between a remote computer (in this case the thin
computer) and an enterprise server environment by creating a virtual private network
(VPN) across TCP/IP-based data networks such as the Internet. It provides a
password-protected path through the enterprise firewall to the enterprise server
environment in which the network and session services required thin computers reside.
The New Connection Wizard can be used (available from Network Connections in the
Control Panel) to configure and invoke a VPN connection.
An Internet Service Provider (ISP) must be available to provide access to the Internet.
Any of the standard means of connecting to the ISP may be used, such as a dial-up
modem, cable modem, and DSL modem. The connection to the ISP must be
established first, before contactin g the enterprise PPTP VPN server. This includes
dial-up access as well as direct access through the cable modem and DSL modem
paths. For more information on the Ne w Connection Wizard, refer to document ation on
the Microsoft Web site at:
http://www.microsoft.com.
Note
More information about setting up access to the enterprise servers is
available in the thin computers’ operating system documentation,
Administrators Guide: Wyse
Embedded.
®
9 Series, Based on Microsoft
®
Windows® XP
Page 39

6 Frequently Asked Questions
This section contains information and help on installation, setup, conflicts, and general
troubleshooting.
Table 6-1 Frequently asked questions about the Wyse X90L and Wyse X90Le
Question Answer
My screen seems to time out too quickly.
I have to constantly hit a key or move the
mouse in order to bring it back. How can I
adjust the screen time-out?
What kind of external microphone can I
use with my thin computer?
Because of a software problem, I was
unable to shut down power normally. I
pressed the power button to force a power
off, but it didn't work. How can I force a
power off?
Why can’t I charge the battery of my thin
computer after it was out of use for some
time?
This is part of Windows Power Management. Access Power
Management by logging in as an Administrator and clicking on
Start | Settings | Contr ol Panel | Power Options. Adjust the
display time-out by selecting a time next to the Turn off
monitor option. You may also select different time-out valu es
for adapter and battery power states.
You need to use a self-amplifying microphone.
Make sure you press the power button for at least four (4)
seconds. Normally, this will force a power off. If this does not
work, you can shut down the thin computer by inserting a
needle into the reset button pinhole. (The reset button locates
on the thin computer bottom side.)
After mobile thin computers have not been used for a long
time (more than one month), the batteries will go into the low
voltage protection mode due to data back-ups and natural
electrical discharge. At that point, restoring normal voltage will
require slow charging over a period of several hours.
Calibration can be performed after the batte ry has return ed to
a normal condition.
Page 40

34 Chapter 6
This page intentionally blank.
Page 41

Figures
3-1 Battery Latches 9
3-2 Connecting the Power Cable 10
3-3 Numeric Keypad 13
3-4 Touch Pad 13
3-5 Power Option Properties - Power Meter 15
3-6 Power Option Properties - Alarms 16
3-7 Battery Latches 17
3-8 Power Option Properties - Advanced 18
3-9 S3Display tab 20
4-1 Installing an Express Card 22
4-2 Express Card Size Restrictions 23
4-3 Welcome to the Add Bluetooth Device Wizard 24
4-4 Add Bluetooth Device Wizard 25
4-5 Bluetooth Devices Window 25
4-6 New Connection Wizard 26
4-7 Connection Name 26
4-8 Connection Window 27
4-9 Opening Port 28
4-10 Entering a Passcode, when Needed 28
4-11 Network Connection 29
Page 42

36
Page 43

Tables
3-1 System Indicator Lights for Status and Power 11
3-2 Keyboard Function Keys for System Control 12
6-1 Frequently asked questions about the Wyse X90L and Wyse X90Le 33
Page 44

Users Guide
Wyse® Mobile Thin Computer X90L/X90Le
Issue: 030708
Written and published by:
Wyse Technology Inc., March 2008
Created using FrameMaker® and Acrobat
®
 Loading...