

Worx WG780 Owner’s Manual

24V 19" Co.Jess La_n Mower EN PO7
To.deuse _ gazon de 19 po sa.s fi| de 24V F PI 8
24V 19" Co_ac6sped sin cab|es ES P30
®
®
®
®
®
®
@
@
A
B C
Dt
E1
GI G2 G3
D3
F
H | J

KI K2 LI
L2 M N
@
0
P
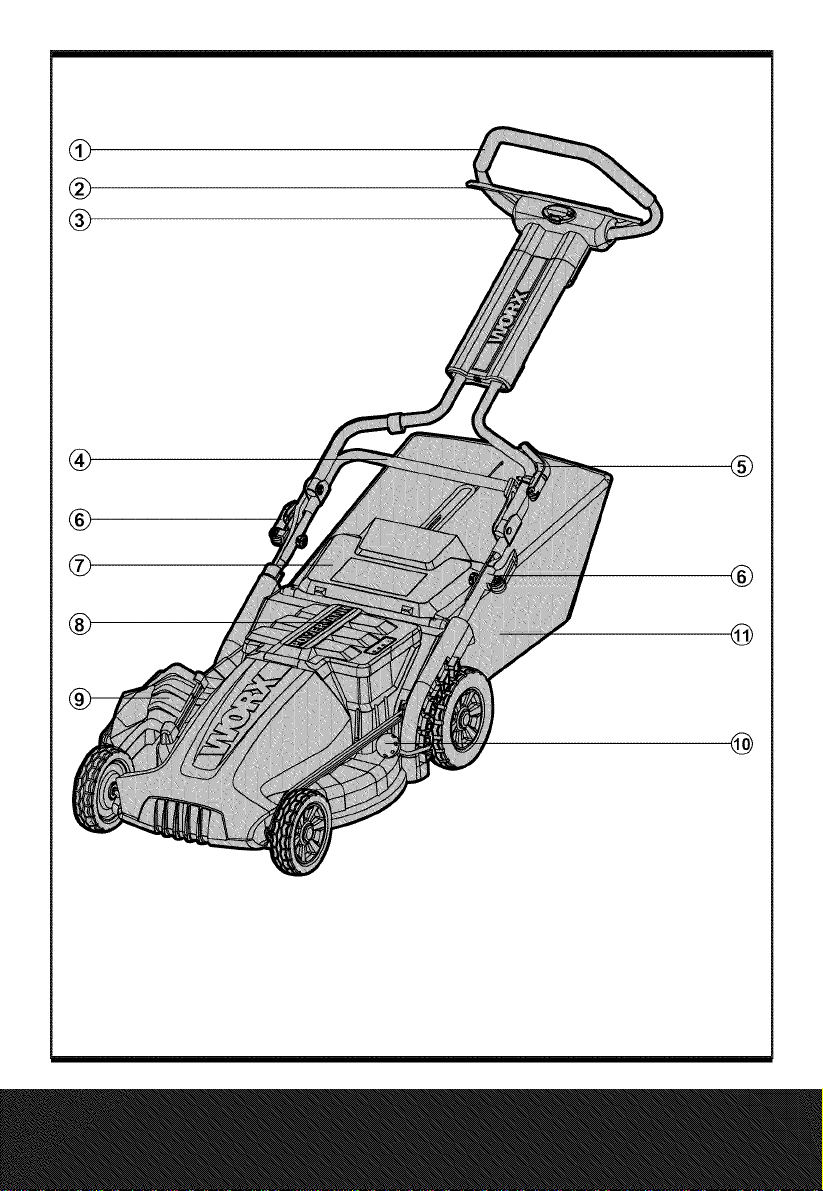
1. UPPER HANDLE
2. SWITCH LEVER
3. SAFETY KEY
4. LOWER HANDLE
5. HANDLE HEIGHT ADJUSTMENT LEVER
G. LOCK CAM LEVER
7. SAFETY GUARD
8. BATTERY HOUSING COVER
9. SIDE-DISCHARGE COVER
10. CUTTING HEIGHT ADJUSTMENT LEVER
11. GRASS COLLECTION BAG
12. MULCH INSERT (SEE KI)
1:3. SIDE-DISCHARGE INSERT (SEE LI)
14. SCREW KNOB (SEE C)
15. BATTERY (SEE U) *
1G. CHARGER (SEE U) *
* Not aJJ the accessories illustrated or described are JncJuded in standard delivery.
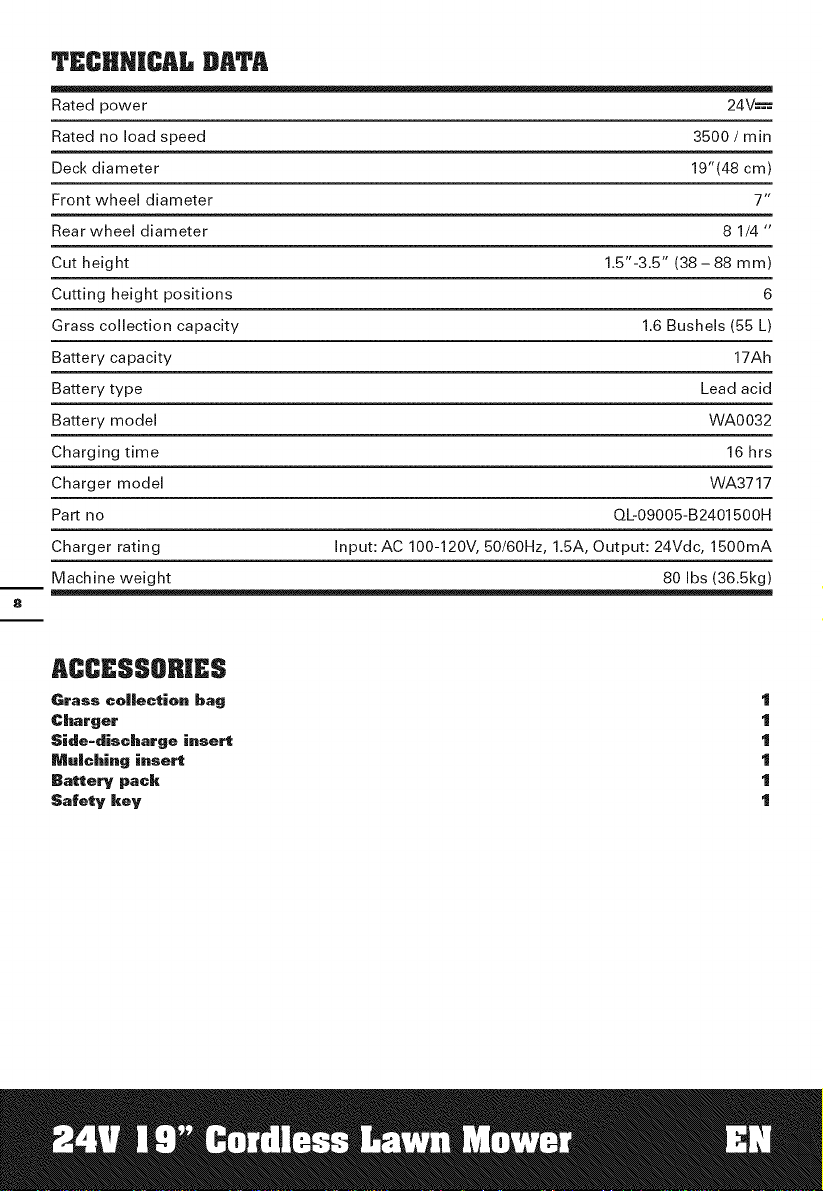
TECRN[CAL DATA
Rated power 24V_
Rated no load speed 3500 / min
Deck diameter 19"(48 cm)
Front wheel diameter 7"
Rear wheel diameter 8 1/4 "
Cut height 1.5"-3.5" (38-88 mm)
Cutting height positions 6
Grass collection capacity 1.6 Bushels (55 L)
Battery capacity 17Ah
Battery type Lead acid
Battery model WA0032
Charging time 16 hrs
Charger model WA3717
Part no Qb09005-B2401500H
Charger rating Input: AC 100-120V, 50/60Hz, 1.5A, Output: 24Vdc, 1500mA
Machine weight 80 Ibs (36.5kg)
ACC£SSOR[£S
Grass co||ection bag
Charger
Side+discharge i.sert
Mu|ching insert
Battery pack
Safety key
1
1
1
1
1
1
$AFETY INSTRUCTIONS
i_k v_NARNiNG. "Read all instructions when
t.____usJng gardening appliances. Basic safety
precautions should always be followed to
reduce the risk of fire, electric shock, and
personal injury.
FOR ALL _WN MOWERS
a) Avoid dangerous environment
Don't use appliances in damp orwet
locations.
hi Don't use in rain.
c) Keep children away
All bystanders (visitors) should be kept at
a safe distance from work area.
d) Dress properJy
Do not wear loose clothing or jewelry.
They can be caught in moving parts. Use
of rubber gloves and substantial footwear
is recommended when working outdoors.
Wear protective hair covering to contain
long hair.
e) Use safety gJasses
Always use face or dust mask if operation
is dusty.
f) Use right app|iance
Do not use appliance for any job except
that for which it is intended.
g) Don't force app|iance
It will do the job better and safer at the
rate for which it was designed.
hi Don't overreach
Keep proper footing and balance at all
times.
i) Stay a|ert
Watch what you are doing. Use common
sense. Do not operate appliance when
you are tired.
j) Store idle appliances indoors
When not in use, appliances should be
stored indoors in dry, and high or locked-
up place -out of reach of children.
k) Maintain app|iance with care
Keep cutting edge sharp and clean
for best and safest performance and
to reduce the risk of injury. Follow
instructions for lubricating and changing
accessories. Keep handles dry, clean, and
free from oil and grease.
|) Check damaged parts
Before further use of the appliance, a
guard or other part that is damaged
should be carefully checked to determine
that it will operate properly and perform
its intended function. Check for alignment
of moving parts, binding of moving
parts, breakage of parts, mounting, and
any other condition that may affect its
operation. A guard or other part that is
damaged should be properly repaired or
replaced by an authorized service center
unless indicated elsewhere in this manual.
m) Keep guards in p|ace and in wor_ng
order.
n) Keep b|ades sharp.
o) Keep hands and feet away from
cutting area.
p) Objects struck by the lawn mower
blade can cause serve injuries to
persons.The lawn should always be
carefully examined and cleared of all
objects prior to each mowing.
q) |f |awn mower strikes a foreign
object, foi|ow these steps:
i) Stop lawn mower. Remove the safety
key.
ii) Inspect for damage.
iii) Repair any damage before restarting
and operating the lawn mower.
r) Use identica| rep|acement b|ades
on|y.
SAFE?Y [HS?RUC?[QH$
FOR RP,??£RY-OP£RATE|)
LAWH MOWERS
a) Do not charge lawn mower in rain, or in
wet locations.
b) Do not use battery-operated lawn mower
in rain.
c) Remove or disconnect safety key before
servicing, cleaning, or removing material
from the lawn mower.
d) Use only the following type and size
battery: WA0032. Never open the battery
pack.
e) Do not dispose ofthe battery in a fire.The
cell may explode. Check with local codes
for possible special disposal instructions.
f) Donotopenormutilatethebattery.
Releasedelectrolyteiscorrosiveandmay
causedamagetotheeyesorskin.Itmay
betoxicifswallowed.
g) Exercisecareinhandlingbatteries
inordernottoshortthebatterywith
conductingmaterialssuchasrings,
bracelets,andkeys.Thebatteryor
conductormayoverheatandcauseburns.
_ CAUTION
The electrolyte is a dilute sulfuric acid that is
harmful to the skin and eyes. It is electrically
conductive and corrosive.The following
procedures should be observed:
a) Wear full eye protection and protective
clothing.
b) If electrolyte contacts the skin, wash it off
immediately with water.
c) If electrolyte contacts the eyes, flush
thoroughly and immediately with water.
Seek medical attention.
SAFETY iNSTRUCTiONS
FOR WALK-REBIND
,o MOWERS
-- |. GENJ:P_L OPs:_T|ON
1. Read, understand, and follow all
instructions on the machine and in the
manual(s) before starting.
2. Do not put hands or feet near or under
the machine. Keep clear of the discharge
opening at all times.
3. Only allow responsible adults, who are
familiar with the instructions, to operate
this machine.
4. Clear the area of objects such as rocks,
wire, toys, etc., which could be thrown by
the blade. Stay behind the handle when
the motor is running.
5. Be sure the area is clear of bystanders
before operating. Stop machine if anyone
enters the area.
6. Do not operate machine barefooted or
while wearing sandals. Always wear
substantial footwear.
7. Do not pull machine backward unless
absolutely necessary. Always look down
and behind before and while moving
backward.
8. Never direct discharged material toward
anyone. Avoid discharging material
against a wall or obstruction. Material
may ricochet back toward the operator.
Stop the blade when crossing gravel
surfaces.
9. Do not operate machine without the
entire grass catcher, discharge guard, rear
guard, or other safety protective devices
in place and working.
10. Never leave a running machine
unattended.
11. Stop the motor, remove the safety
key and wait until the blade comes to
a complete stop before cleaning the
machine, removing grass catcher, or
unclogging the discharge guard.
12. Operate machine only in daylight or good
artificial light.
13. Do not operate machine while under the
influence of alcohol or drugs.
14. Never operate mower in wet grass.
Always be sure of your footing; walk;
never run.
15. Disengage the drive system, if so
equipped, before starting the motor.
16. Ifthe machine should start to vibrate
abnormally, stop the engine (motor) and
check for the cause immediately. Vibration
is generally a warning of trouble.
17. Always wear eye protection when
operating machine.
18. See manufacturer's instructions for proper
operation and installation of accessories.
Only use accessories approved by the
manufacturer.
IlL SL@PE OPIH_!&T|ON
Slopes are a major factor related to slip and
fall accidents, which can result in severe injury.
Operation on all slopes requires extra caution.
If you feel uneasy on a slope, do not mow it.
1. Mow across the face of slopes; never up
and down. Exercise extreme caution when
changing direction on slopes.
2. Watch for holes, ruts, bumps, rocks, or
other hidden objects. Uneven terrain
could cause a slip and fall accident. Tall
grasscanhideobstacles.
3. Donotmowonwetgrassorexcessively
steepslopes.Poorfootingcouldcausea
slipandfallaccident.
4. Donotmowneardrop-offs,ditches,
orembankments.Youcouldloseyour
footingorbalance.
III.CHILDREN
Tragic accidents can occur if the operator is
not alert to the presence of children. Children
are often attracted to the machine and the
mowing activity. Never assume that children
will remain where you last saw them.
1. Keep children out of the mowing area and
under the watchful care of a responsible A
adult other than the operator.
2. Be alert and turn mower off if a child
enters the area.
3. Never allow children to operate the |
machine.
4. Use extra care when approaching blind
corners, shrubs, trees, or other objects
that may block your view of a child. I _'Jl_ I
IV. Gs:NE_L SERVICE
1. Keep all nuts and bolts tight to be sure the
equipment is in safe working condition.
2. Never tamper with safety devices. Check
their proper operation regularly.
3. Keep machine free of grass, leaves, or
other debris build-up.
4. If you strike a foreign object, stop, remove
the safety key inspect the machine. Repair,
if necessary, before starting.
5. Never make any adjustments or repairs
with the motor running.
6. Check grass catcher components and the
discharge guard frequently and replace
with manufacturer's recommended parts,
when necessary.
7. Mower blades are sharp. Wrap the blade
or wear gloves, and use extra caution
when servicing them.
8. Maintain or replace safety and instruction
labels, as necessary.
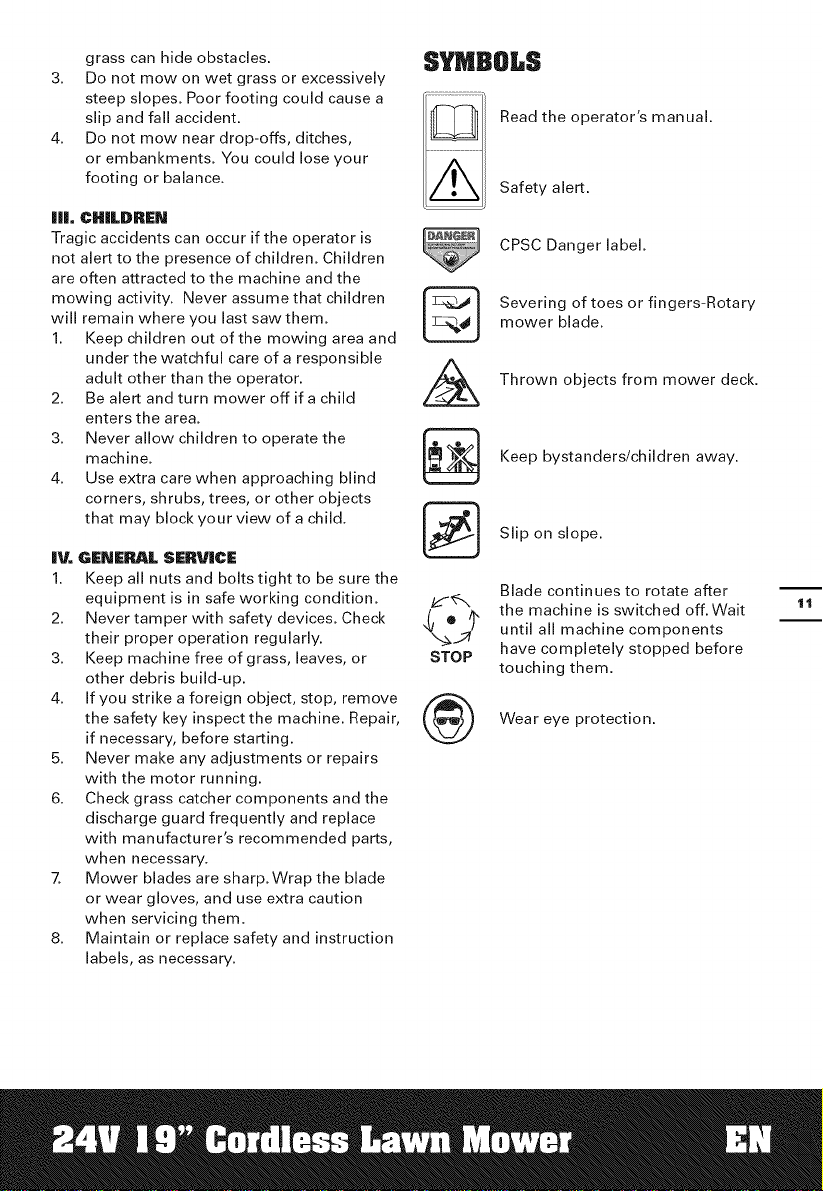
SYMBOLS
Read the operator's manual.
Safety alert.
CPSC Danger label.
Severing of toes or fingers-Rotary
mower blade.
Thrown objects from mower deck.
!
LP_JJ
STOP
®
Keep bystanders/children away.
Slip on slope.
Blade continues to rotate after
the machine is switched off. Wait
until all machine components
have completely stopped before
touching them.
Wear eye protection.
CHARGER SAFETY RULES
1. Plug charger directly into an electrical
outlet. #0 NOT ABUSE THE CORD.
Never carry charger by cord. Do not
disconnect the charger from the outlet or
mower by pulling it by the cord.
2. /_\CAUT|ON: To reduce the risk of fire,
electrical shock, or personal injury do
not attempt to use this charger with any
other product.Likewise, do not attempt to
charge the mower with any other charger.
3. Do not service mower with charger or
safety key installed.
4. Do not operate a damaged charger.
Replace damaged cords or charger
immediately by calling theWORX Helpline
at 1-866-354-9679.
5. Always charge the mower in a dry area
protected from the weather. Do not
expose the mower or charger to rain. Do
not charge in wet locations. Do not charge
mower when temperature is above 104°F
(4O°C) or below 41°F (5°C).
6. Keep the mower and charger away
from water, heat sources, (Such as
radiators, heaters, stoves...etc.) flames, or
chemicals. Be careful not to damage the
charger cord, by keeping cord away from
sharp edges.
CHARGING PROCEDURE
1. Charging can be carried out either with
the battery FITTED (See A) or REMOVED
from the machine (See B).
2. Plug the charger connector into the
receptacle on the battery.
3. Insert the 120 volt plug ofthe charger into
the wall receptacle.
4. The red light on the charger should come
on indicating that you have power and
the battery is being charged.The red light
should extinguish and the green light
will come on when charging is complete
(approximately 16 hours to charge a fully
discharged mower).
NOTe:= Remove the safety key before charging
the battery in the machine.
BATTERY CARE
The battery in your cordless lawnmower is a
24-volt sealed lead acid system.The mower
can be stored in any position without fear of
leakage.
1) For optimal performance the battery
should be kept on constant charge when
not in use.
2) The battery prefers to be charged in a
cool, dry place.
3) The battery does not need to be fully
discharged before recharging.
4) 2 to 3 initial charging cycles may be
required after purchase to achieve
maximum run time capacity.
5) The battery can be safely stored down to
_4OF(-20°C).
6) The battery is maintenance free.
ADDITIONAL BATTERIES can be obtained
from the Customer Helpline 1-866-354-
9679.
ASSEMBLY/ADJUSTMEMT
,/_WARN|NG w.Do not connect the battery
t,...._Jand/or the safety key before product is
completely assembled.
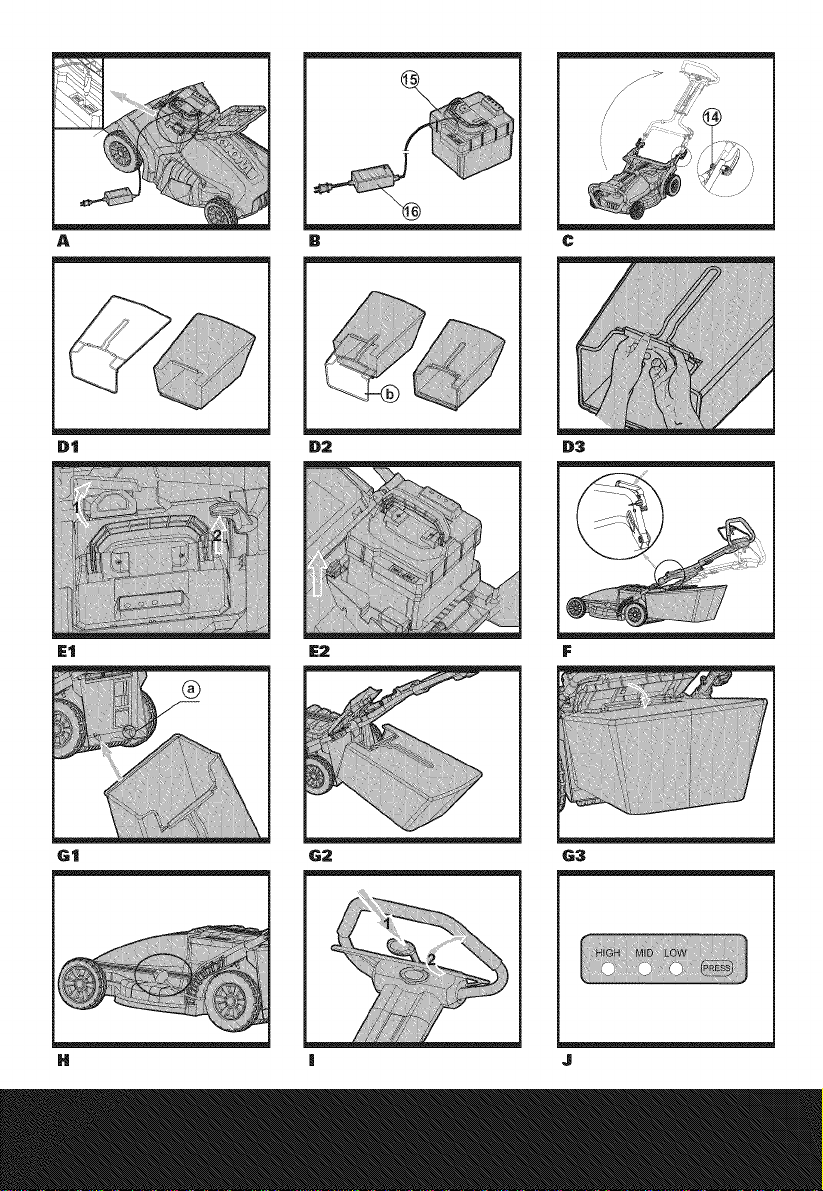
1. ASSe:MBLiNG THe: HANDLe: (Se:E C)
Raise the handle section into place and secure
by tightening the two Lock cam levers.
Check that the handle is FULLY secured.
The cam lever pressure can be adjusted by
adjusting the screw knob (14) clockwise/
counter-clockwise. DO NOT OVERTIGHTEN.
2. ASSe:MRL|NG THe: G_SSRAG
(Re:e: Dl, D2 & D3)
1) Before starting to assemble the grass bag
to the frame (b), check that the grass bag
is positioned to slip over the frame.
2) Slide the grass bag onto the frame.
3) Assemble the top clips to the frame,
then assemble the two side clips and the
bottom clip last.
3. FITTING/Re:MOVING RATTe:RY
(Se:e: e:l oe:2)
Removing battery

Pulloutthebatteryconnector,thenrotatethe
batterylockingknobcounter-clockwiseand
thenusethebatteryhandletoremovethe
battery.
NOTE: Be careful not to drop the battery onto
your foot or on the ground when removing it.
Fitting batte_'
Put the battery into the battery container, press
the battery connector and then rotate the
battery locking knob.
4. HANDLE ADJUSTMENT (SEf F)
The upper handle can be adjusted to 3
different height positions. Release the locking
cam lever, set the upper handle to one of the
three height positions, and make sure to insert
the pin into the hole.Then reset the locking
cam lever.
NOTE= Always check that the upper handle is
fixed firmly.
5. INSTALLING THE GRASS BAG
(SEE GI& G2)
Fitting
1. Turn the mower off, wait until blade stops
and remove safety key.
2. Raise the safety flap and hold it up,
ensure that the mulching insert has been
removed.
3. Pick up the grass bag by the handle, and
position grass bag on the lower hooks (a)
on the mower deck.
4. Release the safety guard to lock the grass
bag into position. Ensure the grass bag is
installed securely.
NOTE: Depress the grass bag slightly to
ensure that it is completely installed.
Removing/emptyi.g
Lift the safety guard and hold it up.The grass
bag will drop automatically.
6. AI)JliSTlltlG THE CUTTING HEIGHT
(SSS H)
/_WARNIHG! Stop, release switch lever
q_&-)and wait until the motor stops before
adjusting height.The blades continue to rotate
after the machine is switched off, a rotating
blade can cause injury.
CAUTION: Do not touch rotating blades.
For the first cutting of the season, a high
cutting adjustment should be selected.
The lawnmower can be set to 6 cutting heights
between 1.5" and 3.5" For this purpose, move
the cutting height adjustment lever outwards
then adjust to the preferred position.
I)PEIIATil)
11.STARTING AND STOPPING (SEE I1
WARHIIIIG! The blade continues
o rotate for a few seconds after the
machine is switched off. Allow the motor/blade
to stop rotating before switching "on" again.
Do not rapidly switch off and on.
Sta_ing:
1. Insert safety key into the housing of the
switch box.
2. Push down the key, until safety key is fully
seated inside housing.
3. Press and hold the safety key, squeeze the
switch lever bar towards the handle and
the mower will start.
4. Release the safety key.
Stopping
Release the switch lever bar.
2. BATTERY STATUS LI:D'S (SEE J)
NOTE: Battery status LED's are not active
in charging mode. The status LInD's will
indicate the battery condition when the
button on the battery is pressed.
The LED's constantly senses and displays the
battery condition as follows:
Press the button "PRESS"the light button is
illuminated.
When the green, yellow and red lights are
illuminated, the battery is in a highly charged
condition.
Whentheyellowandredlightsare
illuminated,thebatteryisinamoderately
chargedcondition.
Whenonlytheredlightisilluminated,the
batterychargeisdepleted.
Beforeusingyournewmowerforthefirst
time,itisrecommendedthattheunitbe
chargedovernighttoensurethatthebatteryis
fullycharged.
Impo_ant
_en only the red light is illuminated,
your battery is overly discharged, even
though the mower may still be capable
of cutting grass. Continuing to operate
your lawnmower with the battery in this
discharged condition may reduce the life
and pe_ormance of your battery.
3. REMOVING MULCH iNSERT (SEE Kl)
To remove the mulching insert so that you can
bag the grass or discharge with the optional
discharge chute, follow the steps listed below:
1) Shut the mower off, wait until the blade
stops and remove the safety key.
2) Raise the safety guard and hold it up.
3) Grasp the middle of the insert, lift and pull
out the mulching insert completely.
-- 4) The safety guard is spring loaded. When
you release it, the guard will return to the
closed position.
4. INSTALLING MULCH INSERT (SEE K2)
1) Turn the mower off, wait until the blade
stops and remove the safety key.
2) Raise the safety guard and hold it up.
3) Slide the mulching insert into the
discharge opening until it is firmly in
contact with the deck.
4) Release safety guard and ensure it is
properly closed.
5. SIDE+DISCHARGE COVER
(SEE U & L2)
Using the mulching insert and side-discharge
insert, the grass can be discharged from the
side-discharge of the machine.
To assemble the side-discharge, raise the side-
discharge cover and hold it up, position the
side-discharge onto the hooks, then release the
cover to lock the side-discharge into position.
G. MOWING TiPS
NOTE: PiJways inspect area where mower
is to he used and remove all stones,
sticks, wire, metal and other debris
which might he thrown hy the rotating
h|ade.
1) Mow across the face of slopes, never
up-and-down. Exercise extreme caution
when changing direction on slopes. Do
not mow excessively steep slopes. Always
maintain good footing.
2) Release switch lever to turn mower "OFF"
when crossing any graveled area (stones
can be thrown by the blade).
3) Set mower at highest cutting height when
mowing in rough ground or in tall weeds.
Removing too much grass at one time can
cause circuit breaker to trip, which stops
mower.
4) If a grass bag is used during the fast
growing season, the grass may tend to
clog up at the discharge opening. Release
switch lever to turn mower "OFF" and
remove the safety key. Remove the grass
bag and shake the grass down to the back
end of the bag. Also clean out any grass
or debris which may be packed around
the discharge opening. Replace the grass
bag.
5) If mower should start to vibrate
abnormally, release switch lever to turn
mower "OFF" and remove safety key.
Check immediately for cause. Vibration
is a warning of trouble. Do not operate
mower until a service check has been
made.
6) Always re|ease switch |ever to turn
mower "off °" and remove safety key
when leaving it unattended even for
a short period of time.
7. MULCHING MOWING TiPS
While mulching, your new mower is designed
to cut the grass clippings into small pieces
and distribute them back into the lawn. Under
normal conditions, the mulched grass will
biodegrade quickly to provide nutrients to the
lawn.
 Loading...