

Page 1

r
l
C
o
d
s
e
s
a
w
L
n
M
w
o
h
c
n
S
u
l
s
r
u
e
T
n
d
o
T
s
a
o
r
e
t
r
C
a
o
c
l
r
e
n
o
S
z
B
r
z
e
p
é
t
e
z
e
V
ă
n
i
M
ş
a
á
r
d
z
e
B
m
u
u
k
A
Corta-relva sem fios
Sladdlös gräsklippare
č
i
ž
z
r
e
B
R
r
e
o
s
a
b
s
é
z
o
w
e
k
t
á
l
n
a
s
n
e
m
e
à
a
n
z
g
o
s
s
n
e
z
a
i
f
l
i
a
a
d
e
t
b
p
r
e
g
d
o
m
n
e
u
t
e
d
á
o
v
r
o
o
t
k
o
a
e
a
a
s
m
a
a
w
o
a
o
k
n
ű
f
s
e
t
b
r
a
i
s
n
s
í
r
a
n
t
v
s
k
o
á
v
a
c
i
n
l
i
s
WG744E WG744E.9
r
e
ä
h
r
e
a
n
s
i
f
l
í
r
a
i
r
e
s
i
a
r
ó
r
í
y
f
a
k
e
k
č
a
t
a
k
r
ă
č
a
a
a
o
r
ă
k
n
w
d
f
a
a
n
i
w
ó
k
r
i
u
v
á
r
t
EN
ES
NL
PL
HU
RO
CZ
SK
PT
SV
SL
P10
D
F
P21
P34
I
P46
P58
P70
P82
P94
P105
P117
P129
P141
P153
P164
Page 2

Original instructions EN
Originalbetriebsanleitung D
Notice originale F
Istruzioni originali I
Manual original ES
Oorspronkelijke gebruiksaanwijzing NL
Instrukcja oryginalna PL
Eredeti használati utasítás HU
Instrucţiuni originale RO
Původní návod k používání CZ
Pôvodný návod na použitie SK
Manual original PT
Bruksanvisning i original SV
Izvirna navodila SL
Page 3
1
2
3
15
14
13
12
11
10
9
4
5
6
16
78
Page 4
A1 A2
C2
B2 B3
C1
B4
C3
1
2
1
2
15
1
2
3
1
2
A4
A3
A5 B1
1
Page 5
B2 B3
B4
1
3
2
C1
1
2
15
C2
C3
1
2
Page 6
D1
D2
100 %
0%
E
G1
F
17
G2
1
2
Page 7
1
2
J2
a
b
H1
ECO
ECO
TURBO
ECO
TURBO
TURBO
H2
5
6
4
3
2
1
1——20mm
2——30mm
3——40mm
4——50mm
5——60mm
6——70mm
I
J1
0%
100 %
1
2
K
Page 8
L
M1
M2
N2
N1
N1-1
N1-2
N1-3
O1
N2-1
N2-2
N2-3
19
18
Page 9

N1-1
N1-2
N1-3
N2-1
N2-2
N2-3
19
18
O2
M2
N2
O1
N1
Page 10

ORIGINAL INSTRUCTIONS
PRODUCT SAFETY
General Power Tool Safety
Warnings
WARNING Read all
safety warnings and all
instructions. Failure to
follow the warnings and
instructions may result in
electric shock, fire and/or
serious injury.
Carefully read the
instructions for the safe
operation of the machine.
Save all warnings and
instructions for future
reference.
- This appliance is not
intended for use by persons
10
(including children) with
reduced physical, sensory
or mental capabilities,
or lack of experience
and knowledge, unless
they have been given
supervision or instruction
concerning use of the
appliance by a person
responsible for their safety.
- Children should be
supervised to ensure that
they do not play with the
appliance.
- The appliance is only to be
used with the power supply
unit provided with the
appliance.
IMPORTANT
READ CAREFULLY BEFORE
USE
KEEP FOR FUTURE
REFERENCE
Safe operation practices
Training
a) read the instructions
carefully. Be familiar with
the controls and the proper
use of the equipment;
b) never allow children or
people unfamiliar with
these instructions to use
the lawnmower. Local
regulations can restrict the
age of the operator;
c) never mow while people,
especially children, or pets
are nearby;
d) keep in mind that the
operator or user is
responsible for accidents or
hazards occurring to other
people or their property
Preparation
a) While mowing, always
wear substantial footwear
and long trousers. Do not
operate the equipment
when barefoot or wearing
open sandals;
b) thoroughly inspect the
area where the equipment
is to be used and remove
all objects which can be
thrown by the machine;
Cordless Lawn Mower EN
Page 11

c) Before using, always
visually inspect to see that
the blades, blade bolts and
cutter assembly are not
worn or damaged. Replace
worn or damaged blades
and bolts in sets to preserve
balance. Replace damaged
and unreadable labels.
Operation
a) mow only in daylight or in
good artificial light;
b) avoid operating the
equipment in wet grass,
where feasible;
c) always be sure of your
footing on slopes;
d) walk, never run;
e) for wheeled rotary
machines, mow across the
face of slopes, never up and
down;
mow across the face of
slopes, never up and down.
f) exercise extreme caution
when changing direction on
slopes;
g) do not mow excessively
steep slopes;
h) use extreme caution when
reversing or pulling the
lawnmower towards you;
i) stop the blade(s) if the
lawnmower has to be
tilted for transportation
when crossing surfaces
other than grass, and
when transporting the
lawnmower to and from the
area to be mowed;
j) never operate the
lawnmower with defective
guards , or without safety
devices, for example
deflectors and/or grass
catchers, in place;
k) switch on the motor
carefully according to
instructions and with feet
well away from the blade(s);
l) do not tilt the lawnmower
when switching on the
motor, except if the
lawnmower has to be tilted
for starting. In this case,
do not tilt it more than
absolutely necessary and
lift only the part which is
away from the operator;
m) do not put hands or feet
near or under rotating parts.
Keep clear of the discharge
opening at all times;
n) not to touch the blades
before the disabling device
has been removed and
the blades have come to a
complete stop;
o) Do not start the lawnmower
when standing in front of
the discharge opening.
p) Do not transport the
lawnmower while the
power source is running.
q) Stop the lawnmower,
and remove the disabling
device. Make sure that all
11
Cordless Lawn Mower EN
Page 12

moving parts have come to
a complete stop.
– whenever leaving the
machine unattended,
– before clearing a blockage,
– before checking, cleaning or
working on the machine,
– after striking a foreign
object. Inspect the machine
for damage and make
repairs before restarting
and operating the
lawnmower
If the lawnmower starts to
vibrate abnormally (check
immediately)
- inspect for damage.
- replace or repair any
damaged parts.
- check and tighten any loose
parts.
12
Maintenance and storage
a) keep all nuts, bolts and
screws tight to be sure
the equipment is in safe
working condition;
b) check the grass catcher
frequently for wear or
deterioration;
c) replace worn or damaged
parts for safety. Use only
genuine replacement parts
and accessories.
d) Be careful during adjusting
of the lawnmower to
prevent entrapment of the
fingers between moving
blades and fixed parts of
the lawnmower.
e) Always allow the
lawnmower to cool down
before storing.
f) When servicing the blades
be aware that, even though
the power source is
switched off, the blades can
still be moved.
SAFETY WARNINGS FOR
BATTERY PACK
a) Do not dismantle, open
or shred cells or battery
pack.
b) Do not short-circuit a
battery pack. Do not
store battery packs
haphazardly in a box or
drawer where they may
short-circuit each other
or be short-circuited by
conductive materials.
When battery pack is not
in use, keep it away from
other metal objects, like
paper clips, coins, keys,
nails, screws or other small
metal objects, that can
make a connection from
one terminal to another.
Shorting the battery
terminals together may
cause burns or a fire.
c) Do not expose battery
pack to heat or fire.
Cordless Lawn Mower EN
Page 13

Avoid storage in direct
sunlight.
d) Do not subject battery
pack to mechanical
shock.
e) In the event of battery
leaking, do not allow
the liquid to come into
contact with the skin
or eyes. If contact
has been made, wash
the affected area with
copious amounts of
water and seek medical
advice.
f) Seek medical advice
immediately if a cell or
battery pack has been
swallowed.
g) Keep battery pack clean
and dry.
h) Wipe the battery pack
terminals with a clean
dry cloth if they become
dirty.
i) Battery pack needs to
be charged before use.
Always refer to this
instruction and use
the correct charging
procedure.
j) Do not maintain battery
pack on charge when
not in use.
k) After extended periods
of storage, it may be
necessary to charge and
discharge the battery
pack several times
to obtain maximum
performance.
l) Battery pack gives its
best performance when
it is operated at normal
room temperature (20 °C
± 5 °C).
m) When disposing of
battery packs, keep
battery packs of
different electrochemical
systems separate from
each other.
n) Recharge only with the
charger specified by
WORX. Do not use any
charger other than that
specifically provided for
use with the equipment.
A charger that is suitable
for one type of battery pack
may create a risk of fire
when used with another
battery pack.
o) Do not use any battery
pack which is not
designed for use with
the equipment.
p) Keep battery pack out of
the reach of children.
q) Retain the original
product literature for
future reference.
r) Remove the battery from
the equipment when not
in use.
s) Dispose of properly.
13
Cordless Lawn Mower EN
Page 14
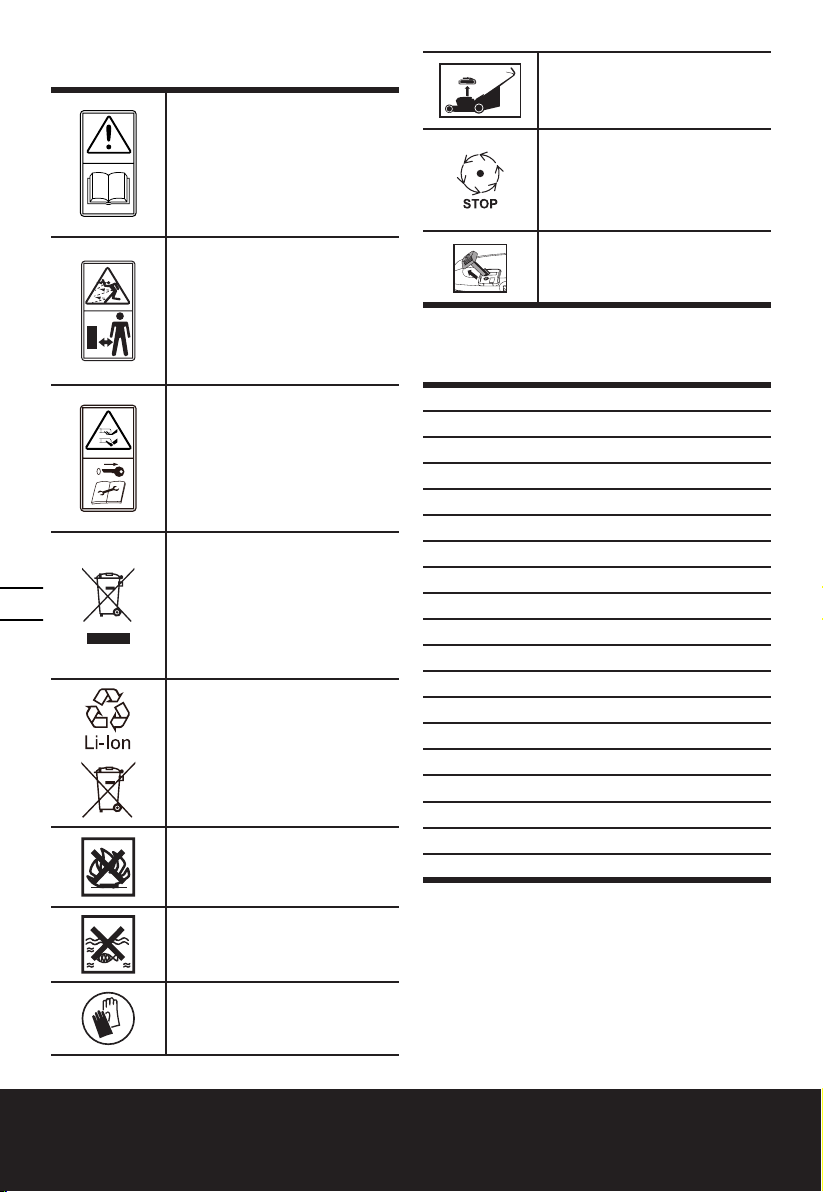
SYMBOLS
14
Read instruction handbook
before operation this machine
Keep bystanders away.
Beware of sharp blades. Blades
continue to rotate after the
motor is switched off- Remove
disabling device before
maintenance
Waste electrical products
must not be disposed of with
household waste. Please recycle
where facilities exist. Check with
your local authorities or retailer
for recycling advice.
Do not dispose of batteries.
Return exhausted batteries to
your local collection or recycling
point.
Do not burn
Do not expose to rain or water
Remove battery from the
socket before carrying out
any adjustment, servicing or
maintenance.
Blade continues to rotate after
the machine is switched off. Wait
until all machine components
have completely stopped before
touching them
Remove the key
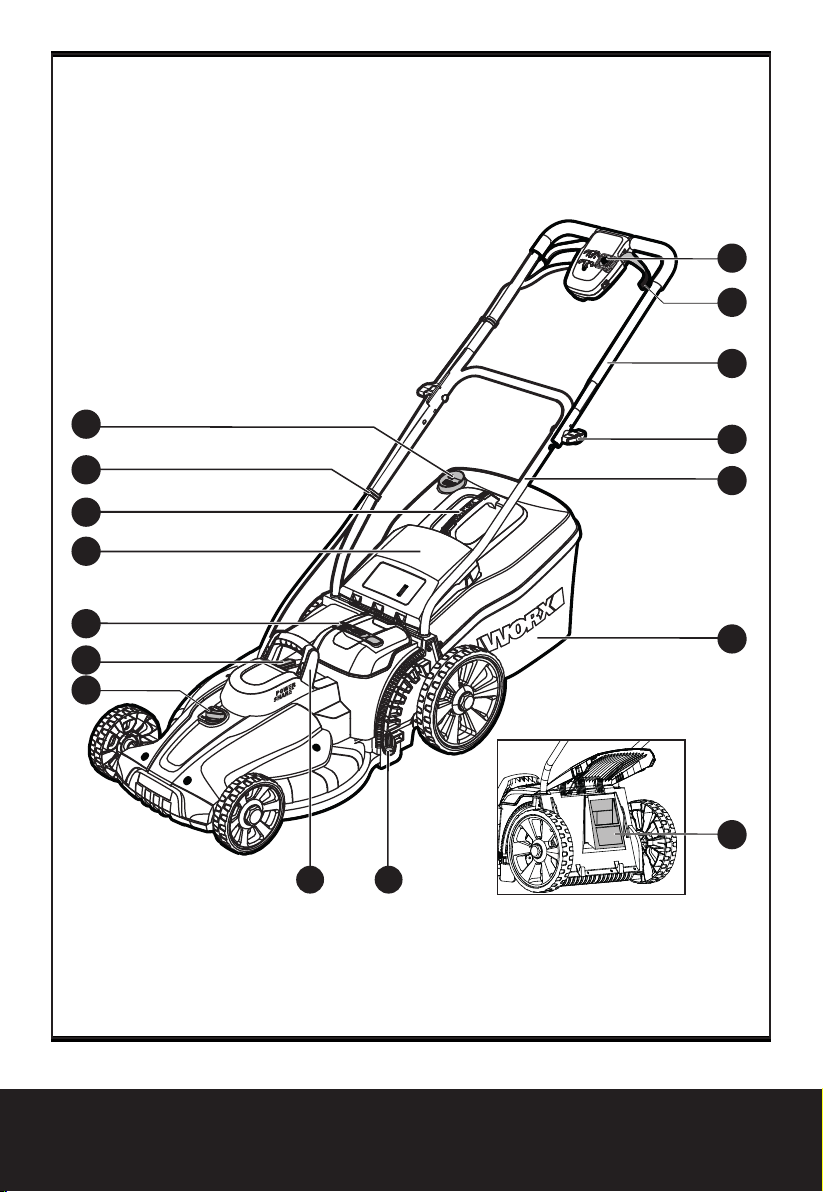
COMPONENT LIST
1. SAFETY KEY
2. SWITCH LEVER
3. UPPER HANDLE
4. HANDLE KNOB
5. LOWER HANDLE
6. GRASS COLLECTION BAG
7. CUTTING HEIGHT ADJUSTMENT KNOB
8. CARRY HANDLE
9. INTELLICUT DIAL
10. BATTERY INDICATOR LIGHT
11. BATTERY PACK COVER
12. SAFETY FLAP
13. BAG HANDLE
14. CABLE CLIP
15. GRASS BAG INDICATOR
16. MULCHING INSERT
17. BATTERY PACK (SEE FIG. E) *
18. BLADE BOLT (SEE FIG. O1)
19. BLADE (SEE FIG. O1)
* Not all the accessories illustrated or
described are included in standard delivery.
Wear protective gloves
Cordless Lawn Mower EN
Page 15
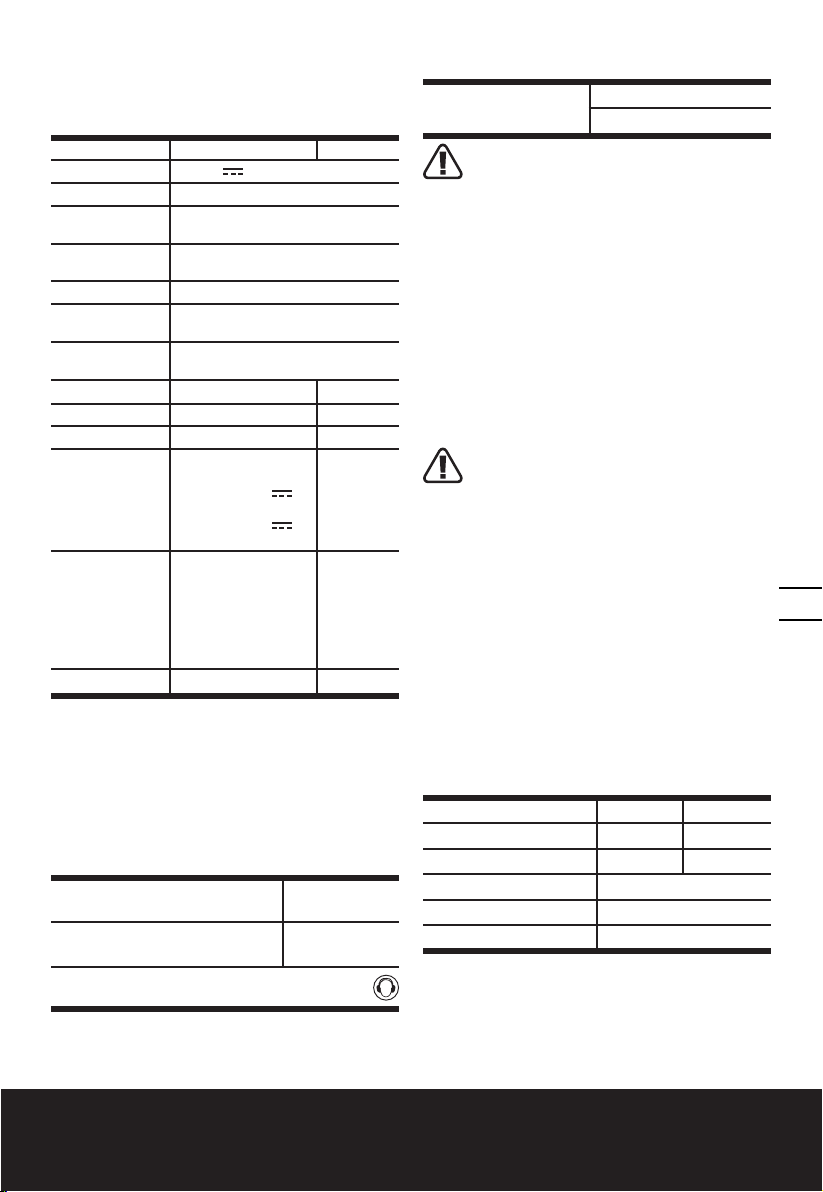
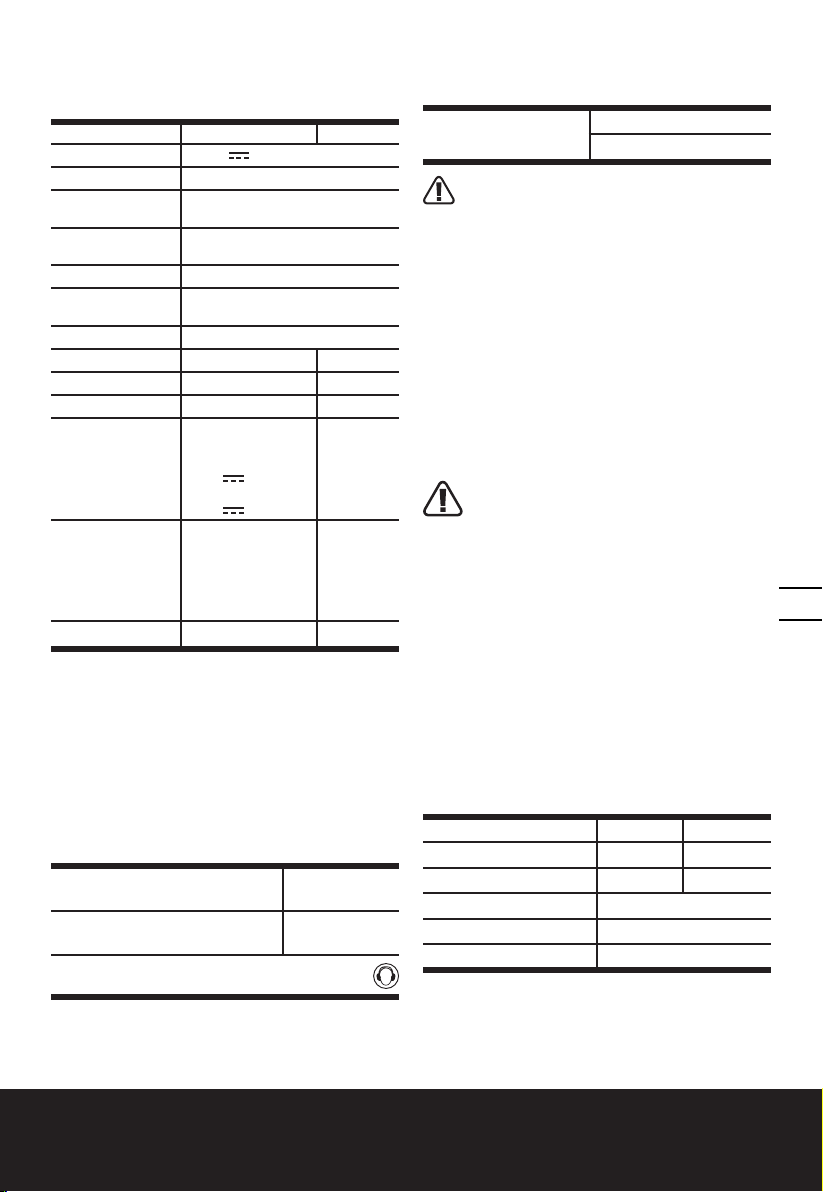
TECHNICAL DATA
Type WG744E, WG744E.9 (740-789 - designation
of machinery, representative of Cordless Lawn
Mower)
WG744E WG744E.9
Voltage 40V Max (2x20V Max)*
Cutting diameter 40cm
Front wheel
diameter
Rear wheel
diameter
Cutting height 20mm-70mm
Cutting height
positions
Grass collection
capacity
Battery type Lithium-ion /
Battery Model WA3553(4.0Ah) /
Charger Model WA3883 /
100-240V~50-60Hz,
Charger rating
Charging time
(approx.)
Battery pack:
2.0 Ah (1pc)
2.0 Ah (2pcs)
4.0 Ah (1pc)
4.0 Ah (2pcs)
Machine Weight 16.7kg 15.4kg
*Voltage measured without workload. Initial battery
voltage reaches maximum of 20 volts. Nominal
voltage is 18 volts.
** Charger output 1 and output 2 mean two ports
with the same output voltage and current.
Output1: 20V ,
Output2: 20V ,
Input:
2.0A**
2.0A**
0.5 hr
1 hr
1 hr
2 hrs
160mm
240mm
6
40L
/
/
NOISE DATA
A weighted sound pressure
A weighted sound power
Wear ear protection
LwA: 68.7dB (A)
KpA= 3dB(A)
LwA: 84.3dB (A)
KwA= 3dB(A)
VIBRATION INFORMATION
Typical weighted
vibration
WARNING: The vibration emission value
during actual use of the power tool can differ
from the declared value depending on the ways in
which the tool is used dependant on the following
examples and other variations on how the tool is
used:
How the tool is used and the materials being cut or
drilled.
The tool being in good condition and well maintained
Using the correct accessory for the tool and ensuring
it is sharp and in good condition.
The tightness of the grip on the handles and if any
anti vibration accessories are used.
And the tool is being used as intended by its design
and these instructions.
This tool may cause hand-arm vibration
syndrome if its use is not adequately managed
WARNING: To be accurate, an estimation of
exposure level in the actual conditions of use
should also take account of all parts of the operating
cycle such as the times when the tool is switched off
and when it is running idle but not actually doing the
job. This may significantly reduce the exposure level
over the total working period.
Helping to minimise your vibration exposure risk.
ALWAYS use sharp chisels, drills and blades
Maintain this tool in accordance with these
instructions and keep well lubricated (where
appropriate)
If the tool is to be used regularly then invest in anti
vibration accessories.
Plan your work schedule to spread any high vibration
tool use across a number of days.
ah= 0.41m/s
uncertainty K=1.5m/s²
2
ACCESSORIES
WG744E WG744E.9
Battery pack (WA3553) 2 /
Charger (WA3883) 1 /
Grass collection bag 1
Mulching insert 1
Cable clip 2
We recommend that you purchase your accessories
listed in the above list from the same store that
sold you the power tool. Refer to the accessory
packaging for further details. Store personnel can
assist you and offer advice.
15
Cordless Lawn Mower EN
Page 16
ASSEMBLY AND OPERATION
ACTION FIGURE
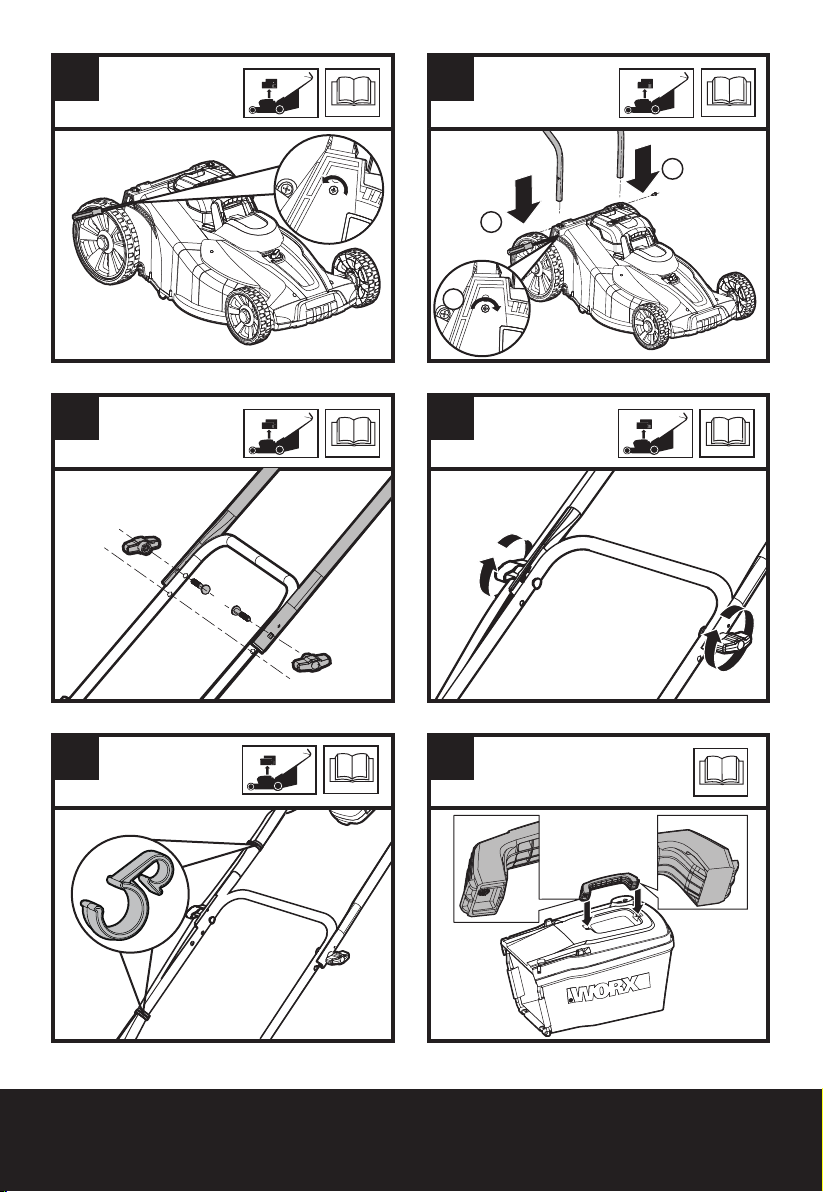
ASSEMBLY
Assembling the handle bar
NOTE:
Choose one of the two holes in the
lower handle for desired handle’s height.
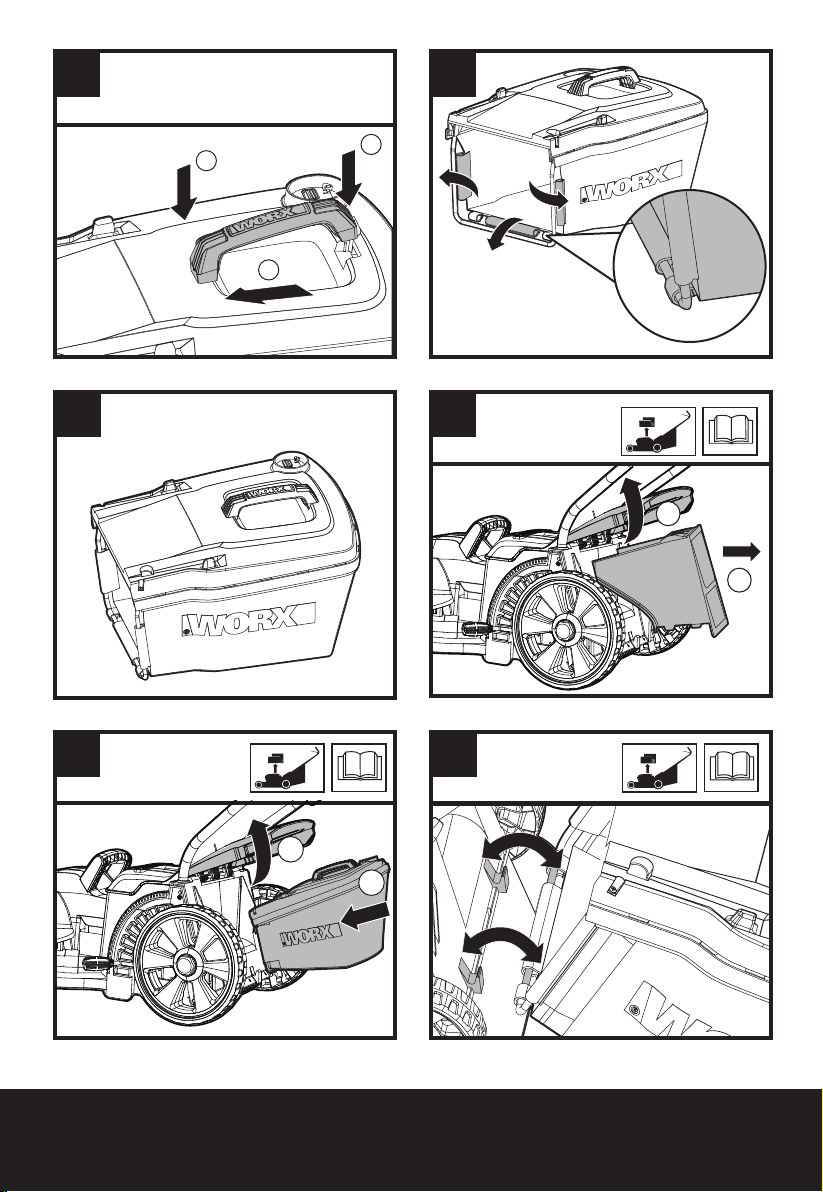
Assembling the grass collection bag
Fitting the grass collection bag to the lawn
mower
N
OTE: Take the mulching insert out of the
lawn mower before fitting the grass collection
bag.
NOTE: Depress the grass collection bag
slightly to ensure that it is completely
installed.
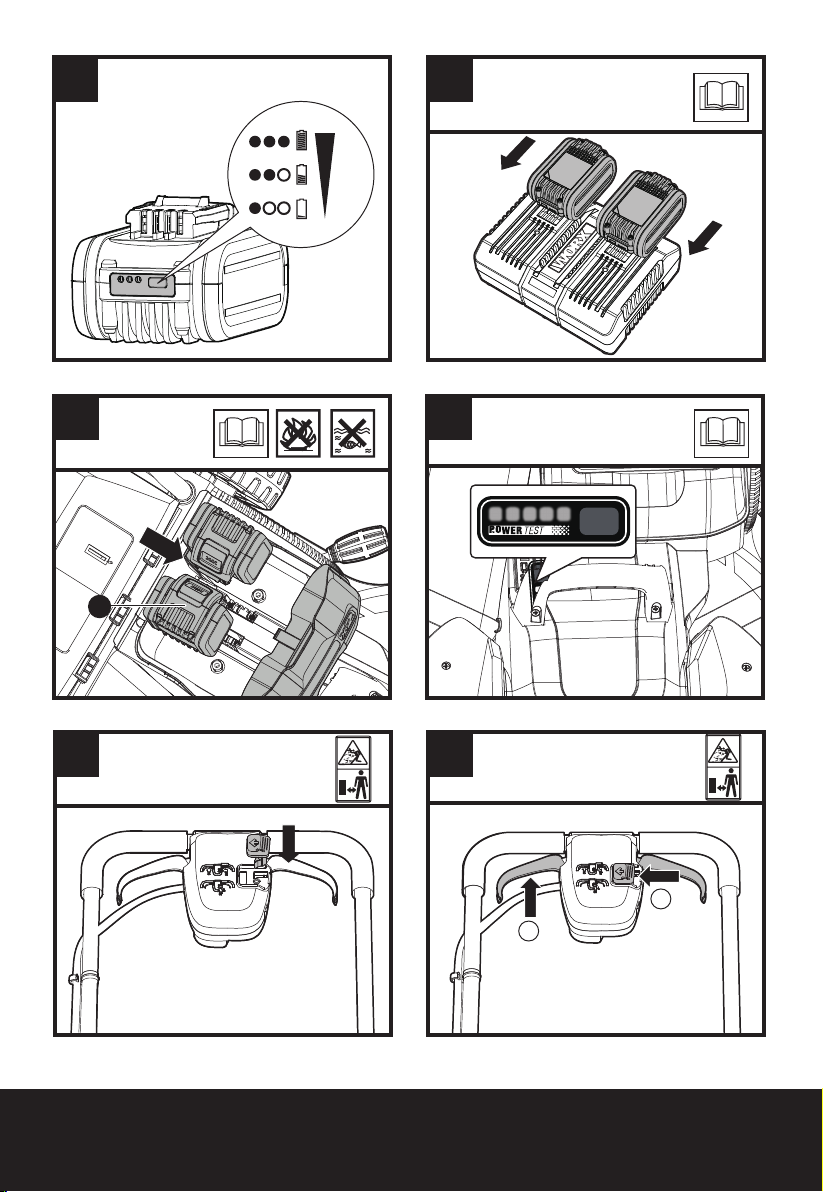
Checking the battery charge condition
NOTE:
Fig. D1 only applies for the battery
pack with battery indicator light.
Charging the battery pack
NOTE: The batteries are shipped
uncharged. Each battery must be fully
charged before the first mow.
Always fully charge the two batteries at
same time. More details can be found in
charger’s manual.
Fitting/Removing Battery
NOTE:
16
• This machine will only run when 2 batteries are installed. Please always use
two batteries with the same capacity and
fully charge the two batteries.
• When you use two batteries with different power, the machine will only run to
the lower common denominator.
OPERATION
Battery power indicator on the machine
See details in BATTERY STATUS part
IMPORTANT
When only one light is illuminated, at
least one battery is almost depleted
and needs to be charged, even though
the mower may still be capable of
cutting grass. Continuing to operate
your lawnmower with the battery in this
discharged condition may reduce the life
and performance of your battery.
When no light is illuminated, at least
one battery is not fully installed or
battery may be defective, please double
check the batteries are fully seated into
position.
Starting & Stopping
See Fig.
A1, A2,
A3, A4,
A5
See Fig.
B1, B2,
B3, B4
See Fig.
C1, C2,
C3
See Fig.
D1
See Fig.
D2
See
Fig. E
See
Fig. F
See Fig.
G1, G2
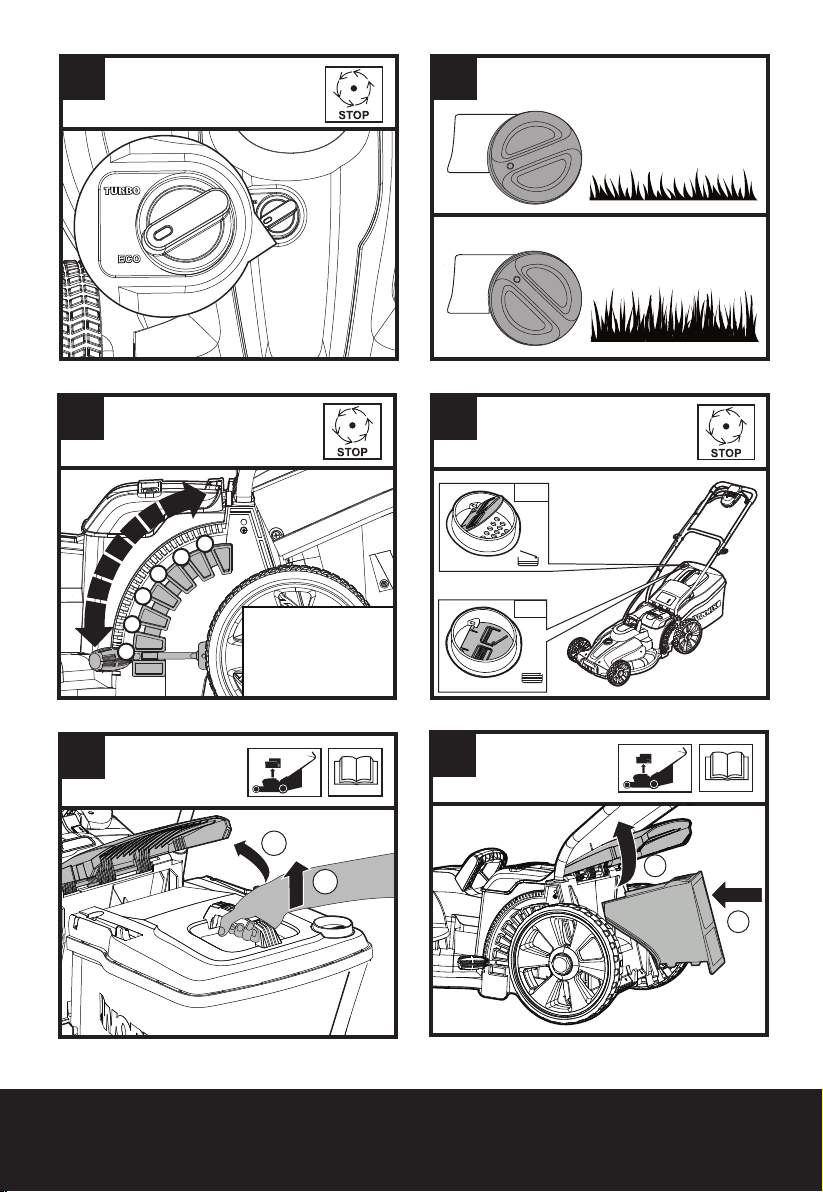
Selecting the INTELLICUT DIAL
ECO MODE
Set the Intellicut Dial to ECO mode when
mowing in everyday conditions, removing
approximately 25mm of grass at a time.
TURBO MODE
Set the Intellicut Dial to POWER mode when
cutting dense or overgrown grass.
Adjusting the Cutting Height
Grass Bag Filling Indicator
Empty status: flap floats (a)
Fully status: flap falls down (b)
Removing/Emptying Grass Collection Bag
Warning! Always check the safety
flap close the discharge outlet
before using. Never lift the safety
flap when the lawn mower is being used
without fitted grass collection bag.
Installing the mulching insert
Rear Discharge
Note: Remove the mulching insert firstly.
Storage
BATTERY STATUS (SEE FIG. F)
Before starting or after use, press the button beside
the power indicator light on the machine to check
the battery capacity. During operation, the battery
capacity will be indicated automatically by the battery
power indicator.
The indicator constantly senses and displays the battery condition as follows.
For the machine with 2 battery packs with different
power, the power indicator light displays the battery
condition with the lower one of the two batteries.
Battery power
indicator status
Five green lights
( ) are
illuminated.
Two, three or four
green lights are
illuminated.
Only one green
light ( ) is
illuminated.
Battery condition
The two batteries are in a
highly charged condition.
The two batteries have a
remaining charge. The more
lights are illuminated, the
more battery capacity.
At least one battery is almost
depleted and needs to be
charged.
See Fig.
H1, H2
See
Fig. I
See Fig.
J1
See Fig.
J2
See
Fig. K
See
Fig. L
See Fig.
M1, M2
Cordless Lawn Mower EN
Page 17
No light is
illuminated.
Only one light is
flashing twice per
cycle.
Only one light
is flashing three
times per cycle.
Only one light is
flashing four times
per cycle.
At least one battery is not fully
installed or battery may be
defective.
At least one battery is over
discharged (please refer to
the battery charge condition),
please recharge the two batteries at once before use again
or storage.
At least one battery is hot,
wait for them cool down
before start again.
The machine is over load.
Raise the cutting height or
push slowly.
MOWING TIPS
NOTE: ALWAYS INSPECT AREA WHERE
MOWER IS TO BE USED AND REMOVE ALL
STONES, STICKS, WIRE, METAL AND OTHER
DEBRIS WHICH MIGHT BE THROWN BY THE
ROTATING BLADE.
1. Mow across the face of slopes, never up-anddown. Exercise extreme caution when changing
direction on slopes. Do not mow excessively steep
slopes. Always maintain good footing.
2. Release switch lever to turn mower “OFF” when
crossing any graveled area (stones can be thrown by
the blade).
3. Set mower at highest cutting height when
mowing in rough ground or in tall weeds. Removing
too much grass at one time can cause circuit breaker
to trip, which stops mower.
4. If a grass bag is used during the fast growing
season, the grass may tend to clog up at the
discharge opening. Release switch lever to turn
mower “OFF” and remove the safety key. Remove
the grass bag and shake the grass down to the back
end of the bag. Also clean out any grass or debris
which may be packed around the discharge opening.
Replace the grass collection bag.
5. If mower should start to vibrate abnormally,
release switch lever to turn mower “OFF” and
remove safety key. Check immediately for cause.
Vibration is a warning of trouble. Do not operate
mower until a service check has been made.
6. ALWAYS RELEASE SWITCH LEVER TO TURN
MOWER “OFF” AND REMOVE SAFETY KEY
WHEN LEAVING IT UNATTENDED EVEN FOR A
SHORT PERIOD OF TIME.
CUTTING AREA
The cutting area can be affected by several factors,
such as cutting height, lawn humidity, grass length
and density. Besides, starting and stopping the
mower too many times during operation will reduce
the cutting area.
The table below gives the relationship between
cutting conditions and cutting area.
Cutting conditions
Grass
conditions
Very thin,
dry grass
Thin, dry
grass
* Used with two fully charged battery packs.
TIPS:
1) It is recommended to mow your lawn more
frequently, walk at normal pace, and not
to start/stop the mower too often during
operation. Please always use the same two
batteries and charge the two batteries at same
time.
2) For best performance, please ensure use a fully
charged battery pack and always cut off 1/3 or
less of the grass height.
3) Walk slowly when cutting long grass, so as
to have more effective cutting and properly
discharge the clippings.
4) Avoid cutting wet grass, otherwise it will stick
to the underside of the deck and the clippings
cannot be collected or discharged properly.
5) A higher cutting height shall be applied to new
or thick grass and it will extend the battery
duration
Cutting
height
cut 7cm
to 5cm
cut 7cm
to 3cm
Cutting area
(maximum)
With 2*20V/4.0Ah
batteries
Up to 500m2 *
Up to 250m2 *
MAINTENANCE
WARNING: Stop the mower and remove the
safety key before removing the grass bag.
Note: To ensure long and reliable service, perform
the following maintenance procedures regularly.
Check for obvious defects such as a loose, dislodged
or a damaged blade, loose fittings, and worn or
damaged components. Check that the covers and
guards are all undamaged and are correctly attached
to mower. Carry out any necessary maintenance
or repairs before operating mower. If the mower
should happen to fail despite regular maintenance,
please call our customer helpline for advice.
BLADE SHARPENING
KEEP BLADE SHARP FOR BEST MOWER
PERFORMANCE.
17
Cordless Lawn Mower EN
Page 18
WEAR PROPER EYE PROTECTION WHILE
REMOVING, SHARPENING, AND INSTALLING
BLADE. ENSURE THAT SAFETY KEY IS REMOVED.
Sharpening the blade twice during a mowing season
is usually sufficient under normal circumstances.
Sand causes the blade to dull quickly. If your lawn
has sandy soil, more frequent sharpening may be
required.
REPLACE BENT OR DAMAGED BLADE
IMMEDIATELY.
WHEN SHARPENING THE BLADE:
1. Make sure blade remains balanced.
2. Sharpen blade at the original cutting angle.
3. Sharpen cutting edges on both ends of blade,
removing equal amounts of material from both
ends.
Note: 1. Be sure the mower is turned off and remove
the key.
2. Place the mower in stand up storage mode.
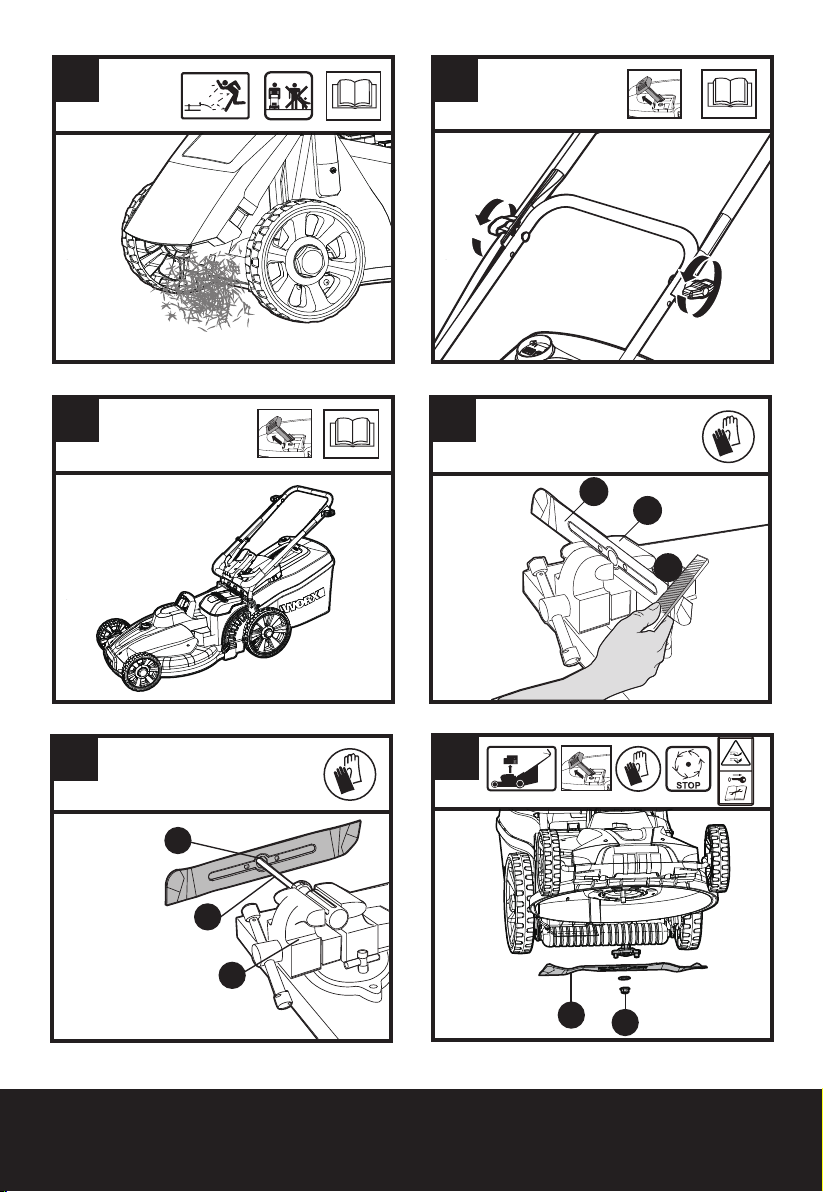
TO SHARPEN BLADE IN A VISE (SEE Fig. N1)
1. Be sure the switch lever is released, the blade
has stopped and the safety key removed before
removing the blade.
2. Remove blade from mower. See instructions for
removing and attaching blade.
3. Secure blade N1-1 in a vise N1-2.
4. Wear safety glasses and be careful not to cut
yourself.
5. Carefully file the cutting edges of the blade with a
fine tooth file N1-3 or sharpening stone.
6. Check balance of blade. See instructions for blade
balancing.
7. Replace blade on mower and tighten securely.
18
Refer to instructions below.
BLADE BALANCING (SEE Fig. N2)
Check balance of blade by placing center hole in
blade N2-1 over a nail or screwdriver shank N2-2,
clamped horizontally in a vise N2-3. If either end of
the blade rotates downward, file that end. Blade is
properly balanced when neither end drops.
BLADE MAINTENANCE (See Fig. O1, O2)
Renew your metal blade after 50 hours mowing
or 2 years, which ever is the sooner-regardless of
condition.
Follow these procedures to remove and replace the
blade. You will need garden gloves (not provided)
and a spanner wrench (not provided) to remove the
blade. Hold the blade(19) and unscrew the blade
bolt(18) counter-clockwise using a spanner wrench,
and then remove blade.
To re-assemble, position the blade(19) with the
cutting edges towards the ground. Then securely
tighten the blade bolt(18) .
STORAGE (SEE Fig. M1, M2)
Stop the mower and always remove the safety key.
Clean the exterior of the machine thoroughly using
a soft brush and cloth. Do not use water, solvents
or polishes. Remove all grass and debris, especially
from the ventilation slots.
Turn the machine on its side and clean the blade
area. If grass cuttings are compacted in the blade
area, remove with a wooden or plastic implement.
Store the machine in a dry place. Do not place other
objects on top of the machine.
To aid storage, release the Lock Cam Lever, and fold
the upper handle as shown in Fig. M1, M2.
ENVIRONMENTAL
PROTECTION
Waste electrical products must not be disposed
of with household waste. Please recycle where
facilities exist. Check with your local authorities
or retailer for recycling advice.
Cordless Lawn Mower EN
Page 19

TROUBLE SHOOTING
Problem Solution
A
. Check to make sure safety key has been installed and is fully seated and that button
1. Mower doesn’t run
when switch lever is
activated.
2. Motor stops while
mowing.
3. Mower runs but
cutting performance
is unsatisfactory, or
does not cut entire
lawn.
4. Mower is too hard
to push
5. Mower is
abnormally noisy and
vibrates.
6. Battery charger
LED’s not on.
7. Battery charger
LED does not flip to
green.
8. Mower not picking
up clippings with the
Grass Collection Bag.
9. When mulching
there are clippings
visible.
10. Low or
diminished run-time
after many uses
11. The battery
charger LED flashes
red and the battery
can’t be charged.
on switch housing is being completely pushed.
B. Release Switch Lever to turn mower off. Remove safety key, turn mower over and
check that blade is free to turn. If not free, return to an authorized servicer. Blade
should turn freely.
C. Has battery been fully charged? Plug in charger and wait for green light to come on.
A. Release Switch Lever to turn mower off. Remove safety key, turn mower over
and check that blade is free to turn. If not free, return to an authorized servicer. Blade
should turn freely.
B. Raise cutting height of wheels to highest position and start mower.
C. Has battery been fully charged? Plug in charger and wait for green light to come on.
D. Avoid overloading the mower. Slow down the cutting pace by pushing mower
slower or raise the cut height. Or both.
A. Has battery been fully charged? Plug in charger and wait for green light to come
on.
B. Release Switch Lever to turn mower off. Remove safety key. Turn mower over
and check: Blade for sharpness - Keep blade sharp. Deck and discharge chute for
clogging.
C. Wheel height adjustment may be set too low for grass condition. Raise cutting
height.
A. Raise cutting height to reduce deck drag on grass. Check each wheel for free
rotation
A. Release Switch Lever to turn mower off. Remove safety key. Turn mower on side
and check blade to ensure it has not been bent or damaged. If blade is damaged,
replace with a replacement blade. If the underside of the deck is damaged return
mower to an Authorized service center.
B. If there is no visible damage to the blade and the mower still vibrates: Release
Switch Lever to turn mower off, remove safety key and remove blade. Rotate
blade 180 degrees and retighten. If mower still vibrates, return the mower to an
authorized service center.
A. Check plug connection.
B. Replace charger.
A. Battery needs to be diagnosed. Take to authorized service center.
A. Remove mulch plate when bagging.
B. Chute clogged. Release Switch Lever to turn mower off. Remove safety key.
Clear chute of grass clippings.
C. Too much cut grass. Raise cutting height of wheels to shorten length of the cut.
D. Bag full. Empty bag more often.
A. Too much cut grass. Raise cutting height of wheels to shorten length of the cut.
Do not cut off more than 1/3 of total length.
B. Check blade for sharpness. Always keep blade sharp.
A. Return to Authorized Service location - may need new battery.
A. The battery overheats after continuous use. Remove battery from the charger
and allow it to cool to 42°C or less.
19
Cordless Lawn Mower EN
Page 20
DECLARATION OF
CONFORMITY
We,
POSITEC Germany GmbH
Grüner Weg 10, 50825 Cologne, Germany
Declare that the product,
Description WORX Cordless Lawn Mower
Type WG744E,WG744E.9 (740-789 -
designation of machinery, representative of
Cordless Lawn Mower)
Function Cutting Grass
Complies with the following Directives:
2006/42/EC, 2014/30/EU, 2011/65/EU,
2000/14/EC amended by 2005/88/EC
2000/14/EC amended by 2005/88/EC:
-
Conformity Assessment Procedure as per
- Measured Sound Power Level 84.3
dB(A)
- Declared Guaranteed Sound Power Level 88 dB(A)
The notified body involved
Name: Intertek Testing & Certification Ltd
(notified body 0359)
Address: Davy Avenue, Knowlhill, Milton
Keynes, MK5 8NL
Standards conform to
EN 60335-1
EN 60335-2-77
EN 62233
EN ISO 3744
EN 55014-1
EN 55014-2
The person authorized to compile the technical file,
Name: Marcel Filz
Address: Positec Germany GmbH
Grüner Weg 10, 50825 Cologne, Germany
Annex VI
2017/12/19
Allen Ding
Deputy Chief Engineer, Testing & Certification
Positec Technology (China) Co., Ltd
18, Dongwang Road, Suzhou Industrial
Park, Jiangsu 215123, P. R. China
Cordless Lawn Mower EN
Page 21
ORIGINALBETRIEBSANLEITUNG
PRODUKTSICHERHEIT
Allgemeine
Sicherheitshinweise
WARNUNG Lesen Sie
alle
Sicherheitshinweise und
Anweisungen. Versäumnisse
bei der Einhaltung der
Sicherheitshinweise und
Anweisungen können
elektrischen Schlag, Brand
und/oder schwere Verletzungen
verursachen.
Carefully read the instructions
for the safe operation of the
machine.
Save all warnings and
instructions for future
reference.
Lesen Sie die
Bedienungsanleitung
zum sicheren Betrieb des
Gerätes aufmerksam durch.
Bewahren Sie alle
Sicherheitshinweise und
Anweisungen für die
Zukunft auf.
- Dieses Gerät ist nicht dafür
bestimmt, durch Personen
(einschließlich Kinder) mit
eingeschränkten physischen,
sensorischen oder geistigen
Fähigkeiten oder mangels
Erfahrung und/oder
mangels Wissen benutzt
zu werden, es sei denn,
sie werden durch eine für
ihre Sicherheit zuständige
Person beaufsichtigt
oder erhielten von ihr
Anweisungen, wie das Gerät
zu benutzen ist.
- Kinder sollten beaufsichtigt
werden um Sicherzustellen,
dass sie nicht mit dem
Ladegerät spielen.
- Das Gerät darf nur mit
dem mitgelieferten Netzteil
verwendet werden.
WICHTIG
VOR GEBRAUCH BITTE
GENAU DURCHLESEN
FÜR SPÄTERE
BEZUGNAHME
AUFBEWAHREN
Sicherer Betrieb
Training
a) Die Anweisungen aufmerksam
durchlesen. Machen Sie sich
mit den Bedienelementen
und dem vorschriftsmäßigen
Gebrauch des Rasenmähers
vertraut.
b) Niemals Kindern oder mit
diesen Anweisungen nicht
vertrauten Personen erlauben,
den Rasenmäher zu benutzen.
Nationale Vorschriften können
das Alter der Bedienperson
möglicherweise beschränken.
c) Niemals mähen, während
sich Personen, insbesondere
Kinder, oder Tiere in
2120
Schnurloser Rasenmäher D
Page 22

unmittelbarer Nähe aufhalten.
d) Bedenken Sie, dass der
Bediener oder Benutzer bei
Unfällen oder Gefährdungen
anderer Personen oder deren
Eigentum die Verantwortung
trägt!
Vorbereitung
a) Tragen Sie beim Mähen
stets festes Schuhwerk
und eine lange Hose. Den
Rasenmäher nicht barfuß
oder mit offenen Sandalen
benutzen.
b) Inspizieren Sie die Gegend,
in der die Ausrüstung
eingesetzt werden soll,
gründlich und entfernen Sie
alle Objekte, die durch die
Maschine aufgeschleudert
werden könnten.
c) Vor der Benutzung immer
durch Augenschein
prüfen, ob Messer,
Messerschrauben und
Schneidbalken abgenutzt
oder beschädigt sind.
Abgenutzte Messer und
Schrauben nur im ganzen
Satz auswechseln, um
Unwuchten zu vermeiden.
Tauschen Sie beschädigte
und unleserliche Etiketten
aus.
Betrieb
a) Nur bei Tageslicht oder
gutem künstlichen Licht
mähen.
b) Nach Möglichkeit nicht in
nassem Gras arbeiten.
c) Auf schrägen Flächen stets
auf sicheren Tritt achten.
d) Gehen Sie; rennen Sie
niemals mit dem Gerät;
e) Mähen Sie bei
Rotormaschinen mit Rädern
Abhänge niemals auf hinaus
oder hinab, sondern immer
seitlich am Hang entlang;
f) Beim Richtungswechsel
an Abhängen äußerst
vorsichtig sein.
g) Keine besonders steilen
Abhänge mähen.
h) Beim Rückwärtsgehen oder
Ziehen des Rasenmähers
äußerst vorsichtig sein.
i) Die Messer müssen stehen,
wenn der Rasenmäher
für den Transport gekippt
werden muss, wenn nicht
mit Gras bepflanzte Flächen
überquert werden und beim
Transport vom und zu dem
zu mähenden Bereich.
j) Den Rasenmäher auf
keinen Fall mit defekten
Schutzvorrichtungen oder
Schutzblechen, oder ohne
ordnungsgemäß montierte
Sicherheitseinrichtungen
wie z. B. Prallbleche und/
oder Grasfangvorrichtung
betreiben.
k) Den Motor wie in den
Anweisungen beschrieben
Schnurloser Rasenmäher D
Page 23

starten und dabei darauf
achten, dass die Füße
ausreichend weit von den
Messern entfernt sind.
l) Den Rasenmäher beim
Starten des Motors nicht
kippen, es sei denn, es ist für
das Anlaufen erforderlich.
In diesem Fall nur so weit
wie nötig und nur auf der
Bediener abgewandten Seite
kippen.
m)Hände und Füße nicht
in die Nähe oder unter
rotierende Teile bringen.
Bei Rotormäher die
Austragsöffnung unbedingt
freihalten.
n) Sie dürfen die Klingen
nicht berühren, bevor die
Sperrvorrichtung entfernt
worden ist und die Klingen
vollständig zum Stillstand
gekommen sind;
o) Starten Sie den Rasenmäher
nicht, wenn Sie vor der
Auslassöffnung stehen.
p) Transportieren Sie den
Rasenmäher nicht, wenn die
Stromquelle eingeschaltet
ist.
q) Stoppen Sie den
Rasenmäher und
entfernen Sie die
Deaktivierungsvorrichtung.
Stellen Sie sicher, dass
die beweglichen Teile zum
vollständigen Stillstand
gekommen sind.
– Sie die Maschine
unbeaufsichtigt lassen,
– Sie ein Hindernis
wegräumen,
– Sie die Maschine
überprüfen, säubern oder an
der Maschine arbeiten,
– nach der Kollision mit
einem Fremdkörper.
Den Rasenmäher
auf Beschädigungen
untersuchen und wenn
notwendig instand setzen
lassen
Falls der Rasenmäher
plötzlich ungewöhnlich stark
zu vibrieren beginnt (sofort
prüfen)
– Auf Schädenhininspizieren.
– Beschädigte Teile
austauschen oder
reparieren.
– Lose Teile überprüfen und
festziehen.
Wartung und aufbewahrung
a)
Den Festsitz aller Schrauben,
Muttern und Bolzen
sicherstellen, um zu
gewährleisten, dass sich
der Rasenmäher in einem
betriebssicheren Zustand
befindet;
b) Den Grasfangkorb regelmäßig
auf Abnutzung überprüfen;
c) Abgenutzte oder beschädigte
2322
Schnurloser Rasenmäher D
Page 24

Teile sicherheitshalber
auswechseln. Nur echte
Ersatz- und Zubehörteile
benutzen.
d) Achten Sie bei der Einstellung
des Gerätes darauf, dass
Ihre Finger nicht zwischen
dem beweglichen Messer
und feststehenden Teilen
eingeklemmt werden.
e) Lassen Sie den Rasenmäher
stets auskühlen, bevor Sie ihn
einlagern.
f) Beim Warten der Messer
denken Sie daran, dass sich
die Klingen noch immer
bewegen lassen, auch wenn
die Stromquelle schon
ausgeschaltet ist.
SICHERHEIT HINWEISE FÜR
AKKUPACK
a) Zellen bzw. Akkupack
nicht zerlegen, öffnen
oder zerdrücken.
b) Akkupack nicht
kurzschließen.
Akkupacks nicht wahllos
in einer Schachtel
oder Schublade
aufbewahren, wo sie
einander kurzschließen
oder durch andere
leitfähige Materialien
kurzgeschlossen
werden könnten. Bei
Nichtverwendung des
Akkupacks ist dieses von
Metallgegenständen
fernzuhalten, wie etwa
Büroklammern, Münzen,
Nägeln, Schrauben
oder anderen kleinen
Metallgegenständen, wo
sich die Batterieklemmen
berühren könnten.
Das Kurzschließen der
Batterieklemmen kann
Verbrennungen bzw. einen
Brand verursachen.
c) Zellen bzw. Akkupacks
nicht Hitze oder Feuer
aussetzen. Lagerung in
direktem Sonnenlicht
vermeiden.
d) Akkupack nicht
mechanischen Stößen
aussetzen.
e) Im Fall, dass Flüssigkeit
aus dem Akku austritt,
darf diese nicht in
Kontakt mit der Haut
oder den Augen
kommen. Sollte dies
dennoch geschehen,
den betroffenen Bereich
sofort mit viel Wasser
spülen und einen Arzt
aufsuchen.
f) Beim Verschlucken
einer Zelle oder eines
Akkupacks muss sofort
ein Arzt herangezogen
werden.
g) Akkupack sauber und
Schnurloser Rasenmäher D
Page 25

trocken halten.
h) Sollten die Klemmen des
Akkupacks schmutzig
werden, diese mit einem
sauberen, trockenen
Tuch abwischen.
i) Akkupackmuss vor
Gebrauch aufgeladen
werden. Immer dieses
Anweisungen beachten
und den korrekten
Ladevorgang ausführen.
j) Akkupack bei
Nichtverwendung nicht
längere Zeit aufladen
lassen.
k) Nach längerer Lagerung
des Gerätes ist es
eventuell notwendig,
die Zellen oder das
Akkupack mehrere
Male aufzuladen und
zu entladen, um eine
optimale Leistung zu
erhalten.
l) Akkupacks funktionieren
bei normaler
Zimmertemperatur (20
°C ± 5 °C) am besten.
m) Beim Entsorgen
von Akkupacks
sollten Akkupacks
mit verschiedenen
elektrochemischen
Systemen voneinander
getrennt gehalten
werden.
n) Nur mit dem von WORX
bezeichneten Ladegerät
aufladen. Kein Ladegerät
verwenden, das nicht
ausdrücklich für den
Gebrauch mit dem
Gerät vorgesehen ist.
Ein Ladegerät, das für
eine bestimmte Art von
Akkupackgeeignet ist, kann
bei Verwendung mit einem
anderen Akkupack eine
Brandgefahr darstellen.
o) Kein Akkupack
verwenden, das nicht für
den Gebrauch mit dem
Gerät vorgesehen ist.
p) Akkupacks von Kindern
fernhalten.
q) Die originalen
Produktunterlagen zum
späteren Nachschlagen
aufbewahren.
r) Den Akku bei
Nichtverwendung aus
dem Gerät nehmen.
s) Ordnungsgemäß
entsorgen.
2524
Schnurloser Rasenmäher D
Page 26

SYMBOLE
Lesen Sie die
Bedienungsanleitung
aufmerksam durch und stellen
Sie sicher
Entfernen Sie den Akku aus
der Halterung, bevor Sie
Einstellungen, Service- oder
Wartungsarbeiten durchführen.
Die Messer drehen sich nach
dem Ausschalten der Maschine
weiter. Warten Sie, bis alle Teile
der Maschine vollkommen zur
Ruhe gekommen sind, ehe Sie
etwas anfassen.
Halten Sie einen
Sicherheitsabstand zu
Unbeteiligten ein.
Vorsicht scharfe Schneidblätter.
Schneidblätter haben einen
Nachlauf, nachdem die Maschine
ausgeschaltet ist - Trennen Sie
vor einer Wartung.
Elektroprodukte dürfen nicht mit
dem normalen Haushaltsmüll
entsorgt werden, sondern
sollten nach Möglichkeit zu einer
Recyclingstelle gebracht werden.
Ihre zuständigen Behörden oder
Ihr Fachhändler geben Ihnen
hierzu gerne Auskunft.
Akku nicht in den Haushaltsmüll
geben. Bringen Sie den leeren
Akku zu Ihrer lokalen Sammeloder Recyclingstelle.
Nicht verbrennen
Vor Regen und Feuchtigkeit
schützen
Ziehen Sie den Schlüssel ab
KOMPONENTEN
1. SICHERHEITSSCHLÜSSEL
2. SCHALTBÜGEL
3. GRIFFOBERTEIL
4. SCHRAUBKNOPF
5. UNTERER HANDGRIFF
6. GRAS-SAMMELBEUTEL
7. SCHNITTHÖHEN-EINSTELLHEBEL
8. GRIFFSTANGE
9. INTELLICUT-WAHLSCHALTER
10. AKKU-LADESTANDSANZEIGE
11. AKKUPACK-ABDECKUNG
12. SICHERHEITSKLAPPE
13. GRASKORBGRIFF
14. KABELKLEMMEN
15. GRASBEHÄLTERFÜLLSTANDANZEIGE
16. MULCHEINSATZ
17. BATTERIEPACK (SIEHE ABB. E) *
18. KLINGENSCHRAUBE (SIEHE ABB. O1)
19. KLINGE (SIEHE ABB. O1)
* Abgebildetes oder beschriebenes Zubehör
gehört teilweise nicht zum Lieferumfang.
Schutzhandschuhe tragen
Schnurloser Rasenmäher D
Page 27
TECHNISCHE DATEN
Typ WG744E, WG744E.9 (740-789 - Bezeichnung der
Maschine, repräsentiert die Schnurloser Rasenmäher)
WG744E WG744E.9
Spannung 40V Max (2x20V Max)*
Schneidradius 40cm
Vorderrad-
Durchmesser
Hinterrad-
Durchmesser
Schnitthöhe 20mm-70mm
Schneidehöhen-
Positionen
Grasfangkorb 40L
Batterietyp Lithium-Ionen /
Akkumodell WA3553(4.0Ah) /
Ladegerätmodell WA3883 /
Leistung des
Ladegeräts
Ladezeit (Ca.)
Batterie-Paket:
2.0 Ah (1pc)
2.0 Ah (2pcs)
4.0 Ah (1pc)
4.0 Ah (2pcs)
Gewicht 16.7kg 15.4kg
*Spannung ohne Arbeitslast gemessen.
Anfangsakkuspannung erreicht maximal 20Volt.
Nennspannung ist 18 Volt.
** Ladegerät-Ausgang 1 und Ausgang 2 bedeuten
zwei Anschlüsse mit gleicher Ausgangsspannung und
gleichem Ausgangsstrom.
100-240V~50-60Hz,
20V , 2.0A**
20V , 2.0A**
160mm
240mm
Eingang:
Ausgang1:
Ausgang2:
0.5 Stunde
1 Stunde
1 Stunde
2 Stunde
6
/
/
INFORMATIONEN ÜBER
VIBRATIONEN
Typischer gewichteter
Vibrationswert
WARNUNG: Der Vibrationsemissionswert kann
während des tatsächlichen Gebrauchs des
Elektrowerkzeugs vom angegebenen Wert abweichen,
je nachdem, wie das Werkzeug gemäß folgenden
Beispielen und weiteren Verwendungsmöglichkeiten
eingesetzt wird:
Die Verwendung des Werkzeugs und die Art, wie die
Materialien geschnitten oder angebohrt werden.
Der Pflege- und Wartungszustand des Werkzeugs.
Die Verwendung des richtigen Zubehörs und dessen
Schärfe und Zustand.
Die Festigkeit der Handgriffe und die Benutzung von
Antivibrationszubehör.
Der bestimmungsgemäß eund diesen Anweisungen
entsprechende Gebrauch.
Wird dieses Werkzeug nicht angemessen
gehandhabt, kann es zum Auftreten des HandArm-Vibrationssyndroms kommen.
WARNUNG: Sie sollten die tatsächlichen
Arbeitsabschnitte genau ermitteln, um so den
Belastungsrad abzuschätzen. Auf diese Weise kann
der Belastungsgrad während der gesamten
möglicherweise wesentlich gemindert werden.
So minimieren Sie das Risiko, dem Sie bei
Vibrationen ausgesetzt sind.
Verwenden Sie IMMER scharfe Meißel, Bohrer und
Sägeblätter.
Pflegen Sie dieses Werkzeug den Anweisungen
entsprechend und achten Sie stets auf eine gutes
Einfetten (wo erforderlich).
Bei regelmäßiger Verwendung von Elektrowerkzeug
sollten Sie in Antivibrationszubehör investieren.
Erstellen Sie einen Arbeitsplan, um die Verwendung von
hochvibrierenden Werkzeugen auf mehrere Tage zu verteilen.
ah= 0.41 m/s
Unsicherheit K=1.5m/s²
2
Arbeitszeit
2726
INFORMATIONEN ÜBER
ZUBEHÖRTEILE
LÄRM
Gewichteter Schalldruck
Gewichtete Schallleistung
Tragen Sie einen Gehörschutz.
LwA: 68.7dB(A)
KpA= 3dB(A)
LwA: 84.3dB(A)
KwA= 3dB(A)
Batterie-Paket (WA3553) 2 /
Aufladegerät (WA3883) 1 /
Gras-Sammelbeutel 1
Mulcheinsatz 1
Kabelklemmen 2
Wir empfehlen Ihnen, sämtliche Zubehörteile
beim selben Fachhändler zu beziehen, bei dem Sie
auch Ihr Elektrowerkzeug gekauft haben. Weitere
Informationen finden Sie auf der Verpackung der
Zubehörteile. Auch Ihr Fachhändler berät Sie gerne.
WG744E WG744E.9
Schnurloser Rasenmäher D
Page 28

MONTAGE UND BEDIENUNG
MASSNAHME
MONTAGE
Montage der Griffstange
HINWEIS: Wählen Sie eines der beiden
Löcher im unteren Griff, um die Griffhöhe
einzustellen.
Montage des Gras-Sammelbeutels
Montage des Gras-Sammelbeutels am
Rasenmäher
HINWEIS:
aus dem Rasenmäher heraus, bevor Sie den
Gras-Sammelbeutel montieren.
HINWEIS:
leicht ein, um sicherzugehen, dass er komplett installiert ist.
Prüfen des Akkuladestands
HINWEIS:
pack mit Akkustandanzeige.
Aufladen des Akkupacks
HINWEIS: Das Akkupack wird ungeladen
geliefert. Der Akku muss vor der ersten
Nutzung vollständig geladen werden.
Laden Sie die beiden Akkus stets
gleichzeitig auf. Weitere Details finden Sie
im Handbuch des Ladegeräts.
Einsetzen/ausbauen der Batterie
HINWEIS:
Dieser Rasenmäher kann nur mit
2 installierten Akkus betrieben
werden. Bitte verwenden Sie immer
zwei gleiche Akkus und laden Sie
diese gleichzeitig auf.
Wenn Sie zwei Batterien mit unterschiedlichem Ladezustand benutzen,
wird das Gerät nur bis zur Entladung
der Batterie mit dem niedrigeren
Ladezustand laufen.
BETRIEB
Nehmen Sie den Mulcheinsatz
Drücken Sie den Gras-Beutel
Abb. D1 gilt nur für das Akku-
ABBIL-
DUNG
Siehe
Abb. A1,
A2, A3,
A4, A5
Siehe
Abb. B1,
B2, B3,
B4
Siehe
Abb. C1,
C2, C3
Siehe
Abb. D1
Siehe
Abb. D2
Siehe
Abb. E
Akku-Ladestandanzeige an der Maschine
Details siehe Abschnitt
BATTERIELADEZUSTAND
WICHTIG
Wenn nur eine Lampe aufleuchtet,
ist mindestens ein Akku leer und
muss aufgeladen werden, auch wenn
der Rasenmäher immer noch in der
Lage sein könnte, Gras zu schneiden.
Wenn Sie den Rasenmäher mit einer
solchen entladenen Batterie weiter
benutzen, könnte dies die Lebensdauer und Leistung Ihrer Batterien
beeinträchtigen.
Wenn keine LED leuchtet, ist mindestens ein Akku nicht vollständig
installiert oder der Akku ist defekt,
bitte überprüfen Sie noch einmal,
dass die Akkus vollständig in Position eingesetzt sind.
Starten & Stoppen
Auswählen des Betriebsmodus
ECO-Modus
Wählen Sie den ECO-Modus beim täglichen
Mähen, wenn die max. Grashöhe 25mm
oder weniger beträgt.
TURBO-Modus
Wählen Sie den TURBO-Modus, wenn Sie
dichtes oder überwachsenes Gras mähen.
Einstellen der Schnitthöhe
Grasbehälterfüllstandanzeige
Leer: Klappe leicht geöffnet (a)
Voll: Klappe geschlossen (b)
Entfernen/Leeren des GrasSammelbeutels
WARNUNG! Überprüfen Sie vor
der Verwendung stets, dass die
Sicherheitsklappe den Auswurf
verschlossen hat. Heben Sie die
Sicherheitsklappe niemals an, wenn der
Rasenmäher ohne montierten GrasSammelbeutel verwendet wird.
Einbau des Mulcheinsatzes
Heckauswurf
HINWEIS:
cheinsatz.
Aufbewahrung
Entfernen Sie zuerst den Mul-
Siehe
Abb. F
Siehe
Abb. G1,
G2
Siehe
Abb. H1,
H2
Siehe
Abb. I
Siehe
Abb. J1
Siehe
Abb. J2
Siehe
Abb. K
Siehe
Abb. L
Siehe
Abb.
M1, M2
Schnurloser Rasenmäher D
Page 29

STATUSANZEIGEN DER BATTERIE (SIEHE ABB. F)
Betätigen Sie vor Beginn oder nach Beendigung
der Nutzung die Taste auf dem Gerät neben der
Strom-Signalleuchte, um die Batteriekapazität zu
überprüfen. Während des Betriebs wird die Batteriekapazität automatisch auf der Ladezustandsanzeige
der Batterie angezeigt.
Die Anzeige überprüft die Batterie durchgehend und
zeigt den Batteriezustand wie folgt an.
Bei einem Gerät mit 2 Batteriepacks mit unterschiedlichem Ladezustand zeigt die Ladezustandsanzeige der Batterie den Zustand der Batterie mit dem
jeweils niedrigeren Ladezustand an.
Status der Akku-
Ladestandanzeige
Fünf grüne LEDs
( )
leuchten.
Zwei, drei oder
vier grüne LEDs
leuchten.
Es leuchtet nur
eine grüne LED (
)
Es leuchtet keine
LED.
Pro Zyklus blinkt
nur eine LED
zweimal.
Pro Zyklus blinkt
nur eine LED
dreimal.
Pro Zyklus blinkt
nur eine LED
dreimal.
Batterieladezustand
Beide Akkus sind vollständig
aufgeladen.
Die beiden Akkus haben eine
Restladung. Je mehr LEDs
leuchten, desto höher ist die
Akkukapazität.
Mindestens ein Akku ist
leer und muss aufgeladen
werden.
Mindestens ein Akku ist nicht
vollständig installiert oder
defekt.
Mindestens ein Akku ist
tiefentladen (siehe Ladestatus
der Batterie); bitte laden Sie
die beiden Akkus auf, bevor
Sie diese erneut nutzen oder
lagern.
Mindestens ein Akku ist heiß
gelaufen; warten Sie vor der
Nutzung, bis dieser abgekühlt
ist.
Die Maschine ist überlastet.
Heben Sie die Schnitthöhe an
oder schieben Sie langsam.
TIPPS FÜR DAS MÄHEN
HINWEIS: INSPIZIEREN SIE IMMER DIE
GEGEND, IN WELCHER DER RASENMÄHER
GENUTZT WERDEN SOLL. ENTFERNEN
SIE ALLE STEINE, STÖCKE, DRÄHTE,
KNOCHEN UND ANDEREN SCHUTT, DER
DURCH DIE ROTIERENDEN KLINGEN HOCH
GESCHLEUDERT WERDEN KÖNNTE.
1. Mähen Sie seitwärts an Abhängen entlang und
niemals hoch oder runter. Seien Sie besonders
vorsichtig, wenn Sie auf Abhängen die Richtung
ändern. Mähen Sie nicht übermäßig auf steilen
Hängen. Bewahren Sie immer eine gute
Standfestigkeit.
2. Lassen Sie den Schalthebel los, um den
Rasenmäher auf “AUS” zu stellen, wenn Sie eine
geschotterte Stelle überqueren. (Steine können
durch die Klingen hoch geschleudert werden.)
3. Stellen Sie den Rasenmäher auf die höchste
Schnittstufe, wenn Sie unebenen Boden oder hohes
Unkraut mähen. Ein Entfernen von zu viel Gras auf
einmal kann zum Schnellschluss des Schutzschalters
führen. Das stoppt den Rasenmäher.
4. Falls ein Gras-Beutel während der Zeit raschen
Wachstums benutzt wird, kann es sein, dass das
Gras die Entleerungs-Öffnung verstopft. Lassen
Sie den Schalthebel los und stellen Sie den
Rasenmäher auf “AUS”. Entfernen Sie dann den
Sicherheitsschlüssel. Entfernen Sie den Gras-Beutel
und schütteln Sie das Gras runter ins hintere Ende
des Beutels. Reinigen Sie auch alles Gras oder jeden
Schutt, der sich rund um die Entleerungs-Öffnung
festgesetzt haben mag. Ersetzen Sie den GrasBeutel.
5. Wenn der Rasenmäher unnormal vibrieren sollte,
lassen Sie den Schalthebel los und stellen Sie den
Rasenmäher auf “AUS”. Entfernen Sie dann den
Sicherheitsschlüssel. Suchen Sie sofort nach der
Ursache. Vibration ist ein Zeichen für Probleme.
Bedienen Sie den Rasenmäher nicht, bis eine
Wartungsprüfung durchgeführt worden ist.
6. LASSEN SIE DEN SCHALTHEBEL LOS;
STELLEN SIE DEN RASENMÄHER AUF
“AUS” UND ENTFERNEN SIE DANN DEN
SICHERHEITSSCHLÜSSEL, IMMER WENN
SIE DEN RASENMÄHER AUCH NUR KURZ
UNBEAUFSICHTIGT LASSEN.
SCHNEIDEBEREICH
Der Schneidebereich kann durch mehrere Faktoren
beeinträchtigt werden, beispielsweise durch die
Schnitthöhe, die Feuchtigkeit des Rasens, die
Graslänge und -dichte. Außerdem wird durch zu
häufiges Starten und Anhalten des Rasenmähers im
laufenden Betrieb der Schneidebereich verkleinert.
Die folgende Tabelle stellt den Zusammenhang
zwischen Schneidbedingungen und Schneidebereich
dar.
Schneidbedingungen
Grasbedingungen Schnitthöhe
Sehr
dünnes,
trockenes
Gras
Dünnes,
trockenes
Gras
Schnitt
7cm bis
5cm
Schnitt
7cm bis
3cm
Schneidebereich
(maximal)
Mit 2 x 20 V/4,0
Ah Akkus
Bis zu 500 m2 *
Bis zu 250 m2 *
2928
Schnurloser Rasenmäher D
Page 30
* Beim gleichzeitigen Betrieb mit 2 vollständig
geladenen Akkus.
TIPPS:
1) Es empfiehlt sich, dass Sie Ihren Rasen häufiger
mähen, mit normaler Geschwindigkeit laufen,
und den Mäher während des Betriebs nicht zu
oft starten bzw. anhalten.
2) Um optimale Leistungen zu erreichen, stellen
Sie sicher, dass zwei vollständig geladene
Akkupacks gleichzeitig genutzt und stets
1/3 oder weniger der Grashöhe geschnitten
werden.
3) Gehen Sie beim Mähen von langem
Gras langsam, damit das Schneiden
effektiver durchgeführt und das Schnittgut
ordnungsgemäß ausgeworfen werden kann.
4) Vermeiden Sie das Schneiden von nassem
Gras; anderenfalls wird dieses auf der
Unterseite des Mähwerks haften und Schnittgut
kann nicht gesammelt bzw. ordnungsgemäß
ausgeworfen werden.
5) Bei frischem oder dickem Gras sollte eine
höhere Schnitthöhe eingesetzt werden, die
zudem die Lebensdauer der Batterie verlängert.
WARTUNG
WARNUNG: Stoppen Sie den Rasenmäher
und ziehen Sie den Sicherheitsschlüssel ab,
bevor Sie den Grasbeutel entfernen.
HINWEIS: Folgende Wartungsarbeiten sind
regelmäßig auszuführen, um den zuverlässigen
und sicheren Betrieb zu gewährleisten. Den
Rasenmäher auf offensichtliche Defekte wie z. B. ein
lockeres, verstelltes oder beschädigtes Messer, lose
Befestigungs- oder Zubehörteile und verschlissene
oder beschädigte Komponenten. Die Abdeckungen
und Schutzbleche müssen in einwandfreiem Zustand
und richtig angebracht sein. Vor dem Betrieb
des Rasenmähers die notwendigen Wartungsund Reparaturarbeiten durchführen. Sollte der
Rasenmäher trotz regelmäßiger Wartung ausfallen,
Bitte rufen Sie den Kundendienst für eine Beratung
an.
SCHÄRFEN DER KLINGE
HALTEN SIE DIE KLINGE FÜR EINE OPTIMALE MÄHLEISTUNG SCHARF.
TRAGEN SIE ORDENTLICHEN AUGENSCHUTZ
BEIM ENTFERNEN, SCHÄRFEN UND EINSETZEN
DER KLINGE. GEHEN SIE SICHER, DASS DER
SICHERHEITSSCHLÜSSEL ENTFERNT IST.
Es ist unter normalen Umständen normalerweise
ausreichend, die Klinge zweimal in der Mäh-Saison
zu schärfen. Sand sorgt dafür, dass die Klinge rasch
stumpf wird. Falls Ihr Rasen auf sandiger Erde
wächst, dann ist es notwendig, öfter zu schärfen.
ERSETZEN SIE EINE VERBOGENE ODER
BESCHÄDIGTE KLINGE SOFORT!
BEIM SCHÄRFEN DER KLINGE:
1. Gehen Sie sicher, dass die Klinge ausbalanciert
bleibt.
2. Schärfen Sei die Klinge am originalen
Schnittwinkel.
3. Schärfen Sie die Schnittkanten an beiden Enden
der Klinge und entfernen Sie von beiden Enden
gleich viel Material.
HINWEIS: 1. Stellen Sie sicher, dass der Mäher
ausgeschaltet ist, und entfernen Sie den Schlüssel.
2. Bringen Sie den Mäher in die senkrechte
Lagerstellung.
DAS SCHÄRFEN EINER KLINGE IN EINEM
SCHRAUBSTOCK (Siehe Abb. N1)
1. Gehen Sie vor dem Herausnehmen der Klinge
sicher, dass der Schalthebel losgelassen ist, die
Klinge zum Stillstand gekommen ist und der
Sicherheitsschlüssel entfernt wurde.
2. Nehmen Sie die Klinge aus dem Rasenmäher.
Lesen Sie die Anweisungen für das Herausnehmen
und Anbringen der Klinge.
3. Sichern Sie die Klinge N1-1 in einem Schraubstock
N1-2.
4. Tragen Sie eine Schutzbrille und passen Sie auf,
dass Sie sich nicht selbst schneiden.
5. Feilen Sie die Schneidekanten der Klinge sorgfältig
mit einer feinen Feile N1-3 oder einem Schleifstein.
6. Überprüfen Sie die Balance der Klinge. Lesen Sie
die Anweisungen für das Ausbalancieren der Klinge.
7. Ersetzen Sie die Klinge auf dem Rasenmäher und
befestigen Sie diese sicher. Schauen Sie sich die
nachstehenden Hinweise an.
AUSBALANCIEREN DER KLINGE (Siehe Abb.
N2)
Überprüfen Sie die Balance der Klinge dadurch, dass
Sie das zentrale Loch in der Klinge N2-1 auf einen
Nagel oder Schraubenzieher-Schaft N2-2 platzieren,
der horizontal im Schraubstock N2-3 eingeklemmt ist.
Wenn eines der beiden Enden der Klinge nach unten
hin rotiert, müssen Sie dieses Ende weiter feilen. Die
Klinge ist ordentlich ausbalanciert, wenn keines der
beiden Enden nach unten hängt.
KLINGEN WARTEN (Siehe Abb. O1, O2)
Erneuern Sie - unabhängig vom Zustand - Ihre
Metallklinge, sobald Sie 50 Stunden mit Ihr gemäht
haben oder spätestens nach 2 Jahren. Je nachdem,
was früher eintritt. Folgen Sie diesen Arbeitsschritten,
um Ihre Klinge herauszunehmen und zu ersetzen.
Sie brauchen dafür Gartenhandschuhe (nicht
mitgeliefert) und einen Gabelschlüssel (nicht
mitgeliefert), um die Klinge herauszunehmen.
Halten Sie die Klinge (19) fest und lösen Sie die
Klingenschraube (18) mit einem Schraubenschlüssel.
Nehmen Sie dann die Klinge ab.
Zum Zusammenbau setzen Sie die Klinge (19) mit
den Schneidflächen zum Boden hin an. N, danach
ziehen Sie den Bolzen (18) fest.
AUFBEWAHRUNG (Siehe Abb. M1, M2)
Stoppen Sie den Mäher, ziehen Sie grundsätzlich
Schnurloser Rasenmäher D
Page 31

den Sicherheitsschlüssel ab. Das Äußere des Rasenmähers gründlich mit einer weichen Bürste und einem
Tuch reinigen. Kein Wasser und keine Lösungs- oder Poliermittel verwenden. Anhaftendes Gras und Schmutz
entfernen, insbesondere von den Lüftungsschlitzen.
Den Rasenmäher auf die Seite legen und den Messerbereich reinigen. Zusammengepresstes Schnittgut im
Messerbereich mit einem Holz- oder Plastikstück entfernen.
Den Rasenmäher an einem trockenen Ort aufbewahren. Keine anderen Gegenstände auf die Maschine stellen.
Um die Lagerung zu erleichtern, lösen Sie den Zusatzhandgriff und klappen Sie den oberen Griff wie in Abb.
M1 & M2 dargestellt ein.
UMWELTSCHUTZ
Elektroprodukte dürfen nicht mit dem normalen Haushaltsmüll entsorgt werden, sondern sollten nach
Möglichkeit zu einer Recyclingstelle gebracht werden. Ihre zuständigen Behörden oder Ihr Fachhändler
geben Ihnen hierzu gerne Auskunft.
STÖRUNGSBEHEBUNG
Problem Abhilfemaßnahme
A. Überprüfen Sie diesen, um zu gewährleisten, dass der Sicherheitsschlüssel
installiert wurde, vollständig eingesetzt ist und die Taste am Schaltergehäuse
1. Rasenmäher
läuft nicht an wenn
Betriebsschalter
gezogen wird.
2. Der Motor blockiert
beim Mähen.
3. Der Rasenmäher
läuft, aber die
Schneidleistung ist
unbefriedigend, oder
nicht den gesamten
Rasen schneidet.
4. Der Rasenmäher
lässt sich nur schwer
schieben.
vollständig gedrückt wurde.
B. Lassen Sie den Schalthebel los, um den Rasenmäher auszuschalten. Entfernen Sie
den Sicherheitsschlüssel, kippen Sie den Rasenmäher auf die Seite, und überprüfen
Sie, ob sich das Messer frei drehen lässt. Ist es nicht frei beweglich, bringen Sie das
Gerät in ein autorisiertes Servicezentrum. Das Messer sollte sich frei drehen lassen.
C. Wurde der Akku vollständig aufgeladen? Schließen Sie das Ladegerät an und warten
Sie, bis die grüne LED aufleuchtet.
A. Lassen Sie den Schalthebel los, um den Rasenmäher auszuschalten. Entfernen Sie
den Sicherheitsschlüssel, kippen Sie den Rasenmäher auf die Seite, und überprüfen
Sie, ob sich das Messer frei drehen lässt. Ist es nicht frei beweglich, bringen Sie das
Gerät in ein autorisiertes Servicezentrum. Das Messer sollte sich frei drehen lassen.
B. Stellen Sie die Schnitthöhe der Räder auf die höchste Position ein, und starten Sie
den Rasenmäher.
C. Wurde der Akku vollständig aufgeladen? Schließen Sie das Ladegerät an und warten
Sie, bis die grüne LED aufleuchtet.
D. Vermeiden Sie eine Überlastung des Rasenmähers. Vermeiden Sie eine Überlastung
des Rasenmähers. Verlangsamen Sie die Schnittgeschwindigkeit, oder heben Sie die
Schnitthöhe an. Oder beides.
A. Wurde der Akku vollständig aufgeladen? Schließen Sie das Ladegerät an und
warten Sie, bis die grüne LED aufleuchtet.
B. Lassen Sie den Schalthebel los, um den Rasenmäher auszuschalten. Entfernen
Sie den Sicherheitsschlüssel. Kippen Sie den Rasenmäher auf die Seite, und
überprüfen Sie Folgendes: Schärfe des Messers – halten Sie das Messer scharf. Das
Deck und die Auswurföffnung auf Verstopfungen.
C. Die Radhöheneinstellung ist möglicherweise zu niedrig für den Rasen. Heben Sie
die Schnitthöhe an.
A. Vergrößern Sie die Schnitthöhe, um den Widerstand durch das Gras zu
verringern. Überprüfen Sie, ob sich die Räder frei drehen lassen.
3130
Schnurloser Rasenmäher D
Page 32

5. Der Rasenmäher
ist ungewöhnlich laut
und vibriert.
6. Ladestatus-LEDs
leuchten nicht.
7. Die LED des AkkuLadegeräts schaltet
nicht auf grün um.
8. Geschnittenes
Gras wird vom
Rasenmäher nicht im
Beutel aufgesammelt.
9. Beim Mulchen
sind Ablagerungen
erkennbar.
10. Niedrige oder
verringerte Laufzeit
nach zahlreichen
Anwendungen.
11. Die LED des
Akkuladegeräts
blinkt rot und der
Akku kann nicht
aufgeladen werden.
A. Lassen Sie den Schalthebel los, um den Rasenmäher auszuschalten. Entfernen
Sie den Sicherheitsschlüssel. Kippen Sie den Rasenmäher auf die Seite, und
überprüfen Sie, ob das Messer verbogen oder beschädigt ist. Ersetzen Sie ein
beschädigtes Messer ggf. durch ein Ersatzmesser von. Übergeben Sie den
Rasenmäher an eine Vertragswerkstatt, wenn die Unterseite des Decks beschädigt
ist.
B. Wenn das Messer nicht sichtlich beschädigt ist und der Rasenmäher weiterhin
vibriert: Lassen Sie den Schalthebel los, um den Rasenmäher auszuschalten,
entfernen Sie den Sicherheitsschlüssel, und entfernen Sie das Messer. Drehen
Sie das Messer um 180 Grad, und setzen Sie es wieder ein. Übergeben Sie den
Rasenmäher an eine Vertragswerkstatt,, wenn das Gerät weiterhin vibriert.
A. Steckverbindung prüfen.
B. Tauschen Sie das Ladegerät aus.
A. Der Akku muss untersucht werden. Bringen Sie diesen zu einem autorisierten
Servicezentrum.
A. Nehmen Sie bei Nutzung des Auffangkorbs die Mulchplatte heraus.
B. Die Auswurföffnung ist verstopft. Lassen Sie den Schalthebel los, um den
Rasenmäher auszuschalten. Entfernen Sie den Sicherheitsschlüssel. Entfernen Sie
abgeschnittenes Gras aus der Auswurföffnung.
C. Zu viel gemähtes Gras. Heben Sie die Schnitthöhe der Räder an, um die
abgeschnittene Länge zu verkürzen.
D. Der Behälter ist voll. Leeren Sie den Behälter öfter.
A. Es wird zu viel Gras abgeschnitten. Heben Sie die Schnitthöhe der Räder an,
um die abgeschnittene Länge zu verkürzen. Schneiden Sie nicht mehr als 1/3 der
Gesamtlänge.
B. Prüfen Sie das Messer auf dessen Schärfe. Halten Sie das Messer stets gut
geschärft.
A. Bringen Sie das Gerät in ein autorisiertes Servicezentrum - eventuell ist ein
neuer Akku erforderlich.
A. Der Akku überhitzt nach dauerhafter Nutzung. Entnehmen Sie den Akku aus dem
Ladegerät und lassen Sie diesen auf 42 °C oder weniger abkühlen.
Schnurloser Rasenmäher D
Page 33

KONFORMITÄTSERKLÄRUNG
Wir,
POSITEC Germany GmbH
Grüner Weg 10, 50825 Cologne, Germany
Erklären Hiermit, Dass Unser Produkt
Beschreibung WORX Schnurloser Rasenmäher
Typ WG744E, WG744E.9 (740-789 - Bezeichnung
der Maschine, repräsentiert die Schnurloser
Rasenmäher)
Funktion Grasschnitt
den Bestimmungen der folgenden Richtlinien
entspricht,
2006/42/EC, 2014/30/EU, 2011/65/EU,
2000/14/EC geändert durch 2005/88/EC
2000/14/EC geändert durch 2005/88/EC:
- Konformitätsbewertungsverfahren nach
Anhang VI
- Gemessene Schallleistung 84.3 dB(A)
- Garantierte Schallleistung 88 dB(A)
Zertifizierungsstelle
Name: Intertek Testing & Certification Ltd
(notifizierte Stelle 0359)
Anschrift: Davy Avenue, Knowlhill, Milton
Keynes, MK5 8NL
Normen,
EN 60335-1
EN 60335-2-77
EN 62233
EN ISO 3744
EN 55014-1
EN 55014-2
Zur Kompilierung der technischen Datei ermächtigte
Person,
Name Marcel Filz
Anschrift Positec Germany GmbH
Grüner Weg 10, 50825 Cologne, Germany
3332
2017/12/19
Allen Ding
Stellvertretender Chefingenieur,
Prüfung und Zertifizierung
Positec Technology (China) Co., Ltd
18, Dongwang Road, Suzhou Industrial
Park, Jiangsu 215123, P. R. China
Schnurloser Rasenmäher D
Page 34

NOTICE ORIGINALE
SÉCURITÉ DU PRODUIT
Avertissements de sécurité
généraux
AVERTISSEMENT Lire
tous les avertissements
de sécurité et toutes les
instructions. Ne pas suivre
les avertissements et
instructions peut donner lieu à
un choc électrique, un incendie
et/ou une blessure sérieuse.
Lire attentivement les
instructions pour utiliser la
machine en toute sécurité.
Conserver tous les
avertissements et toutes
les instructions pour
référence future.
- Cet appareil n’est pas
destiné à être utilisé par des
personnes (y compris les
enfants) dont les aptitudes
physiques, sensorielles ou
mentales sont réduites, ou
qui manquent d’expérience
et de connaissance, à
moins qu’elles ne se
soient supervisées ou
qu’elles n’aient reçus des
instructions concernant
l’utilisation de l’appareil
auprès d’une personne
responsable de leur sécurité.
- Surveillez les enfants afin de
vous assurer qu’ils ne jouent
pas avec l’appareil.
- L’appareil ne doit être
utilisé qu’avec l’unité
d’alimentation fournie avec
l’appareil.
IMPORTANT
LISEZ ATTENTIVEMENT
AVANT UTILISATION
CONSERVEZ POUR
RÉFÉRENCE FUTURE
Pratiques de
fonctionnement en toute
sécurité
Instructions
a) Lire attentivement les
instructions, afin de
connaître l’utilisation
appropriée pour l’appareil;
b) Ne permettez jamais aux
enfants ou aux personnes
ne connaissant pas ces
instructions d’utiliser la
tondeuse. Les règlements
locaux peuvent limiter l’âge
de l’utilisateur;
c) Ne pas tondre à proximité
des gens, particulièrement
des enfants, ou des
animaux;
d) Gardez à l’esprit que
l’opérateur ou l’utilisateur
est responsable des
accidents et des dangers
survenant à d’autres
personnes ou à leurs biens
Tondeuse à gazon sans fil F
Page 35

Préparation
a) Porter toujours des
chaussures de sécurité et
des pantalons longs. Ne pas
utiliser a tondeuse pieds
nus ou avec des chaussures
ouvertes.
b) Examinez complètement la
zone où le matériel doit être
utilisé et enlevez tous les
objets susceptibles d’être
projetés par la machine;
c)
Avant l’utilisation, vérifier
que les lames et les boulons
de lame ne soient pas
endommagés. Remplacer les
lames et les boulons cassés
ou usés. Remplacez les
étiquettes abimées et illisibles
Fonctionnement
a) Porter toujours des
chaussures de sécurité et
des pantalons longs. Ne pas
utiliser a tondeuse pieds
nus ou avec des chaussures
ouvertes.
b) Examinez complètement la
zone où le matériel doit être
utilisé et enlevez tous les
objets susceptibles d’être
projetés par la machine;
c)
Avant l’utilisation, vérifier
que les lames et les boulons
de lame ne soient pas
endommagés. Remplacer les
lames et les boulons cassés
ou usés. Remplacez les
étiquettes abimées et illisibles.
Fonctionnement
a) Tondre uniquement de jour
ou avec une bonne lumière
artificielle;
b) Évitez d’utiliser l’appareil
dans l’herbe humide;
c) S’assurer du bon équilibre
sur les pentes;
d) Marchez, ne courrez jamais;
e) Pour les machines rotatives
à roues, tondez en travers
des pentes, jamais vers le
haut ni vers le bas;
f) Faire extrêmement attention
en changeant de direction
sur les pentes;
g) Ne pas tondre les pentes
excessivement raides;
h) Faire très attention en
renversant ou en tirant
l’appareil vers vous;
i) Arrêter la lame si l’appareil
doit être incliné ou
transporté sur des surfaces
autres que l’herbe;
j) N’utiliser jamais l’appareil
avec des protections (capots
etc.) défectueuses, ou
sans dispositifs de sécurité
en place, par exemple
volet de protection et/ou
récupérateur d’herbe;
k) Se tenir à l’écart des lames
lors du branchement de la
machine;
l) Ne faites pas basculer la
tondeuse à gazon lorsque
vous allumez le moteur,
sauf si la tondeuse à gazon
3534
Tondeuse à gazon sans fil F
Page 36

doit être basculée pour le
démarrage. Dans ce cas, ne
la faites pas basculer plus
de ce qui est absolument
nécessaire et soulevez
uniquement la partie
distante de l’utilisateur;
m)Ne pas mettre les mains ou
les pieds près ou sous les
pièces en mouvement. Pour
les faucheuses rotatives,
conservez clairement de
l’espace à tout moment;
n) Ne touchez pas la lame
avant que le dispositif de
désactivation ait été retiré,
et que les lames soient à
l’arrêt complet;
o) Ne démarrez pas la
tondeuse à gazon en vous
tenant devant la goulotte
d’éjection.
p) Ne transportez pas la
tondeuse lorsque la source
d’énergie est en marche.
q) Arrêtez la tondeuse, et
retirez le dispositif de
désactivation. Assurezvous que toutes les pièces
mobiles sont à l’arrêt
complet.
– toutes les fois que vous
laissez la machine sans
surveillance,
– avant d’éliminer un
bourrage,
– avant le contrôle, le
nettoyage ou toute
opération sur la machine,
– après le choc avec un objet
étranger. Inspecter l’appareil
pour déceler les dommages
et dépanner si besoin.
Si l’appareil commence
à vibrer anormalement
(contrôler immédiatement)
– Recherchez les dommages.
– remplacez ou réparez les
pièces endommagées.
– Vérifiez et resserrez toute les
pièces desserrées.
Entretien
a) Afin d’utiliser la machine en
toute sécurité garder tous
les écrous, boulons, et les
vis serrés;
b) Vérifier fréquemment
l’usure ou la détérioration
du bac récupérateur
d’herbe;
c) Par sécurité, remplacer
toutes parties usées ou
endommagées. N’utilisez
que des accessoires et
des pièces de rechange
d’origine.
d) Soyez prudent lors du
réglage de la machine
pour ne pas vous coincer
les doigts entre les lames
mobiles et les parties fixes
de la machine.
e) Laissez toujours refroidir
la tondeuse avant de la
ranger.
Tondeuse à gazon sans fil F
Page 37

f) Lors de l’entretien des
lames sachez que, même si
la source d’alimentation est
coupée, les lames peuvent
encore être déplacées.
MISES EN GARDE
CONCERNANT LA BATTERIE
a) La batterie et les piles
secondaires ne doivent
pas être ouvertes,
démontées ou broyées.
b) La batterie ne doit pas
être court-circuitée.
Évitez de mettre la
batterie en vrac dans
une boîte ou dans
un tiroir où elles
risqueraient de se courtcircuiter entre elles
ou au contact d’autres
objets métalliques.
Après usage, évitez tout
contact de la batterie avec
d’autres objets métalliques
de petite taille (trombones,
pièces, clés, clous, vis
etc.) susceptibles de courtcircuiter les pôles. Un
court-circuit entre les pôles
de la batterie peut être à
l’origine de brûlures ou
d’un incendie.
c) La batterie ne doit pas
être exposée au feu et
à la chaleur. Évitez de la
ranger à la lumière du
soleil.
d) La batterie et les piles
ne doivent pas être
soumises à des chocs
mécaniques.
e) En cas de fuite des
piles, évitez tout
contact du liquide avec
la peau et les yeux. En
cas de contact, rincez
abondamment la surface
touchée avec de l’eau et
appelez les urgences.
f) En cas d’ingestion d’une
pile ou d’une batterie,
appelez immédiatement
les urgences.
g) La batterie et les piles
doivent rester propres et
sèches.
h) Si la batterie ou les piles
se salissent, essuyez-les
avec un chiffon propre
et sec.
i) La batterie et les piles
doivent être chargées
avant usage. Utilisez
toujours le chargeur
adéquat, et respectez les
instructions du fabricant
ou le mode d’emploi de
l’appareil concernant la
procédure de recharge.
j) Évitez de laisser une
batterie se charger
pendant trop longtemps
lorsqu’elle n’est pas
utilisée.
k) Après de longues
3736
Tondeuse à gazon sans fil F
Page 38

périodes d’inutilisation,
il peut être nécessaire
de charger et décharger
la batterie et les piles
à plusieurs reprises
avant que celles-ci ne
retrouvent leur capacité
maximale.
l) La batterie et les
piles fonctionnent au
mieux de leur capacité
dans une température
ambiante normale,
comprise entre +15°C et
+25°C environ.
m) Les batteries
fonctionnant avec
des systèmes
électrochimiques
différents doivent
être mis au rebut
séparément.
n) N’utilisez pas d’autre
chargeur que celui
spécifié par WORX.
N’utilisez pas d’autre
chargeur que celui
spécifiquement fourni
avec l’appareil. Un
chargeur destiné à un type
de batterie donné peut être
à l’origine d’un incendie s’il
est utilisé avec une autre
batterie.
o) N’utilisez en aucun cas
une batterie autre que
celle prévue pour cet
appareil.
p) La batterie doit être
tenue hors de portée
des enfants.
q) Gardez la documentation
d’origine du produit
afin de pouvoir vous y
référer ultérieurement.
r) Enlevez la batterie de
l’appareil lorsque vous
ne l’utilisez pas.
s) Respectez les
procédures de mise au
rebut.
SYMBOLES
Lire attentivement la notice et la
conserver
Tenez vous à bonne distance.
Prenez garde aux lames
tranchantes. Les lames
continuent de tourner une fois
le moteur coupé.- Enlevez la
prise du secteur avant toute
maintenance.
Tondeuse à gazon sans fil F
Page 39

Les déchets d’équipements
électriques et électroniques
ne doivent pas être déposés
avec les ordures ménagères.
Ils doivent être collectés
pour être recyclés dans des
centres spécialisés. Consultez
les autorités locales ou votre
revendeur pour obtenir
des renseignements sur
l’organisation de la collecte.
Ne pas jeter les batteries. Les
batteries usagées doivent être
déposées dans un centre de
collecte local ou dans un centre
de recyclage.
Ne pas brûler
Do not expose to rain or
waterNe pas exposer à la pluie
ou à l’eau
Portez des gants de protection
Retirez la batterie de la prise
avant de procéder à tout
ajustement, révision ou
maintenance.
LISTE DES COMPOSANTS
1. CLÉ DE SÛRETÉ
2. LEVIER DE COMMUTATION
3. POIGNÉE SUPÉRIEURE
4. BOUTON DE VIS
5. POIGNÉE INFÉRIEURE
6. SAC DE COLLECTE DE L'HERBE
7. LEVIER DE RÉGLAGE DE LA HAUTEUR DE
COUPE
8. MANETTE DE COMMANDE AU GUIDON
9. CADRAN INTELLICUT
10. VOYANT D’ALIMENTATION DE LA BATTERIE
11. COUVERCLE DE LA BATTERIE
12. RABAT DE SÉCURITÉ
13. POIGNÉE DU BAC DE RÉCUPÉRATION
14. SERRE CABLE
15. INDICATEUR DE REMPLISSAGE DU SAC
À HERBE
16. INSERT DE PAILLAGE
17. BATTERIE (VOIR FIG. E) *
18. BOULON DE LA LAME (VOIR FIG. O1)
19. LAME (VOIR FIG. O1)
* Les accessoires reproduits ou décrits ne sont
pas tous compris dans les fournitures.
3938
La lame continue à tourner
après le relâchement de
l’interrupteur. Attendre que tous
les composants de la machine
se soient complètement arrêtés
avant de les toucher.
Retirez la clé
Tondeuse à gazon sans fil F
Page 40

CARACTERISTIQUES
TECHNIQUES
Modèle WG744E, WG744E.9 (740-789 - désignations
des pièces, illustration de la Tondeuse à gazon sans fil)
WG744E WG744E.9
Tension 40V Max (2x20V Max)*
Diamètre de coupe
Diamètre de roue
avant
Diamètre de roue
arrière
Hauteur de coupe 20mm-70mm
Positions de
hauteur de coupe
Capacité du bac 40L
Type de batterie Lithium-Ion /
Modèle de batterie WA3553(4.0Ah) /
Modèle de chargeur
Valeurs nominales
du chargeur
Temps de chargement (environ)
Batterie:
2.0 Ah (1pc)
2.0 Ah (2pcs)
4.0 Ah (1pc)
4.0 Ah (2pcs)
Poids 16.7kg 15.4kg
*La tension est mesurée à vide. La tension initiale de
la batterie attaint un maximum de 20volts. La tension
nominale est de 18 volts.
** Les sorties de chargeur 1 et 2 impliquent deux
ports avec la même tension de sortie et le même
courant.
100-240V~50-60Hz,
Sortie1: 20V ,
Sortie2: 20V ,
40cm
160mm
240mm
6
WA3883 /
Entrée:
2.0A**
2.0A**
0.5 heure
1 heure
1 heure
2 heure
/
/
INFORMATIONS RELATIVES
AUX VIBRATIONS
Valeur de vibration
mesurée
AVERTISSEMENT: La valeur d’émission de
vibrations pendant l’utilisation réelle de l’outil
électrique peut différer de la valeur déclarée selon la
manière dont l’outil est utilisé, selon les exemples
suivants et d’autres variations sur la manière dont
l’outil est utilisé:
Comment l’outil est utilisé et quels matériaux sont
coupés ou percés.
L’outil est en bon état et bien entretenu.
L’utilisation du bon accessoire pour l’outil et
l’assurance qu’il est affûté et en bon état.
La bonne tenue des poignées et, le cas échéant, les
accessoires anti-vibrations utilisés.
L’outil est utilisé comme prévu dans sa
conception et dans le présent mode d’emploi.
Cet outil peut causer un syndrome des
vibrations main-bras s’il n’est pas
correctement géré.
AVERTISSEMENT: Pour être précise, une
évaluation du niveau d’exposition en conditions
réelles d’utilisation doit également tenir compte de
toutes les parties du cycle d’utilisation telles que les
moments où l’outil est éteint, et ceux où il fonctionne au
ralenti mais ne réalise pas réellement de tâche. Ceci peut
réduire de manière significative le niveau d’exposition et
la durée d’utilisation totale.
Afin de minimiser le risque d’exposition aux
vibrations:
Utilisez TOUJOURS des burins, des forets et des lames
affûtés.
Entretenez cet outil de manière conforme au mode
d’emploi et maintenez-le lubrifié (le cas échéant).
Si l’outil doit être utilisé régulièrement,
investissez dans des accessoires
anti-vibrations.
Planifiez votre travail pour étaler l’utilisation des
outils à forte vibration sur plusieurs jours.
ah= 0.41m/s
IncertitudeK=1.5m/s²
2
INFORMATIONS RELATIVES
AU BRUIT
Niveau de pression acoustique
Niveau de puissance acoustique
Porter des protections auditives.
LwA: 68.7dB (A)
KpA= 3dB(A)
LwA: 84.3dB (A)
KwA= 3dB(A)
ACCESSOIRES
WG744E WG744E.9
Batterie (WA3553) 2 /
Chargeur (WA3883) 1 /
Sac de collecte de l'herbe 1
Insert de paillage 1
Serre cable 2
Tondeuse à gazon sans fil F
Page 41

Nous recommandons d’acheter tous les accessoires dans le magasin d’acquisition de la
machine. Pour plus d’informations, se référer à
l’emballage des accessoires. Le personnel du
magasin est également là pour vous conseiller.
ASSEMBLAGE ET
FONCTIONNEMENT
ACTION FIGURE
ASSEMBLAGE
Assemblage du guidon
REMARQUE: Choisissez l’un des deux
orifices de la poignée inférieure pour la
hauteur désirée de poignée.
Installation du sac de collecte d’herbe
Installation du sac de collecte d’herbe sur la
tondeuse à gazon
REMARQUE:
la tondeuse à gazon avant d’installer le sac
de ramassage d’herbe.
REMARQUE:
herbe pour vous assurer qu’il est complètement installé.
Vérification de l’état de charge de la batterie
REMARQUE:
ment à la batterie avec témoin lumineux de
batterie.
Recharge du pack de batteries
REMARQUE: Le pack de batteries est
livré non chargé. La batterie doit être
complètement chargée avant la première
tonte.
Rechargez toujours complètement les
deux batteries en même temps. Pour plus
d’informations, reportez-vous au manuel
du chargeur.
Monter/retirer la batterie
REMARQUE:
Cette tondeuse ne fonctionnera
qu’avec deux batteries installées.
Veuillez toujours utiliser les deux
mêmes batteries et rechargez-les en
même temps.
Lorsque vous utilisez deux batteries
de puissance différente, la machine
ne fonctionnera qu’au dénominateur
commun inférieur.
FONCTIONNEMENT
Retirez l’insert de paillage de
Enfoncez légèrement le sac à
La Fig. D1 s’applique unique-
Voir Fig.
A1, A2,
A3, A4,
A5
Voir Fig.
B1, B2,
B3, B4
Voir Fig.
C1, C2,
C3
Voir Fig.
D1
Voir Fig.
D2
Voir
Fig. E
Voyant d’alimentation de la batterie sur la
machine
Voir détails dans la partie ÉTAT DE LA
BATTERIE
IMPORTANT
Si seul un témoin s’allume, au moins
une batterie est épuisée et doit être
chargée, bien que la tondeuse puisse
encore être capable de couper de
l’herbe. Le fait de continuer à utiliser
votre tondeuse avec la batterie dans
cet état déchargé peut diminuer la
durée de vie et la performance de
vos batteries.
Lorsqu’aucun témoin n’est allumé,
au moins une batterie n’est pas complètement installée ou la batterie
est défectueuse, veuillez vérifier de
nouveau leur complète assise dans
la position correcte.
Démarrage & Arrêt
Sélection à l’aide de la molette du mode de
travail
Mode ECO
Sélectionnez le mode ECO lors de la tonte
dans des conditions quotidiennes lorsque la
hauteur maximale de l’herbe est de 25mm
ou moins.
Mode TURBO
Réglez la molette sur le mode TURBO lors de
la coupe de gazon dense ou envahi par de
mauvaises herbes.
Réglage de la hauteur de coupe
Indicateur de remplissage du sac a herbe
État vide: Le couvercle flotte (a)
État plein: le couvercle s’abaisse (b)
Retrait / Vidage du sac de collecte d’herbe
AVERTISSEMENT ! Toujours
vérifier que le rabat de sécurité
obstrue la sortie de décharge avant
utilisation. Ne jamais soulever le rabat de
sécurité lorsque la tondeuse à gazon est
en cours d’utilisation sans avoir installé
de sac de collecte de l’herbe.
Installation de l'insert de paillage
Déchargement arrière
REMARQUE:
paillage.
Stockage
Retirez d’abord l’insert de
Voir
Fig. F
Voir Fig.
G1, G2
Voir Fig.
H1, H2
Voir
Fig. I
Voir Fig.
J1
Voir Fig.
J2
Voir
Fig. K
Voir
Fig. L
Voir Fig.
M1, M2
4140
Tondeuse à gazon sans fil F
Page 42

LED D’ETAT BATTERIE (VOIR FIG. F)
Avant de démarrer ou après utilisation, appuyez
sur le bouton à côté du voyant d’alimentation sur
la machine pour vérifier la capacité de la batterie.
Au cours du fonctionnement, la capacité de la batterie sera indiquée automatiquement par le témoin
d’alimentation de la batterie.
L’indicateur détecte et affiche en permanence l’état
de la batterie comme suit.
Pour la machine équipée de 2 batteries de puissance
différente, le témoin d’alimentation affiche l’état de
la batterie la plus basse.
État de
l'indicateur
d'alimentation
de la batterie
Cinq voyants verts
sont allumés.(
)
Deux, trois ou
quatre voyants
verts sont allumés.
Un seul voyant
vert est allumé.(
)
Aucun voyant
n'est allumé.
Un seul voyant
clignote deux fois
par cycle.
Un seul voyant
clignote trois fois
par cycle.
Un seul voyant
clignote quatre
fois par cycle.
État de la batterie
Les deux batteries sont très
chargées.
Les deux batteries disposent
d'une charge restante. Plus il
y a de voyants allumés, plus
la capacité de la batterie est
grande.
Au moins une batterie est
épuisée et doit être rechargée.
Au moins une batterie n'est
pas complètement installée
ou la batterie est défectueuse.
Au moins une batterie est
déchargée excessivement
(veuillez vous reporter à l'état
de charge de la batterie),
veuillez recharger les deux
batteries à la fois avant de les
réutiliser ou de les ranger.
Au moins une batterie est
chaude, attendez qu'elle refroidisse avant de redémarrer.
La machine est surchargée.
Augmentez la hauteur de
coupe ou poussez lentement.
CONSEILS POUR TONDRE
REMARQUE: EXAMINEZ TOUJOURS LA ZONE OÙ
LA TONDEUSE DOIT ÊTRE UTILISÉE ET ENLEVEZ
TOUTES LES PIERRES, LES BÂTONS, LES FILS,
LES OS ET AUTRES DÉBRIS QUI POURRAIENT
ÊTRE PROJETÉS PAR LA LAME EN ROTATION.
1. Tondez en travers des pentes, jamais de haut en
bas. Faites extrêmement en changeant de sens sur
les pentes. Ne tondez pas des pentes excessivement
raides. Restez toujours bien en appui.
2. Libérez le levier de commutation pour mettre la
tondeuse sur “ARRÊT” quand vous traversez une
quelconque zone couverte de graviers (des pierres
peuvent être projetées par la lame).
3. Placez la tondeuse sur la hauteur de coupe la plus
élevée quand vous tondez un terrain difficile ou de
l’herbe haute. Enlever trop d’herbe en même temps
peut faire déclencher le disjoncteur, qui arrête la
tondeuse.
4. Si vous utilisez un sac à herbe pendant la saison
de forte croissance, l’herbe peut tendre à obstruer
l’ouverture de décharge. Libérez le levier de
commutation pour mettre la tondeuse sur “ARRÊT”
et retirez la clé de sûreté. Retirez le sac à herbe et
secouez l’herbe vers le bas à l’arrière du sac. Nettoyez
également toute herbe ou débris qui peuvent entourer
l’ouverture de décharge. Remplacez le sac à herbe.
5. Si la tondeuse commence à vibrer anormalement,
libérez le levier de commutation pour mettre la
tondeuse sur “ARRÊT” et retirez la clé de sûreté.
Vérifiez immédiatement la cause. La vibration est
un avertissement de problème. N’actionnez pas la
tondeuse tant qu’un contrôle de service n’a pas été fait.
6. LIBÉREZ TOUJOURS LE LEVIER DE
COMMUTATION POUR METTRE LA TONDEUSE
SUR “ARRÊT” ET RETIREZ LA CLÉ DE SÛRETÉ
QUAND VOUS LA LAISSEZ SANS SURVEILLANCE
MÊME PENDANT UNE COURTE DURÉE.
ZONE DE COUPE
La zone de coupe peut être affectée par plusieurs
facteurs, tels que la hauteur de coupe, l’humidité du
gazon, la longueur et la densité de l’herbe. De plus,
démarrer et arrêter la tondeuse trop de fois au cours du
fonctionnement réduira la zone de coupe.
Le tableau ci-dessous indique le rapport entre les
conditions de coupe et la zone de coupe.
Conditions de coupe
État de
l'herbe
Herbe très
fine, sèche
Herbe fine,
sèche
* Utilisé avec 2 batteries complètement chargées en
même temps.
CONSEILS:
1) Nous vous recommandons de tondre plus
fréquemment votre pelouse, de marcher à un
rythme normal et de ne pas démarrer / arrêter
la tondeuse trop souvent au cours de
Hauteur
de coupe
couper
7cm à
5cm
couper
7cm à
3cm
Zone de coupe
(maximale)
Avec 2 batteries
de 20 V/4,0 Ah
Jusqu’à 500 m2 *
Jusqu’à 250 m2 *
son
Tondeuse à gazon sans fil F
Page 43

fonctionnement. Veuillez toujours utiliser les deux
mêmes batteries et les recharger en même temps.
2) Pour de meilleures performances, veillez à utiliser
une batterie complètement chargée et coupez
toujours 1/3 ou moins de la hauteur de l’herbe.
3) Marchez lentement lors de la coupe d’herbe
longue, de façon à procéder à une coupe plus
efficace et de décharger convenablement l’herbe
coupée.
4) Évitez de couper de l’herbe humide, sinon elle
restera collée sous la station et ne pourra être
correctement recueillie ou déchargée.
5) Une hauteur de coupe plus élevée doit être
appliquée à de l’herbe épaisse ou neuve et
prolongera la durée de la batterie.
ENTRETIEN
AVERTISSEMENT: Arrêtez la tondeuse et
retirez la clé de sûreté avant de retirer le
sac à herbe.
REMARQUE: Pour assurer une utilisation longue
et sans problème, suivre les procédures d’entretien
suivantes de manières régulières. Vérifier les
défauts évidents tels qu’une lame endommagée,
des accessoires mal ajustés, et des pièces usées ou
endommagées. Vérifier que les capots et les protections
soient tous intactes et correctement fixés à la tondeuse.
Effectuer tout l’entretien et toutes les réparations
nécessaires avant d’utiliser la tondeuse. Si la tondeuse
ne fonctionne plus malgré l’entretien régulier, Veuillez
appeler le service client pour tout conseil.
AFFUTAGE DE LA LAME
MAINTENEZ LA LAME AFFUTÉE POUR UNE
MEILLEURE EXÉCUTION DE LA TONTE.
PORTEZ UNE PROTECTION DES YEUX APPROPRIÉE
QUAND VOUS RETIREZ, AFFUTEZ, ET INSTALLEZ LA
LAME. ASSUREZ-VOUS QUE LA CLÉ DE SÛRETÉ EST
RETIRÉE.
L’affutage de la lame deux fois pendant une saison
de tonte est habituellement suffisant dans des
circonstances normales. Le sable émousse la lame
rapidement. Si votre pelouse a un sol sablonneux, un
affutage plus fréquent peut être requis.
REMPLACER IMMÉDIATEMENT TOUTE LAME PLIÉE OU
ENDOMMAGÉE.
EN AFFUTANT LA LAME :
1. Assurez-vous que la lame reste équilibrée.
2. Affutez la lame à l’angle de coupe initial.
3. Affutez les tranchants sur les deux extrémités de la
lame, en enlevant des quantités égales de matière aux
deux extrémités.
REMARQUE: 1. Assurez-vous que la tondeuse soit
éteinte et retirez la clé.
2. Placez la tondeuse en mode de stockage vertical.
POUR AFFUTER LA LAME DANS UN ÉTAU (Voir
Fig. N1)
1. Assurez-vous que le levier de commutation est
relâché, que la lame s’est arrêtée et que la clé de sûreté
est retirée avant de retirer la lame.
2. Retirez la lame de la tondeuse. Voyez les instructions
pour retirer et monter la lame.
3. Fixez la lame N1-1 dans un étau N1-2.
4. Portez des lunettes de sûreté et faites attention à ne
pas vous couper.
5. Limez soigneusement les tranchants de la lame avec
une lime fine N1-3 ou une pierre à aiguiser.
6. Contrôlez l’équilibre de la lame. Voyez les instructions
pour l’équilibrage de la lame.
7. Remettez la lame sur la tondeuse et serrez
solidement. Référez-vous aux instructions ci-dessous.
ÉQUILIBRAGE DE LA LAME (Voir Fig. N2)
Contrôlez l’équilibrage de la lame en plaçant le trou
au centre de la lame N2-1 au-dessus d’un clou ou
d’un tournevis N2-2, maintenu horizontalement dans
un étau N2-3. Si l’une ou l’autre extrémité de la lame
tourne vers le bas, limez cette extrémité. La lame
est correctement équilibrée quand ni l’une ni l’autre
extrémité ne tombe.
MAINTENANCE DE LA LAME (Voir Fig. O1, O2)
Remplacez votre lame en métal après 50 heures de tonte
ou tous les 2 ans, selon la condition qui se réalise le plus
tôt. Suivez ces procédures pour retirer et remplacer la
lame. Vous avez besoin de gants de jardin (non fournis)
et d’une clé à fourche (non fournie) pour retirer la lame.
Tenez la lame (19) et dévissez le boulon de la lame (18)
dans le sens contraire des aiguilles d’une montre à l’aide
de la clé à fourche puis enlevez la lame.
Pour remonter, placez la lame (19) avec les parties
coupantes vers le sol. Serrez alors solidement l’écrou
de la lame (18).
STOCKAGE (Voir Fig. M1, M2)
Arrêtez la tondeuse et retirez toujours la clé de sûreté.
Nettoyer l’extérieur de la machine en utilisant une
brosse douce et un chiffon. N’utiliser jamais d’eau, de
produits chimiques. Enlever tous les herbes et débris et
maintenir les fentes de ventilations propres.
Coucher la machine et nettoyer le secteur de la lame.
Si il reste de l’herbe sous la lame, retirer la avec un
instrument en bois ou en plastique.
Ranger la machine dans un endroit sec. Ne posez pas
d’autres objets sur la machine.
Pour faciliter le stockage, libérez le bouton de la
poignée et pliez la poignée supérieure, tel qu’indiqué
Fig. M1 et M2.
PROTECTION DE
L’ENVIRONNEMENT
Les déchets d’équipements électriques et
électroniques ne doivent pas être déposés
avec les ordures ménagères. Ils doivent
être collectés pour être recyclés dans des centres
spécialisés. Consultez les autorités locales ou votre
revendeur pour obtenir des renseignements sur
l’organisation de la collecte.
4342
Tondeuse à gazon sans fil F
Page 44

GUIDE DE DEPANNAGE
Problème Remède
A. Assurez-vous que la clé de sécurité a été installée et est bien en place, et que le
1. La tondeuse ne
démarre pas lorsque
le levier est actionné.
2. Le moteur s'arrête
pendant la tonte.
3. La tondeuse se
met en marche pour
les perfor¬mances
de tonte ne sont pas
satisfaisantes, ou
toute la pelouse n'est
pas coupée.
4. La tondeuse est
difficile à pousser.
5. La tondeuse est
anormalement
bruyante et vibre.
6. Le voyant du
chargeur de batterie
ne s’allume pas.
7. Le voyant LED du
chargeur de batterie
ne devient pas vert.
8. La tondeuse ne
récupère pas les
résidus de tonte dans
le sac.
9. Lors du paillage,
les tontes sont
visibles.
bouton du boîtier de l’interrupteur est complètement enfoncé.
B. Relâchez le levier de commutation pour éteindre la tondeuse. Retirez la clé de
sécurité, retournez la tondeuse et vérifiez que la lame tourne librement. Si ce n’est pas
le cas, renvoyez-la dans un centre technique agréé. La lame doit tourner librement.
C. La batterie a-t-elle été chargée à fond? Branchez le chargeur et attendez que le
voyant vert s’allume.
A. Relâchez le levier de commutation pour éteindre la tondeuse. Retirez la clé de
sécurité, retournez la tondeuse et vérifiez que la lame tourne librement. Si ce n’est pas
le cas, renvoyez-la dans un centre technique agréé. La lame doit tourner librement.
B. Relevez la hauteur de coupe des roues à la position la plus haute et démarrez la
tondeuse.
C. La batterie a-t-elle été chargée à fond? Branchez le chargeur et attendez que le
voyant vert s’allume.
D. Évitez de surcharger la tondeuse. Ralentissez la cadence de tonte ou relevez la
hauteur de coupe. Ou les deux.
A. La batterie a-t-elle été chargée à fond? Branchez le chargeur et attendez que le
voyant vert s’allume.
B. Relâchez le levier de commutation pour éteindre la tondeuse. Retirez la clé de
sécurité. Retournez la tondeuse et vérifiez: L’affûtage des lames - maintenez les
lames aiguisées en permanence. La présence d’un colmatage en-dessous de la
tondeuse ou dans le passage d’évacuation.
C. Le réglage de la hauteur des roues est peut-être trop bas pour la pelouse à
tondre. Relevez la hauteur de coupe.
A. Relevez la hauteur de coupe pour réduire le freinage sur l’herbe. Vérifiez la
rotation libre de chaque roue.
A. Relâchez le levier de commutation pour éteindre la tondeuse. Retirez la clé de
sécurité. Retournez la tondeuse sur le côté et vérifiez la lame pour vous assurer
qu’elle n’est pas endommagée ou tordue. Si la lame est endommagée, remplacezla par une lame. Si le dessous de la tondeuse est endommagé, confiez la tondeuse
à un Centre de réparation agréé.
B. S’il n’y a pas de dommage visible sur la lame et que la tondeuse vibre encore:
Relâchez le levier de commutation pour éteindre la tondeuse, retirez la clé de
sécurité et enlevez la lame. Faites pivoter la lame de 180 degrés, puis réinstallez-la.
Si la tondeuse vibre toujours, confiez-la à un Centre de réparation agréé.
A. Vérifiez qu’il est correctement branché.
B. Remplacez le chargeur.
A. La batterie doit être diagnostiquée. Emmenez-la dans un centre technique agréé.
A. Retirer la plaque de paillage lors de la mise en place du sac.
B. La descente d’évacuation est bouchée. Relâchez le levier de commutation pour
éteindre la tondeuse. Retirez la clé de sécurité. Éliminez l’herbe accumulée dans la
descente d’évacuation.
C. Trop d’herbe coupée. Augmentez la hauteur de coupe des roues afin de diminuer
la longueur des résidus.
D. Le sac est plein. Videz le sac plus fréquemment.
A. Une quantité d’herbe excessive est tondue. Relevez la hauteur de coupe des
roues afin de diminuer la hauteur de coupe. Ne coupez pas plus de 1/3 de la
longueur totale.
B. Vérifiez la précision de la lame. Gardez toujours la lame bien aiguisée.
Tondeuse à gazon sans fil F
Page 45

10. Temps d'exécution
faible ou réduit après
de nombreuses
utilisations.
11. Le voyant LED du
chargeur de batterie
clignote en rouge et
la batterie ne peut
pas être chargée.
A. Retour au centre technique agréé - peut nécessiter une nouvelle batterie.
A. La batterie surchauffe après une utilisation continue. Retirez la batterie du
chargeur et laissez-la refroidir à 420C ou moins.
DECLARATION DE
CONFORMITE
Nous,
POSITEC Germany GmbH
Grüner Weg 10, 50825 Cologne, Germany
Déclarons ce produit
Description Tondeuse à gazon sans fil WORX
Modèle WG744E, WG744E.9 (740-789 -
désignations des pièces, illustration de la
Tondeuse à gazon sans fil)
Fonction Tondeuse à gazon
Est conforme aux directives suivantes,
2006/42/EC, 2014/30/EU, 2011/65/EU,
2000/14/EC amendée par 2005/88/EC
2000/14/EC amendée par 2005/88/EC:
- Procédure d’évaluation de la conformité
conformément à Annex VI
- Niveau de pression acoustique 84.3dB(A)
- Niveau d’intensité acoustique 88 dB(A)
Notification réalisée par
Nom: Intertek Testing & Certification Ltd
(Organisme notifié 0359)
Adresse: Davy Avenue, Knowlhill, Milton
Keynes, MK5 8NL
Et conforme aux normes,
EN 60335-1
EN 60335-2-77
EN 62233
EN ISO 3744
EN 55014-1
EN 55014-2
La personne autorisée à compiler le dossier
technique,
Nom Marcel Filz
Adresse Positec Germany GmbH
Grüner Weg 10, 50825 Cologne, Germany
2017/12/19
Allen Ding
Ingénieur en chef adjoint, Essais & Certification
Positec Technology (China) Co., Ltd
18, Dongwang Road, Suzhou Industrial
Park, Jiangsu 215123, P. R. China
4544
Tondeuse à gazon sans fil F
Page 46

ISTRUZIONI ORIGINALI
SICUREZZA DEL PRODOTTO
Avvisi generali per la
sicurezza
ATTENZIONE! È
assolutamente
necessario leggere
attentamente tutte le
istruzioni. Eventuali errori
nell’adempimento delle
istruzioni qui di seguito
riportate potranno causare
scosse elettriche, incendi e/o
lesioni gravi.
Leggere accuratamente
queste istruzioni per usare
la macchina in sicurezza.
Conservare tutte le
avvertenze e le istruzioni
qualora fosse necessario
consultarle in futuro.
- Questo apparecchio non è
destinato all’uso da parte di
persone (inclusi I bambini)
con capacità fisiche,
sensoriali o mentali ridotte,
oppure con mancanza di
esperienza e conoscenza,
a meno che non agiscano
sotto supervisione o
abbiano ricevuto istruzioni
sull’utilizzo dell’apparecchio
da parte di una persona
responsabile della loro
sicurezza.
- I bambini devono essere
supervisionati per garantire
che non giochino con
l’apparecchio.
- Il dispositivo deve essere
utilizzato unicamente con
l’unità di alimentazione
fornita in dotazione.
IMPORTANTE
LEGGERE ATTENTAMENTE
PRIMA DELL’USO
CONSERVARE PER
RIFERIMENTO FUTURO
Procedure per un uso
sicuro
Addestramento
a) Leggere con attenzione
le istruzioni. Acquisire
familiarità con i comandi e
il corretto funzionamento
dell’apparecchio.
b) Non permettere mai ai
bambini o alle persone
sprovviste delle necessarie
competenze di utilizzare
l’attrezzo. L’età minima di
utilizzo dello stesso può
variare a seconda delle
diverse normative locali.
c) Non usare il tosaerba in
presenza di altre persone, in
particolar modo di bambini
o di animali domestici.
d) Ricordare che l’operatore o
l’utente sono responsabili
di incidenti o rischi che
dovessero verificarsi
ai danni di terzi o delle
proprietà.
Tosaerba senza fili I
Page 47

Operazioni preliminari
a) Durante il lavoro, indossare
sempre calzature robuste
e pantaloni lunghi. Non
utilizzare l’apparecchio scalzi
o indossando sandali aperti.
b) Ispezionare con attenzione
l’area in cui si deve
utilizzare l’apparecchiatura e
togliere tutti gli oggetti che
potrebbero essere lanciati
dall’apparecchiatura;
c) Prima dell’uso, verificare
visivamente che le lame, i
rispettivi bulloni e il gruppo
di taglio non siano usurati
o danneggiati. In tal caso,
sostituire le lame o i bulloni
in blocco per mantenere
l’equilibrio; Sostituire le
etichette danneggiate e
illeggibili.
Funzionamento
a)
Usare il tosaerba solo
nelle ore diurne o in buone
condizioni di luce artificiale.
b) Se possibile, evitare di
utilizzare l’apparecchio su
erba bagnata.
c) Sui terreni in pendenza, è
necessario mantenere sempre
la stabilità.
d) Camminare, non correre mai;
e) Per le apparecchiatura rotative
dotate di ruote, effettuare il
taglio in senso trasversale
a superfici inclinati, mai
dall’alto verso il basso;
f) Prestare estrema attenzione
ai cambi di direzione nelle
suddette condizioni di
pendenza.
g) Non usare il tosaerba
su pendii estremamente
scoscesi.
h) Prestare la massima
attenzione tirando a sé
l’apparecchio o invertendo la
direzione dello stesso.
i) Arrestare la/e lama/e ove
sia necessario inclinare
l’attrezzo ai fini del trasporto
da o verso un’altra area
di tosatura e su superfici
diverse da quelle erbose.
j) Non utilizzare mai il tosaerba
se le protezioni o i ripari sono
danneggiati o senza i gli
appositi apparati di sicurezza,
come i deflettori e/o il
dispositivo di raccolta erba.
k) Azionare il motore
attenendosi alle istruzioni
e mantenendo i piedi a
distanza di sicurezza dagli
attrezzi da taglio.
l) Avviando il motore, evitare
di ribaltare lateralmente il
tosaerba. Tuttavia, qualora ciò
fosse necessario nella sola
fase di partenza, evitare di
inclinarlo più del necessario e
sollevare solo il lato lontano
dall’operatore.
m) Non avvicinare mani o
piedi accanto o sotto le
parti rotanti. Nel caso di
4746
Tosaerba senza fili I
Page 48

falciatrici rotative, mantenere
costantemente libere le
aperture di scarico.
n) Non toccare le lame
prima che il dispositivo
per la disattivazione sia
stato rimosso e prima del
completo arresto delle lame;
o) Non avviare il tosaerba
stando in piedi davanti
all’apertura di scarico.
p) Non trasportare il
tosaerba mentre la fonte
di alimentazione è in
esecuzione.
q) Fermare il tosaerba e
rimuovere il dispositivo di
disattivazione. Assicurarsi
che tutte le parti mobili
si siano completamente
arrestate.
– Ogni volta che si lascia
l’apparecchiatura incustodita,
– Prima di eliminare
un’ostruzione,
– Prima di controllare, pulire
o effettuare lavori sulla
apparecchiatura,
– Dopo avere colpito un
oggetto estraneo. Ispezionare
l’apparecchio in cerca di
danni ed eventualmente
provvedere alle necessarie
riparazioni.
Qualora l’attrezzo inizi a
vibrare in maniera anomala
(verificare immediatamente)
– controllare i danni.
– sostituire o riparare le parti
danneggiate.
– controllare e stringere le parti
allentate.
MANUTENZIONE E
CONSERVAZIONE
a) Ai fini della sicurezza delle
operazioni, accertarsi che
tutti i dadi, i bulloni e le
viti dell’apparecchio siano
saldamente avvitati;
b) Controllare frequentemente
il grado di usura e
deterioramento del
dispositivo di raccolta erba;
c) Per maggiore sicurezza,
sostituire le parti usurate o
danneggiate. Utilizzare solo
accessori e parti di ricambio
originali.
d) Prestare attenzione durante
la regolazione della macchina
per impedire che le dita
rimangano incastrate tra le
lame mobili e le parti fisse
della macchina.
e) Far sempre raffreddare il
tosaerba prima di riporlo.
f) Quando si fa manutenzione
alle lame siate consapevoli
che, anche se la corrente
è spenta, le lame possono
ancora muoversi.
Tosaerba senza fili I
Page 49

ISTRUZIONI PER LA
SICUREZZA DEL PACCO
BATTERIA
a) Non smontare, aprire
o strappare le cellule
secondarie o il pacco batteria.
b) Non cortocircuitare un
pacco batteria. Non
conservare un pacco
batteria disordinatamente
in una scatola o un
cassetto in cui potrebbero
cortocircuitarsi tra essi o
essere cortocircuitati da altri
oggetti metallici. Quando
il pacco batteria non è in
uso, tenerlo lontano da
altri oggetti metallici come
graffette, monete, chiavi,
chiodi, viti e altri piccoli
oggetti metallici, potrebbe
avverarsi un collegamento
tra i due terminali. Collegare
i terminali della batteria
potrebbe causare incendi o
ustioni.
c) Non esporre il pacco batteria
a calore o fuoco. Evitare di
conservarli alla luce diretta
del sole.
d) Non sottoporre il pacco
batteria a scosse meccaniche.
e) In caso di perdite da una
cellula, evitare che il liquido
entri in contatto con la pelle o
gli occhi. In caso di contatto,
lavare l’area interessata
con abbondante acqua e
consultare un medico.
f) Se si ingerisce una cellula o
un pacco batteria, consultare
immediatamente un medico.
g) Tenere le cellule e il pacco
batteria puliti e asciutti.
h) Pulire i terminali delle cellule
e del pacco batteria con un
panno pulito e asciutto nel
caso in cui si sporchino.
i) Il pacco batteria deve essere
caricato prima dell’uso.
Utilizzare sempre il caricatore
corretto e consultare le
istruzioni.
j) Non lasciare un pacco
batteria in carica se non in
uso.
k) Dopo lunghi periodi di
conservazione, potrebbe
essere necessario caricare
e scaricare le cellule o il
pacco batteria diverse volte
per ottenere le massime
prestazioni.
l) Il pacco batteria offre
prestazioni ottimali se
utilizzate ad una temperatura
ambiente normale (20°C ±
5°C).
m) Quando si smaltiscono i
pacchi batteria, tenere i
pacchi batteria con diversi
sistemi elettrochimici separati
gli uni dagli altri.
n) Ricaricare solo con il
caricatore specificato da
WORX. Non utilizzare
4948
Tosaerba senza fili I
Page 50

caricatori diversi da quelli
forniti per l’uso specifico
con l’apparecchiatura. Un
caricatore adatto ad un tipo
di pacco batteria potrebbe
provocare rischi d’incendi
quando è usato con un altro
pacco batteria.
o) Non utilizzare un pacco
batteria non progettato per
l’uso con l’apparecchiatura.
p) Tenere il pacco batteria fuori
dalla portata dei bambini.
q) Conservare i documenti
originali del prodotto per
riferimenti futuri.
r) Rimuovere la batteria
dall’apparecchiatura, se non
in uso.
s) Smaltire adeguatamente.
SIMBOLI
Leggere attentamente il manuale
d’istruzione ed assicurarsi di
aver compreso completamente
i comandi descritti e il relativo
funzionamento
I prodotti elettrici non possono
essere gettati tra i rifiuti domestici.
L’apparecchio da rottamare
deve essere portato al centro
di riciclaggio per un corretto
trattamento. Controllare con le
autorità locali o con il rivenditore
per localizzare il centro di
riciclaggio più vicino.
Non smaltire le batterie. Portare le
batterie scariche presso un punto
locale di riciclaggio o di raccolta.
Non bruciare
Non esporre alla pioggia o
all’acqua
Indossare guanti protettivi
Rimuovere la batteria dalla presa
prima di eseguire qualsiasi
regolazione, riparazione o
intervento di manutenzione.
Le lame continuano a ruotare
anche dopo lo spegnimento
dell’attrezzo. Prima di toccarle,
attendere fino a quando le parti in
movimento della macchina si sono
completamente arrestate.
Rimuovere la chiave
Tenere gli astanti a distanza di
sicurezza.
Fare attenzione alle lame affilate.
Le lame continuano a ruotare
dopo che il motore è stato spento.
Togliere la spina dalla rete elettrica
prima di eventuali interventi di
manutenzione.
Tosaerba senza fili I
Page 51

ELEMENTI
DELL’APPARECCHIO
1. CHIAVETTA DI SICUREZZA
2. LEVA DI AVVIAMENTO
3. IMPUGNATURA SUPERIORE
4. IMPUGNATURE
5. MANIGLIA INFERIORE
6. SACCO RACCOLTA ERBA
7. LEVA DI REGOLAZIONE DELL’ALTEZZA DI
TAGLIO
8. MANUBRIO
9. MANOPOLA INTELLICUT
10. INDICATORE DI ALIMENTAZIONE DELLA
BATTERIA
11. COPERCHIO DEL PACCOBATTERIA
12. ALETTA DI SICUREZZA
13. IMPUGNATURA DEL CONTENITORE ERBA
14. SERRACAVO
15. INDICATORE DI RIEMPIMENTO DEL
RACCOGLITORE
16. INSERTO PER PACCIAMATURA
17. BATTERIA (VEDI FIG. E) *
18. BULLONE DELLA LAMA (VEDI FIG. O1)
19. LAMA (VEDI FIG. O1)
* Accessori illustrati o descritti non fanno
necessariamente parte del volume di consegna.
SPECIFICHE TECNICHE
Codice WG744E, WG744E.9 (740-789 designazione del macchinario rappresentativo del
Tagliaerba a batteria)
WG744E WG744E.9
Voltaggio 40V Max (2x20V Max)*
Diametro di taglio 40cm
Diametro ruote
anteriori
Diametro ruote
posteriori
Altezza di taglio 20mm-70mm
Posizioni altezza di
taglio
160mm
240mm
6
Capacità
contenitore erba
Tipo di batteria Ioni Di Litio /
Modello batteria WA3553(4.0Ah) /
Modello caricatore WA3883 /
Potenza caricabatteria
Tempo di ricarica
(circa)
Batteria:
2.0 Ah (1pc)
2.0 Ah (2pcs)
4.0 Ah (1pc)
4.0 Ah (2pcs)
Peso dell’utensile 16.7kg 15.4kg
*Tensione misurata senza carico di lavoro. La
tensione iniziale della batteria raggiunge un massimo
di 20 Volt. La tensione nominale è di 18 Volt.
** I dati “Uscita 1 del caricabatterie” e “Uscita 2 del
caricabatterie” si riferiscono a due porte con la stessa
tensione e la stessa corrente.
100-240V~50/60Hz,
Uscita 1 20V ,
Uscita 2 20V ,
Ingresso:
2.0A**
2.0A**
0.5 ore
1 ore
1 ore
2 ore
40L
/
/
INFORMAZIONI SUL
RUMORE
Pressione acustica ponderata
Potenza acustica ponderata
Indossare protezione per le
orecchie.
LwA: 68.7dB (A)
KpA= 3dB(A)
LwA: 84.3dB (A)
KwA= 3dB(A)
INFORMAZIONI SULLA
VIBRAZIONE
Vibrazione ponderata
tipica
AVVERTENZA: Il valore delle vibrazioni
emesse durante il reale utilizzo dello
strumento può differire dal valore dichiarato in base
ai modi con cui viene usato lo strumento, ai seguenti
esempi e ad altre variabili:
Come viene usato l’apparecchio e i materiali tagliati
ah= 0.41m/s
Incertezza K=1.5 m/s²
2
5150
Tosaerba senza fili I
Page 52

o forati.
Le condizioni e la buona manutenzione dello
strumento.
L’uso dell’accessorio corretto per il taglio e la sua
affilatura, nonché le sue buone condizioni.
La stretta sull’impugnatura e l’eventuale utilizzo di
accessori antivibrazione.
L’adeguatezza dell’utilizzo dell’utensile rispetto a
quanto previsto.
.
Questo strumento potrebbe causare la
sindrome da vibrazioni mano-braccio se il suo
utilizzo non viene gestito correttamente.
AVVERTENZA: Per essere precisi, una stima
del livello di esposizione nelle attuali
condizioni di utilizzo dovrebbe anche tenere conto di
tutte le parti del ciclo operativo, come le volte in cui
lo strumento viene spento e il tempo in cui viene
lasciato girare a vuoto senza realmente fare il suo
lavoro. Questo potrebbe ridurre significativamente il
livello di esposizione sul periodo di lavoro totale.
Un aiuto a minimizzare il proprio rischio di
esposizione alle vibrazioni.
USARE sempre scalpelli, trapani e lame affilati.
Conservare questo strumento sempre in conformità
a queste istruzioni e mantenerlo ben lubrificato (dove
appropriato).
Se lo strumento deve essere usato regolarmente,
investire in accessori antivibrazione.
Pianificare il programma di lavoro in modo da
suddividere i lavori che implicano le maggiori
vibrazioni nell’arco di più giorni.
ACCESSORI
WG744E WG744E.9
Batteria (WA3553)
Caricatore (WA3883)
Sacco raccolta erba
Inserto per pacciamatura
Serracavo
2 /
1 /
1
1
2
MONTAGGIO E
FUNZIONAMENTO
AZIONE FIGURA
MONTAGGIO
Montaggio del manubrio
NOTA: scegliere uno dei due fori nel
manubrio inferiore per regolare l’altezza
del manubrio.
Assemblaggio del sacco di raccolta della
polvere
Assemblaggio del sacco di raccolta della
polvere al tagliaerba
NOTA:
prima di montare il sacco di raccolta
dell’erba estrarre l’inserto per pacciamatura
dal tosaerba.
NOTA: Rilasciare leggermente la sacca
raccolta erba per controllare che sia stata
installata bene.
Controllo dello stato di carica della batteria
NOTA:
la Fig. D1 si riferisce solamente alla
batteria con indicatore luminoso.
Caricamento del pacco batteria
NOTA: il pacco batteria viene spedito
scarico. La batteria deve essere
completamente carica prima del primo
taglio.
Caricare sempre completamente le
due batterie nello stesso momento. È
possibile trovare maggiori dettagli nel
manuale del caricatore.
Montaggio/smontaggio della batteria
NOTA:
Questo rasaerba funziona solo se
sono installate entrambe le batterie.
Usare sempre le stesse due batterie
e caricarle contemporaneamente.
Quando si utilizzando due batterie
con potenze diverse l’utensile
funzionerà solamente al valore di
potenza corrispondente al minimo
comun denominatore.
FUNZIONAMENTO
See Fig.
A1, A2,
A3, A4,
A5
See Fig.
B1, B2,
B3, B4
See Fig.
C1, C2,
C3
See Fig.
D1
See Fig.
D2
See
Fig. E
Si raccomanda di acquistare tutti gli accessori nello
stesso negozio in cui è stato acquistato l’attrezzo.
Fare riferimento alla confezione dell’accessorio per
altri dettagli. Il personale del negozio può aiutarvi e
consigliarvi.
Tosaerba senza fili I
Page 53

Indicatore Alimentazione batteria sulla
macchia
Leggere i dettagli nella sezione STATO
DELLA BATTERIA
IMPORTANTE
Quando è illuminata solo una lice,
almeno una delle batterie è scarica
è deve essere ricaricata, anche se il
tagliaerba potrebbe essere ancora
in grado di tagliare l’erba. Se si
continua ad utilizzare il tagliaerba
con la batteria così scarica si rischia
di ridurre la durata e le prestazioni
della batteria.
Quando nessuna spia è accesa,
almeno una delle batterie non è
correttamente installata o è difettosa,
ricontrollare le batterie siano
completamente inserite in sede.
Avvio & Arresto
Selezione della manopola modalità di
funzionamento
Modalità ECO
Selezionare la modalità ECO quando si
taglia in condizioni di tutti i giorni e quando
l’altezza massima dell’erba è di 25mm o
inferiore.
Modalità TURBO
Impostare la manopola sulla modalità
TURBO durante il taglio di erba spessa o
incolta.
Regolazione dell’altezza di taglio
Indicatore di riempimento del raccoglitore
Vuoto: Aletta aperta (a)
Pieno: Aletta chiusa (b)
Rimozione/svuotamento del sacco di
raccolta della polvere
AVVERTENZA! Verificare sempre
che lo sportello di sicurezza chiuda
la bocca di scarico prima dell’uso. Non
sollevare mai lo sportello di sicurezza
quando il rasaerba viene usato senza il
sacco raccoglierba montato.
Installazione dell'inserto per pacciamatura
Scarico posteriore
NOTA:
rimuovere per primo l’inserto per
pacciamatura.
Immagazzinaggio
See
Fig. F
See Fig.
G1, G2
See Fig.
H1, H2
See
Fig. I
See Fig.
J1
See Fig.
J2
See
Fig. K
See
Fig. L
See Fig.
M1, M2
LED DI STATO DELLA BATTERIA (VEDI FIG. F)
Prima dell’avvio e dell’uso premere il pulsante accanto all’indicatore del livello di carica delle batterie
sulla sega per verificare la loro capacità. Durante il
funzionamento la capacità delle batterie sarà indicata
in automatico dall’indicatore del livello di carica.
L’indicatore rileva e visualizza costantemente la condizione delle batterie come descritto di seguito.
Per gli utensili dotati di 2 batterie con potenze
diverse, l’indicatore del livello di carica mostra la
condizione della batteria che ha la potenza inferiore
tra le due.
Stato
dell'indicatore
di carica
Cinque spie verdi
accese. (
)
Due, tre o quattro
spie verdi accese.
Two, three or four
green lights are
illuminated.
Solo una spia
verde accesa.Only
one green light (
)
Nessuna spia
accesa.
Una sola spia
lampeggia due
volte per ciclo.
Una sola spia
lampeggia tre
volte per ciclo.
Una sola spia
lampeggia quattro
volte per ciclo.
Condizione della batteria
Le due batterie sono completamente cariche.
Le due batterie sono ancora
cariche. Più spie sono accese,
maggiore è la carica residua.
Almeno una delle batterie
è scarica e deve essere
ricaricata.
Almeno una delle batterie
non è correttamente installata
o è difettosa.
Almeno una delle batterie è
troppo scarica (consultare lo
stato di carica della batteria):
ricaricare le due batterie
insieme prima dell'uso o del
rimessaggio.
Almeno una delle batterie
è surriscaldata: attendere
il raffreddamento prima di
ricominciare.
La macchina è in
sovraccarico. Aumentare
l'altezza di taglio o spingere
più lentamente.
SUGGERIMENTI PER IL
TAGLIO DEL’ERBA
NOTA: ISPEZIONARE SEMPRE L’AREA NELLA
QUALE SI DEVE UTILIZZARE IL TAGLIAERBA
E TOGLIERE PIETRE, BASTONI, CAVI, OSSI ED
ALTRA SPORCIZIA CHE POTREBBE ESSERE
LANCIATA DALLA LAMA IN ROTAZIONE.
1. Tagliare l’erba lungo la superficie di terreni scoscesi
muovendosi in senso trasversale, e mai dall’alto
5352
Tosaerba senza fili I
Page 54

verso il basso. Prestare molta attenzione quando
si cambia direzione sulle superfici inclinate. Non
utilizzare su terreni molto scoscesi. Fare attenzione a
mantenere sempre una presa ben salda per i piedi.
2. Rilasciare la leva interruttore per spegnere il
tagliaerba quando si attraversano aree con ciotoli (le
pietre possono essere lanciate dalla lama).
3. Impostare il tagliaerba sull’altezza massima di
taglio quando si effettuano tagli su terreni non lisci
o se l’erba è alta. Se si taglia troppa erba potrebbe
scattare l’interruttore di protezione, e il tagliaerba si
arresta.
4. Se durante la stagione con crescita rapida
dell’erba si usa un sacco raccolta erba, l’erba
potrebbe ostruire l’apertura di scarico. Rilasciare la
leva interruttore per spengere il tagliaerba e togliere
la chiavetta di sicurezza. Smontare la sacca per
l’erba e agitarla in modo che l’erba si deposito sul
fondo. Pulire qualsiasi residuo di erba o altri detriti
che possano essersi formati intorno all’apertura di
scarico. Sostituire la sacca per i clienti nuovi.
5. Se il tagliaerba inizia a vibrare in modo anomalo,
rilasciare la leva interruttore per spegnerlo e
togliere la chiavetta di sicurezza. Controllare
immediatamente la causa della vibrazione. Le
vibrazioni sono sempre un’indicazione di problemi.
Non utilizzare il tagliaerba fino a quando non si è
eseguito un controllo.
6. PER SPEGNERE IL TAGLIAERBA
RILASCIARE SEMPRE LA LEVA INTERRUTTORE
E TOGLIERE LA CHIAVETTA DI SICUREZZA
QUANDO LO SI LASCIA INCUSTODITO, ANCHE
SE PER UN BREVE PERIODO DI TEMPO.
AREA DI TAGLIO
L’area di taglio può essere influenzata da diversi
fattori, come altezza di taglio, umidità del manto
erboso, lunghezza dell’erba e densità. Inoltre,
avviare e arrestare il tosaerba troppe volte durante
l’uso può contribuire a ridurre l’autonomia e, di
conseguenza, l’area di taglio.
La seguente tabella descrive il rapporto tra
condizioni di taglio e area di taglio.
Condizioni di taglio
Condizioni
dell'erba
Erba molto
fine e secca
Erba fine e
secca
* Con due pacchi batterie completamente carichi
utilizzati insieme.
Altezza di
taglio
Taglio da
7cm a
5cm
Taglio da
7cm a
3cm
Area di taglio
(massima)
Con 2 batterie da
20 V/4.0 Ah
Fino a 500 m2 *
Fino a 250 m2 *
SUGGERIMENTO:
1) Si consiglia di tagliare l’erba frequentemente,
procedere a un’andatura normale e non
avviare/arrestare il tosaerba troppo spesso
durante l’uso.
2) Per ottenere prestazioni ottimali, utilizzare
due pacchi batterie completamente carichi
e tagliare sempre meno di un terzo della
lunghezza dell’erba ad ogni passata.
3) Procedere più lentamente quando si deve
tagliare erba più alta, così da ottenere un taglio
più efficace e consentire lo scarico dell’erba
tagliata.
4) Evitare di tagliare erba bagnata, in quanto
potrebbe aderire alle superfici interne del
piatto di taglio e ostacolare raccolta o scarico
dell’erba tagliata.
5) In caso di erba fresca o spessa, impostare
un’altezza di taglio maggiore per prolungare la
durata delle batterie.
MANUTENZIONE
AVVERTENZA: Arrestare la falciatrice e
togliere la chiave di sicurezza prima di
asportare il sacco di raccolta dell’erba.
NOTA: Per garantire una vita di servizio più
lunga ed affidabile, è necessario attenersi con
regolarità alle seguenti procedure di manutenzione.
Verificare la presenza di difetti oggettivi, quali lame
allentate, fuori sede o danneggiate, fissaggi lenti
e componenti usurati o guasti. Accertarsi che tutte
le coperture e le protezioni siano in buon ordine
e correttamente agganciate al tosaerba. Eseguire
ogni necessaria operazione di manutenzione o
riparazione prima di utilizzare l’apparecchio. Qualora
i problemi persistano nonostante una manutenzione
regolare, rivolgersi al nostro servizio assistenza
clienti per eventuali consigli e suggerimenti.
AFFILATURA DELLA LAMA
PER AVERE PRESTAZIONI OTTIMALI TENERE LA
LAMA SEMPRE AFFILATA.
QUANDO SI SMONTA, AFFILA E SI RIMONTA LA
LAMA INDOSSARE UNA PROTEZIONE IDONEA
PER GLI OCCHI. VERIFICARE CHE LA CHIAVETTA DI
SICUREZZA SIA STATA TOLTA.
L’affilatura della lama due volte nella stagione in cui
si taglia l’erba è solitamente sufficiente in condizioni
normali di utilizzo. La sabbia consuma rapidamente
il filo della lama. Se il suo prato ha un terreno ricco
di sabbia potrebbe essere necessario dover affilare
la lama con una frequenza maggiore.
SOSTITUIRE IMMEDIATAMENTE LA LAMA SE
PIEGATA O DANNEGGIATA.
QUANDO SI AFFILA LA LAMA:
1. Verificare che la lama rimanga equilibrata.
2. Affilare la lama con l’angolo di taglio originale.
3. Affilare i bordi di taglio su entrambe le estremità
della lama, togliendo la stessa quantità di materiale
Tosaerba senza fili I
Page 55

da entrambi i lati.
NOTA:
1. Assicurarsi che il tagliaerba sia spento e rimuovere
la chiave.
2. Riporre il tagliaerba in modalità di riposo in
posizione verticale.
AFFILARE LA LAMA IN UNA MORSA (Vedi Fig.
N1)
1. Prima di togliere la lama, verificare che la leva
dell’interruttore sia rilasciata, che la lama abbia
interrotto il movimento e che la chiavetta di sicurezza
sia stata tolta.
2. Smontare la lama dal tagliaerba. Vedere le
istruzioni per lo smontaggio e per rimontare la lama.
3. Fissare la lama N1-1 in una morsa N1-2.
4. Indossare occhiali di sicurezza e prestare
attenzione a non tagliarsi.
5. Affilare i bordi taglienti con attenzione utilizzando
una lima fine N1-3 o una pietra per affilare.
6. Controllare l’equilibratura della lama. Vedere le
istruzioni per l’equilibratura della lama.
7. Rimontare la lama sul tagliaerba e serrare bene.
Fare riferimento alle istruzioni riportate di seguito.
EQUILIBRATURA DELLA LAMA (Vedi Fig. N2)
Verificare l’equilibratura della lama posizionando il
foro centrale della lama N2-1 su un chiodo o su un
giravite N2-2, bloccati in orizzontale su una morsa
N2-3. Se una delle estremità della lama ruota verso il
basso deve essere limata. La lama è bene equilibrate
quando nessuna delle due estremità va in basso.
MANUTENZIONE DELLA LAMA (Vedi Fig. O1,
O2)
Sostituire la lama metallica dopo 50 ore di taglio o
2 anni, quale delle due condizioni si verifica prima,
indipendentemente dalle condizioni. Per smontare e
rimontare la lama seguire queste procedure. Sono
necessari guanti da giardinaggio (non in dotazione)
ed una chiave (non in dotazione) per smontare la
lama. Tenere la lama (19) e svitare il bullone della
lama (18) ruotandolo in senso antiorario conla
chiave, poi rimuovere la lama.
Per rimontare, mettere la lama (19) con il lato affilato
verso il basso. Serrare bene il dado della lama (18).
IMMAGAZZINAMENTO (Vedi Fig. M1, M2)
Arrestare il tagliaerba e togliere sempre la chiavetta
di sicurezza. Pulire a fondo la parte esterna della
macchina usando un panno o una spazzola morbida.
Non usare acqua, solventi o prodotti lucidanti.
Rimuovere ogni traccia di grasso e detriti, soprattutto
dalle fessure di ventilazione.
Ribaltare lateralmente il tosaerba e procedere alla
pulizia del gruppo di taglio. Rimuovere dalla lama gli
eventuali accumuli di erba servendosi di un utensile
di legno o plastica.
Conservare la macchina in un posto asciutto. Non
accatastare sopra di essa altri oggetti.
Per agevolare lo stoccaggio, rilasciare la manopola
sul manico e piegare la parte superiore del manico,
come illustrato nelle Figg. M1 e M2.
TUTELA AMBIENTALE
I prodotti elettrici non possono essere gettati tra
i rifiuti domestici. L’apparecchio da rottamare
deve essere portato al centro di riciclaggio per
un corretto trattamento. Controllare con le autorità
locali o con il rivenditore per localizzare il centro di
riciclaggio più vicino.
5554
Tosaerba senza fili I
Page 56

RISOLUZIONE DEI PROBLEMI
Problema Soluzione
A. Verificare che sia stata installata correttamente la chiave di sicurezza e che il
pulsante sull’alloggiamento dell’interruttore venga premuto completamente.
1. La macchina non
parte azionando la
leva interruttore.
2. Il motore si spegne
durante la falciatura.
3. Il motore si spegne
durante la falciatura
o non riesce a
tagliare tutto il prato.
4. Il tosaerba è
troppo duro da
spingere.
5. Il tosaerba fa
rumore e vibra più
del solito.
6. Il LED del
caricabatterie non si
accendono.
7. Il LED del
caricabatterie non
diventa verde.
8. Il rasaerba non
raccoglie lo sfal¬cio
nel sacco.
9. Durante la
pacciamatura si
vedono sfalci evidenti.
B. Rilasciare la leva dell’interruttore per spegnere il tosaerba. Rimuovere la chiave di
sicurezza, capovolgere il tosaerba e controllare che la lama possa ruotare liberamente.
In caso contrario, riportare il tosaerba a un manutentore autorizzato. La lama deve
ruotare liberamente.
C. La batteria è stata caricata completamente? Collegare il caricabatterie e attendere
che si accenda la spia verde.
A. Rilasciare la leva dell’interruttore per spegnere il tosaerba. Rimuovere la chiave di
sicurezza, capovolgere il tosaerba e controllare che la lama possa ruotare liberamente.
In caso contrario, riportare il tosaerba a un manutentore autorizzato. La lama deve
ruotare liberamente.
B. Regolare l’altezza di taglio delle ruote sulla posizione più alta e accendere il
tosaerba.
C. La batteria è stata caricata completamente? Collegare il caricabatterie e attendere
che si accenda la spia verde.
D. Evitare di sovraccaricare il tosaerba. Rallentare la velocità di taglio oppure
aumentare l’altezza di taglio, oppure applicare entrambe le misure.
A. La batteria è stata caricata completamente? Collegare il caricabatterie e attendere che si
accenda la spia verde.
B. Rilasciare la leva dell’interruttore per spegnere il tosaerba. Rimuovere la chiave di
sicurezza. Capovolgere il tosaerba e controllare: l’affilatura della lama – mantenere ben
affilata la lama. Che la scocca e il condotto di scarico non siano intasati.
C. Le ruote possono essere state regolate a un’altezza troppo bassa per le condizioni
dell’erba. Aumentare l’altezza di taglio.
A. Aumentare l’altezza di taglio per ridurre la resistenza della scocca sull’erba.
Controllare che ogni ruota giri liberamente.
A. Rilasciare la leva dell’interruttore per spegnere il tosaerba. Rimuovere la chiave
di sicurezza. Girare di lato il tosaerba e controllare la lama per verificare che
non si sia piegata o danneggiata. Se la lama è danneggiata, sostituirla con una
di ricambio. Se la parte inferiore della scocca è danneggiata, portare il tosaerba
presso un centro assistenza autorizzato.
B. Se non vi sono danni visibili sulla lama e il tosaerba continua a vibrare:
Rilasciare la leva dell’interruttore per spegnere il tosaerba. rimuovere la chiave
di sicurezza e la lama. Ruotare la lama di 180 gradi e rimontarla. Se il tosaerba
continua a vibrare, portarlo presso un centro assistenza autorizzato.
A. Controllare la connessione.
B. Sostituire il caricabatterie.
A. La batteria deve essere esaminata. Portarla in un centro di assistenza autorizzato.
A. Rimuovere la piastra di pacciamatura quando si usa il sacco.
B. Condotto intasato. Rilasciare la leva dell’interruttore per spegnere il tosaerba.
Rimuovere la chiave di sicurezza. Eliminare lo sfalcio dal condotto.
C. Troppa erba tagliata. Sollevare l’altezza di taglio delle ruote per accorciare la
lunghezza del taglio.
D. Sacco pieno. Svuotare il sacco più frequentemente.
A. Viene tagliata troppa erba. Sollevare l’altezza di taglio delle ruote per accorciare
la lunghezza del taglio. Non tagliare più di 1/3 della lunghezza totale.
B. Verificare l’affilatura della lama. Mantenere la lama sempre affilata.
Tosaerba senza fili I
Page 57

10. Tempo di
funzionamento
ridotto dopo molti
utilizzi.
11. Il LED del
caricabatterie
lampeggia in rosso e la
batteria non si carica.
A. Riportare la macchina in un centro di assistenza autorizzato: potrebbe essere
necessaria una nuova batteria.
A. La batteria si surriscalda a seguito di un uso prolungato. Rimuovere la batteria
dal caricabatterie e lasciarla raffreddare fino a 420C o meno.
DICHIARAZIONE DI
CONFORMITÀ
NOI,
POSITEC Germany GmbH
Grüner Weg 10, 50825 Cologne, Germany
Dichiara che l’apparecchio,
Descrizione Tagliaerba a batteria WORX
Codice WG744E, WG744E.9 (740-789 -
designazione del macchinario rappresentativo
del Tagliaerba a batteria)
Funzione Falciatura prati
È conforme alle seguenti direttive,
2006/42/EC, 2014/30/EU, 2011/65/EU,
2000/14/EC modificata dalla 2005/88/EC
2000/14/EC modificata dalla 2005/88/EC:
- Procedura di conformità come da Annex VI
- Potenza acustica pesata 84.3 dB(A)
- Massima potenza di rumore garantita 88 dB(A)
L’organismo competente
Nome:Intertek Testing & Certification Ltd
(organismo notificato 0359)
Indirizzo: Davy Avenue, Knowlhill, Milton
Keynes, MK5 8NL
conforme a,
EN 60335-1
EN 60335-2-77
EN 62233
EN ISO 3744
EN 55014-1
EN 55014-2
Il responsabile autorizzato alla compilazione della
documentazione tecnica,
Nome Marcel Filz
Indirizzo Positec Germany GmbH
Grüner Weg 10, 50825 Cologne, Germany
2017/12/19
Allen Ding
Vice capo ingegnere, testing e certificazione
Positec Technology (China) Co., Ltd
18, Dongwang Road, Suzhou Industrial
Park, Jiangsu 215123, P. R. China
5756
Tosaerba senza fili I
Page 58

MANUAL ORIGINAL
SEGURIDAD DEL PRODUCTO
Advertencias de seguridad
generales
ADVERTENCIA Leer
todas las instrucciones.
Si no se respetan las
instrucciones, existe un riesgo
de descargas eléctricas, de
incendio y/o de graves heridas.
Lea detenidamente las
instrucciones para garantizar
el uso seguro de la máquina.
Conserve este manual de
consejos e instrucciones
para futuras consultas.
- Este aparato no ha sido
diseñado para su uso por
personas (incluyendo niños)
con capacidades físicas,
sensoriales o mentales
reducidas, o falta de
experiencia y conocimientos,
a menos que lo hagan bajo la
supervisión o instrucción de
una persona responsable de
su seguridad.
- Los niños deberán ser
vigilados para asegurar que
no jueguen con el aparato.
- El aparato únicamente debe
utilizarse con la fuente de
alimentación suministrada.
IMPORTANTE
LEER DETENIDAMENTE
ANTES DE UTILIZAR LA
HERRAMIENTA
CONSERVAR PARA
REFERENCIA FUTURA
Prácticas de uso seguro
Familiarización
a) Lea cuidadosamente las
instrucciones. Familiarícese
con los controles y el uso
apropiado de la herramienta.
b) Nunca permita que los niños
o personas no familiarizadas
con estas instrucciones
hagan uso de la herramienta.
Las regulaciones locales
pueden restringir la edad del
operador.
c) Nunca corte el césped
mientras otras personas,
especialmente niños, o
animales domésticos
se encuentran en las
proximidades.
d) Recuerde que el usuario u
operario es el responsable
de los accidentes o riesgos
a los que se sometan otras
personas o propiedades.
Preparación
a) Siempre use calzado
resistente y pantalones
largos cuando efectúe el
corte de césped. No utilice
la herramienta cuando esté
descalzo o use sandalias.
b) Inspeccione bien toda la
zona en la que desee utilizar
el equipo, y retire todos los
objetos que pudieran ser
Cortacésped a batería ES
Page 59

lanzados por la máquina;
c) Antes del uso, siempre
examine visualmente
la herramienta a fin de
comprobar que las cuchillas,
los pernos de las cuchillas y
la unidad de corte no estén
desgastados o dañados.
A fin de evitar posibles
desequilibrios, las cuchillas
y los pernos desgastados
o dañados deben ser
reemplazados por juegos
completos; Sustituya las
etiquetas dañadas o ilegibles.
Funcionamiento
a) Trabaje únicamente de día o
con buena luz artificial.
b) Cuando sea posible, evite
manejar la herramienta sobre
césped mojado.
c) Asegúrese de no perder el
equilibrio en las pendientes.
d) Camine, no corra;
e) En máquinas giratorias con
ruedas, corte en dirección
perpendicular a la pendiente,
nunca hacia arriba y hacia
abajo;
f) Observe extrema precaución
al cambiar de dirección en las
pendientes.
g) No trabaje sobre pendientes
excesivamente empinadas.
h) Tenga mucho cuidado al
invertir la marcha de la
herramienta o al desplazarla
hacia Ud.
i) Detenga la/s cuchilla/s en los
casos en que la herramienta
deba ser inclinada para el
transporte, o para atravesar
superficies donde no hay
césped, o al transportar la
herramienta a y desde el área
a cortar.
j) Nunca utilice la herramienta
con protectores defectuosos,
o sin los dispositivos de
seguridad en su lugar, por
ejemplo deflectores y/o
colectores de césped.
k) Encienda el motor según
las instrucciones y con los
pies bien alejados de la/s
cuchilla/s.
l) No incline la herramienta
para encender el motor,
a menos que la misma
requiera de ello para
arrancar. En este caso,
no la incline más de lo
absolutamente necesario y
levante únicamente la parte
que está más alejada del
operador.
m) No coloque manos ni pies
cerca o bajo las piezas en
rotación. En el caso de
cortadoras rotatorias de
césped, no se acerque a la
abertura de descarga en
ningún momento.
n) No toque la cuchilla antes
de quitar el dispositivo de
desactivación. Las cuchillas
deben haberse detenido por
5958
Cortacésped a batería ES
Page 60

completo;
o) No arranque el cortacésped
cuando esté de pie frente a la
apertura de descarga.
p) No transporte el cortacésped
mientras la fuente
de alimentación está
funcionando.
q) Pare el cortacésped y
extraiga el dispositivo de
desactivación. Asegúrese
de que todas las partes
movibles se han detenido
completamente.
– si se deja la máquina
desatendida,
– antes de eliminar una
obstrucción,
– antes de realizar
comprobaciones,
operaciones de limpieza o
trabajar con la máquina,
– Después de chocar con un
objeto extraño. Examine la
herramienta para comprobar
si hay daño y repare si es
necesario.
Si comienza a vibrar en
forma anormal (verifique
inmediatamente)
– Inspeccione daños.
– Sustituya o repare cualquier
parte dañada.
– Compruebe y apuntale
cualquier parte aflojada.
Mantenimiento y
almacenamiento
a) Mantenga tuercas, pernos
y tornillos ajustados
para cerciorarse de que
la herramienta está en
condiciones seguras de
trabajo n;
b) Verifique periódicamente
el colector de césped para
comprobar si hay desgaste o
deterioro;
c) Para su seguridad, reemplace
las piezas gastadas o
dañadas. Utilice solamente
partes sustituibles y
accesorios genuinos.
d) Tenga cuidado durante el
ajuste de la máquina para
evitar que sus dedos queden
atrapados entre las cuchillas
móviles y las partes fijas de
la máquina.
e) Deje que el cortacésped se
enfríe antes de guardarlo.
f) Cuando revise las cuchillas
tenga en cuenta que aunque
la fuente de alimentación
esté apagado, las cuchillas
pueden aún moverse.
ADVERTENCIAS DE
SEGURIDAD PARA LA
BATERÍA
a) No desmonte, abra o
destruya las pilas o las
baterías recargables.
b) No provoque un
Cortacésped a batería ES
Page 61

cortocircuito en la
batería. No almacene
las baterías de forma
descuidada en una caja
o cajón donde podría
provocar un cortocircuito
entre ellas o mediante
otros objetos metálicos.
Cuando la batería no esté
siendo utilizada, manténgala
alejada de objetos metálicos,
como clips de papel,
monedas, llaves, clavos,
tornillos u otros objetos
metálicos pequeños,
que pueden posibilitar
la conexión de un borne
con otro. Al provocar un
cortocircuito con los bornes
de la batería se pueden sufrir
quemaduras o generar un
incendio.
c) No exponga las baterías
al calor o al fuego. No
las guarde expuestas
directamente al sol.
d) No exponga las baterías a
impactos mecánicos.
e) En caso de que la batería
tenga fugas de líquido,
no permita que el líquido
entre en contacto con
la piel o los ojos. Si se
produce el contacto,
lave la zona afectada
con grandes cantidades
de agua y acuda a un
médico.
f) Acuda a un médico
inmediatamente si se ha
ingerido una pila o una
batería.
g) Mantenga las baterías
limpias y secas.
h) Limpie los bornes de
la batería con un paño
limpio si se ensucian.
i) Cargue la batería
antes de utilizarla.
Consulte siempre estas
instrucciones y aplique el
procedimiento de carga
adecuado.
j) No deje la batería
cargándose durante
prolongados períodos
de tiempo cuando no se
utilice.
k) Después de prolongados
períodos de
almacenamiento, puede
que sea necesario cargar
y descargar la batería
varias veces para obtener
el máximo rendimiento.
l) Las baterías recargables
proporcionan mejor
rendimiento cuando se
utilizan a temperatura
ambiente normal (20 ºC ±
5 ºC).
m) Al eliminar las baterías,
mantenga las baterías
de distinto sistema
electroquímico separadas
unas de otras.
n) Recargue solo con el
cargador indicado por
6160
Cortacésped a batería ES
Page 62

WORX. No utilice ningún
otro cargador que no
sea el específicamente
proporcionado para el
uso con este equipo. El
cargador adecuado para
un tipo de baterías puede
provocar un incendio si
se utiliza con otro tipo de
baterías.
o) No utilice ninguna batería
distinta a la diseñada para
utilizarse con el aparato.
p) Mantenga la batería fuera
del alcance de los niños.
q) Conserve la
documentación original
del producto por si
tuviera que consultarla en
otro momento.
r) Extraiga la batería del
aparato cuando no lo
utilice.
s) Deshágase del producto
correctamente.
Tenga cuidado con las cuchillas.
Las cuchillas continúan rotando
después de apagar el motor.
Extraiga el enchufe de la toma
de suministro eléctrico antes
de realizar operaciones de
mantenimiento.
Los residuos de aparatos
eléctricos y electrónicos no
deben depositarse en la basura
doméstica. Se deben reciclar en
las instalaciones especializadas.
Consulte a las autoridades locales
o el establecimiento para saber
cómo reciclar estos productos.
No tirar las baterías. Las baterías
agotadas deben llevarse al
punto local de recogida o
reciclaje de residuos.
No incinerar
No exponer a la lluvia o al agua
Utilizar guantes de protección
Antes de realizar cualquier
SÍMBOLOS
Lea cuidadosamente el manual
del usuario y cerciórese de
entender todos los controles y la
función que cumple cada uno
Mantenga alejados a los
visitantes.
trabajo de ajuste, reparación o
mantenimiento, desenchufe la
batería de la toma.
La cuchilla continúa rotando
después de apagar la máquina.
Espere hasta que todos los
componentes de la misma
se hayan detenido antes de
tocarlos.
Extraiga la llave
Cortacésped a batería ES
Page 63

LISTA DE COMPONENTES
1. LLAVE DE SEGURIDAD
2. PALANCA DEL INTERRUPTOR
3. MANGO SUPERIOR
4. PERILLAS DE MANGO
5. EMPUÑADURA INFERIOR
6. BOLSA DE RECOLECCIÓN DE HIERBA
7. PALANCA DE AJUSTE DE LA ALTURA DE CORTE
8. BARRA DEL MANGO
9. DIAL DE CORTE INTELIGENTE INTELLICUT
10. INDICADOR DE LA BATERÍA
11. CUBIERTA DEL COMPARTIMENTO DE LA BATERÍA
12. COMPUERTA DE SEGURIDAD
13. MANGO DE LA CAJA DE CÉSPED
14. PIEZAS DE SUJECIÓN DEL CABLE
15. INDICADOR DE LLENADO DEL SACO DE CÉSPED
16. PIEZA DE MANTILLO
17. BATERÍA (VÉASE LA FIG. E) *
18. PERNO DE LA CUCHILLA (VÉASE LA FIG. O1)
19. CUCHILLA (VÉASE LA FIG. O1)
* Los accesorios ilustrados o descritos pueden
no corresponder al material suministrado de
serie con el aparato.
Modelo de la
batería
Modelo del
cargador
Datos nominales
de carga
Tiempo de carga
(Aprox.)
Batería:
2.0 Ah (1pc)
2.0 Ah (2pcs)
4.0 Ah (1pc)
4.0 Ah (2pcs)
Peso 16.7kg 15.4kg
* Voltaje medido sin carga. El voltaje inicial máximo
de la batería es de 20 voltios. El voltaje nominal es de
18 voltios.
** Las salidas 1 y 2 son dos puertos con los mismos
valores de tensión y corriente de salida.
WA3553(4.0Ah) /
WA3883 /
Entrada:
100-240V~50/60Hz,
Salida1: 20V ,
2.0A**
Salida2: 20V ,
2.0A**
0.5 hora
1 hora
1 hora
2 hora
/
/
INFORMACIÓN SOBRE EL
RUIDO
Nivel de presión acústica de
ponderación
Nivel de potencia acústica de
ponderación
LwA: 68.7dB (A)
KpA= 3dB(A)
LwA: 84.3dB (A)
KwA= 3dB(A)
6362
DATOS TÉCNICOS
Modelo WG744E, WG744E.9 (740-789 denominaciones de maquinaria, representantes de
Cortacésped sin cables)
WG744E WG744E.9
Tensión 40V Max (2x20V Max)*
Diámetro de corte 40cm
Diámetro de la
rueda delantera
Diámetro de la
rueda trasera
Altura de corte 20mm-70mm
Posiciones de
altura de corte
Capacidad de
colección de
césped
Tipo de batería Iones de litio /
160mm
240mm
6
40L
Utilice protección auditiva.
INFORMACIÓN SOBRE LAS
VIBRACIONES
Frecuencia de vibración
típica
ADVERTENCIA: El valor de emisión de
vibraciones durante el uso de la herramienta
podría ser distinto al valor declarado dependiendo de
la forma en que se use la herramienta según las
condiciones siguientes, y otras variaciones sobre el
uso de la herramienta:
El modo de uso de la herramienta y los materiales
que se cortan o perforan.
El estado general y las condiciones de
ah= 0.41m/s
Incertidumbre
K= 1.5 m/s²
2
Cortacésped a batería ES
Page 64

mantenimiento de la herramienta.
La utilización del accesorio correcto para la
herramienta y su correcto mantenimiento afilado y
en buenas condiciones.
La firme sujeción de las empuñaduras y la utilización
de accesorios antivibración.
El uso de la herramienta conforme a su diseño y
estas instrucciones.
Esta herramienta podría causar síndrome
de vibración mano-brazo si no se utiliza
correctamente.
ADVERTENCIA: Para conseguir una mayor
precisión, debe tenerse en cuenta una
estimación del nivel de exposición en condiciones
reales de todas las partes del ciclo de uso, como los
tiempos durante los que la herramienta está apagada
o el tiempo que está funcionando al ralentí sin
realizar ningún trabajo. Esto podría reducir
notablemente el nivel de exposición durante el
periodo completo de trabajo.
Cómo minimizar el riesgo de exposición a la
vibración.
Utilice SIEMPRE cinceles, brocas y cuchillas afiladas.
Mantenga esta herramienta de acuerdo con estas
instrucciones y bien lubricada (si es necesario).
Si la herramienta se utiliza regularmente, invierta en
accesorios antivibración.
Planifique su programa de trabajo para distribuir el
uso de la herramienta a lo largo de varios días.
ACCESORIOS
WG744E WG744E.9
Batería (WA3553)
Cargador (WA3883)
Bolsa de recolección de
hierba
Pieza de mantillo
Piezas de sujeción del cable
2 /
1 /
1
1
2
MONTAJE Y FUNCIONAMIENTO
ACCIÓN
MONTAJE
Montaje de la barra del mango
NOTA: Seleccione uno de los dos
agujeros en la parte inferior del mango
para ajustarlo a la altura deseada.
Montaje de la bolsa de recolección de
hierba
Montaje de la bolsa de recolección de
hierba en el cortacésped
NOTA:
Antes de instalar la bolsa de
recogida de hierba, extraiga la pieza de
mantilla del cortacésped.
NOTA:
Presione ligeramente la bolsa para
pasto para asegurarse de que se encuentra
completamente instalada.
Comprobación del nivel de carga de la
batería
NOTA:
La Fig. D1 solo es aplicable a la
batería con indicador de la batería.
Cargar la batería
NOTA: la batería se entrega descargada
y debe cargarse completamente antes
de cortar el césped por primera vez.
Cargue siempre las dos baterías
por completo y al mismo tiempo.
Encontrará más información en el
manual del cargador.
Instalar/extraer la batería
NOTA:
El cortacésped solo funciona si
tiene instaladas 2 baterías. Utilice
siempre las dos mismas baterías y
cárguelas al mismo tiempo.
Cuando se utilizan dos baterías
con diferente cantidad de energía,
la máquina funciona únicamente
con base en el mínimo común
denominador.
FUNCIONAMIENTO
ILUS-
TRACIÓN
Véase la
Fig. A1,
A2, A3,
A4, A5
Véase la
Fig. B1,
B2, B3, B4
Véase la
Fig. C1,
C2, C3
Véase la
Fig. D1
Véase la
Fig. D2
Véase la
Fig. E
Recomendamos que adquiera todos sus
accesorios en el mismo comercio donde compró
la herramienta. Consulte los estuches de los
accesorios para más detalles. El personal del
comercio también puede ayudar y aconsejar.
Cortacésped a batería ES
Page 65

Indicador de la batería en la máquina
Consulte la información de ESTADO DE LA
BATERÍA
IMPORTANTE
Si sólo se ilumina una luz, significa
que como mínimo una batería está
agotada y se tiene que cargar. Esto
será así aunque el cortacésped
continúe funcionando. Si continúa
utilizando su cortacésped con la
batería descargada, podría reducir
la vida y el rendimiento de su
batería.
Si no se ilumina ninguna luz,
significa que como mínimo una
batería no está bien instalada o que
tiene un fallo. Vuelva a comprobar
que las baterías estén colocadas
correctamente.
Arranque & Parada
Selección del dial del modo de trabajo
Modo ECO
Seleccione el modo ECO para cortar la
hierba bajo condiciones normales y si la
hierba no mide más de 25mm.
Modo TURBO
Ajuste el dial al modo TURBO para cortar
hierba densa o muy alta.
Ajuste de la altura de corte
Indicador de llenado del saco de césped
Saco vacío: aleta flotante (a)
Saco lleno: aleta descendida (b)
Desmontaje y vaciado de la bolsa de
recolección de hierba
ADVERTENCIA! Compruebe
siempre que la tapa de
seguridad cierre la salida de descarga
antes del uso. No levante nunca la tapa
de seguridad cuando se esté utilizando
el cortacésped sin la bolsa de hierba
instalada.
Instalación de la pieza de mantillo
Descarga posterior
NOTA:
En primer lugar, retire la pieza de
mantillo.
Almacenamiento
Véase la
Fig. F
Véase la
Fig. G1,
G2
Véase la
Fig. H1,
H2
Véase la
Fig. I
Véase la
Fig. J1
Véase la
Fig. J2
Véase la
Fig. K
Véase la
Fig. L
Véase la
Fig. M1,
M2
LED DE ESTADO DE LA BATERÍA (Véase la fig.
F)
Antes de encender la máquina o cuando termine de
usarla, pulse el botón que hay al lado del indicador
de encendido para ver el nivel de batería. Durante
el funcionamiento. El indicador de batería muestra
automáticamente el nivel de batería.
Este indicador detecta y muestra el nivel de batería
constantemente, tal como se indica a continuación.
En las máquinas con 2 baterías con diferente cantidad de energía, el indicador de alimentación muestra
el nivel de la batería con menos energía.
Estado del
indicador de la
batería
Se iluminan cinco
luces en color
verde ( )
Se iluminan dos,
tres o cuatro luces
en color verde.
Solo se ilumina
una luz en color
verde ( )
No se ilumina
ninguna luz.
Parpadea una
única luz con una
frecuencia de dos
veces por ciclo.
Parpadea una
única luz con una
frecuencia de tres
veces por ciclo.
Parpadea una
única luz con una
frecuencia de
cuatro veces por
ciclo.
Estado de la batería
Las dos baterías tienen mucha carga.
Hay energía en las dos
baterías. Cuantas más luces
se iluminen, mayor es la cantidad de energía restante.
Como mínimo una batería
está agotada y se tiene que
cargar.
Como mínimo una batería
no está bien instalada o tiene
un fallo.
Como mínimo una batería
está sobre descargada
(consulte el estado de carga
de la batería). Recargue las
dos baterías al mismo tiempo
antes de usarlas de nuevo o
de guardarlas.
Como mínimo una batería
está caliente. Deje enfriar las
baterías antes de volver a
encender la máquina.
La máquina está
sobrecargada. Eleve la
altura de corte o empuje
lentamente.
6564
Cortacésped a batería ES
Page 66

SUGERENCIAS DE CORTE
ATENCIÓN: INSPECCIONE SIEMPRE EL ÁREA
EN LA QUE DESEE UTILIZAR EL CORTACÉSPED
Y RETIRE TODAS LAS PIEDRAS, RAMAS,
CABLES, HUESOS Y DEMÁS RESIDUOS QUE
PUDIERAN SER LANZADOS POR LA CUCHILLA
GIRATORIA.
1. En las pendientes, corte en dirección
perpendicular, nunca hacia arriba y hacia abajo.
Extreme la precaución al cambiar de dirección
en las pendientes. No corte sobre pendientes
excesivamente pronunciadas. Mantenga siempre un
apoyo firme.
2. Suelte la palanca para apagar el cortacésped
mientras atraviesa una zona con gravilla (las piedras
podrían dañar las cuchillas).
3. Coloque el cortacésped en el punto de corte
más alto si desea cortar sobre suelos altos. Cortar
demasiada hierba de una vez podría hacer saltar el
interruptor de circuito y detener el cortacésped.
4. Si se utiliza una bolsa de hierba durante la
temporada de crecimiento rápido, la hierba podría
tender a atascarse en la abertura de descarga. Suelte
la palanca para apagar el cortacésped y extraer la
llave de seguridad. Extraiga la bolsa de hierba y
sacuda la hierba para acumularla en la parte trasera
de la bolsa. Limpie también la hierba y demás
residuos que pudieran haberse acumulado en la
abertura de descarga. Cambie la bolsa de hierba.
5. Si el cortacésped comienza a vibrar de forma
anormal, suelte la palanca y detenga el cortacésped.
Extraiga la llave de seguridad. Compruebe la causa
inmediatamente. La vibración suele ser señal de
problemas. No utilice el cortacésped hasta realizar
una comprobación del sistema.
6. SUELTE SIEMPRE LA PALANCA PARA
APAGAR EL CORTACÉSPED Y EXTRAIGA LA
LLAVE DE SEGURIDAD SI PIENSA DEJAR
EL CORTACÉSPED DESATENDIDO, AUNQUE
SÓLO SEA DURANTE UN PERIODO CORTO DE
TIEMPO.
ZONA DE CORTE
La zona de corte puede verse afectada por varios
factores, como la altura de corte, la humedad y
la longitud y la densidad de la hierba. Además,
encender y apagar el cortacésped demasiadas veces
durante el funcionamiento también podría reducir la
zona de corte.
En la siguiente tabla se indica la relación entre el
estado de la hierba y la zona de corte.
Condiciones de corte
Estado de la
hierba
Altura de
corte
Zona de corte
(máximo)
Con 2 baterías de
20 V/4,0 Ah
Hierba seca
y muy fina
Hierba seca
y fina
* Uso simultáneo de 2 baterías completamente
cargadas.
CONSEJOS:
1) Se recomienda incrementar la frecuencia de
corte del césped, andar a velocidad normal y no
encender y apagar el cortacésped demasiadas
veces durante el funcionamiento.
2) Para lograr el mejor rendimiento, asegúrese de
que se utilicen simultáneamente dos baterías
completamente cargadas y corte siempre 1/3 o
menos de la altura de la hierba.
3) Ande lentamente para cortar la hierba larga,
con el fin de mejorar la efectividad del corte
y permitir que los restos se descarguen
correctamente.
4) No corte la hierba cuando esté mojada, ya que
se adheriría a la parte inferior y los restos no
podrían recogerse o descargarse correctamente.
5) Puede aumentarse la altura de corte para cortar
hierba nueva o gruesa, y alargar así la duración
de la batería.
Corte de
7cm a
5cm
Corte de
7cm a
3cm
Hasta 500 m2 *
Hasta 250 m2 *
MANTENIMIENTO
ADVERTENCIA: detenga el cortacésped
y extraiga la llave de seguridad antes de
retirar la bolsa de hierba.
ATENCIÓN: Para asegurarse de un servicio
prolongado y confiable, realice regularmente los
siguientes procedimientos de mantenimiento.
Verifique si hay defectos obvios tales como una
cuchilla suelta, fuera de lugar o dañada, accesorios
sueltos y componentes desgastados o dañados.
Compruebe que las cubiertas y guardas protectoras
no se hayan dañado y estén correctamente unidas a
la cortadora de césped. Realice todo mantenimiento
o reparación necesarios antes de utilizar la cortadora
de césped. Si a pesar del mantenimiento regular
la cortadora llegara a presentar fallas, por favor
llame a nuestra línea de ayuda al cliente para
asesoramiento.
AFILAR LA CUCHILLA
MANTENGA LAS CUCHILLAS AFILADAS PARA
CONSEGUIR EL MEJOR RENDIMIENTO DEL
CORTACÉSPED.
UTILICE PROTECCIÓN OCULAR AL DESINSTALAR,
AFILAR E INSTALAR LA CUCHILLA. ASEGÚRESE DE
RETIRAR LA LLAVE DE SEGURIDAD.
Afilar la cuchilla dos veces durante una sesión
de corte suele ser suficiente en circunstancias
Cortacésped a batería ES
Page 67

normales. La arena hace que la cuchilla se desafile
rápidamente. Si el suelo de su jardín es arenoso,
necesitará afilar las cuchillas con más frecuencia.
CAMBIE INMEDIATAMENTE LAS CUCHILLAS SI
ESTÁN DOBLADAS O DETERIORADAS.
AL AFILAR LA CUCHILLA:
1. Asegúrese de que la cuchilla permanece
equilibrada.
2. Afile la cuchilla con el ángulo de corte original.
3. Afile los bordes de corte a ambos extremos de la
cuchilla, retirando cantidades iguales de material de
ambos bordes.
NOTA: 1. Asegúrese de que el cortacésped esté
apagado y extraiga la llave.
2. Coloque el cortacésped en el modo de
almacenamiento vertical.
PARA AFILAR LA CUCHILLA EN UN TORNO
(Véase la fig. N1)
1. Asegúrese de que la palanca del interruptor está
suelta, que la cuchilla se haya detenido y que se
haya retirado la llave de seguridad antes de extraer
la cuchilla.
2. Extraiga la cuchilla del cortacésped. Consulte las
instrucciones para desinstalar e instalar la cuchilla.
3. Fije la cuchilla N1-1 en un torno N1-2.
4. Utilice gafas de seguridad y tenga cuidado de no
cortarse.
5. Afile con cuidado los bordes de corte de la cuchilla
con un diente fino N1-3 o una piedra de afilado.
6. Compruebe que la cuchilla esté equilibrada.
Consulte las instrucciones para equilibrar la cuchilla.
7. Vuelva a colocar la cuchilla en el cortacésped
y fíjela firmemente. Consulte las instrucciones
siguientes.
EQUILIBRAR LA CUCHILLA (Véase la fig. N2)
Compruebe que la cuchilla se encuentre equilibrada
colocando el orificio central de la cuchilla N2-1
sobre un clavo o un destornillador N2-2 sostenido
horizontalmente en un torno N2-3. Si alguno de
los extremos de la cuchilla gira hacia abajo, afile
ese extremo. La cuchilla se encuentra equilibrada
correctamente cuando no cae ningún extremo.
MANTENIMIENTO DE LAS CUCHILLAS (Véase
la fig. O1, O2)
Cambie la cuchilla metálica después de 50
horas de corte o 2 años, lo que ocurra antes,
independientemente de la condición de las mismas.
Siga el procedimiento siguiente para extraer y
reemplazar la cuchilla. Necesitará guantes de jardín
(no suministrados) y una llave (no suministrada)
para extraer la cuchilla. Sostenga la cuchilla (19) y
desenrosque el perno de la cuchilla (18) hacia la
izquierda utilizando una llave, y extraiga la cuchilla a
continuación.
Para volver a montarla, coloque la cuchilla (19)
con los bordes cortantes orientados hacia el suelo.
Apriete entonces firmemente la tuerca de la cuchilla
(18).
ALMACENAMIENTO (Véase la fig. M1, M2)
Detenga el cortacésped y extraiga siempre la llave
de seguridad. Limpie a fondo las partes exteriores de
la máquina usando una escobilla suave y un paño.
No utilice agua, solventes ni lustradores. Deje su
máquina libre de césped y deshechos, especialmente
en las ranuras de ventilación.
Coloque la máquina de costado y limpie el área
de la cuchilla. Si encuentra residuos de césped
compactados en el área de la cuchilla, retírelos con
un implemento de madera o plástico.
Guarde la máquina en un lugar seco. No coloque
otros objetos encima de la máquina.
Para facilitar el almacenamiento, suelte el mando del
mango y doble la parte superior del mango tal como
se muestra en las Fig. M1 y M2.
PROTECCIÓN AMBIENTAL
Los residuos de equipamientos eléctricos y
electrónicos no deben depositarse con las
basuras domésticas. Se recogen para reciclarse
en centros especializados. Consulte las autoridades
locales o su distribuidor para obtener información
sobre la organización de la recogida.
6766
Cortacésped a batería ES
Page 68

SOLUCIÓN DE PROBLEMAS
Problemas Acción correctora
A. Compruebe que la llave de seguridad esté instalada y colocada correctamente, y
1. El cortacéspedes
no se pone en
marcha al tirar de la
palanca.
2. El motor se
detiene mientras está
cortando el césped.
3. El cortacésped
funciona pero el corte
no es satis¬factorio,
o no se corta todo el
césped.
4. El cortacésped
resulta difícil de
empujar.
5. El cortacésped
produce vibraciones y
ruidos de una manera
inusual.
6. Los LEDs del
cargador de batería
no se encienden.
7. El LED de carga
de la batería no se
vuelve verde.
8. El cortacésped no
recoge los recortes en
la bolsa.
9. Se ven recortes en
el mantillo.
que el botón de la carcasa del interruptor esté presionado completamente.
B. Suelte la palanca del interruptor para apagar el cortacésped. Extraiga la llave de
seguridad, voltee el cortacésped y compruebe que la cuchilla gire libremente. Si no lo
hace, envíe el cortacésped a un taller autorizado. La cuchilla debe girar libremente.
C. ¿La batería está completamente cargada? Conecte el cargador y espere hasta que se
ilumine la luz verde.
A
. Suelte la palanca del interruptor para apagar el cortacésped. Extraiga la llave de seguridad,
voltee el cortacésped y compruebe que la cuchilla gire libremente. Si no lo hace, envíe el
cortacésped a un taller autorizado. La cuchilla debe girar libremente.
B. Eleve la altura de corte de las ruedas a la posición más alta y encienda el cortacésped.
C. ¿La batería está completamente cargada? Conecte el cargador y espere hasta que se ilumine
la luz verde.
D. No sobrecargue el cortacésped. Disminuya la velocidad de corte o aumente la altura de corte.
O ambos.
A. ¿La batería está completamente cargada? Conecte el cargador y espere hasta que se
ilumine la luz verde.
B. Suelte la palanca del interruptor para apagar el cortacésped. Extraiga la llave de
seguridad. Voltee el cortacésped y compruebe lo siguiente: Asegúrese de que la cuchilla esté
siempre afilada. Que no haya obstrucciones en la cubierta ni en el conducto de descarga.
C. Es probable que la altura de las ruedas se haya fijado en una posición demasiado baja
para el estado del césped. Eleve la altura de corte.
A. Eleve la altura de corte para reducir el rozamiento de la cubierta contra el
césped. Compruebe que cada rueda gire libremente.
A. Suelte la palanca del interruptor para apagar el cortacésped. Extraiga la llave de
seguridad. Voltee el cortacésped sobre uno de los lados y revise la cuchilla para
asegurarse de que no esté curvada o dañada. Si la cuchilla está dañada, sustitúyala
por una cuchilla de repuesto. Si la parte inferior de la cubierta está dañada, envíe el
cortacésped a un centro de mantenimiento autorizado.
B. Si no hay daños visibles en la cuchilla y el cortacésped todavía vibra: Suelte la
palanca del interruptor para apagar el cortacésped. Extraiga la llave de seguridad y
retire la cuchilla. Gire la cuchilla 180 grados y vuelva a colocarla. Si el cortacésped
sigue vibrando, envíelo a un centro de mantenimiento autorizado.
A. Compruebe el enchufe de conexión.
B. Sustituya el cargador.
A. Es necesario revisar la batería. Llévela a un centro de servicio autorizado.
A. Extraiga la placa de mantillo al embolsar.
B. Conducto obstruido. Suelte la palanca del interruptor para apagar el
cortacésped. Extraiga la llave de seguridad. Limpie el conducto de recortes de
hierba.
C. Demasiada hierba cortada. Eleve la altura de corte de las ruedas para reducir la
longitud del corte.
D. Bolsa llena. Vacíe la bolsa con más frecuencia.
A. Se está cortando demasiado césped. Eleve la altura de corte de las ruedas para
reducir la longitud del corte. No corte más de 1/3 de la longitud total.
B. Compruebe que la cuchilla esté afilada. La cuchilla debe mantenerse siempre
afilada.
Cortacésped a batería ES
Page 69

10. El tiempo de
funcionamiento se
acorta tras varios
usos.
11. El LED del
cargador de baterías
parpadea en rojo y la
batería no se puede
cargar.
A. Lleve la máquina a un centro de servicio autorizado; es posible que se tenga que
instalar una batería nueva.
A. La batería se sobrecalienta cuando funciona de forma continua. Extraiga la
batería del cargador y deje que se enfríe a 42oC o menos.
DECLARACIÓN DE
CONFORMIDAD
Los que reciben,
POSITEC Germany GmbH
Grüner Weg 10, 50825 Cologne, Germany
Declaran que el producto
Descripción Cortacésped sin cables WORX
Modelo WG744E, WG744E.9 (740-789 -
denominaciones de maquinaria, representantes
de Cortacésped sin cables)
Función Corte de césped
Cumple con las siguientes Directivas,
2006/42/EC, 2014/30/EU, 2011/65/EU,
2000/14/EC modificada por 2005/88/EC
2000/14/EC modificada por 2005/88/EC:
- Procedimiento de evaluación de la conformidad de
acuerdo con Annex VI
- Nivel de presión acústica 84.3 dB(A)
- Nivel de intensidad acústica 88 dB(A)
Notificación realizada por
Nombre: Intertek Testing & Certification Ltd
(cuerpo notificado 0359)
Dirección: Davy Avenue, Knowlhill, Milton
Keynes, MK5 8NL
Normativas conformes a,
EN 60335-1
EN 60335-2-77
EN 62233
EN ISO 3744
EN 55014-1
EN 55014-2
La persona autorizada para componer el archivo
técnico,
Firma Marcel Filz
Dirección Positec Germany GmbH
Grüner Weg 10, 50825 Cologne, Germany
2017/12/19
Allen Ding
Ingeniero Jefe Adjunto. Pruebas y Certificación.
Positec Technology (China) Co., Ltd
18, Dongwang Road, Suzhou Industrial
Park, Jiangsu 215123, P. R. China
6968
Cortacésped a batería ES
Page 70

OORSPRONKELIJKE
GEBRUIKSAANWIJZING
PRODUCTVEILIGHEID
Algemene
veiligheidswaarschuwingen
met de machine gaan spelen.
- Het apparaat mag slechts
gebruikt worden met de
netadapter die bij het
apparaat geleverd wordt.
WAARSCHUWING Lees
alle instructies
zorgvuldig door. Indien u
zich niet aan alle onderstaande
instructies houdt, kan dat
leiden tot een elektrische
schok, brand en/of ernstig
letsel.
Lees de instructies
aandachtig voor een veilig
gebruik van de machine.
Bewaar alle
veiligheidsvoorschriften
en alle instructies voor
70
toekomstig gebruik.
- Dit apparaat is niet bedoeld
voor gebruik door personen
(waaronder kinderen)
met verminderde fysieke,
zintuiglijke of mentale
capaciteiten, gebrek aan
ervaring en kennis, tenzij
ze werken onder toezicht
of instructie betreffende
het gebruik van het
apparaat door iemand die
verantwoordelijk is voor de
veiligheid.
- Kinderen moeten onder
toezicht worden gehouden
om te verhinderen dat ze
BELANGRIJK
LEES DIT VOOR GEBRUIK
BEWAAR DEZE
INSTRUCTIES VOOR
LATERE NASLAG
Veilige manier van
gebruiken
Opleiding
a) Lees de instructies
zorgvuldig door. Maak uzelf
bekend met de bediening
en het juiste gebruik van
het apparaat.
b) Laat nooit kinderen
of mensen die niet
bekend zijn met deze
instructies het apparaat
gebruiken. Plaatselijke
bepalingen kunnen een
minimumleeftijd vereisen
van de gebruiker.
c) Maai nooit wanneer
er mensen, met name
kinderen, of huisdieren in
de buurt zijn.
d) Denk eraan dat de
gebruiker verantwoordelijk
is voor ongevallen en
schade die ontstaan met
andere personen en hun
eigendommen.
Snoerloze graasmaaier NL
Page 71

Voorbereiding
a) Draag bij het maaien altijd
stevige schoenen en een
lange broek. Gebruik dit
apparaat niet wanneer u
op blote voeten of op open
sandalen/slippers loopt.
b) Inspecteer de omgeving
van de gebruikte
apparatuur en verwijder
alle voorwerpen die door
de machine weggeworpen
zouden kunnen worden;
c) Controleer voor het gebruik
altijd of de messen, de
bouten waarmee de
messen vastzitten en
het snijgedeelte niet
versleten of beschadigd
zijn. Vervang versleten of
beschadigde messen en
bouten in paren om zo de
balans te bewaren. Vervang
beschadigde en onleesbare
labels.
Bediening
a) Maai alleen overdag of in
goed kunstlicht.
b) Gebruik het apparaat, voor
zover mogelijk, niet in nat
gras.
c) Zorg er op hellingen altijd
voor dat u stevig staat.
d) Loop, ren niet;
e) Een ronddraaiende machine
op wielen gebruikt u
evenwijdig aan hellingen,
niet op en neer;
f) Wees extra voorzichtig
wanneer u op hellingen van
richting verandert.
g) Maai niet op zeer steile
hellingen.
h) Wees extra voorzichtig
wanneer u het apparaat
achteruit of naar u toe haalt.
i) Stop de messen wanneer
de maaier gekanteld dient
te worden voor vervoer
over oppervlaktes anders
dan gras en wanneer het
apparaat van en naar het
gebied dat gemaaid wordt
getransporteerd.
j) Gebruik het apparaat nooit
wanneer beschermkappen
beschadigd zijn of zonder
dat veiligheidsonderdelen
zoals deflectors en/of
grasopvangers geplaatst
zijn.
k) Schakel de motor in volgens
de instructies en houd uw
voeten uit de buurt van de
messen.
l) Kantel het apparaat nooit
bij het inschakelen van de
motor, behalve wanneer
het apparaat gekanteld
moet worden om gestart te
worden. Kantel het apparaat
in dat geval niet meer dan
absoluut noodzakelijk en til
alleen het gedeelte op dat
niet richting de gebruiker
wijst.
m) Plaats uw handen of
71
Snoerloze graasmaaier NL
Page 72

voeten niet in de buurt
van of onder draaiende
onderdelen. Blijf bij
cirkelmaaiers altijd
uit de buurt van de
uitwerpopening.
n) Raak het mes niet aan
voordat de machine
uitgeschakeld is en de
messen volledig tot
stilstand zijn gekomen;
o) Start de grasmaaier
niet wanneer u voor de
uitlaatopening staat.
p) Vervoer de grasmaaier
niet terwijl de stroom is
ingeschakeld.
q) Stop de grasmaaier
en verwijder het
vergrendelingsapparaat.
72
Controleer of alle
bewegende onderdelen
volledig tot stilstand zijn
gekomen.
– Als u de machine
onbeheerd laat,
– Voordat u een blokkade
verwijdert,
– Voordat u de machine
controleert, schoonmaakt of
eraan werkt,
– Nadat u een vreemd
object heeft geraakt.
Controleer het apparaat op
beschadigingen en repareer
deze indien nodig.
Wanneer het apparaat
abnormaal begint te trillen
(meteen inspecteren)
– Inspecteer op schade.
– vervang o f repareer
eventuele beschadigde
onderdelen.
– controleer en maak alle
losse onderdelen vast.
Onderhoud en opslag
a) Zorg ervoor dat alle bouten,
moeren en schroeven stevig
aangedraaid zijn om er
zeker van te zijn dat er veilig
met het apparaat gewerkt
kan worden;
b) Controleer de grasbak
regelmatig op slijtage of
achteruitgang;
c) Vervang beschadigde
of versleten onderdelen
voor uw eigen veiligheid.
Gebruik alleen originele
vervangonderdelen en
accessoires.
d) Wees voorzichtig bij het
instellen van de machine,
zodat er geen vingers
bekneld raken tussen de
bewegende onderdelen
en de vaste delen van de
machine.
e) Laat de grasmaaier volledig
afkoelen voordat u deze
opbergt.
f) Wanneer u de bladen
onderhoudt, moet u zich
bewust zijn dat ze nog
steeds kunnen bewegen,
Snoerloze graasmaaier NL
Page 73

zelfs als de stroombron is
uitgeschakeld.
VEILIGHEIDSINSTRUCTIES
VOOR HET ACCUPACK
a)
Batterijcellen en
accupacks mogen niet
gedemonteerd, geopend
of vernietigd worden.
b) Sluit accupacks niet
kort. Bewaar accupacks
niet willekeurig in een
doos of lade waar ze
elkaar kunnen kortsluiten
of door geleidende
voorwerpen kortgesloten
kunnen worden. Houd
het accupack op een
afstand van andere metalen
voorwerpen als paperclips,
muntstukken, sleutels,
nagels, schroeven en andere
kleine metalen voorwerpen
die de contacten van de
accupack kunnen verbinden.
Kortgesloten contacten
van accupacks kunnen
brandwonden of brand
veroorzaken.
c) Stel accupacks niet
bloot aan warmte of
vuur. Vermijd opslag in
direct zonlicht.
d) Stel accupacks niet
bloot aan mechanische
schokken.
e) Als een accu lekt dient
men voorzichtig te zijn
dat de vloeistof niet in
contact komt met de
huid of de ogen. Als dat
toch gebeurt spoelt men
de huid onder stromend
water en raadpleegt men
een arts.
f) Raadpleeg meteen een
arts wanneer een batterij
of accupack is ingeslikt .
g) Houd batterijcellen en
accupacks schoon en
droog.
h) Veeg de aansluitingen
van het accupack
schoon met een droge
doek als ze vuil zijn
geworden.
i) Accupacks moeten
voor gebruik worden
opgeladen. Lees de
gebruiksaanwijzing voor
de juiste laadinstructies.
j) Laat accupacks niet
langdurig opladen als ze
niet worden gebruikt.
k) Na een lange
opslagperiode kan het
nodig zijn het accupack
enkele keren op te laden
en te ontladen voor een
optimale prestatie.
l) Accupacks presteren
het best bij normale
kamertemperatuur (20
°C ± 5 °C).
m) Wanneer u accupacks
wegwerpt, dient
73
Snoerloze graasmaaier NL
Page 74

u accupacks van
verschillende
elektrochemische
systemen van elkaar
afgezonderd te houden.
n) Laad alleen op met een
lader met de technische
gegevens van WORX.
Gebruik geen andere
lader dan de lader die
specifiek voor dat doel
met de apparatuur is
meegeleverd. Een lader
voor één type accupack
geschikt is kan een
brandgevaar inhouden
wanneer gebruikt met een
ander type.
o) Gebruikt geen accupack
dat niet bedoeld is
voor gebruik met deze
74
apparatuur.
p) Houd accupacks buiten
het bereik van kinderen.
q) Bewaar de
oorspronkelijke
instructies van het
product voor latere
gebruik.
r) Verwijder het
batterijpakket uit de
apparatuur als het niet in
gebruik is.
s) Volg de juiste procedure
voor afvalverwijdering
na afdanken van dit
apparaat.
SYMBOLEN
Lees de gebruiksaanwijzing
zorgvuldig en zorg ervoor dat u
snapt hoe de bediening werkt
Houd omstanders op afstand
Pas op voor scherpe messen. De
messen blijven draaien als de
motor uitgeschakeld is. Neem
de stekker uit het stopcontact
voordat u onderhoud verricht.
Afgedankte elektrische producten
mogen niet bij het normale
huisafval terechtkomen. Breng deze
producten waar mogelijk naar een
recyclecentrum bij u in de buurt.
Vraag de verkoper of de gemeente
informatie en advies over het
recyclen van elektrische apparatuur.
Batterijen niet weggooien.
Breng lege accu’s naar een
recyclingcentrum of inzamelpunt
voor chemisch afval bij u in de
buurt.
Niet in brand steken
Niet blootstellen aan regen of
water
Draag beschermende
handschoenen
Snoerloze graasmaaier NL
Page 75

Verwijder de batterij uit de
houder voor alle instel-, serviceof onderhoudswerkzaamheden.
De messen blijven nog even
doordraaien nadat de machine
is uitgeschakeld. Wacht tot alle
onderdelen van de machine
helemaal tot stilstand zijn
gekomen voor u deze aanraakt.
Verwijder de sleutel
ONDERDELENLIJST
1. VEILIGHEIDSSLEUTEL
2. SCHAKELHENDEL
3. BOVENSTE HANDVAT
4. SCHROEFKNOP
5. ONDERSTE HANDGREEP
6. GRASOPVANGZAK
7. INSTELHENDEL MAAIHOOGTE
8. GEEP
9. INTELLICUT-KNOP
10. BATTERIJ LAAD INDICATIE
11. AFSCHERMING ACCUPACK
12. VEILIGHEIDSKLEP
13. HENDEL VOOR DE GRASBAK
14. ELEKTRICITEITSSNOER KLEMMEN
15. INDICATOR VULNIVEAU GRASZAK
16. INZETSTUK VOOR MULCHEN
17. ACCU (ZIE FIG. E) *
18. BLADBOUT (ZIE FIG. O1)
19. BLAD (ZIE FIG. O1)
* Sommige afgebeelde of beschreven
toebehoren worden niet meegeleverd.
TECHNISCHE GEGEVENS
Type WG744E, WG744E.9 (740-789 - aanduiding
van machinerie, kenmerkend voor Snoerloze
grasmaaier)
WG744E WG744E.9
Spanning 40V Max (2x20V Max)*
Snijdiameter 40cm
Diameter van
voorwiel
Diameter van
achterwiel
Maaihoogte 20mm-70mm
Hoogte-
instellingen
Capaciteit grasbak 40L
Accutype Lithiumion /
Batterijmodel WA3553(4.0Ah) /
Ladermodel WA3883 /
100-240V~50/60Hz,
Lader cijfer
Oplaadtijd
(Aprox.)
Accu:
2.0 Ah (1pc)
2.0 Ah (2pcs)
4.0 Ah (1pc)
4.0 Ah (2pcs)
Gewicht 16.7kg 15.4kg
*Spanning gemeten zonder belasting. Beginspanning
batterij bereikt maximum 20 volt. Nominale spanning
is 18 volt.
** Uitgang van lader 1 en lader 2 betekent: twee
poorten met dezelfde uitgangsspanning en -stroom.
Secundair1: 20V
Secundair2: 20V
Primair:
, 2.0A**
, 2.0A**
0.5 uur
1 uur
1 uur
2 uur
160mm
240mm
6
/
/
GELUIDSPRODUCTIE
A-gewogen geluidsdruk
A-gewogen geluidsvermogen
LwA: 68.7dB (A)
KpA= 3dB(A)
LwA: 84.3dB (A)
KwA= 3dB(A)
75
Draag oorbescherming.
Snoerloze graasmaaier NL
Page 76

TRILLINGSGEGEVENS
Gewogen trillingswaarde
WAARSCHUWING: De trillings emissie
waarde tijdens het feitelijke gebruik van dit
elektrisch gereedschap kan afwijken van de
opgegeven waarde, afhankelijk van de wijze waarop
het gereedschap wordt gebruikt, zoals in de volgende
voorbeelden:
Hoe het gereedschap wordt gebruikt en welk
materiaal wordt gesneden of geboord.
Of het gereedschap in goede staat verkeerd en
correct wordt onderhouden.
Gebruik van de juiste toebehoren voor het
gereedschap en of deze scherp zijn en in goede staat
verkeren.
De stevigheid van de grip op de handgrepen en het
eventuele gebruik van antivibratie- accessoires.
En of het gereedschap wordt gebruikt waarvoor
het ontworpen is en in overeenstemming met deze
instructies.
Dit gereedschap kan een trillingssyndroom in
de handen en armen veroorzaken als het niet
op de juiste wijze gehanteerd wordt.
WAARSCHUWING: Voor de nauwkeurigheid
moet bij een schatting van het
blootstellingsniveau in de feitelijke
gebruiksomstandigheden rekening worden
76
gehouden met alle delen van de bedrijfscyclus, zoals
het moment waarop het gereedschap wordt
uitgeschakeld en terwijl het gereedschap in werking
is zonder daadwerkelijk gebruikt te worden. Dit kan
het blootstellingsniveau over de totale werkperiode
aanzienlijk verminderen.
Help de blootstelling aan trillingen te minimaliseren.
Gebruik ALTIJD scherpe beitels, boren en messen.
Onderhoud het gereedschap in overeenstemming
met deze instructies en houd het goed gesmeerd
(indien van toepassing).
Schaf antivibratie- accessoires aan wanneer u het
gereedschap geregeld gebruikt.
Plan de werkzaamheden zodat de taken met veel
trillingen over een aantal dagen verspreid worden.
ah=0.41m/s
Onzekerheid K= 1.5 m/s²
2
TOEBEHOREN
WG744E WG744E.9
Accu (WA3553)
Acculader (WA3883)
Grasopvangzak
Inzetstuk voor mulchen
Elektriciteitssnoer klemmen
Wij adviseren u alle accessoires te kopen in de
winkel waar u het gereedschap heeft gekocht. Kijk
op de verpakking van het accessoire voor meer
informatie. Ook het winkelpersoneel kan u helpen
en adviseren.
ASSEMBLAGE EN BEDIENING
ACTIE FIGUUR
MONTAGE
Assembleren van de greepstang
OPMERKING:
in de onderste hendel voor de gewenste
hoogte van de hendel.
Assembleren van grasopvangzak
Assembleren van de grasopvangzak aan
de grasmaaimachine
OPMERKING: Neem het inzetstuk voor
mulchen uit de gazonmaaier, voordat u de
grasverzamelzak plaatst.
OPMERKING: Druk de graszak iets naar
beneden om te controleren of hij volledig
gemonteerd is.
Controleren van de laadtoestand van het
accupack
OPMERKING:
voor het accupack met indicatielampje voor
de accu
Laden van het accupack
OPMERKING: het accupack
wordt onopgeladen geleverd.
Voor de eerste keer maaien moet
het accupack volledig worden
opgeladen.
Laad de twee accu’s altijd op
hetzelfde moment op.
U vindt meer gedetailleerde
informatie in de handleiding voor het
laadapparaat.
Kies één van de twee gaten
Fig. D1 is alleen geschikt
2 /
1 /
1
1
2
Zie Fig.
A1, A2,
A3, A4,
A5
Zie Fig.
B1, B2,
B3, B4
Zie Fig.
C1, C2,
C3
Zie Fig.
D1
Zie Fig.
D2
Snoerloze graasmaaier NL
Page 77

Verwijderen & Plaatsen van het accupack
OPMERKING:
Deze grasmaaier zal alleen werken als
beide accu’s zijn gemonteerd. Gebruik
altijd dezelfde twee accu’s en laad de
twee accu’s op hetzelfde moment op.
Het gebruik van twee verschillende
accu’s of van een niet geheel opgeladen
accu betekent dat het apparaat
slechts zal draaien volgens de laagste
gemeenschappelijke parameter.
BEDIENING
Batterij laad indicatie op de machine
Zie bijzonderheden in het gedeelte
ACCUSTATUS
BEANGRIJK
Deze grasmaaier zal alleen werken
als beide accu’s zijn gemonteerd.
Gebruik altijd dezelfde twee accu’s
en laad de twee accu’s op hetzelfde
moment op.
Als u twee accu’s met verschillend
vermogen gebruikt, zal de machine
alleen draaien volgens de laagste
gemeenschappelijke noemer.
Starten & Stoppen
Kiezen met de werkmodusknop
ECO modus
Kies de ECO-modus bij alledaags maaien,
bij een maximale grashoogte van 25mm
of minder.
TURBO modus
Stel de knop in op de TURBO-modus bij
het maaien van dicht of te lang gras.
Instellen van de maaihoogte
Indicator vulniveau graszak
Lege status: flap zwevend (a)
Volle status: flap omlaag (b)
Zie Fig.
E
Zie
Fig. F
Zie Fig.
G1, G2
Zie Fig.
H1, H2
Zie Fig. I
Zie Fig.
J1
BATTERIJ STATUS (ZIE FIG. F)
Druk vóórdat u start of na gebruik de knop in naast
het vermogensindicatielampje op de machine om
de accucapaciteit te controleren. De accucapaciteit
zal automatisch door de accuvermogensindicator
worden aangegeven.
De indicator controleert en toont de accutoestand als
volgt.
Voor een machine met 2 accupacks met verschillend
vermogen toont het vermogensindicatielampje de
accutoestand van de accu die het minste vermogen
bevat.
Battery power
indicator status
Vijf groene
lampjes branden. (
Twee, drie of vier
groen lampjes
branden.
Er brandt maar
één groen lampje
( )
Er brandt geen
enkel lampje.
Er brandt maar één
lampje tweemaal
per cyclus.
Er brandt maar één
lampje driemaal
per cyclus.
Er brandt maar één
lampje viermaal
per cyclus.
)
Accustatus
De twee accu's zijn geheel
opgeladen.
De twee accu's hebben
restvermogen. Hoe meer
lampjes oplichten, hoe meer
accuvermogen.
Minstens één accu is leeg en
moet worden opgeladen.
Minstens één accu is niet
geheel geïnstalleerd of de
accu is defect.
Tenminste één accu is te
ver ontladen (raadpleeg de
oplaadstatus van de accu).
Laad de twee accu's tegelijk
op voordat u ze opnieuw
gebruikt of opslaat.
Minstens één accu is heet.
Wacht totdat hij is afgekoeld,
voordat u opnieuw opstart.
Het apparaat is overbelast.
Vergroot de maaihoogte of
duw langzamer.
77
Verwijderen/legen van de grasopvangzak
WAARSCHUWING! Controleer
altijd de veiligheidsflap, sluit de
uitlaat voor gebruik. Til nooit de
veiligheidsflap op wanneer de grasmaaier
in gebruik is zonder de grasopvangbak.
Het inzetstuk voor mulchen monteren
Achterafvoer
OPMERKING: Verwijder eerst het
inzetstuk voor mulchen.
Opslag
Zie Fig.
J2
Zie Fig.
K
Zie
Fig. L
Zie Fig.
M1, M2
MAAITIPS
OPMERKING: INSPECTEER DE OPPERVLAKTE
WAAR DE MAAIER GEBRUIKT MOET WORDEN
EN VERWIJDER ALLE STENEN, STOKKEN,
DRAAD, BOTTEN EN ANDER AFVAL DAT DOOR
HET DRAAIENDE MES WEGGEWORPEN ZOU
KUNNEN WORDEN.
1. Maai evenwijdig aan hellingen, niet op en neer.
Wees zeer zorgvuldig als u op een helling van richting
verandert. Maai geen steile hellingen. Zorg ervoor
dat uw voeten stevig staan.
2. Laat de schakelaar los om de maaier “UIT” te
Snoerloze graasmaaier NL
Page 78

schakelen als u over grind gaat (steentjes kunnen
door het mes worden weggeworpen).
3. Zet de maaier op de hoogste snijhoogte als u
maait door ruwe grond of hoog onkruid. Zou u te
veel gras tegelijk verwijderen, dan kan dat resulteren
in het doorslaan van een zekering, waardoor de
maaier stopt.
4. Gebruikt u een graszak in het seizoen waarin het
gras snel groeit, dan kan het gras zich ophopen
in de uitwerpopening. Laat de schakelaar los
om de maaier “UIT” te zetten en verwijder de
veiligheidssleutel. Verwijder de graszak en schud
het gras tot achterin de zak. Verwijder gras en
ander afval dat zich heeft opgehoopt bij de
uitwerpopening. Zet de graszak weer terug.
5. Mocht de maaier abnormaal trillen, laat dan
de schakelaar los om de maaier “UIT” te zetten
en verwijder de veiligheidssleutel. Zoek naar de
oorzaak. Trilling is een waarschuwing voor een
probleem. Gebruik de maaier niet voordat er een
controle is uitgevoerd.
6. LAAT DE SCHAKELAAR ALTIJD LOS OM DE
MAAIER “UIT” TE SCHAKELEN EN VERWIJDER
DE VEILIGHEIDSSLEUTEL ALS U DE MACHINE
ONBEHEERD ACHTER LAAT, ZELFS ALS HET
MAAR EVEN IS.
MAAIGEBIED
Het maaigebied wordt beïnvloed door verscheidene
factoren, zoals de maaihoogte, de vochtigheid van
het gazon, de graslengte en de dichtheid. Overigens
wordt het maaigebied verkleind doordat de maaier
78
tijdens het gebruik te vaak gestart en gestopt wordt.
De tabel hieronder geeft de verhouding tussen de
maaiomstandigheden en het maaigebied weer.
Maaiomstandigheden
Grasconditie Maaihoogte
Bijzonder dun,
droog gras
Dun, droog
gras
* Gebruik met 2 volledig opgeladen accu’s
tegelijkertijd.
TIPS:
1) Aanbevolen wordt om uw gazon vaak te
maaien, met normale tred te lopen, en de
maaier tijdens het gebruik niet te vaak te
starten/stoppen.
2) Om de beste prestatie te behalen dient u voor
twee volledig opgeladen accu‘s tegelijkertijd
te zorgen en altijd 1/3 of minder van de
graslengte af te maaien.
Afsnijlengte
7cm tot 5cm
Afsnijlengte
7cm tot 3cm
Maaigebied
(maximum)
2*20V/4.0Ah
Max. 500m2 *
Max. 250m2 *
Met
accu's
3) Loop langzaam als u lang gras afmaait, zodat
de maaier effectiever werkt, en verwijder het
maaisel grondig.
4) Vermijd maaien van nat gras, anders blijft dit
aan de onderkant van de kap kleven en kan
het maaisel niet worden verzameld of naar
behoren worden verwijderd.
5) Bij nieuw of dik gras dient een grotere
maaihoogte te worden gebruikt. Dit zal de
levensduur van de accu verlengen.
ONDERHOUD
Waarschuwing: stop de maaier en verwijder
de veiligheidspin voordat u de graszak
verwijdert.
OPMERKING: Om er zeker van te zijn dat uw
machine lang meegaat en betrouwbaar blijft, dient
u de volgende onderhoudstaken regelmatig uit te
voeren. Controleer op duidelijk zichtbare defecten,
zoals een loszittend, verbogen of beschadigd mes,
loszittende montages en versleten of beschadigde
onderdelen. Controleer of de afdekkingen en
beschermkappen onbeschadigd zijn en op de
juiste wijze op de grasmaaier bevestigd zijn. Voer
eventueel noodzakelijk onderhoud of noodzakelijke
reparaties uit voordat u de grasmaaier gebruikt.
Wanneer de grasmaaier ondanks regelmatig
onderhoud toch niet werkt, neem contact op met
onze klantenservice voor advies.
HET MES SLIJPEN
HOUD HET MES SCHERP VOOR DE BESTE
PRESTATIES.
DRAAG GOEDE OOGBESCHERMING ALS U
HET MES VERWIJDERT, SLIJPT EN MONTEERT.
ZORG ERVOOR DAT DE VEILIGHEIDSSLEUTEL
VERWIJDERD IS.
Het is meestal voldoende het mes twee keer tijdens
het maaiseizoen te slijpen. Door zand wordt het mes
snel bot. Heeft het gras een zanderige bodem, dan
moet het mes vaker geslepen worden.
VERVANG EEN VERBOGEN OF BESCHADIGD MES
DIRECT.
ALS U HET MES SLIJPT:
1. Zorg ervoor dat het mes gebalanceerd blijft.
2. Slijp het mes op de oorspronkelijke snijhoek.
3. Slijp de randen aan beide kanten van het mes
en verwijder dezelfde hoeveelheid materiaal van
weerszijden.
OPMERKING: 1. Zorg dat de maaimachine is
uitgeschakeld en verwijder de sleutel.
2. Plaats de machine rechtop in de opslagstand.
HET MES SLIJPEN IN EEN BANKSCHROEF (Zie
Fig. N1)
1. Laat de schakelhendel los, wacht tot het mes
gestopt is en verwijder de veiligheidssleutel voordat
u het mes demonteert.
2. Verwijder het mes van de maaier. Zie de
instructies voor het verwijderen en monteren van
het mes.
Snoerloze graasmaaier NL
Page 79

3. Monteer mes N1-1 in een bankschroef N1-2.
4. Draag een veiligheidsbril en pas op dat u zichzelf
niet snijdt.
5. Vijl zorgvuldig de randen van het mes met een
fijne vijl N1-3 of op een slijpsteen.
6. Controleer de balancering van het mes. Zie de
instructies voor de balancering.
7. Zet het mes terug op de maaier en zet het stevig
vast. Zie de instructies hieronder.
HET MES BALANCEREN (Zie Fig. N2)
Controleer de balancering van het mes door het
centrale gat van het mes N2-1 over een spijker of
schroevendraaier N2-2 te zetten, horizontaal in een
bankschroef geklemd N2-3. Als het mes niet in elke
stand blijft staan, vijl dan aan het einde dat naar
beneden komt. Het mes is goed gebalanceerd als het
horizontaal blijft staan.
ONDERHOUD VAN HET MES (Zie Fig. O1, O2)
Vernieuw het metalen mes na 50 uur maaien met
een minimum vanaf 2 jaar, ongeacht de conditie
waarin het mes verkeert. Volg deze werkwijze voor
het verwijderen en vervangen van het mes. Draag
tuinhandschoenen (niet meegeleverd) en gebruik
een moersleutel (niet meegeleverd) om het mes te
verwijderen. Houd het mes (19) vast en schroef de
bout (18) linksom met de moersleutel, en verwijder
vervolgens het blad.
Om opnieuw te monteren, plaatst u het blad (19) met
de snijranden naar de grond gericht. Zet daarna de
moer stevig vast (18).
OPSLAG (Zie Fig. M1, M2 )
Stop de maaier en verwijder de veiligheidssleutel.
Maak de buitenkant van de machine goed
schoon met behulp van een zachte borstel en
een doek. Gebruik geen water, oplosmiddelen of
poetsmiddelen. Verwijder al het gras en andere
resten, met name uit de ventilatieopeningen.
Leg de machine op zijn kant en maak de messen
schoon. Wanneer grasresten vastzitten in de
beschermkap van de messen, kunt u deze
verwijderen met een houten of plastic voorwerp.
Berg de machine op een droge plek op. Plaats geen
andere objecten op de machine.
Om de grasmaaier gemakkelijk op te bergen, geef
de vergrendeling van de handgreep vrij en vouw de
bovenste handgreep op zoals weergegeven op Afb.
M1 en M2.
79
BESCHERMING VAN HET
MILIEU
Afgedankte elektrische producten kunt u niet
met het normale huisafval weggooien. Breng
deze producten, indien mogelijk, naar een
recyclecentrum bij u in de buurt. Vraag de verkoper
of de gemeente naar informatie en advies over het
recyclen van elektrische producten.
Snoerloze graasmaaier NL
Page 80

PROBLEMEN OPLOSSEN
Problemen Herstelhandeling
A. Zorg ervoor dat de veiligheidssleutel geïnstalleerd is en correct geplaatst, en dat de
inschakelknop volledig is ingedrukt.
1. De maaier start niet
als de schakelhendel
wordt bediend.
2. De motor stopt
tijdens het maaien.
3. De maaimachine
werkt maar het
maaien verloopt niet
naar tevredenheid,
of maait niet het hele
gazon.
4. De maaier is
moeilijk te duwen.
80
5. De maaier is
abnormaal luidruchtig
en trilt.
6. LED’s van de
acculader branden
niet.
B. Laat de schakelaarhendel los om de maaier uit te zetten. Trek de veiligheidssleutel
uit, keer de maaier om en controleer of het blad vrij kan draaien. Als dat niet zo is,
retourneer dat dan naar een geautoriseerde onderhoudsmechanicus. Het blad moet
vrij kunnen draaien.
C. Is de accu volledig opgeladen? Koppel de oplader aan op de stroomtoevoer en
wacht tot de groene lamp oplicht.
A. Laat de schakelaarhendel los om de maaier uit te zetten. Trek de veiligheidssleutel
uit, keer de maaier om en controleer of het blad vrij kan draaien. Als dat niet zo is,
retourneer dat dan naar een geautoriseerde onderhoudsmechanicus. Het blad moet
vrij kunnen draaien.
B. Verhoog de maaihoogte van de wielen naar de hoogste positie en start de maaier.
C. Is de accu volledig opgeladen? Koppel de oplader aan op de stroomtoevoer en
wacht tot de groene lamp oplicht.
D. Voorkom overbelasting van de maaier. Ga langzamer maaien of verhoog de
maaihoogte. Of doe beide.
A. Is de accu volledig opgeladen? Koppel de oplader aan op de stroomtoevoer en
wacht tot de groene lamp oplicht.
B. Laat de schakelaarhendel los om de maaier uit te zetten. Trek de
veiligheidssleutel uit. Keer de maaier om en controleer: Het blad op scherpte –
houd het blad scherp. Het dek en de uitwerpgoot op blokkades.
C. De aanpassing van de wielhoogte kan te laag zijn ingesteld voor de staat van het
gras. Verhoog de maaihoogte.
A. Verhoog de maaihoogte om de wrijving tussen het dek en het gras te
verminderen. Controleer of de wielen allemaal vrij kunnen draaien.
A. Laat de schakelaarhendel los om de maaier uit te zetten. Trek de
veiligheidssleutel uit. Draai de maaier op zijn kant en controleer het blad om er
zeker van te zijn dat het niet gebogen of beschadigd is. Als het blad beschadigd
is, vervangt u het door een vervangend blad van. Als de onderzijde van het dek
beschadigd is, brengt u de maaier terug naar een geautoriseerd servicecentrum
van.
B. Als er geen zichtbare schade aan het blad is en de maaier blijft trillen: Laat de
schakelaarhendel los om de maaier uit te zetten, trek de veiligheidssleutel uit en
verwijder het blad. Draai het blad 180 graden en bevestig het weer. Als de motor
nog steeds trilt, brengt u de maaier terug naar een geautoriseerd servicecentrum
van.
A. Controleer dat de stekker goed in het stopcontact zit.
B. Vervang de lader
7. De acculader-LED
wordt niet groen.
8. De maaier pakt
het gemaaide gras
niet op.
9. Bij mulchen
zijn snoeisporen
zichtbaar.
A. De accu moet worden nagekeken. Breng hem naar een geautoriseerd
onderhoudscentrum.
A. Verwijder de mulchplaat als u hem inpakt.
B. De grasopvang zit verstopt. Laat de schakelaarhendel los om de maaier uit te
zetten. Trek de veiligheidssleutel uit. Haal het gemaaide gras uit de grasopvang.
C. Gras wordt teveel weggemaaid. Verhoog de maaihoogte van de wielen zodat het
gras minder kort wordt gemaaid.
D. De zak is vol. Leeg de zak vaker.
A. Het gras wordt te kort gemaaid. Verhoog de maaihoogte van de wielen om de
lengte van het maaisel te reduceren. Maai niet meer dan 1/3 van de totale lengte.
B. Controleer of de bladen scherp zijn. Houd de bladen altijd scherp.
Snoerloze graasmaaier NL
Page 81

10. Laag of
verminderd
arbeidsvermogen na
vele malen gebruik.
11. De LED van de
accu-oplader knippert
rood en de accu
kan niet worden
opgeladen.
A. Retourneer het apparaat naar een onderhoudscentrum – misschien is een
nieuwe accu nodig.
A. De accu raakt na continugebruik oververhit. Haal de accu uit de oplader en laat
hem tot 42°C of minder afkoelen.
CONFORMITEITVERKLARING
Wij,
POSITEC Germany GmbH
Grüner Weg 10, 50825 Cologne, Germany
Verklaren dat het product,
Beschrijving WORX Snoerloze grasmaaier
Type WG744E, WG744E.9 (740-789 -
aanduiding van machinerie, kenmerkend voor
Snoerloze grasmaaier)
Functie Gras maaien
Overeenkomt met de volgende richtlijnen,
2006/42/EC, 2014/30/EU, 2011/65/EU,
2000/14/EC gewijzigd door 2005/88/EC
2000/14/EC gewijzigd door 2005/88/EC:
- Procedure beoordeling conformiteit volgens
Annex VI
- Niveau gemeten geluidsvermogen 84.3 dB(A)
- Opgegeven, gegarandeerde niveau
geluidsvermogen 88 dB(A)
De betrokken aangemelde instantie
Naam: Intertek Testing & Certification Ltd
(aangemelde instantie 0359)
Adres: Davy Avenue, Knowlhill, Milton Keynes,
MK5 8NL
Standaards in overeenstemming met,
EN 60335-1
EN 60335-2-77
EN 62233
EN ISO 3744
EN 55014-1
EN 55014-2
De persoon die bevoegd is om het technische
bestand te compileren,
Naam Marcel Filz
Adres Positec Germany GmbH
Grüner Weg 10, 50825 Cologne, Germany
2017/12/19
Allen Ding
Plaatsvervangend Chief Ingenieur,
Testen en Certificering
Positec Technology (China) Co., Ltd
18, Dongwang Road, Suzhou Industrial
Park, Jiangsu 215123, P. R. China
81
Snoerloze graasmaaier NL
Page 82

INSTRUKCJA ORYGINALNA
BEZPIECZEŃSTWO
PRODUKTU
Ogólne ostrzeżenia
dotyczące bezpieczeństwa
UWAGA Należy przeczytać
wszystkie przepisy. Błędy
w przestrzeganiu następujących
przepisów mogą spowodować
porażenie prądem, pożar i/lub
ciężkie obrażenia ciała.
Należy uważnie przeczytać
podane instrukcje dla
bezpieczeństwa podczas
działania maszyny.
Należy dobrze przechowywać
te przepisy.
- Niniejsze urządzenie
nie jest przeznaczone
82
do użytku przez osoby
(wliczając w to dzieci) z
obniżonymi zdolnościami
zycznymi, sensorycznymi
lub umysłowymi
oraz nieposiadające
doświadczenia i wiedzy na
temat urządzenia, chyba
że zostaną będą one
nadzorowane lub zostaną
poinstruowane w zakresie
obsługi urządzenia przez
osobę odpowiedzialną za ich
bezpieczeństwo.
- Należy zadbać o to, by dzieci
nie bawiły się urządzeniem.
- Urządzenie może być
zastosowane wyłącznie z
zespołem zasilania, który
był dostarczony z tym
urządzeniem.
WAŻNE
PRZED UŻYCIEM NALEŻY
UWAŻNIE PRZECZYTAĆ
NALEŻY ZACHOWAĆ
DO WYKORZYSTANIA W
PRZYSZŁOŚCI
Zalecenia dotyczące
bezpiecznej obsługi
Podstawowe szkolenie
użytkownika
a) Uważnie przeczytaj niniejszą
instrukcję. Zapoznaj się z
elementami sterującymi oraz
zasadami prawidłowego
użytkowania urządzenia.;
b) Nie pozwalaj używać kosiarki
dzieciom lub osobom,
które nie zapoznały się
niniejszą instrukcją. Przepisy
miejscowe mogą regulować
minimalny wiek użytkownika
podobnych urządzeń;
c) Zaprzestań użytkowania
maszyny, gdy w pobliżu
znajdują się ludzie, w
szczególności dzieci, lub
zwierzęta domowe;
d) Zapamiętaj, że operator
lub użytkownik jest
odpowiedzialny za wypadki
lub zagrożenia dla innych
ludzi lub ich mienia.
Bezprzewodowa kosiarka do trawników
PL
Page 83

Przygotowanie
a) Podczas koszenia należy
zawsze nosić odpowiednio
zakryte obuwie i spodnie
z długimi nogawkami. Nie
wolno kosić będąc boso lub
w sandałach z odkrytymi
palcami;
b) Należy dokładnie sprawdzić
teren, gdzie używane
będzie urządzenie i usunąć
wszystkie obiekty, które
mogą być wyrzucane przez
maszynę;
c) Przed uruchomieniem kosiarki
należy zawsze sprawdzić, czy
ostrza, śruby mocujące ostrza
oraz zespół tnący nie uległy
zużyciu lub uszkodzeniu.
Wszystkie zużyte bądź
uszkodzone ostrza i śruby
należy wymieniać razem,
aby zapewnić równomierną
eksploatację tych elementów;
Należy wymienić uszkodzone
i nieczytelne etykiety.
Działanie
a) Kosić należy wyłącznie
w świetle dziennym lub
przy dobrym oświetleniu
sztucznym;
b) Należy w miarę możliwości
unikać koszenia wilgotnej
trawy;
c) Podczas koszenia na
pochyłym terenie należy
uważać, aby nie stracić
równowagi;
d) Należy chodzić, nigdy nie
należy biegać;
e) Podczas pracy z maszynami
poruszającymi się na kołach,
koszenie należy prowadzić w
poprzek stoków, nigdy w górę
i w dół;
f) Podczas zmiany kierunku
koszenia na terenie pochyłym
należy zachować szczególną
ostrożność;
g) Nie wolno kosić nadmiernie
nachylonych stoków;
h) Podczas cofania lub
przyciągania kosiarki do
siebie należy zachować
szczególną ostrożność;
i) W przypadku konieczności
nachylenia kosiarki w
celu jej przeniesienia lub
przekroczenia podłoża innego
niż trawa, a także podczas
transportu kosiarki do miejsca
pracy, należy wyłączyć
urządzenie;
j) Nie wolno używać urządzenia
z uszkodzonymi osłonami lub
bez rmowych zabezpieczeń,
np. owiewek kierunkowych i/
lub odbieraków ściętej trawy;
k) Silnik kosiarki należy
uruchamiać zgodnie z
instrukcją, odsuwając stopy
od ostrza(-y);
l) Nie należy nachylać kosiarki
podczas włączania silnika,
poza sytuacją, gdy kosiarka
musi zostać przechylona
podczas uruchamiania. w
83
Bezprzewodowa kosiarka do trawników
PL
Page 84

takim przypadku, nie należy
nachylać jej bardziej niż jest
to absolutnie konieczne i
unieść wyłącznie część z
drugiej strony operatora;
m) Nie wolno zbliżać ani
wkładać rąk bądź stóp do/
pod części obrotowe kosiarki.
W przypadku kosiarek
obrotowych należy zawsze
zachowywać odpowiednią
odległość od otworu
wylotowego;
n) Nie wolno dotykać ostrzy,
jeśli urządzenie jest
podłączone do zasilania, a
ostrza nie zostały całkowicie
zatrzymane;
o) Nie należy uruchamiać
kosiarki do trawników, stojąc
84
przed wylotem skoszonej
trawy.
p) Nie należy przenosić kosiarki
do trawy, przy uruchomionym
źródle zasilania.
q) Zatrzymaj kosiarkę do trawy i
zdejmij urządzenie blokujące.
Upewnij się, że zostały
całkowicie zatrzymane
wszystkie części ruchome.
– po pozostawieniu maszyny
bez nadzoru,
– przed usunięciem blokady,
– przed przeglądem,
czyszczeniem lub innymi
pracami,
– po zderzeniu z twardym
przedmiotem. Przed
ponownym uruchomieniem i
używaniem kosiarki do trawy,
sprawdź maszynę pod kątem
uszkodzeń
gdy narzędzie ogrodowe
zaczyna wibrować w nietypowy
sposób (natychmiast zbadać
tego przyczynę).
– sprawdź, czy nie ma
uszkodzeń.
– wymień lub napraw wszelkie
uszkodzone części.
– sprawdź i dokręć wszelkie
poluzowane części.
Konserwacja i przechowywanie
a) Aby zachować dobry stan
techniczny kosiarki i zapewnić
bezpieczeństwo pracy, należy
okresowo dokręcać wszystkie
nakrętki i śruby;
b) Kosiarkę należy często
poddawać przeglądowi
pod kątem zużycia
bądź pogorszenia stanu
technicznego;
c) Dla bezpieczeństwa
należy wymieniać zużyte
lub uszkodzone części.
Należy używać wyłącznie
oryginalnych części
zamiennych i akcesoriów.
d) Podczas regulacji kosiarki
do trawy należy zachować
ostrożność, aby zapobiec
uchwyceniu palców pomiędzy
ruchomymi nożami i stałymi
częściami kosiarki do trawy.
Bezprzewodowa kosiarka do trawników
PL
Page 85

e) Przed przechowywaniem
należy zaczekać na
ostygnięcie kosiarki do trawy.
f) Podczas obsługi noży należy
uważać, ponieważ nawet przy
wyłączonym źródle zasilania,
noże mogą się nadal
poruszać.
INSTRUKCJA BEZPIECZEŃSTWA
DOTYCZĄCA MODUŁU
AKUMULATORA
a) Nie demontuj, nie otwieraj
lub nie niszcz ogniw
pomocniczych lub modułu
akumulatora.
b) Nie zwieraj ogniwa lub
modułu akumulatora. Nie
przechowuj ogniw lub
modułu akumulatora w
sposób bezładny w pudle
lub szuadzie, gdzie mogą
się wzajemnie zewrzeć lub
ulec zwarciu przez inne
metalowe przedmioty.
Nie używany akumulator
należy trzymać z daleka od
spinaczy, monet, kluczy,
gwoździ, śrub lub innych
małych przedmiotów
metalowych, które mogłyby
spowodować zmostkowanie
kontaktów. Zwarcie pomiędzy
kontaktami akumulatora może
spowodować oparzenia lub
pożar.
c) Nie narażaj ogniw lub
modułu akumulatora
na działanie ciepła lub
ognia. Unikaj składowania
w miejscach pod
bezpośrednim działaniem
światła słonecznego.
d) Nie narażaj ogniw lub
modułu akumulatora na
uderzenia mechaniczne.
e) W razie wycieku z ogniwa,
nie dopuść, aby płyn
zetknął się ze skórą lub
dostał się do oczu. Jeśli
już nastąpił kontakt z
płynem, przemyj skażoną
powierzchnię dużą ilością
wody i zwróć się o pomoc
medyczną.
f) Nie używaj ogniwa lub
modułu akumulatora nie
przeznaczonego do pracy z
danym urządzeniem.
g) Utrzymuj ogniwa i moduł
akumulatora w czystości i
w stanie suchym.
h) Jeśli zaciski ogniwa lub
akumulatora zostały
zanieczyszczone, oczyść je
czystą i suchą szmatką.
i) Ogniwa pomocnicze i
moduł akumulatora należy
przed użyciem naładować.
Zawsze używaj właściwej
ładowarki i przestrzegaj
instrukcji ładowania
zawartej w instrukcji
obsługi dostarczonej przez
producenta urządzenia.
j) Nie pozostawiaj modułu
85
Bezprzewodowa kosiarka do trawników
PL
Page 86

akumulatora na długie
ładowanie, jeśli go nie
używasz.
k) Po dłuższym okresie
składowania może być
niezbędne kilkukrotne
naładowanie i rozładowanie
ogniw lub modułu
akumulatora, aby uzyskać
optymalną wydajność.
l) Ogniwa pomocnicze
oraz moduł akumulatora
osiągają największą
wydajność podczas pracy
w normalnej temperaturze
pokojowej (20oC ± 5oC).
m) Podczas utylizacji
akumulatorów
należy oddzielić od
siebie akumulatory o
różnych systemach
86
elektromechanicznych.
n) Akumulatory należy
ładować tylko w
ładowarkach, które poleci
producent. Nie należy
używać ładowarki innej
niż dostarczonej wraz z
narzędziem. Ładowarka
odpowiednia dla jednego
rodzaju akumulatorów może
stworzyć ryzyko pożaru, gdy
użyje się jej z innym rodzajem
akumulatorów.
o) Nie używaj ogniwa lub
modułu akumulatora nie
przeznaczonego do pracy z
danym urządzeniem.
p) Trzymaj ogniwa i moduł
akumulatora poza
zasięgiem dzieci.
q) Zachowaj oryginalne
instrukcje produktu do
wglądu.
r) Kiedy to możliwe, wyjmuj
moduł akumulatora, jeśli
urządzenia się nie używa.
s) Zużyte ogniwa i
akumulatory utylizuj
zgodnie z zasadami
gospodarki odpadami.
SYMBOLE
Przed rozpoczęciem używania
tej maszyny należy przeczytać
instrukcje obsługi
Należy zachować bezpieczną
odległość o przechodniów.
Należy uważać na ostrza. Po
wyłączeniu silnika ostrza nadal
obracają się- przed rozpoczęciem
prac konserwacyjnych należy
wyjąć mechanizm blokujący.
Odpady wyrobów elektrycznych
nie powinny być wyrzucane
razem z odpadami gospodarstwa
domowego. Należy korzystać
z recyklingu, jeśli istnieje
odpowiednia infrastruktura. Porady
dotyczące recyklingu można
uzyskać u władz lokalnych lub
sprzedawcy detalicznego.
Bezprzewodowa kosiarka do trawników
PL
Page 87

Nie wyrzucać akumulatorków,
Oddawać zużyte baterie do
odpowiednich punktów zbierania
lub recyklingu.
Nie wrzucać do ognia
Nie wystawiać na działanie
deszczu lub wody
Należy zakładać okulary ochronne
Wyjąć akumulator z gniazda przed
dokonaniem jakiejkolwiek regulacji,
serwisowania lub konserwacji.
Noże obracają się jeszcze przez
jakiś czas po wyłączeniu silnika
narzędzia ogrodowego i mogą
spowodować obrażenia. Przed
dotknięciem elementów maszyny
należy odczekać do momentu ich
całkowitego zatrzymania się.
LISTA KOMPONENTÓW
1. KLUCZ BEZPIECZEŃSTWA
2. DŹWIGNIA WŁĄCZNIKA
3. GÓRNY UCHWYT
4. POKRĘTŁO UCHWYTU
5. UCHWYT DOLNY
6. WOREK NA TRAWĘ
7. DŹWIGNIA REGULACJI WYSOKOŚCI CIĘCIA
8. UCHWYT
9. POKRĘTŁO INTELIGENTNEGO KOSZENIA
10. WSKAŹNIK NAŁADOWANIA AKUMULATORA
11. POKRYWA AKUMULATORA
12. KLAPA BEZPIECZEŃSTWA
13. UCHWYT POJEMNIKA NA ŚCIĘTĄ TRAWĘ
14. ZACISKI KABLOWE
15. WSKAŹNIK NAPEŁNIENIA POJEMNIKA NA TRAWĘ
16. WKŁADKA DO MULCZOWANIA
17. AKUMULATOR (PATRZ RYS. E) *
18. NAKRĘTKA OSTRZA (PATRZ RYS. O1)
19. OSTRZE (PATRZ RYS. O1)
* Nie wszystkie pokazane na ilustracji akcesoria są
dostarczane standardowo.
87
Wyjąć klucz
Bezprzewodowa kosiarka do trawników
DANE TECHNICZNE
Typ WG744E, WG744E.9 (740-789 - przeznaczenie
maszyny, kosiarka do trawy z zasilaniem bateryjnym)
WG744E WG744E.9
Napięcie 40V Maks (2x20V Maks)*
Szerokość cięcia 40cm
Średnica kół
przednich
Średnica kół tylnych
Zakres wysokości
cięcia
Pozycje wysokości
cięcia
Pojemność
zbiornika na trawę
Typ baterii Jonowo-litowy /
Model baterii WA3553(4.0Ah) /
Model ładowarki WA3883 /
160mm
240mm
20mm-70mm
6
40L
PL
Page 88

Wejście:100-
Parametry
ładowarki
Czas ładowania
(Około.)
Akumulator:
2.0 Ah (1pc)
2.0 Ah (2pcs)
4.0 Ah (1pc)
4.0 Ah (2pcs)
Waga urządzenia 16.7kg 15.4kg
*Napięcie mierzone bez obciążenia roboczego.
Początkowe napięcie akumulatora osiąga maksymalnie
20 V. Napięcie nominalne to 18 V.
** Wyjście ładowarki 1 wyjście 2 oznaczają dwa porty
z jednakowymi wartościami napięcia i natężenia prądu
wyjściowego.
240V~50/60Hz,
Wydajność1:20V
, 2.0A**
Wydajność2:20V
, 2.0A**
0.5 godz.
1 godz.
1 godz.
2 godz.
/
/
rozłożenia używania narzędzi wytwarzających wysoki
poziom drgań na kilka dni.
Niepawidłowe prowadzenie tego narzędzia może
spowodować syndrom wibracji rąk.
OSTRZEŻENIE: W szczególności, oszacowanie
poziomu ekspozycji w rzeczywistych warunkach
używania powinno brać także pod uwagę wszystkie
elementy cyklu działania, takie jak czasy wyłączenia
narzędzia i czas bezczynności, ale nie rzeczywiście
wykonywaną pracę. Może to znacznie zmniejszyć
poziom ekspozycji w całym okresie pracy.
Pomoc w minimalizacji narażenia na wibracje.
Należy ZAWSZE używać ostrych dłut, wierteł i ostrzy.
Narzędzie należy konserwować z godnie z instrukcjami i
prawidłowo smarować (w odpowiednich miejscach).
Jeśli narzędzie jest używane regularnie należy zakupić
akcesoria antywibracyjne.
Należy zaplanować harmonogram pracy w celu
rozłożenia używania narzędzi wytwarzających wysoki
poziom drgań na kilka dni.
DANE DOTYCZĄCE
HAŁASU
Ważone ciśnienie akustyczne
Ważona moc akustyczna
88
Używać ochrony słuchu.
INFORMACJE DOTYCZĄCE
DRGAŃ
Typowa wibracja ważona
OSTRZEŻENIE: Wartość emisji wibracji w czasie
rzeczywistego używania elektronarzędzia może
się różnić od zadeklarowanej, w zależności od sposobu
używania narzędzia w następujących przykładach i
innych sposobach używania narzędzia:
Pomoc w minimalizacji narażenia na wibracje.
Należy ZAWSZE używać ostrych dłut, wierteł i ostrzy.
Narzędzie należy konserwować z godnie z instrukcjami i
prawidłowo smarować (w odpowiednich miejscach).
Jeśli narzędzie jest używane regularnie należy zakupić
akcesoria antywibracyjne.
Należy zaplanować harmonogram pracy w celu
ah= 0.41m/s
Niepewność K= 1.5 m/s²
LwA: 68.7dB (A)
KpA= 3dB(A)
LwA: 84.3dB (A)
KwA= 3dB(A)
2
AKCESORIA
WG744E WG744E.9
Akumulator (WA3553)
Ładowarka (WA3883)
Worek na trawę
Wkładka do mulczowania
Zaciski kablowe
Zaleca się zakup wszystkich akcesoriów w sklepie, gdzie
zakupiono narzędzie. Więcej szczegółów można znaleźć
w dodatkowym opakowaniu. Personel sklepu może
również udzielić pomocy i porad.
2 /
1 /
1
1
2
Bezprzewodowa kosiarka do trawników
PL
Page 89

MONTAŻ I OBSŁUGA
DZIAŁANIE
MONTAŻ
Montaż uchwytu
UWAGA: W celu ustawienia żądanej
wysokości uchwytu należy wybrać jeden z
dwóch otworów w uchwycie dolnym.
Montaż worka na trawę
Montaż worka na trawę w kosiarce
UWAGA:
kosiarki przed zamontowaniem worka na trawę.
UWAGA:
upewnić się, że został całkowicie zainstalowany.
Sprawdzanie stanu naładowania akumulatora
UWAGA
torka wyposażonego w kontrolkę świetlną.
Ładowanie akumulatora
UWAGA: akumulator jest dostarczany w
stanie nienaładowanym. Przed pierwszym
użyciem kosiarki należy w pełni naładować
akumulator.
Zawsze ładować oba akumulatory
jednocześnie. Więcej szczegół znajduje się
w instrukcji obsługi ładowarki.
Dopasowanie/wyjęcie baterii
UWAGA:
Ta kosiarka będzie działać tylko, gdy
zainstalowane są 2 akumulatory. Zawsze
używać dwóch takich samych akumulatorów i ładować je równocześnie.
Jeżeli używane są dwie baterie o różnej
mocy, urządzenie będzie działało tylko z
niższą wspólną wartością mocy.
DZIAŁANIE
Wskaźnik mocy akumulatora na urządzeniu
W celu uzyskania szczegółów należy zapoznać
się z rozdziałem STAN AKUMULATORKA
WAŻNE
Jeżeli świeci się tylko jedna kontrolka
oznacza to, że przynajmniej jedna bateria
jest z wyładowana i należy ją doładować.,
jeśli kosiarka nadal może kosić trawę.
Kontynuowanie używania kosiarki z
rozładowaną baterią może zmniejszyć
żywotność i wydajność baterii.
Jeśli nie świeci żadna kontrolka oznacza
to, że przynajmniej jedna bateria nie jest
w pełni doładowana lub jest uszkodzona,
sprawdzić, czy są dobrze założone na
swoim miejscu.
Wyjmij wkładkę do mulczowania z
Naciśnij lekko worek na trawę, aby
: Fig. D1 dotyczy wyłącznie akumula-
RY-
SUNEK
Patrz
Rys. A1,
A2, A3,
A4, A5
Patrz
Rys. B1,
B2, B3,
B4
Patrz
Rys. C1,
C2, C3
Patrz
Rys. D1
Patrz
Rys. D2
Patrz
Rys. E
Patrz
Rys. F
Uruchamianie & Zatrzymywanie
Wybór pokrętła trybu pracy
Tryb ECO
Tryb ECO należy wybrać w przypadku koszenia
w codziennych warunkach, gdy maksymalna
wysokość trawy wynosi 25mm lub mniej.
Tryb TURBO
Należy ustawić pokrętło w trybie TURBO w
przypadku koszenia gęstej lub przerośniętej
trawy.
Regulacja wysokości cięcia
Wskaźnik napełnienia pojemnika na trawę
Stan Pusty: klapka w górę (a)
Stan Pełny: klapka w dół (b)
Demontaż/opróżnianie worka na trawę
OSTRZEŻENIE! Przed użyciem
należy zawsze sprawdzić klapkę
bezpieczeństwa przy wylocie. Nigdy
nie podnosić klapki bezpieczeństwa, gdy
kosiarka jest używana bez worka na trawę.
Montaż wkładki do mulczowania
Tylne wyrzucanie trawy
UWAGA: Najpierw wyjmij wkładkę do mulczowania
Przechowywanie
DIODY LED STANU BATERII (PATRZ RYS. F)
Przed uruchomieniem lub po eksploatacji urządzenia
naciśnij przycisk znajdujący się obok kontrolki zasilania
na urządzeniu, aby sprawdzić pojemność akumulatora. Podczas pracy pojemność akumulatora będzie
wskazywana automatycznie przez wskaźnik naładowania
akumulatora.
Wskaźnik nieustannie mierzy i wyświetla stan akumulatora w następujący sposób.
W przypadku urządzeń z 2 akumulatorami o różnej mocy,
wskaźnik zasilania pokazuje stan naładowania akumulatorka o niższym poziomie naładowania.
Stan kontrolek
LED baterii
Świeci pięć zielonych kontrolek (
)
Dwie baterie są w pełni
doładowane.
Stan baterii
Patrz
Rys. G1,
G2
Patrz
Rys. H1,
H2
Patrz
Rys. I
Patrz
Rys. J1
Patrz
Rys. J2
Patrz
Rys. K
Patrz
Rys. L
Patrz
Rys. M1,
M2
89
Bezprzewodowa kosiarka do trawników
PL
Page 90

Świecą dwie, trzy
lub cztery zielonych
kontrolek.
Świeci wyłącznie
jedna zielona kontrolka ( )
Nie świeci żadna
kontrolka.
Wyłącznie jedna
kontrolka świeci
dwa razy w cyklu.
Wyłącznie jedna
kontrolka świeci trzy
razy w cyklu.
Wyłącznie jedna
kontrolka świeci
cztery razy w cyklu.
Dwie baterie są w czynności.
Większa ilość świecących
kontrolek oznacza wyższy stan
doładowania baterii.
Przynajmniej jedna bateria
jest wyładowana i należy ją
doładować.
Nie zainstalowano przynajmniej jednej baterii lub jest
uszkodzona.
Przynajmniej jedna bateria jest
wyładowana (skontrolować stan
naładowania), przed ponownym
użyciem lub składowaniem
należy naładować dwie baterie.
Przynajmniej jedna bateria jest
gorąca, poczekać do obniżenia
temperatury przed ponownym
użyciem.
Maszyna jest obciążona.
Podnieść wysokość koszenia
lub zwolnić ruch.
WSKAZÓWKI DOTYCZĄCE
PRZEMIESZANIA
UWAGA: NALEŻY ZAWSZE SPRAWDZIĆ
POWIERZCHNIĘ, GDZIE UŻYWANA JEST
KOSIARKA I USUŃ WSZYSTKEI KAMIENIE,
90
PATYKI, PRZEWODY, METALOWE I INNE
ZANIECZYSZCZENIA, KTÓRE MOGŁYBY ZOSTAĆ
WYRZUCONE PRZEZ OBRACAJĄCY SIĘ NÓŻ.
1. Należy przemieszczać się w poprzek stoków, nigdy
w górę i w dół. Należy zachować szczególną uwagę
podczas zmiany kierunku na stokach. Nie należy
przemieszczać się na zbyt stromych stokach. Należy
zawsze utrzymać dobre oparcie dla stóp.
2. Zwolnij dźwignię włącznika w celu “WYŁĄCZENIA”
kosiarki w czasie przemieszczania się w poprzek
zapiaszczonych obszarów (nóż może wyrzucać kamyki).
3. Podczas przemieszczania się na twardym gruncie lub w
wysokich chwastach należy ustawić kosiarkę na pozycję
najwyższej wysokości cięcia. Jednorazowe usunięcie
zbyt dużej ilości trawy może spowodować wyłączenie
bezpiecznika obwodu, a w rezultacie zatrzymanie kosiarki.
4. Jeśli worek na trawę jest używany w okresie szybkiego
wzrostu, trawa może blokować szczelinę wylotową.
Zwolnij dźwignię włącznika na pozycję “WYŁĄCZ” i
wyjmij kluczyk zabezpieczenia. Wyjmij worek na trawę
i wytrząśnij trawę, aż do spodu worka. Usuń także
wszystkie kawałki trawy lub zanieczyszczeń, które mogą
się zebrać w okolicy szczeliny. Załóż ponownie worek na
trawę.
5. Jeśli kosiarka zaczyna nienormalnie drgać, zwolnij
dźwignię włącznika w celu przełączenia kosiarki do
pozycji “WYŁĄCZ” i wyjmij kluczyk zabezpieczenia.
Sprawdź natychmiast przyczynę drgań. Drgania
oznaczają problem. Nie należy posługiwać się kosiarką,
aż do sprawdzenia maszyny.
6. NALEŻY ZAWSZE ZWOLNIĆ DŹWIGNIĘ
PRZEŁĄCZNIKA W CELU PRZEŁĄCZENIA
KOSIARKI DO POZYCJI “WYŁĄCZ” I WYJĄĆ
KLUCZYK ZABEZPIECZENIA W CZASIE
POZOSTAWIANIA KOSIARKI BEZ NADZORU
NAWET NA KRÓTKO.
WIELKOŚĆ POWIERZCHNI
KOSZENIA
Na wielkość powierchni koszenia ma wpływ kilka
czynników, którymi są: wysokość koszenia, wilgotność
trawnika, długość źdźbła trawy oraz gęstość trawy.
Częste uruchamianie i wyłączenia kosiarki podczas
koszenia trawnika, ma również wpyłw na zmiejszenie
wielkości skoszonej powierzchni.
Zależność pomiędzy warunkami koszenia i wielkością
skoszonej powierzchni podano w poniższej tabeli.
Warunki koszenia
Stan
trawnika
Bardzo
rzadki
trawnik
i suchy
trawnik
Rzadki
i suchy
trawnik
* z jednoczesnym użyciem 2 całkowicie
naładowanych akumulatorów
RADY:
1) Zaleca się kosić trawę, w krótszych odstępach
czasu, poruszać się normalnym tempem i nie
uruchamiać lub wyłączać często kosiarki.
2) W celu osiągnięcia maksymalnej wydajności
kosiarki, prosimy o jednoczesne używanie dwóch
całkowicie naładowanych akumulatorów i zawsze
kosić maksymalnie do 1/3 wysokości trawnika.
3) Podczas koszenia wysokiej trawy należy chodzić
pomału, czym zagwarantujemy skuteczne koszenie
i należyte odprowadzanie skoszonej trawy.
4) Wystrzegać się koszenia wigotnej trawy. Trawa
w takim stanie będzie przylegać do dolnej części
mechanizmu koszenia a skoszona trawa nie byłaby
należycie gromadzona i odprowadzana.
5) Przy koszeniu nowego lub gęstego trawnika należy
zastosować większą wysokość koszenia, dzięki
czemu wydłuży się zakres pracy akumulatorów.
Wysokość
koszenia
od 7cm do
5cm
od 7cm do
3cm
Skoszona
powierzchnia
(maksymalnie)
Z akumulatorkami
2*20V/4.0Ah
do 500m2 *
do 250m2 *
Bezprzewodowa kosiarka do trawników
PL
Page 91

KONSERWACJA
OSTRZEŻENIE: Kosiarkę należy zatrzymać i
wyjąć kluczyk zabezpieczenia, przed wyjęciem
worka na trawę.
UWAGA: Aby zapewnić długie i skuteczne działanie
należy regularnie przeprowadzać następujące procedury
konserwacji. Należy sprawdzać widoczne defekty, takie
jak luźnye, nieprawidłowo ulokowany lub uszkodzony
nóż, luźne uszczelnienia i zużyte lub uszkodzone
komponenty. Należy sprawdzić, czy pokrywy i osłony
nie są uszkodzone i czy są prawidłowo zainstalowane
w kosiarce. Przed rozpoczęciem używania kosiarki
należy przeprowadzać wszystkie niezbędne czynności
konserwacyjne lub naprawy. Jeśli nie można wykonać
normalnych czynności konserwacji kosiarki w celu
uzyskania porady należy zadzwonić na linię pomocy
klienta.
OSTRZENIE NOŻA
ABY ZAPEWNIĆ NAJLEPSZĄ WYDAJNOŚĆ
KOSIARKI, NÓŻ POWINIEN BYĆ OSTRY.
PODCZAS WYJMOWANIA, OSTRZENIA I
INSTALOWANIA NOŻA NALEŻY ZAKŁADAĆ
ODPOWIEDNIĄ OSŁONĘ OCZU. NALEŻY
SPRAWDZIĆ, CZY WYJĘTY ZOSTAŁ KLUCZYK
ZABEZPIECZENIA.
W normalnych okolicznościach w ciągu sezonu
wystarcza dwukrotne ostrzenie noża. Piasek może
powodować szybkie tępienie noża. Jeśli trawnik
jest zapiaszczony, może być wymagane częstsze
ostrzeżenie.
WYGIĘTY LUB USZKODZONY NÓŻ NALEŻY
WYMIENIĆ NIEZWŁOCZNIE.
KIEDY NALEŻY OSTRZYĆ NÓŻ:
1. Upewnij się, że nóż jest prawidłowo wyważony.
2. Naostrz nóż pod prawidłowym kątem.
3. Naostrz krawędzie tnące po obu stronach noża,
zdejmując po obu stronach równą ilość materiału.
UWAGA: 1. Należy upewnić się, że kosiarka jest
wyłączona oraz należy wyjąć klucz.
2. Umieścić kosiarkę w pozycji pionowej do
przechowywania.
OSTRZENIE NOŻA W IMADLE (Patrz Rys. N1)
1. Przed odłączaniem noża należy sprawdzić, czy
zwolniona jest dźwignia włącznika, zatrzymany nóż i
wyjęty kluczyk zabezpieczenia.
2. Wyjmij nóż z kosiarki. Patrz, instrukcje odłączania i
podłączania noża.
3. Zamocuj nóż N1-1 w imadle N1-2.
4. Załóż okulary ochronne i uważaj, aby nie pociąć
siebie.
5. Ostrożnie zbierz krawędzie tnące noża pilnikiem
dokładnym N1-3 lub ostrzałką.
6. Sprawdź zrównoważenie noża. Sprawdź instrukcje
dotyczące zrównoważenia noża.
7. Załóż nóż do kosiarki i mocno dokręć. Sprawdź
instrukcje poniżej.
ZRÓWNOWAŻENIE NOŻA (Patrz Rys. N2)
Sprawdź zrównoważenie noża umieszczając centralny
otwór w ostrzu N2-1 nad trzonkiem sztyftu lub śrubokręta
N2-2, zaciśniętego poziomo w imadle N2-3. Jeśli jeden
z końców obraca się w dół należy go podpiłować. Nóż
jest prawidłowo naostrzony, jeśli ni opada żaden z jego
końców.
KONSERWACJA NOŻA (Patrz Rys. O1, O2)
Nóż metalowy należy wymienić na nowy po 50
godzinach koszenia lub po 2 latach, w zależności, co
wcześniej zostanie osiągnięte, niezależnie od warunków.
Należy zastosować się do podanych procedur
zdejmowania i zakładania noża. W celu zdjęcia noża
należy założyć rękawice ogrodowe (niedostarczone)
i użyć klucza (niedostarczone). Przytrzymaj nóż (19)
i odkręć kluczem nakrętkę noża (18) w kierunku
przeciwnym do wskazówek zegara, a następnie wyjmij
nóż.
W celu ponownego montażu, najpierw ustaw nóż (19)
krawędziami tnącymi w kierunku ziemi. Następnie
dokręć nakrętkę noża (18).
PRZECHOWYWANIE: (Patrz Rys. M1, M2 )
Kosiarkę należy zatrzymać i wyjąć kluczyk
zabezpieczenia. Należy dokładnie oczyścić zewnętrzne
części maszyny, miękką szczotką i szmatką. Nie
należy używać wody, rozpuszczalników lub środków do
polerowania. Należy usunąć trawę i zanieczyszczenia,
szczególnie ze szczelin wentylacyjnych. Przekręć
maszynę na bok i oczyść obszar noża. Jeśli w
okolicy noża zbiorą się zbite cząstki trawy, usuń je
drewnianym lub plastykowym narzędziem. Maszynę
należy przechowywać w suchym miejscu. Nie należy
umieszczać innych obiektów na maszynie.
W celu lepszego magazynowania odkręcić pokrętło
uchwytu i złożyć górny uchwyt jak pokazano na Rys. M1
& M2.
ZASADY OCHRONY
ŚRODOWISKA
Nie wolno mieszać zużytych urządzeń
elektrycznych z innymi odpadami domowymi.
Należy je oddawać do recyklingu tam, gdzie
istnieją odpowiednie zakłady bądź punkty zdawania
odpadów. Porady w tym zakresie można zasięgnąć
u najbliższego sprzedawcy lub w przedstawicielstwie
władz lokalnych.
91
Bezprzewodowa kosiarka do trawników
PL
Page 92

ROZWIĄZYWANIE PROBLEMÓW
Objawy Możliwe rozwiązanie
A. Skontrolować czy klucz bezpieczeństwa został w pełni wsunięty i czy przycisk na
1. Kosiarka nie działa,
po przemieszczeniu
dźwigni włącznika do
pozycji włączono
2. Silnik zatrzymuje się
podczas koszenia.
3. Kosiarka jest
włączona ale
skuteczność koszenia
jest niska lub nie
pokosiła całego
trawnika.
4. Kosiarkę pcha
się z nadmiernym
wysiłkiem.
92
5. Kosiarka pracuje
nietypowo głośno i
drga.
6. Nie świeci LED
kontrolka ładowarki.
7. Kontrolka LED
ładowarki nie świeci na
zielonym światłem.
8. Kosiarka nie
przemieszcza
skoszonej trawy do
worka.
9. Widoczne są
wycięcia podczas
mulczowania.
10. Niski lub skrócony
czas pracy po wielu
zastosowaniach.
obudowie jest w pełni wciśnięty.
B. Zwolnić dźwignię włącznika w celu wyłącznia kosiarki. Wyjąć klucz bezpieczeństwa,
przewrócić kosiarkę dołem do góry i sprawdzić, czy ostrze może obracać się swobodnie.
Jeżeli nie, należy skontaktować się z punktem serwisowym.
C. Czy akumulator został całkowicie naładowany? Baterię umieścić w ładowarce i poczekać
do rozświecania się zielonej kontrolki.
A. Zwolnić dźwignię włącznika w celu wyłącznia kosiarki. Wyjąć klucz bezpieczeństwa,
przewrócić kosiarkę dołem do góry i sprawdzić, czy ostrze może obracać się swobodnie.
Jeżeli nie, należy skontaktować się z punktem serwisowym.
B. Zwiększyć wysokość ustawienia kół do najwyższego położenia i włączyć kosiarkę.
C. Czy akumulator został całkowicie naładowany? Baterię umieścić w ładowarce i poczekać
do rozświecania się zielonej kontrolki.
D. Unikać przeciążania kosiarki. Zmniejszyć prędkość lub zwiększyć wysokość koszenia.
Bądź dwóch.
A. Czy akumulator został całkowicie naładowany? Baterię umieścić w ładowarce i
poczekać do rozświecania się zielonej kontrolki.
B. Zwolnić dźwignię włącznika w celu wyłącznia kosiarki. Wyjąć klucz bezpieczeństwa.
Przewrócić kosiarkę dołem do góry i sprawdzić: Ostrość ostrza - Utrzymywać ostrze
naostrzone. Czy spód i otwór wylotowy nie są zatkane.
C. Wysokość kół może być ustawiona za nisko dla danego stanu trawy. Zwiększyć
wysokość koszenia.
A. Zwiększyć wysokość koszenia w celu zmniejszenia oporu powodowanego przez tarcie
spodem kosiarki o trawę. Sprawdzić, czy wszystkie koła obracają się swobodnie.
A. Zwolnić dźwignię włącznika w celu wyłącznia kosiarki. Wyjąć klucz bezpieczeństwa.
Przewrócić kosiarkę na bok i sprawdzić, czy ostrze nie jest wygięte lub uszkodzone.
Jeśli ostrze jest uszkodzone, wymienić je na ostrze zamienne. Jeśli spód kosiarki jest
uszkodzony, przekazać kosiarkę do autoryzowanego centrum serwisowego.
B. Jeśli nie ma żadnych widocznych uszkodzeń ostrza, a kosiarka nadal drga: Zwolnić
dźwignię włącznika w celu wyłącznia kosiarki, wyjąć klucz bezpieczeństwa, następnie
zdemontować nóż. Obrócić ostrze o 180 stopni i założyć je na miejsce. Jeśli kosiarka
nadal drga, przekazać kosiarkę do autoryzowanego centrum serwisowego.
A. Skontrolować podłączenie do sieci elektrycznej.
B. Wymienić ładowarkę.
A. Należy skontrolować baterię. Skontaktować się z autoryzowanymi punktem
serwisowym.
A. Usunąć ściółkę mulczową podczas pakowania.
B. Zsuw jest uniedrożniony. Zwolnić dźwignię włącznika w celu wyłącznia kosiarki.
Opróżnić zsuw.
C. Za duża ilość skoszonej trawy. Podwyższyć wysokość cięcia w celu obniżenia długość
ściętej trawy.
D. Worek/pojemnik jest pełny. Częściej opróżniać worek/pojemnik.
A. Koszona jest nadmierna ilość trawy naraz. Zwiększyć wysokość kół, aby zmniejszyć
długość ścinanych fragmentów. Nie kosić więcej niż 1/3 długości.
B. Skontrolować stan naostrzenia noży. Ostrza zawsze utrzymywać w dobrze
naostrzonym stanie.
A. Skontaktować się z autoryzowanym punktem serwisowym – być może konieczna jest
wymiana baterii.
Bezprzewodowa kosiarka do trawników
PL
Page 93

11. Kontrola LED
ładowarki miga na
czerwono, baterii nie
można doładować.
A. Bateria jest przegrzana po ciągłym użyciu. Wyjąć baterię z ładowarki i poczekać na jej
schłodzenie do 42°C lub mniej.
DEKLARACJA ZGODNOŚCI
My,
POSITEC Germany GmbH
Grüner Weg 10, 50825 Cologne, Germany
deklarujemy, że produkt,
Nazwa Bezprzewodowa kosiarka do trawy WORX
Typ WG744E, WG744E.9 (740-789 - oznaczenie
urządzenia, reprezentuje Bezprzewodowa kosiarka
do trawy)
Funkcje Koszenie trawy
jest zgodny z następującymi dyrektywami
2006/42/EC, 2014/30/EU, 2011/65/EU, 2000/14/EC
zmieniona dyrektywą 2005/88/EC
2000/14/EC zmieniona dyrektywą 2005/88/EC:
- Procedura oceny zgodności zgodna z Aneksem VI
Dyrektywy
- Moc dźwięku 84.3 dB(A)
- Deklarowana gwarantowana moc dźwięku 88 dB(A)
Dane jednostki notykowanej
Nazwa: Intertek Testing & Certication Ltd (jednostka
notykowana 0359)
Adres: Davy Avenue, Knowlhill, Milton Keynes, MK5
8NL
Normy są zgodne z,
EN 60335-1
EN 60335-2-77
EN 62233,
EN ISO 3744
EN 55014-1
EN 55014-2
Osoba upoważniona do kompilacji pliku technicznego,
Nazwa Marcel Filz
Adres Positec Germany GmbH
Grüner Weg 10, 50825 Cologne, Germany
93
2017/12/19
Allen Ding
Zastępca głównego inżyniera,
testowanie i certykacja
Positec Technology (China) Co., Ltd
18, Dongwang Road, Suzhou Industrial
Park, Jiangsu 215123, P. R. China
Bezprzewodowa kosiarka do trawników
PL
Page 94

EREDETI HASZNÁLATI
UTASÍTÁS
BIZTONSÁGOS
TERMÉKHASZNÁLAT
Általános gyelmeztetések
FIGYELEM Olvasson el
minden biztonsági
gyelmeztetést és valamennyi
utasítást. A gyelmeztetések és
utasítások gyelmen kívül hatása
áramütést, tüzet és/vagy súlyos
sérülést eredményezhet.
A készülék biztonságos
működtetése érdekében
gyelmesen olvassa el az
utasításokat.
Őrizzen meg minden
gyelmeztetést és utasítást, a
jövőben szüksége lehet ezekre.
- Ezt a készüléket nem
94
használhatják csökkent
zikai, érzékszervi vagy
értelmi képességű személyek
(ide értve a gyermekeket),
illetve tapasztalatlan vagy
a készüléket nem ismerő
személyek, kivéve, ha a
biztonságukért felelős személy
felügyelete mellett teszik, vagy
ha a biztonságukért felelős
személy utasításokat ad nekik
a készülék használatára
vonatkozóan.
- Felügyelje a gyermekeket,
hogy ne játszhassanak a
készülékkel.
- A készülék kizárólag a
vele együtt szállított táppal
használható.
FONTOS
HASZNÁLAT ELŐTT
FIGYELMESEN OLVASSA EL
ŐRIZZE MEG, KÉSŐBB
SZÜKSÉGE LEHET RÁ
A biztonságos működtetés
gyakorlata
Tájékozódás
a) gyelmesen olvassa el az
utasításokat. Ismerkedjen
meg a vezérlőgombokkal,
és a készülék megfelelő
használatával;
b) soha ne hagyja, hogy a
fűnyírót olyan gyermekek vagy
felnőttek használják, akik nem
ismerik ezeket az utasításokat.
A helyi szabályozások
korlátozhatják a működtető
életkorát;
c) soha ne nyírja a füvet, ha a
közelben emberek - különösen
gyermekek - vagy állatok
vannak;
d) ne feledje, hogy a
készüléküzemeltetője vagy
használója felel a másokat
ért balesetek vagy az őket ért
károk miatt
Előkészítés
a) Fűnyíráshoz mindig csukott
cipőt és hosszú nadrágot
viseljen. Ne működtesse a
készüléket mezítláb vagy
Vezetékmentes fűnyíró HU
Page 95

nyitott szandálban;
b) alaposan ellenőrizze a
területet, ahol a készüléket
használni fogja, és távolítson
el minden tárgyat, amit a
fűnyíró eldobhatna;
c) Használat előtt mindig nézze
meg alaposan, hogy a kések,
csavarok és a vágószerkezet
nem kopottak vagy sérültek-e.
A kopott vagy sérült késeket
és csavarokat az egyensúly
megőrzése végett mindig
párban cserélje. A sérült
és olvashatatlan címkéket
cserélje ki.
Működtetés
a) csak nappal vagy erős
mesterséges fényben
végezze a fűnyírást;
b) ha lehetséges, a készüléket
ne használja vizes fű
nyírására;
c) lejtőn mindig vigyázzon, hogy
hova lép;
d) lépkedjen, sose szaladjon;
e) kerekes, forgó készülékek
használatakor lejtőn mindig
széltében haladjon, soha ne
fel vagy lefele;
f) mindig legyen rendkívül
óvatos, ha lejtőn irányt vált;
g) ne nyírja a rendkívül meredek
lejtőket;
h) ha a fűnyírót megfordítja vagy
maga felé húzza, mindig
legyen rendkívül óvatos;
i) állítsa le a kés(eke)t, ha a
fűnyírót szállításhoz meg kell
döntenie, ha más felületen
(nem füvön) halad át, és ha a
fűnyírót a nyírandó területre
vagy onnan szállítja;
j) soha ne működtesse
a fűnyírót, ha a védője
megsérült, illetve a biztonsági
eszközök, például terelők és/
vagy fűtartályok nélkül;
k) a motort óvatosan, az
utasításoknak megfelelően,
lábfejét a kés(ek)től jó távol
tartva indítsa el;
l) ne döntse meg a fűnyírót
a motor elindítása közben,
kivéve, ha a fűnyírót
az indításhoz meg kell
dönteni. Ebben az esetben
csak annyira döntse meg,
amennyire mindenképpen
szükséges, és csak a
működtetőtől távolabb eső
részt emelje meg;
m) a kezét vagy a lábfejét ne
tegye a forgó részek közelébe
vagy azok alá. Maradjon távol
az ürítőnyílástól;
n) ne érintse meg a késeket
mindaddig, amíg ki nem veszi
a blokkolóeszközt, és a kések
teljesen le nem állnak;
o) Ne indítsa el a fűnyírót úgy,
hogy az ürítőnyílás előtt áll.
p) Ne szállítsa bekapcsolva a
fűnyírót.
q) Állítsa le a fűnyírót, és
vegye ki a blokkolóeszközt.
Bizonyosodjon meg róla,
95
Vezetékmentes fűnyíró HU
Page 96

hogy minden mozgó alkatrész
teljesen leállt.
– minden olyan esetben, ha
őrizet nélkül hagyja a kerti
kisgépet,
– a beékelődések elhárítása
előtt,
– mieltt a kerti kisgépet
ellenőrizné, megtisztítaná,
vagy azon valamilyen munkát
végezne,
– egy idegen testtel való
ütközés után. Ellenőrizze,
hogy a készülék nem sérült-e,
és mielőtt újra elindítaná,
végezze el a szükséges
javításokat
ha a kerti kisgép szokatlan
módon rezgésbe jön (azonnal
ellenőrizze).
– ellenőrizze, hogy vannak-e
96
sérülések.
– cserélje ki vagy javítsa meg a
sérült részeket.
– ellenőrizze és szorítsa meg a
meglazult részeket.
Karbantartás és tárolás
a) minden csavar és anya
legyen szoros, hogy a
készüléket biztonságosan
működtethesse;
b) a fűfogót ellenőrizze gyakran,
hogy nem kopott vagy
sérült-e;
c) a biztonság érdekében
cserélje ki a kopott vagy
sérült részeket. Csak eredeti
cserealkatrészeket és
tartozékokat használjon.
d) A fűnyíró beállításakor
vigyázzon, nehogy az ujja
beszoruljon a mozgó kések
és a rögzített részek közé.
e) Tárolás előtt mindig várja
meg, hogy a fűnyíró lehűljön.
f) A kések kezelésekor vagy
cseréjekor tartsa szem
előtt, hogy a kések akkor is
mozgathatók, ha a készülék
nincs áram alatt.
Az akkumulátorral
kapcsolatos biztonsági
gyelmeztetések
a) Az akkumulátort ne szedje
szét, ne nyissa fel és ne
vágja meg.
b) Ne zárja rövidre az
akkumulátort. Az
akkumulátorokat ne
tárolja olyan dobozban
vagy ókban, ahol rövidre
zárhatják egymást, vagy
valamilyen vezető anyag a
rövidzárlatukat okozhatja.
Az akkumulátorokat
használaton kívül
tartsa a fémtárgyaktól,
például gemkapcsoktól,
pénzérméktől, kulcsoktól,
szögektől, csavaroktól vagy
más kis fémtárgyaktól távol,
mert ezek összekapcsolhatják
a pólusokat. Az akkumulátor
pólusainak rövidzárlata égés-
Vezetékmentes fűnyíró HU
Page 97

és tűzveszélyes.
c) Ne tegye ki hőnek vagy
tűznek az akkumulátort.
Ne tárolja közvetlen
napfényben.
d) Az akkumulátort ne tegye ki
ütésnek.
e) Ha az akkumulátor
szivárog, vigyázzon, hogy a
folyadék ne kerüljön a bőrre
vagy szembe. Amennyiben
a bőrre vagy szembe kerül,
az érintett területet mossa
le bő vízzel, és forduljon
orvoshoz.
f) Az akkumulátor vagy egy
cella lenyelése esetén
azonnal forduljon orvoshoz.
g) Vigyázzon, hogy az
akkumulátor tiszta és
száraz maradjon.
h) Ha az akkumulátor
pólusaira szennyeződés
kerül, azt egy tiszta, száraz
ruhával törölje le.
i) Az akkumulátort használat
előtt fel kell tölteni. A töltést
mindig az utasításoknak
megfelelően, helyes eljárást
használva végezze.
j) Használaton kívül ne hagyja
töltőn az akkumulátort.
k) Hosszan tartó tárolást
követően a maximális
teljesítmény elérése
érdekében szükséges
lehet, hogy az akkumulátort
többször feltöltse és
lemerítse.
l) Az akkumulátor
szobahőmérsékleten (20 °C
± 5 °C) használva nyújtja a
legjobb teljesítményt.
m) Az akkumulátorok
ártalmatlanításakor a
különböző elektrokémiai
rendszereket különítse el
egymástól.
n) Csak a WORX által javasolt
töltővel töltse fel. Kizárólag
a készülékhez való
használatra mellékelt töltőt
használja. Ha egy adott
akkumulátorhoz megfelelő
töltőt másik akkumulátorral
használ, az tűzveszélyes
lehet.
o) Ne használjon a készülékkel
való használatra tervezettől
eltérő akkumulátort.
p) Az akkumulátor
gyermekektől távol
tartandó.
q) Őrizze meg a termékhez
mellékelt utasításokat, a
későbbiekben szüksége
lehet ezekre.
r) Amikor a szerszámot nem
használja, vegye ki belőle
az akkumulátort.
s) Ártalmatlanításnál
megfelelően járjon el.
97
Vezetékmentes fűnyíró HU
Page 98

SZIMBÓLUMOK
Viseljen védőkesztyűt.
98
Mielőtt a készüléket működtetné,
gyelmesen olvassa el a
kézikönyvet
A közelben ne álldogáljon senki
Vigyázzon, a kések élesek! A
kések a motor leállítását követően
is tovább forognak - karbantartás
előtt vegye ki a blokkolóeszközt.
A leselejtezett elektromos
készülékek nem dobhatók ki a
háztartási hulladékkal. Ha van
a közelben elektromos hulladék
gyűjtő udvar, vigye oda a
készüléket. Az újrahasznosítási
lehetőségekről tájékozódjon
a helyi hatóságoknál vagy a
kereskedőnél.
A tönkrement akkumulátort ne
dobja a háztartási szemétbe,
hanem vigye a helyi gyűjtő- vagy
újrahasznosító központokba.
Ne dobja tűzbe
Ne tegye ki esőnek vagy víznek
Mindennemű beállítás, javítás
vagy karbantartás előtt vegye ki az
akkut az akkuházból.
A kések a kerti kisgép
kikapcsolása után még tovább
forognak és sérüléseket
okozhatnak. Mielőtt az
alkatrészekhez hozzáérne, várja
meg, míg a berendezés minden
alkatrésze leáll.
Távolítsa el a fedelet
AZ ALKATRÉSZEK LISTÁJA
1. BIZTONSÁGI KULCS
2. KAPCSOLÓKAR
3. FELSŐ FOGANTYÚ
4. KARRÖGZÍTŐ ANYA
5. ALSÓ FOGANTYÚ
6. FŰGYŰJTŐ KOSÁR
7. VÁGÁSI MAGASSÁGOT BEÁLLÍTÓ KAR
8. MARKOLAT
9. INTELLICUT VEZÉRLÉS
10. AKKU TÖLTÖTTSÉG JELZŐ
11. AKKUHÁZ FEDÉL
12. BIZTONSÁGI LAP
13. FŰGYŰJTŐ TARTÁLY FOGANTYÚJÁT
14. KÁBELRÖGZÍTŐ
15. FŰTARTÁLY TELÍTETTSÉGJELZŐJE
16. TALAJTAKARÓ BETÉT
17. AKKUMULÁTOR (LÁSD AZ E ÁBRÁT) *
18. VÁGÓKÉS CSAVAR (LÁSD AZ O1 ÁBRÁT)
19. KÉS (LÁSD AZ O1 ÁBRÁT)
* Nem minden készülék tartalmazza valamennyi, a
fentiekben felsorolt alkatrészt.
Vezetékmentes fűnyíró HU
Page 99

MŰSZAKI ADATOK
Típus WG744E, WG744E.9 (740-789 - a készülék
jelölése, akkumulátorral működtetett fűnyírót jelöl)
WG744E WG744E.9
Feszültség 40V Max (2x20V Max)*
Vágási átmérő 40cm
Az első kerék
átmérője
A hátsó kerék
átmérője
Vágásmagasság 20mm-70mm
Vágásmagasság
beállítások
Fűgyűjtő kapacitása 40L
Akkumulátor típusa Lítium-ion /
Akkumulátor-típus WA3553(4.0Ah) /
Töltő típusa WA3883 /
Bemenet:100-
240V~50/60Hz,
Töltő besorolása
Töltésidő (Kb.)
Akkumulátor:
2.0 Ah (1pc)
2.0 Ah (2pcs)
4.0 Ah (1pc)
4.0 Ah (2pcs)
A gép súlya 16.7kg 15.4kg
*Terhelés nélküli feszültség. Az akkumulátor kezdő
feszültsége maximum 20 V. A névleges feszültség 18 V.
** A töltő 1-es és 2-es kimenete alatt két olyan portot
értünk, amelyek egyforma feszültséget és áramerősséget
szolgáltatnak.
Kimenet1:20V ,
Kimenet2:20V ,
2.0A**
2.0A**
0.5 óra
1 óra
1 óra
2 óra
160mm
240mm
6
/
/
ZAJÉRTÉKEK
REZGÉSÉRTÉKEK
ah= 0.41 m/s
Tipikus súlyozott rezgés
FIGYELEM: Az elektromos kéziszerszám
használata során a rezgéskibocsátás eltérhet a
fenti értéktől attól függően, hogy a szerszámot hogyan
használják. Az érték függhet az alábbiaktól:
Hogyan használják a szerszámot, milyen anyagokat
vágnak vagy fúrnak.
Az eszköz jó állapotban van-e, megfelelően
karbantartják-e.
Megfelelő tartozékokat használnak-e az eszközhöz,
vigyáznak-e, hogy éles legyen és jó állapotban maradjon.
A fogantyú megfelelően rögzül-e, használnak-e
rezgéscsillapító tartozékokat.
A szerszámot rendeltetésszerűen, kialakításának és a
jelen utasításoknak megfelelően használják-e.
Ha a szerszámot nem kezelik megfelelően, kéz-kar
vibrációs szindrómát okozhat.
FIGYELEM: A pontosság érdekében az
expozíciós szint becsült értékéhez a valós
használati körülmények között gyelembe kell venni a
működési ciklus valamennyi elemét, így azt az időt is,
amikor a szerszám ki van kapcsolva, és amikor
üresjáratban működik. Ez a teljes munkaidőszak
viszonylatában jelentősen csökkentheti az expozíciós
szintet.
A rezgéskockázatnak való kitettséget az alábbiakkal
csökkentheti:
MINDIG éles vésőt, pengét, és hegyes fúrófejet
használjon.
Az eszközt jelen utasításoknak megfelelően tartsa
karban, és vigyázzon a megfelelő kenésre (ahol erre
szükség van).
Ha rendszeresen használja az eszközt, vásároljon
rezgéscsillapító tartozékokat.
Úgy tervezze meg a munkáját, hogy a magas
rezgésszámú eszközök használatát igénylő feladatokat
több napra ossza el.
Bizonytalanság K= 1.5
m/s²
2
99
A-súlyozású hangnyomásszint
A-súlyozású hangerő
Viseljen hallásvédőt.
LwA: 68.7dB (A)
KpA= 3dB(A)
LwA: 84.3dB (A)
KwA= 3dB(A)
Vezetékmentes fűnyíró HU
Page 100

TARTOZÉKOK
WG744E WG744E.9
Akkumulátor (WA3553)
Töltőkészülék (WA3883)
Fűgyűjtő tartály
Talajtakaró betét
Kábelrögzítő
Javasoljuk, hogy a tartozékokat ugyanabból a boltból
vásárolja meg, ahol a szerszámot is vásárolta. További
részleteket a tartozék csomagolásán talál. Kérjen
segítséget és tanácsot a bolti eladóktól.
2 /
1 /
ÖSSZESZERELÉS ÉS
MŰKÖDÉS
MŰVELET ÁBRA
ÖSSZESZERELÉS
A fogantyú összeszerelése
MEGJEGYZÉS: Válassza az alsó fogantyú
két furatának egyikét a fogantyú kívánt
magasságban való beállításához.
Gyűjtőkosár összeállítása
100
A gyűjtőkosár felerősítésre a fűnyíróra
MEGJEGYZÉS: A fűgyűjtő zsák felszerelése
előtt távolítsa el a talajtakaró betétet a
fűnyírógépről.
MEGJEGYZÉS: Kicsit nyomja le a fűgyűjtő
tartályt, hogy ellenőrizze, teljesen rögzült-e.
Akku töltöttség állapot ellenőrzés
MEGJEGYZÉS: A D1 ábra csak az akku
feltöltöttségi szintjét is jelző akkucsomagra
vonatkozik.
Akkutöltés
MEGJEGYZÉS: A csomagolásban található
elem töltetlen állapotú. Az első fűnyírás előtt
az akkut teljesen fel kell tölteni.
A két akkut mindig egyidőben és teljesen
töltse fel. További részletek a töltő használati
útmutatójában.
1
1
2
Lásd a
A1, A2,
A3, A4,
A5 ábrát
Lásd a
B1, B2,
B3, B4
ábrát
Lásd a
C1, C2,
C3 ábrát
Lásd a
D1 ábrát
Lásd a
D2 ábrát
Az akkumulátor behelyezése és eltávolítása
MEGJEGYZÉS:
Ez a fűnyírógép csak mindkét akku
beszerelése után működik. Kérjük, hogy
mindig ugyanazt a két akkut használja,
és hogy mindig egyidőben töltse fel őket.
Amennyiben eltérő teljesítményű akkumulátorokat használ, a gép csak az
alacsonyabb közös teljesítményen fog
dolgozni.
MŰKÖDÉS
Akku töltöttségi állapot jelző a fűnyírón
Lásd a részleteket az AKKU ÁLLAPOTA című
fejezetben
FONTOS
Ha csak egy jelzőfény világít, legkevesebb
egy akku lemerült, és azt fel kell tölteni, bár
előfordulhat, hogy még lehet füvet vágni vele.
Ha a fűnyírót lemerült akkumulátorral tovább
működteti, az csökkentheti az akkumulátor
élettartamát és teljesítményét.
Ha egyetlen jelzőfény sem ég, minimum egy
akku nincs tökéletesen behelyezve, vagy az
akku hibás. Kérjük, alaposan ellenőrizze az
akkuk megfelelő behelyezését és pozicionálását.
Elindítás & Leállítás
Üzemmód-választó
ECO mód
Átlagos körülmények között, ha körülbelül
25mm füvet nyír egyszerre, válassza a ECO
módot.
TURBO mód
Ha sűrű vagy magasra nőtt füvet vág, állítsa a
tárcsát TURBO módra.
Fűnyírási magasság beállítás
A fűgyűjtő tartály
Üres: a fedőlap “lebeg” (a)
Tele: a fedőlap leesik (b)
A gyűjtőkosár leemelése/kiürítése
FIGYELMEZTETÉS! Használat előtt
mindig ellenőrizze a kibocsátó nyílás
közelében található biztonsági
csappantyút. Ha a fűnyírógépet fűgyűjtő
zsák nélkül szándékszik használni, soha
nem emelje fel a biztonsági csappantyút.
A talajtakaró betét felszerelése
Hátsó ürítés
MEGJEGYZÉS: Legelőször távolítsa el a
talajtakaró betétet.
Lásd a E
ábrát
Lásd a F
ábrát
Lásd a
G1, G2
ábrát
Lásd a
H1, H2
ábrát
Lásd a I
ábrát
Lásd a
J1 ábrát
Lásd a
J2 ábrát
Lásd a K
ábrát
Lásd a L
ábrát
Vezetékmentes fűnyíró HU
 Loading...