

Wolfgang Puck BETFS020 Use And Care Manual
Model BETFS020
Model BETFS020
For questions or concerns please contact customer service at:
W.P. Appliances, Inc. • P.O. Box 3150 • Hallandale, FL 33008
Toll-free: 800-275-8273 • Hours: M - F 8:30am - 5:00pm EST
www.wphousewares.com • Printed in China
IMPORTANT NOTICE
Please read operating instructions before using this
product. Please keep original box and packing materials
in the event that service is required.
TRIPLE
STEAMER
USE AND CARE

IMPORTANT SAFEGUARDS
1 Read all instructions.
2 Do not touch hot surfaces. Use handles or knobs.
3 To protect against electrical shock do not immerse cord, plug, or the
steamer housing in water or other liquid.
4 Close supervision is necessary when any appliance is used by or near
children.
5 Unplug from outlet when not in use and before cleaning. Allow to cool
before putting on or taking off parts.
6 Do not operate any appliance with a damaged cord or plug or after
the appliance malfunctions, or has been damaged in any manner.
Return appliance to the nearest authorized service facility for
examination, repair or adjustment.
7 The use of accessory attachments not recommended by the W.P.
Appliances, Inc. may cause injuries.
8 Do not use outdoors.
9 Do not let cord hang over edge of table or counter, or touch hot
surfaces.
10 Do not place on or near a hot gas or electric burner, or in a heated
oven.
11 Extreme caution must be used when moving an appliance containing
hot oil or other hot liquids.
12 To disconnect, turn any control to “off,” then remove plug from wall
outlet.
13 Do not use appliance for other than intended use.
SAVE THESE INSTRUCTIONS
HOUSEHOLD USE ONLY
GROUNDING INSTRUCTIONS:
This appliance must be grounded. It is equipped with a 3-wire cord
having a grounded plug.
NOTE:
This appliance is rated 1,500 watts and should be the only appliance
operating on the circuit. The plug must be plugged into an outlet which
is properly installed and grounded.
WARNING:
Improper use of the grounded wire can result in the risk of electric shock.
Consult a qualified electrician if necessary. Do not attempt to defeat this
safety feature by modifying the plug.
A short power-supply cord is provided to reduce the hazards resulting
from entanglement or tripping over a longer cord. If it is necessary to use
an extension cord, it should be positioned such that it does not drape
over the counter or tabletop where it can be pulled on by children or
tripped over and:
Use only 3-wire extension cord with 3-blade grounding plug.
The marked rating of the extension cord must be equal to or greater
than the rating of this appliance.
A
B
A
B
C
D
E
Before Your First Use
Wash all parts according to the Care & Cleaning Section of this manual.
Additional Safety Information
When using electrical appliances, basic safety precautions should
always be followed, including the following:
Only fill the Water Reservoir with cold water. Do not fill with warm or
hot water, salt, pepper, seasonings, herbs, wine, stock or any other
liquid.
Make sure the Water Reservoir is filled up to the MAX line as indicated
on the Water Level Window. Do not overfill the Water Reservoir above
the MAX line and never allow the water level to fall below the MIN line
to prevent damaging the appliance. Water can be added during the
steaming process via the Drip Tray Water Spout.
Steamer Housing, Steamer Baskets, Steamer Trays, Lids, and Steamer
Basket Handles will become very hot while cooking. Do not touch
them with your hands during operation.
To avoid burn injury, keep away from the Steam Vent on the Lid when
steamer is in use.
Before turning on the steamer, ensure that the Drip Tray, Basket(s),
Steamer Tray(s), and Lid(s) are properly assembled onto the Housing.
This will prevent scalding injury as a result of the hot steam coming
from the Housing.
Other Safety Precautions
2 3

In the beginning, there was
Wolfgang Puck. There were cooks
and there were kitchens and there
were people eating food, but the
world had never seen anything
like Spago — with its California
cuisine, its casual elegance, and its
chef whose genuine warmth and
love of craft redefined the dining
experience. And they came — from
LA and from everywhere — to
experience the future. Wolfgang
Puck shaped the modern culinary
landscape: he was the first celebrity
chef, the inventor of fusion cuisine,
the first in farm-to-table. His work
is inspired by California living, and
an insistence on only the freshest
ingredients. From his legendary
fine dining icons, his entrepreneurial
spirit has built an empire — from
dining, to catering, to products for the home — touching the lives of millions
around the globe. Today, as always, Chef Puck is earnestly, restlessly, tirelessly
at work behind the scenes inventing what’s next. He is driven by a genuine
love of his craft, a passion for what’s possible, and its potential to change the
world.
Table of Contents
Important Safeguards ................................................................ 2
Additional Safety Information ............................................... 3
Before Your First Use ................................................................. 3
Other Safety Precautions ......................................................... 3
About Wolfgang Puck ...............................................................4
Know Your Steamer .................................................................... 6
Assembling Your Steamer ....................................................... 7
Using Your Steamer .................................................................... 7
Steaming Rice ................................................................................ 8
Steaming Chart ............................................................................. 8
Care & Cleaning ............................................................................ 9
Recipes ............................................................................................ 10
Limited Warranty .......................................................................27
Contact Information ........................................................... Back
4 5
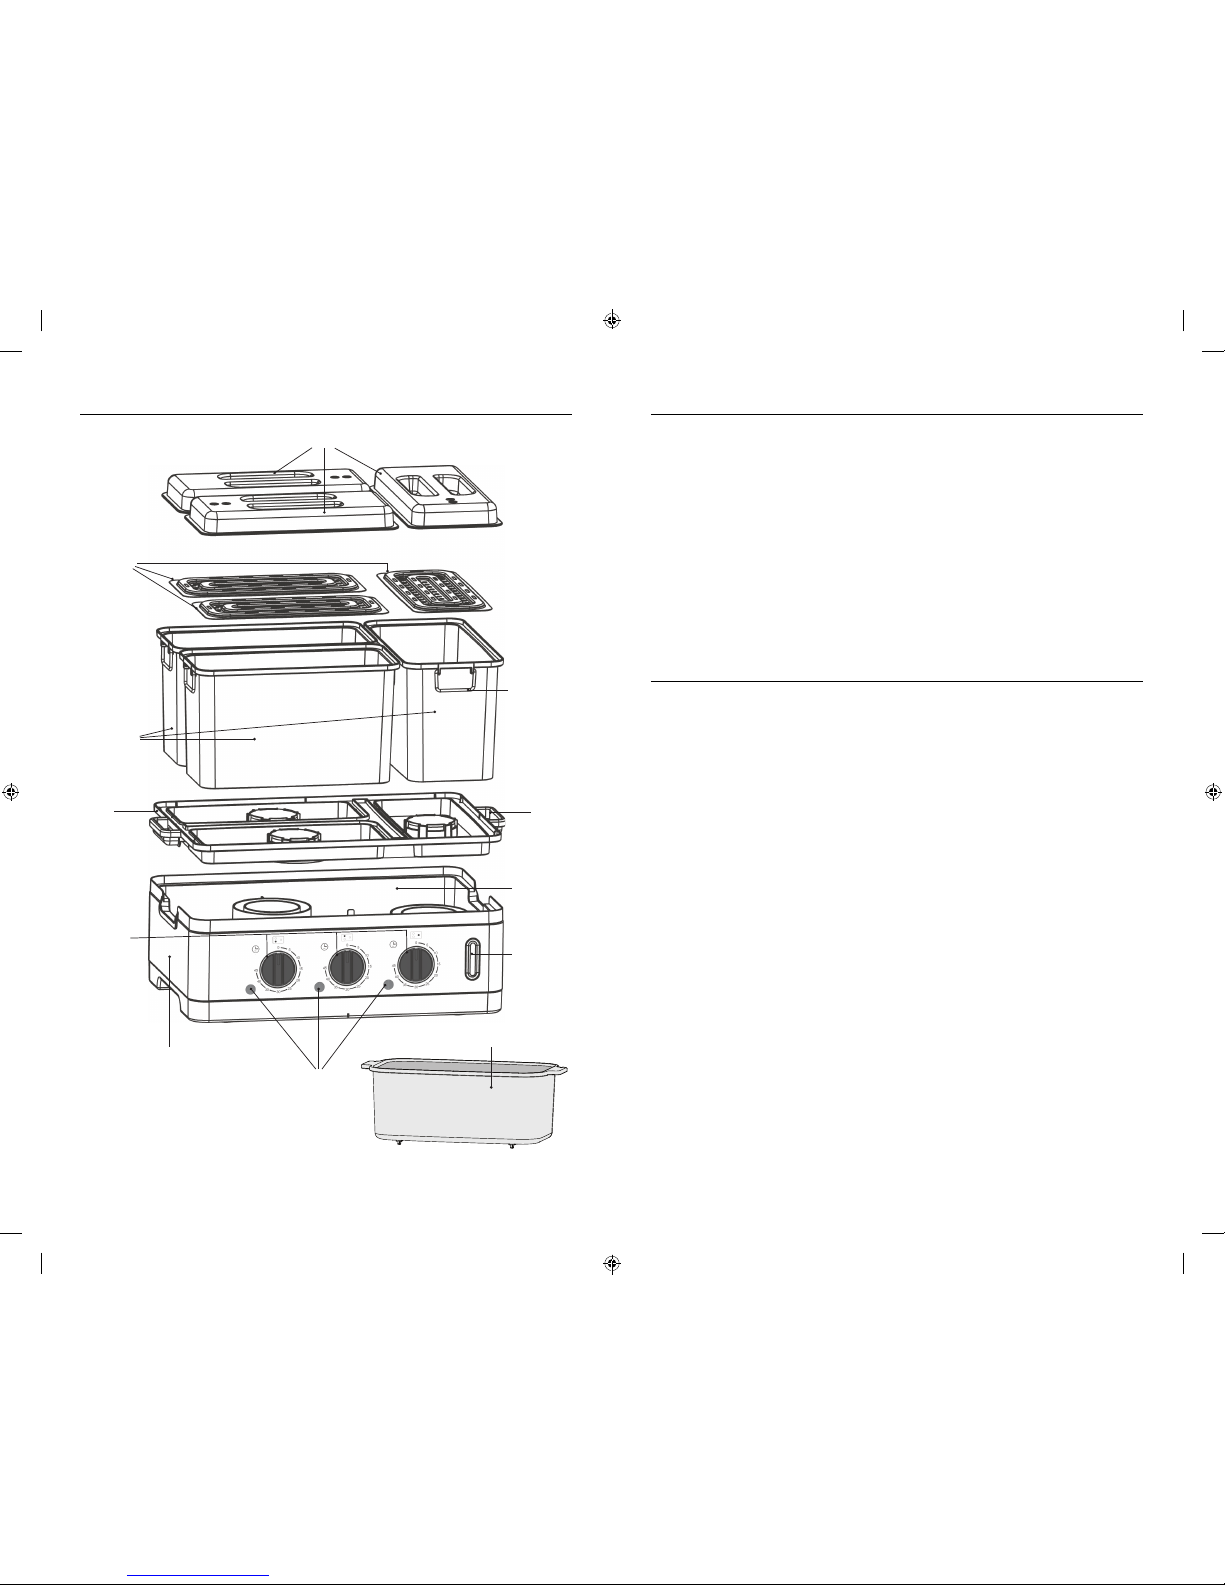
Lid(s)
Steamer
Tray(s)
Steamer
Basket
Handle(s)
Steamer
Basket(s)
Drip
Tra y
Housing
Rice Bowl
Timer
Knobs
Drip
Tra y
Wat er
Spout
Wat er
Reservoir
Wat er
Level
Window
Power
Indicator
Lights
Know Your Steamer
Actual product may differ slightly from illustrations on this page
Assembling Your Steamer
1 Place the Housing on a stable, level surface.
2 Place the Drip Tray (used for collecting all kinds of liquid dripped from
the steaming baskets, such as gravy, sauce, water and soup) on top of
the Housing.
3 Place the Steamer Tray (universal and can be place in any of the three
baskets) inside the Steamer Basket ensuring that it is lying flat and
centered at the bottom of the Steamer Basket.
4 Place the Lid on the Steamer Basket.
5 The assembled baskets are universal and can be placed in any
position on the Drip Tray. Ensure the bottom of basket covers the
rectangular shape on the Drip Tray.
Using Your Steamer
1 Fill the Water Reservoir to the MAX line as indicated on the Water
Level Window. Do not overfill the Water Reservoir above the MAX line
and never allow the water level to fall below the MIN line to prevent
damage to your steamer. Water can be added during the steaming
process via the Drip Tray Water Spout.
2 Note: This steamer is rated 1,500 watts and should be the only
appliance operating on the circuit.
3 Place food in the assembled Steamer Basket. Use 1, 2 or all 3 Baskets
and Rice Bowl as needed for your recipe.
4 Plug in the power cord to a standard 120V AC outlet.
Note: If using the Rice Bowl it must only be used in the assembled
Steamer Basket. Never place the Rice Bowl directly on the Drip Tray.
5 Turn the Timer Knob to set your desired steaming time, the maximum
time is 45 minutes.
6 The Power Indicator will light up when the corresponding Timer Knob
is turned on.
Warning: Housing, Steamer Baskets, Steamer Trays, Lids, and
Steamer Basket Handles will become very hot while cooking.
To prevent a burn injury always handle with an oven mitt or
protective, dry towel. DO NOT place anything on top of the Lids
during cooking to prevent overheating, and never place your hands
over the vents on the Lids.
7 When the cooking time is over, the Power Indicator Light will go out
and the signal bell will sound.
8 Unplug the steamer. Wait for about 4 – 5 min for the steamer to cool
down. Then, open the Lid and release the remaining steam.
6 7

Steaming Rice
1 As a general guideline use 1/2 cup of white rice to 1 cup of water.
When cooking brown rice, add an additional 2 tablespoons of water.
Adjust to suit your own personal taste. White rice takes approximately
30 minutes to cook whereas brown rice will take 45 minutes.
2 Put rice and water in the Rice Bowl.
3 Place the Rice Bowl into the Steamer Basket and cover with Lid.
Before cleaning the appliance, turn Timer Knob off (0) and unplug
the appliance. Let the assembled steamer cool down entirely before
cleaning.
Do not immerse the Housing or power cord in water or any other
liquid.
Do not clean any parts with an abrasive cleaning tool or cloth (such
as steel wool).
The following parts can be placed in the dishwasher or hand washed
with warm soapy water and rinsed thoroughly:
The following parts should be hand washed only with warm soapy
water and rinsed thoroughly:
Steamer Basket
Steamer Trays
Steamer Lids
Rice Bowl
Drip Tray
Steamer Housing Water Reservoir: Wipe with a clean damp soapy
nonabrasive cloth and rise with a damp nonabrasive wet cloth and
dry thoroughly. To prevent damage to the appliance or possible
electric shock do not place the Housing in the dishwasher or
immerse in water.
•
•
•
•
•
Care & Cleaning
◦
◦
◦
◦
◦
◦
Steaming Chart
Food Type
Fish Fillets
Boneless, Skinless Chicken Breast
Tender Beef
Pork Chops
Carrots/Potatoes/Turnips/Squash
Spinach/Arugula
Broccoli/Cauliflower/Green Beans
Eggs
Peas
Kale/Collards/Swiss Chard/Turnip Greens
Portion
1-2 fillets
1-2 breasts
1-2 pieces
1-2 chops
1/2 - 1 lb
4 cups
3 cups
1-15 eggs
2 cups
4 cups
Steaming Time
5-8 min
8-10 min
6-8 min
8-10 min
18-20 min
3 min
5-7 min
7-12 min
3 min
6-8 min
Rice Type
White Rice
Brown Rice
Boiling Water
1 cup
1 cup + 2 tablespoons
Rice
1/2 cup
1/2 cup
Steaming Time
30 min
45 min
Steaming times stated in the below table are for reference only. The times
may vary depending on the food size, portion and freshness as well as
personal preferences. Please adjust cooking time accordingly.
8 9
 Loading...