


I M P O R T A N T N O T I C E
PLEASE DO NOT RETURN TO STORE. If you have any problems with this unit, contact Consumer Relations for service PHONE: 1-800-275-8273.
Please read operating instructions before using this product.
Please keep original box and packing materials in the event that service is required.
Signature Collection
W.P. APPLIANCES, INC.
Toll Free (800) 275-8273 Email address: wpappliances@ss2000.com Website: www.wolfgangpuck-kitchenware.com
Model BCGL0025 Printed in China REV 3.5
W O L F G A N G PUCK
Panini Maker and Multipurpose Grill Manual
All trademarks, service marks and trade names (collectively the “Marks”) are proprietary to Wolfgang Puck World Wide.

Important Safeguards
When using electrical appliances, basic safety precautions should always be followed, including the following:
1Read all instructions carefully.
2Do not touch hot surfaces. Use handles only.
3To protect against risk of electric shock, do not immerse appliance, cord, or plug in water or other liquid.
4Close supervision is necessary when any appliance is used by or near children.
5Unplug from outlet when not in use and before cleaning. Allow to cool before putting on or taking off parts, and before cleaning the appliance.
6Do not operate any appliance with a damaged cord or plug or after the appliance malfunctions or is dropped or damaged in any manner. Return the appliance to an authorized service facility for examination, repair, or electrical or mechanical adjustment.
7Never use this appliance without the drip tray in place underneath grease spout.
8The use of accessory attachments not recommended or sold by the appliance manufacturer may cause fire, electric shock, or injury.
9Do not use outdoors.
10Do not let cord hang over edge of table or counter or touch hot surfaces, including the stove.
11Extreme caution must be used when moving an appliance containing hot oil or other hot liquids.
12Do not use this appliance for other than intended use.
13This appliance is for household use only.
14Extreme care must be used when operating this appliance as surface temperatures get extremely hot.
15Do not place on or near a hot gas or electric burner, or in a heated oven.
Save These Instructions
This appliance has a polarized plug (one blade is wider than the other). As a safety feature, this plug will fit in a polarized outlet only one way. If the plug does not fit fully in the outlet, reverse the plug. If it still does not fit, contact a qualified electrician. Do not attempt to defeat this safety feature.
A short power-supply cord is provided to reduce the hazards resulting from entanglement or tripping over a longer cord. An extension cord may be used with care; however, be sure the marked electrical rating is at least as great as the electrical rating of this appliance. The extension cord should be positioned such that it does not drape over the counter or tabletop where it can be pulled on by children or tripped over. The electrical rating of this appliance is listed on the bottom panel of the unit.
2

Wolfgang Puck,
owner of the famous Spago restaurants and one of the most influential chefrestauranteurs in America, is credited with reviving California’s rich culinary heritage. His cooking innovations, a result of blending fresh California
ingredients with his classical French techniques, are enjoyed by world leaders, stars and fellow chefs alike. He established other trend-setting restaurants like Postrio in San Francisco, Chinois on Main in Santa Monica, Granita, Vert and Trattoria del Lupo. Home chefs can also share Mr. Puck’s talents through his cookbooks and, of course, through his appliances!
Table of Contents
Important Safeguards |
2 |
|
|
|
|
About Wolfgang Puck |
3 |
|
|
|
|
Know Your Panini Maker |
5 |
|
|
|
|
Before Your First Use |
7 |
|
|
|
|
About Your Panini Maker |
7 |
|
|
|
|
Using Your Panini Maker |
8 |
|
|
|
|
Helpful Hints |
9 |
|
|
|
|
Care and Cleaning |
9 |
|
|
|
|
Recipes |
10 |
|
|
|
|
Cooking Chart |
28 |
|
|
|
|
Limited Warranty |
29 |
|
|
|
|
Contact Information |
31 |
|
|
|
3 |
Signature Collection |
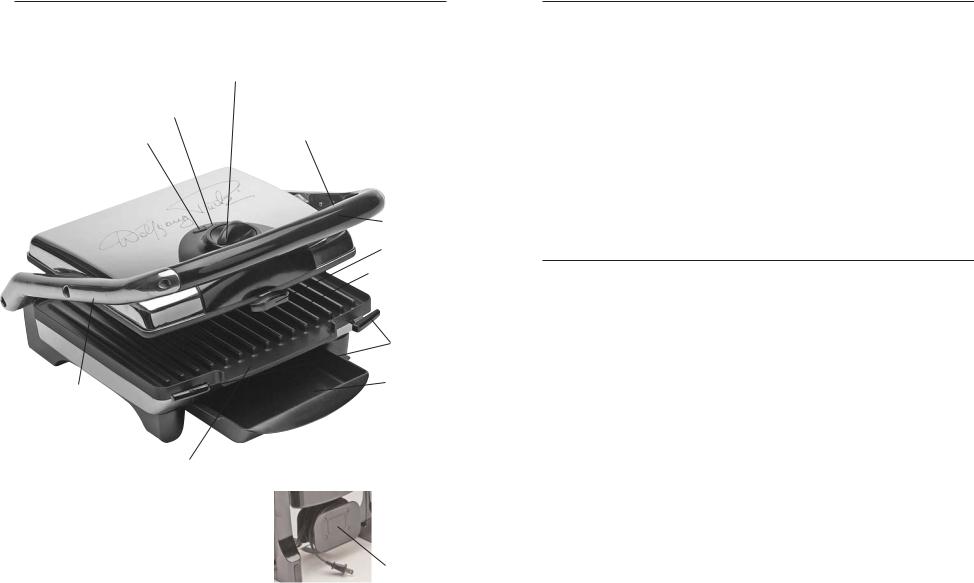
Know Your Panini Maker
Adjustable Temperature Control •
Green Power Indicator •
Red Pre-Heat Light •
Side Handles •
Grease Channel •
•Storage Lock (cannot be used with optional waffle plates)
•Front Handle
•Top Plate Lock
•Ribbed Grill Plate
•Bottom Plate Locks
•Drip Drawer
• Cord Storage
Before Your First Use
Carefully unpack the appliance and remove all packaging materials. Ensure that the unit is unplugged. Remove the cooking plates and wash in warm soapy water or place in the dishwasher.
Caution: Do not immerse the appliance, cord or plug in water. Never operate this appliance without the grill plates locked into position on the main housing. See “Adding and Removing Plates” on page 7.
To remove any dust that may have accumulated during packaging, wipe the exterior with a clean, damp cloth.
Important: Do not use harsh or abrasive cleansers on any part of the appliance.
About Your Wolfgang Puck
Panini Maker
and Multipurpose Grill
The English translation of Panini means little breads, or rolls and is equated with sandwiches. In the United States, Panini has come to denote a grilled Italian sandwich.
The Panini sandwiches of today are generally made using fresh, crusty Italian breads. Your Wolfgang Panini Maker uses the weight of the heated upper grill plate to grill both sides at the same time. Use your Panini Maker to prepare authentic Italian Panini’s and Cuban sandwiches, as well as to grill poultry, meat, fish, sausages, and a variety of other foods. Your Panini Maker is designed to sear foods perfectly. The special hinged top plate inherent on all Panini grills allows the grill to be used on extra thick sandwiches and food items.
With the purchase of the optional waffle plates or flat griddle plates, you can expand the versatility of this unit even further.
5 |
6 |

Adding and Removing Plates
Caution: Always ensure that your Panini Grill is unplugged and has completely cooled prior to removing or adding plates.
Assembling the Plates
Standing in front of your unit grasp the bottom plate and line of the two rear locking pins on the back of the plate with the receptacles in the rear of the unit. Gently lay the plate down and apply downward pressure to snap the front plate locks into place (see figure 1)
figure 1
The top plate is identified by the nub which appears on the reverse side towards the front (see figure 2). Align the two rear locking pins on the back of the top plate with the two receptacles in the top housing. Gently press the plate in until it locks into place.
figure 2
Removing the Grill Plates
With your unit in the open position, remove the bottom plate by pressing down on the bottom plate locks located on the front of the unit (see figure 3) while lifting the plate up and towards you.
figure 3
With your unit in the open position, press down on the single top plate lock located in the center front of your unit while keeping one hand on the plate itself. (see figure 4). Guide the plate forward with your hand and lift up to remove.
figure 4
Using Your Panini Maker
Your Panini Maker is best used with thick, crusty breads, such as French, Italian, and focaccia. The top grill plate is weighted to compress and grill a Panini to perfection in about 3 minutes (depending on the bread, filling, and personal taste). Your Panini Maker can also be used to grill a variety of food items, such as meats, poultry, fish, and vegetables.
1Completely pull out Drip Drawer prior to use. Place drip tray underneath grease runoff so that any drippings will fall into the tray.
2Preheat the grill to the desired temperature. Close the cover and plug into a 120-volt 60 HZ AC outlet only. The red light will turn on indicating that the appliance is preheating. After approximately 8 minutes, the green light will turn on indicating that the appliance is preheated and ready for use.
3Open the lid using the black handle only, being careful not to touch any hot surfaces such as the housing or grill plates. We recommend the use of oven mitts or potholders to prevent the risk of injury.
4Place items to be cooked on the bottom grill plate.
5Lower the cover and cook the food according to desired temperature or doneness. Do not apply excessive force to close the lid and do not lock latch on handle.
Note: The green ready light is thermostatically controlled and will cycle on and off during cooking to ensure that the correct temperature is maintained.
Important: Grill only with the lid in the closed position.
6When you have finished using your appliance, disconnect the plug from the wall and allow the unit to cool down completely before cleaning.
7 |
8 |
 Loading...