

Page 1

USE & CARE
Cookie Press
LIFE IS ABOUT BALANCE
AND EATING WELL
IMPORTANT NOTICE
PLEASE DO NOT RETURN TO STORE.
If you have any problems with this unit, contact Consumer
Relations for service PHONE: 1-800-275-8273 or visit our
website at wphousewares.com
Please read operating instructions before using this
product. Please keep original box and packing materials
in the event that service is required.
W.P. APPLIANCES, INC. Toll Free (800) 275-8273
Model BECP0030 Printed in China REV 1.0
All trademarks, service marks and trade names (collectively the “Marks”) are proprietary
to Wolfgang Puck World Wide.
HSN_CookiePressManual10 8/4/10 10:34 PM Page 1
Page 2

1 2
POLARIZED PLUG
This appliance has a polarized plug (one prong is wider than the other).
To reduce the risk of electric shock, this plug will fit into a polarized
outlet only one way. If the plug does not fit fully into the outlet, reverse
the plug. If it still does not fit, contact a qualified electrician. Do not
modify the plug in any way.
Do not attempt to defeat this safety feature by
modifying the plug in any way.
SHORT POWER CORD
A short power-supply cord is provided to reduce the hazards resulting
from entanglement or tripping over a longer cord. An extension cord
may be used with care; however, be sure the marked electrical rating is
at least as great as the electrical rating of this appliance. The extension
cord should be positioned such that it does not drape over the counter
or table top where it can be pulled on by children or tripped over.
Before Your First Use
1
Carefully unpack the Cookie Press and all accessories.
2
After unpacking, wash Cookie Discs, Pastry Tips, Pastry Tip Adapter, Tube
Cover, Pastry Tip Cover, Tube, Cam Disc, Press Disc and Cam Shaft with
warm, soapy water. Rinse and dry thoroughly.
3
Make sure the unit is unplugged and then wipe all surfaces of the
Motor Body with a slightly moistened, soft cloth and dry thoroughly.
Never immerse the Motor Body, plug or cord in water or any other liquid.
Do not use steel wool, scouring pads or abrasive cleansers as they will
damage the finish.
4
Thoroughly dry all parts so that no water enters the Motor Body.
IMPORTANT SAFEGUARDS
When using electrical appliances, basic safety precautions should always
be followed, including the following:
1 Read all instructions carefully.
2 To protect against risk of electrical shock, do not put immerse or
rinse Motor Body, cord or plug in water or any other liquid.
3 This appliance should not be used by children and care should be
taken when used near children.
4 Unplug from outlet when not in use, before putting on or taking off
parts, and before cleaning.
5 Avoid contact with moving parts.
6 The use of attachments not recommended or sold by the appliance
manufacturer may cause fire, electric shock, or injury.
7 Do not use outdoors.
8 Keep hands, hair, clothing, as well as utensils away from moving
parts and Discs while processing to prevent the risk of severe injury
to persons or damage to the Cookie Press. Handle Discs and Tips
carefully when removing, inserting or cleaning.
9 Be certain Tube and Tube Cover are securely locked in place before
operating appliance. Do not attempt to remove Tube or Tube Cover
while operating.
10 Be certain that cover and tube are securely locked in place before
operating appliance.
SAVE THESE INSTRUCTIONS
HOUSEHOLD USE ONLY
HSN_CookiePressManual10 8/4/10 10:34 PM Page 1
Page 3

3
Table of Contents
Important Safeguards 1
Before Your First Use 2
About Wolfgang Puck 3
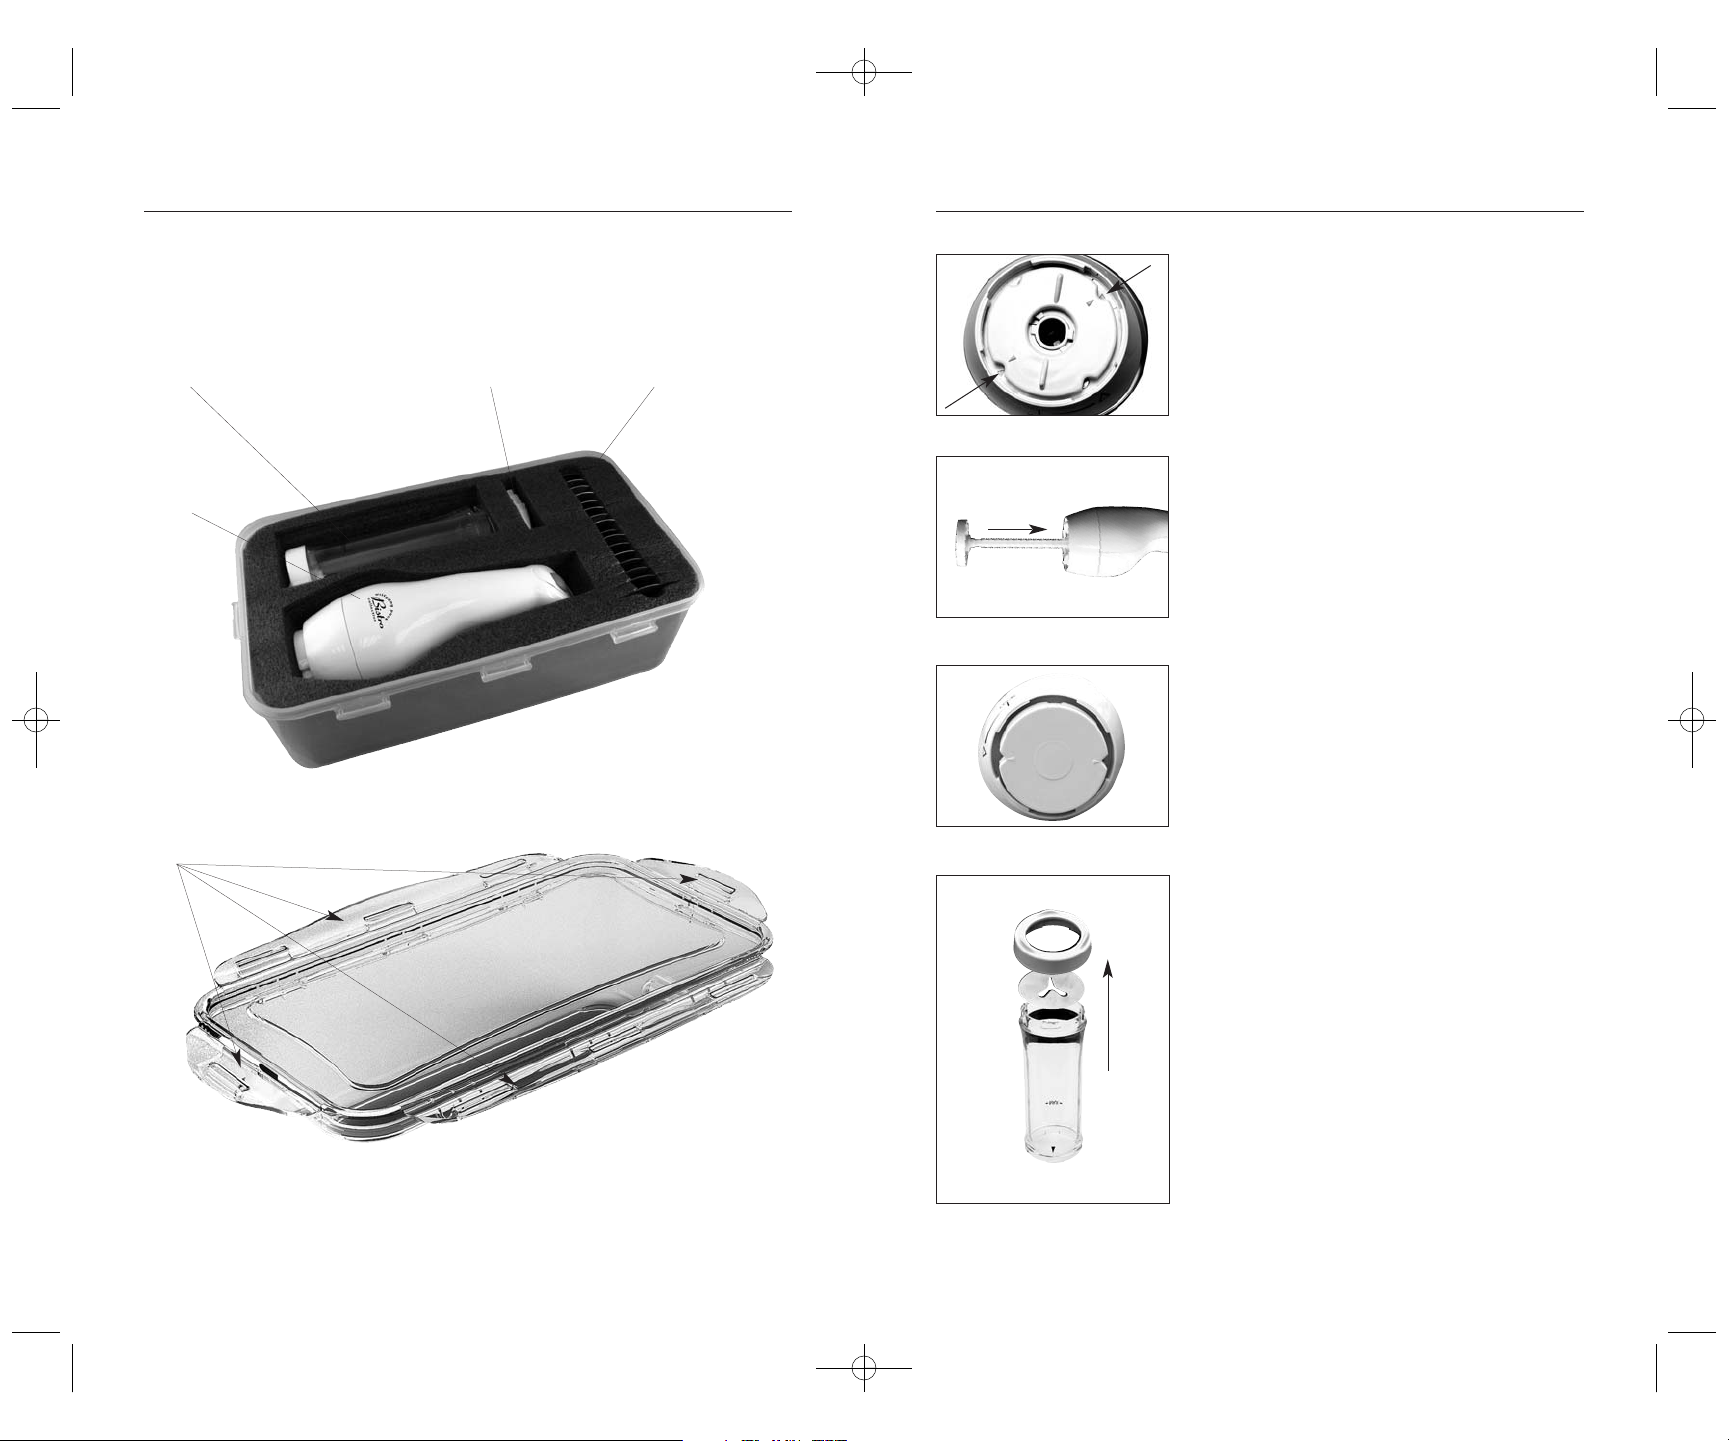
Know Your Cookie Press 5
Know Your Cookie Press Storage Box 7
Assembly Instructions 8
Instructions for Making Cookies 10
Refilling the Cookie Press 11
Helpful HInts 1 2
Cookie Shapes 13
Pastry Tip Shapes 14
Care and Cleaning 15
Storage 16
Recipes 17
Limited Warranty 34
Contact Information back cover
Wolfgang Puck,
owner of the famous
Spago restaurants and
one of the most influential
chef-restauranteurs in
America, is credited with
reviving California’s rich
culinary heritage. His
cooking innovations,
a result of blending fresh
California ingredients with his classical French techniques, are enjoyed
by world leaders, stars and fellow chefs alike. He established other
trend-setting restaurants like Postrio in San Francisco, Chinois on
Main in Santa Monica, Trattoria del Lupo, and his latest creation, Cut, a
gourmet steakhouse in the Beverly Wilshire Hotel. Home chefs can
also share Mr. Puck’s talents through his cookbooks and, of course,
through his appliances!
HSN_CookiePressManual10 8/4/10 10:34 PM Page 3
Page 4

5 6
Know Your
Cookie Press
Cam Disc
Pastry Tip Adapter
Pastry Tip Cover
Cam
Shaft
Press Disc
Tube Cover
Tube
On/Off Button
Motor Body
HSN_CookiePressManual10 8/4/10 10:34 PM Page 5
Page 5
Assembly Instructions
8
1 Align the arrows on the Cam Disc
with the arrows on the Motor Body
(See Figure 1).
2 Attach Press Disc to the Cam Disc
by inserting stem of the Cam Shaft into
the Cam Disc’s center hole. Fit the
Shaft all the way inside the unit.
Press firmly then turn clockwise. You
will hear a click as it snaps in place
(See Figure 2).
3 The outside contours of the 2 Discs will
line up (See Figure 3).
NOTE: Turn Cam Disc one click counterclockwise if Shaft is difficult to insert into
Motor Body.
4 Select a Disc and place it inside the
Tube Cover. Then place the Tube Cover
onto the Tube, turning clockwise until
locked (See Figure 4).
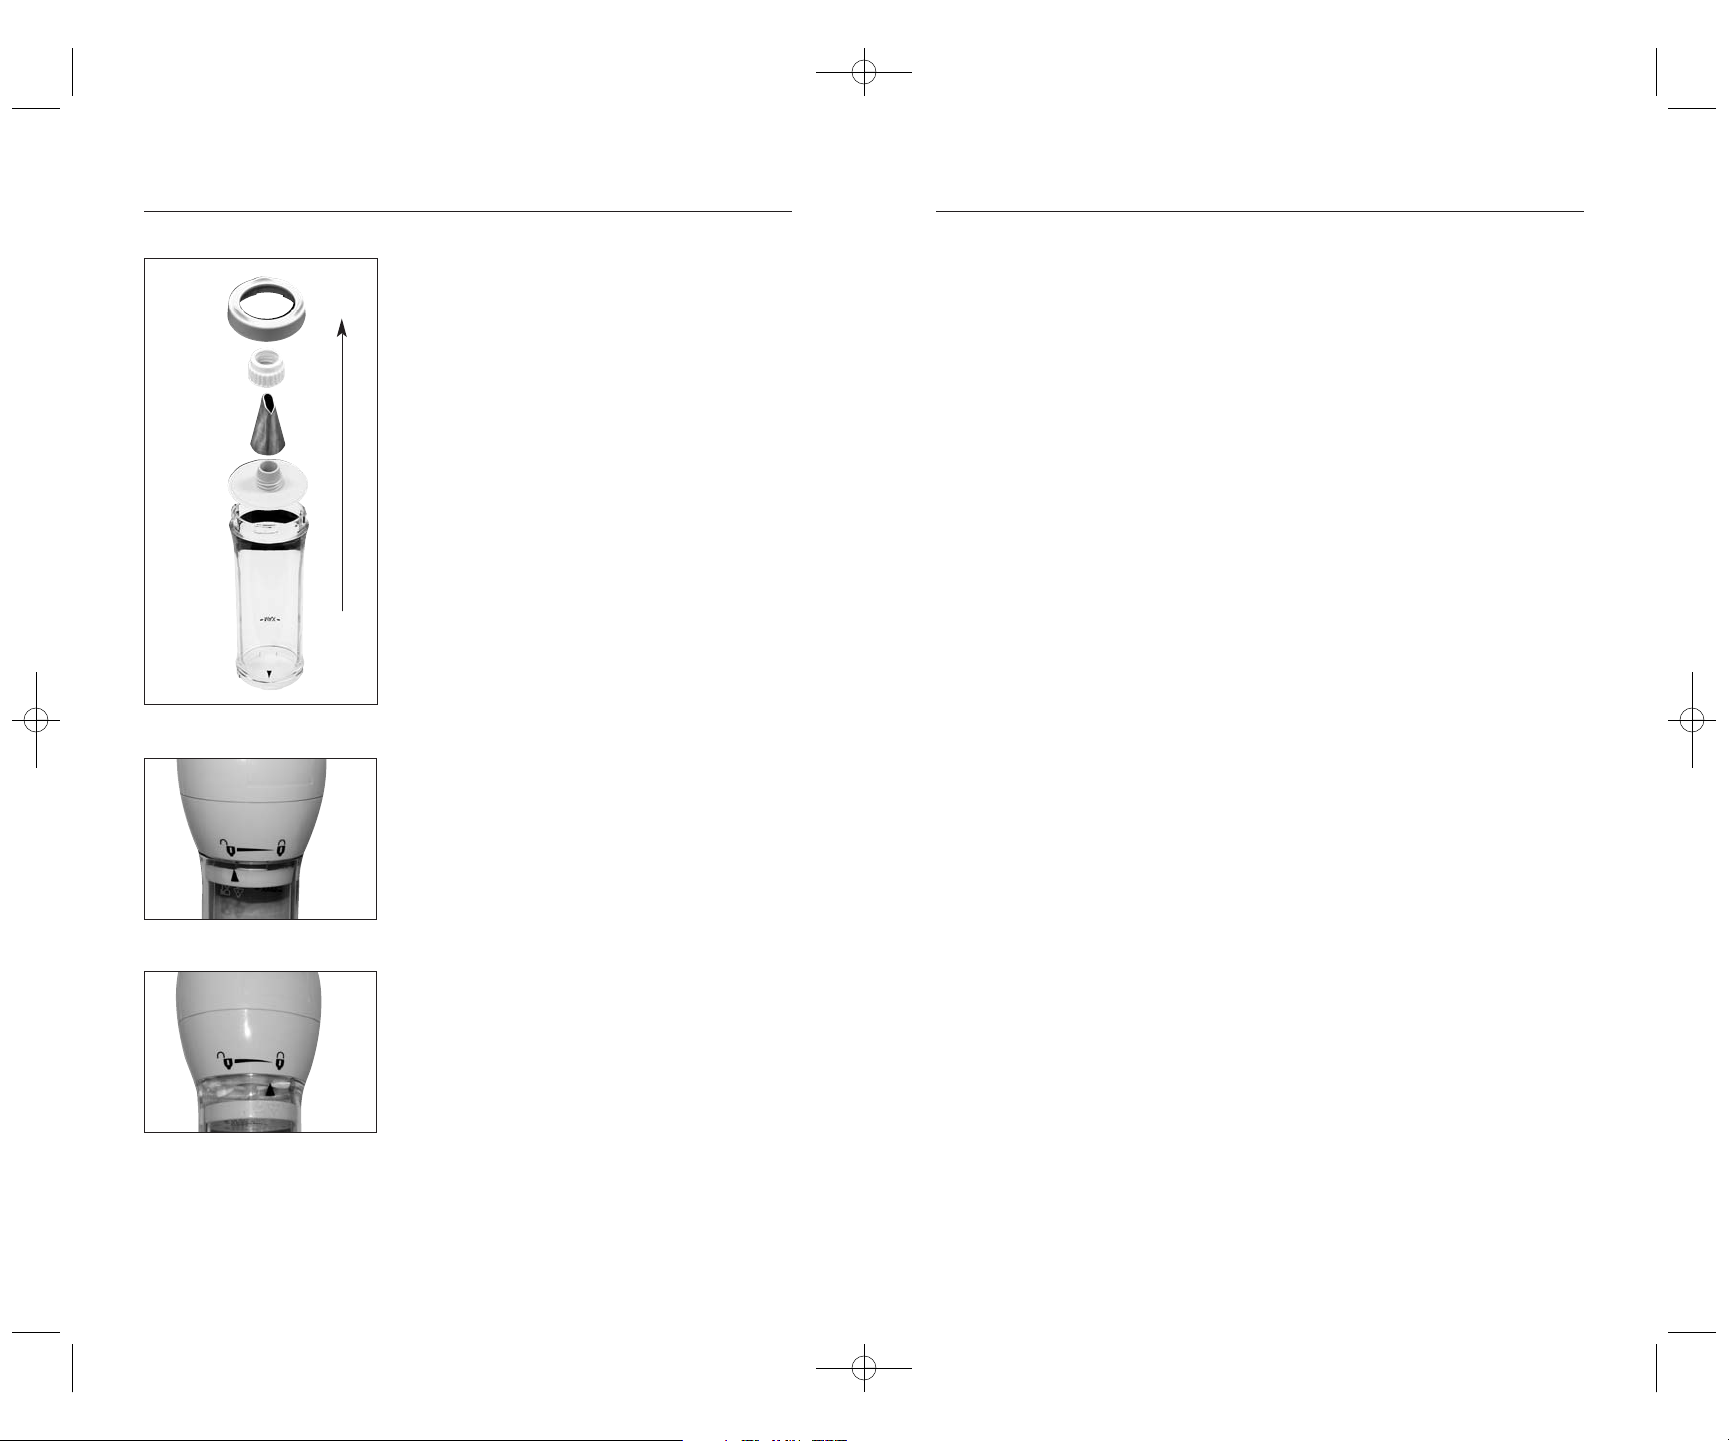
5 If a Pastry Tip is to be used, refer to
Figure 5 and fit the desired Tip over the
Pastry Tip Adapter and secure it with
the Pastry Tip Cover. Place the Pastry
Tip Assembly inside the Tube Cover.
Then place the Tube Cover onto the
Tube turning clockwise until locked.
6 With a spoon or spatula, load freshly
prepared cookie dough or filling.
NOTE: To ensure proper operation, do not
fill the Tube past the MAX Fill Line. DO NOT
OVERFILL!
Figure 1
Figure 2
Figure 3
Figure 4
7
Know Your Cookie Press
Storage Box
Tube
Motor
Body
Locking
Place cover on box and press the four locking tabs down to until they
click into place
Pastry Tips Cookie Discs
Photo above may differ slightly from actual product
HSN_CookiePressManual10 8/4/10 10:34 PM Page 7
Page 6
10
Instructions for Making Cookies
The proper consistency of cookie dough is very important. If the dough
is too stiff, it won’t release from the Cookie Press. If the dough is too soft
or sticky, chill in the refrigerator for 15 minutes. For best results, use the
recipes in this booklet until you get a feel for the proper consistency of
the dough.
We do not recommend using store-bought refrigerated
cookie doughs.
1 Plug the fully assembled and filled Cookie Press into a standard 120V
AC outlet.
NOTE: To avoid your cookie press from jamming never place cold dough
in the cookie press tube. If necessary, place your cookie dough in the
microwave on high for 5 seconds prior to filling the tube with dough.
2 Stand the Cookie Press upright and press against the surface of the
cookie sheet. The Cookie Press has been specially designed for
thumb operation, which provides better balance for placing the
cookie shapes on the cookie sheets.
3 When the Tube is filled with cookie dough and the ON/OFF Button
is pressed, the Press Disc pushes downward, forcing the dough
through the Disc or Tip to form an attractive cookie or decoration.
4 Holding the Cookie Press in position against the cookie sheet press
and hold the ON/OFF Button until the air pockets have been
removed and the dough starts to emerge from the openings in the
Cookie Disc.
5 Press a cookie for 2 seconds and note the result.
NOTE: The time to press each cookie will be based on the desired
thickness and shape of your cookie and the dough you are using.
Experiment with varying times and pressures until the desired cookie
thickness is achieved.
6 Release the ON/OFF Button and quickly step to the next position
on the cookie sheet.
9
Assembly Instructions
7 Align the long ridges on the inside of
the Tube with the outside contours of
the assembled 2 Discs. The arrow on
the Tube will line up with the arrow on
the Motor Body (See Figure 6). Grasp
Tube firmly and turn clockwise until the
top arrow on the Tube lines up in the
LOCK position. (See Figure 7)
8 Your Cookie Press is now fully
assembled and ready for use.
Figure 6
Figure 7
Figure 5
HSN_CookiePressManual10 8/4/10 10:34 PM Page 9
Page 7

12
Helpful Hints
• Avoid greased or nonstick cookie sheets, as they will not hold the
shape of the cookie as well.
• When a recipe calls for butter and margarine, both must be used.
Do not substitute one with the other.
• Dough should be pliable enough to easily emerge from the Disc and
stick on the cookie sheet.
• If dough is too soft or sticky, refrigerate for 15 minutes, or beat
in a small amount of flour. If the dough is too stiff, mix in the yolk
of one egg.
• Once dough has been loaded, use it immediately.
• Cookie dough that has been refrigerated overnight will be too stiff
and will not work properly.
• Some doughs and Discs work better when you move faster, and
some when you move slower. After some practice with rhythm and
timing, the shapes will improve.
• Use Discs with cookie dough for the preparation of cookies.
• Use Pastry Tips with soft dough for decorating canapes, candies,
cookies, desserts, pastry fillings, etc.
• If dough is not moist enough to hold the decorations, lightly brush a
little water, milk, honey or a little egg white where decorations are to
be placed.
• The amount of cookies per batch will vary with each recipe, the
Cookie Disc used, and the thickness of the cookies.
• To avoid your cookie press from jamming never place cold dough in
the cookie press tube. If necessary, place your cookie dough in the
microwave on high for 5 seconds prior to filling the tube with dough.
11
Refilling the Cookie Press
1 Unplug the Cookie Press.
2 Hold the Handle of the Motor Body with one hand. With the other
hand turn the Tube counter-clockwise until the arrow from the Motor
Body lines up with the arrow on the Tube, the unlock position.
3 Fill the Tube with freshly prepared cookie dough up to the MAX
Fill Line.
NOTE: To ensure proper operation, do not fill the Tube past the MAX
Fill Line. DO NOT OVERFILL!
4 Attach the Tube to the Motor Body. Align the arrow on the
Tube with the arrow on the Handle. Grasp the Tube firmly and
turn clockwise until the top arrow on the Tube lines up in the
LOCK position.
5 Your Cookie Press is ready for use again.
NOTE: Sometimes it may be necessary to disassemble and clean the
entire Cookie Press before refilling. For example, if you wish to use a
different type of dough or if dough has built up in the Cam Disc and is
preventing optimal performance. In these cases, clean and re-assemble
your Cookie Press. as directed in this manual. Always practice food
safety guidelines.
HSN_CookiePressManual10 8/4/10 10:34 PM Page 11
Page 8

14
Pastry Tip Shapes
Choose any of the Pastry Tips to decorate and add textures, colors, or
flavors to cookies, cakes and candies. Below is a sample of what can be
done with a few of the tips.
BASIC ROUND TIP (TIP #1)
Use this tip to fill cream puffs or jelly doughnuts.
CROWN TIP (TIP #5)
The bottom edge is flat and the top is ridged. Use this tip to decorate
fruits, vegetables or crackers, and to prepare beautiful canapes with
delicious cream cheese spreads.
Have fun and experiment with different motions while decorating
cookies: a back and forth motion creates a “ribbon” effect. Create soft
swirls by using a circular motion.
13
Cookie Shapes
Choose from any one of the Cookie Discs below to make beautiful
bakery-style cookies.
HSN_CookiePressManual10 8/4/10 10:34 PM Page 13
Page 9

16
Storage
1 Clean the Cookie Press as instructed above.
2 When the unit is not in use, be sure to leave it unplugged.
3 Store the Cookie Press and parts in its original box in a clean, dry
location.
15
Care and Cleaning
To keep your Cookie Press operating properly, we recommend cleaning
after each recipe.
1 Unplug the Cookie Press.
2 Hold the Tube pointing down with one hand and turn the Tube
Cover counter-clockwise. This will unlock the Tube Cover and the
Cookie Disc or Tip. Remove the Disc or Tip Assembly and set all
parts aside.
3 Hold the Handle of the Motor Body with one hand. With the other
hand turn the Tube counter-clockwise until the arrow from th e
Motor Body lines up with the arrow on the Tube, the unlock position.
4 Remove the Tube from the Motor Body. Pull the Cam Shaft with
Press Disc out of the Motor Body. Rinse and dry thoroughly.
CAUTION: Avoid any contact with liquid to the inside of the Motor Body.
5 Remove the Cam Disc from the Motor Body. Using the two Grips on
the Cam Disc, firmly turn the Disc counter-clockwise until the Disc
lifts out easily.
6 Clean the Cam Disc with soapy water. Rinse and dry thoroughly.
7 Wash all removable parts and accessories used immediately after
each use in warm, soapy water. Rinse and dry thoroughly. Do not
wash in dishwasher.
8 Cookie Discs and Pastry Tips are made of Stainless Steel and should
be cleaned with a soft cloth or sponge. Dry immediately after
cleaning to avoid spotting. Do not put Discs or Tips into dishwasher,
as they will discolor.
9 Wipe the exterior of the Motor Body with a soft, damp cloth. Dry
thoroughly.
10 Do not use steel wool, scouring pads or abrasive cleansers as they
will damage the finish.
11 As Cookie Discs and Pastry Tips get older, they may darken in color.
This is normal and in no way interferes with the use of the product.
12 A stiff brush will aid in cleaning the inside of the Tube and
Pastry Tips.
HSN_CookiePressManual10 8/4/10 10:34 PM Page 15
Page 10

18
Deb’s Spritz Cookies
Makes approximately 6 dozen cookies
INGREDIENTS
3 1/2 cups all-purpose flour
1 teaspoon baking powder
1/4 teaspoon salt
1 1/2 cups unsalted butter
1 cup sugar
1 egg
1 teaspoon vanilla
1/2 teaspoon almond extract
2 teaspoons orange zest
Food coloring, if desired
METHOD
1 Preheat oven to 350 degrees.
2 Stir together flour, baking powder and salt. Set aside.
3 In a separate bowl, beat the butter with a mixer until softened.
Add sugar and mix until light and fluffy. Add egg, vanilla, almond
extract, and orange zest. Beat well.
4 Gradually add flour mixture and beat until well mixed. If desired,
you can tint the dough with food coloring.
5 Place parchment paper on a cookie sheet. Load the cookie
press with the dough, and turn out cookies 1 to 2 inches apart.
Add sprinkles or sprinkle with sugar if desired.
6 Bake at 350 degrees for 10 minutes
TIP
To make the sprinkles stick better, brush dough with egg wash before
adding the sprinkles. To make an egg wash, beat 1 egg white with 2
teaspoons water.
To ensure easy passage through the cookie press, do not chill dough.
Recipe courtesy Debra Murray, Wolfgang Puck HSN Host
17
Recipes
HSN_CookiePressManual10 8/4/10 10:34 PM Page 17
Page 11

20
Peanut Butter Spritz Cookies
Makes approximately 40 cookies
INGREDIENTS
1 18.25 ounce box butter recipe yellow cake mix
2 large eggs
1/2 cup creamy peanut butter
2 tablespoons cream
METHOD
1 Preheat oven to 350 degrees.
2 Using a mixer, combine cake mix, eggs, peanut butter and cream.
Mix well.
3 Load the cookie press with the dough, and turn out cookies 1 to 2
inches apart on an ungreased cookie sheet.
4 Bake at 350 degrees for 10 minutes.
TIP
To ensure easy passage through the cookie press, do not chill dough.
Recipe courtesy Debra Murray, Wolfgang Puck HSN Host
19
Easy Lemon Kisses
Makes 48 cookies
INGREDIENTS
1 18.25-ounce box lemon cake mix
2 large eggs, beaten
1/4 cup canola oil
1 teaspoon fresh grated lemon zest
Sugar to sprinkle on cookies (optional)
METHOD
1 Preheat oven to 350 degrees.
2 Combine all ingredients and mix together well. Fill cookie press to fill
line. Fit cookie press with star cookie disc (#6).
3 Turn out cookies on cookie sheet one to two inches apart. If desired,
sprinkle with sugar.
4 Bake at 350 degrees for 10 minutes. Let cool.
Recipe courtesy Debra Murray, Wolfgang Puck HSN Host
HSN_CookiePressManual10 8/4/10 10:34 PM Page 19
Page 12

22
Deviled Eggs
Makes 4 - 6 Servings
INGREDIENTS
12 hard boiled eggs, peeled and halved
1/4 cup mayonnaise
2 ounces cream cheese
4 tablespoons unsalted butter, room temperature
1/2 teaspoon salt
1/2 teaspoon freshly ground pepper
1/2 teaspoon red pepper sauce
1/4 teaspoon dry mustard
METHOD
1 Remove the yolks from the eggs, and set whites aside.
2 Place the yolks with all of the other ingredients in food processor
and puree until smooth.
3 Place the mixture in the cookie press, filling 3/4 full. Fit the cookie
press with the star-shaped pastry tip (#6) and fill each of the egg
halves with the filling. Garnish with caviar or olive slices if desired.
Recipe courtesy Debra Murray, Wolfgang Puck HSN Host
21
Cheese Straws
Makes about 10 dozen
INGREDIENTS
1 1/2 cups butter, softened
8 ounces sharp cheddar cheese, shredded
8 ounces mild cheddar cheese, shredded
1 1/2 teaspoons salt
1 teaspoon freshly ground black pepper
3/4 teaspoon cayenne
4 cups all-purpose flour
METHOD
1 Preheat oven to 350 degrees.
2 Beat the first 5 ingredients at medium speed using a mixer until
blended. Gradually add flour, beating just until combined well.
3 Load the cookie press with the dough 2/3 full. Fit the cookie press
with the star-shaped disc (#6).
4 On parchment-lined baking sheets make long ribbons the length of
the cookie sheet with the dough. Cut the ribbons into 2-inch pieces.
5 Bake at 350 degrees for 12-15 minutes or until lightly browned.
Remove to wire racks to cool.
TIP
To ensure easy passage through the cookie press, do not chill dough.
Recipe courtesy Debra Murray, Wolfgang Puck HSN Host
HSN_CookiePressManual10 8/4/10 10:34 PM Page 21
Page 13

24
Savory Cheddar Cheese Straws
Makes 4 dozen straws
INGREDIENTS
1 2/3 cups unbleached all-purpose flour
1 tablespoon dry mustard powder
1 teaspoon cayenne pepper (or to taste)
1 teaspoon onion powder, optional
2 teaspoons kosher salt
1 large egg
1/2 cup unsalted butter, softened
8 ounces extra sharp cheddar cheese, shredded
1/2 teaspoon extra kosher salt, for sprinkling on tops
METHOD
1 Preheat oven to 425 degrees.
2 In bowl of food processor combine all ingredients except for last
measure of kosher salt in order listed.
3 Pulse until a dough ball forms. Then, process for 30 seconds until
dough is uniformly smooth and no visible bits of cheese remain.
4 Fill cookie press to MAX line. Attach a disk which has a large
opening (Try #5 or #6).
5 Press onto foil-lined cookie sheets and sprinkle tops of each straw
with a bit of the reserved kosher salt.
6 Bake 15-20 minutes or until deep golden brown and crisp.
Recipe courtesy Marian Getz, Wolfgang Puck Pastry Chef
23
Fat-Free Chocolate Chewies
Makes 3 dozen cookies
INGREDIENTS
1/3 cup cocoa powder
3 tablespoons unbleached all-purpose flour
2 1/4 cups powdered sugar
1/2 teaspoon kosher salt
1 teaspoon vanilla extract
2 large egg whites
METHOD
1 Preheat oven to 325 degrees.
2 In bowl of food processor, combine ingredients in order listed.
Process until soft dough forms.
3 Fill cookie press to MAX line. Attach a disk which has a large
opening (Try #5 or #6).
4 Press onto foil-lined cookie sheets.
5 Bake for 15-20 minutes or until surface of cookies is dry but soft in
the center when pressed.
6 Please note, these cookies will spread and will not keep the exact
shape of the disk.
Recipe courtesy Marian Getz, Wolfgang Puck Pastry Chef
HSN_CookiePressManual10 8/4/10 10:34 PM Page 23
Page 14

26
Coconut Tea Cookies
Makes 6 dozen cookies
INGREDIENTS
1/2 cup solid white shortening
1/2 cup unsalted butter, softened
4 tablespoons cream cheese, softened
1 cup granulated sugar
1 large egg
2 teaspoons coconut extract
1 teaspoon butter vanilla extract
1/4 teaspoon baking soda
1 teaspoon kosher salt
2 1/4 cups unbleached all-purpose flour
1/2 cup shredded sweetened coconut flakes, for topping
METHOD
1 Preheat oven to 375 degrees.
2 Combine ingredients in food processor in order listed except for the
coconut flakes. Pulse until a smooth dough forms.
3 Fill cookie press to MAX line. Attach a disk which has a large
opening (Try #5 or #6).
4 Press cookies onto foil-lined cookie sheets.
5 Sprinkle the coconut flakes evenly over cookies.
6 Bake for 10-15 minutes.
Recipe courtesy Marian Getz, Wolfgang Puck Pastry Chef
25
Lemon Butter Cookies
Makes 6 dozen cookies
INGREDIENTS
2 1/4 cups unbleached all-purpose flour
3/4 cup powdered sugar
1/3 cup granulated sugar
1 cup unsalted butter, softened
1/2 teaspoon kosher salt
1/4 teaspoon baking soda
4 large egg yolks
1 tablespoon fresh lemon zest, very finely grated using a microplane
1 tablespoon fresh lemon juice
1 teaspoon pure lemon oil or extract
METHOD
1 Preheat oven to 350 degrees.
2 Combine ingredients in food processor in order listed. Pulse until
a smooth dough forms.
3 Fill cookie press to MAX line. Attach a disk which has a large
opening (Try #5 or #6).
4 Press cookies onto foil-lined cookie sheets.
5 Bake 8-10 minutes.
Recipe courtesy Marian Getz, Wolfgang Puck Pastry Chef
HSN_CookiePressManual10 8/4/10 10:34 PM Page 25
Page 15

28
Classic Spritz Cookies
Makes 6 dozen cookies
INGREDIENTS
1 cup unsalted butter, softened
1/2 cup granulated sugar
1 large egg
1 teaspoon vanilla extract
1/2 teaspoon kosher salt
2 1/2 cups unbleached all-purpose flour
METHOD
1 Preheat oven to 375 degrees.
2 With an electric mixer, cream the butter and sugar until uniformly
blended, about 1 minute. Scrape bowl.
3 Add egg and vanilla and mix for 1 minute. Scrape bowl again.
4 Add remaining ingredients and mix on lowest speed just until dry
ingredients are incorporated.
5 Fill cookie press to MAX line; attach desired disc; press cookies onto
foil-lined cookie sheets.
6 Bake for 8-10 minutes.
Recipe courtesy Marian Getz, Wolfgang Puck Pastry Chef
27
Holiday Butter Cookies
Makes 6 dozen cookies
INGREDIENTS
1 cup unsalted butter, softened
3/4 cup granulated sugar
1 large egg
1 teaspoon vanilla extract
1 teaspoon butter vanilla extract
1/2 teaspoon kosher salt
1/4 teaspoon baking powder
2 1/4 cups unbleached all-purpose flour
Food coloring, sprinkles, jimmies and colored sugar as desired
METHOD
1 Preheat oven to 375 degrees.
2 With an electric mixer, cream the butter and sugar until uniformly
blended, about 1 minute. Scrape bowl.
3 Add egg, vanilla and butter vanilla and mix for 1 minute. Scrape
bowl again.
4 Add salt, baking powder and flour, and mix on lowest speed just
until dry ingredients are incorporated. Add a few drops of food
coloring, if desired.
5 Fill cookie press to MAX line; attach desired disk; press cookies out
onto foil-lined cookie sheets. Top with desired sprinkles.
6 Bake for 10-15 minutes.
Recipe courtesy Marian Getz, Wolfgang Puck Pastry Chef
HSN_CookiePressManual10 8/4/10 10:34 PM Page 27
Page 16

30
Whipped Cream Frosting
Makes 1 1/2 cups
INGREDIENTS
1 cup heavy whipping cream
1/2 teaspoon vanilla extract
1/4 cup powdered sugar
Sprinkles, jimmies, coconut or colored sugar, for decorating, as desired
METHOD
1 Whip cream, vanilla and powdered sugar until stiff peaks form.
2 Fill cookie press to MAX line.
3 Attach one of the pastry tips.
4 Decorate cookies with frosting as desired.
5 Top with sprinkles.
Recipe courtesy Marian Getz, Wolfgang Puck Pastry Chef
29
Buttery Gingersnap Cookies
Makes 7 dozen cookies
INGREDIENTS
3/4 cup unsalted butter, softened
3/4 cup dark brown sugar, packed
3/4 cup molasses
1 large egg
2 teaspoons vanilla extract
1/2 teaspoon kosher salt
1 teaspoon baking soda
4 cups unbleached all-purpose flour
2 teaspoons ground cinnamon
1 teaspoon ground cloves
2 teaspoons ground ginger
1/2 teaspoon ground nutmeg
1 teaspoon ground allspice
METHOD
1 Preheat oven to 375 degrees.
2 With an electric mixer, cream the butter and sugar until uniformly
blended, about 1 minute. Scrape bowl.
3 Add molasses, egg and vanilla and mix for 1 minute. Scrape bowl
again.
4 Add remaining ingredients and mix on lowest speed just until dry
ingredients are incorporated.
5 Fill cookie press to MAX line; attach desired disc; press cookies onto
foil-lined cookie sheets.
6 Bake for 10-15 minutes.
Recipe courtesy Marian Getz, Wolfgang Puck Pastry Chef
HSN_CookiePressManual10 8/4/10 10:34 PM Page 29
Page 17

32
Recipe Notes
31
Homemade Colored Decorator
Sugar Crystals
Makes 1 cup
INGREDIENTS
1 cup granulated sugar
4 - 8 drops desired food coloring
Zipper-top plastic bag
METHOD
1 Combine sugar and food coloring in zipper-top bag.
2 Close top and shake vigorously until sugar is uniformly colored.
3 If any spots of darker color remain, press bag between fingers to
incorporate into sugar.
4 Shake again.
5 Use this sugar to decorate cookies
Recipe courtesy Marian Getz, Wolfgang Puck Pastry Chef
HSN_CookiePressManual10 8/4/10 10:34 PM Page 31
Page 18

34
Limited Warranty
This warranty covers all defects in workmanship or materials in the
mechanical and electrical parts, arising under normal usage and care, in
this product for a period of 12 months from the date of purchase
provided you are able to present a valid proof-of-purchase. A valid
proof-of-purchase is a receipt specifying item, date purchased, and
cost of item. A gift receipt with date of purchase and item is also an
acceptable proof-of-purchase. Product is intended for household use only.
Any commercial use voids the warranty.
This warranty covers the original retail purchaser or gift recipient. During
the applicable warranty period within normal household use,we will
repair or replace, at our discretion, any mechanical or electrical part
which proves defective, or replace unit with a comparable model.
To obtain service under the terms of this warranty,
call Toll Free (800) 275-8273.
THIS LIMITED WARRANTY COVERS UNITS PURCHASED AND USED
WITHIN THE UNITED STATES AND DOES NOT COVER:
• Damages from improper installation.
• Defects other than manufacturing defects.
• Damages from misuse, abuse, accident, alteration, lack of proper
care and maintenance, or incorrect current or voltage.
• Damage from service by other than an authorized dealer or
service center.
This warranty gives you special legal rights and you may also
have other rights to which you are entitled which may vary from
state to state.
33
Recipe Notes
HSN_CookiePressManual10 8/4/10 10:34 PM Page 33
 Loading...