

Wolfgang Puck BDRCRD010 Use & Care Manual
USE & CARE
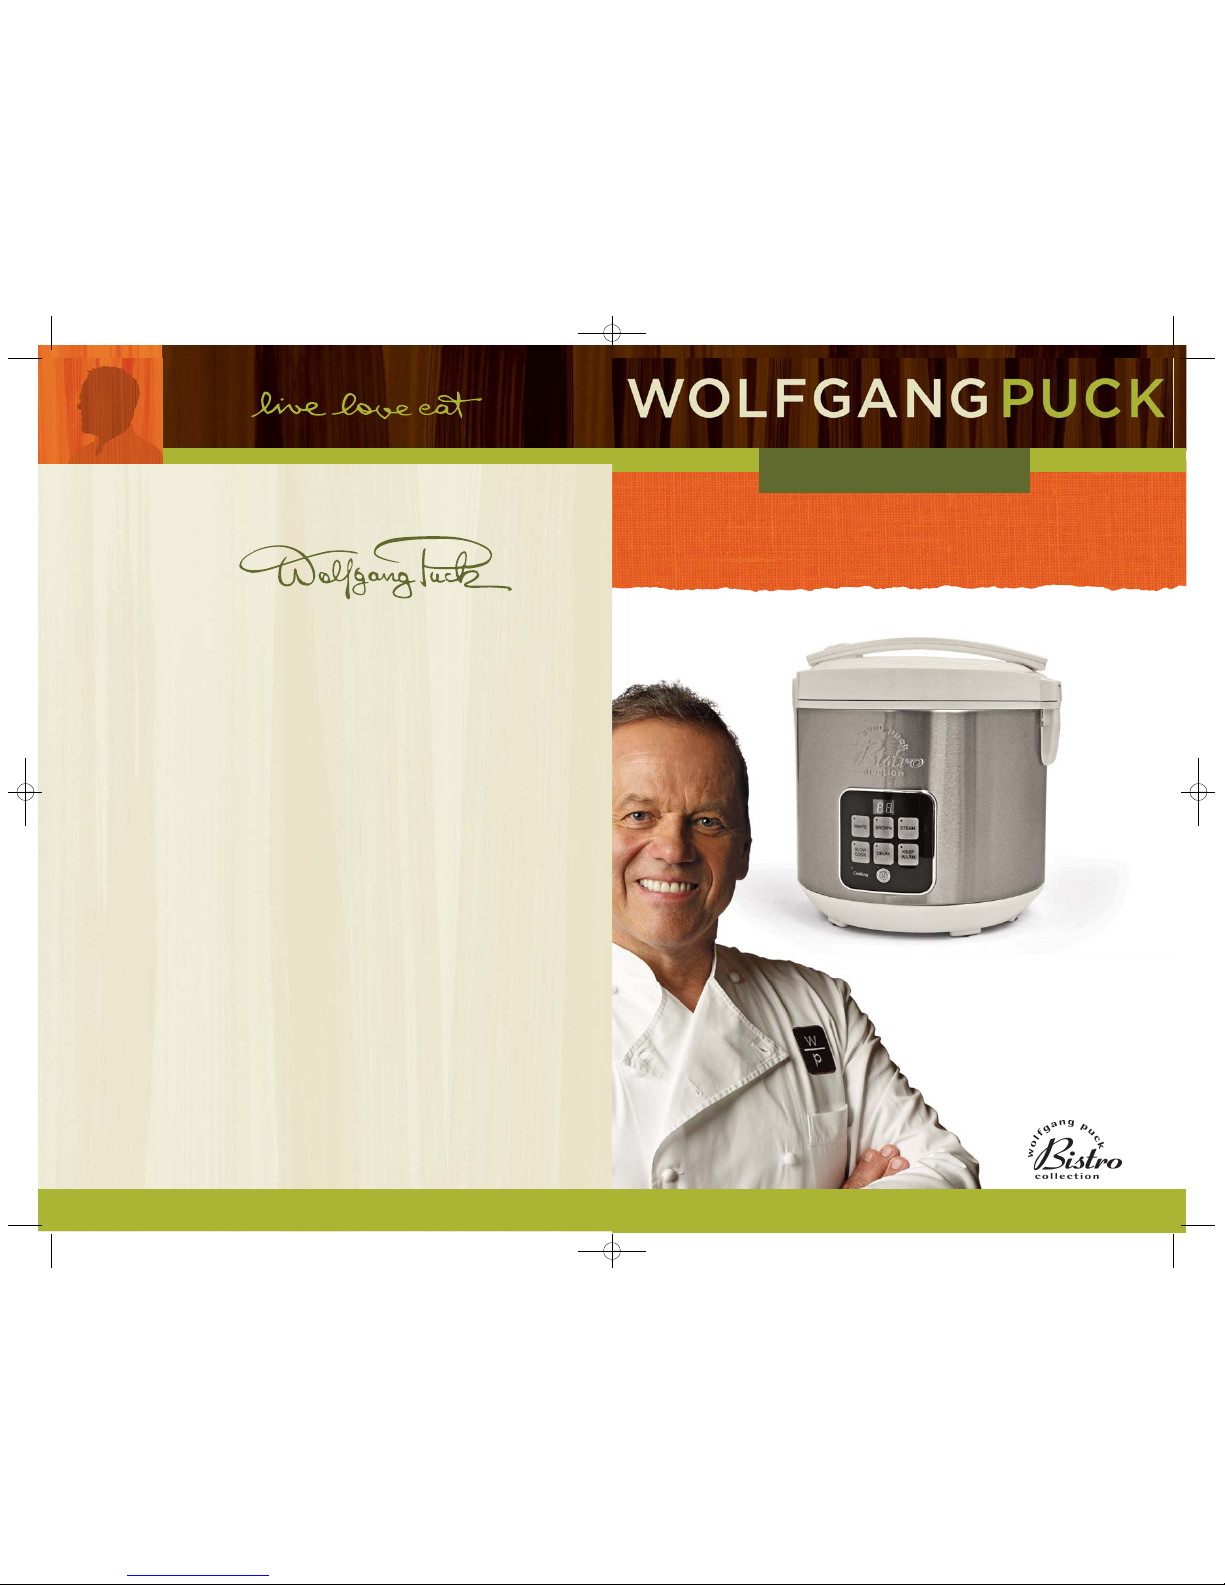
10-cup Digital Multi-Cooker
LIFE IS ABOUT BALANCE
AND EATING WELL
IMPORTANT NOTICE
PLEASE DO NOT RETURN TO STORE.
If you have any problems with this unit, contact Consumer
Relations for service PHONE: 1-800-275-8273 or visit our
website at wphousewares.com
Please read operating instructions before using this
product. Please keep original box and packing materials
in the event that service is required.
W.P. APPLIANCES, INC. Toll Free (800) 275-8273
Model BDRCRD010 Printed in China REV 1.0
All trademarks, service marks and trade names (collectively the “Marks”) are proprietary
to Wolfgang Puck World Wide.
HSNDigitalRiceCooker:HSNDigitalRiceCooker 1/11/11 4:14 PM Page 1

1 2
ADDITIONAL SAFETY
INFORMATION
IMPORTANT SAFEGUARDS
When using electrical appliances, basic safety precautions should always
be followed, including the following:
1 Read all instructions carefully.
2 Do not touch hot surfaces. Use handles only.
3 To protect against risk of electric shock, do not immerse appliance,
cord, or plug in water or other liquid.
4 Close supervision is necessary when any appliance is used by
or near children.
5 Unplug from outlet when not in use and before cleaning. Allow
to cool before putting on or taking off parts, and before cleaning
the appliance.
6 Do not operate any appliance with a damaged cord or plug or after
the appliance malfunctions or is dropped or damaged in any manner.
Return the appliance to an authorized service facility for examination,
repair, or electrical or mechanical adjustment.
7 Do not place on or near a hot gas or electric burner, or in a
heated oven.
8 The use of accessory attachments not recommended or sold by the
appliance manufacturer may cause fire, electric shock, or injury.
9 Do not use outdoors.
10 Do not let cord hang over edge of table or counter or touch hot
surfaces, including the stove.
11 Extreme caution must be used when moving an appliance
containing hot oil or other hot liquids.
12 Do not use this appliance for other then intended use.
13 Always attach plug to appliance first, then plug cord into the wall
outlet. To disconnect, press the (POWER button) to turn the unit
off, then unplug from the wall outlet. Always hold the plug, never
pull the cord.
14 To reduce the risk of shock, cook only in removable container.
15 To ensure continued protection against risk of electric shock,
connect to properly grounded outlets only.
SAVE THESE INSTRUCTIONS
HOUSEHOLD USE ONLY
GROUNDING INSTRUCTIONS: This appliance must be grounded. It is
equipped with a 3-prong cord having a grounded plug. The plug must be
plugged into an outlet which is properly installed and grounded.
Warning: Improper use of the grounded cord can result in the risk of
electric shock. Consult a qualified electrician if necessary. Do not attempt to
defeat this safety feature by modifying plug.
A short power-supply cord is provided to reduce the hazards resulting
from entanglement or tripping over a longer cord. If it is necessary to
use an extension cord, it should be positioned such that it does not
drape over the counter or tabletop where it can be pulled on by children
or tripped over and:
A. Use only 3-prong extension cord with 3-blade grounding plug.
B. The marked rating of the extension cord must be equal to or
greater then the rating of this appliance. The electrical rating is
listed on the bottom of this unit.
Before Your First Use
Carefully unpack the Multi-Cooker and remove all packaging
materials. Wash all parts according to the Care & Cleaning instructions
in this manual.
Warning: Do not immerse Multi-Cooker housing or power cord in water
or any other liquid. Reassemble the unit after cleaning.
About Your Digital Multi-Cooker
Your Wolfgang Puck Digital Multi-Cooker is equipped with a micro
computer chip that regulates the temperature for a wide variety or rice
grains providing perfect results every time. In addition to cooking rice,
you can steam, slow cook, and even set the Delay Timer to come home
from work to a perfectly fresh pot of rice.
The Steam function allows you to set the time from 5 – 30 minutes,
and will not start counting down until the water has reached boiling
temperature. The Slow Cook function is programmed to simulate
traditional slow cookers that have both a High and Low temperature
setting. And when you are finished cooking, clean up is a breeze with
the nonstick removable pot. Please read through this manual to
familiarize yourself with all of the features and benefits that this
Multi-Cooker offers.
HSNDigitalRiceCooker:HSNDigitalRiceCooker 1/11/11 4:14 PM Page 1
3 4
Table of Contents
Important Safeguards 1
Before Your First Use 2
About Your Digital Multi-Cooker 2
About Wolfgang Puck 3
Know Your Multi-Cooker 5
Caution 7
Removing the Detachable Lid 9
Attaching the Detachable Lid 10
Using Your Digital Multi-Cooker 1 1
LED Timer Display 1 1
White & Brown Rice 12
Steam 13
Slow Cook 14
Delay Timer 15
Keep Warm 16
Helpful Hints 17
Care & Cleaning 18
Fresh Vegetable Steaming Chart 19
Main Dish and Side Dish Recipes 20
Dessert Recipes 48
Limited Warranty 58
Contact Information Back
Wolfgang Puck,
owner of the famous
Spago restaurants and
one of the most influential
chef-restauranteurs in
America, is credited with
reviving California’s rich
culinary heritage. His
cooking innovations,
a result of blending fresh
California ingredients with his classical French techniques, are enjoyed
by world leaders, stars and fellow chefs alike. He established other
trend-setting restaurants like Postrio in San Francisco, Chinois on
Main in Santa Monica, Trattoria del Lupo, and his latest creation, Cut,
a gourmet steakhouse in the Beverly Wilshire Hotel. Home chefs can
also share Mr. Puck’s talents through his cookbooks and, of course,
through his appliances!
HSNDigitalRiceCooker:HSNDigitalRiceCooker 1/11/11 4:14 PM Page 3
5
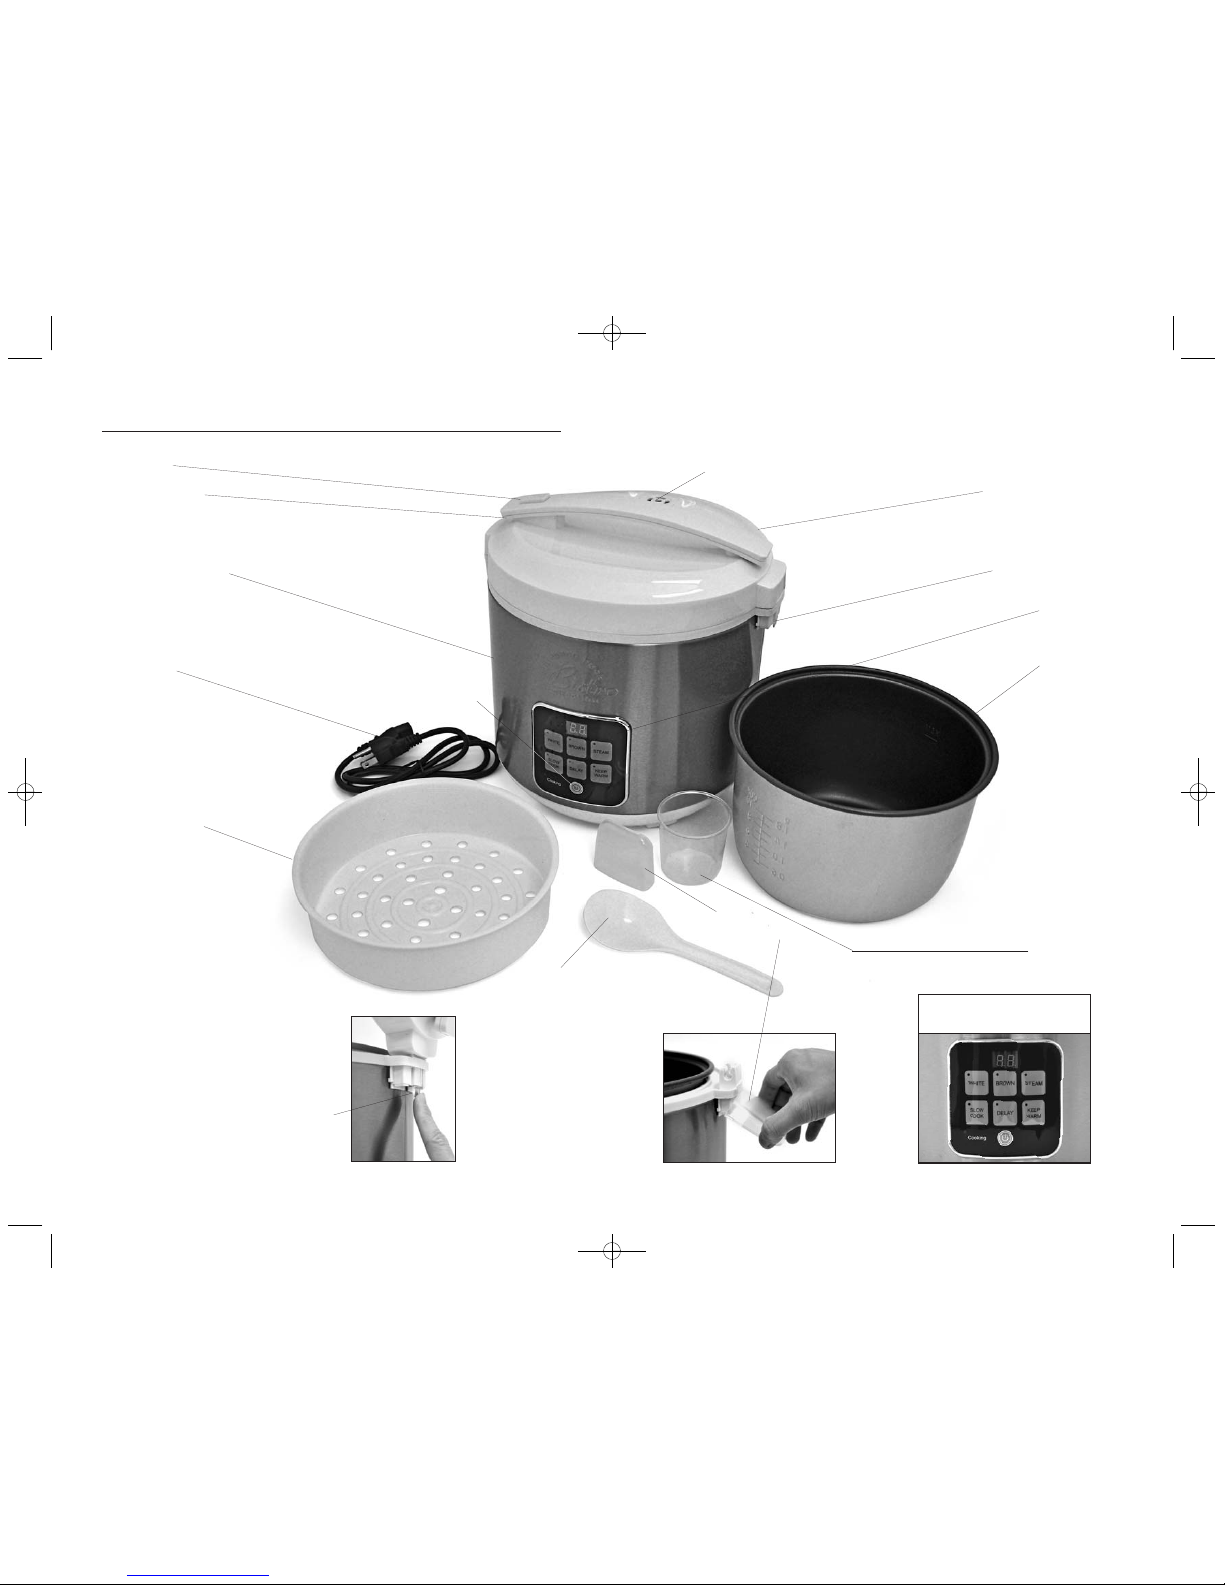
Know Your Multi-Cooker
Multi-Cooker Housing
Detachable Lid
Steam Vent
Detachable Lid Stem
Carrying Handle
Lid Release
Steaming Basket
6
Condensation
Collector
Control Panel
Power Cord
Power
Button
Measuring Cup
Multi-Cooker
Inner Pot
Scoop
Detachable Lid Stem
Control Panel
HSNDigitalRiceCooker:HSNDigitalRiceCooker 1/11/11 4:14 PM Page 5

7 8
Caution
Be sure to observe the following to prevent malfunction that may cause
an accident:
1
Measure the quantity of rice and water according to the Instructions on
page 12.
2
Clean the Multi-Cooker, particularly the condensation collector after each
use (see Care & Cleaning section of this manual).
3
Set the unit on a stable, level surface.
4
DO NOT expose to water, high humidity, or heat sources. DO NOT use the
pot directly on an open flame.
5
Be sure to keep the unit out of the reach of children.
6
Keep holes that drain into the condensation collector clean and free
of debris.
7
The unit becomes hot when in use. DO NOT touch the lid with your hand,
and do not place your face or hand directly over the steam coming from
the cooker.
8
Always keep the outside bottom of the pot and the heating plate
clean and dry. Any foreign matter between them will cause the unit
to malfunction.
9
DO NOT tilt the Multi-Cooker on its edge or place it upside down with
its power supply plug connected or with food in the pot as this may
cause damage to the cooker or injury to yourself. When tilting or placing
the Multi-Cooker upside down, make sure to disconnect the power
supply plug.
11
Do not fill the unit above the MAXIMUM CUP MARKING.
12
The lid must be closed tightly in the latched position at all times during
cooking. (i.e. The unit must not be operated with the lid opened).
13
DO NOT cover the lid with a cloth. The lid may deform or change color.
14
DO NOT damage the power cord and do not attempt to repair it if it
is damaged.
15
Never attempt to customize the cord. Keep the cord away from high
temperatures. Avoid unnecessary bending, twisting and pulling on the
cord. Never place heavy objects on the cord or attempt to tie it up. Using
a damaged power cord can lead to electrical shock, shorting or fire.
16
Ensure that the plug fits all the way into the outlet and the opposite end
into the receptacle of the Multi-Cooker. Partially plugged-in cords may
cause electric hazard.
17
DO NOT MOVE the unit while cooking.
Caution
HSNDigitalRiceCooker:HSNDigitalRiceCooker 1/11/11 4:14 PM Page 7
109
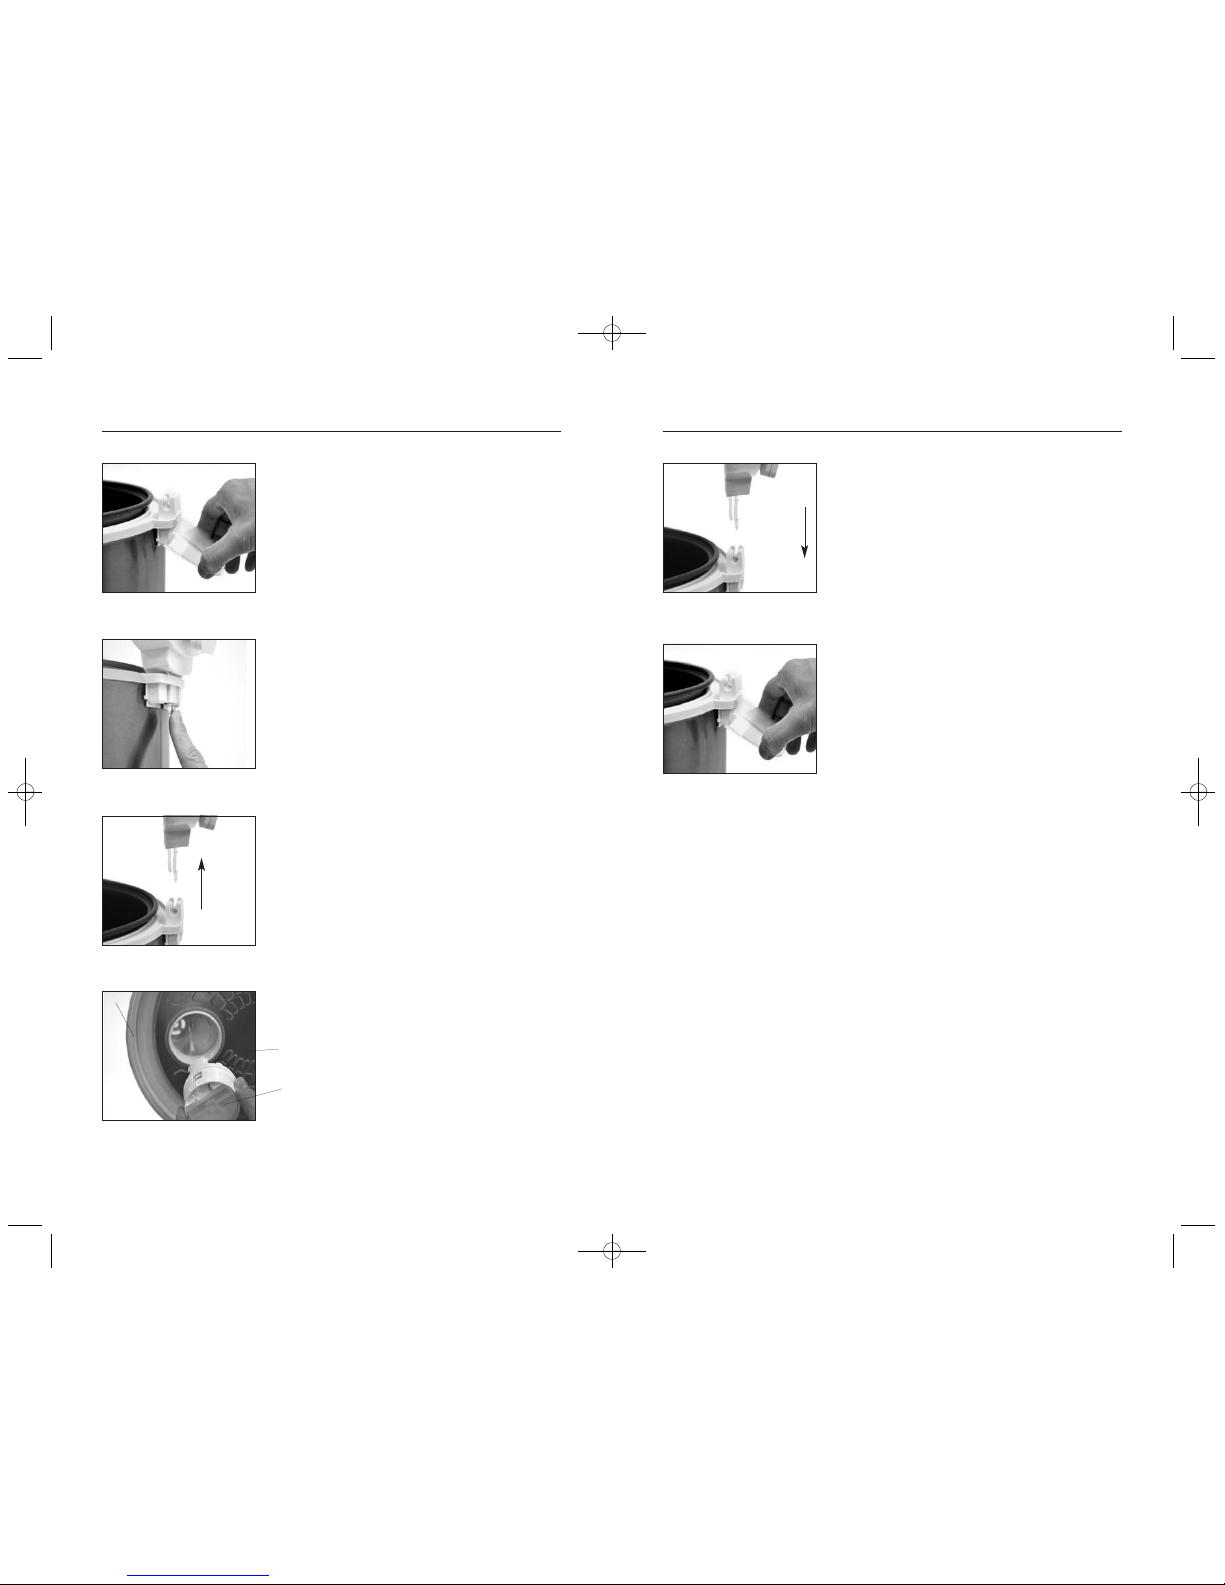
Attaching the Detachable Lid
1 To attach the Detachable Lid, slide the
Lid Stem into the Lid Stem Receptacle
on the Multi-Cooker Housing. Push
straight down until the Lid clicks in
place. See Figure 6.
CAUTION: Ensure that your Lid Stem is
locked in place by attempting to
remove it by pulling straight up. A
Serious burn injury can occur if you try
to move your Multi-Cooker without the
Lid locked into place.
2 Replace the Condensation Collector by
pressing straight in over the Lid Stem
until snaps into place. See Figure 7.
Figure 7
Figure 6
Removing the Detachable Lid
1 To remove the Detachable Lid, first
remove the Condensation Collector
located under the Lid hinge by pulling
it away from the Multi-Cooker Housing.
See Figure 1.
2 Remove the Detachable Lid by pushing
the Detachable Lid Stem in while lifting
the lid straight up. See Figures 2 and 3.
3 If needed, the Steam Valve can be
removed in order to rinse the steam
vent. To remove, turn it counterclockwise and lift straight up.
See Figure 4.
4 Do not attempt to remove the
Inner Lid or silicone gasket. See
Figure 4. Do not place the Removable
Lid in the dishwasher. Simply wash
the Inner Lid with warm soapy water
and rinse thoroughly.
Figure 2
Figure 1
Figure 3
Figure 4
Inner Lid
Steam Valve
Silicone Gasket
HSNDigitalRiceCooker:HSNDigitalRiceCooker 1/11/11 4:14 PM Page 9

12
White & Brown Rice
1 Only measure rice with the enclosed measuring cup. See “Helpful
Hints” section for comments on rinsing rice.
2 Place rice in the pot and add water to the measuring mark in the pot
that coincides with the number of rice cups added. As an example,
for 10 cups of uncooked rice (yields 20 cups of cooked rice), add 10
full scoops of rice to the pot. Add water to the 10 cup line on the
inside of the pot. Always add the rice to the pot BEFORE adding the
water to the pot. The water level marked on the inner pot is based
upon having rice added already. Follow the above example for
smaller quantities, i.e. 5 cups of rice added to the Pot, then water
to the 5 cup line.
3 Place the pot in the Multi-Cooker, Close the outer lid. The lid is
properly closed when it clicks.
4 Plug the cooker in, you will hear a single beep. Press the (POWER
button) once and the Multi-Cooker will beep once perform a selftest by stepping through all of the settings. The display will
show two dashes.
5 Press the WHITE or BROWN rice button; you will hear a short beep
indicating the selected mode, the indicator will flash six times and a
second beep will sound indicating that the cooking cycle has
started. The COOKING indicator will stay illuminated during the
cooking cycle.
6 At the end of the cooking process the Multi-Cooker will beep 5 times
and automatically switch to “KEEP WARM”. The TIMER display will
show two dashes and the KEEP WARM indicator will illuminate. The
KEEP WARM function will continue until the (POWER button) is
turned off, or the unit is unplugged.
NOTE: It is recommended that you do not keep your rice in KEEP WARM
mode longer than 5 hours.
7 Open the Multi-Cooker by pressing the release button on the handle.
Be sure to open the lid facing away from you to avoid any hot steam.
8 After each use remove and clean the condensation collector, press
the (POWER button) until no lights are illuminated, and unplug
your Multi-Cooker from the outlet.
NOTES ABOUT BROWN RICE
Brown rice contains extra bran layers than white rice and requires
a longer soaking / cooking time. For brown rice follow the directions
for white rice with the exception that you will press the BROWN RICE
button instead. The Multi-Cooker is programmed to compensate for a
longer soaking/cooking cycle than white rice. No additional water is
required.
11
Using Your Digital Multi-Cooker
POWER LOSS MEMORY
Your Multi-Cooker is equipped with a memory of where it left off should
power be interrupted. The Multi-Cooker will resume the cooking cycle up
to 10 hours once power is restored. Ensure that after every use of your
Multi-Cooker, you press the (POWER button) until no lights are
illuminated indicating that the Multi-Cooker is off, and then unplug
from the wall outlet. Do not unplug your Multi-Cooker during any active
mode. Always press the (POWER button) first, and then unplug from
the outlet.
Plug the detachable cord of your Multi-Cooker into the receptacle at the
back of the cooker. Plug the blade end into a standard 120V AC outlet.
You will hear a single beep indicating that your Multi-Cooker has power.
Press the (POWER button) and the Control Panel will initiate a selftest and cycle once through all of the functions in order of WHITE,
BROWN, STEAM, KEEP WARM, DELAY, and SLOW COOK. You will then
notice two dashes appear in the TIMER. Your Multi-Cooker is now in
standby mode and ready for you to select the desired function.
LED Timer Display
The TIMER display is only applicable for the following functions:
STEAM, SLOW COOK, and DELAY
HSNDigitalRiceCooker:HSNDigitalRiceCooker 1/11/11 4:14 PM Page 11

14
Slow Cook
The SLOW COOK function allows for both a HIGH and LOW
temperature modes depending upon the number of hours selected.
For cooking times of 2 – 6 hours your Multi-Cooker will cook on HIGH
mode, and for cooking times of 7 – 10 hours your Multi-Cooker will cook
on LOW mode. If you require extra time in either mode once the time
has elapsed simply press the SLOW COOK button a second time and
set the additional time needed.
NOTE: For additional slow cook time the above rule still applies.
Additional time of 2 – 6 hours will be at the HIGH temperature setting.
If you want to add additional LOW temperature cooking set the time
between 7 and 10 hours and manually time the cooking process if less
than 7 hours.
To Slow Cook in HIGH mode select a cooking time between 2 and 6 hours.
To Slow Cook in LOW mode select a cooking time between 7 and 10 hours
1 Place ingredients in the pot according to recipe instructions.
2 Place the pot in the Multi-Cooker.
3 Close the lid. The lid is properly closed when it clicks.
4 Plug the cooker in. Press the (POWER button) once and the
Multi-Cooker will cycle through all of the settings. Press the SLOW
COOK button, you will hear a short beep indicating the selected
mode and the TIMER will display 2 hours. To increase the time press
the SLOW COOK button repeatedly after the first beep and the
TIMER will adjust in 1 hour increments. You can set the SLOW COOK
time from 2 to 10 hours. If you do not change the default time you
will hear a second beep a few seconds later, the COOKING indicator
will illuminate and the TIMER will start counting down from set time.
You cannot change the time once the COOKING indicator has
illuminated. If you need to adjust the time press the (POWER
button) once followed by the SLOW COOK button repeatedly until
the desired time is selected.
5 At the end of the cooking process the Multi-Cooker will beep 5 times
and automatically switch to “KEEP WARM”. The TIMER display will
show two dashes and the KEEP WARM indicator will illuminate. The
KEEP WARM function will continue until the unit is unplugged
6 Open the Multi-Cooker by pressing the release button on the handle.
7 Be sure to open the lid facing away from you to avoid any hot steam.
8 After each use remove and clean the condensation collector, press
the (POWER button) until no lights are illuminated, and unplug
your Multi-Cooker from the outlet.
13
Steam
NOTE: The countdown timer will not start until the water has reached
the proper steaming temperature.
1 Pour 1 1/2 cups of water into the Inner Pot. See the Steaming Chart
on Page 19 for a reference on cooking times.
2 Place inner pot in the Multi-Cooker housing and place the steaming
basket in the pot.
3 Add ingredients to steaming tray and close the lid. The lid is properly
closed when it clicks.
4 Plug the cooker in. Press the (POWER button) once and the
Multi-Cooker will cycle through all of the settings. Press the STEAM
button, you will hear a short beep indicating the selected mode and
the TIMER will display 10 minutes. To increase the time press the
STEAM button repeatedly after the first beep and the TIMER will
adjust in 1 minute increments. You can set the steaming time from
5 to 30 minutes. If you do not change the default time you will hear
a second beep a few seconds later and the COOKING indicator will
illuminate. Once the water reaches the proper temperature the
TIMER will start counting down from set time. You cannot change
the time once the COOKING indicator has illuminated. If you need to
adjust the time press the (POWER button) once followed by the
STEAM button repeatedly until the desired time is selected. Ensure
that there is adequate water in the pot if extending the steaming
time..
5 At the end of the cooking process the Multi-Cooker will beep 5 times
and automatically switch to “KEEP WARM”. The TIMER display will
show two dashes and the KEEP WARM indicator will illuminate. The
KEEP WARM function will continue until the unit is unplugged. The
cooking indicator does not illuminate during the KEEP WARM cycle.
NOTE: It is recommended that you remove your steamed food once
the set time has elapsed otherwise the food will continue to cook.
6 Open the Multi-Cooker by pressing the release button on the handle.
Be sure to open the lid facing away from you to avoid any hot steam.
7 After each use remove and clean the condensation collector, press
the (POWER button) until no lights are illuminated, and unplug
your Multi-Cooker from the outlet.
HSNDigitalRiceCooker:HSNDigitalRiceCooker 1/11/11 4:14 PM Page 13

16
Keep Warm
Your Multi-Cooker will automatically switch to KEEP WARM mode after
any of the cooking functions (WHITE, BROWN, STEAM). If you
accidently turned your Multi-Cooker off and want to manually turn on
the KEEP WARM mode, press the KEEP WARM button once, you will
hear a short beep, followed by a second beep a few seconds later
indicating that your Multi-Cooker is in KEEP WARM mode.
When in KEEP WARM mode the KEEP WARM indicator will remain on,
the TIMER display will show two dashes and the COOKING indicator
light will remain off.
NOTE: Do not attempt to cook in KEEP WARM mode. The KEEP WARM
mode is not intended to reheat cold food. Only use KEEP WARM mode
for fully cooked, hot food.
15
Delay Timer
The DELAY Timer function only works for the WHITE Rice and BROWN
Rice modes and can be set to delay cooking up to 15 hours.
1 Follow steps 1 – 5 of the WHITE & BROWN RICE section of this
manual on page 12.
2 Press the desired Rice function (WHITE or BROWN)
3 Press the DELAY button once and the TIMER Display will show
1 indicating a 1 hour delay before the unit starts the cooking cycle.
You can increase the DELAY timer in 1 hour increments by simply
pressing the DELAY timer repeatedly until the desired DELAY time
appears.
4 The DELAY timer will countdown in 1 hour increments. When the
DELAY time has elapsed the COOKING indicator light will illuminate
and the Rice will begin the cooking cycle.
NOTE: If you want to add time after the DELAY cycle has started press
the (POWER button) once, press the desired RICE mode and then
press the DELAY button repeatedly until the desired time is displayed.
Your Multi-Cooker is in DELAY mode when the selected Rice Cooker
function and the DELAY indicator lights are on.
HSNDigitalRiceCooker:HSNDigitalRiceCooker 1/11/11 4:14 PM Page 15
 Loading...