


I M P O R TA N T N O T I C E
Please read operating instructions before using this product. Please keep original box and packing materials in the event that service is required.
For questions or concerns please contact customer service at:
W.P. Appliances, Inc. • P.O. Box 3150 • Hallandale, FL 33008
Toll-free: 800-275-8273 • Hours: M - F 8:30am - 5:00pm EST www.wphousewares.com • Printed in China
Model BDFR1000
U S E A N D C A R E
E L E C T R O N I C D E E P
F R Y E R
Model BDFR1000

IMPORTANT SAFEGUARDS
When using electrical appliances, basic safety precautions should always be followed, including the following:
1 Read all instructions carefully.
2 Do not touch hot surfaces. Use handles or knobs.
3To protect against risk of electric shock, do not immerse the control panel or plug in water or any other liquid.
4Close supervision is necessary when any appliance is used by or near children.
5Unplug from outlet when not in use and before cleaning. Allow to cool before putting on or taking off parts, and before cleaning the appliance.
6Do not operate any appliance with a damaged cord or plug or after the appliance malfunctions or is dropped or damaged in any manner. Contact our Customer Service Department for examination of your fryer.
7 Do not mix different types of oils.
8The use of accessory attachments not recommended or sold by the appliance manufacturer may cause fire, electric shock, or injury.
9 Do not use outdoors.
10 Do not let cord hang over edge of table or counter or touch hot surfaces.
11Do not place on or near a hot gas or electric burner or in a heated oven.
12Extreme caution must be used when moving fryer containing hot oil.
13Be sure the basket handle is properly assembled to the basket and locked in place. See detailed assembly instructions on page 12.
14This fryer is for indoor, countertop use only
15Always cook with lid in closed position, except when frying French fries and high moisture foods.
16Ensure both the lid and Oil Pot are completely dry after washing and before use.
17Always attach plug to appliance first, then plug cord into wall outlet. To disconnect, turn fryer off, then remove plug fromwall outlet.
18Do not use this appliance for other than intended use.
SAVE THESE INSTRUCTIONS
HOUSEHOLD USE ONLY
POLARIZED PLUG
This appliance has a polarized plug (One blade is wider than the other.). As a safety feature to reduce the risk of electrical shock, this plug is intended to fit in a polarized outlet only one way. If the plug does not fit fully in the outlet, reverse the plug. If it still does not fit, contact a qualified electrician. Do not attempt to defeat this safety feature.
SHORT POWER CORD
1A short power-supply cord is provided to reduce risks of injuring yourself from becoming entangled in or tripping over a longer cord.
2 Do not use with an extension cord.
Warning: Serious hot-oil burns may result if deep fryer is pulled off a countertop. Do not allow the cord to hang over the edge of the counter where it may be grabbed by children or become entangled by the user. This is why the Deep Fryer is equipped with a magnetic-release detachable power cord.
Before Your First Use
Carefully unpack the Deep Fryer and remove all packaging materials. Remove the Lid, Oil Pot, Frying Basket and Control Panel. Wash you appliance according to the care and cleaning section of this manual.
If you have any questions regarding use of your Deep Fryer that is not answered in this instruction manual, or if you need assistance with a part replacement, contact Customer Service at 1.800.275.8273 or via our website at www.wppotsandpans.com
2 |
3 |

In the beginning, there was Wolfgang Puck. There were cooks and there were kitchens and there were people eating food, but the world had never seen anything like Spago — with its California cuisine, its casual elegance, and its chef whose genuine warmth and love of craft redefined the dining experience. And they came — from LA and from everywhere — to experience the future. Wolfgang Puck shaped the modern culinary landscape: he was the first celebrity chef, the inventor of fusion cuisine, the first in farm-to-table. His work is inspired by California living, and an insistence on only the freshest ingredients. From his legendary fine diningicons,hisentrepreneurial spirit has built an empire — from
dining, to catering, to products for the home — touching the lives of millions around the globe. Today, as always, Chef Puck is earnestly, restlessly, tirelessly at work behind the scenes inventing what’s next. He is driven by a genuine love of his craft, a passion for what’s possible, and its potential to change the world.
Table of Contents
Important Safeguards 2 Before Your First Use 3 About Wolfgang Puck 4 Additional Safety Precautions 6 Know Your Deep Fryer 7 Assembling Your Deep Fryer 10 Assembling Your Deep Fryer Basket 12 Using Your Deep Fryer 13 Draining Oil 14 Preparing for Frying 15 Care and Cleaning 16 Troubleshooting Guide 17 Recipes 18 Limited Warranty 35 Contact Information Back
4 |
5 |

Additional Safety
Precautions
1Do not use the Deep Fryer without oil. The Fryer will be severely damaged if heated dry. Only use liquid oil in your Deep Fryer. Never use solid fat or shortening, as this will cause your Deep Fryer to overheat, or possibly start a fire.
2This Deep Fryer is equipped with a safety Reset Button in order to prevent operation of the appliance in the event of improper use, or irregular operation. Once your Deep Fryer has completely cooled press the Reset Button on the back of the Control Panel with a pen tip or paper clip. See illustration on Page 8 for location of the Reset Button. If your Deep Fryer does not operate after using the Reset Button contact our customer service department for repair.
3Before using your Deep Fryer for the first time, wash the appliance according to the care and cleaning section of this manual.
4Do not place oversized foods or utensils not recommended by the manufacturer in the Deep Fryer.
5This product should never be used unsupervised by children or infirmed persons.
6To prevent burns do not touch any metal parts of the Deep Fryer as they are very hot. Always use heat-resistant gloves.
7Never use less oil than the MIN line, or more oil than the MAX line within your Oil Pot. Overfilling the Oil Pot could cause overflow of hot oil and possible cause a scalding injury.
8Do not exceed 3/4 full of the Frying Basket. Overfilling the Frying Basket could cause oil to overflow from the Oil Pot and cause a scalding injury.
9Hot oil and water are dangerous. Water can cause the hot oil to bubble and overflow and cause excess spluttering. Do not add water, wet foods or icy frozen foods to hot oil.
10 As an important safety feature, your Deep Fryer is designed with a Magnetic Release Power Cord that will break away from the Deep Fryer Housing if the Power Cord is pulled off or tripped over. This safety feature will prevent the appliance from tipping or being pulled off the table.
WARNING: Always attach the Power Cord to the Deep Fryer first, then plug into the proper wall receptacle. Never leave the Magnetic Release Power Cord plugged into the wall without having it plugged into the appliance.
11 Do not use an extension cord with this appliance.
Know Your Deep Fryer
|
|
|
|
|
Power |
|||||
|
|
|
|
|
Button |
|||||
Temperature |
|
|
|
|
|
Temperature |
||||
|
|
|
|
|
||||||
Indicator Light |
|
|
|
|
|
|||||
|
|
|
|
|
||||||
|
|
|
|
|
|
|
|
|
Button |
|
|
|
|
|
|
||||||
|
|
|
Timer |
|
|
|
|
Timer |
||
|
|
|
|
|
|
|
Buttons |
|||
|
|
|
Display |
|
|
|
|
|||
|
|
|
|
|
|
|
|
|
||
|
|
|
|
|
|
|
|
|
|
|
|
|
|
|
|
|
|
|
|
|
|
|
|
|
|
|
|
|
|
|
|
|
|
|
|
|
|
|
|
|
|
|
|
|
|
|
|
|
|
|
|
|
|
|
|
|
|
|
|
|
|
|
|
|
|
|
|
|
|
|
|
|
|
|
|
|
|
|
|
|
|
|
|
|
|
|
Oil |
|
|
Power |
|
|
|
|||
Indicator |
|
Drain |
|
|||
Light |
|
Button |
|
|||
|
|
|
|
|
|
|
|
Oil |
|
|
Oil |
||
|
Cooling |
|
|
Drain |
||
|
Indicator |
|
|
Indicator |
||
|
Light |
|
|
Light |
||
6 |
7 |
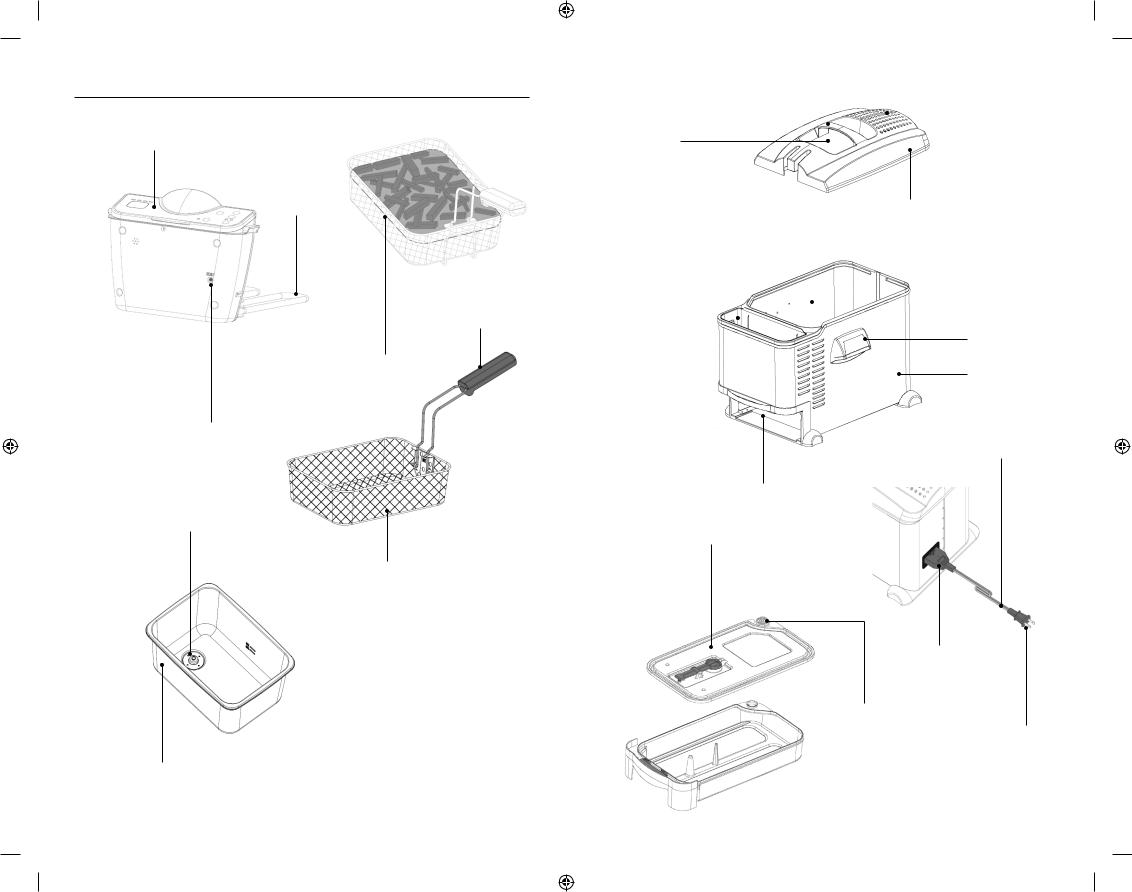
Know Your Deep Fryer (Cont.)
Control
Panel
Heating
Element
Removable
Basket Handle
Maximum Food
Level - 3/4 Full
Reset Button
Fixed Mesh
Filter/Drain Tap
Frying Basket
 MIN/MAX Line
Oil Pot
Actual product may differ slightly from illustrations on this page
Lid Handle |
|
|
|
Permanent |
|
|
|
||
|
|
|
Steam Filter |
|
|
|
Viewing
Window
Lid
Control |
Oil Pot |
||
Panel |
Housing |
||
Housing |
|
|
|
|
|
||
|
|
|
|
|
|
|
|
Side Handles
Deep Fryer
Housing
Power Cord
Oil Container Housing
Oil Container Lid
Magnetic
Connector
Pouring
Cap
Plug
 Oil Container
8 |
9 |
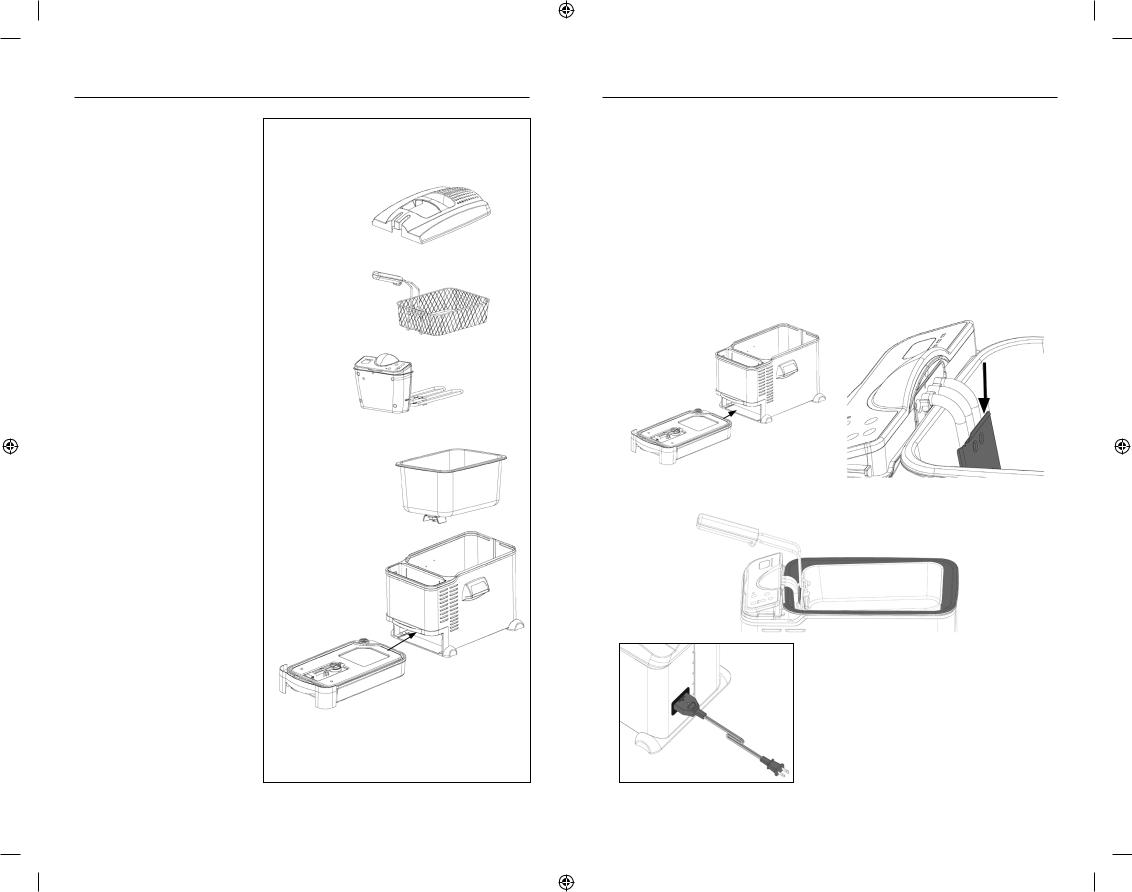
Assembling Your Deep Fryer
1Place the Deep Fryer on a stable, level surface.
2Ensure that all components of your Deep Fryer are
completely dry prior to use to avoid risk of injury due to spattering.
3Ensure that the Oil Container Lid is secularly snapped into place
on the Oil Container and the Pouring Cap is also snapped closed. Slide the Oil Container into the Oil Container Housing as shown in Figure 2.
4Place the Oil Pot into the Oil Pot Housing with the Drain Tap towards the front of the Deep Fryer (Figure 1).
5Slide the Control Panel down into the Control Panel Housing and ensure that it is fully seated by applying downward pressure (your Deep Fryer is equipped with a safety microswitch which will not allow the Control Panel to work unless it is properly seated into the Control Panel Housing).
6Add the appropriate amount of oil to the Oil Pot. Do not fill with oil above the MAX level or below the MIN level marked on the inside of the Oil Pot.
7Place the Lid on top of the Oil Pot with the
Permanent Steam Filter towards the rear of the
Deep Fryer. |
Figure 1 |
Assembling Your Deep Fryer
(Cont.)
8Attach the Magnetic Connector end of the Power Cord into the receptacle on the back of the Deep Fryer Housing (Figure 5) ensuring that the side marked "THIS SIDE UP" is facing up (Figure 5).
9Once the oil has been preheated to the desired temperature, place the assembled Frying Basket (see "Assembling Your Deep Fryer Basket" on page 12) onto the hook in the Oil Pot (Figure 3) so that it is in the elevated position with the Basket Handle extending over the Control Panel (Figure 4). This allows the Frying Basket to sit out of the oil while still being able to place the Lid on the Oil Pot.
|
|
|
Figure 2 |
|
Figure 3 |
|
|
|
|
|
|
Figure 4
Figure 5
10 |
11 |
 Loading...