

Wolf VS24 Use & Care

VACUUM SEAL DRAWER
USE AND CARE GUIDE
CLEANING, MAINTENANCE, AND MORE

VACUUM SEAL DRAWER
Contents
4 Safety Precautions
5 Vacuum Seal Drawer Features
6 Vacuum Seal Drawer Operation
9 Care Recommendations
10 Troubleshooting
11 Wolf Warranty
2 | Wolf Customer Care 800.222.7820

VACUUM SEAL DRAWER
Customer Care
The model and serial number are printed on the enclosed
product registration card. Both numbers are also listed on
the product rating plate. Refer to page 5 for rating plate
location. For warranty purposes, you will also need the date
of installation and name of your authorized Wolf dealer.
Record this information below for future reference.
SERVICE INFORMATION
Model Number
Serial Number
Date of Installation
Certied Service Name
Certied Service Number
Authorized Dealer
Dealer Number
If your product ever needs attention, be sure to use a
Wolf Factory Certied Service provider recommended
by our Customer Care Center, or select one from our list
of providers available at wolfappliance.com/locator. All
Factory Certied Service providers are carefully selected
and thoroughly trained by us.
Important Note
To ensure this product is installed and operated as safely
and efciently as possible, take note of the following types
of highlighted information throughout this guide:
IMPORTANT NOTE highlights information that is especially
important.
CAUTION indicates a situation where minor injury or product
damage may occur if instructions are not followed.
WARNING states a hazard that may cause serious injury or
death if precautions are not followed.
IMPORTANT NOTE: Throughout this guide, dimensions in
parentheses are millimeters unless otherwise specied.
wolfappliance.com | 3

SAFETY PRECAUTIONS
SAFETY PRECAUTIONS
This appliance was built to achieve recognized
standards in technology and safety regulations and
is designed for use in the home for preparing food.
It is not intended for use by persons with reduced
physical, sensory, or mental capabilities, or lack of
experience and knowledge, unless supervised or
unless they have been given instruction concerning
the use of the appliance by a person responsible for
their safety. Proper use is essential to avoid damage
or accidents.
Installation and connection to power supply must be
performed by a qualied electrician in accordance
with provided installation instructions.
Please retain this guide for future reference. If you
sell the appliance or pass it on to a third party, please
ensure these instructions accompany the appliance.
This product is intended for household use only.
WARNING
PROPOSITION 65 FOR CALIFORNIA RESIDENTS
Cancer and Reproductive Harm—
www.P65Warnings.ca.gov
IMPORTANT SAFEGUARDS
When using electrical appliances, always follow basic
safety precautions, including the following:
• Read all instructions.
• Do not operate any appliance with a damaged cord
or plug, or after the appliance malfunctions or has
been damaged in any manner. Return the appliance to the nearest authorized service facility for
examination, repair, or adjustment.
• Never use a steam cleaner to clean the appliance.
• Do not touch hot surfaces. Use handles or knobs.
• Do not use aggressive or abrasive detergent or
sharp metal scrapers to clean the glass lid.
• Close supervision is necessary when any appliance
is used by or near children.
• Warranty service must be performed by Wolf
Factory Certied Service.
• Only use Wolf vacuum bags with this product.
• Do not operate the unit if the glass top is broken or
cracked.
• Do not use appliance for other than intended use.
4 | Wolf Customer Care 800.222.7820
• Save these instructions.
VACUUM SEAL DRAWER FEATURES
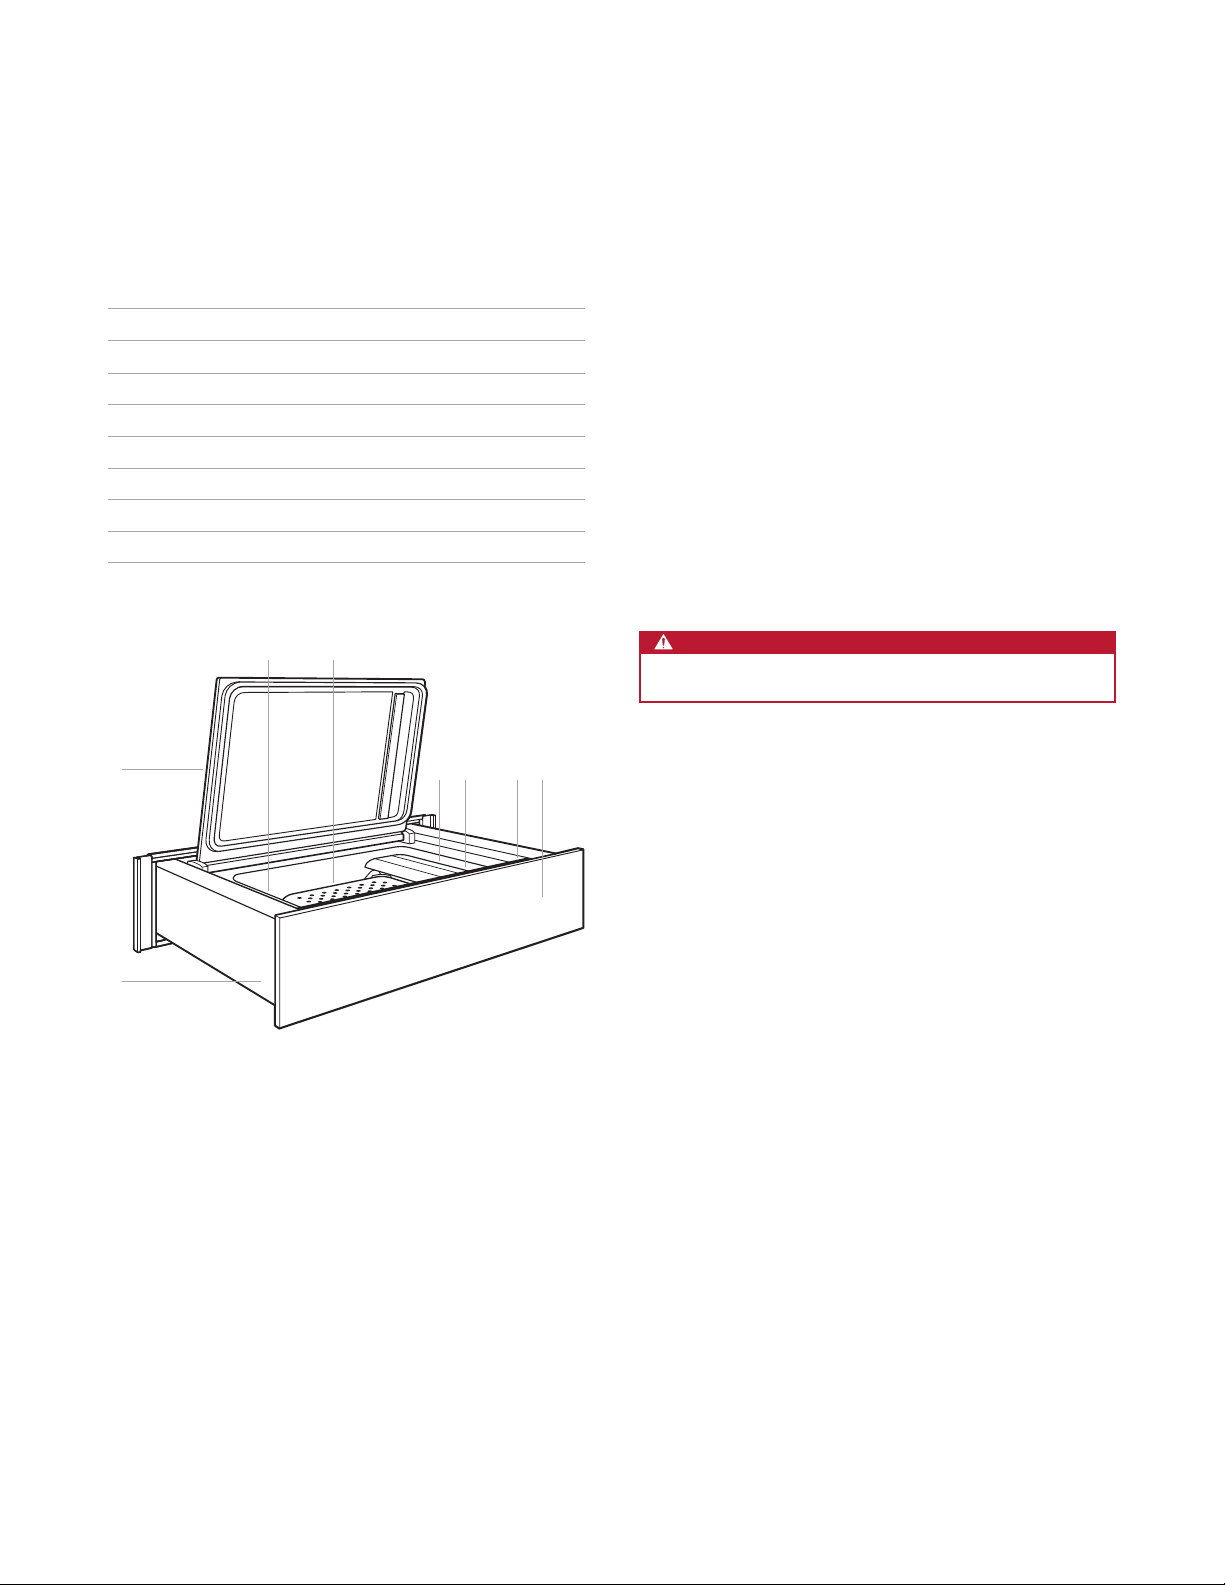
Vacuum Seal Drawer Features
FEATURES
1
Product Rating Plate
2
Lid
3
Sealing Bar
4
Bag Clip
5
Control Panel
6
Shelf
7
Push-Pull Drawer Opening
8
Vacuum Inlet
8 6
Getting Started
Before you start using your new vacuum seal drawer, please
take some time to read this use and care guide. It will be to
your benet to familiarize yourself with the safety practices,
features, operation, and care recommendations of your Wolf
vacuum seal drawer.
To ensure all residual oil from the manufacturing process
has been removed, clean the vacuum seal drawer thoroughly with hot water and a mild detergent prior to use.
Rinse and dry with a soft cloth. Refer to Care Recommendations on page 9.
Vacuum Bags
CAUTION
Only use Wolf vacuum bags.
Select the appropriate size bag to ensure the food does not
5 72
4
3
exceed
To ensure the bag seals properly, fold the top of the bag
down approximately 2"
2
/3 of the volume of the bag.
(51) before lling.
1
Vacuum seal drawer
Wolf vacuum bags are approved for sous vide cooking with
a temperature range of -40°F to 240°F.
Wolf vacuum bags are microwave-safe. Pierce the bag prior
to cooking.
wolfappliance.com | 5
VACUUM SEAL DRAWER OPERATION
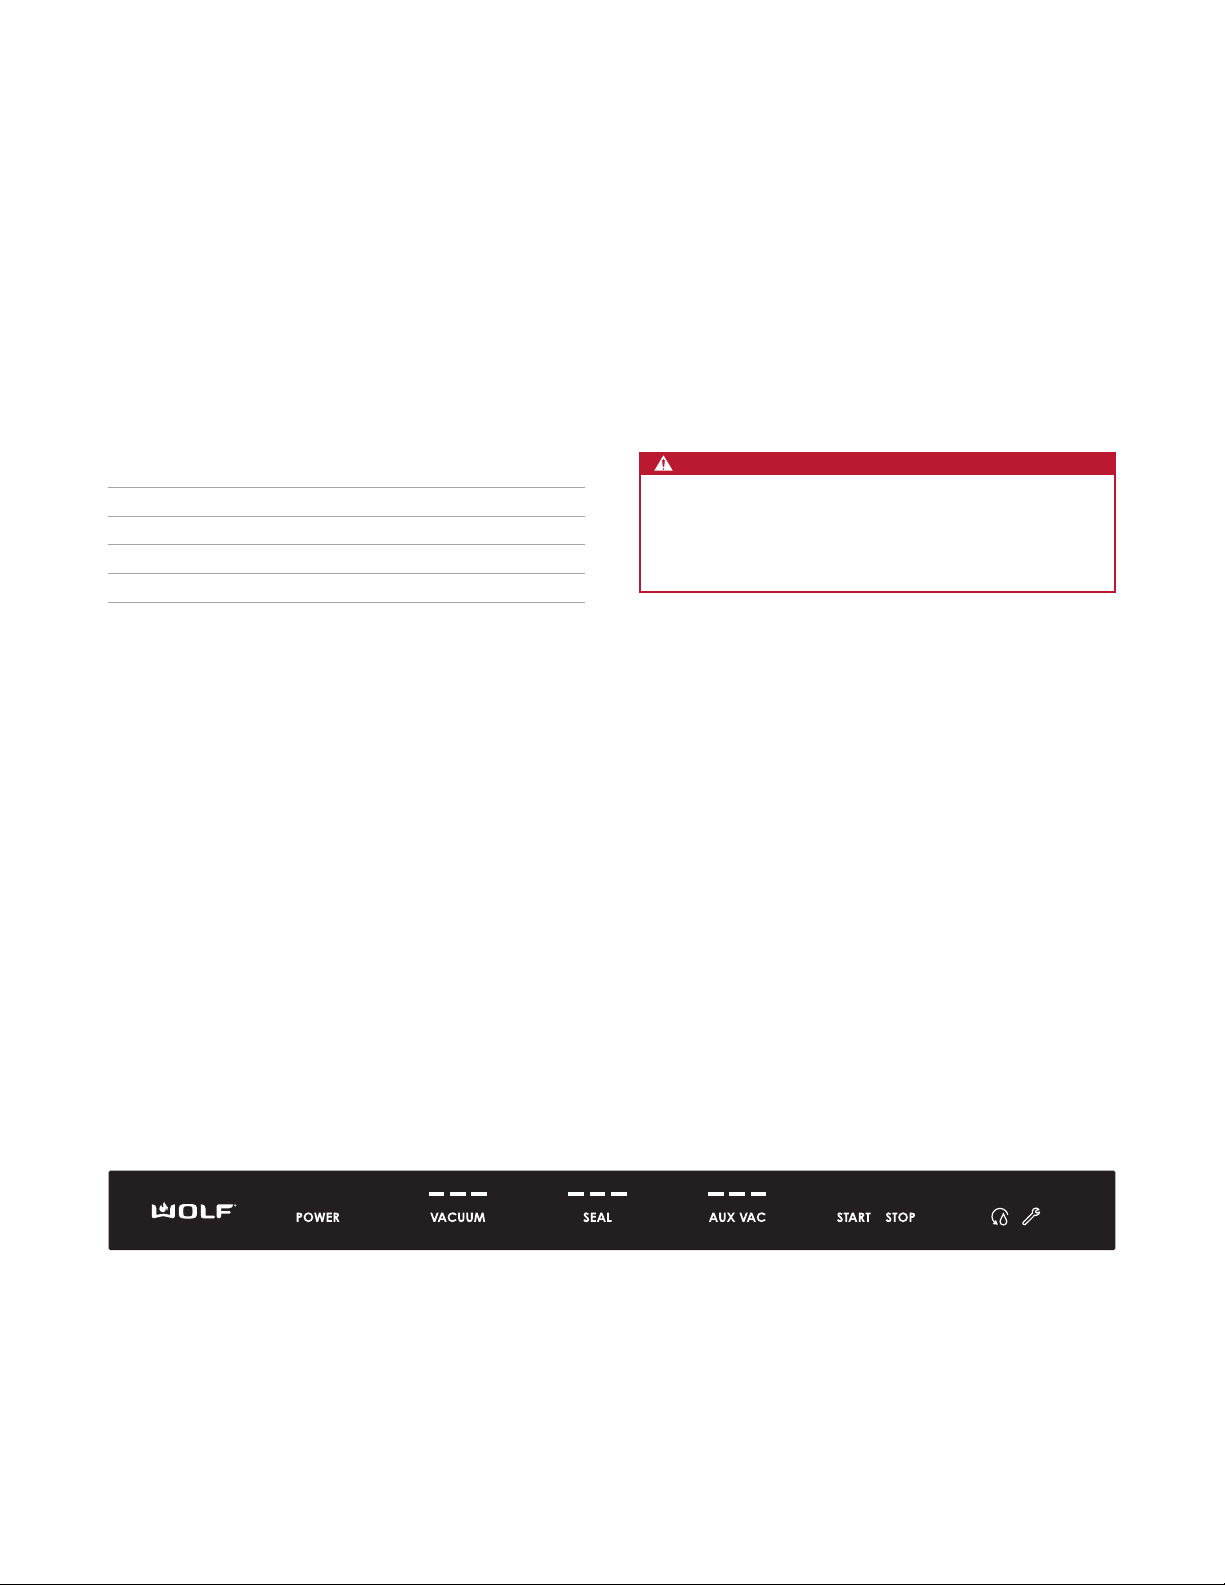
Control Panel
The electronic control panel features touch controls and
LED indicators. Refer to the illustration below. The control
panel is hidden when the vacuum seal drawer is closed.
Open the drawer to access the control panel.
The controls feature Vacuum, Seal, Auxiliary Vacuum, and
Pump Dehumidication Cycle.
INDICATORS RECOMMENDED USES
0 Seal bag only
1 Fruits, berries, and liquids
2 Fish and vegetables
3 Meats and frozen foods
Operation
VACUUM AND SEAL
Vacuum Level: Indicated by one, two, or three illuminated
dashes above VACUUM.
Seal Level: Indicated by one, two, or three illuminated
dashes above SEAL.
CAUTION
Selecting an improper seal level can damage the seal
bar. Wait at least two minutes between sealing cycles.
All contents must be at or below room temperature
prior to the sealing operation.
To Vacuum and Seal:
1 Place food in the vacuum bag.
2 Open the lid and place the bag into the chamber.
3 Place the open end of the bag under the bag clip. For
smaller bags, insert the shelf to support the bag while
sealing.
Control panel
4 Press POWER.
5 Press VACUUM multiple times to select the desired
vacuum level.
6 Press SEAL multiple times to select the desired seal
level.
7 Press down on the lid and press START to initiate the
vacuum process.
8 An audible signal indicates the process is complete.
9 Open the lid and remove the food.
6 | Wolf Customer Care 800.222.7820

VACUUM SEAL DRAWER OPERATION
Operation
VACUUM ONLY
WARNING
This process is not intended for canning or making jam.
All contents should be at or below room temperature.
Jars less than 3" (76) with screw-top lids can be vacuumed
to remove air. Once the vacuum seal is broken, the contents
should be placed in the refrigerator.
To Vacuum Only:
1 Place the lid on the jar, then lightly tighten the ring and
place in the chamber.
IMPORTANT NOTE: Do not overtighten the lid. Air must
be able to escape.
2 Press POWER.
3 Press VACUUM multiple times to select the desired
vacuum level.
4 Press SEAL multiple times until no LED indicators are
illuminated.
5 Press START, then press down on the lid to initiate the
vacuum process.
6 An audible signal indicates the process is complete.
7 Open the lid and remove the food.
SEAL ONLY
Bags can be sealed without creating a vacuum. The vacuum
will cycle briey during the Seal Only operation to seat the
lid and ensure the seal bar is in contact with the bag.
IMPORTANT NOTE: For best results, ll the vacuum seal
bags less than half full when sealing fragile foods.
The original food packaging can be sealed using the Seal
Only function. Adjust the seal level according to the thickness of the bag. Use seal level 1 for bags thinner than the
Wolf vacuum seal bags.
To Seal Only:
1 Place food in the vacuum bag.
2 Open the lid and place the bag into the chamber.
3 Place the open end of the bag under the bag clip. For
smaller bags, insert the shelf to support the bag while
sealing.
4 Press POWER.
5 Press VACUUM multiple times until no LED indicators
are illuminated.
6 Press SEAL multiple times to select the desired vacuum
level. Use level 2 for all bags unless otherwise specied
for the bag.
7 Press down on the lid and press START to initiate the
vacuum process.
8 An audible signal indicates the process is complete.
9 Open the lid and remove the food.
wolfappliance.com | 7
VACUUM SEAL DRAWER OPERATION
Operation
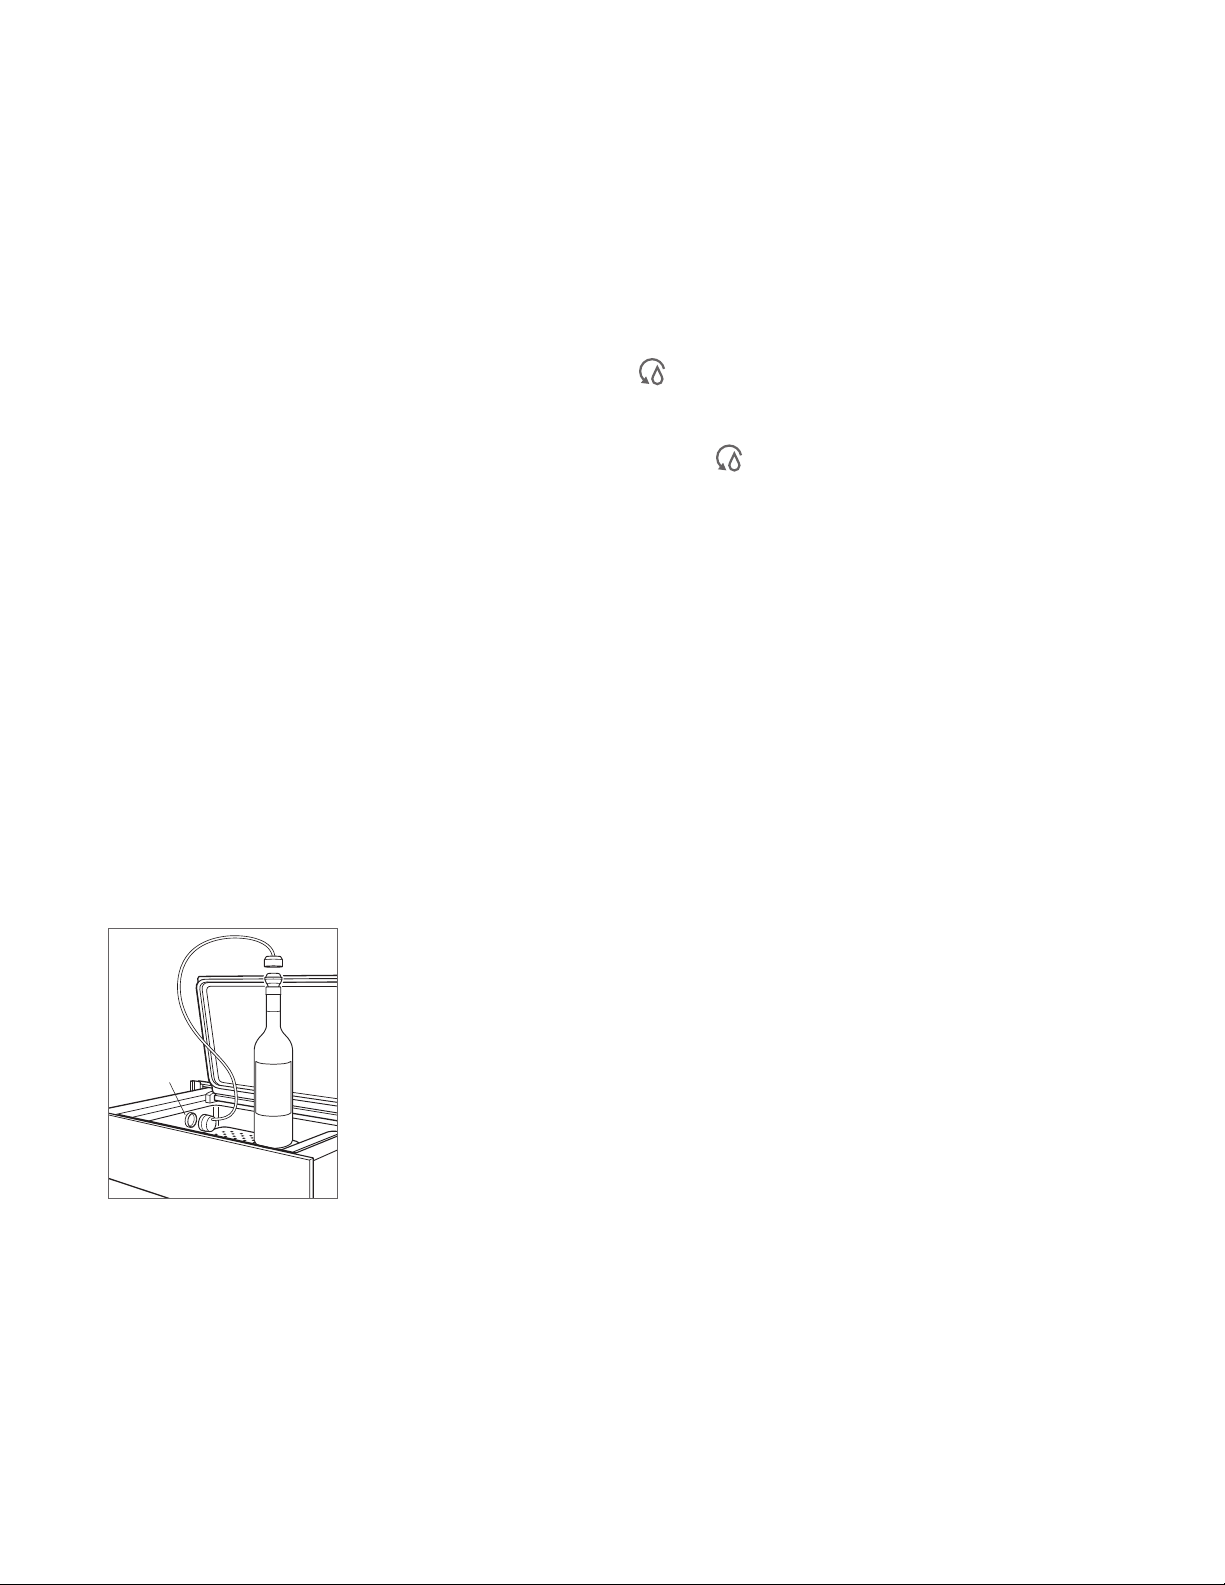
AUXILIARY ATTACHMENT
The auxiliary attachment provided can be used to vacuum
seal wine bottles and other rigid containers.
To Vacuum Seal Rigid Containers:
1 Place the unit adapter and wine bottle adapter onto
opposite ends of the vacuum hose.
2 Place the unit adapter over the vacuum inlet in the
vacuum chamber. Refer to the illustration below.
3 Place a bottle stopper in the wine bottle.
4 Place the bottle adapter over the stopper.
5 Press AUX VAC multiple times to select the desired
vacuum level. Use level 1 for all bottles and rigid containers unless otherwise specied for the container.
6 Press START to initiate the vacuum cycle.
7 An audible signal indicates the process is complete.
NOTE: When AUX VAC is pressed, the lights indicating the
VACUUM and SEAL level will turn off. To resume normal
operation, select a VACUUM setting.
PUMP DEHUMIDIFICATION CYCLE
Moisture can build up in the vacuum pump oil, which could
damage the unit. Run a pump dehumidication cycle when
appears on the display.
To Remove Moisture from the Vacuum Pump:
1 Press .
2 The pump cycles for approximately 10 minutes.
3 Once complete, the unit turns off.
4 Allow the unit to cool for 1 hour before starting another
cycle.
VACUUM
INLET
Auxiliary attachment
8 | Wolf Customer Care 800.222.7820

CARE RECOMMENDATIONS
Care Recommendations
CLEANING
Stainless steel Use a nonabrasive stainless steel cleaner and apply with a soft lint-free cloth. To bring out the natural luster,
lightly wipe the surface with a water-dampened microber cloth followed by a dry polishing chamois. Always
follow the grain of the stainless steel.
Glass lid Spray glass cleaner on a cloth to clean.
Control panel Use a spray degreaser to remove ngerprints and food soil. Spray on a cloth before wiping the control panel.
IMPORTANT NOTE: Do not spray cleaners directly on the control panel.
Interior Wipe with a soft damp cloth. Clean the interior and drawer liner with hot water and a mild detergent.
wolfappliance.com | 9

TROUBLESHOOTING
Troubleshooting
OPERATION
Unit does not operate.
• Verify power is on.
• Verify electrical power to the unit and home circuit
breaker is on.
• Allow the unit to cool for 2 minutes after every vacuum
cycle.
• Allow the unit to cool for 1 hour after every pump dehu-
midication cycle.
Vacuum bag is not sealing correctly.
• Select the next highest vacuum level.
• Use a new bag.
• Verify the bag is correctly positioned on the sealing pad.
• Verify the seal area of the bag is clean, dry, and free of
any bag contents.
Lid will not open.
• Wait until the vacuum cycle is complete and ventilated.
SERVICE
• Maintain the quality built into your product by contacting
Wolf Factory Certied Service. For the name of the
nearest Wolf Factory Certied Service, check the contact
and support section of our website, wolfappliance.com,
or call Wolf Customer Care at 800-222-7820.
• When contacting service, you will need the model and
serial number of your product. Both numbers are listed
on the product rating plate. Refer to page 5 for rating
plate location.
• For warranty purposes, you will also need the date of
installation and name of your authorized Wolf dealer. This
information should be recorded on page 3 of this guide.
Unit cannot reach the desired pressure.
• Apply light pressure to the lid when starting the vacuum
cycle.
• Verify the lid gasket and contact surface are clean.
• Select the next lowest vacuum level.
• Verify the bag is correctly positioned on the sealing pad.
Contents start to boil during the vacuum cycle.
• Select a lower vacuum setting.
• Press SEAL to stop the vacuum process and immedi-
ately seal the bag.
illuminates.
• Initiate a pump dehumidication cycle.
Sub-Zero, Sub-Zero & Design, Sub-Zero & Snowake Design, Dual Refrigeration, The Living Kitchen, Great American Kitchens The Fine Art of Kitchen Design, Wolf, Wolf &
Design, Wolf Gourmet, W & Design, red colored knobs, Cove, and Cove & Design are registered trademarks and service marks of Sub-Zero Group, Inc. and its subsidiaries.
All other trademarks are property of their respective owners in the United States and other countries.
10 | Wolf Customer Care 800.222.7820
 Loading...