

Wolf SO3050TEST, DO3050TEST, DO3050PESP, SO3050PESP Installation Guide
E Series Oven
Installation Guide
SPECIFICATIONS, INSTALLATION, AND MORE

E Series Oven
Contents
2Important Note
3Product Information
4Specifications
12 Installation
E Series Oven
Important Note
To make sure this product is installed and operated safely and efficiently, take note of the following types of highlighted information throughout this guide:
IMPORTANT NOTE: Highlights information that is especially important.


 CAUTION
Indicates a situation where minor injury or product damage may occur if instructions are not followed.


 WARNING
States a hazard that may cause serious injury or death if precautions are not followed.
IMPORTANT NOTE: Throughout this guide, dimensions in parentheses are millimeters unless otherwise specified.
2 | English
E Series Oven
Product Information
Important product information, including the model and serial number, are listed on the product rating plate. If service is necessary, contact Wolf Factory Certified Service with the model number and serial number. For the name of the nearest Wolf Factory Certified Service or for questions regarding the installation, visit the Product Support section of our website, or call Wolf Customer Care at 800-222-7820.
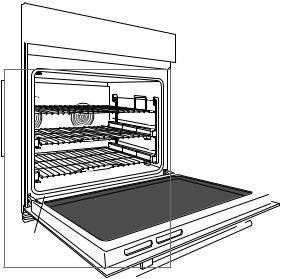
The rating plate is located near the bottom trim on the left. The oven door must be open to view the rating plate.
RATING |
PLATE |
wolfappliance.com | 3
Specifications
Installation Requirements
The oven can be installed in a standard or flush inset application. If a cooktop is installed above an oven, a minimum of 1/4" (6) is required between the units. The location of the electrical supply within the oven opening may require additional cabinet depth.
Base Support |
Min |
|
|
Single Oven |
250 lb (115 kg) |
|
|
Double Oven |
400 lb (181 kg) |
|
|
Finish the edges of the opening. They may be visible when the door is open.
For standard installations, the face trim overlaps stiles and rails.
Trim Overlap |
Dimension |
|
|
Top |
1" (25) |
|
|
Bottom |
0" |
|
|
Sides |
11/16" (18) |
For flush inset installations, a minimum 1/8" (3) reveal is required on all sides. To ensure consistent reveals, each corner of the opening must be exactly 90°.
4 | English
Dual Installation
Two 30" single ovens can be installed side by side in a standard or flush inset application. A dual installation kit is required. To maintain appropriate airflow, the ovens must be installed into one opening. Any cosmetic or structural material placed between the ovens will impede airflow and is not recommended. Refer to the illustrations on the following pages.
The dual installation kit is available through an authorized Wolf dealer. For local dealer information, visit the locator section of our website subzero-wolf.com.

Specifications
Electrical Requirements
Installation must comply with all applicable electrical codes.
Locate the electrical supply flush with the back wall and within the shaded area shown in the illustrations on pages 6-11. For ease of installation, the electrical supply for the oven can be placed in an adjacent cabinet within reach of the conduit.
Performance may be compromised if the electrical supply is less than 240 volts.
The oven is supplied with a conduit consisting of two insulated hot lead conductors and a bare ground conductor. The wiring diagram covering the control circuit is provided with the oven.
ELECTRICAL REQUIREMENTS-Single Oven
Electrical Supply |
grounded, 240/208 VAC, |
|
60Hz |
||
|
||
|
|
|
Service |
30 amp dedicated circuit |
|
|
|
|
Conduit |
4' (1.2 m) |
|
|
|
|
Total Amps |
22 |
|
|
|
|
Max Connected Load |
5.4 kW |
|
|
||
ELECTRICAL REQUIREMENTS-Double Oven |
||
|
|
|
Electrical Supply |
grounded, 240/208 VAC, |
|
60Hz |
||
|
||
|
|
|
Service |
50 amp dedicated circuit |
|
|
|
|
Conduit |
5' (1.5 m) |
|
|
|
|
Total Amps |
45 |
|
|
|
|
Max Connected Load |
10.8 kW |
|
|
|
|
wolfappliance.com | 5
Specifications
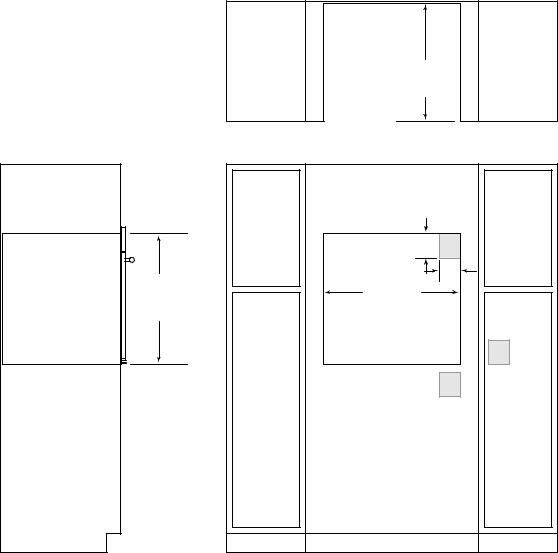
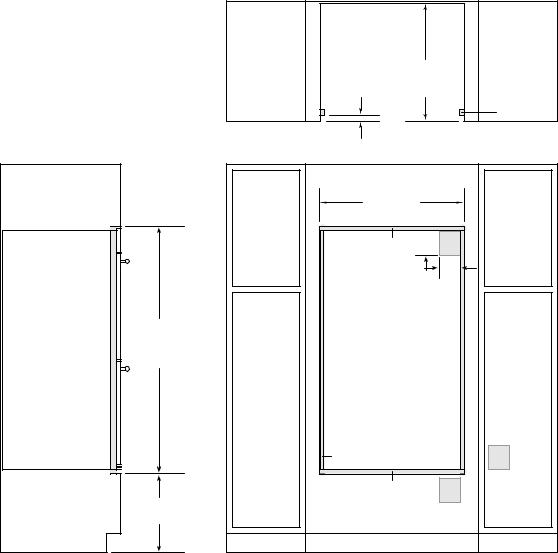
30" Single Oven Standard
Installation
231/4" (591) |
OPENING |
DEPTH |
TOP VIEW
|
5" |
E |
|
(127) |
|
|
|
|
|
|
4" |
271/2" |
|
(102) |
281/2" (724) |
|
|
(699) |
|
|
OPENING |
OPENING WIDTH |
|
HEIGHT |
|
|
|
|
E |
|
|
E |
SIDE VIEW |
FRONT VIEW |
|
NOTE: Location of electrical supply within opening may require additional cabinet depth.
6 | English
Specifications
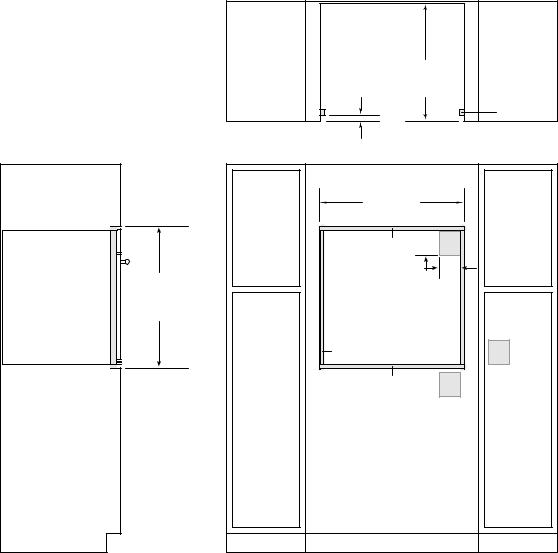
30" Single Oven Flush Inset
Installation
|
24" (610) |
7/8" (22) |
FLUSH INSET |
DEPTH |
|
|
FINISHED |
|
CLEATS* |
TOP VIEW
|
301/8" (765) |
|
|
|
FLUSH INSET WIDTH** |
|
|
|
11/8" (29) |
5" |
E |
|
(127) |
||
|
|
|
4" |
|
283/4" |
|
(102) |
|
|
|
|
|
(730) |
|
|
|
FLUSH INSET |
|
|
|
HEIGHT** |
|
|
|
13/16" (21) |
|
E |
|
1/8" (3) |
|
E |
SIDE VIEW |
FRONT VIEW |
|
|
*Shaded areas will be visible and should be finished to match cabinetry. **Dimension provides minimum reveals.
NOTE: Location of electrical supply within opening may require additional cabinet depth.
wolfappliance.com | 7
Specifications
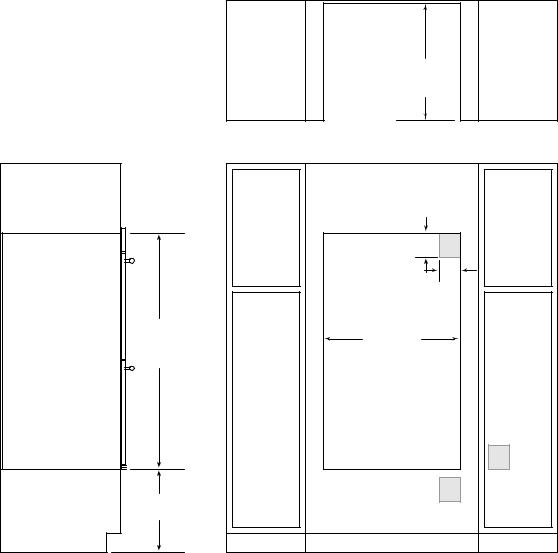
30" Double Oven Standard
Installation
497/8"
(1267) OPENING HEIGHT
17" (432) TYPICAL
231/4" (591) |
OPENING |
DEPTH |
TOP VIEW
5" |
E |
|
(127) |
||
|
||
|
4" |
|
|
(102) |
|
281/2" (724) |
|
|
OPENING WIDTH |
|
|
|
E |
|
|
E |
SIDE VIEW |
FRONT VIEW |
NOTE: Location of electrical supply within opening may require additional cabinet depth.
8 | English
Specifications
30" Double Oven Flush |
|
|
|
|
Inset Installation |
|
|
|
|
|
|
24" (610) |
||
|
7/8" (22) |
FLUSH INSET |
||
|
DEPTH |
|
||
|
|
|
|
FINISHED |
|
|
|
|
CLEATS* |
|
TOP VIEW |
|
|
|
|
301/8" (765) |
|
||
|
FLUSH INSET WIDTH** |
|
||
|
11/8" (29) |
5" |
E |
|
|
(127) |
|||
|
|
|
|
4" |
|
|
|
|
(102) |
511/8" |
|
|
|
|
(1299) |
|
|
|
|
FLUSH INSET |
|
|
|
|
HEIGHT** |
|
|
|
|
|
13/16" (21) |
|
|
E |
|
|
1/8" (3) |
|
E |
17" (432) |
|
|
|
|
TYPICAL |
|
|
|
|
SIDE VIEW |
FRONT VIEW |
|
||
*Shaded areas will be visible and should be finished to match cabinetry. **Dimension provides minimum reveals.
NOTE: Location of electrical supply within opening may require additional cabinet depth.
wolfappliance.com | 9
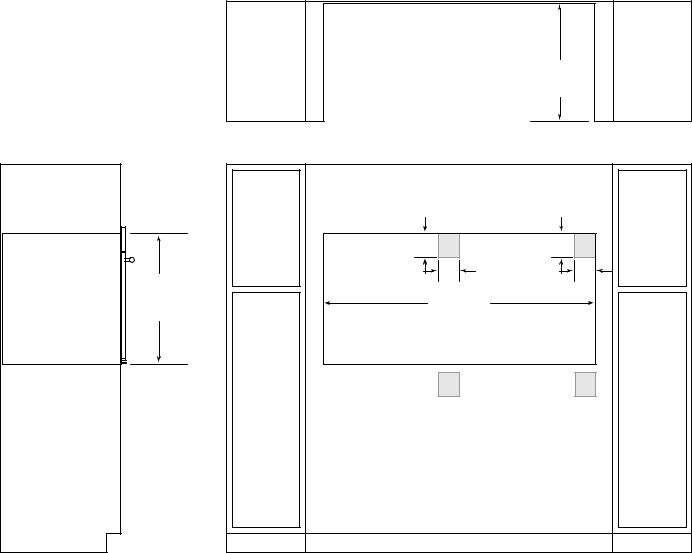
Specifications
30" Single Oven Dual
Standard Installation
231/4" (591) |
OPENING |
DEPTH |
TOP VIEW
|
5" |
|
E |
5" |
E |
|
(127) |
(127) |
|||
|
|
|
|||
|
|
|
4" |
|
4" |
271/2" |
|
|
(102) |
|
(102) |
|
|
|
|
|
|
(699) |
581/2" (1486) |
|
|
||
OPENING |
|
|
|||
HEIGHT |
OPENING WIDTH |
|
|
||
|
|
|
E |
|
E |
SIDE VIEW |
|
FRONT VIEW |
|
|
|
NOTE: Location of electrical supply within opening may require additional cabinet depth. A dual installation kit is required for this installation.
10 | English

Specifications
30" Single Oven Dual Flush
Inset Installation
|
24" (610) |
7/8" (22) |
FLUSH INSET |
DEPTH |
|
|
FINISHED |
|
CLEATS* |
TOP VIEW
|
601/8" (1527) |
|
|
||
|
FLUSH INSET WIDTH** |
|
|
||
11/8" (29) |
5" |
|
E |
5" |
E |
(127) |
(127) |
||||
|
|
|
4" |
|
4" |
283/4" |
|
|
(102) |
|
(102) |
|
|
|
|
|
|
(730) |
|
|
|
|
|
FLUSH INSET |
|
|
|
|
|
HEIGHT** |
|
|
|
|
|
13/16" (21) |
|
|
|
|
|
1/8" (3) |
|
|
E |
|
E |
SIDE VIEW |
|
FRONT VIEW |
|
|
|
*1" (25) minimum depth. Shaded areas will be visible and should be finished to match cabinetry. ** Dimension provides minimum reveals.
NOTE: Location of electrical supply within opening may require additional cabinet depth. A dual installation kit is required for this installation.
wolfappliance.com | 11
Installation
Preparation
Before moving the oven, protect any finished flooring and secure the oven door(s) closed to prevent damage.
Use an appliance dolly to move the oven near the opening. Place the appliance dolly on the side or back to prevent damage. Remove and recycle packing materials. Do not lift or carry the oven by the door handle.
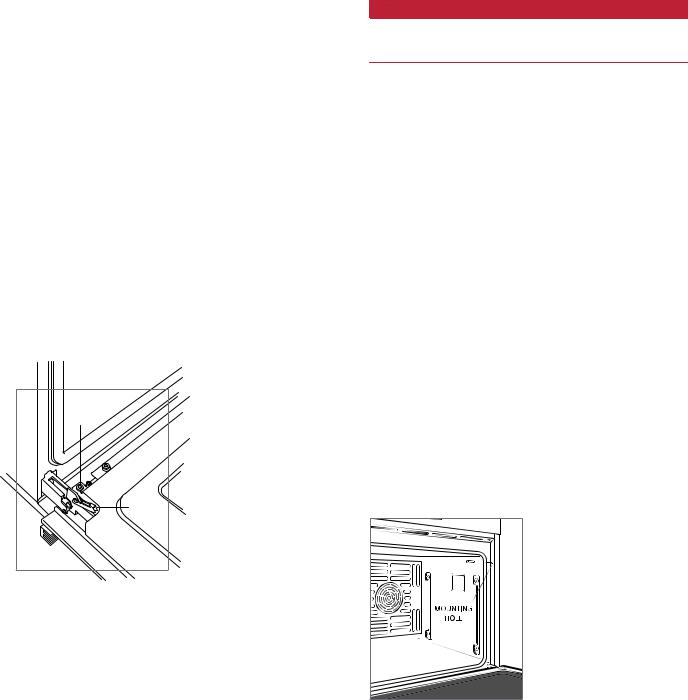
Oven Door Removal
To lighten the load, the oven door(s) can be removed. Remove only if necessary. Door removal should be done only by a certified installer or service technician. Do not lift or carry the oven door by the door handle.
To remove, open the door completely. Rotate both hinge locks back completely, remove the screw closest to the hinge on both sides of the door, and pull the door forward.
To install, slide the door onto the hinges. Rotate the hinge locks forward completely and install the screws.
SCREW |
HINGE |
LOCK |
Electrical Connection


 WARNING
Verify that power is disconnected from the electrical box before proceeding.
If the electrical supply is located in the opening, electrical connection must be made prior to placing the oven in the opening. If the electrical supply is in an adjacent cabinet, electrical connection can be made after placing the oven in the opening. The conduit on the back of the unit allows for a 3-wire or 4-wire installation.
1Connect the black appliance wire to the black (L1) power supply.
2Connect the red appliance wire to the red (L2) power supply.
3Connect the bare appliance wire to the green/ground wire.
4For a four-wire system, install a wire nut on the white/ neurtral wire.
Installation
Place the oven in the opening and slide into position. To ensure adequate depth for proper installation, the conduit must fit into the recessed area along the rear edge of the oven.
Locate the mounting hole in each side trim. Drill 1/16" (2) pilot holes and install #6 x 3/4" screws.
Remove and recycle packing materials including the white protective material behind each rack guide mounting location.
12 | English
 Loading...