

Page 1

INSTALLATION GUIDE
Multi-Function Cooktop
Page 2

Contents
Important Note
Wolf Multi-Function Cooktop . . . . . . . . . . . . . . . . . . . . 3
Multi-Function Cooktop Specifications . . . . . . . . . . . . 4
Multi-Function Cooktop Installation . . . . . . . . . . . . . . . 8
Service Information . . . . . . . . . . . . . . . . . . . . . . . . . . . 10
Features and specifications are subject to change at any time
without notice. Visit wolfappliance.com/specs for the most
up-to-date information.
IMPORTANT NOTE: Throughout this guide, dimensions in
parentheses are millimeters unless otherwise specified.
o ensure the safe and efficient use of Wolf equipment,
T
please take note of the following types of highlighted
information throughout this guide:
IMPORTANT NOTE highlights information that is especially
important.
CAUTION signals a situation where minor injury or product
damage may occur if instructions are not followed.
WARNING states a hazard that may cause serious injury or
death if precautions are not followed.
Page 3
Wolf Multi-Function Cooktop 3
wolfappliance.com/specs
Multi-Function Cooktop Installation
IMPORTANT NOTE: I
function cooktop must be completed by a qualified
installer.
Read this entire installation guide prior to installation and
save for the local inspector’s reference. The homeowner
should keep this installation guide for future reference.
This appliance must be installed in accordance with
National Electrical Codes, as well as all state, municipal
and local codes. The correct voltage, frequency and
amperage must be supplied to the appliance from a dedicated, grounded circuit which is protected by a properly
sized circuit breaker or time delay fuse. The proper
voltage, frequency and amperage ratings are listed on the
product rating plate.
The Wolf multi-function cooktop is manufactured for use
with natural gas or LP gas. Check the product rating plate
for type of gas.
Record the model and serial numbers before installing
the multi-function cooktop. Both numbers are listed on the
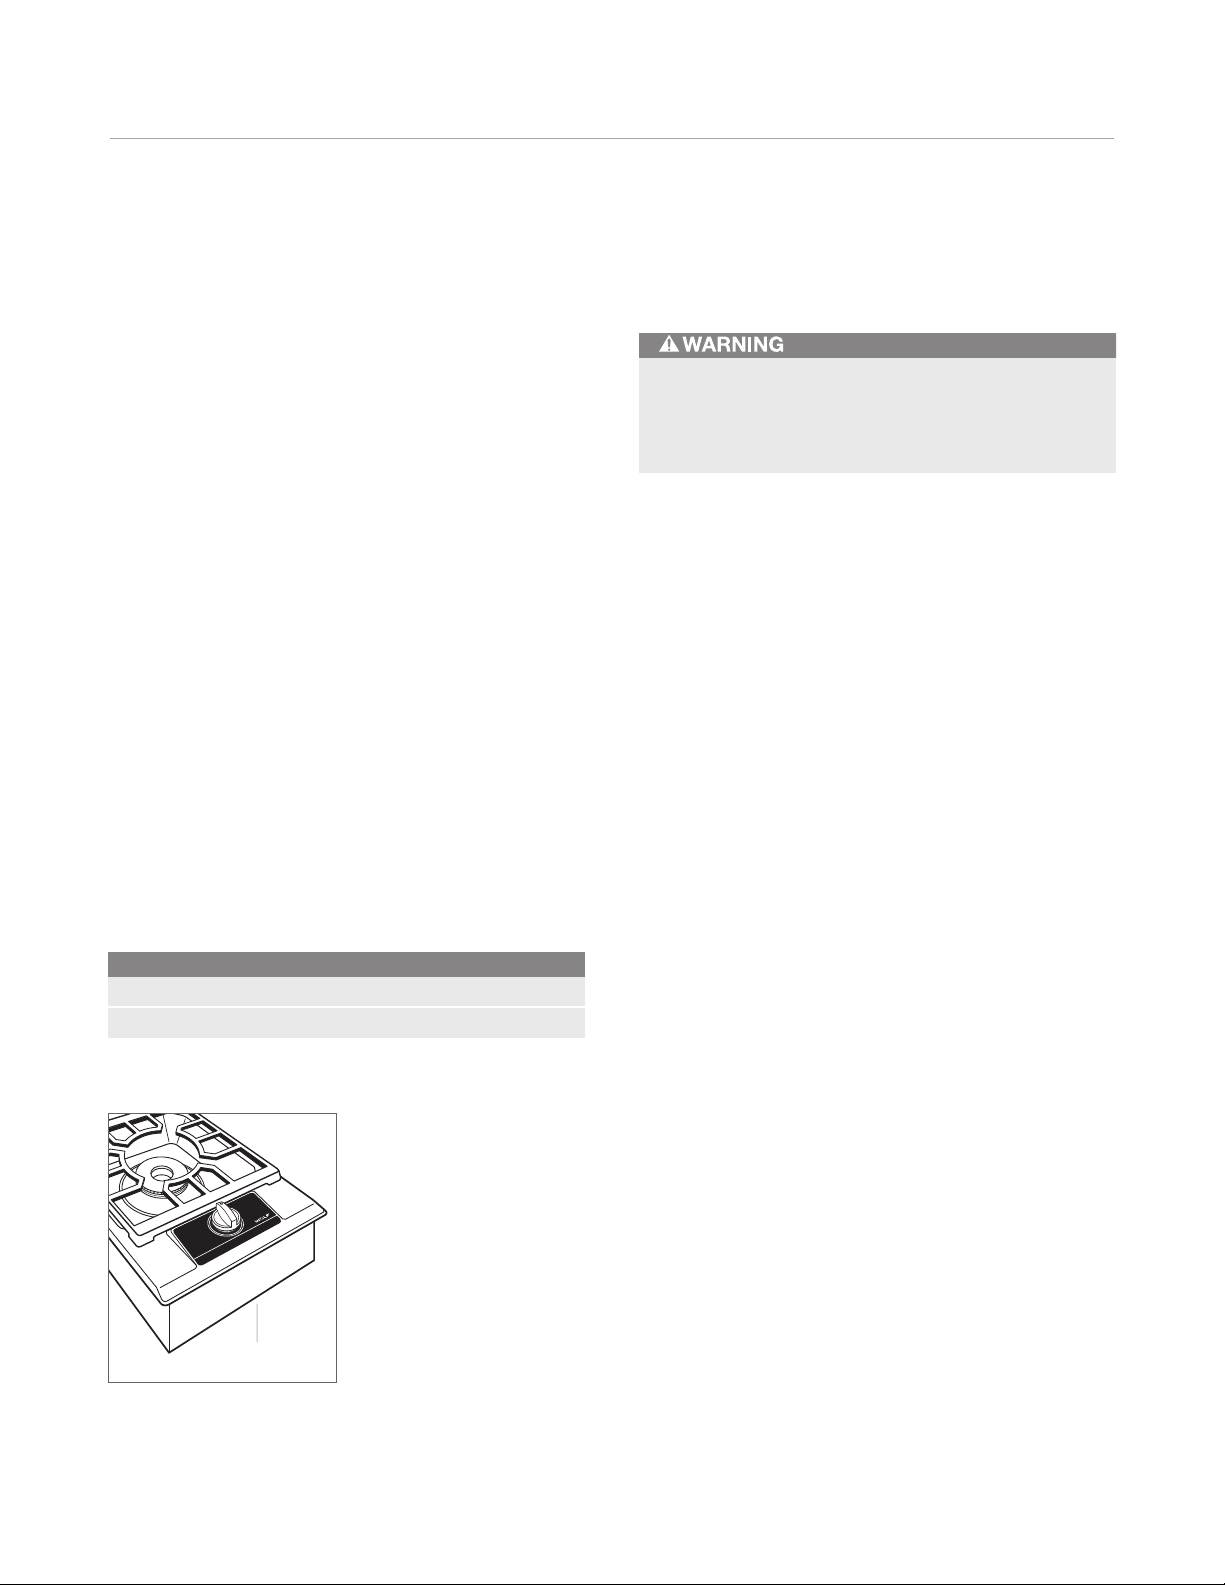
product rating plate, located on the underside of the
module. Refer to the illustration below.
Wolf Multi-Function Cooktop
Model Number IM15/S
Serial Number
nstallation of the Wolf gas multi-
IMPORTANT INSTRUCTIONS
If the information in this guide is not followed
exactly, a fire or explosion may result, causing
property damage, personal injury or death.
•
Installation and service must be performed by a
qualified installer, service agency or the gas supplier.
•
Warranty service must be performed by Wolf factory
certified service.
•
Do not store or use gasoline or other flammable
vapors and liquids in the vicinity of this or any other
appliance.
•
A ventilation hood or downdraft system is recommended for use with the multi-function cooktop.
•
In Massachusetts: Installations and repairs must be
performed by a qualified or licensed contractor,
plumber or gasfitter qualified or licensed by the
state, province, or region where this appliance is
being installed. Only use gas shut-off valves
approved for use within the state, province or region
where this appliance is being installed. A flexible gas
connector, when used, must not exceed 3' (.9 m).
RATING PLATE
Location of rating plate.
WHAT TO DO IF YOU SMELL GAS:
•
Do not try to light any appliance.
•
Do not touch any electrical switch.
•
Do not use any phone in your building.
•
Immediately call your gas supplier from a neighbor’s
phone. Follow the gas supplier’s instructions.
•
If you cannot reach your gas supplier, call the fire
department.
Page 4
Multi-Function Cooktop Specifications 4
1
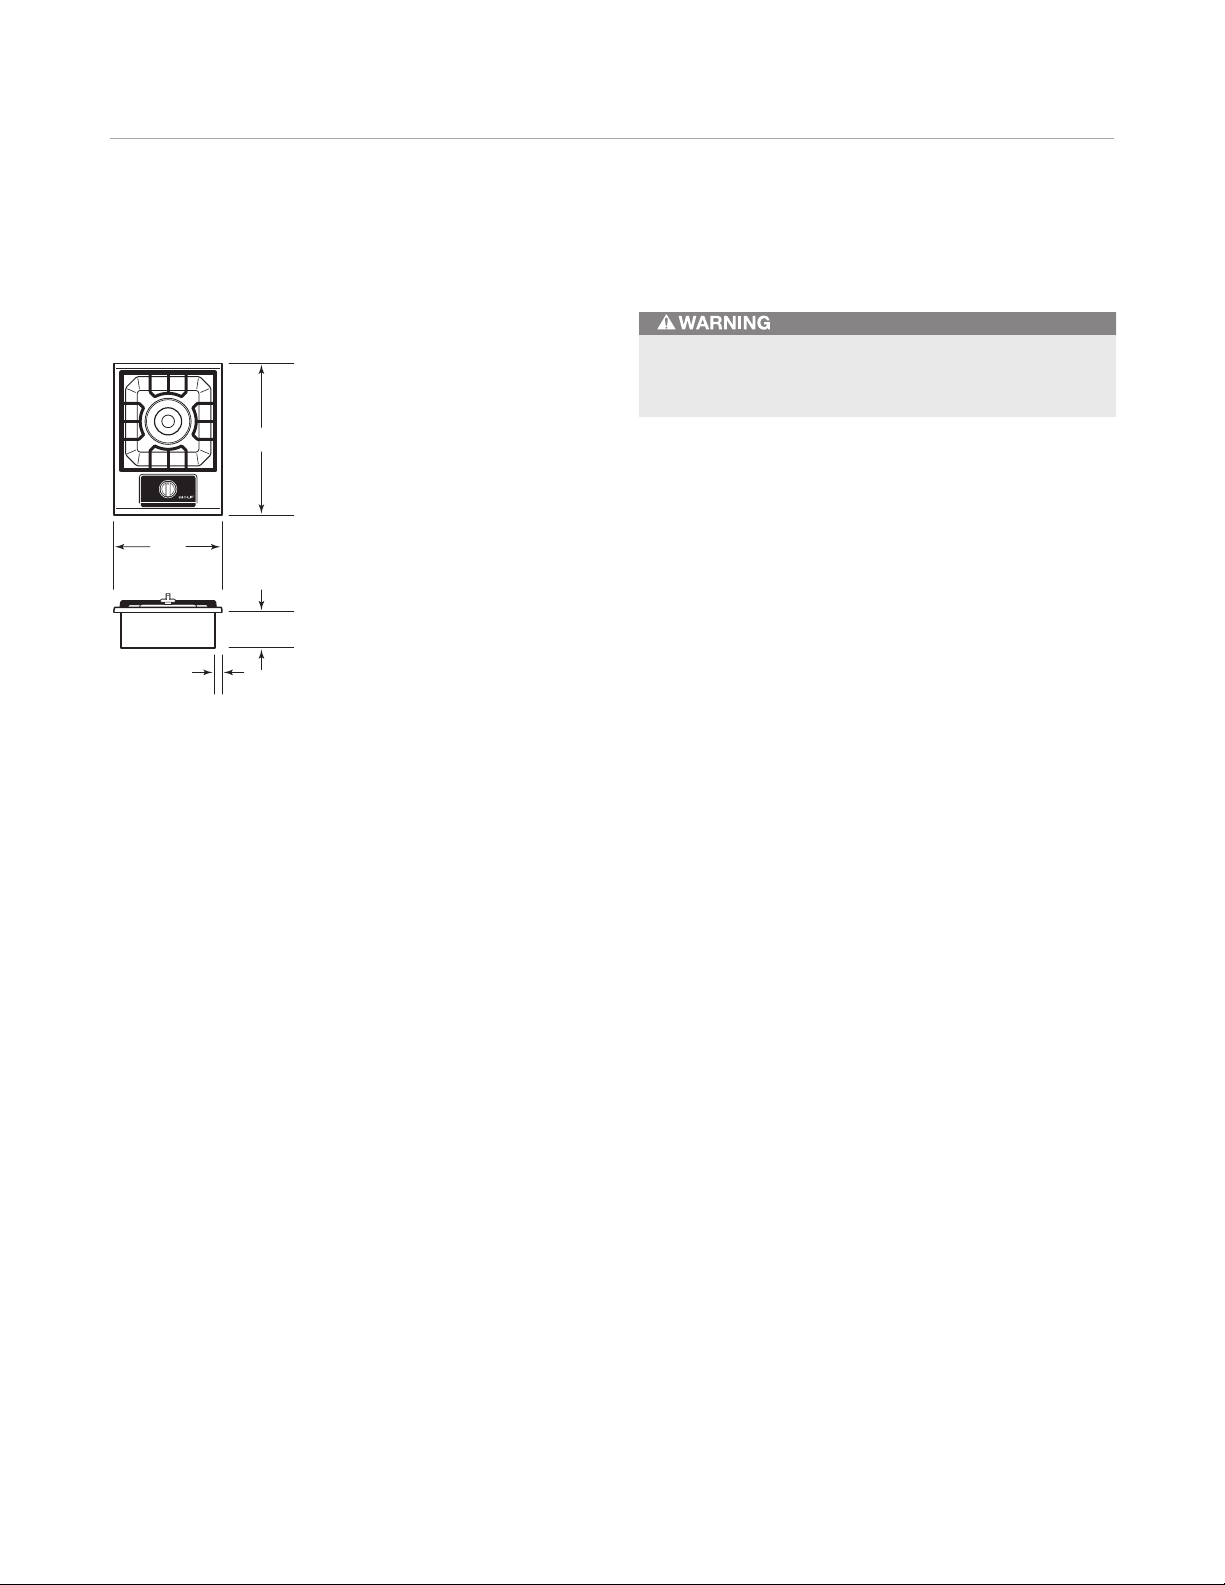
/2" (13)
SIDES
1" (
25)
FRONT / BACK
5" (127)
21" (
533)
15"
(381)
Overall Dimensions
MULTI-FUNCTION COOKTOP
Installation Specifications
Failure to locate the multi-function cooktop without the
proper clearances will result in a fire hazard.
IMPORTANT NOTE: Installation of the Wolf gas multi-
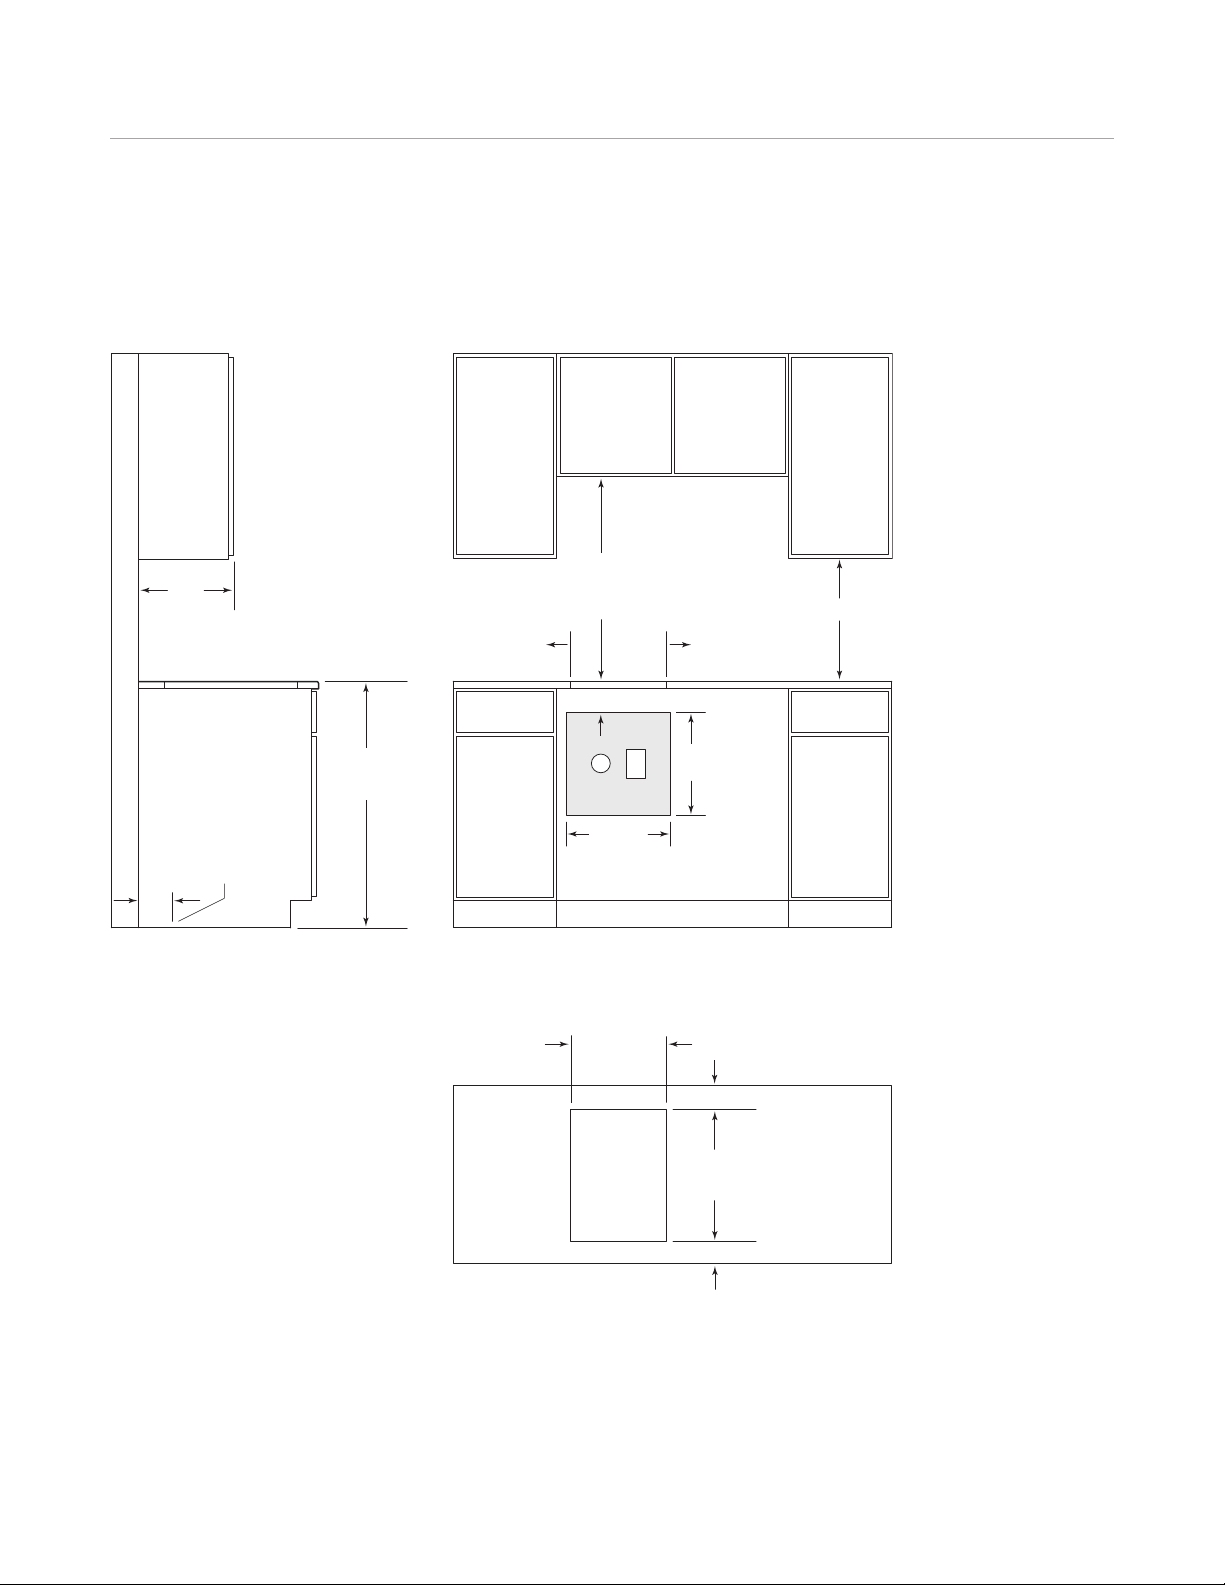
function cooktop must meet minimum clearance requirements shown in the installation specifications illustration
on the following page.
The Wolf multi-function cooktop is intended for indoor
use. An adequate supply of fresh air is required to assure
proper combustion and ventilation. It is designed to fit a
standard 24"
countertop. Before making the countertop cut-out, verify
that the module will clear the side walls of the base
cabinet.
There should be at least 5
countertop and any combustible surface directly below
the multi-function cooktop.
If the multi-function cooktop is not installed above an
oven, the gas service may be supplied through the floor.
When an oven is installed below the cooktop, unless you
are using cabinets deeper than 24"
mended that the electrical supply be placed in the base
cabinet to the right of the oven. Refer to the illustration
on the following page for specifics on placement of the
electrical and gas supply.
(610) deep base cabinet with 25" (635) deep
1
/2" (140) clearance between the
(610), it is recom-
It is recommended that you use a Wolf cooktop ventilation
hood, downdraft, pro hood or hood liner with the multifunction cooktop. Refer to the Wolf design guide.
Page 5
Multi-Function Cooktop Specifications 5
36" (914)
FLOOR TO
COUNTERTOP
30" (762) min
COUNTERTOP
TO COMBUSTIBLE
MATERIALS
SEE COUNTERTOP
C
UT-OUT BELOW
14" (356)
CUT-OUT
WIDTH
COUNTERTOP CUT-OUT
FRONT
191/4" (489)
CUT-OUT
DEPTH
21/2" (64) min
7" (178) T
O
COMBUSTIBLE
*
7" (178) T
O
COMBUSTIBLE
*
S
IDE
CABINET
13" (
330)
max
E
15" (381)
15"
(381)
4"
(
102
)
18" (457) min
5"
(127)
LOCATION OF GAS
AND ELECTRICAL
EXTENDS ON FLOOR
G
21/2" (64) min*
FRONT VIEWSIDE VIEW
*Minimum clearance from cooktop cut-out to combustible materials up to 18" (457) above countertop.
NOTE: Application shown allows for installation of two 15" (381) modules side by side.
wolfappliance.com/specs
Installation Specifications
MULTI-FUNCTION COOKTOP
Page 6
Multi-Function Cooktop Specifications 6
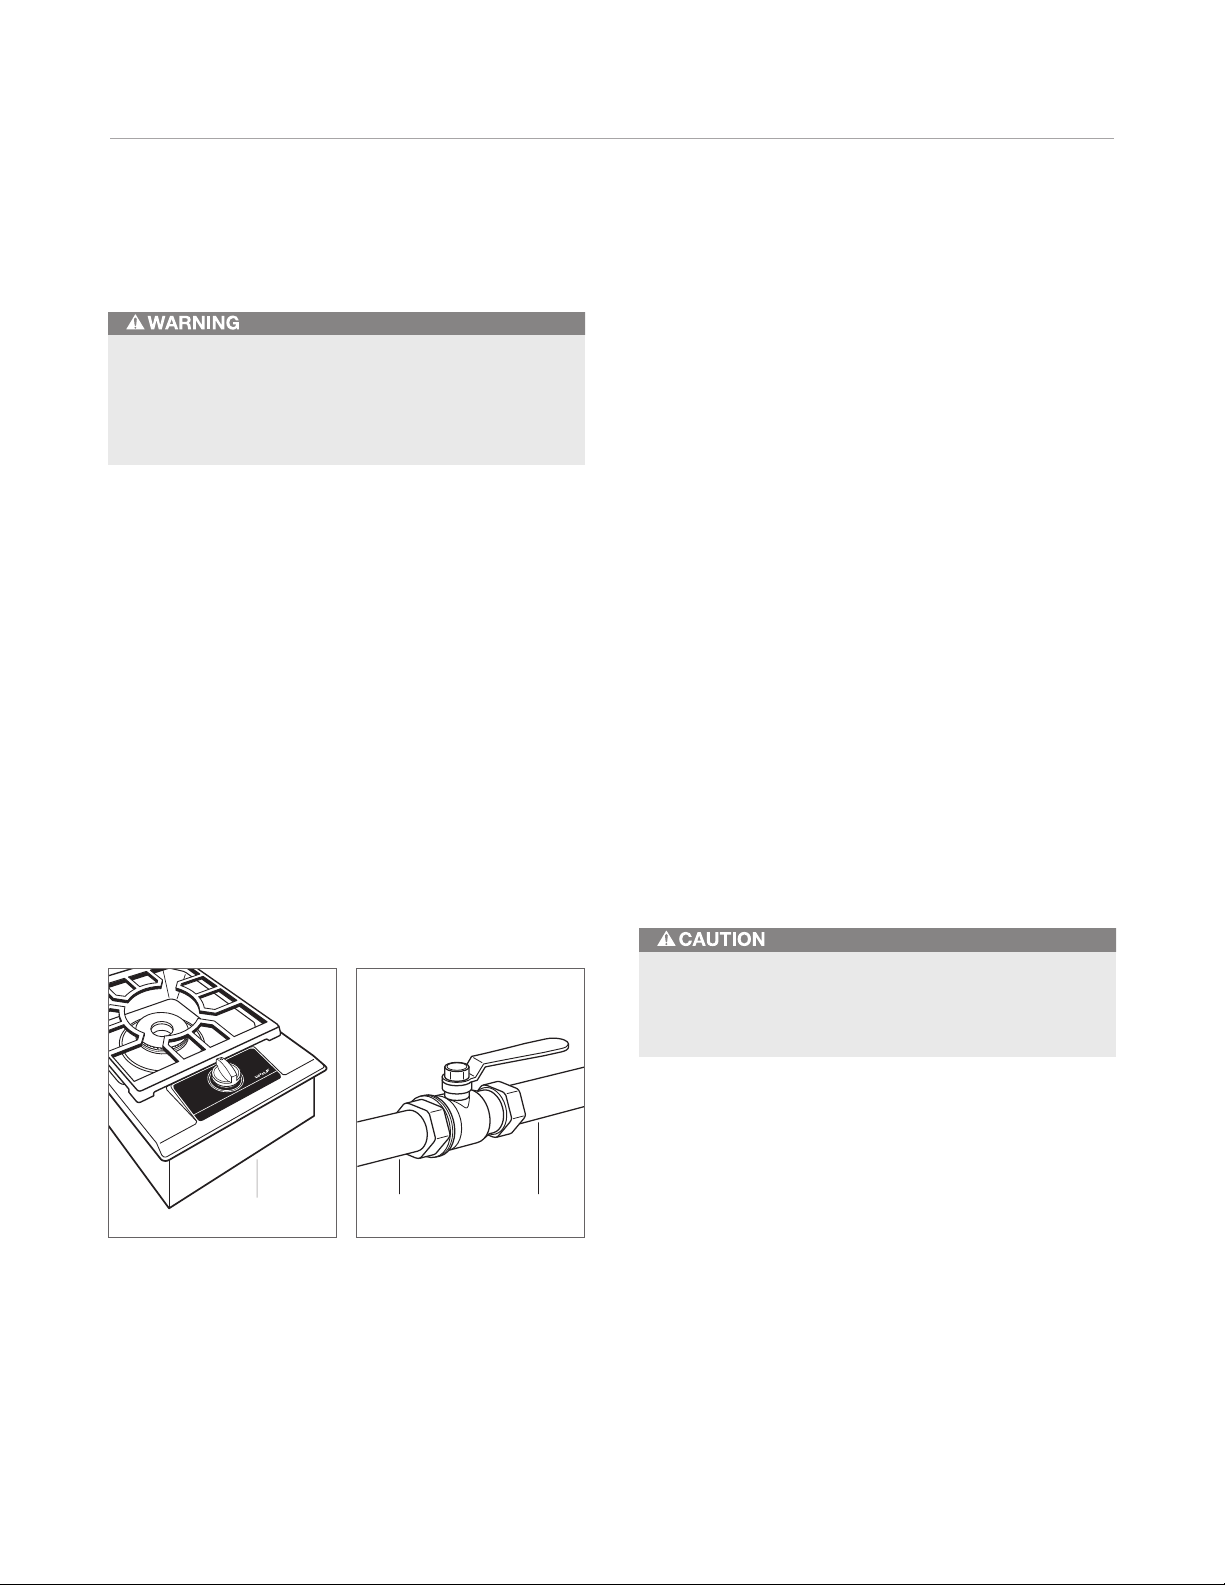
SHUT-OFF VALVE
OPEN POSITION
GAS SUPPLYTO APPLIANCE
Gas Supply Requirements
GAS SUPPLY LINE
EXPLOSION HAZARD: Use a certified gas supply line
and install a gas shut-off valve. Securely tighten all gas
connections. Failure to follow these instructions can
result in explosion, fire or death.
IMPORTANT NOTE: This installation must conform with
local codes and ordinances. In the absence of local
codes, installations must conform with American National
Standard, National Fuel Gas Code ANSI Z223.1—latest
edition or CANI—B149.1 or 2.
The gas multi-function cooktop is equipped for use with
natural or LP gas. It is design certified by the Canadian
Standards Association (CSA) for natural or LP gases. The
product rating plate, located on the underside of the
cooktop, has information on the type of gas that should be
used. Refer to the illustration below. If this information
does not agree with the type of gas available, contact your
authorized Wolf dealer or local gas supplier. For local
dealer information, visit the find a showroom section of
our website, wolfappliance.com.
IMPORTANT NOTE:
The gas multi-function cooktop must
be connected to a regulated gas supply.
3
A gas supply line of
/4" (19) rigid pipe must be provided
to the cooktop. For LP gas, piping or tubing size can be
1
/2" (13) minimum. LP gas suppliers usually determine the
size and materials used on the system. If local codes
permit, a certified,
1
/2" (13) or3/4" (19) ID flexible metal
appliance connector is recommended to connect the
cooktop to the gas supply line. The gas pressure regulator
on the cooktop has
1
/2" (13) female threads.
IMPORTANT NOTE: The supply line must be equipped
with an approved external gas shut-off valve located near
the cooktop in an accessible location. Do not block
access to the shut-off valve. Refer to the illustration below.
The Wolf natural gas multi-function cooktop will function
up to an altitude of 10,250'
ment. LP gas cooktops will function up to 8,600'
(3124 m) without any adjust-
(2621 m)
without adjustment. If the installation exceeds these elevations, contact your authorized Wolf dealer for a high
altitude conversion kit.
RATING PLATE
Location of rating plate. Gas shut-off valve.
Before connecting the gas supply, make sure all valves
are in a closed position. Do not connect the gas supply
to an appliance that shows any sign of damage.
Page 7

Multi-Function Cooktop Specifications 7
wolfappliance.com/specs
Gas Supply Requirements
GAS MANIFOLD PRESSURE
• Natural Gas: Standard orifices are set for 5" (12.5 mb)
WC (water column).
• LP Gas: Standard orifices are set for 10"
(25 mb) WC.
• Gas Supply Pressure: The maximum gas supply
pressure to the regulator should never exceed 14"
(34.9 mb) WC; .5 psi (3.5 kPa) for natural and LP gas.
The minimum line pressure is 7"
natural gas and 11"
(27.4 mb) WC for LP gas.
(17.5 mb) WC for
• Gas Pressure Regulator: To control and maintain a
uniform gas pressure in the gas manifold, the unit must
be used with a gas pressure regulator. The burner
orifices, etc. are sized for the gas pressure delivered by
the supplied regulator. Do not remove the regulator.
The maximum gas supply pressure to the regulator
should never exceed 14"
(34.9 mb) WC; .5 psi (3.5 kPa).
Page 8
Multi-Function Cooktop Specifications 8
GROUNDING
PLUG
GROUNDED
ELECTRICAL OUTLET
N
A
11
22
BLACK
BLACK
WHITE
WHITE
RED
WHITE
RED
WHITE
RED
SPARK
MODULE
3 CONDUCTOR
POWER CORD
GRN
BLK
Electrical Requirements
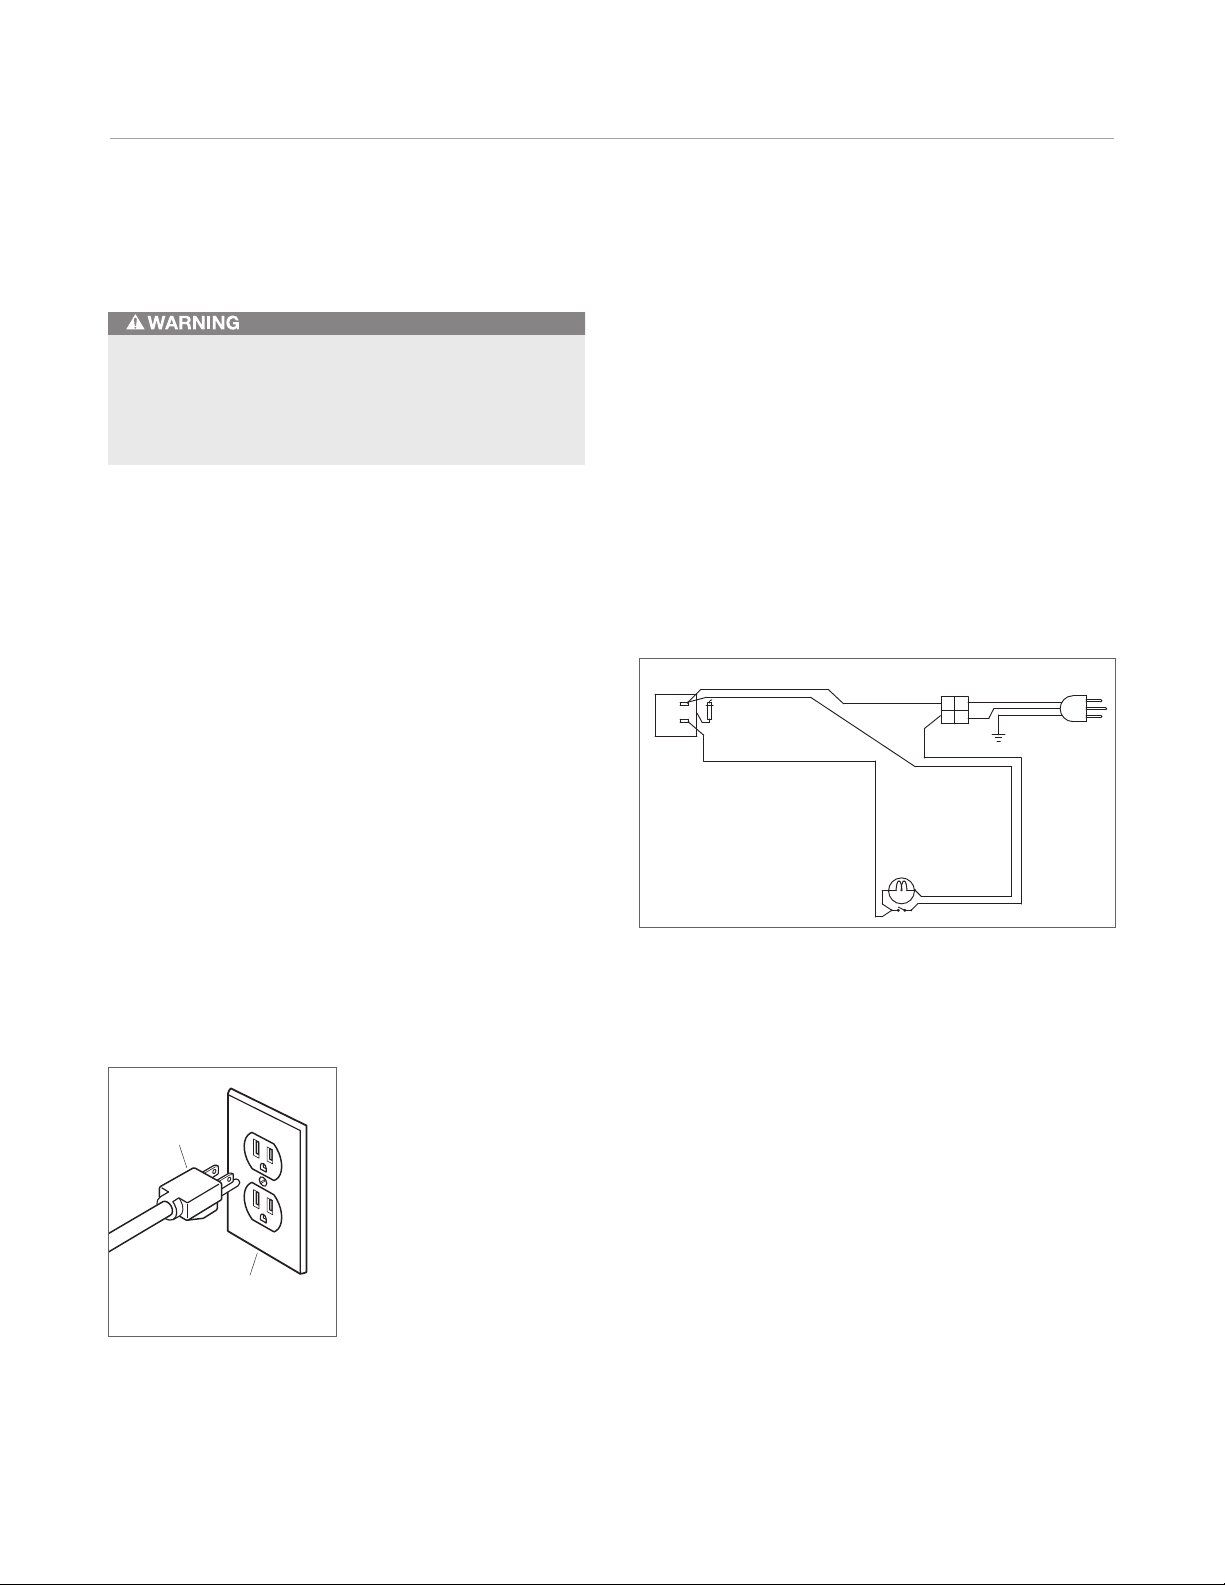
ELECTRICAL SHOCK HAZARD: Plug into a grounded
3-prong outlet. Do not remove ground prong. Do not
use an adapter. Failure to follow these instructions can
result in electric shock, fire or death.
The Wolf multi-function cooktop requires a 120 V AC,
60 Hz, 15-amp, fused electrical supply. A time-delay fuse
or circuit breaker is recommended. It is recommended that
a separate circuit serving only this appliance be provided.
A ground fault circuit interrupter (GFCI) is not recommended and may cause interruption of operation.
ELECTRICAL GROUND
The 6' (1.8 m) power cord is equipped with a 3-prong,
grounding plug for protection against shock hazard. The
power cord must be plugged into a mating 3-prong
grounded outlet, grounded to conform with the National
Electrical Code, ANSI/NFPA 70 latest edition, or Canadian
Electrical Code (CSA) and all local codes and ordinances.
Refer to the illustration below.
IMPORTANT NOTE: E
lectronic ignition systems operate
within wide voltage limits, but proper ground and polarity
are necessary. In addition to checking that the electrical
outlet provides 120 V AC power and is correctly grounded,
the outlet must be checked by a qualified electrician to
see if it is wired with correct polarity.
WIRING DIAGRAM
The wiring diagram below covers the control circuit for the
Wolf multi-function cooktop.
IMPORTANT NOTE: This appliance must be properly
grounded to avoid electrical shock hazard. Do not ground
to a gas pipe.
Electrical ground.
Wiring diagram.
Page 9

Multi-Function Cooktop Specifications 9
wolfappliance.com/specs
Installation Specifications
MULTIPLE COOKTOP INSTALLATION
If the multi-function cooktop is to be used in combination
with additional cooktops or modules with a filler strip, refer
to the chart below for the countertop cut-out width. The
dimensions are derived by adding an additional 1
1
/4" (32)
for each additional unit, to give you the total countertop
cut-out width. Dimensions include the filler strip.
When multiple cooktops are installed side by side, each
unit must have its own separate, recommended electrical
circuit. When multiple gas cooktops are installed next to
one another, they can receive their gas supply from a
common line. However, each unit must have its own gas
pressure regulator.
When two or more cooktops or modules are installed
together, an integrated module filler strip is recommended.
The filler strip and other accessories are available through
your authorized Wolf dealer. For local dealer information,
visit the find a showroom section of our website,
wolfappliance.com.
IMPORTANT NOTE: Review specific installation instruc-
tions for product to product capabilities.
Multiple Cooktops
COUN TERTOP CUT-OUT WIDT H
2 Modules 291/4" (743)
3 Modules 441/2" (1130)
4 Modules 593/4" (1518)
30" (762) Cooktop / Module 441/4" (1124)
30" (762) Cooktop / 2 Modules 591/2" (1511)
36" (914) Cooktop / Module 501/4" (1276)
Page 10
Multi-Function Cooktop Installation 10
FOAM
STRIP
BURNER BOX
31/2" (89)
CLAMPING
SCREW
BURNER
BOX
COUNTERTOP
BRACKET
CLIP
Install the Cooktop
emove the multi-function cooktop and gas pressure
R
regulator from its shipping carton and discard packing
materials.
Lower the multi-function cooktop into the countertop
cut-out opening. Center the cooktop in the opening and
check that the front edge of cooktop is parallel to the front
edge of the countertop. Check that all required clearances
are met. Using a pencil, outline the rear edge of the
cooktop frame on the countertop. Remove the cooktop
from the countertop opening.
IMPORTANT NOTE: When repositioning the multi-function
cooktop in the countertop opening, lift the entire cooktop
up from the opening to prevent scratching the countertop.
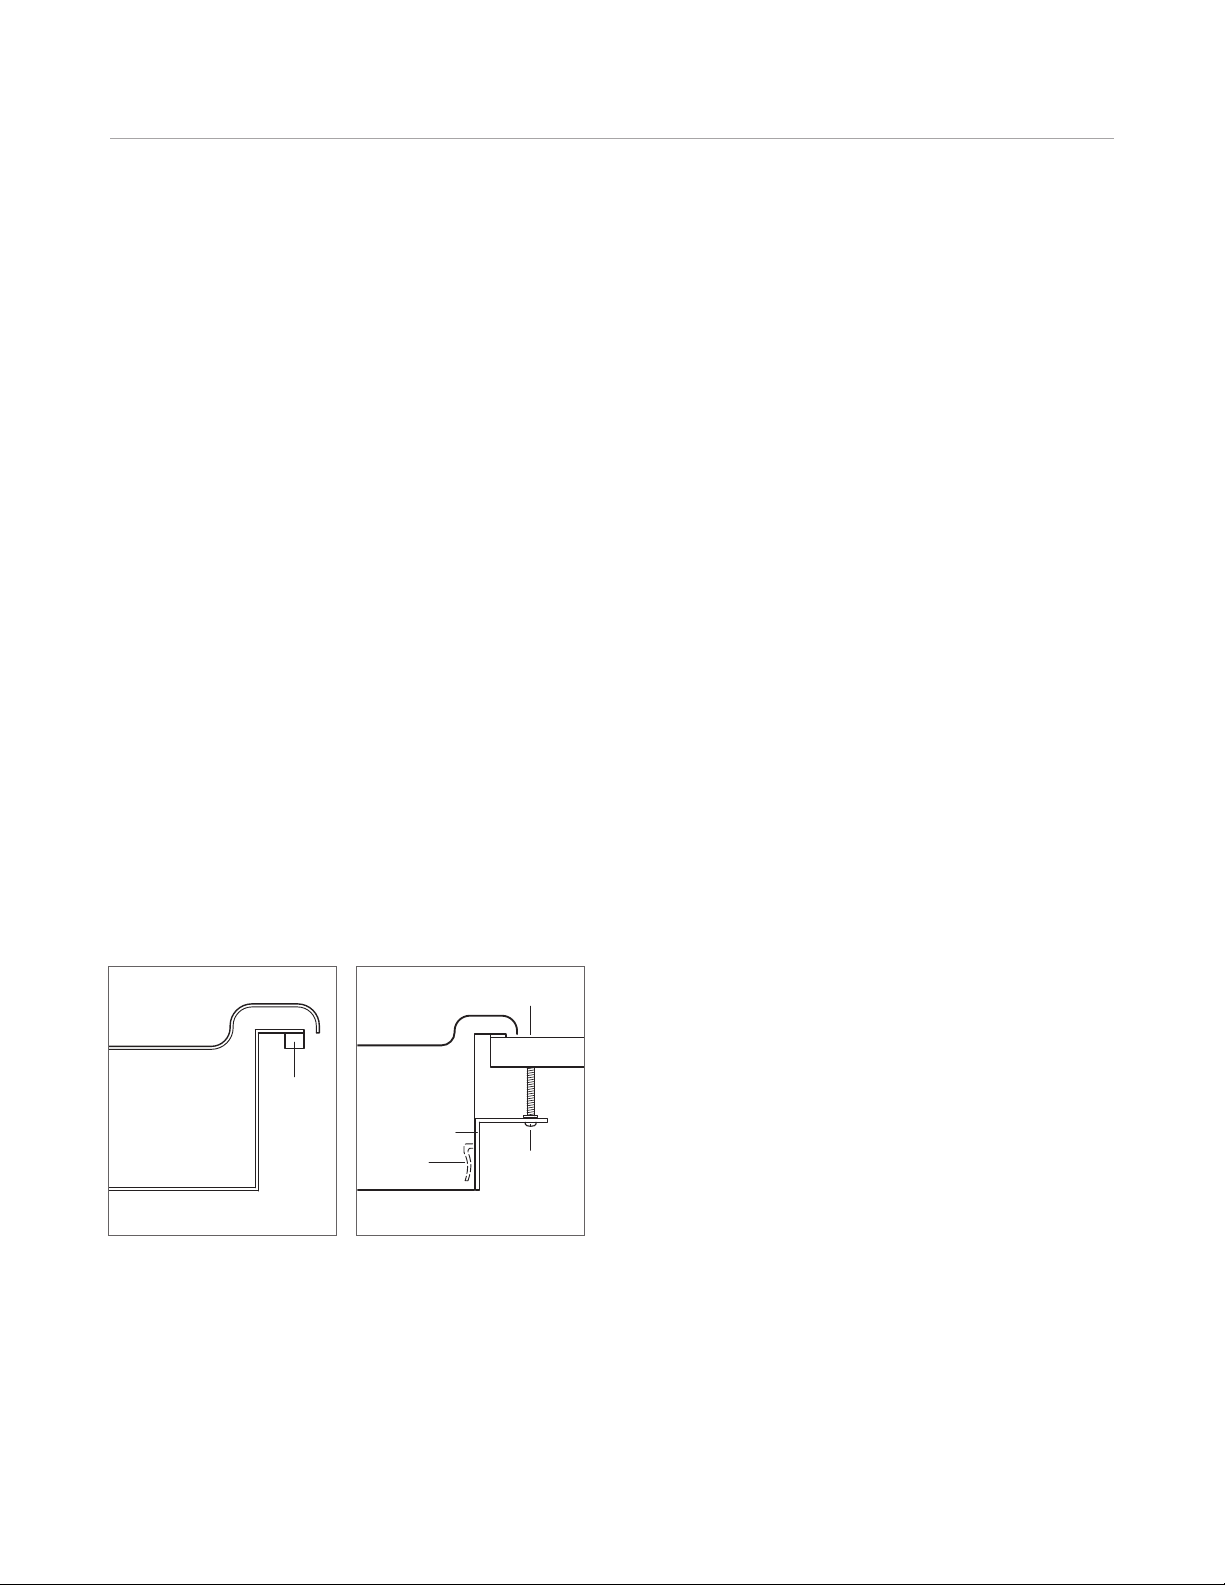
Apply the foam strip, included in the hardware package,
to the underside of the multi-function cooktop frame.
Refer to the illustration below.
Reinsert the multi-function cooktop into the countertop
opening. Align the rear edge of the cooktop frame with the
pencil line and check that it is parallel to the front edge of
the countertop. Lift the entire cooktop to make adjustments.
ttach the brackets to the burner box by inserting the
A
clips into the rectangular punchouts on the left and right
side of the burner box. Insert the 3
1
/2" (89) clamping
screws into the brackets. Use a screwdriver to tighten the
clamping screws against the underside of the countertop.
Refer to the illustration below. Do not overtighten screws.
IMPORTANT NOTE: Do not seal the cooktop to the coun-
tertop. It must be removed if service is necessary.
Foam strip. Installation brackets.
Page 11
Multi-Function Cooktop Installation 11
COOKTOP
ACCESS
CAP
ARROW
POINTS UP
FLEXIBLE
METAL CONNECTOR
GAS PRESSURE
REGULATOR
SHUT-OFF
VALVE
NIPPLE
ADAPTERADAPTER
NIPPLE
wolfappliance.com/specs
Install the Cooktop
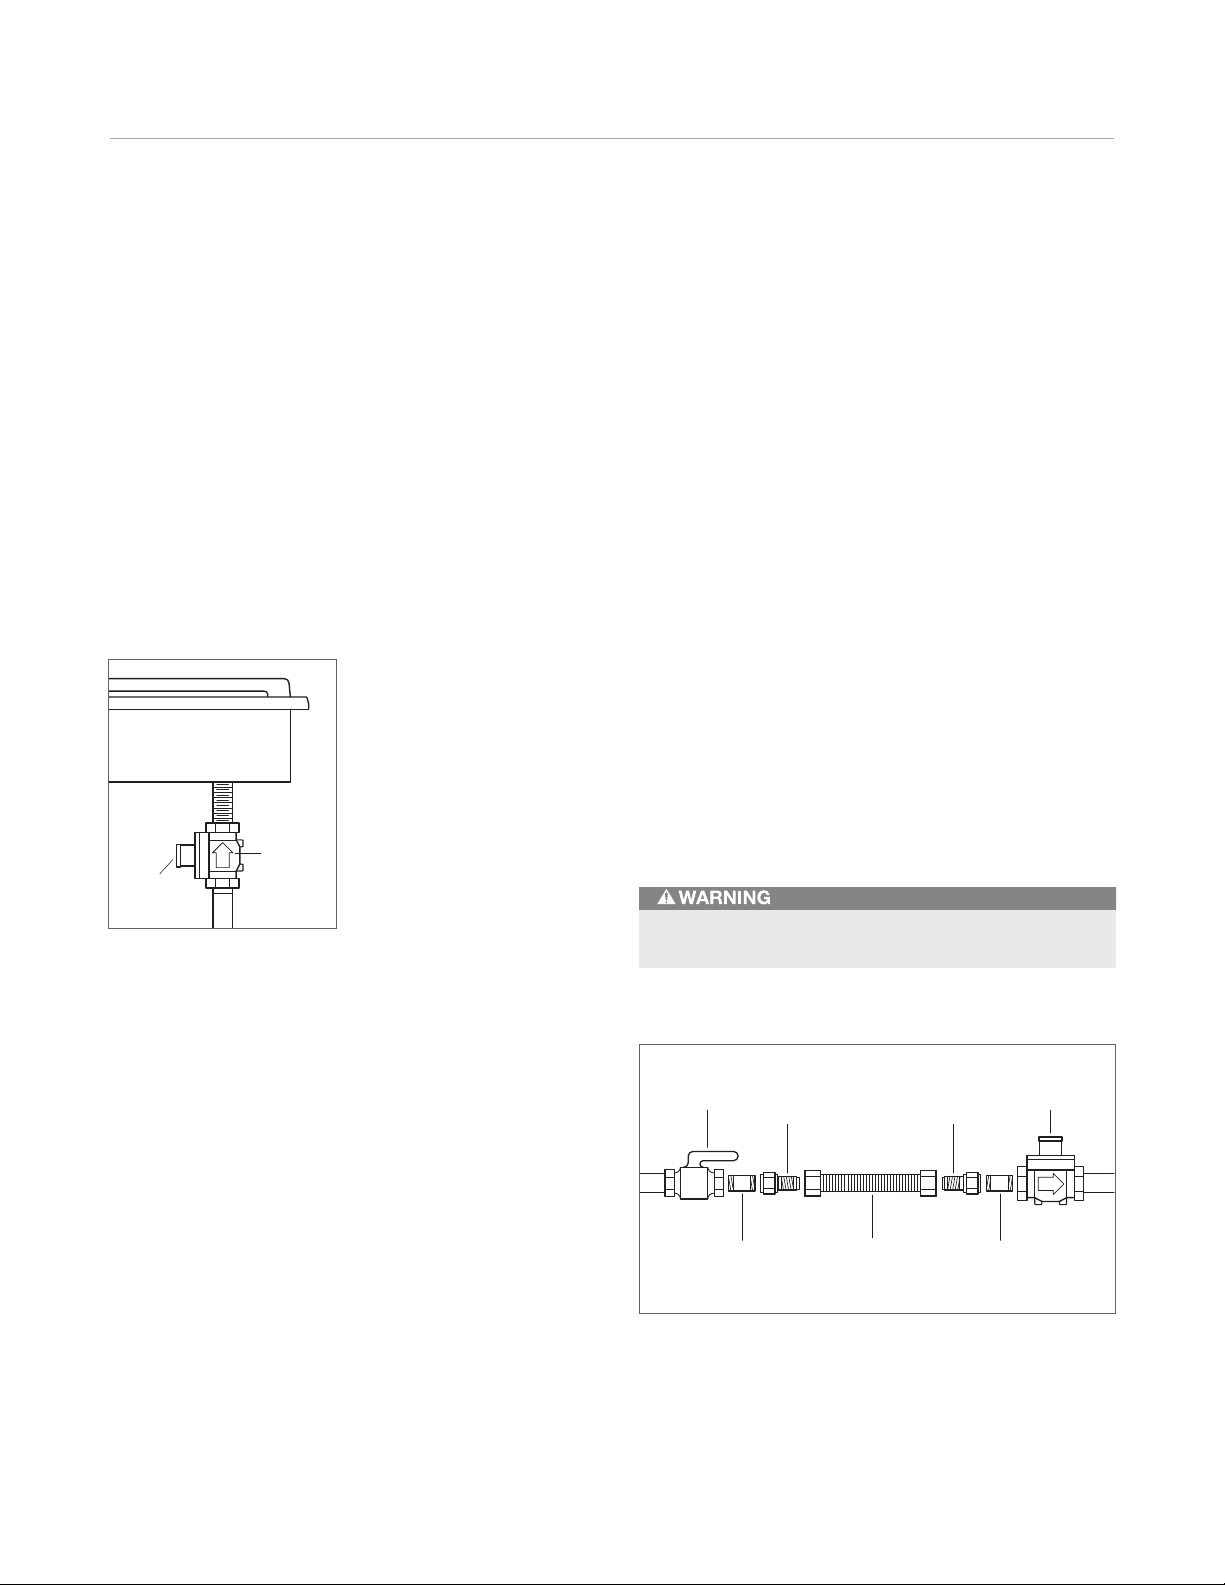
GAS PRESSURE REGULATOR
Install the gas pressure regulator with the arrow on the
regulator pointing up toward the unit and in a position
where you can reach the access cap. Refer to the illustration below.
IMPORTANT NOTE: All connections must be wrench-tight-
ened. Do not make connections to the regulator too tight,
as this may crack the regulator and cause a gas leak. Do
not allow the regulator to turn on the pipe when tightening
fittings.
GAS SUPPLY CONNECTION
Assemble the flexible metal connector from the gas supply
pipe to the gas pressure regulator. You will need to determine the fittings required, depending on the size of your
gas supply line, flexible metal connector and shut-off
valve. Refer to the illustration below.
Use a pipe joint compound made for use with natural and
LP gas. If a flexible metal connector is used, be sure the
tubing is not kinked.
Open the gas shut-off valve in the gas supply line. Wait a
few minutes for the gas to move through the line. Refer to
the illustration on page 6.
GAS LEAK TESTING
Use a brush and liquid detergent to test all gas connections for leaks. Bubbles around connections will indicate a
leak. If a leak appears, shut off the gas supply and adjust
connections. Then check connections again. Clean the
detergent solution from the cooktop.
Gas pressure regulator.
Never test for a gas leak with a match or other flame.
Page 12

Multi-Function Cooktop Installation 12
Install the Cooktop
COMPLETE THE INSTALLATION
Once the multi-function cooktop has been checked for
gas leaks, plug the power cord into the grounded electrical outlet. Place the burner head on the burner base and
position the burner grate over the burner assembly.
Read the entire Wolf multi-function cooktop use & care
guide included with the unit. It contains important safety,
operation, service and warranty information.
Before operating, clean the multi-function cooktop thoroughly with hot water and a mild detergent. Rinse and dry
with a soft cloth. This removes any residual oil and grease
left on the surface from the manufacturing process. Refer
to care recommendations in the use & care guide.
VERIFY OPERATION
The burner of the gas multi-function cooktop uses an
electronic igniter in place of a standing pilot. When the
control knob is pushed in and turned to the HIGH position,
the system creates a spark to light the burner. This
sparking continues until the electronic ignition senses a
flame.
To check operation of the burner, push in and turn the
control knob to the HIGH position. The flame should light
within four seconds.
If the burner does not light properly, turn the control knob
to the OFF position. Check that the burner head is in the
proper position. Make sure the power cord is plugged in
and the circuit breaker or house fuse has not blown.
Check that the gas shut-off valve is in the open position.
Check operation again; if the burner does not light
properly at this point, contact Wolf factory certified
service.
IMPORTANT NOTE: Initial lighting of the burner may take
slightly longer as air in the system must be purged before
gas can be supplied to the burner.
Page 13

Multi-Function Cooktop Installation 13
wolfappliance.com/specs
Cooktop Removal
The multi-function cooktop must be disconnected from
the electrical and gas supply prior to removal.
IMPORTANT NOTE: Removal of the multi-function cooktop
should only be performed by Wolf factory certified service.
If removing the multi-function cooktop is necessary for
cleaning or service, shut off the gas supply. Disconnect
the electrical and gas supply. Remove the mounting
brackets on each side of cooktop and remove. Reinstall in
the reverse order and check gas connections for leaks.
Troubleshooting
IMPORTANT NOTE: I
operate properly, follow these troubleshooting steps:
• Verify that electrical power is being supplied to the
cooktop.
• Check the gas supply and electrical connections to
ensure that the installation has been completed
correctly.
• Check that the gas supply shut-off valve is in the open
position.
• Check polarity of the electrical outlet if excessive
igniter clicking occurs immediately after installation.
• Follow troubleshooting procedures outlined in the
Wolf gas multi-function cooktop use & care guide.
• If the multi-function cooktop still does not operate
properly, contact Wolf factory certified service. Do not
attempt to repair the cooktop yourself. Wolf is not
responsible for service required to correct a faulty
installation.
f the multi-function cooktop does not
Page 14
Service Information 14
Service Information
f service is necessary, maintain the quality built into your
I
multi-function cooktop by contacting Wolf factory certified
service.
For the name and number of Wolf factory certified service
nearest you, check the contact & support section of our
website, wolfappliance.com or call Wolf customer care at
800-222-7820.
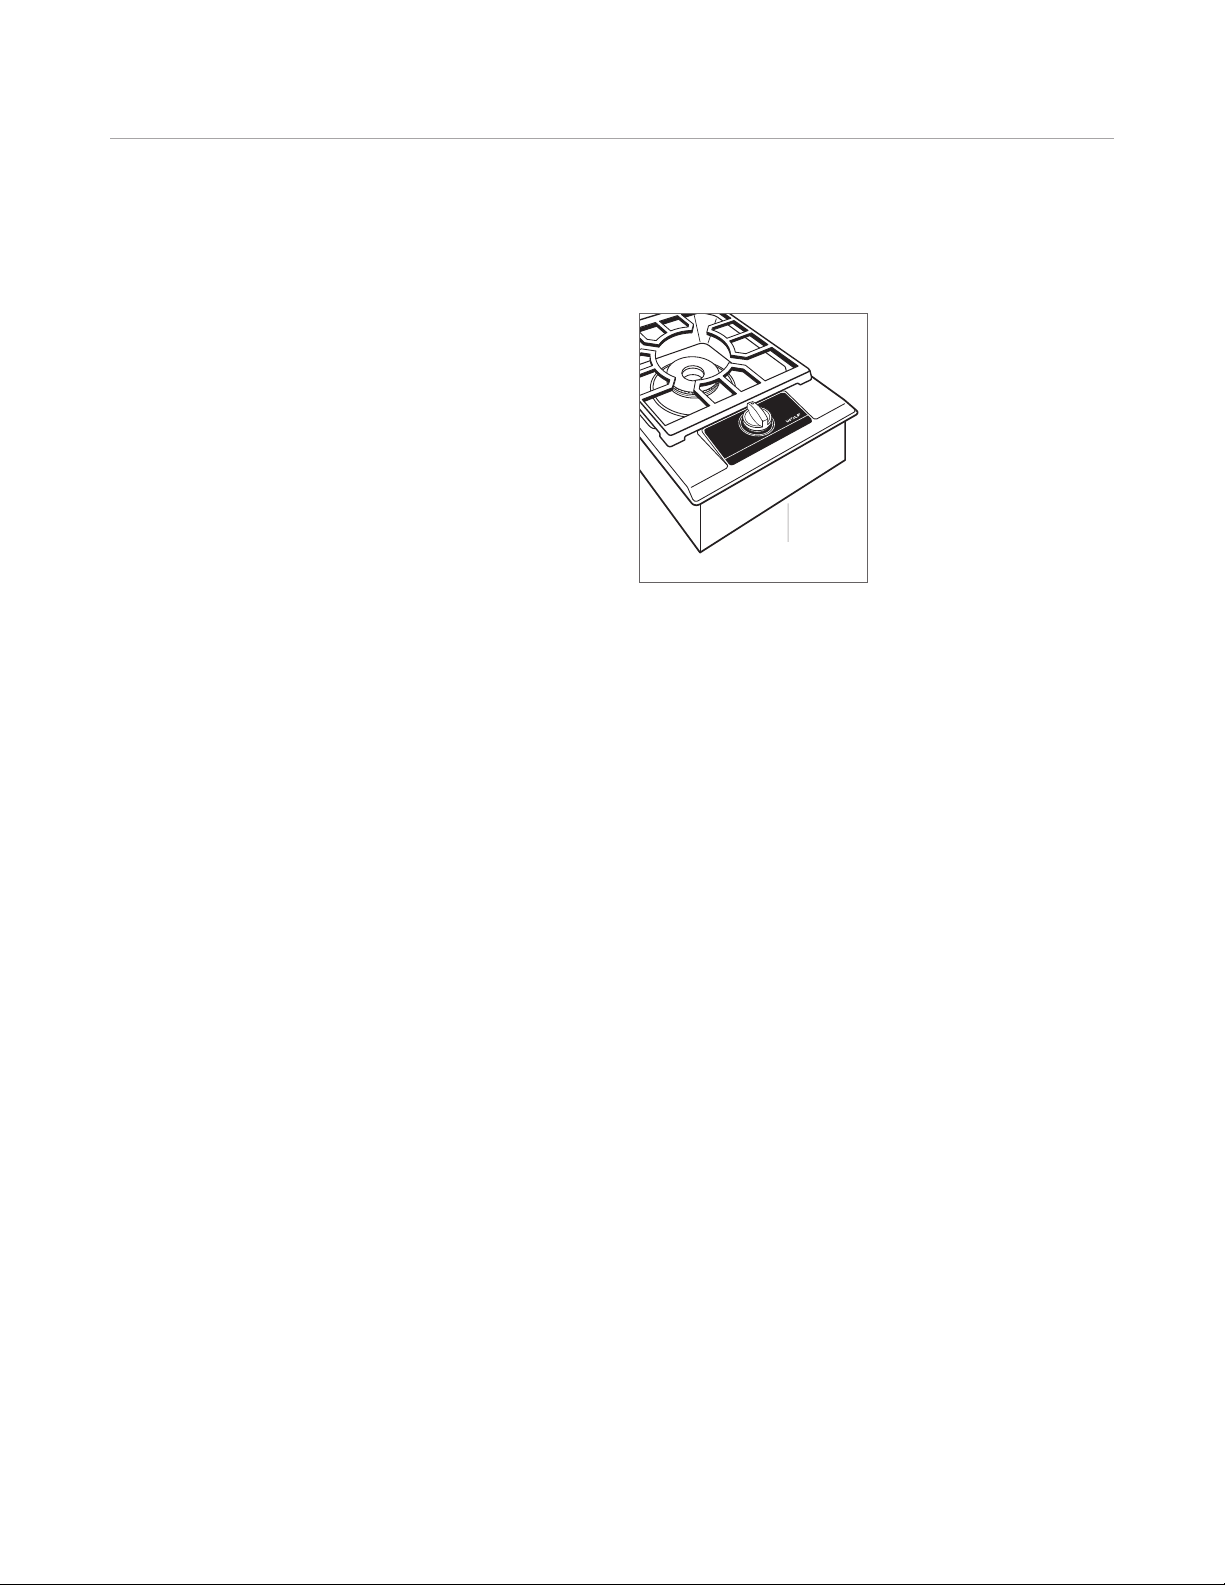
When calling for service, you will need the model and
serial numbers of the multi-function cooktop. Both
numbers are listed on the product rating plate located on
the underside of the cooktop. Refer to the illustration for
the location of the rating plate.
IMPORTANT NOTE: Installation and service must be
performed by a qualified installer or service agency.
Warranty service must be performed by Wolf factory
certified service.
Location of rating plate.
RATING PLATE
Page 15

The information and images in this guide are the copyright property of Wolf Appliance, Inc. Neither this guide nor any information or images contained herein
may be copied or used in whole or in part without the express written permission of Wolf Appliance, Inc. ©Wolf Appliance, Inc. all rights reserved.
Wolf, Wolf & Design, Wolf Gourmet, W & Design and the color red as applied to knobs are registered trademarks and service marks of Wolf Appliance, Inc.
Sub-Zero, Sub-Zero & Design, Dual Refrigeration, Constant Care and The Living Kitchen are registered trademarks and service marks of Sub-Zero, Inc.
(collectively,the“Company Marks.”) All other trademarks or registered trademarks are property of their respective owners in the United States and other countries.
Page 16

WO LF AP PLIAN CE, IN C. P. O . BOX 4 4848 MADIS ON, W I 5374 4 WOL FAPPLI ANCE. COM 80 0.222 .7820
817 485 RE V-A 3/ 2011
 Loading...