

Wolf ICBBI-30UG, ICBBI-36UG, ICBBI-36R, ICBBI-36F, ICBBI-36RG Use & Care Information Manual
...
BUILT-IN REFRIGERATION
USE & CARE INFORMATION
GU ÍA DE US O Y MANTENIMIENTO
GU IDE D’UTILISATION ET D’ENTRET IEN
IN FOR MAZIONI SU USO E MANUTENZIONE
BE DIE NUNGS- UND PFLEGEANLEITUN G

2
E
NG LIS H
Sub-Zero Built-I n Refrigeration 3
Sub-Zero Built-I n Features 3
Sub-Zero Built-I n Models 4
Sub-Zero Built-I n Use & Care 7
Keeping Food at Its Best 15
Food Storage Rec ommendations 17
T
roubleshooting G uide 20
Service Informa tion 21
E
SP AÑO L
Refrigeración Em potrable Sub-Zero 22
C
aracterísticas de los Modelos
Empotrables de S ub-Zero 22
Modelos Empotrab les Sub-Zero 23
Uso y Mantenimie nto de Productos
Empotrables de S ub-Zero 26
Conservación Óp tima de los Alimentos 34
R
ecomendaciones R elativas
a la Conservaci ón de Alimentos 36
Guía de Localiza ción y Solución
de Problemas 39
Información Sobr e el Mantenimiento 40
F
RA NÇA IS
Appareils de Réf rigération
Encastrables Sub -Zero 41
Caractéristique s des Appareils
Encastrables Sub -Zero 41
M
odéles Encastrab les Sub-Zero 42
Utilisation et E ntratien des
A
ppareils Encastr ables Sub-Zero 45
C
onservation Opt imale des Aliments 53
Recommandations pour la
Conservation de s Aliments 55
Guide de Dépista ge des Pannes 58
Service Aprés-Vente 59
IT ALI AN O
Frigoriferi da I ncasso Sub-Zero 60
Caratteristiche da Incasso Sub- Zero 60
Modelli da Incas so Sub-Zero 61
Utilizzo e Manut enzione delle
Unitá da Incasso Sub-Zero 64
Per Conservare gli Alimenti in
Maniera Ideale 72
Consigli per la Conservazione
degli Alimenti 74
Guida alla Soluz ione dei Problemi 77
Informazioni sul Servizio di As sistenza 78
DE UTS CH
Einbaukühltechni k von Sub-Zero 79
Merkmale der Ein baugeräte von Sub-Zero 79
Einbaugerätemode lle von Sub-Zero 80
Bedienung und Pf lege von
Einbaumodellen S ub-Zero 83
Optimale Aufbewa hrung von Lebensmitteln 91
Empfehlungen zur Lagerung
von Lebensmittel n 93
Fehlersuche und - Behebung 96
Serviceinformat ionen 97

BU ILT-I N F EAT URE S
• Overlay models blend seamlessly into your
o
verall room design and complement sur-
rounding cabinetry.
• New flush inset application allows the unit to
be flush with surrounding cabinetry. Options
include using custom panels or Sub-Zero
a
ccessory panels in classic stainless steel.
Classic stainless steel models feature
w
rapped doors, stainless steel tubular handles and flip-up grille, designed specifically to
enhance the aesthetics of today’s professional
looking kitchens.
• Models ICBBI-36RG, ICBBI-30UG and
ICBBI-36UG offer a unique feature—a glass
door. These units each come in the overlay/
flush inset or classic stainless steel design
and meet stringent energy requirements.
• Glass door models add a contemporary look
that is quite unique and innovative, with subdued interior lighting.
• Shallow-depth design means access is easy
to any area of the refrigerator.
• Built-In combination models have the
Sub-Zero dual refrigeration system, which
ensures the freshest food and energy efficiency at the same time. You have precise
independent control of the refrigerator and
freezer sections.
3
TH ANK YO U
Thank you for purchasing your new Sub-Zero
B
uilt-In unit. With Sub-Zero, you can rely on a
60-year tradition of quality and reliability. The
Built-In line brings together the latest and finest
features in home refrigeration to give you the
freshest food possible.
S
ub-Zero’s design, beauty and quality are
reflected in the broad range of standard features
t
hat put Sub-Zero in a class by itself. The custom
design appearance of the Sub-Zero Built-In line
gives you options no other line offers, whether
you have chosen an overlay/ flush inset, stainless
steel or glass door style unit.
This Use & Care Information will answer most of
your questions about the features, operation and
maintenance of your Built-In unit. If you have
questions that are not addressed here, contact
your Sub-Zero dealer or visit our website,
subzero.com.
As you read this Use & Care Info rmation, take
particular note of the CAUTION and WARNING
symbols when the y appear. This information is
important for s afe and efficient use of the
Sub-Zero equipme nt.
In addition, thi s Use & Care Information may
signal an IMPORTANT NOTE which highlight s
information that is especially i mportant.
SUB-ZERO®is a registered tradem ark of Sub-Zero, Inc.
• All Built-In models have a microprocessor to
g
ive you better control, automatic defrosting
that senses, then adapts to your use patterns,
and a service indicator light. Our microprocessor continuously monitors each section, and should a problem arise, the
processor will turn on the indicator in the
control display panel.
•
Controls are up front and easy to use.
They give you digital readings for quick, easyto-read reference. Up-front controls also keep
you informed about the operation of the unit
on a continuous basis.
• All Built-In models have a flip-up grille,
making it even easier to clean your condenser.
• Air Purification —bacteria, odors and gases
are removed by this advanced air purification
system.
• Bright lighting spreads even illumination
throughout each section. The source of the
illumination is concealed.
• A door alarm will let you know with an
audible chime if your refrigerator or freezer
door is left ajar.
• The full-extension, high-humidity crisper
drawer(s) are large and deep, with smooth
sides and removable dividers in most models.
• The steel reinforced cantilevered glass
shelves make repositioning quick and easy.
They’re easy to clean and spill proof.
SU B-Z ER O B UIL T-I N F EATU RE S
• In-door shelves are adjustable in 25 mm
i
ncrements for complete flexibility.
• The dairy compartment is adjustable,
with one-door access. The dairy shelf is magnetically sealed to maintain freshness.
• Over-and-under models offer a full-extension
freezer drawer.
•
Ice maker provides high-quality, crescentshaped ice.
• Max Ice feature increases the rate of ice pro-
duction for a 24 hour period.
• Magnetic gaskets around all doors give extra-
tight seals.
• Our solid-core doors improve insulation and
structural integrity.
• Solid, adjustable kickplate gives a true
built-in look.
SU B-Z ER O B UIL T-I N R EFRI GE RAT ION
These appliances are Star-K complia nt
to meet strict religious regula tions in
conjunction with specific instr uctions
found on www.star-k.org.
signals a situat ion where minor injury or
product damage m ay occur if you do not
follow instructi ons.
CAUTION
states a hazard that may cause serious
injury or death if precautions a re not
followed.
WARNING

4
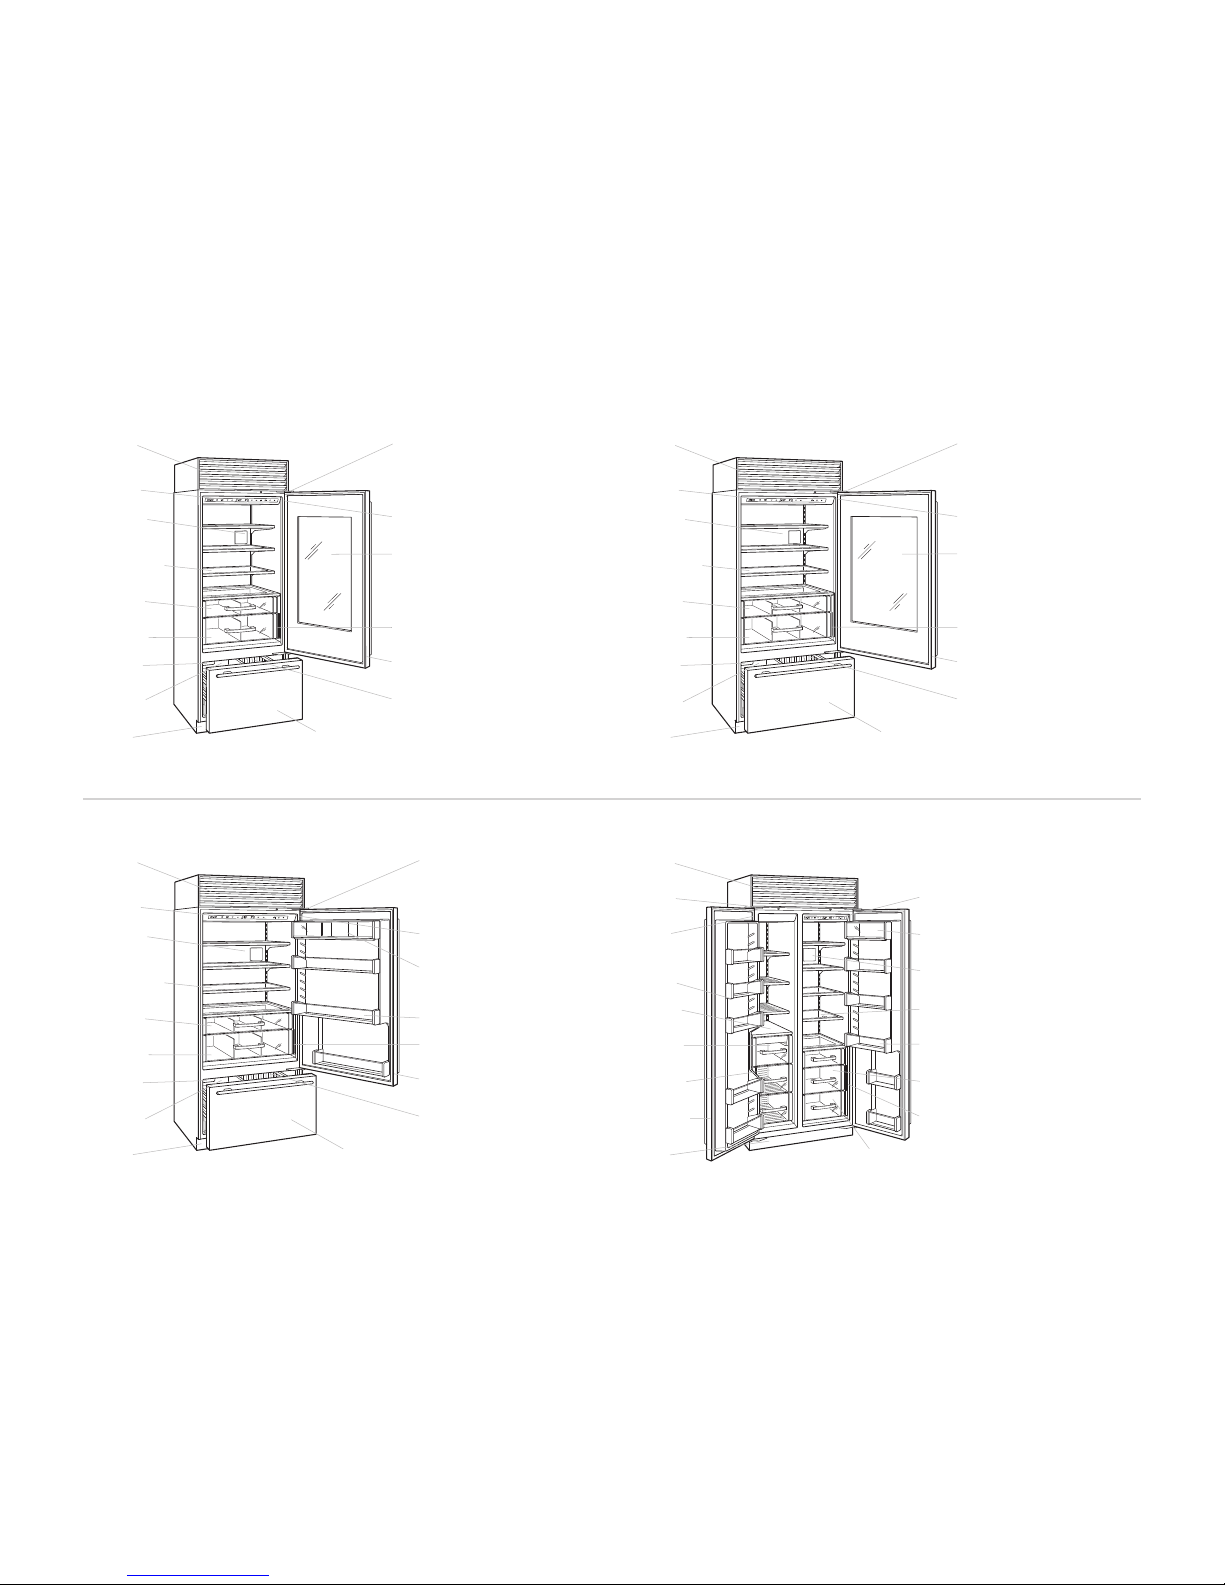
SU B-Z ER O B UIL T-I N M ODEL S
MO DEL IC BBI -3 6F
A
LL FRE EZE R
MO DEL IC BBI -3 0U
OV ER- AN D-U NDE R R EFR IG ERA TOR|FR EEZ ER
L
ocation of
rating plate
Four-sided magnetic gaskets
Removable
kickplate
Removable ice
container
Adjustable wire
shelves
Lighted, electronic
control panel
Door closer
Freezer storage
baskets
Automatic ice
m
aker
Adjustable door
s
helves
Location of
rating plate
Adjustable dairy
compartment
Two-tier freezer
storage baskets
Removable
kickplate
High-humidity
crisper drawer
Adjustable, spillproof glass shelves
Air purification
system
Lighted, electronic
control panel
Door closer
Automatic ice
maker
Removable ice
container
Full-extension rollout freezer drawer
Refrigerator
storage drawer
Four-sided magnetic gaskets
Adjustable door
shelves
User reference
cards
Easy-access,
flip-up grille
Easy-access,
flip-up grille
MO DEL IC BBI -3 6R
A
LL REF RIG ER ATO R
L
ocation of
rating plate
Adjustable dairy
compartment
Four-sided magnetic gaskets
Removable
kickplate
Refrigerator
storage drawers
Adjustable, spillproof glass shelves
A
ir purification
system
Lighted, electronic
control panel
Easy-access,
f
lip-up grille
Door closer
U
ser reference
cards
High-humidity
crisper drawer
S
tationary door
shelves
Adjustable door
s
helves
MO DEL IC BBI -3 6R G
AL L R EF RIG ERA TOR WIT H G LA SS DO OR
Location of
rating plate
Triple-pane, UVresistant glass door
Four-sided magnetic gaskets
Removable
kickplate
Refrigerator
storage drawers
Adjustable, spillproof glass shelves
Air purification
system
Lighted, electronic
control panel
Easy-access,
flip-up grille
Door closer
User reference
cards
High-humidity
crisper drawer
5
MO DEL IC BBI -3 0U G
O
VE R-A ND -UN DER WIT H G LAS S DO OR
L
ocation of
rating plate
Triple-pane, UVresistant glass door
Two-tier freezer
s
torage baskets
Removable
kickplate
High-humidity
crisper drawer
Adjustable, spillproof glass shelves
A
ir purification
system
L
ighted, electronic
control panel
Door closer
A
utomatic ice
maker
Removable ice
c
ontainer
Full-extension rollout freezer drawer
Refrigerator
s
torage drawer
F
our-sided mag-
netic gaskets
User reference
cards
Easy-access,
f
lip-up grille
SU B-Z ER O B UIL T-I N M ODEL S
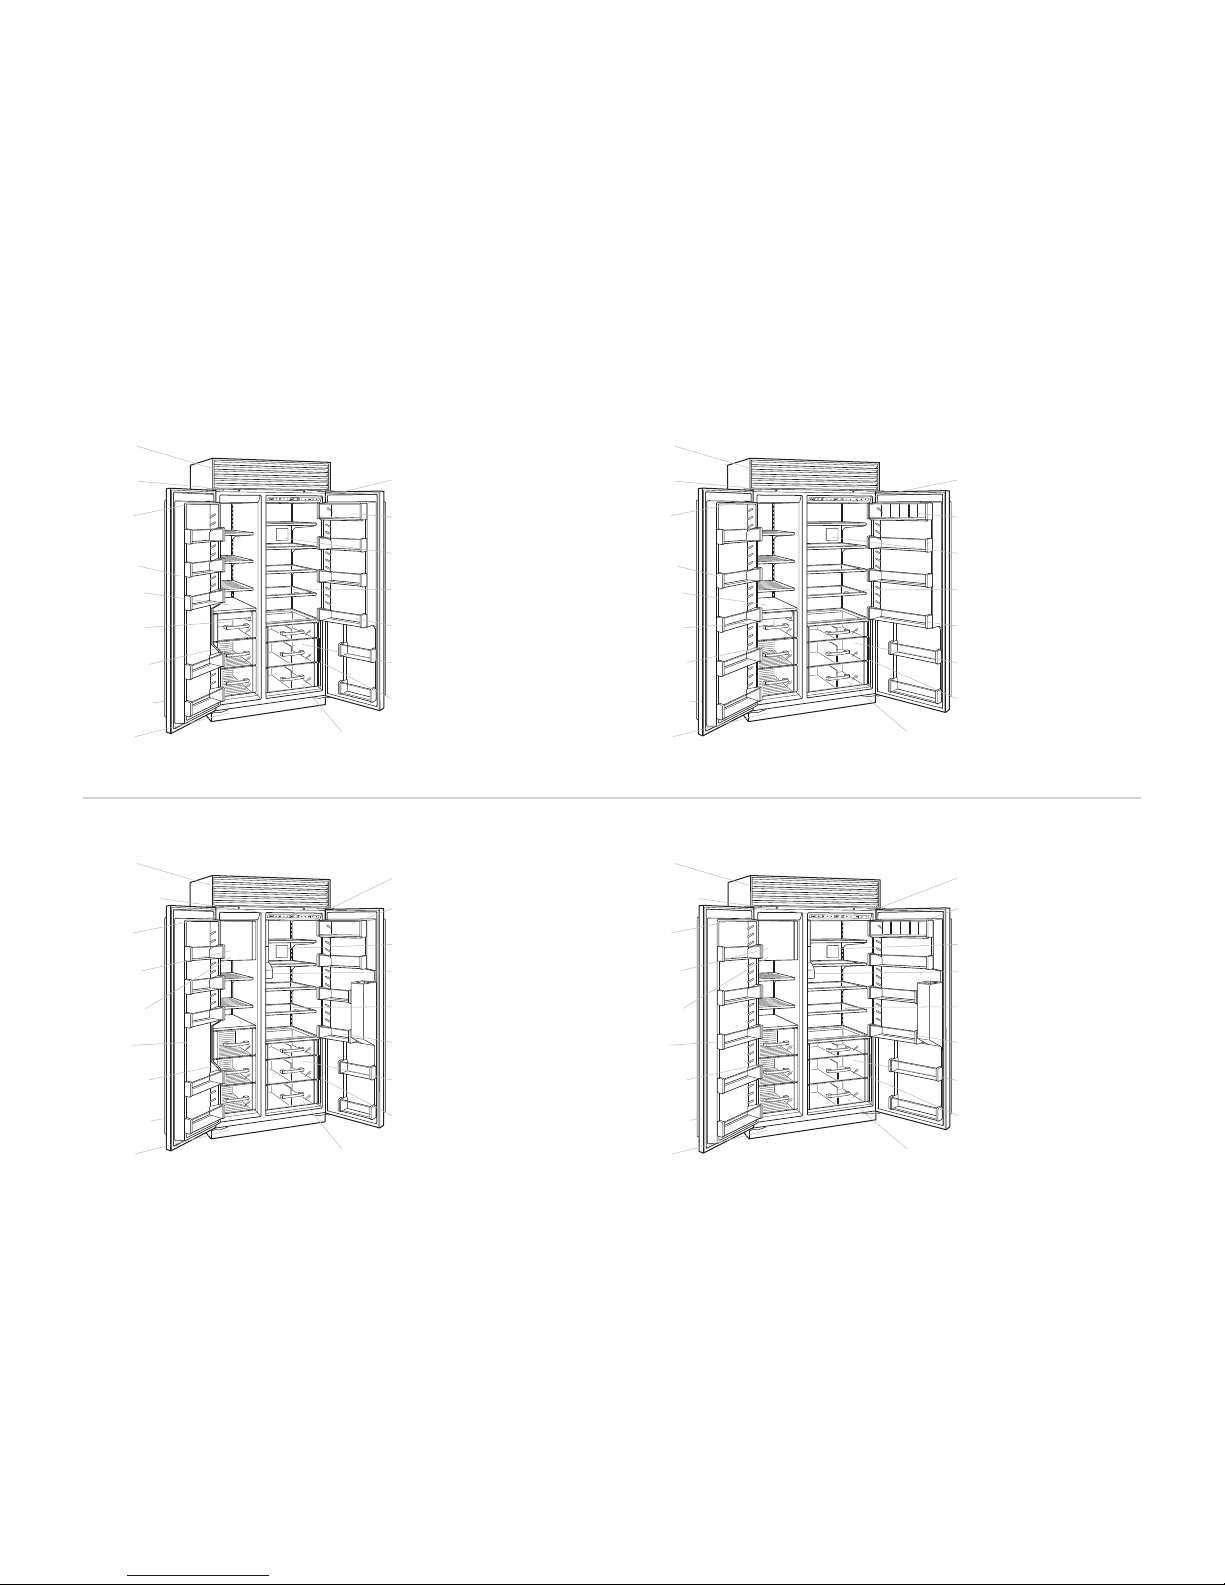
MO DEL IC BBI -3 6U
OV ER- AN D-U NDE R R EFR IG ERA TOR|FR EEZ ER
MO DEL IC BBI -3 6U G
O
VE R-A ND -UN DER WIT H G LAS S DO OR
MO DEL IC BBI -3 6S
SI DE- BY -SI DE R EFR IGE RAT OR|FR EEZ ER
Location of
rating plate
Adjustable dairy
compartment
Two-tier freezer
storage baskets
Removable
kickplate
High-humidity
crisper drawer
Adjustable, spillproof glass shelves
Air purification
system
Lighted, electronic
control panel
Door closer
Automatic ice
maker
Removable ice
container
Full-extension rollout freezer drawer
Refrigerator
storage drawer
Four-sided magnetic gaskets
Adjustable door
shelves
User reference
cards
L
ocation of
rating plate
Triple-pane, UV-resistant glass door
Two-tier freezer
s
torage baskets
Removable
kickplate
High-humidity
crisper drawer
Adjustable, spillproof glass shelves
A
ir purification
system
L
ighted, electronic
control panel
Door closer
A
utomatic ice
maker
Removable ice
c
ontainer
Full-extension rollout freezer drawer
Refrigerator
s
torage drawer
F
our-sided mag-
netic gaskets
User reference
cards
Easy-access,
flip-up grille
Easy-access,
f
lip-up grille
Adjustable dairy
compartment
Air purification
system
User reference
cards
Removable
kickplate
Removable ice
container
Adjustable
door shelves
Location of
rating plate
Door closers
Easy-access,
flip-up grille
Lighted, electronic
control panel
Freezer storage
baskets
Four-sided magnetic gaskets
Refrigerator storage
drawers
Automatic ice
maker
High-humidity
crisper drawer
Adjustable, spillproof glass shelves
Adjustable door
shelves
6
Air purification
system
Bulk ice
dispenser
User reference
cards
Removable
kickplate
Adjustable
door shelves
Automatic ice
maker
Location of
rating plate
Lighted, electronic
control panel
Easy-access,
flip-up grille
Adjustable dairy
compartment
Freezer storage
baskets
Four-sided magnetic gaskets
Refrigerator storage
drawers
Removable ice
container
Door closers
High-humidity
crisper drawer
Adjustable, spillproof glass shelves
Adjustable door
shelves
SU B-Z ER O B UIL T-I N M ODEL S
MO DEL IC BBI -4 8S
S
ID E-B Y- SID E R EFR IGE RA TOR
|
F
RE EZE R
MO DEL IC BBI -4 8S D
SI DE- BY -SI DE W ITH I CE|WA TER DIS PE NSI NG
A
djustable dairy
compartment
Air purification
system
User reference
cards
Removable
kickplate
Removable ice
container
Adjustable
door shelves
L
ocation of
rating plate
Door closers
Easy-access,
f
lip-up grille
Lighted, electronic
control panel
F
reezer storage
baskets
Four-sided magnetic gaskets
Refrigerator storage
drawers
Automatic ice
m
aker
H
igh-humidity
crisper drawer
Adjustable, spillp
roof glass shelves
Adjustable door
shelves
Air purification
system
Bulk ice
dispenser
User reference
cards
Removable
kickplate
Adjustable
door shelves
Automatic ice
maker
Location of
rating plate
Lighted, electronic
control panel
Easy-access,
flip-up grille
Adjustable dairy
compartment
Freezer storage
baskets
Four-sided magnetic gaskets
Refrigerator storage
drawers
Removable ice
container
Door closers
High-humidity
crisper drawer
Adjustable, spillproof glass shelves
Adjustable door
shelves
MO DEL IC BBI -4 2S D
SI DE- BY -SI DE W ITH I CE|WA TER DIS PE NSI NG
A
djustable dairy
compartment
Air purification
system
User reference
cards
Removable
kickplate
Removable ice
container
Adjustable
door shelves
L
ocation of
rating plate
Door closers
Easy-access,
f
lip-up grille
Lighted, electronic
control panel
F
reezer storage
baskets
Four-sided magnetic gaskets
Refrigerator storage
drawers
Automatic ice
m
aker
H
igh-humidity
crisper drawer
Adjustable, spillp
roof glass shelves
Adjustable door
shelves
MO DEL IC BBI -4 2S
S
ID E-B Y- SID E R EFR IGE RA TOR
|
F
RE EZE R
7
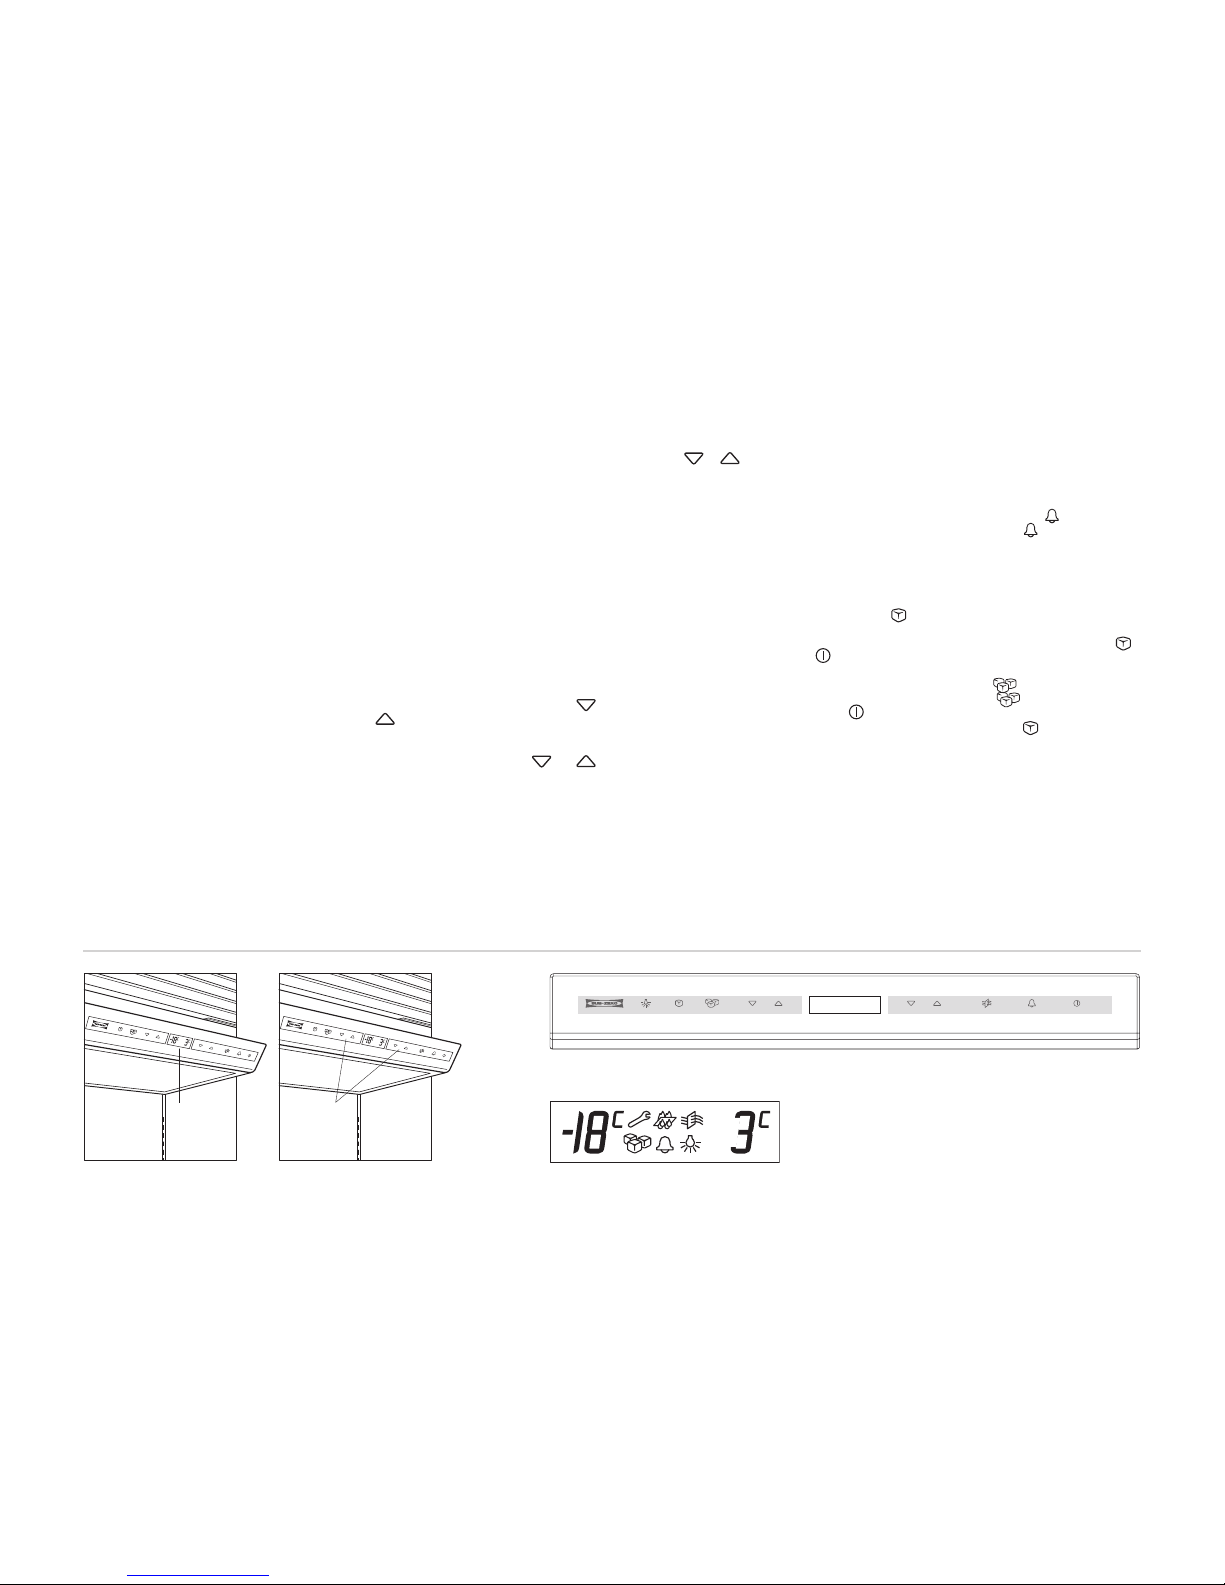
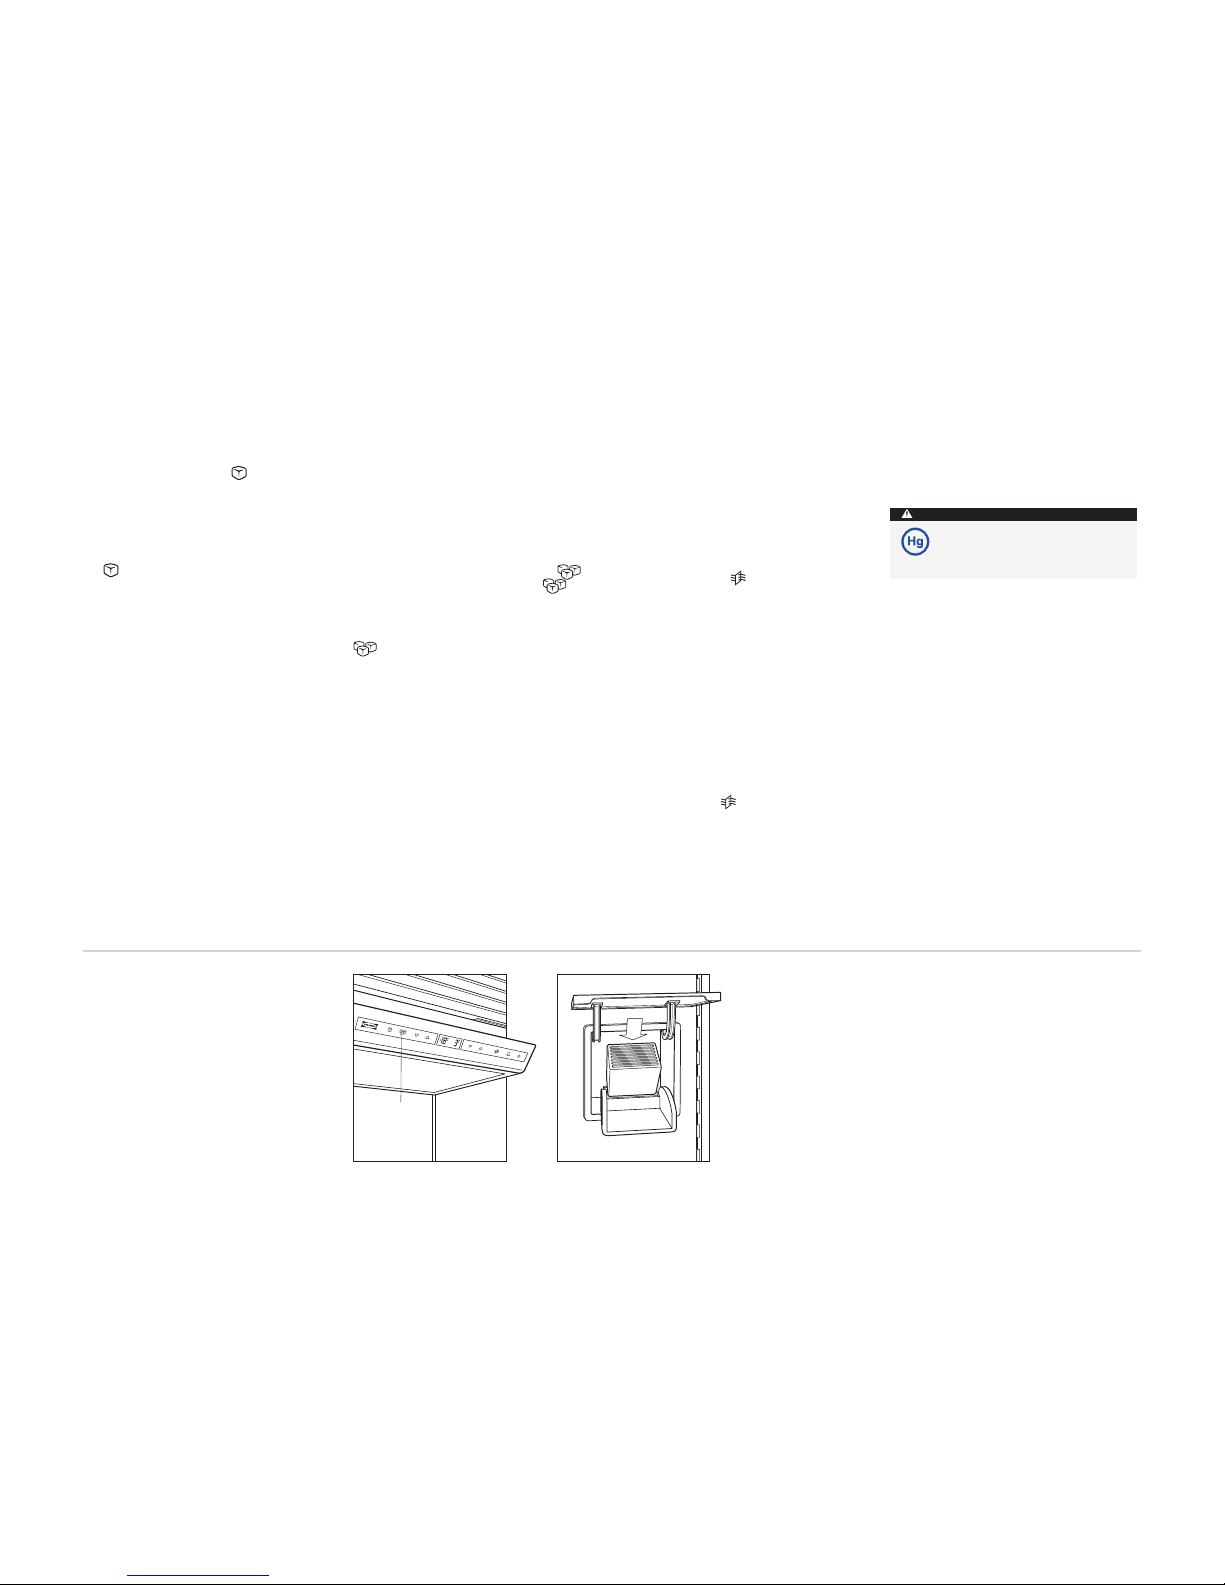
EL ECT RO NI C C ONT ROL SY STE M
The Electronic Control System of your Sub-Zero
B
uilt-In unit monitors and accurately displays
temperatures within one degree of your preset
temperature. It also monitors operation of the
unit and lets you know if there’s a problem.
You’ll find the Control Center located in the
refrigerator section of all models, except Model
ICBBI-36F where it is in the freezer section. Refer
to the illustration below.
TE MPE RA TU RE CONT RO L
Your new Built-In unit was thoroughly inspected
and tested before it was shipped from the
Sub-Zero factory. Temperatures are preset at 3˚C
in the refrigerator section and -18˚C in the freezer
section. Temperatures are displayed in the Control Center display panel.
For combination units, there are two sets of
and key pads on the Control Center, one for
the refrigerator section and the other for the
freezer section. Models ICBBI-36R, ICBBI-36RG
and ICBBI-36F have only one set of and
key pads.
To adjust the temperature in either section,
d
epress the or key padson the Control
Center.
The temperature ranges are -23˚C to -15˚C in the
freezer section, and 1˚C to 7˚C in the refrigerator
section. It is normal for temperatures to fluctuate
s
lightly, depending on external influences such
as an open door, the degree of humidity and
r
oom temperature.
IMPORTANT NOTE:
Always allow 24 hours
for the unit to reach the temperature you set.
PO WER
All Sub-Zero Built-In models feature a key
pad on the Control Center. This key pad will turn
off all electrical power to the unit. When the
power is off, the OFF indicator light will be visible in the Control Center display panel. This
key pad means you don’t have to shut off power
at the circuit breaker or wall receptacle. To
service or replace a light bulb, disconnect power
supply from the receptacle before changing light
bulb. The power cord is located in the far right
corner behind the flip-up grille.
AL ARM FE ATU RE
A
ll Built-In models have an alarm feature with an
audible chime if the door is left ajar.
The alarm will sound after 30 seconds. It can be
deactivated by depressing the key pad. When
the alarm is activated, the indicator will be
v
isible in the Control Center display panel.
IC E M AK ER CONTRO L
Built-In models with an ice maker feature an
key pad on the Control Center. This key pad
switches the power to the ice maker system on
or off. When the ice maker system is on, the
indicator will be illuminated in the Control
Center display panel. The ice maker can also be
turned on using the key pad, activating the
Max Ice feature. The indicator will be illuminated in the Control Center display panel when
this feature is on. Use the key pad to shut
down the ice maker during extended vacations.
SU B-Z ER O B UIL T-I N U SE & C ARE
Display
Panel
Colder/Warmer
Key Pads
Electronic contr ol center display panel
Temperature adjustment key pads
Display Panel
Control Panel (M odel ICBBI-30UG)
DU AL R EF RI GER ATIO N
The Built-In line continues the Sub-Zero tradition
o
f superior quality and reliability. Sub-Zero pioneered the development of our dual refrigeration
system, giving you optimum fresh and freezer
food storage in ideal self-contained sections.
Both refrigerator and freezer maintain accurate,
consistent temperatures. Dual refrigeration
keeps your food fresh longer than any other
system available.
With dual refrigeration, the freezer maintains a
constant temperature within one degree of the
temperature you set within our range of -23˚C to
-15˚C, without unwanted moisture and odor from
the refrigerator. Similarly, you can adjust the
refrigerator temperature within a range of 1˚C to
7˚C, for proper humidity levels tailored for longer
food life expectancy.
The dual refrigeration system also means there
is no transfer of fresh food odors to frozen food
or ice. The Sub-Zero system does not freeze the
moisture out of the air in the fresh food section.
Sub-Zero dual refrigeration is also more energy
efficient than old-fashioned single refrigeration
systems. When the refrigerator is used frequently during the day it does not require the
freezer to circulate its very cold, dry air to the
refrigerator. Instead, the refrigerator uses moist
air to keep fresh foods fresh and energy use
minimal.
8
SU B-Z ER O B UIL T-I N U SE & C ARE
RE FRI GE RAT OR S TOR AGE
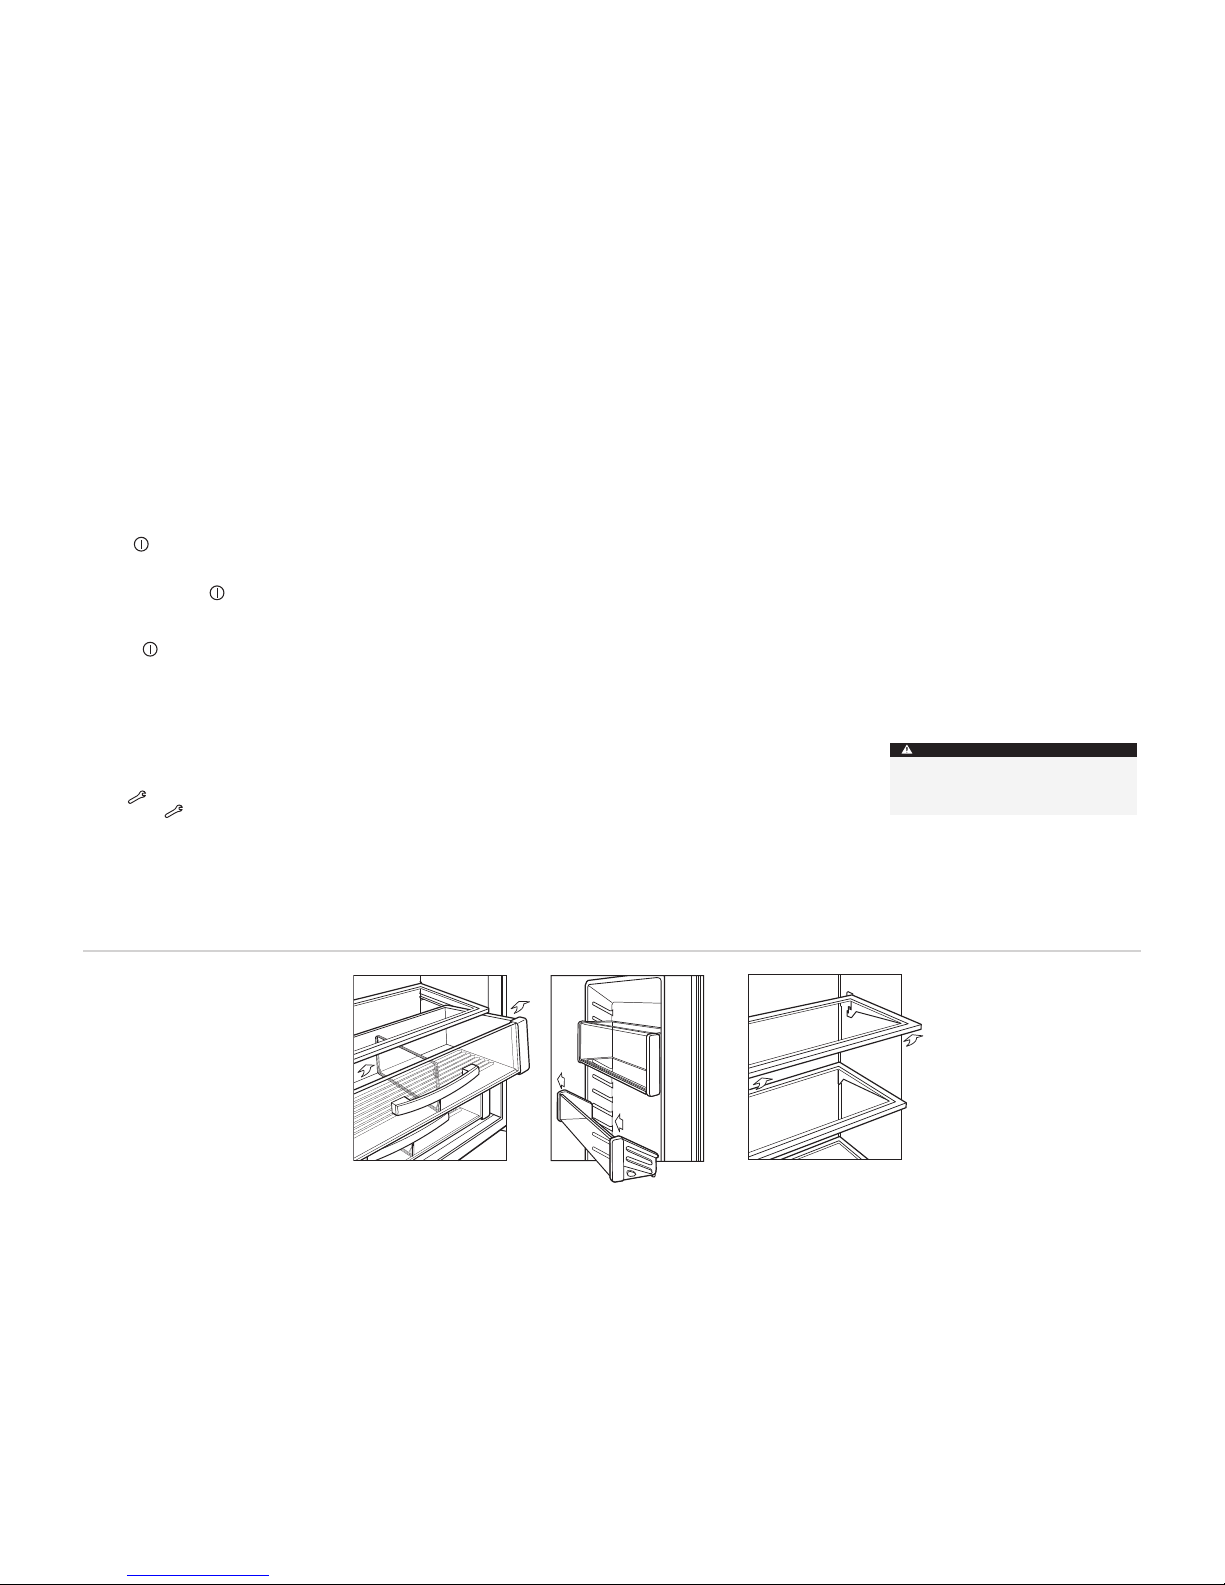
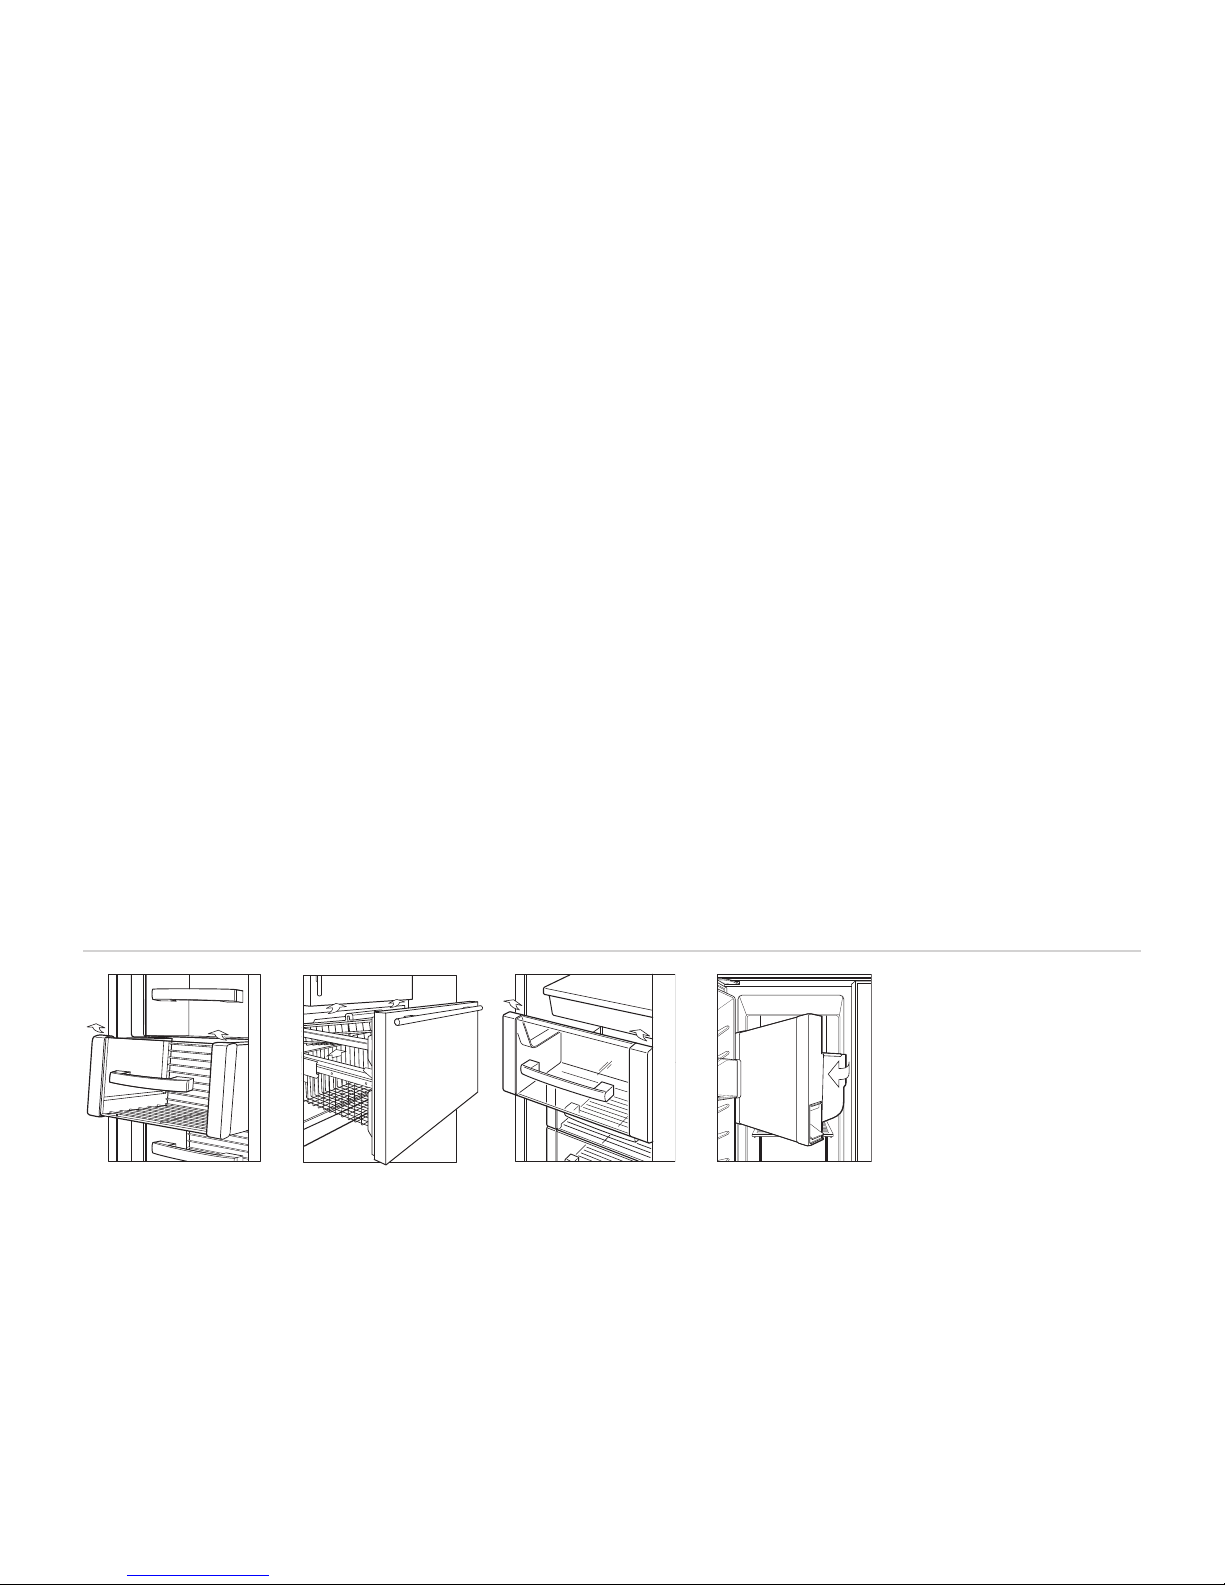
ST ORA GE DRA WE RS
T
o remove a storage drawer in the refrigerator
section, pull the drawer out until it stops. Lift the
f
ont of the drawer slightly and pull the drawer
straight forward. Refer to the illustration below.
IMPORTANT NOTE:
If the door is limited to a
9
0° door opening, the shallow door shelves will
need to be removed from the bottom of the door
in order to remove a drawer.
To reinstall, push the drawer slides back into the
refrigerator. Align the drawer with the slides,
then push the drawer straight back on to the
slides until it stops. The front of the drawer
should drop slightly and click when it is properly
engaged onto the slides.
DO OR S HE LV ES A ND D AIR Y
C
OM PAR TM EN T
The door shelves and dairy compartment are
a
djustable within the guides of the door liner.
NOTE: Glass door models do not have door
shelves or a dairy compartment.
To remove a shelf or the dairy compartment, lift
i
t up and out from the bottom. To reinstall, push
it down into the guides. Refer to the illustration
below.
Refrigerator st orage drawer
removal Door shelf remov al
Adjustable glass shelf removal
AC CES SO RIE S
Optional accessories are avail able
through your
Sub-Zero dealer. To
obtain local dea ler
information, vis it
our website,
subzero.com.
AD JUS TA BL E G LAS S S HEL VE S
B
e sure to read and understand the following
instructions before removing or adjusting
s
helves. To remove or adjust shelves, first tilt the
shelf up at the front, then lift it up and out of the
tracks on the rear wall of the refrigerator. Refer
to the illustration below.
If the door is limited to a 90° opening, you'll
need to clear the door shelves in order to
remove a shelf. Lift and pivot the end of the shelf
nearest the door upward, and remove.
To replace a shelf, insert it in the tracks at the
rear of the refrigerator with the front of the shelf
raised slightly. As you push the shelf in, lower
the front of the shelf until it locks into position.
IMPORTANT NOTE:
Always be careful in handling glass shelves to prevent breaking or
scratching the interior.
EL ECT RO NI C C ONT ROL SY STE M
SA BBA TH MOD E ( ST AR- K)
A
ll Built-In models feature the Sabbath Mode.
This is for certain religious observances where
t
he lights and ice maker function need to be
turned off.
To initiate Sabbath Mode, while the unit is on
p
ress the key pad so that OFF is visible in the
Control Center display panel. Your unit will be
off.
Then press and hold the key pad for 10 seconds. This will turn the unit back on and will disable the lights and ice maker. To return the unit
to normal operating conditions, press and
release the key pad.
If you have questions about Star-K compliance,
visit www.star-k.org.
VI SUA L S ER VIC E D ISP LAY
The Control Center monitors refrigerator and
freezer temperatures as well as the ice maker
system. If there is a temperature or ice maker
problem, you’ll be alerted by an illuminated or
flashing indicator in the Control Center display panel. The indicator may also be illuminated if the condenser needs cleaning. Before
calling for service, please check and see if your
condenser area needs cleaning. See Condenser
Cleaning, page 13.
Glass shelves should warm to room
temperature before immersing in warm
water.
CAUTION
9
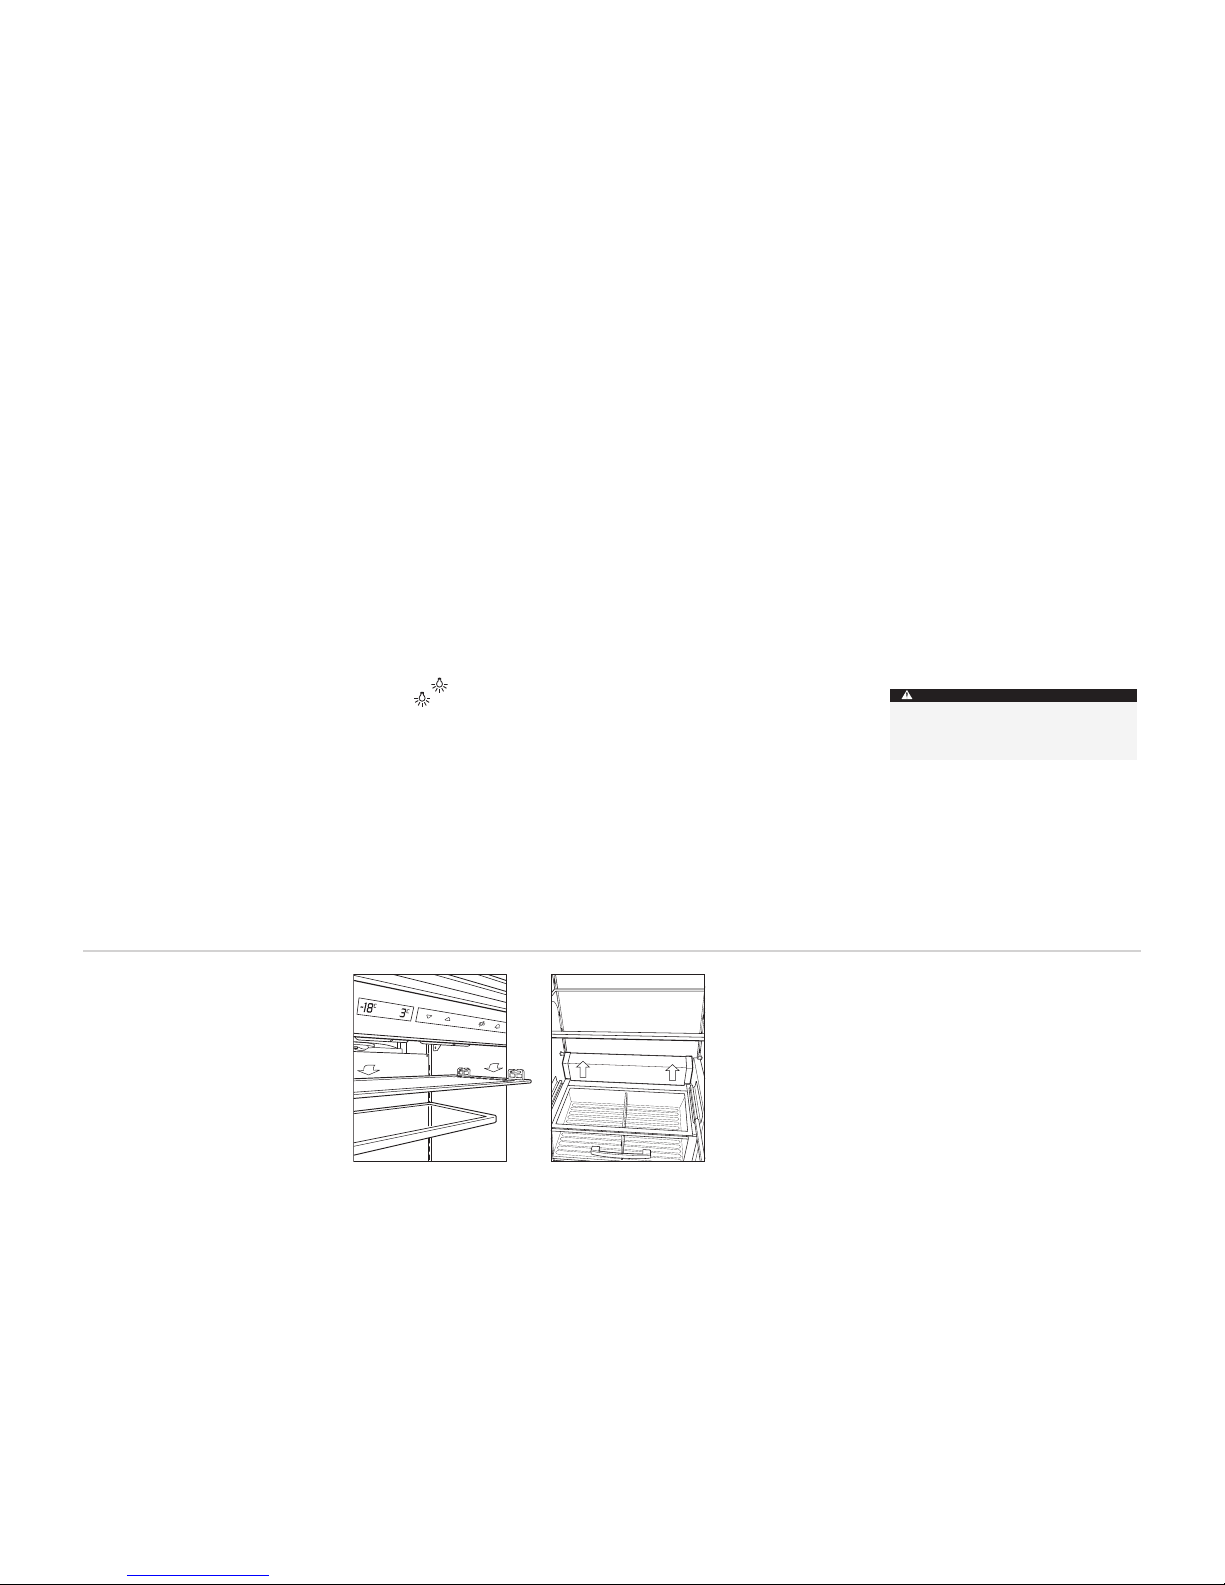
Over-and-under models:
First, unload the
f
reezer baskets. To remove the upper freezer
basket, lift up on the front and pull forward to
release the basket. To remove the lower freezer
basket, lift the basket directly upward and out.
Refer to the illustration below.
T
o reinstall the lower freezer basket, insert the
basket into the four corner retainers. To reinstall
t
he upper freezer basket, position the basket
onto the slide rails. Slide the basket towards the
back. You should hear an audible click when the
engagement is made.
IMPORTANT NOTE:
Unload the freezer baskets
before removing.
FR EEZ ER STO RA GE
FR EEZ ER BAS KE T R EMO VAL
A
ll freezer and side-by-side models:First,
unload the freezer basket. To remove the basket,
p
ull it out until it stops. Behind the bottom two
corners of the front face of the basket are metal
clips. Pull these clips toward the front of the
basket and lift and rotate the basket up.
IMPORTANT NOTE:
To remove the baskets from
Models ICBBI-36S, ICBBI-42S or ICBBI-42SD, the
basket must be raised and pulled through the
opening in the door liner after disengaging the
basket from the slides.
IMPORTANT NOTE:
If Models ICBBI-36F or
ICBBI-36S are limited to a 90° opening, it may be
necessary to remove the basket and/ or shelf
above in order to remove the basket.
To reinstall, push the drawer slides back into the
freezer. Align the basket with the slides, and
push the basket straight back onto the slides
until it stops. Press downward on the front of the
basket to engage the basket clips with the slides.
Models ICBBI-42SD and ICBBI-48SD:
To
r
emove the ice bucket, pull the bucket out part of
the way, then rotate the right side of the bucket
as you continue to pull the bucket out. Refer to
the illustration below.
IC E B UC KE T R EMO VAL
O
ver-and-under models and Model ICBBI-36F:
To remove the ice bucket, pull the freezer drawer
o
r basket out until it stops and lift the ice bucket
out.
Models ICBBI-36S, ICBBI-42S and ICBBI-48S:
T
o remove the ice bucket, pull the bucket forward until it stops. Next, lift the bucket to clear
the carrier assembly along the back edge of the
bucket. Once the bucket has cleared the
assembly, continue to pull forward and out. If the
door is limited to a 90° opening, repeat the procedure, but when lifting the ice bucket out, pivot
the right side of the bucket toward you and out.
This will allow the ice bucket to clear the door.
Refer to the illustration below.
Freezer basket r emoval—all freezer
and side-by-side models
Freezer basket r emoval—
over-and-under model s
Ice bucket remov al—Models
ICBBI-36S, ICBB I-42S and ICBBI-48S
Ice bucket remov al—Models
ICBBI-42SD and I CBBI-48SD
SU B-Z ER O B UIL T-I N U SE & C ARE
10
MA X I CE FEA TU RE
T
he Max Ice feature increases the rate of ice production for times where you need more than
n
ormal. The increased ice production will last for
24 hours, at which time it will return to the
normal production level. You can expect about a
40% increase in ice production when this feature
is turned on.
To initiate the Max Ice feature, press the key
pad on the Control Center so that the indicator is visible in the display panel. Refer to the
illustration below.
To turn off the Max Ice feature, simply press the
key pad and the unit will return to normal
ice production.
IC E M AK ER OPERATI ON
The ice maker in your Sub-Zero freezer is fully
a
utomatic and has been tested at the factory. To
start making ice, activate the key pad on the
Control Center.
The ice maker system will not shut off if the ice
bucket is not in place.
When removing the ice bucket for an extended
period, deactivate the ice maker by depressing
t
he key pad on the Control Center.
IC E P RO DU CT ION
The ice maker is designed to produce enough ice
for normal family use. The timing of ice-making
cycles will vary depending on load conditions,
door openings and room temperature. On
average, you can expect a cycle of ice (eight
cubes per cycle) every two hours.
The ice maker operates on water pressure of 2.1
bar to 6.9 bar. In some cases, a reverse osmosis
water filter system may not be able to maintain
the minimum pressure.
IMPORTANT NOTE:
If ice is not used regularly it
tends to fuse together. To avoid this, empty and
replace the ice in the container as needed.
SU B-Z ER O B UIL T-I N U SE & C ARE
Max Ice
Key Pad
Max Ice key pad
AI R P UR IF IC ATIO N S YSTEM
All Sub-Zero Built-In models (except Model
I
CBBI-36F) include an advanced air purification
system. This system reduces bacteria, odors,
and even ethylene gas, which causes premature
ripening in fruits and vegetables. The air purification cartridge has been factory installed and is
located inside the refrigerator, on the right-hand
side of the back wall.
T
he air purification cartridge will last for approximately one year. The indicator will flash in
the Control Center display panel when it needs
to be replaced. To replace the cartridge, grab the
outside cover from the bottom and pull it forward. It will flip up and expose another flap and
the cartridge. Refer to the illustration below. Pull
the flap forward from the top, which will cause
the cartridge to pop out of position. Remove the
cartridge.
To replace, put the new cartridge into place, with
the connector pointing down. Once in place,
close the flap until you hear a click. Then flip
down the outside cover until it closes against the
wall.
Once the air purification cartridge has been
replaced, press the keypad on the Control
Center for 5 seconds. This will reset the air purification indicator and will no longer be displayed.
Air purification cartridge
RE PLA CE ME NT CART RI DG ES
R
eplacement air purification cartridges can be
ordered by contacting your Sub Zero dealer.
IMPORTANT NOTE:
The warranty for the air
purification cartridge supplied with the unit only
covers defects in materials or workmanship and
not replacement due to normal use.
AC CES SO RIE S
Optional accessories are avail able
through your
Sub-Zero dealer. To
obtain local dea ler
information, vis it
our website,
subzero.com.
CAUTION
LAMP CONTAINS MERCURY
Manage in accordance with disposal
laws.
11
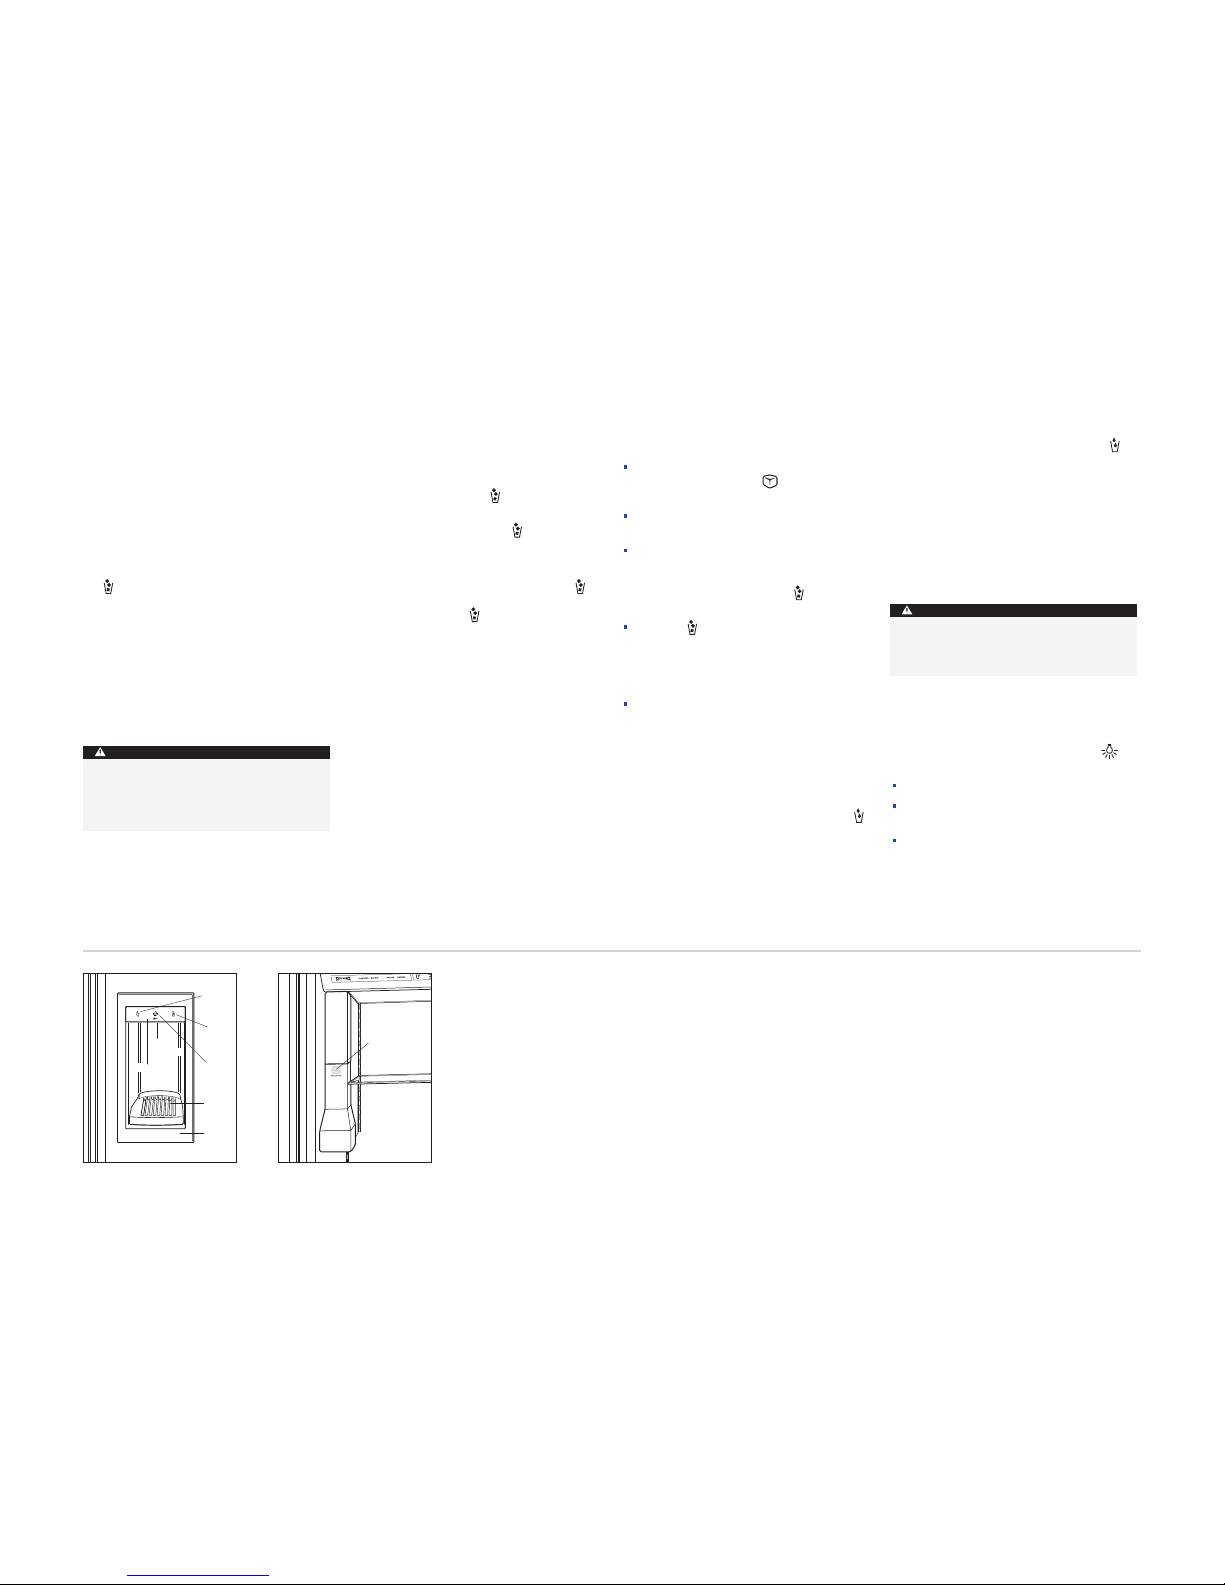
IC E D IS PE NS ING
M
odels ICBBI-42SD and ICBBI-48SD have a feature that limits the maximum amount of ice that
i
s dispensed each time the key pad on the
glasswell is pressed.
To dispense ice, hold down the key pad for
a
pproximately two seconds. The dispenser will
meter out ice for about two seconds, collect the
ice directly above the glass, then drop the ice
into the glass. If less ice is desired, hold the
key pad down for less than two seconds. If more
ice is desired, hold the key pad down until the
dispensing cycle repeats.
IMPORTANT NOTE:
Be sure that dispenser key
pads are clean and dry when pressed to avoid
problems with the dispenser operation.
SU B-Z ER O B UIL T-I N U SE & C ARE
IC E A ND WATE R DISPENS ER
For dispenser Models ICBBI-42SD and
I
CBBI-48SD, the automatic ice and water dispenser gives you both ice and chilled water
without having to open doors.
IC E D IS PE NS ER O PER ATI ON
T
o operate the ice dispenser for Models
ICBBI-42SD and ICBBI-48SD, set a glass on the
water grille of the glasswell, and press and hold
the key pad on the glasswell until you have
the ice you need. For larger quantities of ice,
open the refrigerator door and place an ice container under the dispenser chute, then press the
BULK ICE
pad on the left hand wall inside the
refrigerator section. Refer to the illustration
below.
After initial ice maker start-up, discard the first
few batches of ice— they may be discolored by
the new system plumbing.
Initially, for water to dispense properly, the
k
ey pad must be depressed and held until water
flows from the dispenser. You may have to hold
the key pad for 60 seconds for water to fill the
internal reservoir tank.
IMPORTANT NOTE:
The chilled water reservoir
t
ank is mounted inside the refrigerator section. It
will take several hours to chill the water to the
r
efrigerator temperature during the original fill
or after a lot of water is used.
DI SPE NS ER LIGHTS
For dispenser models, there are three lighting
states than can be cycled by pressing the key
pad on the glasswell.
All lights OFF
All lights ON (blue key pad and white
glasswell)
Key pad lights ON only
During water or ice dispensing, all lights will illuminate until dispensing is complete, then lights
will return to their previous state.
IC E D IS PE NS ER O PER ATI NG TIP S
I
f there’s no ice, make sure the ice maker
system is turned on and indicator is illum
inated in the Control Center display panel.
Make sure there is a supply of ice in the ice
bucket. See Ice Bucket Removal, page 9.
Make sure the ice bucket is all the way in and
e
ngaging the auger motor at the back of the
bucket. If it is not all the way back, push on
the ice bucket and depress the key pad on
the glasswell at the same time.
Press the key pad on the glasswell. If you
do not hear auger motor noise, wait five minutes, then try again. If you do not hear auger
noise after the second try, contact your
Sub-Zero dealer.
If the ice dispenser is not used for a long
period, the ice may fuse together. To avoid
this, empty the ice bucket as needed.
WA TER DI SPE NS ER OPERAT IO N
To operate the water dispenser for Models ICBBI42SD and ICBBI-48SD, set a glass on the water
grille of the glasswell, and press and hold the
key pad on the glasswell until the glass is filled.
The first time you use the water dispenser, purge
the water system and storage tank for three minutes. This will clear out any air in the system,
along with foreign material in the new plumbing
connection.
Water
Grille
Ice
Key Pad
Light
Key Pad
Water
Key Pad
TouchPad
Lock
Indicator
Bezel
Bulk Ice
Glasswell— Models ICBBI-42SD
and ICBBI-48SD
Bulk ice dispens er—Models
ICBBI-42SD and I CBBI-48SD
Limit continuous ice and/or water dispenser
operation to seven minutes or less, to avoid
damaging the equipment.
CAUTION
Use a sturdy glass to catch ice crescents.
Fragile glasses can break. Also, to avoid
breakage, make sure that the glass is sitting
vertically on the water grille.
CAUTION

12
SU B-Z ER O B UIL T-I N U SE & C ARE
OP ERATION S
DO OR A ND DRA WE R C LOS ING
O
ver-and-under models:Your refrigerator door
has a door closing cam to help in closing the
d
oor. With the door opened to about 110°, the
cam will hold in the open position if the door is
stopped. As you close the door, the cam will take
over at about 15° to help close the door.
Your freezer drawer has a self-closing mechanism. The incline, built into roller assemblies on
the drawer, uses gravity to assist in closing the
drawer.
If your Built-In unit is positioned in a corner, you
may want to install an optional door stop, which
limits door opening to 90°. This door stop is provided with each Built-In model and is shipped in
a plastic bag in the grille area.
DO OR C LO SI NG
All refrigerator, all freezer and side-by-side
models:
Your refrigerator and freezer doors have
spring-loaded closure mechanisms. As the doors
are closed, the door closure engages to help
close and seal the doors. A 90° door stop is provided with each unit and is shipped in a plastic
bag in the grille area.
CO NDE NS ER FAN MOT OR
A
ll Sub-Zero Built-In models have a fan behind
the grille to cool the compressor area. This fan
r
uns with either compressor.
AU TOM AT IC DEFROS T
Your Sub-Zero unit is equipped with an automatic defrost system. The refrigerator section
will defrost during each off cycle of the refrigerator compressor. The freezer section is controlled by an energy-saving Adaptive Defrost
system, which defrosts as needed.
SO UND S
You may hear some noises in the normal operation of the unit. Surrounding acoustics like walls,
floors and cabinets may affect the sound of your
unit. For example, a gurgling or running water
sound is probably refrigerant circulating through
the tubing. In Models ICBBI-42SD and ICBBI48SD, the ice dispenser motor inside the refrigerator door closes five seconds after either the
or key pad is released.
During the ice maker cycle you may hear the
sound of ice dropping into the container or the
water valve operating while refilling the ice
maker with water. During the freezer defrost you
may hear crackling and/or sizzling as the heat
from the defrost element clears the frost from
the freezer coil and water runs into the water
pan.
While the compressors are in operation, you
may hear a slight hum. During the start-up and
shutdown of the compressor, you may feel vibration for a few seconds.
Some of these noises may be enhanced when
the unit door(s) are open.
VA CAT ION TI ME
For extended vacations, shut off power to the
u
nit. Empty the unit and block the doors open
slightly. A 25 mm space will let fresh air in to
keep the interior dry and fresh.
For short vacations, remove all perishable items.
Shut off the ice maker and empty the ice bucket.
D
o not change the control settings.
If the unit is put into service temporarily and
l
ater shut off, block the doors open to allow
fresh air to circulate inside the unit. Be sure to
shut off power to the unit.
If your religious observances (Sabbath Mode)
require turning off the lights and ice maker, see
Sabbath Mode, page 8.
IC E A ND WATE R DISPENS ER
DI SPE NS ER WATER G RI LL E
F
or dispenser models, a water grille at the base
of the glasswell will catch and evaporate small
spills. Because there is no drain in this area, do
not pour water into the water grille. To clean the
area, remove the water grille by pressing the
f
ront left corner of the grille and lifting it out.
L
OC K
For dispenser models, the lock feature is used to
prevent unintended ice and water dispensing.
When the dispenser is locked, all key pads on the
glasswell are deactivated to allow cleaning or to
prevent small children from using the dispenser.
To activate the lock feature, hold down the
key pad on the glasswell until the key pad lights
flash once and the red icon is illuminated
(approximately five seconds). The lights will
remain in the state they were in before the lock
feature was activated.
To deactivate the lock feature, hold down the
key pad until the key pad lights flash once and
the red icon is no longer illuminated
(approximately five seconds). The lights will
remain in the state they were in before the lock
feature was deactivated.
Be sure to block doors open when unit is not
in service. Moisture buildup during even the
shortest amount of run time could attack the
interior metal surfaces.
CAUTION

CO NDE NS ER CLEANI NG
I
n all Sub-Zero Built-In models, the condenser is
located behind the grille. First, pull out on the
b
ottom edge of the grill and tilt forward. Then
using a soft bristle brush, vacuum to remove
dust and lint from the condenser. Refer to the
illustration below for location of the condenser.
NOTE: To avoid bending the condenser fins, be
s
ure to vacuum in the direction of the fins (up
and down). Clean the condenser area every three
to six months.
13
CL EAN IN G
ST AIN LE SS STEEL E XT ER IOR
C
lassic stainless steel finish:To clean the exte-
rior of the classic stainless steel finish, use a soft,
n
onabrasive stainless steel cleaner and apply
with a soft 100% lint-free cloth.
Different light types and source locations can
r
esult in variations in shading on different com-
ponents and areas of large appliances.
To bring out the natural luster, lightly wipe the
surface with a water-dampened microfiber cloth
followed by a dry polishing chamois. All work
should follow the grain direction of the finish.
Better results are obtained by keeping the cloth
in continuous contact with the stainless steel.
IN TER IO R C LEA NIN G
T
o clean interior surfaces and removable parts,
wash with a mild solution of soap and lukewarm
w
ater with a little baking soda. Rinse and dry
thoroughly. Avoid getting water on lights, Control Center and display panel.
GL ASS WE LL CLEANI NG
To clean the glasswell of Models ICBBI-42SD and
ICBBI-48SD, use a mild solution of soap and
water with a little baking soda. Wipe up spills
after removing the dispenser water grille.
For the stainless steel areas of the glasswell on
Models ICBBI-42SD and ICBBI-48SD, you may
use the Stainless Steel Exterior cleaning procedure.
SU B-Z ER O B UIL T-I N U SE & C ARE
CL EAN IN G C OMB INA TIO N UNI TS
F
or over-and-under and side-by side models,
it is possible to turn off one section of your comb
ination unit for an extended period without disrupting the other.
First, turn the unit off. Press and hold the
k
ey pad of the section you want to disable. While
holding the key pad, depress the key
pad. Then, release both key pads. The disabled
section will appear blank in the Control Center
display panel. Repeat the process to turn the section back on. See Electronic Control System,
page 7.
Display
Panel
Control center d isplay panel
Condenser
Location of cond enser
Failure to clean the condenser could result in
temperature loss or mechanical failure or
damage.
CAUTION
Do not use vinegar, rubbing alcohol or other
alcohol-based cleaners on any interior surface.
CAUTION
Do not submerge or pour hot water over cold
glass shelves.
CAUTION
Before cleaning the unit, shut the electricity
off at the control panel. When you clean the
condenser, wear gloves to avoid injury from
the sharp condenser fins.
CAUTION
14
LI GHT IN G I NFO RMAT ION
IMPORTANT NOTE:
When the refrigerator or
f
reezer doors are left open for a long time, the
lights may go off. This protects the internal parts
from overheating. To reset the light system,
close the door for 15 to 30 minutes.
Your Sub-Zero Built-In unit contains unique 40
w
att appliance bulbs (7009935) in refrigerator
and freezer sections.
I
MPORTANT NOTE:To replace a light bulb, dis-
connect power supply from the receptacle before
changing light bulb. The power cord is located in
the far right corner behind the flip-up grille.
SU B-Z ER O B UIL T-I N U SE & C ARE
Overhead light s hield removal
OV ERH EA D L IGH TIN G
Y
ou’ll need to remove the light shield in the top
of the refrigerator or freezer to replace the bulbs.
P
lace your hands under the light shield and slide
back slowly until the key slots on the sides of the
light shield drop past the mounting studs in the
upper brackets. Then remove the shield. The
bulbs are now accessible. Refer to the illustration
b
elow.
Models ICBBI-36RG, ICBBI-30UG and
ICBBI-36UG:
Like all Sub-Zero units, lights in
glass door models will fully illuminate when the
door is open. With the ICBBI-36RG, ICBBI-30UG
and ICBBI-36UG, however, you have the option
of having subdued lighting even with the door
closed. You can easily turn this feature off by
depressing the key pad on the Control
Center. The indicator will appear when
accent lights are enabled.
CR ISP ER LIG HT IN G
C
risper drawer lighting is located behind the
upper crisper drawer and mounted to the back
w
all of the refrigerator. To remove the light
shield first remove the crisper drawer. Next
remove the upper crisper shelf. Then place both
hands under the bottom right and left sides of
the light shield and push upward.
S
ee illustration below.
FR EEZ ER LIG HT IN G
Models ICBBI-30U, ICBBI-30UG, ICBBI-36U
and ICBBI-36UG:
Freezer lighting is located in
upper front section of the freezer compartment.
To remove the light shield, gently compress the
shield to release it from the supporting guides.
Models ICBBI-42S and ICBBI-48S:
Freezer
basket lighting is located above the ice bucket.
To access the bulbs, remove the ice bucket. Next,
push the ice bucket assembly to the back of the
unit. Once the assembly is against the back wall
of the unit, the bulb will be accessible under the
fixed shelf in front of the icemaker.
Models ICBBI-42SD and ICBBI-48SD:
Freezer
l
ighting above the ice bucket is accessible by
removing the ice bucket. See Ice Bucket
Removal, page 9. Once the bucket has been
removed, remove the light shield. See Overhead
Lighting, page 14.
F
reezer lighting below the Ice bucket is accessible by removing the glass light shield. To
r
emove the glass, press the plastic lip up and
pull the glass out of the supporting guides.
Freezer basket lighting is located below the fixed
shelf on the back wall of the freezer. To access
the light first remove the freezer basket below
the fixed shelf. To remove the light shield, gently
compress the shield to release it from the supporting guides.
Light shield rem oval—crisper
AC CES SO RIE S
Optional accessories are avail able
through your
Sub-Zero dealer. To
obtain local dea ler
information, vis it
our website,
subzero.com.
Disconnect power supply from the receptacle
before changing light bulb. Wear protective
gloves when handling bulbs.
CAUTION

15
KE EPI NG FOO D A T I TS B EST
KE EPI NG FOO D F RE SH
Your Sub-Zero unit features our unique dual
c
ompressor refrigeration system to keep food
fresher longer. However, the quality and safety of
your food also depends on how you handle it.
The information in this section gives you the
most up-to-date handling and storage recomm
endations to help you keep food at its best. If
you have specific questions that are not
a
ddressed here, contact a University or County
Extension Service or your local utility company.
Most food inevitably deteriorates over time.
From the very beginning until it is consumed,
food undergoes changes. Microorganisms get
into food, multiply and cause spoiling.
Enzymes that occur naturally in food continue
the ripening process even after the food is harvested. Improper temperatures cause food to
deteriorate faster. Changes in humidity cause
wilting and shriveling that can lead to spoiling.
Sub-Zero’s dual refrigeration system is specifically designed to combat these changes and
keep your food fresh longer. The individual
refrigerator and freezer systems have been
designed to maintain accurate, consistent temperatures and proper humidity levels for longer
food life expectancy. Dual refrigeration eliminates transfer of fresh food odors to frozen food
or ice and does not freeze the moisture out of
the air in the fresh food section.
In addition, good handling practices can minimize the rate of changes in food.
HA NDL IN G R ECO MME NDA TION S
•
Follow the recommended storage times and
temperatures in this guide. Your Sub-Zero
u
nit helps to slow the ripening process by tailoring temperatures to each section as
needed.
•
Use specially designed compartments for
dairy foods, deli foods and fresh produce.
These compartments maintain temperature
and humidity levels that keep specific food
groups fresh.
• Rotate food in refrigeration units, using a
first-in, first-out system.
• When food does spoil, it’s usually obvious. It
becomes moldy, has an off-odor and looks
rotten. But there are times when spoiling may
not be so apparent. If you think a food has
been stored too long, discard it. Don’t taste it
to check if it’s okay.
KE EPI NG FOO D S AF E T O E AT
Most food-borne illness is caused by bacteria
s
uch a Staphylococcu s, Salmonella, E-coli and
Clostridium botu linum, the bacteria that causes
botulism. These bacteria grow rapidly at temperatures between 4˚C and 60˚C, a range that’s
called the
Danger Zone
. Never leave food in the
danger zone for more than two hours. When the
bacteria have multiplied to the millions in warm
temperatures, they cause illness. Some bacteria
cause flu-like symptoms, while others cause
serious illness or even death. Young children, the
elderly and people who are already ill are more
likely to become sick from food poisoning.
To reduce your risk of food-borne illness, use the
following techniques to keep your food safe to
eat:
WH EN Y OU ’R E S HOP PIN G
• Place packages of raw meat, seafood or
poultry in plastic bags to keep them from
dripping on other foods.
• Shop for meat, seafood and poultry last.
Don’t leave these foods in a hot car when
you’ve finished shopping. Take along a cooler
in hot weather or when you have to travel
long distances.
• Check
use by
and
sell by
dates on foods to
make sure they’re fresh. Use extra care when
buying deli food. Buy only the amount you
will use in 1– 2 days. Discard hot or cold deli
food that has been at room temperature for
more than two hours.
WH EN Y OU STO RE FOO D
•
Monitor temperatures of the refrigerator and
freezer sections on the electronic control
p
anel of your Sub-Zero unit. Keep the refrigerator temperature at 4˚C or below and
freezer temperature at -18˚C.
•
Follow the recommended refrigerator and
freezer storage times and temperatures in
this guide.
• Store raw meat, poultry and seafood separate
from other foods. Keep juices from these
packages from dripping on other food.
• Never taste food that looks or smells strange
to test its freshness. Discard it.
• For refrigerator storage, leave raw meat,
poultry and seafood in its original wrapper
unless it is torn. Repeated handling can introduce bacteria to these foods.
• Wrap food stored in the refrigerator unit in
foil or plastic wrap, or place it in plastic bags
or airtight containers to keep it from drying
out. Date all packages.
• For freezer storage, use freezer wrap, freezer-
quality plastic bags or aluminum foil over the
commercial wrap if foods will be stored in the
freezer for more than a couple of months.
This minimizes dehydration and quality loss.
Single layers of aluminum foil may tear and
cause freezer burn.

16
KE EPI NG FOO D A T I TS B EST
KE EPI NG FOO D S AF E T O E AT
WH EN Y OU PRE PA RE FOOD
•
Clean everything that comes in contact with
food.
• Wash your hands for 20 seconds before and
after handling food.
• Sanitize counters, equipment and utensils
after handling raw meat, seafood or poultry.
R
inse with a diluted chlorine bleach solution,
5 ml to 1 L of water.
• Use clean kitchen towels, sponges and cloths.
Replace sponges every few weeks.
• Use disposable plastic gloves if you have an
infected cut or burn on your hands.
• Thaw food in the refrigerator or microwave
oven, not on the counter. When you thaw
food in a microwave oven, cook it immediately.
• Marinate food only in the refrigerator.
• Rinse poultry and seafood in cold water
before cooking.
• Avoid cross-contamination in preparing food.
Keep raw meat, poultry and seafood and their
juices away from other food. For example,
don’t use the same surface and utensils for
preparing raw meat, poultry and seafood that
you use for preparing salad ingredients.
• Thoroughly clean your plastic and wooden
cutting boards. Wash with hot water and soap
and rinse with a diluted chlorine bleach solution of 5 ml to 1 L of water.
WH EN Y OU COO K F OO D
•
Cook meat to an internal temperature of 75˚C
or above, poultry to 80˚C or above. For cuts
m
ore than 51 mm thick, use a meat thermometer to check the temperature. For
thinner cuts, clear juices (not pink) are a sign
of doneness.
• If you are cooking frozen meat or poultry that
has not been defrosted, increase the cooking
time to 1
1
/2times the time required for
thawed items.
• Roast meats or poultry in oven temperatures
of 165˚C or above.
• Cook eggs until the yolk and white are firm,
not runny.
• Don’t use recipes in which eggs remain raw
or partially cooked.
• If your microwave has a temperature probe,
use it. Check temperatures of meat and
poultry in at least three spots. Rotate foods
during microwaving.
• Don’t taste raw or partially cooked meat,
poultry, eggs or fish.
FR ESH FO OD S TO RA GE
Shelf life of fresh foods varies depending on
h
ow fresh it is when you buy it. To keep your
food fresher longer, follow the recommended
storage tips.
Vegetables:
Wash vegetables in cool water and
drain. Store in airtight containers or plastic wrap.
V
egetables stay fresh longer in high humidity
storage.
F
ruits:Wash and dry fresh fruits. Store more
aromatic fruits in plastic bags. Most fruits stay
fresh longer in low humidity storage.
Prepackaged Meats:
Store in original packaging. After opening, rewrap tightly in plastic
wrap or aluminum foil.
Fresh Meats, Fish and Poultry:
Remove store
wrappings, then rewrap in plastic wrap, foil or
waxed paper and refrigerate immediately.
Eggs:
Store eggs unwashed in their carton or a
portable egg tray. Use within 3 weeks.
Milk, Cream and Cottage Cheese:
Keep carton
closed. Store on refrigerator shelf and use within
1–2 weeks.
Cheese:
Store in original packaging until ready
to use. After opening, rewrap tightly in plastic
wrap or aluminum foil.
Leftovers:
Let cool and cover tightly with plastic
wrap or foil. Airtight plastic containers work well
to prevent drying out and odor transfer.
ET HYL EN E
Some fruits and vegetables will produce ethylene, a gas that initiates the ripening process.
Ethylene can cause premature ripening in some
foods, while in others, it can actually cause
damage. To reduce unnecessary spoilage of your
fresh produce, do not store ethylene producing
fruits and vegetables with those that are ethylene sensitive. Refer to the chart on page 18.
WH EN Y OU HAV E L EF TOV ERS
•
Refrigerate or freeze cooked leftovers in
small, covered containers within 2 hours after
c
ooking. Make sure there is adequate air
space around the containers so that food can
cool down quickly.
•
Remove the stuffing from meat or poultry and
store it separately.
• Date packages of leftovers and use within a
safe period of time.
• Cover and reheat leftovers thoroughly before
serving.
• Bring sauces, soups and gravy to a boil. Heat
other foods to 75˚C.
• If you think food may be spoiled, discard it.
When in doubt, throw it out.

17
FR OZE N F OO D S TOR AGE
Freezer Storage:
Wrap foods in material
d
esigned for frozen food storage. The wrap must
seal out air and moisture.
Do not refreeze
thawed meats.
Ice Cream:
The firmness of the ice cream will
depend on its cream content. Higher quality ice
c
reams usually have a higher cream content,
requiring colder freezer temperatures to maint
ain their firmness. Soft ice cream is not always
an indication of a temperature problem.
Make sure your refrigerator and freezer doors
close freely and completely. Overloading will
affect temperatures inside the unit. Do not fill
your freezer with large quantities of unfrozen
foods expecting them to fast freeze. Give the
freezer ample time to circulate cold air around
unfrozen items before adding additional items.
SU GGE ST ED FOOD STO RAGE
The food storage charts on the following pages
g
ive you specific information to help you keep
food safe and keep it at its best quality. The recommended storage temperatures will help you
determine optimal storage conditions for your
food. As a general rule, food that is handled
properly and kept at temperatures below 4˚C will
be safe to eat.
S
toring food at temperatures below 4˚C keeps it
out of the
Danger Zone
. The storage times for
refrigeration will help keep food from spoiling or
becoming dangerous to eat. The time limits for
frozen foods are to maintain flavor and texture.
Food kept frozen longer than the recommended
time will still be safe to eat, but its quality may
diminish.
FI SH, ME ATS AND PO ULTR Y
Recommended
T
emperature
Storage Life
(
refrigerator)
Storage Life
(
freezer)*
C
omments
FR ES H F IS H & SE AFO OD
c
od, flounder, haddock
sole bluefish, perch
mackerel, salmon
shrimp, oysters
1
˚C
1˚C
1˚C
1˚C
2
days
2 days
4 days
1 day
6
months
2–3 months
5–9 months
6 months
F
reeze in original wrap up to 2 weeks. Use
freezer wrap, freezer-quality plastic bags or
aluminum foil over the commercial wrap if
foods will be frozen for more than a coupl e
o
f months.
FR ES H M EAT
beef steaks, roasts
lamb chops, roasts
p
ork and veal chops, roasts
v
ariety meats (tongue, liver, etc.)
1–2˚C
1–2˚C
1
–2˚C
1
–2˚C
3–5 days
3–5 days
3
–5 days
1
–2 days
6–12 months
6–9 months
4
–6 months
3
–4 months
Freeze in original wrap up to 2 weeks. Use
freezer wrap, freezer-quality plastic bags or
a
luminum foil over the commercial wrap if
f
oods will be frozen for more than a couple
of months.
HA MB URG ER , G RO UN D & S TE W ME ATS
hamburger, stew meats,
ground turkey, veal, pork, lamb
and mixtures
1–2˚C
1–2 days
3–4 months
Freeze in original wrap up to 2 weeks. Use
freezer wrap, freezer-quality plastic bags or
aluminum foil over the commercial wrap if
f
oods will be frozen for more than a couple
o
f months.
HO TDO GS & LU NC H ME ATS
h
otdogs (opened package)
hotdogs (unopened package)
l
unch meats (opened package)
lunch meats (unopened package)
1
–2˚C
1–2˚C
1
–2˚C
1–2˚C
1
week
2 weeks
3
–5 days
2 weeks
1
–2 months
1–2 months
1
–2 months
1–2 months
F
reeze in freezer wrap. Check ”sell by”
dates. Do not use more than 1 week after
t
his date.
BA CON & S AU SAG E
bacon
raw sausage (pork, beef, turkey)
smoked breakfast links or patties
hard sausage (pepperoni, jerky
sticks)
1–2˚C
1–2˚C
1–2˚C
1–2˚C
7 days
1–2 days
7 days
2–3 weeks
1 month
1–2 months
1–2 months
1–2 months
Keep wrapped, and store at recommended
refrigerator temperatures.
HA M & CO RNE D BE EF
corned beef
ham, whole
ham, half
ham, slices
1–2˚C
1–2˚C
1–2˚C
1–2˚C
5–7 days
7 days
3–5 days
3–4 days
1 month
1–2 months
1–2 months
1–2 months
For freezer storage, drain juices.
FR ES H P OU LTRY
chicken or turkey, whole
chicken or turkey, pieces
duck or goose
1–2˚C
1–2˚C
1–2˚C
1–2 days
1–2 days
1–2 days
12 months
9 months
6 months
Freeze in original wrap up to 2 weeks. Use
freezer wrap, freezer-quality plastic bags or
aluminum foil over the commercial wrap if
foods will be frozen for more than a coupl e
of months.
*Recommen ded freezer storage temperature is - 18˚C.
FO OD S TO RA GE R ECO MME NDAT IO NSKE EPI NG FOO D A T I TS B EST

18
FR ESH VE GETABLE S
Recommended
Temperature
Storage Life
(refrigerator)
Comments
FR ES H V EG ETA BLE S
anise
a
rtichokes
asparagus
b
eans, green/ snap/ lima*
bean sprouts
beets
belgian endive
bok choy
1–2˚C
1
˚C
1–2˚C
4
–7˚C
1˚C
1˚C
2–3˚C
1˚C
2–3 weeks
1
–2 weeks
2–3 weeks
7
–10 days
7–9 days
3–4 months
2–4 weeks
3 weeks
Wash vegetables in cool water and drain. Store in airtight cont
ainer or plastic wrap.
Most vegetables should be stored in higher humidity.
broccoli
brussels sprouts
cabbage
carrots
cauliflower
c
eleriac
celery
chinese broccoli
1˚C
1˚C
1˚C
1˚C
1˚C
1
˚C
1˚C
1˚C
1–2 weeks
3–5 weeks
3–6 weeks
1–5 months
3–4 weeks
6
–8 months
1–2 months
10–14 days
Discard any fresh vegetables that are mold y or have other
signs of spoilage and wipe out the refriger ator compartment.
For fresh-cut produce, follow storage dire ctions on package.
chinese cabbage
corn, sweet
cucumbers*
d
aikon
eggplant*
endive/ escarole
garlic
horseradish
1˚C
1˚C
7˚C
1
˚C
7˚C
1˚C
1˚C
1˚C
2–3 months
5–8 days
10–14 days
4
months
1–2 weeks
2–3 weeks
6–7 months
10–12 months
R
efer to the list of ethylene sensitive and ethylene producing
vegetables and fruits.
jerusalem artichokes
kale
kohlrabi
leeks
lettuce
mushrooms
okra*
onions, bulb
1˚C
1˚C
1˚C
1˚C
1˚C
1˚C
7˚C
1˚C
1–2 weeks
1–2 months
10–14 days
2 months
2–3 weeks
1–2 weeks
1–2 weeks
1–6 months
onions, green
parsley
parsnips
peas, pods and shelled
peppers, bell*
peppers, chile
pumpkins*
radicchio
1˚C
1˚C
1˚C
1˚C
7˚C
7˚C
3–7˚C
1˚C
7–10 days
1–2 months
4–5 months
1–2 weeks
2–3 weeks
2–3 weeks
3–4 months
2–3 weeks
*Sensitive to chill injury, a cause of spoilage. D amage may not be apparent until the vegetable is returned to a warm er temperature.
NOTE: See food preserv ation guide for complete instruction s on freezing vegetables. Recommend ed freezer storage temperature is -1 8˚C.
FR ESH VE GETABLE S
ET HYL EN E G AS
Recommended
Temperature
Storage Life
(refrigerator)
Comments
F
RE SH V EGE TAB LE S
radishes
romaine
rutabagas
salsify
s
hallots
snow peas
spinach
squash, summer*
1˚C
1˚C
1˚C
1˚C
1
˚C
1˚C
1˚C
4–7˚C
1–2 months
2–3 weeks
4–6 months
2–4 months
6
months
1–2 weeks
10–14 days
1–2 weeks
Wash vegetables in cool water and drain. Store in a irtight container or plastic wrap.
M
ost vegetables should be stored in higher humidity.
tamarillos
t
omatoes (ripe)
turnips
water chestnuts
w
atercress
3–4˚C
8
–10˚C
1˚C
1–2˚C
1
˚C
10 weeks
1
–3 weeks
4–5 months
2–4 months
2
–3 weeks
D
iscard any fresh vegetables that are mold y or have other
signs of spoilage and wipe out the refrige rator compartment.
For fresh-cut produce, follow storage dir ections on package.
R
efer to the list of ethylene sensitive and ethylene producing
vegetables and fruits.
*Sensitive to chill injury, a cause of spoilage. Da mage may not be apparent until the vegetable is returned to a warm er temperature.
NOTE: See food preserv ation guide for complete instruction s on freezing vegetables. Recommend ed freezer storage temperature is -1 8˚C.
ET HY LEN E PR OD UCI NG F OOD S
apples
apricots
avocados
ripening bananas
cantaloupe
cherimoyas
figs
guavas
honeydew
kiwifruit
mamey sapote
mangoes
mangosteen
nectarines
papayas
passion fruit
peaches
pears
persimmons
plantains
plums
prunes
quince
tomatoes
ET HY LEN E SE NS ITI VE F OOD S
unripe bananas
green beans
belgian endive
broccoli
brussels sprouts
cabbage
carrots
cauliflower
chard
cucumbers
eggplant
unripe kiwifruit
leafy greens
lettuce
okra
peas
peppers
spinach
squash
sweet potatoes
watercress
watermelon
NOTE: Do not store ethy lene producing foods with ethylene sensitive foods.
FO OD S TO RA GE R ECO MME NDAT IO NS

19
FR ESH FR UIT S
Recommended
Temperature
Storage Life
(refrigerator)
Comments
FR ES H F RU ITS
apples* (macintosh,
grimes golden,
yellow newtown)
a
pples
apricots
a
sian pears
a
vocados*
b
lackberries
b
lood oranges
blueberries
cantaloupe*
1–4˚C
-
1˚C
1˚C
1
˚C
4
˚C
1
˚C
4
–7˚C
1˚C
2–5˚C
1–2 months
3
–6 months
1–2 weeks
5
–6 months
2
–4 weeks
2
–3 days
3
–8 weeks
10–18 days
2–3 weeks
Wash and dry most fruits, and store in the crisper compartment. (Do not wash berries and cherries u ntil you are ready to
use them, however.)
Most fruits should be stored in lower hum idity.
cassavas
cherries, sweet
clementines
cranberries*
f
igs, fresh
grapes
guavas*
honeydew
1˚C
1˚C
4˚C
2–4˚C
1
˚C
1˚C
4–7˚C
7˚C
1–2 months
2–3 weeks
2–4 weeks
2–4 months
7
–10 days
2–3 weeks
2–3 weeks
3–4 weeks
F
ully ripe fruits should be stored in the r efrigerator at recom-
mended temperatures to slow down the ripen ing process.
To hasten the ripening process, you can place unripe fruit in a
p
aper bag that has holes poked in it. Close the bag and set it
on a counter. The fruit will produce ethylene, a gas that ini tiates the ripening process. Check the bag each day.
k
iwifruit
kumquats
lychees
nectarines
oranges*
papayas*
peaches
pears
1
˚C
4˚C
2˚C
1˚C
1–7˚C
7˚C
1˚C
1˚C
4
–6 weeks
2–4 weeks
3–5 weeks
2–4 weeks
3–8 weeks
1–3 weeks
2–4 weeks
2–3 weeks
Discard any fresh fruits that are moldy o r have other signs of
spoilage and wipe out the refrigerator com partment.
Refer to the list of ethylene sensitive an d ethylene producing
vegetables and fruits.
persimmons
pineapple*
plums and prunes
pomegranates*
quinces
raspberries
rhubarb
strawberries
1˚C
7˚C
1˚C
4˚C
1˚C
1˚C
1˚C
1˚C
3–4 months
2–4 weeks
2–5 weeks
2–3 months
2–3 months
3–6 days
2–3 weeks
7–10 days
tangerines
watermelon*
4˚C
7˚C
2–4 weeks
2–3 weeks
*Sensitive to chill injury, a cause of spoilage. Da mage may not be apparent until the fruit is returned to a warmer tem perature.
NOTE: See food preserv ation guide for complete instructions on freezing fruits. Recommend ed freezer storage temperature is -18 ˚C.
DE LI F OO DS , D AIR Y P ROD UCT S A ND OTHER F OO DS
R
ecommended
T
emperature
S
torage Life
(
refrigerator)
S
torage Life
(
freezer)*
C
omments
DE LI F OOD S
thinly sliced lunch meats
egg, chicken, tuna and ham salads
macaroni salads
pre-stuffed chops, chicken breasts
store-prepared convenience meals
1–2˚C
1–2˚C
1–2˚C
1–2˚C
1–2˚C
1–2 days
3–5 days
3–5 days
1 day
1–2 days
NR
NR
NR
NR
NR
Check ”use by” or ”sell by” dates. These
foods do not freeze well. If you need to
freeze, do so immediately, not after they
have been held in the refrigerator.
D
AI RY FO OD S
b
utter
cottage or ricotta cheese
cream cheese
natural cheese (cheddar, brick, etc.)
process cheese
grated Parmesan or Romano
yogurt
w
hole, lowfat or skim milk
1
–2˚C
1–2˚C
1–2˚C
1–2˚C
1–2˚C
1–2˚C
1–2˚C
1
–2˚C
3
months
1–2 weeks
2 weeks
3–6 months
3–4 weeks
1 year
1 month
1
–2 weeks
1
year
4 weeks
6–8 months
6–8 months
C
heck ”sell by” dates.
Store cheese in original packaging until
ready to use. After opening, rewrap tightl y
in plastic wrap or aluminum foil.
Thaw frozen cheese in the refrigerator to
reduce crumbling.
EG GS
fresh, in shell
h
ard cooked
liquid pasteurized or egg substitutes
o
pened
unopened
1˚C
1
–2˚C
1
–2˚C
1–2˚C
3 weeks
1
week
3
days
10 days
NR
N
R
N
R
1 year
Keep fresh eggs refrigerated.
D
o not eat hard cooked eggs that have
been at room temperature for more than
2
hours.
CO OK ED ME AT & PO ULT RY LE FTO VER S
cooked meat and meat dishes
gravy and meat broth
fried or plain chicken, pieces
cooked poultry dishes
pieces covered with broth, gravy
chicken nuggets, patties
1–2˚C
1–2˚C
1–2˚C
1–2˚C
1–2˚C
1–2˚C
3–4 days
1–2 days
3–4 days
3–4 days
1–2 days
1–2 days
2–3 months
2–3 months
4 months
4–6 months
6 months
1–3 months
Refrigerate or freeze leftovers in covere d
shallow containers within 2 hours after
cooking. Reheat leftovers to 74˚C.
SO UP S & S TE WS
vegetable
meat added
1–2˚C
1–2˚C
3–4 days
3–4 days
2–3 months
2–3 months
Reheat to at least 74˚C before serving.
*Recommen ded freezer storage temperature is - 18˚C. (NR) stands for not recommende d for freezing.
FO OD S TO RA GE R ECO MME NDAT IO NS

20
TR OUB LE SH OO TIN G G UID E
FR EQU EN TLY ASK ED QUE STIO NS
IC E P RO DU CT ION
I
MPORTANT NOTE:Make sure that the power is
on for your ice maker. The indicator will be
v
isible in the Control Center display panel.
IMPORTANT NOTE:
Dispose of the first two
buckets of ice produced by your new unit to
e
nsure that pipe residue or other particles asso-
ciated with new water lines are not consumed.
Q:
My ice maker isn’t producing very much ice.
A:
On average, you can expect a cycle of ice
(eight cubes per cycle) every two hours.
Increased ice production can be achieved
with the Max Ice feature.
Q:
My ice is freezing together and clumping.
A:
If ice is not used regularly it tends to fuse
together. You may need to discard the ice and
allow ice to be replenished.
NO ISE
Q:
Why do I hear my unit running constantly?
A:
It is normal to hear the operation of fans and
motors. Sounds will be accentuated based on
the placement of the unit and overall room
design.
TE MPE RA TU RE
I
MPORTANT NOTE:Unless the unit is being
serviced, make sure the power for your unit is
o
n. If the unit is not on, OFF will be visible in the
Control Center display panel.
Q:H
ow do I adjust the temperatures?
A:T
o adjust temperatures, refer to Temperature
Control, page 7.
Q:
What are the suggested temperature settings?
A:
The recommended settings are 3˚C for the
refrigerator section and -18˚C for the freezer
section.
Q:
Condensation is forming on the inside and
outside of my unit.
A:
In climates with higher humidity, condensation will form and is considered normal.
Leaving the door open for a long period of
time may also contribute to condensation
forming on the inside your unit.
Q:
My unit isn’t cooling properly.
A:
Clean the condenser area as outlined on page
13.
DO OR O PE RA TIO N
Q:
Why is my door hard to open?
A:
Your unit was designed for an airtight seal. A
vacuum seal can form after the door is
closed. Wait several seconds for pressure to
equalize before reopening the door.
Q:
The door on my unit is opening too fast and
hitting the wall or surrounding cabinets.
A:
The unit may not be leveled properly or a
door stop may be required. Install the
optional 90° door stop provided with the unit.
TR OUB LE SH OO TIN G
If your Built-In unit is not operating properly, use
t
he following troubleshooting guide before contacting your Sub-Zero dealer. This guide will
save you time and trouble and may help you
avoid the expense of a service call.
T
he indicator is illuminated or flashing in
the Control Center display panel.
•
The microprocessor has sensed a problem
with the operating system. There may be
instructions in the Control Center display
panel to solve the problem.
• This may also indicate that the condenser
needs cleaning. Follow the Condenser
Cleaning procedure outlined on page 13.
• If this occurs, turn the unit off with the key
pad and then restart by depressing the key
pad again. If the indicator is still present,
contact your Sub-Zero dealer.
The flashing with audible chime and
indicators are both flashing in the Control
Center display panel.
• Check for excess water near the unit. If you
see excess water, turn off the water at the
shut-off valve. Also, verify temperatures
inside the unit and manage the contents
accordingly. Once you have verified there is
an issue, contact your Sub-Zero dealer. The
audible chime can be reset for 24 hours by
holding the key and depressing the
key.
Refrigerator /Freezer is not running.
•
Is there electrical power to the unit?
• Is the home circuit breaker or fuse off?
• Is the refrigerator /freezer control on?
• Is the condenser area clean?
• Has a door or drawer been left open for an
extended period? Be sure that food is not
obstructing proper door or drawer closing.
• Has one section been manually disabled? See
Cleaning Combination Units, page 13.
• If the unit is still not running, it may be in
defrost mode.
• Wait 30 minutes and try to restart again.
Refrigerator /Freezer is warmer than usual.
• Is the control set properly?
• Is the condenser area clean?
• Has a door or drawer been left open for an
extended period? Be sure that food is not
obstructing proper door or drawer closing.
• Has a large amount of food been added
recently?

21
There is an odor inside the unit.
•
Replace air purification system cartridge.
• Clean the unit thoroughly.
• Cover all food tightly.
• Clean the unit drain pipe.
• Clean the drain pan.
Light bulb needs to be replaced.
• See Lighting Information, page 14.
You need service.
• If service is necessary, maintain the quality
built into your Sub-Zero unit by contacting a
Sub-Zero dealer.
• To obtain the name and number of a
Sub-Zero dealer, check the Showroom
Locator section of our website,
subzero.com
.
• When calling for service, you will need the
model and serial number of your unit. Both
numbers are listed on the product rating plate
located at the top of the side frame, inside the
unit, close to the hinge.
TR OUB LE SH OO TIN G
Refrigerator /Freezer runs for long periods of
t
ime.
• Is the condenser area clean?
•
Has a door or drawer been left open for an
extended period? Be sure that food is not
obstructing proper door or drawer closing.
• Has a large amount of food been added
r
ecently?
• On hot days and in warm room temperatures,
the motor runs longer.
• There may be normal operation noises
related to refrigerant circulation, fan operation, ice maker operation, defrost cycle or
compressor operation.
Refrigerator /Freezer is frosted up.
• Has a door or drawer been left open for an
extended period? Be sure that food is not
obstructing proper door or drawer closing.
• Are door(s) and/or drawer closing and
sealing properly? Contact your dealer if
door(s) are not adjusted properly. NOTE:
When opening the freezer drawer, you may
notice a side-to-side motion in the drawer.
This motion is normal, with the tolerance
built into the drawer slides. When the drawer
is closed it will automatically adjust and close
with correct alignment.
You hear unusual noises.
• These noises may be normal operating
sounds related to refrigerant circulation, fan
operation, ice maker operation, defrost cycle
or compressor operation. Noises may be
more noticeable when door(s) are open.
TR OUB LE SH OO TIN G G UID E
SE RVI CE INF ORM ATI ON
This Use & Care Information book gives you the
t
ools necessary to preserve food at optimum
quality in your Built-In unit. Keep doors and
drawers closed as much as possible whenever
the unit is operating.
If you do need service, be sure to have the
m
odel and serial number when you call. You’ll
find these numbers on the product rating plate
l
ocated at the top of the side frame, inside the
unit, close to the hinge. Refer to pages 4–6 for
location of the rating plate for your specific
model. Record this information below for future
reference.
Model Number
Serial Number
Installation Date
Sub-Zero Dealer and Phone
BE FOR E C AL LIN G F OR S ERVI CE
Before calling a Sub-Zero dealer, refer to the
Troubleshooting Guide on pages 20–21. Check
the household fuse or circuit breaker to see if it
has been blown or tripped and that the electrical
connection to the appliance has not been disconnected. A power outage may also have caused a
disruption in service.
The information and images in th is guide are the
copyright proper ty of Sub-Zero, Inc. Neither this
book nor any inf ormation or images contained
herein may be co pied or used in whole or in pa rt
without the expr ess written permission of
Sub-Zero, Inc.
©Sub-Zero, Inc. all rights reserved.
SE RVI CE INF OR MA TI ON
You hear occasional buzzing.
•
Is the water supply connected to ice maker
and turned on?
Condensation forms inside the unit.
•
This is normal during periods of higher
humidity (summer) and with frequent door
o
penings.
• Are door(s) and/or drawer closing and
sealing properly?
Condensation forms outside the unit.
• During periods of high humidity, some con-
densation may appear on outside surfaces.
The condensation will disappear when the
humidity drops. Be sure that door(s) and/or
drawer are closing and sealing properly. If
condensation persists, contact your Sub-Zero
dealer.
Outside of the freezer section heats up.
• Clean the condenser area.
There is no ice.
• Is the ice bucket in position?
• Is the ice maker turned on?
• Is the water supply connected?
Shut off power to the unit at the circuit
breaker before replacing light bulbs. Wear
protective gloves when handling bulbs.
WARNING

CA RAC TE RÍ ST ICA S D E L OS MOD EL OS
E
MP OTR AB LE S
L
os modelos revestibles se integran a la
p
erfección en el diseño global de la
habitación y son el complemento ideal
del mobiliario circundante.
La nueva aplicación empotrable permite que
l
a unidad quede perfectamente al ras con el
resto del mobiliario. Entre las opciones
disponibles se incluye la de utilizar paneles
personalizados o paneles accesorios de
Sub-Zero de acero inoxidable. Los modelos
clásicos de acero inoxidable incluyen
puertas acabadas en este material, tiradores
tubulares de acero inoxidable y una rejilla
que sale hacia arriba: todo ello diseñado
específicamente para mejorar la estética de
las cocinas actuales de aspecto profesional.
Los modelos ICBBI-36RG, ICBBI-30UG e
ICBBI-36UG incorporan una característica
exclusiva—una puerta de cristal. Estas
unidades se entregan con el diseño
revestible/empotrable o en acero inoxidable
clásico y cumplen estrictos requisitos
energéticos.
Los modelos con puerta de cristal ofrecen un
aspecto moderno exclusivo e innovador, con
una iluminación interior tenue.
El diseño de poca profundidad permite el
fácil acceso a cualquier zona del frigorífico.
Todos los modelos combi empotrables
disponen del doble sistema de refrigeración
de Sub-Zero que garantiza la conservación
de los alimentos con la máxima frescura al
tiempo que se consigue un ahorro
energético. De este modo, puede controlar
de forma independiente y precisa los compartimentos del frigorífico y del congelador.
GR ACI AS
Gracias por comprar el nuevo modelo de unidad
e
mpotrable de Sub-Zero. Con Sub-Zero, puede
c
onfiar en una tradición que avala 60 años de
calidad y fiabilidad. La línea de productos empotrable unifica las opciones de decoración más
elegantes y novedosas en refrigeración para el
hogar con el fin de mantener los alimentos con
la máxima frescura posible.
El diseño, la belleza y la calidad de Sub-Zero se
r
eflejan en el amplio conjunto de características
de serie que convierten a Sub-Zero en una clase
en sí misma. La apariencia personalizada de la
línea empotrable de Sub-Zero le da opciones
que no le ofrece ninguna otra línea, tanto si ha
optado por una unidad revestible/empotrable,
de acero inoxidable o de puerta de cristal.
Esta guía de información de uso y mantenimiento responderá a la mayoría de las preguntas que puedan surgirle sobre las
características, el funcionamiento y el mantenimiento de su unidad empotrable. Si no
encuentra en esta guía respuesta a sus preguntas, póngase en contacto con el distribuidor
de Sub-Zero o visite nuestra página web,
wwwwww..ssuubbzzeerr oo..ccoomm..
Cuando lea esta guía de uso y mantenimiento
deberá prestar e special atención cuando
aparezcan los sí mbolos de PRECAUCIÓN
y AVISO. Esta informació n es importante
para utilizar de forma segura y eficaz el
equipo de Sub-Ze ro.
Además, esta guí a de uso y mantenimiento
puede incluir un a NOTA IMPORTANTE para
resaltar informa ción especialmente importante .
SUB-ZERO®es una marca comercia l registrada de Sub-Zero, Inc.
T
odos los modelos empotrables disponen de
u
n microprocesador que le permite un mejor
control, un sensor de descongelación
automático y que se adapta a sus patrones
de uso y una luz indicadora de servicio. Nuestro microprocesador controla permanentemente todos los compartimentos y, en caso
d
e que se produzca un problema, enciende
el indicador del panel de mandos.
Los mandos digitales son de última
generación y fáciles de utilizar.
Le muestran los valores registrados de
forma digital para facilitar y agilizar su
consulta. Asimismo, los mandos digitales
le mantienen permanentemente informado
del funcionamiento de la unidad.
Todos los modelos empotrables tienen
una rejilla que sale hacia arriba, lo que
permite limpiar más fácilmente el
condensador.
Purificación del aire: las bacterias, olores
y gases se eliminan mediante este avanzado
sistema de purificación del aire.
La iluminación brillante se propaga de forma
uniforme por todos los compartimentos. La
fuente de la iluminación permanece oculta.
La alarma de la puerta emitirá un pitido
audible si se ha dejado la puerta del frigorífico o del congelador entreabierta.
Los cajones para frutas y verduras de extracción total y de alta humedad son grandes y
profundos, con laterales lisos y divisores
extraíbles en la mayoría de los modelos.
Los estantes de cristal de tipo voladizo
reforzados con acero permiten su colocación
de forma rápida y sencilla. Son fáciles de
limpiar y están hechos a prueba de goteo.
Los estantes de la puerta se pueden ajustar
en incrementos de 25 mm, lo que le ofrece
una flexibilidad completa.
CA RAC TE RÍ ST ICA S D E L OS M ODE LOS EM POTR AB LES DE SU B- ZE RO
El compartimento de los productos lácteos
es ajustable y consta de una puerta.
Además, dispone de un sistema magnético
de hermeticidad que asegura la frescura de
los productos.
Los modelos combi ofrecen además un
cajón de extracción total para el congelador.
El fabricador de cubitos de hielo proporciona
h
ielo semicircular de alta calidad.
La característica Max Ice aumenta la
velocidad de producción de hielo durante
un período de 24 horas.
Las juntas magnéticas colocadas alrededor
de todas las puertas proporcionan una
hermeticidad adicional.
Las puertas de núcleo sólido de nuestros
modelos mejoran el aislamiento y la
integridad de la estructura.
El zócalo sólido y ajustable proporciona
un aspecto realmente integrado.
RE FRI GE RA CI ÓN EMP OTR AB LE SU B-Z ERO
Estos aparatos l levan el certificado
Star-K que indica qu e cumplen
rigurosas normas religiosas junto
con instruccione s específicas que
aparecen en la p ágina www.star-k.org.
indica una situa ción en la que se pueden
sufrir heridas l eves o provocar daños
secundarios al p roducto si no se siguen
las instruccione s.
PRECAUCIÓN
indica peligro d e que se produzcan heridas
personales grave s o incluso puede provocar
la muerte si no se siguen las precauciones
especificadas.
AVISO
22
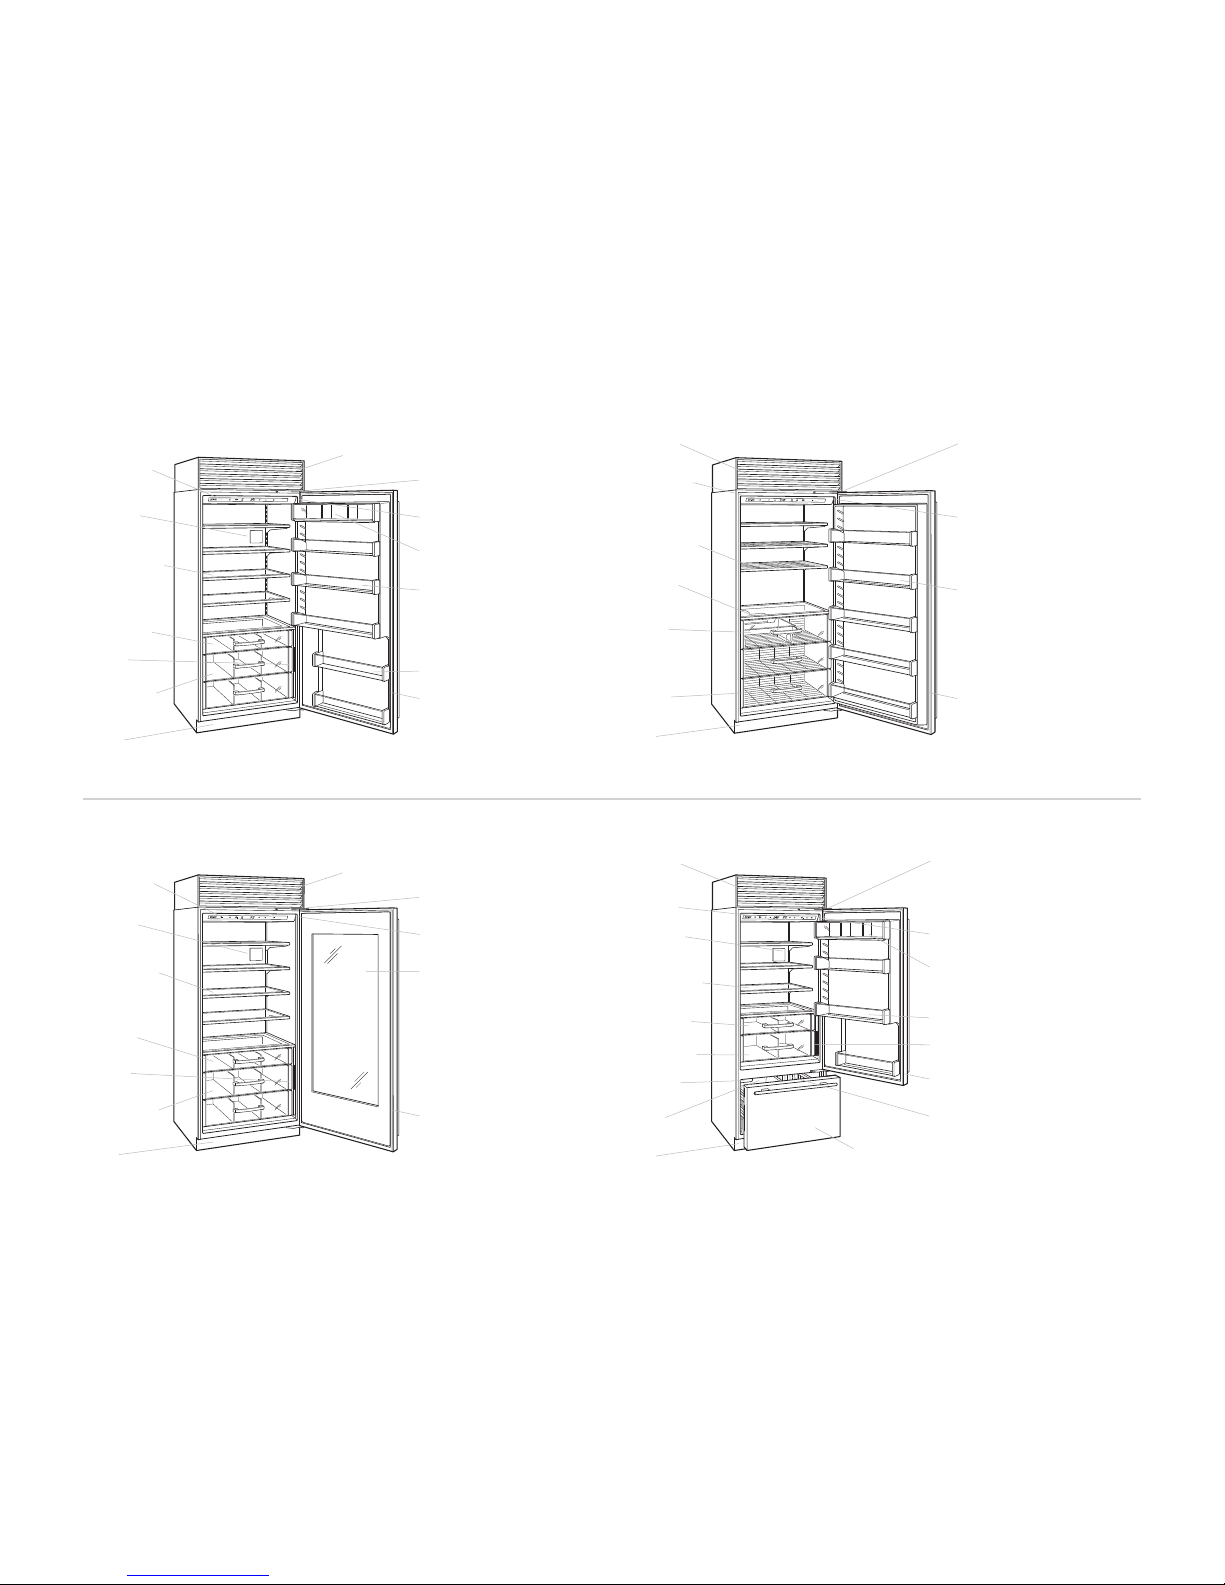
23
MO DEL OS E MP OTR ABL ES SU B- ZER O
MO DEL O IC BB I-3 6F
T
OD O F RI GOR ÍFI CO
MO DEL O IC BB I-3 0U
CO MBI F RIG ORÍ FIC O|CO NGE LA DOR
U
bicación de
l
a placa de datos
Juntas magnéticas
de cuatro lados
Zócalo
extraíble
Recipiente
extraíble de hielo
Estantes metálicos
ajustables
Panel de mandos
electrónico
iluminado
Sistema de cierre
de puertas
Cestas de
almacenamiento
del congelador
Fabricador de
cubitos de hielo
automático
Estantes en la
puerta ajustables
Ubicación de la placa
de datos
Compartimento para productos lácteos ajustable
Cestas del congelador
en dos niveles
Zócalo
extraíble
Cajón para frutas
y verduras de
alta humedad
Estantes de cristal
ajustables a
prueba de goteo
Sistema de
purificación
de aire
Panel de mandos
electrónico
iluminado
Sistema de cierre
de puertas
Fabricador de
cubitos de hielo
automático
Recipiente
extraíble de hielo
Cajón congelador deslizante de
extracción total
Cajón de
almacenamiento
del frigorífico
Juntas magnéticas
de cuatro lados
Estantes en la
puerta ajustables
Fichas de referencia
para el usuario
Rejilla de fácil
acceso,
sale hacia arriba
Rejilla de fácil
acceso,
sale hacia arriba
MO DEL O IC BB I-3 6R
T
OD O F RI GOR ÍFI CO
U
bicación de la placa
d
e datos
Compartimento para
p
roductos lácteos
a
justable
Juntas magn
éticas de cuatro
lados
Zócalo
extraíble
Cajones de
almacenamiento
del frigorífico
Estantes de cristal
ajustables a prueba
de goteo
Sistema de
purificación de
aire
Panel de mandos
electrónico
iluminado
Rejilla de fácil acceso,
sale hacia arriba
Sistema de cierre
de puertas
Fichas de
referencia para
e
l usuario
C
ajón para frutas
y verduras de alta
humedad
E
stantes fijos de
l
as puertas
Estantes en la
puerta ajustables
MO DEL O IC BB I-3 6RG
TO DO FR IGO RÍF ICO CO N PUE RTA DE C RIS TAL
Ubicación de
la placa de datos
Puerta de cristal
triple resistente a
los rayos UV
Juntas
magnéticas
de cuatro
lados
Zócalo
extraíble
Cajones de
almacenamiento
del frigorífico
Estantes de cristal
ajustables a prueba
de goteo
Sistema de
purificación
de aire
Panel de mandos
electrónico
iluminado
Rejilla de fácil acceso,
sale hacia arriba
Sistema de cierre
de puertas
Fichas de
referencia para
el usuario
Cajón para frutas
y verduras de alta
humedad
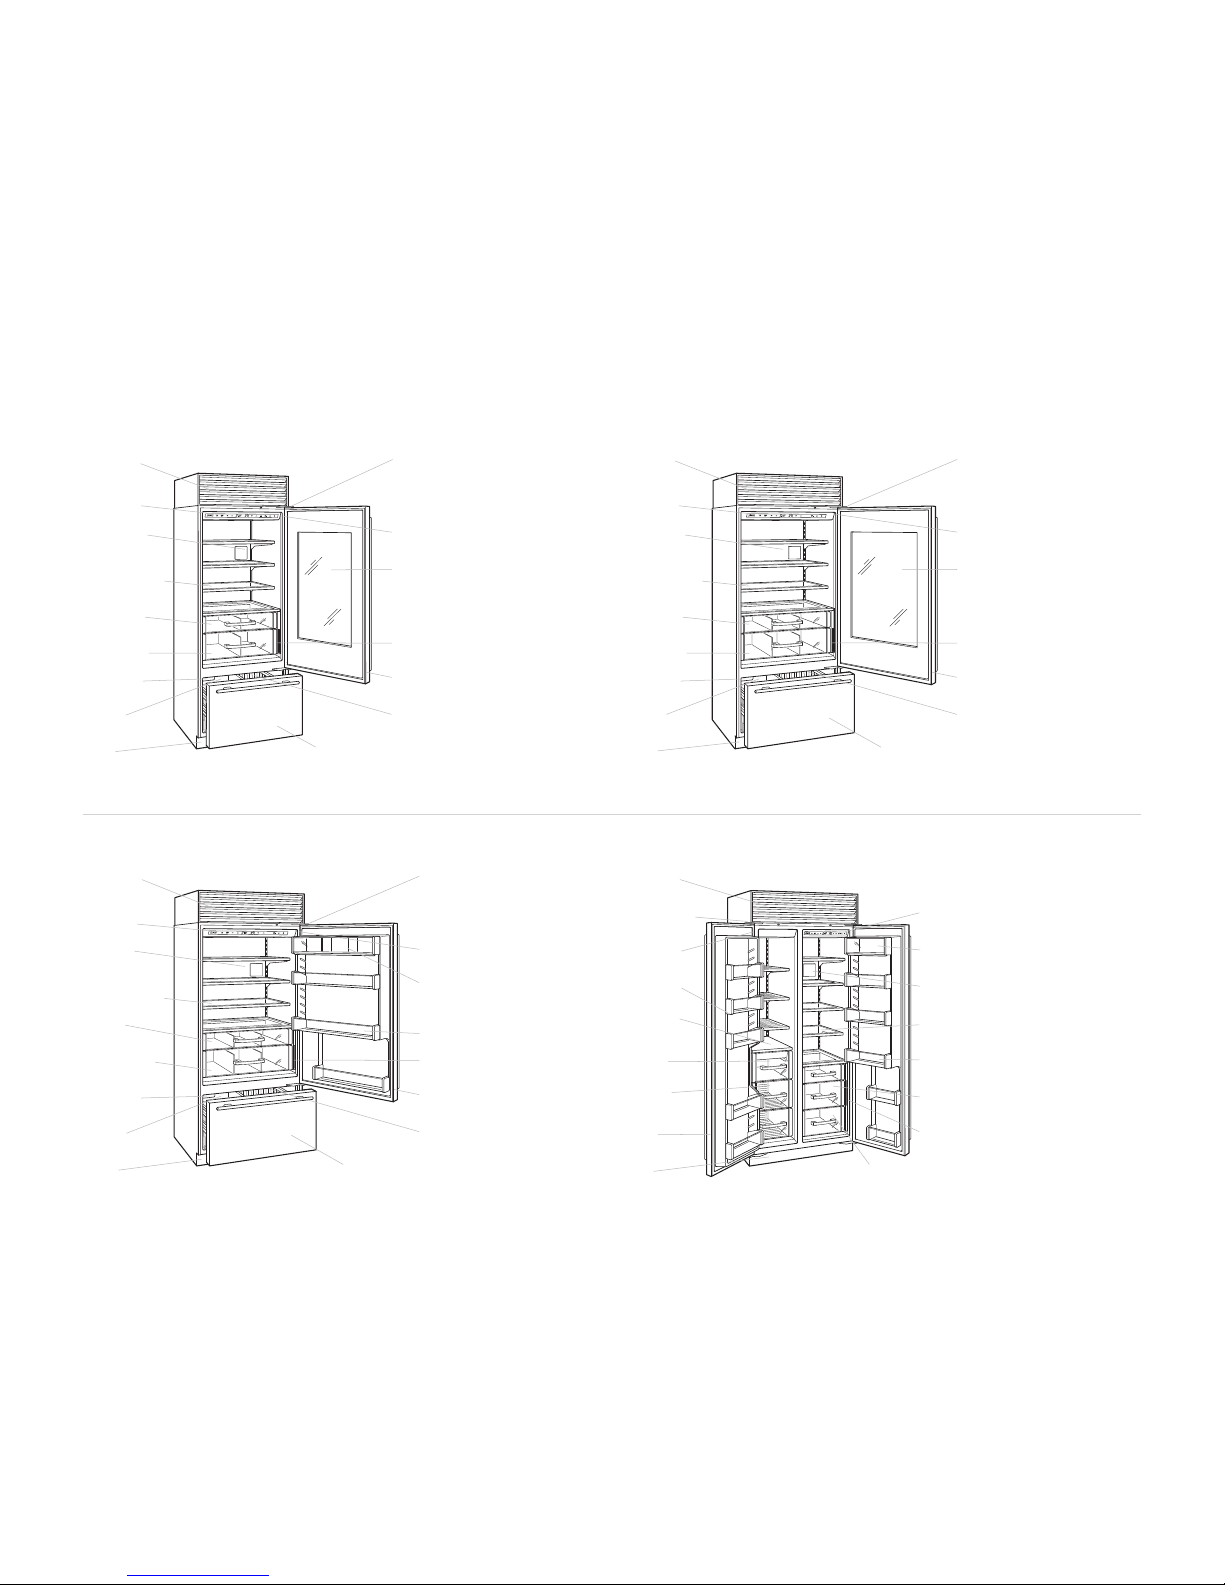
24
MO DEL O IC BB I-3 0UG
CO MBI C ON PUE RTA DE C RIS TAL
Ubicación de la
p
laca de datos
Puerta de cristal
t
riple resistente
a
los rayos UV
Cestas del
c
ongelador
en dos niveles
Zócalo
extraíble
Cajón para frutas
y verduras de
alta humedad
Estantes de cristal
ajustables a prueba
de goteo
S
istema de purificación de aire
Panel de mandos
electrónico
iluminado
Sistema de cierre
de puertas
Fabricador de
cubitos de hielo
automático
Recipiente
extraíble de hielo
Cajón congelador
deslizante de
extracción total
Cajón de
almacenamiento
del frigorífico
Juntas
m
agnéticas de
cuatro lados
Fichas de
referencia
para el usuario
Rejilla de fácil
acceso,
sale hacia arriba
MO DEL OS E MP OTR ABL ES SU B- ZER O
MO DEL O IC BB I-3 6U
CO MBI F RIG ORÍ FIC O|CO NGE LA DOR
MO DEL O IC BB I-3 6UG
CO MBI C ON PUE RTA DE C RIS TAL
MO DEL O IC BB I-3 6S
SI DE- BY -SI DE FRI GOR ÍF ICO |CO NGE LA DOR
Ubicación de la placa
de datos
Compartimento para
productos lácteos
ajustable
Cestas del congelador
en dos niveles
Zócalo
extraíble
Cajón para frutas
y verduras de alta
humedad
Estantes de cristal
ajustables a prueba
de goteo
Sistema de
purificación
de aire
Panel de mandos
electrónico
iluminado
Sistema de cierre
de puertas
Fabricador de
cubitos de hielo
automático
Recipiente
extraíble de hielo
Cajón congelador deslizante de
extracción total
Cajón de
almacenamiento
del frigorífico
Juntas
magnéticas de
cuatro lados
Estantes en la
puerta ajustables
Fichas de
referencia para
el usuario
U
bicación de la
p
laca de datos
Puerta de cristal triple
r
esistente a los
r
ayos UV
C
estas del congelador
en dos niveles
Zócalo
extraíble
Cajón para frutas
y verduras de
alta humedad
Estantes de cristal
a
justables a
p
rueba de goteo
S
istema de
purificación
de aire
Panel de mandos
electrónico
iluminado
Sistema de cierre
de puertas
Fabricador de
cubitos de hielo
automático
Recipiente
extraíble de hielo
Cajón congelador deslizante
de extracción total
Cajón de almacenamiento del
frigorífico
Juntas magnéticas
de cuatro lados
Fichas de referencia
para el usuario
Rejilla de fácil
acceso,
sale hacia arriba
Rejilla de fácil
acceso,
sale hacia arriba
Compartimento para
productos lácteos
ajustable
Sistema de
purificación de aire
Fichas de referencia
para el usuario
Zócalo
extraíble
Recipiente
extraíble de hielo
Estantes en la
puerta ajustables
Ubicación de
la placa de datos
Sistema de cierre
de puertas
Rejilla de fácil
acceso,
sale hacia arriba
Panel de mandos
electrónico iluminado
Cestas de
almacenamiento
del congelador
Juntas
magnéticas de
cuatro lados
Cajones de almacenamiento
del frigorífico
Fabricador de
cubitos de hielo
automático
Cajón para frutas y
verduras de alta
humedad
Estantes de cristal
ajustables a prueba
de goteo
Estantes en la
puerta ajustables
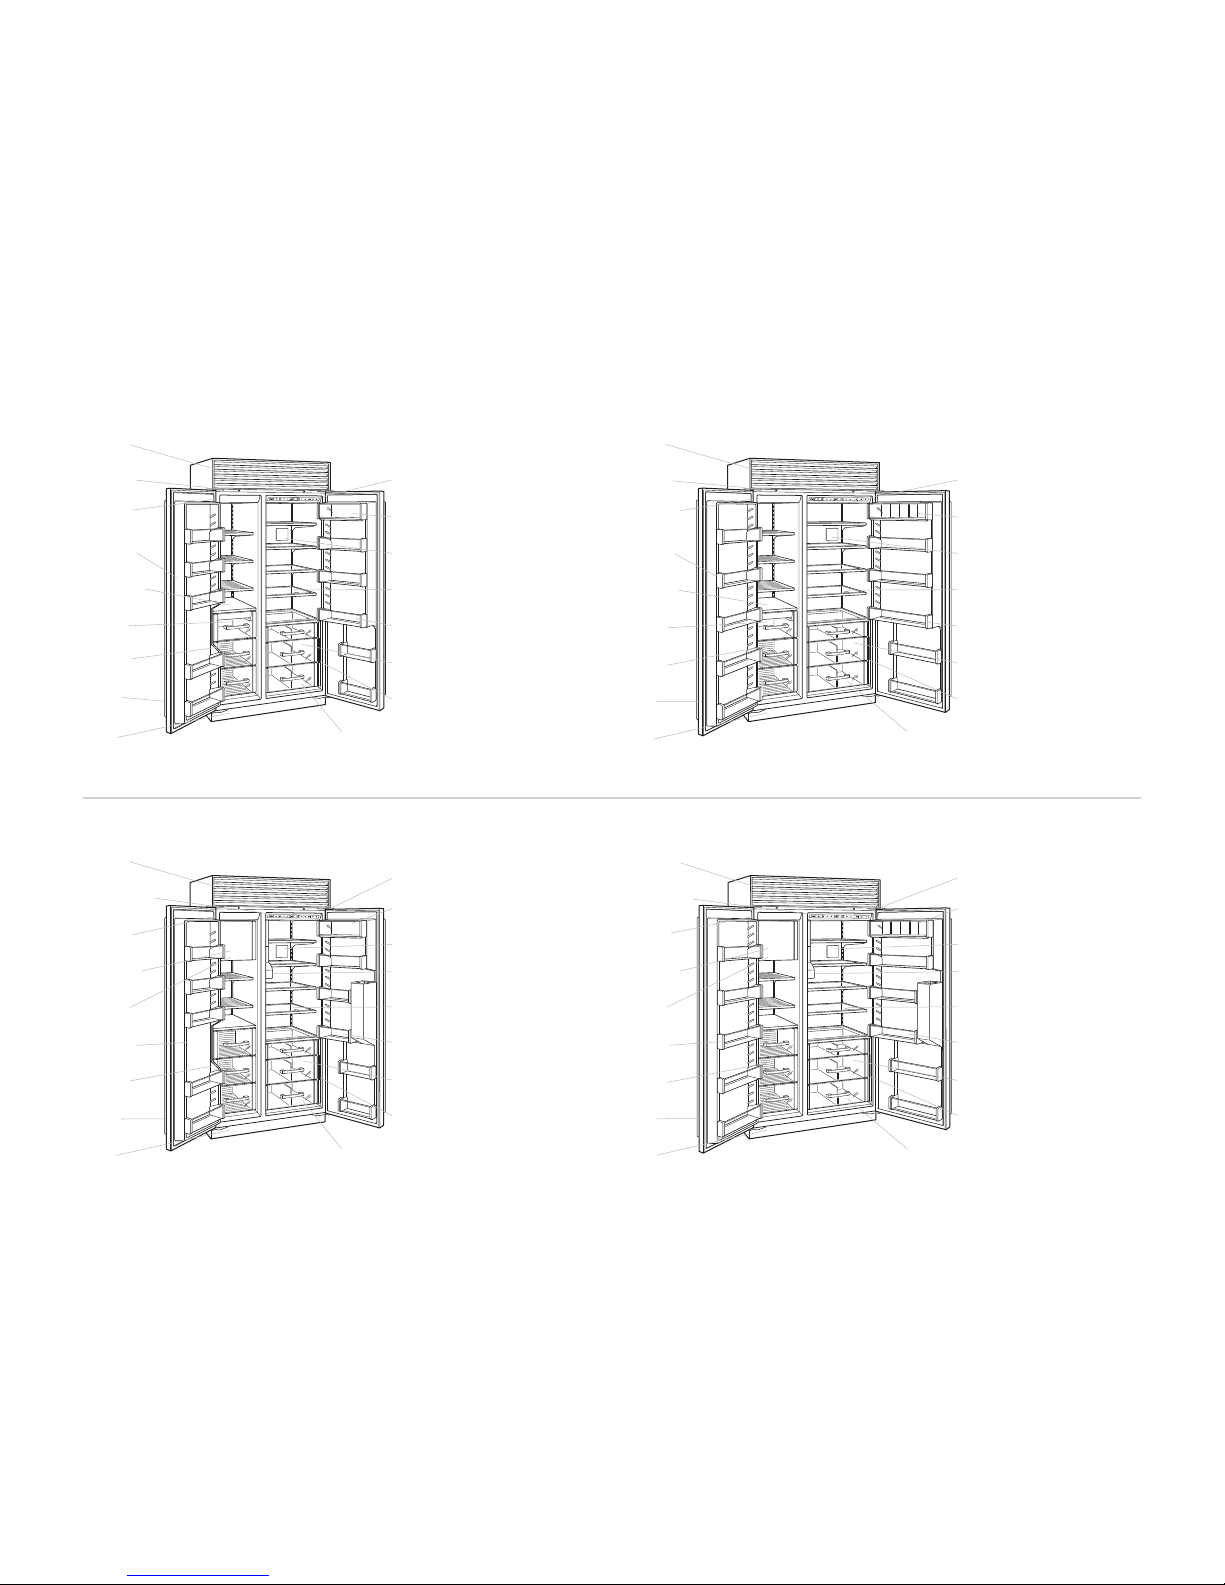
25
Sistema de purificación
de aire
Dispensador de hielo
a granel
Fichas de referencia para
el usuario
Zócalo
extraíble
Estantes en
la puerta
ajustables
Fabricador de
cubitos de hielo
automático
Ubicación
de la placa
de datos
Panel de mandos
electrónico
iluminado
Rejilla de fácil
acceso,
sale hacia arriba
Compartimento para
productos lácteos ajustable
Cestas de
almacenamiento
del congelador
Juntas
magnéticas de
cuatro lados
Cajones de almacenamiento
del frigorífico
Recipiente
extraíble de hielo
Sistema de cierre
de puertas
Cajón para frutas y verduras
de alta humedad
Estantes de cristal
ajustables a prueba de
goteo
Estantes en la puerta
ajustables
MO DEL OS E MP OTR ABL ES SU B- ZER O
MO DEL O IC BB I-4 8S
S
ID E-B Y- SID E F RIG ORÍ FI CO
|
C
ON GEL AD OR
MO DEL O IC BB I-4 8SD
SI DE- BY -SI DE CON DI SP ENS ADO R D E H IE LO|AG UA
C
ompartimento
para productos
lácteos ajustable
Sistema de purificación
d
e aire
Fichas de referencia
para el usuario
Zócalo
extraíble
Recipiente
extraíble
de hielo
E
stantes en
la puerta
ajustables
Ubicación de
la placa
de datos
Sistema de
cierre de puertas
Rejilla de
fácil acceso,
sale hacia arriba
Panel de mandos
electrónico iluminado
C
estas de
a
lmacenamiento
del congelador
Juntas
magnéticas de
cuatro lados
Cajones de almacenamiento
del frigorífico
Fabricador de
cubitos de hielo
automático
C
ajón para frutas y
v
erduras de alta
humedad
E
stantes de cristal
a
justables a prueba de
g
oteo
Estantes en la
puerta ajustables
Sistema de purificación de
aire
Dispensador de hielo
a granel
Fichas de referencia para
el usuario
Zócalo
extraíble
Estantes en
la puerta
ajustables
Fabricador de
cubitos de hielo
automático
Ubicación
de la placa
de datos
Panel de mandos
electrónico
iluminado
Rejilla de
fácil acceso,
sale hacia arriba
Compartimento para
productos lácteos
ajustable
Cestas de
almacenamiento
del congelador
Juntas
magnéticas de
cuatro lados
Cajones de almacenamiento
del frigorífico
Recipiente
extraíble de hielo
Sistema de cierre de
puertas
Cajón para frutas y
verduras de alta
humedad
Estantes de cristal
ajustables a prueba
de goteo
Estantes en la
puerta ajustables
MO DEL O IC BB I-4 2SD
SI DE- BY -SI DE CON DI SP ENS ADO R D E H IE LO|AG UA
C
ompartimento para
p
roductos lácteos
ajustable
Sistema de purificación
d
e aire
Fichas de referencia
para el usuario
Zócalo
extraíble
R
ecipiente
e
xtraíble
de hielo
Estantes en
la puerta
ajustables
U
bicación
de la placa
de datos
Sistema de
cierre de puertas
Rejilla de
fácil acceso,
sale hacia arriba
Panel de mandos
electrónico iluminado
Cestas de
almacenamiento
d
el congelador
Juntas
magnéticas de
cuatro lados
Cajones de almacenamiento
del frigorífico
F
abricador de
c
ubitos de hielo
automático
C
ajón para frutas
y
verduras de alta
humedad
Estantes de cristal
ajustables a prueba
de goteo
Estantes en la
puerta ajustables
MO DEL O IC BB I-4 2S
S
ID E-B Y- SID E F RIG ORÍ FI CO
|
C
ON GEL AD OR
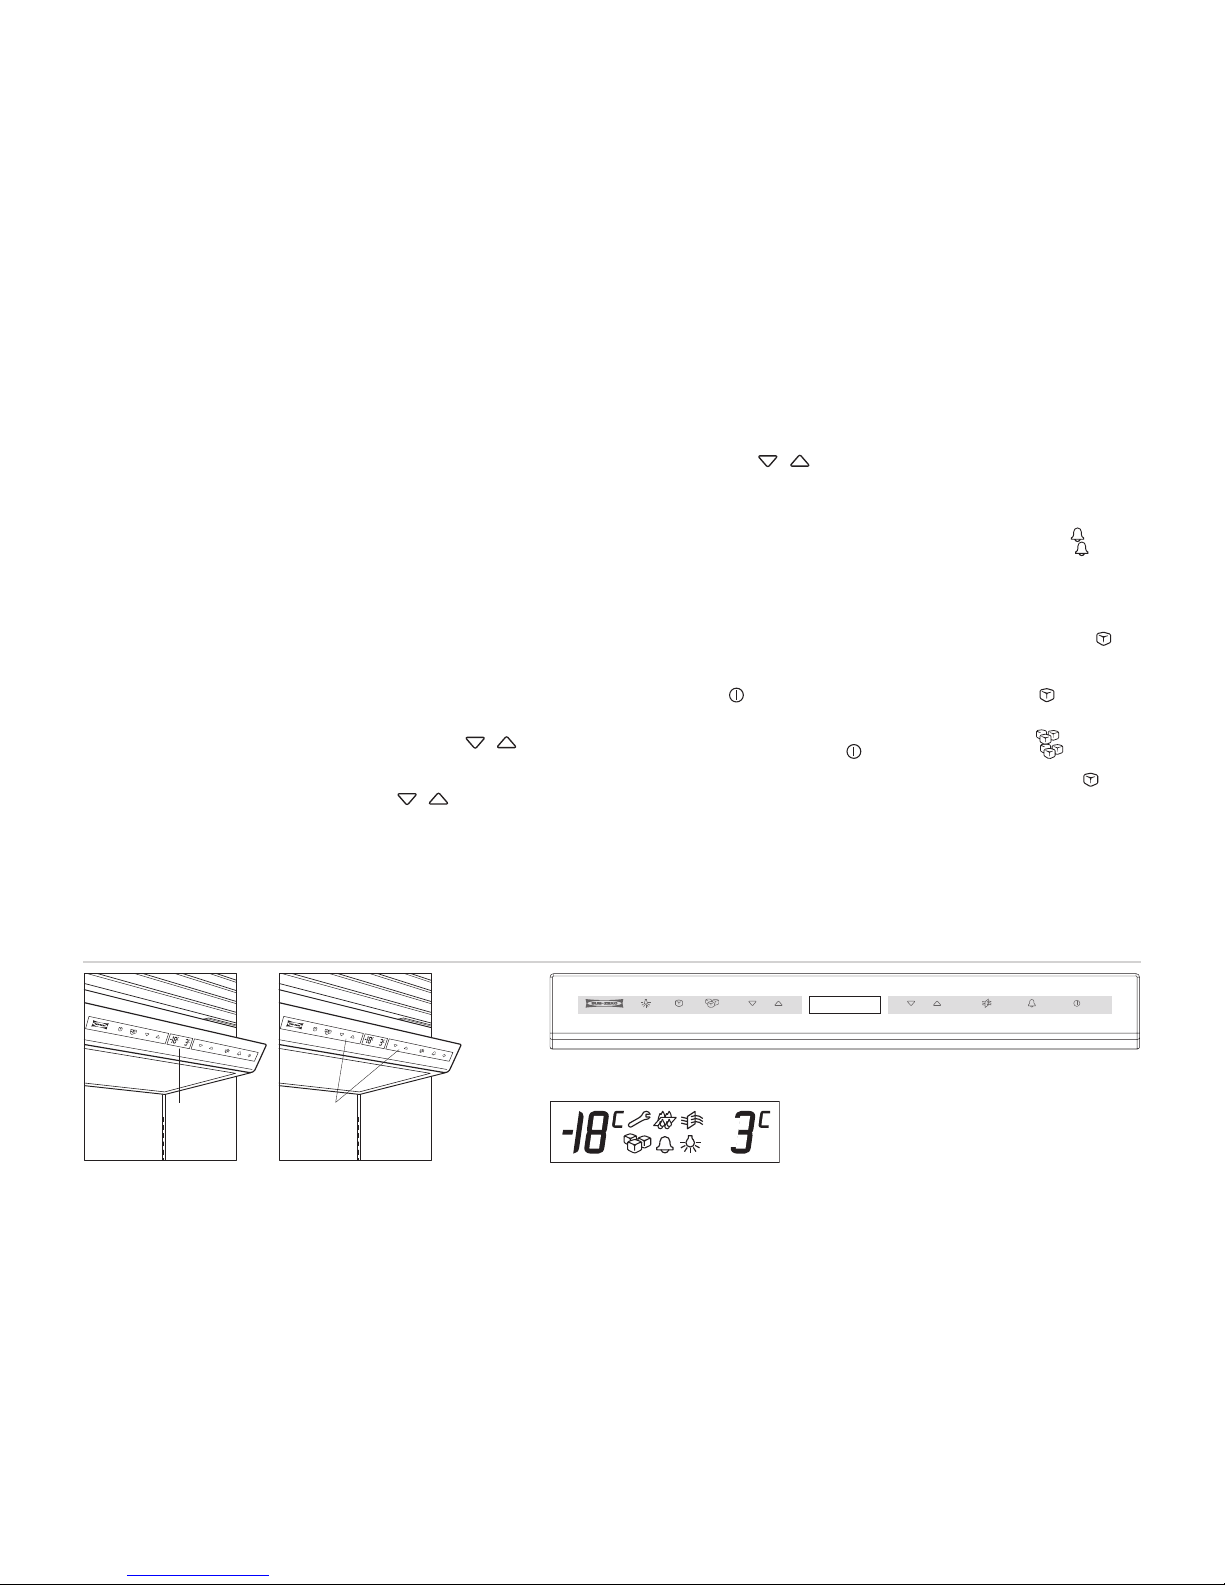
26
SI STE MA D E CON TRO L E LE CT RÓN ICO
El sistema de control electrónico de su unidad
e
mpotrable de Sub-Zero controla y muestra con
p
recisión la temperatura de grado en grado con
respecto a la temperatura preseleccionada.
También controla el funcionamiento de la unidad
y le permite saber si existe algún problema.
Encontrará el Centro de control en la sección del
frigorífico en todos los modelos, excepto en el
m
odelo ICBBI-36F, en el que está situado en el
congelador. Observe la siguiente ilustración.
CO NTR OL D E TEM PER ATU RA
Su nueva unidad empotrable se ha inspeccionado y verificado al completo antes de salir
de la fábrica de Sub-Zero. La preselección de
la temperatura es de 3 °C para el frigorífico y
-18 °C en el congelador. La temperatura se
muestra en el panel del Centro de control.
En el caso de unidades combi, tienen dos
conjuntos de botones y en el Centro
de control, uno para el frigorífico y otro para el
congelador. Los modelos ICBBI-36R, ICBBI-36RG
e ICBBI-36F sólo cuentan con un conjunto de
botones y .
Si desea ajustar la tem per atura de los compartim
entos, pulse los botones o
d
el Centro de control.
La selección de temperatura es de -23 °C a -15 °C
e
n el congelador y de 1 °C a 7 °C en el frigorífico.
Es normal que las temperaturas fluctúen ligeramente dependiendo de las circunstancias
externas, por ejemplo, una puerta abierta, el
grado de humedad y la temperatura ambiente.
NOTA IMPORTANTE:
Deje transcurrir siempre
24 horas para que la unidad alcance la
temperatura que ha configurado.
AL IME NT AC IÓ N E LÉC TRI CA
Todos los modelos empotrables de Sub-Zero
incorporan un botón en el Centro de control.
Este botón desconecta el suministro eléctrico de
la unidad. Cuando la unidad esté desconectada,
la luz indicadora de apagado (OFF) aparece en
la pantalla del Centro de control. Este botón
supone que no tiene que desconectar la alimentación en el cortacircuitos o del enchufe.
Para realizar labores de mantenimiento o cambiar una bombilla, desconecte la alimentación
eléctrica del enchufe antes de cambiar la bombilla. El cable de alimentación está situado en
la esquina del extremo derecho, por detrás de
la rejilla que sale hacia arriba.
OP CIÓ N D E ALA RMA
T
odos los modelos empotrables disponen de
una función de alarma que emite un pitido
audible si la puerta queda entreabierta.
L
a alarma suena después de 30 segundos. Se
puede desactivar al pulsar el botón . Cuando
la alarma esté activada, el indicador aparece
en la pantalla del Centro de control.
CO NTR OL D EL FA BRI CAD OR D E H IEL O
Los modelos empotrables con fabricador de
cubitos de hielo incorporan un botón de
en el Centro de control. Este botón conecta o
desconecta la alimentación del sistema de fabricación de hielo. Si está activado el fabricador de
cubitos de hielo, el indicador se iluminará en
el panel del Centro de control. Asimismo, el fabricador de cubitos de hielo también se puede
encender mediante el botón , que activa la
función Max Ice. El indicador se iluminará
en el panel del Centro de control cuando esté
activada esta función. Utilice el botón para
desconectar el fabricador de cubitos de hielo
durante periodos de vacaciones largos.
US O Y M AN TE NIM IEN TO DE P ROD UCT OS EMPO TR ABL ES DE SU B- ZE RO
Panel
Más frío/más
templado
Botones
Panel del centro de control
electrónico
Botones de ajust e de la temperatura
Panel
Panel de mandos (Modelo ICBBI-30UG)
DO BLE R EF RI GER ACI ÓN
La línea empotrable continúa con la tradición
de Sub-Zero de ofrecer una calidad y fiabilidad
superiores. Sub-Zero ha sido pionero en el
desarrollo de nuestro sistema de doble refrigeración, que permite conservar los alimentos en
su máxima frescura en compartimentos independientes. Tanto el frigorífico como el congelador
mantienen temperaturas constantes y precisas.
La doble refrigeración mantiene los alimentos
frescos durante mucho más tiempo que
cualquier otro sistema actual.
Con el sistema de doble refrigeración, el congelador mantiene una temperatura constante que
se selecciona de grado en grado conforme a su
necesidad y que oscila entre -23 °C y -15 °C, evitando así el traspaso de humedades y olores del
frigorífico. De igual manera, la temperatura del
frigorífico se puede seleccionar entre 1 °C y 7 °C
para obtener el nivel de humedad adecuado en el
que los alimentos se conserven durante mucho
más tiempo.
Con el sistema de doble refrigeración, los alimentos frescos no traspasarán sus olores a los
alimentos congelados o al hielo. El sistema
Sub-Zero no congela la humedad del aire en
los compartimentos de los alimentos frescos.
Asimismo, la doble refrigeración de Sub-Zero
ahorra más energía que los sistemas de refrigeración convencionales. Otra de las diferencias
es que cuando el frigorífico se utiliza con frecuencia a lo largo del día, con la doble refrigeración el aire seco y frío del congelador no
pasa al compartimento del frigorífico. En su
lugar, el frigorífico utiliza aire húmedo para
mantener los alimentos frescos y así, el
consumo de energía es menor.
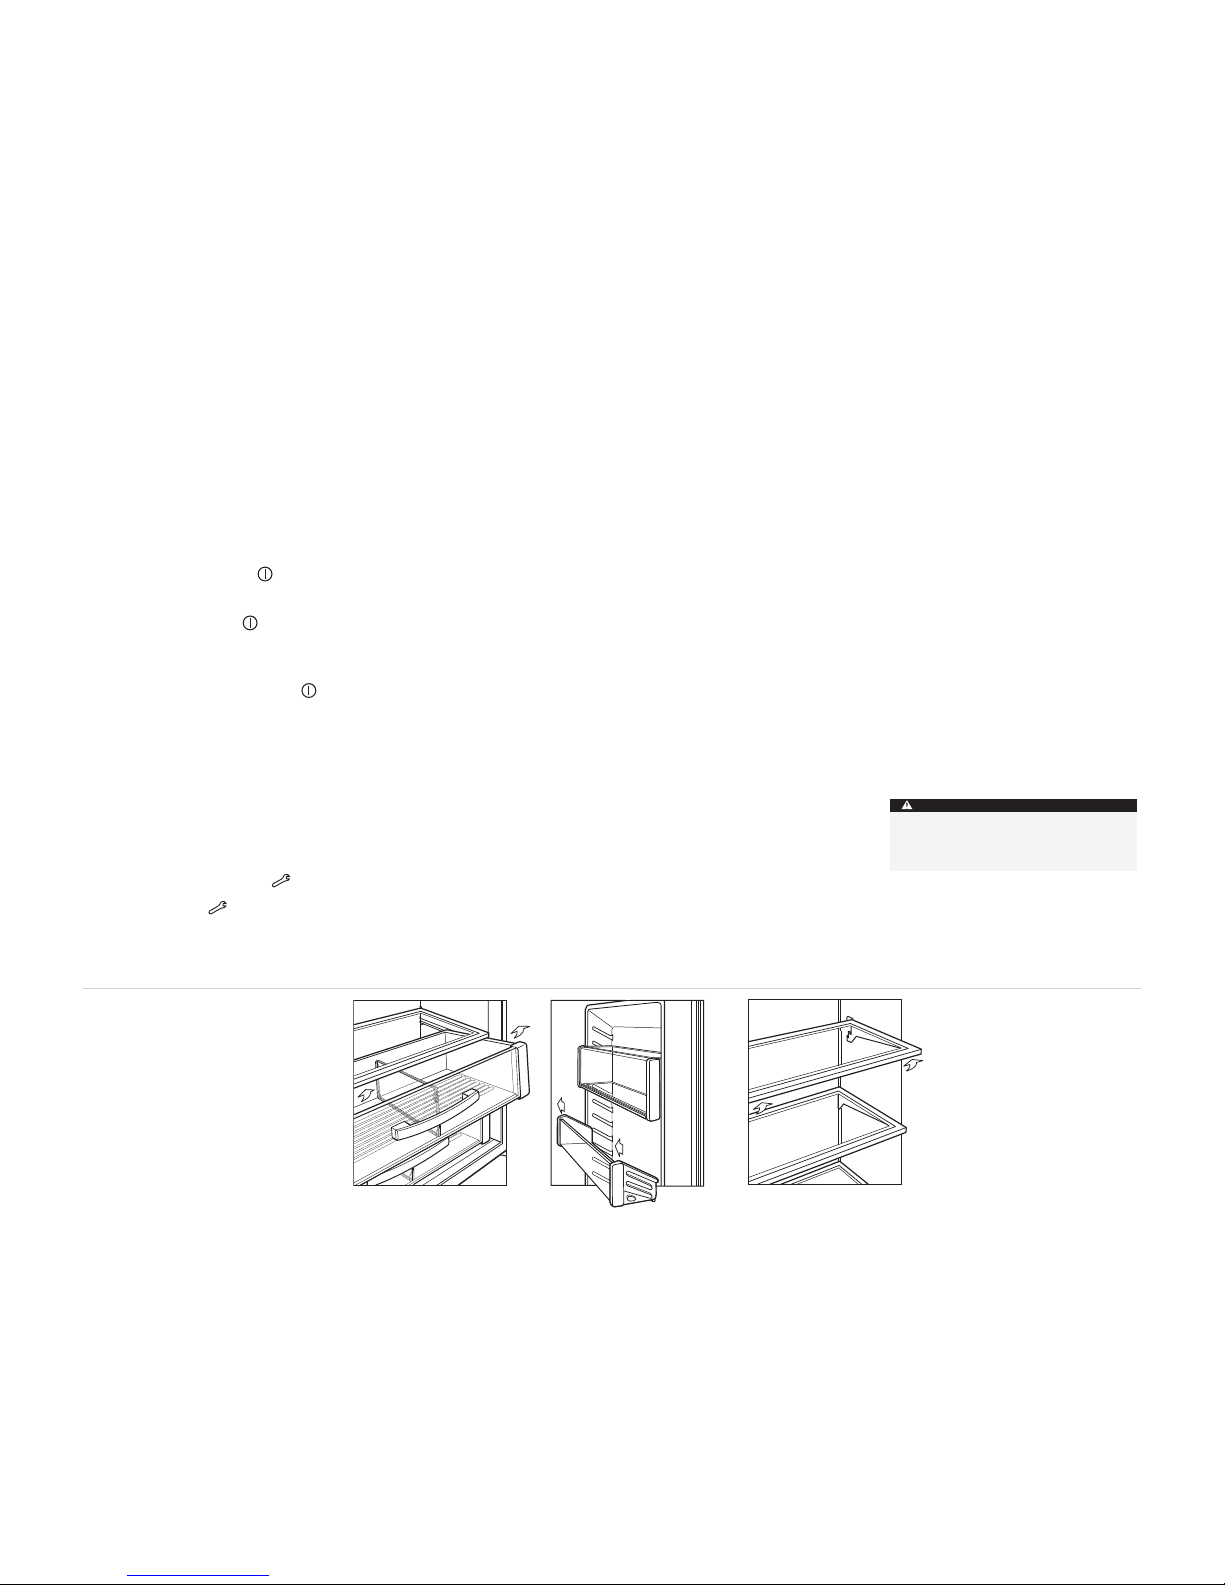
27
US O Y M AN TE NIM IEN TO DE P ROD UCT OS EMPO TR ABL ES DE SU B- ZE RO
SI STE MA D E ALM ACE NAJ E
D
EL FR IG OR ÍF ICO
C
AJ ONE S DE A LMA CEN AMI EN TO
Para extraer un cajón de almacenamiento del
frigorífico, tire del mismo hasta que llegue al
t
ope. Levante la parte delantera ligeramente y
tire del cajón hacia usted. Observe la siguiente
i
lustración.
NOTA IMPORTANTE:
Si la puerta tiene un tope
de apertura de 90°, será necesario extraer los
estantes de poca profundidad de la puerta para
poder sacar el cajón.
Para volver a ponerlo en su sitio, deslice el cajón
por las guías dentro del frigorífico. Alinee el
cajón con las guías y empuje el cajón hasta que
se detenga. La parte delantera del cajón deberá
caer un poco y hacer clic una vez que esté
correctamente metido en las guías.
ES TAN TE S DE LA PU ERT A Y COM PAR TIME NTO D E PR ODU CTO S L ÁC TE OS
Los estantes de la puerta y el compartimento
de productos lácteos se regulan según las guías
d
e la puerta.
NOTA: los modelos con puerta de cristal no
tienen estantes en la puerta ni compartimento
d
e productos lácteos.
Si desea extraer un estante o el compartimento
de productos lácteos, levántelo y tire de él desde
la parte inferior. Para volver a colocarlo en su
sitio, presione hasta que encaje en las guías.
Observe la siguiente ilustración.
Extracción del c ajón de
almacenamiento d el frigorífico Extracción de lo s estantes
de la puerta
Extracción de lo s estantes de cristal
ajustables
AC CES OR IOS
Podrá disponer d e accesorios opcionale s a través
de su distribuid or de
Sub-Zero. Para o btener
la información d el distribuidor más ce rcano,
visite nuestra p ágina web
www.subzero.com
E
ST ANT ES D E CRI STA L A JU ST ABL ES
Asegúrese de leer y comprender las siguientes
instrucciones antes de extraer o regular los
estantes. Para extraer o ajustar un estante,
incline el estante hacia arriba por la parte
delantera y, a continuación, levántelo y sáquelo
de las guías de la pared trasera del frigorífico.
Observe la siguiente ilustración.
Si la apertura de la puerta está limitada a 90°,
antes tendrá que vaciar los estantes de la puerta
para poder extraer el estante. Levante y gire
hacia arriba el extremo del estante más cercano
a la puerta y extráigalo.
Para colocar el estante, insértelo en las guías de
la parte trasera del frigorífico con la parte
delantera del estante ligeramente levantada.
A medida que empuja el estante, baje la parte
delantera del mismo hasta que encaje en
la posición adecuada.
NOTA IMPORTANTE:
maneje con cuidado los
estantes de cristal para evitar que se rompa o se
raye el interior.
SI STE MA D E CON TRO L E LE CT RÓN ICO
MO DO SA BB AT H ( STA R-K )
T
odos los modelos empotrables incorporan el
Modo Sabbath. Este modo se utiliza durante
d
eterminadas festividades religiosas de modo
que las luces y la función de fabricación de
h
ielo permanecen desconectadas esos días.
Para iniciar el modo Sabbath cuando la unidad
está encendida, presione el botón para que
se visualice OFF en el panel del Centro de
control. A continuación, la unidad se apaga.
Mantenga presionado el botón durante 10
segundos. Mediante este proceso la unidad
volverá a encenderse, pero con las luces y el
fabricador de cubitos de hielo desactivados.
Para que la unidad vuelva a funcionar de
manera normal, presione y suelte el botón .
Si tiene alguna pregunta referente al cumplimiento de la certificación Star-K para productos
kosher, visite la página web www.star-k.org.
PA NTA LL A IN FOR MAT IVA D E
MA NTE NI MI EN TO
El Centro de control controla la temperatura
del frigorífico y del congelador, así como la del
sistema del fabricador de cubitos de hielo. Si se
produce algún problema relacionado con la temperatura o el fabricador de cubitos de hielo, se
iluminará o parpadeará un indicador del
panel del Centro de control para avisarle. Es
posible que el indicador se ilumine también
si detecta que es necesario limpiar el condensador. Antes de avisar al servicio técnico, compruebe si es necesario limpiar el área del
condensador. Consulte la sección Limpieza
del condensador, página 32.
Es necesario que los estantes se calienten
a la temperatura ambiente antes de sumergirlos en agua caliente.
PRECAUCIÓN
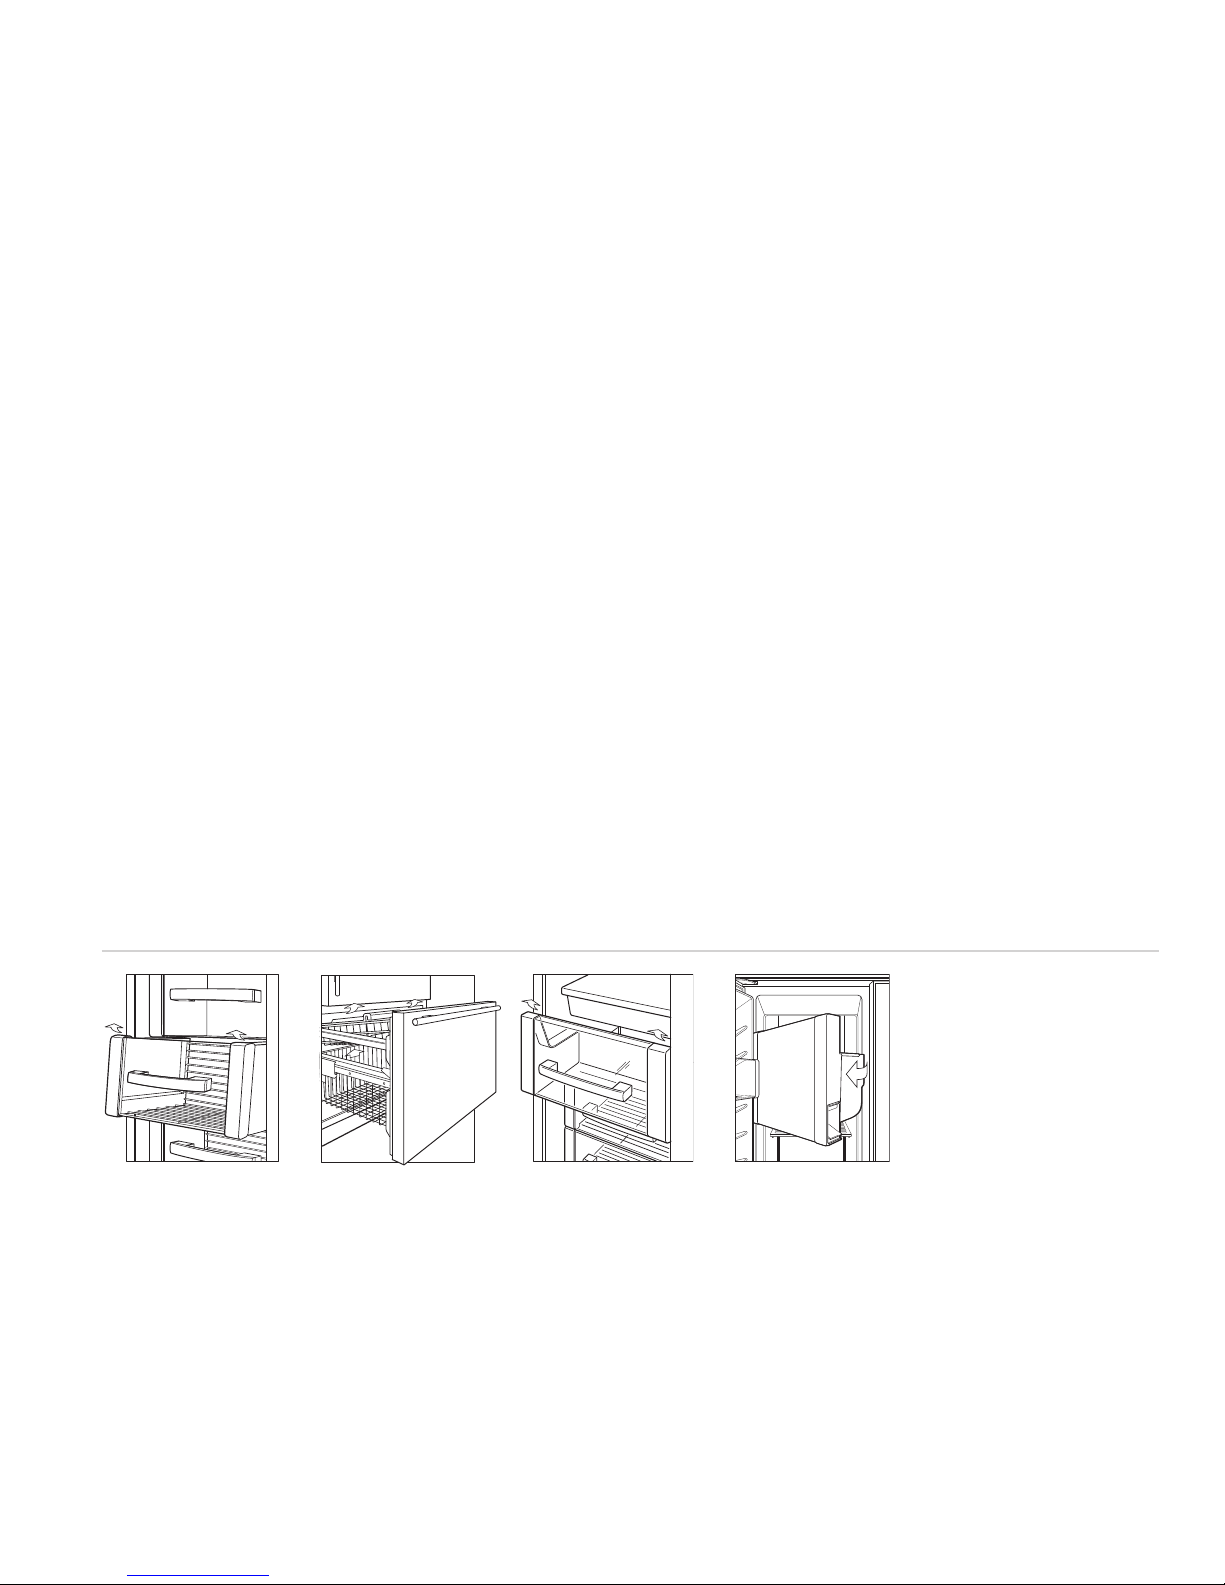
28
Modelos combi:
En primer lugar, descargue las
c
estas del congelador. Si desea extraer la cesta
s
uperior del congelador, levante por la parte
delantera y tire de ella para liberarla. Para sacar
la cesta inferior, levante la cesta directamente
y tire de ella para sacarla. Observe la siguiente
ilustración.
Para volver a colocar la cesta inferior del congelador, introdúzcala en los cuatro retenedores de
l
as esquinas. Para volver a colocar la cesta superior, colóquela en los rieles guía. Deslice la cesta
hasta el fondo. Cuando se enganche escuchará
un clic.
NOTA IMPORTANTE:
Descargue las cestas del
congelador antes de extraerlas.
AL MAC EN AM IE NTO DE L C ON GE LAD OR
EXTRAC CIÓN DE LA CESTA DEL CO NGELADOR
Modelos todo congelador y side-by-side:
En
primer lugar, descargue la cesta del congelador.
Para extraerla, tire de ella hasta que llegue al
t
ope. Detrás de las dos esquinas inferiores del
frontal de la cesta hay sujeciones metálicas.
T
ire de estas sujeciones hacia la parte delantera
de la cesta y levante y gire la cesta hacia arriba.
NOTA IMPORTANTE:
si desea extraer las cestas
de los modelos ICBBI-36S, ICBBI-42S o
ICBBI-42SD, debe levantar la cesta y tirar de
ella a través de la abertura de las guías de la
puerta una vez desenganchada de las guías.
NOTA IMPORTANTE:
si los modelos ICBBI-36F
o ICBBI-36S tienen la apertura de la puerta limitada a 90 grados, es posible que sea necesario
extraer la cesta y/ o el estante superior para
poder hacerlo.
Para volver a ponerlo en su sitio, deslice el cajón
por las guías dentro del congelador. Alinee la
cesta con las guías y empújela por las mismas
hasta que se detenga. Presione hacia abajo en
la parte delantera de la cesta para enganchar
las sujeciones de ésta con las guías.
Modelos ICBBI-42SD e ICBBI-48SD:
Para
e
xtraer la cubeta del hielo, saque la cubeta
p
arcialmente y a continuación gire el lado
derecho de la misma mientras continúa
tirando. Observe la siguiente ilustración.
EX TRA CC IÓ N DE LA CUB ET A DEL HI ELO
M
odelos combi y modelo ICBBI-36F: Para
extraer la cubeta del hielo, saque el cajón o la
cesta del congelador hasta que llegue al tope
y levante la cubeta del hielo hasta que salga.
Modelos ICBBI-36S, ICBBI-42S e ICBBI-48S:
Para extraer la cubeta del hielo, tire de ésta hasta
que llegue al tope. A continuación, levántela
para dejar libre el conjunto de desplazamiento
situado a lo largo del borde posterior de la
cubeta. Una vez llegado a este punto, sigua
tirando hacia fuera. Si la apertura de la puerta
está limitada a 90 grados, repita el procedimiento, pero al levantar la cubeta del hielo
para sacarla, gire el lado derecho de la misma
hacia usted y sáquela. Esto permitirá que la
cubeta de hielo pueda salir por la puerta.
Observe la siguiente ilustración.
Extracción de la s cestas
de congelador — modelos to do
congelador y sid e-by-side
Extracción de la s cestas
de congelador — modelos combi
Extracción de la cubeta del hielo —
Modelos ICBBI-36 S, ICBBI-42S e
ICBBI-48S
Extracción de la cubeta del hielo —
Modelos ICBBI-42 SD e ICBBI-48SD
US O Y M AN TE NIM IEN TO DE P ROD UCT OS EMPO TR ABL ES DE SU B- ZE RO
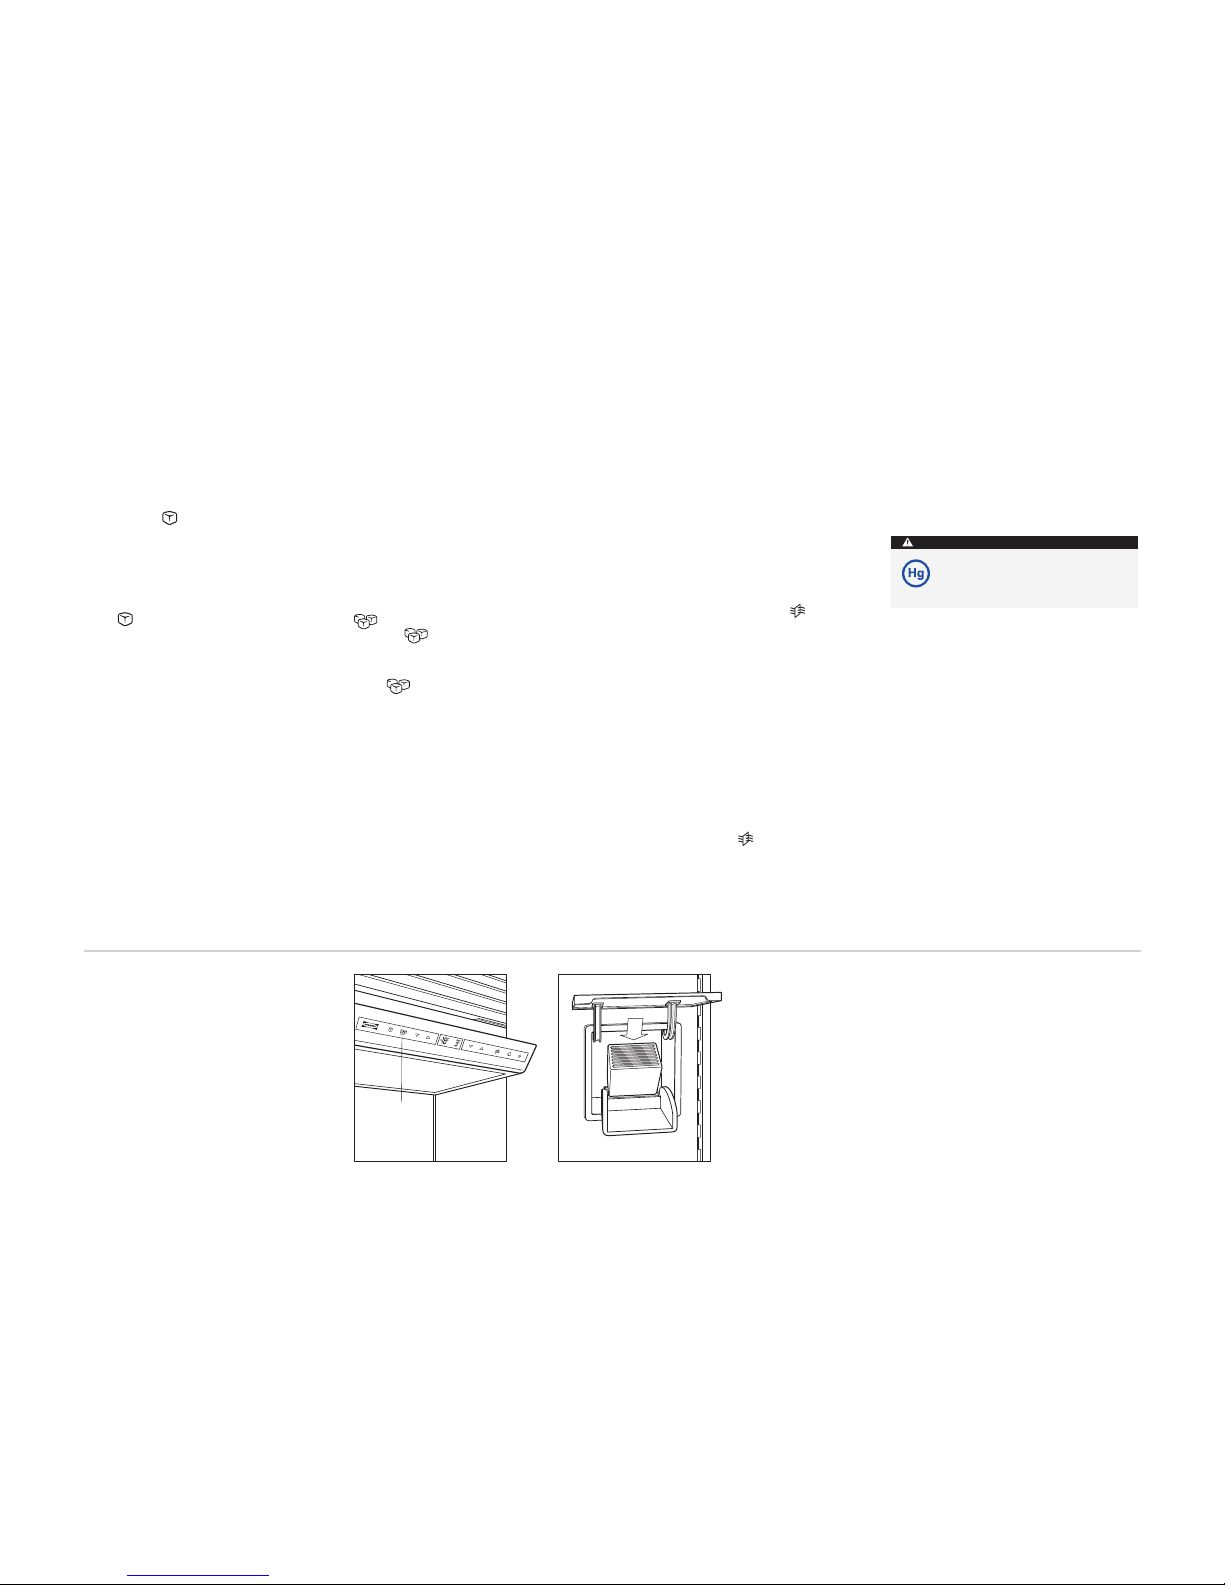
29
F
UN CIÓ N MA X ICE
La función Max Ice aumenta la velocidad de
producción de hielo en aquellos momentos en
l
os que necesita más de lo normal. El aumento
en la producción de hielo dura 24 horas, después
d
e las cuales el nivel de producción vuelve a su
ritmo normal. Si activa esta función, el aumento
en la producción de hielo es de aproximadamente un 40%.
Para activar la función Max Ice, pulse el botón
del Centro de control hasta que aparezca el
indicador en el panel. Observe la siguiente
ilustración.
Para desactivar la función Max Ice, pulse el
botón y la producción de la unidad
volverá al ritmo normal.
FU NCI ON AM IE NTO DE L F ABR ICA DOR
D
E CUB IT OS D E H IEL O
E
l fabricador de cubitos de hielo de su conge-
l
ador Sub-Zero es completamente automático
y se ha sometido a numerosas pruebas en la
fábrica. Para que comience a producir hielo,
active el botón del Centro de control.
El sistema del fabricador de cubitos de hielo no
se desconecta si la cubeta no está en su sitio.
Si va a extraer la cubeta del hielo durante un
periodo prolongado de tiempo, desactive el
fabricador de cubitos de hielo al pulsar el
botón del Centro de control.
FA BRI CA CI ÓN DE L H IEL O
El fabricador de cubitos de hielo está diseñado
para que fabrique hielo suficiente para el uso
normal de una familia. La duración de los ciclos
de fabricación de los cubitos de hielo varía
según las condiciones de carga, apertura de la
puerta y temperatura ambiente. Normalmente,
se produce un ciclo de fabricación de hielo cada
dos horas (ocho cubitos de hielo por ciclo).
El fabricador de cubitos de hielo funciona con
presiones de agua entre 2,1 bares y 6,9 bares.
En algunas ocasiones, es posible que el sistema
de filtrado de agua por ósmosis invertida no sea
capaz de mantener la presión de agua mínima.
NOTA IMPORTANTE:
Si los cubitos de hielo
no se utilizan de manera regular, el hielo tiende
a fundirse. Para evitarlo, vacíe y sustituya el
hielo del contenedor según sea conveniente.
US O Y M AN TE NIM IEN TO DE P ROD UCT OS EMPO TR ABL ES DE SU B- ZE RO
Botón
Max Ice
Botón Max Ice
SI STE MA D E PUR IFI CAC IÓ N DE AIR E
T
odos los modelos empotrables de Sub-Zero
(
excepto el modelo ICBBI-36F) incluyen un
sistema avanzado de purificación de aire. Este
sistema reduce las bacterias, los olores e incluso
el etileno, que provoca la maduración prematura
de frutas y verduras. El cartucho de purificación
de aire viene instalado de fábrica y está situado
e
n el frigorífico, en el lado derecho de la pared
trasera.
El cartucho de purificación del aire dura aproximadamente un año. El indicador parpadea
en el panel del Centro de control cuando es
necesario sustituirlo. Para sustituir el cartucho,
sujete la cubierta externa por la parte inferior y
tire de ella. Ésta saldrá hacia arriba y dejará al
descubierto otra solapa y el cartucho. Observe
la siguiente ilustración. Tire de la solapa por la
parte superior, lo que provocará que el cartucho
salga de su posición. Extraiga el cartucho.
Para volver a colocarlo, ponga el cartucho nuevo
en su sitio con el conector hacia abajo. Una vez
que esté en su lugar, cierre la solapa hasta que
haga clic. A continuación coloque la cubierta
exterior hasta que se cierre contra la pared.
Una vez colocado el cartucho de purificación
de aire, pulse el botón del Centro de control
durante cinco segundos. De esta manera se
restablecerá el indicador de purificación del
aire y ya no aparecerá.
Cartucho de pur ificación de aire
C
AR TUC HO S DE SU STI TUC IÓ N
Puede pedir los repuestos de cartuchos de
purificación de aire al ponerse en contacto con
s
u distribuidor de Sub Zero.
NOTA IMPORTANTE:
La garantía del cartucho
de purificación del aire que se suministra con
la unidad cubre únicamente defectos de los
materiales o mano de obra, pero no su
sustitución por el uso normal.
AC CES OR IOS
Podrá disponer d e accesorios opcionales a través
de su distribuid or de
Sub-Zero. Para o btener
la información d el distribuidor más ce rcano,
visite nuestra p ágina web
www.subzero.com
PRECAUCIÓN
LA BOMBILLA CONTIENE MERCURIO
A la hora de deshacerse de ella,
observe las leyes vigentes al respecto.

30
DI SPE NS AD OR DE CU BIT OS D E H IEL O
Los modelos ICBBI-42SD e ICBBI-48SD cuentan
con una función que limita la cantidad máxima
d
e hielo que se dispensa cada vez que se pulsa
el botón del hueco para vasos.
Para utilizar el dispensador de hielo, mantenga
pulsado el botón durante aproximadamente
d
os segundos. El dispensador medirá el hielo
durante alrededor de dos segundos, recogerá
los cubitos directamente encima del vaso y a
continuación los dejará caer dentro de éste. Si
desea menos hielo, mantenga pulsado el botón
menos de dos segundos. Si desea más hielo,
mantenga pulsado el botón hasta que se
repita el ciclo de dispensación.
NOTA IMPORTANTE:
asegúrese de que los
botones del dispensador estén limpios y secos
al pulsarlos para así evitar problemas en el
funcionamiento del mismo.
CO NSE JO S DE FU NCI ONA MI EN TO DEL
DI SPE NS AD OR DE HI ELO
Si no hay hielo, compruebe que el sistema
del fabricador de cubitos de hielo esté encendido y que el indicador esté iluminado en
el panel del Centro de control.
US O Y M AN TE NIM IEN TO DE P ROD UCT OS EMPO TR ABL ES DE SU B- ZE RO
DI SPE NS AD OR DE HI ELO Y A GUA
En los dispensadores de los modelos ICBBI-42SD
e
ICBBI-48SD, el dispensador automático de
a
gua y hielo le proporciona hielo y agua fría
sin necesidad de abrir la puerta.
FU NCI ON AM IE NTO DE L D IS PE NSA DOR DE
CU BIT OS D E HIE LO
Para utilizar el dispensador de cubitos de hielo
en los modelos ICBBI-42SD e ICBBI-48SD,
coloque un vaso en la rejilla del agua del hueco
para vasos y pulse de manera continua el botón
del hueco para vasos hasta tener el hielo que
necesite. Si necesita cantidades más grandes
de hielo, abra la puerta del frigorífico y coloque
un contenedor de hielo bajo la tolva del dispensador, pulse el botón
BULK ICE
situado en la
pared izquierda del interior del frigorífico.
Observe la siguiente ilustración.
Tras la puesta en marcha inicial del fabricador de
cubitos de hielo, deseche las primeras tandas de
hielo—pueden aparecer descoloridas por los
nuevos conductos del sistema.
Al principio, para que el agua salga correctamente, deberá pulsar el botón y mantenerlo
pulsado hasta que el agua fluya del dispensador.
Es posible que tenga que mantener pulsado el
botón durante 60 segundos para que se rellene
de agua el depósito interno.
NOTA IMPORTANTE:
El depósito de agua fría
s
e instala en el interior del compartimento del
frigorífico. La primera vez que se rellena el
d
epósito o después de utilizar una gran cantidad
de agua se tarda varias horas en enfriar el agua
a la temperatura del frigorífico.
LU CES D EL D ISP ENS ADO R
En los modelos con dispensador hay tres
estados de iluminación cuyos ciclos se pueden
pasar al pulsar el botón del hueco para
vasos.
Todas las luces APAGADAS
Todas las luces ENCENDIDAS (botón azul
y hueco para vasos blanco)
Sólo luces de los botones ENCENDIDAS
Al dispensar agua o cubitos de hielo, todas
las luces se iluminarán hasta que finalice la
operación, momento en el que las luces
vuelven a su estado anterior.
Asegúrese de que haya producción de hielo
en la cubeta del hielo. Consulte Extracción
d
e la cubeta del hielo, página 28.
Asegúrese de que la cubeta del hielo esté
totalmente metida y conectada con el motor
transportador de la parte trasera de la misma.
Si no está totalmente introducida, empuje la
cubeta del hielo y pulse el botón del hueco
para vasos simultáneamente.
Pulse el botón del hueco para vasos. Si
no escucha el ruido del motor transportador,
espere cinco minutos y vuelva a intentarlo. Si
tampoco escucha el ruido del transportador
tras el segundo intento, póngase en contacto
con su distribuidor de Sub-Zero.
Si no se utiliza el dispensador de hielo
durante un periodo de tiempo prolongado,
es posible que el hielo se funda. Para evitarlo,
vacíe la cubeta del hielo según sea necesario.
FU NCI ON AM IE NTO DE L D IS PE NSA DOR
DE AG UA
Para utilizar el dispensador de agua de los modelos ICBBI-42SD e ICBBI-48SD, coloque un vaso
en la rejilla del agua del hueco para vasos y
pulse de manera continua el botón del hueco
para vasos hasta que se haya llenado el vaso.
La primera vez que utilice el dispensador de
agua, purgue el sistema de agua y el depósito de
almacenamiento durante tres minutos. Con ello
eliminará todo el aire que haya en el sistema, así
como los posibles elementos extraños de la
nueva conexión de conductos.
Rejilla
del agua
Botón
para el hielo
Botón
para la luz
Botón
para el agua
Indicador
de bloqueo
Mando digital
Bisel
Hielo
a granel
Hueco para vasos —Modelos
ICBBI-42SD e ICB BI-48SD
Dispensador de h ielo a granel
Modelos ICBBI-42 SD e ICBBI48SD
No utilice el dispensador de hielo y /o agua
durante más de siete minutos seguidos para
evitar dañar el equipo.
PRECAUCIÓN
Utilice un vaso resistente para recoger los
cubitos de hielo. Si utiliza un vaso frágil,
éste se puede romper. Asimismo, para
evitar roturas, compruebe que el vaso esté
en posición vertical sobre la rejilla del agua.
PRECAUCIÓN
 Loading...