

Page 1

M SERIES OVEN
USE AND CARE GUIDE
CLEANING, MAINTENANCE, AND MORE
Page 2

M SERIES OVEN
Contents
4 Safety Precautions
6 M Series Oven Features
7 Oven Operation
17 Cooking Guide
20 Care Recommendations
21 Troubleshooting
23 Wolf Warranty
2 | Wolf Customer Care 800.222.7820
Page 3

M SERIES OVEN
Customer Care
The model and serial number are printed on the enclosed
product registration card. Both numbers are also listed on
the product rating plate. Refer to page 6 for rating plate
location. For warranty purposes, you will also need the date
of installation and name of your authorized Wolf dealer.
Record this information below for future reference.
SERVICE INFORMATION
Model Number
Serial Number
Date of Installation
Certied Service Name
Certied Service Number
Authorized Dealer
Dealer Number
If your product ever needs attention, be sure to use a Wolf
Factory Certied Service provider recommended by our
customer care center, or select one from our list of providers
available at wolfappliance.com/locator. All Factory Certied Service providers are carefully selected and thoroughly
trained by us.
Important Note
To ensure this product is installed and operated as safely
and efciently as possible, take note of the following types
of highlighted information throughout this guide:
IMPORTANT NOTE highlights information that is especially
important.
CAUTION indicates a situation where minor injury or product
damage may occur if instructions are not followed.
WARNING states a hazard that may cause serious injury or
death if precautions are not followed.
IMPORTANT NOTE: Throughout this guide, dimensions in
parentheses are millimeters unless otherwise specied.
wolfappliance.com | 3
Page 4

SAFETY PRECAUTIONS
IMPORTANT INSTRUCTIONS
GENERAL SAFETY PRECAUTIONS
• Read this guide carefully before using this appli-
ance to reduce risk of re, electric shock or injury.
• This appliance must be properly installed and ser-
viced by a qualied installer or service agency and
grounded by a qualied technician.
• Clean only those parts listed in this guide.
• Do not use oven cleaners. No commercial oven
cleaner or oven liner protective coating of any kind
should be used in or around any part of the oven.
• Do not touch heating elements or interior surfaces
of oven. Heating elements may be hot even though
they are dark in color. Interior surfaces become hot
enough to cause burns. During and after use, do
not touch, or let clothing or other ammable materials contact heating elements or interior surfaces
of oven until they have had sufcient time to cool.
• Exercise caution when opening the oven door. Let
hot air or steam escape before looking or reaching
into the oven.
• Always use dry pot holders when removing pans
from this appliance. Wet or damp pot holders can
cause steam burns. Do not use a towel or bulky
cloth in place of pot holders.
• Position oven racks in desired locations when oven
is cool. If a rack must be repositioned after the
oven is already hot, be sure pot holder does not
contact a hot heating element in the oven.
• Do not repair or replace any part of this appli-
ance unless specically recommended in literature
accompanying this appliance.
• Do not use aluminum foil to line any part of this
appliance.
• Never use this appliance to warm or heat the room.
• Do not leave children alone or unattended in the
area where this appliance is in use. Never allow
children to sit or stand on the appliance.
• Do not store items of interest to children above or
at the back of this appliance, as they could climb
on the appliance to reach items and be injured.
• Be sure that the oven cool air intake (located above
the door) and oven exhaust vent (located below the
door) are unobstructed at all times.
CAUTION
Before using self-clean, remove broiler pan, oven
racks, oven rack guides and any other utensils.
4 | Wolf Customer Care 800.222.7820
Page 5
SAFETY PRECAUTIONS
IMPORTANT INSTRUCTIONS
GENERAL SAFETY PRECAUTIONS
• Do not use water on grease res. Smother
the ame or use a dry chemical or foam-type
extinguisher.
• Do not heat unopened food containers, such as
baby food jars and cans. Pressure build-up may
cause the container to burst and cause injury.
• Do not store or use gasoline or other ammable
vapors and liquids in the vicinity of this or any other
appliance.
• Do not clean oven gasket; rubbing or moving the
gasket may compromise the door seal.
• Wear proper apparel. Loose-tting or hanging
garments should never be worn while using this
appliance.
• For contemporary models, press the upper middle
section of the door rmly to open. To close, rotate
the door upward, then press rmly to close. Refer
to the illustration below.
WARNING
PROPOSITION 65 FOR CALIFORNIA RESIDENTS
Cancer and Reproductive Harm—
www.P65Warnings.ca.gov
PRESS TO OPEN
Contemporary model
wolfappliance.com | 5
Page 6
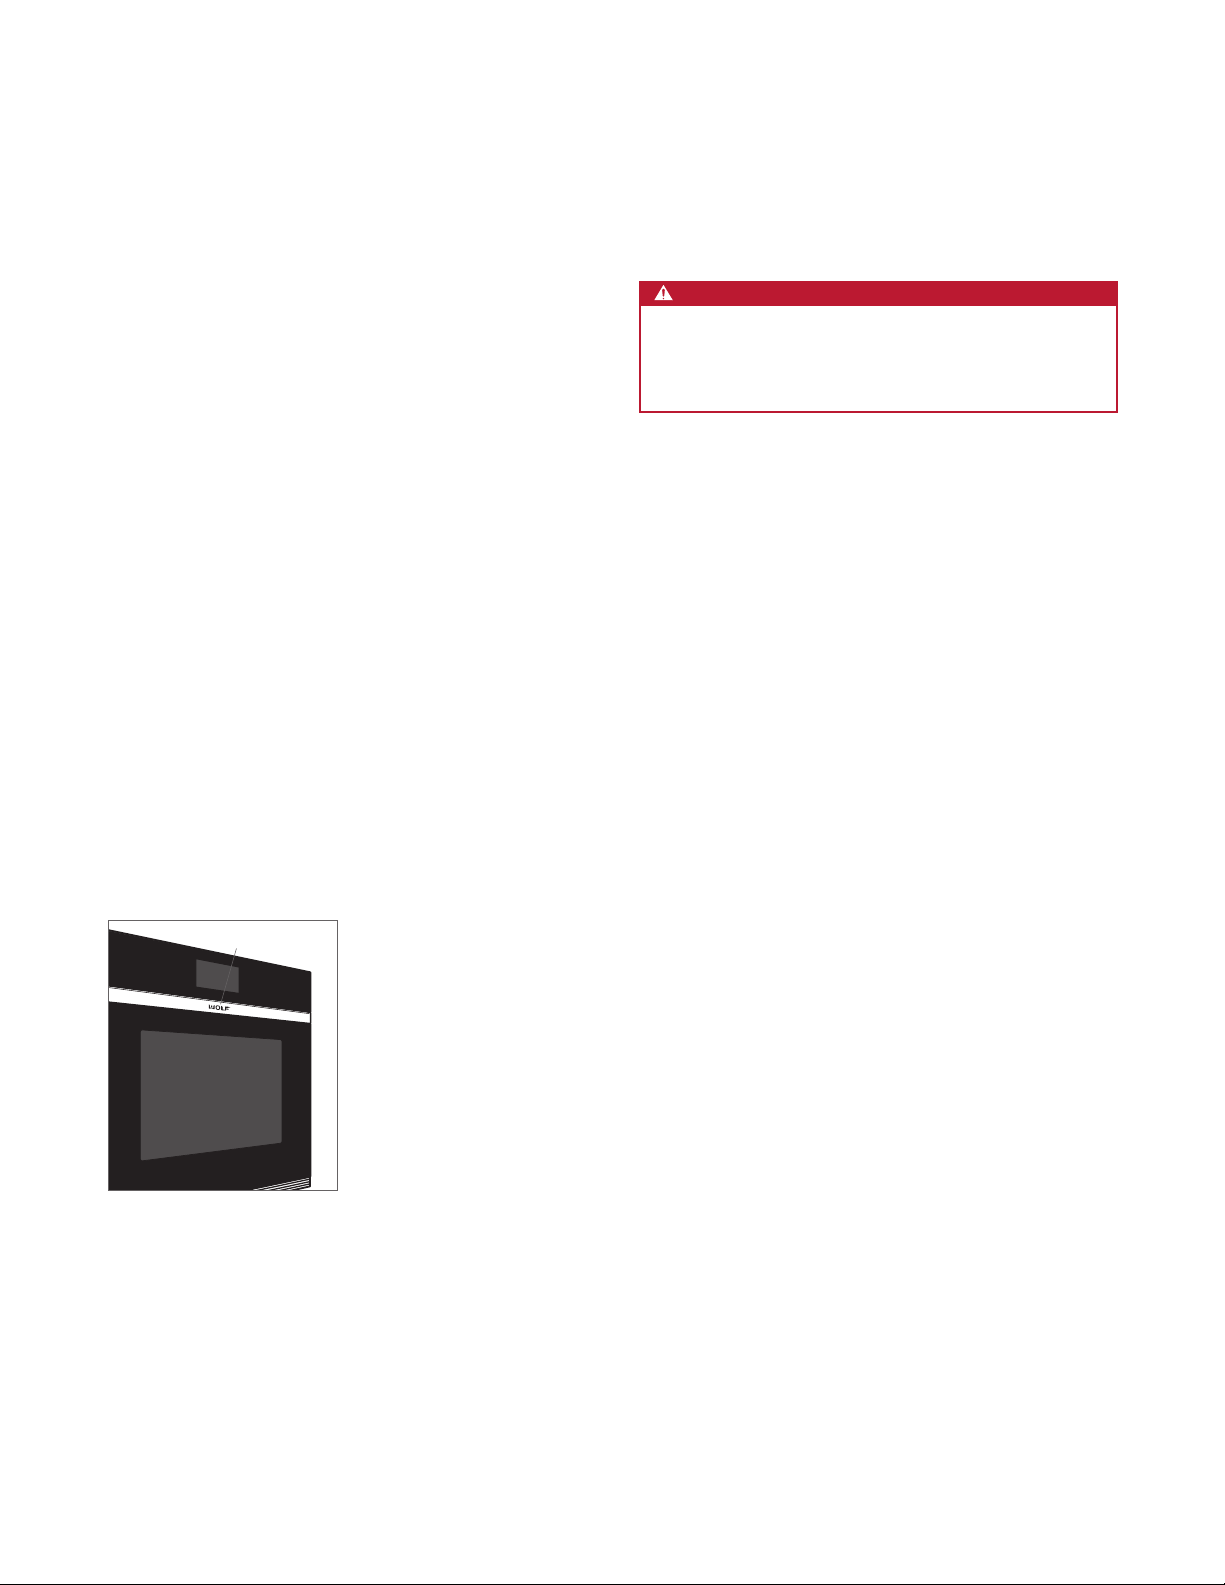
M SERIES OVEN FEATURES
M Series Oven Features
FEATURES
1
Product Rating Plate (lower oven for double ovens)
2
Adjustable Oven Rack
3
Full-Extension Oven Racks
4
Control Panel and Display
5
Control Knobs (professional model)
6
Convection Fans
7
Temperature Probe Receptacle
8
Halogen Lighting
4
Getting Started
We know you are eager to start cooking, but before you
do, please take some time to read this use & care guide.
Whether you are an occasional cook or an expert chef, it
will be to your benet to familiarize yourself with the safety
practices, features, operation and care recommendations
of your Wolf M series oven.
To ensure the best results, review cooking modes and
special features on page 12.
CAUTION
Do not place cookware on the oven oor or use
aluminum foil or other material to line the oven oor or
side walls. Failure to adhere to this notice will damage
the porcelain interior and will void your warranty.
4
5
7
6
1
M series single oven—transitional
7
8
2
3
6
8
2
3
M series double oven—professional
6 | Wolf Customer Care 800.222.7820
Page 7
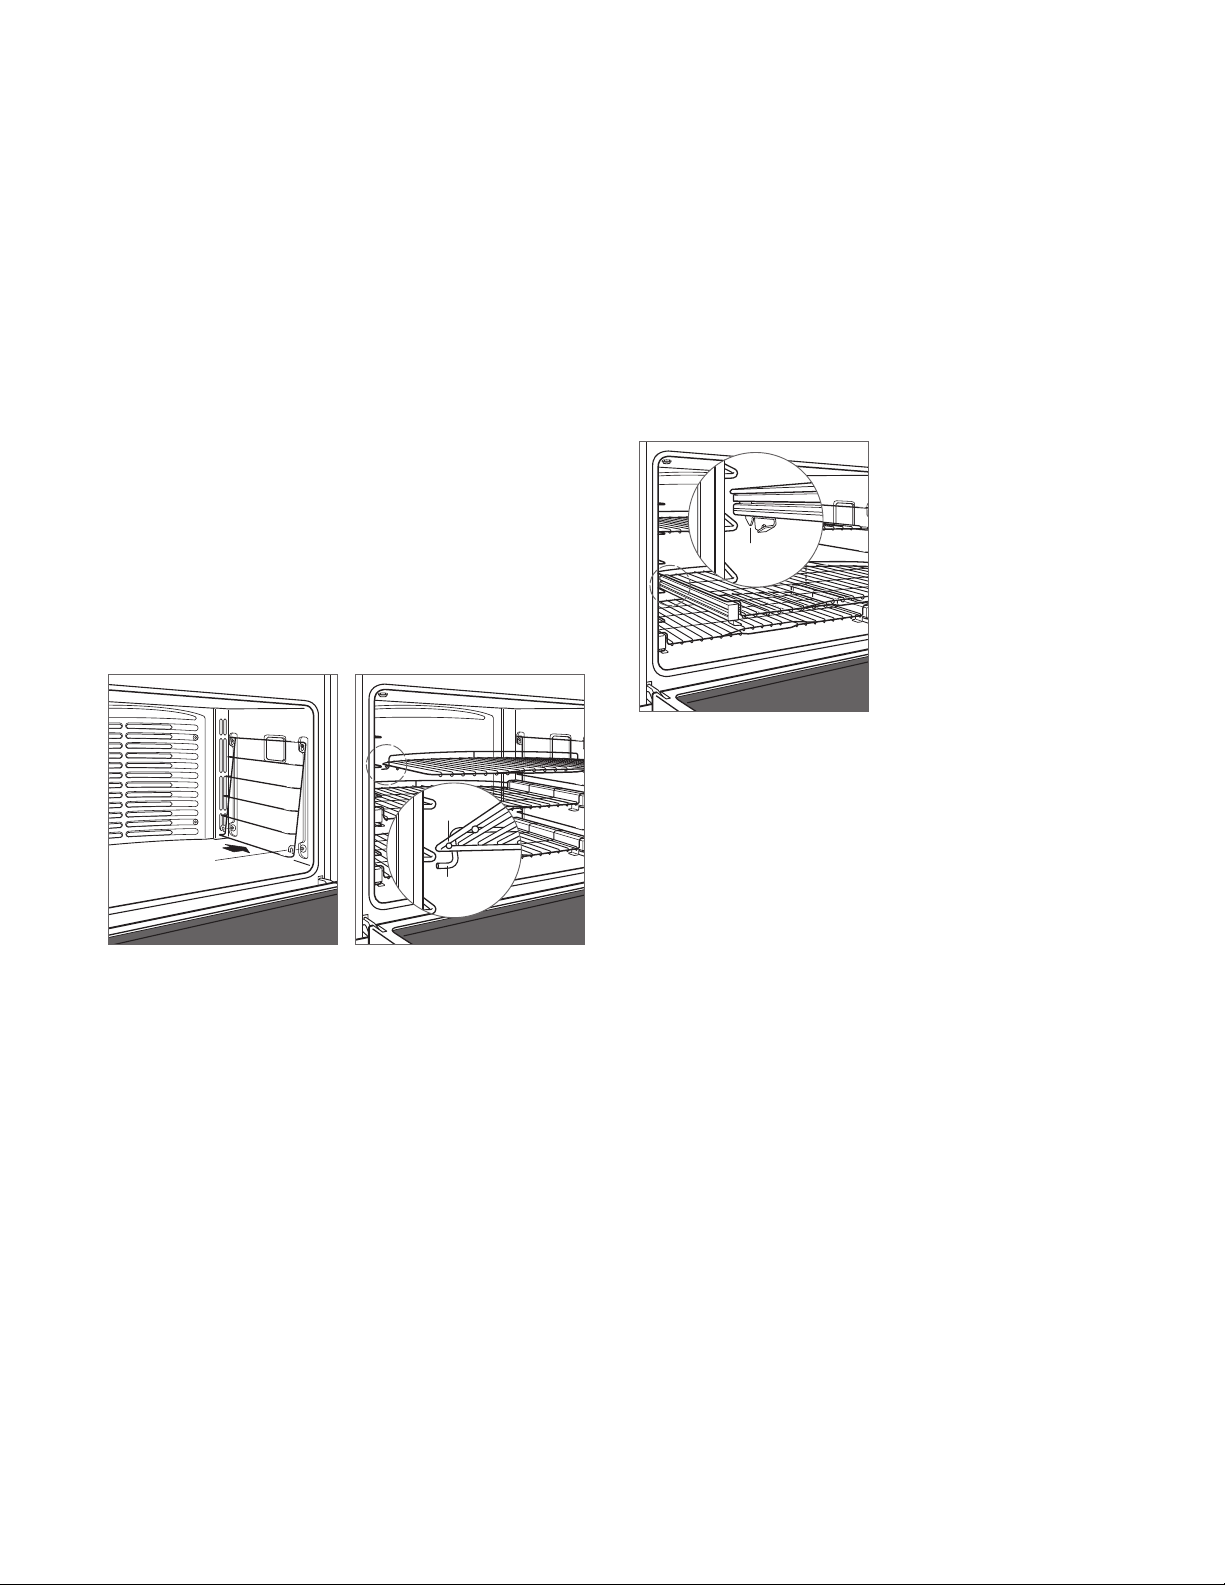
OVEN OPERATION
Oven Racks
OVEN RACK GUIDES
To insert the rack guides in the oven, locate the mounting
screws on the oven side walls. Place the rack guide
mounting tabs over the top screws, pivot inward and slide
down until fully seated. Refer to the illustration below.
OVEN RACKS
To insert a standard rack in the oven, place the rack anti-tip
lock under the side rack guide rails. Slide the rack back
and lift up to clear the rack stops. Continue to slide the
rack back until completely inside the oven. Refer to the
illustration below.
RACK
STOP
MOUNTING
TA B
ANTI-TIP
LOCK
To insert a full-extension rack, place the two rear tabs onto
the rack guide (one tab above and one below). Refer to the
illustration below. Angle the rack slightly and slide back until
the front rack notch engages the front rack guide.
REAR TAB
Full-extension rack
Oven rack guide
Oven rack anti-tip lock
wolfappliance.com | 7
Page 8
OVEN OPERATION
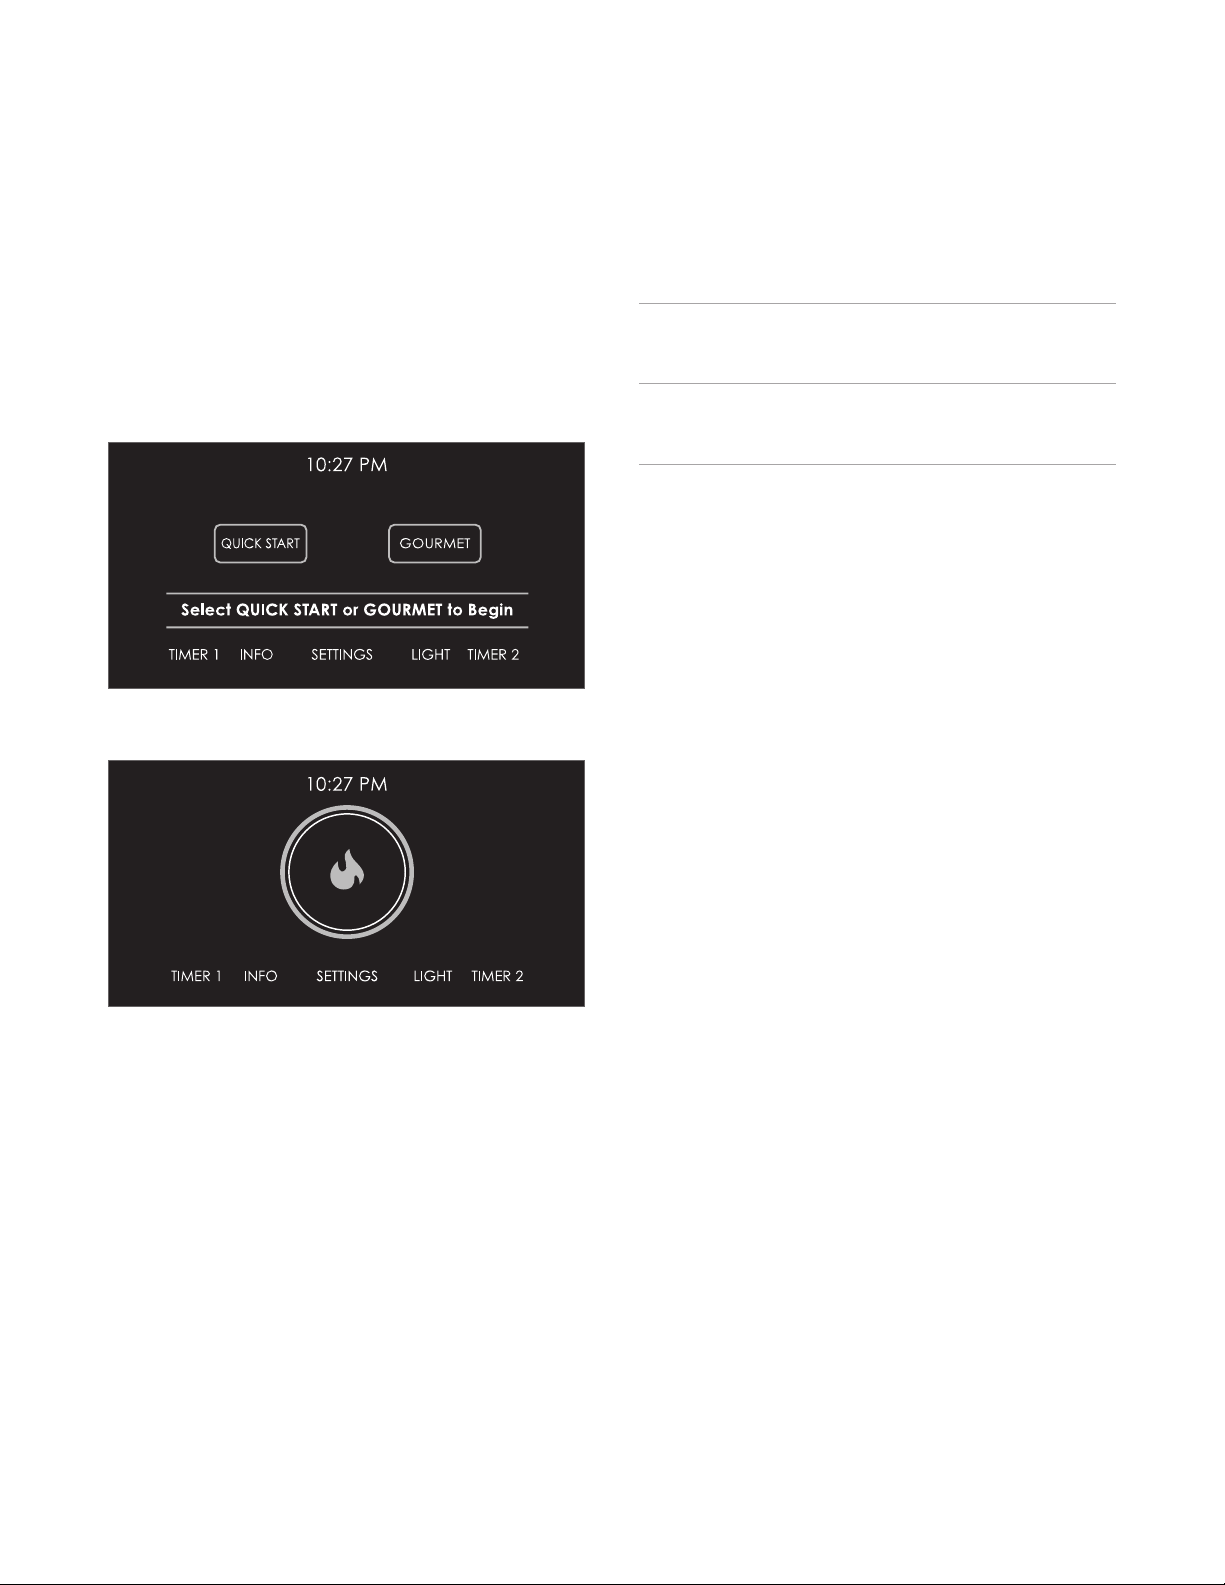
Interactive Control Panel
The interactive control panel utilizes touch technology to
select cooking modes and other functions. Refer to the
illustrations below. For professional models, cooking modes
and temperatures are selected using selector knobs.
Home screen—single transitional and contemporary shown
COOKING OPTIONS
QUICK
START
GOURMET Touch to initiate Gourmet meal preparations, then
Touch to initiate cooking, then select from options
on the control panel. For professional model, turn
selector knob to desired mode.
select from options on the control panel. For professional model, turn selector knob to GOURMET.
Home screen—single professional shown
8 | Wolf Customer Care 800.222.7820
Page 9

OVEN OPERATION
Oven Operation
PRIOR TO USE
To ensure all residual oil from the manufacturing process
has been removed, each oven must go through the following procedure:
1 Clean oven thoroughly with hot water and a mild deter-
gent. Rinse and dry with a soft cloth.
2 Turn on ventilation. Some smoke and odor is normal.
3 Touch or turn knob to CONVECTION ROAST and adjust
temperature to 500°F
4 Touch OFF (turn knob for professional model) and allow
(260°C) for one hour.
oven to cool with door closed.
PREHEAT
During preheat, the oven is heated as quickly and evenly
as possible and is not ideal for cooking. Preheat should be
utilized for all cooking modes except broil, warm and some
modes in Gourmet. Once preheat is complete, an audible
chime indicates the oven has reached set temperature.
CLOCK
The clock is visible on the control panel during all cooking
modes, however, the oven is shipped with the standby
power feature enabled which causes the screen to go blank
after ve minutes of inactivity. To disable standby power,
refer to extended options on page 10. It is very important
the clock is set to the correct time if a timed cook feature is
used. The clock must be reset after a power outage.
Setting clock:
1 Touch SETTINGS, then select TIME.
2 Touch 12 HOUR or 24 HOUR mode.
3 Use slide bar to set time of day, select AM or PM, then
touch SET. An audible chime indicates the clock has
been set.
Time can also be adjusted by touching the time display on
the home screen.
wolfappliance.com | 9
Page 10

OVEN OPERATION
Oven Operation
TIMER
Each timer can be set for a maximum of 11 hours and 59
minutes. Once a time is set, the countdown is illuminated
on the control panel display. The timer is independent from
the oven. Setting the timer does not affect cook time or stop
time.
Setting timer:
1 Touch TIMER 1 or TIMER 2.
2 Use slide bar to set duration, then touch SET. An audible
chime indicates the timer has been set.
3 To cancel or edit, touch the countdown time on the
display.
4 Oven will chime and time will ash when complete. Timer
will continue to chime until canceled or reset.
EXTENDED OPTIONS
Touch SETTINGS to access extended options. Touch or use
the slide bar to select the desired option. If more information
is needed, touch INFO.
• Temperature Offset (service only).
• Calibration—screen calibration.
• Sound—volume and tone.
• Brightness.
• Time—12 hour or 24 hour.
• Sabbath Mode.
• Clock—digital or analog.
• Standby Power.
• Language.
• Units—°F/Imperial or °C/Metric.
• Showroom Mode (for showroom use only).
• About (service only).
10 | Wolf Customer Care 800.222.7820
Page 11

OVEN OPERATION
Cooking Modes
The oven has ten cooking modes—bake, roast, broil, convection roast, convection, Gourmet, proof, stone, dehydrate
and warm. Stone and dehydrate require accessories. Refer
to the chart on page 12.
SETTING CONTROLS
1 Touch QUICK START. Oven will default to BAKE mode.
Touch or use slide bar to select desired cooking mode.
For professional model, turn selector knob to desired
cooking mode.
2 Touch START to select preset temperature. To change
temperature, touch or use slide bar to select desired
temperature, then touch START. For professional model,
turn selector knob to adjust temperature.
3 Touch OFF to end mode. For professional model, turn
selector knob to OFF.
GOURMET
Gourmet provides a variety of quick and convenient meal
preparations. Gourmet also provides recommendations for
ideal rack positions and tips to ensure cooking condence.
Choose from six categories—meat, sh, baked goods,
pizza, vegetables and one dish meals. Each category can
be rened to ensure the most effective cooking mode and
rack position to create a cooking masterpiece. Refer to the
Gourmet guide below.
GOURMET GUIDE
MEAT Beef* steak, tenderloin, roast,
prime rib, meatloaf, slow cook
Poultry* whole bird, fresh pieces, whole
breast
Pork* ribs, tenderloin, roast, steak,
chop, whole ham
Lamb* leg, roast, rib rack
FISH Steak*
Fillet*
BAKED GOODS Cookies
Cake sheet, uted, angel, pound,
cupcakes
Pie single crust, double crust
Bread quick bread, yeast loaf,
yeast rolls, biscuits
PIZZA Fresh
Par-Baked
Calzone
VEGETABLES Roasted
Sweet Potato*
Baked Potato*
ONE DISH MEALS Casserole*
Lasagna*
Quiche
*Does not require preheat.
wolfappliance.com | 11
Page 12

OVEN OPERATION
Cooking Modes
MODE PRESET RANGE PROBE USES
BAKE 350°F
(175°C)
200 – 550°F
(95 – 290°C)
Best for single-rack cooking, primarily baked foods. Use for
•
standard recipes.
ROAST 350°F
(175°C)
BROIL High
Med
Low
CONVECTION ROAST 325°F
(165°C)
CONVECTION 325°F
(165°C)
200 – 550°F
(95 – 290°C)
550°F (290°C)
450°F (230°C)
350°F (175°C)
200 – 550°F
(95 – 290°C)
200 – 550°F
(95 – 290°C)
GOURMET — —
PROOF 85°F
(30°C)
STONE 450°F
(230°C)
DEHYDRATE 135°F
(60°C)
WARM 180°F
(80°C)
85 – 110°F
(30 – 45°C)
200 – 550°F
(95 – 290°C)
110 – 170°F
(45 – 75°C)
140 – 200°F
(60 – 95°C)
Best for roasting less tender cuts of meat, such as chuck roasts
•
and stew meat that should be covered.
Best for broiling meats, sh and poultry pieces up to 1" thick.
Utilize two-piece broiler pan and always broil with oven door
closed.
Gently browns exterior and seals in juices. Perfect for roasting
•
tender cuts of beef, lamb, pork and poultry.
Uniform air movement makes it possible to multi-level rack cook
•
with even browning.
Gourmet provides quick and convenient meal preparations with
•
recommendations for cooking mode and rack position. Refer to
page 11. Preset temperature and range are dependent on food
and desired doneness.
Ideal for proong, or rising bread dough. Refer to page 13.
Baking on a ceramic stone. Great for pizza and bread. Stone
•
accessory required. Refer to page 13.
Dry a variety of fruits, vegetables, herbs and meat strips.
Accessory racks required. Refer to page 13.
Designed to keep foods at serving temperature.
•
12 | Wolf Customer Care 800.222.7820
Page 13

OVEN OPERATION
Cooking Modes
PROOF
Setting controls:
1 Touch QUICK START, then select PROOF. For profes-
sional model, turn selector knob to MORE, then select
PROOF on the control panel.
2 Touch START to select preset temperature. To change
temperature, touch or use slide bar to select desired
temperature, then touch START. For professional model,
turn selector knob to adjust temperature.
3 Touch OFF to end mode. For professional model, turn
selector knob to OFF.
STONE
Accessory kit required. Accessories are avail able through an
authorized Wolf dealer. For local dealer information, visit the
nd a showroom section of our website, wolfappliance.com.
Additional use & care information is included with the
accessory kit.
Setting controls:
1 Touch QUICK START, then select STONE. For profes-
sional model, turn selector knob to MORE, then select
STONE on the control panel.
DEHYDRATE
Accessory kit required. Accessories are avail able through an
authorized Wolf dealer. For local dealer information, visit the
nd a showroom section of our website, wolfappliance.com.
Additional use & care information is included with the
accessory kit.
Setting controls:
1 Place door stop supplied with accessory kit.
2 Touch QUICK START, then select DEHYDRATE. For pro-
fessional model, turn selector knob to MORE, then select
DEHYDRATE on the control panel.
3 Touch START to select preset temperature. To change
temperature, touch or use slide bar to select desired
temperature, then touch START. For professional model,
turn selector knob to adjust temperature.
4 Touch OFF to end mode. For professional model, turn
selector knob to OFF.
2 Touch START to select preset temperature. To change
temperature, touch or use slide bar to select desired
temperature, then touch START. For professional model,
turn selector knob to adjust temperature.
3 Touch OFF to end mode. For professional model, turn
selector knob to OFF.
wolfappliance.com | 13
Page 14
OVEN OPERATION
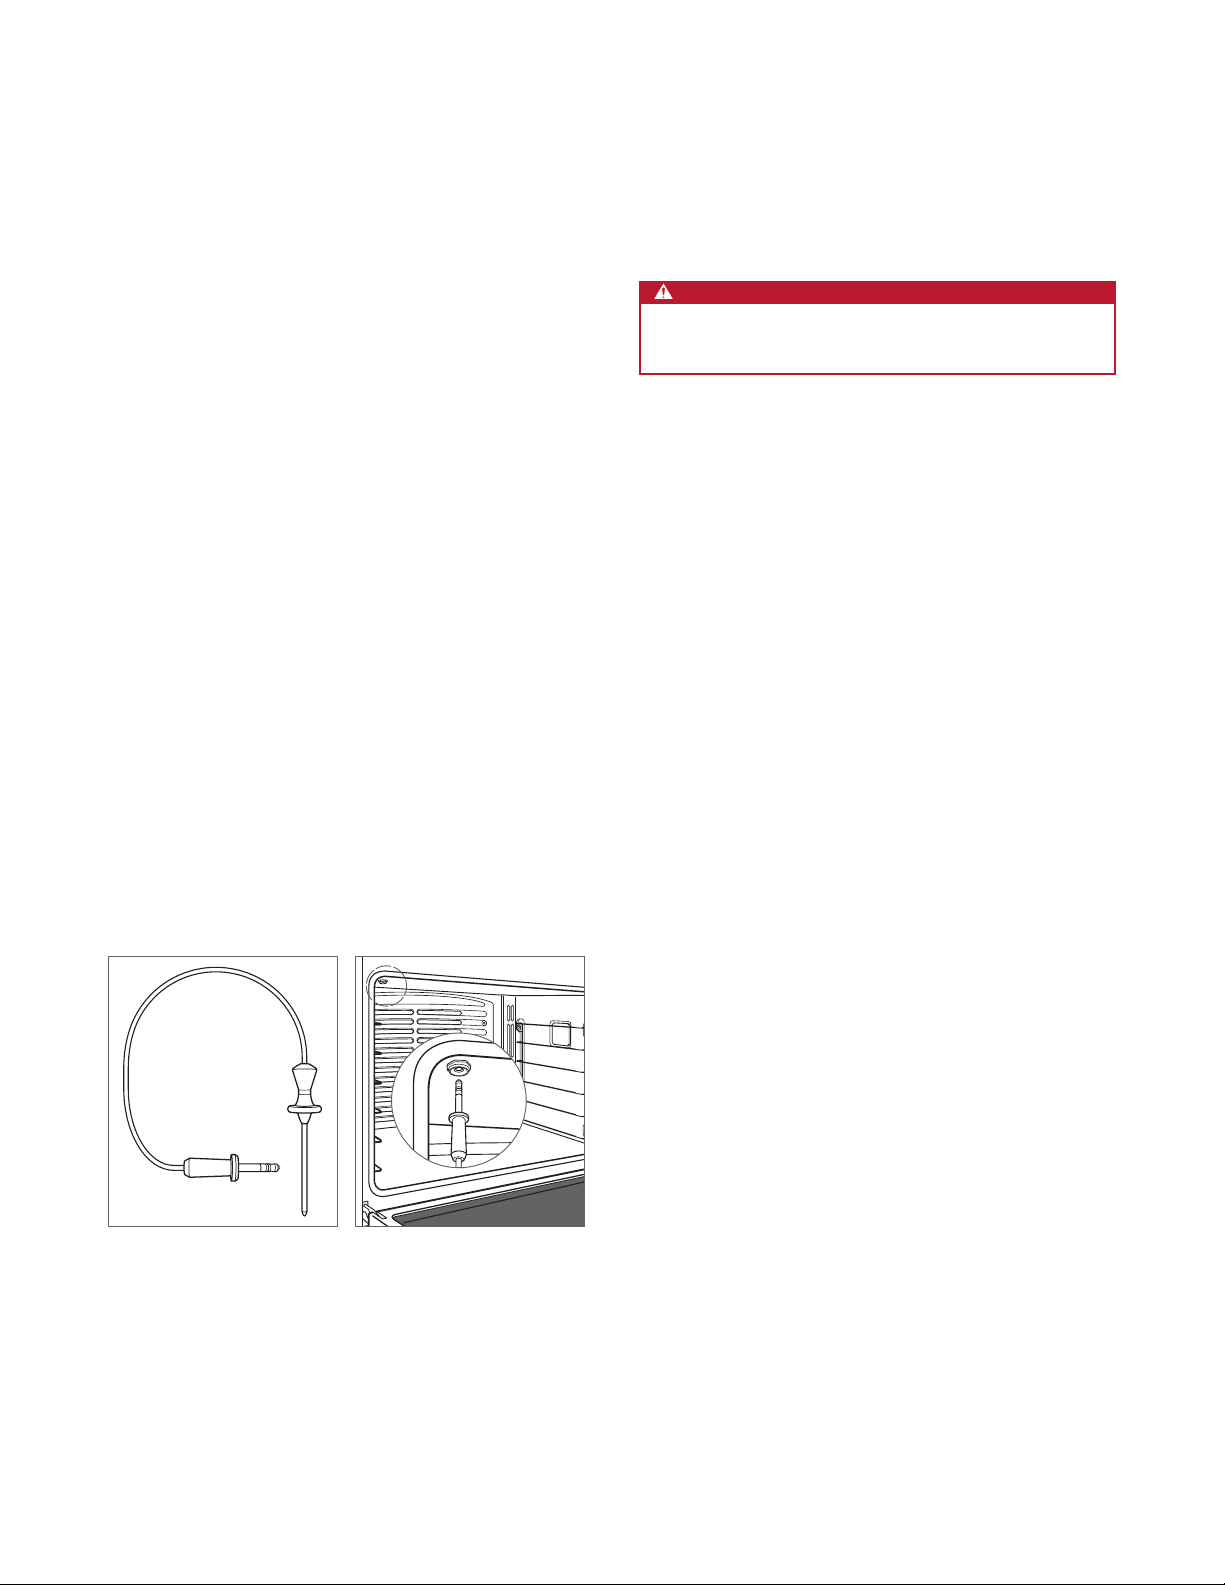
Temperature Probe
Use only the temperature probe shipped with this appliance. Refer to the illustration below. The temperature probe
measures the internal temperature of food while cooking. It
can be used with all cooking modes except broil, proof and
dehydrate.
Setting controls:
1 Preheat oven to desired oven temperature in desired
mode (BAKE or STONE mode for breads).
2 Insert probe into the thickest area of food. When making
bread, cook for approximately 10 minutes before
inserting probe.
3 When preheat is complete, insert probe into probe
receptacle. Refer to the illustration below. Close oven
door.
4 Touch PROBE.
5 Touch SET to select preset temperature. To change
temperature, use slide bar to select desired temperature,
then touch SET.
6 An audible chime indicates internal temperature has
reached probe setpoint. Remove and reinsert probe to
verify internal temperature, then select OK or OFF.
CAUTION
Probe and probe receptacle will be very hot. Handle
with care.
Temperature probe
14 | Wolf Customer Care 800.222.7820
Probe receptacle
Page 15

OVEN OPERATION
Auto Program
TIMED COOK | DELAYED START
Timed cook automatically turns the oven off at a specied
time. The oven will begin to heat immediately and will turn
off at the desired stop time. Delayed start automatically
turns the oven on and off at specied times. The oven will
remain idle until the desired start time and will turn off at the
desired stop time. If preheat is required, preheat time must
be accounted for when determining cooking duration. The
clock must be set to the correct time to function properly.
Use in any cooking mode except broil, Gourmet or stone.
Setting controls:
1 Touch QUICK START, then select desired cooking mode
and temperature. For professional model, turn selector
knobs to desired mode and temperature.
2 Touch TIMED COOK, then select cooking duration.
3 Touch SET to conrm stop time or use slide bar to select
desired stop time, then touch SET. Cooking duration and
stop time will appear on the display. Oven will chime with
one minute remaining. Oven will chime when complete
and will continue to chime until canceled or reset.
Sabbath
This appliance is certied by Star-K to meet strict religious
regulations in conjunction with specic instructions found
on www.star-k.org.
Roast, bake, proof and warm modes can be used in
Sabbath.
Setting controls:
1 Turn oven light on or off.
2 Touch SETTINGS, then select SABBATH MODE.
3 Touch ON, then touch SET.
4 Select cooking mode and temperature, then touch
START.
5 Touch to initiate Sabbath mode.
6 Touch OFF to end mode. For professional model, turn
selector knob to OFF.
4 To cancel, reset or turn oven off, touch TIMED COOK.
5 Oven will automatically turn off when cook time is com-
plete. Touch OK to clear display.
wolfappliance.com | 15
Page 16
OVEN OPERATION
LIGHT
COVER
Clean
During clean, the oven is heated to an extremely high temperature to burn off food soil. Oven lights are disabled.
Setting controls:
1 Touch QUICK START, then select CLEAN. For profes-
sional model, turn selector knob to MORE, then select
CLEAN on the control panel.
2 Remove oven racks and rack guides, then touch OK.
3 Touch START.
4 Touch OFF to end mode. For professional model, turn
selector knob to OFF.
5 Oven door will lock and remain locked until clean cycle
has ended and oven temperature has cooled below
(290°C).
550°F
CAUTION
During clean, exterior surfaces may get hotter than
usual. Children should be kept away.
Oven Light
WARNING
Verify power is disconnected from the electrical box
before replacing a light bulb.
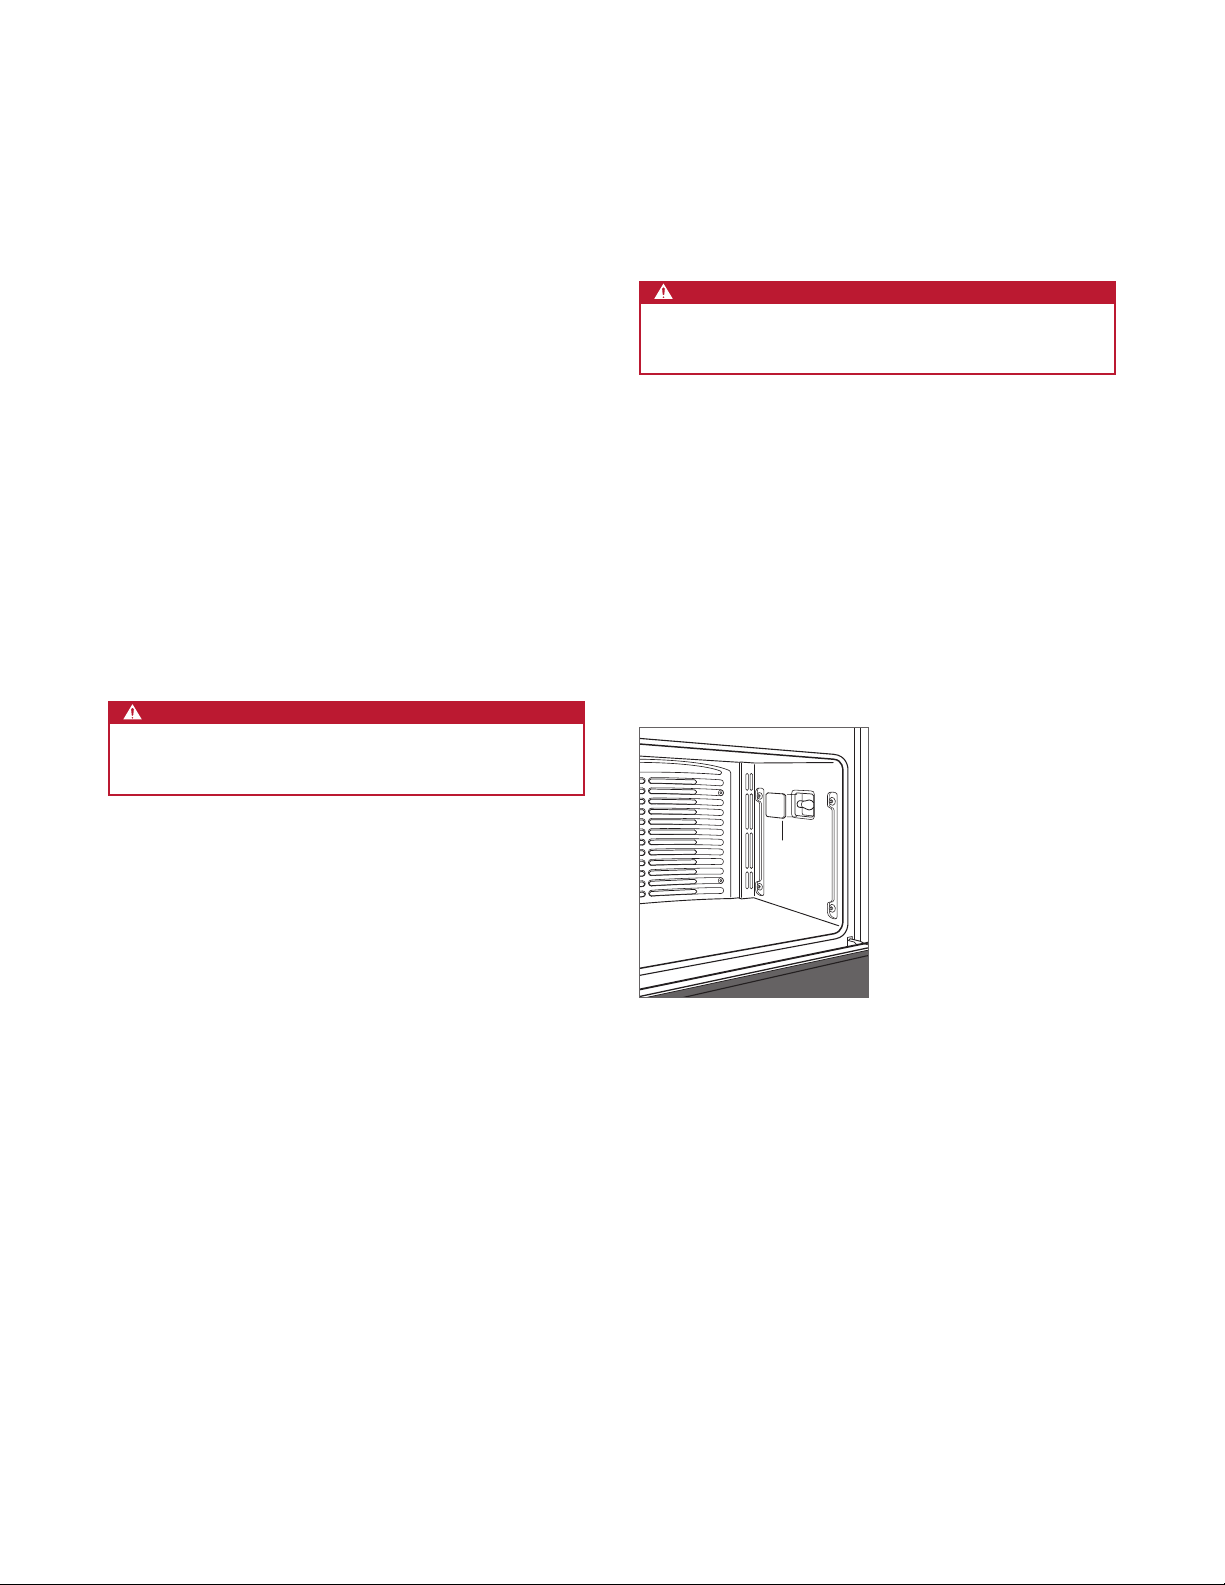
Allow the oven to cool completely, then remove oven racks
and rack guides. To remove the light cover, gently pry the
bottom edge with a at screwdriver. Remove the existing
bulb and replace with a 40-watt halogen bulb. Refer to the
illustration below.
To replace the light bulb located on the top of the oven
cavity, contact Wolf Factory Certied Service. For the name
of the nearest Wolf Factory Certied Service, check the contact & support section of our website, wolfappliance.com or
call Wolf customer care at 800-222-7820.
16 | Wolf Customer Care 800.222.7820
Light bulb replacement
Page 17

COOKING GUIDE
Wolf Cooking Guide
FOOD RACK(S) MODE OVEN TEMP POSITION TIME NOTES
BREADS
Biscuits 1 Roast 400°F (205°C) 3 5–10 min
2 Convection 425°F
3 Convection 425°F
Cinnamon rolls 1 Bake 350°F
2 Convection 325°F
3 Convection 325°F
Mufns 1 Bake 400°F (205°C) 3 15–20 min
2 Convection 375°F
3 Convection 375°F (190°C) 2, 4, 6 10–15 min
Yeast rolls 1 Convection 375°F
2 Convection 375°F
3 Convection 375°F
Yeast bread (loaf pan) 1 Bake 350°F
Yeast bread (no pan) 1 Stone 450°F (230°C) 1 15–45 min
Quick breads 1 Bake 350°F
Garlic bread 1 Broil
Toast 1 Broil High 5
(220°C) 2, 5 5–10 min
(220°C) 2, 4, 6 5–10 min
(175°C) 3 20–25 min
(165°C) 2, 5 20–25 min
(165°C) 2, 4, 6 20–25 min
(190°C) 2, 5 10–15 min
(190°C) 3 10–20 min
(190°C) 2, 5 10–20 min
(190°C) 2, 4, 6 10–20 min
(175°C) 3 20–45 min
(175°C) 3 40–50 min
Med
5
CAKES
Angel food cake 1 Bake 350°F (175°C) 1 35–45 min
Bundt or pound cake 1 Bake 350°F
(175°C) 3 40–50 min
Mixes or from scratch 1 Bake 350°F (175°C) 3 20–30 min
2 Convection 325°F
3 Convection 325°F
Cupcakes 1 Bake 350°F
2 Convection 325°F
3 Convection 325°F
COOKIES
(165°C) 2, 5 20–30 min
(165°C) 2, 4, 6 20–30 min
(175°C) 3 20–25 min
(165°C) 2, 5 15–25 min
(165°C) 2, 4, 6 15–25 min
Cookies or bars 1 Bake 350°F (175°C) 3 10–25 min
2 Convection 325°F
3 Convection 325°F
PIES
(165°C) 2, 5 10–25 min
(165°C) 2, 4, 6 10–25 min
2-crust, lled or streusel topped 1 Bake 375°F (190°C) 3 40–45 min
Lemon meringue 1 Broil Low 3 10–15 min
Pumpkin or custard 1 Bake 425°F
(220°C) /
3 see note Bake for 15 min at 425°F, reduce
325°F (165°C)
Pie crust (empty) 1 Bake 425°F (220°C) 3 10–15 min
Puff pastry 1 Bake 400°F
2 Convection 375°F
3 Convection 375°F
Cream puffs 1 Convection 400°F
Consuming raw or undercooked meats, poultry, seafood, shellsh or eggs may increase your risk of foodborne illness.
(205°C) 3 10–15 min
(190°C) 2, 5 10–15 min
(190°C) 2, 4, 6 10–15 min
(205°C) 3 20–30 min
temp to 325°F and bake until pie is
set, 45–60 min.
wolfappliance.com | 17
Page 18

COOKING GUIDE
Wolf Cooking Guide
FOOD MODE OVEN TEMP RACK TIME PROBE TEMP NOTES
BEEF
Ground patties Broil High 5 10–15 min Turn over at 7 min.
Steaks (under 1" thick) Broil High 5 10–15 min Turn over at 6 min.
Steaks (1–3" thick) Broil High 5 10–20 min Turn over at 8 min.
Chuck roast Conv Roast 325°F
Roast 350°F
Roast Roast 425°F (220°C) /
(165°C) 3 20–25 min/lb Med 150°F (65°C) Place in dish, liquid
(175°C) 3 20–25 min/lb Med 150°F (65°C)
of the meat.
2 see note Rare 135°F (60°C) Roast for 30 min at 425°F, reduce
325°F (165°C)
temp to 325°F and cook to desired
internal temp.
Slow roast Bake 300°F (150°C) 2 Place in covered dish, liquid 1/4 the
height of the meat.
Prime rib Roast 450°F
225°F (105°C)
(230°C) /
2 see note Rare 130°F (55°C) No preheat required. Roast for
30 min at 450°F, reduce temp to
225°F and cook to desired internal
temp.
Tenderloin Conv Roast 450°F (230°C) 3 10–20 min/lb Rare 130°F (55°C)
1
/2 the height
POULTRY
Chicken, bone-in Conv Roast 325°F (165°C) 5 20–25 min Thigh 180°F (80°C)
Chicken, whole Conv Roast 325°F (165°C) 2 10–20 min/lb Thigh 180°F (80°C)
Turkey, whole (brined) Bake 350°F (175°C) 1 10–15 min/lb Thigh 180°F (80°C)
Turkey, whole Conv Roast 325°F (165°C) 1 10–15 min/lb Thigh 180°F (80°C)
Roast 325°F (165°C) 1 10–15 min/lb Thigh 180°F (80°C)
Duck Conv Roast 325°F (165°C) 2 15–20 min/lb Thigh 180°F (80°C)
Goose Conv Roast 325°F (165°C) 2 15–20 min/lb Thigh 180°F (80°C)
Cornish hen Conv Roast 325°F (165°C) 3 1 hour Thigh 180°F (80°C)
Roast 350°F (175°C) 3 1 hour Thigh 180°F (80°C)
Chicken quarters, thighs Broil Med 5 20–25 min Turn over halfway through broiling.
Roast 350°F (175°C) 3 30–40 min Thigh 180°F (80°C)
Conv Roast 325°F (165°C) 3 30–40 min Thigh 180°F (80°C)
Bake 350°F (175°C) 3 30–40 min Thigh 180°F (80°C)
Turkey pieces Conv Roast 325°F (165°C) 3 30–40 min Thigh 180°F (80°C)
Roast 350°F (175°C) 3 30–40 min Thigh 180°F (80°C)
Chicken boneless breast Broil Med 5 10–15 min Turn over halfway through broiling.
1
(attened to
/2" thick) Conv Roast 350°F (175°C) 3 15–20 min Breast 165°F (75°C)
Turkey breast, whole Conv Roast 325°F (165°C) 2 15–20 min Breast 165°F (75°C)
Roast 350°F (175°C) 2 15–20 min Breast 165°F (75°C)
Consuming raw or undercooked meats, poultry, seafood, shellsh or eggs may increase your risk of foodborne illness.
18 | Wolf Customer Care 800.222.7820
Page 19

COOKING GUIDE
Wolf Cooking Guide
FOOD MODE OVEN TEMP RACK TIME PROBE TEMP NOTES
PORK
Chops, steaks (1/2" thick) Broil High 5 5–10 min Turn over halfway through broiling.
Conv Roast 350°F
Slow roast Bake 300°F
Ribs Bake 300°F
Tenderloin Conv Roast 400°F
Ham steak (1/2" thick) Broil High 5 5–10 min Turn over halfway through broiling.
Ham steak (1" thick) Broil High 5 10–15 min Turn over halfway through broiling.
Ham, whole Bake 335°F
LAMB
Chops, steaks (3/4" thick) Broil High 5 5–10 min Turn over halfway through broiling.
Leg Conv Roast 425°F
Veal roast Conv Roast 300°F
Crown rack Conv Roast 325°F (165°C) 2 15–20 min/lb 145°F (65°C)
(175°C) 3 10–15 min
(150°C) 2 Place in covered dish, liquid
height of the meat.
(150°C) 3 Place in foil packets or covered
dish, liquid 1/4 the height of the
meat.
(205°C) 3 15–20 min/lb Rare 130°F (55°C)
(170°C) 2 10–15 min/lb 160°F (70°C) Cover and rest 15 min.
(220°C) /
325°F (165°C)
2 see note 145°F (65°C) Roast for 30 min at 425°F, reduce
temp to 325°F and cook to desired
internal temp.
(150°C) 2 30–35 min/lb 140°F (60°C)
1
/4 the
PIZZA
Calzones Stone 375°F (190°C) 1 10–15 min
Homemade Stone 450°F
(230°C) 1 5–15 min
French bread pizza Broil Med 5 10–15 min
FISH
Fillet (under 1" thick) Broil Med 5 10–20 min
Fillet (over 1" thick) Conv Roast 375°F (190°C) 5 15–25 min
VEGETABLES
Potatoes, sweet potatoes Bake 350°F (175°C) 3 45–60 min
Mixed vegetables Conv Roast 400°F
OTHER
Meatloaf Roast 425°F (220°C) /
(205°C) 4 10–20 min
2 see note 165°F (75°C) Roast for 20 min at 425°F, reduce
325°F (165°C)
temp to 325°F and cook to desired
internal temp.
Sausage, bratwurst (fresh) Broil Med 5 10–15 min Turn over halfway through broiling.
Nachos Broil Low 3 15–20 min
Quiche Bake 350°F
One dish meals Bake 350°F
Consuming raw or undercooked meats, poultry, seafood, shellsh or eggs may increase your risk of foodborne illness.
(175°C) 3 40–50 min
(175°C) 3 45–60 min 175°F (80°C)
wolfappliance.com | 19
Page 20

CARE RECOMMENDATIONS
Care Recommendations
CLEANING
Stainless steel Use a nonabrasive stainless steel cleaner and apply with a soft lint-free cloth. To bring out the natural
luster, lightly wipe surface with a water-dampened microber cloth followed by a dry polishing chamois.
Always follow the grain of stainless steel.
Black glass Spray glass cleaner on a cloth to clean.
Oven racks and guides Remove and place on a at surface near the sink. Clean with hot water and mild detergent or paste of
baking soda and water. Do not immerse in water. Towel dry.
Control panel Use a spray degreaser to remove ngerprints and food soil. Spray on a cloth before wiping panel.
IMPORTANT NOTE: Do not spray cleaners directly on control panel.
Oven interior Before utilizing the clean feature, use a razor blade to gently lift baked on foods from the oven cavity and
window. For stubborn stains, spray with a mild abrasive cleaner or spray degreaser and scrub with a noscratch Scotch-Brite™ pad (pink or blue). Wash the entire oven cavity with soap and water to remove all
cleaning chemicals before entering the clean cycle. If residue is not cleaned from the cavity, etching of the
porcelain may occur. Once the clean cycle is complete, allow the oven to cool completely and wipe out ash
with a damp cloth.
Broiler pan To clean the upper rack, use mild detergent and a scouring pad. Rinse and dry. To clean the bottom pan,
discard grease and wash with hot water and mild detergent. Rinse and dry. The upper rack is dishwasher
safe, however, do not place the porcelain-coated pan in dishwasher.
20 | Wolf Customer Care 800.222.7820
Page 21

TROUBLESHOOTING
Troubleshooting
OPERATION
Oven does not operate.
• Verify power is on.
• Verify electrical power to oven and home circuit breaker
is on.
Oven temperature issue.
• Contact Wolf customer care at 800-222-7820 for
recommendations.
No response from control panel touch pads.
• Unit in Sabbath mode (
refer to page 15.
• Turn circuit breaker off for 20 seconds, then turn
back on.
displayed on control panel),
‘PROBE SHORTED’ displayed on control panel.
• Touch OFF. Verify probe connector is fully seated into
the receptacle. Reset oven temperature and probe
temperature.
Error message displayed during clean cycle.
• For double ovens, if one oven is in an active clean cycle,
the other oven can not be used.
Oven ‘pops’ or ‘bangs’ during preheat or cool down.
• Normal with new oven cavity expansion and contraction.
• Run clean cycle. If it persists, contact Wolf customer
care at 800-222-7820.
wolfappliance.com | 21
Page 22

TROUBLESHOOTING
Service
• Maintain the quality built into your product by contacting
Wolf Factory Certied Service. For the name of the
nearest Wolf Factory Certied Service, check the contact
& support section of our website, wolfappliance.com or
call Wolf customer care at 800-222-7820.
• When contacting service, you will need the model and
serial number of your product. Both numbers are listed
on the product rating plate. Refer to page 6 for rating
plate location.
• For warranty purposes, you will also need the date of
installation and name of your authorized Wolf dealer. This
information should be recorded on page 3 of this guide.
Sub-Zero, Sub-Zero & Design, Sub-Zero & Snowake Design, Dual Refrigeration, The Living Kitchen, Great American Kitchens The Fine Art of Kitchen Design, Wolf, Wolf &
Design, Wolf Gourmet, W & Design, red colored knobs, Cove, and Cove & Design are registered trademarks and service marks of Sub-Zero Group, Inc. and its subsidiaries.
All other trademarks are property of their respective owners in the United States and other countries.
22 | Wolf Customer Care 800.222.7820
Page 23

Wolf Appliance Residential Limited Warranty
FOR RESIDENTIAL USE
FULL TWO YEAR WARRANTY*
For two years from the date of original installation, this Wolf Appliance product warranty covers all parts
and labor to repair or replace, under normal residential use, any part of the product that proves to be
defective in materials or workmanship. All service provided by Wolf Appliance under the above warranty
must be performed by Wolf factory certied service, unless otherwise specied by Wolf Appliance, Inc.
Service will be provided during normal business hours.
LIMITED FIVE YEAR WARRANTY
For ve years from the date of original installation, Wolf Appliance will repair or replace the following
parts that prove to be defective in materials or workmanship: gas burners (excludes appearance), electric
heating elements, blower motors (ventilation hoods), electronic control boards, magnetron tubes and
induction generators. If the owner uses Wolf factory certied service, the service provider will repair or
replace these parts with the owner paying for all other costs, including labor. If the owner uses non-certied service, the owner must contact Wolf Appliance, Inc. (using the information below) to receive repaired
or replacement parts. Wolf Appliance will not reimburse the owner for parts purchased from non-certied
service or other sources.
TERMS APPLICABLE TO EACH WARRANTY
The warranty applies only to products installed for normal residential use. The warranty applies only to
products installed in any one of the fty states of the United States, the District of Columbia or the ten
provinces of Canada. This warranty does not cover any parts or labor to correct any defect caused by
negligence, accident or improper use, maintenance, installation, service or repair.
THE REMEDIES DESCRIBED ABOVE FOR EACH WARRANTY ARE THE ONLY ONES THAT WOLF APPLIANCE,
INC. WILL PROVIDE, EITHER UNDER THIS WARRANTY OR UNDER ANY WARRANTY ARISING BY OPERATION
OF LAW. WOLF APPLIANCE, INC. WILL NOT BE RESPONSIBLE FOR ANY CONSEQUENTIAL OR INCIDENTAL DAMAGES ARISING FROM THE BREACH OF THIS WARRANTY OR ANY OTHER WARRANTY, WHETHER
EXPRESS, IMPLIED OR STATUTORY.
Some states do not allow the exclusion or limitation of incidental or consequential damages, so the above
limitation or exclusion may not apply to you. This warranty gives you specic legal rights and you may also
have other legal rights that vary from state to state.
To receive parts and/or service and the name of Wolf factory certied service nearest you, contact Wolf
Appliance, Inc., P.O. Box 44848, Madison, WI 53744; check the contact & support section of our website,
wolfappliance.com, email us at customerservice@subzero.com or call 800-222-7820.
*Stainless steel (doors, panels, handles, product frames and interior surfaces) are covered by a limited
60-day parts and labor warranty for cosmetic defects.
*Replacement lters for ventilation hood recirculating kits are not covered by the product warranty.
Page 24

HORNO DE LA SERIE M
Contenido
4 Precauciones de seguridad
6 Características de los hornos de la serie M
7 Funcionamiento del horno
17 Guía de cocina
20 Recomendaciones sobre el cuidado
21 Resolución de problemas
23 Garantía de Wolf
2 | Atención al cliente de Wolf 800.222.7820
Page 25

HORNO DE LA SERIE M
Atención al cliente
El modelo y número de serie están impresos en la tarjeta
de registro del producto adjunta. Los dos números también
aparecen en la placa de datos del producto. Consulte la
página 6 para encontrar la placa de datos. Para nes de la
garantía, usted también necesitará la fecha de instalación y
el nombre de su distribuidor autorizado de Wolf. Anote esta
información abajo para referencia futura.
INFORMACIÓN PARA SERVICIO
Número de modelo
Número de serie
Fecha de instalación
Nombre de servicio certicado
Número de servicio certicado
Distribuidor autorizado
Número de distribuidor
Si su producto alguna vez necesita servicio asegúrese
de usar un proveedor de servicios certicado por Wolf y
recomendado por nuestro centro de atención al cliente, o
seleccione uno de nuestra lista de proveedores en wolfappliance.com/locator. Todos los proveedores de los centros
de servicio autorizados han sido cuidadosamente seleccionados y entrenados a fondo por nosotros.
Aviso importante
Para garantizar que este producto se instale y opere de
la forma más segura y eciente posible, tome nota de los
siguientes tipos de información resaltada en esta guía:
AVISO IMPORTANTE señala la información que es especial-
mente importante.
PRECAUCIÓN indica una situación en la que se pueden
sufrir heridas leves o provocar daños al producto si no se
siguen las instrucciones.
ADVERTENCIA indica peligro de que se produzcan heridas
graves o incluso la muerte si no se siguen las precauciones.
AVISO IMPORTANTE: en toda esta guía, las dimensiones
entre paréntesis son milímetros, a menos que se especique lo contrario.
wolfappliance.com | 3
Page 26

PRECAUCIONES DE SEGURIDAD
INSTRUCCIONES IMPORTANTES
PRECAUCIONES GENERALES DE SEGURIDAD
• Lea este manual con atención antes de utilizar
este electrodoméstico para reducir el riesgo de
incendio, descarga eléctrica o lesiones.
• Un técnico calicado o una agencia de servicio
deben instalar o reparar este electrodoméstico y
un técnico calicado lo debe conectar a tierra.
• Limpie solamente las partes enumeradas en este
manual.
• No utilice limpiadores para hornos. No debe utilizar
limpiadores comerciales para hornos ni capas
protectoras de ninguna clase en o alrededor de
cualquier parte del horno.
• No toque los elementos calefactores ni las super-
cies internas del horno. Los elementos calefactores pueden permanecer calientes incluso cuando
tienen un color oscuro. Las supercies internas
alcanzan altas temperaturas y pueden causar
quemaduras. Durante y después del uso, no toque,
ni deje que su ropa u otros materiales ignífugos
entren en contacto con los elementos calefactores
o supercies internas del horno hasta que hayan
tenido suciente tiempo para enfriarse.
• Tenga cuidado al abrir la puerta del horno. Deje
salir el aire caliente o el vapor antes de mirar o
meter las manos dentro del horno.
• Asegúrese de que la entrada de aire fresco del
horno (que se encuentra arriba de la puerta) y la
rejilla de ventilación del horno (que se encuentra
abajo de la puerta) estén libres de obstáculos en
todo momento.
• Utilice siempre guantes de cocina secos al retirar
las cacerolas de este electrodoméstico. Los
guantes de cocina húmedos o mojados pueden
provocar quemaduras por vapor. No utilice una
toalla ni un paño voluminoso en lugar de los
guantes de cocina.
• Coloque las rejillas del horno a la altura deseada
cuando el horno esté frío. Si debe cambiar una
rejilla de posición cuando el horno esté caliente,
asegúrese de que el guante de cocina no entre en
contacto con un elemento calefactor caliente al
interior del horno.
• No intente reparar ni cambiar parte alguna de este
electrodoméstico a menos que esté especícamente recomendado en la documentación que
acompaña a este electrodoméstico.
• No utilice papel de aluminio para forrar ninguna
parte de este electrodoméstico.
• Nunca utilice este electrodoméstico para entibiar o
calentar la habitación.
• No deje a los niños menores solos ni desatendidos
en el área donde se utiliza este electrodoméstico.
Nunca permita que los niños se sienten o paren
sobre el electrodoméstico.
• No almacene artículos que puedan llamar la
atención de niños menores arriba o detrás de
este electrodoméstico, ya que podrían subirse al
electrodoméstico para alcanzar los objetos y sufrir
lesiones.
PRECAUCIÓN
Antes de utilizar la autolimpieza, retire la parrilla,
las rejillas del horno, las guías de las rejillas y
cualquier otro utensilio.
4 | Atención al cliente de Wolf 800.222.7820
Page 27

PRECAUCIONES DE SEGURIDAD
INSTRUCCIONES IMPORTANTES
PRECAUCIONES GENERALES DE SEGURIDAD
• No utilice agua en incendios causados por grasas.
Sofoque el fuego o utilice extinguidor químico seco
o de espuma.
• No caliente recipientes de comida cerrados, como
frascos de alimentos para bebés o enlatados. La
acumulación de presión puede hacer que el recipiente explote y cause lesiones.
• No almacene ni utilice gasolina u otros vapores o
líquidos ignífugos en las proximidades de este o
cualquier otro electrodoméstico.
• No limpie el empaque del horno, ya que frotar o
mover el empaque puede comprometer el sello de
la puerta.
• Utilice ropa adecuada. Nunca debe utilizar ropa
holgada ni con aplicaciones sueltas al utilizar este
electrodoméstico.
• Para los modelos contemporáneos, pulse la parte
central superior de la puerta con rmeza para abrir.
Para cerrar, gire la puerta hacia arriba, luego presione rmemente para cerrar. Consulte la siguiente
ilustración.
ADVERTENCIA
PROPUESTA 65 PARA RESIDENTES DE
CALIFORNIA
Cáncer y Daño Reproductivo—
www.P65Warnings.ca.gov
PULSE PARA ABIR
PRESS TO OPEN
Modelo contemporáneo
wolfappliance.com | 5
Page 28

CARACTERÍSTICAS DE LOS HORNOS DE LA SERIE M
Características de los hornos de la serie M
CARACTERÍSTICAS
1
Placa de datos del producto (horno inferior para hornos
dobles)
2
Rejillas ajustables del horno
3
Rejillas de extensión completa del horno
4
Panel de control y pantalla electrónica
5
Perillas de control (modelo profesional)
6
Ventiladores de convección
7
Recipiente de la sonda de temperatura
8
Luz de halógeno
4
Primeros pasos
Sabemos que está ansioso por empezar a cocinar, pero
antes de hacerlo, dedique un poco de tiempo a leer este
manual de uso y cuidado. Si usted es un cocinero ocasional
o un chef experto, se beneciará de conocer las prácticas
de seguridad, características, funcionamiento y recomendaciones sobre el cuidado de su horno de la serie M.
Para obtener los mejores resultados revise los modos de
cocción y características especiales en la página 12.
PRECAUCIÓN
No coloque utensilios de cocina sobre el piso del horno
ni utilice papel de aluminio u otro material para recubrir
el piso o las paredes laterales del horno. Si hace caso
omiso de este aviso se dañará el interior de porcelana
y se anulará la garantía.
4
5
7
6
1
Horno sencillo de la serie M—de transición
7
8
2
3
6
8
2
3
Horno doble de la serie M—profesional
6 | Atención al cliente de Wolf 800.222.7820
Page 29

FUNCIONAMIENTO DEL HORNO
Rejillas del horno
GUÍAS DE LAS REJILLAS DEL HORNO
Para insertar las guías de las rejillas del horno busque los
tornillos de montaje en las paredes laterales del horno.
Coloque las lengüetas de montaje de la guía de la rejilla
sobre los tornillos superiores, presione hacia adentro y deslice hasta que quede bien asentada. Consulte la siguiente
ilustración.
REJILLAS DEL HORNO
Para insertar una rejilla estándar en el horno, coloque el
bloqueo antivuelco de la rejilla debajo de los rieles laterales
de la guía de la rejilla. Deslice la rejilla hacia atrás y levante
para dejar libres los topes de la rejilla. Siga deslizando la
rejilla hacia atrás hasta que esté completamente en el interior del horno. Consulte la siguiente ilustración.
Para insertar una rejilla de extensión completa, coloque las
dos lengüetas posteriores sobre la guía de la rejilla (una lengüeta arriba y una abajo). Consulte la siguiente ilustración.
Incline ligeramente la rejilla y deslícela hasta que la muesca
frontal de la rejilla se acople con la guía frontal de la rejilla.
LENGÜETA
REAR TAB
TRANSERA
Rejilla de extensión completa
RACK
TOPE DE
STOP
LA REJILLA
LENGÜETA
MOUNTING
DE MONTAJE
TA B
BLOQUEO
ANTI-TIP
ANTIVUELCO
LOCK
Guías de las rejillas del horno Bloqueo antivuelco para las
rejillas del horno
wolfappliance.com | 7
Page 30

FUNCIONAMIENTO DEL HORNO
Panel de control interactivo
El panel de control interactivo utiliza la tecnología de toque
("touch") para seleccionar los modos de cocción y otras
funciones. Consulte las siguientes ilustraciones. Para los
modelos profesionales, los modos de cocción y las temperaturas se seleccionan utilizando las perillas del selector.
Pantalla de inicio—se muestra la sencilla, de transición y
contemporánea
OPCIONES DE COCCIÓN
QUICK
START
(INICIO
RÁPIDO)
GOURMET Pulse para iniciar la preparación de alimentos
Pulse para iniciar la cocción, y después seleccione
de las opciones en el panel de control. Para el
modelo profesional, gire la perilla del selector al
modo deseado.
Gourmet, y después seleccione de las opciones en
el panel de control. Para el modelo profesional, gire
la perilla del selector a GOURMET.
Pantalla de inicio—se muestra la sencilla profesional
8 | Atención al cliente de Wolf 800.222.7820
Page 31

FUNCIONAMIENTO DEL HORNO
Funcionamiento del horno
ANTES DE UTILIZARLO
Para asegurarse de que todo el aceite residual del proceso
de fabricación se haya eliminado, cada horno tiene que
pasar por el siguiente procedimiento.
1 Limpie cuidadosamente el horno con agua caliente y un
detergente suave. Enjuague y seque con un paño suave.
2 Encienda la ventilación. La presencia de un poco de
humo y olor es normal.
3 Pulse o gire la perilla a CONVECTION ROAST (ASAR
POR CONVECCIÓN) y ajuste la temperatura a 500°F
(260°C)
durante una hora.
4 Pulse OFF (APAGAR) (para el modelo profesional, gire la
perilla) y deje que el horno enfríe con la puerta cerrada.
PRECALENTAMIENTO
Durante el precalentamiento, el horno se calienta lo más
rápido y uniforme posible y no es ideal para cocinar. El
precalentamiento debe ser utilizado para todos los modos
de cocción excepto el de asado, calentamiento y algunos
modos Gourmet. Una vez que se haya completado el precalentamiento, un aviso sonoro indica que el horno alcanzó la
temperatura programada.
RELOJ
El reloj es visible en el panel de control durante todos los
modos de cocción; sin embargo, el horno se entrega con
la función de energía en modo de espera habilitada, lo
que provoca que la pantalla se apague después de cinco
minutos de inactividad. Para deshabilitar la función de
energía en modo de espera, consulte las opciones extendidas en la página 10. Es muy importante jar el reloj en la
hora correcta si se utiliza la función de cocción cronometrada. El reloj debe restablecerse después de un corte de
energía.
Para congurar el reloj:
1 Pulse SETTINGS (CONFIGURACIÓN), luego seleccione
TIME (HORA).
2 Pulse para seleccionar el modo de 12 HORAS o de
24HORAS.
3 Utilice las barras deslizantes para jar la hora del día,
seleccione AM o PM, y después pulse SET (FIJAR). Una
señal sonora indica que el reloj ha quedado congurado.
La hora también puede ajustarse mediante la selección de
la pantalla de hora en la pantalla de inicio.
wolfappliance.com | 9
Page 32

FUNCIONAMIENTO DEL HORNO
Funcionamiento del horno
TEMPORIZADOR
El temporizador se puede ajustar para un máximo de
11horas y 59 minutos. Una vez que se ajusta el tiempo,
la cuenta regresiva se ilumina en la pantalla del panel de
control. El temporizador es independiente del horno. Ajustar
el temporizador no afecta el tiempo de cocción ni el tiempo
de parada.
Para congurar el temporizador:
1 Pulse TIMER 1 o TIMER 2.
2 Utilice las barras deslizables para jar la duración, y
después pulse SET (FIJAR). Una señal sonora indica que
el temporizador ha quedado congurado.
3 Para cancelar o editar, pulse el reloj en cuenta regresiva
que está en pantalla.
4 El horno emitirá una señal sonora y el tiempo parpa-
deará cuando haya terminado. El temporizador continuará emitiendo una señal sonora hasta que se cancele
o restablezca.
OPCIONES EXTENDIDAS
Para tener acceso a opciones extendidas, pulse SETTINGS
(CONFIGURACIONES). Pulse o utilice la barra deslizable
para seleccionar la opción deseada. Si necesita más información, pulse INFO.
• Márgenes de temperatura (solamente servicio).
• Calibración—pantalla de calibración.
• Sonido—volumen y tono.
• Brillo.
• Hora—12 horas o 24 horas.
• Modo Sabbath.
• Reloj—digital o análogo.
• Energía en modo de espera.
• Idioma.
• Unidades—°F/Imperiales o °C/Métricas.
• Modo de salón muestra (solamente para utilización en
salón muestra).
• Acerca de (solamente servicio).
10 | Atención al cliente de Wolf 800.222.7820
Page 33

FUNCIONAMIENTO DEL HORNO
Modos de cocción
El horno tiene diez modos de cocción: hornear, asar, asado,
asar por convección, convección, Gourmet, fermentación,
piedra, deshidratar y calentamiento. Para cocer en piedra
cerámica y para deshidratar se requieren accesorios. Consulte la tabla de la página 12.
AJUSTAR CONTROLES
1 Pulse QUICK START (INICIO RÁPIDO). Por omisión, el
horno estará en modo HORNEAR (BAKE). Pulse o utilice
la barra deslizable para seleccionar el modo de cocción
deseado. Para el modelo profesional, gire la perilla del
selector al modo de cocción deseado.
2 Pulse START (INICIAR) para seleccionar prejar tempera-
tura. Para cambiar la temperatura, pulse o utilice la barra
deslizable para seleccionar la temperatura deseada,
y después pulse START (INICIAR). Para el modelo
profesional, gire la perilla del selector para ajustar la
temperatura.
3 Pulse OFF (APAGAR) para terminar el modo. Para el
modelo profesional, gire la perilla del selector a OFF
(APAGAR).
GOURMET
Gourmet ofrece una variedad de preparaciones de comidas
rápidas y convenientes. Gourmet también proporciona recomendaciones respecto a posiciones ideales de las rejillas y
consejos para garantizar la conanza al cocinar.
Elija de entre seis categorías: carne, pescado, alimentos
horneados, pizza, verduras y comidas de un platillo. Cada
categoría puede renarse para garantizar el modo de
cocción más efectivo y la posición de la rejilla para crear
una obra maestra de cocina. Consulte la guía Gourmet
siguiente.
GUÍA GOURMET
CARNE Carne de
res*
Carne de
aves*
Carne de
puerco*
Carne de
cordero*
PESCADO Bistec*
Filete*
PRODUCTOS
HORNEADOS
PIZZA Fresca
VERDURAS Asados
COMIDAS DE
UN PLATILLO
*No requiere precalentamiento.
Galletas
Pastel en hojas, tipo auta, de ángel, de
Pay de costra sencilla, de costra doble
Pan pan rápido, hogaza de levadura,
Pre-horneada
Calzone
Camotes/batatas*
Papas horneadas*
Casserole*
Lasagna*
Quiche
bistec, lomo, carne asada, costilla,
pastel de carne, cocción lenta
entero, piezas frescas, pechuga
entera
costillas, lomo, carne asada, bistec,
chuleta, jamón entero
pierna, carne asada, costillar
libra, pastelitos
rollos de levadura, bisquets
wolfappliance.com | 11
Page 34

FUNCIONAMIENTO DEL HORNO
Modos de cocción
MODO PRECONFIGURADO RANGO SONDA UTILIZA
BAKE (HORNEAR) 350°F
(175°C)
200 a 550°F
(95
a 290°C)
Lo mejor para cocinar en rejilla sencilla, principalmente alimentos
•
horneados. Utilice para recetas estándar.
ROAST (ASAR) 350°F
(175°C)
BROIL (ASADO) Alto
Medio
Bajo
CONVECTION
ROAST (ASAR POR
325°F
(165°C)
200 a 550°F
(95
a 290°C)
550°F
450°F (230°C)
350°F (175°C)
200 a 550°F
(95
a 290°C)
CONVECCIÓN)
CONVECCIÓN 325°F
(165°C)
200 a 550°F
(95
a 290°C)
GOURMET — —
PROOF
(FERMENTACIÓN)
STONE (PIEDRA) 450°F
DESHIDRATAR 135°F
CALENTAMIENTO 180°F
85°F
(30°C)
(230°C)
(60°C)
(80°C)
85 a 110°F
(30
a 45°C)
200 a 550°F
(95
a 290°C)
110 a 170°F
(45
a 75°C)
140 a 200°F
(60
a 95°C)
(290°C)
El mejor para asar cortes menos tiernos de carne, como asados en
•
trozo y carne para estofado que debe ir cubierta.
Lo mejor para asar piezas de carne, pescado y aves hasta de 1" de
grosor. Utilice la parrilla de dos partes y siempre realice el asado
con la puerta del horno cerrada.
Dora suavemente el exterior y sella interiormente los jugos. Per-
•
fecto para asar cortes tiernos de res, cordero, puerco y aves.
El movimiento uniforme del aire hace posible la cocción en varios
•
niveles de rejillas con un dorado uniforme.
Gourmet proporciona preparaciones de comidas rápidas y conve-
•
nientes con recomendaciones respecto al modo de cocción y la
posición de la rejilla. Consulte la página 11. La temperatura preestablecida y el rango dependen de la comida y el punto de cocción
deseado.
Ideal para fermentar o levar la masa de pan. Consulte la página 13.
Hornear sobre una piedra cerámica. Excelente para pizza y pan.
•
Se requiere un accesorio de piedra. Consulte la página 13.
Seca una diversidad de frutas, verduras, hierbas y tiras de carne.
Se requieren accesorios para rejillas. Consulte la página 13.
Diseñado para mantener los alimentos a la temperatura para
•
servirse.
12 | Atención al cliente de Wolf 800.222.7820
Page 35

FUNCIONAMIENTO DEL HORNO
Modos de cocción
PROOF (FERMENTACIÓN)
Ajuste de los controles:
1 Pulse QUICK START (INICIO RÁPIDO), y después
seleccione PROOF (FERMENTACIÓN). Para el modelo
profesional, gire la perilla del selector a MORE (MÁS),
y después seleccione PROOF (FERMENTACIÓN) en el
panel de control.
2 Pulse START (INICIAR) para seleccionar prejar tempera-
tura. Para cambiar la temperatura, pulse o utilice la barra
deslizable para seleccionar la temperatura deseada,
y después pulse START (INICIAR). Para el modelo
profesional, gire la perilla del selector para ajustar la
temperatura.
3 Pulse OFF (APAGAR) para terminar el modo. Para el
modelo profesional, gire la perilla del selector a OFF
(APAGAR).
STONE (PIEDRA)
Se requiere un kit de accesorios. Los accesorios están
disponibles a través de un distribuidor autorizado de Wolf.
Para obtener más información acerca de los distribuidores
locales, visite la sección para encontrar una sala de exposición de nuestro sitio web, wolfappliance.com. Con el kit de
accesorios se incluye información adicional sobre el uso y el
cuidado.
DESHIDRATAR
Se requiere un kit de accesorios. Los accesorios están
disponibles a través de un distribuidor autorizado de Wolf.
Para obtener más información acerca de los distribuidores
locales, visite la sección para encontrar una sala de exposición de nuestro sitio web, wolfappliance.com. Con el kit de
accesorios se incluye información adicional sobre el uso y el
cuidado.
Ajuste de los controles:
1 Coloque el tope de puerta suministrado con su kit de
accesorios.
2 Pulse QUICK START (INICIO RÁPIDO), y después selec-
cione DEHYDRATE (DESHIDRATAR). Para el modelo
profesional, gire la perilla del selector a MORE (MÁS), y
después seleccione DEHYDRATE (DESHIDRATAR) en el
panel de control.
3 Pulse START (INICIAR) para seleccionar prejar tempera-
tura. Para cambiar la temperatura, pulse o utilice la barra
deslizable para seleccionar la temperatura deseada,
y después pulse START (INICIAR). Para el modelo
profesional, gire la perilla del selector para ajustar la
temperatura.
4 Pulse OFF (APAGAR) para terminar el modo. Para el
modelo profesional, gire la perilla del selector a OFF
(APAGAR).
Ajuste de los controles:
1 Pulse QUICK START (INICIO RÁPIDO), y después selec-
cione STONE (PIEDRA). Para el modelo profesional, gire
la perilla del selector a MORE (MÁS), y después seleccione STONE (PIEDRA) en el panel de control.
2 Pulse START (INICIAR) para seleccionar prejar tempera-
tura. Para cambiar la temperatura, pulse o utilice la barra
deslizable para seleccionar la temperatura deseada,
y después pulse START (INICIAR). Para el modelo
profesional, gire la perilla del selector para ajustar la
temperatura.
3 Pulse OFF (APAGAR) para terminar el modo. Para el
modelo profesional, gire la perilla del selector a OFF
(APAGAR).
wolfappliance.com | 13
Page 36

FUNCIONAMIENTO DEL HORNO
Sonda de temperatura
La sonda de temperatura mide la temperatura interna de los
alimentos durante la cocción. Se puede utilizar con todos
los modos de cocción excepto los de asado, fermentación
y deshidratar.
Ajuste de los controles:
1 Precaliente el horno a la temperatura deseada del horno
en el modo deseado (modo hornear o piedra para
panes).
2 Inserte la sonda en la parte más gruesa de los alimentos.
Al hacer pan, cocine aproximadamente 10 minutos antes
de insertar la sonda.
3 Cuando se complete el precalentamiento, inserte la
sonda dentro del recipiente de la sonda. Consulte la
siguiente ilustración. Cierre la puerta del horno.
4 Pulse PROBE (SONDA).
5 Pulse SET (FIJAR) para seleccionar prejar temperatura.
Para cambiar la temperatura, pulse o utilice la barra
deslizable para seleccionar la temperatura deseada, y
después pulse SET (FIJAR).
6 Una señal sonora indica que la temperatura interna ha
alcanzado el punto establecido de la sonda. Retire y
reinserte la sonda para vericar la temperatura interna, y
entonces seleccione OK u OFF (APAGAR).
PRECAUCIÓN
La sonda y el recipiente de la sonda estarán muy
calientes. Manipule con cuidado.
Recipiente de la sonda
14 | Atención al cliente de Wolf 800.222.7820
Page 37

FUNCIONAMIENTO DEL HORNO
Programa automático
COCCIÓN CRONOMETRADA | INICIO RETARDADO
La cocción cronometrada apaga automáticamente el horno
a una hora especíca. El horno empezará a calentar inmediatamente y se apagará a la hora que usted desee que
se apague. El inicio retardado enciende y apaga el horno
automáticamente a una hora especíca. El horno permanecerá inactivo hasta la hora de inicio deseada y se apagará
a la hora que usted desee que se apague. Si se requiere
precalentamiento, el tiempo del mismo debe registrarse al
determinar la duración de la cocción. El reloj debe estar
congurado con la hora correcta para que el inicio automático funcione correctamente. Utilice cualquier modo de cocción excepto el de asado, Gourmet o piedra para hornear.
Ajuste de los controles:
1 Pulse QUICK START (INICIO RÁPIDO), y después selec-
cione el modo de cocción y la temperatura deseados.
Para el modelo profesional, gire la perilla del selector al
modo y temperatura deseados.
2 Pulse TIMED COOK (COCCIÓN CRONOMETRADA), y
después seleccione la duración de la cocción.
Sabbath
Este electrodoméstico lleva el certicado Star-K que indica
que cumple con estrictas normas religiosas junto con instrucciones especícas que aparecen en www.star-k.org.
Los modos asar, hornear, fermentar y de calentamiento
pueden usarse en Sabbath.
Ajuste de los controles:
1 Encienda o apague la luz del horno.
2 Pulse SETTINGS (CONFIGURACIÓN), luego seleccione
SABBATH MODE (MODO SABBATH).
3 Pulse ON (ENCENDER), y después pulse SET (FIJAR).
4 Seleccione el modo y la temperatura de cocción, y des-
pués pulse START (INICIAR).
5 Pulse para iniciar el modo Sabbath.
6 Pulse OFF (APAGAR) para terminar el modo. Para el
modelo profesional, gire la perilla del selector a OFF
(APAGAR).
3 Pulse SET (FIJAR) para conrmar la hora de paro o
utilice las barras deslizables para seleccionar la hora
deseada de paro, y después pulse SET (FIJAR). Aparecerán en la pantalla la duración de la cocción y la hora
de paro. El horno emitirá una alarma sonora cuando
reste un minuto. El horno emitirá una alarma sonora al
terminar, y continuará dicha alarma sonora hasta cancelar o restablecer.
4 Para cancelar, restablecer o apagar el horno, pulse
TIMED COOK (COCCIÓN CRONOMETRADA).
5 El horno se apagará automáticamente al terminar la
cocción. Pulse OK para borrar la pantalla.
wolfappliance.com | 15
Page 38

FUNCIONAMIENTO DEL HORNO
LIGHT
COVER
Limpieza
Durante la autolimpieza, el horno alcanza una temperatura
extremadamente alta para quemar los residuos de los alimentos. Se desactivan las luces del horno.
Ajuste de los controles:
1 Pulse QUICK START (INICIO RÁPIDO), y después selec-
cione CLEAN (LIMPIAR). Para el modelo profesional, gire
la perilla del selector a MORE (MÁS), y después seleccione CLEAN (LIMPIAR) en el panel de control.
2 Retire las rejillas del horno y las guías de las rejillas, y
después pulse OK.
3 Pulse START (INICIAR).
4 Pulse OFF (APAGAR) para terminar el modo. Para el
modelo profesional, gire la perilla del selector a OFF
(APAGAR).
5 La puerta del horno se bloqueará y permanecerá blo-
queada hasta que la autolimpieza esté completa y la
temperatura del horno haya descendido a menos de
(290°C).
550°F
Luz del horno
ADVERTENCIA
Compruebe que la energía esté desconectada de la
caja eléctrica antes de reemplazar un foco.
Deje que el horno enfríe por completo, luego retire las
rejillas del horno y las guías de las rejillas. Para retirar la
cubierta de la luz, haga palanca suavemente en el borde
inferior con un destornillador plano. Retire el foco existente
y reemplácelo con un foco de halógeno de 40 vatios. Consulte la siguiente ilustración.
Para reemplazar el foco ubicado en la parte superior de
la cavidad del horno, póngase en contacto con el servicio
certicado de fábrica de Wolf. Para obtener los datos del
centro de servicio autorizado de Wolf más cercano, eche
un vistazo a la sección de contacto y servicio técnico en
nuestro sitio web, wolfappliance.com o llame a la línea de
atención al cliente de Wolf al 800-222-7820.
PRECAUCIÓN
Durante la autolimpieza las supercies externas
pueden alcanzar una temperatura más alta de lo
normal. Debe mantener a los niños alejados.
CUBIERTA
DE LA LUZ
Reemplazo del foco
16 | Atención al cliente de Wolf 800.222.7820
Page 39

GUÍA DE COCINA
Guía de cocina de Wolf
ALIMENTOS REJILLA(S) MODO TEMP HORNO POSICIÓN HORA NOTAS
PANES
Bisquets 1 Asar 400°F (205°C) 3 5-10 min
2 Convección 425°F
3 Convección 425°F
Rollos de canela 1 Hornear 350°F
2 Convección 325°F
3 Convección 325°F
Pastelillos 1 Hornear 400°F (205°C) 3 15-20 min
2 Convección 375°F
3 Convección 375°F (190°C) 2, 4, 6 10-15 min
Rollos de levadura 1 Convección 375°F
2 Convección 375°F
3 Convección 375°F
Pan de levadura (hogaza) 1 Hornear 350°F
Pan de levadura (sin charola) 1 Piedra 450°F (230°C) 1 15-45 min
Panes rápidos 1 Hornear 350°F
Pan de ajo 1 Asado
Pan tostado 1 Asado Alta 5
(220°C) 2, 5 5-10 min
(220°C) 2, 4, 6 5-10 min
(175°C) 3 20-25 min
(165°C) 2, 5 20-25 min
(165°C) 2, 4, 6 20-25 min
(190°C) 2, 5 10-15 min
(190°C) 3 10-20 min
(190°C) 2, 5 10-20 min
(190°C) 2, 4, 6 10-20 min
(175°C) 3 20-45 min
(175°C) 3 40-50 min
Medio
5
PASTELES
Pan de ángel 1 Hornear 350°F (175°C) 1 35-45 min
Tarta o budín 1 Hornear 350°F
(175°C) 3 40-50 min
Mezclas o desde inicio 1 Hornear 350°F (175°C) 3 20-30 min
2 Convección 325°F
3 Convección 325°F
Pastelitos 1 Hornear 350°F
2 Convección 325°F
3 Convección 325°F
GALLETAS
(165°C) 2, 5 20-30 min
(165°C) 2, 4, 6 20-30 min
(175°C) 3 20-25 min
(165°C) 2, 5 15-25 min
(165°C) 2, 4, 6 15 -25 min
Galletas o barras 1 Hornear 350°F (175°C) 3 10-25 min
2 Convección 325°F
3 Convección 325°F
PAYS
De 2 costras, relleno o
1 Hornear 375°F (190°C) 3 40-45 min
(165°C) 2, 5 10-25 min
(165°C) 2, 4, 6 10-25 min
recubierto
Merengue de limón 1 Asado Baja 3 10 -15 m in
Calabaza o natillas 1 Hornear 425°F
(220°C) /
3 vea nota Hornee durante 15 min a 425°F,
325°F (165°C)
Costra de pay (vacía) 1 Hornear 425°F (220°C) 3 10-15 mi n
Hojaldres 1 Hornear 400°F
2 Convección 375°F
3 Convección 375°F
Hojaldres con crema 1 Convección 400°F
(205°C) 3 10-15 mi n
(190°C) 2, 5 10-15 min
(190°C) 2, 4, 6 10-15 m in
(205°C) 3 20-30 min
reduzca la temperatura a 325°F y
hornee hasta que el pay esté listo,
de 45 a 60 min.
El consumo de carnes, aves, mariscos, ostras o huevos crudos o sin buena cocción, puede aumentar su riesgo de enfermedades derivadas de los alimentos.
wolfappliance.com | 17
Page 40

GUÍA DE COCINA
Guía de cocina de Wolf
ALIMENTOS MODO TEMP HORNO REJILLA HORA TEMP SONDA NOTAS
RES
Hamburguesas de
carne molida
Bistecs (de menos de
1" de grueso)
Bistecs (de 1" a 3" de
grueso)
Agujas asadas Asar Conv 325°F
Asar 350°F
Asar Asar 425°F (220°C) /
Asado lento Hornear 300°F
Prime rib Asar 450°F
Lomo Asar Conv 450°F (230°C) 3 10-20 min/lb Ligeramente cocida
Asado Alta 5 10-15 min Voltear a los 7 min.
Asado Alta 5 10-15 min Voltear a los 6 min.
Asado Alta 5 10-20 min Voltear a los 8 min.
(165°C) 3 20–25 min/lb Med 150°F (65°C) Coloque en el plato, con líquido a
(175°C) 3 20–25 min/lb Med 150°F (65°C)
2 vea nota Ligeramente cocida
325°F (165°C)
135°F (60°C)
de la altura de la carne.
Ase durante 30 min a 425°F, reduzca
la temperatura a 325°F y cueza a la
temperatura interna deseada.
(150°C) 2 Coloque en un plato cubierto, con
líquido a 1/4 de la altura de la carne.
(230°C) /
225°F (105°C)
2 vea nota Ligeramente cocida
130°F (55°C)
No es necesario precalentar. Ase
durante 30 min a 450°F, reduzca la
temperatura a 225°F y cueza a la
temperatura interna deseada.
130°F (55°C)
1
/2
AVES
Pollo con hueso Asar Conv 325°F (165°C) 5 20-25 min Muslo 180°F (80°C)
Pollo entero Asar Conv 325°F (165°C) 2 10-20 min/lb Muslo 180°F (80°C)
Pavo entero (en
Hornear 350°F (175°C) 1 10-15 mi n / lb Muslo 180°F (80°C)
salmuera)
Pavo entero Asar Conv 325°F (165°C) 1 10 -15 m in/lb Muslo 180°F (80°C)
Asar 325°F (165°C) 1 10-15 mi n /lb Muslo 180°F (80°C)
Pato Asar Conv 325°F (165°C) 2 15-20 min/lb Muslo 180°F (80°C)
Ganso Asar Conv 325°F (165°C) 2 15-20 min/lb Muslo 180°F (80°C)
Codorniz Asar Conv 325°F (165°C) 3 1 hora Muslo 180°F (80°C)
Asar 350°F (175°C) 3 1 hora Muslo 180°F (80°C)
Cuartos de pollo,
Asado Medio 5 20-25 min Voltear a la mitad del tiempo de
muslos
Asar 350°F (175°C) 3 30-40 min Muslo 180°F (80°C)
Asado Conv 325°F (165°C) 3 30-40 min Muslo 180°F (80°C)
Hornear 350°F (175°C) 3 30-40 min Muslo 180°F (80°C)
Piezas de pavo Asado Conv 325°F (165°C) 3 30-40 min Muslo 180°F (80°C)
Asar 350°F (175°C) 3 30-40 min Muslo 180°F (80°C)
Pechuga de pollo
Asado Medio 5 10-15 min Voltear a la mitad del tiempo de
deshuesada
1
(aplanada a
/2" de
grueso)
Pechuga de pavo
entera
Asar Conv 350°F (175°C) 3 15-20 min Pechuga 165°F
(75°C)
Asar Conv 325°F (165°C) 2 15-20 min Pechuga 165°F
(75°C)
Asar 350°F (175°C) 2 15-20 min Pechuga 165°F
(75°C)
asado.
asado.
El consumo de carnes, aves, mariscos, ostras o huevos crudos o sin buena cocción, puede aumentar su riesgo de enfermedades derivadas de los alimentos.
18 | Atención al cliente de Wolf 800.222.7820
Page 41

GUÍA DE COCINA
Guía de cocina de Wolf
ALIMENTOS MODO TEMP HORNO REJILLA HORA TEMP SONDA NOTAS
CERDO
Chuletas, bistecs (1/2"
de grueso)
Asado lento Hornear 300°F
Costillas Hornear 300°F
Lomo Asar Conv 400°F
Bistec de jamón
(1/2" de grueso)
Bistec de jamón
(1" de grueso)
Jamón entero Hornear 335°F
Asado Alta 5 5 -10 min Voltear a la mitad del tiempo de asado.
Asar Conv 350°F
(175°C) 3 10-15 min
(150°C) 2 Coloque en un plato cubierto, con
líquido a 1/4 de la altura de la carne.
(150°C) 3 Coloque en paquetes con papel alu-
minio o en un plato cubierto, con líquido
a 1/4 de la altura de la carne.
(205°C) 3 15-20 min/lb Ligeramente
cocida 130°F
(55°C)
Asado Alta 5 5 -10 min Voltear a la mitad del tiempo de asado.
Asado Alta 5 10-15 min Voltear a la mitad del tiempo de asado.
(170° C) 2 10 -15 min/lb 160°F (70°C) Cubra y deje reposar durante 15 min.
CORDERO
Chuletas, bistecs (3/4"
Asado Alta 5 5 -10 min Voltear a la mitad del tiempo de asado.
de grueso)
Pierna Asar Conv 425°F
(220°C) /
2 vea nota 145°F (65°C) Ase durante 30 min a 425°F, reduzca la
325°F (165°C)
Asado de ternera Asar Conv 300°F
(150°C) 2 30-35 min/lb 14 0°F (60°C)
Coronilla Asar Conv 325°F (165°C) 2 15-20 min/lb 145°F (65°C)
PIZZA
Calzone Piedra 375°F (190°C) 1 10-15 min
Casera Piedra 450°F
(230°C) 1 5 -15 min
Pizza de pan francés Asado Medio 5 10-15 min
PESCADO
Filete (de menos
Asado Medio 5 10-20 min
de 1" de grueso)
Filete (de más de
Asar Conv 375°F (190°C) 5 15-25 min
1" de grueso)
VERDURAS
Papas, camotes Hornear 350°F (175°C) 3 45-60 min
Verduras mixtas Asar Conv 400°F
OTROS
Pastel de carne Asar 425°F (220°C) /
(205°C) 4 10-20 min
2 vea nota 165°F (75°C) Ase durante 20 min a 425°F, reduzca la
325°F (165°C)
Salchicha, bratwurst
Asado Medio 5 10-15 mi n Voltear a la mitad del tiempo de asado.
(fresca)
Nachos Asado Baja 3 15-20 min
Quiche Hornear 350°F
Comidas de un platillo Hornear 350°F
(175°C) 3 40-50 min
(175°C) 3 45-60 min 175°F (80°C)
temperatura a 325°F y cueza a la temperatura interna deseada.
temperatura a 325°F y cueza a la temperatura interna deseada.
El consumo de carnes, aves, mariscos, ostras o huevos crudos o sin buena cocción, puede aumentar su riesgo de enfermedades derivadas de los alimentos.
wolfappliance.com | 19
Page 42

RECOMENDACIONES SOBRE EL CUIDADO
Recomendaciones sobre el cuidado
LIMPIEZA
Acero inoxidable Use un limpiador no abrasivo para acero inoxidable y aplique con un paño suave sin pelusa. Para resaltar
el lustre natural, limpie suavemente la supercie con una tela de microbra humedecida con agua, seguida
con una gamuza para pulir en seco. Siempre siga la dirección del acabado del acero inoxidable.
Cristal negro Rocíe líquido limpiador de cristales en un paño para limpiar.
Rejillas del horno y guías de
las rejillas
Panel de control Utilice desengrasante en aerosol para retirar las marcas de los dedos y los residuos de alimentos. Rocíe el
Interior del horno Antes de activar la función de autolimpieza, retire suavemente con un cuchillo los restos de alimentos
Parrilla para asar Para limpiar la rejilla superior, utilice detergente suave y un estropajo. Enjuague y seque. Para limpiar la
Retire y coloque sobre una supercie plana cerca del fregadero. Límpielas con agua caliente y un detergente suave o con pasta de bicarbonato de sodio y agua. No las sumerja en agua. Seque con una toalla.
producto en un paño antes de limpiar el panel.
AVISO IMPORTANTE: no aplique o rocíe los limpiadores directamente sobre el panel de control.
adheridos a la cavidad y la puerta del horno. Para eliminar manchas difíciles, aplique un limpiador ligeramente abrasivo o desengrasante en aerosol y frótelo con una esponja Scotch-Brite™ cero rayones (rosa o
azul). Lave la cavidad del horno con agua y jabón para eliminar todos los productos químicos de limpieza
antes de activar el modo de autolimpieza. Si no se retiran los residuos de la cavidad, es posible que la
porcelana se desgaste por corrosión. Una vez que el ciclo de autolimpieza haya terminado, deje enfriar el
horno por completo y limpie la ceniza con un paño húmedo.
parrilla inferior, deseche la grasa y lave con agua caliente y detergente suave. Enjuague y seque. La rejilla
superior puede lavarse en lavavajillas, sin embargo, no coloque la parrilla cubierta de porcelana en el
lavavajillas.
20 | Atención al cliente de Wolf 800.222.7820
Page 43

RESOLUCIÓN DE PROBLEMAS
Resolución de problemas
OPERACIÓN
El horno no funciona.
• Compruebe que esté encendido.
• Compruebe que la alimentación eléctrica a la unidad y el
interruptor de circuito de la casa estén encendidos.
Problema con la temperatura del horno.
• Póngase en contacto con la línea de atención al
cliente de Wolf al 800-222-7820 para para obtener
recomendaciones.
El panel táctil del panel de control no responde.
• Unidad en modo Sabbath (
control), consulte la página 15.
• Apague el interruptor de circuito durante 20 segundos,
después vuelva a encenderlo.
mostrado en el panel de
En el panel de control se visualiza "PROBE SHORTED"
(SONDA EN CORTO CIRCUITO)
• Pulse OFF (APAGAR). Compruebe que el conector de la
sonda está bien asentado en el recipiente. Restablezca
la temperatura del horno y la temperatura de la sonda.
Se muestra mensaje de error durante el ciclo de
autolimpieza.
• Para el caso de hornos dobles, si un horno está activo
en un ciclo de autolimpieza, el otro horno no puede
usarse.
El horno hace "pop" o "bang" durante el precalentamiento
o el enfriamiento.
• Eso es normal debido a la expansión y contracción de la
nueva cavidad del horno.
• Ejecute un ciclo de autolimpieza. Si el problema persiste,
póngase en contacto con atención al cliente de Wolf al
800-222-7820.
wolfappliance.com | 21
Page 44

RESOLUCIÓN DE PROBLEMAS
Servicio
• Para mantener la calidad incorporada en su producto,
póngase en contacto con el servicio certicado de
fábrica de Wolf. Para obtener los datos del centro de
servicio autorizado de Wolf más cercano, eche un
vistazo a la sección de contacto y servicio técnico en
nuestro sitio web, wolfappliance.com o llame a la línea
de atención al cliente de Wolf al 800-222-7820.
• Al comunicarse con el servicio, necesitará el modelo
y número de serie de su producto. Los dos números
también aparecen en la placa de datos del producto.
Consulte la página 6 para encontrar la placa de datos.
• Para nes de la garantía, usted también necesitará la
fecha de instalación y el nombre de su distribuidor autorizado de Wolf. Esta información debe estar registrada
en la página 3 de este manual.
Sub-Zero, Sub-Zero & Design, Sub-Zero & Snowake Design, Dual Refrigeration, The Living Kitchen, Great American Kitchens The Fine Art of Kitchen Design, Wolf, Wolf &
Design, Wolf Gourmet, W & Design, red colored knobs, Cove, and Cove & Design son marcas registradas y marcas de servicio de Sub-Zero Group, Inc. y sus asociados. Todas
las demás marcas registradas son propiedad de sus dueños respectivos en los Estados Unidos y otros países.
22 | Atención al cliente de Wolf 800.222.7820
Page 45

Garantía limitada residencial de Wolf Appliance
PARA USO RESIDENCIAL
GARANTÍA COMPLETA DE DOS AÑOS*
Durante dos años a partir de la fecha de la instalación original, la garantía de su producto Wolf Appliance
cubre todas las partes y mano de obra para reparar o reemplazar, bajo el uso residencial normal, cualquier
parte del producto que se compruebe estar defectuosa en material o mano de obra. Todos los servicios
proporcionados por Wolf Appliance bajo la garantía anterior deben ser ejecutados por servicios certicados de fábrica de Wolf, a menos que Wolf Appliance, Inc. lo especique de otra manera. El Servicio será
proporcionado durante el horario comercial normal.
GARANTÍA LIMITADA DE CINCO AÑOS
Por cinco años a partir de la fecha de la instalación original, Wolf Appliance reparará o reemplazará los
siguientes componentes que se comprueben estar defectuosos en material o mano de obra: quemadores de gas (excluyendo la apariencia), elementos eléctricos de calentamiento, motores de sopladores
(campanas de ventilación), módulos de control eléctrico, tubos magnetrón y generadores de inducción.
Si el propietario utiliza el servicio certicado de fábrica de Wolf, el prestador del servicio reparará o
reemplazará estas partes mediante el pago de todos los otros costos, incluyendo mano de obra, a cargo
del propietario. Si el propietario utiliza un servicio no certicado, debe ponerse en contacto con Wolf
Appliance, Inc. (utilizando la información anotada más adelante) para recibir los componentes reparados
o de reemplazo. Wolf Appliance no reembolsará al propietario los importes correspondientes a componentes comprados a un servicio no certicado o a otras fuentes.
TÉRMINOS APLICABLES A CADA GARANTÍA
La garantía se aplica solamente a los productos instalados para uso residencial normal. La garantía
se aplica solamente a los productos instalados en cualquiera de los cincuenta estados de los Estados
Unidos, el Distrito de Columbia o las diez provincias de Canadá. Esta garantía no cubre las partes o mano
de obra para corregir cualquier defecto causado por negligencia, accidente o uso, mantenimiento, instalación, servicio o reparación inadecuados.
LOS RECURSOS DESCRITOS ANTERIORMENTE PARA CADA GARANTÍA SON LOS ÚNICOS QUE WOLF
APPLIANCE, INC. PROPORCIONARÁ, YA SEA BAJO ESTA GARANTÍA O BAJO CUALQUIER GARANTÍA QUE
RESULTE DE LA APLICACIÓN DE LA LEY. WOLF APPLIANCE, INC. NO SE HACE RESPONSABLE POR LOS
DAÑOS INDIRECTOS O INCIDENTALES DERIVADOS DE LA VIOLACIÓN DE ESTA GARANTÍA O CUALQUIER
OTRA GARANTÍA, YA SEA EXPRESA, IMPLÍCITA O LEGAL.
Algunos estados no permiten la exclusión o limitación de daños incidentales o consecuentes, por lo tanto
la limitación o exclusión anterior podrían no aplicarse en su caso. Esta garantía le otorga derechos legales
especícos, y usted también puede tener otros derechos legales que varían entre estados.
Para recibir las partes o el servicio y el nombre del servicio certicado de fábrica de Wolf más cercano
a usted, póngase en contacto con Wolf Appliance, Inc., P.O. Box 44848, Madison, WI 53744; eche un
vistazo a la sección de contacto y servicio técnico en nuestro sitio web, wolfappliance.com, envíenos un
correo electrónico a customerservice@subzero.com o llame al 800-222-7820.
*Las puertas, paneles, manijas, estructuras de acero inoxidable y supercies internas están cubiertas por
una garantía limitada de 60 días sobre piezas y mano de obra, por defectos cosméticos.
*Los ltros de repuesto para los kits de circulación de la campana de ventilación no están cubiertos por
la garantía del producto.
Page 46

FOUR DE LA SÉRIE M
Table des matières
4 Précautions de sécurité
6 Caractéristiques du four de la série M
7 Fonctionnement du four
17 Guide de cuisson
20 Recommandations d'entretien
21 Dépannage
23 Garantie de Wolf
2 | Service à la clientèle de Wolf 800.222.7820
Page 47

FOUR DE LA SÉRIE M
Service à la clientèle
Le numéro de modèle et le numéro de série sont imprimés
sur la che d'enregistrement du produit ci-jointe. Les deux
numéros sont aussi indiqués sur la plaque signalétique du
produit. Reportez-vous à la page 6 pour connaître l'emplacement de la plaque signalétique. Pour les besoins de la
garantie, vous devrez aussi avoir la date d'installation et le
nom de votre dépositaire Wolf autorisé. Inscrivez ces renseignements ci-dessous pour consultation ultérieure.
RENSEIGNEMENTS SUR LE SERVICE
Numéro de modèle
Numéro de série
Date de l'installation
Nom du service certié
Numéro du service certié
Dépositaire autorisé
Numéro du dépositaire
Si votre produit a besoin d'être réparé, assurez-vous
d'utiliser un fournisseur de service certié par l'usine Wolf
recommandé par notre centre de service à la clientèle, ou
sélectionnez-en un parmi la liste de fournisseurs disponibles
à wolfappliance.com/locator. Tous les fournisseurs de service certiés par l'usine sont soigneusement sélectionnés et
rigoureusement formés par nous.
Remarque importante
Pour s'assurer que ce produit est installé et utilisé en toute
sécurité et aussi efcacement que possible, prenez note des
types de renseignement mis en évidence tout au long de ce
guide :
REMARQUE IMPORTANTE met en évidence des renseigne-
ments qui sont particulièrement importants.
MISE EN GARDE indique une situation où une blessure
mineure ou des dommages au produit peuvent se produire
si les directives ne sont pas respectées.
AVERTISSEMENT décrit un danger qui peut causer une
blessure grave ou la mort si les précautions ne sont pas
respectées.
REMARQUE IMPORTANTE : tout au long de ce guide, les
dimensions entre parenthèses sont en millimètres à moins
d'indication contraire.
wolfappliance.com | 3
Page 48

PRÉCAUTIONS DE SÉCURITÉ
DIRECTIVES IMPORTANTES
PRÉCAUTIONS DE SÉCURITÉ GÉNÉRALE
• Lisez ce guide attentivement avant d'utiliser cet
appareil an de réduire le risque d'incendie, de
choc électrique ou de blessures.
• Cet appareil doit être correctement installé et
réparé par un installateur qualié ou une agence de
service et mis à la terre par un technicien qualié.
• Nettoyez seulement les pièces indiquées dans ce
guide.
• N'utilisez pas de nettoyants pour le four. Aucun
nettoyant pour le four commercial ni aucun revêtement protecteur de toute sorte ne doivent être
utilisés dans ou autour des pièces du four.
• Ne touchez pas aux éléments chauffants ou aux
surfaces intérieures du four. Les éléments chauffants peuvent être chauds même s'ils sont de
couleur foncée. Les surfaces intérieures deviennent
assez chaudes pour causer des brûlures. Pendant
et après l'utilisation, ne touchez pas et ne laissez
pas les vêtements ou d'autres matériaux inammables entrer en contact avec les éléments chauffants ou les surfaces intérieures du four avant qu'ils
n'aient eu sufsamment de temps pour se refroidir.
• Faites attention lorsque vous ouvrez la porte du
four. Laissez l'air chaud ou la vapeur s'échapper
avant de regarder ou de mettre les bras dans le
four.
• Assurez-vous que l'admission d'air frais du four
(située au-dessus de la porte) et le conduit de
sortie du four (situé sous la porte) soient dégagés
en tout temps.
• Utilisez toujours des poignées sèches pour retirer
les casseroles de cet appareil. Des poignées mouillées ou humides peuvent causer des brûlures de
vapeur. N'utilisez pas une serviette ou un chiffon
épais au lieu de poignées.
• Placez les grilles du four aux endroits désirés
lorsque le four est froid. Si une grille doit être
déplacée et que le four est déjà chaud, assurez-vous que les poignées n'entrent pas en contact
avec l'élément chauffant chaud du four.
• Ne réparez pas et ne remplacez pas toute pièce de
cet appareil à moins que cela ne soit spéciquement recommandé dans la documentation accompagnant l'appareil.
• N'utilisez pas du papier en aluminium pour couvrir
toute partie de cet appareil.
• N'utilisez jamais cet appareil pour réchauffer ou
chauffer la pièce.
• Ne laissez pas des enfants seuls ou sans surveil-
lance dans la zone où cet appareil est utilisé. Ne
laissez jamais des enfants s'asseoir ou se tenir
debout sur l'appareil.
• Ne rangez pas des articles intéressants pour les
enfants au-dessus ou à l'arrière de cet appareil
puisqu'ils pourraient grimper sur l'appareil pour les
atteindre et se blesser.
MISE EN GARDE
Avant d'utiliser la fonction autonettoyage, retirez
la lèchefrite, les grilles du four, les guides de grille
et tout autre ustensile.
4 | Service à la clientèle de Wolf 800.222.7820
Page 49

PRÉCAUTIONS DE SÉCURITÉ
PRESS TO OPEN
DIRECTIVES IMPORTANTES
PRÉCAUTIONS DE SÉCURITÉ GÉNÉRALE
• N'utilisez pas de l'eau sur des incendies de
graisse. Étouffez la amme ou utilisez un extincteur
à poudre chimique ou à mousse.
• Ne chauffez pas des contenants d'aliment non
ouverts comme les pots et les boîtes de nourriture
pour bébé. L'accumulation de pression peut faire
éclater le contenant et causer des blessures.
• Ne rangez pas et n'utilisez pas de l'essence ou
d'autres vapeurs ou liquides inammables à proximité de cet appareil ou de tout autre appareil.
• Ne nettoyez pas le joint du four; le frottage ou
le déplacement du joint peuvent compromettre
l'étanchéité de la porte.
• Portez des vêtements appropriés. Des vêtements
lâches ou pendants ne doivent jamais être portés
pendant que vous utilisez cet appareil.
• Pour les modèles contemporains, appuyez sur la
partie supérieure milieu de la porte fermement à
ouvrir. Pour fermer, tourner la porte vers le haut,
puis appuyez fermement pour fermer. Reportezvous à l'illustration ci-dessous.
AVERTISSEMENT
PROPOSITION 65 POUR RESIDENTS DE LA
CALIFORNIE
Cancer et Troubles de l’appareil reproducteur—
www.P65Warnings.ca.gov
APPUYEZ SUR
POUR OUVRIR
Modèle contemporain
wolfappliance.com | 5
Page 50

CARACTÉRISTIQUES DU FOUR DE LA SÉRIE M
Caractéristiques du four de la série M
CARACTÉRISTIQUES
1
Plaque signalétique du produit (four inférieur pour les fours
doubles)
2
Grille du four réglable
3
Grilles du four à extension complète
4
Panneau de commande et afchage
5
Boutons de commande (modèle professionnel)
6
Ventilateurs de convection
7
Prise de la sonde de température
8
Éclairage à l'halogène
4
Comment commencer
Nous savons que vous êtes impatient de commencer à
cuisiner, mais avant de le faire, veuillez prendre quelques
instants pour lire ce guide d'utilisation et d'entretien. Que
vous soyez un cuisinier occasionnel ou un chef expert, il
vous sera bénéque de vous familiariser avec les pratiques
de sécurité, les fonctions, le fonctionnement et les recommandations d'entretien de votre four de la série M.
Pour obtenir les meilleurs résultats, examinez les modes de
cuisson et les caractéristiques spéciales à la page 12.
MISE EN GARDE
Ne placez pas des casseroles dans le fond du four
et n'utilisez pas du papier d'aluminium ou d'autres
matériaux pour couvrir le fond ou les parois du four.
Le non-respect de cet avis endommagera l'intérieur en
porcelaine et annulera votre garantie.
4
5
7
6
1
Four simple de la série M—style transitionnel
7
8
2
3
6
8
2
3
Four double de la série M—style professionnel
6 | Service à la clientèle de Wolf 800.222.7820
Page 51

FONCTIONNEMENT DU FOUR
Grilles du four
GUIDES DE GRILLE DU FOUR
Pour insérer les guides de grille dans le four, repérez les vis
de montage sur les parois latérales. Placez les onglets de
montage du guide de grille sur les vis supérieures, pivotez
vers l'intérieur et glissez vers le bas jusqu'à ce qu'il soit bien
appuyé. Reportez-vous à l'illustration ci-dessous.
GRILLES DU FOUR
Pour insérer une grille standard dans le four, placez le verrou
antibasculement de la grille sous les rails latéraux du guide
de grille. Glissez la grille vers l'arrière et soulevez-la pour
contourner les arrêts de grille. Continuez à glisser la grille
vers l'arrière jusqu'à ce qu'elle soit complètement à l'intérieur du four. Reportez-vous à l'illustration ci-dessous.
RACK
ARRÊT DE
STOP
GRILLE
Pour insérer une grille à extension complète, placez les deux
onglets arrière sur le guide de grille (un onglet au-dessus et
un onglet en-dessous). Reportez-vous à l'illustration ci-dessous. Inclinez la grille légèrement et glissez-la vers l'arrière
jusqu'à ce que l'encoche de grille avant enclenche le guide
de grille avant.
ONGLET
REAR TAB
ARRIÉRE
Grille à extension complète
ONGLET DE
MOUNTING
MONTAGE
TA B
Guides de grille du four
VERROU ANTI-
ANTI-TIP
BASCULEMENT
LOCK
Verrouillage antibasculement
de grille du four
wolfappliance.com | 7
Page 52

FONCTIONNEMENT DU FOUR
Panneau de commande interactif
Le panneau de commande interactif utilise la technologie
tactile pour les modes de cuisson et les autres fonctions.
Reportez-vous aux illustrations ci-dessous. Pour les
modèles professionnels, les modes de cuisson et les températures sont sélectionnés au moyen de boutons sélecteurs.
Écran d'accueil—four simple à style transitionnel et contemporain illustré
OPTIONS DE CUISSON
DÉPART
RAPIDE
GASTRONOMIQUE
Touchez pour initier la cuisson, puis sélectionnez
une des options sur le panneau de commande. Pour
le modèle professionnel, tournez le bouton sélecteur
jusqu'au mode désiré.
Touchez pour initier la préparation de repas gastronomiques, puis sélectionnez une des options
sur le panneau de commande. Pour le modèle
professionnel, tournez le bouton sélecteur jusqu'à
GOURMET (gastronomique).
Écran d'accueil—four simple à style professionnel illustré
8 | Service à la clientèle de Wolf 800.222.7820
Page 53

FONCTIONNEMENT DU FOUR
Fonctionnement du four
AVANT L'UTILISATION
Pour s'assurer que toute l'huile résiduelle du processus de
fabrication ait été éliminée, chaque four doit subir la procédure suivante.
1 Nettoyez le four à fond avec de l'eau chaude et un
détergent doux. Rincez et séchez avec un chiffon doux.
2 Mettez la ventilation en marche. Il est normal de voir de
la fumée et de sentir une odeur.
3 Touchez ou tournez le bouton à CONVECTION ROAST
(rôtissage par convection) et réglez la température à
(260°C) pendant une heure.
500°F
4 Touchez à OFF (arrêt) (tournez le bouton sur le modèle
professionnel) et laissez le four se refroidir en gardant la
porte fermée.
PRÉCHAUFFAGE
Durant le préchauffage, le four se chauffe aussi rapidement
et uniformément que possible et il n'est pas à son meilleur
pour la cuisson. Le préchauffage doit être utilisé pour tous
les modes de cuisson, sauf grillage, réchauffer et certains
modes gastronomiques. Une fois le préchauffage terminé,
une sonnerie audible indique que le four a atteint la température de réglage.
HORLOGE
L'horloge est visible sur le panneau de commande durant
tous les modes de cuisson; cependant, le four est livré avec
la fonction d'alimentation en attente activée, ce qui permet
à l'écran de s'éteindre après cinq minutes d'inactivité.
Pour désactiver l'alimentation d'attente, reportez-vous aux
options supplémentaires à la page 10. Il est très important
que l'horloge soit réglée à la bonne heure pour utiliser une
fonction de cuisson minutée. L'horloge doit être réinitialisée
après une panne de courant.
Réglage de l'horloge :
1 Touchez à SETTINGS (réglages), puis sélectionnez TIME
(heure).
2 Touchez au mode de 12 HEURES ou de 24 HEURES.
3 Utilisez les glissières pour régler l'heure du jour, sélec-
tionnez AM ou PM, puis touchez à SET (régler). Une
sonnerie retentit indiquant que l'horloge a été réglée.
L'heure peut aussi être réglée en touchant à l'afchage de
l'heure sur l'écran d'accueil.
wolfappliance.com | 9
Page 54

FONCTIONNEMENT DU FOUR
Fonctionnement du four
MINUTERIE
Chaque minuterie peut être réglée pour une période maximale de 11 heures et 59 minutes. Une fois la durée réglée,
le décompte s'illumine sur l'écran du panneau de commande. La minuterie est indépendante du four. Le réglage
de la minuterie n'affecte pas la durée de cuisson ou l'heure
d'arrêt.
Réglage de la minuterie :
1 Touchez à TIMER 1 (minuterie 1) ou à TIMER 2
(minuterie 2).
2 Utilisez les glissières pour régler la durée, puis touchez
à SET (régler). Une sonnerie retentit indiquant que la
minuterie a été réglée.
3 Pour annuler ou modier, touchez au compte à rebours
afché sur l'écran.
4 Le four retent et la durée clignote lorsque la cuisson est
terminée. La minuterie continue à retentir jusqu'à ce
qu'elle soit annulée ou réinitialisée.
OPTIONS SUPPLÉMENTAIRES
Touchez à SETTINGS (réglages) pour accéder aux options
supplémentaires. Touchez ou utilisez la glissière pour sélectionner l'option désirée. Si vous avez besoin de renseignements supplémentaires, touchez à INFO.
• Décalage de température (service seulement).
• Étalonnage—étalonnage de l'écran.
• Son—volume et tonalité.
• Luminosité.
• Heure—12 heures ou 24 heures.
• Mode repos.
• Horloge—numérique ou analogique.
• Alimentation d'attente.
• Langue.
• Unités—°F/système impérial ou °C/système métrique.
• Mode salle d'exposition (pour usage dans les salles
d'exposition seulement).
• Au sujet (service seulement).
10 | Service à la clientèle de Wolf 800.222.7820
Page 55

FONCTIONNEMENT DU FOUR
Modes de cuisson
Le four possède dix modes de cuisson—cuisson, rôtissage,
grillage, rôtissage par convection, convection, gastronomique, apprêt, pierre de cuisson, déshydratation et
réchauffer. Les modes pierre de cuisson et déshydratation
nécessitent des accessoires. Reportez-vous au tableau à la
page 12.
RÉGLAGE DES COMMANDES
1 Touchez à QUICK START (démarrage rapide). Le four
se met au mode BAKE (cuisson) par défaut. Touchez ou
utilisez la glissière pour sélectionner le mode de cuisson
désiré. Pour le modèle professionnel, tournez le bouton
sélecteur jusqu'au mode de cuisson désiré.
2 Touchez à START (marche) pour sélectionner la tempé-
rature préréglée. Pour modier la température, touchez
ou utilisez la glissière pour sélectionner la température
désirée, puis touchez à START (marche). Pour le modèle
professionnel, tournez le bouton sélecteur pour régler la
température.
3 Touchez à OFF (arrêt) pour mettre n au mode. Pour le
modèle professionnel, tournez le bouton sélecteur à OFF
(arrêt).
GASTRONOMIQUE
Le mode gastronomique fournit une variété de préparations
de repas rapides et pratiques. Le mode gastronomique
fournit aussi des recommandations pour la position idéale
des grilles et des conseils pour vous permettre de cuisiner
en toute conance.
Choisissez parmi six catégories—viande, poisson, produits
de pâtisserie, pizza, légumes et repas dans un plat. Chaque
catégorie peut être afnée pour obtenir le mode de cuisson
et la position des grilles les plus efcaces pour créer un chef
d'œuvre culinaire. Reportez-vous au guide gastronomique
ci-dessous.
GUIDE GASTRONOMIQUE
VIANDE Bœuf* steak, let, rôti, côte de bœuf,
pain de viande, cuisson lente
Volaille* poulet entier, morceaux frais,
poitrine complète
Porc* côtes levées, let, rôti, steak,
côtelette, jambon entier
Agneau* gigot, rôti, carré
POISSON Steak*
Filet*
PRODUITS DE
PÂTISSERIE
PIZZA Fraîche
LÉGUMES Rôtis
REPAS DANS UN
PLAT
*Ne nécessite pas de préchauffage.
Biscuits
Gâteau en feuille, cannelé, aux anges,
pound, petits gâteaux
Tarte croûte simple, croûte double
Pain pain éclair, pain à la levure,
petits pains mollets à la levure,
biscuits à la poudre levante
De blé
Calzone
Patate douce*
Pomme de terre au four*
Casserole*
Lasagne*
Quiche
wolfappliance.com | 11
Page 56

FONCTIONNEMENT DU FOUR
Modes de cuisson
MODE PRÉRÉGLAGE ÉTENDUE SONDE
CUISSON 350°F
(175°C)
RÔTISSAGE 350°F
(175°C)
GRILLAGE Élevée
Moyenne
Faible
RÔTISSAGE PAR
CONVECTION
CONVECTION 325°F
325°F
(165°C)
(165°C)
GASTRONOMIQUE — —
APPRÊT 85°F
PIERRE DE CUISSON 450°F
(30°C)
(230°C)
200 – 550°F
(95
– 290°C)
200 – 550°F
(95
– 290°C)
(290°C)
550°F
450°F (230°C)
350°F (175°C)
200 – 550°F
(95
– 290°C)
200 – 550°F
(95
– 290°C)
85 – 110°F
(30
– 45°C)
200 – 550°F
(95
– 290°C)
•
•
•
•
•
•
UTILISATIONS
Idéal pour la cuisson sur une seule grille, surtout pour les aliments
de boulangerie. À utiliser pour les recettes standards.
Idéal pour le rôtissage de coupes moins tendres de viande,
comme les rôtis de palette et la viande à ragoût, qui doivent être
couvertes.
Convient au grillage des morceaux de viande, de poisson et
de volaille jusqu'à 1po d'épaisseur. Utilisez la lèchefrite à deux
pièces et grillez toujours en gardant la porte du four fermée.
Brunit légèrement l'extérieur et capte les jus à l'intérieur. Idéal pour
rôtir des coupes tendres de bœuf, d'agneau, de porc et de volaille.
Il est possible de cuire sur plusieurs grilles avec brunissage uniforme dans ce mode grâce au mouvement uniforme de l'air.
Le mode gastronomique fournit des préparations rapides et
pratiques de repas avec des recommandations pour le mode de
cuisson et la position de la grille. Reportez-vous à la page 11. La
température préréglée et l'étendue dépendent de l'aliment et du
niveau de cuisson désirés.
Idéal pour apprêter ou faire lever la pâte à pain. Reportez-vous à
la page 13.
Cuisson sur une pierre en céramique. Idéale pour les pizzas et le
pain. La pierre de cuisson est requise. Reportez-vous à la page 13.
DÉSHYDRATATION 135°F
(60°C)
RÉCHAUFFER 180°F
(80°C)
110 – 170°F
(45
– 75°C)
Sèche une variété de fruits, de légumes, d'herbes et de bandes de
viande. Des grilles accessoires sont requises. Reportez-vous à la
page 13.
140 – 200°F
(60
– 95°C)
Conçu pour garder les aliments à la température de service.
•
12 | Service à la clientèle de Wolf 800.222.7820
Page 57

FONCTIONNEMENT DU FOUR
Modes de cuisson
APPRÊT
Réglage des commandes :
1 Touchez à QUICK START (démarrage rapide), puis sélec-
tionnez PROOF (apprêt). Pour le modèle professionnel,
tournez le bouton sélecteur à MORE (plus), puis sélectionnez PROOF (apprêt) sur le panneau de commande.
2 Touchez à START (marche) pour sélectionner la tempé-
rature préréglée. Pour modier la température, touchez
ou utilisez la glissière pour sélectionner la température
désirée, puis touchez à START (marche). Pour le modèle
professionnel, tournez le bouton sélecteur pour régler la
température.
3 Touchez à OFF (arrêt) pour mettre n au mode. Pour le
modèle professionnel, tournez le bouton sélecteur à OFF
(arrêt).
PIERRE DE CUISSON
Une trousse d'accessoires est requise. Les accessoires sont
offerts par les dépositaires Wolf autorisés. Pour obtenir des
renseignements sur le dépositaire local, visitez la section
salle d'exposition de notre site Web, wolfappliance.com.
Des renseignements supplémentaires sur l'utilisation et l'entretien sont compris avec la trousse d'accessoires.
Réglage des commandes :
DÉSHYDRATATION
Une trousse d'accessoires est requise. Les accessoires sont
offerts par les dépositaires Wolf autorisés. Pour obtenir des
renseignements sur le dépositaire local, visitez la section
salle d'exposition de notre site Web, wolfappliance.com.
Des renseignements supplémentaires sur l'utilisation et l'entretien sont compris avec la trousse d'accessoires.
Réglage des commandes :
1 Placez la butée de porte fournie avec la trousse
d'accessoires.
2 Touchez à QUICK START (démarrage rapide), puis sélec-
tionnez DEHYDRATE (déshydratation). Pour le modèle
professionnel, tournez le bouton sélecteur à MORE
(plus), puis sélectionnez DEHYDRATE (déshydratation)
sur le panneau de commande.
3 Touchez à START (marche) pour sélectionner la tempé-
rature préréglée. Pour modier la température, touchez
ou utilisez la glissière pour sélectionner la température
désirée, puis touchez à START (marche). Pour le modèle
professionnel, tournez le bouton sélecteur pour régler la
température.
4 Touchez à OFF (arrêt) pour mettre n au mode. Pour le
modèle professionnel, tournez le bouton sélecteur à OFF
(arrêt).
1 Touchez à QUICK START (démarrage rapide), puis sélec-
tionnez STONE (pierre). Pour le modèle professionnel,
tournez le bouton sélecteur à MORE (plus), puis sélectionnez STONE (pierre) sur le panneau de commande.
2 Touchez à START (marche) pour sélectionner la tempé-
rature préréglée. Pour modier la température, touchez
ou utilisez la glissière pour sélectionner la température
désirée, puis touchez à START (marche). Pour le modèle
professionnel, tournez le bouton sélecteur pour régler la
température.
3 Touchez à OFF (arrêt) pour mettre n au mode. Pour le
modèle professionnel, tournez le bouton sélecteur à OFF
(arrêt).
wolfappliance.com | 13
Page 58

FONCTIONNEMENT DU FOUR
Sonde de température
La sonde de température mesure la température interne
des aliments pendant la cuisson. Elle peut être utilisée
avec tous les modes de cuisson, sauf grillage, apprêt et
déshydratation.
Réglage des commandes :
1 Préchauffez le four à la température de four désirée dans
le mode choisi (cuisson ou pierre de cuisson pour le
pain).
2 Insérez la sonde dans la zone la plus épaisse de l'ali-
ment. Lorsque vous faites du pain, cuisez pendant
environ 10 minutes avant d'insérer la sonde.
3 Lorsque le préchauffage est terminé, insérez la sonde
dans la prise. Reportez-vous à l'illustration ci-dessous.
Fermez la porte du four.
4 Touchez à PROBE (sonde).
5 Touchez à SET (régler) pour sélectionner la tempéra-
ture préréglée. Pour modier la température, utilisez la
glissière pour sélectionner la température désirée, puis
touchez à SET (régler).
6 Une sonnerie retentit indiquant que la température
interne a atteint le point de réglage de la sonde. Retirez
et réinsérez la sonde pour vérier la température interne,
puis sélectionnez OK ou OFF (arrêt).
MISE EN GARDE
La sonde et la prise de la sonde seront très chaudes.
Manipulez-les avec soin.
Prise de la sonde
14 | Service à la clientèle de Wolf 800.222.7820
Page 59

FONCTIONNEMENT DU FOUR
Programmation automatique
CUISSON MINUTÉE/MARCHE DIFFÉRÉE
La cuisson minutée éteint automatiquement le four à une
heure précisée. Le four commencera à chauffer immédiatement et s'éteindra à l'heure d'arrêt désirée. La mise en
marche différée met automatiquement le four en marche
et l'éteint à des heures précisées. Le four demeurera en
attente jusqu'à l'heure de mise en marche et s'éteindra
à l'heure d'arrêt désirée. Si un préchauffage est requis,
la durée du préchauffage doit être prise en compte pour
déterminer la durée de la cuisson. L'horloge doit être réglée
à la bonne heure pour que cette option fonctionne correctement. Utilisez cette fonction avec tout mode de cuisson
sauf grillage, gastronomique ou pierre de cuisson.
Réglage des commandes :
1 Touchez à QUICK START (démarrage rapide), puis sélec-
tionnez le mode de cuisson et la température désirée.
Pour le modèle professionnel, tournez le bouton sélecteur jusqu'au mode et jusqu'à la température désirés.
2 Touchez à TIMED COOK (cuisson minutée), puis sélec-
tionnez la durée de la cuisson.
Repos
Cet appareil est certié par Star-K pour répondre à des
règlements religieux rigoureux relativement à des directives
précises se trouvant sur www.star-k.org.
Les modes rôtissage, cuisson, apprêt et réchauffer peuvent
être utilisés en mode repos.
Réglage des commandes :
1 Allumez ou éteignez la lumière du four.
2 Touchez à SETTINGS (réglages), puis sélectionnez SAB-
BATH (repos).
3 Touchez à ON (marche), puis touchez à SET (régler).
4 Sélectionnez le mode de cuisson et la température, puis
touchez à START (marche).
5 Touchez à pour initier le mode Sabbath (repos).
6 Touchez à OFF (arrêt) pour mettre n au mode. Pour le
modèle professionnel, tournez le bouton sélecteur à OFF
(arrêt).
3 Touchez à SET (régler) pour conrmer l'heure d'arrêt ou
utilisez les glissières pour sélectionner l'heure d'arrêt
désirée, puis touchez à SET (régler). La durée de la
cuisson et l'heure d'arrêt apparaîtront sur l'écran. Le four
retentira lorsqu'il ne restera qu'une minute. Le four retentira lorsque la durée sera écoulée et continuera à émettre
une sonnerie jusqu'à ce que la fonction soit annulée ou
réinitialisée.
4 Pour annuler, réinitialiser ou éteindre le four, touchez à
TIMED COOK (cuisson minutée).
5 Le four s'éteint automatiquement lorsque la cuisson est
terminée. Touchez à OK pour effacer l'écran.
wolfappliance.com | 15
Page 60

FONCTIONNEMENT DU FOUR
LIGHT
COVER
Nettoyage
Durant le nettoyage, le four est chauffé jusqu'à une température extrêmement élevée pour brûler les restes d'aliments.
Les lumières du four sont désactivées.
Réglage des commandes :
1 Touchez à QUICK START (démarrage rapide), puis
sélectionnez CLEAN (nettoyage). Pour le modèle professionnel, tournez le bouton sélecteur à MORE (plus),
puis sélectionnez CLEAN (nettoyage) sur le panneau de
commande.
2 Retirez les grilles du four et les guides de grille, puis
touchez à OK.
3 Touchez à START (marche).
4 Touchez à OFF (arrêt) pour mettre n au mode. Pour le
modèle professionnel, tournez le bouton sélecteur à OFF
(arrêt).
5 La porte du four se verrouillera et demeurera verrouillée
jusqu'à ce que le cycle de nettoyage soit terminé et la
température du four se trouve en dessous de 550°F
(290°C)
.
Lampe du four
AVERTISSEMENT
Assurez-vous que le courant soit coupé au niveau du
coffret électrique avant de remplacer l'ampoule.
Laissez le four se refroidir complètement, puis retirez les
grilles et les guides de grille. Pour retirer le pare-lumière,
dégagez doucement le rebord inférieur avec un tournevis
plat. Retirez l'ampoule existante et remplacez-la par une
ampoule halogène de 40 watts. Reportez-vous à l'illustration ci-dessous.
Pour remplacer l'ampoule située dans la partie supérieure
de la cavité du four, communiquez avec le service certié
par l'usine de Wolf. Pour obtenir le nom du centre de service
Wolf certié par l'usine le plus près, consultez la section
Contact et assistance de notre site Web, wolfappliance.com
ou appelez le service à la clientèle de Wolf à 800-222-7820.
MISE EN GARDE
Pendant le nettoyage, les surfaces extérieures peuvent
devenir plus chaudes que d'habitude. Les enfants ne
doivent pas s'approcher.
PARE-
LUMIÈRE
Remplacement de l'ampoule
16 | Service à la clientèle de Wolf 800.222.7820
Page 61

GUIDE DE CUISSON
Guide de cuisson Wolf
ALIMENT GRILLE(S) MODE TEMP DU FOUR POSITION DURÉE REMARQUES
PAINS
Biscuits à la poudre levante 1 Rôtissage 400°F (205°C) 3 5-10 min
2 Convection 425°F
3 Convection 425°F
Brioches à la cannelle 1 Cuisson 350°F
2 Convection 325°F
3 Convection 325°F
Mufns 1 Cuisson 400°F (205°C) 3 15-20 min
2 Convection 375°F
3 Convection 375°F (190°C) 2, 4, 6 10-15 min
Petits pains à la levure 1 Convection 375°F
2 Convection 375°F
3 Convection 375°F
Pain à la levure (moule à pain) 1 Cuisson 350°F
Pain à la levure (sans moule) 1 Pierre de
cuisson
Pains éclairs 1 Cuisson 350°F
Pain à l'ail 1 Grillage
Rôtie 1 Grillage Élevée 5
(220°C) 2, 5 5-10 mi n
(220°C) 2, 4, 6 5 -10 m in
(175°C) 3 20-25 min
(165°C) 2, 5 20-25 min
(165°C) 2, 4, 6 20-25 min
(190°C) 2, 5 10 -15 min
(190°C) 3 10-20 min
(190°C) 2, 5 10-20 min
(190°C) 2, 4, 6 10-20 min
(175°C) 3 20-45 min
450°F (230°C) 1 15-45 min
(175°C) 3 40-50 min
Moyenne
5
GÂT EAU X
Gâteau des anges 1 Cuisson 350°F (175°C) 1 35-45 min
Bundt ou pound cake 1 Cuisson 350°F
(175°C) 3 40-50 min
Mélange ou fait à la maison 1 Cuisson 350°F (175°C) 3 20-30 min
2 Convection 325°F
3 Convection 325°F
Petits gâteaux 1 Cuisson 350°F
2 Convection 325°F
3 Convection 325°F
BISCUITS
(165°C) 2, 5 20-30 min
(165°C) 2, 4, 6 20-30 min
(175°C) 3 20-25 min
(165°C) 2, 5 15-25 min
(165°C) 2, 4, 6 15-25 min
Biscuits ou barres 1 Cuisson 350°F (175°C) 3 10 -25 min
2 Convection 325°F
3 Convection 325°F
TAR TES
Deux croûtes, remplies ou
1 Cuisson 375°F (190°C) 3 40-45 min
(165°C) 2, 5 10-25 min
(165°C) 2, 4, 6 10-25 min
garnies de streusel
Meringue au citron 1 Grillage Faible 3 10 -15 min
Citrouille ou crème pâtissière 1 Cuisson 425°F
325°F (165°C)
(220°C) /
3 reportez-
vous à la
remarque
Croûte de tarte (vide) 1 Cuisson 425°F (220°C) 3 10 -15 min
Pâte feuilletée 1 Cuisson 400°F
2 Convection 375°F
3 Convection 375 °F
Chou à la crème 1 Convection 400°F
(205°C) 3 10 -15 m in
(190°C) 2, 5 10 -15 min
(190°C) 2, 4, 6 10 -15 min
(205°C) 3 20-30 min
Cuire pendant 15 minutes à
425°F, réduire la température à
325°F et cuire jusqu'à ce que la
tarte soit prise, 45 à 60 minutes.
Consommer de la viande, de la volaille, des fruits de mer, des mollusques et crustacés crus ou pas assez cuits peut augmenter votre risque de maladie
d'origine alimentaire.
wolfappliance.com | 17
Page 62

GUIDE DE CUISSON
Guide de cuisson Wolf
ALIMENT MODE TEMP DU FOUR GRILLE DURÉE TEMP SONDE REMARQUES
BŒUF
Galettes de viande Grillage Élevée 5 10-15 mi n Retournez après sept minutes.
Steaks (moins de 1
po d'épaisseur)
Steaks (de 1 à 3 po
d'épaisseur)
Rôti de n de palette Rôtissage par
Rôtissage 350°F
Rôtissage Rôtissage 425°F (220°C) /
Rôti à feu doux Cuisson 300°F
Côte de bœuf Rôtissage 450°F
Filet Rôtissage par
VOLAILLE
Poulet, non désossé Rôtissage par
Poulet, entier Rôtissage par
Dinde, entière
(saumurée)
Dinde, entière Rôtissage par
Canard Rôtissage par
Oie Rôtissage par
Poule Cornish Rôtissage par
Quarts, cuisses de
poulet
Morceaux de dinde Rôtissage par
Poitrine de poulet
désossée
(aplatie à ½ po
d'épaisseur)
Poitrine de dinde,
entière
Consommer de la viande, de la volaille, des fruits de mer, des mollusques et crustacés crus ou pas assez cuits peut augmenter votre risque de maladie
d'origine alimentaire.
Grillage Élevée 5 10 -15 m in Retournez après six minutes.
Grillage Élevée 5 10-20 min Retournez après huit minutes.
(165°C) 3 45– 55 min/kg Moyenne 150°F (65°C) Placez dans un plat avec du
convection
325°F
(175°C) 3 45 –55 min/kg Moyenne 150°F (65°C)
325°F (165°C)
2 reportez-vous
à la remarque
Saignant 135°F (60°C) Rôtir pendant 30 minutes à
liquide à moitié de la hauteur de
la viande.
425°F, réduisez la température
à 325°F et cuisez jusqu'à la
température interne désirée.
(150°C) 2 Placez dans un plat couvert
avec du liquide au quart de la
hauteur de la viande.
(230°C) /
225°F (105°C)
2 reportez-vous
à la remarque
Saignant 130°F (55°C) Aucun préchauffage requis.
Rôtir pendant 30 minutes à
450°F, réduisez la température
à 225°F et cuisez jusqu'à la
température interne désirée.
(230°C) 3 25– 45 min/kg Saignant 130°F (55°C)
450°F
convection
325°F (165°C) 5 20-25 min Cuisse 180°F (80°C)
convection
325°F (165°C) 2 25– 45 min/kg Cuisse 180°F (80°C)
convection
Cuisson 350°F (175°C) 1 25–35 min/kg Cuisse 180°F (80°C)
325°F (165°C) 1 25–35 min/kg Cuisse 180°F (80°C)
convection
Rôtissage 325°F (165°C) 1 25–35 min/kg Cuisse 180°F (80°C)
325°F (165°C) 2 35-45 min/kg Cuisse 180°F (80°C)
convection
325°F (165°C) 2 35-45 min/kg Cuisse 180°F (80°C)
convection
325°F (165°C) 3 1 heure Cuisse 180°F (80°C)
convection
Rôtissage 350°F (175°C) 3 1 heure Cuisse 180°F (80°C)
Grillage Moyenne 5 20-25 min Retournez à mi-chemin pendant
le grillage.
Rôtissage 350°F
Rôtissage par
(175°C) 3 30-40 min Cuisse 180°F (80°C)
325°F (165°C) 3 30-40 min Cuisse 180°F (80°C)
convection
Cuisson 350°F (175°C) 3 30-40 min Cuisse 180°F (80°C)
325°F (165°C) 3 30-40 min Cuisse 180°F (80°C)
convection
Rôtissage 350°F (175°C) 3 30-40 min Cuisse 180°F (80°C)
Grillage Moyenne 5 10 -15 min Retournez à mi-chemin pendant
le grillage.
Rôtissage par
(175°C) 3 15-20 min Poitrine 165°F (75°C)
350°F
convection
Rôtissage par
325°F (165°C) 2 15-20 min Poitrine 165°F (75°C)
convection
Rôtissage 350°F (175°C) 2 15-20 min Poitrine 165°F (75°C)
18 | Service à la clientèle de Wolf 800.222.7820
Page 63

GUIDE DE CUISSON
Guide de cuisson Wolf
ALIMENT MODE TEMP DU FOUR GRILLE DURÉE TEMP SONDE REMARQUES
PORC
Côtelettes, steaks
(½ po d'épaisseur)
Rôtissage à feu doux Cuisson 300°F
Côtes levées Cuisson 300°F
Filet Rôtissage par
Steak de jambon
(½po d'épaisseur)
Steak de jambon
(1 po d'épaisseur)
Jambon, entier Cuisson 335°F
AGNEAU
Côtelettes, steaks
(¾ po d'épaisseur)
Cuisse Rôtissage par
Rôti de veau Rôtissage par
Couronne Rôtissage par
PIZZA
Calzones Pierre de
Faite à la maison Pierre de
Pizza à pain français Grillage Moyenne 5 10 -15 min
POISSON
Filet (moins de 1 po
d'épaisseur)
Filet (plus de 1 po
d'épaisseur)
LÉGUMES
Pommes de terre,
patates sucrées
Légumes mélangés Rôtissage par
AUTRE
Pain de viande Rôtissage 425°F (220°C) /
Saucisse, saucisse
Bratwurst (fraîches)
Nachos Grillage Faible 3 15-20 min
Quiche Cuisson 350°F
Repas dans un plat Cuisson 350°F
Consommer de la viande, de la volaille, des fruits de mer, des mollusques et crustacés crus ou pas assez cuits peut augmenter votre risque de maladie
d'origine alimentaire.
Grillage Élevée 5 5-10 min Retournez à mi-chemin pendant le
grillage.
Rôtissage par
(175°C) 3 10-15 min
350°F
convection
(150°C) 2 Placez dans un plat couvert avec
du liquide au quart de la hauteur de
la viande.
(150°C) 3 Placez dans dans du papier d'alu-
minium ou un plat couvert avec du
liquide au quart de la hauteur de la
viande.
(205°C) 3 35-45 min/kg Saignant 130°F
400°F
convection
(55°C)
Grillage Élevée 5 5-10 min Retournez à mi-chemin pendant le
grillage.
Grillage Élevée 5 10 -15 min Retournez à mi-chemin pendant le
grillage.
(170°C) 2 25–35 min/kg 160°F (70°C) Couvrez et laissez reposer pendant
15 minutes.
Grillage Élevée 5 5-10 min Retournez à mi-chemin pendant le
grillage.
convection
(220°C) /
425°F
325°F (165°C)
2 repor-
tez-vous à la
remarque
145°F (65°C) Rôtir pendant 30 minutes à 425°F,
réduisez la température à 325°F
et cuisez jusqu'à la température
interne désirée.
(150°C) 2 65-75 min/kg 140°F (60°C)
300°F
convection
325°F (165°C) 2 35-45 min/kg 145°F (65°C)
convection
375°F (190°C) 1 10-15 mi n
cuisson
(230°C) 1 5-15 min
450°F
cuisson
Grillage Moyenne 5 10-20 min
Rôtissage par
(190°C) 5 15-25 min
375°F
convection
Cuisson 350°F (175°C) 3 45-60 min
(205°C) 4 10-20 min
400°F
convection
325°F (165°C)
2 repor-
tez-vous à la
remarque
165°F (75°C) Rôtir pendant 20 minutes à 425°F,
réduisez la température à 325°F
et cuisez jusqu'à la température
interne désirée.
Grillage Moyenne 5 10 -15 m in Retournez à mi-chemin pendant le
grillage.
(175°C) 3 40-50 min
(175°C) 3 45-60 min 175°F (80°C)
wolfappliance.com | 19
Page 64

CONSEILS D'ENTRETIEN
Conseils d'entretien
NETTOYAGE
Acier inoxydable Utilisez un nettoyant non abrasif pour l'acier inoxydable et appliquez-le avec un chiffon doux non pelu-
cheux. Pour faire ressortir le lustre naturel, essuyez légèrement la surface avec un chiffon en microbres
humecté d'eau suivi d'un chamois à polir sec. Suivez toujours le grain de l'acier inoxydable.
Verre noir Pulvérisez du nettoyant à vitre sur un chiffon propre.
Grilles et guides de grille du four Enlevez-les et déposez-les sur une surface plate près de l'évier. Nettoyez avec de l'eau chaude et un
détergent doux ou une pâte de bicarbonate de soude et d'eau. N'immergez pas dans l'eau. Séchez avec
une serviette.
Panneau de commande Utilisez un dégraissant pulvérisé pour éliminer les empreintes de doigts et les taches de nourriture. Pul-
vérisez sur un chiffon avant d'essuyer le panneau.
REMARQUE IMPORTANTE : ne pulvérisez pas les produits à nettoyer directement sur le panneau de
commande.
Intérieur du four Avant d'utiliser la fonction nettoyage, utilisez une lame de rasoir pour soulever doucement les aliments
cuits sur la cavité et la fenêtre du four. Pour les taches rebelles, pulvérisez un nettoyant abrasif doux
ou un dégraissant en aérosol et frottez avec un tampon Scotch-Brite™ sans égratignure (rose ou bleu).
Lavez la cavité du four au complet avec du savon et de l'eau pour éliminer tout produit chimique de
nettoyage avant d'utiliser le mode nettoyage. Si le résidu n'est pas nettoyé de la cavité, la porcelaine
risque d'être gravée. Une fois le cycle de nettoyage terminé, laissez le four se refroidir complètement et
essuyez les cendres avec un chiffon humide.
Lèchefrite Pour nettoyer la grille supérieure, utilisez un détergent doux et un tampon à récurer. Rincez et séchez.
Pour nettoyer la partie inférieure, jetez la graisse et lavez dans de l'eau chaude avec un détergent doux.
Rincez et séchez. La grille supérieure peut aller dans le lave-vaisselle, mais ne placez pas le plateau
enduit de porcelaine dans un lave-vaisselle.
20 | Service à la clientèle de Wolf 800.222.7820
Page 65

DÉPANNAGE
Dépannage
FONCTIONNEMENT
Le four ne fonctionne pas.
• Assurez-vous qu'il y ait du courant.
• Vériez l'alimentation électrique vers le four et assu-
rez-vous que le disjoncteur est en marche.
Problème de température du four.
• Communiquez avec le service à la clientèle de Wolf au
800-222-7820 pour obtenir des recommandations.
Aucune réaction de la part des touches du panneau de
commande.
• L'unité se trouven en mode repos (
panneau de commande), reportez-vous à la page 15.
• Mettez le disjoncteur hors tension pendant 20 secondes,
puis remettez-le en marche.
afché sur le
Les mots « PROBE SHORTED » sont afchés sur le panneau de commande.
• Touchez à OFF (arrêt). Assurez-vous que le connecteur
de sonde soit entièrement appuyé au fond de la prise.
Réinitialisez la température du four et la température de
la sonde.
Message d'erreur afché durant le cycle de nettoyage.
• Pour les fours doubles, si un four se trouve dans un
cycle de nettoyage actif, l'autre four ne peut pas être
utilisé.
Le four émet des bruits pendant le préchauffage ou le
refroidissement.
• Ceci est normal avec l'expansion et la contraction de
toute nouvelle cavité.
• Lancez le cycle de nettoyage. Si le problème persiste,
communiquez avec le service à la clientèle de Wolf au
800-222-7820.
wolfappliance.com | 21
Page 66

DÉPANNAGE
Service
• Préservez la qualité intégrée dans votre produit en
communiquant avec un service Wolf certié par l'usine.
Pour obtenir le nom du centre de service Wolf certié par
l'usine le plus près, consultez la section Contact et assistance de notre site Web, wolfappliance.com ou appelez
le service à la clientèle de Wolf au 800-222-7820.
• Avant d'appeler pour obtenir du service, ayez en main
les numéros de modèle et de série de votre produit. Les
deux numéros sont indiqués sur la plaque signalétique
du produit. Reportez-vous à la page 6 pour connaître
l'emplacement de la plaque signalétique.
• Pour les besoins de la garantie, vous devrez aussi avoir
la date d'installation et le nom de votre dépositaire Wolf
autorisé. Ces renseignements doivent être notés à la
page 3 de ce guide.
Sub-Zero, Sub-Zero & Design, Sub-Zero & Snowake Design, Dual Refrigeration, The Living Kitchen, Great American Kitchens The Fine Art of Kitchen Design, Wolf, Wolf &
Design, Wolf Gourmet, W & Design, les boutons de couleur rouge, Cove et Cove & Design sont des marques déposées et de service de Sub-Zero Group, Inc. et ses liales.
Toutes les autres marques de commerce appartiennent à leurs propriétaires respectifs aux États-Unis et dans d'autres pays.
22 | Service à la clientèle de Wolf 800.222.7820
Page 67

Garantie limitée résidentielle Wolf Appliance
POUR UTILISATION RÉSIDENTIELLE
GARANTIE COMPLÈTE DE DEUX ANS*
Pendant deux ans à compter de la date d’installation originale, cette garantie de produit Wolf Appliance
couvre toutes les pièces et la main d’œuvre pour réparer ou remplacer, selon un usage résidentiel normal,
toute partie du produit qui s’avèrerait défectueuse en vertu des matériaux ou de la fabrication. Tout service
fourni par Wolf Appliance en vertu de la garantie ci-dessus doit être effectué par un centre de service Wolf
certié par l’usine, à moins d’indication contraire de la part de Wolf Appliance, Inc. Le service sera fourni
pendant les heures normales d’affaires.
GARANTIE LIMITÉE DE CINQ ANS
Pendant cinq ans à compter de la date originale d’installation, Wolf Appliance réparera ou remplacera les
pièces suivantes qui s’avèreront défectueuses en vertu des matériaux ou de la fabrication : les brûleurs
au gaz (sauf l’apparence), les éléments de chauffage électrique, les moteurs de souferie (hottes de
ventilation), les circuits de contrôle électronique, les tubes magnétrons et les génératrices à induction.
Si le propriétaire utilise le service Wolf certié en usine, le fournisseur de service réparera ou remplacera
ces pièces et le propriétaire paiera pour tous les autres frais, y compris la main d’œuvre. Si le propriétaire
utilise un service non certié, il doit communiquer avec Wolf Appliance, Inc. (avec les renseignements
ci-dessous) pour obtenir des pièces réparées ou de rechange. Wolf Appliance ne remboursera pas le
propriétaire pour les pièces achetées d’un service non certié ou d’autres sources.
CONDITIONS S’APPLIQUANT À CHAQUE GARANTIE
La garantie s’applique uniquement aux produits installés pour un usage résidentiel normal. La garantie
s’applique seulement aux produits installés dans l’un des cinquante états des États-Unis, dans le District
of Columbia ou les dix provinces du Canada. Cette garantie ne couvre pas les pièces ou la main d’œuvre
pour corriger tout défaut causé par de la négligence, un accident ou une utilisation, un entretien, une
installation, un service ou une réparation inappropriés.
LES REMÈDES DÉCRITS CI-DESSUS POUR CHAQUE GARANTIE SONT LES SEULS QUI SONT OFFERTS PAR
WOLF APPLIANCE, INC. EN VERTU DE CETTE GARANTIE OU EN VERTU DE TOUTE GARANTIE DÉCOULANT
DE L’OPÉRATION DE LA LOI. WOLF APPLIANCE, INC. NE SERA PAS RESPONSABLE DES DOMMAGES INDIRECTS OU CONSÉCUTIFS DÉCOULANT DE LA VIOLATION DE CETTE GARANTIE OU DE TOUTE GARANTIE,
EXPRESSE, IMPLICITE OU LÉGALE.
Certaines provinces ne permettent pas l’exclusion ou la restriction des dommages indirects ou consécutifs, par conséquent, la limite ou l’exclusion ci-dessus peut ne pas s’appliquer à votre cas. Cette garantie
vous confère des droits légaux précis et vous pouvez aussi avoir d’autres droits légaux qui peuvent varier
d’une province à l’autre.
Pour obtenir des pièces et/ou du service et le nom du centre de service Wolf certié par l’usine le plus
près de chez vous, communiquez avec Wolf Appliance, Inc., P.O. Box 44848, Madison, WI 53744 É.-U.;
vériez la section Contact et assistance de notre site Web, wolfappliance.com, envoyez-nous un courriel
à customerservice@subzero.com ou composez le 800-222-7820.
*L’acier inoxydable (les portes, les panneaux, les poignées, les cadres et les surfaces intérieures) est
couvert par une garantie limitée de 60 jours sur les pièces et la main d’œuvre pour toute défectuosité
cosmétique.
*Les ltres de rechange pour les trousse de recirculation de hotte ne sont pas couverts par la garantie du
produit.
Page 68

WOLF APPLIANCE, INC. P.O. BOX 44848 MADISON, WI 53744 WOLFAPPLIANCE.COM 800.222.7820
9005945 REV-D 2/ 2018
 Loading...