

Page 1
Dual Fuel Ranges Use & Care Guide
Page 2

DUAL FUEL RANGES
Contents
4 Safety Precautions
8 Dual Fuel Range Features
9 Oven Operation
16 Surface Operation
20 Care Recommendations
21 Troubleshooting
23 Wolf Warranty
Customer Care
The model and serial number are printed on the enclosed
product registration card. Both numbers are also listed on
the product rating plate. Refer to page 8 for rating plate
location. For warranty purposes, you will also need the date
of installation and name of your authorized Wolf dealer.
Record this information below for future reference.
If your product ever needs attention, be sure to use a Wolf
factory certied service provider recommended by our
customer care center, or select one from our list of providers
available at wolfappliance.com/locator. All factory certied service providers are carefully selected and thoroughly
trained by us.
SERVICE INFORMATION
Model Number
Serial Number
Date of Installation
Certied Service Name
Certied Service Number
Authorized Dealer
Dealer Number
Important Note
To ensure this product is installed and operated as safely
and efciently as possible, take note of the following types
of highlighted information throughout this guide:
IMPORTANT NOTE highlights information that is especially
important.
CAUTION indicates a situation where minor injury or product
damage may occur if instructions are not followed.
WARNING states a hazard that may cause serious injury or
death if precautions are not followed.
IMPORTANT NOTE: Throughout this guide, dimensions in
parentheses are millimeters unless otherwise specied.
2 | Wolf Customer Care 800.222.7820
Page 3

Thank You
Thank you for your purchase. We look forward to being part of your home for decades
to come. As a third-generation family-owned company, we take a very personal stake in
the preparation of your family’s food. We built our business and our reputation on helping
families serve the nest food possible.
With your purchase, you receive one of the strongest warranties in the appliance industry.
Take a moment to read the full warranty statement on page 23. It’s also important to
register your Wolf appliance to ensure that you don’t miss out on exclusive owner benets, such as; assurance that you will be taken care of in the unlikely event that service
becomes necessary during the warranty period, and a proof-of-purchase record in case
of a home insurance claim. You may register by one of the following options:
• Mail in the completed Wolf product registration card.
• Register online at wolfappliance.com/register and create a personalized My Sub-Zero/
Wolf account using the serial number on your product.
• Register by phone by calling Wolf Customer Care at 800-222-7820.
As a Wolf owner, you can count on ongoing support, day in and day out. Our customer
care center is available 24 hours a day, seven days a week and staffed by knowledgeable
product experts at our factory in Madison, Wisconsin. Should the need arise, simply call
800-222-7820 and speak with one of our product experts. They will help troubleshoot any
issues you might have.
We are condent this guide will answer your questions about the features, operation,
and maintenance of your Wolf, but if you have additional questions, please contact us at
800-222-7820 or visit us online at wolfappliance.com.
wolfappliance.com | 3
Page 4
SAFETY PRECAUTIONS
IMPORTANT INSTRUCTIONS
WARNING
If the information in this guide is not followed
exactly, a re or explosion may result, causing
property damage, personal injury or death.
Do not store or use gasoline or other ammable
vapors and liquids in the vicinity of this or any
other appliance.
WHAT TO DO IF YOU SMELL GAS:
• Do not try to light any appliance.
• Do not touch any electrical switch.
• Do not use any phone in your building.
• Immediately call your gas supplier from a
neighbor’s phone. Follow the gas supplier’s
instructions.
• If you cannot reach your gas supplier, call the
re department.
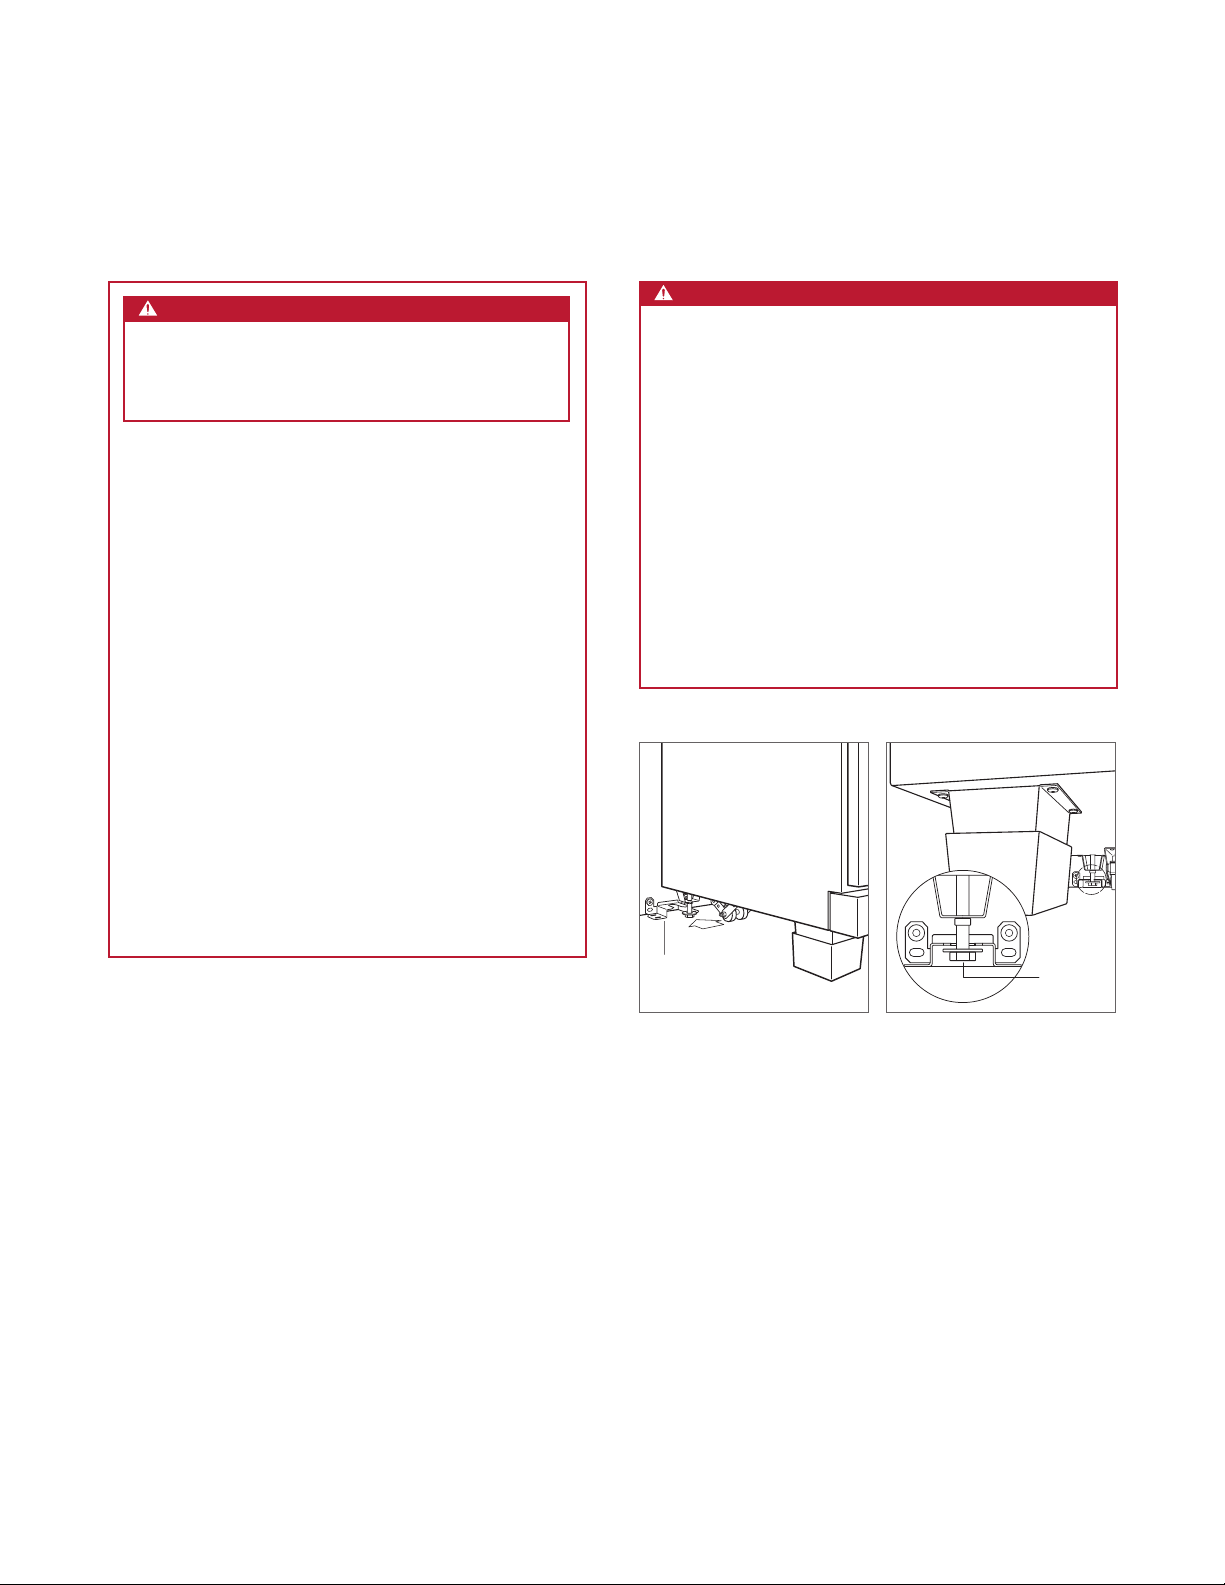
WARNING
A child or adult can tip this appliance and be
killed.
Verify the anti-tip device has been properly
installed and engaged. Ensure the anti-tip device
is re-engaged when this appliance is moved. Refer
to the illustrations below for how to verify correct
installation.
Do not operate this appliance without the anti-tip
device in place and engaged. Failure to do so
can result in death or serious burns to children or
adults.
To reduce the risk of burns, do not move this
appliance while hot.
This appli ance must be properly installed and serviced by a qualied installer, service agency or gas
supplier and grounded by a qualied technician.
ANTI-TIP
DEVICE
Anti-tip device location.
ANTI-TIP
DEVICE
ENGAGED
Anti-tip device engaged.
4 | Wolf Customer Care 800.222.7820
Page 5

SAFETY PRECAUTIONS
IMPORTANT INSTRUCTIONS
GENERAL SAFETY PRECAUTIONS
• Read this guide carefully before using this appli-
ance to reduce risk of re, electric shock or injury.
• Before performing service, shut off gas supply by
closing the gas shut-off valve and shut off electricity to this appliance.
• Keep appliance area clear and free from combus-
tible material.
• For safety when cooking, set burner controls so
ame does not extend beyond the bottom of pan.
• Exercise caution when opening oven door. Let hot
air or steam escape before looking or reaching into
oven.
• IMPORTANT: Do not install a ventilation system
that blows air downward toward this gas cooking
appliance. This type of ventilation system may
cause ignition and combustion problems with this
gas cooking appliance resulting in personal injury
or unintended operation.
• Do not use aluminum foil to line any part of this
appliance.
• Never use this appliance to warm or heat the room.
Doing so may result in carbon monoxide poisoning.
• Be sure the oven cool air intake (above the door)
and oven exhaust vent (below the door) are unobstructed at all times.
• Wear proper apparel. Loose-tting or hanging gar-
ments should never be worn using this appliance.
• Use extreme caution when moving a grease kettle
or disposing of hot grease.
• Always use dry pot holders when removing pans
from this appliance. Wet or damp pot holders can
cause steam burns. Do not use a towel or bulky
cloth in place of pot holders.
• Position oven racks in desired locations when oven
is cool. If a rack must be repositioned after the
oven is already hot, be sure pot holder does not
contact a hot heating element in the oven.
wolfappliance.com | 5
Page 6

SAFETY PRECAUTIONS
IMPORTANT INSTRUCTIONS
GENERAL SAFETY PRECAUTIONS
• Clean only those parts listed in this guide.
• Do not use oven cleaners. No commercial oven
cleaner or oven liner protective coating of any kind
should be used in or around any part of the oven.
• Before using self-clean, remove broiler pan, oven
racks, oven rack guides and any other utensils.
• Do not repair or replace any part of this appli-
ance unless specically recommended in literature
accompanying this appliance.
• Do not obstruct the ow of air to ensure proper
combustion and ventilation.
• When using this appliance, do not touch grates,
burner caps, burner bases or any other parts in
proximity to the ame. These components may be
hot enough to cause burns.
• Do not clean oven gasket; rubbing or moving the
gasket may compromise the door seal.
• Do not use water on grease res. Smother the ame
or use a dry chemical or foam-type extinguisher.
• Never leave this appliance unattended when in use.
Boilovers and greasy spills may smoke or ignite.
• Do not touch heating elements or interior surfaces
of oven. Heating elements may be hot even though
they are dark in color. Interior surfaces become hot
enough to cause burns. During and after use, do
not touch, or let clothing or other ammable materials contact heating elements or interior surfaces
of oven until they have had sufcient time to cool.
• Do not leave children alone or unattended in the
area where this appliance is in use. Never allow
children to sit or stand on the appliance.
• Do not store items of interest to children above or
at the back of this appliance, as they could climb
on the appliance to reach items and be injured.
• Do not heat unopened food containers, such as
baby food jars and cans. Pressure build-up may
cause the container to burst and cause injury.
• Do not store ammable materials in an oven, near
burners or let grease or other ammable substances accumulate on this appliance.
6 | Wolf Customer Care 800.222.7820
Page 7

SAFETY PRECAUTIONS
IMPORTANT INSTRUCTIONS
CALIFORNIA PROPOSITION 65
WARNING
Burning gas cooking fuel generates some byproducts that are on the list of substances known
to cause cancer or reproductive harm. To minimize
exposure to these substances, always operate
this unit according to the instructions contained in
this guide and provide good ventilation.
COMMONWEALTH OF MASSACHUSETTS
• Installations and repairs must be performed by a
qualied or licensed contractor, plumber or gas
tter, qualied or licensed by the state, province or
region where this appliance is being installed.
• Use only gas shut-off valves approved for use
within the state, province or region where this
appliance is being installed.
• A exible gas connector, when used, must not
exceed 3' (.9 m).
wolfappliance.com | 7
Page 8
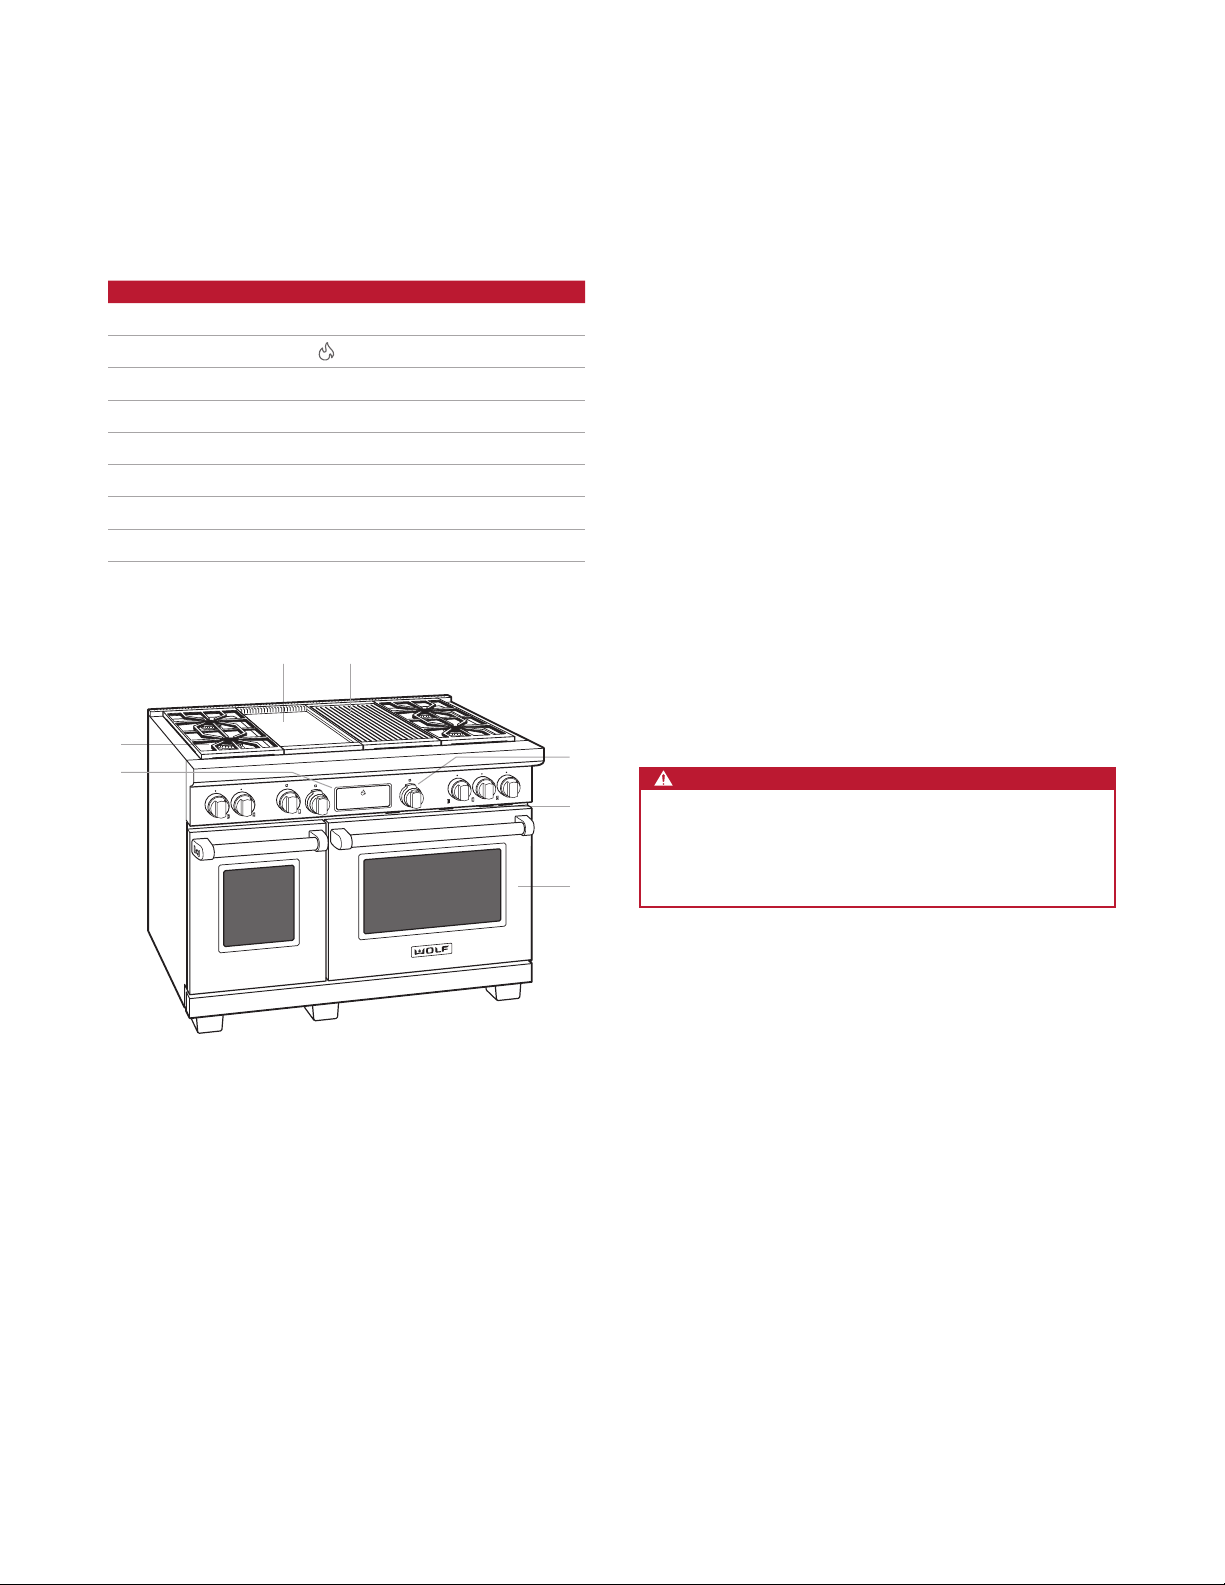
DUAL FUEL RANGE FEATURES
Dual Fuel Range Features
FEATURE
1
Product Rating Plate
2
Control Panel (press to access)
3
Oven Control Knob
4
Convection Oven
5
Surface Burner
6
Optional Charbroiler
7
Optional Griddle
8
Optional French Top (not shown)
7
5
2
6
PG
Getting Started
We know you are eager to start cooking, but before you
2
10
10
10
16
17
18
19
3
1
4
do, please take some time to read this use & care guide.
Whether you are an occasional cook or an expert chef, it
will be to your benet to familiarize yourself with the safety
practices, features, operation and care recommendations of
your Wolf dual fuel range.
• To ensure all residual oil from the manufacturing process
has been removed, clean the range thoroughly with hot
water and mild detergent prior to use. Rinse and dry with
a soft cloth. Refer to care recommendations on page 20.
• Verify surface burner components are assembled
correctly.
• Optional charbroiler, griddle and French top require
special attention. Refer to pages 17–19.
• To ensure the best results, review cooking modes and
special features on page 12.
CAUTION
Do not place cookware on the oven oor or use
aluminum foil or other material to line the oven oor or
side walls. Failure to adhere to this notice will damage
the porcelain interior and will void your warranty.
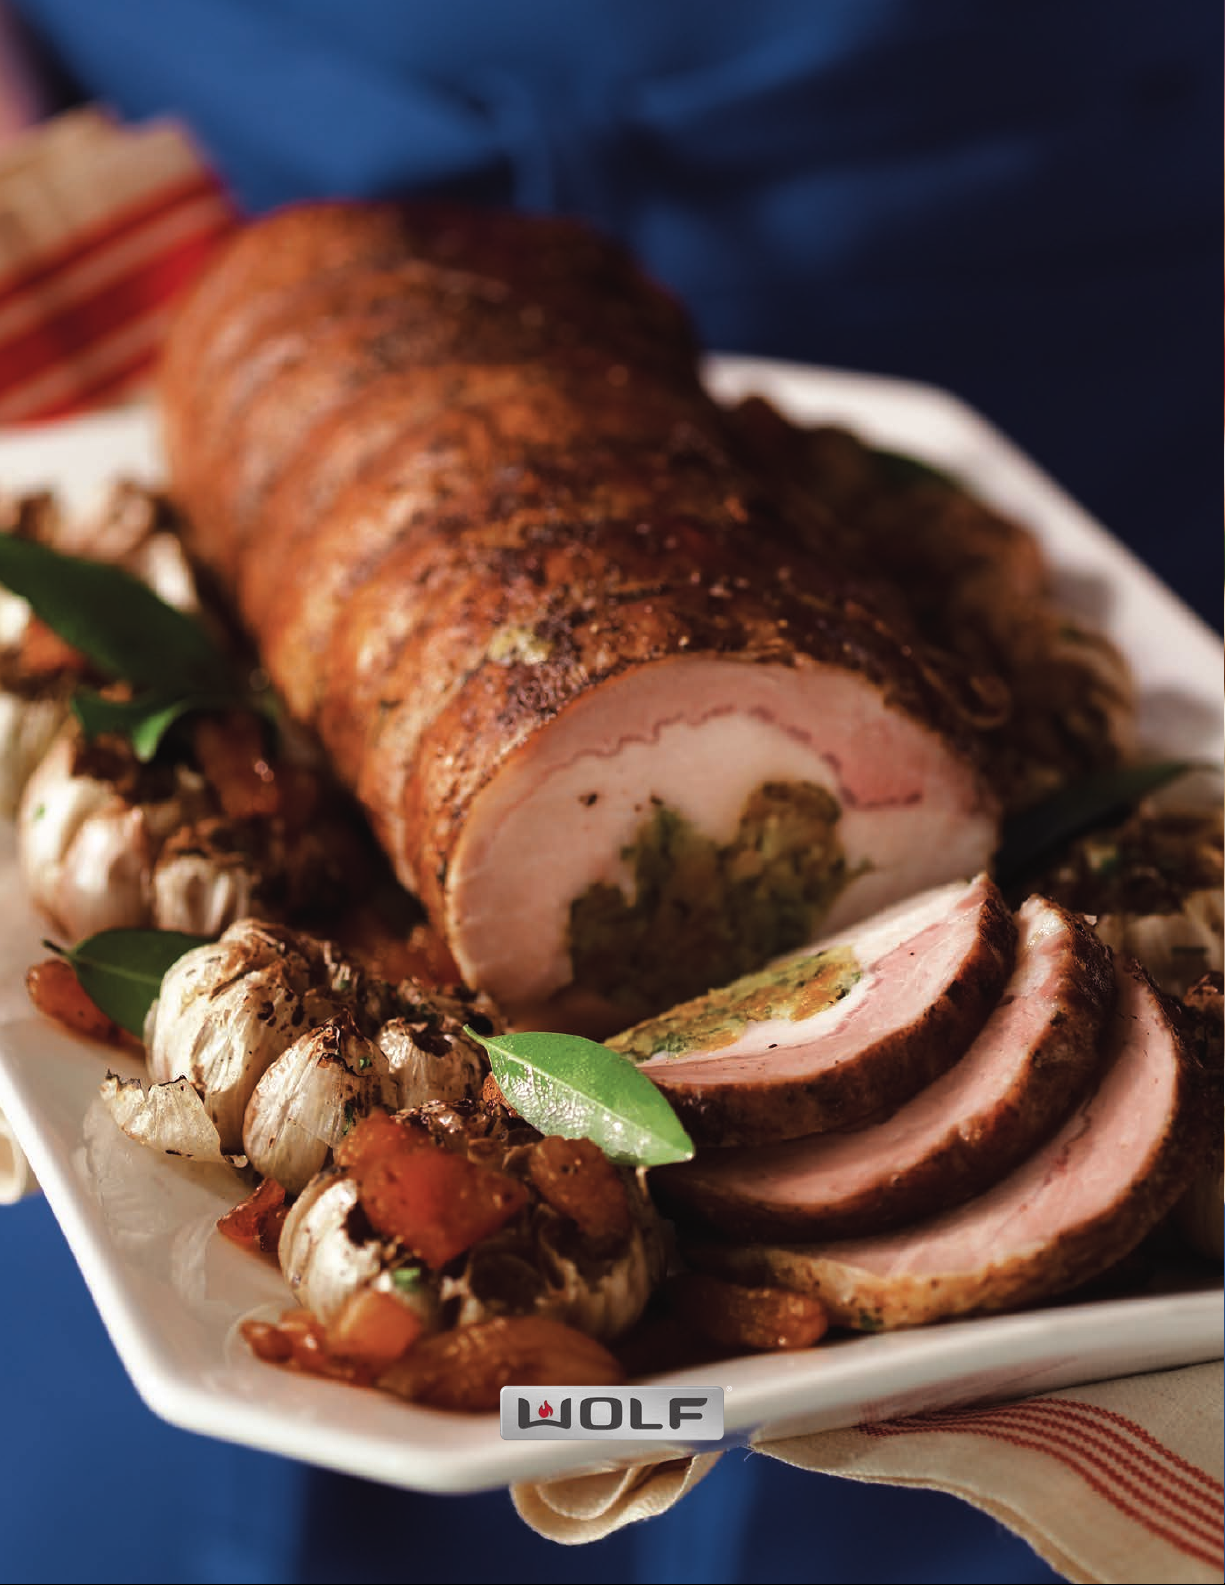
48" dual fuel range shown.
8 | Wolf Customer Care 800.222.7820
Page 9
OVEN OPERATION
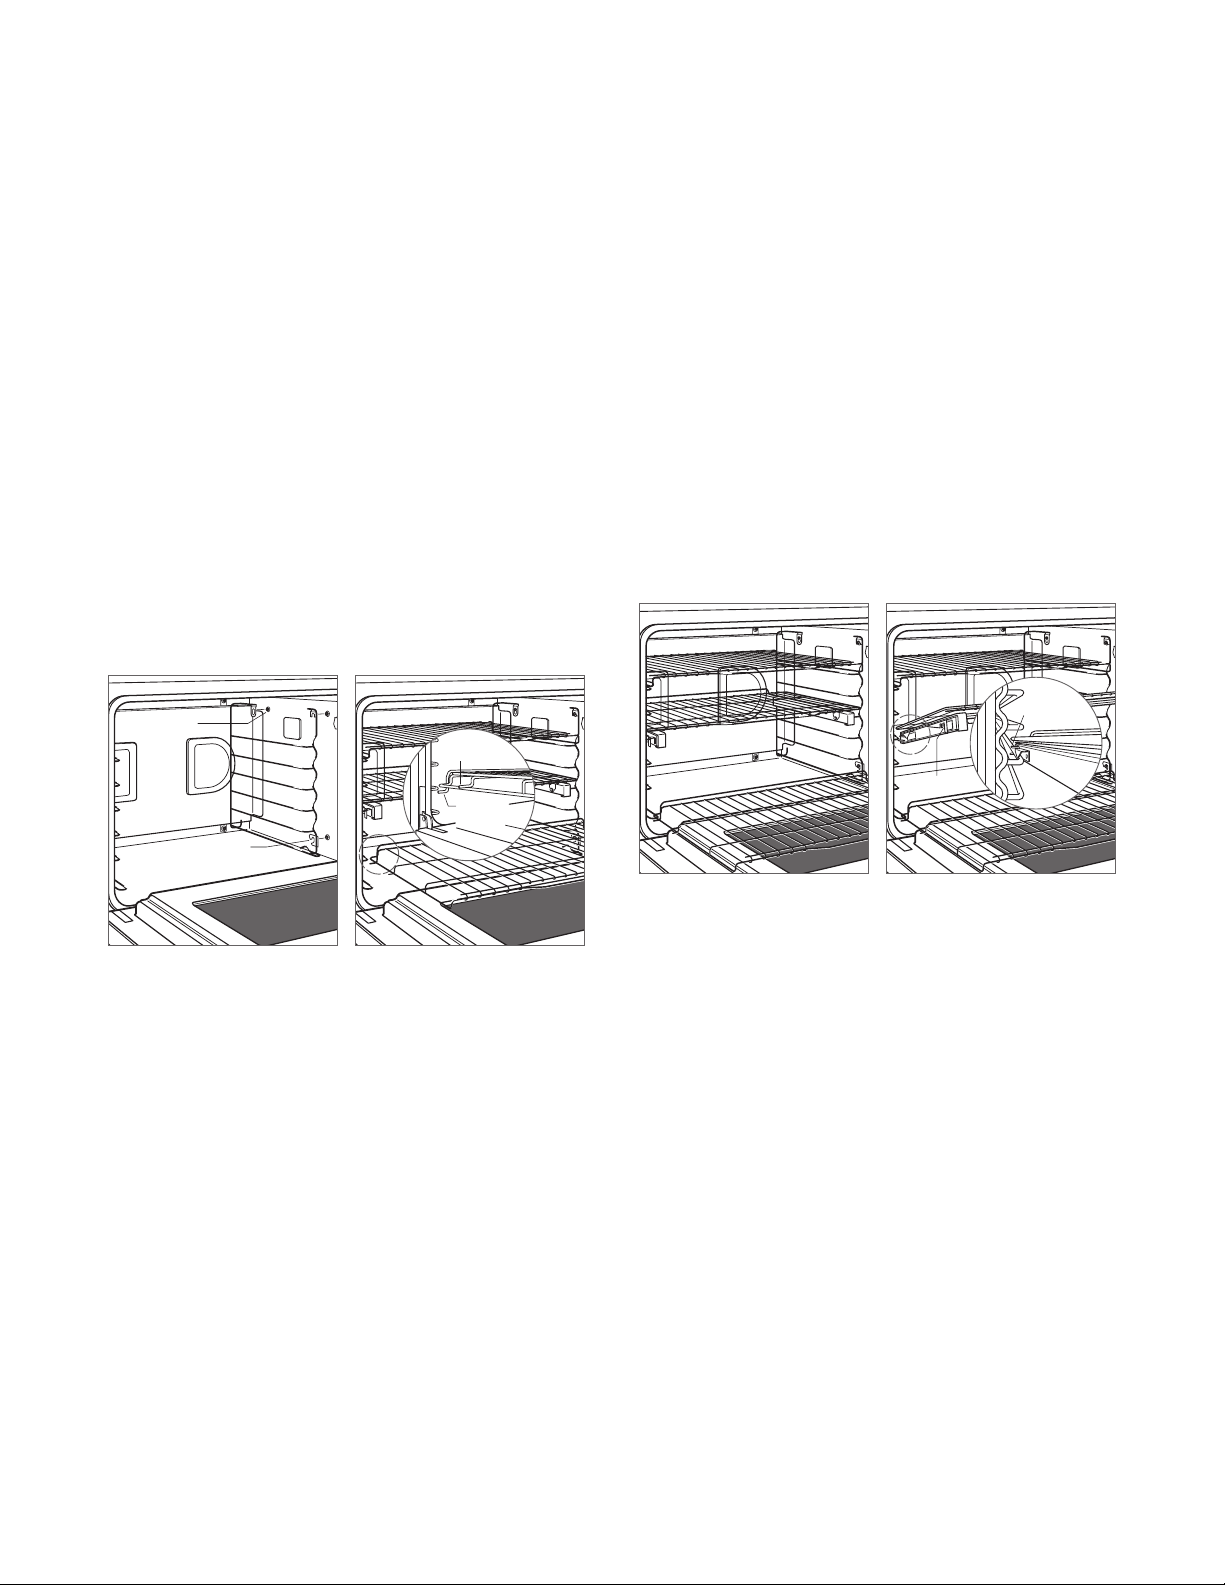
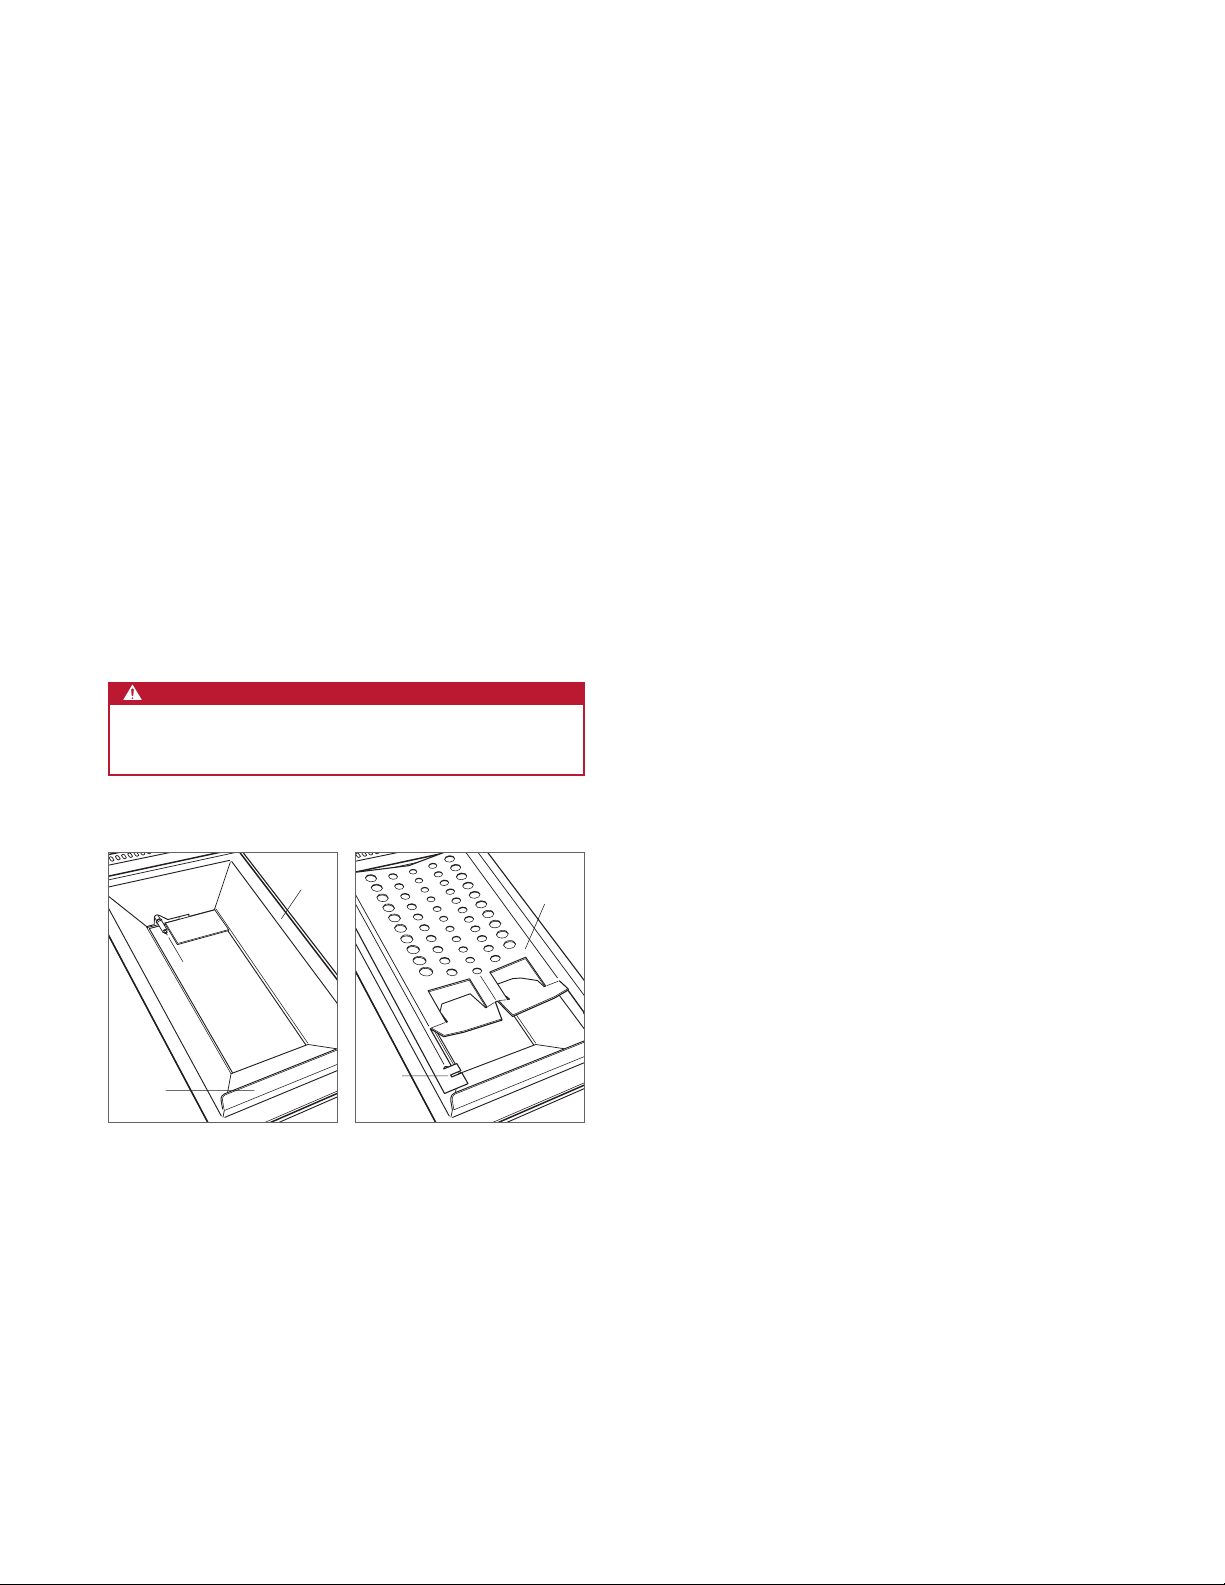
Oven Racks
OVEN RACK GUIDES
To insert the rack guides in the oven, locate the mounting
screws on the oven side walls. Place the rack guide
mounting tabs over the screws and slide down until fully
seated. Refer to the illustration below.
OVEN RACKS
To insert a standard rack in the oven, place the rack anti-tip
lock under the side rack guide rails. Slide the rack back
and lift up to clear the rack stops. Continue to slide the
rack back until completely inside the oven. Refer to the
illustration below.
MOUNTING
SCREW
MOUNTING
TAB
RACK STOP
ANTI-TIP
LOCK
The bottom oven rack has a full-extension capability which
is supported by the oven door (excluding 18" oven). With
the rack in the lowest rack guide position, slide it onto the
door guides for greater stability and accessibility. Refer to
the illustration below.
To insert a full-extension easy glide rack, place the two rear
tabs onto the rack guide (one tab above and one below).
Refer to the illustration below. Angle the rack slightly and
slide back until the front rack notch engages the front rack
guide.
REAR TABS
NOTCH
Bottom rack.
Full-extension rack.
Oven rack guides.
Oven rack anti-tip lock.
wolfappliance.com | 9
Page 10
OVEN OPERATION
Oven Operation
Wolf dual fuel ranges utilize a combination of a cooking
mode selector bezel, oven temperature control knob and
electronic control panel to select desired cooking modes,
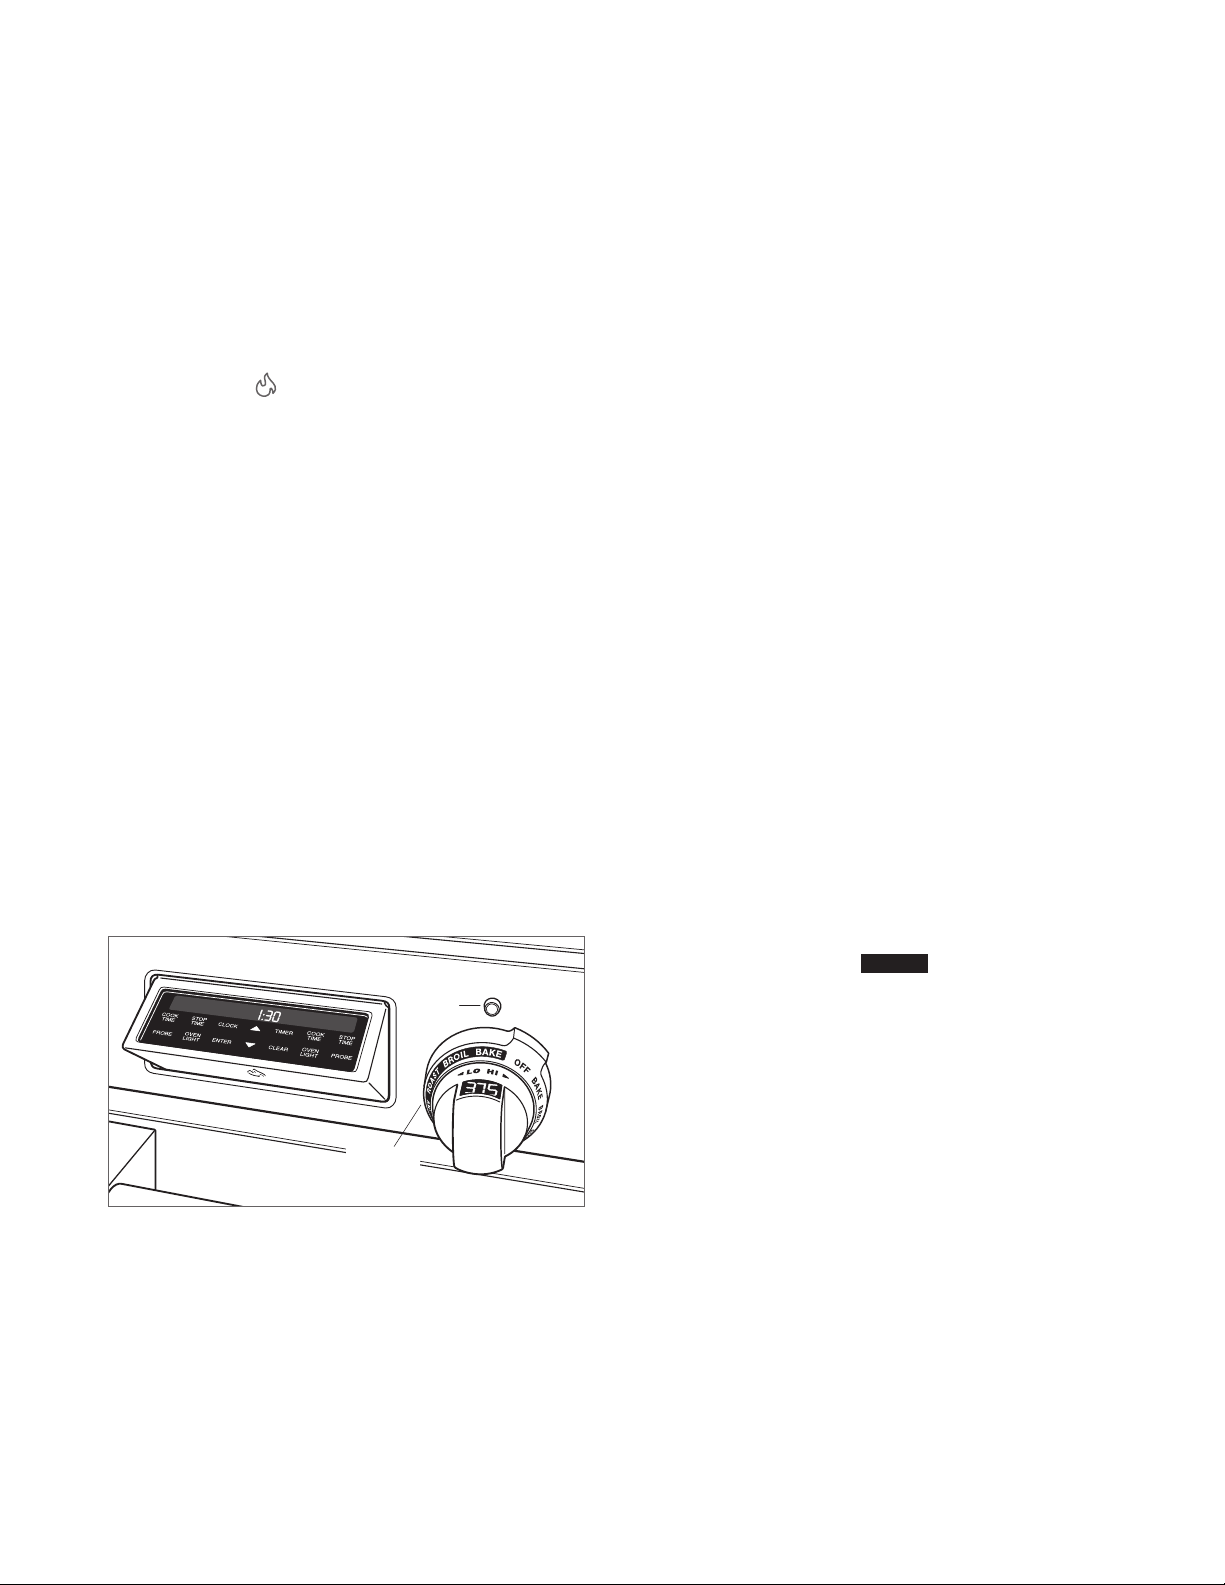
oven temperature and exclusive features. Open the control
panel by pressing
.
Temperatures are displayed in Fahrenheit. To change to
Celsius, touch and hold CLOCK for 5 seconds. Touch
COOK TIME to alternate between °F and °C, then touch
ENTER.
When using the oven, Wolf has created a two-step process
to ensure it is never accidentally turned on:
1 Rotate selector bezel to desired cooking mode. Stan-
dard modes are displayed in the silver area of the bezel.
Convection modes are displayed in the black area of the
bezel. Refer to the illustration below. Once the desired
cooking mode is selected, a preset temperature will
appear on the control knob.
2 Select preset temperature by touching ENTER on
the control panel or turn the control knob to increase
or decrease temperature. Either action completes
the second step of the process. Oven indicator light
illuminates and preheat begins.
OVEN LIGHT
The oven light turns on automatically when the door is open
and off when closed. To turn the light on while the door is
closed, touch OVEN LIGHT on the control panel.
PREHEAT
During preheat, the oven is heated as quickly and evenly
as possible and is not ideal for cooking. Preheat should be
utilized for all cooking modes except broil and convection
broil. During preheat, temperatures below 150°F
(65°C)
appear as ‘Lo’. Once preheat is complete, an audible
chime indicates the oven has reached set temperature and
the oven indicator light is no longer illuminated. To adjust
temperature once preheat is complete, turn the knob to the
desired temperature.
PRIOR TO USE
To ensure all residual oil from the manufacturing process
has been removed, each oven must go through the following procedure.
1 Clean oven thoroughly with hot water and mild deter-
gent. Rinse and dry with a soft cloth.
TIMER
SELECTOR
BEZEL
Control panel and oven control knob.
INDICATOR
LIGHT
2 Turn on ventilation. Some smoke and odor is normal.
3 Rotate selector bezel to ROAST and adjust temperature
to 550°F
4 Rotate bezel to OFF and allow oven to cool with the door
(290°C) for one hour.
closed.
10 | Wolf Customer Care 800.222.7820
Page 11

OVEN OPERATION
Oven Operation
CLOCK
The clock is visible on the control panel during all cooking
modes, except when the timer is in use. It is very important
the clock is set to the correct time if the cook time or stop
time feature is used. The clock must be reset after a power
outage.
Setting clock:
1 Touch CLOCK on the control panel.
2 Use up and down arrows to set time of day. Time will
change from am to pm by passing 12:00.
3 Touch CLOCK. An audible chime indicates time has
been set.
4 To change to 24-hour clock, press and hold CLOCK for
5 seconds. Touch CLOCK, then ENTER.
CLOCK STANDBY POWER
The range is shipped in standby power mode which disables the clock approximately 10 minutes after the cooling
fan operation is complete or the oven is inactive. The clock
will illuminate after any touch of the controls or oven use.
TIMER
The timer can be set for a maximum of 9 hours, 59 minutes.
Once a time is set, the countdown is illuminated on the
control panel display. The last minute counts down in seconds. The timer is independent from the oven. Setting the
timer does not affect cook time or stop time. For information
regarding auto program features, refer to page 14.
Setting timer:
1 Touch TIMER on the control panel.
2 Use up and down arrows to set time in hours and
minutes.
3 Touch TIMER to start. An audible chime indicates timer
has been set. Oven will chime and time will ash when
complete. Timer will continue to chime until CLEAR is
touched on the control panel.
Enable/disable standby power:
1 Touch and hold CLOCK on the control panel for 5
seconds.
2 Touch STOP TIME to toggle on or off, then touch
ENTER.
wolfappliance.com | 11
Page 12
OVEN OPERATION
O
F
F
B
A
K
E
B
R
O
I
L
R
O
A
S
T
P
R
O
O
F
C
L
E
A
N
C
O
N
V
R
O
A
S
T
B
R
O
I
L
B
A
K
E
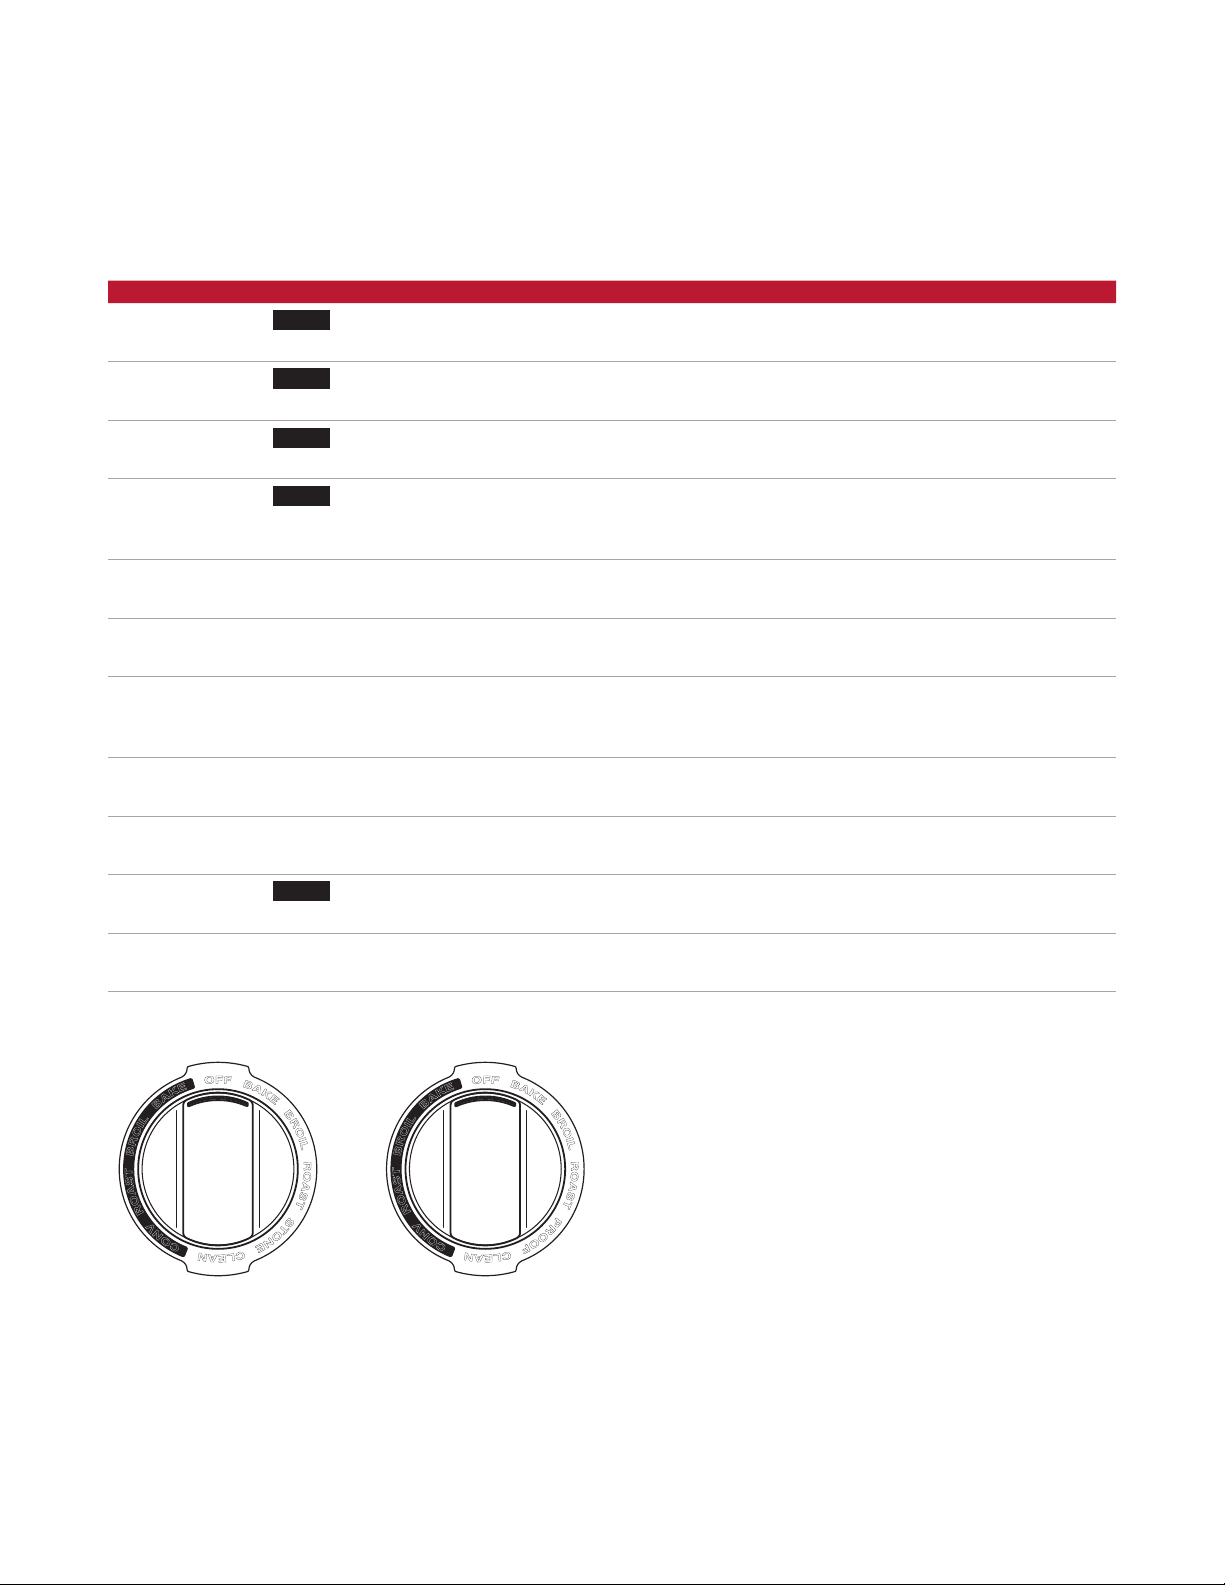
Cooking Modes
MODE
BEZEL PRESET RANGE PROBE USES
Convection CONV 325°F
(165°C)
Convection Bake BAKE 375°F
(190°C)
Convection Roast ROAST 325°F
(165°C)
Convection Broil BROIL Br1
Br2
Br3
Bake BAKE 350°F
(175°C)
Roast ROAST 350°F
(175°C)
Broil BROIL Br1
Br2
Br3
Bake Stone STONE 400°F
(205°C)
Proof PROOF 85°F
(30°C)
170 – 550°F
(75 – 290°C)
170 – 550°F
Uniform air movement makes it possible to multi-level rack
•
cook with even browning.
Ideal for pie baking.
•
(75 – 290°C)
170 – 550°F
(75 – 290°C)
550°F (290°C)
450°F (230°C)
350°F (175°C)
170 – 550°F
(75 – 290°C)
170 – 550°F
(75 – 290°C)
550°F (290°C)
450°F (230°C)
350°F (175°C)
170 – 550°F
(75 – 290°C)
85 – 110°F
(30 – 45°C)
Perfect for roasting tender cuts of beef, lamb, pork and
•
poultry.
Shortens broiling times for thicker cuts of meat, sh and
poultry. Utilize two-piece broiler pan and always broil with
oven door closed.
Best for single-rack cooking, primarily baked foods. Use for
•
standard recipes.
Best for roasting less tender cuts of meat, such as chuck
•
roasts and stew meat that should be covered.
Best for broiling meats, sh and poultry pieces up to 1"
thick. Utilize two-piece broiler pan and always broil with
oven door closed.
Baking on a ceramic stone. Great for pizza and bread. Bake
•
stone accessory required. 30" and 36" ovens only.
Ideal for proong, or rising bread dough. 18" oven only. For
•
30" and 36" ovens, refer to page 13.
Dehydration CONV 135°F
(60°C)
Self-Clean CLEAN
F
F
O
B
E
K
A
B
L
I
O
R
B
T
S
A
O
R
V
N
O
C
A
K
E
B
R
O
I
L
R
O
A
S
T
S
T
O
N
E
C
L
N
E
A
L
I
O
R
B
T
S
A
O
R
Selector bezel (30" / 36" ovens).
12 | Wolf Customer Care 800.222.7820
Selector bezel (18" oven).
110 – 160°F
(45 – 70°C)
F
F
O
B
E
K
A
B
V
N
O
C
A
K
F
C
L
N
E
A
Dry a variety of fruits, vegetables and meats. Accessory
racks required. Refer to page 13.
Oven heats to an extremely high temperature to allow food
soil to burn off. Refer to page 15.
E
B
R
O
I
L
R
O
A
S
T
P
R
O
O
Page 13
OVEN OPERATION
Proof
Setting controls for 30" and 36" ovens:
1 Rotate selector bezel to BAKE.
2 Turn oven control knob left until ‘PrF’ is displayed, then
release.
3 Oven temperature is preset to 85°F (30°C). Touch ENTER
to select preset temperature or turn control knob to
change temperature. Display alternates between set
temperature and ‘PrF.’
Dehydration
Accessory kit required. Accessories are avail able through an
authorized Wolf dealer. For local dealer information, visit the
nd a showroom section of our website, wolfappliance.com.
Setting controls:
1 Place door stop supplied with accessory kit, onto oven
door lock.
2 Rotate selector bezel to CONV .
3 Turn oven control knob left until ‘dEH’ is displayed, then
release.
4 Oven temperature is preset to 110°F (45°C). Touch
ENTER to select preset temperature or turn control knob
to change temperature. Display alternates between set
temperature and ‘dEH.’
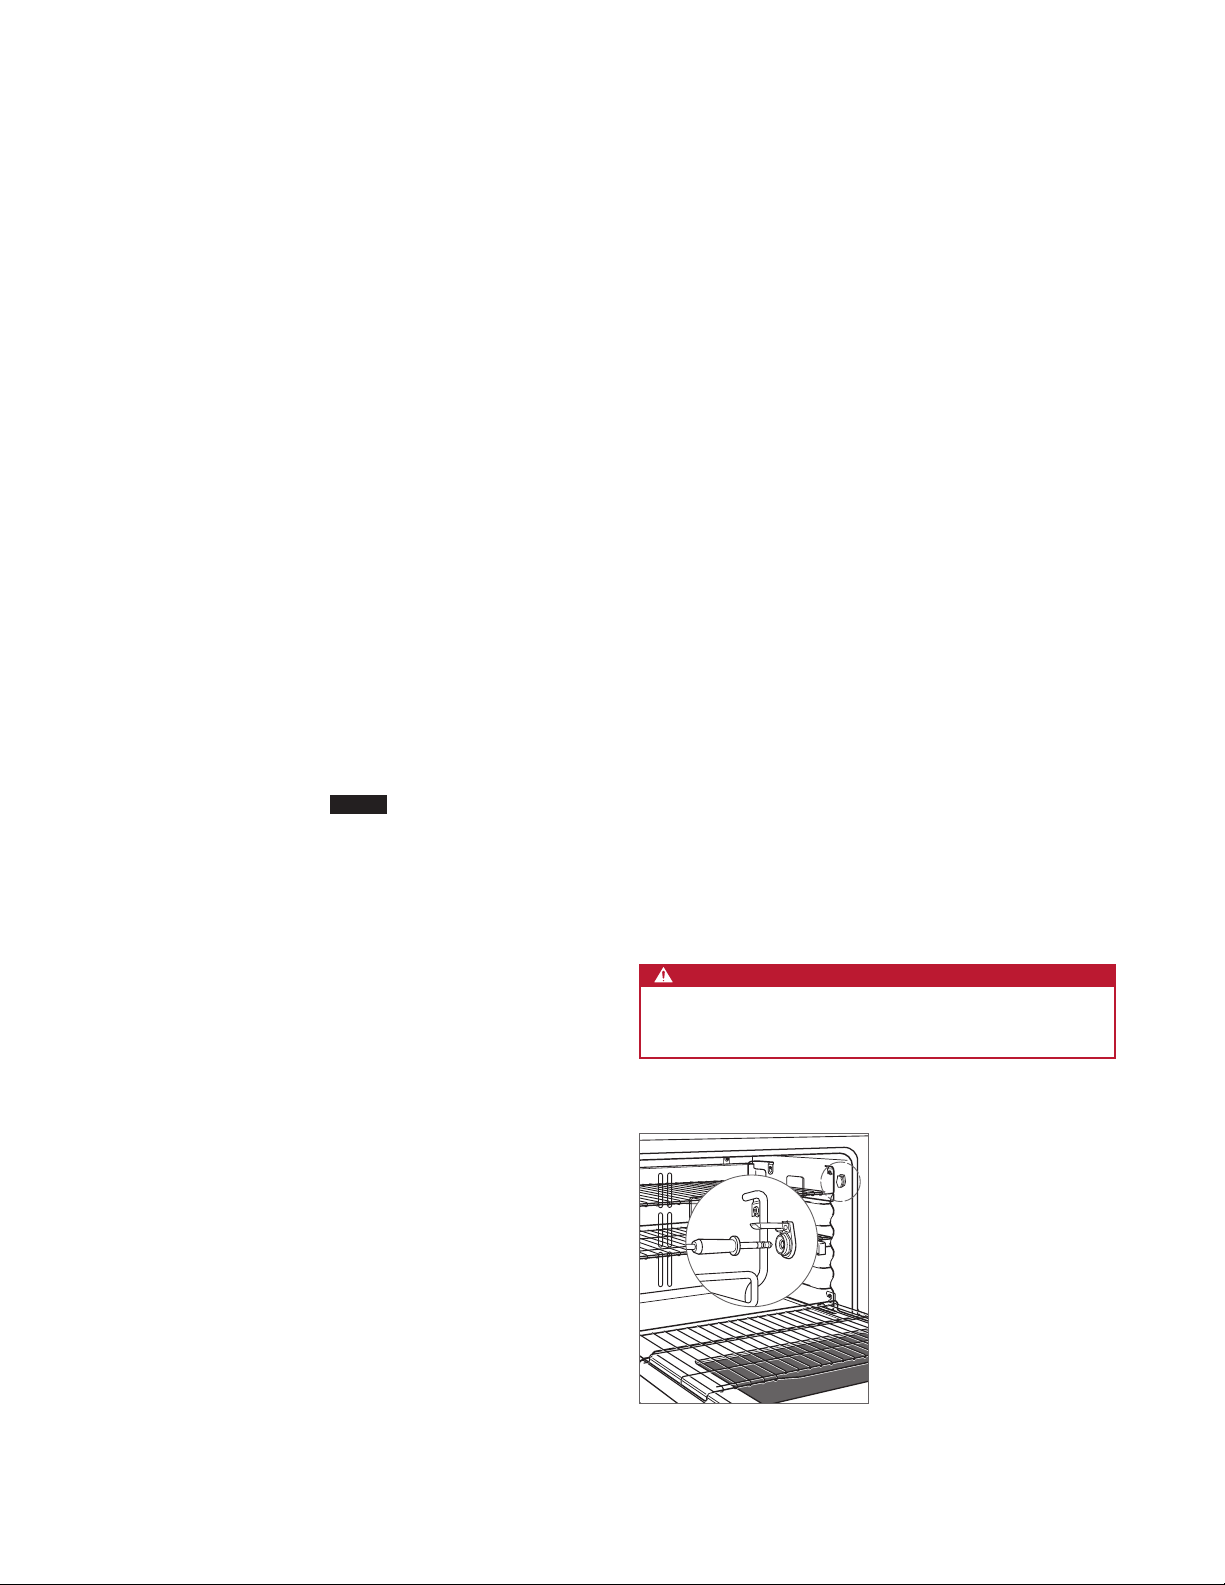
Temperature Probe
The temperature probe measures the internal temperature
of food while cooking. It can be used with all cooking
modes except broil and convection broil.
Setting controls:
1 Rotate selector bezel to desired cooking mode.
2 Touch ENTER to select preset temperature or turn con-
trol knob to change temperature.
3 Insert probe into the thickest area of food. When making
bread, cook for approximately 10 minutes before
inserting probe.
4 When preheat is complete, use a pot holder to lift probe
receptacle cover, then insert probe. Refer to the illustration below.
5 Probe temperature is preset to 160°F (70°C). Touch
ENTER to select preset temperature or turn control knob
to change temperature. Display alternates between oven
set temperature and actual probe temperature. To alternate between probe set point and actual probe temperature, press PROBE. Temperatures below 70°F
displayed as ‘Lo.’
6 An audible chime indicates internal temperature has
reached probe set point. Remove, then reinsert probe to
verify internal temperature.
CAUTION
Probe and probe receptacle will be very hot. Handle
with care.
(20°C) are
Probe receptacle.
wolfappliance.com | 13
Page 14

OVEN OPERATION
Auto Program
TIMED COOK
Timed cook automatically turns the oven off at a specied
time. The oven will begin to heat immediately and will turn
off at the desired stop time. The clock must be set to the
correct time for timed cook to function properly. Use in
any cooking mode except broil, convection broil and bake
stone.
Setting controls:
1 Rotate selector bezel to desired cooking mode.
2 Touch ENTER to select preset temperature or turn con-
trol knob to change temperature.
3 Touch COOK TIME. Use arrows to select desired cook
time in hours and minutes.
4 Touch ENTER.
DELAYED START
Delayed start automatically turns the oven on and off at
specied times. The oven will remain idle until the desired
start time and will turn off at the desired stop time. The
clock must be set to the correct time for delayed start to
function properly. Use in any cooking mode except broil,
convection broil and bake stone.
Setting controls:
1 Rotate selector bezel to desired cooking mode.
2 Touch ENTER to select preset temperature or turn con-
trol knob to change temperature. If ENTER is touched,
oven will begin to heat immediately, but will enter idle
mode once stop time is set.
3 Touch COOK TIME. Use arrows to select desired cook
time in hours and minutes.
4 Touch STOP TIME. Use arrows to select desired time
oven should turn off.
5 Touch ENTER.
14 | Wolf Customer Care 800.222.7820
Page 15

OVEN OPERATION
Self-Clean
During self-clean, the oven is heated to an extremely high
temperature to burn off food soil. Remove all oven racks
and rack guides. They will discolor if left in during self-clean.
The oven door will lock and remain locked until self-clean
is complete and oven temperature has cooled below 300°F
(150°C)
. Self-clean times include one hour for cool down.
Setting controls for 4-hour self-clean:
1 Rotate selector bezel to CLEAN.
2 Touch ENTER.
Setting controls for 3-hour self-clean:
1 Rotate selector bezel to CLEAN.
2 Touch STOP TIME.
3 Touch down arrow to reduce stop time by 1 hour.
4 Touch ENTER twice.
CAUTION
During self-clean, exterior surfaces may get hotter than
usual. Children should be kept away.
Sabbath
This appliance is certied by Star-K to meet strict religious
regulations in conjunction with specic instructions found
on www.star-k.org.
Sabbath overrides the automatic 12-hour shut off feature.
Sabbath must be reset after a power outage.
Setting controls:
1 Turn oven light on or off.
2 Rotate selector bezel to BAKE or ROAST and select
desired temperature.
3 Touch and hold ENTER for 5 seconds. ‘SAb’ will appear
and ash on oven control knob indicating Sabbath mode
has been initiated.
4 To change oven temperature while in Sabbath mode,
turn control knob. Each turn will increase or decrease
temperature by 10° (F or C). Display and audible chime
are disabled, but temperature will randomly change after
new temperature is selected. Oven will remain on until
selector bezel is rotated to OFF.
wolfappliance.com | 15
Page 16
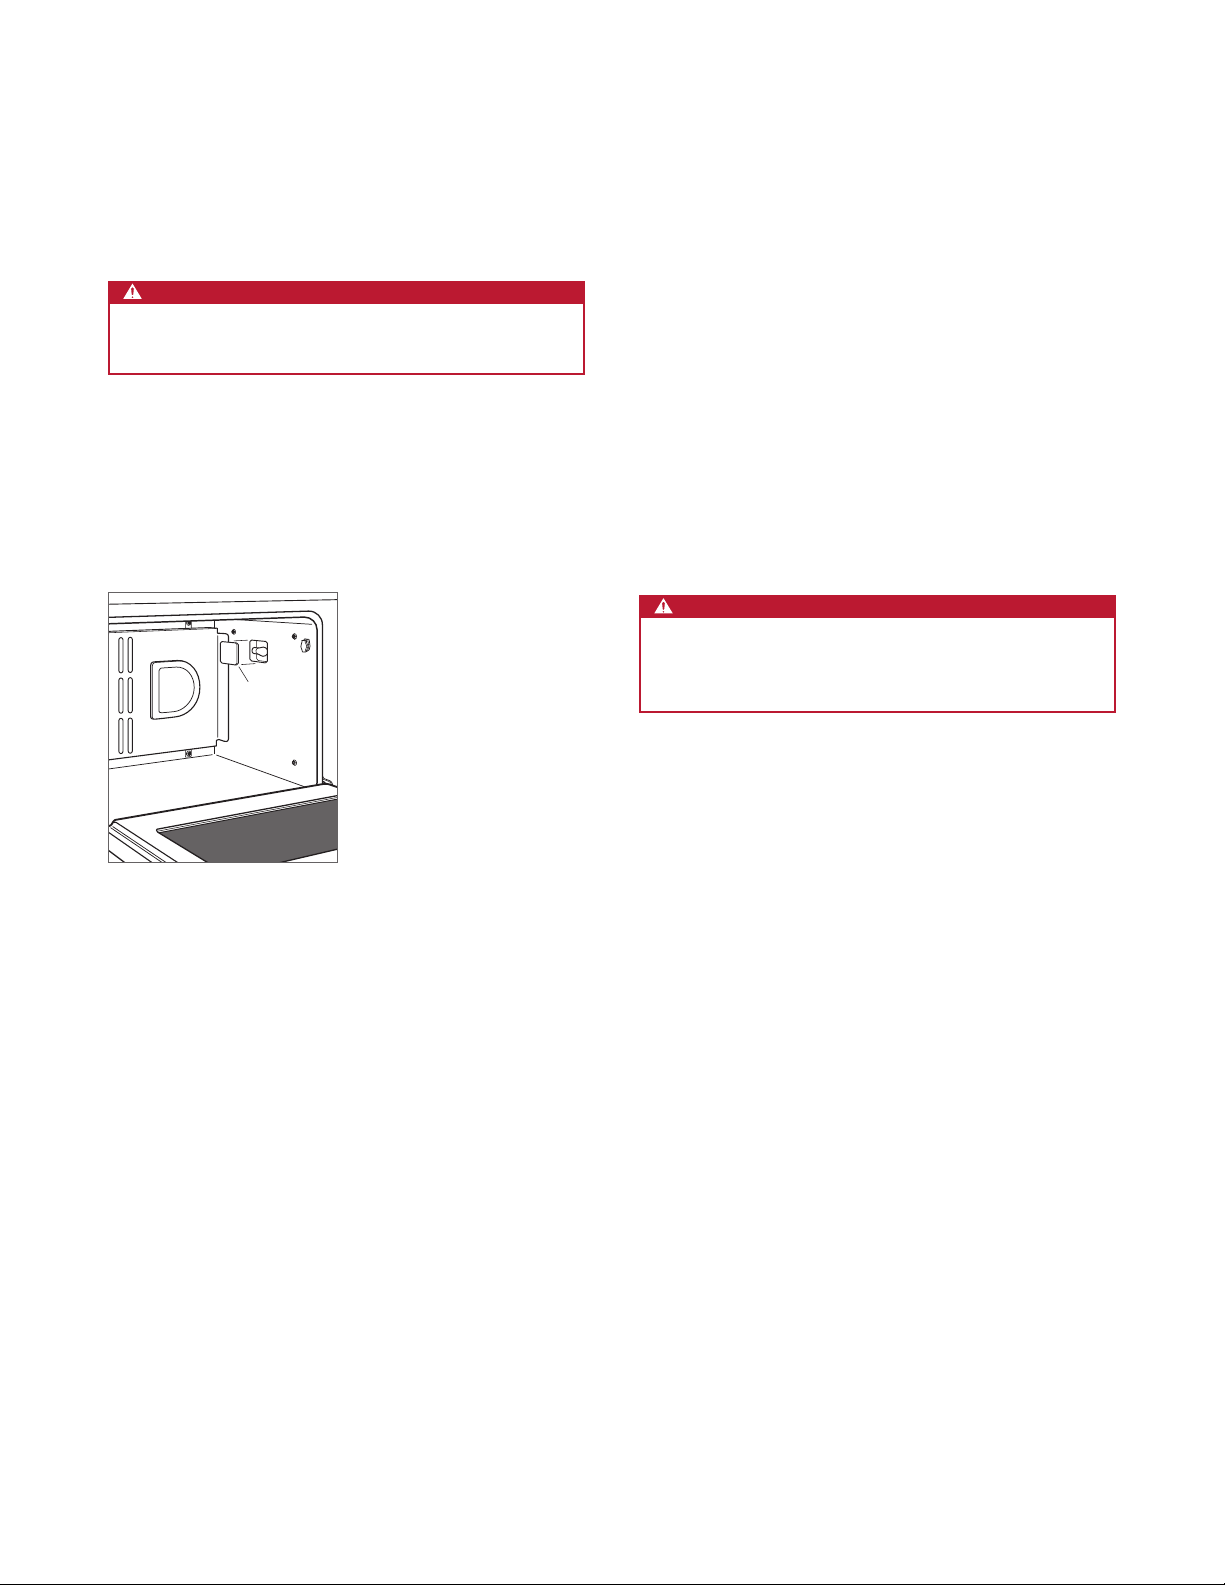
SURFACE OPERATION
Oven Light
WARNING
Verify power is disconnected from the electrical box
before replacing a light bulb.
Allow the oven to cool completely, then remove oven racks
and rack guides. To remove the light cover, gently pry the
bottom edge with a at screwdriver. Remove the existing
bulb and replace with a 20-watt halogen bulb. Refer to the
illustration below.
LIGHT
COVER
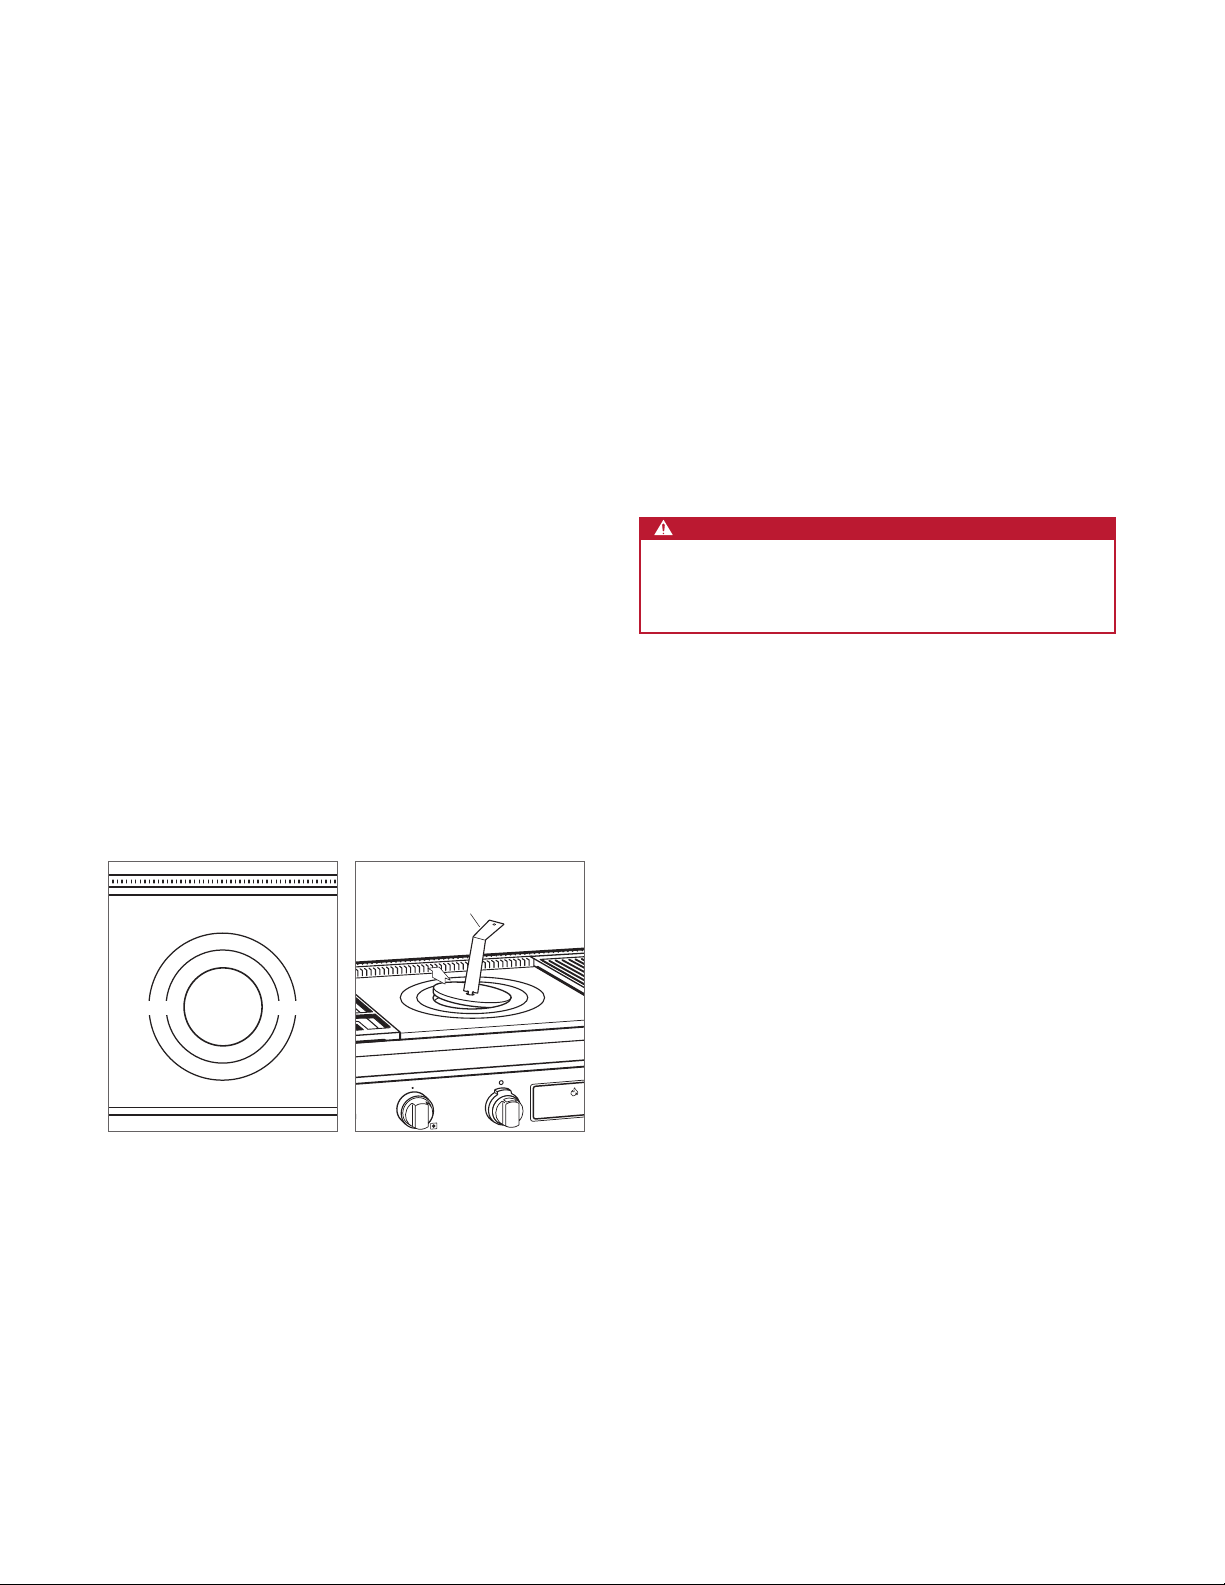
Surface Burners
To light a burner, push and turn the corresponding control
knob counterclockwise to HI. The igniter will begin to click
until the burner is lit. Once lit, continue to turn the knob
counterclockwise to desired setting.
To select a simmer setting, turn the control knob to the
detent at the lowest setting. Push and continue to turn
counterclockwise. The ame will transition to the second
tier on the burner cap. Continue to turn the knob to desired
simmer setting.
During a power outage, surface burners can be lit manually.
Turn the knob to HI and light using a multi-purpose lighter.
CAUTION
Never leave pans on a high setting unattended. Be
careful when cooking food in fat or grease; it can
become hot enough to ignite.
Light bulb replacement.
16 | Wolf Customer Care 800.222.7820
Page 17
SURFACE OPERATION
Infrared Charbroiler
The charbroiler has an infrared burner that transfers intense
heat to food, searing the outside to seal in juices. Cook food
directly on the charbroiler grate, do not use cookware. The
back 7"
(178) of the charbroiler is cooler than the rest of the
surface. This area can be utilized to hold foods until ready to
serve.
Assemble charbroiler:
1 To assemble, position the charbroiler frame on the range.
Refer to the illustration below.
2 Align slots of the radiant plate with the front angle of the
frame. Refer to the illustration below. Slots should t
over the front angle and sit at on the charbroiler frame.
3 Install the charbroiler grate.
CAUTION
Use care when assembling the charbroiler to avoid
contact with the igniter.
CHARBROILER OPERATION
The stainless steel cover must be removed prior to
operation.
1 Turn on ventilation.
2 Push and turn the control knob counterclockwise to HI.
The igniter will begin to click until the
3 Allow to preheat for 10 minutes.
burner is lit.
CHARBROILER CARE
• After cooking is complete, allow the charbroiler to remain
on for 10 minutes. High heat will help burn off excess
food particles.
• When cool, remove the grate and place in the sink.
Cover with wet dish towels and pour hot water over it
to help loosen residue. Clean with soap and a scouring
pad. Rinse and dry.
• To clean the frame, remove and place in the sink. Soak
in hot water and mild detergent. Wash thoroughly and
scrub with a scouring pad.
IGNITER
FRONT
ANGLE
Charbroiler frame.
FRAME
RADIANT
SLOT
Charbroiler radiant plate.
PLATE
wolfappliance.com | 17
Page 18

SURFACE OPERATION
Infrared Griddle
The griddle is thermostatically controlled to maintain a
consistent temperature. To prevent food from sticking, it is
necessary to “season” the griddle prior to use.
Season griddle:
1 Turn on ventilation.
2 The griddle has a protective coating that must be
removed before use. Use hot water and mild detergent
to remove. Rinse and dry.
3 Push and turn the control knob counterclockwise to
(175°C) and heat for 30 minutes. After 30 minutes,
350°F
turn knob to OFF and allow to cool.
4 While the surface is slightly warm, pour a small amount
of peanut or vegetable oil on a paper towel and spread
evenly.
5 Push and turn the control knob to 350°F (175°C). Heat
until the griddle begins to smoke, then turn knob to OFF
and allow to cool. Once cool, wipe off any excess oil.
GRIDDLE OPERATION
The stainless steel cover must be removed prior to
operation.
1 Turn on ventilation.
2 Push and turn the control knob counterclockwise to
desired temperature. The igniter will begin to click until
the burner is lit. The double griddle has separate controls
for each side.
3 The indicator light above the knob illuminates until the
griddle reaches set temperature. The light will cycle on
and off as more heat is required to maintain set temperature.
GRIDDLE CARE
• Scrape grease into the grease collection tray after each
use. When the surface has cooled, wipe with a paper
towel to remove excess grease or oil.
• After each use, reapply a small amount of peanut or
vegetable oil on a paper towel and spread evenly.
1
• Occasionally, remove seasoning. Pour
warm water and 1 teaspoon
(5 ml) griddle cleaner onto
/2 cup (120 ml)
the griddle and scrape residue into the grease collection
tray, then empty. When dry, reapply a small amount of oil
for seasoning.
18 | Wolf Customer Care 800.222.7820
Page 19
SURFACE OPERATION
French Top
The French top is a graduated cooking surface with the
highest temperature under the center plate. Always use
cookware, do not cook food directly on the surface. For
higher cooking heat, place cookware closer to the center
and for lower heat, closer to the edges. Refer to the illustration below.
To protect the surface from food splatters and moisture, it is
necessary to “season” the French top prior to use.
Season French top:
1 The French top has a protective coating that must be
removed before use. Use hot water and mild detergent
to remove. Rinse and dry.
2 Push and turn the control knob counterclockwise to HI
and heat for 30 minutes. After 30 minutes, turn knob to
OFF and allow to cool.
3 While the surface is slightly warm, pour a small amount
of peanut or vegetable oil on a paper towel and spread
evenly.
FRENCH TOP OPERATION
The stainless steel cover must be removed prior to
operation.
1 Turn on ventilation.
2 Push and turn the control knob counterclockwise to HI.
The igniter will begin to click until the burner is lit.
3 Allow to preheat for 30 minutes.
CAUTION
Never leave pans on a high heat zone unattended.
Be careful when cooking food in fat or grease; it can
become hot enough to ignite.
FRENCH TOP CARE
• Clean the entire surface after each use while slightly
warm. Wipe with mild detergent and water. Rinse and
dry.
• After each use, reapply a small amount of peanut or
vegetable oil on a paper towel and spread evenly.
LOW
MED MED
LOW
French top heating zones.
HIGH
HIGH
HIGH
LOW
LOW
Center plate removal.
CENTER
PLATE HOOK
• Occasionally, remove seasoning. Apply a small amount
of white vinegar and water to the surface while slightly
warm. Scrub and repeat until excess oil has been
removed. Reapply a small amount of oil for seasoning.
• The French top burner is located below the center plate.
To remove, use the center plate hook supplied with the
range as shown in the illustration. Never remove the
center plate while cooking.
wolfappliance.com | 19
Page 20

CARE RECOMMENDATIONS
Care Recommendations
CLEANING
Stainless steel Use a nonabrasive stainless steel cleaner and apply with a soft lint-free cloth. To bring out the natural
luster, lightly wipe surface with a water-dampened microber cloth followed by a dry polishing chamois.
Always follow the grain of stainless steel.
Burner grates
Oven rack guides
Burner pan Remove surface debris before cleaning to help speed up the cleaning process and decrease the chance
Surface burners Allow to cool. Use mild detergent or spray degreaser to clean. Rinse with water and towel dry.
Charbroiler
Griddle
French top
Control knobs
Bezels
Control panel Use a spray degreaser to remove ngerprints and food soil. Spray on a cloth before wiping panel.
Oven interior Before utilizing the self-clean feature, use a razor blade to gently lift baked on foods from the oven cavity
Broiler pan To clean the upper rack, use a mild detergent and scouring pad. Rinse and dry. To clean the bottom pan,
Remove and place on a at surface near the sink. Clean with hot water and mild detergent or paste of
baking soda and water. Do not immerse in water. Towel dry.
of scratching the surface during cleaning. Using mild abrasive cleaners or spray degreasers, clean and
rinse the surface and dry immediately to avoid streaking. To clean hard water stains, use white vinegar
and water. Rinse and dry immediately.
Refer to pages 17–19 for care recommendations.
Using a damp cloth, wipe with a mild detergent or spray degreaser; rinse and dry. Do not place in
dishwasher.
IMPORTANT NOTE: Do not spray cleaners directly on the control panel.
and window. For stubborn stains, spray with a mild abrasive cleaner or spray degreaser and scrub with a
no-scratch Scotch-Brite™ pad (pink or blue). Wash the entire oven cavity with soap and water to remove
cleaning chemicals before entering self-clean mode. If residue is not cleaned from the cavity, etching of
the porcelain may occur. Once the self-clean cycle is complete, allow the oven to cool completely and
wipe out ash with a damp cloth.
discard grease and wash with hot water and mild detergent. Rinse and dry. The stainless steel upper
rack is dishwasher safe, however, do not place any porcelain-coated rack or pan in dishwasher.
20 | Wolf Customer Care 800.222.7820
Page 21

TROUBLESHOOTING
Troubleshooting
OPERATION
Range does not operate.
• Verify power is on.
• Verify electrical power to range and home circuit breaker
is on.
• Oven will automatically turn off after 12 hours of con-
tinual use, except in dehydration or Sabbath mode.
Clock display turns off.
• Clock display is in standby power mode. Refer to
page 11.
OVEN
Oven temperature issue.
• Contact Wolf customer care at 800-222-7820 for
recommendations.
No control knob display.
• Pull oven control knob out and reinsert fully. Turn circuit
breaker off for 5 seconds, then turn back on.
No response from control panel touch pads.
• Turn oven bezel to OFF to exit Sabbath mode.
• Turn circuit breaker off for 5 seconds, then turn back on.
‘SAb’ displayed on the oven control knob.
• Turn oven bezel to OFF to exit Sabbath mode.
‘PF’ displayed on the oven control knob.
‘OPP’ displayed on the oven control knob.
• One of the ovens may be in self-clean mode. If one oven
is in self-clean, the other can not be used.
‘OE’, ‘OC’ or other error displayed.
• Contact Wolf factory certied service.
Oven ‘pops’ or ‘bangs’ during preheat or cool down.
• Normal with new oven cavity expansion and contraction.
• Run self-clean cycle. If it persists, contact Wolf customer
care at 800-222-7820.
RANGE SURFACE
Erratic ame, poor ignition or no ignition.
• Verify burner caps are positioned properly.
• Clean burner and igniter properly.
• If water spilled over recently, let area dry completely.
Use hair dryer, if desired.
• If burner cap secures to burner head, verify it is tightly
fastened.
• Push in knob, then release. Verify knob springs back.
Charbroiler clicks continually.
• Verify knob is set fully at HI.
Griddle indicator light ashes.
• Turn knob off, then back on. Flame was lost and unit
entered safety lock-out mode.
• Unit had a power outage. Turn selector bezel to a
cooking mode, then back to OFF to reset.
• Turn circuit breaker off for 5 seconds, then turn back on.
wolfappliance.com | 21
Page 22

TROUBLESHOOTING
Troubleshooting
SERVICE
• Maintain the quality built into your product by contacting
Wolf factory certied service. For the name of the
nearest Wolf factory certied service, check the contact
& support section of our website, wolfappliance.com or
call Wolf customer care at 800-222-7820.
• When contacting service, you will need the model and
serial number of your product. Both numbers are listed
on the product rating plate. Refer to page 8 for rating
plate location.
• For warranty purposes, you will also need the date of
installation and name of your authorized Wolf dealer. This
information should be recorded on page 2 of this guide.
Wolf, Wolf & Design, Wolf Gourmet, W & Design and the color red as applied to knobs are registered trademarks and service marks of Wolf Appliance, Inc. Sub-Zero,
Sub-Zero & Design, Dual Refrigeration, The Living Kitchen, Great American Kitchens The Fine Art of Kitchen Design, and Ingredients are registered trademarks and service marks
of Sub-Zero, Inc. All other trademarks or registered trademarks are property of their respective owners in the United States and other countries.
22 | Wolf Customer Care 800.222.7820
Page 23

Wolf Appliance Residential Limited Warranty
FOR RESIDENTIAL USE
FULL TWO YEAR WARRANTY*
For two years from the date of original installation, this Wolf Appliance product warranty covers all parts
and labor to repair or replace, under normal residential use, any part of the product that proves to be
defective in materials or workmanship. All service provided by Wolf Appliance under the above warranty
must be performed by Wolf factory certied service, unless otherwise specied by Wolf Appliance, Inc.
Service will be provided during normal business hours.
LIMITED FIVE YEAR WARRANTY
For ve years from the date of original installation, Wolf Appliance will repair or replace the following
parts that prove to be defective in materials or workmanship: gas burners (excludes appearance), electric
heating elements, blower motors (ventilation hoods), electronic control boards, magnetron tubes and
induction generators. If the owner uses Wolf factory certied service, the service provider will repair or
replace these parts with the owner paying for all other costs, including labor. If the owner uses non-certied service, the owner must contact Wolf Appliance, Inc. (using the information below) to receive repaired
or replacement parts. Wolf Appliance will not reimburse the owner for parts purchased from non-certied
service or other sources.
TERMS APPLICABLE TO EACH WARRANTY
The warranty applies only to products installed for normal residential use. The warranty applies only to
products installed in any one of the fty states of the United States, the District of Columbia or the ten
provinces of Canada. This warranty does not cover any parts or labor to correct any defect caused by
negligence, accident or improper use, maintenance, installation, service or repair.
THE REMEDIES DESCRIBED ABOVE FOR EACH WARRANTY ARE THE ONLY ONES THAT WOLF APPLIANCE,
INC. WILL PROVIDE, EITHER UNDER THIS WARRANTY OR UNDER ANY WARRANTY ARISING BY OPERATION
OF LAW. WOLF APPLIANCE, INC. WILL NOT BE RESPONSIBLE FOR ANY CONSEQUENTIAL OR INCIDENTAL DAMAGES ARISING FROM THE BREACH OF THIS WARRANTY OR ANY OTHER WARRANTY, WHETHER
EXPRESS, IMPLIED OR STATUTORY.
Some states do not allow the exclusion or limitation of incidental or consequential damages, so the above
limitation or exclusion may not apply to you. This warranty gives you specic legal rights and you may also
have other legal rights that vary from state to state.
To receive parts and/or service and the name of Wolf factory certied service nearest you, contact Wolf
Appliance, Inc., P.O. Box 44848, Madison, WI 53744; check the contact & support section of our website,
wolfappliance.com, email us at customerservice@subzero.com or call 800-222-7820.
*Stainless steel (doors, panels, handles, product frames and interior surfaces) are covered by a limited
60-day parts and labor warranty for cosmetic defects.
*Replacement lters for ventilation hood recirculating kits are not covered by the product warranty.
Page 24

ESTUFAS DE ENERGÍA DUAL
Contenido
4 Precauciones de seguridad
8 Funciones de la estufa de energía dual
9 Funcionamiento del horno
16 Funcionamiento de la supercie
20 Recomendaciones sobre el cuidado
21 Resolución de problemas
23 Garantía de Wolf
Atención al cliente
El modelo y número de serie están impresos en la tarjeta
de registro del producto adjunta. Los dos números también
aparecen en la placa de datos del producto. Consulte la
página 8 para encontrar la placa de datos. Para nes de la
garantía, usted también necesitará la fecha de instalación y
el nombre de su distribuidor autorizado de Wolf. Anote esta
información abajo para referencia futura.
Si su producto alguna vez necesita servicio asegúrese
de usar un proveedor de servicios certicado por Wolf y
recomendado por nuestro centro de atención al cliente,
o seleccione uno de nuestra lista de proveedores en
wolfappliance.com/locator. Todos los proveedores de los
centros de servicio autorizados han sido cuidadosamente
seleccionados y entrenados a fondo por nosotros.
INFORMACIÓN PARA SERVICIO
Número de modelo
Número de serie
Fecha de instalación
Nombre de servicio certicado
Número de servicio certicado
Distribuidor autorizado
Número de distribuidor
2 | Atención al cliente de Wolf 800.222.7820
Aviso importante
Para garantizar que este producto se instale y opere de
la forma más segura y eciente posible, tome nota de los
siguientes tipos de información resaltada en esta guía:
AVISO IMPORTANTE señala la información que es
especialmente importante.
PRECAUCIÓN indica una situación en la que se pueden
sufrir heridas leves o provocar daños al producto si no se
siguen las instrucciones.
ADVERTENCIA indica peligro de que se produzcan heridas
graves o incluso la muerte si no se siguen las precauciones.
AVISO IMPORTANTE: en toda esta guía, las dimensiones
entre paréntesis son milímetros, a menos que se especique
lo contrario.
Page 25

Gracias
Muchas gracias por su compra. Esperamos poder ser parte de su hogar durante las décadas
venideras. Como una empresa familiar de tercera generación, tenemos un interés muy
personal en la preparación de los alimentos de su familia. Hemos construido nuestro negocio
y nuestra reputación al ayudar a las familias a servir comida de la mejor calidad posible.
Con su compra, usted recibe una de las garantías más sólidas en la industria de los
electrodomésticos. Lea la declaración de garantía completa de la página 23. También
es importante que registre su Wolf para asegurarse de no perder los benecios de
propietario exclusivo, como por ejemplo, la garantía de que va a recibir atención en el
improbable caso de que necesite servicio durante el periodo de garantía, y un registro
de prueba de compra en caso de una reclamación sobre el seguro de vivienda. Puede
registrarse mediante una de las siguientes opciones:
• Envíe a Wolf la tarjeta de registro del producto llena.
• Regístrese en línea en wolfappliance.com/register y cree una cuenta personal en
My Sub-Zero/Wolf con el número de serie de su producto.
• Regístrese por teléfono llamando a la línea de atención al cliente de Wolf al
800-222-7820.
Como propietario de un electrodoméstico Wolf, puede contar con soporte técnico constante,
día tras día. Nuestro centro de atención al cliente está disponible 24 horas al día, los siete
días a la semana, y lo conforman expertos conocedores del producto en nuestra fábrica en
Madison, Wisconsin. En caso necesario, simplemente llame al 800-222-7820 y hable con uno
de los expertos de nuestros productos. Ellos le ayudarán a solucionar cualquier problema
que pueda tener.
Estamos seguros de que esta guía contestará sus preguntas acerca de las características,
el funcionamiento y mantenimiento de su electrodoméstico Wolf, pero si usted tiene
preguntas adicionales, póngase en contacto con nosotros en el 800-222-7820 o visítenos
en línea en wolfappliance.com.
wolfappliance.com | 3
Page 26

PRECAUCIONES DE SEGURIDAD
INSTRUCCIONES
IMPORTANTES
ADVERTENCIA
Si no se sigue la información de esta guía al
pie de la letra se puede provocar un incendio o
una explosión, y causar daños a la propiedad,
lesiones personales o incluso la muerte.
No almacene ni utilice gasolina u otros vapores o
líquidos ignífugos en las proximidades de este o
cualquier otro electrodoméstico.
QUÉ HACER SI PERCIBE OLOR A GAS:
• No intente encender ningún electrodoméstico.
• No toque ningún interruptor eléctrico.
• No utilice ningún teléfono en su edicio.
• Llame inmediatamente a su proveedor de gas
desde el teléfono de un vecino. Siga las instrucciones del proveedor de gas.
• Si no puede contactar a su proveedor de gas,
llame al departamento de bomberos.
ADVERTENCIA
Si un niño o un adulto jalan el electrodoméstico
este puede volcarse y causarles la muerte.
Compruebe que el dispositivo antivuelco haya
sido instalado y esté enganchado correctamente.
Asegúrese de volver a enganchar el dispositivo
antivuelco después de cambiar el electrodoméstico
de lugar. Consulte las ilustraciones siguientes para
saber cómo comprobar su instalación correcta.
No opere este electrodoméstico sin el dispositivo
antivuelco en posición y enganchado. No seguir
esta instrucción puede resultar en la muerte o en
graves quemaduras en niños o adultos.
Para reducir el riesgo de quemaduras, no mueva
el electrodoméstico mientras está caliente.
Este electrodoméstico debe ser instalado y
reparado por un técnico calicado, una agencia
de servicio o un proveedor de gas y conectado a
tierra por un técnico calicado.
DISPOSITIVO
ANTIVUELCO
Ubicación del dispositivo
antivuelco.
DISPOSITIVO
ANTIVUELCO
ENGANCHADO
Dispositivo antivuelco
enganchado.
4 | Atención al cliente de Wolf 800.222.7820
Page 27

PRECAUCIONES DE SEGURIDAD
INSTRUCCIONES
IMPORTANTES
PRECAUCIONES GENERALES DE SEGURIDAD
• Lea este manual con atención antes de utilizar
este electrodoméstico para reducir el riesgo de
incendio, descarga eléctrica o lesiones.
• Antes de dar servicio, cierre el suministro de gas
mediante la llave de paso de gas y desconecte el
electrodoméstico de la corriente eléctrica.
• Mantenga el área del electrodoméstico limpia y
libre de materiales combustibles.
• Para mayor seguridad al cocinar, programe los
controles del quemador de manera que la llama no
se extienda más allá del fondo de la sartén.
• Tenga cuidado al abrir la puerta del horno. Deje
salir el aire caliente o el vapor antes de mirar o
meter las manos dentro del horno.
• IMPORTANTE: no instale un sistema de ventilación
que sople aire hacia abajo en dirección al aparato
de cocción de gas. Este tipo de sistema de ventilación puede ocasionar problemas de ignición y
combustión con este aparato de cocción de gas
y causar lesiones personales o funcionamiento
accidental.
• No utilice papel de aluminio para forrar ninguna
parte de este electrodoméstico.
• Nunca utilice este electrodoméstico para entibiar
o calentar la habitación. Hacerlo puede resultar en
intoxicación por monóxido de carbono.
• Asegúrese de que la entrada de aire fresco del
horno (arriba de la puerta) y la rejilla de ventilación
del horno (abajo de la puerta) estén libres de
obstáculos en todo momento.
• Utilice ropa adecuada. Nunca debe utilizar ropa
holgada ni con aplicaciones sueltas al utilizar este
electrodoméstico.
• Tenga mucho cuidado al mover un hervidor con
grasa o desechar la grasa caliente.
• Utilice siempre guantes de cocina secos al retirar las
cacerolas de este electrodoméstico. Los guantes
de cocina húmedos o mojados pueden provocar
quemaduras por vapor. No utilice una toalla ni un
paño voluminoso en lugar de los guantes de cocina.
• Coloque las rejillas del horno a la altura deseada
cuando el horno esté frío. Si debe cambiar una rejilla
de posición cuando el horno esté caliente, asegúrese
de que el guante de cocina no entre en contacto con
un elemento calefactor caliente al interior del horno.
wolfappliance.com | 5
Page 28

PRECAUCIONES DE SEGURIDAD
INSTRUCCIONES
IMPORTANTES
PRECAUCIONES GENERALES DE SEGURIDAD
• Limpie solamente las partes enumeradas en este
manual.
• No utilice limpiadores para hornos. No debe utilizar
limpiadores comerciales para hornos ni capas
protectoras de ninguna clase en o alrededor de
cualquier parte del horno.
• Antes de utilizar la autolimpieza, retire la parrilla,
las rejillas del horno, las guías de las rejillas y
cualquier otro utensilio.
• No intente reparar ni cambiar parte alguna de este
electrodoméstico a menos que esté especícamente
recomendado en la documentación que acompaña a
este electrodoméstico.
• No obstruya el ujo de aire para asegurar una
combustión y ventilación adecuadas.
• Cuando utilice este electrodoméstico, no toque
las rejillas, las tapas de los quemadores, las bases
de los quemadores o cualquier otra parte en
proximidad a la llama. Estos componentes pueden
estar lo sucientemente calientes como para
causar quemaduras.
• No limpie el empaque del horno, ya que frotar o mover
el empaque puede comprometer el sello de la puerta.
• No utilice agua en incendios causados por grasas.
Sofoque el fuego o utilice extinguidor químico seco
o de espuma.
• Nunca deje este electrodoméstico desatendido
cuando se encuentre en uso. El rebosamiento por
ebullición y los derrames de grasa pueden generar
humo o incendiarse.
• No toque los elementos calefactores ni las supercies
internas del horno. Los elementos calefactores pueden
permanecer calientes incluso cuando tienen un
color oscuro. Las supercies internas alcanzan altas
temperaturas y pueden causar quemaduras. Durante
y después del uso, no toque, ni deje que su ropa u
otros materiales ignífugos entren en contacto con los
elementos calefactores o supercies internas del horno
hasta que hayan tenido suciente tiempo para enfriarse.
• No deje a los niños menores solos ni desatendidos
en el área donde se utiliza este electrodoméstico.
Nunca permita que los niños se sienten o paren
sobre el electrodoméstico.
• No almacene artículos que puedan llamar la
atención de niños menores arriba o detrás de
este electrodoméstico, ya que podrían subirse
al electrodoméstico para alcanzar los objetos y
sufrir lesiones.
• No caliente recipientes de comida cerrados, como
frascos de alimentos para bebés o enlatados.
La acumulación de presión puede hacer que el
recipiente explote y cause lesiones.
• No almacene materiales ignífugos en un horno,
cerca de los quemadores y tampoco permita la
acumulación de grasa u otras sustancias ignífugas
en este electrodoméstico.
6 | Atención al cliente de Wolf 800.222.7820
Page 29

PRECAUCIONES DE SEGURIDAD
INSTRUCCIONES
IMPORTANTES
PROPUESTA 65 DE CALIFORNIA
ADVERTENCIA
El quemar gas como combustible para cocinar
genera algunos subproductos que se encuentran en
la lista de sustancias que se sabe causan cáncer o
daños reproductivos. Para minimizar la exposición
a estas sustancias, siempre opere esta unidad de
acuerdo con las instrucciones contenidas en esta
guía y asegúrese de tener buena ventilación.
MANCOMUNIDAD DE MASSACHUSETTS
• Las instalaciones y reparaciones deben ser realizadas
por un contratista, plomero o un instalador de gas
autorizado o calicado por el estado, la provincia o
región donde se va a instalar este electrodoméstico.
• Utilice únicamente llaves de paso para gas
aprobadas para su uso dentro del estado, provincia o
región donde se va a instalar este electrodoméstico.
• Un conector de gas exible, cuando se utilice, no
debe sobrepasar 3'
(.9 m).
wolfappliance.com | 7
Page 30

FUNCIONES DE LA ESTUFA DE ENERGÍA DUAL
Funciones de la estufa de energía dual
CARACTERÍSTICA
1
Placa de datos del producto
2
Panel de control (presione para tener acceso)
3
Perilla de control del horno
4
Horno de convección
5
Quemador superior
6
Parrilla opcional
7
Plancha opcional
8
Encimera francesa opcional (no representada)
7
5
2
6
PÁG
Primeros pasos
Sabemos que está ansioso por empezar a cocinar, pero antes
2
10
10
10
16
17
18
19
3
1
4
de hacerlo, dedique un poco de tiempo a leer este manual de
uso y cuidado. Si usted es un cocinero ocasional o un chef
experto, se beneciará de familiarizarse con las prácticas de
seguridad, características, funcionamiento y recomendaciones
de cuidado de su estufa de energía dual de Wolf.
• Para asegurarse de que todo el aceite residual del proceso
de fabricación se haya eliminado, limpie a fondo la estufa
con agua caliente y un detergente suave antes de utilizarla.
Enjuague y seque con un paño suave. Consulte las
recomendaciones sobre el cuidado en la página 20.
• Compruebe que los componentes del quemador
superior estén ensamblados correctamente.
• La parrilla, plancha y la encimera francesa opcionales
requieren de atención especial. Consulte las páginas 17 a 19.
• Para obtener los mejores resultados revise los modos de
cocción y características especiales en la página 12.
PRECAUCIÓN
No coloque utensilios de cocina sobre el piso del horno
ni utilice papel de aluminio u otro material para recubrir
el piso o las paredes laterales del horno. Si hace caso
omiso de este aviso se dañará el interior de porcelana
y se anulará la garantía.
Representación de la estufa de energía dual de 48".
8 | Atención al cliente de Wolf 800.222.7820
Page 31

FUNCIONAMIENTO DEL HORNO
Rejillas del horno
GUÍAS DE LAS REJILLAS DEL HORNO
Para insertar las guías de las rejillas del horno busque los
tornillos de montaje en las paredes laterales del horno.
Coloque las lengüetas de montaje de la guía de la rejilla
sobre los tornillos y deslice hasta que quede bien asentada.
Consulte la siguiente ilustración.
REJILLAS DEL HORNO
Para insertar una rejilla estándar en el horno, coloque el
bloqueo antivuelco de la rejilla debajo de los rieles laterales
de la guía de la rejilla. Deslice la rejilla hacia atrás y levante
para dejar libres los topes de la rejilla. Siga deslizando
la rejilla hacia atrás hasta que esté completamente en el
interior del horno. Consulte la siguiente ilustración.
TORNILLO
DE MONTAJE
DE MONTAJE
LENGÜETA
TOPE DE
LA REJILLA
BLOQUEO
ANTIVUELCO
La rejilla inferior del horno tiene una capacidad de extensión
completa que se apoya en la puerta del horno (con
excepción del horno de 18"). Con la rejilla en la posición
más baja de la guía de la rejilla, deslícela sobre las guías
de la puerta para lograr mayor estabilidad y accesibilidad.
Consulte la siguiente ilustración.
Para insertar una rejilla de extensión completa y de fácil
deslizamiento, coloque las dos lengüetas posteriores
sobre la guía de la rejilla (una lengüeta arriba y una abajo).
Consulte la siguiente ilustración. Incline ligeramente la rejilla
y deslícela hasta que la muesca frontal de la rejilla se acople
con la guía frontal de la rejilla.
LENGÜETAS
TRASERAS
MUESCA
Rejilla inferior.
Rejilla de extensión completa.
Guías de las rejillas del horno. Bloqueo antivuelco para las
rejillas del horno.
wolfappliance.com | 9
Page 32

FUNCIONAMIENTO DEL HORNO
Funcionamiento del horno
Las estufas de energía dual de Wolf utilizan una
combinación de anillo de selección de modos de cocción,
perilla de control de temperatura del horno y panel de
control electrónico para seleccionar los modos de cocción
deseados, la temperatura del horno y las funciones
exclusivas. Para abrir el panel de control presione
.
Las temperaturas se visualizan en grados Fahrenheit.
Para cambiar a grados Centígrados, presione y mantenga
presionado CLOCK (RELOJ) durante 5 segundos. Presione
COOK TIME (TIEMPO DE COCCIÓN) para alternar entre °F
y °C, a continuación presione ENTER (INTRO).
Para el uso del horno, Wolf ha creado un proceso de dos
pasos para garantizar que el horno nunca se encienda
accidentalmente:
1 Gire el anillo de selección al modo de cocción deseado.
Los modos estándar se visualizan en el área plateada
del anillo. Los modos de convección se visualizan en
el área de color negro del anillo. Consulte la siguiente
ilustración. Una vez seleccionado el modo de cocción
deseado, la temperatura preestablecida aparecerá en la
perilla de control.
2 Para seleccionar la temperatura preestablecida presione
ENTER (INTRO) en el panel de control o gire la perilla
de control para aumentar o disminuir la temperatura.
Cualquier acción completa el segundo paso del proceso.
La luz indicadora del horno se ilumina y comienza el
precalentamiento.
LUZ DEL HORNO
La luz del horno se enciende automáticamente al abrir la
puerta y se apaga al cerrarla. Para encender la luz cuando
la puerta está cerrada, presione OVEN LIGHT (LUZ DEL
HORNO) en el panel de control.
PRECALENTAMIENTO
Durante el precalentamiento, el horno se calienta lo más
rápido y uniforme posible y no es ideal para cocinar. El
precalentamiento debe ser utilizado para todos los modos
de cocción excepto el de asado y asado por convección.
Durante el precalentamiento, las temperaturas inferiores
a 150 °F
(65 °C) aparecen como ‘Lo’. Una vez que el
precalentamiento esté completo, una señal sonora indica
que el horno ha alcanzado la temperatura programada y
la luz indicadora del horno deja de estar iluminada. Para
ajustar la temperatura una vez que se ha completado el
precalentamiento, gire la perilla a la temperatura deseada.
ANTES DE UTILIZARLO
Para asegurarse de que todo el aceite residual del proceso
de fabricación se haya eliminado, cada horno tiene que
pasar por el siguiente procedimiento.
1 Limpie cuidadosamente el horno con agua caliente y un
detergente suave. Enjuague y seque con un paño suave.
2 Encienda la ventilación. La presencia de un poco de
humo y olor es normal.
TIMER
ANILLO DE
SELECCIÓN
Panel de control y perilla de control del horno.
10 | Atención al cliente de Wolf 800.222.7820
LUZ
INDICADORA
3 Gire el anillo de selección a ROAST (ASAR) y ajuste la
temperatura a 550 °F
4 Gire el anillo de selección a OFF (APAGAR) y deje que el
(290 °C) durante una hora.
horno enfríe con la puerta cerrada.
Page 33

FUNCIONAMIENTO DEL HORNO
Funcionamiento del horno
RELOJ
El reloj se visualiza en el panel de control durante todos los
modos de cocción, excepto cuando el temporizador está en
uso. Es muy importante jar el reloj en la hora correcta si se
utiliza la función de tiempo de cocción o tiempo de apagado.
El reloj debe restablecerse después de un corte de energía.
Para congurar el reloj:
1 Presione CLOCK (RELOJ) en el panel de control.
2 Utilice las echas de arriba y abajo para ajustar la hora del
día. La hora cambiará de a.m. a p.m. al pasar de las 12:00.
3 Presione CLOCK (RELOJ). Una señal sonora indica que
la hora ha quedado congurada.
4 Para cambiar al reloj de 24 horas, presione y mantenga
presionado CLOCK (RELOJ) durante 5 segundos.
Presione CLOCK (RELOJ), y luego ENTER (INTRO).
ENERGÍA EN MODO DE ESPERA CON RELOJ
La estufa se envía en modo de espera, el cual deshabilita el
reloj aproximadamente 10 minutos después de que termine
de funcionar el ventilador de enfriamiento o de que el horno
esté inactivo. El reloj se iluminará después de tocar los controles o de utilizar el horno.
TEMPORIZADOR
El temporizador se puede ajustar para un máximo de 9 horas
y 59 minutos. Una vez que se ajusta el tiempo, la cuenta
regresiva se ilumina en la pantalla del panel de control. El
último minuto se cuenta en segundos. El temporizador es
independiente del horno. Ajustar el temporizador no afecta
el tiempo de cocción ni el tiempo de parada. Para obtener
información acerca de las características del programa
automático, consulte la página 14.
Para congurar el temporizador:
1 Presione TIMER (TEMPORIZADOR) en el panel de control.
2 Utilice las echas de arriba y abajo para ajustar la hora
en horas y minutos.
3 Pulse TIMER (TEMPORIZADOR) para empezar. Una señal
sonora indica que el temporizador ha quedado congurado.
El horno emitirá una señal sonora y el tiempo parpadeará
cuando haya terminado. El temporizador seguirá sonando
hasta que presione CLEAR (BORRAR) en el panel de control.
Activar/Desactivar energía en modo de espera:
1 Toque y mantenga presionado el botón CLOCK (Reloj)
en el panel de control durante 5 segundos.
2 Toque el botón STOP TIME (Detener tiempo) para
activarlo o desactivarlo y luego toque el botón ENTER
(Intro).
wolfappliance.com | 11
Page 34

FUNCIONAMIENTO DEL HORNO
O
F
F
B
A
K
E
B
R
O
I
L
R
O
A
S
T
P
R
O
O
F
C
L
E
A
N
C
O
N
V
R
O
A
S
T
B
R
O
I
L
B
A
K
E
Modos de cocción
MODO
ANILLO PRECONFIGURADO RANGO SONDA UTILIZA
Convección CONV 325 °F
(165 °C)
Hornear por
convección
Asar por
convección
Asado por
convección
BAKE
(HORNEAR)
ROAST
(ASAR)
BROIL
(ASADO)
375°F
(190°C)
325 °F
(165 °C)
Br1
Br2
Br3
Hornear BAKE
(HORNEAR)
Asar ROAST
(ASAR)
Asado BROIL
(ASADO)
350°F
(175°C)
350 °F
(175 °C)
Br1
Br2
Br3
Piedra para
hornear
STONE
(PIEDRA)
400 °F
(205 °C)
170 a 550 °F
(75 a 290 °C)
170 a 550 °F
El movimiento uniforme del aire hace posible la cocción en
•
varios niveles de rejillas con un dorado uniforme.
Ideal para hornear tartas.
•
(75 a 290 °C)
170 a 550 °F
(75 a 290 °C)
550°F (290°C)
450°F (230°C)
350°F (175°C)
170 a 550 °F
(75 a 290 °C)
170 a 550 °F
(75 a 290 °C)
Perfecto para asar cortes tiernos de res, cordero, puerco
•
y aves.
Acorta el tiempo de asado para cortes más gruesos de
carne, pescado y aves. Utilice la parrilla de dos partes y
siempre realice el asado con la puerta del horno cerrada.
Lo mejor para cocinar en rejilla sencilla, principalmente
•
alimentos horneados. Utilice para recetas estándar.
El mejor para asar cortes menos tiernos de carne, como
•
asados en trozo y carne para estofado que debe ir
cubierta.
550°F (290°C)
450°F (230°C)
350°F (175°C)
170 a 550 °F
(75 a 290 °C)
Lo mejor para asar piezas de carne, pescado y aves hasta
de 1" de grosor. Utilice la parrilla de dos partes y siempre
realice el asado con la puerta del horno cerrada.
Hornear sobre una piedra cerámica. Excelente para pizza
•
y pan. Se requiere un accesorio de piedra para hornear.
Hornos de 30" y 36" solamente.
Fermentación PROOF
(FERMEN-
85°F
(30°C)
TACIÓN)
Deshidratación CONV 135°F
(60°C)
Autolimpieza CLEAN
(LIMPIAR)
F
F
O
B
E
K
A
B
L
I
O
R
B
T
S
A
O
R
V
N
O
C
Anillo de selección
(hornos de 30"/36").
12 | Atención al cliente de Wolf 800.222.7820
A
K
E
B
R
O
I
L
R
O
A
S
T
S
T
O
N
E
C
L
N
E
A
A
B
L
I
O
R
B
T
S
A
O
R
V
N
Anillo de selección
85 a 110 °F
(30 a 45 °C)
110 a 160 °F
(45 a 70 °C)
F
F
O
B
E
K
O
C
(horno de 18").
A
C
L
N
E
A
Ideal para fermentar o levar la masa de pan. Horno de 18"
•
solamente. Para los hornos de 30" y 36", consulte la
página 13.
Seca una variedad de frutas, vegetales y carnes. Se
requieren accesorios para rejillas. Consulte la página 13.
El horno alcanza una temperatura extremadamente alta
para permitir que los residuos de alimentos se quemen.
Consulte la página 15.
K
E
B
R
O
I
L
R
O
A
S
T
P
R
O
O
F
Page 35

FUNCIONAMIENTO DEL HORNO
Fermentación
Ajuste de los controles para los hornos de 30" y 36":
1 Gire el anillo de selección a BAKE (HORNEAR).
2 Gire la perilla de control del horno hacia la izquierda
hasta que se visualice ‘PrF’, luego suelte la perilla.
3 La temperatura del horno está preestablecida a 85 °F
(30 °C)
. Presione ENTER (INTRO) para seleccionar la
temperatura preestablecida o gire la perilla de control
para cambiar la temperatura. La pantalla alterna entre
la temperatura programada y ‘PrF’.
Deshidratación
Se requiere un kit de accesorios. Los accesorios están
disponibles a través de un distribuidor autorizado de Wolf.
Para obtener más información acerca de los distribuidores
locales, visite la sección para encontrar una sala de
exposición de nuestro sitio web, wolfappliance.com.
Ajuste de los controles:
1 Coloque el tope de puerta suministrado con su kit de
accesorios en la cerradura de la puerta del horno.
2 Gire el anillo de selección a CONV .
3 Gire la perilla de control del horno hacia la izquierda
hasta que se visualice ‘dEH’, luego suelte la perilla.
4 La temperatura del horno está preestablecida a 110°F
(45°C)
. Presione ENTER (INTRO) para seleccionar la
temperatura preestablecida o gire la perilla de control
para cambiar la temperatura. La pantalla alterna entre la
temperatura programada y ‘dEH’.
Sonda de temperatura
La sonda de temperatura mide la temperatura interna de los
alimentos durante la cocción. Se puede utilizar con todos los
modos de cocción excepto el de asado y asado por convección.
Ajuste de los controles:
1 Gire el anillo de selección al modo de cocción deseado.
2 Presione ENTER (INTRO) para seleccionar la temperatura
preestablecida o gire la perilla de control para cambiar la
temperatura.
3 Inserte la sonda en la parte más gruesa de la comida.
Al hacer pan, cocine aproximadamente 10 minutos
antes de insertar la sonda.
4 Cuando el precalentamiento esté completo, utilice un
guante de cocina para levantar la cubierta del recipiente
de la sonda y luego inserte la sonda. Consulte la
siguiente ilustración.
5 La temperatura de la sonda está preestablecida en 160 °F
(70 °C)
. Presione ENTER (INTRO) para seleccionar la
temperatura preestablecida o gire la perilla de control
para cambiar la temperatura. La pantalla alterna entre la
temperatura programada del horno y la temperatura real
de la sonda. Para alternar entre el punto establecido de la
sonda y la temperatura real de la sonda, presione PROBE
(SONDA). Las temperaturas inferiores a 70 °F
visualizan como ‘Lo’.
6 Una señal sonora indica que la temperatura interna
ha alcanzado el punto establecido de la sonda. Retire
y luego vuelva a insertar la sonda para comprobar la
temperatura interna.
PRECAUCIÓN
La sonda y el recipiente de la sonda estarán muy
calientes. Manipule con cuidado.
(20 °C) se
Recipiente de la sonda.
wolfappliance.com | 13
Page 36

FUNCIONAMIENTO DEL HORNO
Programa automático
COCCIÓN CRONOMETRADA
La cocción cronometrada apaga automáticamente el
horno a una hora especíca. El horno empezará a calentar
inmediatamente y se apagará a la hora que usted desee
que se apague. El reloj debe estar congurado con la
hora correcta para que la cocción cronometrada funcione
correctamente. Utilice cualquier modo de cocción excepto
el de asado, asado por convección y piedra para hornear.
Ajuste de los controles:
1 Gire el anillo de selección al modo de cocción deseado.
2 Presione ENTER (INTRO) para seleccionar la temperatura
preestablecida o gire la perilla de control para cambiar la
temperatura.
3 Presione COOK TIME (TIEMPO DE COCCIÓN). Utilice
las echas para seleccionar el tiempo de la cocción
deseado en horas y minutos.
4 Presione ENTER (INTRO).
INICIO RETARDADO
El inicio retardado enciende y apaga el horno automáticamente
a una hora especíca. El horno permanecerá inactivo hasta la
hora de inicio deseada y se apagará a la hora que usted desee
que se apague. El reloj debe estar congurado con la hora
correcta para que el inicio retardado funcione correctamente.
Utilice cualquier modo de cocción excepto el de asado, asado
por convección y piedra para hornear.
Ajuste de los controles:
1 Gire el anillo de selección al modo de cocción deseado.
2 Presione ENTER (INTRO) para seleccionar la temperatura
preestablecida o gire la perilla de control para cambiar
la temperatura. Si presiona ENTER (INTRO), el horno
se encenderá inmediatamente, pero entrará en modo
inactivo una vez que congure la hora de apagado.
3 Presione COOK TIME (TIEMPO DE COCCIÓN). Utilice
las echas para seleccionar el tiempo de la cocción
deseado en horas y minutos.
4 Presione STOP TIME (TIEMPO DE APAGADO). Utilice
las echas para seleccionar la hora a la que el horno se
debe apagar.
5 Presione ENTER (INTRO).
14 | Atención al cliente de Wolf 800.222.7820
Page 37

FUNCIONAMIENTO DEL HORNO
Autolimpieza
Durante la autolimpieza, el horno alcanza una temperatura
extremadamente alta para quemar los residuos de los alimentos.
Retire todas las rejillas del horno y las guías de las rejillas.
Estas perderán su color si las deja dentro del horno durante la
autolimpieza. La puerta del horno se bloqueará y permanecerá
bloqueada hasta que autolimpieza esté completa y la temperatura
del horno haya descendido a menos de 300 °F
tiempos de autolimpieza incluyen una hora de enfriamiento.
Ajustar los controles para una autolimpieza de 4 horas:
1 Gire el anillo de selección a CLEAN (LIMPIEZA).
2 Presione ENTER (INTRO).
Ajustar los controles para una autolimpieza de 3 horas:
1 Gire el anillo de selección a CLEAN (LIMPIEZA).
2 Presione STOP TIME (TIEMPO DE APAGADO).
3 Presione la echa hacia abajo para reducir el tiempo de
apagado por 1 hora.
4 Presione ENTER (INTRO) dos veces.
PRECAUCIÓN
Durante la autolimpieza las supercies externas pueden
alcanzar una temperatura más alta de lo normal. Debe
mantener a los niños alejados.
(150 °C). Los
Sabbath
Este electrodoméstico lleva el certicado Star-K que indica
que cumple con estrictas normas religiosas junto con
instrucciones especícas que aparecen en www.star-k.org.
El modo de Sabbath anula la función de apagado
automático por 12 horas. El modo de Sabbath debe
restablecerse después de un corte de energía.
Ajuste de los controles:
1 Encienda o apague la luz del horno.
2 Gire el anillo de selección a BAKE (HORNEAR) o ROAST
(ASAR) y seleccione la temperatura deseada.
3 Presione y mantenga presionado ENTER (INTRO)
durante 5 segundos. ‘SAb’ aparecerá y parpadeará en la
perilla de control del horno para indicar que el modo de
Sabbath se ha iniciado.
4 Para cambiar la temperatura del horno mientras
se encuentra en modo de Sabbath, gire la perilla
de control. Cada giro aumentará o disminuirá la
temperatura en 10° (F o C). La pantalla y la señal
sonora están desactivadas, pero la temperatura
cambiará de forma aleatoria después de seleccionar
nueva temperatura. El horno permanecerá encendido
hasta que gire el anillo de selección a OFF (APAGADO).
wolfappliance.com | 15
Page 38

FUNCIONAMIENTO DE LA SUPERFICIE
Luz del horno
ADVERTENCIA
Compruebe que la energía esté desconectada de la
caja eléctrica antes de reemplazar el foco.
Deje que el horno enfríe por completo, luego retire las
rejillas del horno y las guías de las rejillas. Para retirar la
cubierta de la luz, haga palanca suavemente en el borde
inferior con un destornillador plano. Retire el foco existente
y reemplácelo con un foco de halógeno de 20 vatios.
Consulte la siguiente ilustración.
CUBIERTA
DE LA LUZ
Quemadores superiores
Para encender un quemador, empuje y gire la perilla de
control correspondiente en sentido opuesto a las manecillas
del reloj a HI (ALTO). El piloto comenzará a hacer clic
hasta que se encienda el quemador. Una vez encendido,
siga girando la perilla de control en sentido opuesto a las
manecillas del reloj hasta llegar a la programación deseada.
Para seleccionar una programación a fuego lento, gire la
perilla de control hasta que se detenga en la programación
más baja. Pulse y siga girando en sentido opuesto a las
manecillas del reloj. La llama pasará al segundo nivel en la
tapa del quemador. Siga girando la perilla hasta llegar a la
programación de fuego lento deseada.
Durante un corte de energía, los quemadores superiores se
pueden encender manualmente. Gire la perilla a HI (ALTO) y
encienda con un encendedor multiusos.
PRECAUCIÓN
Nunca deje desatendidas las cacerolas en una
programación de alta temperatura. Tenga cuidado al
cocinar los alimentos en grasa o aceite, estos pueden
calentarse lo suciente como para incendiarse.
Reemplazo del foco.
16 | Atención al cliente de Wolf 800.222.7820
Page 39

RANURA
FUNCIONAMIENTO DE LA SUPERFICIE
Parrilla infrarroja
La parrilla tiene un quemador infrarrojo que transere un
calor intenso a los alimentos, por lo que dora el exterior y
sella los jugos dentro. Cocine los alimentos directamente
sobre la rejilla de la parrilla, no utilice utensilios de cocina.
El espacio de 7"
(178) detrás de la parrilla es más fresco
que el resto de la supercie. Puede utilizar esta zona para
mantener los alimentos hasta que estén listo para servirlos.
Cómo ensamblar la parrilla:
1 Para ensamblar, coloque el marco de la parrilla sobre la
estufa. Consulte la siguiente ilustración.
2 Alinee las ranuras de la placa radiante con el ángulo
frontal del marco. Consulte la siguiente ilustración. Las
ranuras deben ajustarse sobre el ángulo frontal y quedar
completamente planas sobre el marco de la parrilla.
3 Instale la rejilla de la parrilla.
PRECAUCIÓN
Tenga cuidado al ensamblar la parrilla para evitar el
contacto con el piloto.
FUNCIONAMIENTO DE LA PARRILLA
La cubierta de acero inoxidable se debe retirar antes de utilizarla.
1 Encienda la ventilación.
2 Presione y gire la perilla de control en sentido opuesto a
las manecillas del reloj hasta llegar a HI (ALTO). El piloto
comenzará a hacer clic hasta que se encienda el quemador.
3 Deje que se caliente durante 10 minutos.
CUIDADO DE LA PARRILLA
• Una vez que termine de cocinar, deje encendida la
parrilla durante 10 minutos. El fuego alto ayudará a
quemar el exceso de partículas de alimentos.
• Una vez que la rejilla se enfríe, retírela y colóquela en
el fregadero. Cúbrala con toallas de cocina húmedas y
vierta agua sobre ella para aojar los residuos. Limpie
con jabón y una almohadilla abrasiva. Enjuague y seque.
• Para limpiar el marco, retírelo y colóquelo en el
fregadero. Remójelo en agua caliente y detergente
suave. Lávelo y frótelo con una almohadilla abrasiva.
PILOTO
ÁNGULO
FRONTAL
Marco de la parrilla.
MARCO
PLACA
RADIANTE
Placa radiante de la parrilla.
wolfappliance.com | 17
Page 40

FUNCIONAMIENTO DE LA SUPERFICIE
Plancha infrarroja
La plancha está controlada por termostato para mantener
una temperatura constante. Para evitar que los alimentos se
peguen, es necesario "preparar" la plancha antes de usarla.
Preparación de la plancha:
1 Encienda la ventilación.
2 La plancha tiene una capa protectora que debe quitarse
antes de usarla. Utilice agua caliente y detergente suave
para quitarla. Enjuague y seque.
3 Presione y gire la perilla de control en sentido opuesto
a las manecillas del reloj hasta llegar a 350 °F
(175 °C) y
caliente durante 30 minutos. Una vez transcurridos los
30 minutos, APAGUE y deje enfriar.
4 Cuando la supercie esté ligeramente caliente, vierta
una pequeña cantidad de aceite de maní o vegetal en
una toalla de papel y extienda uniformemente.
5 Presione y gire la perilla de control a 350° F (175 °C).
Caliente hasta que la plancha empiece a sacar humo,
luego APAGUE y deje enfriar. Una vez que enfríe, limpie
el exceso de aceite.
FUNCIONAMIENTO DE LA PLANCHA
La cubierta de acero inoxidable se debe retirar antes de utilizarla.
1 Encienda la ventilación.
2 Presione y gire la perilla de control en sentido opuesto
a las manecillas del reloj hasta alcanzar la temperatura
deseada. El piloto comenzará a hacer clic hasta que se
encienda el quemador. La plancha doble tiene controles
independientes para cada lado.
3 La luz indicadora encima de la perilla se enciende hasta que
la plancha alcanza la temperatura programada. La luz se
encenderá y apagará por ciclos a medida que se necesita
más calor para mantener la temperatura programada.
CUIDADO DE LA PLANCHA
• Raspe la grasa en la bandeja de recolección de grasa
después de cada uso. Cuando la supercie se haya
enfriado, límpiela con papel absorbente para retirar el
exceso de grasa o aceite.
• Después de cada uso, vuelva a aplicar una pequeña
cantidad de aceite de maní o vegetal en una toalla de
papel y extienda uniformemente.
1
• De vez en cuando, retire la preparación. Vierta
(120 ml) de agua tibia y 1 cucharadita (5 ml) de limpiador
/2 taza
para plancha sobre la plancha y raspe la grasa en la
bandeja de recolección de grasa, y después vacíela.
Una vez que esté seca, vuelva a aplicar una pequeña
cantidad de aceite para prepararla.
18 | Atención al cliente de Wolf 800.222.7820
Page 41

FUNCIONAMIENTO DE LA SUPERFICIE
Encimera francesa
La encimera francesa (french top) es una supercie de
cocción graduada con la temperatura más alta debajo de
la placa central. Siempre utilice utensilios de cocina, no
cocine los alimentos directamente sobre la supercie. Para
más calor de cocción, coloque los utensilios más cerca
del centro y para menos calor, más cerca de los bordes.
Consulte la siguiente ilustración.
Para proteger la supercie contra las salpicaduras de
alimentos y la humedad, es necesario "preparar" la
encimera francesa antes de utilizarla.
Preparación de la encimera francesa:
1 La encimera francesa tiene una capa protectora que
debe quitarse antes de su uso. Utilice agua caliente y
detergente suave para quitarla. Enjuague y seque.
2 Presione y gire la perilla de control en sentido opuesto a
las manecillas del reloj hasta llegar a HI (ALTO) y caliente
durante 30 minutos. Una vez transcurridos los 30
minutos, APAGUE y deje enfriar.
3 Cuando la supercie esté ligeramente caliente, vierta
una pequeña cantidad de aceite de maní o vegetal en
una toalla de papel y extienda uniformemente.
FUNCIONAMIENTO DE LA ENCIMERA FRANCESA
La cubierta de acero inoxidable se debe retirar antes de utilizarla.
1 Encienda la ventilación.
2 Presione y gire la perilla de control en sentido opuesto a
las manecillas del reloj hasta llegar a HI (ALTO). El piloto
comenzará a hacer clic hasta que se encienda el quemador.
3 Deje que se caliente durante 30 minutos.
PRECAUCIÓN
Nunca deje cacerolas desatendidas en una zona de alta
temperatura. Tenga cuidado al cocinar los alimentos en
grasa o aceite, estos pueden calentarse lo suciente
como para incendiarse.
CUIDADO DE LA ENCIMERA FRANCESA
• Limpie toda la supercie después de cada uso cuando
aún esté ligeramente caliente. Limpie con detergente
suave y agua. Enjuague y seque.
• Después de cada uso, vuelva a aplicar una pequeña
cantidad de aceite de maní o vegetal en una toalla de
papel y extienda uniformemente.
BAJA
MEDIA MEDIA
BAJA
Zonas de calentamiento de la
encimera francesa.
ALTA
ALTA
ALTA
BAJA
BAJA
GANCHO DE LA
PLACA CENTRAL
Cómo extraer la placa central.
• De vez en cuando, retire la preparación. Aplique una
pequeña cantidad de vinagre blanco y agua a la
supercie cuando aún se encuentre ligeramente caliente.
Frote y repita hasta que haya retirado todo el exceso de
aceite. Vuelva a aplicar una pequeña cantidad de aceite
para prepararla.
• El quemador de la encimera francesa se encuentra
debajo de la placa central. Para retirarlo, utilice el
gancho de la placa central suministrado con la estufa
tal y como se muestra en la ilustración. Nunca retire la
placa central durante la cocción.
wolfappliance.com | 19
Page 42

RECOMENDACIONES SOBRE EL CUIDADO
Recomendaciones sobre el cuidado
LIMPIEZA
Acero inoxidable Use un limpiador no abrasivo para acero inoxidable y aplique con un paño suave sin pelusa. Para resaltar
el lustre natural, limpie suavemente la supercie con una tela de microbra humedecida con agua, seguida
con una gamuza para pulir en seco. Siempre siga la dirección del acabado del acero inoxidable.
Parrillas de quemadores
Guías de las rejillas del horno
Bandeja del quemador Retire los desechos de la supercie antes de limpiarla para agilizar el proceso de limpieza y disminuir
Quemadores superiores Deje enfriar. Límpielos con detergente suave o desengrasante en aerosol. Enjuague con agua y séquelos
Parrilla
Plancha
Encimera francesa
Perillas de control
Anillos
Panel de control Utilice desengrasante en aerosol para retirar las marcas de los dedos y los residuos de alimentos. Rocíe
Interior del horno Antes de activar la función de autolimpieza, retire suavemente con un cuchillo los restos de alimentos
Retire y coloque sobre una supercie plana cerca del fregadero. Límpielas con agua caliente y un detergente
suave o con pasta de bicarbonato de sodio y agua. No las sumerja en agua. Seque con una toalla.
las posibilidades de rayar la supercie. Utilizando limpiadores ligeramente abrasivos o desengrasantes
en aerosol, limpie y enjuague la supercie y séquela de inmediato para evitar que se raye. Utilice vinagre
blanco y agua para limpiar las manchas ocasionadas por el agua con alto contenido de minerales.
Enjuague y seque de inmediato.
con una toalla.
Consulte las páginas 17 a 19 para consultar las recomendaciones de cuidado.
Utilizando un paño húmedo, límpielos con detergente suave o desengrasante en aerosol; enjuague y
deje secar. No los coloque en el lavavajillas.
el producto en un paño antes de limpiar el panel.
AVISO IMPORTANTE: no aplique los limpiadores directamente sobre el panel de control.
adheridos a la cavidad y la puerta del horno. Para eliminar manchas difíciles, aplique un limpiador
ligeramente abrasivo o desengrasante en aerosol y frótelo con una esponja Scotch-Brite™ cero rayones
(rosa o azul). Lave la cavidad del horno con agua y jabón para eliminar todos los productos químicos de
limpieza antes de activar el modo de autolimpieza. Si no se retiran los residuos de la cavidad, es posible
que la porcelana se desgaste por corrosión. Una vez que el ciclo de autolimpieza haya terminado, deje
enfriar el horno por completo y limpie la ceniza con un paño húmedo.
Parrilla para asar Para limpiar la rejilla superior, utilice detergente suave y un estropajo. Enjuague y seque. Para limpiar la
parrilla inferior, deseche la grasa y lave con agua caliente y detergente suave. Enjuague y seque. La rejilla
superior de acero inoxidable puede lavarse en lavavajillas, sin embargo, no coloque ninguna rejilla o
parrilla cubierta de porcelana en el lavavajillas.
20 | Atención al cliente de Wolf 800.222.7820
Page 43

RESOLUCIÓN DE PROBLEMAS
Resolución de problemas
OPERACIÓN
La estufa no funciona.
• Compruebe si la unidad está encendida.
• Compruebe que la alimentación eléctrica a la unidad y el
interruptor de circuito de la casa estén encendidos.
• El horno se apagará automáticamente después de
12 horas de uso continuo, excepto en los modos de
deshidratación o Sabbath.
HORNO
Problema con la temperatura del horno.
• Póngase en contacto con la línea de atención al cliente
de Wolf al 800-222-7820 para obtener recomendaciones.
No se visualiza la perilla de control.
• Jale la perilla de control del horno hacia fuera y vuelva
a insertar plenamente. Apague el interruptor de circuito
durante 5 segundos, después vuelva a encenderlo.
El panel táctil del panel de control no responde.
• Gire el anillo a OFF (APAGAR) para salir del modo de Sabbath.
• Apague el interruptor de circuito durante 5 segundos,
después vuelva a encenderlo.
Se visualiza ‘SAb’ en la perilla de control del horno.
• Gire el anillo a OFF (APAGAR) para salir del modo de Sabbath.
Se visualiza ‘PF’ en la perilla de control del horno.
• La unidad tuvo un corte de energía. Gire el anillo de
selección a un modo de cocción, luego regrese a OFF
(APAGAR) para reiniciar.
• Apague el interruptor de circuito durante 5 segundos,
después vuelva a encenderlo.
Se visualiza ‘OPP’ en la perilla de control del horno.
• Uno de los hornos puede estar en modo de autolimpieza.
Si un horno está en modo de autolimpieza, el otro no
puede utilizarse.
Se visualiza ‘OE’, ‘OC’ u otro error.
• Póngase en contacto con el servicio certicado de
fábrica de Wolf.
El horno hace "pop" o "bang" durante el precalentamiento
o el enfriamiento.
• Eso es normal debido a la expansión y contracción de la
nueva cavidad del horno.
• Ejecute un ciclo de autolimpieza. Si el problema persiste,
comuníquese con la línea de atención al cliente de Wolf
al 800-222-7820.
SUPERFICIE DE LA ESTUFA
Flama errática, encendido inadecuado o no enciende.
• Compruebe que las tapas de los quemadores estén
colocadas correctamente.
• Limpie bien el quemador y el piloto.
• Si se derramó agua recientemente, deje que el área seque
por completo. Utilice una secadora de cabello si así lo desea.
• Si la tapa del quemador se asegura a la cabeza del
quemador, compruebe que esté bien sujeta.
• Empuje la perilla hacia adentro, luego suéltela.
Compruebe que la perilla regrese a su posición original.
La parrilla hace clic continuamente.
• Compruebe que la perilla se encuentre completamente
en HI (ALTO).
La luz indicadora de la plancha parpadea.
• Apague la perilla y luego vuelva a encenderla. La llama se
apagó y la unidad entró en modo de bloqueo de seguridad.
wolfappliance.com | 21
Page 44

RESOLUCIÓN DE PROBLEMAS
Resolución de problemas
SERVICIO
• Para mantener la calidad incorporada en su producto,
póngase en contacto con el servicio certicado de
fábrica de Wolf. Para obtener los datos del centro de
servicio autorizado de Wolf más cercano, eche un
vistazo a la sección de contacto y servicio técnico en
nuestro sitio web, wolfappliance.com o llame a la línea
de atención al cliente de Wolf al 800-222-7820.
• Al comunicarse con el servicio, necesitará el modelo
y número de serie de su producto. Los dos números
también aparecen en la placa de datos del producto.
Consulte la página 8 para encontrar la placa de datos.
• Para nes de la garantía, usted también necesitará
la fecha de instalación y el nombre de su distribuidor
autorizado de Wolf. Esta información debe estar
registrada en la página 2 de este manual.
Wolf, Wolf & Design, Wolf Gourmet, W & Design y el color rojo aplicado a las perillas son marcas comerciales registradas y marcas de servicio de Wolf Appliance, Inc. Sub-Zero,
Sub-Zero & Design, Dual Refrigeration, The Living Kitchen, Great American Kitchens The Fine Art of Kitchen Design, e Ingredients son marcas comerciales registradas y marcas de
servicios de Sub-Zero, Inc. Todas las demás marcas comerciales o marcas comerciales registradas son propiedad de sus respectivos propietarios en los Estados Unidos y otros países.
22 | Atención al cliente de Wolf 800.222.7820
Page 45

Garantía limitada residencial de Wolf Appliance
PARA USO RESIDENCIAL
GARANTÍA COMPLETA DE DOS AÑOS*
Durante dos años a partir de la fecha de la instalación original, la garantía de su producto Wolf Appliance
cubre todas las partes y mano de obra para reparar o reemplazar, bajo el uso residencial normal,
cualquier parte del producto que se compruebe estar defectuosa en material o mano de obra. Todos los
servicios proporcionados por Wolf Appliance bajo la garantía anterior deben ser ejecutados por servicios
certicados de fábrica de Wolf, a menos que Wolf Appliance, Inc. lo especique de otra manera. El
Servicio será proporcionado durante el horario comercial normal.
GARANTÍA LIMITADA DE CINCO AÑOS
Por cinco años a partir de la fecha de la instalación original, Wolf Appliance reparará o reemplazará
los siguientes componentes que se comprueben estar defectuosos en material o mano de obra:
quemadores de gas (excluyendo la apariencia), elementos eléctricos de calentamiento, motores de
sopladores (campanas de ventilación), módulos de control eléctrico, tubos magnetrón y generadores
de inducción. Si el propietario utiliza el servicio certicado de fábrica de Wolf, el prestador del servicio
reparará o reemplazará estas partes mediante el pago de todos los otros costos, incluyendo mano de
obra, a cargo del propietario. Si el propietario utiliza un servicio no certicado, debe ponerse en contacto
con Wolf Appliance, Inc. (utilizando la información anotada más adelante) para recibir los componentes
reparados o de reemplazo. Wolf Appliance no reembolsará al propietario los importes correspondientes
a componentes comprados a un servicio no certicado o a otras fuentes.
TÉRMINOS APLICABLES A CADA GARANTÍA
La garantía se aplica solamente a los productos instalados para uso residencial normal. La garantía
se aplica solamente a los productos instalados en cualquiera de los cincuenta estados de los Estados
Unidos, el Distrito de Columbia o las diez provincias de Canadá. Esta garantía no cubre las partes o
mano de obra para corregir cualquier defecto causado por negligencia, accidente o uso, mantenimiento,
instalación, servicio o reparación inadecuados.
LOS RECURSOS DESCRITOS ANTERIORMENTE PARA CADA GARANTÍA SON LOS ÚNICOS QUE WOLF
APPLIANCE, INC. PROPORCIONARÁ, YA SEA BAJO ESTA GARANTÍA O BAJO CUALQUIER GARANTÍA QUE
RESULTE DE LA APLICACIÓN DE LA LEY. WOLF APPLIANCE, INC. NO SE HACE RESPONSABLE POR LOS
DAÑOS INDIRECTOS O INCIDENTALES DERIVADOS DE LA VIOLACIÓN DE ESTA GARANTÍA O CUALQUIER
OTRA GARANTÍA, YA SEA EXPRESA, IMPLÍCITA O LEGAL.
Algunos estados no permiten la exclusión o limitación de daños incidentales o consecuentes, por lo tanto
la limitación o exclusión anterior podrían no aplicarse en su caso. Esta garantía le otorga derechos legales
especícos, y usted también puede tener otros derechos legales que varían entre estados.
Para recibir las partes o el servicio y el nombre del servicio certicado de fábrica de Wolf más cercano
a usted, póngase en contacto con Wolf Appliance, Inc., P.O. Box 44848, Madison, WI 53744; eche un
vistazo a la sección de contacto y servicio técnico en nuestro sitio web, wolfappliance.com, envíenos un
correo electrónico a customerservice@subzero.com o llame al 800-222-7820.
*Las puertas, paneles, manijas, estructuras de acero inoxidable y supercies internas están cubiertas por
una garantía limitada de 60 días sobre piezas y mano de obra, por defectos cosméticos.
*Los ltros de repuesto para los kits de circulación de la campana de ventilación no están cubiertos por
la garantía del producto.
wolfappliance.com | 23
Page 46

CUISINIÈRES MIXTES
Table des matières
4 Précautions de sécurité
8 Caractéristiques de la cuisinière mixte
9 Fonctionnement du four
16 Fonctionnement de la surface
20 Conseils d’entretien
21 Dépannage
23 Garantie Wolf
Service à la clientèle
Le numéro de modèle et le numéro de série sont imprimés
sur la che d’enregistrement du produit ci-jointe. Les deux
numéros sont aussi indiqués sur la plaque signalétique
du produit. Reportez-vous à la page 8 pour connaître
l’emplacement de la plaque signalétique. Pour les besoins
de la garantie, vous devrez aussi avoir la date d’installation
et le nom de votre dépositaire Wolf autorisé. Inscrivez ces
renseignements ci-dessous pour consultation ultérieure.
Si votre produit a besoin d’être réparé, assurez-vous
d’utiliser un fournisseur de service certié par l’usine Wolf
recommandé par notre centre de service à la clientèle, ou
sélectionnez-en un parmi la liste de fournisseurs disponibles
à wolfappliance.com/locator. Tous les fournisseurs de service
certiés par l’usine sont soigneusement sélectionnés et
rigoureusement formés par nous.
RENSEIGNEMENTS SUR LE SERVICE
Numéro de modèle
Numéro de série
Date de l’installation
Nom du service certié
Numéro du service certié
Dépositaire autorisé
Numéro du dépositaire
2 | Service à la clientèle de Wolf 800.222.7820
Remarque importante
Pour s’assurer que ce produit est installé et utilisé en toute
sécurité et aussi efcacement que possible, prenez note
des types de renseignement mis en évidence tout au long
de ce guide :
REMARQUE IMPORTANTE met en évidence des
renseignements qui sont particulièrement importants.
MISE EN GARDE indique une situation où une blessure
mineure ou des dommages au produit peuvent se produire
si les directives ne sont pas respectées.
AVERTISSEMENT décrit un danger qui peut causer une blessure
grave ou la mort si les précautions ne sont pas respectées.
REMARQUE IMPORTANTE : tout au long de ce guide, les
dimensions entre parenthèses sont en millimètres à moins
d’indication contraire.
Page 47

Merci
Merci de votre achat. Nous nous réjouissons à l’idée de faire partie de votre résidence
pendant des décennies à venir. À titre d’entreprise familiale de troisième génération,
nous avons un intérêt personnel dans la préparation des aliments de votre famille. Nous
avons bâti notre entreprise et notre réputation en aidant les familles à servir les meilleurs
aliments qui soient.
Grâce à votre achat, vous obtiendrez l’une des garanties les plus robustes de l’industrie
des appareils électroménagers. Prenez un moment pour lire la déclaration de garantie
complète à la page 23. Il est aussi important d’enregistrer votre appareil Wolf pour vous
assurer de ne pas manquer les avantages exclusifs offerts aux propriétaires, comme
l’assurance que vous serez pris en charge dans le cas peu probable où un service
serait nécessaire durant la période de garantie et d’avoir une preuve d’achat en cas de
réclamation d’assurance habitation. Vous pouvez effectuer l’enregistrement de l’une des
façons suivantes :
• En postant la che d’enregistrement du produit Wolf dûment remplie.
• En enregistrant votre appareil en ligne à wolfappliance.com/register et en créant un
compte personnalisé My Sub-Zero/Wolf avec le numéro de série de votre produit.
• Par téléphone en appelant le service à la clientèle de Wolf au 800-222-7820.
À titre de propriétaire Wolf, vous pouvez compter sur un soutien continu, jour après jour.
Notre centre de service à la clientèle est offert 24 heures par jour, sept jours par semaine
et composé d’employés experts en produit bien informés dans notre usine de Madison
au Wisconsin. En cas de besoin, composez simplement le 800-222-7820 et parlez avec
un de nos experts en produit. Ils vous aideront à résoudre tout problème que vous
pourriez avoir.
Nous sommes conants que ce guide répondra à vos questions au sujet des
caractéristiques, du fonctionnement et de l’entretien de votre Wolf, mais si vous avez des
questions supplémentaires, communiquez avec nous au 800-222-7820 ou visitez-nous
en ligne à wolfappliance.com.
wolfappliance.com | 3
Page 48

PRÉCAUTIONS DE SÉCURITÉ
DIRECTIVES IMPORTANTES
AVERTISSEMENT
Si les renseignements se trouvant dans ce
manuel ne sont pas respectés à la lettre, un
incendie ou une explosion peuvent se produire
causant ainsi des dommages matériels, des
blessures ou la mort.
Ne rangez pas et n’utilisez pas de l’essence ou
d’autres vapeurs ou liquides inammables à
proximité de cet appareil ou de tout autre appareil.
QUOI FAIRE SI VOUS SENTEZ DU GAZ :
• Ne tentez pas d’allumer un appareil.
• Ne touchez pas aux commutateurs électriques.
• N’utilisez pas les téléphones se trouvant dans
votre édice.
• Communiquez immédiatement avec votre
fournisseur de gaz en utilisant le téléphone d’un
voisin. Suivez les directives du fournisseur de gaz.
• Si vous ne pouvez pas joindre votre fournisseur
de gaz, communiquez avec les pompiers.
AVERTISSEMENT
Un enfant ou un adulte peuvent faire basculer cet
appareil et être tués.
Vériez que le dispositif antibasculement est
correctement installé et enclenché. Assurez-vous
que le dispositif antibasculement est enclenché à
nouveau lorsque l’appareil est déplacé. Reportezvous aux illustrations ci-dessous pour savoir
comment vérier l’installation.
Ne faites pas fonctionner cet appareil sans que
le dispositif antibasculement ne soit en place
et enclenché. Le non-respect de cette directive
peut entraîner la mort ou des brûlures graves aux
enfants ou aux adultes.
Pour réduire le risque de brûlure, ne déplacez pas
cet appareil lorsqu’il est chaud.
Cet appareil doit être correctement installé et réparé
par un installateur qualié, une agence de service
ou un fournisseur de gaz et mis à la terre par un
technicien qualié.
4 | Service à la clientèle de Wolf 800.222.7820
DISPOSITIF
ANTIBASCULEMENT
Emplacement du dispositif
antibasculement.
DISPOSITIF
ANTIBASCU-
LEMENT
ENCLENCHÉ
Dispositif antibasculement
enclenché.
Page 49

PRÉCAUTIONS DE SÉCURITÉ
DIRECTIVES IMPORTANTES
PRÉCAUTIONS DE SÉCURITÉ GÉNÉRALE
• Lisez ce guide attentivement avant d’utiliser cet
appareil an de réduire le risque d’incendie, de choc
électrique ou de blessures.
• Avant d’effectuer tout service, coupez l’alimentation
en gaz en fermant le robinet d’arrêt du gaz et coupez
l’alimentation en électricité vers l’appareil.
• Gardez la zone de l’appareil propre et libre de
matériaux combustibles.
• Pour une question de sécurité lorsque vous
cuisinez, réglez les commandes des brûleurs de
manière à ce que la amme ne se prolonge pas
au-delà du fond du chaudron.
• Faites attention lorsque vous ouvrez la porte du four.
Laissez l’air chaud ou la vapeur s’échapper avant de
regarder ou de mettre les bras dans le four.
• IMPORTANT : n'installez pas un système de
ventilation qui soufe de l'air vers le bas vers cet
appareil de cuisson au gaz. Ce type de système de
ventilation peut causer des problèmes d'allumage
et de combustion avec cet appareil de cuisson
au gaz, entraînant des blessures ou un fonctionnement non prévu.
• N’utilisez pas du papier en aluminium pour couvrir
toute partie de cet appareil.
• N’utilisez jamais cet appareil pour réchauffer
ou chauffer la pièce. Cela peut causer un
empoisonnement au monoxyde de carbone.
• Assurez-vous que l’admission d’air frais du four
(au-dessus de la porte) et le conduit de sortie du
four (sous la porte) soient dégagés en tout temps.
• Portez des vêtements appropriés. Des vêtements
lâches ou pendants ne doivent jamais être portés
lorsque vous utilisez cet appareil.
• Faites extrêmement attention lorsque vous déplacez
une marmite de graisse ou jetez de la graisse chaude.
• Utilisez toujours des poignées sèches pour retirer les
casseroles de cet appareil. Des poignées mouillées
ou humides peuvent causer des brûlures de vapeur.
N’utilisez pas une serviette ou un chiffon épais au
lieu de poignées.
• Placez les grilles du four aux endroits désirés
lorsque le four est froid. Si une grille doit être
déplacée et que le four est déjà chaud, assurezvous que les poignées n’entrent pas en contact avec
l’élément chauffant chaud du four.
wolfappliance.com | 5
Page 50

PRÉCAUTIONS DE SÉCURITÉ
DIRECTIVES IMPORTANTES
PRÉCAUTIONS DE SÉCURITÉ GÉNÉRALE
• Nettoyez seulement les pièces indiquées dans ce guide.
• N’utilisez pas de nettoyants pour le four. Aucun
nettoyant pour le four commercial ni aucun
revêtement protecteur de toute sorte ne doivent
être utilisés dans ou autour des pièces du four.
• Avant d’utiliser la fonction autonettoyage, retirez la
lèchefrite, les grilles du four, les guides de grille et
tout autre ustensile.
• Ne réparez pas et ne remplacez pas toute pièce de
cet appareil à moins que cela ne soit spéciquement
recommandé dans la documentation accompagnant
l’appareil.
• Ne bloquez pas le débit d’air pour assurer une
combustion et une ventilation appropriées.
• Lorsque vous utilisez cet appareil, ne touchez pas
aux grilles, aux capuchons de brûleur, aux bases
des brûleurs ou à toute autre partie à proximité de
la amme. Ces pièces peuvent être assez chaudes
pour causer des brûlures.
• Ne nettoyez pas le joint du four; le frottage ou
le déplacement du joint peuvent compromettre
l’étanchéité de la porte.
• N’utilisez pas de l’eau sur des incendies de graisse.
Étouffez la amme ou utilisez un extincteur à poudre
chimique ou à mousse.
• Ne laissez jamais l’appareil sans surveillance lorsqu’il
fonctionne. Les débordements par bouillonnement
et les renversements de graisse peuvent créer de la
fumée ou s’enammer.
• Ne touchez pas aux éléments chauffants ou aux surfaces
intérieures du four. Les éléments chauffants peuvent être
chauds même s’ils sont de couleur foncée. Les surfaces
intérieures deviennent assez chaudes pour causer des
brûlures. Pendant et après l’utilisation, ne touchez pas
et ne laissez pas les vêtements ou d’autres matériaux
inammables entrer en contact avec les éléments
chauffants ou les surfaces intérieures du four avant qu’ils
n’aient eu sufsamment de temps pour se refroidir.
• Ne laissez pas des enfants seuls ou sans surveillance
dans la zone où cet appareil est utilisé. Ne laissez jamais
des enfants s’asseoir ou se tenir debout sur l’appareil.
• Ne rangez pas des articles intéressants pour les
enfants au-dessus ou à l’arrière de cet appareil
puisqu’ils pourraient grimper sur l’appareil pour les
atteindre et se blesser.
• Ne chauffez pas des contenants d’aliment non
ouverts comme les pots et les boîtes de nourriture
pour bébé. L’accumulation de pression peut faire
éclater le contenant et causer des blessures.
• Ne rangez pas des matériaux inammables près
des brûleurs et ne laissez pas de la graisse ou
d’autres substances inammables s’accumuler sur
la surface de cuisson.
6 | Service à la clientèle de Wolf 800.222.7820
Page 51

PRÉCAUTIONS DE SÉCURITÉ
DIRECTIVES IMPORTANTES
PROPOSITION 65 DE LA CALIFORNIE
AVERTISSEMENT
Le carburant de cuisson qui brûle le gaz génère
des produits dérivés qui se trouvent sur la liste des
substances reconnues comme causant le cancer ou
étant nocives pour la reproduction. Pour minimiser
l’exposition à ces substances, utilisez toujours cette
unité conformément aux directives se trouvant dans
ce guide et assurez une ventilation adéquate.
COMMONWEALTH DU MASSACHUSETTS
• Les installations et les réparations doivent être effectuées
par un entrepreneur ou un plombier qualié ou autorisé ou
un monteur d’installation au gaz qualié ou autorisé par
l’État, la province ou la région où cet appareil sera installé.
• Utilisez seulement des robinets d’arrêt du gaz
approuvés pour utilisation dans l’État, la province ou
la région où cet appareil sera installé.
• Si un connecteur de gaz souple est utilisé, il ne doit
pas dépasser 3 pi (0,9 m) de longueur.
wolfappliance.com | 7
Page 52

CARACTÉRISTIQUES DE LA CUISINIÈRE MIXTE
Caractéristiques de la cuisinière mixte
CARACTÉRISTIQUE
1
Plaque signalétique du produit
2
Panneau de commande (appuyez sur pour y
accéder)
3
Bouton de commande du four
4
Four à convection
5
Brûleur de surface
6
Grilloir type charbon de bois en option
7
Plaque à frire en option
8
Table de cuisson française en option (non illustrée)
7
5
2
6
PAGE
10
10
10
16
17
18
19
Comment commencer
Nous savons que vous êtes impatient de commencer à
2
3
1
4
cuisiner, mais avant de le faire, veuillez prendre quelques
instants pour lire ce guide d’utilisation et d’entretien. Que vous
soyez un cuisinier occasionnel ou un chef expert, il vous sera
bénéque de vous familiariser avec les pratiques de sécurité,
les caractéristiques, le fonctionnement et les recommandations
d’entretien de votre cuisinière mixte de Wolf.
• Pour s’assurer que toute l’huile résiduelle du processus
de fabrication a été enlevée, nettoyez la cuisinière à fond
avec de l’eau chaude et un détergent doux avant de
l’utiliser. Rincez et séchez avec un chiffon doux. Reportezvous aux recommandations d’entretien à la page 20.
• Vériez que les composants du brûleur en surface soient
correctement assemblés.
• Le grilloir type charbon de bois, la plaque à frire et la
table de cuisson française en option nécessitent une
attention spéciale. Reportez-vous aux pages 17 à 19.
• Pour obtenir les meilleurs résultats, révisez les modes de
cuisson et les caractéristiques spéciales à la page 12.
MISE EN GARDE
Ne placez pas des casseroles dans le fond du four
et n’utilisez pas du papier d’aluminium ou d’autres
matériaux pour couvrir le fond ou les parois du four.
Le non-respect de cet avis endommagera l’intérieur
en porcelaine et annulera votre garantie.
Cuisinière mixte de 48 po illustrée.
8 | Service à la clientèle de Wolf 800.222.7820
Page 53

FONCTIONNEMENT DU FOUR
Grilles du four
GUIDES DES GRILLES DU FOUR
Pour insérer les guides de grille dans le four, repérez les
vis de montage dans les parois latérales du four. Placez les
onglets de montage du guide de grille sur les vis et glissez
vers le bas jusqu’à ce qu’il soit bien appuyé. Reportez-vous
à l’illustration ci-dessous.
GRILLES DE FOUR
Pour insérer une grille standard dans le four, placez le
verrou antibasculement de la grille sous les rails latéraux du
guide de grille. Glissez la grille vers l’arrière et soulevez-la
pour contourner les arrêts de grille. Continuez à glisser la
grille vers l’arrière jusqu’à ce qu’elle soit complètement à
l’intérieur du four. Reportez-vous à l’illustration ci-dessous.
VIS DE MONTAGE
ARRÊT
DE GRILLE
VERROU
ANTIBASCU-
LEMENT
ONGLET DE
MONTAGE
La grille de four inférieure peut être sortie complètement et
soutenue par la porte du four. La grille étant à la position
de guide de grille la plus basse, glissez-la sur les guides de
porte pour augmenter sa stabilité et son accès. Reportezvous à l’illustration ci-dessous.
Pour insérer une grille facile à glisser à extension complète,
placez les deux onglets arrière sur le guide de grille (un
onglet au-dessus et un onglet en-dessous). Reportez-vous
à l’illustration ci-dessous. Inclinez la grille légèrement et
glissez-la vers l’arrière jusqu’à ce que l’encoche de grille
avant enclenche le guide de grille avant.
ONGLETS
ARRIÈRE
ENCOCHE
Grille inférieure.
Grille à extension complète.
Guides de grille du four.
Verrouillage antibasculement de
grille du four.
wolfappliance.com | 9
Page 54

FONCTIONNEMENT DU FOUR
Fonctionnement du four
Les cuisinières mixtes de Wolf utilisent une combinaison d’un
cadran sélecteur de mode de cuisson, de bouton de commande
de température du four et un panneau de commande
électronique pour sélectionner les modes de cuisson désirés,
la température du four et les fonctions exclusives. Ouvrez le
panneau de commande en appuyant sur
.
Les températures sont afchées en Fahrenheit. Pour passer à
Celsius, touchez et tenez la touche CLOCK (horloge) pendant
cinq secondes. Touchez à COOK TIME (durée de cuisson)
pour alterner entre °F et °C, puis touchez à ENTER (entrée).
Lorsque vous utilisez le four, Wolf a créé un processus
à deux étapes pour s’assurer qu’il n’est jamais
accidentellement mis en marche :
1 Tournez le cadran sélecteur au mode de cuisson désiré. Les
modes standards sont afchés dans la zone argentée du
cadran. Les modes à convection sont afchés dans la zone
noire du cadran. Reportez-vous à l’illustration ci-dessous.
Une fois le mode de cuisson désiré choisi, une température
pré-réglée apparaîtra sur le bouton de commande.
2 Sélectionnez une température préréglée en touchant à
ENTER (entrée) sur le panneau de commande ou tournez
le bouton de commande pour augmenter ou réduire
la température. Chaque action termine la seconde
étape du processus. Le voyant du four s’illumine et le
préchauffage commence.
LUMIÈRE DU FOUR
La lumière du four s’allume automatiquement lorsque la
porte est ouverte et s’éteint lorsqu’elle est fermée. Pour
allumer la lumière lorsque la porte est fermée, touchez à
OVEN LIGHT sur le panneau de commande.
PRÉCHAUFFAGE
Durant le préchauffage, le four se chauffe aussi rapidement
et uniformément que possible et il n’est pas à son meilleur
pour la cuisson. Le préchauffage doit être utilisé pour tous les
modes de cuisson, sauf grillage et grillage par convection.
Durant le préchauffage, les températures inférieures à 150 °F
(65 °C)
apparaissent comme « Lo ». One fois le préchauffage
terminé, une sonnerie retentit indiquant que le four a atteint
la température choisie et le voyant du four n’est plus illuminé.
Pour modier la température lorsque le préchauffage est
terminé, tournez le bouton jusqu’à la température désirée.
AVANT L’UTILISATION
Pour s’assurer que toute l’huile résiduelle du processus
de fabrication ait été éliminée, chaque four doit subir la
procédure suivante.
1 Nettoyez le four à fond avec de l’eau chaude et un
détergent doux. Rincez et séchez avec un chiffon doux.
VOYANT
CADRAN
SÉLECTEUR
LUMINEUX
TIMER
Panneau de commande et bouton de commande du four.
10 | Service à la clientèle de Wolf 800.222.7820
2 Mettez la ventilation en marche. Il est normal de voir de
la fumée et de sentir une odeur.
3 Tournez le cadran sélecteur à ROAST (rôtissage) et régler
la température à 550 °F
4 Tournez le cadran jusqu’à OFF (arrêt) et laissez le four se
(290 °C) pendant une heure.
refroidir en gardant la porte fermée.
Page 55

FONCTIONNEMENT DU FOUR
Fonctionnement du four
CLOCK (HORLOGE)
L’horloge est visible sur le panneau de commande durant
tous les modes de cuisson, sauf lorsque la minuterie est
utilisée. Il est très important que l’horloge soit réglée à la
bonne heure si la fonction durée de cuisson ou cuisson
minutée est utilisée. L’horloge doit être réinitialisée après
une panne de courant.
Réglage de l’horloge :
1 Touchez à CLOCK (horloge) sur le panneau de commande.
2 Utilisez les èches vers le haut et le bas pour régler l’heure
du jour. L’heure passera de « am » à « pm » après 12:00.
3 Touchez à CLOCK (horloge). Une sonnerie retentit
indiquant que l’heure a été réglée.
4 Pour passer à l’horloge de 24 heures, appuyez et tenez
la touche CLOCK (horloge) pendant cinq secondes.
Touchez à CLOCK (horloge), puis à ENTER (entrée).
ALIMENTATION DE SECOURS DE L'HORLOGE
La cuisinière est expédiée en mode d'alimentation de
secours qui désactive l'horloge dans un délai d'environ 10
minutes après la n du fonctionnement du ventilateur de
refroidissement ou d'inactivité du four. L'horloge s'illumine
lorsque les touches des commandes sont enfoncées ou
lorsque le four est utilisé.
TIMER (MINUTERIE)
La minuterie peut être réglée pour une période maximale
de 9 heures et 59 minutes. Une fois la durée réglée, le
décompte s’illumine sur l’écran du panneau de commande.
La dernière minute s’afche en secondes. La minuterie est
indépendante du four. Le réglage de la minuterie n’affecte
pas la durée de cuisson ou l’heure d’arrêt. Pour des
renseignements au sujet des fonctions de programmation
automatique, reportez-vous à la page 14.
Réglage de la minuterie :
1 Touchez à TIMER (minuterie) sur le panneau de commande.
2 Utilisez les èches vers le haut et le bas pour régler la
durée en heures et minutes.
3 Touchez à TIMER (minuterie) pour commencer. Une
sonnerie retentit indiquant que la minuterie a été réglée.
Le four retentira et l’heure clignotera lorsque la cuisson
sera terminée. La minuterie continuera de retentir jusqu’à
ce que CLEAR (annuler) soit enfoncé sur le panneau de
commande.
Activer/désactiver l'alimentation de secours :
1 Touchez et tenez la touche CLOCK (horloge) sur le pan-
neau de contrôle pendant cinq secondes.
2 Touchez à STOP TIME (heure d'arrêt) pour basculer entre
la marche et l'arrêt, puis touchez à ENTER (entrée).
wolfappliance.com | 11
Page 56

FONCTIONNEMENT DU FOUR
O
F
F
B
A
K
E
B
R
O
I
L
R
O
A
S
T
P
R
O
O
F
C
L
E
A
N
C
O
N
V
R
O
A
S
T
B
R
O
I
L
B
A
K
E
Modes de cuisson
MODE
CADRAN PRÉ-RÉGLAGE ÉTENDUE SONDE UTILISATIONS
Convection CONV 325 °F
(165 °C)
Cuisson par
convection
Rôtissage par
convection
Grillage par
convection
BAKE 375 °F
(190 °C)
ROAST 325 °F
(165 °C)
BROIL Br1
Br2
Br3
Cuisson BAKE 350 °F
(175 °C)
Rôtissage ROAST 350 °F
(175 °C)
Grillage BROIL Br1
Br2
Br3
Pierre de cuisson STONE 400 °F
(205 °C)
170 – 550 °F
(75 – 290 °C)
170 – 550 °F
Il est possible de cuire sur plusieurs grilles avec brunissage
•
uniforme dans ce mode grâce au mouvement uniforme de l’air.
Idéal pour la cuisson des tartes.
•
(75 – 290 °C)
170 – 550 °F
(75 – 290 °C)
550°F (290°C)
450°F (230°C)
350°F (175°C)
170 – 550 °F
(75 – 290 °C)
170 – 550 °F
(75 – 290 °C)
Idéal pour rôtir des coupes tendres de bœuf, d’agneau,
•
de porc et de volaille.
Réduit les temps de grillage pour les tranches épaisses de
viande, de poisson et de volaille. Utilisez la lèchefrite à deux
pièces et grillez toujours en gardant la porte du four fermée.
Idéal pour la cuisson sur une seule grille, surtout pour les
•
aliments de boulangerie. À utiliser pour les recettes standards.
Convient pour le rôtissage de coupes moins tendres de
•
viande, comme les rôtis de palette et la viande à ragoût,
qui doivent être couvertes.
550°F (290°C)
450°F (230°C)
350°F (175°C)
170 – 550 °F
(75 – 290 °C)
Convient au grillage des morceaux de viande, de poisson et
de volaille jusqu’à 1 po d’épaisseur. Utilisez la lèchefrite à deux
pièces et grillez toujours en gardant la porte du four fermée.
Cuisson sur une pierre en céramique. Idéale pour les pizzas
•
et le pain. L’accessoire à pierre de cuisson est requis. Fours
de 30 et 36 po seulement.
Apprêt PROOF 85 °F
(30 °C)
Déshydratation CONV 135 °F
(60°C)
Autonettoyage CLEAN
F
F
O
B
E
K
A
B
L
I
O
R
B
T
S
A
O
R
V
N
O
C
Cadran sélecteur
(fours de 30 po/36 po).
12 | Service à la clientèle de Wolf 800.222.7820
A
K
E
B
R
O
I
L
R
O
A
S
T
S
T
O
N
E
C
L
N
E
A
B
L
I
O
R
B
T
S
A
O
R
V
Cadran sélecteur
K
A
N
O
(four de 18 po).
85 – 110 °F
(30 – 45 °C)
Idéal pour apprêter ou faire lever la pâte à pain. Four de 18 po
•
seulement. Pour les fours de 30 et 36 po, reportez-vous à la
page 13.
110 – 160 °F
(45 – 70 °C)
Sèche une variété de fruits, légumes et viandes. Des grilles
accessoires sont requises. Reportez-vous à la page 13.
Le four se chauffe jusqu’à une température extrêmement
élevée pour permettre de brûler les restes de nourriture.
Reportez-vous à la page 15.
F
F
O
B
E
C
A
K
E
B
R
O
I
L
R
O
A
S
T
P
R
O
O
F
C
L
N
E
A
Page 57

FONCTIONNEMENT DU FOUR
Apprêt
Commandes de réglage pour les fours de 30 et 36 po :
1 Tournez le cadran sélecteur à BAKE (cuisson).
2 Tournez le bouton de commande du four vers la gauche
jusqu’à ce que « PrF » soit afché, puis relâchez-le.
3 La température du four est préréglée à 85 °F (30 °C).
Touchez à ENTER (entrée) pour sélectionner une
température pré-réglée ou tournez le bouton de
commande pour modier la température. L’afchage
bascule entre la température réglée et « PrF ».
Déshydratation
Une trousse d’accessoire est requise. Les accessoires sont
offerts par les dépositaires Wolf autorisés. Pour obtenir des
renseignements sur le dépositaire local, visitez la section
salle d’exposition de notre site Web, wolfappliance.com.
Réglage des commandes :
1 Placez la butée de porte fournie avec la trousse
d’accessoires dans le verrou de la porte du four.
2 Tournez le cadran sélecteur à CONV (convection).
3 Tournez le bouton de commande du four vers la gauche
jusqu’à ce que « dEH » soit afché, puis relâchez-le.
Sonde de température
La sonde de température mesure la température interne des
aliments pendant la cuisson. Elle peut être utilisée avec tous
les modes de cuisson, sauf grillage et grillage par convection.
Réglage des commandes :
1 Tournez le cadran sélecteur au mode de cuisson désiré.
2 Touchez à ENTER (entrée) pour sélectionner une
température pré-réglée ou tournez le bouton de
commande pour modier la température.
3 Insérez la sonde dans la zone la plus épaisse de
l’aliment. Lorsque vous faites du pain, cuisez pendant
environ 10 minutes avant d’insérer la sonde.
4 Lorsque le préchauffage est terminé, utilisez une poignée
pour soulever le couvercle de la prise de sonde, puis
insérez la sonde. Reportez-vous à l’illustration ci-dessous.
5 La température de la sonde est préréglée à 160 °F (70 °C).
Touchez à ENTER (entrée) pour sélectionner une
température pré-réglée ou tournez le bouton de commande
pour modier la température. L’afchage bascule entre la
température réglée du four et la température réelle de la
sonde. Pour basculer entre le réglage de la température
réglée de la sonde et la température réelle de la sonde,
appuyez sur PROBE (sonde). Les températures inférieures
(20 °C) sont afchées comme « Lo ».
à 70 °F
4 La température du four est préréglée à 110 °F (45 ºC).
Touchez à ENTER (entrée) pour sélectionner une
température pré-réglée ou tournez le bouton de
commande pour modier la température. L’afchage
bascule entre la température réglée et « dEH ».
6 Une sonnerie retentit indiquant que la température interne a
atteint le point de réglage de la sonde. Retirez, puis insérez
la sonde à nouveau pour vérier la température interne.
MISE EN GARDE
La sonde et la prise de la sonde seront très chaudes.
Manipulez-les avec soin.
Prise de la sonde.
wolfappliance.com | 13
Page 58

FONCTIONNEMENT DU FOUR
Programmation automatique
CUISSON MINUTÉE
La cuisson minutée éteint automatiquement le four à une heure
précisée. Le four commencera à chauffer immédiatement et
s’éteindra à l’heure désirée. L’horloge doit être réglée à la bonne
heure pour que la fonction de cuisson minutée fonctionne
correctement. Utilisez cette fonction avec tout mode de cuisson
sauf grillage, grillage par convection et pierre de cuisson.
Réglage des commandes :
1 Tournez le cadran sélecteur au mode de cuisson désiré.
2 Touchez à ENTER (entrée) pour sélectionner une
température pré-réglée ou tournez le bouton de
commande pour modier la température.
3 Touchez à COOK TIME (durée de cuisson). Utilisez les èches
pour choisir la durée de cuisson en heures et minutes.
4 Touchez à ENTER (entrée).
MISE EN MARCHE DIFFÉRÉE
La mise en marche différée met automatiquement le four en
marche et l’éteint à des heures précisées. Le four demeurera en
attente jusqu’à l’heure de mise en marche et s’éteindra à l’heure
d’arrêt désirée. L’horloge doit être réglée à la bonne heure
pour que la fonction de mise en marche différée fonctionne
correctement. Utilisez cette fonction avec tout mode de cuisson
sauf grillage, grillage par convection et pierre de cuisson.
Réglage des commandes :
1 Tournez le cadran sélecteur au mode de cuisson désiré.
2 Touchez à ENTER (entrée) pour sélectionner une
température pré-réglée ou tournez le bouton de commande
pour modier la température. Si vous touchez à ENTER
(entrée), le four commence à chauffer immédiatement, mais
passe au mode d’attente dès que l’heure d’arrêt est réglée.
3 Touchez à COOK TIME (durée de cuisson). Utilisez les èches
pour choisir la durée de cuisson en heures et minutes.
4 Touchez à STOP TIME (heure d’arrêt). Utilisez les èches
pour sélectionner l’heure à laquelle le four doit s’arrêter.
5 Touchez à ENTER (entrée).
14 | Service à la clientèle de Wolf 800.222.7820
Page 59

FONCTIONNEMENT DE LA SURFACE
Autonettoyage
Durant le nettoyage automatique, le four est chauffé jusqu’à
une température extrêmement élevée pour brûler les restes
d’aliments. Retirez toutes les grilles et tous les guides de grille
du four. Ils changeront de couleur s’ils sont laissés dans le
four pendant l’autonettoyage. La porte du four se verrouillera
et demeurera verrouillée jusqu’à ce que le l’autonettoyage
soit terminé et la température du four se trouve en dessous
de 300 °F
une heure pour le refroidissement.
Réglage des commandes pour l’autonettoyage de quatre
heures :
1 Tournez le cadran sélecteur à CLEAN (nettoyage).
2 Touchez à ENTER (entrée).
Réglage des commandes pour l’autonettoyage de trois heures :
1 Tournez le cadran sélecteur à CLEAN (nettoyage).
2 Touchez à STOP TIME (heure d’arrêt).
3 Touchez à la èche vers le bas pour réduire l’heure
4 Touchez à ENTER (entrée) deux fois.
(150 °C). Les durées d’autonettoyage comprennent
d’arrêt d’une heure.
Shabbath
Cet appareil est certié par Star-K pour répondre à des
règlements religieux rigoureux relativement à des directives
précises se trouvant sur www.star-k.org. Shabbath l’emporte
sur la fonction d’arrêt automatique de 12 heures. La fonction
Shabbath doit être réinitialisée après une panne de courant.
Réglage des commandes :
1 Allumez ou éteignez la lumière du four.
2 Tournez le cadran sélecteur à BAKE (cuisson) ou ROAST
(rôtissage) et sélectionnez la température désirée.
3 Touchez et tenez la touche ENTER (entrée) pendant
cinq secondes. « SAb » apparaîtra et clignotera sur le
bouton de commande du four indiquant que le mode
Shabbath a été initié.
4 Pour modier la température du four en mode Shabbath,
tournez le bouton de commande. Chaque tour
augmentera ou diminuera la température de 10° (F ou C).
L’afchage et la sonnerie sont désactivés, mais la
température sera modiée au hasard lorsqu’une nouvelle
température est choisie. Le four demeure en marche
jusqu’à ce que le cadran soit tourné à OFF (arrêt).
MISE EN GARDE
Pendant l’autonettoyage, les surfaces extérieures peuvent
devenir plus chaudes que d’habitude. Les enfants ne
doivent pas s’approcher.
wolfappliance.com | 15
Page 60

FONCTIONNEMENT DE LA SURFACE
Lampe du four
AVERTISSEMENT
Assurez-vous que le courant soit coupé au niveau du
coffret électrique avant de remplacer l’ampoule.
Laissez le four se refroidir complètement, puis retirez les grilles
et les guides de grille. Pour retirer le pare-lumière, dégagez
doucement le rebord inférieur avec un tournevis plat. Retirez
l’ampoule existante et remplacez-la par une ampoule halogène
de 20 watts. Reportez-vous à l’illustration ci-dessous.
PARE-
LUMIÈRE
Brûleurs de surface
Pour allumer un brûleur, enfoncez et tournez le bouton de
commande correspondant dans le sens antihoraire jusqu’à la
position HI (élevé). L’allumeur commencera à cliquer jusqu’à ce
que le brûleur s’allume. Une fois allumé, continuez à tourner le
bouton dans le sens antihoraire jusqu’au réglage désiré.
Pour sélectionner un réglage SIMMER (mijoter), tournez le
bouton de commande jusqu’au réglage le plus bas. Poussez et
continuez à tourner dans le sens antihoraire. La amme passera
au second niveau sur le capuchon du brûleur. Continuez à
tourner le bouton jusqu’au réglage de mijotage désiré.
Durant une panne d’électricité, les brûleurs peuvent être
allumés manuellement. Tournez le bouton jusqu’à HI (élevé)
en utilisant un allumoir à usages multiples.
MISE EN GARDE
Ne laissez jamais des chaudrons à un réglage élevé
sans surveillance. Faites attention lorsque vous cuisez
des aliments dans du gras ou de la graisse; ils peuvent
devenir assez chauds pour s’enammer.
Remplacement de l’ampoule.
16 | Service à la clientèle de Wolf 800.222.7820
Page 61

FONCTIONNEMENT DE LA SURFACE
Grilloir type charbon de bois infrarouge
Le grilloir type charbon de bois possède un brûleur
infrarouge qui transfère de la chaleur intense aux aliments,
pour saisir l’extérieur et sceller les jus. Cuisez les aliments
directement sur la grille du grilloir type charbon de bois,
n’utilisez pas de chaudrons. La surface de 7 po
(178) à
l’arrière du grilloir type charbon de bois sont plus frais que
le reste de la surface. Cette zone peut être utilisée pour
garder les aliments jusqu’à ce qu’ils soient prêts à servir.
Assemblage du grilloir type charbon de bois :
1 Pour assembler, placez le cadre du grilloir type charbon
de bois sur la cuisinière. Reportez-vous à l’illustration
ci-dessous.
2 Alignez les fentes sur la plaque à rayonnement avec l’angle
avant du cadre. Reportez-vous à l’illustration ci-dessous.
Les fentes doivent se glisser sur l’angle avant et s’appuyer
à plat sur le cadre du grilloir type charbon de bois.
3 Installez la grille du grilloir type charbon de bois.
MISE EN GARDE
Faites attention lorsque vous assemblez le grilloir type
charbon de bois pour éviter tout contact avec l’allumeur.
FONCTIONNEMENT DU GRILLOIR TYPE CHARBON DE BOIS
Le couvercle en acier inoxydable doit être enlevé avant l’utilisation.
1 Mettez la ventilation en marche.
2 Poussez et tournez le bouton de commande dans le sens
antihoraire jusqu’à HI (élevé). L’allumeur commencera à
cliquer jusqu’à ce que le brûleur s’allume.
3 Laissez préchauffer pendant 10 minutes.
ENTRETIEN DU GRILLOIR TYPE CHARBON DE BOIS
• Une fois la cuisson terminée, laissez le grilloir type charbon
de bois en marche pendant 10 minutes. La chaleur élevée
aidera à brûler l’excédent de particules alimentaires.
• Lorsqu’il est refroidi, retirez la grille et mettez-la dans l’évier.
Couvrez de linges à vaisselle et versez de l’eau chaude
dessus pour aider à dissoudre les résidus. Nettoyez avec
du savon et un tampon à récurer. Rincez et séchez.
• Pour nettoyer le cadre, retirez-le et placez-le dans l’évier.
Trempez-le dans de l’eau chaude et un détergent doux.
Lavez à fond et frotter avec un tampon à récurer.
CADRE
ALLUMEUR
ANGLE
AVANT
Cadre du grilloir type charbon
de bois.
PLAQUE
À RAYON-
NEMENT
FENTE
Plaque à rayonnement du grilloir type charbon de bois.
wolfappliance.com | 17
Page 62

FONCTIONNEMENT DE LA SURFACE
Plaque à frire infrarouge
La plaque à frire est contrôlée thermostatiquement de manière
à garder une température constante. Pour empêcher les
aliments de coller, il est nécessaire « d’assaisonner » la plaque
à frire avant de l’utiliser.
Assaisonner la plaque à frire :
1 Mettez la ventilation en marche.
2 La plaque à frire possède un revêtement protecteur qui
doit être enlevé avant l’utilisation. Utilisez de l’eau chaude
et un détergent doux pour l’enlever. Rincez et séchez.
3 Poussez et tournez le bouton de commande dans le
sens antihoraire jusqu’à 350 °F
(175 °C) et chauffez
pendant 30 minutes. Après la période de 30 minutes,
mettez à OFF (arrêt) et laissez refroidir.
4 Tandis que la surface est un peu chaude, versez une
petite quantité d’huile d’arachide ou végétale sur une
serviette en papier et étalez uniformément.
5 Poussez et tournez le bouton de commande à 350 °F (175 °C).
Chauffez jusqu’à ce que la plaque à frire commence à
produire de la fumée, puis éteignez-la (OFF) et laissez refroidir.
Une fois refroidie, essuyez l’excédent d’huile.
FONCTIONNEMENT DE LA PLAQUE À FRIRE
Le couvercle en acier inoxydable doit être enlevé avant l’utilisation.
1 Mettez la ventilation en marche.
2 Poussez et tournez le bouton de commande dans
le sens antihoraire jusqu’à la température désirée.
L’allumeur commencera à cliquer jusqu’à ce que le
brûleur s’allume. La plaque à frire double possède des
commandes séparées pour chaque côté.
3 Le voyant au-dessus du bouton s’illumine jusqu’à ce que
la plaque à frire atteigne la température choisie. Le voyant
s’allumera et s’éteindra si de la chaleur supplémentaire
est requise pour maintenir la température choisie.
ENTRETIEN DE LA PLAQUE À FRIRE
• Grattez et poussez la graisse dans le collecteur de
graisse après chaque utilisation. Une fois la surface
refroidie, essuyez-la avec un essuie-tout pour éliminer
l’excédant de graisse ou d’huile.
• Après chaque utilisation, réappliquez une petite quantité
d’huile d’arachide ou végétale sur une serviette en
papier et étalez uniformément.
• Éliminez l’assaisonnement de temps à autre. Versez
1
/2 tasse (120 ml) d’eau tiède et 1 cuiller à thé (5 ml) de
nettoyant à plaque à frire sur la plaque à frire et grattez
le résidu dans le collecteur de graisse, puis videz-le.
Lorsque la plaque est sèche, versez à nouveau une
petite quantité d’huile pour l’assaisonner.
18 | Service à la clientèle de Wolf 800.222.7820
Page 63

FONCTIONNEMENT DE LA SURFACE
Table de cuisson française
La table de cuisson française est une surface de cuisson
graduée avec la température la plus élevée sous la plaque
centrale. Utilisez toujours des chaudrons, ne cuisez pas
les aliments directement sur la surface. Pour obtenir une
chaleur de cuisson supérieure, placez le chaudron près du
centre et pour une chaleur inférieure, plus près des rebords.
Reportez-vous à l’illustration ci-dessous.
Pour protéger la surface des éclaboussements de nourriture
et de l’humidité, il est nécessaire « d’assaisonner » la table
de cuisson française avant de l’utiliser.
Assaisonner la table de cuisson française :
1 La table de cuisson française possède un revêtement
protecteur qui doit être enlevé avant l’utilisation. Utilisez
de l’eau chaude et un détergent doux pour l’enlever.
Rincez et séchez.
2 Poussez et tournez le bouton de commande dans le
sens antihoraire jusqu’à HI (élevé) et chauffez pendant
30 minutes. Après la période de 30 minutes, mettez à
OFF (arrêt) et laissez refroidir.
3 Tandis que la surface est un peu chaude, versez une
petite quantité d’huile d’arachide ou végétale sur une
serviette en papier et étalez uniformément.
FONCTIONNEMENT DE LA TABLE DE CUISSON FRANÇAISE
Le couvercle en acier inoxydable doit être enlevé avant l’utilisation.
1 Mettez la ventilation en marche.
2 Poussez et tournez le bouton de commande dans
le sens antihoraire jusqu’à HI (élevé). L’allumeur
commencera à cliquer jusqu’à ce que le brûleur s’allume.
3 Laissez préchauffer pendant 30 minutes.
MISE EN GARDE
Ne laissez jamais des chaudrons sur la zone de chaleur
élevée sans surveillance. Faites attention lorsque vous
cuisez des aliments dans du gras ou de la graisse; ils
peuvent devenir assez chauds pour s’enammer.
ENTRETIEN DE LA TABLE DE CUISSON FRANÇAISE
• Nettoyez la surface au complet après chaque utilisation
pendant qu’elle est encore tiède. Essuyez avec un
détergent doux et de l’eau. Rincez et séchez.
• Après chaque utilisation, réappliquez une petite quantité
d’huile d’arachide ou végétale sur une serviette en
papier et étalez uniformément.
FAIBLE
FAIBLE
Zones thermiques de la table
de cuisson française.
ÉLEVÉ
ÉLEVÉ
MOY MOY
ÉLEVÉ
FAIBLE
FAIBLE
CROCHET DE LA
PLAQUE CENTRALE
Retrait de la plaque centrale.
• Éliminez l’assaisonnement de temps à autre. Appliquez
une petite quantité de vinaigre blanc et d’eau sur la
surface pendant qu’elle est encore légèrement chaude.
Frottez et répétez jusqu’à ce que l’excédent d’huile ait
été éliminé. Versez une petite quantité d’huile à nouveau
pour l’assaisonner.
• Le brûleur de la table de cuisson française se trouve
sous la plaque centrale. Pour le retirer, utilisez le crochet
de la plaque centrale fourni avec la cuisinière, comme il
est montré dans l’illustration. Ne retirez jamais la plaque
centrale pendant la cuisson.
wolfappliance.com | 19
Page 64

CONSEILS D’ENTRETIEN
Conseils d’entretien
NETTOYAGE
Acier inoxydable Utilisez un nettoyant non abrasif pour l’acier inoxydable et appliquez-le avec un chiffon doux non
pelucheux. Pour faire ressortir le lustre naturel, essuyez légèrement la surface avec un chiffon en
microbres humecté d’eau suivi d’un chamois à polir sec. Suivez toujours le grain de l’acier inoxydable.
Grilles du brûleur
Guides de grille du four
Cuvette du brûleur Retirez les débris en surface avant de nettoyer pour aider à accélérer le processus de nettoyage et réduire
Brûleurs de surface Laissez refroidir. Utilisez un détergent doux ou un dégraissant en aérosol pour nettoyer. Rincez avec de
Grilloir type charbon de bois
Plaque à frire
Table de cuisson française
Boutons de commande
Cadrans
Panneau de commande Utilisez un dégraissant pulvérisé pour éliminer les empreintes de doigts et les taches de nourriture.
Intérieur du four Avant d’utiliser la fonction autonettoyage, utilisez une lame de rasoir pour soulever doucement les
Enlevez-les et déposez-les sur une surface plate près de l’évier. Nettoyez avec de l’eau chaude et un détergent
doux ou une pâte de bicarbonate de soude et d’eau. N’immergez pas dans l’eau. Séchez avec une serviette.
le risque d’égratignures à la surface pendant le nettoyage. Au moyen de nettoyants légèrement abrasifs
ou de dégraissants en aérosol, nettoyez et rincez la surface et séchez immédiatement pour éviter les stries.
Pour nettoyer les taches d’eau dure, utilisez du vinaigre blanc et de l’eau. Rincez et séchez immédiatement.
l’eau et séchez avec une serviette.
Reportez-vous aux pages 17 à 19 pour voir les recommandations d’entretien.
Avec un chiffon humide, essuyez avec un détergent doux ou un dégraissant en aérosol; rincez et séchez.
Ne les mettez pas dans le lave-vaisselle.
Pulvérisez sur un chiffon avant d’essuyer le panneau.
REMARQUE IMPORTANTE : ne pulvérisez pas les produits à nettoyer directement sur le panneau de commande.
aliments cuits sur la cavité et la fenêtre du four. Pour les taches rebelles, pulvérisez un nettoyant
abrasif doux ou un dégraissant en aérosol et frottez avec un tampon Scotch-Brite™ sans égratignure
(rose ou bleu). Lavez la cavité du four au complet avec du savon et de l’eau pour éliminer tout produit
chimique de nettoyage avant d’utiliser le mode autonettoyage. Si le résidu n’est pas nettoyé de la
cavité, la porcelaine risque d’être gravée. Une fois le cycle autonettoyage terminé, laissez le four se
refroidir complètement et essuyez les cendres avec un chiffon humide.
Lèchefrite Pour nettoyer la grille supérieure, utilisez un détergent doux et un tampon à récurer. Rincez et séchez.
Pour nettoyer la partie inférieure, jetez la graisse et lavez dans de l’eau chaude avec un détergent doux.
Rincez et séchez. La grille supérieure en acier inoxydable peut aller dans le lave-vaisselle, mais ne placez
pas la grille ou le plateau enduits de porcelaine dans un lave-vaisselle.
20 | Service à la clientèle de Wolf 800.222.7820
Page 65

DÉPANNAGE
Dépannage
FONCTIONNEMENT
La cuisinière ne fonctionne pas.
• Assurez-vous que l’unité est sous tension.
• Vériez l’alimentation électrique vers l’unité et que le
disjoncteur de la résidence est en marche.
• Le four s’éteindra automatiquement après 12 heures
d’utilisation continue, sauf en mode déshydratation ou
Shabbath.
FOUR
Problème de température du four.
• Communiquez avec le service à la clientèle de Wolf au
800-222-7820 pour obtenir des recommandations.
Pas d’afchage du bouton de commande.
• Tirez le bouton de commande du four vers l’extérieur et
repoussez-le complètement. Mettez le disjoncteur hors
tension pendant cinq secondes, puis remettez-le en marche.
Aucune réaction de la part des touches du panneau de
commande.
• Tournez le cadran jusqu’à OFF (arrêt) pour quitter le
mode Shabbath.
• Mettez le disjoncteur hors tension pendant cinq
secondes, puis remettez-le en marche.
« SAb » est afché sur le bouton de commande du four.
• Tournez le cadran jusqu’à OFF (arrêt) pour quitter le
mode Shabbath.
« PF » est afché sur le bouton de commande du four.
• L’unité a subi une panne de courant. Tournez le cadran
sélecteur jusqu’à un mode de cuisson, puis revenez à
OFF (arrêt) pour le réinitialiser.
• Mettez le disjoncteur hors tension pendant cinq
secondes, puis remettez-le en marche.
« OPP » est afché sur le bouton de commande du four.
• Un des fours peut être en mode autonettoyage. Si un
des fours est en mode autonettoyage, l’autre ne peut
pas être utilisé.
« OE », « OC » ou une autre erreur sont afchés.
• Communiquez avec le centre de service Wolf certié par
l’usine.
Le four émet des bruits pendant le préchauffage ou le
refroidissement.
• Ceci est normal avec l’expansion et la contraction de
toute nouvelle cavité.
• Lancez le cycle d’autonettoyage Si le problème persiste,
communiquez avec le service à la clientèle de Wolf au
800-222-7820.
SURFACE DE LA CUISINIÈRE
Flamme erratique, mauvais allumage ou pas d’allumage.
• Vériez que les capuchons de brûleur sont correctement
placés.
• Nettoyez le brûleur et l’allumeur adéquatement.
• Si de l’eau a été renversée récemment, laissez la zone
sécher complètement. Utilisez un sèche-cheveux, au besoin.
• Si le capuchon du brûleur se xe sur la tête du brûleur,
assurez-vous qu’il est bien xé.
• Enfoncez le bouton, puis relâchez-le. Assurez-vous qu’il
se remette en place.
Le grilloir type charbon de bois clique continuellement.
• Vériez que le bouton est bien réglé à HI (élevé).
Le voyant de la plaque à frire clignote.
• Mettez le bouton à OFF (arrêt), puis remettez-le en
marche. La amme a disparu et l’unité est passée au
mode de verrouillage de sécurité.
wolfappliance.com | 21
Page 66

DÉPANNAGE
Dépannage
SERVICE
• Préservez la qualité intégrée dans votre produit en
communiquant avec un service Wolf certié par l’usine.
Pour obtenir le nom du centre de service Wolf certié par
l’usine le près de chez vous, consultez la section Contact
et assistance de notre site Web, wolfappliance.com ou
appelez le service à la clientèle de Wolf à 800-222-7820.
• Avant d’appeler pour obtenir du service, ayez en main
les numéros de modèle et de série de votre produit. Les
deux numéros sont indiqués sur la plaque signalétique
du produit. Reportez-vous à la page 8 pour connaître
l’emplacement de la plaque signalétique.
• Pour les besoins de la garantie, vous devrez aussi avoir
la date d’installation et le nom de votre dépositaire Wolf
autorisé. Ces renseignements doivent être notés à la
page 2 de ce guide.
Wolf, Wolf & Design, Wolf Gourmet, W & Design et la couleur rouge qui est appliquée aux boutons sont des marques déposées et des marques de service de Wolf Appliance, Inc.
Sub-Zero, Sub-Zero & Design, Dual Refrigeration, The Living Kitchen, Great American Kitchens The Fine Art of Kitchen Design et Ingredients sont des marques déposées et des
marques de service de Sub-Zero, Inc. Toutes les autres marques de commerce ou déposées appartiennent à leurs propriétaires respectifs aux États-Unis et dans d'autres pays.
22 | Service à la clientèle de Wolf 800.222.7820
Page 67

Garantie limitée résidentielle Wolf Appliance
POUR UTILISATION RÉSIDENTIELLE
GARANTIE COMPLÈTE DE DEUX ANS*
Pendant deux ans à compter de la date d’installation originale, cette garantie de produit Wolf Appliance
couvre toutes les pièces et la main d’œuvre pour réparer ou remplacer, selon un usage résidentiel normal,
toute partie du produit qui s’avèrerait défectueuse en vertu des matériaux ou de la fabrication. Tout service
fourni par Wolf Appliance en vertu de la garantie ci-dessus doit être effectué par un centre de service Wolf
certié par l’usine, à moins d’indication contraire de la part de Wolf Appliance, Inc. Le service sera fourni
pendant les heures normales d’affaires.
GARANTIE LIMITÉE DE CINQ ANS
Pendant cinq ans à compter de la date originale d’installation, Wolf Appliance réparera ou remplacera les
pièces suivantes qui s’avéreront défectueuses en vertu des matériaux ou de la fabrication : brûleurs au gaz
(sauf l’apparence), éléments chauffants électriques, moteurs à souferie (hottes d’évent), tableaux de contrôle
électronique, tubes magnétrons et génératrices à induction. Si le propriétaire utilise le service Wolf certié en usine,
le fournisseur de service réparera ou remplacera ces pièces et le propriétaire paiera pour tous les autres frais, y
compris la main d’œuvre. Si le propriétaire utilise un service non certié, il doit communiquer avec Wolf Appliance,
Inc. (avec les renseignements ci-dessous) pour obtenir des pièces réparées ou de rechange. Wolf Appliance ne
remboursera pas le propriétaire pour les pièces achetées d’un service non certié ou d’autres sources.
CONDITIONS S’APPLIQUANT À CHAQUE GARANTIE
La garantie s’applique uniquement aux produits installés pour un usage résidentiel normal. La garantie
s’applique seulement aux produits installés dans l’un des cinquante états des États-Unis, dans le District
of Columbia ou les dix provinces du Canada. Cette garantie ne couvre pas les pièces ou la main d’œuvre
pour corriger tout défaut causé par de la négligence, un accident ou une utilisation, un entretien, une
installation, un service ou une réparation inappropriés.
LES REMÈDES DÉCRITS CI-DESSUS POUR CHAQUE GARANTIE SONT LES SEULS OFFERTS PAR WOLF
APPLIANCE, INC. EN VERTU DE CETTE GARANTIE OU DE TOUTE GARANTIE DÉCOULANT DE L’OPÉRATION
DE LA LOI. WOLF APPLIANCE, INC. NE SERA PAS RESPONSABLE DES DOMMAGES INDIRECTS OU
CONSÉCUTIFS ISSUS DE LA VIOLATION DE CETTE GARANTIE OU DE TOUTE AUTRE GARANTIE, EXPRESSE,
IMPLICITE OU LÉGALE.
Certaines provinces ne permettent pas l’exclusion ou la restriction des dommages indirects ou consécutifs,
par conséquent, la limite ou l’exclusion ci-dessus peut ne pas s’appliquer à votre cas. Cette garantie vous
confère des droits légaux précis et vous pouvez aussi avoir d’autres droits légaux qui peuvent varier d’une
province à l’autre.
Pour obtenir des pièces et/ou du service et le nom du centre de service Wolf certié par l’usine le plus
près de chez vous, communiquez avec Wolf Appliance, Inc., P.O. Box 44848, Madison WI, 53744 É.-U.;
vériez la section Contact et assistance de notre site Web, wolfappliance.com, envoyez-nous un courriel
à customerservice@subzero.com ou composez le 800-222-7820.
*L’acier inoxydable (les portes, les panneaux, les poignées, les cadres et les surfaces intérieures) est couvert
par une garantie limitée de 60 jours sur les pièces et la main d’œuvre pour toute défectuosité cosmétique.
*Les ltres de rechange pour les trousse de recirculation de hotte ne sont pas couverts par la garantie du produit.
wolfappliance.com | 23
Page 68

WOLF APPLIANCE, INC. P.O. BOX 44848 MADISON, WI 53744 WOLFAPPLIANCE.COM 800.222.7820
9002486 REV-A 9/ 2014
 Loading...