

Page 1

coffee wakes up the world
User Manual
Espresso machine
Model Series 8400 33 2413 0900 01.2010
North America English
04.04.001
Page 2

2
User manual WMF bistro!
Introduction and General Information
Safety Warnings
The lightning flash with arrowhead symbol, within an equilateral
triangle, is intended to alert the user to the presence of uninsulated
“dangerous voltage” within the product’s enclosure that may be of
sufficient magnitude to constitute a risk of fire or electric shock to
persons.
The exclamation point within an equilateral triangle is intended to
alert the user to the presence of important operating and maintenance
(servicing) instructions in the literature accompanying the appliance.
Do not use the machine if it is not working properly or if it is damaged.
Never alter built-in safety devices.
Ensure that there is always a receptacle under the outlet when dispensing
hot beverages and hot steam to avoid scalding.
Do not touch hot machine components.
Never reach into the coffee grinders.
Never reach into the chocolate hopper.
Switch off the machine before cleaning the front panel to avoid a hot
beverage being accidentally dispensed.
The milk system must be thoroughly cleaned at least once a day to ensure
proper hygiene.
Milk hose should be changed at regular intervals.•
Never reach under the spouts while cleaning the machine.•
Ensure that mixer hose is replaced securely because hot liquid may •
escape.
Never reach under the spouts while cleaning.
Do not reach into the bean hopper or the brewing unit opening when
the espresso machine is switched on to avoid bruising or crushing when
handling moving parts.
Avoid risk of electrocution: when replacing the fuse, disconnect main
power and only use fuse F4A.
Do not remove cover.
No user-serviceable parts inside.
Repair should be done by authorized service personnel only.
Page 3

3
User manual WMF bistro!
Introduction and General Information
Warnin g
Risk of fire or electric shock.
Do not open.
WARNING, to reduce the risk of fire or electric shock,
do not remove cover (or back),
no user-serviceable parts inside,
repair should be done by authorized service personnel only.
(33 1453 500 0)
Safety Warning Signs
For a detailed description of the warnings, see the “Safety”
chapter 9.1.
NOTICE
Hazard to the machine.
Read and understand user
manual before using this
machine.
CAUTION
Burn hazard.
Hot surface.
See chapter 9.1: Safety.
CAUTION
Hazard to the user.
See chapter 9.1: Safety.
CAUTION
Burn hazard.
Hot steam. Hot liquids.
See chapter 9.1: Safety.
CAUTION CAUTION
Hot steam.
See chapter 9.1: Safety.
Bruising or crushing
hazard.
See chapter 9.1: Safety.
WARNING
Failure to follow safety
warnings can lead to
serious injury.
See chapter 9.1: Safety.
Page 4

4
User manual WMF bistro!
Introduction and General Information
Congratulations on the purchase of your
WMF espresso machine
The WMF bistro! espresso machine is a fully automatic
single cup machine for espresso, café crème, cappuccino,
milk coffee, latte macchiato, foamed milk and hot water.
With its optionally available Choc hopper, the bistro! can
also make hot chocolate with milk or milk foam.
Each beverage is freshly brewed at the press of a button
which guarantees a high quality beverage.
Operator control of the machine is possible via a graphic
touch-pad display. Up to eight beverage buttons are
available on the operating panel. The beverage buttons
can be allocated on two levels and have a lettering space.
Additional function keys may be allocated, depending on
the machine configuration.
Keep these instructions near the espresso machine so that
you and your operating staff have the right information
handy and can take the correct action in the event of any
technical problems that may arise.
CAUTION
Read and
under stand user
manual before
using this machine.
Ensure staff have access to
the user manual.
Important.
See p age 2 and 3:
Safet y warnings.
See chapter 9.1: Safety.
NOTICE
Obser ve the manual.
Observe the chapt er 9.5:
Warranty
In the event of failure to comply
with maintenance information
(w chapter 7: Maintenance),
no liabilit y is accepted for any
resultant damage.
Similarly all guarantee/warranty
obligations cease to apply in
such cases .
Page 5

5
User manual WMF bistro!
Table of Contents
Safety Warnings ...................................................2
Safety Warning Signs ...............................................3
Chapter 1 Introduction 8
1.1 Parts of the espresso machine 8
Signs and symbols used in the user manual ............................10
Glossary . . . . . . . . . . . . . . . . . . . . . . . . . . . . . . . . . . . . . . . . . . . . . . . . . . . . . . . . . 11
Chapter 2 Operation 12
2.1 Switch on espresso machine 12
2.2 Dispense beverages 12
2.3 Multiple preselection 12
2.4 Shift button (optional) 13
2.5 Dispense hot water 13
2.6 Dispense milk or milk foam 13
2.7 Connect up the milk 14
2.7.1 Standard ..........................................................14
2.7.2 WMF Cooler, WMF Cup&Cool (optional) . . . . . . . . . . . . . . . . . . . . . . . . . . . . . . . . . 14
2.8 Dispense Steam (optional) 15
2.7 Steam Milk (optional) / Dual Milk (optional) 16
2.10 Height adjustment of the combi spout 17
2.11 Bean hopper / product hopper 17
2.12 Manual insert 17
2.13 Coffee grounds container 18
2.14 Grounds disposal through the counter (optional) 18
2.15 Drip tray 19
2.16 Switch off the espresso machine 19
Special button (optional) ...........................................13
Warm beverages .................................................. 15
Foam milk .......................................................15
Chapter 3 Software 20
3.1 An overview 20
3.2 Ready to operate display 22
3.2.1 Ready to operate display ..............................................22
3.2.2 Warm rinse pad. . . . . . . . . . . . . . . . . . . . . . . . . . . . . . . . . . . . . . . . . . . . . . . . . . . . . 22
3.2.3 Barista pad . . . . . . . . . . . . . . . . . . . . . . . . . . . . . . . . . . . . . . . . . . . . . . . . . . . . . . . . 22
3.2.4 Information . . . . . . . . . . . . . . . . . . . . . . . . . . . . . . . . . . . . . . . . . . . . . . . . . . . . . . . . 23
3.2.5 To main menu ......................................................24
Standard display for normal operation ................................22
Standard display for SB mode (self-service) . . . . . . . . . . . . . . . . . . . . . . . . . . . . 22
Service .........................................................23
Customer care ...................................................23
Brew time . . . . . . . . . . . . . . . . . . . . . . . . . . . . . . . . . . . . . . . . . . . . . . . . . . . . . . . 23
Journal .........................................................23
Timer . . . . . . . . . . . . . . . . . . . . . . . . . . . . . . . . . . . . . . . . . . . . . . . . . . . . . . . . . . . 23
Page 6

6
User manual WMF bistro!
Table of Contents
3.3 Main menu 24
3.3.1 Milk and foam .....................................................24
3.3.2 Timer program ..................................................... 25
3.3.3 Customer care .....................................................29
3.3.4 Settings . . . . . . . . . . . . . . . . . . . . . . . . . . . . . . . . . . . . . . . . . . . . . . . . . . . . . . . . . . . 31
3.3.5 Enter PIN .........................................................38
3.3.6 PIN rights access control ............................................38
3.3.7 Accounting numbers of beverages .....................................40
3.3.8 Waiter accounting system (optional) ...................................40
Milk foam quality . . . . . . . . . . . . . . . . . . . . . . . . . . . . . . . . . . . . . . . . . . . . . . . . . 24
Latte macchiato pause interval ......................................25
Timer state ......................................................25
Set timer . . . . . . . . . . . . . . . . . . . . . . . . . . . . . . . . . . . . . . . . . . . . . . . . . . . . . . . . 26
Copy day . . . . . . . . . . . . . . . . . . . . . . . . . . . . . . . . . . . . . . . . . . . . . . . . . . . . . . . . 27
Timer overview . . . . . . . . . . . . . . . . . . . . . . . . . . . . . . . . . . . . . . . . . . . . . . . . . . . 27
Delete timer .....................................................28
Timer information ................................................ 28
Cleaning program . . . . . . . . . . . . . . . . . . . . . . . . . . . . . . . . . . . . . . . . . . . . . . . . . 29
Milk system .....................................................29
Choc system (mixer rinsing) (optional) . . . . . . . . . . . . . . . . . . . . . . . . . . . . . . . . 30
Filter change (optional) ............................................30
Customer check-up (optional) . . . . . . . . . . . . . . . . . . . . . . . . . . . . . . . . . . . . . . . 30
Recipe and beverage buttons . . . . . . . . . . . . . . . . . . . . . . . . . . . . . . . . . . . . . . . 31
Selecting the beverage button when setting. . . . . . . . . . . . . . . . . . . . . . . . . . . . 31
Adjust values
Start a brewing test with the current values
Save setting
Cup volumes . . . . . . . . . . . . . . . . . . . . . . . . . . . . . . . . . . . . . . . . . . . . . . . . . . . . . 31
Change recipes . . . . . . . . . . . . . . . . . . . . . . . . . . . . . . . . . . . . . . . . . . . . . . . . . . . 32
Set decaf (optional)
Sequence of ingredients additions ...................................34
Button allocation . . . . . . . . . . . . . . . . . . . . . . . . . . . . . . . . . . . . . . . . . . . . . . . . . 34
Testing ......................................................... 35
Weigh grounds
Quality check
Reset . . . . . . . . . . . . . . . . . . . . . . . . . . . . . . . . . . . . . . . . . . . . . . . . . . . . . . . . . . . 35
Time / date . . . . . . . . . . . . . . . . . . . . . . . . . . . . . . . . . . . . . . . . . . . . . . . . . . . . . . . 35
Language .......................................................35
Display contrast. . . . . . . . . . . . . . . . . . . . . . . . . . . . . . . . . . . . . . . . . . . . . . . . . . . 35
Scale filter ......................................................35
Capacity ........................................................36
Warm-up rinsing .................................................36
SB operation (self-service) . . . . . . . . . . . . . . . . . . . . . . . . . . . . . . . . . . . . . . . . . 36
Foamer rinsing ...................................................36
Rinsing interval ..................................................36
Operating options ................................................37
Illumination (optional) ............................................. 37
Cleaning level . . . . . . . . . . . . . . . . . . . . . . . . . . . . . . . . . . . . . . . . . . . . . . . . . . . . 38
Setting level .................................................... 38
Accounting level ..................................................39
Delete PIN . . . . . . . . . . . . . . . . . . . . . . . . . . . . . . . . . . . . . . . . . . . . . . . . . . . . . . . 39
Page 7
7
User manual WMF bistro!
Table of Contents
Chapter 4 Other settings 41
4.1 Set pinch valve 41
4.2 Labelling of beverage buttons 41
Chapter 5 Care 42
5.1 Cleaning program 44
5.2 Milk system cleaning 44
5.3 Choc system rinsing 45
5.4 General cleaning 45
5.5 Choc mixer cleaning (optional) 46
5.6 Steam Milk outlet cleaning (Standard and Steam Milk) 47
5.7 Foils for bean hopper cleaning 47
5.8 Cleaning the Choc product hopper (optional) 48
Standard . . . . . . . . . . . . . . . . . . . . . . . . . . . . . . . . . . . . . . . . . . . . . . . . . . . . . . . . 44
Plug&Clean ......................................................45
Chapter 6 HACCP schedule 49
Chapter 7 Maintenance 51
7.1 Customer Check-up 51
7.2 Maintenance 51
7.3 Mixer 51
7.4 WMF Service 51
Chapter 8 Messages and instructions 52
8.1 Messages for operation 52
8.2 Error messages / malfunctions 53
8.3 Error without error display 56
Chapter 9 Safety 57
9.1 Hazards to the operator 57
9.2 Hazards to the espresso machine 58
9.3 Directives 59
9.4 Duties of the owner / operator 59
9.5 Warranty claims 60
No warranty is provided: ..........................................61
Appendix A: Cleaning instruction 62
Appendix B: Technical data 63
Technical data for espresso machine 63
Conditions for usage and installation 64
Appendix C: Accessories and spare parts 66
Index 70
Page 8

8
User manual WMF bistro!
Introduction and General Information
Chapter 1 Introduction
1.1 Parts of the espresso machine
3
1
2
10
18
19
21
22
23
2
5
11
12
13
14
15
16
17
7
8
1
5
6
7
8
9
4
4
1
20
Display for self-service operation
Page 9

9
User manual WMF bistro!
Introduction and General Information
1
Bean hopper(s) (optional 1 or 2, espresso on the left)
2
Choc container (optional)
3
Manual insert / Tablet insert
4
Touch-screen display
5
Beverage buttons *
6
Steam button* or special preselection buttons (optional)
7
Pinch valve (when dispensing milk and milk foam through the combi spout)
8
Plug&Clean (optional)
9
Steam dispensing (optional), Steam Milk outlet (optional)
10
Height-adjustable combi spout with integral milk foamer
11
ON / OFF button
12
Decaf button **
13
Shift button **
14
Hot water button *
15
Hot water spout
16
Coffee grounds container
17
Removable drip tray with drip plate (drip grid)
18
Warm rinse pad
19
Barista pad
20
Timer and clock display
21
Info pad
22
Messages / error messages
23
Menu pad (opens main menu)
* Standard allocation
** Alternative button allocation
Page 10

10
User manual WMF bistro!
Introduction and General Information
Signs and symbols used in the user manual
For a detailed description of the warnings, see
the “Safety” chapter.
Tip
Instruction
Start position
Main menu
If the menu symbol is shown in this user manual the
description starts at the start position.
Call up the main menu
Touch the
pad
The main menu is displayed.
w
There are other display options
Main menu.
Cross reference
Very important.
Must be strictly
observed.
Main menu
Page 11

11
User manual WMF bistro!
Introduction and General Information
Glossary
Term Declaration
• Listings, selection options•
Individual steps
Text in italics Description of espresso machine state and / or explanations of
automatic steps.
sec Seconds
min Minutes
Steam Milk Automatic steam dispensing through the Steam Milk outlet.
1-Step Beverages are dispensed and ready to drink with one push of a button.
2-Step In the first step, the Steam Milk outlet is used to make milk and milk
foam. In the second step, coffee and chocolate beverages are dispensed
with a push of a button, and the beverage components are mixed
manually.
Dual Milk In the optional Dual Milk version, 1-Step and 2-Step beverages can be
made with just one coffee machine.
Override
function
Additions Components of a recipe for a beverage, in addition to coffee, such as
Barista Professional coffee server
Beverage
dispensing
Carbonate
hardness
Choc Hot chocolate
Decaf Decaffeinated coffee
Dispensing
options
Grounds chute See grounds disposal through counter chapter 2.14
Main tap Water stop cock, angle valve
Milk system Combi spout, milk nozzle and flexible milk hose.
Mixer system Complete module, mixer with portion controller for Choc
Operating
range
Preinfusion Prior to brewing, coffee is briefly infused in order to ensure a more
Pressing Automatic pressing of coffee grounds prior to brewing
Rinsing Intermediate cleansing
SB mode Self-service
Milk can be heated or foamed without automatic shut-off, up to
a maximum milk or foam temperature of 194 °F (90 °C).
milk, milk foam, Choc.
Dispensing of coffee, hot water or a Choc beverage
Quoted in gpg (°dKH). The water hardness is a measure of the calcium
dissolved in the water.
Start-Stop: dispensing runs up to the set amount and can be stopped by
pressing the button again
Free-flow: dispensing runs for as long as the button is pressed
Metered: the set amount is dispensed
For example: Performance of the calcium filter in litres of water it can
filter
intense release of its aromatic substances.
Page 12

12
User manual WMF bistro!
Operation
Chapter 2 Operation
2.1 Switch on espresso machine
Press ON / OFF button for longer than 2 seconds
Espresso machine switches on and heats up.
When the machine is ready to dispense beverage, the
Ready to operate display appears.
The machine can also be switched on using the timer.
2.2 Dispense beverages
Pressing the beverage button triggers dispensing of the
beverage selected.
Lit up button• = Ready to dispense
Flashing button• = Dispense beverage
Unlit button• = not ready to dispense /
button barred
Place a suitably sized beverage receptacle below the
dispenser
Press desired beverage button
Desired beverage and progress of dispensing indicated on
the display.
2.3 Multiple preselection
After beginning brewing, the display will show a cup
symbol during dispensing.
PIN protection
w
Software
w
Settings
w
Operating options
page 37
w
Timer program
w
Software w Timer
page 23
CAUTION
Burn hazard.
Hot steam.
Hot liquids.
Do not reach under
the spouts.
Button allocation
w
Software w Settings
w
Recipe and beverage buttons
page 31
Preselection for multiple dispensing
Increase the preselection for a beverage:
Touch on the pad
Reduce the preselection for a beverage:
Touch on the pad
The display shows the current preselection and the number
of beverages begun.
The multiple preselection for dispensing larger quantities,
for example for a pot of coffee.
Displaying the multiple
preselection:
The example shows 6 cafe cremes.
Beverage 2 of 6 is currently
being dispensed. Dispensing of a
maximum of 12 times the single
beverage is possible.
Page 13

13
User manual WMF bistro!
Operation
2.4 Shift button (optional)
2X
Each beverage button may be doubly allocated.
Level 1 always active.
Press on the Shift button
Level 2 activated
Press desired beverage button
Level 1 is active again after dispensing a beverage at
Level 2.
Special button (optional)
There are special buttons available on the control panel
such as S, M, L or the Decaf button depending on the
version.
These are preselection buttons which establish the desired
amount of the beverage or preparation from the Decaf
grinder before selection of the beverage using the beverage
buttons.
2.5 Dispense hot water
Press on the hot water button
Dispensing occurs according to the dispensing option.
Multiple preselections are possible for the dispensing
option “metered“.
Shift button (active / inactive)
w
Settings wOperating options
page 37
2.6 Dispense milk or milk foam
Press the beverage button assigned to milk or milk foam
Dispensing occurs according to the dispensing option
which was set.
w
Multiple preselection
page 12
Dispensing options
w
Button allocation w Settings
page 34
Free-flow, Start-Stop or metered
Page 14

14
User manual WMF bistro!
Operation
2.7 Connect up the milk
Insert the milk nozzle into the milk connection on the
combi spout
Use a suitable milk nozzle.
Color Milk temperature
green• 39 - 46 °F (4-8 °C); with a refrigerator
white• 46 - 61 °F (8-16 °C)
brown• 61 - 75 °F (16-24 °C)
red• 39 - 46 °F (4-8 °C);
for the Milkpower option
blue• 46 - 61 °F (8-16 °C);
for the Milkpower option
pink or purple• for the Milkpower option if the other
nozzles spatter at the spout
2.7.1 Standard
Open the milk packaging and place on the left next to
the espresso machine
Lead the milk hose through the side wall and through
the pinch valve
Insert the milk hose with the beige milk nozzle into the
milk packaging
The hose must not be under tension or bent when adjusting
the height of the combi spout.
Adjusting the pinch valve
w
Other settings
page 41
2.7.2 WMF Cooler, WMF Cup&Cool (optional)
Pull out the milk container
Push the cover of the milk container back
Fill milk into the milk container
Place the cover back on the container
Insert the adapter on the milk hose into the connection
in the milk container lid
Push the milk container back in carefully
The milk hose is inserted into the adapter.
Page 15
15
User manual WMF bistro!
Operation
2.8 Dispense Steam (optional)
Press the steam button
Steam is dispensed for as long as the button is held
pressed.
Steam warms beverages•
Steam manually foams milk•
Warm beverages
Use as tall and slim a Cromargan® jug as possible, with
handle
Fill jug to no more than half way
Immerse steam nozzle deeply into jug
Press and hold steam button until desired temperature
is reached
Release steam button
Swing steam outlet over to the drip tray
Briefly press steam button
Residue in the steam outlet tube is rinsed out.
Wipe steam outlet with a damp cloth
Foam milk
Use as tall and slim a Cromargan® jug as possible, with
handle
Fill jug to no more than half way
Immerse steam nozzle into jug to just under the surface
Press and hold steam button whilst rotating jug in
a clockwise direction
A thick creamy milk foam results.
Release steam button
Swing steam outlet over to the drip tray
Briefly press steam button
Residue in the steam outlet tube is rinsed out.
Wipe steam outlet with a damp cloth
CAUTION
Burn hazard.
Hot steam.
Do not reach under
the spouts.
A Cromargan® jug, such as
WMF order code 06 3417 6040
CAUTION
Burn hazard.
Hot surfaces .
Do not touch the
steam outlet and the
hot surfaces .
Do not overheat milk when
foaming, otherwise foam volume
decreases.
CAUTION
Burn hazard.
Hot surfaces .
Do not touch the
steam outlet and the
hot surfaces .
Page 16

16
User manual WMF bistro!
Operation
2.7 Steam Milk (optional) / Dual Milk (optional)
The milk is automatically heated or foamed.
The Steam Milk buttons can be assigned to up to four milk
foam quality levels, or to hot milk.
The Steam Milk buttons are assigned at the factory to three
foam quality levels (superfine, fine, standard) and hot milk.
Steam Milk buttons
Heat milk or foam milk
Fill a tall, narrow container with the desired milk
quantity
Do not fill the container above the halfway point, so that
the milk will not run over when it foams.
Insert the steam nozzle deep into the milk
Briefly press the desired Steam Milk button
Steam is discharged, depending on the Steam Milk button
assignment.
Steam dispensing ends after reaching the set temperature,
or when the Steam Milk button is pressed again.
Wipe steam outlet with a damp cloth
Override function (optional)
Function is adjusted upon request by WMF Service.
Milk and foam can boil over if the temperature is set to
194 °F (90 °C), or when the override function is used.
Press and hold the desired Steam Milk button
Steam is dispensed for as long as the button is held
pressed.
Wipe steam outlet with a damp cloth
The maximum temperature setting is 194 °F (90 °C).
Button allocation
w
Software w Settings
w
Recipe and buttons
page 31
w
Change recipes
page 32
CAUTION
Scald hazard.
Do not fill the milk
above the halfway
point , to avoid that
the hot milk will run
over.
Do not overheat milk when
foaming, otherwise foam volume
decreases.
Page 17

17
User manual WMF bistro!
Operation
2.10 Height adjustment of the combi spout
The combi spout height is adjustable.
To adjust height:
Take hold of the combi spout from the front and push to
the desired height
2.11 Bean hopper / product hopper
Fill the hopper to a maximum of the amount needed for
one day to maintain the freshness of the products.
2.12 Manual insert
The manual insert is located at the front in the centre of
the espresso machine lid.
Manual insert is used
To insert cleaning tablets•
When using an additional coffee variety, for example •
decaffeinated coffee
For a coffee trial•
Preparation of coffee grounds over the manual insert
Open manual insert lid
Insert coffee grounds (max. 0,035 lbs /16 g)
Close manual insert lid
Select the desired beverage
Clearance height range:
2.36- 6.7 inch (60 - 170 mm)
Espresso beans on the left
Only put in the coffee grounds or cleaning tablet after
instructions to do so are shown on the display.
NOTICE
Follow the instruc tions
beside.
See chapter 9.5: Warranty.
Page 18

18
User manual WMF bistro!
Operation
2.13 Coffee grounds container
The coffee grounds container receives the used coffee
grounds. It has the capacit y to receive coffee grounds for
approx. 70 brewings.
The display shows a message as soon as the coffee grounds
container needs to be emptied.
Beverage dispensing is blocked for as long as the coffee
grounds container is removed.
Pull out coffee grounds container
Empty and replace coffee grounds container
Acknowledge procedure on the display
If coffee grounds container cannot be inserted, check
chute for coffee residues and remove them.
Always empty coffee grounds container before
reinserting. Replacing without emptying results in the
coffee grounds container being overfilled. The espresso
machine will be soiled. This may cause subsequent
damage to the machine.
If this is not observed, the warranty is invalidated in the
event of any resultant damage.
2.14 Grounds disposal through the counter (optional)
The espresso machine can be fitted with a counter-fitting
coffee grounds container. Both the coffee grounds
container and the espresso machine base have an opening
in them, in this case, which passes through the counter
the machine is placed on. The spent coffee grounds are
collected in a large reservoir under the counter.
NOTICE
Follow the instruc tions
beside.
See chapter 9.5: Warranty.
Clean coffee grounds chute daily
w
C a r e
Page 19

19
User manual WMF bistro!
Operation
2.15 Drip tray
For espresso machines without a drain connection, the drip
tray must be emptied regularly.
Switch off the machine
Pull out the drip tray carefully and empty
Insert the drip tray
Clean drip tray daily.
w
C a r e
Move the drip tray carefully so that no water accidentally
drips down.
2.16 Switch off the espresso machine
The espresso machine must be cleaned daily prior to
switching it off.
Press the
switches off
Disconnect mains plug
Turn off mains water tap
If this is not observed, the warranty is invalidated in the
event of any resultant damage.
ON / OFF button until the espresso machine
CAUTION
Burn hazard.
Hot steam. Hot
liquids.
Switch off the
machine before
moving the drip
tray.
Move the drip tray
carefully.
Do not reach under
the spouts.
PIN protection
w
Software w Settings
w
Operating options
page 37
NOTICE
Allways follow proc edures
when switch off machine.
See chapter 9.5: Warranty.
Page 20
20
User manual WMF bistro!
Software
Chapter 3 Software
3.1 An overview
Ready to operate display
Touch clear pad on ready to operate display.
Additional pads are activated.
There are various options for the ready to operate display.
If there are errors, pad is displayed.
If cleaning
Other display options
is required then a care message pad is displayed.
w
S e t t i n g s w Operating options.
Pads on the ready to operate display
Warm rinse
Chapter 3.2.2
Barista (strength of the coffee)
Chapter 3.2.3
Information
Chapter 3.2.4
Main menu
Chapter 3.2.5
Error message
Touching the p ad calls up the error message.
Care message
Touching the pad leads directly into the menu.
Chapter 3.2
Self-service and
operating options
w
Settings
page 37
Page 21

21
User manual WMF bistro!
Software
Functions main menu (pads)
Milk and foam
Chapter 3.3.1
Timer
Chapter 3.3.2
Customer care
Chapter 3.3.3
Settings
Chapter 3.3.4
Entering a PIN
Chapter 3.3.5
PIN access control
Chapter 3.3.6
Accounting
Chapter 3.3.7
Menu control pads
Saving settings
Starting or confirming a step
Chapter 3.3
Back to the higher menu level
Abort / leave without saving (Exit)
Clear or reset
Start test brew
grounds check
Increase and reduce settings values
Forward or back one step in listings
Page 22

22
User manual WMF bistro!
Software
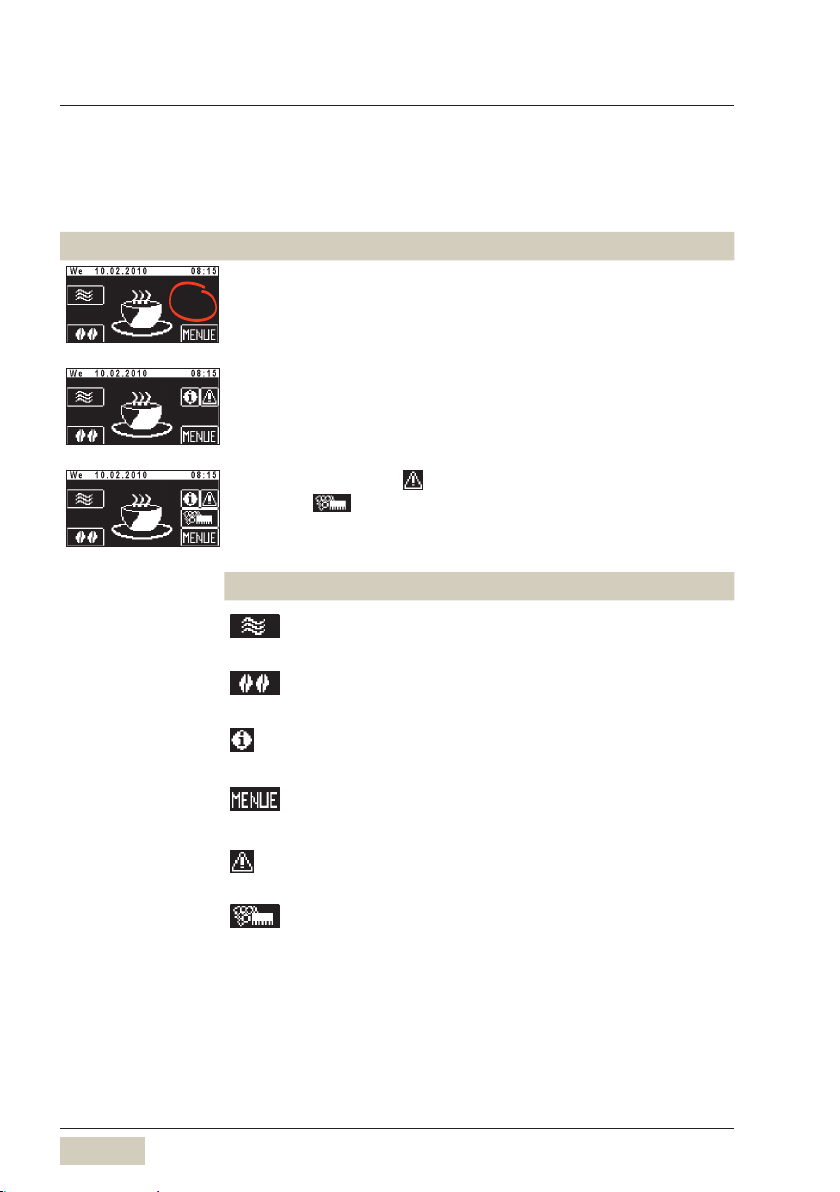
3.2 Ready to operate display
3.2.1 Ready to operate display
Standard display for normal operation
• Warm rinse pad
Barista pad•
Menu•
Information•
Standard display for SB mode (self-service)
All pads that allow changes to be made are not available.
The warm rinse pad, Barista pad, menu pad and messages
are inactive. Error messages are not shown, only the
Caution symbol is shown.
3.2.2 Warm rinse pad
Touch the warm rinse pad
Rinsing of the pipes with hot water begins. The water
warms the brewing system and guarantees an optimum
coffee temperature.
3.2.3 Barista pad
Touch the Barista pad
The coffee strength will be altered once for the next brew.
Recommended af ter a longer
brewing pause, especially before
dispensing a cup of espresso .
Warm rinse pad (active / inactive)
w
Settings w Operating options
page 37
weaker (-15 %)
normal, as per setting
stronger (+15 %)
Barista pad (active / inactive)
w
page 37
Settings w Operating options
Page 23

23
User manual WMF bistro!
Software
3.2.4 Information
Touch on pad ready to operate display
The menu Information appears.
The main “Information“ menu contains the following
selection options:
Service
• Service
Next date for maintenance•
Commissioning data•
Software versions•
Customer care
Journal •
Journal of last cleaning
Information about cleaning •
Period since the last cleaning
If no beverages were dispensed since the last cleaning,
“OK“ is indicated.
Information about maintenance •
Information about the remaining period and brews until
the next maintenance dates
Information about the scale filter (optional) •
Information about the remaining capacity and period
until filter change is needed
Brew time
Brew time of last beverage dispensed •
Journal
• List of recorded errors and messages.
(for the telephone support team)
Timer
Display of the timer status (On / Off)•
Display of the next switching time•
Page 24

24
User manual WMF bistro!
Software
3.2.5 To main menu
Access to main menu
Press on the ready to operate display on
Main menu is displayed.
3.3 Main menu
3.3.1 Milk and foam
Ready to operate display
... with additional pads
Delayed fade-in
w
Settings w Operating options
page 37
Other illustrations of the main
menu for protected levels.
w
PIN access control
page 38
Milk foam quality
When dispensing milk and milk foam through the combi
spout.
The milk foam quality is set here.
This setting will apply to all beverages with milk foam.
Reduce setting value -> finer
Increase setting value -> coarser
Steam Milk set tings
w
S o f t w a r e w R e c i p e s
page 31
Page 25

25
User manual WMF bistro!
Software
Latte macchiato pause interval
When dispensing milk and milk foam through the combi
spout.
Latte macchiato is more successful if the interval between
milk and milk foam dispensing is lengthened. The standard
setting is 3 seconds.
Reduce value -> shorter interval
Increase value -> longer interval
3.3.2 Timer program
The timer program sets on / off times.
The main “Timer Program“ menu contains the following
selection options:
Timer state•
Set timer•
Timer overview•
Timer delete •
Timer info •
Timer state
Touch the pad
Activate / deactivate timer = On / Off.
When the timer is activated,
the timer symbol, a lit tle clock,
appears on the display.
Page 26

26
User manual WMF bistro!
Software
Set timer
Touch the pad
Program the switch on and switch off times.
Touch the
The operating time display appears. Here the day, time, and
desired operation are set.
Set day (Day)
1 = Monday•
2 = Tuesday, etc. up to 7 = Sunday•
1-5 = Monday to Friday (weekdays)•
1-7 = entire week (Monday to Sunday)•
Set the time (hours, minutes)
Set the desired switching time (action)
Switch on time • =
Switch off time • =
Confirm with
or
Delete with
pad
I
(on display)
(on display)
O
Example:
In day 1-5 or day 1-7, the
switching times are copied to the
indicated days.
Select desired settings with the
and .
pads
Current sele ction is inversely
displayed.
Display programmed switching times
Touch the pad
Programmed switch times are displayed here.
Up to 16 switch times (events) per day are possible.
Programmed times are listed chronologically.
Any new switch time is sorted chronologically immediately
upon input and confirmation with
Touch on the
pad directly accesses the timer overview.
.
Page 27

27
User manual WMF bistro!
Software
Copy day
Any day may be copied to other days, complete with its
switch times / events.
Touch the pad
Program the switch on and switch off times.
Touch the
pad
Touch number pad under
The selction of the week days is displayed.
Scroll through to page 4
Touch the
pad
The selction of the week days is displayed again.
Select the day that you want to copy
Touch the
pad
Select the day you want to copy the time settings to
The day is copied.
Timer overview
Checking the programmed switch times:
Touch the pad
The week overview is displayed graphically. Operating times
are indicated by bars.
In day 1-5 or day 1-7, the
switching times are copied to the
indicated days.
The individual days 1,2,3 ... 7 are
displayed..
To check times
w
Timer overview
Example:
Timer event s Monday to Friday
(1-5).
On time 7 a.m. (7:00)
Off time 6 p.m. (18:00)
Page 28

28
User manual WMF bistro!
Software
Delete timer
Touch on page 2 of the timer main program menu
Scroll to desired day and touch to select
A security dialogue now appears querying whether deletion
is actually intended.
Confirm with
The day is deleted with all its timer events.
Besides individual days, “all workdays” or the entire week
can also be deleted.
Timer information
Touching the pad calls up a display with
the next swith time and the timer state (On / Off).
This action cannot be undone.
Page 29

29
User manual WMF bistro!
Software
3.3.3 Customer care
Cleaning programs are started from the Care main menu.
The Care main menu contains the following selection
options:
Cleaning program•
Milk system (When dispensing milk and milk foam •
through the combi spout)
Choc system•
Filter change (optional)•
Customer care (optional)•
Cleaning program
Touch
The daily cleaning program starts.
The program automatically executes milk system rinsing if
milky beverages have been dispensed beforehand. If there
is a Choc system installed (mixer system) then Choc system
rinsing occurs.
The cleaning program sequence is described in cleaning
instruction.
Prior to carrying out cleaning, please note the safety
instructions in the safety chapter. Read the cleaning
instruction and the Care chapter, starting on page 42.
Milk system
See Cleaning instruction for milk system rinsing.
In the Software chapter w Care
display-guided sequences are
described in detail.
Physical cleaning actions are
described in the w Care chapter.
w
Cleaning instruction
CAUTION
Irritation and scald
hazard.
See chapter 9.1:
Safety.
During milk system cleaning the milk system is flushed out
using clear water. Using the option Plug&Clean the milk
system cleaning is executed automatically.
Milk system rinsing is performed automatically by the
cleaning program.
CAUTION
Irritation and scald
hazard.
See chapter 9.1:
Safety.
Page 30

30
User manual WMF bistro!
Software
Choc system (mixer rinsing) (optional)
See Cleaning instruction for Choc system rinsing.
During Choc system cleaning the mixer system is rinsed out
using hot water.
Choc system rinsing is performed automatically by the
cleaning program when a Choc system is installed.
Filter change (optional)
This point can be selected by trained personnel if the
function WMF Service has been enabled.
Question: Was the filter changed?
Y e s / N o
Customer check-up (optional)
This point can be selected by trained personnel if the
function WMF Service has been enabled.
Question: Has customer check-up been performed?
Y e s / N o
CAUTION
Irritation and scald
hazard.
See chapter 9.1:
Safety.
Page 31

31
User manual WMF bistro!
Software
3.3.4 Settings
Recipe and beverage buttons
Menu shows the options:
• Cup volumes
Change recipes •
Sequence of addition ingredients•
Button allocation•
Testing•
Selecting the beverage button when setting
Press the desierd beverage button
Selecting the beverage button on the 2nd Level
Press the shift button
Press the desierd beverage button
Selecting the beverage button in conjunction with one
of the preselection buttons S, M, L or decaf
Press the desierd preselection button
Press the desierd beverage button
= more
= less
= leave without change
= save the values
= start test
Adjust values
Adjust values with the and pads
Start a brewing test with the current values
Touch the pad
The values are not saved yet.
Save setting
Save with
Cup volumes
Cup volumes are matched to the cups used.
Individual beverage ingredients are matched to the new
cup volumes with no effect on composition and quality.
Page 32

32
User manual WMF bistro!
Software
Change recipes
All beverages
Ground coffee quantity / Choc powder quantity
Water volume
Milk beverages
Milk foam volume
Milk volume
Coffee beverages
Quality
The quality levels influence the coffee brewing.
The higher the quality level the more intensive the release
of the taste and aromatic substances in the coffee.
Quality 1
After pressing, the coffee grounds space is
made for swelling.
Quality 2
After pressing, the coffee it is immediately
brewed.
Quality 3
Quality 4
After pressing, a pre-infusion occurs.
After pressing and a pre-infusion, a second
wet pressing occurs.
Quality 5
Same as for Quality 4, but with stronger wet
pressing.
Quality 6
Same as for Quality 5, but with stronger wet
pressing.
Quality 7
Same as for Quality 6, but with longer wet
pressing.
Temperature
The brewing temperature can be set to obtain an optimal
coffee taste.
For each beverage button separately, up to 2 stages
higher and up to 2 stages lower. 1 stage represents about
35.6 °F (2 °C).
(Default value is 201.2 °F / 94 °C)
Example: Ground coffee quantity
An excessively high quality setting
may lead to a brew water error.
(error F161)
Page 33

33
User manual WMF bistro!
Software
Steam Milk settings (optional)
Milk foam quality
Milk temperature
Touch the
Press the desired Steam Milk button
Select milk or milk foam
Adjust the milk foam quality
Set the shut-off temperature
Save with
The maximum temperature setting is 194 °F (90 °C).
pad
Set decaf (optional)
Decaf grinder is always the right-hand grinder.
Touch
Press “Decaf” button
Ground coffee quantity for decaf is set by percentage for
the ground coffee quantity set in the recipe.
This setting applies to all preselected “Decaf” coffee
beverages.
Save with
Page 34

34
User manual WMF bistro!
Software
Sequence of ingredients additions
The sequence of additions is only possible for beverages
whose recipe contains at least two ingredients.
Sequence examples
The sequence in which the individual additions will be
dispensed.
Adjustable additions
Coffee•
Milk•
Milk foam•
Choc•
Set the sequence
a.) Upper line: Set start position for dispensing milk,
milk foam or Choc.
b.) Lower line: Set start position for coffee brewing
Touch the start position pad until the desired addition
is shown
The next addition will be shown each time it is touched.
Sequence of dispensing from left to right.
Button allocation
The beverages are allocated to the beverage buttons.
This button allocation is set here.
Press beverage button
Select the desired recipe, for example espresso, from
the list
Alter dispensing option for milk*, foam*, steam or hot
water
Press beverage button
Select recipe, for example foam*
Select dispensing option
* When dispensing milk and milk foam through the combi spout.
a >
b >
First cof fee and milk foam at the
same time and then milk´´
First milk foam, then milk, then
coffee
First milk , then milk f oam, then
coffee
Load a new recipe:
the previous set tings will be
overwritten by the work s standard
values for the new recipe.
Only setable recipes are indicated.
Select grinder for a coffee beverage
Press beverage button
Select recipe, for example espresso
Select grinder (on the right or left)
Page 35

35
User manual WMF bistro!
Software
Testing
Weigh grounds
Empty and replace coffee grounds container
Touch the pad
The process dispenses ground coffee directly into the
grounds container and the grounds may then be weighed.
The grind quantity is dispensed three times.
Quality check
The components of a beverage are delivered individually
(coffee, milk, milk foam, Choc).
The volumes of the individual components can be
determined exactly.
Reset
The espresso machine software is restarted.
Time / date
Set the time and date here.
Language
Set the language of the display guide here.
Display contrast
Set the display contrast here.
(Default value is 70)
Scale filter
Query regarding whether the WMF Service is enabled.
Set here whether a scale filter is fitted or not.
This affects the descaling intervals.
Page 36

36
User manual WMF bistro!
Software
Capacity
If there is a scale filter fitted: Set the capacity of the scale
filter here.
(The scale filter capacity can be found in the scale filter
documentation.)
Warm-up rinsing
Whether the espresso machine should rinse out the
brewing unit with hot water after heating up is set here.
Recommended setting: active.
SB operation (self-service)
(active / inactive, default value: inactive)
SB mode active
No manual insert (only cleaning tablets)•
No beverage preselection possible•
It is not possible to interrupt the beverage dispensing •
cycle
Menu pad delayed•
Maintenance and error messages suppressed•
Barista pad and hot rinsing pad not displayed•
Setting the scale filter and
capacity; only possible if enabled
by the WMF Service team.
Foamer rinsing
Automatic foamer rinsing after the last beverage with milk
components is dispensed.
Y e s / N o
It is not possible to interrupt the beverage dispensing cycle.
Rinsing interval
The time elapsed between the last removal of a beverage
with milk in it and a foamer rinsing.
Maximum value with Plug&Clean is 3 minutes.
Recommended setting: 2 minutes.
Page 37

37
User manual WMF bistro!
Software
Operating options
The following operating options are available.
Warm rinse pad (active / inactive)•
Barista pad (active / inactive)•
Beverage preselection (active / inactive)•
2. Level, Shift button (Yes / No)•
ON / OFF button (direct / via PIN)•
Cancel beverage (Yes / No)•
Menu pad (immediately / delayed)•
Warm rinse pad
Recommendation for self-service: inactive.
Barista pad
Recommendation for self-service: inactive.
Beverage preselection
Recommendation for self-service: inactive.
Shift button
Recommendation for self-service: inactive.
ON / OFF button
Recommendation for self-service: via PIN.
If “via PIN“ is set then the PIN for the cleaning level will be
queried on switching on or off.
Cancel beverage
Recommendation for self-service: no.
Menu pad
Recommendation for self-service: delayed
Default: immediately
Illumination (optional)
Set the colour values here of the LEDs for the desired
illumination colour.
Example settings red green blue
permanent colour change 1 0 0
amber 25 30 0
blue 0 0 30
If customers ser ve themselves then
some f unctions can be switched
to inactive. The inactivated pads
will not be shown on the ready to
operate display.
w
PIN rights access control
page 38
w
PIN rights access control
page 38
Page 38

38
User manual WMF bistro!
Software
3.3.5 Enter PIN
Individual authorisation levels can be protected using a
PIN. For access to a PIN-protected level, the PIN must be
entered via pad .
Touch in the main menu
Numerical keyboard display appears.
Enter required 4-figure PIN
Confirm with
Following entry of a valid PIN, the assigned functions are
available.
3.3.6 PIN rights access control
If a PIN has been assigned for a particular level no access
will be granted without a PIN.
Cleaning level
On entering the valid PIN access to:
= Set milk and foam quality* (for all beverages)
= Timer program (read only)
= Customer care
= PIN-protected ON / OFF button
PIN-entry display
Cleaning level access
* Milk and foam settings for the Steam Milk button require
PIN access at the Accounting level.
Setting level
On entering the valid PIN access to:
= Set milk and foam quality (for all beverages)
= Timer program
= Customer care
= PIN-protected ON / OFF button
= Settings (beverage, general, others)
Setting level access
Page 39

39
User manual WMF bistro!
Software
Accounting level
On entering the valid PIN access to:
= Set milk and foam quality (for all beverages)
= Timer program
= Customer care
= PIN-protected ON / OFF button
= Settings (beverage, general, others)
= Assign PIN rights, award access control
= Accounting numbers of beverages
A PIN may be assigned to any level. The levels are
hierarchical.
Example: The PIN for level
levels and , but not for level
.
is valid for
Accounting level access
Example:
PIN entry for the cleaning level:
1234
This PIN is carried over to the
higher levels.
Touch in the main menu
Select desired level
Example:
Numerical keyboard display appears.
Enter desired 4-figure number
Number entered is displayed.
Confirm with
This level is now PIN-protected.
When a PIN is assigned to a subordinate level that PIN is
automatically assumed for superior levels if the latter are
not already PIN-protected.
Delete PIN
Entering 0000 will delete access control for the given level.
Deletion of one level automatically deletes the subordinate
levels.
Example:
PIN entry for the
cleaning level: 1234,
set level: 9876,
account level: 7777
= more
= less
= leave without change
= save the values
= delete
Page 40

40
User manual WMF bistro!
Software
3.3.7 Accounting numbers of beverages
Touch the pad
The day counter menu displays the counter for each
beverage.
Read counter
Touch desired beverage on the display
Delete counter
Touch the clear pad
If no beverage is selected, on touching the clear pad
a dialogue appears in the display querying whether the
counter readings for all drinks should be zeroed.
The “Accounting numbers of beverages“ function should
be protected with a PIN to prevent unauthorized access.
Function over additional PIN (setting by service personnel):
Only possible to view the day counter, not to delete it.
3.3.8 Waiter accounting system (optional)
See additional user manual.
Page 41

41
User manual WMF bistro!
Chapter 4 Other settings
4.1 Set pinch valve
When dispensing milk and milk foam through the combi
spout.
The milk dispensing temperature is determined by the milk
nozzle and by the setting of the pinch valve.
For dispensing of the milk foam, the dispensing
temperature is only determined by the milk nozzle, not the
pinch valve.
Press in the pin with a ball pen or something similar
Turn the pinch valve by one notch at a time
Test at each step
The milk should not spit during dispensing.
Setting for colder milk = turning clockwise
4.2 Labelling of beverage buttons
First switch off espresso machine in order not to trigger
dispensing inadvertently.
Pull out existing labelling behind front glass in a
downward direction
Write on label stickers as desired using the WMF
template
Stick on label mount and re-insert behind the front
glass panel
Other settings
Print-out of the template is possible on adhesive labels or
paper.
Stick paper to label mount using an adhesive sticker.
Free download of WMF template
from www.servicecenter.wmf.com
Matching adhesive labels:
Zweckform-Avery No. 3659
Page 42

42
User manual WMF bistro!
Care
Chapter 5 Care
Regular cleaning is essential in order to ensure problemfree operation of the espresso machine and to ensure
optimum coffee quality.
If the machine has been or will be shut off for several
days, perform all cleanings.
The milk system must be thoroughly cleaned at
least once a day to ensure proper hygiene.
Milk hose should be changed at regular
intervals.
Mixer hose should be changed at regular
intervals.
Ensure that mixer hose is replaced securely
because hot liquid may escape.
Never reach under the spouts while cleaning
the machine.
Before cleaning the front panel, switch off the
machine to avoid a hot beverage being accidentally dispensed.
CAUTION
Health hazard.
Follow the hygiene
instructions.
See chapter 6:
HACCP schedule.
Page 43

43
User manual WMF bistro!
Care
Overview of cleaning intervals
Customer care
Daily
Weekly
Regularly
Automatic
Foamer rinsing
x
x
x
x
x
x
x
x
(x) x
x
x
Daily = Daily, at least once daily and as required
Weekly = Weekly cleaning
Regularly = Regularly as required
Required = As required
(x) = Daily as required
* = Optional (according to model)
Cleaning program
Milk system rinsing
Combi spout cleaning (Standard)
Combi spout cleaning (Plug&Clean)*
Choc system rinsing*
Coffee grounds container cleaning
Drip tray cleaning
Mixer cleaning*
Steam outlet cleaning
Steam Milk outlet cleaning*
Bean hopper(s) cleaning
x
Choc hopper cleaning*
x
Cleaning program
Milk system rinsing
Combi spout cleaning
Chocsystem rinsing
w
Cleaning instruction
Page 44

44
User manual WMF bistro!
Care
5.1 Cleaning program
The cleaning program is guided by software in the
following sequence through the whole cleaning program:
Milk system cleaning•
Choc system rinsing•
Cleaning program for the machine with cleaning tablets: •
coffee carrying parts
5.2 Milk system cleaning
CAUTION
Irritation and scald
hazard.
Hot steam.
Hot liquids.
Do not reach under
the spout s during
cleaning.
Cleaning program
w
Cleaning instruction
See Cleaning instruction for milk system rinsing.
The milk system consists of:
Combi spout•
Milk nozzle•
Milk hose•
The milk system must be thoroughly cleaned and sanitized
at least once a day, after no more 24 hours.
For machines with Plug&Clean, this must be done as part
of the machine cleaning at the end of the service day.
If this Plug&Clean cleaning is not done, then the combi
spout must be disassembled and cleaned manually.
Milk hose should be changed at regular intervals.
Standard
Cleaning of the combi spout consists of three parts.
Automatic foamer rinsing after each beverage with milk •
or milk foam
Display guided milk system rinsing•
Once per day• , lay combi spout, milk hose and milk
nozzles in a cleaning solution
CAUTION
Scald hazard.
Hot steam.
Hot liquids.
Do not reach under
the spout s during
cleaning.
CAUTION
Health hazard.
Follow the hygiene
instructions.
See H ACCP schedule
in chapter 6.
Combi spout cleaning
w
Cleaning instruction
Page 45

45
User manual WMF bistro!
Care
Plug&Clean
Cleaning of the Plug&Clean consists of three parts.
Automatic foamer rinsing for a maximum of 3 minutes •
after each beverage with milk or milk foam
Display guided milk system rinsing•
Once per week• , lay combi spout, milk hose and milk
nozzles in a cleaning solution
5.3 Choc system rinsing
Choc system rinsing is interim cleaning of the mixer.
See Cleaning instruction for Choc system rinsing.
5.4 General cleaning
Grounds container cleaning (grounds chute, optional)
Empty the coffee grounds container and rinse under
running water
Clean with a clean, damp cloth
Drip tray, housing and front panel
Clean the cold machine using a damp cloth
Wipe dry using a fine woolen cloth or chamois leather
Cleaning metal surfaces
For cleaning metal housing parts (matte surface), we
recommend WMF Purargan® forte cleaner.
Do not clean with scouring powders or similar.
There is a risk of causing scratches or scores.
Do not use any sharp cleaning materials or implements.
CAUTION
Health hazard.
Follow the hygiene
instructions.
See H ACCP schedule
in chapter 6.
Plug&Clean cleaning program
w
Cleaning instruction
The Choc system rinsing is an
integral part of the cle aning
program.
Order numbers for the WMF care
program
w
Appendix C
Accessories and spare parts
page 66
Switch off the machine before
cleaning the front panel to avoid
a beverage being accidentally
dispensed.
NOTICE
Follow the instruc tions
beside.
See chapter 9.5: Warranty.
Page 46

46
User manual WMF bistro!
Care
5.5 Choc mixer cleaning (optional)
Cleaning will be more / less frequent depending on the
powder used.
Switch off espresso machine using the ON / OFF button
Pull out mains plug
Remove the coffee grounds container
Pull off mixer hose from mixer to c ombi spout
Turn stud on bayonet fitting underneath the mixer jug
counter-clockwise
The mixer jug is released from the arrester lock.
The propeller for the mixer is now visible and can be
cleaned with a cloth
Dismantle two-piece mixer jug
Clean both parts of mixer jug and mixer hosing under
warm running water
Allow all parts to dry completely
On re-assembly all openings must face in the same
direction.
Ensure that the spiral guide is plugged on and the hose is
not pinched.
Replace mixer jug
Turn stud on bayonet fixing back in a clockwise
direction
Push mixer hose onto mixer jug fitting again and plug in
combi spout
Replace the coffee grounds container
Ensure that mixer hose is replaced securely.
This is important as otherwise, during the next dispensing,
hot water or hot Choc may escape.
closed open
CAUTION
Scald hazard.
Hot liquids.
Ensure mixer hose is
replaced securely.
Page 47

47
User manual WMF bistro!
Care
5.6 Steam Milk outlet cleaning (Standard and Steam Milk)
Daily
Mix 5 ml of cleaner in a tall jug with 0.5 l of lukewarm
water
Immerse the steam nozzle in the cleaning solution, and
briefly press the steam button or a Steam Milk button
Reaction time: 30 minutes
Clean with a brush
Rinse thoroughly with water
Press on the steam button
The steam clears the holes of the steam nozzle of milk
residue, and removes cleaner residue.
Weekly
Unscrew the steam nozzle
Place the steam nozzle in the cleaning solution for at
least 5 hours
Clean with a brush
Rinse thoroughly with clean water
Screw the steam nozzle onto the Steam Milk spout
Immerse the steam nozzle in a receptacle with clear
water
Briefly press a Steam Milk button
Wipe steam outlet with a damp cloth
CAUTION
Irritation and scald
hazard.
See chapter 9.1:
Safety.
CAUTION
Scald hazard.
Hot steam.
Hot liquids.
Do not reach under
the spout s during
milk system rinsing.
5.7 Foils for bean hopper cleaning
Clean the inserted foils of the bean hopper as required and
at regular intervals (at least once a month).
Only perform cleaning on empty or almost empty bean
hoppers.
Never reach into the coffee grinders.
Never clean the foils in a dishwasher.
Switch off espresso machine using the ON / OFF button
Disconnect mains plug
Remove bean hopper cover
Remove inserted foils upwards
Clean thoroughly using a moist, non-woven cloth
Allow the foils to dry completely
Insert foil again
CAUTION
Bruising or
crushing hazard.
Never reach into the
coffee grinder s.
NOTICE
Follow the instruc tions
beside.
See chapter 9.5: Warranty.
Page 48

48
User manual WMF bistro!
Care
5.8 Cleaning the Choc product hopper (optional)
Cleaning will be more / less frequent depending on powder
used.
Switch off espresso machine using the ON / OFF button
Disconnect mains plug
Unlock hopper lock on the machine cover
Tip hopper backwards and remove upwards
Empty hopper completely
Unscrew union nut at front and rear
Pull out dosing auger
Thoroughly wipe out hopper with a damp cloth
Thoroughly clean individual dosing auger components
Allow hopper and individual components to dry
completely
Re-assemble and insert the dosing auger and screw on
union screws
Ensure correct orientation of discharge.
Fill and mount hopper
Shut hopper lock on the machine cover
CAUTION
Bruising or
crushing hazard.
Never clean the
built-in hopper.
Portion controller with individual
parts, dosing auger
Page 49

49
User manual WMF bistro!
Chapter 6 HACCP schedule
You are required by law to ensure that your customers
are not subject to any health risks as a consequence of
consumption of food items you serve.
A HACCP schedule (Hazard Analysis Critical Control Points)
for risk identification and assessment is required. You
should carry out a risk analysis on your premises. The
aim of the analysis is to recognize and preempt food
hygiene hazard points. For this purpose, monitoring and,
where necessary, test procedures must be established and
implemented.
With correct installation, care, maintenance and cleaning
WMF espresso machines meet the requirements described
above. If care of the espresso machines is not carried out
properly, dispensing milk beverages will constitute a food
hygiene hazard point.
Please observe the following points in order to comply with
the HACCP schedule:
Sterilize the milk system daily
Follow the cleaning instructions for the milk system •
contained in the cleaning instruction. This will ensure
that your system contains a minimum of bacteria at
commencement of operation.
HACCP schedule
“Food Hygiene Ordinance from
05 .08.1997 “
Use our HACCP schedule for
monitoring of regular cleaning.
You can call up the logs of the most recent cleaning
operations via information pad .
Always commence operation with a freshly opened
prerefrigerated milk pack
• Original packaged UHT milk is usually free from harmful
bacteria. Always open a new pre-refrigerated pack at
commencement of operation.
Ensure absolute cleanliness on opening the milk pack. •
Germs can be introduced from dirty hands or tools
when opening.
Recommendation:
Only use UHT milk with a
1.5% fat content.
Page 50

50
User manual WMF bistro!
HACCP schedule
Keep milk cool.
• Always have a new pre-refrigerated milk pack handy.
If a pre-refrigerated freshly opened pack is used within •
a period not exceeding 3 hours, refrigeration during use
is not necessary.
If little milk is being used, pre-refrigerated milk must be •
replaced in the refrigerator again during operation.
At commencement of operation
milk should b e at approx . 43-46 °F
(6 - 8 ° C).
Depending on the setting, one litre
of milk is suffi cient for approx.
20 cappuccinos .
WMF AG offers a range of
refrigeration options (e.g., WMF
countertop coolers or WMF milk
coolers).
HACCP schedule
Use only cooled UHT milk as otherwise health risks due to microbacteria cannot be excluded!
For Choc use only products which are not past their sell-by date.
Cleaning steps:
Date
Cleaning steps
Signatur e
Date
Cleaning steps
Signatur eTime Time
1 2 3 4 1 2 3 4
1. 17 .
2. 18.
3. 19.
4. 20.
5. 21.
6. 22.
7. 23.
8. 24.
9. 25.
10. 26.
11 . 27 .
12 . 28.
13. 29.
14 . 30.
15 . 31 .
16.
1. Perform Maintenance Mode.
w
Cleaning instruction
2a. Cleaning Milk Foamer (combi spout)
w
Cleaning instruction
2b. Daily Mixer Cleaning.
w
Cleaning instruction
3a. Foamer Cleaning or change of combi spout after 4 hours operation.
(Absolutely essential with low throughput and with uncooled milk).
3b. Weekly Mixer Cleaning and regular cleaning of product reservoir.
Maintenance chapter
4. General machine cleaning.
Month Ye a r
Page 51

51
User manual WMF bistro!
Chapter 7 Maintenance
Please observe that this is a professional
industrial espresso machine which needs regular
maintenance and descaling.
The maintenance schedule is based on the degree of use of
the machine and is shown on the display. If maintenance
is undertaken by the WMF Service, then descaling of the
brewing system is done at the same.
The espresso machine may continue to be operated after
the message but Customer Care or contract maintenance
should be carried out promptly to ensure correct
functioning and so as to avoid any consequent damage.
7.1 Customer Check-up
The Customer Check-up should take place at the latest
every 6 months; this can be done by yourself.
Maintenance
7.2 Maintenance
Maintenance must take place every 30,000 brews, at the
latest however after 1 year.
7.3 Mi xer
Maintenance of the mixer system must take place every
6,000 cycles, at the latest however after 1 year.
7.4 WMF Service
You can reach the WMF Service via a central centre if the
WMF Service is not known locally.
WMF Americas Inc.
1881 SR 81 Suite 101
Ft. Lauderdale, FL 33315-2008
coffee@wmfamericas.com
888-4-wmfhelp
888-496-3435
For other maintenance work and
repairs please contact your local
WMF Service. The telephone
number can b e found on the
address sticker on the espresso
machine and on the delivery note.
Page 52

52
User manual WMF bistro!
Messages and instructions
Chapter 8 Messages and instructions
8.1 Messages for operation
Refill beans
Top up bean hopper (refer to display)
Check:
Is the product hopper lock open?•
w
C a r e
Beans do not feed through?•
Stir with large spoon and confirm with
Open water supply
Turn on water mains tap and confirm
Empty coffee grounds container
Empty coffee grounds container
No coffee grounds container fitted
Insert the grounds container again correctly
Change filter
Please call the WMF Service
Observe the user manual for the scale filter.
Please consult the user manual
Error number is displayed
w
Error messages / malfunctions
Please call the WMF Service
Error number is displayed
w
Error messages / malfunctions
Service maintenance
Please call the WMF Service
Page 53

53
User manual WMF bistro!
Messages and instructions
8.2 Error messages / malfunctions
Basic procedure on display of error messages.
Switch off espresso machine and then switch it on again
after a few seconds
Repeat the process which led to the error
In many cases the error is rectified by this and you can
carry on working.
If this does not work:
Find the error message or error code in the following list
and follow the sequence of actions indicated.
If this does not rectify the error or if the error number is
not listed please call WMF Service.
Some messages lead to blocking of individual functions.
You will notice this by the fact that the beverage button
light goes out. The beverage buttons that are still
illuminated can continue to be used.
Your WMF bistro! is provided with a diagnostics program.
Any errors occurring are shown on the display. The errors
listed may also be caused by an interruption to the mains
electricity supply.
If there is a current error or a message to the operator, pad
is displayed.
WARNING
Risk of fire or
electric shock.
Do not remove cover.
No user-serviceable
parts inside.
Repair should be
done by authorized
service per sonnel
only.
Touch the pad
Error number is displayed.
Page 54

54
User manual WMF bistro!
Messages and instructions
Error
number
Error description Action instruction
Grinders
24 Motor blocked
34 Motor blocked
Steam boiler
186 Steam boiler filling time
189 Heating time of the steam
boiler
Sensor system (current)
130 General current error
148 Current error on the steam
131 Current error on the hot
132 Current error on cold water
137 Current error on mixer / valve
boiler vent valve
water valve
mixing valve, hot water
valve
All associated brews barred. Note hopper switchover.
Tap on beans hopper
The beans may slide down and the light barrier is touched.
All associated brews barred. Note hopper switchover.
Tap on beans hopper
The beans may slide down and the light barrier is touched.
Steam dispensing barred, milk foam barred.
Machine Off-On; note heating display for
information for the WMF Service.
Water tap open?
Heating off, steam dispensing barred.
Machine Off-On
Check local fuses
Machine Off-On
Switch off lighting (
w
Settings),
all colours to zero
Allow the machine to cool off and try again
Call the WMF Service if the error occurs again
One can continue to use the machine; dosing fluctuations can occur
for milk meterings.
Confirm steam dispensing or milk dispensing
from time to time
Call the WMF Service
The hot water dispensing is barred: One can continue to use the
machine. Do not use hot water anymore.
Call the WMF Service
Hot water dispensing is barred: One can continue to use the machine.
Do not use hot water anymore.
Call the WMF Service
Barr on beverage mixer: One can continue to use the machine. Do
not use Choc anymore.
Call the WMF Service
Page 55

55
User manual WMF bistro!
Messages and instructions
Error
number
140 Current error on steam
141 Current error on steam
142 Current error on the cap.
143 Current error on the cap.
134 Current error on brewing
149 General current error
161 Flow error
165 Flow error during Choc
170 Steam Milk sensor
171 Steam Milk sensor
Error description Action instruction
valve 1
valve 2
valve 1
valve 2
valve for cold water
dosing
damaged
short
Steam dispensing is barred: One can c ontinue to use the machine. Do
not use steam disp ensing or Steam Milk.
Call the WMF Service
Steam dispensing is barred: One can c ontinue to use the machine. Do
not use steam disp ensing or Steam Milk.
Call the WMF Service
Milk beverages are barred: The machine can be used except for milk
beverages. If installed use steam dispensing for foaming.
Call the WMF Service
Milk beverages are barred: The machine can be used except for milk
beverages. If installed use steam dispensing for foaming.
Call the WMF Service
One can continue to use the machine. Coffee beverages may be
brewed too hot.
Call the WMF Service
Machine Off-On
Allow the machine to cool off and tr y again
If the error occurs again:
Call the WMF Service
Water tap opened.
Machine Off-On
Perform cleaning and try again
Water tap opened.
Machine Off-On
Remove and clean mixer
Perform Choc cleaning
Machine Off-On
Allow the machine to cool off and tr y again
If the error occurs again:
Call the WMF Service
Steam Milk is barred: One can continue to use the machine for coffee
beverages.
Machine Off-On
Allow the machine to cool off and tr y again
If the error occurs again:
Call the WMF Service
Steam Milk is barred: One can continue to use the machine for coffee
beverages.
Page 56

56
User manual WMF bistro!
Messages and instructions
8.3 Error without error display
Error pattern Action instruction
Coffee dispensing on the •
left / right differs
No milk foam / no milk •
dispensing, although there
is milk in the hopper
Milk foam not OK •
Temperature too low•
The milk foam dispensing •
spits strongly
Milk to hot•
Choc is blocked• Is the hose kinked?
No illumination•
No display•
No tone when pressing a •
button
Clean the combi spout
w
Cleaning instruction
Check whether the milk hose is kinked or squashed
Lay milk hose correctly
Clean the combi spout
Milk nozzle blocked?
w
Cleaning instruction
Pinch valve turned to strongly?
w
Other settings
Change milk nozzle:
- green milk nozzle for use of cooled milk
- white or brown milk nozzle for uncooled milk
Clean the combi spout
w
Cleaning instruction
Close pinch valve
w
Other settings
Use white or brown milk nozzle
Set foam quality lower
Clean milk cleaning system
w
Cleaning instruction
Open pinch valve
w
Other settings
Perform milk cleaning and rinsing oftener
If necessary daily.
w
Care and Cleaning instruction
Dose less powder
Dose more water
Disconnect power
Pull out drip tray
Check the fuse behind the drip tray
Only fuse F4A is permissible.
Replace fuse
WARNING
Electrocution hazard.
Failure to follow
instructions can result in
death or serious injury.
Disc onnect power before
replacing the fuse.
Use only designated fuse.
Page 57

57
User manual WMF bistro!
Chapter 9 Safety
9.1 Hazards to the operator
At WMF, safety is one of the most essential product
features. The effectiveness of safety devices can only be
ensured if the following points are observed:
Read the user manuals carefully prior to use.•
Do not touch hot machine components.•
Do not use the machine if it is not working properly or if •
it is damaged.
Built-in safety devices must never be altered. •
• This device is not designed for persons (including
children) with limited physical, sensory or mental
capabilities or who lack the required experience and / or
knowledge, unless they are supervised by a person
responsible for their safety or have received instructions
from them about how the device should be used.
Children should be supervised to ensure that they do •
not play with the machine.
Despite safety devices, every machine poses numerous
hazards if incorrectly used. Please observe the following
instructions when using the espresso machine so as to
prevent injury and health hazards:
Safety
WARNING
Failure to follow
instructions can
result in death or
serious injury.
Scald hazard.
When dispensing coffee, hot water and steam there
is hazard of scalding. Ensure that there is always
a receptacle under the outlet when dispensing beverages.
CAUTION
Scald hazard .
Burn hazard.
Hot steam.
Hot liquids.
Do not reach under
the spouts.
Page 58

58
User manual WMF bistro!
Safety
Bruising or crushing hazard.
There is a hazard of bruising or crushing when handling
all moving parts. Do not reach into the bean hopper or
the brewing unit opening when the espresso machine is
switched on.
Health hazard.
The product container (coffee beans) and manual insert
may only be filled with materials for the use intended.
Health hazard.
When handling special cleaners for the milk foamer and
cleaning tablets, please observe the protective measures
on the packaging. The special cleaners for the milk
foamer and cleaning tablets are irritants. Only put in
cleaning tablets after instructions to do so are shown on
the display.
Irritation and scald hazard.
Never reach under the spouts while cleaning.
Cleaning fluid runs out of the combi spout when cleaning.
9.2 Hazards to the espresso machine
Please observe the following points so as to prevent
problems with and damage to the espresso machine:
For water with a carbonate hardness in excess of •
5 gpg (5 °dKH), a WMF anti-scale filter must be fitted;
otherwise, the espresso machine can be damaged due to
build-up of scale.
For insurance reasons always ensure that, at the end •
of operation, the mains water supply is turned off
and the mains power is switched off or the machine is
unplugged.
CAUTION
Bruising or
crushing hazard.
Hazard of being
injured.
Swich off the
machine before
cleaning.
CAUTION
Health hazard.
Only fill in products
for the use as
intended.
CAUTION
Irritation and scald
hazard.
Obser ve the
protective measures
on the cleaning
tablets and the
cleaners packaging.
Obser ve the
instructions beside.
CAUTION
Irritation and scald
hazard.
Cleaning fluids.
Do not cont act the
cleaning fluid.
Page 59

59
User manual WMF bistro!
Safety
We recommend damage prevention measures such as: •
- installation of a suitable water monitor in the mains
water supply
- installation of smoke detectors
• After a company holiday, we recommend running
the cleaning mode at least twice before reusing the
machine.
9.3 Directives
The espresso machine fulfils the requirements of of the
UL 197 / NSF4.
9.4 Duties of the owner / operator
The operator of such equipment must ensure regular
maintenance by WMF Service technicians, their agents or
other authorised persons, and checking of safety devices.
In order to ensure operational safety of your espresso
machine replacement of safety valves after 2 years is
advised and boiler replacement after no longer than
6 years.
Access to the service area is permitted only for persons
with knowledge and practical experience with the unit,
especially regarding safety and hygiene.
The espresso machine must be set up by the operator such
that care and maintenance are possible unhindered.
In office / floor supply or similar self-service applications,
only staff instructed in operation of the machine should
supervise the machine. Trained personal should carry out
maintenance and be available for questions regarding use.
w
Cleaning instruction
Page 60

60
User manual WMF bistro!
Warranty
The operator shall ensure that electrical equipment and
operating facilities are in a fit state (in USA in accordance
with NEC).
In order to ensure the operating safety of your espresso
machine, it is essential to regularly check safety valves
and the pressure containers, among other checks. These
measures are conducted by the WMF Service or by WMF
authorised service personnel as part of the maintenance
work.
Machine cleaning must be done only with the WMF special
cleaning agent intended by WMF for the machine (tablets),
and for the milk system (cleaning liquid).
The manufacturer‘s specifications regarding maintenance
w
cycles and frequency of maintenance (
Maintenance) are
to be observed.
9.5 Warranty claims
During the warranty period of 12 months from transfer of
risk, the purchaser has statutory warranty entitlements.
The vendor should always be afforded the opportunity to
rectify errors within an appropriate period.
Claims that exceed the above terms, in particular damage
claims as a result of consequential damage, are excluded to
the extent that this is legally permissible.
Material defects shall be reported to the vendor
immediately and in writing.
WMF special cleaning agent,
w
Appendix C
Accessories and spare parts
page 66
Warranty period 12 months
Page 61

61
User manual WMF bistro!
Warranty
No warranty is provided:
On any parts subject to natural wear and tear. This •
includes, seals, mixer and the brewing unit, among other
items.
For malfunctions due to the effect of the weather, scale •
build-up, chemical, electrochemical or electrical effects,
unless attributable to a fault on the part of WMF.
• If a scale filter is not fitted even though the local water
supply requires use of an scale filter and if malfunctions
occur as a consequence.
If malfunctions occur as a result of failure to follow •
handling instructions and regulations, maintenance and
care of the unit (e.g., user manuals and maintenance
instructions).
If malfunctions occur as the result of failure to use •
original WMF replacement parts, or incorrect assembly
by the purchaser or by third parties, or by faulty or
negligent treatment.
• If improper modifications are made without our consent
or repair or reconditioning work by the purchaser or by
third parties.
If malfunctions are caused by inappropriate or improper •
use.
Inappropriate use of the espresso machine shall be •
deemed to have taken place if the customer exceeds
the annual number of coffee or Choc mixer servings
prescribed within the 12 month warranty period (from
the date of purchase). Annual maximum volume is
60,000 coffee servings and a maximum of 6,000 Choc
drinks.
The highest amounts are permissible for regular
performance of maintenance work according to the
Maintenance and Descaling chapter.
NOTICE
Follow the manual.
The customer is advise d in the order
confirmation whether or not use of
a scale filter is required.
w
Maintenance
page 51
Page 62

62
User manual WMF bistro!
Appendix: Additional instructions
33 2413 0900 1.3 01.2008
Cleaning instruction WMF bistro!
Please refer to WMF bistro User manual.
Prior to the first cleaning read the Care chapter
in the User Manual.
Observe the Overv iew of cleaning interval
Schedule in Care chapter in the User Manual.
Never reach under the spouts while cleanin g
the machine.
Esure that the mixer hose is replaced s ecurely
beacause hot liquid may escape.
Cleaning Program Standard
12345
We 10.02.2010 08:15
main menu
choc system
cleaning prog.
customer care
milk system
switchingOff
customer care
no switchingOff
cleaning prog.
cleaning
cleaning prog.
start now?
switchingOff
start
Touch pad Touch
(Customer Care)
Touch Cleaning prog. Touch SwitchingOff Touch Start
Cleaning program
sequence starts.
6 6.1 7 7.1 8
Prepared water
cleaning prog.
for rinsing?
switchingOff
continue
Empty
cleaning prog.
grounds container.
switchingOff
Caution.
Never reach into
the brewing unit.
Open tablet insert.
cleaning prog.
Insert the
switchingOff
cleaning tablet.
Provide 30.51 cin of
clear, cold water in a
receptacle
Insert milk hose
Touch
Continue
Empty the grounds
container
Open the manual insert
Insert a WMF special
cleaning tablet
Caution.
Never reach under
the spouts while
cleaning the
machine.
8.1 9 1 0 11
Caution.
Esure that the mixer
hose is replaced
securely beacause
hot liquid may
escape.
Cleaning tablet
cleaning prog.
inserted?
switchingOff
yes
In progress…
cleaning prog.
milk system
In progress…
cleaning prog.
choc system
Close the manual insert
Touch
Yes
Milk system rinse starts.
Duration approx. 30 secs.
The choc system rinse
starts.
Duration approx. 30 secs.
11.1 12 12.1
Step 6 and 10:
Only after dispensing of milk beverage s.
Step 11:
Only after dispensing of choc beverage s (with optional
mixer system).
In progress…
cleaning prog.
switchingOff
Machine cleaning starts.
Duration 8 mins.
Milk system rinse Choc system rinse
choc system
cleaning prog.
customer care
milk system
Prepared water
cleaning prog.
for rinsing?
switchingOff
continue
In progress…
cleaning prog.
milk system
choc system
cleaning prog.
customer care
milk system
In progress…
cleaning prog.
choc system
Touch on milk system
on submenu
Touch on
Start
Provide 30.51 cin of
clear, cold water in a
receptacle
Insert milk hose
Touch
Continue
Milk system rinse starts.
Duration approx. 30 secs.
Touch on choc system
on submenu
Touch on
Start
The choc rinse starts.
Duration approx. 30 secs.
Cleaning program Plug&Clean
12345
We 10.02.2010 08:15
main menu
choc system
cleaning prog.
customer care
milk system
switchingOff
customer care
no switchingOff
cleaning prog.
cleaning
cleaning prog.
start now?
switchingOff
start
Touch pad Touch
(Customer Care)
Touch Cleaning prog. Touch SwitchingOff Touch Start
Cleaning program
sequence starts.
6 6.1 7 7.1 8
plugged into
cleaning prog.
Plug&Clean socket?
milk system
continue
Is milk hose
Attention! Do not jam the
milk hose!
Empty
cleaning prog.
grounds container.
switchingOff
Caution.
Never reach into the
brewing unit.
Open tablet insert.
cleaning prog.
Insert the
switchingOff
cleaning tablet.
Plug the connection of
the milk hose onto the
Plug&Clean adapter
Touch
Continue
Empty the grounds
container
Open the manual insert
Insert a WMF special
cleaning tablet
Close the manual insert
Confirm with
OK
9 1 0 10 .1 11 11.1
Plug&Clean
cleaning prog.
In progress…
milk system
In progress…
cleaning prog.
choc system
In progress…
cleaning prog.
switchingOff
The Plug&Clean Cleaning
starts.
Duration approx. 2 mins.
The Choc system rinsing
starts.
Duration approx. 30 secs.
The machine cleaning
starts.
Duration approx. 8 mins.
Step 8-9: Only after dispensing of milk bevera ges.
Step 10: Only after dispensing of choc beverages (with optional mixer system).
After the Plug&Clean cleaning: The cl eaned milk hose along with the adapter can be stored in a close d refrigerator.
Milk system rinse: See the flip-side un der “Milk system rinse” for interim cleaning.
Manual cleaning of the combi spout with Plug& Clean: Run at least 1 x per week. See below.
Manual combi spout cleaning Prior to cleaning switch of f at ON/OFF button. Pull out mains pl ug!
A
B
Caution.
Carefully disconnect
the milk hose.
Pull forward the lever behind the
combi spout
Remove combi spout
Remove milk hose from milk
container and release from combi
spout
If a mixer hose is fitted remove
it too
Mix 5 ml of WMF special
cleaner with 17 US fl. oz
with (0.5 l) of warm water
Dismantle combi spout
Soak all parts of combi spout
together with milk hose in the
cleaning solution
If a Mixer is fitted:
Soak mixer hose in the cleaning
solution
All parts must be completely
immersed.
After 5 hours clean all parts
thoroughly with a brush
C
Rinse combi spout and milk hose
very thoroughly with clear water
so that no cleaner fluid remains
Reassemble combi spout
Replace combi spout
Replace milk hose and mixer hose
Machines with pinch valve: remove milk hose. Replace in rever se order.
1 22.133.1
Pull forwards with both
hands
Remove upwards from
the pinch valve
Appendix A: Cleaning instruction
Page 63

63
User manual WMF bistro!
Appendix B: Technical data
Technical data for espresso machine
Appendix: Technical data
Version
Rated power * 3.1 - 3.5 kW 4.3 - 5.0 KW 5.0 kW 5.5 - 6.5 kW
Mains power
connection *
Nominal Line Voltage 220 -240 V 220-240 V 208 V 220-240 V
Line Voltage
Tolerances
Power Plug NEMA L6-20P NEMA L6-30P NEMA L21-30P NEMA L6-30P
Output per hour** 300 Espressos
Overall hot water
output approx.
Illumination LED class 1
External dimensions
Coffee bean hopper 2.2 lbs (1,000 g) per load
Choc hopper 1.1 - 2.2 lbs (500 - 1,000 g) per load,
Empty weight about 176 lbs (80kg)
Continuous sound
pressure level (Lpa)
*****
3US 4US 5US 6US
2ø 120 / 240 V, 60
Hz (2P / 3 W)
230 V±10 %
(207 – 253 V)
200 Cappuccinos
200 Café Crèmes
120 Coffees***
120 Chocs****
5,9 US gal / h
(22.4 l / h)
2ø 120 / 240 V, 60
Hz (2P / 3 W)
230 V±10 %
(207 – 253 V)
300 Espressos
220 Cappuccinos
220 Café Crèmes
120 Coffees***
120 Chocs****
8,2 US gal / h
(31.2 l / h)
width 17,7 inch (450 mm)
height 28.9 inch (733 mm) (with bean hopper)
depth 21,9 inch (555 mm)
depending on the choc powder
3ø 120 / 208 V, 60
Hz (4P / 5 W)
208 V±10 %
(187–229 V)
300 Espressos
220 Cappuccinos
220 Café Crèmes
120 Coffees***
120 Chocs****
9,7 US gal / h
(36.8 l / h)
< 70 dB (A)
2ø 120 / 240 V,
60Hz (2 P / 3W)
230 V±10 %
(207 – 253 V)
300 Espressos
220 Cappuccinos
220 Café Crèmes
120 Coffees***
120 Chocs****
13,2 US gal / h
(50 l / h)
We reserve the right to make technical modifications.
* For special models see model label. Values given above are for the basic model.
** The outputs per hour are STANDARD VALUES which can be dependent upon the following factors: Ground
coffee quantity, type of coffee, grinding degree, brewing temperature, brewing blend Ø, brewing pres sure, water
hardness and the general operating condition of the machine (i.e. scaling, connection conditions, electrical
power, drinking water, drainage, wear, etc.)
*** Only for model version ECF
**** Only with the optional Choc
***** The A-evaluated sound pressure level Lpa (slow) and Lpa (impulses) at the operating personnel workplace are
under 70 dB (A) in any working mode.
Page 64

64
User manual WMF bistro!
Appendix: Technical data
Conditions for usage and installation
Necessary preparatory work for electricity , water and
drainage connections at the customer‘s premises are to
be arranged by the machine owner / operator. The work
must be carried out by authorised installation technicians
in compliance with general, country-specific and local
The equipment is to be
installed to comply with
applicable federal, state or
local plumbing c ode s.
This includes adequate
backflow protection.
NOTICE
regulations. The WMF Service technicians may only
connect the machine to existing prepared connection
points. The WMF Service technicians are neither
authorised nor responsible for carrying out any work prior
to connection.
Water supply 3/8 inch hose connector with main valve, and filter with 0.2 to
0.25 mm mesh size, on site.
Min. of a 29 psi (0.2 MPa) flow pressure at 2 l/min., max. 87 psi
(0.6 MPa.)
Water temperature max. 95 °F (35 °C).
Use the hose supplied with the new coffee machine and/or new
water filter. Do not use old hoses.
Water quality For drinking water with a carbonate hardness above 5 gpg
(5 °dKH), a WMF scale filter should be installed upstream.
Water drain pipe
(optional)
Hose a min. DN 19, minimum downward slope of 0,02 inch/inch
(2 cm/m)
Ambient temperature + 41 °F (+ 5 °C) to max. of + 95 °F (+ 35 °C)
(empty the water line in case of frost).
Maximum humidity
80% relative humidity without condensation.
Do not use unit outdoors.
Degree of protection
Installation surface
IP X0
The unit must be placed on a level, flat, and sturdy surface.
The unit is not intended to be located on a surface that is
sprayed or cleaned with a water hose, steam jets, steam cleaner,
or similar devices.
Inbuilt clearances
For operating, service and safety reasons the machine should
be installed with a clearance of not less than 2 inch (50 mm) at
the back and sides from the building or non-WMF components.
A clear height of 44 inch (1100 mm) from the top of the
supporting surface should be ensured. The height of the instal-
lation surface above the floor is at least 34 inch (850 mm). If
the machine connections should be passed downwards through
the counter please make space for the lines which can reduce
the usable space below the machine.
Installation dimensions
See the user manual for the scale filter.
of the scale filter
Page 65

65
User manual WMF bistro!
Appendix: Technical data
It may be necessary to also observe additional country-specific
regulations.
The lo cal p ower supply must be constructed according to NEC . To improve
safet y, the espresso machine should be fitted with an FI 30 mA earth leakage
current circuit breaker complying with EN 610 08. Near the machine or ab out
12 inch (30 cm) below the counter top there should be a shockproof socket
as a single-phase connection installe d loc ally on the rear or side wall of the
counter substructure or a country-specific single-phas e socket and, in the
case of a 3-phase connection, a 5-pin CEE / CEKON-socket according to EN
60309 or a country-specific multi-pin socket. If the mains connection lead for
this espresso machine is damaged then it must be replaced by our customer
service personnel or a similarly qualified person. If the espresso machine is
permanently connecte d to the mains then an all-pole disc onnecting separator
(mains switch) according to EN 60947 with a minimum ⅛ inch (3 mm) contact
gap must be installed. A separator switch is recommended for a flexible
conne ction. The mains cable must not come into contact with hot surfaces .
The mains switch and plug top are part of the customer‘s on-site installation.
The machine may not be fitted with a fixed permanent mains connection if
installed on a transporting trolley (a mobile station).
In order to avoid possible faults from arising on our screened data lines
due to potential equalization currents between the devices, an additional
potential equalization unit should be planned for devices connected to the
vending system. (See EN 60309)
Page 66

66
User manual WMF bistro!
Appendix: Accessories and spare parts
Number Unit Designation Order number Position number Fitting
Combi spout complete with Choc
1 pc Combi spout Standard (complete) 33 2259 8000 10 all
1 pc Combi spout Milkpower (complete) 33 2259 8100 10 all
1 pc Combi spout addition Choc 33 2296 2000 10 Choc
1 meter Milk hose 00 004 8 4948 10 fresh milk
1 pc Milk nozzle, milk temperature + 39 - 46 °F (4-8 °C) (green) 33 2317 8000 10 fresh milk
1 pc Milk nozzle, milk temperature + 46 - 61 °F (8-16 °C) (white) 33 9516 9000 10 fresh milk
1 pc Milk nozzle, milk temperature +61 - 75 °F (16-24 °C) (brown) 33 2031 5100 10 fresh milk
1 pc Milk nozzle with Milkpower, milk temperature + 39 - 46 °F (4-8 °C) (red) 33 2410 1000 10 fresh milk
1 pc Milk nozzle with Milkpower, milk temperature + 46 - 61 °F (8-16 °C) (blue) 33 1384 3100 10 fre sh milk
1 pc Milk nozzle with Milkpower, milk temperature 61 °F (16 °C) (pink) 33 2410 2000 10 fresh milk
1 pc Milk nozzle with Milkpower, milk temperature + 39 - 46 °F (4-8 °C) (violet) 33 2410 3000 10 fresh milk
0,22 meter Mixer hose 00 0048 0064 10 Choc
1 pc Mixer bowl 33 2318 0000 10 Mixer bowl
Cup&Cool width 27 cm
1 pc Adapter Plug & Clean 33 2427 5000
fresh milk
1 pc Milk container 33 2388 6000
fresh milk
1 pc Milk container lid 33 2388 7000
fresh milk
Cup&Cool width 36 cm
1 pc Adapter Plug & Clean 33 2427 5000
fresh milk
1 pc Milk container 350 33 2418 4000
fresh milk
1 pc Milk container lid 350 33 2388 8000
fresh milk
Documentation/instructions
1 pc Set of documents:
User Manual bistro! •
Cleaning instruction bistro!•
33 2413 0900
all
Bean hopper (complete)
1 pc Foil bean hopper 33 2813 8000 1 all
1 pc Bean hopper lid 33 9500 0200 1 all
1 pc Bean hopper lid, lockable 33 2809 700 0 1
1 pc Spare key 33 2071 8100 2 Choc
Appendix C: Accessories and spare parts
Page 67

67
User manual WMF bistro!
Appendix: Accessories and spare parts
Number Unit Designation Order number Position number Fitting
Choc hopper
1 pc Choc hopper 33 2801 5099 2 Choc
1 pc Choc hopper lid 33 9508 0100 2 Choc
1 pc Choc hopper lid, lockable 33 2809 800 0 2 Choc
1 pc Spare key 33 2071 8100 2 Choc
1 sheet Labels for choc container 33 2315 3000 2 Choc
Coffee grounds container
1 pc Coffee grounds container (with design sheet metal) 33 280 0 3000 15 1 pc Grounds disposal through the counter (with design sheet metal) 33 2800 3100 1 5
Drip tray / drip tray grid
1 pc Drip tray 33 2372 3000 16 all
1 pc Drip tray grid 33 2372 4000 16 all
Fuse
1 pc Fuse F4 33 0330 0000
all
1 pc Fuse holder lid 33 1597 0000
all
Customer service-kit 0.5/15.000
1 pc Customer service-kit 0.5/15.00 0 33 2809 6000
Standard
1 pc Customer service-kit 0.5/15.00 0 Milkpower 33 2809 6100
Milkpower
Order numbers for the WMF Care program:
1 bottle WMF Special cleaner for milkfoamer 33 0683 6000
fresh milk
1 box WMF Special cleaning tablets (box with 100 pc) 33 0681 1000
all
1 pc Pipe cleaner 33 0350 0000
all
1 pc Cleaning brush 33 1521 9000
all
1 tube Valve lubricating and sealing grease Molykote 5 gr. 33 2179 9000
all
Page 68

68
User manual WMF bistro!
Page 69

69
User manual WMF bistro!
Page 70

70
User manual WMF bistro!
Index
Index
1-Step 11
2-Step 11
A
Acces s control 38
Acces sories and spare p arts 66
Account ing number s of items 40
Account ing level 39
Adjustable addition ingredients 34
Antiscale filter 61
B
Barista p ad 22, 37
Bean hopper 17
Bean hopper(s) 9
Beverag e buttons 31
Beverag e dispensing 12
Brewing temperatur e 32
Brewing time 23
Button allocation 34
C
Calling up the main menu 10
Capacit y 36
Care mes sage 20
Change re cipes 32
Charact ers and symbols used in the user manual 3, 10
Choc powder quantit y 32
Chocs ystem 30
Claims under warrant y 60
Cleaning 23
Cleaning instruct ion 62
Cleaning level 38
Cleaning metal surf aces 45
Cleaning program 29, 44
Cleaning the bean ho pper 47
Cleaning the mixer 46
Cleaning the product hopper 48
Coffee grounds co ntainer 18
Coffee with coff ee grounds 17
Combi spout cleaning 45
Conditions for usage and installation 64
Connection to an ele ctrical power source 65
Cool milk 14, 5 0
Copy day 27
Cup volume s 31
Customer Care 23, 29, 42
D
Daily cle aning 44
Damage preventio n measure s 59
Danger for the coffee machine 58
Danger for the operator 57
Delete counter 28, 4 0
Delete PIN 39
Diagnos tic program 53
Dispensing hot water 13
Dispensing milk foa m 13
Dispensing milk or milk foam 13
Dispensing option 34
Display switching times 26
Dosing auger 48
Drip tray 19
Drip tray, ho using and front panel 45
Dual Milk 16
Duties of th e owner/operator 59
E
Empty cof fee grounds conta iner. 52
Error list 53
Error mes sage 20, 53
Error number 53
Error on the b rewer 52
Error witho ut a fault disp lay 56
F
Filter change 30
Foamer rinsing 36
Functio ns main menu 21
G
Glossary 10
Ground coffee quantity 32
Grounds container cl eaning 45
Grounds container not fitted 52
H
HACCP cle aning concept 49
Height adjustment co mbi spout 17
I
Information 20, 23
Ingredients 34
Instructions 52
Introduc tion 8
L
Labelling beverage buttons 41
Language display guide 35
Latte macchiato 25
Log 23
M
Main menu 20 , 24
Maintanan ce 23
Malfunctions 53
Manual ins ert 9
Manual ins ert 17
Menu control pads 21
Messages and instructio ns 52
Messages for op eration 52
Milk and foam 24
Milk foam quality 24
Milk foam volume 32
Page 71

71
User manual WMF bistro!
Index
Milk sys tem 29
Milk sys tem rinsing 45
Milk volume 32
Mixer rinsing 45
Multiple dispensing 12
N
Numbers of items 40
O
ON/OFF button 37
Open wate r tap 52
Operating options 36, 37
Operation 12
Other set tings 41
Overrid e function 16
Overv iew of cleaning intervals 43
P
Pads on the readiness state display 20
Parts of t he coffee machine 8
Pause time for latte macchiato 25
PIN entry 3 8
PIN rights 3 8
Preselection 12
Product hopper 17
Q
Qualit y check 35
Qualit y level 32
R
Read counter 40
Readine ss to operate 20, 22
Recipes and beverages but tons 31
Recorded error s and mess ages 23
Refill with be ans 52
Reset 35
Rinsing inte rval 36
S
Safety devices 57
Safety equipment 57
SB operation 36
Scale filter installed 35
Second level 37
Select grinder 34
Self-ser vice 22, 36 , 37
Sequenc e of adding the ingredients 34
Service 23
Servicing 51
Set sequence 34
Set timer 26
Setting 31
Setting level 38
Shift key 13, 37
Software 20
Steam disp ensing 15
Steam Milk 11, 16
Steam Milk buttons 16
Steam Milk outlet cleaning 47
Sterilize milk syste m 49
Switching of f 19
Switch off time 26, 27
Switch on cof fee machine 12
Switch on time 26, 27
Symbols us ed in the user manual 3, 10
T
Tablet inser t 9
Technical d ata 63
Testing 35
Time and da te 35
Timer 23, 25
Timer info rmation 28
Timer overview 27
Timer pro gram 25
Timer sta te 25
Touch-screen display 9
V
Volume preselection 12
W
Waiter accounting s ystem 4 0
Warm rinse p ad 20, 22
Warm-up rinsing 36
Warm rinse button 36
Warm rinse p ad 37
Warranty 61
Weigh grounds 35
WMF origin al replac ement parts 61
WMF Service 51
Page 72

Your nearest WMF Service Centre:
© 2007-2010 WMF AG
Espresso machines Division
Postfach 1401, D-73309 Geislingen / Steige, Germany.
All rights reserved, in particular duplication, distribution and translation rights.
No part of this Manual may be reproduced in any form or processed, duplicated or
distributed using electronic systems without written consent.
Design and production / t ypesetting and print presentation:
TecDoc GmbH; Geislingen, info@tecdocgmbh.de
Original user manual. Printed in Germany.
Subject to technical modifi cation.
04.05.2010
 Loading...