

Page 1
LONO
Waffeleisen Edition
Gebrauchsanweisung 2
de
Operating Manual 6
en
Mode d’emploi 12
fr
Istruzioni per l’uso 16
it
Instrucciones de uso 20
es
nl
Gebruiksaanwijzing 24
da
Brugsanvisning 28
sv
Användarguide 32
Käyttöohje 36
no
Bruksanvisning 40
Page 2

Gebrauchsanweisung
Wichtige Sicherheitshinweise
▪ Das Gerät kann von Kindern ab 8 Jahren sowie von
▪ Kinder dürfen nicht mit dem Gerät spielen.
▪ Reinigung und Benutzerwartung dürfen nicht durch
▪ Kinder jünger als 8 Jahre sind vom Gerät und der
▪ Das Gerät darf nicht über eine externe Zeitschaltuhr
▪ Wenn die Netzanschlussleitung dieses Gerätes beschä-
▪ Reinigen Sie nach Verwendung des Gerätes alle Flä-
▪ Dieses Gerät ist dafür bestimmt, im Haushalt und
Personen mit reduzierten physischen, sensorischen oder
mentalen Fähigkeiten oder Mangel an Erfahrung und/
oder Wissen benutzt werden, wenn sie beaufsichtigt
oder bezüglich des sicheren Gebrauchs des Gerätes
unterwiesen wurden und die daraus resultierenden
Gefahren verstanden haben.
Kinder durchgeführt werden, es sei denn, sie sind älter
als 8 Jahre und beaufsichtigt.
Anschlussleitung fernzuhalten.
oder Fernbedienung betrieben werden.
digt wird, muss sie durch den Hersteller oder seinen
Kundendienst oder eine ähnlich qualifizierte Person
ersetzt werden, um Gefährdungen zu vermeiden.
chen/Teile, die mit Nahrungsmitteln in Berührung
gekommen sind. Bitte befolgen Sie die Hinweise im
Kapitel „Reinigung und Pflege“.
ähnlichen Anwendungen verwendet zu werden, wie
beispielsweise:
⋅ in Küchen für Mitarbeiter in Läden, Büros und
anderen gewerblichen Bereichen;
⋅ in landwirtschaftlichen Anwesen;
⋅ von Kunden in Hotels, Motels und anderen Wohn-
einrichtungen;
⋅ in Frühstückspensionen.
Das Gerät ist nicht für den rein gewerblichen
Gebrauch bestimmt.
2
Page 3

de
▪ Achtung: Die berührbaren Oberflächen können bei
eingestecktem Gerät heiß werden und bleiben auch
nach dem Ausstecken heiß!
Vor dem Benutzen
Das Gerät darf nur für den vorgesehenen Zweck gemäß dieser Gebrauchsanweisung verwendet werden. Lesen Sie die Gebrauchsanweisung deshalb vor der
Inbetriebnahme sorgfältig. Sie gibt Anweisungen für den Gebrauch, die Reinigung
und die Pflege des Gerätes. Bei Nichtbeachtung übernehmen wir keine Haftung
für eventuelle Schäden. Bewahren Sie die Gebrauchsanweisung sorgfältig auf und
geben Sie diese gemeinsam mit dem Gerät an Nachbenutzer weiter. Beachten Sie
auch die Garantiehinweise am Ende.
Beim Gebrauch die Sicherheitshinweise beachten.
Technische Daten
Nennspannung: 220 – 240 V~ 50-60 Hz
Leistungsaufnahme: 760-900 W
Schutzklasse: I
Sicherheitshinweise
▪ Gerät nur an eine vorschriftsmäßig installierte Schutzkontaktsteckdose
anschließen. Zuleitung und Stecker müssen trocken sein.
▪ Die Anschlussleitung nicht über scharfe Kanten ziehen oder einklemmen, nicht
herunterhängen lassen sowie vor Hitze und Öl schützen.
▪ Das Gerät nicht auf heiße Oberflächen wie Herdplatten o. Ä. stellen und nicht
in der Nähe offener Flammen betreiben.
▪ Den Netzstecker nicht an der Leitung oder mit nassen Händen aus der Steck-
dose ziehen.
▪ Das Gerät nicht in Betrieb nehmen bzw. sofort Netzstecker ziehen, wenn:
⋅ Gerät oder Netzkabel beschädigt ist
⋅ der Verdacht auf einen Defekt nach einem Sturz oder Ähnlichem besteht.
In diesen Fällen das Gerät zur Reparatur geben.
▪ Das Gerät nicht in Wasser tauchen.
▪ Bei Zweckentfremdung, falscher Bedienung oder nicht fachgerechter Repa-
ratur wird keine Haftung für eventuelle Schäden übernommen. Ebenso sind
Garantieleistungen in solchen Fällen ausgeschlossen.
▪ Das Gerät ist nicht für den gewerblichen Gebrauch bestimmt.
▪ Decken Sie das Gerät nicht ab.
▪ Ziehen Sie nach dem Gebrauch den Netzstecker aus der Steckdose und öffnen
Sie das Gerät.
▪ Lassen Sie das Gerät abkühlen, bevor Sie es transportieren oder verstauen.
de
Inbetriebnahme
▪ Reinigen Sie die Backflächen vor der ersten Verwendung mit einem feuchten
Tuch und etwas Geschirrspülmittel. Nach dem Trocknen die Backflächen mit
einigen Tropfen Öl einpinseln.
3
Page 4

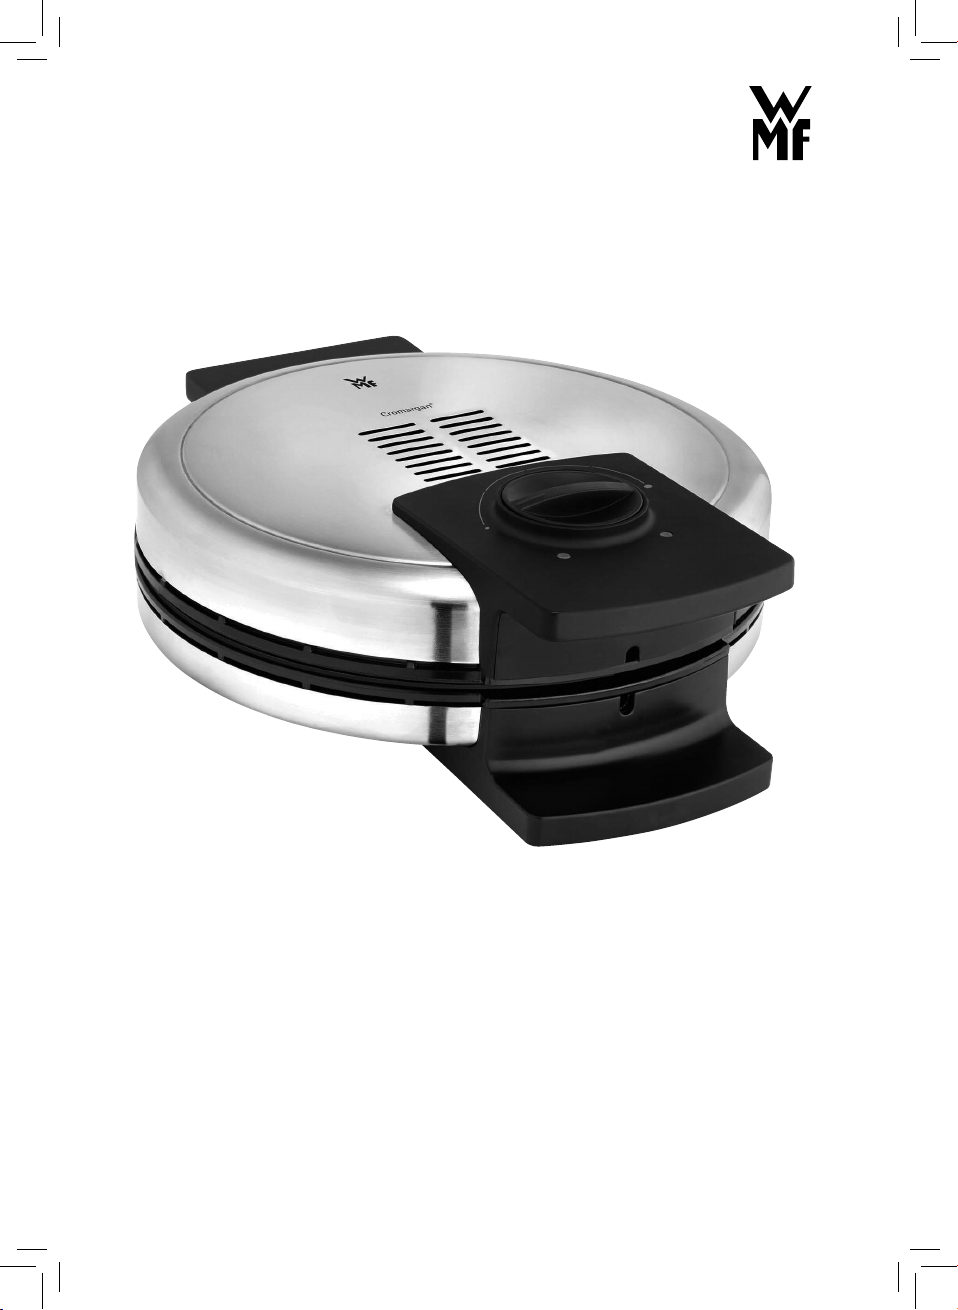
▪ Zum Aufheizen stellen Sie den Einstellknopf auf die maximale Stufe . Nach
dem Anschließen des Netzsteckers an eine Schutzkontaktsteckdose zeigt die
rote Kontrollleuchte an, dass das Waffeleisen aufheizt. Die Backtemperatur ist
erreicht, wenn die Kontrollleuchte von Rot auf Weiß wechselt.
▪ Bei der ersten Inbetriebnahme des neuen Gerätes kann es zu einer geringen
Rauchentwicklung kommen. Dies ist technisch bedingt und kein Grund zur
Beunruhigung.
Backen
▪ Geben Sie den dickflüssigen Teig in die Mitte der unteren Backform und
schließen Sie das Gerät sofort.
Nach kurzer Zeit leuchtet die rote Kontrollleuchte erneut auf, das Gerät heizt
nach.
▪ Sobald die Anzeige wieder auf Weiß wechselt, ist der Backvorgang beendet.
▪ Öffnen Sie das Gerät und entnehmen Sie die Waffel. Ist die Waffel zu hell -
eine höhere Einstellung wählen. Ist sie zu dunkel - den Einstellknopf niedriger
einstellen.
Mit dem Regler können Sie ganz nach Ihrem Geschmack Waffeln von nur
leicht (Einstellung min
backen.
Hinweis: Die erste Waffel aus dem neuen Gerät sollte nicht verzehrt werden.
) bis kräftig, dunkel gebräunt (Einstellung max )
Tipps zum besseren Gelingen
Alle Backzutaten sollten vor dem Teigzubereiten Zimmertemperatur haben.
Das Einfüllen muss schnell erfolgen, da sonst die Waffel oben und unten unterschiedlich braun wird.
Bei zu wenig Teig wird die Bräunung ungleichmäßig fleckig.
Optimale Backergebnisse erhalten Sie, wenn Sie unmittelbar nach dem Entnehmen der fertigen Waffel den Teig für die nächste einfüllen.
Legen Sie die fertigen Waffeln auf einem Küchenrost aus, so bleiben sie knusprig.
Gestapelte Waffeln werden schnell weich.
Reinigung und Pflege
Nach Gebrauch Netzstecker ziehen und das Gerät abkühlen lassen.
Das Gerät niemals in Wasser tauchen oder unter fließendem Wasser reinigen.
Reinigen Sie die Backflächen mit einem weichen Pinsel oder einer Bürste. Außen
nur mit einem feuchten Tuch abwischen und abtrocknen.
Die antihaftbeschichteten Backflächen keinesfalls mit spitzen oder harten Gegenständen bearbeiten, die Antihaftbeschichtung könnte dadurch beschädigt werden.
Waffelrezepte
Grundrezept
Zutaten: 80 g Butter, 60 g Zucker, 1 Päckchen Vanillezucker, 3 Eier, 3/8 l Milch,
300 g Mehl, ½ Päckchen Backpulver, Rum nach Geschmack, Puderzucker zum
Bestäuben
4
Page 5
de
Zubereitung: Die Butter mit dem Zucker, Vanillezucker und den Eiern schaumig
rühren. Nach und nach das gesiebte und mit dem Backpulver vermischte Mehl
abwechselnd mit der Milch dazugeben. Nach Geschmack kann etwas weniger
Milch, dafür mehr Rum dazugegeben werden. Die Flüssigkeit ist stets so zu dosieren, dass der Teig dickflüssig wird. Vor dem Servieren mit Puderzucker bestäuben.
Vanillewaffeln
Zutaten: 150 g Butter oder Margarine, 200 g Zucker, 4 Eier, ausgeschabtes Mark
von einer Vanilleschote, Salz, 250 g Mehl, 1 gestrichener Teelöffel Backpulver, 1-2
Esslöffel Dosenmilch, Puderzucker zum Bestäuben
Zubereitung: Das weiche Fett in eine hohe Schüssel geben, Zucker, Eier, Salz,
Vanillemark, Mehl und Backpulver dazugeben und alles mit einem Handrührgerät
auf höchster Schaltstufe ca. 2 Minuten verrühren. Zuletzt Dosenmilch unter den
Teig mischen.
Käsewaffeln
Zutaten: 200 g Butter oder Margarine, 4 Eier, ½ Teelöffel Salz, 200 g Mehl, ½
Teelöffel Backpulver, 60 ml lauwarmes Wasser, 100 g geriebener Käse, Paprika.
Zubereitung: Fett, Eier und Salz gut verrühren. Abwechselnd mit Backpulver
gemischtes und gesiebtes Mehl und lauwarmes Wasser, zuletzt geriebenen Käse
hinzufügen. Den Teig mit Paprika abschmecken und sofort backen. Die Waffeln
müssen langsam bei etwas geringerer Einstellung backen.
Garantie-Information
Für unsere Geräte übernehmen wir gegenüber dem Endkunden eine 24-monatige
Haltbarkeitsgarantie. Sie beginnt mit dem Kauf des Gerätes durch den Endkunden
und gilt im Gebiet der Bundesrepublik Deutschland.
Ansprüche aus dieser Garantie sind unter Vorlage des Kaufbelegs direkt gegenüber unserem zentralen Kundendienst geltend zu machen.
Von der Garantie ausgeschlossen sind Schäden durch normalen Verschleiß,
unsachgemäßen Gebrauch sowie unterbliebene Pflege.
Der Endkunde besitzt zusätzlich zu den Ansprüchen aus dieser Garantie gesetzliche Ansprüche wegen Mängeln des Gerätes gegenüber seinem direkten Verkäufer/Händler, die durch diese Garantie nicht eingeschränkt werden.
Das Gerät entspricht den Europäischen Richtlinien 2006/95/EG, 2004/108/EG und
2009/125/EG.
Dieses Produkt darf am Ende seiner Lebensdauer nicht über den normalen
Haushaltsabfall entsorgt werden, sondern muss an einem Sammelpunkt für das
Recycling von elektrischen und elektronischen Geräten abgegeben werden.
Die Werkstoffe sind gemäß ihrer Kennzeichnung wiederverwertbar. Mit der Wiederverwendung, der stofflichen Verwertung oder anderen Formen der Verwertung
von Altgeräten leisten Sie einen wichtigen Beitrag zum Schutze unserer Umwelt.
Bitte erfragen Sie bei der Gemeindeverwaltung die zuständige Entsorgungsstelle.
Änderungen vorbehalten
5
Page 6

Operating Manual
Important safety information
▪ The appliance can be used by children older than eight
years of age as well as by people with limited physi-
cal, sensory or mental capabilities and persons lack-
ing experience and/or lacking knowledge, if they are
supervised or have received instructions on how to use
the appliance safely and have understood the resulting
risks.
▪ Children must not play with the appliance.
▪ Children must not clean or maintain the appliance
unless they are older than eight years of age and are
supervised.
▪ Keep the appliance and its connection cable out of
reach of children under eight years of age.
▪ The appliance must not be operated via an external
timer or remote control.
▪ If the supply cord is damaged, it must be replaced by
the manufacturer, its service agent or a similarly quali-
fied person in order to avoid hazards.
▪ After using the appliance, clean all surfaces/parts
which have come into contact with food. Follow the
instructions in the “Cleaning and care” section.
▪ This appliance is designed for use in households and
similar environments such as:
⋅ staff kitchen areas in shops, offices and other work-
ing environments;
⋅ farm houses;
⋅ by clients in hotels, motels and other residential
facilities;
⋅ bed-and-breakfast establishments.
The appliance is not intended for purely commercial
use.
▪ Please note: When the appliance is plugged in, its
touchable surfaces can get very hot and they remain
hot even after the appliance has been unplugged!
6
Page 7
en
Before use
The appliance may only be used for the intended purpose according to these
instructions for use. Therefore, carefully read the instructions for use before
operating the appliance. They contain instructions for using, cleaning and caring
for the appliance. We accept no liability for any damages caused in the event of
non-compliance. Keep the instructions for use in a safe place and pass them on
to any subsequent user together with the appliance.
Observe the safety information when using the appliance.
Technical data
Rated voltage: 220 – 240 V~ 50-60 Hz
Power consumption: 760-900 W
Protection class: I
Safety information
▪ Only connect the appliance to earthed wall sockets that have been installed
pursuant to regulations. The supply cable and plug must be dry.
▪ Do not pull or clamp the connection cable over sharp edges. Do not leave it
dangling and protect it from heat and oil.
▪ Do not place the appliance on hot surfaces, such as on hotplates or similar
areas, and do not operate near naked flames.
▪ Never pull the mains plug out of the socket by the cable or with wet hands.
▪ Stop using the appliance and/or pull out the mains plug immediately if:
⋅ the appliance or power cord is damaged.
⋅ you suspect that there is a defect after the appliance has fallen or suf-
fered a similar incident.
In such cases, arrange for the appliance to be repaired.
▪ Do not immerse the appliance in water.
▪ We accept no liability for any damages caused as a result of misuse, incorrect
operation or improper repairs. Warranty payments are also excluded in such
cases.
▪ The appliance is not intended for commercial use.
▪ Do not cover the appliance.
▪ Pull the mains plug out of the socket after use and open the appliance.
▪ Leave the appliance to cool down before transporting it or putting it away.
en
Starting up the appliance
▪ Clean the baking surfaces with a damp cloth and some washing-up liquid
before using the appliance for the first time. Once the baking surfaces have
dried, brush them with a few drops of oil.
▪ To heat the appliance up, set the adjustment knob to the maximum level
Once the mains plug has been inserted into an earthed wall socket, the red
indicator light comes on to show that the waffle iron is heating up. The bak-
ing temperature has been reached when the indicator light changes from red
to white.
▪ There may be a slight odour the first time you use your new appliance. This is
for technical reasons and is perfectly normal.
.
7
Page 8
Baking
▪ Add the thick batter to the centre of the bottom baking mould and close the
appliance immediately.
After a short time, the red indicator light comes on again to show that the
appliance is heating up.
▪ As soon as the indicator switches back to white, the baking process is com-
plete.
▪ Open the appliance and remove the waffle. If the waffle is too light, select a
higher setting. If the waffle is too dark, move the adjustment knob to a lower
setting.
With the control, you can make waffles entirely to suit your taste, from just
slightly (min. setting
Note: Do not eat the first waffle cooked in the new appliance.
) to strong, dark brown (max. setting ).
Tips for a better outcome
All the baking ingredients should be at room temperature before you prepare the
batter.
Pour the batter into the baking mould quickly, otherwise the waffle will be different shades of brown on the top and bottom.
The colour of your waffle will be uneven and patchy if you do not add enough
batter.
Add the batter for your next waffle immediately after removing the finished one
to achieve the best baking results.
Place the finished waffles on a wire rack to keep them crispy. Waffles go soft
quickly when stacked.
Cleaning and care
After use, remove the mains plug and allow the appliance to cool down.
Never immerse the appliance in water or clean it under running water.
Clean the baking surfaces with a soft brush or a scrubber. Only wipe the outside
using a damp cloth and then dry it.
Under no circumstances should you use sharp or hard objects on the baking
surfaces with a non-stick coating; these could damage the non-stick coating.
8
Page 9

en
Waffle recipes
Basic recipe
Ingredients: 80 g butter, 60 g sugar, 1 sachet of vanilla sugar, 3 eggs, 3/8 l milk,
300 g flour, ½ sachet baking powder, rum to taste, icing sugar for dusting
Preparation: Beat butter with sugar, vanilla sugar and eggs until fluffy. Alternating with milk, gradually add the sieved flour mixed with baking powder. Add less
milk and more rum to taste. Always add the liquid in such a quantity that the
batter is thick. Dust with icing sugar before serving.
Vanilla waffles
Ingredients: 150 g butter or margarine, 200 g sugar, 4 eggs, pulp scraped from a
vanilla pod, salt, 250 g flour, 1 level tsp baking powder, 1-2 tbsp evaporated milk,
icing sugar for dusting
Preparation: Place the soft butter or margarine in a high-sided bowl, add the
sugar, eggs, salt, vanilla pulp, flour and baking powder and use a hand mixer
on the highest setting to mix everything for approx. 2 minutes. Lastly, mix the
evaporated milk in with the batter.
Cheese waffles
Ingredients: 200 g butter or margarine, 4 eggs, ½ tsp salt, 200 g flour, ½ tsp
baking powder, 60 ml lukewarm water, 100 g grated cheese, paprika.
Preparation: Mix the butter or margarine, eggs and salt well. Alternating with
lukewarm water, add the sieved flour mixed with baking powder, then add the
grated cheese last. Season the batter to taste with paprika and bake immediately.
The waffles must bake slowly at a slightly lower setting.
9
Page 10
For UK use only
▪ This product is supplied with a 13 A plug conforming to BS 1363 fitted to the
mains lead. If the plug is unsuitable for your socket outlets or needs to be
replaced, please note the following. If the plug is a non-rewireable one, cut
it from the mains lead and immediately dispose of it. Never insert it into a
socket outlet as there is a very great risk of an electric shock.
▪ The replacement of the plug at the mains lead has to be done according to the
following instructions:
Warning - This appliance must be earthed
Important: The wires in this mains lead are coloured in accordance with the
following code:
green/yellow Earth
blue Neutral
brown Live
As the colours of the wires in the mains lead of this appliance may not
correspond with the coloured markings identifying the terminals in your plug,
proceed as follows:
⋅ the wire which is coloured green and yellow must be connected to the
terminal which is marked with the letter E or by the earth symbol
coloured green or green and yellow,
⋅ the wire which is coloured blue must be connected to the terminal which
is marked the letter N or coloured black,
⋅ the wire which is coloured brown must be connected to the terminal
which is marked with the letter L or coloured red.
▪ If a 13 A (BS 1363) plug is used it must be fitted with a 13 A fuse conforming
to BS 1362 and be ASTA approved. If any other type of plug is used, the
appliance must be protected by a 10 A fuse either in the plug or adapter or at
the distribution board.
If in doubt - consult a qualified electrician.
▪ Never use the plug without closing the fuse cover.
, or
10
The device complies with the European Directives 2006/95/EG, 2004/108/EG and
2009/125/EG.
At the end of its service life, this product may not be disposed of in the normal
household waste, but rather must be disposed of at a collection point for recycling electrical and electronic devices. The materials are recyclable according to
their labelling. You make an important contribution to protecting our environment by reusing, recycling or utilising old devices in other ways. Please ask the
municipal administration where the appropriate disposal facility is located.
Subject to change.
Page 11

en
11
Page 12

Mode d’emploi
Consignes de sécurité importantes
▪ Les enfants à partir de 8 ans ainsi que les personnes
ayant des capacités physiques, sensorielles ou mentales
restreintes ou ayant un manque d’expérience et/ou
de connaissances peuvent utiliser cet appareil sous
surveillance ou s’ils ont été formés pour utiliser cet
appareil en toute sécurité et ont compris les dangers
pouvant résulter de son utilisation.
▪ Ne pas laisser les enfants jouer avec cet appareil.
▪ Ne pas laisser les enfants effectuer le nettoyage et la
maintenance sauf s’ils sont âgés de plus de 8 ans et
sous surveillance.
▪ Les enfants de moins de 8 ans doivent être maintenus à
l’écart de l’appareil et de son câble de raccordement.
▪ L’appareil ne doit pas être mis en service à l’aide d’une
minuterie externe ou d’une commande à distance.
▪ Si le câble d’alimentation de l’appareil est endommagé,
il doit être remplacé par le fabricant ou son SAV ou
par une personne qualifiée, afin d’éviter toute mise en
danger.
▪ Après avoir utilisé l’appareil, nettoyez toutes les
surfaces/pièces qui sont entrées en contact avec les
aliments. Veuillez suivre les instructions du chapitre
«Nettoyage et entretien».
▪ L’appareil est conçu pour un usage domestique ou pour
des applications similaires telles que:
⋅ dans des cuisines pour le personnel dans des
boutiques, des bureaux ou d’autres secteurs
professionnels;
⋅ dans des exploitations agricoles;
⋅ par des clients dans des hôtels, des motels et autres
établissements résidentiels;
⋅ dans des chambres d’hôtes.
L’appareil n’est pas conçu pour un usage purement
commercial.
12
Page 13

fr
▪ Attention: Les surfaces accessibles peuvent devenir
très chaudes lorsque l’appareil est branché et gardent
leur chaleur lorsque l’appareil est éteint.
Avant l’utilisation
L’appareil ne doit être utilisé que pour l’usage prévu conformément à ce mode
d’emploi. En conséquence, veuillez lire attentivement le manuel d’utilisation
avant la mise en service. Il contient des consignes importantes pour l’utilisation,
le nettoyage et l’entretien de l’appareil. Nous déclinons toute responsabilité
en cas de dommage découlant du non-respect des consignes. Conservez
soigneusement ce mode d’emploi et transmettez-le avec l’appareil en cas de
remise à une tierce personne.
Respectez les consignes de sécurité lors de l’utilisation.
Caractéristiques techniques
Tension nominale: 220 – 240 V~ 50-60 Hz
Puissance: 760-900W
Catégorie de protection: I
Consignes de sécurité
▪ Brancher l’appareil uniquement dans une prise de courant de sécurité,
installée conformément aux prescriptions. Le câble d’alimentation et la prise
doivent être secs.
▪ Ne pas tirer le câble d’alimentation sur des bords tranchants, ne pas le coincer,
ne pas le laisser pendre et le protéger de la chaleur et de l’huile.
▪ Ne pas poser l’appareil sur des surfaces chaudes telles que des plaques de
cuisson ou équivalent et ne pas l’utiliser à proximité d’une flamme nue.
▪ Ne pas débrancher l’appareil en tirant sur le câble ou avec les mains mouillées.
▪ Ne pas mettre l’appareil en marche ou le débrancher immédiatement si:
⋅ l’appareil ou le câble d’alimentation sont endommagés;
⋅ l’appareil a été endommagé suite à une chute ou équivalent.
Dans ces cas, porter l’appareil en réparation.
▪ Ne plongez pas l’appareil dans l’eau.
▪ Nous déclinons toute responsabilité en cas de dommage découlant de
l’utilisation détournée, de la mauvaise utilisation ou de la réparation
inappropriée de l’appareil. Pour de tels cas, toute intervention sous garantie
est exclue.
▪ L’appareil ne doit pas faire l’objet d’un usage professionnel.
▪ Ne pas recouvrir l’appareil.
▪ Débranchez la fiche de l’appareil de la prise de courant après l’utilisation puis
ouvrez-le.
▪ Laissez l’appareil refroidir avant de le transporter ou de le ranger.
fr
13
Page 14

Mise en service
▪ Nettoyer les surfaces de cuisson avant la première utilisation avec un chiffon
humide et un peu de liquide vaisselle. Après séchage, badigeonner les surfaces
de cuisson avec quelques gouttes d’huile.
▪ Pour le faire chauffer, placer le bouton de réglage au niveau maximum
. Après avoir branché la fiche sur une prise électrique avec terre, le témoin
de contrôle rouge indique que le gaufrier est en chauffe. La température de
cuisson est atteinte lorsque le témoin de contrôle passe de rouge à blanc.
▪ Lors de la première mise en service d’un nouvel appareil, de légères fumées
peuvent apparaître. Celles-ci sont d’origine technique, vous ne devez pas vous
en soucier.
Cuisson
▪ Placez la pâte épaisse au milieu du moule inférieur et fermez immédiatement
l’appareil.
Peu après, le témoin de contrôle rouge s’allume de nouveau, l’appareil
continue à chauffer.
▪ Dès que l’indicateur est repassé au blanc, la cuisson est terminée.
▪ Ouvrez l’appareil et sortez la gaufre. Si la gaufre n’est pas assez dorée, opter
pour un réglage supérieur. Si la gaufre est trop dorée, positionner le bouton
de réglage sur un réglage inférieur.
Vous pouvez, à l’aide du régleur, préparer vos gaufres selon votre goût de
faible dorage (réglage min
Remarque: La première gaufre réalisée avec l’appareil neuf ne doit pas être
consommée.
) jusqu’au dorage fort à foncé (réglage max ).
Astuces pour mieux réussir vos gaufres
Avant de préparer la pâte, tous les ingrédients doivent être à température
ambiante.
Il est nécessaire de déposer la pâte rapidement afin d’éviter que le dorage de la
gaufre ne soit différent au-dessus et au-dessous.
Le dorage ne sera pas uniforme s’il y a trop peu de pâte.
Vous obtiendrez des résultats de cuisson optimaux en déposant la pâte pour la
gaufre suivante immédiatement après avoir retiré la gaufre prête.
Placez les gaufres préparées sur une grille de cuisine afin qu’elles restent
croustillantes. Les gaufres ramollissent vite lorsqu’elles sont empilées.
14
Nettoyage et entretien
Après utilisation, débrancher l’appareil et le laisser refroidir.
Ne jamais plonger l’appareil dans l’eau et ne jamais le nettoyer sous l’eau
courante.
Nettoyez les surfaces de cuisson avec une brosse ou un pinceau souple. Essuyez
simplement l’extérieur avec un chiffon humide avant de le sécher.
Ne jamais traiter les surfaces de cuisson anti-adhésives avec des objets pointus ou
durs, sous peine d’endommager le revêtement anti-adhésif.
Page 15

fr
Recettes de gaufres
Recette de base
Ingrédients: 80g de beurre, 60g de sucre, 1 sachet de sucre vanillé, 3 œufs,
3/8l de lait, 300g de farine, ½ sachet de levure chimique, du rhum selon votre
goût, sucre glace à saupoudrer
Préparation: Faire mousser le beurre avec le sucre, le sucre vanillé et les œufs.
Ajouter petit à petit la farine tamisée et mélangée avec la levure en alternance
avec le lait. Selon les goûts, ajouter un peu moins de lait et un peu plus de rhum.
Il convient de toujours doser le liquide de manière à ce que la pâte soit épaisse.
Saupoudrer avec du sucre glace avant de servir.
Gaufres à la vanille
Ingrédients: 150g de beurre ou de margarine, 200g de sucre, 4 œufs, la pulpe
grattée d’une gousse de vanille, sel, 250g de farine, 1 cuillère café rase de levure
chimique, 1-2 cuillère(s) à café de lait concentré, sucre glace à saupoudrer
Préparation: Placer la matière grasse molle dans un bol haut, ajouter le sucre,
les œufs, le sel, la pulpe de vanille, la farine et la levure chimique, puis mélanger
le tout avec un fouet électrique à vitesse maximale pendant env. 2 minutes.
Incorporer en dernier le lait concentré dans la pâte.
Gaufres au fromage
Ingrédients: 200g de beurre ou de margarine, 4 œufs, ½ cuillère à café de sel,
200g de farine, ½ cuillère à café de levure chimique, 60ml d’eau tiède, 100g de
fromage râpé, poivre.
Préparation: Bien mélanger la matière grasse, les œufs et le sel. Ajouter
en alternance la farine tamisée et mélangée avec la levure et l’eau tiède,
puis en dernier le fromage râpé. Assaisonner la pâte avec le poivre et cuire
immédiatement. Les gaufres doivent cuire lentement avec un réglage un peu
moins fort.
L’appareil est conforme aux Directives européennes 2006/95/CE, 2004/108/CE et
2009/125/CE.
Au terme de son utilisation, ce produit ne doit pas être éliminé avec les déchets
ménagers habituels, mais il doit être déposé dans un point de collecte pour le
recyclage d’appareils électriques et électroniques.
Les matériaux sont recyclables conformément à leur marquage. Grâce à la
réutilisation, au recyclage de matériaux ou à d’autres formes de recyclage des
vieux appareils, vous contribuez de manière significative à la protection de notre
environnement.
Veuillez contacter votre municipalité pour connaître le centre de traitement
compétent.
Sous réserve de modifications
15
Page 16

Istruzioni per l’uso
16
Importanti indicazioni per la sicurezza
▪ Questo apparecchio può essere utilizzato da bambini
a partire dagli 8 anni di età e da persone con ridotte
capacità fisiche, sensoriali o mentali o che mancano di
esperienza e/o di conoscenza, solo se sono sorvegliate o
se sono state istruite riguardo all’utilizzo sicuro dell’ap-
parecchio e se ne hanno compreso i pericoli risultanti.
▪ I bambini non devono giocare con l’apparecchio.
▪ La pulizia e la manutenzione a carico dell’utente non
devono essere eseguite da bambini, eccetto nel caso in
cui essi abbiano più di 8 anni e siano sorvegliati.
▪ Tenere l’apparecchio e il cavo di collegamento lontani
dalla portata dei bambini con meno di 8 anni.
▪ Il dispositivo non deve essere azionato da un timer
esterno o da un telecomando.
▪ Se il cavo di allacciamento alla rete è guasto, è neces-
sario richiederne la sostituzione al produttore, al suo
servizio clienti o a un’altra persona competente del
settore, onde evitare pericoli.
▪ Terminato l’utilizzo dell’apparecchio, pulire tutte le
superfici/parti che sono state a contatto con gli ali-
menti. Seguire le indicazioni contenute nel capitolo
“Pulizia e manutenzione”.
▪ Questo apparecchio può essere utilizzato solo in ambito
domestico e in applicazioni simili, come ad esempio:
⋅ in cucine per i dipendenti di negozi, uffici e altri
settori commerciali;
⋅ in tenute agricole;
⋅ da clienti in hotel, motel e altri impianti di sog-
giorno;
⋅ in bed & breakfast.
Questo apparecchio non è destinato ad un uso
puramente commerciale.
▪ Attenzione: le superfici che si possono toccare possono
essere calde quando la spina dell’apparecchio è collegata e rimangono calde anche dopo lo scollegamento!
Page 17

it
Prima dell‘uso
L’apparecchio deve essere adoperato solo per l’uso previsto, seguendo le presenti
istruzioni per l’uso. A tal fine, leggere accuratamente le istruzioni per l’uso prima
della messa in servizio. Esse forniscono istruzioni per l’utilizzo, la pulizia e la cura
dell’elettrodomestico. In caso di inosservanza, non ci assumiamo alcuna responsabilità per eventuali danni. Conservare accuratamente le istruzioni per l’uso e, in
caso di cessione dell’elettrodomestico, consegnarle all’utente successivo insieme
all’apparecchio.
Durante l’uso osservare scrupolosamente le istruzioni per la sicurezza.
Dati tecnici
Tensione nominale: 220 – 240 V~ 50-60 Hz
Potenza assorbita: 760-900 W
Classe di protezione: I
Istruzioni per la sicurezza
▪ Collegare l’apparecchio soltanto a una presa schuko installata a norma. Il cavo
di alimentazione e il connettore devono essere asciutti.
▪ Non tirare o incastrare il cavo di collegamento contro spigoli taglienti, non
lasciarlo sospeso e proteggerlo dal calore e dall’olio.
▪ Non collocare l’apparecchio su superfici calde come piastre e simili e non
metterlo in funzione in prossimità di fiamme libere.
▪ Non staccare la spina dalla presa, tirandola per il cavo o con le mani bagnate.
▪ Non mettere in funzione l’apparecchio e staccare subito la spina, se:
⋅ l’apparecchio o il cavo di alimentazione sono guasti;
⋅ si sospetta un difetto dopo una caduta o un evento simile.
In questi casi far riparare l’apparecchio.
▪ Non immergere l’apparecchio in acqua.
▪ Non ci si assume alcuna responsabilità per eventuali danni in caso di utilizzo
per scopi diversi da quelli previsti, per un uso errato oppure in caso di riparazione non professionale. In questi casi sono escluse anche le prestazioni di
garanzia.
▪ Questo apparecchio non è destinato a un uso commerciale.
▪ Non coprire l’apparecchio.
▪ Togliere la spina dalla presa dopo l’utilizzo e aprire l’apparecchio.
▪ Far raffreddare l’apparecchio prima di spostarlo o riporlo.
it
Prima messa in servizio
▪ Alla prima messa in servizio, pulire le piastre di cottura con un panno umido e
una piccola quantità di detersivo per piatti. Dopo aver asciugato le piastre di
cottura, ungerle con qualche goccia di olio.
▪ Per avviare il riscaldamento, posizionare il selettore sul massimo
aver collegato il cavo di alimentazione a una presa schuko, la spia di controllo
rossa indica che la piastra per waffel si sta scaldando. Una volta raggiunta la
temperatura di cottura, la spia di controllo rossa diventa bianca.
▪ Alla prima messa in servizio dell’apparecchio nuovo può generarsi un po’ di
fumo. Ciò è dovuto a motivi tecnici e non c’è motivo di preoccuparsi.
. Dopo
17
Page 18

Cuocere al forno
▪ Versare la pastella al centro dello stampo inferiore e chiudere subito l’appa-
recchio.
Dopo poco la spia di controllo torna ad essere rossa e l’apparecchio continua
a riscaldare.
▪ Appena la cottura è ultimata, la spia di controllo torna ad essere bianca.
▪ Aprire l’apparecchio e togliere il waffel. Se il waffel è troppo chiaro, impostare
un grado di cottura maggiore. Se è troppo scuro, impostare il selettore su un
grado più basso.
Il regolatore permette di impostare la cottura a proprio piacimento, in modo
che il waffel sia solo leggermente (min
Nota: si consiglia di non mangiare il primo waffel preparato con l’apparecchio
nuovo.
) o molto (max ) dorato.
Consigli per risultati ottimali
Preparare la pastella con ingredienti a temperatura ambiente.
Versare la pastella molto rapidamente, in modo che le due facce del waffel non
raggiungano gradi di cottura diversi.
Con una quantità insufficiente di pastella, la cottura non sarà uniforme.
Per una cottura ottimale, versare la nuova pastella immediatamente dopo aver
tolto il waffel pronto.
Adagiare il waffel pronto su una griglia per dolci in modo da conservarne la
croccantezza. Se impilati, i waffel si ammorbidiscono.
Pulizia e manutenzione
Dopo l’uso, staccare la spina e far raffreddare l’apparecchio.
Non immergere l’apparecchio in acqua e non lavarlo sotto l’acqua corrente.
Pulire le piastre di cottura con un pennello morbido o una spazzola. Pulire e
asciugare l’esterno solo con un panno umido.
Non utilizzare strumenti appuntiti o duri sulle piastre di cottura antiaderenti per
evitare di danneggiarne il rivestimento.
18
Page 19

it
Ricette per waffel
Ricetta base
Ingredienti: 80 g burro, 60 g zucchero, 1 bustina di zucchero vanigliato, 3 uova,
375 ml latte, 300 g farina, ½ bustina di lievito per dolci, rum a piacere, zucchero
a velo per la decorazione
Preparazione: Sbattere lo zucchero, lo zucchero vanigliato e le uova fino a ottenere un composto spumoso. Aggiungere la farina setacciata con il lievito e il latte
poco a poco, alternandoli. È possibile ridurre leggermente la quantità di latte
compensandola con il rum, a seconda dei gusti. Gli ingredienti liquidi devono
essere dosati in modo da ottenere una pastella densa. Prima di servire, cospargere
con zucchero a velo.
Waffel alla vaniglia
Ingredienti: 150 g burro (o margarina), 200 g zucchero, 4 uova, polpa estratta da
un baccello di vaniglia, sale, 250 g farina, 1 cucchiaino raso di lievito per dolci,
1-2 cucchiai di latte condensato, zucchero a velo per la decorazione
Preparazione: Mettere il burro (o la margarina) ammorbidito in una ciotola
con i bordi alti, unire zucchero, uova, sale, polpa di vaniglia, farina e lievito, e
mescolare con lo sbattitore elettrico impostato sul massimo, per 2 minuti. Unire il
latte condensato al composto.
Waffel al formaggio
Ingredienti: 200 g burro (o margarina), 4 uova, ½ cucchiaino di sale, 200 g
farina, ½ cucchiaino di lievito per dolci, 60 ml acqua tiepida, 100 g formaggio
grattugiato, peperoncino in polvere.
Preparazione Unire burro (o margarina), uova e sale mescolando. Aggiungere la
farina setacciata con il lievito per dolci alternandola all’acqua tiepida, unire poi il
formaggio grattugiato. Insaporire con il peperoncino e cuocere subito. Cuocere i
waffel lentamente impostando una temperatura più bassa.
L’apparecchio è conforme alle direttive europee 2006/95/CE, 2004/108/CE e
2009/125/CE.
Alla fine del suo ciclo di vita non buttare il prodotto nella spazzatura domestica,
ma consegnarlo in un centro di riciclaggio di apparecchi elettrici o elettronici.
I materiali possono essere riciclati in conformità con la loro etichettatura. Grazie
al riciclaggio, al recupero dei materiali e ad altre forme di riutilizzo di vecchi
apparecchi, si riesce a contribuire in modo significativo alla protezione dell’ambiente.
Per informazioni relative al centro di smaltimento, si prega di contattare l’amministrazione comunale.
Con riserva di modifiche
19
Page 20

Instrucciones de uso
Advertencias de seguridad importantes
▪ Este aparato puede ser utilizado por niños mayores
▪ Los niños no deben jugar con el aparato.
▪ Los niños tampoco deben realizar su limpieza ni man-
▪ El aparato y el cable de conexión deben mantenerse
▪ No ponga el aparato a funcionar con un temporizador
▪ Si el cable de alimentación de red de este aparato está
▪ Luego de utilizar el aparato, limpie todas las superficies
▪ Este aparato está diseñado para el uso doméstico u
▪ Atención: ¡Las superficies de contacto pueden calen-
20
de 8 años y por personas con discapacidades físicas,
psíquicas o sensoriales o que carezcan de la experiencia
y/o conocimientos necesarios para usarlo solamente si
lo utilizan bajo vigilancia, o si reciben las instrucciones
necesarias para utilizarlo con seguridad y comprenden
los peligros relacionados con su uso.
tenimiento, a menos que sean mayores de 8 años y lo
hagan bajo la vigilancia de adultos.
fuera del alcance de los niños menores de 8 años.
externo o mando a distancia.
estropeado, deberá ser sustituido por uno nuevo por el
fabricante, por el servicio de atención al cliente o por
personal cualificado, para evitar cualquier peligro.
y piezas que hayan estado en contacto con alimentos.
Siga las indicaciones contenidas en el capítulo “Lim-
pieza y cuidados”.
otras aplicaciones similares, tales como:
⋅ en cocinas para el personal de tiendas, oficinas y
otros ámbitos comerciales;
⋅ en fincas agrícolas;
⋅ para clientes de hoteles, moteles y otros estableci-
mientos de hospedaje;
⋅ en pensiones con desayuno.
No está diseñado para el uso meramente comercial.
tarse cuando el aparato está enchufado y permanecen
calientes luego de desconectarlo!
Page 21

es
Antes de usarlo
Utilice el aparato solo para el fin para el que se ha diseñado y siempre siguiendo
las instrucciones de uso de este manual. Lea atentamente estas instrucciones
antes de poner el aparato en funcionamiento. En ellas encontrará indicaciones
para el uso, la limpieza y el mantenimiento correctos del mismo. No nos responsabilizamos de los daños que puedan producirse por un uso no conforme al previsto.
Guarde bien estas instrucciones y entréguelas al siguiente usuario junto con el
aparato.
Respete siempre las indicaciones de seguridad durante el uso.
Datos técnicos
Tensión nominal: 220 – 240 V~ 50-60 Hz
Consumo de energía: 760-900 W
Clase de protección: I
Indicaciones de seguridad
▪ Enchufe el aparato solamente a una toma de corriente con puesta a tierra que
esté instalada correctamente según las normativas correspondientes. El cable y
el enchufe deben estar secos.
▪ No tire del cable de conexión cuando éste se encuentre sobre bordes afilados
ni lo aprisione, no deje que cuelgue y protéjalo del calor y del aceite.
▪ No ponga el aparato a funcionar sobre superficies calientes, como placas de
cocina o lugares similares, y manténgalo alejado de las llamas abiertas.
▪ No desenchufe nunca el aparato tirando del cable o con las manos mojadas.
▪ No ponga en funcionamiento el aparato y desconéctelo inmediatamente de la
red si:
⋅ el aparato o el cable de red están dañados,
⋅ tiene la sospecha de que se haya podido producir algún fallo después de
una caída del aparato o similar.
En estos casos, envíe el aparato para que sea reparado.
▪ No lo sumerja en agua.
▪ No asumiremos ninguna responsabilidad por posibles daños en caso de un
uso diferente al previsto, un manejo incorrecto o una reparación que no haya
sido realizada por profesionales. En esos casos están excluidas también las
prestaciones de garantía.
▪ El aparato no se ha diseñado para el uso comercial.
▪ No cubra el aparato.
▪ Desconecte el enchufe de la toma de corriente después de usar el aparato y
ábralo.
▪ Deje enfriar el aparato antes de transportarlo o guardarlo.
es
21
Page 22

Puesta en funcionamiento
▪ Antes del primer uso, limpie las superficies de cocción con un paño húmedo
y algo de detergente. Cuando las superficies de cocción estén secas, aplique
algunas gotas de aceite con un pincel.
▪ Para el calentamiento coloque el botón de ajuste en el máximo nivel
Luego de conectar el enchufe a una toma de corriente con puesta a tierra, la
luz de control roja se enciende para indicar que la gofrera se está calentando.
La luz roja cambia a blanco para indicar que ha sido alcanzada la temperatura
de cocción.
▪ Durante el primer uso del nuevo aparato puede producirse una pequeña
cantidad de humo. Esto ocurre por razones técnicas y no es motivo de
preocupación.
.
Hornear
▪ Incorpore la masa líquida en el centro del molde inferior y cierre inmediata-
mente el aparato.
Luego de un instante, la luz roja se enciende nuevamente para indicar que el
aparato vuelve a calentarse.
▪ El proceso de cocción ha finalizado cuando la luz roja vuelve a tornarse
blanca.
▪ Abra el aparato y retire el gofre. Si el gofre está demasiado blanco, seleccione
un ajuste más alto. Si está demasiado tostado, ponga más bajo el botón de
ajuste.
Con el regulador podrá seleccionar a su gusto el horneado de los gofres desde
muy suaves (ajuste mín.
Indicación: El primer gofre cocido con el aparato nuevo no se debe ingerir.
) hasta muy cocidos y tostados (ajuste máx. ).
Consejos para un mejor resultado
Todos los ingredientes deben estar a temperatura ambiente antes de preparar la
masa.
El llenado debe realizarse rápidamente, porque de lo contrario los gofres tendrán
distintos grados de horneado arriba y abajo.
Si se incorpora muy poca masa, el tostado será irregular y con manchas.
Obtendrá los mejores resultados de horneado cuando incorpore la masa para el
próximo gofre inmediatamente después de haber sacado el anterior.
Coloque los gofres terminados sobre una rejilla metálica de cocina, para que
permanezcan crocantes. Si coloca los gofres uno encima del otro, se ablandarán
rápidamente.
22
Limpieza y cuidados
Luego del uso, desconecte el enchufe de red y deje enfriar el aparato.
Nunca sumerja el aparato en agua o lo limpie con agua corriente.
Limpie las superficies de cocción con un pincel o un cepillo suaves. Para el exterior utilice solamente un paño húmedo y luego séquelo.
Nunca utilice objetos filosos o duros para trabajar sobre las superficies de cocción
anti-adherentes, ya que esto podría dañarlas.
Page 23

es
Recetas de gofres
Receta básica
Ingredientes: 80 g de manteca, 60 g de azúcar, 1 paquetito de azúcar de vainilla,
3 huevos, 3/8 l de leche, 300 g de harina, ½ paquetito de polvo de hornear, ron a
gusto, azúcar impalpable para espolvorear
Preparación: Bata la manteca con el azúcar, el azúcar de vainilla y los huevos
hasta que tengan consistencia espumosa. Incorpore de a poco la harina previamente tamizada y mezclada con el polvo de hornear, agregando alternadamente
la leche. Según su gusto personal, puede utilizar menos leche y más ron. El líquido
se debe dosificar siempre de manera tal que la masa quede espesa. Antes de servir,
espolvoree con azúcar impalpable.
Gofres de vainilla
Ingredientes: 150 g de manteca o margarina, 200 g de azúcar, 4 huevos, ralla-
dura de una vaina de vainilla, sal, 250 g de harina, 1 cucharadita al ras de polvo
de hornear, 1-2 cucharada/s sopera/s de leche condensada, azúcar impalpable
para espolvorear
Preparación: Incorpore la manteca o margarina blanda en un recipiente, agregue
el azúcar, los huevos, la sal, la ralladura de vainilla, la harina y el polvo de hornear
y bata todo con una batidora manual en la velocidad más alta durante aprox. 2
minutos. Por último, mezcle la leche condensada con la masa.
Gofres de queso
Ingredientes: 200 g de manteca o margarina, 4 huevos, ½ cucharadita de sal,
200 g de harina, ½ cucharadita de polvo de hornear, 60 ml de agua tibia, 100 g
de queso rallado, pimentón.
Preparación: Bata bien la manteca o margarina con la sal y los huevos. Incorpore
alternando el agua tibia y la harina, previamente tamizada y mezclada con el
polvo de hornear. Por último agregue el queso rallado. Sazone la masa con el
pimentón y hornéela inmediatamente. Los gofres deben hornearse lentamente a
una temperatura algo menor.
El aparato cumple con las directivas europeas 2006/95/CE, 2004/108/CE y
2009/125/CE.
Al finalizar su ciclo de vida, el producto no debe desecharse con la basura
doméstica, sino que debe llevarse a un punto de recogida y reciclaje para aparatos
eléctricos y electrónicos.
Los materiales se reutilizan conforme a su etiquetado. Volver a usar, reciclar o
utilizar con otro fin aparatos viejos ayuda a proteger el medio ambiente.
Pregunte a las autoridades locales por el lugar específico donde debe entregar o
tirar el producto para su eliminación.
Sujeto a modificaciones
23
Page 24

Gebruiksaanwijzing
Belangrijke veiligheidsinstructies
▪ Deze apparaten mogen door kinderen vanaf 8 jaar en
door personen met verminderde fysieke, sensorische
of mentale vaardigheden of gebrek aan ervaring en/
of kennis worden gebruikt, wanneer ze onder toezicht
staan of over het veilige gebruik van het apparaat zijn
geïnstrueerd en de daaruit resulterende risico’s hebben
begrepen.
▪ Kinderen mogen niet met het apparaat spelen.
▪ Reiniging en onderhoud mogen niet door kinderen
worden uitgevoerd, behalve wanneer ze ouder zijn dan
8 jaar en onder toezicht staan.
▪ Kinderen jonger dan 8 jaar dienen uit de buurt van het
apparaat en de stroomkabel gehouden te worden.
▪ Het apparaat mag niet via een externe timer of
afstandsbediening worden geactiveerd.
▪ Wanneer de stroomkabel van dit apparaat beschadigd
is, mag deze alleen door de fabrikant, diens klantenser-
vice of door een vergelijkbaar gekwalificeerde persoon
worden vervangen. Dit om enig risico op gevaar te
voorkomen.
▪ Reinig na het gebruik van het apparaat alle oppervlak-
ken en onderdelen die met levensmiddelen in aanraking
zijn gekomen. Volgt u alstublieft de instructies in het
hoofdstuk “Reiniging en onderhoud”.
▪ Dit apparaat is bedoeld voor huishoudelijk en vergelijk-
baar gebruik, zoals:
⋅ in de keuken door medewerkers van winkels, kanto-
ren en andere zakelijke omgevingen;
⋅ bij agrarische bedrijven;
⋅ door klanten van hotels, motels en andere ver-
blijfsomgevingen;
⋅ in pensions met ontbijt.
Het apparaat is niet bedoeld voor puur zakelijk
gebruik.
24
Page 25

nl
▪ Let op: Bij een ingeschakeld apparaat kunnen de con-
tactvlakken zeer heet worden. Deze blijven ook na het
uitschakelen nog steeds heet!
Vóór het gebruik
Het apparaat mag alleen voor het beoogde doel en overeenkomstig deze
gebruiksaanwijzing worden gebruikt. Leest u deze gebruiksaanwijzing daarom
zorgvuldig door voordat u het apparaat in gebruik neemt. De gebruiksaanwijzing
bevat aanwijzingen voor het gebruik, de reiniging en het onderhoud van het
apparaat. Wanneer u de gebruiksaanwijzing niet in acht neemt, zijn wij niet
aansprakelijk voor eventuele schade. Berg de gebruiksaanwijzing goed op en geef
deze samen met het apparaat aan een volgende gebruiker.
Neem bij het gebruik de veiligheidsinstructies in acht.
Technische gegevens
Nominale spanning: 220 – 240 V~ 50-60 Hz
Vermogen: 760-900 W
Veiligheidsklasse: I
Veiligheidsinstructies
▪ U mag het apparaat alleen op een volgens de voorschriften geplaatst en
geaard stopcontact aansluiten. Kabel en stekker moeten droog zijn.
▪ Zorg ervoor dat de stroomkabel niet langs scherpe randen loopt of beklemd
raakt, laat de kabel niet naar beneden hangen en bescherm de kabel tegen
hitte en olie.
▪ Plaats het apparaat niet op een heet oppervlak zoals een kookplaat en gebruik
het niet in de buurt van open vuur.
▪ U mag de stekker niet aan de kabel of met natte handen uit het stopcontact
trekken.
▪ Neem het apparaat niet in gebruik of trek direct de stekker uit het stopcontact
wanneer:
⋅ het apparaat of de stroomkabel beschadigd is.
⋅ na een val enz. het vermoeden bestaat dat het apparaat defect is.
In dat geval moet u het apparaat ter reparatie afgeven.
▪ U mag het apparaat niet in water onderdompelen.
▪ Bij onjuist gebruik, verkeerde bediening of onvakkundige reparatie accepteren
wij geen aansprakelijkheid voor eventuele schade. In dergelijke gevallen zijn
garantievergoedingen ook uitgesloten.
▪ Het apparaat is niet bestemd voor commercieel gebruik.
▪ Dek het apparaat niet af.
▪ Trek de stroomstekker na het gebruik uit het stopcontact en open het appa-
raat.
▪ Laat het apparaat afkoelen voor u het transporteert of opbergt.
nl
25
Page 26

In gebruik nemen
▪ Reinig de bakvlakken voor het eerste gebruik met een vochtige doek en
wat vaatwasmiddel. Na het drogen de bakvlakken met een druppeltje olie
bestrijken.
▪ Voor het opwarmen zet u de instelknop op de maximale stand
aansluiten van de stroomstekker op een geaard stopcontact duidt het rode
controlelampje aan dat het wafelijzer aan het opwarmen is. De baktemperatuur is bereikt als het controlelampje van rood naar wit wijzigt.
▪ Bij de eerste ingebruikname van het nieuwe apparaat kan een geringe
rookontwikkeling ontstaan. Dat heeft een technische oorzaak en is geen reden
voor ongerustheid.
. Na het
Bakken
▪ Schep een dik vloeibaar deeg in het midden van de onderste bakvorm en sluit
het apparaat onmiddellijk.
Na korte tijd licht het rode controlelampje opnieuw op, d.w.z. dat het apparaat
weer gaat opwarmen.
▪ Zodra het controlelampje weer wit is geworden, is het bakproces beëindigd.
▪ Open het apparaat en haal de wafel eruit. Als de wafel te licht is - een hogere
instelling kiezen. Is deze te donker - de instelknop lager instellen.
Met de regelaar kunt u volgens naar eigen smaak wafels van licht gebakken
(instelling min
Aanwijzing: De eerste wafel uit het nieuwe apparaat mag niet worden
opgegeten.
) tot krachtig, donkerbruin (instelling max. ) bakken.
Tips voor een beter resultaat
Alle bakingrediënten moeten voor het bereiden van het deeg op kamertemperatuur zijn.
Het vullen moet snel gebeuren omdat de wafel anders bovenaan en onderaan niet
in gelijke mate bruin is.
Bij te weinig deeg wordt de bruining ongelijkmatig vlekkerig.
U verkrijgt optimale bakresultaten als u onmiddellijk na het uitnemen van de vers
gebakken wafel deeg voor de volgende aanbrengt.
Leg de gebakken wafels op een keukenrooster, zo blijven ze knapperig. Gestapelde
wafels worden snel zacht.
26
Reiniging en onderhoud
Na het gebruik de stekker uit het stopcontact trekken en het apparaat laten
afkoelen.
Het apparaat nooit in water onderdompelen of onder stromend water reinigen.
Reinig de bakvlakken met een zacht penseel of een borstel. De buitenzijde alleen
alleen met een vochtige doek afvegen en vervolgens droogwrijven.
De bakvlakken met antikleeflaag in geen geval met scherpe of harde voorwerpen
bewerken. De antikleeflaag zou daarbij beschadigd kunnen worden.
Page 27

nl
Wafelrecepten
Basisrecept
Ingrediënten: 80 g boter, 60 g suiker, 1 pakje vanillesuiker , 3 eieren, 3/8 l
melk, 300 g bloem, ½ pakje bakpoeder, rum naar smaak, poedersuiker voor het
bestuiven
Bereiding: De boter met de suiker, vanillesuiker en de eieren schuimig roeren.
Beetje bij beetje de gezeefde en met het bakpoeder vermengde bloem toevoegen,
afgewisseld met het toevoegen van een beetje melk. Naar smaak kan wat minder
melk en wat meer rum worden toegevoegd. De vloeistof steeds zo doseren dat
het deeg dik vloeibaar wordt. Vóór het serveren de wafels met poedersuiker
bestrooien.
Vanillewafels
Ingrediënten: 150 g boter of margarine, 200 g suiker, 4 eieren, uitgeschraapt
merg van een vanillestokje, zout, 250 g bloem, 1 afgestreken theelepel bakpoeder,
1-2 eetlepel(s) melk uit een blikje, poedersuiker om te bestuiven
Bereiding: Het zachte vet in een hoge kom doen, suiker, eieren, zout, vanillemerg,
bloem en bakpoeder toevoegen en alles met een handmixer op de hoogste stand
ca. 2 minuten roeren. Op het laatst de melk uit het blikje door het deeg mengen.
Kaaswafels
Ingrediënten: 200 g boter of margarine, 4 eieren, ½ theelepel zout, 200 g bloem,
½ theelepel bakpoeder, 60 ml lauwwarm water, 100 g geraspte kaas, paprika.
Bereiding: Vet, eieren en zout goed roeren. Afwisselend het met bakpoeder
gemengde en gezeefde bloem en lauwwarm water toevoegen. Als laatste de
geraspte kaas toevoegen. Het deeg met paprika op smaak brengen en meteen
bakken. De wafels moeten langzaam bakken, bij een iets lagere stand.
Het apparaat voldoet aan de Europese richtlijnen 2006/95/EG, 2004/108/EG en
2009/125/EG.
Dit product mag aan het einde van de levensduur niet met het normale huishoudelijke afval worden weggegooid. Het dient afgegeven te worden bij een
inzamelpunt van elektrische en elektronische apparaten.
De materialen zijn geschikt voor hergebruik, e.e.a. volgens de markering. Door
het aanbieden voor hergebruik, de stoffelijke verwerking of andere vormen van
verwerking van oude apparaten, levert u een belangrijke bijdrage aan de bescherming van ons milieu.
Neem contact op met de gemeentelijke instantie over het verantwoordelijke
afvalverzamelstation.
Wijzigingen voorbehouden
27
Page 28

Brugsanvisning
Vigtige sikkerhedsanvisninger
▪ Apparatet kan bruges af børn over 8 år og personer
med reducerede fysiske, åndelige og sensoriske fær-
digheder eller manglende erfaring og/eller viden, hvis
de er under opsyn af en voksen eller er blevet sat ind
i, hvordan apparatet skal anvendes og har forstået de
farer, som er forbundet med anvendelsen.
▪ Børn må ikke lege med apparatet.
▪ Børn må kun udføre rengørings- og vedligeholdelses-
arbejder på apparatet, hvis de er over 8 år og er under
opsyn af en voksen.
▪ Børn under 8 år skal holdes væk fra apparatet og
tilslutningsledningen.
▪ Apparatet må ikke betjenes via en ekstern timer eller
fjernbetjening.
▪ Hvis apparatets strømledning bliver beskadiget, skal
den udskiftes af producenten, producentens kundeser-
vice eller en tilsvarende kvalificeret person for at undgå
fare.
▪ Efter anvendelse af apparatet rengøres alle flader og
dele, der har været i berøring med fødevarerne. Følg
anvisningerne i afsnittet ”Rengøring og pleje”.
▪ Dette apparat er beregnet til at blive brugt i hushold-
ningen og lignende former for anvendelse som for
eksempel:
⋅ i køkkener for ansatte i butikker, kontorer og andre
erhvervsvirksomheder;
⋅ på landbrugsbedrifter;
⋅ af kunder i hoteller, moteller og andre former for
beboelse;
⋅ i Bed & Breakfast-pensionater.
Apparatet er ikke beregnet til industrianvendelse.
▪ Vigtigt: Overfladerne, der kan berøres, bliver varme, når
apparatet er tændt og forbliver varme noget tid efter,
at det er slukket!
28
Page 29

da
Inden ibrugtagning
Apparatet må kun anvendes til det tiltænkte formål i henhold til denne brugsanvisning. Læs brugsanvisningen grundigt, inden apparatet tages i brug. Brugsanvisningen indeholder anvisninger om brug, rengøring og pleje af apparatet. Ved
manglende overholdelse påtager vi os intet ansvar for eventuelle skader. Opbevar
brugsanvisningen omhyggeligt, og videregiv den sammen med apparatet til
efterfølgende brugere.
Overhold sikkerhedsanvisningerne ved brug af apparatet.
Tekniske data
Mærkespænding: 220 – 240 V ~ 50-60 Hz
Effektforbrug: 760-900 W
Beskyttelsesklasse: I
Sikkerhedshenvisninger
▪ Apparatet må kun tilsluttes en stikkontakt, der er installeret i henhold til
forskrifterne. Ledningen og stikket skal være tørre.
▪ Ledningen må ikke trækkes over skarpe kanter eller klemmes eller hænge løst
ned. Beskyt ledningen imod varmekilder og olie.
▪ Apparatet må ikke stilles på varme overflader, som f.eks. kogeplader eller
lignende steder, og det må ikke anvendes i nærheden af åben ild.
▪ Træk ikke i ledningen, og berør ikke ledningen eller stikket med våde hænder,
når stikket trækkes ud af stikkontakten.
▪ Apparatet må ikke anvendes, og stikket skal straks tages ud af stikkontakten,
hvis:
⋅ Apparatet eller strømledningen er beskadiget.
⋅ Der er mistanke om en defekt efter fald eller lignende.
I disse tilfælde skal apparatet indleveres til reparation.
▪ Apparatet må ikke nedsænkes i vand.
▪ Ved anvendelse til andre formål end det tilsigtede, forkert betjening eller
ukorrekt reparation påtager producenten sig intet ansvar for eventuelle
skader. Garantien bortfalder også i disse tilfælde.
▪ Apparatet er ikke egnet til erhvervsmæssig brug.
▪ Apparatet må ikke være dækket til.
▪ Tag stikket ud af stikkontakten efter brug, og åbn apparatet.
▪ Lad apparatet køle af, før det transporteres eller sættes til side.
da
Ibrugtagning
▪ Rengør bagepladerne med en fugtig klud og lidt opvaskemiddel før den første
anvendelse. Smør et par dråber olie på bagepladerne med en pensel, efter at
de er tørret af.
▪ Apparatet opvarmes ved at dreje indstillingsknappen over på højeste trin
. Efter tilslutning af netledningen til en stikkontakt viser den røde kontrol-
lampe, at vaffeljernet opvarmes. Bagetemperatur er nået, når kontrollampen
skifter fra rødt til hvidt.
▪ Der kan forekomme mindre røgudvikling ved den første ibrugtagning af det
nye apparat. Dette er teknisk betinget og ingen grund til bekymring.
29
Page 30

Vaffelbagning
▪ Hæld den tyktflydende dej ind i midten af den nederste bageform, og luk
apparatet med det samme.
Kontrollampen begynder at lyse igen efter kort tid, for at vise at apparatet
varmer op igen.
▪ Når kontrollampen skifter tilbage til hvid, er vaflen bagt.
▪ Åbn apparatet, og tag vaflen ud. Hvis vaflen er for lys, skal du vælge en højere
indstilling. Hvis vaflen er for mørk, skal indstillingsknappen sættes til en lavere
indstilling.
Med regulatoren kan du bage dine vafler fra ganske lidt (indstilling min.
kraftig, mørk bruningsgrad (indstilling maks.
Bemærk: Den første vaffel fra det nye apparat bør ikke spises.
), alt efter din smag.
) til
Tip, så dine vafler bliver bedst
Alle ingredienserne bør have stuetemperatur, før du laver dejen.
Påfyldning af dej skal ske hurtigt, da vaflerne ellers vil blive bagt uens på overog undersiden.
Hvis der påfyldes for lidt dej, brunes vaflen uregelmæssigt i pletter.
Du opnår optimalt bagte vafler, hvis du fylder dej på apparatet til den næste
vaffel, så snart du har taget den færdige vaffel af.
Læg de færdige vafler på en rist, så de holder sig sprøde. Hvis du stabler vaflerne,
bliver de hurtigt bløde.
Rengøring og pleje
Træk stikket ud efter brug, og lad apparatet køle af.
Dyp aldrig apparatet i vand, og rengør det aldrig under rindende vand.
Rengør bagepladerne med en blød pensel eller en børste. Apparatet må kun tørres
af og tørres udvendig med en fugtig klud.
Bagepladerne med nonstick-belægning må aldrig komme i kontakt med spidse
eller hårde genstande, da det kan ødelægge belægningen.
30
Page 31

da
Vaffelopskrifter
Grundopskrift
Ingredienser: 80 g smør, 60 g sukker, 8 g vaniljesukker, 3 æg, 3/8 l mælk, 300 g
mel, 8 g bagepulver, rom efter behag, flormelis til drys
Tilberedning: Rør smør skummende med sukker, vaniljesukker og æg. Bland mel
og bagepulver, si blandingen, og tilsæt det til dejen lidt efter lidt og skiftevist
med mælken. Brug eventuelt mindre mælk og mere rom efter smag. Væsken skal
altid doseres, så dejen bliver tyktflydende. Drys flormelis over vaflen før servering.
Vaniljevafler
Ingredienser: 150 g smør eller margarine, 200 g sukker, 4 æg, korn fra en
vaniljestang, salt, 250 g mel, 1 strøget tsk. bagepulver, 1-2 spsk. kondensmælk,
flormelis til drys
Tilberedning: Bland fedtstof, sukker, æg, salt, vaniljekorn, mel og bagepulver i en
høj skål med en håndmikser på højeste trin i ca. 2 minutter. Tilsæt kondensmælk
til dejen til sidst.
Ostevafler
Ingredienser: 200 g smør eller margarine, 4 æg, ½ tsk. salt, 200 g mel, ½ tsk.
bagepulver, 60 ml lunkent vand, 100 g revet os, paprika.
Tilberedning: Rør fedtstof, æg og salt grundigt sammen. Bland mel og bagepulver, og tilsæt blandingen skiftevis med lunkent vand. Tilsæt revet ost til sidst.
Tilsmag dejen med paprika, og bag vaflerne med det samme. Vaflerne skal bage
langsomt ved lidt lavere indstilling.
Apparatet opfylder de europæiske retningslinjer 2006/95/EF, 2004/108/EF og
2009/125/EF.
Dette produkt må ved slutningen af dets levetid ikke bortskaffes med det almindelige husholdningsaffald, men skal afleveres på et opsamlingssted for genbrug af
elektriske og elektroniske apparater.
Materialerne kan genanvendes ifølge deres typebetegnelse. Ved aflevering af
brugte apparater på en genbrugsplads bidrager du til beskyttelse af miljøet.
Kontakt din kommune for oplysninger om nærmeste genbrugsplads.
Der tages forbehold for ændringer
31
Page 32

Användarguide
Viktiga säkerhetsanvisningar
▪ Produkten får endast användas av barn över 8 år eller
personer med nedsatt fysisk, psykisk eller sensorisk
förmåga eller som saknar erforderliga kunskaper eller
erfarenhet om dessa personer först fått instruktioner
hur man använder produkten på ett säkert sätt och
förstår de risker som finns.
▪ Barn får inte leka med apparaten.
▪ Rengöring och användning får inte utföras av barn
om de inte är äldre än 8 år och hålls under uppsikt av
vuxen.
▪ Apparaten och anslutningskabeln ska hållas borta från
barn som är yngre än 8 år.
▪ Apparaten får inte användas via extern timer eller
fjärrkontroll.
▪ Om sladden skulle skadas ska den bytas ut genom
tillverkarens centrala kundtjänst eller en person som
tillverkaren godkänt.
▪ Efter användning av apparaten rengör alla ytor/delar
som kommit i beröring med livsmedel. Följ anvisning-
arna i kapitlet ”Rengöring och skötsel”.
▪ Apparaten är avsedd att användas i hushåll och lik-
nande tillämpningar som:
⋅ kök för personal i butiker, kontor och på andra
arbetsplatser
⋅ jord- och lantbruksmiljö
⋅ hotell, motell och liknande anläggningar
⋅ Bed & Breakfast
Apparaten är inte avsedd att användas i rent kom-
mersiellt syfte.
▪ OBS: Åtkomliga ytor på apparaten kan bli mycket
varma när apparaten är på, och håller sig varma även
efter avstängning!
32
Page 33

sv
Före användning
Apparaten får användas endast för det ändamål som beskrivs i den här användarguiden. Läs därför noga igenom användarguiden innan du börjar använda
apparaten. Guiden innehåller anvisningar för användning, rengöring och skötsel
av apparaten. Om du inte följer instruktioner och anvisningar, tar vi inget ansvar
för eventuella skador. Förvara instruktionerna på ett säkert ställe så att du vid
behov kan ge dem vidare till näste ägare.
Följ säkerhetsanvisningarna för hur apparaten ska användas.
Tekniska data
Nominell spänning: 220-240 V ~ 50-60 Hz
Effekt: 760-900 W
Skyddsklass: I
Säkerhetsanvisningar
▪ Apparaten får endast anslutas till ett korrekt installerat, jordat vägguttag.
Ledning och kontakt måste vara torra.
▪ Dra eller kläm inte in anslutningskabeln runt skarpa kanter. Låt den inte hänga
fritt och skydda den från värme och olja.
▪ Ställ inte apparaten på heta ytor som plattor och liknande, och inte nära
öppen låga.
▪ Dra inte ur nätkontakten från vägguttaget om du har våta händer och inte
heller genom att dra direkt i strömkabeln.
▪ Om följande skulle inträffa, ska du inte använda apparaten och genast dra ur
kontakten:
⋅ Apparaten eller sladden är skadad.
⋅ Du misstänker att apparaten kan ha tagit skada på grund av att den fallit
i golvet eller liknande.
I så fall ska apparaten lämnas på reparation.
▪ Sänk inte ner apparaten i vatten.
▪ I händelse av missbruk, felaktig användning eller reparation tas inget ansvar
för eventuella skador. Garantin utesluts också i sådana fall.
▪ Apparaten är inte avsedd att användas i kommersiellt syfte.
▪ Apparaten får inte övertäckas.
▪ Efter användningen: dra ut nätsladden ur stickkontakten och öppna appara-
ten.
▪ Låt apparaten svalna innan den transporteras eller förvaras.
sv
33
Page 34

Användning
▪ Rengör stekytorna före första användningen med en fuktig trasa och lite
diskmedel. Låt stekytorna torka och pensla in med några droppar olja.
▪ För att hetta upp dem ställs inställningsvredet till det maximala läget
att nätsladden har en anslutits till en stickkontakt visar den röda kontrollampan att våffeljärnet är upphettat. Stektemperaturen är uppnådd när kontrolllampan växlar från rött till vitt sken.
▪ Vid den första användningen kan viss rökutveckling förekomma. Detta beror
på dess tekniska egenskaper och är helt normalt.
. Efter
Steka våfflor
▪ Placera den trögflytande smeten i mitten av den undre halvan av våffeljärnet
och stäng genast apparaten.
Kort därefter tänds den röda kontrollampan för att visa att apparaten hettas
upp.
▪ Så fort lampan växlar till vitt sken är våfflorna klara.
▪ Öppna apparaten och ta ur våfflan. Är våfflan för ljus - välj en högre inställ-
ning. Är våfflan för mörk - välj en lägre inställning.
Med inställningsvredet du helt efter egen smak steka våfflor från ljusa och
fluffiga (min. inställningen
OBS: Den första våfflan från den nya apparaten bör inte förtäras.
) till mörka och hårt stekta (max. inställningen ).
Tips för bättre tillagning
Alla ingredienser ska vara rumstempererade innan smeten blandas och tillagas.
Ihällningen och stängningen måste ske snabbt så att våfflan blir jämnt stekt på
ovan- och undersidan.
Används för lite smet blir våfflan ojämnt stekt.
Optimal tillagning uppnås genom att hälla i smet till nästa våffla omedelbart
efter att den föregående klara våfflan har tagits ut.
Placera de färdiga våfflorna på en köksgaller blir de krispiga. Staplade våfflor blir
snabbt mjuka.
34
Rengöring och skötsel
Dra ur nätsladden och låt apparaten svalna.
Sänk aldrig ned apparaten i vatten och rengör den aldrig under rinnande vatten.
Rengör stekytorna med en pensel eller en mjuk borste. Rengör apparaten utvändigt endast med en fuktig trasa och låt torka.
Nonstick-stekytorna får aldrig bearbetas med spetsiga eller hårda föremål, då kan
nonstick-beläggningen skadas.
Page 35

sv
Våffelrecept
Grundrecept
Ingredienser: 80 g smör, 60 g socker, 1 påse vaniljsocker, 3 ägg, 3/8 l mjölk, 300 g
mjöl, 1/2 påse bakpulver, rom efter smak, florsocker för pudring
Förberedelser: Rör ihop socker, vaniljsocker och ägg tills det blir löddrigt. Rör
gradvis och omväxlande ned det siktade och med bakpulver blandade mjölet och
mjölken. Efter smak kan lite av mjölken bytas ut mot rom. Vätskorna ska doseras
så att smeten blir trögflytande. Strö över florsocker innan servering.
Vaniljvåfflor
Ingredienser: 150 g smör eller margarin, det urskrapade innanmätet från en
vaniljstång, salt, 250 g mjöl, 200 g socker, 4 ägg, 1 struken tsk bakpulver, 1-2 msk
kondenserad mjölk florsocker för pudring.
Förberedelser: Placera det mjuka fettet i en hög behållare, lägg till socker, ägg,
salt, vaniljstång, mjöl och bakpulver och blanda med en handhållen mixer på högsta hastigheten i cirka 2 minuter. Blanda till slut i kondenserad mjölk i smeten.
Ostvåfflor
Ingredienser: 200 g smör eller margarin, 4 ägg, ½ tesked salt, 200 g vetemjöl, ½
tsk bakpulver, 60 ml ljummet vatten, 100 g riven ost, paprikapulver.
Förberedelser: Rör ihop fett, ägg och salt. Blanda växelvis i siktat mjöl blandat
med bakpulver och ljummet vatten, tillsätt slutligen osten. Smaka av smeten
med paprika och stek genast. Våfflorna måste stekas långsamt vid något lägre
inställning.
Apparaten motsvarar de europeiska riktlinjerna 2006/95/EG, 2004/108/EG och
2009/125/EG.
Den här produkten får inte kastas tillsammans med hushållsavfall utan ska lämnas
in på en återvinningsstation för elektriskt och elektroniskt avfall.
Hur de olika materialen ska återvinnas ser du på märkningen. Genom att återvinna gamla hushållsapparater bidrar du till att skydda miljön.
Du kan fråga på kommunen var den närmaste återvinningsstationen ligger.
Ändringar förbehållna
35
Page 36

Käyttöohje
Tärkeitä turvallisuusohjeita
▪ Yli 8-vuotiaat lapset sekä fyysisiltä, aistillisilta tai
henkisiltä kyvyiltään rajoittuneet tai kokemattomat ja/
tai taitamattomat henkilöt saavat käyttää laitetta vain
siinä tapauksessa, että käyttöä valvotaan tai heitä on
opastettu käyttämään laitetta turvallisesti ja he ovat
ymmärtäneet laitteen käyttöön liittyvät vaarat.
▪ Lapset eivät saa leikkiä laitteella.
▪ Lapset eivät saa puhdistaa eivätkä huoltaa laitetta,
elleivät he ole yli 8-vuotiaita ja aikuisen valvonnassa.
▪ Laite ja sen liitäntäjohto on pidettävä poissa alle
8-vuotiaiden lasten luota.
▪ Laitetta ei saa käyttää ulkoisen ajastimen avulla eikä
kauko-ohjauksella.
▪ Jos laitteen verkkojohto vahingoittuu, on sen vaihtami-
nen annettava valmistajan, valmistajan asiakaspalvelun
tai vastaavan ammattitaitoisen henkilön tehtäväksi
vaarojen välttämiseksi.
▪ Puhdista laitteen käytön jälkeen kaikki pinnat/osat,
jotka ovat olleet kosketuksissa ruoka-aineiden kanssa.
Noudata kappaleen ”Puhdistus ja huolto” ohjeita.
▪ Laite on tarkoitettu käytettäväksi kotitalouksissa ja
muissa vastaavissa käyttötilanteissa, kuten
⋅ työpaikkakeittiöissä myymälöissä, toimistoissa ja
muissa kaupallisissa ympäristöissä
⋅ maatalousalueilla
⋅ asiakastiloissa hotelleissa, motelleissa ja muissa
majoituspaikoissa
⋅ aamiaismajoitusta tarjoavissa majataloissa.
Laitetta ei ole tarkoitettu puhtaasti kaupalliseen
käyttöön.
▪ Huomautus: Kosketettavissa olevat pinnat voivat olla
kuumia laitteen ollessa kytkettynä verkkovirtaan, ja ne
myös pysyvät kuumina jonkin aikaa pistokkeen irrottamisen jälkeen!
36
Page 37

fi
Ennen käyttöä
Käytä laitetta vain tässä käyttöohjeessa kuvatulla tavalla ja vain siihen tarkoitukseen, johon se on suunniteltu. Lue sen vuoksi käyttöohje huolellisesti ennen
laitteen käyttöönottoa. Se sisältää tietoa laitteen käytöstä, puhdistamisesta ja
huollosta. Valmistaja ei vastaa mahdollisista vahingoista, jotka syntyvät käyttöohjeessa annettujen ohjeiden noudattamatta jättämisestä. Säilytä käyttöohje
huolellisesti ja anna se laitteen mukana eteenpäin seuraavalle käyttäjälle.
Noudata laitteen käytössä turvallisuusohjeita.
Tekniset tiedot
Nimellisjännite: 220–240 V~ 50–60 Hz
Tehonkulutus: 760–900 W
Suojaluokka: I
Turvallisuusohjeet
▪ Kytke laite vain määräysten mukaisesti asennettuun, maadoitettuun pistorasi-
aan. Liitäntäjohdon ja pistokkeen on oltava kuivia.
▪ Älä vedä liitäntäjohtoa terävien reunojen yli tai ympäri äläkä anna johdon
roikkua reunan yli. Suojaa johto kuumuudelta ja öljyltä.
▪ Älä aseta laitetta kuumille pinnoille, kuten liedelle, äläkä käytä sitä avotulen
lähellä.
▪ Älä irrota pistoketta pistorasiasta johdosta vetämällä tai märin käsin.
▪ Älä käytä laitetta ja irrota pistoke heti pistorasiasta, jos:
⋅ laite tai liitäntäjohto on vahingoittunut
⋅ on syytä epäillä laitteen vioittuneen putoamisen tms. jälkeen.
Näissä tapauksissa laite on toimitettava korjattavaksi.
▪ Älä upota laitetta veteen.
▪ Jos laitetta käytetään käyttötarkoituksen vastaisesti tai väärin tai sille
suoritetaan epäasianmukaisia korjauksia, valmistaja ei vastaa mahdollisista
vahingoista. Myöskään laitteen takuu ei kata tällaisia tapauksia.
▪ Laitetta ei ole tarkoitettu kaupalliseen käyttöön.
▪ Laitetta ei saa peittää.
▪ Irrota pistoke pistorasiasta käytön jälkeen ja avaa laite.
▪ Anna laitteen jäähtyä ennen sen kuljetusta tai pakkaamista säilytystä varten.
fi
37
Page 38

Käyttöönotto
▪ Puhdista leivontapinnat kostealla liinalla ja tilkalla astianpesuainetta ennen
ensimmäistä käyttökertaa. Voitele leivontapinnat kuivumisen jälkeen muutamalla öljytipalla.
▪ Laite kuumennetaan asettamalla säätönuppi maksimiasetukseen
verkkopistoke on liitetty suojakosketinpistorasiaan, punainen merkkivalo
ilmaisee, että vohvelirauta kuumenee. Leivontalämpötila on saavutettu, kun
merkkivalon väri vaihtuu punaisesta valkoiseksi.
▪ Uuden laitteen ensikäyttöönoton yhteydessä voi ilmetä hieman savua. Sille on
tekninen syy eikä huoleen ole syytä.
. Kun
Leivonta
▪ Lisää paksu taikina alemman leivontamuotin keskelle ja sulje laite heti.
Punainen merkkivalo syttyy jälleen hetken kuluttua, laite kuumenee.
▪ Leivonta on päättynyt, kun näyttö muuttuu jälleen valkoiseksi.
▪ Avaa laite ja poista vohveli. Jos vohveli jää liian vaaleaksi, valitse korkeampi
säätö. Jos vohveli on liian tumma, aseta säätö pienemmälle.
Säätimen ansiosta voit valmistaa vohvelin aivan oman makusi mukaiseksi vain
vähän ruskistuneesta (säätö min
seen asti (säätö max
Vinkki: Uudella laitteella valmistettua ensimmäistä vohvelia ei tulisi syödä.
).
) aina voimakkaan tummaksi ruskistunee-
Valmistusta helpottavia vinkkejä
Kaikkien leivonta-ainesten tulisi olla huonelämpötilassa ennen taikinan valmistusta.
Taikina täytyy lisätä laitteeseen nopeasti, sillä muutoin vohvelin ylä- ja alapuolen
ruskeusasteesta tulee erilaisia.
Ruskeudesta tulee epätasaisen laikullista, jos käytetään liian vähän taikinaa.
Optimaaliset leivontatulokset saadaan aikaan, jos seuraavan vohvelin taikina
lisätään heti valmiin vohvelin poistamisen jälkeen.
Laita valmiit vohvelit keittiöritilälle, jotta ne pysyvät rapeina. Pinotut vohvelit
pehmenevät nopeasti.
38
Puhdistus ja huolto
Irrota käytön jälkeen pistoke pistorasiasta ja anna laitteen jäähtyä.
Älä koskaan upota laitetta veteen tai pese sitä juoksevassa vedessä.
Puhdista leivontapinnat pehmeällä pensselillä tai harjalla. Pyyhi vain ulkopuoli
kostealla rätillä ja kuivaa.
Tarttumattomia leivontapintoja ei saa missään tapauksessa käsitellä terävillä tai
kovilla esineillä, koska tarttumaton pinnoite voi vaurioitua.
Page 39

fi
Vohvelireseptit
Perusresepti
Ainekset: 80 g voita, 60 g sokeria, 1 pakkaus vaniljasokeria, 3 munaa, 3/8 l
maitoa, 300 g jauhoja, ½ pakkausta leivinjauhetta, rommia maun mukaan,
tomusokeria ripoteltavaksi
Valmistus: Sekoita voi sokerin, vaniljasokerin ja munien kanssa vaahtomaiseksi.
Lisää vähitellen ja välillä siivilöityjä ja leivinjauheen kanssa sekoitettuja jauhoja
ja maitoa. Maun mukaan voidaan lisätä hieman vähemmän maitoa ja sen sijasta
enemmän rommia. Neste on annosteltava aina niin, että taikinasta tulee paksua.
Ripottele tomusokeria ennen tarjoilua.
Vaniljavohvelit
Ainekset: 150 g voita tai margariinia, 200 g sokeria, 4 munaa, yhden vaniljatan-
gon kaavittu ydin, suolaa, 250 g jauhoja, 1 tasattu teelusikallinen leivinjauhetta,
1–2 ruokalusikallista kestokermaa, tomusokeria ripoteltavaksi
Valmistus: Lisää pehmeä rasva korkeaan vatiin, lisää sokeri, munat, suola, vaniljaydin, jauhot ja leivinjauhe ja sekoita kokoonpanoa sähkövatkaimella suurimmalla asetuksella noin 2 minuutin ajan. Lisää viimeiseksi taikinaan kestokerma.
Juustovohvelit
Ainekset: 200 g voita tai margariinia, 4 munaa, ½ teelusikallista suolaa, 200 g
jauhoja, ½ teelusikallista leivinjauhetta, 60 ml haaleaa vettä, 100 g juustoraastetta, paprikamaustetta.
Valmistus: Sekoita hyvin rasva, munat ja suola. Lisää välillä joukkoon siivilöityjä ja
leivinjauheen kanssa sekoitettuja jauhoja ja haaleaa vettä ja viimeiseksi juustoraaste. Mausta taikina paprikalla ja leivo heti. Vohvelit täytyy valmistaa hitaasti
hieman pienemmällä asetuksella.
Laite vastaa EU:n direktiivien 2006/95/EY, 2004/108/EY ja 2009/125/EY määräyksiä.
Tätä tuotetta ei saa hävittää sen elinkaaren päätyttyä tavallisten kotitalousjätteiden mukana, vaan se on toimitettava sähkö- ja elektroniikkalaitteiden keräyspisteeseen kierrätystä varten.
Valmistusaineet soveltuvat uusiokäyttöön tunnusmerkintänsä mukaisesti. Uusiokäytön, raaka-aineiden hyödyntämisen tai muunlaisten käytettyjen laitteiden
hyödyntämismuotojen avulla autat omalta osaltasi ympäristön suojelua.
Tiedustele kuntasi hallinnolta, missä ovat tähän tarkoitetut kierrätyspisteet.
Oikeudet muutoksiin pidätetään.
39
Page 40

Bruksanvisning
Viktige sikkerhetsanvisninger
▪ Apparatet kan brukes av barn fra 8 år og oppover og
av personer som har begrensede fysiske, sensoriske
eller mentale evner, eller som mangler erfaring og/
eller kunnskap, så fremt de er under tilsyn eller har fått
opplæring i sikker bruk av apparatet og forstår farene
knyttet til slik bruk.
▪ Barn må ikke leke med apparatet.
▪ Rengjøring og vedlikehold må ikke utføres av barn, med
mindre de er over 8 år og under tilsyn.
▪ Barn under 8 år skal holdes borte fra apparatet og
strømledningen.
▪ Apparatet må ikke betjenes via et eksternt tidsur eller
en fjernkontroll.
▪ Hvis apparatets strømledning blir skadet, må den byttes
av produsenten eller produsentens kundeserviceavde-
ling eller av en person med tilsvarende kvalifikasjoner
for å unngå farer.
▪ Etter bruk må alle apparatets overflater/deler rengjøres,
som har vært i kontakt med næringsmidler. Følg rådene
i kapittelet ”Rengjøring og vedlikehold”.
▪ Dette apparatet er beregnet på bruk i husholdninger og
lignende bruksområder, for eksempel:
⋅ på kjøkkenet for personale i butikker, kontorer og
andre næringsområder
⋅ i landbruksvirksomheter
⋅ av kunder på hoteller, moteller og andre overnat-
tingssteder
⋅ i pensjonater
Apparatet er ikke beregnet til utelukkende kommer-
siell bruk.
▪ Viktig: De berørbare overflatene kan bli varme når
apparatet er koblet til strømmen og er også varme
etter at støpselet er trukket ut.
40
Page 41

no
Før bruk
Apparatet må bare brukes til de beregnede formålene og i samsvar med denne
bruksanvisningen. Les derfor bruksanvisningen nøye før du tar apparatet i bruk.
Den gir informasjon om bruk, sikkerhet og vedlikehold av apparatet. Hvis denne
informasjonen ikke følges, bortfaller vårt ansvar for eventuelle skader. Oppbevar
bruksanvisningen godt og gi den videre til neste eier sammen med apparatet.
Ta hensyn til sikkerhetsanvisningene under bruk.
Tekniske data
Nominell spenning: 220–240 V~ 50-60 Hz
Strømforbruk: 760–900W
Beskyttelsesklasse: I
Sikkerhetsanvisninger
▪ Apparatet må kun kobles til en forskriftsmessig installert stikkontakt. Strøm-
ledning og støpsel må være tørre.
▪ Strømledningen må ikke dras eller klemmes over skarpe kanter. Den må heller
ikke henge løst, og den må være beskyttet mot varme og olje.
▪ Apparatet må ikke settes på varme overflater som kokeplater o.l. eller brukes i
nærheten av åpne flammer.
▪ Støpselet må ikke trekkes ut av stikkontakten etter strømledningen eller med
våte hender
▪ Apparatet må ikke tas i bruk og støpselet skal trekkes ut umiddelbart dersom:
⋅ apparatet eller strømledningen er skadet
⋅ det foreligger mistanke om en defekt etter et fall eller lignende.
I slike tilfeller må apparatet leveres inn til reparasjon.
▪ Ikke senk apparatet ned i vann.
▪ Ved feil bruk av apparatet, feil betjening eller ikke fagmessig reparasjon, påtar
vi oss ikke noe ansvar for eventuelle skader. I slike tilfeller bortfaller også
garantien.
▪ Apparatet er ikke beregnet til næringsbruk.
▪ Apparatet må ikke tildekkes.
▪ Trekk ut støpselet etter bruk, og åpne apparatet.
▪ La apparatet avkjøles før det flyttes eller settes bort.
no
41
Page 42

Ta i bruk
▪ Rengjør stekeplatene med en fuktig klut med litt oppvaskmiddel før første
gangs bruk. Når stekeflatene er tørre, skal de pensles med noen dråper olje.
▪ Apparatet varmes opp ved å stille temperaturvelgeren til høyeste trinn
støpselet er satt i kontakten, viser den røde kontrollampen at vaffeljernet varmes opp. Når lyset i kontrollampen blir hvitt, har apparatet steketemperatur.
▪ Den første gangen du bruker apparatet, kan det avgi noe røyk. Dette er av
tekniske årsaker, og det er ingen grunn til bekymring.
. Når
Steke
▪ Hell den tyktflytende røren midt på den nederste stekeplaten, og lukk vaf-
feljernet.
Etter kort tid lyser den røde kontrollampen igjen, og apparatet varmes opp.
▪ Så snart lyset i lampen blir hvitt, er vaffelplaten ferdigstekt.
▪ Åpne apparatet og ta ut vaffelen. Hvis vaffelen er for lys, kan du velge en
høyere innstilling. Er den for mørk, kan du prøve en lavere innstilling.
Med temperaturregulatoren kan du steke vaflene slik du foretrekker dem – alt
fra lyse, lettstekte (min-innstilling
) vafler.
Merk: Den første vaffelen du steker på nytt jern, bør ikke spises.
) til mørke, godt stekte (max-innstilling
Tips for et godt vaffelresultat
For å sikre et godt resultat bør alle ingredienser være romtempererte.
Røren bør helles raskt i vaffeljernet for å få lik farge på begge sider av vaffelplaten.
Hvis du har i for lite røre, blir vaflene ujevnt stekt.
Optimale stekeresultater får du ved å helle i ny røre med en gang du har tatt ut
en ferdig vaffelplate.
Legg de ferdige vaflene på en rist hvis du vil ha dem sprø. Vafler som stables, blir
myke.
42
Rengjøring og vedlikehold
Etter bruk skal du trekke ut støpselet og la apparatet avkjøles.
Apparatet må aldri dyppes i vann eller rengjøres under rennende vann.
Rengjør stekeplatene med en myk pensel eller en børste. Vask og tørk av med en
fuktig klut.
Bruk aldri spisse eller harde redskaper på stekeplater med slippbelegg, da det kan
skade belegget.
Page 43

no
Vaffeloppskrifter
Basisoppskrift
Ingredienser: 80g smør, 60g sukker, 2–3 ts vaniljesukker, 3 egg, 3,75dl melk,
300 g mel, 2ts bakepulver, rom etter smak og behag, melis til å strø over
Tilberedning: Rør smøret sammen med sukker, vaniljesukker og egg til det blir
skumaktig. Tilsett siktet mel med bakepulver vekselvis med melken. Alt etter smak
og behag kan noe av melken erstattes med rom. Væsken må doseres slik at røren
blir tyktflytende. Strø på melis før servering.
Vaniljevafler
Ingredienser: 150g smør eller margarin, 200g sukker, 4egg, frø fra en vanilje-
stang, salt, 250g mel, 1 strøken ts bakepulver, 1–2 ss kondensert melk, melis til å
strø over
Tilberedning: Ha mykt smør i en høy skål, tilsett sukker, egg, salt, vaniljefrø, mel
og bakepulver og rør i ca. 2minutter med en håndmikser ved høyeste trinn. Til
slutt rører du inn kondensert melk.
Ostevafler
Ingredienser: 200g smør eller margarin, 4egg, ½ts salt, 200g mel, ½ts bak-
epulver, 60ml lunkent vann, 100g revet ost, paprika.
Tilberedning: Rør smør, egg og salt godt sammen. Tilsett siktet mel med bakepulver vekselvis med lunkent vann, og ha til slutt revet ost i. Smak til med paprika og
stek røren. Vaflene skal stekes langsomt ved litt lavere varme.
Apparatet er i samsvar med EU-direktivene 2006/95/EF, 2004/108/EF og
2009/125/EF.
Dette produktet må etter endt brukstid ikke kastes sammen med vanlig husholdningsavfall, men leveres til et returpunkt for gjenvinning av elektrisk og
elektronisk utstyr.
Materialene kan resirkuleres i samsvar med merkingen. Med gjenbruk, resirkulering eller andre former for gjenvinning av utrangerte apparater yter du et viktig
bidrag til å beskytte miljøet.
Ta eventuelt kontakt med kommunen for informasjon om ansvarlig returpunkt.
Med forbehold om endringer
43
Page 44

Kundendienst-Adresse:
WMF consumer electric GmbH
Standort Trepesch
Steinstraße 19
D-90419 Nürnberg
Germany
Tel.: +49 (0) 7331 256 256
eMail: service-wmf@wmf-ce.de
Hersteller:
WMF consumer electric GmbH
Messerschmittstraße 4
D-89343 Jettingen-Scheppach
Germany
www.wmf-ce.de
Änderungen vorbehalten - IB-15210011-01-1601
type: 0415210011
 Loading...