

Page 1
Withings Home
HD camera with environmental sensors
Installation and Operating Instructions
Withings Home
v1.0 | December 1st, 2014
Page 2

Safety Instructions
Caution: Do not cover the Withings Home
Caution: Do not allow the Withings Home to
come into contact with liquids.
Warning: Using an iOS device in some circumstances can distract you and may
cause a dangerous situation (for example, avoid using it while driving a vehicle
or riding a bicycle). Observe local laws and rules that prohibit or restrict the
use of mobile phones. Do not use your iOS or its applications while performing
activities that require your full attention. Always comply with posted signs
and the laws and regulations in the areas where you are using iOS device and
always use common sense.
Warning: This product cannot replace adult supervision.
Warning: Power cord may present a strangulation hazard. Keep out of reach of
children.
Warning: The Withings Home is not a carbon monoxide detector, and does not
provide alerts or warnings about hazardous levels of carbon monoxide.
Caution: This device is designed for indoor use only.
Ensure your child’s health by checking on him/her regularly.
Place the product at least 50 centimeters (20 inches) away from any person.
This product is not a toy. Do not allow children to play with it.
The environmental sensors cannot be used to adjust the environmental
parameters in the rooms.
Only use the power supply supplied with the product.
Withings Home
v1.0 | December 1st, 2014
EN - 2
Page 3

Install the Withings Home close to an easily accessible power outlet. Do not
install the equipment in a way that stretches or stresses the power cord.
Use the product at temperatures between 10°C and 35°C (50°F and 95°F).
Product may be stored in a clean, dry location at 0°C to 50°C (32°F and 122°F)
when not in use.
Never use the product for extended periods in direct sunlight.
Full safety instructions are available on withings.com/home/safety_instructions.
Withings Home
v1.0 | December 1st, 2014
EN - 3
Page 4

Table of Contents
Safety Instructions .................................................................................... 2
Box Contents .............................................................................................. 6
Minimum Requirements ..........................................................................7
Wi-Fi router ......................................................................................................................7
iOS device ........................................................................................................................7
iOS version ....................................................................................................................... 7
Product Overview ......................................................................................8
Short description of the Withings Home Monitoring System .......................................... 8
System update / upgrade ................................................................................................9
Overview of the Withings Home Setup ...............................................10
Setup the Withings Home in Your Home ............................................11
Withings Home ..............................................................................................................11
Before installing ............................................................................................................12
Withings Home App ................................................................................15
Install the Withings Home App on your iOS device .......................................................15
Launch the Withings Home App ....................................................................................15
Creating a new user using the Withings Home App ......................................................16
Withings Home App help les .......................................................................................18
Upgrade the Withings Home App ..................................................................................18
Setup using the Withings Home App ..................................................19
Bluetooth pairing ...........................................................................................................19
Quick Wi-Fi network conguration ................................................................................21
Manual Wi-Fi network conguration .............................................................................22
Ethernet network conguration .....................................................................................23
Conguring the Withings Home in the Withings Home App ..........................................25
Upgrade the Withings Home rmware...........................................................................28
Display the rmware version .........................................................................................29
Withings Home
v1.0 | December 1st, 2014
EN - 4
Page 5

Home Monitoring ....................................................................................30
Live stream ....................................................................................................................31
Photo album ..................................................................................................................33
Notication settings ......................................................................................................35
Activity tracking (Home Diary) ......................................................................................37
Live data (air quality) .....................................................................................................43
Cloud Video Recording (CVR Plans) ..............................................................................45
Functions ..................................................................................................46
Time settings .................................................................................................................46
Push-to-talk (PTT) .........................................................................................................46
Lullaby program .............................................................................................................47
Connect and charge an iOS device using the USB port .................................................50
Privacy Mode ............................................................................................51
Dissociate a Withings Device ................................................................52
Access the Quick Start Guide Using the Withings Home App .......53
Access to the FAQ and Withings Home Support ..............................54
Using the Withings Home App .......................................................................................54
Using a Web browser .....................................................................................................54
Troubleshooting .......................................................................................55
Home Withings Reset ....................................................................................................56
Care and Cleaning Instructions ............................................................57
Specications ...........................................................................................58
Document Release Overview ................................................................60
Warranty ....................................................................................................61
Regulatory Statements ..........................................................................62
Cameras Privacy Statement ..........................................................................................62
Federal Communications Commission (FCC) Statements ............................................62
Industry Canada statement: ..........................................................................................63
Europe – EU Declaration of Conformity ........................................................................63
European Union—Disposal Information .........................................................................64
Withings Home
v1.0 | December 1st, 2014
EN - 5
Page 6
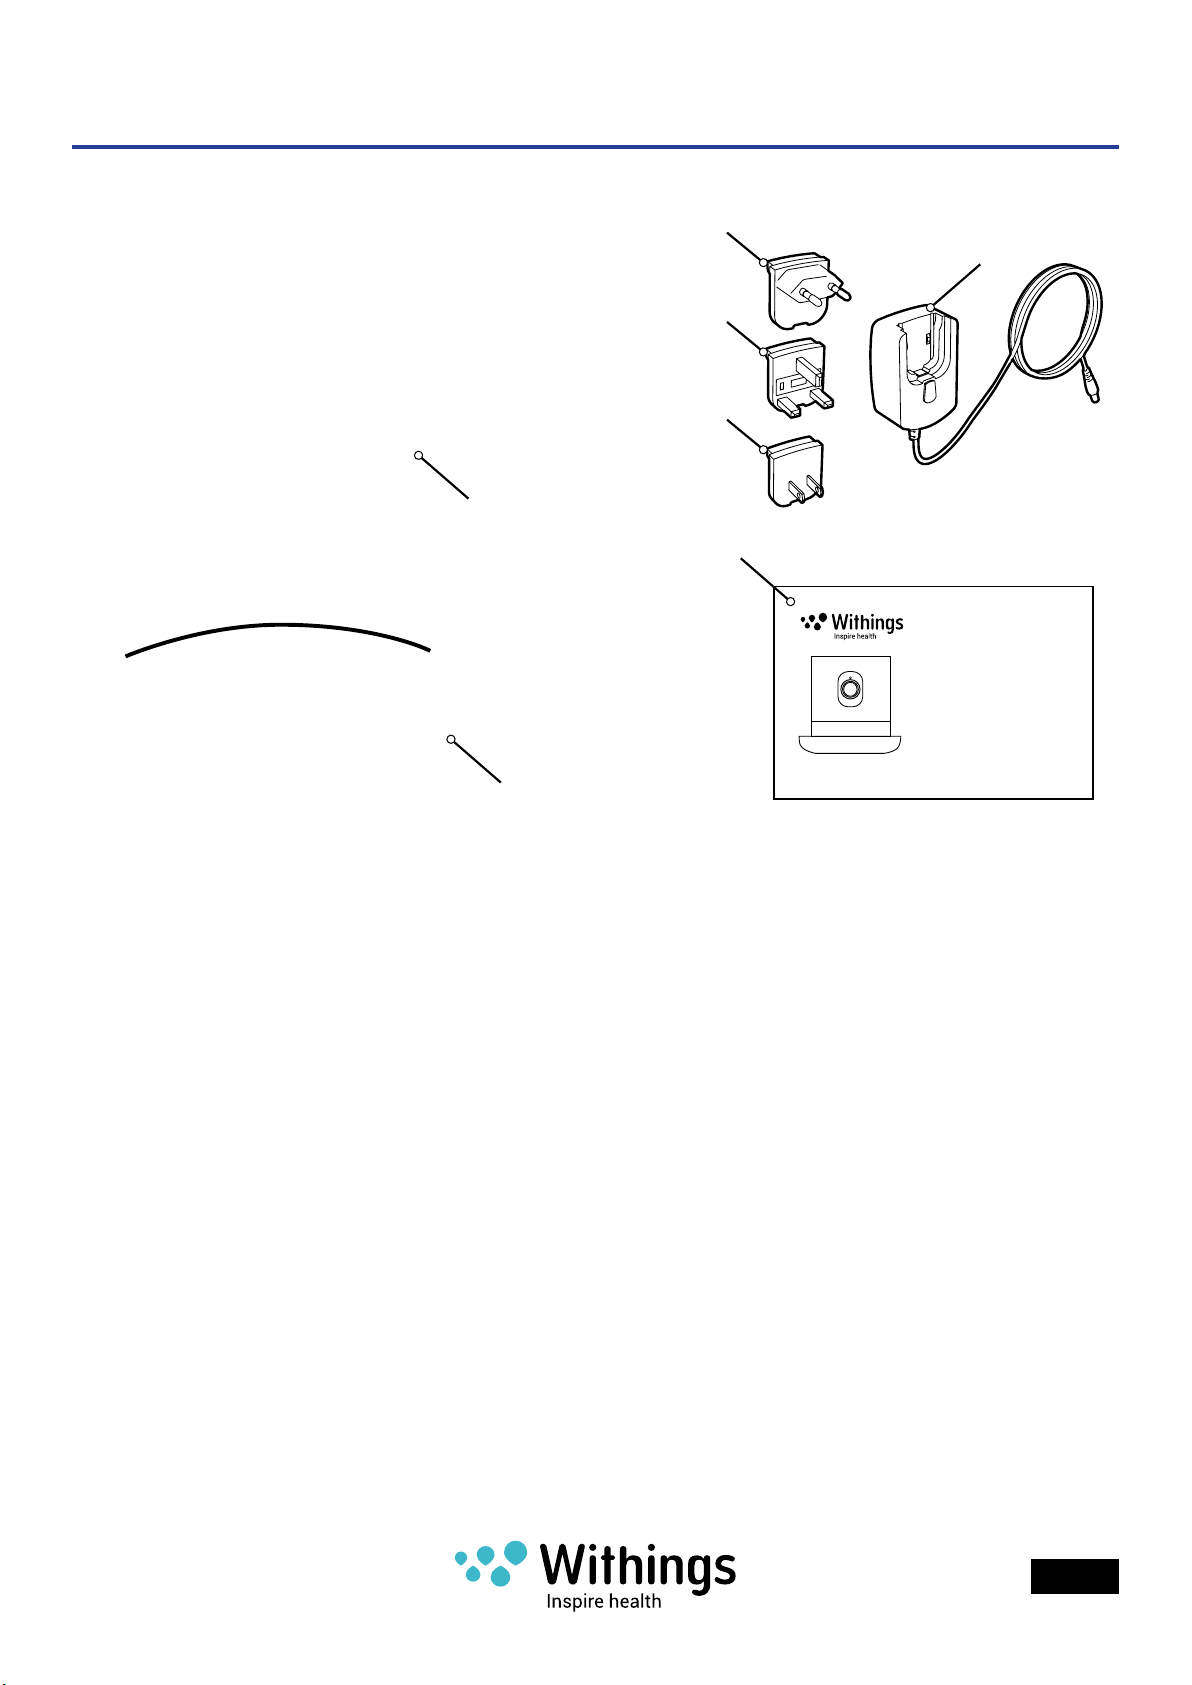
Box Contents
(1)
(3A)
(3B)
(3C)
(4)
(3)
Home
HD camera with air quality sensors
Quick Start Guide
FR Démarrage rapide | DE Schnellstart | ES Inicio rápido
IT Avvio rapido | PT Iniciação rápida | CN 快速入门指南
JP セットアップガイド
(2)
g - 01
(1)Withings Home (2)Table stand (3)Micro-USB power supply
5V 2A
(3A)Plug adapter for
European Union countries
(4)Quick start guide
(3B)Plug adapter for United
Kingdom
(3C)Plug adapter for North
America
Withings Home
v1.0 | December 1st, 2014
EN - 6
Page 7

Minimum Requirements
Wi-Fi router
A personal home Wi-Fi router connected to the Internet is required to:
• Set up the Withings Home,
• Upgrade the rmware,
• Upload data.
Your Wi-Fi router must be 802.11. b/g/n/ on a 2.4 GHz frequency. For more details about
Wi-Fi router compatibility, refer to “Specications” on page58.
Note: For a wired connection to your home network, you need: a free RJ45 port on the
router and a Cat-5 Ethernet cable.
iOS device
An iOS device1 (with operational Bluetooth and Wi-Fi) is required to:
• Set up the Withings Home
• Access the video and other functions
• Track data
It is not possible to use the Withings Home without a compatible iOS device at this time. For
iOS device compatibility information, refer to “Specications” on page58.
iOS version
iOS2 version 7 or higher is required to install and run the Withings Home App from the Apple
App Store.
1 iOS device refer to any mobile electronic devices marketed by Apple Inc, such as iPod Touch, iPhone and
iPad (see the full compatibility list in “Specications” on page58
2 iOS (previously iPhone OS) is a mobile operating system developed by Apple Inc. and distributed
exclusively for Apple hardware.
Withings Home
v1.0 | December 1st, 2014
EN - 7
Page 8

Product Overview
Short description of the Withings Home Monitoring System
Withings Home and Withings Home App work together to provide you with the benets of
an extended home monitoring system.
The uniqueness of the Withings Home is its dual functionality. You can protect your
belongings with the video and alert functions, and protect those who live inside your home
through the measurement of the indoor air quality for VOCs (Volatile Organic Compounds).
Designed to be mobile, Withings Home can be installed anywhere indoors. It is ready to
work after a simple installation and a quick setup of your preferences.
After setup, the Withings home monitoring system will be able to capture, record, and
transmit a live video stream. Once the automatic calibration is complete (48 hours), it will
also inform you about environmental data in real time by reporting indoor air quality.
The Withings home monitoring system analyses the different sounds and movements in
its surroundings and detects unusual VOCs levels. From these analyses and your settings,
it determines whether the events are worthy of your attention. In case of a noteworthy
event, it will send you specic alerts as instant notications on your iOS device. All alerts
will appear in chronological order on an interactive timeline called the Home Diary. You can
view the captured data simply by touching on the Home Diary. The data (photos, videos,
sounds, VOCs spikes) are also stored in your account on a remote server so they can be
synchronized across all of your iOS devices.
Alternatively, you can start live video streaming at any time to see what happens at home.
For example, you ask yourself the question: did I turn off the TV before leaving? Switch on
the video stream to check your room and see!
All of these data exchanges are encrypted to ensure secure data transmission and protect
your family’s privacy. Additionally, video is compressed using the best methods possible,
thereby ensuring smooth video while minimizing your mobile plan data usage.
Sometimes you are at work and you miss the good times that take place at home such as
your child’s rst steps, or when she sings for the rst time. You have the possibility to store
these data long term by choosing one of the plans available from Withings. You can also
attach an external hard drive to record these moments to local storage.
Besides the home monitoring system, the Withings Home gives you the opportunity to
participate and interact with what’s happening at home. You can communicate with your
child through the “2-Way interactive audio system” or to help him fall asleep by playing a
lullaby remotely.
In only thirty seconds, you can set up a complete home monitoring solution. Let’s get
started!
Withings Home
v1.0 | December 1st, 2014
EN - 8
Page 9

System update / upgrade
The Withings Home includes remotely upgradeable rmware.
The rmware is upgraded to the latest version during the setup.
After the initial setup, you will be informed automatically of future rmware upgrades by an
alert on your iOS device.
The rmware upgrade can bring additional features to the system. To keep you informed,
new functions are listed in the chapter “Document release overview” for each new release of
this user guide.
Withings Home
v1.0 | December 1st, 2014
EN - 9
Page 10

Overview of the Withings Home Setup
To easily install and set up the Withings Home, follow the steps below, which will be detailed
in the following pages:
1. Place the Withings Home on a suitable piece of furniture.
2. Plug the AC power adapter into a power outlet. Refer to page13.
3. Install the Withings Home App on your iOS device. Refer to page15.
4. Enable Bluetooth on your iOS device: Settings>Bluetooth.
5. Launch the Withings Home App. Refer to page15.
6. If you do not have already a Withings user account, create one using the Withings Home
App. Refer to page16.
7. Pair the Withings Home and your iOS device. Refer to page19.
8. Setup using the Withings Home App. Refer to page19.
9. Share Wi-Fi settings from your iOS device, using the Withings Home App. Refer to
page21.
10. Install Withings Home using the Withings Home App. Refer to page25.
Withings Home
v1.0 | December 1st, 2014
EN - 10
Page 11
Setup the Withings Home in Your Home
Withings Home
(1K)
(1D)
(1G)
(1E)
(1A)
(1B)
(1C)
(1F)
(1)
(1H)
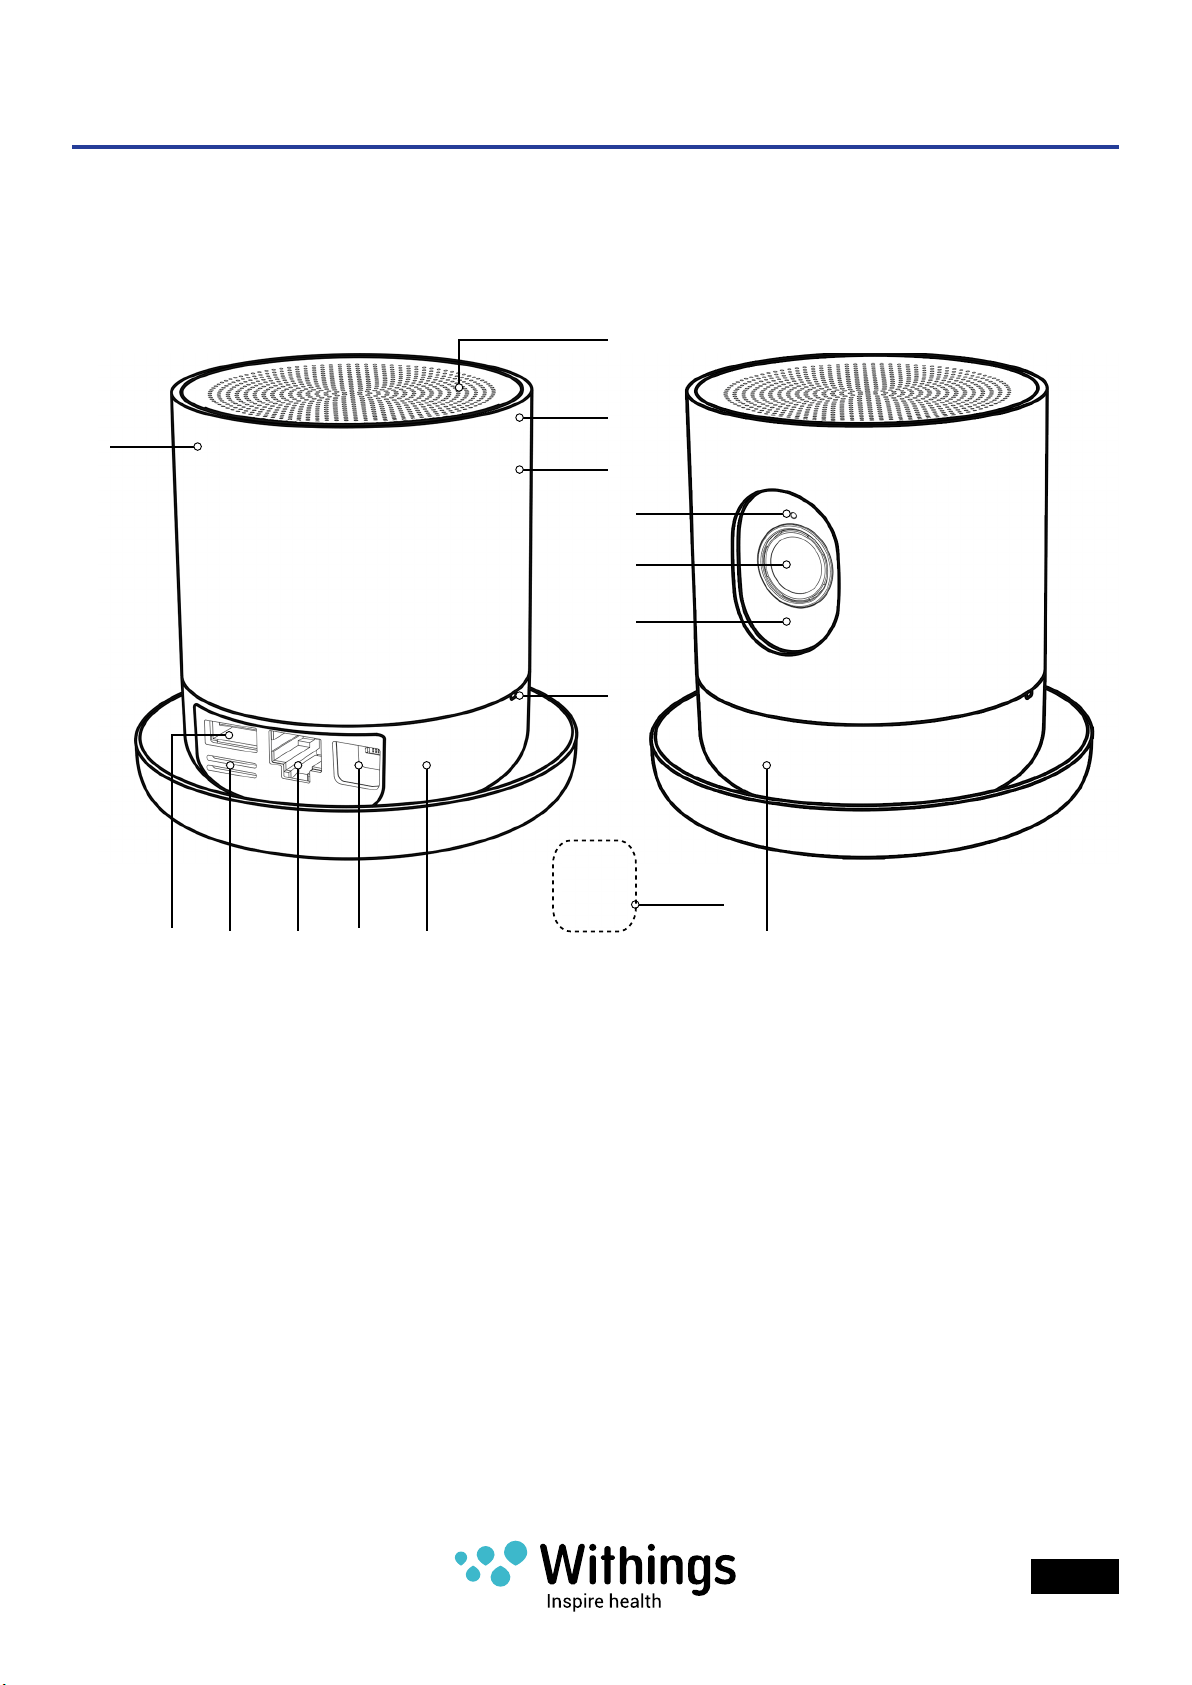
(1)Withings Home (1A)Ambient light sensor (1B)5 MP wide angle video
(1C)IR LED – Night Vision (1D)VOC sensor (1E)Interchangeable cover
(1F)2 digital microphones (1G)Accelerometer (1H)USB 2.0 port
(1I)Environmental sensors (1J)Ethernet port (1K)HQ 2W Speaker
(1L)Multicolor night light (1M)Magnets (1N)Micro-USB port
(1I) (1J) (1N) (1M)
(1L)
g - 02
sensor
Withings Home
v1.0 | December 1st, 2014
EN - 11
Page 12

Before installing
The Withings Home is designed to be easily integrated into your home or ofce
environment. Before installing the Withings Home, it is necessary to follow the safety and
usage instructions listed below.
• Before installation, refer to the “Safety Instructions” on page2 and “Cameras Privacy
Statement” on page62.
• The Withings Home is equipped with environmental sensors to measure air quality. To
obtain representative data for the air quality, this product should be placed away from
areas with high levels of humidity such as kitchens or humidiers.
• The video streaming requires a strong wireless signal
without radio The video streaming requires a strong
wireless signal without radio interferences between
the Withings Home and the Wi-Fi router. between the
Withings Home and the Wi-Fi router. So, it is important
to:
- Place the Withings Home within range of the WiFi router, and avoid placing the Withings Home
such that there are many obstacles (such as walls,
separate floors of the home) between the two items
- Reduce the distance between your Wi-Fi router and
your Withings Home as in “g - 03”.
- Keep electrical devices that generate radio
interference away from the Withings Home.
Note: Your Withings Home uses 2.4 Ghz frequency band
to communicate your Wi-Fi router. Other appliances in
your room such as cordless phones, microwave ovens,
or subwoofers may interfere and degrade the wireless
communication. You can mitigate such interference by
distancing your Withings Home of these devices.
g - 03
Note: The Withings Home (1) can be held tilted with its magnetic Table Stand (2), this in
order to adjust vertically the area to be monitored.
(1)
+α
-α
(2)
g - 04
Withings Home
v1.0 | December 1st, 2014
EN - 12
Page 13
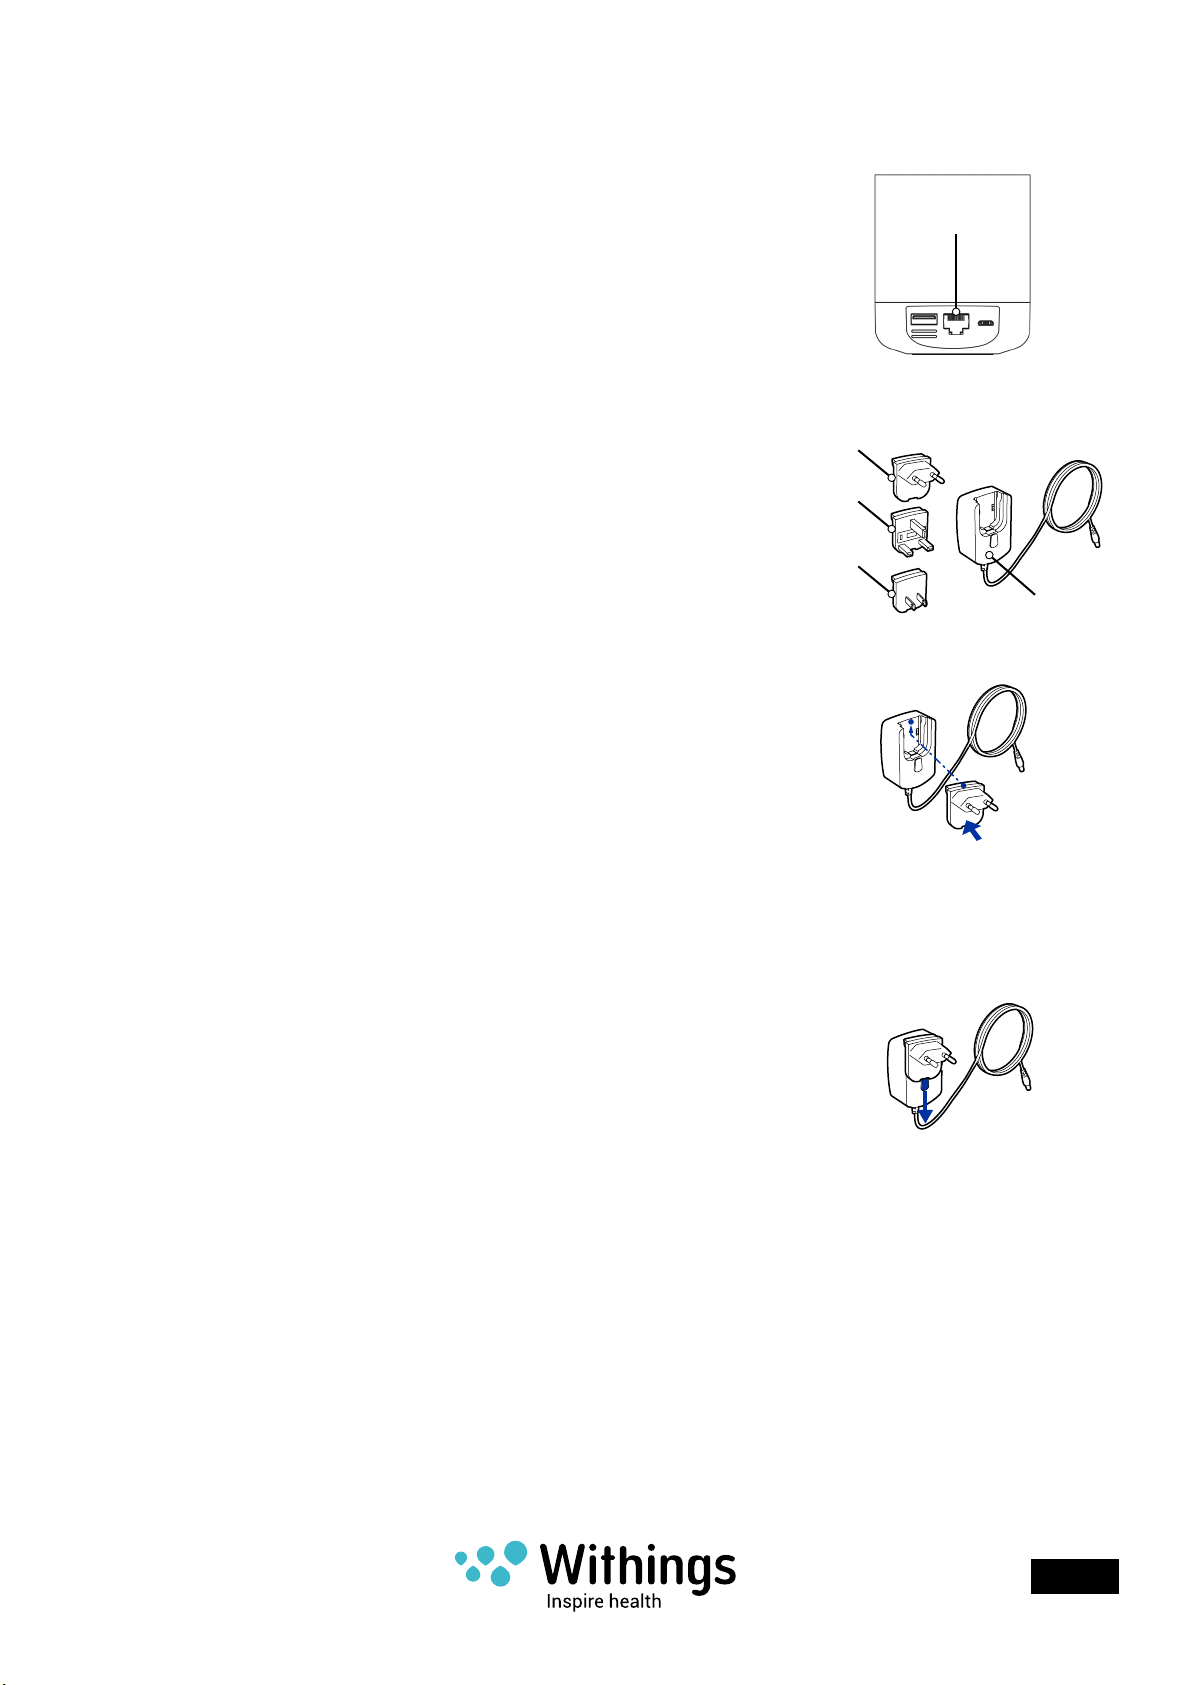
Connect your Withings Home as follows:
(3A)
1. If you prefer to use a wired connection (such as to avoid
the interference problems mentioned above), use a Cat-5
Ethernet cable to connect your Withings Home to your
router.
2. Select the correct plug adapter from the travel adapter
plug set: (3A) for European Union countries, (3B) for the
United Kingdom, and (3C) for North America.
(1J)
g - 05
(3B)
(3C)
(3)
3. Follow the arrow in “g - 07” to connect the plug adapter
to the AC power adapter using the blue matching dots.
4. Push the lower side of the plug adapter down until a click
sound is heard.
5. Ensure that the plug adapter is properly seated into the
AC power adapter slot.
6. If the plug adapter is not properly seated, pull down
the release button to disengage the plug adapter, and
connect it again.
g - 06
g - 07
g - 08
Withings Home
v1.0 | December 1st, 2014
EN - 13
Page 14
7. Connect the AC power adapter (3) to the Micro-USB port
(1N) on the Withings Home.
8. Plug the AC power adapter into a power outlet.
g - 09
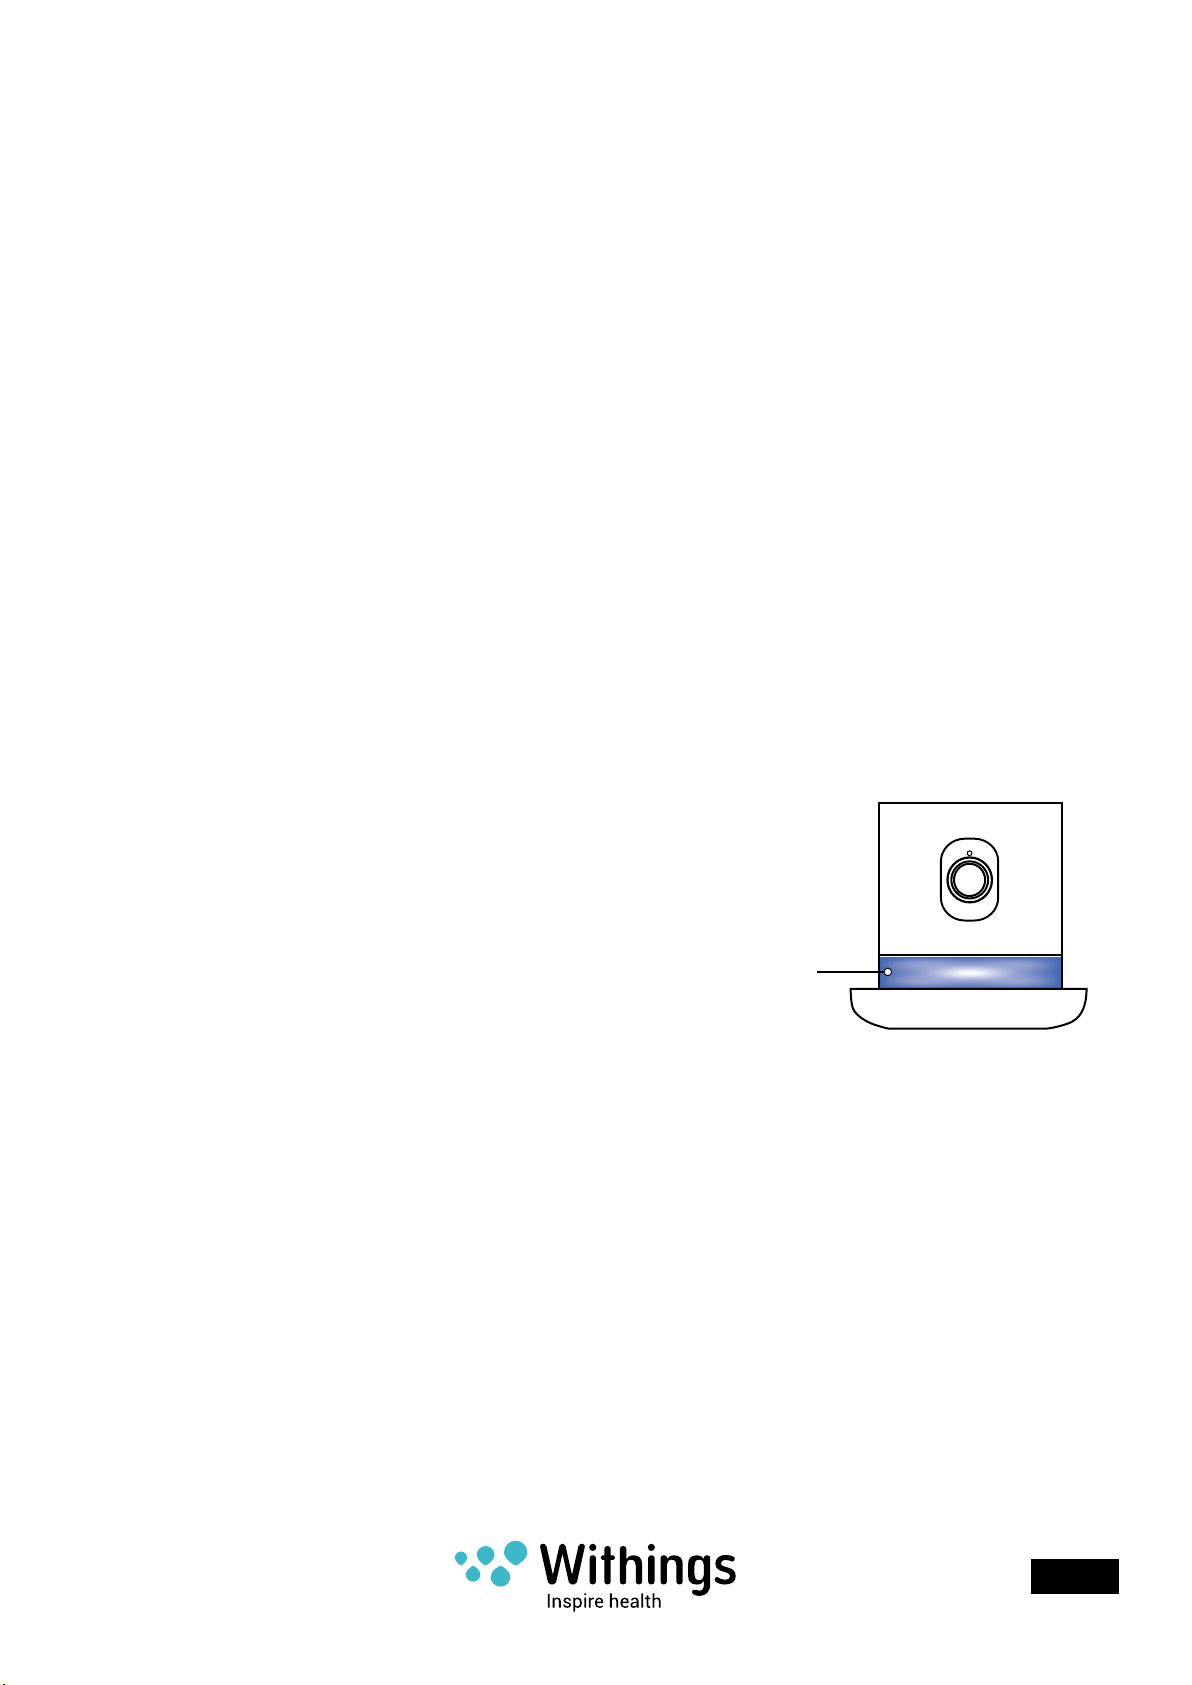
9. The Withings Home will start up. The Multicolor night
light (1L) will start with the orange light pulsing during
few seconds before changing to the blue light pulsing.
10. The blue light pulsing indicates that the Withings Home
is ready for setup. Refer to “Setup using the Withings
Home App” on page19.
Note: The Multicolor night light (1L) also informs about
possible malfunctioning. For more information, refer to
“Troubleshooting” on page55.
g - 10
(1L)
g - 11
Withings Home
v1.0 | December 1st, 2014
EN - 14
Page 15

Withings Home App
Install the Withings Home App on your iOS device
1. Type getapp.withings.com into your iOS device’s web browser.
2. Tap “Download on App Store” as in “g - 12”.
3. Tap “GET” as shown in “g - 13”.
g - 12
Launch the Withings Home App
Tap on the Withings Home App icon .
Withings Home
v1.0 | December 1st, 2014
g - 13
g - 14
EN - 15
Page 16
Creating a new user using the Withings Home App
If you are already using another Withings product and have an existing Withings account,
log into this account now by selecting “Log In” as shown in “g - 15”.
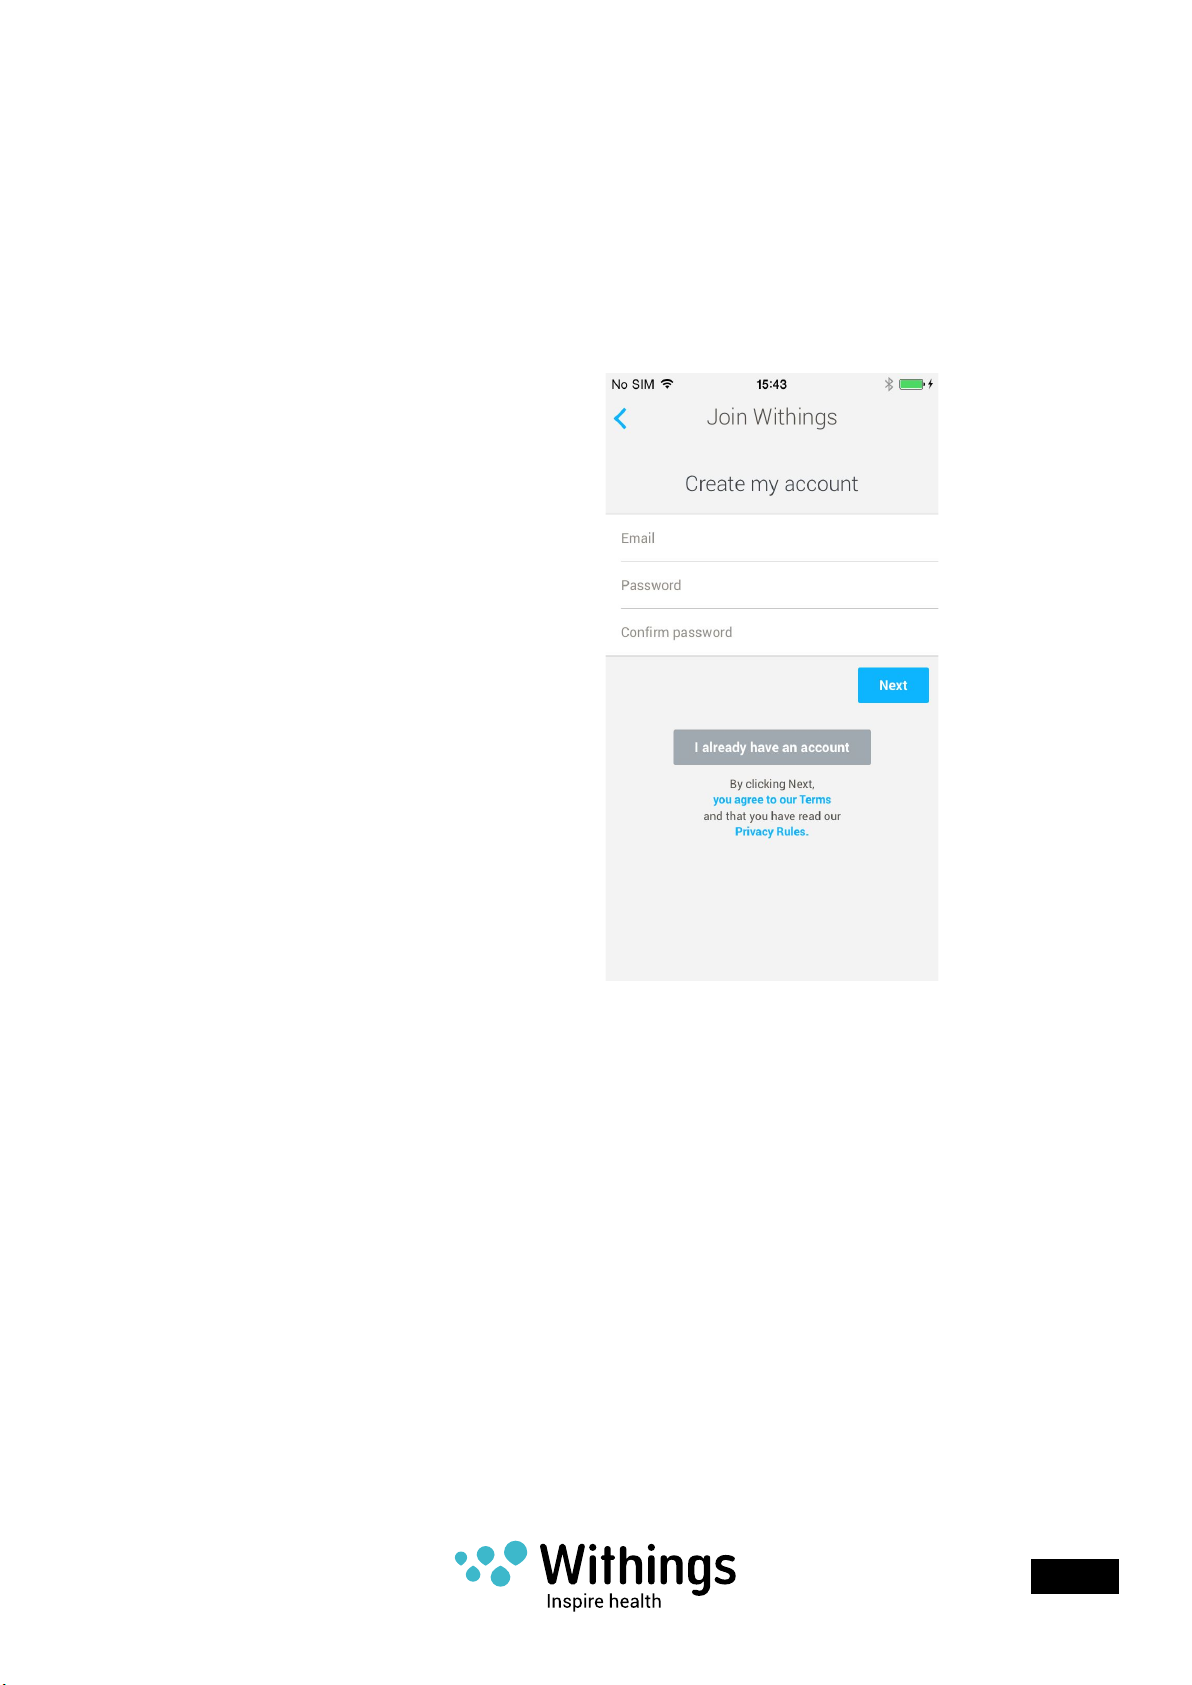
If you have not already created a Withings account, the Withings Home App prompts you to
create an account automatically before the install process continues. Select “Join Withings”,
then follow the steps in the Withings Home App and ll all required elds to create a user, as
in “g - 16”.
Withings Home
v1.0 | December 1st, 2014
g - 15 g - 16
EN - 16
Page 17
Tap on the icon of 3 bars to access to the Withings Home List” screen.
g - 17 g - 18
Withings Home
v1.0 | December 1st, 2014
EN - 17
Page 18
Withings Home App help les
Tap on the icon of 3 bars to access to the Withings Home List screen.
From the Withings Home App, you can access to some useful tips to help you learn more
about the Home.
Scroll up while viewing the Home Diary. At the bottom of the screen, you will nd following
links:
• Learn about the application
• All about my Withings Home device
• How to read Air Quality
g - 19 g - 20 g - 21
Upgrade the Withings Home App
Like other iOS applications, the App Store noties you
whenever an upgrade is available. Be sure to always update
to the latest version of the App for the best experience with
your Withings Home.
Withings Home
v1.0 | December 1st, 2014
g - 22
EN - 18
Page 19

Setup using the Withings Home App
The Multicolor night light (1L) starts pulsing with orange light at the start up.
The Multicolor night light (1L) provides information on the progress of the installation.
Blue light pulsing starts for a new Withings Home which has never been paired with an iOS
device.
Note: The Multicolor night light (1L) also informs about possible malfunctioning. For more
information, refer to “Troubleshooting” on page55.
Bluetooth pairing
Prerequisites:
• Withings Home App has been installed on the iOS device. Refer to “Install the Withings
Home App on your iOS device” on page15.
• The Withings Home is plugged into power.
• The iOS device is connected to your personal Wi-Fi network or mobile data.
1. Enable Bluetooth connection on your iOS device: Settings>Bluetooth.
2. The Withings Home App starts to search for Withings Home device in the Bluetooth
range. An activity indicator shows that the current task is in progress. This step can
take up to one minute.
3. An alert will appear prompting you to select your device from the accessory list, select
your Withings Home as shown in “g - 26”.
g - 23
Withings Home
v1.0 | December 1st, 2014
g - 24
g - 25
EN - 19
Page 20

4. If the Home does not appear on the list after waiting for about one minute as shown
in “g - 26”, you will need to go to the Bluetooth Devices menu on your iOS device and
select the Withings Home to pair manually. Then, return to the Withings Home App and
return to step 3. above.
5. Tap “Next” to pair Withings Home to your iOS device as in “g - 28”.
g - 26 g - 27 g - 28
Withings Home
v1.0 | December 1st, 2014
EN - 20
Page 21

Quick Wi-Fi network conguration
Withings Home can share Wi-Fi settings (network name, password) stored on your iOS
device using the Withings Home App and Bluetooth technology.
Prerequisites:
• Withings Home App already installed on the device. Refer to “Install the Withings Home
App on your iOS device” on page15
• A compatible Wi-Fi router. Refer to “Specications” on page58
• The Withings Home paired with your iOS device, refer to “Bluetooth pairing” on
page19.
• iOS device connected to your personal home Wi-Fi network.
1. Tap “Quick setup”.
2. Once the personal Wi-Fi network is displayed, tap to
select “Quick setup”
3. An alert appears, tap “Allow” to share Wi-Fi settings with
the Withings Home App.
g - 29
g - 30
Withings Home
v1.0 | December 1st, 2014
EN - 21
Page 22

Manual Wi-Fi network conguration
Free Wi-Fi
For most users, the Quick Wi-Fi Conguration is the best choice. However, the Withings
Home App allows users to manually select a Wi-Fi network. This function is especially
helpful when multiple personal Wi-Fi network are in the range. For example, a home-ofce
equipped with a personal and professional network.
1. Tap “Setup another network”, as shown in “g - 29” on page21
2. Select your desired Wi-Fi network to set up your device as in “g - 31”.
3. If your network doesn’t appear, swipe down from the top of the screen to refresh Wi-Fi
network list.
4. Select your preferred Wi-Fi network. If you have a hidden SSID, tap “Manual
conguration” and enter your SSID.
5. Enter the password and tap “OK”
Withings Home
v1.0 | December 1st, 2014
g - 31
g - 32
EN - 22
Page 23

Ethernet network conguration
Prerequisites:
For a wired connection to the home network, you need:
(1J)
• a free RJ45 port on the router
• a Cat-5 Ethernet cable (solde separately).
g - 33
From the “Withings Home List” screen, tap on “Settings”, then tap the “+” button under “MY
DEVICES”.
g - 34 g - 35 g - 36
Withings Home
v1.0 | December 1st, 2014
EN - 23
Page 24

Note: if no Wi-Fi network is detected, a screen, the Withings
Home App starts the wired conguration and asks for
plugging the Ethernet cable as shown.
The Ethernet network conguration will be done
automatically.
Note: After the setup is complete with the Ethernet cable,
Wi-Fi and Bluetooth are switched off automatically.
You can manually congure the Ethernet connection from
the “Wi-Fi setup” screen.
g - 37
Withings Home
v1.0 | December 1st, 2014
g - 38
EN - 24
Page 25

Conguring the Withings Home in the Withings Home App
Prerequisites:
• A Withings account is required to install and congure the Withings Home.
If a user account is not registered in the Withings Home App, the app will prompt you to
create one automatically. Refer to “Creating a new user using the Withings Home App” on
page16.
During the conguration, the Withings Home App will ensure that the Withings Home is
upgraded to the last rmware version. This step might takes few minutes.
A screen as in “g - 39”, indicates that the installation has
been completed.
Withings Home
v1.0 | December 1st, 2014
g - 39
EN - 25
Page 26

All installed devices are listed in the “MY DEVICES” screen.
From the “Withings Home List” screen, select “Settings” to reach the “MY DEVICES” screen.
g - 40 g - 41 g - 42
From the “Settings” screen, you can:
• Edit your Withings Home parameters:
- Rename your Withings Home’s name (eg. Living room, Baby’s room)
- Change your Withings Home conguration
• Modify your account settings:
- Change the Withings Home App language
- Change your Withings account password
- Change the iOS system authorizations for notications
Withings Home
v1.0 | December 1st, 2014
EN - 26
Page 27

To change the device name, follow steps shown in “g - 41”, “g - 42”, “g - 43”, and “g - 44”
g - 43
g - 44
To change the iOS system authorizations for notications, follow steps shown in “g - 45”,
“g - 46”, and “g - 47”.
g - 45 g - 46 g - 47
Withings Home
v1.0 | December 1st, 2014
EN - 27
Page 28

Upgrade the Withings Home rmware
During the installation, the Withings Home App automatically
checks that the rmware of the Withings Home is up to date.
After the installation, the Withings Home will automatically
download the new update and leave you the choice to reboot
immediately or later.
Note: During an update, the startup indicator turns on, as in
“g - 04” on page 20.
g - 48
Withings Home
v1.0 | December 1st, 2014
EN - 28
Page 29

Display the rmware version
To see what version of the rmware your Withings Home is currently running, go to “MY
DEVICES” in the “Withings Home List” screen, and tap the device you wish to check.
g - 49 g - 50 g - 51
Withings Home
v1.0 | December 1st, 2014
EN - 29
Page 30

Home Monitoring
The Withings home monitoring system provides continuous monitoring over time, so you
can know what is happening right now, as well as what happened just a few moments ago.
The Withings Home App allows you to view the live video feed as well as see a history of
recent noteworthy events.
With its environmental sensors, Withings Home helps you understand your indoor air quality
trends over time so you can take steps to improve it.
You can activate the video streaming at any time to view a live stream of the video from
your Withings Home. But, even if you’re not viewing the video, you can still nd out what’s
happening.
Each time a noteworthy event is detected, the Withings home monitoring system will send
an instant notication that will appear on your iOS device’s home screen.
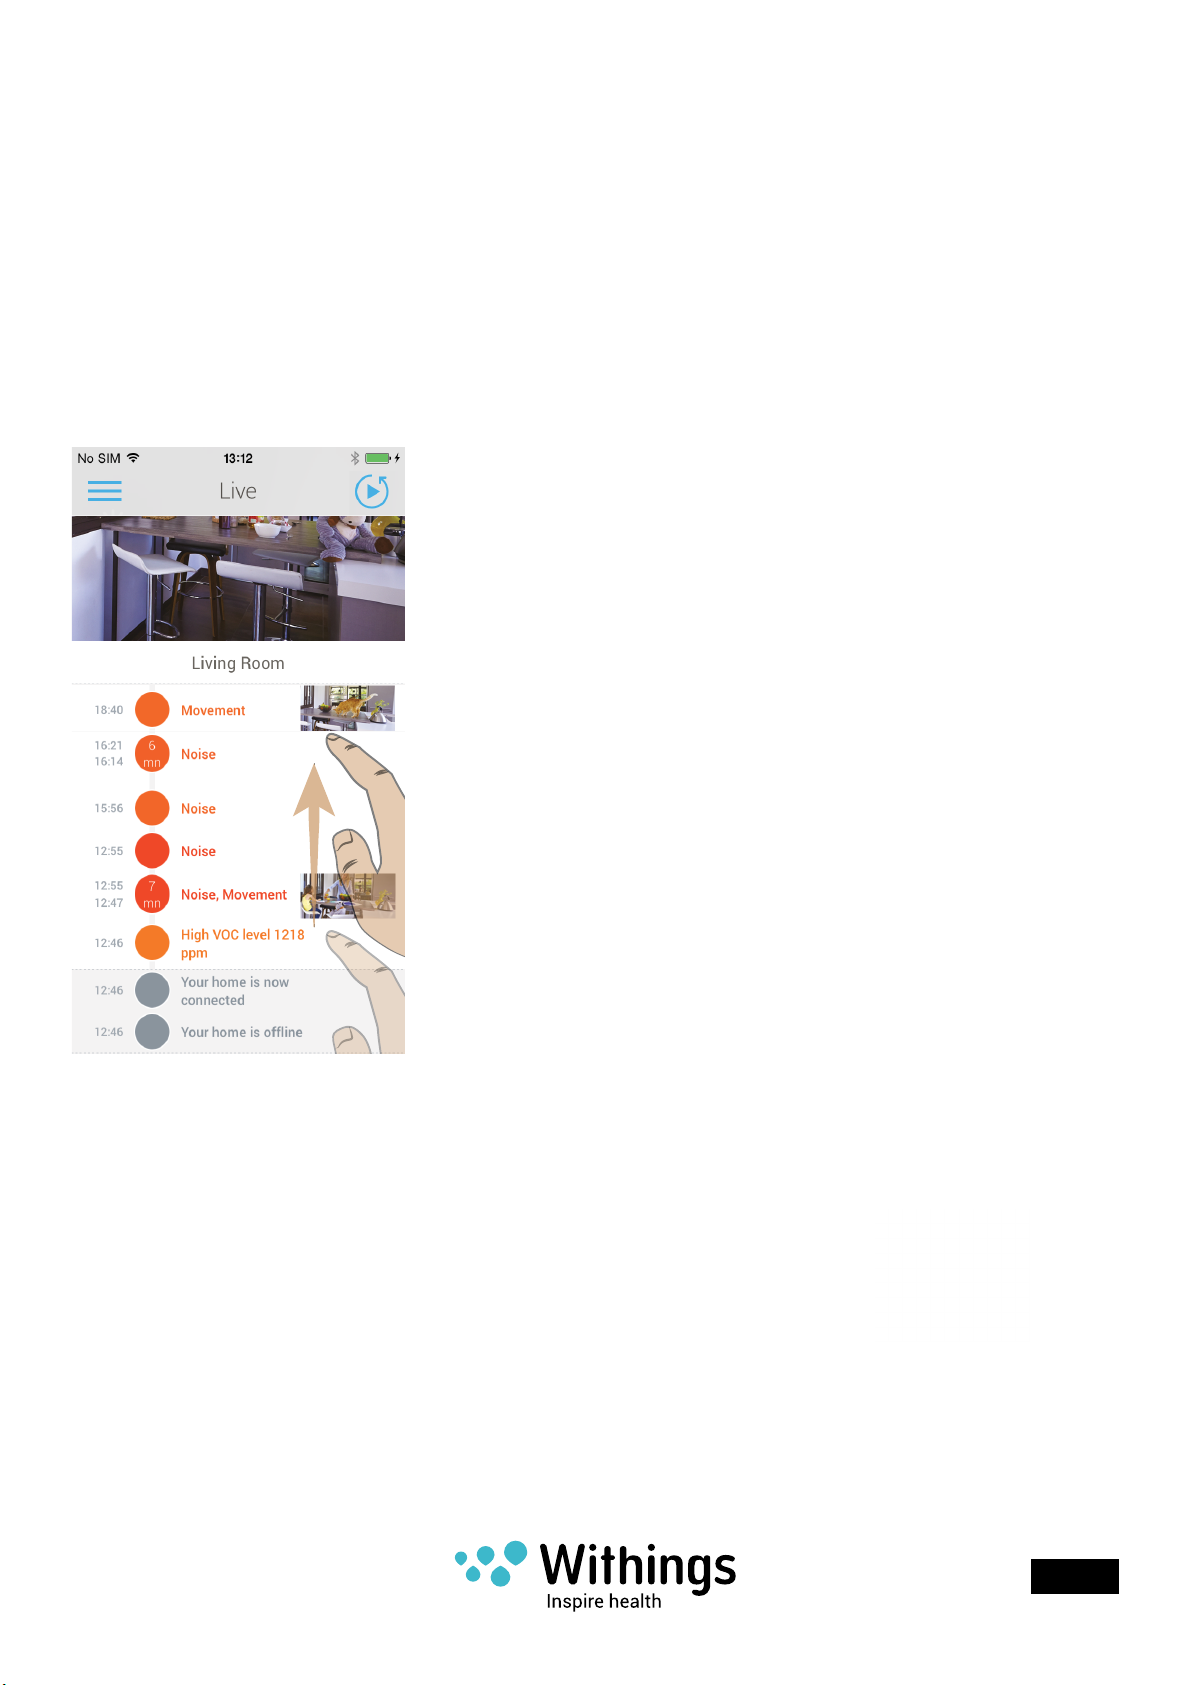
All notications are transcribed on an interactive timeline, called the Home Diary. The Home
Diary is an interactive timeline to quickly see a history of the events that your Withings
Home reported. It contains any noise, movement, or air quality alerts that have occurred, as
well as their duration, in chronological order.
Additionally, the Withings Home Monitoring System backs up these data on remote servers
in two ways: short video clips based on noteworthy events, and optional continuous Cloud
Video Recording (CVR).
You can easily access to the recorded data simply by tapping on the event in the Home
Diary.
Alternatively, you can activate the video streaming at any time to see what happens at
home.
The Home diary is an interactive timeline to quickly see what happened. It contains different
periods with noise and movement alerts.
Withings Home
v1.0 | December 1st, 2014
EN - 30
Page 31

Live stream
You can access to the live stream screen whenever you open the Withings Home App or by
tapping the “Live Stream” option on the “Withings Home List” menu screen.
Note: Withings Home can be congured on multiple iOS devices using the same account,
but can only stream to one of the devices. Multi-user video streaming will be supported at a
later date.
A double tap on the live stream window opens the stream in portrait mode full screen. You
can change the live stream orientation to landscape mode to see more of the video by
rotating your iOS device.
Withings Home
v1.0 | December 1st, 2014
g - 52 g - 53 g - 54
EN - 31
Page 32

Slide apart your thumb and index ngers to zoom in to the video; pinch closed to zoom out.
Rotate your iOS device to change the display mode from portrait to landscape.
g - 55
Withings Home
v1.0 | December 1st, 2014
EN - 32
Page 33

Photo album
Whenever a noteworthy event is detected, your Withings Home takes a photo and backs it
up on a remote server for 2 days.
Tap the Photo Album in the Withings Home List menu.
You can preview a photo in a new screen by tapping its thumbnail in the Photo Album.
g - 56 g - 57 g - 58
Withings Home
v1.0 | December 1st, 2014
EN - 33
Page 34

In the preview screen, tap the upload icon on the right upper corner, to:
• Share the photo by AirDrop, Message, Mail, and iCloud Photo Sharing
• Save Image
• Copy
• Print
g - 59 g - 60
Withings Home
v1.0 | December 1st, 2014
EN - 34
Page 35

Notication settings
The Withings Home Monitoring System provides two types of notications: instant and
Home Diary notications.
Instant notications appear immediately on your iOS device home screen whenever
a noteworthy event is detected. You can enable or disable instant notications on the
“Withings Home List” screen as shown in “g - 66”. Disabling can be useful when you don’t
want to be disturbed with push notications.
Depending on your iOS device settings, instant notications will be displayed as:
• Banners that appear at the top of the screen and go away automatically as shown in “g
- 61”.
• Alerts that require an action before proceeding as shown in “g - 62”.
g - 61 g - 62 g - 63
To set permissions settings , notication settings, and the number of items to show in
notication center, see “g - 44” through “g - 47” on page27
Home Diary notications are the instant notications that are transcribed and stored on the
Home Diary for several days as in “g - 63”.
Note: Even disabled, instant notications continue to be transcribed on the Home Diary.
Withings Home
v1.0 | December 1st, 2014
EN - 35
Page 36

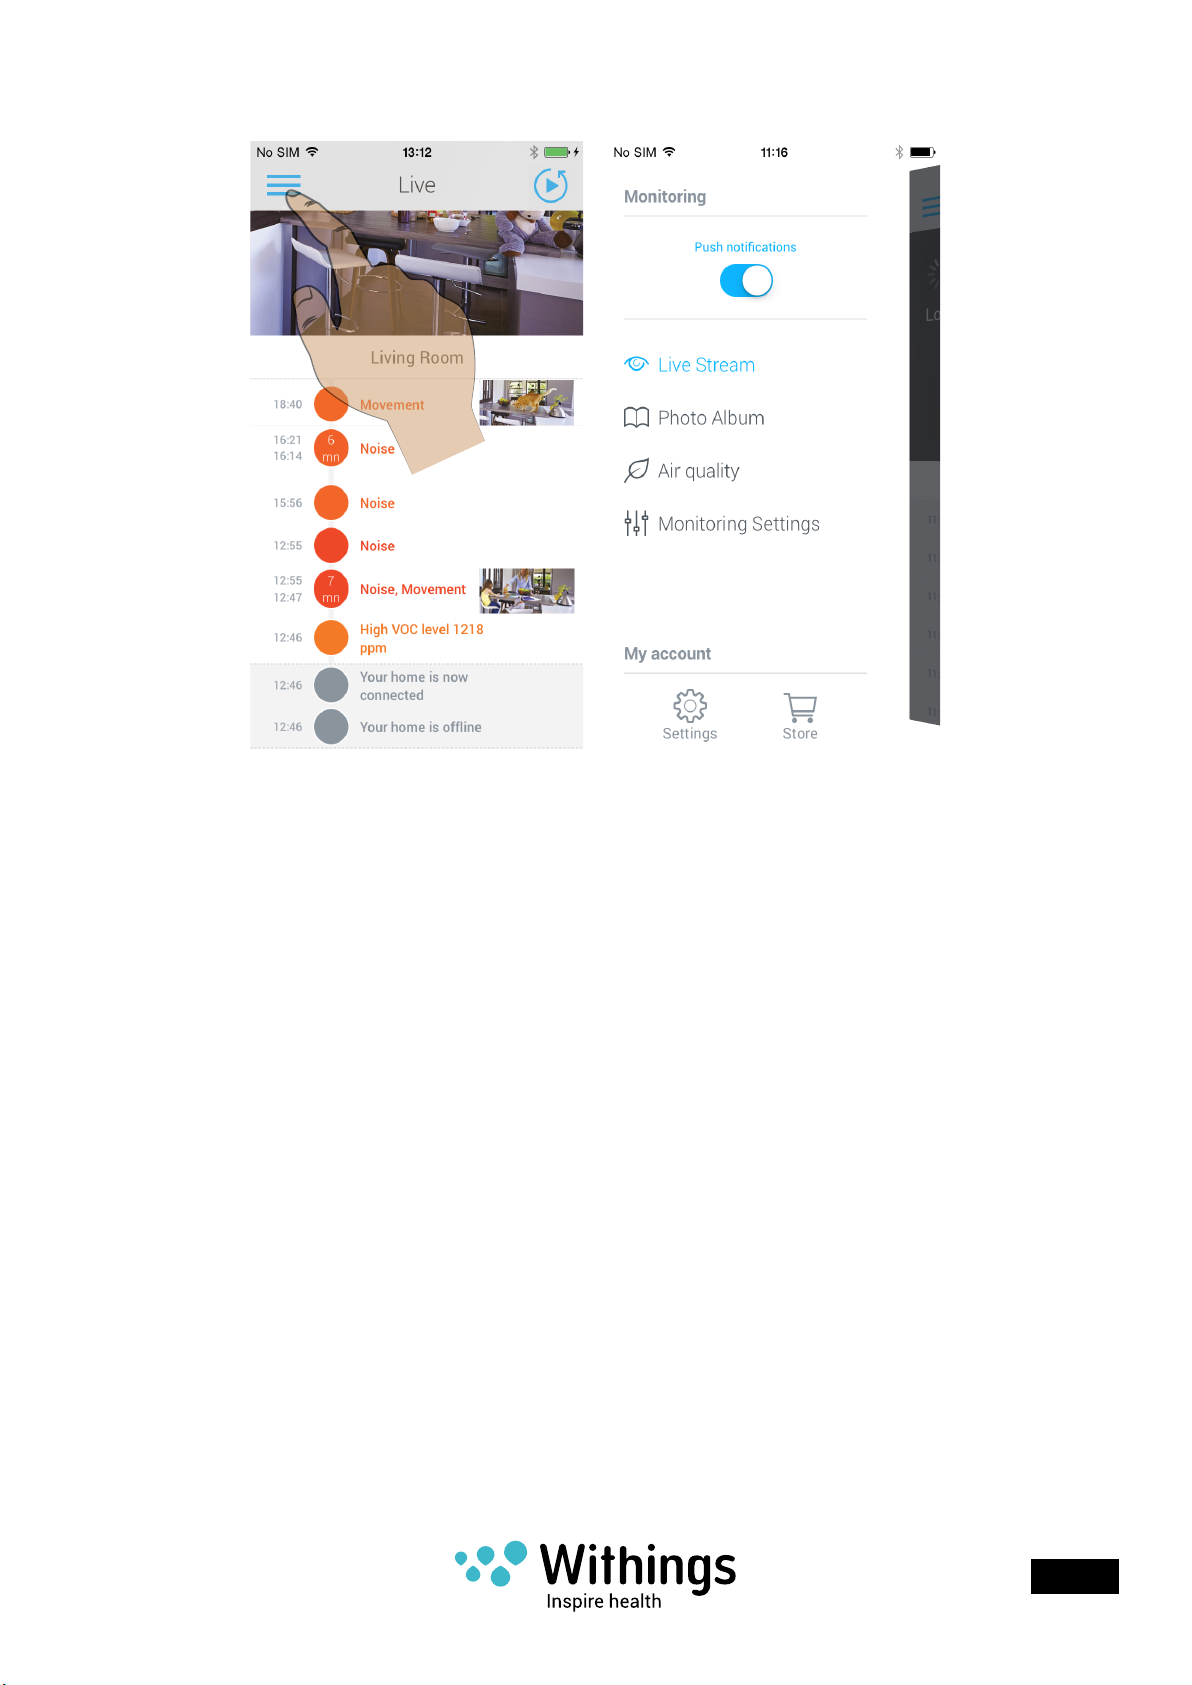
Monitoring settings
You can enable or disable notications, select which type of event you are interested in, and
adjust the level for VOC alert notication.
For activity detection, you can choose to receive notications when certain movement
events occur such as someone walking into the room, movements by the window, or a
crying child. Withings Home can identify particular activities and to keep you in the know.
For the indoor air quality degradation, you can set the VOCs level (Volatile organic
compounds) and choose to receive notications when a VOC spike is reached.
Go to the “Withings Home List” menu screen and tap on “Monitoring Settings”.
g - 64 g - 65 g - 66
Using the switches, you can enable or disable event notication for:
• Motion detection
• Sound detection
• Indoor air quality spike alert (adjustable level)
Using the “Push notications” switch, you can enable receiving alerts for the above settings
or disable all notications.
Disabling notications is useful particularly when you are aware of upcoming repetitive
events (eg. you disable sound notication because the renovation of your neighbour’s
apartment makes a lot of noise).
Withings Home
v1.0 | December 1st, 2014
EN - 36
Page 37

Using the slider, you can adjust from what level of VOCs (Volatile organic compounds
measured on PPM, Parts Per Million) you want to receive alerts for indoor air quality
degradation.
g - 67 g - 68 g - 69
The range for VOCs on the Withings Home is from 450 — 5000 ppm. An average value is
about 1000 ppm for a regular home interior.
• Good: 450 to 1,000 ppm
• Medium: 1,000 to 2,000 ppm
• Bad: 2,000 to 3,000 ppm
• Very Bad: Beyond 3,000 ppm
To get more information about air quality, refer to “Photo album” on page33.
Activity tracking (Home Diary)
Your Withings Home records videos, pictures, and sounds. Everything will be visible, here, in
your Home Diary.
Each time your Withings Home detects a noteworthy event, it takes a photo, records a
short audio clip, or records a ve seconds video. These are then backed up and stored for
two days, forming a Home Diary over time. Scroll through the diary to understand what
happened in your home.
From the Home Diary, you can display what happened by tapping on the event.
At any time, you can subscribe to one of the three optional cloud video recording (CVR)
plans for extended video back up of two or fourteen days. For more information refer to
“Cloud Video Recording (CVR Plans)” on page45.
Withings Home
v1.0 | December 1st, 2014
EN - 37
Page 38

Movement detection:
Whenever a movement is detected, your Withings Home takes a photo and its thumbnail
(reduced-size of photo) appears on the Home Diary. Withings Home works out and indicates
the importance of the event by color coded icons in the Home Diary: orange (important), or
red (very important).
You can display the captured photo in a new screen by tapping its thumbnail.
You can share or save the captured photo by tapping the upload icon on the right upper
corner of the screen. Refer to “Photo album” on page33
Withings Home
v1.0 | December 1st, 2014
g - 70 g - 71
EN - 38
Page 39

Noise detection:
Whenever a noise is detected, your Withings Home records
the sound. Withings Home works out and indicates the
duration and the importance of the event by color coded
icons in the Home Diary: orange (important), or red (very
important).
You can play the recorded sound in a new screen by tapping
on the event.
g - 72
Withings Home
v1.0 | December 1st, 2014
EN - 39
Page 40

Noise and movement detection:
Whenever a noise and movement are detected, your Withings Home takes a video and its
thumbnail appears on the Home Diary. Withings Home works out and indicates the duration
importance of the event by color coded icons in the Home Diary: orange (important), or red
(very important).
You can open the captured video in a new screen by tapping its thumbnail.
g - 73 g - 74
Withings Home
v1.0 | December 1st, 2014
EN - 40
Page 41

Indoor air quality degradation detection:
Whenever higher levels of VOCs (Volatile organic compounds) relative to your settings (refer
to “Notication settings” on page35) are detected, your Withings Home displays the VOC
data and indicates the importance of the event by orange icons (important) or red icons
(very important) on the Home Diary.
You can display the VOC data and its evolution over time in a new screen by tapping on the
event.
Withings Home
v1.0 | December 1st, 2014
g - 75 g - 76
EN - 41
Page 42

Detected movement time-lapse:
From the Home Diary screen, tap the play icon in the right upper corner to view all recorded
movements in a timelapse in a new screen.
g - 77 g - 78 g - 79
Withings Home
v1.0 | December 1st, 2014
EN - 42
Page 43

Live data (air quality)
Warning: The Withings Home is not a carbon monoxide detector, and does not
provide alerts or warnings about hazardous levels of carbon monoxide.
You can access the live data of your air quality readings whenever you run the Withings
Home App or by tapping the “Air quality” on the “Withings Home List” screen. You can swipe
the screen to display captured data during previous days.
g - 80 g - 81 g - 82
Note: A period of 48 hours is required after setup for the VOC sensor to calibrate and
provide accurate data.
Withings Home
v1.0 | December 1st, 2014
EN - 43
Page 44

From the “Air quality” screen shown above, tap “Help”
to access more information about air quality within the
Withings Home App.
What are VOC ?
Volatile Organic Compounds (VOC) are a large group of
carbon—based chemicals that easily evaporate at room
temperature. Examples of VOC include: Acetone, Benzene or
Ethylene glycol.
VOCS are a good indicator to measure indoor air quality and
level of ventilation in your room.
Withings Home addresses the issue of indoor air quality with
a Volatile Organic Compounds (VOCs) sensor giving a good
indication of the presence of air contaminants.
Why is it useful to monitor for VOCs?
VOCs are potentially harmful airborne organic chemicals
originating. Indoor VOC levels are typically ten times higher
than outdoor levels. Combined these compounds have
both short and long-term detrimental effects on human
and animal health. Use the Withings Home to monitor their
presence in your home throughout the day, and to know
when it’s time to clear the air.
g - 83
What are ppm?
VOC are measured in particles per million (ppm). The range for VOCs on the Withings Home
is from 450 — 5000 ppm. An average value is about 1000 ppm for a regular home interior.
• Good: 450 to 1,000 ppm
• Medium: 1,000 to 2,000 ppm
• Bad: 2,000 to 3,000 ppm
• Very Bad: Beyond 3,000 ppm
Withings Home
v1.0 | December 1st, 2014
EN - 44
Page 45

Cloud Video Recording (CVR Plans)
Note: Cloud Video Recording (CVR) will be available in the rst quarter 2015.
You have the possibility to store smart snapshots and video clips captured by your Withings
Home. For benet from this service, you can choose one of the optional Cloud Video
Recording plans available from the Withings web site.
For more information, visit home.withings.com/cvr
Two and fourteen days Cloud Video Recording (CVR)
Cloud Video Recording (CVR) automatically saves video on a rolling basis, so you can easily
review footage from the past two or fourteen days
Thirty days Home diary
The Home Diary is automatically saving on a thirty days rolling basis smart snapshots and
a ve seconds video clips when a noteworthy event is detected.
Withings Home
v1.0 | December 1st, 2014
EN - 45
Page 46

Functions
Time settings
The time of your Withings Home is set and synced automatically with the Withings web
service. In the event of a power failure in your home, the Withings Home will reboot once
power has returned. The Withings Home will retrieve the current time via Withings web
service.
Before using the Withings Home, you must complete the initial setup. For more information
on setting up your Withings Home, refer to “Overview of the Withings Home Setup” on
page10.
Prerequisites:
• The Withings Home is set up and connected to your personal home Wi-Fi network,
• Your iOS device is connected to your personal home Wi-Fi network or plugged into
Ethernet.
Push-to-talk (PTT)
Note: Withings Home can be congured on multiple iOS devices using the same account,
but can only stream to one of the devices at the time. However, it will support multi user
streaming later on.
The Withings Home allows an enhanced two way-talk with
audio echo cancellation and noise reduction. This allows you
to hear what’s happening wherever your Withings Home is
placed, and respond with the Home as your speaker using
the Withings Home App.
Tap and hold the push-to-talk to speak with people near your
Withings Home as shown in “g - 84” and “g - 85”.
• The blue microphone button indicates the two way-talk
progress.
• The green microphone button indicates that the
communication was successful.
• The red microphone button indicates that you didn’t hold
the button for long enough. Try to tap the screen for
longer before speaking next time.
Withings Home
v1.0 | December 1st, 2014
g - 84
EN - 46
Page 47

g - 85 g - 86 g - 87
Lullaby program
The lullaby program will play music (lullaby sound) and lights
(rainbow animation) to help your baby fall asleep.
You can switch on the night light or start a lullaby remotely,
even if you are away.
To play the Lullaby program:
• Tap the Lullaby program button
• Turn the wheel to set the duration as shown in “g - 90”.
• Tap in the center of the wheel to activate the Lullaby
program as shown in “g - 91”.
Withings Home
v1.0 | December 1st, 2014
g - 88
EN - 47
Page 48

g - 89 g - 90 g - 91
The wheel goes away during the program to allow you to
watch your baby falling asleep. A circular arc indicates the
lullaby’s progress.
To stop the Lullaby program:
• Tap the Lullaby program button
• Turn the wheel counterclockwise until the “OFF” is displayed.
• Tap in the center of the wheel to stop the program.
g - 92
Withings Home
v1.0 | December 1st, 2014
g - 93 g - 94
EN - 48
Page 49

To congure the Lullaby program, open the “Night Light” screen as shown in “g - 96”.
From this screen, you can:
• Adjust the lullaby sound volume using the “Volume” slider as shown in “g - 95”
• Adjust the night light using the “Brightness” slider as shown in “g - 95”
• Activate/deactivate the rainbow animation as in “g - 98”
• Select the night light color as shown in “g - 97”.
g - 95 g - 96
Withings Home
v1.0 | December 1st, 2014
EN - 49
Page 50

g - 97 g - 98
Connect and charge an iOS device using the USB port
The Withings Home can charge your iPod or iPhone.
The USB power delivery is limited to 500mA.
Do not connect or charge other devices such as
iPad, iPad Air, or iPad mini.
Plug your iPod or iPhone into the USB port (1H) using its
charging cable.
(1H)
g - 99
Withings Home
v1.0 | December 1st, 2014
EN - 50
Page 51

Privacy Mode
LEX
To enter in Privacy Mode, turn the Interchangeable Cover (1E) as shown. Entering the
Privacy Mode blocks all new requests for audio and video streaming. For example, if you’ve
arrived home, and no longer need the video stream available. However, this handling does
not interrupt the current streaming.
(1E)
g - 100
Note: The Withings Home App displays this live screen to
indicate that your Withings Home is in Privacy Mode.
Be aware that local law and regulation can
restrict the use of your Withings Home. We
advise you to inform your family, relatives and
home employee, if any, that you have installed
the Withings Home on your premises.
Withings Home
v1.0 | December 1st, 2014
g - 101
EN - 51
Page 52

Dissociate a Withings Device
Dissociate a device removes it from your account. You may
want to do this if you will be giving the Withings Home to
someone else after setting it up and using it yourself.
1. To dissociate a Withings device, select it under “MY
DEVICES” in the Withings Home App’s “Settings” screen.
2. Choose the device you want to dissociate.
3. Select “Remove from my account”.
Note: Dissociating your device will cause all images and
video clips backed up remotely to also be deleted. Be sure to
save these locally before you continue with dissociating your
device.
g - 102
g - 103 g - 104 g - 105
Withings Home
v1.0 | December 1st, 2014
EN - 52
Page 53

Access the Quick Start Guide Using the Withings Home App
From the Withings Home App and following the steps below, you can access to the digital
version of the Quick Start Guide (4).
g - 106 g - 107 g - 108
Withings Home
v1.0 | December 1st, 2014
EN - 53
Page 54

Access to the FAQ and Withings Home Support
Using the Withings Home App
From the Withings Home App and following the steps below, you can accede directly to FAQ
(Frequently Asked Questions).
g - 109 g - 110
Using a Web browser
You can accede directly to the Withings Home FAQ (Frequently Asked Questions) by clicking
on the following link: http://support.withings.com/home, or by typing the web address into a
web browser.
Withings Home
v1.0 | December 1st, 2014
EN - 54
Page 55

Troubleshooting
The Withings Home can self diagnose certain issues. The Multicolor night light (1L)
provides you about the statues of your Withings Home.
• Blue light pulsing indicates that your Withings Home is ready for Bluetooth pairing with
your iOS device
• Orange light pulsing indicates that your Withings Home cannot establish the connection
with your router
• Green light pulsing indicates that the setup of your Withings Home has been successful
• Red light pulsing indicates that the setup of your Withings Home has failed.
(1L)
(1L)
(1L)
(1L)
g - 111
Withings Home
v1.0 | December 1st, 2014
EN - 55
Page 56

Home Withings Reset
You may need to reset your Withings Home, in case of a
malfunction, or if you want to give it to another person after
you’ve already used it.
1. From “MY DEVICES”, select your Withings Home and tap
“Reset device”.
2. Follow one of the two methods below
• First method
- Unplug your Withings Home from the power supply
- Plug in your Withings Home to the power supply
- Within fteen minutes after the boot, quick tap ve
times on the top surface as shown
- The Multicolor night light (1L) will start with red light
pulsing to indicate a successful reset.
x5
(1L)
g - 112
• Second method
- Unplug the Micro-USB from your Withings Home
- Plug in and unplug the Micro-USB of the Withings Home ve times, allowing the
orange light to power on for at least one second while it is plugged in, as show in the
three steps in “g - 113”.
>1s
x5
g - 113
Your Withings Home will restart. A blue light pulsing indicates that your Withings Home is
ready for Bluetooth pairing with your iOS device.
3. Go in the your iOS device Bluetooth settings and tap “Forget this device”.
Withings Home
v1.0 | December 1st, 2014
EN - 56
Page 57

Care and Cleaning Instructions
To clean your Withings Home, wipe surfaces down with soap and slightly damp cloth only.
The Interchangeable Cover (1E) comes with your Withings Home is made of
genuine European White Oak. Do not use any solvent to clean it.
Withings Home
v1.0 | December 1st, 2014
EN - 57
Page 58

Specications
Withings Home
• Friendly and elegant design to t diverse room styles
• Multi-color LED technology
High denition camera
• 5 Megapixels CMOS sensor
• Pan range: Ultra wide 135° angle lens (camera angular eld of view: horizontal, vertical,
diagonal)
• Tilt range: +/- 15° angle using the Table stand
• Night vision: LED InfraRed Illumination Light (IR LED)
Audio
• 2 digital microphones
• High-quality 2-way audio speaker 2W
Video communication (streaming)
• Video adjustment: image dimension, quality, frame rate, and bit rate
• Video resolution / frame rate: 1280 x 720 / 30 fps – 640 x 480 / 24 fps – 320 x 180 / 24 fps
• Video compression:
Audio communication
• Enhanced 2 way-talk – Audio Echo cancellation and Noise Reduction
Connectivity
• Wired network connectivity: Ethernet 10-100 Mbits/s
• Wireless network connectivity:
- Wireless LAN standards: Wi-Fi 802.11 b/g/n (2,4 Ghz only) with multiple antennas:
MIMO 2x2
- Wireless security: Wired Equivalent Privacy (WEP) / Wi-Fi Protected Access (WPA) /
Wi-Fi Protected Access II (WPA2)
• Bluetooth connectivity: Bluetooth 4.0 or Bluetooth Low Energy (BLE) marketed as
Bluetooth Smart Ready
Media player / recorder
• Remote Lullaby music player with multicolor night light animation
• Event audio and video playback
• Event audio and video recorder
Environmental sensors
• Air Quality Sensor: Volatile Organic Compounds (VOCs)
Withings Home
v1.0 | December 1st, 2014
EN - 58
Page 59

Sensors
• Ambient light sensor
• Gravity sensor (accelerometer)
• Motion sensor
• Noise sensor
Smart alerts
• Motion detection
• Audio detection
• Indoor air quality degradation: Volatile Organic Compounds depending on spike levels
Compatible iOS devices
• iPhone (all versions above iPhone 4S)
• iPad (3rd generation or higher)
• iPad Air (all versions)
• iPad mini (all versions)
• iPod touch (5th generation)
Compatible iOS versions
• iOS 7.0 and above
iOS App
• Withings Home App
Remote supervision
• Security: Secure streaming - DTLS end-to-end encryption
• Ultra low delay: Usually less than one second in 4G or Wi-Fi
• Compatible Browsers:
External Device Interface
• USB port with 0.5 Amp output for iOS device charger function
Dimensions
• 75 x 75 x 87 mm (2.95 x 2.95 x 3.43 in.)
Withings Home
v1.0 | December 1st, 2014
EN - 59
Page 60

Document Release Overview
Release date Modications
December 1st 2014 v1.0 First release
The screenshots in this manual are used for explanatory purposes. Your actual
screens may differ from the screenshots in this manual.
Withings Home
v1.0 | December 1st, 2014
EN - 60
Page 61

Warranty
Withings Inc. of 16192 Coastal Highway, Lewes, DE 19958 (“Withings”) warrants the
Withings-branded Home hardware product and accessories contained in the original
packaging (“Withings Product”) against defects in materials and workmanship when used
normally in accordance with Withings’ published guidelines for a period of ONE (1) YEAR
from the date of original retail purchase by the end-user purchaser («Warranty Period»).
Withings’ published guidelines include but are not limited to information contained in
technical specications, safety instructions and quick start guide. Withings does not
warrant that the operation of the Withings Product will be uninterrupted or error-free.
Withings is not responsible for damage arising from failure to follow instructions relating to
the Withings Product’s use.
Withings Home
v1.0 | December 1st, 2014
EN - 61
Page 62

Regulatory Statements
LEX
LEX
Cameras Privacy Statement
To protect privacy, avoid installing the Withings Home camera overlooking the
street or your neighbours’ property.
Be aware that local law and regulation can restrict the use of your Withings
Home. We advise you to inform your family, relatives and home employee, if
any, that you have installed the Withings Home on your premises.
Federal Communications Commission (FCC) Statements
These instructions apply to equipment model FCC ID: XNAWBP02
15.21 - You are cautioned that changes or modications not expressly approved by the
part responsible for compliance could void the user’s authority to operate the equipment.
15.105(b) - This equipment has been tested and found to comply with the limits for a
Class B digital device, pursuant to part 15 of the FCC rules. These limits are designed to
provide reasonable protection against harmful interference in a residential installation.
This equipment generates, uses and can radiate radio frequency energy and, if not
installed and used in accordance with the instructions, may cause harmful interference
to radio communications. However, there is no guarantee that interference will not occur
in a particular installation. If this equipment does cause harmful interference to radio or
television reception, which can be determined by turning the equipment off and on, the user
is encouraged to try to correct the interference by one or more of the following measures:
- Reorient or relocate the receiving antenna.
- Increase the separation between the equipment and receiver.
- Connect the equipment into an outlet on a circuit different from that to which the receiver
is connected.
- Consult the dealer or an experienced radio/TV technician for help.
This device complies with Part 15 of the FCC Rules. Operation is subject to the following
two conditions: 1) this device may not cause harmful interference and 2) this device must
accept any interference received, including interference that may cause undesired operation
of the device.
FCC RF Radiation Exposure Statement: This equipment complies with FCC radiation
exposure limits set forth for an uncontrolled environment. End users must follow the
specic operating instructions for satisfying RF exposure compliance. This transmitter
must not be co-located or operating in conjunction with any other antenna or transmitter.
Withings Home
v1.0 | December 1st, 2014
EN - 62
Page 63

This equipment complies with FCC radiation exposure limits set forth for an uncontrolled
environment. This equipment should be installed and operated with minimum distance
20cm between the radiator & your body.
Country Code selection feature to be disabled for products marketed to the US/CANADA.
Industry Canada statement:
This device complies with Industry Canada licence-exempt RSS standard(s). Operation is
subject to the following two conditions:
(1) this device may not cause interference, and
(2) this device must accept any interference, including interference that may cause
undesired operation of the device.
Radiation Exposure Statement:
This equipment complies with IC radiation exposure limits set forth for an uncontrolled
environment. This equipment should be installed and operated with minimum distance
20cm between the radiator & your body.
Type Connector Gain
Ant_1_wi_left PIFA IPEX 2.26
Ant_2_wi_right PIFA IPEX 1.8
Europe – EU Declaration of Conformity
This device complies with the R&TTE Directive:
A copy of the EU Declaration of Conformity is available online at www.withings.com/
compliance
- This appliance can be used by children aged from 8 years and above and persons with
reduced physical, sensory or mental capabilities or lack of experience and knowledge if they
have been given supervision or instruction concerning use of the appliance in a safe way
and understand the hazards involved
- Children shall not play with the appliance
- Cleaning and user maintenance shall not be made by children without supervision
Withings Home
v1.0 | December 1st, 2014
EN - 63
Page 64

This device complies with the essential requirements of the R&TTE Directive 1999/5/CE.
The following test methods have been applied in order to prove presumption of conformity
with the essential requirements of the R&TTE Directive 1999/5/CE:
- EN 60950-1:2006+A11:2009+A1:2010+A12:2011
- EN62311 : 2008
- EN 300 328 V1.8.1: 2012
- EN 301 489-1 V1.9.2: 2011
- EN 301 489-17 V2.2.1: 2012
In Italy the end-user should apply for a license at the national spectrum authorities in
order to obtain authorization to use the device for setting up outdoor radio links and/or for
supplying public access to telecommunications and/or network services.
European Union—Disposal Information
The symbol means that according to local laws and regulations your
product shall be disposed of separately from household waste. When this
product reaches its end of life, take it to a collection point designated by
local authorities. The separate collection and recycling of your product
at the time of disposal will help conserve natural resources and ensure
that it is recycled in a manner that protects human health and the
environment.
Withings Home
v1.0 | December 1st, 2014
EN - 64
Page 65

Withings Home
v1.0 | December 1st, 2014
©2014 Withings. All rights reserved.
withings.com/home
 Loading...