

Page 1
PT Series
Translation of the original operating instructions
Version 4
Page 2

English |
Table of contents
1 Introduction .................................................................................................................................................................. 4
1.1 About these operating instructions....................................................................................................................... 4
1.2 Copyright.............................................................................................................................................................. 4
1.3 Proper use............................................................................................................................................................ 4
1.4 Improper use ........................................................................................................................................................ 4
1.5 Symbols used....................................................................................................................................................... 5
2 Safety notes .................................................................................................................................................................. 6
2.1 Operator obligations............................................................................................................................................. 6
2.2 User obligations ................................................................................................................................................... 6
2.3 Qualification requirements for personnel ............................................................................................................. 6
2.4 Mechanical dangers ............................................................................................................................................. 7
2.5 Electrical dangers................................................................................................................................................. 7
2.6 Thermal dangers .................................................................................................................................................. 7
2.7 Handling of chemicals .......................................................................................................................................... 7
2.8 Safety settings...................................................................................................................................................... 8
2.9 Maintenance, repair and spare parts ................................................................................................................... 8
3 Machine description..................................................................................................................................................... 9
3.1 Description of function.......................................................................................................................................... 9
3.2 Overview .............................................................................................................................................................. 9
3.3 Display ................................................................................................................................................................. 11
3.4 Washing programmes .......................................................................................................................................... 12
3.5 Info menu ............................................................................................................................................................. 13
3.6 Chemicals ............................................................................................................................................................ 13
3.7 Suction tube with level control.............................................................................................................................. 14
3.8 Technical data...................................................................................................................................................... 14
4 Software ........................................................................................................................................................................ 16
4.1 Dishwashing staff menu ....................................................................................................................................... 16
4.2 Chef menu............................................................................................................................................................ 16
4.2.1 Hygiene logbook .......................................................................................................................................... 17
4.2.2 Operating data ............................................................................................................................................. 17
4.2.3 Water hardness............................................................................................................................................ 18
4.2.4 Dosage......................................................................................................................................................... 18
4.2.5 Timer ............................................................................................................................................................ 20
4.2.6 Pictograms ................................................................................................................................................... 21
4.2.7 Basic cleaning .............................................................................................................................................. 22
4.2.8 Descale ........................................................................................................................................................ 23
4.2.9 Brightness .................................................................................................................................................... 25
4.2.10 Sounds ......................................................................................................................................................... 25
4.2.11 Date / time.................................................................................................................................................... 25
4.2.12 Language ..................................................................................................................................................... 25
4.2.13 Units ............................................................................................................................................................. 26
4.2.14 CONNECTED WASH .................................................................................................................................. 26
4.2.15 Water back-flow counter .............................................................................................................................. 26
2 | 89014547; Version 4 | Operating instructions PT Series
Page 3

| English
5 Commissioning ............................................................................................................................................................ 27
5.1 Installing the warewasher..................................................................................................................................... 27
5.2 Connecting the warewasher................................................................................................................................. 27
5.2.1 Water connection ......................................................................................................................................... 27
5.2.2 Electrical connection .................................................................................................................................... 29
5.3 Multifunction interface overview ........................................................................................................................... 31
5.4 Connecting the suction tube hydraulics ............................................................................................................... 32
5.5 Establish the electrical connection of the suction tubes....................................................................................... 32
5.6 Establish the electrical connection of the external dosing devices ...................................................................... 33
5.7 Configuring the transfer strip................................................................................................................................ 34
5.8 Connecting the external energy management system......................................................................................... 35
5.9 Before working with the warewasher for the first time.......................................................................................... 35
6 Operation ...................................................................................................................................................................... 36
6.1 Switching on the warewasher .............................................................................................................................. 36
6.2 Checking for completeness.................................................................................................................................. 36
6.3 Washing ............................................................................................................................................................... 36
6.4 Opening/closing the hood (automatic hood option).............................................................................................. 39
6.5 Unlocking the hood (automatic hood optional)..................................................................................................... 39
6.6 Soaking programme............................................................................................................................................. 40
6.7 Changing the tank water ...................................................................................................................................... 41
6.8 Switching off the warewasher .............................................................................................................................. 41
7 Malfunctions ................................................................................................................................................................. 42
7.1 Notifications.......................................................................................................................................................... 42
7.2 Displaying the error code of a serious error ......................................................................................................... 43
7.3 Poor wash result .................................................................................................................................................. 43
8 Cleaning and maintenance.......................................................................................................................................... 44
8.1 Cleaning the warewasher during operation.......................................................................................................... 44
8.2 Cleaning the warewasher at the end of the working day ..................................................................................... 44
8.3 Topping up the regeneration salt ......................................................................................................................... 47
8.4 Replacing the canister.......................................................................................................................................... 48
8.5 Changing the chemicals....................................................................................................................................... 48
8.6 Descaling the warewasher ................................................................................................................................... 49
8.7 Maintenance by the customer service department .............................................................................................. 49
9 Disassembly and disposal .......................................................................................................................................... 50
9.1 Taking the warewasher out of operation for long production stops...................................................................... 50
9.2 Disassembly......................................................................................................................................................... 50
9.3 Disposal ............................................................................................................................................................... 50
10 Annex ............................................................................................................................................................................ 51
10.1 Declaration of Conformity..................................................................................................................................... 51
Operating instructions PT Series | 89014547; Version 4 | 3
Page 4

English | 1 | Introduction
1 Introduction
1.1 About these operating instructions
This operating manual constitutes a component of the warewasher and must be stored in a place that is accessible to the
user. To be able to work safely with the warewasher, the safety and operating instructions provided must be observed.
Compliance with the valid national accident prevention regulations and general safety provisions must be ensured.
1.2 Copyright
The instructions are protected for the manufacturer by copyright.
The instructions contain guidelines and drawings or parts of drawings of a technical nature, which must not be repro-
duced, distributed, or used for the purpose of competion without authorisation, nor shared with third parties, either in
whole or in part.
The operator of the warewasher is permitted to make copies, in whole or part, expressly for internal use relating to the operation of the dishwasher. The manufacturer is entitled to claim damages for any infringements. Further rights are reserved.
Subject to technical alterations
© 2025 by Winterhalter Gastronom GmbH
1.3 Proper use
– The warewasher is intended only for washing dishes, cutlery, glasses, kitchen utensils, pots, trays, plates, and GN
containers for gastronomic and similar use.
– Operate the warewasher with chemicals from Winterhalter. If other chemicals are used, please contact Winterhalter or
an authorised customer service team in advance.
– The warewasher is a technical device for commercial use and is not intended for private use.
– Only operate the warewasher as described in these operating instructions.
1.4 Improper use
– Never wash without a wash rack.
– Do not wash electrical cooking appliances.
– Do not wash items made of wood.
– Do not wash ashtrays or objects covered with wax.
– Only wash plastic parts that are resistant to heat and alkalis.
– Do not make any changes, additions or modifications without the approval of the manufacturer.
– Winterhalter Gastronom GmbH assumes no liability for any damage caused by improper use of the warewasher.
4 | 89014547; Version 4 | Operating instructions PT Series
Page 5
1.5 Symbols used
Ø This symbol indicates an instruction.
ð This symbol indicates the results of your actions.
– This symbol indicates a list.
Note:Indicates an additional important piece of information.
The following symbol refers to additional information: } page 6
Warning notices have the following layout:
CAUTION
Type and source of danger
Consequences of danger
Ø Measures to avert the danger.
The danger level is indicated by the signal word.
DANGER
The signal word DANGER indicates an immediate danger; ignoring it will lead to serious injury or death.
Introduction | 1 | English
WARNING
The signal word WARNING indicates a potential danger; ignoring it may lead to serious injury or death.
CAUTION
The signal word CAUTION indicates a potential danger; ignoring it may lead to minor or moderate injury.
NOTE
The signal word NOTE indicates potential damage to property.
Operating instructions PT Series | 89014547; Version 4 | 5
Page 6

English | 2 | Safety notes
2 Safety notes
Winterhalter Gastronom GmbH assumes no liability or warranty in the event of non-compliance with these safety and operating instructions.
2.1 Operator obligations
The commercial warewasher is used in the restaurant industry and similar businesses (bakeries, butcher’s shops, etc.).
The operator of the warewasher is therefore subject to the legal obligations for occupational safety. In addition to the
warning and safety information in these operating instructions, the operator must comply with the current provisions regarding safety, accident prevention and environmental protection for the area of application of the warewasher. To ensure
safe use of the warewasher, the operator must take the following measures:
– Arrange for the warewasher to be connected by authorised technicians according to the locally applicable standards
and regulations.
– Provide the user with information on the provisions regarding occupational safety.
– Ensure that only personnel who have read and understood the operating instructions and safety notes and are trained
in handling the warewasher and the chemicals work with them.
– Refer users to the safety notes and inform them of potential dangers. Repeat training sessions at regular intervals to
prevent accidents.
– Arrange for the Winterhalter customer service team or a specialist dealer to provide instruction in operating and using
the warewasher.
– Provide the user with the operating instructions and quick guide.
– Operate the warewasher only when it is in perfect technical and hygienic condition.
2.2 User obligations
In addition to the warning and safety notes given in these operating instructions, the operator must comply with the current safety, accident prevention and environmental protection provisions relevant to the area of application of the commercial warewasher.
In particular, the user must take the following measures:
– Adhere to the applicable occupational safety regulations.
– Fulfil the assigned responsibilities for installation, operation, maintenance and cleaning of the warewasher.
– Read the operating instructions and safety notes.
– Only work on the warewasher after receiving training in handling the warewasher and the chemicals.
– Only operate the warewasher when it is in perfect technical and hygienic condition.
– Switch off the warewasher immediately should a malfunction occur.
Switch the warewasher back on only once the cause of the malfunction has been remedied by an authorised service
technician.
– Ensure that the area around the warewasher is clean and tidy.
– Turn off the on-site water supply at the end of the working day.
2.3 Qualification requirements for personnel
Activity User group Qualification / training
Connection to the mains supply Specialist personnel Authorised electrician or personnel with equival-
ent qualification
Installation, initial commissioning, maintenance, repair, recommissioning
Operation, cleaning and maintenance in
daily use
Specialist personnel Electrician with Winterhalter training or
Winterhalter service technician with training as
an electrician or personnel with equivalent qualification
Adults Instruction and briefing regarding dangers
provided by the operator, based on the operating
instructions (quick guide and safety notes)
Young people over the age of14Instruction and briefing regarding dangers
provided by the operator, based on the operating
instructions (quick guide and safety notes)
Under supervision
Children under the age of 14 Not permitted
6 | 89014547; Version 4 | Operating instructions PT Series
Page 7

Safety notes | 2 | English
2.4 Mechanical dangers
– In order to avoid the risk of slipping on wet floors when operating the warewasher, prevent dirt from accumulating on
the floor and wear non-slip footwear.
– Wear protective gloves during assembly and repair work to avoid cutting yourself on sharp metal edges.
– Rusting foreign bodies inside the warewasher can also cause stainless steel to rust. Use only undamaged wire grate
racks, rust-free wash items and suitable cleaning utensils, and ensure that water pipes are protected from rust.
– If the machine is installed and operated in a vehicle, follow the additional requirements for unstable surfaces.
2.5 Electrical dangers
– Connection to the mains supply may only be carried out by a specialist electrical company authorised by the energy
supplier.
– Work on the electrical system, installation and maintenance work and repairs may be carried out only by qualified
specialists. The electrical engineering safety rules must be observed to avoid electrical accidents:
– Disconnect all poles from the power supply.
– Secure the machine to prevent it from being switched on again.
– Ensure that there is no voltage.
– Earth and short circuit.
– Cover or cordon off neighbouring parts that are live.
– Do not open any machine covers if doing so requires the use of tools. There is a danger of electric shock.
– The electrical safety of this warewasher is guaranteed only if it is connected to a correctly installed protective circuit.
Winterhalter cannot be held responsible for damage caused by a missing or broken protective conductor (e.g. electric
shock).
– If the mains cable is damaged, it must be replaced by Winterhalter, its customer service team or another qualified per-
son to prevent danger. The mains cable must be a H07RN-F type or equivalent.
– Touching live components can lead to death by electric shock. In the event of a defect or damage to an electrical
component / cable or its insulation, switch off the power supply immediately and arrange for repair by a specialist.
2.6 Thermal dangers
– Contact with hot components and surfaces can cause burns.
– Before installation and maintenance work and repairs, allow the warewasher and surfaces to cool down.
– Wear protective clothing and gloves.
– When attaching additional equipment, lay electric cables and dosing tubes a sufficient distance away from hot com-
ponents to prevent damage.
– Do not operate the warewasher at ambient temperatures below 0°C to avoid damage to the hoses, tank and boiler
and prevent functional damage.
2.7 Handling of chemicals
Chemicals can cause severe chemical burns, eye damage and poisoning if they come into contact with the skin or eyes.
– In the event of contact with the eyes or skin, wash thoroughly with tap water and proceed according to the instructions
in the safety data sheet for the chemicals.
– Never drink chemicals or wash water or pour them into other containers.
– Wear protective clothing, protective gloves and protective goggles as specified in the safety data sheet when working
with chemicals.
– Read and observe the danger and safety notes on the container and safety data sheet.
Operating instructions PT Series | 89014547; Version 4 | 7
Page 8

English | 2 | Safety notes
2.8 Safety settings
The commercial warewasher has been built in accordance with the applicable legal provisions and is safe to operate.
Dangerous areas that cannot be excluded by design are fitted with safety devices.
– Hood limit switch
All safety devices must be fitted and fully functional when operating the commercial warewasher.
Safety devices must not be changed or modified.
2.9 Maintenance, repair and spare parts
– Only service technicians who have been trained and authorised by Winterhalter are permitted to carry out mainten-
ance work and repairs. Improper maintenance or repairs may cause significant danger to the user, for which
Winterhalter cannot assume liability.
– Only original Winterhalter spare parts may be used for maintenance and repairs. If original spare parts are not used,
the warranty is void. The information in the spare parts catalogue is definitive in this respect.
– Arrange for an installer or an electrician to remedy on-site water and electricity supply malfunctions. Arrange for other
malfunctions to be remedied by an authorised service technician or specialist dealer.
8 | 89014547; Version 4 | Operating instructions PT Series
Page 9
Machine description | 3 | English
1 2 3
4
19
23
16
21
12
15
5
22
13
6
10 11
14
20
7 8 9
17 18
24
3 Machine description
3.1 Description of function
After the warewasher is switched on, the boiler and the tank are filled and heated up to the operating temperature. Once
the target temperatures are reached, the warewasher is ready for use.
The warewasher is fully automatic with programmes consisting of three steps: Wash, Drain and Rinse.
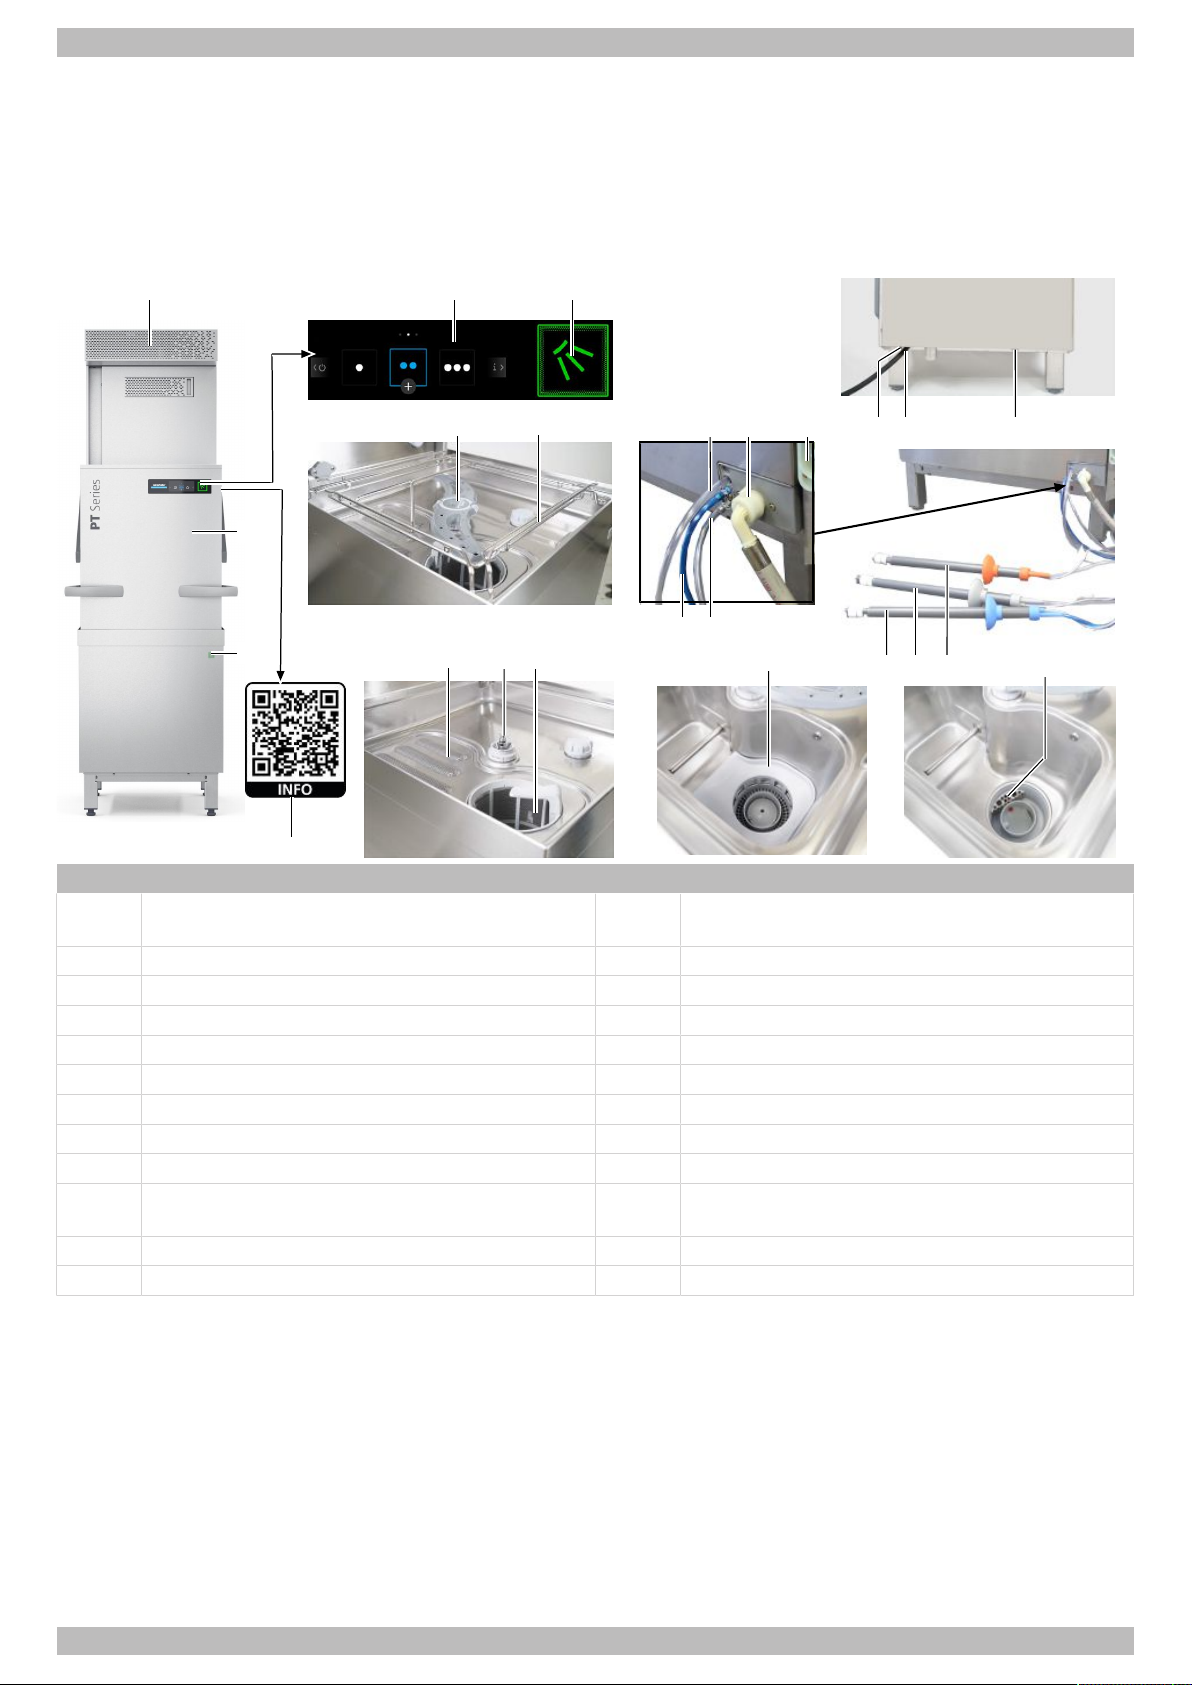
3.2 Overview
Item Description Item Description
1 Energy module (optional) 13 Start button (only for automatic hood mechan-
isms)
2 Display 14 Strainer
3 Start button 15 Wash field bearing
4 Hood 16 Filter cylinder
5 Lower wash field 17 Rinse aid connection
6 Rack carrier 18 Detergent connection
7 Defoamer hose guide 19 Filter bottom
8 Supply hose 20 Rinse aid suction tube
9 Multifunction interface 21 Suction tube for detergent (optional)
10 Connection for on-site equipotential bonding sys-
tem
11 Mains cable 23 Pump protection strainer
12 Waste water connection 24 QR code for accessing digital services
22 Suction tube for defoamer (optional)
Operating instructions PT Series | 89014547; Version 4 | 9
Page 10
English | 3 | Machine description
Automatic hood start
Closing the hood automatically starts a washing programme. The automatic hood start can be deactivated by an authorised service technician (P572). Every washing programme will then need to be started by pressing the start button.
Automatic hood mechanism (optional for PT-M and PT-L)
The hood opens automatically after every washing programme and can be closed again using the start button on the front
cover.
EnergyPlus (optional)
Note:Cold water connection required.
The Energy module above the warewasher includes a fan motor and a heat exchanger. The fan motor extracts the moist,
warm air (=vapours) out of the washing compartment and transfers the generated energy to the cold inlet water via a
heat exchanger. A waste water heat exchanger provides an additional energy gain.
ClimatePlus (optional for PT-M and PT-L)
Note:Cold water connection required.
The heat pump module above the warewasher includes a fan motor and a heat pump. The fan motor extracts the moist,
warm air (=vapours) out of the washing compartment and the area around the warewasher and transfers the generated
energy to the cold inlet water via a heat exchanger.
Cool (optional)
Note:Cold water connection required.
The rinse temperature can be changed for warewashers with this option. Glasses are ready to be used again faster with
cold rinsing.
Utensil (optional for the PT-L and PT-XL)
Warewashers with this option combine two applications and can wash both utensils (e.g. pots, trays) and dishes. Two
tank heaters are installed to maintain the tank water temperature.
Integral water softener (optional)
Warewasher with built-in salt container for regeneration salt. The regeneration salt softens the inlet water and thus prevents a build-up of limescale inside the warewasher and on the items being washed.
PAY PER WASH (optional)
Further information is available on our homepage.
www.pay-per-wash.com
CONNECTED WASH
Further information is available on our homepage.
www.connected-wash.com
10 | 89014547; Version 4 | Operating instructions PT Series
Page 11
Machine description | 3 | English
3
1
2 4
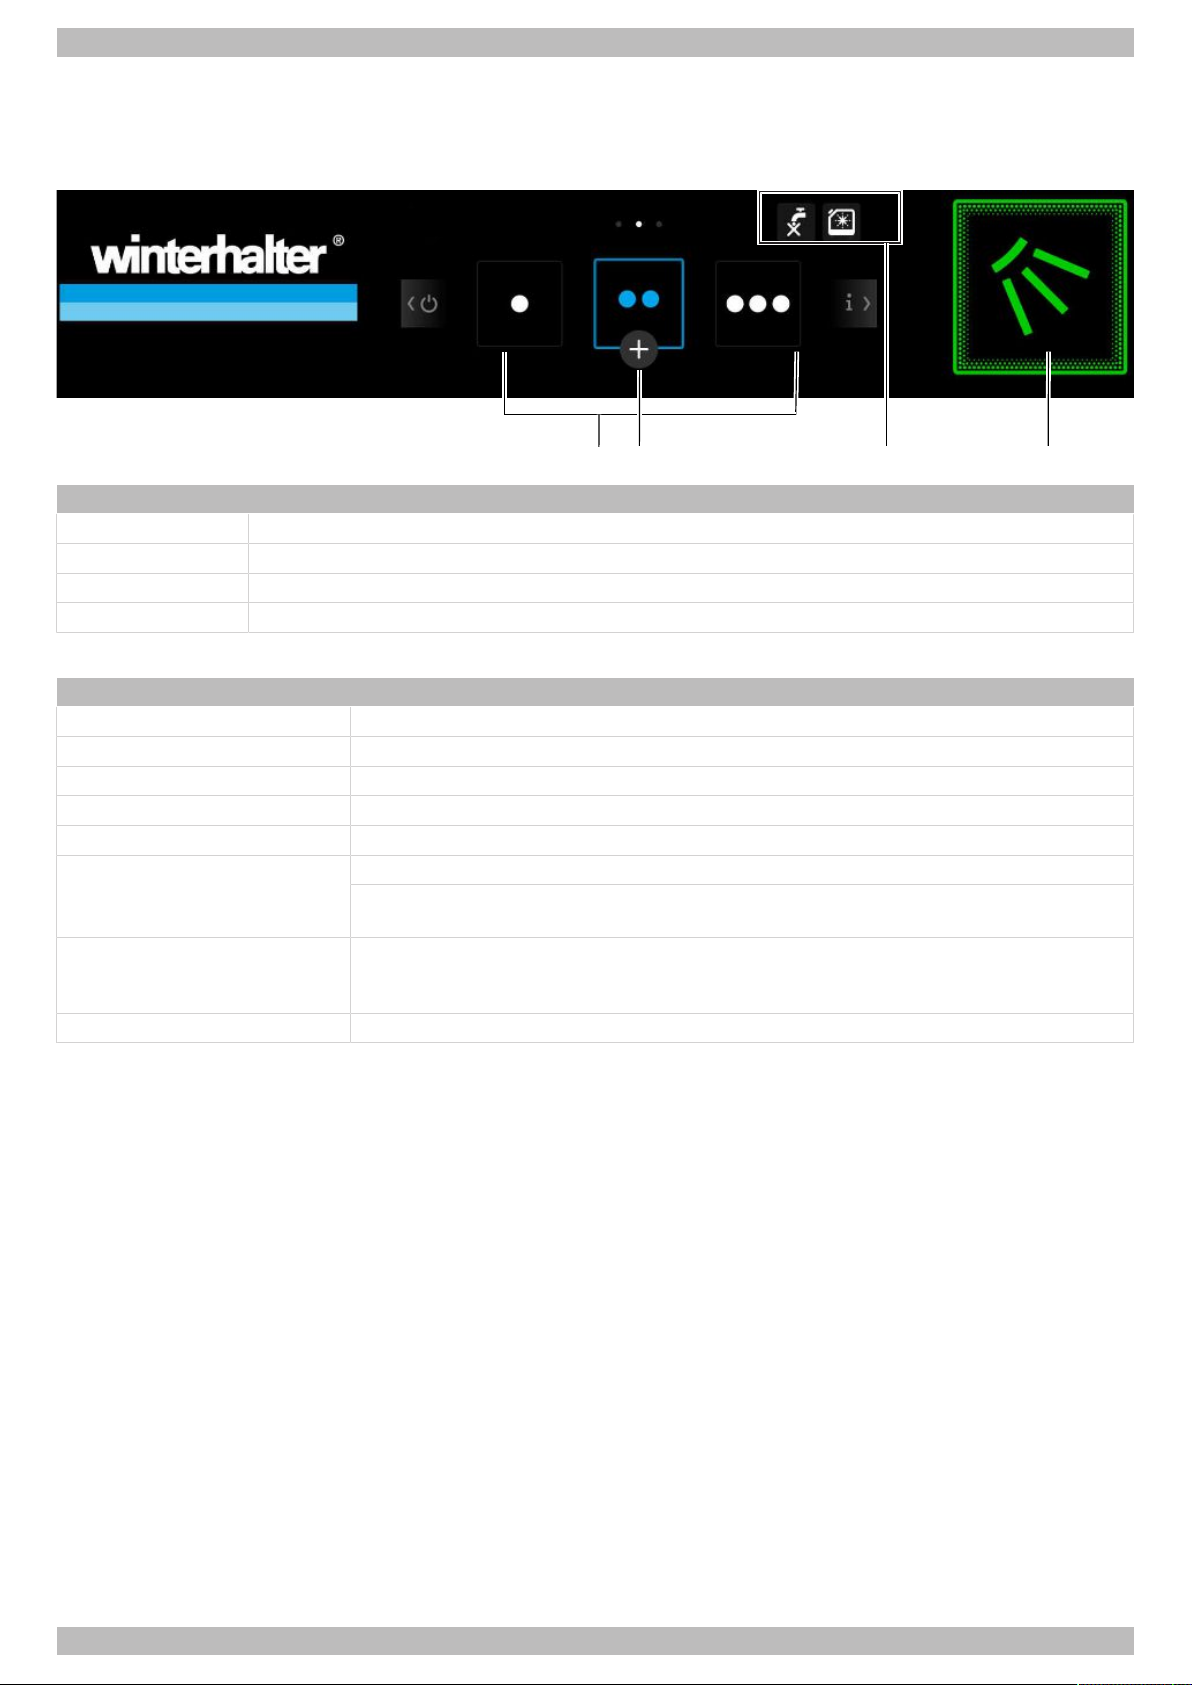
3.3 Display
Operating the display is similar to operating a smartphone. The display responds to light touches. Therefore, only operate
the display with your fingers and do not use any sharp objects. You can also operate the display and start button with wet
hands or rubber gloves.
Item Description
1 Washing programmes
2 Selection of additional programmes
3 Display area for error pictograms
4 Start button
Start button (4)
Colour Meaning
No light Warewasher is switched off.
Orange Warewasher is filling and heating up.
Green Warewasher is ready for use.
Flashing green Washing programme has ended; hood has not been opened yet.
Blue Warewasher is washing.
Flashing blue Soaking programme is running.
Only for warewashers with automatic hood mechanism:
The hood moves down, a washing programme then starts automatically.
Flashing green-blue Only for warewashers with Energy module or heat pump module:
Warm, humid air is being extracted. The washing programme is complete only when
the start button flashes green.
Red The warewasher has stopped washing because there is a serious error.
On machines with an automatic hood, the start button on the front panel behaves in the same way as the start button on
the display.
Screen saver
The display is dimmed if it is not used for a long time. Washing can also be carried out when the display is darkened.
Operating instructions PT Series | 89014547; Version 4 | 11
Page 12
English | 3 | Machine description
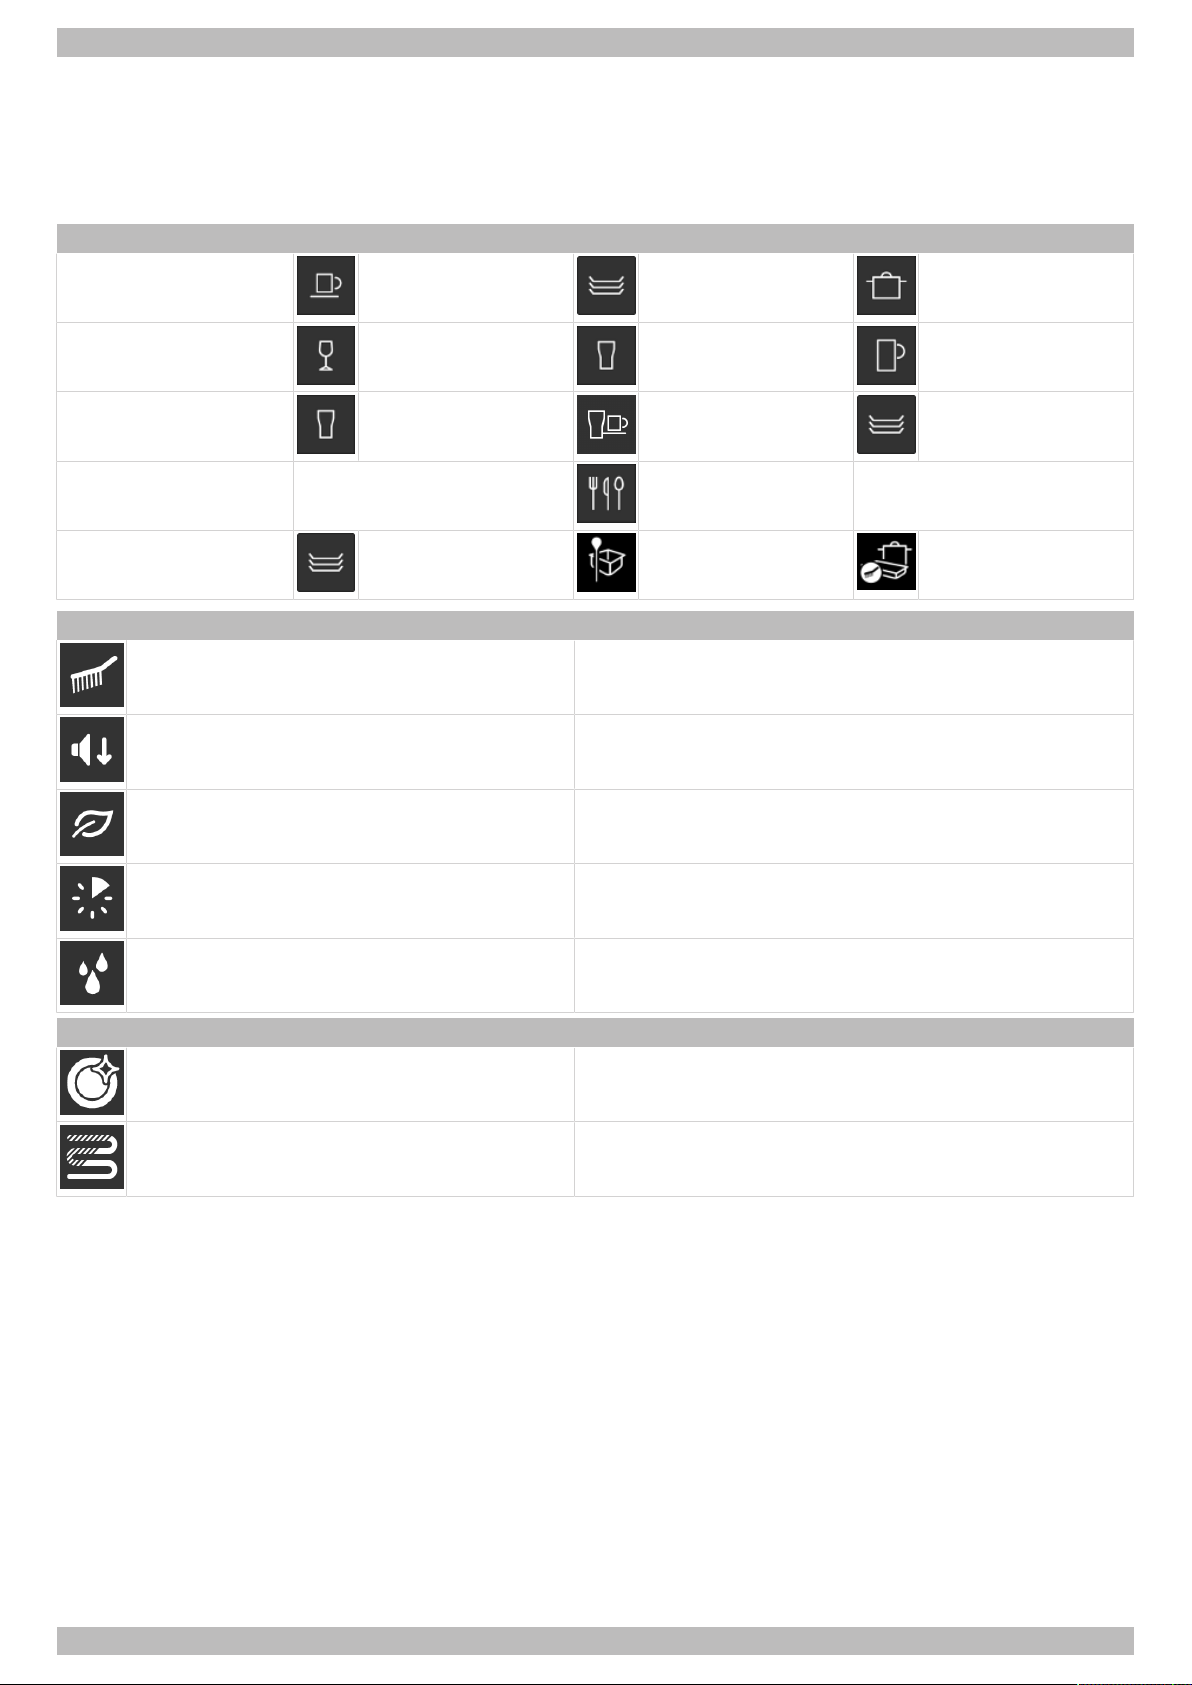
3.4 Washing programmes
The washing programmes differ depending on the type of warewasher, as they are adapted to the respective wash items.
The authorised service technician can adjust programmes (temperature, wash pressure, dosing, and programme length).
Programme 2 is pre-selected as soon as the warewasher is ready for operation.
Additional pictograms are available via the chef menu.
Warewasher type Programme 1 Programme 2 Programme 3
Dishwasher Slightly dirty dishes Moderately dirty dishes Very dirty dishes
Glasswasher Delicate glasses Glasses Robust glasses
Bistro warewasher Glasses Glasses and cups Plates
Cutlery washer - Cutlery -
Utensils
(PT Utensil)
Pictogram / additional programme Meaning
Intensive programme Longer wash time for heavy soiling
Silence programme Quieter washing programme that uses reduced wash pressure
ECO programme Longer wash time with reduced use of resources
Short programme Shortened wash time with slightly higher detergent consump-
Soaking programme
Pictogram / special programme Meaning
Basic cleaning programme Menu-guided programme for thorough cleaning of wash items,
Dishes Utensils Utensils Plusfor heav-
and longer wash time
tion
Programme for soaking and dissolving dried-on residues (}
page 40)
e.g. to remove starch residues (} page 22)
ily soiled utensils
Descaling programme Menu-guided programme for descaling the inside of the ware-
washer (} page 23)
12 | 89014547; Version 4 | Operating instructions PT Series
Page 13
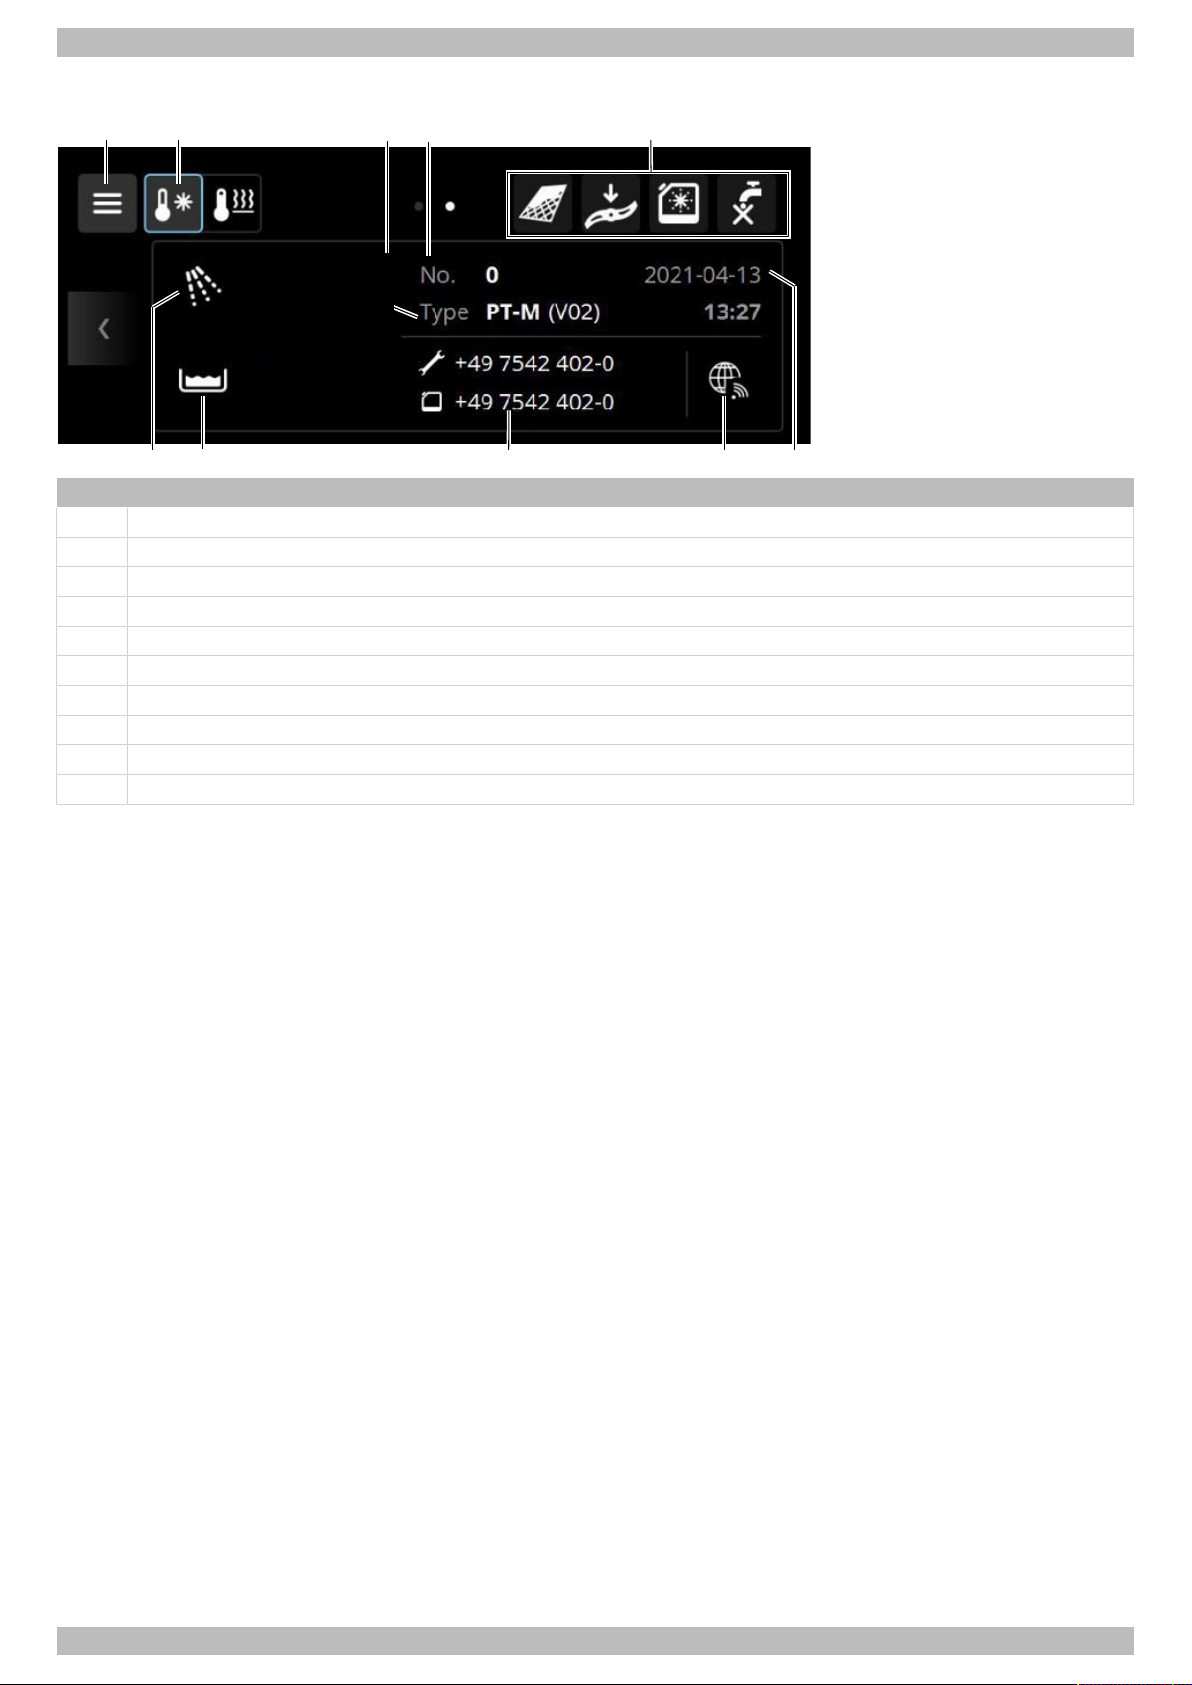
3.5 Info menu
1 2
3
678
4
5
9
10
62 °C
85 °C
Item Description
1 Access to the dishwashing staff menu / chef menu
2 Cool (optional): switching the rinse water temperature
3 Machine model
4 Machine number
5 Display area for error pictograms
6 Date / time
7 CONNECTED WASH: warewasher is connected to the internet
8 Telephone number for service technician and chemical supplier
9 Current tank temperature
10 Current rinse water temperature
Machine description | 3 | English
3.6 Chemicals
Operate the warewasher with chemicals from Winterhalter. Contact Winterhalter or an authorised customer service team
before using other chemicals.
Rinse aid
Rinse aid is required to ensure that water on the wash items runs off as a thin film after washing. This helps the wash
items to dry quickly.
Rinse aid is automatically dispensed using an integrated or external dosing device.
Detergent
A detergent is required to dissolve food residues and dirt on the wash items. Detergent is automatically dispensed using
an (optional) integrated or external dosing device.
To avoid damaging the warewasher and to achieve a good wash result:
– Do not use acidic detergents.
– Do not use foaming products (e.g. manual washing-up liquid) for pre-treating the wash items.
Defoamer
Defoamer is necessary if heavy foam formation prevents a good wash result. Defoamer is automatically dispensed using
an (optional) integrated dosing device.
Operating instructions PT Series | 89014547; Version 4 | 13
Page 14
English | 3 | Machine description
1
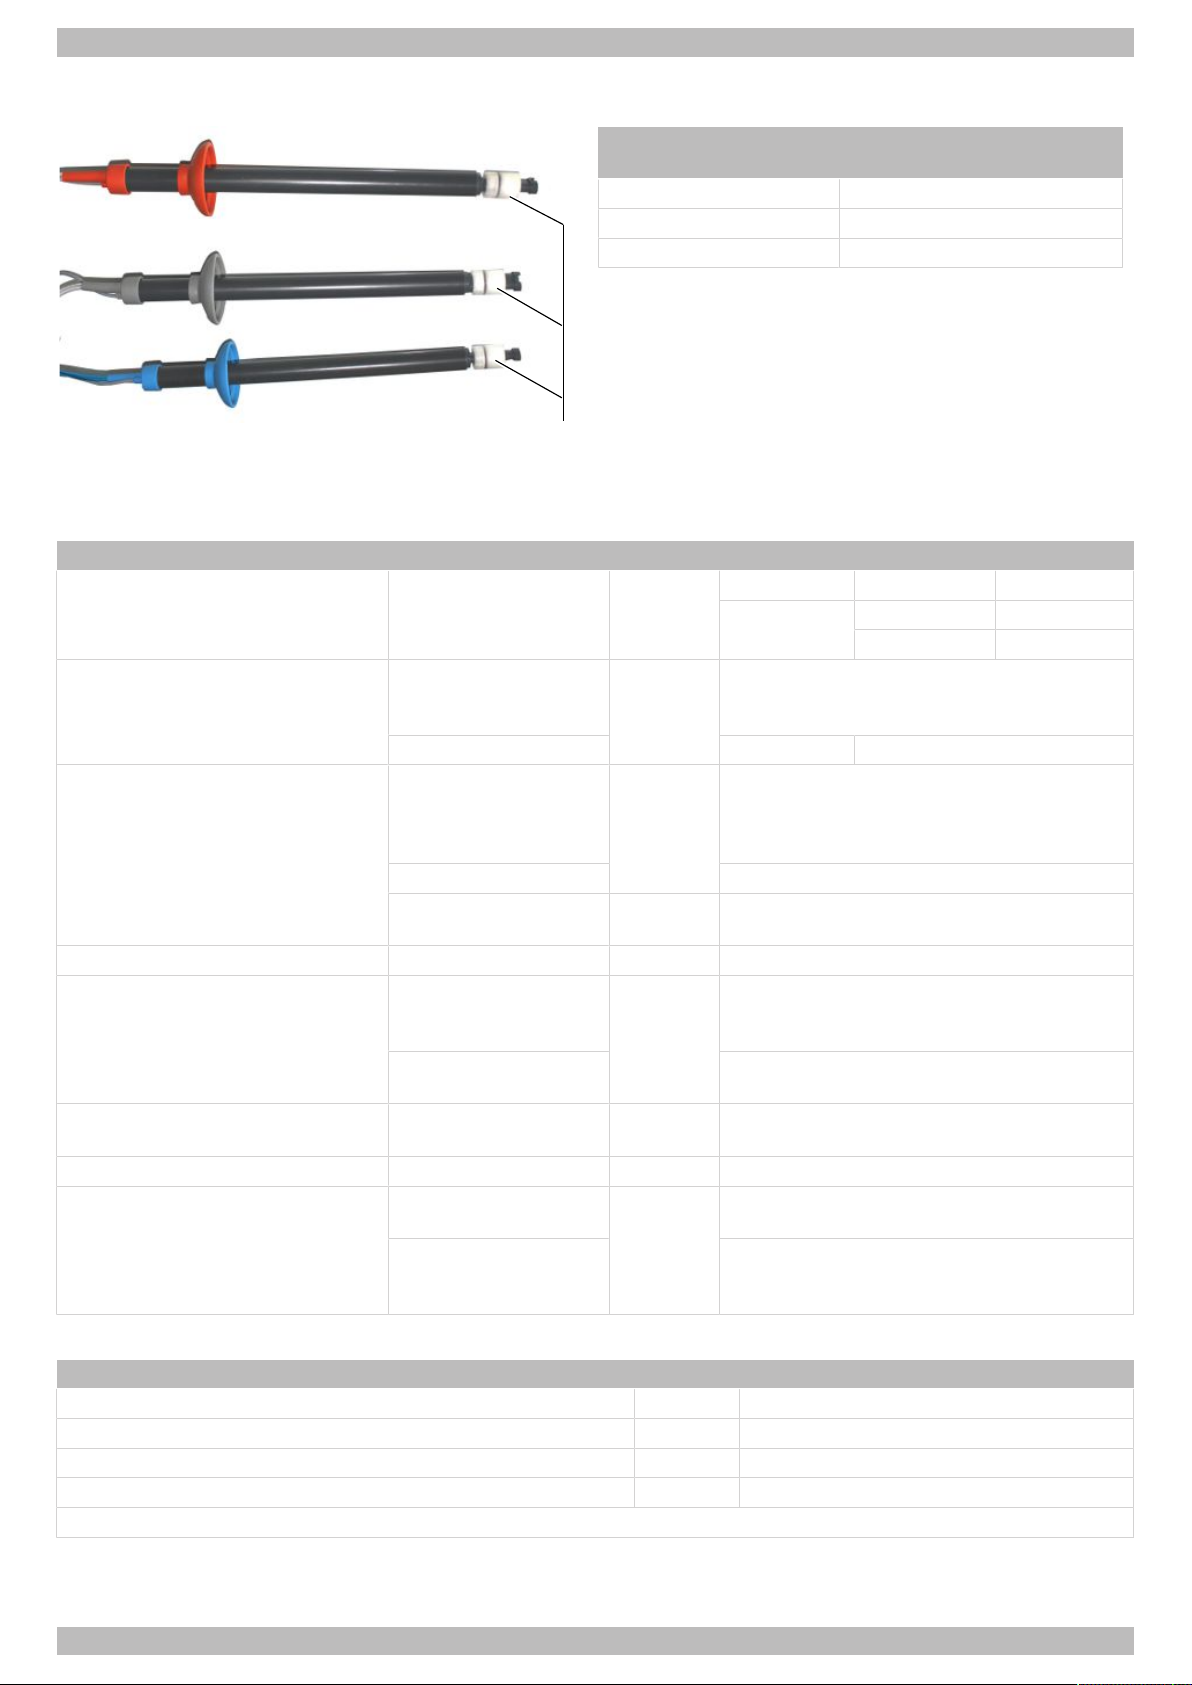
3.7 Suction tube with level control
Colour
(cover cap)
Orange Defoamer
Grey Detergent
Blue Rinse aid
The float switch (1) can detect a defect in the chemicals and indicates this on the display (} page 42).
Canister
3.8 Technical data
Description Note Unit Value
Rack dimensions mm PT-M PT-L PT-XL
500 x 500 500 x 500 500 x 500
500 x 600 500 x 600
Tank capacity PT Standard,
PT EnergyPlus,
PT Cool
PT Utensil - 36
Noise emission PT Standard,
PT EnergyPlus,
PT Cool,
PT Utensil
PT ClimatePlus max. 70
Measurement uncer-
tainty
IP protection class IPX5
Min. water flow pressure PT Standard,
PT Cool,
PT Utensil
PT ClimatePlus,
PT EnergyPlus
Max. inlet pressure
(back pressure)
Flow rate l/min min. 4
Inlet water temperature PT Standard,
PT Utensil
PT Cool,
PT ClimatePlus,
PT EnergyPlus
l 35
dB(A) max. 62
dB 2.5
kPa (bar) 100 (1.0)
150 (1.5)
kPa (bar) 1000 (10.0)
°C max. 60
max. 20
Heat pump (ClimatePlus option)
Description Unit Value
Refrigerant name (in line with ISO 817) - R450A
Refrigerant charge kg 0.8
CO2 equivalent t 0.484
Global warming potential (GWP100, IPCC-AR4) - 605
Heat pump contains fluorinated greenhouse gases in a hermetically sealed device.
14 | 89014547; Version 4 | Operating instructions PT Series
Page 15

Machine description | 3 | English
Exhaust air
Observe local guidelines, e.g. DIN EN 16282 / VDI guideline 2052 when constructing the ventilation system.
Operating conditions
Description Unit Value
Temperature at the installation site °C 10 - 40
Temperature at installation site for machines with
ClimatePlus heat pump
Relative humidity at the installation site % < 95
Storage temperature
At storage temperatures of 4°C to -25°C, make the
machine frost-proof as specified in the service instructions.
Max. height of the installation location above sea
level
°C ≥ 18 - 32
°C > -25
m 3000
Operating instructions PT Series | 89014547; Version 4 | 15
Page 16
English | 4 | Software
62°C
85°C
15 75
62°C
85°C
1 2
3
4
1 5 6
4 Software
4.1 Dishwashing staff menu
The following menus are available:
Menu Functions
Error log List of current errors and history of corrected errors
Priming Priming the dosing devices
Videos Instructional videos
Addresses Addresses of service technicians and suppliers for rinse aid and detergent
Licences Software licences
PAY PER WASH PAY PER WASH Enter information and wash codes (optional)
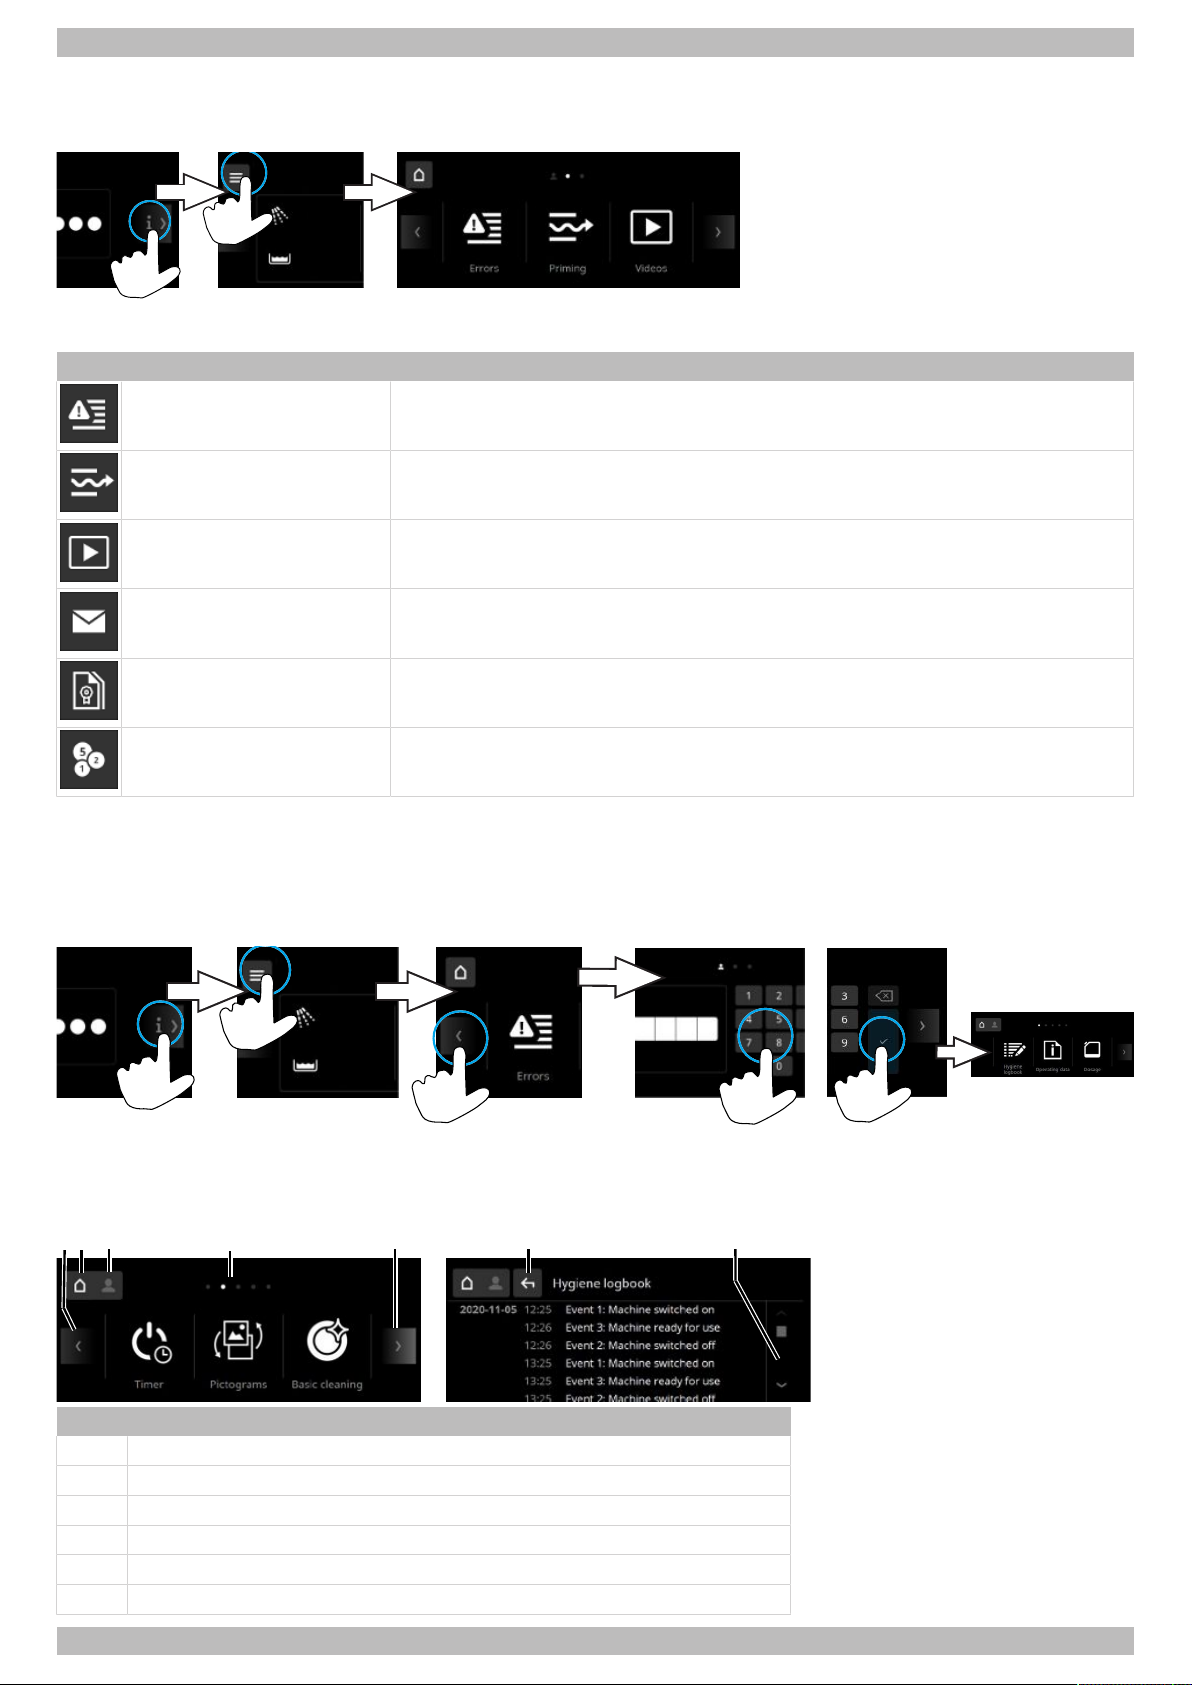
4.2 Chef menu
In this menu the chef can change settings to the warewasher and access information. The warewasher switches off when
the menu is accessed. After leaving the menu, the warewasher must be switched back on.
Accessing the Chef menu
A PIN protects the menu from unauthorised access. The PIN is 1575. If you enter your PIN incorrectly three times in a
row, input will be blocked for 10 minutes.
Navigation
Item Description
1 Continue to the next window by tapping or “swiping”
2 Exit the menu
3 “Chef menu” symbol
4 Number of windows on the same level
5 One level back
6 Scroll up or down
16 | 89014547; Version 4 | Operating instructions PT Series
Page 17
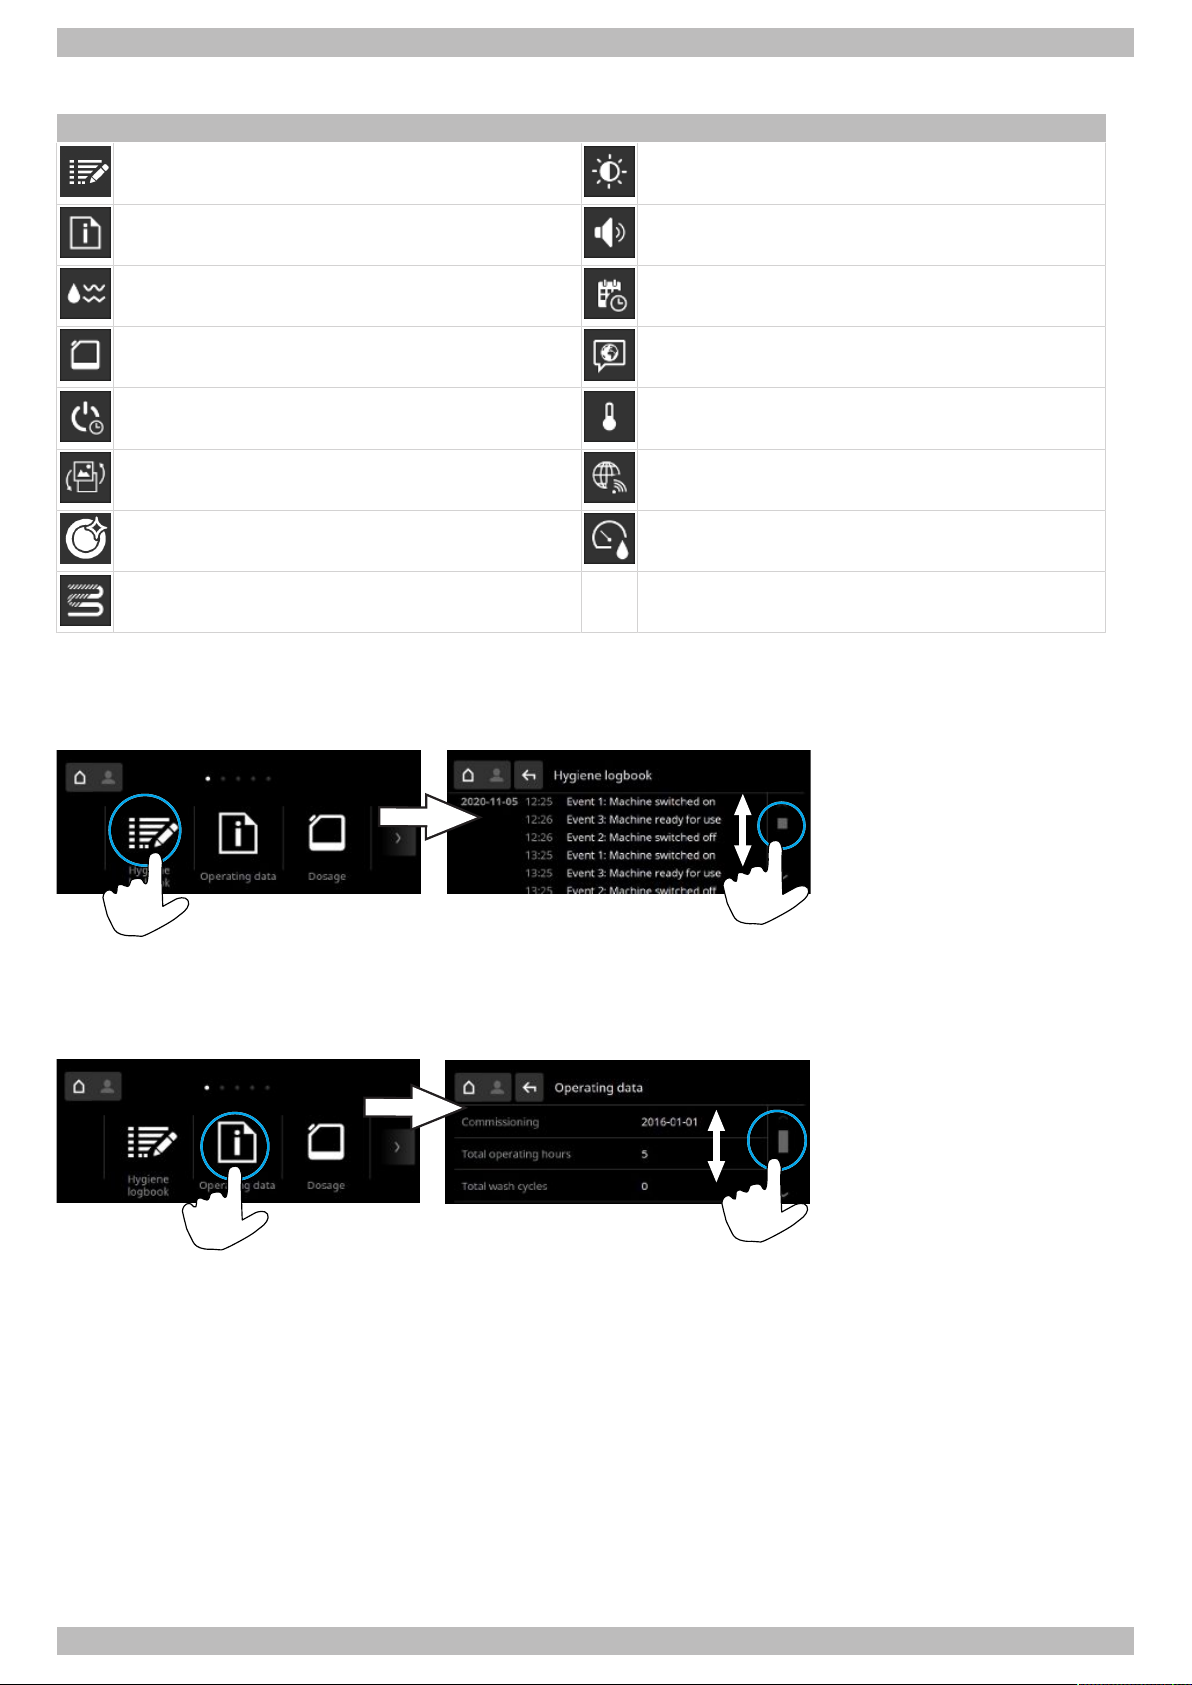
The following menus are available:
Menu Menu
Hygiene logbook Brightness
Operating data Sounds
Water hardness Date / time
Dosage Language
Timer Units
Pictograms CONNECTED WASH
Basic cleaning Water countdown meter
Descaling
Software | 4 | English
The number of menus depends on the configuration of the warewasher.
4.2.1 Hygiene logbook
In this menu, the daily operating statuses are shown in chronological order.
4.2.2 Operating data
This menu shows the operating data, e.g. consumption values and operating hours.
The water consumption figures are calculated values and are not based on exact measurements.
Operating instructions PT Series | 89014547; Version 4 | 17
Page 18
English | 4 | Software
2
1
3
4
5
1
2
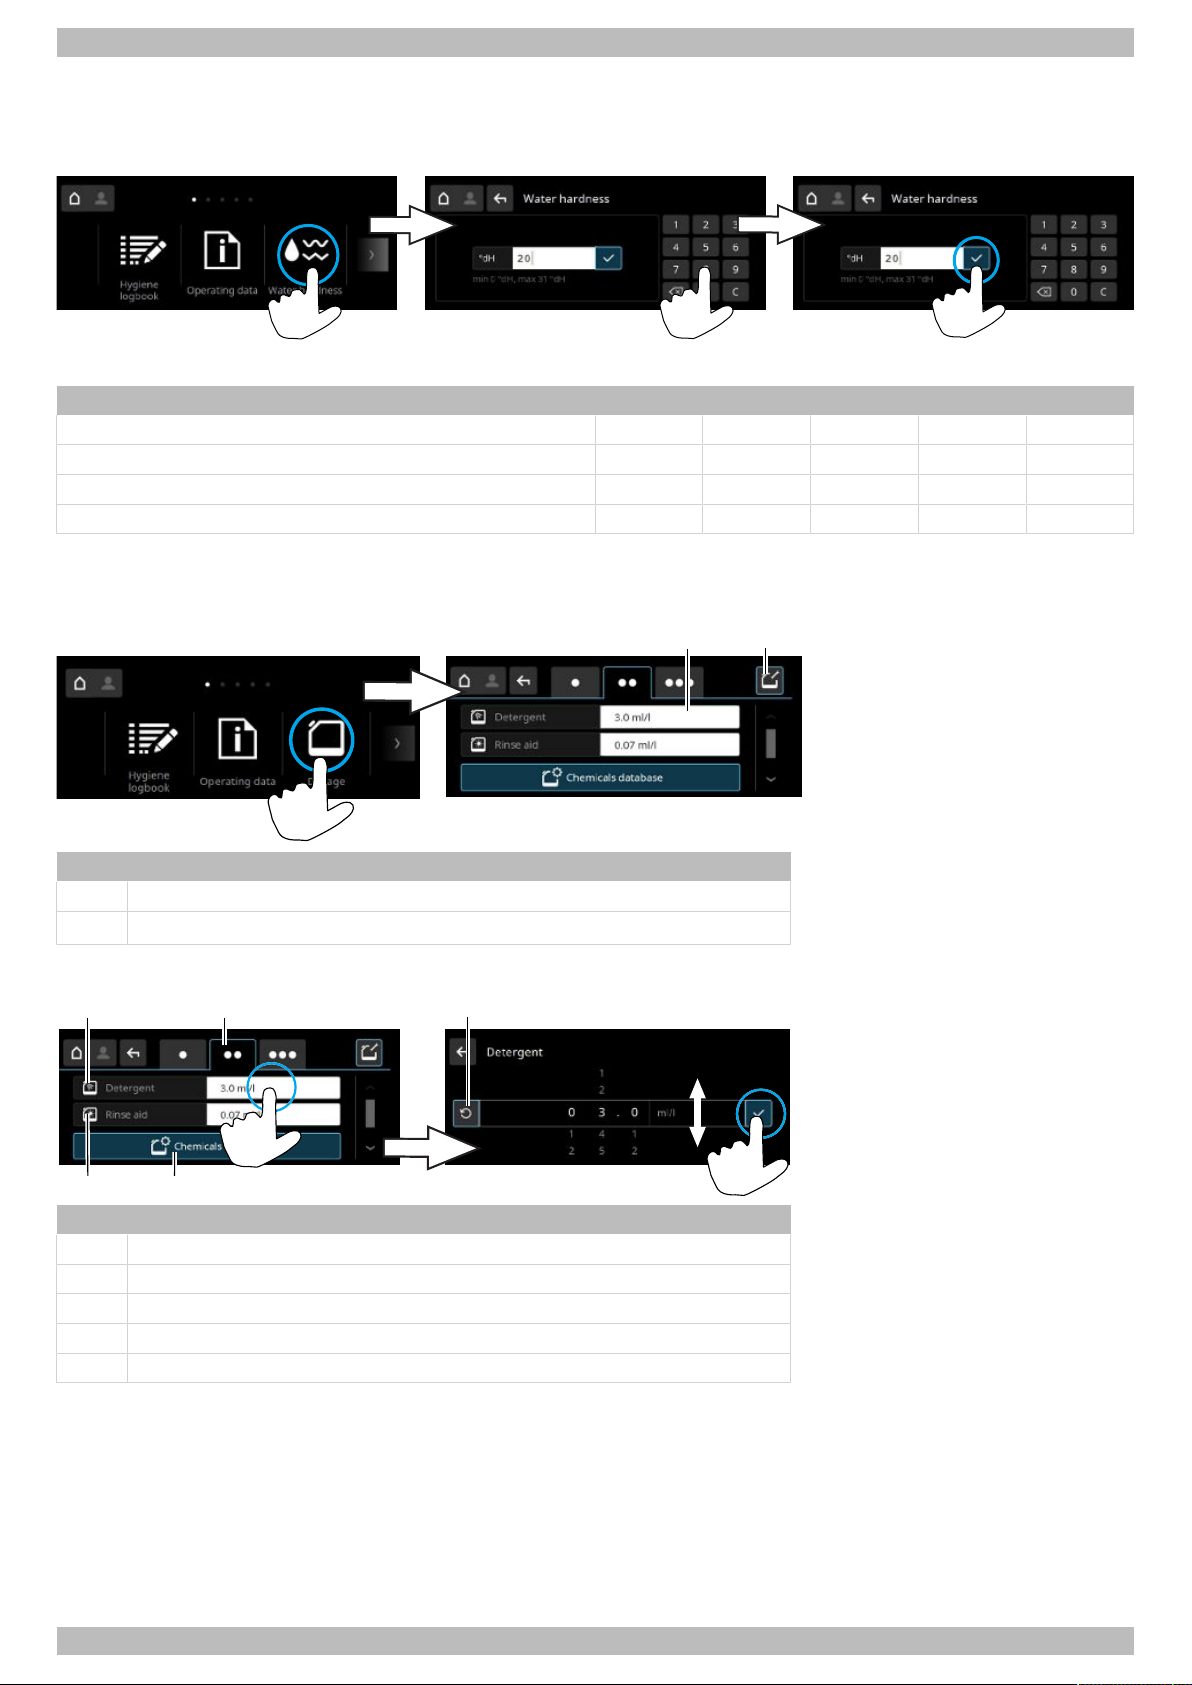
4.2.3 Water hardness
Note:Only for machines with an integral water softener.
The water hardness of the inlet water is entered in this menu.
Calculation table
°dH °e °TH mmol/l
German hardness 1°dH= 1.0 1.253 1.78 0.179
English hardness 1°e= 0.798 1.0 1.43 0.142
French hardness 1°TH= 0.560 0.702 1.0 0.1
mmol/l 1 mmol/l= 5.6 7.02 10.0 1.0
4.2.4 Dosage
In this menu you set the dosing amounts and configure the transfer strip for the dosing devices.
Item Description
1 Set the dosing amount
2
Configure the transfer strip } page 34
Set the dosing amount
Item Description
1 Detergent dosing
2 Rinse aid dosing
3 Washing programmes
4 Chemicals database
5 Reset to default setting
Note:The defoamer dosage must be set by an authorised service technician.
18 | 89014547; Version 4 | Operating instructions PT Series
Page 19
Software | 4 | English
1 2
3
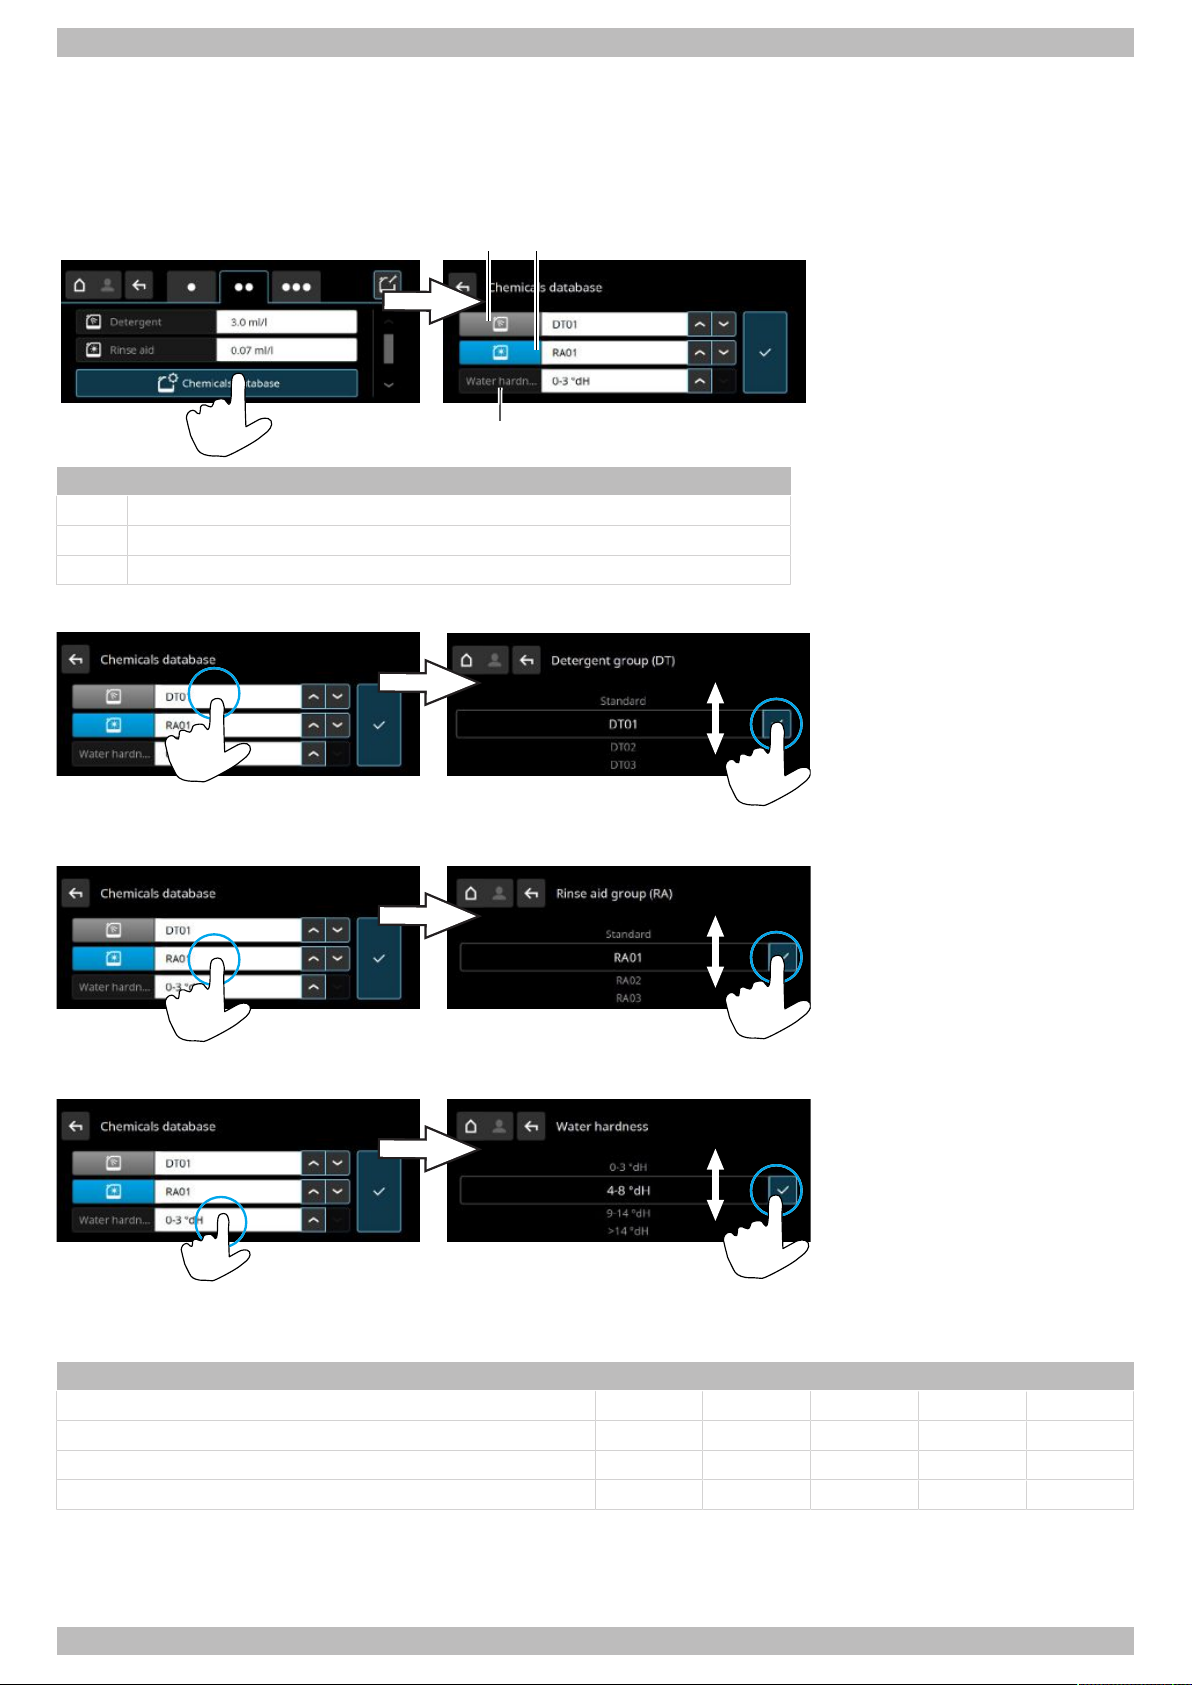
Accessing the chemicals database
When using Winterhalter rinse aid and detergent, the canisters incorporate the information for a detergent group (e.g.
DT05) or rinse aid group (e.g. RA01). This information is used as an aid for dosing. However, we recommend that the
dosing setting be set precisely by an authorised service technician.
Note:Canisters with “DT” or “RA” information are not available in all countries.
Item Description
1 Detergent group (DT)
2 Rinse aid group (RA)
3 Water hardness
Setting the detergent group
Setting the rinse aid group
Setting the water hardness
Calculation table
Note:Enter water hardness in °dH. Set “0-3 °dH” for machines with an integral water softener.
°dH °e °TH mmol/l
German hardness 1°dH= 1.0 1.253 1.78 0.179
English hardness 1°e= 0.798 1.0 1.43 0.142
French hardness 1°TH= 0.560 0.702 1.0 0.1
mmol/l 1 mmol/l= 5.6 7.02 10.0 1.0
Operating instructions PT Series | 89014547; Version 4 | 19
Page 20
English | 4 | Software
1 2
1
234
Exit the menu
4.2.5 Timer
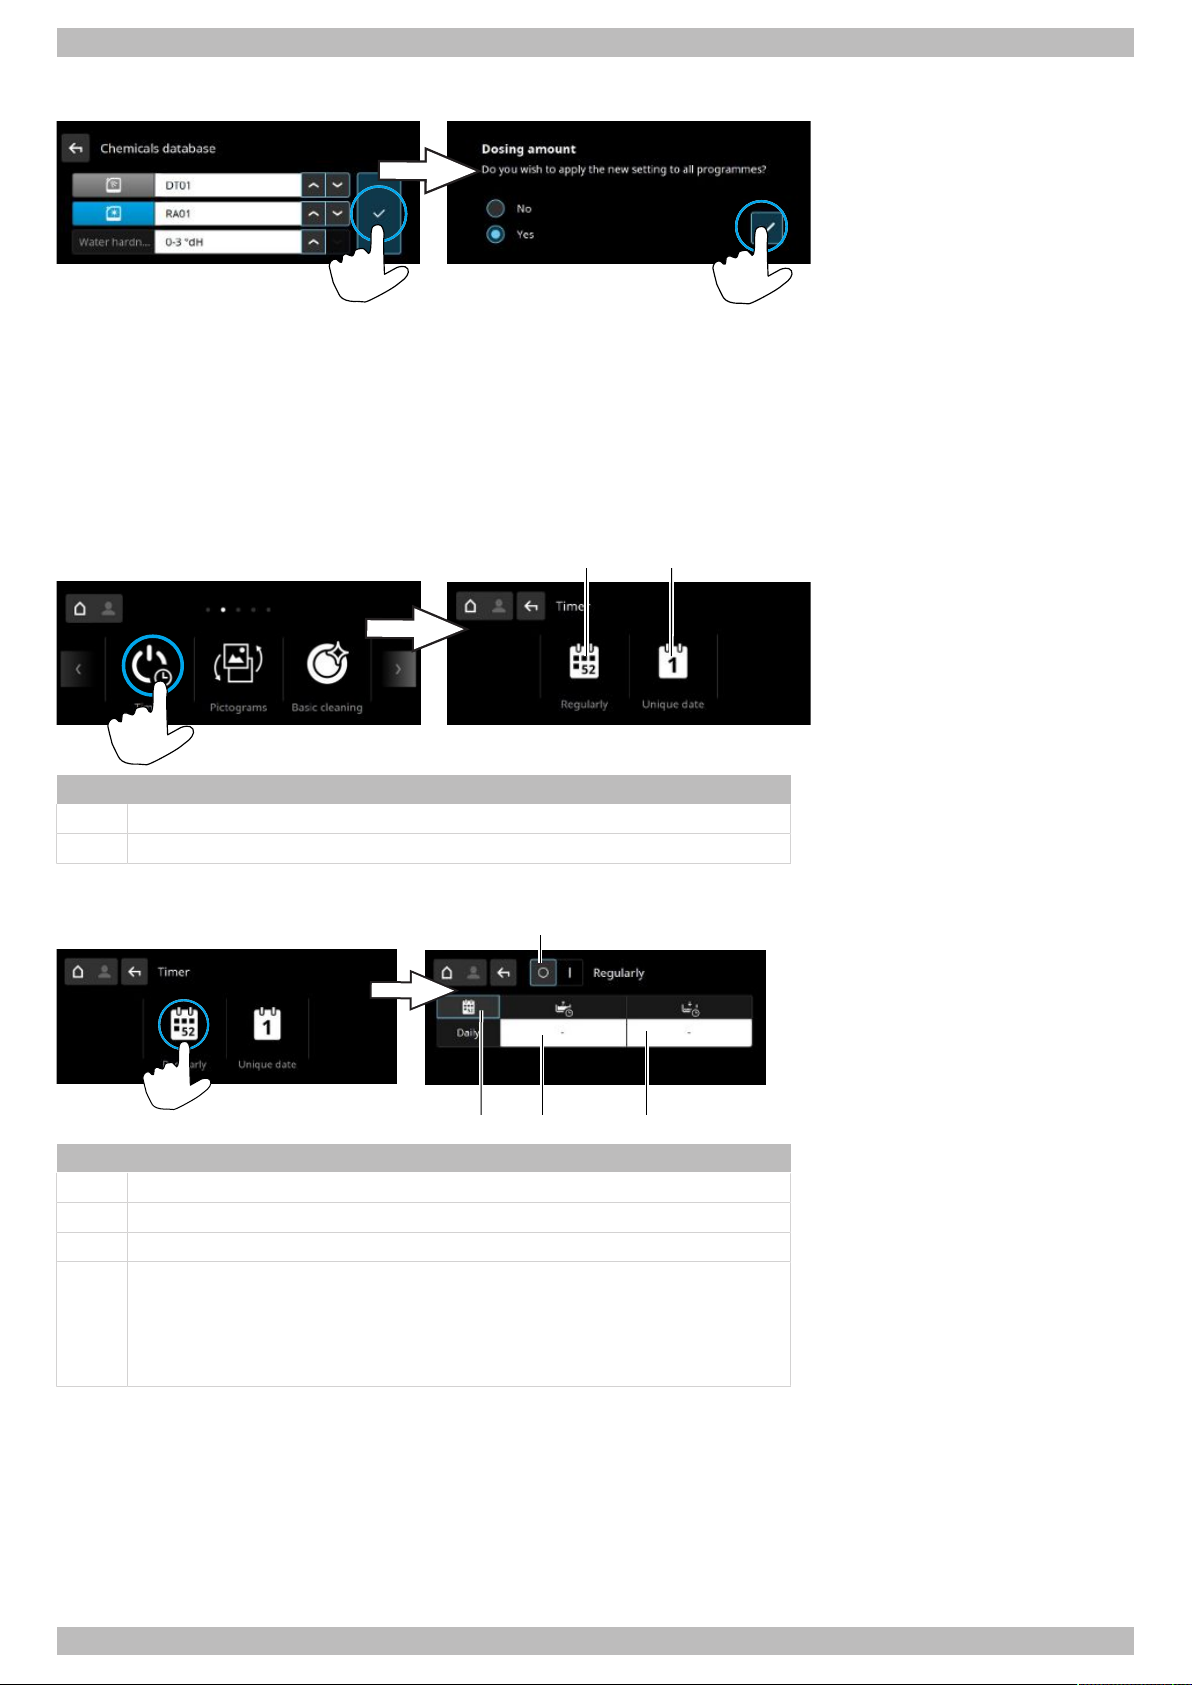
The timer can be used to programme the warewasher to switch on or off automatically using a time-controlled schedule.
The following requirements must be met to enable the warewasher to switch on automatically as set in the time-controlled
schedule:
– The hood is closed.
– The on-site mains voltage is switched on.
– The local water supply is open.
Item Description
1 Set a regular time
2 Set a non-recurring date
Setting a regular time
Item Description
1 Switch the timer off/on
2 Time-controlled switch-off time
3 Time-controlled switch-on time
4 Select timer schedule
– Daily
– Mon - Fri, Sat - Sun
– Individual (a different time on each weekday)
20 | 89014547; Version 4 | Operating instructions PT Series
Page 21
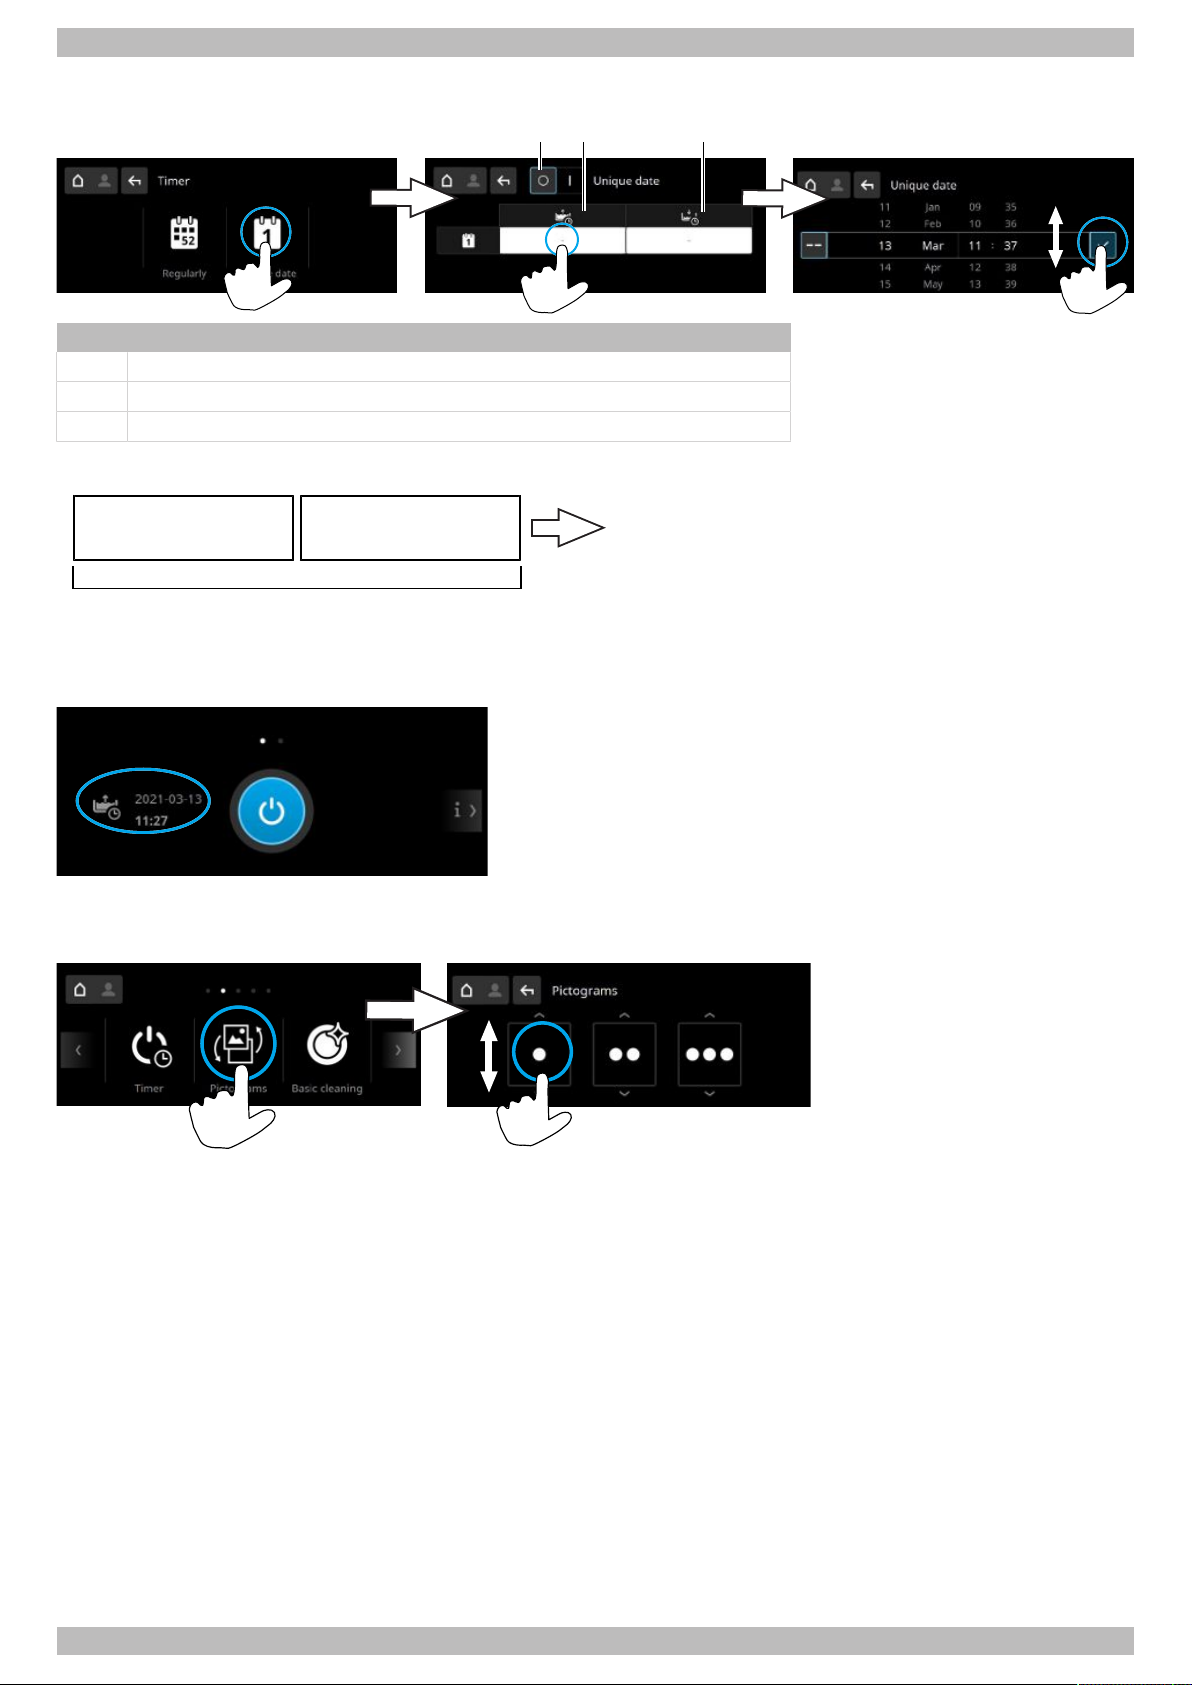
Setting a non-recurring date
1 2 3
The self-cleaning programme empties and
switches off the warewasher.
Sequence of sounds 10 s pause
3x
Item Description
1 Switch the timer off/on
2 Time and date for time-controlled switch-on
3 Time and date for time-controlled switch-off
Time-controlled switch-off process
Software | 4 | English
If the hood is open when the time-controlled function switches off the warewasher, the warewasher will be pumped empty
and switched off, but the inside will not be cleaned.
Displaying the programmed time
4.2.6 Pictograms
The pictograms for the 3 washing programmes can be changed in this menu.
Changing the pictograms has no effect on parameters such as programme length or temperatures.
Operating instructions PT Series | 89014547; Version 4 | 21
Page 22
English | 4 | Software
1
2
3
4.2.7 Basic cleaning
The menu-guided basic cleaning programme is used for the thorough cleaning of wash items:
– Removal of starch residues from dishes
– Basic cleaning of new glasses
– Removal of residues on glasses
We recommend running the basic cleaning programme at the end of the working day, as the machine’s tank is emptied
when the programme ends. This programme requires a basic cleaner that is suitable for commercial warewashers. For
dishes, Winterhalter recommends the A 20 ST basic detergent, and for glasses the A 25 GL basic cleaner.
WARNING
Risk of chemical burns due to chemicals
Chemicals can cause severe burns or serious eye damage if they come into contact with the skin or eyes.
Ø In the event of contact with the eyes or skin, wash thoroughly with tap water. If necessary, seek medical
attention.
Ø Wear protective clothing, protective gloves and protective goggles.
Ø Read and observe the danger and safety notes on the container and safety data sheet.
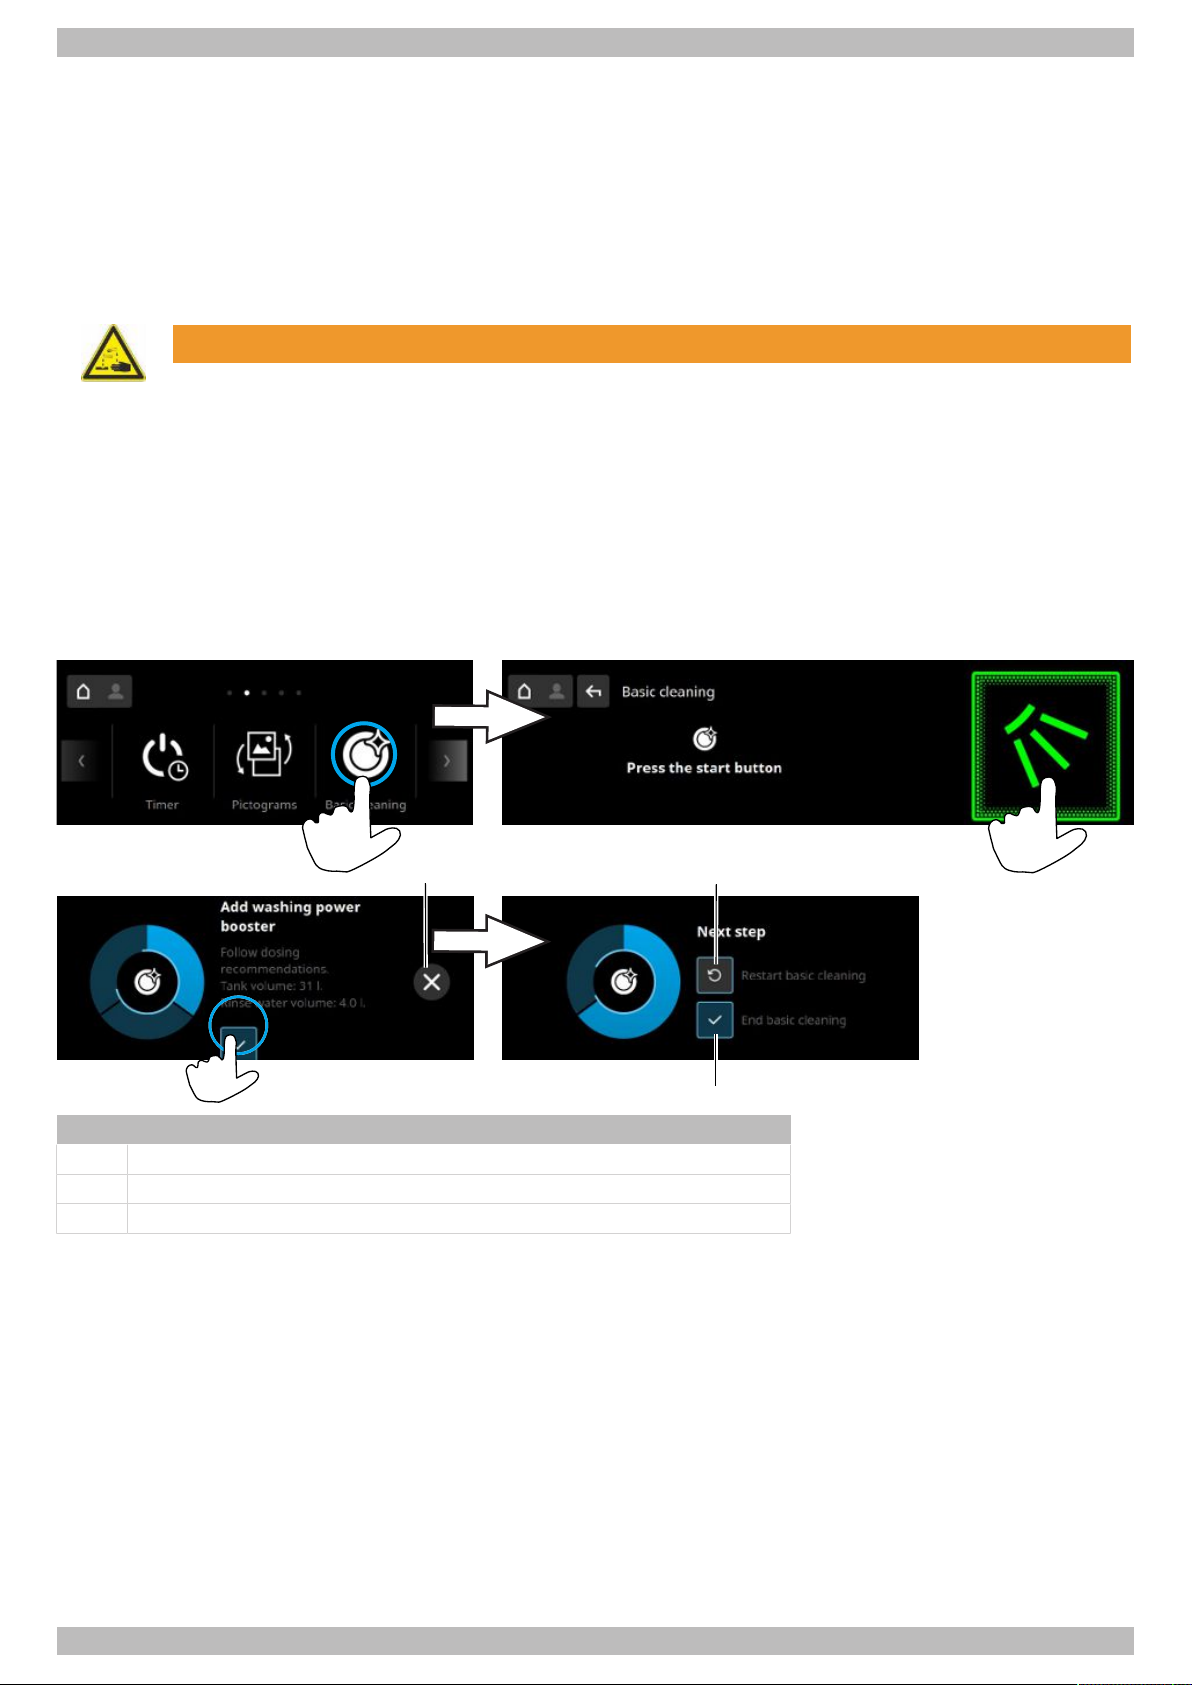
Starting the basic cleaning programme
Follow dosing recommendations when adding the basic cleaner. The initial dose for the first use of the programme depends on the machine’s tank volume.
The post-dosing for each additional programme depends on the rinse water volume.
Item Description
1 Cancel the basic cleaning programme
2 Restart the basic cleaning programme
3 End the basic cleaning programme
22 | 89014547; Version 4 | Operating instructions PT Series
Page 23
Software | 4 | English
1
2
3
4.2.8 Descale
If the warewasher is operated in a hard water area without a water treatment system, then the boiler, the machine interior
and all water-bearing lines and components may develop scale. Limescale deposits and the dirt and residual grease they
contain present a hygiene risk, while scaling can cause heating elements to fail. If limescale deposits form, the warewasher must be descaled.
The interior of the warewasher can be descaled using the descaling programme (} page 23). We recommend running
the descaling programme at the end of the working day only because the machine’s tank is emptied when the programme
starts and ends.
The descaling programme is used to descale the interior of the warewasher. We recommend running the descaling programme at the end of the working day only because the machine’s tank is emptied when the programme starts and ends.
Water-bearing lines and the boiler can only be descaled by an authorised service technician.
For descaling, you require an acid-based descaler suitable for commercial warewashers. Winterhalter recommends A 70
LS descaler.
WARNING
Risk of chemical burn due to contact with descaler
Contact between descaler and the skin or eyes can lead to severe burns or serious eye damage.
Ø Wear protective clothing, protective gloves, protective goggles and protective mask.
Ø Observe the hazard and safety notes on the canister and the safety data sheet.
WARNING
Danger of chlorine gas developing
Mixing active chlorine cleaner and acid-based descaler produces chlorine gas. Contact with chlorine gas
leads to eye, nose and throat irritations.
Ø Do not mix active chlorine cleaner and acid-based descaler.
Ø Ensure good ventilation when you descale the warewasher.
NOTE
Danger of corrosion due to descaler solution
Descaler solution has a corrosive effect when in contact with metals and plastics for a long time and therefore must not remain in the interior of the machine (e.g. overnight).
Ø Do not cancel the descaling programme and follow the instructions on the display.
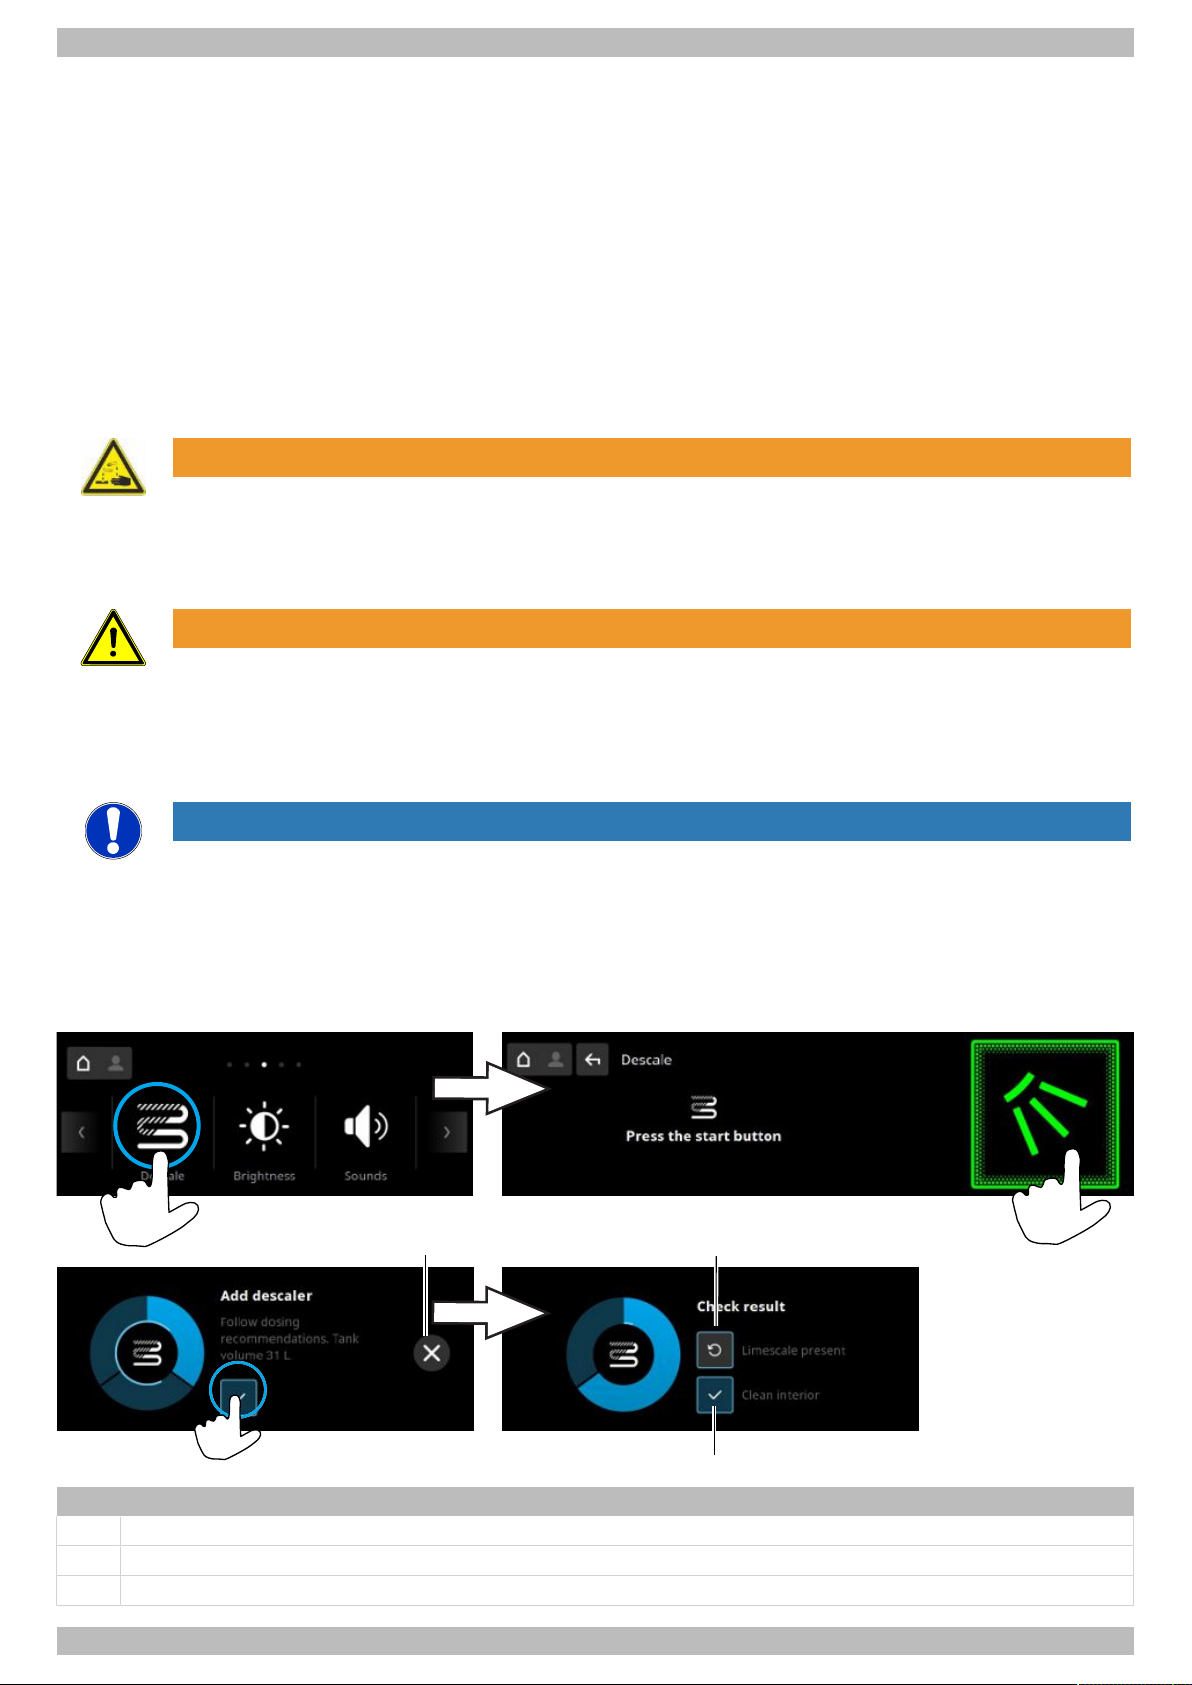
Starting the descaling programme
When adding the descaler, observe the tank volume and dosing recommendation.
Item Name
1 Cancel descaling programme (possible as long as no descaler has been added)
2 Repeat descaling programme
3 End descaling programme
Operating instructions PT Series | 89014547; Version 4 | 23
Page 24

English | 4 | Software
See also
2 Descale [}23]
24 | 89014547; Version 4 | Operating instructions PT Series
Page 25
4.2.9 Brightness
1
2
1
2
1
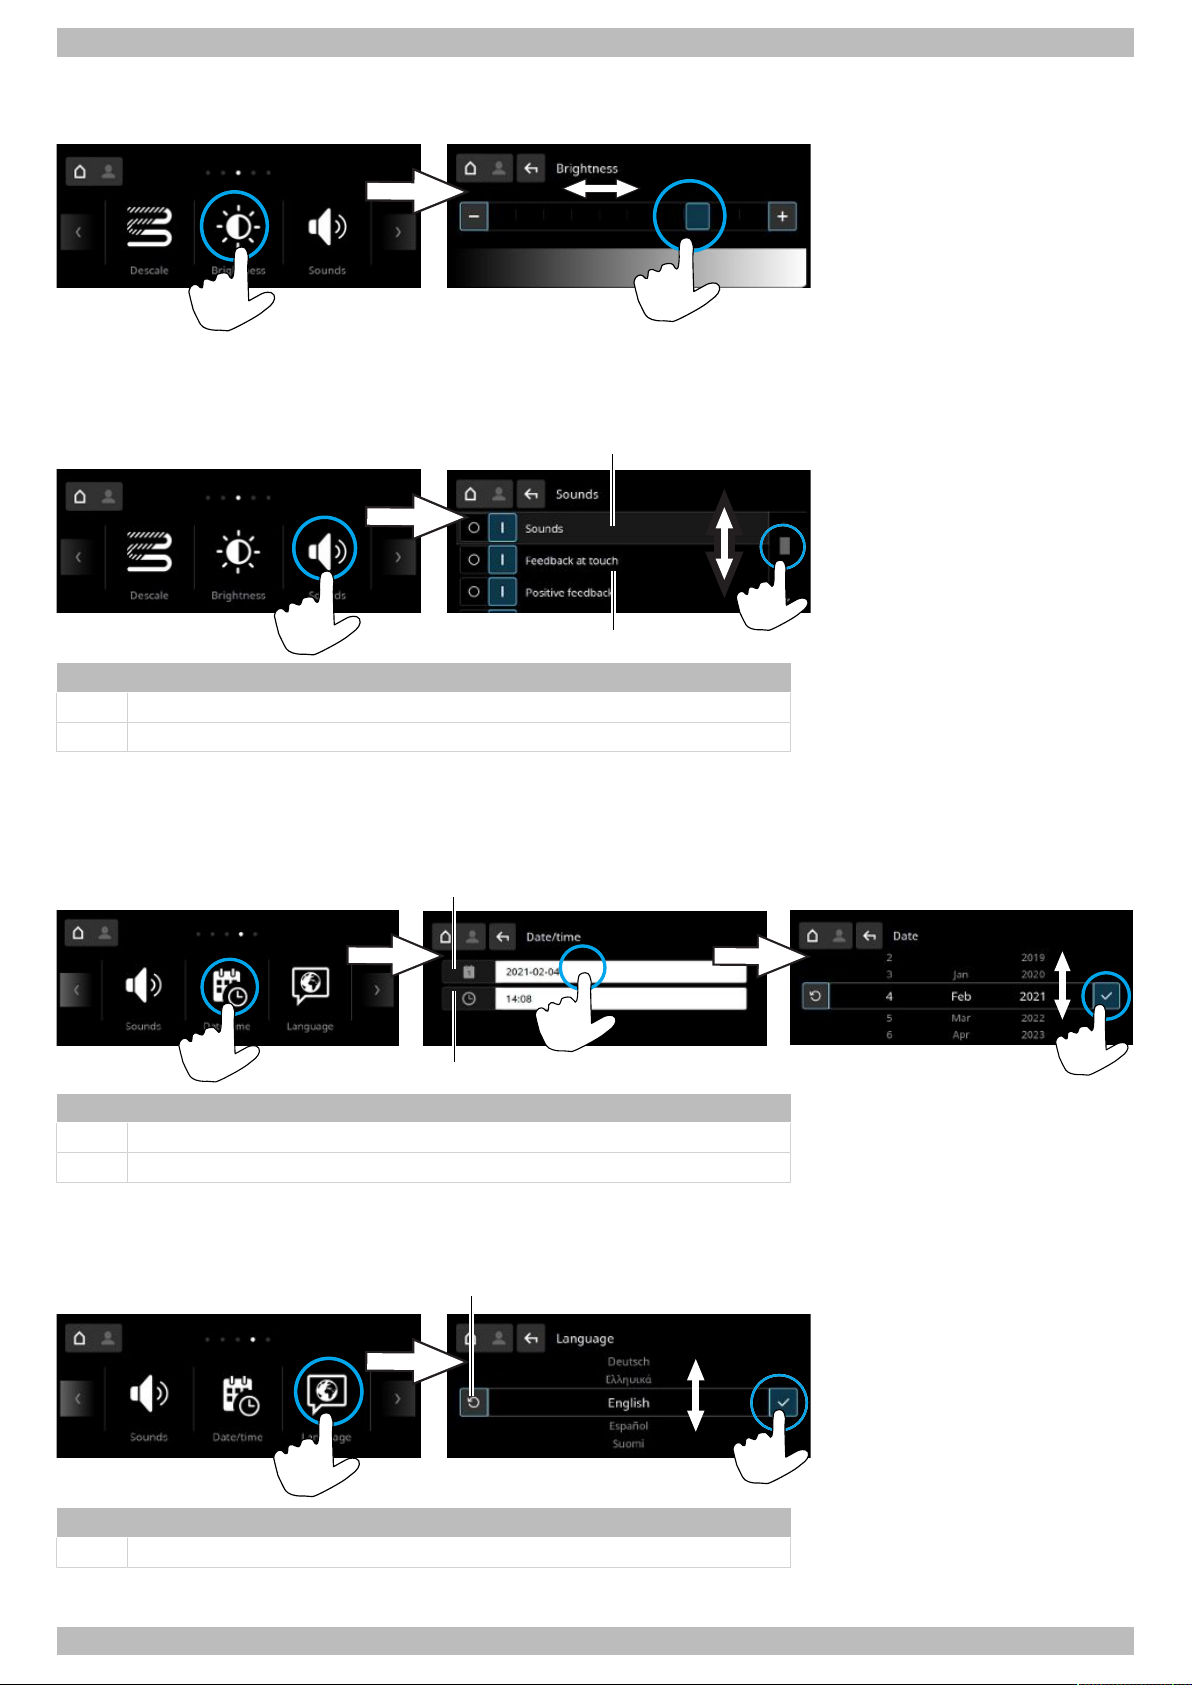
In this menu, the brightness of the display is set.
4.2.10 Sounds
In this menu sounds are turned on or off.
Software | 4 | English
Item Name
1 Turn all sounds on or off
2 Turn individual sounds on or off
4.2.11 Date / time
In this menu, the date and time are entered.
Note:Time must be changed for the summer/ winter time changeover.
Item Name
1 Set date
2 Set time
4.2.12 Language
In this menu the language of the display texts is set.
Item Name
1 Reset to last language set
Operating instructions PT Series | 89014547; Version 4 | 25
Page 26
English | 4 | Software
1 2
4.2.13 Units
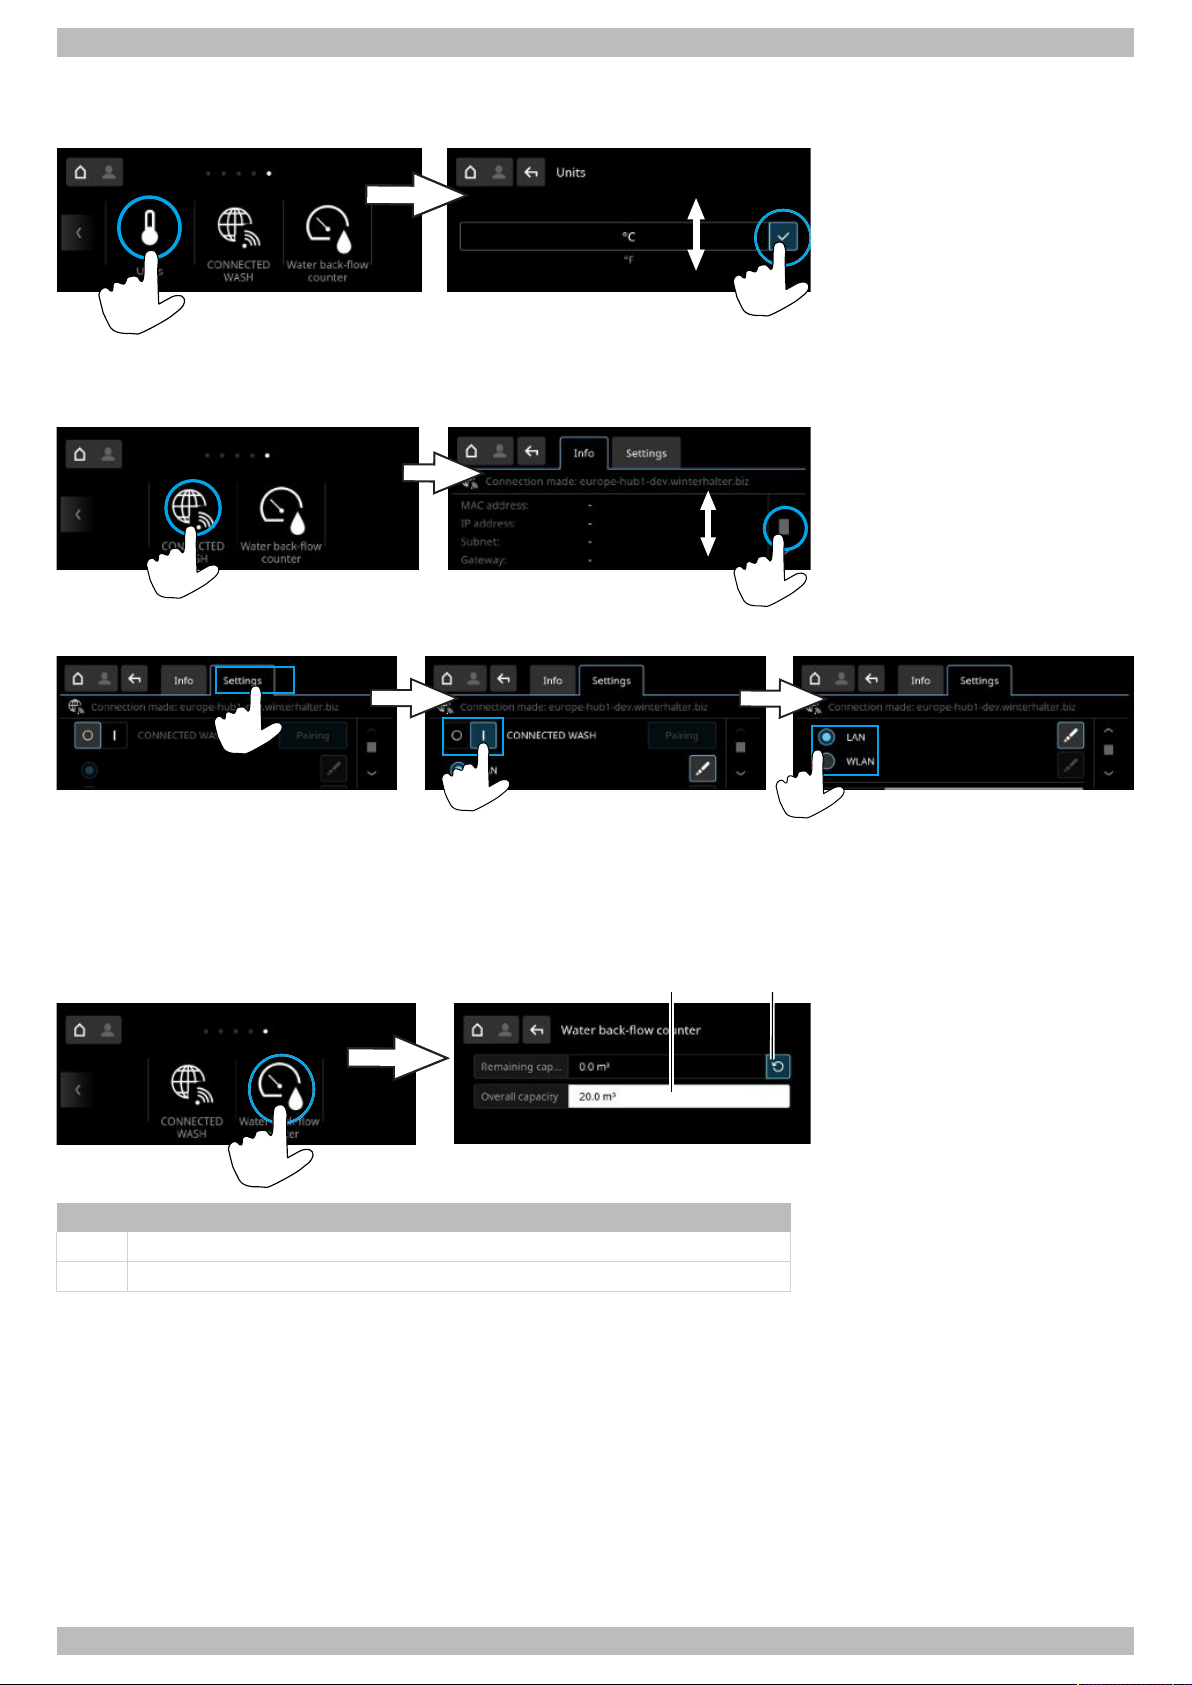
In this menu the unit and temperature indicator are changed.
4.2.14 CONNECTED WASH
The link to the CONNECTED WASH system is configured in this menu.
Activating CONNECTED WASH
You will find detailed information and instructions on the website: } page 10
4.2.15 Water back-flow counter
This menu is used to set the total capacity of an external water treatment system. The water countdown meter must be
reset if the external water treatment system has been regenerated or replaced.
Item Description
1 Set the total capacity
2 Reset the water countdown meter
26 | 89014547; Version 4 | Operating instructions PT Series
Page 27
Commissioning | 5 | English
1
3
4
2
5 Commissioning
5.1 Installing the warewasher
The installation site must be frost-resistant to prevent the water supply systems from freezing.
Ø Level the warewasher horizontally using a spirit level.
Ø Adjust any unevenness of the base using the height-adjustable machine feet.
5.2 Connecting the warewasher
The warewasher and any other relevant additional devices must be connected in adherence to local standards and regulations by an electrical company authorised by the relevant electricity supplier.
5.2.1 Water connection
The warewasher must be connected to the fresh water supply via the provided dirt trap to ensure that the water safety requirements stipulated in DIN EN 61770 are met.
The dirt trap prevents particles from the inlet water from entering the warewasher, thus preventing extraneous rust on the
cutlery and in the warewasher.
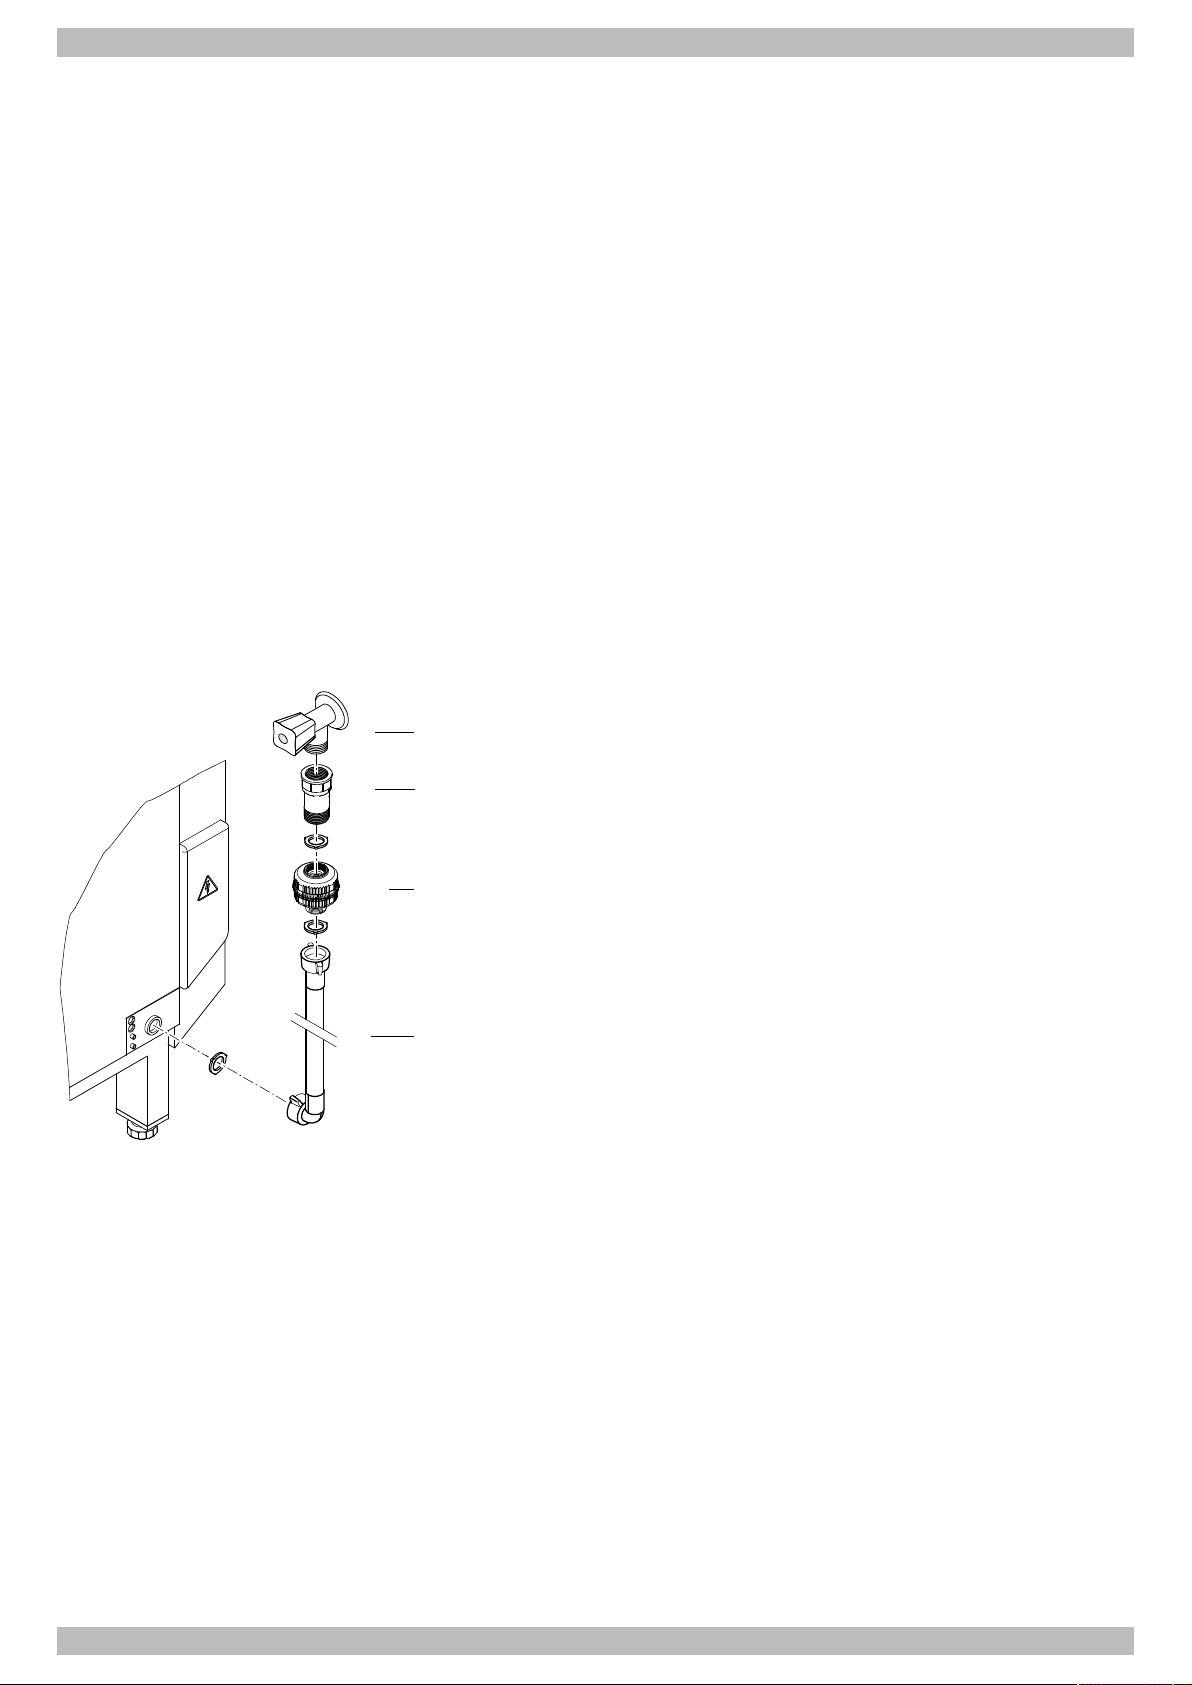
Connecting the supply hose
Important notes:
– The supply hose must not be shortened or damaged.
– Only use the supply hose provided. Old, pre-existing supply hoses must not be re-used.
– Do not kink the supply hose when laying it.
– Only install the dirt trap by hand. Do not use tools.
Ø Connect the supply hose (4) to the warewasher.
Ø For installation in Australia and New Zealand: Connect
the double check valve (2) with thread sealing tape to
the on-site water supply (1).
Ø Connect the dirt trap (3) to the on-site water supply (1)
or the double check valve (2).
Ø Connect the supply hose (4) to the dirt trap (3).
Ø Open the water supply (1) and check that the connec-
tions do not leak.
Checking the dynamic water pressure
Ø Open and close other appliances (e.g. sink, hand basin).
Ø Measure the water pressures.
Ø Check whether the minimum flow pressure is reliably present.
Ø If the minimum flow pressure is not reached, modify the in-house plumbing or connect a pressure expansion vessel
upstream.
Operating instructions PT Series | 89014547; Version 4 | 27
Page 28
English | 5 | Commissioning
1
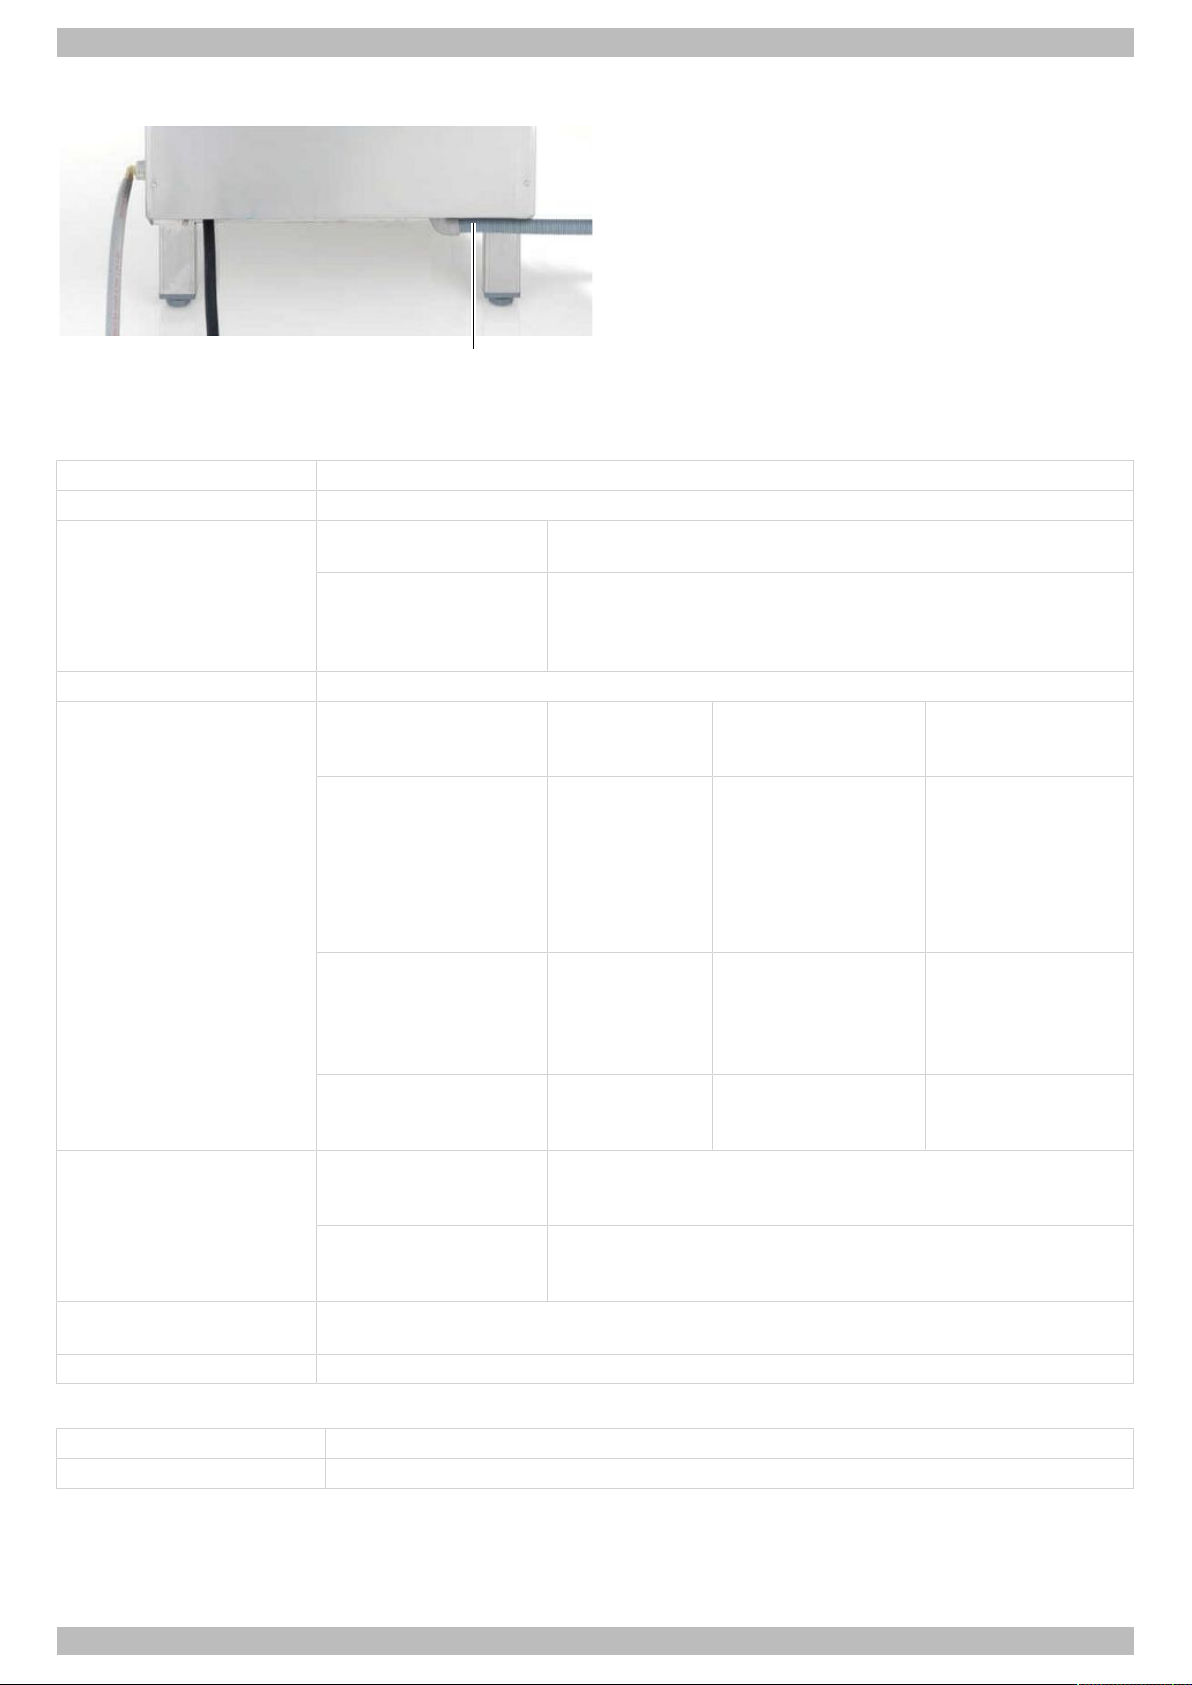
Connecting the warewasher to the waste water system
Ø Connect the waste water hose (1) to the warewasher.
Ø Guide and connect the waste water hose to the on-site
waste water connection.
Requirements for on-site installation
Inlet water connection
Location approx. 500 mm above finished floor; to the right of the machine
Construction Isolation valve with G ¾” external thread
Inlet water temperature PT Standard,
PT Utensil
PT EnergyPlus,
PT ClimatePlus,
PT Cool
PT Utensil EnergyPlus
Water quality Microbiologically, fresh water must be of drinking water quality
Water hardness Machines without
PT Standard,
PT Cool,
PT Utensil
PT EnergyPlus,
PT Utensil EnergyPlus
PT ClimatePlus ≤ 3°dH (3.8°e /
Water flow pressure PT Standard,
PT Cool,
PT Utensil
PT EnergyPlus,
PT ClimatePlus
PT Utensil EnergyPlus
Max. inlet pressure
(back pressure)
Flow rate min. 4l/min
1000kPa (10.0bar)
max. 60°C
max. 20°C
integrated
softener
≤ 3°dH (3.8°e /
5.34°TH / 0.54
mmol/l)
Recommended,
to prevent warewasher from
scaling up.
≤ 3°dH (3.8°e /
5.34°TH / 0.54
mmol/l)
5.34°TH / 0.54
mmol/l)
100kPa (1.0bar)
150kPa (1.5bar)
Machines with integrated softener
≤ 31°dH (37.6°e /
53.4°TH / 5.35mmol/l)
≤ 20°dH (25.1°e /
35.6°TH / 3.58mmol/l)
- The conductivity must
Note
-
With a conductivity <
200 µS/cm (128 ppm
TDS), a stainless-steel
exhaust air heat exchanger is necessary.
be ≥200µS/cm (128
ppm TDS).
Waste water connection
Location approx. 650 mm above finished floor; left or right of the machine
Dimensions Ø40 mm or 50 mm with trap
28 | 89014547; Version 4 | Operating instructions PT Series
Page 29

Commissioning | 5 | English
5.2.2 Electrical connection
DANGER
Danger of electric shock due to live components
A fatal electric shock can occur when the warewasher and its additional devices are connected to the electrical mains supply.
Ø The warewasher must be connected by an electrical company authorised by the relevant electricity sup-
plier as per the locally applicable standards and regulations.
Ø Locally applicable standards and regulations must be observed when connecting to the electrical mains
supply.
Ø Connect the protective circuit according to the instructions.
Ø The electrical safety of this warewasher is only guaranteed if it is connected to a correctly installed protective circuit.
Ø The wiring diagram must be observed.
Ø The warewasher may be operated only at the voltages and frequencies specified on the rating plate.
Ø For machines delivered without a plug, a fixed connection must be installed as an overriding priority.
Ø The electrical connection must be secured as a separately fused circuit with slow fuses or circuit breakers. The fuse
protection used depends on the total connected load of the warewasher. The total connected load is specified on the
rating plate of the warewasher.
Ø PT ClimatePlus: Local fuse protection via circuit breaker with a C or K rating is necessary.
Ø If a residual current circuit breaker is provided on-site, we recommend installing a Class B all-current sensitive resid-
ual current circuit breaker.
Ø Determine the cable cross-section of the mains cable using the following table:
On-site fuse protection [A] Cable cross-section [mm2]
15 2.5
16 2.5
20 2.5
25 4
32 6
40 10
50 10
The mains cable must be a H07RN-F type or equivalent.
Operating instructions PT Series | 89014547; Version 4 | 29
Page 30
English | 5 | Commissioning
1
2
3
4
5
6 7
1
1
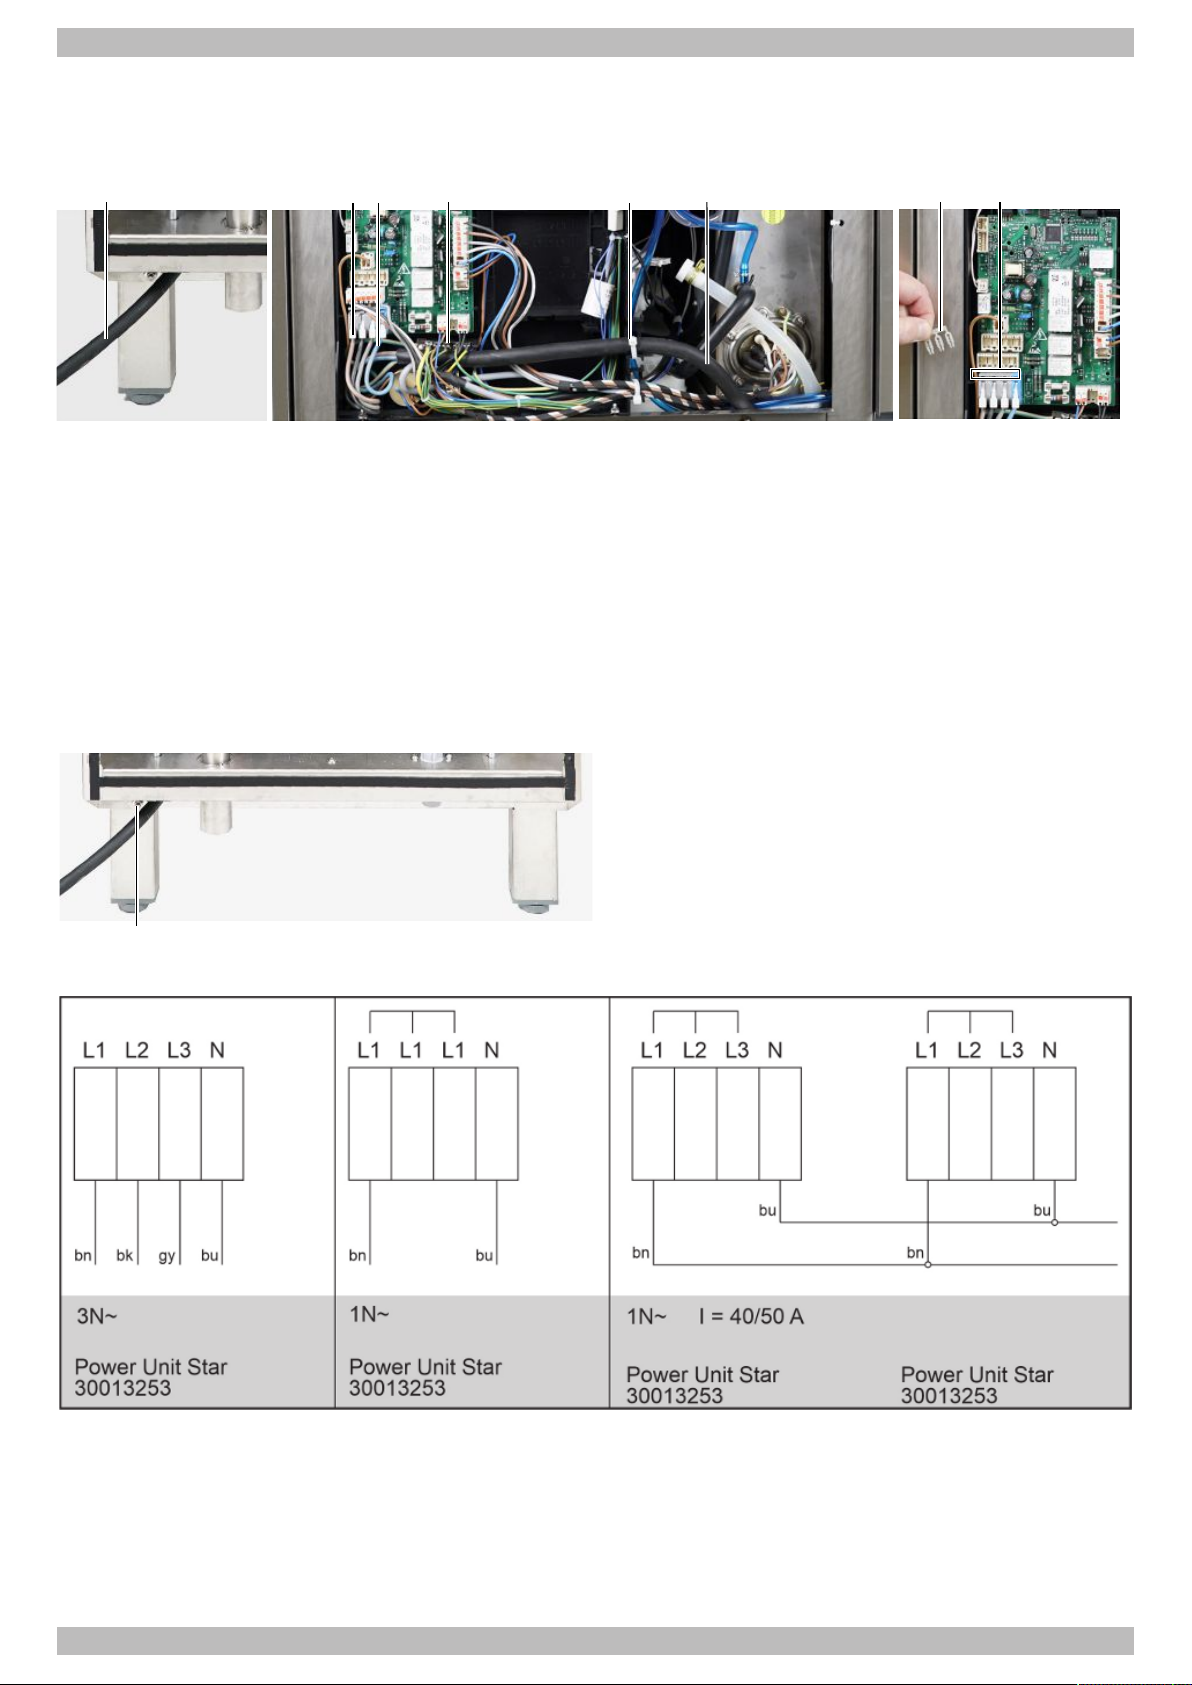
Connecting the mains cable
Note:Select the correct cross section and number of wires in the mains cable to suit the on-site voltage and fuse
protection.
Ø Remove the front cover.
Ø Insert the mains cable (1) at the rear of the machine.
Ø Pull the mains cable (1) out at the front and guide it to the left.
Ø Strip the wire ends of the mains cable and attach ferrules.
Ø Connect the mains cable wires (3) according to the connection diagram (} page 30) and close the quick release con-
nectors (2).
Ø If necessary, connect the bridges (6) according to the connection diagram (7) and press in firmly using a screwdriver.
Ø Connect the green-yellow wire to the distributor of the earth wires (4).
Ø Fasten the mains cable to the mounting plate using a cable tie (5) for strain relief.
Establishing equipotential bonding
Connection diagram
Ø Connect the warewasher to the on-site equipotential
bonding system.
Ø See the drawing for the position of the connecting screw
(1).
30 | 89014547; Version 4 | Operating instructions PT Series
Page 31
5.3 Multifunction interface overview
4
6
5
21 3
DANGER
Danger of electric shock due to live components
A fatal electric shock can occur when the warewasher and its additional devices are connected to the electrical mains supply.
Ø The warewasher must be connected by an electrical company authorised by the relevant electricity sup-
plier as per the locally applicable standards and regulations.
Ø Locally applicable standards and regulations must be observed when connecting to the electrical mains
supply.
Ø Connect the protective circuit according to the instructions.
Commissioning | 5 | English
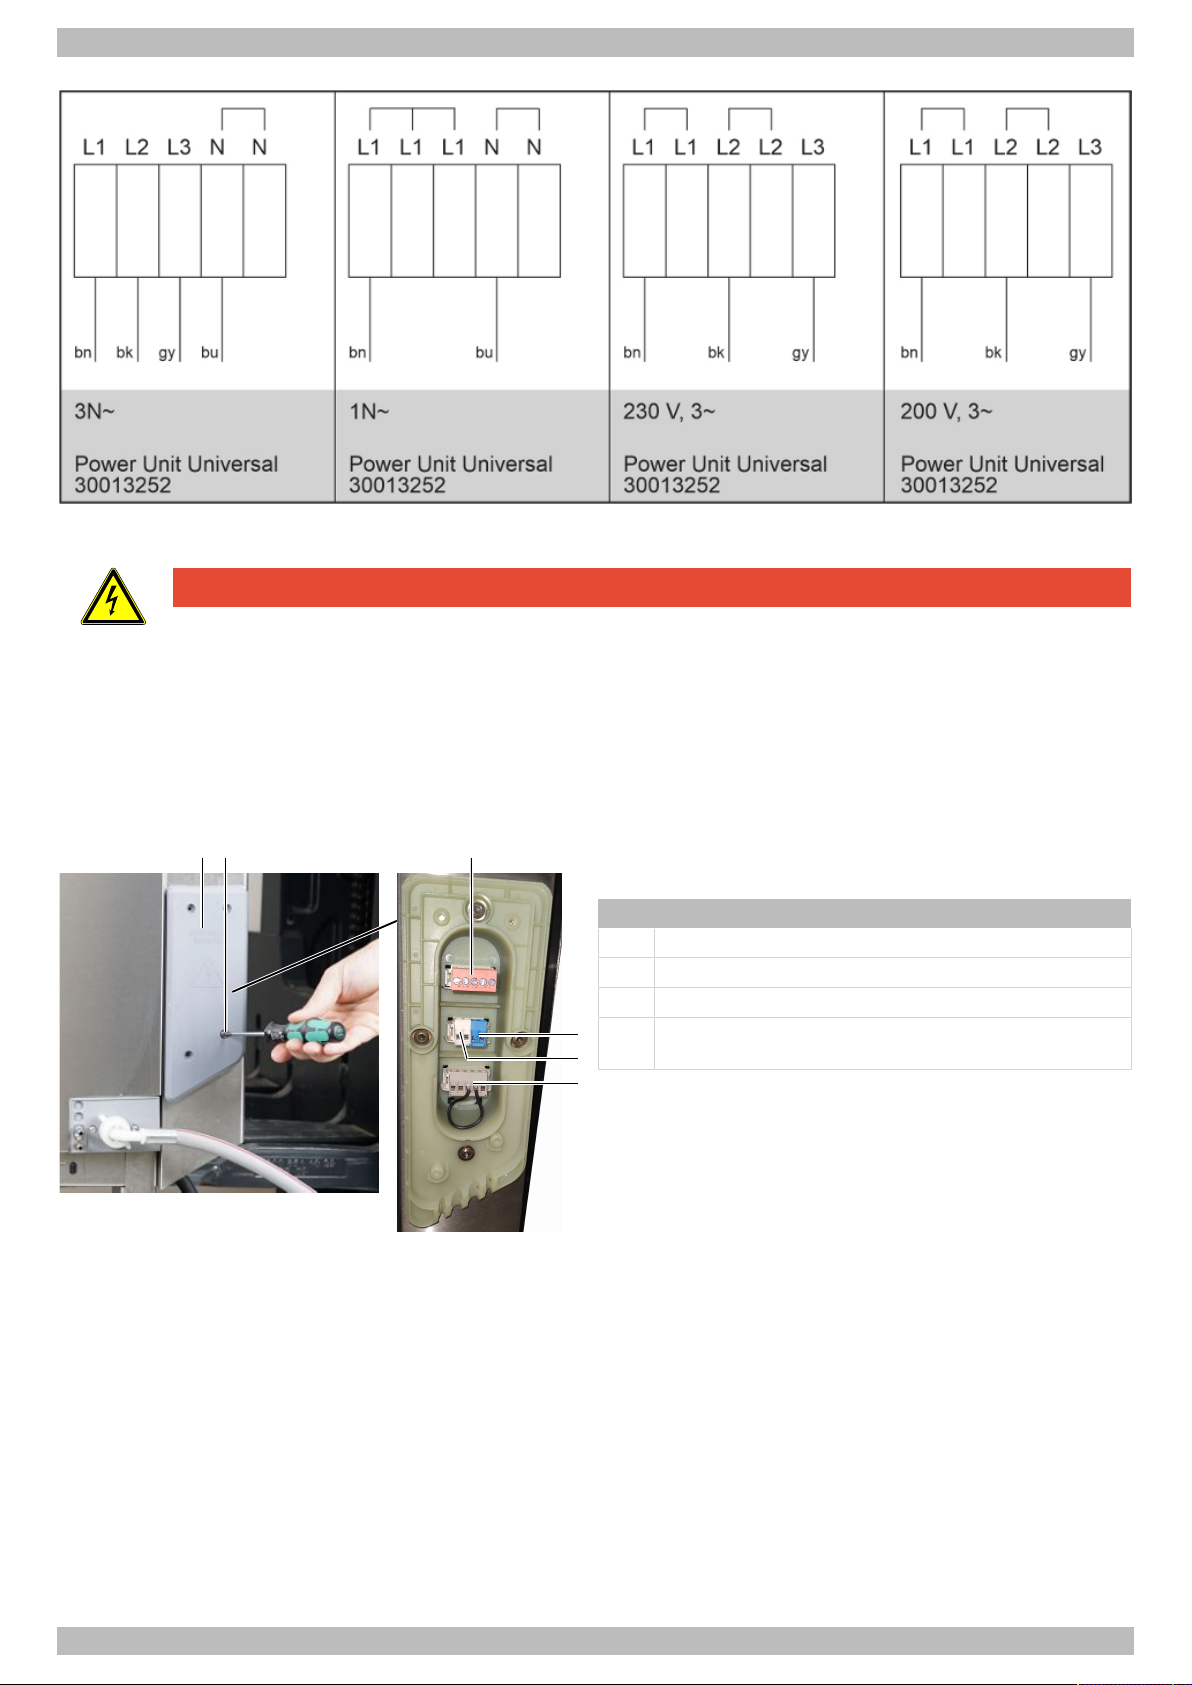
Ø Loosen the screws (2) and remove the cover (1).
Item Description
3 Transfer strip for external dosing devices
4 Terminals for rinse aid suction tube
5 Terminals for detergent and defoamer suction tube
6 Terminals for external energy management system
in accordance with DIN 18875 (optional)
Operating instructions PT Series | 89014547; Version 4 | 31
Page 32
English | 5 | Commissioning
12
35
4
1 2
5.4 Connecting the suction tube hydraulics
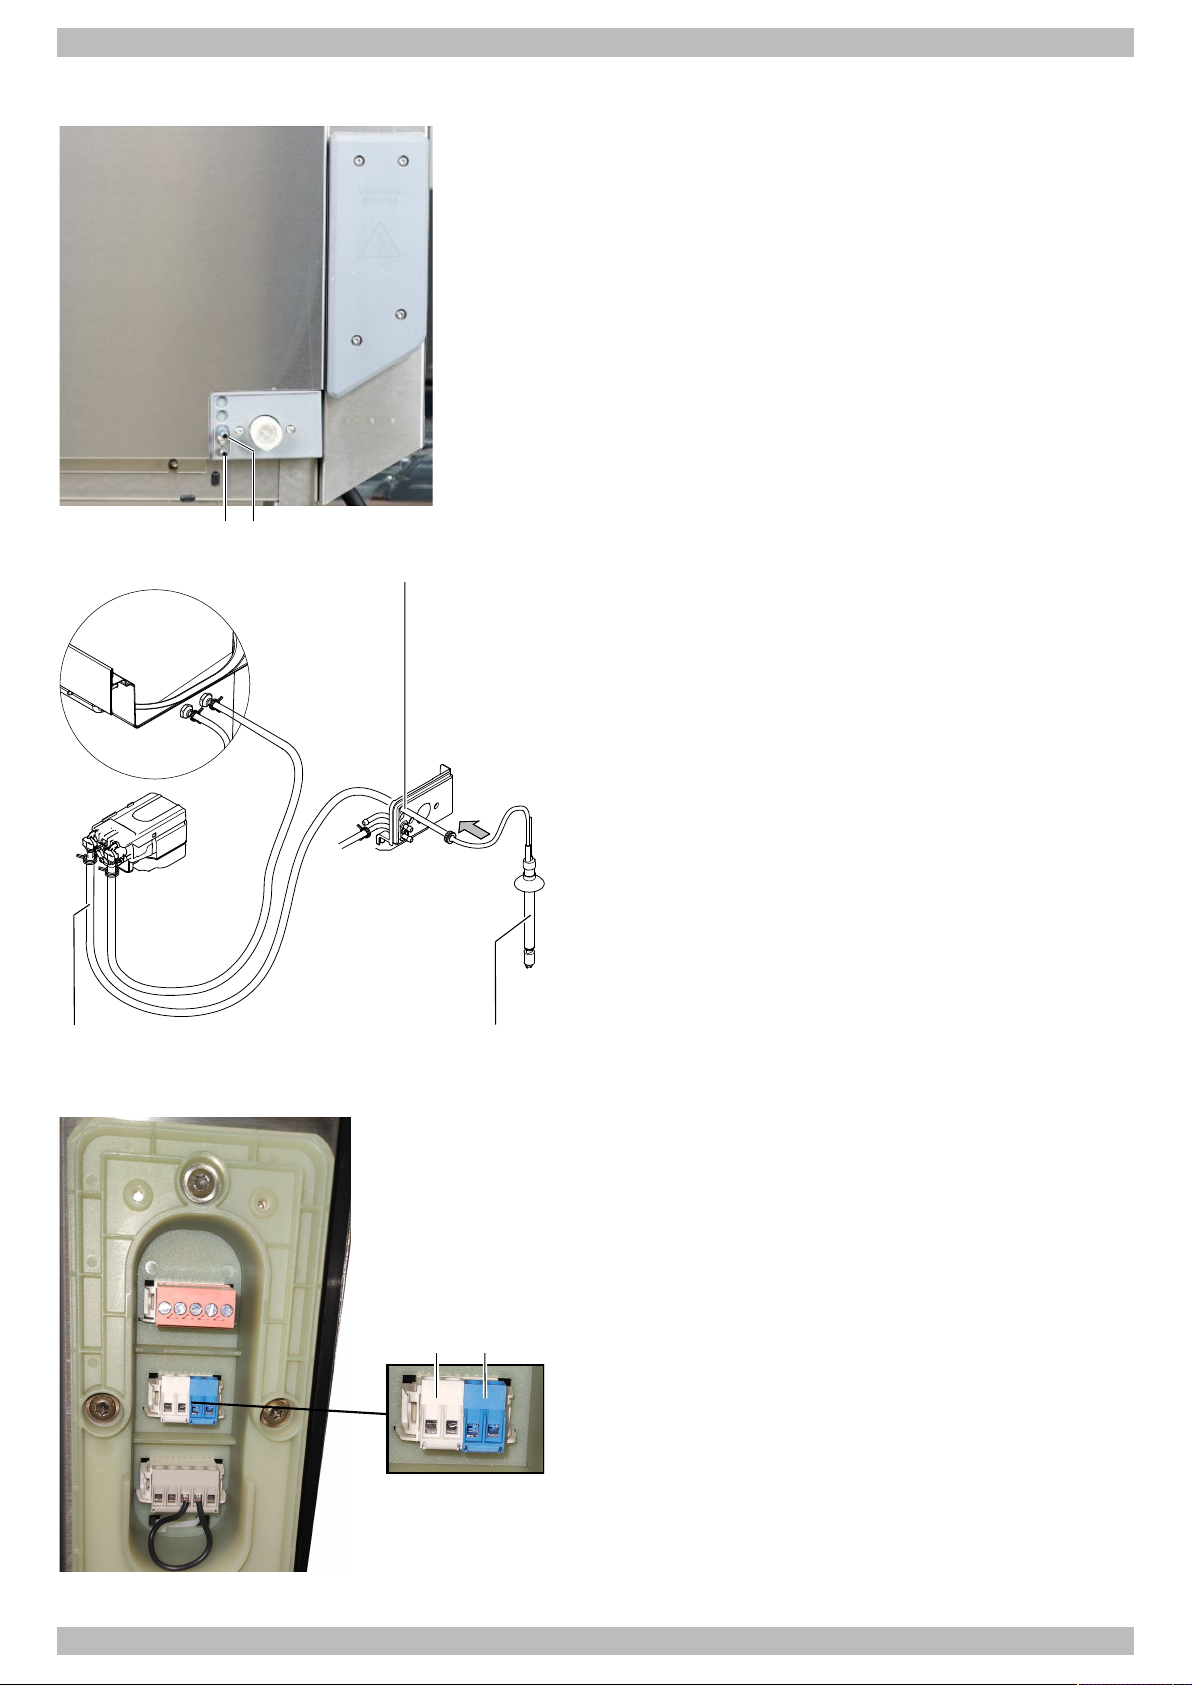
Ø Fasten the hose of the rinse aid suction tube to the con-
nection (1) using a wire hose clip.
Ø Fasten the hose of the detergent suction tube to the
connection (2) using a wire hose clip.
Ø Guide the hose of the suction tube defoamer (3) through
the hose guide (4) and attach it to the dosing device (5)
with a wire hose clip.
5.5 Establish the electrical connection of the suction tubes
Ø Connect the suction tube for the detergent and the suc-
tion tube for the defoamer to the terminal (1).
Ø Connect the suction tube for the rinse aid to the terminal
(2).
32 | 89014547; Version 4 | Operating instructions PT Series
Page 33
5.6 Establish the electrical connection of the external dosing devices
1 2 43 5
DANGER
Electric shock from live components
A fatal electric shock can occur during installation and maintenance work and when carrying out repairs.
Ø Isolate and lockout the mains supply to the warewasher.
Ø Check that there is no voltage present.
Note:Maximum current drain at the transfer strip: 0.5
A. Only connect external dosing devices with their own
fuse protection. Include the dosing device in the protective circuit (PE) of the warewasher.
Ø Disconnect the warewasher from the electrical mains
supply and secure against unintended activation.
Ø Connect external dosing device to transfer strip.
Ø Configure the transfer strip (} page 34).
Commissioning | 5 | English
Item Name Note
1 DETERGENT For detergent dosing device (type-dependent)
2 WASH For detergent dosing device (type-dependent)
3 RINSE For rinse aid dosing device
4 N Neutral / phase 2
5 L1 Continuous voltage / phase 1
Depending on the configuration of the transfer strip, voltage is present at the RINSE and DETERGENT terminals.
Terminal Voltage present Condition Restriction
DETERGENT While machine is filling – Hood closed
– Minimum water level
in the tank
Parallel to solenoid valve
– While machine is filling
– During the rinse
WASH Parallel to wash pump – Hood closed – Not during the self-cleaning programme
RINSE Parallel to rinse pump – Hood closed – Not during the self-cleaning programme
Parallel to solenoid valve
– While machine is filling
– During the rinse
– Hood closed – Not during the self-cleaning programme
– Not while the machine is being filled
– Not during the descaling and basic cleaning
programme
– Not while the machine is being filled
– Not during the descaling and basic cleaning
programme
– Hood closed – Not during the self-cleaning programme
Operating instructions PT Series | 89014547; Version 4 | 33
Page 34
English | 5 | Commissioning
32
1
1
2 3
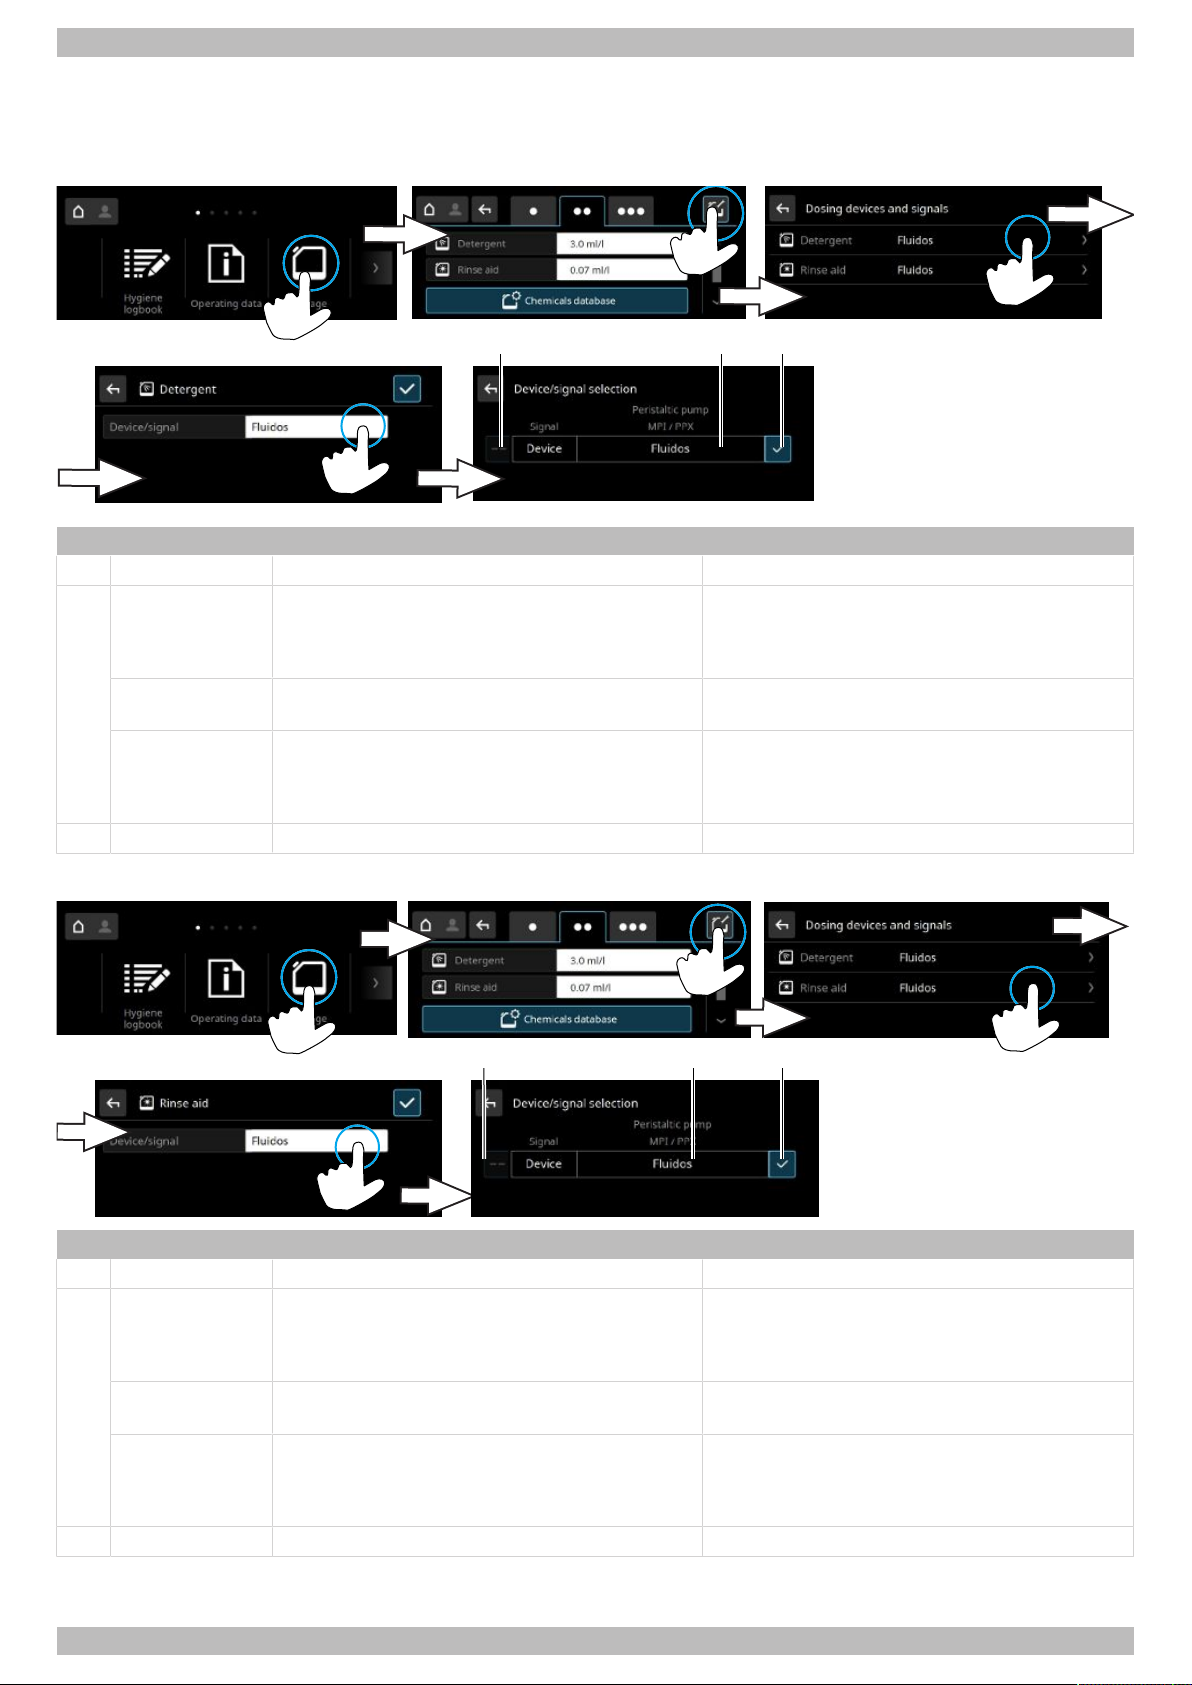
5.7 Configuring the transfer strip
A service technician configures the transfer strip in the Dosing menu, specifying the type of dosing device.
Detergent dosing device
Item Setting Description Note
1 Reset to default setting
2 Signal For dosing devices not from Winterhalter:
– While machine fills
– Parallel to the solenoid valve
Device – Peristaltic pump When setting the “peristaltic pump”, also set the
output in ml/min.
Device For Winterhalter dosing device:
– Fluidos
– MPI/PPX
3 Save settings
Set the dosing amount in the dosing menu.
Rinse aid dosing device
Item Setting Description Note
1 Reset to default setting
2 Signal For dosing devices not from Winterhalter:
– Parallel to the rinse pump
– Parallel to the solenoid valve
Device – Peristaltic pump When setting the “peristaltic pump”, also set the
output in ml/min.
Device For Winterhalter dosing device:
– Fluidos
– MPI/PPX
3 Save settings
Set the dosing amount in the dosing menu.
34 | 89014547; Version 4 | Operating instructions PT Series
Page 35
5.8 Connecting the external energy management system
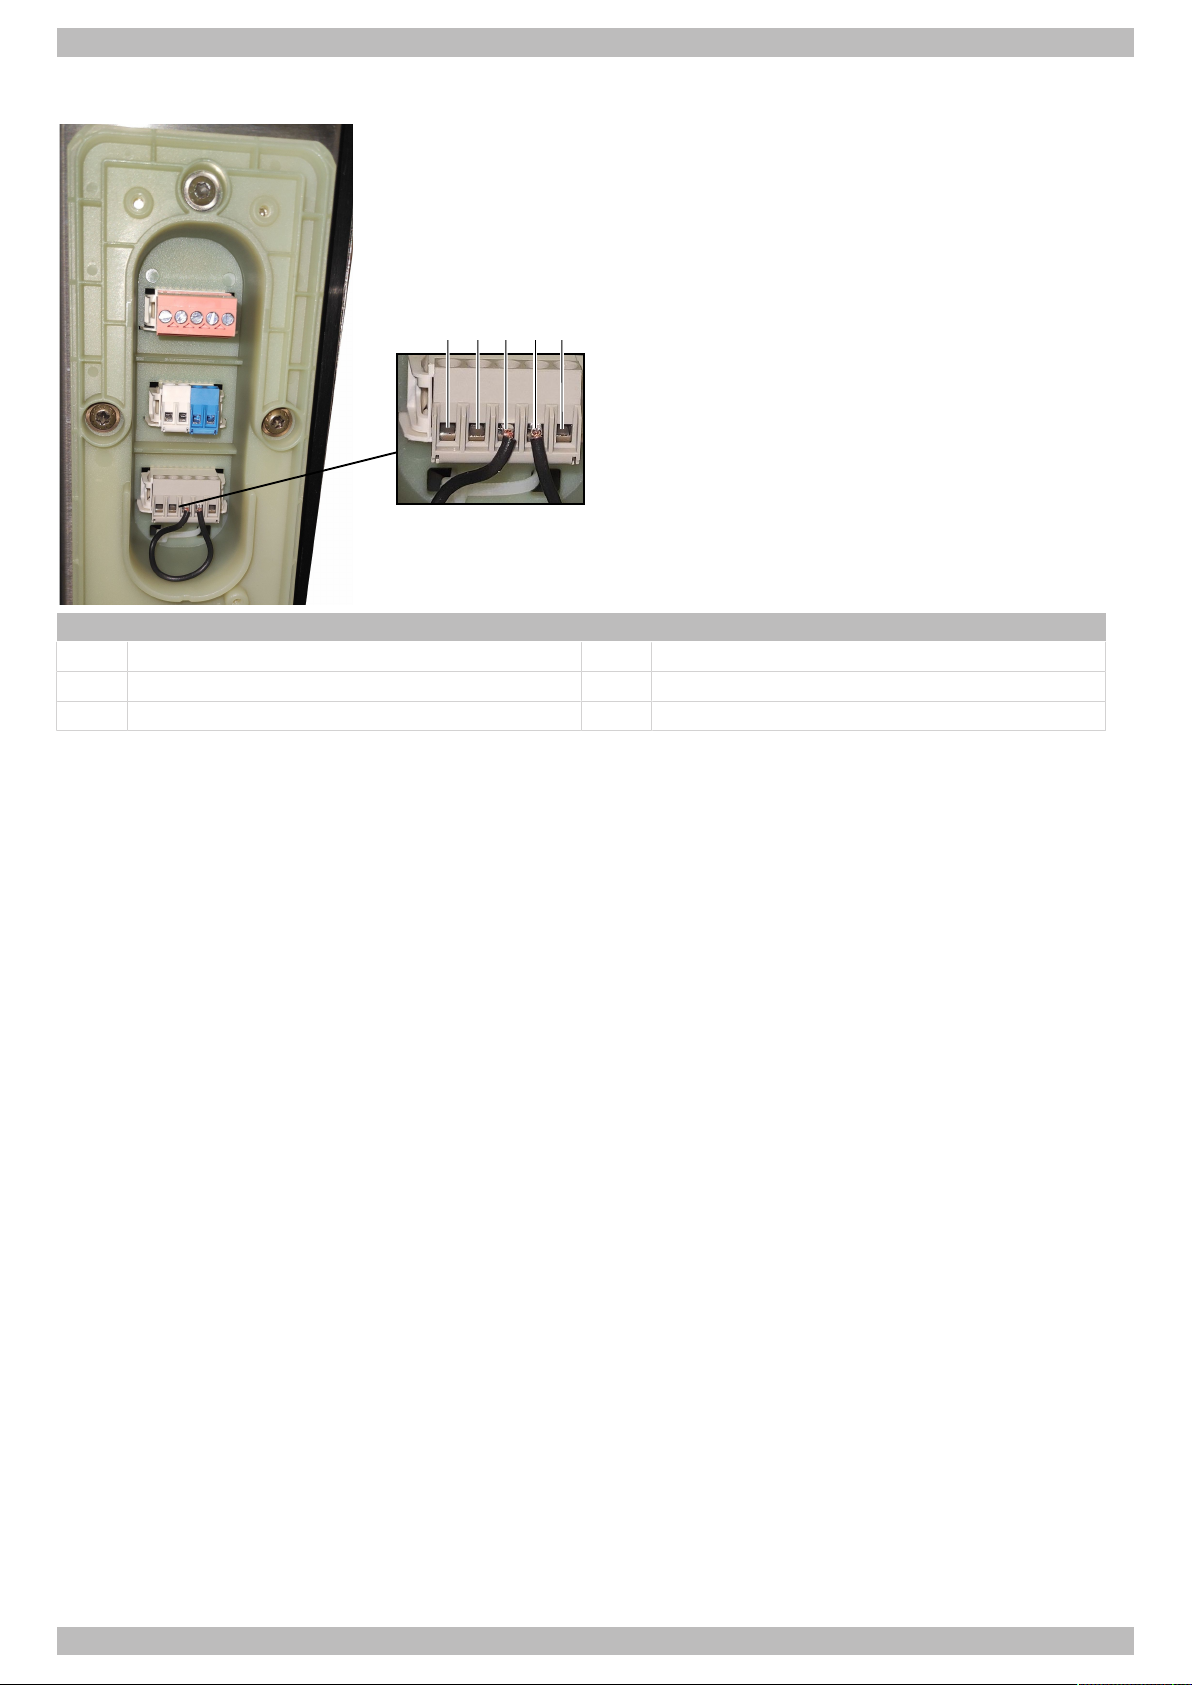
12345
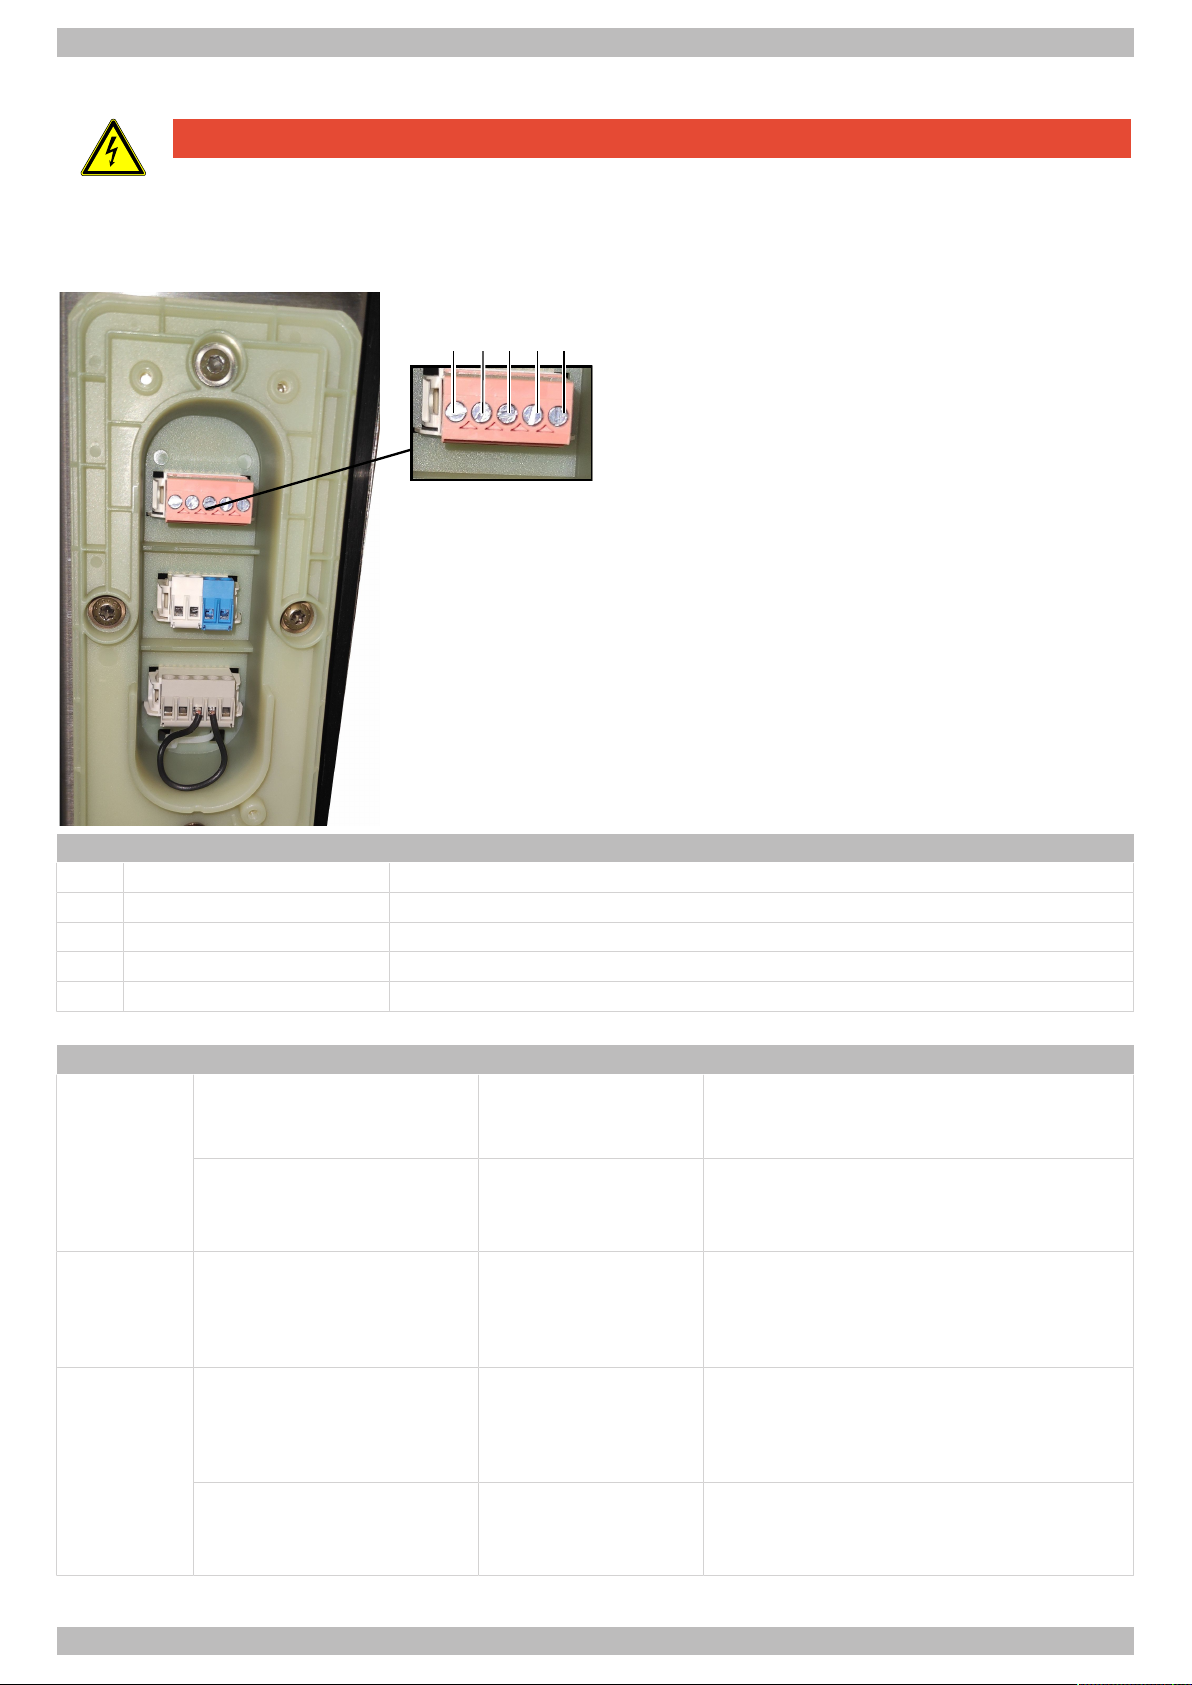
Ø Connecting the external energy management system.
Terminals (1) to (5) are available.
Commissioning | 5 | English
Item Description Item Description
1 Terminal A Machine ON 4 Terminal D Neutral
2 Terminal B Power request 5 Terminal PE
3 Terminal C Power release
5.9 Before working with the warewasher for the first time
Ø Arrange for the warewasher to be set up by an authorised service technician or by your dealer.
Ø Arrange for the warewasher to be connected by authorised technicians according to the locally applicable standards
and regulations (water, waste water, electrical system).
Ø After connecting the water and the power properly, contact the relevant Winterhalter dealership or your dealer to ar-
range for commissioning of the warewasher. Arrange for the operator and operating personnel to be trained in operating the warewasher.
Operating instructions PT Series | 89014547; Version 4 | 35
Page 36
English | 6 | Operation
2 s
6 Operation
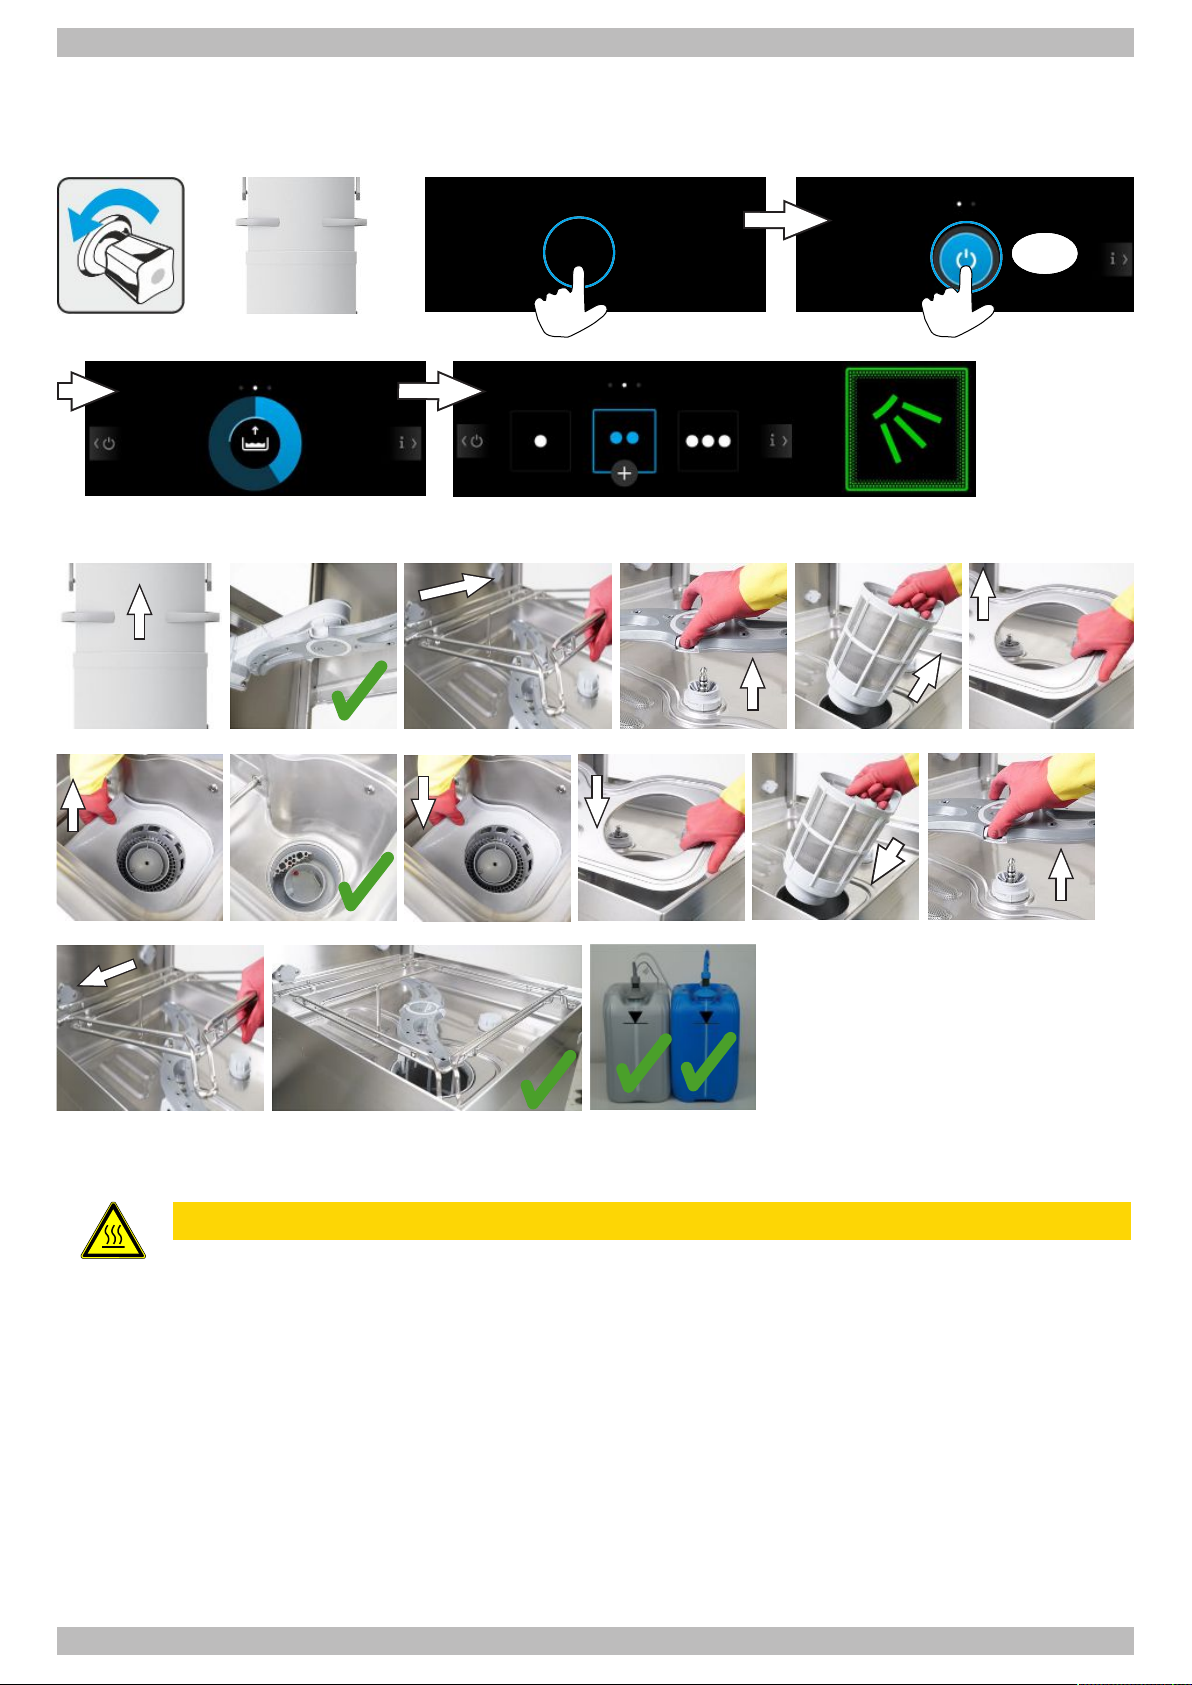
6.1 Switching on the warewasher
The warewasher is ready for operation as soon as the start button lights up green.
6.2 Checking for completeness
Note:Ensure that there is always enough detergent and rinse aid available to achieve an optimum wash result.
6.3 Washing
CAUTION
Risk of scalding from hot wash water
Ø Do not open the hood during washing.
Ø Before opening the hood, cancel the washing programme by pressing the start button and wait a few
seconds.
– Never wash items without using a wash rack.
– Do not wash electrical cooking appliances.
– Do not wash wooden items.
– Do not wash ashtrays or objects covered with wax.
– Only wash plastic parts that are heat-resistant and resistant to alkalis.
36 | 89014547; Version 4 | Operating instructions PT Series
Page 37
Operation | 6 | English
Tips for good wash results
– Thoroughly soak cutlery. Do not use any foaming pre-cleaners (e.g. manual washing-up liquid).
– Do not polish glasses, cutlery or dishes. Germs and bacteria can be found even in fresh multi-purpose cloths.
– Only wash items that are made of aluminium (e.g. pots, containers or oven trays) using a suitable detergent to avoid
black discolouration.
Arranging the wash items in the wash rack
Ø Remove large pieces of food residues.
Ø Pour away beverage residues (outside the warewasher).
Ø Place canteen trays with their upper surface facing forwards.
Ø Load plates with their upper surface facing forwards.
Ø Place glasses, cups, bowls and pots rim down.
Ø CAUTION!Possible risk of injury from sharp or pointed utensils when loading the wash racks! Wash cutlery up-
right in the cutlery holder or lying in the shallow wash rack. Always arrange the handle ends downwards. Make sure
that the cutlery is well spaced.
Ø Do not overload racks so that the wash water can reach all dirty surfaces.
Ø Space glasses to prevent them from rubbing against each other. This will avoid scratches.
Ø For tall glasses, choose a wash rack with appropriate divisions so that the glasses are held in a stable position.
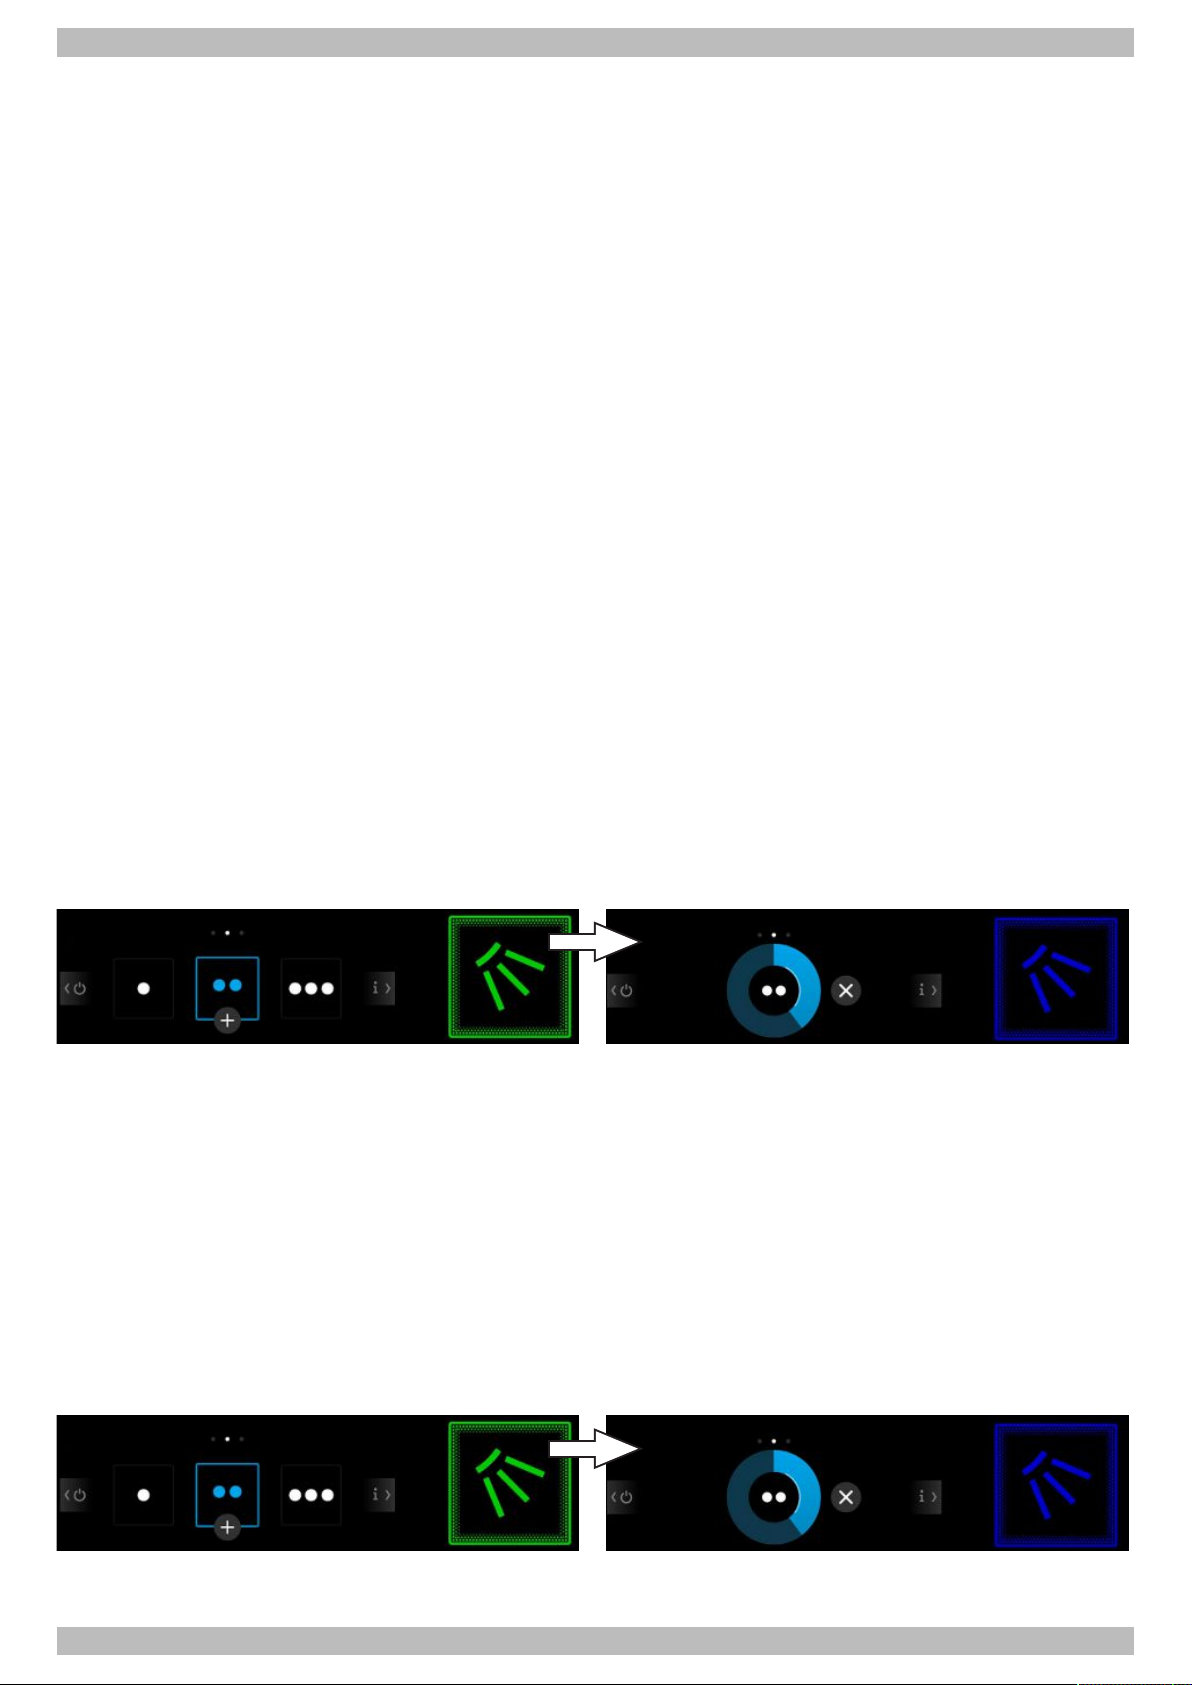
Starting the washing programme with an automatic hood
Ø Arrange the wash rack correctly.
Ø Slide the wash rack into the warewasher.
Ø Press the start button on the front cover or hood to close the hood.
ð The washing programme starts automatically.
ð Start button lights up blue.
ð For warewashers with an Energy module or heat pump module, the start button flashes blue-green before the end
of the programme. At the same time, the warm and humid air is extracted from the interior and the heat energy
stored in it is recovered for the next washing programme.
ð Start button lights up green and the hood opens as soon as the programme ends.
Starting the washing programme without an automatic hood
Ø Arrange the wash rack correctly.
Ø Open the hood.
Ø Slide the wash rack into the warewasher.
Ø Close the hood.
ð The washing programme starts automatically.
ð Start button lights up blue.
ð For warewashers with an Energy module or heat pump module, the start button flashes blue-green before the end
of the programme. At the same time, the warm and humid air is extracted from the interior and the heat energy
stored in it is recovered for the next washing programme.
ð Start button flashes green as soon as the programme ends.
Ø Do not open the hood until the start button flashes green.
Operating instructions PT Series | 89014547; Version 4 | 37
Page 38
English | 6 | Operation
1 2
1
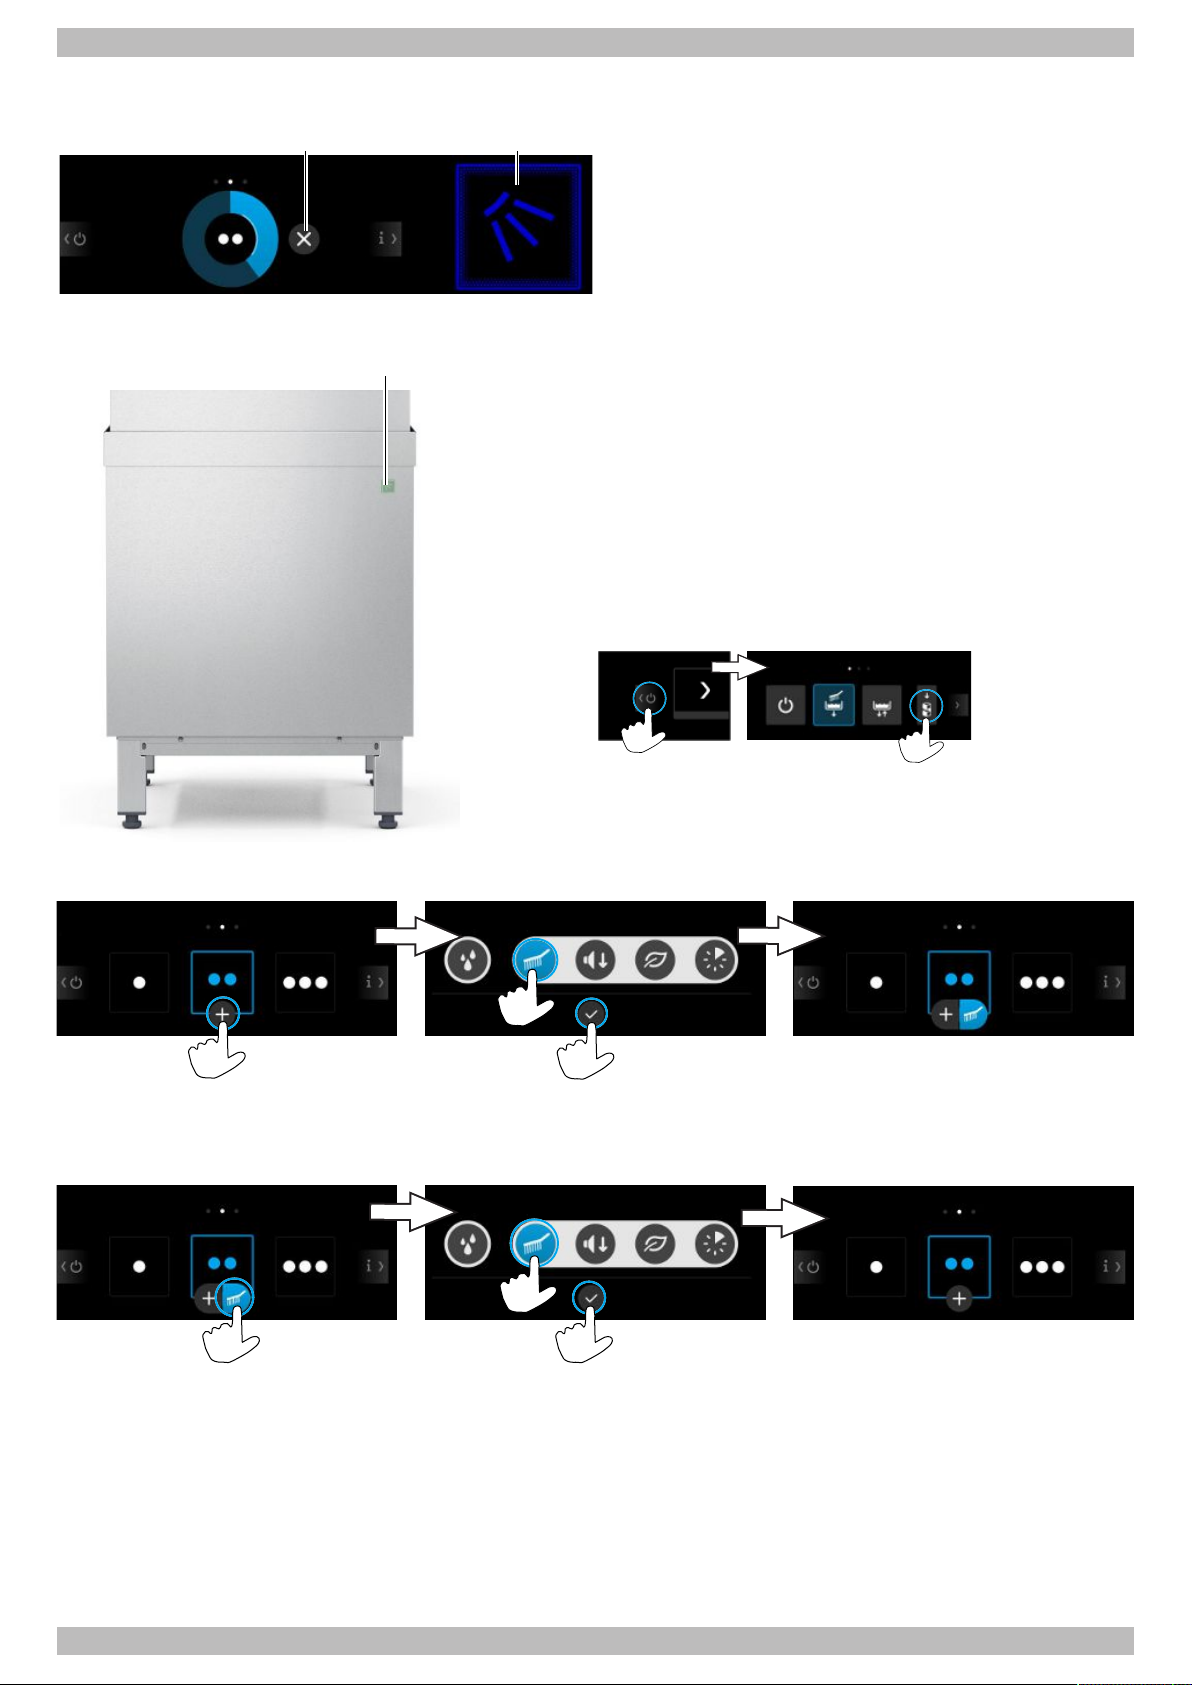
Cancelling the washing programme
Wash breaks
Ø Press button (1) or (2).
ð The start button lights up green.
Ø Do not switch the warewasher off during wash breaks.
Ø Close the hood to prevent the machine from cooling
down.
Ø Without an automatic hood: Close the hood to the bot-
tom detent position.
Ø With an automatic hood: To close the hood without
starting a programme, press the start button (1) on the
front cover for 2 seconds.
or
Ø Press the “Close hood” button.
Activating an additional programme
The additional programme remains activated until it is deactivated or another additional or washing programme is selected.
Deactivating an additional programme
38 | 89014547; Version 4 | Operating instructions PT Series
Page 39
Operation | 6 | English
1
1
2
6.4 Opening/closing the hood (automatic hood option)
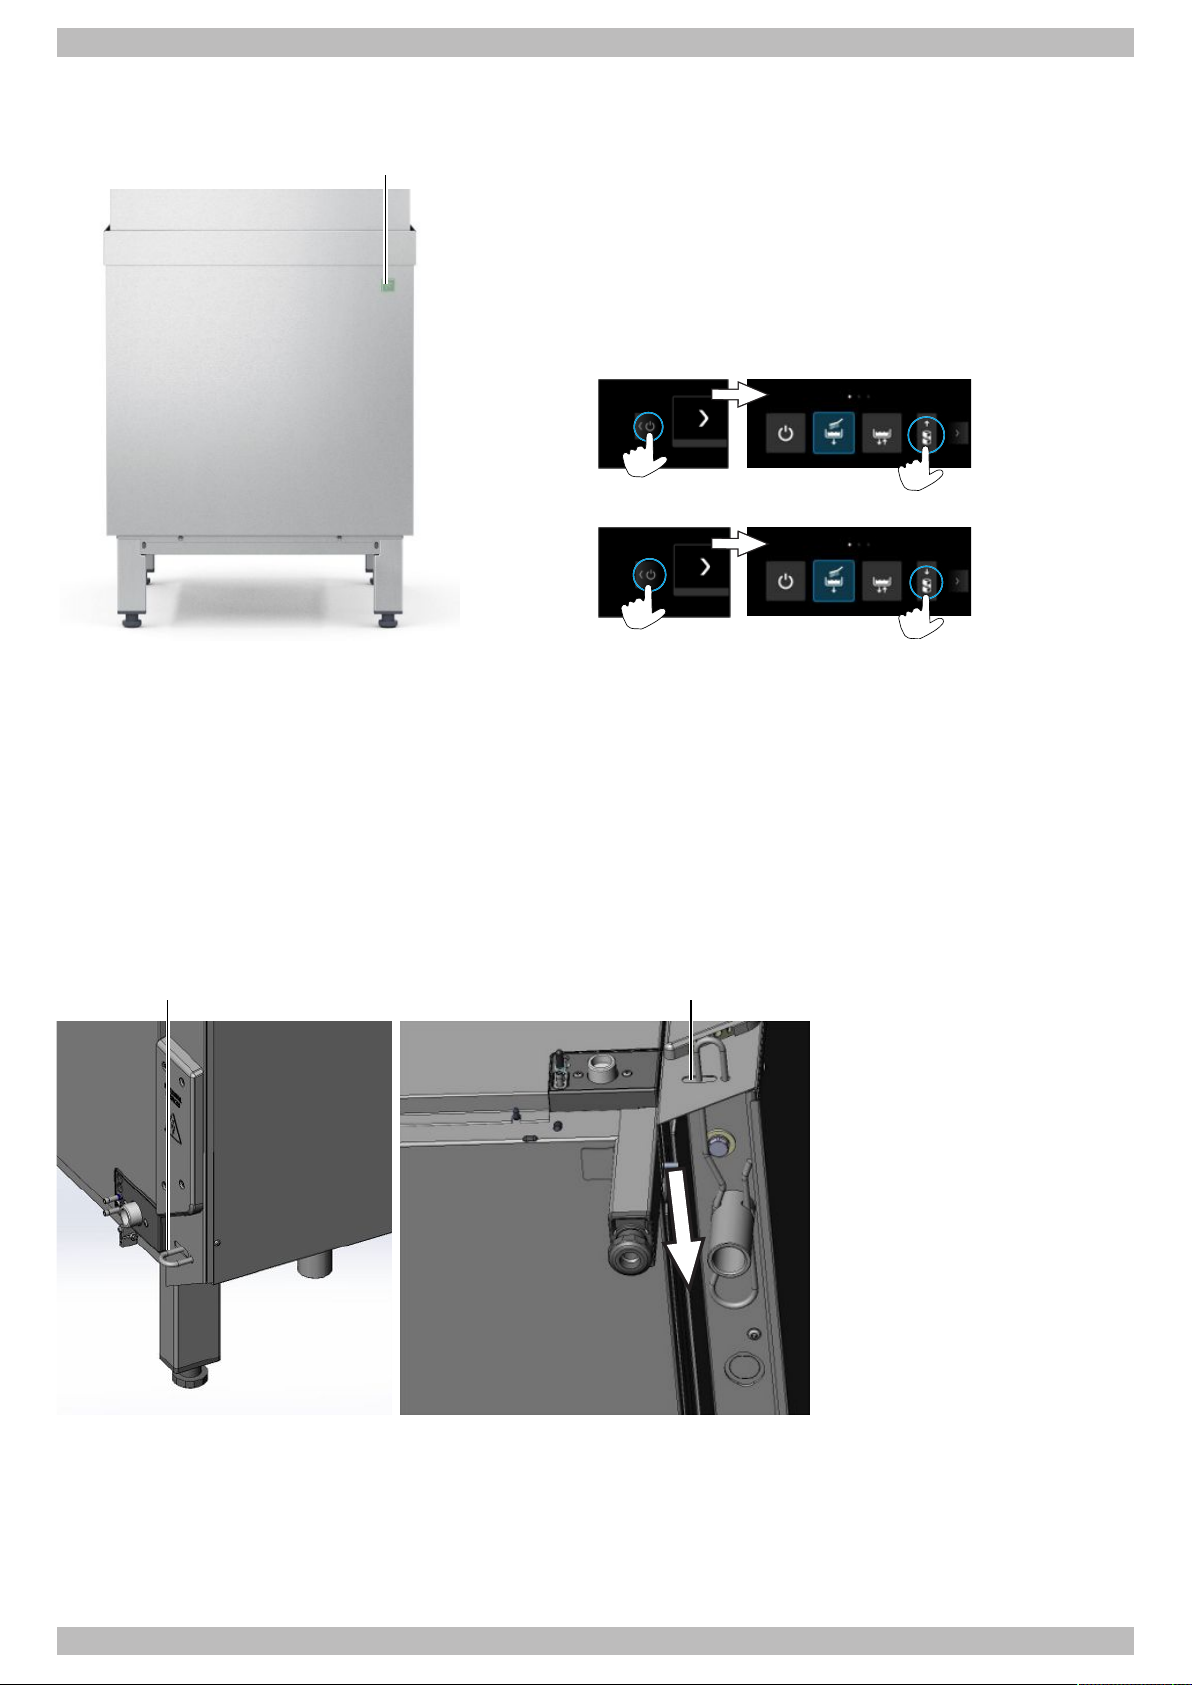
There are two options to open the hood and close it without starting a programme (e.g. during idle periods):
Opening and closing the hood using the start
button
Ø Press the start button (1) on the front cover for 2
seconds.
Opening and closing the hood via the display
The position of the hood is indicated by the arrows on the
pictogram.
Ø Press the “Open hood” button.
Ø Press the “Close hood” button.
6.5 Unlocking the hood (automatic hood optional)
If the hood can no longer be moved, the hood can be unlocked manually.
Ø Pull the retaining clip (1) forwards out of the safety mechanism and guide it into the slot (2).
Ø Press the retaining clip (1) through the slot (2) in the direction of the arrow.
Ø Remove the retaining clip (1).
ð The automatic hood is unlocked.
It is still possible to wash when manually opening and closing the hood. A fault message appears on the display at the
end of each programme.
Ø Acknowledge the fault message.
Ø Contact an authorised service technician for the repair.
Operating instructions PT Series | 89014547; Version 4 | 39
Page 40
English | 6 | Operation
6.6 Soaking programme
We recommend the soaking programme for soaking and dissolving dried-on residues.
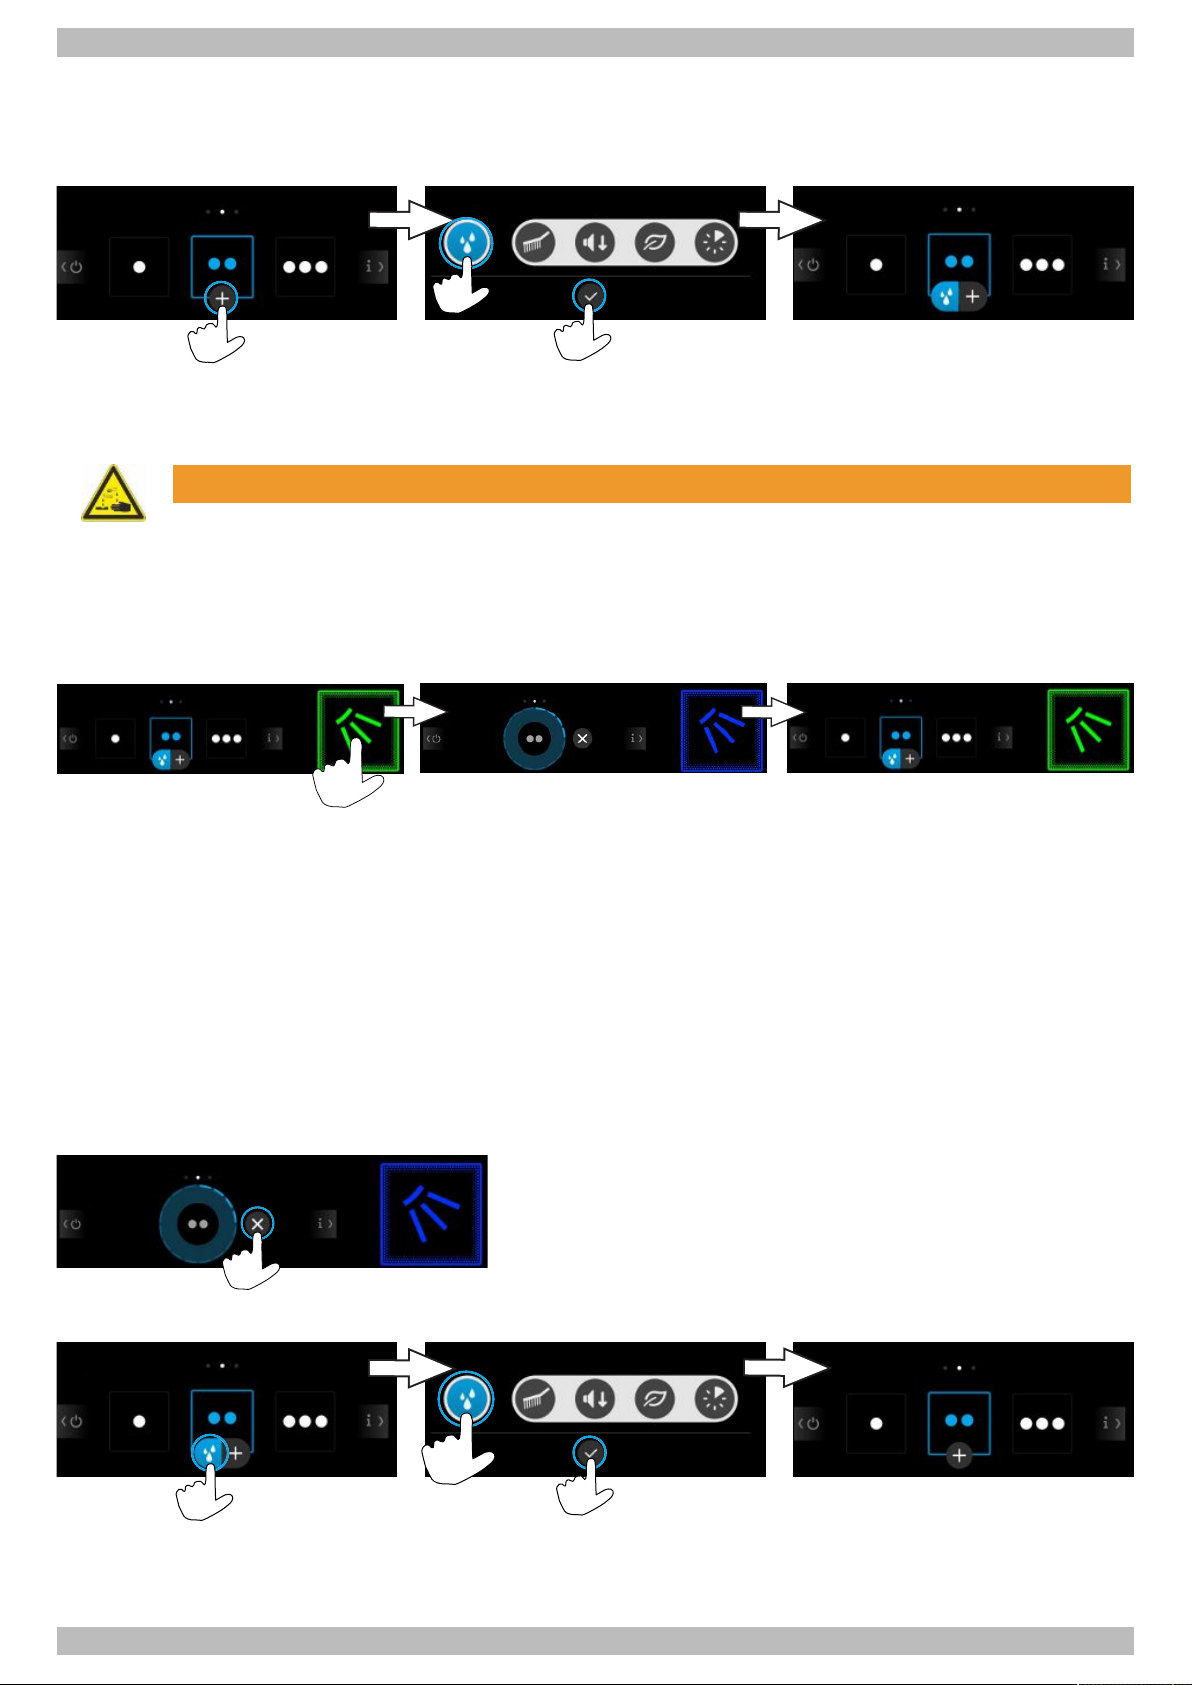
Activating the soaking programme
The soaking programme remains activated until it is deactivated and can be combined with another additional programme.
Starting the soaking programme
WARNING
Risk of chemical burns due to chemicals
Chemicals can cause severe burns or serious eye damage if they come into contact with the skin or eyes.
Ø In the event of contact with the eyes or skin, wash thoroughly with tap water. If necessary, seek medical
attention.
Ø Wear protective clothing, protective gloves and protective goggles.
Ø Read and observe the danger and safety notes on the container and safety data sheet.
Five seconds after the soaking programme has started, the wash pump circulates the tank water for seven seconds. The
soaking time of five minutes begins after this circulation. The tank water moistens the wash items and soaks the contaminants.
– If you open the hood during this time and close it again within 10 seconds, the wash pump circulates the tank water
again for five seconds. The soaking time is not extended.
– If you open the hood for longer than 10 seconds to put more wash items into the wash rack, the soaking programme
will start once the hood has been closed. A washing programme starts automatically after the end of the soaking
period. The soaking period can also be shortened by pressing the start button.
A service technician can adjust the times mentioned above.
Ø Remove the wash items only once the washing programme has finished and the start button flashes green.
Cancelling the soaking programme
After cancelling the soaking programme, always start a washing programme to rinse the tank water off the wash items.
Deactivating the soaking programme
40 | 89014547; Version 4 | Operating instructions PT Series
Page 41
Operation | 6 | English
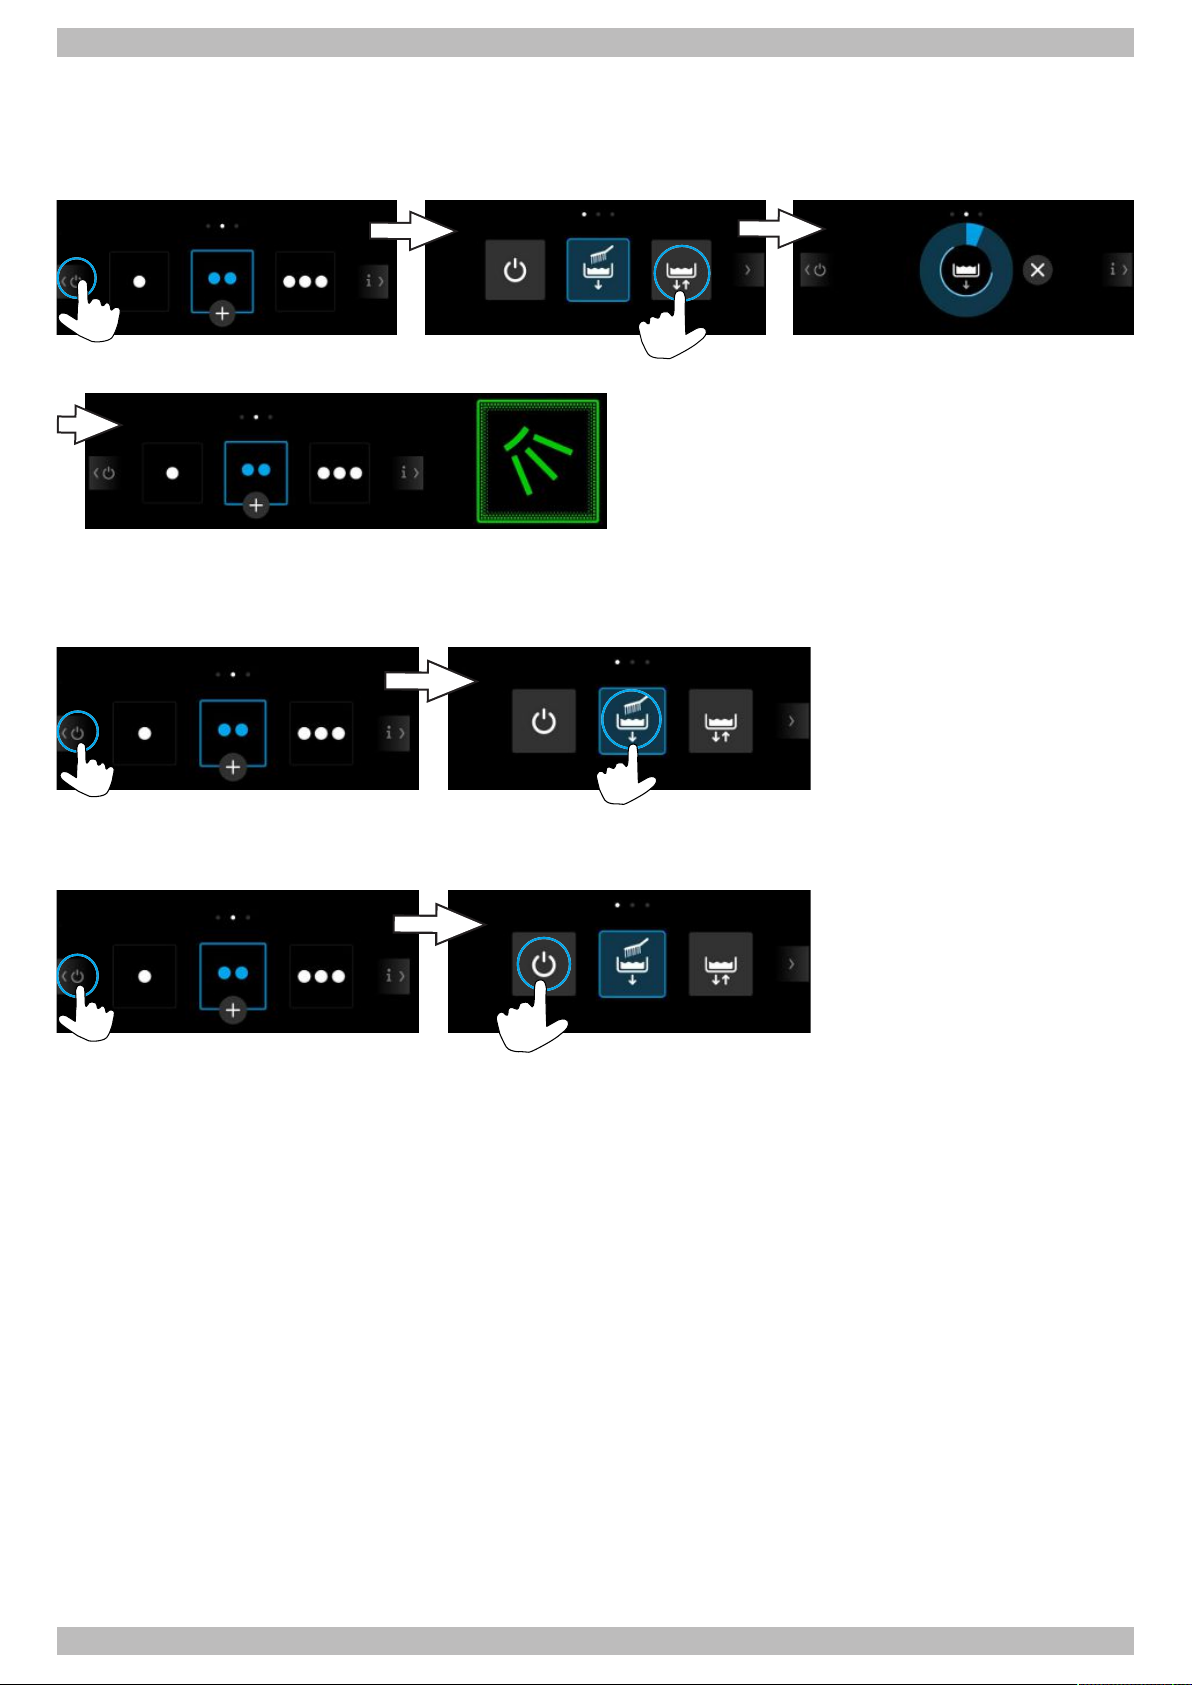
6.7 Changing the tank water
Change the tank water if it is very dirty and if wash results deteriorate.
Note:The tank is first emptied and then refilled and reheated, so it takes a few minutes until the warewasher is
ready for operation again.
6.8 Switching off the warewasher
We recommend switching off the warewasher at the end of the working day with the self-cleaning programme (} page
45) so that it is cleaned and emptied each day.
Pressing the On/Off button switches the warewasher off. The tank stays filled but will no longer be kept at temperature. If
the tank temperature has dropped too much before the machine is switched on again, the machine will be emptied and
refilled automatically.
Operating instructions PT Series | 89014547; Version 4 | 41
Page 42
English | 7 | Malfunctions
7 Malfunctions
7.1 Notifications
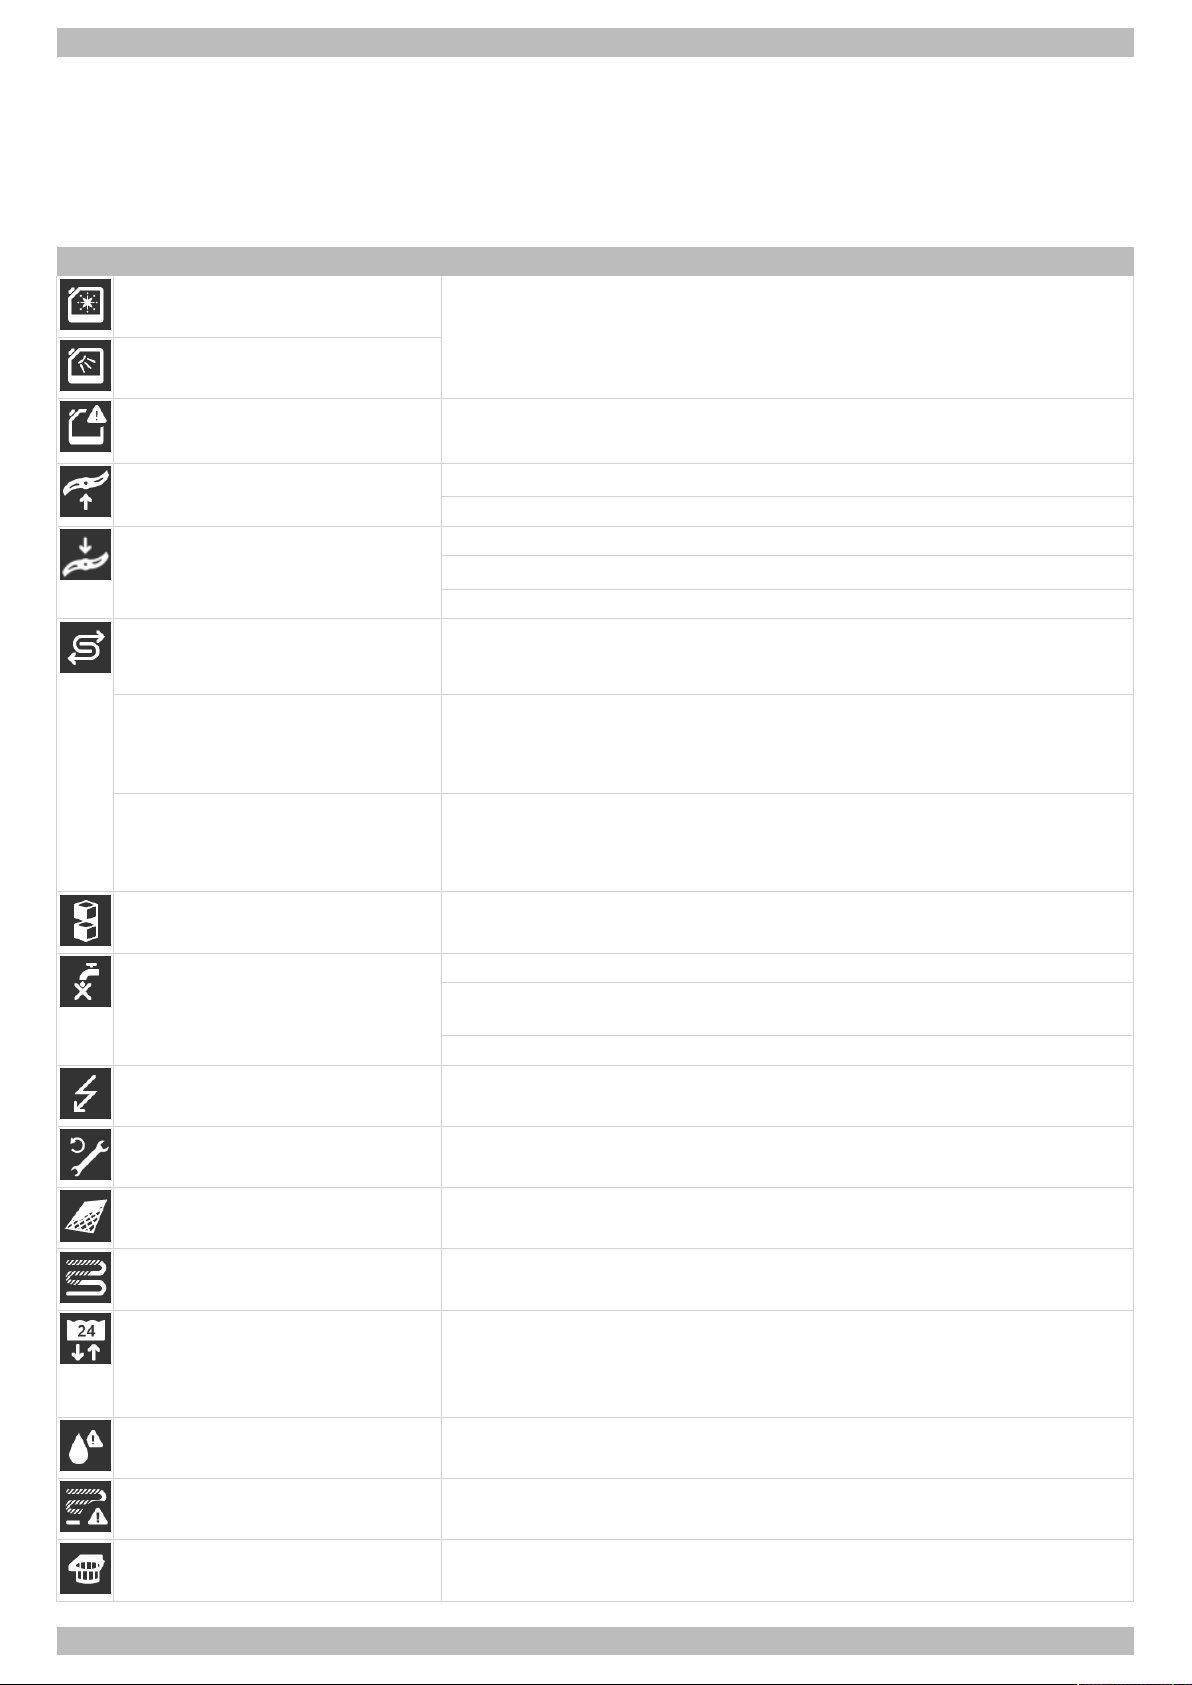
Notifications are displayed as pictograms. If there are many notifications, washing will still be possible but the end wash
result will be impaired. Please therefore rectify any notification as soon as possible. If you cannot rectify the notification,
contact an authorised service technician.
By tapping the pictogram, additional information will appear on the display.
Cause / meaning Remedy
Lack of rinse aid
Lack of detergent
Replace the canister and prime the dosing device (} page 48).
Detergent dosing failed
Upper wash field does not rotate
Lower wash field does not rotate Ensure the wash field is engaged correctly.
For warewashers with an integrated
softener:
Lack of salt
Warewasher with external partial
demineralisation cartridge:
Partial demineralisation cartridge
used up
Warewasher with external full demineralisation cartridge:
Full demineralisation cartridge used
up
Hood is open Close the hood.
Lack of water Open the water supply.
Energy optimisation active Wait until the local energy optimisation activates the warewasher.
Replace the detergent canister (} page 48) and prime the dosing device.
If the error is not cleared: Contact an authorised service technician.
Remove the obstruction or clean or descale the jet (} page 44).
Contact an authorised service technician.
Remove the obstruction or clean or descale the jet (} page 44).
Contact an authorised service technician.
Fill the salt container with regeneration salt. The display disappears after
filling the salt container after approx. 3 wash cycles have been completed
and some of the salt has dissolved.
Replace the partial demineralisation cartridge. Reset the water countdown
meter (} page 26).
Have the resin of the full demineralisation cartridge replaced by an authorised service technician. Reset the water countdown meter (} page 26).
Have the dirt trap cleaned by a service technician or have a new dirt trap installed.
Have the solenoid valve repaired by an authorised service technician.
Service interval expired Contact an authorised service technician.
Strainer clogged Clean the strainer and restart the programme.
Descaling required
Tank water exchange recommended
Tank water has not been changed
for at least 24 h.
Error in external water treatment
device
Tank heating encrusted Clean the tank heating.
Filter bottom not installed Insert filter bottom.
42 | 89014547; Version 4 | Operating instructions PT Series
Start the descaling programme (} page 23).
Change the tank water (} page 41).
Check the water treatment device.
Page 43
Malfunctions | 7 | English
85°C
62°C
Cause / meaning Remedy
Note on saving energy Close the hood.
Error on automatic hood Follow the instructions on the display.
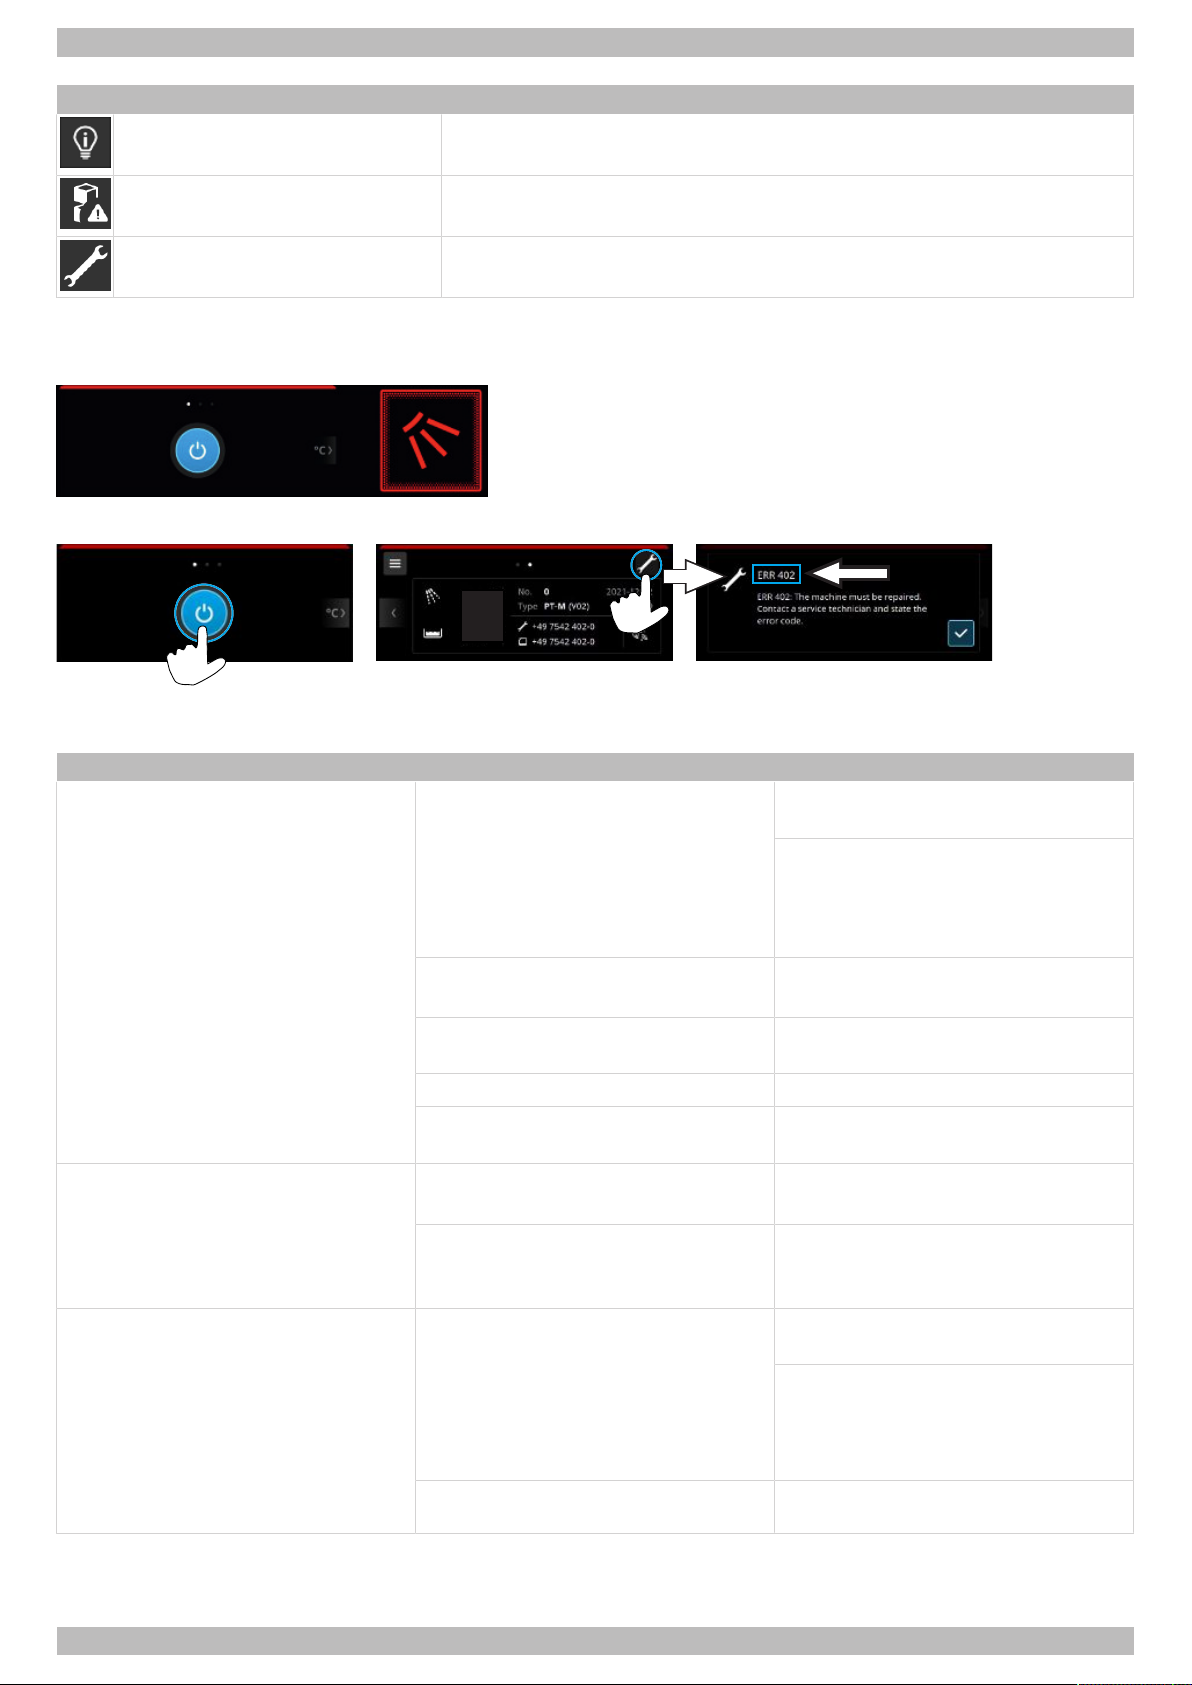
Various Tap the pictogram and note the error code. Contact an authorised service
technician.
7.2 Displaying the error code of a serious error
If a serious error occurs, washing is no longer possible and a red bar appears at the top of the display:
Accessing the error code
7.3 Poor wash result
Possible cause Remedy
Wash items not clean No or low detergent dosing Set the dosing amount as per the man-
ufacturer’s specifications (} page 18).
Check the dosing hose (for kinks,
breakage, etc.).
Prime the dosing device (} page 48).
Replace the canister, if empty.
Wash items incorrectly arranged
Wash field jets clogged Remove the wash field and clean the
Temperatures too low
Tank water too heavily soiled Start the tank water exchange pro-
Spots visible on the wash items If scaling is present:
the water is too hard
For starch residues:
temperature of manual pre-cleaning is
above 40 °C
The wash items do not dry on their own No or low rinse aid dosing Set the dosing amount as per the man-
Rinse temperature too low Contact an authorised service techni-
Arrange the wash items correctly (}
page 37).
jets (} page 46).
Check the temperatures (} page 13).
gramme (} page 41).
Check the external water treatment.
Connect the water treatment device.
Carry out deep cleaning.
Lower the temperature of manual precleaning.
ufacturer’s specifications (} page 18).
Check the dosing hose (for kinks,
breakage, etc.).
Prime the dosing device.
Replace the canister, if empty.
cian.
Note:Water quality affects the washing and drying result. We therefore recommend supplying the warewasher
with softened water in areas with water of a total hardness above 3°dH (0.53mmol/l).
Operating instructions PT Series | 89014547; Version 4 | 43
Page 44
English | 8 | Cleaning and maintenance
1 2
3
8 Cleaning and maintenance
The following materials must not be used for cleaning:
– High-pressure cleaner, steam jet
– Detergents containing chlorine or acid
– Cleaning sponges or wire brushes containing metal
– Abrasives or abrasive cleaning agents
8.1 Cleaning the warewasher during operation
8.2 Cleaning the warewasher at the end of the working day
Cleaning the Energy module
Daily, before emptying the warewasher for warewashers with an Energy module or heat pump module
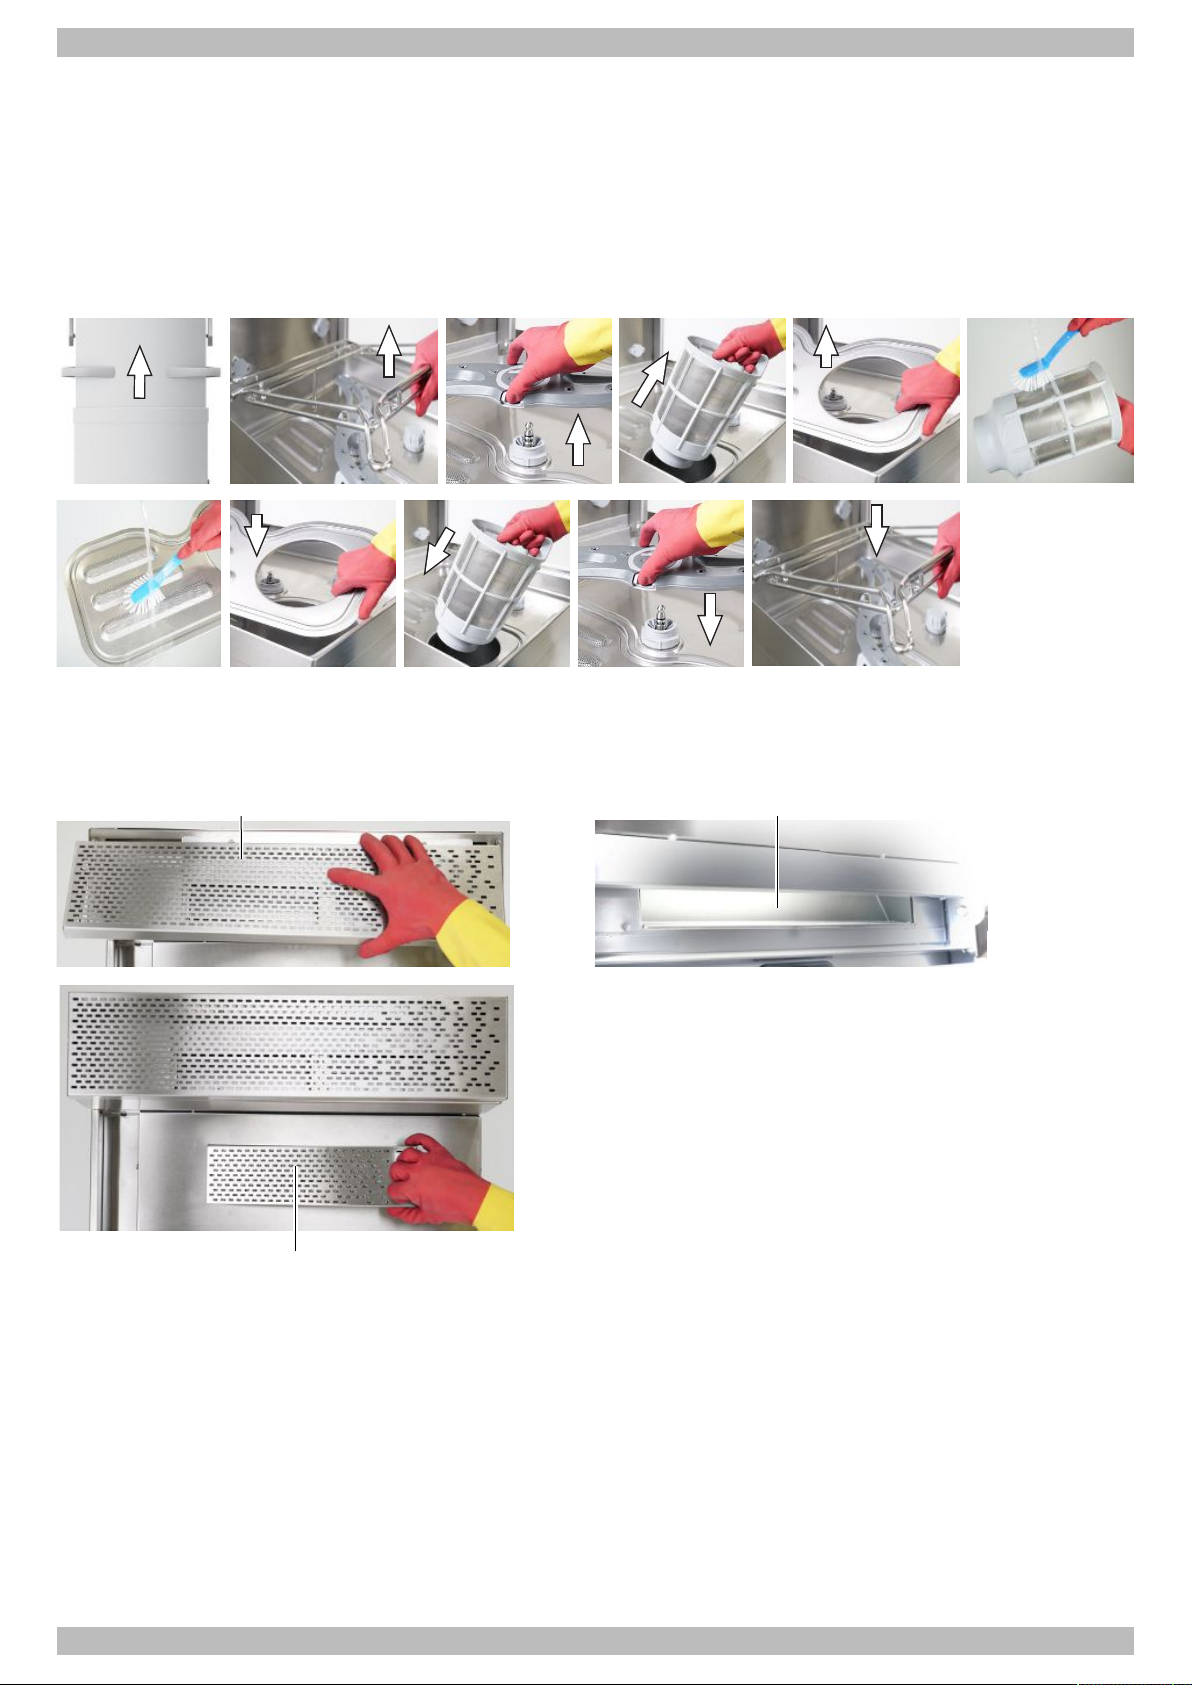
Cleaning the ventilation grill
Ø Remove the ventilation grill (1) from the top and wash in
the warewasher.
Ø Refit the ventilation grill (1).
Cleaning the suction channel
Ø Open the hood.
Ø Spray the suction channel (2) with warm water. Use a
water hose, not a high-pressure cleaner.
Cleaning the grease filter
Ø Remove the grease filter (3) from the front and wash in
the warewasher.
Ø Refit the grease filter (3).
44 | 89014547; Version 4 | Operating instructions PT Series
Page 45
Cleaning and maintenance | 8 | English
Self-cleaning programme
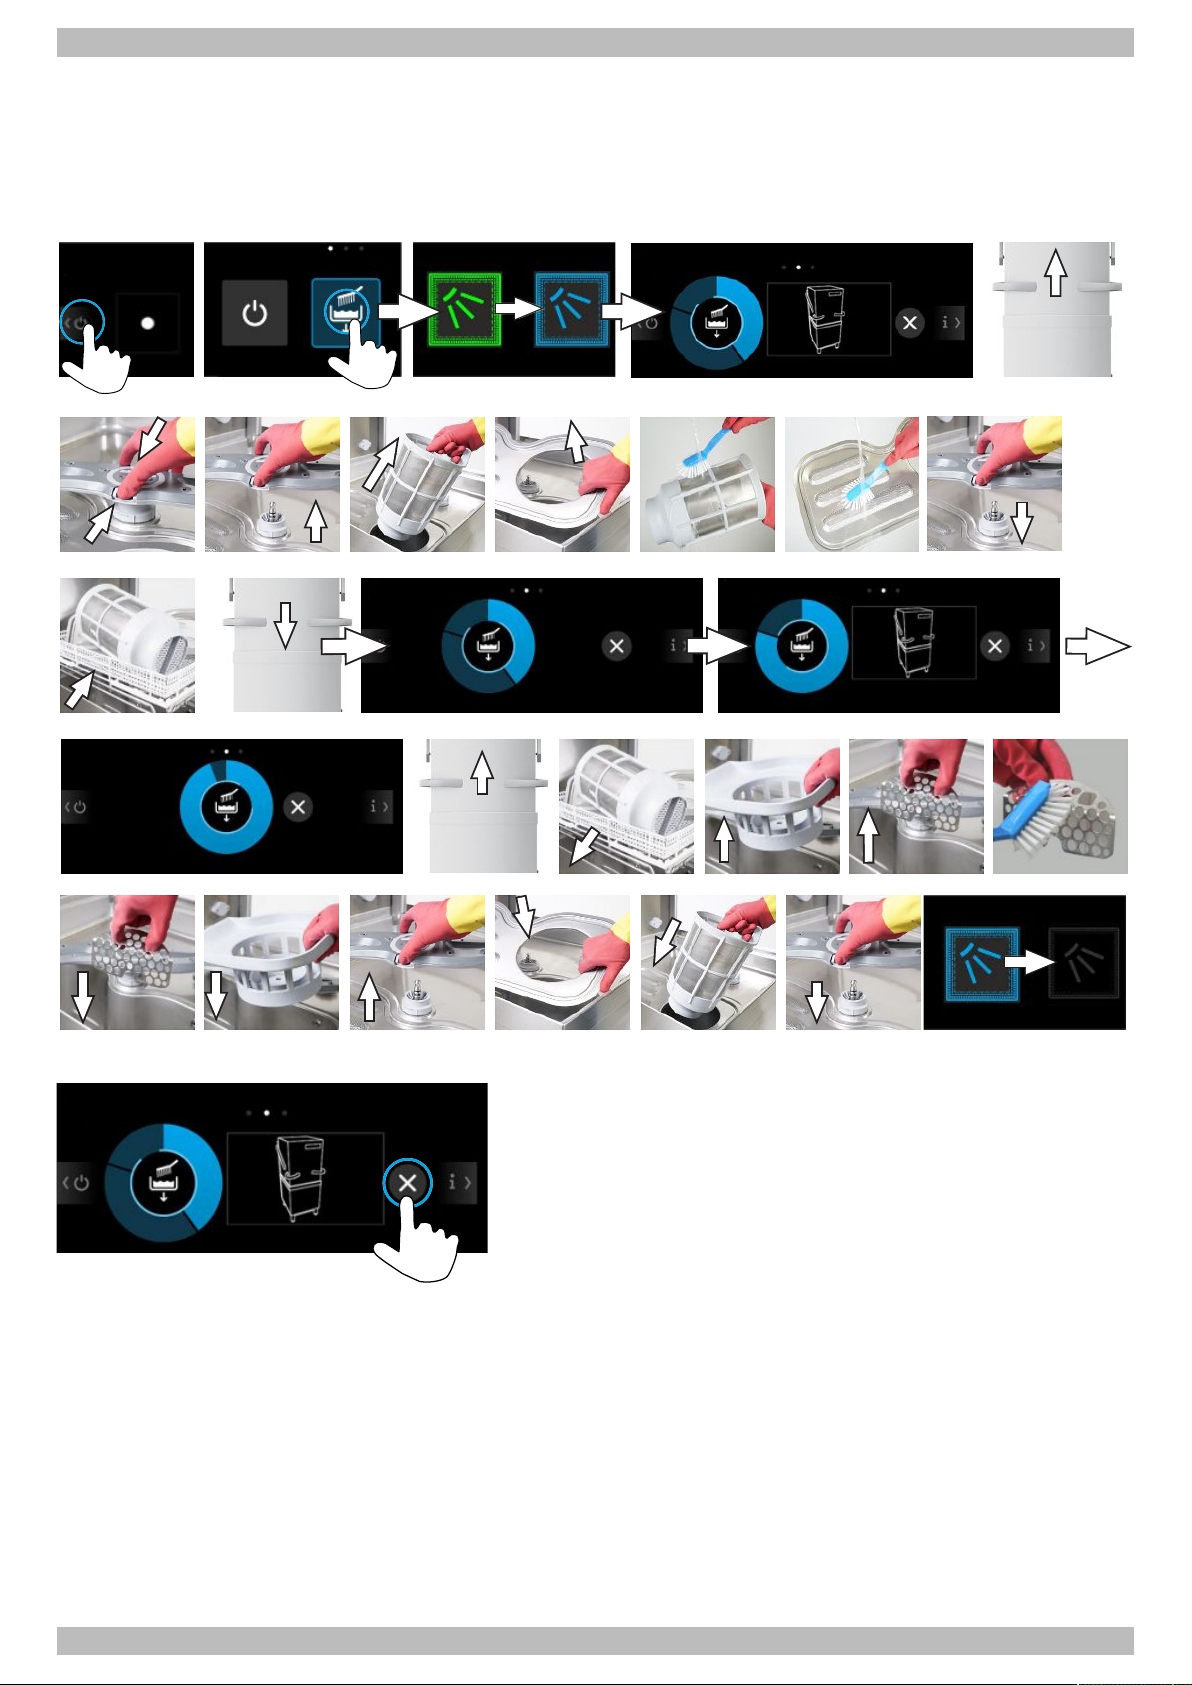
The self-cleaning programme is helpful for cleaning the inside of the warewasher at the end of the work day. We recommend that you also use A 15 MC cleaning tablets. The A 15 MC cleaning tablets help to remove unpleasant odours and
light limescale deposits.
After the first programme step, the self-cleaning programme is interrupted and a video with further steps is shown on the
display. If no notice is taken of the video, the self-cleaning programme will start automatically.
Cancelling the self-cleaning programme
Cleaning the warewasher interior
Make sure that there are no rusting foreign bodies inside the warewasher that could also cause stainless steel to rust.
Rust particles can come from non-rust wash items, from cleaning aids, damaged wire grate racks or from water pipes that
are not protected against rust.
To achieve an optimal wash result and to increase the service life of the warewasher, we recommend cleaning the interior
daily.
Ø Hose down the interior with a water hose.
Ø Remove dirt with a brush or cloth.
Operating instructions PT Series | 89014547; Version 4 | 45
Page 46
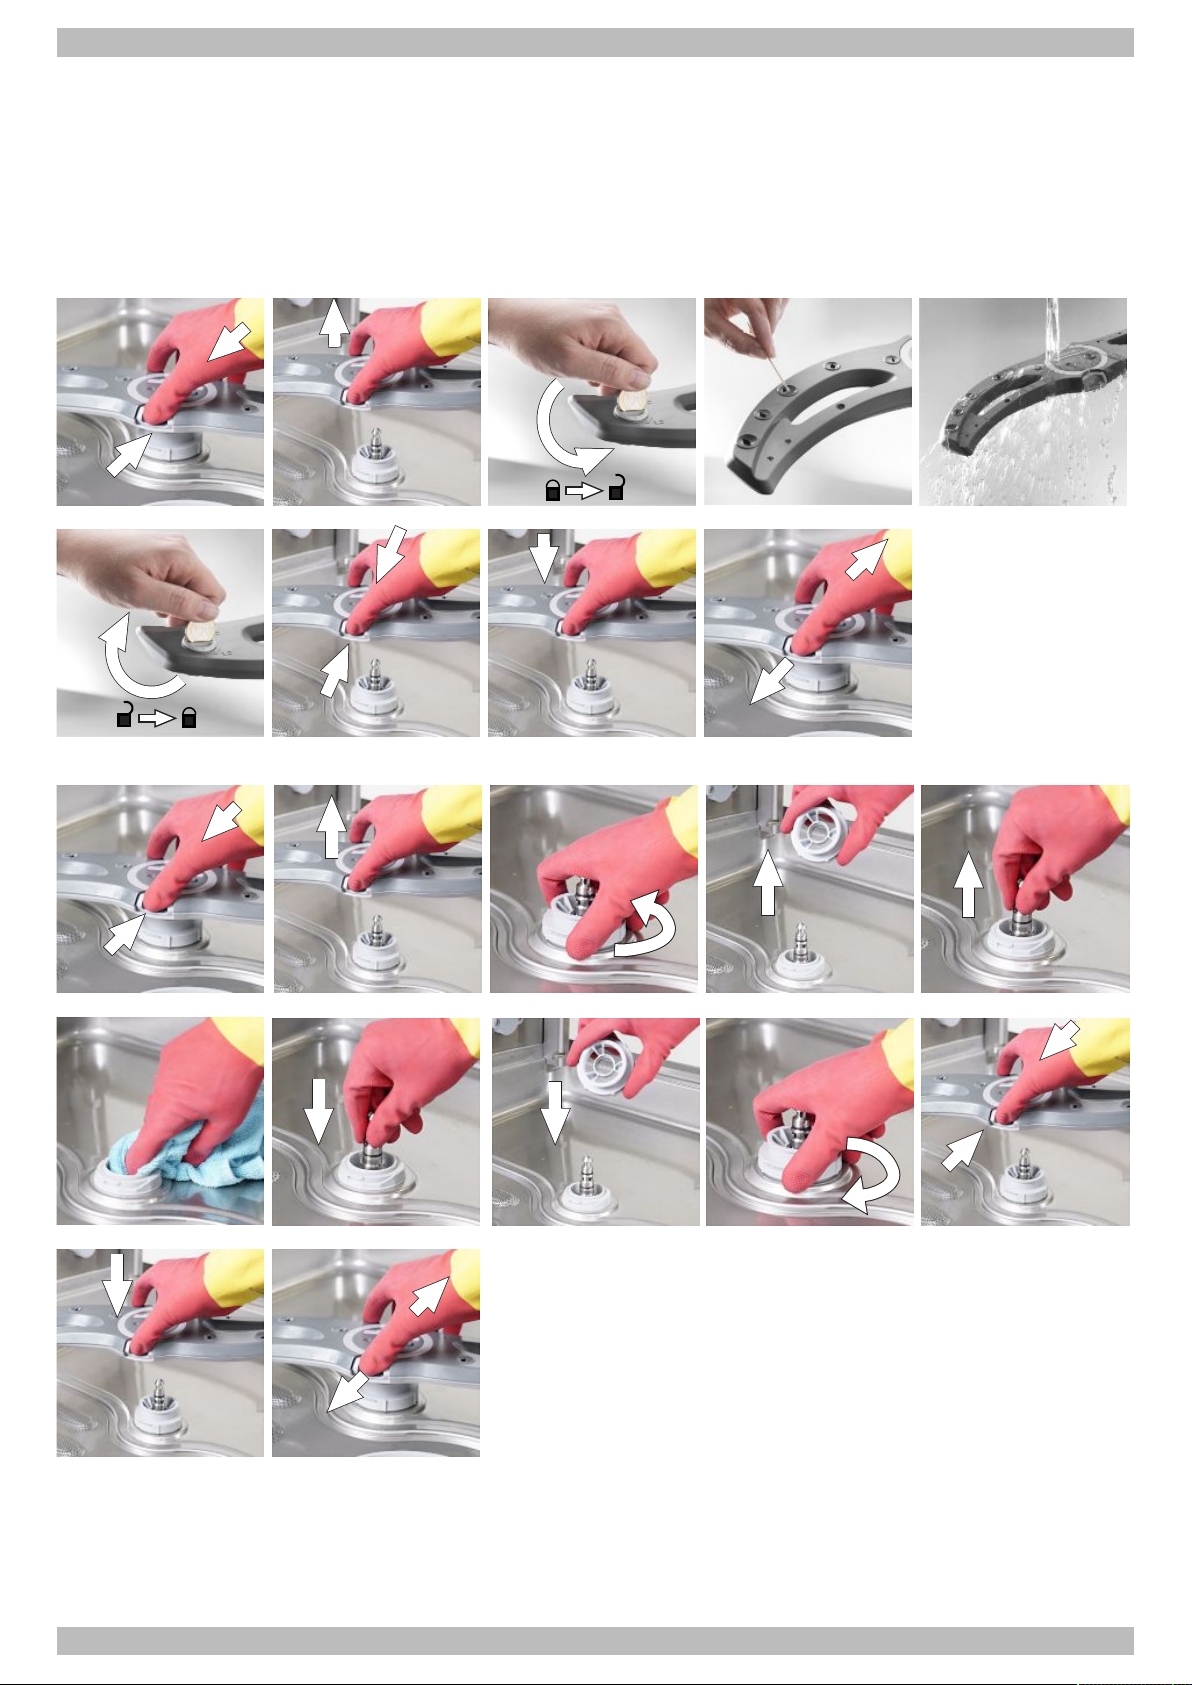
English | 8 | Cleaning and maintenance
Cleaning the outside of the warewasher
Ø Do not spray the warewasher and the surrounding area (panels, floor) with a steam jet or high-pressure cleaner.
Ensure when cleaning the floor that the plinth of the warewasher is not flooded, to prevent an uncontrolled inflow of
water.
Ø Clean the display with a damp cloth.
Ø Clean the external surfaces using a stainless steel cleaner and stainless steel polish.
Cleaning the upper and lower wash field
Clean the upper and lower wash field bearing
46 | 89014547; Version 4 | Operating instructions PT Series
Page 47
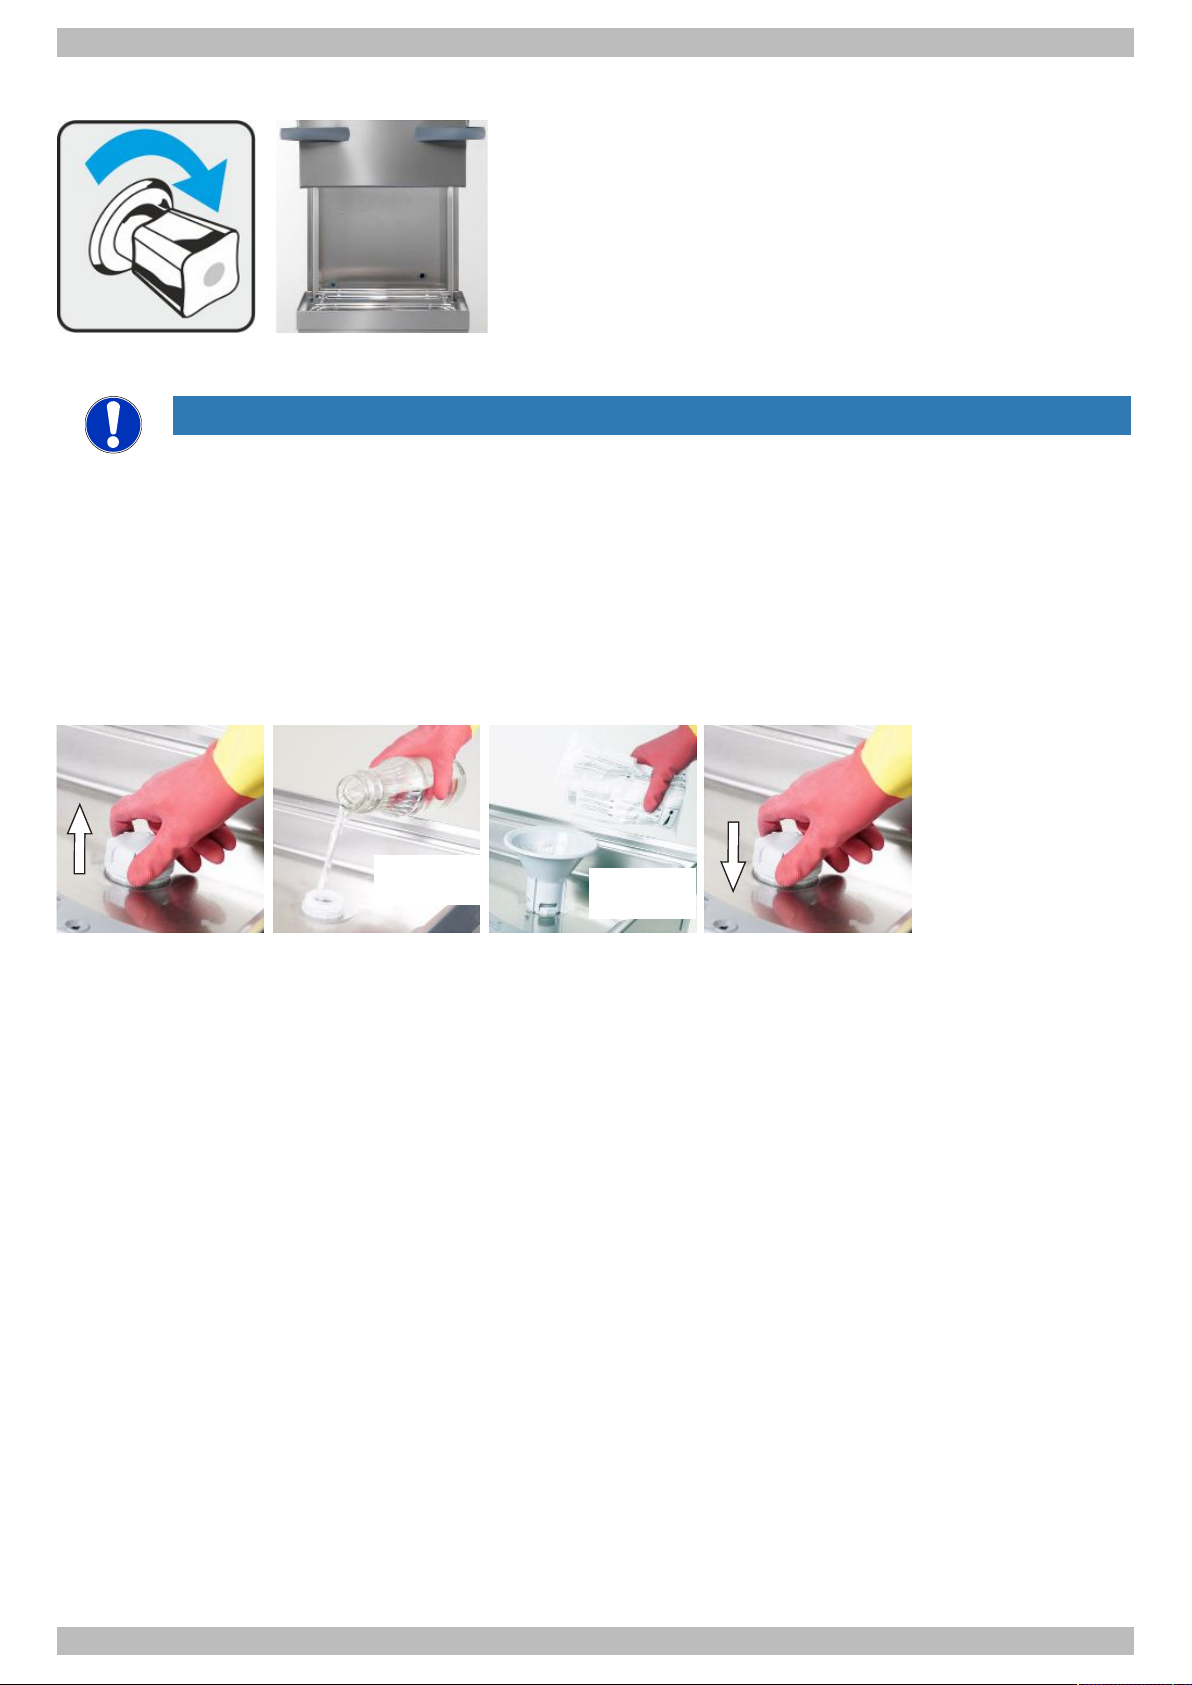
After cleaning
~ 1,5 l
~ 1,5 kg
8.3 Topping up the regeneration salt
NOTE
Risk of damaging the water softener
Chemicals, e.g. detergent, rinse aid or other salts, such as table salt or thawing salt, will inevitably damage
the water softener.
Ø Only fill with regeneration salt with a maximum grain size of 0.4–7mm.
Ø Only fill with water when commissioning the water softener for the first time.
Ø Top up the regeneration salt.
Cleaning and maintenance | 8 | English
Ø Note:Danger of rust formation in the filling area as a result of salt residues! After filling the regeneration salt,
start a washing programme or the self-cleaning programme in order to wash away any salt residues that may be
present. We recommend starting the self-cleaning programme, as salt residues can have a negative impact on the
wash result.
Operating instructions PT Series | 89014547; Version 4 | 47
Page 48
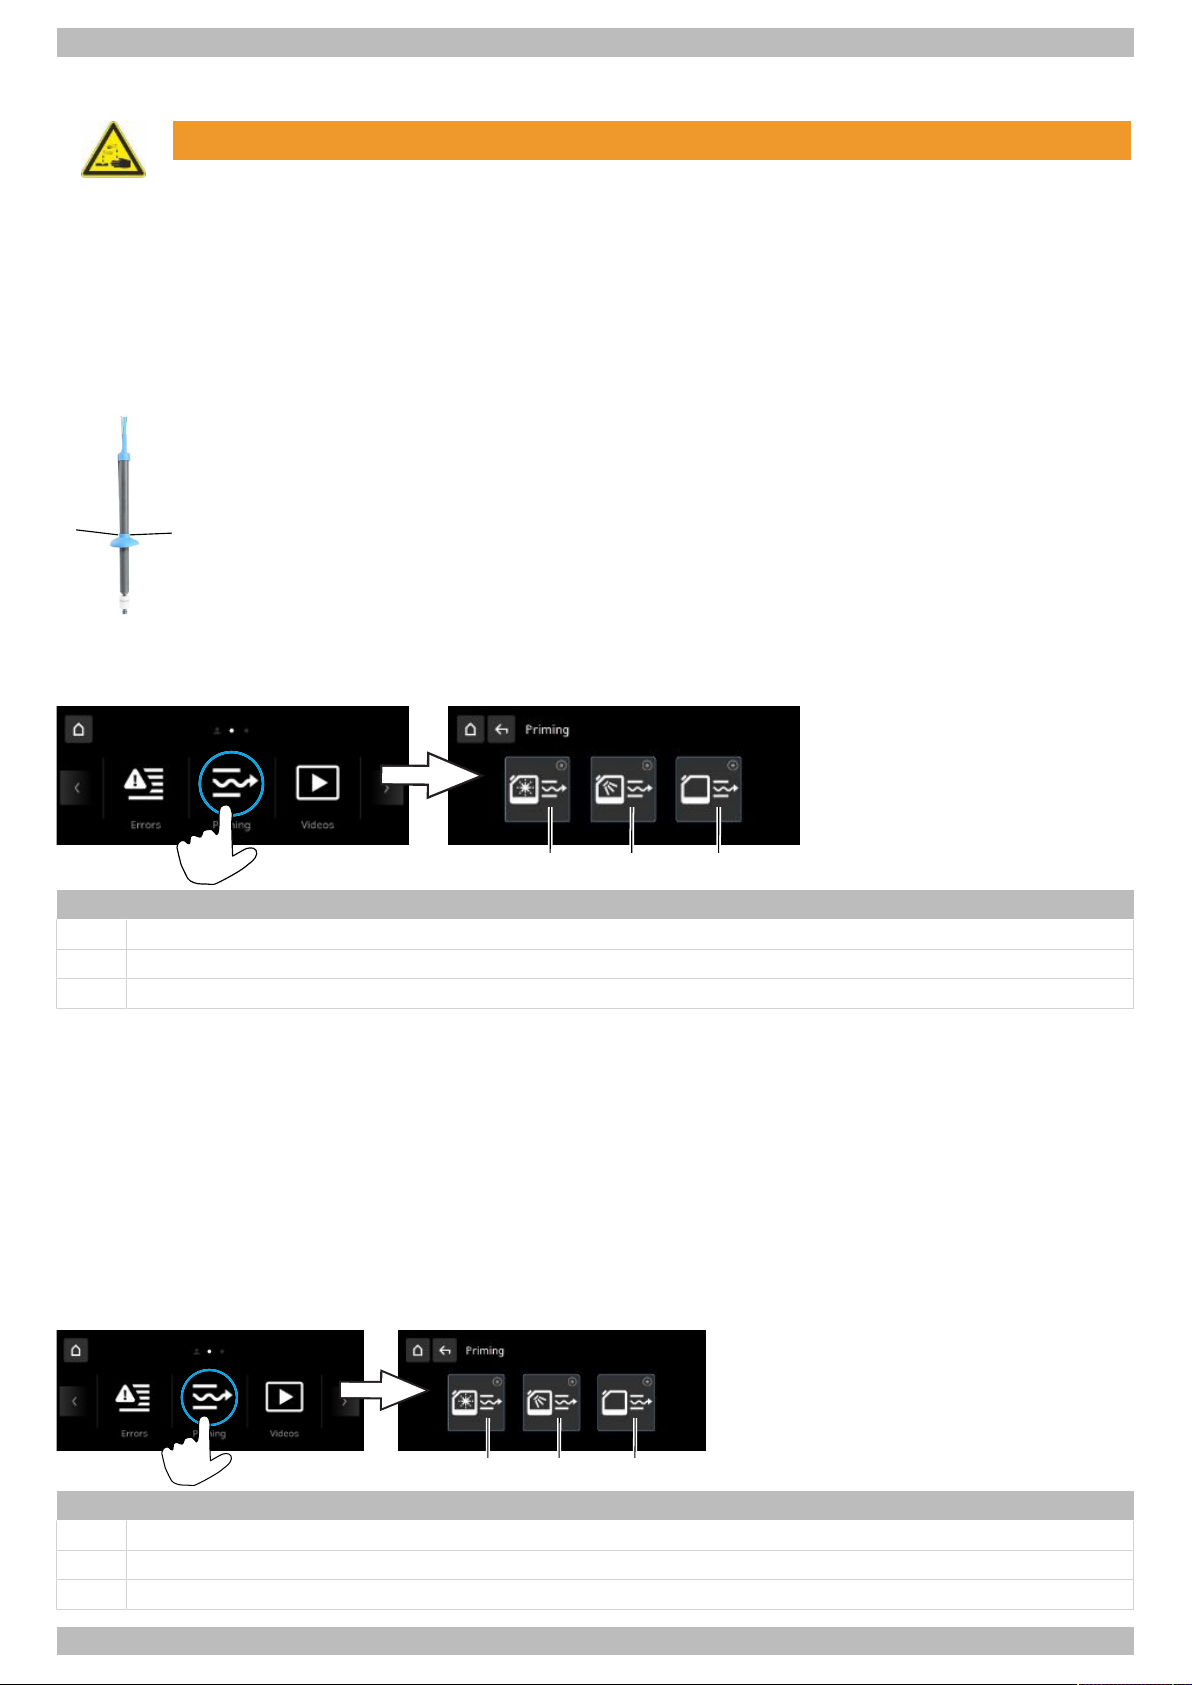
English | 8 | Cleaning and maintenance
1
1
1 2 3
1 2 3
8.4 Replacing the canister
WARNING
Risk of chemical burns due to chemicals
Ø Read and observe the danger and safety notes on the container and safety data sheet.
Ø Wear protective clothing, protective gloves and protective goggles.
A suction tube is needed to suck out the chemicals from the containers.
– Do not place the suction tube for the rinse aid in the container holding detergent defoamer, or vice versa.
– Use the suction tube only with sufficiently stable containers. Narrow and tall containers can tip as soon as the suction
tube is pulled.
– Do not pull on the dosing hose or main power cable, as this may lead to a defect.
Ø Wear protective clothing, protective gloves and protective goggles.
Ø Pull the suction tube carefully out of the empty canister.
Ø Check whether both vent holes (1) in the cover cap are open. Clean if required.
Ø Place suction tube in the new canister.
Ø Slide the cover cap slowly downwards until the canister opening is closed.
Ø Prime the dosing device.
Priming the dosing devices
The dosing device must be primed if air has entered the dosing hose. This occurs if the canister is not replaced in time.
Item Description
1 Rinse aid dosing device
2 Detergent dosing device
3 Defoamer dosing device
Ø Press button 1, 2 or 3.
ð The button turns white.
ð The dosing device is primed.
Ø As soon as the button light goes out, exit the menu.
8.5 Changing the chemicals
Crystallisation can occur as a result of mixing different chemical products, which can damage the dosing device.
The dosing device and the dosing hoses must therefore be flushed with water before a new chemical product is used.
If this is not done, the Winterhalter Gastronom GmbH warranty and product liability will be void.
Ø Remove the suction tube from the canister and place it in a water-filled container.
Ø Rinse the dosing device with water via the “Priming” menu.
Item Description
1 Rinse aid dosing device
2 Detergent dosing device
3 Defoamer dosing device
48 | 89014547; Version 4 | Operating instructions PT Series
Page 49

Cleaning and maintenance | 8 | English
Ø Press button 1, 2 or 3.
ð The button turns white and the dosing device is activated.
ð The dosing hoses and the dosing device are rinsed out with water.
Ø As soon as the button goes off, insert the suction tube into the new canister.
Ø Press button 1, 2 or 3 again.
ð The button turns white and the dosing device is activated.
ð The water in the dosing hoses and dosing device is replaced by the new chemical product.
The dosing must also be reset.
Ø Use an authorised service technician to continue to attain good wash results.
8.6 Descaling the warewasher
If the warewasher is operated in a hard water area without a water treatment system, then the boiler, the machine interior
and all water-bearing lines and components may develop scale. Limescale deposits and the dirt and residual grease they
contain present a hygiene risk, while scaling can cause heating elements to fail. If limescale deposits form, the warewasher must be descaled.
The interior of the warewasher can be descaled using the descaling programme (} page 23). We recommend running the
descaling programme at the end of the working day only because the machine’s tank is emptied when the programme
starts and ends.
The descaling programme is used to descale the interior of the warewasher. We recommend running the descaling programme at the end of the working day only because the machine’s tank is emptied when the programme starts and ends.
Water-bearing lines and the boiler can only be descaled by an authorised service technician.
See also
2 Descale [}23]
8.7 Maintenance by the customer service department
We recommend that you have the warewasher serviced by an authorised service technician at least once a year so that
vulnerable components subject to ageing and wear can be checked and replaced as required. Original spare parts must
be used for repairs or to replace consumable parts.
Consumable parts include:
– Dosing tubes
– Supply hose
Service interval
The warewasher control unit specifies the number of operating hours or wash cycles at which the pictogram for service is shown.
Note:This function is deactivated ex-works. On request, the service technician can activate this
function.
Operating instructions PT Series | 89014547; Version 4 | 49
Page 50

English | 9 | Disassembly and disposal
9 Disassembly and disposal
9.1 Taking the warewasher out of operation for long production stops
If the warewasher is taken out of operation for long periods (company holidays, seasonal operation), carry out the following steps:
Ø Have the dosing devices rinsed with water by a service technician and allow them to dry. Observe the dosing device
information provided by third-party manufacturers.
Ø Use the self-cleaning programme to empty the warewasher.
Ø Clean the warewasher.
Ø Open the hood.
Ø Switch off the on-site water supply.
Ø Disconnect the warewasher from the electrical mains supply.
Ø Empty the water treatment unit (e.g. partial demineralisation cartridges).
If the warewasher is located in a room that is not free from frost, the warewasher must be frost-proofed by a service technician (e.g. boiler and water circuits emptied).
Ø Instruct an authorised service technician to secure the warewasher against frost.
9.2 Disassembly
WARNING
Risk of chemical burns due to chemicals
Chemicals can cause severe burns or serious eye damage if they come into contact with the skin or eyes.
Ø In the event of contact with the eyes or skin, wash thoroughly with tap water. If necessary, seek medical
attention.
Ø Wear protective clothing, protective gloves and protective goggles.
Ø Read and observe the danger and safety notes on the container and safety data sheet.
Ø Remove any wash items and racks from the warewasher.
Ø Flush the dosing device and hoses with fresh water to remove any chemical residues.
Ø Empty the warewasher completely.
Ø Disconnect the warewasher from the electrical mains supply.
Ø Disconnect the warewasher from the local water supply.
Ø Disassemble the table system.
Ø Disassemble the exhaust air system, if present.
Ø If necessary, have the warewasher frost-proofed by an authorised service technician.
9.3 Disposal
Incorrect or negligent disposal can cause considerable environmental pollution and/or damage. We recommend contacting a dealer, customer service department or qualified specialist company to recycle the product as far as possible and
reduce the amount of waste created.
Ø Dismantle the warewasher professionally (} page 50).
Ø Read and obey the disposal instructions for chemicals stipulated in the safety data sheets.
Ø Dispose of the product and all components in accordance with national regulations.
Ø Dispose of packaging material for recycling.
50 | 89014547; Version 4 | Operating instructions PT Series
Page 51
10 Annex
10.1 Declaration of Conformity
Annex | 10 | English
Operating instructions PT Series | 89014547; Version 4 | 51
Page 52

Page 53

Winterhalter Gastronom GmbH
Gewerbliche Spülsysteme
Winterhalter Gastronom GmbH
Commercial Dishwashing Systems
Winterhalterstr. 2-12
88074 Meckenbeuren
Deutschland
Tel. + 49 7542 402-0
www.winterhalter.de
[email protected]
89014547; 2025-02
Winterhalterstr. 2-12
88074 Meckenbeuren
Germany
Telephone: +49 (0) 7542 4 02-0
www.winterhalter.com
[email protected]
 Loading...