


Rack pass-through dishwasher PT Series
Operating Instructions

Operating Instructions
For Winterhalter PT Series rack pass-through dishwasher (translation of the original German operating instructions)
Table of contents |
|
|
1 |
About this manual-------------------------------- |
2 |
2 |
Safety notes ---------------------------------------- |
2 |
2.1 |
Proper use ------------------------------------------- |
2 |
2.2 |
Improper use ---------------------------------------- |
2 |
2.3 |
Electrical Safety ------------------------------------ |
3 |
2.4 |
Safety Instructions for Maintenance and |
|
|
Repairs ----------------------------------------------- |
3 |
2.5 |
General safety notes ------------------------------ |
3 |
3 |
Before working with the machine ----------- |
4 |
4 |
Product description------------------------------ |
4 |
4.1 |
Mode of operation---------------------------------- |
4 |
4.2 |
Special equipment --------------------------------- |
4 |
4.3 |
Overview --------------------------------------------- |
5 |
4.4 |
Display (Touchscreen) and start button ------ |
6 |
4.5 |
Standard washing programmes ---------------- |
7 |
5 |
Rinse aid and detergent ------------------------ |
8 |
5.1 |
Rinse aid --------------------------------------------- |
8 |
5.2 |
Detergent--------------------------------------------- |
8 |
5.3 |
Suction tube with level control ------------------ |
9 |
5.4 |
Changing the detergent product---------------- |
9 |
5.5 |
Priming the dosing devices --------------------- |
10 |
6 |
Integral water softener (special |
|
|
equipment)----------------------------------------- |
10 |
6.1 |
Lack of salt display-------------------------------- |
10 |
6.2 |
Filling regeneration salt -------------------------- |
10 |
7 |
Operation------------------------------------------- |
11 |
7.1 |
Before switching on the machine-------------- |
11 |
7.2 |
Switching on the machine and preparing it |
|
|
for operation ---------------------------------------- |
11 |
7.3 |
Washing --------------------------------------------- |
11 |
7.4 |
Switching off---------------------------------------- |
13 |
8 |
Servicing and maintenance ------------------ |
14 |
8.1 |
Daily cleaning -------------------------------------- |
14 |
8.2 |
Weekly cleaning ----------------------------------- |
15 |
8.3 |
Monthly cleaning ---------------------------------- |
16 |
8.4 |
Descaling-------------------------------------------- |
16 |
8.5 |
Maintenance by the Customer Service ------ |
16 |
9 |
Malfunctions -------------------------------------- |
17 |
9.1 |
Error code call ------------------------------------- |
19 |
9.2 |
Poor cleaning result ------------------------------ |
19 |
9.3 |
Increased generation of noise ----------------- |
19 |
10 |
Info Level 1 ---------------------------------------- |
20 |
11 |
Info Level 2 ---------------------------------------- |
22 |
12 |
PIN Menu ------------------------------------------- |
23 |
12.1 |
General settings ----------------------------------- |
23 |
12.2 |
Programming automatic switch on / switch |
|
|
off ----------------------------------------------------- |
25 |
12.3 |
Operating data ------------------------------------- |
26 |
12.4 |
Hygiene logbook----------------------------------- |
27 |
12.5 |
Descaling / basic cleaning ---------------------- |
28 |
12.6 |
Changing the amount of detergent / rinse aid30 |
|
12.7 |
Resetting the water back-flow counter ------- |
30 |
13 |
Integrated operating instructions ---------- |
31 |
14 |
Customer-specific modifications----------- |
31 |
15 |
Installing the machine and tables---------- |
31 |
15.1 |
Installing the machine ---------------------------- |
31 |
15.2 |
Attaching the tables------------------------------- |
31 |
15.3 |
Converting the rack guide----------------------- |
32 |
16 |
Water connection-------------------------------- |
33 |
16.1 |
Requirements for the on-site inlet water |
|
|
connection ------------------------------------------ |
33 |
16.2 |
Requirements for the on-site water stop cock33 |
|
16.3 |
Connecting the supply hose -------------------- |
33 |
16.4 |
Connecting the drain hose ---------------------- |
33 |
17 |
Electrical connection--------------------------- |
34 |
17.1 |
Connecting the mains cable -------------------- |
34 |
17.2 |
Establishing an earth connection-------------- |
34 |
17.3 |
Connection diagram ------------------------------ |
35 |
18 |
External dosing devices----------------------- |
36 |
18.1 |
Terminals-------------------------------------------- |
36 |
18.2 |
Electrical connection ----------------------------- |
37 |
18.3 |
Setting parameters-------------------------------- |
38 |
19 |
Taking the machine out of service for a |
|
|
long period ---------------------------------------- |
38 |
20 |
Putting the machine back into service |
|
|
after a long period of disuse----------------- |
38 |
21 |
Technical Information-------------------------- |
39 |
22 |
Emissions------------------------------------------ |
39 |
23 |
Disposal -------------------------------------------- |
39 |
1
About this manual
1 About this manual
This manual contains information and instructions for the safe operation and maintenance of your dishwasher.
Please note carefully the safety notes listed here.
The following symbols are used in these instructions:
Symbol Meaning
Warning against potential serious or fatal injuries to persons if the described precautionary
measures are not taken.
Danger
Warning against potential minor injuries to persons or potential material damage if the de-
scribed precautionary measures are not taken.
Warning
Warning against defects in or destruction of the product if the described precautionary
measures are not taken.
Caution
IMPORTANT Important information is given here.
INFO Useful information is given here.
This symbol indicates instructions.
This symbol indicates results of your actions.
This symbol indicates itemizations.
This symbol refers to a chapter with more detailed information.
2 Safety notes
2.1 Proper use
The PT Series dishwasher is a technical device for commercial use and is not intended for private use.
Use the dishwasher only for the washing of dishes such as plates, cups, cutlery and trays or for washing glasses of a gastronomic and related type.
2.2 Improper use
This device may be used by children from the age of 8 upwards as well as by those with reduced physical, sensory or mental capabilities or a lack of experience and knowledge if they are supervised or have been instructed on how to safely use the device and understand the risks associated with it.
Children must not play with the device.
Cleaning and user maintenance should not be carried by children without supervision.
Do not use the dishwasher to wash electrically heated devices or parts made of wood.
Do not wash without a wash rack.
Do not wash parts made of plastic if they are not heat and lye-resistant.
Use a suitable detergent to wash parts made of aluminium such as jars, containers or plates in order to prevent black stains.
Winterhalter Gastronom GmbH does not assume liability for any damage caused due to improper use of the device.
2

Safety notes
2.3 Electrical Safety
The electrical safety of this machine is guaranteed only if it is connected to a correctly installed protective circuit and a residual current circuit breaker. It is very important that this basic safety requirement is tested and in case of doubt the house installation is checked by a qualified electrician.
Winterhalter cannot be held responsible for damage caused by a missing or broken earthing system (e.g. electrical shock).
2.4 Safety Instructions for Maintenance and Repairs
Maintenance work and repairs may only be performed by service technicians authorised by Winterhalter. Improper maintenance or repairs may cause significant danger for the user, for which Winterhalter is not liable.
When performing maintenance and repair work, unplug machine from the power network. Electricity consumers (heating element, frequency inverter, ...) are under voltage until the on-site mains disconnect switch has been operated.
Only original Winterhalter spare parts may be used for maintenance and repairs. If original spare parts are not used, the warranty is invalidated.
A damaged or leaking machine can endanger your safety. In case of defects, switch off the machine immediately. Switch off the on-site mains disconnector (main switch). Only then is the machine without power.
Do not operate a damaged machine. In case of defects resulting from an unknown cause, switch off the machine, and do not switch it on until the defect has been rectified.
Contact your installer or electrician if the on-site water or electricity supply is the cause of the malfunction.
Notify an authorised service technician or your retailer if another fault has occurred.
If the mains cable of this machine is damaged, it must be replaced by the Winterhalter or its Customer Service or another qualified person in order to prevent hazards. The mains cable must be H07 RN-F type or equivalent.
2.5 General safety notes
Read through the safety notes and operating instructions in this manual carefully. Retain the operating instructions for future reference. Winterhalter Gastronom GmbH does not assume liability or warranty in case of non-adherence to these safety and operating instructions.
Do not make changes, additions or reconstructions in the dishwasher without the approval of the manufacturer.
Do not transport the warewasher with the ClimatePlus heat pump installed. The centre of gravity is situated on the right side and the warewasher could tip over.
Use the dishwasher only after you have read and understood the operating manual. Allow the Winterhalter Customer Service Department to provide information about the operation and functioning of the dish washer. Always operate the machine as described in these operating instructions.
Train the operating personnel as regards handling the machine and inform them about the safety notes. Repeat the training sessions at regular intervals to prevent accidents.
For your safety, test the local fault current circuit breaker (FI) regularly by pressing the test button.
Close the on-site water shut-off valve after the work is complete.
Switch off the local mains disconnector after the work is complete.
3

Before working with the machine
3 Before working with the machine
Have the machine set up by an authorised service technician or your dealer ( 15).
Have the machine connected as per the locally applicable standards and the regulations by authorised mechanics (water, waste water, electrical system) ( 16 and 17).
After connecting the water and the power properly, contact the relevant Winterhalter dealer or your dealer for the commissioning of the machine and for providing training in its operation. Get yourself and your operating personnel trained in the operation of the machine.
4 Product description
4.1 Mode of operation
The boiler and the tank fill and are warmed up to the operating temperature after the machine is switched on. During the heating phase, the lighting of the start button (3) changes gradually from red to green. When the target temperatures are reached, the machine is ready for use. The start button lights up green.
The machine is fully automatic with programmes consisting of three steps: Wash, Drain and Rinse. Whilst a washing programme is running, the start button gradually moves from blue to green.
4.2 Special equipment
The following special equipment is available:
Cool (only for glass washers)
Requirement: Connect the machine to the cold water. In this process, the rinse is effected with cold fresh water.
 The glasses are ready to use immediately after washing.
IMPORTANT The first rinses after activating this function will still be with hot or warm rinse water. INFO This function can be deactivated at any time.
effect
Requirement: Connection of the machine to water at a maximum 50 °C when the glasswasher is operated.
In this process, you wash with reduced tank and boiler temperatures.
 Sustainable improvement of the kitchen climate and reduction of operating costs.
IMPORTANT Washing at these temperatures requires Winterhalter detergents and rinse aids which are appropriate for this process.
INFO This function can be deactivated at any time.
EnergyPlus
Requirement: Connect the machine to the cold water.
In the construction above the machine there is a fan motor and a heat exchanger. The fan draws the moist, warm air (= vapours) out of the interior and transfers the generated energy to the cold inlet water via a heat exchanger. A waste water heat exchanger provides an additional energy gain.
 Sustainable improvement of the kitchen climate and reduction of operating costs.
ClimatePlus (PT-M and PT-L only)
Requirement: Connect the machine to the cold water.
In the construction above the machine there is a fan motor and a heat pump. The fan motor extracts the moist, warm air (= vapours) out of the interior and transfers the generated energy to the cold inlet water via a heat exchanger. A waste water heat exchanger provides an additional energy gain.
 Air-conditioning effect on the kitchens and reduction of operating costs.
Automatic hood opening
The hood opens automatically after each wash cycle.
Integral softener ( 6)
4

Product description
4.3 Overview
Pos. |
Description |
(1) |
Energy module (special equipment) or heat |
|
pump module (special equipment, no illus- |
|
tration) |
(2) |
Display (Touchscreen) |
(3) |
Start button |
(4) |
Machine hood (= hood) |
(5) |
Rack guide |
(6) |
Lower rotating wash field |
(7) |
Tank cover |
(8) |
Filter cylinder |
(9) |
Pump inlet filter |
(10) |
Wash field bearing |
Pos. |
Description |
(11) |
Bushings for cables and hoses |
(12) |
Water supply hose |
(13) |
Suction tube for rinse aid |
|
(blue cap and blue suction hose) |
(14) |
Suction tube for detergent |
|
(black cap and transparent suction hose) |
(15) |
Water drain hose |
(16) |
Hoses and cable for the suction tubes |
(17) |
Mains cable |
(18) |
Connection for local equipotential bonding |
|
system |
5

Product description
4.4 Display (Touchscreen) and start button
Activating the display
Touch the display with your finger.
The display turns on and then off again after a short time. This saves energy and prevents accidental switching on of the ma-
chine.
INFO
On the screen touch-sensitive buttons (keys) are displayed. Operate the screen with your fingers only, not with sharp objects. Each touch of a button is confirmed by a beep. Events such as the end of the programme or malfunctions are indicated by a sequence of tones.
INFO An authorised service technician can deactivate the beep and the sequence of tones.
Operational state
(a)On/Off key
(b)Self-cleaning programme
(c)Change to Info Level 1 Info Level 2 PIN Menu
(d)Start button
Start button
The coloured lighting of the start button (d) has the following meanings:
Colour |
Meaning |
not lit |
Machine is switched off |
red |
Machine is not yet ready for use |
green |
Machine is ready for use |
blue |
Machine is washing |
red and green |
Machine is filling and heating up |
green and blue |
Washing programme is running |
blue and not lit |
Self-cleaning programme is running |
flashing green |
Washing programme is ended; hood has not been opened yet |
flashing green-blue |
Only for the EnergyPlus und ClimatePlus models: |
|
Vapours being extracted. The washing programme has not completely finished. |
Menu levels
The machine electronic control unit is split into 3 levels:
Level for the dishwashing staff ( 4.5)
Info level 1 with additional washing programmes and information ( 10)
Info level 2 with access to the PIN Menu ( 11)
6

Product description
4.5 Standard washing programmes
The washing programme display depends on which application the machine has been programmed for. If necessary, the machine can also be reprogrammed later.
Programme 2 is already pre-selected when the machine is ready. Another washing programme is selected by tapping. The selected programme is represented by a button with a white background.
Application of the |
|
Programme 1 for |
Programme 2 for |
Programme 3 for |
machine |
|
|||
|
|
|
|
|
|
|
|
|
|
Dishwasher |
|
slightly dirty dish- |
medium dirty |
heavily dirty dish- |
|
es |
dishes |
es |
|
|
|
|||
|
|
|
|
|
Glasswasher |
|
delicate glasses |
less delicate |
robust glasses |
|
glasses |
|||
|
|
|
|
|
|
|
|
|
|
Bistro dishwasher |
|
glass |
glasses and cups |
plates |
|
|
|
|
|
Bistro and cutlery |
|
glass |
cutlery |
plates |
washer |
|
|||
|
|
|
|
|
|
|
|
|
|
Cutlery washer |
|
|
cutlery |
|
|
|
|
|
|
INFO The indicator on your dishwasher may vary since the authorised service technician can display appropriate images for your machine from a collection of images. At your request, the service technician can also hide programmes.
7

Rinse aid and detergent
5 Rinse aid and detergent
When handling chemicals, observe the safety precautions and the dosage recommendations on the packaging.
Danger Wear protective clothing, protective gloves and protective goggles when handling chemicals.
Use only products that are suitable for commercial dishwashers. Such products are appropriately marked. We recommend Winterhalter products. These are especially adapted to
Caution |
Winterhalter dishwashers. |
Do not put rinse aids in the storage container for detergents and vice versa. |
5.1 Rinse aid
A rinse aid is necessary to ensure that water on the dishes drains off after washing and dries off after a short while. Rinse aid is automatically dosed from an external container. The rinse aid dosing device is an integral component of the machine. The dosing amount is set by the authorised service technician when commissioning the machine ( 12.6).
5.2Detergent
Do not use acidic detergents.
Do not mix different detergent products in order to prevent crystallisation that could destroy
|
the detergent dosing device ( 5.4) |
|
Caution |
||
Do not use products that can create foam, e.g. hand soap, soft soap, hand wash liquid. En- |
||
|
||
|
sure that these do not enter the machine even during the pre-treatment of the dishes. |
A detergent is necessary to ensure that the leftovers and dirt on the dishes is cleaned. Detergents can be dosed as follows:
Manually as detergent powder.
Automatically from an external container using a detergent dosing device.
INFO The detergent dosing device is not included in the scope of delivery of all machines. When using an external dosing device, a transfer strip is available for connecting the dosing device ( 18).
5.2.1 Manual dosing of detergent powder Pre-dosing
Switch on the machine and wait until the start button is lit green.
Adhere to the dosing instructions on the packaging of the detergent. The machine's tank capacity is approx. 35 litres.
Place approx. 100 g of detergent powder in the machine. This corresponds to a dosing of approx. 3 g/l.
Then start the wash cycle immediately to mix the detergent powder with the water.
Post-dosing
At each wash cycle approx. 2.0-2.5 litres of fresh water enter the dishwasher, which must be mixed with detergent powder.
Fill approx. 30 - 40 g detergent powder into the machine after 5 wash cycles.
5.2.2Automatic dosing of liquid detergent
The dosing amount is set by the authorised service technician when commissioning the machine ( 12.6).
8
Rinse aid and detergent
5.3Suction tube with level control
Only use the suction tube with sufficiently stable containers. Narrow and tall containers can tip if the suction tube is pulled.
|
|
Do not place the suction tube for the rinse aid in the detergent container or vice versa. |
Caution |
||
|
|
Do not pull unnecessarily on the suction hose or main power cable, as this may lead to a |
|
|
defect. |
As an option, with your machine you may have one or more suction tubes. The suction tube is already connected to the machine.
Figure 1:
Suction tube for detergent
Transparent suction hose
Black cap
Figure 2:
Suction tube for rinse aid
Blue suction hose
Blue cap
Figure 1 |
Figure 2 |
Servicing and maintenance
Rinse the suction tube at every container change under running water. Remove crystallised detergent residue.
Ensure that both vent holes (a) in the caps are open.
Put the suction tube back into the container. Slide the cap downwards until the container opening is closed.
5.4Changing the detergent product
Mixing different detergents can lead to efflorescence that can lead to a failure of the detergent dosing device. This is applicable even if the new detergent is from the same manufac-
|
turer. |
|
Caution |
||
The dosing tubes and the detergent dosing device must be thoroughly rinsed with water |
||
|
||
|
before the new detergent is used. |
A new detergent product usually requires a new setting of the detergent dosing device. Assign the required work to an authorised service technician to attain good cleaning results.
If this is not done, the warranty and product liability of Winterhalter Gastronom GmbH expires.
9
Integral water softener (special equipment)
Procedure:
Observe the safety precautions when handling chemicals and the dosage recommendations on the packaging.
Danger |
|
Wear protective clothing, protective gloves and protective goggles when handling chemicals. |
|
|
Do not mix different detergents. |
Remove the suction tube from the container and place it in a water-filled container.
Rinse the dosing tube and the detergent dosing device with water. To do this, use the "prime dosing device" function several times ( 10). The frequency depends on the length of the dosing tubes.
Place the suction tube in the new detergent container.
Use the "prime dosing device" function several times ( 10), to replace the water in the dosing tubes with detergent.
5.5 Priming the dosing devices
Dosing devices must be primed when air is reached in the dosing tubes because the containers were not exchanged or refilled in time ( 10).
6 Integral water softener (special equipment)
By softening the inlet water, limescale build-up in the machine and on the dishes is avoided. For the integral water softener to work correctly, the salt container must be filled with regeneration salt.
INFO At the commissioning of the machine the authorised service technician measures the water hardness and saves it in the machine's electronic control unit.
6.1 Lack of salt display
A pictogram appears on the screen when an empty salt container requires refilling. The display disappears after filling the salt container, as soon as approx. 3 wash cycles have been completed and part of the salt has been dissolved.
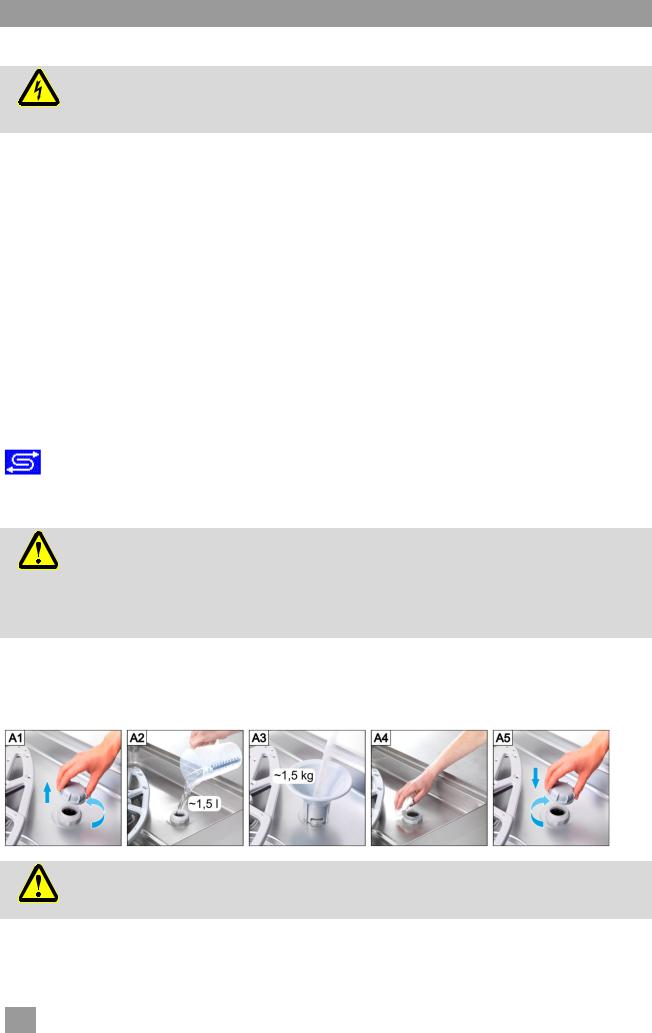
6.2 Filling regeneration salt
|
Possible risk of damage to the water softener |
|
Chemicals such as detergent and rinse aid inevitably lead to damage to the water softener. Fill |
Caution |
only with regeneration salt or pure evaporated salt. |
|
Possible malfunction of the water softener
Do not fill with other salts (e.g table salt cleaning or de-icing salt). These can contain waterinsoluble components. Fill only with fine-grained salt (max. 0.4 - 7 mm grain size).
INFO Because of their size, salt tablets are not suitable.
Proceed in accordance with Figures A1 to A5. IMPORTANT Figure A2 is only relevant for the first filling.
Risk of rust formation in the filling area
Immediately after filling, start a wash cycle to rinse off any salt residue.
Caution
10

Operation
7 Operation
7.1 Before switching on the machine
|
Possible risk of damage due to suction of items from within the machine e.g. pieces of |
|
|
cutlery |
|
Caution |
The pump inlet filter protects the circulating pump and the drain pump. Operate the machine |
|
only with the pump inlet filter fitted. |
||
|
Open the water shut-off valve.
Switch on the local mains disconnector.
For your own safety, test the on-site residual-current circuit breaker (FI).
Open the hood.
Remove the filter cylinder (1).
Check whether the pump inlet filter (2) is fitted. If it is not fitted there will be an error message when the machine is switched on.
Insert the filter cylinder (1).
Check whether the rotating wash fields (top and bottom) are fitted and properly engaged.
Close the hood.
Check whether sufficient detergent and rinse aid are present in the storage containers. Replace the storage containers in time so that the cleaning results are not affected.
7.2Switching on the machine and preparing it for operation
7.3 Washing
Possible risk of scalding from hot wash water
|
|
Keep children away from the dishwasher. The wash water is at a temperature of approx. |
|
|
|
62 °C. |
|
Caution |
|
||
Do not open the hood while the machine is washing. There is a risk of the hot wash water |
|||
|
|||
|
|
spilling out. Stop the washing programme before doing so ( 7.3.7). |
Possible risk of injury
Do not place any objects on the hood.
Arrange sharp, pointed utensils so that they do not cause injury.
Possible failure of the washing programme due to heavy dirt ingress
Pre-rinse all dishes and pans with cold water. Remove food residues.
11

Operation
7.3.1 Arranging the dishes in the washing rack Dishes and cutlery
Place plates with their upper surface facing forwards.
Place cups, bowls and pots rim down.
Wash cutlery either standing in the cutlery holder or lying in a shallow basket. Make sure that they are not too close together. Soak cutlery, before you wash it.
Position knives and other sharp objects in the cutlery holder with the handle up in order to prevent injuries.
Glasses
Pour out drink residue (not in the machine).
Remove scraps of paper.
Rinse off ash with water.
Place glasses rim down.
Space the glasses, so they do not rub against each other. This will avoid scratches.
For tall glasses choose a basket with appropriate divisions so that the glasses are held in a stable position.
7.3.2 Using automatic hood start
Choose a washing programme ( 4.5).
INFO The washing programme remains selected until a different washing programme is chosen. Slide the washing rack into the machine.
Check that the top and bottom rotating wash fields are free to turn. Close the hood.
The washing programme is started.
7.3.3 Interrupting automatic hood start
Do not close the hood completely, but only as far as the lower detent position.
INFO The automatic hood start can be deactivated by an authorised service technician (P516). Every washing programme must then be started by pressing the start button.
7.3.4Changing washing programme
Choose a different washing programme by tapping the button ( 4.5).
The background of the button (4) becomes white.
Close the hood.
The washing programme is started.
7.3.5Intensive programme
If the stains are particularly dried in, the washing programme can be intensified
Close the hood and press the start button twice in short succession ("double click").
In the info field, the "Brush" icon flashes.
INFO The intensive programme only affects the current washing programme and is then automatically deactivated again.
7.3.6End of the programme
The start button flashes green, as soon as the washing programme has ended and the hood remains unopened.
Only for the EnergyPlus und ClimatePlus models:
At first, the start button flashes blue-green. At the same time, the warm-humid vapour is extracted from the washing compartment, and the heat energy stored in it is recovered for the next wash cycle. If possible, do not open the hood yet at this time.
The start button flashes green as soon as the warm air is extracted.
12
 Loading...