

Page 1

AUTOMATIC RICE COOKER
USE AND CARE BOOK
HOUSEHOLD USE ONLY
Pages 1-5
OLLA AUTOMATICA
PARA COCINAR ARROZ
MANUAL DE USO Y MANTENIMIENTO
PARA USO DOMESTICO SOLAMENTE
Páginas 6-10
Page 2
1
IMPORTANT SAFETY
INSTRUCTIONS
When using electrical appliances, especially when children are present, basic safety
precautions should always be followed to reduce the risk of fire, electric shock, and/or
injury to persons, including the following:
1. READ ALL INSTRUCTIONS.
2. Do not touch hot surfaces. Use potholders when removing cover or handling
hot containers.
3. To protect against electrical shock, do not immerse cord, plug or base unit in water
or other liquid.
4. Close supervision is necessary when any appliance is used by or near children.
5. Unplug from outlet when not in use. Allow to cool before cleaning.
6. Do not operate appliance with a damaged cord or plug, or after the appliance
malfunctions or has been damaged in any manner. Return appliance to an
authorized service facility for examination, repair or adjustment.
7. The use of accessory attachments not recommended by this appliance
manufacturer may cause injury.
8. Do not use outdoors.
9. Do not let cord hang over edge of table or counter, or touch hot surfaces.
10. Do not place on or near a hot gas or electric burner, or in a heated oven.
11. Extreme caution must be used when moving an appliance containing hot food,
water or other hot liquids.
12. Do not use appliance for other than intended use.
13. Lift and open cover carefully to avoid scalding, and allow water to drip into unit.
14. Do not store any materials other than the manufacturer’s recommended accessories
in this unit when not in use.
SAVE THESE INSTRUCTIONS
2
This appliance is for HOUSEHOLD USE ONLY. It may be plugged into any AC electrical
outlet (ordinary household current). Do not use any other electrical outlet.
NOTE:
This appliance has a polarized plug (one blade is wider than the other). As a safety
feature, this plug fits in a polarized outlet only one way. If the plug does not fit into the
outlet, reverse the plug and try again. If it still does not fit, contact a qualified electrician.
Do not attempt to defeat this safety feature.
A short power-supply cord is provided to reduce the hazards resulting from entanglement
or tripping over a longer cord. An extension cord may be used with care; however, its
marked electrical rating should be at least as great as the electrical rating of this
appliance. The extension cord should not drape over the counter or tabletop, where it
can be pulled on by children or tripped over.
LINE CORD SAFETY TIPS
1. Never pull or yank on cord or the appliance.
2. To insert plug, grasp it firmly and guide it into outlet.
3. To disconnect appliance, grasp plug and remove it from outlet.
OPERATING INSTRUCTIONS
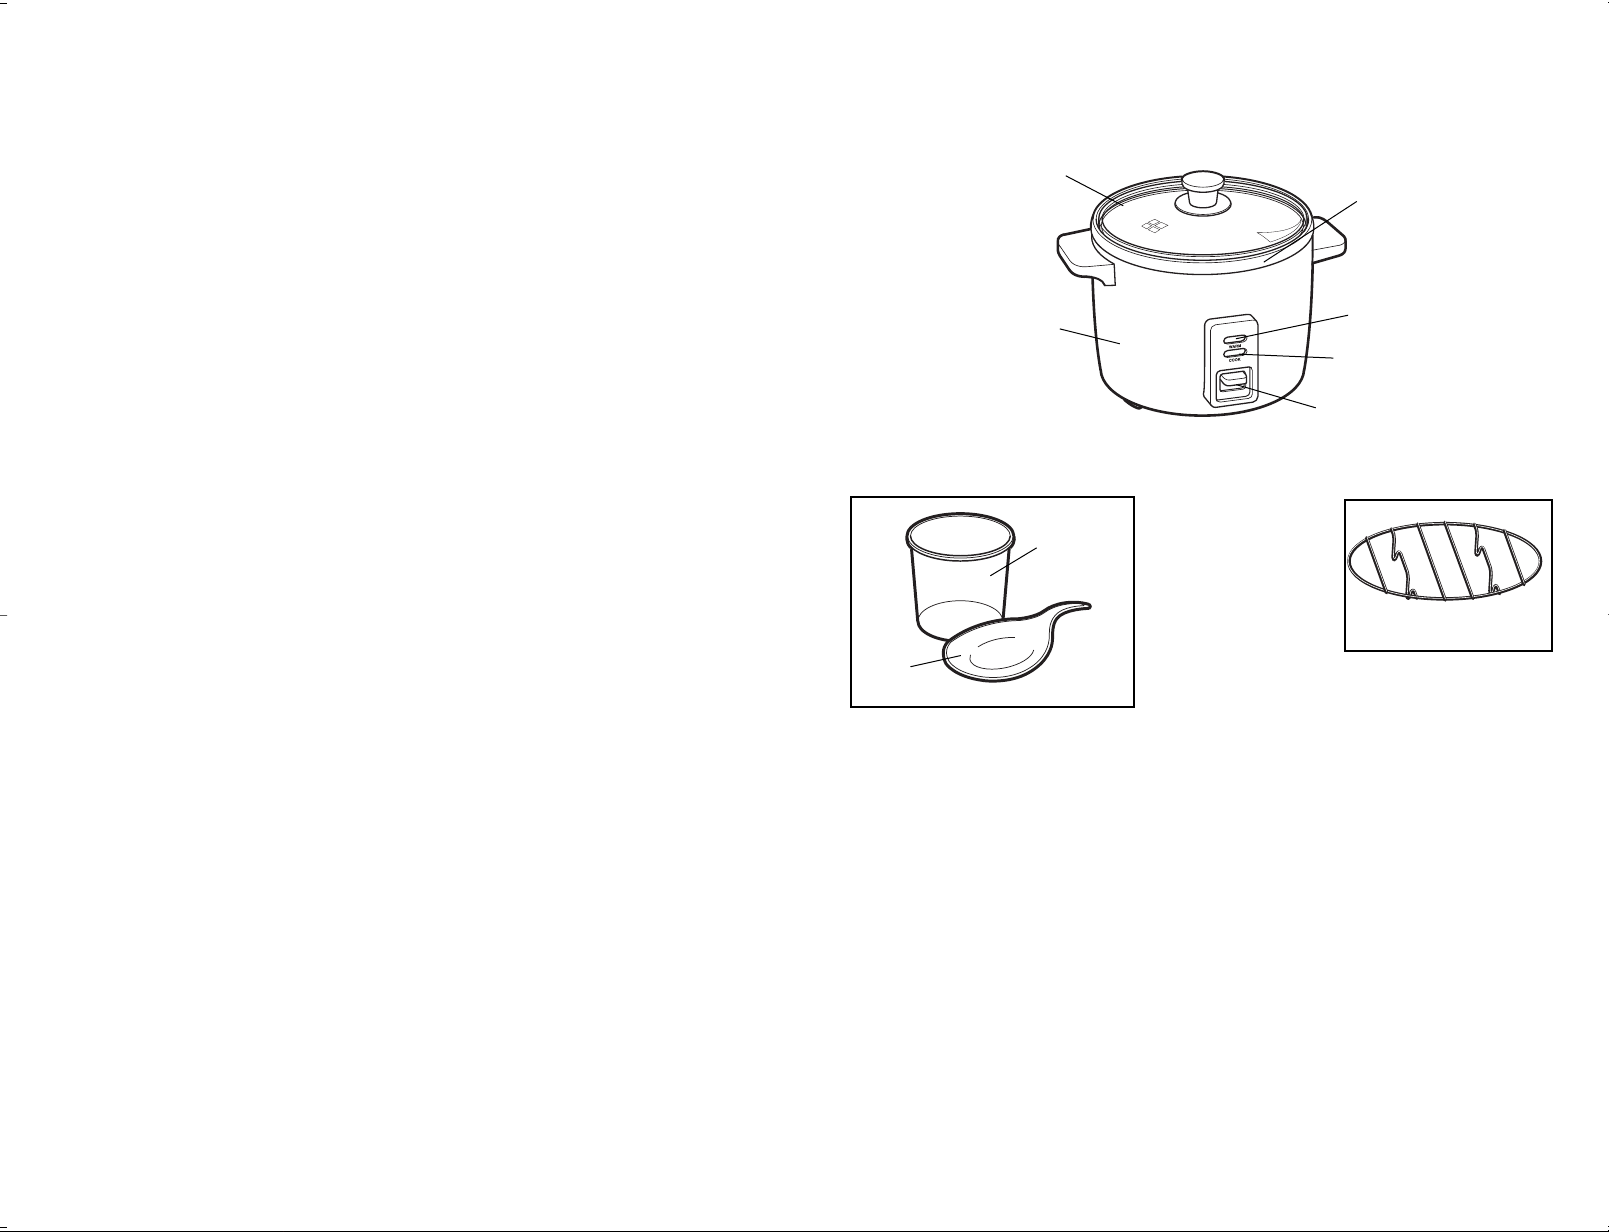
PRODUCT MAY VARY SLIGHTLY FROM ILLUSTRATIONS
Inner Pot
Cover
Outer Pot (Base)
Warm Light
Cook Light
Measuring
Cup
Cook Lever
Ladle
Steaming Rack
Page 3

3
4. Before each use, inspect the line cord for cuts and/or abrasion marks. If any are
found, this indicates that the appliance should be serviced and the line cord
replaced. Please return it to our Service Department or to an authorized service
representative.
5. Never wrap the cord tightly around the appliance, as this could place undue
stress on the cord where it enters the appliance and cause it to fray and break.
DO NOT OPERATE APPLIANCE IF THE LINE CORD SHOWS ANY DAMAGE, OR IF
APPLIANCE WORKS INTERMITTENTLY OR STOPS WORKING ENTIRELY.
IMPORTANT INFORMATION
BEFORE USING
• Read all instructions.
• Wash inner pot, steaming rack, cover, measuring cup and ladle in warm, soapy water.
Rinse and dry thoroughly.
• Never immerse outer pot in water.
• Never place liquid in the outer pot; place it only in the inner pot.
• Never try to force cook lever to stay in the “Cook” position after it has shifted
automatically to the “Warm” position.
• Always place inner pot inside outer pot before plugging in the rice cooker.
• When plugging in the cooker, always be sure inner pot contains liquid, or be ready to
add oil, butter or margarine immediately to the inner pot.
• Save these instructions and refer to them often.
NOTE: Always wipe down the outer surface of the inner pot before placing it inside the
cooker. Any moisture remaining on inner pot surface may cause a crackling noise while
the unit is heating up. Except for actual cooking area, keep all surfaces dry to prevent
damage to the inner workings of the appliance while it is in operation.
TO USE
1. Place inner pot inside outer pot. Rotate inner pot slightly to make sure that it is well
seated on the heating plated.
2. Measure desired amounts of rice and water into inner pot: Use only clean water in
water reservoir.
(a) If measuring cup provided is used, 1 cup of uncooked rice will yield approximately
2-3 cups of cooked rice. Remember that this measuring cup when filled holds
slightly more than half of the amount held by a standard U. S. 1-cup
measure.
For softer rice, increase by 1-2 tablespoons the amount of water mixed with
rice cover.
(b) If package directions are followed, using a standard measuring cup to measure
rice and water may be preferred.
3. Plug unit into a standard 120-volt outlet. The WARM light will immediately go on.
4. To begin cooking rice, push down on the cook lever located on front of unit.
The WARM light will go off, and the COOK light will immediately come on to indicate
that rice is beginning to heat.
NOTE: Cook lever will not work unless inner pot is in place and filled with water and rice.
If inner pot is removed for any reason, the unit will automatically stop heating, the COOK
light will go off, and the WARM light will go on again to indicate that unit is still plugged
in. Do not remove cover while rice is cooking.
5. When rice has finished cooking, cooker will automatically switch off, COOK light will
go out and WARM light will go on again. Cooking time will take approximately 25-30
minutes for long-grain white rice and approximately 35-40 minutes for brown rice,
which takes longer to cook.
4
6. After steaming, rice may be seasoned to taste with salt, pepper, butter, etc.
7. Rice will be ready to serve immediately, but if preferred, rice may be allowed to
stand in cooker on WARM for 10 to 15 minutes before cover is removed and
rice is served.
USING THE VEGETABLE STEAMING RACK
1. Prepare vegetables. (See VEGETABLE STEAMING GUIDE.)
2. Place inner pot of rice cooker inside outer pot, and set steaming rack on bottom of
inner pot.
3. Add water to inner pot, making sure that it does not cover steaming rack.
4. Arrange vegetables on steaming rack. (If steaming vegetables such as green beans
or mushrooms, take care to arrange them so that they do not fall through rack into
the water.)
5. Cover and plug in unit.
6. Push down on COOK lever. COOK light will go on and vegetables will begin to steam.
Steaming times will vary greatly, depending on vegetable type, quantity and quality, as
well as personal preferences. As a rule of thumb, however, bear in mind that items like
bean sprouts or pea pods, or vegetables that are served sliced or shredded such as
mushrooms, carrots or shredded cabbage, will take the shortest amount of time (less
than 10 minutes, and usually less than 5). Vegetables of greater size and density, such
as asparagus, broccoli and cauliflower will take longer (up to 15-16 minutes, and in the
case of potatoes, 20 minutes or more).
7. Test occasionally to see if desired doneness has been reached.
8. When vegetables are done, unplug unit. Remove cover and using tongs, place
vegetables in serving dish. Serve immediately.
NOTE: When lifting cover during steaming process, be sure to hold it so that hot steam is
directed away from face, hands and body.
IF UNIT COMES WITH STEAMING TRAY:
Steaming tray may be used to cook a variety of vegetables. Before using, make sure
unit is unplugged. To use:
1. Fill inner pot of rice cooker with water (approximately 1-2 cups, using measuring cup
provided). Do not overfill. Place inside outer pot.
2. Place vegetables to be cooked in center of steaming tray. Try as much as possible
not to block steam vents.
3. Place steaming tray inside inner pot. Lip on steaming tray will fit easily on rim of pot.
Cover. Do not operate without cover in place.
4. Plug in unit. The WARM light will immediately go on. Begin cooking by pushing down
on the cook lever located on front of unit. The WARM light will go off, and the COOK
light will go on.
NOTE: Cook lever will not work unless inner pot is in place and filled with water.
If steaming tray is removed for any reason, water in inner pot will still continue to heat.
However, if inner pot and steaming tray are BOTH removed, the unit will automatically
stop heating, the COOK light will go off, and the WARM light will go on again to indicate
that unit is still plugged in.
As vegetables heat, check from time to time to see if they have achieved desired level of
doneness. NOTE: When checking vegetables while they are cooking, be sure to tilt lid so
that steam released flows away from hands, face and body. Steaming times will vary
greatly, depending on type, quantity and quality of vegetables being cooked.
5. When vegetables have finished cooking, turn unit off by pushing upward on switch on
front of unit. Unplug unit.
6. Remove cover, once again avoiding contact with steam. Using a pair of tongs, lift
vegetables from tray and place them in serving dish. Serve immediately.
Page 4

5
VEGETABLE STEAMING GUIDE
1. Clean vegetables thoroughly. Cut off stems, peel or chop, if necessary. Smaller pieces
steam faster than larger ones.
2. Quantity, quality, freshness and size/uniformity may affect steam timing. Adjust water
amounts and cooking time as desired.
3. Frozen vegetables should be steamed without thawing, in order to lock in flavor
and nutrients.
4. Frozen vegetables should be separated or stirred after 10-12 minutes.
MAINTENANCE INSTRUCTIONS
This appliance requires little maintenance. It contains no user serviceable parts. Never
open or remove bottom cover of unit. Do not try to repair appliance yourself. Refer it to
qualified personnel if servicing is needed.
UNPLUG CORD FROM OUTLET. BEFORE WASHING, ALLOW RICE COOKER TO COOL.
Never immerse outer pot in water.
TO CLEAN:
TO CLEAN INNER POT, STEAMING RACK, COVER, MEASURING CUP AND LADLE:
• Wash in hot, soapy water; rinse and dry all parts, OR wash on top rack of dishwasher.
• Do not use abrasive cleaners.
TO STORE: Unplug unit; store in its box in a clean, dry place. Never store it while it is hot
or still plugged in. Make sure to clean before storing. Never wrap cord tightly around
the appliance. Do not put any stress on the cord where it enters the unit, as it could
cause the cord to fray and break.
ONE YEAR LIMITED WARRANTY
Within one year of purchase, we will replace this appliance free if defective in
material or workmanship. For replacement, return appliance with evidence of
purchase. This warranty is voided if appliance has been dropped, abused,
altered, misused or tampered with in any way.
SAVE THIS FOR YOUR RECORDS
INSTRUCCIONES IMPORTANTES
DE SEGURIDAD
Cuando esté usando aparatos electrodomésticos, especialmente en presencia de niños,
debe seguir siempre medidas básicas de seguridad, para reducir el riesgo de incendio,
choques eléctricos y/o lesiones personales, incluyendo las siguientes:
1. LEA TODAS LAS INSTRUCCIONES.
2. No toque las superficies que están calientes. Use agarraderas cuando retire la tapa
o esté en contacto con envases calientes.
3. Para protegerse contra descargas eléctricas, no sumerja el cordón, enchufe o base
de la unidad en agua u otro líquido.
4. Atenta supervisión es necesaria cuando cualquier artefacto está siendo usado por
o cerca de niños.
5. Desenchufe la unidad cuando no la esté usando. Deje que se enfríe antes de
limpiarla.
6. Nunca use este artefacto con el cordón o enchufe dañado, después de un mal
funcionamiento o esté dañado de cualquier manera. Lleve el artefacto a la
instalación de servicio más cercana para que sea examinado, reparado o para
un ajuste.
7. El uso de accesorios no recomendados por el fabricante de este artefacto puede
ser peligroso.
8. No lo use al aire libre.
9. No deje el cordón colgando de la mesa o del mostrador o que toque
superficies calientes.
10. No lo coloque en o cerca de una hornilla de gas o eléctrica o en un horno caliente.
11. Se debe tener mucho cuidado cuando mueva un artefacto conteniendo alimentos
calientes, agua u otros líquidos calientes.
12. No use este artefacto para otros fines que no sean los especificados.
13. Levante y abra la tapa con mucho cuidado para evitar quemaduras y deje que
el agua gotee en la unidad.
14. No guarde ningún material en esta unidad cuando no la esté usando que no sean
accesorios recomendados por el fabricante.
GUARDE ESTAS INSTRUCCIONES
6
Page 5

7
Este aparato es para USO DOMESTICO SOLAMENTE y puede ser enchufado en
cualquier tomacorriente de corriente alterna (corriente ordinaria doméstica). No use ningún
otro tomacorriente.
NOTA: Este aparato tiene un enchufe polarizado (una hoja es más ancha que la otra).
Como medida de precaución, este enchufe debe ser usado en un toma corriente
polarizado en un solo sentido. Si el enchufe no entrara en el tomacorriente, inviértalo.
Si aún así no entrara, busque la ayuda de un electricista calificado. No intente anular este
sistema de seguridad.
Un cordón corto le es provisto para reducir el peligro resultante del enredo o tropiezos que
causa uno más largo. Una extensión puede ser usada con cuidado; sin embargo, la
graduación eléctrica que marca debe ser por lo menos de la misma graduación del
artefacto. La extensión no debe colgar del mostrador o de la mesa, donde se pueda
tropezar con ella o quede al alcance de los niños.
SUGERENCIAS PARA SEGURIDAD CON EL CORDON
1. Nunca hale o tire del cordón o del artefacto.
2. Para introducir el enchufe, sujételo firmemente y guíelo hacia el tomacorriente.
3. Para desconectar el artefacto, sujete el enchufe y retírelo del tomacorriente.
4. Antes de cada uso, inspeccione el cordón si tiene cortes y/o raspaduras. Si algo
fuera encontrado, esto indica que el artefacto deberá ser revisado y el cordón
deberá ser reemplazado. Por favor, devuélvalo a nuestro Departamento de
Servicio o a un representante de servicio autorizado.
INSTRUCCIONES DE FUNCIONAMIENTO
ESTE PRODUCTO PUEDE VARIAR LIGERAMENTE DE LAS ILUSTRACIONES
Olla interior
Tapa
Olla exterior (base)
Luz de mantener caliente
Luz de cocinar
Taza para
medir
Palanca para cocinar
Paleta
Parrilla para cocinar
al vapor
8
5. Nunca enrolle el cordón ajustadamente alrededor del artefacto, ya que esto
podría causar una presión excesiva en el cordón donde éste entra al artefacto
y causar desgaste y rotura.
NO HAGA FUNCIONAR EL ARTEFACTO SI EL CORDON MUESTRA CUALQUIER
DAÑO, O SI EL ARTEFACTO FUNCIONA INTERMITENTEMENTE O DEJA DE
FUNCIONAR COMPLETAMENTE.
INFORMACION IMPORTANTE
ANTES DE USAR
• Lea todas las instrucciones.
• Lave la olla interior, parrilla para cocinar al vapor, tapa, taza para medir y paleta en
agua tibia jabonosa. Enjuague y seque completamente.
• Nunca sumerja la olla exterior en el agua.
• Nunca ponga líquido en la olla exterior; póngalo en la olla interior.
• Nunca trate de forzar la palanca para cocinar para que permanezca en la posición
“Cook” (Cocinar) después que ésta ha pasado automáticamente a la posición “Warm”
(Caliente).
• Coloque siempre la olla interior dentro de la exterior antes de enchufar la olla para
cocinar el arroz.
• Cuando enchufe la olla para cocinar el arroz, asegúrese que la olla interior contenga
líquido o esté lista para añadirle inmediatamente el aceite, margarina o mantequilla.
• Guarde estas instrucciones y remítase a ellas a menudo.
NOTA:Siempre limpie la superficie de la parte de abajo de la olla interior antes de
colocarla dentro de la olla de arroz. Cualquier vestigio de humedad que haya en la
superficie de la olla interior puede producir un ruido como crujido mientras la unidad se
está calentando. Excepto para el área actual donde cocina, mantenga todas las
superficies secas para prevenir que se dañe el funcionamiento interior mientras el artefacto
está funcionando.
PARA USAR
1. Coloque la olla interior dentro de la olla exterior. Rote la olla interior ligeramente para
asegurarse que esté bien asentada en la plancha de calentamiento.
2. Mida la cantidad deseada de arroz y agua en la olla interior: Use solamente agua limpia
en el depósito para el agua.
(a) Si se usa la taza para medir provista, 1 taza de arroz crudo le rendirá 3 tazas de
arroz cocinado. Recuerde que esta taza para medir cuando está llena contiene
un poquito más de la mitad de la cantidad contenida en la medida de una
taza estándar de los EE.UU. Para un arroz más suave, aumente de 1 a 2 tazas
de la cantidad de agua mezclada con el arroz. Tápela.
(b) Si se siguen los pasos del paquete, sería preferible usar una taza estándar para
medir el arroz y el agua.
3. Enchufe la unidad en un tomacorriente de 120 voltios. La luz de mantener caliente
(Warm light) se iluminará.
4. Para comenzar a cocinar el arroz, presione la palanca para cocinar que está en el
frente de la unidad. La luz de mantener caliente (Warm light) se apagará y la luz de
cocinar (Cook light) se iluminará inmediatamente para indicar que el arroz está
comenzando a calentarse.
NOTA:El interruptor no funcionará a menos que la olla interior esté en su lugar y llena con
agua y arroz. Si la olla interior es removida por cualquier razón, la unidad automáticamente
dejará de calentar, la luz de cocinar (Cook light) se apagará y la luz de mantener caliente
(Warm light) se encenderá nuevamente para indicar que la unidad está todavía enchufada.
No retire la tapa mientras el arroz se esté cocinando.
Page 6

9
5. Cuando el arroz ya esté cocinado, la arrocera automáticamente se apagará, la luz de
cocinar (Cook light) se apagará y la luz de mantener caliente (Warm light)) se iluminará
nuevamente. El tiempo de cocción tomará aproximadamente de 25 a 30 minutos con
arroz blanco y aproximadamente de 35 a 40 minutos el arroz oscuro, el cual toma más
tiempo para cocinarse.
6. Después que esté cocinado, el arroz puede ser sazonado con sal al gusto, pimienta,
mantequilla, etc.
7. El arroz estará listo para ser servido inmediatamente, pero si prefiere, el arroz puede
dejarlo reposar en Warm (Caliente) de 10 a 15 minutos antes de retirar la tapa
y servir el arroz.
COMO USAR LA PARRILLA AL VAPOR PARA
LOS VEGETALES
1. Prepare los vegetales (Vea GUIA PARA EL COCIMIENTO DE VEGETALES).
2. Coloque la olla interior dentro de la exterior y coloque la parrilla para cocinar al vapor
dentro de la olla interior.
3. Añada agua a la olla interior , asegurándose que no cubra la parrilla.
4. Acomode los vegetales en la parrilla. (Si está cocinando vegetales tales como
arverjitas o champiñones, tenga cuidado en colocarlos de tal manera que no se
caigan al agua a través de la parrilla.)
5. Tápela y enchufe la unidad.
6. Presione hacia abajo la palanca "Cook" (Cocinar). La luz de cocinar se iluminará y los
vegetales comenzarán a cocinarse. El tiempo de cocción varía grandemente,
dependiendo del tipo de vegetal, cantidad y calidad, también como los gustos
personales. Como regla general, sin embargo, tenga en cuenta que productos como
el frijol chino o guisantes, o vegetales que son servidos en rodajas o rallados tales
como los champiñones, zanahorias o col en tiras, le tomará mucho menos tiempo
(menos de 10 minutos y usualmente menos de 5). Vegetales de gran tamaño
y densidad, como los espárragos, brocoli y coliflor le tomarán más tiempo (de 15 - 16
minutos y en el caso de las papas, 20 minutos o más).
7. Pruebe ocasionalmente para ver si ha alcanzado el cocimiento deseado.
8. Cuando los vegetales estén listos, desenchufe la unidad. Retire la tapa y usando las
tenazas, coloque los vegetales en el plato. Sirva inmediatamente.
NOTA:Cuando levante la tapa durante el proceso de cocción, asegúrese de sostenerla de
tal manera que el vapor caliente esté dirigido lejos de la cara, manos y cuerpo.
SI LA UNIDAD VIENE CON CANASTA PARA COCINAR AL VAPOR:
La canasta para cocinar al vapor puede ser usada para cocinar una variedad de vegetales.
Antes de usarla, asegúrese que la unidad esté desenchufada.
Como usarse:
1. Llene la olla interior de la arrocera con agua (aproximadamente 1 a 2 tazas, usando la
taza para medir provista). No la llene mucho. Colóquela dentro de la olla externa.
2. Coloque los vegetales que van a ser cocinados en el centro de la parrilla. Trate lo más
posible de no bloquear los salideros de vapor.
3. Coloque la parrilla dentro de la olla interior. El borde la parrilla encajará fácilmente con
el de la olla. Tápela. No la haga funcionar sin la tapa en su lugar.
4. Enchufe la unidad. La luz de mantener caliente (Warm light) se iluminará
inmediatamente. Comience a cocinar cuando presione hacia abajo la palanca para
cocinar que se encuentra en el frente de la unidad. La luz de mantener caliente (Warm
light) se apagará y la luz de cocinar (Cook light) se iluminará.
NOTA : La palanca para cocinar no funcionará hasta que la olla interior esté en su lugar y
llena con agua. Si la canasta para cocinar al vapor es removida por cualquier razón, el
agua de la olla interior continuará calentándose. Sin embargo, si la olla interior y la parrilla
10
fueran ambas removidas la unidad automáticamente dejará de calentar, la luz de cocinar
se apagará y la luz de mantener caliente se iluminará nuevamente para indicar que la
unidad está todavía enchufada.
Conforme vayan calentándose los vegetales observelos de rato en rato para ver si ya
están cocinados. NOT A: Cuando observe los vegetales mientras se están cocinando,
asegúrese de inclinar la tapa de tal manera que el vapor que fluya esté alejado de sus
manos, cara y cuerpo. El tiempo de cocinado al vapor varía grandemente, dependiendo
del tipo, cantidad y calidad de los vegetales que se están cocinando.
5. Cuando ya los vegetales estén cocinados, apague la unidad empujando hacia arriba
el interruptor que está delante de la unidad. Desenchufe la unidad.
6. Retire la tapa, evitando nuevamente de entrar en contacto con el vapor. Use tenazas,
levante los vegetales de la canasta y colóquelos en un plato. Sirva inmediatamente.
GUIA PARA EL COCIMIENTO DE LOS VEGET ALES
1. Lave muy bien los vegetales. Corte los tallos; pele o corte si es necesario.
Piezas pequeñas se cocinan más fácilmente que las grandes.
2. Cantidad, calidad, frescura y tamaño/uniformidad pueden afectar el tiempo de
cocimiento. Ajuste la cantidad de agua y el tiempo de cocimiento como lo desee.
3. Los vegetales que están congelados deben ser cocinados sin descongelarse
previamente, para conservar su sabor y nutrientes.
4. Los alimentos congelados deben ser separados o movidos después de
10 a 12 minutos.
INSTRUCCIONES DE MANTENIMIENTO
Este artefacto requiere poco mantenimiento. No contiene piezas de repuesto que puedan
ser reparadas por el usuario. Nunca abra o remueva la cubierta de la unidad.
No trate de repararla usted mismo. Póngase en contacto con personal calificado si es
necesario servicio.
DESENCHUFE EL CORDON. ANTES DE LAVAR LA OLLA, DEJELA QUE SE ENFRIE.
Nunca sumerja la olla exterior en el agua.
PARA LIMPIAR:
PARA LIMPIAR LA OLLA INTERIOR, PARILLA PARA COCINAR AL VAPOR, TAPA,
TAZA PARA MEDIR Y PALETA:
• Lávelos en agua caliente jabonosa, enjuague y seque todas las partes, o lávelos en la
parte de arriba de la lavadora de platos.
• No use limpiadores abrasivos.
PARA GUARDAR:Desenchufe la unidad; guárdela en su misma caja en un lugar limpio
y seco. Nunca la guarde mientras esté caliente o enchufada. Asegúrese de limpiarla antes
de guardarla. Nunca enrolle el cordón ajustado alr ededor de la unidad . No ponga
presión al cordón donde éste entra a la unidad, ya que esto podría causar el desgaste del
cordón y su posible rotura.
GARANTIA LIMITADA POR UN AÑO
Dentro de un año de garantía, nosotros le reemplazaremos este artefacto sin costo alguno
por defectos en material o manufactura. Para reemplazo, envíe el artefacto con evidencia
de compra. Esta garantía es nula si el artefacto se ha caído, abusado, alterado
o mal usado en cualquier forma.
GUARDE PARA REFERENCIA
Page 7

Printed in/Impreso en Hong Kong
2000/3-20-35E/S RC-4 (UL/SPE)
 Loading...