

Page 1
OPERATING INSTRUCTIONS
E
J
E
C
T
PRODUCT MAY VARY SLIGHTLY FROM ILLUSTRATIONS
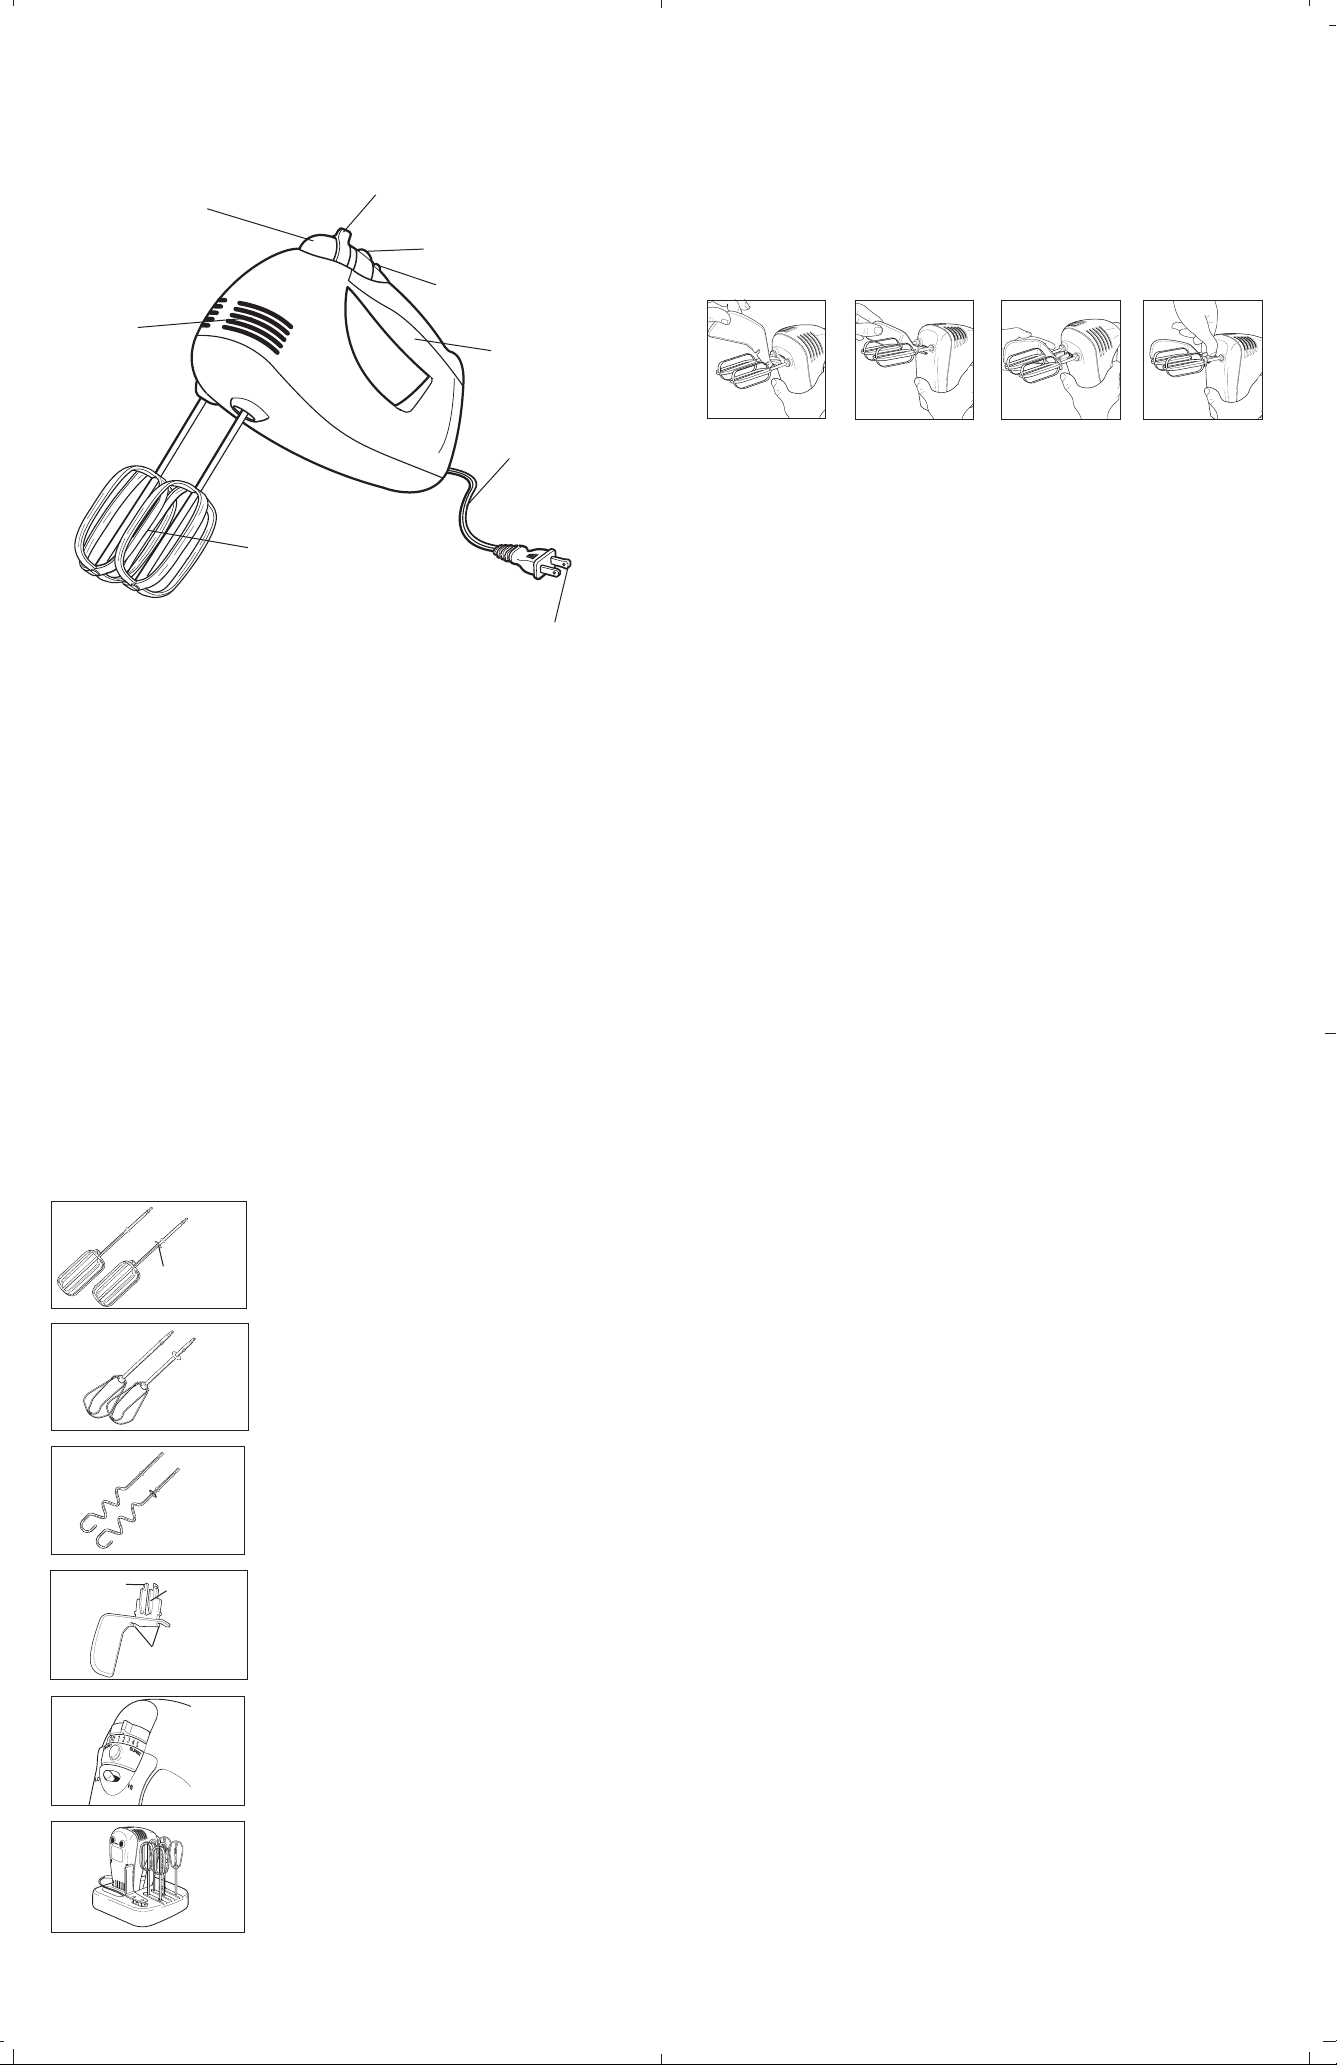
Speed Control Lever:
Eject Button
OFF/1/2/3/4/5
Boost-of-Power Button
LO/HI Speed Switch
ATTACHING BEATERS/DOUGH HOOKS: Be sure appliance is
unplugged. One attachment from each pair of either beaters or dough
hooks has a small metal washer-ring around the top of the stem; the
other does not. The attachment with the washer-ring must be inserted
into the larger of the two holes in the mixer. (Hole is located to the right
if you are viewing the bottom of the mixer.) Align notches on the beater
with the slots inside the hole. Push until attachment clicks to lock into
place. Insert attachment without the washer-ring into the smaller hole,
and push until it clicks to lock in place. Make sure that the attachments
fit snugly into the receptacles. Gently tug on each attachment to ensure
it is secured properly.
SPATULA ATTACHMENT:
Ventilation
Heavy-Duty
Beaters
Easy-to-Hold
Handle
Power Supply
Cord
Polarized Plug
This appliance is for HOUSEHOLD USE ONLY. It may be plugged into
any 120-volt AC electrical outlet (ordinary household current). Do not
use any other type of outlet.
BEFORE USING: Before using the mixer for the first time, wash
beaters, dough hooks and spatula attachment in warm, soapy water.
Rinse and dry thoroughly.
Wipe mixer and storage stand with a soft, slightly damp cloth or sponge
to remove any packaging dust. NEVER IMMERSE mixer, cord or plug,
in water or any other liquid. Use only gentle liquid detergents to wash
attachments. Do not use harsh detergents or abrasive cleaners to clean
any part.
HOW TO USE ATTACHMENTS: This 10-Speed Hand Mixer is capable
of blending several ingredients. Place beaters/dough hooks, etc. in
container holding ingredients, and switch on. This versatile mixer can be
used to make cakes, pies, whipped toppings, mashed potatoes and
much more.
HEAVY-DUTY BEATERS: Designed for allpurpose mixing. Cut through thick or thin
batters with ease.
Washer Ring
WIRE BEATERS: Spindly, thin wire beaters
are ideal for whisking sauces or whipping
light, fluffy ingredients.
DOUGH HOOKS: Spiral dough hooks are
designed to mix heavier batter. Hooks may
also be used for gently mixing pastry dough.
Grips
Tabs
SPATULA ATTACHMENT: Designed to keep
the bowl sides clean from spatters and dry
ingredients when mixing. Not recommended
Slots
for thick dough, whipping cream or egg
whites.
FIG. 1
FIG. 2
FIG. 3
FIG. 4
The plastic spatula attachment directs ingredients that cling to the sides
of the bowl into the path of the beaters. It consists of a spatula blade, a
grip with slots and two prongs extending from the handle.
TO ATTACH SPATULA: Attach beaters first. Stand mixer on a smooth,
flat surface with ventilation pointing upward. Use one hand to hold
mixer steady. Place spatula atop beater sticks so that prongs are
pointing downward between the beaters (Fig. 1). Push down on spatula
grip so that prongs extend beyond beaters and slots on grip are parallel
with beaters (Fig. 2). Gently turn spatula so that beater sticks fit into
slots. Prongs on spatula will now be parallel with beater sticks (Fig. 3).
Grasp prongs from underneath with thumb and forefinger, and pinch
them together slightly. Guide notched tabs at end of prongs into slot
between beater holes on mixer and push until they click into place.
Gently tug on the spatula to ensure that it is properly connected.
TO DETACH SPATULA: Grasp prongs from underneath and pinch them
together slightly to release spatula (Fig. 4). Turn spatula so that prongs
point downward, and lift spatula from beater sticks.
TO USE: Insert plug into any standard household outlet. Place beaters
directly into container holding ingredients to be mixed.
With Speed Switch at LO, slide the Speed Control Lever to select low
to medium speeds. With Speed Switch at HI, slide the Speed Control
Lever to select medium to high speeds. Be sure to turn unit OFF before
changing Speed Switch from LO to HI or vice-versa.
Use the chart below to help you determine the proper speed(s)
for mixing.
With Speed With Speed
Control Switch at
Lever at
1-2 LO Best for mixing dry ingredients and
folding in liquid ingredients, egg whites
and whipped cream.
3-4 LO Ideal for creaming, stirring, making
sauces, gravies, puddings and
quick breads.
5 LO All-purpose mixing.
1 HI All-purpose mixing.
2-3 HI Beats and creams butter and sugar for
cake mixes and frostings. Great for
thicker batters.
4-5 HI Best for whipping cream, beating egg
whites or mashing potatoes.
NOTE: BE SURE SPEED SELECTOR LEVER IS IN THE OFF
POSITION BEFORE CHANGING LO/HI SPEED SWITCH FROM
LO TO HI OR VICE-VERSA.
CAUTION: When using dough hooks in dough, use only with Speed
Switch in HI position and Speed Control Lever on settings 3, 4 or 5.
When kneading dough, use only with Speed Switch on HI and Speed
Control Lever at 4 or 5. To avoid overheating, do not operate longer
than 5 minutes.
BOOST-OF-POWER: The Boost-of-Power provides maximum speed
to get through tough mixing tasks at any speed. Depress the boost-ofpower button to obtain maximum mixing speed anytime an extra boost
of power for thick, heavy batters is needed. Release the button and the
mixing returns to the previously selected speed.
CAUTION: Do not use the boost-of-power in excess of two minutes at
a time, as motor may overheat.
REMOVING BEATERS/DOUGH HOOKS: Slide speed control lever
to the “OFF” position. Unplug appliance. Push down on the eject button
to eject beaters/dough hooks.
5 speeds at LO or HI for a total of 10 speeds,
plus boost-of power at any speed.
USER MAINTENANCE INSTRUCTIONS
This appliance requires little maintenance. It contains no user
serviceable parts. Do not try to repair it yourself. Refer it to qualified
personnel if servicing is needed.
NEVER IMMERSE MOTOR HOUSING IN WATER.
Storage Stand holds hand mixer and
attachments.
TO CLEAN: Be sure unit is unplugged. Remove spatula attachment
and/or eject beaters or dough hooks from unit and wash normally.
The attachments are dishwasher safe. Wipe mixer with a damp cloth
or sponge.
TO STORE: Unplug unit; store in its box in a clean, dry place. Never
store it while it is hot or still plugged in. Never wrap cord tightly
around the appliance. Do not put any stress on the cord where it
enters the unit, as it could cause the cord to fray and break.
Page 2

IMPORTANT SAFETY
INSTRUCTIONS
When using electrical appliances, especially when children are present,
basic safety precautions should always be followed, including the
following:
1. READ ALL INSTRUCTIONS.
2. To protect against electrical shock, do not submerge the mixer
or allow AC cord to come in contact with water or other liquids.
3. This appliance should not be used by children, and care should
be taken when used near children.
4. Unplug from outlet when not in use, before putting on or taking
off parts, and before cleaning.
5. Avoid contact with moving parts.
6. Do not operate any appliance with a damaged cord or plug,
or after the appliance malfunctions or has been dropped
or damaged in any manner. Return appliance to the nearest
authorized service facility for examination, repair or electrical
or mechanical adjustment.
7. The use of attachments not recommended or sold by the
appliance manufacturer may cause fire, electric shock or injury.
8. Do not use outdoors.
9. Do not let cord hang over edge of table or counter or touch hot
surfaces, including the stove.
10. Keep hands, hair, clothing, as well as spatulas and other utensils,
away from beaters during operation to reduce the risk of injury
to persons and/or damage to the mixer.
11. Remove beaters from mixer before washing.
SAVE THESE
POLARIZED PLUG:
This appliance has a polarized plug (one blade is wider than the other).
As a safety feature, this plug fits in a polarized outlet only one way. If the
plug does not fit into the outlet, reverse the plug and try again. If it still
does not fit, contact a qualified electrician. Do not attempt to defeat this
safety feature.
LINE CORD SAFETY TIPS
1. Never pull or yank on the cord or the appliance.
2. To insert plug, grasp it firmly and guide it into outlet.
3. To disconnect appliance, grasp plug and remove it from outlet.
4. Before each use, inspect the line cord for cuts and/or abrasion
marks. If any are found, this indicates that the appliance should
be serviced and the line cord replaced. Please return it to our
Service Department or to an authorized service representative.
5. Never wrap the cord tightly around the appliance, as this could
place undue stress on the cord where it enters the appliance and
cause it to fray and break.
DO NOT OPERATE APPLIANCE IF THE LINE CORD SHOWS ANY
DAMAGE, OR IF APPLIANCE WORKS INTERMITTENTLY OR STOPS
WORKING ENTIRELY.
INSTRUCTIONS
FULL ONE-YEAR WARRANTY
Applica warrants this product against any defects that are due
to faulty material or workmanship for a one-year period after
the original date of consumer purchase. This warranty does not
include damage to the product resulting from accident or
misuse. If the product should become defective within the
warranty period, we will repair it or elect to replace it free
of charge.
This warranty gives you specific legal rights and you may also
have other rights which vary from state to state or province
to province. Answers to any questions regarding warranty
or service locations may be obtained by calling Consumer
Assistance and Information: 203-926-3230.
10-SPEED
200-WATT
HAND MIXER
WITH STORAGE
STAND
Printed in Hong Kong
R297/11-14-87 MXD-10 (UL/SPE)
USE AND CARE BOOK
HOUSEHOLD
USE ONLY
 Loading...