

Page 1
OPERATING INSTRUCTIONS
PRODUCT MAY VARY SLIGHTLY FROM ILLUSTRATIONS
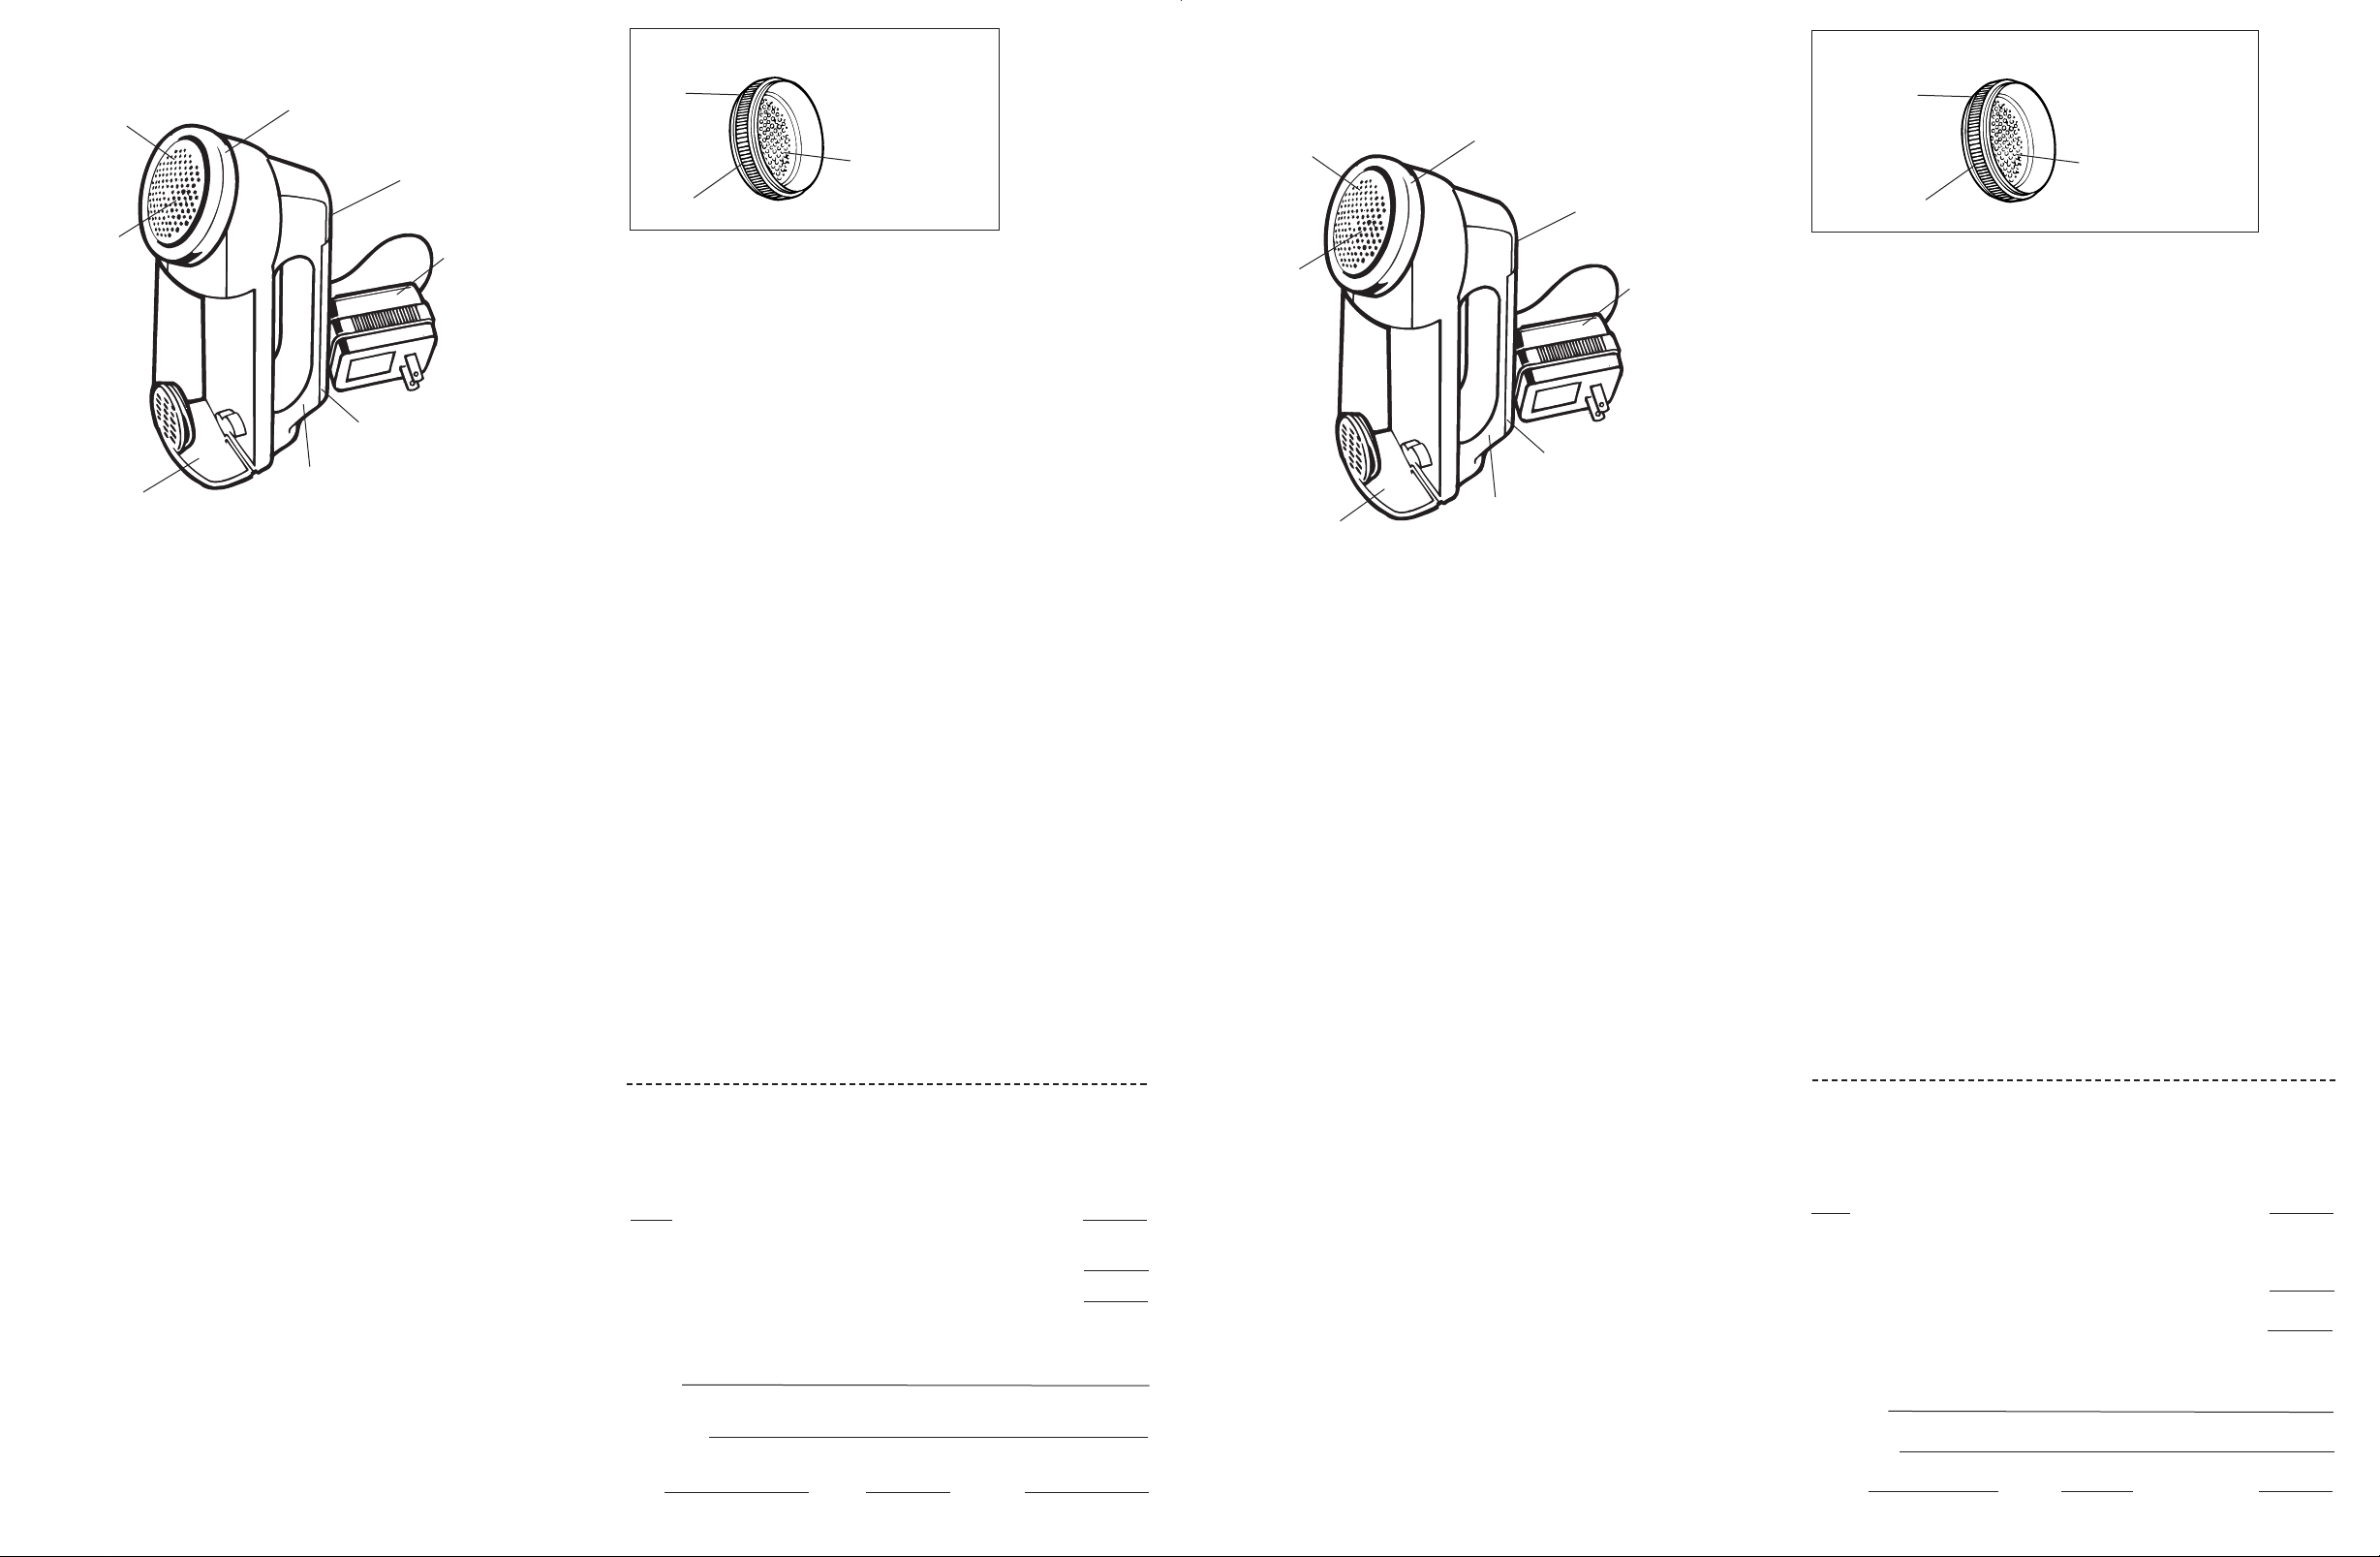
Protective
Cutting Foil
Cutting
Blade/Fan
Storage Bin
USE AND CARE
1. The Clothes Shaver Plus
for use on some fabrics than others. Do not use this device on
very soft fabrics or materials textured by design. Prior to use,
always test the Clothes Shaver Plus
hidden, inconspicuous area of the garment to be shaved.
2. Remove the protective cap and slide the On/Off switch to the
“On” position. Glide the head of the unit lightly over the garment
to remove fuzz, pills (nubby fabric clusters caused by friction)
and pulled threads.
3. After each use, or when the storage bin is about half full, empty
it. To remove, press firmly on the sides and slide the bin down.
After emptying, replace the storage bin by sliding it up on the
unit. When the bin “clicks,” it is positioned properly. This
procedure will ensure best cutting performance.
4. Keep the protective cap on the unit when not in use.
NOTE:
It is recommended for best performance of this product to add a
thin coating of light oil or silicone spray to the inner surface of the
foil. Apply the oil/spray to a lint-free cloth; then gently pass the
cloth over the inner surface of the foil (which is the side that does
not contact the fabric). Do not lubricate the side that comes into
contact with the fabric. After lubricating the unit, run the shaver in
the “On” position over a piece of cloth for ten seconds to remove
any excess oil from the face of the cutter. Reapply oil/spray after
using the unit several times. SEE DIAGRAM.
TO OPERA TE WITH ADAPTER
Insert adapter cord into the Clothes Shaver Plus
remover, plug into any AC household outlet. When not using
adapter, remove from the Clothes Shaver Plus
do not tangle, and store in a cool, dry place.
NOTE: When using the AC adapter for an extended period of time,
remove batteries from unit. When not using batteries for an
extended period of time, remove from unit.
LINE CORD SAFETY TIPS
1. To insert plug, grasp it firmly and guide it into outlet.
2. To disconnect appliance, grasp plug and remove it from
outlet. Do not pull or yank on the cord or appliance.
3. Before each use, inspect the line cord for cuts and/or
abrasion marks. If any are found, this indicates that the
appliance should be serviced and the line cord replaced.
Please return it to our Service Department or to an
authorized service representative.
DO NOT OPERATE APPLIANCE IF THE LINE CORD SHOWS
ANY DAMAGE.
Cap
On/Off Switch
Adapter (Also
operates on
4 “AA”
batteries, not
included)
Battery
Cover
Battery Cover
Lock Tab
®
fabric pill remover is better suited
®
fabric pill remover on a
®
fabric pill
®
fabric pill remover,
PROTECTIVE CAP WITH FOIL
Outer
Rim
Inner Surface
of Foil. Apply oil
or silicone as
Threads
HELPFUL HINT
The Clothes Shaver Plus
Instructed
®
fabric pill remover will operate more
efficiently when the piece of clothing to be “shaved” is placed on a
smooth, flat surface. On some fabrics, it may be best to stretch the
material while “shaving.” On other fabrics, additional pressure may
bring better results. Always use an inconspicuous area of the
clothing to determine the best method of operation.
CAUTION:
The Clothes Shaver Plus
®
fabric pill remover is not suitable for
use on all fabrics or materials. Damage may result if used on
very delicate fabrics such as angora wool. Some materials may
have a deliberate texture by design, and application of the
Clothes Shaver Plus
®
fabric pill remover may act to remove
such texture.
MAINTENANCE:
At some point it may become apparent that the unit no longer
shaves clothes as effectively as when it was new. Improved
performance may be achieved by cleaning the cutting blades. If this
becomes necessary , please follow the instructions below.
1. Be sure the On/Off switch is in the “Off” position, the
batteries have been removed from the unit, and the adapter has
been unplugged from the wall outlet.
2. Remove the cutting foil by turning it counterclockwise.
3. Remove the cutting blade/fan assembly by gently pulling it out
of the Clothes Shaver Plus
®
fabric pill remover.
WARNING: Extreme care should be taken when handling
the sharp blades of this assembly.
4. Clean the cutting blades with a soft brush, removing any
build-up from the cutting edges.
5. Reassemble unit in the reverse order.
If operation is still not satisfactory , it may be necessary to or der
replacement cutting blades.
HOW TO ORDER REPLACEMENT PARTS FOR THE
CLOTHES SHAVER PLUS®FABRIC PILL REMOVER
Complete coupon, clip and mail to:
SERVICE CENTER, 5980 Miami Lakes Drive; Miami Lakes, FL 33014
NOTE: Be sure to enclose check or money order for full amount, payable to
SERVICE CENTER. Allow four weeks for delivery. Price subject to change
without notice.
PLEASE SEND ME THE FOLLOWING PACKAGE(S) OF REPLACEMENT
PARTS, FOR THE CLOTHES SHAVER PLUS®FABRIC PILL REMOVER,
AT PRICE STATED:
TOTAL
pkg(s). CUTTING FOIL/FAN ASSEMBLY @ $8.00 ea
STOCK # 209-742
Add postage and handling cost $ 1.00
TOTAL AMOUNT DUE
Send to (please print clearly):
NAME:
ADDRESS:
CITY STATE ZIP CODE
INSTRUCCIONES DE FUNCIONAMIENTO
ESTE PRODUCTO PUEDE VARIAR LIGERAMENTE
DE LAS ILUSTRACIONES
Cortador de
aluminio
Cuchilla
giratoria
Caja de depósito
USO Y CUIDADO
1. El removedor de pelusas Clothes Shaver Plus®, es más
adecuado para usarse en algunas telas que en otras.
No use este dispositivo en telas muy suaves o en materiales
con diseños. Antes de usar el removedor de pelusas Clothes
Shaver Plus®, haga una prueba en una área oculta de la prenda
a ser afeitada.
2. Remueva la tapa protectora y deslice el interruptor a la posición
Encendido (ON). Pase suavemente la cabeza de la unidad
sobre la prenda, para remover las bolitas de pelusas (causadas
por la misma fricción) e hilos corridos.
3. Después de cada uso, o cuando la caja del depósito esté
medio llena de pelusas, deséchelas. Para removerla, presione
firmemente en los lados y deslice la caja hacia abajo. Después
de vaciar el depósito, colóquelo nuevamente en la unidad
deslizándola hacia arriba. Cuando la caja del depósito haya
hecho un sonido es que está colocada correctamente.
Este procedimiento le dara mejores resultados para cortar
las pelusas.
4. Mantenga la tapa protectora en la unidad cuando no la
esté usando.
NOT A:
Para mejor rendimiento de este producto se recomienda añadir una
ligera capa de aceite o silicona en aerosol a las superficies internas
del cortador. Aplique el aceite/aerosol a un paño que no contenga
pelusas, luego suavemente pase el paño sobre la superficie interna
del cortador (que es el lado que no entra en contacto con las telas).
No lubrique el lado que está en contacto con las telas. Después de
lubricar la unidad, haga funcionar la afeitadora corriéndola a la
posición Encendido (ON) sobre un pedazo de tela por 10 segundos
para remover cualquier exceso de aceite de la cara del cortador.
Vuelva a aplicar aceite/aerosol después de haber usado la unidad
varias veces. VEA DIAGRAMA.
PARA OPERAR CON EL ADAPTADOR
Coloque el cordón del adaptador en el removedor de pelusas
Clothes Shaver Plus
®
, enchúfelo en cualquier tomacorriente de
Corriente Alterna (corriente ordinaria doméstica). Cuando no esté
usando el adaptador, remuévalo del removedor de pelusas Clothes
Shaver Plus®; no lo enrede, guárdelo en un lugar fresco y seco.
NOTA: Cuando lo use con el adaptador por un período largo de
tiempo, saque las baterías de la unidad. Cuando no lo use con
baterías por un período largo de tiempo, remuévalas de la unidad.
SUGERENCIAS PARA LA SEGURIDAD CON EL CORDON
1. Para introducir el enchufe, sujételo firmemente y guíelo
hacia el tomacorriente.
2. Para desconectar el artefacto, sujete el enchufe y retírelo
del tomacorriente. No lo jale, o tire del cordón, o
del artefacto.
3. Antes de cada uso, inspeccione el cordón si tiene cortes
y/o raspaduras. Si algo fuera encontrado, esto indica que
el artefacto deberá ser revisado y el cordón reemplazado.
Por favor, devuélvalo a nuestro Departamento de Servicio
o a un representante de servicio autorizado.
Tapa
protectora
Interruptor
Encendido/Apagado
(On/Off)
Adaptador
(También
opera con 4
baterías “AA”,
no incluidas)
Tapa de la
batería
Seguro de la
tapa de la
batería
TAPA PROTECTORA CON CORTADOR DE ALUMINIO
Borde de
afuera
Superficie interna del
cortador de aluminio.
Aplique aceite o silicona
Rosca
como se indica
NO HAGA FUNCIONAR EL ARTEFACTO SI EL CORDON
MUESTRA CUALQUIER DAÑO.
El removedor de pelusas Clothes Shaver Plus®opera más
eficientemente cuando la pieza de tela a ser afeitada es colocada
en una superficie suave y plana. En algunas telas puede ser mucho
mejor estirar la tela mientras se está afeitando. En otras telas,
presión adicional puede dar mejores resultados. Siempre use un
área oculta de la tela para determinar el mejor método de
operación.
ADVERTENCIA:
No se recomienda el uso del removedor de pelusas Clothes
Shaver Plus
®
en todas las telas o materiales. Podría causar
daño si se usa en telas muy delicadas, tales como lana de
angora. Algunos materiales pueden tener una textura de
diseños y la aplicación del removedor de pelusas Clothes
Shaver Plus®puede remover dicha textura.
MANTENIMIENTO:
Hasta cierto punto podría pensarse que la unidad ya no afeita la
prenda como lo hacia cuando estaba nueva. Limpiando las
cuchillas podrá rendir mejores resultados. Si esto fuera necesario,
por favor siga las siguientes instrucciones.
1. Asegúrese que el interruptor esté en la posición Apagado (OFF),
que las baterías hayan sido removidas de la unidad y que el
adaptador ha sido enchufado al tomacorriente.
2. Remueva la tapa cortadora dándole vuelta hacia la izquierda.
3. Remueva la cuchilla giratoria, tirando suavemente hacia afuera
del removedor de pelusas Clothes Shaver Plus
®
.
PRECAUCION: Mucho cuidado se deberá tener cuando
esté manipulando las cuchillas filudas de este aparato.
4. Limpie las cuchillas con un cepillo suave, removiendo cualquier
residuo de los bordes de las cuchillas.
5. Arme la unidad en la forma inversa a como lo hizo para
desarmarla.
Si el funcionamiento no es satisfactorio, podría ser necesario
ordenar cuchillas de repuesto.
COMO ORDENAR PIEZAS DE REPUESTO PARA SU
REMOVEDOR DE PELUSAS CLOTHES SHAVER PLUS
Complete el cupón recórtelo y envíelo a:
SERVICE CENTER: 5980 Miami Lakes Drive; Miami Lakes, FL 33014
NOT A: Asegúrese de incluir cheque o giro postal por la cantidad exacta,
pagadero a SERVICE CENTER. Demora cuatro semanas para su entrega.
Precio sujeto a cambio sin aviso.
POR FAVOR ENVIEME EL (LOS) SIGUIENTE(S) PAQUETE(S) DE PIEZAS,
PARA EL REMOVEDOR DE PELUSAS CLOTHES SHAVER PLUS®,
AL PRECIO EST ABLECIDO:
PAQUETE(S) COR TADOR DE ALUMINIO/ @ $8.00 c/u
CUCHILLA GIRA TORIA
STOCK # 209-742
Agregar franqueo y costos de manejo $ 1.00
TOT AL
Enviar a (escribir con claridad):
NOMBRE:
DIRECCION
CIUDAD EST ADO CODIGO POST AL
®
TOT AL
Page 2

PRECAUCION
No use este artefacto para afeitar la piel, ya que esto podría
causar heridas. El removedor de pelusas Clothes Shaver Plus
contiene cuchillas muy filudas y el mismo cuidado se debe
tener con este aparato así como con cualquier otro utensilio
cortante.
Antes de usarlo lea cuidadosamente todas las instrucciones.
INST ALACION DE LAS BATERIAS
El removedor de pelusas Clothes Shaver Plus
4 baterías alcalina “AA” (no incluidas).
Para instalar las baterías, primero remueva la tapa del
compartimento, presionando el seguro localizado en la base de la
tapa. Coloque las baterías como se indica en las señales internas
de la tapa de la batería. (+ y - deben estar en la posición correcta
para que la unidad funcione.) Adapte la tapa de la batería en la
unidad.
®
, opera con
GARANTIA LIMITADA POR UN AÑO
®
WARNING
,
Do not use this appliance to shave skin, as it may result in
injury. The Clothes Shaver Plus
sharp cutting blades, and the same care should be exercised
with this appliance as with any sharp cutting utensil.
Read all instructions carefully prior to use.
BA TTERY INSTALLATION
The Clothes Shaver Plus
size alkaline batteries (not included).
To install batteries, first remove the battery cover by pressing the
lock tab located on the bottom of the cover. Insert the batteries as
indicated by the internal markings on the battery cover (+ and must be in the proper position for the unit to operate.) Snap the
battery cover back on the unit.
®
®
fabric pill remover contains
fabric pill remover operates on four “AA”
Este producto lleva una garantía por defectos en material y
manufactura por un período de un año desde la fecha de compra.
IMPORTANTE: Esta garantía no cubre daños resultantes por
accidentes, mal uso o abuso, falta de cuidado, el uso de cualquier
otro aditamento no autorizado, pérdida de piezas o expuesto el
artefacto a cualquier otro voltaje que el especificado. (Lea las
instrucciones cuidadosamente.)
Si ocurriera un mal funcionamiento, no use la unidad. Simplemente,
envuélvala bien asegurada y envíela por correo a:
SERVICE CENTER
5980 MIAMI LAKES DRIVE; MIAMI LAKES, FL 33014
Para asegurar un pronto servicio, por favor incluya una carta
indicando la razón por el retorno de la unidad. Nosotros la
repararemos o reemplazaremos (a nuestra discreción) sin cargo
para usted. Por favor incluya $4.00 (cheque o giro postal) para
cubrir los gastos de franqueo. Los residentes de California tienen la
opción de devolver la unidad defectuosa al lugar original de su
compra, conjuntamente con el comprobante de su compra, dentro
del período de la garantía.
Si la garantía ha expirado u otros términos no se ajustan a ella,
envíenos la unidad como se indica arriba. Habrá un cargo por
servicio de acuerdo a la reparación necesaria, y la unidad le será
devuelta contra entrega de pago.
Esta garantía le da específicos derechos legales y usted también
puede tener otros derechos, los cuales varían de estado a estado,
por ejemplo, California. Ninguna otra garantía expresa es dada.
Algunos estados no permiten la exclusión o limitación de daños
casuales o sus consecuencias, por lo tanto la limitación o exclusión
pueden no aplicar a usted.
ONE YEAR LIMITED WARRANTY
This product is warranted to be free from defects in material and
workmanship for a period of one year from the date of purchase.
IMPORTANT: This warranty does not cover damages r esulting fr om
accident, misuse or abuse, lack of reasonable care, the affixing of
any unauthorized attachments, loss of parts, or subjecting the
appliance to other than the specified voltage. (Read directions
carefully.)
If a malfunction occurs, do not use the unit. Simply wrap the unit
securely, and mail postage paid to:
SERVICE CENTER
5980 MIAMI LAKES DRIVE; MIAMI LAKES, FL 33014
To insure prompt service, please include a letter indicating the
specific reason for returning the unit. We will repair or replace it
(at our option) at no charge to you. Please include $4.00 (check or
money order) to cover return postage and handling. California
residents have the option of returning the defective unit to the
original place of purchase, along with proof of purchase, within the
warranty period for replacement.
If the warranty period has expired, or other terms of the warranty
are not met, mail the unit to us as indicated above. A service charge
will be made according to the repairs needed, and the unit will be
returned to you C.O.D.
This warranty gives you specific legal rights, and you may also have
other rights which vary from state to state, e.g., California. No other
express warranty is given. Some states do not allow the exclusion
or limitation of incidental or consequential damages, so the
limitation or exclusion may not apply to you.
SAVE THIS FOR YOUR RECORDS
GUARDE PARA REFERENCIA
Printed in/Impreso en Hong Kong
R194/11-4-28E/S CS-2 (UL1)
Printed in/Impreso en Hong Kong
R194/11-4-28E/S CS-2 (UL1)
®
CLOTHES
®
®
SHAVER PLUS
PROFESSIONAL-SIZE FABRIC
PILL REMOVER
REMOVEDOR DE PELUSAS
TAMAÑO PROFESIONAL
USE AND CARE BOOK
MANUAL DE USO
Y MANTENIMIENTO
 Loading...