

Page 1
Operating Instructions
Analogue Temperature Transmitters
Model T91.10 / T91.20
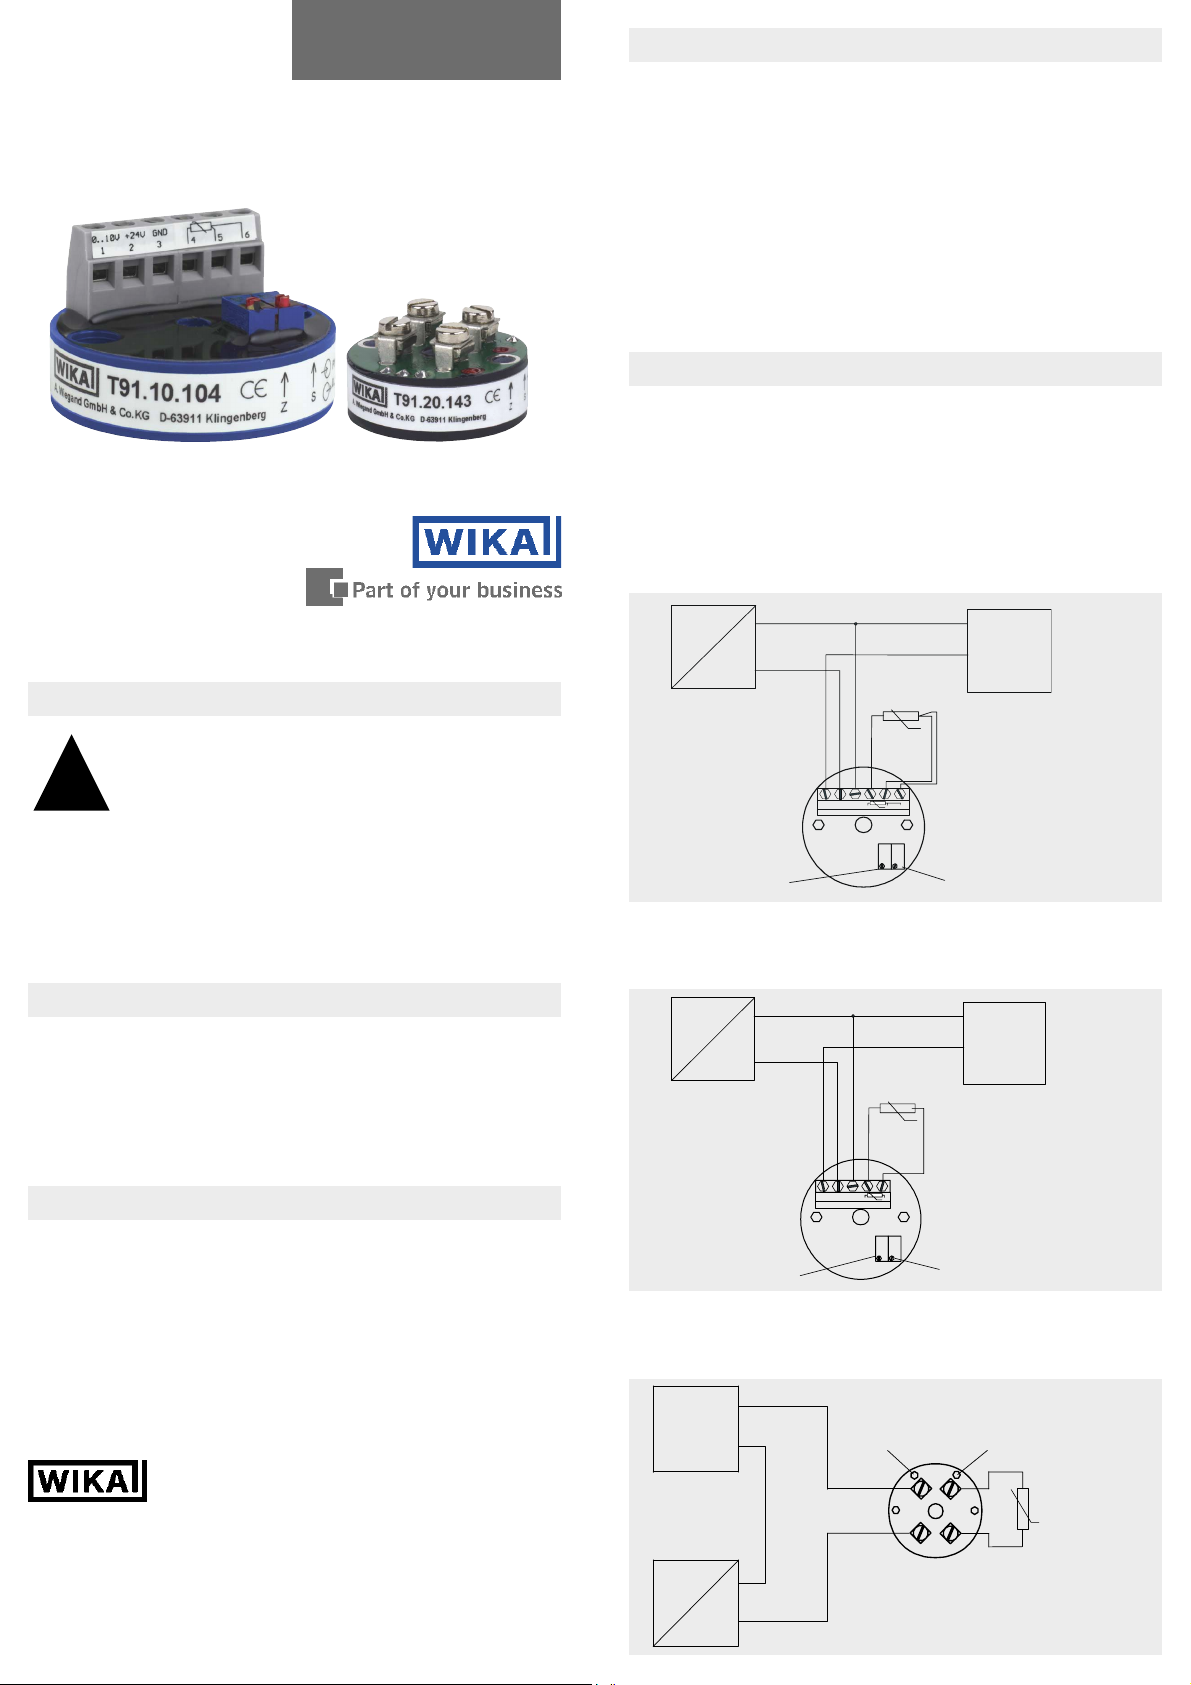
Model T91.10 Model T91.20
4. Electrical connections
These transmitters have an internal galvanic connection between
the sensor input and analogue output. No external connection
should be made (for example, by earthing) between the
connected temperature sensor and analogue output! For this
reason it is best to use isolated thermocouples. For flying leads
we recommend using crimped connector sleeves.
To connect a thermocouple: Make sure that the thermocouple is
connected with the correct polarity. If the cable between the
thermocouple and the transmitter must be extended, only use the
appropriate thermal or compensating cable for the connected
thermocouple type.
4.1 Pt100 input
Model T91.10.104
Pt100 in 2- or 3-wire connection.
For a 2-wire connection the resistance of the wires affects the
measurement results. Therefore this circuit should only be
selected if the wires are short, or accuracy requirements are low.
If using a 2-wire connection, always connect a jumper between
input terminals 5 and 6.
Transmitter output signal: 0 ... 10 V / 3-wire design
1. Safety instructions
When mounting, commissioning and operating these
transmitters, it is important to observe the respective
national safety precautions and regulations in effect
!
(e.g. VDE 100). Nonobservance of the applicable
regulations may cause severe injury to persons or damage to
equipment. Only staff with suitable qualifications should work with
these transmitters. Before commissioning, check the instrument's
suitability for the intended application. In particular, it is important
to observe the ambient and operating limits as specified in the
WIKA data sheet, TE 91.01.
2. Mounting
Model T91.10 head mounting transmitters are designed to be
mounted on a measuring insert in a DIN Form B connection head.
Model T91.20 head mounting transmitters are designed to be
mounted on a measuring insert in a Form J connection head. The
connecting wires of the measuring insert must be approx. 50 mm
long and insulated.
3. Maintenance
230 VAC
24 VDC
-
+
0..10V +24V GND
1 2 3
Pt100
4 5 6
J
-
Load
(PLC, PC)
+
J
Zero Span
Model T91.10.424
Pt100 in 2-wire connection
Transmitter output signal: 0 ... 10 V / 3-wire design
230 VAC
24 VDC
-
+
0..10V +24V GND
1 2 3
4 5
Pt100
J
-
Load
(PLC, PC)
+
J
C_104.01
C_424.01
The temperature transmitters described here are maintenance
free! The electronics do not incorporate any components which
could be repaired or replaced. Depending upon operating
conditions, it may be advisable to check the calibration of the
transmitter yearly.
Technical alteration rights reserved.
WIKA Alexander Wiegand GmbH & Co. KG
Alexander-Wiegand-Straße 30
63911 Klingenberg/Germany
Phone (+49) 93 72/132-0
Fax (+49) 93 72/132-406
E-Mail info@wika.de
www.wika.de
Model T91.20.143
Pt100 in 2-wire connection
Transmitter output signal: 4 ... 20 mA / 2-wire design
09/2006 GB
Load
(PLC, PC)
230 VAC
24 VDC
Zero Span
+
Span Zero
-
Loop
-
+
C_143.01
Pt100
Page 2

4.2 Thermocouple input
Model T91.10.102
The positive lead of the thermocouple is connected to terminal
TC+ on the transmitter and the negative lead to terminal TC-.
Transmitter output signal: 0 ... 10 V / 3-wire design
230 VAC
24 VDC
Zero Span
Model T91.20.141
The positive lead of the thermocouple is connected to terminal
TC+ on the transmitter and the negative lead to terminal TC-.
Transmitter output signal: 4 ... 20 mA / 2-wire design
230 VAC
24 VDC
Load
(PLC, PC)
--
Load
+-
4 5
Loop
(PLC, PC)
+
+
Thermocouple
-
+
0..10V +24V GND
1 2 3
+
-
Span Zero
-
+
Thermocouple
C_102.01
C_141.01
commend the use of passive resistances.
When simulating a thermocouple, the actual terminal temperature
of the transmitter must be pre-set on the simulator (Cold Junction
Compensation).
T
Connect a mA meter in the 4 ... 20 mA-loop or a multimeter to
the 0 … 10 V output signal
T
Connect a suitable power supply to the transmitter
5.2 Adjustment of the 0 … 10 V output signal
1) Set the simulator with approx. 1 V offset from the lower limit of
the measuring range (e.g. -20 °C = 1 V for measurement range
-30 ... +70 °C)
2) Turn the zero potentiometer Z, until the output signal (in our
example -20 °C = 1 V output signal) matches the desired value
3) Set the end value of the measurement range with the simulator,
e.g. +70 °C for measurement range -30 ... +70 °C
4) Turn the span potentiometer S, until the output signal (in our
example 70 °C = 10 V) matches the desired value.
5) Repeat step 1 and check signal (1 V)
6) Repeat step 3 and check signal (10 V)
5.3 Adjustment of the 4 … 20 mA output signal
1) Set the lower value of the measurement range with the
simulator, e.g. -30 °C for measurement range -30 ... +50 °C
2) Turn the zero potentiometer Z , until the output signal shows
the desired value
3) Set the end value of the measurement range with the simulator,
e.g. +50 °C for measurement range -30 ... +50 °C
4) Turn the span potentiometer S, until the output signal shows
the desired value
5) Repeat step 1 and check output signal of zero point
6) Repeat step 3 and check output signal of span
5.4 Closing steps
4.3 Electrical connection 0 ... 10 V output signal
Model Terminals
T91.10 1 (+signal), 2 (+24 V), 3 (-GND)
Maximum power supply: 15 …35 VDC (reverse-polarity protected)
The output voltage follows the applied input signal linearly. Please
note that the output can only be regulated to within approx. 0.002
V at the lower supply voltage. (model T91.10.424 approx. 0.02 V).
4.4 Electrical connection 4 ... 20 mA-loop
Model Terminals
T91.20 loop + / -
Maximum power supply: 10 …35 VDC (reverse-polarity protected)
In the current loop the transmitter and the indicator/processor are
connected in series. The transmitter regulates the current in
proportion to the input signal. The load can be connected either to
the positive or negative terminals of the transmitter. With the load
connected to the positive terminal, the power supply and load
may not have a common earth.
5. Transmitter adjustment
Zero point and Span adjustment is carried out via potentiometers.
These are on the upper face of the transmitter.
The potentiometers are protected against accidental alteration.
The zero-point potentiometer can be adjusted to make small
corrections. After any adjustment of the span potentiometer,
a complete adjustment of the transmitter is necessary.
5.1 Preparation
Connect a suitable simulation source to the input of the T91
(Pt100 or thermocouple simulator). When simulating a Pt100,
connect the simulator in a 2- or 3-wire configuration. We re-
Disconnect the simulator, the multimeter and the power supply
6. Fault diagnostics
When measuring with resistance thermometers or thermocouples,
factors arising from the design and measuring technology used
can falsify the results measured. The most important effects that
can lead to faults are listed below:
Error Possible cause
No voltage output - No supply voltage
- Display unit not working
- Circuit interruption in the supply line
- 4-20 mA output: polarity in the loop is
not correct
Output signal
1) 0 V / < 4 mA - Short circuit in the Pt100
2) corresponds to room temperature - Short circuit in the thermocouple
Output signal - Sensor break
> 10 V / > 20 mA
Temperature read out - Poor lead insulation resistance
too low/fluctuates
Read out obviously - Moisture in the sensor or in the senor
too high or too low wire
- Not correct compensation wire or
incorrect thermocouple
If the measuring point is - Thermocouple polarity incorrect
heated up the output signal
reduces
When only one pole of the - Electromagnetic disturbances are
thermocouple is connected, coupled to the input lead
a value is still displayed - Through poor galvanic isolation, and
poor insulation, parasitic voltages are
present, e.g. through the thermal
insulation
Displayed value obviously - Electromagnetic disturbances are
incorrect coupled to the input lead
- Parasitic galvanic voltages, e.g. as a
result of moisture in the compensation
cable insulation
 Loading...