White 634D User Manual

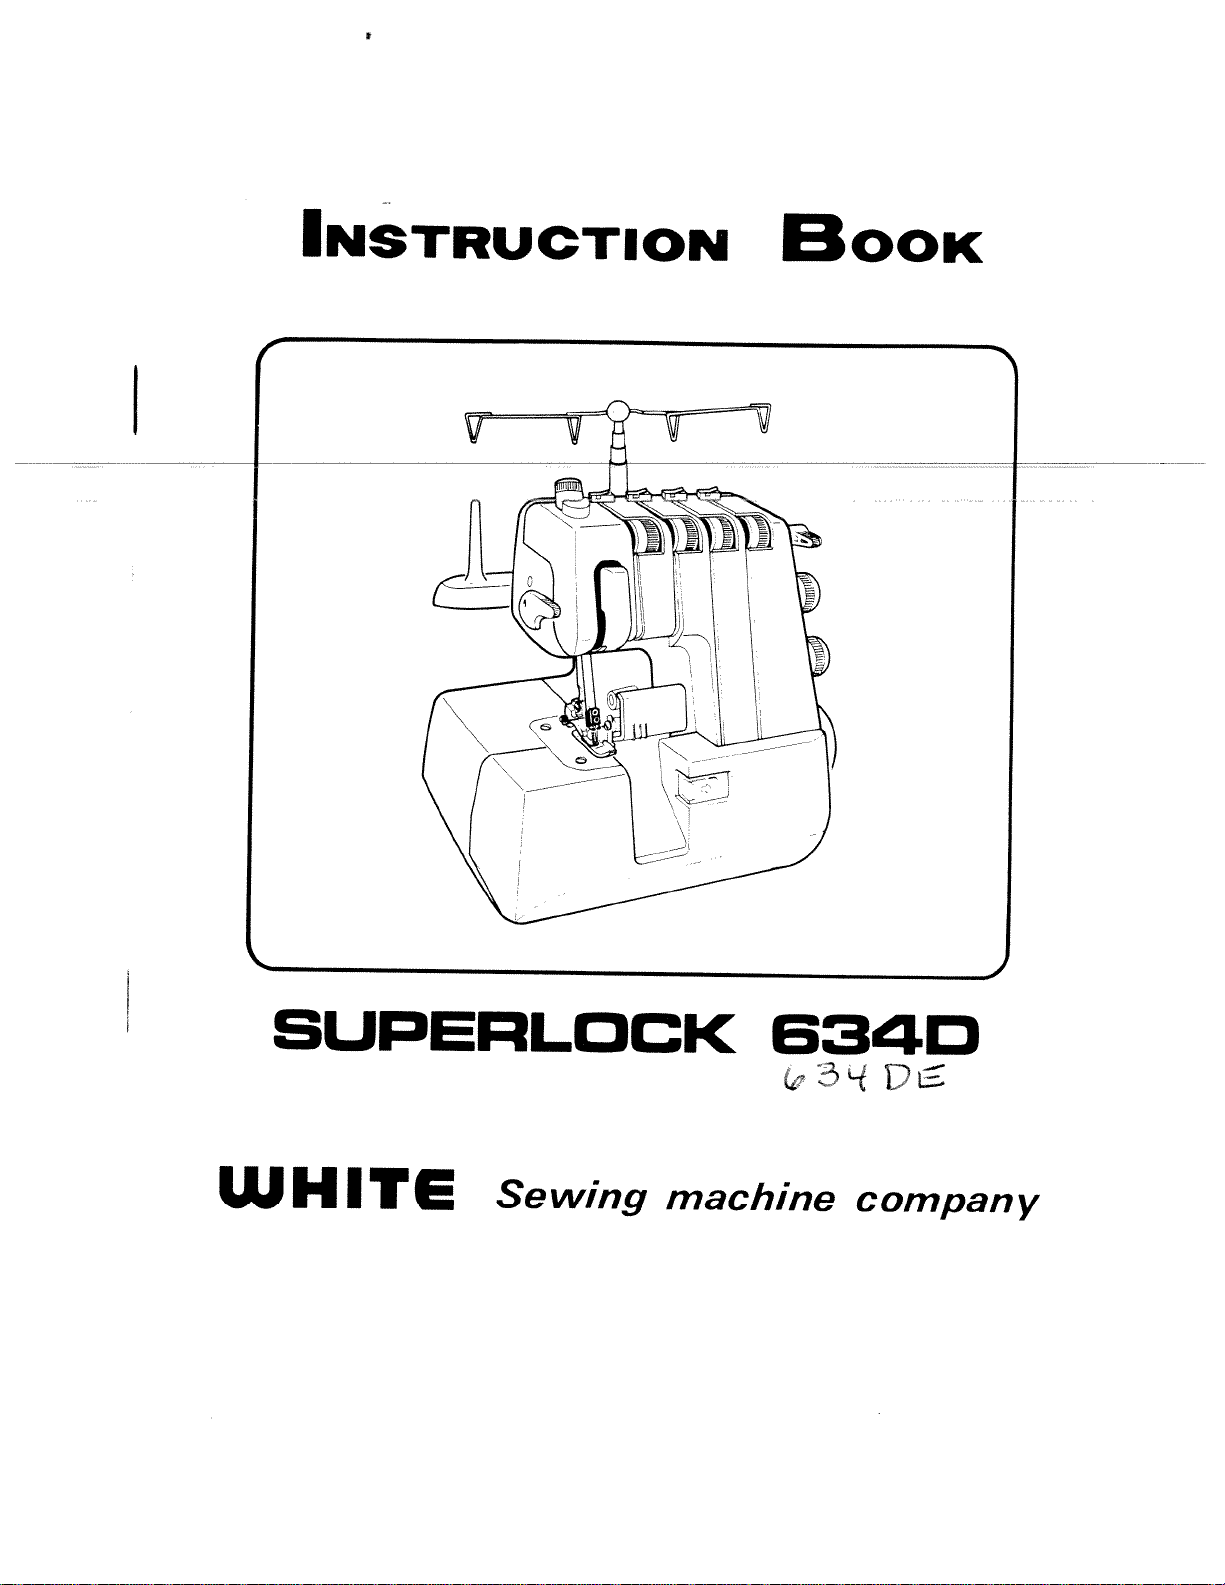
Specifications and Main Features

  • Number of threads: 3 or 4 Threads
  • Number of needles: 1 or 2 Needles.
  • Needles: Standard HAx1 #11–#14.
  • Overlock width: W-bracket between two needles
  • Width of the Standard Cutter: Usually standard cutting is 5.5 mm which is between 5.2 to 7 mm.
  • Maximum stitch length: 5 mm, minimum is 1 mm.
  • Sewing ratio: the differential feed ratio is set to one to two.
  • s/m speed: Maximum Speed is 1500 RPM.
  • Machine measurements:
  • Width: 300 mm
  • Depth: 230 mm which max out to 340 mm
  • Height: 290 mm which can reach to 350 mm or 555 mm.
  • Weight: the weight is roughly around 8.7 kilograms.

Frequently Asked Questions

Q: What kind of sewing and stitches can this sewing machine do?

A: The most appropriate sewing machine for making overlock stitches and for rolling edge stitches.

Q: Why is it difficult for me to adjust the stitches in an appropriate length on this machine?

A: A Length dial is typically the best way to adjust stitch length as it has a range of 1 to 5 millimeters.

Q: What will you recommend to me if my needle happened to break?

A: Remove the fabric, see if the needle is bent, blunt, put improperly, or if the fabric was being pulled or sewn. In case of any of these conditions do replace the needle.

Q: What is the maximum sewing speed of the machine?

A: The maximum sewing speed is pegged at 1500 RPM.

Q: How can I replace the lower cutter?

A: There is a certain order which one needs to follow to replace the lower cutter, Unplug the machine, remove the front cover, disengage the upper cutter, tighten the clamp screw of the lower cutter and remove the lower cutter then insert a new one.

Q: Which needles does this machine require?

A: For this machine you need to have the HAx1 needles, size #11 to #14 (SCHMETZ 130/705H) as it is efficient with such size needles.

Q: Will I be able to change the differential feed ratio?

A: Of course, the differential feed ratio can be altered between 1:07 to 2 according to the different fabrics and to avoid the material to pucker.

User Manual

Page 1
INSTRUCTION
BOOK
BUPEFILDCK
W
H
I
TE
634D
machine
company
Page 2
____________________________
reduce
To
has
a other). one
way. reverse
qualified
not
change
POLARIZED
the
polarized
This
the
if
the
electrician
Record
Model
and
Serial
The
I
Model
The
Serial Model
Retain
risk
plug
plug.
the
space
in
No.
No.
these
plug
will
plug
plug
No.
No.
No.
634
numbers
of
does
it
If
to
provided
this
of
located
is
located
is
0
PLUG
electric
(one
in
fit
still
install
any
in
appliance.
for
CAUTION
shock,
blade
polarized
a
fit
not
does
the
way.
below
of
Rear
of
Rear
future
this
wider
is
fully
not
proper
Serial
the
arm.
arm.
reference.
in
fit,
outlet
the
No.
appliance
than
the
only
outlet,
contact
outFet
a
Uo
Page 3
IMPORTANT
electrical
an
When
followed,
using
including
the
SAFETY
appliance,
following:
basic
INSTRUCTIONS
safety
precautions
should
always
be
Read
all
appliance).
DANGER
from
shock,..
allow
or
by
appliance
this
operate
if
to
or operate the
of
loose
and
drop
should
the
to
near
recommended
has
it
the
mechanical
sewing
or
appliance
An
appliance
electric.
not
Do
1
used
is
Use
2
attachments
Never
3. properly appliance electrical
Never
4.
ings dust,
Never
5.
instructions
reduce
—To
unattended
left
be
never
immediately
electric
be
this
nearest
the
cloth.
insert
outlet
or
used
children.
only
appliance
dropped
been
authorized
adjustment. appliance machine
any
aerosol
injwy*tc.
Close
toy.
a
as
intended
its
for
the
by
it
if
or
with
foot
and
into
object
(spray)
before
the
when
after
persons:
attention
use
manufacturer
damaged
a
has
damaged,
or
dealer
openings
air
any
controller
opening.
any
products
risk
using
described
as
as
or
service
free
are
of
plugged
and
necessary
is
contained cord dropped
center
blocked,
from
being
using
electric
Always
in.
before
when
this
in
in
plug,
or
into
for
Keep
accumulation
the
used
(this
shock:
unplug
cleaning.
appliance
this
manual.
manual,
this
not
is
it
if
water.
examination,
or
Return
ventilation
where
this
only
Use
working
repai
open
of
oxygen
the
int,
is
bni:
8. outlet.
unplug
not
Do
9.
DANGER
not
not
not
unplug
reach
place
place
1.
2.
3.
Always
Do
Do
Do
in
by
before
for
or
or
all
rn
pulling
appliance
an
store
drop
controls
cord.
on
relamping.
appliance
water
into
to
Replace
that
where
or
the
To
has
off
unplug,
fallen
other
bulb
can
it
liquid.
(“0”)
grasp
position,
with
into
fall
the
same
water.
or
be
then
plug,
type Unplug pulled
remove
the
not
rated
immediately.
a
into
cord.
15
tub
plug
watts.
or
from
sink.
Page 4
WARNING
Keep
1. machine
Always
2.
Do
3.
Do
4. break.
Switch
5. area,
Always
6. lubricating, instruction
7.
fingers
not
not
such
Never
needle.
use
use
pull
the
unplug
manual.
operate
away
the
bent
or
sewing
as
or
from
proper
needles.
push
threading
sewing
when
on
all
needle
fabric
machine
machine
making
soft
a
moving
plate.
while
off
needle,
any
surface
parts.
The
stitching.
0”)
(
changing
from
other
such
Special
wrong
when
the
user
as
care
plate
may
It
making
needle,
electrical
servicing
bed
a
is
can
deflect
any
or
changing
outlet
adjustments
couch
or
required
the
cause
needle
the
adjustments
when
where
around
needle
causing
presser
removing
mentioned
the
in
the
to
the
foot,
air
sewing
break.
to
it
needle
etc.
covers,
the
in
openings
SAVE
THESE
INSTRUCTIONS
Page 5
CONTENTS
NAMES
1,
OPERATION
2.
PREPARATION
3.
3-1.
3-2.
3-3.
3-4.
3-5.
F-UR
4
4-i.
4-2.
4-3.
4-4.
4-5.
4-6.
ADJUSTING
5.
STITCH
6.
DIFFERENTIAL
7.
CORDED
8.
SEWING
9.
THREE
10,
ROLLED
11.
PIN
12.
REPLACING
13.
CHANGING
14.
LUBRICATION
15.
ACCESSORIES
16.
TABLE
17.
PROBLEM
18.
SPECIFICATIONS
19.
OPTIONAL
20.
PARTS
OF
AND
FOR
Connecting
Setting
Changing
Replacing
Threading
Power
Telescopic
Threads
Needle
THREADQVERLOcksTiTCH
Bcforc
Setting
Beginning
Adjustment
Thread
Thread
TUCKS
Sewing
the
Tension
Tension
LENGTH
OVERLOCK
FOR
THREAD
EDGE
SEWING
OF
SOLVING
Fabric
and
of
BALANCE
FEED
CURVED
LOWER
LIGHT
ACCESSORY
FUNCTION
SEWING
Cord
Thread
Ending
Presser
the
Chart
Adjustment
OF
ADJUSTMENT
SEAMS
OVERLOCK
CUTTER
BULB
MATERIALS,
OF
Stand
Sewing
of
Foot
STITCH
STITCH
PRESSER
PARTS
WIDTH
NEEDLES
USING
Pressure
USING
FEET
AND
NEEDLES
2
NEEDLE
1
AND
CUTTING
THREADS
WIDTH
1
2
4
4
5
5
6
7
10
10
10
10
11
12
13
15
15
16
17
17
18
19
20
21
21
21
23
24
25
26
27
Page 6
NAMES
1.
OF
PARTS
1.
Spool Thread
2. Pressure
3.
4.
Thread Telescopic
5.
6.
Thread
7.
Tension
Differential
8.
9.
Stitch Presser
10. Cutting
11.
Presser
12.
13.
Upper
14.
Front
15.
Cutter
Front
16.
17.
Handwheel Stitch
18.
19.
Stitch
pin
take
tension
tension
release
length
foot
width
foot
cutter
cover
cover
panel
finger finger
up
regulator
thread
feed
dial
lifter
adjusting
(Right
knob
lever
screw
support
stand
dials
lever
dial
side
cover
dial
of
machine)
I-
Needle
plate
—1—
Page 7
OPERATION
2. PARTS
Handwheel
Always
+
turn
AND
handwheel
FUNCTION
toward
you.
OF
Changing
Switch
Raise
1. Raise
2. turning Push
3. Position
4. the lifter
Opening
open
To
and
right
Closing
off
presser
needles
handwheel
red
groove
that
so
Front
front
pull
Front
Presser
the
button
new
the
of
holder
cover,
it
Foot
machine.
foot.
to
A
foot
the
Cover
down
Cover
their toward and
ankle.
catches
push
foot
with
part
toward
highest
you.
will
the Lower
the
of
B you.
come
pin
presser
cutter
position
right
presser
off.
under
toot.
cover
by
foot
to
—2--
Push
+
part
Always
and
B close
close
front
it.
cover
when
sewing.
Page 8
Finger
Stitch
(Conversion
Raise
+
turning
Overlock:
For Push
stitch
line
©
Rolled
For
stitch
Pull
red
front
,,,,,,,,
Presser
the
Raise
Knob
overlock
from
finger
needle Edge:
t
Lifter
to
knob
knob
on
needle
handwheeItoward
on
finger
line
Foot
presser
the
plate.
needle
foot
align
to
toward
lifter to
rolled
to
highest
you.
you
plate
it
lift
with
to
up
edge)
position
the
align
the
rear
with
it
presser
by
red
Needle
plate
Stitch knob
finger
foot. Presser
When materials,
more
step
foot
replacing
presser
to
lifter
obtain
stops
presser
foot
wider gap.
at
foot
lifter
position
can
or
A.
sewing
be
lifted
very
up
thick
one
Disengaging
in
ease
For
from
screw
and
+
hand
turn
and
hand.
right
Since taken
sure
the when
to
+
Be
Upper
threading,
A
grasp
the
it
in
upper
put
side
the
direction
cutter
moving
cutter
Cutter
push
with
back
the
right
is
this
upper
the
forefinger end
arrow
of
sharp.
part.
down
of
care
before
cutter
the
B
your
of
holder
with
should
sewing.
holder
left
your
be
foot
foot
C,
8
cutter
—3—
Page 9
PREPARATION
3.
FOR
SEWING
ConneCting
3-1.
Connect Before
voltage
plate
a
on
Specifications
±
Press power
Always
±
in
foot
plugging
same
is
at
switch
the
the
and
switch
use.
control
in
as
back
sewing
Power
your
that of
vary
on
off
power
and
machine,
your
of
machrne).
from
machine
the
light.
unplug
or
Cord
cord
be
machine.
country
machine
®
sure
to
to
that
(written
country.
turn
when
on
the
the
not
—4--
more
The
machine When
not
will
control.
DO
÷
the
NOT
you
runs.
power
operate
put
press
switch
anything
the
even
foot
is by
control,
turned
pressure
foot
on
the
the
off,
control.
on
faster
machine
the
the
foot
Page 10
Setting
3-2.
Extend
turn
then
position.
the
it
Telescopic
telescopic
until
the
thread
shaft
Thread
stand
clicks
to
into
its
Stand
height,
full
locked
its
3-3.
The
iiiy
(1)
(2)
(3)
Changing
machine
au
I
the
Cut
(behind
thread
new
the
of
Raise foot.
Press thread
the
out
comes
is
thread
the
original
presser
the
down
knot
looper
about
to
Threads
supplied
•.y
in
telescopic
the
on
thread.
foot
tension
the
pass
can
thread
10
with
use
thread
spindle
lifter
through
cm
thread
near
and
to
release
until
past
but
the
stand).
tie
lift
up
lever
smoothly,
the
presser
the
cone
Place
to
it
the
so
thread
spool
end
the
presser
that
draw
foot.
the
the
knot
(4)
When the
needle
pulled
is
changing
thread
to
knot
avoid
and
the before bending
caught
needle
reaches
it
the
the
in
thread,
the
needle
needle’s
off
cut
the
of
eye
knot
the
as
eye.
—5—
Page 11
Cover prevent
the
thread
spool
from
with
slipping
the
“NET”
down
on
as
thread
needed
cones.
to
When usingastandard
spooi
the
adapter
(supplied
type
thread
with
machine) (as
the
spool,
insert
shown).
Replacing Needle
3-4.
to
screw
its
out
highest
right
following
you.
way:
power
the
positionbyturning
needle,
and remove
left
supply
loosen
needle.
needle
plug
right
For
clamp
Clamp
Scr
Right Clamp
Needle
Screw
Tighten
Replace
needleinthe Note:besuretotake before
replacing needle.
(1)
Bring
needle
handwheel
(2)
When needle left
needle
towards
replacing
clamp
replacing, loosen screw. With
the
flat
into
go.
#11—#14”
the
side
groove
same
(3)
needle
Loosen
\
new
it
will
as
“HAx1
Use NO:
75-.9O)
These
machine.
are
from
away
needle
of
(SCHMETZ 130/705H.
for
home-use
as
you,
insert the
barasfar
sewing
—6—
Page 12
Threading
3-5.
threading
When threading
sequence:
Lower
First: Second: Finally:
Lower
(1) Open
Take
the through order, dial
©.
must
Upper
Needle
looper
front
thread
guide
through
(Fig.
loopef
cover.
©
guides
A)
machine
the
carried
be
threading looper threading
threading (See
drawn
of
the
out
threading
(C,
Page
from
the
thread
©and
©—
from
(A)
D)
(A)
2)
in
(B)
spool
stand
the
the
and
and
thread
beginning,
following
pass
then,
tension
it,
in
A
Fig.
While
right
your discs
Bring turning thread
Hook
illustrated. Then,
turning
by Thread tweezers.
Cut
the
thread.
pressing
hand,
your
with
lower
the
handwheel
through
thread
move
the
thread
(Fig.
down
lower
around
the
the
hole
D)
the
thread
lay
hand.
left
looper
towards looper
part
lower
handwheel
the
of
leaving
tension
between (Fig.
the
to
S
looper
lower
about
far
you,
thread
from
slightly
towards
10cm
release
thread
B)
left
and
guide
back
looper
position
to
you.
(4”)
lever
pass
to
the
9
of
with
tension
the
(Fig
front
right
.
using
spare
by
C)
as
—7--
Page 13
Upper
(2)
Bring
turning
Draw
of
( guides
looper
upper
the
handwheel
thread
thread
the
©-.Ø.(Fig.
from
threading
looper
toward
spool
stand
A)
and
and
(B)
by
guide
through
through
it,
order,
in
position
lowest
its
to
you.
pass
then,
pressing
While
right
your
with
discs
Thread Cut thread.(Fig.
Close
the
the
the
hand,
your
hole
thread
front
C)
down
lay
left
of leaving
cover.
the
thread
hand.
upper
tension
between
(Fig.
looper
about
release
B)
©
10cm
thread
using
(4”)
with
lever
tension
tweezers.
spare
of
—8--
Page 14
(3)
1.
2.
3.
4.
Needle
ease
For
the
to
Raise Draw guide Lay while
Pass needle Pass needle
Threading
threading,
in
non-operating
needles
the
thread
®.
pressing
thread
thread.
thread
thread.
between
through
thread
from
down
through
(Fig
(C)
turn
position.
their
to
spool
thread
the
guides
A)
(D).
the
and
tension
guides
moveable
(See
highest
pass
tension
©, ®,
©,
Page
position.
it
discs
release
© ©
cutter
3).
through
©
lever.
right
for
left
for
Fig.
A
Then
5. Cut
the
spare
tweezers
Use
Preparation
that
Check Confirm
cutter
lower
towards
slowly
is
there
the
Turn
to
hand
finger
stitch
thread
If
the
the
of threaded
thread
thread
thread.
for
no
the
that
correctly
fabric
any
handwheel
check
of doesn’t
needle
incorrectly.
each
leaving
for
Sewing
thread
upper
you.
or
that the
plate,
needle’s
easy
slips
by
Ifitis
waste
towards
the
needle
wind
check
eye
about
threadingtoneedle’s
Checking
and
guides,
off
moves
cutter
turning
not
thread
you
thread
winds
plate.
around
if
©.
10cm
the
correct,
between
with
the
any
(4”)
of
breaks.
or
against
handwheel
check
cutters.
your
around
finger
stitch
threads
I-
eye.
F
the
if
right
the
are
—9—
Page 15
FOUR
4. USING
4-1.
After
are out foot,
two finger.
4-2.
When
ahead
There
For
foot
material front
sewing.
Before
threading
wound
not
four
the
and
three
or
Setting
beginning of is
setting
lifter
of
THREAD
NEEDLES
2
Sewing
is
around
threads
the
turn
times
presser
the
need
no
the
lift
to
under
cutter
the
OVERLOCK
completed,
the
under
handwheel
make
to
Fabric
the
sew,
to
foot
raise
to
thick
very
the
up
presser
the
and
and
stitch
and
stitch
place
and
the
material;
presser
foot
lower
when
finger,
behind
towards
form
the
will
it
presser
and
presser
STITCH
the gently the
you on
material
fed
be
Raise
foot.
push
threads
presser
by
the
through.
foot
Place
toot
draw
hand
stitch
just
lifter.
presser
the the
it
to
before
—10—
Beginning
4-3.
Beginning
(1) Place
begin
and
the
to
material
sewing
and
sew
under
slowly.
Ending
toe
the
Sewing
of
presser
of
the
foot
Page 16
Ending
(2)
off
Sew
thread
the
from
sewing.
the
Draw
as
left
the chain-stitches.
cut
Then
foot
not
Do
+
break.
and
sewing
of
material
untying
finished
the
thread
the
pull
it
forming
fabric
machine
This
roughly
out
and
is
5
to
gently
is
called
6cm
chain
a
prepare
backwards
operating
chain-stitch
from
(2”)
the
as
to
for
needle
prevent
the
and
sewing.
presser
the
will
next
and
make
bend
the
to
Adjustment
4-4W
Pressure
presser
The
materials Adjustment
thin
very Accordingly,
pressure Increase tightening
and
of
or
the
the
foot
medium
necessary
is
very
sew
thicker
pressure
adjustment
of
pressure
thick
thinner
materials
the
(standard)
only
materials.
materials
the
of
screw.
Presser
pre-adjusted
is
thickness.
when
with
presser
you
more
Foot
work
with
pressure.
foot
for
on
less
by
\—
—11—
Page 17
4-5.
Thread
Tension
Chart
‘N.N.
N
THREAD TENSION
N..
PATTERN’N
STITCHES
OVERLOCK
ROLLED
FINE
Ffl(F
ROLLED
EDGE
Left
Needle
Right
Needle
II1
C>IH
[LJ
4 4 4
t>Il4I
LJ
4
4
Upper Looper
1II
II!
A
4 4
Lower Loope
[J
4
0
STITCH
LENGTH
2.5-5
mm
1-1.5
mm
CUTTING
WIDTH
5-6
mm
5-6
mm
The
tension different above. Since thread tension Thread and
the The
differential
according
the
figures tension, slightly.
tensions
thread.
for
each
it
will
feed
in
to
the
may
of
the
the
be
differ
ratio
thread
pattern
chart
necessary
according
is
normally
are
tension
stitches
for
average to
to
“N”.
dials
asinthe
adjust
the
kind
(See
should
strength
the
thread
fabric
of
R16)
be
chart
of
—12—
Page 18
4-6.
the
Set
To
tighten
number.
To
loosen
number.
Left
®
Right
©
Upper
©
Lower
Correct
(1)
Lower well threads
fabric.)
Needle
Thread
balance
the
the
needle
needle
looper
looper
looper
balanced
should
thread
Tension
of
tension,
tension,
thread
tension.
thread
with
should
the tension
turn
turn
tension
thread
thread
thread
and upper
same
make
crosses
not
Adjustment
weak
as
tension
tension
tension
teqsion
tension
thread
tension.
at
be
slacken,
as
dial
dial
(Both
the
edgeofthe
possible.
to
a
higher
toalower
should
looper
or
pulled.
be
thread Right
thread
looper
needle
(2)
Unbalanced round
Tighten
©)or
(Dial
the
loosen
©).
and
thread
the
over
thread
upper
the
tension
looper
back:
of
tension
the
upper
of
the
thread
looper
lower
wraps
(Dial
looper
Upper thread
looper
—13—
Page 19
C.)
CD0
0
U)
0
(P
..
CD
U)
0
0
-
o_
0.
CD
z.
CD
C)
0
ZCDCD
CD
oO.
0.CD
CD
CD
zT
CD
C
-
a
CD
T.
-‘0
(D?
-
0-’
0
.
.
.
C
CD
a
-
D
.
CD
0.
-
a_
-
-
U)
0
0
3_
Page 20
5.
ADJUSTING
WIDTH
• Adjust
(1)
(0.28”) The Open
If
the width, cutting arrow.
the
standard
the
cutting
AND
cutting
according
cutting
front
cover
width
leavinioops
width
adjusting
(To
a
bigger
BALANCE
CUTTING
width
from
to
the
kind
width
is
to
adjust
is
narrower
off
the
fabric
dial
number)
OF
WIDTH
5.2
(0.2”)
of
material.
5.5mm
the
cutting
than
edge,
to
the
STITCH
to
7.0mm
(0.21
width.
the
stitch
turn
direction
“).
the
of
(2)
causing the of
6.
STITCH
The
regular stitch 5mm
+
For
2.5mm is
If
the
cutting
cutting
the
machine
seaming
length
by
one-touch
normal
used
a
pucker
width
arrow.
LENGTH
is
from
overlock
to
5mm.
only
width
(To
pre-set
and
1mm
of
A
for
rolled
is
wider
than
within
the
overlock
adjusting
a
smaller
dial
number)
ADJUSTMENT
to
a
2.5mm
overlock.
the
stitch
(Narrow
stitch
set
the
length
edge.
You
stitch
the
to
stitch
may
rolled
length
less
stitch
seam.turn
the
length
adjust
edge)
dial.
length
than
width,
direction
for
the
to
from
2.5mm
—15—
Page 21
Refer
DIFFERENTIAL
7.
since
one
and
at
function
indicates
material
of
feed
two
behind
different
produces
and
Differential fabrics, front
feed
to
This stretchable
“N”
+
scrap
a
chart
below
to
the
performance
stitch
test
and
on
FEED
prevents
independent
the
ratio.
a
lightweight
normal
the
are
you
stretching
needles,
finish
neat
fabrics.
position.
going
feed
can
to
or
dogs,
be
overlock
of
use.
puckering
one
adjusted
in
for
—16—
Page 22
CORDED
8.
OVERLOCK
Corded
stabilize such There
Place
(1)
hole sew the
Sew
(2)
edge
SEWiNG
9.
For For trimming
the your pressure
hand
overlock
stitches
knitted
as
are
in
with
cord.
over
of
neat
a inside
presser
left
to
two
the
the
the
curves,
line
hand, in
hold
can
fabrics.
ways
narrow
foot
the
narrow
a
overlocked
FOR
clean
and
of
foot,
the
it
be
when
of
cord
and
right
CURVED
guide
fabric
the
applying
the
at
opposite
against
used
joining
corded
back
needle
cord,
finish
the
pressure
same
the
tc
elastic
overlock.
(about
under
stitching
positioning
stitch.
curved
of
fabric
under
time,
direction
cutter
strengthen
materials
3mm)
foot,
the
SEAMS
seams:
gently
right
the
the
to
apply
with
shown.
as
and
into
then
through
it
on
with
front
fabric
a
your
the
the
the
of with little
right
outside
For directions
curves,
the
of
apply
above.
pressure
opposite
the
in
—17—
Page 23
THREE
10. STITCH
Though stitch To simply
(1)
Three-thread wideasa can Use width
The
this
overlock
three-thread
sew
remove
removing
By
achieved.
be
the
is
differential
left
THREAD
USING
machine
using
stitch
needle.
1
the
overlock
4-thread
normally 6mm.
thread
feed
overlock
tension.
ratio
OVERLOCK
NEEDLE
1
mainly
made
is
needles.
2
overlock
right
needle.
stitch using
stitch
(Dial
is
normally
for 4
using
needle
1
using
®).The
“N”.
1
needles
2
(See
thread
needle
for
cutting
R16).
as
—18—
By
(2)
right
The
thread
right normally
differential
The
removing
needle
tension
4mm.
sews
feed
the
with
(Dial
ratio
left
needle.
narrow
a
©).The
normally
is
width.
cutting
“N”.
Use
width
(See
the
is
P16).
Page 24
11.
Rolled
ideal
(1)
Remove needle>
(2)
Pull
with
ROLLED
Fine
Rolled
The
fabric
looper
edge
for
use
stitch
front
is
thread.
is
with
the
finger
red
EDGE
Edge
overlocked
achieved
thin
left
needle.
knob
line
on
/
with
by
rolling
materials.
(Sew
toward
needle
4
upper
only
you
plate.
the
and
with
to
lower
fabric
the
align
and
right
it
The
fabric
is
rolled
by
The
thread
upper
7.
1q
looper
tension
thread.
adjusting.
and
is
overlocked
with
STANDARD
CUTflNG
STITCH
LENGTH
DIFFERENTIAL
THREAD
TENSION
+
Adjust the
fabric
(3)
At
the
end
of
CHART
WIDTH
FEED
NEEDLE UPPER
THREAD
LOWER
THREAD
as
needed and
beginning
the
thread
FOR
RATIO
THREAD
LOOPER
LOOPER
according
the
threads.
of
chain.
ROLLED
sewing,
ROLLED EDGE
5-6
mm
1-1.5
mm
N
3-5
to
(See
gently
the
EDGE
kind
P24)
pull
FINE ED
5-6
1-1.5
ROLL-
EDGE
mm
mm
N
3-5
3
5
-
-
of
the
7.
\__
A
—19—-
Page 25
12.
PIN
TUCKS
Pin
tucks
avoid
Pin
tucking
clothing
(1)
Remove desired needle.)
(2)
Raise
+
Raise
(3)The
(See
+
Mark
+
The
are
cutting
is
and
pintuck
the the
tension
P12)
and
differential
overlocked the
fabric,
suited
a
lady’s
left
the
width.
upper presser
is
set
priin
feed
to
blouse.
or
cutter.
foot
for
tucks
on raise
the
right
(Sew
(See
lifter.
normal
ratio
the
the
design
only
in
is
normally
edge.
upper
of
needle
with
P3)
overlock.
advnce
So
a
child’s
the
as
cutter.
for
one
“N’.’.
to
your
(4)
Place the plate
+
Make (See
(5)The
sewing
the
edge
and
chain-stitch
P11)
tuck
is
fabric
in
line
to
start
is
ironed
finished.
under with
sew.
at
the
the side
the
one
to
end
presser
of
of
side
the
the
when
foot
needle
sewing.
with
your
—20—
Page 26
13.
REPLACING
LOWER
CUTTER
Replacing
*
Unplug
(1)
Open
(‘See
(2)
Loosen lower
(3)
Set
Align
needle
screw
CHANGING
14.
When the itisswitched
Howtoremove
(1)
Take
(2)
Remove Remove
(3) (4)
Change Replace
(5)
page
the
out
Lower
the
front
lower
cutter.
new
the
plate,
a
light
the
the
the
the
the
machine
cover
3) cutter
lower
of
top
and
does
on:
the
power
presser
lamp
light
lamp
Cutter
and
clamp
cutter.
lower
tighten
LIGHT
not
lamp
supply
cover.
bulb.
cover.
disengage
screw®and
cutter
lower
BULB
come
cover.
plug.
foot
lifterbypulling
with
on
upper
the
cutter
even
cutter.
remove
top clamp
though
it
out.
F
a
of
How
to
use
(1)
Take
out
(2)
Place
the
in
the
accessory directionofarrow of
arrow
Replace
(3)
of (2).
15.
LUBRICATION
Although machine a
special
dropsofoil
durability.
Lubrication
since
oil
impregnated
the
the
bulb
©,
the
on
bulb power
catcher
and
new
the
important
moving
catcher
supply
(plastic
box
around
,
turnitin
remove
bulbinthe
is
not
required
sintered
metal
the
parts
(plastic
plug.
the
bulb.
are
metal,
parts
sheath),
sheath)
bulbinthe
the
direction
reverse
often
all
made
oneortwo
will
increase
found
steps
for
this
of
—21—
Page 27
CLEANING
First
disconnect
removing
1.
Open
2.
Using
and
front
the
lint
plug
that
from
cover
brush
has
machine
the
and
provided,
accumulated.
from
electric
side
power
outlet.
cover.
remove
(See
all
supply
Page
the
by
3)
dust
STORAGE
1.
When disconnect removing
2.
Using your
3.
Store
the
plug
the
machine
away
machine
it
from
vinyl
when
from
from
cover
bright
is
the
the
provided
you
and
not
power
electric
finish
damp
in
use,
outlet.
please
your
supply
sewing.
places.
please
by
cover
SERVICING
are
to
h
Hdrd
..J
machine
was
purchased.
+-
...‘.........
Page 28
16.
ACCESSORIES
Screw
(large)
(small)
Tweezers
Cleaning
drivers
brush
Lower
Net
Vinyl
cutter
(anti-spill
cover
sleeves)
U U
Oiler
Needles
HAx1
(SCHMETZ
130/705H)
—ZE
—--—
#11...2 (75)
—23—
Spool
plastic
Adapter
sheath
Page 29
17.
(For
machine)
TABLE
Needle
home-use
Thread
SEWING
OF
HA
xl
(SCHMETZ
130/705
H)
sewing
MATERIALS,
Thin
material
(crepe,
#11
(75)
#60/2
Twisted
—#80/2
(#80/3
#100/3
twisted
Twisted
twisted
NEEDLES
georgette)
thread
thread
thread
thread)
AND
Medium material
(Serge,
#60/2
(Three overlock
THREADS
to
gabardine,
#11
or
(75)
Twisted
or
four-thread stitch)
thick
#14
(90)
thread
etcj
Thick
(thick
#50/2
-—60/2
(Three
overlock
material denim)
#14 (90)
Twisted
twisted
or
four-thread stitch)
thread
thread
(Between edge)
Use
ball
Thread
(Needle
Overedging
left
Stitch
point
tension
thread)
width
needle
length
needles
and
for
Man-Made
(Three-thread stitch)
Loose
5.2—5.5mm
2—2.5mm
fibers
overlock
(Set
or
stretch
the
fabrics.
Medium
balance
of
looper
5.2—5.5mm
2.5—3mm
tensions
Tight
weak)
5.5—6mm
2.5—3mm
—24—
Page 30
PROBLEM
18
SOLVING
Under
Machine
Machine not
properly
Needle
normal
wgcrenure
PROBLEM
does
does
feed
Breaks
conditions,
Not
insufficient
you
if
plugged
Pressure
Differential
or
Bent
Needle Pulling
inserted
fabric
carefully
of
CAUSE
on
feed
blunt
machine.
properly
in
presser
not
needle
incorrectly
while
follow
Check
foot
set
sewing
instruction
correctly
your
for
machine
Plug
and
Increase pressure right
Adjust
Insert
Reset
Do
operating,
before
CORRECTION
into
cord
machine
pressure
regulator
differential
needle
new
needle
fabric
pull
not
difficult
no
you
electrical
properly
by
screw
feed
call
turning
or
for
outlet
to
special
service.
adjustment
is
Skipphig
Irregular tches
Puckering
Tension
Needle tight
Improper
Need
adjusted
not
thread
threading
drfferential
tensions
feed
properly
are
too
Re-thread
•Re-thread
Check
Loosen
Re-thread
Set
machine
machine
thread
needle
machine
differential
tensions
thraad
feed
tensions
0.7
-
new
N
—25—
Page 31
SPECIFICATIONS
19.
Number
of
threads
4
Threads
(3
threads)
Number
Needles
Width
between
Overlock
length
Stitch
Differential
of
width
feed
needles
two
ratio
needles
Standard
Standard
HAx1
NO:
2
Needles
#11
75—90)
5.5
mm
#14
1
1:
2mm
O.7—2
(1
needle)
(SCHMETZ
(Range
5mm
5.2
1301705H
mm)
7
Maximum
Machine
Weight
sewing
dimensions
speed
—26—
Width Depth
Height
300mm 230mm
290mm
1500
(Max.
340mm)
(Max.
350mm—555mm)
8.7
RPM
kg
Page 32
0
p
w
m
Ci)
z
-4
0
3
0
a.
0
(D
3
3
01
p
3
3
b
C)
0
0
-4
0
0
(0
Page 33
L
17-8—L.LI—6000L9
Loading...