

Page 1
mo
cflri—
>0
=
C)
I
=
m
0-ti
0>
CI)
m
zc,
>
0
C
z
>
—I
C)
0
0
z
E
z
m
Page 2
_________________
________________
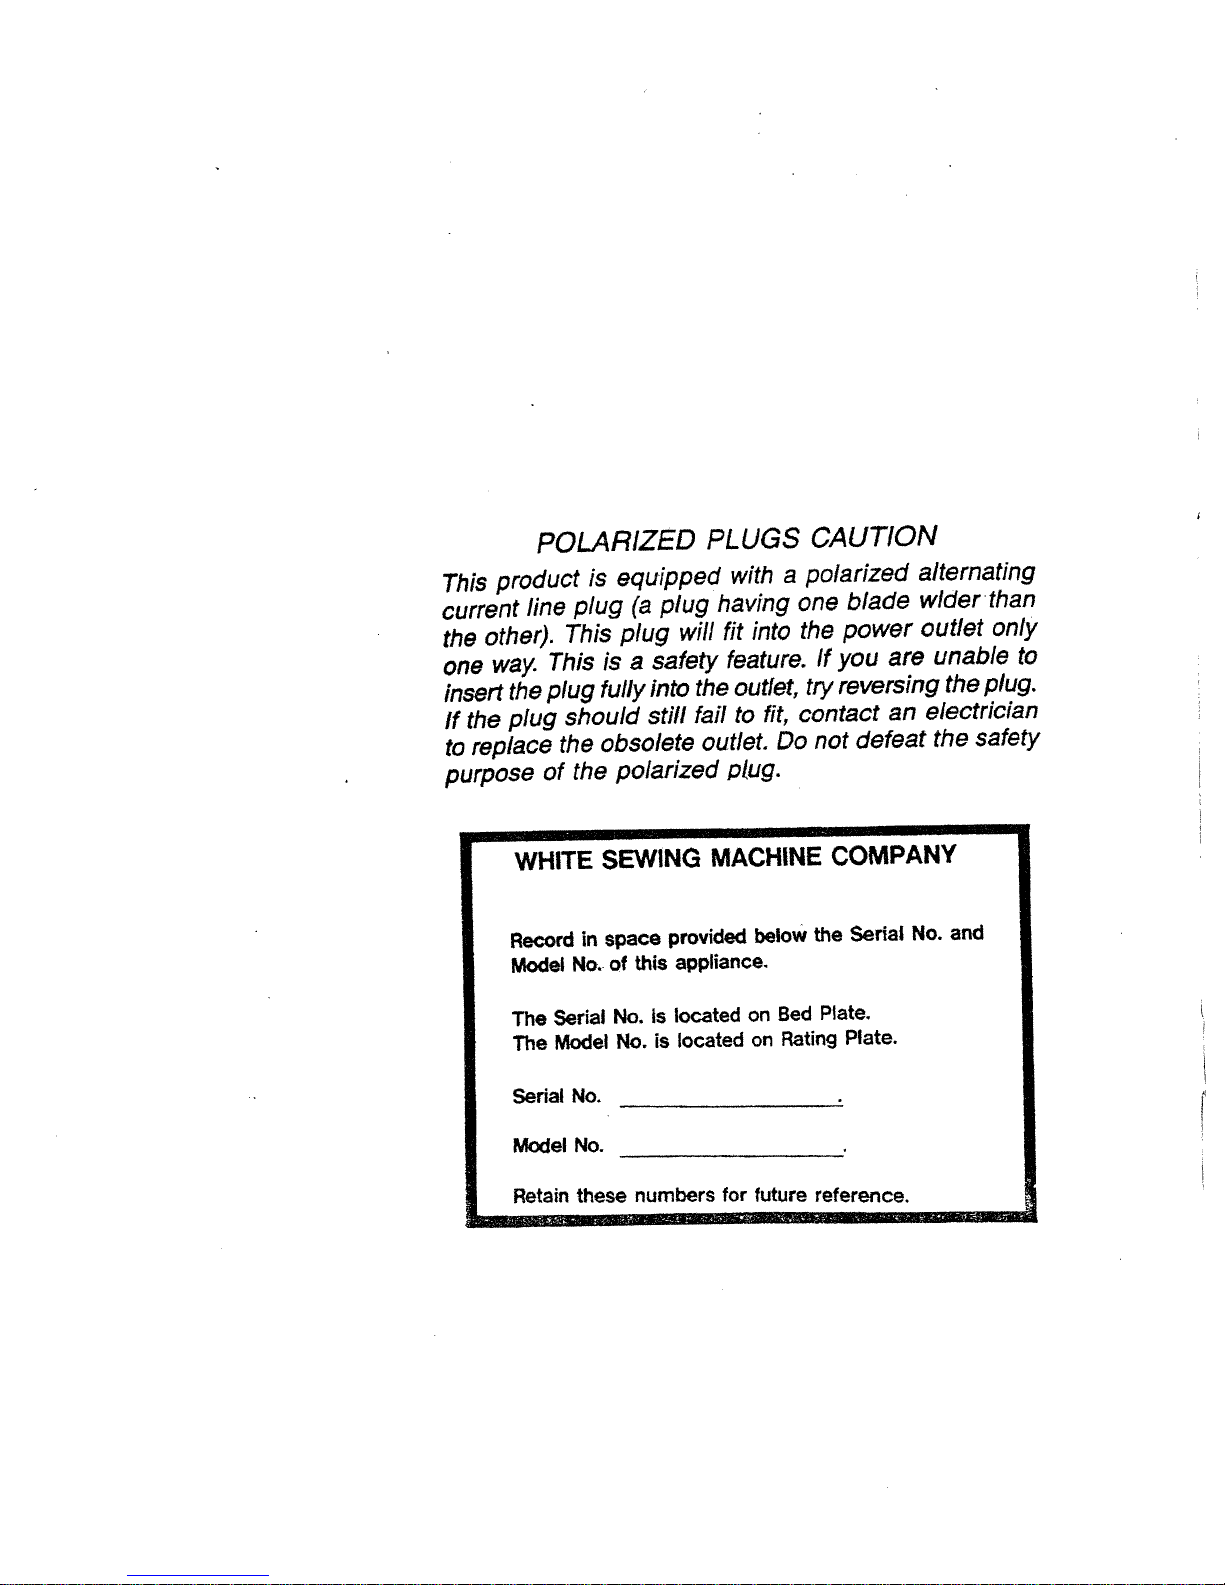
product
This
current
other).
the
way.
one
insert
the
If
replace
to
purpose
POLARIZED
is
plug
line
This
is
This
fully
plug
the
should
plug
obsolete
the
the
of
in
No.
Serial
Model
No.
SEWING
space
of
WHITE
Record
Model
The
The
Serial
equipped
plug
(a
will
plug
safety
a
into
still
polarized
provided
appliance.
this
located
Is
No.
is
No.
located
PLUGS
a
with
having
fit
into
feature.
the
outlet,
fit,
to
fail
outlet.
Do
plug.
MACHINE
below
Bed
on
Rating
on
CAUTION
polarized
blade
one
power
the
you
If
reversing
try
contact
defeat
not
COMPANY
Serial
the
Plate.
Plate.
alternating
wider
outlet
unable
are
the
electrician
an
the safety
and
No.
than
only
to
plug.
Model
Retain
No.
these
numbers
for
future
reference.
Page 3
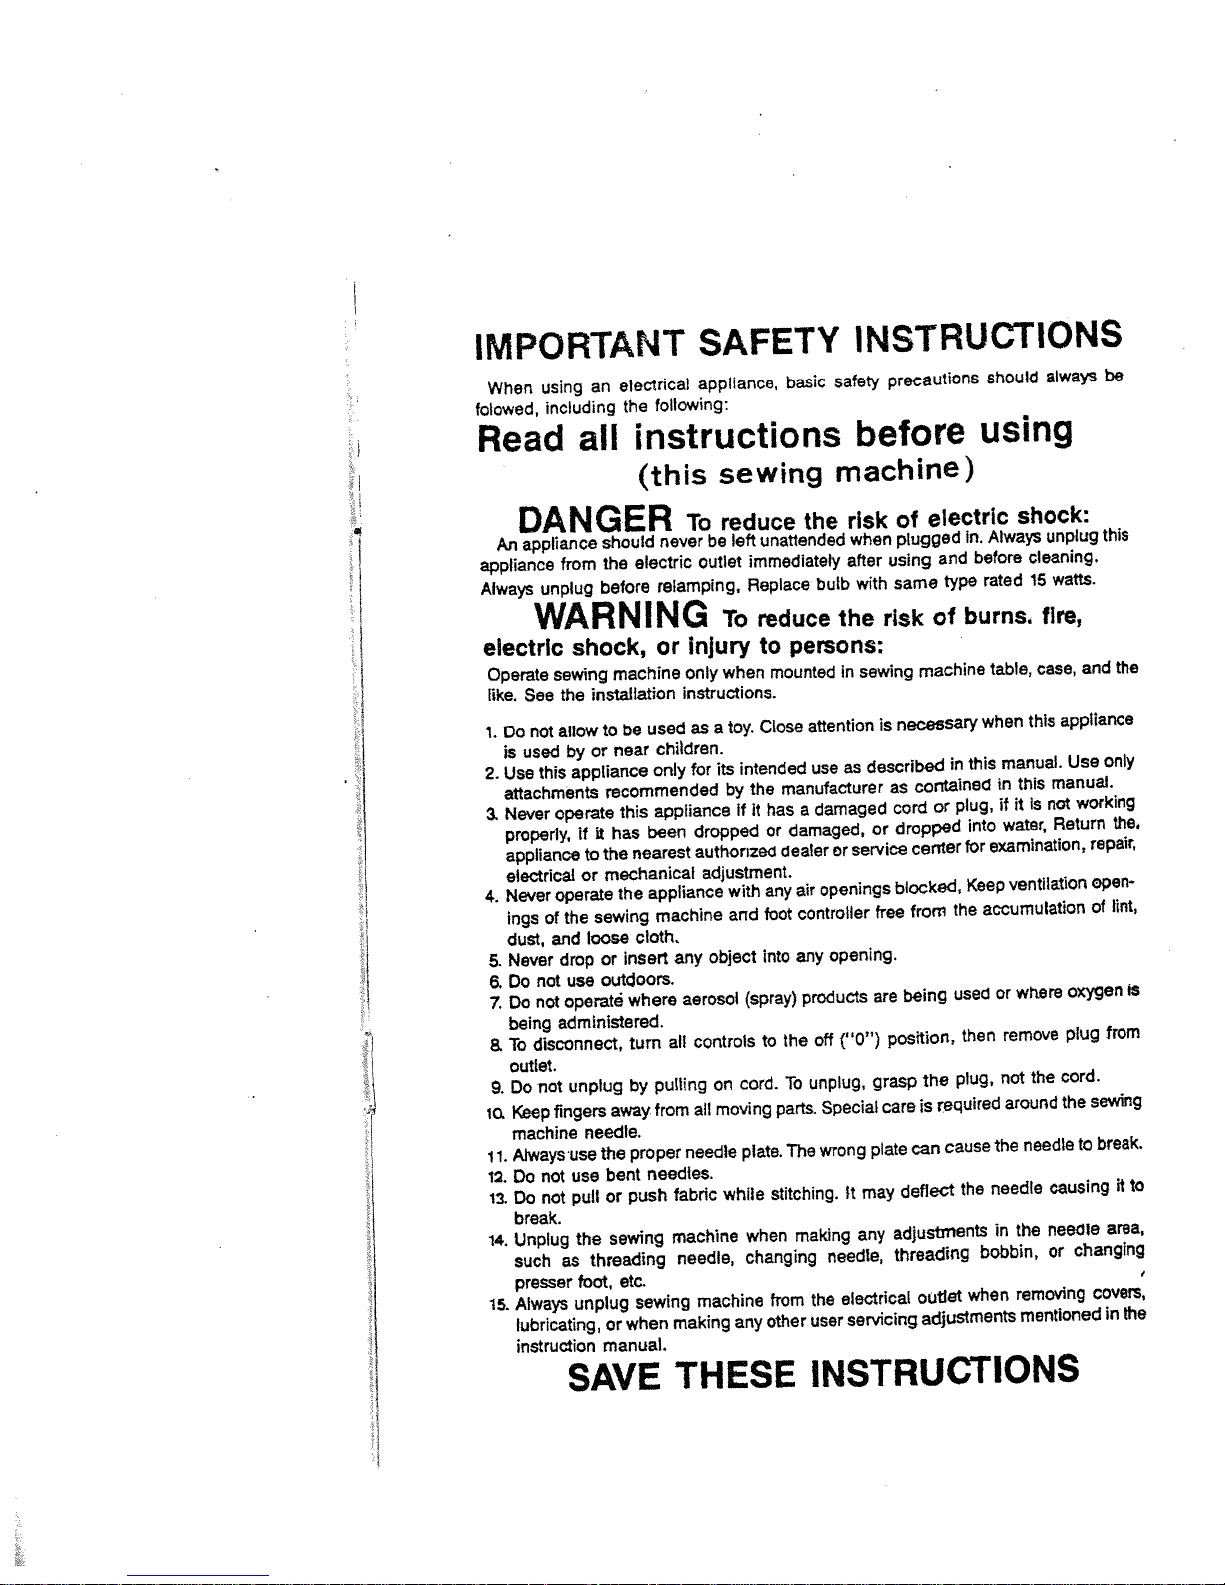
IMPORTANT
electrical
an
using
When
folowed,
Read
including
all
following:
the
instructions
(this
SAFETY
appliance
sewing
basic
INSTRUCTIONS
always
precautions
safety
before
machine)
should
using
be
DANGER
appliance
An
appliance
Always
from
unplug
WARNING
electric
Operate
like
1Donot
is
2
Use
attachments
Never
a
properly,
appliance
electrical
Never
4.
ings
dust,
Never
5.
Do
6.
7.
Do
being
To
8.
outlet.
Do
9.
10.
lep
machine
Always
11.
12.
Do
13.
14.
15.
shock,
sewing
the
See
allow
used
by
appliance
this
operate
if
operate
the
of
and
drop
not
use
operate
not
administered.
disconnect,
not
unplug
fingers
use
use
not
pull
not
Do
break.
Unplug
such
presser
Always
the
as
toot,
unplug
lubricating,
instruction
installation
or
to
or
sewing
loose
needle.
threading
never
should
electric
the
relamping,
before
or
machine
used
be
to
children
near
only
recommended
appliance
this
been
it
has
nearest
the
mechanical
appliance
the
machine
cloth.
insert
or
outdoors.
where
all
turn
pulling
by
from
away
proper
the
needles.
bent
push
or
sewing
etc.
sewing
when
or
manual.
reduce
To
left
be
outlet
To
injury
when
Only
Instructions
toy
a
as
its
for
by
dropped
authorized
adjustment.
with
and
object
any
aerosol
controls
on
moving
all
needle
while
fabric
machine
needle,
machine
making
unattended
immediately
Replace
reduce
to
persons:
mounted
Close
intended
the
manufacturer
ifithas
or
damaged,
dealer
any
foot
into
(spray)
to
the
To
cord.
parts.
The
plate.
stitching.
when
changing
from
other
any
risk
the
after
bulb
the
in
attention
as
use
damaged
a
or
openings
air
controller
opening.
any
products
(“0”)
off
unplug,
Special
wrong
It
making
needle,
electrical
the
servicing
user
when
with
risk
sewing
is
described
or
service
free
are
grasp
care
plate
may
any
electric
of
plugged
and
using
type
same
of
machine
necessary
in
contained
as
or
cord
dropped
center
blocked,
the
from
used
being
position,
the
required
is
cause
can
deflect
adjustments
threading
outlet
adjustments
in.
Always
before
rated
burns,
table,
when
manual
this
in
if
plug,
water,
into
for
examination,
ventilation
Keep
accumulation
or
remove
then
not
plug,
around
the
needle
the
in
bobbin,
when
shock:
unplug
cleaning.
watts.
15
fire,
case,
appliance
this
Use
manual.
this
is
not
it
Return
oxygen
wtere
plug
cord.
the
the
needle
causing
needle
the
or
removing
mentioned
this
the
and
only
working
the,
repait
open
lint,
of
from
sewing
break.
to
it
area,
changing
covers,
in
the
IS
to
/
SAVE
THESE
INSTRUCTIONS
Page 4

CONTENTS
Parts
of
Name
Accessories
Before
sewing(Power
extension
Take out
Winding
the bobbin
Removing
Inserting
Inserting
Threading
Drawingupbobbin
Levelling
Changing
Adjusting
Regulating
Drop
Changing
FabricSewing(pattern
Tostartsewing
Toflnish
Straight
Zigzag
Overcasting
Stretch
Blind
Button
Binding
Zipper
Button
Hemming
Twin
Embroidery
Quilter
Seam
Maintenance
Checking
bobbin
bobbin
machine
sewing
thread
feed
needle
Thread-
seam
stitch
sewing
stitch
stitch
sewing
sewing
hole
Needle
guide
Performance
bobbin
upper
the
presser
sewing
(Cleaning and
supply
tablefree
and
case
into
bobbin
case
into
thread
&
thread
directions
tension
foot
Needle
table
selector)and
Problems
and
Sewing
arm
sewing
bobbin
case
race
shuttle
Twin
needle
pressure
operation table
oiling)
WHATTODO
lamp)
threading
&2
1
3
4
5
6
7
7
8
9
10
11
12
13
14
15
15
16
17
18
19
20
20
21
21
22-23
24
24
25
25
27
28
28
29
29
30
31
A
Page 5
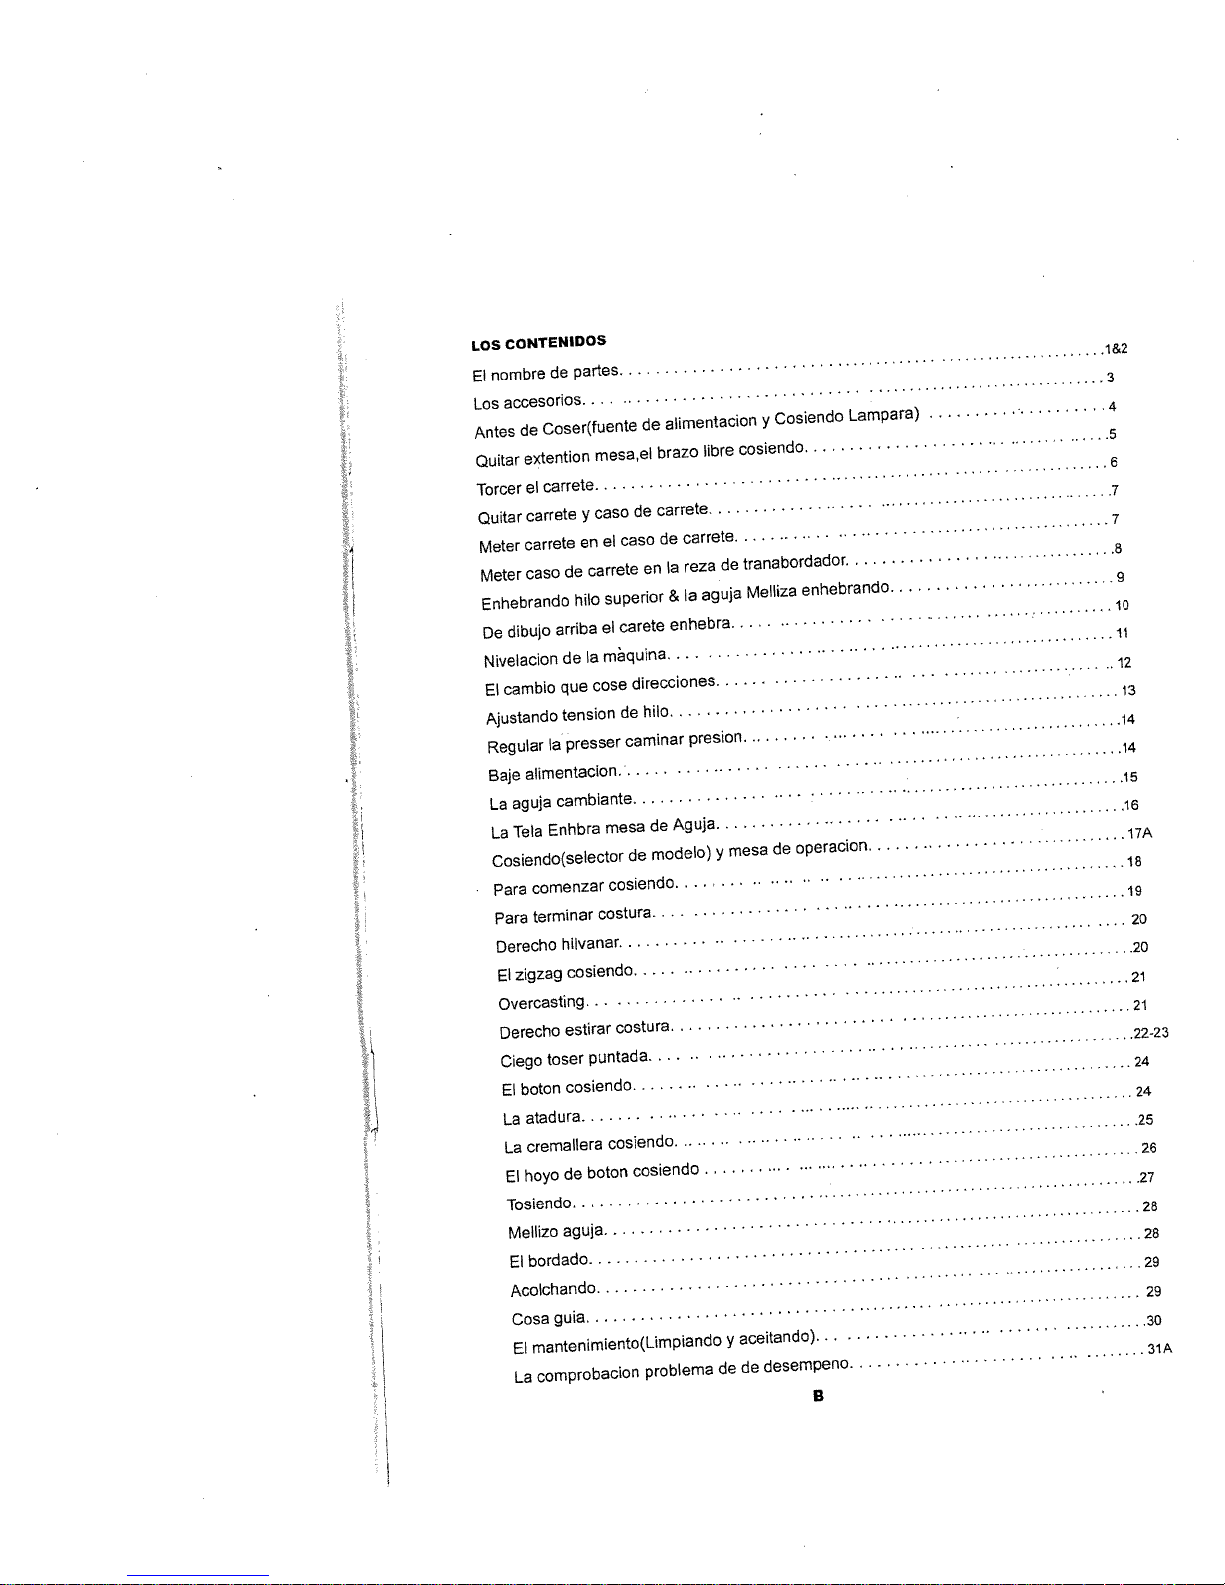
CONTENIDOS
LOS
de
nombre
El
accesorios
Los
Coser(fuente
de
Antes
extention
Quitar
Torcerelcarrete
carrete
Quitar
carrete
Meter
caso
Meter
Enhebrando
dibujo
De
Nivelacion
cambio
El
Ajustanclo
alimentacion
aguja
Tela
La
a
Enhbra
Regular
Baje
La
Cosiendo(selector
comenzar
Para
terminar
Para
Derecho
zigzag
El
Overcasting
Derecho
toser
Ciego
boton
El
atadura
La
cremallera
La
hoyo
El
Tosiendo
Mellizo
bordado
El
Acoichando
Cosa
mantenimiento(Limpiando
El
comprobacion
La
partes
mesa
caso
y
en
carrete
de
hilo
el
arriba
Ia
de
cose
que
tension
presser
cambiante
costura
hilvanar
cosiendo
estirar
puntada
cosiendo
boton
do
aguja
guia
de
el
de
caso
el
en
superior
carete
maquina
direcciones
hilo
de
caminar
mesa
de
cosiendo
costura
cosiendo
cosiendo
alimentacion
brazo
carrete
carrete
de
reza
a
Ia
&
enhebra
presion
Aguja
de
modelo)
problema
libre
aguja
y
do
de
mesa
y
Cosiendo
y
cosiendo
tranabordador
enhebrando
Melliza
operacion
de
aceitando)
desempeno
do
B
Lampara)
1&2
3
4
5
6
7
7
8
10
11
12
13
14
14
15
16
17A
18
19
20
20
21
21
22-23
24
24
25
26
27
28
28
29
29
30
31A
Page 6
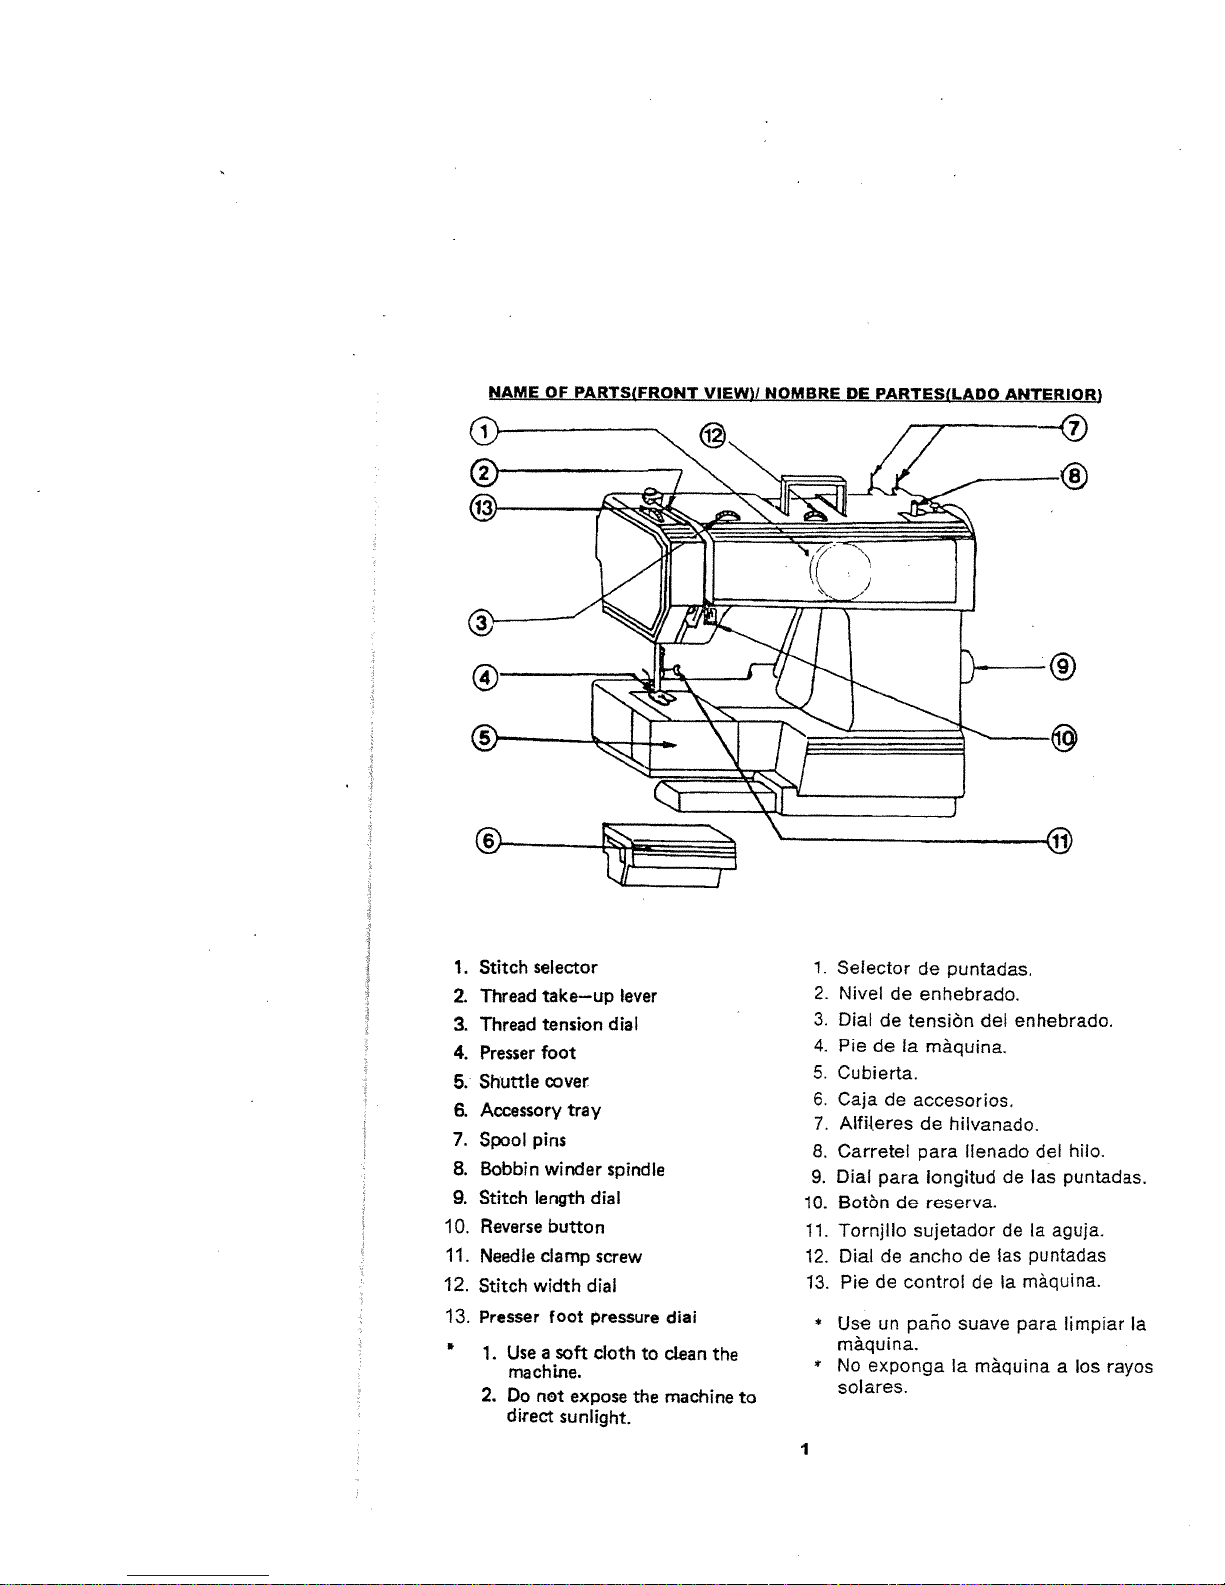
NAME
PARTS(FRONT
OF
VIEW)!
NOMBRE
PARTES(LADO
DE
ANTERIOR)
1.
2.
3.
4.
5.
6.
7.
8.
9.
10.
11.
12.
13.
‘
selector
Stitch
Thread
take—up
Thread
Presser
foot
Shuttle
Accessory
pins
Spool
Bobbin
Stitch
length
Reverse
clamp
Needle
width
Stitch
Presser
Use
a
1.
machine.
2.
not
Do
direct
tension
cover
tray
winder
button
foot
soft
expose
sunlight.
lever
dial
spindle
dial
screw
dial
pressure
cloth
to
the
dial
clean
the
machine
1.
Selector
Nivel
2.
Dial
3.
4.
Pie
Cubierta.
5.
Caja
6.
Alfileres
1.
Carretel
8.
Dial
9.
Botàn
10.
Tornjllo
11.
Dialdeancho
12,
Pie
13.
*
Use
de
de
de
para
de
un
de
enhebrado.
de
tensiàn
Ia
màquina.
accesorios.
de
para
longitud
reserva.
de
sujetador
control
pane
puntadas,
del
hilvanado.
llenaclo
de
de
las
de
Ia
de
suave
enhebrado.
hilo.
del
puntadas.
las
Ia
aguja.
puntadas
màquifla.
para
limpiar
Ia
màquina.
*
No
exporiga
ares.
to
sol
I
Ia
màquina
rayos
los
a
Page 7
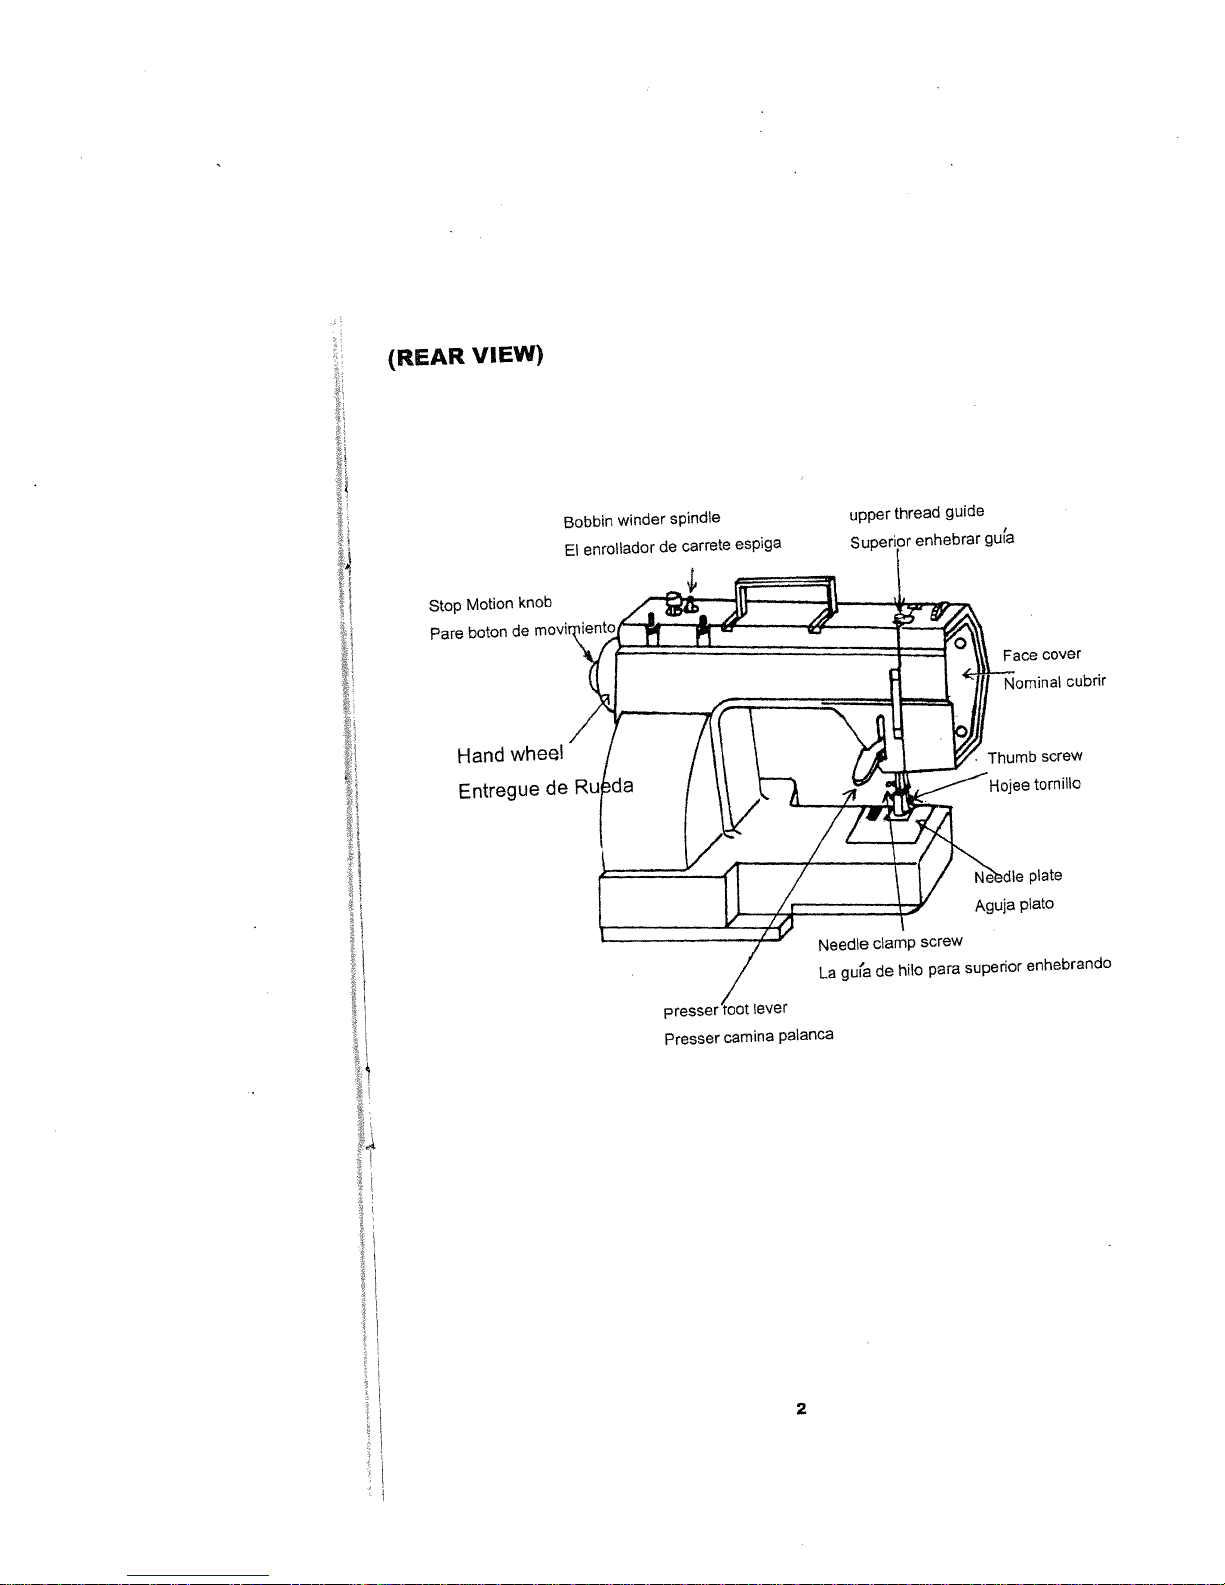
(REAR
Stop
Pare
VIEW)
knob
Motion
boton
whee’
Hand
EntregUe
de
Bobbin
enrollador
El
winder
spindle
de
carrete
espiga
upper
thread
enhebrar
guide
gula
Hojee
Aguja
Face
Nominal
torn
plate
plato
cover
cubrir
illo
Presser
lever
camina
palanca
2
La
gui’a
superior
para
hilo
de
enhebrando
Page 8
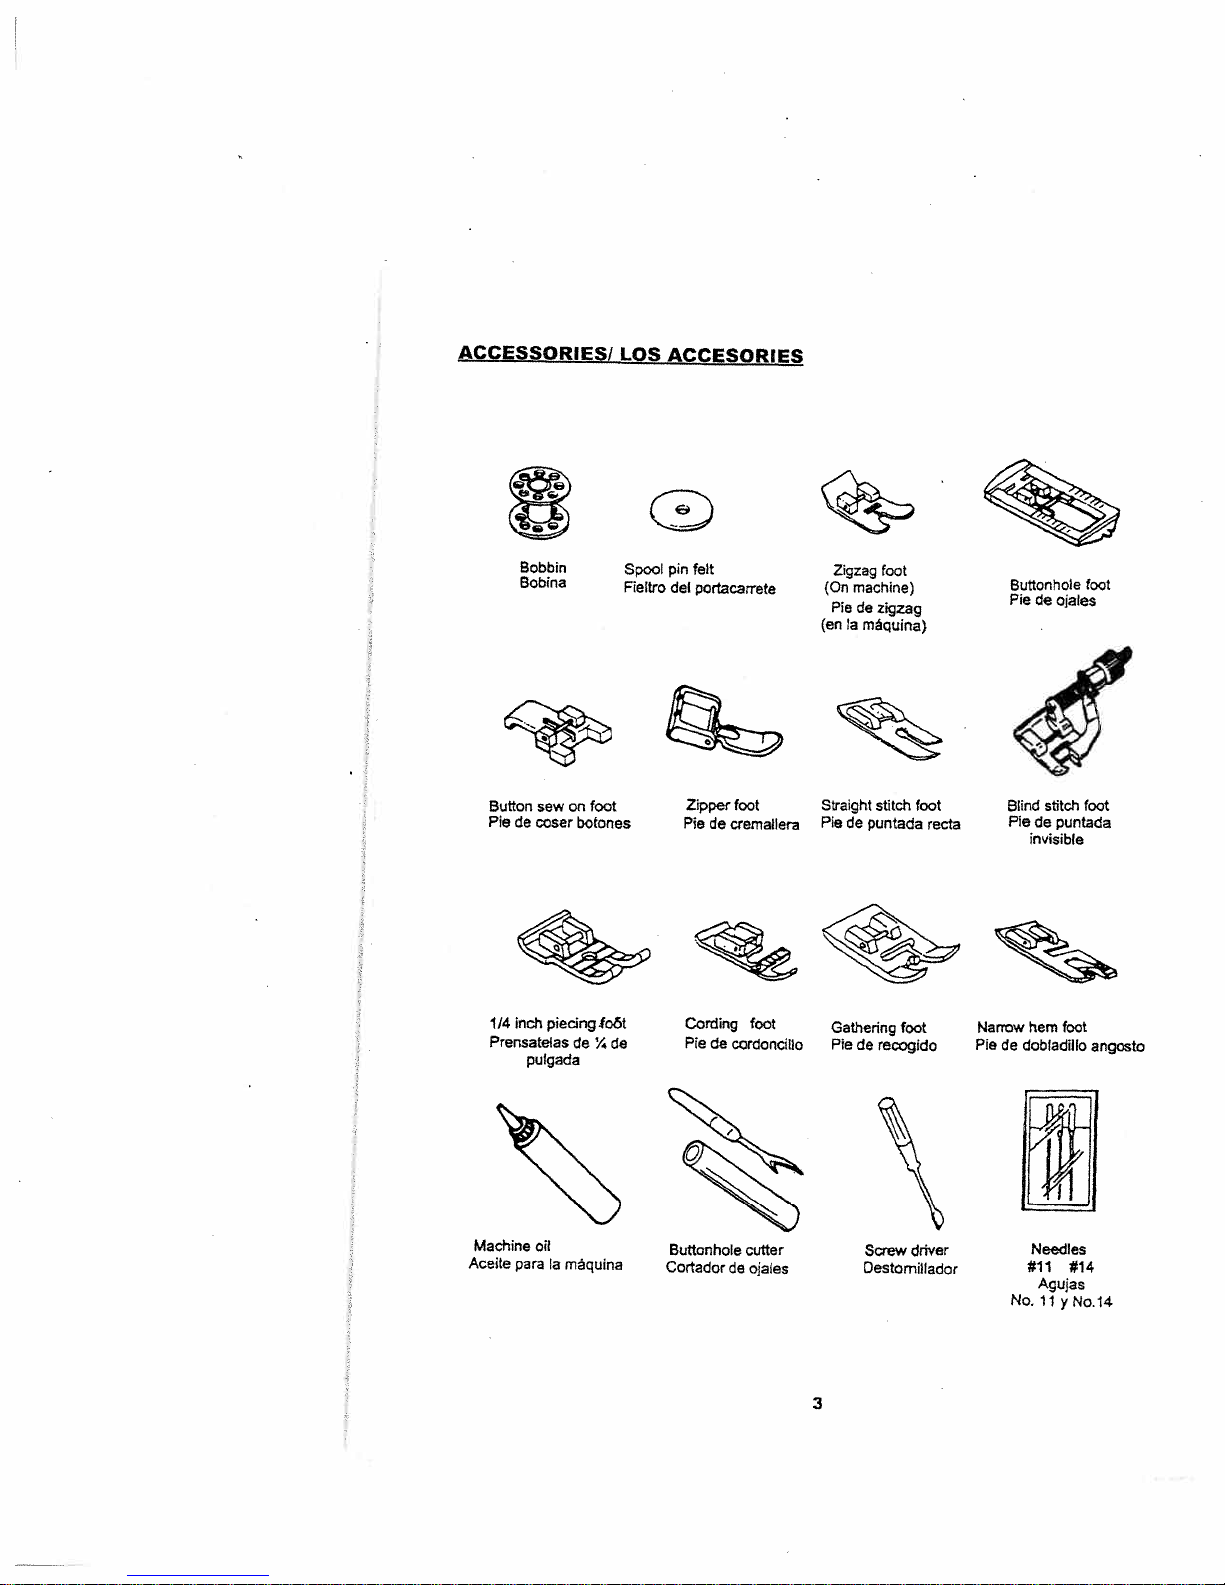
ACCESSORIES!
LOS
ACCESORIES
Bobbin
Bobina
Button
sew
Pie
de
coser
•b
Inch
1/4
Prensatelas
pulgada
Spool
Fieltro
on
foot
botones
piecing.foãt
tie%tie Pie
pin
felt
del
portacarrete
Zipper
Pie
Cording
foot
de
crematlera
de
cordoncillo
foot
Zigzag
(On
machine)
Pie
de
(en
a
Straight
Pie
tie
Gathering
Pie
de
foot
zigzag
máquina)
stitch
puntada
foot
recogido
foot
recta
Blind
Narrow
Pie
tie
Buttonhole
Pie
tie
ojates
i
stitch
Pie
de
puntada
in’isible
hem
dobtadillo
foot
foot
foot
angosto
Machine
Aceite
para
OIl
a
maquina
Buttonhole
Cortador
de
cutter
ojales
3
driver
Screw
Destomillador
Needles
#11
No.11
#14
Agujas
yNo.14
Page 9
________________________________
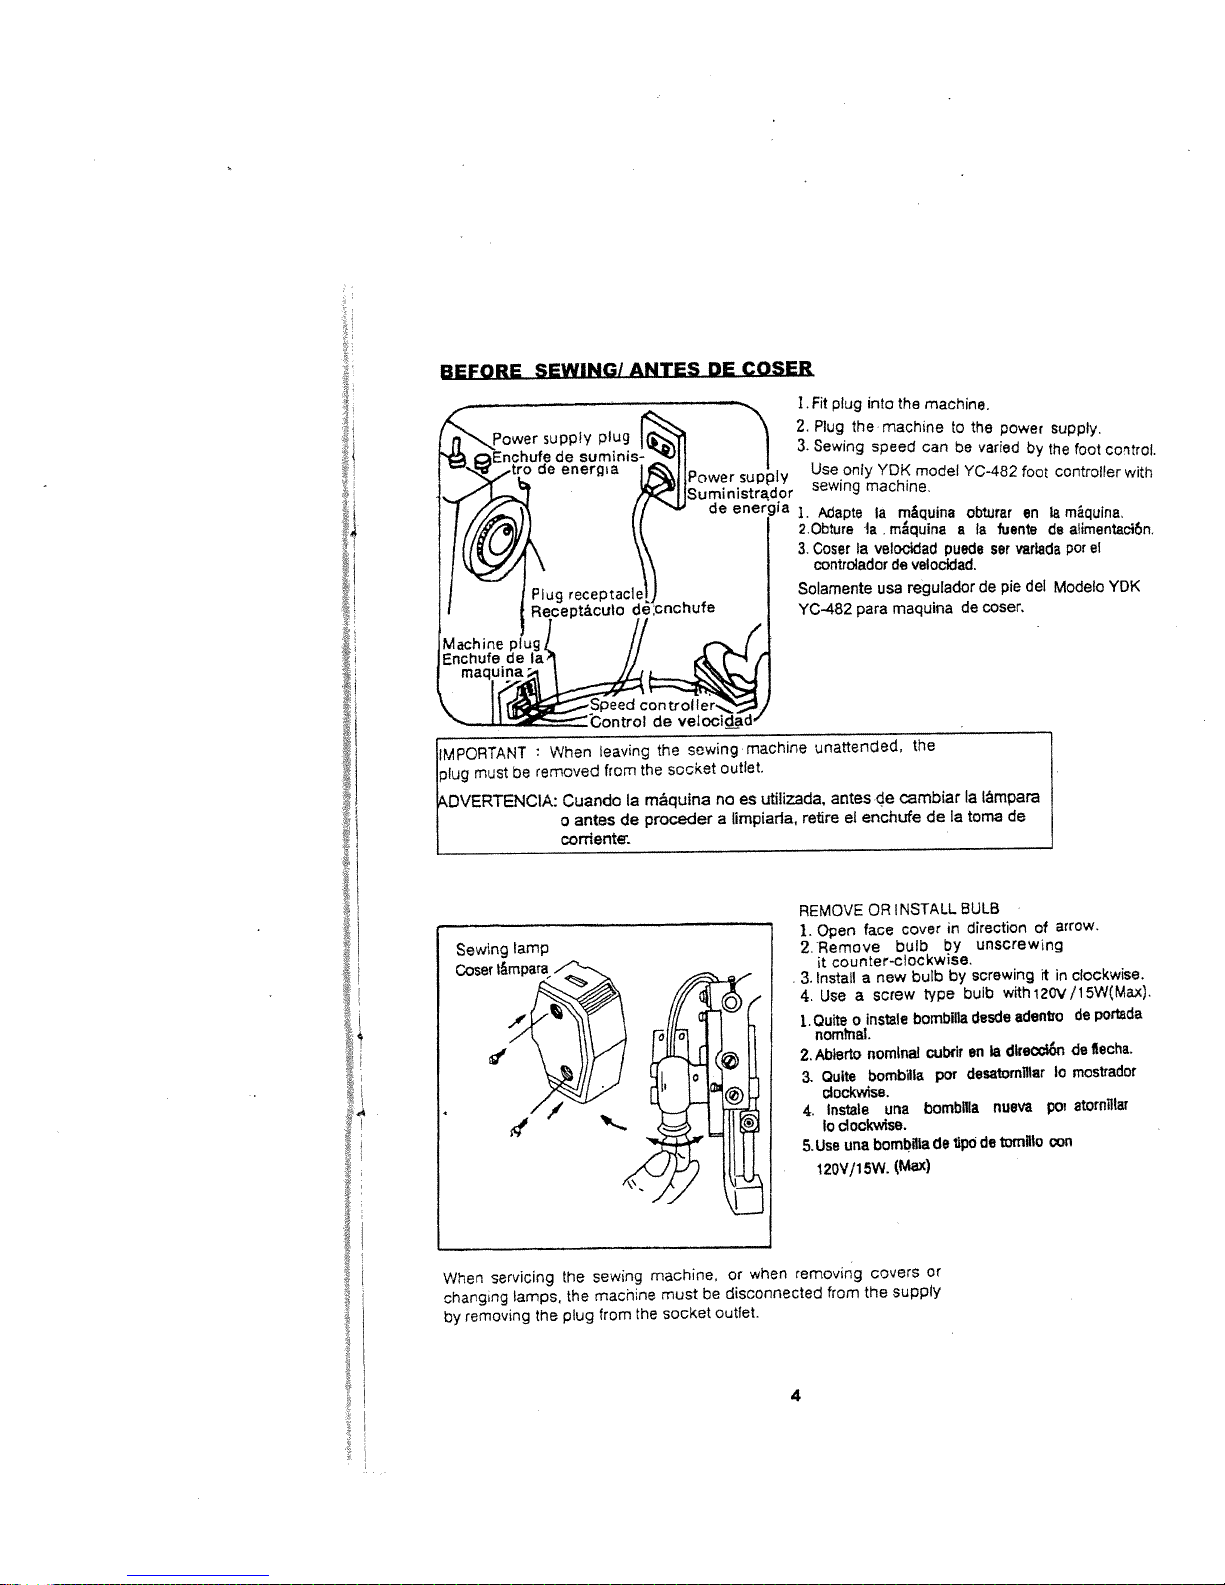
BEFORE
SEWING!
ANTES
DE
COSER
plug
into
the
machinetothe
speed
only
YDK
machine.
Ia
la
mquina
Ia
velocidad
usa
maquina
para
the
machine.
can
model
máquina
regulador
.Fit
2.
Plug
3.
Sewing
Use
sewing
1.
Adapte
2.Obture
3.
Coser
controladordevelocidad.
Solamente
YC-482
be
varied
YC-482
obturar
aIafuente
ser
puede
de
coser,
de
power
supply.
by
the
controller
foot
enIamáquina,
do
varlada
del
pie
Modelo
foot
control.
with
alimentad6n.
por
el
YDK
:•1I
I.
4
IMPORTANT
plug
DVERTENClA:
must
Sewing
Coser
be
lamp
iâmpara
/\
40
When
removed
Cuando
o
antes
corriente.
—“---
leaving
the
from
máquina
Ia
proceder
de
\\—1
sowingmachine
the
socket
outlet.
es
rio
a
limpiaria,
utilizada,
retire
REMOVE
1.
2.
3.
4.
1.
2.
3.
4.
5.Use
unattended,
eI
a
o
una
cambiar
de
enchufe
INSTALL
OR
face
bulb
now
a
screw
instale
nominal
bombilla
una
bomblila
(Max)
cover
arites
Open
Remove
counter-clockwise.
it
Install
Use
Quite
nomtnal.
Abierto
QuIte
clockwise.
Instale
clockwise.
lo
120Y/15W.
the
a
de
in
by
by
bulb
type
bombilla
cubrir
par
bomblila
tlpo
do
Iãmpara
a
de
toma
BULB
direction
screwing
bulb
desde
en
desatornullar
of
unscrewing
it
withl2Ov/15W(Max).
adentro
dlrección
Ia
nueva
totnlo
do
arrow.
clockwise.
in
de
do
mostrador
Ic
atorniutar
pci
con
portada
fiecha.
When
changing
removing
by
servicing
lamps,
the
the
the
plug
sewing
machine
from
machine,
must
socket
the
or
disconnected
be
outlet.
when
removing
from
4
covers
the
or
supply
Page 10
REMOVING
EXTENSION
TABLE!
QUE
QUITA
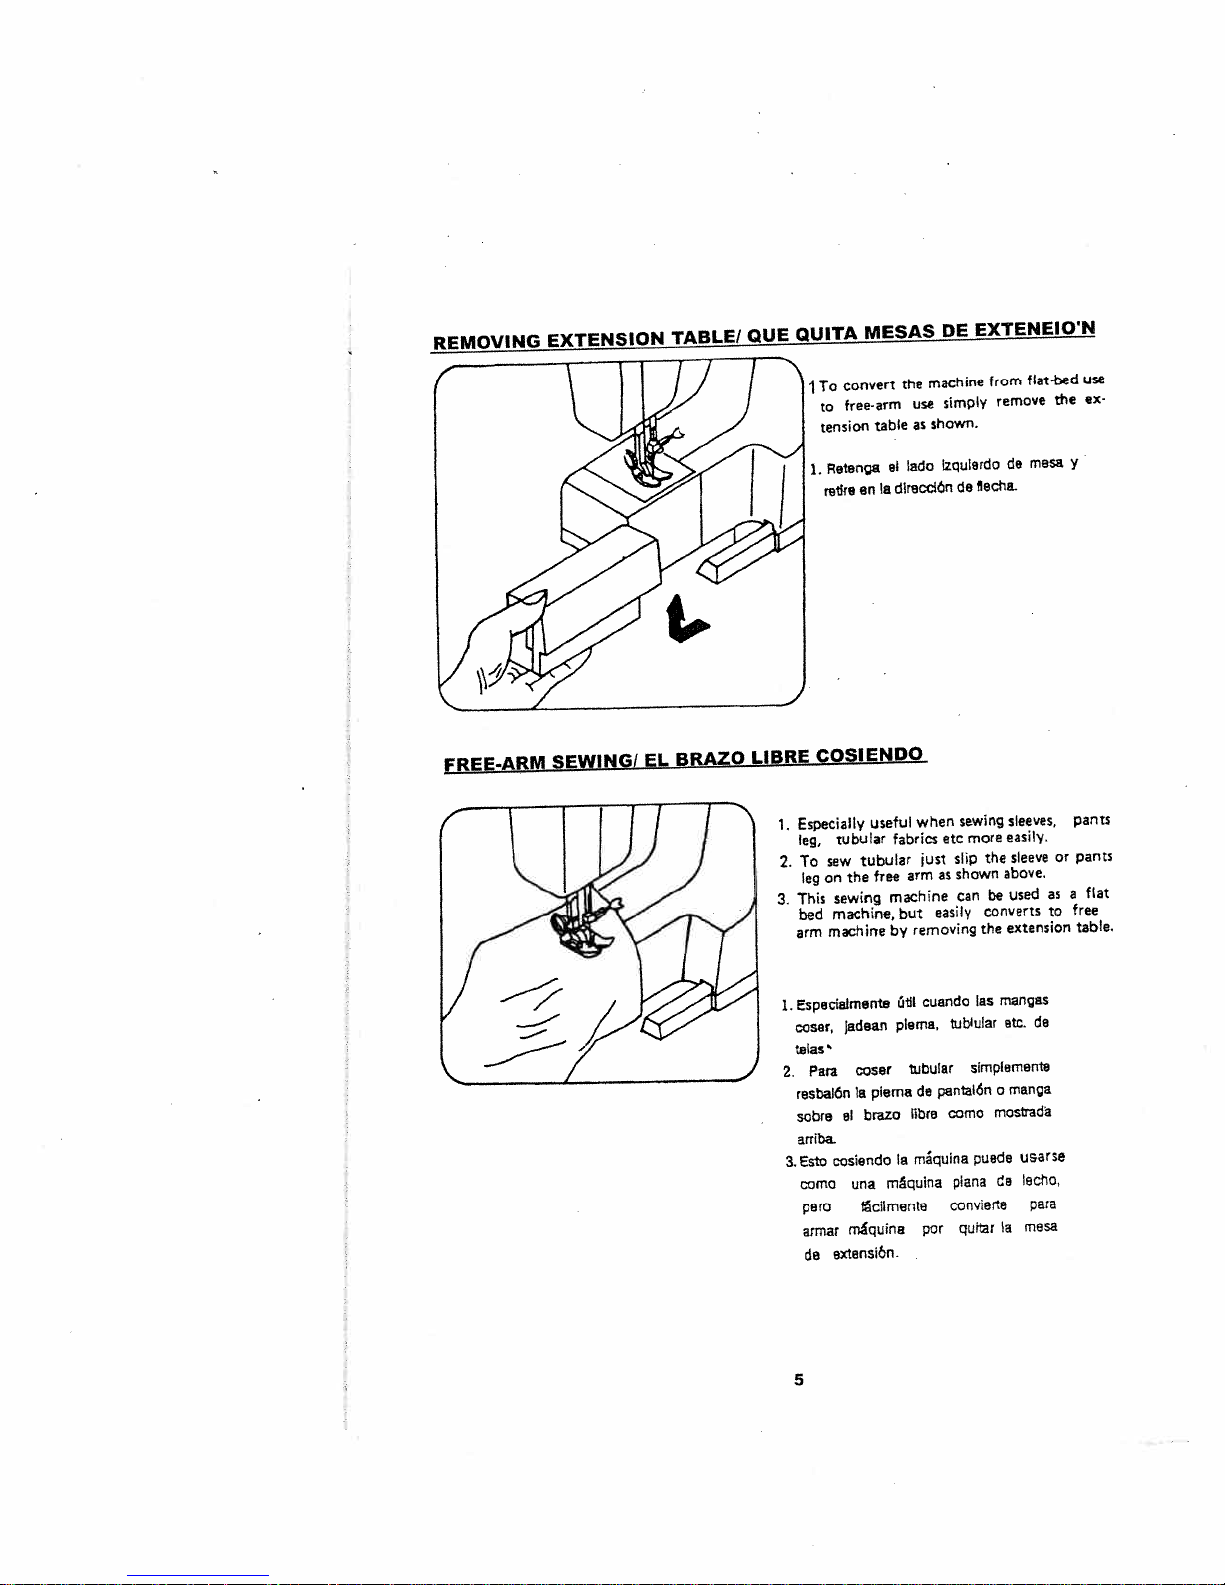
To
1
to
tension
Retenga
1.
r8tSN
MESAS
convert
free-as-rn
table
Ia
en
the
use
as
lado
el
dlreccl6n
EXTENEIO’N
DE
machine
simply
shown
lzquledo
ilecha.
de
from
remove
de
flat-bed
the
mesa
use
ex
y
FREE-ARM
SEWING!
EL
BRAZO
LIBRE
1.
2
3.
1.
2.
3.
COSIENDO
Especially
tubular
leg,
sew
To
on
the
leg
sewing
This
machine,
bed
machirre
arm
specialmente
jadean
coser,
tales
Pare
resbalón
el
sobre
arriba.
cosiersdo
Esto
como
una
pero
mquina
armar
extensi&n.
tie
useful
fabrics
tubular
free
machine
but
by
lIl
plema,
coser
piema
Ia
brazo
Ia
mquina
fci1n-rente
when
etc
just
as
arm
easily
removing
cuando
tibular
de
pantal6n
libre
rnquina
por
sewing
more
slip
shown
can
the
las
lubular
simplamente
como
puede
plana
convierte
quir
sleeves,
easily.
sleeve
the
above,
used
be
converts
extension
manges
etc.
manga
o
mostath
de
Ia
de
usarse
echo,
pare
mesa
pants
or
pants
flat
a
as
free
to
table
5
Page 11
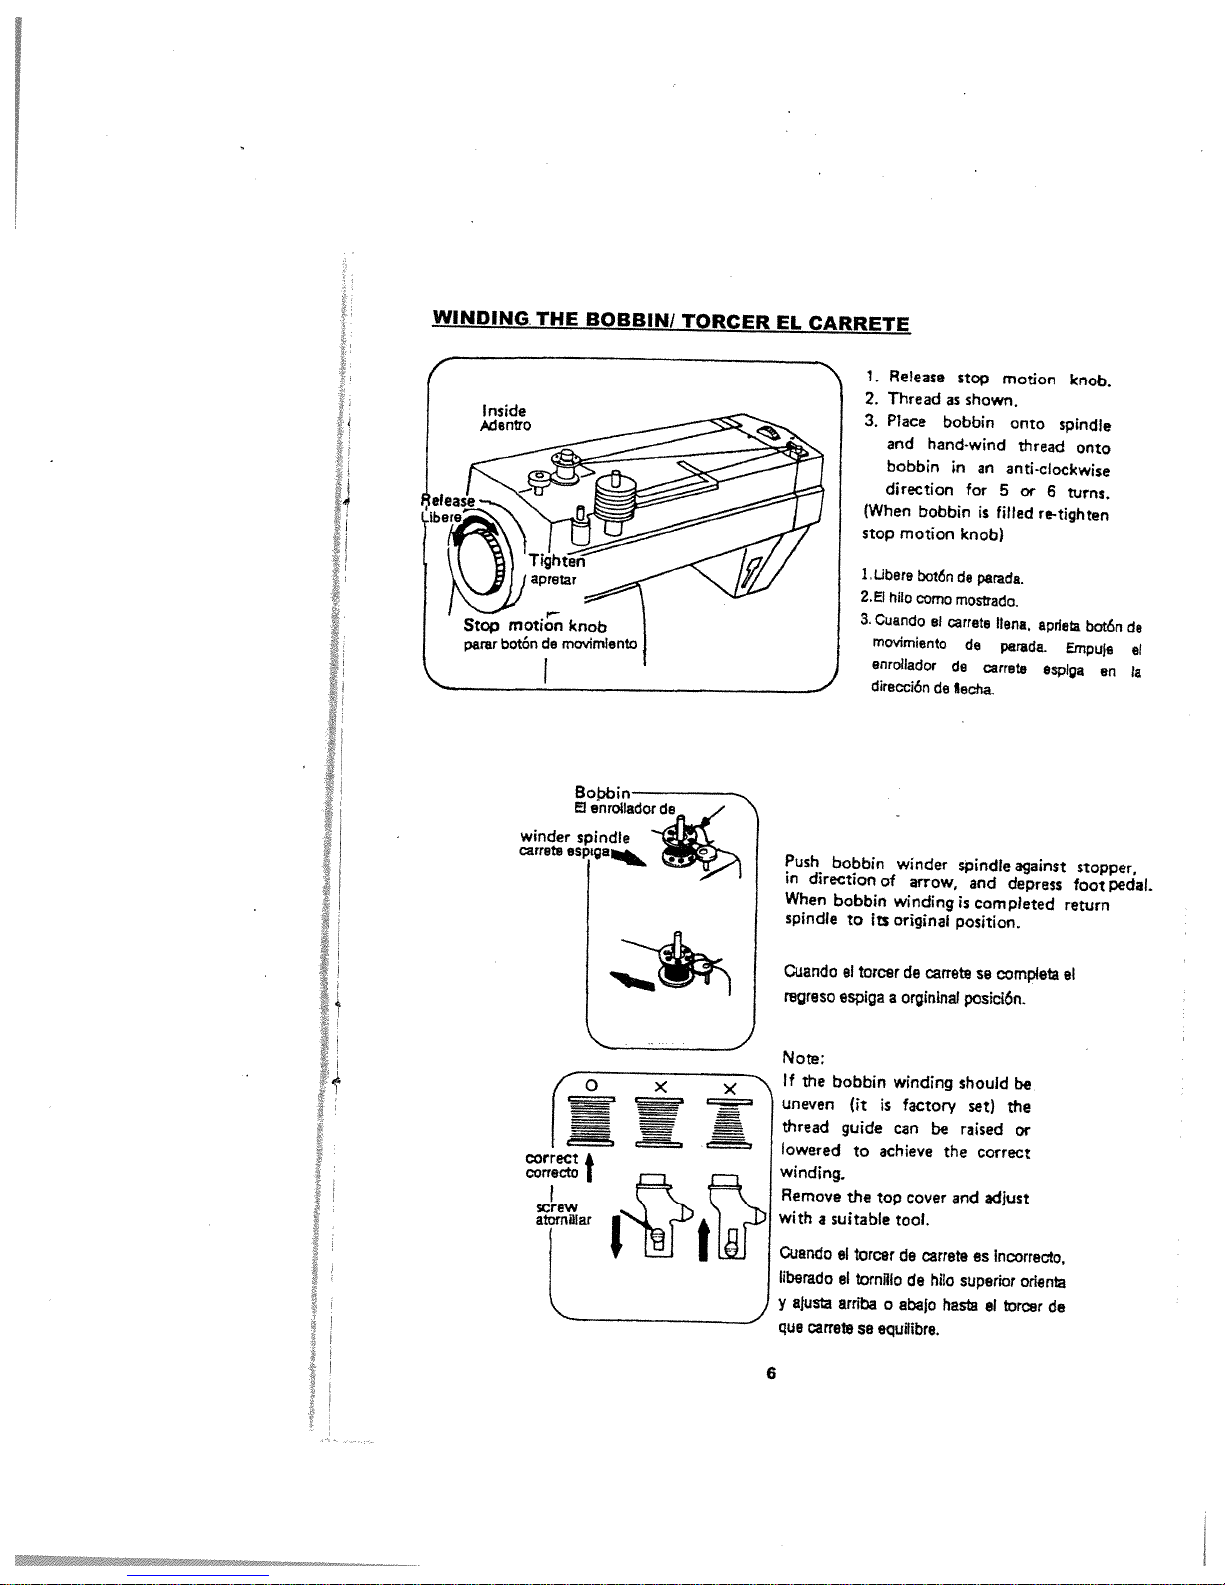
WINDING.
THE
winder
carrete
BOBBIN!
Bo,bin
El
enrollador
spindle
espiga
TORCER
cia
EL
CARRETE
Push
in
direction
When
spindle
2.El
3.
bobbin
bobbin
to
1.
Release
Thread
2.
Place
3.
and
bobbin
direction
(When
stop
motion
1
Ubere
botón
hue
como
Cuando
movimiento
enrollador
dirección
winder
of
arrow,
winding
original
its
stop
as
bobbin
hand-wind
in
bobbin
knob)
de
mostudo
el
carrate
cia
de
fiecha.
spindle
is
position.
motion
shown.
an
anti-clockwise
for
5
is
filled
parade.
liens.
de
parade.
Garrets
and
depress
completed
onto
thread
or
against
knob.
spindle
onto
6
turns.
re-tighten
ap!ie
botón
Empuje
espiga
stopper,
foot
return
en
pedaL
de
el
Ia
Cuando
el
torcer
de
carrete
Se
complete
regreso
Note:
If
the
uneven
thread
lowered
espiga
bobbin
.4
(it
guide
to
orgininal
a
winding
is
factory
can
achieve
be
the
posici6n.
should
set)
raised
correct
el
be
the
or
winding.
Remove
with
Cuando
liberado
y
qua
ajuste
carrete
suitable
a
el
el
arriba
the
torcer
tornillo
se
top
cover
tool.
cia
carrete
de
o
abajo
equilibre.
ho
and
superior
haste
adjust
es
incorrecto,
torcer
el
oriente
de
6
Page 12
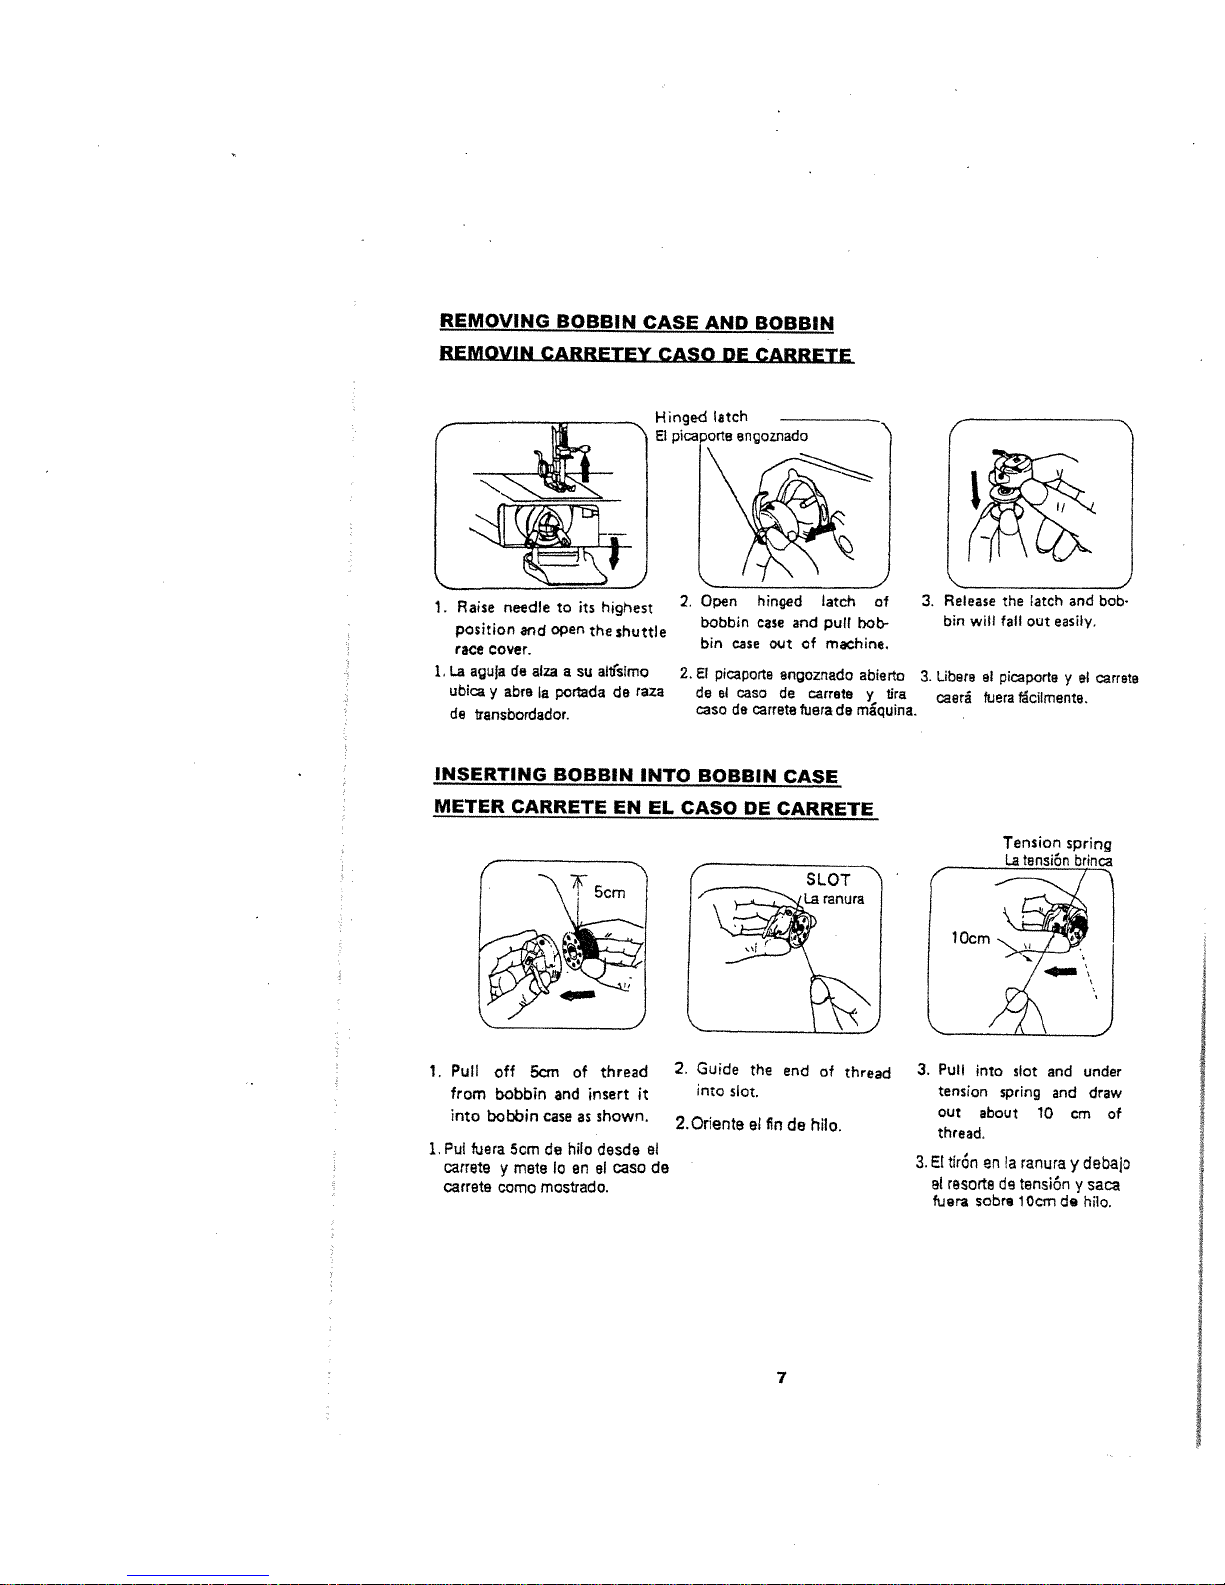
REMOVING
REMOVIN
BOBBIN
CARRETEY
CASE
CASO
AND
DE
BOBBIN
CARRETE
L
needle
Raise
1.
position
race
cover.
La
1,
aguta
ubica
abcs
y
de
transbordador.
INSERTING
METER
1.
Pull
off
bobbin
from
into
bobbin
Put
fuera
1.
carrete
y
Garrets
como
to
open
and
de
atza
a
su
portada
a
BOBBIN
CARRETE
of
5cm
and
caseasshown.
5cm
hue
de
en
mete
To
mostrado.
its
the
insert
desde
el
highest
shuttle
altfstmo
de
EN
thread
caso
raza
INTO
EL
it
el
de
Open
2.
bobbin
bin
El
2.
picaporte
et
de
case
BOBBIN
CASO
2.
Guide
into
2.Or!ertte
case
caso
de
slot.
carrete
DE
the
et
hinged
and
case
of
out
engoznado
de
fuera
CASE
CARRETE
end
fin
de
latch
pull
machine.
carrete
de
of
hilo.
of
bob-
able
y
maquina.
threrJ
rto
tira
3.
will
bin
&I
Libere
3.
3.
3.
ftjera
caerâ
[1ocmJ
Pull
into
tension
out
about
thread.
El
tlrón
en
at
resortedatension
sobre
fuera
out
fall
picaporte
citmente.
Tension
La
tensión
slot
spring
10
a
ranura
10cm
easily.
y
and
and
de
el
spring
brinca
under
draw
cm
debajo
y
y
saca
hilo.
carrete
of
7
Page 13

INSERTING
METER
CASO
BOBBIN
DE
CASE
CARRETE
INTO
EN
SHUTTLE
RAZA
LA
RACE
TRANSBORDADOR
DE
El
picaporte
Ensure
1.
Pulling
latch
Levante
1.
tirando
picaporte
retiene
Insert
Meta
engoznado
needle
thread
bobbin
of
aguja
hilo
de
lo.
front,
hold
abriendo
de
position.
open
it.
rns
carete
the
alta,
el
y
highest
its
at
is
the
to
and
case
posición
a
su
frente,,
Ia
a
caso
el
Holding
2.
onto
latch.
tenencia
l.a
2.
pone
sujeta
transbordador.
latch
Centre
caso
el
en
open,
pin
de
de
picaporte
el
s&ittle
in
picaporte
de
carrete
8
place
en
de
bobbin
and
abre,
centro
el
alivic
case
release
y
Page 14

THREADING
Thread
Enhebre
the
UPPER
machine
hilo
el
THREADI
A
from
desde
ENHEBRANDO
per
I
as
to
hasta
A
illustration.
I
segün
ilustracián
Ia
HILO
SUPERIOR
needle
Twin
Enhebrado
threading
Ia
para
aguja
gemela
9
Page 15

DRAWING
Hold
1.
needle
highest
its
Retenga
1.
usted
suando
Ughilly
upper
goes
hasta
ra
UP
thread
down
position.
hilo
que
takeup
Ia
el
BOBBIN
with
and
Light’y
superior
agua
Ia
Ia
superior
hilo
THREAD
left
comes
draw
Ia
con
vayaa
palanca
de
hand,
up.
mario
est
carrete
Then
up
izquiecda,
abajo
turn
en
a
the
y
hilo
the
stop
viene
su
upper
posiciôn
criará
se
hand
the
vuelva
arriba.
wheel
hand
threacwilI
)EI
Ia
rnás
una
en
slowly
when
wheel
be
(J
--(
mario
Entonces
atta.
presilla.
towards
brought
i(
rodar
parar
you
takeup
the
in
up
lenlamente
mario
a
a
until
it
rodar
the
levers
loop.
flacia
T
i
rear
the
to
Ia
foot
retaguardia
iTiáquina.
de
presser
presser
under
pie
a
threads
both
oJt
Pull
2.
machine.
of
hues
arnbos
Retire
2.
and
debajo
junta
ponga
los
y
10
together
them
place
Page 16

0
z
m
r
r
rn
z
‘Ii
z
I
0:,
>C>Q
Page 17

CHANGING
CAMBIANDO
needle
Lower
1.
needletochange
SEWING
COSIENDO
down
direction
DIRECTIONS
DIRECCIONES
F
into
fabric
as
and
desired.
raise
presser
foot,
pivot
the
fabric
aro4Jrd
the
6
I
1.
Más
aguja
inferior
para
agua
cambiar
abajo
enTatela
direccin
(
‘.,-
Put
2.
start
Poriga
2.
para
conio
down
to
abajo
coser
y
I
sew.
aiza
desear.
presser
presser
_
I’
foot
presserfoot
pie,
NOTE
NOTAj
and
comienzo
y
-Th
pivote
Ta
tela
airededor
Ia
12
Page 18

ADJUSTING
AJUSTANDO
normally
only
is
It
tension
thread
between
The
the
La
velvet
higher
tension.
tensiOn
Ia
the
superiora
tensiOn
)ncorrect
lncorrecto
Increase
UPPER
TENSION
to
upper
number
the
tie
necessary
achieve
and
de
dail.
bile
THREAD
correct
the
lower
the
on
puede
hilo
Inside
Adentro
Upper
Superior
isrnmnUya
HILO
OF
adjustthe
to
balance
threads.
the
dial
ajustada
set
fabric
of
de.tela
thread
enliebrar
un
Come
para
correc
do
carrete
carrete
el
Si
SB
desatademaslado
obtiene
se
una
bajar
ADJUS1ING
Lower
on
to
tension.
L.a
sobre
tensiOn
TENSION
upper
greater
per
a
As
tension
wound
and
loose
obtained
to
drop
the
jntiI
general
normal
en
herida
case
y
un
cuando
distarscia
thread
bobbin
the
increase
ms
tensiOn
case
el
al
o
Fabric
tela
La
general
for
bobbin
immediately
case
should
and
when
short
a
the
bobbin
desired
the
orientar
cosiendo
caso
su
inmediatamente
deberra
Y
delgado
drOss
anica
cotta
LOWER
tension
case
tension,
inferior
carrete
de
lzquierda
Correct
Correcto
o
ci
only,
guide
sewing,
normal
tnlco.
por
case
its
in
fall
increased.
be
jerk
slight
a
distance
is
tension
is
effect
at
cuidadosamenta
per
bib.
at
pot
bib
del
THREAD
be
can
slightly
(Anti-clockwise)
puede
hflo
do
ligeramente
disminuir
para
Upper
Superior
Bobbrn
t_
El
user
the
carefully
by
the
by
ground,
the
to
the
of
If
only.
tight
too
achieved.
usuarlo
al
cacda
aumentada.
ocasiorsa
TENSION
adjusted
the
to
ajustada
set
Ia
a
tensiOn.
thread
carrete
can
thread.
The
thread
action
this
and
puede
terreno,
La
by
the
to
derecha
Enhebrar
thread
enhebra
the
achieve
suspending
If
the
tension
the
correct
causes
does
be
should
lograr
suspendiendo
tenskn
carreto
el
turning
right
(clock-wise)
left
velvet
per
para
correct
bobbin
is
tension
bobbin
the
move
not
loosened
tension
Ia
tensiOn
Ia
correcta
para
the
decrease
to
tornillo
aumentar
the
too
is
et
screw
,crease
13
Page 19

REGULATING
REGULAR
1.
Move
the
fabrics
2
low
puntadas
en
EDI
and
darning
el
1,
0.
2.
Too
fabric.
3.
When
1.
Moeva
ponga
Tambièn
2.
Cuando
3.
er
DROP
EL
lever
heavy
pressure
or
nivel
telas
bajar
dificultades
o
zurce,
BAJE
THE
PRESSER
PRESSER
the
to
pressure
fabrics
can
result
sewing
free-hand
presàn
de
medianas
presiàn
Ia
cose
o
ALIMENTACION
3.
in
2
para
borda
FOOT
CAMINA
you
want.
poor
feeding,
embroidery
que
Ud.
telas
y
puede
dirigir
con
For
desee.
pesadas
resul
las
PRESSURE
PRESION
j
light,
elastic
skipped
the
pressure
Para
3.
tar
una
latela.
manos
°1\
fabrics
stitches
must
prendas
mala
libres,
or
alimentaciOn,
Ia
choose
difficulties
be
released.
de
presiàn
setth,g
Set
tela
se
1,
medium
guiding
in
at
0.
eiàstica,
omision
clebe
the
de
pot’
4
E
4
Lower
feed
dog
by
Used
For
general
Más
inferior
Ningn
Usado
cosiendo,
dirección
when
sewing
sewing,
alimentar
alimentando
cuando
levantando
fiecha.
cle
on
raise
de
cosiendo
pushing
perro
tela.
buttons,
height
sobre
altura
por
lever,
free
of
a
palanca
botones,
alimentación
de
down
feed
in
hand
dog
empujar,
mano
direction
ernbroider’,
by
lifting
abajo
libre
bordado,
acosar
of
arrow.
)No
etc.
leverindirection
en
a
direcci6n
etc.
Para
por
hIlling
feeding
el
palanca
de
of
of
arrow.
fiecha.
general
en
fabric)
ha
14
Page 20

CHANGING
Raise
1.
2,
3.
4.
Loosen
With
will
go.
Tighten
needle
the
neale
the
NEEDLE/
to
clamp
flat
sideofthe
needle
its
highest
screw
clamp
LA
position.
and
needle
screw
AGUJA
remove
facing
securely.
CAMBIANTE
-
Needle
Aguja
Flat
away
Piano
lejos
old
needle.
away
from
clamp
tornillo
face
from
nominal
de
jsted
you,
screw”
de
Tighten
Apnete
Loosen
side
you.
soportar
insert
grapa
needle
as
far
up
as
it
1.Levante
2.
Desate
3.
Con
Apriete
4.
agua
su
posidOn
a
Ia
grape
de
el
lado
piano
Ia
grapä
de
agója
de
aguja
La
aguja
atornilla
alti’sima.
atornilla
que
quite
aguja
y
en
care
firmemente.
15
lejos
vieja.
de
usted,
mete
aguja
tan
lejos
arriba
como
Page 21

Chart
This
chart
Fabrics
Light
Medium
—
fabric,
gives
Tricot,
Orgaridie,
Cotton,
wool,
qabardonie
you
silk,
poplin,
light
needle
some
tulle,
taffeta,
corduroy,
and
useful
chiffong
lawn
satin,
thread
hints
velvet,
for
sewing
in
different
Needle
size
60-70(8-10)
80
(12)
fabrics.
Thread
Light
thread
Cotton
type
cotton
or
synthetic
or
synthetic
thread
Heavy
Note!
Denim,
coat
Always
tweed,
material
use
the
corduroy,
same
size
on
upper
cashmere,
and
90-100(1416)
lower
thread.
Heavy
thread
cotton
or
synthetic
I
DLAGRAMA-GENERO,
Este
I
ferentes
Genero
Delgado
Mediano
diagràma
generos.
Seda
Batista
Algodón,Popojin,
Cotele
I.
Grueso
Atencion!
Mescilla,
Cachemira
Siempre
le
organdi,
de!gädo,
utilice
aporta
Tweed,
AGUJA
algunas
Tuil,
Satin
Gabardina
Cotele
el
mismo
Chifon
E
HILO
sugerencias.itiles
grosor
en
Aguja
60-70(8-10)
80
(12)
90-100(14-16)
el
hilo
superior
para
Tipo
Algodón
sintetico
.A!godãn
srntetico
Algodón
sintetico
e)
y
hilo
coser
hilo
en
suave
suave
grueso
inferior.
di
0
o
o
1
I
16
Page 22

m
r
w
2
0
-4
>
m
0
0
0
2
0
-4
C,
m
m
Cl)
2
rn
0
a
2
LI.
Page 23

OPERACIONES
DE
Y
PUNTO)
DEL
(SELECC(ON
COSTIiRA
DE
TABLA
Page 24

TO
START
SEWING!
PARA
COMENZAR
COSIENDO
Important
1.
sewing.
2.
Hold
three
3.
Sufficient
4.
Depress
5.
Test
machine
Attention
1,
When
Guide
2.
3.
To
Los
Indicios
I
.Levante
parando
2.Retenga
puntadas.
3.La
tela
4.Oeprima
5.Pruebe
rnáquina
La
atención
1
.Cuando
2.Oriente
3.Para
prevenir
Raise
stitches,
the
prevent
Ia
cosiendo.
ambos
suficiente
pie
Ia
máquina
para
volviendo
el
pa?lo
Hints
the
takeup
both
threads
fabric
footlSpeed
machine
for
the
turning
the
the
cloth
breaking
importantes
participacién
hUes
deberià
o
apure
controlar
hilvana
Ia
longitud
la
mane
suavemente
quebrar
una
should
length
hand
gently
sobre
ponersa
de
aguja
lever
about
control
stitches
with
needle
arTiba
10cm
y
sobre
puntada
rodar
con
to
its
highest
10
cms
be
placed
nd
start
on
scrap
a
of
stitch
and
wheel
manually,
your
always
a
palanca
a
a
retaguardia
debajo
Ia
comenzar
un
trozo
y
tensin
para
rnanualmente,
su
mane.
siempro
parar
to
the
under
to
of
tension
hand.
stop
a
su
posiciân
agua
coser.
de
t&a
conveniente
siempre
con
Ia
position
rear
needle
sew.
fabric
suitable
always
with
the
de
máquiria
antes
usted
volver
aguja
wher
of
machine
before
you
turn
needle
m
de
lowering
planifica
a
su
fuera
lo
plan
to
it
alta
para
tela.
hacia
de
starting
for
lowering
use,
to
your
toward
out
cuando
las
primera
presser
para
usleri.
Ia
tela.
and
the
adjusting
fabric.
you.
of
the
comenndo
usar
stopping
first
presser
fabric.
dos
pie.
y
ajustar
two
0
to
foot.
the
y
tres
Ia
18
Page 25

TO
FINISH
SEAM!
1
.Sew
2.Push
3.Raise
4.Lift
presser
.Cosa
2.Empuje
3.Levante
4.La
elevaciôn
PARA
to
the
edgeofseam.
the reverse
needle
foot
al
borde
el
revs
aguja
button
to
its
and puIl’ou
de
costura,
abotonar
a
su
posición
presser
TERMINAR
and
sew
highest
position.
the
y
coser
rnás
caminayretira
COSTURA
in
fabric
en
el
alta.
reverse
to
revés
Ta
tela
rear
para
para
for
of
sobre.
about
machine.
3-4cms.
criar
de
3-4
cms.
rnáquina.
5.Cut
5.Los
threads
hUes
as
de
cortadura,
shown
on
the
come
19
thread
mostrados.
cutter.
sobreelcortador
de
Tub.
Page 26

STRAIGHT
1.
type
This
The
zig-zag
2.
sewing
For
3.
(Refer
STITCH!
stitching
of
presser
light
page
to
DERECHO
foot
fabric,
for
16
is
use
dial
the
can
one
used
be
used
smaller
setting).
HILVANAR
frequently.
most
boi
size
straight
and
for
stitch
left
zig-zag
and
needle
sewing.
position.
tipo
Este
1.
zig
The
2.
Para
3.
coser
colocaciones
ZIGZAG
Zig-zag
stitching
Satin
sewing
hdvanar
tie
zagpresser
tata
SEWING!
stitching
initials,
as
&
liviana,
diaL
tie
is
“closed
is
a
patterns,
usado
el
uno
pie
usaruntamaflo
ZIG
a
puede
ZAG
general
up”,
applique,
usarse
very
etc.
frecuentarnente.
debe
ambos
pam
manordepuntada.
COSIENDO
Pattern
<
Decore
E
short
stitch.
stitch
purpose
derecho
selector
posici6n
length,
zig
y
Refiera
position.
de
and
cosiando,
zag
paginar
para
selector
can
be
15
para
used
for
Zig
El
y
hilvariando
zag
satén
puede
hilvanando
para
usarse
as
una
es
coser
puntada
una
siglas,
general
cercano
decora
prop&ito.
tie
arriba
appliques.
y
20
y
Ia
longitud
tie
puntada
muy
corta,
Page 27

_________________________________
OVERCASTING
these
Use
estas
Use
ásperos.
multi-zig
Use
austando
aplicación.
stitches
puntadas
zag
lorigitud
oversewing
for
para
puntada
puntada
de
sobre
para
edges.
rough
bordes
coser
reparacionas,
favorecer
para
[
STRAIGHT
STRETCH
In
Ill
01
STITCH!
DERECHO
this
Use
stretchy
stitch
The
out
with
also
is
It
under
areas
e
Use
La
tetas.
fuera
con
puritada
tension.
Ia
ESTIRAR
stitch
fabrics.
enattes
breaking
very
a
stress.
puntada
puntada
quebrando
+derecho
with
the
strong
con
permite
PUNTADA
knied.tricot
Sean,
your
thread.
straight
icot
tejida,
su
hilo.
ci
fuerte
muy
other
or
stretch
to
stitch
u
costura
tambiên
Es
para
for
oo
de
areas
setchy
estirar
una
debajo
21
Page 28

BLIND
STITCH!
CIEGO
1.
I.
TOSER
Fold
La
tela
fabric
de
doblez
PUNTADA
as
shown.
como
rnostrada
2.
2.
To
finish
La
costura
puntada
seam
de
shown
as
conduión
simplemente
ladra
22
como
mostrada
Ia
dobtez
asegura
de
qtte
Ia
zg
zag
Ia
tela.
Ia
Page 29

is
Needle
foldatall,
La
aujanotaladra
doblez en
not
todos.
piercing
el
edge
borde
do
Adjust
correct
Ajuste
of
width
and
seam.
doblez
Needleispierces
much.
La
aguja
demasiada.
needle
tela
do
taladraelbordedodoblez
positiontoobtain
obtenet
para
edge
of
costura
fold
correcta.
too
I
(A)
Correct
Correcto
Z1
(8)
seam
coser,
—‘
23
Page 30

BUTTON
(Use
drop
I
.Lower
drop
Place
2.
buttoti
3.P1a
button
4.Manuafly
into
both
(Increase
5.Sew
about
6.Puli
both
threads
El
uso
que
bot6n
cenro
6
hilo
zurce
alimenta,
de
botán
tie
o7
a
Ia
.Cover
2.I
.Ponga
4.Manualmente
el
5.Cosa
5.
Tire
SEWING!
feed
see
feed,
presser
between
turn
hand
holes
of
or
decrease
7
stitches.
plato
con
uso
que
entro
volver
un
primero
punladas.
underside
page
foot
wheel
button
to
the
ye
zwcir
case
presser
entregar
y
EL
14)
in
position
presser
towards
without
width
underside
pgina
plate.
pie
pie
hoyo
corbata.
BOTON
foot
setting),
14
y
ad
Junta
la
y
rodar
y
entonces
and
attach
and
fabric
you
ensuring
obstruction.
and
tie
firmemente.
tela
y+rebaiar
hacia
usted
el
COSIENDO
firmly.
and
lower
that
together.
presser
y
prueba
otro.Si
presser
the
needle
pie.
cuidadosamente
necesaric,
foot.
ajustar
enters
zig
que
zag
Is
aguja
anchura.
vs
mediarrte
BINDING!
LA
ATADURA
To
the
Para
selecciona
24
sew
multi
fabrics
coser
zig-zag
el
La
edge
stitch.
borcie
multi
to
zig
edge
de
zag
select
telas
puntada.
para
afilar
Page 31

____________________________
ZIPPER
SEWING!
LA
L
CREMALLERA
straight
Select
1.lold
the
foot.
2.Zipper
preventing
Selecto
derecho
1
2.E1
1.To
2To
Ia
.Plieguo
piedocremallera
evando
sew
on
foot
sew
foot
the
COSIENDO
stitch.
fabric
foot
is
seWing
hvanar.
lela
sobre
preveniendo
the
left
left
the
the
to
about
designed
on
2
so
side
side.ofthe
right
the right
2cm
to
sew
Zipper.
cm
y
disea
cosiendo
of
the
side
sideofthe
close
lola
pare
zipper,set
needle.
of
and
do
sobre
luger
cosar
the
needle.
place
fabric
to
raised
a
debajo
cercadoon
Ia
cremallera.
the
zipper
under
edge
el
plo.
zipper
bring
borde
H
L
1.
2.
sew
PaM
Ia
cremallera
Para
Ierecha
as
coser
coser
at
lade
illustrated.
25
el
lade
do
lado
Gamma
derectro
Ia
aguta.
izquierdo
sobre
do
el
lade
Ia
crernallera
do
La
izquierdo
crernallera
doIaagula.
traer
elpie
coior
a
Ia
Page 32

BUTTON
stitch
Select
El
selecto
dial
HOLE
length
longitud
de
SEWING!
dialinarea
de-
puntada
EL
indicated.
en
area
a
HOYO
indicó
DE
BOTON
COSIENDO
Pattern
selector
Decore
selector
IJ
U
L
[
I
dial
“2”
“3”
““
Settings
Coloca
position.
position.
siton.
.Coloque
1
lade
2.Cosa
3.Levante
4.Coloque
5.Cosa
5a6
5.Levanta
Ia
7.Cologue
lade
8.Cosa
9.Lavante
10.coloque
11
.Cosa5aS
t2.LenteIaaguja.
dial
izquierdo.
Ia
agula.
dial
pundas.
aguja.
dial
derecho.
Ia
aguja.
dial
a
#1
a
0
2
a
#3
a
#4
puntadas.
posición.
poaición.
posición,
posici5n.
—
Steps
Camina
x
1.
2.
3.
4.
5.
6.
1.
8.
9.
10.
1
12.
1.
Set
Sew
Raise
Set
Sew
RaIse
Set
Sew
Raise
Set
Sew
Raise
dial
left
dial
54
dial
right
dial
the
the
5-6
to
tO
the
the
““
side.
needle
stihes.
needle
to
side.
needle
to
stitches.
needle
dial
de
I
Before
as
shown,
Ailtes
bot&,
sewing
de coser
come
fit
buiton-hoje
atste
mostrado.
shown.
OYO
el
corlador
along
do
botãnalo
buttonhole
foot
pie
el
do
hoyo
do
26
Cut
cutter
centro
as
of
con
como
with
large
do
mostrado.
ol
centre
Page 33

HEMMING!
TOSIENDO
1mm
1.
Raise
Fold
2.
with
pulling
.Levante
1
2.Pliegiie
con
par
pie
Lower
3.
4.
During
5.
Make
be
fed
through
Only
best
resulu.
the
over
few
a
the
el
sabre
unas
rar
the
sure
into
suitable
foot
the
stitches.
threads.
pie
y
el
pocas
los
foot
sewing,
that
the
the
groove
materials
and
fabric
Ia
agula
borde
puntadas.
hilos
an
fold
the
scroll
the
edge
de
fabric
under
needle
Take
a
su
tela
tire
of
can
by
about
posic6n
por
Tome
fabric
does
the
the
be
to
its
out
the
sabre
fuera
not
hemmer
foot.
used
highest
3mm
workpiece
ms
3mm
el
o
the
move
and
position.
and
place
alta.
Reemplace
lugar
y
abajo
left
a
under
sufficiently
scare
practice
and
el
little
Replace
it
under
draw
a
debajo
pedazo
and
the
to
the
the
el
pie
el
saca
y
allowitto
right
that
may
be
the
foot.
hem
con
pie.
half
the
necessary
foot
into
el
hemmer
Asegure
el
dobladillo
of
work
with
Secure
run
the
piece
the
foot.
to
the
the
hemmer
pie.
el
borde
en
into
edge
acheive
hemmer
folded
plegado
eI
hemmer
the
The
runs
foot
edge
foot
hemmer
fabric
freely
by
foot.
must
3.
+
4.Durante
5.Asegure
lista
Ia
Los
acheive
rebajar
del
ranura
materlales
mejores
el
pie
coser,
que
hemmer
debajo
+
coser
y
Ia
plegar
tela
no
Ia
sucientemente
el
pie.
convenientes
resultados.
dobladillo.
el
tela&izquierda
mueve
debajo
para
nlcos
Un
Ia
qua
pueden
mid
pocoypermidr
÷derecho
el
Irabajo
usarse
repare
y
27
del
alguna
Ic
corrar
pie.
de
L.a
borde
práctica
en
tela
el
corre
puede
hemmer
debe
libremente
pie.
aLirnenrse
ser
necesaria
en
mediante
Ia
a
Page 34

TWIN
optional
ANOTE:La
NEEDLE!
aguja
melliza
MELLIZO
pueda
comparse
AGUJA
separedamente.
Thread
procedure:
N8.
Wi!
Enhebre
mismo
ANOTE:Coser
mhne
Sewing
I
result
Ia
procedimiento.
in
maquina
EMBROIDERY/
(Use
drop
feed
Lower
feed
dog
El
usc
que
zurce
La
alimentacjân
el
efecto
deseado.
as
width
breaking
Ia
anchura
see
page
and
move
plato
mãs
infertor
for
should
of
needle.
en
lo
que
no
EL
BORDADO
14)
hooped
ye
pgina
acosa
normal
not
concieme
deberfa
14
sewing
exceed
exceder
fabric
y
el
rnovimiento
the
a
normal
a
slowly
passrng
third
cosiendo
tercera
to
enarc6
both
widest
anchura
form
threads
stitch
pasar
the
tela
through
width,
ambos
amplima
desired
lentamente
exceeding
hcs
de
effect.
para
the
meiiante
puntada.
format
same
this
el
28
I
Page 35

QUILTER!
optional
supporter
Insert
1.
2.
1
2.EJ
Move
diapositiva
.La
movlmiento
quilter
ACOLCHANDO
quilter.
of
stitch
adjust
and
acolcha
gura
derecho
quo
quo
acoicha
—
distance.
la
en
ranura
lzquierda
a
arriha
do
presser
gui
palanca
ajustar
do
alMa
de
distancia
do
punlada.
de
pie.
SEAM
optional
Use
1.
of
Set
2.
Run
3.
guide
1.
Use
desde
La
2.
ajusta
La
3.
orienta
GUIDE!
seam
material.
guide
machire
at
gura
Ia
el
do
gui
distancia.
máqulna
en
guide
in
an
do
borde
conunto
do
un
COSA
hole
angle
costura
do
corrida
ángulo
when
on
with
to
material
en
GUA
sewing
bed,
edge
few
cuando
el
hoyo
con
para
at
a
el
coser
long
a
right
of
curved
sobre
borde
seam
of
material
seam.
cosiendo
lecho
et
de
material
costura
una
of
needle
una
en
regular
plate,
touching
costura
el
derecho
quo
curva.
toca
distance
adjust
and
guide.
larga
de
guià.El
do
agula
..
from
distance.
Position
distancia
platea
pao
edge
de
cloth
regular
y
posición
29
Page 36

MAINTENANCE
EL
MANTENIMIENTO
Cleaning
(A)
(B)
(C)
La
#
#
shuttle
Latch
knob
Shuttle
Shuttle
Umpleza
A
de
boton
de
+
transbord&tor
C÷tracsbordador
(CLEANING
C
race
race
cover
hook
de
ansborado
Plcaporte.
portada
ganc1o.
—
LIMPIANDO
corre.
de
ran.
AND
OILING)
V
1.
Raise
2.
Take
3.
Turn
4.
Take
5.
Take
6.
Clean
then
1.
Levante
2.
Tome
3.
Turn
llusUado.
4.
Tome
5.
Tome
6.
LImplo
gancho.
ACEITANDO
needle
to
out
latch
off
out
and
replace
aguja
luei’a
el
botôn
fuera
fuera
y
its
bobbin
knob
A
shuttle
race
shuttle
hook.
oil
shuttle
in
the
a
su
caso
do
do
transborcjador
gancho
aceitar
transbordador
highest
case.
as
illustrated.
cover,
race
and
reverse
posición
cafrete.
pfcaporte
correr
de
tmnsbordador.
position.
hook,
order.
ms
#
tin
poitacia.
alta.
correr
con,o
y
L
Open
indicated.
E
abierto
petróleo
face
y
cover
puntos
portada
and
oil
nominales
indicaron.
points
do
Cleaning
Limpio
30
feed
aiimentar
dog
perros,
Page 37

CORRECTION
DO
TO
WHAT
CAUSE
PROBLEMS
PROBABLE
motion.
dog.
stop
feed
Raise
Moving
—
—
.
moving.
down,
not
dog
Feed
Machine
—
—
foot,
presser
on
1’4.
to
pressure
dial
needle.
Increase
Reset
Moving
—
—
—
foot.
position.
0
needle.
presser
in
of
on
dial
setting
length
pressure
Light
Incorrect
Stitch
—
—
—
fabric.
and
needle,
needle.
fabric.
new
using
pull
not
Replace
Do
Correct
—
—
—
fabric.
and
needle, thread
using
fabric.
bent.
Incorrect
Pulhng
Needle
—
—
thread,
position.
correct
to
Moving
—
dial.
width
zigzag
of
position
Incorrect
—
—
tension.
thread
needle.
machine.
new
upper
Rethread
Loosen
Replace
—
—
—
tension.
thread
threading.
bent.
upper
Improper
Tight
Needle
—
—
—
burrs
off
polish
or
shuttle,
Replace
completely,
—
shuttle.
on
burrs
or
Nicks
—
tension.
thread
bobbin
needle.
Loosen
Reset
—
—
tension.
needle.
of
thread
setting
bobbin
Incorrect
Tight
—
.—
machine.
shuttle.
Rethread
Clean
—
—
shuttle.
in
threading.
thread
and
Improper
Oust
—
—
shuttle.
oil.
Need
Clean
—
—
oil.
No
—
shuttle.
in
thread
and
Dust
—
thread.
and
pressure.
needle
foot
fabric.
sewing
using
Reset.
Regulating
Correct
—
—
—
strong.
too
fabric,
tight.
pressure
using
too
toot
Incorrect
Tension
Sewing
—
—
-.
thread.
and
needle,
PERFORMANCE
not
.
PROBLEM
Fabric
CHECKING
mov)rlg
Needle
Breaking
Upper
Thread
Breaking
Bobbin
Breadkin
Thread
Noise
Jamming
Knocking
Machine
.
Puckering
Page 38

HACER
PARA
QU
4.
#
Ithur
#
a
parade,
do
dial
allmentación.
COHRECClON
do
LA
perw
movimienlo
dade
presión
mudanza
Levante
Mueva
La
—
Aumente
—
—
pie.
presser
sobre
aguja.
+
Reset
tela.
y
nueva.
hilo,
aguja
aguja,
Iota.
tiran
Reempiace
No
Correcto
—
—
—
posición.
corregir
superiora
pare
elabora.
tension
rnovimienlo
El
Rethread
Desate
—
—
—
marca.
bib.
do
aguja.
Reempiace
—
burrs
fuera
pula
o
carrete.
do
hibo
transbordador
tenslOrido
aguja.
Reemplace
Desate
completamonte,
Reset
—
—
—
etabora,
transbordador.
Rethread
Limplo
—
—
aceitan.
transbordador
necesidades
Las
Limplo
—
Reset
—
—
pie.
enhebra.
do
y
agula
presiOn
cose
corrocta.
quo
Iota
Reset
La
—
DESEMPENO
DE
bao.
DE
PROBLEMAS
COMPROBACIO’N
LA
OCASIONAR
acosa
rnovlendo.
no
PROBABLE
atimentación
máquina
La
La
—
—
MOVIENDO
PROBIEMA
EL
NO
TELA
LA
pie,
poslción;
#0
en
presser
cobra
marca
longitud
prosionar
Ia
Such
Livan
—
—
anchura
Iota.
y
zag
zig
do
aguia.
de
hilo
incoicocta
incorrecta
aguja,
doblo.
tela.
colocaclOn
La
—
aguja
La
—
Tlrar
—
posiciOn
tncorrecto
La
—
—
AGUJA
DE
QUEBRANTAMIENTO
EL
DE
tenslón.
enhebrar
enhebrando.
superior
dobtO.
aguja
Auslado
La
—
—
—
—
tension.
transbordador.
et
enbebra
cobra
burrs
o
ajustado
carrete
muesca
÷
El
—
DE
ENHEBRA
QUEBRANTAMIENTO
EL
SUPERIOR
QUEBRANTAMIENTO
EL
transbordador.
aguja.
ot
do
en
Incorrecta
enhebre
y
enhebrando.
colocaci6n
La
Inadecuado
Desempoive
—
—‘
—
ENHEBRA
CARRETE
DE
transbordador.
at
en
ajustada.
enhebre
y
petrOteo.
demaslado
tensiOn
Ninguno
—
ATASCANOO
MAQUINA
LA
La
s6mp0
—
—
RUIDO
TOCANDO
0
tuerle.
enhobra.
y
domaslado
agula
preslona
pie
incorrecta,
at
lola
Coser
La
—
—
PUCKERING.
 Loading...